

Page 1
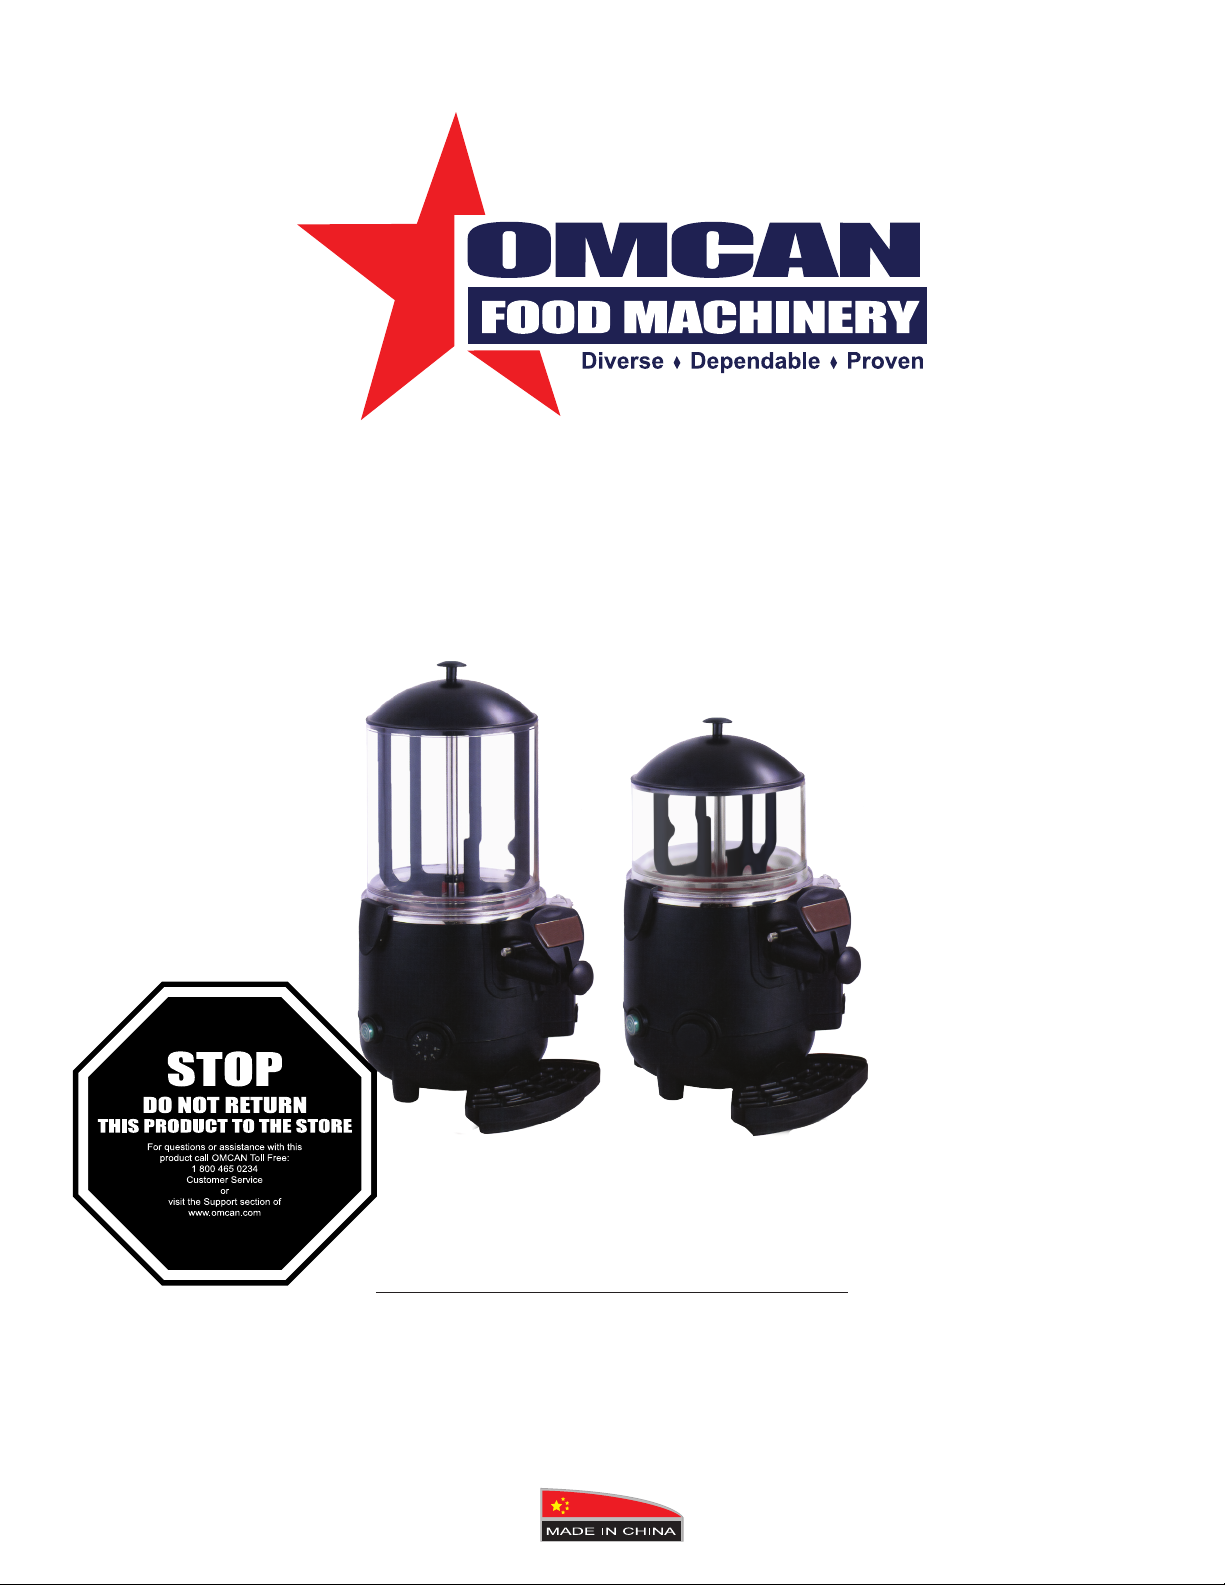
Hot Chocolate Dispensers
Model DI-CN-1 & DI-CN-3
Instruction Manual
Version 1
3115 Pepper Mill Court, Mississauga, ON, L5L 4X5
4450 Witmer Industrial Estates, Unit 4, Niagara Falls, NY, 14305
1-800-465-0234
www.omcan.com
Page 2

Table of Contents
Model DI-CN-1 / Model DI-CN-3
Section
General Information
Safety & Warranty
Technical Specications
Installation
Operation
Maintenance
---------------------------------------------------------------------------------------- 7 - 8
--------------------------------------------------------------------------------------- 8 - 10
--------------------------------------------------------------------------------- 10 - 20
-------------------------------------------------------------------------------- 3
------------------------------------------------------------------------------ 3 - 5
Page
---------------------------------------------------------------------- 5 - 6
Troubleshooting
Parts Breakdowns
Electrical Schematics
Warranty Registration
----------------------------------------------------------------------------------- 21
-------------------------------------------------------------------------- 22 - 23
---------------------------------------------------------------------------- 24
---------------------------------------------------------------------------- 25
2
Page 3

General Information
Omcan Manufacturing and Distributing Company Inc. and Food Machinery of America, Inc. dba Omcan
are not responsible for any harm or injury caused due to any person’s improper or negligent use of
this equipment. The product shall only be operated by someone over the age of 18, of sound mind, and
not under the inuence of any drugs or alcohol, who has been trained in the correct operation of this
machine, and is wearing authorized, proper safety clothing. Any modication to the machine voids any
warranty, and may cause harm to individuals using the machine or in the vicinity of the machine while
in operation.
Omcan provides food processing equipment, baking equipment, professional kitchen equipment, steel kitchen
ware, commercial refrigeration equipment and ice cream machine, and all kinds of products for you to choose.
They are environment-friendly with excellent designs. The units save power, complete functions, are easy to
operate and our products are more competitive than those of the same line in the international market.
CHECK PACKAGE UPON ARRIVAL
Upon receipt of an Omcan shipment please inspect for external damage. If no damage is evident on the
external packaging, open carton to ensure all ordered items are within the box, and there is no concealed
damaged to the machine. If the package has suffered rough handling, bumps or damage (visible or concealed),
please note it on the bill of lading before accepting the delivery and contact Omcan within 24 hours, so we may
initiate a claim with the carrier. A detailed report on the extent of the damage caused to the machine must be
lled out within three days, from the delivery date shown in the shipping documents. Omcan has no recourse
for damaged products that were shipped collect or third party.
Safety & Warranty
GENERAL SAFETY RULES
Carefully read the entire instruction manual before use. The connection to the electricity main socket must
comply with the current safety standards. The machine must be connected to an electric outlet that is:
• Compatible with the plug provided with the machine.
• Of dimensions conforming to the data shown on the rating plate on the side of the machine.
• Properly grounded.
• Connected to a system provided with a differential switch and circuit breaker.
• Connected to a system that has been certied according to the current standards and regulations in the
country of use.
The power cord must not be:
• Allowed to come into contact with any kind of liquid: danger of electric shocks and/or re.
• Crushed and/or brought into with sharp surfaces.
• Used to move the machine.
• Used if it shows any damage.
• Handle with dent or wet hands.
3
Page 4

Safety & Warranty
• Would into a coil when the machine is on.
• Tampered with.
Do not:
• Install the machine in a manner other than that described in installation.
• Install the machine in a place where it may be exposed to sprays of water.
• Use the machine near inammable and/or explosive substances.
• Leave plastic bags, polystyrene, nails etc. within children’s reach, since they are potential sources of
danger.
• Allow children to play or stay near the machine.
• Use spare parts other than those recommended by the manufacturer.
• Make any technical changes to the machine.
• Immerse the machine in any kind of liquid.
• Spray water to the machine to wash it.
• Use the machine other than as directed in this manual.
• Use the machine when not in full possession of your mental and physical faculties; Under the inuence of
the drugs, alcohol, etc.
• Install the machine on top of other equipment.
• Use the machine in an explosive aggressive atmosphere or in the presence of a high concentration of dust
or oily substances suspended in the air.
• Use the machine in a place where there is a risk of re.
• Use the machine to dispense substances that are not compatible with the machine’s specications.
• Clean and service the machine when the main switch is set to –ON- or with the plug inserted into the mains
outlet.
The appliance is not intended for use by persons (including children) with reduced physical, sensor or mental
capabilities, or lack of experience and knowledge, unless they have been given supervision or instruction
concerning use of the appliance by a person responsible for their safety. Before cleaning the machine, make
sure it is unplugged; wait until the machine has cooled down sufciency. Do not clean the machine with
gasoline and/or solvents of any kind. Repair work may be performed only by a Service Center authorized
by the Manufacturer and/or specialized, trained personnel. Do not site the machine near heating equipment
(stoves or radiators). In case of re, use carbon dioxide (C02) extinguishers. Do not use water or powder
extinguishers. In the event of improper use, all warranty rights will be forfeited and the manufacturer will accept
no liability for injury or damage to persons and/or property.
The following are to be considered improper use:
• Any use other than the intended use and/or with methods other than those described herein.
• Any operation on the machine that is in contrast with the directions provided herein.
• Use of the machine after any components have been tampered with and/or safety devices have been
changed.
• Use of the machine after it has undergone repair with components not authorized by the manufacturer.
• Outdoor installation of the machine.
Stop Functions
The machine is shut down by turning off the on/off switch.
4
Page 5

Safety & Warranty
Plates
None of the plates or labels applied on the machine must be removed, covered or damaged, especially those
relating to safety. In the event of damage to any of the rating plates on the machine, contact the manufacturer
for a replacement.
EMERGENCY SITUATIONS
Warning: to stop the machine in any emergency situation, rmly press the main switch so that it sets to OFF.
In the event of re, it is necessary to clear the area in order to allow trained staff, with the proper protective
equipment to intervene. Always use approved extinguishers and never use water or substances of an uncertain
nature.
1 YEAR PARTS AND LABOR WARRANTY
WARNING:
The packaging components (cardboard, polyethylene, and others) are classied as normal solid urban waste
and can therefore be disposed of without difculty.
In any case, for suitable recycling, we suggest disposing of the products separately (differentiated
waste) according to the current norms.
DO NOT DISCARD ANY PACKAGING MATERIALS IN THE ENVIRONMENT!
Technical Specications
MACHINE DESCRIPTION
Use of the Machine
The machine for professional use you have purchased is intended to produce hot chocolate drinks.
5
Page 6
Technical Specications
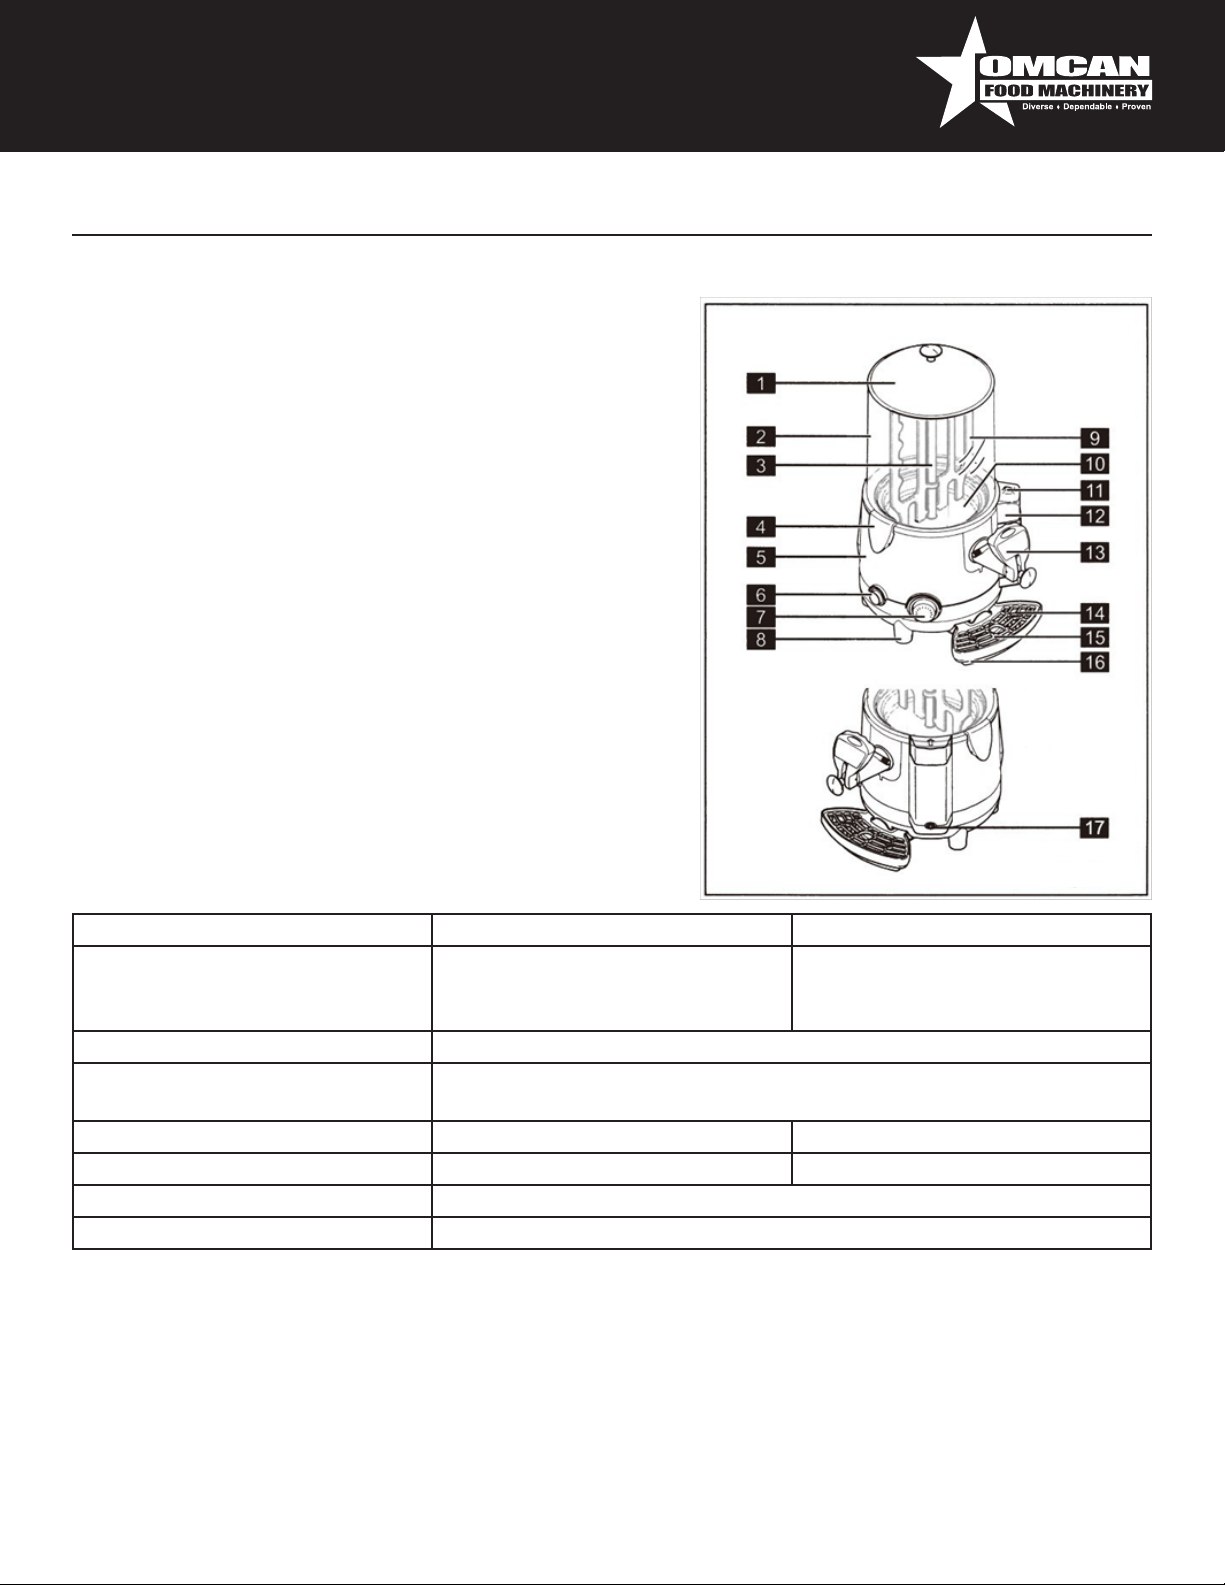
MAIN COMPONENTS
The main components making up the machine are:
1. Bowl lid.
2. Bowl (5 or 10 liters [1.32 or 2.64 US gals]).
3. Mixing auger.
4. Bowl hook-on handles.
5. Machine body.
6. Main switch.
7. Chocolate temperature adjustment thermostat (°C - °F).
8. Lower body.
9. Mixer.
10. Pan.
11. Lid for boiler tank water level indicator tray.
12. Boiler tank water level indicator tray.
13. Product dispenser unit (tap).
14. Drip tray maximum level indicator.
15. Drip tray grid.
16. Drip tray.
17. Boiler tank drainage cap.
TECHNICAL DATA
The technical data and features are listed below:
Model DI-CN-1 DI-CN-3
Machine dimensions L=41 cm (16.14”)
W=28 cm (11.02”)
H=46.50 cm (18.31”)
Operating voltage (V) See rating plate on side of machine
Ambient operating temperature Min. 10°C(50°F)
Max. 320°C(89.6°F)
Number of bowls 1 1
Capacity of each bowl 5 Liters (1.32 Gal US) 10 Liters (2.64 Gal US)
Sound pressure level << 70 dB.
Class N
Note: The manufacturer reserves the right to make changes to the machine without notice.
Important: Any changes and/or additions of accessories must be explicitly approved and implemented by the
manufacturer.
L=41 cm (16.14”)
W=28 cm (11.02”)
H=58 cm (22.83”)
6
Page 7
Installation
The machine must be installed indoors in a well-lit and well-ventilated room with a rm, solid, level oor
(slope less than 20°); during installation, place the machine well out of the reach of children and unauthorized
persons.
The machine may only operate in places with an ambient temperature ranging between 10°C (50°F) and 32°C.
(89,6°F).
Accessories Supplied
Pipe cleaner: for correct cleaning of the hot chocolate dispensing channel.
POSITIONING
It is necessary to check the following:
• The site has been duly prepared for machine
installation.
• That the premises are suitably well lit, aired, clean
and hygienic, and that the power socket is within
easy reach.
• The surface the machine will be installed on is rm,
at and solid.
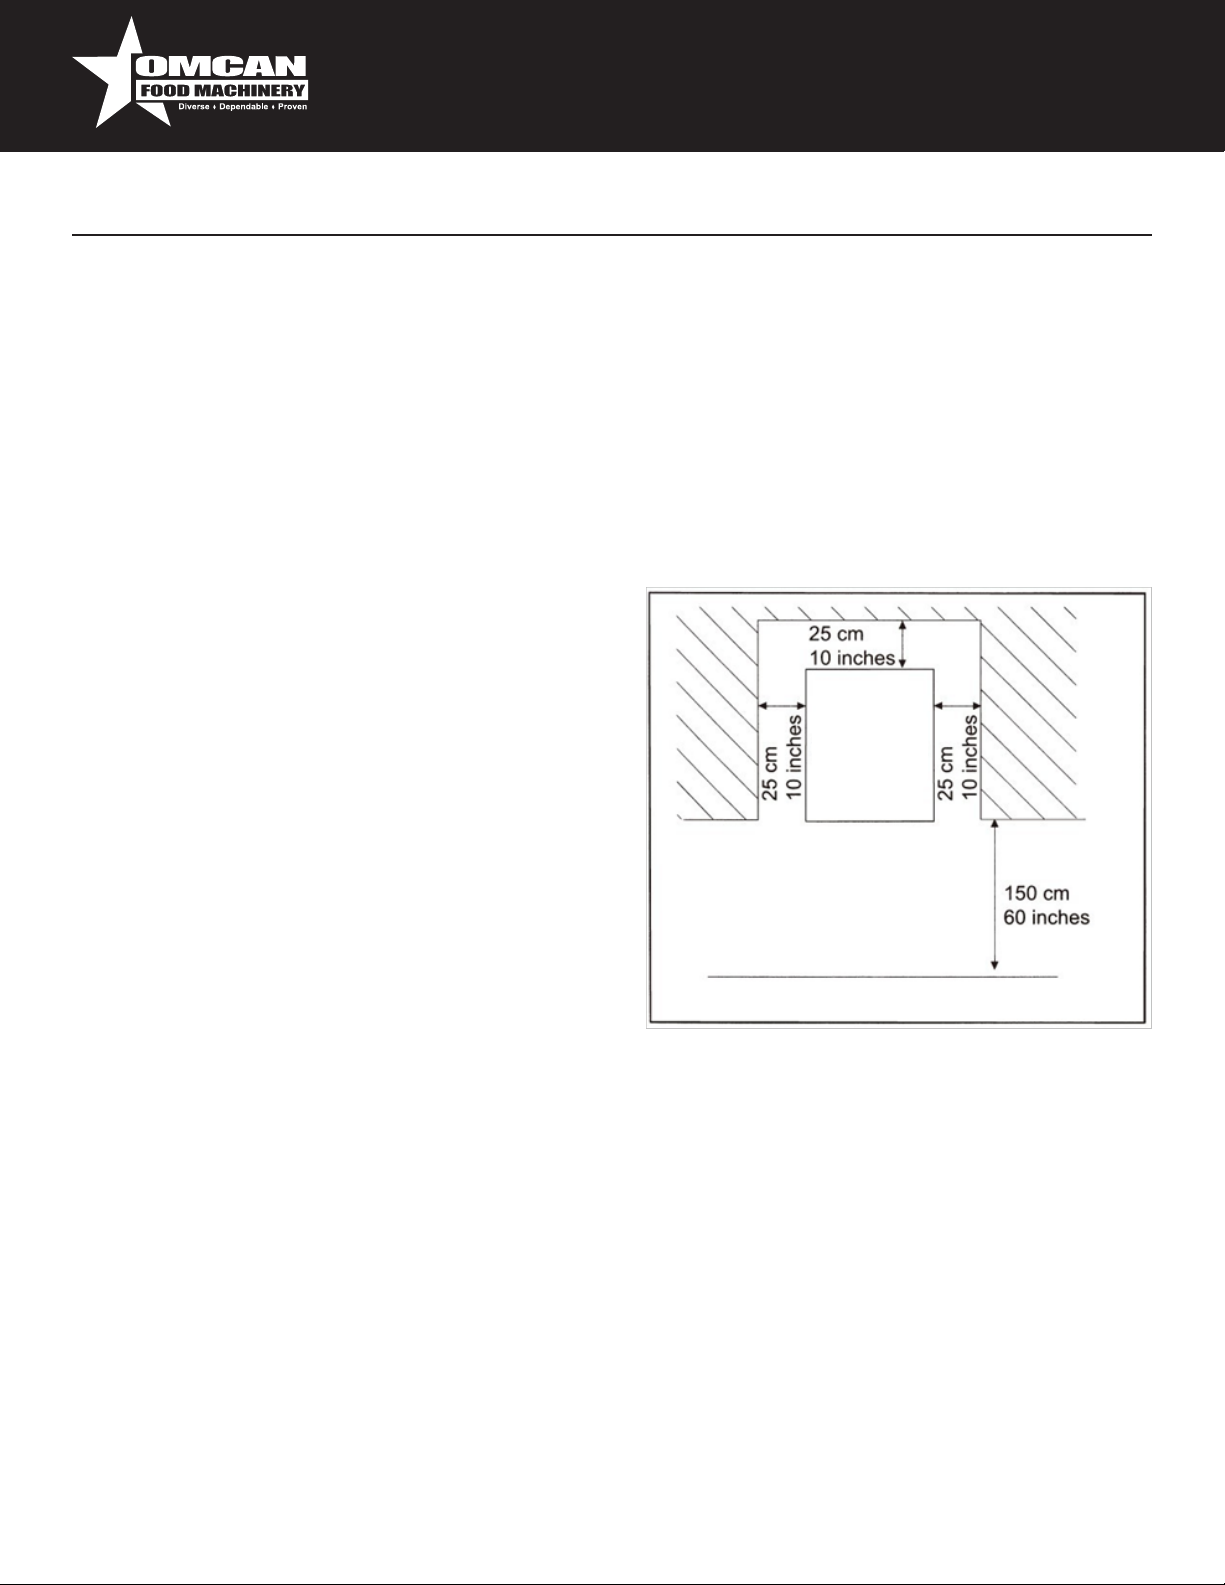
• That the machine is placed at least 20 cm {7.8
inches) from the edge of the top used.
Adequate clearance must be left around the machine
to enable personnel to work without any constraints
and also to leave the work area immediately in case
of need. The image to the right shows the minimum
clearances for installation.
The image shows the clearances required for accessing:
• The controls situated on the left side.
• Machine parts so that they may be serviced in the event of a fault.
Important note: when lifting the machine, do not use the product dispenser unit (tap), drainage pipe, water
level indicator tray, bowl hook on handles or the bowl itself; grip the bottom machine body. Any damage to the
machine deriving from failure to follow these rules will not be covered by the warranty.
After positioning the packing container in the vicinity of the installation site, proceed as follows:
• Open the front pad of the packing container.
• Lift the machine and remove it from its packing.
• Then position it on the prepared site.
Before the machine is operated the rst time, its components must be thoroughly cleaned; for further details
see the relevant section herein.
7
Page 8
Installation
DISPOSAL OF PACKING MATERIALS
After opening the box, make sure to separate the packing materials according to type and dispose of them
in accordance with the current regulations in the user’s country. We recommend keeping the box for future
conveyance or transport.
ELECTRICAL CONNECTION
This job may be performed only by specialized technical personnel. Before inserting the plug into the mains
power socket, make sure that:
• The line voltage used is the same as the value indicated on the manufacturer’s rating plate.
• The main switch is set to OFF.
If the machine is being connected to the electricity mains for the rst time, this operation must be performed by
a specialized technician, while the Customer will be responsible for and have to take care of any subsequent
connections. The machine must be connected to the electricity main socket by means of the plug tted on the
power cord. Be sure to comply with:
• The technical regulations and standards in force at the time of installation.
• The data shown on the rating plate on the side of the machine.
Warning: the electric outlet must be situated in a place easily within reach of the user, so that no effort is
required in order to disconnect the machine from the power supply when necessary. If the power cord is
damaged, you must have it replaced either by the manufacturer or a specialized technician.
It is forbidden:
• To use extension cords of any type.
• To replace the original plug.
• To use adaptors.
Operation
Before the machine may be started up for the rst time, specialized
technical personnel must check that it functions properly.
STARTING UP
To start up the machine carry out the following steps:
• Make sure that the switch is set to off.
• Take off the lid.
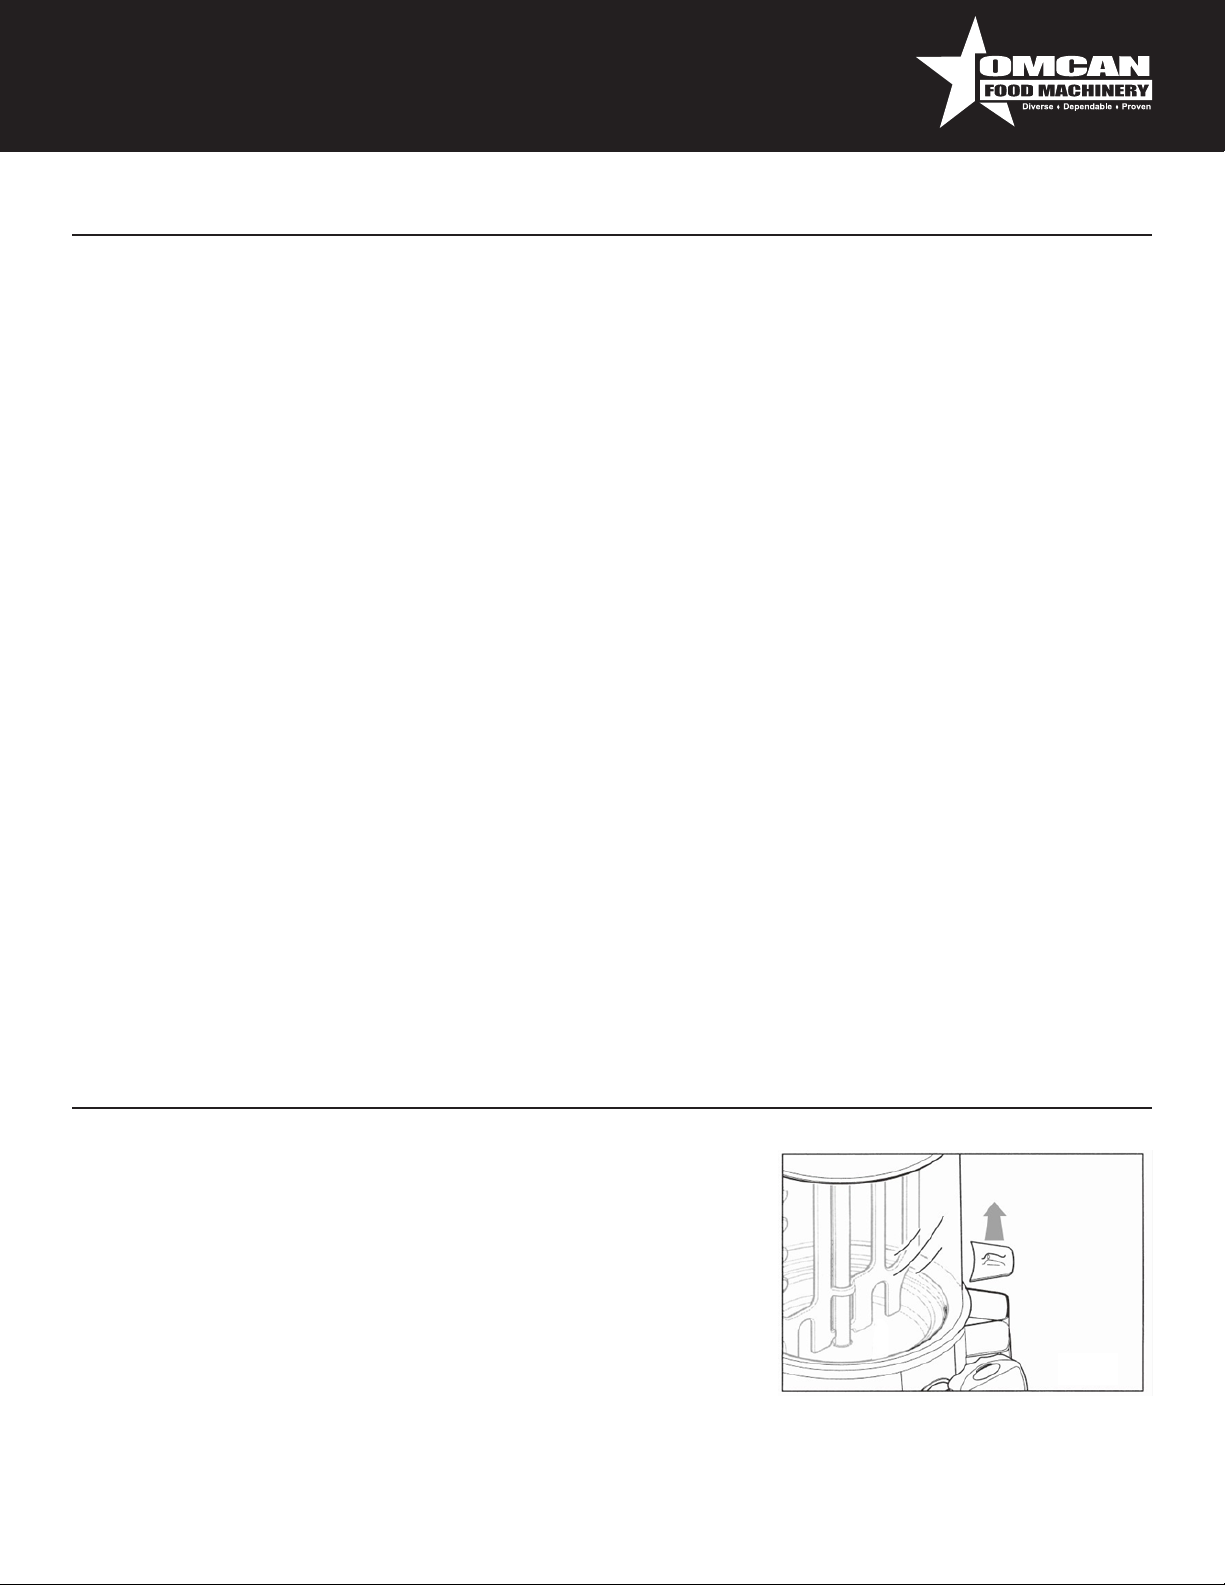
• Fill the boiler tank with water using the boiler tank level indicator
tray, until it reaches the maximum value indicated on the tray itself,
which is marked MAX.
8
Page 9
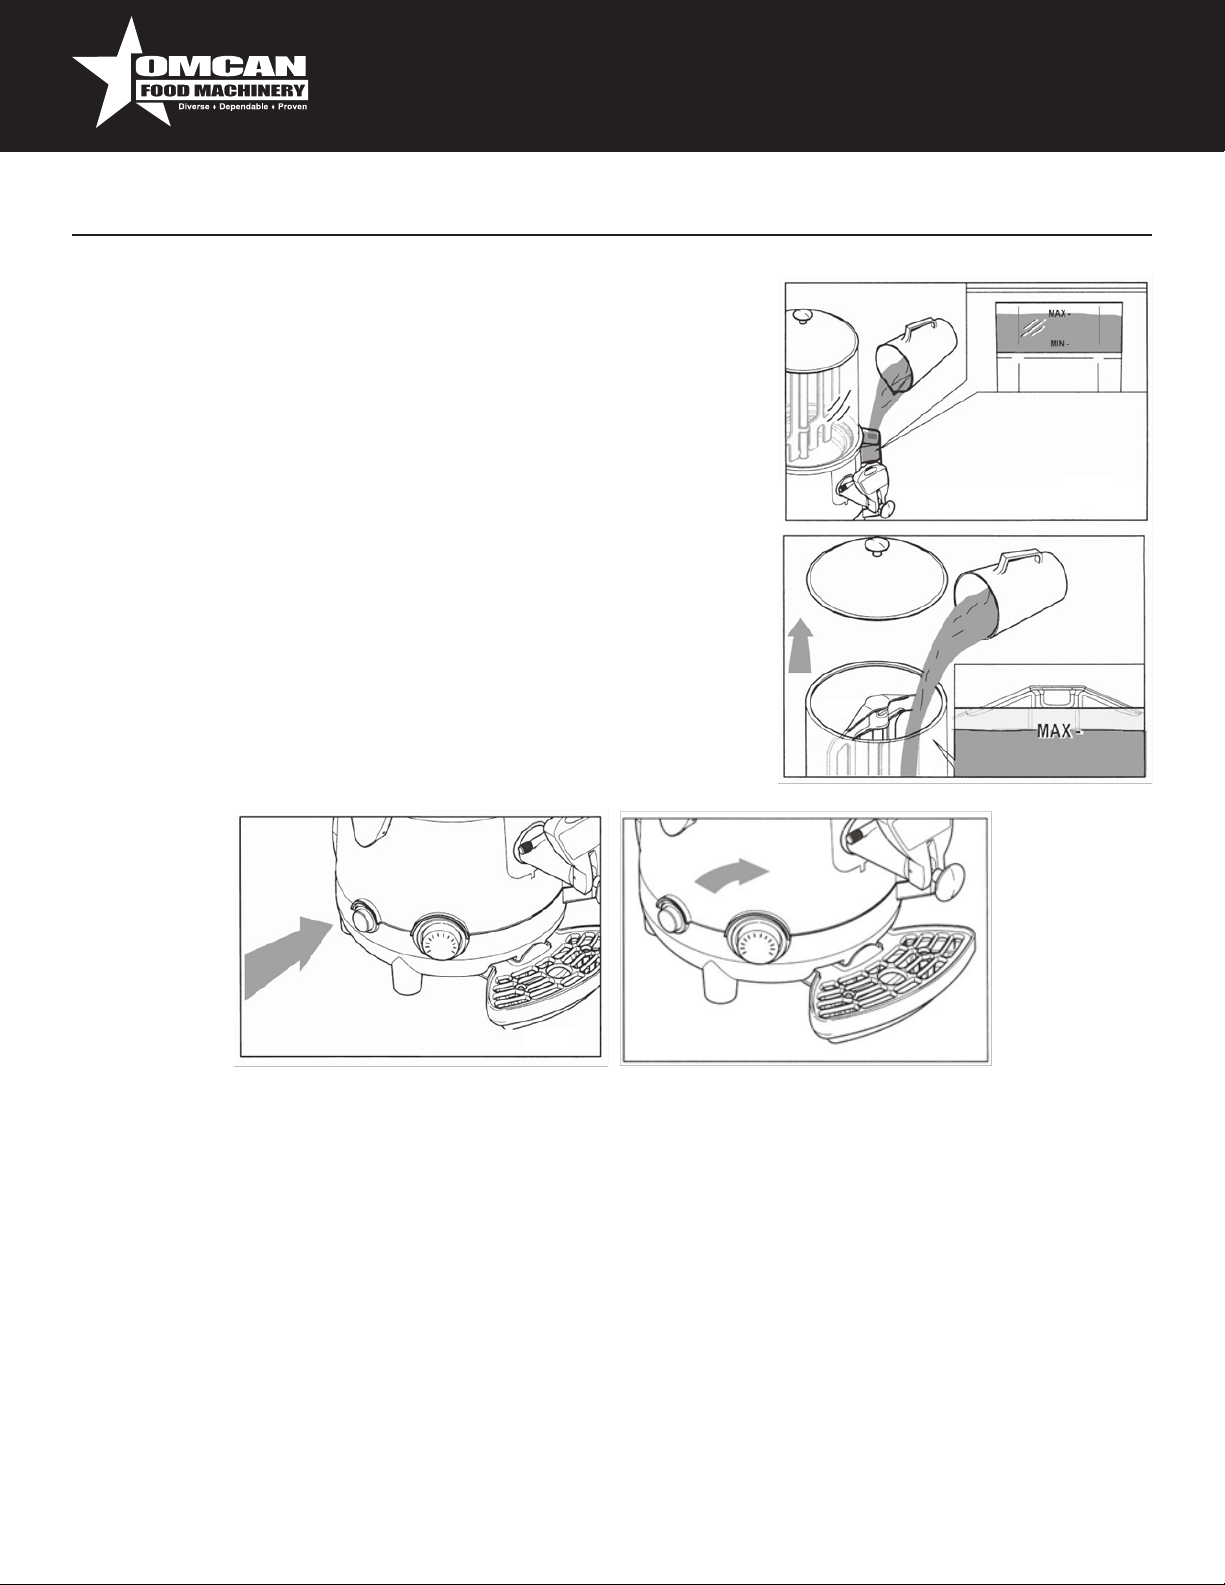
Warning: ll the boiler tank by pouring in water slowly and check for a
few seconds to make sure that the water level has reached the MAX
level and that it is stable.
When lling an empty boiler rank for the rst time, the amount of water
needed to completely ll the tank is approximately 3.25 liters(0.86
GAL US).
• Remove the lid and pour the beverage prepared according to the
manufacturer’s instructions into the bowl.
• Never exceed the maximum level, which is marked MAX on the
tray itself.
• After pouring the product into the bowl,t the lid back in place.
• Make sure that the plug has been inserted into the mains socket.
• Press the main switch to start the machine; the product inside the
bowl will start to be mixed.
Operation
LIT LED: MACHINE ON.
LED OFF: MACHINE OFF.
• Set the thermostat to the required temperature to heat the product inside the bowl.
• The machines with LCD offer the opportunity to make a visual check to see when the product has reached
the required temperature inside the bowl.
Warning: during bowl and/or boiler switch off the machine using the main switch (LED off). There is a
temperature sensor, if the water is boiled up and the heating element is over heated. The temperature sensor
will shut down the machine. Then you need to press the reset button to restart the machine.
DISPENSING THE PRODUCT
Warning: The products dispensed from the machine has a very high temperature; risk of scalding.
9
Page 10
Operation
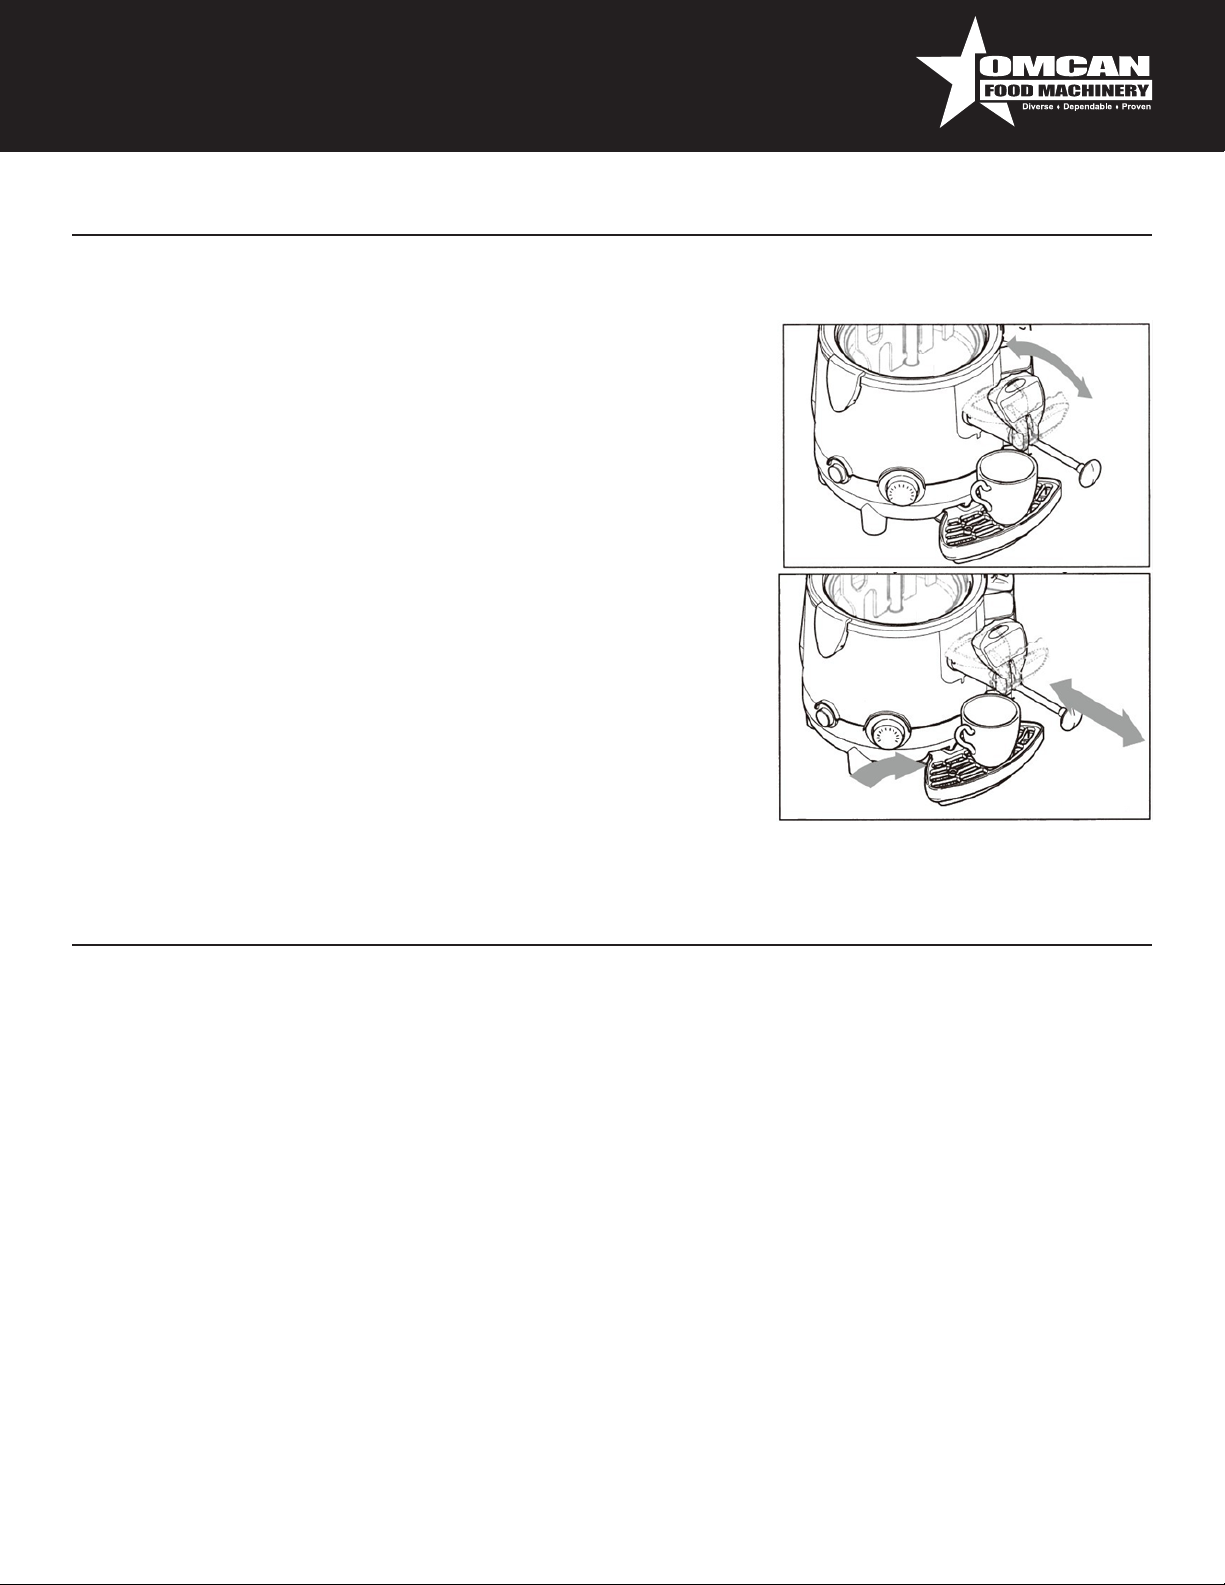
To dispense hot chocolate proceed as follows:
Note: It is advisable to keep the rod in the maximum dispensing
position to help the product to ow at the required rate.
• Place a cup beneath the tap.
• Use the lever on the tap (the product is dispensed when the level
is pressed or pulled) until the required amount of product has been
poured inside the cup.
• Gradually release the tap level so that it returns to the standby
position(tap off).
• If the product is especially think, it is advisable to keep the rod
pulled out at the maximum position; any clogging in the spout may
be removed by sliding the rod back and forth while keeping the
machine.
Warning: never touch the bowl or lid while the machine is operating,
since they are very hot, Always use the knob when moving the bowl
lid.
Maintenance
CLEANING AND MAINTENANCE
Machine cleaning and maintenance must be performed with the main switch set to OFF and the machine
unplugged from the main socket.
Warning: each time that the bowl is lled with any type of product (food or sanitizing product), make sure that
the mixing rod is present.
Warning: before carrying out any cleaning job wait until the machine has cooled down sufciently.
Warning: the use of abrasive and/or metal sponges to clean the machine or its components is completely
prohibited; only use ad amp cloth and/or non-abrasive sponge for cleaning.
Warning: only use the cleaning brush provided to clean the channel connecting between the tank and the tap;
never use this brush to clean other parts.
Before performing any cleaning and maintenance operation on the machine, wear the personal protections
(gloves, glasses,etc.), which are recommended by the safety standards in force in the country where the
10
Page 11
Maintenance
machine is used.
When performing the Cleaning and Maintenance operations, follow these instructions:
• Wear protection accident-proof gloves.
• Do not use solvents or in ammable materials.
• Do not use abrasive and/or metal sponges to clean the machine and its components.
• Do not wash machine components in a dishwasher.
• Do not dry parts of the machine in a conventional and/or microwave oven.
• Do not immerse the machine in water.
• Do not expose the machine to direct sprays of water.
• Clean only with warm water and a sanitizing product made from sodium hypochlorite diluted in water to
obtain an active chloride concentration.
• On completing work, make sure that all protective covers and guards that have been removed or opened
are set back in place and properly secured.
Cleaning and sanitization are operations that must be performed with utmost care and on a regular basis to
guarantee the quality of the beverages dispensed and compliance with mandatory hygiene standards.
Each bowl must be cleaned and sanitized for a product change at least every 2 days and in any case in
compliance with the current hygiene regulations in the user’s country. These operations must be made
more frequently if demanded by the characteristics of the product used; for further details, contact the
product supplier.
The metal, plastic and rubber materials used to make these parts, combined with their specic shapes
make cleaning easier but do not prevent the formation of bacteria and mould in the event of insufcient
cleaning.
CLEANING AND SANITATION PROCEDURES
EMPTYING THE BOWL
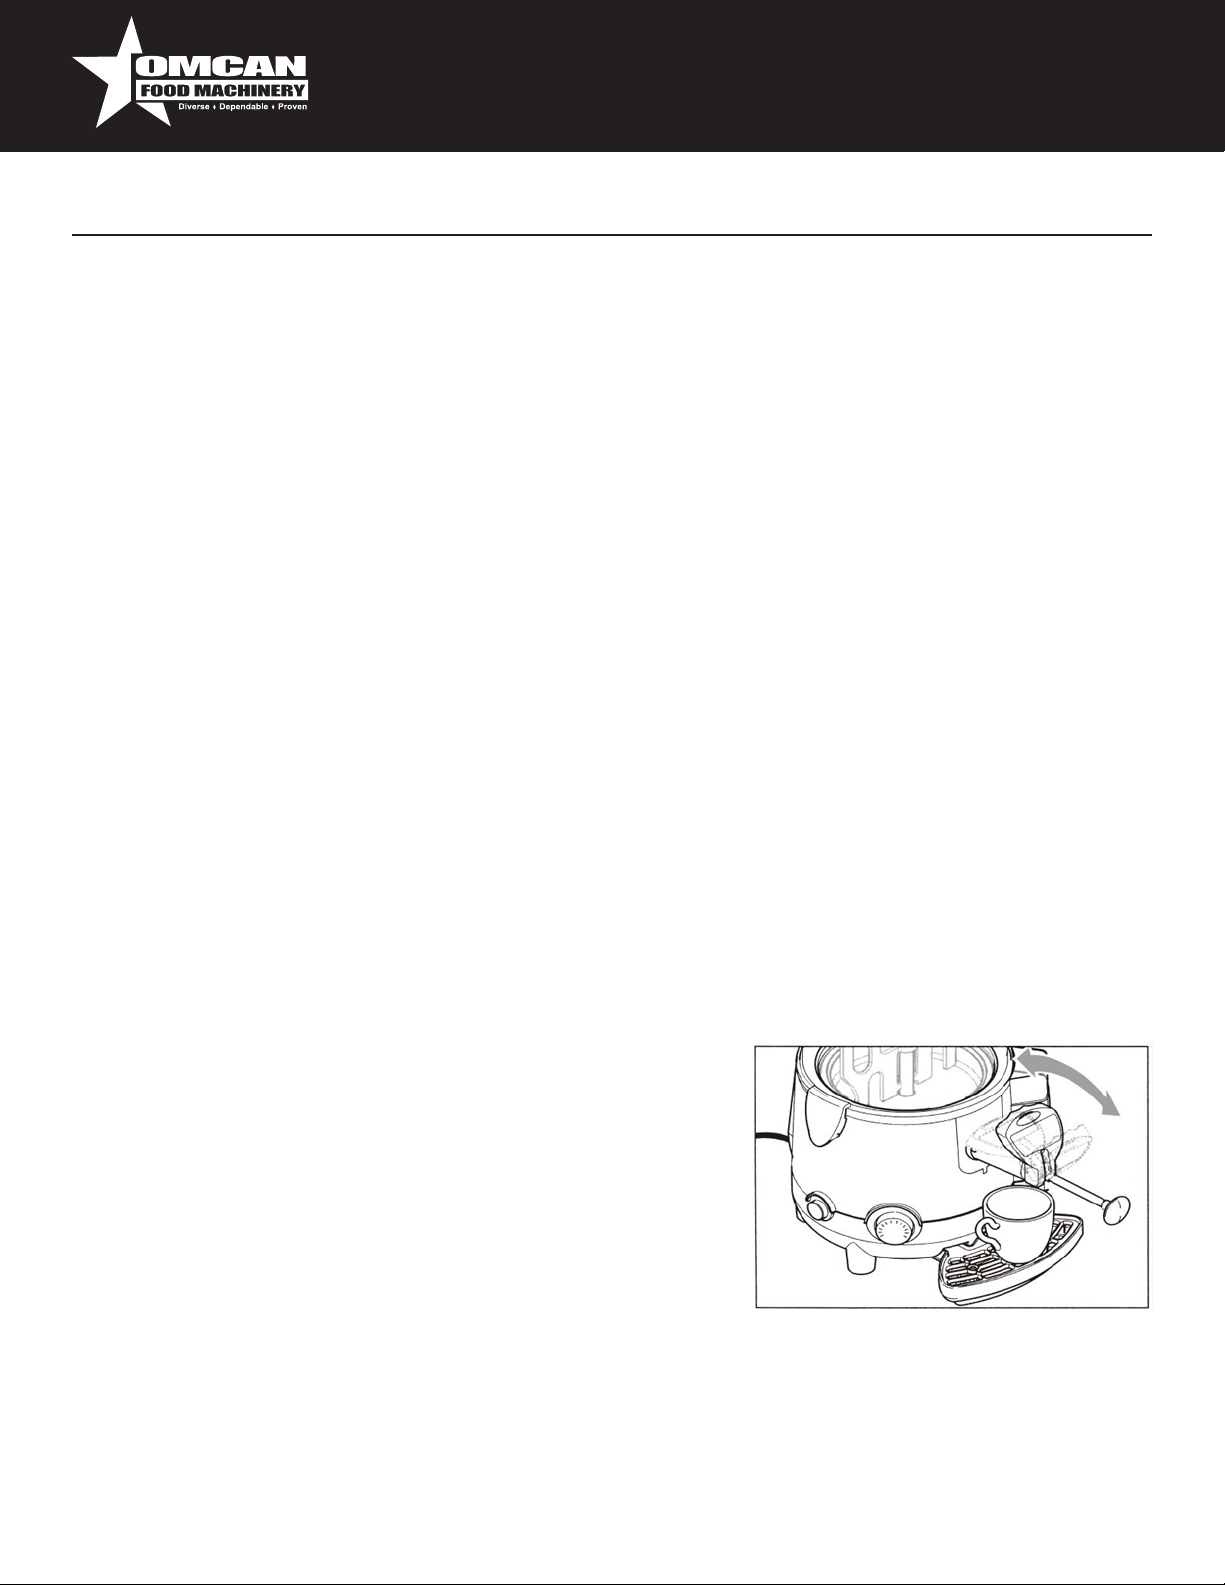
Before cleaning out the bowl, it is rst necessary to empty out any
production inside it.
With the machine switched on, empty out all of the product still
inside the bowl, using the level on the tap. Fill the bowl with water
and set thermostat to 50°C(122°F),Operate the appliance for at
least 15-20 minutes; increasing this amount of time will release any
product residues that may be stuck to the sides of the bowl. Empty
out the entire contents of the bowl, using the lever on the tap.
Warning: the product dispensed from the machine has a very high temperature; risk of scalding.
11
Page 12

Maintenance
REMOVING THE BOWL
Warning: before removing the bowl, make sure that the main switch is off and that the machine is unplugged
from the mains electricity and sufciently cooled down.
Removing the bowl is prohibited if it contains the product or any other liquid. It Is fundamentally important to
remove the bowl and its component parts if the machine is to be correctly cleaned and sainted.
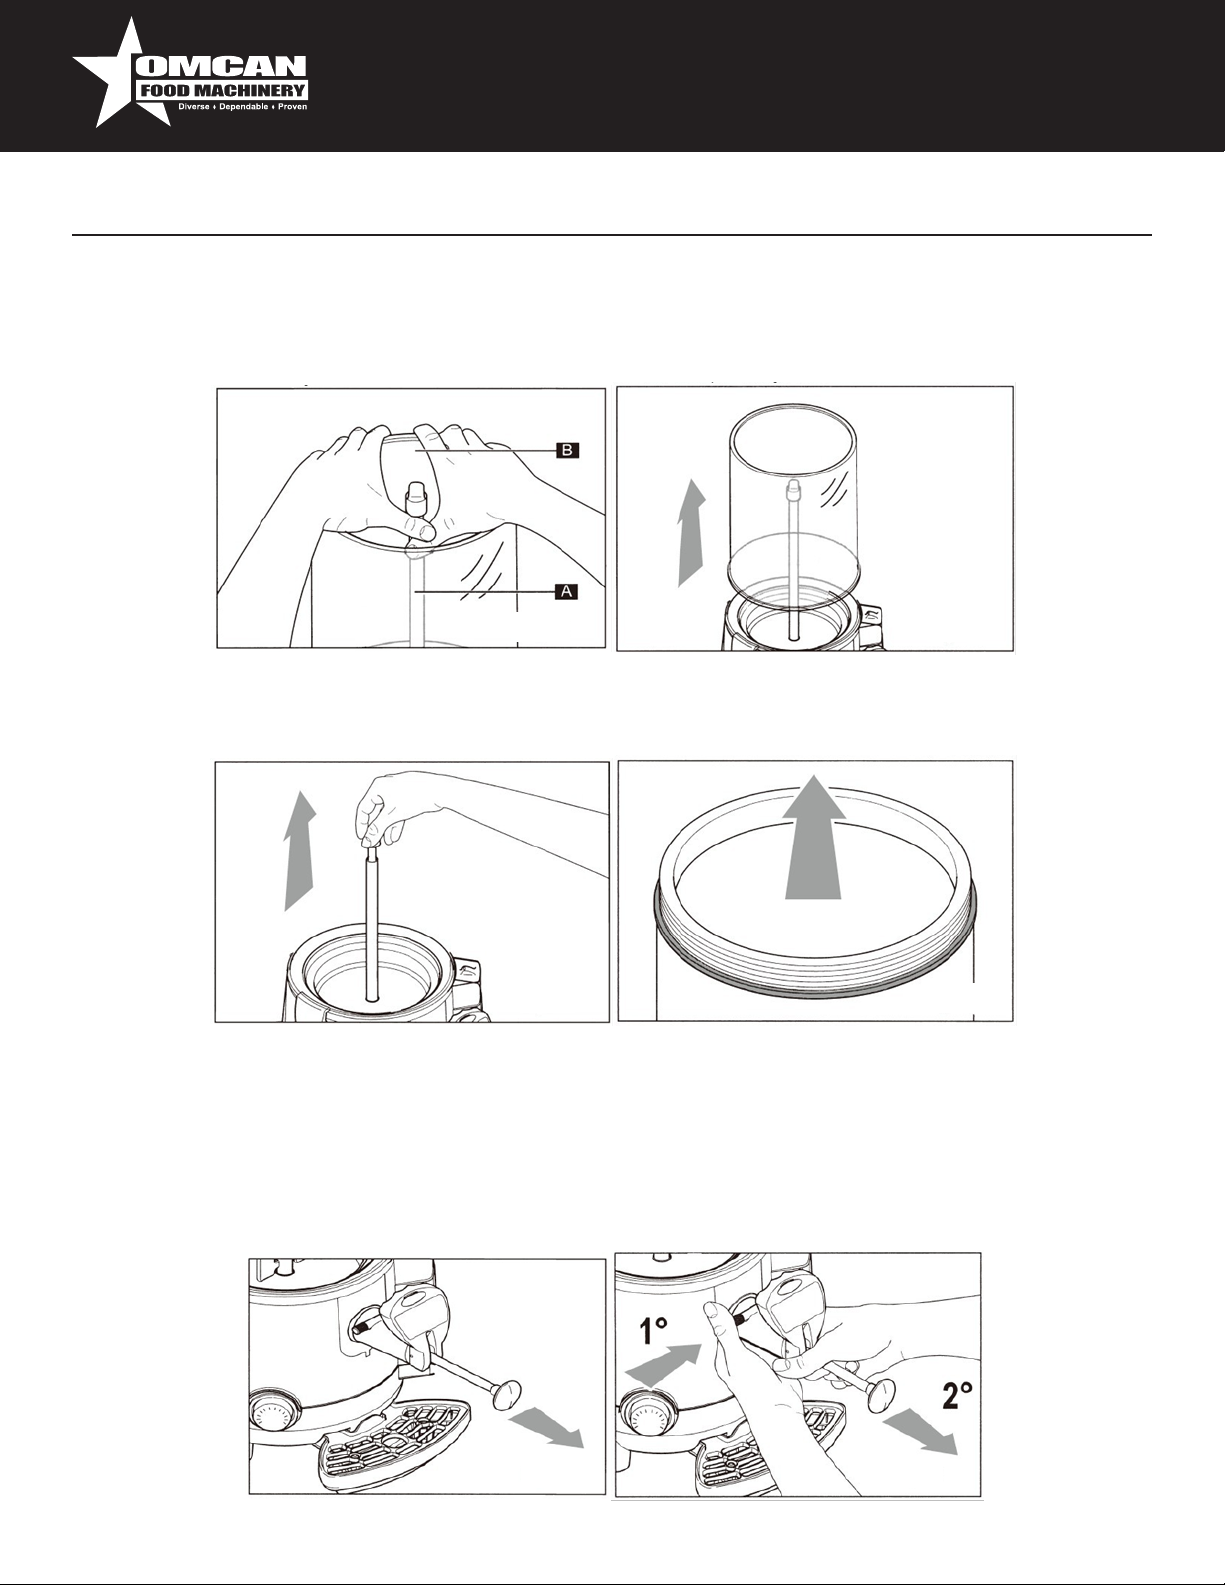
To remove the bowl correctly proceed as follows:
• Take off the lid.
• Slide the mixer upwards to remove it, keeping it in line with the central rod until the bottom slot of the mixer
itself is level with the rotation pin.
• Tilt the mixer and slide it upwards, as illustrated in the gure, to remove it completely.
• Unlock the bowl hook-on handles, as illustrated in the gure, to free the bowl from the machine body.
12
Page 13
Maintenance
• Release the bowl from the machine body, using two ngers to pry it away from the xed steel part of the
mixer auger(A) and the others to grip the outlet edge of the bowl(B): Gradually pull the bowl harder until it
comes away from its seating.
• Slide the bowl upwards using both hands.
• Slide the mixing auger upwards with one hand, taking care to grip it by the rotation pin.
• Place the bowl on a at surface and using both hands, remove the gasket by sliding it upwards in the
direction shown by the arrow.
REMOVING THE TAP
Removing the tap is prohibited if the bowl contains the product or any other liquid.
To remove the tap, proceed as follows:
• Move the rod to the maximum dispensing position.
• Press the button(A) securing the tap to the machine and then remove the tap(B) with both hands.
13
Page 14
Maintenance
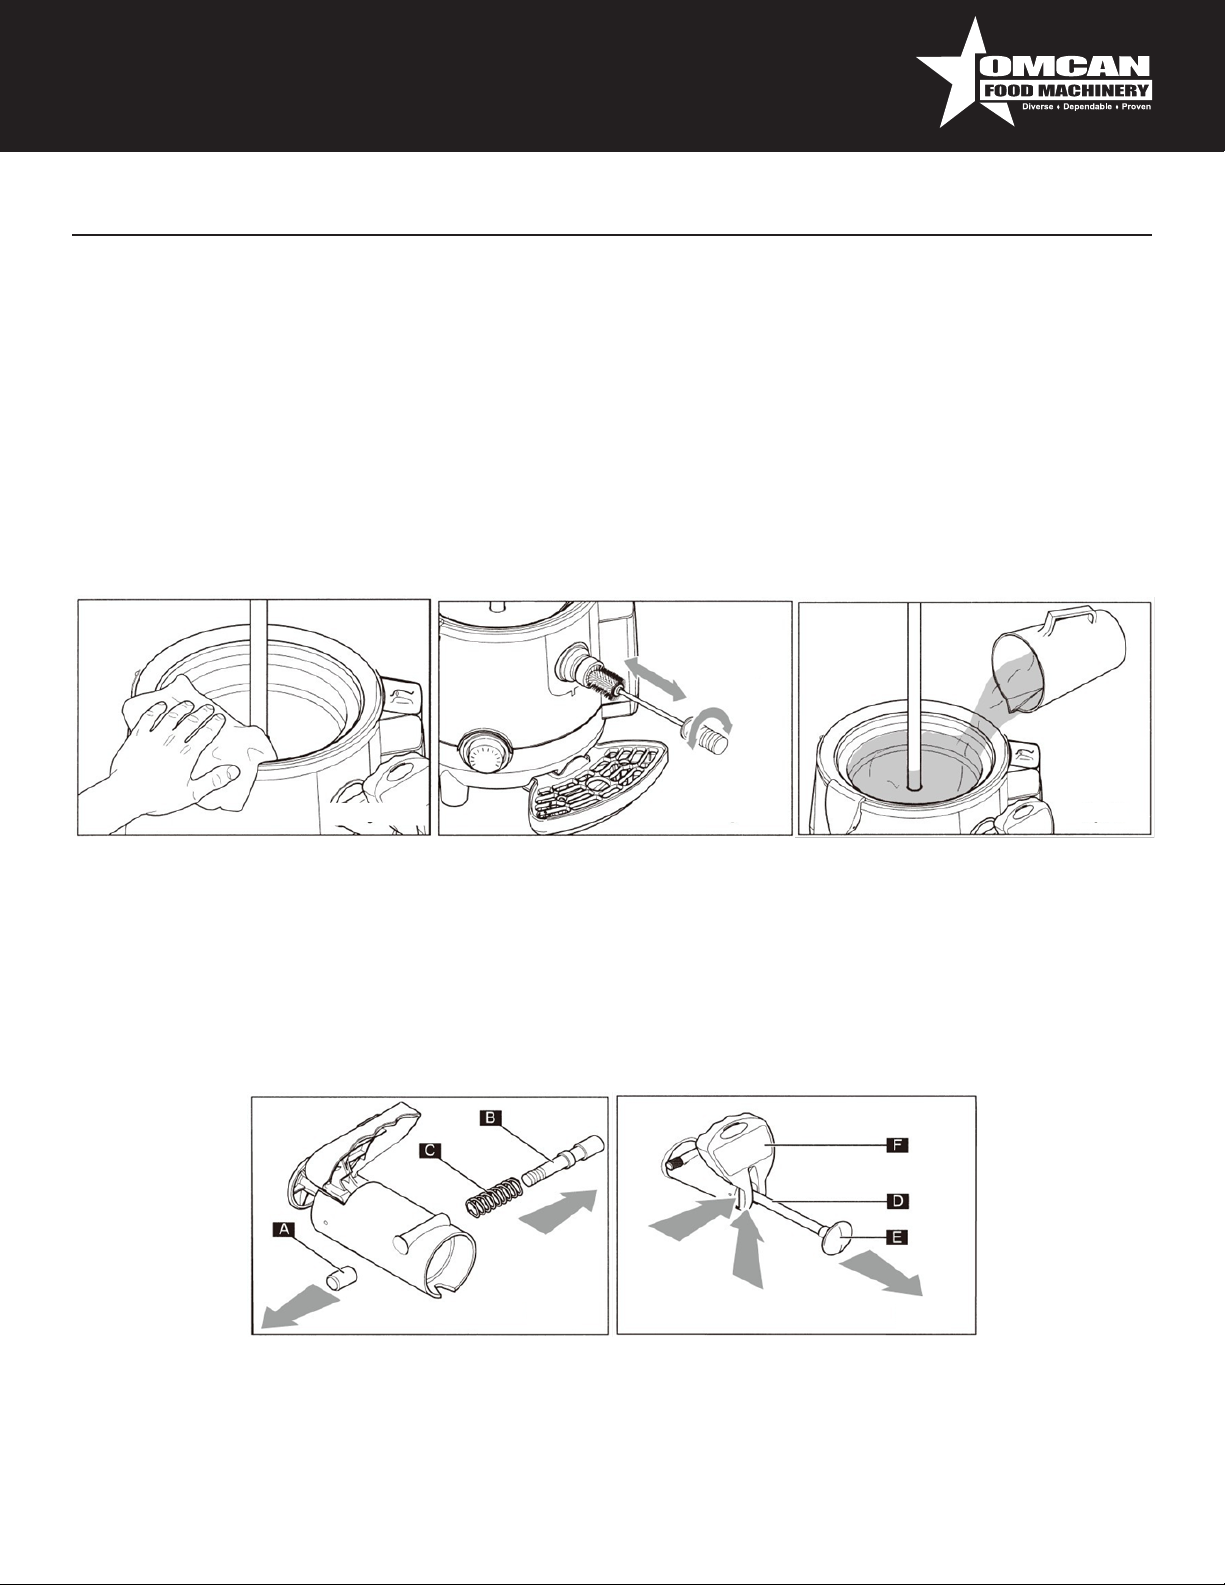
CLEANING THE PAN
It is necessary to remove all parts tted to the pan:
• Remove any product left in the bowl.
• Remove the bowl from the machine.
• Remove the tap from the machine.
• Clean the entire surface of the pan using a damp cloth and/or a non-abrasive sponge.
• Clean the channel connecting the bowl and the tap, using a cleaning brush.
• Ret the tap.
• Pour a little water inside the pan.
• Use the tap to drain out all water from the pan so as to eliminate any small product residues inside the
dispensing channel.
DISASSEMBLING THE TAP
To clean the inside of the tap more thoroughly, disassemble it as follows:
• Remove the tap.
• Place the tap on a clean, at surface, then loosen and remove the screw(A) fastening the button to the
machine, then slide out the pin(B) and relevant spring(C)from the seating.
• Pull the(D) all the way out from the knob(E) then push the lever(F) upwards from the bottom until it comes
out from the pin guide.
14
Page 15
Maintenance
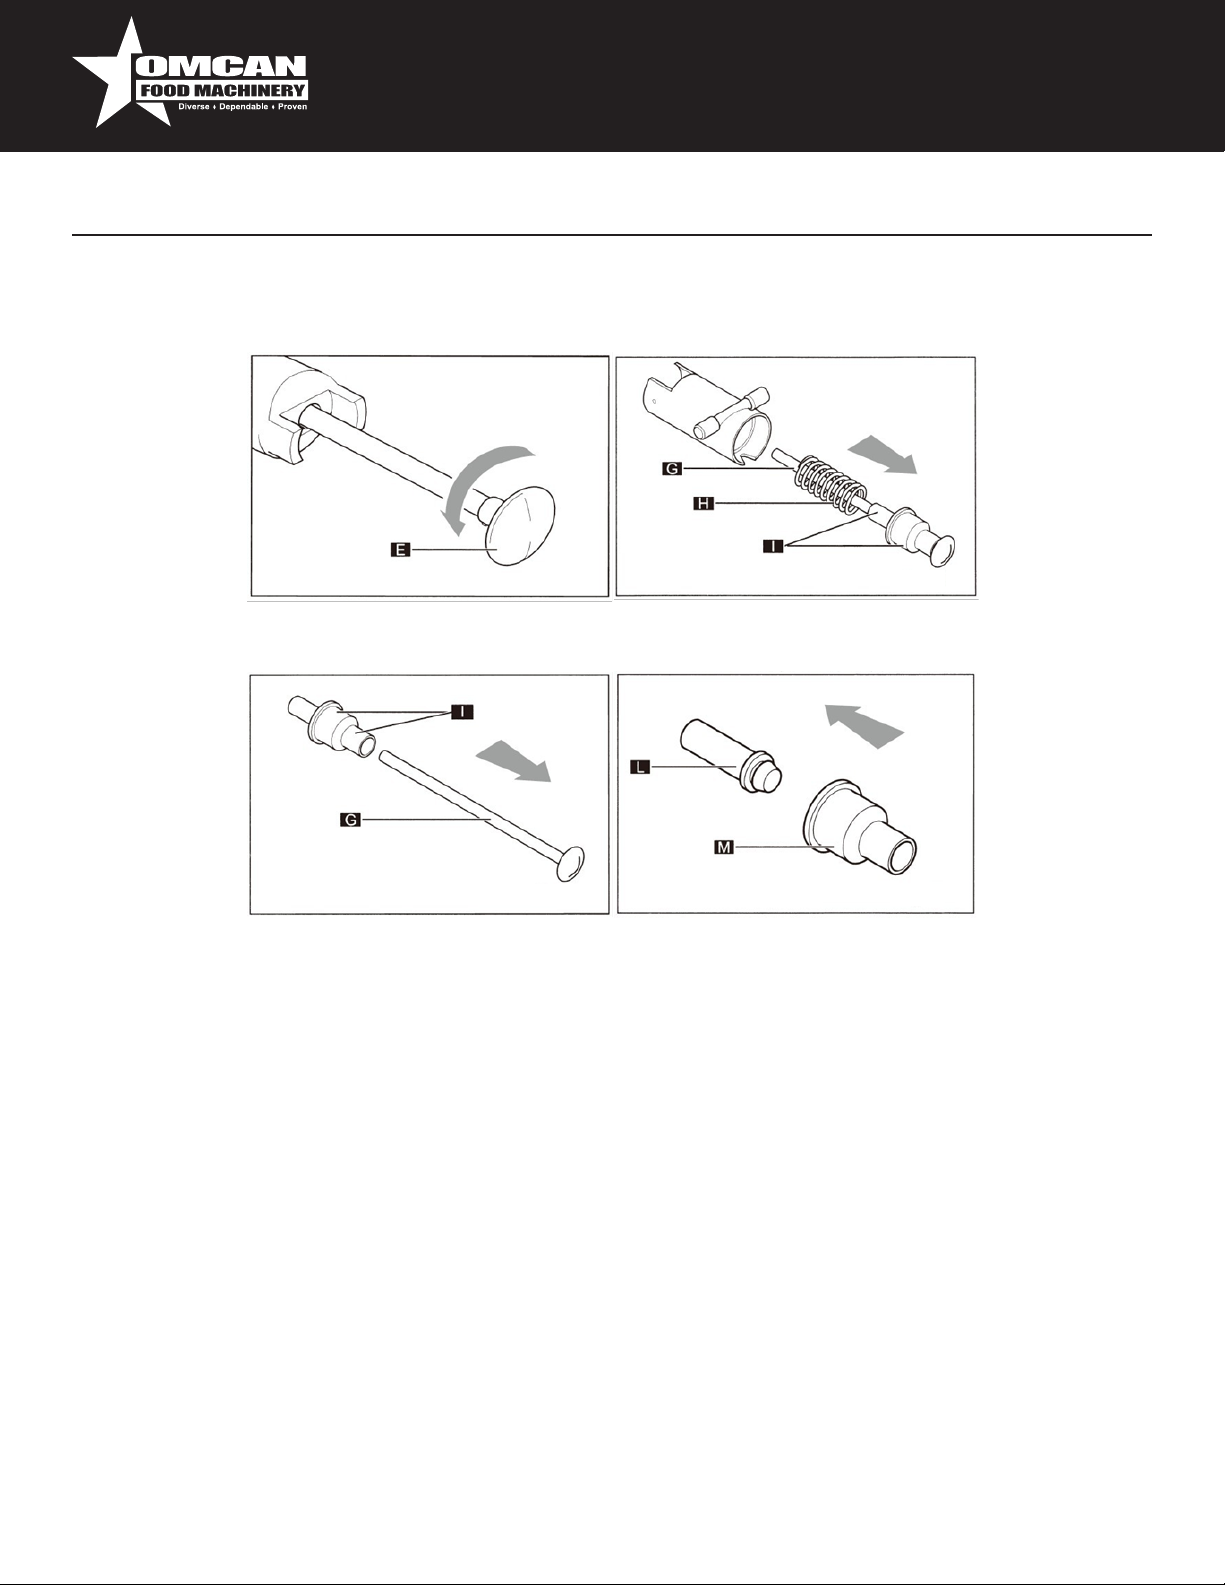
• Unscrew the knob(E) by turning it counterclockwise while holding the rod in place.
• Pull out the rod(G) and spring(H) from the tap body (the pin/gasket assembly(I) will slide out together with
the rod).
• Detach the rod(G) from the pin/gasket assembly(I).
• Disassemble (by pulling) the pin(L) from the gasket(M).
WASHING AND SANITIZING THE COMPONENTS
All of the component parts previously disassembled (tap, mixer, mixing auger, gasket and bowl) must be
carefully washed and sanitized.
To carry out this procedure correctly proceed as follows:
• Fill a container with detergent and hot water with a temperature of 50~60°C(122~140°F).
• Wash the disassembled components with the detergent solution.
• Rinse with hot water.
• Clean only with warm water and a sanitizing product made from sodium hypochlorite diluted in water to
obtain an active chloride concentration of 0.02%.
• Immerse the disassembled component parts in the sanitizing solution for about 30 minutes.
• Rinse with clean water.
• Clean the bowl lid.
• Place the components on a clean surface and dry them.
ASSEMBLING THE WASHED COMPONENTS
All washed and sanitized component parts must be re-assembled with care and then subsequently retted to
15
Page 16
Maintenance
the machine, following the relevant steps.
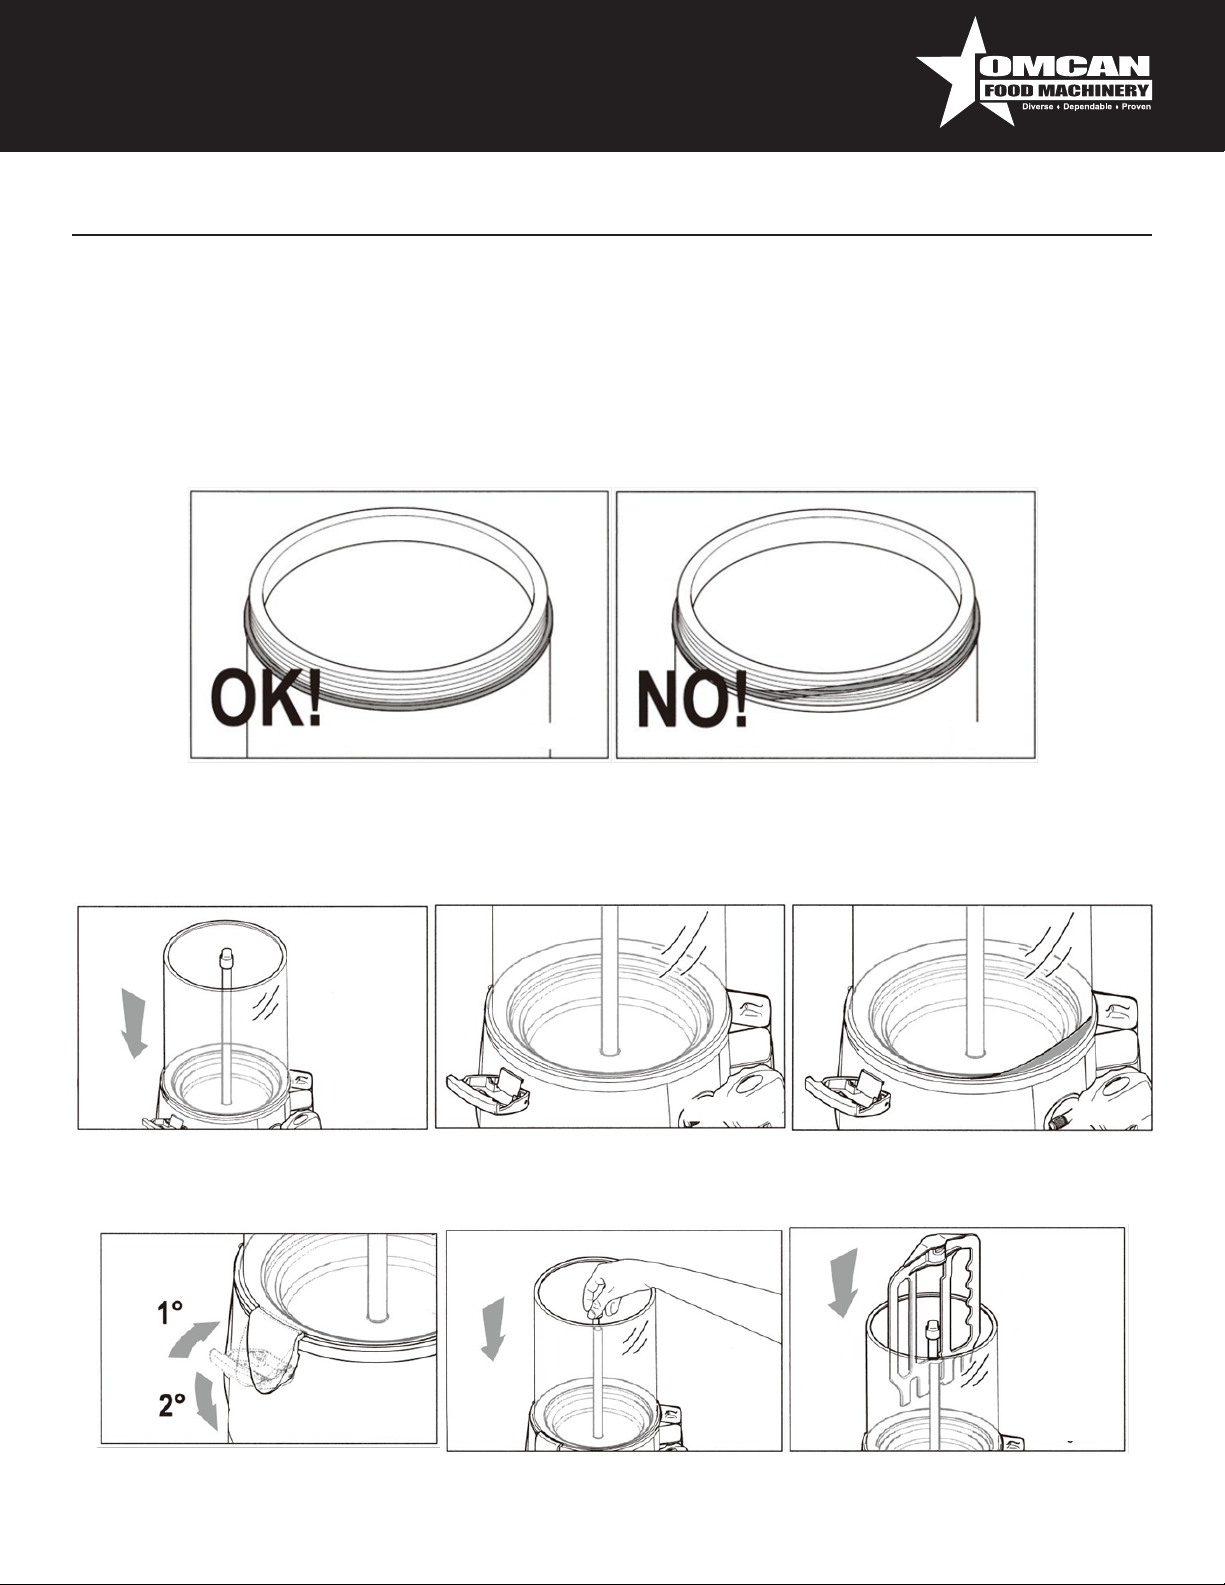
Assembling the Bowl
Warning: make sure that the gasket is correctly assembled.
The rst image shows a seal correctly assembled; here the seal perfectly adheres to the bowl edge. The
second image shows a seal which is not correctly assembled; here the seal does not perfectly adhere to the
bowl edge.
• Fit the bowl back into place rmly downward, after moistening the seal with water.
DO NOT USE GREASE OR VASELINE.
Warning: make sure that the bowl is correctly tted to the machine; an incorrectly tted bowl will cause the
product to leak out; risk of scalding!
OK NO
• Fix the bowl to the machine body using the relevant hook-on handles.
• Insert the mixer auger into its seating.
• Insert the mixer into its seating following the steps described in “Removing the Bowl” in reverse order.
16
Page 17
Maintenance
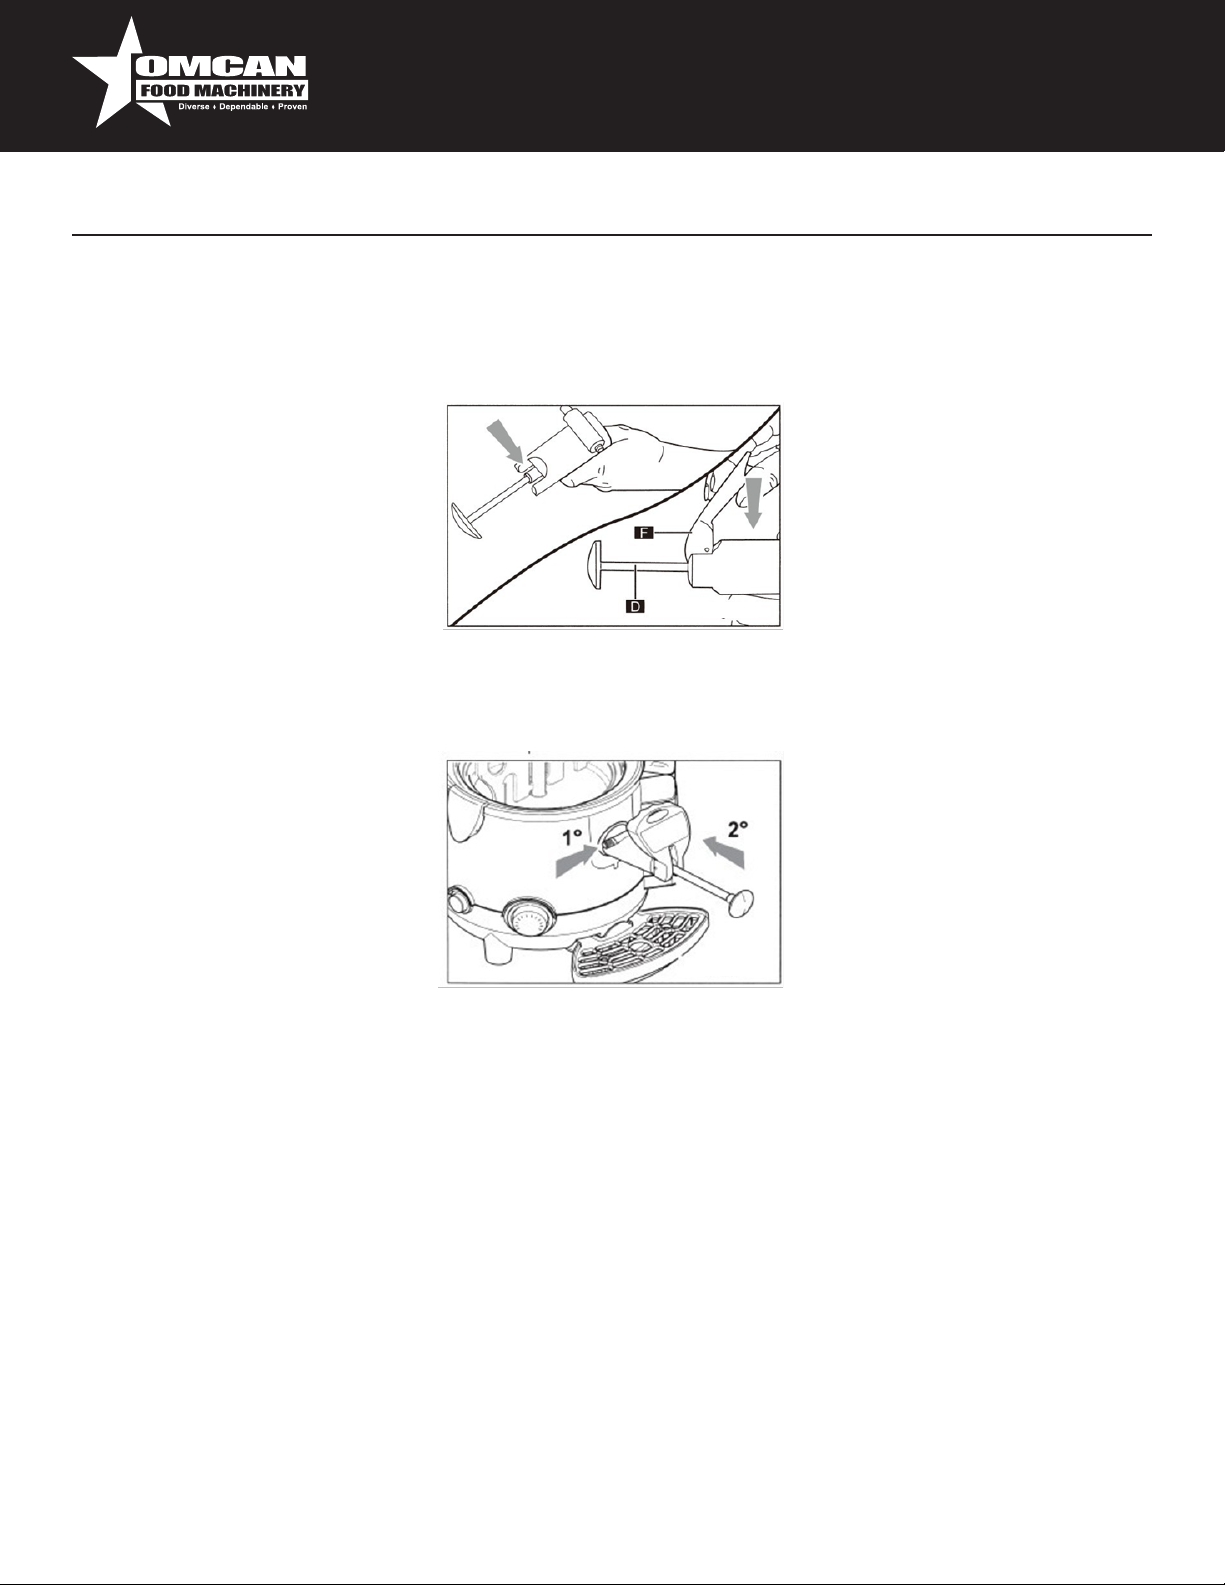
Assembling the bowl
To assemble the tap, carry out in reverse all of the disassembly steps illustrated previously.
To t the level(F) push the rod(D) from the inside until the guides protrude; the insert the level(F) and slowly
release the rod(D).
Fitting the tap
To t the lap correctly back in place proceed as follows;
1. Hold down the button, making sure that the road is completely extracted.
2. Introduce the tap into the seat provide and push until the push button returns to its initial position.
INTERNAL SANITIZATION
Warning: The thermostat must be set to OFF.
Carry out the following steps:
• Prepare the sanitizing solution.
• Fill the bowl with the sanitizing solution.
• Leave the solution to act for about 30 mins.
• Empty out the sanitizing solution from the bowl.
• Then rinse out the bowl and inside surfaces thoroughly to eliminate all residues of sanitizing solution.
CLEANING THE DRIP TRAY
The drip tray should be emptied and cleaned daily.
Note: the tray needs to be emptied out and cleaned every time that the red oat tted to the grid rises, this is to
stop liquid from leaking out.
17
Page 18

Maintenance
• Lift the tray with grid and pull it outwards to remove it from its seating.
• Wash the tray and grid separately with lukewarm water.
• Dry all of the components.
• Reposition the grid on top of the tray.
• Fit the tray back in place and press down to secure it to the machine.
CLEANING THE BOWL LID
• Remove the bowl lid from the machine.
• Clean the surface using a damp cloth and / or a non-abrasive sponge soaked in sanitizing product.
• Rinse thoroughly using clean water.
EMPTYING THE BOILER
Warning: while the boiler is being emptied, the machine must be unplugged.
Warning: The boiler may be emptied only when the bowl is empty and the machine has cooled down
sufciently.
The use of water from the boiler tank for food purposes is prohibited.
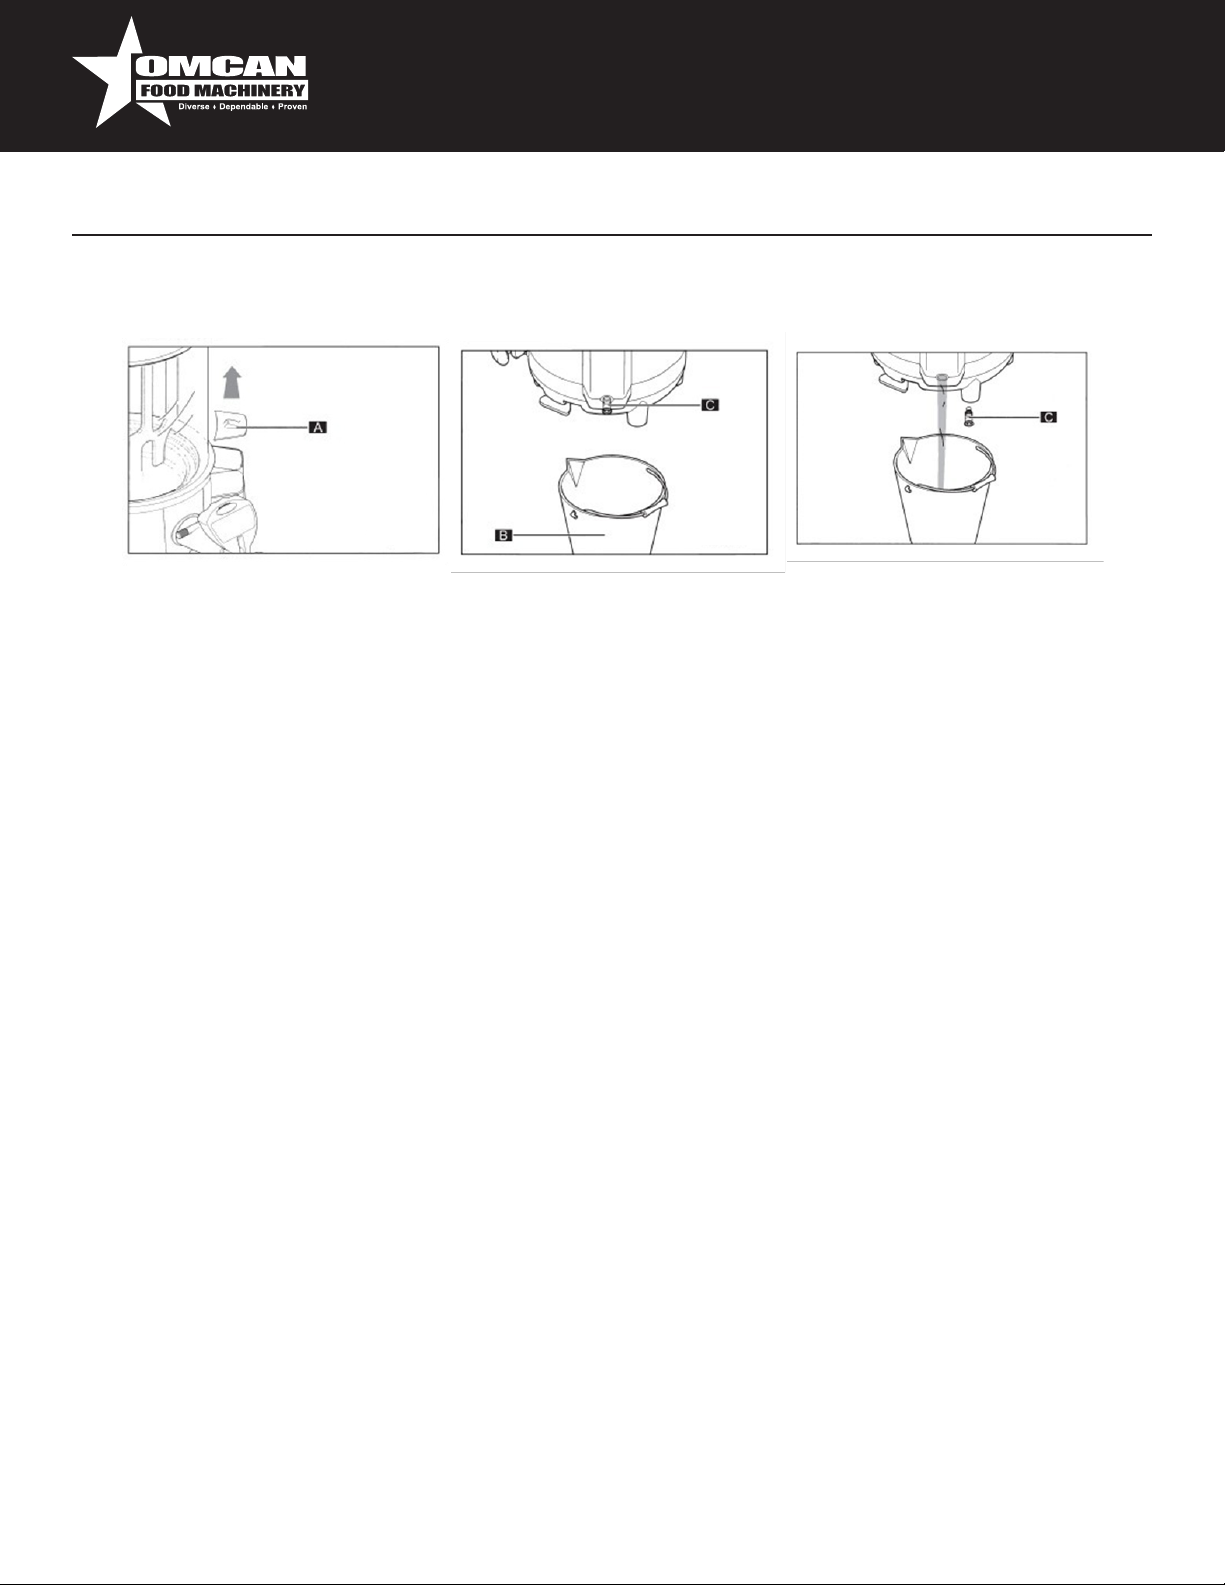
To empty the boiler proceed as follows:
• Unplug the machine.
• Remove the drip tray.
• Remove the cap(A).
• Place the machine on a at surface and with the boiler tank water level indicator tray turned towards to the
outer edge of the support surface.
• Place a container(B) with a capacity of more than 3 liters (0.8 US gals) underneath the bleeder cap(C).
18
Page 19
Maintenance
• Use a coin or Allen wrench to unscrew the bleeder cap(C).
• Pull out the cap(C) with a rm movement and wait for all the water to empty out from the boiler tank.
CLEANING AND DE-SCALING THE BOILER TANK
The boiler tank needs to be de-scaled on a regular basis; this operation is recommended at least once every 3
months.
• Follow the steps for draining out the boiler tank.
• Insert and secure the boiler tank bleeder cap.
• Insert water plus scale remover for coffee machines into the tank (follow the instructions on the scale
remover package).
• Insert and secure the boiler tank bleeder cap.
• Leave the solution to act for the time indicated in the instruction of the solution itself.
• Empty out the solution from inside the boiler tank.
• Rinse out the tank with plenty of water, by lling and emptying it.
RESETTING THE TEMPERATURE SENSOR
The temperature sensor can only be reset by a specialized technician, who must organize all of the operating
sequences and the use of the correct equipment to operate in strict compliance with the current laws to this
regard.
Warning: after the temperature sensor has intervened to shut down the machine, it is indispensable to drain
out any product contained inside the bowl and to clean all components before restoring the machine function.
Warning: before resetting the temperature sensor, switch off the machine using the relevant switch and unplug
it from the electrical main socket, then wait for the machine to cool down.
19
Page 20
Maintenance
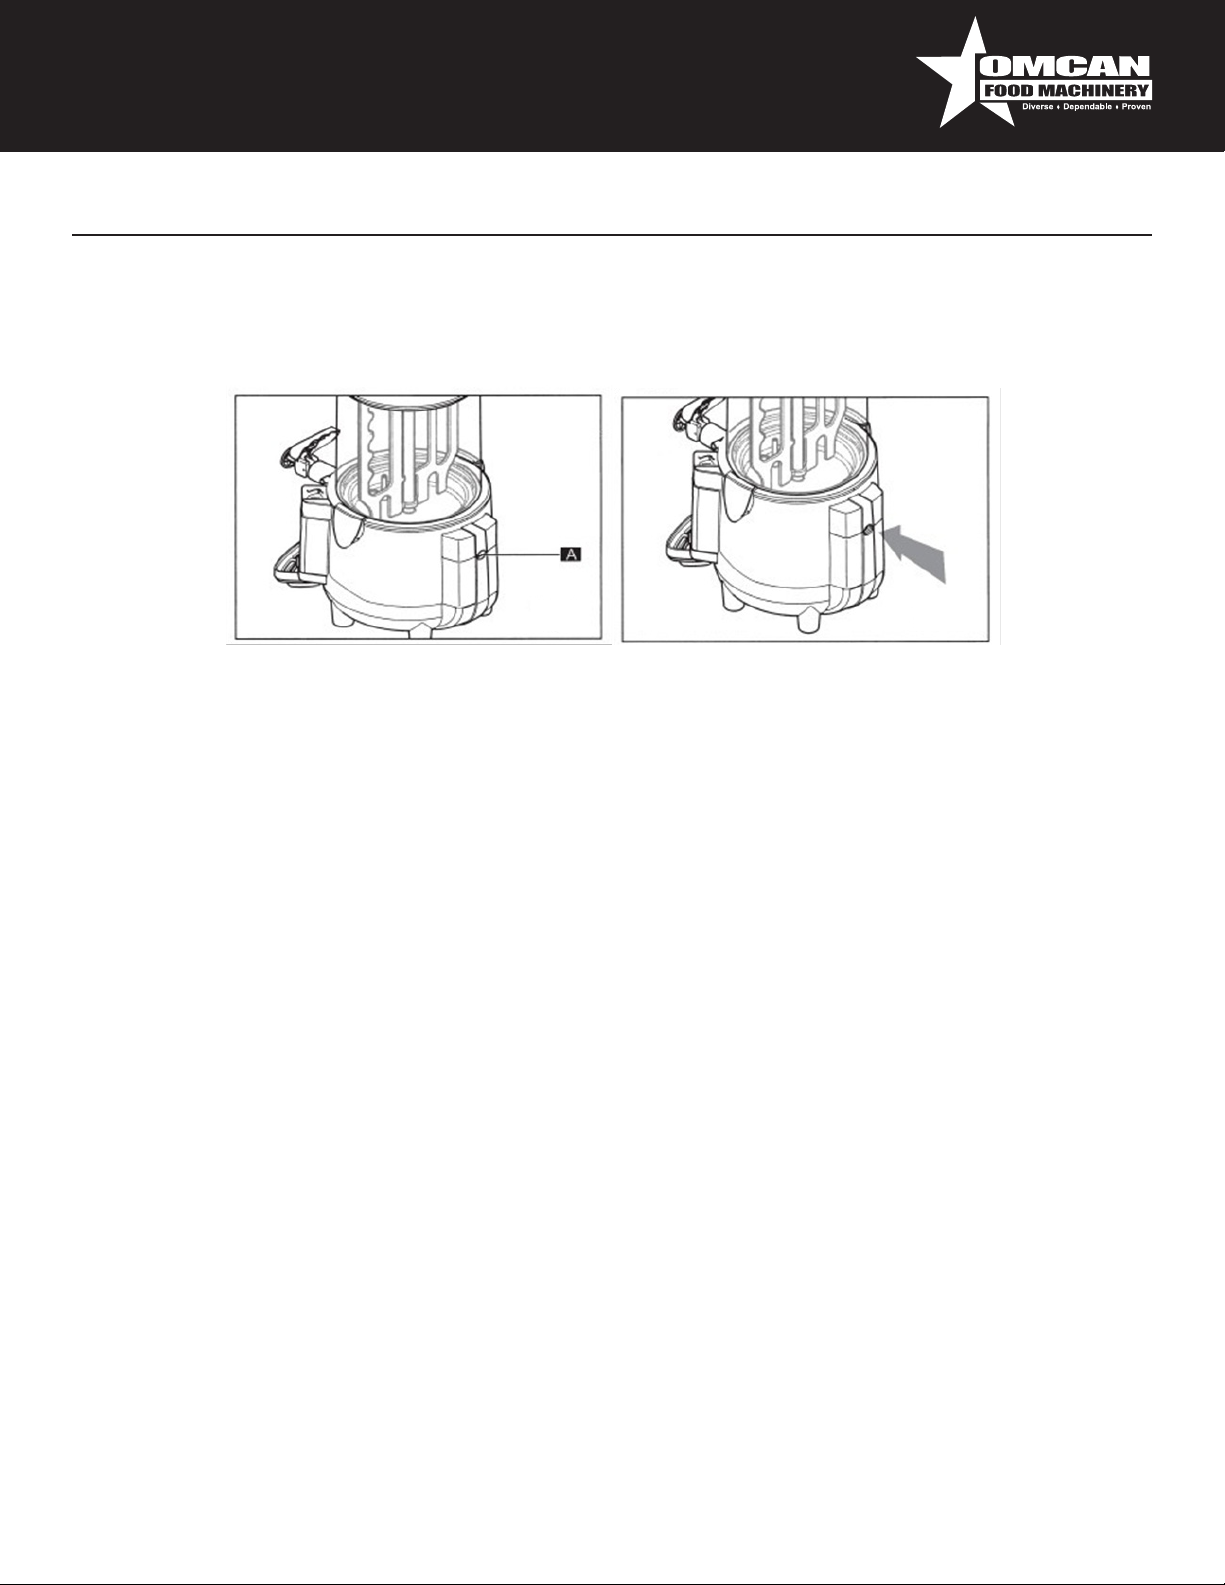
The operator is strictly prohibited from resetting the boiler tank minimum water level temperature sensor.
• Use a suitable tool to loosen and remove the protective screw.
• Use a suitable tool to press the button inside to restore normal machine operation.
PERIODIC MAINTENANCE
The machine must be periodically checked (at least once a year) by a specialized technician, this periodic
check serves to ensure that all the components installed and the machine itself are maintained at a high level
of safety. Any worn components must be replaced by an original spare part. It is forbidden to use the machine
when even only one of its components is faulty or worn. Users are forbidden to perform periodic maintenance.
SCRAPPING
Electrical and electronic equipment needs to be disposed of according to the European Directive 2002/96/
CE and in compliance with the standards and regulations in force for the country in which the machine is
used. Such equipment may not be disposed of as normal municipal solid waste but must rather be separately
collected to optimize recovery and recycling of the materials used to manufacture them. All products are
marked with the crossed out wheeled bin, symbol as a reminder of separate collection obligations. Correct
observance of all of the provisions for the disposal of end-of –life products will contribute to safeguarding the
environment.
20
Page 21
Troubleshooting
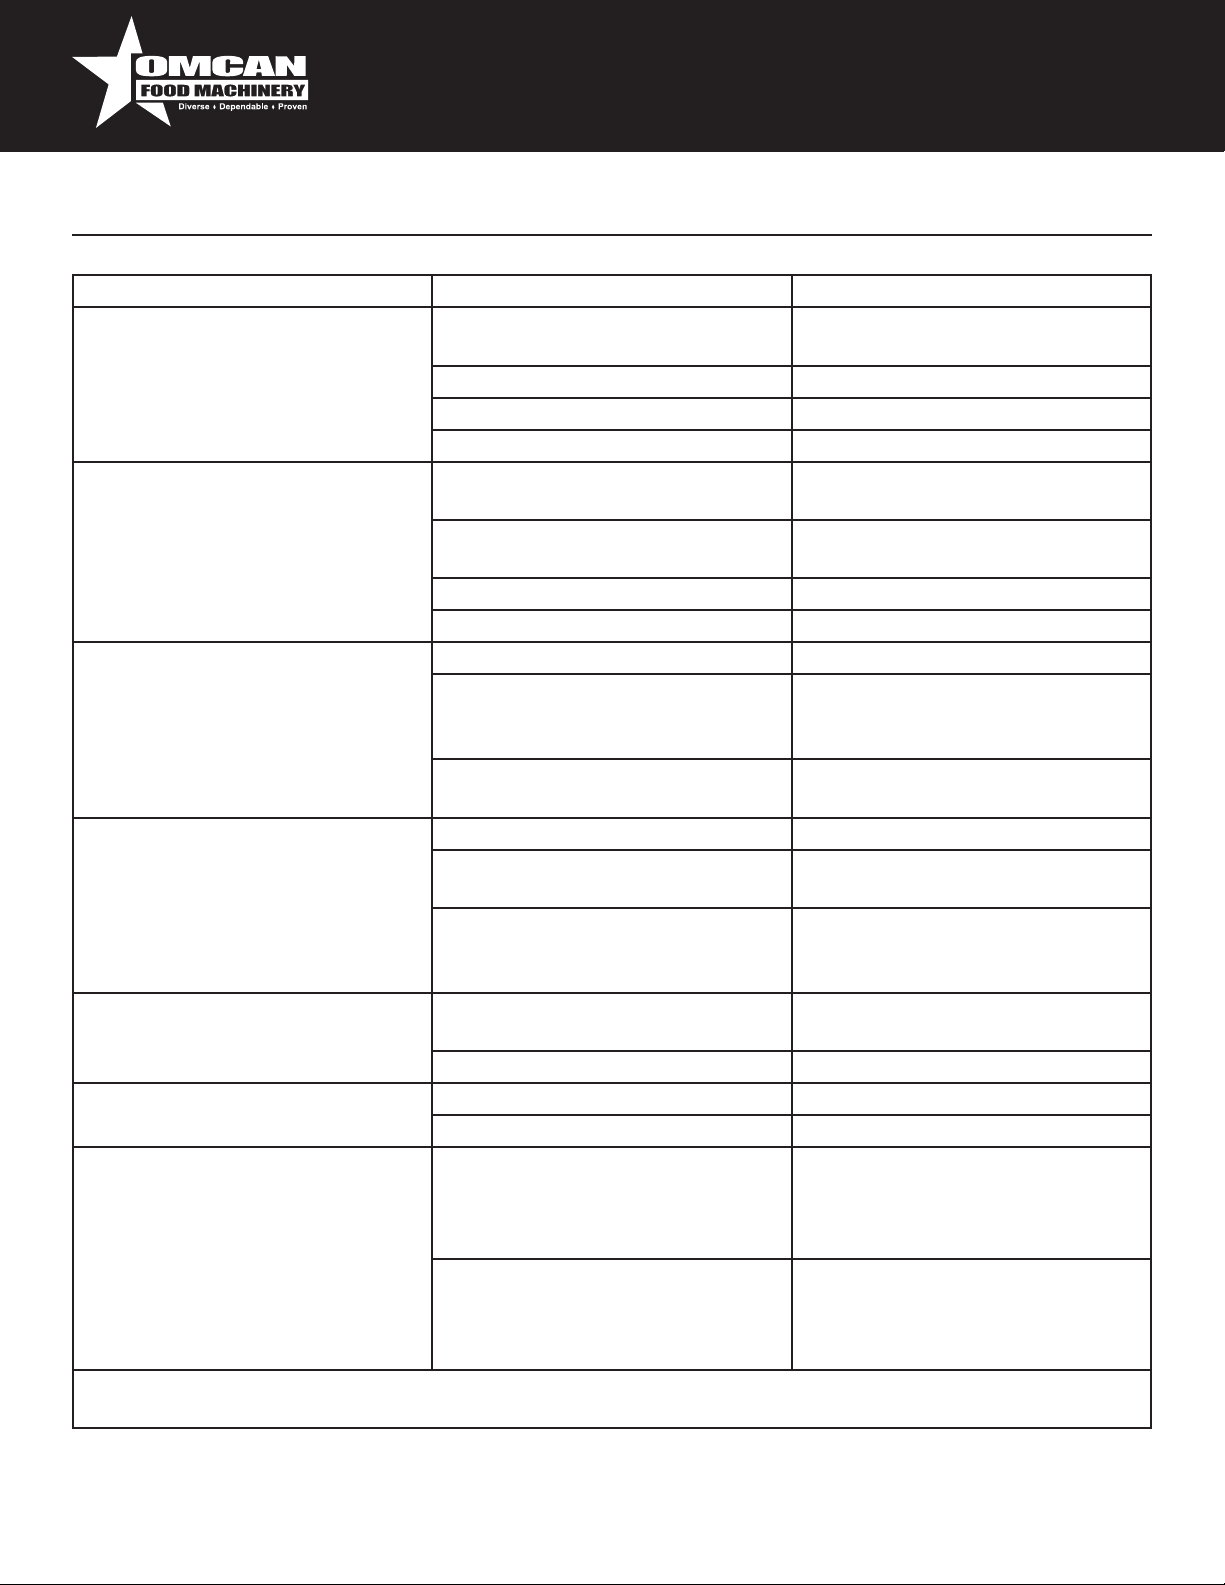
Problem Cause Remedy
Does not heat. No power. Make sure that the machine is
plugged in properly.
Switch set to OFF. Set the switch to ON.
Thermoprobe intervention. Reset the thermal protector.
Thermostat on “0”. Adjust the thermostat.
Mixing Paddle does not turn. No power. Make sure the machine is plugged
in properly.
The driving shaft is not properly in
place.
Motor fault. Contact service personnel.
On/Off switch on (0). Press the switch on.
Tap leaks. It has not been t correctly. Empty the machine and t the tap.
The outlet and rubber are dirty. Empty the machine and clean the
The sealing gasket needs
replacing.
Water is escaping from the level
tank.
Product leaks from the bottom of
the transparent bowl.
The thermometer does not show
the temperature.
Machine shutdown. The water level in the boiler tank
If the machine malfunctions due to causes other than those listed in this table or the proposed remedies do
not solve the problem, contact a specialized technician.
Temperature too high. Lower the temperature.
The sealing gasket of the level
tube needs replacing.
The water level is above the MAX
indication when the machine is at
room temperature.
The bowl has not been t correctly
in place.
The seal needs replacing. Contact service personnel.
Dead Battery. Replace the battery.
Probe malfunction. Call a specialized technician.
has fallen below the minimum
level.
No water in boiler tank. Top up the boiler tank, if a
Remove the shaft and then inset it
correctly.
entire tap thoroughly, t back on
the machine.
Contact service personnel.
Contact service personnel.
Allow the machine to cool down
and empty the boiler until reaching
the level indicated.
Empty the machine, remove the
bowl and t it in place.
Top up the boiler tank, if a
level sensor is tted, call for a
specialized technician to reset the
machine.
level sensor is tted, call for a
specialized technician to reset the
machine.
21
Page 22
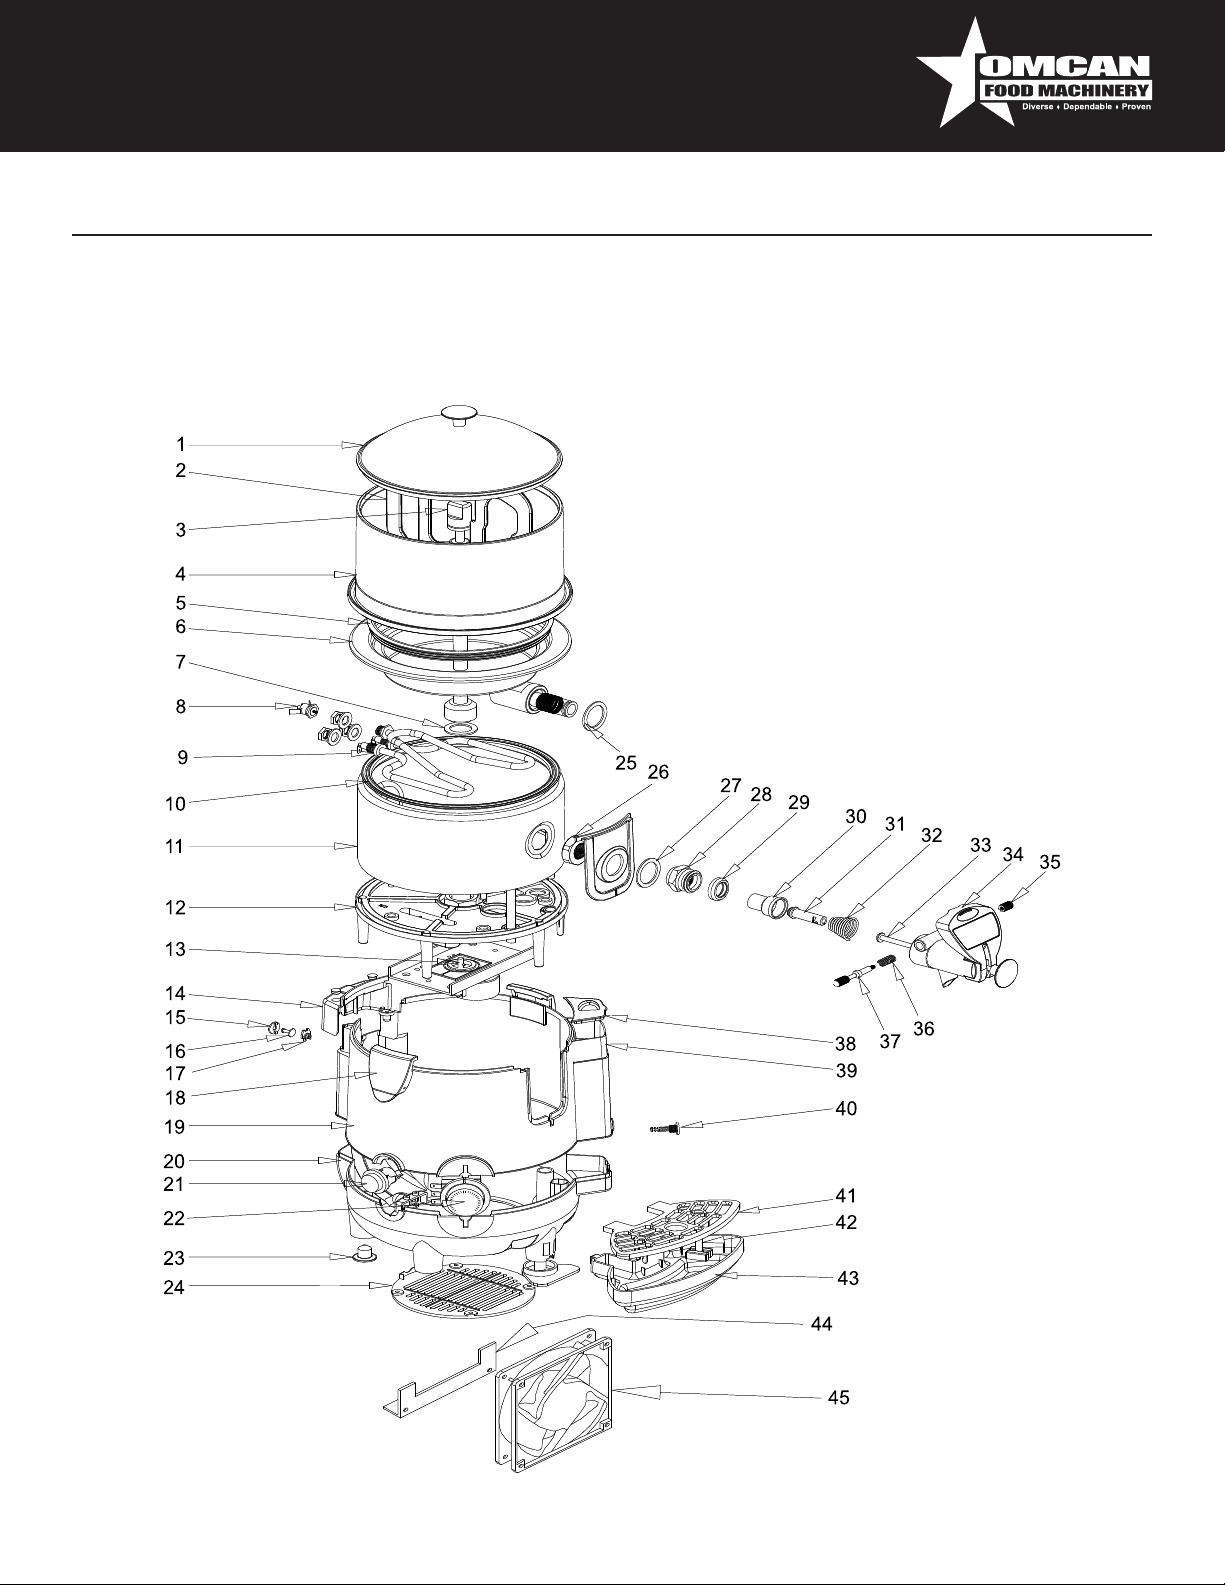
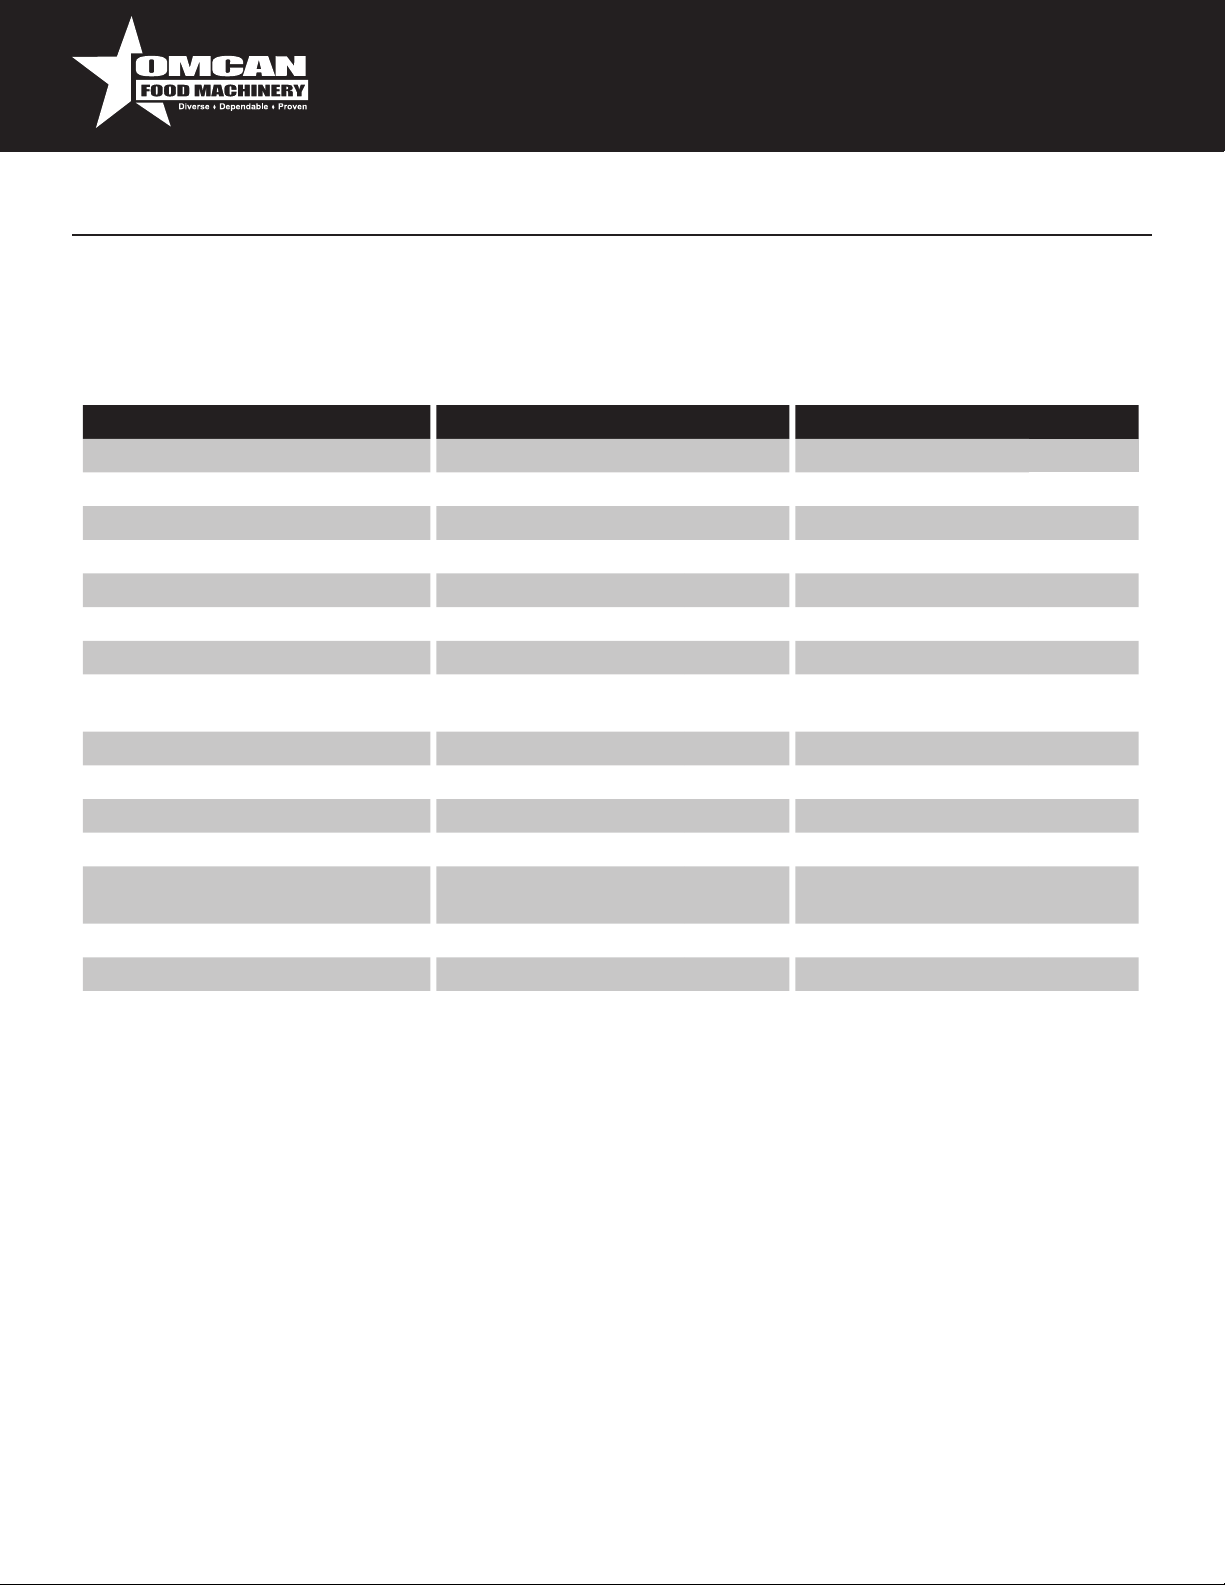
Parts Breakdown
DI-CN-1 39482
DI-CN-3 31840
22
Page 23
Parts Breakdown
DI-CN-1 39482
DI-CN-3 31840
Description Position Description Position Description Position
Tank Cover 1-A Cover of Overheat Protector 15 Moving Pin 31
Knob of Tank Lid 1-B Button of Overheat Protector 16 Faucet Spring 32
Paddle 2 Button Stop of Protector 17 Cleaner Shaft 33
Lid of Stirring Rod 3-A Tank Hinge 18 Tap Handle 34
Stirring Rod 3-B Upper Exterior 19 Screw of Faucet 35
PC Tank 4 Lower Exterior 20 Pin Spring 36
Gasket of PC Tank 5 Power Switch 21 Pin 37
Stainless Steel Boiler (Upper
Part)
Gasket 7 Foot 23 Water Bin 39
Overheat Protector 8 Ventilation Grill 24 Drainage Plug 40
Heater Element 9 Washer of Faucet (Interior) 25 Lid of Water Tray 41
Boiler Gasket 10 Nut of Faucet (Interior) 26 Floater 42
Stainless Steel Boiler (Lower
Part)
Supporter 12 Nut of Faucet (Exterior) 28 Supporter of Fan 44
Motor 13 Gasket of Faucet Screw 29 Fan 45
Back Cover 14 Gasket Inside the Faucet 30
6 Thermostat 22 Lid of Water Bin 38
11 Gasket of Faucet 27 Water Tray 43
23
Page 24
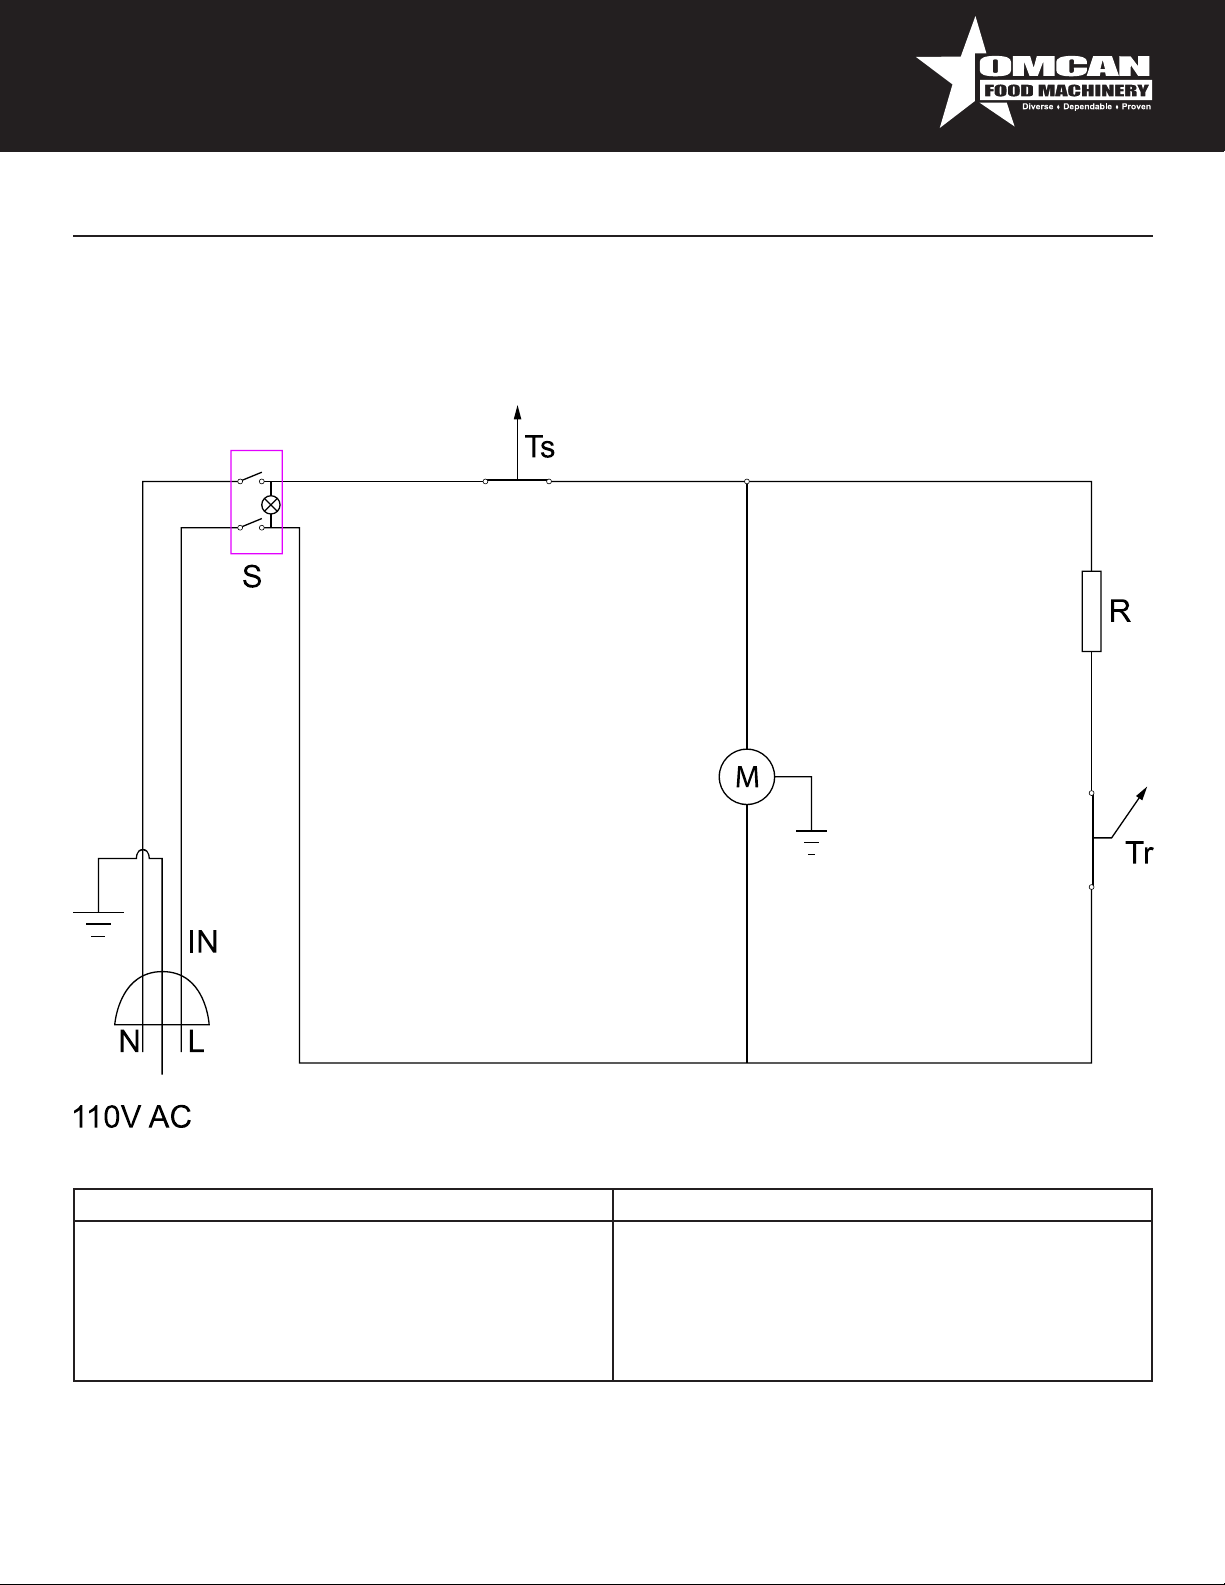
Electrical Schematics
DI-CN-1 39482
DI-CN-3 31840
ITEM DESCRIPTION
S POWER SWITCH
Ts SAFETY THERMOSTAT
M MIXER MOTOR
Tr ADJUSTMENT THERMOSTAT
R HEATING ELEMENT
24
Page 25
Warranty Registration
Thank you for purchasing an Omcan product. To register your warranty for this product, complete the information below, tear off the card at
the perforation and then send to the address specied below. You can also register online by visiting:
www.omcan.com/warrantyregistration.html
For mailing in Canada For mailing in the US
OMCAN INC.
PRODUCT WARRANTY REGISTRATION
3115 Pepper Mill Court,
Mississauga, Ontario
Canada, L5L 4X5
PRODUCT WARRANTY REGISTRATION
4450 Witmer Industrial Estates, Unit 4,
Niagara Falls, New York
OMCAN
USA, 14305
Purchaser’s Information
Name: Company Name:
Address:
Telephone:
City: Province or State: Postal or Zip: Email Address:
Country: Type of Company:
Restaurant Bakery Deli
Dealer from which Purchased: Butcher Supermarket Caterer
Dealer City: Dealer Province or State: Institution (specify):
Invoice: Other (specify):
Model Name: Model Number: Serial Number:
Machine Description:
Date of Purchase (MM/DD/YYYY): Date of Installation (MM/DD/YYYY):
Thank you for choosing Omcan
25
Page 26

26
Page 27

27
Page 28
Over the last 60 years, Omcan has grown to become a leading supplier to the food
service industry in Canada and the USA. Our success over these many years is
directly attributed to our established relationships with all of our valued customers
and through providing them with Diverse, Dependable and Proven products.
Omcan continues to help our customers remain competitive.
With associates in North America, Europe, Asia, and South America, our global
footprint continues to expand as we hold to the principle that clients benet from
the accessibility and familiarity of our sales team. In 2013 as our geography and
brand recognition continued to grow, we changed to one name Omcan Food
Machinery.
In over 200,000 sq ft of warehouse space we stock over 2,500 quality food
equipment and supplies for the food preparation market.
 Loading...