

Page 1

Potato Peeler
Model DB-25HD
Instruction Manual
3115 Pepper Mill Court, Mississauga, ON, L5L 4X5
4450 Witmer Industrial Estates, Unit 4, Niagara Falls, NY, 14305
Version 1
1-800-465-0234
www.omcan.com
Page 2

Table of Contents
Model DB-25HD
Section
General Information
Safety & Warranty
-------------------------------------------------------------------------------- 3
------------------------------------------------------------------------------ 3 - 5
Technical Specications
Installation
Operation
Maintenance
-------------------------------------------------------------------------------------------- 7
----------------------------------------------------------------------------------------- 7 - 8
------------------------------------------------------------------------------------- 8 - 9
Page
---------------------------------------------------------------------- 5 - 6
Troubleshooting
Parts Breakdowns
Electrical Schematics
Warranty Registration
------------------------------------------------------------------------------- 9 - 10
-------------------------------------------------------------------------- 11 - 14
---------------------------------------------------------------------------- 15
---------------------------------------------------------------------------- 17
2
Page 3

General Information
Omcan Manufacturing And Distributing Company Inc. and Food Machinery Of America, Inc. dba Omcan
are not responsible for any harm or injury caused due to any person’s improper or negligent use of
this equipment. The product shall only be operated by someone over the age of 18, of sound mind, and
not under the inuence of any drugs or alcohol, who has been trained in the correct operation of this
machine, and is wearing authorized, proper safety clothing. Any modication to the machine voids any
warranty, and may cause harm to individuals using the machine or in the vicinity of the machine while
in operation.
When misused, the Potato Peeler DB-25HD can be potentially DANGEROUS. Maintenance, cleaning or any
other service of this machine must be made only by properly trained technicians and the power plug must be
disconnected. For your safety, the following instructions must be followed in order to avoid accidents.
Safety & Warranty
1. Unplug the machine when you need to remove any removable part during cleaning, maintenance or any
other operation.
2. Never make use of any tool or instrument that is not originally part of the machine during any operation.
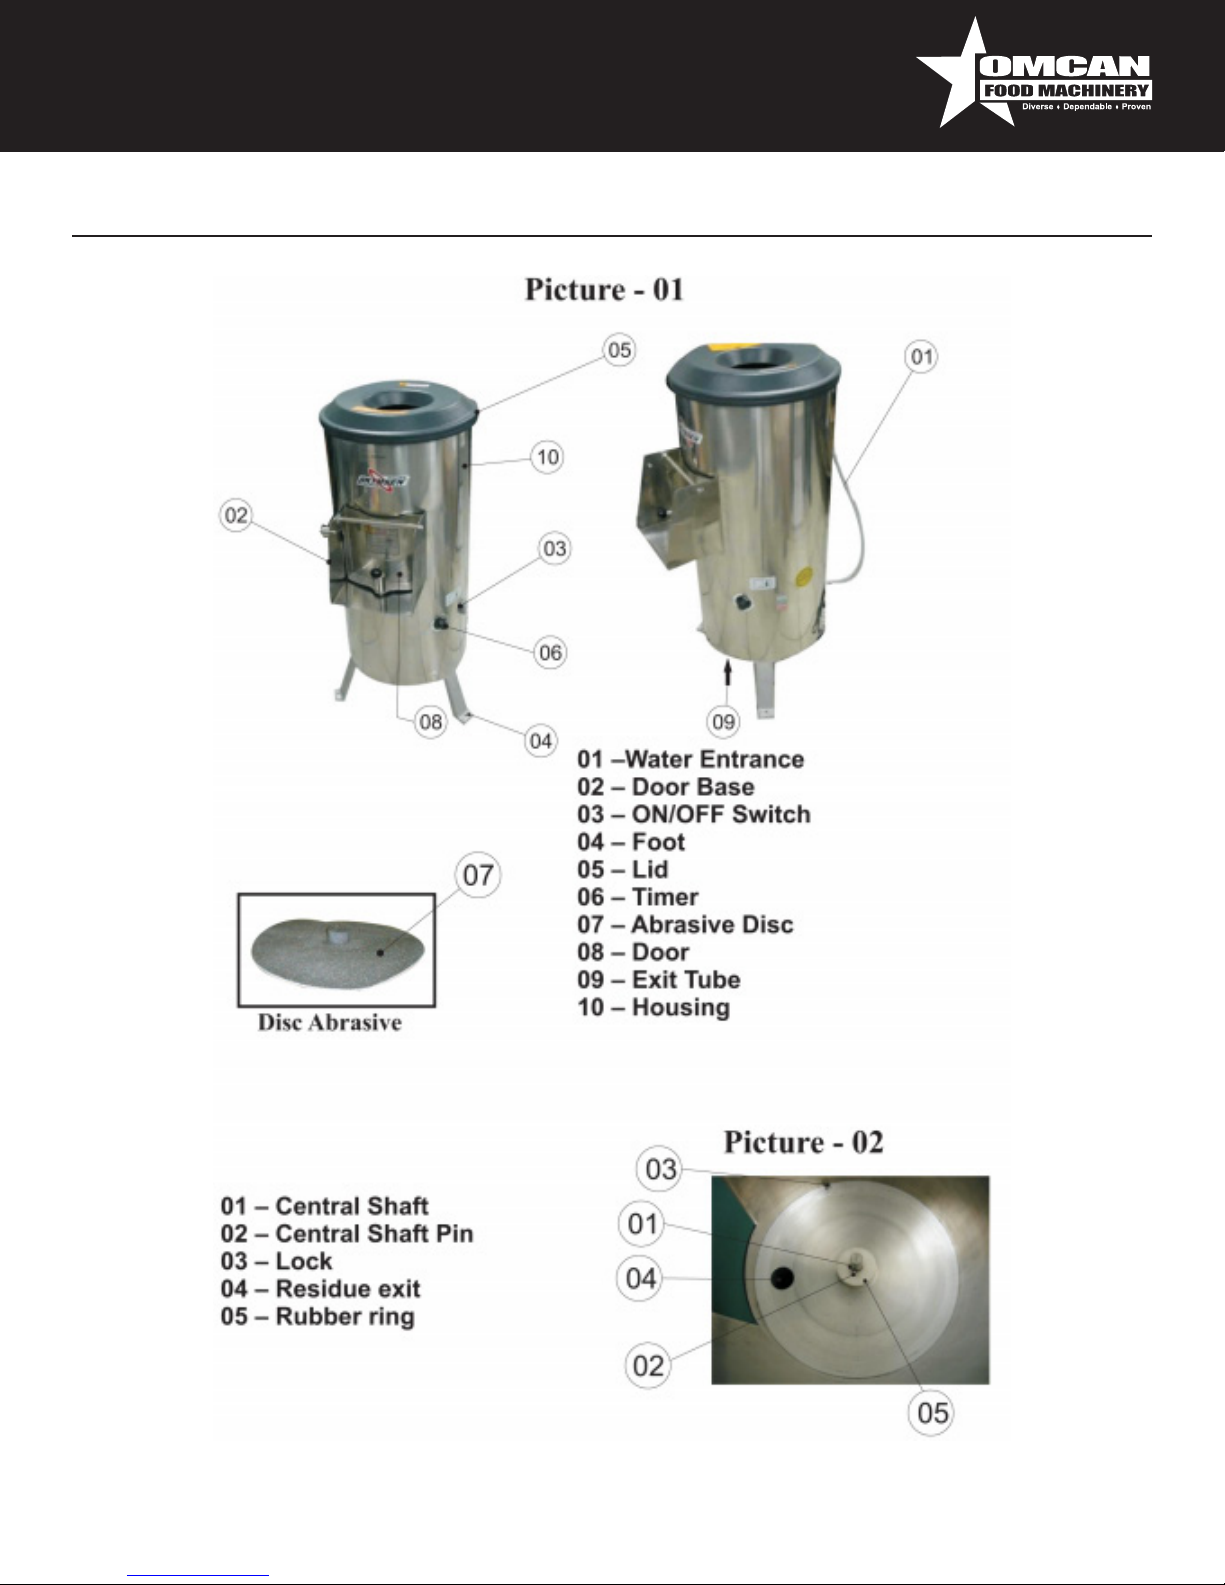
3. Never touch the Abrasive Disc (Pic. 1, #7) when the machine is working because it can cause injury.
4. Keep hands away from moving parts.
5. When replacing the Abrasive Disc (Pic. 1, #7), ensure that it perfectly ts into the Central Shaft Pin (Pic. 2,
#2) to avoid damages to the machine.
1 YEAR BENCH WARRANTY
WARNING:
The packaging components (are classied as normal solid urban waste and can therefore be disposed of
without difculty.
In any case, for suitable recycling, we suggest disposing of the products separately (differentiated
waste) according to the current norms.
DO NOT DISCARD ANY PACKAGING MATERIALS IN THE ENVIRONMENT!
3
Page 4
Safety and Warranty
ATTENTION
Always unplug the machine before cleaning or maintenance.
IMPORTANT
This equipment is not to be used by persons (including children) with any physical or mental inabilities, or
without operation experience and knowledge, only acquired by means of instruction and supervision of a
security staff.
IMPORTANT
If the cord is not in a condition to be used, to avoid accidents it must be replaced through the supplier, an
authorized technician or someone qualied for the service.
DANGERS
Some areas of the electric device have parts and terminals that are connected to high voltage. These parts
may cause severe, or even lethal, electrical shocks when touched. Never touch manual commands such
as switches, buttons, keys and knobs with wet hands, wet clothes and/or wet shoes. By not following these
instructions, the operator could be exposed to severe, or even fatal, electrical shocks.
WARNINGS
The operator has to be familiar with the position of the ON / OFF switch to make sure the switch is easily
accessed when necessary. Before any kind of maintenance, physically remove the plug from its socket.
Provide space for comfortable operation to avoid accidents. Water or oil spilled on the oor will be slippery and
dangerous. Make sure the oor is clean and dry. Never use a manual command (switch, buttons, lever) without
full understand of the function. If any work is to be made by two or more persons, coordination signs will have
to be given for each operation step. Every step of the operation shall be taken only if a sign has been made
and responded.
RECOMMENDATIONS
In case of power shortage, immediately turn the machine OFF. Use recommended or equivalent lubricants,
oils or greases. Avoid mechanical shocks as they may cause failures or malfunction. Do not allow water, dirt
or dust to penetrate the mechanical or electrical components of the machine. DO NOT MODIFY the original
characteristics of the machine. DO NOT MODIFY original characteristics of the machine. DO NOT REMOVE,
TEAR OFF OR TAMPER any safety or identication labels of the machine. If any label has been removed or is
no longer legible, contact your nearest dealer for a replacement.
SAFETY PROCEDURES AND NOTES BEFORE SWITCHING THE MACHINE ON
IMPORTANT
Carefully read ALL instructions of this manual before turning the machine ON. Be sure to be familiar with
4
Page 5

Safety and Warranty
the instructions and that you understand all information contained in this manual. If you have any questions,
contact your nearest dealer.
DANGER
An electric cable or electric wire with a damaged jacket or bad insulation could cause electrical shocks as well
as electrical leaks. Before using the equipment, check conditions of all wires and cables.
RECOMMENDATIONS
Be sure ALL instructions in this manual have been thoroughly read and understood. Every function and
operational procedure has to be understood by the operator. Any manual command (switch, button or lever)
shall be given only after being sure it is the correct one.
PRECAUTIONS
The electric cable has to be compatible with the power required by the machine. Cables touching the oor or
close to the machine need to be protected against short circuiting.
ROUTINE INSPECTION
RECOMMENDATIONS
When checking the tension of the belts or chains, DO NOT introduce your ngers between the belts, pulleys,
chain and gears.
PRECAUTIONS
Check the motor and turning or sliding parts of the machine, in case of abnormal noises. Check the tension
of the belts and chains and replace the set when belt, chain or gears show signs of being worn out. When
checking tension belts or chain, DO NOT introduce your ngers between belts, pulleys, chains and gears.
Check protections and safety devices to make sure they are working properly.
Technical Specications
Technical Characteristics DB-25HD
Voltage (V) 110 or 220
Power Rating (CV) 1
Consumption (kW/h) 0.73
Height / Width / Depth (mm) 1160 × 550 × 670
Net/Gross Weight (Kg) 45/53
Capacity (Kg) 25
Average Production (Kg/h) 500
5
Page 6
Technical Specications
6
Page 7

Installation
The Potato Peeler must be installed onto a stable working surface. Verify the voltage of the power source it will
be connected to (110V). The power cord has two (2) at pins and one (1) round pin for grounding (ground wire
pin). It is mandatory that the three pins are properly connected before using the equipment. It is recommended
to install the machine close to a sewer or to canalize the residues by extending the Exit Tube (Pic. 1, #9)
located on the lower part of the machine.
IMPORTANT
Make sure the Abrasive Disc (Pic. 1, #7) is well placed on the Central Shaft Pin (Pic. 2, #2) before switching
the machine on.
Check if the Potato Peeler is rm in its position. Install the water entrance and exit. Check if the inner abrasive
disc walls are properly placed. Observe the link attachment with the lock (Pic. 2, #3).
Operation
IMPORTANT
Under no circumstances touch the Abrasive Disc when it is in moving. Secure the lid (Pic. 1, #5), open the
water tap, set the timer (Pic. 1, #6) and activate the ON/OFF switch (Pic. 1, #3). With the machine on, pour
the product to be processed inside it. For the DB-25HD, put 25 Kg of potatoes at most. The working time
varies from one (1) to ve (5) minutes. If the potatoes are being peeled to irregularly, it is possible to observe
the process through the lid opening. To remove the peeled product, keep the machine running and open the
Door (Pic. 3, #1) by pulling the lock (Pic. 3, #2 upwards. Lift it until the side lock (Pic. 3, #3) and keep the door
(Pic. 3, #1) open. This way the product will be expelled. To close the door, release the side lock (Pic. 3, #3) by
pulling it sideways.
7
Page 8

Operation
Do not operate the machine with long hair which might touch any part of the machine because it may lead to
serious accidents. Tie your hair up well and/or cover your hair with a scarf. Only trained or skilled personnel
shall operate this machine. NEVER operate the machine without all original safety devices in perfect condition.
Maintenance
Keep the machine clean. Always TURN THE MACHINE OFF by removing the plug from the socket before
cleaning it. Never clean the machine unless it has come to a complete stop. Put all components back to their
functional positions before turning it ON again. Do not place your ngers in between belts, pulleys, chains and
gears.
DANGER
Every maintenance operation is dangerous when the machine is ON. TURN IT OFF BY PULLING THE PLUG
OUT OF THE SOCKET DURING MAINTENANCE.
IMPORTANT
Always remove the plug from the power point in any case of emergency.
CLEANING
To conduct the proper cleaning of the machine, follow the instructions below:
1. Remove the internal lining (Pic. 5, #1) by lifting it upwards. Clean this part with plenty of water.
2. Turn the empty machine on and let it function for a few minutes while adding water.
3. Switch OFF the machine and unplug it, then wait until the Abrasive Disc (Pic. 7) has stopped moving
completely.
4. Rub the external part of the machine with a wet cloth.
5. Remove the Abrasive Disc (Pic. 7, #1) by lifting vertically.
6. Use a brush with nylon bristles and plenty of water to clean the disc.
7. Replace the internal lining, minding the lock attachment (Pic. 6, #1).
8. Replace the disc on the machine proceeding inversely. Make sure the disc ts proper to the pin of the
central shaft.
8
Page 9

IMPORTANT
Maintenance
Never use water jets to wash the machine.
IMPORTANT
Take care of your machine and use it properly and with responsibility. It will bring you benets.
Troubleshooting
PROBLEMS, CAUSES AND SOLUTIONS
The Potato Peeler was designed to operate with minimum maintenance. However, some irregularities may
occur during its operation due to the natural wear caused by the use of the equipment. If there is any problem
with your machine, check the below table for possible solutions.
Problems Causes Solution
The machine does not turn ON. Power outage. Problem on internal
or external electric circuit of the
machine.
Burnt smell or smoke. Problem on the internal or external
electric circuit of the machine.
Check if there is power. Call a
qualied technician.
Call a qualied technician.
9
Page 10

Troubleshooting
The machine turns on but when
the product is placed on the disc, it
stops or spins in low rotation.
Strange noises. Abrasive Disc is misplaced. There
Water leak in the bottom of the
machine.
Skidding belts or problems with the
electric motor.
are damaged ball bearings.
Damaged retainer. Call a qualied technician.
Call a qualied technician.
Place the Abrasive Disc
appropriately on the Central Shaft
Pin. Call a qualied technician.
ADJUSTMENTS AND REPLACEMENT OF COMPONENTS
The Abrasive Disc is covered with an aluminum oxide layer responsible for the food peeling. After some time,
the aluminum oxide wears out and the efciency of the machine decreases. The Abrasive Disc must then be
replaced.
10
Page 11

Model DB-25HD 20367
Parts Breakdown
11
Page 12

Parts Breakdown
Model DB-25HD 20367
12
Page 13

Model DB-25HD 20367
Rim with mounted Feet
Parts Breakdown
Complete Abrasive Disc
Complete Background
34366.8
Full Door Set
34210.6
49072.5
34181.9
13
Page 14

Parts Breakdown
Model DB-25HD 20367
Item
No.
1 FUNNEL LID (MOL.37663.9) 34305.6 33 RING 10 DIN 6799 21127.3 A3 DOOR SET DB 25HD 34339.0
2 NYLON WASHER 34330.7 34
3 CENTRAL SHAFT PIN 34176.2 35 KEY WAY 4.76X25 25657.9 A5 INSULATION FRAME 44569.0
4
5 ID LABLE MOTOR/RESIST 10204.0 37 SCREW M6X16 03988.8 B2 MACHINE RIM 34139.8
6 ABRASIVE DISC DB/C 34366.8 38 EXIT TUBE 34198.3 B3 PE MACHINED (ETCHED) 34209.2
7 WASHER L.A8 0.4 ZB 02730.8 40
8 SCREW M8X16 DIN 933 ZB 19059.4 41 BACK LOCK 34205.0 D1 COMPLETE BACKGROUND 34181.9
9 CABINET 34141.0 42 SCREW M4X10 14463.0 D2 RUBBER PROTECTION 34177.0
10 KNOB M5X10MM 03967.5 43 MOVING PULLEY 00955.5 D3 47X1.75 DIN 472 09217.7
11 SIDE LOCK PIN 35266.7 44 SCREW 5/16X5/16 00031.0 D4 RETAINER 25X47X10 34175.4
12 LATERAL LATCH COVER 35264.0 45 BELT A 22 12945.3 D5 BEARING 6005 DDU 28584.6
13 SIDE LOCK SPRING 35280.2 46 PFS SEX UNC 1/4X3/4 00030.2 D6 CENTRAL SHAFT 34133.9
14
15 RING 10X1 DIN 471 03115.1 48
16 PFS M5X5 DIN 916 INOX 22786.2 49 SCREW M8X20 DIN 933 04474.1 X2 SKYMSEN LOGO 145MM 00167.8
17 NIPPLE/REDUCTION SET 36394.4 50
18 WATER INLET SET 33630.0 51
19 SEPARATOR DOOR 34218.1 52 MB 05504.2 X5 GLUE KIT DB/DP 10/DC 04636.1
20 WASHER L 1/4 00269.0 53
21 SCREW M6X12 DIN 933 S/S 12384.6 54 TIMER 14050.3 X7 PFS B.3 0.5X19 DIN 7981 16973.0
22 OMCAN LOGO (MACHINES) 27154.3 55 SILICONE PROTECTION CAP 29693.7 X8 PFS M6X30 DIN 933 INOX 24861.4
23 TIMER LABEL 16833.5 56 ON/OFF SWITCH 26228.5 X9 MOTOR 1.0CV 60HZ 28785.7
24 BUTTON 27551.4 57
25 BUTTON HOLE TIMER 31211.8 58 SCREW M5X10 DIN 933 21081.1 X11 PULLEY POLY V (PRIMER) 34174.6
26 SCREW B.3 0.5X9.5 DIN 7971 15599.3 59 PLATE CONTACTOR GREY 36094.5 X12 REVETTING PLATE 34312.9
27 PFS M6X20M DIN 965 INOX 08779.3 60
28 45231.9 61 NYLON COVER 03678.1 X14
29 TRIGGER AXIS C / FOLD 34365.0 62 CLAMP K22 (T 50R) 00210.0 X15 COATIN SET 35216.0
30 SPHERE WITH HOLE 1/2 01661.6 63 CRAMP T 18R SMALL 04203.0 X16 SERVICE MARK 38533.6
31 COVER TRIGGER 34225.4 A1 FULL DOOR SET 49073.3
32 SPRING TRIGGER 34215.7 A2 READY COLA DB / DP 10 20468.4
Description Position
MAINTENANCE/CLEANING
LABEL
WASHER L 3/8 STAINLESS
STEEL
34686.1 36 WASHER 7X30X3 34179.7 B1 RIM WITH MOUNTED FEET 34210.6
03213.1 47 MOTOR SUPPORT 34354.4 D7
Item
No.
Description Position
DRIVEN PULLEY D.164
(PRIMER)
SHORT THREAD ADAPTER
D0.60X2
INSULATING TERMINAL EF
4228
PRE-INSULATED TERMINAL
165012
CABLE 3X1.5MM 2 WITH
PLUG
CORD HOLDER PG13.5
LC+P/9
CONTACTOR CWM18.10 110V
50HZ
FIO INTERNAL
2X1.5X1000MM
46047.8 A4
34329.3 C1 ALUMINIUM OXIDE No. 46 36969.1
01213.0 X1
00736.6 X3 OXID OF ALUMINIUM 00257.7
22491.0 X4 ALLEN SCREW M6X8 03188.7
31923.6 X6 SPACER WASHER 16971.4
26218.8 X10
26323.0 X13 POLY BELT V 12PJ 34421.4
Item
No.
Description Position
PLATE DIMTERE 0.4X180X233MM
BACKGROUND MACHINED
(ETCHED)
CENTRAL BEARING W/
BUSH
MOVED PULLEY POLY V
(PRIMER)
DIAMOND RUBBER PLATE
SET
36456.8
34132.0
00000.0
34165.7
35214.4
14
Page 15

Model DB-25HD 20367
Electrical Schematics
15
Page 16

16
Page 17

Warranty Registration
Thank you for purchasing an Omcan product. To register your warranty for this product, complete the information below, tear off the card at
the perforation and then send to the address specied below. You can also register online by visiting:
www.omcan.com/warrantyregistration.html
For mailing in Canada For mailing in the US
OMCAN INC.
PRODUCT WARRANTY REGISTRATION
3115 Pepper Mill Court,
Mississauga, Ontario
Canada, L5L 4X5
PRODUCT WARRANTY REGISTRATION
1889 Maryland Avenue,
Niagara Falls, New York
OMCAN
USA, 14305
Purchaser’s Information
Name: Company Name:
Address:
Telephone:
City: Province or State: Postal or Zip: Email Address:
Country: Type of Company:
Restaurant Bakery Deli
Dealer from which Purchased: Butcher Supermarket Caterer
Dealer City: Dealer Province or State: Institution (specify):
Invoice: Other (specify):
Model Name: Model Number: Serial Number:
Machine Description:
Date of Purchase (MM/DD/YYYY): Date of Installation (MM/DD/YYYY):
Thank you for choosing Omcan
17
Page 18

Page 19

Page 20

Over the last 60 years, Omcan has grown to become a leading supplier to the food
service industry in Canada and the USA. Our success over these many years is
directly attributed to our established relationships with all of our valued customers
and through providing them with Diverse, Dependable and Proven products.
Omcan continues to help our customers remain competitive.
With associates in North America, Europe, and Asia, our global footprint continues
to expand as we hold to the principle that clients benet from the accessibility
and familiarity of our sales team. In 2013 as our geography and brand recognition
continued to grow, we changed to one name Omcan Food Machinery.
In over 200,000 sq ft of warehouse space we stock over 2,500 quality food
equipment and supplies for the food preparation market.
 Loading...