

Page 1
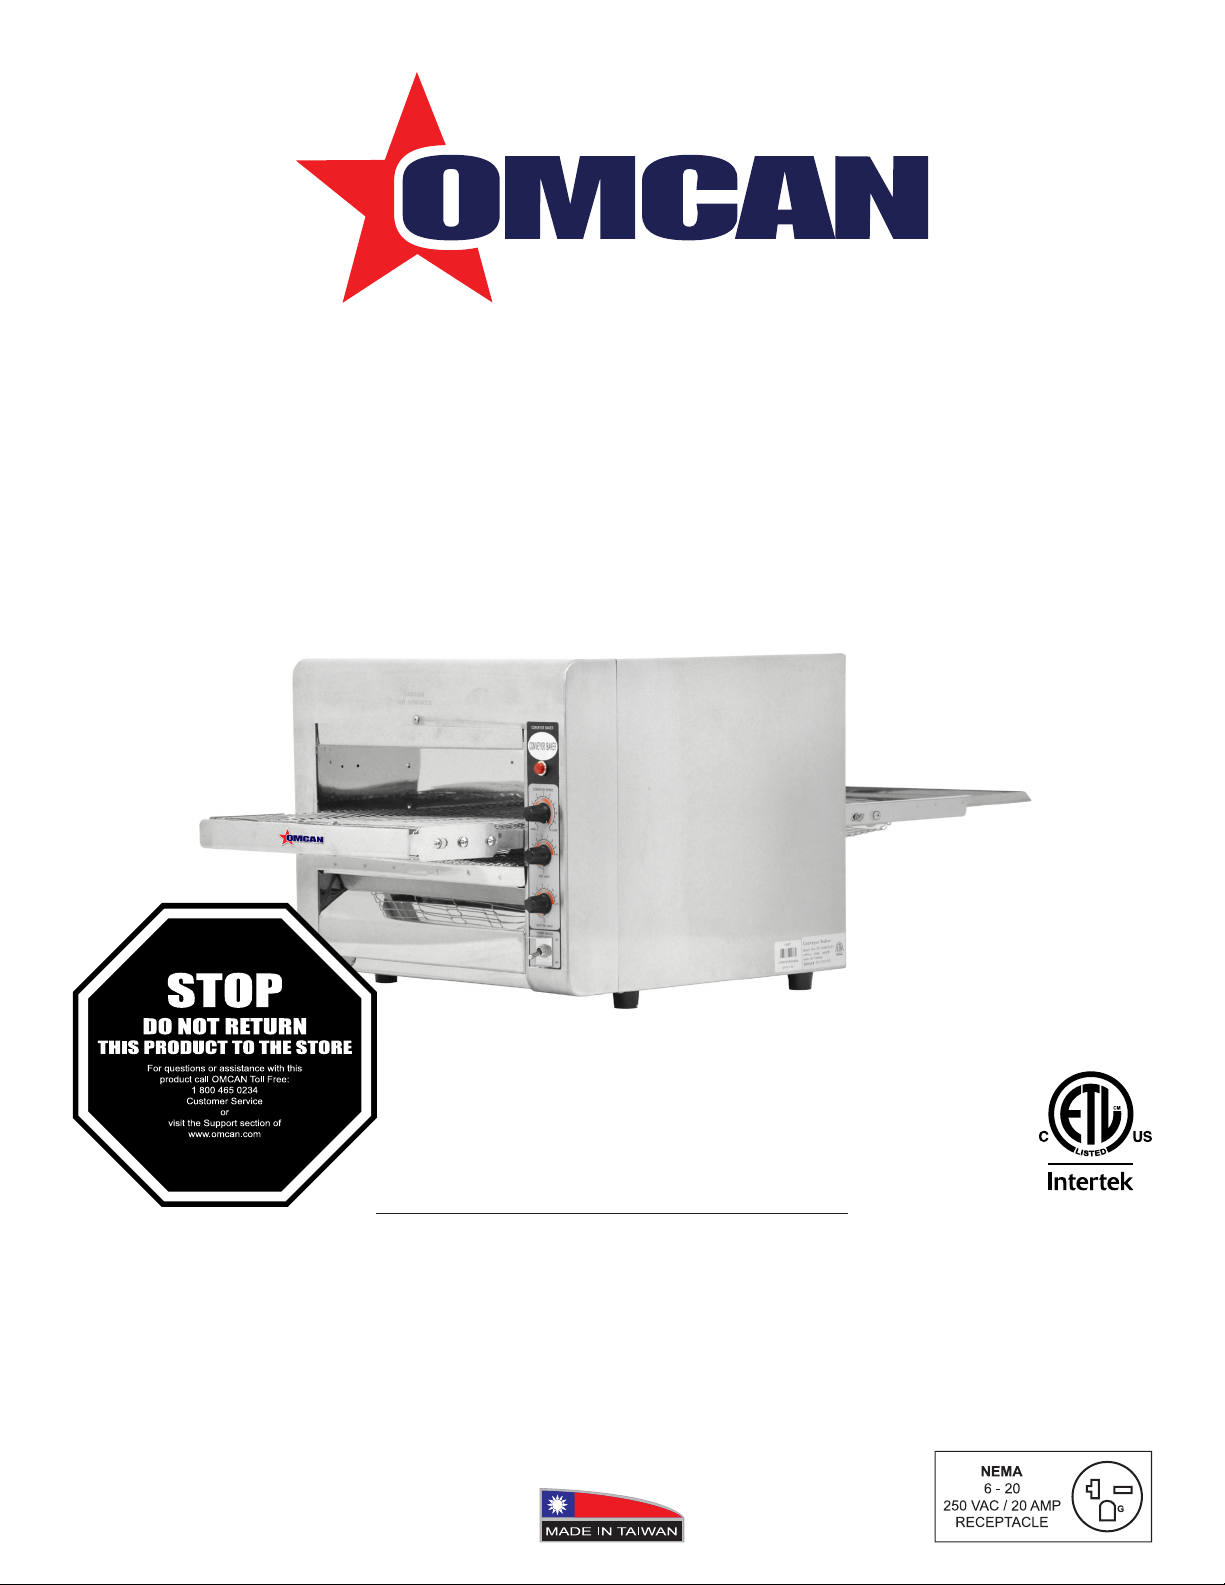
Conveyor Oven
Model CE-TW-0356
Item 11387
Instruction Manual
Revised - 01/28/2022
Toll Free: 1-800-465-0234
Fax: 905-607-0234
Email: [email protected]
www.omcan.com
Page 2

Table of Contents
Model CE-TW-0356
Section
General Information
Safety and Warranty
Technical Specications
Installation
Operation
Maintenance
--------------------------------------------------------------------------------------- 6 - 7
--------------------------------------------------------------------------------------------- 7
----------------------------------------------------------------------------------- 7 - 11
--------------------------------------------------------------------------- 3 - 4
--------------------------------------------------------------------------- 4 - 5
Page
-------------------------------------------------------------------------- 6
Parts Breakdown
Electrical Schematics
Warranty Registration
---------------------------------------------------------------------------- 11 - 17
---------------------------------------------------------------------------- 18
---------------------------------------------------------------------------- 19
2
Page 3

General Information
Omcan Manufacturing and Distributing Company Inc., Food Machinery of America, Inc. dba Omcan
and Omcan Inc. are not responsible for any harm or injury caused due to any person’s improper or
negligent use of this equipment. The product shall only be operated by someone over the age of 18, of
sound mind, and not under the inuence of any drugs or alcohol, who has been trained in the correct
operation of this machine, and is wearing authorized, proper safety clothing. Any modication to the
machine voids any warranty, and may cause harm to individuals using the machine or in the vicinity of
the machine while in operation.
CHECK PACKAGE UPON ARRIVAL
Upon receipt of an Omcan shipment please inspect for external damage. If no damage is evident on the
external packaging, open carton to ensure all ordered items are within the box, and there is no concealed
damage to the machine. If the package has suffered rough handling, bumps or damage (visible or concealed),
please note it on the bill of lading before accepting the delivery and contact Omcan within 24 hours, so we may
initiate a claim with the carrier. A detailed report on the extent of the damage caused to the machine must be
lled out within three days, from the delivery date shown in the shipping documents. Omcan has no recourse
for damaged products that were shipped collect or third party.
Before operating any equipment, always read and familiarize yourself with all operation and safety
instructions.
Omcan would like to thank you for purchasing this machine. It’s of the utmost importance to save
these instructions for future reference. Also save the original box and packaging for shipping the
equipment if servicing or returning of the machine is required.
---------------------------------------------------------------------------------------------------------------------------------------------------
Omcan Fabrication et distribution Companie Limité et Food Machinery d’Amerique, dba Omcan et
Omcan Inc. ne sont pas responsables de tout dommage ou blessure causé du fait que toute personne
ait utilisé cet équipement de façon irrégulière. Le produit ne doit être exploité que par quelqu’un de
plus de 18 ans, saine d’esprit, et pas sous l’inuence d’une drogue ou d’acohol, qui a été formé pour
utiliser cette machine correctement, et est vêtu de vêtements de sécurité approprié. Toute modication
de la machine annule toute garantie, et peut causer un préjudice à des personnes utilisant la machine
ou des personnes à proximité de la machine pendant son fonctionnement.
VÉRIFIEZ LE COLIS DÈS RÉCEPTION
Dès réception d’une expédition d’Omcan veuillez inspecter pour dommages externes. Si aucun dommage
n’est visible sur l’emballage externe, ouvrez le carton an de s’assurer que tous les éléments commandés
sont dans la boîte, et il n’y a aucun dommage dissimulé à la machine. Si le colis n’a subi aucune mauvaises
manipulations, de bosses ou de dommages (visible ou cachée), notez-le sur le bond de livraison avant
d’accepter la livraison et contactez Omcan dans les 24 heures qui suivent, pour que nous puissions engager
une réclamation auprès du transporteur. Un rapport détaillé sur l’étendue des dommages causés à la machine
doit être rempli dans un délai de trois jours, à compter de la date de livraison indiquée dans les documents
d’expédition. Omcan n’a aucun droit de recours pour les produits endommagés qui ont été expédiées ou cueilli
par un tiers transporteur.
3
Page 4

General Information
Avant d’utiliser n’importe quel équipement, toujours lire et vous familiariser avec toutes les opérations
et les consignes de sécurité.
Omcan voudrais vous remercier d’avoir choisi cette machine. Il est primordial de conserver ces
instructions pour une référence ultérieure. Également conservez la boîte originale et l’emballage pour
l’expédition de l’équipement si l’entretien ou le retour de la machine est nécessaire.
---------------------------------------------------------------------------------------------------------------------------------------------------
Omcan Empresa De Fabricacion Y Distribucion Inc. Y Maquinaria De Alimentos De America, Inc. dba
Omcan y Omcan Inc. no son responsables de ningun daño o perjuicío causado por cualquier persona
inadecuada o el uso descuidado de este equipo. El producto solo podra ser operado por una persona
mayor de 18 años, en su sano juicio y no bajo alguna inuencia de droga o alcohol, y que este ha sido
entrenado en el correcto funcionamiento de esta máquina, y ésta usando ropa apropiada y autorizada.
Cualquier modicación a la máquina anúla la garantía y puede causar daños a las personas usando la
máquina mientras esta en el funcionamiento.
REVISE EL PAQUETE A SU LLEGADA
Tras la recepcion de un envio Omcan favor inspeccionar daños externos. Si no hay daños evidentes en el
empaque exterior, Habra el carton para asegurararse que todos los articulos solicitados ésten dentro de la
caja y no encuentre daños ocultos en la máquina. Si el paquete ha sufrido un manejo de poco cuidado, golpes
o daños (visible o oculto) por favor anote en la factura antes de aceptar la entrega y contacte Omcan dentro
de las 24 horas, de modo que podamos iniciar una reclamación con la compañia. Un informe detallado sobre
los daños causados a la máquina debe ser llenado en el plazo de tres días, desde la fecha de entrega que se
muestra en los documentos de envío. Omcan no tiene ningun recurso por productos dañados que se enviaron
a recoger por terceros.
Antes de utilizar cualquier equipo, siempre lea y familiarizarse con todas las instrucciones de
funcionamiento y seguridad.
Omcan le gustaría darle las gracias por la compra de esta máquina. Es de la mayor importancia para
salvar estas instrucciones para futuras consultas. Además, guarda la caja original y el embalaje para el
envío del equipo si servicio técnico o devolución de la máquina que se requiere.
Safety and Warranty
• Disconnect power to the unit from receptacle at the end of each day.
• Do not leave the unit in operation without an attendant.
• Do not leave the unit at high temperature when not in use or during idle periods. This will cause food
particles and grease lm to carbonize and burn.
• Turning the temperature setting down will save energy. It will take only a few minutes for the unit to regain
operating temperature.
• Never immerse the unit in water as it will cause damage to the unit and the warranty will be voided.
4
Page 5

Safety and Warranty
• DO NOT CLEAN WITH WATER JETS.
• Do not touch to the handle of drawer with “HOT SURFACE” when the unit is operating.
• Variable speed and top/bottom heat control for perfect color and texture of bread, bagels, English mufns
and more.
• Extended stainless steel conveyor belt for easy loading and large warming area for higher production.
• Safe load up area with full width coated front burn guard and cool to the touch exterior.
• Smart crumb tray keeps the bread crumbs from falling under the toaster.
• Heated holding area to keep toaster at the perfect temperature.
• Hi-limit switch prevents toaster from overheating protecting critical component parts.
• Preventive maintenance for this unit consists of the recommended cleaning procedures later in the manual.
To keep your oven in its top operating condition. These steps should be performed daily, weekly or as
required.
Turn unit off, disconnect unit from power supply or turn power off at wall breaker, remove plug from
outlet.
RESIDENTIAL USERS: Vendor assumes no liability for parts or labor coverage for component failure
or other damages resulting from installation in non-commercial or residential applications. The right
is reserved to deny shipment for residential usage; if this occurs, you will be notied as soon as
possible.
1 YEAR PARTS AND LABOUR BENCH WARRANTY
Within the warranty period, contact Omcan Inc. at 1-800-465-0234 to schedule a drop off to either
an Omcan authorized service depot in the area, or to an Omcan Service warehouse to repair the
equipment.
Unauthorized maintenance will void the warranty. Warranty covers electrical and part failures, not
improper use.
Please see https://omcan.com/disclaimer for complete info.
WARNING:
The packaging components are classied as normal solid urban waste and can therefore be disposed of
without difculty.
In any case, for suitable recycling, we suggest disposing of the products separately (differentiated
waste) according to the current norms.
DO NOT DISCARD ANY PACKAGING MATERIALS IN THE ENVIRONMENT!
5
Page 6
Technical Specications
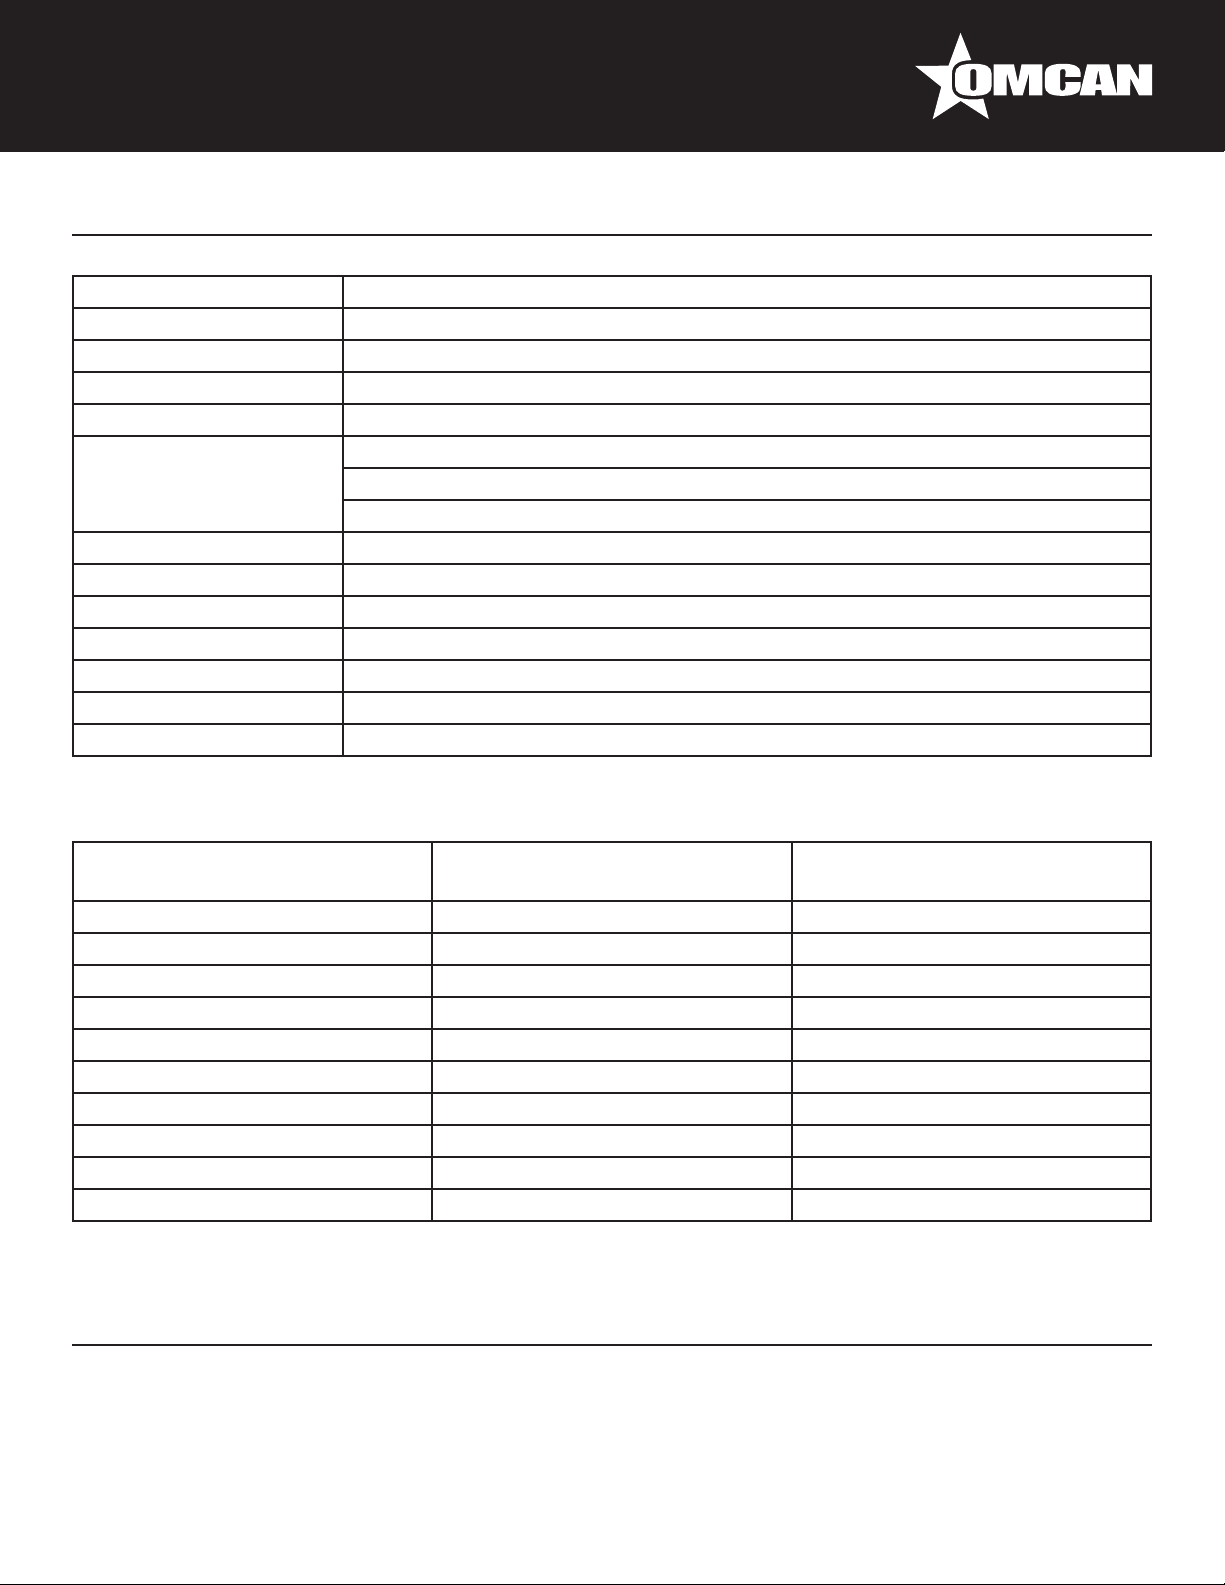
Model CE-TW-0356
Current 15A
Power 3.6 kW
Belt Width 14” / 355mm
Opening (HxW) 3.3” x 14.3” / 83 x 363mm
16 - 14” / 356mm pizzas per hour
Capacity
Electrical 240V / 60Hz / 1
Temperature Range 70 - 260°C / 158 - 500°F
Dimensions 41” x 18.5” x 15.7” / 1050 x 470 x 400mm
Weight 53 lbs. / 24 kgs.
Packaging Dimensions 36.5” x 26” x 19” / 927 x 660 x 483mm
Packaging Weight 61 lbs. / 27.7 kgs.
Item Number 11387
19 - 12” / 305mm pizzas per hour
25 - 9” / 229mm pizzas per hour
TEMPERATURE SETTINGS AND TIMES
Setting
Dial 1 70-90°C / 158-194°F 10 Minutes - 5 Seconds
Dial 2 90-110°C / 194-230°F 8 Minutes - 50 Seconds
Dial 3 130-140°C / 266-284°F 7 Minutes - 45 Seconds
Dial 4 140-155°C / 284-311°F 6 Minutes - 35 Seconds
Dial 5 155-180°C / 311-356°F 5 Minutes - 45 Seconds
Dial 6 185-205°C / 365-401°F 5 Minutes - 5 Seconds
Dial 7 205-220°C / 401-428°F 4 Minutes - 20 Seconds
Dial 8 240-260°C / 464-500°F 3 Minutes - 30 Seconds
Dial 9 250-260°C / 482-500°F 1 Minute - 45 Seconds
Dial 10 250-260°C / 482-500°F 1 Minute - 20 Seconds
(Top and Bottom Heat)
Installation
Temperature
Time
(Minutes - Seconds)
• Place on a level and stable surface.
• Keep the unit away from ammable objects.
• Ensure that the power cord and the socket are not damaged prior to use, and socket is the correct
6
Page 7
Installation
electrical rating for this toaster.
Operation
1. Turn the power to FULL power.
2. Set the conveyor speed on 4.
3. Allow warm-up time of 5 to 10 minutes.
4. Place a sample product on the conveyor belt to test the setting.
A. If toasting is too light, turn conveyor speed control clockwise to a slow speed.
B. If toasting is too dark, turn conveyor control clockwise to a faster speed.
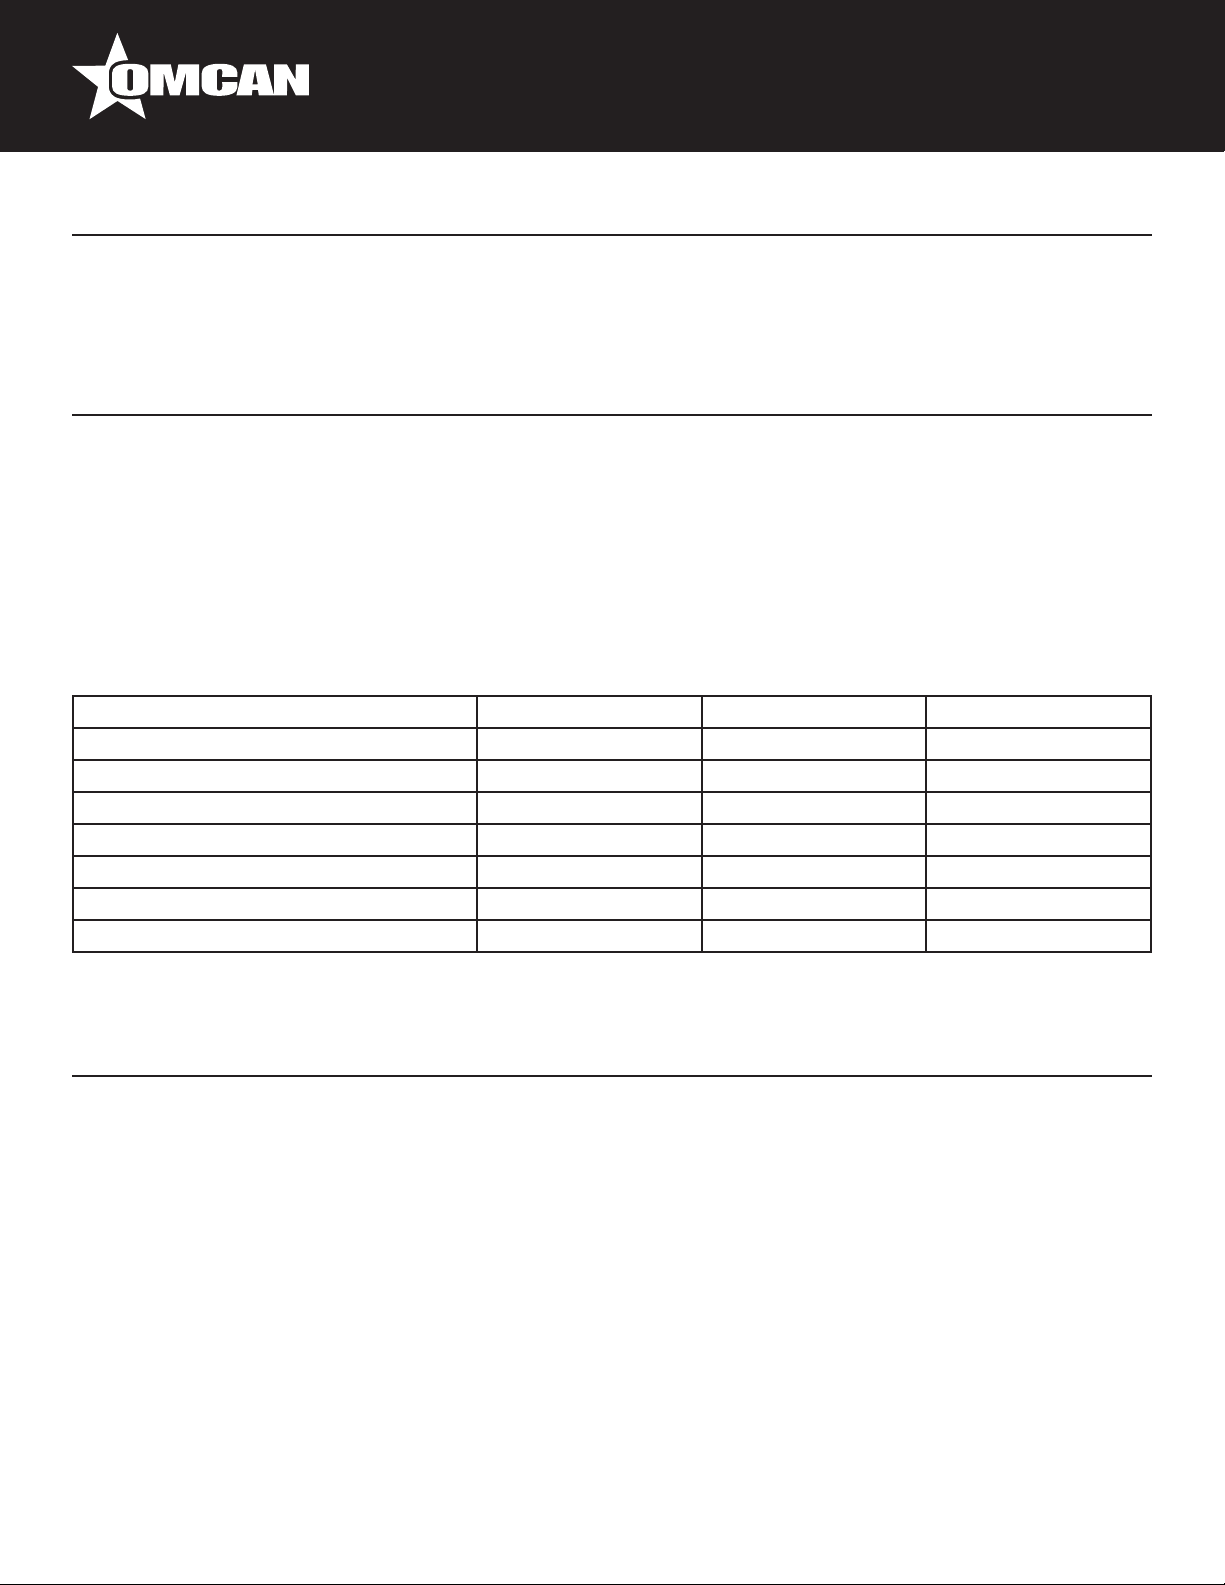
RECOMMENDED BAKING TIMES
Product Top Heat Bottom Heat Belt Speed
Pizza 12” Blanched 148.9°C / 300°F 204.4°C / 400°F 6 minutes
Meat and Cheese Sandwich 232.2°C / 450°F 148.9°C / 300°F 4 minutes
Meatball 260°C / 500°F 176.7°C / 350°F 2 minutes
Bagel (open) 260°C / 500°F 204.4°C / 400°F 2 minutes
1 oz. cookies 93.3°C / 200°F 121.1°C / 250°F 10 minutes
Garlic Bread Lightly Seasoned 260°C / 500°F 260°C / 500°F 2 minutes
Fish Sizzle Platter 204.4°C / 400°F 260°C / 500°F 6 minutes
Maintenance
CLEANING
DAILY
1. Turn main power switch to the OFF position, Disconnect unit from power source and allow unit to cool.
2. Using a mild detergent, wipe exterior surfaces, clean with a damp cloth.
A. For lightly soiled build-up, clean with a damp cloth.
B. For heavily soiled build-up, use a soft damp cloth and mild detergent. DO NOT USE CORROSIVE
CLEANERS.
3. Remove the load and unload tray by lifting it out of position. Clean using mild detergent and warm water.
4. Remove each crumb tray by sliding each of them out from under the conveyor belt. Clean crumb tray by
wiping with a damp cloth and mild detergent. DO NOT use corrosive cleaners. Place trays in place prior to
putting unit back into operating.
7
Page 8
Maintenance
5. Reconnect power.
Note: When placing the tray back into position, be sure that the message “CAUTION HOT SURFACE” is
the right side up.
WEEKLY
CLEANING THE CONVEYOR BELT
1. Turn power switch to the OFF position. Disconnection unit from
power source and allow to cool.
2. Perform daily cleaning procedures.
3. Using a damp cloth, wipe the fan guard located on the box cover
under the unit. Reconnect power or turn power back on.
4. Switch the ON/OFF switch to the ON position, and turn conveyor to its
fastest setting (Make sure the heater is off).
5. With the conveyor turned on and the crumb tray in place, take a wire grill
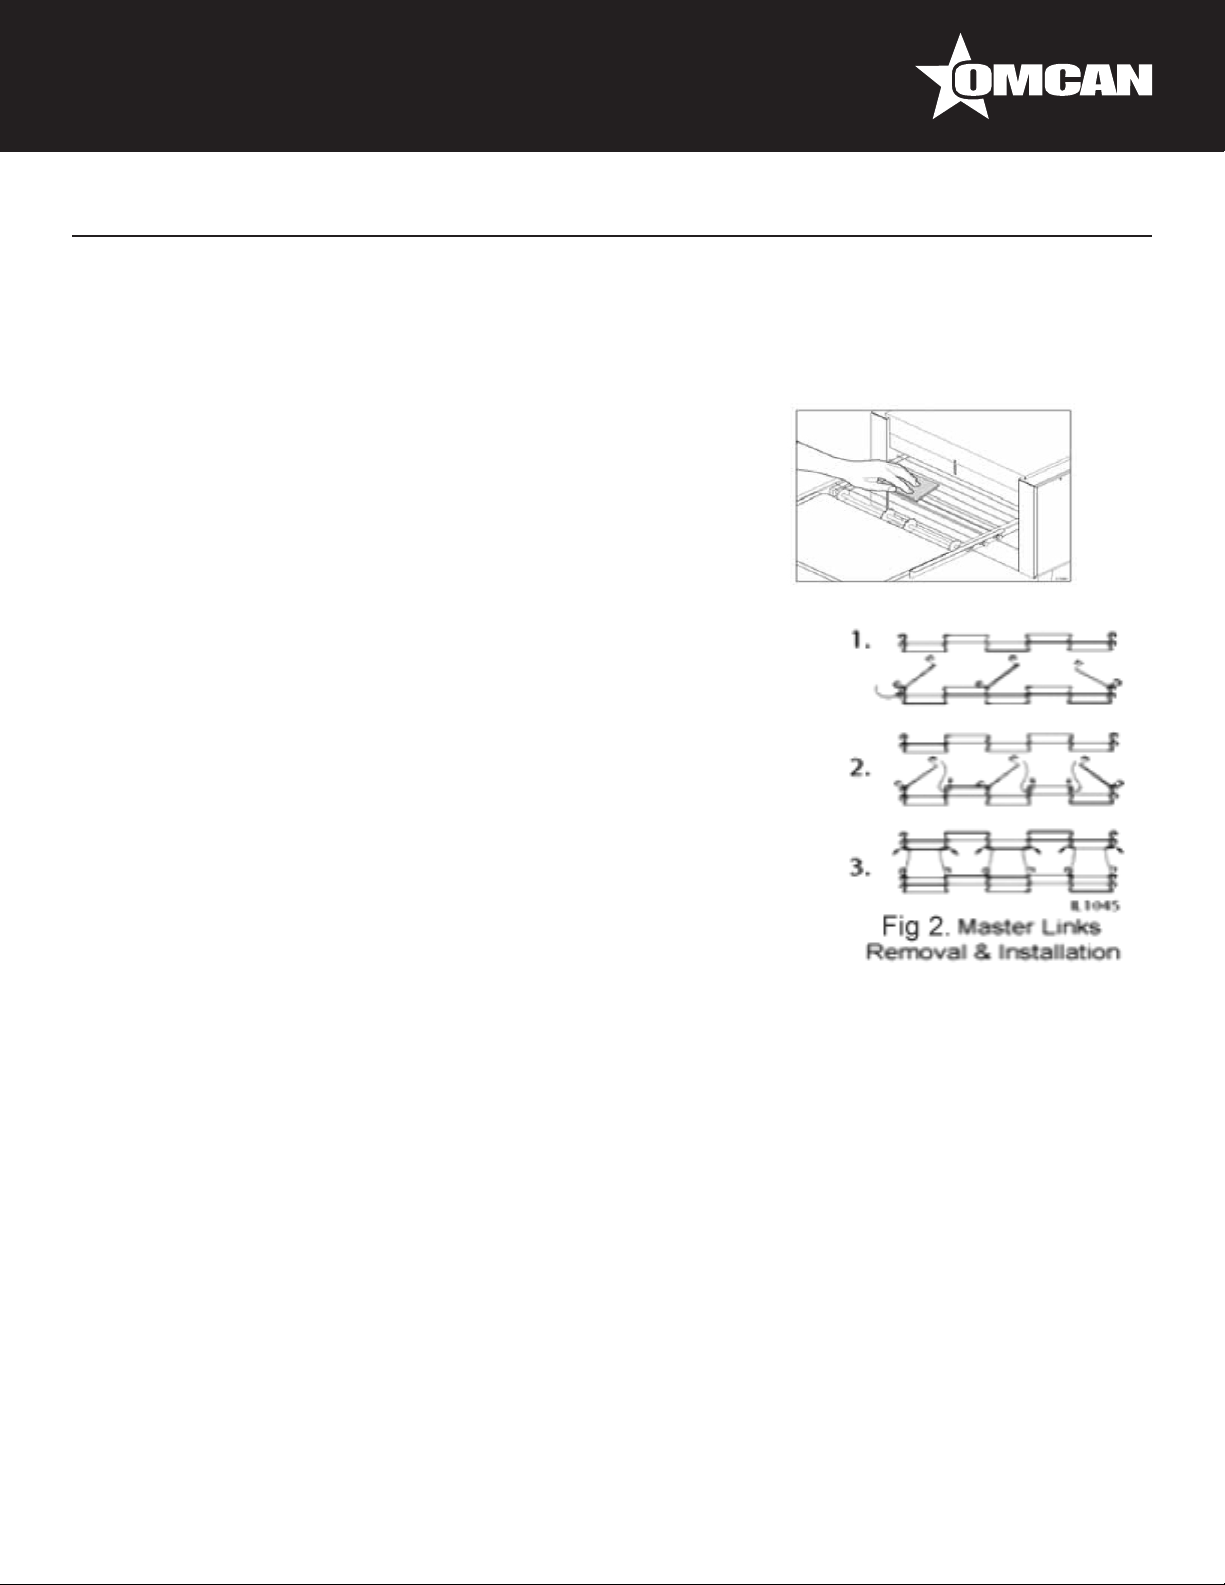
brush or dry abrasive pad, clean the exposed surface of conveyor belt
by passing the brush or pad, back and forth across the surface of the
conveyor belt as the belt moves past (Figure 1). Continue until the entire
belt is clean. Make sure the crumb tray is installed, this will minimize the
amount of particles that fall into the oven.
6. When the conveyor belt is clean, take a damp cloth and wipe the
conveyor, removing any loose particles on the belt surface.
7. Remove the crumb tray by sliding it out from beneath the conveyor belt.
Clean the crumb tray by wiping with a damp cloth and mild detergent.
Figure 1
• Do not use corrosive cleaners.
• Do not run conveyor oven without crumb trays installed.
• Overheating to electrical components and premature failure can occur.
• Do not immerse or let the unit stand in water.
• Do not hose down the unit or the table/counter if the unit is on the table/counter.
• Keep away from running water.
MONTHLY
REMOVAL AND CLEANING OF CONVEYOR BELT
1. Turn main power switch to the OFF position. Disconnect unit from its power source and allow to cool.
2. Perform daily and weekly cleaning procedures. Follow the step 1 in Fig 2, to remove all of the master links.
To remove, unhook each end of one link and bring the two ends together, and un-thread. Once detached,
re-hook onto itself so not to get damaged.
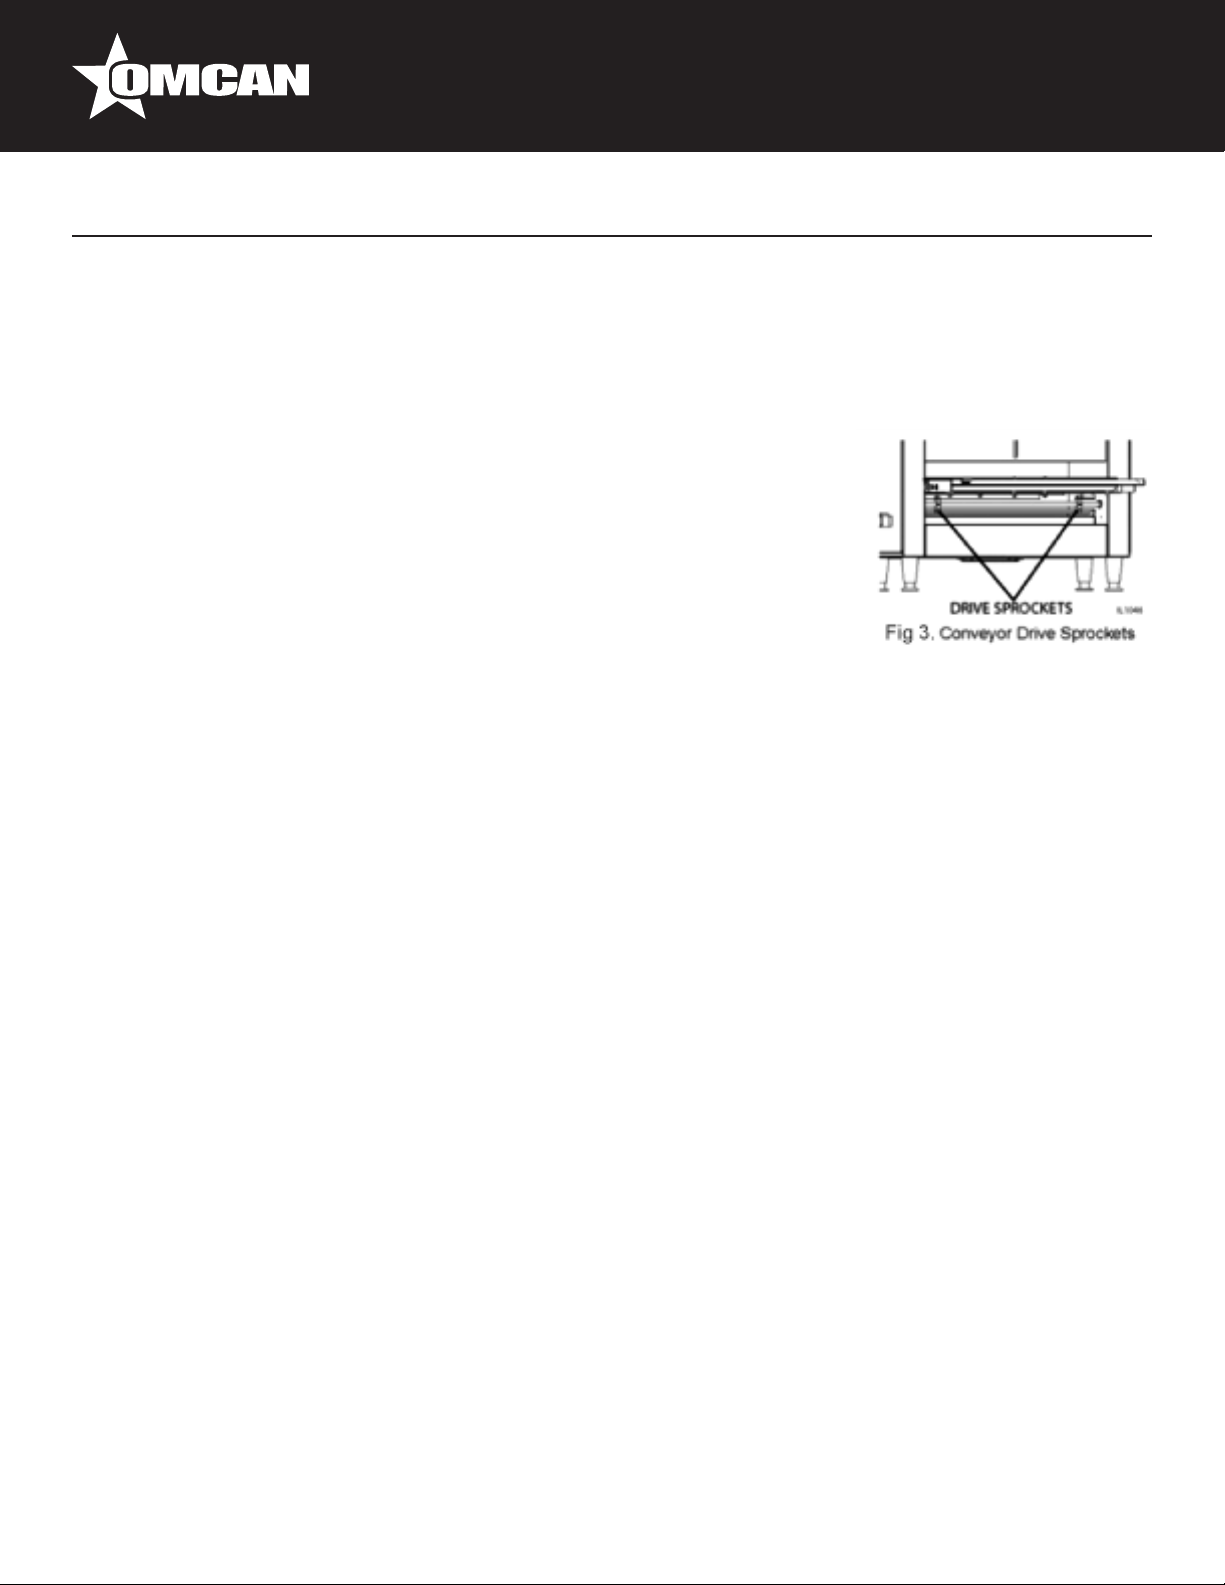
3. Now that the links have been unhooked, the conveyor can now be carefully removed from the oven.
Standing at one end of the oven. Starting with the end on the bottom, roll the conveyor belt until it has been
totally removed. Take careful notice being sure not to damage the heater tubes, and working it over the
8
Page 9
Maintenance
drive sprockets, (see Figure 3).
4. Clean conveyor belt in deep sink, caustic cleaners may be used. For a heavy soiled conveyor belt, soak
over night in hot soapy water.
NOTE: Do not attempt to clean the heater tubes.
5. Take this opportunity to clean and remove any loose materials inside the
unit. Using a mild cleaner and damp cloth, carefully wipe the inside surfaces
being sure NOT to clean the heater tubes. DAMAGE CAN OCCUR TO
THE HEATER TUBES FROM IMPROPER CLEANING. DO NOT SPRAY
CLEANING SOLUTIONS INTO OVEN CAVITY.
6. Reinstall conveyor belt by rst laying the belt along the bottom of the oven
cavity making sure the hooks on the sides are facing the inside and ends of
the hooks will be pointing away from the direction of the belt so not to catch
on any internal components once put back into operating. Also, being sure
to properly align the belt over the conveyor drive sprockets shown in Fig 3.
NOTE: The direction of the belt.
7. Next, pull one end of the conveyor belt over the top of the sprockets, (being sure to line the links up
properly with the sprockets) bring the two ends together.
8. Reinstall the previously removed master links as shown in step 2 & 3 in Fig.2. Unhook the last link of the
conveyor, farthest away from you, and re-thread through the other end, and reconnect back onto itself.
9. Examine the oven to assure proper installation, once satised, install crumb trays if you have not done so.
DO NOT OPERATE UNIT WITHOUT CRUMB TRAYS INSTALLED.
10. Reconnect oven to power supply and check for proper operation.
REPLACING HEATER TUBES
1. DISCONNECT POWER SOURCE.
2. Remove the top cover panel. By removing the truss head screws. Pull the top cover panel out slightly.
3. Remove each heater tube wires which are requiring replacement from its terminal block connection. One
tube at a time.
4. Remove heater tube retainer by removing retainer screws with washer.
5. Gently, pull defective heater tube out of unit.
6. Gently, put new heater tube into unit.
7. Replace heater tube retainers.
8. Reconnect the heater tube wires to the terminal block.
9. Install top cover panel.
10. Connect unit to power source and test unit for proper operation.
REPLACING FAN MOTOR
1. DISCONNECT POWER SOURCE.
2. After unit has cooled, remove the crumb tray, and turn unit over so this bottom is facing upward. Never
9
Page 10
Maintenance
place unit on its side.
3. Unplug power supply cord from fan motor.
4. Remove screws which hold fan motor and grill to the control box cover and remove fan.
5. Once removed, clean fan grill and control box cover using warm soapy water.
6. Put replacement motor and grill in place and secure to control box cover with screws previously removed.
7. Reconnect power supply cord to fan motor.
8. Replace back panel and enclosure.
9. Connect unit to power source, reinstall the crumb tray and test unit for proper operation.
REPLACING BELT DRIVE MOTOR
1. DISCONNECT POWER SOURCE.
2. After unit has cooled, remove the crumb tray and turn unit over so the bottom is facing upward. Never place
unit on its side.
3. Remove the control box cover which contains the fan motor.
4. Remove the cover that will expose the drive chain and sprockets.
5. Remove the sprockets from motor shaft, using an Allen wrench and loosening the set-screw.
6. Remove the wire from terminal block connecting the drive motor to the internal wiring.
7. Remove screws holding motor in place and remove motor from unit.
8. Put new motor in place and attach loosely with mounting screws.
9. Replace sprocket on motor shaft.
NOTE: The two sprockets must line up ush with each other, so the chain does not twist any during
operating. Also the hub gets installed closest to the motor.
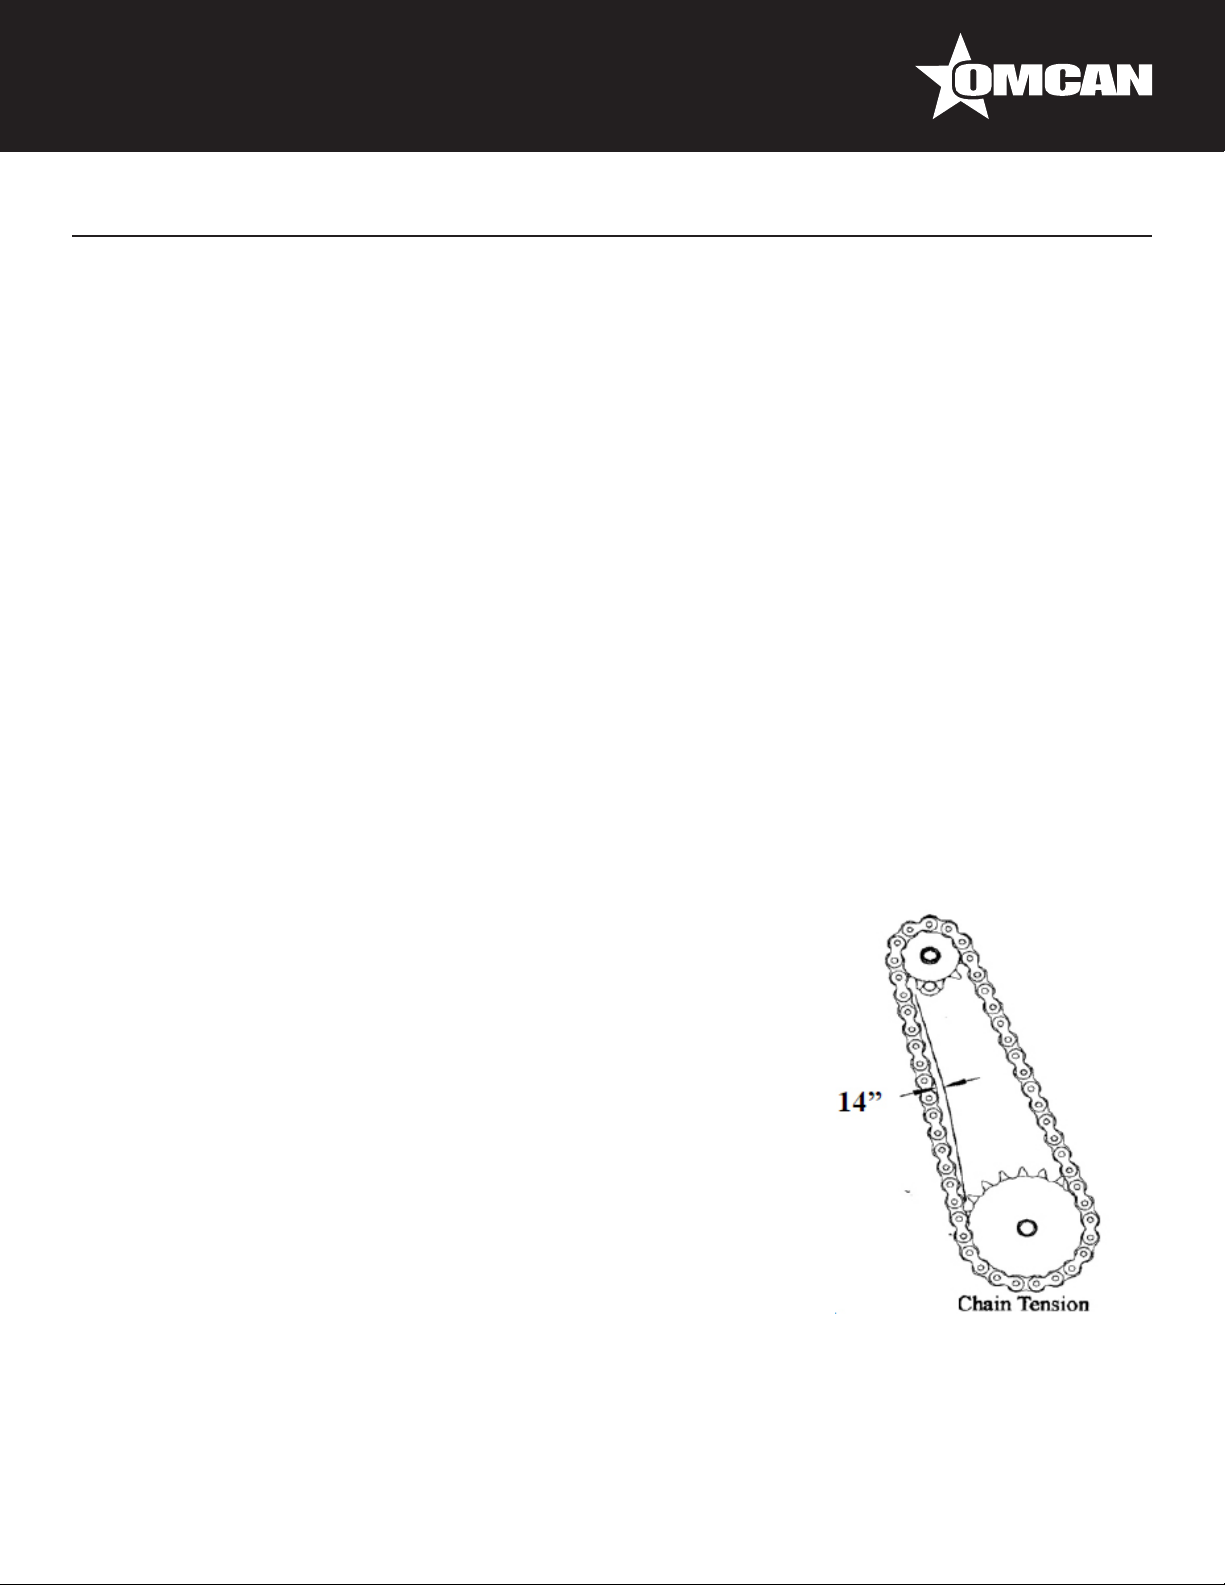
10. Slide motor unit the drive chain has about 1/4” slack when lightly pushed
at the center of its top open run. (See chain tensioning illustration.)
11. Tighten screw to secure motor.
12. Rewire leads.
13. At this time you may plug unit in and test for proper operation prior to
reinstalling panel and turning unit back over onto its feet.
14. If unit is working correctly, turn unit off and unplug unit completed.
15. Reinstall side panels and control box cover. Place unit back into its upright
position. Reinstall the crumb tray.
16. Connect unit to power source and test unit for proper operation.
CLEANING AIR INTAKE ONCE A WEEK
1. DISCONNECT POWER SOURCE.
2. Place unit upside down.
NOTE: you may damage the heater tubes by placing unit on its side.
3. Use a vacuum cleaner and or a damp cloth to clean the air intake. The procedure should be done at least
once a week.
10
Page 11
Maintenance
LUBRICATE THE CHAIN & SPROCKETS EVERY MONTH
1. DISCONNECT POWER SOURCE.
2. Remove the panel which exposes chain drive.
3. Using an extreme pressure, synthetic chain lubricant with a temperature range up to 400°F. Apply liberally
onto chain and sprockets.
4. Replace panel, reconnect power source and test unit.
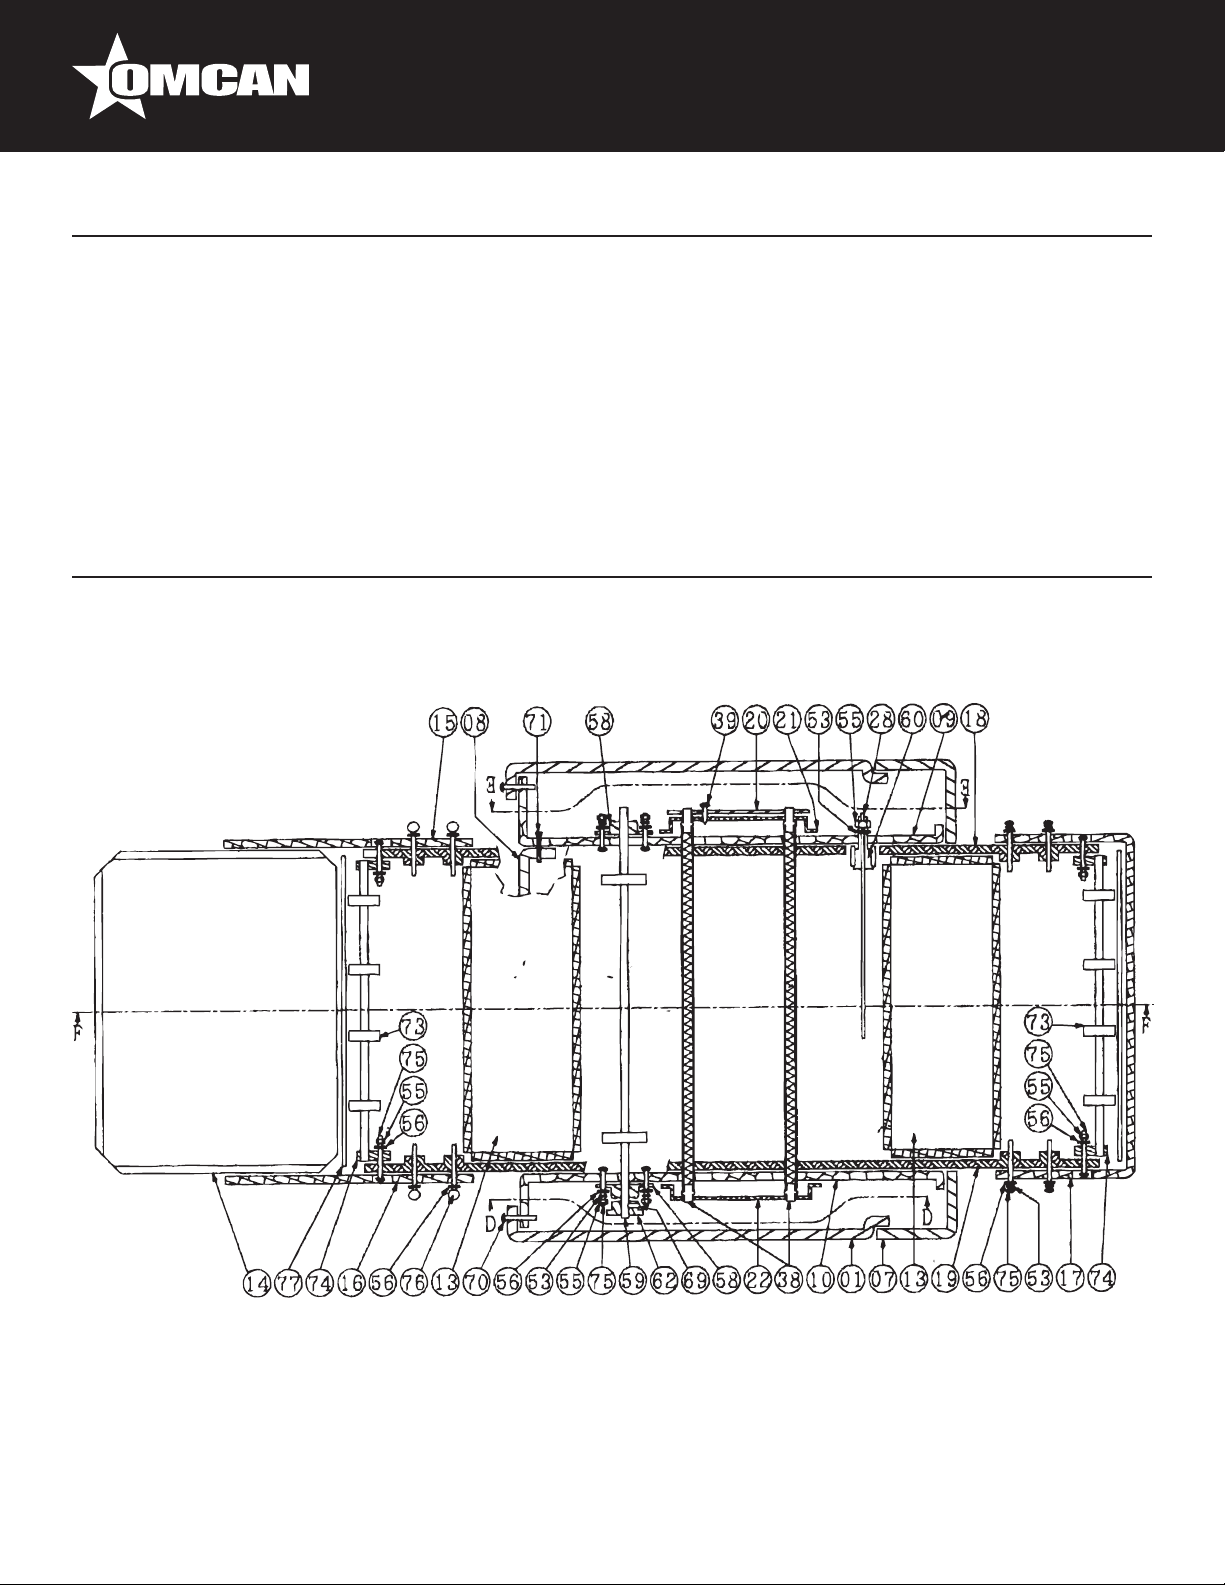
Parts Breakdown
Model CE-TW-0356 11387
11
Page 12
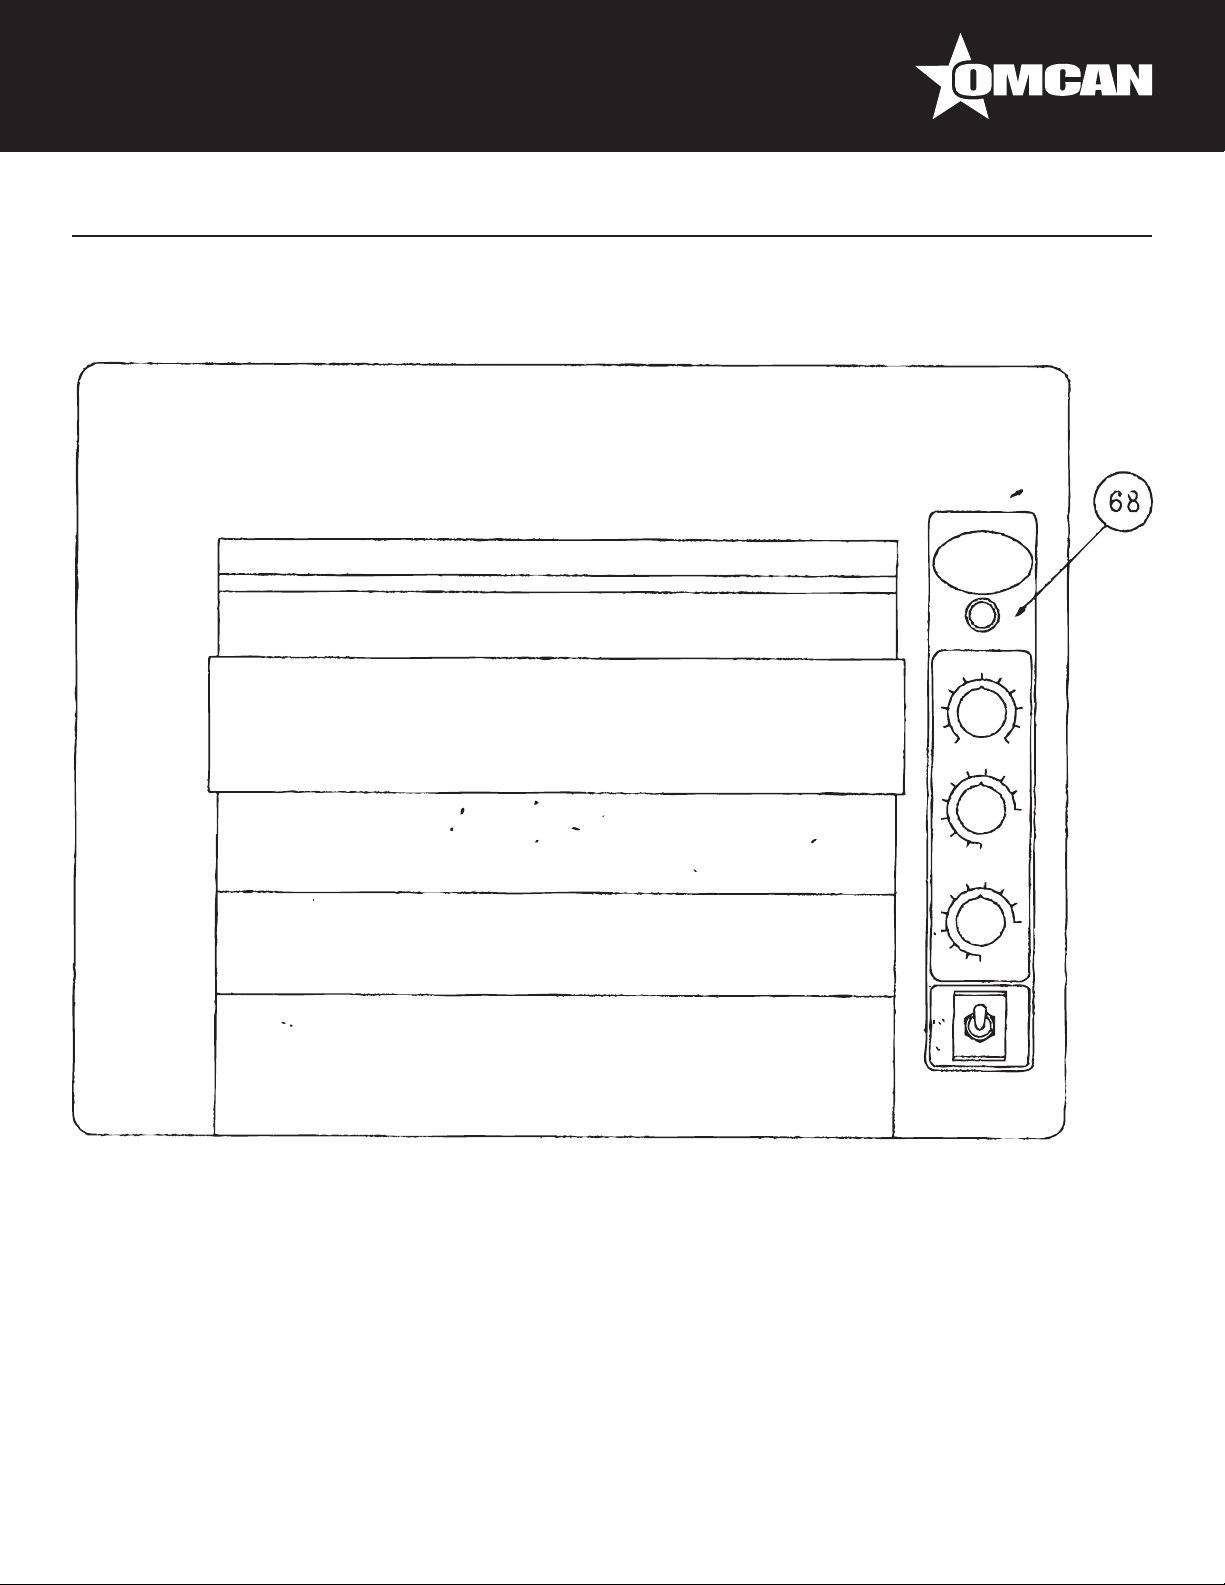
Parts Breakdown
Model CE-TW-0356 11387
12
Page 13
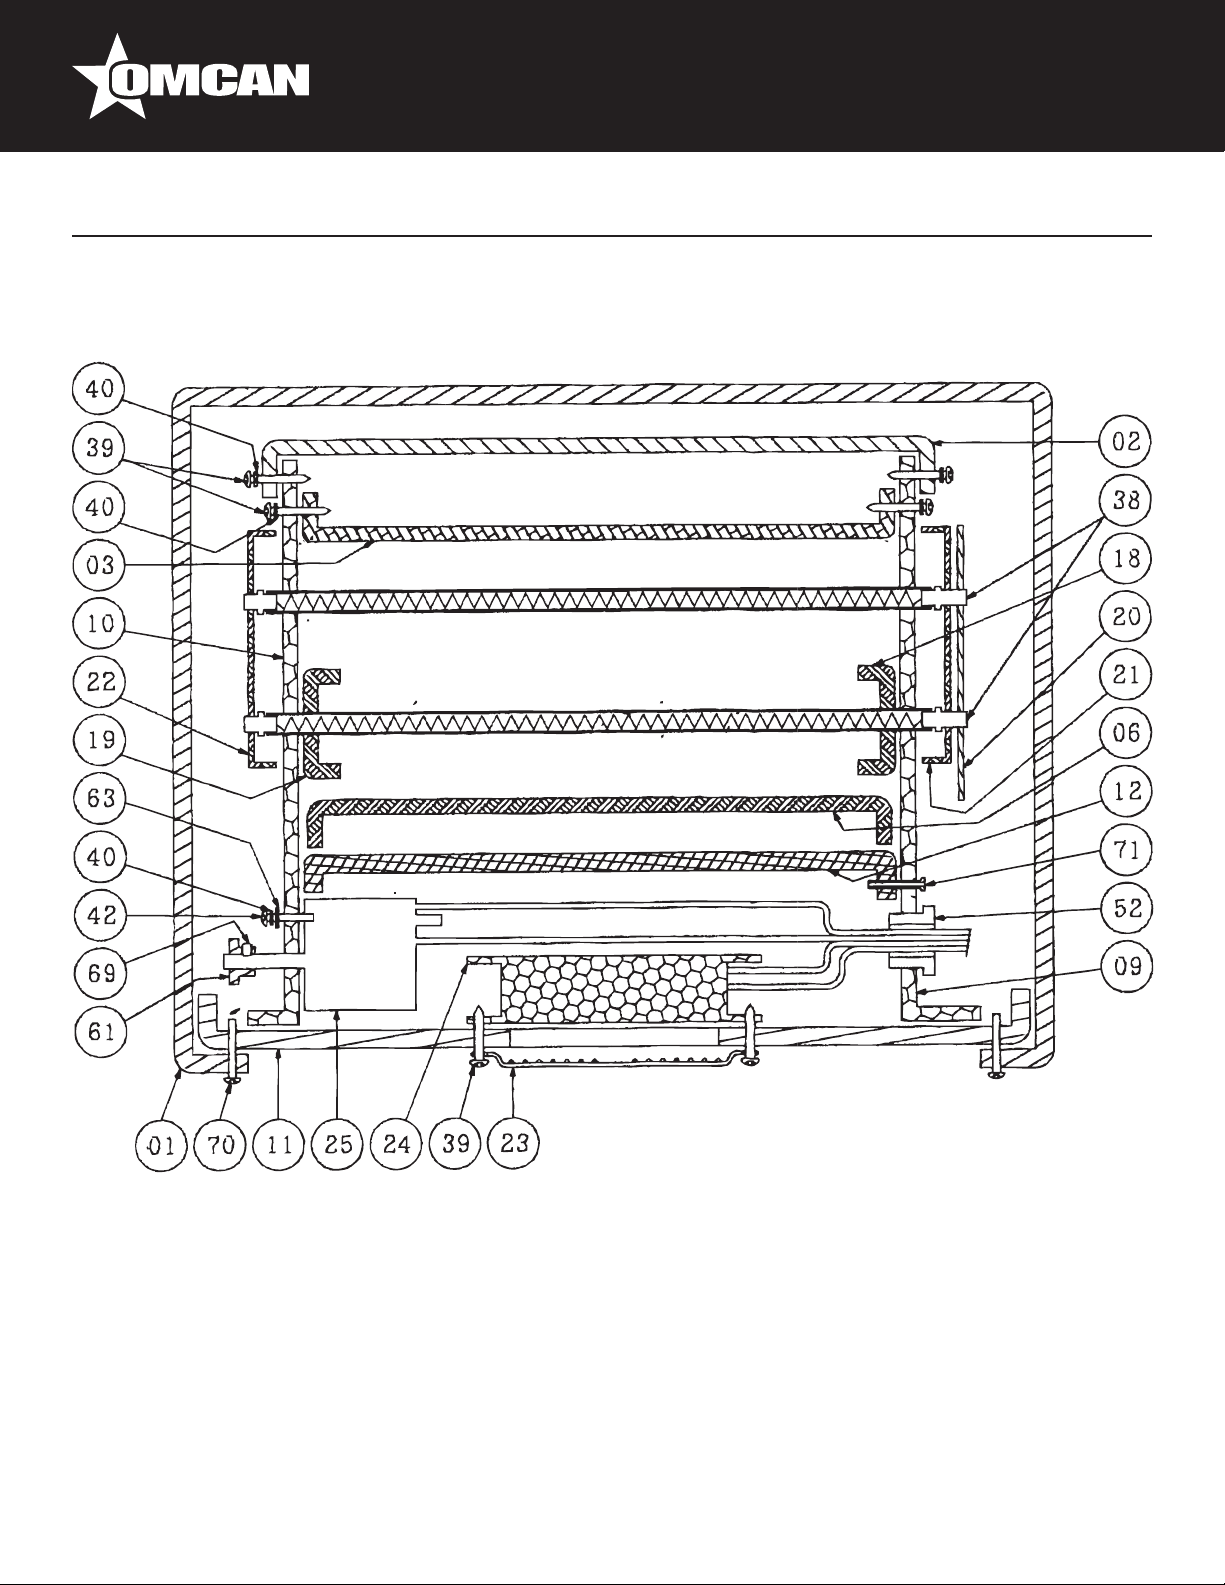
Model CE-TW-0356 11387
Parts Breakdown
13
Page 14
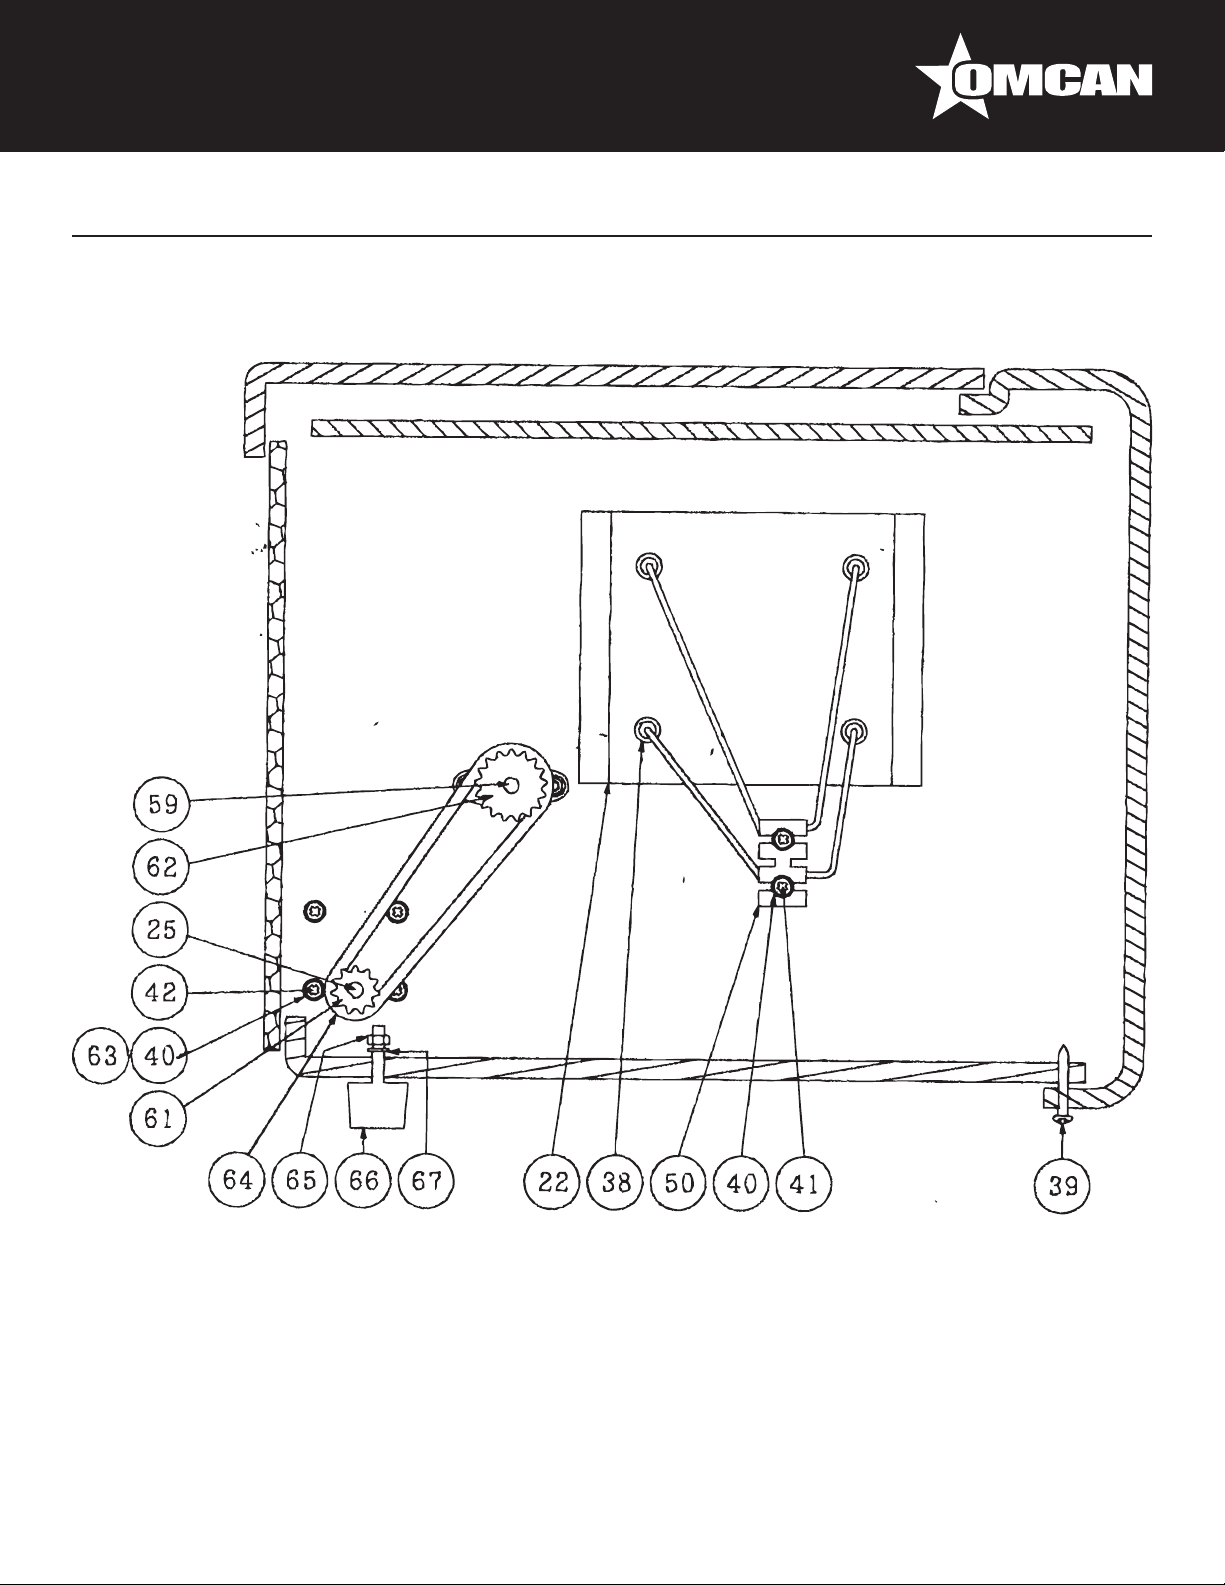
Parts Breakdown
Model CE-TW-0356 11387
14
Page 15
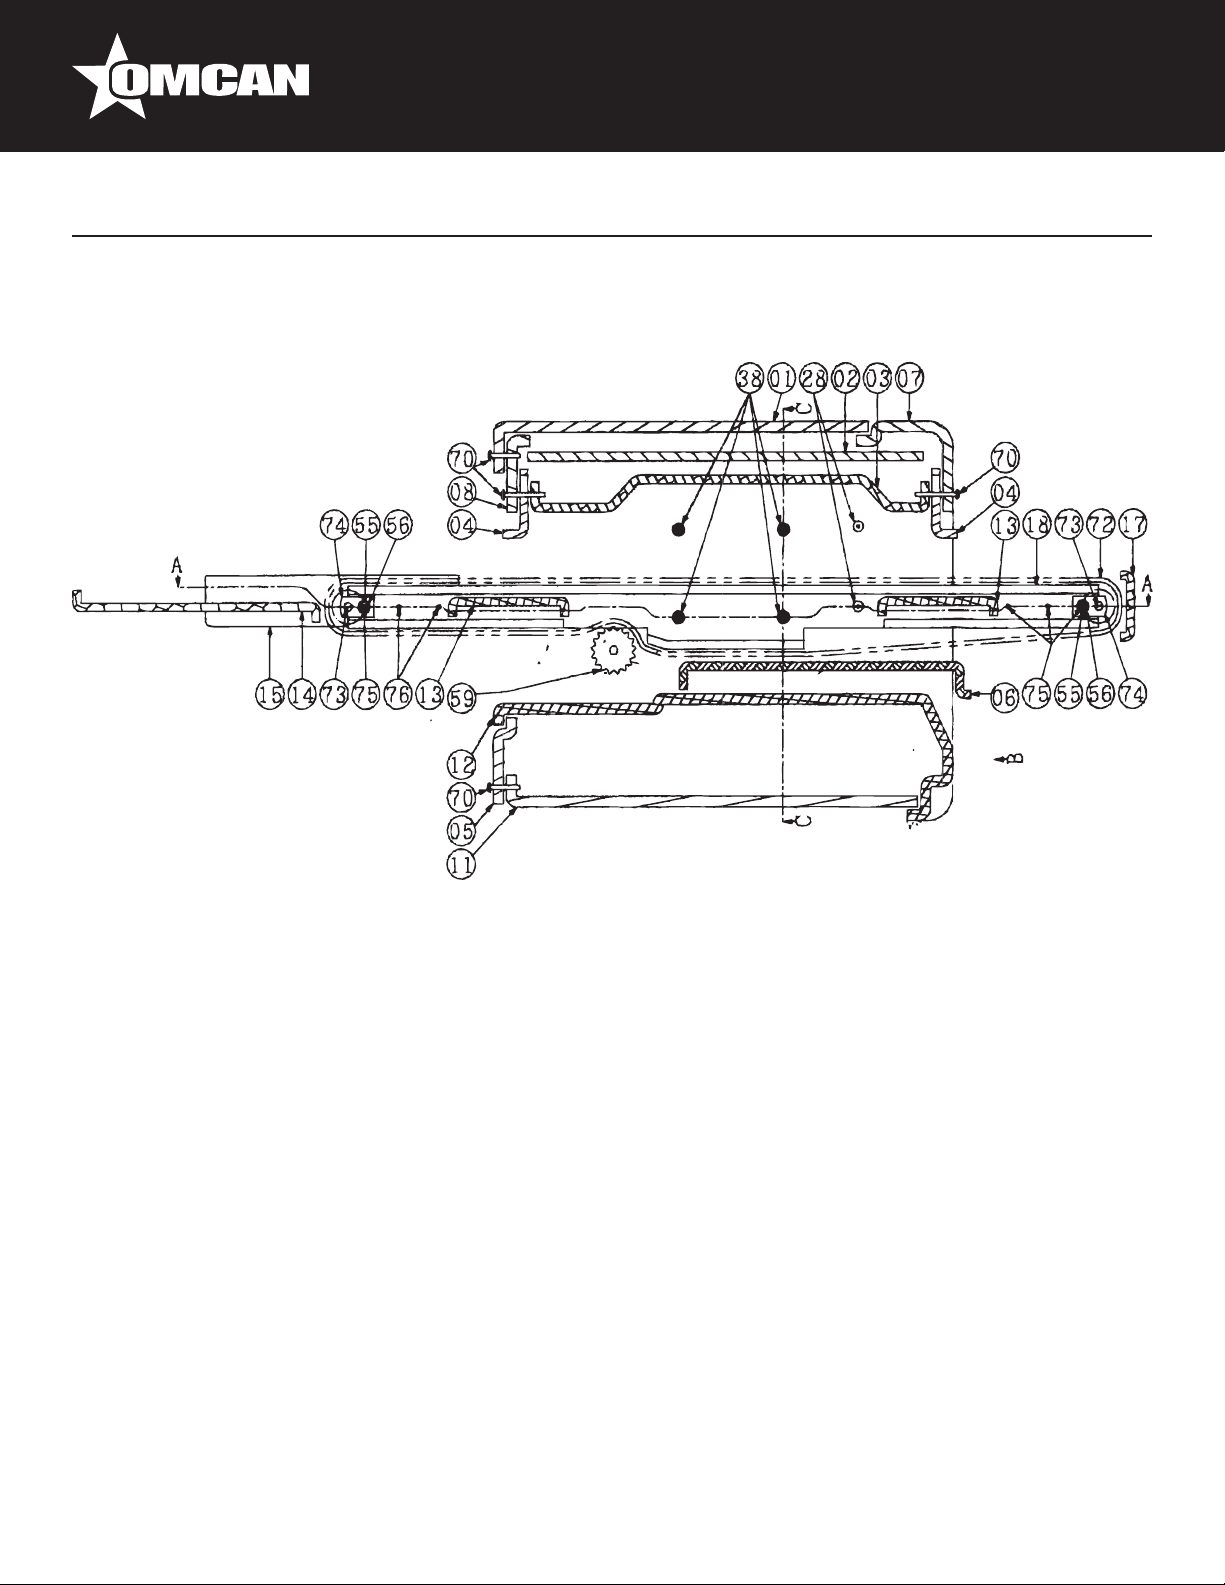
Model CE-TW-0356 11387
Parts Breakdown
15
Page 16
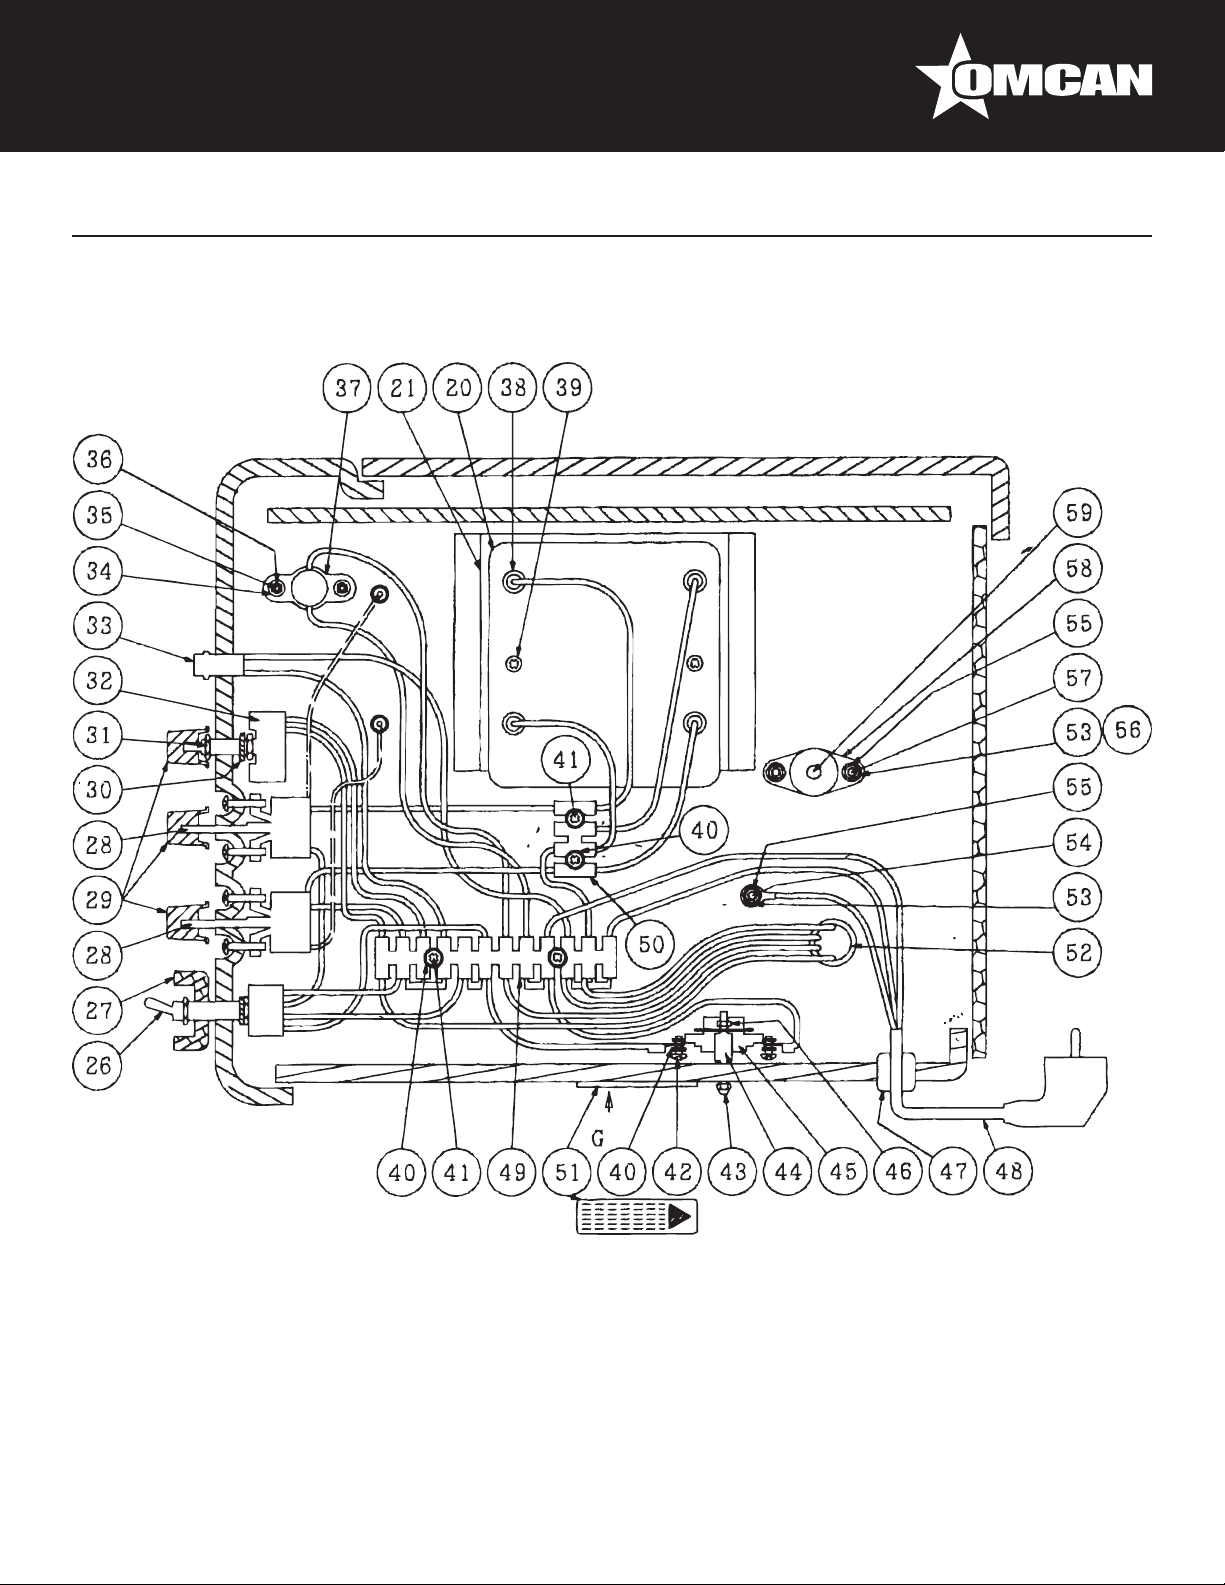
Parts Breakdown
Model CE-TW-0356 11387
16
Page 17

Parts Breakdown
Model CE-TW-0356 11387
Item No. Description Position Item No. Description Position Item No. Description Position
19023 Stainless Steel Cover for 11387 01 19037 Protection for Conveyor for 11387 17 - 19 19051
19024 Fan Terminal for 11387 02 19038 Protection for Element for 11387 20 - 22 40560 Small Terminal Block for 11387 50
19025 Insulation Plate for 11387 03 19039 Fan with Protection for 11387 23 - 24 19393 Drive Axel for 11387 59
19026 Plate Front for 11387 04 19040 Motor for 11387 25 19052 Gear 11T for 11387 61
19027 Cover Rear for 11387 05 19041 4P On/Off Switch for 11387 26 19053 Gear 17T for 11387 62
19028 Drawer for 11387 06, 06-1 19042 Switch Protection for 11387 27 40561 Chain Belt (#25x56Mesh) for 11387 64
19029 Front Plate for 11387 07, 07-1 19043
19030 Rear Plate for 11387 08 19044
19031 Left Plate for 11387 09 19046
19032 Right Plate for 11387 10 19047 Indicate Light for 11387 33 19054 Stainless Steel Conveyor for 11387 72
19033 Base Plate for 11387 11 19048 T.O.D.36 F65 for 11387 37 AG705 Driver Shaft for 11387 73
19034 Insulation Plate Middle for 11387 12 19055 Heater Element 240V 3600W for 11387 38-2 AG706 Teon Holder for 11387 74
19035 Conveyor Frame Completed for 11387 13 19050
27537 Complete Tray for 11387 14 - 16 AH670 Hi Limit Switch for 11387 46 AI875
EGO Switch 250C (Middle for Top Heat
Control) for 11387
EGO Switch 320C (Bottom for Lower
Heat Control) for 11387
11VR1KOM Speed Regular Switch for
11387
CR-1 Thermostat (Top - Speed Control)
for 11387
28-1 AG702 Rubber Feet for 11387 66
28-2 AG703 Panel for 11387 68
32 AG704 Screw for 11387 70
45 47387 Stacking Kit for 11387
Big Terminal Block PA-12 (12P) for
11387
Master Link of Stainless Steel Conveyor
for 11387
49
17
Page 18
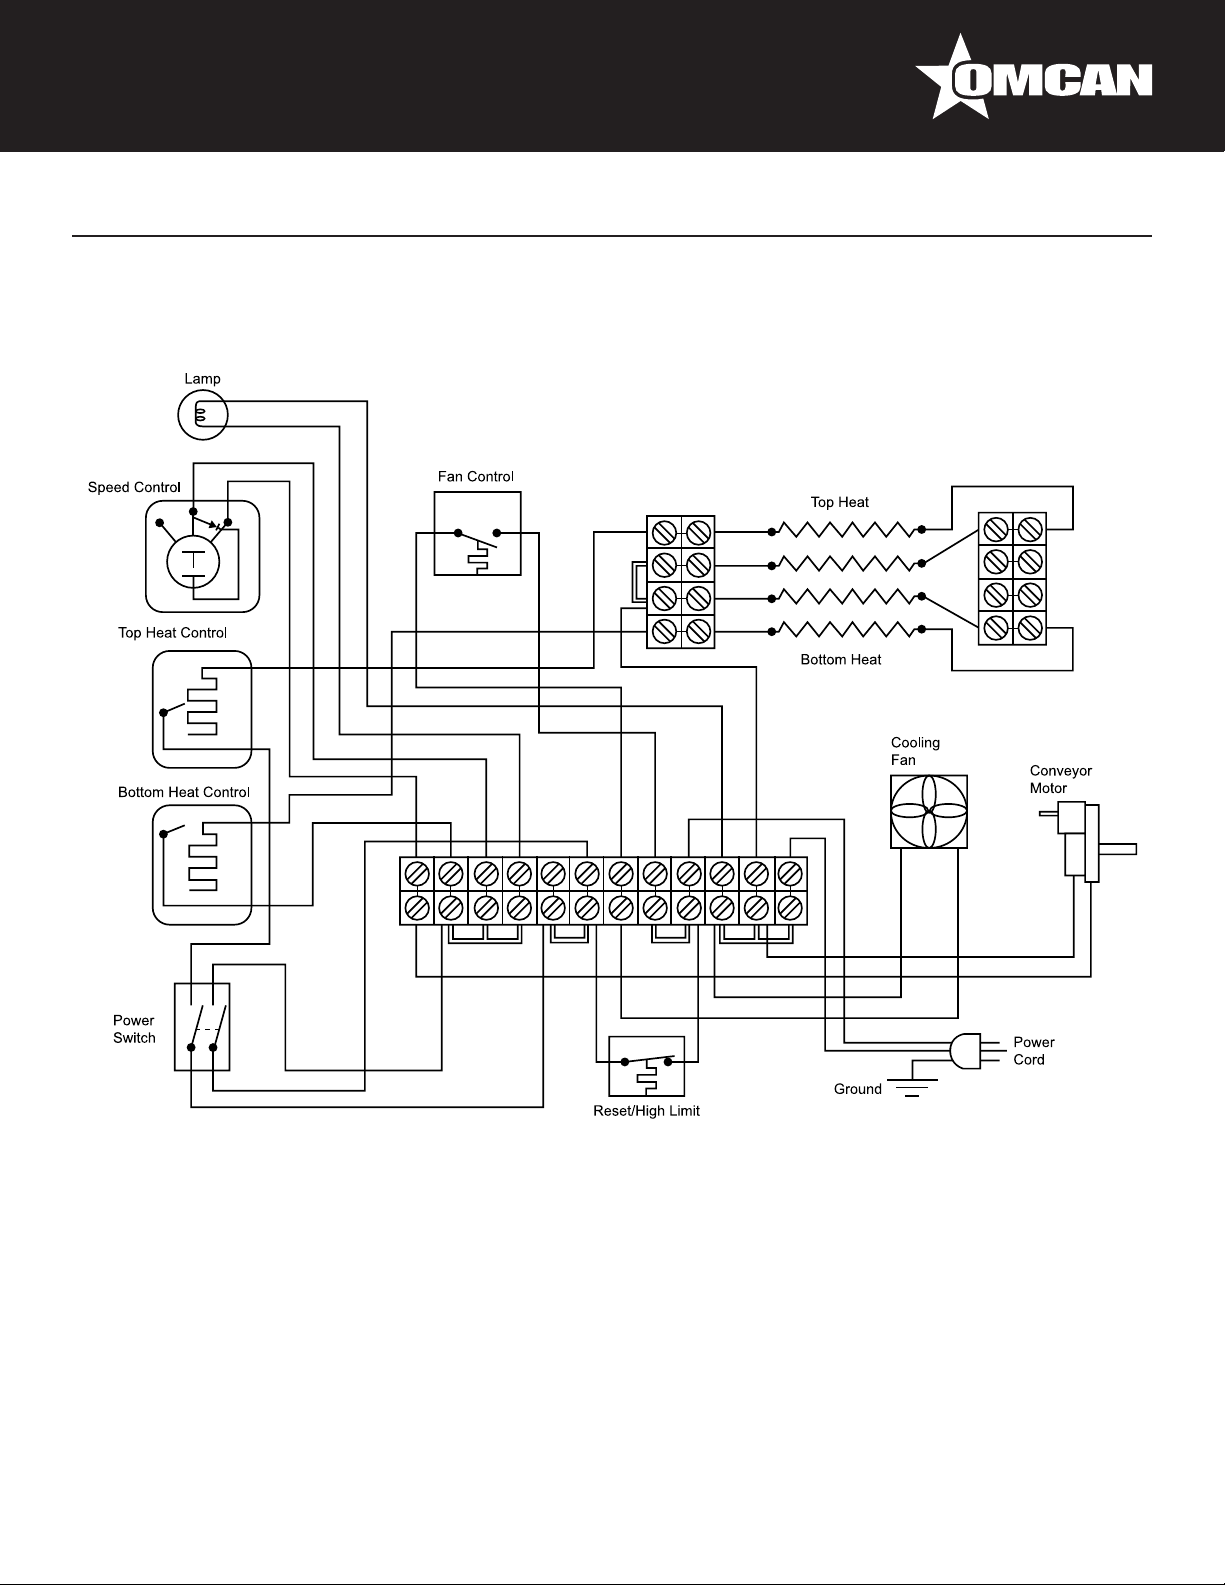
Electrical Schematics
Electrical Schematic
Model TS7000 11387
Model CE-TW-0356 11387
18
Page 19
Warranty Registration
Thank you for purchasing an Omcan product. To register your warranty for this product, complete the information below, tear off the card at
the perforation and then send to the address specied below. You can also register online by visiting:
Merci d’avoir acheté un produit Omcan. Pour enregistrer votre garantie pour ce produit, complétez les informations ci-dessous, détachez la
carte au niveau de la perforation, puis l’envoyer à l’adresse spécié ci-dessous. Vous pouvez également vous inscrire en ligne en visitant:
Gracias por comprar un producto Omcan usted. Para registrar su garantía para este producto, complete la información a continuación,
cortar la tarjeta en la perforación y luego enviarlo a la dirección indicada a continuación. También puede registrarse en línea en:
https://omcan.com/warranty-registration/
For mailing in Canada
Pour postale au Canada
Por correo en Canadá
OMCAN
PRODUCT WARRANTY REGISTRATION
3115 Pepper Mill Court,
Mississauga, Ontario
Canada, L5L 4X5
PRODUCT WARRANTY REGISTRATION
4450 Witmer Industrial Estates, Unit 4,
For mailing in the US
Pour diffusion aux États-Unis
Por correo en los EE.UU.
OMCAN
Niagara Falls, New York
USA, 14305
or email to: [email protected]
Purchaser’s Information
Name: Company Name:
Address:
Telephone:
City: Province or State: Postal or Zip: Email Address:
Country: Type of Company:
Restaurant Bakery Deli
Dealer from which Purchased: Butcher Supermarket Caterer
Dealer City: Dealer Province or State: Institution (specify):
Invoice: Other (specify):
Model Name: Model Number: Serial Number:
Machine Description:
Date of Purchase (MM/DD/YYYY): Date of Installation (MM/DD/YYYY):
Would you like to extend the warranty? Yes No
Thank you for choosing Omcan | Merci d’avoir choisi Omcan | Gracias por elegir Omcan
19
Page 20

Since 1951 Omcan has grown to become a leading distributor of equipment and supplies to the North
American food service industry. Our success over these many years can be attributed to our commitment
to strengthen and develop new and existing relationships with our valued customers and manufacturers.
Today with partners in North America, Europe, Asia and South America, we continually work to improve
and grow the company. We strive to offer customers exceptional value through our qualied local sales
and service representatives who provide convenient access to over 6,500 globally sourced products.
Depuis 1951 Omcan a grandi pour devenir un des “leaders” de la distribution des équipements et
matériel pour l’industrie des services alimentaires en Amérique du Nord. Notre succès au cours de ces
nombreuses années peut être attribué à notre engagement à renforcer et à développer de nouvelles
et existantes relations avec nos clients et les fabricants de valeur. Aujourd’hui avec des partenaires en
Amérique du Nord, Europe, Asie et Amérique du Sud, nous travaillons continuellement à améliorer et
développer l’entreprise. Nous nous efforçons d’offrir à nos clients une valeur exceptionnelle grâce à
nos ventes locales qualiées et des représentants de service qui offrent un accès facile à plus de 6500
produits provenant du monde entier.
Desde 1951 Omcan ha crecido hasta convertirse en un líder en la distribución de equipos y suministros
de alimentos en América del Norte industria de servicios. Nuestro éxito en estos años se puede atribuir
a nuestro compromiso de fortalecer y desarrollar nuevas relaciones existentes con nuestros valiosos
clientes y fabricantes. Hoy con socios de América del Norte, Europa, Asia y América del Sur, que trabajan
continuamente para mejorar y crecer la empresa. Nos esforzamos por ofrecer a nuestros clientes valor
excepcional a través de nuestro local de ventas y representantes de los servicios que proporcionan un
fácil acceso a más de 6,500 productos con origen a nivel mundial.
 Loading...