

OMB Guitars OMB Upgrade Kit User Manual

OMB
User Guide
OMB Guitars Ltd.
info@ombguitars.com
Version 0.I

OMB User Guide - Version 0.I
© 2019OMB
All rights reserved.
OMB, OMB App, and Add-On Device are trademarks of OMB Ltd., and protected by U.S patent
numbers 9,721,552, .9,858,909, 9,053,690, Japanese patent numbers 6338313, JP6089284B2,
European Patent Office numbers EP2959472, EP2732444, and Chinese patent number
ZL2015800143031. Additional patents are pending.
Android, Apple Play Store, Apple, Appstore, iPad, iPhone, and Bluetooth are trademarks owned
by their respective companies.
i

OMB Introduction 1
Install the OMB App 2
How to Use this Guide 2
Safety 3
Battery Information 3
Responsible Recycling 4
EMC and Certificate of Conformity 4
The OMB Upgrade Kit 6
Unpacking the Add-On Device 7
Preparing the Add-On Device 8
Preparing Your Guitar 9
Attaching the Add-On Device to Bridge-Pin Acoustic Guitars 10
Attaching the Add-On Device to Pinless Bridge Acoustic Guitars 13
Attaching the Add-On Device to String-Through Body Electric Guitars 14
Attaching the Add-On Device to Hard-Tail Bridge Electric Guitars 18
Attaching the Add-On Device to Tune-o-matic Bridge Electric Guitars 20
Attaching Flat Conductive Tape to the Guitar Neck 21
Soldering the Flat Conductive Tape to the Frets 22
Attaching the Diamond Conductive Tape for Acoustic Guitars 23
Attaching the Diamond Conductive Tape for Electric Guitars 25
Completing Add-On Device Installation 27
Palm Muting with the Add-On Device 28
Let’s Make Music with OMB 29
OMB App Main Screen 31
ii

OMB User Guide - Version 0.I
OMB Settings Menu 33
Settings 33
Power-Up Your OMB Guitar 35
Bluetooth Pairing 36
Calibration 38
Playing in Chord Mode 41
Playing in Solo Mode 44
Playing in Pad Mode 46
Recording using OMB 48
Shutting Down 50
The OMB Foot Pedal 51
Unpacking the OMB Foot Pedal 52
Attaching the OMB Foot Pedal Legs 53
Bluetooth Pairing for OMB Foot Pedal 54
Pedal 55
Pedal Sync in Chord Mode 56
Pedal in Solo Mode 57
Adding Additional OMB Foot Pedals 58
Troubleshooting 59
Warranty 60
iii

OMB Introduction
OMB enables guitarists to take their guitar playing to the next level with three game-changing
features: auto-backup music in real-time, an instrument-swap mode, and a no-delay guitar-toMIDI mode. It’s the missing link between guitars and seemingly magical technology, unleashing
any guitarist’s sound—no matter the style.
Of course you want to start playing right away, but first take a moment to look over the following
points.
• The OMB system uses Bluetooth technology for your guitar and app to communicate.See
EMC and Certificate of Conformity on page4 for all of the specifics.
• The OMB system battery should provide you hundreds of hours of cable-free playing
(between charging). When the battery can no longer hold a charge, contact OMB Service for
instructions.
• All things come to an end, and, at some point, the curtain will come down on the electronics
in your OMB-powered guitar. See Responsible Recycling on page4 when that time comes.
1

OMB User Guide - Version 0.I
Install the OMB App
Download the OMB App according to your device.
We recommend using the OMB App on your tablet for the best user experience.
J
Site QR Code
Apple Store
Google Play
You may find that a feature works differently than you expect or is not available on your
device’s platform. OMB is committed to continuous improvement, and every effort is made to
put things write in the next revision.
How to Use this Guide
We know: no one likes to read a user guide. So go ahead—jump in and start. We want you to
start enjoying your OMB experience right away.
However, to enjoy yourself to the full, you might want to look through this guide to see if you
missed anything, or if something we think is intuitively obvious is anything but. (Let us know;
we’ll fix it.)
At the beginning of a section a short introduction discusses what is to be done, and it often
includes an identification of parts. A list of the parts is shown with capital letters in triangles
(A, B, C) keyed to the illustration below.
We hope that you'll be able to understand what to do just by looking at the illustrations. If some
step isn’t clear, look at the written instructions, which are keyed to annotations in the
illustration.
At last count, OMB enhances eight different types of guitars—and more coming. Thumbnail
drawings indicate the location of parts or features where they might differ, on your guitar, from
other models.
Install the OMB App
2

Safety
There’s a reason why we’ve put in this chapter, and it’s not to warn you about getting blisters on
your fingers from playing too long. (But you might want to lay in a supply of adhesive bandages
just in case.)
The information here is important to you and to your environment. So take a moment and look it
over.
The standard operating temperature for your OMB device is 86°F(30°C)
J
Battery Information
OMB products are powered by rechargeable LiPo batteries.
The batteries are not user-replaceable. If the operating time of your OMB guitar becomes
sluggish, or if you see shorter intervals between recharging, contact OMB Service for
information about how to have the battery replaced.
Attempting to change the battery yourself will violate the warranty and may damage the OMB
N
device. If you replace the battery with the incorrect type you run the risk of explosion.
3

OMB User Guide - Version 0.I
Responsible Recycling
Disposal of waste batteries (applicable in the European Union and other European countries with
separate collection systems)
This symbol on the battery or on the packaging indicates that the battery provided
with this product shall not be treated as household waste.
On certain batteries this symbol might be used in combination with a chemical
symbol. The chemical symbols for mercury (Hg) or lead (Pb) are added if the battery
contains more than 0.0005% mercury or 0.004% lead.
By ensuring these batteries are disposed of correctly, you will help prevent
potentially negative consequences for the environment and human health which
could otherwise be caused by inappropriate waste handling of the battery. The
recycling of the materials will help to conserve natural resources.
In case of products that for safety, performance or data integrity reasons require a
permanent connection with an incorporated battery, this battery should be replaced
by qualified service staff only.
To ensure that the battery will be treated properly, hand over the product at end-oflife to the applicable collection point for the recycling of electrical and electronic
equipment.
For all other batteries, please view the section on how to remove the battery from the
product safely. Hand the battery over to the applicable collection point for the
recycling of waste batteries.
For more detailed information about recycling of this product or battery, please
contact your local Civic Office, your household waste disposal service or the shop
where you purchased the product.
Disposal of Old Electrical & Electronic Equipment (Applicable in the European Union and other
European countries with separate collection systems)
This symbol on the product or on its packaging indicates that this product shall not
be treated as household waste. Instead it shall be handed over to the applicable
collection point for the recycling of electrical and electronic equipment.
By ensuring this product is disposed of correctly, you will help prevent potential
negative consequences for the environment and human health, which could
otherwise be caused by inappropriate waste handling of this product. The recycling
of materials will help to conserve natural resources. For more detailed information
about recycling of this product, please contact your local Civic Office, your
household waste disposal service or the shop where you purchased the product.
EMC and Certificate of Conformity
Class B Warnings
Responsible Recycling
4

OMB User Guide - Version 0.I
The FCC Wants You to Know
This equipment has been tested and found to comply with the limits for a Class B digital device,
pursuant to Part 15 of the FCC rules. These limits are designed to provide reasonable protection
against harmful interference in a residential installation. This equipment generates, uses and
can radiate radio frequency energy and, if not installed and used in accordance with the
instructions, may cause harmful interference to radio communications. However, there is no
guarantee that interference will not occur in a particular installation. If this equipment does
cause harmful interference to radio or television reception, which can be determined by turning
the equipment off and on, the user is encouraged to try to correct the interference by one or
more of the following measures:
• Reorient or relocate the receiving antenna.
• Increase the separation between the equipment and receiver.
• Connect the equipment to an outlet on a circuit different from that to which the receiver is
connected.
• Consult the dealer or an experienced radio/TV technician.
RF Exposure Warnings
Mobile Device RF Exposure Statement
Mobile Device definition:
a Mobile: (§2.1091) (b) — A mobile device is defined as a transmitting device designed to be
used in other than fixed locations and to generally be used in such a way that a separation
distance of at least eight inches is normally maintained between the transmitter’s radiating
structure(s) and the body of the user or nearby persons. Per §2.1091d(d)(4) In some cases (for
example, modular or desktop transmitters), the potential conditions of use of a device may not
allow easy classification of that device as either Mobile or Portable. In these cases, applicants
are responsible for determining minimum distances for compliance for the intended use and
installation of the device based on evaluation of either specific absorption rate (SAR), field
strength, or power density, whichever is most appropriate
RF Exposure
This device is only authorized for use in a mobile application. At least 8" of separation distance
between the OMB Upgrade Kit and the user's body must be maintained at all times.
EMC and Certificate of Conformity
5

The OMB Upgrade Kit
The OMB Upgrade Kit is for those guitarists who want to use OMB but love their own guitars too
much to play any other. The OMB Upgrade Kit works on most electric and acoustic guitars with
steel strings.
Installing the OMB Upgrade Kit is not very complicated, but it still has to be done correctly, and
in the right order. But we've tried to make everything clear and simple.
The OMB Upgrade Kit, and all OMB-powered guitars, can be switched to right-handed fingering
by single setting in the OMB App, so no special hardware adjustments are required during
installation. See Settings on page33 for more information.
Almost everything you need is included in the OMB Upgrade Kit. All you have to add is a soft
cloth, a bit of your favorite guitar cleaning solution, and about thirty minutes.
Oh—and one more thing: a soldering iron that can be adjusted to 660 °F (350 °C).
If you’re not acquainted with the terms “cold joint,” or “insufficient wetting”—if you don’t own
your own soldering iron—you might not want to experiment on your guitar for your first
soldering project. So find an electronics-savvy friend, or a trusted guitar shop, to take care of
this part of the installation for you.
6

H
A
B
C
F
G
D
E
IJK
OMB
OMB
OMB User Guide - Version 0.I
Unpacking the Add-On Device
After opening the OMB Upgrade Kit packaging check to make sure that nothing is missing.
The OMB Upgrade Kit includes parts for upgrading either a steel string acoustic guitar or an
electric guitar. At the end of installation you’ll have some extra parts left over. The list below
indicates what parts belong to what kind of installation.
A Add-On Device
B USB-C Cable (0.5 m)
C Fine Steel Wool
D Flat Conductive Tape (25" x 2) (65 cm x 2)
E Diamond Conductive Tape (20") (50 cm)
F Add-On Device Adhesive Strip (x 2)
G Set of guitar strings
H String guide insulating sleeve
I String-through spacer block (for string-though body electric guitars)
J Hard-tail bridge spacer block (for hard-tail bridge electric guitars)
K Hard-tail bridge spacer block insulating sleeves (x 6)
Unpacking the Add-On Device
7
1
2
1
4 3
OMB User Guide - Version 0.I
Preparing the Add-On Device
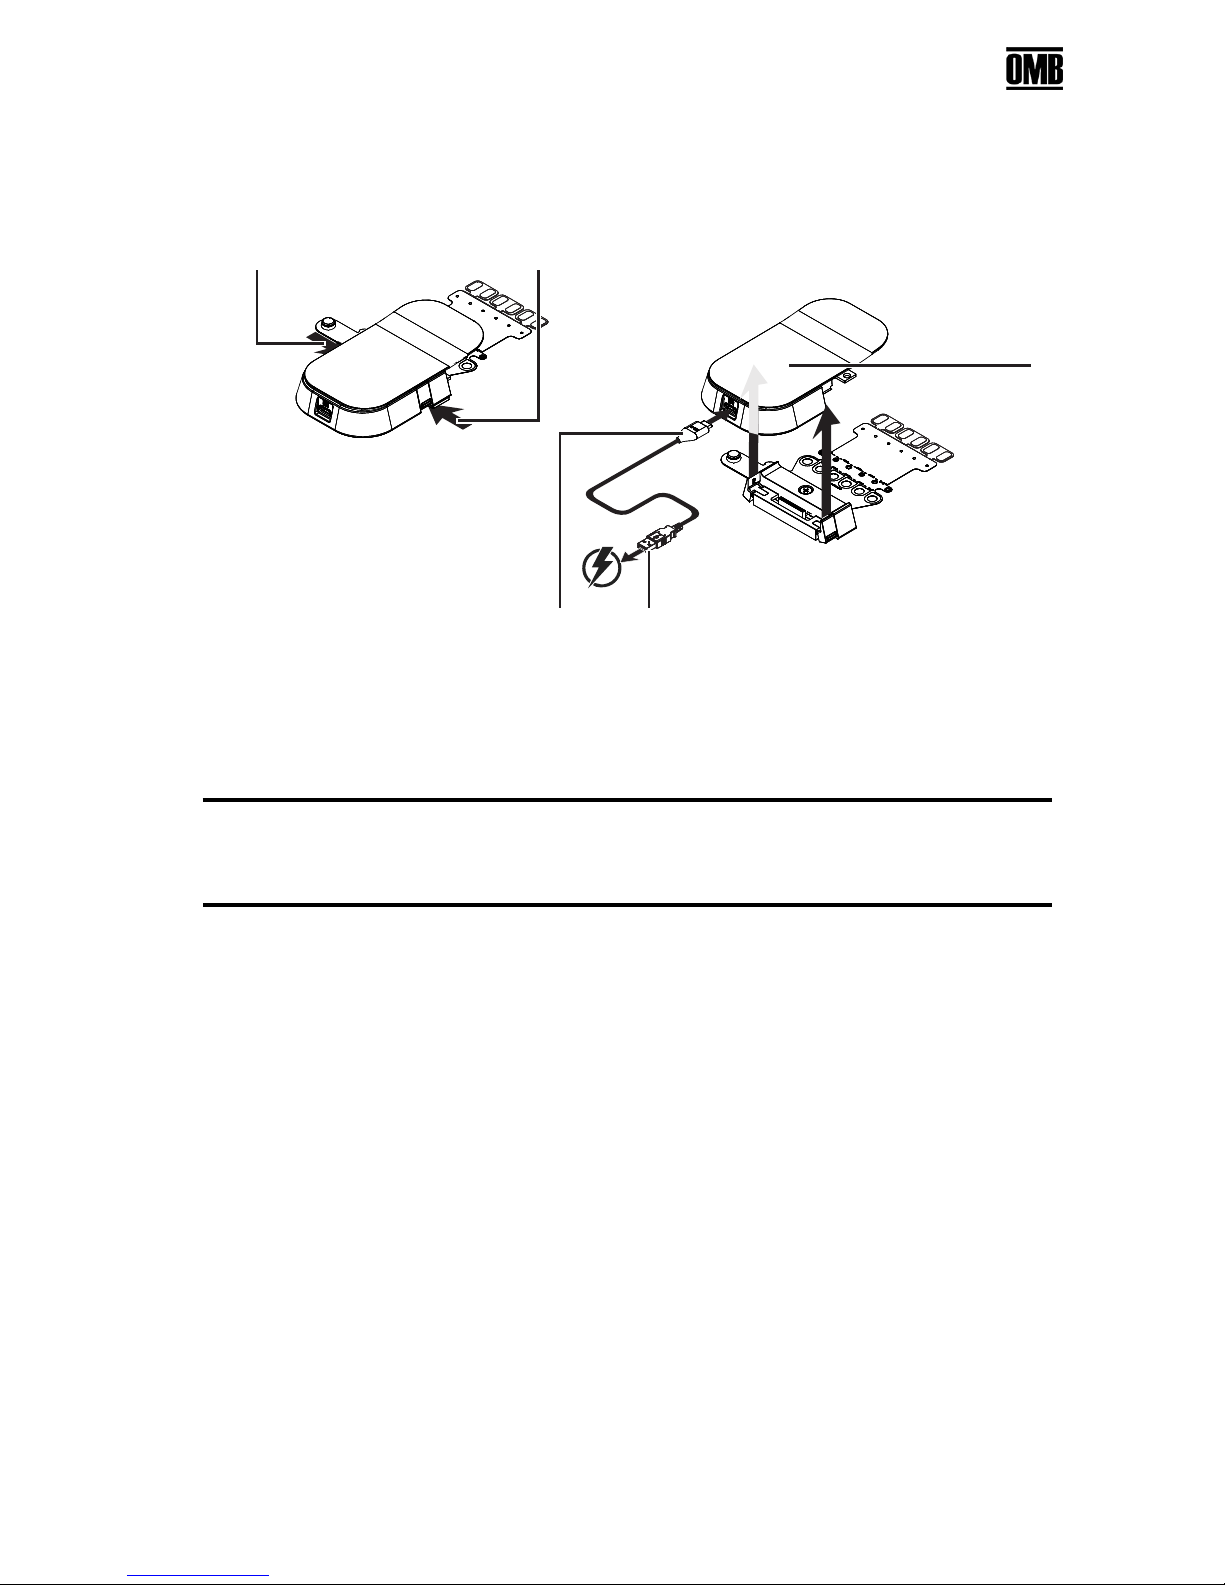
In this step we prepare the Add-On Device for installation.
1 Press the bottom of the two clasps of the Base inward…
2 …and lift the Brain straight up.
3 Take the supplied USB-C cable and plug it into a power source…
4 …and insert the other end into the Brain USB connector to begin the charging process.
It may take up to two hours to charge completely.
J
Preparing the Add-On Device
8
3
4
1 2
OMB User Guide - Version 0.I
Preparing Your Guitar
Before beginning to install the Add-On Device, remove your old strings, set them aside, and
then get your guitar ready as follows:
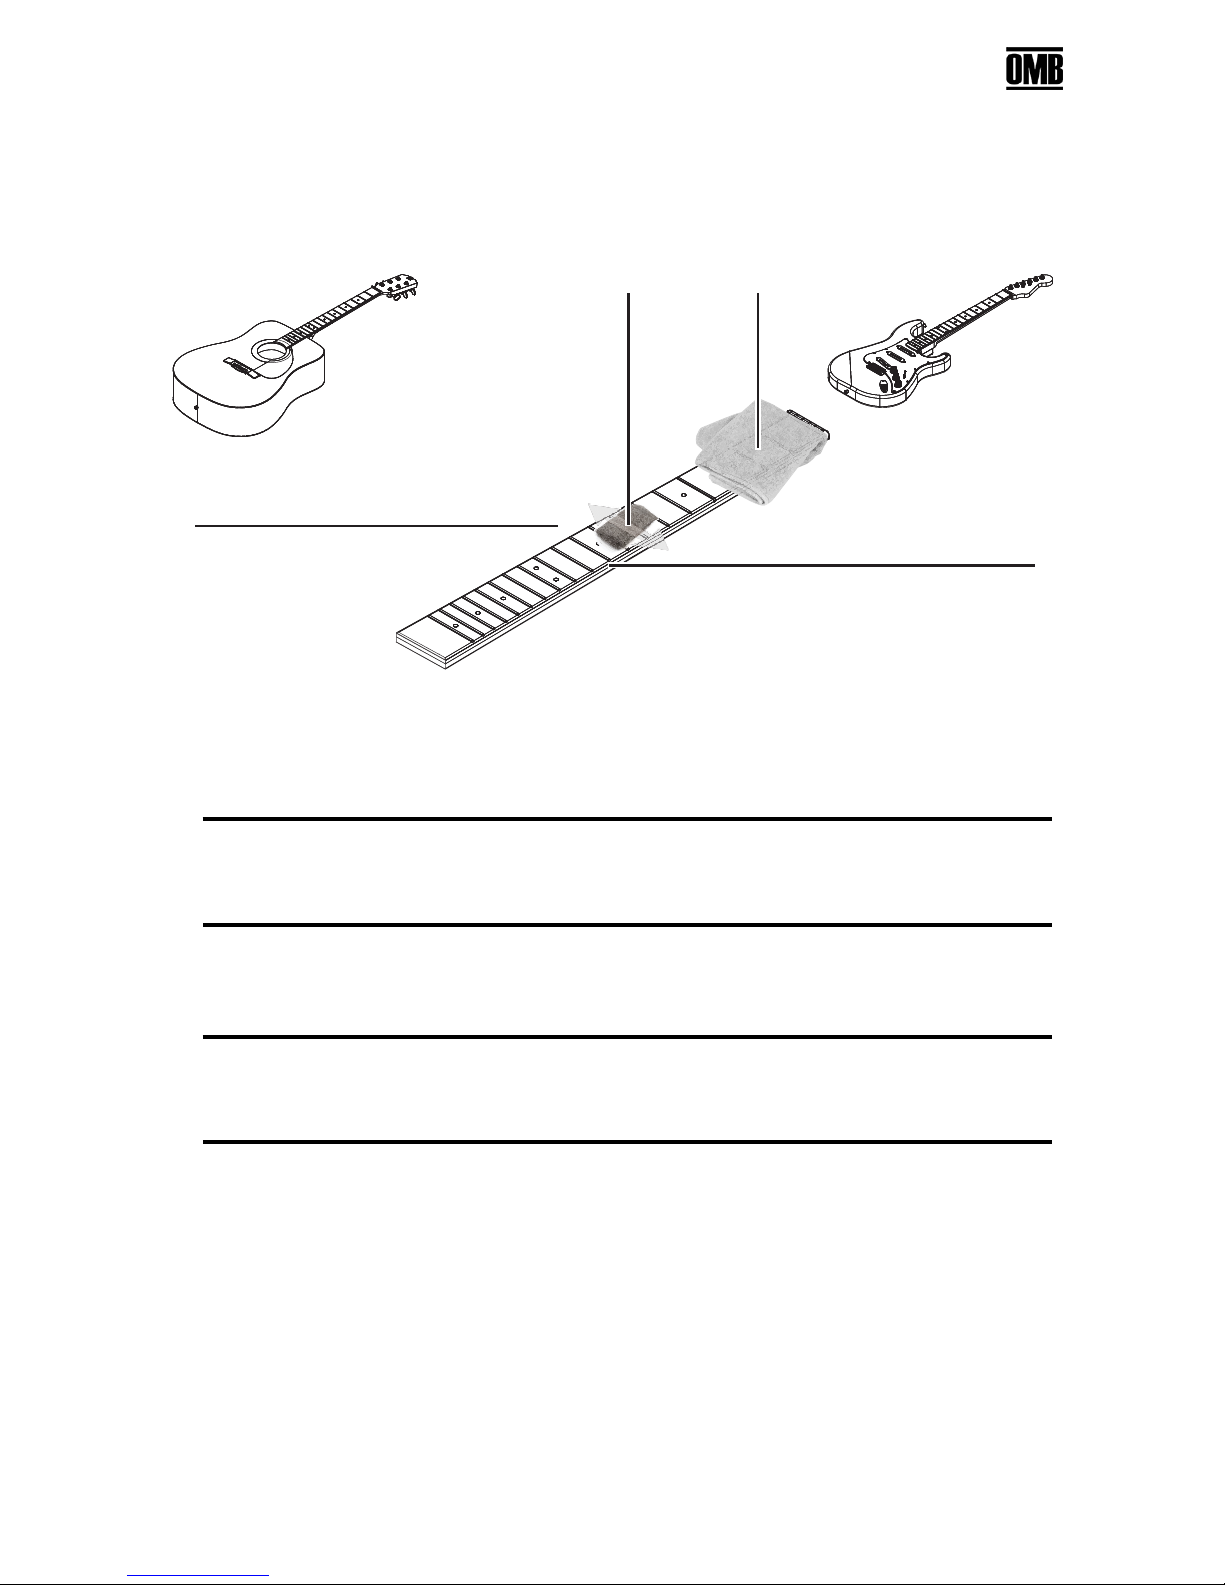
1 Take the fine steel wool from the packaging and very gently remove any corrosion or grease
from the surface of the frets. Remember to include the fret edges on both sides of the
fingerboard.
Be careful not to scrape the finish off of the frets.
N
2 Use a soft cloth moistened with your favorite cleaning fluid to clean the fingerboard, taking
special care to remove any residue of the steel wool.
We recommend that you do not use alcohol for cleaning your guitar.
J
3 Continue cleaning the side of the neck, directly below the frets…
4 …and finish up with the other side of the neck.
When your guitar has dried thoroughly continue on the page indicated according to your guitar
type:
• Attaching the Add-On Device to Bridge-Pin Acoustic Guitars (page 10)
• Attaching the Add-On Device to Pinless Bridge Acoustic Guitars (page 13)
• Attaching the Add-On Device to String-Through Body Electric Guitars (page 14)
• Attaching the Add-On Device to Hard-Tail Bridge Electric Guitars (page 18)
Preparing Your Guitar
9
1
2
3
4
6
5
OMB User Guide - Version 0.I
Attaching the Add-On Device to Bridge-Pin Acoustic Guitars
In this step you will modify the Add-On Device for your guitar, depending on the height of your
bridge and the level of the bridge pins. If you have a pinless bridge guitar go to Attaching the
Add-On Device to Pinless Bridge Acoustic Guitars (page 13).
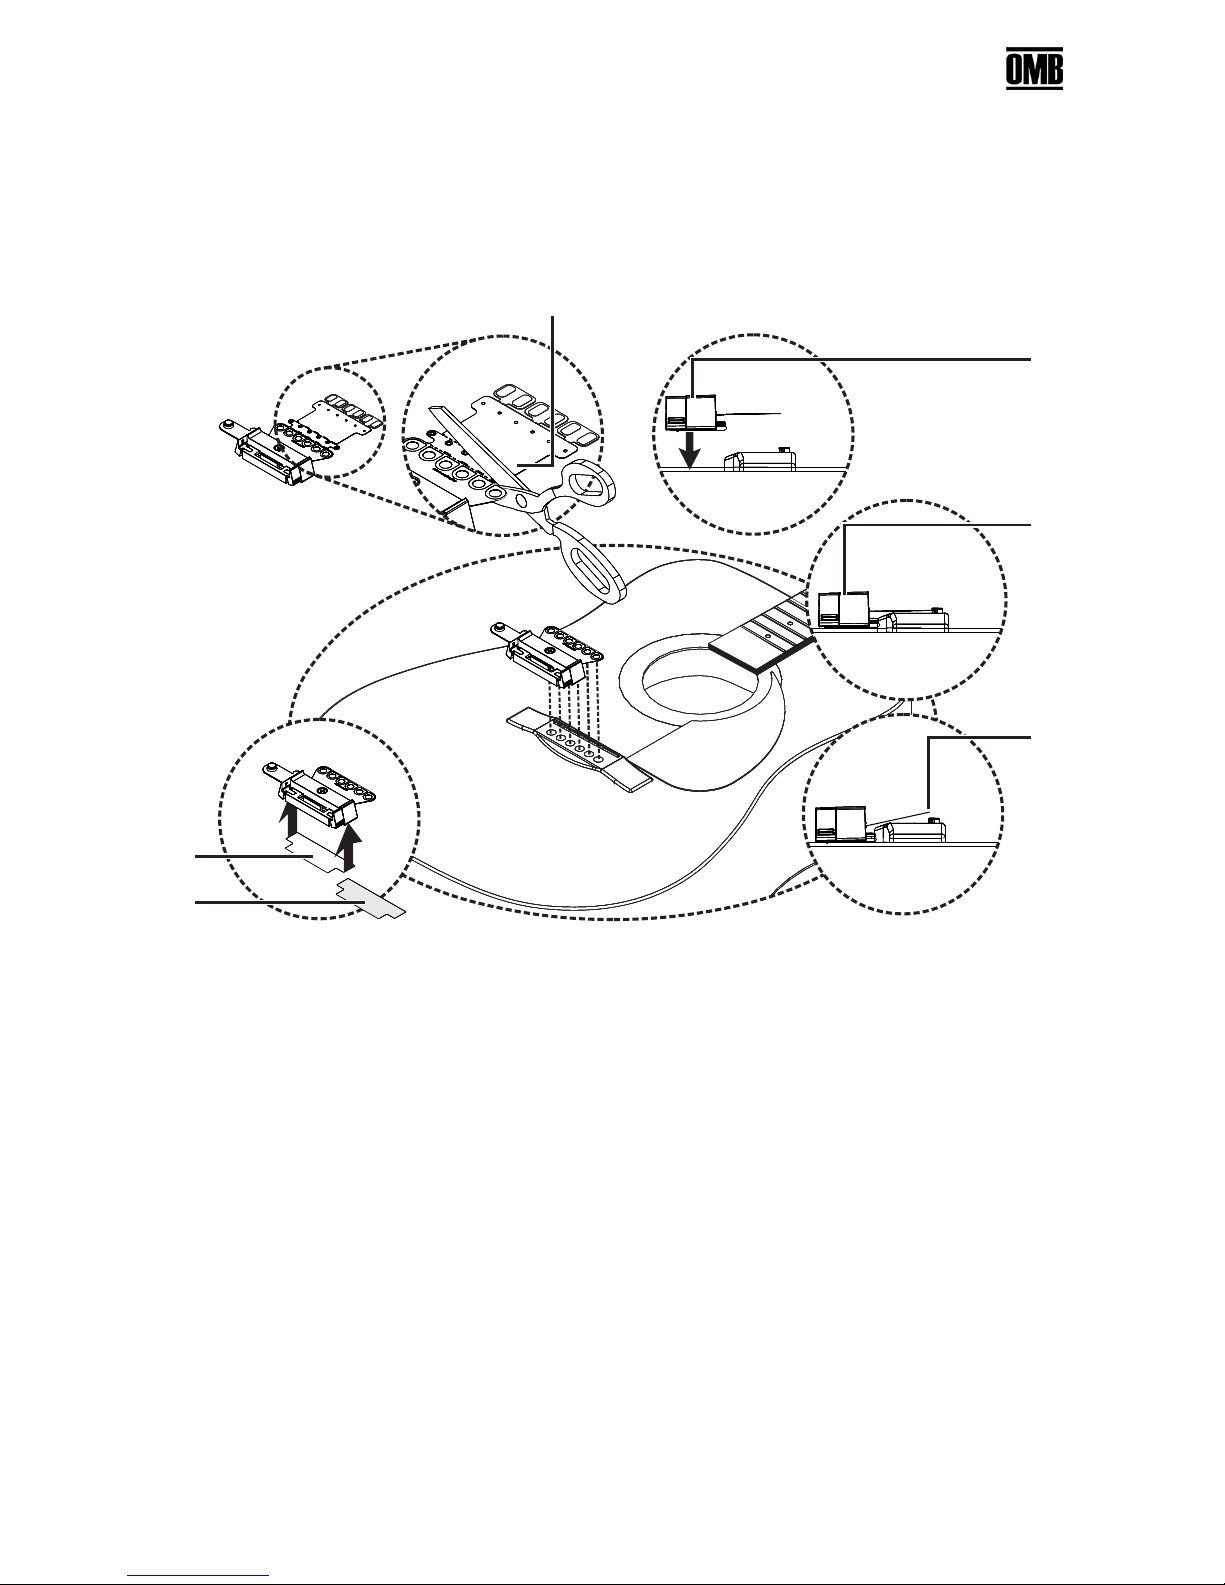
1 With a pair of scissors, cut the flex connector on the first perforation after the large set of
holes. Discard the excess where your community collects recyclable electronics.
2 Temporarily place the Base on the body of the guitar so the holes on the flex connector line
up with the pin holes on the bridge.
3 If the level of the flex connector is suitable to the height of the bridge, you’re finished with
this step. Go to page 11.
4 However, if you own a guitar with a higher bridge, the flex connector will not fit comfortably
on top of it. In that case…
5 …remove the adhesive backing from one of the pieces of the Add-On Device adhesive
strip…
6 …and attach it into the bottom of the Base.
Attaching the Add-On Device to Bridge-Pin Acoustic Guitars
10

6
8
7
1 2
4
3
5
OMB User Guide - Version 0.I
Continue as follows:
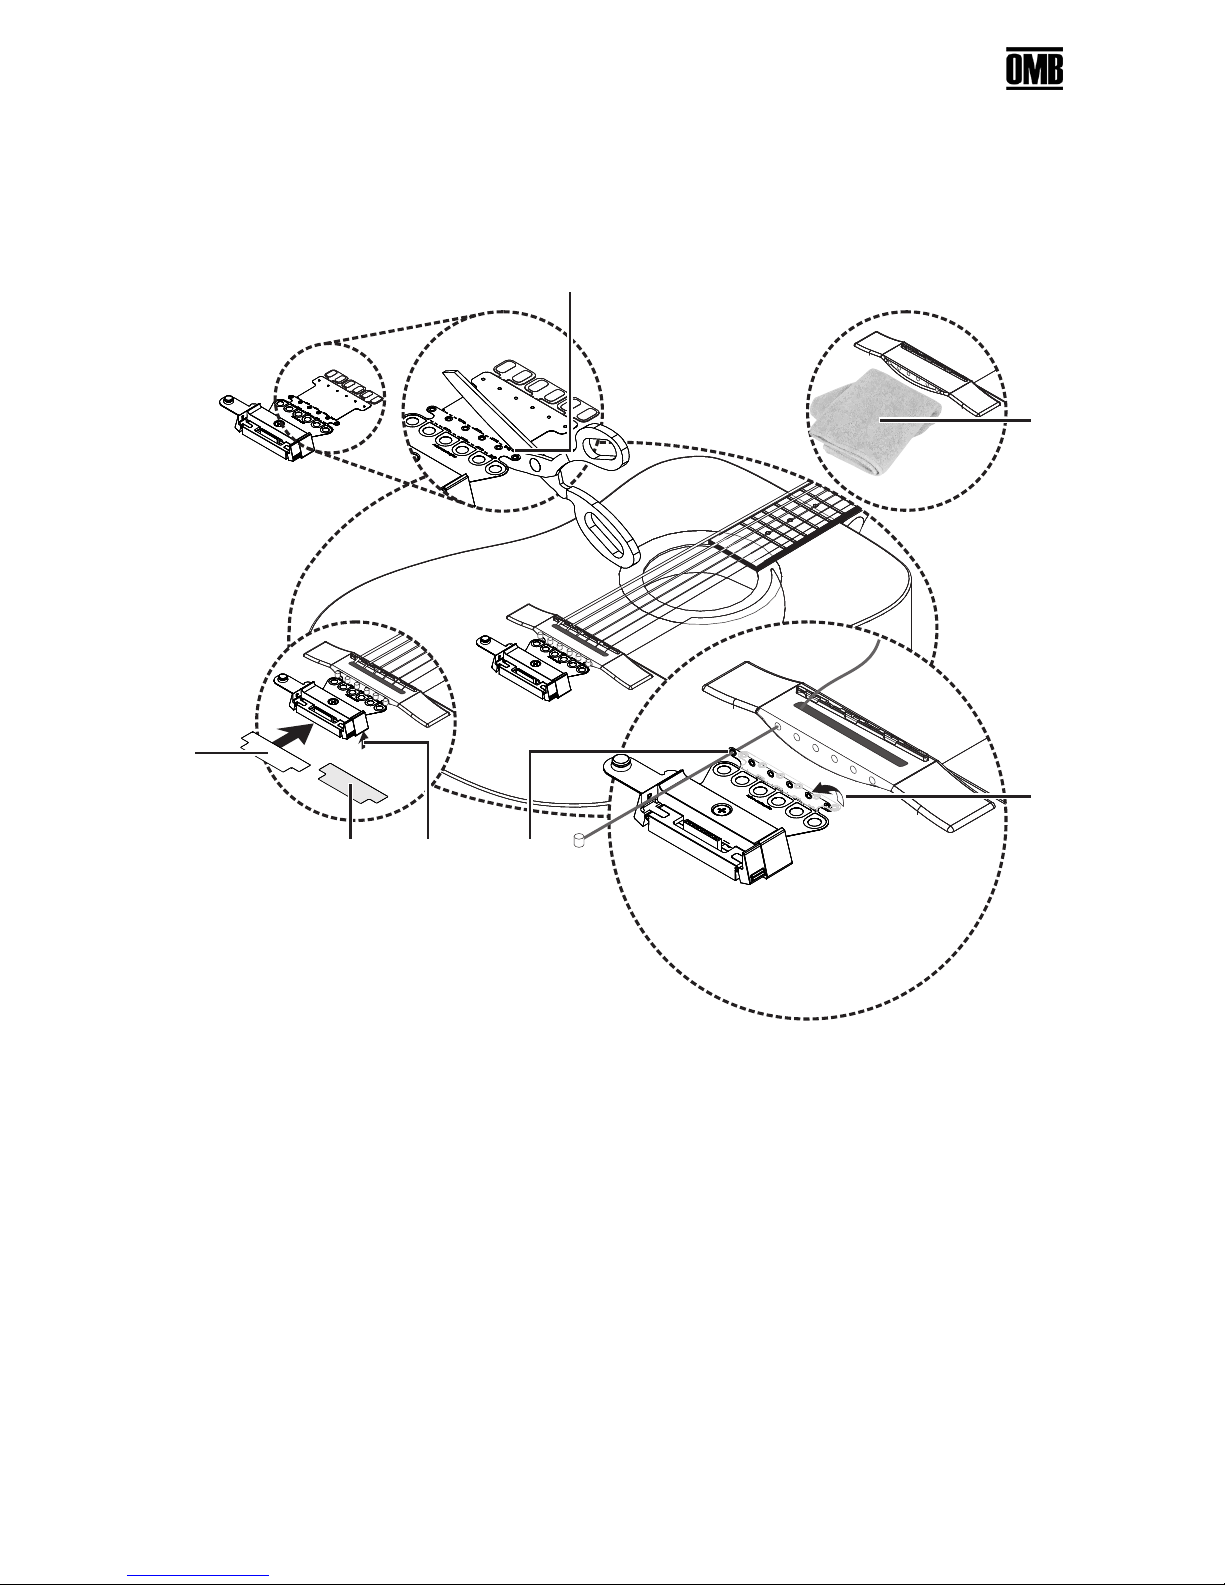
1 Clean the body of the guitar below the bridge with soft cloth and your favorite cleaning fluid.
2 Set the Base on the body of the guitar so the holes on the flex connector line up with the pin
holes on the bridge.
3 Gently put the first string through the flex connector, taking care not to rip or damage it.
Most nickle-coated steel strings are compatible with OMB technology. However, we
J
recommend that you use the strings provided in the OMB Upgrade Kit.
4 Lock the first string in place with its pin. Again, take care not to rip or damage to flex
connector.
5 Continue stringing your guitar in the same way.
6 When you completed the last string slightly angle the base upward…
7 …remove the adhesive backing, take the adhesive strip…
Attaching the Add-On Device to Bridge-Pin Acoustic Guitars
11

OMB User Guide - Version 0.I
8 …and put the adhesive strip under the base. Then press it down on the body of the guitar to
fix it in place.
Continue with Attaching the Diamond Conductive Tape for Acoustic Guitars (page 23).
Attaching the Add-On Device to Bridge-Pin Acoustic Guitars
12
1
56
7
2
3
4
OMB User Guide - Version 0.I
Attaching the Add-On Device to Pinless Bridge Acoustic Guitars
In this step you will modify the Add-On Device for your pinless bridge guitar. If you have a
bridge pin guitar go to Attaching the Add-On Device to Bridge-Pin Acoustic Guitars (page 10).
1 With a pair of scissors, cut the flex connector on the second perforation after the large set of
holes. Discard the excess where your community collects recyclable electronics.
2 Clean the body of the guitar below the bridge with a soft cloth and your favorite cleaning
fluid.
3 Set the base on the body of the guitar and gently fold the flex connector so the holes line up
with the string holes.
4 Begin stringing your guitar. Take care not to damage or tear the flex connector.
5 When you have finished stringing your guitar, slightly angle the base upward…
6 …remove the adhesive backing, take the adhesive strip…
7 …and put the adhesive strip under the base. Then press it down on the body of the guitar to
fix it in place.
Continue with Attaching the Diamond Conductive Tape for Acoustic Guitars (page 23).
Attaching the Add-On Device to Pinless Bridge Acoustic Guitars
13
3
4
1
2
OMB User Guide - Version 0.I
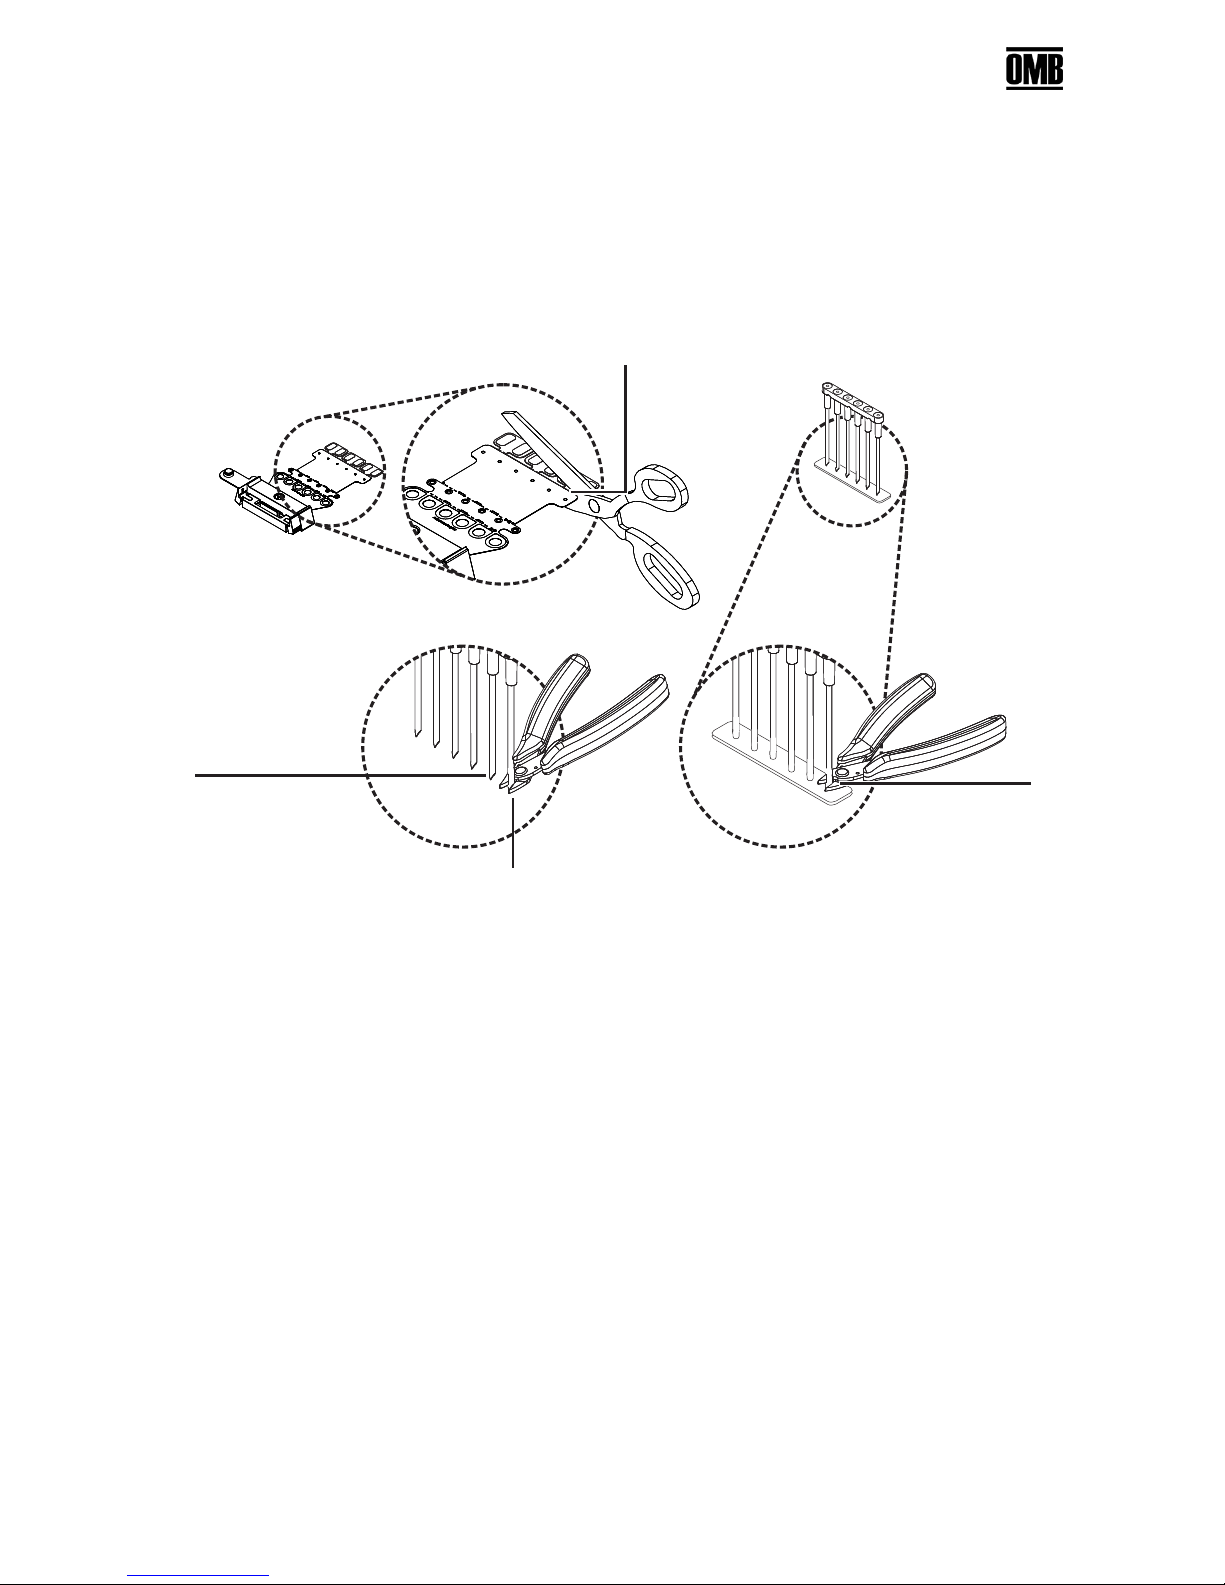
Attaching the Add-On Device to String-Through Body Electric Guitars
In this step you will attach the Add-On Device to your guitar, which includes the means to
prevent your strings from touching any metal part of your guitar. If you have a hard-tail bridge
electric guitar go to Attaching the Add-On Device to Hard-Tail Bridge Electric Guitars (page 18).
If you have a Tune-o-matic bridge electric guitar go to Attaching the Add-On Device to Tune-o-
matic Bridge Electric Guitars (page 20).
1 With a pair of scissors, cut the flex connector on the third perforation after the large set of
holes. Discard the excess where your community collects recyclable electronics.
2 Take a clipper and cut the bracing member off of the String-through spacer block, and then
discard it.
3 Now trim the end of each of the exposed tubes so that theyhave a sharp narrow point. This
point eases the passage through the guitar string holes in the next step.
4 Continue with the rest of the exposed tubes.
Attaching the Add-On Device to String-Through Body Electric Guitars
14

3
4
5
6
1
2
OMB User Guide - Version 0.I
1 Remove the back plate.
2 Take the trimmed String-through spacer block and thread the crescent insulation strips
through the string holes, making sure that the open portion faces the bottom of the guitar.
3 Turn the guitar over and thread the flex connector through the small opening below the
bridge…
4 Turn the guitar over again and bend the flex connector over the holes in the string spacer.
5 Insert the guitar strings, one by one, taking care not to rip or damage the flex connector.
6 Replace the back plate.
When you next replace your strings you do not have to remove the back plate.
J
Attaching the Add-On Device to String-Through Body Electric Guitars
15
5 62 3 41
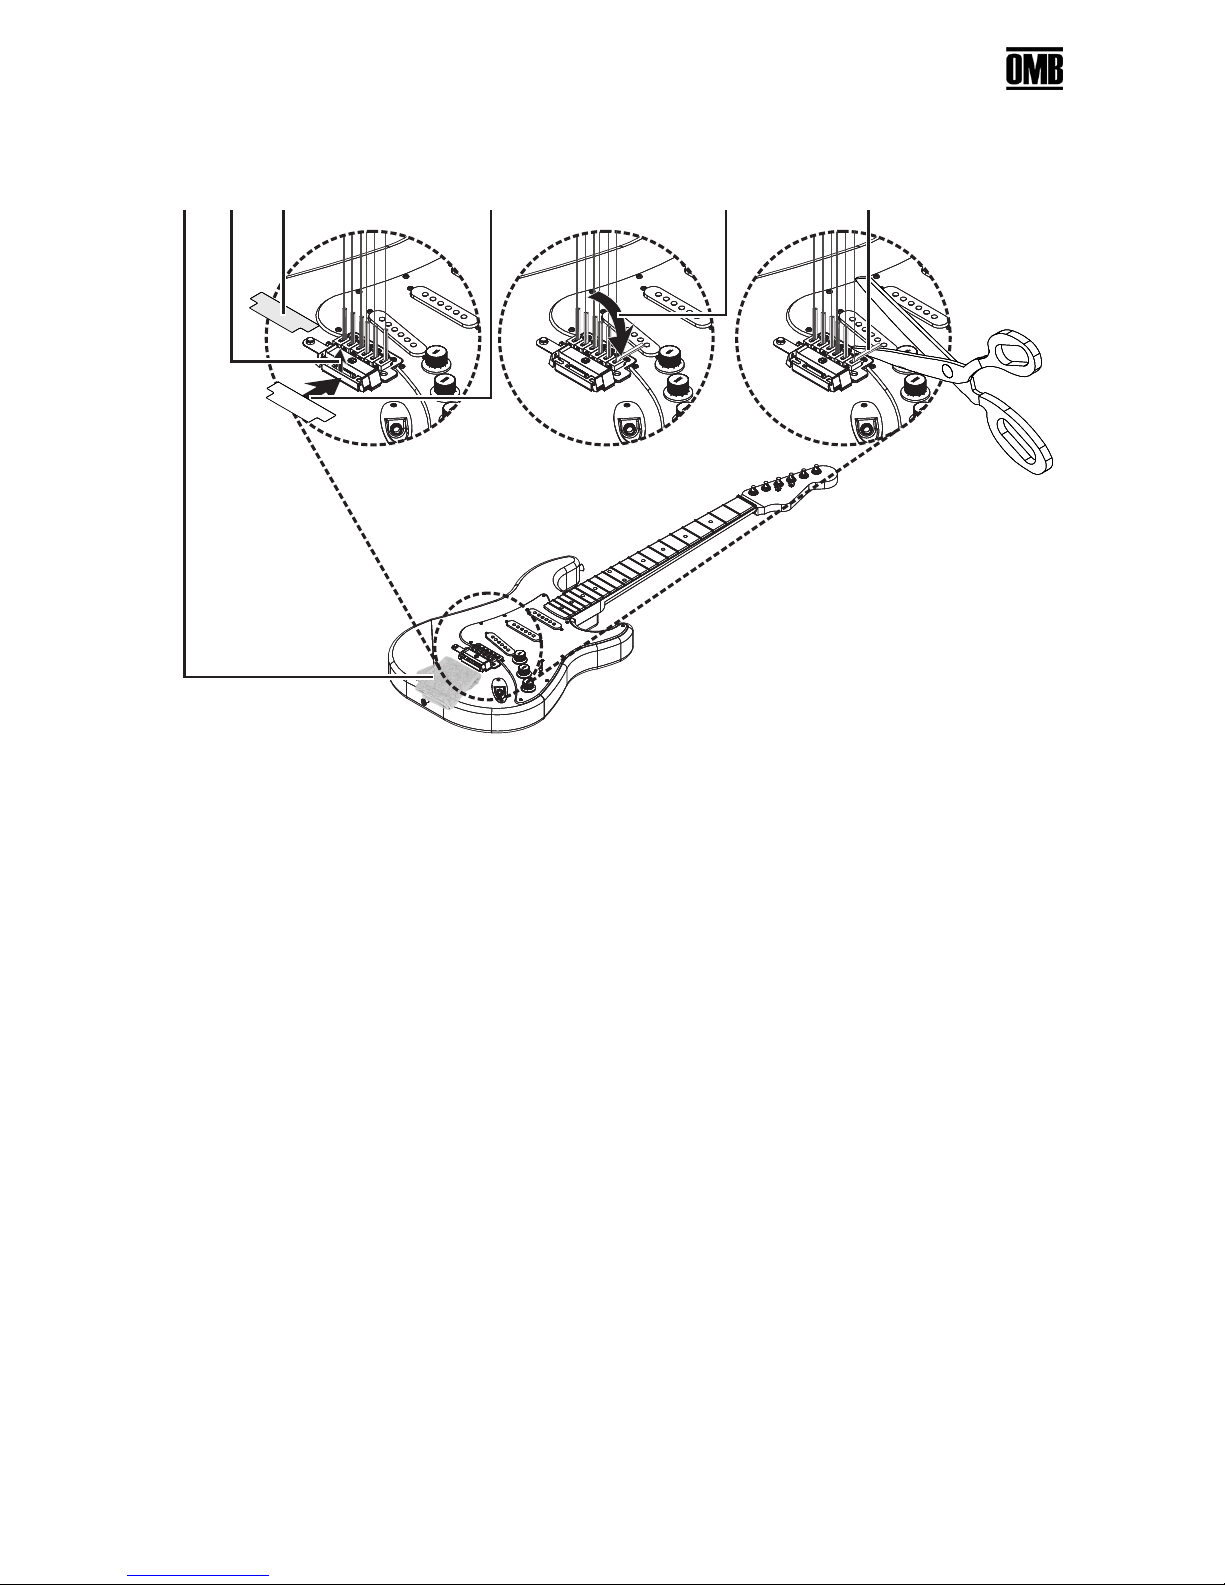
OMB User Guide - Version 0.I
Turn the guitar over and continue as follows:
1 Clean the body of the guitar below the bridge with soft cloth and your favorite cleaning fluid.
2 Slightly angle the Base upward…
3 …remove the adhesive backing, take the adhesive strip…
4 …and put the adhesive strip under the base. Then press it down on the body of the guitar to
fix it in place.
5 Bend the String-through spacer block insulation sleeve over the bridge…
6 …and then cut it just beyond the bridge so that it is long enough to prevent the string from
touching the metal but short enough so that it will not buzz when you play.
Attaching the Add-On Device to String-Through Body Electric Guitars
16
 Loading...