

Page 1
Via 4 Novembre, 6
PRINT
RETURN
21040 OGGIONA SANTO STEF ANO (V A)-Italy
T el. +39 0331 21431 1 - Fax +39 0331 214350
E- Mail: omas@omasspa.it
www.omasspa.it
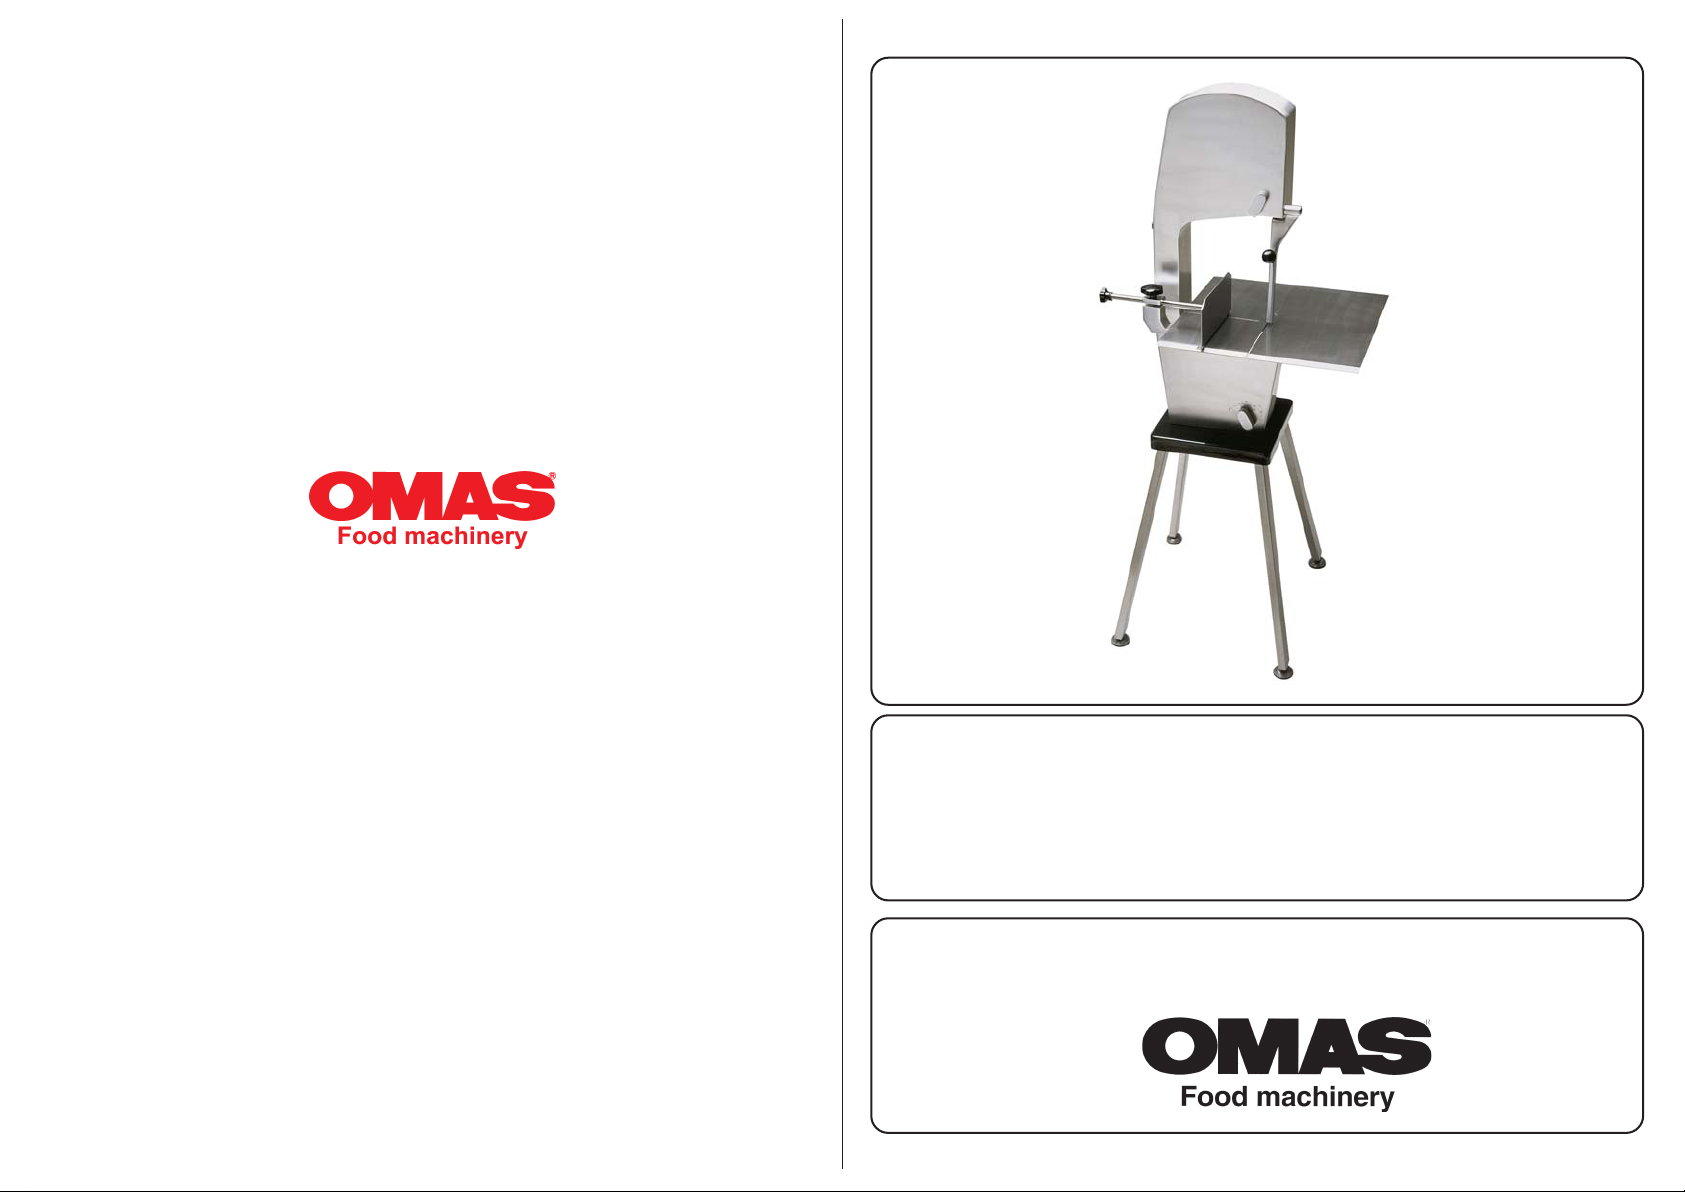
T 210
T 250
Rev .05 150606
MANUALE D'USO
INSTRUCTION MANUAL
Via 4 Novembre, 6 - 21040 Oggiona S. Stefano (Va) - Italy
SEGAOSSI
BONE SA W
Page 2

Page 3
Parte 1
Part 1
I
Gentile Cliente
Il segaossi e i suoi accessori sono stati
costruiti secondo la Direttiva Macchine
98/37 CEE, per rispondere ai requisiti
richiesti dalla legislazione alla data di
costruzione.
Caratteristiche fondamentali sono la facilita'
di pulizia, la robustezza della costruzione,
la sicurezza e l'affidabilita' di funzionamento.
I materiali utilizzati, alluminio anodizzato,
acciaio inox e materie plastiche, sono stati
scelti nel rispetto delle normative igienico
sanitarie, per rendere la macchina
inalterabile nel tempo.
Le normative che regolamentano la
costruzione sono:
EN12268 (CEN TC 153 WG2 N 31.2E) Macchine per l’industria alimentare – Seghe a
nastro – Requisiti di sicurezza e di igiene
EN 60204 Impianto elettrico delle macchine:
Parte 1 Regole generali
89/109/CEE Direttiva per i materiali e gli
oggetti destinati a venire a contatto con i
prodotti alimentari
GB
Dear Customer,
The bone saw machine and its accessories
are manufactured in accordance with the
EEC 98/37 Machinery Directive.
They meet all legislative requirements valid
at the date of manufacture.
Its principle characteristics are easy
cleaning, robust manufacture, safe and
reliable operation.
The materials utilized, anodized aluminium,
stainless steel and plastics have been
selected with due regard to hygiene
regulations and ensure that the machine has
a long life.
The regulations applicable to its manufacture
are the following:
EN12268
processing machinery – Band saw machines
– Safety and hygiene requirements.
EN 60204 Electrical equipment of machines:
Part 1 General requirements
89/109/EEC Directives for the materials and
things destined to come into contact with
food
(CEN TC 153 WG2 N 31.2E) Food
Regolamento CE n. 1935/2004
Riguardante i materiali e gli oggetti destinati
a venire a contatto con i prodotti alimentari
89/336/CEE Direttiva sulla Compatibilità
Elettromagnetica(EMC).
73/23/CEE Direttiva bassa tensione.
2002/95/CE RoHS- Sulla restrizione dell’uso
di determinate sostanze pericolose nelle
apparecchiature elettriche ed elettroniche.
La Dichiarazione CE di Conformità, lo
schema elettrico sono allegati al
presente Manuale che, per una
corretta installazione e utilizzo della
macchina, consigliamo di leggere
attentamente.
Ci auguriamo che possiate apprezzare le
prestazioni dei nostri prodotti.
Cordialmente
Rule CE n. 1935/2004 for the materials and
things destined to come into contact with
food
89/336/EEC Directive on Electromagnetic
Compatibility (EMC)
73/23/EEC Directive on low voltage
2002/95/CE (RoHS - Restriction of
Hazardous Substances).
The EEC Declaration of Conformity and
the circuit diagram are delivered
together with the instruction manual,
that we recommend to read with great
attention for a correct installation and
use of the machine.
We hope that you can make the best use of
the performance of our products.
Yours faithfully.
11
1
11
Page 4
Page 5
Parte 2
Part 2
Indice
DESCRIZIONE
Parte 1
Parte 2
Indice
Parte 3
Note generali alla consegna
Condizioni di fornitura
Identificazione della macchina
Elenco optionals
Parte 4
Definizione componenti
Parte 5
Caratteristiche tecniche
Parte 6
Prescrizione di sicurezza
Parte 7
Installazione
Allacciamento elettrico
Controllo senso di rotazione
Parte 8
Descrizione della macchina
Contents
DESCRIPTION
Part 1
Part 2
Index
Part 3
General delivery conditions
Delivery conditions
Machine identification
List of optional accessories
Part 4
Definition
Part 5
Technical data
Part 6
Safety rules
Part 7
Installation
Electrical supply
Check of the rotation direction
Part 8
Machine description
1
2
3
6
7
9
11
17
Parte 9
Funzionamento e uso del segaossi
Parte 10
Dispositivo di sicurezza termico
Salvamotore (macchina con motore
monofase)
Parte 11
Pulizia
Rimozione componenti
Lubrificazione
Manutenzione
Parte 12
Anomalie e soluzioni
Parte 13
Garanzia
Parte 14
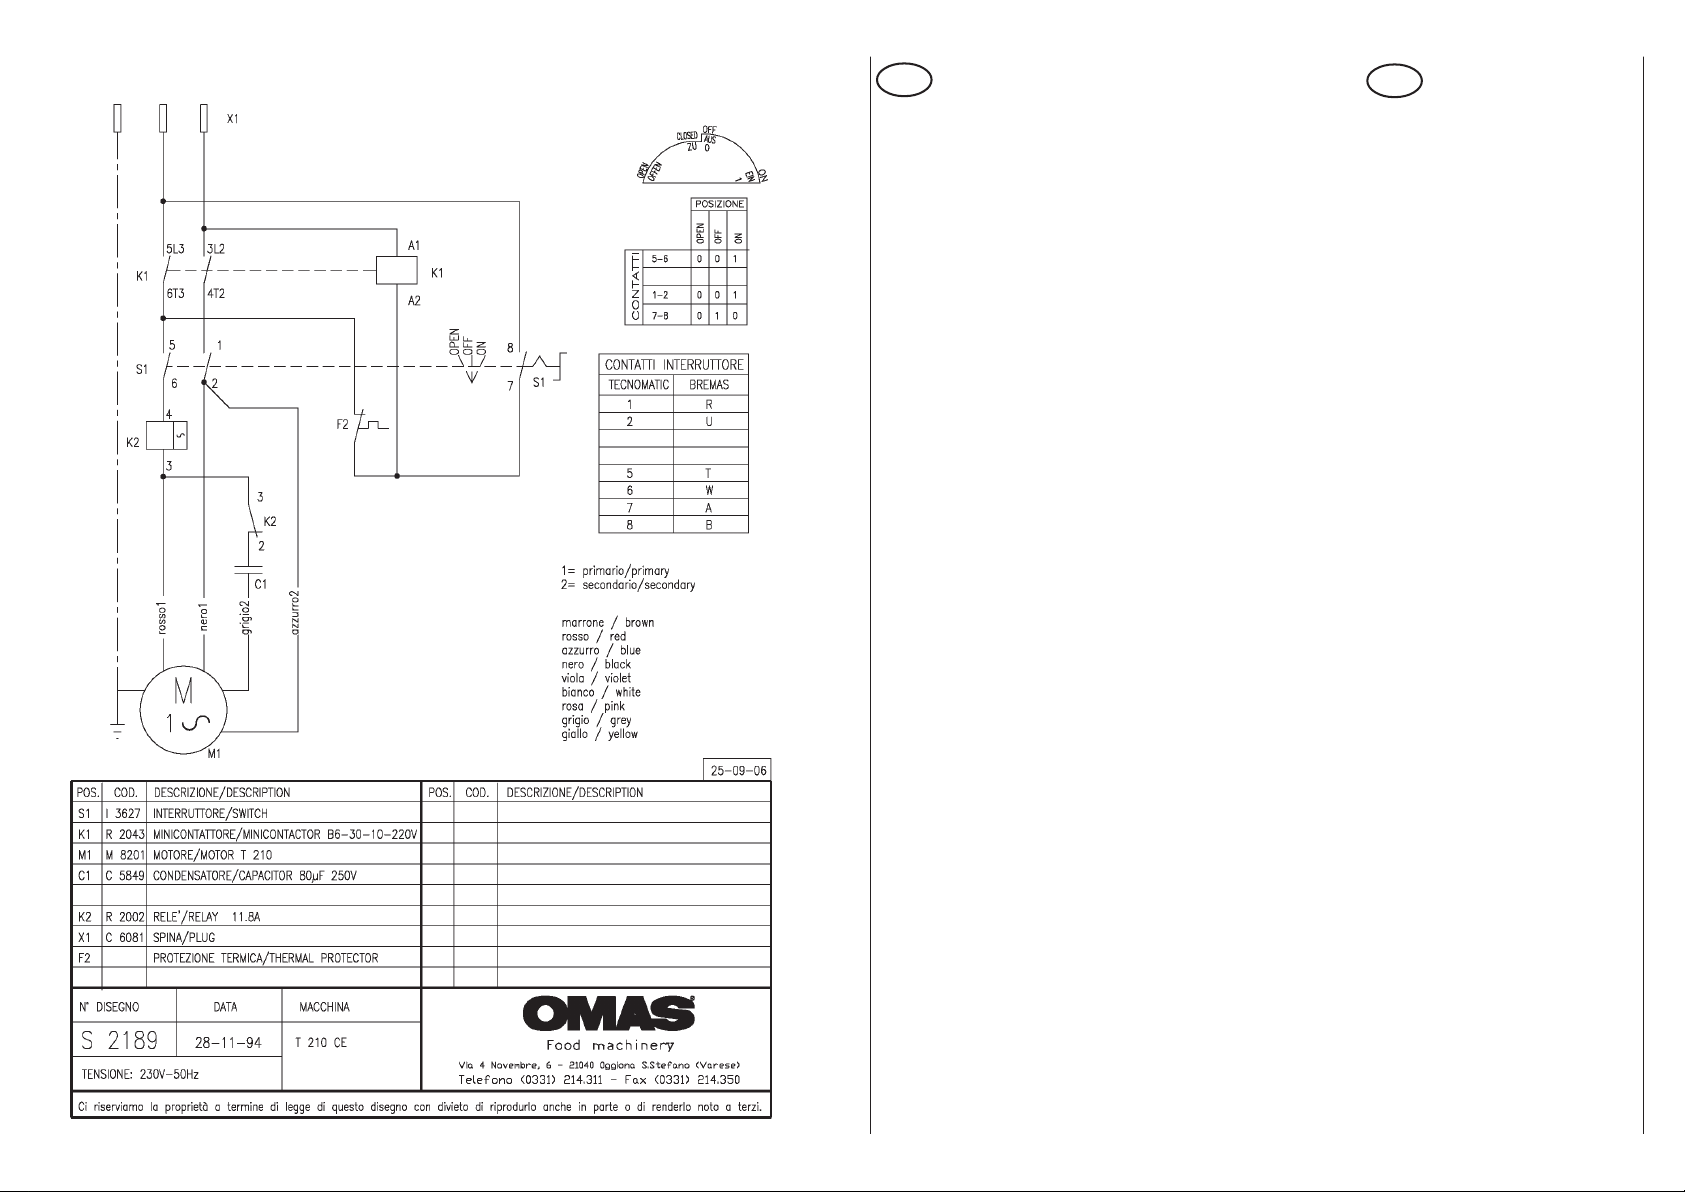
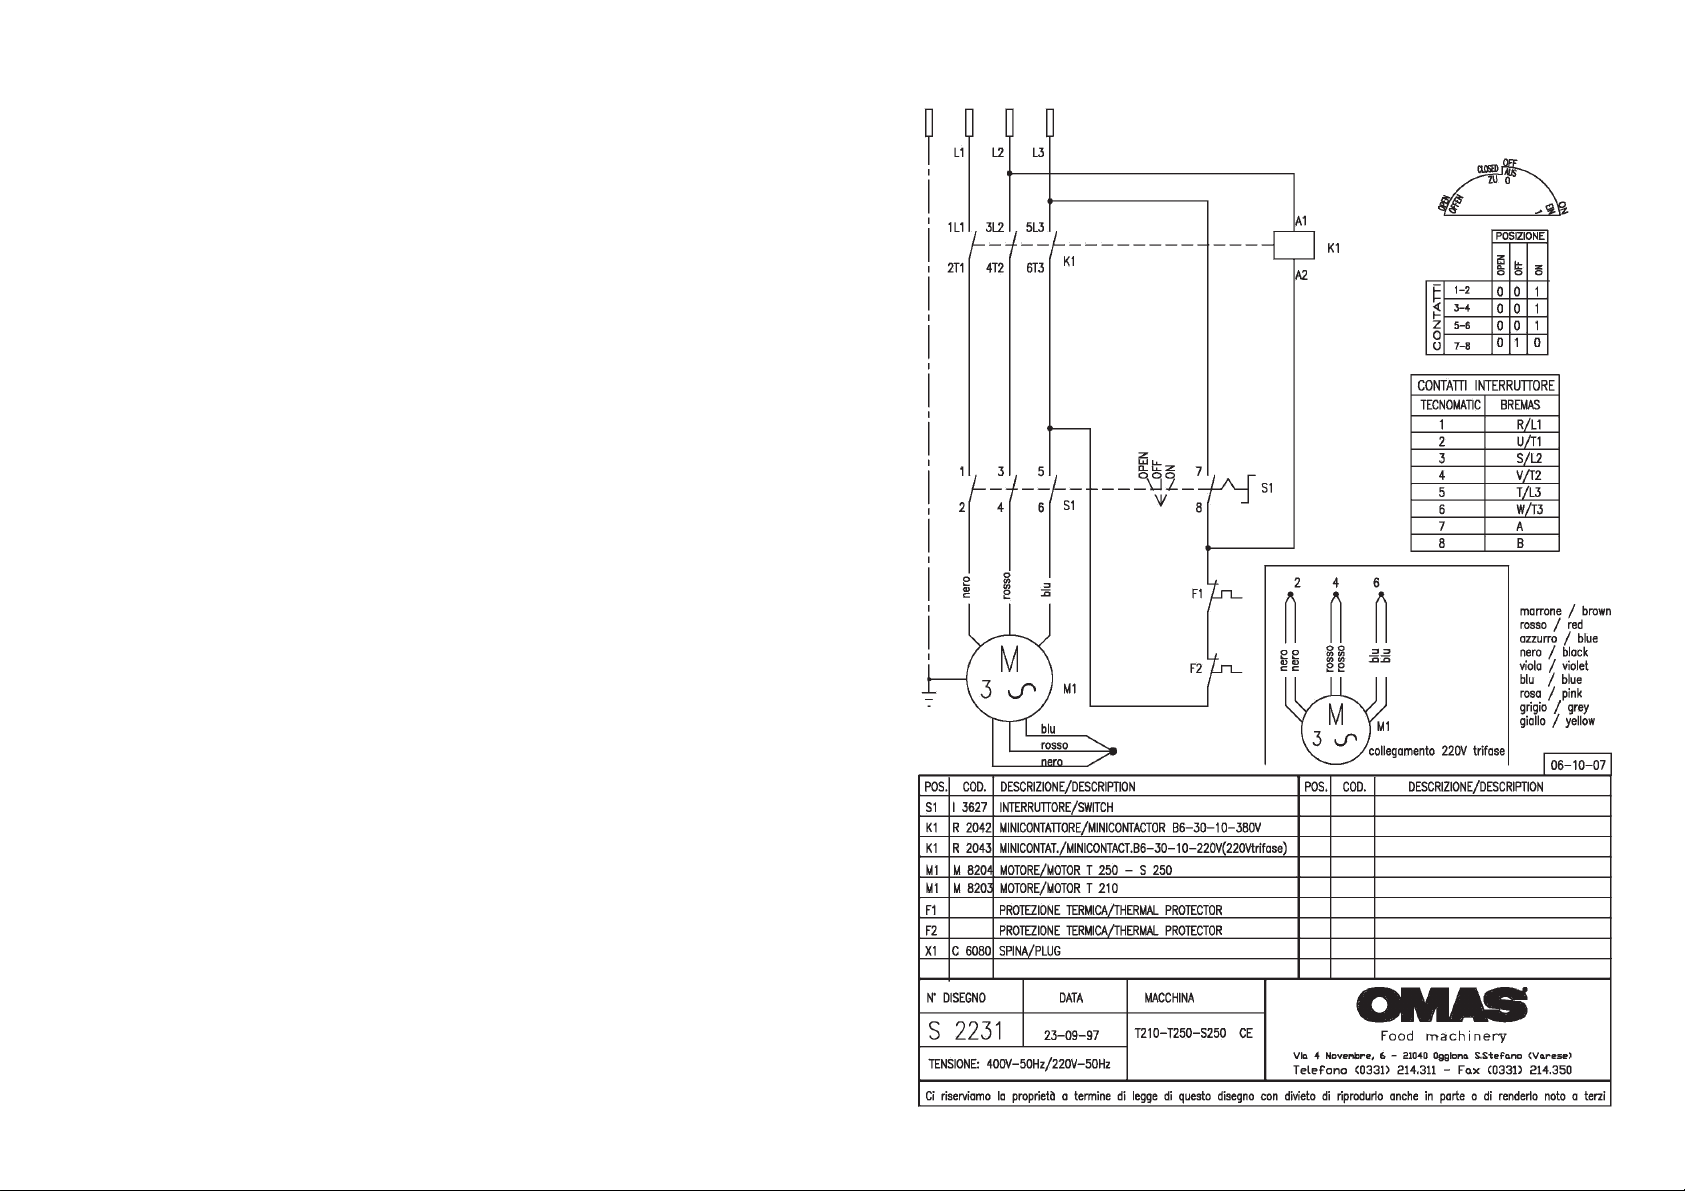
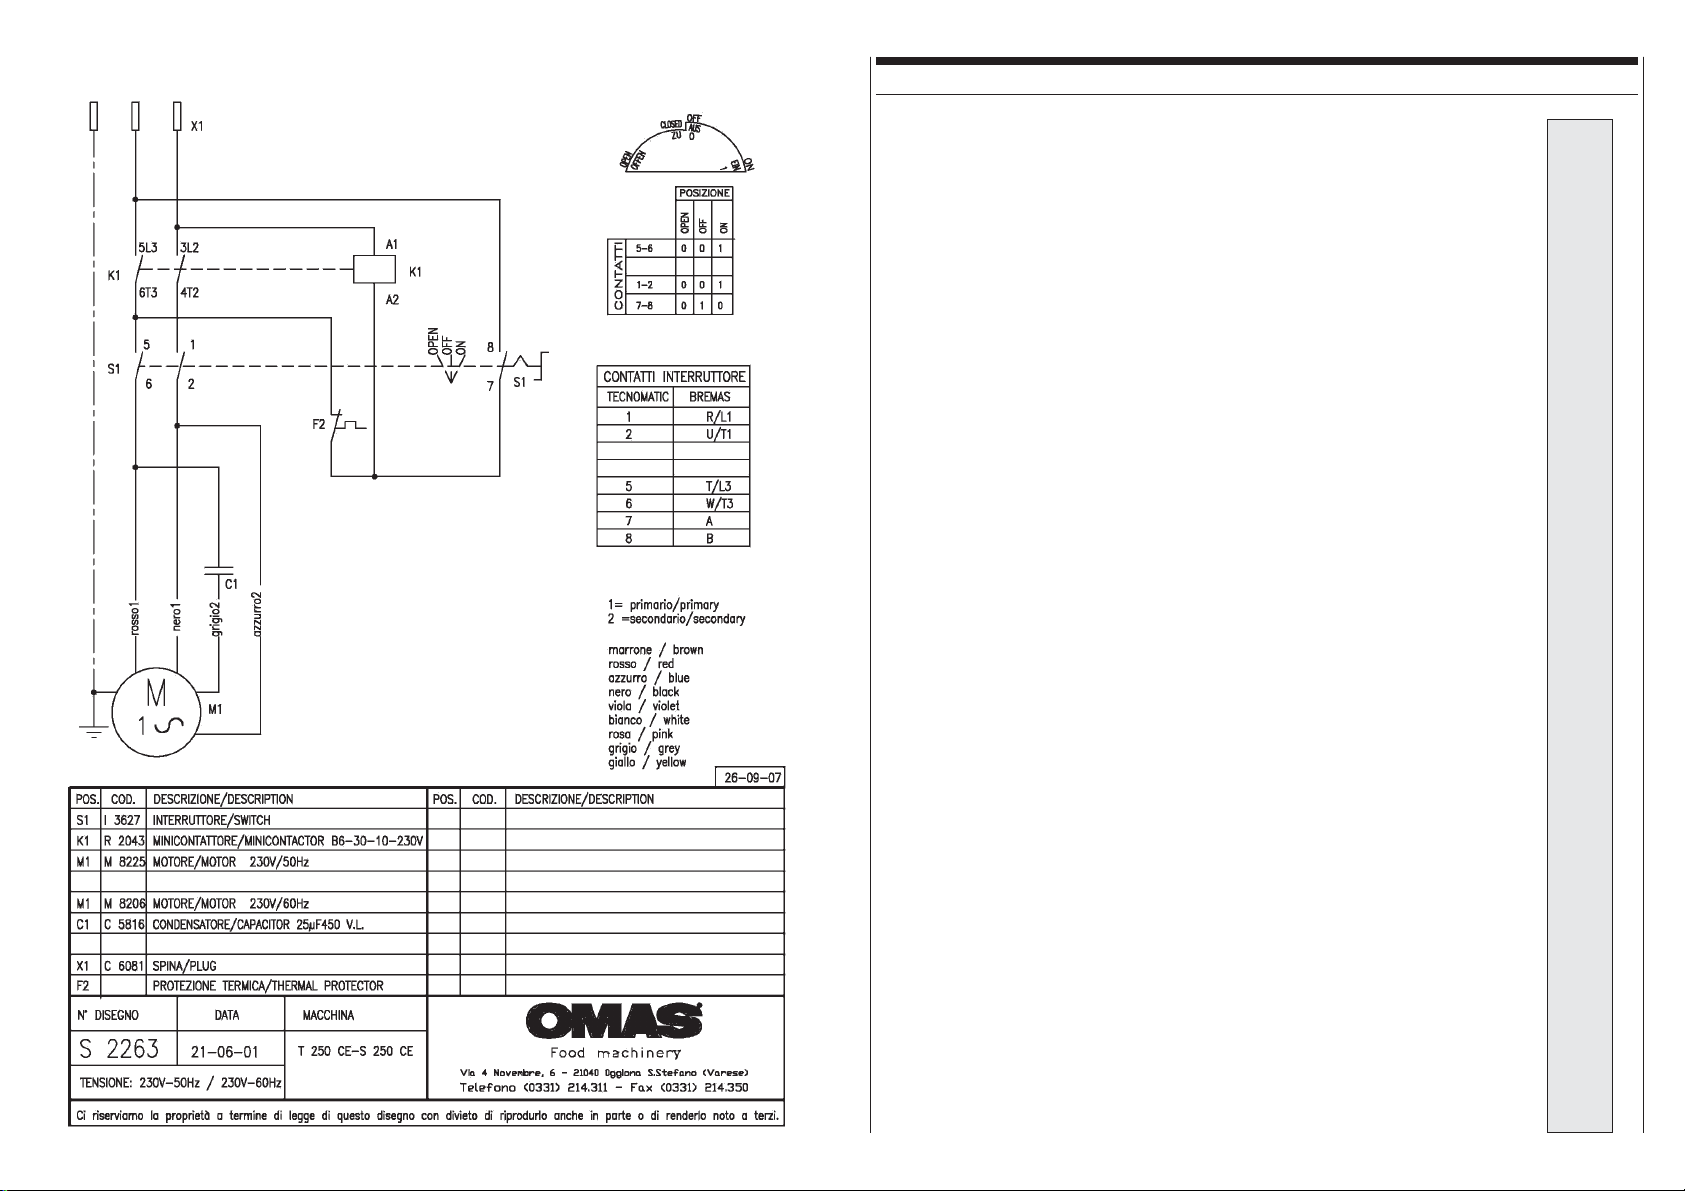
Schemi elettrici
Part 9
Bandsaw functioning and use
Part 10
Thermic safety device
Motor protector (machine with
single phase motor)
Part 11
Cleaning
Compnents removal
Lubrication
Maintenance
Part 12
Problems and corrective actions
Part 13
Warranty
Part 14
Wiring diagrams
22
2
22
20
22
24
28
29
30
Page 6
Parte 3
Part 3
Parte 12
Part 12
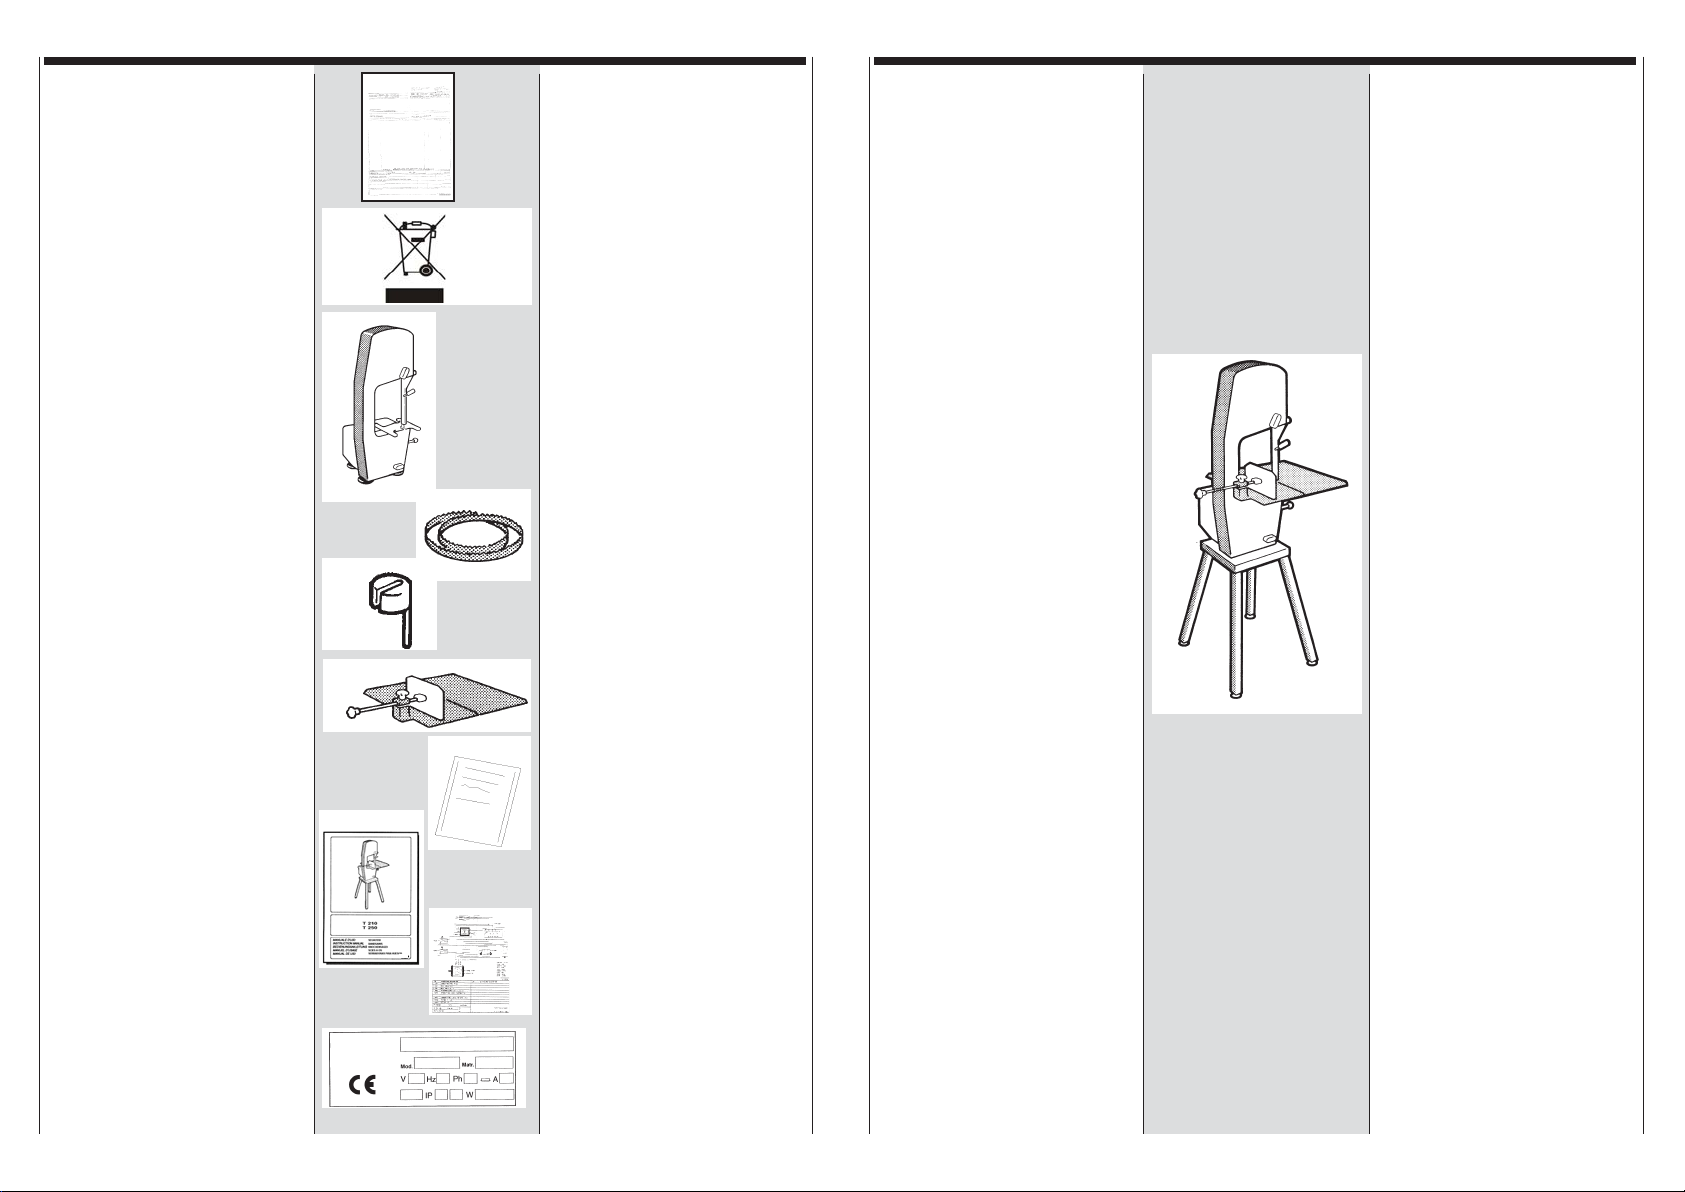
Note generali alla
consegna
La macchina viene sempre
consegnata adeguatamente
imballata. I componenti dell'
imballo (cartone, sacchi di
polietilene, poliuretano espanso),
sono assimilabili ai rifiuti solidi
urbani, lo smaltimento avviene
senza difficoltà.
Non disperdere nell'ambiente.
Direttiva 2002/96/CE RAEE:
Conferire la macchina alla ditta
costruttrice, per effettuare lo
smaltimento a norma di legge.
Condizioni di fornitura
Alla consegna controllare che l’imballo sia integro e che la fornitura
corrisponda all’ordine o al documento di accompagnamento. In
caso contrario informare immediatamente lo spedizioniere. Tolto il segaossi dall' imballo, in due
persone, collocare la macchina su
un piano adatto a sostenerne il
peso (pag. 7).
Elenco componeti:
1 Segaossi
2 Lama dentata
3 Guidalama
4 Piatto portamerce
5 Manuale d’uso
General delivery
conditions
The machine is always delive-red
with its packaging. The packaging
materials (card-board, polyethylene sacks, expanded polyurethane) are to be considered city
waste materials. Even though
each material must not be
collected separately , it should be
disposed of with consideration.
1
Standard 2002/96/CE W AEE:
Give back the machine to the
manufacturer to manage its
disposal according the rules.
Delivery conditions
Check on delivery that the packaging is unbroken and that the
goods correspond to those
described on the order or the
delivery note. In case of error,
2
inform the shipper immediately.
Remove the bansaw from the
3
package the machine must be
placed by two operators it on a
stable base adequate to support
its weight (page 7).
List of components:
4
5
1 Bandsaw
2 Saw blade
6
3 Blade guide
4 Feed table
5 Instruction manual
Garanzia
Il fabbricante garantisce, al
primo utente, per la durata di
sei mesi, l'affettatrice di propria
produzione da ogni difetto di
costruzione o di montaggio.
Il fabbricante si impegna a
sostituire e riparare presso il
proprio stabilimento, qualsiasi
parte che risulti anche a suo
giudizio difettosa.
Sono esclusi dalla riparazione
in garanzia tutti i guasti
derivanti dal trasporto, cattivo
uso e manutenzione, incuria e
manomissione della macchina.
Sono esclusi dalla garanzia la
finitura esterna, le materie
plastiche,le parti elettriche e le
parti soggette a logorio
naturale.
La sostituzione gratuita delle
parti in garanzia e' subordinato
alla visione del pezzo difettoso.
Le spese di trasporto e di
trasferta sono a carico di chi
richiede il servizio.
Warranty
The producer guarantees its
slicer to the first user for a
period of 6 months against any
manufacturing or assembly
defect.
The producer wil replace or
repair in his factory any part
that, in his judgement, turns
out to be defective.
Any damage caused by
transport, bad use or
maintenance, negligence or
machine tampering are
excluded from repairs under
warranty.
External finishing, plastic
materials, electric parts and all
parts that naturally wear out
are excluded from warranty .
The replacement, free of
charge, of the parts under
warranty is always subject to
the visual inspection of the
defective parts.
Transport charges are always
to be paid by the person who
requested the service.
6 Dichiarazione CE
di Conformità
7 Schema elettrico
Identificazione della
macchina
Per qualsiasi informazione,
rivolgersi al costruttore, citando
sempre il numero di matricola
riportato sulla targhetta di
identificazione.
6 EC Declaration
7
33
3
33
of Conformity
7 Wiring diagram
Machine identification
In any communication with the
manufacturing company always
quote the serial number
indicated on the identification
label of the machine.
Il fabbricante e' esonerato da
ogni responsabilita' e
obbligazione per qualsiasi
incidente alle persone in
dipendenza della merce fornita.
2828
28
2828
The producer is exonerated
from any responsibility or
obligation in case of any
accident to any person using
the machine supplied.
Page 7

Parte 12
Part 12
Parte 3
Part 3
ANOMALIA
MOTORE MONOF ASE, SE
DURANTE L'USO SI FERMA
Soluzione
Premere il pulsante di
ripristino motore. Riavviare la
macchina secondo la procedura standard (pag. 22).
ANOMALIA
MOTORE TRIFASE, SE
DURANTE L'USO SI FERMA
Soluzione
Attendere qualche minuto in
modo che la temperatura
interna si abbassi. Riavviare
la macchina secondo la procedura standard (pag. 22).
ANOMALIA
LA LAMA NON ESEGUE UN
T AGLIO RETTILINEO
Soluzione
1. Sostituire la lama se
usurata
2. Controllare il guidalama
e sostituirlo se usurato
ANOMALIA
LA LAMA CADE DALLA
PULEGGIA
Soluzione
1. Controllare la centratura
della lama
2. Controllare la saldatura
della lama, se é il caso
sostituirla
PROBLEM
THE SINGLE-PHASE MOTORS STOPS DURING USE
Corrective action
Push the motor reset switch.
Restart the machine following
the standard procedure
(pag. 22).
PROBLEM
THE THREE-PHASE MOTORS STOPS DURING USE
Corrective action
Wait a few minuts (to allow
the inside temperature to fall).
Restart the machine
following the standard
procedure (page 22).
PROBLEM
THE BLADE DOES NOT CUT
STRAIGHT
Corrective action
1. Replace the blade
if it is worn.
2. Check the blade guide
and replace it if is worn.
PROBLEM
THE BLADE FALLS OFF
THE PULLEY
Corrective action
1. Check the blade centering
2. Check the blade welding,
if necessary replace it.
Elenco Optionals
N° Descrizione
Rif.
33 Guidalama regolabile
con spingimerce, utile per
mantenere rigida la lama
in qualsiasi condizione di
taglio, lasciando scoperta
solo la zona utile per il
taglio.
38 Cavalletto inox con
piastra scarico segatura.
permette di collocare il
segaossi a pavimento.
Costruito in acciaio inossidabile con piedi in
gomma per assicurare
la necessaria stabilità.
3 9 Base d'appoggio in
alluminio dà la giusta
stabilità alla macchina e
ne permette il posizionamento sopra ad un tavolo
di lavoro. E' corredata di
un grosso cassetto per la
raccolta della segatura.
85 Motore autofrenante,
blocca in mezzo secondo
la rotazione della lama
List of optional
accessories
N° Description
Rif.
33 Adjustable blade guide
is for keeping the blade
stiff in ay cutting condition, leaving exposed only
the part necessary for
cutting.
38 Thanks to the stand it is
possible to place the bandsaw on the floor. The
bone sawings fall down
into a special opening
with a hook for the collecting sack, It is made in
stainless steel with rubber feet to ensure the
necessary for cutting.
3 9 Aluminium base gives
the right steadiness to
the machine and makes
it possible to position it
on a worktable. It is supplied with a big drawer to
collect the bone sawings.
85 Autobraking motor
stops the rotation of the
blade in half second
Nel caso le soluzioni
proposte non risolvono
l'anomalie indicate,
interpellare l'assistenza.
2727
27
2727
In the event of any faulty
operation do not hesitate
to contact the customer
service.
9 5 Raschialama supple-
mentare permette un'ulte-
riore pulizia della lama
durantel'uso (indicato per
carni grasse)
95 Supplementary blade
scratcher makes further
blade cleaning possible
during use ( suitable for
fatty meat).
44
4
44
Page 8

Parte 3
Part 3
Parte 1 1
Part 1 1
Elenco Optionals
N° Descrizione
Rif.
Tipi di Lame
40 Lama acciaio inox tipo A
con dente sagomato per
un taglio morbido senza
residui, ideale per
cotolette.
4 1 Lama tipo B con ondula-
tura per tagliare merci con
ossa tenere. Taglio dolce
e rapido, senza scarti
e segatura.
4 9 Lama tipo C per taglio di-
ritto della carne senza ossa, come fegato e salumi.
46 Lama tipo D con dente
temperato per taglio di
carne e pesce surgelati,
ottima anche per il
formaggio grana.
47 Lama tipo E in acciaio
temperato
List of optional
accessories
N° Description
Rif.
Blades types
A
4 0 Stainless steel Blade
type A, shaped teeth for
a soft cut without residue,
ideal for cutles.
14 Rimontare le puleggie se-
condo la procedura inversa.Fare attenzione che la
puleggia inferiore sia centrata nella spina a fondo corsa, che la molla di fermo
entri correttamente nella
propria sede.
15 Montare i componenti
rimanenti seguendo le indicazioni della "pag. 13
Montaggio componenti"
Lubrificazione
B
41 Corruugated Blade
type B to cut meat with
soft bones. Soft, fast cut,
without waste or bone
sawings.
C
4 9 Blade type C, for a
straigh cut of meat
without bones, such as
liver and dressed pork.
D
46 Blade type D, with
medium teeth to cut
frozen meat or fish, excellent for parmesan cheese.
Al termine di ogni lavaggio lubrificare i rullini dei gruppi
guidalama con qualche goccia
di olio tipo SHELL ONDINA 15 o
ESSO MARCOL 82 o equivalenti con l'attenzione di farli ruotare
durante la lubrificazione.
Manutenzione
Se il taglio é ondulato o se la
lama tende a sbandare e crea
un taglio inclinato oppure l'operatore deve esercitare più pressione per tenerla in linea, é un
sintomo di lama usurata. V a sostituita secondo le indicazioni
riportate nella pag. 12 Rimozio-
ne lama dentata.
Messa Fuori Servizio e
Smaltimento
E
47 Blade type E Hardened
steel.
55
5
55
Il simbolo apposto sulla
macchina indica il divieto di
smaltimento con i rifiuti solidi
urbani.
La Direttiva Europea 2002/96/
CE classifica la macchina come
RAEE, lo smaltimento deve
avvenire a norma di legge.
2626
26
2626
14 Reassemble the wheels
following the reverse
procedure.
Making sure thet the top
wheel is perfectly central
on the shaft and that
retaining spring iis
correctly located.
15 Follows the instructions on
the "page 13 Components
assembly" to mounte the
others components.
Lubrication
After each washing, grease the
rollers with some drops of oil
type SHELL ONDINA 15 or
ESSO MARCOL 82 or similar
oil marking sure that they rotate while they are being
lubricated.
Maintenance
When the cut is jagged or the
blade begins to slide producing
a sloping cut or when the
operator must increase the
pressure to keep it in line, it
means that the blade is worn. It
must be replaced following the
instructions in the page 12 Saw
blade removal.
Removal and disposal
The symbol affixed on the
machine means that it must not
be disposed with usual urban
waste.
The European 2002/96/EC
Directive classifies the machine
as WEEE, which disposal must
be effected according to law .
Page 9

Parte 1 1
Part 1 1
Parte 4
Part 4
9 Lavare le parti asportate
con acqua corrente.
10 Pulire i residui di prodotto
con uno scovolino a setole
morbide e uno straccio.
11 Lavare la struttura con
acqua corrente e una
spugna (evitare acqua
a pressione).
9 Wash the parts removed
with running water.
10 Clean the residuals of
product with a small
brush with soft bristles
and a cloth.
11 Wash the structure with
running water and a
sponge (avoid using water
under pressure).
10
4
Chiusura inferiore
1
porta protezione
Interruttore
ON/OFF
14
8
7
6
5
9
8
Puleggia
superiore
Puleggia inferiore
9
14
4
1
Lower blade
guard lock
ON/OFF switch
1
11
12
6
5
8
9
3
3
Top wheel
Bottom wheel
13
2
12 Sterilizzare frequente-
mente il piatto portamerce in lavastoviglie
industriale.
2525
25
2525
12 The plate must be
frequently sterilized in
an industrial washing
machine.
Dispositivo
2
tendilama
Lama dentata
3
Piatto portamerce
4
Pressamerce
5
Impugnatura
6
pressamerce
Chiusura
7
superiore porta
di protezione
Dispositivo di
10
regolazione
spessore taglio
Impugnatura di
11
bloccaggio
guidalama
Barra di protezio-
12
ne regolabile
Guidalama
13
Estrattore
14
puleggia inferiore
2
Blade tensioning
device
Saw blade
3
Feed table
4
Product pusher
5
Product pusher
6
handle
Upper blade
7
guard lock
66
6
66
Portionning
10
plate
Blade guide
11
handle
Adjustable
12
saw guard
Blade guide
13
Bottom wheel
14
extractor
Page 10

Parte 5
Part 5
Parte 1 1
Part 1 1
Caratteristiche tecniche
1
Dimensioni (mm)
2
Peso Kg
Con piedini senza imballo
a
Con piedini con imballo
b
Con base senza imballo
c
Con base con imballo
d
Con cavalletto senza imballo
e
Con cavalletto con imballo
f
3
Caratteristiche della lama
g
Velocità m/sec
h
Lunghezza mm
m
Larghezza mm
n
Spessore lama tipo A mm
p
Spessore lama tipo B mm
q
Spessore lama tipo C mm
r
Spessore lama tipo D mm
s
Spessore lama tipo E mm
4
Temperatura di utilizzo
5
Rumorosità dB a vuoto
6
Rumorosità dB a pieno carico
7
Grado di protezione IP
Caratteristiche
motore
T 210
T 250
1200
W HzV
120
700
220
900
230
1400 400
120
1100
220
230
1600 400
60
50
60
50
Technical data
Dimensions (mm)
1
Weight Kg
2
With feet without packaging
a
With feet with packaging
b
With base without packaging
c
With base with packaging
d
With stand without packaging
e
With stand with packaging
f
3
Blade, technical data
g
Speed m/sec
h
Length mm
m
Width mm
n
Thickness blade type A mm
p
Thickness blade type B mm
q
Thickness blade type C mm
r
Thickness blade type D mm
s
Thickness blade type E mm
4
Range temperature
5
Acoustic dB no load
6
Acoustic dB full load
7
Degree of protection IP
n
min
N°. Fasi
Phase N°.
Collegamenti
Connection
1150
1~
1~
1450
3~
1~
1150
1~
950
3~
CL
B
Servizio
Service
S1
Motors
data
6 Sollevare e sfilare la
puleggia superiore
IMPORTANTE
La puleggia inferiore, può
essere facilmente sfilata
dall'albero motore.
Evitare di raschiare l'interno
del foro puleggia, può essere
pregiudicato il buon funzionamento del segaossi.
7 Sganciare la molla, con
DUE MANI sfilare la
puleggia di avviamento
IMPORTANTE
Se la puleggia inferiore non si
sfila facilmente, utilizzare
l'estrattore puleggia inferiore in
dotazione, collocato sotto il
piatto portamerce.
8 Togliere il gruppo guida-
lama superiore e inferiore.
6 Lift up and take off
the bottom wheel
IMPORTANT
The top wheel, wich can be
easily taked off to the motor
shaft.
Avoid scraping inside the
wheel hole, the efficient
working of the bandsaw
may be undermined.
7 Remove the spring and,
with TWO HANDS pull
o ff the drive pulley .
IMPORTANT
When the bottom pulley
doesn’t pull of
f easily , use the
bottom wheel extractor
supplied
8 Remove the bottom and
t
opblade guide group.
77
7
77
2424
24
2424
Page 11

Parte 11
Part 11
Parte 5
Part 5
Pulizia
IMPORT ANTE
Il segaossi deve essere
pulito frequentemente in
quanto i residui dei prodotto lavorati si decompongono e sono causa di inquinamento e infezione per i
prodotti che verranno
lavorati successivamente.
La macchina è stata progettata per rendere più
facile la pulizia.
Rimozione componenti
1 Munirsi di guanti protettivi
2 Aprire la porta di protezio-
ne lama.
3 Togliere la lama seguendo
la procedura indicata nella
pag. 12 Rimozione
lama dentata
4 Togliere il guidalama
centrale.
5 Togliere il piatto port a
merce
Cleaning
IMPORT ANT
The bandsaw must be
frequently cleaned, any
product residue will
putrefy and will cause
pollution and infection of
products that will be
subsequently work.
The machine has been
designed to make
cleaning easy.
Components removal
1 Wear protectives gloves
2 Open the blade protection
door.
3 Remove the blade accor-
ding to the procedure as
described in the page 12
Saw blade removal
4 Remove the central blade
guide.
5 Remove the feed table
T 210 T 250
A 800 930
A1 670
B 650 780
C 400 500
1
D 440 500
E 215 250
E1 190 105 <E1<260
F 195 235
G 480
H 500
L 370 400
a38 47
b44 56
c40 49
2
d49 60
e47 60
f56 69
g15 12
h 1650 1980
m15 15
n 0,5 0,5
p 0,6 0,6
3
q 0,5 0,5
r 0,5 0,5
s 0,5 0,5
4
5
6
7
+5° : +40°C
67
74
65
OPTIONAL: Guidalama regolabile
OPTION: Adjustable blade guide
L
OPTIONAL: Base d'appoggio
OPTION: Aluminium base
2323
23
2323
88
8
88
Page 12

Parte 6
Part 6
Parte 10
Part 10
Prescrizioni di sicurezza Dispositivo di
Prima della pulizia e manutenzione spegnere il segaossi
e isolarlo dalle fonti di energia.
In qualsiasi caso quando il
segaossi non é utilizzato
l'interruttore deve essere
sulla posizione OFF.
Controllare che la tensione
corrisponda ai dati di targa e
che la presa sia munita di
messa a terra.
IMPORT ANTE
Un particolare sistema di interblocco non permette l’avviamento della macchina; verificare il funzionamento premendo, in posizione “OFF”,
l’impugnatura chiusura inferiore, la stessa deve avere uno
spostamento in avanti con
ritorno automatico.
A TTENZIONE
Non asportare e non manomettere i dispositivi sicurezza e protezione. La
macchina deve essere utilizzata solo con i dispositivi
di sicurezza e protezione
installati correttamente.
Safety rules Thermic safety
Before cleaning and maintenance, turn off the bandsaw
and disconnect the plug.
Whenever the bandsaw
is not used the switch must
be on OFF.
Check that the power supply
voltage corresponds to that
described on the information
label and that it is connected
to an adequate earth.
IMPORT ANT
A special interlock device
avoids the start of the
machine. Test its function by
pushing the lower closing
handle, in its ‘OFF’ position.
The handle should move
forwards and than
automatically come back.
A TTENTION
Never take off and tamper
with the safety and
protection devices.
The machine must be use
only with the safety and
protection device correctly
installed.
sicurezza termico
A TTENZIONE
Questa macchina é dotata
di protezione termica al
motore. Se durante un uso
particolarmente intenso il
motore si arresta attendere
10-20 minuti (il tempo
necessario per ridurre
la temperatura del nucleo
del motore).
Riprendere il lavoro
nel modo seguente:
1 Riportare l’interruttore
su OFF.
2 Il dispositivo di sicurezza, si
ripristina automaticamente.
device
WARNING
This machine is fitted
with motor thermic safety
device.
If the motor stops after a
long use wait 10-20
minutes (the time
necessary to reduce the
motor temperature).
Start again by following
these instructions:
1 Re-position the switch
to OFF
2 The safety device resets
itself automatically
PERICOLO
USARE SEMPRE IL PRESSAMERCE PER T AGLIARE.
QUESTO MODO DI OPERARE E' SICURO ED E'
QUANTO RICHIESTO
DALLE NORME.
MAI SPINGERE LA
MERCE CON LE MANI.
Il segaossi deve lavorare
esclusivamente con la porta di
protezione della lama chiusa.
DANGER
ALW A YS USE THE PRODUCT PUSHER TO CUT .
THIS OPERA TING SYSTEM
IS SAFE ANDMEETS THE
REQUIRED REGULA TIONS.
NEVER PUSH MEA T
WITH YOUR HANDS.
The bandsaw must be
operated only with the blade
guard closed.
99
9
99
3 Posizionare l'interrutore
su ON per avviare la
macchina.
2222
22
2222
3 Position the switch to ON
to turn on the machine.
Page 13

Parte 9
Part 9 Part 6
Parte 6
PERICOLO
6 Con la mano destra
lontana dalla lama
dentata, appoggiare il
prodotto da tagliare al
dispositivo di regolazione di spessore taglio.
Con la mano sinistra
impugnado il pressamerce, spingere il prodotto contro la lama
dentata fino al taglio
completo.
A TTENZIONE
Nel caso é montato il guidalama regolabile (optional), non
lavorare mai con il guidalama
alto, abbassarlo al limite della
merce da tagliare.
7 Terminat a la lavorazione
posizionare l'interruttore
su OFF
IMPORT ANTE
Se mentre il segaossi sta funzionando e manca la tensione
di rete, la macchina si arresta
istantaneamente. Quando
ritorna la tensione di rete non
si avvia anche se l'interruttore
é in posizione ON.
Per riavviare la macchina
occorre portare l'interruttore
su OFF e quindi su ON.
DANGER
6 With your right hand
away from the saw
blade, put the product
to be cut on the
portioning plate.
With the product pusher
in your left hand, push
the product towards
the saw blade until
the cut is completed.
A TTENZIONE
In the case is mounted the
adjustable blade guide
(optional), never work with
the blade guide upwards but
alwais put it down on to the
goods to be cut.
7 Once finished the
operation, position the
switch to OFF
IMPORT ANT
I f the bandsaw is in function
and unexpected power failure,
the machine will stop
immediately.
When the power returns the
machine will not work even
though the switch is in the
ON position.
To restart, turn the switch
to OFF and then to ON.
Le persone esposte non
devono avere indumenti
svolazzanti o maniche aperte.
Durante il lavoro non ci devono
essere persone estranee in
vicinanza del segaossi.
Usare guanti protettivi nel
montare o sostituire le lame.
In caso di sostituzione di
pezzi richiedere esclusivamente ricambi originali.
Quando é montato il guidalama regolabile (Optional), non
lavorare con il guidalama alto
ma abbassarlo al limite della
merce da tagliare.
Non manomettere le etichette
collocate sulla macchina,
in caso di danneggiamento
farle sostituire da personale
qualificato.
V 230
V 400
Any person in the vicinity of
the machine should not wear
loose clothes or opened
sleeves.
No other persons may be
near the bandsaw machine
during its working.
Use protective gloves to assemble or replace the blades.
In the event of replacing parts,
request only original spare
parts.
When the machine is used
with the adjustable blade
guide (Optional), never work
with the blade guide upwards
but always put it down on to
the goods to be cut.
Do not remove the labels
placed on the machine and
replace them if damaged by
qualifed personel.
2121
21
2121
1010
10
1010
Page 14

Parte 7
Parte 9
Part 9Part 7
Installazione
IMPORT ANTE
La macchina deve essere
installata vicino ad una presa
di corrente.
Tipi di fornitura
Il segaossi può essere fornito
in tre differenti versioni:
A - Piedini di appoggio
B - Base di appoggio
C - Cavalletto
Installazione caso A
Il segaossi deve essere
collocato su un banco di
lavoro, piano orizzontale e
rigido, adatto a sostenerne il
peso (pag. 7).
1 Scegliere la posizione
di lavoro del segaossi e
praticare due fori di Ø 12
sul tavolo di lavoro ad una
distanza di 245 mm.
2 Utilizzare due prigionieri
M10, di lunghezza tale che
assicurino un fissaggio di
almeno 15 mm sul corpo
macchina, con due rondelle larghe e due dadi.
Installation
IMPORT ANT
The machine must be
installed near to a mains
socket.
Supply types
The bandsaws can be
supplied with three versions:
A - Support feet
B - Support base
C - Stand
Installation case A
The bandsaw must be
mounted horizzontally on a
stable and rigid work-table
adequate to support its
weight (page. 7).
1 Choose th bandsaw wor-
king position and make
two holesof Ø 12 mm
on the work table at a
distance of 245 mm.
2 Use 2 M10 studs long
enough to ensure a fixing
of at least 15 mm on the
machine, with 2 large
washers and 2 nuts.
Funzionamento ed uso
del segaossi
Tipi di prodotto da lavorare
Il segaossi permette di soddisfare ogni esigenza di taglio,
dalla carne con o senza osso
a quella congelata, al pollame,
al pesce, ai prodotti alimentari
surgelati.
A TTENZIONE
Non tagliare prodotti non
alimentari.
Uso del segaossi
1 Allentare l'impugnatura di
blocco in senso antiorario.
2 Regolare il dispositivo di
regolazione spessore
taglio sulla profondità di
spessore di taglio scelto.
3 Ruotare l'impugnatura di
blocco in senso orario per
bloccare il dispositivo di
regolazione spesore taglio.
4 Avviare la macchina ruo-
tando l'interruttore su ON.
Bandsaw functioning
and use
T ypes of product to worke
With the bandsaw is possible
to satisfy any cutting needs,
from meat with or without
bone to frozen meat, from
poultry to fish, or any general
food products, also frozeen.
A TTENZIONE
Should not be used to cut or
saw any non food products.
Bandsaw use
1 Loose the block-handle in
a counterclockwise
direction.
2 Adjust the portioning plate
to the depth of cut required
and lock it with the handle.
3 Rotate the block-handle in
a clockwise direction to
block the portioning plate.
4 S tart the machine by
turn ON the switch.
Installazione caso B
Collocare il segaossi su una
superficie piana orizzontale,
antiscivolo e stabile, adatta
a sostenerne il peso (pag. 7).
1111
11
1111
Installation case B
The bandsaw must be
mounted horizontally on a
stable, robust and antiskid
base suitable to support its
weight (page 7).
5 Sollevare il pressamerce.
2020
20
2020
5 Lift the product pusher .
Page 15

Parte 8
Part 8 Part 7
Parte 7
Rivestimento interno
antiaderente: permette di
risparniare tempo nella pulizia.
Con un getto d'acqua o con
uno straccio bagnato potrete
lavare e pulire il vostro
segaossi, che é completamente liscio "come smaltato"
senza nessun punto critico
dove possa fermarsi lo sporco.
Motore e l'impianto elettrico: sono completamente
chiusi nelle proprie custodie,
acqua e umidità non possono
intaccare le parti elettriche.
Comando di avviamento: il
comando é posto nella chiusura della porta, garantisce lo
spegnimento del motore prima
che la porta possa aprirsi,
salvaguardando la sicurezza e
l'incolumità dell'operatore.
Internal non-stick covering:
thanks its it is possible to
save time cleaning.
With a water jet or with a
wet cloth you can wash and
clean your bandsaw, it is
completely smooth and there
are no critical pioints where
dirt can hide.
Motor and electric system:
they are completely enclosed
in their cases, so that water
and damp cannot damage the
electrical parts.
Machine start command:
the command is placed in the
door lock assures the motor
switches off before the door
is opened, protecting the
operator.
Installazione caso C
1 Sdraiare la macchina,
fissare le due gambe e la
piastra forata al segaossi
utilizzando le quattro viti
e le quattro rondelle in
dotazione.
2 Assemblato il cavalletto al
segaossi, in due persone,
sollevare il tutto e regolare
i piedini in modo che
l'appoggio a pavimento
sia stabile.
Rimozione lama
dentata
1 Munirsi di guanti protettivi
2 Rimuovere la fascetta che
blocca il pressamerce
alla lama dentata
Installation case C
1 Lay down the machine,
fix the two legs and the
drilled plate and the bandsaw using the supplied
four screws and four
washers.
2 Assembled the stand to
the bandsaw, in two
persons, lift the machine
and adjust the feet so
that is steady.
Saw blade removal
1 Wear protectives gloves
2 Removed the tyrep that
blocks the product pusher
at the saw blade.
Dispositivo di sicurezza
termico: nel motore è inserito
il dispositivo di sicurezza
termico, quale protezione
contro le sovratemperature.
1919
19
1919
Thermic safety device: Into
the motor is fitted a thermic
safety device as a protection
against excess temperature.
3 Aprire la porta di
protezione
4 Ruotare il dispositivo
tendilama in modo che la
puleggia inferiore si sollevi.
1212
12
1212
3 Open the protective door
4 Turn the blade tensioning
device so that the top
wheel is raised.
Page 16

Parte 7 Parte 8
4 Rimuovere la lama dentata
A TTENZIONE
Riporre la lama dentata in
un luogo sicuro.
Pulizia preliminare
La macchina e tutti i componenti devono essere puliti
dall'olio di protezione prima
di essere assemblati.
Seguire le indicazioni riportate
nella pag. 24.
Montaggio componenti
Piatto portamerce
5 Infilare il piatto fisso nelle
quattro spine di riferimento
6 Inserire il guidalama
Part 7
4 Remove the saw blade
A TTENTION
Position the saw blade in
a safety place.
Preliminary cleaning
Before assembling, clean off
the protective oil from the
machine and al components.
follow the instructions
indicated in page 24.
Components assembly
Feed plate
5 Insert the fixed plate
on the four dowels.
6 Insert the blade guide.
Guidalama-raschialama:
dispositivi sintesi di riuscite
soluzioni tecniche costituiti da
un corpo in nylon con fibra di
vetro, supportano due alberi in
acciaio inossidabile che a loro
volta guidano una ruota in metallo duro "widia" e due ruote
in acciaio inossidabile trattato
termicamente. Queste costituiscono una guida sicura e
precisa dove la lama scorre
senza possibilità di deviare
dalla direzione di taglio. Inoltre
il "gruppo guidalama", é facilmente asportabile per la
necessaria pulizia.
Puleggie superiore ed
inferiore: sono perfettamente
calibrate con un'accurata lavorazione su tutte le superfici,
l'equilibratura dinamica toglie
ogni residuo di vibrazione.
La parte a contatto con la
lama dentata ha un anello in
acciaio inox, per mantenere la
sagoma originale ed evitarne
la caduta. La puleggia superiore é a lubrificazione permanente. Un labirinto a tenuta
mantiene internamente il
grasso necessario al funzionamento, evita che lo sporco
o l'acqua del lavaggio penetrino all'interno. La puleggia
inferiore, può essere facilmente sfilata dall'albero, all'interno
del mozzo, uno speciale
riporto di "T eflon", consente la
necessaria scorrevolezza
sull'albero stesso. Evitare di
raschiare l'interno del foro
puleggia, potreste pregiudicare il buon funzionamento del
segaossi.
Guidalama: in lega speciale
inossidabile antiusura, pemette un taglio lineare. La lama
dentata, sfiora le pareti del
guidalama, mantendo costante l'allineamento di taglio.
Part 8
Blade guide- Bladescraper:
devices resulting from technical research, consist of a
nylon body with glass fibre,
supporting two stainless steel
shafs that guide a wheel in
tough metal "widia" and two
heat treated stailess steel
wheels. These form a safe
and precise guide where the
blade can run without
deviation during cutting.
In addition, the "blade guide"
can be easily removed for
cleaning.
Bottom and top wheels: are
perfectly calibrated for precise
working on all surfaces, and
the balancing avoids any
residual vibration.
A stainless steel ring in the
zone in contact with the saw
blade maintains the original
shape and prevents the blade
drooping.
The bottom wheel has e
permanent lubrication.
A retaining chamber holds the
grease necessary for working
and prevents dirt and cleaning
water from penetrting inside.
The top wheel, which can be
easily slipped off the shaft,
has inside the hub a special
part in "Teflon" to permit
smooth running on the shaft.
Avoid scraping inside the
wheel hole, the efficient
working of the bandsaw
may be undermined.
Blade guide: made from a
special stainless wear
resistant alloy , ensure linear
cut. The saw blade, skimming
the blade-guide walls, keeps
the cut alignment steady .
1313
13
1313
1818
18
1818
Page 17

Parte 8
Part 8
Parte 7
Part 7
Descrizione macchina
I segaossi rappresentano la
massima evoluzione , fino ad
oggi raggiunta, per ottenere un
taglio veloce e perfetto di
qualsiasi prodotto alimentare.
La vasta gamma di lame
(optional) permette di soddisfare ogni esigenza di taglio,
dalla carne con o senza osso
a quella congelata, al pollame,
al pesce.
I segaossi si distinguono
per le seguenti caratteristiche:
Dispositivo di regolazione
spessore taglio: in acciaio
inossidabile con sagomatura
particolare per facilitare lo
scorrimento del prodotto.
La facile regolazione consente
di ottenere tagli costanti e
uniformi.
Machine description
Bandsaw machines represent
the state of the art in fast,
perfect cuting for any foodstuff.
Thanks to wide range of
blades (optional) it is possible
to satisfy any cutting needs,
from meat with bone to frozen
meat, from poultry to fish.
The bandsaw are
recognized by some
features follows:
Portioning plate: in stain-
less stell with special mouldings to facilitate the product
sliding.
Thanks to its simple regulation device, uniform cuts
can be made.
Lama dentata
7 Munirsi di guanti protettivi
8 Ruotare la leva del
dispsositivo tendilama
in modo che la puleggia inferiore si sollevi.
IMPORT ANTE
La lama deve corrispondere alle caratteristiche
indicate nella tabella
della pag. 7 al fine di
evitare il danneggiamento della macchina.
La lunghezza nominale,
ha una tolleranza massima di ±10 mm.
Qualora la lama non sia
in tolleranza non é
possibile montarla e
tenderla.
9 Controllare che i denti di
taglio della lama siano
rivolti verso l'operatore e
verso il basso.
Saw blade
7 Wear protectives gloves
8 Turn the blade tensioning
device lever so that the
top wheel is raised.
IMPORT ANT
The blade must have
the caracteristics
described in the table
in pag. 7 in order to
avoid any damage to
the amchine.
The average length has
a maximum tolerance
of ±10 mm.
If it is over these limits
the blade cannot be
mounted or stretched.
9 Check that the saw teeth
of the blade in the cut
zone are positiong down
and towards the operator.
Pressamerce: permette di
tagliare sino alla più piccola
porzione senza pericolo per
l'operatore.
Dispositivo tendilama: una
soluzione tecnica con una
molla ad aria consente di
avere sempre la stessa
pressione sulla puleggia e
mantenere la tensione della
lama ai valori ottimali stabiliti.
Questa soluzione evita l'usura
precoce della lama e la rende
più stabile sulle puleggie.
1717
17
1717
Product pusher: grip to cut
the smallest portion, whithout
hazard for the operator.
Blade tensioning device: a
tecnichal solution whit an air
spring alwais makes it possible to keep the same pressure on the pulley and maintain the blade tension at the
optimum values constantly .
This solution avoids rapid
wear of the blade and makes
it more stable on the pulleys.
10 Collocare la lama sulle
due pulegge in modo che
sia guidata dal guidalama
superiore e inferiore
11 T endere la lama ruot ando
la leva del dispositivo
tendilama.
Un meccanismo interno
porterà automaticamente
la lama alla corretta
tensione.
1414
14
1414
10 Position the blade on the
two wheels and that it is
guided by the top and
bottom blade guides.
11 Tension the blade by
turning the tensioning
lever.
An internal device
automatically adjust the
corrent tension on the
blade.
Page 18

Parte 7
12 Ruotare manualmente la
puleggia superiore per
posizionare correttamente la lama dentata.
13 Controllare che i denti di
taglio sporgano completamente dalla puleggia
superiore.
Part 7 Part 7
12 Rotate manually rotate
the bottom wheel in order
to position the saw blade
correctly.
13 Make sure that the teeth
protrude from the positioning bottom wheel for
their whole depth.
Allacciamento Eletrrico
Controllare che la tensione di
linea corrisponda ai dati di
targa e che sia corredata di
messa a terra.
Fare attenzione al cavo rete,
non deve essere d'intralcio
durante il lavoro.
Parte 7
Electrical supply
Check that the electrical supply corresponds to the data
on the label and that it is supplied with an adequate earth.
Pay attention at the supply
cable, it don't must be to hindrance during the work.
IMPORT ANTE
14 Se i denti di taglio non
sporgono dalla puleggia
superiore, eseguire le
seguenti operazioni:
- Allentare il controdado
della vite di registro.
- Ruotando l'impugnatura
della vite di registro, in
uno dei due sensi, varia
l'inclinazione della puleggia superiore.
- Agire sulla vite di registro e contemporaneamente ruotare manualmente la puleggia
superiore, finchè i denti
di taglio della lama sporgano completamente
dalla puleggia superiore.
- Bloccare la puleggia
superiore, avvitando il
controdado della vite di
registro.
IMPORT ANT
14 If the teeth do not pro-
trude out of the upper
wheel, act as follows :
- Loosen the locknut of
the register screw;
- Turn the handle of the
register screw to the
right, or to the left, in
order to modify the
inclination of the upper
wheel;
- Act on the register
screw and simultaneously rotate manually the upper wheel
until the teeth of the
blade protrude completely out of the upper
wheel;
- Block the upper wheel
screwing again tightly
the locknut of the
register screw.
Controllo senso di
rotazione lama dentata
Nel caso di macchina con
motore trifase, verificare il
senso di rotazione della lama:
1 Dando un impulso al moto-
re,osservare se la lama
ruota in senso orario.
2 Ruotare l'interruttore sulla
posizione OFF
3 Se il senso di rotazione é
antiorario, togliere la spina
ed invertire i fili di collegamento come indicato in
figura.
NEL CASO IN CUI LA MACCHINA E' CORREDA T A CON
UNA SPINA A VENTE L'INVERTITORE DI F ASE INCORPORA TO, UTILIZZANDO UN
CACCIA VITE PREMERE E
RUOT ARE DI 180° PER
OTTENERE L'INVERSIONE
AUTOMA TICA DELLE F ASI.
Saw blade direction
control
In the case of the machine
with three-phase motor, check
the rotation of the blade:
1 Switch the motor on biefly
and make sure that the
blade must rotate in a
clockwise direction.
2 Turn on OFF position the
switch
3 If the rotation is an a coun-
terclockwise direction,
disconnected the plug and
reverse the wires in the
plug as indicated in figure.
IF THE MACHINE IS FITTED
WITH A PLUG WITH SELFCONT AINED PHASE INVERTER, USE A SCREWDRIVER
TO PRESS AND ROTA TE IT
THROUGH 180° IN ORDER
TO AUTOMA TICALL Y SWAP
THE PHASES.
15 Chiudere lo sportello
di protezione.
1515
15
1515
15 Close the protection door.
RICOLLEGARE LA MACCHINA ALLA PRESA DI CORRENTE, CONTROLLARE IL
SENSO DI ROT AZIONE.
1616
16
1616
RE-CONNECT THE PLUG ,
CHECK THE ROT ATION OF
THE BLADE
 Loading...