

Page 1
取扱説明書
PT-Eシリーズ用防水レンズポート
Instruction Manual
Underwater Lens Port for the PT-E Series
Mode d’emploi
Port d’objectif étanche pour la série PT-E
Bedienungsanleitung
Unterwasser-Objektiv-Port für PT-E Serie
Manual de instrucciones
Puerto de objetivo hermético para la serie PT-E
Kr
Cs
Sp
De
Fr
En
Jp
PPO-E03
Page 2
E-1
WARNING
Disclaimer
■ Unauthorized copying of this manual in part or in full, except for personal use, is prohibited. Unauthorized
reproduction is strictly prohibited.
■ Olympus shall not be responsible for damages, loss of profit or any claims by third parties in case of any
damage occurring from incorrect use of this product.
IMPORTANT - Please read the following before using the product
■ This product has been designed to be used underwater at depths up to 60 meters (200 ft). Handle this
product with care.
■ This product must always be used in combination with an applicable lens. Do not combine this product
with an inapplicable lens.
■ To ensure correct and safe use of this product, always use it as described in this instruction manual.
For safe use
This instruction manual uses pictographs to show how to use the product correctly and how to prevent danger to the
user and other persons as well as damage to property. These pictographs and their meanings are shown below.
●
This product should be kept out of reach of infants and children to prevent accidents such as the following:
•
Injury caused by the product falling from a height and striking the body from a height.
•
Injury caused by the swallowing of small parts. Please consult a doctor immediately if this happens.
●
This product is partly made of glass. If it is broken or smashed by being dropped or hit against a hard
object, glass splinters could cause injury. Please handle this product carefully.
●
If water gets into this product during underwater use, immediately stop using it, remove the moisture from
the product and detach it from the camera and lens.
●
Do not disassemble or modify this product. This may result in injury.
●
The silicone O-ring grease is not edible.
CAUTION
●
Do not expose this product to high temperatures for extended periods. This may lead to deterioration of the
product’s components.
●
When mounting this product on the PT-E series waterproof case, be sure to follow the steps described in
this manual.
●
Before detaching this product from the PT-E series waterproof case, make sure that the case is completely
dry and free of moisture.
●
Never attach or detach this product in locations where there is a lot of sand, dust or dirt. If any foreign matter gets on the O-ring sections, the waterproof sealing will be compromised and water leakage may result.
●
This product has been designed and manufactured for use in a water pressure equivalent to a depth of 60
meters (200 ft). Please note that diving in depths over 60 meters may cause irreparable damage and/or
may result in water leaking into this product and the camera and lens.
●
When sealing this product, make sure that no foreign matter is caught on the O-rings or O-ring contact surfaces.
●
Before storing this product, always remove it from the camera and lens.
● To control manual focus (MF) operation from this product, the provided gear must be attached to the MF
ring on the lens. Attach the gear to the MF ring on the lens as instructed in this manual.
■ Thank you for buying this product. To assure safe and correct use of this product, please read this instruction manual carefully. After reading, store the manual together with the warranty card in a safe, easily
accessible place.
■ This product is the Waterproof Lens Port (PPO-E03) designed exclusively for use with the PT-E series of
waterproof case.
■ Underwater manual focus (MF) is possible by attaching the provided gear to the MF ring on the camera
lens.
■ Note that this will restrict the rotation range of the MF ring to within 180°.
WARNING
CAUTION
Please pay particular attention to this information. If ignored when using
the product, there is a risk of serious injury and even death.
Ignoring this information when using the product could lead to injury or
material damage.
Page 3
E-2
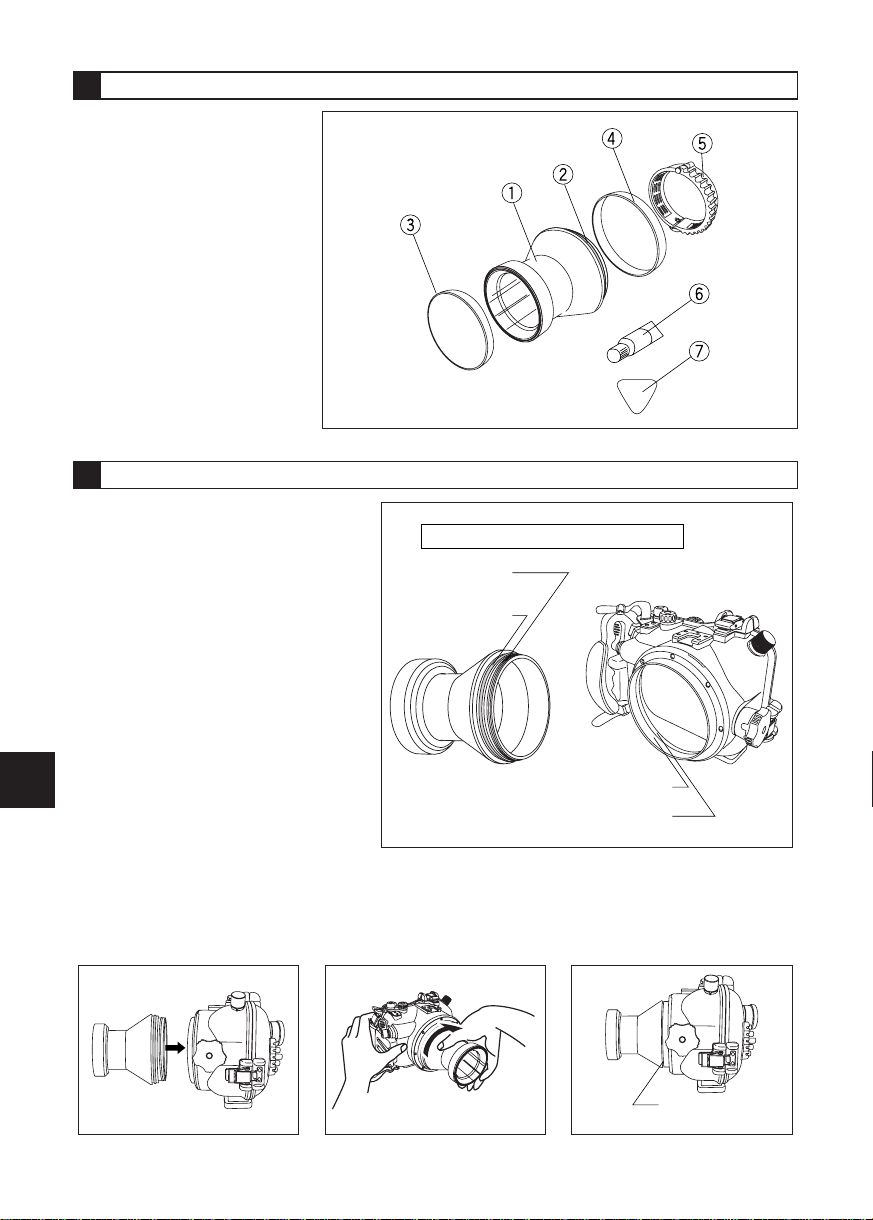
PPO-E03 main body
Silicon O-ring (POL-E101)
Front cap
Rear cap
MF Gear
Grease for silicone O-ring
Pick for O-ring removal
1 Name of Parts
2 Mounting the PPO-E03 on the Waterproof Case
This section describes how to mount this
product on the PT-E series case. Before
mounting, check that no foreign matter is
attached to the O-rings, the port mount
thread on the PT-E series case, or the Oring contact surfaces. Apply a thin layer of
the provided silicone O-ring grease.
Align the threaded section of the PPO-E03 with the port mount thread on the PT-E series case.
Hold the PT-E series case firmly with one hand, hold the main body of the PPO-E03 with your other
hand and screw it into the PT-E series by turning the PPO-E03 clockwise.
Resistance increases as the PPO-E03 is screwed in more deeply. However, be sure to screw it in all the
way until there is no gap visible below the threaded section of the PPO-E03.
Grease applying surface on O-rings
Threaded
section
O-ring
O-ring contact surfaces
Port mount thread
Screw in until
there is no gap.
Page 4
E-3
3 Dismounting the PPO-E03
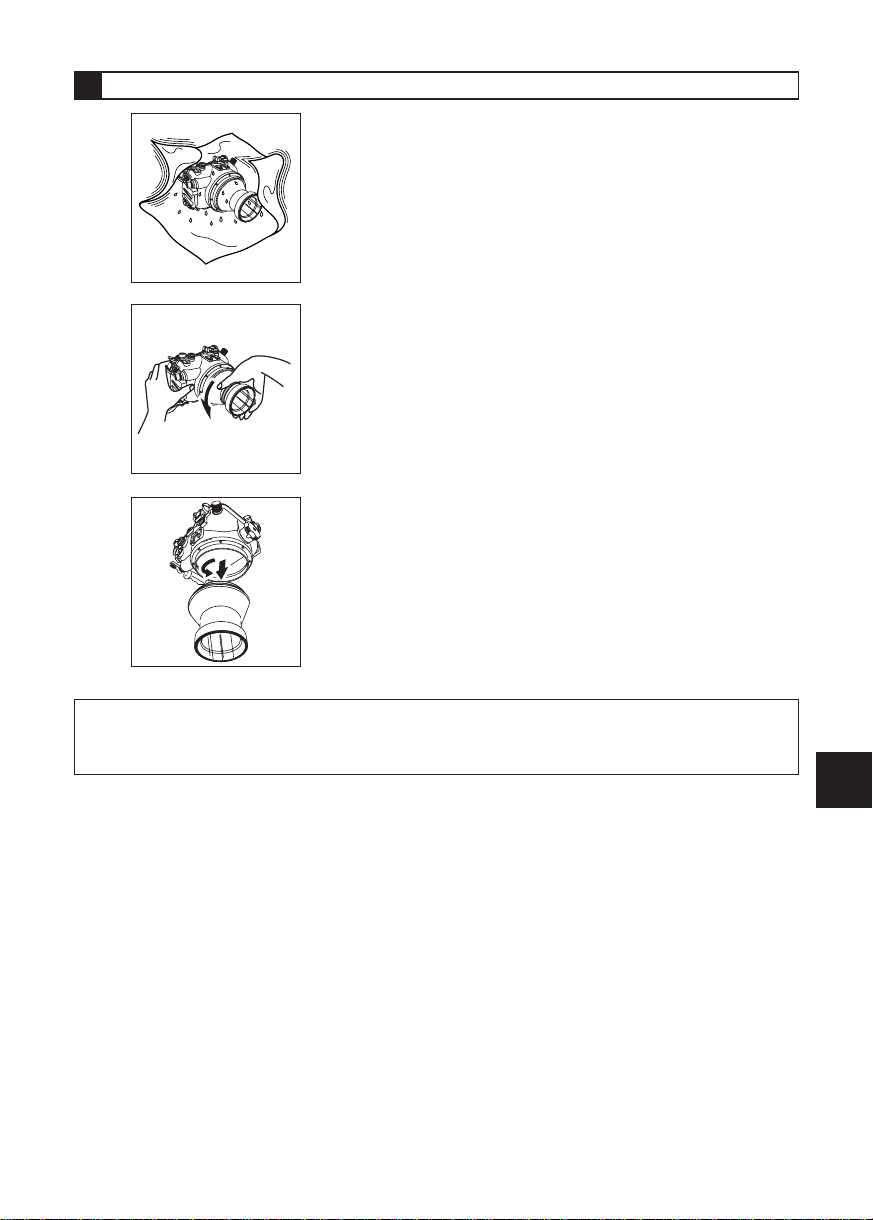
If any water is on the product, wipe it completely away and
make sure that the product is dry.
CAUTION:・ While dismounting the PPO-E03 from the case, water remaining on the PPO-E03 may splat-
ter on the lens or camera. If this happens, wipe the water off the lens and camera with a dry
cloth.
・ Make sure that the port is completely dry before dismounting.
Holding the PT-E series case firmly with one hand, loosen the
PPO-E03 by turning it about 90 degrees counterclockwise. If
the PPO-E03 is attached too tightly to turn, wrap it with a piece
of rubber or similar non-slip material.
After loosening the PPO-E03, point its lens downward and
turn it further counterclockwise until it is separated from the
PT-E series case. Be careful not to drop the PPO-E03 or
PT-E series case.
Page 5
E-4
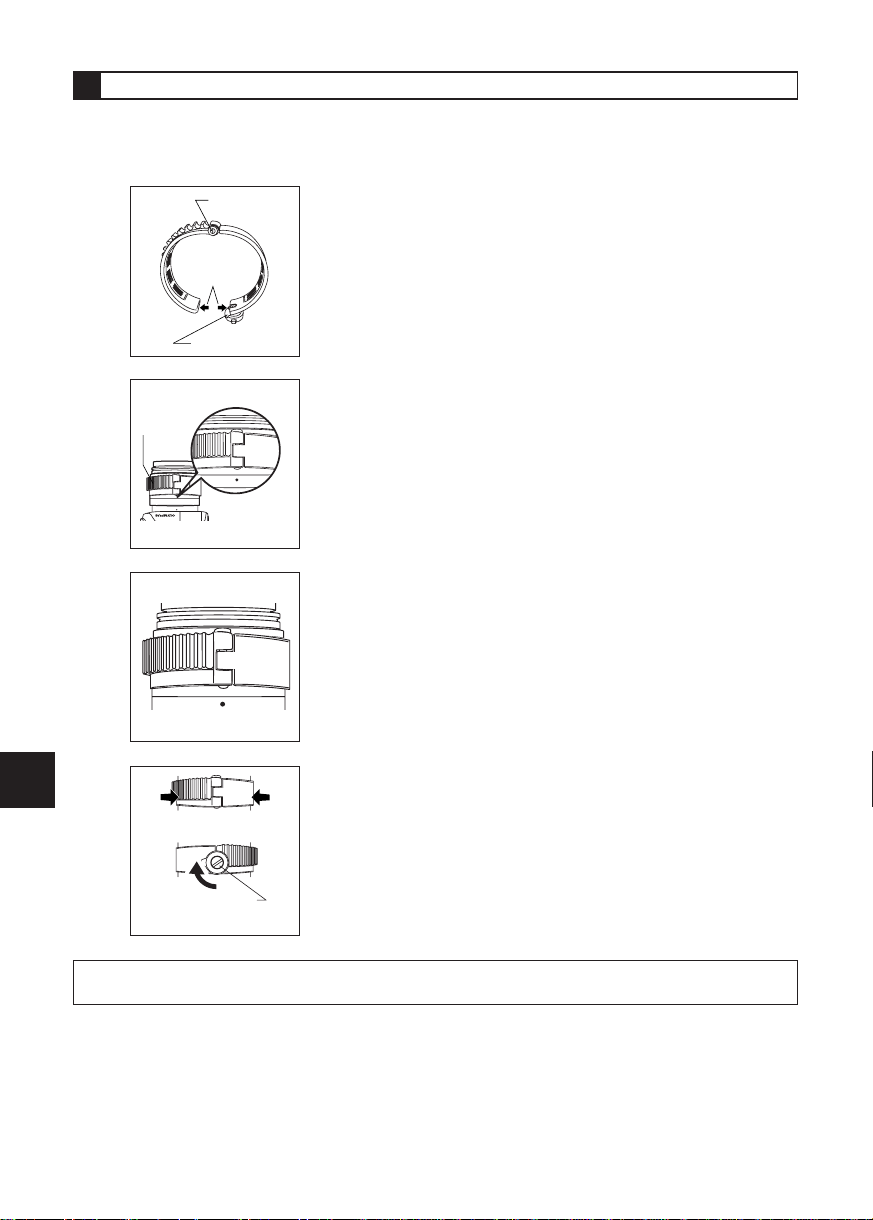
4 Attaching the Gear to the Lens
Confirm the position of the gear’s lock dial and hinge. Turn
the lock dial counterclockwise to release the lock and open
the gear.
Open the gear all the way, place it on the lens and adjust the
rotation direction of the gear. At this time, bring the gear to
the left of the hinge as shown in the illustration.
Set the front-rear direction of the gear by aligning the edge
of the hinge with the end of the rubber section on the lens’
MF ring.
After positioning the gear, place it against the lens’ MF ring,
while taking care not to displace it. Turn the gear’s lock dial
all the way clockwise to lock it so that the gear will not open.
To control the camera lens’s manual focus (MF) operation, the provided gear must be attached to the MF
ring on the lens.
* Note that this will restrict the rotation range of the MF ring to within 180°.
CAUTION: Ifthegearisturnedinthewrongdirectionoritsfront-rearorientationisincorrect,thelens’sMF
operationcannotbecontrolledsmoothly.Besuretoattachthegearcorrectly.
Gear
Hinge
Open
Lock dial
Align the hinge
with the index.
Push the gear with a finger
to place the gear against
the lens.
Turn the lock dial
to lock the zoom
gear.
Page 6
E-5
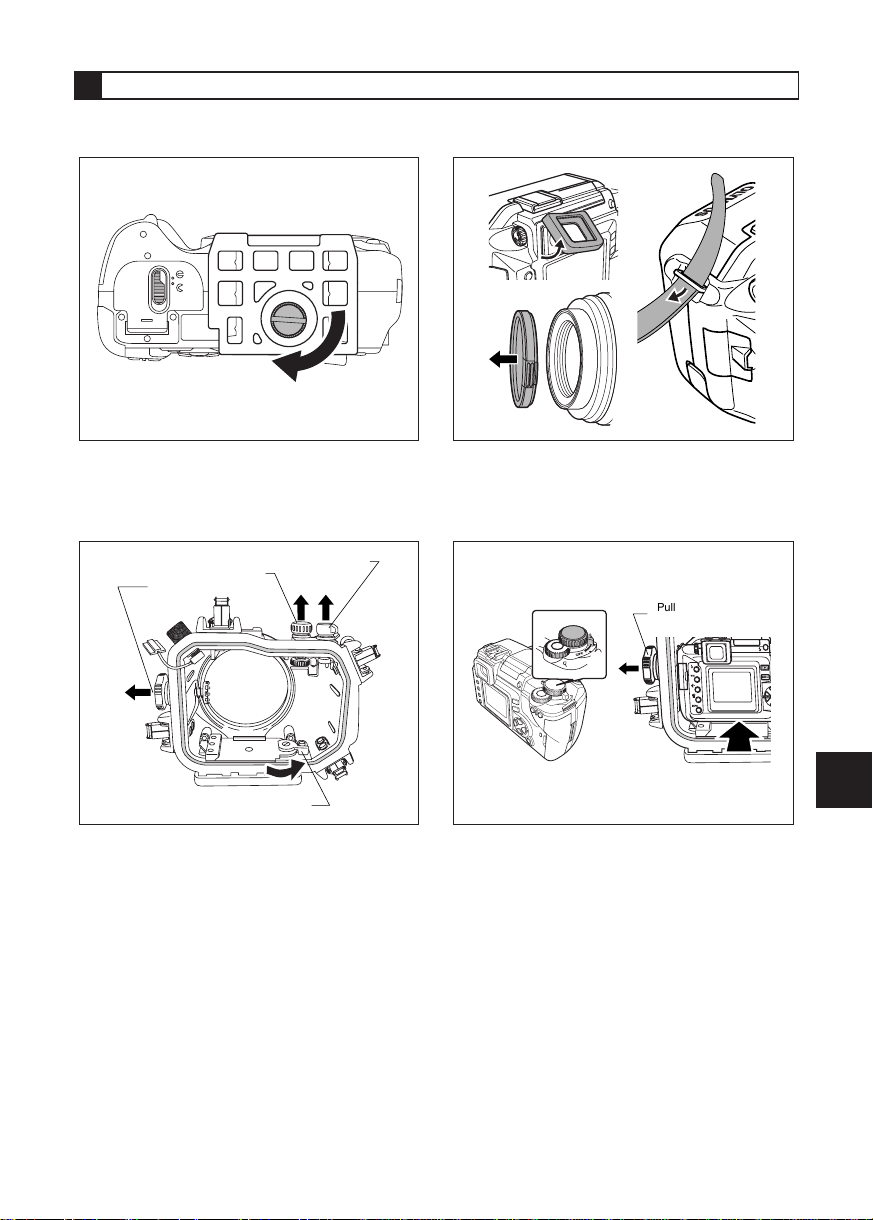
Screw the camera table provided with the PT-E
series case firmly into the bottom of the camera.
5 Loading the Camera and Lens
After attaching the gear to the camera’s lens, insert the camera and lens into the PT-E series case on which
the PPO-E03 is mounted.
Remove the eyecup from the camera’s viewfinder. If a lens cap or filter is attached to the lens or
the strap is attached to the camera, remove them
as well.
Pull up the power switch dial, mode dial knob
and zoom/MF dial on the PT-E series case,
and turn the case’s camera table lock lever
counterclockwise to release the lock. Attach the
flash hot shoe cable as instructed in the PT-E
series case manual.
Confirm that the camera’s power switch is OFF.
While pulling out the zoom/MF dial on the PT-E
series case , slide the camera table with camera attached as far as it will go into the camera
table mount on the inner side of the case’s front
lid.
Mode dial knob
Zoom/MF dial
Camera table lock lever
Power switch dial
Pull out the zoom/MF
dial further.
MENU
Page 7
E-6
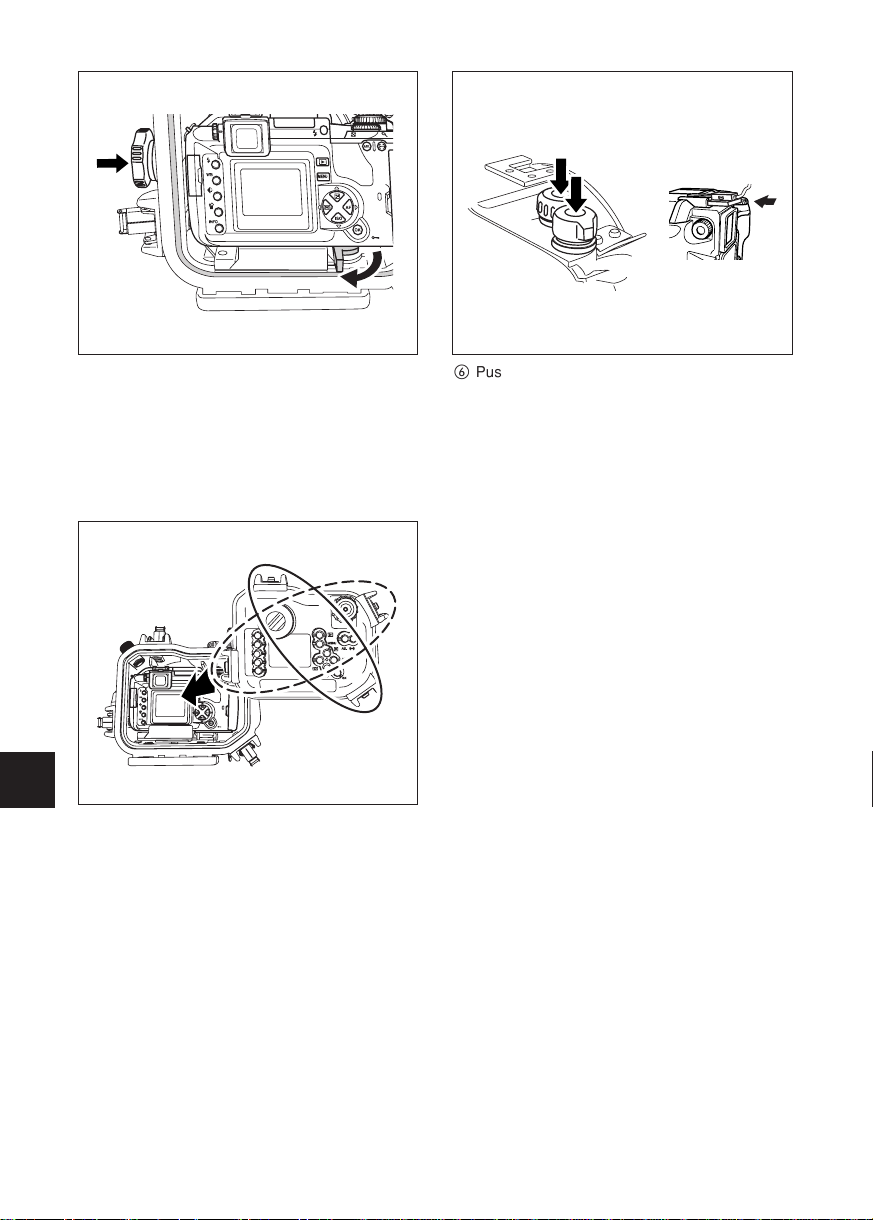
After inserting the camera, turn the PT-E series
case’s camera table lock lever all the way clockwise to lock the camera table. Then, push in the
zoom/MF dial on the PT-E series case and
engage it with the gear attached to the lens.
Turn the zoom/MF dial to confirm that it can control the lens’s MF operation.
MENU
Push in the PT-E series case’s power switch
dial and mode dial knob. Turn the power switch
dial and mode dial knob and confirm that they
can control the camera power ON-OFF and
mode switching. Connect the hot shoe mount
section of the hot shoe cable that has been
connected to the PT-E series case to the hot
shoe of the camera.
Attach the rear lid of the PT-E series case and
lock the four buckles (two diagonally located
buckles first, and then the other two diagonally
located buckles). Underwater shooting is now
possible.
Page 8
E-7
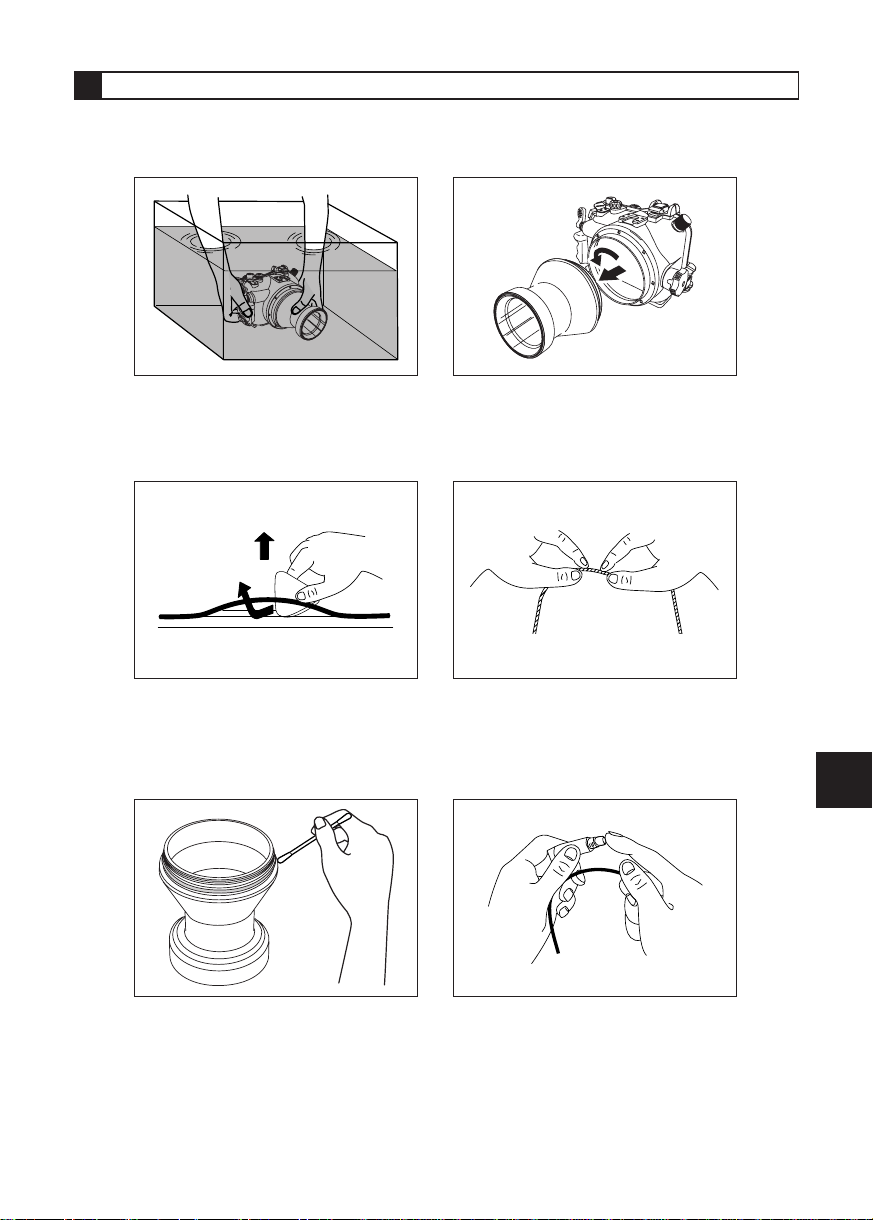
After shooting, remove the inserted camera and lens, then re-seal the empty
case and immerse it in tap water to
remove any salt as soon as possible.
6 Maintenance
For safe use of this product, always perform maintenance after each diving session.
For details, refer to “Handling After Shooting” and “Maintaining the Waterproof Function” in the PT-E series
case instruction manual. Apply the same procedures to this product.
Remove the O-rings from this product
using the provided pick for removing
O-rings. Take care not to damage the
O-rings.
If any foreign matter is attached to the
O-ring grooves, remove it using a
clean, lint-free cloth or cotton swab.
Also remove any foreign matter from
the O-ring contact surfaces and from
the port mount thread on the PT-E
series case.
After making sure that the PT-E series
case is completely dry, dismount this
product from the case.
Remove sand and dust from the O-rings.
Pinch each O-ring between your fingers
and lightly rub the entire circumference
to check for foreign matter, scratches
and cracks.
After removing foreign matter, apply the
provided grease to the O-rings and fit
them into the O-ring grooves.
To apply grease to each O-ring, squeeze
a drop of grease about the size of a
grain onto your finger and lightly rub the
entire circumference of the O-ring to
spread the grease thinly and evenly.
Page 9
E-8
Description
O-ring for use with the PT-E series case.
Applicable case : PT-E series
Applicable lens : ZUIKO DIGITAL ED 50mm F2.0 Macro
Main materials
Main body : Aluminum.
Lens window : Chemically reinforced glass.
O-rings : Silicon rubber.
MF gear : Polycarbonate resin.
Front cap : NBR rubber.
Rear cap : Polyethylene resin.
Withstanding pressure : Water depth of 60 m (200 ft)
Dimensions : Max. diameter 108 mm x Depth 87 mm
Weight : 420 g (excluding the conversion lens)
7 Specifications
Note) We reserve the right to change the external appearance and specifications without notice.
8 Consumable Items
This product uses the following consumable items.
Product Model
POL-E101
■ Silicon O-rings
Description
Grease for O-rings
Product Model
PSOLG- 1
■ Grease for silicone O-ring
Shinjuku Monolith, 3-1 Nishi Shinjuku 2-chome, Shinjuku-ku, Tokyo, Japan
Two Corporate Center Drive, Po Box 9058, Melville, NY 11747-9058, U.S.A.
Tel. 631-844-5000
Technical Support (USA)
24/7 online automated help: http://www.olympusamerica.com/support
Phone customer support: Tel. 1-888-553-4448 (Toll-free)
Our phone customer support is available from 8 am to 10 pm
(Monday to Friday) ET
E-Mail: [email protected]
Olympus software updates can be obtained at:
http://www.olympus.com/digital/
© 2005 OLYMPUS IMAGING CORP.
Premises : Wendenstrasse 14-18, 20097 Hamburg, Germany
Goods delivery : Bredowstrasse 20, 22113 Hamburg, Germany
Letters : Postfach 10 49 08, 20034 Hamburg, Germany
European Technical Customer Support:
Please visit our homepage http://www.olympus-europa.com
or call our TOLL FREE NUMBER* : 00800 - 67 10 83 00
for Austria, Belgium, Denmark, Finland, France, Germany,
Italy, Luxemburg, Netherlands, Norway, Portugal, Spain,
Sweden, Switzerland, United Kingdom
*Please note that some (mobile) phone services/ provider do
not permit access or request an additional prefix to +800
numbers.
For all not listed European Countries and in case that you
can’t get connected to the above mentioned number please
make use of the following
CHARGED NUMBERS:
+49 180 5 - 67 10 83 or +49 40 - 237 73 899
Our Technical Customer Support is available from 9am to 6pm MET
(Monday to Friday)
Tel: +49 40-23 77 3-0 Fax: +49 40-23 07 61
Page 10

© 2005 OLYMPUS IMAGING CORP.
PPO-E03_01Printed in Japan
 Loading...