

Page 1
DIGITAL PHOTO PRINTER
P-11
Instruction Manual
Manuel d’utilisation
Bedienungsanleitung
Manual de instrucciones
ENGLISH
FRANÇAIS
DEUTSCH
ESPAÑOL
)2
)40
)80
)120
Page 2
Thank you for purchasing the P-11 Digital Photo Printer. Read this manual carefully prior to use to ensure
optimum performance.
For customers in North and South America
For customers in USA
Declaration of Conformity
Product Name : Digital Photo Printer
ENGLISH
Model Number : P-11
Trade Name : OLYMPUS
Responsible Party :
Address : Two Corporate Center Drive, PO Box 9058, Melville, NY 11747-9058 U.S.A.
Telephone Number : 1-631-844-5000
Tested To Comply With FCC Standards
FOR HOME OR OFFICE USE
This device complies with Part 15 of the FCC rules. Operation is subject to the following two conditions:
(1) This device may not cause harmful interference.
(2) This device must accept any interference received, including interference that may cause
undesired operation.
FCC Notice
• Radio and Television Interference
Change or modifications not expressly approved by the manufacturer may void the user’s authority to
operate this equipment. This equipment has been tested and found to comply with the limits for a Class
B digital device, pursuant to Part 15 of the FCC Rules.
These limits are designed to provide reasonable protection against harmful interference in a residential
installation.
This equipment generates, uses, and can radiate radio frequency energy and, if not installed and used
in accordance with the instructions, may cause harmful interference to radio communications.
However, there is no guarantee that interference will not occur in a particular installation.
If this equipment does cause harmful interference to radio or television reception, which can be
determined by turning the equipment off and on, the user is encouraged to try to correct the
interference by one or more of the following measures:
- Adjust or relocate the receiving antenna.
- Increase the distance between the equipment and receiver.
- Connect the equipment to an outlet on a circuit different from that to which the receiver is connected.
- Consult your dealer or an experienced radio/TV technician for help.
WARNING: The connection of a non-shielded equipment interface cable to this equipment will
invalidate the FCC Certification of this device and may cause interference levels which exceed the
limits established by the FCC for this equipment. It is the responsibility of the user to obtain and use a
shielded equipment interface cable with device. Changes or modifications not expressly approved by
the manufacturer could void the user’s authority to operate the equipment.
Any unauthorized changes or modifications to this equipment would void the user’s authority to
operate.
For customers in Canada
This Class B digital apparatus complies with Canadian ICES-003.
For customers in Europe
“CE” mark indicates that this product complies with the European requirements for safety, health,
environment and customer protection. “CE” mark printers are intended for sales in Europe.
This symbol [crossed-out wheeled bin WEEE Annex IV] indicates separate collection of waste
electrical and electronic equipment in the EU countries. Please do not throw the equipment into the
domestic refuse.
Please use the return and collection systems available in your country for the disposal of this product.
Trademarks
Windows is registered trademark of Microsoft Corporation.
All other brand names and product names appearing in this instruction manual are trademarks or
registered trademarks of their respective holders.
2
Page 3

Contents
Introduction
Safety precautions ..................................................................................... 4
Care and storage ....................................................................................... 9
What this printer can do ........................................................................... 10
Checking the accessories ........................................................................ 11
Identifying the parts.................................................................................. 12
Preparation
Connecting the power supply and turning on/off the printer..................... 14
Loading the ink ribbon cartridge............................................................... 16
Loading paper .......................................................................................... 19
Removing the paper tray from the printer ......................................................... 19
Loading paper into the paper tray..................................................................... 20
Inserting the paper tray into the printer............................................................. 22
Printing
Printing pictures from a digital camera..................................................... 23
About PictBridge compatible digital cameras ................................................... 23
Connecting a digital camera to the printer ........................................................ 23
Using the digital camera to control the print operation ..................................... 24
Printing pictures from a computer ............................................................ 26
Installing the printer driver (during initial setup) ................................................ 26
Connecting a computer to the printer ............................................................... 26
Printing.............................................................................................................. 28
ENGLISH
Introduction
Preparation Printing
For Your Reference
If an indicator is lit or blinking ................................................................... 30
Troubleshooting ....................................................................................... 31
If paper is jammed ............................................................................................ 32
If the ink ribbon cartridge is removed during printing........................................ 33
Replenishing the paper supply and replacing the ink ribbon cartridge..... 34
If paper runs out during printing........................................................................ 34
If the ink ribbon runs out during printing ........................................................... 34
About the print pack (ink ribbon cartridge and paper) .............................. 35
Specifications ........................................................................................... 37
Service and maintenance......................................................................... 38
Definition of terms .................................................................................... 39
For Your
Reference
3
Page 4
ENGLISHPreparationPrinting
Introduction
Safety precautions
Various icons are used in this manual to indicate correct product use,
and help prevent property damage and injury to you and others. The
meanings of these icons are described below.
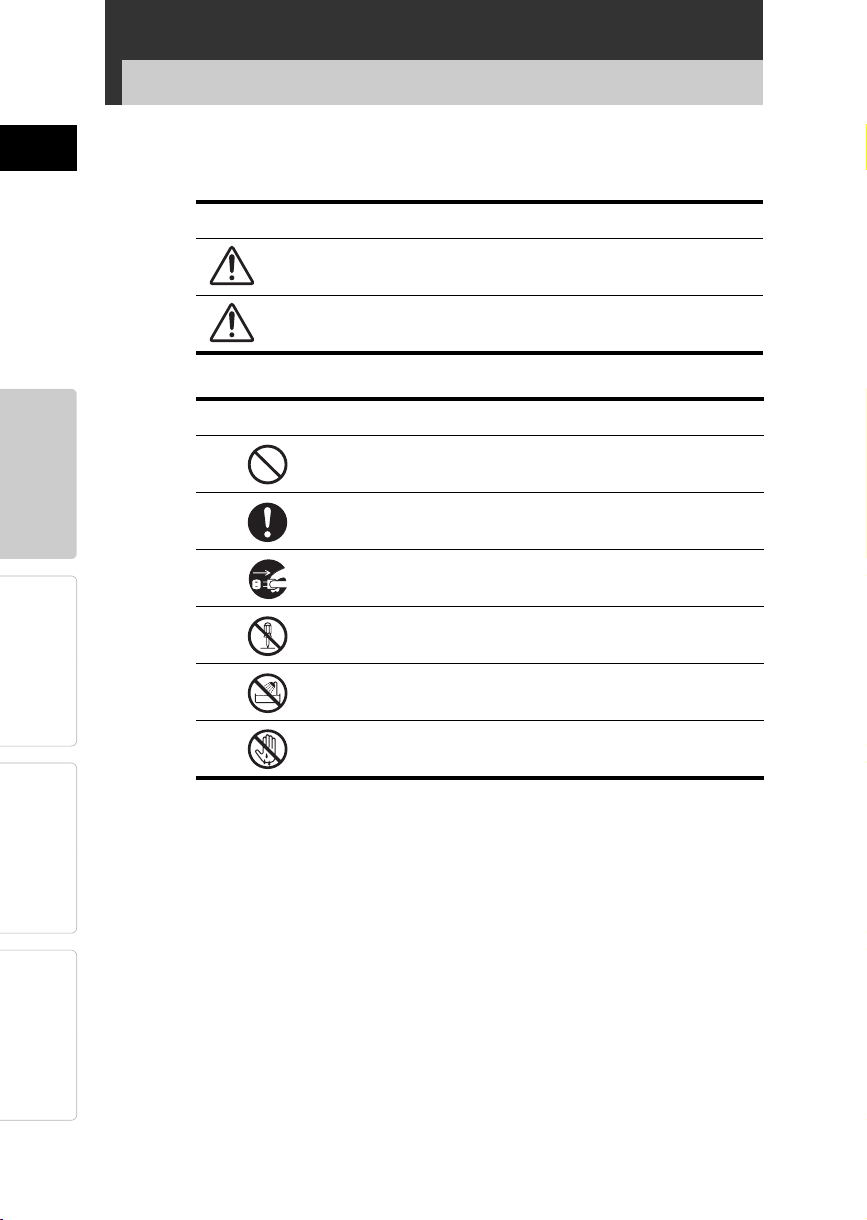
Icon Description
WARNING
Failure to follow instructions indicated by this
icon may lead to serious injury or death.
Introduction
CAUTION
Precautionary notations are indicated by the following symbols.
Icon Description
Failure to follow instructions indicated by this
icon may lead to injury or property damage.
Do not perform this action.
You are strongly encouraged to perform this action.
Unplug the device from the power source.
Do not disassemble.
Avoid contact with water and other liquids.
Do not touch if your hands are wet.
For Your
Reference
4
Page 5
WARNING
Safety precautions
J If this device acts abnormally, unplug it
Do not use the printer if it emits smoke, unusual smells, strange
sounds, or becomes unusually warm.
Use under these conditions may cause fire or electric shock.
Turn off and unplug the printer. Then contact your nearest Olympus
service center.
J Should any liquid or foreign objects get into the printer, unplug
the power cord
Do not allow any liquids, metals, or flammable objects to get into the
printer through the ventilation holes.
This may cause fire or electric shock.
Turn off and unplug the printer. Then contact your nearest Olympus
service center.
J If the printer cabinet is damaged, unplug the power cord
Do not use this device if the cabinet (body) is damaged.
Use in this condition may cause fire or electric shock.
Turn off and unplug the printer. Then contact your nearest Olympus
service center.
J If the power cord is damaged, unplug it
Do not use a damaged power cord.
Use in this condition may cause fire or electric shock.
Turn the printer off, and unplug the power cord being careful not to
touch any exposed wires. Then contact your nearest Olympus
service center.
ENGLISH
Introduction
Preparation Printing
For Your
Reference
5
Page 6
Safety precautions
WARNING
J Do not damage the power cord
Do not damage or modify the power cord.
A damaged power cord may result in fire or electric shock. To
ENGLISHPreparationPrinting
Introduction
prevent the cord from becoming damaged, DO NOT: pull on the
cord to unplug it, bend the cord excessively, or place heavy objects
on the cord.
If the power cord is damaged, contact your nearest Olympus
service center.
J Do not disassemble or modify the printer
The printer has both hot and high voltage parts on the inside.
Touching these parts may result in burns, electric shock, and/or
damage to the printer. Never attempt to disassemble or modify the
printer as this may lead to electric shock or printer malfunction.
For service or repair, contact your nearest Olympus service center.
J Do not allow liquids near the printer
If liquid gets into the printer, it may result in fire or electric shock.
J Do not place heavy objects on the printer
Heavy objects may damage the printer cabinet, resulting in fire or
electric shock.
Damage may also result from the printer being dropped or falling.
J Do not install the printer in the following places
For Your
Reference
6
To prevent fire, electric shock, and printer malfunction, do not install
the printer in the following places:
Dusty, humid, or oily places
Should any dust or liquid get into the printer, it may result in fire
or electric shock.
Extremely hot places
Do not expose the printer to direct sunlight (for example, inside a
car or near a window) or extremely high temperatures (for
example, near a heater). Doing so may damage the printer
cabinet, resulting in fire or electric shock.
Use the printer in an environment with an ambient temperature
between 5 to 35°C (41 to 95°F) and humidity of 20 to 80%.
Page 7
WARNING
Safety precautions
J Do not use the printer in the following places
Unstable or inclined surfaces.
Outdoors (particularly on beaches, etc.), or places that expose
the printer to excessive dust or debris.
Places subject to rain, dripping, or enclosed places where
condensation could occur such as inside a plastic bag.
J Do not use the printer with an AC adapter or power cord other
than that specified/provided
J Do not use the provided AC adapter or power cord with any
other devices
J Provide correct voltage
Incorrect voltage may damage printer parts.
Use with incorrect voltage may cause fire or electric shock.
J Connect the power cord correctly/safely
For example, if the power cord is plugged in loosely, it may cause a
fire or electric shock.
Push the plug all the way into the outlet.
J Make sure that excessive dust and debris do not accumulate
on the power cord
Dust and debris may conduct electricity, which can cause fire and
electric shock.
If excessive dust and debris accumulate on the cord, unplug the
cord and clean it.
ENGLISH
Introduction
Preparation Printing
J Always unplug the power cord during an electrical storm
The induced electricity from storms may cause fire, electric shock,
or printer malfunction.
J Do not hold the power cord plug with wet hands
Doing so may result in fire, electric shock, or printer malfunction.
Be sure your hands are dry before handling.
J Plug the printer directly into an outlet
Avoid plugging into a socket that is already being used by several
appliances.
For Your
Reference
7
Page 8
Safety precautions
CAUTION
J Do not put the printer on an unstable surface
Do not put the printer on an unstable surface such as a shaky table.
Injury may result from the printer being dropped or falling. This
ENGLISHPreparationPrinting
Introduction
could also damage the printer or cause the printer to malfunction.
J Do not touch the non-user-serviceable parts inside the printer
Doing so may cause injury or burns. This applies especially to
children and those unfamiliar with the printer.
J Do not move the printer when the power cord is taut
Moving the printer when the power cord is taut may damage the
cord.
Using the printer when damaged may cause fire or electric shock.
When moving the printer, unplug and bundle the power cord.
J Do not unplug the printer by jerking or pulling on the power
cord
To unplug the power cord, hold it by the plug. Pulling on the cord
may damage it, possibly resulting in fire or electric shock.
J Unplug the printer for servicing
Always unplug the printer before servicing or performing
maintenance.
J Unplug the printer if it will not be used for an extended period
For Your
Reference
8
of time
Unplug the printer if it will not be used for an extended period of
time, such as while you are away on a long trip.
Otherwise, deteriorated insulation or current leakage may cause fire
or electric shock.
Page 9

Care and storage
Protect against moisture condensation
Moisture condensation is water vapor in the air that becomes liquid, and collects on
the printer surface.
This phenomenon occurs under the following conditions.
The room in which the printer is placed is rapidly heated or cooled.
The printer is directly subjected to cool air, such as from an air conditioner.
The printer is moved from a cold place to a warm place.
Moisture in the air condenses on the paper, deteriorating print quality or causing
paper jams.
Under conditions where condensation has occurred or may occur, do not operate
the printer until it is dry or until there is no possibility that condensation will occur.
ENGLISH
Do not spray on or allow volatile solvents to come in
contact with the printer
Spraying an insecticide near the printer, or wiping it with thinner or benzene for
example, may damage or discolor the printer cabinet.
Use a soft cloth to clean the outside of the printer cabinet. For difficult to remove
stains, dampen a soft cloth with water or a mild detergent diluted with water, and
wring out the cloth to remove as much of the moisture as possible before wiping the
outside of the cabinet.
Do not allow the printer to be in contact with rubber
or plastic products for an extended period of time
Deterioration and discoloration may occur if the printer is in contact with rubber or
plastic products for an extended period of time.
Operate the printer at least once every six months
If the printer is not used for an extended period of time, it may malfunction.
Operate the printer at least once every six months.
Carry the printer with both hands
When lifting or carrying the printer, use both hands.
Transport the printer carefully
Introduction
Preparation Printing
For Your
Reference
When transporting the printer, place it in the original box with the original packing
material. If you don’t have the original packaging, pack the printer with enough
cushioning material to absorb any impacts during transportation.
9
Page 10

ENGLISHPreparationPrinting
What this printer can do
Direct Print
The printer supports the PictBridge standard for communication
between a digital camera and printer. If you connect a PictBridge
compatible digital camera to the printer using the USB cable supplied
with the digital camera, you can print pictures directly from the digital
camera.
Variety of prints
The printer supports multi prints where multiple copies of the same
picture are printed on one sheet, index prints where multiple different
pictures are printed on one sheet, date prints where the date and time
are included, and edged (bordered)/not edged (borderless) prints.
Note
Some functions may be limited depending on the digital camera
connected.
Introduction
For Your
Reference
Printing from a computer
If you connect a computer to the printer using a commercially available
USB cable, you can print pictures stored on the computer.
We recommend using OLYMPUS Master or OLYMPUS Master Plus for
easy printing and management of your digital pictures.
High-quality overcoat printing
High-quality overcoat printing ensures long lasting and durable prints.
This is especially useful for printing important pictures you wish to
treasure for years to come.
Printing 50 sheets continuously
The supplied paper tray can continuously supply up to 50 sheets of
paper to the printer. A single sheet takes about 30 seconds to print (for
3.5" × 5" paper, this excludes the data transmission time from the digital
camera or computer).
10
Page 11
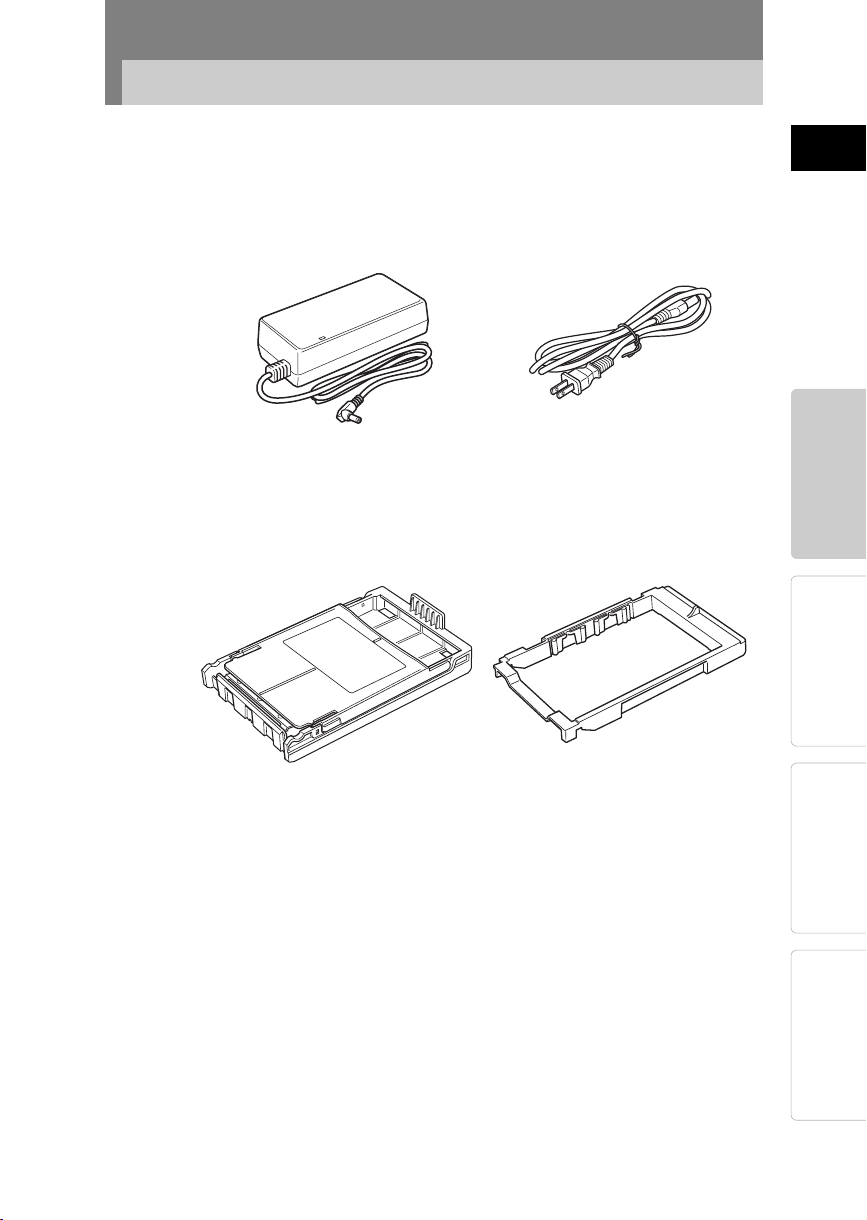
Checking the accessories
When unpacking the printer, make sure that the following accessories
are included.
If any accessories are missing, contact your nearest Olympus service
center.
AC adapter (1) Power cord (1)
ENGLISH
Introduction
Paper tray (1)
(The paper tray is already inserted into the printer at the time of purchase.)
Starter kit
Ink ribbon cartridge for 4 × 6 printing (for 5 prints) and
4 × 6 inch paper (5 sheets)
Instruction manual (this manual) (1)
Warranty card (1)
CD-ROM (printer driver) (1)
Conversion tray (for 3.5" × 5") (1)
(This tray is in the paper tray.)
(Place this tray in the paper tray.
Depending on area, may not be
supplied with printer.)
Preparation Printing
For Your
Reference
11
Page 12
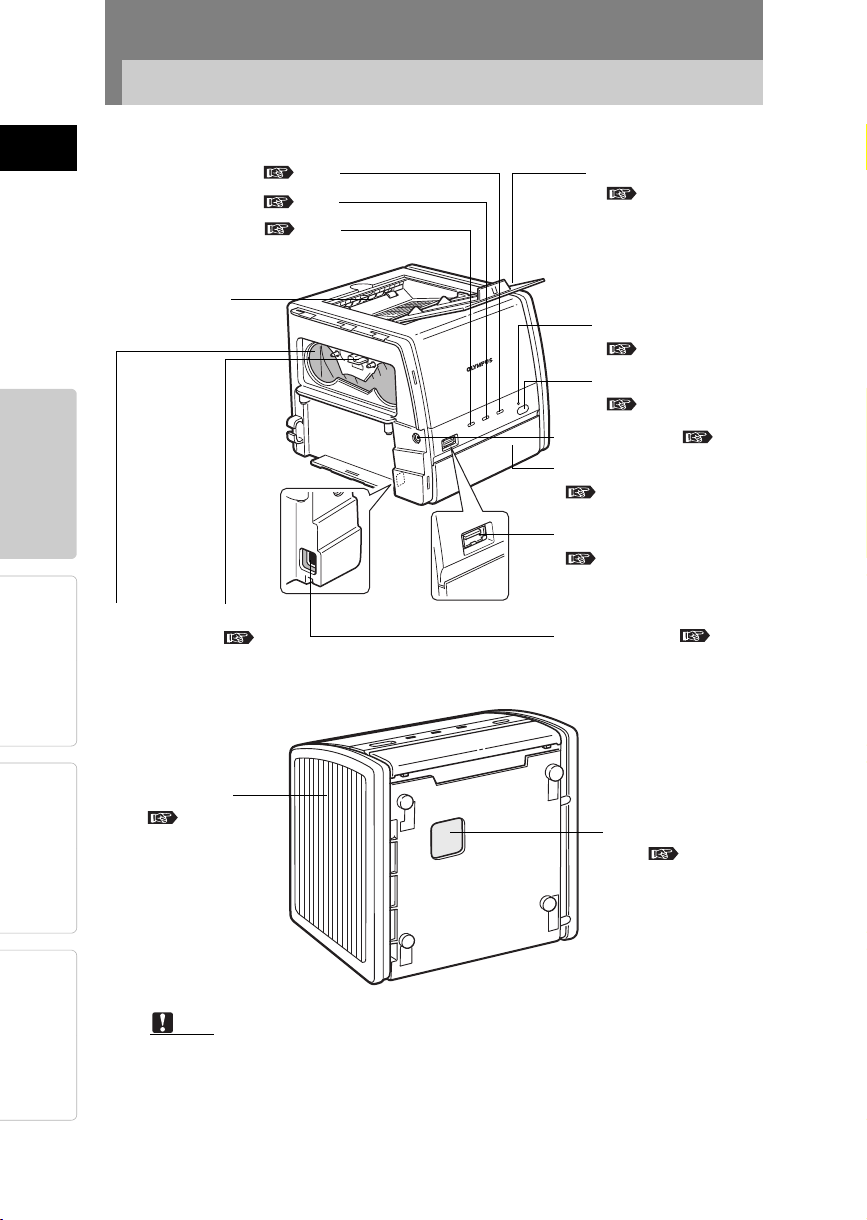
Identifying the parts
QFront
RIBBON indicator ( P.30)
PAPER indicator ( P.30)
ACCESS indicator ( P.30)
ENGLISHPreparationPrinting
Paper eject
section
Introduction
Paper output tray
( P.24, 27)
POWER indicator
( P.30)
POWER button
( P.15)
DC-IN terminal ( P.14)
Paper tray door
( P.19, 22)
PictBridge connector
( P.23)
For Your
Reference
12
Cartridge
slot
Side cover
( P.14)
Note
Ta b
( P.17)
USB connector( P.27)
QBottom
Paper dispenser
slot ( P.32)
The left side cover can be removed but the right side cover cannot be
removed.
When the printer is not in use, keep the paper output tray closed.
Page 13
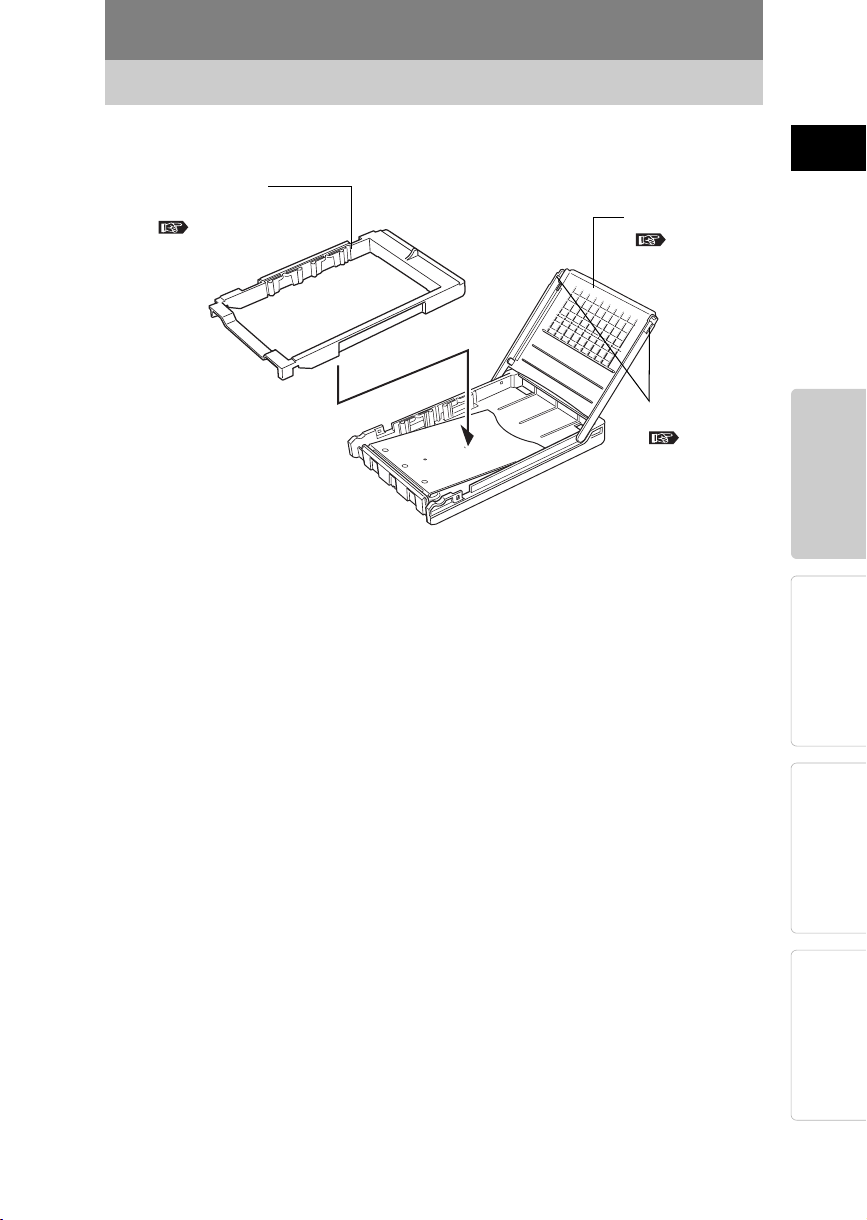
QPaper tray
Identifying the parts
Conversion tray
(for 3.5" × 5")
( P.20, 21)
Tray cover
( P.20)
Tray cover tab
( P.20)
ENGLISH
Introduction
Preparation Printing
13
For Your
Reference
Page 14
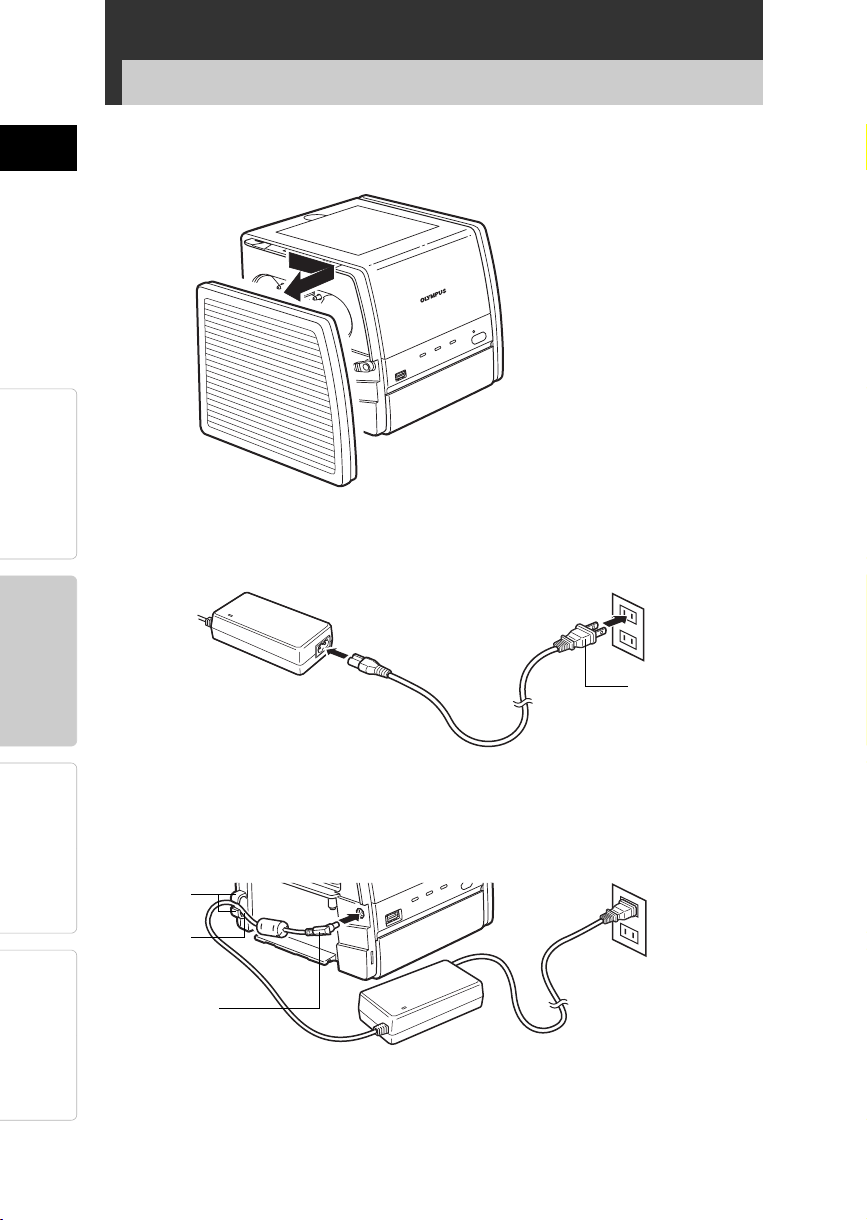
Preparation
Connecting the power supply and turning on/off the printer
1 Remove the left side cover of the printer.
2 Connect the power cord to the AC adapter and insert the power
plug into an outlet.
PreparationPrinting Introduction ENGLISH
For Your
Reference
14
Power plug
3 Connect the DC plug to the DC-IN terminal of the printer and set
the cord in the guide on the printer as shown in the picture.
Be sure to pass the cord through the guide.
Guide
Cord
DC plug
Page 15
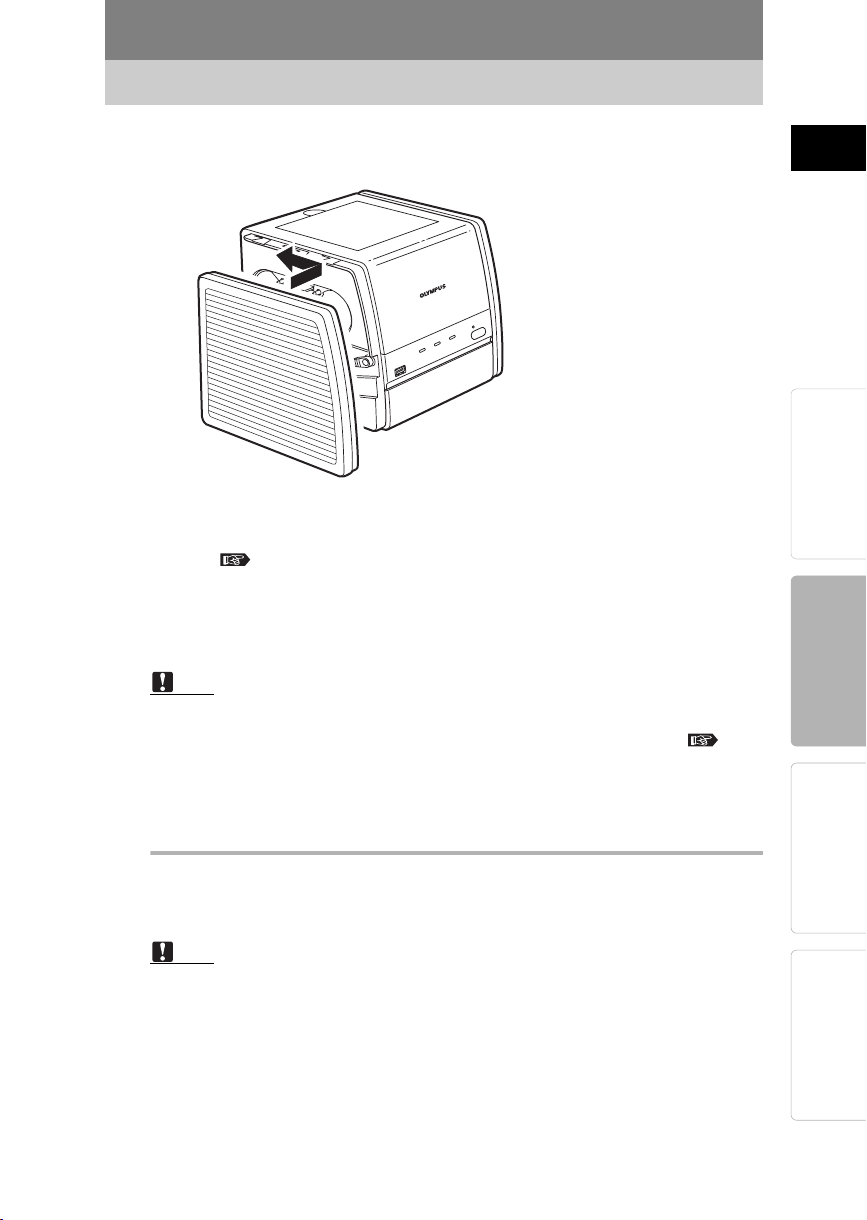
Connecting the power supply and turning on/off the printer
4 Attach the side cover.
If this is your first time using the printer, load the ink ribbon cartridge
before you attach the side cover.
See page 16. “Loading the ink ribbon cartridge”
5 Press the POWER button.
The POWER indicator lights and the printer turns on.
Note
If you are connecting a digital camera, turn on the printer, then connect the
digital camera to the printer before turning on the digital camera. P.23
If you are connecting a computer, connect the computer to the printer, then
turn on the printer before turning on the computer.
ENGLISH
Introduction
Preparation Printing
Turning off the printer
Press the POWER button.
The POWER indicator goes out when the printer turns off.
Note
If the DC plug is accidentally unplugged during printing, reinsert the DC
plug and turn on the printer. Leaving the printer without restoring the power
may cause a malfunction.
15
For Your
Reference
Page 16

Loading the ink ribbon cartridge
ENGLISHPreparationPrinting Introduction
About the print pack
You need the supplied starter kit or an optional print pack for printing.
Always use the ink ribbon cartridge together with the paper supplied
in the same pack.
Do not reuse paper that has been printed on or fed through the
printer.
1 Remove the left side cover.
See page 14. “Connecting the power supply and turning on/off the
printer”
For Your
Reference
16
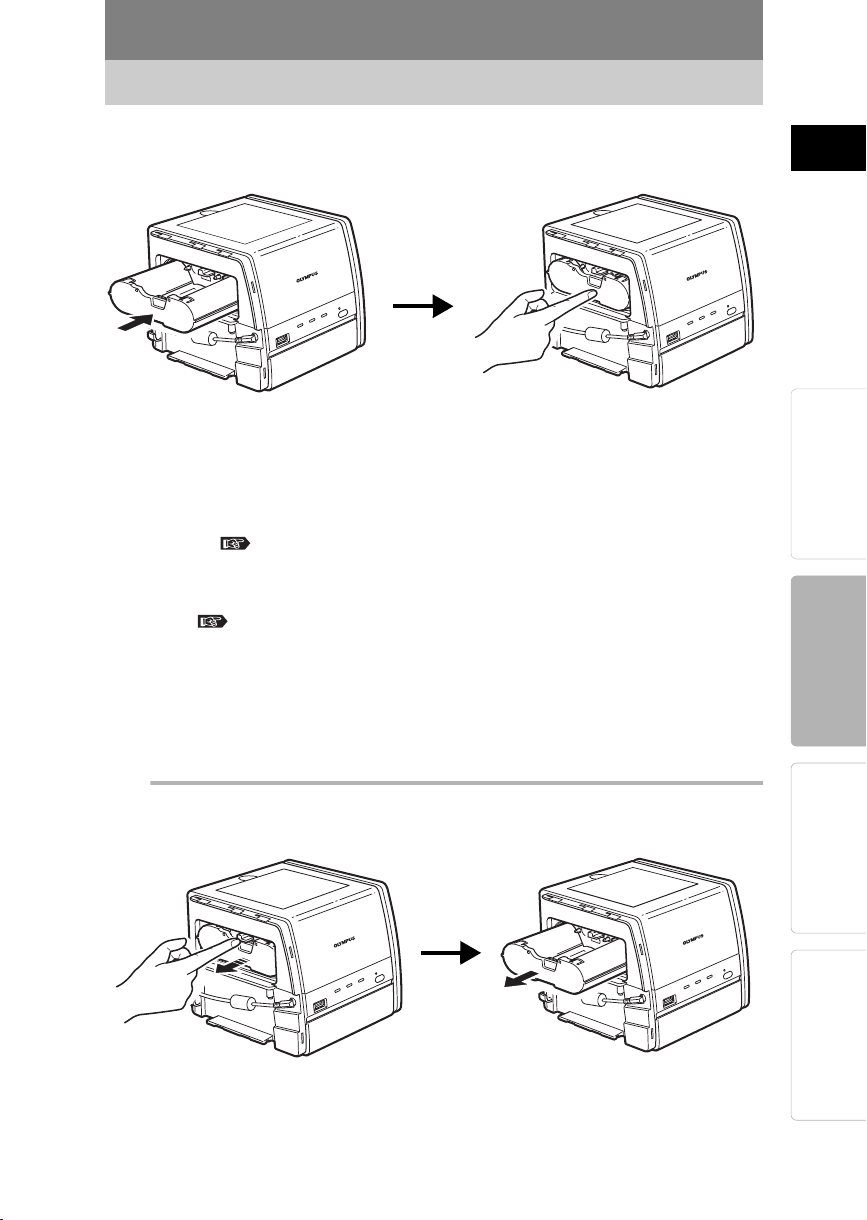
2 Release the ink ribbon cartridge stop and wind the ink ribbon to
remove any slack.
While pressing the center of the reel,
wind the ink ribbon in the direction of
the arrow.
To continue using a partially used ink ribbon cartridge, reinsert it
after removing any slack as shown in the picture.
Page 17
Loading the ink ribbon cartridge
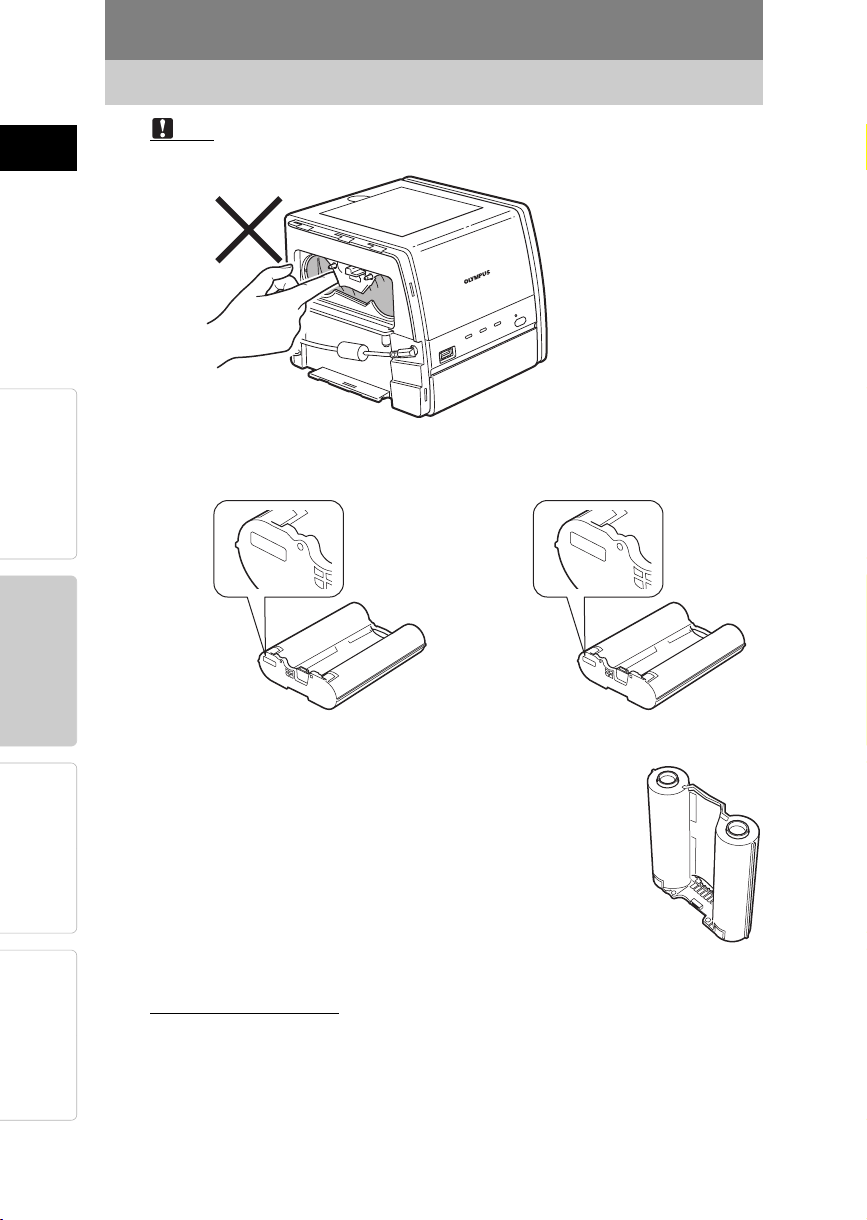
3 Insert the ink ribbon cartridge all the way.
Remove the protective material from the cartridge slot and insert the
ink ribbon cartridge.
The RIBBON indicator blinks and an error will be generated if you do
not press from the center of the ink ribbon cartridge to slide it all the
way until you hear a clicking sound.
See page 30. “If an indicator is lit or blinking”
4 Attach the side cover.
See page 14. “Connecting the power supply and turning on/off the
printer”
If the side cover cannot be attached properly, remove the ink ribbon
cartridge and then reinsert it.
ENGLISH
Introduction
Preparation Printing
Removing the ink ribbon cartridge
Lift up the tab to release the ink ribbon cartridge, and remove the
cartridge.
17
For Your
Reference
Page 18
Loading the ink ribbon cartridge
Note
Do not touch the inside of the cartridge slot because it may be very hot.
ENGLISHPreparationPrinting Introduction
The print packs are either for 4 × 6 or 3.5" × 5" printing. Use an ink ribbon
cartridge for 4 × 6 printing when printing on 4 × 6 paper and use an ink
ribbon cartridge for 3.5" × 5" printing when printing on 3.5" × 5" paper.
For Your
Reference
P
P
Ink ribbon cartridge
for 4 × 6 printing
L
L
Ink ribbon cartridge
for 3.5" × 5" printing
When setting an ink ribbon cartridge down, stand it on its
side to avoid getting dust on the ink ribbon.
Do not touch the ink ribbon, or leave it in a place
subject to excessive dust.
Fingerprints or dust on the ink ribbon may degrade
print quality.
If the ink ribbon tears, replace the ink ribbon cartridge with a new one.
Storage considerations
Do not store the ink ribbon cartridge in a place subject to high temperature
or humidity, excessive dust, or direct sunlight.
18
Page 19
Loading paper
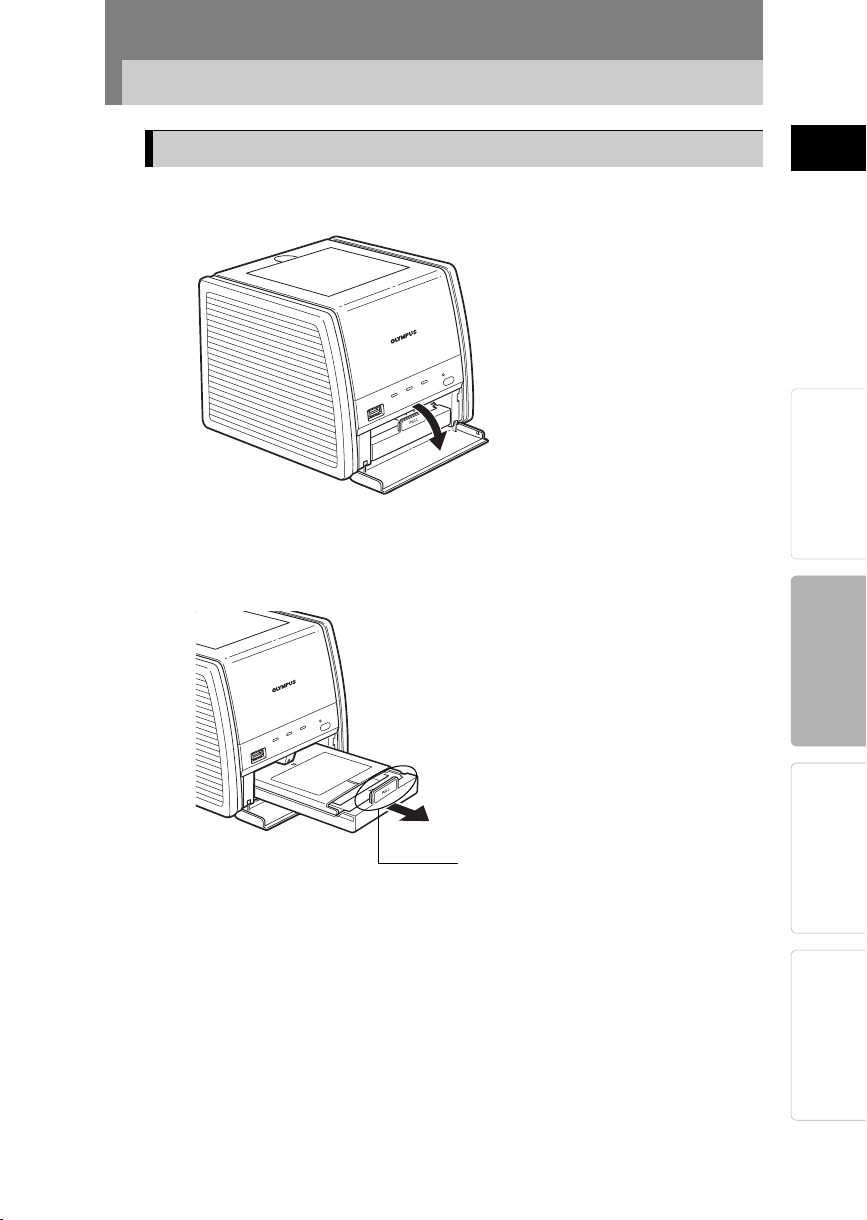
Removing the paper tray from the printer
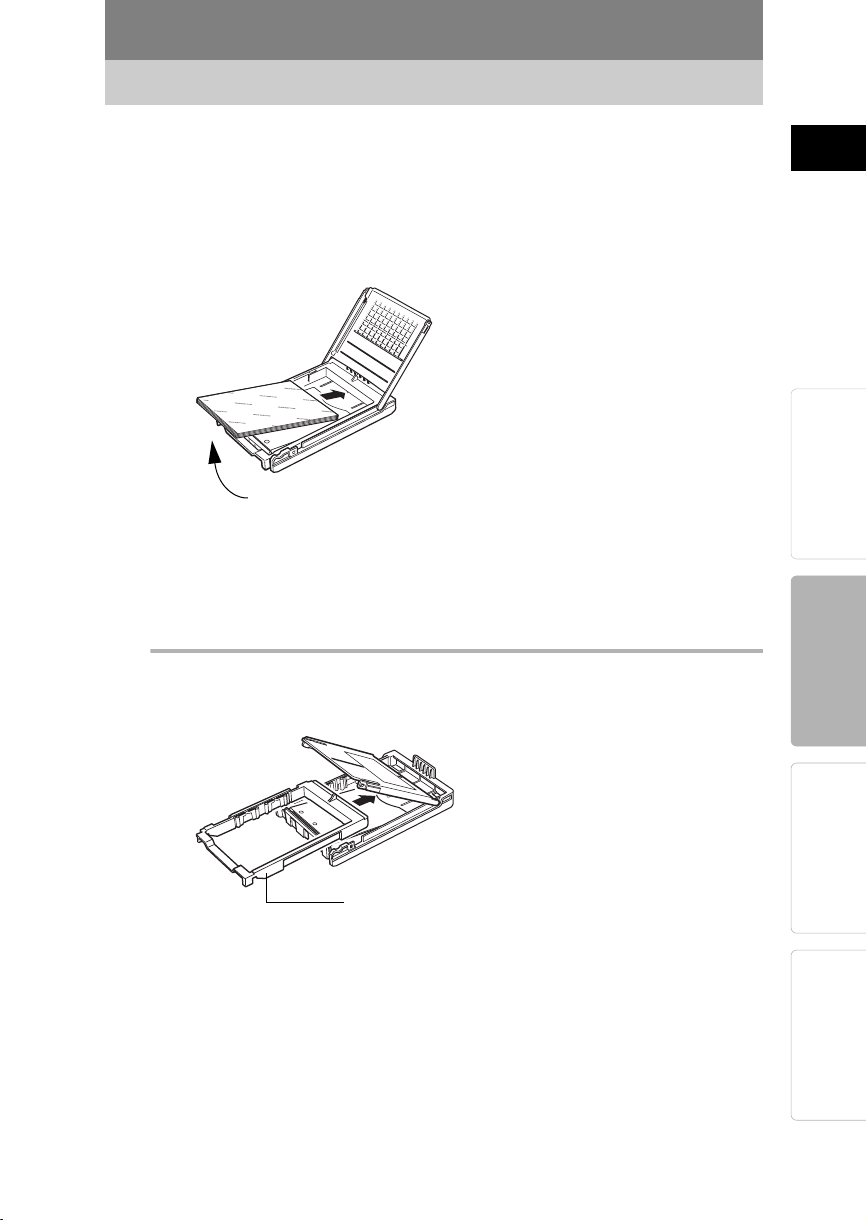
1 Open the paper tray door by pulling it towards you.
2 Hold the part indicated by “PULL” and pull towards you.
ENGLISH
Introduction
Preparation Printing
PULL
19
For Your
Reference
Page 20
Loading paper
Loading paper into the paper tray
Note
ENGLISHPreparationPrinting Introduction
Always use specialty paper. Using paper other than specialty paper
such as inkjet printer paper may cause a printer failure such as paper
becoming jammed or sticking to the ink ribbon.
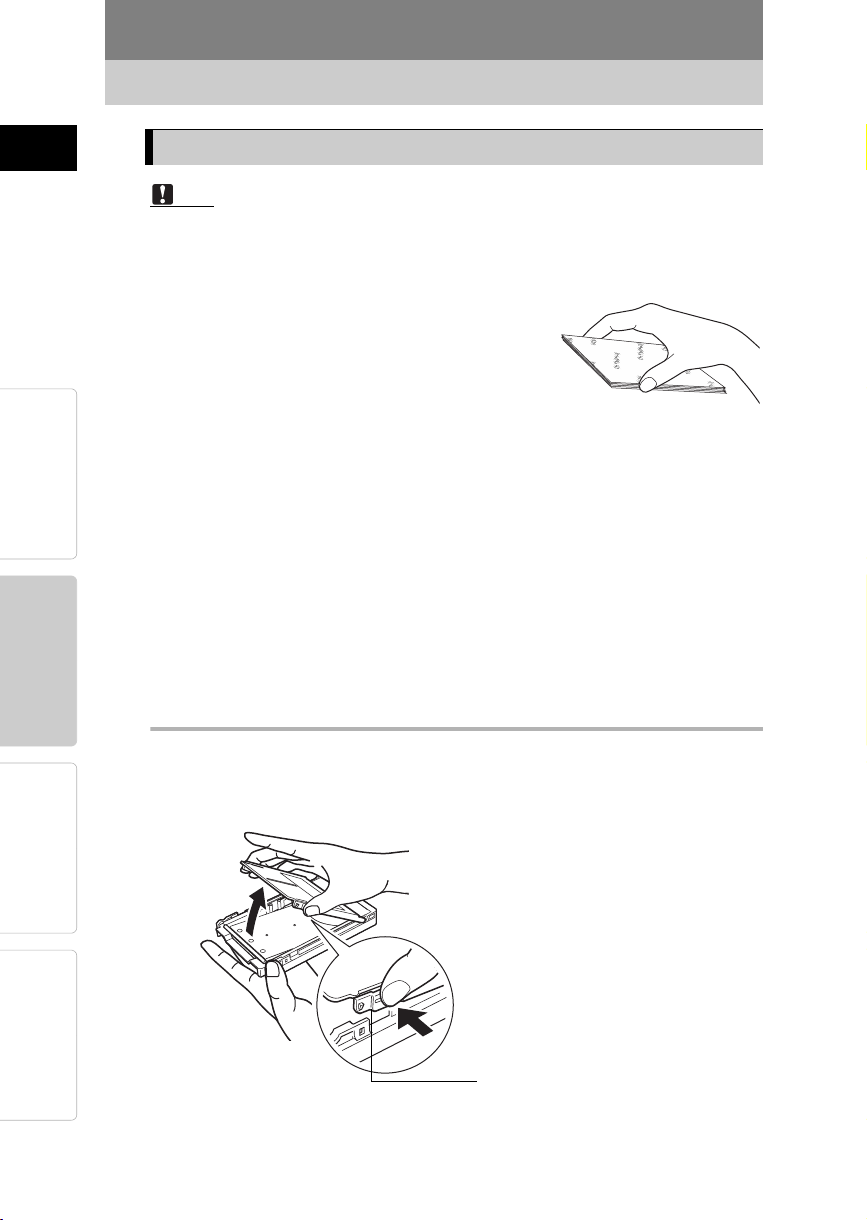
Do not touch the print surface (the blank,
glossy surface) when handling paper.
Do not store paper in a place subject to high temperature, high humidity, or
direct sunlight.
Do not leave paper in a place subject to excessive dust. Fingerprints or
dust on the print surface may degrade print quality.
Up to 50 sheets of paper can be placed in the paper tray. Be careful not to
exceed this number when loading additional paper. Loading too many
sheets of paper may cause a paper jam.
Folding or bending paper may cause a paper jam.
Do not write on paper before printing a picture on it. If you want to write
something, use an oil based pen after printing. It is not possible to print
characters on this paper from a word processor or typewriter.
Printing on 4 × 6 paper
1 Open the tray cover while simultaneously pressing in both tray
cover tabs, and then remove the conversion tray.
For Your
Reference
20
Tray cover tab
Page 21
Loading paper
2 Load paper into the paper tray so that the print surface is facing
down.
Remove the protective sheet before loading paper.
Up to 50 sheets can be loaded.
Print surface facing down
3 Close the cover of the paper tray.
Be careful not to trap paper between the cover and tray.
Printing on 3.5" × 5" paper
When using 3.5" × 5" paper for printing, insert the conversion tray in the
paper tray before loading paper.
ENGLISH
Introduction
Preparation Printing
Conversion tray
Be careful not to stain or damage the conversion tray.
21
For Your
Reference
Page 22
Loading paper
ENGLISHPreparationPrinting Introduction
Inserting the paper tray into the printer
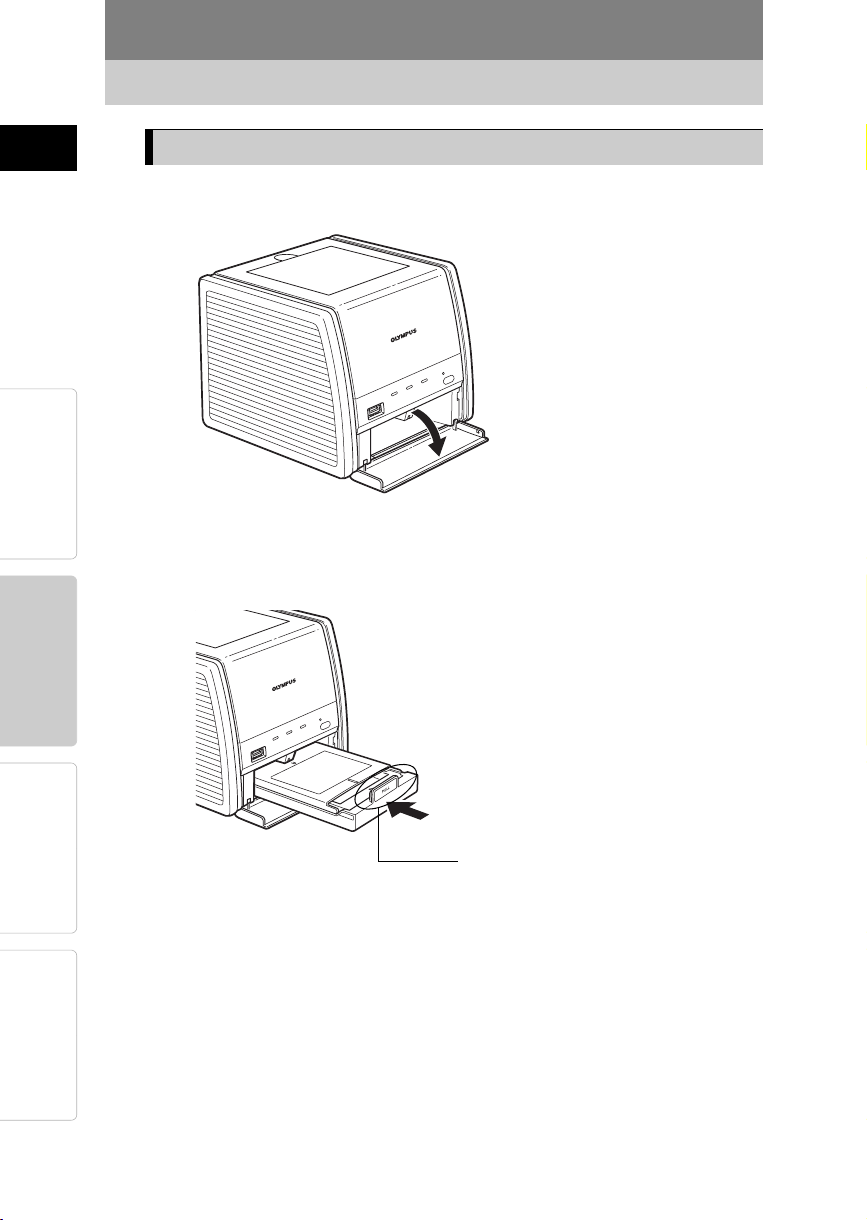
1 Open the paper tray door by pulling it towards you.
2 Insert the paper tray all the way.
For Your
Reference
22
PULL
Insert the paper tray until it locks into place with a click.
When removing the paper tray, hold the part indicated by “PULL” and pull
towards you.
Close the paper tray door after inserting the paper tray.
Page 23
Printing
Printing pictures from a digital camera
About PictBridge compatible digital cameras
You can connect any PictBridge compatible digital camera to the printer
and print pictures.
The printing procedure may vary depending on the digital camera. For
details on printing, refer to the instruction manual for the digital camera.
Information about PictBridge compatible digital cameras is also
available on the Olympus web site.
Default printer settings when using PictBridge is used are as follows.
Paper size: Size of the paper loaded in the printer.
Copy count: 1
Not edged (borderless) printing.
Date printing: No.
File name printing: No.
Note
Pictures not taken with a digital camera must be printed from a computer.
Connecting a digital camera to the printer
ENGLISH
Introduction
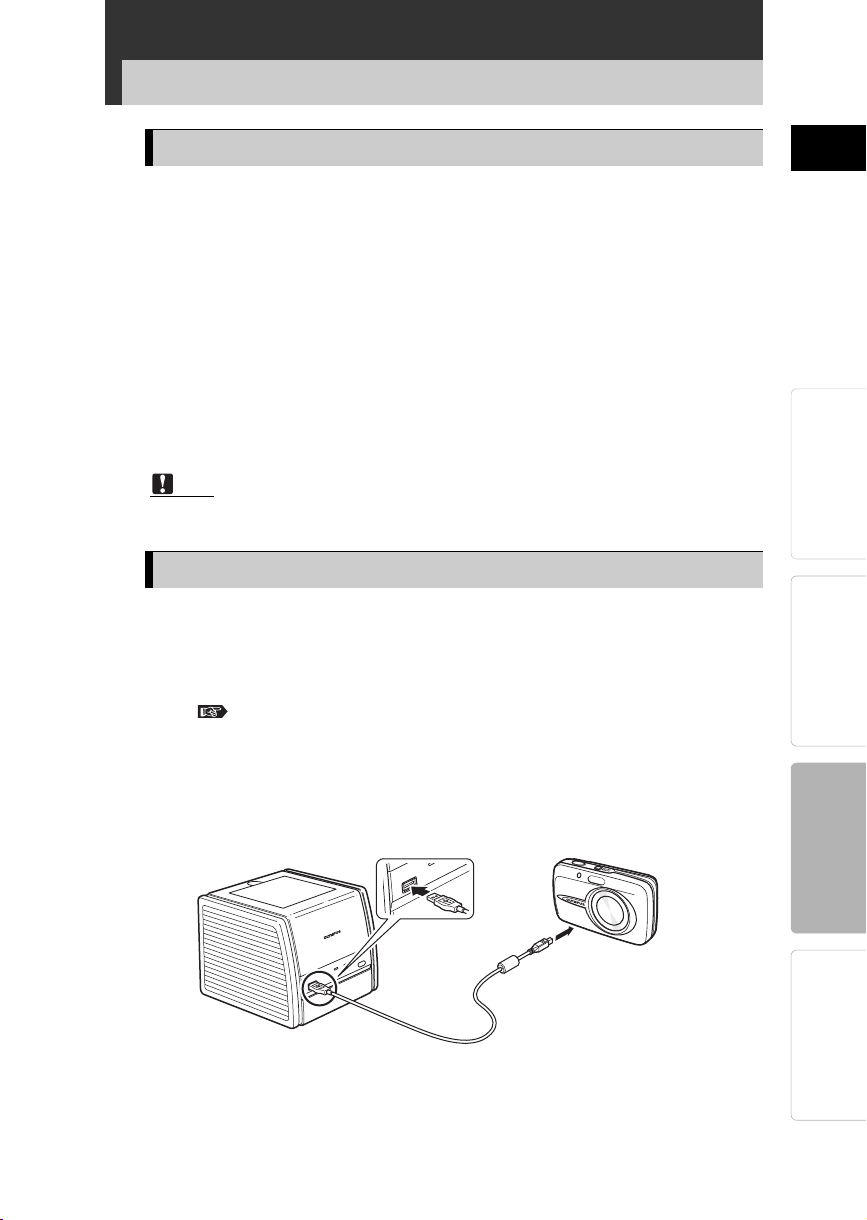
Connect the digital camera to the printer using the USB cable
supplied with the digital camera.
1 Plug in and turn on the printer.
See page 14. “Connecting the power supply and turning on/off the
printer”
2 Insert one plug of the USB cable into the digital camera USB
connector, and the other plug into the PictBridge connector on
the front of the printer.
23
Preparation Printing
For Your
Reference
Page 24
Printing pictures from a digital camera
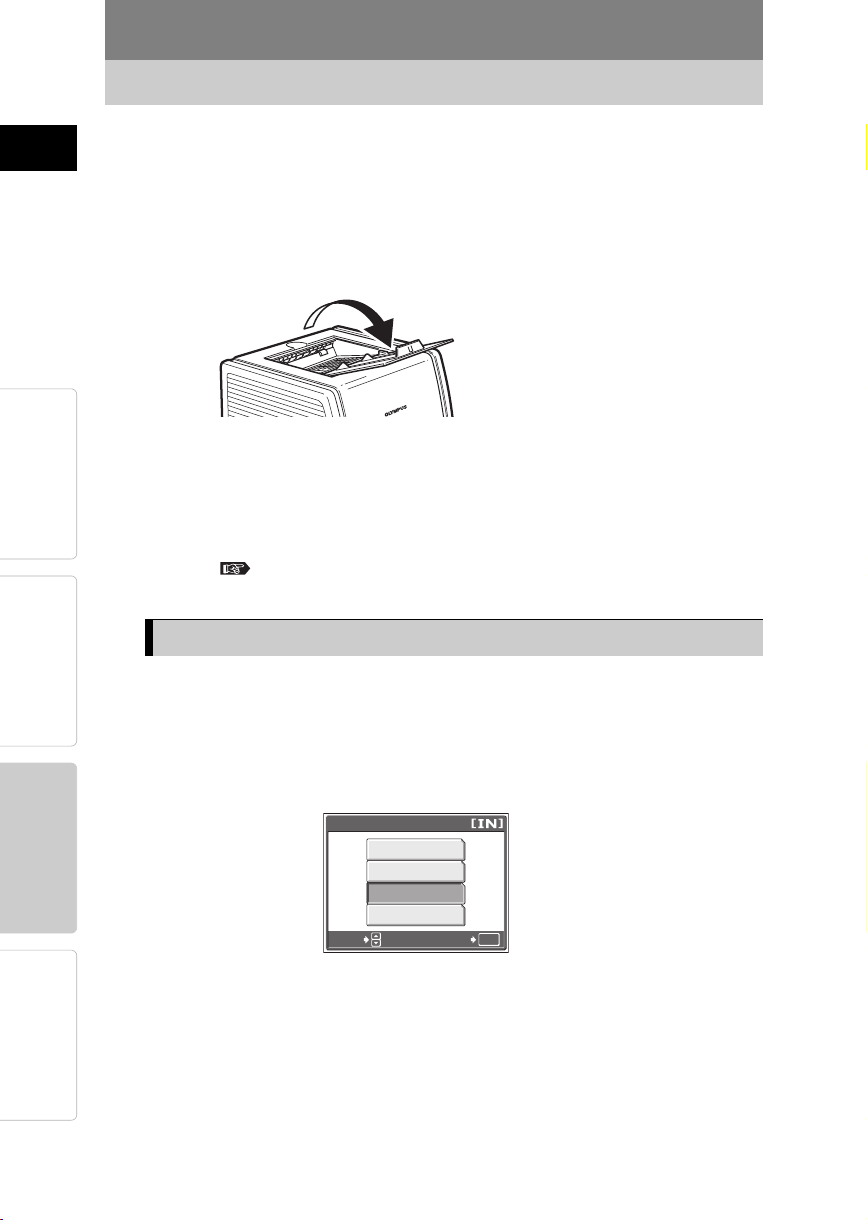
3 Open the paper output tray of the printer.
Open the paper output tray before you use the printer.
If it is not open when the printer is used, paper may be jammed
or the printer may be damaged.
When the printer is not in use, keep the paper output tray closed to
prevent dust and foreign objects from entering.
4 Turn on the digital camera, and set it so it is ready to print.
The ACCESS indicator on the printer lights briefly before turning off.
Introduction ENGLISH
The monitor of the digital camera turns on and printing related
operations can be performed.
For details on operating the digital camera, refer to the
instruction manual for the digital camera.
Using the digital camera to control the print operation
PreparationPrinting
For Your
Reference
24
1 Control print operations using the digital camera.
Follow the onscreen instructions displayed on the monitor of the
digital camera to print.
Sample digital camera display
Screens and menu items may differ depending on the camera.
USB
P C
EASY PRINT
CUSTOM PRINT
EXIT
SELECT
The following functions can be selected on this screen.
[EASY PRINT] Selecting this is a quick and easy way to print one
copy of the picture displayed on the camera’s LCD.
CUSTOM PRINT]Allows you to select the pictures you want to print, the
[
or [PRINT]
number of copies, size, and with or without borders.
GO
OK
Page 25

Printing pictures from a digital camera
After printing begins, the ACCESS indicator on the printer blinks.
When printing is finished, the indicator turns off.
For details on operating the digital camera, refer to the
instruction manual for the digital camera.
2 After printing is complete, turn off the digital camera and printer
before disconnecting the USB cable.
Note
Do not remove the ink ribbon cartridge or paper tray during printing.
Do not move the printer during printing.
Do not turn off the printer and digital camera or disconnect the AC adapter
during printing. In the event that the power is turned off or the AC adapter is
disconnected, turn the power back on. After the paper is automatically
ejected, perform the operation again. Leaving the printer without restoring
the power may cause a malfunction.
If printing does not start up again after you and more paper, remove the
ribbon cartridge once and then insert it again. Printing will resume
automatically.
If the print setting [Not Edged] (borderless) is selected, the edges of
pictures will be cut off during printing because the width and height ratio
with which pictures are taken by the camera is usually 4:3.
When taking pictures, make sure the composition sufficiently compensate
for this.
If the print setting [Edged] (bordered) is selected, the picture size will be
smaller but the whole picture will be printed.
ENGLISH
Introduction
Preparation Printing
25
For Your
Reference
Page 26
ENGLISHPreparationPrinting
Printing pictures from a computer
We recommend using OLYMPUS Master (supplied with every Olympus
digital camera), OLYMPUS Master Plus, Olympus Studio or other
image processing application to print pictures stored on your computer.
Note
Pictures not taken with a digital camera must be printed from a computer.
Installing the printer driver (during initial setup)
Supported operating systems: Windows 2000/XP
Note
Be sure to install the printer driver before you connect the computer to the
printer.
Introduction
For Your
Reference
1 Start the computer and insert the supplied CD-ROM into the CD-
ROM drive.
For details, refer to the installation guide on the supplied CD-ROM.
2 Follow the onscreen instructions to install the printer driver.
For details, refer to the instruction manual for the computer.
User registration
Registering your product enables you to activate your warranty
and receive information on product updates, special offers, and
more. You can register by using the supplied CD-ROM.
Connecting a computer to the printer
Use a commercially available USB cable (Type A-B) to connect to
the printer.
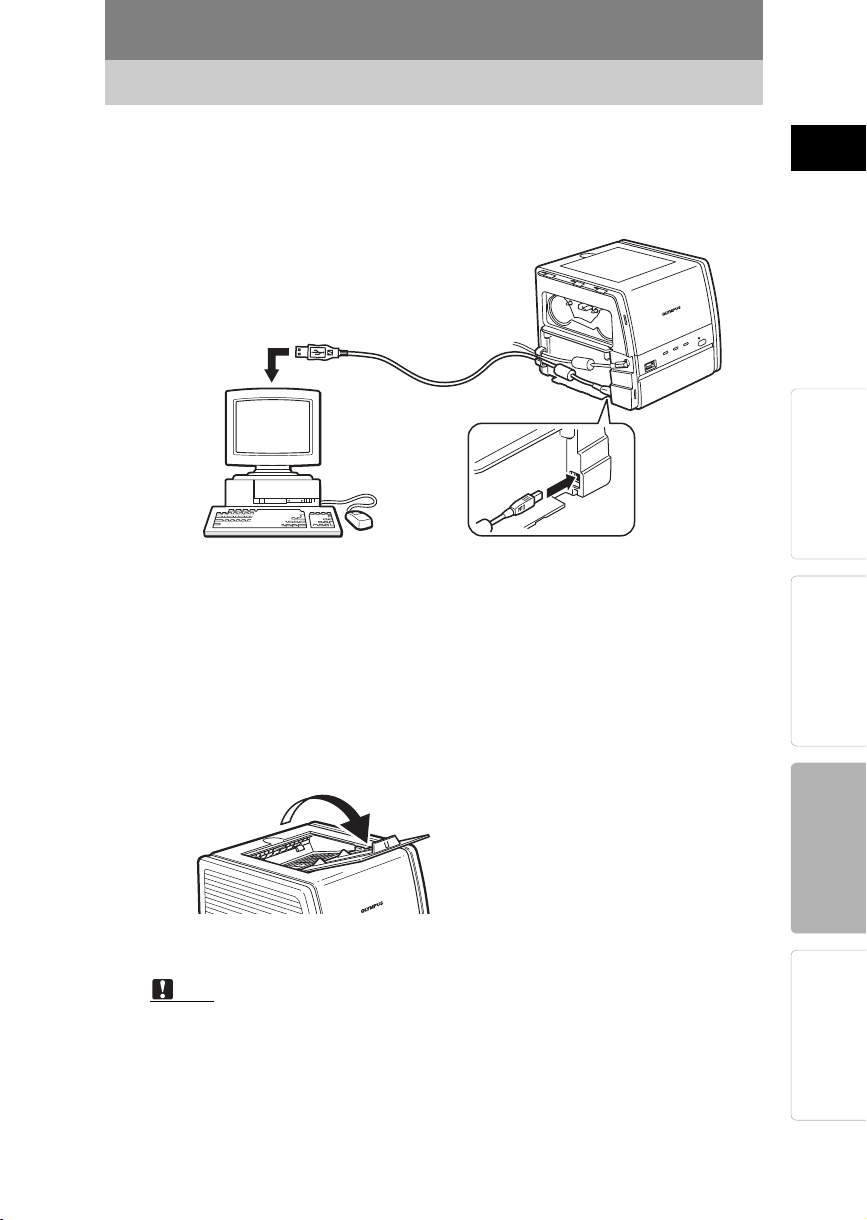
1 Remove the left side cover.
See page 14. “Connecting the power supply and turning on/off the
printer”
26
Page 27
Printing pictures from a computer
2
Insert one plug of the USB cable into the computer’s USB port, and
the other plug into the USB connector on the back of the printer.
Be sure to pass the cable through the guide.
3 Attach the side cover.
4 Open the paper output tray of the printer.
Open the paper output tray before you use the printer.
If it is not open when the printer is used, paper may be jammed
or the printer may be damaged.
When the printer is not in use, keep the paper output tray closed to
prevent dust and foreign objects from entering.
ENGLISH
Introduction
Preparation Printing
5 Turn on the printer.
Note
If both a computer and a PictBridge compatible digital camera are
connected to the printer at the same time, the digital camera connection
has priority over the computer. Disconnect the digital camera.
The printer is not guaranteed to work on a network.
The printer is not guaranteed to work when connected to a USB hub.
27
For Your
Reference
Page 28
Printing pictures from a computer
Printing
1 Use digital imaging software (or other image processing
application) to open the image(s) you would like to print.
2 Select [Print] from the File menu and select [OLYMPUS P-11] as
the printer in the Print dialog box.
Note
The procedure for selecting [Print] and the printer varies depending on the
application. Refer to the instruction manual for the application you are
using.
3 Click [Properties], check the paper size and other properties,
and then start printing.
Introduction ENGLISH
See page 29. “Printer settings”
4 Turn off the printer after printing completes.
Note
Do not remove the ink ribbon cartridge or paper tray during printing.
Do not move the printer during printing.
PreparationPrinting
Do not turn off the printer and computer or disconnect the AC adapter
during printing. In the event that the power is turned off or the AC adapter is
disconnected, turn the power back on. After the paper is automatically
ejected, perform the operation again. Leaving the printer without restoring
the power may cause a malfunction.
If [Not Edged] (borderless) is selected for [Print Area] on the [Paper] tab,
the edges of pictures will be cut off during printing because the width and
height ratio with which pictures are taken by the camera is usually 4:3.
When taking pictures, make sure the composition sufficiently compensate
for this.
If [Edged] (bordered) is selected for [Print Area] on the [Paper] tab, the
picture size will be smaller but the whole picture will be printed.
Furthermore, you can achieve the desired composition for printing without
edges if you use image editing software such as OLYMPUS Master to trim
the picture.
For Your
Reference
28
Page 29
Printer settings
Printing pictures from a computer
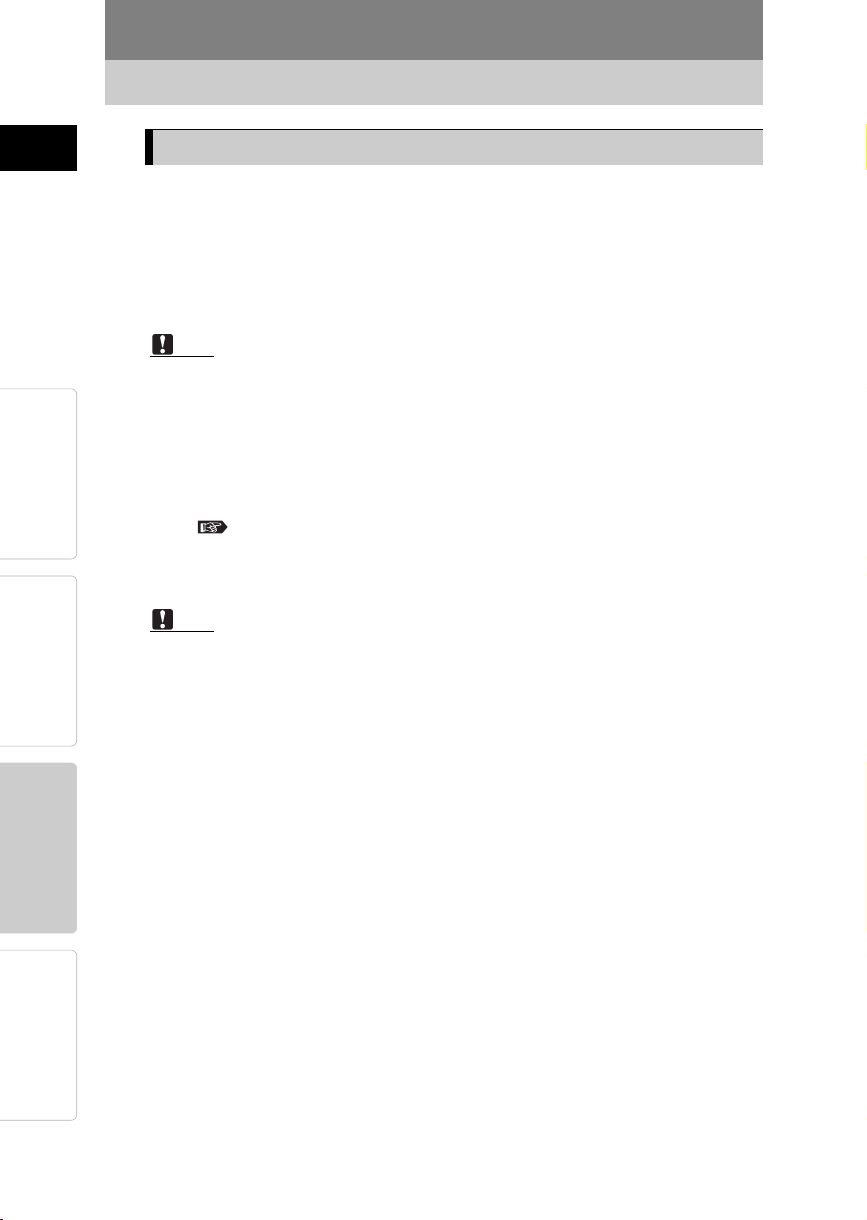
You can set the paper size, copy count, and color adjustment settings
on the [Paper] and [Graphics] tabs of the Printing Preferences window.
[Paper] tab [Graphics] tab
The following items can be selected on the [Paper] tab.
Item Description
Paper Size
Copy Count Select up to 50 copies.
Orientation Select the print orientation.
Print Area Select [Not Edged] or [Edged].
Separation Select 2, 4, 9, or 16 separation printing. This setting is
Sharpness Select [Soft], [Normal] or [Hard].
Over Coat This setting should normally be left unchanged.
Select 4 × 6 (100 × 148 mm) or 3.5" × 5" (89 × 127 mm).
only available when [Edged] is selected.
ENGLISH
Introduction
Preparation Printing
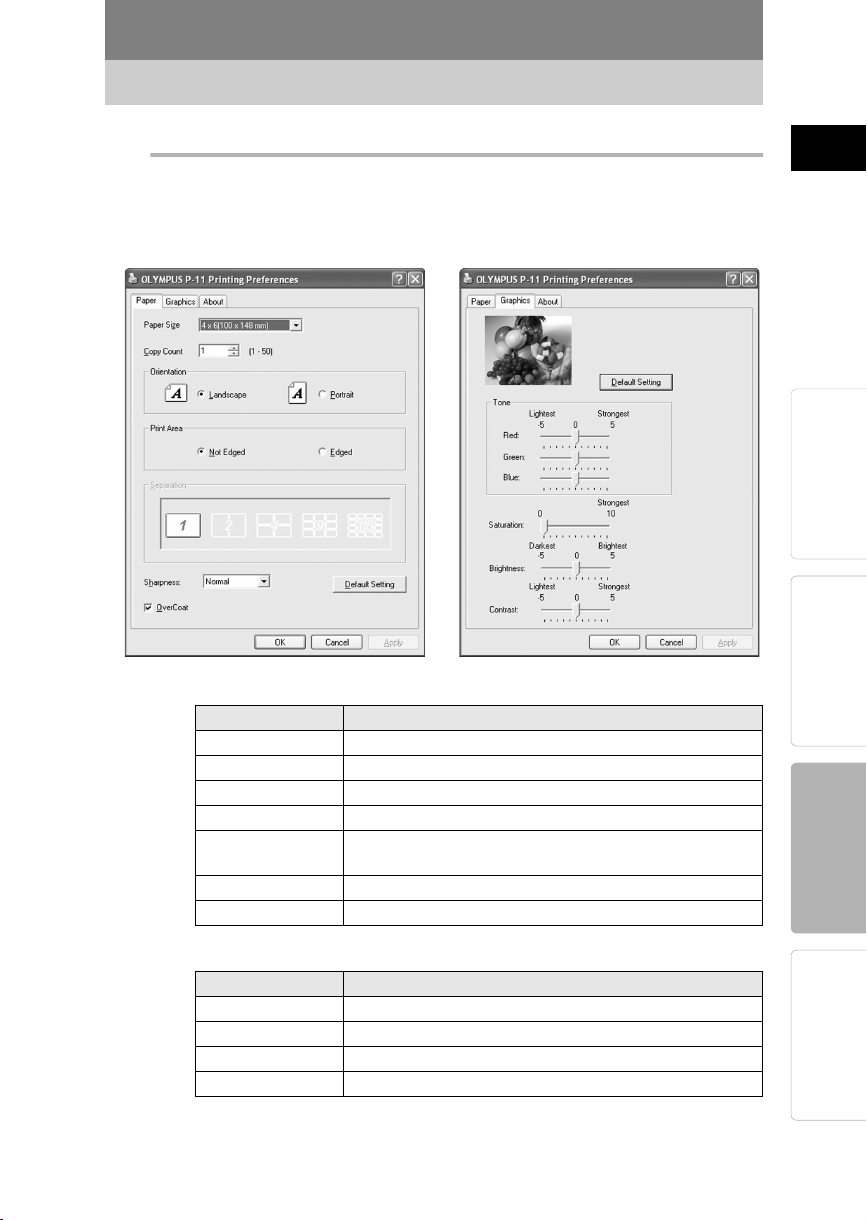
The following items can be selected on the [Graphics] tab.
Item Description
Tone Adjust the red, green and blue tones from -5 to +5.
Saturation Set the saturation of the whole image from 0 to +10.
Brightness Set the brightness of the whole image from -5 to +5.
Contrast Set the contrast from -5 to +5.
29
For Your
Reference
Page 30
For Your Reference
If an indicator is lit or blinking
Indicator
POWER On Power on
ACCESS On * Connecting to
Indicator
status
Off Power off
ENGLISHPreparationPrinting
Blinking
slowly
Blinking
very
slowly
PAPER Blinking
slowly
Introduction
RIBBON Blinking
rapidly
Blinking
slowly
ACCESS,
PAPER
ACCESS, RIBBON
ACCESS,
RIBBON,
PAPER
Blinking
simultaneously
Blinking
simultaneously
Blinking
simultaneously
Printer status Necessary countermeasure
—14
digital camera
Communicating
Printing
Out of paper Remove the paper tray, load
The paper
and ink
ribbon
cartridge are
incompatible
End of ink
ribbon
Ink ribbon
cartridge not
Inserted
The paper
and ink
ribbon
cartridge are
incompatible
Paper jam Remove jammed paper.
Communication error
Internal
problem
Do not disconnect the digital
camera or computer.
——
paper in the tray, and replace
the tray in the printer.
When printing on 4×6 paper,
use an ink ribbon cartridge for
4×6 printing. When printing on
3.5"×5" paper, use an ink ribbon
cartridge for 3.5"×5" printing.
Replace the ink ribbon cartridge
with a new one.
Insert an ink ribbon cartridge in
the printer. An error will be
generated if it is not pushed in
until you hear a clicking sound.
When printing on 4×6 paper,
use an ink ribbon cartridge for
4×6 printing. When printing on
3.5"×5" paper, use an ink ribbon
cartridge for 3.5"×5" printing.
Ensure that the digital camera is
PictBridge compatible.
Turn the printer off and on, then
retry printing.
If the error persists, consult your
nearest Olympus service center.
Consult your nearest Olympus
service center. —
Page
—
19, 34
18
16, 34
16, 17
18
32
—
—
For Your
* When communication is successfully established, the light turns off.
Reference
30
Page 31

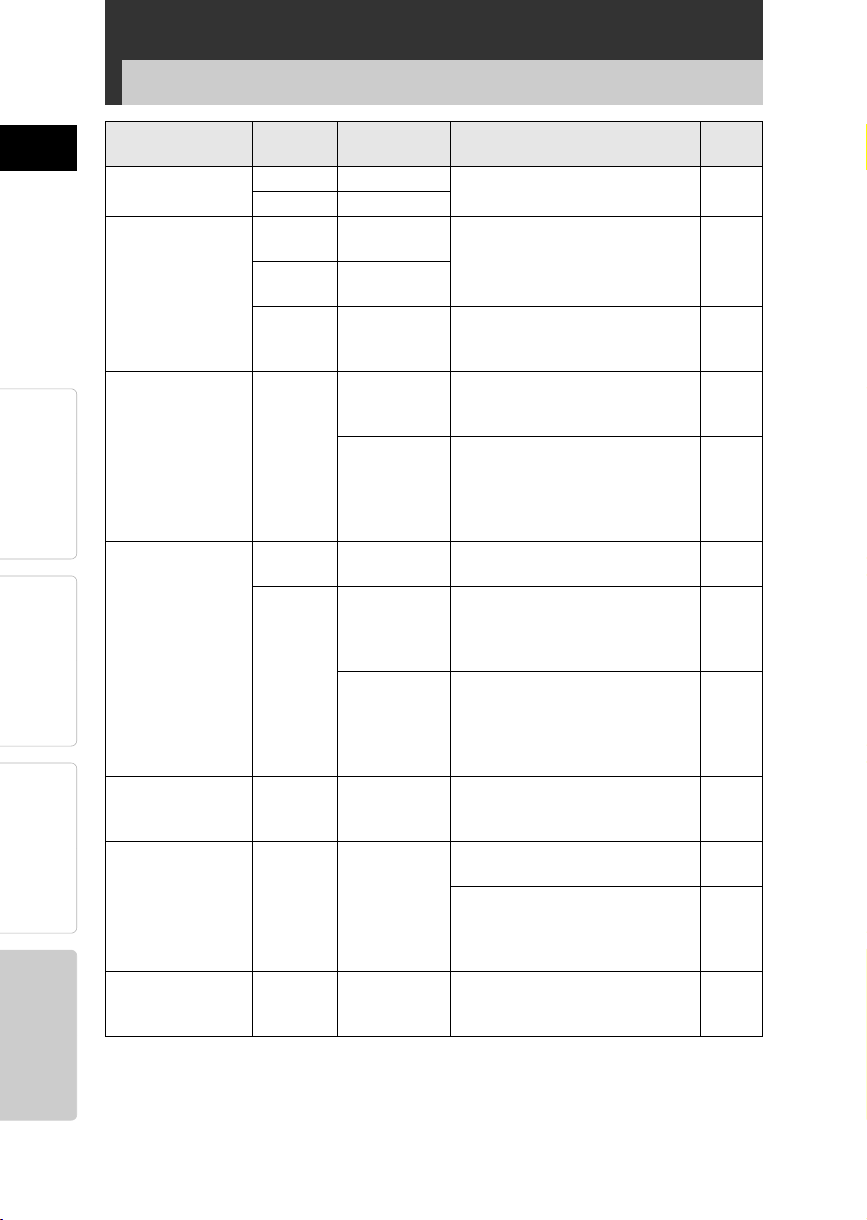
Troubleshooting
Before sending your printer for service, check the following to try to resolve the
problem. If the problem persists, contact your nearest Olympus service center.
Problem Cause·status Resolution
Cannot turn the
printer on.
Cannot remove
the ink ribbon
cartridge.
Printing from the
digital camera
takes a long time
to start.
Printing does not
start.
Noise interferes
with printed
images.
Printing intervals
have become
longer.
The AC adapter is not
connected.
The printer turned off
during the operation.
The printer takes a long
time to open a TIFF file.
Trimming selected by
DPOF takes a long time.
The paper or ribbon
cartridge is not suitable
for the paper size you are
using.
The print size set on the
digital camera or computer
does not match the sizes
of the loaded paper and
ribbon cartridge.
The ink ribbon cartridge is
not Inserted.
Paper or the paper tray is
not inserted.
Paper is jammed at the
paper eject section.
The printer driver is not
properly installed on the
computer.
Indicators light or blink. — 30
Pictures that were not
taken with a digital
camera were printed from
a digital camera.
Printing intervals are
automatically extended
during continuous printing
to prevent the internal
components from
overheating.
Connect the AC adapter
properly.
Push the ink ribbon cartridge in
you hear a clicking
until
sound.
Turn the printer on
again and wait until the
mechanical sound stops.
Opening time varies depending
on the image size. Wait until
opening finishes.
Wait until opening finishes.
Use the same size ribbon
cartridge and paper.
Insert the same size paper and
ribbon cartridge as selected on
the digital camera or computer.
Insert an ink ribbon cartridge.
Load paper into the paper tray
and then insert the paper tray.
Remove the paper.
Install or re-install the printer
driver on the computer. 26
Use a computer to print image
data that has not been
recorded by a digital camera.
This is not a malfunction. Wait
a few minutes.
Page
18, 35
20, 22
14
—
—
—
16
32
26
—
ENGLISH
Introduction
Preparation Printing
For Your
Reference
• If paper is jammed, see page 32. “If paper is jammed”
31
Page 32

Troubleshooting
Introduction ENGLISH
PreparationPrinting
If paper is jammed
If paper jams in the printer, the ACCESS indicator and PAPER indicator
both blink, and printing stops.
Follow the steps below to clear a paper jam in the printer.
1 Turn the printer off.
2 After removing the paper tray,
make sure no print paper is bent or
curled and that paper is properly
placed in the tray.
3 With the paper tray removed, turn the printer on again to
automatically eject the paper from the printer.
If paper is automatically ejected, go to Step 8.
If paper is not automatically ejected, turn the printer off and go to
Step 4.
For Your
Reference
32
4 Look through the paper tray door opening to see if there is any
jammed paper visible at the back.
If jammed paper is visible, go to Step 5.
If jammed paper is not visible, contact your nearest Olympus service
center for repairs.
5 Set the printer on its rear so that the
front of the printer is facing up.
Insert your finger in the paper
dispenser slot located on the
bottom and slide the jammed paper
towards the paper tray door.
If you cannot move the paper with
your finger, use tweezers or the like.
Page 33

Troubleshooting
6 After the paper has moved partway, you will then be able to
remove it through the paper tray door opening.
7 Turn the printer on.
8 Reinsert the paper tray.
If operation is normal, the paper jam has been successfully cleared
and you can continue printing.
Note
After removing the jammed paper, do not attempt to use it again in the
printer. Doing so may damage your printer.
If paper other than specialty paper such as inkjet printer paper is used or if
the same paper is printed on twice, the paper may stick to the ink ribbon or
become jammed in the printer. If this happens, send your printer for repair.
If the ink ribbon cartridge is removed during
printing
1 Turn the printer off.
2 Insert the ink ribbon cartridge until you hear a clicking sound.
ENGLISH
Introduction
Preparation Printing
3 Turn the printer on.
33
For Your
Reference
Page 34

ENGLISHPreparationPrinting
Replenishing the paper supply and replacing the ink ribbon cartridge
If paper runs out during printing
The PAPER indicator blinks slowly. Replenish the paper supply in the
paper tray. The remaining copies will automatically continue to be
printed.
The ink ribbon normally ends at the same time the paper in a print pack
is used up, so please replace the ink ribbon cartridge at the same time.
If the ink ribbon runs out during printing
The RIBBON indicator blinks fast. After the paper has ejected from the
printer, replace the ink ribbon cartridge with a new one. Once the new
ink ribbon cartridge is inserted, the remaining copies will automatically
continue to be printed.
Introduction
For Your
Reference
Disposing of used ink ribbon cartridge
When disposing of a used ink ribbon cartridge, do so in compliance with
the plastic waste disposal method prescribed by your local authorities.
34
Page 35

About the print pack (ink ribbon cartridge and paper)
J Always use print packs specified by Olympus.
The print packs are either for 4 × 6 or 3.5" × 5" paper. The print
pack for 4 × 6 printing contains 4 × 6 paper and an ink ribbon
cartridge for 4 × 6 printing. The print pack for 3.5" × 5" printing
likewise contains 3.5" × 5" paper and an ink ribbon cartridge for
3.5" × 5" printing.
* The print pack for 3.5" × 5" printing may not be available in all
locations.
Print pack (ink ribbon cartridge and paper)
Paper type Number of prints Model number
4 × 6 Paper (100 mm × 148 mm) 100 P-P100
4 × 6 Paper (100 mm × 148 mm) 40 P-P40
3.5" × 5" Paper (89 mm × 127 mm)
3.5" × 5" Paper (89 mm × 127 mm)
Purchasing print packs
For customers in Europe
Please visit the following URL to find the nearest dealer
offering the P-11 consumables.
http://www.olympus-europa.com/printerpaper
100 P-L100
40 P-L40
ENGLISH
Introduction
Preparation Printing
For customers in North and South America
Print packs are available at your local retailer or visit
http://www.olympusamerica.com/store.
If you have any questions, please visit Customer Support at
http://www.olympusamerica.com/support.
Always use the ink ribbon cartridge and paper from a print pack
together.
J The used ink ribbon cartridge is not reusable.
J Exercise care when handling the ink ribbon cartridge to ensure that it
remains clean.
J Do not disassemble the ink ribbon cartridge.
J Fingerprints, dirt, scratches, oil or other debris on the print surface
may degrade print quality.
J Do not open the print pack until ready to use.
35
For Your
Reference
Page 36

About the print pack (ink ribbon cartridge and paper)
Storage Considerations
J Do not store the print pack in the following locations.
Do not store the print pack in a place subject to high temperature
(above 30°C/86°F), low temperature (below 5°C/41°F), high
humidity, or excessive dust.
Do not store the print pack with chemicals.
Do not store the print pack where exposed to direct sunlight or
bright light.
Note
Do not leave the print pack for long periods in an environment exceeding
40°C/10
to direct sunlight). The same applies to when the print pack is installed in
the printer.
4°F (such as in a car or on a window ledge where it will be exposed
Introduction ENGLISH
PreparationPrinting
For Your
Reference
Storing prints
J Do not store the prints with the printed surfaces facing each other.
J Do not allow the print surface to be in contact with cellophane tape, a
desk pad or an eraser containing plastic for an extended period of
time. Prolonged contact may cause the print surface to become
discolored.
J Do not allow organic solvents to come in contact with the print
surface. Such contact may cause discoloration.
J Avoid prolonged exposure of the print surface to sunlight or bright
light. Prolonged exposure may cause the print surface to become
discolored.
J Use an oil-based pen when writing on the print surface.
J Avoid locations that are subject to direct sunlight, high temperature/
humidity, or are in the reach of children.
J Olympus is not responsible for print discoloration or fading.
If you experience problems
J Olympus will replace each defective product with a new one if the
defect was caused by a problem during manufacture. Olympus
assumes no liability for any defects not related to manufacturing.
36
Page 37

Specifications
Printer
Printing Method Sublimation dye transfer printing 4-pass printing
Resolution 310 dpi × 310 dpi
Print Paper Size 3.5" × 5" Paper : 89 (H) × 127 (V) mm (3.5" × 5")
Maximum Print Size 1)When not edged (borderless) printing is selected
Color Expression Over 16.77 million colors
Printing Speed 3.5" × 5" Paper : Approx. 30 seconds per sheet
Interfaces PictBridge compatible digital camera connection:
Compatible OS Windows 2000/XP
Ink Ribbon Cartridge Y+M+C 3 layers and light-resistant overcoat
Compatible Graphics File
Formats
Power Source DC 24 V, 2.5 A (Dedicated AC adapter)
Rated Power Consumption
Operating Temperature 5 - 35°C (41 - 95°F)
Operating Humidity 30 - 80%
Dimensions 184 (W) × 180 (D) × 158 (H) mm (7.2" × 7.1" × 6.2")
Weight 2.2 kg (77.6 oz.) (including paper tray)
(Yellow/Magenta/Cyan and protective overcoat layer)
4 × 6 Paper : 100 (H) × 148 (V) mm (3.9" × 5.8")
3.5"×5" Paper: 130.4 mm×93.7 mm (1591×1144 dots)
•
• 4 × 6 Paper: 151.4 × 104.9 mm (1848 × 1280 dots)
2)When edged (bordered) printing is selected printing
is selected
3.5"×5" Paper: 104.9 mm×78.7 mm (1280×960 dots)
•
•
4 × 6 Paper: 120.3 mm × 90.2 mm (1468 × 1101 dots)
4 × 6 Paper : Approx. 33 seconds per sheet
(excluding data transmission time from digital camera or computer)
USB Type-A connector
Computer connection: USB Type-B connector
(protective layer)
Exif 1.0-2.2 compatible (JPEG/TIFF)
DPOF 1.1 compatible
60 W (during printing), 4 W (during standby)
(not including protruding parts)
ENGLISH
Introduction
Preparation Printing
AC adapter
Type Switching regulator
Input Voltage AC 100-120 V or AC 220-240 V, 50/60 Hz (AC adapter
type and voltage differ by region)
Output Voltage DC 24 V, 2.5 A
Design and specifications are subject to change without notice.
37
For Your
Reference
Page 38

Service and maintenance
ENGLISHPreparationPrinting
Introduction
Your dealer gave you a limited warranty card that contains the dealer
name and purchase date. If there are any mistakes on the card,
please correct them with your dealer. Please read the limited
warranty card, and keep it in a safe place.
For questions concerning service, or in the event of a device
problem, consult your nearest Olympus service center. If a problem
occurs with this device when used in accordance with the instruction
manual, the limited warranty allows repair at no cost for one year
after the date of purchase.
Charges may apply for repairs performed after the warranty period
has expired.
Olympus will attempt to maintain replacement parts for this product
for 5 years after manufacture of this printer ends. Therefore, service
for this printer will generally be available during this period. It may
also be possible to receive service after this period. If necessary,
please consult your nearest Olympus service center.
Olympus is not responsible for any damages (costs or lost profits) as
the result of device malfunction.
When sending a product for repair, enclose documentation indicating
device problem or malfunction, and place the device in the original
box and the original packaging material. If you don’t have the original
packaging, pack the printer with enough cushioning material to
absorb any impacts during transportation. In addition, use a
traceable delivery service or registered mail. Postage costs are the
responsibility of the customer.
For Your
Reference
38
Page 39

Definition of terms
DPOF (Digital Print Order Format)
Recording format for automatic printing of digital camera data. Prints
can easily be created from a media card at DPOF compatible photo
shops or on printers by specifying the desired images, and number of
copies.
PictBridge
A common standard used to connect a digital camera directly to a
printer to print images. If the devices are PictBridge compatible, prints
can be made using simple digital camera controls regardless of the
device manufacturers. Various print options are available, such as
automatic printing of DPOF specified images, index print, and image
trimming.
RGB
The three colors comprising light: red (R), green (G) and blue (B).
Colors are displayed on televisions and computer monitors using these
three colors.
YMC
The three primary colors: cyan (C), magenta (M), and yellow (Y). Colors
are printed using these three colors. The range of colors that can be
displayed using YMC differs from the range of colors available using
RGB. Therefore, some colors for images that are displayed on a
monitor cannot be reproduced exactly using a printer and are replaced
with similar colors.
ENGLISH
Introduction
Preparation Printing
39
For Your
Reference
Page 40

Nous vous remercions pour l’achat de cette imprimante photo numérique P-11. Veuillez lire soigneusement ce
manuel avant la mise en service afin de garantir des performances optimales.
Pour les utilisateurs en Amérique du Nord et du Sud
Pour les utilisateurs aux États-Unis
Déclaration de conformité
Nom du produit : Imprimante photo numérique
Numéro de modèle : P-11
Marque : OLYMPUS
Organisme responsable :
Adresse :
FRANÇAIS
Numéro de téléphone : 1-631-844-5000
Testé pour être en conformité avec la réglementation FCC
POUR L’UTILISATION À LA MAISON OU AU BUREAU
Cet appareil est conforme aux normes de la Section 15 des directives FCC. Son utilisation est soumise aux
deux conditions suivantes :
(1) Cet appareil ne doit pas causer de brouillage radioélectrique.
(2) Cet appareil doit pouvoir résister à toutes les interférences, y compris celles susceptibles d’entraver son
Avis de la FCC
• Interférences radio et télévision
Tout changement ou modification qui n’est pas expressément approuvé par le fabricant peut annuler le droit
de l’utilisateur à faire fonctionner cet appareil. Cet appareil a été testé et déclaré conforme aux limites des
dispositifs numériques de Classe B conformément à la Section 15 des directives FCC. Ces limites sont
conçues pour assurer une protection raisonnable contre les interférences gênantes au sein d’une installation
résidentielle.
Cet appareil génère, utilise et peut diffuser de l’énergie haute fréquence et, s’il n’est pas installé et utilisé selon
les instructions, peut provoquer des interférences gênantes aux communications radio.
Toutefois, il n’est pas garanti que de telles interférences surviendront dans une installation déterminée. Si cet
appareil provoque des interférences gênantes à la réception des émissions de radio ou de télévision, ce qui
peut être déterminé en mettant l’appareil hors et sous tension, l’utilisateur est encouragé à essayer d’éliminer
les interférences par une ou plusieurs manières suivantes :
- Réglez ou déplacez l’antenne réceptrice.
- Augmentez la distance entre l’appareil et le récepteur.
- Raccordez l’appareil à une prise d’un circuit électrique différent de celui auquel le récepteur est raccordé.
- Sollicitez l’aide d’un revendeur ou d’un technicien radio/TV expérimenté.
AVERTISSEMENT : La connexion d’un câble d’interface d’équipement non blindé à cet équipement annulera
le Certificat FCC de cet appareil et risquera de causer des niveaux d’interférences dépassant les limites
établies par le FCC pour cet équipement. L’utilisateur a la responsabilité de se procurer et d’utiliser un câble
d’interface d’équipement blindé avec l’appareil. Tout changement ou transformation non approuvés
expressément par le fabricant est susceptible d’annuler le droit de l’utilisateur à utiliser l’équipement.
Tout changement ou modification non autorisé apporté à cet appareil annulerait le droit de l’utilisateur à le faire
fonctionner.
Pour les utilisateurs au Canada
Cet appareil numérique de la classe B est conforme à la norme ICES-003 du Canada.
bon fonctionnement.
Two Corporate Center Drive, PO Box 9058, Melville, NY 11747-9058 U.S.A.
Pour les utilisateurs en Europe
Le label “CE” indique que ce produit est conforme aux normes européennes en matière de sécurité,
de santé, d’environnement et de protection du consommateur. Les imprimantes comportant le label
“CE” sont destinées à être vendues en Europe.
Le symbole [poubelle sur roue barrée d’une croix WEEE annexe IV] indique une collecte séparée
des déchets d’équipements électriques et électroniques dans les pays de l’UE. Veuillez ne pas jeter
l’équipement dans les ordures domestiques.
A utiliser pour la mise en rebut de ces types d’équipements conformément aux systèmes de
traitement et de collecte disponibles dans votre pays.
Marques commerciales
Windows est une marque déposée de Microsoft Corporation.
Tous les autres noms de marques et de produits dans le présent manuel sont des marques, déposées ou non,
de leurs propriétaires respectifs.
40
Page 41

Sommaire
Introduction
Consignes de sécurité.............................................................................. 42
Entretien et rangement............................................................................. 47
Possibilités de cette imprimante............................................................... 48
Contrôle des accessoires......................................................................... 49
Identification des composants.................................................................. 50
Préparation
Branchement de l’alimentation et mise en marche/arrêt de
l’imprimante.............................................................................................. 52
Chargement de la cartouche de ruban encreur ....................................... 54
Chargement du papier ............................................................................. 57
Retrait du bac d’alimentation de l’imprimante................................................... 57
Chargement du papier dans le bac d’alimentation ........................................... 58
Insertion du bac d’alimentation dans l’imprimante............................................ 60
Impression
Impression des photos depuis un appareil numérique............................. 61
À propos des appareils photo numériques compatibles PictBridge.................. 61
Raccordement d’un appareil photo numérique à l’imprimante ......................... 61
Commande de l’impression depuis l’appareil photo numérique ....................... 62
Impression des photos à partir d’un ordinateur........................................ 64
Installation du pilote d’imprimante (pendant la configuration initiale) ............... 64
Raccordement d’un ordinateur à l’imprimante .................................................. 64
Impression ........................................................................................................ 66
FRANÇAIS Préparation Impression
Introduction
Pour votre information
Si des voyants sont allumés et clignotent ................................................ 68
En cas de difficultés ................................................................................. 69
En cas de bourrage du papier .......................................................................... 70
En cas de retrait de la cartouche de ruban encreur pendant l’impression........ 71
Ajout de papier dans le bac d’alimentation et remplacement de
la cartouche de ruban encreur ................................................................. 72
Si le papier vient à épuisement pendant l’impression....................................... 72
Si le ruban encreur vient à épuisement pendant l’impression .......................... 72
Mise au rebut d’une cartouche de ruban encreur usagée ................................ 72
À propos du kit d’impression (cartouche de ruban encreur et papier) ..... 73
Spécifications ........................................................................................... 75
Service après-vente et entretien .............................................................. 77
Définitions ................................................................................................ 78
41
Pour votre
information
Page 42

Introduction
Consignes de sécurité
Introduction FRANÇAIS
Différents symboles sont utilisés dans ce manuel pour indiquer
l’utilisation correcte du produit et pour contribuer à éviter tout dommage
aux biens et aux personnes. Ces symboles sont décrits ci-dessous.
Symbole Description
Le non-respect des instructions
AVERTISSEMENT
ATTENTION
Les actions nécessitant des précautions particulières sont signalées
par les symboles suivants.
Symbole Description
N’effectuez pas cette action.
Il est vivement recommandé d’effectuer cette action.
signalées par ce symbole peut entraîner
des lésions graves et même la mort.
Le non-respect des instructions
signalées par ce symbole peut entraîner
des lésions corporelles ou des
dommages matériels.
PréparationImpression
Pour votre
information
42
Débranchez l’appareil de la source d’alimentation.
Ne pas démonter.
Éviter le contact avec l’eau ou d’autres liquides.
Ne pas toucher avec des mains mouillées.
Page 43

Consignes de sécurité
AVERTISSEMENT
J Si cet appareil fonctionne anormalement, débranchez-le
N’utilisez pas l’imprimante si elle émet de la fumée, des odeurs
inhabituelles, des sons étranges ou si elle devient anormalement
chaude.
Une utilisation sous ces conditions risque de provoquer un incendie
ou une électrocution.
Éteignez l’imprimante et débranchez-la puis Contactez ensuite le
centre S.A.V. OLYMPUS le plus proche.
J Si des liquides ou des corps étrangers pénétraient dans
l’imprimante, débranchez le cordon d’alimentation
Ne laissez aucun liquide, pièce métallique ou objet inflammable
pénétrer dans l’imprimante par les orifices de ventilation.
La conséquence pourrait être un incendie ou une électrocution.
Éteignez l’imprimante et débranchez-la puis Contactez ensuite le
centre S.A.V. OLYMPUS le plus proche.
J Si le boîtier de l’imprimante est endommagé, débranchez le
cordon d’alimentation
N’utilisez pas cet appareil si le boîtier (corps) est endommagé.
Une utilisation dans cet état risque de provoquer un incendie ou
une électrocution.
Éteignez l’imprimante et débranchez-la puis Contactez ensuite le
centre S.A.V. OLYMPUS le plus proche.
FRANÇAIS
Introduction
Préparation Impression
J Si le cordon d’alimentation est endommagé, débranchez-le
N’utilisez pas un cordon d’alimentation endommagé.
Une utilisation dans cet état risque de provoquer un incendie ou
une électrocution.
Éteignez l’imprimante et débranchez le cordon d’alimentation en
prenant garde de ne pas toucher les fils éventuellement apparents.
Contactez ensuite le centre S.A.V. OLYMPUS le plus proche.
43
Pour votre
information
Page 44

Consignes de sécurité
J Ne pas endommager le cordon d’alimentation
J Ne pas démonter ni modifier l’imprimante
J Ne laissez aucun liquide pénétrer dans l’imprimante
Introduction FRANÇAIS
J Ne pas poser des objets lourds sur l’imprimante
J Ne pas installer l’imprimante dans les endroits suivants
PréparationImpression
J N’utilisez pas l’imprimante dans les endroits suivants
Pour votre
information
AVERTISSEMENT
Ne pas endommager ni modifier le cordon d’alimentation.
Un cordon d’alimentation endommagé peut provoquer un incendie
ou une électrocution. Pour éviter d’endommager le cordon
d’alimentation, NE PAS : tirer sur le cordon pour le débrancher, le
plier excessivement ou placer des objets lourds dessus.
Si le cordon est endommagé, contactez le centre S.A.V. OLYMPUS
le plus proche.
L’imprimante contient à la fois des pièces chaudes et sous tension.
Tout contact avec ces pièces peut entraîner des brûlures, une
électrocution et/ou endommager l’imprimante. N’essayez jamais de
démonter ou de modifier l’imprimante, vous risqueriez d’être
électrocuté ou de causer une défaillance de l’imprimante.
Contactez le centre S.A.V. OLYMPUS le plus proche pour toute
intervention ou réparation.
La pénétration de liquide dans l’imprimante peut provoquer un
incendie ou une électrocution.
Des objets lourds risquent de déformer le boîtier de l’imprimante, ce
qui risque de provoquer un incendie ou une électrocution.
L’imprimante risque également d’être endommagée par une chute.
Pour éviter tout risque d’incendie, d’électrocution ou de mauvais
fonctionnement de l’imprimante, ne pas l’installer dans les endroits
suivants :
Endroits poussiéreux, humides ou huileux
Toute pénétration de poussière ou de liquide dans l’imprimante
risque de provoquer un incendie ou une électrocution.
Endroits très chauds
N’exposez pas l’imprimante directement au soleil (par exemple
dans une voiture ou à côté d’une fenêtre) ou à des températures
très élevées (près d’un appareil de chauffage, par exemple). Le
boîtier de l’imprimante risquerait alors d’être endommagé, ce qui
peut provoquer un incendie ou une électrocution.
Utilisez l’imprimante avec une température ambiante comprise
entre 5 et 35°C et un taux d’humidité relative compris entre 20 et
80%.
Surfaces instables ou inclinées.
À l’extérieur (notamment sur la plage, etc.) ou en des endroits où
l’imprimante serait très exposée à la poussière ou à des impuretés.
Endroits exposés à la pluie ou aux projections d’eau, endroits
clos où de la condensation pourrait se produire comme à
l’intérieur d’un sac en plastique.
44
Page 45

Consignes de sécurité
AVERTISSEMENT
J N’utilisez pas l’imprimante avec un adaptateur secteur ou un
cordon d’alimentation autre que celui spécifié/fourni
J N’utilisez pas l’adaptateur secteur ou le cordon d’alimentation
fournis avec d’autres appareils
J Assurez-vous de la présence d’une tension correcte
Une tension incorrecte risque d’endommager des composants de
l’imprimante.
Une utilisation avec une tension incorrecte risque de provoquer un
incendie ou une électrocution.
J Le cordon d’alimentation doit être raccordé correctement et en
toute sécurité
Un branchement incorrect du cordon d’alimentation, par exemple,
peut provoquer un incendie ou une électrocution.
Enfoncez complètement la fiche dans la prise.
J Éviter une accumulation excessive de poussière et
d’impuretés sur le cordon d’alimentation
La poussière et les impuretés peuvent être conductrices d’électricité,
ce qui risque de provoquer un incendie ou une électrocution.
En cas d’accumulation excessive de poussière et d’impuretés sur le
cordon, débranchez-le et nettoyez-le.
J
Débranchez toujours le cordon d’alimentation pendant un orage
L’électricité induite par les orages peut provoquer un incendie, une
électrocution ou un mauvais fonctionnement de l’imprimante.
J Ne tenez pas la fiche du cordon d’alimentation avec les mains
mouillées
Vous risqueriez d’être électrocuté.
Veillez à bien vous sécher les mains avant toute manipulation.
J Branchez l’imprimante directement à une prise
Évitez de la brancher à une prise qui est déjà utilisée par d’autres
appareils.
FRANÇAIS
Introduction
Préparation Impression
45
Pour votre
information
Page 46

Consignes de sécurité
ATTENTION
J N’installez pas l’imprimante sur une surface instable
N’installez pas l’imprimante sur une surface instable comme une
table branlante. Une chute risquerait d’endommager l’imprimante
ou de provoquer un mauvais fonctionnement.
J Ne touchez pas les composants non accessibles à l’utilisateur
à l’intérieur de l’imprimante
Vous risqueriez de vous blesser ou de vous brûler. Cette remarque
concerne plus particulièrement les enfants et les personnes non
familiarisées avec l’imprimante.
J Ne déplacez pas l’imprimante lorsque le cordon d’alimentation
est tendu
Le cordon d’alimentation risquerait d’être endommagé si vous
déplacez l’imprimante alors qu’il est tendu.
Introduction FRANÇAIS
PréparationImpression
L’utilisation de l’imprimante avec un cordon endommagé risque de
provoquer un incendie ou une électrocution.
Avant de déplacer l’imprimante, débranchez et enroulez le cordon
d’alimentation.
J Ne débranchez par l’imprimante en tordant ou en tirant le
cordon d’alimentation
Pour débrancher le cordon d’alimentation, tenez-le par la fiche. En
tirant directement sur le cordon, il risque d’être endommagé avec
risques d’incendie ou d’électrocution.
J Débranchez l’imprimante pour toute intervention
J Débranchez l’imprimante si elle ne sera pas utilisée pendant
Pour votre
information
46
Débranchez toujours l’imprimante avant toute intervention ou
opération d’entretien.
une période prolongée
Débranchez l’imprimante si elle ne sera pas utilisée pendant une
période prolongée (avant une absence prolongée, par exemple).
Le cas contraire, un défaut d’isolement ou une fuite de courant
pourrait provoquer un incendie ou une électrocution.
Page 47

Entretien et rangement
Protection contre la condensation
La condensation est provoquée par la vapeur d’eau présente dans l’air qui devient
liquide et s’accumule sur la surface de l’imprimante.
Ce phénomène se produit dans les conditions suivantes.
Chauffage ou rafraîchissement rapide de la pièce dans laquelle l’imprimante est
installée.
L’imprimante est directement exposée à un courant d’air froid tel qu’un
climatiseur, par exemple.
L’imprimante est transportée d’un endroit froid vers un endroit chaud.
L’humidité dans l’air se condense sur le papier, ce qui altère la qualité d’impression
ou provoque des bourrages de papier.
Si les conditions risquent de donner lieu à de la condensation, ne faites pas
fonctionner l’imprimante jusqu’à ce qu’elle soit sèche ou que tout risque de
condensation ait disparu.
Ne pulvérisez pas de solvant et ne laissez aucun
solvant volatile entrer en contact avec l’imprimante
La pulvérisation d’un insecticide à proximité de l’imprimante ou le fait de l’essuyer
avec du diluant ou du benzène, par exemple, risque de détériorer ou de décolorer
le boîtier de l’imprimante.
Nettoyez le boîtier de l’imprimante avec un chiffon doux. Pour les taches difficiles à
enlever, trempez un chiffon doux dans l’eau ou dans un détergent doux dilué dans
l’eau et essorez-le pour en éliminer le plus de liquide possible avant d’essuyer
l’extérieur du boîtier.
Ne laissez pas l’imprimante en contact prolongé
avec des produits en caoutchouc ou en plastique
FRANÇAIS
Introduction
Préparation Impression
Un contact prolongé de l’imprimante avec des produits en caoutchouc ou en
plastique peut provoquer une détérioration et une décoloration.
Faites fonctionner l’imprimante au moins une fois
tous les six mois
Si l’imprimante n’est pas utilisée pendant une longue période, elle risque de ne
plus fonctionner correctement.
Faire fonctionner l’imprimante au moins une fois tous les six mois.
Portez l’imprimante avec les deux mains
Utilisez les deux mains pour lever ou porter l’imprimante.
Transportez l’imprimante avec prudence
Pour transporter l’imprimante, placez-la dans sa boîte d’origine avec le matériel
d’emballage d’origine. Si vous n’avez plus l’emballage d’origine, emballez
l’imprimante avec suffisamment de matériel amortisseur pour absorber tout choc
pendant le transport.
47
Pour votre
information
Page 48

Possibilités de cette imprimante
Introduction FRANÇAIS
Impression directe
Cette imprimante prend en charge la norme PictBridge pour la
communication entre un appareil photo numérique et une imprimante.
Si vous raccordez un appareil photo numérique compatible PictBridge à
l’imprimante à l’aide du câble USB fourni avec l’appareil, vous pouvez
imprimer des photos directement depuis l’appareil photo numérique.
Diversité d’impression
Cette imprimante prend en charge l’impression multiple qui consiste à
imprimer plusieurs exemplaires d’une même photo sur une seule page,
l’impression d’index où plusieurs photos différentes sont imprimées sur
une page, l’impression datée où la date et l’heure de la prise de vue
apparaissent et les tirages avec ou sans bord.
Remarque
Certaines fonctions peuvent être limitées en fonction de l’appareil photo
numérique raccordé.
Impression à partir d’un ordinateur
Si vous branchez un ordinateur à l’imprimante avec un cordon USB du
commerce, vous pouvez imprimer les images stockées sur l’ordinateur.
Nous vous recommandons d’utiliser OLYMPUS Master ou OLYMPUS
Master Plus pour faciliter l’impression et la gestion de vos photos
numériques.
PréparationImpression
Pour votre
information
48
Impression sur papier couché de haute qualité
L’impression sur papier couché de haute qualité garantit des tirages qui
tiendront très longtemps. Cette possibilité est notamment utile pour
l’impression de photos importantes que vous souhaitez conserver pour
les années à venir.
Impression de 50 feuilles en continu
Le bac d’alimentation fourni peut fournir jusqu’à 50 feuilles de papier en
continu à l’imprimante. L’impression d’une page au format
89 mm × 127 mm nécessite environ 30 secondes (sans compter la
transmission des données depuis l’appareil photo numérique ou
l’ordinateur).
Page 49

Contrôle des accessoires
Au déballage de l’imprimante, vérifier la présence des accessoires
suivants.
Si l’un des accessoires est manquant, contactez n’importe quel centre
S.A.V. Olympus.
Adaptateur secteur (1) Cordon d’alimentation (1)
Bac d’alimentation (1) Bac d’adaptation
(pour format 89 mm × 127 mm)
(1)
(Ce bac se trouve dans le bac
d’alimentation.)
(Placez ce bac dans le bac
d’alimentation. Suivant la région, il
n’est pas forcément fourni avec
l’imprimante.)
FRANÇAIS
Introduction
Préparation Impression
(Le bac d’alimentation est déjà inséré dans l’imprimante au moment de
l’achat.)
Kit de démarrage
Cartouche de ruban encreur pour format 100 mm × 148 mm (pour 5
tirages) et papier au format 100 mm × 148 mm (5 feuilles)
Manuel d’utilisation (ce livret) (1)
Certificat de garantie (1)
CD-ROM (Pilote d’imprimante) (1)
49
Pour votre
information
Page 50

Identification des composants
)
QAvant
Voyant RIBBON (Ruban) ( P.68)
Voyant PAPER (Papier) ( P.68)
Voyant ACCESS (Accès) ( P.68)
Bac de sortie du
papier
( P.62, 65)
d’éjection du
Introduction FRANÇAIS
Logement de
cartouche
d’encre
PréparationImpression
Cache latéral
( P.52)
Section
papier
Languette
( P.55)
QDessous
Voyant POWER
(Marche/Arrêt)
( P.68)
Bouton POWER
(Marche/Arrêt)
( P.53)
Prise d’alimentation
secteur ( P.52)
Volet du bac
d’alimentation
( P.57, 60)
Connecteur PictBridge
( P.61)
Connecteur USB ( P.65
Fente du
distributeur de
papier ( P.70)
Pour votre
information
50
Remarque
Le cache latéral gauche peut être retiré, mais pas le droit.
Laissez le bac de sortie du papier fermé lorsque l’imprimante n’est pas en
cours d’utilisation.
Page 51

QBac d’alimentation
Bac d’adaptation
(pour format
89 mm × 127 mm)
( 58, 59)
Identification des composants
Capot du bac
( 58)
FRANÇAIS
Languette du
capot du bac
( 58)
Introduction
Préparation Impression
Pour votre
information
51
Page 52

Préparation
Branchement de l’alimentation et mise en marche/arrêt de l’imprimante
1 Retirez le cache latéral gauche de l’imprimante.
Introduction FRANÇAIS
PréparationImpression
Pour votre
information
2 Raccordez le cordon d’alimentation à l’adaptateur secteur et
insérez la fiche d’alimentation dans une prise secteur.
Fiche
d’alimentation
3 Raccordez la fiche CC à la prise DC-IN de l’imprimante et
placez le cordon dans le guide sur l’imprimante comme illustré.
Assurez-vous de bien faire passer le cordon à travers le guide.
Guide
Cordon
Fiche CC
52
Page 53

Branchement de l’alimentation et mise en marche/arrêt de l’imprimante
4 Remettez le cache latéral en place.
Si vous utilisez l’imprimante pour la première fois, chargez la
cartouche de ruban encreur avant de fixer le capot latéral.
Voir page 54 “Chargement de la cartouche de ruban encreur”
FRANÇAIS
Introduction
5 Appuyez sur le bouton POWER.
Le voyant POWER s’allume et l’imprimante se met en marche.
Remarque
Si vous branchez l’imprimante à un appareil photo numérique, allumez
l’imprimante et branchez l’appareil photo à l’imprimante avant d’allumer
l’appareil photo. P.61
Si vous branchez l’imprimante à un ordinateur, branchez ce dernier et
allumez l’imprimante avant d’allumer l’ordinateur.
Arrêt de l’imprimante
Appuyez sur le bouton POWER.
Le voyant POWER s’éteint lorsque l’imprimante s’arrête.
Remarque
Si la fiche CC est débranchée accidentellement pendant l’impression,
rebranchez-la et allumez l’imprimante. Le fait de laisser l’imprimante hors
tension risque de causer un mauvais fonctionnement.
53
Préparation Impression
Pour votre
information
Page 54

Chargement de la cartouche de ruban encreur
Introduction FRANÇAIS
À propos du kit d’impression
Pour l’impression, vous avez besoin du kit de démarrage fourni ou d’un
kit d’impression en option.
Utilisez toujours la cartouche de ruban encreur et le papier fournis
dans le même kit.
Ne réutilisez pas de papier qui a déjà été imprimé ou qui est déjà
passé à travers l’imprimante.
1 Retirez le cache latéral gauche.
Voir page 52 “Branchement de l’alimentation et mise en marche/
arrêt de l’imprimante”
PréparationImpression
Pour votre
information
54
2 Retirez la butée d’arrêt de la cartouche de ruban encreur et
enroulez le ruban pour le tendre.
Tout en appuyant sur le centre de la
bobine, enroulez le ruban encreur
dans le sens de la flèche.
Pour continuer d’utiliser une cartouche de ruban encreur partiellement
utilisée, insérez-la de nouveau après avoir tendu le ruban comme illustré.
Page 55

Chargement de la cartouche de ruban encreur
3 Insérez la cartouche de ruban encreur à fond.
FRANÇAIS
Libérez le logement de cartouche d’encre de sa protection et insérez
la cartouche de ruban encreur.
Le voyant RIBBON clignote et une erreur se produit si vous
n’appuyez pas fermement au centre de la cartouche de ruban
encreur pour l’insérer à fond jusqu’à entendre l’enclenchement.
Voir page 68 “Si des voyants sont allumés et clignotent”
4 Remettez le cache latéral en place.
Voir page 52 “Branchement de l’alimentation et mise en marche/
arrêt de l’imprimante”
S’il est impossible de remettre le cache latéral en place
correctement, retirez la cartouche de ruban encreur et réinsérez-la.
Enlever la cartouche de ruban encreur
Soulevez la languette pour libérer la cartouche de ruban encreur et
retirez-la.
Introduction
Préparation Impression
Pour votre
information
55
Page 56

Chargement de la cartouche de ruban encreur
Remarque
Ne touchez pas l’intérieur du logement de la cartouche d’encre, il risque
d’être très chaud.
Les kits d’impression sont conçus pour un format de papier 100 mm × 148 mm
ou 89 mm × 127 mm. Utilisez une cartouche de ruban encreur pour tirage
100 mm × 148 mm lorsque vous imprimez sur du papier au format
100 mm × 148 mm et une cartouche pour tirage 89 mm × 127 mm lorsque
Introduction FRANÇAIS
vous imprimez sur du papier au format 89 mm × 127 mm.
PréparationImpression
Pour votre
information
56
P
P
Cartouche de ruban encreur
pour format 100 mm × 148 mm
pour format 89 mm × 127 mm
L
L
Cartouche de ruban encreur
Lorsque vous posez une cartouche de ruban encreur,
placez-la sur le côté pour éviter que de la poussière se
dépose sur le ruban encreur.
Ne touchez pas le ruban encreur et ne le laissez pas
exposé à la poussière.
Les traces de doigts ou la poussière sur le ruban
encreur risquent de dégrader la qualité d’impression.
Si le ruban encreur est épuisé, remplacez la cartouche de ruban encreur
par une neuve.
Conditions de stockage
Ne pas ranger les cartouches de ruban encreur dans un endroit soumis à de
hautes températures, à une humidité élevée, trop poussiéreux ou en plein soleil.
Page 57

Chargement du papier
Retrait du bac d’alimentation de l’imprimante
1 Ouvrez le volet du bac d’alimentation en le tirant vers vous.
2 Maintenez la partie marquée “PULL” et tirez-la vers vous.
FRANÇAIS
Introduction
Préparation Impression
PULL (Tirer)
57
Pour votre
information
Page 58

Chargement du papier
Chargement du papier dans le bac d’alimentation
Remarque
Utilisez toujours du papier spécial. L’utilisation d’un papier différent
Ne touchez pas la surface d’impression (face
Ne rangez pas le papier dans un endroit exposé à une température ou un
Introduction FRANÇAIS
PréparationImpression
Le bac d’alimentation peut contenir un maximum de 50 feuilles. Veillez à ne
Du papier plié ou froissé risque de provoquer du bourrage.
N’écrivez pas sur le papier d’impression avant d’y imprimer une photo. Si
Impression sur du format 100 mm × 148 mm
tel que du papier pour imprimante jet d’encre peut provoquer une
défaillance de l’imprimante (bourrage ou adhérence du papier au
ruban encreur).
brillante vierge) en manipulant le papier.
taux d’humidité élevé ou en plein soleil.
Ne laissez pas le papier dans un endroit poussiéreux. Les traces de doigts ou la
poussière sur la surface d’impression risquent de dégrader la qualité d’impression.
pas dépasser cette limite lorsque vous rajoutez du papier. Un excès de
papier risque de provoquer du bourrage.
vous voulez écrire quelque chose, utilisez un stylo à base d’huile après
l’impression. Il est impossible d’imprimer des caractères de traitement de
texte ou de machine à écrire sur ce papier.
Pour votre
information
58
1 Ouvrez le capot du bac en appuyant simultanément sur ses
deux languettes et sortez le bac d’adaptation.
Languette du capot du bac
Page 59

Chargement du papier
2 Chargez le papier dans le bac avec la surface d’impression vers
le bas.
Retirez la feuille de protection avant de charger le papier.
Vous pouvez charger jusqu’à 50 feuilles.
Surface d’impression au-dessous
3 Fermez le capot du bac d’alimentation.
Veillez à ce que le papier ne reste pas coincé entre le capot et le
bac.
Impression sur du format 89 mm × 127 mm
FRANÇAIS
Introduction
Préparation Impression
Lorsque vous voulez imprimer sur des feuilles au format
89 mm × 127 mm, insérez le bac d’adaptation dans le bac
d’alimentation avant de charger le papier.
Bac d’adaptation
Veillez à ne pas tacher ni endommager le bac d’adaptation.
59
Pour votre
information
Page 60

Chargement du papier
Insertion du bac d’alimentation dans
l’imprimante
1 Ouvrez le volet du bac d’alimentation en le tirant vers vous.
Introduction FRANÇAIS
2 Enfoncez le bac d’alimentation à fond.
PréparationImpression
Pour votre
information
60
PULL (Tirer)
Insérez le bac d’alimentation jusqu’à entendre un bruit de verrouillage.
Pour retirer le bac d’alimentation, maintenez la partie marquée “PULL” et
tirez vers vous.
Fermez le volet du bac d’alimentation après avoir inséré celui-ci.
Page 61

Impression
Impression des photos depuis un appareil numérique
À propos des appareils photo numériques
compatibles PictBridge
Vous pouvez raccorder tout appareil photo numérique compatible
PictBridge à l’imprimante est imprimer des photos.
La procédure d’impression peut varier en fonction de l’appareil.
Reportez-vous au manuel d’utilisation de l’appareil photo numérique
pour plus d’informations sur l’impression.
Des informations sur les appareils photo numériques compatibles
PictBridge sont également disponibles sur le site Web OLYMPUS.
En mode PictBridge, les paramètres d’impression par défaut sont les
suivants :
Format du papier : Format du papier chargé dans l’imprimante.
Nombre d’exemplaires : 1
Impression sans marge.
Impression de la date : Non
Impression du nom de fichier : Non
Remarque
Les photos non prises avec un appareil photo numérique doivent être
imprimées depuis un ordinateur.
IntroductionFRANÇAIS
Préparation Impression
Raccordement d’un appareil photo numérique à l’imprimante
Raccordez l’appareil photo numérique à l’imprimante avec le câble
USB fourni avec l’appareil.
1 Branchez et allumez l’imprimante.
Voir à la page 52. “Branchement de l’alimentation et mise en
marche/arrêt de l’imprimante”
2 Insérez une fiche du câble USB dans le connecteur USB de
l’appareil photo numérique et l’autre fiche dans le connecteur
PictBridge à l’avant de l’imprimante.
61
Pour votre
information
Page 62

Impression des photos depuis un appareil numérique
3 Ouvrez le bac de sortie du papier de l’imprimante.
Ouvrez le bac de sortie du papier avant d’utiliser l’imprimante.
S’il n’est pas ouvert lorsque l’imprimante est utilisée, un
bourrage de papier peut se produire et l’imprimante risque
d’être endommagée.
Laissez le bac de sortie du papier fermé lorsque l’imprimante n’est
pas en cours d’utilisation pour éviter la pénétration de poussière et
de corps étrangers.
Introduction FRANÇAIS
PréparationImpression
Pour votre
information
4 Allumez l’appareil photo et configurez-le de manière à ce qu’il
soit prêt pour l’impression.
Le voyant ACCESS sur l’imprimante s’allume pendant un court
instant, puis s’éteint de nouveau.
Le moniteur de l’appareil photo numérique s’allume et les fonctions
relatives à l’impression deviennent accessibles.
Reportez-vous au manuel d’utilisation de l’appareil photo
numérique pour plus d’informations sur son utilisation.
Commande de l’impression depuis l’appareil
photo numérique
1 Commandez le déroulement de l’impression à l’aide de
l’appareil photo numérique.
Suivez les instructions qui s’affichent sur le moniteur de l’appareil
photo numérique pour effectuer l’impression.
62
Page 63

Impression des photos depuis un appareil numérique
Exemple d’écran d’appareil photo numérique
Les écrans et les commandes des menus peuvent varier en fonction
de l’appareil.
USB
P C
IMPRESSION FACILE
IMPRESSION SPÉCIALE
QUITTE
SELECT
OK
OK
Vous pouvez sélectionner les fonctions suivantes sur cet écran :
[IMPRESSION FACILE] Cette fonction offre une méthode
rapide et aisée pour réaliser un tirage
de la photo affichée sur le moniteur
LCD de l’appareil photo.
[IMPRESSION SPÉCIALE] Vous permet de sélectionner les
ou [IMPRESSION] photos que vous voulez imprimer, le
nombre d’exemplaires, le format et
avec ou sans marges.
Lorsque l’impression a commencé, le voyant ACCESS de
l’imprimante clignote. Le voyant s’éteint lorsque l’impression est
terminée.
Reportez-vous au manuel d’utilisation de l’appareil photo
numérique pour plus d’informations sur son utilisation.
2 Lorsque l’impression est terminée, éteignez l’appareil photo
numérique et l’imprimante avant de débrancher le câble USB.
IntroductionFRANÇAIS
Préparation Impression
Remarque
Ne retirez pas la cartouche de ruban encreur ni le bac d’alimentation
pendant l’impression.
Ne déplacez pas l’imprimante pendant l’impression.
N’éteignez pas l’imprimante ni l’appareil photo et ne débranchez par
l’adaptateur secteur pendant l’impression. Si l’alimentation est coupée ou si
l’adaptateur secteur est débranché pendant l’impression, remettez
l’imprimante en marche. Répétez l’opération après l’éjection automatique
du papier. Le fait de laisser l’imprimante hors tension risque de causer un
mauvais fonctionnement.
Si l’impression ne reprend pas bien que le papier a été mis après un
manque de papier, retirer la cartouche de ruban encreur et l’insérer de
nouveau. L’impression reprendra automatiquement.
Si vous avez sélectionné l’option [Sans marge], les bords de la photo
seront coupés car le rapport hauteur/largeur des photos prises avec
l’appareil est généralement de 4:3.
Assurez-vous de cadrer la photo en conséquence au moment de la prise
de vue.
Si vous avez sélectionné l’option [Marge], la taille de la photo sera plus
petite mais elle sera imprimée dans son intégralité.
63
Pour votre
information
Page 64

Impression des photos à partir d’un ordinateur
Introduction FRANÇAIS
PréparationImpression
Nous recommandons d’utiliser OLYMPUS Master (fourni avec chaque
appareil photo numérique Olympus), OLYMPUS Master Plus, Olympus
Studio ou une autre application de traitement d’image pour imprimer les
images enregistrées sur votre ordinateur.
Remarque
Les photos non prises avec un appareil photo numérique doivent être
imprimées depuis un ordinateur.
Installation du pilote d’imprimante (pendant la configuration initiale)
Systèmes d’exploitation pris en charge : Windows 2000/XP
Remarque
Veillez à ce que le pilote soit installé avant de raccorder l’ordinateur à
l’imprimante.
1 Démarrez l’ordinateur et introduisez le CD-ROM fourni dans le
lecteur de CD-ROM.
Reportez-vous au guide d’installation qui se trouve sur le CD-ROM
pour plus d’informations.
2 Suivez les instructions à l’écran pour installer le pilote
d’imprimante.
Reportez-vous au manuel d’utilisation de l’ordinateur pour plus
d’informations.
Pour votre
information
64
Enregistrement d’un utilisateur
L’enregistrement de votre produit vous permet d’activer la
garantie et de recevoir des informations sur les mises à jour
des produits, des offres spéciales et bien plus encore. Vous
pouvez vous enregistrer à l’aide du CD-ROM fourni.
Raccordement d’un ordinateur à l’imprimante
Connectez l’imprimante à l’aide d’un câble USB standard du
commerce (Type A-B).
1 Retirez le cache latéral gauche.
Voir à la page 52. “Branchement de l’alimentation et mise en
marche/arrêt de l’imprimante”
Page 65

Impression des photos à partir d’un ordinateur
2 Insérez une fiche du câble USB dans le port USB de l’ordinateur
et branchez l’autre fiche dans le connecteur USB à l’arrière de
l’imprimante. Assurez-vous de bien faire passer le câble à
travers le guide.
3 Remettez le cache latéral en place.
4 Ouvrez le bac de sortie du papier de l’imprimante.
Ouvrez le bac de sortie du papier avant d’utiliser l’imprimante.
S’il n’est pas ouvert lorsque l’imprimante est utilisée, un bourrage de
papier peut se produire et l’imprimante risque d’être endommagée.
Laissez le bac de sortie du papier fermé lorsque l’imprimante n’est
pas en cours d’utilisation pour éviter la pénétration de poussière et
de corps étrangers.
IntroductionFRANÇAIS
Préparation Impression
5 Allumez l’imprimante.
Remarque
Si un ordinateur et un appareil photo numérique compatible PictBridge sont
branchés simultanément sur l’imprimante, l’appareil photo a priorité sur
l’ordinateur. Débranchez l’appareil photo.
Le fonctionnement de cette imprimante en réseau n’est pas garanti.
Le fonctionnement de cette imprimante sur un concentrateur (hub) USB
n’est pas garanti.
65
Pour votre
information
Page 66

Impression des photos à partir d’un ordinateur
Impression
1 Utilisez un logiciel d’imagerie numérique (ou toute autre
application de traitement d’image) pour ouvrir la ou les images
que vous voulez imprimer.
2 Cliquez sur [Imprimer] dans le menu Fichier et sélectionnez
[OLYMPUS P-11] dans la boîte de dialogue d’impression.
Remarque
La procédure d’accès à la fonction [Imprimer] et la sélection de l’imprimante
varient en fonction de l’application. Reportez-vous aux instructions de votre
application.
3 Cliquez sur [Propriétés], vérifiez le format du papier et les autres
Introduction FRANÇAIS
propriétés puis lancez l’impression.
Voir à la page 67. “Paramètres d’impression”
4 Arrêtez l’imprimante lorsque l’impression est terminée.
Remarque
PréparationImpression
Pour votre
information
66
Ne retirez pas la cartouche de ruban encreur ni le bac d’alimentation
pendant l’impression.
Ne déplacez pas l’imprimante pendant l’impression.
N’éteignez pas l’imprimante ni l’ordinateur et ne débranchez par
l’adaptateur secteur pendant l’impression. Si l’alimentation est coupée ou si
l’adaptateur secteur est débranché pendant l’impression, remettez
l’imprimante en marche. Répétez l’opération après l’éjection automatique
du papier. Le fait de laisser l’imprimante hors tension risque de causer un
mauvais fonctionnement.
Si vous avez sélectionné l’option [Sans marge] pour la [Zone d’impression]
sur l’onglet [Papier], les bords de la photo seront coupés car le rapport
hauteur/largeur des photos prises avec l’appareil est généralement de 4:3.
Assurez-vous de cadrer la photo en conséquence au moment de la prise
de vue.
Si vous avez sélectionné l’option [Marge] pour la [Zone d’impression] sur
l’onglet [Papier], la taille de la photo sera plus petite mais elle sera
imprimée dans son intégralité. Vous pouvez en outre obtenir le cadrage
souhaité pour l’impression sans marges en utilisant un logiciel de retouche
d’image tel que OLYMPUS Master pour rogner la photo.
Page 67

Impression des photos à partir d’un ordinateur
Paramètres d’impression
Les onglets [Papier] et [Graphiques] de la fenêtre des préférences
d’impression vous permettent de définir le format du papier, le nombre
d’exemplaires et d’effectuer le réglage des couleurs.
Onglet [Papier] Onglet [Graphiques]
IntroductionFRANÇAIS
Préparation Impression
Vous pouvez sélectionner les paramètres suivants sur l’onglet [Papier].
Paramètre Description
Format papier
Nombre d’exemplaires
Orientation Sélectionnez l’orientation de l’impression.
Zone d’impression Sélectionnez [Sans marge] ou [Marge].
Séparation Sélectionnez l’impression avec séparation de 2, 4, 9
Netteté Sélectionnez [Doux], [Normal] ou [Dur].
Revêtement
Sélectionnez 100 mm × 148 mm ou 89 mm × 127 mm.
Sélectionnez jusqu’à 50 exemplaires.
ou 16 photos. Ce paramètre est seulement
disponible si vous avez sélectionné [Marge].
Ce paramètre ne devrait normalement pas être modifié.
Vous pouvez sélectionner les paramètres suivants sur l’onglet
[Graphiques].
Paramètre Description
Ton Réglez les teintes rouge, vert et bleu entre -5 et +5.
Saturation
Luminosité
Contraste Réglez le contraste entre -5 et +5.
Réglez la saturation de la totalité de la photo entre 0 et +10.
Réglez la luminosité de la totalité de la photo entre -5 et +5.
67
Pour votre
information
Page 68

Pour votre information
Si des voyants sont allumés et clignotent
POWER
(Marche/Arrêt)
ACCESS
(Accès)
PAPER
(Papier)
Introduction FRANÇAIS
RIBBON
(Ruban)
PréparationImpression
ACCESS,
PAPER
ACCESS
(Accès),
RIBBON
(Ruban)
ACCESS,
RIBBON,
Pour votre
PAPER
information
* Lorsque la communication est établie, le voyant s’éteint.
Voyant
État du voyant
Allumé Sous tension
Éteint Hors tension
Allumé * Connexion à
Clignotement
lent
Clignotement
très lent
Clignotement
lent
Clignotement
rapide
Clignotement
lent
Clignotement
simultané
Clignotement
simultané
Clignotement
simultané
État de l’imprimante
l’appareil photo
numérique
Communication en cours
Impression
Plus de papier
Le papier et la
cartouche de
ruban encreur
sont
incompatibles
Ruban encreur
épuisé
Cartouche de
ruban encreur
non inséreé
Le papier et la
cartouche de
ruban encreur
sont
incompatibles
Bourrage
papier
Erreur de
communication
Problème
interne
Action corrective nécessaire Page
—52
Ne débranchez pas l’appareil
photo numérique ni l’ordinateur.
—
——
Retirez le bac d’alimentation, ajoutez du
papier et remettez le bac d’alimentation
en place dans l’imprimante.
Lors d’une impression sur du papier
au format 100 mm × 148 mm,
assurez-vous d’utiliser une cartouche
de ruban encreur de ce format. De
même, lorsque vous imprimez sur du
papier au format 89 mm × 127 mm,
utilisez une cartouche de ruban
encreur de ce format.
Remplacer la cartouche de ruban
encreur par une nouvelle.
Insérez une cartouche de ruban
encreur dans l’imprimante. Il faut
l’enfoncer jusqu’à entendre
l’enclenchement, sinon une erreur
se produira.
Lors d’une impression sur du papier
au format 100 mm × 148 mm,
assurez-vous d’utiliser une cartouche
de ruban encreur de ce format. De
même, lorsque vous imprimez sur du
papier au format 89 mm × 127 mm,
utilisez une cartouche de ruban
encreur de ce format.
Retirez le papier coincé.
Vérifiez que l’appareil photo
numérique est compatible PictBridge.
Éteignez puis rallumez l’imprimante et
faites une nouvelle tentative
d’impression.
Si l’erreur persiste, consultez le centre
S.A.V. OLYMPUS le plus proche.
Consultez le centre S.A.V.
OLYMPUS le plus proche. —
57,
72
56
54,
72
54,
72
56
70
—
—
68
Page 69

En cas de difficultés
Avant de renvoyer votre imprimante en réparation, vérifiez les points suivants pour essayer de
résoudre le problème. Si le problème persiste, contactez le centre S.A.V. OLYMPUS le plus proche.
Problème Cause·État Solution Page
Impossible de mettre
l’imprimante en marche.
Impossible de
retirer la cartouche
de ruban encreur.
L’impression
depuis l’appareil
photo numérique
prend beaucoup de
temps pour
commencer.
L’impression ne
démarre pas.
Les images
imprimées
contiennent des
parasites.
Les intervalles
d’impression
deviennent plus
longs.
En cas de bourrage papier, voir page 70. “En cas de bourrage du papier”
L’adaptateur secteur
n’est pas branché.
L’imprimante a été
éteinte pendant qu’elle
fonctionnait.
L’imprimante prend
beaucoup de temps pour
ouvrir un fichier TIFF.
Le rognage réservé par
DPOF prend beaucoup
de temps.
Le chargeur de papier ou
la cartouche de ruban ne
convient pas au format
de papier utilisé.
Le format d’impression défini
sur un appareil photo
numérique ou un ordinateur
est différent de celui du
Chargeur de papier/
Cartouche de ruban en place.
La cartouche de ruban
encreur n’est pas en place.
Le bac d’alimentation n’est
pas inséré ou il est vide.
Bourrage de papier dans
la section d’éjection.
Le pilote d’imprimante n’est
pas installé correctement
sur l’ordinateur.
Les voyants sont
allumés ou clignotent.
Des photos qui n’ont pas
été prises par un appareil
photo numérique ont été
imprimées depuis un
appareil photo numérique.
Les intervalles d’impression
sont automatiquement
allongés pendant
l’impression continue pour
éviter une surchauffe des
composants internes.
Raccordez correctement
l’adaptateur secteur.
Poussez la cartouche de ruban
encreur jusqu’à ce que vous
entendiez un bruit de verrouillage.
Rallumez l’imprimante et attendez
que les bruits mécaniques s’arrêtent.
Le temps d’ouverture dépend de la
taille de l’image. Attendez la fin de
l’ouverture.
Attendez la fin de l’ouverture.
Utilisez une cartouche de ruban et
un chargeur de papier de même
format.
Insérez une cartouche de ruban et
du papier de même format que
celui sélectionné sur l’appareil
photo numérique ou l’ordinateur.
Insérez une cartouche de ruban
encreur.
Chargez du papier dans le bac puis
mettez le bac d’alimentation en place.
Retirez le papier.
Installez ou réinstallez le pilote
d’impression sur l’ordinateur. 64
Utilisez un ordinateur pour
imprimer des données d’image qui
n’ont pas été enregistrées par un
appareil photo numérique.
Ce n’est pas un mauvais
fonctionnement. Patientez
quelques minutes.
52
—
—
—
56,
73
54
58,
60
70
—68
64
—
Préparation ImpressionIntroductionFRANÇAIS
Pour votre
information
69
Page 70

En cas de difficultés
En cas de bourrage du papier
1 Éteignez l’imprimante.
2 Après avoir retiré le bac
Introduction FRANÇAIS
3 Toujours avec le bac d’alimentation retiré, rallumez l’imprimante
PréparationImpression
4 Regardez par le volet du bac d’alimentation pour vérifier si le
En cas de bourrage du papier dans l’imprimante, les voyants ACCESS
(Accès) et PAPER (Papier) clignotent et l’impression s’arrête.
Effectuez les opérations suivantes pour éliminer le bourrage du papier
dans l’imprimante.
d’alimentation, assurez-vous
qu’aucune feuille n’est pliée ou
froissée et que les feuilles de
papier sont placées correctement
dans le bac.
pour en éjecter automatiquement le papier.
Si le papier est éjecté automatiquement, poursuivez à l’étape 8.
Si le papier n’est pas éjecté automatiquement, éteignez l’imprimante
et poursuivez à l’étape 4.
papier est visible à l’arrière.
Si le papier coincé est visible, allez à l’étape 5.
Si le papier coincé n’est pas visible, contactez le centre S.A.V.
OLYMPUS le plus proche.
Pour votre
information
70
5 Positionnez l’imprimante sur son
dos de manière à ce que l’avant soit
dirigé vers le haut. Introduisez votre
doigt dans la fente du distributeur
de papier située sur le dessous et
faites glisser le papier coincé en
direction du volet du bac
d’alimentation.
Si vous ne parvenez pas à faire bouger le papier avec votre doigt,
utilisez des pincettes ou quelque chose de similaire.
Page 71

En cas de difficultés
6 Vous pourrez sortir le papier par le volet du bac d’alimentation
après l’avoir glissé sur une certaine distance.
7 Allumez l’imprimante.
8 Remontez le bac d’alimentation dans son emplacement.
Si le fonctionnement est normal, le bourrage a complètement
disparu et vous pouvez poursuivre votre impression.
Prudence
N’essayez pas d’utiliser de nouveau un papier qui était resté coincé dans
l’imprimante. Vous risqueriez d’endommager l’imprimante.
Si vous utilisez un papier autre que du papier spécial tel que du
papier pour imprimante jet d’encre ou si vous imprimez deux fois sur
le même papier, le papier risque d’adhérer au ruban encreur ou de
provoquer un bourrage dans l’imprimante. Si cela se produit,
renvoyez votre imprimante en réparation.
En cas de retrait de la cartouche de ruban
encreur pendant l’impression
Préparation ImpressionIntroductionFRANÇAIS
1 Éteignez l’imprimante.
2 Enfoncez la cartouche de ruban encreur jusqu’à entendre
l’enclenchement.
3 Allumez l’imprimante.
71
Pour votre
information
Page 72

Ajout de papier dans le bac d’alimentation et remplacement de la cartouche de ruban encreur
Introduction FRANÇAIS
Si le papier vient à épuisement pendant
l’impression
Le voyant PAPER (Papier) clignote lentement. Ajoutez du papier dans
le bac d’alimentation. Les exemplaires restant seront automatiquement
imprimés.
Si vous utilisez un kit d’impression, le ruban encreur vient normalement
à épuisement au même moment que le papier. Vous devez donc
remplacer la cartouche de ruban encreur en même temps.
Si le ruban encreur vient à épuisement pendant
l’impression
Le voyant RIBBON (Ruban) clignote rapidement. Lorsque le papier a
été éjecté de l’imprimante, remplacez la cartouche de ruban encreur
par une neuve. Les exemplaires restant seront automatiquement
imprimés après avoir introduit la nouvelle cartouche.
Mise au rebut d’une cartouche de ruban encreur
usagée
PréparationImpression
Pour votre
information
72
La mise au rebut des cartouches de ruban encreur usagés doit
s’effectuer en conformité avec les méthodes de rejet des déchets
plastiques prescrites par les autorités locales.
Page 73

À propos du kit d’impression (cartouche de ruban encreur et papier)
J Utilisez toujours les kits d’impression spécifiés par OLYMPUS.
Les kits d’impression sont conçus pour un format de papier
100 mm × 148 mm ou 89 mm × 127 mm. Le kit d’impression pour le
format 100 mm × 148 mm contient du papier et une cartouche de
ruban encreur au format 100 mm × 148 mm. De même, le kit
d’impression pour le format 89 mm × 127 mm contient du papier et
une cartouche de ruban encreur au format 89 mm × 127 mm.
* Le kit d’impression pour le format 89 mm × 127 mm n’est pas
disponible partout.
Kit d’impression (cartouche de ruban encreur et papier)
Type de papier Nombre de
tirages
Papier 100 mm × 148 mm 100 P-P100
Papier 100 mm × 148 mm 40 P-P40
Papier 89 mm × 127 mm 100 P-L100
Papier 89 mm × 127 mm 40 P-L40
Achat de kits d’impression
Pour les utilisateurs en Europe
Vous trouverez le distributeur de consommables P-11 le
plus proche en vous connectant au site suivant :
http://www.olympus-europa.com/printerpaper
Numéro de
référence
Préparation ImpressionIntroductionFRANÇAIS
Pour les utilisateurs en Amérique du Nord et du Sud
Les kits d’impression sont disponibles chez votre revendeur
local ou sur le site
http://www.olympusamerica.com/store.
Pour toute question, consultez les pages d’assistance
Customer Support sur le site
http://www.olympusamerica.com/support.
Utilisez toujours la cartouche de ruban encreur et le papier
d’impression d’un même kit d’impression.
J La cartouche de ruban encreur usagée n’est pas réutilisable.
J Manipulez la cartouche de ruban encreur avec soin afin qu’elle reste
propre.
J Ne démontez pas la cartouche de ruban encreur.
J Les traces de doigts, les rayures, l’huile ou la poussière sur la
surface d’impression risquent de dégrader la qualité d’impression.
J N’ouvrez pas le kit d’impression avant son utilisation.
73
Pour votre
information
Page 74

À propos du kit d’impression (cartouche de ruban encreur et papier)
Conditions de stockage
J Le stockage du kit d’impression dans les endroits suivants est
vivement déconseillé :
Températures extrêmes (supérieure à 30 °C ou inférieure à
5 °C), taux d’humidité élevé ou poussière.
Présence de produits chimiques.
En plein soleil ou en présence d’une lumière vive.
Prudence
Ne pas exposer à une température supérieure à 40 °C pendant une
période prolongée. La même précaution s’impose lorsqu’il est installé dans
l’imprimante. (Pendant le transport ou à une fenêtre en plein soleil.)
Stockage des tirages
Introduction FRANÇAIS
PréparationImpression
Pour votre
information
J Ne rangez pas les tirages avec les faces imprimées les unes contre
les autres.
J Ne laissez pas la surface d’impression entrer en contact avec du film
cellophane, un sous-main ou une gomme contenant du plastique
pendant une durée prolongée. Un contact prolongé risque de
provoquer une décoloration de la surface d’impression.
J Ne laissez pas de solvants organiques entrer en contact avec la
surface d’impression. La conséquence pourrait être une
décoloration.
J Une exposition prolongée de la surface d’impression au soleil ou à
une lumière vive risque de provoquer une décoloration.
J Utilisez un feutre gras pour écrire sur la surface d’impression.
J Évitez les emplacements en plein soleil, exposés à de fortes
températures ou des taux d’humidité élevés ou qui sont à la portée
des enfants.
J OLYMPUS n’est pas responsable de la décoloration de l’altération
des tirages.
Si vous rencontrez des problèmes
J Tout problème résultant d’un défaut de fabrication par OLYMPUS
donnera lieu à un échange contre la même quantité de produit neuf.
La responsabilité d’OLYMPUS ne saurait être engagée dans
d’autres situations.
74
Page 75

Spécifications
Imprimante
Méthode d’impression Impression en 4 passes par transfert des couleurs par
Résolution 310 dpi × 310 dpi
Format du papier
d’impression
Taille d’impression
maximale
Rendu des couleurs Plus de 16 770 000 de couleurs
Vitesse d’impression
Interfaces Raccordement à un appareil photo numérique compatible
Systèmes d’exploitation
compatibles
Cartouche de ruban
encreur
Formats de fichiers
graphiques
compatibles
Source d’alimentation 24 V CC, 2,5 A (adaptateur secteur spécifique)
Consommation
nominale
Température d’utilisation
Humidité de
fonctionnement
Dimensions 184 (L) × 180 (P) × 158 (H) mm
Poids 2,2 kg (bac d’alimentation compris)
sublimation (Jaune/Magenta/Cyan et pellicule de protection)
Papier au format 89 mm × 127 mm : 89 (H) × 127 (V) mm
Papier au format 100 mm × 148 mm : 100 (H) × 148 (V) mm
1) Impression sans marges
• Papier au format 89 mm × 127 mm : 130,4 mm × 93,7 mm
(1591 × 1144 points)
Papier au format 100 mm × 148 mm : 151,4 mm × 104,9 mm
•
(1848 × 1280 points)
2) Impression avec marges
• Papier au format 89 mm × 127 mm : 104,9 mm × 78,7 mm
(1280 × 960 points)
• Papier au format 100mm × 148 mm : 120,3 mm × 90,2 mm
(1468 × 1101 points)
Papier au format 89 mm × 127 mm : 30 secondes environ par feuille
Papier au format 100 mm × 148 mm : 33 secondes environ par feuille
(sans compter le temps de transmission des données depuis
l’appareil photo numérique ou l’ordinateur)
PictBridge : connecteur USB Type-A
Raccordement à un ordinateur : connecteur USB Type-B
Windows 2000/XP
3 couches Y+M+C (Jaune/Magenta/Cyan) et une fine
pellicule résistante (couche de protection)
Compatible Exif 1.0 - 2.2 (JPEG/TIFF) compatible DPOF 1.1
60 W (pendant l’impression)
4 W (en attente)
5 - 35 °C
30 - 80%
(parties en saillie non comprises)
Préparation ImpressionIntroductionFRANÇAIS
Pour votre
information
75
Page 76

Spécifications
Adaptateur secteur
Type Régulateur à découpage
Tension d’entrée 100 - 120 V AC ou 220 - 240 V AC 50/60 Hz
Tension de sortie 24 V CC, 2,5 A
La conception et les spécifications sont sujettes à modifications sans préavis.
Introduction FRANÇAIS
(le type d’adaptateur secteur et la tension varient suivant la région)
PréparationImpression
Pour votre
information
76
Page 77

Service après-vente et entretien
Votre revendeur vous a remis un certificat de garantie qui comporte
son nom ainsi que la date de l’achat. En cas d’erreur sur le certificat,
corrigez-les avec votre revendeur. Lisez attentivement le certificat de
garantie et conservez-le en un endroit sûr.
Consultez le centre S.A.V. OLYMPUS le plus proche pour toute
question concernant le service après-vente ou en cas de problème
avec l’appareil. Si un problème survient avec cet appareil alors qu’il
est utilisé conformément aux instructions du manuel, la garantie
limitée vous permettra de bénéficier d’une réparation gratuite
pendant l’année qui suit la date de l’achat.
Les réparations effectuées après expiration de la période de garantie
peuvent être facturées.
OLYMPUS essaiera de maintenir les pièces de rechange pour ce
produit pendant une durée de 5 ans après la fin de la production. Par
conséquent, le service après-vente de cette imprimante sera
généralement assuré pendant cette période. Un service après-vente
pourra éventuellement être assuré même après cette période. En
cas de besoin, consultez le centre S.A.V. OLYMPUS le plus proche.
OLYMPUS n’est pas responsable des éventuels dommages (coûts
ou pertes financières) provoqués par un défaut de fonctionnement
de l’appareil.
Lorsque vous renvoyez un produit pour réparation, joignez un
document décrivant le problème ou le défaut rencontré et mettez
l’appareil dans sa boîte d’origine en utilisant le matériel d’emballage
original. Si vous n’avez plus l’emballage d’origine, emballez
l’imprimante avec suffisamment de matériel amortisseur pour
absorber tout choc pendant le transport. Faites appel à un service de
livraison avec suivi ou faites un envoi postal en recommandé. Les
frais d’envoi sont à la charge du client.
Préparation ImpressionIntroductionFRANÇAIS
77
Pour votre
information
Page 78

Définitions
DPOF (Digital Print Order Format)
Format d’enregistrement permettant l’impression automatique des
données d’un appareil photo numérique. Vous pouvez très facilement
effectuer des tirages à partir d’une carte mémoire auprès d’un magasin
photo ou sur des imprimantes qui reconnaissent le format DPOF en
sélectionnant les photos souhaitées et le nombre d’exemplaires.
PictBridge
Une norme commune utilisée pour la connexion directe d’un appareil
photo numérique à une imprimante pour imprimer des photos. Si le
périphérique est compatible PictBridge, vous pouvez effectuer des
tirages tout simplement en utilisant les commandes de l’appareil photo
numérique et indépendamment de la marque du périphérique. Il existe
différentes options d’impression telles que l’impression automatique ou
les images avec définition DPOF, l’impression d’index et le détourage
d’image.
Introduction FRANÇAIS
PréparationImpression
Pour votre
information
RGB
Les trois couleurs qui composent la lumière : rouge (R), vert (G) et bleu
(B). Les couleurs sont affichées sur les téléviseurs et les écrans
d’ordinateur en utilisant ces trois couleurs.
YMC
Les trois couleurs primaires : cyan (C), magenta (M) et jaune (Y). Les
teintes sont imprimées en utilisant ces couleurs. La gamme des
couleurs pouvant être affichées en utilisant le mode YMC est différente
de la gamme des couleurs RGB. Certaines couleurs des photos
affichées sur un moniteur ne peuvent ainsi pas être reproduites
exactement sur une imprimante qui les remplacera par des couleurs
similaires.
78
Page 79

MEMO
FRANÇAIS
79
Page 80

Wir bedanken uns für den Kauf dieses digitalen Fotodruckers P-11. Lesen Sie bitte diese Anleitung vor
Inbetriebnahme des Druckers aufmerksam durch, um eine optimale Funktion zu gewährleisten.
Für Kunden in Nord- und Südamerika
Für Kunden in den USA
DEUTSCH
Betriebserlaubnis
Produktname : Digitaler Fotodrucker
Modell-Nummer : P-11
Markenname : OLYMPUS
Verantwortlicher Hersteller :
Anschrift : Two Corporate Center Drive, PO Box 9058, Melville, NY 11747-9058, U.S.A.
Telefonnummer : 1-631-844-5000
Auf Übereinstimmung mit den FCC-Bestimmungen geprüft.
FÜR DEN HEIM- UND BÜROGEBRAUCH
Dieses Gerät erfüllt die Auflagen unter Abschnitt 15 der FCC-Bestimmungen. Das Betreiben dieses Geräts ist
zulässig, wenn die nachfolgend genannten Auflagen erfüllt werden:
(1) Von diesem Gerät dürfen keine schädlichen Störeinstreuungen ausgehen.
(2) Dieses Gerät muss die Einwirkung von Störeinstreuungen zulassen. Dies schließt Störeinstreuungen ein,
welche Beeinträchtigungen der Funktionsweise oder Betriebsstörungen verursachen können.
FCC-Vermerk
• Funkstörungen
Änderungen und Modifikationen, die vom Hersteller nicht ausdrücklich genehmigt sind, haben ein Erlöschen
der Betriebsbefugnis dieses Geräts zur Folge. Dieses Gerät wurde geprüft und als übereinstimmend mit den
Einschränkungen für ein Digitalgerät der Klasse B gemäß Abschnitt 15 der FCC-Richtlinien befunden. Diese
Einschränkungen sind vorgesehen, einen ausreichenden Schutz gegen schädliche Störungen in
Wohnanlagen zu gewährleisten.
Dieses Gerät generiert und nutzt Hochfrequenzenergie und kann solche Energie abstrahlen. Wenn es nicht in
Übereinstimmung mit den Anweisungen eingerichtet und betrieben wird, kann es die Funkkommunikation
störende Interferenzen erzeugen.
Es wird jedoch nicht dafür garantiert, dass Störungen in bestimmten Einrichtungen nicht auftreten. Sollte das
Gerät den Rundfunkempfang (Radio oder Fernsehen) stören, was durch Aus- und Wiedereinschalten des
Geräts ermittelt werden kann, wird dem Benutzer empfohlen, durch eine der folgenden Maßnahmen Abhilfe
zu schaffen:
- Ausrichten oder Umstellen der Antenne.
- Vergrößern des Abstands zwischen Kamera und Empfänger.
- Anschluss des Geräts an eine Steckdose in einem Versorgungskreis, der von dem des Empfängers getrennt
ist.
- Wenn Sie diesbezüglich Hilfe benötigen, wenden Sie sich an Ihren Rundfunkfachmann.
ACHTUNG: Der Anschluss eines nicht abgeschirmten Anschlusskabels an dieses Gerät macht die FCCZertifizierung dieses Gerätes ungültig und kann Störpegel verursachen, welche die von der FCC für dieses
Gerät vorgeschriebenen Grenzen überschreiten. Der Benutzer ist dafür verantwortlich, ein abgeschirmtes
Anschlusskabel zu besorgen und mit diesem Gerät zu benutzen. Änderungen oder Modifizierungen, die nicht
ausdrücklich vom Hersteller genehmigt worden sind, können die Befugnis des Benutzers zum Betrieb des
Gerätes nichtig machen.
Unbefugte Änderungen oder Modifikationen an diesem Gerät haben einen Verfall der Betriebsbefugnis zur Folge.
Für Kunden in Kanada
Dieses digitale Gerät der Klasse B erfüllt die kanadischen Vorschriften ICES-003.
Für Kunden in Europa
Das (CE)-Zeichen bestätigt, dass dieses Produkt mit den europäischen Bestimmungen für
Sicherheit, Gesundheit, Umweltschutz und Personenschutz übereinstimmt. Mit dem (CE)-Zeichen
versehene Drucker sind für den europäischen Markt bestimmt.
Dieses Symbol [durchgestrichene Mülltonne nach WEEE Anhang IV] weist auf die getrennte
Rücknahme elektrischer und elektronischer Geräte in EU-Ländern hin.
Bitte werfen Sie das Gerät nicht in den Hausmüll. Informieren Sie sich über das in Ihrem Land gültige
Rücknahmesystem und nutzen dieses zur Entsorgung.
Warenzeichen
Windows ist ein eingetragenes Warenzeichen der Microsoft Corporation.
Alle anderen Marken- und Produktbezeichnungen, die in dieser Bedienungsanleitung verwendet werden, sind
Warenzeichen oder eingetragene Warenzeichen der jeweiligen Rechteinhaber.
80
Page 81

Inhalt
Einleitung
Sicherheitshinweise ................................................................................. 82
Pflege und Aufbewahrung........................................................................ 87
Was dieser Drucker leistet ....................................................................... 88
Überprüfen der Zubehörteile .................................................................... 89
Bezeichnung der Teile ............................................................................. 90
Vorbereitung
Anschließen der Stromversorgung und Ein-/Ausschalten des
Druckers................................................................................................... 92
Einlegen der Farbbandkassette ............................................................... 94
Einlegen von Druckpapier ........................................................................ 97
Entnehmen des Papierfachs aus dem Drucker ................................................ 97
Einlegen von Druckpapier in das Papierfach.................................................... 98
Einsetzen des Papierfachs in den Drucker..................................................... 100
Drucken
Ausdrucken von Bildern der Digitalkamera ............................................ 101
Informationen zu PictBridge-kompatiblen Digitalkameras .............................. 101
Anschließen einer Digitalkamera an den Drucker .......................................... 101
Verwendung der Digitalkamera zur Steuerung des Druckvorgangs............... 102
Bilder von einem Computer aus drucken ............................................... 104
Installation des Druckertreibers (beim erstmaligen Einrichten) ...................... 104
Anschließen des Druckers an einen Computer .............................................. 104
Drucken .......................................................................................................... 106
EinleitungDEUTSCH
Vorbereitung Drucken
Zu Ihrer Information
Wenn Anzeigen blinken oder ständig leuchten ...................................... 108
Fehlersuche ........................................................................................... 109
Wenn ein Papierstau aufgetreten ist............................................................... 110
Wenn die Farbbandkassette während des Druckens entnommen wird ......... 111
Auffüllen des Papiervorrats und Austausch der Farbbandkassette ....... 112
Wenn der Papiervorrat während des Druckens erschöpft ist ......................... 112
Wenn das Farbband während des Druckens verbraucht ist........................... 112
Entsorgung gebrauchter Farbbandkassetten ................................................. 112
Informationen zum Print-Pack (Farbbandkassette und Druckpapier) .... 113
Technische Daten .................................................................................. 115
Kundendienst und Wartung.................................................................... 117
Erklärung der Fachbegriffe..................................................................... 118
81
Zu Ihrer
Information
Page 82

Einleitung
Sicherheitshinweise
In dieser Anleitung werden verschiedene Symbole verwendet, um auf
den korrekten Gebrauch des Produkts hinzuweisen und Sachschäden
oder Verletzungen vorzubeugen. Die Bedeutung dieser Symbole ist im
Folgenden angegeben.
Warnsymbol Erläuterung
ACHTUNG
VORSICHT
Die folgenden Symbole kennzeichnen Vorsichtshinweise.
Warnsymbol Erläuterung
Diesen Vorgang nicht ausführen.
Sie werden ausdrücklich dazu aufgefordert, diesen
Vorgang auszuführen.
Bei Nichtbefolgen der durch dieses
Symbol gekennzeichneten Anweisungen
besteht die Gefahr schwerer
Verletzungen mit Todesfolge!
Bei Nichtbefolgen der durch dieses
Symbol gekennzeichneten Anweisungen
besteht die Gefahr von Verletzungen oder
Sachschäden!
VorbereitungDrucken Einleitung DEUTSCH
Zu Ihrer
Information
82
Ziehen Sie den Netzstecker aus der Steckdose.
Nicht zerlegen!
Kontakt mit Wasser und anderen Flüssigkeiten
vermeiden.
Nicht mit nassen Händen berühren.
Page 83

Sicherheitshinweise
ACHTUNG
J Wenn sich das Gerät außergewöhnlich verhält, Netzstecker
ziehen.
Den Drucker bei Rauch- oder ungewöhnlicher Geruchsentwicklung,
außergewöhnlichen Geräuschen oder ungewöhnlich starker
Wärmeentwicklung nicht benutzen.
Andernfalls besteht Stromschlag- und/oder Feuergefahr.
Den Drucker unverzüglich ausschalten und den Netzstecker
ziehen. Wenden Sie sich an die nächstgelegene OLYMPUSKundendienstvertretung.
J Falls Flüssigkeit oder Fremdkörper in das Innere des Druckers
eindringen, unverzüglich den Netzstecker ziehen.
Darauf achten, dass keinerlei Flüssigkeiten, Metallgegenstände
oder brennbare Materialien durch die Lüftungsöffnungen in das
Innere des Druckers gelangen.
Andernfalls besteht Stromschlag- und/oder Feuergefahr.
Den Drucker unverzüglich ausschalten und den Netzstecker
ziehen. Wenden Sie sich an die nächstgelegene OLYMPUSKundendienstvertretung.
J Den Netzstecker ziehen, wenn das Druckergehäuse beschädigt
ist.
Das Gerät nicht benutzen, wenn das Gehäuse beschädigt wurde.
Andernfalls besteht Stromschlag- und/oder Feuergefahr.
Den Drucker unverzüglich ausschalten und den Netzstecker
ziehen. Wenden Sie sich an die nächstgelegene OLYMPUSKundendienstvertretung.
DEUTSCH
Einleitung
Vorbereitung Drucken
J Den Netzstecker sofort ziehen, wenn am Netzkabel Schäden
festgestellt werden.
Verwenden Sie kein beschädigtes Netzkabel.
Andernfalls besteht Stromschlag- und/oder Feuergefahr.
Den Drucker unverzüglich ausschalten, den Netzstecker ziehen
und darauf achten, keine freiliegenden Drähte zu berühren.
Wenden Sie sich an die nächstgelegene OLYMPUSKundendienstvertretung.
83
Zu Ihrer
Information
Page 84

Sicherheitshinweise
ACHTUNG
J Darauf achten, das Netzkabel nicht zu beschädigen.
Das Netzkabel nicht beschädigen oder umbauen.
Ein beschädigtes Netzkabel kann Feuer und/oder Stromschläge verursachen.
Um Schäden am Netzkabel zu vermeiden, achten Sie bitte auf die folgenden
Punkte: Ziehen Sie NICHT am Kabel, um den Stecker herauszuziehen, biegen
Sie das Kabel NICHT übermäßig und stellen Sie KEINE schweren
Gegenstände auf das Kabel.
Falls am Netzkabel Schäden festgestellt werden, wenden Sie sich bitte an die
nächstgelegene OLYMPUS-Kundendienstvertretung.
J Den Drucker nicht zerlegen oder umbauen.
Im Drucker befinden sich sowohl heiße als auch Hochspannung führende Teile.
Beim Berühren dieser Teile besteht Verbrennungs- und Stromschlaggefahr und
der Drucker könnte beschädigt werden. Versuchen Sie keinesfalls den Drucker
zu zerlegen oder umzubauen, da dies einen Stromschlag oder eine Störung des
Druckers zur Folge haben kann.
Wenn Wartungs- oder Reparaturarbeiten anfallen, wenden Sie sich bitte an die
nächstgelegene OLYMPUS-Kundendienstvertretung.
J Achten Sie darauf, dass sich in der Nähe des Druckers keine
Flüssigkeiten befinden.
Falls Flüssigkeit in das Innere des Druckers gelangt, besteht Stromschlag- und/
oder Feuergefahr.
J Den Drucker niemals einer hohen Gewichtsbelastung oder
VorbereitungDrucken Einleitung DEUTSCH
J Den Drucker niemals an Orten aufstellen, die den folgenden
Zu Ihrer
Information
84
starken Erschütterung aussetzen.
Das Druckergehäuse kann durch darauf abgestellte schwere Gegenstände
beschädigt werden, so dass Stromschlag- und/oder Feuergefahr besteht.
Der Drucker kann auch durch Fallenlassen oder Herunterfallen beschädigt
werden.
Einwirkungen ausgesetzt sind.
Um Stromschlag- und/oder Feuergefahr und Druckerstörungen oder -schäden
zu vermeiden, den Drucker niemals an den folgenden Orten aufstellen:
An Orten, an denen hohe Feuchtigkeit und/oder Öldämpfe auftreten können.
Falls Flüssigkeit oder Staub in das Innere des Druckers gelangen, besteht
Stromschlag- und/oder Feuergefahr.
An Orten, die hohen Temperaturen ausgesetzt sein können.
Den Drucker niemals direkter Sonneneinstrahlung (z. B. in einem
geschlossenen Fahrzeug oder hinter einem Fenster) oder extrem hohen
Temperaturen (z. B. in der Nähe von Heizkörpern) aussetzen. Das
Druckergehäuse kann hierdurch beschädigt werden, so dass Stromschlagund/oder Feuergefahr besteht.
Den Drucker bei geeigneten Umgebungstemperaturen von 5 °C bis 35 °C
und zulässiger Umgebungsluftfeuchtigkeit von 20 bis 80 % betreiben.
Page 85

Sicherheitshinweise
ACHTUNG
J Den Drucker niemals an Orten betreiben, die folgende
Besonderheiten aufweisen:
Geneigte Flächen oder instabile Unterlagen.
Im Freien (insbesondere nicht an Stränden etc.) oder an Orten, an denen
der Drucker viel Staub oder Fremdkörpern ausgesetzt ist.
Orte, an denen Nässe (Regen etc.) oder Feuchtigkeit (auch
Kondensationsfeuchtigkeit, z. B. in einer Kunststofftüte) auftreten kann.
J Den Drucker ausschließlich mit dem zulässigen/mitgelieferten
Netzteil und Netzkabel mit Strom versorgen.
J Das mitgelieferte Netzteil und Netzkabel nicht für andere
Geräte verwenden.
J Auf die richtige Stromspannung achten.
Durch eine falsche Stromspannung können Teile des Druckers beschädigt
werden.
Bei Gebrauch mit einer unzulässigen Spannung besteht Stromschlag- und/oder
Feuergefahr.
J Auf einwandfreien/sicheren Anschluss des Netzkabels achten.
Falls der Netzstecker nicht einwandfrei in die Steckdose gesteckt ist, besteht
Stromschlag- und/oder Feuergefahr.
Darauf achten, dass der Netzstecker vollständig in die Netzsteckdose gesteckt
wurde.
DEUTSCH
Einleitung
Vorbereitung Drucken
J Darauf achten, dass sich am Netzkabel nicht zuviel Staub oder
sonstige Fremdkörper anlagern.
Staub und Fremdkörper können stromführend sein, so dass Stromschlag- und/
oder Feuergefahr besteht.
Bei übermäßiger Staub- und/oder Fremdkörperanlagerung den Netzstecker aus
der Netzsteckdose ziehen und das Kabel säubern.
J Bei Gewitter immer den Netzstecker ziehen
Bei Blitzschlag auftretende Stromspitzen können schwere Schäden am Drucker
verursachen und es besteht Stromschlag- und/oder Feuergefahr.
J Das Netzkabel niemals mit nassen Händen anfassen.
Andernfalls besteht Stromschlaggefahr.
Das Netzkabel ausschließlich mit trockenen Händen berühren.
J Den Drucker direkt an eine Steckdose anschließen.
Den Netzstecker nicht in eine Mehrfachsteckdose stecken, über die bereits
andere Geräte gespeist werden.
85
Zu Ihrer
Information
Page 86

Sicherheitshinweise
VORSICHT
J Den Drucker niemals auf einer instabilen Fläche aufstellen.
Den Drucker niemals auf einer instabilen Unterlage (wackeliger Tisch
etc.) platzieren. Durch Fallenlassen oder Herunterfallen des Druckers
können Verletzungen verursacht werden. Hierdurch kann der Drucker
zudem beschädigt werden oder eine Störung des Druckers auftreten.
J Niemals die nicht benutzerseitig zu wartenden Teile im
Druckerinneren berühren.
Andernfalls kann es zu Verletzungen und Verbrennungen kommen.
Dies gilt insbesondere für Kinder und/oder Personen, die mit den
Besonderheiten des Druckers nicht vertraut sind.
J Den Drucker niemals bewegen, wenn das Netzkabel straff
gespannt ist.
Wenn der Drucker bei straff gespanntem Netzkabel bewegt wird, kann
das Kabel beschädigt werden.
Wird der Drucker trotz Beschädigung betrieben, besteht Stromschlag
und/ oder Feuergefahr.
Wenn der Drucker bewegt werden muss, das Netzkabel abziehen und
bündeln.
J Den Stecker des Druckers nicht durch ruckartiges Bewegen
oder durch Ziehen am Netzkabel aus der Steckdose ziehen.
Das Netzkabel zum Abziehen am Stecker anfassen. Wenn am Kabel
gezogen wird, kann das Netzkabel beschädigt werden und es besteht
VorbereitungDrucken Einleitung DEUTSCH
Stromschlag- und/oder Feuergefahr.
J Für Wartungsarbeiten den Netzstecker ziehen.
Den Netzstecker des Druckers vor Service- oder Wartungsarbeiten
immer vom Netz trennen.
J Den Netzstecker bei längerem Nichtgebrauch ziehen.
Zu Ihrer
Information
86
Den Netzstecker bei längerem Nichtgebrauch des Druckers (z. B.
während des Urlaubs) vom Netz trennen.
Andernfalls besteht bei einer beschädigten Netzkabelisolierung oder
infolge von Kriechströmen Stromschlag- und/oder Feuergefahr.
Page 87

Pflege und Aufbewahrung
Vor Kondensationsniederschlag schützen
Kondensationsniederschlag tritt auf, wenn sich in der Luft enthaltener
Wasserdampf verflüssigt und sich am Drucker anlagert.
Dies geschieht wenn:
Der Raum, in dem sich der Drucker befindet, rasch aufgeheizt oder gekühlt wird.
Der Drucker direkt kalter Luft ausgesetzt wird, z. B. von einer Klimaanlage.
Der Drucker von einem Ort mit niedriger Umgebungstemperatur an einen Ort mit
hoher Umgebungstemperatur gebracht wird.
Luftfeuchtigkeit lagert sich als Kondensfeuchte am Papier an. Dies vermindert die
Druckqualität und kann zu Papierstau führen.
Falls Bedingungen auftreten, unter denen es zu Kondensationsniederschlag am
Drucker gekommen ist oder kommen kann, den Drucker nicht verwenden, bis sich
der Kondensationsniederschlag verflüchtigt hat oder nicht mehr auftreten kann.
Nicht auf den Drucker sprühen und keine ätherischen
Lösungsmittel in Kontakt mit dem Drucker bringen
Wenn verdunstende Flüssigkeiten wie Insektenspray, Farbverdünner oder Reinigungsbenzin
auf das Druckergehäuse einwirken, kann dieses beschädigt werden oder sich verfärben.
Verwenden Sie zur Reinigung der Außenseite des Druckergehäuses ein weiches
Tuch. Befeuchten Sie für die Beseitigung schwer zu entfernender Flecken ein
weiches Tuch mit Wasser oder einem in Wasser gelösten milden Reinigungsmittel
und wringen Sie das Tuch aus, um möglichst viel Feuchtigkeit aus dem Tuch zu
entfernen, bevor Sie damit die Außenseite des Druckergehäuses abwischen.
Bringen Sie den Drucker nicht über längere Zeit in
Berührung mit Weichplastik oder Gummi
Verfärbungen oder Verformungen können auftreten, wenn das Druckergehäuse
über längere Zeit in Berührung mit Weichplastik oder Gummi verbleibt.
DEUTSCH
Einleitung
Vorbereitung Drucken
Den Drucker mindestens einmal innerhalb von 6
Monaten betreiben
Falls der Drucker über einen längeren Zeitraum nicht betrieben wird, können
Betriebsstörungen auftreten.
Der Drucker sollte daher mindestens einmal innerhalb von 6 Monaten betrieben werden.
Den Drucker stets mit beiden Händen tragen
Beim Anheben oder Tragen des Druckers beide Hände verwenden.
Beim Transportieren des Druckers besondere
Vorsicht walten lassen
Soll der Drucker transportiert werden, muss dieser in der Originalverpackung unter
Verwendung des Originalverpackungsmaterials verstaut werden. Falls die Originalverpackung
nicht mehr verfügbar ist, den Drucker mit geeignetem stoßabsorbierendem Material umhüllen,
so dass dieser beim Transportieren gegen Erschütterungen ausreichend geschützt ist.
87
Zu Ihrer
Information
Page 88

VorbereitungDrucken Einleitung DEUTSCH
Was dieser Drucker leistet
Direktes Ausdrucken von der Digitalkamera
Der Drucker unterstützt den PictBridge-Standard für die
Datenübertragung zwischen einer Digitalkamera und einem Drucker.
Wenn Sie eine PictBridge-kompatible Digitalkamera mit dem USBKabel, das zur Digitalkamera mitgeliefert wurde, an diesen Drucker
anschließen, können Sie Abzüge direkt von der Digitalkamera aus
anfertigen.
Variable Druckfunktionen
Dieser Drucker unterstützt das Mehrfachbild-Layout, mit dem mehrere
Kopien desselben Bilds auf einem Blatt gedruckt werden können, das
Drucken von Indexbildern, bei dem auf einem Blatt mehrere
verschiedene Bilder gedruckt werden können, das Einbelichten von
Aufnahmedatum und -zeit sowie Ausdrucke mit oder ohne Rand.
Vorsicht
Manche dieser Funktionen sind abhängig von der an den Drucker
angeschlossenen Digitalkamera unter Umständen nur beschränkt
verfügbar.
Von einem Computer aus drucken
Wenn Sie diesen Drucker mit einem handelsüblichen USB-Kabel an
einen Computer anschließen, können Sie Abzüge von Bildern
anfertigen, die auf dem Computer gespeichert sind.
Für das schnelle und mühelose Drucken und das Verwalten Ihrer
Digitalbilder empfehlen wir den Einsatz von OLYMPUS Master oder
OLYMPUS Master Plus.
Zu Ihrer
Information
88
Qualitativ hochwertiger Ausdruck mit Laminierung
Durch qualitativ hochwertigen Ausdruck mit Laminierung erhält man
haltbare und dauerhafte Abzüge. Dies ist besonders nützlich, wenn
man wichtige Bilder ausdruckt, die man für lange Jahre aufbewahren
möchte.
Papierzufuhr bis zu 50 Blatt
Das mitgelieferte Papierfach nimmt bis zu 50 Blatt auf, die dem Drucker
kontinuierlich zugeführt werden können. Für den Druck eines einzelnen
Blatts werden etwa 30 Sekunden benötigt (für 89 mm × 127 mmFotopapier, zusätzlich zu der für die Datenübertragung von der
Digitalkamera oder dem Computer benötigten Zeit).
Page 89

Überprüfen der Zubehörteile
Vergewissern Sie sich beim Auspacken des Druckers, dass die
folgenden Zubehörteile im Lieferumfang enthalten sind.
Falls eines der Zubehörteile fehlen sollte, wenden Sie sich bitte
umgehend an eine OLYMPUS-Kundendienstvertretung.
Netzteil (1) Netzkabel (1)
Papierfach (1) Formatwechselfach
(für 89 mm × 127 mm) (1)
(Dieses Fach befindet sich im
Papierfach.)
(Setzen Sie dieses Fach in das
Papierfach ein. Das Fach ist,
abhängig vom Verkaufsgebiet,
gegebenenfalls nicht im
Lieferumfang des Druckers
enthalten.)
DEUTSCH
Einleitung
Vorbereitung Drucken
(Der Drucker wird bereits mit eingesetztem Papierfach geliefert.)
Starter-Kit
Farbbandkassette für Ausdrucke mit 100 mm × 148 mm (für 5
Seiten) und 100 mm × 148 mm-Fotopapier (5 Blatt)
Bedienungsanleitung (dieses Handbuch) (1)
Garantiebescheinigung (1)
CD-ROM (Druckertreiber) (1)
89
Zu Ihrer
Information
Page 90

Bezeichnung der Teile
QVorderseite
RIBBON-Anzeige ( S. 108)
PAPER-Anzeige ( S. 108)
ACCESS-Anzeige ( S. 108)
Papierausgabefach
( S. 102, 105)
Papierausgabe-
Farbbandkassettenfach
VorbereitungDrucken Einleitung DEUTSCH
Seitenabdeckung
( S.92)
bereich
Riegel
( S.95)
QUnterseite
POWER-Anzeige
( S. 108)
POWER-Taste
( S.93)
Gleichspannungseingang
(DC-IN) ( S. 92)
Kassettenfach
( S. 97, 100)
PictBridge-Anschluss
( S. 101)
USB-Anschluss ( S. 105)
Öffnung zum
Herausschieben
des Papiers
( S.110)
Zu Ihrer
Information
90
Vorsicht
Die linke Seitenabdeckung kann abgenommen werden, die rechte
Seitenabdeckung jedoch nicht.
Wenn der Drucker nicht verwendet wird, das Papierausgabefach
geschlossen lassen.
Page 91

Bezeichnung der Teile
QPapierfach
Formatwechselfach
(für 89 mm × 127 mm)
( S.98, 99)
Fachabdeckung
( S.98)
Fachabdeckungsriegel
( S.98)
DEUTSCH
Einleitung
Vorbereitung Drucken
91
Zu Ihrer
Information
Page 92

Vorbereitung
Anschließen der Stromversorgung und Ein-/Ausschalten des Druckers
1 Die linke Seitenabdeckung des Druckers abnehmen.
2 Das Netzkabel an das Netzteil anschließen und den Netzstecker
in eine Haushaltssteckdose stecken.
VorbereitungDrucken Einleitung DEUTSCH
Zu Ihrer
Information
92
Netzstecker
3 Den Stecker des Gleichspannungskabels am
Gleichspannungseingang (DC-IN) des Druckers anschließen
und das Kabel wie in der Abbildung gezeigt in die Führung am
Drucker einlegen. Denken Sie daran, das Kabel in die Führung
einzulegen.
Führung
Kabel
Stecker des
Gleichspannungskabels
Page 93

Anschließen der Stromversorgung und Ein-/Ausschalten des Druckers
4 Die Seitenabdeckung wieder anbringen.
Wenn Sie den Drucker zum ersten Mal verwenden, die Farbbandkassette
einsetzen, bevor die Seitenabdeckung geschlossen wird.
Siehe Seite 94. „Einlegen der Farbbandkassette“
EinleitungDEUTSCH
5 Die POWER-Taste drücken.
Die POWER-Anzeige leuchtet auf und der Drucker wird eingeschaltet.
Vorsicht
Schalten Sie zum Anschließen einer Digitalkamera zunächst den Drucker
ein. Schließen Sie dann die Digitalkamera an den Drucker an und schalten
Sie erst danach die Digitalkamera ein. S. 101
Wenn Sie einen Computer anschließen, stellen Sie zunächst die
Verbindung mit dem Computer her und schalten Sie dann zuerst den
Drucker und erst anschließend den Computer ein.
Ausschalten des Druckers
Die POWER-Taste drücken.
Die POWER-Anzeige erlischt, wenn der Drucker ausgeschaltet wird.
Vorsicht
Falls der Stecker des Gleichspannungskabels während des Druckbetriebs
versehentlich abgezogen wird, den Stecker des Gleichspannungskabels wieder
anschließen und den Drucker einschalten. Falls der Drucker im
ausgeschalteten Zustand belassen wird, können Betriebsstörungen resultieren.
93
Vorbereitung Drucken
Zu Ihrer
Information
Page 94

Einlegen der Farbbandkassette
Informationen zum Print-Pack
Zum Ausdrucken ist das mitgelieferte Starter-Kit oder ein gesondert
erhältliches Print-Pack erforderlich.
Stets die in einem Print-Pack enthaltene Farbbandkassette und das
Druckpapier zusammen verwenden.
Verwenden Sie kein bereits bedrucktes Papier oder Papier
nochmals, dass bereits durch den Drucker eingezogen wurde.
1 Die Seitenabdeckung abnehmen.
Siehe Seite 92. „Anschließen der Stromversorgung und Ein-/
Ausschalten des Druckers“
VorbereitungDrucken Einleitung DEUTSCH
Zu Ihrer
Information
94
2 Lösen Sie die Sperre der Farbbandkassette und straffen Sie das
Farbband, um den Durchhang zu beseitigen.
Die Nabe in der Mitte andrücken und
dabei das Farbband in Pfeilrichtung
drehen.
Um eine teilweise verbrauchte Farbbandkassette weiterhin zu
benutzen, den Durchhang des Farbbands wie in der Abbildung
dargestellt beseitigen, bevor die Kassette wieder eingelegt wird.
Page 95

Einlegen der Farbbandkassette
3 Die Farbbandkassette vollständig einschieben.
Entfernen Sie das Verpackungsmaterial vom Farbbandkassettenfach
und legen Sie die Farbbandkassette ein.
Wenn die Farbbandkassette nicht durch Drücken gegen die Mitte der
Kassette vollständig eingeschoben wird, bis ein Klicken zu hören ist,
blinkt die RIBBON-Anzeige und es wird eine Fehlermeldung erzeugt.
Siehe Seite 108. „Wenn Anzeigen blinken oder ständig leuchten“
4 Die Seitenabdeckung wieder anbringen.
Siehe Seite 92. „Anschließen der Stromversorgung und Ein-/
Ausschalten des Druckers“
Wenn sich die Seitenabdeckung nicht richtig anbringen lässt, die
Farbbandkassette entnehmen und erneut einlegen.
Entnehmen der Farbbandkassette
Heben Sie den Riegel an, um die Farbbandkassette freizugeben, und
entnehmen Sie die Farbbandkassette.
EinleitungDEUTSCH
Vorbereitung Drucken
Zu Ihrer
Information
95
Page 96

Einlegen der Farbbandkassette
Vorsicht
Berühren Sie nicht die Innenseite des Fachs für die Farbbandkassette, sie
kann sehr heiß sein.
Die Print-Packs sind entweder für 100 mm × 148 mm-Ausdrucke oder 89 mm × 127 mmAusdrucke vorgesehen. Verwenden Sie für Ausdrucke auf 100 mm × 148 mm-Fotopapier
eine Farbbandkassette für Ausdrucke mit 100 mm × 148 mm und für Ausdrucke auf
89 mm × 127 mm-Fotopapier eine Farbbandkassette für Ausdrucke mit 89 mm × 127 mm.
VorbereitungDrucken Einleitung DEUTSCH
Zu Ihrer
Information
P
P
Farbbandkassette
für Ausdrucke mit 100 mm × 148 mm
für Ausdrucke mit 89 mm × 127 mm
L
L
Farbbandkassette
Wenn die Farbbandkassette abgelegt wird, diese auf der
Seitenkante aufstellen, um Staubanlagerungen am
Farbband zu vermeiden.
Das Farbband nicht berühren und nicht an Orten mit
starker Staubeinwirkung aufbewahren.
Fingerabdrücke oder Staub auf dem Farbband können
die Druckqualität vermindern.
Wenn das Farbband reißt, die Farbbandkassette durch
eine neue Kassette austauschen.
Hinweise zur Aufbewahrung
Farbbänder niemals an Orten aufbewahren, die hohen Temperaturen,
Feuchtigkeit, starker Staubeinwirkung oder direkter Sonneneinstrahlung
ausgesetzt sind.
96
Page 97

Einlegen von Druckpapier
Entnehmen des Papierfachs aus dem Drucker
1 Die Papierfachöffnung durch Ziehen in Ihre Richtung öffnen.
2 Das durch „PULL“ gekennzeichnete Teil ergreifen und in Ihre
Richtung ziehen.
EinleitungDEUTSCH
Vorbereitung Drucken
PULL (Ziehen)
97
Zu Ihrer
Information
Page 98

Einlegen von Druckpapier
Einlegen von Druckpapier in das Papierfach
Vorsicht
Ausschließlich das spezielle Druckpapier verwenden. Wird anderes
Papier als das spezielle Druckpapier verwendet, wie beispielsweise
Papier für Tintenstrahldrucker, kann es zu Druckerstörungen kommen
wie z.B. Papierstau oder Papier, das am Farbband festklebt.
Das Druckpapier vorsichtig handhaben und
insbesondere darauf achten, die
bedruckbare Seite (unbedruckte glänzende
Seite) nicht zu berühren.
Das Druckpapier niemals an Orten aufbewahren, die hohen Temperaturen,
Feuchtigkeit oder direkter Sonneneinstrahlung ausgesetzt sind.
Druckpapier nie an einem Ort aufbewahren, der starker Staubeinwirkung
ausgesetzt ist. Fingerabdrücke oder Staub auf der bedruckbaren Seite des
Papiers können die Druckqualität vermindern.
Das Papierfach fasst bis zu 50 Blatt Druckpapier. Wenn Papier nachgefüllt
wird, unbedingt darauf achten, dass diese Zahl nicht überschritten wird. Wird
zuviel Druckpapier eingelegt, kann möglicherweise ein Papierstau entstehen.
Gefaltetes oder geknicktes Druckpapier kann einen Papierstau verursachen.
Druckpapier niemals vor dem Bedrucken beschriften. Soll Druckpapier
beschriftet werden, dieses erst nach dem Ausdruck mit einem Filzschreiber
(Tinte auf Ölbasis) beschriften. Dieses Druckpapier kann nicht mit Text
durch eine Schreibmaschine oder einen Textdrucker beschriftet werden.
VorbereitungDrucken Einleitung DEUTSCH
Zu Ihrer
Information
98
Bedrucken von 100 mm × 148 mm-Fotopapier
1 Die Fachabdeckung durch Ergreifen und gleichzeitigem
Zusammendrücken der beiden Fachabdeckungsriegel öffnen
und das Formatwechselfach entnehmen.
Fachabdeckungsriegel
Page 99

Einlegen von Druckpapier
2 Papier mit der bedruckbaren Seite nach unten in das Papierfach
einlegen.
Das Deckblatt entfernen bevor das Papier eingelegt wird.
Es können bis zu 50 Blatt eingelegt werden.
Bedruckbare Papierseite nach unten
3 Die Papierfachabdeckung schließen.
Darauf achten, dass kein Druckpapier zwischen Abdeckung und
Fach eingeklemmt wird.
Bedrucken von 89 mm × 127 mm-Fotopapier
EinleitungDEUTSCH
Vorbereitung Drucken
Soll 89 mm × 127 mm-Fotopapier verwendet werden, vor dem Einlegen
des Druckpapiers das Formatwechselfach in das Papierfach einsetzen.
Formatwechselfach
Darauf achten, dass das Formatwechselfach nicht verschmutzt oder
beschädigt wird.
99
Zu Ihrer
Information
Page 100

Einlegen von Druckpapier
Einsetzen des Papierfachs in den Drucker
1 Die Papierfachöffnung durch Ziehen in Ihre Richtung öffnen.
2 Das Papierfach vollständig einschieben.
VorbereitungDrucken Einleitung DEUTSCH
Zu Ihrer
Information
100
PULL (Ziehen)
Das Papierfach einschieben, bis es hörbar einrastet.
Zum Entfernen des Papierfachs, das durch „PULL“ gekennzeichnete Teil
ergreifen und in Ihre Richtung ziehen.
Die Papierfachöffnung nach dem Einsetzen des Papierfachs schließen.
 Loading...