

Page 1
Page 2
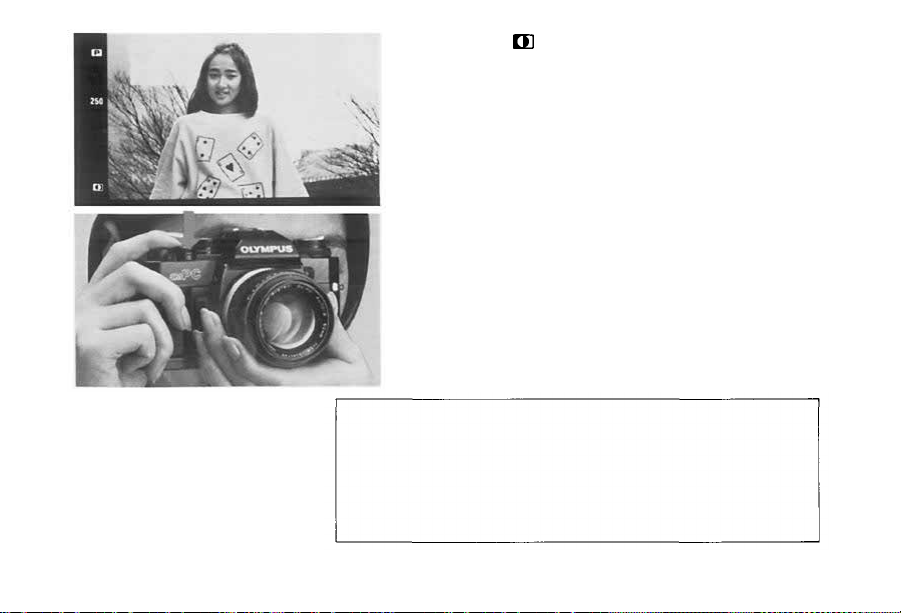
Thank you for choosing the Olympus OM-PC. This
camera is equipped with a unique "ESP" (Electro-Selective
Pattern) metering system. By combining this metering
mode with the automatic film speed setting mode and
programmed exposure mode, anyone can take perfectly
exposed
pictures
with
ease.
Before
using
the
camera,
please
read this operation manual carefully through while checking with your camera to become familiar with this versatile SLR.
Note: All the components of the Olympus OM-PC are carefully designed and their production and
assembly is strictly controlled to enhance the unmatched performance of the system. If any
interchangeable lenses, flashes, or accessories other than Olympus products are used, Olympus
cannot be responsible fo r poor results or damage of the OM-PC.
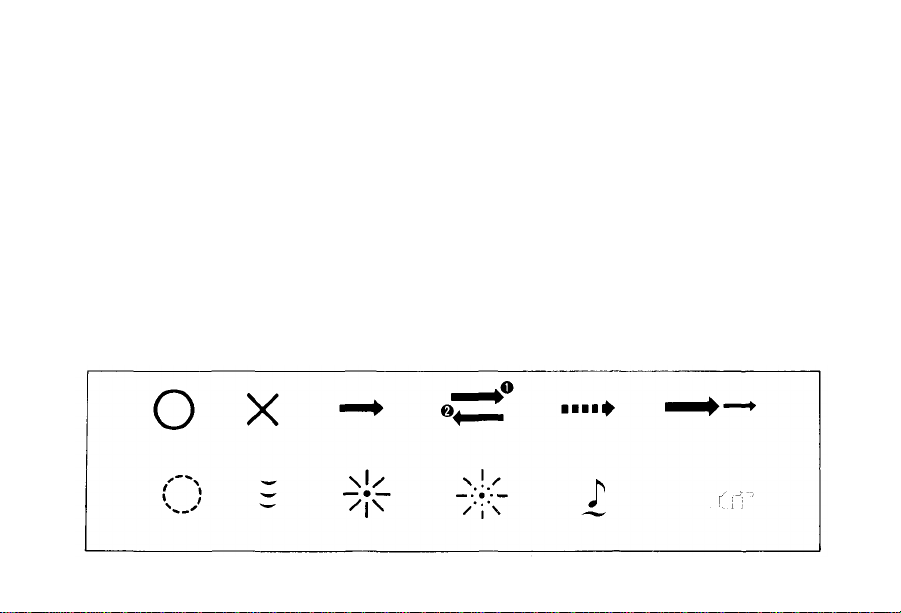
Correct
Attention
Incorrect
Press
lightly
Operation
Lamp on
Operation order
Lamp blinking
Automatic
operation
Continuous sound
Two-step operation
Reference
1
Page 3

TABLE OF CONTENTS
< Preparations before Taking Pictures >
•
Mounting
•
Loading
•
Checking
• Setting the Camera fo r Automatic Film
•
Loading
< Taking photographs (I) >
• How to Take Programmed Automatic Exposure
• Rewind the Film .................. 17
< Taking Photographs (II) >
• How to Take Aperture-Preferred
•
Manual
•
Manual
•
Exposure
< Other Operations >
•
Using
•
Bulb
< Advanced Techniques >
• Selecting the Metering Mode
• Selecting the Metering Mode
•
Guide
• Selecting the Exposure Mode
•
Program
the
the
the
Speed
Setting
the
Pictures
with
Automatic
Exposure
Film
Compensation
the
Self-Timer
Exposure
(A
Choice
of Two
(How
to Use ESP
to
Selection
–
PROGRAM –
Diagrams
Lens
.................
Batteries
Batteries
...............
...............
...................
Film
...................
ESP
Metering
Exposure
..................
Speed
Setting
...........
Pictures
..........
............ 25
..............
................
...................
Metering
Metering)
of
.................
Modes)
Exposure
...........
Mode
.................
......
......
5
7
8
9
10
14
20
23
27
29
31
33
35
40
41
42
• Selecting the Exposure Mode
-
AUTO
of
Button
Speeds
Exposure
Exposure
(Aperture
Field
Mode
•
Depth
•
Preview
•
Shutter
• Viewfinder Display for Automatic Exposure . .
• Selecting the Exposure Mode — MANUAL — . . 49
• Combinations of Metering Mode and
• Selecting the Film Speed Setting Mode .....
•
Bulb
• Multiple Exposure/Infrared Photography . . . 54
Preferred)
...................
...................
...................
.........
..................
...................
46
47
53
< OM SYSTEM >
•
Flash
Photography
•
T-Series
• How to Use
•
• Using E l e c t ronic Flashes Other Than
•
•
•
•
•
Flashes/Mounting
Bounce
Flash/Close-up
Olympus
Shooting
Motor
Macrophotography
with
Drive
Macrophoto
Other
System
.................
T-Series
Flashes
T-Series
Units
Motor
Group
Group
Drive
Units
.................
Units
Units
................
the
Flash
......
..........
Flash
..........
.............
............
.............
.............
56
57
58
59
60
61
62
63
64
65
< For Longer Service of Your Camera >
•
Handling
•
Storage
•
Questions
•
Description
•
Specifications
Care
....................
Care
....................
and
Answers
of
Controls
....................
..............
..............
67
68
69
73
76
44
45
48
50
51
2
Page 4
3
Page 5

< Preparations before Taking Pictures >
The Olympus OM-PC is basically designed for automatic f il m speed setting
with DX coded film.
4
Page 6
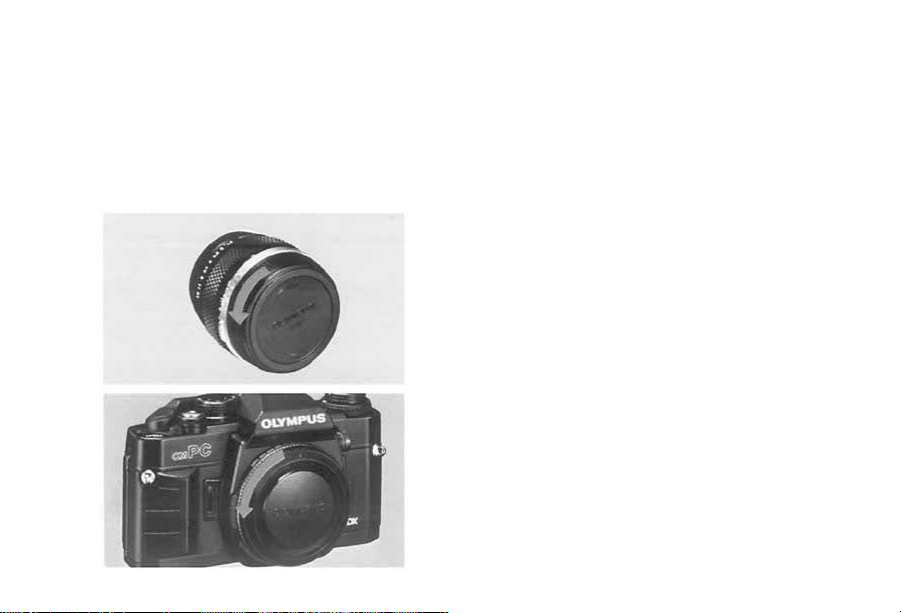
Mounting the Lens
Remove the rear lens cap.
1
Remove the body cap.
2
5
Page 7
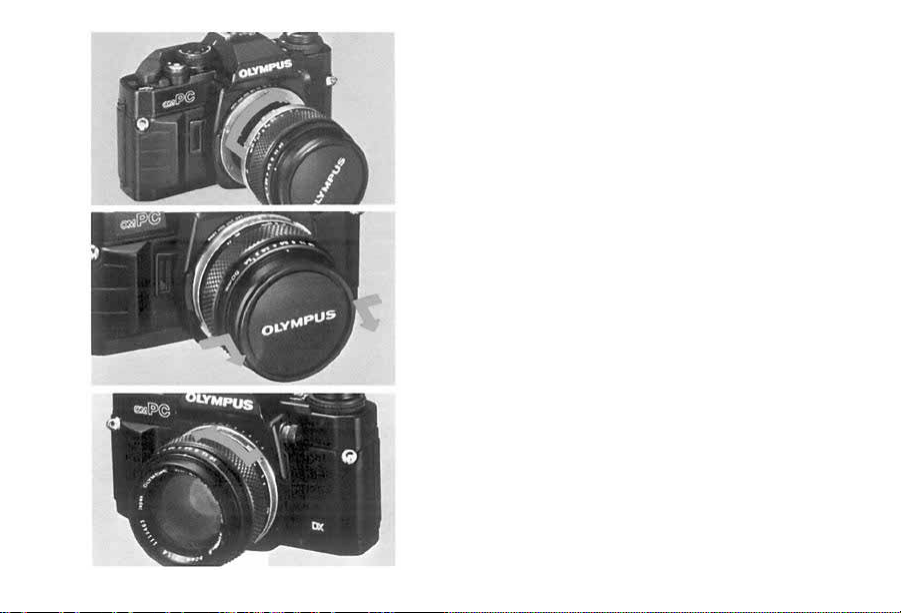
Align the red dots and rotate the lens clockwise
until it locks.
3
Remove
the
front
lens
cap.
tabs on the edges of the lens cap parallel with
"OLYMPUS").
4
(Press
Removing the Lens:
Press
the
lens
release
button
counter-clockwise.
and
in the
turn
mount
the
lens
6
Page 8
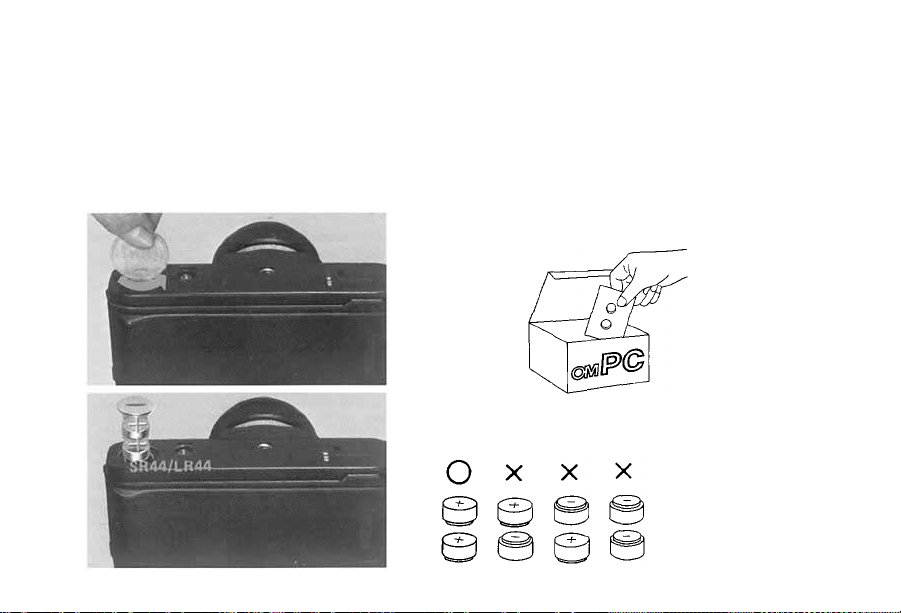
Loading the Batteries
Remove the battery cover.
1
Wipe battery surfaces clean. Make sure that +
signs are facing upwards. Replace the battery cover.
2
7
Page 9
Checking the Batteries
After inserting the batteries, always check as follows:
Rotate the mode selector dial to the "BAT-
TERY CHECK" position.
1
The
the battery voltage is sufficient.
If these signals are emitted intermittently, it means
2
that t he batteries are almost worn out. Replace them
with new ones a s so on as possible.
audible
and
visual
signals
will
tell
you
that
8
Page 10

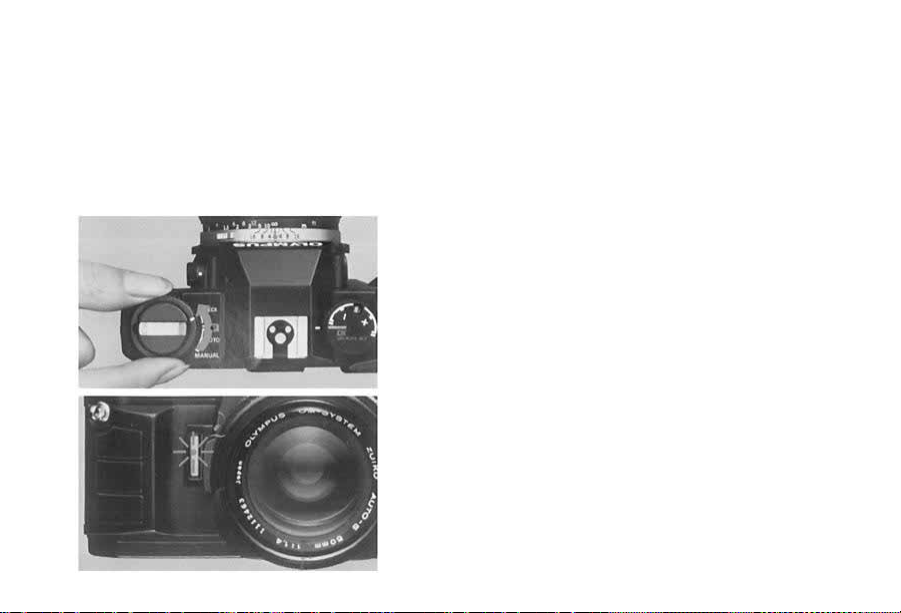
Setting the Camera for Automatic Film Speed Setting
With
DX
coded
film,
the
OM-PC
sets
the
film
speed
automatically.
Make sure the film you are using is marked
"DX".
1
If the film you are using is not marked "DX" refer
to page 25.
Set the film speed dial to
2
9
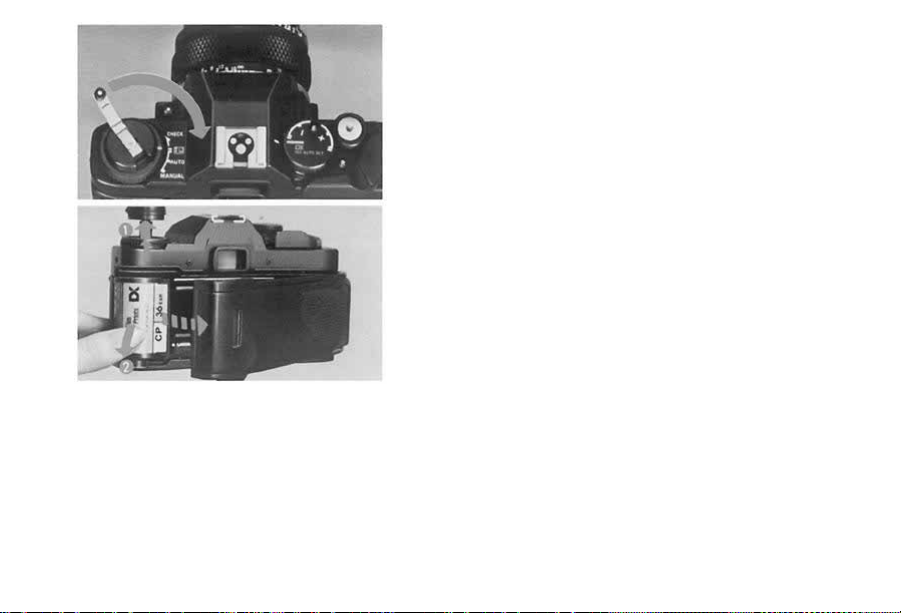
Page 11
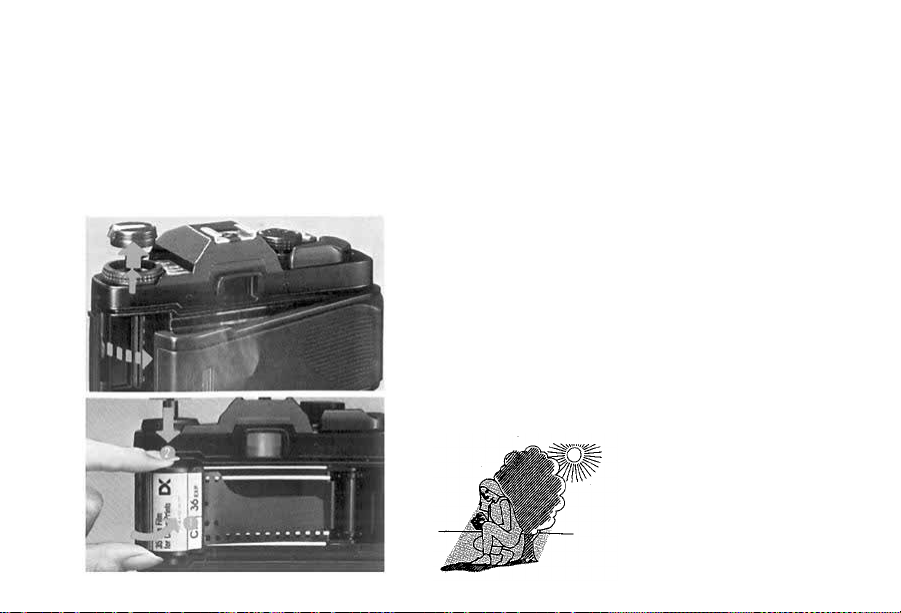
Loading the Film
Pull up on the rewind knob to open the camera
back.
1
Place
2
the
film
cartridge
shade.
in the
film
chamber.
Always load film in the
10
Page 12
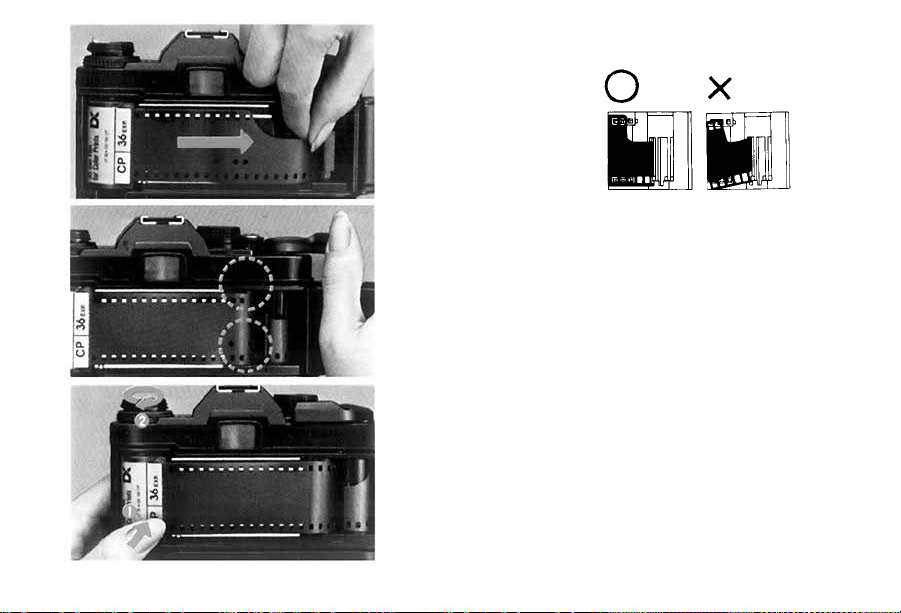
11
Insert the film leader into the take-up spool.
3
Wind the fi lm and make sure the sprocket teeth
catch both the upper and lower film perforations.
4
Take up the slack by turning the rewind crank
clockwise.
5
Page 13
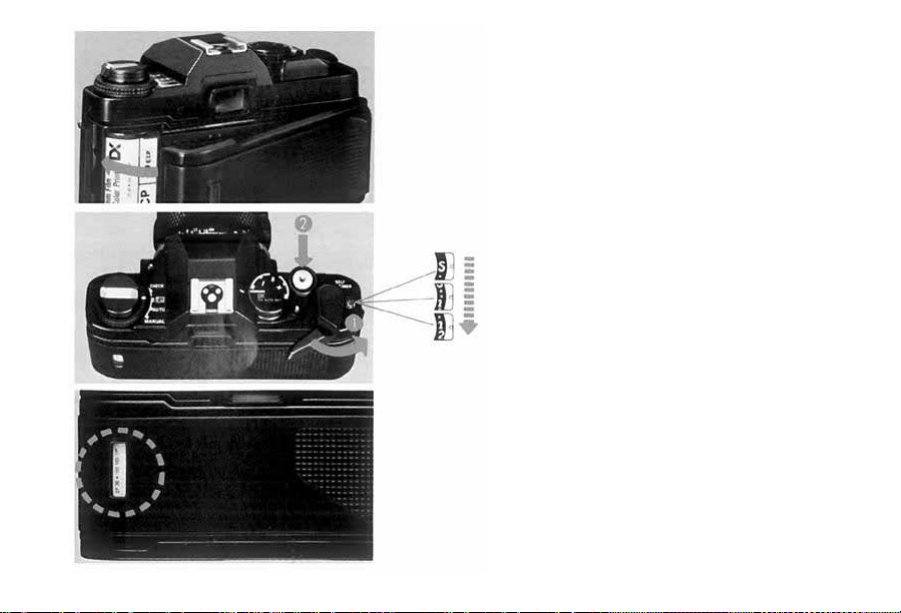
Close
the
camera
back
until
it
clicks
6
Take two blank shots to bring the film to the
first frame.
7
Checking the type of film:
The film check window in the camera back will
allow you to check the type of film loaded in the
camera.
into
place.
12
Page 14

13
< Taking Photographs (I) >
This chapter explains how to take programmed automatic exposure pic-
tures with ESP metering. In th is mode, anyone can enjoy taking pictures wit h
ease, even in difficult lighting conditions such as backlight.
Page 15
How to Take Programmed Automatic Exposure Pictures with ESP Metering
Make sure the camera is set for the ESP meter-
ing.
1
Set the mode selector dial to the "PROGRAM"
position.
2
14
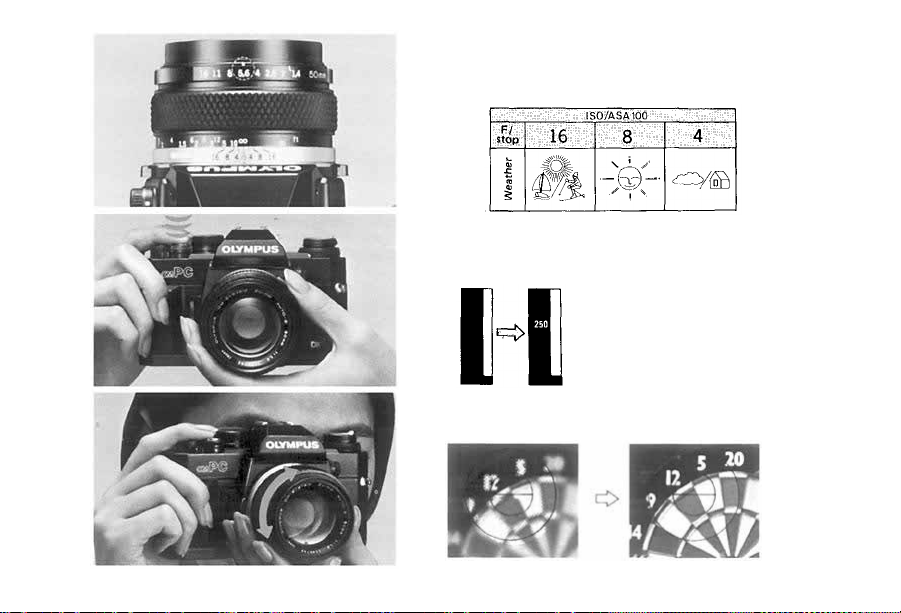
Page 16
15
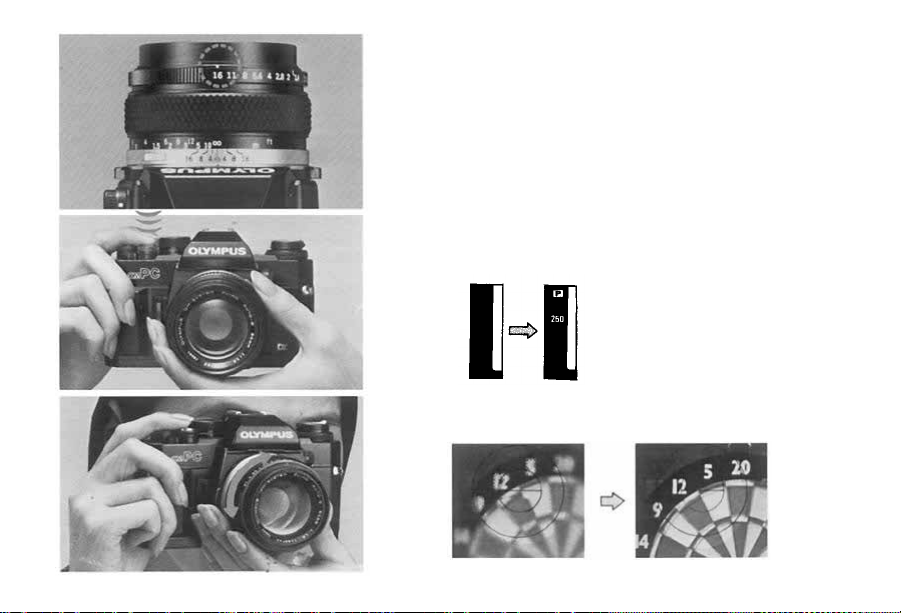
Set the lens to its minimum aperture, which is
the largest number on the aperture ring.
3
Press
the
viewfinder display.
shutter
4
Focus on your subject.
5
release
lightly
to
activate
the
Page 17
The mark will appear in the finder when
ESP metering is adjusting the exposure.
6
Press the shutter release to take the picture.
7
(A built-in battery conserver turns off the viewfinder
display after 60 sec.)
16
Page 18
17
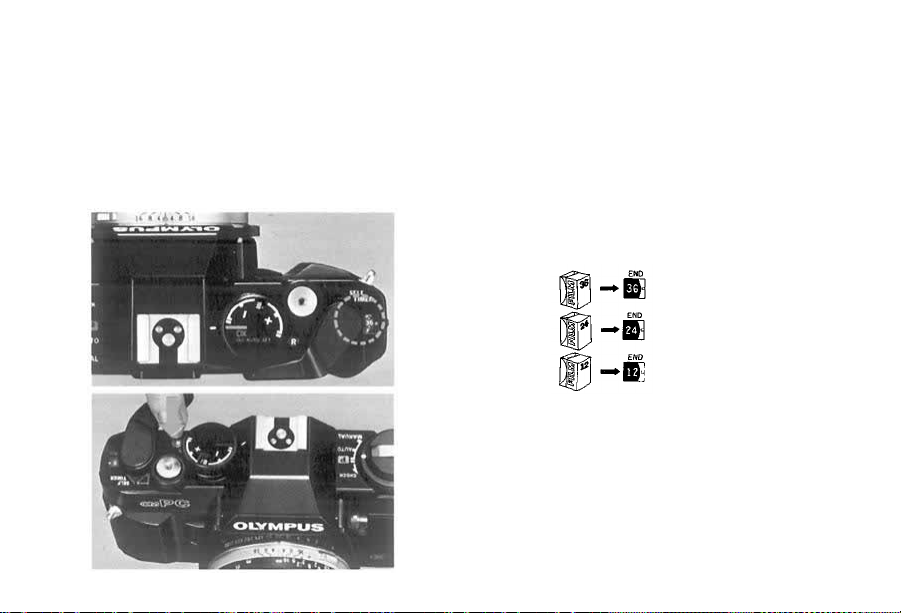
Rewinding the Film
When the exposure counter indicates the end of
your roll of film.
1
Push the "R" button.
2
Page 19
Fold out the rewind crank and wind it until th e
film tension is released.
3
Open the camera back by pulling up on the
rewind knob and remove the film.
4
18
Page 20

19
< Taking Photographs (ll)>
This mode allows you to respond creatively to the photo situ atio n by fr ee
selection of the lens aperture, shutter speed and exposure compensation settings.
Page 21

How to Take Aperture-Preferred Automatic Exposure Pictures
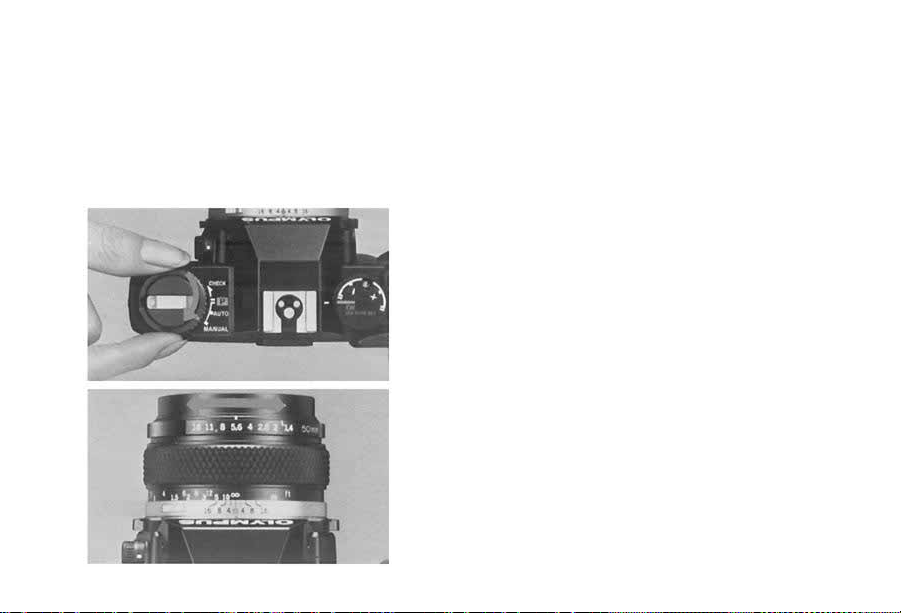
Set the mode selector dial to the "AUTO"
position.
1
Select the light metering mode.
2
ESP Metering.
"OTF" Light Metering (Center-
Weighted Average Metering)
20
Page 22
21
3
viewfinder display.
4
5
Set the aperture.
Basic aperture settings.
Press the shutter release lightly to activate the
Focus on your subject.
Page 23
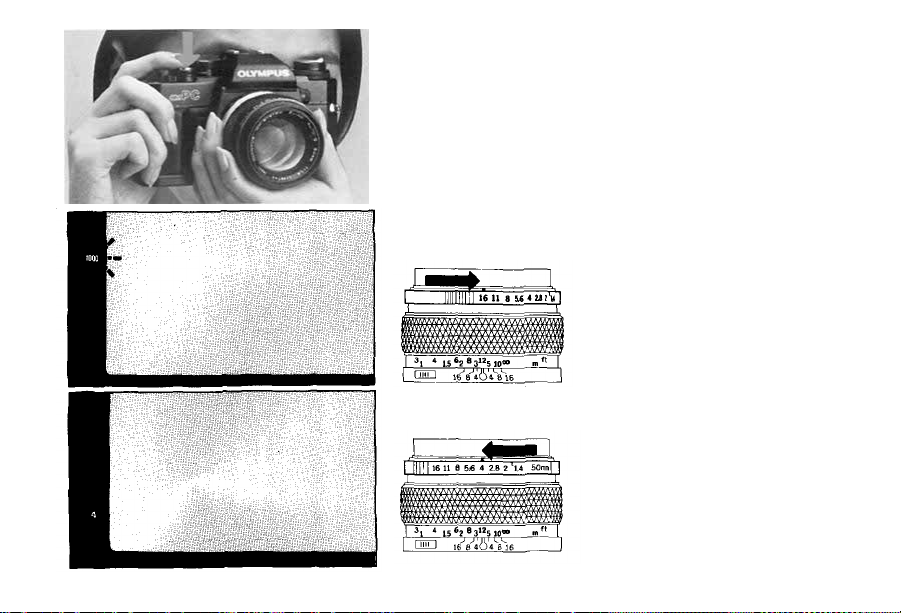
Press the shutter release to take the photograph.
6
If you see an overexposure warning signal (the
number
"1000"
number.
blinks),
If the shutter speed is too slow, set the apeture
to a smaller number to prevent camera shake.
set the
aperture
to a
larger
22
Page 24
23
Manual Exposure
position.
1
2
Set the mode selector dial to the "MANUAL"
Set the aperture.
Page 25

Select the shutter speed.
3
Focus, then press the shutter release.
4
To obtain th e proper exposure, set the shutter
speed ring to the setting indicated in the viewfinder.
ESP
Metering.
Center Weighted Averaged Metering.
24
Page 26

Manual Film Speed Setting
Release the DX ISO AUTO SET mode.
1
Lift up the outer collar and rotate until the
desired ISO speed appears in the window.
2
25
ISO/ASA25~3200
Page 27

Readjust the Index line.
3
If the
film
speed
dial
cannot be turned to the ISO number of the film used, set
it once at an intermediate value then repeat steps 2 to 3
until the desired ISO number is set.
(exposure
compensation
dial)
26
Page 28

27
Exposure Compensation
For exposure compensation, set the dial anywhere except at "DX ISO AUTO SET".
When an exposure compensation is set, the
indicator lights in the viewfinder.
1
After use, be sure to return the dial to the"
normal setting.
2
Page 29

< Other Operations >
28
Page 30

29
Using the Self-Timer
Wind the film once.
1
Set the self-timer lever.
2
Page 31

Press the shutter release to start the self-timer.
The shutter will fire in 12 seconds.
3
Wind the film fo r the next shot. The self-timer
lever will automatically return to its original position.
4
If you continue to use the self-timer, wind the film in
several
short
strokes,
and it
will
remain
that
shutter
will
fire
even
to its original position while it is running.
if you
return
activated.
the
self-timer
Take
note
lever
30
Page 32

31
Bulb Exposure
Set the exposure mode selector dial to the
"MANUAL" position.
1
Set the shutter speed dial to "B" (bulb).
("B" is not displayed in the viewfinder.)
2
Page 33

Advanced Techniques
If you want to improve your pictures or refine your shooting
techniques, it is important to understand the operation of your
camera thoroughly. The following pages will provide detailed
technical information on the OM-PC to help you create more
sophisticated photographs.
32
Page 34

SELECTING THE METERING MODE (A Choice of Two Metering Modes)
ESP
TTL Direct
"OTF" Light
Measuring
(Centerweighted
average
metering)
33
Mode
Metering
Selector
switch
Viewfinder
Display
This symbol
appears only
when ESP
Metering is
operational.
Features
1.
This mod e can be selected fo r general use at all times.
2.
Depending on the light distribution in the composition,
metering is carried out as follows:
When the central part of the composition is darker than
areas on the periphery, the camera computer increases the
exposure to compensate according to the degree of difference in brightness indicated.
When the central area is brighter than the rest of the composition the camera sets a predetermined compensation
value to reduce the exposure.
When the sun or other extremely bright light sources appear directly in the composition they are ignored in making
the exposure calculation.
When the whole composition is illuminated evenly the
camera operates in the same way as in TTL Direct
"OTF" Auto Mode (using center-weighted average
metering). In this case the ESP Metering symbol
does not appear.
1. This mode should be selected wh en you do not want to
leave everything up to the camera, but prefer to set the ex-
posure according to your own experience, 'feel' and crea-
tive requirements.
2. In this mode the camera decides the exposure by taking an
average (center-weighted) of the brightness of the overall
composition, without analyzing light distribution in differ-
ent parts of the composition.
Page 35

ESP (Electro-Selective Pattern) Metering
Generally, a photograph includes objects with
different levels of brightness. Center-weighted,
averaged light metering is an excellent method for
the majority of ordinary subjects. It averages the
light intensity in a picture frame to determine
exposure. With backlighting and other types of
illumination, however, this metering method may
not provide correct exposure because the light
level often differs between the subjects and backgrounds. The Olympus OM-4, OM-3 and OM-2S
PROGRAM have adopted spot metering systems
which allow the photographer to isolate the subject
for specific metering and therefore to obtain more
accurate exposures.
The new ESP metering system has been specifically
developed for the OM-PC to simplify exposure in
these difficult lighting conditions. As soon as you
fire the shutter, the camera will measure the light
intensity in both the center of the frame and outer
area separately. The micro computer then processes
this information, including contrast data, and auto-
matically sets optimum exposure according to the
ESP algorith m*. By simply depressing the shutter
release, you can produce a photograph in which the
subject will appear as yo u see it wi th your eyes.
* For furt her information on ESP algorithm, refer
to page 39.
TTL Direct Off-The-Film "OTF" Light Metering
(Center-Weighted Average Metering)
This is the direct, center-weighted, averaged light
metering system which Olympus pioneered in the
original model OM-2. It measures the brightness of
the subject as the light registers on the film during
the actual exposure. "OTF" metering can respond
to any sudden changes in light during exposure, and
therefore it is very advantageous for taking quick
candid shots and fast moving subjects. In flash
photography with an Olympus T-Series flash, this
"OTF" Light Metering method will also fully
control the flash exposure, thereby eliminating any
need for complicated guide number exposure
calculations. You can work with all available aper-
tures of your lens and use sophisticated techniques
such as bounce flash and multi flash in a fully
automatic mode. It has also solved difficult ex-
posure problems with macrophotography.
34
Page 36

SELECTING THE METERING MODE (How t o Use ESP Metering)
ESP Metering is the mode t o set for general use. In
this mode, you don't have to worry about how the
picture
will
turn
out.
All you
need
do is
with
press
the
shutter release. Even in tricky situations such as
sharp backlighting, the camera responds flexibly to
give you correctly exposed shots. This mode
assures
trouble-free
pictures that often turned out as failures because
the exposure was wrong. In fact, ESP Metering
greatly increases the range of auto exposure tech-
nology. The following examples should provide a
shooting
even
useful reference.
* When taking pictures in ESP metering mode, acti-
vate the viewfinder display by pressing the shutter
release button lightly, then shoot.
Subjects for which ESP Metering is Specially Effective
35
kind
the
of
Backlighting
With center-weighted average metering, this kind of
situation tends to leave the subject's face pitch
black. But ESP Metering assures even the fine
shades of the subject's expression are faithfully
conveyed. For the best results, try to keep the
main subject fairly near the center of the composition. Check fo r the ESP Metering symbol in
the viewfinder.
Page 37

When part of the subject area is extremely bright
If a part of the picture frame is extremely bright,
the subject is underexposed under the influence of
a
strong
light
on the
table
in the
case
of
center-
weighted, averaged metering. In the same picture
taken with the ESP metering, even the expression
of her face is clearly seen.
When the surrounding a re a is ver y d ark
In center-weighted, averaged light metering, the
subject appears slightly overexposed under the
influence of a dar k surrounding. In ESP metering
mode, however, it is correctly exposed. In this
case
too,
you
will
get the
best
results
by
keeping
the main subject close to the center of the composition.
36
Page 38

When the background is extremely bright in
sunlight
In center-weighted, averaged light metering, the
subject appears completely dark; in ESP metering
mode, you will see even her f ace clearly. If there is
an extremely bright object in the viewfinder frame,
ESP metering mode disregards this object when
determining exposure, as shown in thi s example.
37
Ordinary lighting conditions
In this case, the exposure is the same as in center-
weighted, averaged light metering. The mark
will n ot appear.
Page 39

Notes on ESP metering
The ESP metering mode works properly for the
majority of subjects, but it may not be as effective
in the following cases:
When the subject is too small
In this case, the metering method is practically the
same as the center-weighted averaged metering.
Manual exposure in ESP metering mode
Set the metering mode switch to the ESP and the
exposure mode to manual.
Compose your photograph.
Aim the camera so that your subject is located
in the center of the viewfinder. Now, the
mark will turn on.
When the subject is not in the center of the
viewfinder
Because
ESP
the center of the viewfinder frame, it will give
metering
substantially the same result as the center-weighted,
averaged metering. In this case, use manual exposure in ESP metering mode as fol l o w s.
measures
with
emphasis
on
Set the shutter speed at the same value as
indicated in the viewfinder.
Reframe your subject again as you originally
did in , then focus and shoot it by depressing
the shutter release button.
38
Page 40

ESP Meter ing Chart (ESP Algorithm)
Compositions with the sun in the scene
Bright outdoor scenes
Normally lit outdoor scenes
Evening shots and interiors
Night shots
39
Main subject bright
Subject Contrast
Background bright
Concentration on low light areas
Center weighted metering for high contrast subjects
Center weighted metering
Averaged metering
Modes
PROGRAM
AUTO
(Aperture
preferred
exposure)
MANUAL
Mode
Selector Dial
Page 41

GUIDE TO SELECTION OF EXPOSURE MODE
Viewfinder
Indication
Features
1. This is the ideal normal mode for snapshots an d general photography.
2. When this mode is set the camera automatically decides both the shutter
speed and the aperture. Fully automatic exposures are possible over a wid e
range of subject brightnesses.
3. You can concentrate on following the subject in the viewfinder without
worrying about exposure or shutter speed settings.
4. If yo u set an intermediate aperture on the lens, th e progr am automatically
becomes a continuously variable program.
1. This is basically an aperture preferred mode, but it is possible to use it al so
as a shutter speed preferred system. This mode is the one to select when you
want
to put
your
creative
ideas
into
the
the
picture.
shutter
is
both
opened
and
closed
2. In this mode you can concentrate on special depth of field effects, adjusting
the aperture to determine whether the background, etc., will be blurred or in
clear focus.
Here the background is blurred to make the main subject stand out. (Wide
open lens aperture)
Here the background is also in sharp focus, giving a feeling of greater spa-
ciousness and expansiveness. (Stopped down aperture)
3. Y ou can c onc en tra te on shutter speed effects (blurring with motion, etc.).
Here a fast shutter speed arrests the movement of the subject, giving it a kind
of timelessness. (Wide open aperture)
Here use of a slow shutter speed results in a blurred subject, emphasizing the
sense of speed. (Stopped d own aperture)
1. In Manual Mode, both the lens aperture and the shutter speed ar e set by
hand, giving free reig n to you r experience and 'feel' for the picture situation.
2. Use when you want to keep the same exposure settings regardless of the
brightness of the subject.
3. Use for
4. Use when you are basing the exposure on the values given by a separate
"Bulb"
manually.
exposure meter.
photography
when
40
Page 42

SELECTING THE EXPOSURE MODE - PROGRAM -
Program Exposures
In this mode the camera automatically selects the
ideal lens aperture and shutter speed fo r the sub-
ject brightness, making you highly responsive even
to unexpected shots. In Program Mode, the photographer can forget about exposures and shutter
speeds completely, and give full concentration to
the subject in the viewfinder. The only settings
needed are to turn the Mode Selector Dial to
Program , and set the aperture ring to the
smallest available aperture (largest F number).
Whether the subject is extra bright or unusually
dark, you can still rely on f ully automatic shots
41
with the best possible aperture and shutter speed
settings. Even if you suddenly come from a dark
place out into bright sunlight, the camera responds
immediately, assuring you fine photos in both
situations. Better still, when you use the Program
exposure mode together with the ESP Metering
mode, eve n raw beginners a re assured of great shots
in every situation — including tricky backlit or high
contrast shots that used to stump the experts too!
This is the perfect mode for snapshots and general
photography, as well as for such special fields as
news photography, where being ready for everything at all times is the most important require-
ment.
Page 43

PROGRAM DIAGRAMS
Regular Progra m Diagram
Continuously Variable Program
Diagram
Program Diagram with Use of T
Series Flash Unit
This program shows the regular
program settings that will be
obtained with a 50mm F 1.8 lens
on the camer a. From dim light
conditions up to a shutter speed
of 1/60 sec. the lens aperture
remains wide open. At faster
speeds than 1/60 sec. the shutter
speed and lens aperture settings
change in coordinati on at a ratio
of 6/5 as shown. Thus the pro-
gram is designed to assure
adequate shutter speeds and
minimize the risk of camera
shake spoiling the picture. With
still brighter subjects, the program concentrates on closing
down the lens aperture sufficiently to assure sharp and clear
depth of field effects.
The special OM-PC program
system also allows you to intentionally set different lens apertures for a continuously variable
program able to assure precise
depth of field effects, etc. For a
quick unexpected shot, the
program
will
exposure providing the shutter
speed you need is not over 1/
1000 sec. If the lens aperture
setting calls for a shutter speed
faster than 1/1000 sec., this
symbol and the 1000 in-
dicator in the viewfinder will
flash on and off, and will warn
you to reset the aperture to the
largest number.
assure a correct
The OM-PC assures you "OTF"
Program Auto flash perform-
ance when you use an OM
System T Series
flash will fire automatically at
program shutter speeds of 1/60
sec. or slower, whenever the
flash unit is switched ON. In
this situation the camera program automatically shifts three
settings to the special Flash
Program. The final exposure is
made precisely accurate by the
camera computer, which shuts
off the fl ash the instant the right
amount of light has reached the
film.
flash
unit.
The
42
Page 44

Viewfinder Display in the Program Mode
Set the exposure mode dial to and press the
shutter release button lightly while looking through
the viewfinder.
The mark will be lighted and the shutter speed
will be displayed in the left side of the viewfinder.
If and
"1000"
blink
alternately,
it
means
have not set the aperture ring to its minimum
aperture. Even if it is set at other positions, however, the camera will operate on programmed exposure and
will not tu rn on if the shutter
speed does not exceed 1/1000 sec. This is another
intelligent and functional feature of the OM-PC.
If
"1000"
alone
blinks,
it
means
your
subject
be overexposed. Use a Neutral density (ND) filter
to reduce the amount of light entering the lens, or
a slower film depending on shooting conditions.
43
you
will
Lights to Show Program Mode
Setting.
Both indications blink to warn
lens aperture must be stopped
down to avoid overexposure.
Blinks to show overexposure.
Shutter speed indications. Appropriate figure lights up.
Shutter speed of 1 sec. or slower.
Page 45

SELECTING THE EXPOSURE MODE - AUTO (Aperture Preferred) -
Auto Exposures
This is an aperture preferred auto mode in which
the shutter speed is set automatically by the camera
to give the correct exposure for the aperture which
the photographer has set after considering the kind
of picture desired. Settings are simple. First set the
Mode Selector Dial to AUTO. Then set the desired
aperture on the aperture ring. In this mode you
have a creative freedom to select desired depth of
field and other effects, for t he kind of results it is
hard to obtain in Program Mode. For example, if
you want to eliminate the background in a portrait
shot, open up the lens aperture as fa r as you can.
When you want the background to appear sharply
too, clos e the aperture down. In this way you can
precisely adjust the lens depth of field for just the
effect you want. Although this mode is basically
aperture preferred, you can also use it as a shutter
speed preferred mode by adjusting the lens aperture
to get the shutter speed you require in the viewfinder display. Used in this way it is also highly
suitable for getting the effects you want with moving subjects.
44
Page 46

DEPTH OF FIELD
Depth of field is the area of acceptable sharpness
in front o f and behind the subject in focus. A s you
get closer to your subject or as you open your lens
(e.g. f ro m F16 to F2.8) the depth of field becomes
shallower. By stopping your lens down (e.g. from
F2.8 to F16) or getting farther away from your
subject this depth of f i e l d ca n be increased.
The table below shows that when the camera-to-
subject distance is 3m, the depth of field at F16
ranges from 1.93m to 6.93m.
As you press the preview button, looking through
the viewfinder, you can ascertain the actual depth
of field.
Depth of Fie ld Table (F1.8 & F1.4 50mm Lenses)
Circ le of least confusion 1/30mm
45
The double series of numbers engraved on the
depth of field scale represent F stops: F4, F8 and
F16. Once you have focused on your subject, all
objects within the distance range indicated on the
lens distance scale between the marks for the F/
stop
you
have
ness.
* For other lenses, see the lens
instruction manual.
selected
will
have
acceptable
sharp-
Page 47

PREVIEW BUTTON
When you wish to see which objects
fall within the acceptable zone of
sharpness (depth of field), press the
preview button on your lens. The dia-
phragm of the lens will stop down to
the preset F stop enabling you to see
the depth of field in the viewfinder.
In PROGRAM mode, it is impossible to check
the depth of field with the preview button.
CAUTION: • Do not take pictures in the programm e d exposure m o d e with the preview button
depressed.
46
Page 48

SHUTTER SPEEDS
This camera offers various possibilities for visual
expression by changing the shutter speed.
High shutter speeds can be used to "freeze" a
moving subject to give sharp definition of the im-
age.
Shutter
speeds
of
1/1000
sec.
movement of a considerably fast moving subject.
A shutter speed of about 1/250 sec. will be enough
to shoot a child at play, if he is not moving too
quickly.
There are two methods f or givi ng dynamic expres-
sions. The first one is to blur out the movement of
the subject itself, thereby creating a moving image.
The second one is to pan the camera according to
the movement of the subject. While the background
is blurred, the subject is sharply defined to create
a moving image.
* In using slow shutter speeds, it is necessary to
guard against camera shake. We will suggest a
47
can
"stop"
the
very practical method for choosing shutter speeds.
Generally, shutter speeds of which denominator
value is larger than the focal length value of the
lens used are good for preventing camera shake.
If you are using a 50mm lens, for example, shutter speeds of 1/60 sec. or higher are best; and if
you are using a 200mm lens, shutter speeds of
1/250 sec. or higher a re best.
Page 49

VIEWFINDER DISPLAY FOR AUTOMATIC EXPOSURE
If you press the shutter release button lightly while
looking through the viewf inder, you will see the
automatic shutter speed in the left side of the
frame.
However,
overexposure
aperture.
If the
"1000"
lens is set to its minimum aperture, the subject is
outside the range of automatic exposure control.
In
this
case
shoot with film having a lower ISO number.
if the
and you
does
not
use an ND
"1000"
will
have
disappear
(neutral
blinks,
to
close
even
density)
it
means
down
when
filter
the
the
or
Blinks to warn lens aperture must
be stopped down to avoid overexposure.
Shutte r speed indications. Appro-
priate figure lights up.
Shutter speed of 1 sec. or slower.
48
Page 50

SELECTING THE EXPOSURE MODE - MANUAL -
The OM-PC also provides manual exposure con-
trol.
With
the
you can choose your desired aperture and shutter
exposure
speed combination. You will see the following
display in the viewfinder.
As you adjust the aperture ring, the appropriate
shutter
speed
for the
displayed in the viewfinder. Set the shutter speed
dial to that value.
If you are shooting fast moving subjects such as
sports scenes, you may prefer to set your shutter
speed
first.
the preselected shutter speed is indicated in the
viewfinder. This technique is useful when a specific
If so,
shutter speed is needed.
49
aperture
then
mode
adjust
dial
you
set to
your
have
aperture
MANUAL,
set
will
until
be
Lights to Sh ow Manual Mode Set-
ting.
Shutter speed indications.
Appropriate figure lights up.
Shutter speed of 1 sec. or slower.
Page 51

COMBINATIONS OF METERING MODE AND EXPOSURE MODE
Exposure
Metering
Modes
ESP
Metering
Modes
PROGRAM
The ideal mode for snapshots and general photography, that lets y ou t ak e properly exposed shots easily,
even
in
difficult
conditions.
It is still simpler and more
convenient when combined
with the DX ISO AUTO
SET Mode for automatic
setting of the film speed.
lighting
AUTO (aperture preferred)
A creative photographic
mode that allows control
over depth of field and
other effects for portraits,
souvenir photos, etc. Features automatic exposure
compensation for backlit
situations.
Useful for situations such
as when the main subject
is on the edge of the com-
position in a backlit situa-
tion, etc.
MANUAL
TTL Direct
"OTF"Light
Measuring
(centerweighted
average
metering)
The simple snapshot mode
that guarantees good results.
This
mode
does
full
control
justice
avail-
to the photographer's creative intentions, assuring the
full
range
able with conventional high
quality 35mm Single Lens
Reflex cameras.
of
This is the sphere of total
manual control. Both the
aperture and the shutter
speed are entirely in the
hands of the photographer.
In this situation creativity
is everything, based on the
photographer's own experience and instincts. And
when needed, the viewfinder indications are still
there to offer helpful suggestions.
50
Page 52

SELECTING THE FILM SPEED SETTING MODE
51
Mode
DX ISO
AUTO
SET
ISO
MANUAL
SET
Mode
Selector Dial
Finder
Indication
Features
1. If you use film that has the DX code and set the selector
dial
to
this
mode,
the
film
speed
is set
the camera. (The range of auto settings available is from
ISO 25 to 3,200.)
1. For when you use film without the DX code.
(The range of settings is from ISO 25 t o 3,200.)
2. For
when
you
prefer
useful
to set a
to set a
cording to your own experience or preference.
3. For when you plan to use forced or under-developing of
the film.
1. You can make this setting manually according to your
own experience in order to prevent darkening of the
model's face, etc., in backlit or strong contrast situations. (The exposure compensation range is from —2 to
+2 stops, in 1/3 stop increments.)
2. When using a super wide angle lens in situations where
the sky unavoidably fo rms a large part of the composition,
it may be
tion.
3. When using together with ESP Metering mode, exposure
compensation set by the ESP Metering system are added
to those that are manually set.
automatically
different
plus
film
exposure compensa-
speed
on
ac-
Page 53

DX ISO A UTO Film Speed Setting
Film speed information is recorded in the digital
pattern imprinted on t he cassette of DX type film.
The OM-PC reads this information through the
electrical contacts located at six positions in the
film chamber, and conveys it to the camera's
computer. On reading this information, the film
speed is automatically set on the camera. In other
words, when you tu rn the OM-PC film speed di al
to the DX ISO AUTO SET position, whatever the
film speed it is automatically set on the camera.
There is no risk of getting a mistaken setting when
you change to a different film speed ... a common
disaster in the past! When using the DX ISO AUTO
setting, first make sure that you are using DX
film. Also note that if there is any damage to the
digital pattern on the fil m cassette, this could result in a mistaken film speed setting.
ISO Manual Setting
The OM-PC also allows manual setting of the film
speed in exactly the same way as previous cameras.
Als o use this mode at times when you wish to set
an exposure compensation on the dial.
Exposure compensation
Whether it is in the programmed exposure mode,
automatic exposure mode, or manual mode, the
OM-PC permits exposure compensation with the
exposure compensation dial. (Remember, exposure
compensation is not possible in the film speed
auto-set mode.) For example, if the background is
brighter than the subject (backlighting), turn and
set the dial to the (+) side. This will provide more
light for the subject.
As you turn t he dial, the sign will blink in the
viewfinder and the displayed shutter speed will
shift depending on the amount of compensation.
The dial can also be set
at the intermediate click
positions providing
accurate 1/3 stop
+ 2 Stops
+ 1 Stop
exposure com-
pensations.
0
– 1 Stop
-2 Stops
52
Page 54

53
BULB EXPOSURE
If you require long exposure,
set the shutter speed dial at
"B" (bulb). This is useful for
night exposures or other spe-
cial effects.
* When taking pictures with
the shutter speed dial set at
"B", it is recommended that
you use a tripod and cable
release to prevent camera
shake.
Page 55

MULTIPLE EXPOSURE
By tripping the shutter several times on the same
frame, multiple images are produced on the same
frame.
This is how to do:
After the first exposure is ended, erect the re-
wind crank and turn it clockwise as far as it
will
go to
take
up
film
While holding both the rewind knob and rewind
button with your fingers to prevent them from
moving, wind the film advance lever.
In fact, the film is not wound and the shutter is
cocked by this operation.
Press the shutter release as you would do normally, and double exposure will occur.
By repeating the steps and , the frame
will be exposed as many times as you want. How ever, the frame counter advances each time the
shutter release is pressed.
After ending the multiple exposure, put the
front lens cap on and make a blind shot.
Note: The frame may shift slightly.
slack.
INFRARED PHOTOGRAPHY
When shooting infrared pictures with infrared film
and a red filter, the point of focus will slightly differ if you focus visually. The amount of shift varies
with the lens and a red line or red dot is marked on
the lens' depth of field scale to compensate for it.
First, focus the lens without a red filter on as you
would do normally. Next, read that distance on the
distance scale and shift it opposite the infrared
mark, then put on a red filter an d shoot. (The above
picture was taken with the distance at infinity.)
54
Page 56

55
Page 57

Flash Photography
The OM-PC is designed to provide "OTF" Automatic Exposure with Olympus T-Series electronic
flashes. There is nothing to set since exposure is
determined by the sensors in the camera body
itself. You can even adjust exposures using the
compensation dial on the camera. Because it
directly measures the light at the film plane, it
does not allow for flash exposure error utilizing
the
sensor
built
into
the
full
automatic
flash.
ease.
Such special techniques as bounce flash, diffused
illumination and ultra close-ups can now be ac-
complished
Combined with T-Series flashes, the OM-PC per-
mits flash exposure in three modes: "OTF" programmed exposure mode, "OTF" automatic ex-
with
posure mode and manual mode.
56
Page 58

T-Series Flashes
Electronic flash T20 (small-size flash with a guide
number of 20)
Electronic flash T32 (high-capacity flash with a
guide number of 3 2)
Mounting the Flash
Slide
the
flash
into
the
lock it by turning knob until the flash is tight.
camera's
Make sure the flash is pushed fully forward, to
insure proper electrical contact.
accessory
shoe
and
57
* The electronic flash T45 and other flashes that
have no direct hot shoe contact cannot be used.
* If the flash unit switch is left on, the camera
batteries will be drained. Make sure to turn off
the flash switch after taking pictures.
Page 59

How to Use T-Series Flashes
With a T-Series flash on the camera, the flash mode
will
be
automatically
posure mode. To take pictures in the programmed
mode, switch the mode selector dial of the OM-PC
to PROGRAM, set the lens' aperture ring to its
minimum aperture and turn on the flash. The
camera will determine the appropriate aperture
depending on the brightness of the subject.
To take pictures in the auto mode, set the mode
selector dial to AUTO and choose your desired
aperture.
To shoot in the manual mode, switch the camera's
mode selector dial to MANUAL and set the shutter
speed dial at 1/60 sec. or slower. Select the appro-
priate aperture based on existing conditions. In
MANUAL mode, the flash will always fire at full
power output.
* When the power switch of a T-Series flash is
turned on in the programmed mode, the camera's
exposure mode will switch to the flash program
if the light intensity is below the specified level.
You will see it because the indicated shutter
speed is "8" or slower. In this case, the shutter
will trip at 1/60 sec.
* In the "OTF" auto flash mode, T-Series flashes
will fire when the shutter speed is 1/60 sec. or
slower. If you want to ensure that the flash will
fire, however, adjust the aperture so that the
shutter speed in the viewfinder becomes 1/30 sec.
or slower.
set to
match
the
camera's
ex-
Lights
to
show
full
and blinks no less than 2 sec. to
confirm correct flash exposure.
Lights to Show Program Mode
Setting
Lights to Show Manual Mode Set-
ting
flash charge,
58
Page 60

Bounce Flash
Close-up Flash
59
The T32 has an adjustable flash head that tilts
as much as 90° upward. As it operates on "OTF"
auto, it allows you to use bounce flash automati-
cally by simply activating the flash switch.
* Set the tilting angle so that the subject is ilumi-
nated by reflected light.
On the T32, the flash head also can be adjusted as
much as 15° downward. A s it operates with all
available apertures on "OTF" auto, this feature
allows you to take close-ups automatically by sim-
ply activating flash switch.
Page 61

Using Electronic Flashes Other Than Ol ymp us T- Series Units
(1) Mount the flash on the accessory shoe.
The OM-PC does not accept flash units without direct hot shoe contacts.
(2) Setting the aperture
If you are using an automatic flash, check the
specifications on the flash and set the aperture
accordingly.
If you are using a manual flash, determine the
required aperture by the following formula.
You can also use the flash's calculator panel
and s et t he a pe rtu re based on t h i s information.
Aperture =
(3) Switch the camera's mode selector dial to
MANUAL and shoot with a shutter speed of
1/60 sec. or slower.
* Read the instruction manual of your flash
carefully.
Flas h guide number
Flash-to-subject distance
60
Page 62

61
Shooting with Motor Drive
Shooting with motor drive is both functional and
very exciting. It enables you to capture your subject in a critical moment by making several shots in
a second.
The high speed OM S ystem motor drive has achieved an extremely compact and lightweight design to
take
full
maneuverability.
advantage
of
operational
ease
and
high
The OM-PC is designed to accept the high-speed
Motor Drive 2* as w ell as the Winder 2. Both offe r
single-frame exposures and sequential exposures
by simply turning a dial.
The OM System's outstanding maneuverability and
operability are ideal for shooting dynamic sports
photos and documentary press photos.
To shoot on the ESP meterin g, first activate the
viewfinder display by pressing the camera's shutter
release
softly.
The
display
will
remain
seconds. Then shoot by pressing the Motor Drive's
shutter release.
* Up to 3.5 frames a second with OM-PC, OM-
2S PROGRAM and up to 5 frames a second
with OM-1, OM-2, OM-3, OM-4, OM-G and
OM-F.
* *
When
shooting a sequence
Aperture priority or Manual Mode is recommended. In Program mode, the shutter speed
may be slowed depending on the shooting
condition.
with
on for 60
Motor
Drive,
Page 63

Motor Drive Group Units
Motor Drive 2. If you want to shoot very fast
moving subjects such as a dashing animal or a racing
car driving at full speed, the Motor Drive 2 is the
best choice because it permits continuous shooting
at a maximum speed of 5 frames a second (up to
3.5 frames a second with OM-PC.) This quick
shooting capability will often allow you to catch a
dramatic instant that would be missed with a
slower drive.
The power sources for Motor Drive 2 are a flat-
type, rechargeable M.15V Ni-Cd Control Pack 2
and a pistol grip-type replaceable battery powered
M.18V Control Grip 2.
Winder
2. The
very convenient for shooting. While not as fast as
Motor Drive 2, it can help you capture impressive
moments such as sports scenes and children at play.
The Winder 2 has a self-contained power supply,
but two external power units ("AA" battery type)
are also available.
Remote Control System In addition, the M. Quartz
Remote Controller 1 permits interval shooting with
remote control and LCD display. The Remote
Cords 1.2m an d 5m allow you to shoot aw ay from
the camera by simple button operation.
Winder
2 is
compactly
built
and
62
Page 64

Macrophotography
63
The world of macrophotography is filled with marvelous discoveries. However, macrophotography
has been generally considered difficult technically.
In particular, calculations for correct macro exposures in available light photography as well as in
flash
photography
for professionals.
Equipped with an "OTF" Light M etering system,
the OM-PC has solved this difficult problem
and
will
always
The OM Macro System includes a wide choice of
macro lenses that offer excellent life-size and larger
than
life
other components enable you to take hand-held
macro shots that previously required a tripod.
size
have
been a difficult
provide
correct
photographs.
exposure.
Extension
job
units
even
and
Page 65

Macrophoto Group Units
• Simplified Macro System
These units allow you to take close-ups up to life
size
with
ease.
For example, Close-up lenses 49mm and 55mm
(f=40cm) — the 49mm can be used on normal
50mm F 1.8, F 1.4 and F 1.2 standard lenses. You
can tak e up to 0.63X life size close-ups by simply
screwing them into the front of the standard lens.
• Auto Extension Tubes 7, 14 and 25. These co m -
ponents are placed between the lens and camera
body and available in three thicknesses: 7mm,
14mm and 25mm. Used in combination up to
seven variations, they allow you to take up to
1. 1 X close-ups with a 50mm lens.
• Basic System
This is a full-scale macro system that permits low
to high magnifications. It will produce brilliant
images of the marvelous world of tiny things such
as the geometric beauty of the compound eye of a
dragon fly, or extreme close-ups of flowers. A
studio type and a field type a r e available.
Studio type: This system is suited for taking high-
magnification pictures in a studio or other indoor
situation.
• Auto Bellows. A basic unit that helps you take
full
advantage
bination with various lighting units and mounts
for extended magnification ratios.
of the
system's
capabilities
in
com-
• Zuiko Auto Macro 20mm F2. Large-aperture
macro lens designed exclusively for macrophoto-
graphy. Combined with the Auto Bellows, it
permits magnifications ranging from 4.2X to 16X.
• Zuiko Auto Macro 38mm F2.8. This lens is de-
signed exclusively for macrophotography and
permits magnifications of 2.3X to 6.7X with the
Auto Bellows. (Provided with a helicoid for fine
focusing.)
• Macrophoto Stand VST-1. A compa ct and sturdy
multi-purpose stand for solid camera support in
close-up and macrophoto work. Comes with
frosted
stage
glass
for
• Epi-illuminator PM-LSD2. A two-piece lighting
set which provides ideal re f l ec t e d light for m acrophotography.
Field type: This is a handy and highly maneuvera-'
ble system which includes various macro lenses
and a telescopic extension tube.
• Telescopic Auto Extension Tube 65 ~ 116. With
its variable tube length, this auto extension tube
enables you to change the shooting distance,
magnification and angle of view freely. Combined
with the Zuiko Macro 80mm F4 and 135mm
F4.5, it constitutes a highly maneuverable system
suited for outdoor shooting from infinity to 2X
life size.
• Zuiko 1:1 Macro 80mm F4 . This lens is designed
exclusively for macrophotography and permits
image magnifications of 1/2 ~ 2X.
incident
light.
64
Page 66

OTHER SYSTEM UNITS
65
• Zuiko Macro 135mm F4.5. Permits magnifica-
tions up to 0.43X with the Telescopic Aut o Ex -
tension
Tube
65 ~
116.
This
lens
will
find
application because it can also be used as a super
sharp 135mm telephoto lens.
• Zu ik o Macro 50mm F3.5. A convenient lens that
can be used not on ly fo r close-ups, but also as a
standard lens fo r normal shooting situations.
wide
Interchangeable Lenses: There are lenses to fit
every subject, from fisheyes to super telephotos.
Filters: Used to change the color temperature, or
for special effects.
Eyecup 1: Attached to the camera eyepiece to
prevent stray light spoiling t he viewfinder image.
Dioptric Correction Lenses: Used to correct the
photographer's own vision. Available in a range
from +2 to –5 diopters.
Varimagni Finder: Allows easy, unstrained viewing
for low angle shots, copying work, etc. Can be
switched between 1.2 and 2.5 magnifications.
Semi- Har d Case: Protects the camera from dust
and scratches.
Be su re to get the OM-PC v ersion.
Page 67

For Longer Service of Your Camera
66
Page 68

67
Handling Care
Take ca re in handling the camera.
Do not apply excessive force.
Page 69

Storage Care
Guard against high temperature and magnetic fields.
In
case
of
your nearest Olympus service station.
malfunction,
Battery Precaution
take
the
camera
to
68
Page 70

QUESTIONS AND ANSWERS
69
Q: The film rewind knob does not turn when
winding the film, although the camera is loaded
with film.
A: This indicates th e film is not being wound be-
cause it has slipped out of the take-up spool.
Load the film correctly again.
Q: A dark shadow "shimmers" in the microprism
collar or in the split image rangefinder in the
center of the viewfinder.
A: This phenomenon will occur when an inter-
changeable lens of F5 or slower is used or when
the preview button is pressed with the aperture
set to F5.6 or smaller. However, there is nothing
wrong with the microprism.
Q: The display in the viewfinder turned off while I
was looking through the viewfinder.
A: To conserve battery power, it wil l a ut omatically
turn off after 60 seconds. To turn it on again,
press
the
shutter
release
button
lightly.
Q: In the auto mode, the actual shutter speed
seems to be slower than the one displayed in
the viewfinder.
A: If the shutter is fired in auto mode with no
film in the camera, the shutter speed will be
slower than that displayed in the viewfinder.
This is because the OM-PC uses an "OTF"
Light Metering that measures the light reflected
off the f ilm plane. To test the shutter, load an
unwanted roll of film that has not been developed or the test card that comes with your
camera.
Q: The film rewind crank won't turn.
A:
Press
in the
film
rewind
button.
Do not
force
the rewind crank.
Q: The fi lm advance lever does not operate. Wh y ?
A: You
have
wound
the
film,
but you
have
tripped the shutter. If you depress the shutter
release
button,
you
will
be
able
to
not yet
operate
the
advance lever. It is also possible that the film
has come to its end. If the exposure counter
shows
the
last
frame
of
your
film,
do not
the lever, but rewind the film back into its
force
cartridge.
Q: The film advance lever does not operate and I
see nothing in the viewfinder.
A: The camera is designed to be switched off for
safety when the batteries are exhausted. If the
audible and visual signals do not function when
you rotate the mode selector dial to the "BAT-
TERY CHECK" position, be sure to replace
both batteries.
Q: When must the batteries be checked?
Page 71

A: (1) When new batteries are inserted into the
camera, (2) when you are using the camera after
it hasn't been used for a long time, (3) when
you think the b atter ies may be wor n out, and
(4) when the temperature is extremely low.
(If the battery voltage is low, the shutter may
not fire when using the self-timer; even if the
batteries check out OK.)
Q: What type of batteries should I buy?
A: Buy two SR44 silver-oxide batteries or LR44
alkaline batteries. Do not use HR44 mercury
batteries or two different types of batteries of
the same size, or mix an old battery with a new
battery.
Always replace both batteries at the same time.
Q: H ow long do the batteries last?
A: Generally, SR44 batteries will last about one
year and LR44 batteries about six months.
Q: The batteries seem to have been worn out while
I was shooting in cold weather. What can I
then do to take pictures?
A: Bring them to room temperature by keeping
the cam er a inside your coat close to your body.
They may recover and allow you to resume
shooting. Never heat batteries with an electrical
appliance or other device.
Q: I took my picture at an intermediate point be-
tween two aper ture numbers.
A: No problem. Your picture is correctly exposed.
Q: In the manual mode, I took my picture at an
intermediate shutter speed.
A: Intermediate shutter speeds cannot be used. If
you have set the shutter speed dial at an i nter-
mediate position, the shutter will fire at either
of its neighboring shutter speeds.
Q: I want to take m acro pictures with flash in the
programmed mode. Is it possible?
A: The programmed mode tends to give a larger
aperture, causing the picture to turn out over-
exposed or not have enough depth of field. It is
recommended, therefore, to use the aperturepreferred "OTF" auto flash mode for macro
shots.
Q: In the
program
blink even with the lens set at its minimum
mode,
"1000"
and
aperture.
A: This indicates overexposure with a lens having
less than fi ve aperture stops. In this case, use an
ND
filter
suited
or a
slower
film.
Q: In the program mode, it seems that the
shutter speed displayed in the viewfinder differs
from the actual shutter speed.
70
Page 72

71
A: When using a 50mm F1.2, 50mm F1.4, 75 ~
150mm ZOOM or 35 ~ 105mm ZOOM lens,
the shutter speed displayed in the viewfinder
can differ from the actual one; but by approxi-
mately less than one stop. However, correct
exposure is always insured.
Q: Are there any lenses that cannot be used?
A: The 1000mm F11 lens cannot be used. The
following three lenses cannot be used in the
programmed mode. Use them in the aperture-
pre fer re d auto mode or manual.
250mm F2, 350mm F2.8, 600mm F6.5
Q: My pictures tend to be overexposed when
shooting transparencies with flash in the pro-
grammed mode.
A: In this case, the pictures may turn out over-
exposed depending on the shooting conditions.
Use the aperture-preferred auto mode an d sto p
down the aperture.
Q: The shutter speed display and ESP mark
sometimes blink during metering.
A: In the case of a subject with an intermediate
luminance, the LED shutter speed display will
apparently blink because the adjacent figures
turn on alternately. When shooting under a
fluorescent lamp, they may blink more fre-
quently. The reason of this phenomenon is as
follows: Though the fluorescent lamp appears
to the human eye as if it were lighting con-
tinuously, it is in fact blinking repeatedly at a
frequency of 50 — 60 cycles a second. In both
cases, however, exposure is correct and there is
no problem at all.
Q: The flash does not fire.
A: The flash will not fire whe n the shutter speed is
faster then 1/60 sec.
Q: The shutter release button cannot be depressed.
A: You may not have wound the film properly,
or the
film
may
have
come
to its
Q: Though the audible and visual signals do not
end.
turn on when checking the batteries, the viewfinder display appears faintly.
A: If the battery voltage is extremely low, the
LED for viewfinder display may sometimes
turn on because the camera circuit allows it.
Q: Even when I gently push down the shutter
button, the viewfinder display doesn't come on.
A: Check the batteries by turning the Exposure
mode selector dial to the CHECK position. If
the batteries are all right, you have probably set
the camera to the "B" (Bulb) position on the
shutter speed dial. On "B" the finder display
does not light.
Page 73

Q: The mirror does not spring back.
A: Check the batteries. If the batteries are in good
condition, and in case the mirror should not
spring back or the shutter should not close, the
safety mechanism will operate to return them
to their original position.
Q: The mark does not turn on when the pic-
ture is composed with th e s u n in a corner of the
picture frame.
A: If the sun is located in a corner of the picture
frame, exposure correction with the ESP meter-
ing is not effected. Because the four corners of
the picture frame have a reduced metering
sensitivity, the ESP metering need not be
operated.
Other cautions
•
When
the
for
OM-PC
poor
lenses, Olympus can not assume any responsi-
bility
This Is particularly true when other brand lenses
are used in PROGRAM mode.
• The exposure value will shift on spot metering
with a linear
circular polarizing filter.
• If the exposure mode is switched while the self-
timer is running, the shutter will trip.
• The DX ISO auto-setting is not effective when
the ISO speed window shows a number "800" or
larger. First, set it at "640" or smaller then adjust
for ISO auto setting.
• If you are not likely to use the camera for a long
time, remove the ba tteries before putting it away.
• The batteries that c ome with your camera may
not las t so long as stated in the camera specifica-
tions because they are supplied for test at the
time of purchase.
is
image
polarizing
used
quality
filter.
with
or
In
other
other
this
brand
problems.
case,
use a
72
Page 74

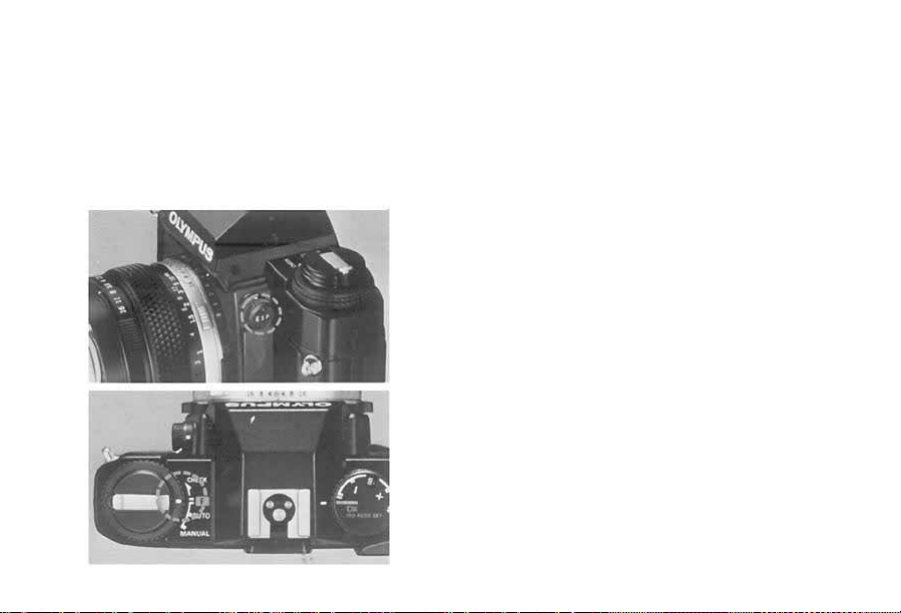
Description of Controls
Self-Timer/Battery
Check Signal
73
Preview Button
Light Metering Mode
Selector Lever
Shoulder Strap Eyelet
Lens
Lens Release Button
Depth of Field Scale
Aperture Ring
Focusing Ring
Page 75

Manual Shutter Speed Dial
Exposure Mode Selector Dial
Rewind Crank
Rewind Knob/Camera
Back Release
Film Speed Dial/Exposure
Compensation Dial
ISO /AS A Film Speed
Window
Shutter Release Button
Grip
Self-Timer Lever
Exposure Counter
Film Advance Lever
Accessory Shoe
Rewind Release Button
Flash Control Contact
X Contact
74
Page 76

Shutter Curtain
75
Film Rewind Shaft
View finder Eyepiece Frame
Sprocket
Film Take-up Spool
Camera Back
Pressure Plate
Film Cartridge Pressure
Plate
Film Chamber
Film Guide Pins
Lens Mount Ring
Motor
Guide
Pin Hole
Fil m Window
Tripod Socket
Motor Coupling Terminals
Motor Coupling Socket
Battery Chamber
Page 77

SPECIFICATIONS
Type: TTL auto-exposure 35mm SLR camera.
Film Format: 24mm × 36mm.
Lens Mount: Olympus OM Mount.
Shutter: Horizontal running electronic control type
focal plane shutter with automatic exposure controls from 2 sec. to 1/1000 sec.
Synchronization: X contact. Hot shoe with direct
contact for OM T-Series electronic flash units.
Metering System: ESP (Electro-Selective Pattern)
Metering and TTL Direct "off-the-film" Light
Metering (center-weighted averaged metering).
Programmed Automatic Exposure: Type; Electronic
shutter with automatic settings of aperture and
shutter speed. Light measuring range; 2—1/1000
sec. (with ISO 100 film and 50mm F1.4 lens).
EV0–18.
Aperture-Preferred Automatic Exposure: Type;
Automatic exposure control with aperture-preferred electronic shutter. Light measuring range:
2-1/1000 sec . (with ISO 100 film and 50mm
F1.4 lens). EV 0–18.
Manual Exposure: B, 1—1/1000 sec.
Auto Flash Exposure: Choice of "OTF" Auto Flash
or "OTF" Program Flash. Direct contacts for
"OTF" Auto Flash. (Full automatic f lash with TSeries Flash); Automatic shutter speed setting
for flash exposures.
Exposure Compensation: ±2 EV in 1/3 stop incre-
ments.
Film
Speed:
ISO
setting for DX coded films or manual setting.
Film Advance: Film advance lever with 130° angle
for one long or several short strokes and preadvance angle 30°. Motor drive and winder usable.
Film Rewind: Rewind crank.
Viewfinder: Pentaprism eye-level type. Wide field
finder with bright Lumi-Micron Matte focussing
screen with central microprism/split image rangefinder. Finder view-field: 93% of actual picture
field. Finder magnification: 0.92X with 50mm
lens
at
Viewfinder Information: LED multi-mode display (1
min. limiter).
Self-timer: 12 second delay electronic self-timer. Set-
ting by lever. Automatically cancelled by film advance. Audio-visual LED and PCV indications.
Battery Check: 3-level display wit h LED and alarm
sound.
Camera Back: Non-detachable, with window for read-
ing DX coded film information.
Grip: Large elastic grip on fron t and rear of camera
with non-slip tex ture.
Power Source: Two 1.5V silver oxide (SR44) batteries
or alkaline-manganese (LR44) batteries.
Dimensions: 135.5x86x53mm (5.33"x3.39"x2.09")
(Body only).
Weight: 460 g. (16.2 oz.) (Body only).
25-3200.
infinity.
Selection
of
automatic
76
Page 78

OLYMPUS
San-Ei Building,
OLYMPUS OPTICAL CO.,LTD.
22-2,
Nishi Shinjuku 1-chome, Shinjuku-ku Tokyo, Japan. Tel. 03-340-2211
OLYMPUS CORPORATION
Crossways Park, Woodbury, New York 11797, U.S.A. Tel. 516-364-3000
OLYMPUS OPTICAL CO.(EUROPA) GMBH
Postfach 104908, Wendenstrasse 14-16, 2 Hamburg 1, West Germany. Tel: 040-23773-0
OLYMPUS OPTICAL CO. (U. K. ) LTD.
2-8 Honduras Street, London EC1Y OTX, England. Tel. 01-253-2772
®
PRINTED IN JAPAN 0985 •18MS
 Loading...