

Page 1
Refer to the endoscope’s companion manual, the “OPERATION MANUAL” whose cover lists the model of
your endoscope, for operation information.
USA: CAUTION: Federal law restricts this device to sale by or on the order of a physician.
INSTRUCTIONS
EVIS EXERA GASTROINTESTINAL VIDEOSCOPE
OLYMPUS GIF TYPE XP160
OLYMPUS GIF TYPE 160
OLYMPUS GIF TYPE Q160
OLYMPUS GIF TYPE Q160Z
OLYMPUS GIF TYPE 1TQ160
OLYMPUS GIF TYPE XTQ160
EVIS EXERA COLONOVIDEOSCOPE
OLYMPUS CF TYPE Q160L/I
OLYMPUS CF TYPE Q160AL/I
OLYMPUS CF TYPE Q160ZL/I
OLYMPUS CF TYPE Q160DL/I
OLYMPUS PCF TYPE 160AL/I
EVIS EXERA SIGMOIDOVIDEOSCOPE
OLYMPUS CF TYPE Q160S
Page 2

Page 3

Contents
i
EVIS EXERA GIF/CF/PCF TYPE 160 Series REPROCESSING MANUAL
Contents
Symbols......................................................................................... 1
Chapter 1 General Policy ......................................................... 2
1.1 Instructions...................................................................................... 2
1.2 Signal words ................................................................................... 3
1.3 Precautions ..................................................................................... 3
Chapter 2 Compatible Reprocessing Methods and Chemical
Agents ...................................................................... 7
2.1 Compatibility summary.................................................................... 7
2.2 Detergent solution........................................................................... 9
2.3 Disinfectant solution........................................................................ 9
2.4 Rinsing water .................................................................................. 10
2.5 ETO gas sterilization....................................................................... 10
2.6 Steam sterilization (autoclaving) of accessories ............................. 12
Chapter 3 Cleaning, Disinfection and Sterilization Procedures
.................................................................................. 14
3.1 Required reprocessing equipment .................................................. 14
3.2 Cleaning, disinfection and sterilization procedures......................... 24
3.3 Precleaning ..................................................................................... 25
3.4 Leakage testing............................................................................... 31
3.5 Manual cleaning.............................................................................. 37
3.6 High-level disinfection ..................................................................... 50
3.7 Rinsing after high-level disinfection ................................................ 52
3.8 Sterilization ..................................................................................... 56
3.9 Cleaning, disinfection and sterilization procedures for reusable parts
and reprocessing equipment........................................................... 58
Chapter 4 Cleaning and Disinfection Equipment................... 65
Chapter 5 Storage and Disposal.............................................. 67
5.1 Storage ........................................................................................... 67
5.2 Disposal .......................................................................................... 68
Page 4

Contents
ii
EVIS EXERA GIF/CF/PCF TYPE 160 Series REPROCESSING MANUAL
Page 5

Symbols
1
EVIS EXERA GIF/CF/PCF TYPE 160 Series REPROCESSING MANUAL
Symbols
The meaning(s) of the symbol(s) shown on the back cover of this instruction
manual are as follows:
Manufacturer
Authorized representative in the European Community
Page 6

2
Chapter 1 General Policy
EVIS EXERA GIF/CF/PCF TYPE 160 Series REPROCESSING MANUAL
Chapter 1 General Policy
1.1 Instructions
• Chapters 1, “General Policy” through 4, “Cleaning and Disinfection
Equipment” describe recommended procedures and equipment for
cleaning and disinfecting or sterilizing this instrument.
• Thoroughly review the manuals of all equipment which will be used with
this instrument, and use the equipment as instructed.
• If you have any questions or comments about any information in this
manual, or if a problem that cannot be solved occurs while reprocessing,
contact Olympus.
• The medical literature reports incidents of patient cross contamination
resulting from improper cleaning, disinfection or sterilization. It is
strongly recommended that reprocessing personnel have a thorough
understanding of and follow all national and local hospital guidelines and
policies.
• A specific individual or individuals in the endoscopy unit should be
responsible for reprocessing endoscopic equipment. It is highly
desirable that a trained backup be available should the primary
reprocessing individual(s) be absent.
• All individuals responsible for reprocessing should thoroughly
understand:
occupational health and safety regulations
all national and local hospital guidelines and policies
the instructions in this manual
the mechanical aspects of endoscopic equipment
pertinent germicide labeling
Page 7
Chapter 1 General Policy
3
EVIS EXERA GIF/CF/PCF TYPE 160 Series REPROCESSING MANUAL
1.2 Signal words
The following signal words are used throughout this manual:
Indicates a potentially hazardous situation which, if not
avoided, could result in death or serious injury.
Indicates a potentially hazardous situation which, if not
avoided, may result in minor or moderate injury. It may also
be used to alert against unsafe practices or potential
equipment damage.
Indicates additional helpful information.
1.3 Precautions
• Failure to properly clean and high-level disinfect or sterilize
endoscopic equipment after each examination can
compromise patient safety. To minimize the risk of
transmitting diseases from one patient to another, after each
examination the endoscope must undergo thorough manual
cleaning followed by high-level disinfection or sterilization.
• ALL channels of the endoscope, including auxiliary water
channel where fitted, MUST be cleaned and high-level
disinfected or sterilized during EVERY reprocessing cycle,
even if the channels were not used during the previous
patient procedure. Otherwise, insufficient cleaning and
disinfection or sterilization of the endoscope may pose an
infection control risk to the patient and/or operators
performing the next procedure with the endoscope.
• If the endoscope is not cleaned meticulously, effective
disinfection or sterilization may not be possible. Clean the
endoscope and accessories thoroughly before disinfection or
sterilization to remove microorganisms or organic material
that could reduce the efficacy of disinfection or sterilization.
Page 8

4
Chapter 1 General Policy
EVIS EXERA GIF/CF/PCF TYPE 160 Series REPROCESSING MANUAL
• Olympus confirms validation of the endoscope reprocessors
recommended by Olympus only. If using endoscope
reprocessor that are not recommended by Olympus, the
endoscope reprocessor manufacturers are responsible for
validation of the endoscope reprocessor with the endoscope
models listed in its intended use statement. If using an
endoscope reprocessor, confirm that it is capable of
reprocessing endoscope including all channels. If there are
channels and/or other parts which cannot be cleaned and
high-level disinfected by the endoscope reprocessor, have to
undergo manual cleaning and high-level disinfection or
sterilization as described in Chapter 3, “Cleaning,
Disinfection and Sterilization Procedures” after using the
endoscope reprocessor. Otherwise, insufficient cleaning and
disinfection or sterilization of the endoscope may pose an
infection control risk to the patient and/or operators
performing the next procedure with the endoscope. If you are
uncertain as to the ability of your endoscope reprocessor to
clean and high-level disinfect endoscope including all
channels, contact the endoscope reprocessor supplier for
specific instructions and/or connectors.
• Patient debris and reprocessing chemicals are hazardous.
Wear personal protective equipment to guard against
dangerous chemicals and potentially infectious material.
During cleaning and disinfection or sterilization, wear
appropriate personal protective equipment, such as eye
wear, face mask, moisture-resistant clothing and
chemical-resistant gloves that fit properly and are long
enough so that your skin is not exposed. Always remove
contaminated personal protective equipment before leaving
the reprocessing area.
• Thoroughly rinse off the disinfectant solution. Rinse the
external surfaces of the endoscope, all channels and
cleaning equipment thoroughly with clean water to remove
any disinfectant solution residue.
• The disinfection/sterilization room must be adequately
ventilated. Adequate ventilation protects against the buildup
of toxic chemical fumes.
• Store alcohol in an air-tight container. Alcohol stored in an
open container is a fire hazard and will lose its efficacy due to
evaporation.
Page 9

Chapter 1 General Policy
5
EVIS EXERA GIF/CF/PCF TYPE 160 Series REPROCESSING MANUAL
• With the cleaning, disinfection and sterilization methods
stated in this instruction manual, prions, which are
considered to be the pathogenic substance of the
Creutzfeldt-Jakob disease (CJD) cannot be destroyed or
inactivated. When using this instrument on a patient with CJD
or variant Creutzfeldt-Jakob disease (vCJD), be sure to use
this product for such patient only and/or immediately dispose
of this product after use in an appropriate manner. For
methods to handle CJD, please follow the respective
guidelines in your country.
• This instrument is not durable, or does not have sufficient
durability against the respective methods stated in the
guidelines of each country for destroying or inactivating
prions. For information on the durability against each
method, please contact Olympus. If cleaning, disinfection
and sterilization methods not stated in this instruction manual
are performed, Olympus cannot guarantee the effectiveness,
safety and durability of this instrument. Make sure to confirm
that there is no abnormality before use, and use under
responsibility of a physician. Do not use if any abnormality is
found.
• When aerating or irrigating the endoscope channels, the air
or water pressure must not exceed 0.5 MPa (5 kgf/cm
2
,
71 psig).
• When reprocessing EVIS videoscope models, confirm that
the water-resistant cap (MH-553) is securely attached to the
endoscope connector before immersion in reprocessing
fluids.
• When reprocessing the CF-Q160ZL/I, confirm that the
water-resistant cap (MAJ-583) is securely attached to the
zoom connector before immersion in reprocessing fluids.
• When reprocessing the CF-Q160DL/I, confirm that the
water-resistant cap (MAJ-942) is securely attached to the
UPD scope connector before immersion in reprocessing
fluids.
Page 10

6
Chapter 1 General Policy
EVIS EXERA GIF/CF/PCF TYPE 160 Series REPROCESSING MANUAL
• When reprocessing an endoscope that has the flexibility
adjustment mechanism, make sure that the insertion tube is
set to the softest condition (indicated by the “” mark on the
flexibility adjustment ring) before immersing the endoscope in
cleaning/disinfectant solution.
If the endoscope is cleaned and disinfected or sterilized while
the insertion tube is stiff, the endoscope may be damaged.
Endoscope models Water-resistant cap
CF-Q160ZL/I MH-553, MAJ-583
CF-Q160DL/I MH-553, MAJ-942
Other MH-553
Table 1.1
Page 11

Chapter 2 Compatible Reprocessing Methods and Chemical Agents
7
EVIS EXERA GIF/CF/PCF TYPE 160 Series REPROCESSING MANUAL
Chapter 2 Compatible Reprocessing
Methods and Chemical
Agents
2.1 Compatibility summary
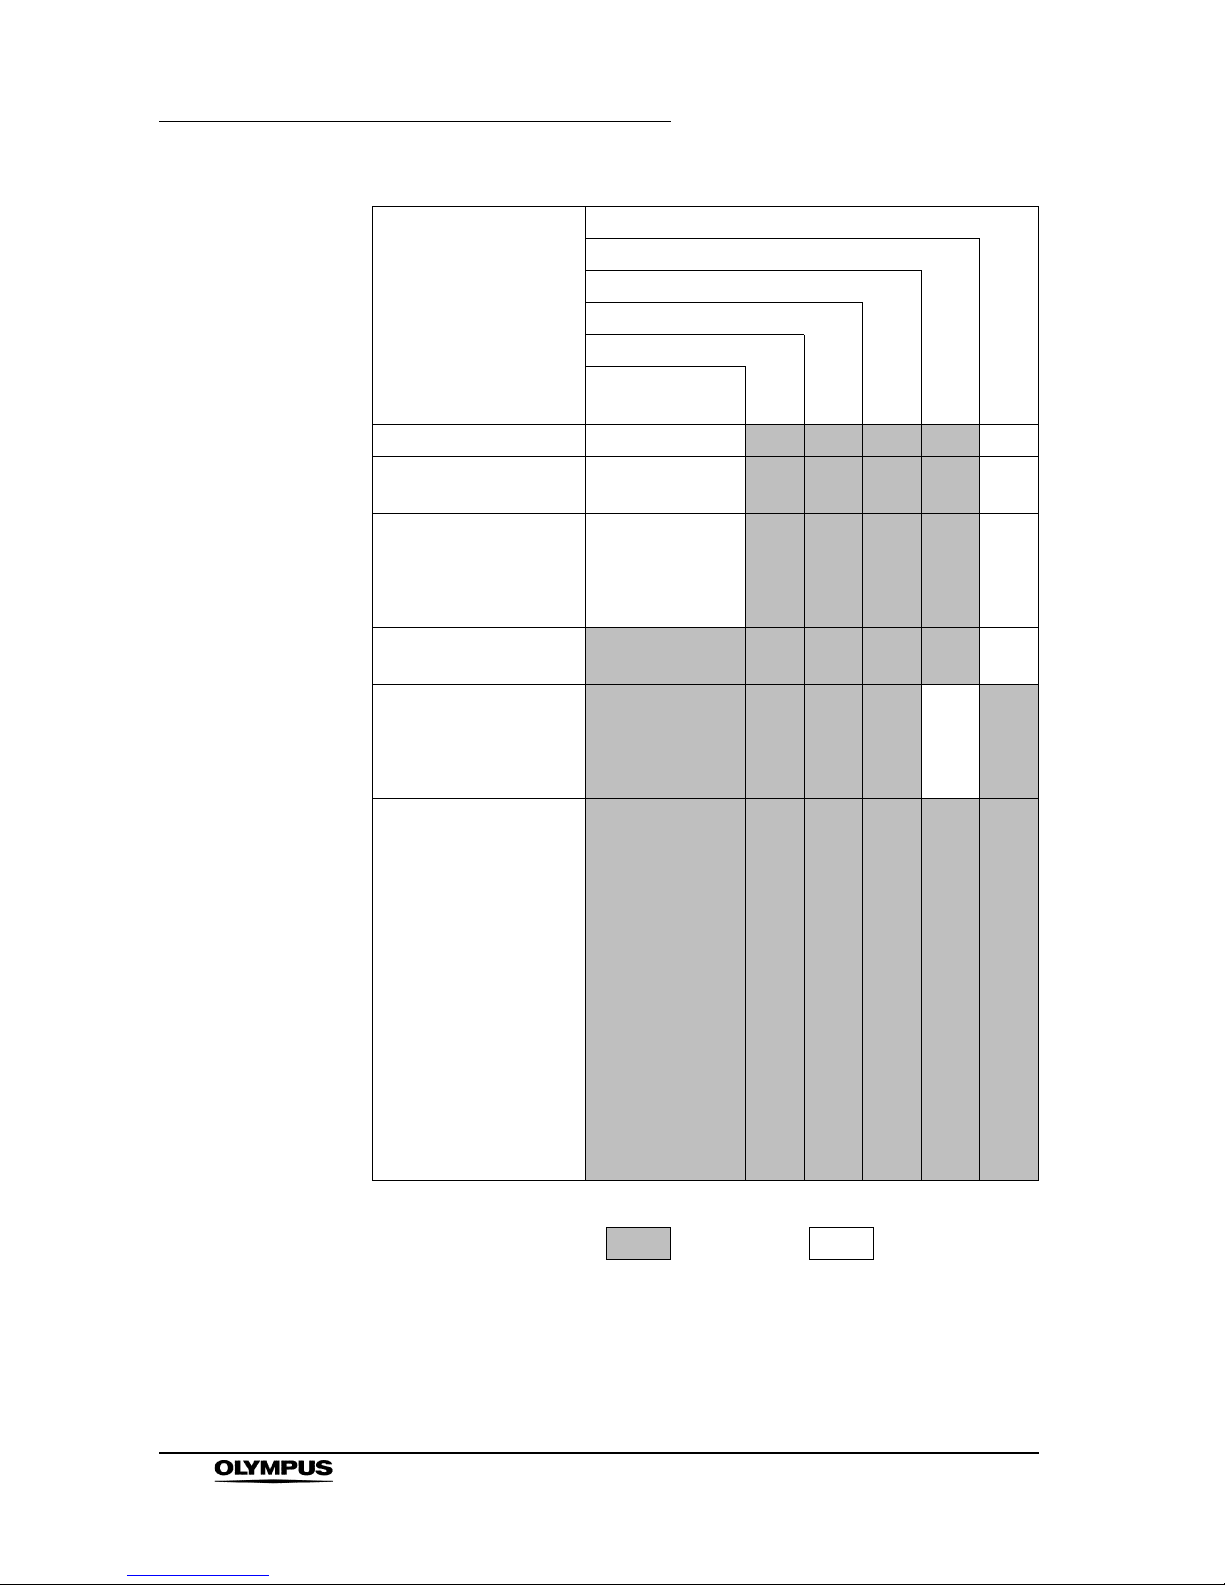
Olympus endoscopic equipment is compatible with several methods of
reprocessing. Certain components and accessories, however, are not
compatible with some methods, which can cause equipment damage. For
appropriate reprocessing methods, refer to Table 2.1 below, the
recommendations of your infection control committee and all national and local
hospital guidelines and policies.
Page 12
8
Chapter 2 Compatible Reprocessing Methods and Chemical Agents
EVIS EXERA GIF/CF/PCF TYPE 160 Series REPROCESSING MANUAL
Steam sterilization (autoclaving)
ETO gas sterilization
2 – 3.5% glutaraldehyde
70% ethyl or isopropyl alcohol
Detergent solution
Ultrasonic
cleaning
Endoscope
Water-resistant cap
(MH-553)
Water-resistant cap
(MAJ-583)
Water-resistant cap
(MAJ-942)
Forceps suction plug
(T-plug) (MH-405)
Channel cleaning brush
(BW-17K, BW-20T)
Channel-opening
cleaning brush (MH-507)
Air/water valve (MH-438)
Suction valve (MH-443)
Channel plug (MH-944)
Injection tube (MH-946)
Suction cleaning
adapter (MH-856)
AW channel cleaning
adapter (MH-948)
Mouthpiece (MB-142,
MA-474)
Biopsy valve (MB-358)
Auxiliary water tube
(MAJ-855)
applicable not applicable
Table 2.1
Page 13
Chapter 2 Compatible Reprocessing Methods and Chemical Agents
9
EVIS EXERA GIF/CF/PCF TYPE 160 Series REPROCESSING MANUAL
Endo-therapy accessories which are marked by the words
“AUTOCLAVE” or “AUTOCLAVABLE”, or accessories with a
green model reference label, are compatible with
autoclaving.
2.2 Detergent solution
Use a medical-grade, low-foaming, neutral pH detergent or enzymatic detergent
and follow the manufacturer’s dilution and temperature recommendations.
Contact Olympus for the names of specific brands that have been tested for
compatibility with the endoscope. Do not reuse detergent solutions.
Excessive detergent foaming can prevent fluid from
adequately contacting internal lumens (e.g. channels).
2.3 Disinfectant solution
In the U.S., agents used to achieve high-level disinfection are defined as liquid
chemical germicides registered with the U.S. Food and Drug Administration as
“sterilant/disinfectants” which are used according to the time, temperature and
dilution recommended by the disinfectant manufacturer for achieving high-level
disinfection. These conditions usually coincide with those recommended by the
disinfectant manufacturer for 100% kill of mycobacterium tuberculosis.
In general, 2.0 – 3.5% glutaraldehyde solutions, when used according to the
manufacturer’s instructions for achieving high-level disinfection, are compatible
with Olympus endoscopes. Contact Olympus for the names of specific brands
that have been tested for compatibility with the endoscope.
If the disinfectant solution is reused, routinely check its efficacy with a test strip
recommended by the manufacturer. Do not use solutions beyond their expiration
date.
Alcohol is not a sterilant or high-level disinfectant.
Page 14
10
Chapter 2 Compatible Reprocessing Methods and Chemical Agents
EVIS EXERA GIF/CF/PCF TYPE 160 Series REPROCESSING MANUAL
2.4 Rinsing water
Once removed from disinfectant solution, the instrument must be thoroughly
rinsed with sterile water to remove any disinfectant residue. If sterile water is not
available, clean potable tap water or water which has been processed (e.g.
filtered) to improve its microbiological quality may be used.
When non-sterile water is used after disinfection, wipe the endoscope and flush
the channels with 70% ethyl or isopropyl alcohol, then air-dry all internal
channels to inhibit the growth of residual bacteria. Do not reuse rinsing water.
2.5 ETO gas sterilization
This instrument and other accessories listed as compatible with ethylene oxide
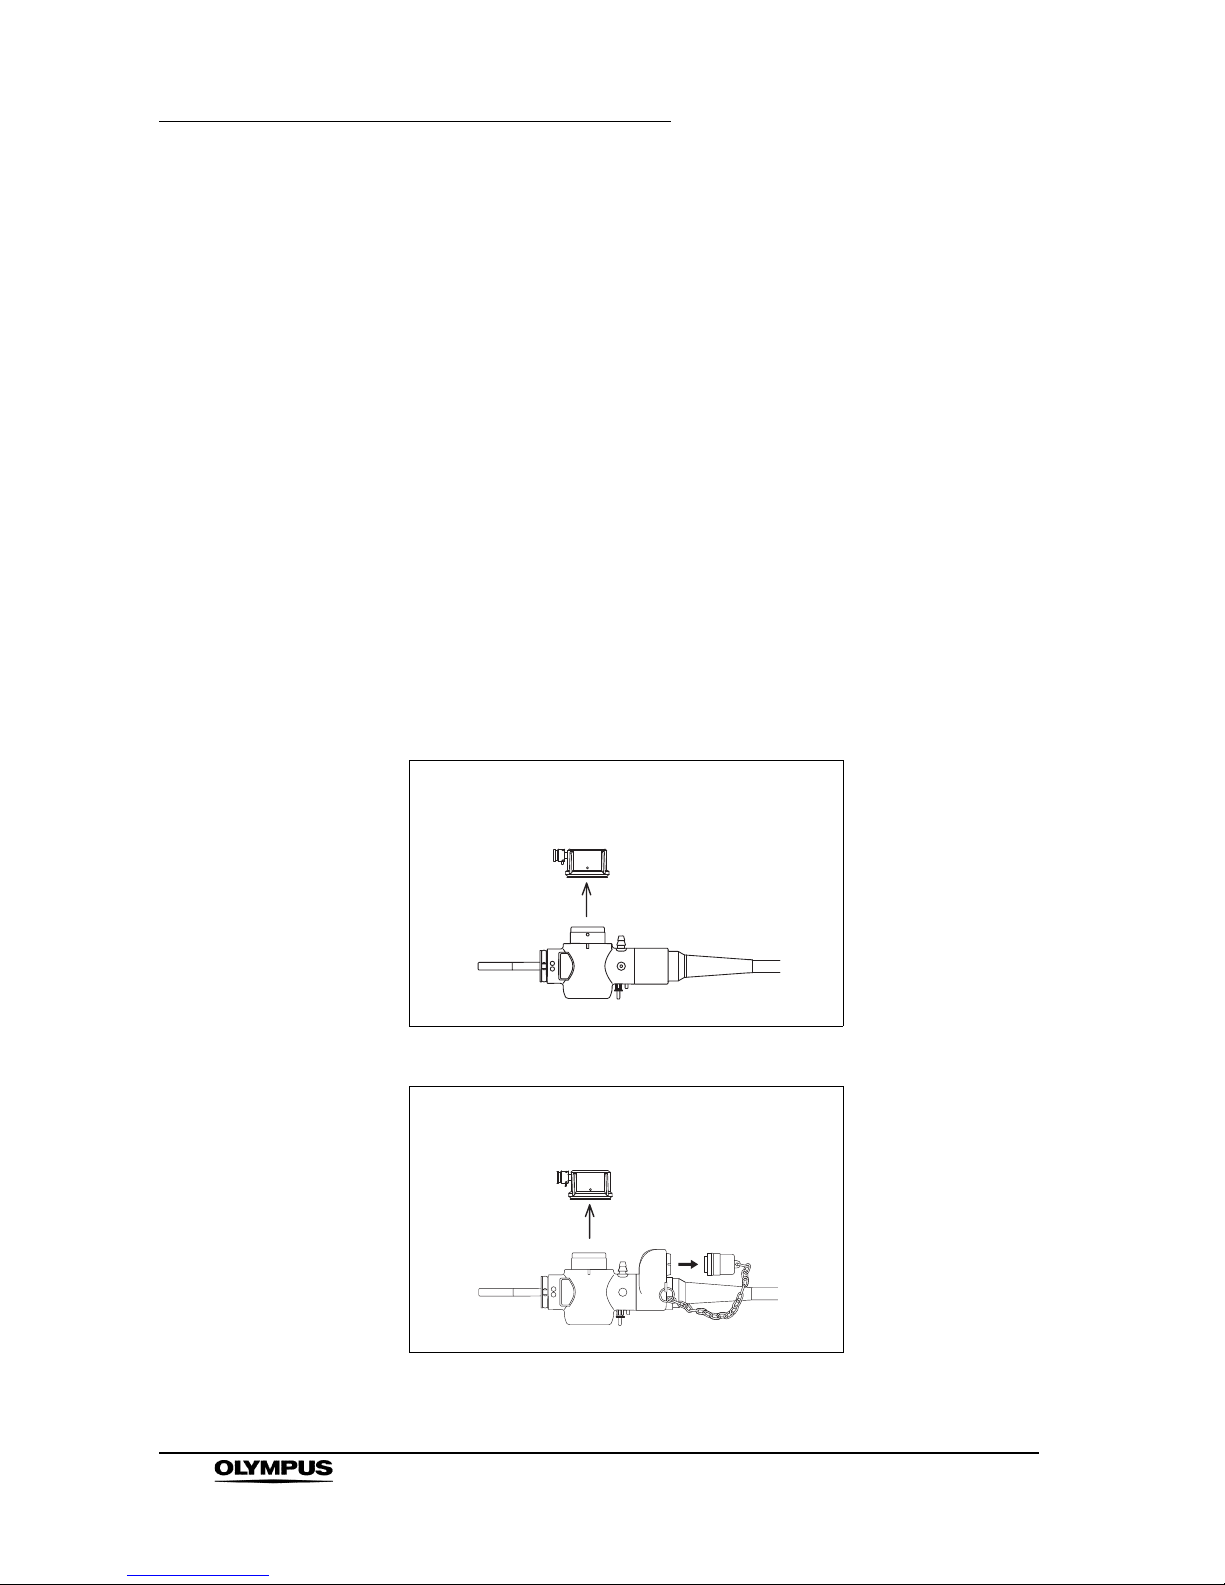
(ETO) gas sterilization in Table 2.1 can be sterilized by ETO gas and aerated
within the parameters given in Table 2.2. When performing sterilization, follow
the hospital’s protocol and the sterilization equipment manufacturer’s
instructions.
Figure 2.1
Figure 2.2
EVIS videoscope models
(except CF-Q160ZL/I and CF-Q160DL/I)
CF-Q160ZL/I and CF-Q160DL/I
Page 15
Chapter 2 Compatible Reprocessing Methods and Chemical Agents
11
EVIS EXERA GIF/CF/PCF TYPE 160 Series REPROCESSING MANUAL
• Before sterilization, the instrument must be thoroughly
cleaned and dried. Residual moisture inhibits sterilization.
• The results of sterilization depend on various factors such as
how the sterilized instrument was packed or the positioning,
method of placing and loading of the instrument in the
sterilization device. Please verify the sterilization effects by
using biological or chemical indicators. Also follow the
guidelines for sterilization issued by medical administrative
authorities, public organizations or the infection management
sections at each medical facility, as well as the instruction
manual of the sterilization device.
• All instruments must be properly aerated following ETO gas
sterilization to remove toxic ethylene oxide residuals.
• Exceeding the recommended parameters may cause
equipment damage.
• When reprocessing EVIS videoscope models, remove the
water-resistant cap before ETO gas sterilization (see Figures
2.1 and 2.2).
• Repeated ETO gas sterilization procedures will gradually
deteriorate the instrument. Do not perform ETO gas
sterilization to the instrument unnecessarily.
ETO gas exposure parameters
Process Parameters
ETO gas sterilization Temperature 57C (135F)
Pressure 0.1 – 0.17 MPa
(1 – 1.7 kgf/cm
2
)
(16 – 24 psig)
Humidity 55%
Exposure time 1.75 hours
ETO gas
concentration
0.6 – 0.7 mg/cm
3
(600 – 700 mg/l)
Aeration Minimum aeration
parameters
12 hours in an aeration chamber
at 50 – 57C (122 – 135F) or
7 days at room temperature
Table 2.2
Page 16
12
Chapter 2 Compatible Reprocessing Methods and Chemical Agents
EVIS EXERA GIF/CF/PCF TYPE 160 Series REPROCESSING MANUAL
Gas mixture
For the USA
12% ETO/88% CFC
For countries other than the USA
20% ETO/80% CO
2
2.6 Steam sterilization (autoclaving) of accessories
The accessories listed as compatible with steam sterilization (autoclaving) in
Table 2.1 can be sterilized by steam within the parameters given in Table 2.3.
When steam sterilizing, follow the hospital’s protocol and the sterilization
equipment manufacturer’s instructions.
• The results of sterilization depend on various factors such as
how the sterilized instrument was packed or the positioning,
method of placing and loading of the instrument in the
sterilization device. Please verify the sterilization effects by
using biological or chemical indicators. Also follow the
guidelines for sterilization issued by medical administrative
authorities, public organizations or the infection management
sections at each medical facility, as well as the instruction
manual of the sterilization device.
• Exceeding the recommended parameters may cause
equipment damage.
• Do not steam sterilize the endoscope. Steam sterilization
(autoclaving) will severely damage the endoscope.
• Effective sterilization will not be possible if items are packed
tightly together in the autoclave; always pack items loosely.
• Inspect each instrument package for openings, tears or other
damage. If an instrument package is opened or damaged,
seal the components in a new package and sterilize again.
Page 17

Chapter 2 Compatible Reprocessing Methods and Chemical Agents
13
EVIS EXERA GIF/CF/PCF TYPE 160 Series REPROCESSING MANUAL
• Allow the packages to dry within the autoclave, using the
autoclave’s drying cycle (if available) or by opening the door
of the autoclave and allowing the packages to air-dry.
Handling a wet package can compromise its sterility.
Process Parameters
Prevacuum Temperature 132 – 134C
(270 – 274F)
Exposure time 5minutes
Table 2.3 Steam sterilization (autoclaving) exposure parameters
Page 18
14
Chapter 3 Cleaning, Disinfection and Sterilization Procedures
EVIS EXERA GIF/CF/PCF TYPE 160 Series REPROCESSING MANUAL
Chapter 3 Cleaning, Disinfection and
Sterilization Procedures
ALL channels of the endoscope, including auxiliary water
channel where fitted, MUST be cleaned and high-level
disinfected or sterilized during EVERY reprocessing cycle,
even if the channels were not used during the previous
patient procedure. Otherwise, insufficient cleaning and
disinfection or sterilization of the endoscope may pose an
infection control risk to the patient and/or operators
performing the next procedure with the endoscope.
3.1 Required reprocessing equipment
Preparation of the equipment
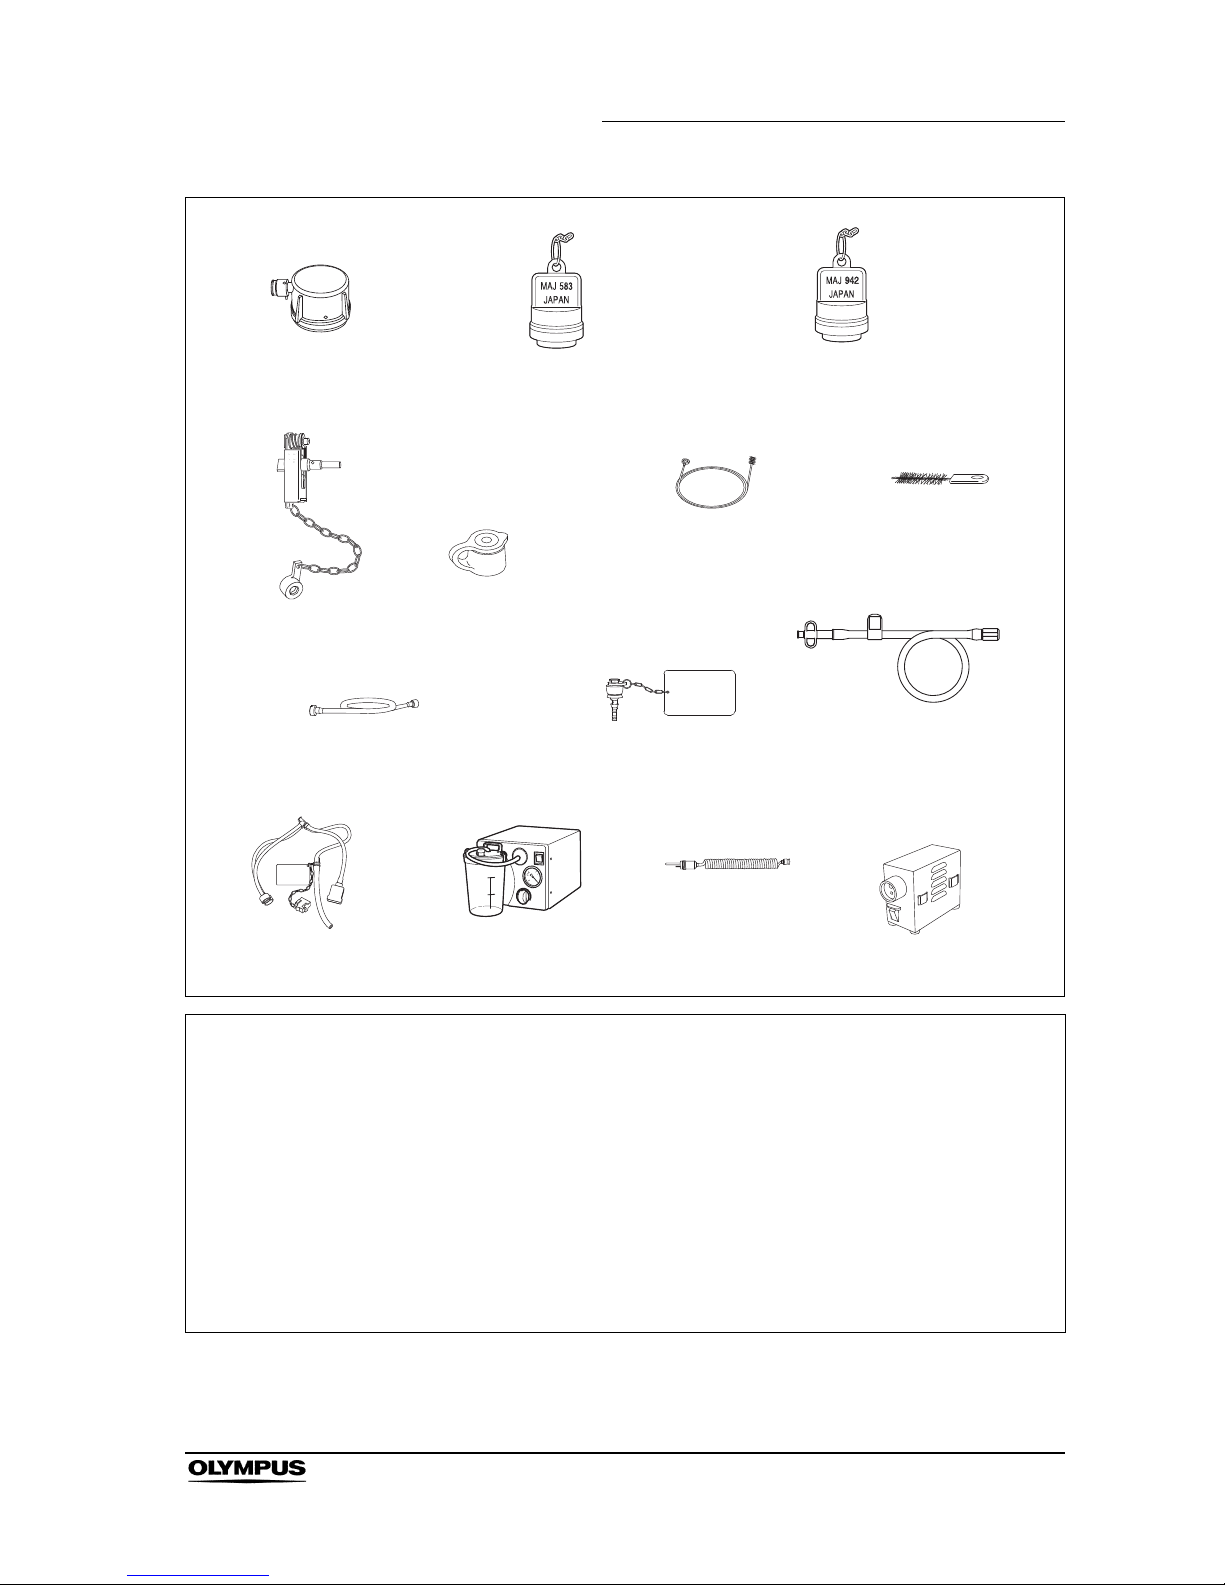
Prior to cleaning, disinfection or sterilization, prepare the equipment shown in
Figure 3.1.
• Use basins which are at least 40 cm by 40 cm (16” by 16”) in
size and deep enough to allow the endoscope to be
completely immersed.
• For proper reprocessing results, do not coil the insertion tube
or the universal cord with a diameter of less than 40 cm.
• Do not coil the endoscope’s insertion tube or universal cord
with a diameter of less than 12 cm. The endoscope can be
damaged if coiled too tightly.
Page 19
Chapter 3 Cleaning, Disinfection and Sterilization Procedures
15
EVIS EXERA GIF/CF/PCF TYPE 160 Series REPROCESSING MANUAL
Figure 3.1
• Detergent solution • Large basins for rinsing and
leakage testing
• Sterile, lint-free cloths
• Clean water
•30cm
3
(30 ml) syringe
• Sterile cotton swabs
• Sterile water • Soft brush • Small containers
• 70% ethyl or isopropyl alcohol • Personal protective equipment • Small basin
• Disinfectant solution
• Large basins with tight fitting
lids for detergent and
disinfectant solution
• Clean, lint-free cloths
• 500 cm
3
(500 ml) container
Water-resistant cap
(MH-553)
Water-resistant cap
(MAJ-583
for CF-Q160ZL/I only)
Water-resistant cap
(MAJ-942
for CF-Q160DL/I only)
Channel-opening
cleaning brush
(MH-507)
Channel cleaning brush
(BW-20T)
(BW-17K
for GIF-XTQ160 only)
Biopsy valve
(MB-358)
Channel plug
(MH-944)
Suction cleaning adapter
(MH-856)
AW channel cleaning
adapter (MH-948)
Auxiliary water tube
(MAJ-855
for endoscopes with
auxiliary water
feeding only)
Maintenance unit
(MU-1)
Leakage tester
(MB-155)
Suction pump
(KV-5, KV-4, SSU-2)
Injection tube
(MH-946)
Page 20
16
Chapter 3 Cleaning, Disinfection and Sterilization Procedures
EVIS EXERA GIF/CF/PCF TYPE 160 Series REPROCESSING MANUAL
Reprocessing equipment parts and functions
For inspection of other equipment than that mentioned below, refer to the
instruction manual for the equipment being used.
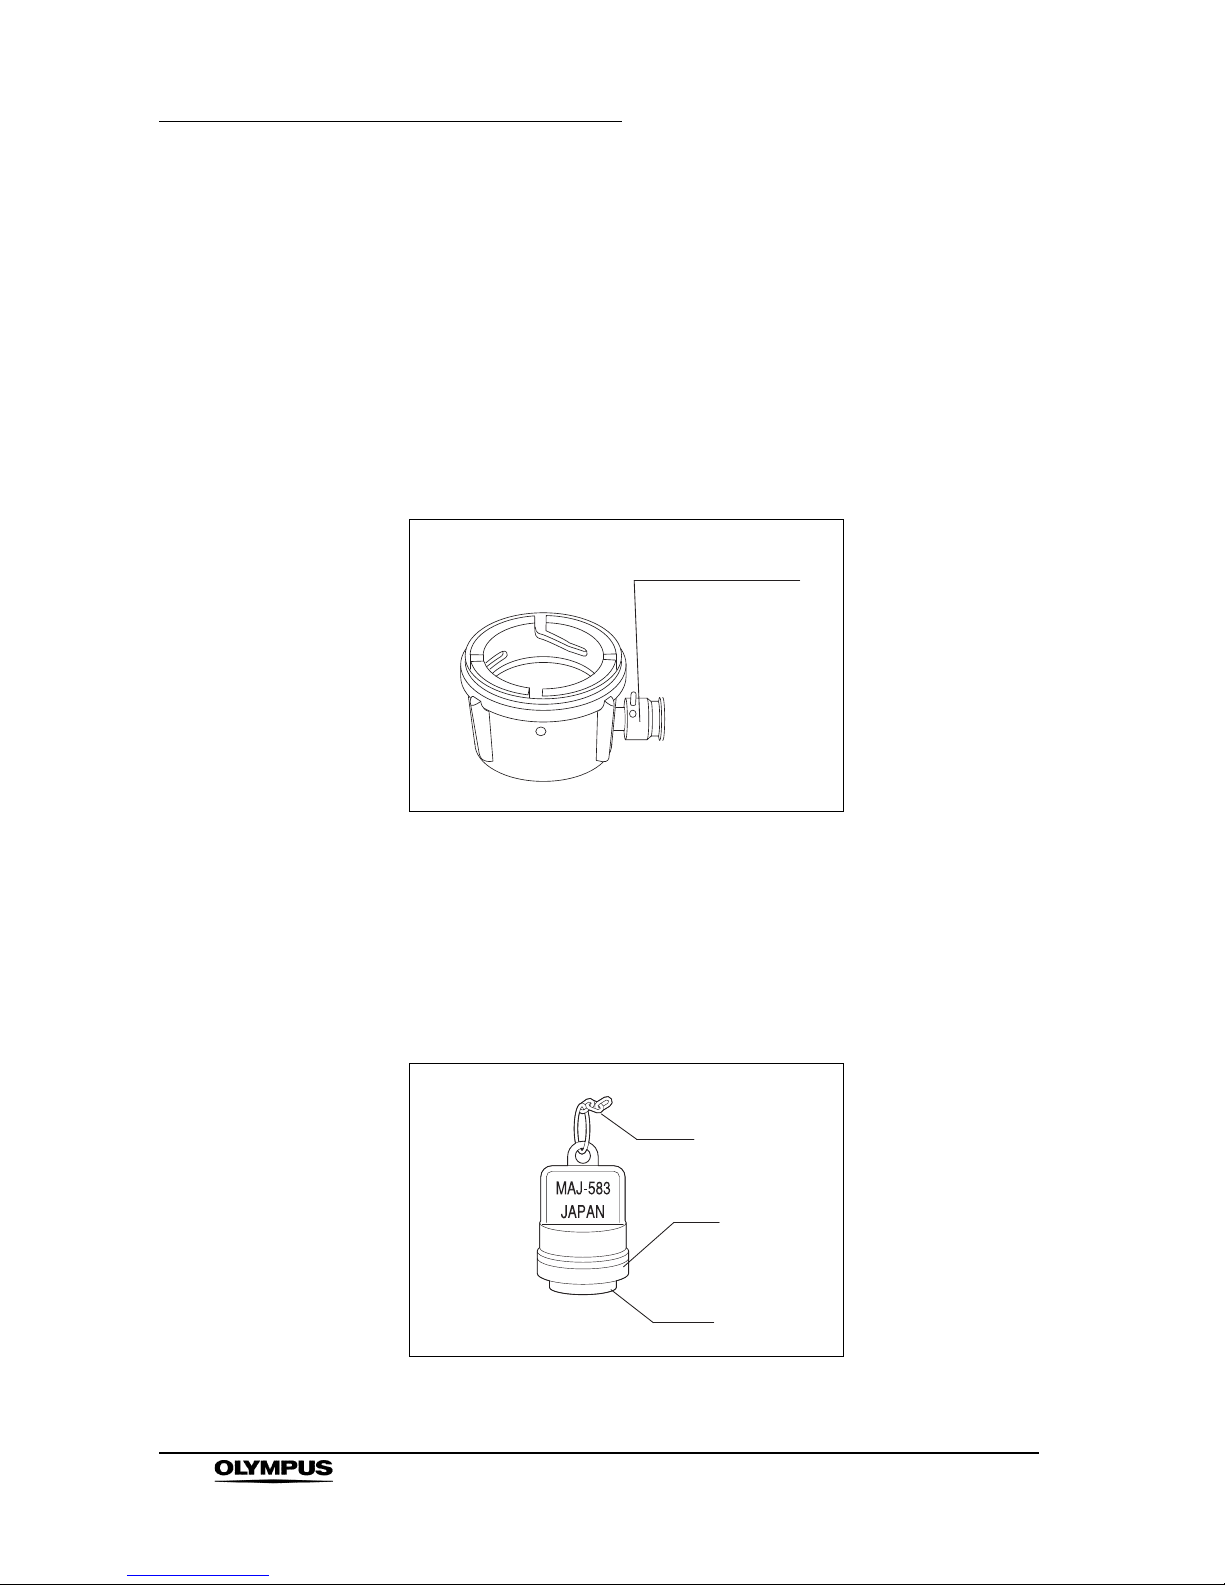
Water-resistant cap (MH-553)
The water-resistant cap is attached to the electrical connector on the endoscope
to protect the connector from water penetration during reprocessing. For leakage
testing, the venting connector on the water-resistant cap must be connected to
the leakage tester (see Figure 3.2).
Figure 3.2
Water-resistant cap (MAJ-583 for CF-Q160ZL/I only)
The water-resistant cap (MAJ-583) is attached to the zoom connector on the
endoscope to protect the connector from water penetration during reprocessing.
The water-resistant cap is connected to the endoscope by a chain (see Figure
3.3).
Figure 3.3
Venting connector
Chain
Seal
Thread
Chain
Page 21
Chapter 3 Cleaning, Disinfection and Sterilization Procedures
17
EVIS EXERA GIF/CF/PCF TYPE 160 Series REPROCESSING MANUAL
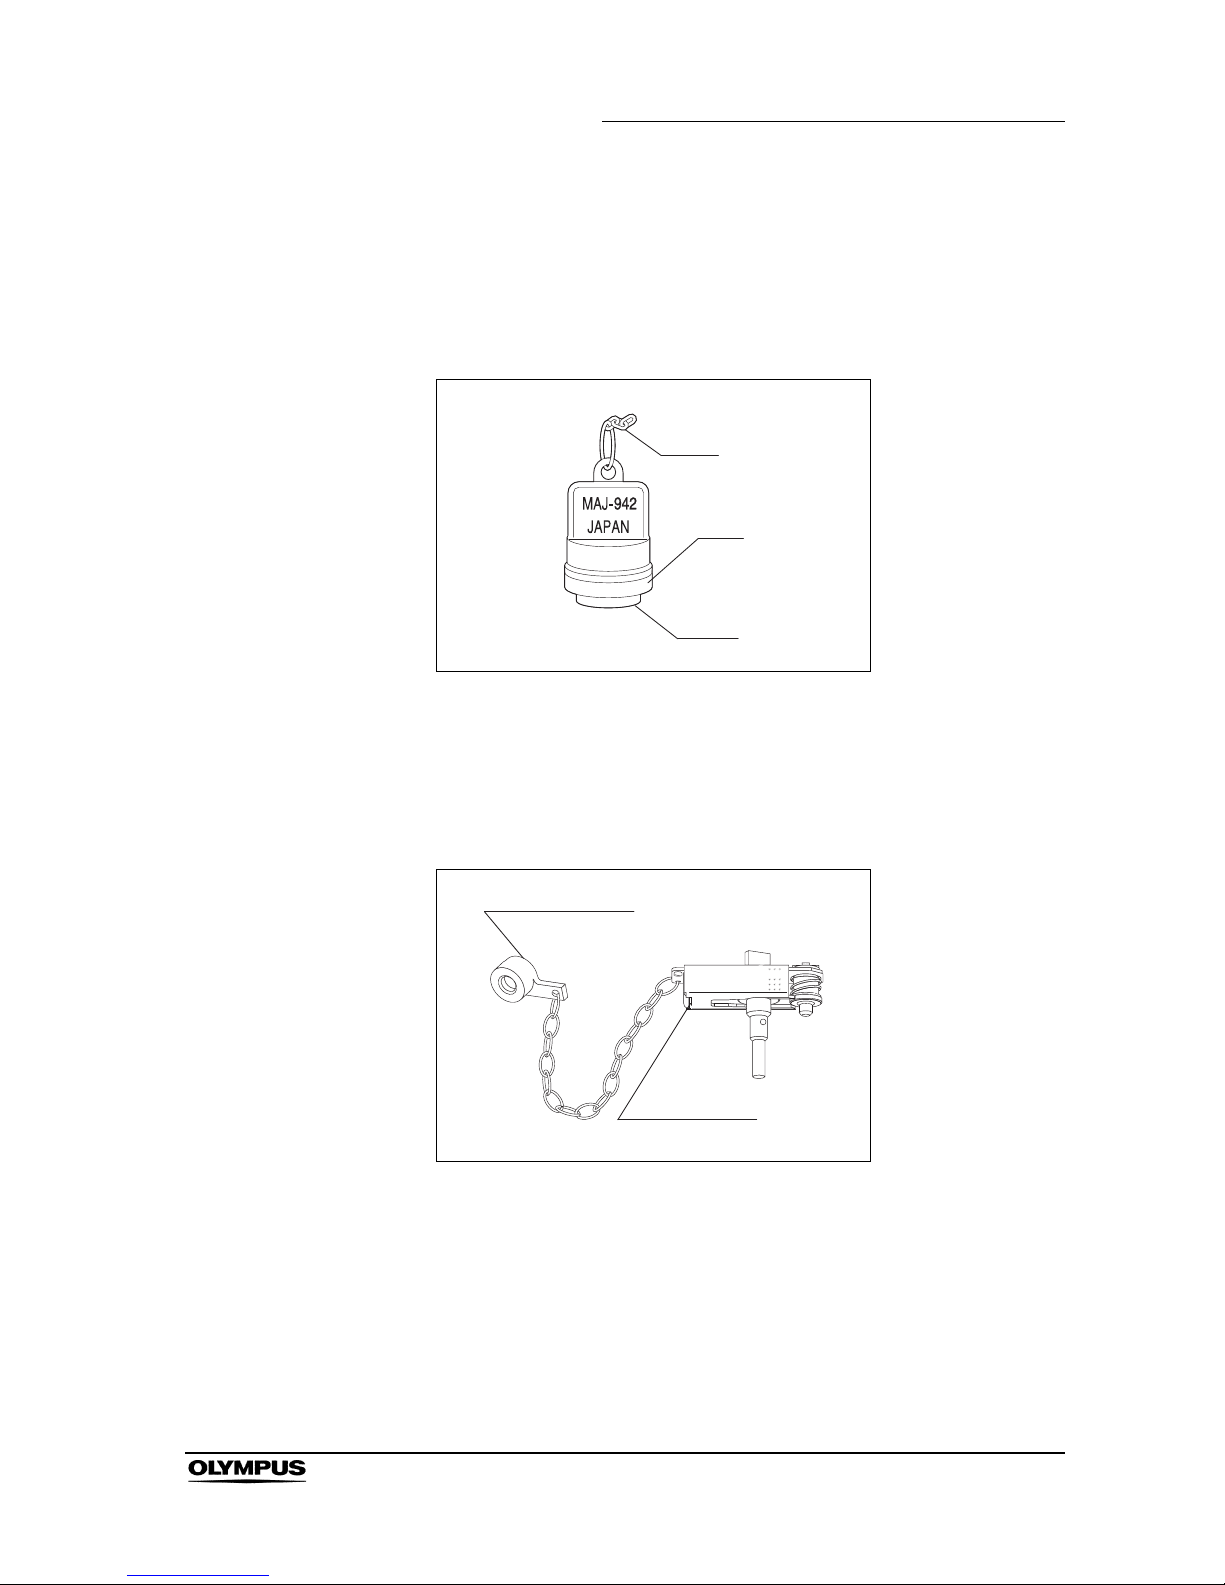
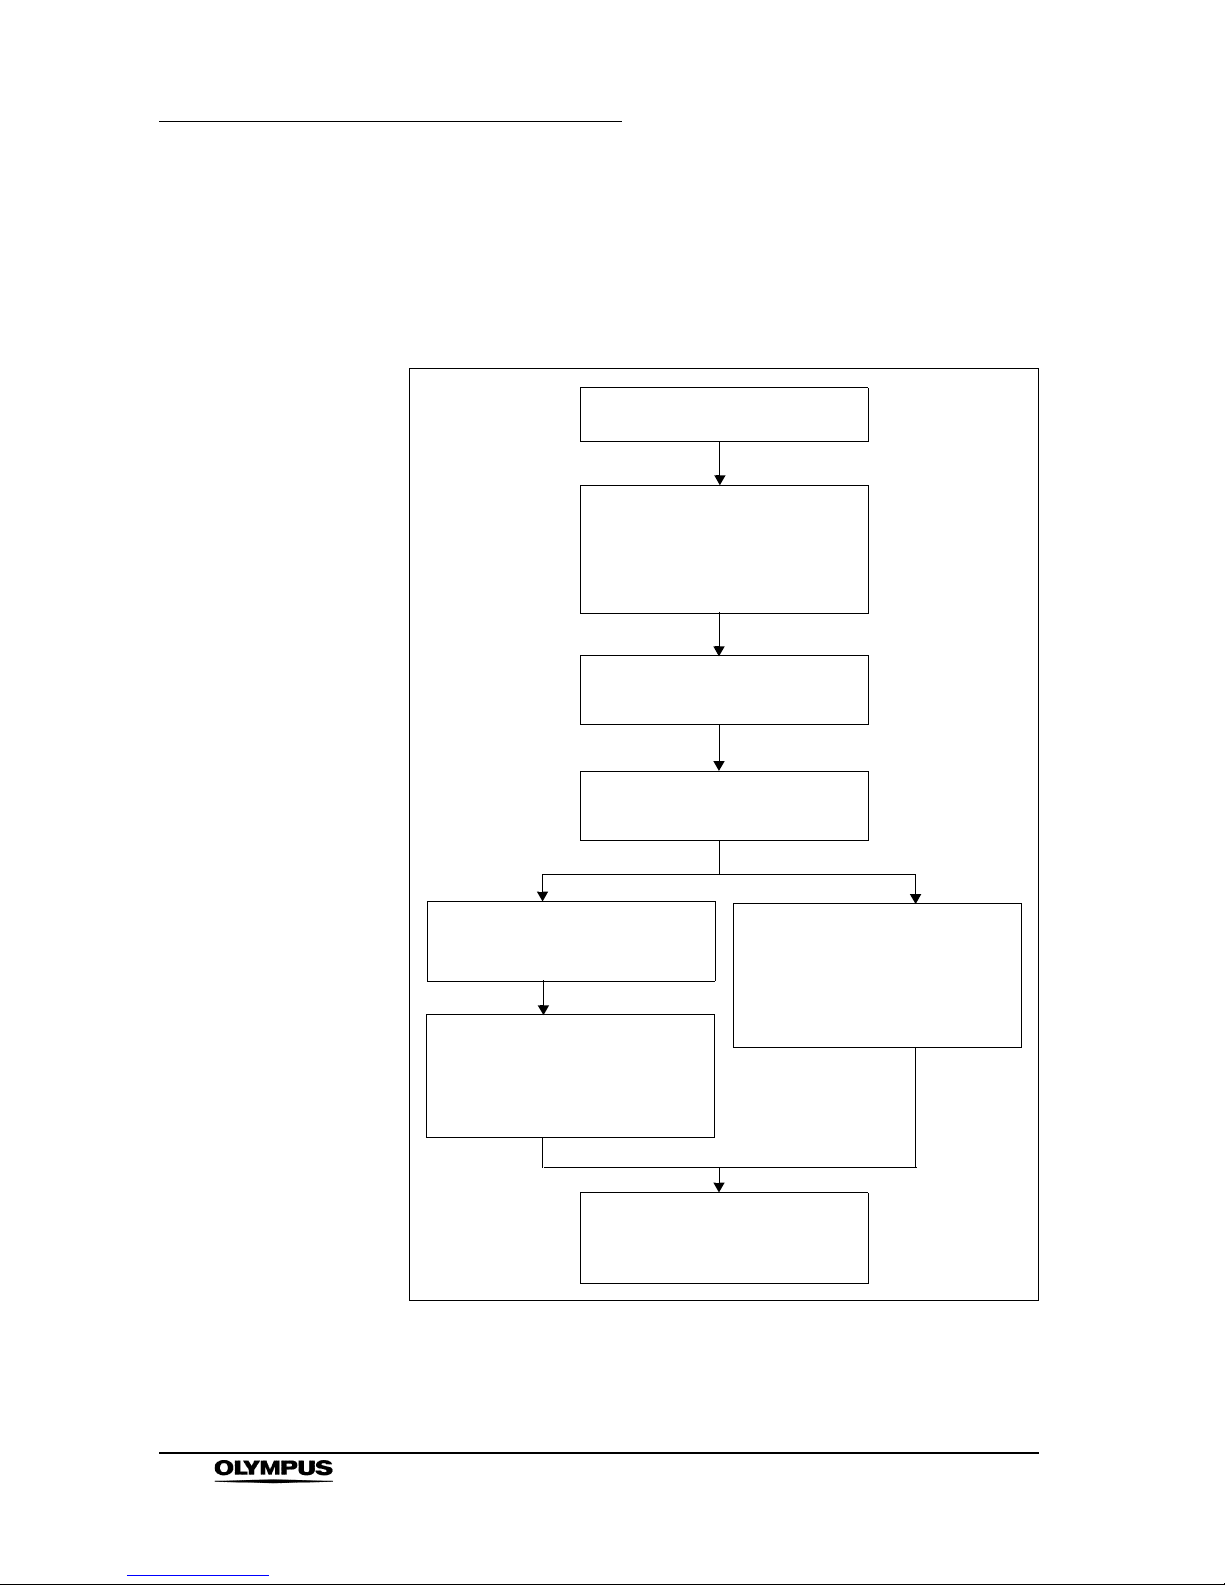
Water-resistant cap (MAJ-942 for CF-Q160DL/I only)
The water-resistant cap (MAJ-942) is attached to the UPD scope connector on
the endoscope to protect the connector from water penetration during
reprocessing. The water-resistant cap is connected to the endoscope by a chain
(see Figure 3.4).
Figure 3.4
Channel plug (MH-944)
The channel plug is used to plug the openings of the instrument channel port,
air/water and suction cylinders during cleaning (see Figure 3.5).
Figure 3.5
Seal
Thread
Chain
Biopsy valve cap
Cylinder plug
Page 22
18
Chapter 3 Cleaning, Disinfection and Sterilization Procedures
EVIS EXERA GIF/CF/PCF TYPE 160 Series REPROCESSING MANUAL
Injection tube (MH-946)
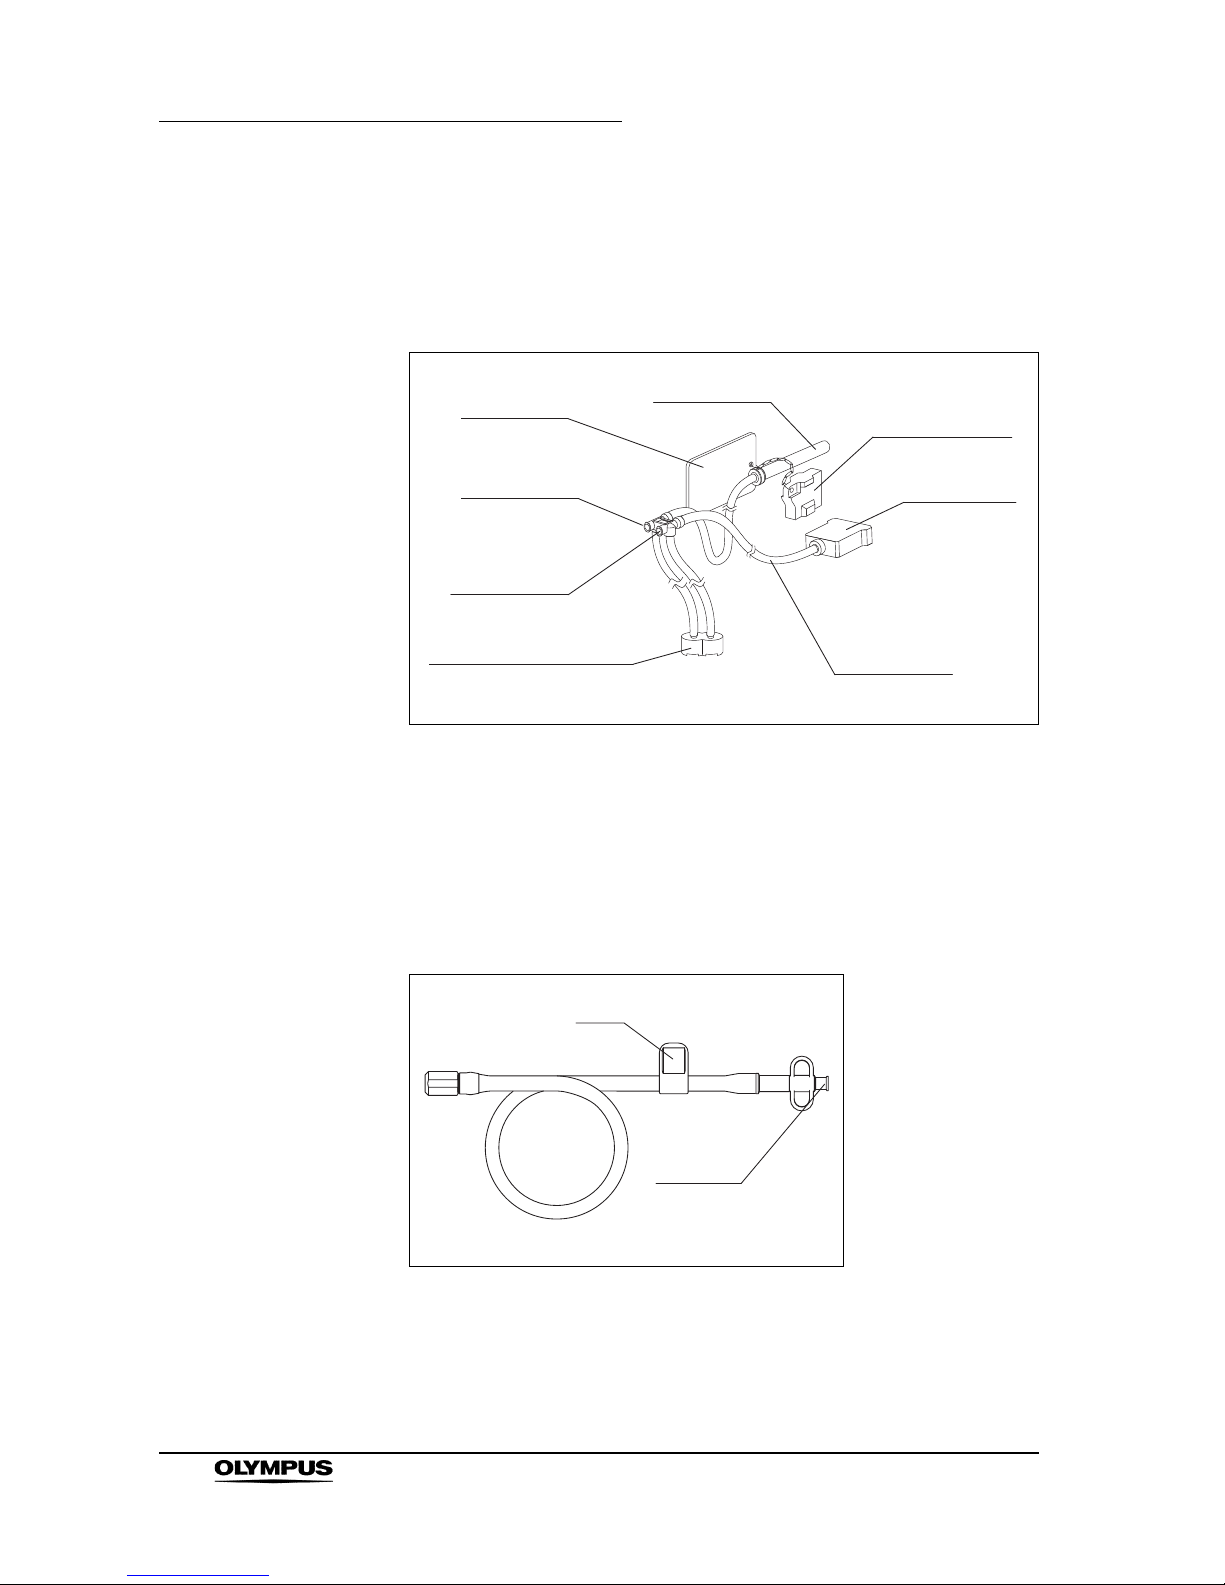
The injection tube is used to inject detergent solution, disinfectant solution, water
and alcohol into the air/water and suction channels and to flush air through the
channels to expel fluids (see Figure 3.6).
Figure 3.6
Auxiliary water tube (MAJ-855 for endoscopes with
auxiliary water feeding only)
The auxiliary water tube is used to inject detergent solution, disinfectant solution,
water and alcohol into the auxiliary water channel and to flush air through the
channel to expel fluids (see Figure 3.7).
Figure 3.7
Suction
channel tube
Notice card
Connector plug
Air pipe port
Air/water
channel port
(including the filter mesh)
Air/water
channel tube
Suction port
Suction
channel port
Clip
Luer port
Page 23
Chapter 3 Cleaning, Disinfection and Sterilization Procedures
19
EVIS EXERA GIF/CF/PCF TYPE 160 Series REPROCESSING MANUAL
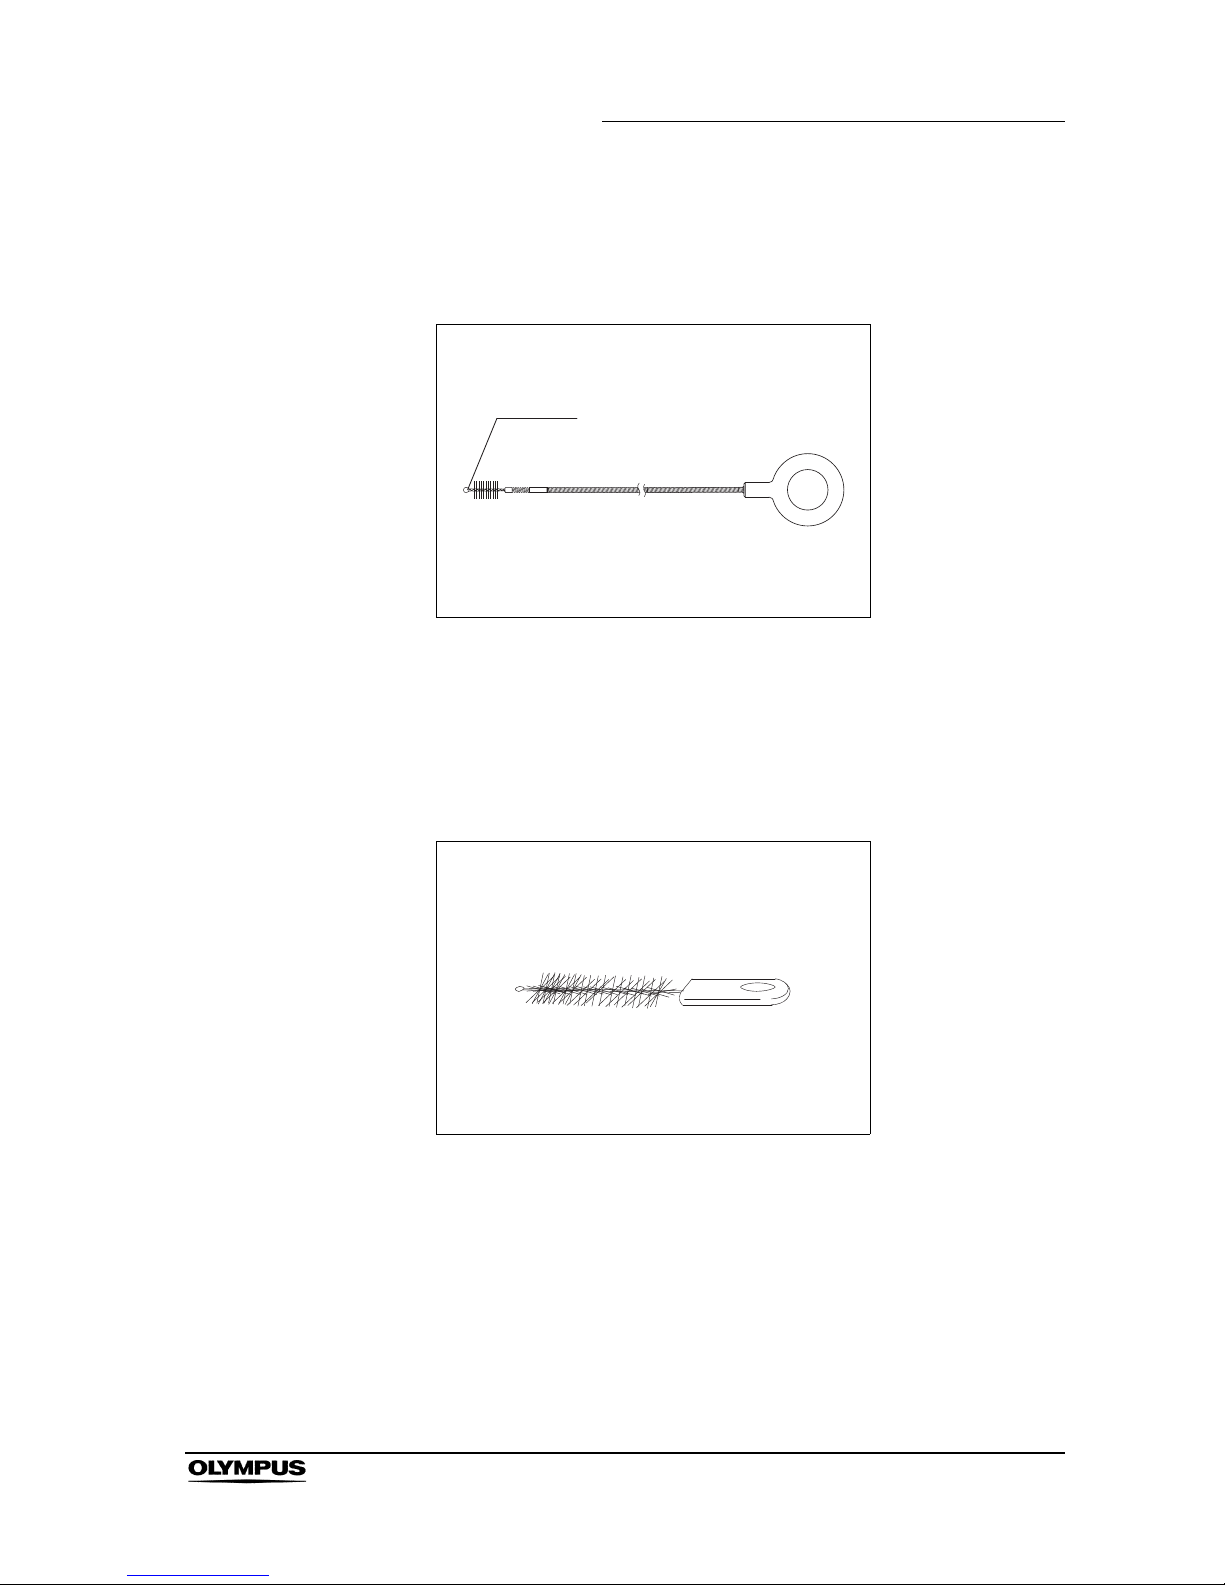
Channel cleaning brush (BW-17K, BW-20T)
The channel cleaning brush is used to brush the inside of the instrument/suction
channels and the holes in the air/water and suction valves (see Figure 3.8).
Figure 3.8
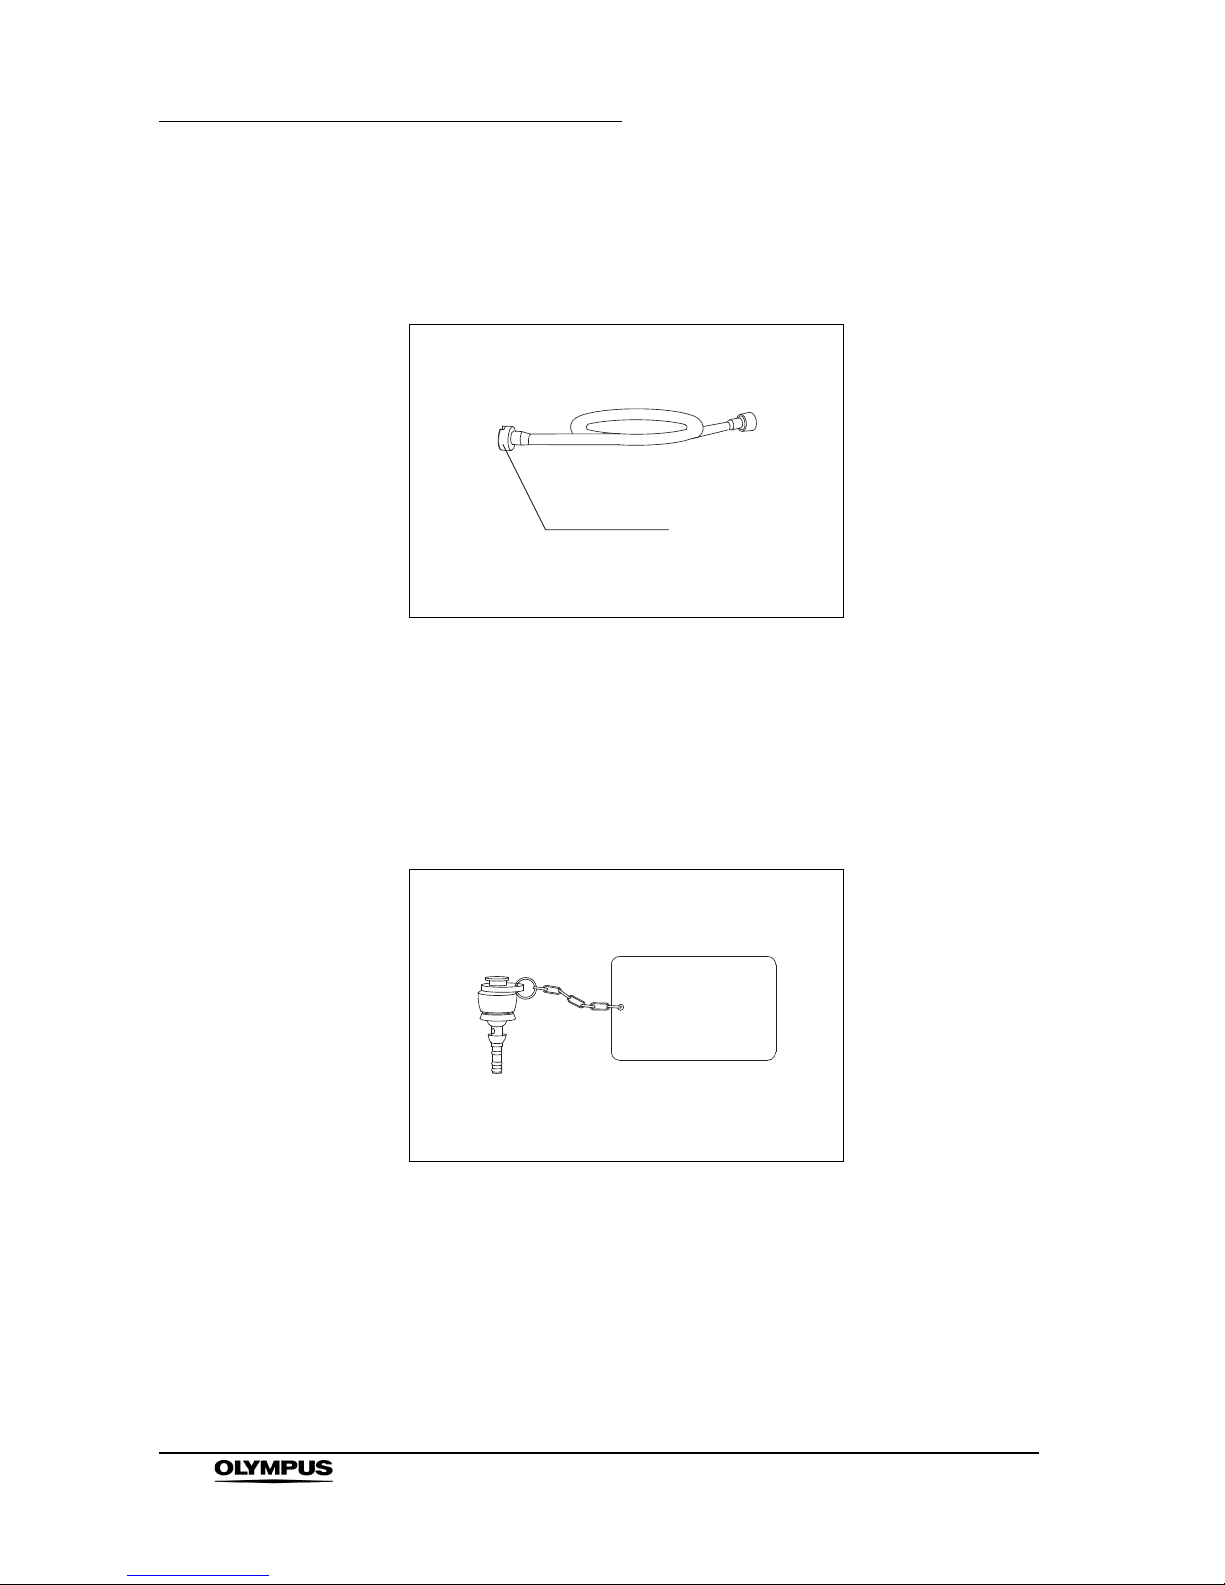
Channel-opening cleaning brush (MH-507)
The channel-opening cleaning brush is used to brush the external surface of the
distal end of the endoscope, the suction cylinder and the instrument channel port
(see Figure 3.9).
Figure 3.9
Metal tip
Page 24
20
Chapter 3 Cleaning, Disinfection and Sterilization Procedures
EVIS EXERA GIF/CF/PCF TYPE 160 Series REPROCESSING MANUAL
Suction cleaning adapter (MH-856)
The suction cleaning adapter is used to aspirate reprocessing fluids from the
distal end of the endoscope through the instrument channel (see Figure 3.10).
Figure 3.10
AW channel cleaning adapter (MH-948)
During precleaning, the AW channel cleaning adapter is connected to the
air/water cylinder. When the adapter is depressed, water is fed through the
air/water nozzle. Air is continuously fed when the adapter is not depressed (see
Figure 3.11).
Figure 3.11
Weighted end
Page 25

Chapter 3 Cleaning, Disinfection and Sterilization Procedures
21
EVIS EXERA GIF/CF/PCF TYPE 160 Series REPROCESSING MANUAL
Inspection of the equipment
For inspection of other equipment than that mentioned below, refer to the
instruction manual for the equipment being used.
The cleaning brushes are consumable items. Should the
slightest irregularity be suspected, use a spare instead.
Using a defective brush may cause equipment damage.
Inspection of the water-resistant cap (MH-553)
1. Confirm that the inside of the water-resistant cap is dry and free from debris
(see Figure 3.2).
2. Confirm that the seal inside the water-resistant cap is free from scratches,
flaws and debris.
3. Check the venting connector for looseness.
Inspection of the water-resistant cap (MAJ-583 for
CF-Q160ZL/I only)
1. Confirm that the inside of the water-resistant cap is dry and free from debris
(see Figure 3.3).
2. Confirm that the seal of the water-resistant cap is free from scratches, flaws
and debris.
3. Confirm that the thread of the water-resistant cap is free from deformation
and other flaws.
Inspection of the water-resistant cap (MAJ-942 for
CF-Q160DL/I only)
1. Confirm that the inside of the water-resistant cap is dry and free from debris
(see Figure 3.4).
2. Confirm that the seal of the water-resistant cap is free from scratches, flaws
and debris.
3. Confirm that the thread of the water-resistant cap is free from deformation
and other flaws.
Page 26

22
Chapter 3 Cleaning, Disinfection and Sterilization Procedures
EVIS EXERA GIF/CF/PCF TYPE 160 Series REPROCESSING MANUAL
Inspection of the channel plug
Confirm that the cylinder plug and biopsy valve cap are free from cracks,
scratches, flaws and debris (see Figure 3.5).
Inspection of the injection tube
1. Confirm that all components of the injection tube are free from cracks,
scratches, flaws and debris (see Figure 3.6).
2. Confirm that the filter mesh is in the suction port.
3. Attach the 30 cm
3
(30 ml) syringe to the air/water channel port. With the
filter mesh immersed in rinsing water, withdraw the syringe plunger and
confirm that rinsing water is drawn into the syringe. Depress the plunger and
confirm that rinsing water is emitted from the air pipe port. Confirm that
water is not emitted from the suction port.
4. Attach the 30 cm
3
(30 ml) syringe to the suction channel port. With the filter
mesh immersed in rinsing water, withdraw the syringe plunger and confirm
that rinsing water is drawn into the syringe. Depress the plunger and confirm
that rinsing water is emitted from the distal end of the suction channel tube.
Confirm that water is not emitted from the suction port.
Inspection of the auxiliary water tube (for endoscopes with
auxiliary water feeding only)
Check for cracks, scratches, flaws, debris and other damage (see Figure 3.7).
Inspection of the channel cleaning brush
1. Confirm that the brush section and the metal tip at the distal end are
securely in place. Check for loose or missing bristles (see Figure 3.8).
2. Check for bends, scratches and other damage to the shaft.
3. Check for debris on the shaft and/or in the bristles of the brush.
Page 27

Chapter 3 Cleaning, Disinfection and Sterilization Procedures
23
EVIS EXERA GIF/CF/PCF TYPE 160 Series REPROCESSING MANUAL
Inspection of the channel-opening cleaning brush
1. Check for loose or missing bristles (see Figure 3.9).
2. Check for debris on the shaft and/or in the bristles of the brush.
Inspection of the suction cleaning adapter
Check for cracks, scratches, flaws, debris and other damage (see Figure 3.10).
Inspection of the AW channel cleaning adapter
Check for cracks, scratches, flaws, debris and other damage (see Figure 3.11).
Page 28
24
Chapter 3 Cleaning, Disinfection and Sterilization Procedures
EVIS EXERA GIF/CF/PCF TYPE 160 Series REPROCESSING MANUAL
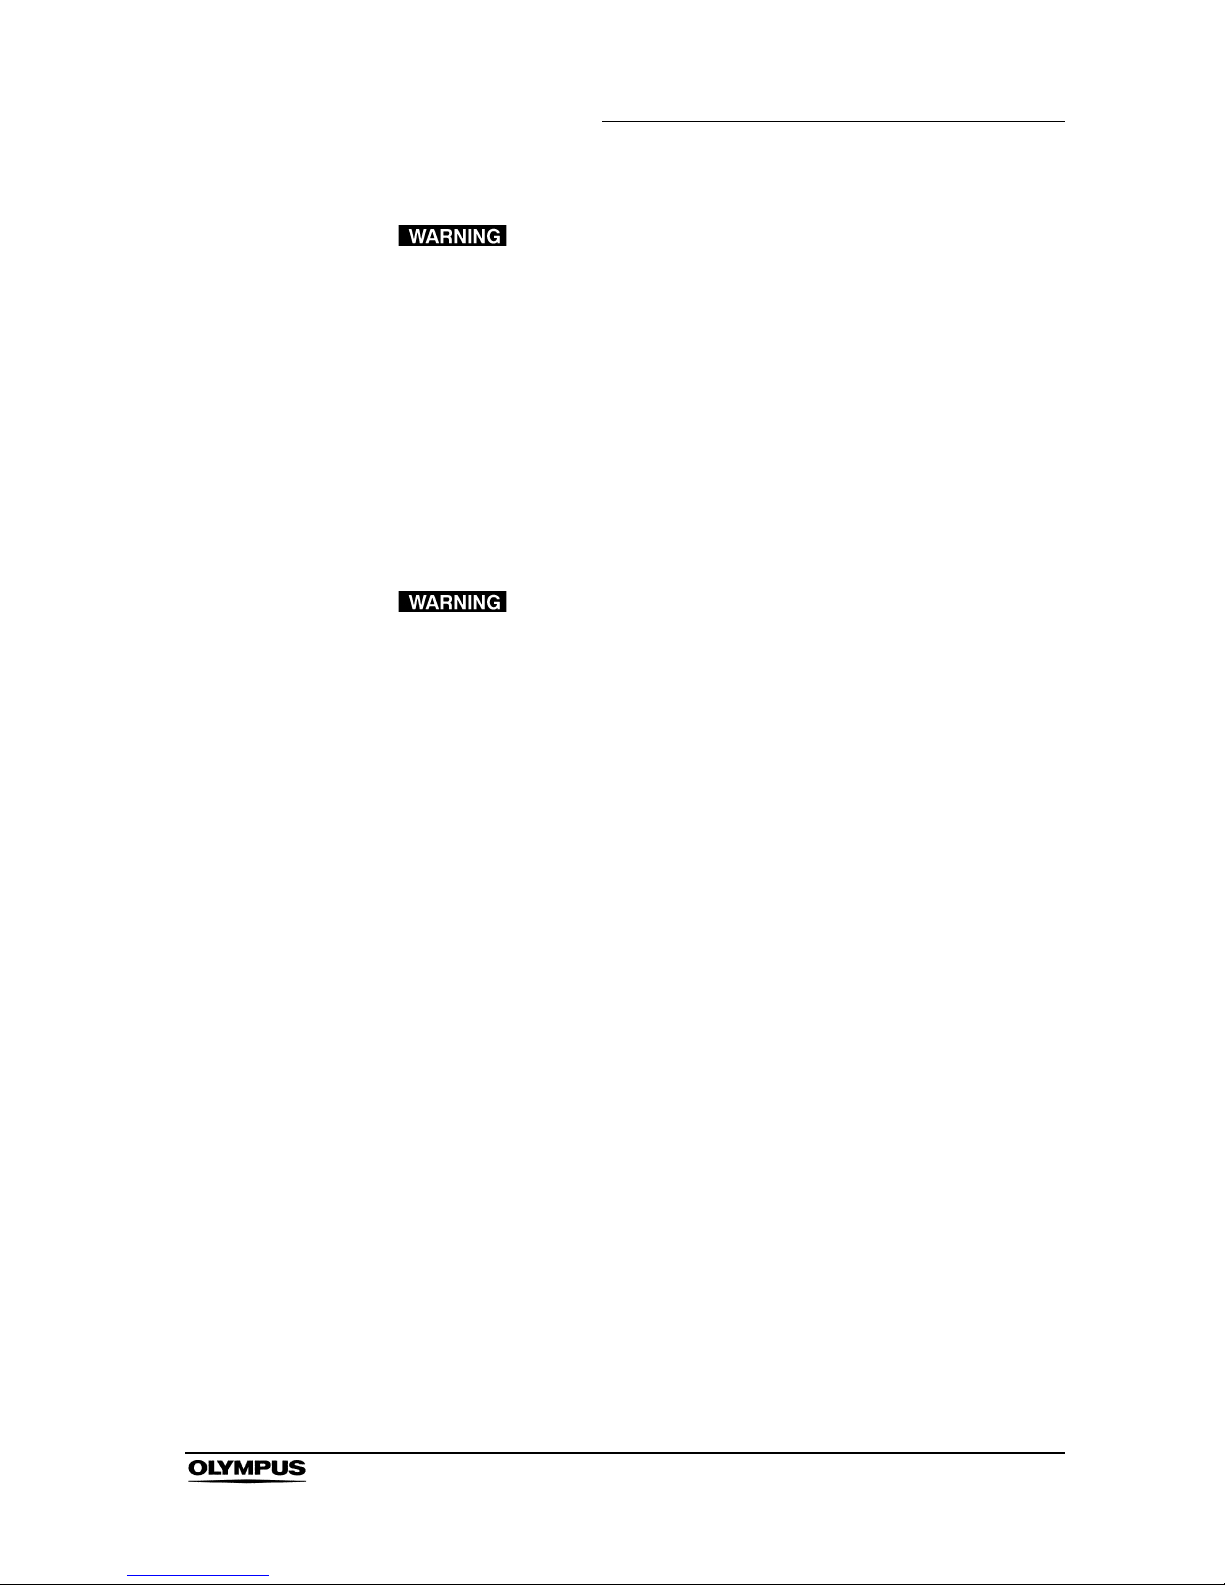
3.2 Cleaning, disinfection and sterilization
procedures
Endoscope reprocessing summary chart
Withdrawal of the endoscope
Precleaning (Section 3.3)
Leakage testing (Section 3.4)
Manual cleaning (Section 3.5)
High-level disinfection
(Section 3.6)
Rinsing after high-level
disinfection (Section 3.7)
ETO gas sterilization
(Section 3.8)
Storage and Disposal (Chapter 5)
Page 29
Chapter 3 Cleaning, Disinfection and Sterilization Procedures
25
EVIS EXERA GIF/CF/PCF TYPE 160 Series REPROCESSING MANUAL
ALL channels of the endoscope, including auxiliary water
channel where fitted, MUST be cleaned and high-level
disinfected or sterilized during EVERY reprocessing cycle,
even if the channels were not used during the previous
patient procedure. Otherwise, insufficient cleaning and
disinfection or sterilization of the endoscope may pose an
infection control risk to the patient and/or operators
performing the next procedure with the endoscope.
3.3 Precleaning
• If the endoscope is not immediately precleaned, residual
organic debris will begin to solidify and it may be difficult to
effectively reprocess the endoscope.
• Turn the endoscope’s illumination OFF immediately after the
examination. The temperature at the distal end of an
illuminated endoscope may exceed 41C (106F) and reach
50C (122F) due to intense endoscopic illumination.
Surface temperature above 41C (106F) may cause burns.
Preclean the endoscope at the bedside in the procedure room immediately after
the procedure.
Equipment needed
Prepare the following equipment:
• Personal protective equipment
• Clean, lint-free cloths
•500cm
3
(500 ml) container (except for GIF-XTQ160)
• 1000 cm
3
(1000 ml) container (for GIF-XTQ160 only)
• Detergent solution
• Clean water
•30cm
3
(30 ml) syringe
• AW channel cleaning adapter (MH-948)
• Auxiliary water tube (MAJ-855)
Page 30
26
Chapter 3 Cleaning, Disinfection and Sterilization Procedures
EVIS EXERA GIF/CF/PCF TYPE 160 Series REPROCESSING MANUAL
Wipe down the insertion tube
Handle the insertion tube carefully. Tightly gripping or sharply
bending the insertion tube or bending section can stretch or
severely damage the insertion tube and the covering of the
bending section.
1. Prepare detergent solution in a 500 cm
3
(500 ml) container (except for
GIF-XTQ160).
2. Prepare detergent solution in a 1000 cm
3
(1000 ml) container (for
GIF-XTQ160 only).
3. Wipe the entire insertion tube with a clean, lint-free cloth soaked in
detergent solution. Wipe from the boot at the control section toward the
distal end.
Aspirate detergent solution
Monitor the suction bottle on the suction pump carefully to
ensure that it does not overflow. Otherwise, suction pump
damage could result.
1. Turn the suction pump and the light source ON.
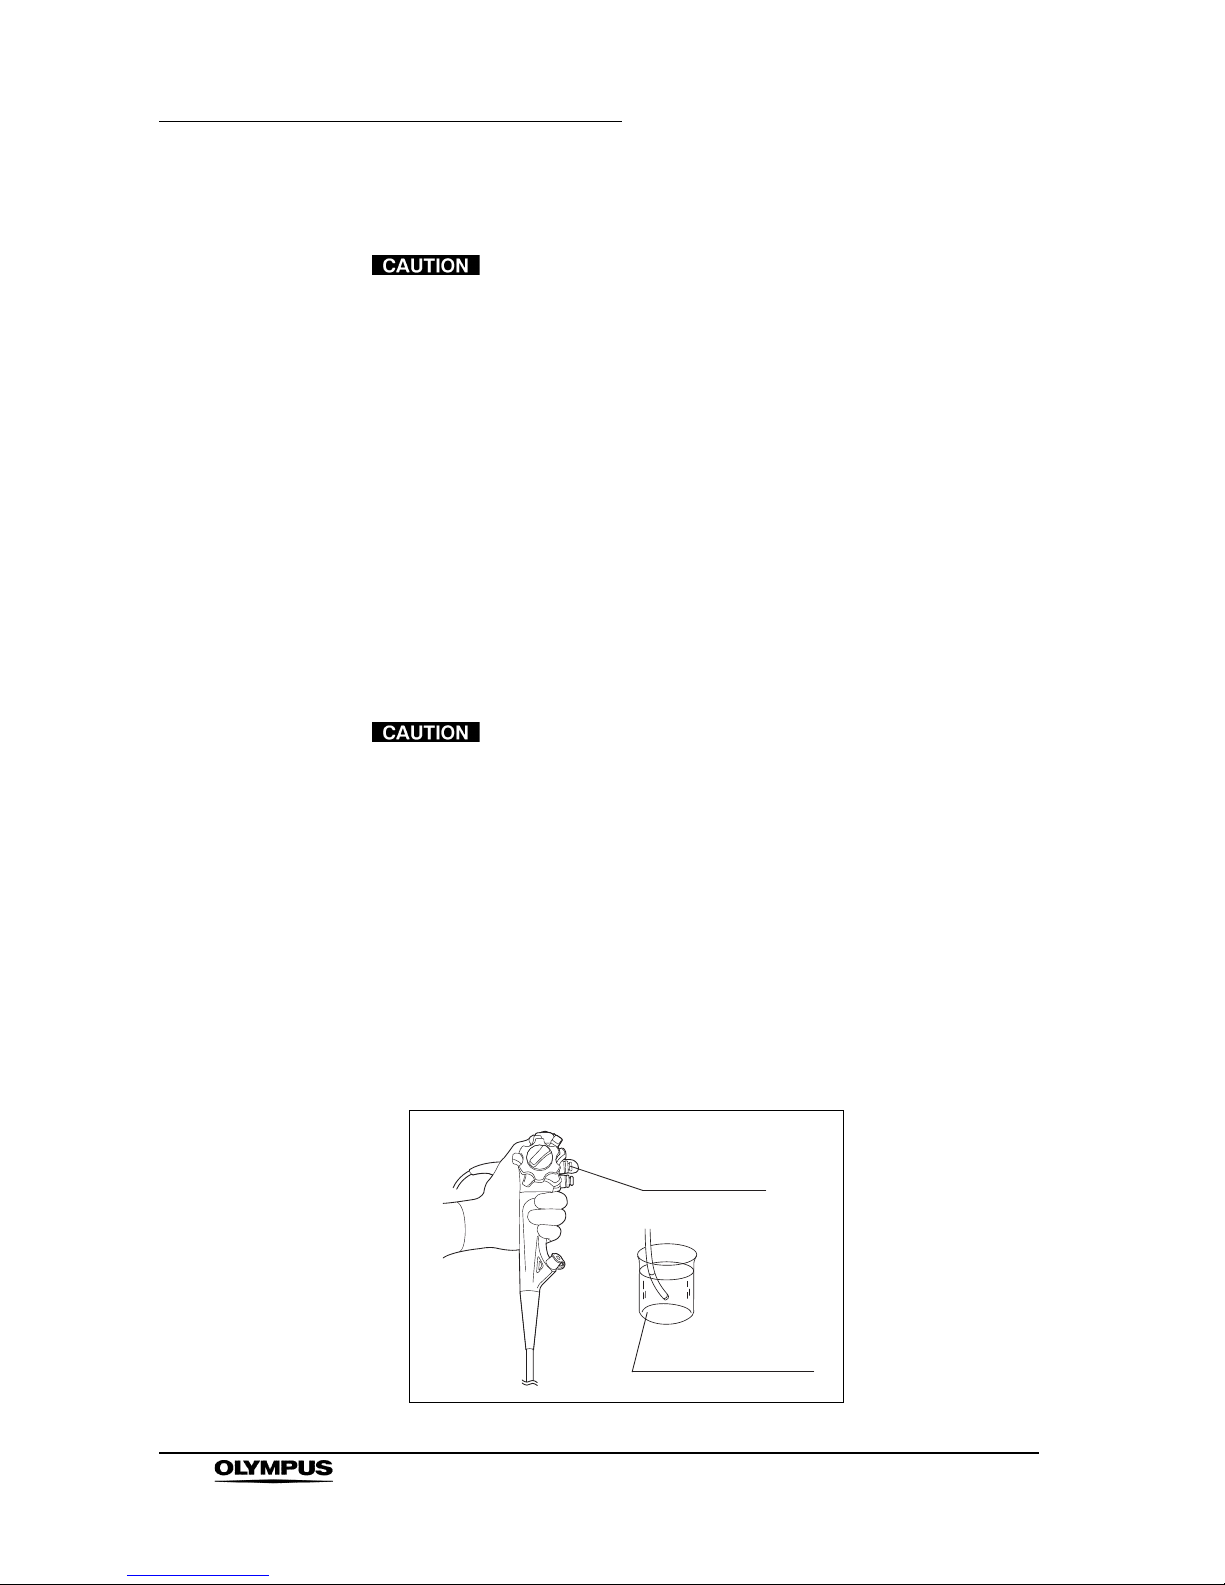
2. Immerse the distal end of the insertion tube in detergent solution. Depress
the suction valve and aspirate detergent solution into the instrument channel
for 30 seconds (see Figure 3.12).
3. Remove the distal end of the insertion tube from the detergent solution.
Depress the suction valve and aspirate air for 10 seconds.
4. Turn the suction pump OFF.
Figure 3.12
Suction valve
Detergent solution
Page 31

Chapter 3 Cleaning, Disinfection and Sterilization Procedures
27
EVIS EXERA GIF/CF/PCF TYPE 160 Series REPROCESSING MANUAL
Flush water and air into the air/water channel
Do not use the AW channel cleaning adapter for patient
examinations. It will cause continuous insufflation and could
result in patient injury.
• To prevent clogging of the air/water nozzle, always use the
AW channel cleaning adapter to clean the air/water channel
after each use.
• Do not apply lubricants to the AW channel cleaning adapter.
Lubricants may cause malfunction of the AW channel
cleaning adapter.
1. Prepare clean water in a 500 cm
3
(500 ml) container (except for
GIF-XTQ160).
2. Prepare clean water in a 1000 cm
3
(1000 ml) container (for GIF-XTQ160
only).
3. Switch “OFF” the airflow regulator on the light source.
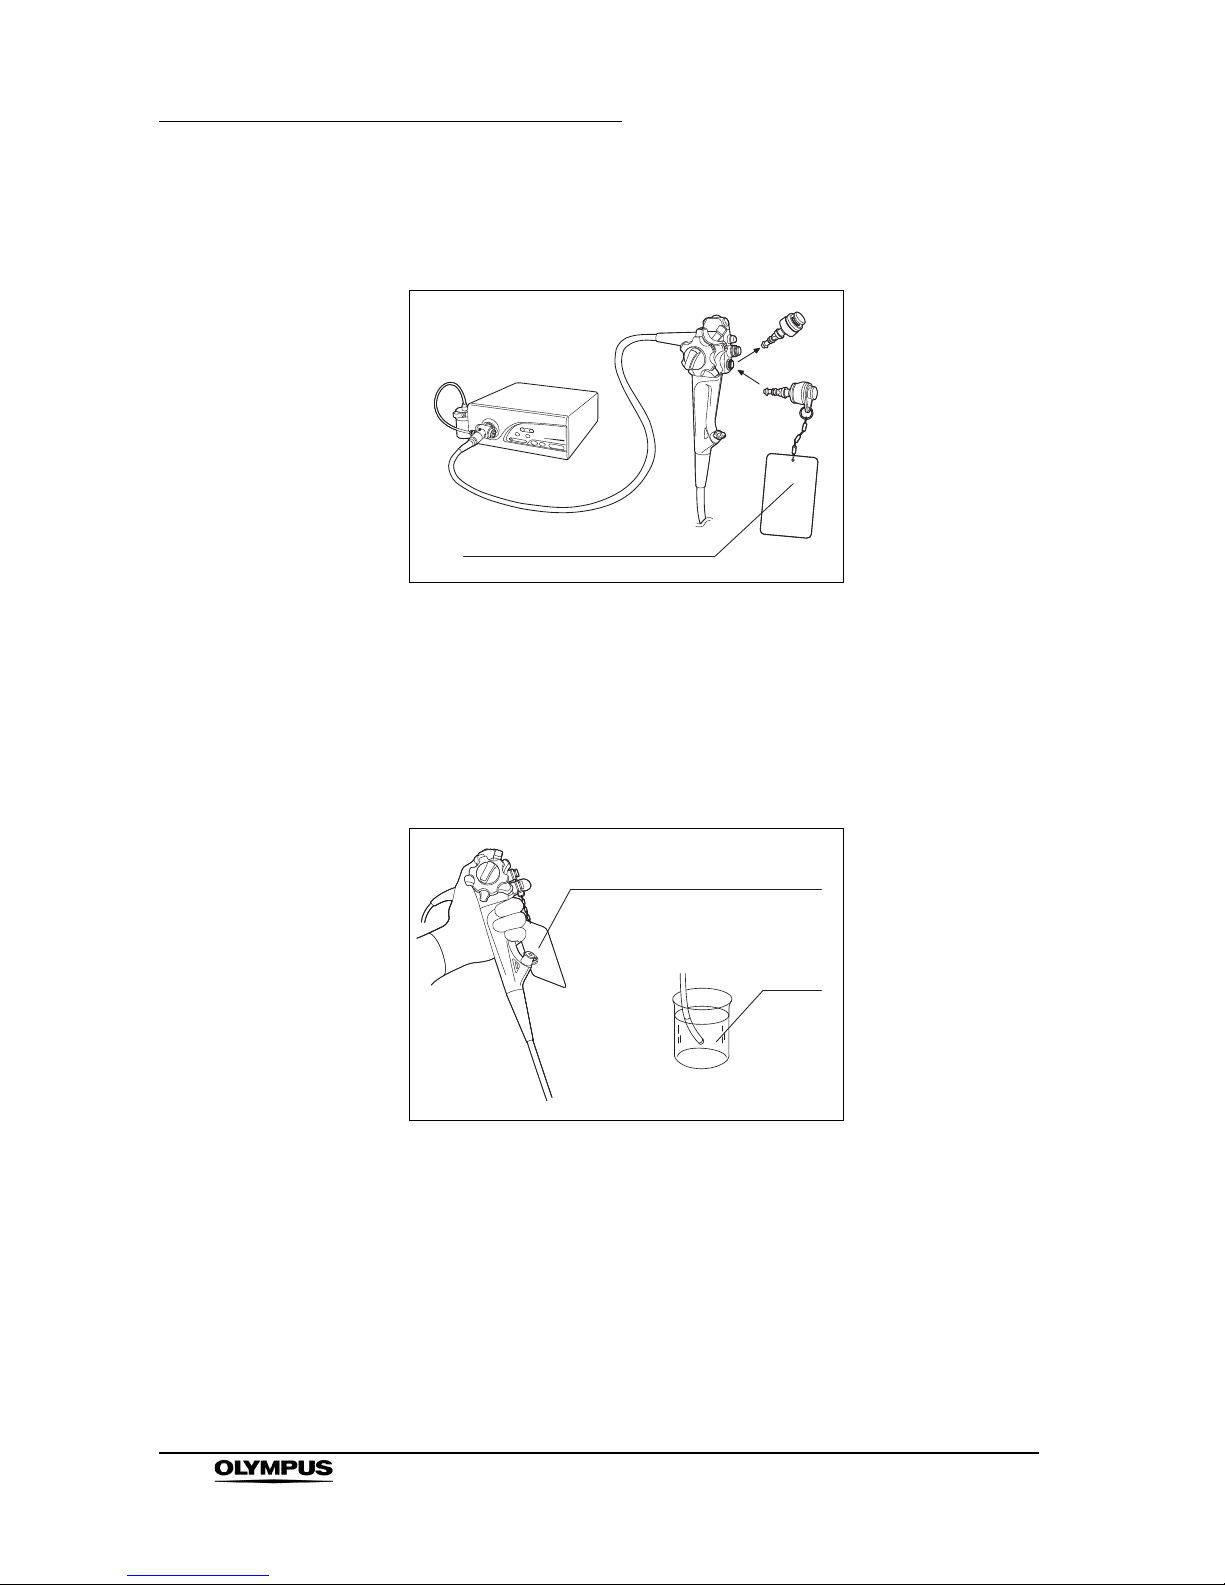
4. Remove the air/water valve from the endoscope and place it in a container
of detergent solution (see Figure 3.13).
Water may drip from the air/water cylinder when the air/water
valve is detached. The water dripping from the air/water
cylinder is clean (i.e., sterile water in the water container). If
water is dripping from the air/water cylinder, hold the control
section higher than the water container.
Page 32
28
Chapter 3 Cleaning, Disinfection and Sterilization Procedures
EVIS EXERA GIF/CF/PCF TYPE 160 Series REPROCESSING MANUAL
5. Attach the AW channel cleaning adapter to the air/water cylinder of the
endoscope (see Figure 3.13).
Figure 3.13
6. Switch the airflow regulator to maximum output (“HIGH” or “3”).
7. Immerse the distal end of the insertion tube in the water (see Figure 3.14).
8. Depress the AW channel cleaning adapter to feed water through the
channels for 30 seconds. Release the valve to feed air through the channels
for 10 seconds or more (see Figure 3.14).
Figure 3.14
9. Turn the light source and EVIS video system center OFF.
AW channel cleaning adapter
AW channel cleaning adapter
Clean
water
Page 33
Chapter 3 Cleaning, Disinfection and Sterilization Procedures
29
EVIS EXERA GIF/CF/PCF TYPE 160 Series REPROCESSING MANUAL
Flush detergent solution and air into the auxiliary water
channel (for endoscopes with auxiliary water feeding only)
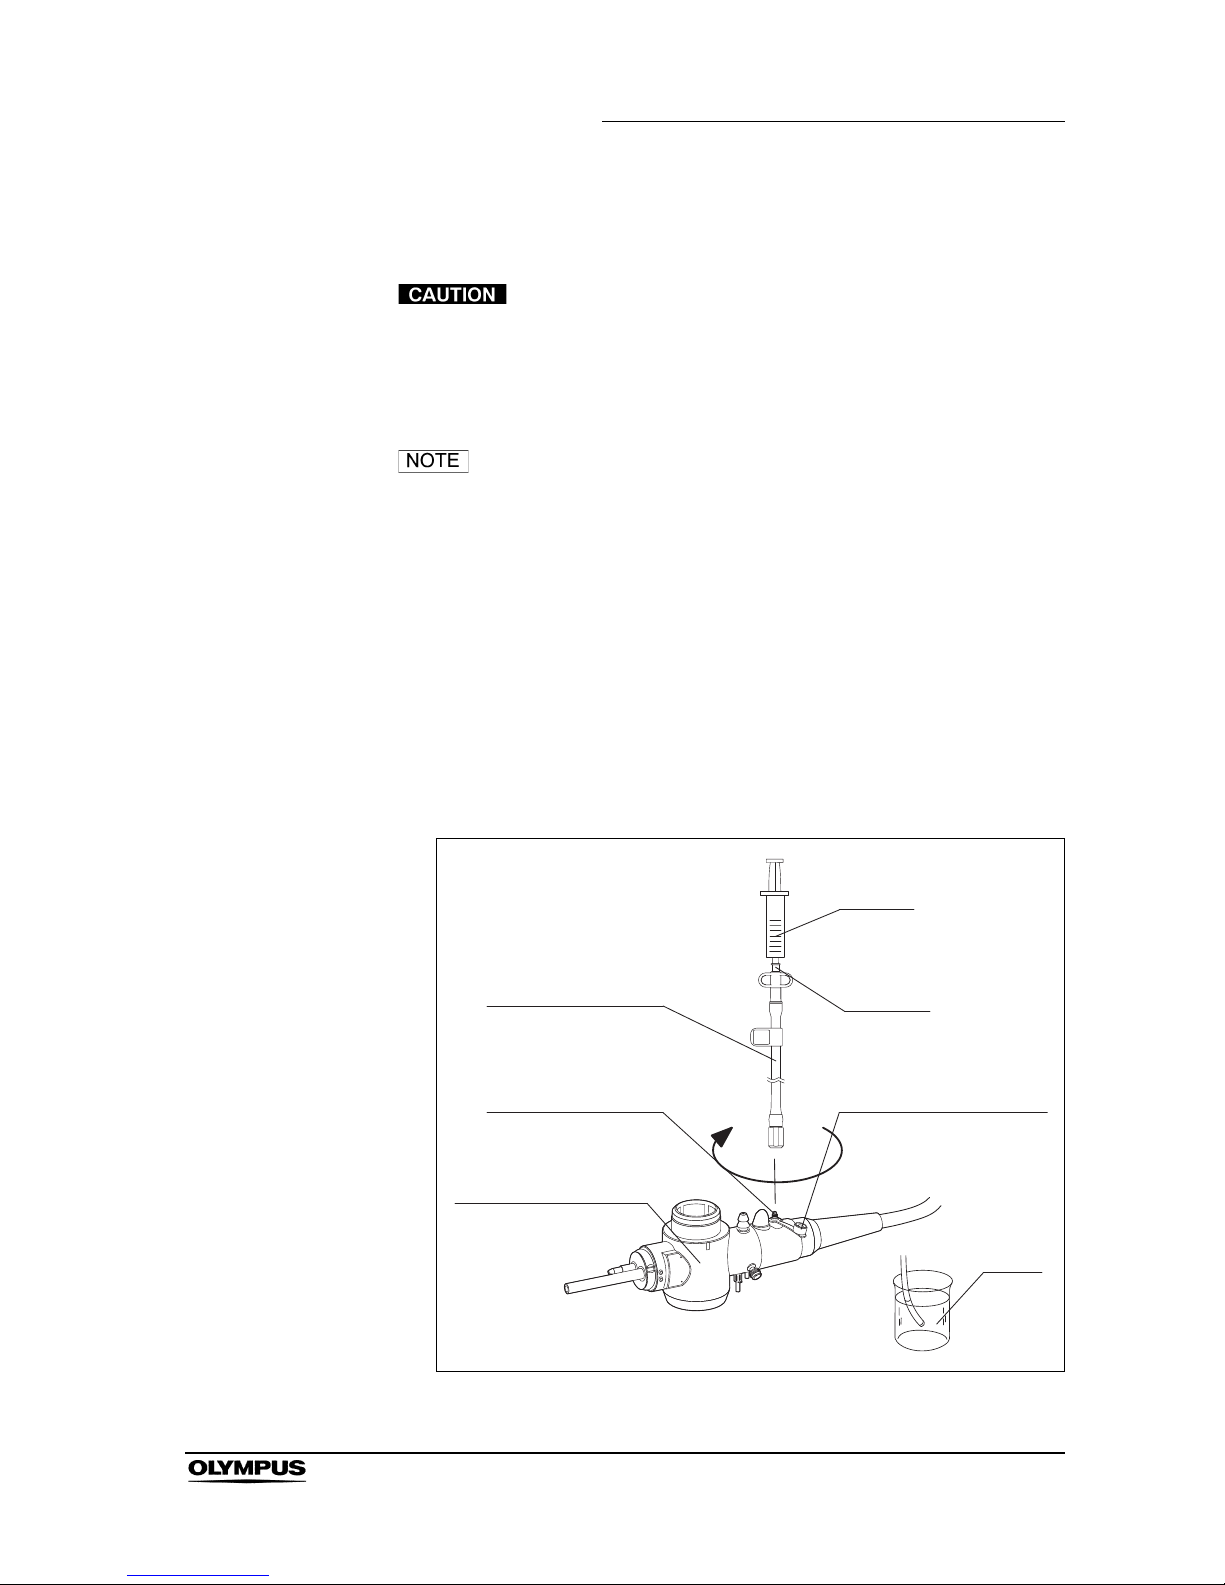
• Do not cap the auxiliary water inlet during reprocessing.
• If the auxiliary water tube is not connected to the auxiliary
water inlet, uncap the auxiliary water inlet and connect the
auxiliary water tube (see Figure 3.15).
Prior to reprocessing endoscopes equipped with auxiliary
water feeding, attach the auxiliary water inlet cap to the
auxiliary water inlet and open the cap (see Figure 3.15).
1. Immerse the distal end of the insertion tube in the water.
2. Using the 30 cm
3
(30 ml) syringe, slowly flush detergent solution through
the auxiliary water channel several times until no bubbles exit the distal end.
3. Using the 30 cm
3
(30 ml) syringe, slowly flush water through the auxiliary
water channel several times.
4. Using the 30 cm
3
(30 ml) syringe, slowly flush air through the auxiliary water
channel several times until a steady stream of bubbles exits the distal end.
Figure 3.15
Luer port
Auxiliary water inlet
Endoscope connector
Auxiliary water inlet cap
Clean
water
Syringe
Auxiliary water tube
Page 34

30
Chapter 3 Cleaning, Disinfection and Sterilization Procedures
EVIS EXERA GIF/CF/PCF TYPE 160 Series REPROCESSING MANUAL
Disconnect the endoscope, reusable parts and cleaning
equipment
1.
Disconnect the AW channel cleaning adapter, suction valve and biopsy
valve from the endoscope and place them in a container of detergent
solution. Clean, disinfect and sterilize the items according to the instructions
given in Section 3.9, “Cleaning, disinfection and sterilization procedures for
reusable parts and reprocessing equipment”.
2. Disconnect the auxiliary water tube from the endoscope and place it in a
container of detergent solution. Clean, disinfect and sterilize the items
according to the instructions given in Section 3.9, “Cleaning, disinfection
and sterilization procedures for reusable parts and reprocessing equipment”
(for endoscopes with auxiliary water feeding only).
3. Disconnect the water container’s water supply tube from the air/water
supply connector of the endoscope connector.
4. Disconnect the suction tube from the suction connector of the endoscope
connector.
5. Disconnect the magnification controller cable from the zoom connector of
the endoscope connector (for CF-Q160ZL/I only).
6. While holding the endoscope connector, disconnect the UPD cable from the
UPD scope connector of the endoscope connector (for CF-Q160DL/I only).
7. Disconnect the videoscope cable from the endoscope’s electrical connector.
8. Disconnect the endoscope connector from the light source.
Do not touch the light guide of the endoscope connector
immediately after removing it from the light source because it
is extremely hot. Operator or patient injury may result.
9. Transport the endoscope and the container holding the other items to the
reprocessing area.
Page 35

Chapter 3 Cleaning, Disinfection and Sterilization Procedures
31
EVIS EXERA GIF/CF/PCF TYPE 160 Series REPROCESSING MANUAL
3.4 Leakage testing
After precleaning, perform leakage testing on the endoscope to ensure that it is
waterproof.
Equipment needed
Prepare the following equipment:
Attach the water-resistant cap (MH-553)
• The electrical connector of the endoscope is not waterproof.
Before immersing or leakage testing the endoscope, always
attach the water-resistant cap.
• If the exterior of the electrical connector is scratched, the
connector may no longer be waterproof and the seal inside
the water-resistant cap may be scratched. If the electrical
connector is scratched, send it immediately to Olympus for
repairs.
• Never immerse the water-resistant cap unless it is attached
to the endoscope. Water remaining inside the water-resistant
cap can be transferred to and damage the electrical
connector.
• Personal protective equipment
• Large basin
• Clean water
• Maintenance unit or light source (MU-1 or CLV-160)
• Leakage tester (MB-155)
• Water-resistant cap (see Table 1.1)
Page 36
32
Chapter 3 Cleaning, Disinfection and Sterilization Procedures
EVIS EXERA GIF/CF/PCF TYPE 160 Series REPROCESSING MANUAL
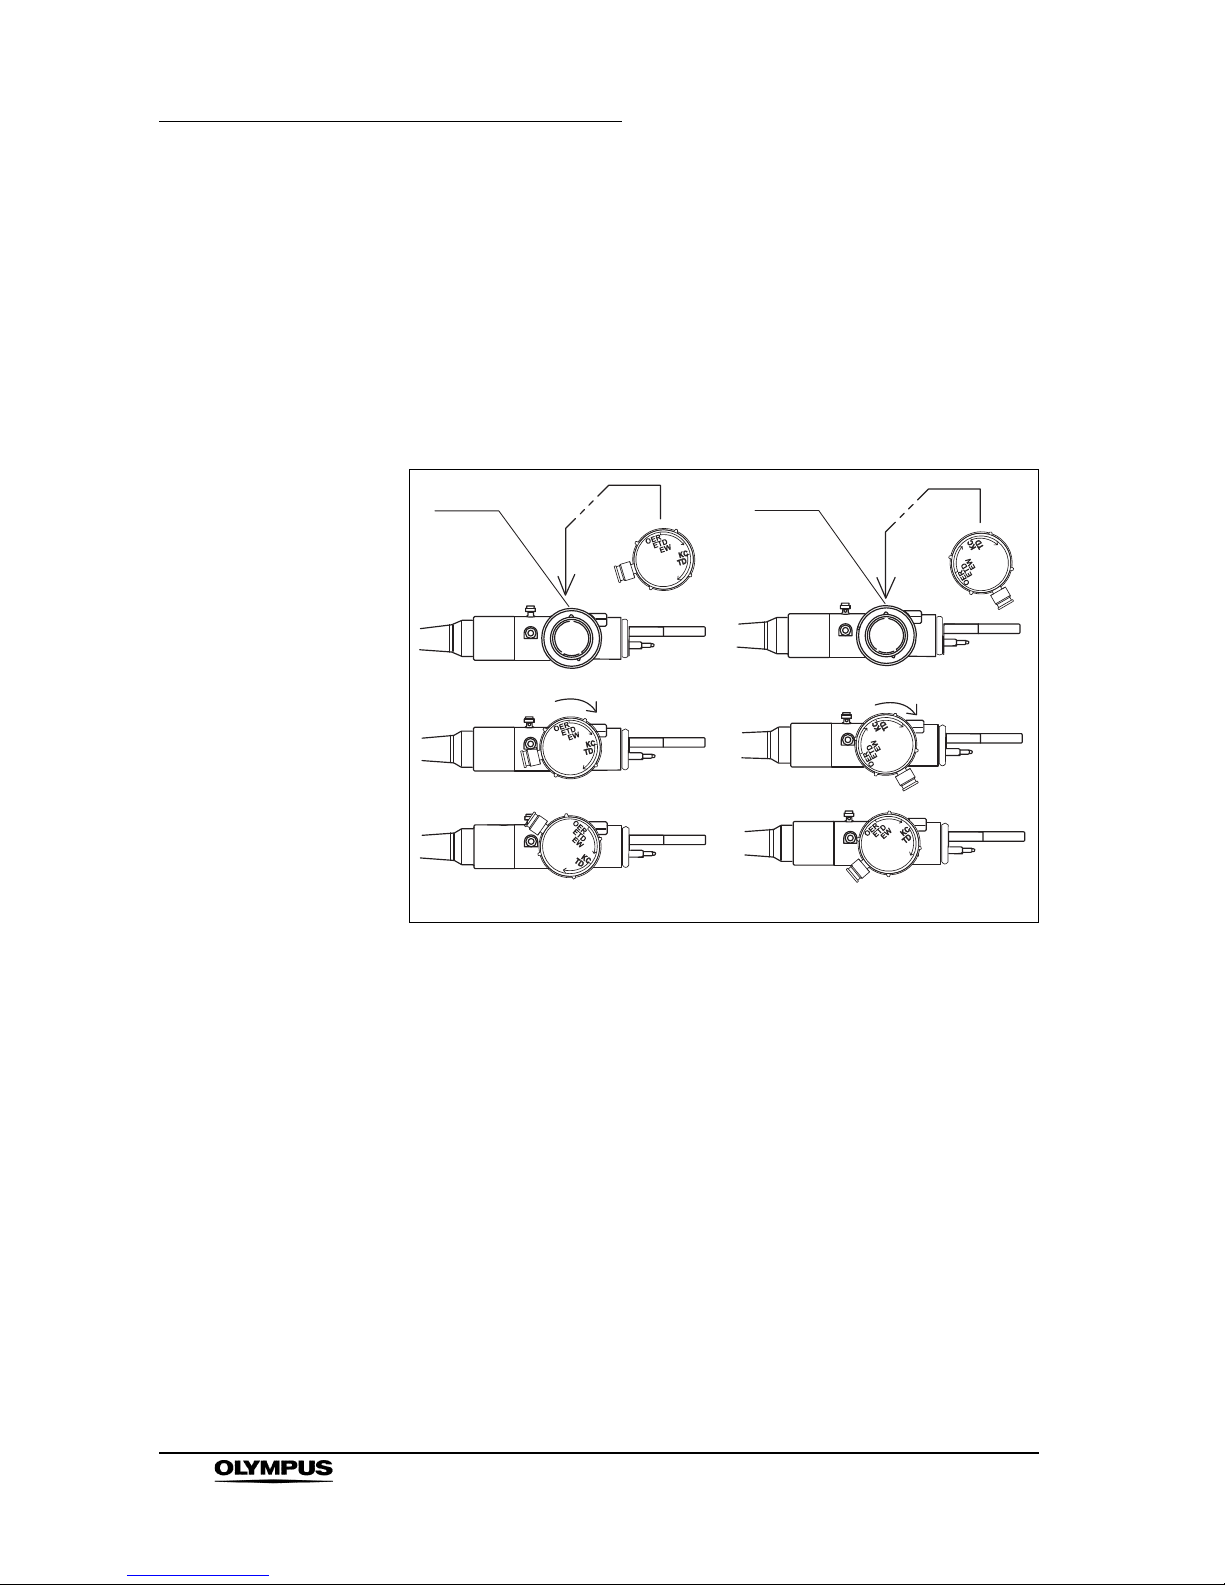
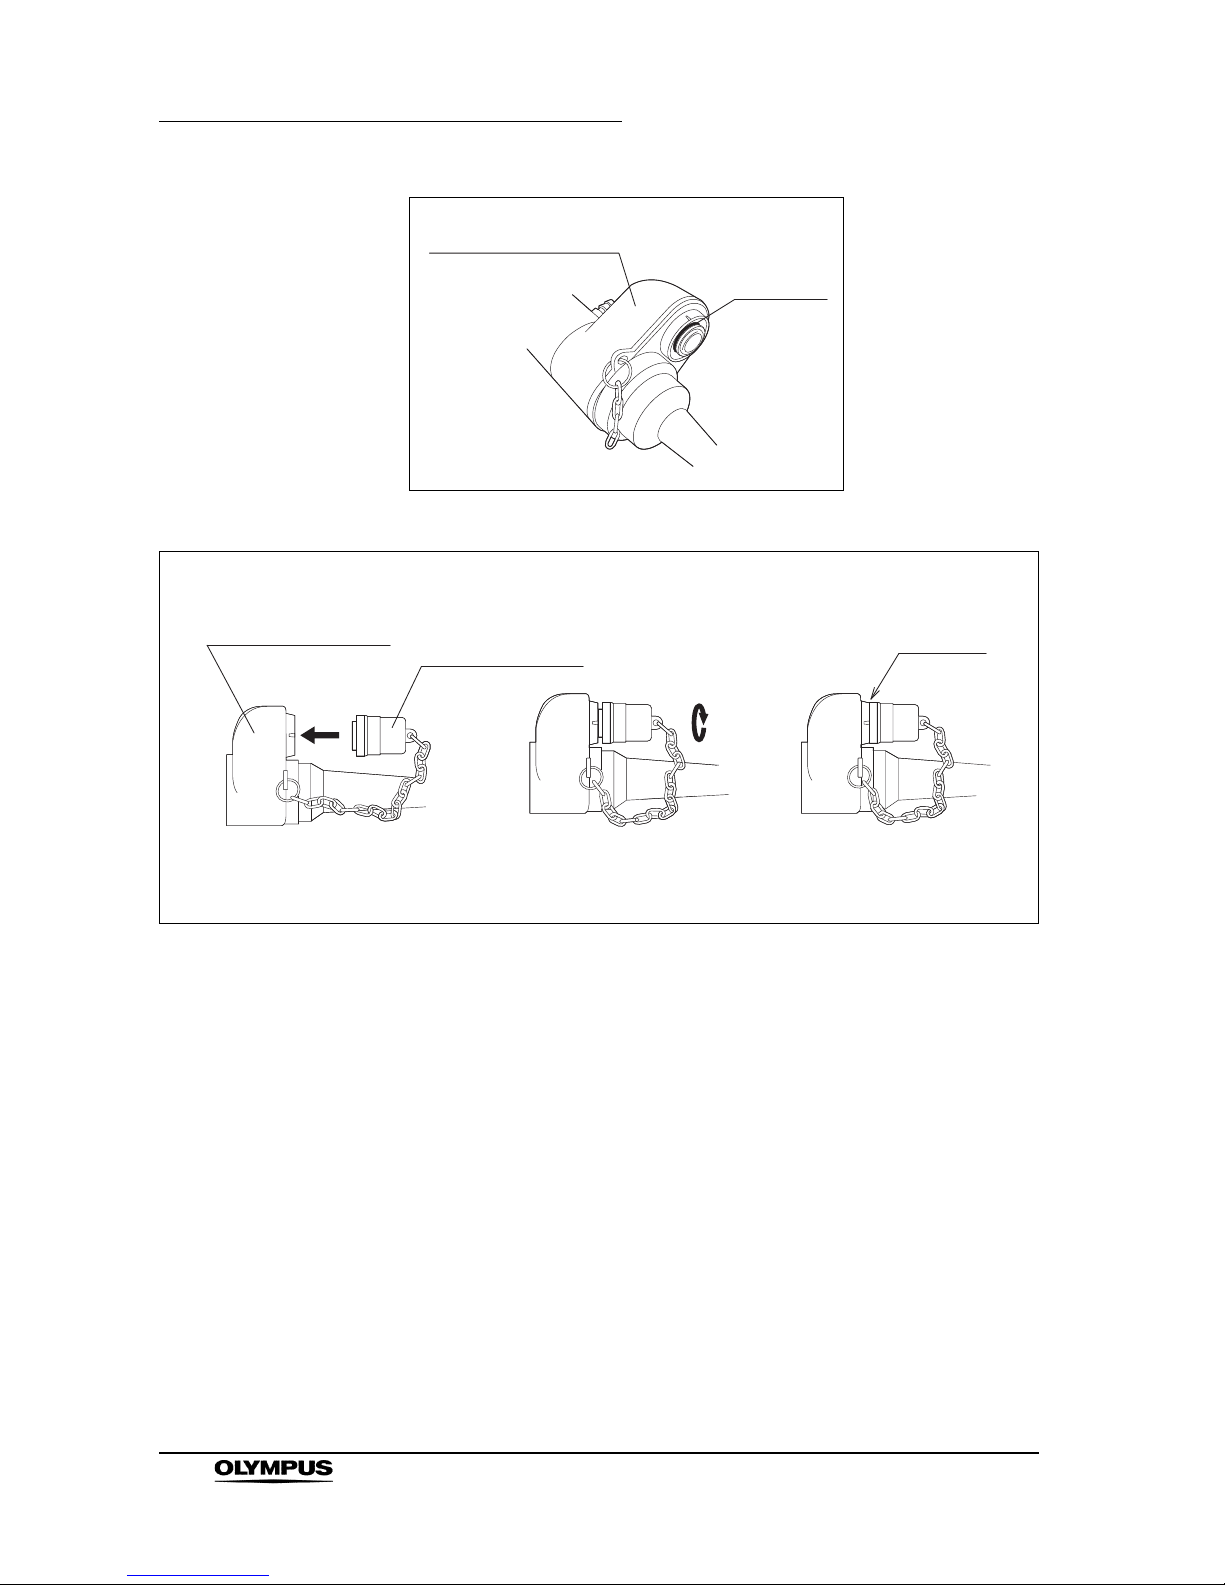
1. Align the OER/ETD/EW character (see Figure 3.16 a), the EW character or
KC/TD character (see Figure 3.16 b) on the water-resistant cap with mark 2
on the electrical connector housing.
2. Align the pin on the electrical connector with the groove on the
water-resistant cap.
3. Push the water-resistant cap into position and rotate it clockwise until it
stops (approximately 45).
Figure 3.16
a) (OER/ETD/EW character) b) (KC/TD character)
Mark 2
Mark 2
Rotate
Rotate
1.
1.
2.
2.
3.
3.
Page 37

Chapter 3 Cleaning, Disinfection and Sterilization Procedures
33
EVIS EXERA GIF/CF/PCF TYPE 160 Series REPROCESSING MANUAL
Attach the water-resistant cap (MAJ-583 for CF-Q160ZL/I only)
• The zoom connector of the endoscope is not waterproof.
Before immersing the endoscope, always attach the
water-resistant cap.
• If the seal ring on the zoom connector is scratched, the zoom
connector may no longer be waterproof. Send the endoscope
immediately to Olympus for repairs.
• Never immerse the water-resistant cap unless it is attached
to the endoscope. Water remaining inside the water-resistant
cap can be transferred to and damage the zoom connector.
1. Confirm that the seal ring on the zoom connector is not scratched (see
Figure 3.17).
2. Push the water-resistant cap straight onto the zoom connector and turn it
clockwise (see Figure 3.18 (1) and (2)).
3. Confirm that there is no gap between the zoom connector and the
water-resistant cap (see Figure 3.18 (3)).
Attach the water-resistant cap (MAJ-942 for CF-Q160DL/I only)
• The UPD scope connector of the endoscope is not
waterproof. Before immersing the endoscope, always attach
the water-resistant cap.
• If the seal ring on the UPD scope connector is scratched, the
UPD scope connector may no longer be waterproof. Send
the endoscope immediately to Olympus for repairs.
• Never immerse the water-resistant cap unless it is attached
to the endoscope. Water remaining inside the water-resistant
cap can be transferred to and damage the UPD scope
connector.
1. Confirm that the seal ring on the UPD scope connector is not scratched (see
Figure 3.17).
2. Push the water-resistant cap straight onto the UPD scope connector and
turn it clockwise (see Figure 3.18 (1) and (2)).
3. Confirm that there is no gap between the UPD scope connector and the
water-resistant cap (see Figure 3.18 (3)).
Page 38
34
Chapter 3 Cleaning, Disinfection and Sterilization Procedures
EVIS EXERA GIF/CF/PCF TYPE 160 Series REPROCESSING MANUAL
Figure 3.17
Figure 3.18
Seal ring
Zoom connector or
UPD scope connector
Zoom connector or
UPD scope connector
Water-resistant cap
No space
Assembled
(1)
(2)
(3)
Page 39

Chapter 3 Cleaning, Disinfection and Sterilization Procedures
35
EVIS EXERA GIF/CF/PCF TYPE 160 Series REPROCESSING MANUAL
Performing the leakage test
• During leakage testing, a continuous series of bubbles
emerging from a location on the endoscope indicates a leak
at that location. This means that water will be able to
penetrate the inside of the endoscope. If you locate a leak,
remove the endoscope from the water and contact Olympus.
• Never connect or disconnect the water-resistant cap(s) or the
leakage tester’s connector cap while immersed. Doing so
could allow water to enter the endoscope and equipment
damage can result.
• Rotate the leakage tester’s connector cap until it stops. If it is
not fully and properly attached, the endoscope’s interior will
not be pressurized and accurate leakage testing will be
impossible.
• When attaching the leakage tester’s connector cap to the
water-resistant cap’s venting connector, make sure that the
inside of the leakage tester’s connector cap and the outside
of the water-resistant cap’s venting connector are thoroughly
dry. Water remaining on either component may penetrate the
inside of the water-resistant cap (MH-553) and could cause
endoscope malfunction.
• Detaching the leakage tester’s connector cap from the
venting connector while the leakage tester is still connected
to the light source will not allow the endoscope to
depressurize properly. This may damage the endoscope.
When the leakage tester connector is in place, the covering
of the bending section will expand as the air pressure inside
the endoscope increases. This is normal.
1. Fill a basin with clean water. Use a basin which is at least 40 cm by 40 cm
(16” by 16”) in size and deep enough to allow the endoscope to be
completely immersed.
2. Insert the leakage tester connector into the output socket of the
maintenance unit or the light source and turn the maintenance unit or the
light source ON. Set the light source’s airflow regulator switch to “HIGH” or
“3”.
3. Confirm that the leakage tester is emitting air by gently depressing the pin
located inside the leakage tester’s connector cap.
Page 40
36
Chapter 3 Cleaning, Disinfection and Sterilization Procedures
EVIS EXERA GIF/CF/PCF TYPE 160 Series REPROCESSING MANUAL
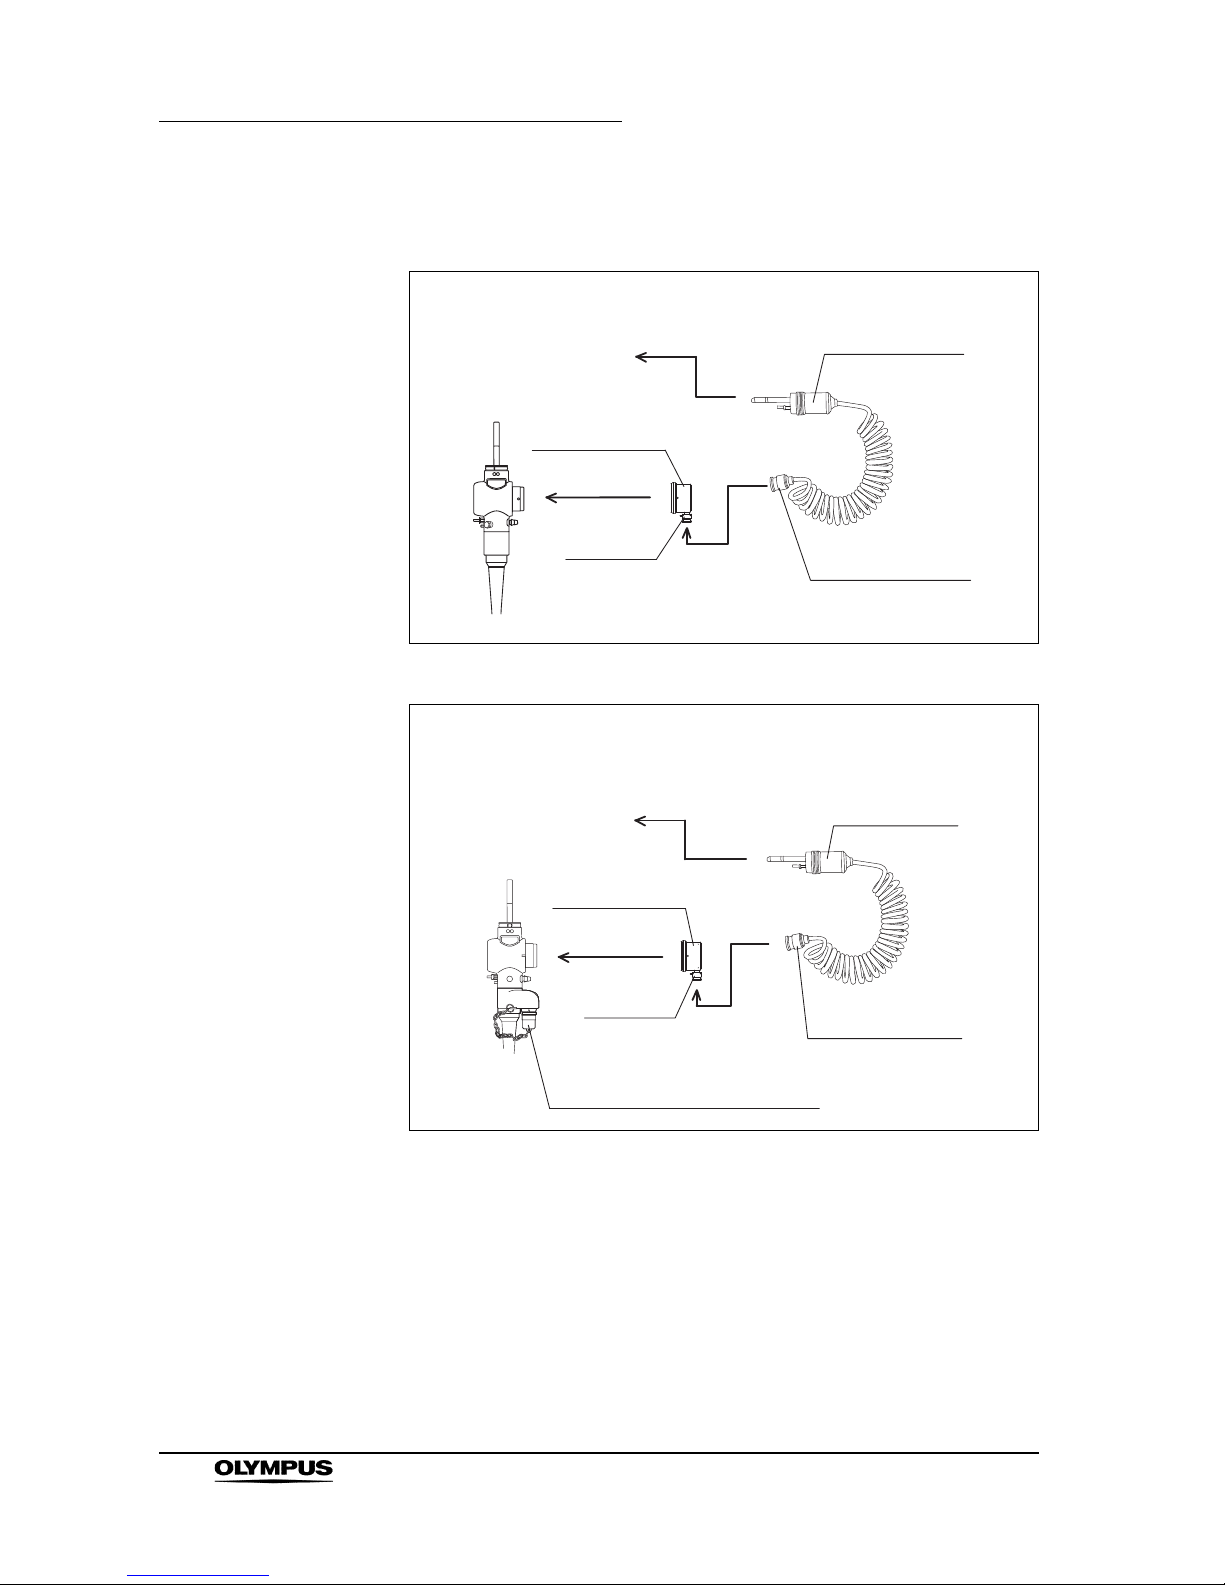
4. Connect the leakage tester’s connector cap to the venting connector of the
water-resistant cap (MH-553) (see Figures 3.19 or 3.20).
Figure 3.19
Figure 3.20
5. With the leakage tester connected, immerse the endoscope in water and
observe for approximately 30 seconds while angulating the bending section.
Confirm that there is no location on the endoscope from which a continuous
series of bubbles emerges.
6. Remove the endoscope from the basin with the leakage tester attached.
7. Turn the maintenance unit or the light source OFF.
8. Disconnect the leakage tester from the maintenance unit or the light source.
Maintenance unit
or light source
Water-resistant
cap (MH-553)
Ven ting
connector
Leakage tester’s
connector cap
Leakage tester
connector
2.
4.
For CF-Q160ZL/I and CF-Q160DL/I only
Maintenance unit
or light source
Water-resistant
cap (MH-553)
Ven ting
connector
Leakage tester’s
connector cap
Leakage tester
connector
2.
4.
Water-resistant cap
(MAJ-583 for CF-Q160ZL/I only)
(MAJ-942 for CF-Q160DL/I only)
Page 41

Chapter 3 Cleaning, Disinfection and Sterilization Procedures
37
EVIS EXERA GIF/CF/PCF TYPE 160 Series REPROCESSING MANUAL
9. Wait 30 seconds, or until the covering of the bending section contracts to its
pre-expansion size. Disconnect the leakage tester’s connector cap from the
venting connector.
10. Thoroughly dry the leakage tester.
3.5 Manual cleaning
After completing the leakage test, perform manual cleaning according to the
procedures described below.
Equipment needed
Prepare the following equipment:
To prevent damage to the endoscope, never immerse it
together with objects other than the reprocessing
accessories.
• Personal protective equipment
• Soft brush
• Clean, lint-free cloths
• Large basins
• Detergent solution
• Clean water
• Suction pump
•30cm
3
(30 ml) syringe
• Suction cleaning adapter (MH-856)
• Channel plug (MH-944)
• Injection tube (MH-946)
• Channel cleaning brush (BW-20T)
• Channel cleaning brush (BW-17K for GIF-XTQ160 only)
• Channel-opening cleaning brush (MH-507)
• Auxiliary water tube (MAJ-855 for endoscopes with
auxiliary water feeding only)
Page 42
38
Chapter 3 Cleaning, Disinfection and Sterilization Procedures
EVIS EXERA GIF/CF/PCF TYPE 160 Series REPROCESSING MANUAL
Cleaning the external surface
1.
Fill a basin with water and detergent solution at the temperature and
concentration recommended by the detergent manufacturer. Use a basin
which is at least 40 cm by 40 cm (16” by 16”) in size and deep enough to
allow the endoscope to be completely immersed.
2. Immerse the endoscope in the detergent solution.
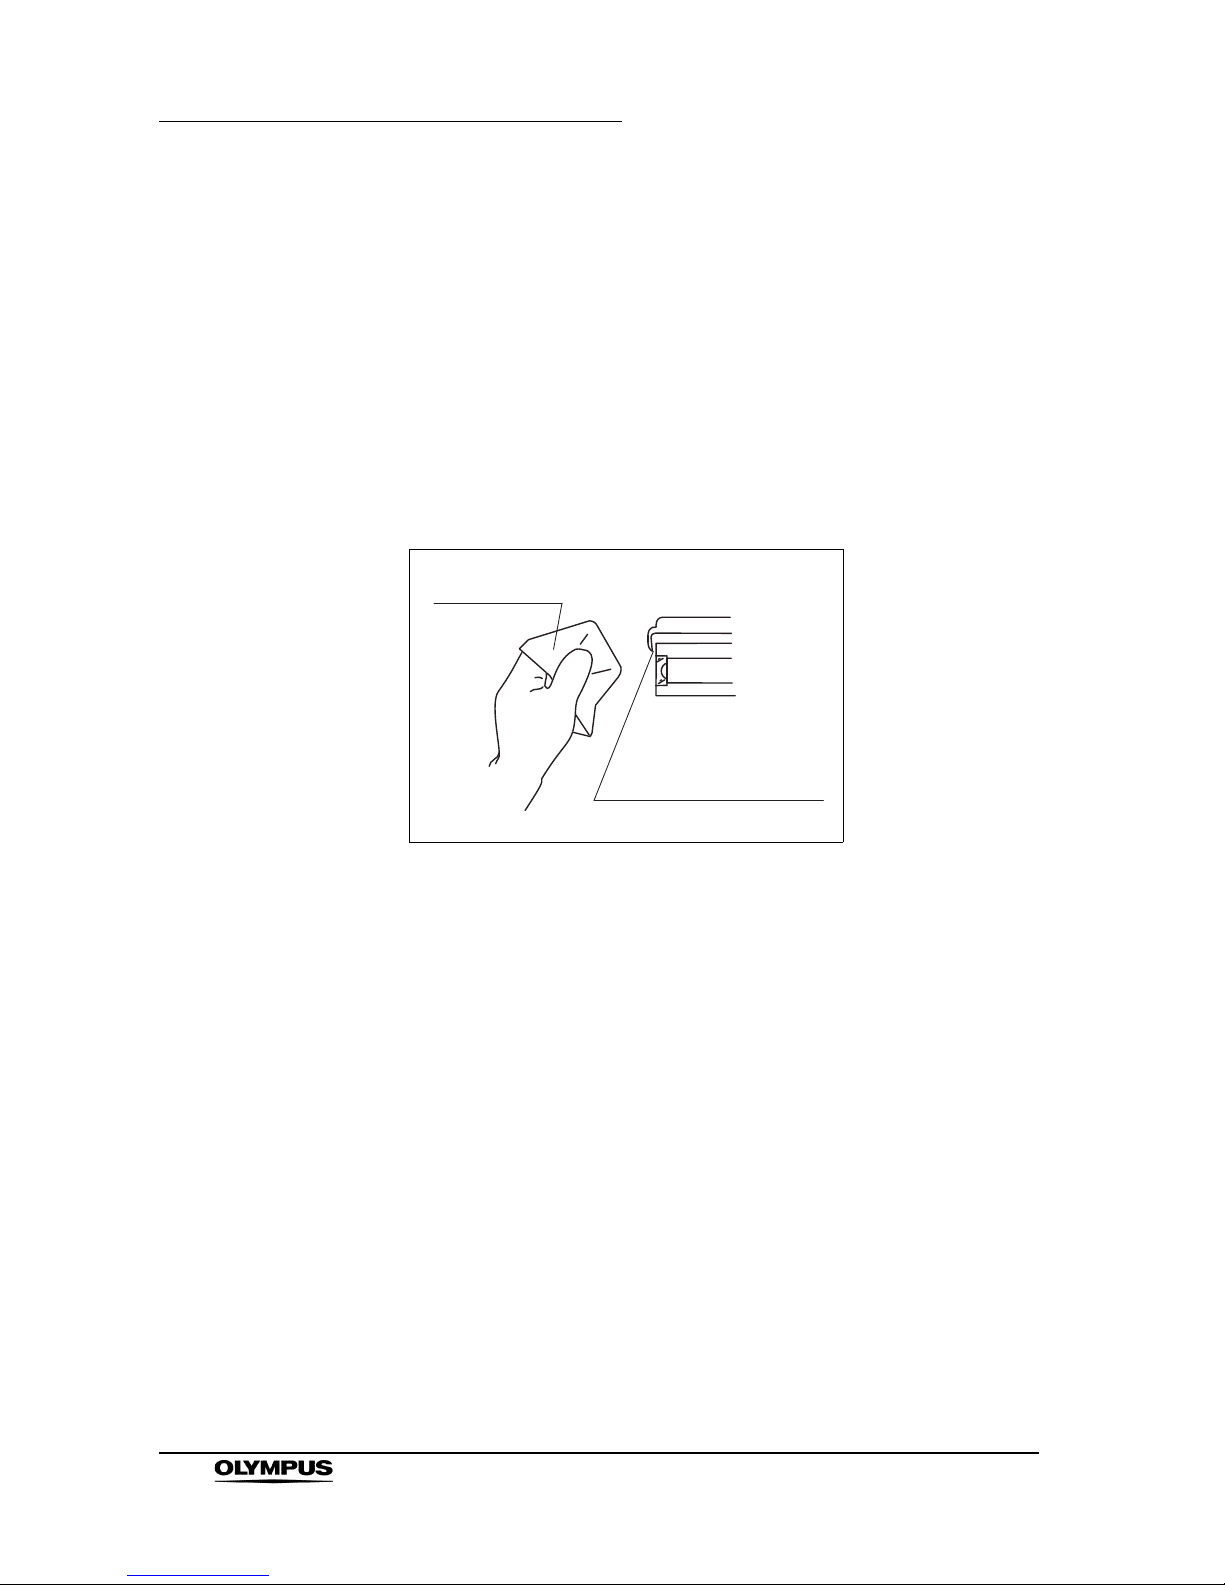
3. With the endoscope immersed, use a soft brush or lint-free cloth to
thoroughly brush or wipe all external surfaces of the endoscope. Pay
particular attention to the air/water nozzle opening and ensure that all
surfaces of the distal end are cleaned thoroughly (see Figure 3.21).
Figure 3.21
Lint-free cloth
Air/water nozzle opening
Page 43

Chapter 3 Cleaning, Disinfection and Sterilization Procedures
39
EVIS EXERA GIF/CF/PCF TYPE 160 Series REPROCESSING MANUAL
Brushing the channels
• To avoid splattering detergent solution when the channel
cleaning brush is pulled out, keep the endoscope
submerged.
• The channel cleaning brush is a consumable item that is
subject to wear. If the brush head is bent or kinked during
use, the brush may come off. Confirm that the brush is free
from any damages or irregularities before and after each use.
Should a part of the brush head come off, immediately
retrieve it and carefully confirm that no parts are left inside
the channel of the endoscope by passing a new cleaning
brush or other endo-therapy accessories through it. Any part
left in the channel, may drop into the patient during the
procedure. Depending on the location, the missing part may
not be recoverable by passing a new brush or other
endo-therapy accessory through the channel. In this case,
contact Olympus.
Withdraw the channel cleaning brush from the suction
channel gently, ensuring its shaft does not rub against the
external opening of the suction cylinder, as this may damage
the brush and may wear a groove in the opening, leading to
impaired suction and liquid leakage.
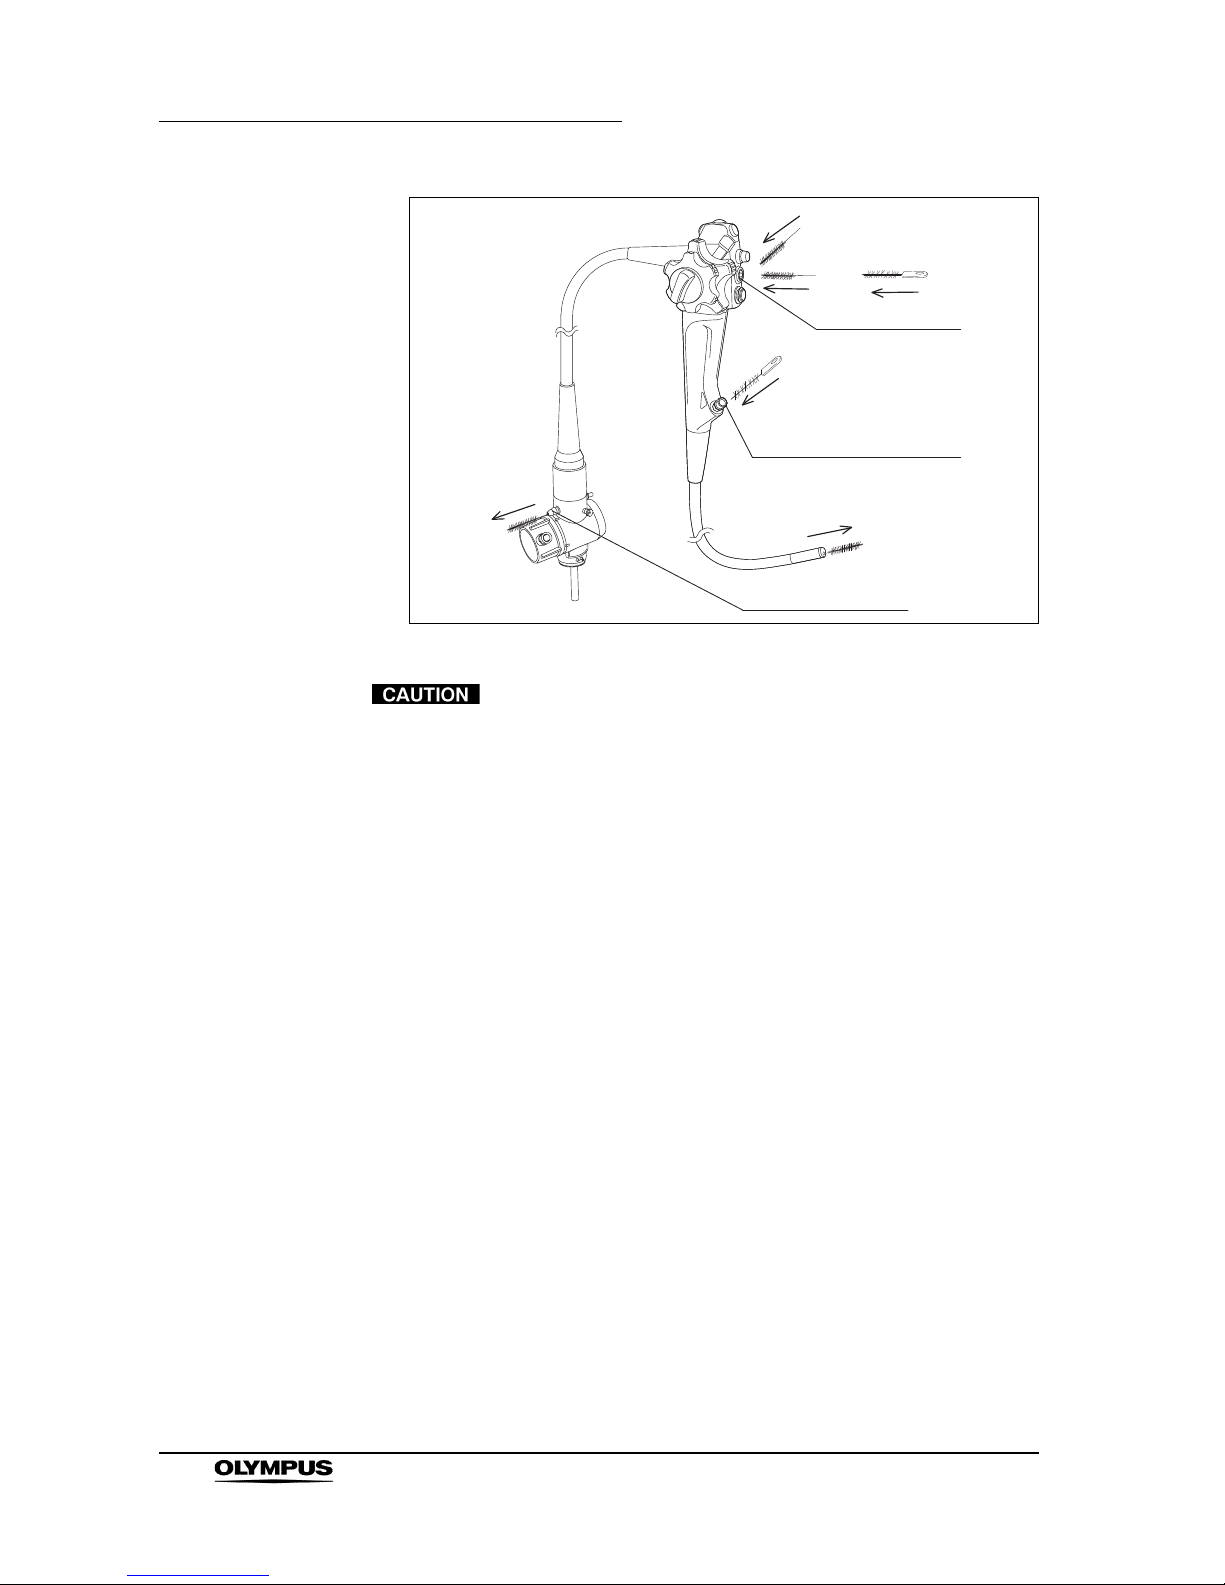
While the endoscope is submerged, brush the instrument and suction channels,
suction cylinder and instrument channel port according to the following
procedures (see Figure 3.22).
Page 44
40
Chapter 3 Cleaning, Disinfection and Sterilization Procedures
EVIS EXERA GIF/CF/PCF TYPE 160 Series REPROCESSING MANUAL
Figure 3.22
Use the channel cleaning brush (BW-17K) to brush the
instrument channel of the GIF-XTQ160. If the BW-17K is not
used on this endoscope, effective cleaning of the instrument
channel will not be possible.
Brushing the instrument/suction channel in the insertion
tube (location A) (except for GIF-XTQ160)
1. Straighten the endoscope’s bending section. Grip the channel cleaning
brush (BW-20T) at a point 3 cm from the bristles.
2. Insert the channel cleaning brush (BW-20T) at a 45 angle into the opening
located in the side wall of the suction cylinder as illustrated by A in Figure
3.22. Using short strokes, feed the brush through the insertion tube until it
emerges from the distal end of the endoscope.
3. Clean the bristles with your fingertips in the detergent solution. Carefully pull
the brush out through the channel.
4. Clean the bristles in the detergent solution again.
5. Repeat until all debris is removed.
Suction cylinder
Instrument channel port
Suction connector
A
A
C
B
D
B
Page 45

Chapter 3 Cleaning, Disinfection and Sterilization Procedures
41
EVIS EXERA GIF/CF/PCF TYPE 160 Series REPROCESSING MANUAL
Brushing the instrument/suction channel in the insertion
tube (location A) (for GIF-XTQ160 only)
Use the channel cleaning brush (BW-17K) to brush the
instrument channel of the GIF-XTQ160. If the BW-17K is not
used on this endoscope, effective cleaning of the instrument
channel will not be possible.
1. Straighten the endoscope’s bending section. Grip the channel cleaning
brush (BW-17K) at a point 3 cm from the bristles.
2. Insert the channel cleaning brush (BW-17K) at a 45 angle into the opening
located in the side wall of the suction cylinder as illustrated by A in Figure
3.22. Using short strokes, feed the brush through the insertion tube until it
emerges from the distal end of the endoscope.
3. Clean the bristles with your fingertips in the detergent solution. Carefully pull
the brush out through the channel.
4. Clean the bristles in the detergent solution again.
5. Repeat until all debris is removed.
Brushing the suction channel in the universal cord
(location B)
Use the channel cleaning brush (BW-20T) to brush the
suction channel in the universal cord. If the BW-20T is not
used on this endoscope, effective cleaning of the suction
channel will not be possible.
1. Grip the channel cleaning brush (BW-20T) at a point 3 cm from the bristles.
2. Insert the channel cleaning brush (BW-20T) straight into the opening of the
suction cylinder as illustrated by B in Figure 3.22. Using short strokes, feed
the brush through the universal cord until it emerges from the suction
connector on the endoscope connector.
3. Clean the bristles with your fingertips in the detergent solution. Carefully pull
the brush out through the channel.
4. Clean the bristles in the detergent solution again.
5. Repeat until all debris is removed.
Page 46

42
Chapter 3 Cleaning, Disinfection and Sterilization Procedures
EVIS EXERA GIF/CF/PCF TYPE 160 Series REPROCESSING MANUAL
Brushing the suction cylinder (location C)
When inserting the channel-opening cleaning brush into the
suction cylinder, do not forcibly insert the brush beyond the
middle of the brush section. Otherwise, the brush may
become stuck in the suction cylinder.
1. Insert the channel-opening cleaning brush into the suction cylinder as
illustrated by C in Figure 3.22, until half of the brush section is inserted.
2. Turn the inserted brush once.
3. Pull the brush out and clean the bristles in the detergent solution.
4. Repeat until all debris is removed.
Brushing the instrument channel port (location D)
1. Insert the channel-opening cleaning brush into the instrument channel port
until the brush handle touches the channel opening as illustrated by D in
Figure 3.22.
2. Turn the inserted brush once.
3. Pull the brush out and clean the bristles in the detergent solution.
4. Repeat until all debris is removed.
5. Reprocess the cleaning brushes (BW-17K, BW-20T and MH-507) as
described in Section 3.9, “Cleaning, disinfection and sterilization procedures
for reusable parts and reprocessing equipment”.
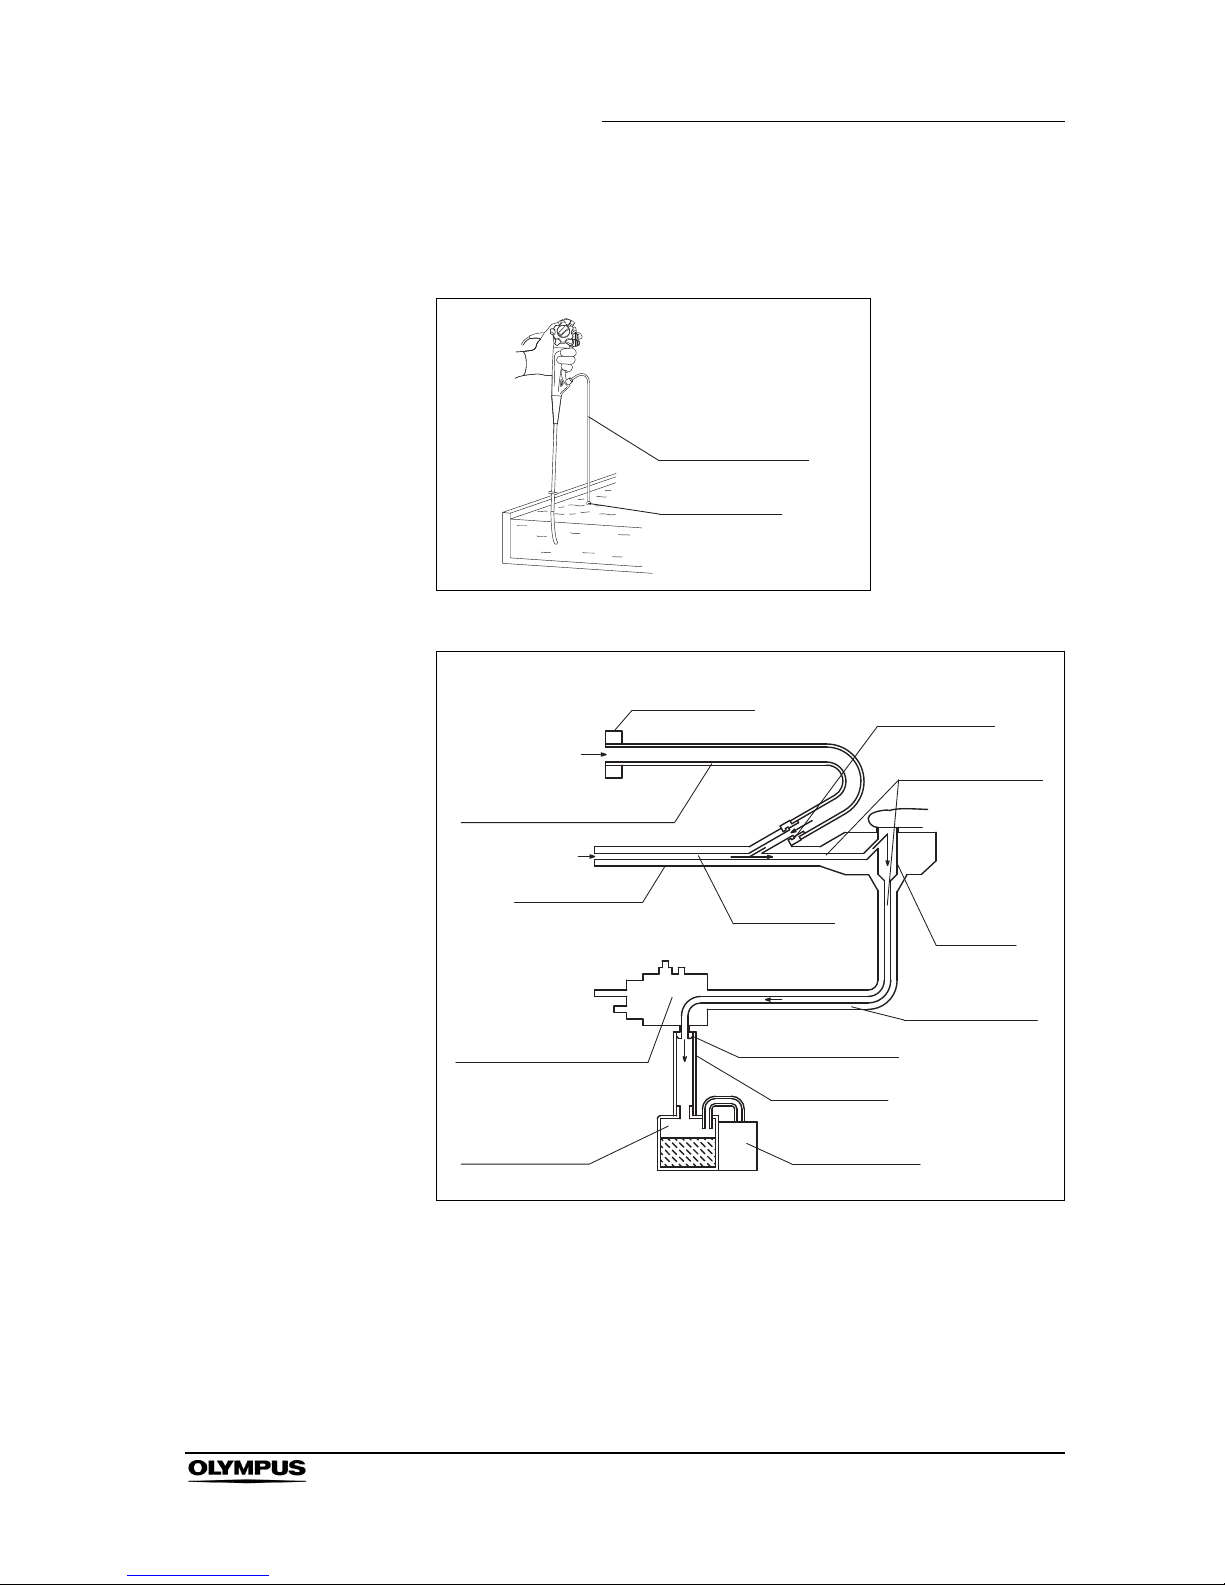
Aspirating detergent solution into the suction channels
1.
Attach the suction cleaning adapter to the instrument channel port (see
Figures 3.23 and 3.24).
2. Connect the suction tube from the suction pump to the suction connector on
the endoscope connector. Turn the suction pump ON.
3. Immerse both the endoscope’s distal end and the weighted end of the
suction cleaning adapter in the detergent solution.
4. Cover the suction cylinder with your finger and aspirate detergent solution
for approximately 30 seconds.
5. Turn the suction pump OFF.
6. Disconnect the suction tube and the suction cleaning adapter.
Page 47
Chapter 3 Cleaning, Disinfection and Sterilization Procedures
43
EVIS EXERA GIF/CF/PCF TYPE 160 Series REPROCESSING MANUAL
7. Reprocess the suction cleaning adapter as described in Section 3.9,
“Cleaning, disinfection and sterilization procedures for reusable parts and
reprocessing equipment”.
Figure 3.23
Figure 3.24
Suction cleaning
adapter
Weighted end
Weighted end
Instrument
channel port
Suction channel
Suction
cylinder
Universal cord
Suction connector
Suction tube
Suction pump
Suction bottle
Endoscope connector
Insertion tube
Suction cleaning adapter
Instrument
channel
Page 48
44
Chapter 3 Cleaning, Disinfection and Sterilization Procedures
EVIS EXERA GIF/CF/PCF TYPE 160 Series REPROCESSING MANUAL
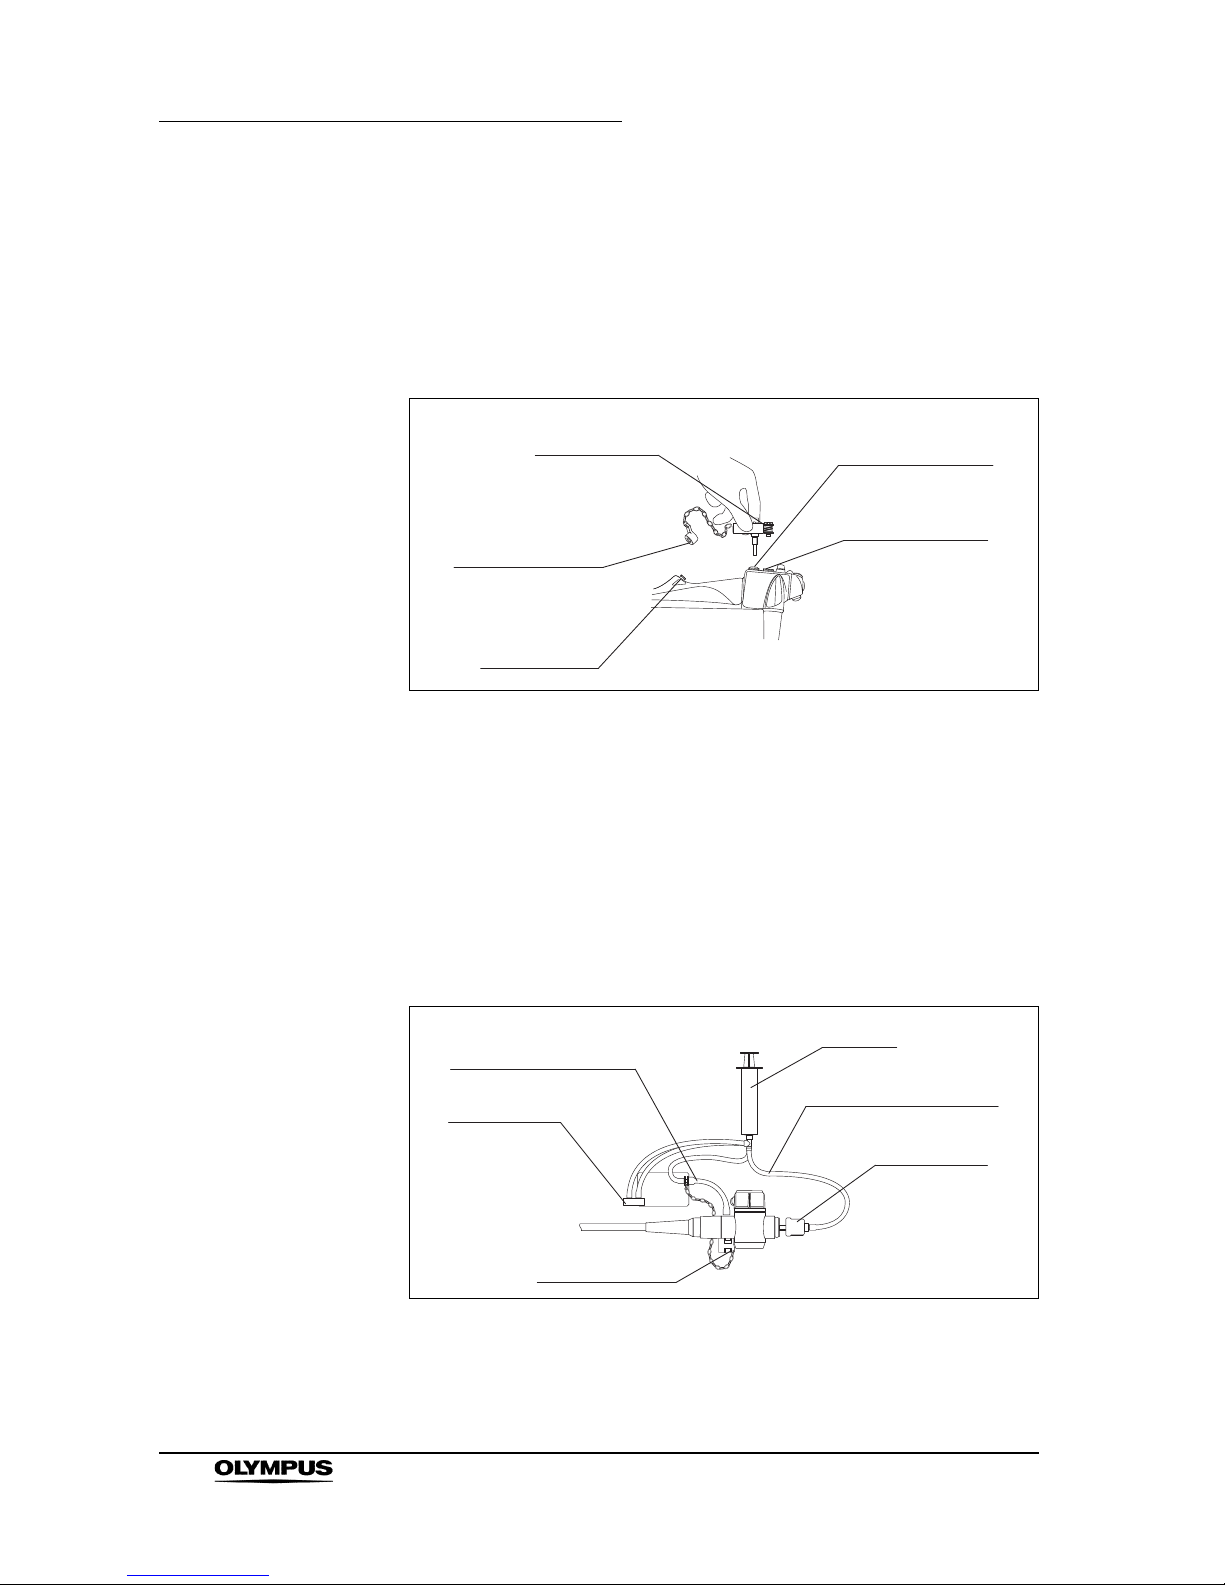
Flushing detergent solution into the air/water channels
1.
Attach the channel plug’s biopsy valve cap to the instrument channel port
(see Figure 3.25).
2. Lower the channel plug’s cylinder plug onto the air/water and suction
cylinders and slide the plug until it stops (see Figure 3.25).
Figure 3.25
3. Attach the injection tube’s connector plug to the air and water supply
connectors on the endoscope connector (see Figure 3.26).
4. Attach the injection tube’s air pipe port to the air pipe on the endoscope
connector (see Figure 3.26).
5. Attach the injection tube’s suction channel tube to the suction connector on
the endoscope connector (see Figure 3.26).
6. Immerse the suction port of the injection tube in the detergent solution.
Figure 3.26
Air/water cylinder
Suction cylinder
Biopsy valve cap
Cylinder plug
Instrument
channel port
Suction channel tube
Syringe
Air/water channel port
Air pipe port
Connector plug
Suction port
Page 49
Chapter 3 Cleaning, Disinfection and Sterilization Procedures
45
EVIS EXERA GIF/CF/PCF TYPE 160 Series REPROCESSING MANUAL
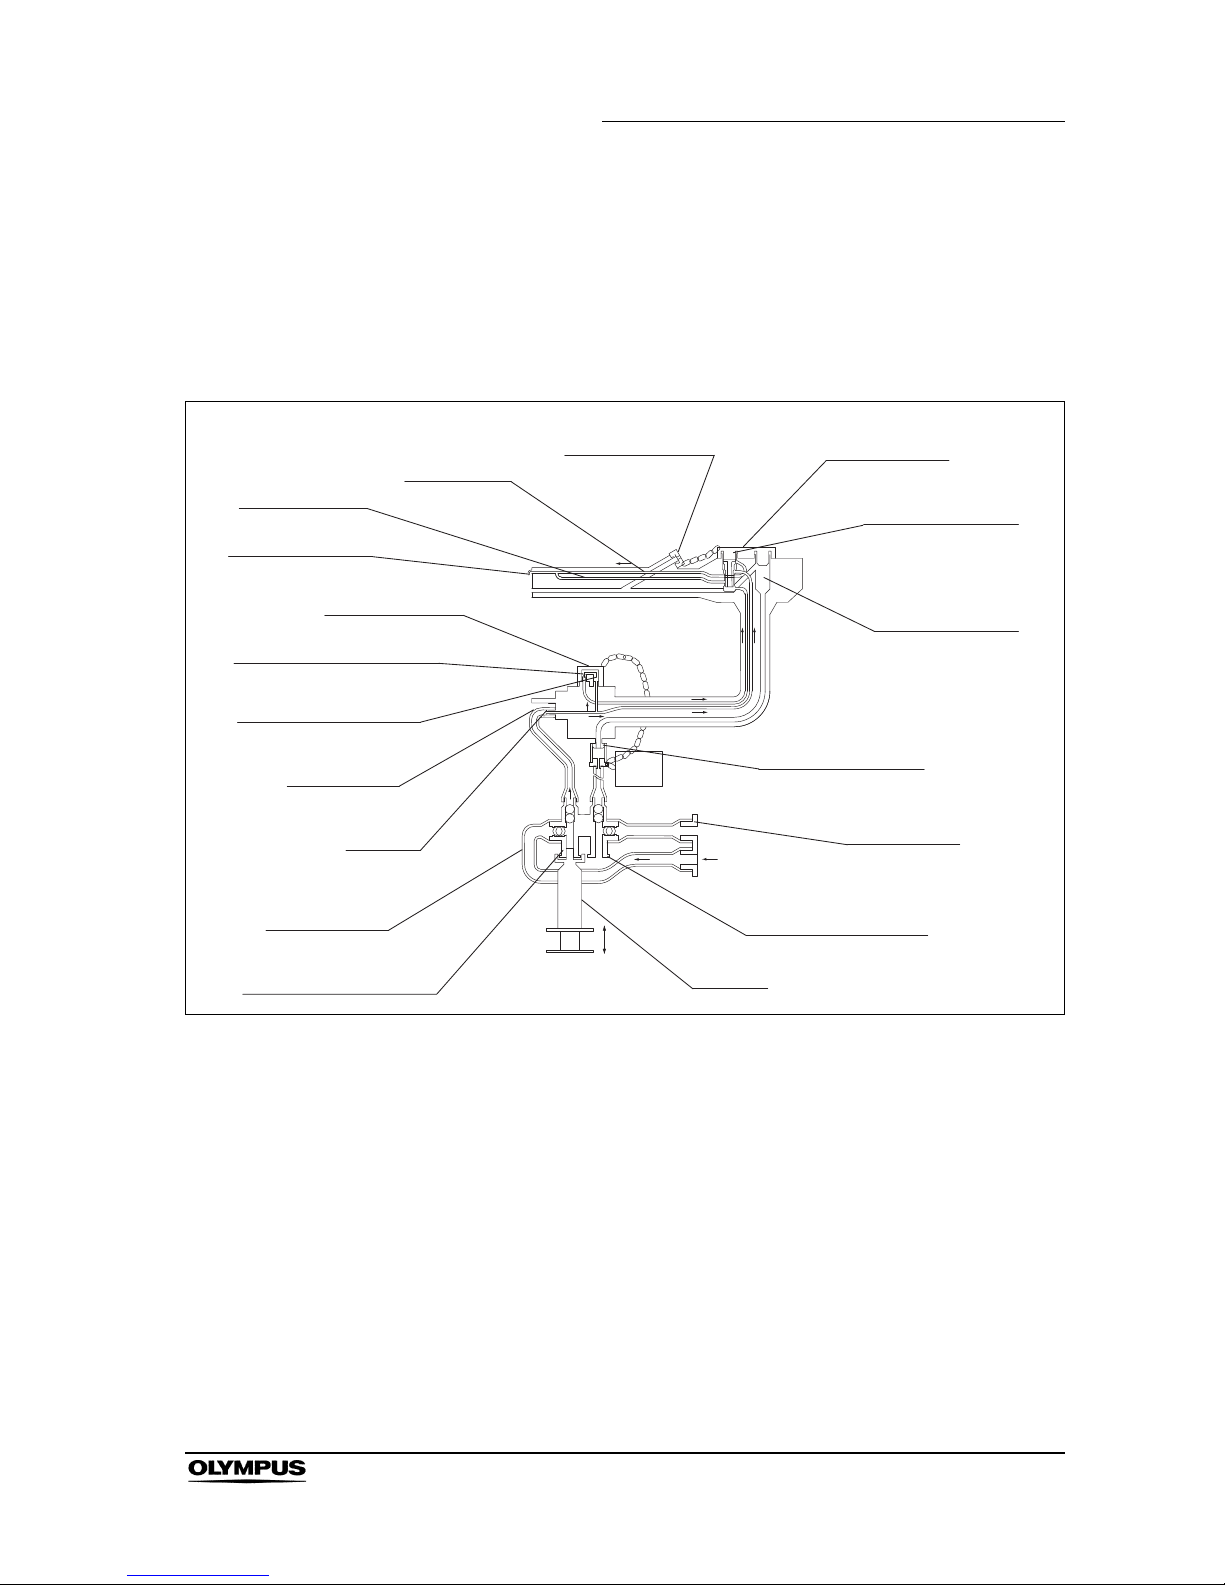
7. Attach the 30 cm
3
(30 ml) syringe to the injection tube’s air/water channel
port (see Figure 3.27).
8. Inject 90 cm
3
(90 ml) of detergent solution into the air/water channel.
9. Disconnect the channel plug and injection tube from the endoscope, and
leave all items immersed.
Figure 3.27
Biopsy valve cap
Channel plug
Air channel
Air/water cylinder
Suction cylinder
Suction connector
Suction port
Suction channel port
Syringe
Water channel
Air/water nozzle
Connector plug
Water supply connector
Air supply connector
Air pipe
Injection tube
Air/water channel port
Air pipe port
Page 50
46
Chapter 3 Cleaning, Disinfection and Sterilization Procedures
EVIS EXERA GIF/CF/PCF TYPE 160 Series REPROCESSING MANUAL
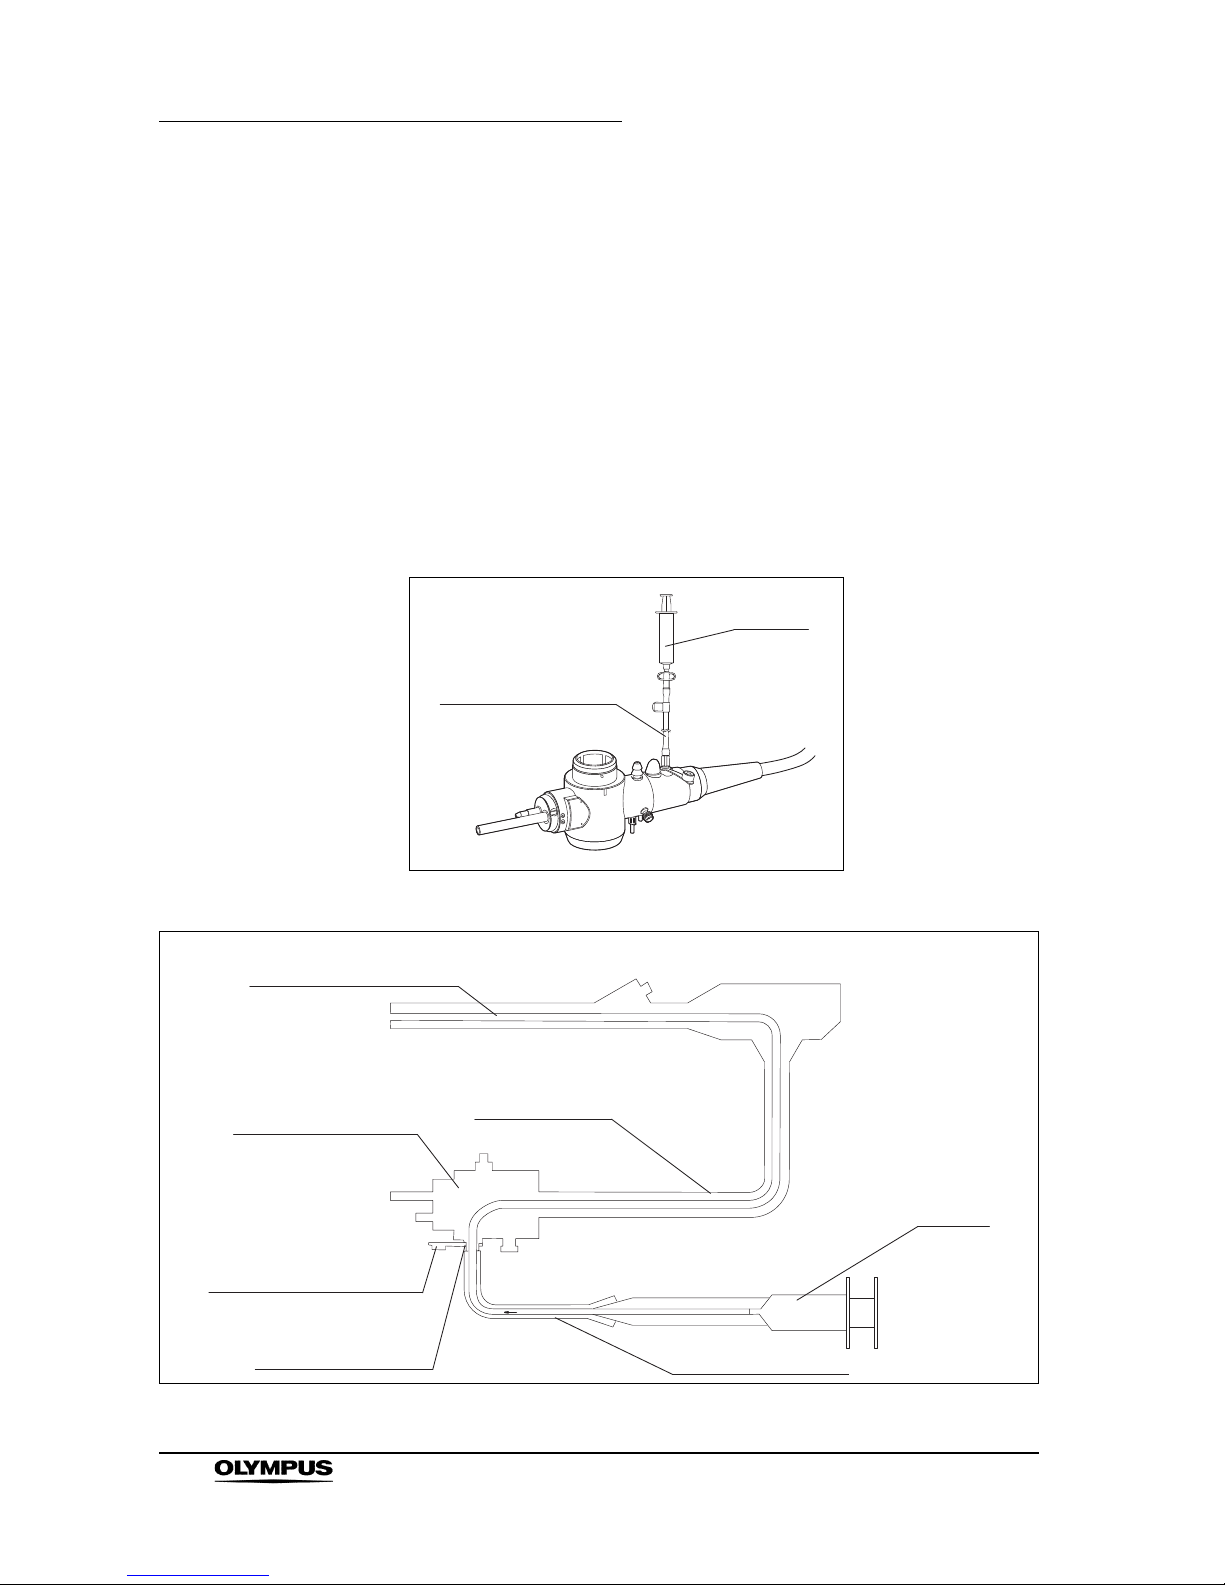
Flushing detergent solution into the auxiliary water channel
(for endoscopes with auxiliary water feeding only)
Using the auxiliary water tube and 30 cm3 (30 ml) syringe, inject detergent
solution into the auxiliary water channel.
1. Attach the auxiliary water tube to the auxiliary water inlet (see Figures 3.28
and 3.29).
2. Using the 30 cm
3
(30 ml) syringe, inject 90 cm3 (90 ml) of detergent
solution.
3. Disconnect the auxiliary water tube from the endoscope and immerse it in
detergent solution.
Figure 3.28
Figure 3.29
Syringe
Auxiliary water tube
Auxiliary water channel
Universal cord
Endoscope connector
Auxiliary water inlet cap
Auxiliary water inlet
Auxiliary water tube
Syringe
Page 51

Chapter 3 Cleaning, Disinfection and Sterilization Procedures
47
EVIS EXERA GIF/CF/PCF TYPE 160 Series REPROCESSING MANUAL
Soaking the endoscope and all equipment in detergent
solution
1.
Using a clean, lint-free cloth, wipe all debris from the endoscope’s external
surfaces while the endoscope is immersed in the detergent solution.
2. Cover the basin with a tight fitting lid to minimize the release of detergent
vapors.
3. Soak the endoscope and all equipment for the amount of time and at the
temperature recommended by the detergent manufacturer.
Removing and rinsing the endoscope and all equipment
1.
Remove the endoscope and all equipment from the detergent solution and
place them in clean water.
2. Gently agitate them to thoroughly rinse.
Removing detergent solution from all channels
1.
Connect the channel plug and the injection tube to the endoscope. Place the
suction port in clean water.
2. Attach the 30 cm
3
(30 ml) syringe to the injection tube’s air/water channel
port and inject 90 cm
3
(90 ml) of clean water into the air/water channel (see
Figure 3.27).
3. Attach the 30 cm
3
(30 ml) syringe to the suction channel port and inject
90 cm
3
(90 ml) of clean water into the suction channel (see Figure 3.30).
4. Attach the auxiliary water tube to the auxiliary water inlet (for endoscopes
with auxiliary water feeding only).
5. Attach the 30 cm
3
(30 ml) syringe to the luer port of the auxiliary water tube
and inject 90 cm
3
(90 ml) of clean water to the auxiliary water channel (for
endoscopes with auxiliary water feeding only).
6. Remove the endoscope, together with all equipment, from the water.
7. Attach the 30 cm
3
(30 ml) syringe to the suction channel port and flush the
suction channel with 90 cm
3
(90 ml) of air (see Figure 3.30).
8. Attach the 30 cm
3
(30 ml) syringe to the injection tube’s air/water channel
port and flush the air/water channel with 90 cm
3
(90 ml) of air (see Figure
3.27).
9. Attach the 30 cm
3
(30 ml) syringe to the luer port of the auxiliary water tube
and flush the auxiliary water channel with 90 cm
3
(90 ml) of air (for
endoscopes with auxiliary water feeding only).
Page 52
48
Chapter 3 Cleaning, Disinfection and Sterilization Procedures
EVIS EXERA GIF/CF/PCF TYPE 160 Series REPROCESSING MANUAL
10. Detach the channel plug and injection tube from the endoscope.
11. Detach the auxiliary water tube from the endoscope (for endoscopes with
auxiliary water feeding only).
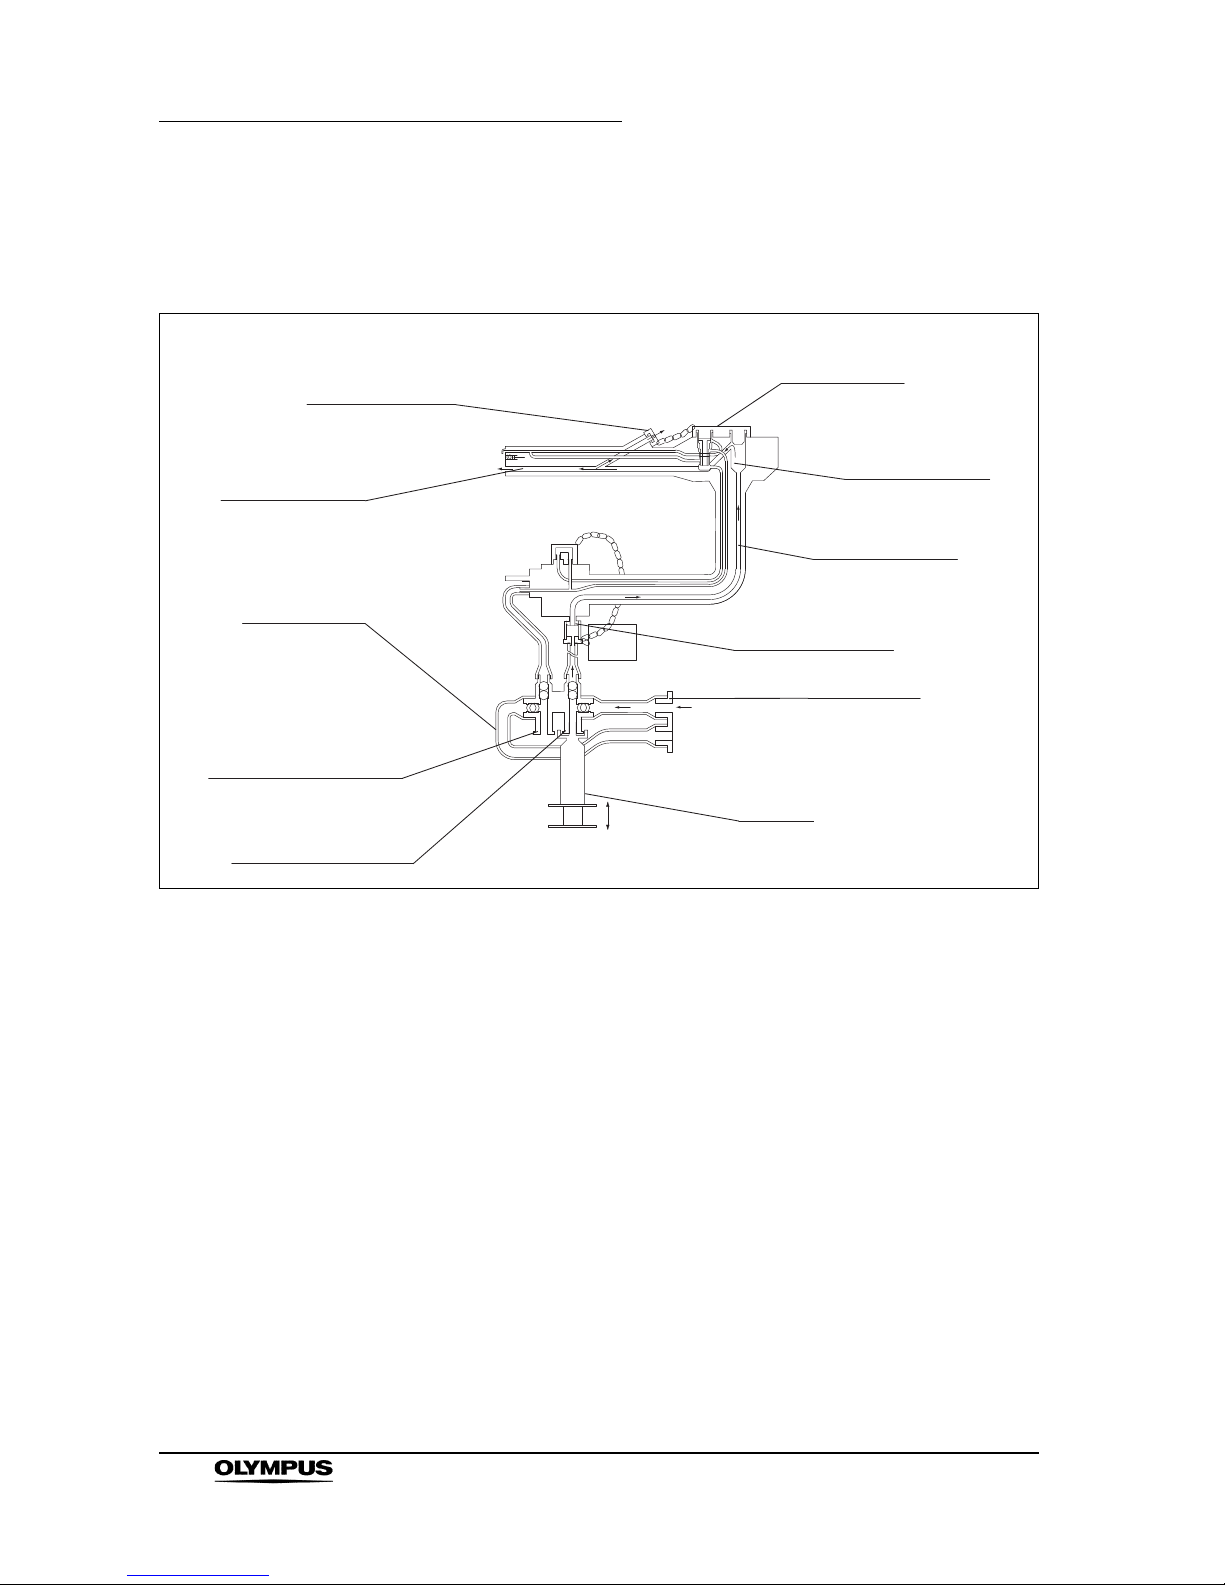
Figure 3.30
Dry external surfaces
1.
Using a clean, lint-free cloth, thoroughly wipe and dry the external surfaces
of the endoscope, channel plug and injection tube.
2. Inspect the endoscope for residual debris. Should debris remain, repeat the
procedures given in this section.
Biopsy valve cap
Channel plug
Suction cylinder
Suction channel
Suction channel
Injection tube
Air/water channel port
Suction channel port
Syringe
Suction port
Suction connector
Page 53

Chapter 3 Cleaning, Disinfection and Sterilization Procedures
49
EVIS EXERA GIF/CF/PCF TYPE 160 Series REPROCESSING MANUAL
Presoak for excessive bleeding and/or delayed reprocessing
Follow the steps below only in case of excessive bleeding
and/or delayed reprocessing; unnecessary immersions
should be avoided. Consecutive extended immersions may
damage the endoscope.
Preclean and perform a leakage test on the endoscope as described in Section
3.3, “Precleaning” and Section 3.4, “Leakage testing”.
1. Fill a basin with detergent solution at the temperature and concentration
recommended by the detergent manufacturer. Use a basin which is at least
40 cm by 40 cm (16” by 16”) in size and deep enough to allow the
endoscope to be completely immersed.
2. Carefully coil the endoscope’s insertion tube and universal cord, and
completely immerse the endoscope in the detergent solution.
Do not coil the insertion tube or universal cord with a
diameter of less than 12 cm. Equipment damage can result.
3. Fill all the channels with the detergent solution following the procedures
described in this section.
4. Soak the endoscope for 10 hours at the temperature recommended by the
detergent manufacturer.
5. Remove the endoscope from the detergent solution.
6. After soaking the endoscope, manually clean it following the procedures
described in this section, then disinfect or sterilize the endoscope following
the procedures described in Section 3.6, “High-level disinfection” or Section
3.8, “Sterilization”.
Page 54

50
Chapter 3 Cleaning, Disinfection and Sterilization Procedures
EVIS EXERA GIF/CF/PCF TYPE 160 Series REPROCESSING MANUAL
3.6 High-level disinfection
After manual cleaning, disinfect the endoscope according to the procedures
described below.
Equipment needed
Prepare the following equipment:
All disinfection steps should be performed with the
endoscope and all equipment completely immersed. While
they are immersed, if the equipment is connected to the
endoscope or any part of them is not immersed completely,
disinfectant solution may not adequately contact all surfaces
of the equipment.
Preparation
1.
Fill a basin with disinfectant solution at the temperature and concentration
recommended by the disinfectant manufacturer. Use a basin which is at
least 40 cm by 40 cm (16” by 16”) in size and deep enough to allow the
endoscope to be completely immersed.
2. Connect the channel plug and the injection tube to the endoscope.
3. Attach the auxiliary water tube to the auxiliary water inlet (for endoscopes
with auxiliary water feeding only).
• Personal protective equipment
• Clean, lint-free cloths
• Large basin
• Disinfectant solution
• Channel plug (MH-944)
• Injection tube (MH-946)
• Auxiliary water tube (MAJ-855 for endoscopes with
auxiliary water feeding only)
Page 55

Chapter 3 Cleaning, Disinfection and Sterilization Procedures
51
EVIS EXERA GIF/CF/PCF TYPE 160 Series REPROCESSING MANUAL
Flushing disinfectant solution into all channels
1.
Immerse the endoscope and all equipment in the disinfectant solution.
2. Using the 30 cm
3
(30 ml) syringe, flush at least 90 cm3 (90 ml) of
disinfectant solution through the air/water and suction channels respectively.
Confirm that no bubbles exit the distal end of the endoscope.
3. Using the 30 cm
3
(30 ml) syringe, flush at least 90 cm3 (90 ml) of
disinfectant solution through the auxiliary water channel. Confirm that no
bubbles exit the distal end of the endoscope (for endoscopes with auxiliary
water feeding only).
4. With the endoscope, channel plug, injection tube and auxiliary water tube
completely immersed in the disinfectant solution, disconnect all equipment
from the endoscope. Leave the endoscope and all equipment immersed in
the disinfectant solution.
Soaking the endoscope and all equipment in disinfectant
solution
1.
If air bubbles adhere to the surfaces of the endoscope, channel plug,
injection tube or the auxiliary water tube, remove them using a clean,
lint-free cloth.
2. Cover the basin with a tight fitting lid to minimize the release of disinfectant
vapors.
3. Soak the endoscope and all equipment in disinfectant solution for the
amount of time and at the temperature recommended by the disinfectant
manufacturer.
Removing the endoscope and all equipment from disinfectant
solution
1.
Before removing the endoscope from the disinfectant solution, connect the
channel plug and injection tube to the endoscope.
2. Before removing the endoscope from the disinfectant solution, attach the
auxiliary water tube to the endoscope (for endoscopes with auxiliary water
feeding only).
3. Remove the injection tube’s suction port from the disinfectant solution.
4. Attach the 30 cm
3
(30 ml) syringe to the injection tube’s air/water channel
port and flush the air/water channel with 90 cm
3
(90 ml) of air.
5. Attach the 30 cm
3
(30 ml) syringe to the injection tube’s suction channel port
and flush the suction channel with 90 cm
3
(90 ml) of air.
Page 56

52
Chapter 3 Cleaning, Disinfection and Sterilization Procedures
EVIS EXERA GIF/CF/PCF TYPE 160 Series REPROCESSING MANUAL
6. Attach the 30 cm
3
(30 ml) syringe to the luer port of the auxiliary water tube
and flush the auxiliary water channel with 90 cm
3
(90 ml) of air (for
endoscopes with auxiliary water feeding only).
7. Remove the endoscope and all equipment from the disinfectant solution.
8. Disconnect all equipment from the endoscope.
3.7 Rinsing after high-level disinfection
After reprocessing, purge the channels of the endoscope to
thoroughly dry them. Otherwise, bacteria may proliferate in
the channels and pose an infection-control risk to the patient
and/or operators performing the next procedure with the
endoscope.
After high-level disinfection, rinse the endoscope according to the procedures
described below.
Use water of appropriate microbiological quality. Once removed from disinfectant
solution, the instrument must be thoroughly rinsed with sterile water to remove
any disinfectant residue. If sterile water is not available, fresh potable tap water
or water which has been processed (e.g. filtered) to improve its microbiological
quality may be used with 70% ethyl or isopropyl alcohol rinse (see “Non-sterile
water rinse and alcohol flush” on page 55). Consult with your hospital’s infection
control committee.
Page 57

Chapter 3 Cleaning, Disinfection and Sterilization Procedures
53
EVIS EXERA GIF/CF/PCF TYPE 160 Series REPROCESSING MANUAL
Equipment needed
Prepare the following equipment:
• Personal protective equipment
• Sterile, lint-free cloths
• Large basin
• Sterile water (for sterile water rinse)
• Suction pump (with sterile suction tube)
•30cm
3
(30 ml) syringe
• Sterile cotton swabs
• 70% ethyl or isopropyl alcohol
• Channel plug (MH-944)
• Injection tube (MH-946)
• Auxiliary water tube (MAJ-855 for endoscopes with
auxiliary water feeding only)
• Clean water (for non-sterile water rinse)
• Small container
Page 58

54
Chapter 3 Cleaning, Disinfection and Sterilization Procedures
EVIS EXERA GIF/CF/PCF TYPE 160 Series REPROCESSING MANUAL
Sterile water rinse
1. Fill a basin with sterile water. Use a basin which is at least 40 cm by 40 cm
(16” by 16”) in size and deep enough to allow the endoscope to be
completely immersed.
2. Immerse the endoscope, channel plug and injection tube in the sterile water.
Using a sterile, lint-free cloth, thoroughly rinse and wipe all external
surfaces.
3. Immerse the auxiliary water tube in the sterile water. Using a sterile, lint-free
cloth, thoroughly rinse and wipe all external surfaces (for endoscopes with
auxiliary water feeding only).
4. Connect the channel plug and the injection tube to the endoscope. Place the
suction port in sterile water.
5. Attach the 30 cm
3
(30 ml) syringe to the injection tube’s air/water channel
port and inject 90 cm
3
(90 ml) of sterile water into the air/water channel.
6. Attach the 30 cm
3
(30 ml) syringe to the suction channel port and inject
90 cm
3
(90 ml) of sterile water into the suction channel.
7. Attach the auxiliary water tube to the auxiliary water inlet (for endoscopes
with auxiliary water feeding only).
8. Using the 30 cm
3
(30 ml) syringe, inject 90 cm3 (90 ml) of sterile water into
the auxiliary water channel (for endoscopes with auxiliary water feeding
only).
9. Remove the endoscope, together with all equipment, from the water.
10. Using the 30 cm
3
(30 ml) syringe, flush the air/water and suction channels
with 90 cm
3
(90 ml) of air.
11. Using the 30 cm
3
(30 ml) syringe, flush the auxiliary water channel with
90 cm
3
(90 ml) of air (for endoscopes with auxiliary water feeding only).
12. Disconnect the injection tube only. Connect a sterile suction tube from the
suction pump to the suction connector on the endoscope. Turn the suction
pump ON and aspirate air for at least 15 seconds.
13. Turn the suction pump OFF and disconnect all equipment from the
endoscope.
14. Using a sterile, lint-free cloth, thoroughly wipe and dry the external surfaces
of the endoscope and all equipment.
Page 59
Chapter 3 Cleaning, Disinfection and Sterilization Procedures
55
EVIS EXERA GIF/CF/PCF TYPE 160 Series REPROCESSING MANUAL
Flushing the channels with 70% ethyl or isopropyl alcohol
after rinsing them with sterile water facilitates drying inside
the channels.
Non-sterile water rinse and alcohol flush
Alcohol is flammable. Handle with care.
1. Fill a small container with 70% ethyl or isopropyl alcohol.
2. Inject non-sterile water and air following the procedures given in “Sterile
water rinse” on page 54.
3. Immerse the suction port of the injection tube in the alcohol. Using the
30 cm
3
(30 ml) syringe, flush the air/water and suction channels with 90 cm3
(90 ml) of the alcohol respectively.
4. Remove the suction port of the injection tube from the alcohol. Flush the
air/water and the suction channels with 90 cm
3
(90 ml) of air.
5. Using the 30 cm
3
(30 ml) syringe, flush the auxiliary water channel with
90 cm
3
(90 ml) of the alcohol (for endoscopes with auxiliary water feeding
only).
6. Using the 30 cm
3
(30 ml) syringe, flush the auxiliary water channel with
90 cm
3
(90 ml) of air (for endoscopes with auxiliary water feeding only).
7. Disconnect all equipment from the endoscope.
8. Remove all equipment and the endoscope from the basin.
9. Using a sterile, lint-free cloth, thoroughly wipe and dry the external surfaces
of the endoscope and all equipment.
10. Using a sterile, lint-free cloth moistened with alcohol, thoroughly wipe the
external surfaces of the endoscope and all equipment.
11. Connect the channel plug and injection tube to the endoscope. Using the
30 cm
3
(30 ml) syringe, flush the air/water channel with 90 cm3 (90 ml) of
air.
12. Connect the auxiliary water tube to the endoscope. Using the 30 cm
3
(30
ml) syringe, flush the auxiliary water channel with 90 cm
3
(90 ml) of air (for
endoscopes with auxiliary water feeding only).
13. Disconnect the injection tube only. Connect a clean suction tube from the
suction pump to the suction connector on the endoscope and aspirate air for
15 seconds.
Page 60
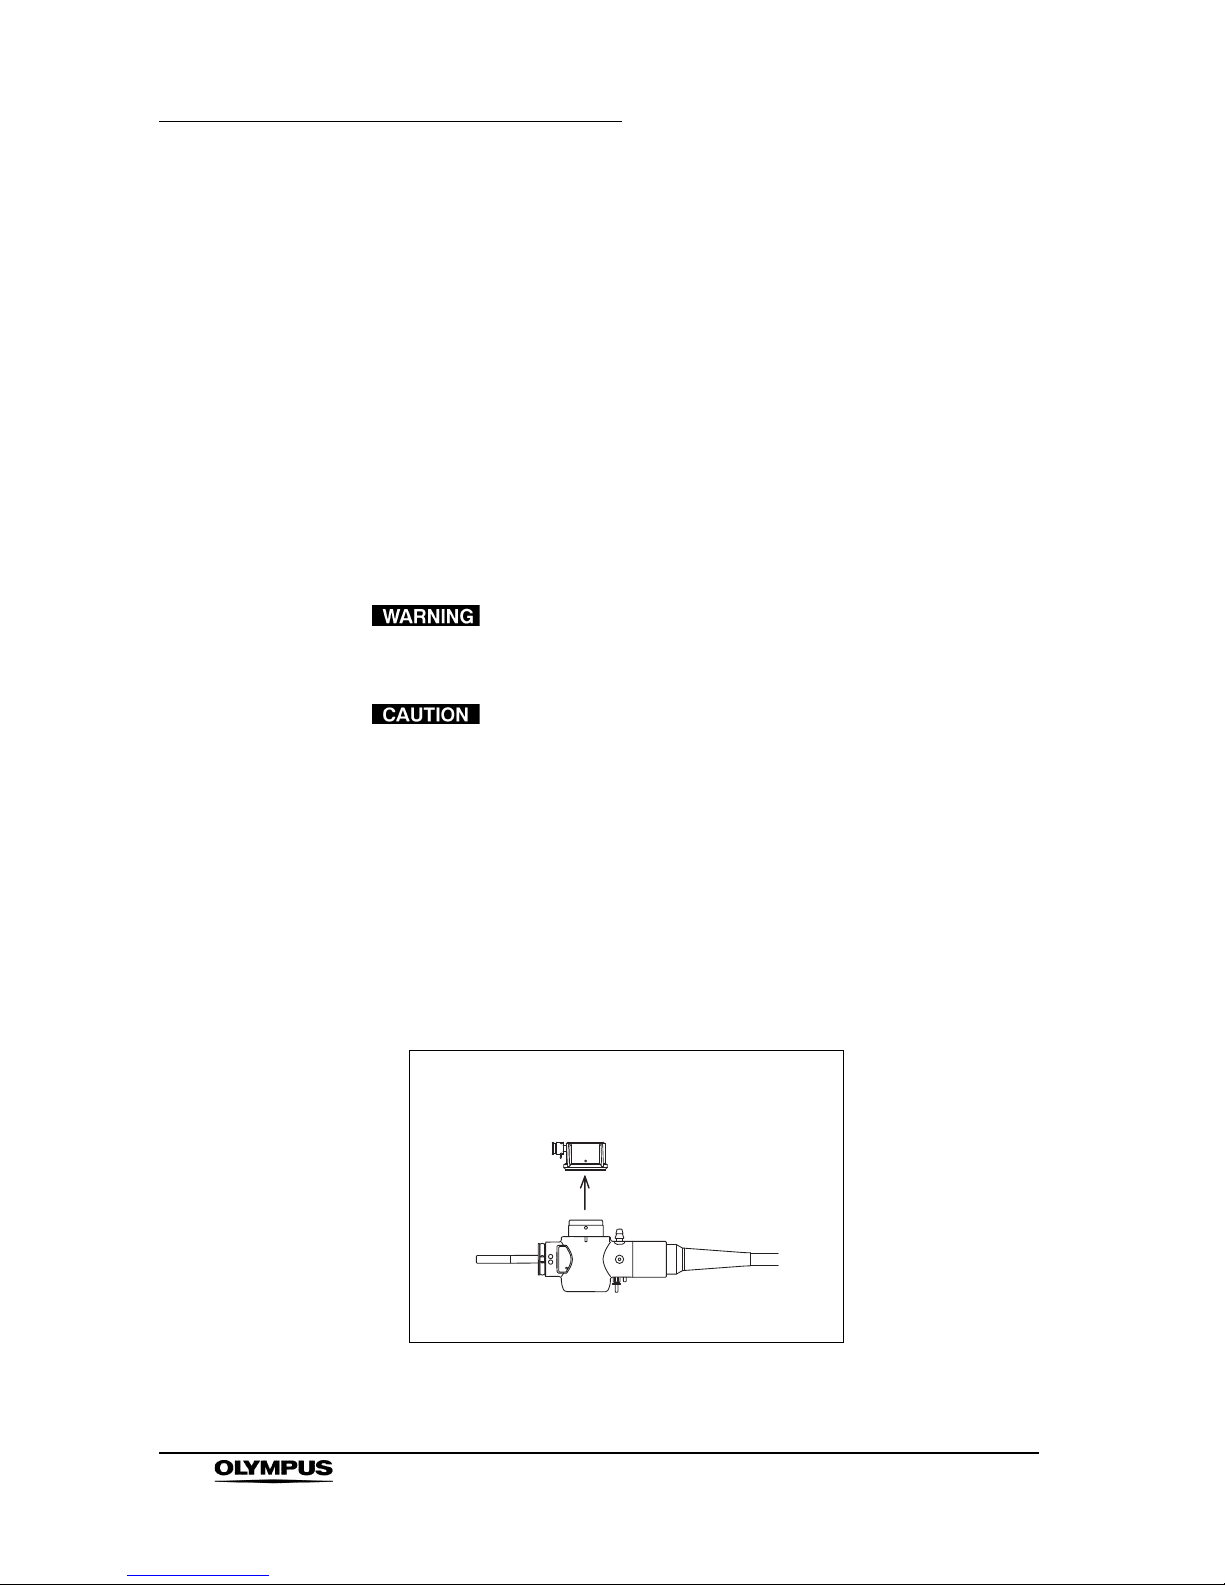
56
Chapter 3 Cleaning, Disinfection and Sterilization Procedures
EVIS EXERA GIF/CF/PCF TYPE 160 Series REPROCESSING MANUAL
14. Disconnect all equipment from the endoscope.
15. Using sterile cotton swabs, dry the inside of the air/water cylinder, suction
cylinder and instrument channel port.
3.8 Sterilization
ETO gas sterilization
As an alternative to high-level disinfection, the endoscope can be sterilized by
ethylene oxide (ETO) gas. After performing manual cleaning and drying as
described in Section 3.3, “Precleaning” and Section 3.5, “Manual cleaning”,
follow the procedures given below.
Exceeding the recommended parameters may cause
equipment damage.
If ETO gas sterilization is performed while the water-resistant
cap is attached, the covering of the bending section can be
damaged.
1. Remove the water-resistant cap (MH-553) before ETO gas sterilization (see
Figure 3.31).
2. Remove the water-resistant cap (MAJ-583) before ETO gas sterilization
(see Figure 3.32, for CF-Q160ZL/I only).
3. Remove the water-resistant cap (MAJ-942) before ETO gas sterilization
(see Figure 3.32, for CF-Q160DL/I only).
Figure 3.31
EVIS videoscope models
(except for CF-Q160ZL/I and CF-Q160DL/I)
Page 61
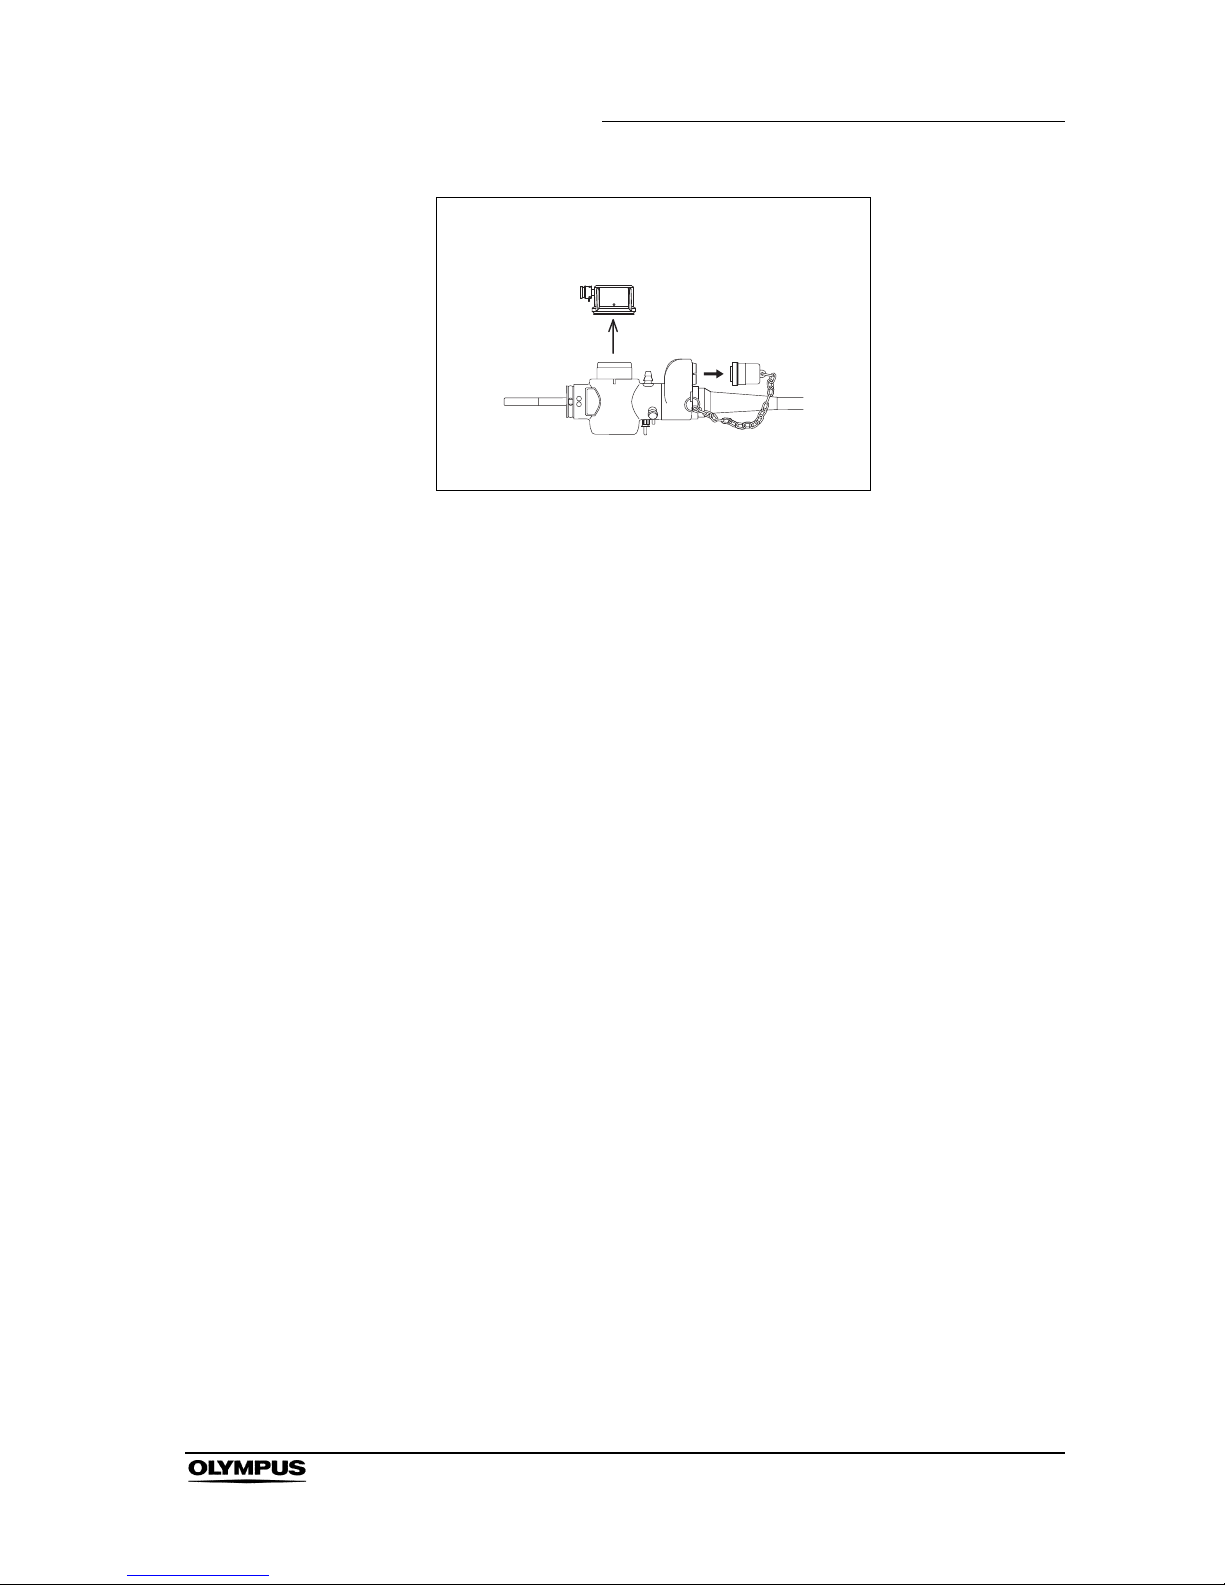
Chapter 3 Cleaning, Disinfection and Sterilization Procedures
57
EVIS EXERA GIF/CF/PCF TYPE 160 Series REPROCESSING MANUAL
Figure 3.32
4. Seal the instrument in a package appropriate for ETO gas sterilization
according to your hospital’s protocol.
5. Sterilize the package according to the recommended ETO gas exposure
parameters described in Section 2.5, “ETO gas sterilization” and the
sterilizer manufacturer’s instructions.
6. Aerate the components following the minimum aeration parameters
specified in Section 2.5, “ETO gas sterilization”.
7. Store the components following the instructions given in Chapter 5, “Storage
and Disposal”.
CF-Q160ZL/I, CF-Q160DL/I
Page 62

58
Chapter 3 Cleaning, Disinfection and Sterilization Procedures
EVIS EXERA GIF/CF/PCF TYPE 160 Series REPROCESSING MANUAL
3.9 Cleaning, disinfection and sterilization
procedures for reusable parts and reprocessing
equipment
This section includes the cleaning, disinfection and sterilization procedures for
the reusable parts and reprocessing equipment listed below. For all other parts,
refer to their respective instruction manuals. For compatible reprocessing
methods, refer to Section 2.1, “Compatibility summary”.
Equipment needed
Reusable parts which are normally reprocessed with the
endoscope
• Personal protective equipment
• Soft brush
• Large basin
• Detergent solution
• Clean water (for non-sterile water rinse)
• Clean, lint-free cloths
• Disinfectant solution
• Sterile water (for sterile water rinse)
• Sterile, lint-free cloths
• Small container
• 70% ethyl or isopropyl alcohol
•30cm
3
(30 ml) syringe
• Channel plug (MH-944)
• Injection tube (MH-946)
• Water-resistant cap (see Table 1.1)
Page 63

Chapter 3 Cleaning, Disinfection and Sterilization Procedures
59
EVIS EXERA GIF/CF/PCF TYPE 160 Series REPROCESSING MANUAL
Reusable parts which are normally reprocessed separately
from the endoscope
Manual cleaning
• Make sure that the items immersed in detergent solution do
not contact one another.
• Make sure not to scratch the seals on the air/water valve and
AW channel cleaning adapter with brushes, etc.
1. Fill a basin with clean water and low-foaming detergent solution at the
temperature and concentration recommended by the detergent
manufacturer. Use a basin which is deep enough to allow all equipment to
be completely immersed.
2. Immerse all equipment in the detergent solution. For the biopsy valve,
remove the cap from the body. Using a clean, soft brush or lint-free cloth,
meticulously clean all external surfaces in detergent solution.
3. Clean the bristles of the channel cleaning brushes thoroughly while the
brushes are immersed.
4. While immersed, depress and release the pistons of the air/water valve,
suction valve and AW channel cleaning adapter.
5. Using the channel cleaning brush, thoroughly brush the openings of the
suction valve, air/water valve and biopsy valve until no debris can be seen.
Clean the bristles of the brush while it is immersed in the detergent solution.
6. To clean the suction cleaning adapter, attach the 30 cm
3
(30 ml) syringe
and flush the tube thoroughly with detergent solution.
• Air/water valve (MH-438)
• Suction valve (MH-443)
• Biopsy valve (MB-358)
• Mouthpiece (MA-474, MB-142)
• AW channel cleaning adapter (MH-948)
• Suction cleaning adapter (MH-856)
• Channel cleaning brush (BW-20T)
• Channel cleaning brush (BW-17K for GIF-XTQ160 only)
• Channel-opening cleaning brush (MH-507)
• Auxiliary water tube (MAJ-855 for endoscopes with
auxiliary water feeding only)
Page 64

60
Chapter 3 Cleaning, Disinfection and Sterilization Procedures
EVIS EXERA GIF/CF/PCF TYPE 160 Series REPROCESSING MANUAL
7. To clean the auxiliary water tube, attach the 30 cm
3
(30 ml) syringe to the
luer port of the auxiliary water tube and flush the tube thoroughly with
detergent solution (for endoscopes with auxiliary water feeding only).
8. Soak all equipment for the amount of time and at the temperature
recommended by the detergent manufacturer.
9. Remove all equipment from the detergent solution and place it in clean
water.
10. Inspect all equipment. If debris remains, ultrasonically clean at 38 – 47 kHz
for 5 minutes.
11. While immersed, depress and release the pistons of the air/water valve,
suction valve and AW channel cleaning adapter.
12. Attach the 30 cm
3
(30 ml) syringe to the suction cleaning adapter and flush
the tube with clean water.
13. Attach the 30 cm
3
(30 ml) syringe to the luer port of the auxiliary water tube
and flush the tube with water (for endoscopes with auxiliary water feeding
only).
14. Remove all equipment from the clean water.
15. Attach the 30 cm
3
(30 ml) syringe to the suction cleaning adapter and flush
air to remove the clean water.
16. Attach the 30 cm
3
(30 ml) syringe to the luer port of the auxiliary water tube
and flush air to remove the water (for endoscopes with auxiliary water
feeding only).
17. Using a clean, lint-free cloth, thoroughly wipe and dry all external surfaces of
all equipment.
Page 65

Chapter 3 Cleaning, Disinfection and Sterilization Procedures
61
EVIS EXERA GIF/CF/PCF TYPE 160 Series REPROCESSING MANUAL
High-level disinfection
1.
Fill a basin with disinfectant solution at the temperature and concentration
recommended by the disinfectant manufacturer. Use a basin which is deep
enough to allow all equipment to be completely immersed.
2. Immerse all equipment in the disinfectant solution.
3. While immersed, depress and release the pistons of the valves and AW
channel cleaning adapter.
4. Using the 30 cm
3
(30 ml) syringe, flush the interior and recessed parts of
them while they are immersed. Ensure that all air bubbles are expelled.
5. Using the 30 cm
3
(30 ml) syringe, flush the interior and recessed parts of the
cap of the biopsy valve. Ensure that all air bubbles are expelled.
6. Attach the 30 cm
3
(30 ml) syringe to the suction cleaning adapter and flush
the tube with disinfectant solution. Ensure that all air bubbles are expelled.
7. Attach the 30 cm
3
(30 ml) syringe to the luer port of the auxiliary water tube
and flush the tube with disinfectant solution. Ensure that all air bubbles are
expelled (for endoscopes with auxiliary water feeding only).
8. Using a sterile, lint-free cloth and/or 30 cm
3
(30 ml) syringe, wipe and/or
flush all surfaces with the disinfectant solution to remove all air bubbles.
9. Rub the bristles of the cleaning brushes to remove all air bubbles.
10. Soak all equipment for the amount of time and at the temperature
recommended by the disinfectant manufacturer.
Rinsing after high-level disinfection
After high-level disinfection, rinse all equipment according to the procedures
described below.
Use water of appropriate microbiological quality. Once removed from disinfectant
solution, the instrument must be thoroughly rinsed with sterile water to remove
any disinfectant residue. If sterile water is not available, fresh potable tap water
or water which has been processed (e.g. filtered) to improve its microbiological
quality may be used with 70% ethyl or isopropyl alcohol rinse (see “Non-sterile
water rinse and alcohol flush” on page 63). Consult with your hospital’s infection
control committee.
Page 66

62
Chapter 3 Cleaning, Disinfection and Sterilization Procedures
EVIS EXERA GIF/CF/PCF TYPE 160 Series REPROCESSING MANUAL
Sterile water rinse
1. Fill a basin with sterile water. Use a basin which is deep enough to allow all
equipment to be completely immersed.
2. Remove the suction cleaning adapter from the disinfectant solution and
attach the 30 cm
3
(30 ml) syringe. Flush air to expel all disinfectant solution.
Immerse the suction cleaning adapter in the sterile water.
3. Remove the auxiliary water tube from the disinfectant solution and attach
the 30 cm
3
(30 ml) syringe. Flush air to expel all disinfectant solution.
Immerse the auxiliary water tube in the sterile water (for endoscopes with
auxiliary water feeding only).
4. Remove the remaining equipment from the disinfectant solution and
immerse it in the sterile water.
5. While immersed, depress and release the pistons of the air/water valve,
suction valve and AW channel cleaning adapter.
6. Attach the 30 cm
3
(30 ml) syringe to the suction cleaning adapter and flush
the tube with sterile water.
7. Attach the 30 cm
3
(30 ml) syringe to the luer port of the auxiliary water tube
and flush the tube with sterile water (for endoscopes with auxiliary water
feeding only).
8. Gently agitate all equipment to thoroughly rinse them.
9. Remove all equipment from the sterile water.
10. Attach the 30 cm
3
(30 ml) syringe to the suction cleaning adapter and flush
air to dry the inside of the tube.
11. Attach the 30 cm
3
(30 ml) syringe to the luer port of the auxiliary water tube
and flush air to dry the inside of the tube (for endoscopes with auxiliary
water feeding only).
12. Using a sterile, lint-free cloth, thoroughly wipe and dry all external surfaces.
Flushing the channels with 70% ethyl or isopropyl alcohol
after rinsing them with sterile water facilitates drying inside
the channels.
Page 67

Chapter 3 Cleaning, Disinfection and Sterilization Procedures
63
EVIS EXERA GIF/CF/PCF TYPE 160 Series REPROCESSING MANUAL
Non-sterile water rinse and alcohol flush
Alcohol is flammable. Handle with care.
1. Fill a small container with 70% ethyl or isopropyl alcohol.
2. Immerse all equipment in non-sterile water following all procedures given in
“Sterile water rinse” on page 62.
3. Attach the 30 cm
3
(30 ml) syringe to the suction cleaning adapter and flush
the tube with alcohol.
4. Attach the 30 cm
3
(30 ml) syringe to the luer port of the auxiliary water tube
and flush the tube with alcohol (for endoscopes with auxiliary water feeding
only).
5. Immerse all equipment in the alcohol and gently agitate them.
6. While immersed, depress and release the pistons of the air/water valve,
suction valve and AW channel cleaning adapter.
7. Remove all equipment from the alcohol.
8. Attach the 30 cm
3
(30 ml) syringe to the suction cleaning adapter and flush
air to dry the inside of the tube.
9. Attach the 30 cm
3
(30 ml) syringe to the luer port of the auxiliary water tube
and flush air to dry the inside of the tube (for endoscopes with auxiliary
water feeding only).
10. Using a sterile, lint-free cloth, thoroughly wipe and dry all external surfaces.
Page 68

64
Chapter 3 Cleaning, Disinfection and Sterilization Procedures
EVIS EXERA GIF/CF/PCF TYPE 160 Series REPROCESSING MANUAL
Sterilization
ETO gas sterilization
The cleaning brushes are not compatible with ETO gas
sterilization.
After cleaning and drying as described in “Manual cleaning” on page 59, follow
the procedures given below.
1. Before sterilization, confirm that the parts of the equipment are thoroughly
cleaned and dried.
2. Seal the individual parts or equipment separately in packages appropriate
for ETO gas sterilization according to your hospital’s protocol.
3. Sterilize the packages according to the recommended ETO gas exposure
parameters as described in Section 2.5, “ETO gas sterilization” and the
sterilizer manufacturer’s instructions.
4. Aerate the components following the minimum aeration parameters
specified in Section 2.5, “ETO gas sterilization”.
5. Store the components following the instructions given in Chapter 5, “Storage
and Disposal”.
Steam sterilization (autoclaving)
After cleaning as described in “Manual cleaning” on page 59, steam sterilize
(autoclave) according to the procedures given below.
1. Seal the individual parts or equipment separately in packages appropriate
for steam sterilization (autoclaving) according to your hospital’s protocol.
2. Steam sterilize the packages according to the recommended steam
sterilization (autoclaving) exposure parameters as described in Section 2.6,
“Steam sterilization (autoclaving) of accessories” and the sterilizer
manufacturer’s instructions.
3. Following steam sterilization (autoclaving), let all components gradually cool
down to room temperature. Sudden changes in temperature may damage
the instruments.
Page 69

Chapter 4 Cleaning and Disinfection Equipment
65
EVIS EXERA GIF/CF/PCF TYPE 160 Series REPROCESSING MANUAL
Chapter 4 Cleaning and Disinfection
Equipment
The endoscope is compatible with some endoscope reprocessors
recommended by Olympus. Refer to the instruction manual of endoscope
reprocessor for details on operation.
• Thoroughly clean the endoscope as described in Chapter 3,
“Cleaning, Disinfection and Sterilization Procedures” before
cleaning and disinfection of an endoscope in an endoscope
reprocessor. If the endoscope reprocessor is used with an
endoscope with a large amount of debris attached to it,
cleaning and disinfection may pose an infection-control risk
to the patients and/or operators who perform the next
procedure with it. Note that cleaning of the endoscope
becomes difficult if debris is allowed to solidify because of a
delay before cleaning following the procedure. Refer to the
instruction manual of endoscope reprocessor for details.
• Olympus confirms validation of the endoscope reprocessors
recommended by Olympus only. If using endoscope
reprocessor that are not recommended by Olympus, the
endoscope reprocessor manufacturers are responsible for
validation of the endoscope reprocessor with the endoscope
models listed in its intended use statement. If using an
endoscope reprocessor, confirm that it is capable of
reprocessing endoscope including all channels. If there are
channels and/or other parts which cannot be cleaned and
high-level disinfected by the endoscope reprocessor, have to
undergo manual cleaning and high-level disinfection or
sterilization as described in Chapter 3, “Cleaning,
Disinfection and Sterilization Procedures” after using the
endoscope reprocessor. Otherwise, insufficient cleaning and
disinfection or sterilization of the endoscope may pose an
infection control risk to the patient and/or operators
performing the next procedure with the endoscope. If you are
uncertain as to the ability of your endoscope reprocessor to
clean and high-level disinfect endoscope including all
channels, contact the endoscope reprocessor supplier for
specific instructions and/or connectors.
Page 70

66
Chapter 4 Cleaning and Disinfection Equipment
EVIS EXERA GIF/CF/PCF TYPE 160 Series REPROCESSING MANUAL
• Use connectors special to each model when cleaning and
disinfecting the endoscope with the endoscope reprocessor.
Otherwise, insufficient cleaning and disinfection or
sterilization of the endoscope may pose an infection control
risk to the patient and/or operators performing the next
procedure with the endoscope. The applicable connectors for
each endoscope model should be listed in the automated
endoscope reprocessor instruction manual. If your
endoscope model is not listed in this table, please contact the
manufacturer of the endoscope reprocessor.
Page 71

Chapter 5 Storage and Disposal
67
EVIS EXERA GIF/CF/PCF TYPE 160 Series REPROCESSING MANUAL
Chapter 5 Storage and Disposal
5.1 Storage
• The storage cabinet must be clean, dry, well ventilated and
maintained at ambient temperature. Storing the endoscope in
direct sunlight, at high temperatures, in high humidity or
exposed to X-rays and ultraviolet-rays may damage the
endoscope or present an infection control risk.
• Prior to storage, detach all removable parts from the
endoscope. It will allow air to circulate through the internal
lumens of the endoscope and will assist drying.
• Prior to storage, uncap the auxiliary water inlet. This will
allow air to circulate through the internal lumen of the
endoscope and will assist drying (for endoscopes with
auxiliary water feeding only).
• Do not store the endoscope in the carrying case. Use the
carrying case only for shipping the endoscope. Routinely
storing the endoscope in a humid, non-ventilated
environment such as the carrying case may present an
infection control risk.
• When storing an endoscope that has the flexibility
adjustment mechanism, make sure that the insertion tube is
set to the softest condition (indicated by the “” mark on the
flexibility adjustment ring). If the endoscope is stored while
the insertion tube is too stiff, the endoscope may be
damaged (for endoscopes with flexibility adjustment only).
1. Before storage of a high-level disinfected endoscope, thoroughly dry all
parts of the endoscope (especially all internal lumens, the distal end, lenses
and electrical contacts) and all accessories.
2. Using a cotton swab moistened with 70% ethyl or isopropyl alcohol,
carefully wipe the lenses at the distal end.
3. If the endoscope has the flexibility adjustment mechanism, make sure that
the insertion tube is set to the softest condition by aligning the “” mark on
the flexibility adjustment ring with the “ ” mark at the bottom of the grip
section (for endoscopes with flexibility adjustment only).
Page 72

68
Chapter 5 Storage and Disposal
EVIS EXERA GIF/CF/PCF TYPE 160 Series REPROCESSING MANUAL
4. Turn the endoscope’s angulation locks to the “F ” direction.
5. Hang the endoscope in the storage cabinet with the distal end hanging
freely. Make sure that the insertion tube hangs vertically and as straight as
possible.
5.2 Disposal
When disposing of the endoscope, or any of its components (such as valves),
follow all applicable national and local laws and guidelines.
Page 73

©2003 OLYMPUS MEDICAL SYSTEMS CORP. All rights reserved.
No part of this publication may be reproduced or distributed without the
express written permission of OLYMPUS MEDICAL SYSTEMS CORP.
OLYMPUS is a registered trademark of OLYMPUS CORPORATION.
Trademarks, product names, logos, or trade names used in this
document are generally registered trademarks or trademarks of each
company.
Page 74
Printed in Japan 20061222 *0000
GE1016 10
Manufactured by
2951 Ishikawa-cho, Hachioji-shi, Tokyo 192-8507, Japan
Fax: (042)646-2429 Telephone: (042)642-2111
(Premises/Goods delivery) Wendenstrasse 14-18, 20097 Hamburg, Germany
(Letters) Postfach 10 49 08, 20034 Hamburg, Germany
3500 Corporate Parkway, P.O. Box 610, Center Valley, PA
18034-0610, U.S.A.
Fax: (484)896-7128 Telephone: (484)896-5000
KeyMed House, Stock Road, Southend-on-Sea, Essex SS2 5QH, United Kingdom
Fax: (01702)465677 Telephone: (01702)616333
491B, River Valley Road #12-01/04, Valley Point Office Tower, Singapore 248373
Fax: 6834-2438 Telephone: 6834-0010
A8F, Ping An International Financial Center, No. 1-3, Xinyuan South Road,
Chaoyang District, Beijing, 100027 P.R.C.
Fax: (86)10-5976-1299 Telephone: (86)10-5819-9000
117071, Moscow, Malaya Kaluzhskaya 19, bld. 1, fl.2, Russia
Fax: (095)958-2277 Telephone: (095)958-2245
3 Acacia Place, Notting Hill, VIC 3168, Australia
Fax: (03)9543-1350 Telephone: (03)9265-5400
5301 Blue Lagoon Drive, Suite 290 Miami, FL 33126-2097, U.S.A.
Fax: (305)261-4421 Telephone: (305)266-2332
Distributed by
Olympus Tower 9F, 446, Bongeunsa-ro, Gangnam-gu, Seoul, Korea 135-509
Fax: (02)6255-3494 Telephone: (02)6255-3210
Fax: (040)23773-4656 Telephone: (040)23773-0
 Loading...