

Olympus BF-P190, EVIS EXERA III, BF-XP190, BF-H190, BF-Q190 Instructions Manual
...
INSTRUCTIONS
EVIS EXERA III BRONCHOVIDEOSCOPE
OLYMPUS BF-XP190
OLYMPUS BF-P190
OLYMPUS BF-Q190
OLYMPUS BF-H190
OLYMPUS BF-1TH190
Symbols 1
Important Information — Please Read Before
Use 2
Chapter 1 Checking the Package Contents 13
Chapter 2 Instrument Nomenclature and
Specifications 17
Chapter 3 Preparation and Inspection 27
Chapter 4 Operation 51
Chapter 5 Troubleshooting 75
Appendix 83
Refer to the endoscope’s companion manual, the “REPROCESSING MANUAL” with your
endoscope model listed on the cover, for reprocessing information.
USA: CAUTION: Federal law restricts this device to sale by or on the order of a physician.
OPERATION MANUAL


Contents
i
BF-190 Series OPERATION MANUAL
Contents
Symbols .............................................................................................................................. 1
Important Information — Please Read Before Use ......................................................... 2
Intended use .......................................................................................................................... 2
Applicability of endoscopy and endoscopic treatment ........................................................... 2
Instruction manual ................................................................................................................. 3
User qualifications ................................................................................................................. 3
Instrument compatibility ......................................................................................................... 4
Reprocessing before the first use/reprocessing and storage after use ................................. 4
Spare equipment ................................................................................................................... 4
Maintenance management .................................................................................................... 4
Prohibition of improper repair and modification ..................................................................... 5
Signal words .......................................................................................................................... 5
Warnings and cautions .......................................................................................................... 6
Warnings and cautions: disappeared or frozen endoscopic image ...................................... 11
Examples of inappropriate handling .................................................................................... 12
Chapter 1 Checking the Package Contents ....................................... 13
1.1 Checking the package contents ............................................................................ 13
Packaged items for the Americas, Europe, Australasia, Middle East, and Africa ............... 14
Packaged items for countries other than the Americas, Europe, Australasia, Middle East,
and Africa ............................................................................................................................ 15
Chapter 2 Instrument Nomenclature and Specifications .................. 17
2.1 Nomenclature and functions ................................................................................. 17
Control section, insertion section ......................................................................................... 18
Endoscope connector .......................................................................................................... 21
2.2 Specifications ......................................................................................................... 22
Environment ........................................................................................................................ 22
Specifications ....................................................................................................................... 23
Chapter 3 Preparation and Inspection ................................................ 27
3.1 The workflow of preparation and inspection ....................................................... 27
3.2 Preparation of the equipment ................................................................................ 29
3.3 Inspection of the endoscope ................................................................................. 30
Inspection of the endoscope ................................................................................................ 30
Inspection of the bending mechanism ................................................................................. 33
Inspection of the insertion tube rotation mechanism ........................................................... 35
3.4 Inspection of accessories ..................................................................................... 36
Inspection of the suction valve (MAJ-207) or single use suction valve (MAJ-209) .............. 36
Inspection of the biopsy valve (MD-495) ............................................................................. 37
Inspection of the single use biopsy valve (MAJ-210) ........................................................... 38
Inspection of the mouthpiece (MA-651) ............................................................................... 39

ii
Contents
BF-190 Series OPERATION MANUAL
3.5 Attaching accessories to the endoscope ............................................................. 40
Attaching the suction valve (MAJ-207) or the single use suction valve (MAJ-209) ............. 40
Attaching the biopsy valve (MD-495) or single use biopsy valve (MAJ-210) ....................... 41
3.6 Inspection of ancillary equipment ........................................................................ 42
3.7 Connection of the endoscope and ancillary equipment ..................................... 42
Connection to the light source ............................................................................................. 42
Connection of the suction tube ............................................................................................ 43
3.8 Inspection of the endoscopic system .................................................................. 44
Inspection summary ............................................................................................................ 44
Inspection of the ancillary equipment .................................................................................. 44
Inspection of the endoscopic image .................................................................................... 44
Inspection of the remote switches ....................................................................................... 46
Inspection of the water feeding function .............................................................................. 47
Inspection of the suction function ........................................................................................ 48
Inspection of the instrument channel ................................................................................... 49
Chapter 4 Operation ............................................................................. 51
4.1 Warnings and cautions: operation ........................................................................ 51
4.2 Insertion .................................................................................................................. 53
Holding and manipulating the endoscope ........................................................................... 53
Insertion of the endoscope .................................................................................................. 54
Observation of the endoscopic image ................................................................................. 56
Angulation of the distal end ................................................................................................. 56
Operation of the insertion tube rotation ............................................................................... 57
Feeding fluids ...................................................................................................................... 58
Suction ................................................................................................................................. 59
4.3 Using EndoTherapy accessories .......................................................................... 60
Insertion of EndoTherapy accessories into the endoscope ................................................. 61
Operation of EndoTherapy accessories .............................................................................. 64
Withdrawal of EndoTherapy accessories ............................................................................ 64
High-frequency cauterization treatment ............................................................................... 65
Argon plasma coagulation (APC) ........................................................................................ 67
Laser cauterization .............................................................................................................. 69
Ultrasonic observation ......................................................................................................... 70
Bronchoalveolar lavage ....................................................................................................... 71
4.4 Withdrawal of the endoscope ................................................................................ 72
4.5 Transportation of the endoscope .......................................................................... 73
Transporting within the hospital ........................................................................................... 73
Transporting outside the hospital ......................................................................................... 73

Contents
iii
BF-190 Series OPERATION MANUAL
Chapter 5 Troubleshooting .................................................................. 75
5.1 Troubleshooting ..................................................................................................... 75
5.2 Troubleshooting guide ........................................................................................... 76
Image quality or brightness ................................................................................................. 76
Water feeding ...................................................................................................................... 77
Suction ................................................................................................................................. 77
EndoTherapy accessories ................................................................................................... 78
Others .................................................................................................................................. 78
5.3 Withdrawal of the endoscope with an irregularity .............................................. 79
Withdrawal when the WLI and NBI endoscopic images appear on the monitor .................. 79
Withdrawal when either the WLI or the NBI endoscopic image does not appear
on the monitor ...................................................................................................................... 80
Withdrawal when no endoscopic image appears on the monitor or a frozen image
cannot be restored ............................................................................................................... 80
5.4 Returning the endoscope for repair ..................................................................... 81
Appendix ................................................................................................. 83
Combination equipment .................................................................................................. 83
System chart ........................................................................................................................ 83
Reprocessing equipment ..................................................................................................... 85
Compatible EndoTherapy accessories ................................................................................ 86
EMC information .............................................................................................................. 92

iv
Contents
BF-190 Series OPERATION MANUAL
Symbols
1
BF-190 Series OPERATION MANUAL
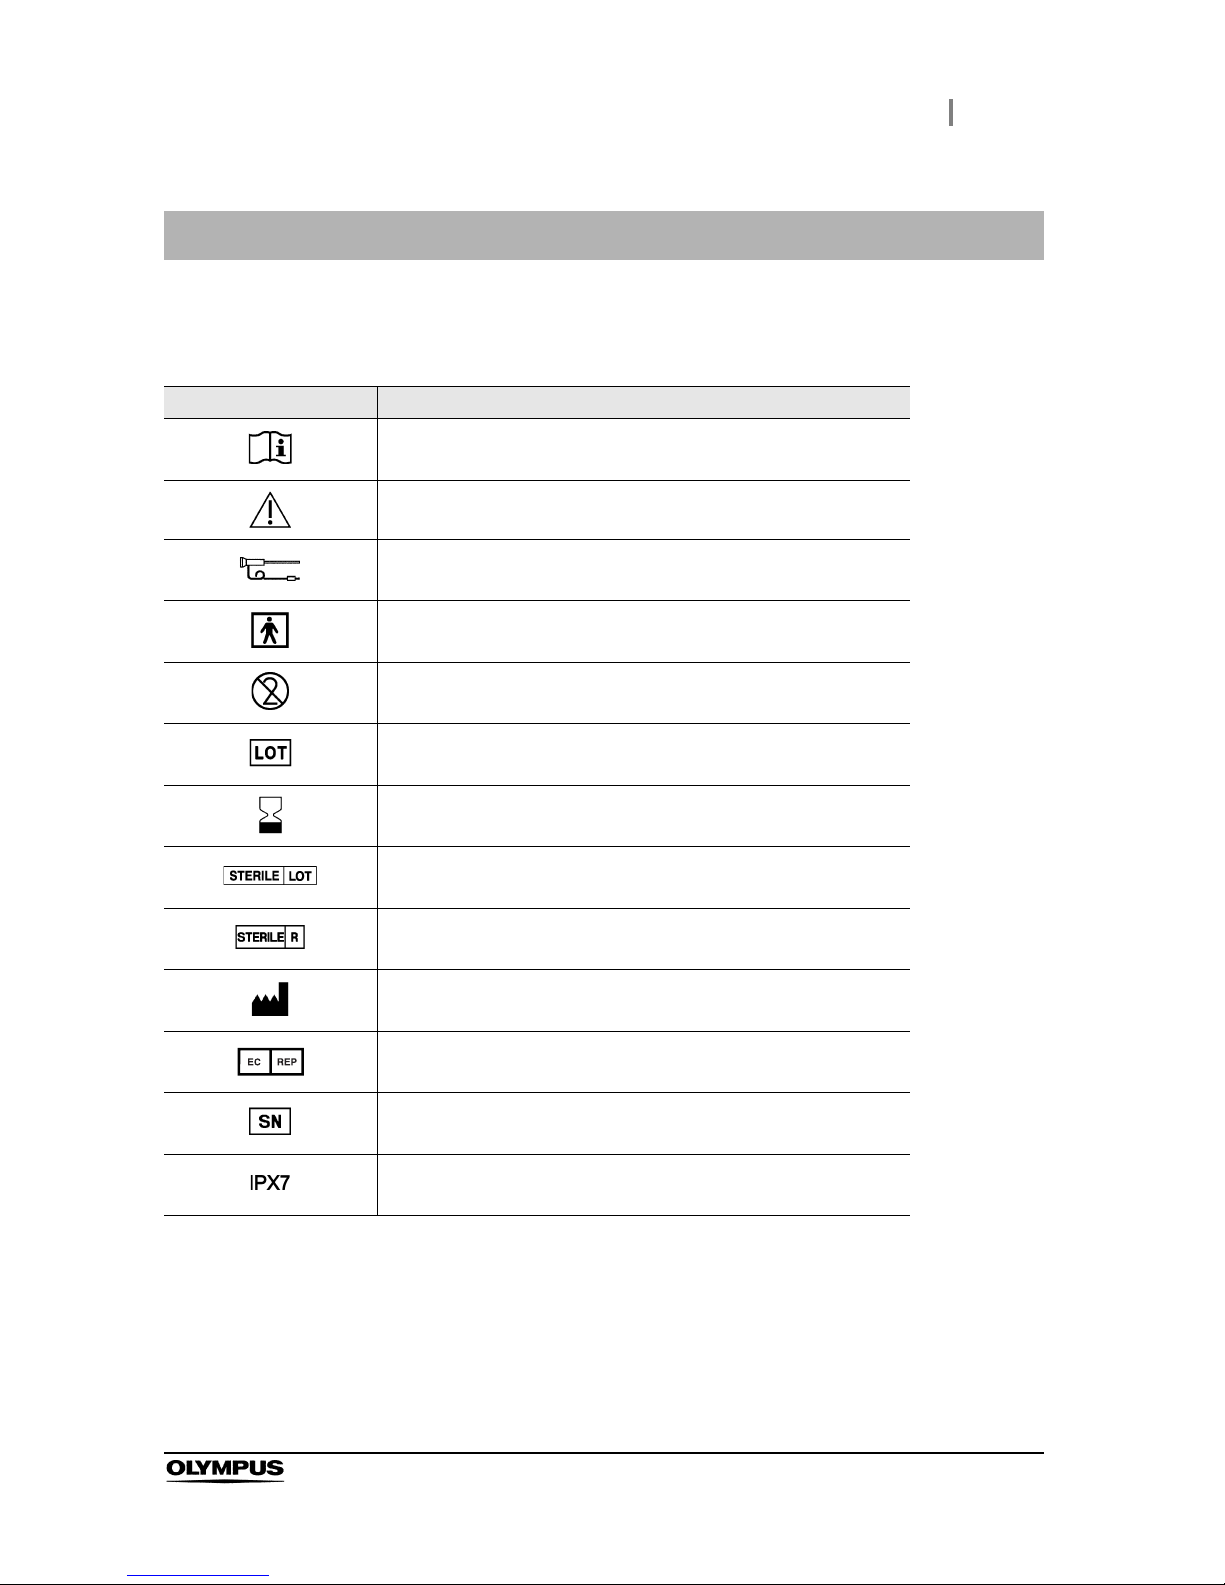
The meaning(s) of the symbol(s) shown on the component packaging, the back cover of the instruction
manual, and/or the instrument are as follows:
For US Customers only
For a Symbols Glossary, visit us:
http://www.olympus-global.com/en/common/pdf/symbolsglossary.pdf
Symbols
Symbol Description
Refer to instructions.
Caution
Endoscope
TYPE BF applied part
Single use only
Lot number
Use by (expiration date)
Sterilization lot number
Sterilized using irradiation
Manufacturer
Authorized representative in the European Community
Serial number
Ingress protection rating is 7.

2
Important Information — Please Read Before Use
BF-190 Series OPERATION MANUAL
Intended use
This instrument is intended to be used with an Olympus video system center, light source,
documentation equipment, monitor, EndoTherapy accessories (such as a biopsy forceps), and other
ancillary equipment for endoscopy and endoscopic surgery.
This instrument is indicated for use within the airways and tracheobronchial tree.
Do not use this instrument for any purpose other than its intended use.
Select the endoscope to be used according to the objective of the intended procedure based on the full
understanding of the endoscope’s specifications and functionality as described in this instruction
manual.
Applicability of endoscopy and endoscopic treatment
If there are official standards on the applicability of endoscopy and endoscopic treatment that are
defined by the hospital’s administrations or other official institutions, such as academic societies on
endoscopy, follow those standards. Before starting endoscopy and endoscopic treatment, thoroughly
evaluate its properties, purposes, effects, and possible risks (their nature, extent, and probability).
Perform endoscopy and endoscopic treatment only when its potential benefits are greater than its
risks.
Fully explain to the patient the potential benefits and risks of the endoscopy and endoscopic treatment
as well as any examination/treatment methods that can be performed in its place, and perform the
endoscopy and endoscopic treatment only after obtaining the consent of the patient.
Even after starting the endoscopy and endoscopic treatment, continue to evaluate the potential
benefits and risks, and immediately stop the endoscopy/treatment and take proper measures if the
risks to the patient become greater than the potential benefits.
Important Information — Please Read Before Use

Important Information — Please Read Before Use
3
BF-190 Series OPERATION MANUAL
Instruction manual
This instruction manual contains essential information on using this instrument safely and effectively.
Before use, thoroughly review this manual and the manuals of all equipment that will be used during
the procedure and use the equipment as instructed.
Note that the complete instruction manual set for this endoscope consists of this manual and the
“REPROCESSING MANUAL” with your endoscope model listed on the cover. It also accompanied the
endoscope at shipment.
Keep this and all related instruction manuals in a safe, accessible location.
If you have any questions or comments about any information in this manual, contact Olympus.
Terms used in this manual
NBI (Narrow Band Imaging) observation:
This is optical-digital observation using narrowband light.
Normal light observation (or WLI (White Light Imaging) observation):
This is observation using white light.
Image sensor:
The image sensor is a device that converts light into electrical signals.
User qualifications
If there are official standards for user qualifications to perform endoscopy and endoscopic treatment
that are defined by the hospital’s medical administrators or other official institutions, such as academic
societies on endoscopy, follow those standards. If there are no official qualification standards, the
operator of this instrument must be a physician approved by the medical safety manager of the
hospital or person in charge of the department (department of internal medicine, etc.).
The physician should be capable of safely performing the planned endoscopy and endoscopic
treatment following guidelines set by the academic societies on endoscopy, etc., and considering the
difficulty of endoscopy and endoscopic treatment. This manual does not explain or discuss endoscopic
procedures.

4
Important Information — Please Read Before Use
BF-190 Series OPERATION MANUAL
Instrument compatibility
Refer to “Combination equipment” on page 83 to confirm that this instrument is compatible with the
ancillary equipment being used. Using incompatible equipment can result in patient or operator injury
and/or equipment damage.
This instrument complies with the EMC standard for medical electrical equipment, edition 2
(IEC 60601-1-2: 2001) and edition 3 (IEC 60601-1-2: 2007). However, when connected with an
instrument that complies with the EMC standard for medical electrical equipment, edition 1
(IEC 60601-1-2: 1993), the whole system complies with edition 1.
Reprocessing before the first use/reprocessing and
storage after use
This instrument was not reprocessed before shipment. Before using this instrument for the first time,
reprocess it according to the instructions given in the endoscope’s companion “REPROCESSING
MANUAL” with your endoscope model listed on the cover.
After using this instrument, reprocess and store it according to the instructions given in the
endoscope’s companion reprocessing manual. Improper and/or incomplete reprocessing or storage
can pose an infection control risk, cause equipment damage, or reduce performance.
Spare equipment
Be sure to prepare another endoscope to avoid interruption of the examination due to equipment
failure or malfunction.
Maintenance management
The probability of failure of the endoscope and ancillary equipment increases as the number of
procedures performed and/or the total operating hours increase. In addition to the inspection before
each procedure, the person in charge of medical equipment maintenance in each hospital should
inspect the items specified in this manual periodically following regulations, guidelines, etc. required of
you. An endoscope with an observed irregularity should not be used, but should be inspected by
following Section 5.2, “Troubleshooting guide”. If the irregularity is still observed after inspection,
contact Olympus.
Important Information — Please Read Before Use
5
BF-190 Series OPERATION MANUAL
Prohibition of improper repair and modification
This instrument does not contain any user-serviceable parts. Do not disassemble, modify, or attempt to
repair it; patient or operator injury and/or equipment damage may result.
Equipment that has been disassembled, repaired, altered, changed, or modified by persons other than
Olympus’ own authorized service personnel is excluded from Olympus’ limited warranty and is not
warranted by Olympus in any manner.
Signal words
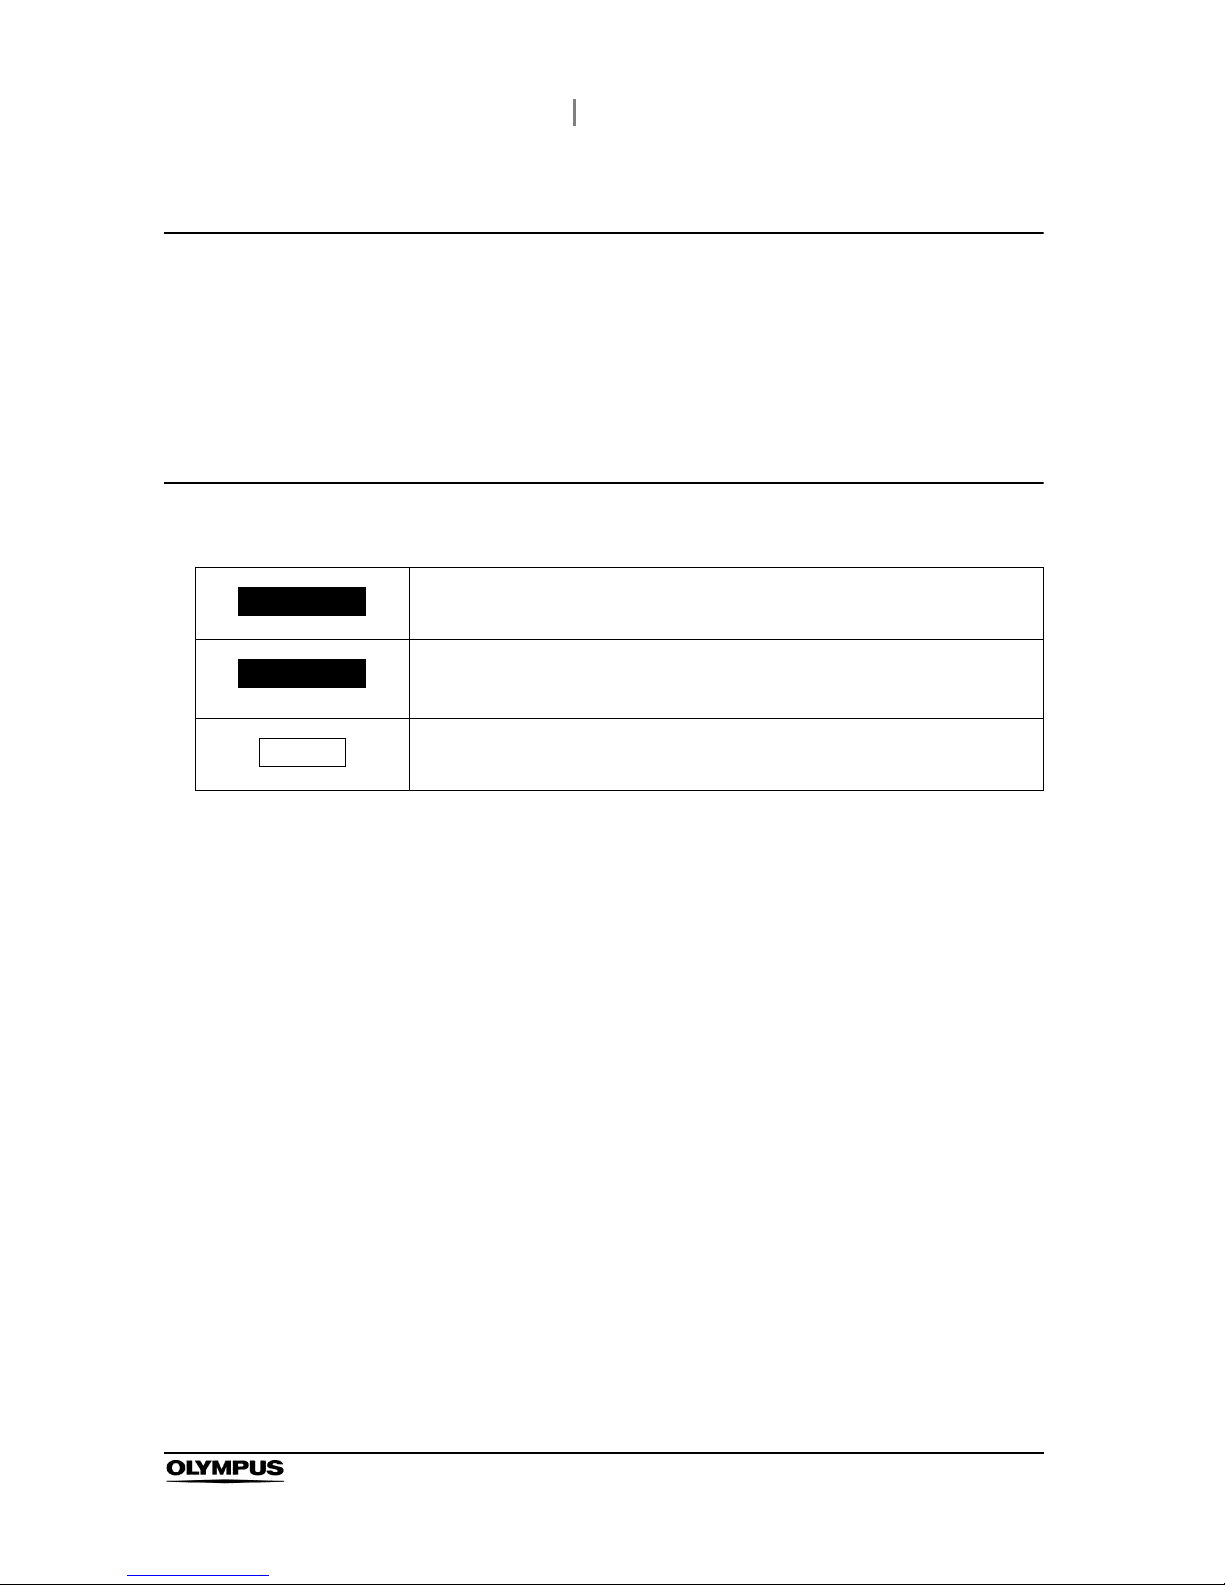
The following signal words are used throughout this manual:
Indicates a potentially hazardous situation which, if not avoided, could result in
death or serious injury.
Indicates a potentially hazardous situation which, if not avoided, may result in minor
or moderate injury. It may also be used to alert against unsafe practices or potential
equipment damage.
Indicates additional helpful information.
WARNING
CAUTION
NOTE

6
Important Information — Please Read Before Use
BF-190 Series OPERATION MANUAL
Warnings and cautions
Follow the warnings and cautions given below when handling this endoscope. This information is to be
supplemented by the warnings and cautions given in each chapter.
WARNING
• After using this endoscope, reprocess and store it according to the instructions
given in the endoscope’s companion “REPROCESSING MANUAL” with your
endoscope model listed on the cover. Using improperly or incompletely
reprocessed or stored instruments may cause patient cross-contamination and/or
infection.
• Before endoscopy, remove any metallic objects (watch, glasses, necklace, etc.)
from the patient. Performing high-frequency cauterization treatment while the
patient is wearing metallic objects may cause burns on the patient in areas around
the metallic objects.
• Do not strike, hit, or drop the endoscope’s distal end, insertion tube, bending
section, control section, universal cord, or endoscope connector. Also, do not bend,
pull, or twist the endoscope’s distal end, insertion tube, bending section, control
section, universal cord, or endoscope connector with excessive force. The
endoscope may be damaged and could cause patient injury, burns, bleeding,
and/or perforations. It could also cause parts of the endoscope to fall off inside the
patient.
• Never perform angulation control forcibly or abruptly. Never forcefully pull, twist, or
rotate the angulated bending section. Patient injury, bleeding, and/or perforation
may result. It may also become impossible to straighten the bending section during
an examination.
• Never insert or withdraw the endoscope’s insertion section while the bending
section is locked in position. Patient injury, bleeding, and/or perforation may result.
• Never operate the bending section, perform suction, insert or withdraw the
endoscope’s insertion section, rotate the insertion section, or use EndoTherapy
accessories while no endoscopic image is observed or the endoscopic image is
frozen. Patient injury, bleeding, and/or perforation may result.
• Never insert, withdraw, or rotate the endoscope’s insertion section with excessive
force or while an optimum field of view cannot be obtained. Patient injury, bleeding,
and/or perforation may result. If it is difficult to insert the endoscope, do not forcibly
insert the endoscope; stop the endoscopy. Forcible insertion can result in patient
injury, bleeding, and/or perforation.
• Never insert or withdraw the insertion section abruptly or with excessive force.
Patient injury, bleeding, and/or perforation may result.

Important Information — Please Read Before Use
7
BF-190 Series OPERATION MANUAL
WARNING
• Do not touch the light guide on the endoscope connector immediately after
removing it from the light source because it is extremely hot. Operator or patient
burns can result.
• Although the illumination light emitted from the endoscope’s distal end is required
for endoscopic observation, it may also cause alteration of living tissues such as
protein denaturation of living tissue and perforation of the tissue through improper
usage. Observe the following warnings for illumination.
Always set the minimum required brightness. The brightness of the image on a
monitor may differ from the actual brightness at the distal end of the endoscope.
Pay attention to the brightness level setting of the light source, particularly when
operating the electrical shutter function of a video system center. When using a
light source and video system center that are compatible with the light source’s
automatic brightness control function, make sure to use the automatic
brightness control function. This function can better maintain the illumination
level. Refer to the instruction manual for the light source and the video system
center for further details.
Always maintain a suitable distance necessary for adequate viewing while using
the minimum level of illumination for the minimum amount of time. Do not use
close stationary viewing or leave the distal end of the endoscope close to the
mucous membrane for a long time without necessity.
When the endoscope will not be used for a long period, be sure to turn OFF the
light source or activate the light shield function (standby mode, etc.) so that the
endoscope is not illuminated unnecessarily.
• Do not connect the endoscope connector while the electrical contacts are wet
and/or dirty, which may result in an electric shock, causing severe damage to the
endoscope and compromising patient and/or operator safety.
• If the endoscopic image becomes dimmer during the procedure, it may indicate that
blood or mucus is adhering to the light guide lens on the distal end of the
endoscope or that the light guide lens has been discolored. Immediately withdraw
the endoscope from the patient, remove blood or mucus, and confirm that the light
guide lens has no irregularities to use it again. If you continue to use the endoscope
with its obstructed or discolored light guide lens, the temperature at the distal end
may rise, which may cause patient injury or operator and/or patient burns.

8
Important Information — Please Read Before Use
BF-190 Series OPERATION MANUAL
WARNING
• When the endoscopic image does not appear on the monitor, the image sensor
may have been damaged. Turn the video system center OFF immediately.
Continued power supply in such a case will cause the distal end to become hot and
could cause operator and/or patient burns.
• Do not rely on the NBI observation mode alone for primary detection of lesions or to
make a decision regarding any potential diagnostic or therapeutic intervention.
• When performing transnasal insertion with the endoscope, follow the warnings
below.
The shape and size of the nasal cavity and its suitability for transnasal insertion
may vary from patient to patient. No endoscope, including this one, can always
be inserted transnasally into all patients. Before proceeding, always be sure to
confirm that transnasal insertion is possible with the patient by considering both
the size of the patient’s nasal cavity as well as the size of the endoscope’s
insertion section. Patient injury can result or the endoscope could become
lodged and difficult to withdraw.
Transnasal insertion is accompanied by the risk of inflammation of the nasal
cavity. If this happens, the nasal passage will be constricted, making it more
difficult to withdraw the endoscope. In this case, do not use force to withdraw
the endoscope because patient injury, bleeding, and/or perforation may result.
Transnasal insertion is accompanied by the risk of bleeding in the nasal cavity.
Be sure to be prepared to deal with any bleeding. When withdrawing the
endoscope, observe the inside of the nasal cavity to ensure that there is no
bleeding. Even when the endoscope has been withdrawn without bleeding, do
not allow the patient to blow his or her nose strongly because this could cause it
to start bleeding.
Before transnasal insertion, apply the appropriate pretreatment and lubrication
to the patient to enlarge the nasal cavity. Otherwise, patient injury can result or
the endoscope could become lodged and difficult to withdraw. When applying a
pretreatment agent through a tube, insert the tube into the same path as the
path planned for the endoscope’s insertion. Otherwise, the treatment will have
no effect. The effects of the pretreatment agent and lubricant will decrease the
longer the procedure lasts. Apply the pretreatment agent or lubricant as
required during the procedure – for example, when withdrawal seems to be
difficult.
Transnasal insertion of the endoscope should be performed carefully. If
resistance to insertion is felt, or the patient reports pain, stop the insertion
immediately. Patient injury can result or the endoscope could become lodged
and difficult to withdraw.

Important Information — Please Read Before Use
9
BF-190 Series OPERATION MANUAL
WARNING
If it becomes impossible to withdraw the transnasally inserted endoscope, pull
its distal end out of the mouth, cut the flexible tube using wire cutters, and after
ensuring that the cut section will not injure the body cavity or nasal cavity of the
patient, withdraw the endoscope carefully. Therefore, always prepare wire
cutters in advance.
• When using the electronic zoom function of the video system center, never insert or
withdraw the endoscope’s insertion section or use EndoTherapy accessories while
the image is electronically zoomed. Patient injury, bleeding, and/or perforation can
result.
• The bending section will only bend to the UP or DOWN direction. To insert or
withdraw, operate the endoscope by considering the direction in which the bending
section is angulated. Never apply excessive force to the RIGHT or LEFT direction
when inserting or withdrawing the endoscope. Patient injury, bleeding, and/or
perforation can result.
CAUTION
• Do not pull the universal cord during an examination. The endoscope connector will
be pulled out from the output socket of the light source and the endoscopic image
will disappear.
• Do not coil the insertion tube or universal cord with a diameter of less than 12 cm.
Equipment damage may result.
• Do not attempt to bend or twist the endoscope’s insertion section with excessive
force. The insertion section may be damaged.
• Do not apply shock to the distal end of the insertion section, in particular the
objective lens surface at the distal end. Visual abnormalities may result.
• If the endoscope is dropped or the distal end of the endoscope receives a hard
impact, the endoscope may be damaged even if no visible damage of the lens on
the distal end can be found. In this case, stop using the endoscope, and contact
Olympus.
• Do not twist or bend the bending section with your hands. Equipment damage may
result.
• Do not squeeze the bending section forcefully. The covering of the bending section
may stretch or break and cause water leakage.
• Do not put or press the endoscope connector on the insertion section when
transporting or reprocessing. The insertion section may be damaged.

10
Important Information — Please Read Before Use
BF-190 Series OPERATION MANUAL
CAUTION
• Turn the video system center ON only when the endoscope connector is connected
to the light source. In particular, confirm that the video system center is OFF before
connecting or disconnecting the endoscope connector. Failure to do so can result
in equipment damage, including destruction of the image sensor.
• The endoscope’s remote switches cannot be removed from the control section.
Pressing, pulling, or twisting them with excessive force can break the switches
and/or cause water leakage.
• Do not hit or bend the electrical contacts on the endoscope connector. The
connection to the light source may be impaired and a faulty contact can result.
• Electromagnetic interference may occur on this endoscope near equipment
marked with the following symbol or other portable and mobile RF (Radio
Frequency) communications equipment, such as cellular phones. If
electromagnetic interference occurs, mitigation measures may be necessary, such
as reorienting or relocating this endoscope, or shielding the location.
• When using an endotracheal tube with the endoscope, select the tube that gives a
sufficient gap between the insertion section of the endoscope and itself. A narrow
gap may make it difficult for a patient to breathe and/or damage the endoscope.
• Before inserting the endoscope with an endotracheal tube into the patient, confirm
that the insertion section of the endoscope can be inserted into the endotracheal
tube smoothly by running it back and forth over the entire length of the insertion
section and that the tube does not damage the endoscope. Any protrusions may
damage the bending section cover or strip the external surface of the insertion
section. When using lubrication, make above confirmation before applying
lubrication.
• To check the electromagnetic interference from other equipment (any equipment
other than this endoscope or the components that constitute this system), the
system should be observed to verify its normal operation in the configuration in
which it will be used.
NOTE
• This endoscope contains a memory chip that stores information about the
endoscope and communicates this information to the video system center CV-190.
• When the endoscope gets strong static electricity, noise may be observed in the
endoscopic image. This does not indicate a malfunction.

Important Information — Please Read Before Use
11
BF-190 Series OPERATION MANUAL
Warnings and cautions: disappeared or frozen endoscopic
image
WARNING
• If the endoscopic image disappears unexpectedly or the frozen image cannot be
restored during an examination, immediately stop using the endoscope and
withdraw it from the patient as described in Section 5.3, “Withdrawal of the
endoscope with an irregularity”. Continued use of the endoscope under this
condition could result in patient injury, bleeding, and/or perforation.
• Follow the warnings given below. Otherwise, the endoscopic image may disappear
unexpectedly or the frozen image may not be restored during the examination.
Connect the endoscope connector to the light source completely by pushing the
endoscope connector until it clicks. Otherwise, a faulty contact can result.
Do not bend, hit, pull, or twist the insertion section, bending section, control
section, universal cord, and endoscope connector. The endoscope may be
damaged, and water leakage and/or breakage of internal parts like the image
sensor cable can result.
Before connecting the endoscope connector to the light source, confirm that the
endoscope connector, including the electrical contacts, is completely dry and
clean. If the endoscope is used with the electrical contacts wet and/or dirty, the
endoscope and light source may malfunction.
If air bubbles emerge from the endoscope continuously during the leakage test,
do not use the endoscope. Water may enter the endoscope and cause a short
circuit. This may result in image sensor damage.
When inserting the endoscope through the mouth, place the mouthpiece
(MA-651) in the patient’s mouth as necessary before inserting the endoscope to
prevent the patient from accidentally biting the insertion section. Biting the
insertion section may result in a break in the cable or malfunction of the light
guide.

12
Important Information — Please Read Before Use
BF-190 Series OPERATION MANUAL
Examples of inappropriate handling
Details on clinical endoscopic technique are the responsibility of trained specialists. Patient safety in
endoscopic examinations and endoscopic treatment can be ensured through appropriate handling by
the physician and the medical facility. Examples of inappropriate handling are described below.
• Applying suction with the distal end in contact with the mucosal surface, with higher suction
pressure than required or with prolonged suction time may cause bleeding and/or lesions.
• The endoscope has not been designed for use in retroflexed observation. Performing
retroflexed observation in a narrow lumen may make it impossible to straighten the angle of
the bending section and/or withdraw the endoscope from the patient. In case the patient
moves due to coughing and other reasons while the endoscope is angulated in the narrow
lumen, the bending section of the endoscope may be pushed into the lumen and be
retroflexed. Pretreatment to control patient’s coughing reflex and other possible unexpected
moves is the responsibility of trained specialists. Retroflexed observation should be
performed only when the usefulness of doing so is determined to be greater than the risk that
is posed to the patient.
• Inserting, withdrawing, and using EndoTherapy accessories without a clear endoscopic
image may cause patient injury, burns, bleeding, and/or perforation.
• Inserting or withdrawing the endoscope, rotating the insertion section, applying suction, or
operating the bending section without a clear endoscopic image may cause patient injury,
bleeding, and/or perforation.
• For reasons described below, do not rely on the NBI
*1
observation mode alone for primary
detection of lesions or to make a decision regarding any potential diagnostic or therapeutic
intervention.
NBI has not been demonstrated to increase the yield or sensitivity of finding any specific
mucosal lesion.
NBI has not been demonstrated to aid in differentiating and establishing the presence or
absence of dysplasia or neoplastic changes within mucosa or mucosal lesions.
*1 Narrow Band Imaging. For more details, refer to the instruction manual for
the video system center CV-190.
1.1 Checking the package contents
13
BF-190 Series OPERATION MANUAL
Ch.1
Chapter 1 Checking the Package
Contents
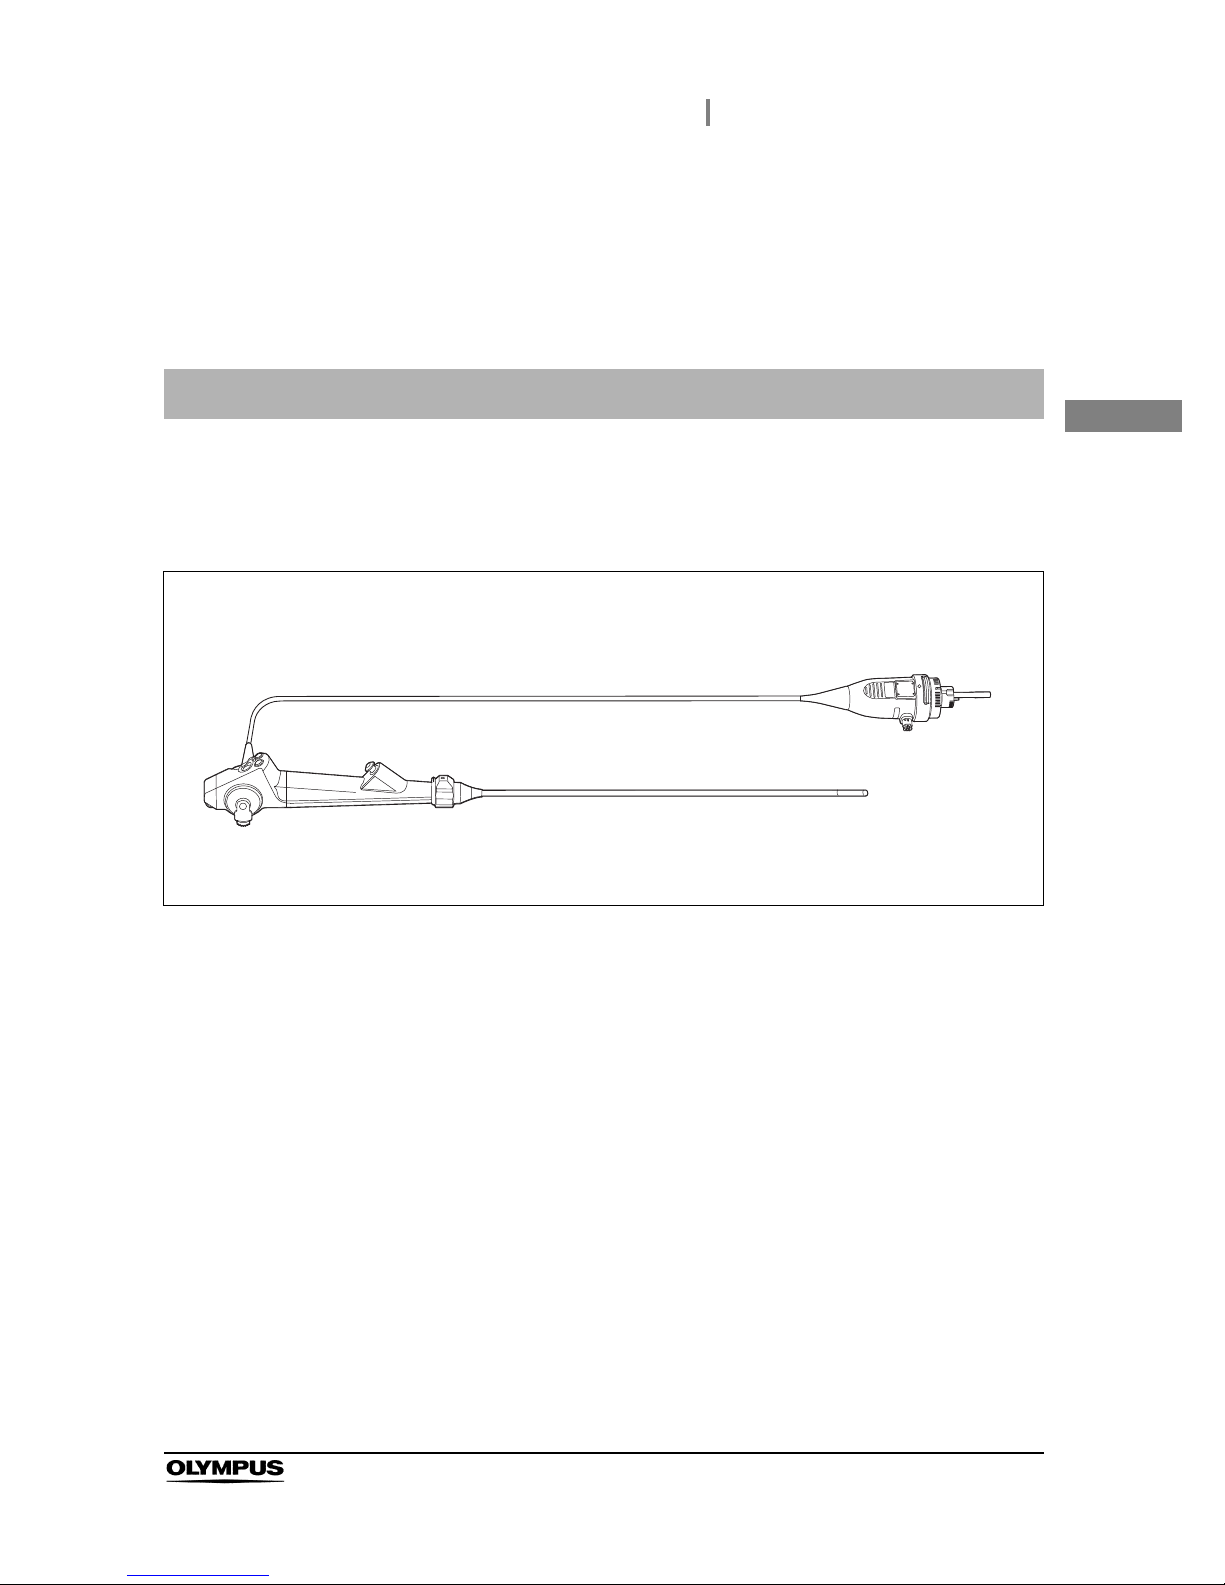
Match all items in the package with the components shown below. Inspect each item for damage. If the
endoscope is damaged, a component is missing, or you have any questions, do not use the items;
immediately contact Olympus.
1.1 Checking the package contents
Endoscope
BF-XP190, BF-P190, BF-Q190, BF-H190, BF-1TH190
14
1.1 Checking the package contents
BF-190 Series OPERATION MANUAL
Ch.1
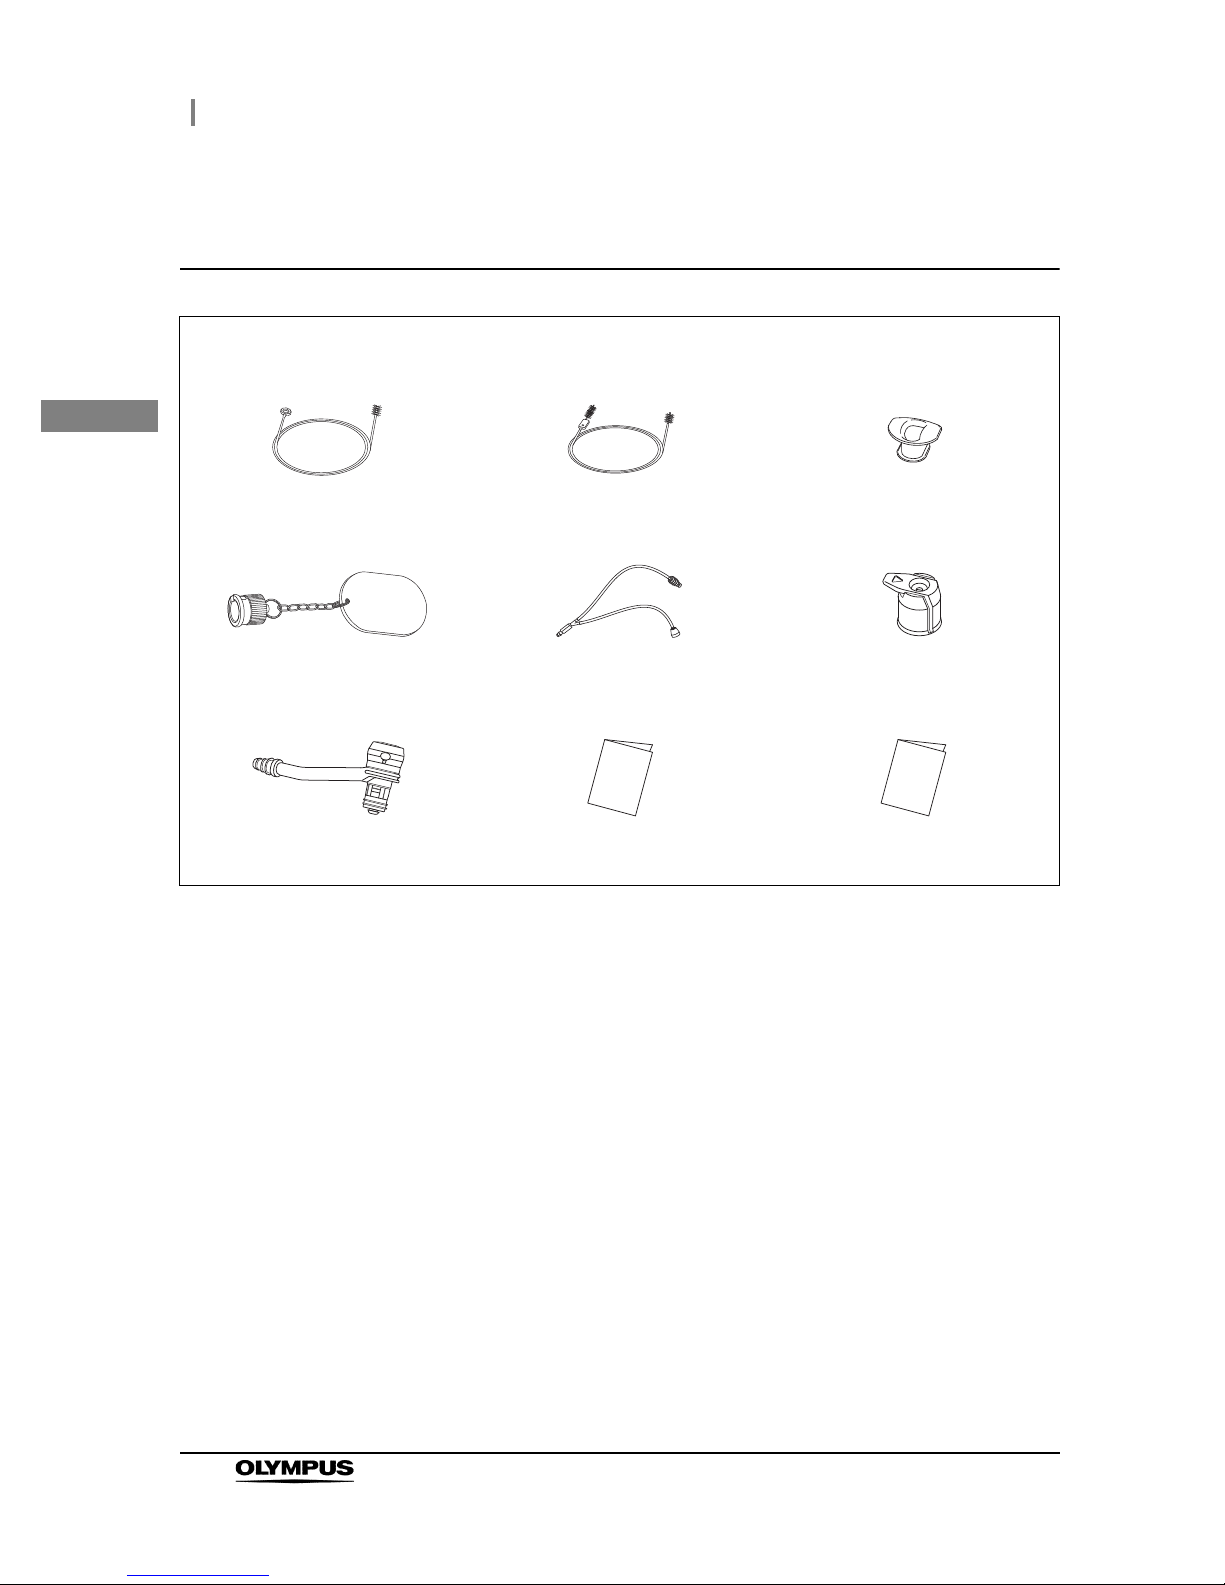
Packaged items for the Americas, Europe, Australasia,
Middle East, and Africa
Accessories
BF-XP190
Single use single-ended cleaning
brush (BW-400B, 3 pcs)
Single use combination cleaning
brush (BW-411B, 3 pcs)
Mouthpiece (MA-651, 2 pcs)
Sterilization cap (MAJ-1538) Suction cleaning adapter
(MAJ-222)
Single use biopsy valve
(MAJ-210, 20 pcs (1 box))
Single use suction valve
(MAJ-209, 20 pcs (1 box))
Operation manual Reprocessing manual
1.1 Checking the package contents
15
BF-190 Series OPERATION MANUAL
Ch.1
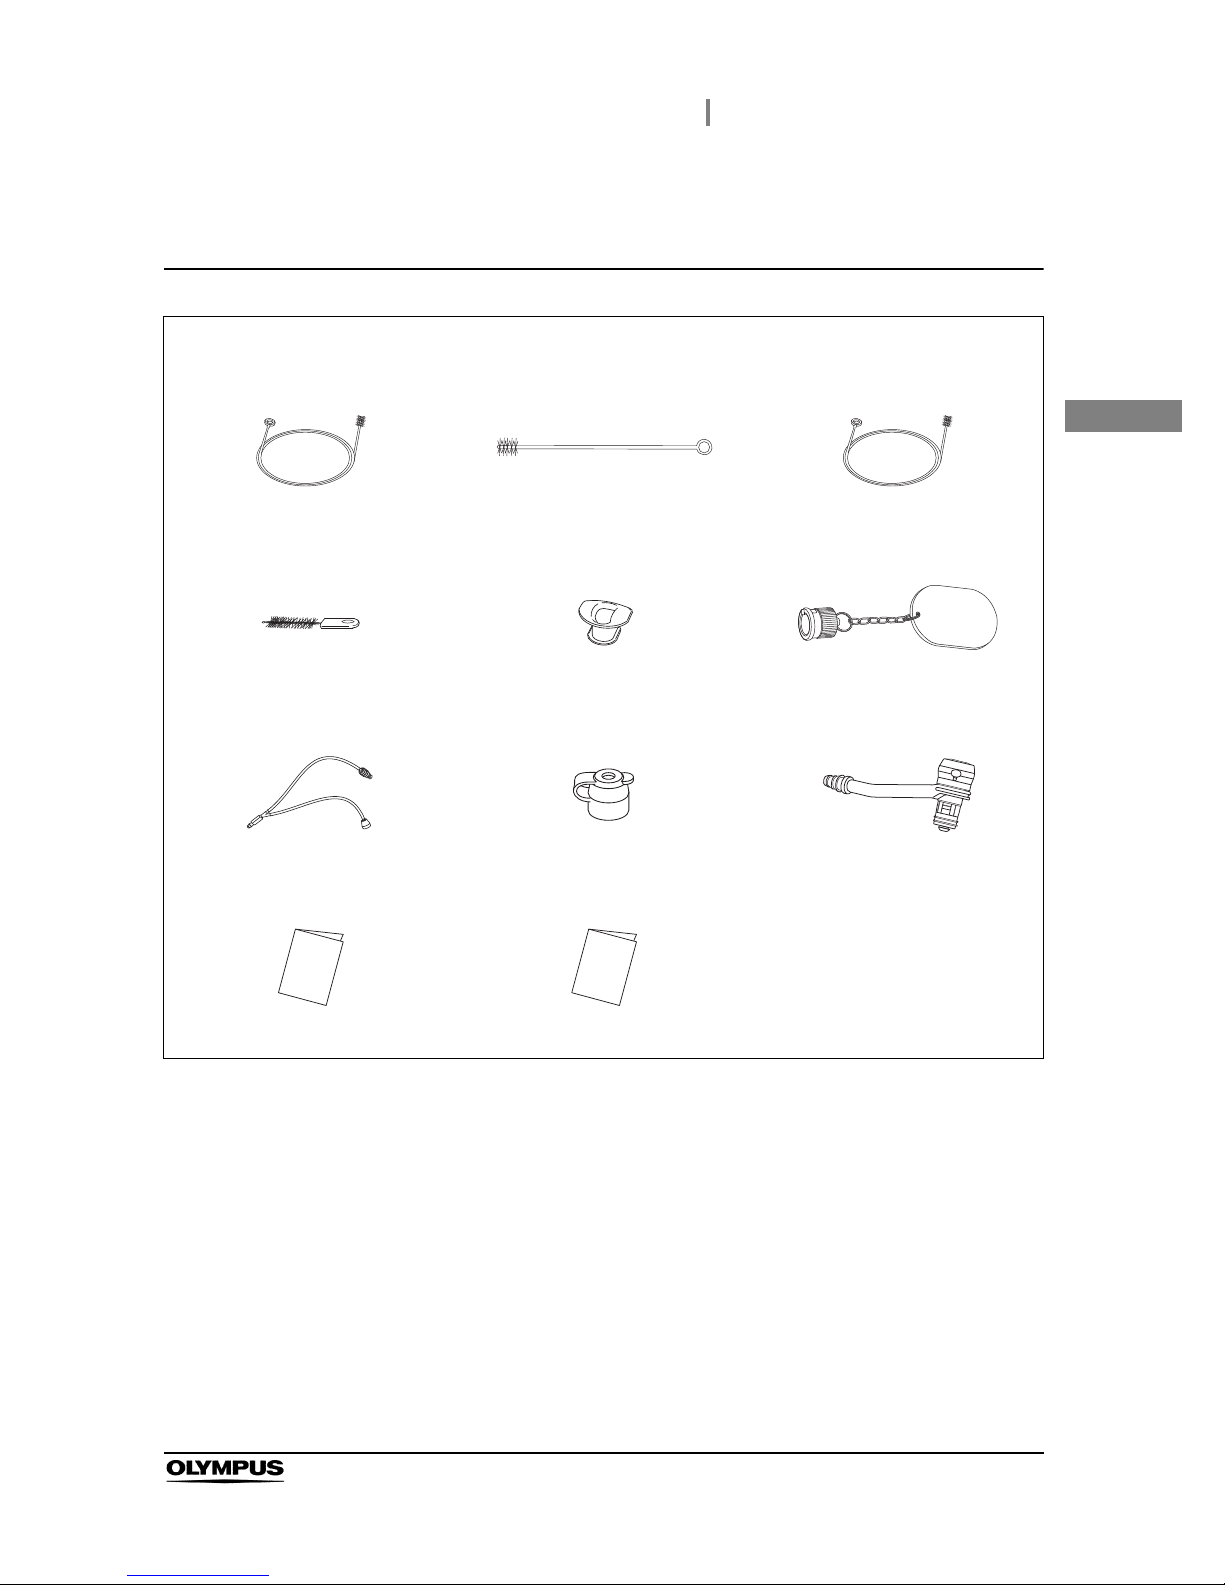
Packaged items for countries other than the Americas,
Europe, Australasia, Middle East, and Africa
Accessories
BF-XP190
Single use single-ended cleaning
brush (BW-400B, 3 pcs)
BF-XP190
Suction connector cleaning brush
(BW-15SH)
Except BF-XP190
Channel cleaning brush (BW-15B)
Channel-opening cleaning brush
(MH-507)
Mouthpiece (MA-651, 2 pcs) Sterilization cap (MAJ-1538)
Suction cleaning adapter
(MAJ-222)
Biopsy valve
(MD-495, 10 pcs (1 set))
Suction valve
(MAJ-207, 10 pcs (1 set))
Operation manual Reprocessing manual

16
1.1 Checking the package contents
BF-190 Series OPERATION MANUAL
Ch.1

2.1 Nomenclature and functions
17
BF-190 Series OPERATION MANUAL
Ch.2
Chapter 2 Instrument Nomenclature
and Specifications
The instrument nomenclature, functions, and specifications are described in this chapter.
2.1 Nomenclature and functions
18
2.1 Nomenclature and functions
BF-190 Series OPERATION MANUAL
Ch.2
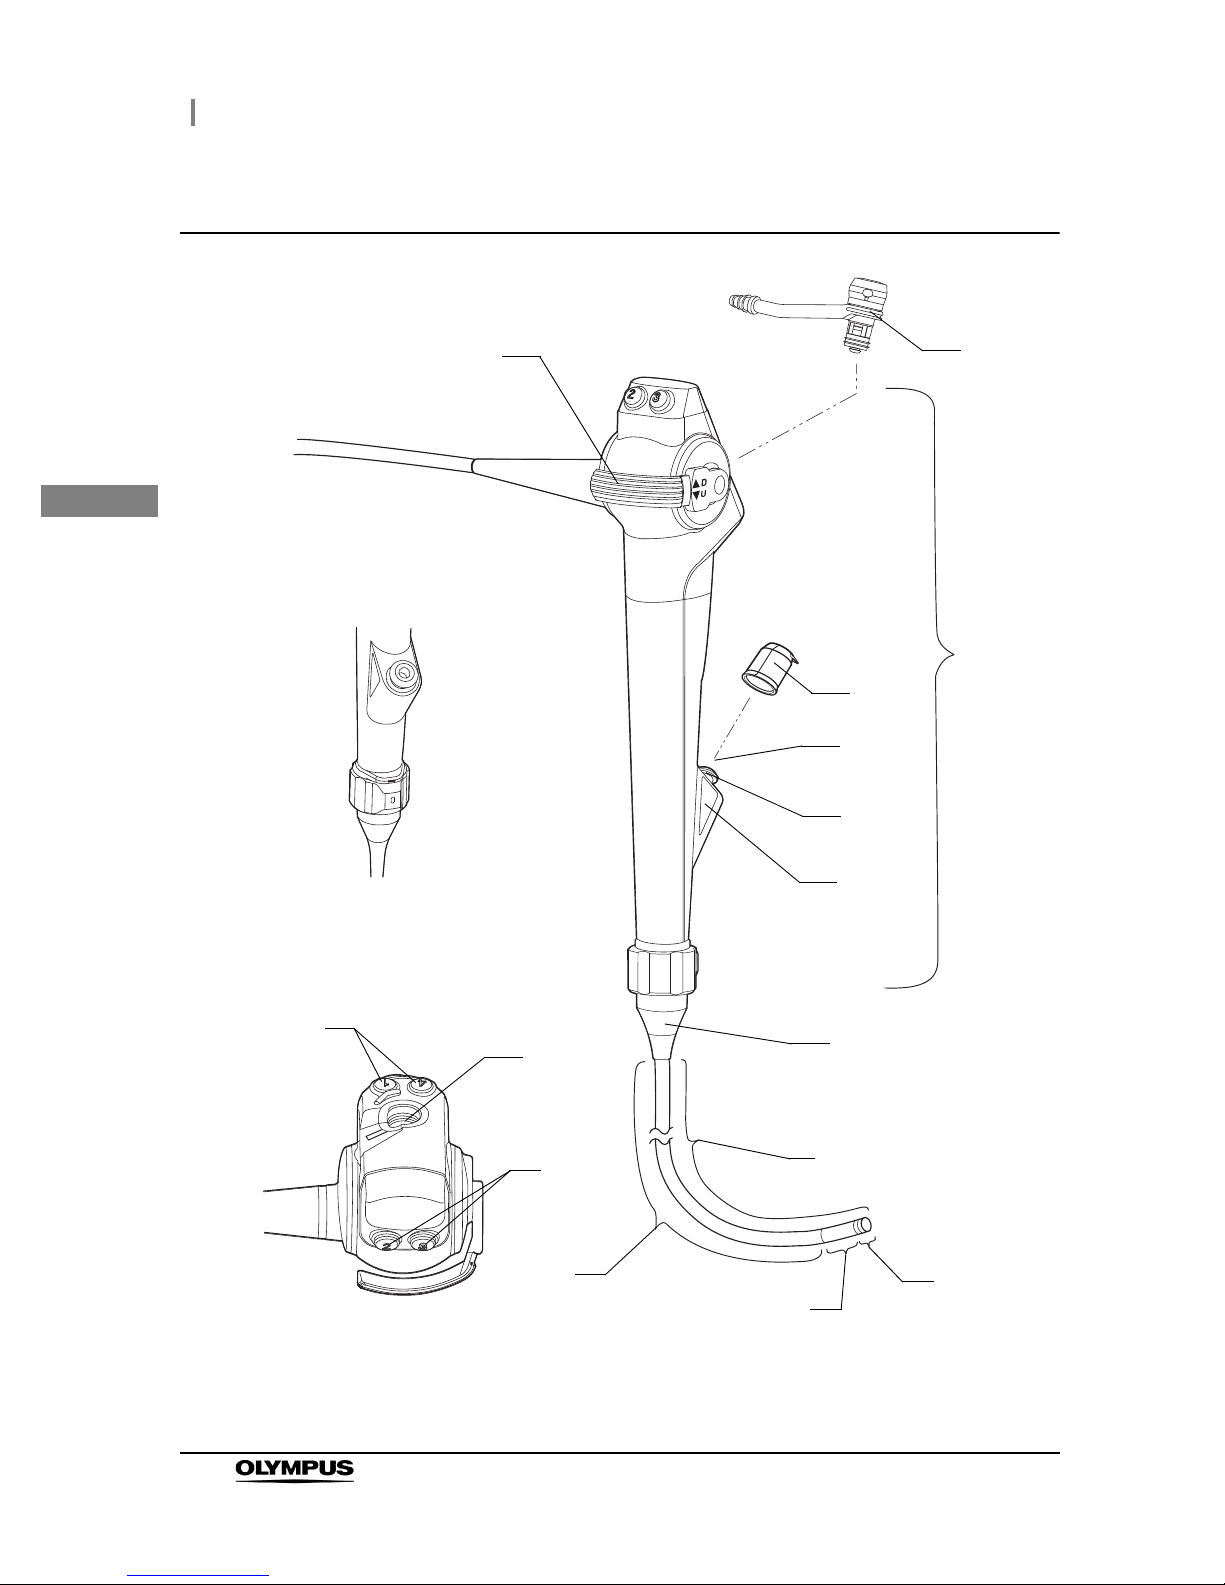
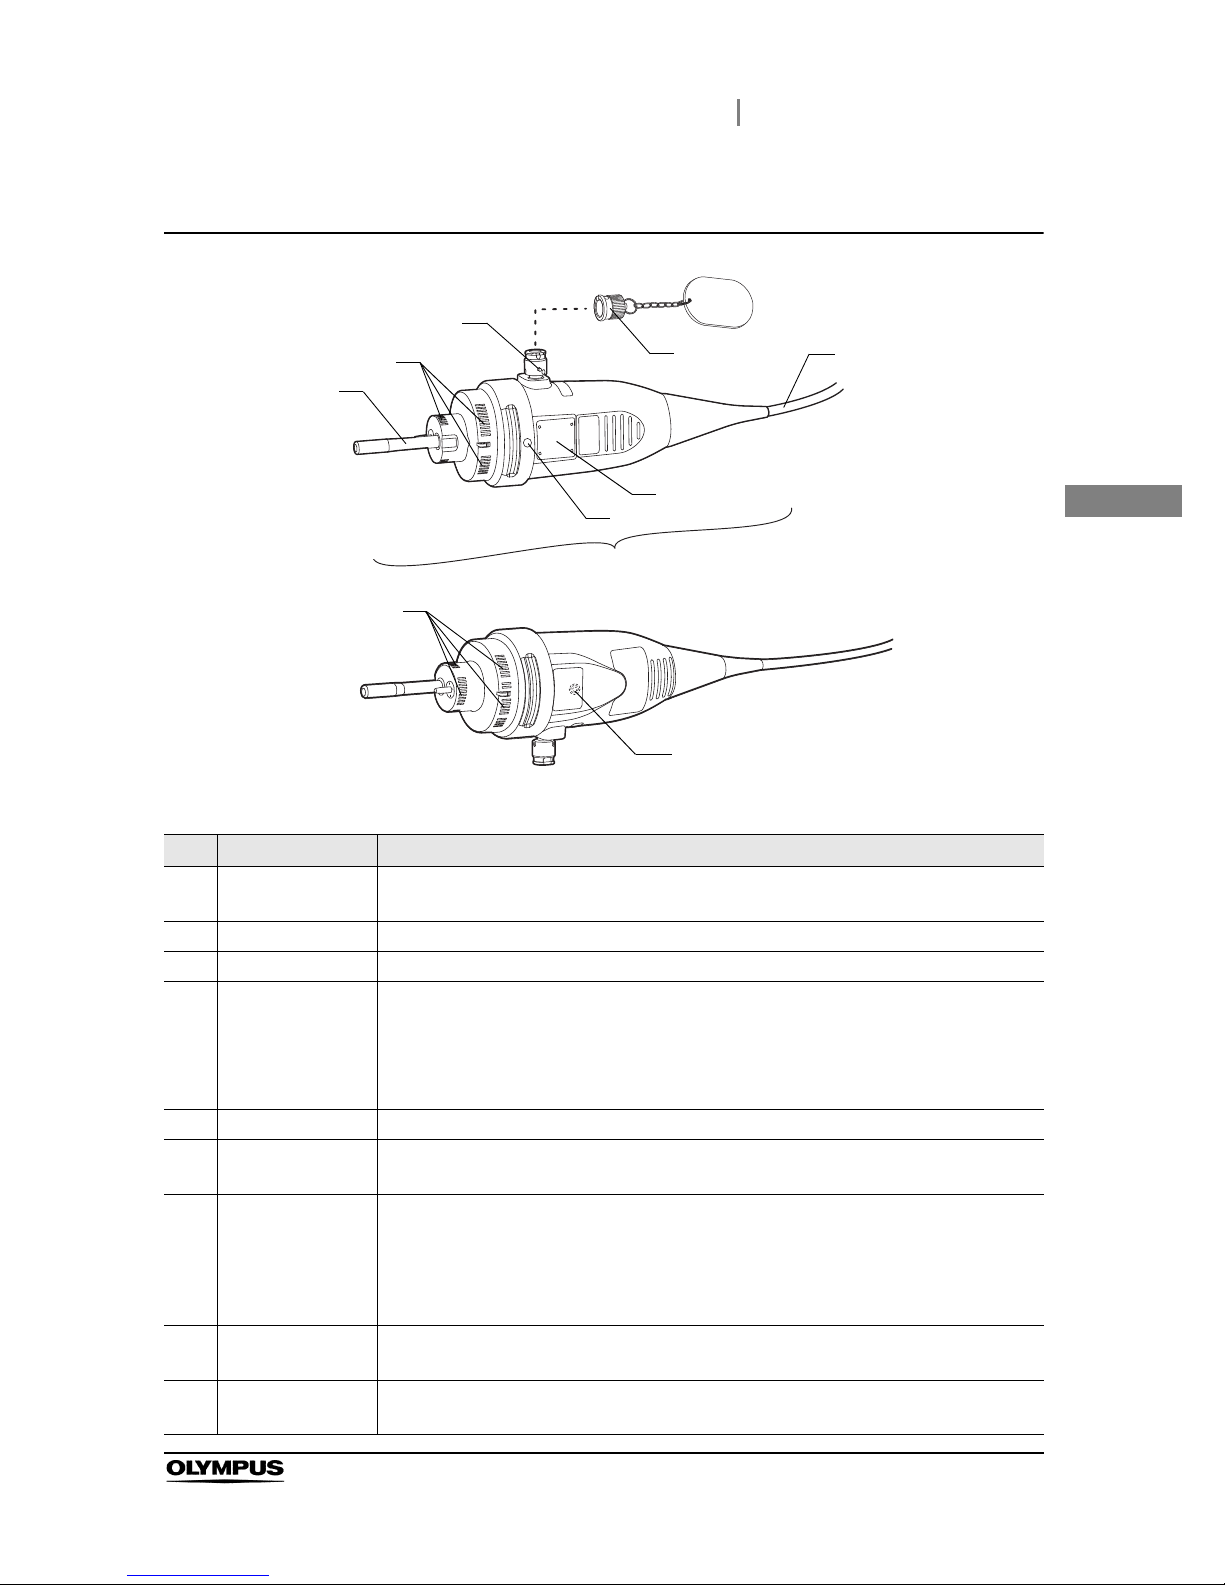
Control section, insertion section
13
13
12
11
9
10
3
1
Top view
Insertion tube rotation ring
8
2
4
5
6
7
14

2.1 Nomenclature and functions
19
BF-190 Series OPERATION MANUAL
Ch.2
No. Nomenclature Description
1UP/DOWN
angulation control
lever
When this lever is operated in the “U” direction, the bending section moves UP; when
the lever is operated in the “D” direction, the bending section moves DOWN.
2 Single use suction
valve (MAJ-209) or
suction valve
(MAJ-207
*1
)
*1 These products may not be available in some areas.
The suction valve is depressed to activate suction. The valve is also used to remove any
fluid or debris adhering to the objective lens.
3 Control section Operates the endoscope, such as controlling angulation.
4 Single use biopsy
valve (MAJ-210) or
biopsy valve
(MD-495
*1
)
This valve is attached to the instrument channel port, and an EndoTherapy accessory
can be inserted or a syringe can be attached.
5 Instrument channel
inlet
An EndoTherapy accessory can be inserted into this port. The instrument channel inlet
is connected to the instrument channel outlet on the distal end via the instrument
channel.
The instrument channel functions are as follows:
• Channel for the insertion of EndoTherapy accessories
• Suction channel
• Fluid feed channel (from a syringe via the biopsy valve)
6 Instrument channel
port
Attach the biopsy valve to this port.
7 Color code This color code and numeral show the compatibility of EndoTherapy accessories.
• Blue: BF-Q190, BF-H190, BF-P190
• Yellow: BF-1TH190
• White: BF-XP190
The endoscope can be used with EndoTherapy accessories that have the same color
code. For more information on combining the endoscope with particular EndoTherapy
accessories, refer to “Combination equipment” on page 83 and the instruction manuals
for the compatible accessories.
8 Boot Protects the junction between the insertion tube and control section from bending.
9 Insertion section This section is inserted into the patient body cavity. It can be rotated to the left and right
at angles up to 120 respectively on the control section by rotating the insertion tube
rotation ring.
10 Distal end The objective lens and light guide lens are on this distal end.
11 Bending section The bending section moves the distal end of the endoscope when the UP/DOWN
angulation control lever is operated.
12 Insertion tube Connects the control section and bending section.
13 Remote switches 1
to 4
The functions of the remote switches 1 to 4 can be selected on the video system center.
Refer to the instruction manual for the video system center when setting these functions.
14 Suction cylinder Attach the suction valve to this cylinder.
20
2.1 Nomenclature and functions
BF-190 Series OPERATION MANUAL
Ch.2
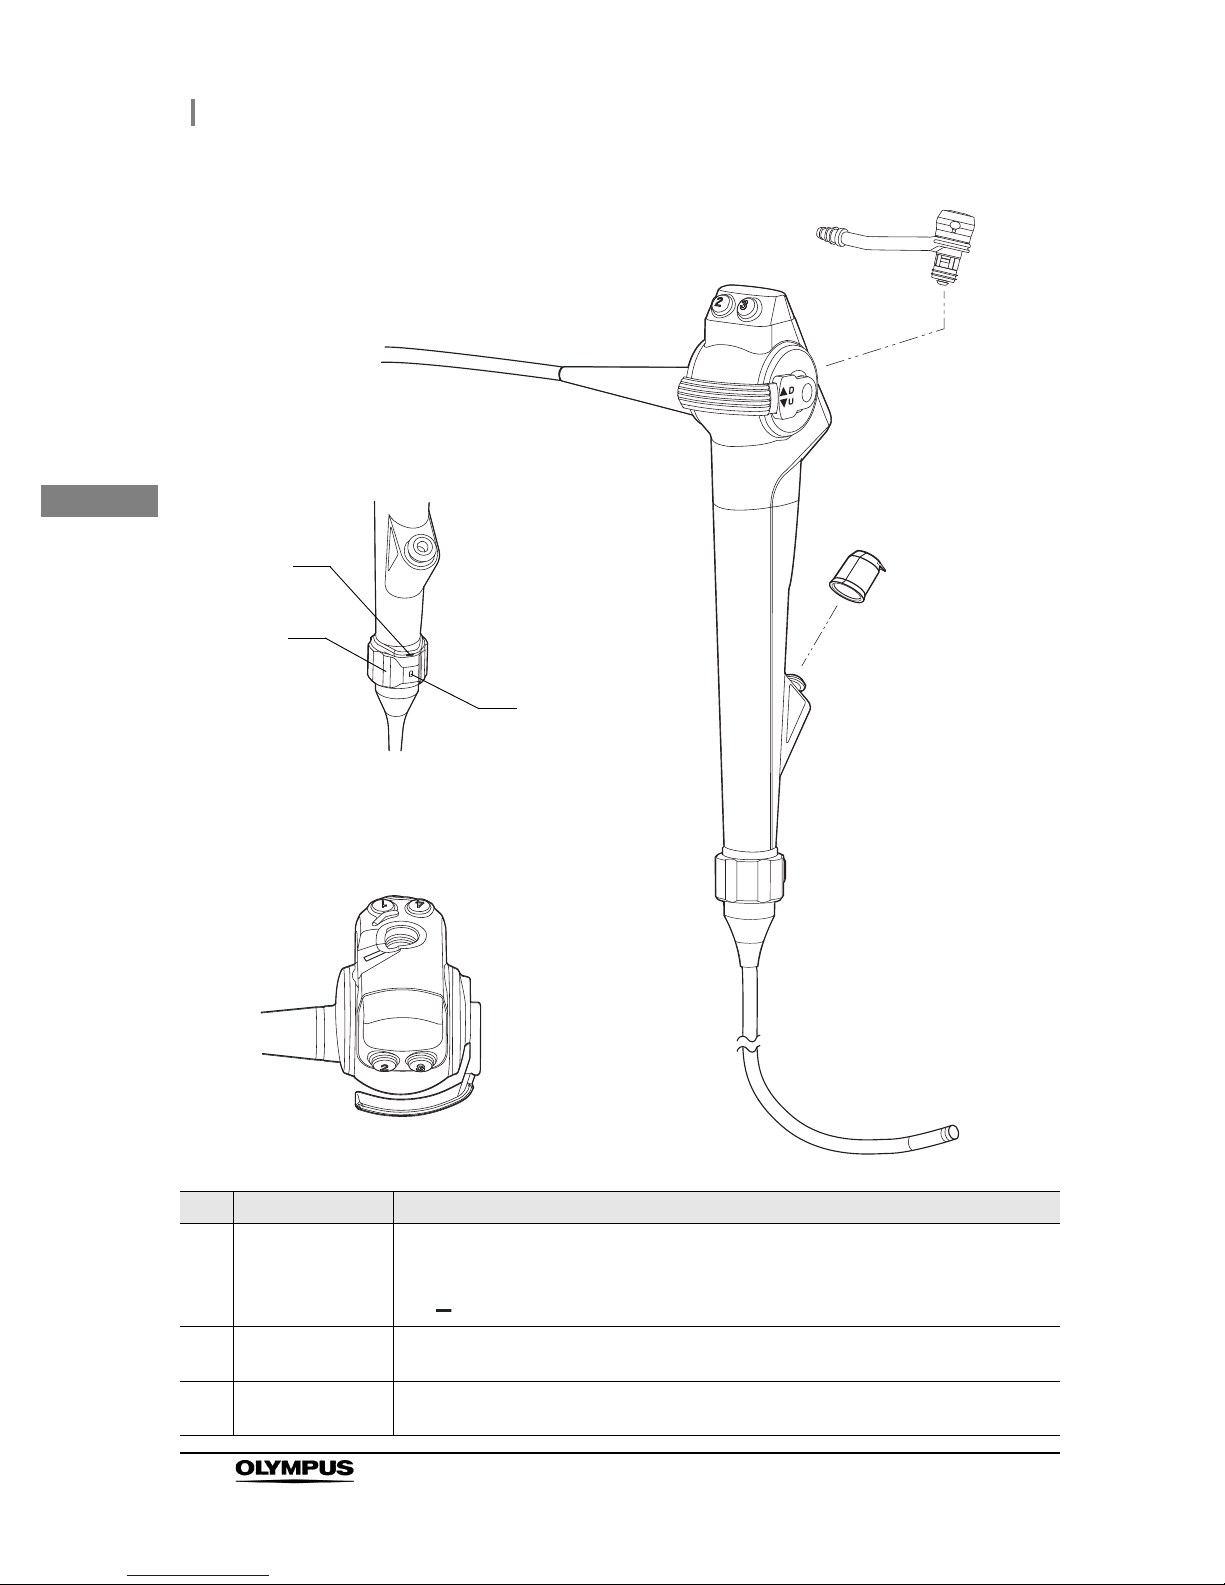
No. Nomenclature Description
15 UP indication This indication shows the UP direction of the insertion tube. The direction of this
indication is the same as the UP direction of the bending section. When returning the
insertion tube to its neutral position, turn the insertion tube until the indication aligns with
the “ ” indication on the control section.
16 Insertion tube
rotation ring
When the ring is turned in the right or left direction, the insertion tube turns in the same
direction.
17 UP indication on
the control section
This indication shows the neutral position of the insertion tube rotation ring when it is
aligned with the UP indication of the insertion tube.
Top view
15
17
16
Insertion tube rotation ring
2.1 Nomenclature and functions
21
BF-190 Series OPERATION MANUAL
Ch.2
Endoscope connector
No. Nomenclature Description
18 Light guide Connects the endoscope to the light source and transmits light to the distal end of the
endoscope.
19 Electrical contacts Connect the light source and the endoscope electrically.
20 Venting connector Attach the sterilization cap or leakage tester here.
21 Sterilization cap
(MAJ-1538)
The sterilization cap equalizes the outer and inner pressure of the endoscope. The cap
must be attached prior to gas sterilization (ethylene oxide gas, STERRAD®, etc.) and
aeration and removed prior to immersion or clinical examination. The cap must also be
attached when the endoscope is transported outside the hospital (shipment, return for
repairs, etc.).
22 Universal cord Connects the endoscope connector and the control section.
23 Product (model)
and serial number
The product name (model) and serial number are marked here.
24 Endoscope
connector
Connects the endoscope to the light source to transmit light to the distal end of the
endoscope and an accessory is connected to this connector.
The endoscope contains a memory chip that stores information about the endoscope
and communicates this information to the video system center CV-190. For more
details, refer to the instruction manual for the CV-190.
25 UP mark When the endoscope connector is connected to the light source, the “” mark (UP
mark) faces upward.
26 Scope ID mark The RFID (radio frequency identification) chip for the endoscope identification
information is embedded here.
19
20
22
24
21
25
18
23
26
19
Rear side

22
2.2 Specifications
BF-190 Series OPERATION MANUAL
Ch.2
Environment
2.2 Specifications
Operating
environment
Ambient
temperature
10 – 40C (50 – 104F)
Relative humidity 30 – 85%
Atmospheric
pressure
700 – 1060 hPa
(0.7 – 1.1 kgf/cm
2
)
(10.2 – 15.4 psia)
Standard storage
environment (e.g.
within the
hospital)
Ambient
temperature
5 – 40C (41 – 104F)
Relative humidity 10 – 95%
Atmospheric
pressure
700 – 1060 hPa
(0.7 – 1.1 kgf/cm
2
)
(10.2 – 15.4 psia)
Transportation
environment
(conditions during
transportation
and short-term
storage)
Ambient
temperature
–47 to +70C (–52.6 to +158F)
Relative humidity 10 – 95%
Atmospheric
pressure
700 – 1060 hPa
(0.7 – 1.1 kgf/cm
2
)
(10.2 – 15.4 psia)
2.2 Specifications
23
BF-190 Series OPERATION MANUAL
Ch.2
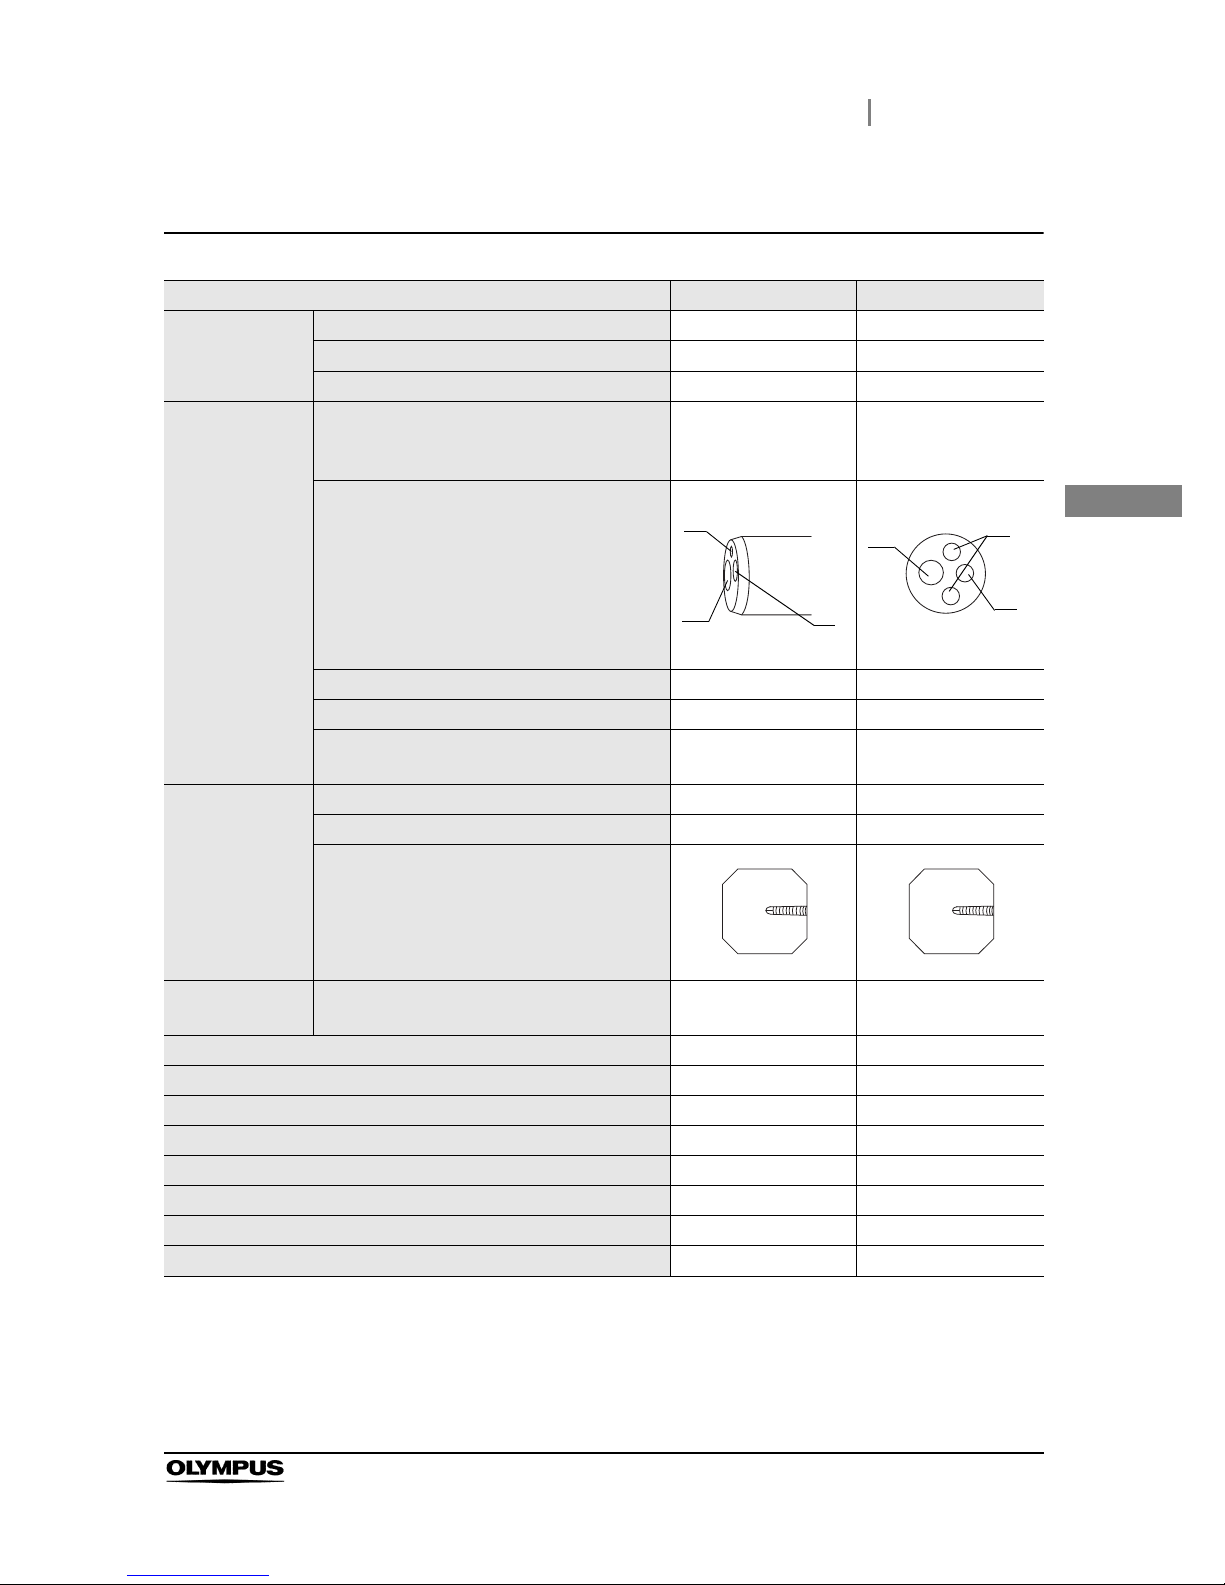
Specifications
Model BF-XP190 BF-P190
Optical system Field of view 110° 110 °
Direction of view 0 (Forward viewing) 0 (Forward viewing)
Depth of field 2 – 50 mm 2 – 50 mm
Insertion section Distal end outer diameter ø 3.1 mm
(Tapered part of distal
tip: ø 2.9 mm)
ø4.2mm
Distal end enlarged
1 Objective lens
2 Light guide lens
3 Instrument channel outlet
Insertion tube outer diameter ø2.8mm ø4.1mm
Insertion section working length 600 mm 600 mm
Rotation range Right: 120
Left: 120
Right: 120
Left: 120
Instrument
channel
Channel inner diameter ø1.2mm ø2.0mm
Minimum visible distance
*1
*1 Distance from the distal end of the endoscope.
1.5 mm 3 mm
Direction from which EndoTherapy
accessories enter and exit the endoscopic
image
Bending section Angulation range UP: 210
DOWN: 130
UP: 210
DOWN: 130
Total le n g th 880 mm 880 mm
Pre-freeze function
*2
*2 For more details, refer to the instruction manual for the CV-190.
Available Available
Electronic zoom function
*2
Not available Not available
Electronic shutter function
*2
Not available Not available
Records of endoscope’s information
*2
Available Available
NBI observation
*2
Available Available
High-frequency treatment Not Compatible Compatible
Laser treatment Not Compatible Not Compatible
2
1
3
UP
DOWN
2
1
3
UP
DOWN
24
2.2 Specifications
BF-190 Series OPERATION MANUAL
Ch.2
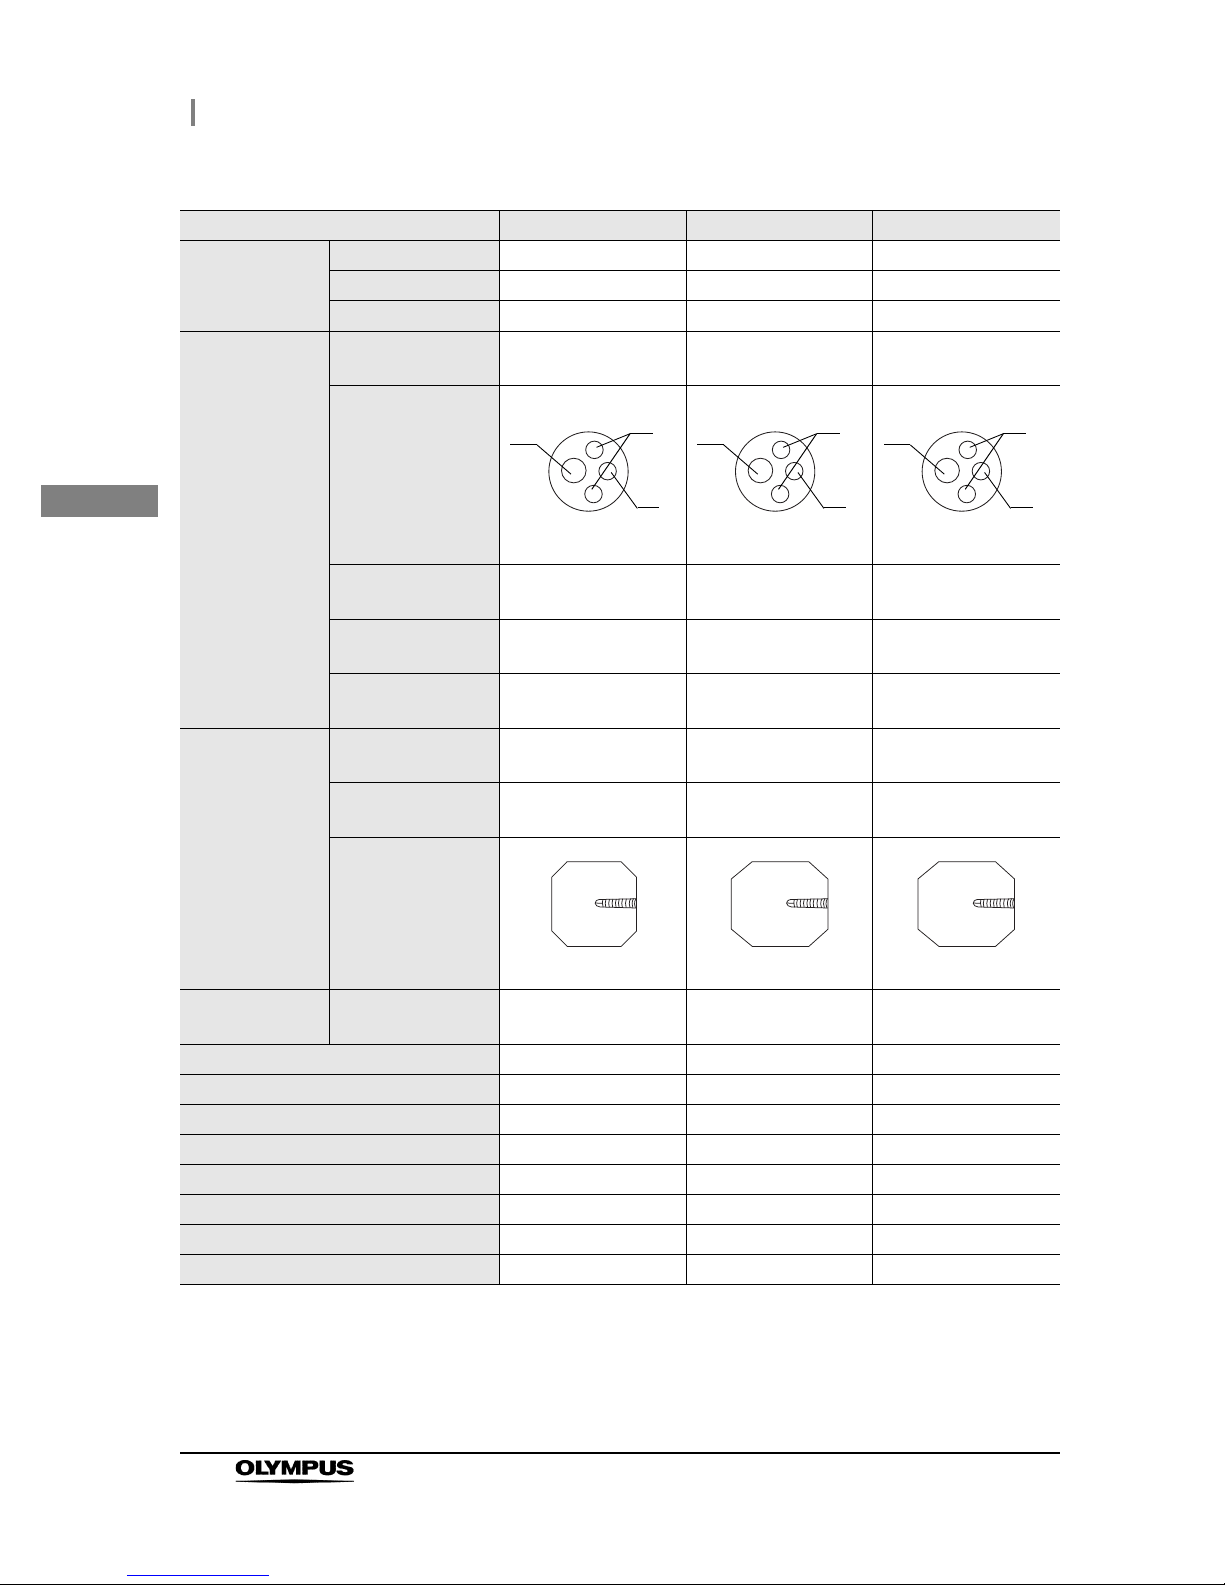
Model BF-Q190 BF-H190 BF-1TH190
Optical system Field of view 120 120 120
Direction of view 0 (Forward viewing) 0 (Forward viewing) 0 (Forward viewing)
Depth of field 3 – 100 mm 3 – 100 mm 3 – 100 mm
Insertion section Distal end outer
diameter
ø 4.8 mm ø 5.5 mm ø 6.2 mm
Distal end enlarged
1 Objective lens
2 Light guide lens
3 Instrument
channel outlet
Insertion tube outer
diameter
ø 4.9 mm ø 5.1 mm ø 6.0 mm
Insertion section
working length
600 mm 600 mm 600 mm
Rotation range Right: 120
Left: 120
Right: 120
Left: 120
Right: 120
Left: 120
Instrument
channel
Channel inner
diameter
ø 2.0 mm ø 2.0 mm ø 2.8 mm
Minimum visible
distance
*1
*1 Distance from the distal end of the endoscope.
3mm 3mm 3mm
Direction from
which
EndoTherapy
accessories enter
and exit the
endoscopic image
Bending section Angulation range UP: 210
DOWN: 130
UP: 210
DOWN: 130
UP: 180
DOWN: 130
Total length 880 mm 880 mm 880 mm
Pre-freeze function
*2
*2 For more details, refer to the instruction manual for the CV-190.
Available Available Available
Electronic zoom function
*2
Available Available Available
Electronic shutter function
*2
Available Available Available
Records of endoscope’s information
*2
Available Available Available
NBI observation
*2
Available Available Available
High-frequency treatment Compatible Compatible Compatible
Laser treatment Compatible Compatible Compatible
2
1
3
UP
DOWN
2
1
3
UP
DOWN
2
1
3
UP
DOWN
 Loading...