

Page 1

INSTRUCTIONS
Page 2
Thank you for your purchase of an Olympus OM-88 . This newly developed automatic SLR camera
features an advanced power focus system, programmed exposure control and an automatic film handling
system to let you take beautiful pictures with ease. Further, if you use this new type of programmed SLR
camera wit h a Manual Adapter 2, it also permits aperture-priority automatic exposure and manual
exposure to give you the possibility of creative visual expressions that are possible only with an SLR.
Anyone can enjoy taking pictures with it very easily — not on ly simple snapshots, but also highly
sophisticated pictures. Before using the camera, please study this instruction manual carefully with the
OM-88 in front of you, so that you can get the very best performance and service life from your new
camera.
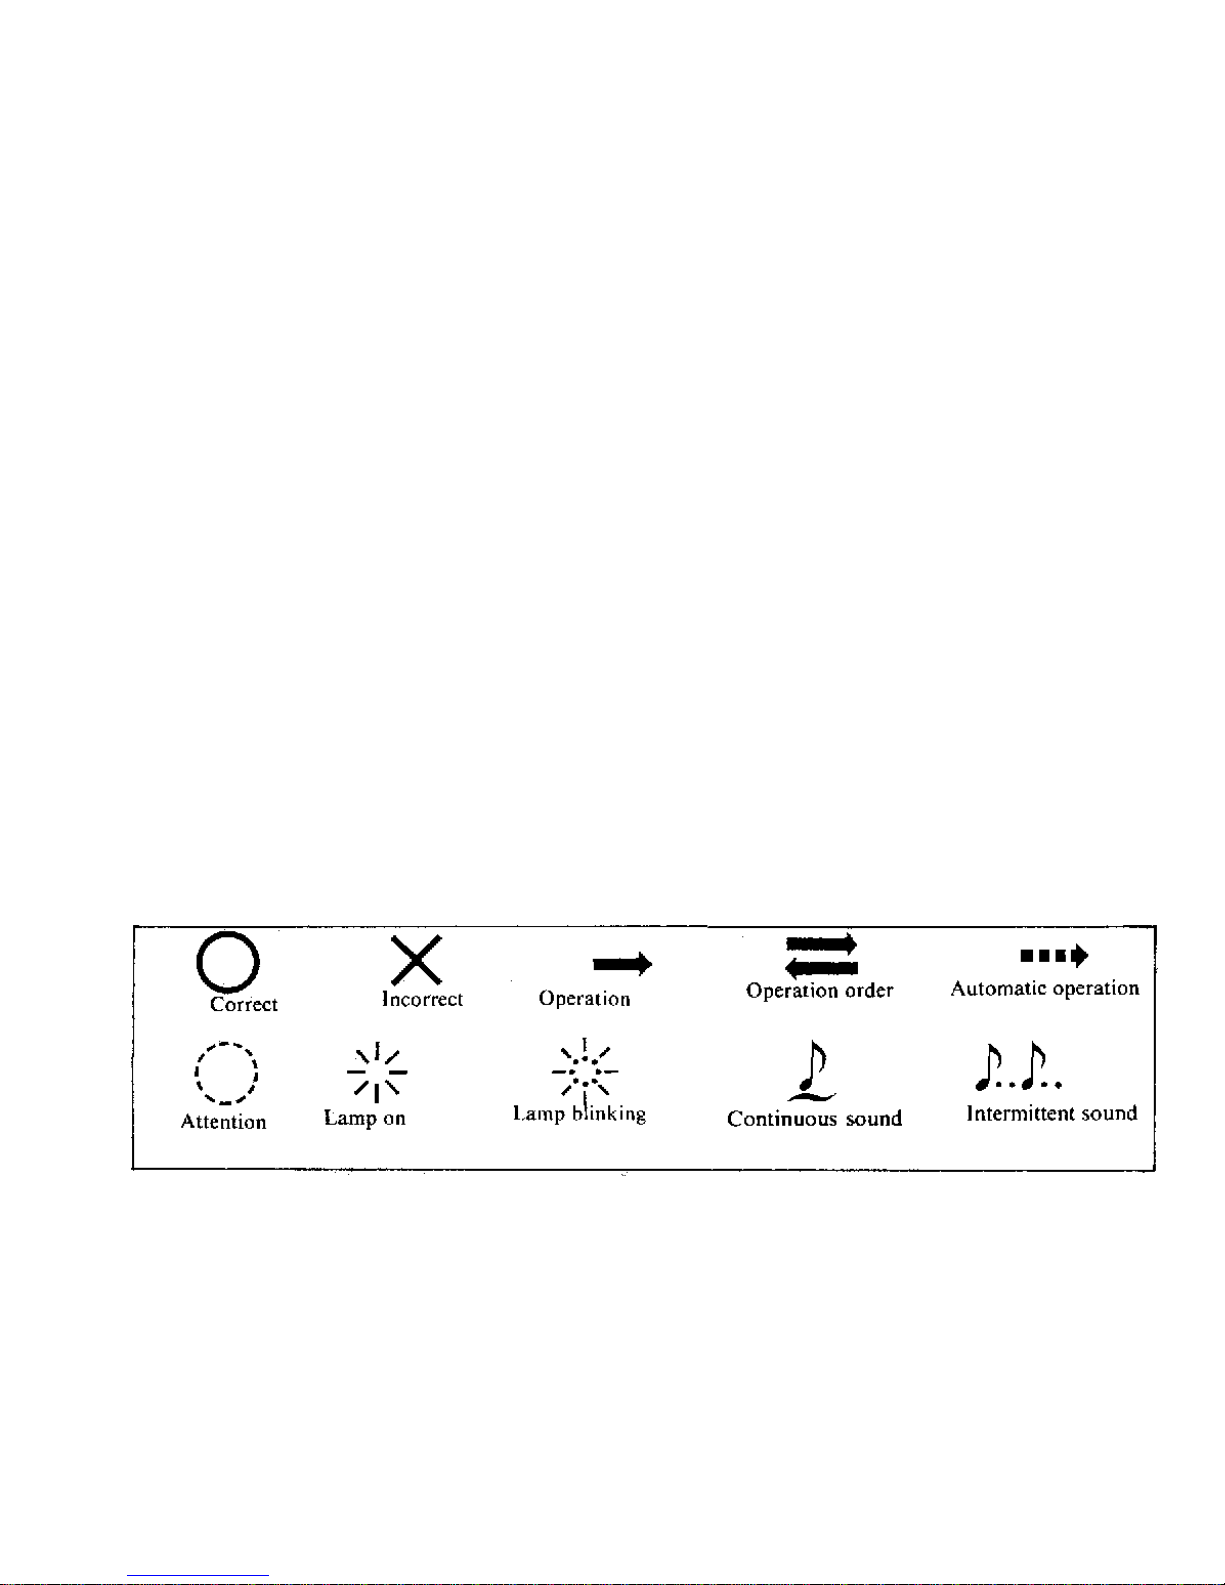
Symbols used in this manual
1
Page 3

TABLE OF CONTENTS
Using conventional auto flash units
To
take better photographs:
................
Programmed exposure ....................
TTL Direct "OTF" Light Metering
Display in the viewfinder .................
Using the Manual Adapter 2 ............
OM- 8 8 system .............................
Notes on the OM-88 with current
OM System Units ..........................
Conventional OM Lenses ................
Care
and
Storage
...........................
Questions and Answers ...................
Description o f Controls .................
Specifications .............................
Manual Adapter 2 Description of
Controls
....................................
Manual Adapter 2 Specifications .....
Preparations
for
Taking Pictures
...........
Loading the Batteries ......................
Checking the Batteries ....................
Mounting t he Lens ........................
Taking Photographs I .........................
Loading the Film ...........................
Taking Photographs
.......................
Rewinding t he Fil m ........................
Taking Photographs
II
........................
Using the backlight control button .....
Using the self-timer ........................
Using OM Lenses ..........................
Taking Photographs I I I
(flash photography)
............................
Using T-series Electronic Flashes
(T18, T20andT32) ........................
Using the Full-Synchro Flash F280 . . . .
Taking Photographs IV
Using the OM-88 with the Manual
Adapter
2
........................................
Mounting the Manual Adapter 2 .......
Aperture-priority auto exposure ........
Manual exposure ...........................
Bulb exposure
...............................
3
4
5
6
7
8
11
13
14
15
16
17
19
20
22
24
25
26
28
30
31
33
34
37
38
39
42
43
44
45
47
49
52
53
54
2
Page 4

Preparations for Taking Pictures
The OM-88 is designed primarily for use with Olympus AF Lenses a n d 50mm
F2.0 PF Lens. (Regarding the instructions for use of conventional OM Lenses, refer
to page 17.)
3
Page 5
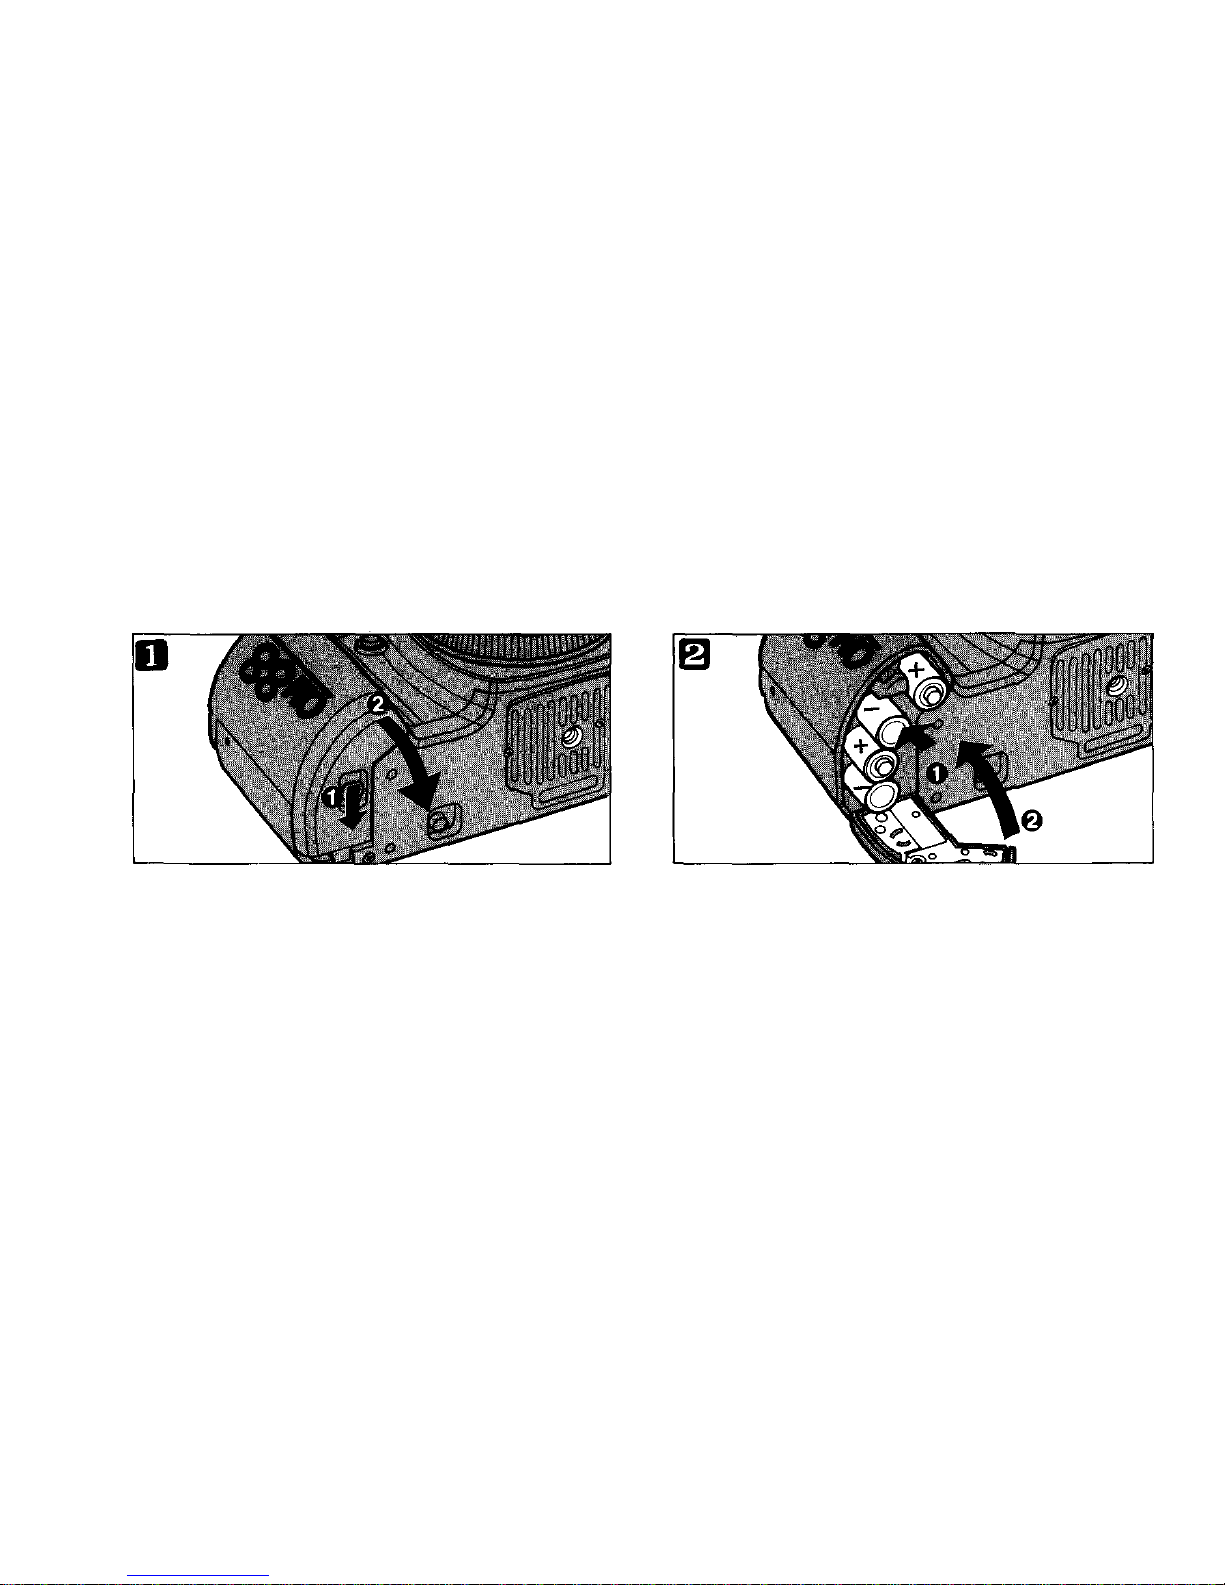
Open the battery compartment cover by
slidi ng the kn o b in the lower part of t he grip.
4 LR03 (AAA) batteries
Inset the batteries in the correct direction
and close the cover.
Loading the Batteries
Do not use different kinds of batteries or new and old batteries at the same ti m e. If
you are not likely to use the camera for an extended period of time, remove t he
batteries. Before changing
the
batteries,
set the
mode di al
at
"OFF".
4
Page 6
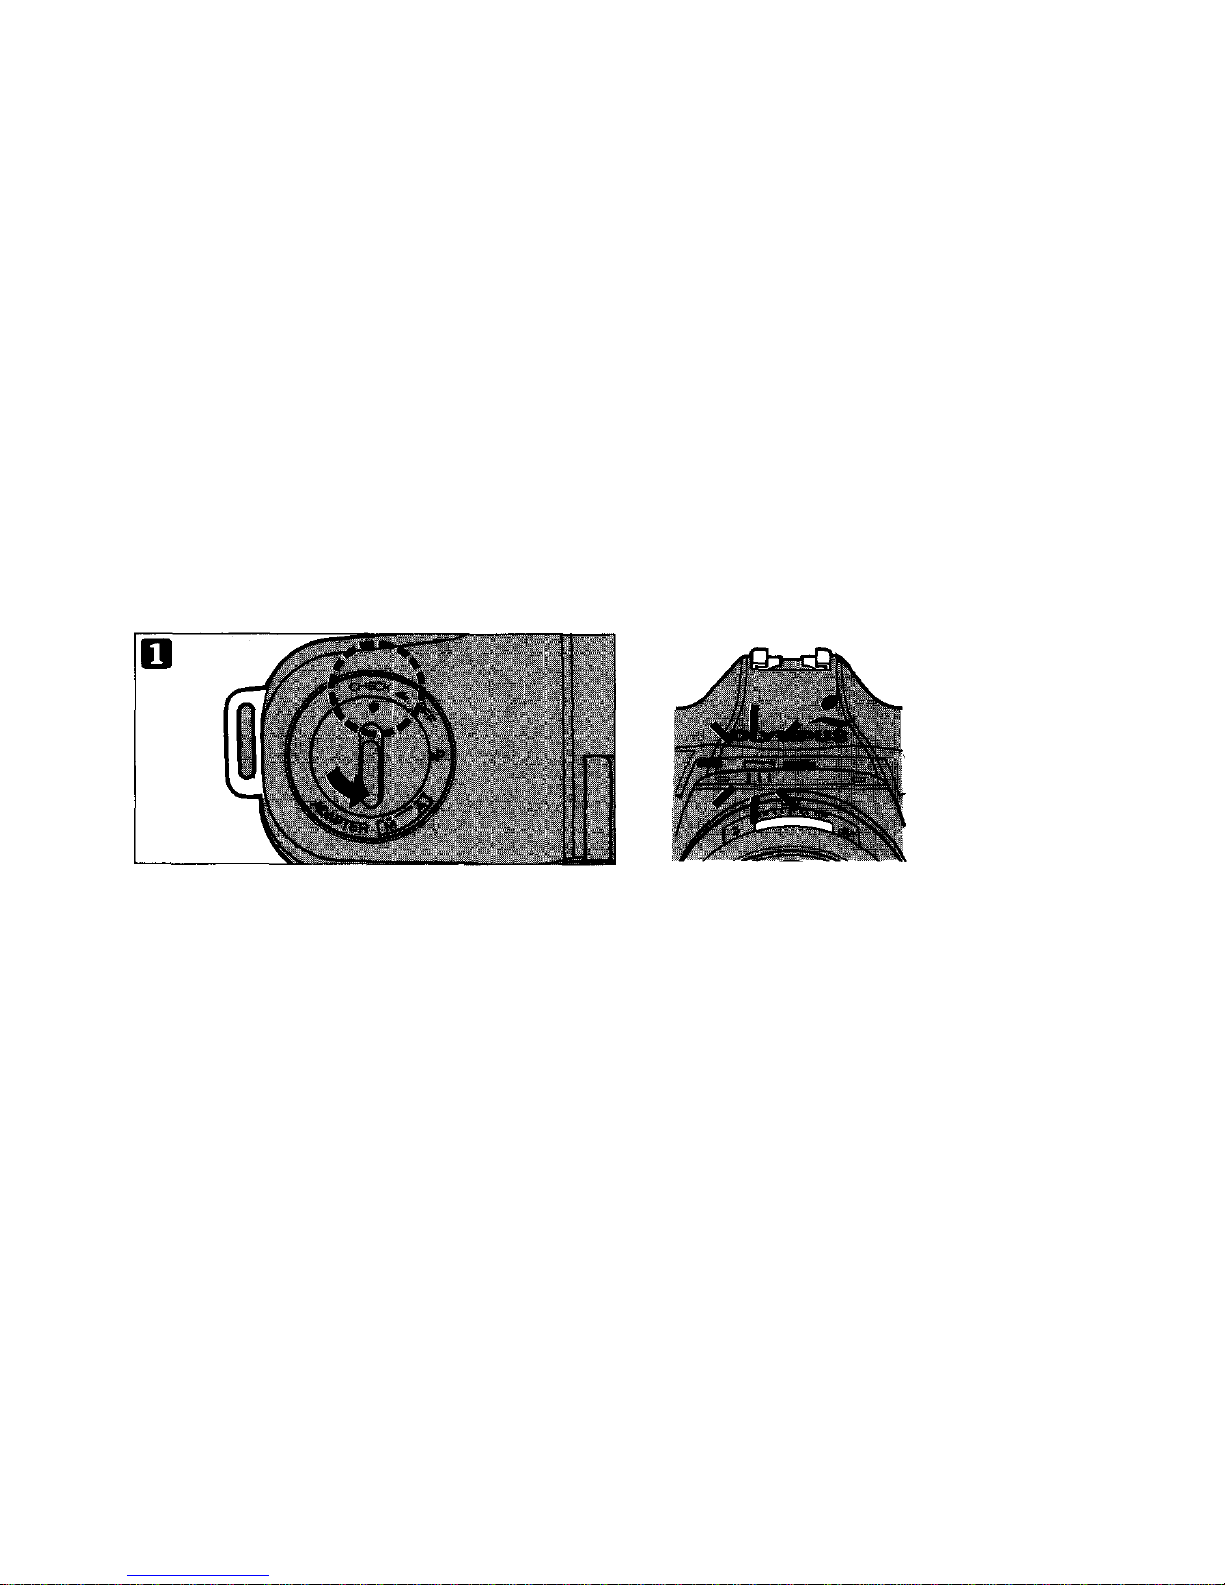
The audible and visual signals will tell you
that the batteries have enough power.
As the battery power weakens, both the
audible and visual signals become
intermittent. Replace the batteries as soon as
possible.
(When the batteries are completely
exhausted the audible and visual signals do
not operate at all.)
Set the mode dial at "CHECK".
Alwa ys check t he batteries after inserting new batteries, when shooting i n cold
weather, or if the camera has not been used for a long lime.
Checking the Batteries
5
Page 7
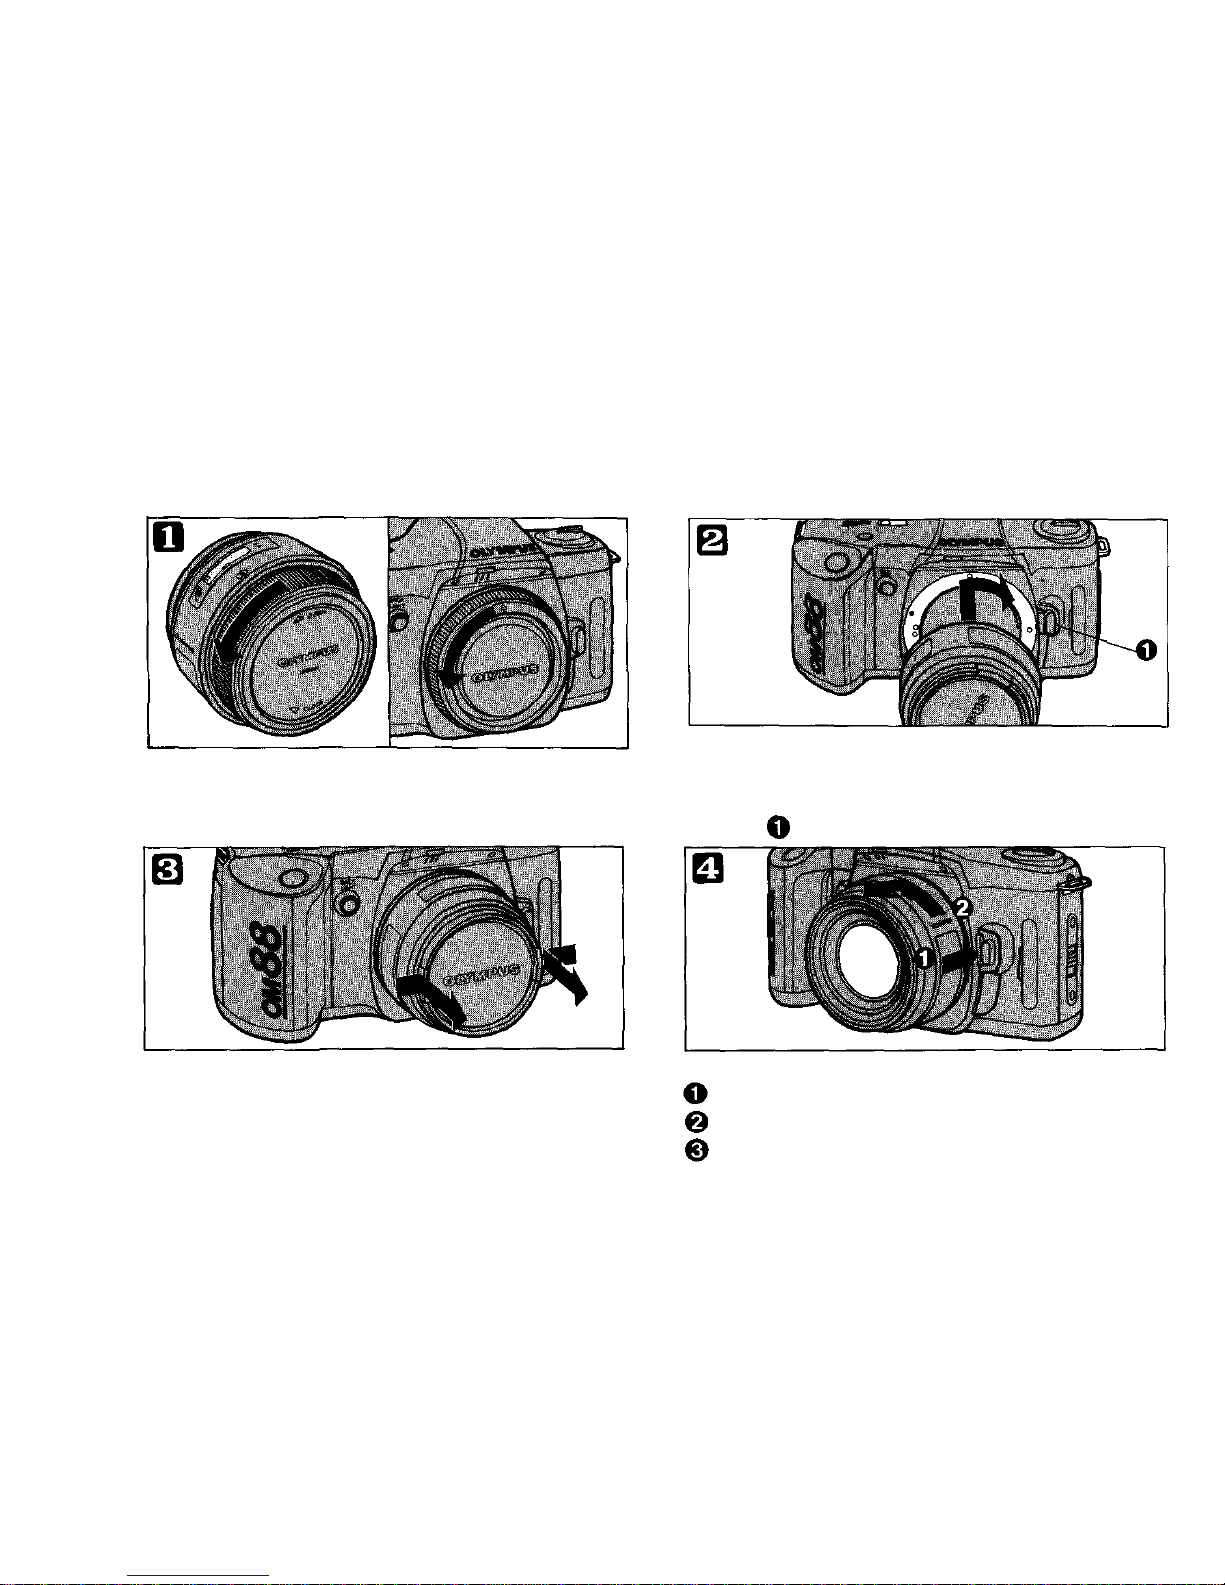
Mounting the Lens
(if you are using an OM lens, refer to page 17.)
Remove the rear lens cap and the body cap.
Align the red dots on the body and the lens
as shown, push in the lens and turn it slowly
clockwise until it locks. (Do not touch the
button ).
Removing the Lens:
Press the lens release button.
Turn the lens until it stops.
Pull the lens forward to remove it from
the camera body.
Remove the front lens cap.
6
Page 8

Taking Photographs 1
The OM-88 is so designed to allow everyone to enjoy the fascinating world of SLR
photography wi th ease. T his chapter explains its basic procedure how to ta ke
programmed exposure pictures (see page 34 for details).
7
Page 9
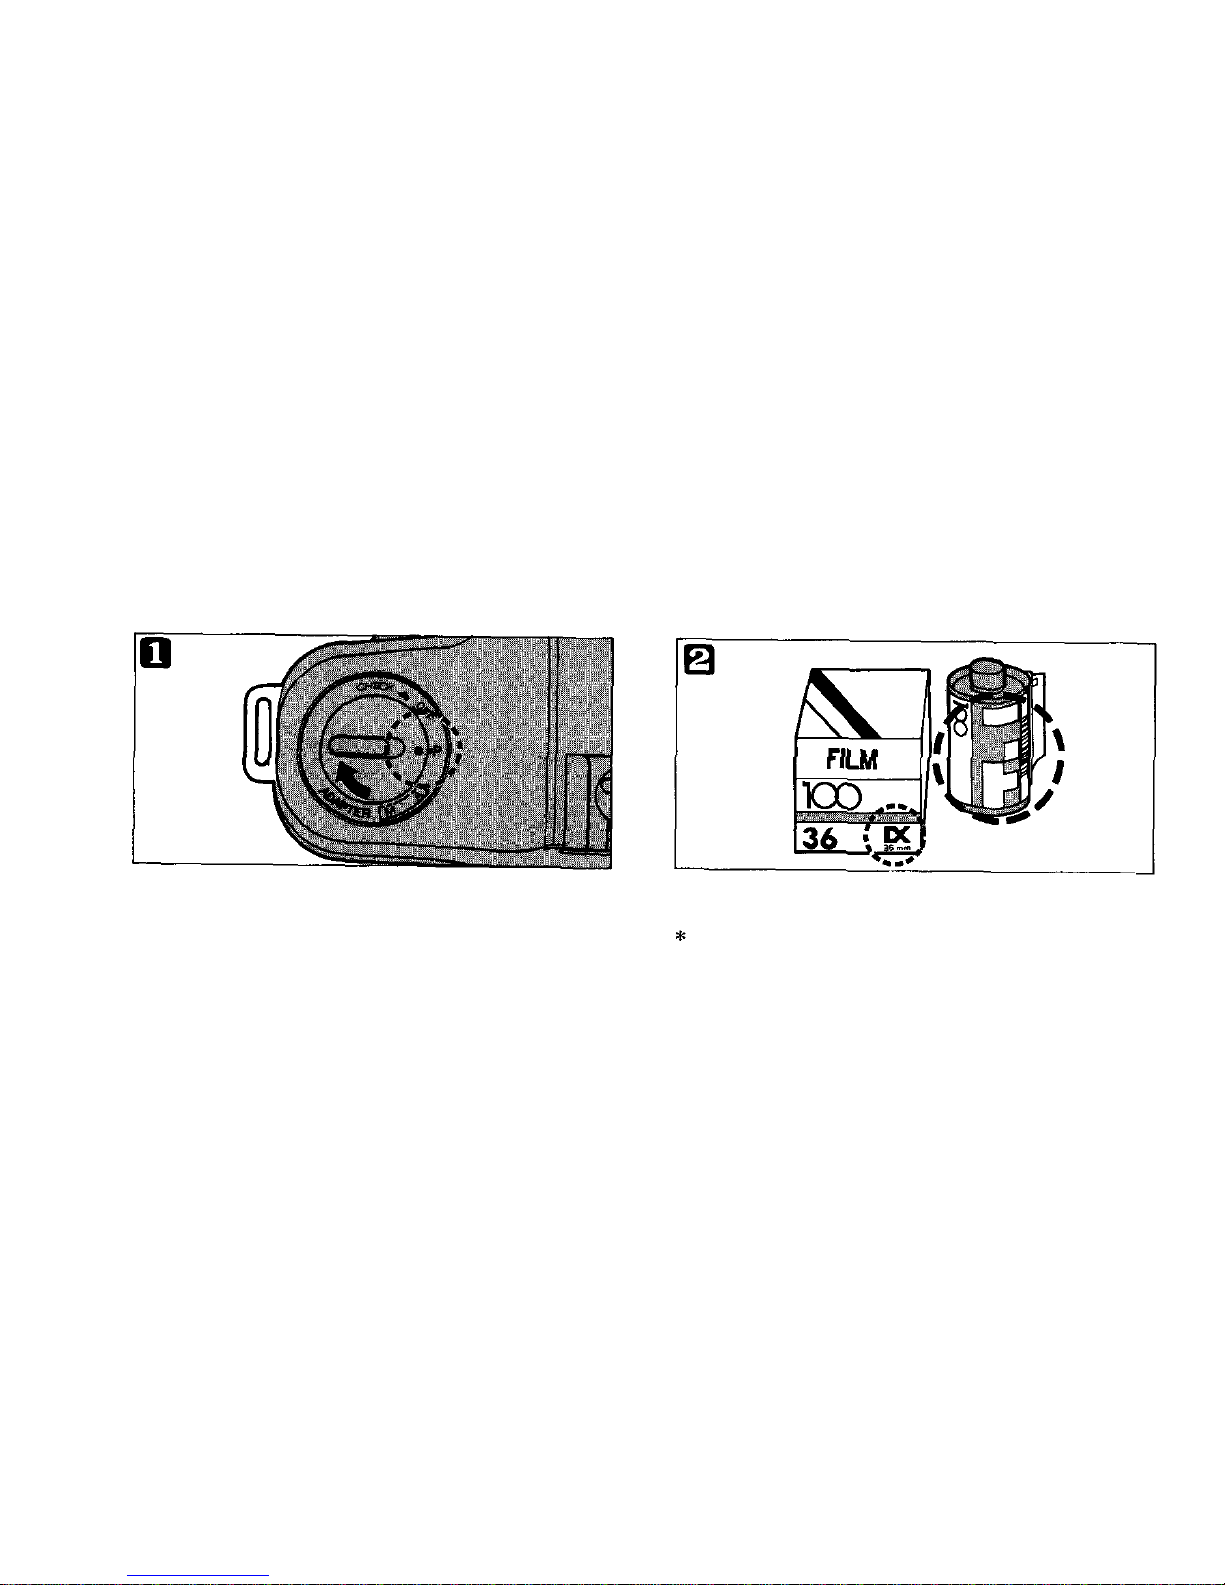
Loading t he Fi l m
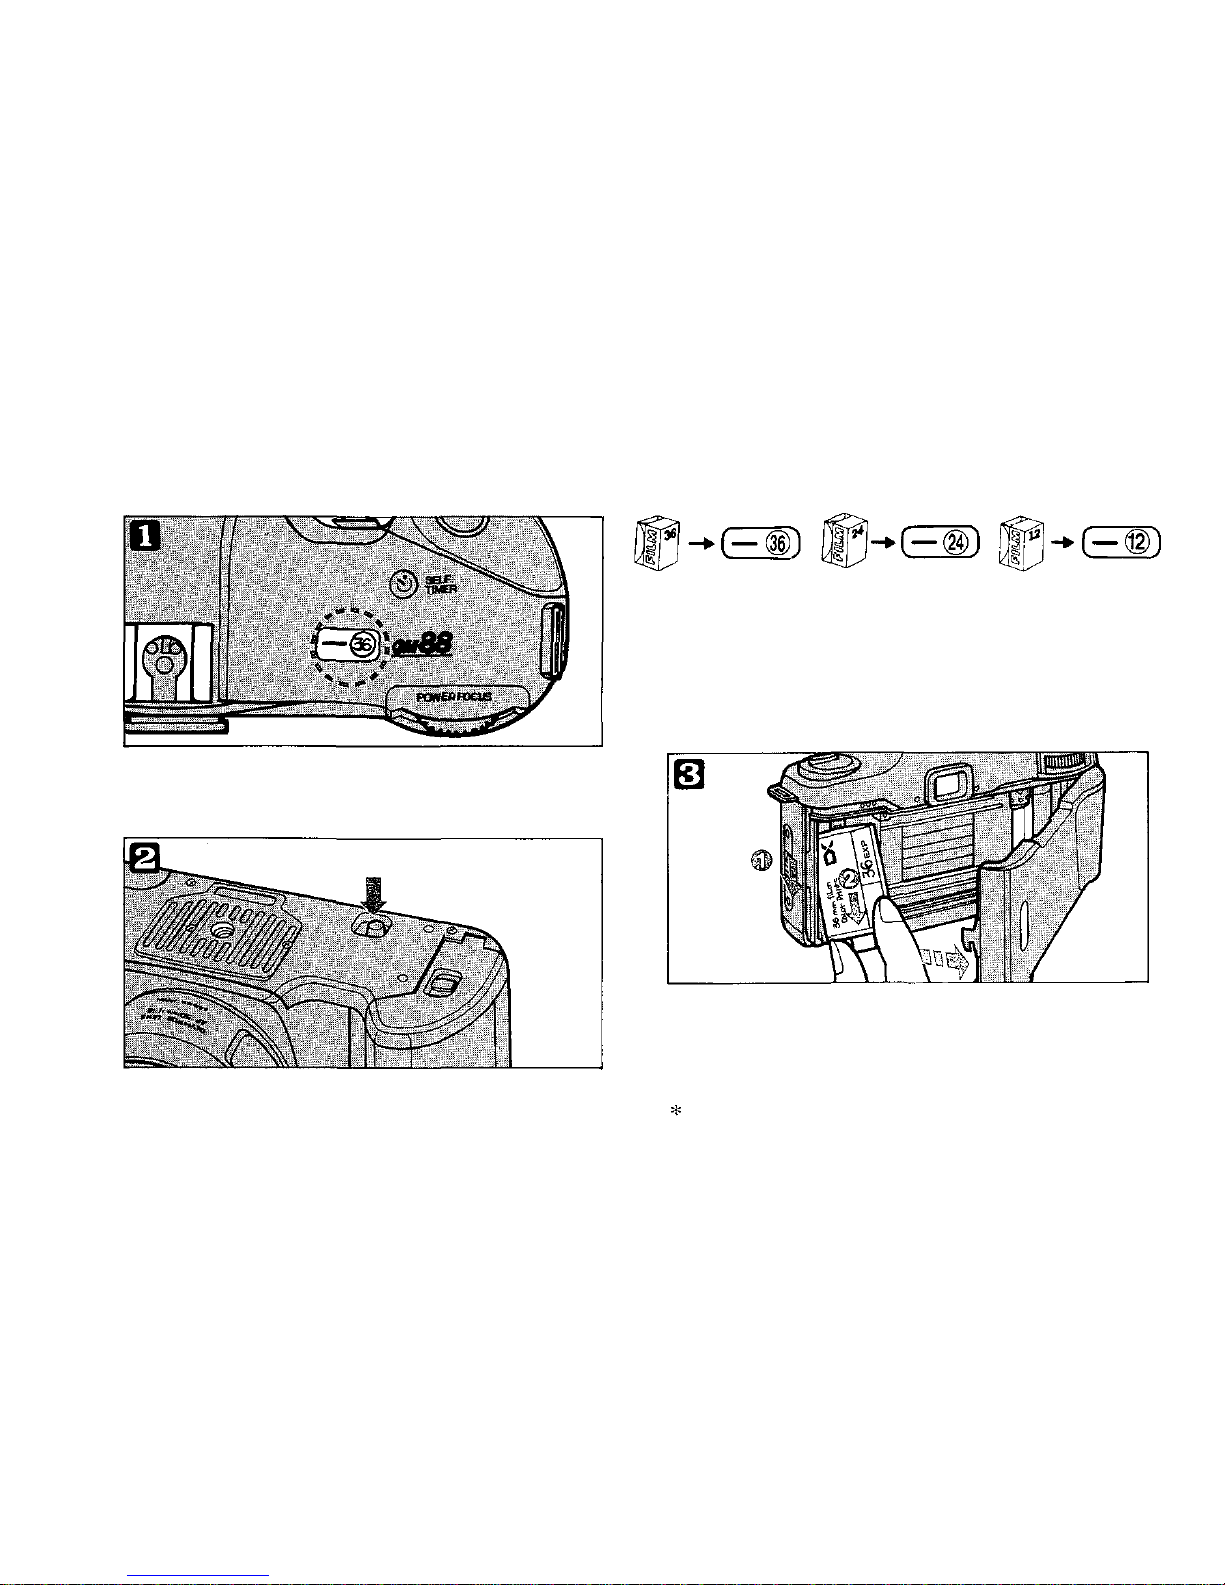
Loading and film-speed selection f or D X fi l m arc automatic.
Set the mode dial at "P".
Make sure you are using a DX coded film,
This camera does not accept non-DX
coded films.
8
Page 10
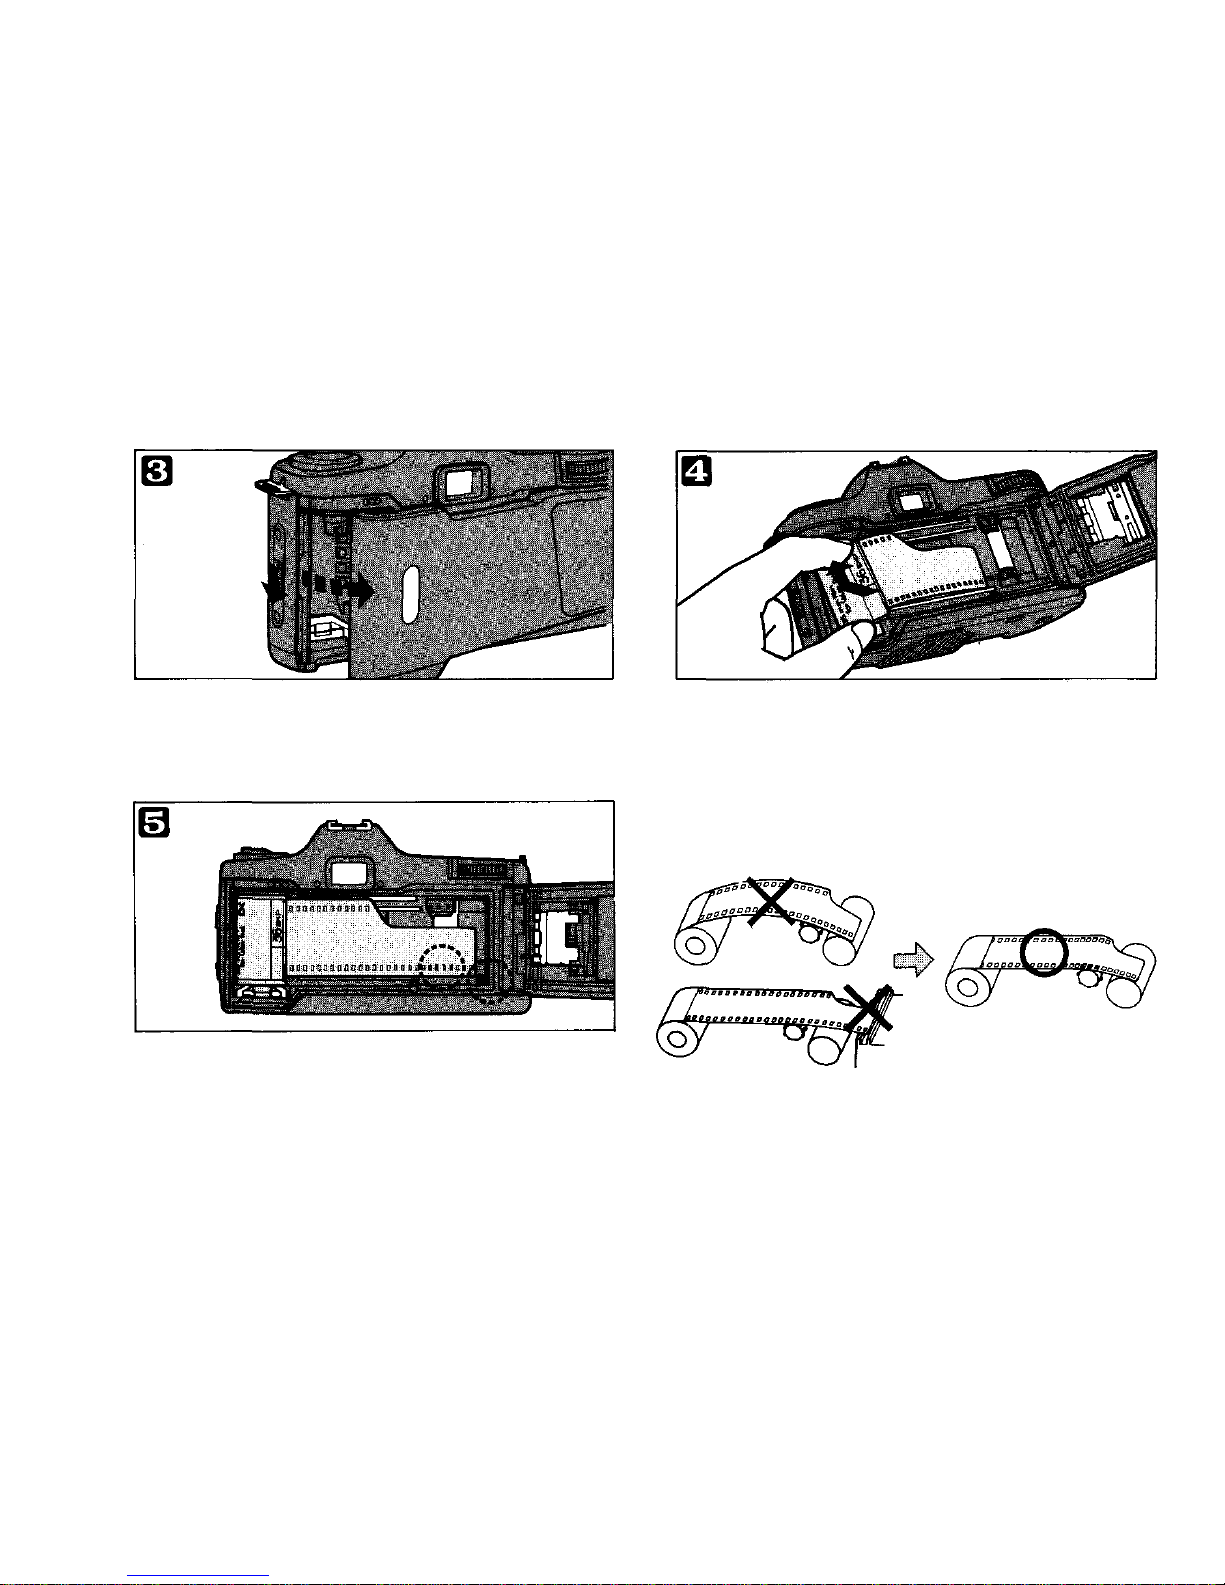
Open the camera back by sliding the release
knob.
Avoiding direct sunlight, inset the film
cartridge.
Take care not to touch the shutter curtain
with your finger or the film leader.
Align the film leader with the red mark and
insert the sprocket teeth in the film
perforations.
9
Page 11
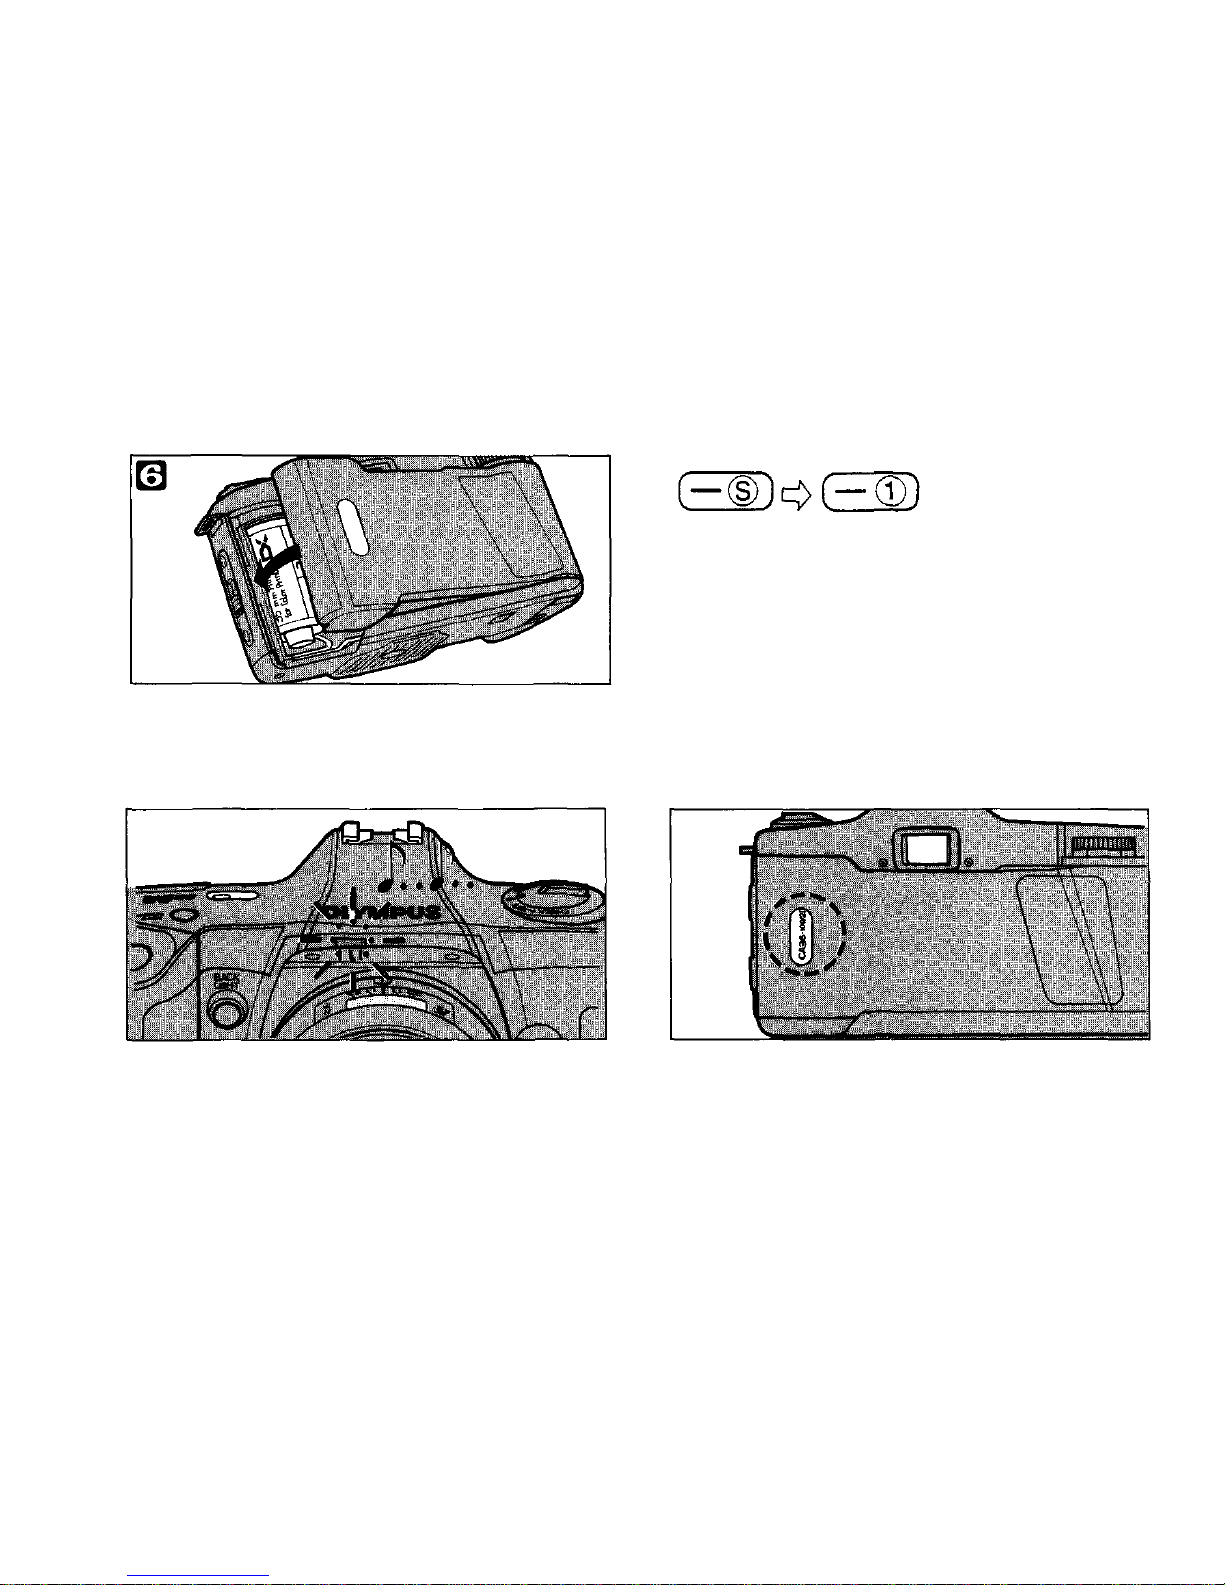
* If t he mode dial is at "OFF", the film will
not advance.
Close th e ca mer a back.
The camera will automatically advance the
film and the exposure counter will show "1".
When the film is incorrectly loaded, the
camera will warn you with audible and
visual signals. Reload the film.
Film type confirmation is possible through
the film window in the camera back.
10
Page 12
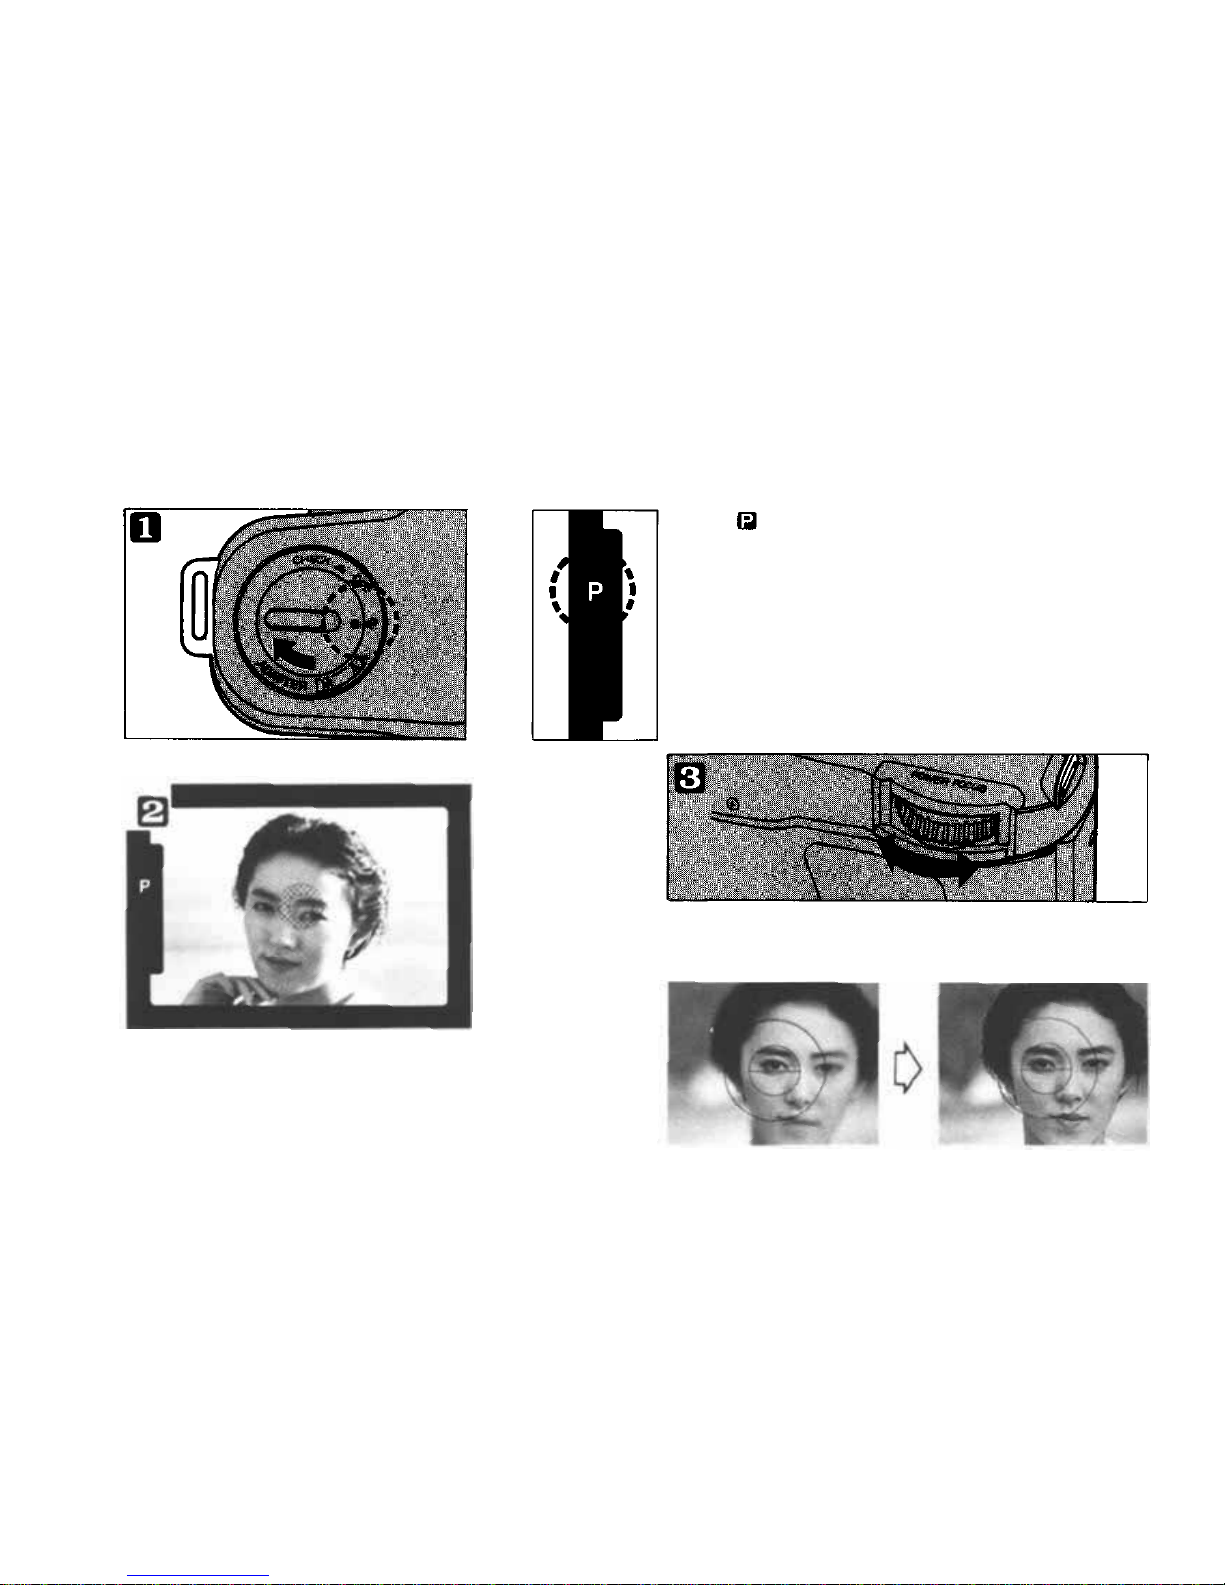
Taking Photographs
Set the mode dial at "P".
The will turn on in the viewfinder. If it
blinks the shutter will tri p at 1/60 sec. or a
slower. In this case, use flash or mount the
camera on a tripod. (Lightly press the
shutter release if the viewfinder display
doesn't show. The display in the viewfinder
will remain on for 30 seconds.)
Focus on the focusing screen w ith th e power
focus dial. *Do not touch the lens front part.
Look through the viewfinder
and aim the camera at your
subject.
11
Page 13
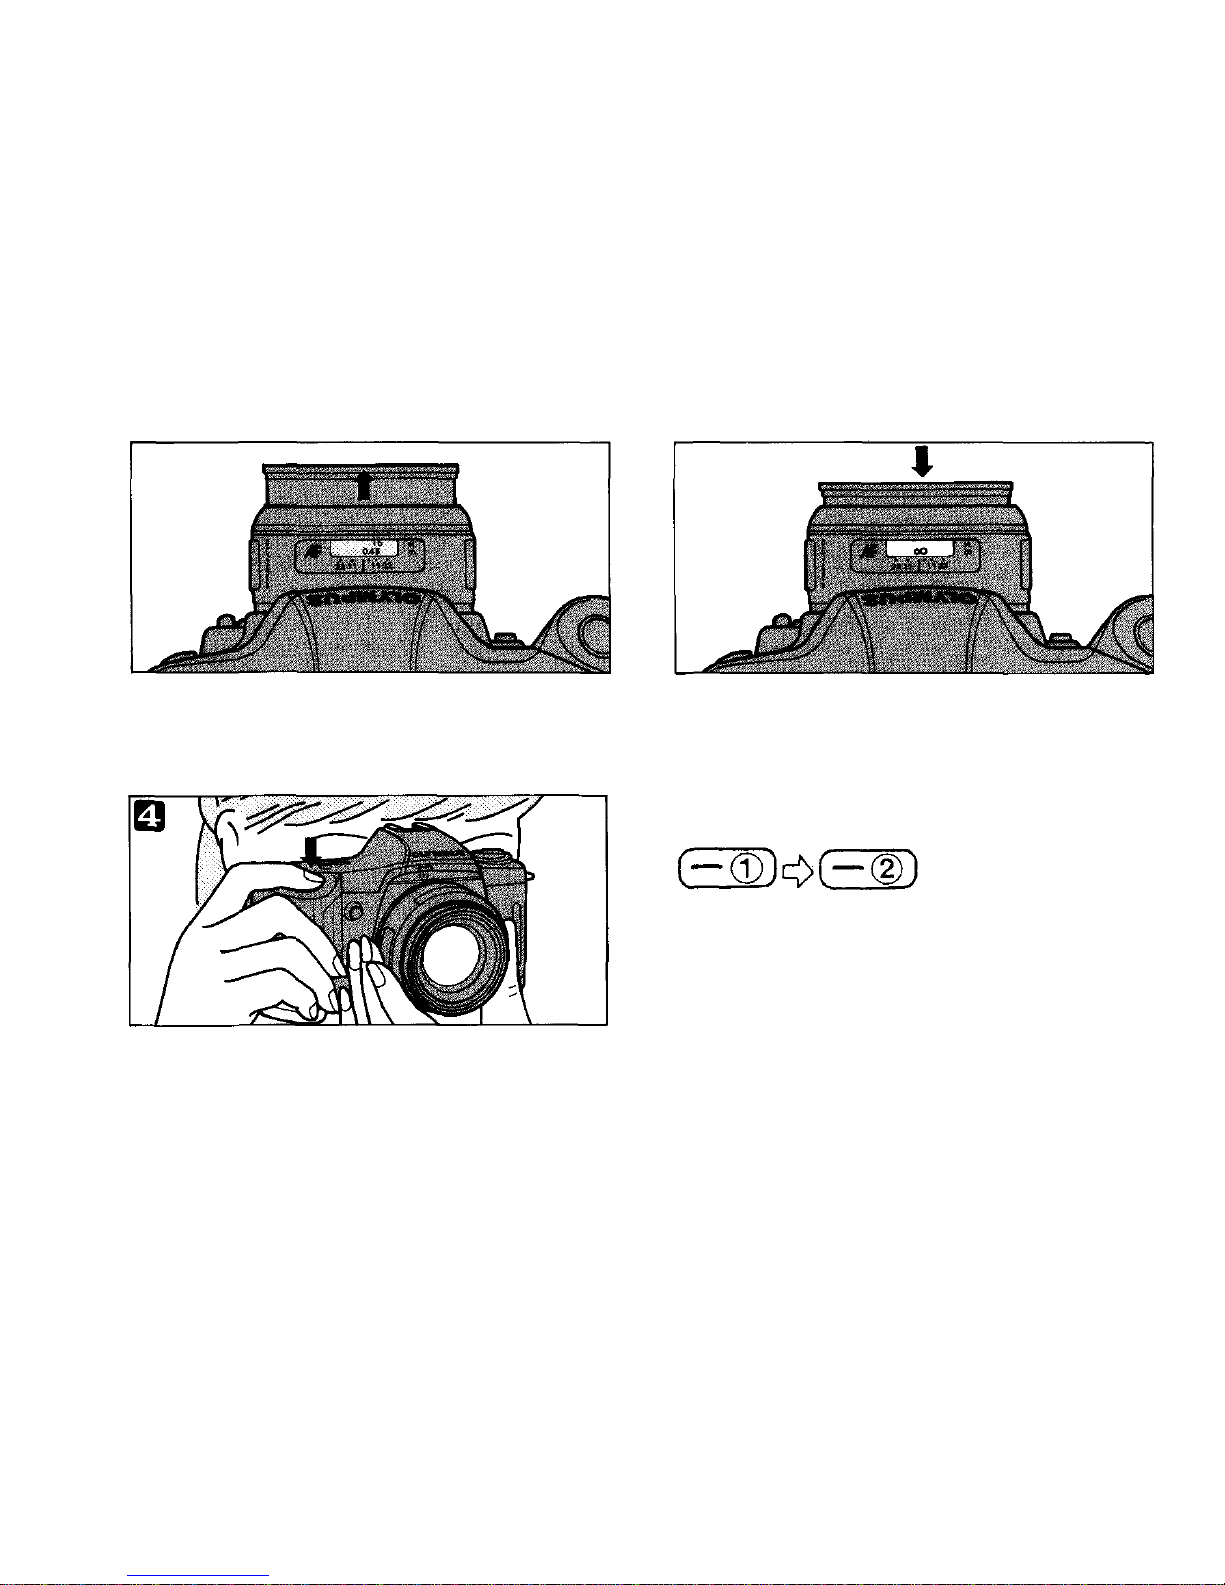
Depress th e shutter release. The f il m wi ll
automatically advance for th e next shot.
When the dial is turned to the right, the lens When turned to the left, the lens focuses on
focuses on closer subjects. farther subject.
* The speed of the lens movement changes in accordance wit h a rotation speed of the dial.
12
Page 14
Press the rewind button.
The film will be rewound automatically.
Make sure the film has come to its end.
After making sure the motor noise stops,
open the camera back and unload the film.
As soon as yo u open the camera back, th e
exposure counter will return to "S".
The film is completely rewound into the
cartridge.
When the end of film is reached, the motor
whir stops midway, and if the shutter release
is depressed, the camera will wa rn yo u with
audible and visual signals.
Rewinding the Film
Film rewinding is also automatic.
13
Page 15

Taking Photographs I I
The OM-88 is designed primarily for use with Olympus AF Lens and 50mm F2.0
PF lens, bu t you c an also use conventional OM Lenses wi th it. Th is chapter
explains various functions which expand your picture-taking possibilities, and how
to use OM Lenses.
14
Page 16
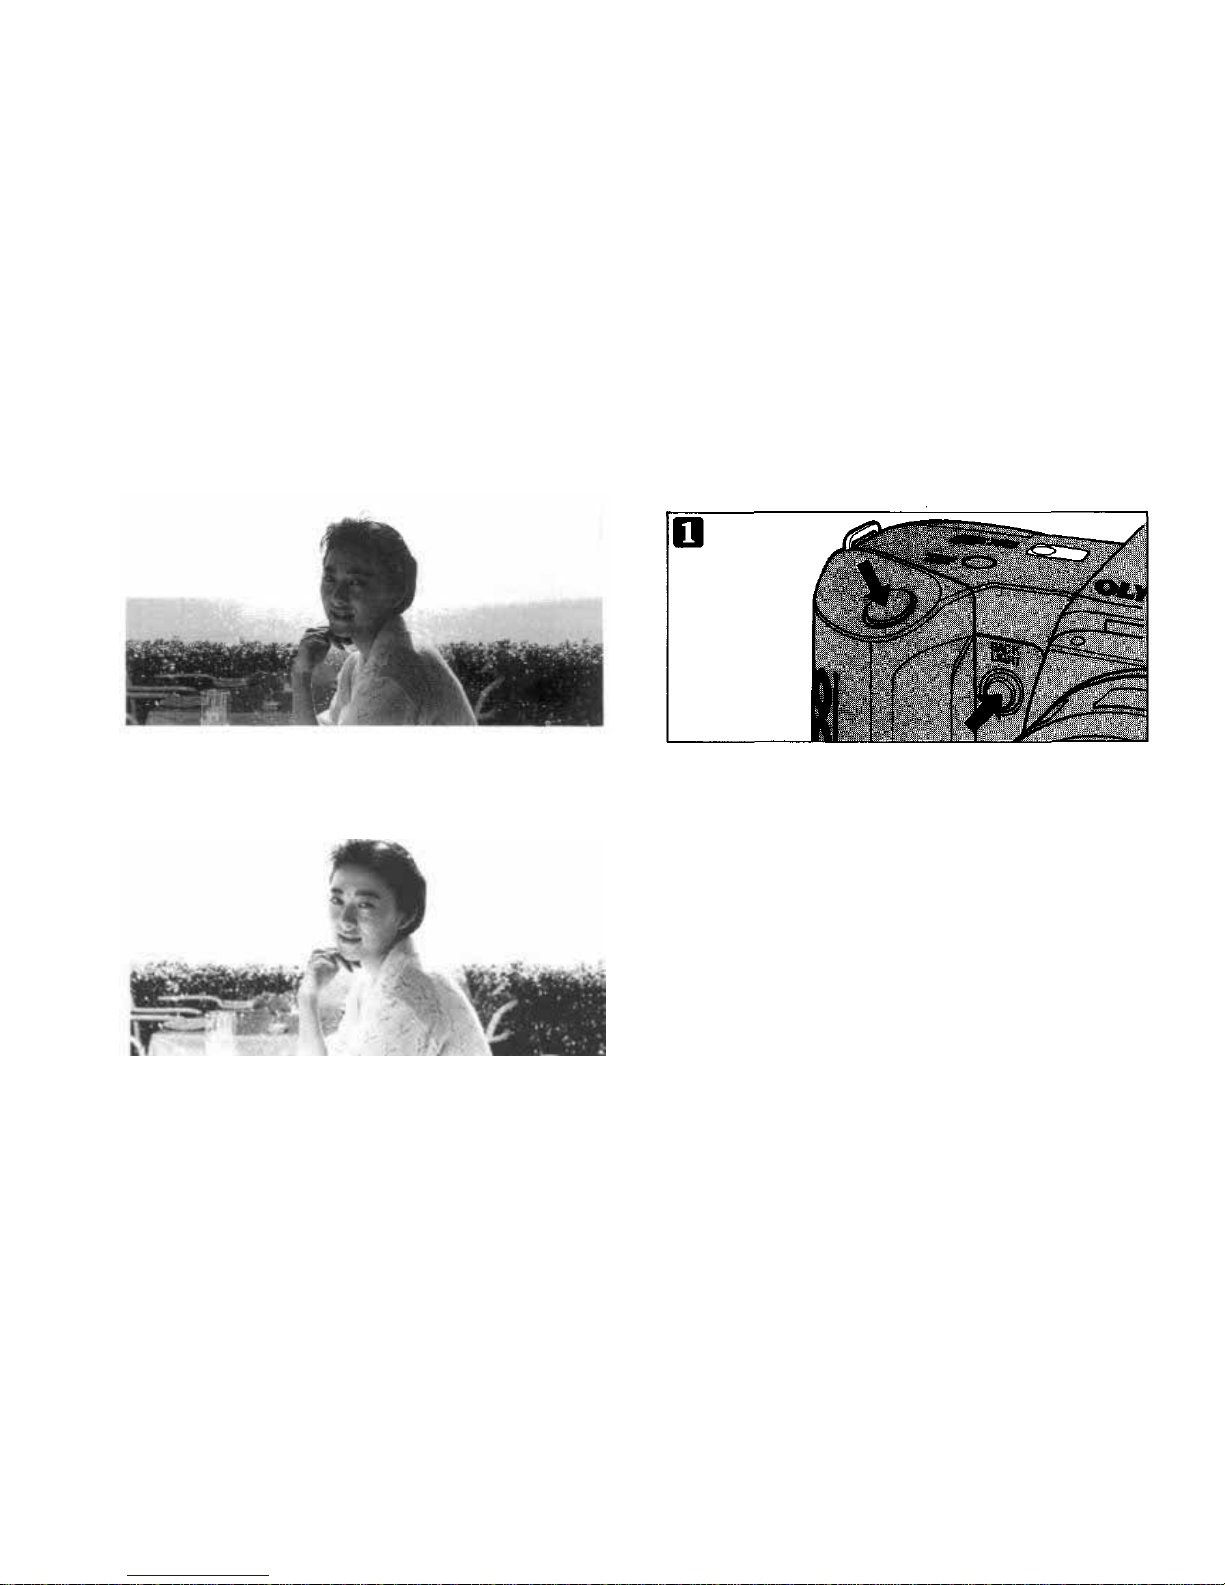
Using the backlight control button
If you r subject stands against a bright
background, the main subject in the front
will tur n out dar k.
While pressing the backlight control button,
depress the shutter release.
* Backlight control does not function when
film speed is set at ISO 25.
The main subject will turn out beautifully
exposed, almost unaffected by the bright
background.
15
Page 17
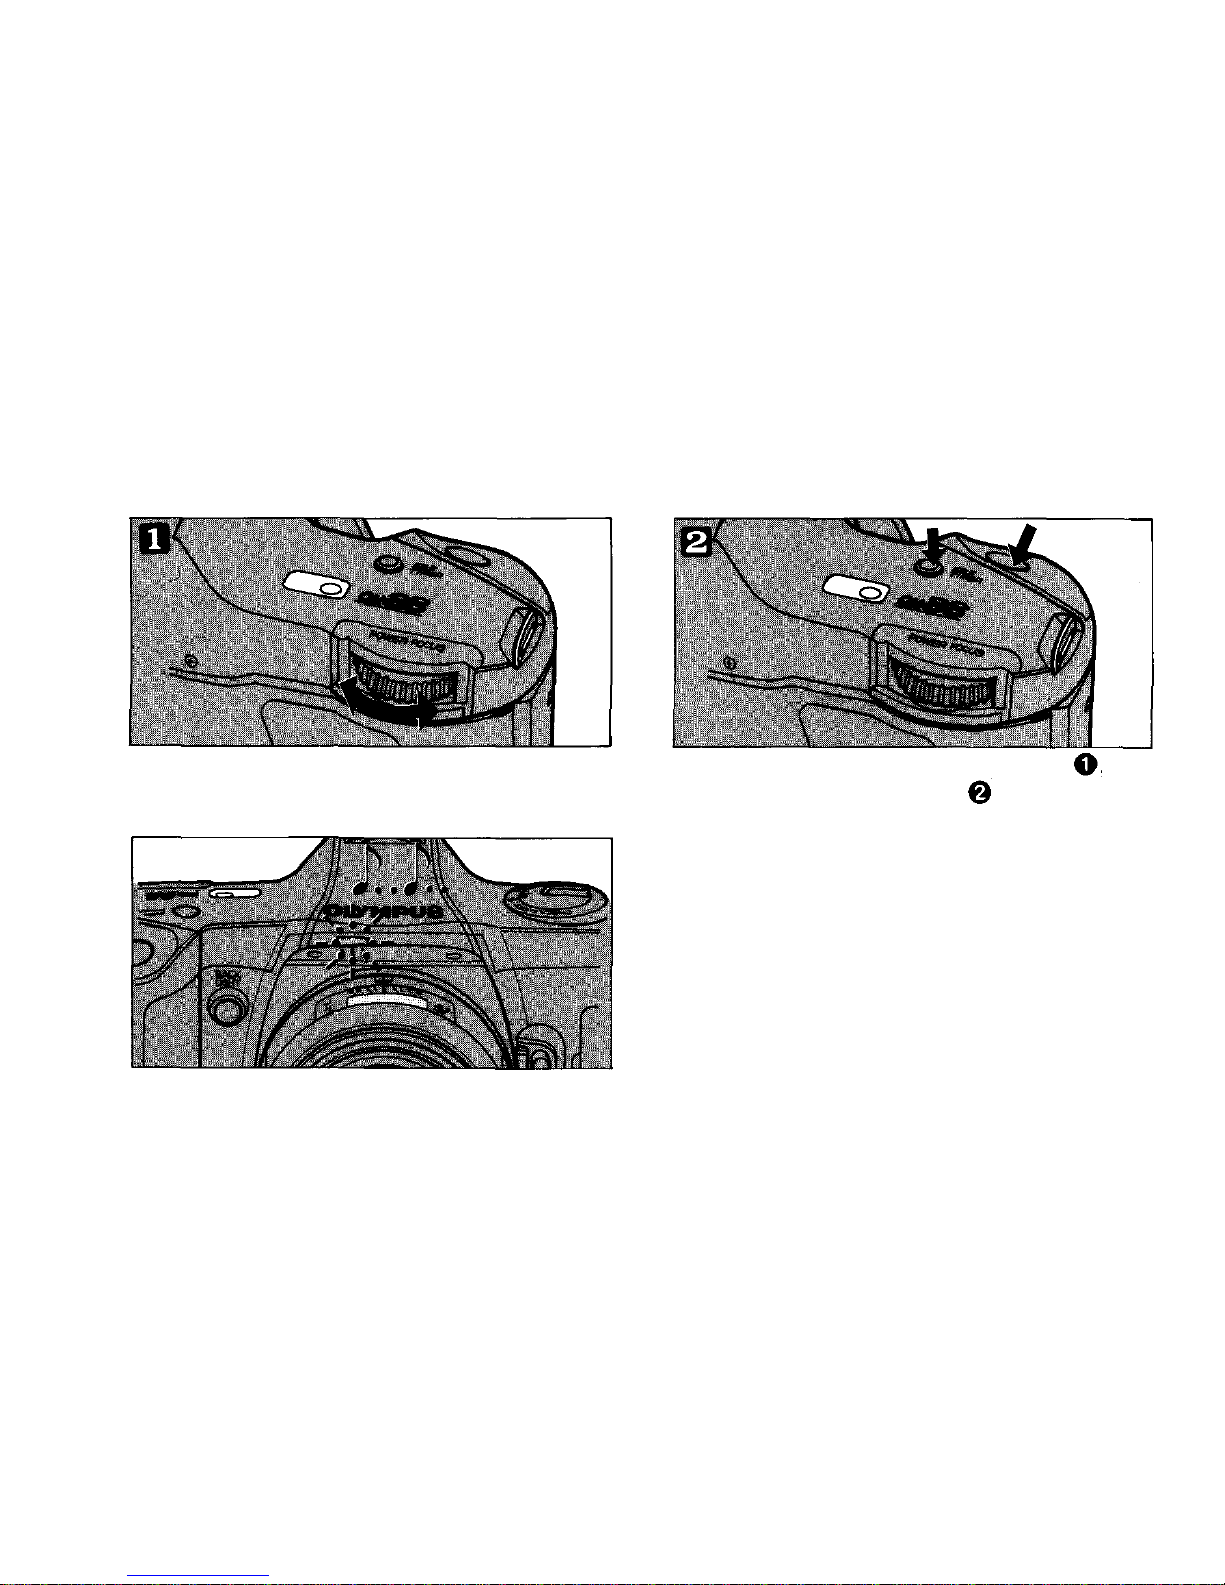
Using the self-timer
Mou nt the camera on a tripod or other steady surface.
While pressing the self-timer button
depress the shutter release
Focus on your subject with the power focus
dial.
Audible and visual signals will let yo u kn ow
that the self-timer has started.
The shutter will trip after 12 seconds, the
audible signal will change its tone two
seconds before the shutter trips.
* The self-timer can be cancelled by pressing
the self-timer button again or switching the
m o d e d i a l t o "OFF".
16
Page 18
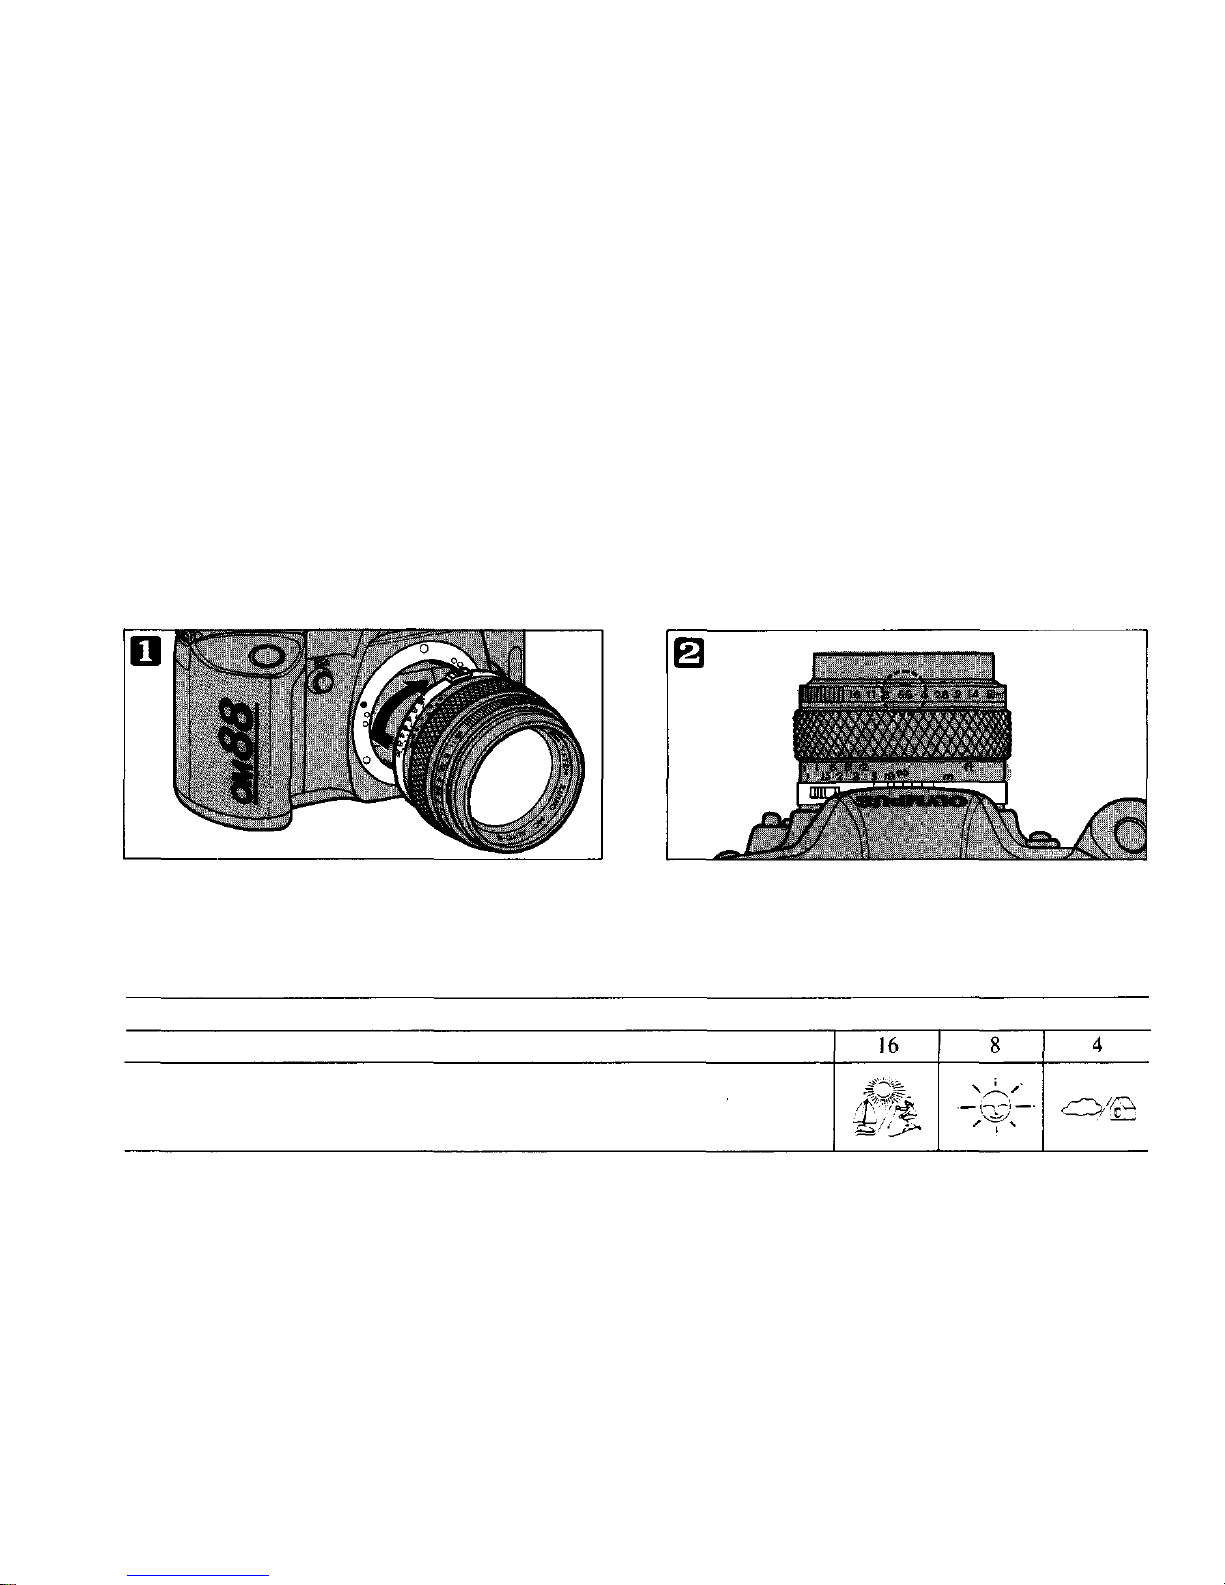
Using OM Lenses
With OM Lenses, the camera will always take pictures in the aperture-priority auto
exposure mode when the mode dial is set at P, A or M. (See page 44 for details)
Mount the Lens.
Align the red dots and turn the lens slowly
until it locks.
Example:
Choose your desired aperture.
Aperture
ISO 100
Weather/
Lighting
condition
17
Page 19
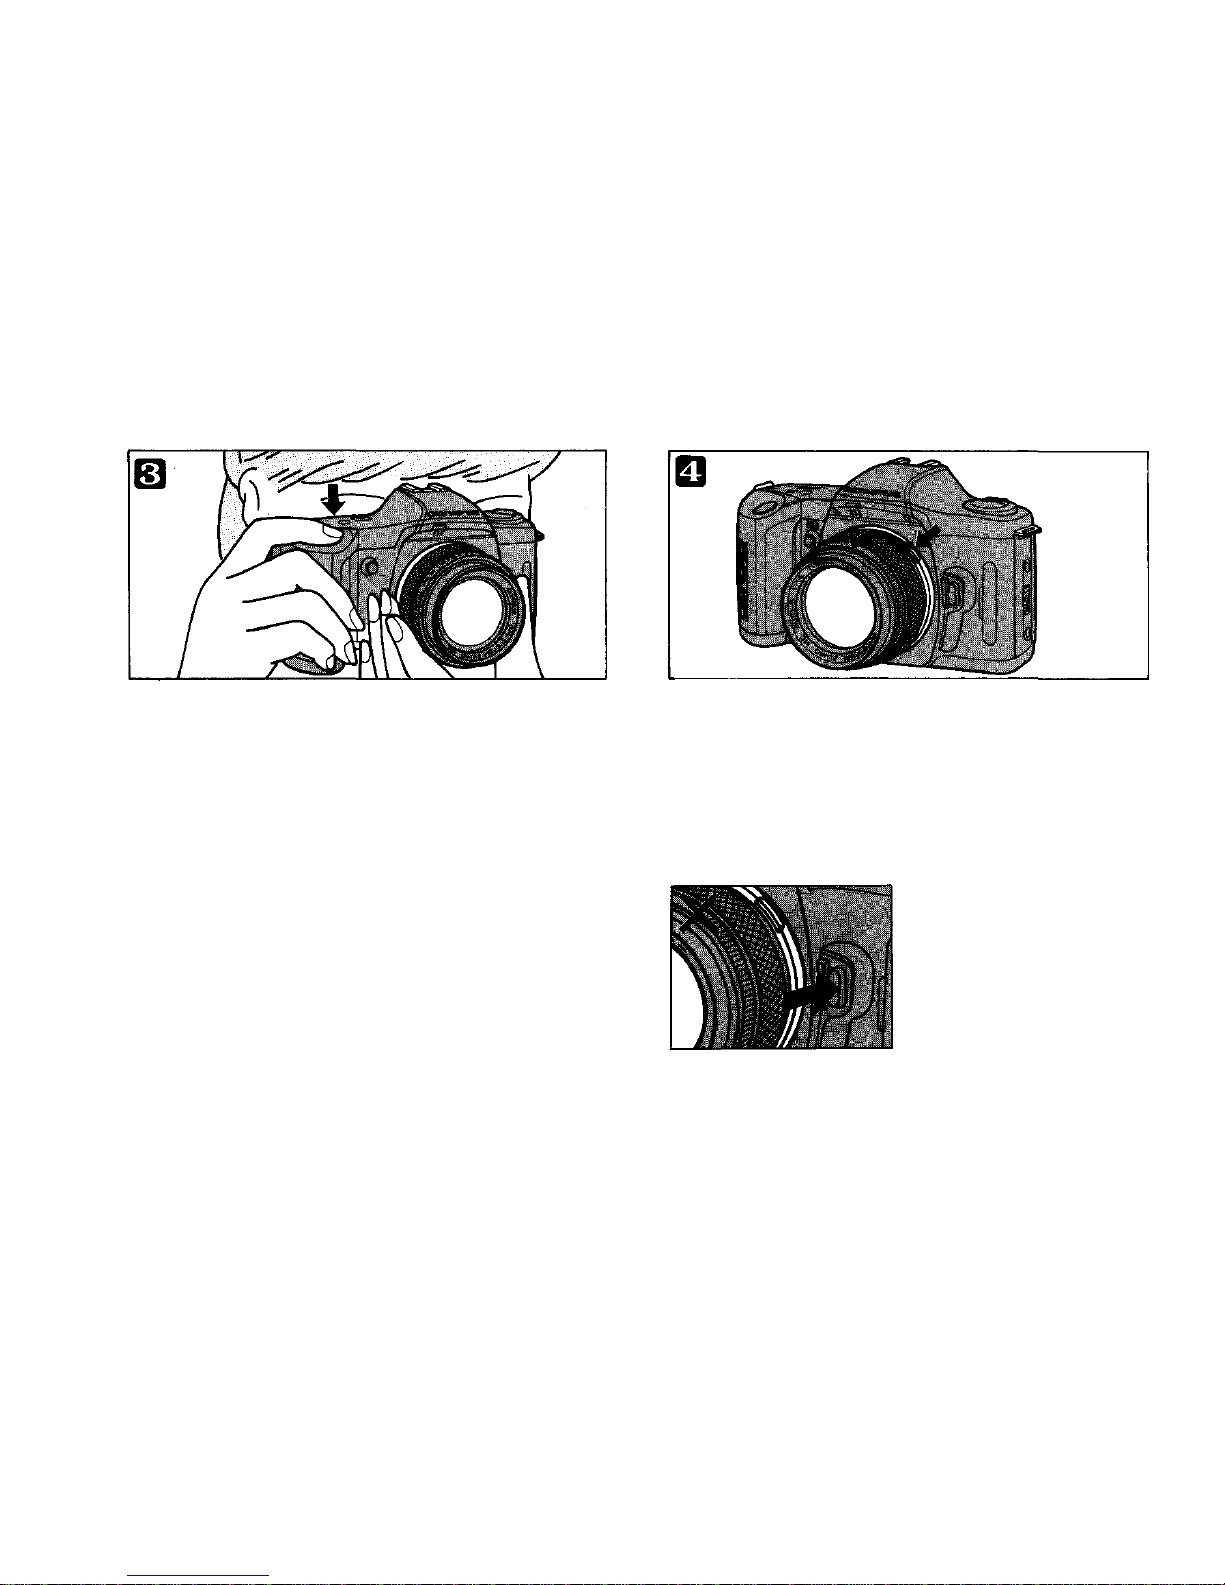
Focus on the subject by turning the focus
ring on the lens barrel and depress the
shutter release.
* The lens will not move by turning the
power focus dial.
To dismount the lens, press the button on
the lens side, hold it there and turn the lens
until it detaches.
It is impossible to dismount it with the
button on th e camera side.
* T his button is designed for AF and PF
lens.
* W ith an OM Lens on th e camera, no
display will appear in the viewfinder.
18
Page 20

The OM-88 incorporates a "OTF" Program (refer to page 37) mode for controlling
T-series flashes (T18, T20 and T32 etc.) and t h e F ul l- S yn c hr o Flash F280. Taking
flash pictures with it is very easy without troublesome settings. This chapter
explains the procedure for shooting with these flash units, especially with T18.
(If you are using other auto flash units, refer to page 31.)
The following explanation is based on th e use of Olympus AF Lenses an d 50mm
F2.0PF Lens.
Regarding the instructions for use of conventional OM Lenses, refer to page 44.
19
Taking Photographs III (flash photography)
Page 21
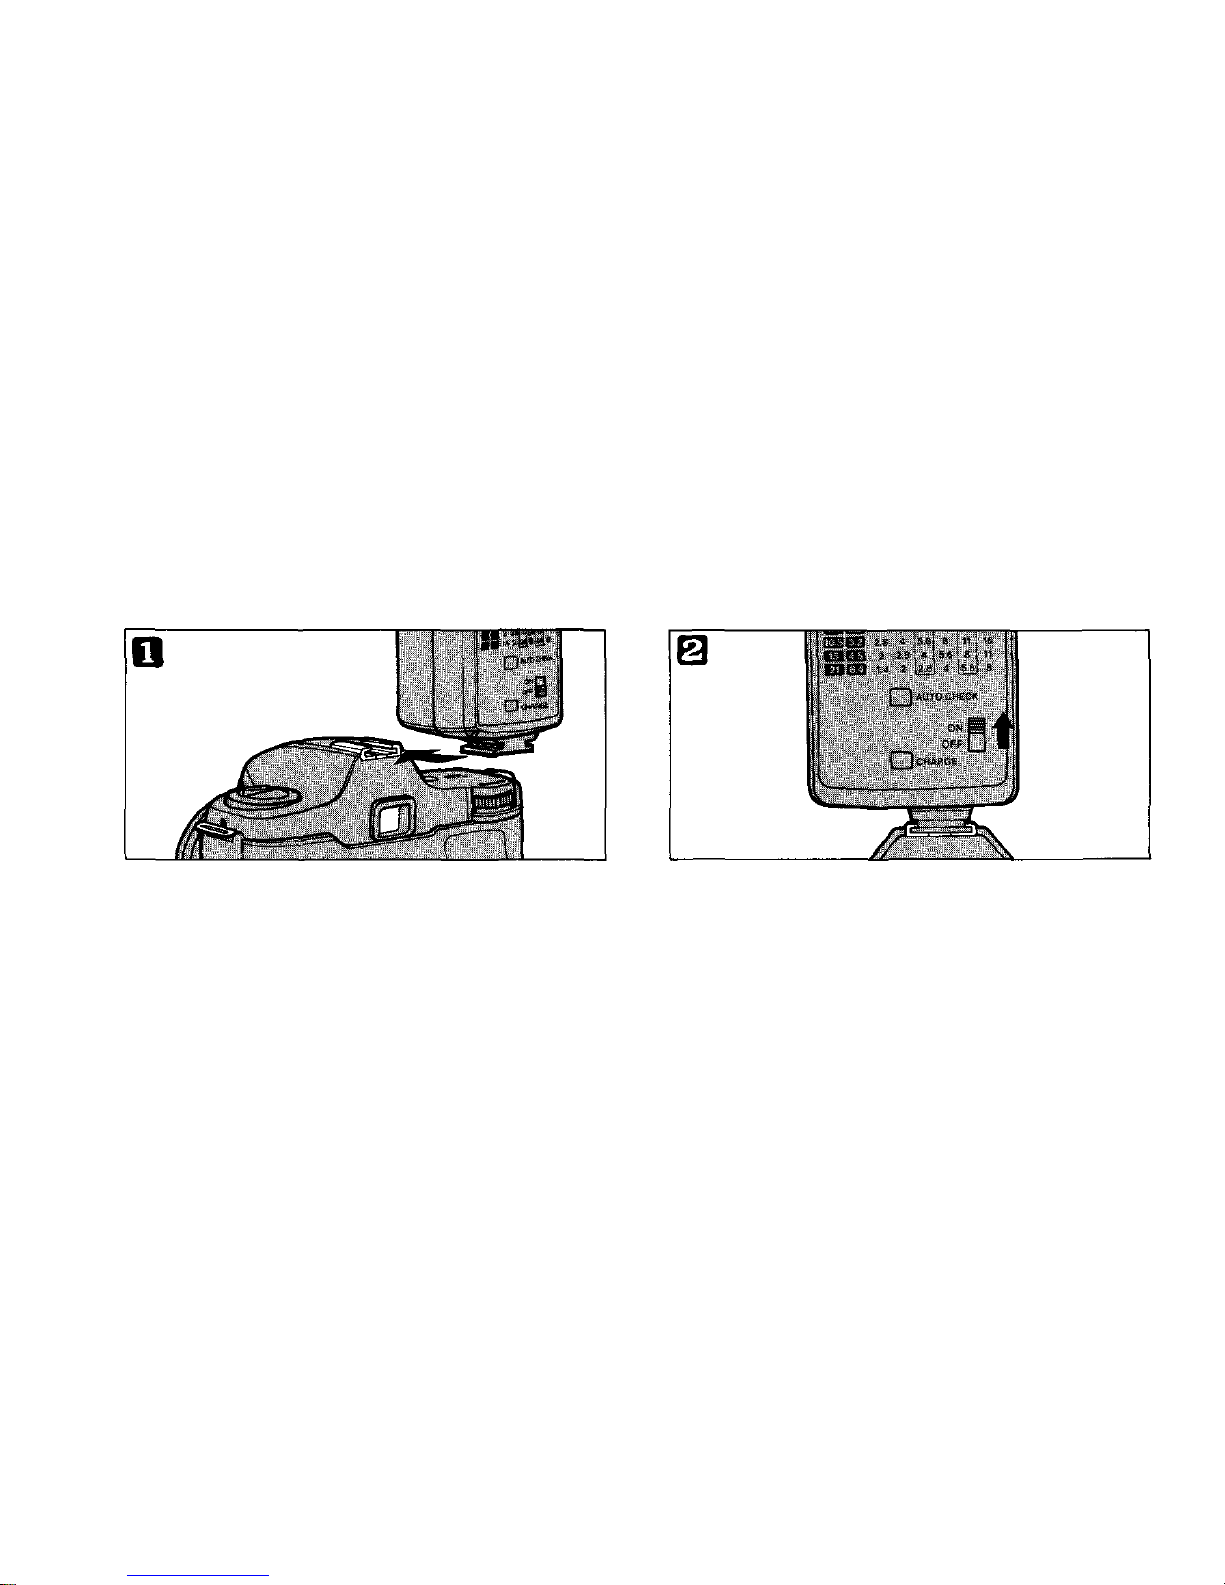
Using T-series Electronic Flashes (T18, T20 and T32)
Mount the flash onto the accesory shoe, and
secure with lock-screw.
* If you are using a T20 or T32, set the
calculator panel so that "full automatic
control by OM-2 is displayed.
Turn on the power switch.
20
Set the mode dial on the camera to "P ". (Sec page 36 for details.)
Page 22
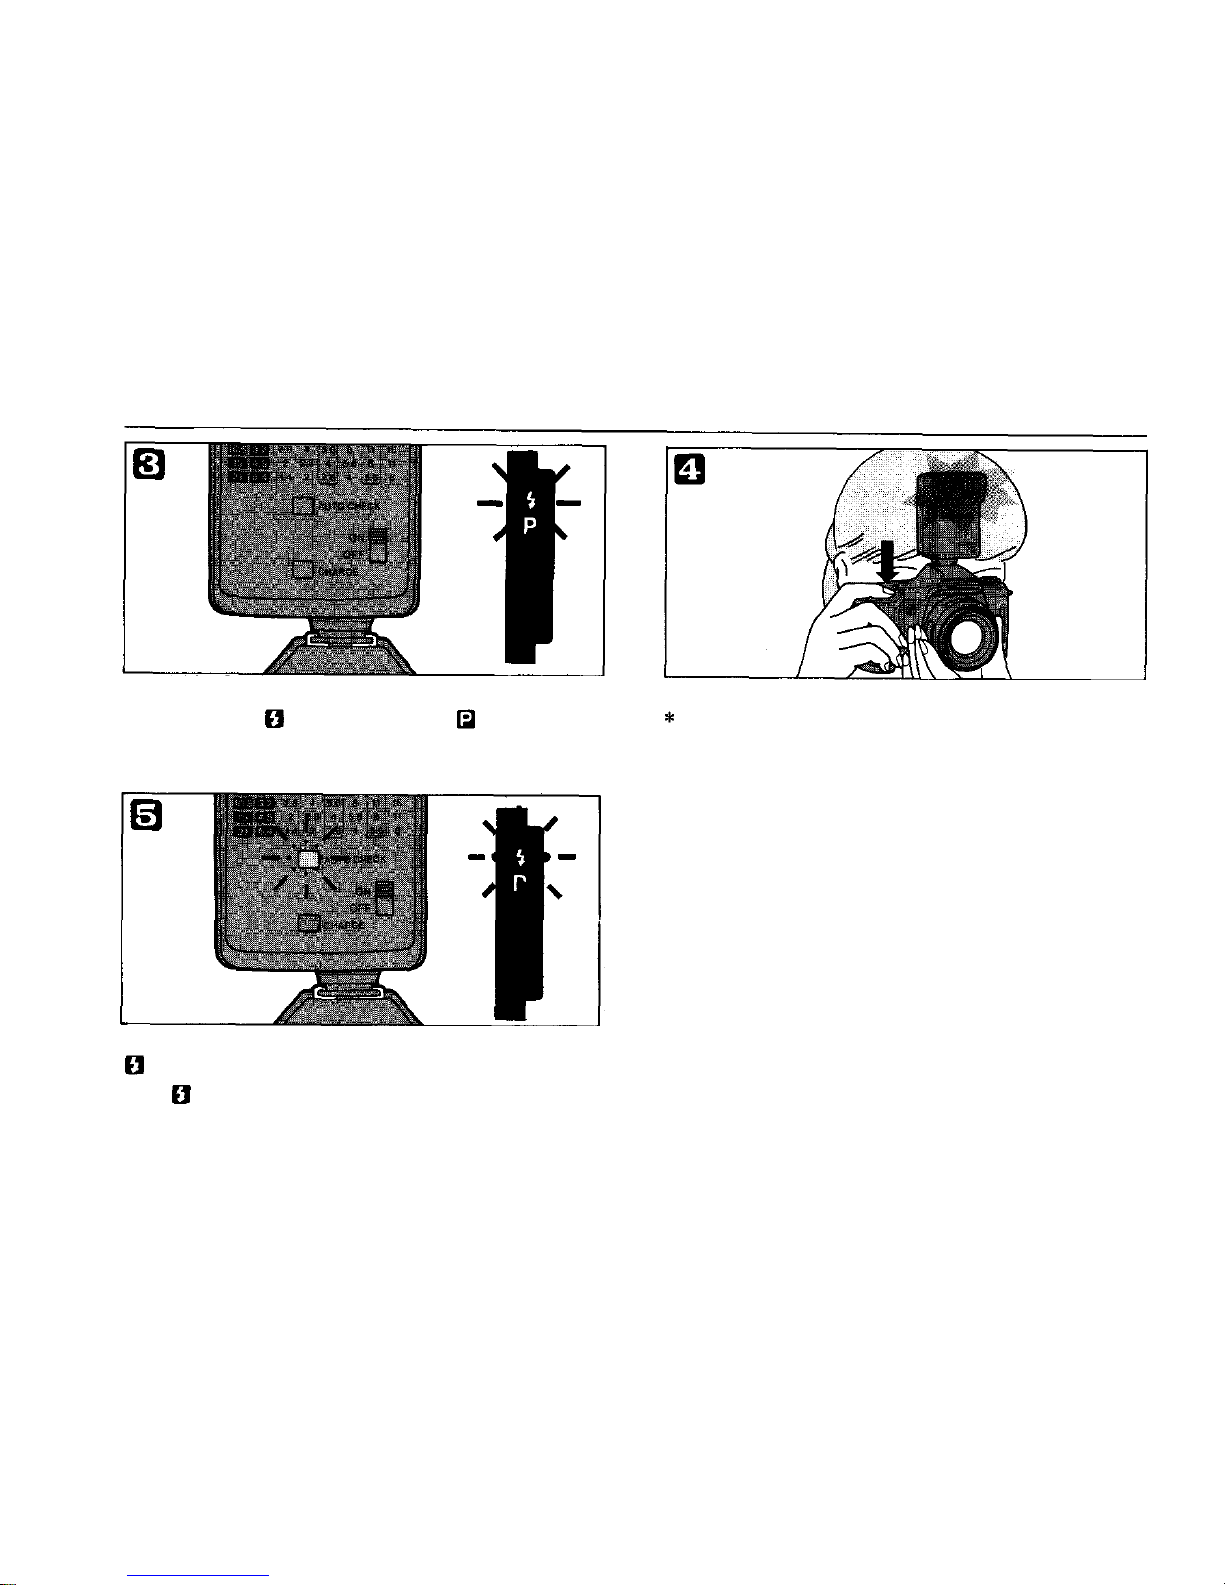
Make sure the flash is fully charged.
If the mark turns on and Blinks (it
indicates 1/60 sec. or slower), the flash is
ready to fire.
Depress the shutter release.
The flash shooting range differs with the
lens' maximum-aperture an d shooting
conditions. For example, when using T18
wi th a 50mm F1.8 lens, a shooting range
up to 7m (23 feet) is possible. (with ISO
100 film)
Check fo r correct exposure.
blinks to indicate correct exposure.
No indicates under-exposure.
21
Page 23
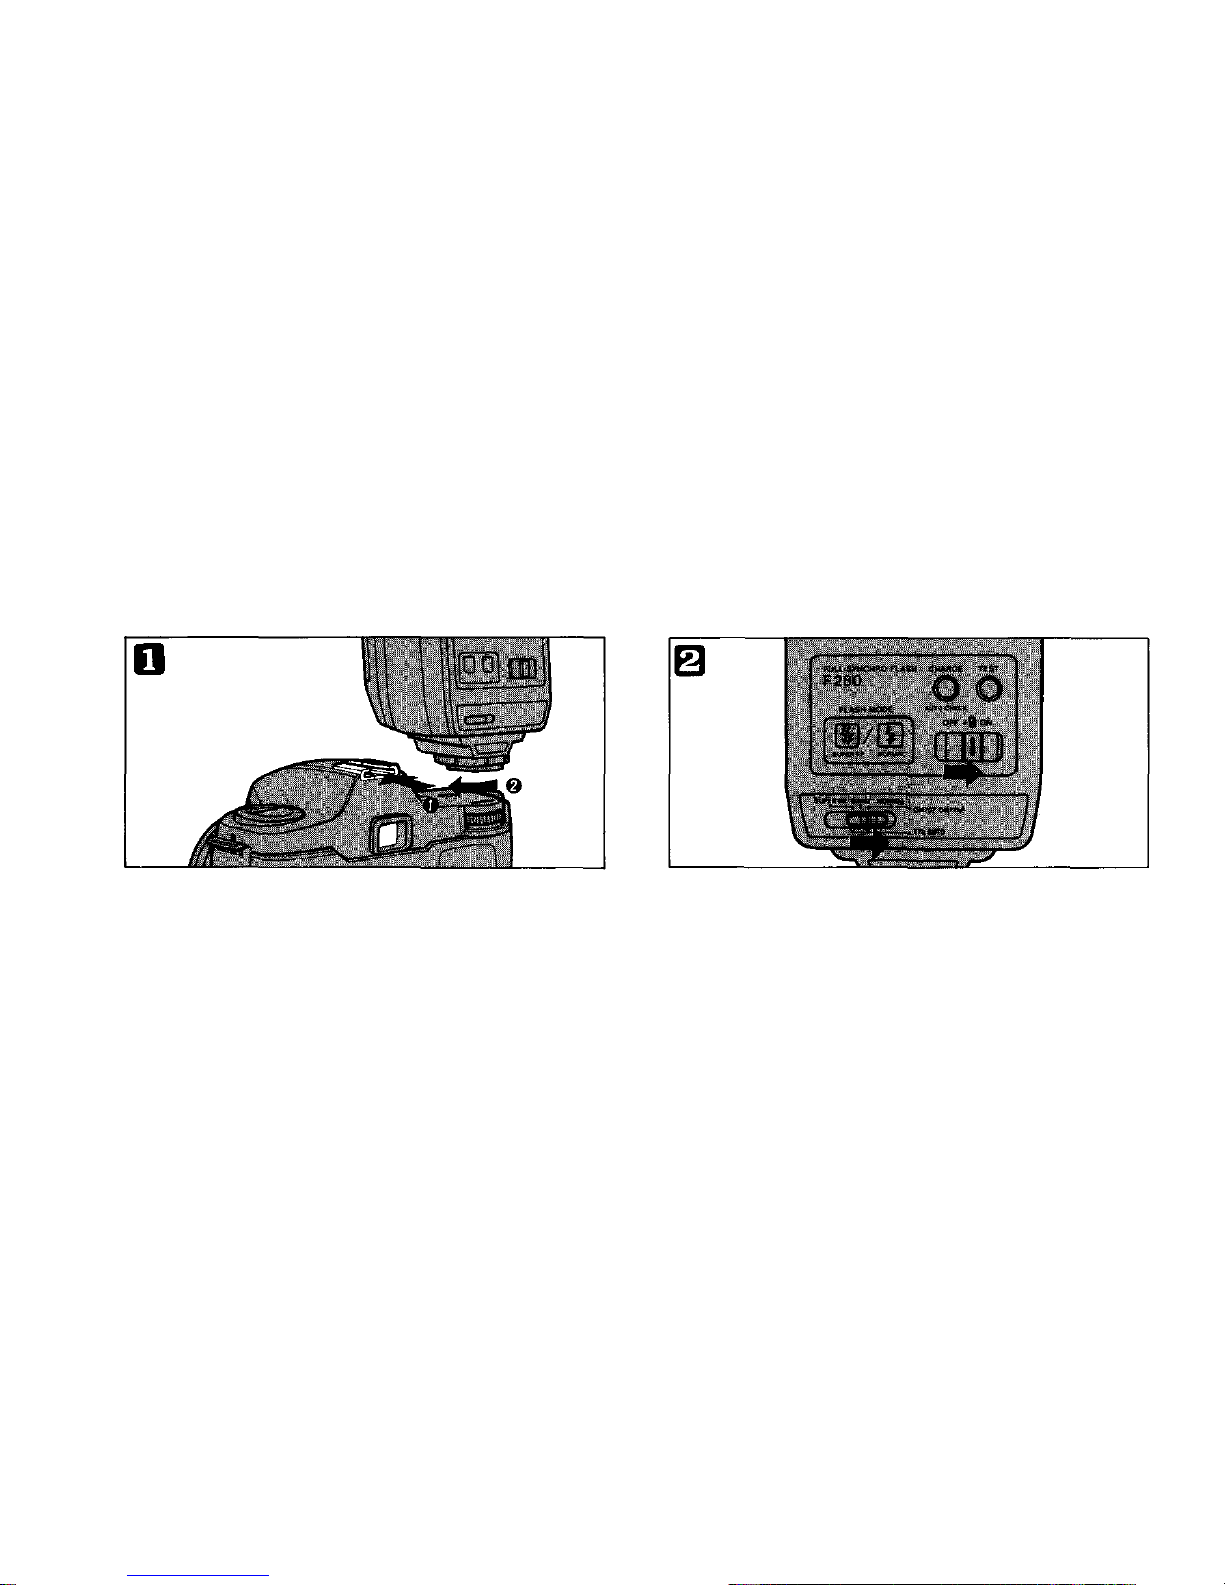
Using the Full-Synchro Flash F280
The Full-Synchro Flash F280 allows you to take flash pictures In the "OTF" auto
mod e. However, the super FP flash mode cannot be used. Se t the mode dial on the
camera to "P". (See page 3 6 f o r details)
Turn on the power switch and be sure to set
the mode switch to "NORMAL".
Mount the F280 onto the accesory shoe and
secure wit h the lock-screw.
22
Page 24
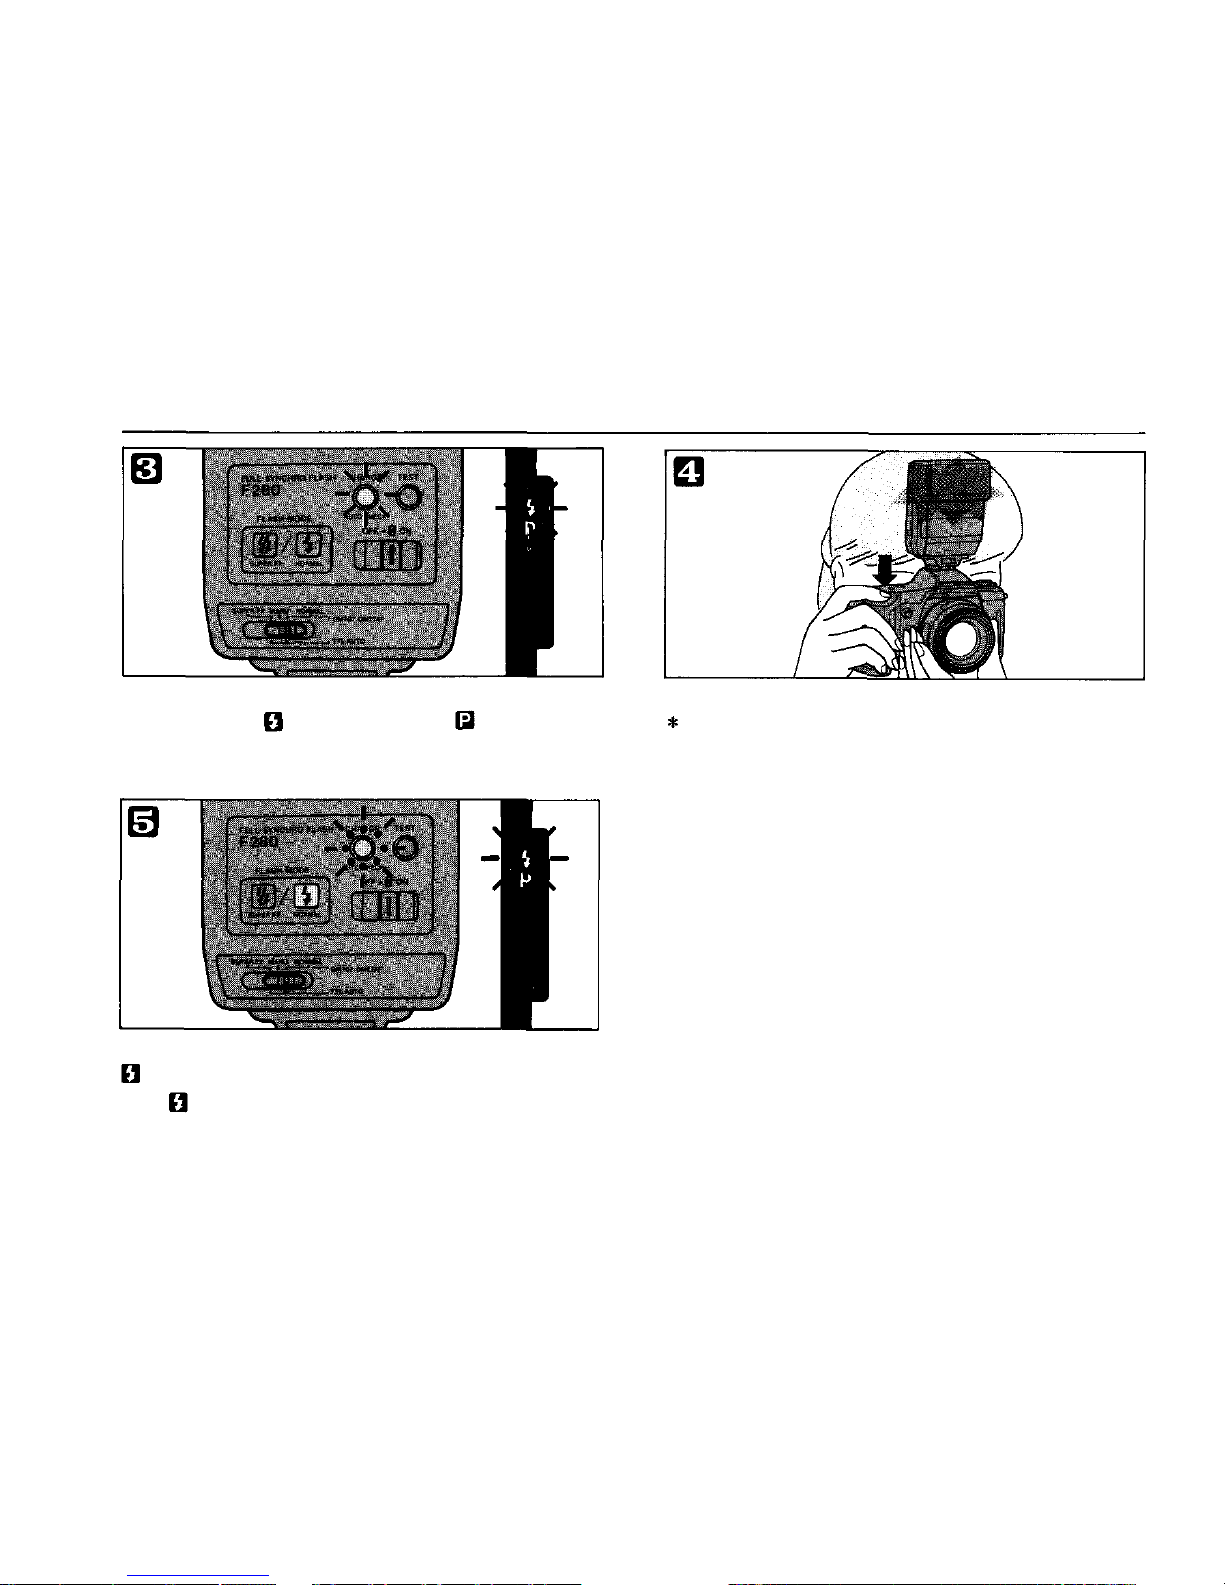
Make sure the flash is fully charged.
If the mark turns on and blinks ( it
indicates of 1/60 sec. or slower), the flash is
ready to fire.
Depress the shutter release.
The flash shooting range differs with the
maximum-aperture and shooting
conditions. For example, when using F280
wi th a 50mm F1.8 lens, a shooting range
up to 11m (36 feet) is possible (with ISO
100 film).
Check for correct exposure.
blin ks to indicate correct exposure.
No indicates under-exposure.
23
Page 25

Taking Photographs I V
Using the OM-88 with the Manual Adapter 2
In combination with the Manual Adapter 2. the OM-S8 permits aperture-priority
auto exposure and manual exposure to develop it to a high-grade SLR suited for
creative photography. This chapter explains mainly how to use the Manual Adapter 2.
(See page 39. I f you are using conventional OM Lenses, refer to page 44.)
24
Page 26
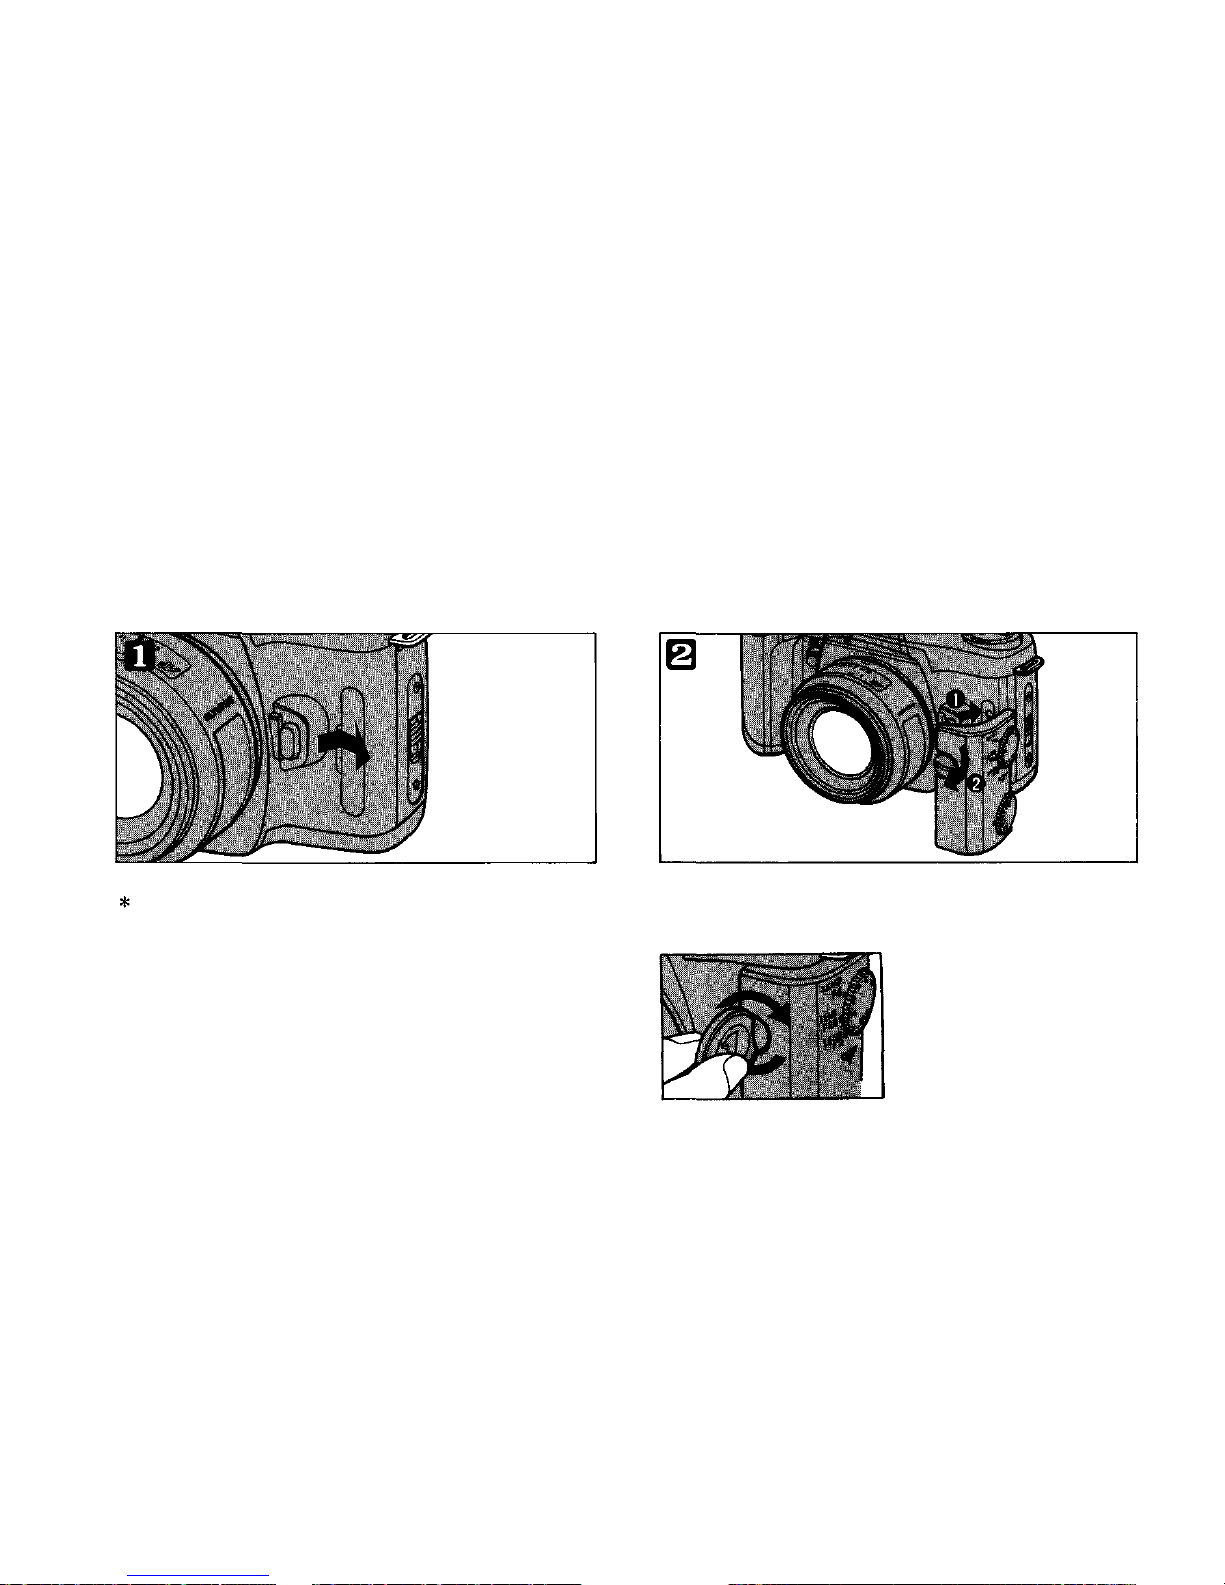
Mounting the Manual Adapter 2
Remove the Manual Adapter contact cover.
When the Manual Adapter is not mounted,
keep th e contact cover on the camera.
Align the contacts, mount the Manual
Adapter 2 and tighten the screw with a coin.
25
Page 27
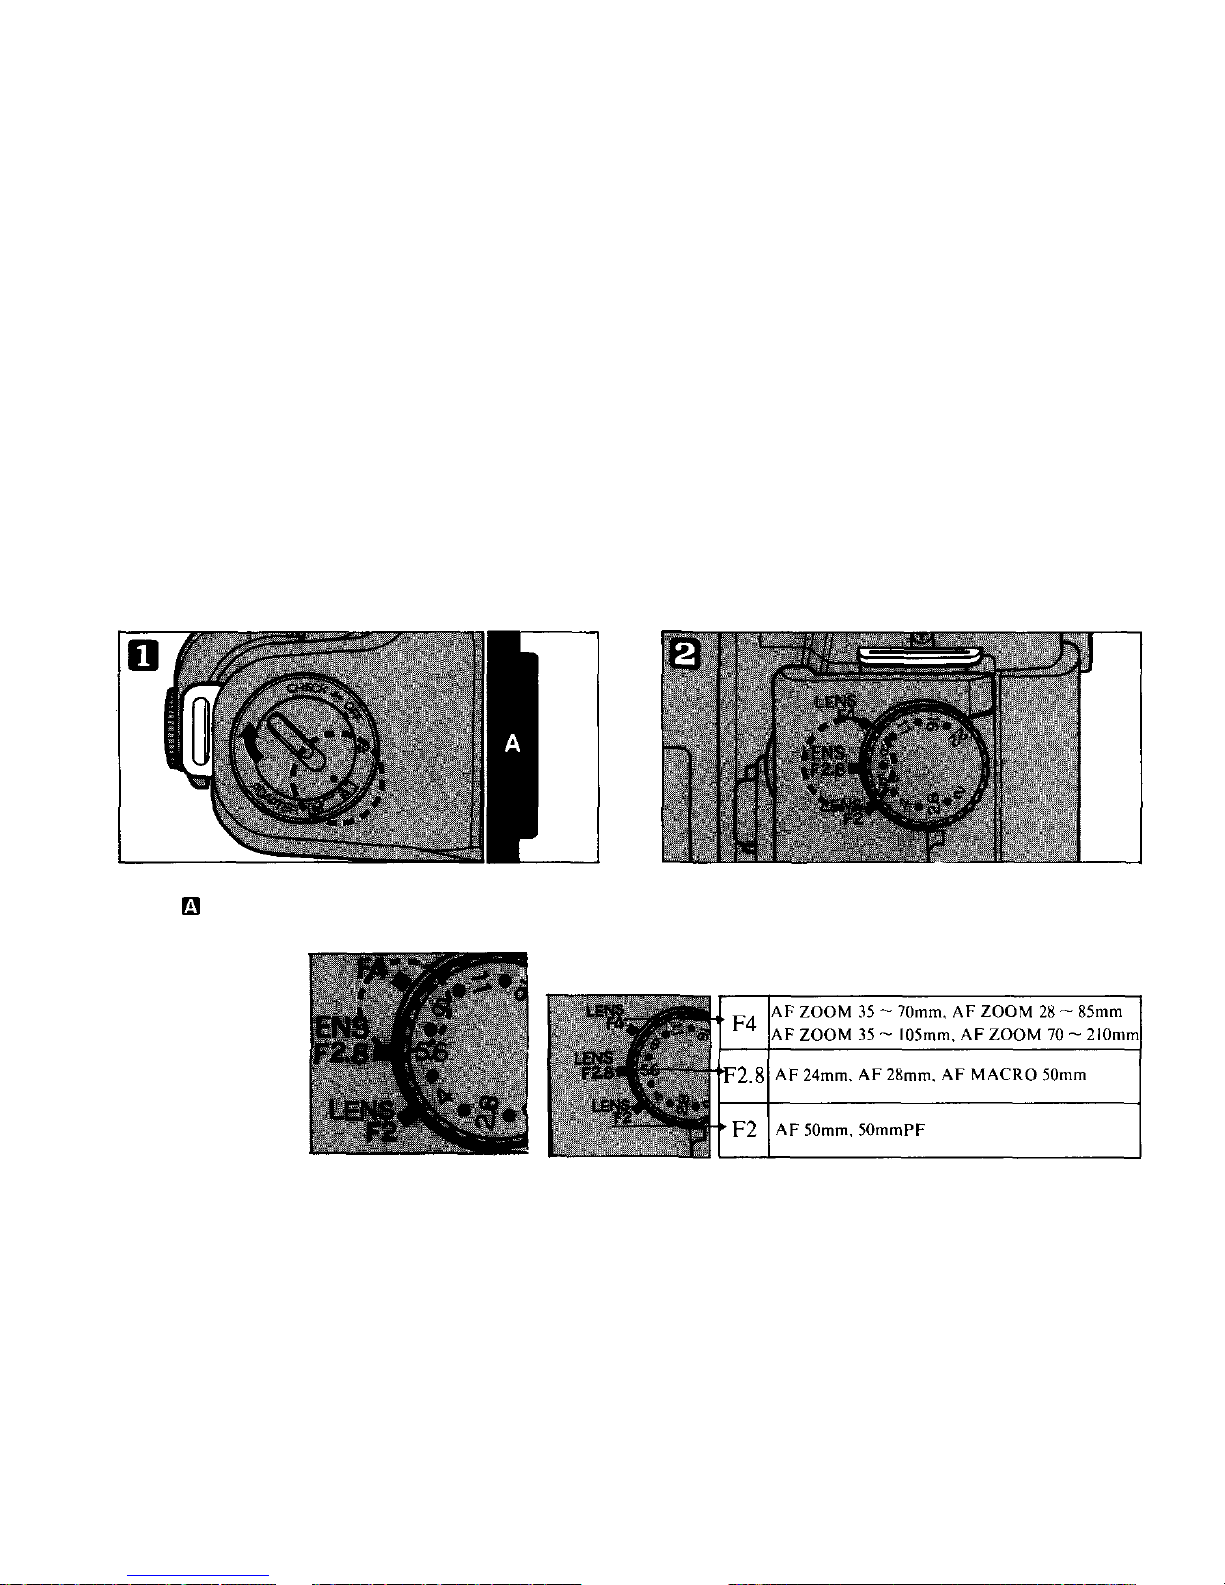
Aperture-priority auto exposure
Set the mode dial at "A".
The will turn on in the viewfinder.
Example:
Lens used:
AF Zoom 35-
70mm F3.5-4.5
Desired Aper-
ture: F8
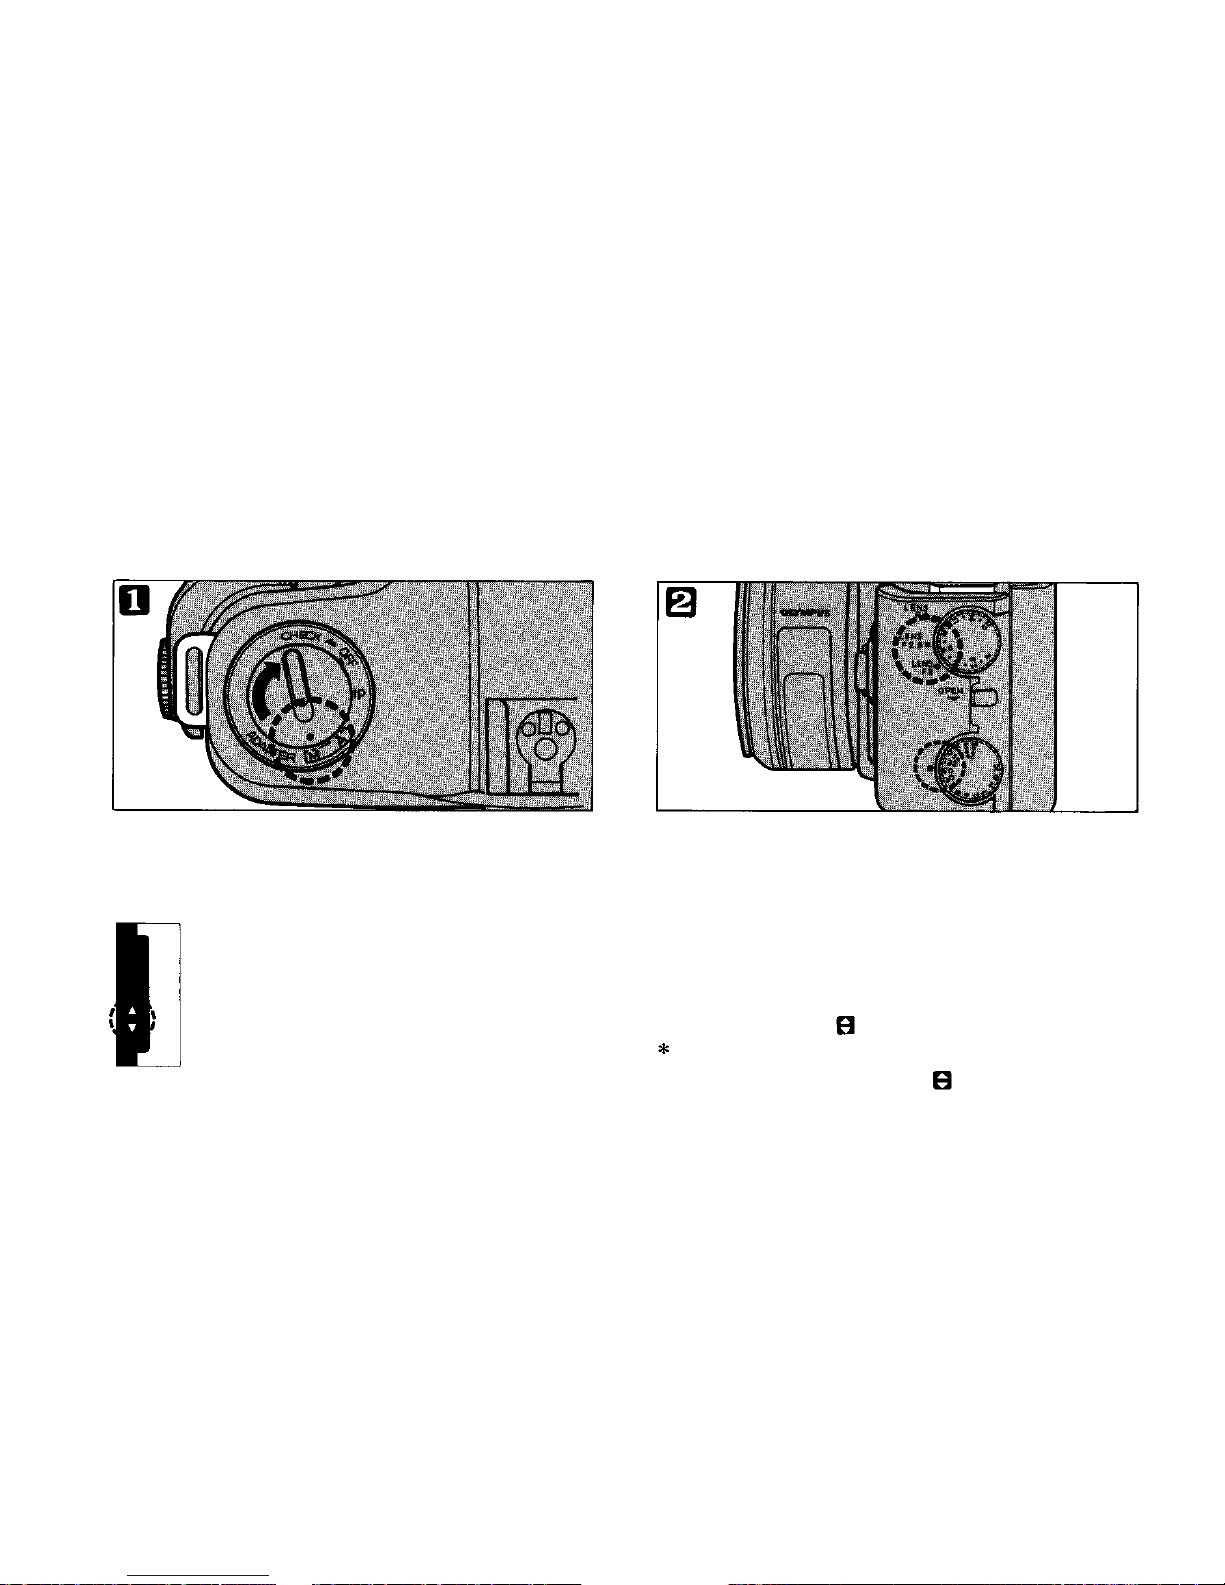
Align your desired aperture on the aperture
setting dial with the indicated aperture (F2,
2.8 or 4) closest to th e maximum aperture of
th e lens y ou are using.
26
Page 28
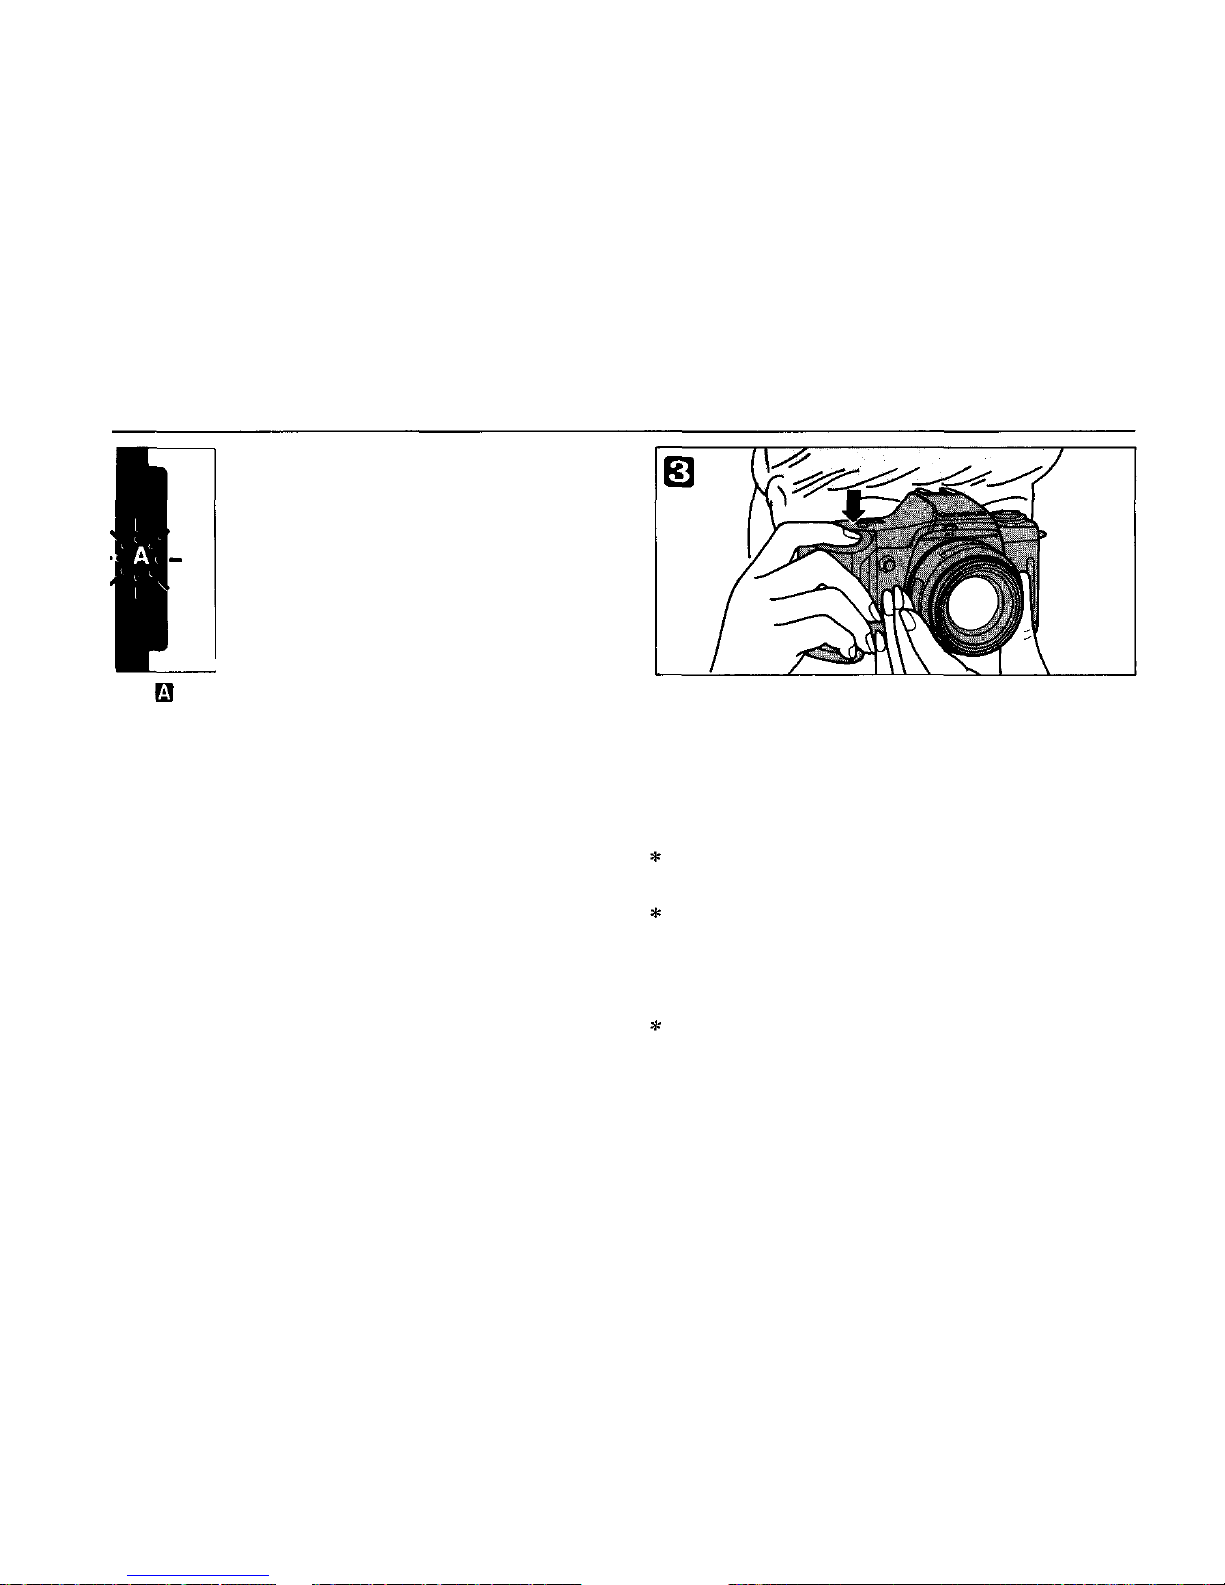
If blinks, it means that the shutter speed
will be 1/6 0 sec. or slower. I n this case,
change the aperture; or mount the camera
on a tripod or use flash.
Focus on the subject with th e power focus
dial and depress the shutter release.
If the mode dial is set at "P", pictures are
taken in the programmed exposure mode.
If the mode dial is set at "A", the camera
will take pictures in the aperture-priority
auto exposure mode, regardless of where
the shutter speed d ial is set.
If you have set an aperture which is beyond
the maximum or minimum aperture of the
lens used, the camera will choose th e
maximum or minimum aperture of that
lens instead.
27
Page 29
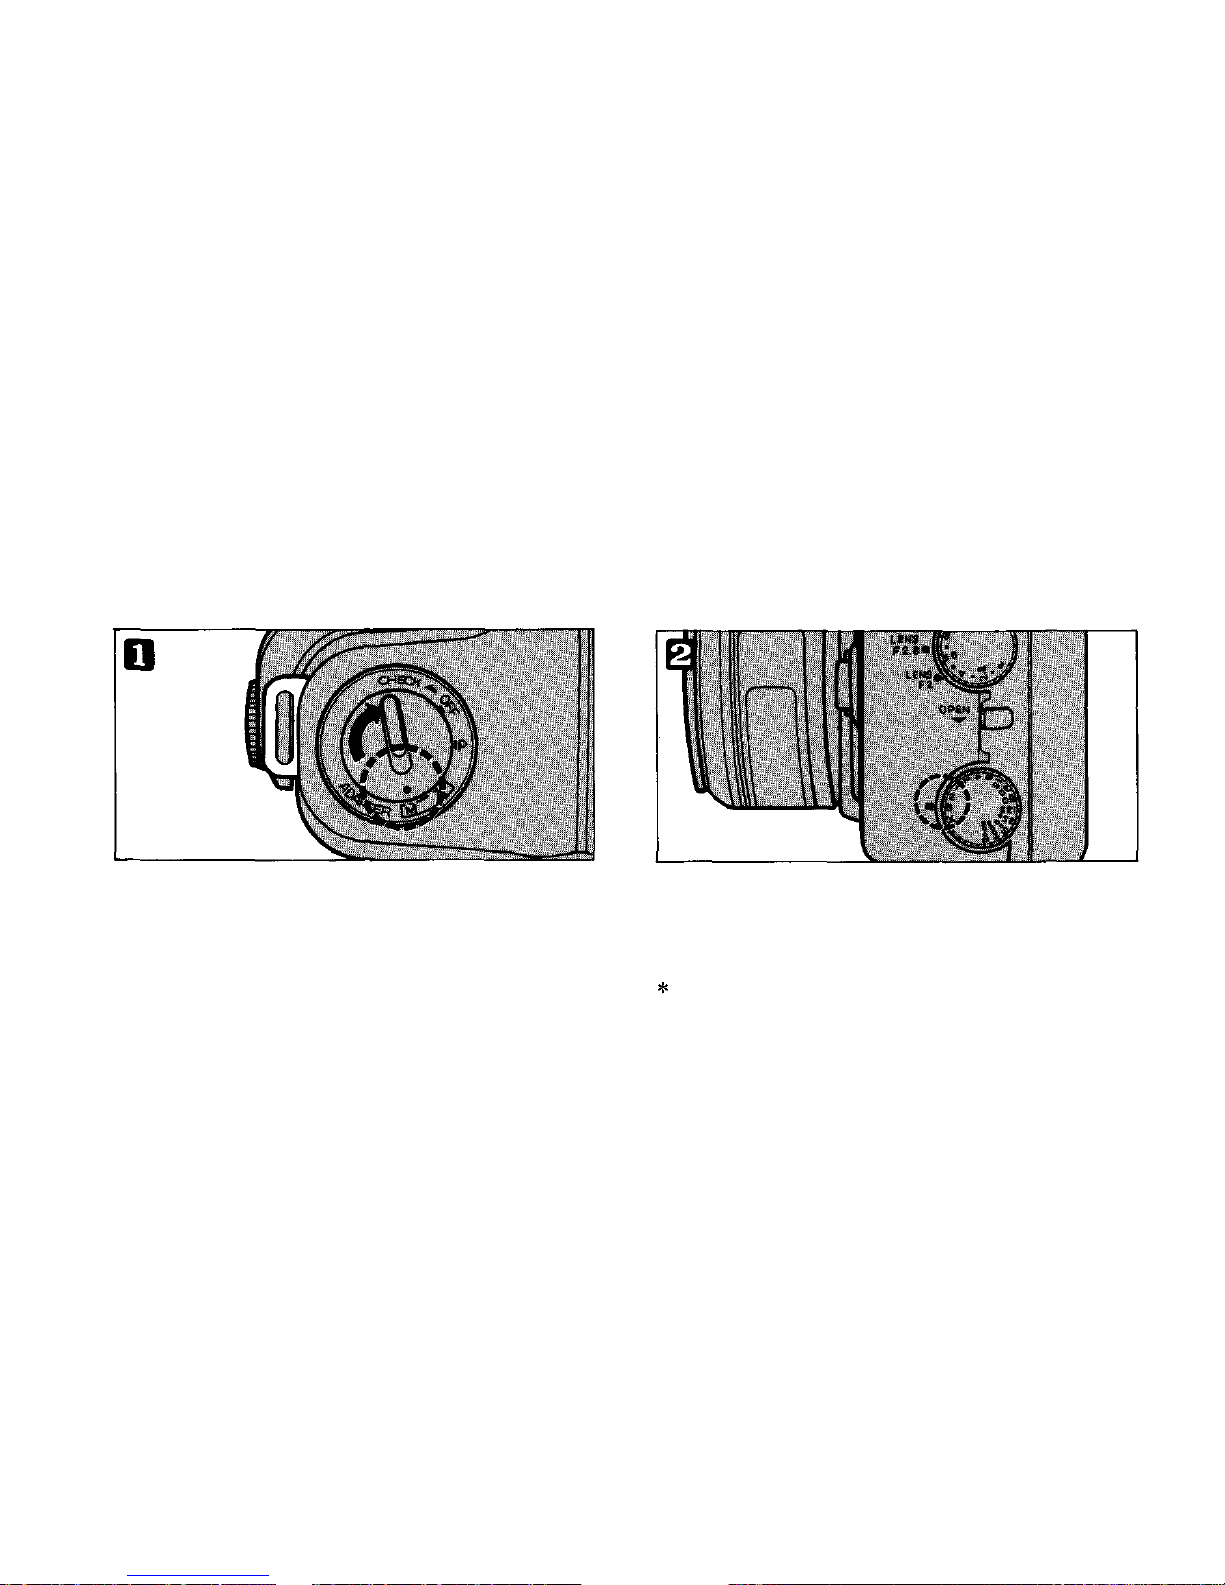
Manual exposure
Set the mode dial at "M".
The manual exposure indication will be
displayed in the viewfinder.
Choose the aperture and shutter speed by
rotating the dials on the Manual Adapter.
(Align your desired aperture on the aperture
setting dial with the indicated aperture
closest to the maximum aperture of the lens
you are using. — see page 26)
In order to obtain correct exposure, adjust
th e dial so th at may t u r n on.
Under fluorescent lamp lighting, either
upper or lower part of may flash with
the other turning on, however a correct
exposure can still be obtained.
28
Page 30
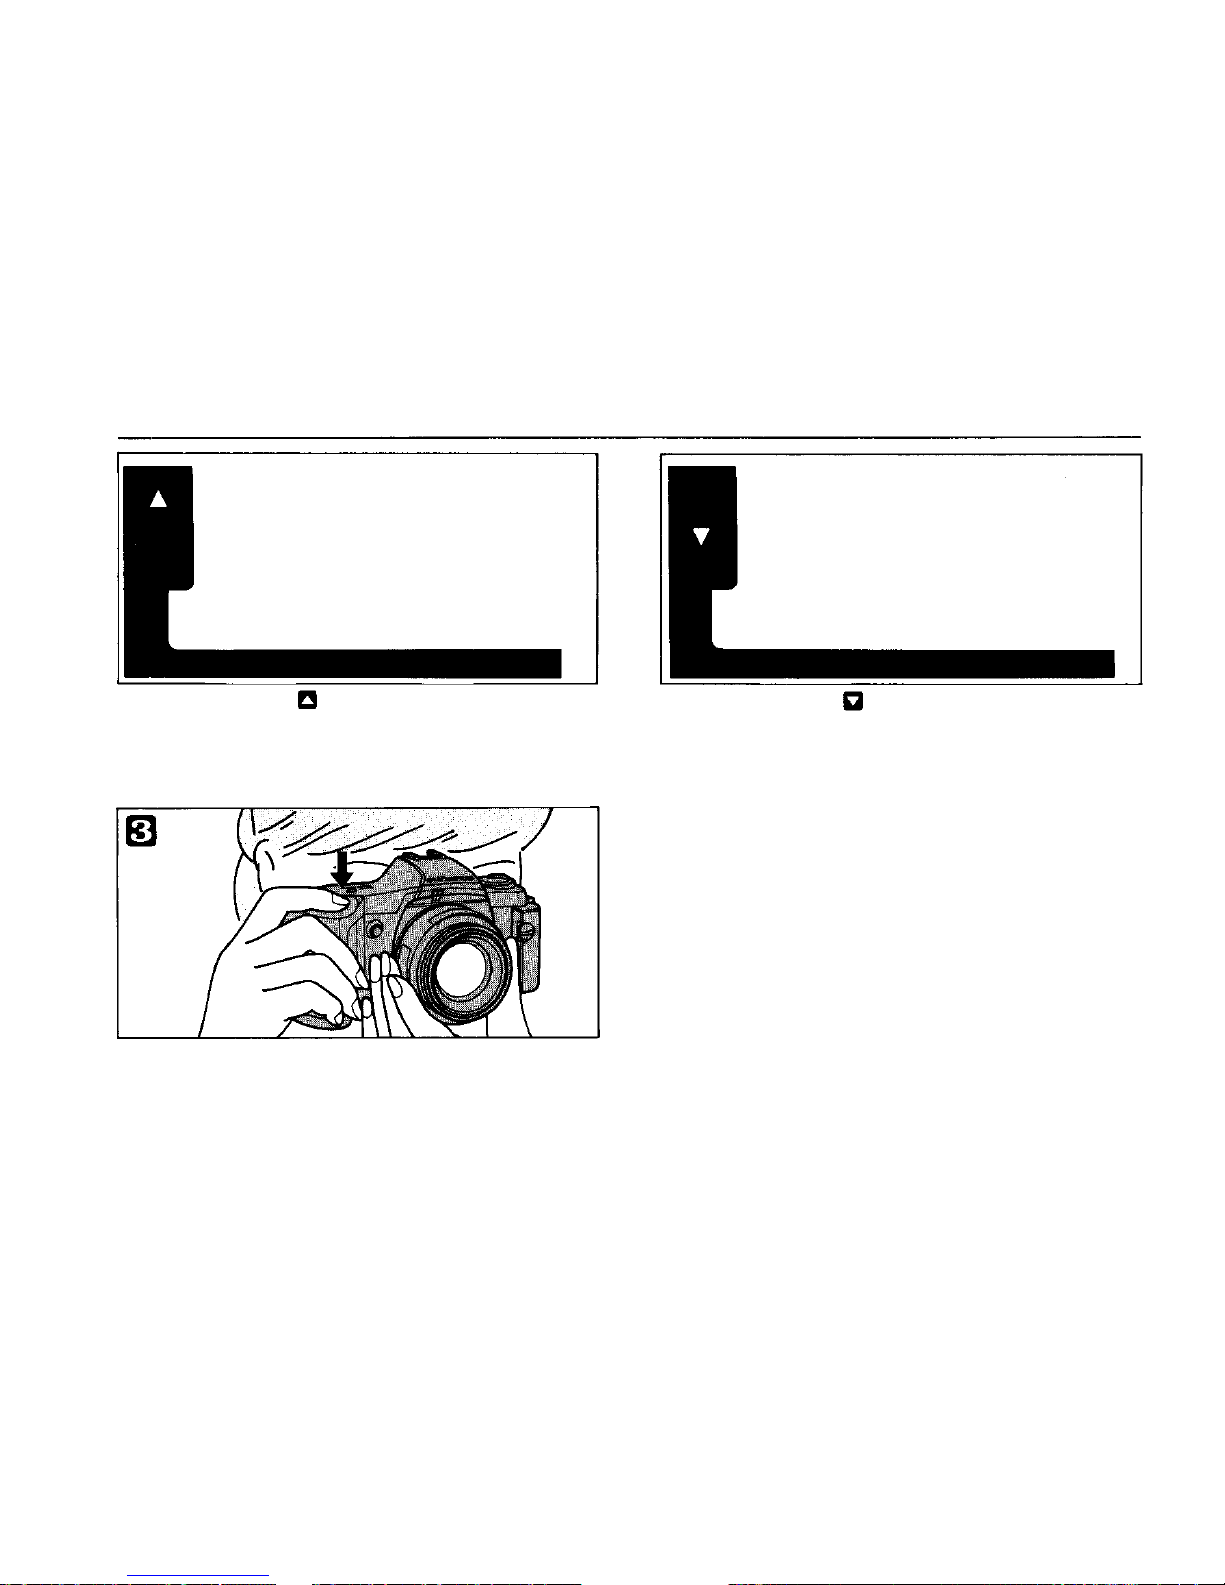
If the indicator turns on (+0.5 —
+ 1.5EV) or blinks (over +1.5EV), your
subject will be overexposed.
If the indicator turns o n (—0.5 —
-1.5EV) or blinks (under -1.5EV), yo ur
subject will be underexposed.
Focus the lens and depress the shutter
release.
29
Page 31
Set th e mode di al at "M".
Set the shutter speed dia l to "B" and depress
and hold the shutter release.
(The shutter will remain open while the
shutter release is depressed.)
The manual exposure indicator will not be
displayed in the viewfinder.
30
Bulb exposure
Page 32
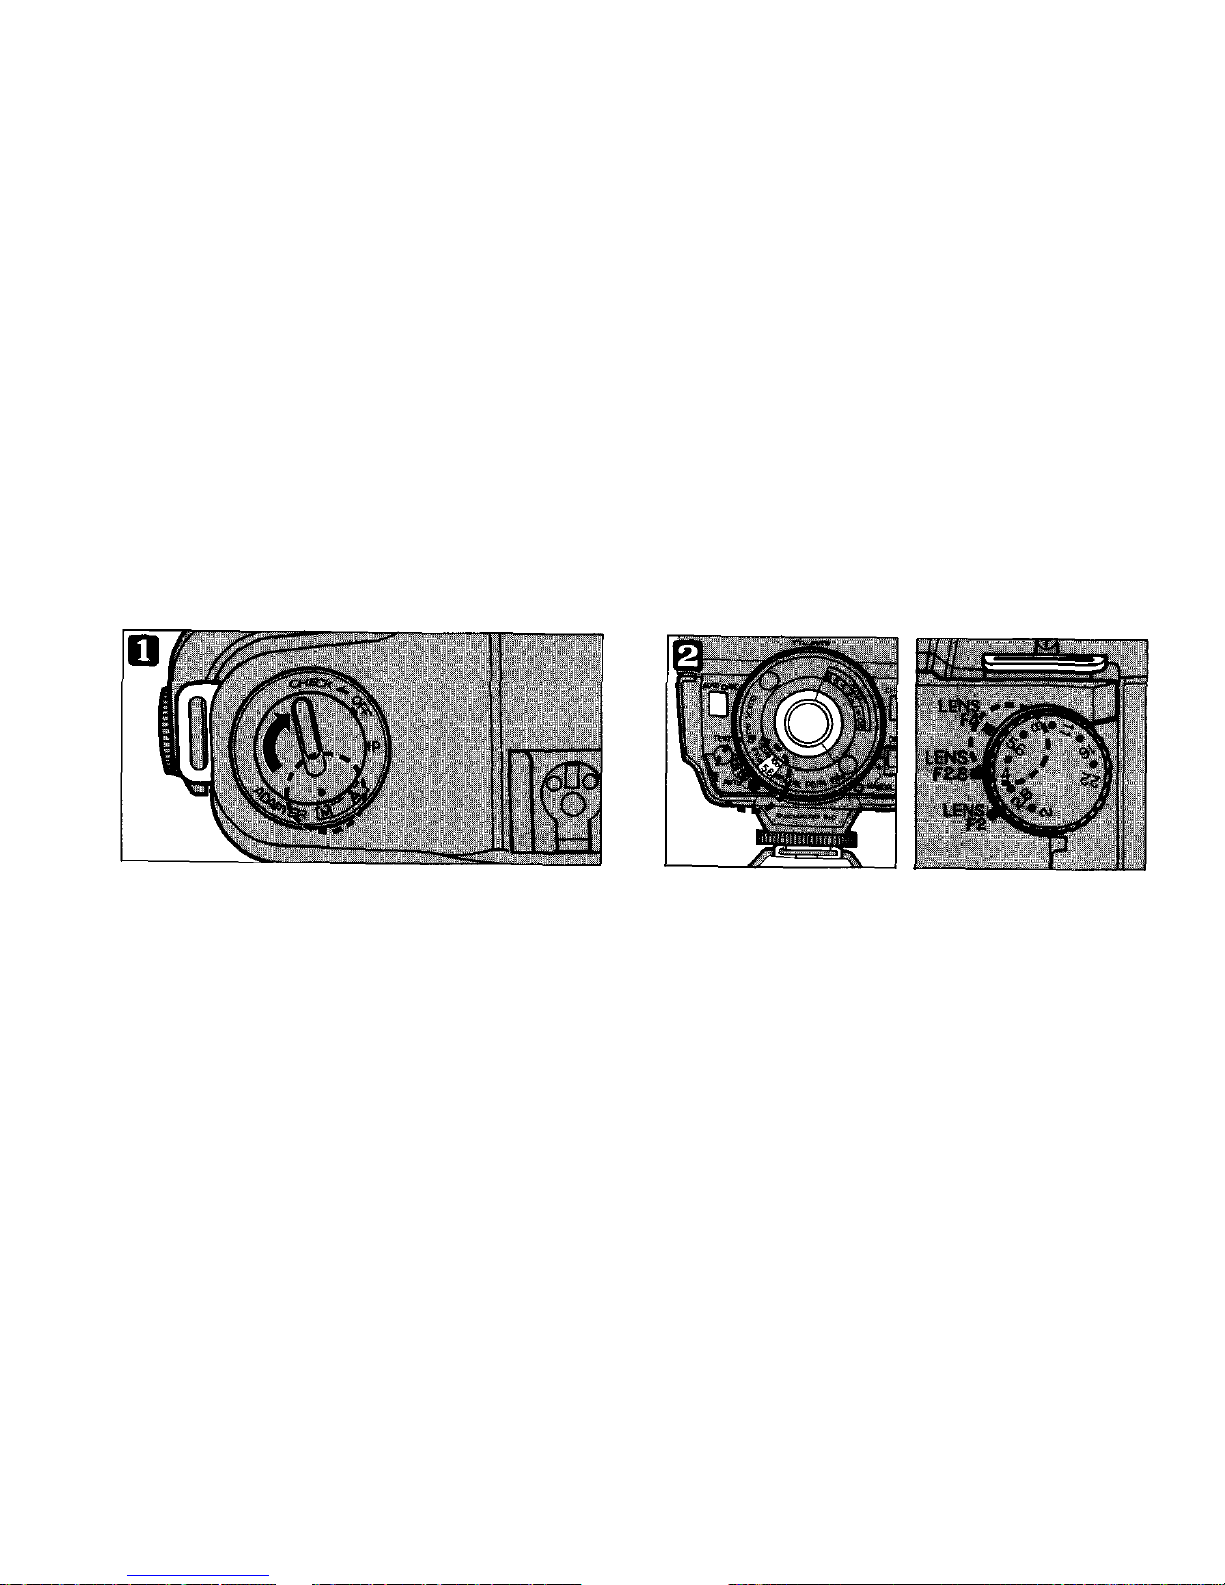
Adjust the aperture dial to the aperture
mode of the flash unit. (Refer to Section 2 in
page 26 as to adjustment of the aperture
dial.)
Example: Lens Used — AF ZOOM 35 —
70m m F 3.5 — 4.5
Set the mode dial at "M".
Using conventional auto flash units
If you us e non-dedicated conventional auto flash units other than T-saries flashes and
the F280, it is necessary to use a Manual Adapter 2. The flash will not fire without it
when used wi th an A F lens.
31
Page 33
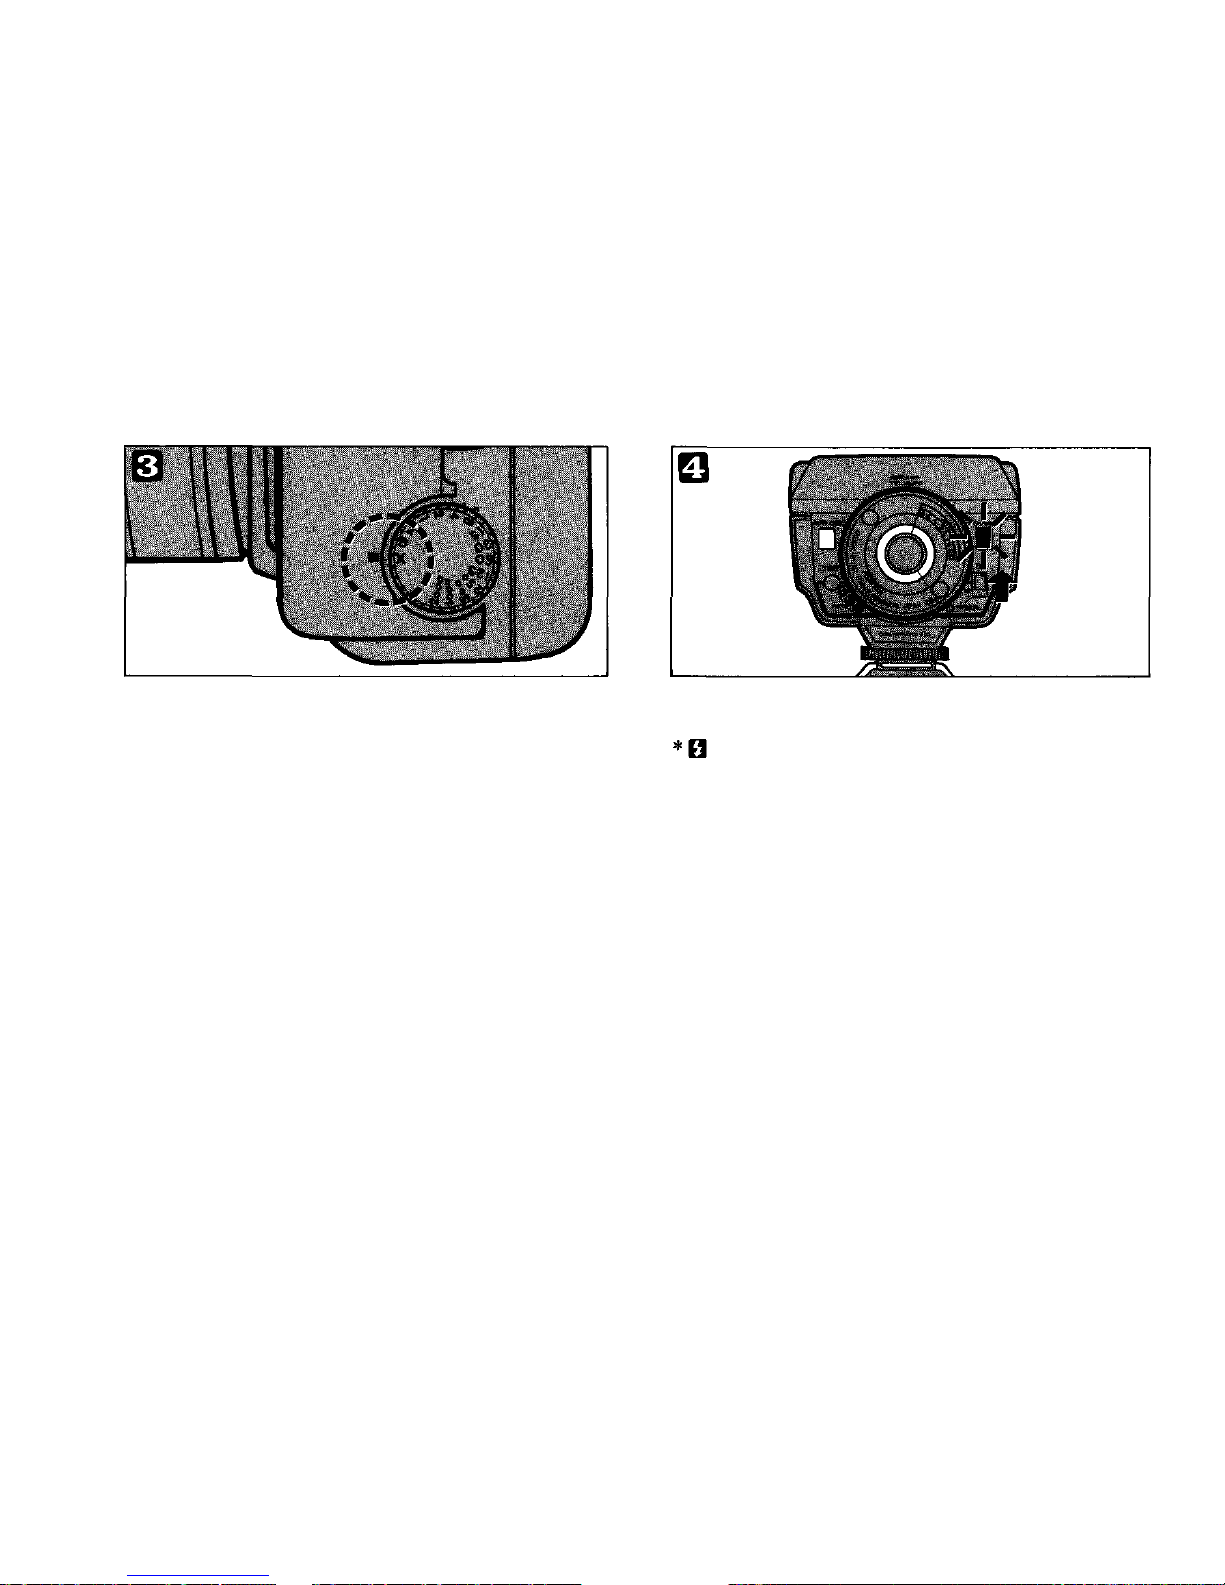
Set the shutter speed dial to "X".
Turn on the flash's main switch, make sure
the flash is fully charged, and shoot.
will not be activated in the
viewfinder when used with non-dedicated
conventional auto flash units.
32
Page 34

To take better photographs:
If you want to improve your pictures or refine your picture-taking techniques, i t is
important to understand your camera well. The following pages have been
compiled to help you use for more sophisticated techniques. P l e as e read them to
master these techniques.
33
Page 35

Programmed exposure
The programmed exposure control system lets you shoot at any moment you like, because
the camera automatically selects the optimum combination of shutter speed and aperture for
you according to the brightness of the subject. Freed from the need of complicated exposure
settings which require photo knowledge and experience, the photographer can concentrate
his attention through the viewfinder. To take pictures, you need only mount an AF or PF
Lens on the camera and set the mode dial at "P". Whether the subject is br ight or dark , the
camera will always provide ideal exposure.
Even if you move suddenly from a dark place to a bright place, t he camera will immediately
react to insure correct exposure. The program enables even beginners to use the full
functions of this SLR from the very beginning.
34
Page 36
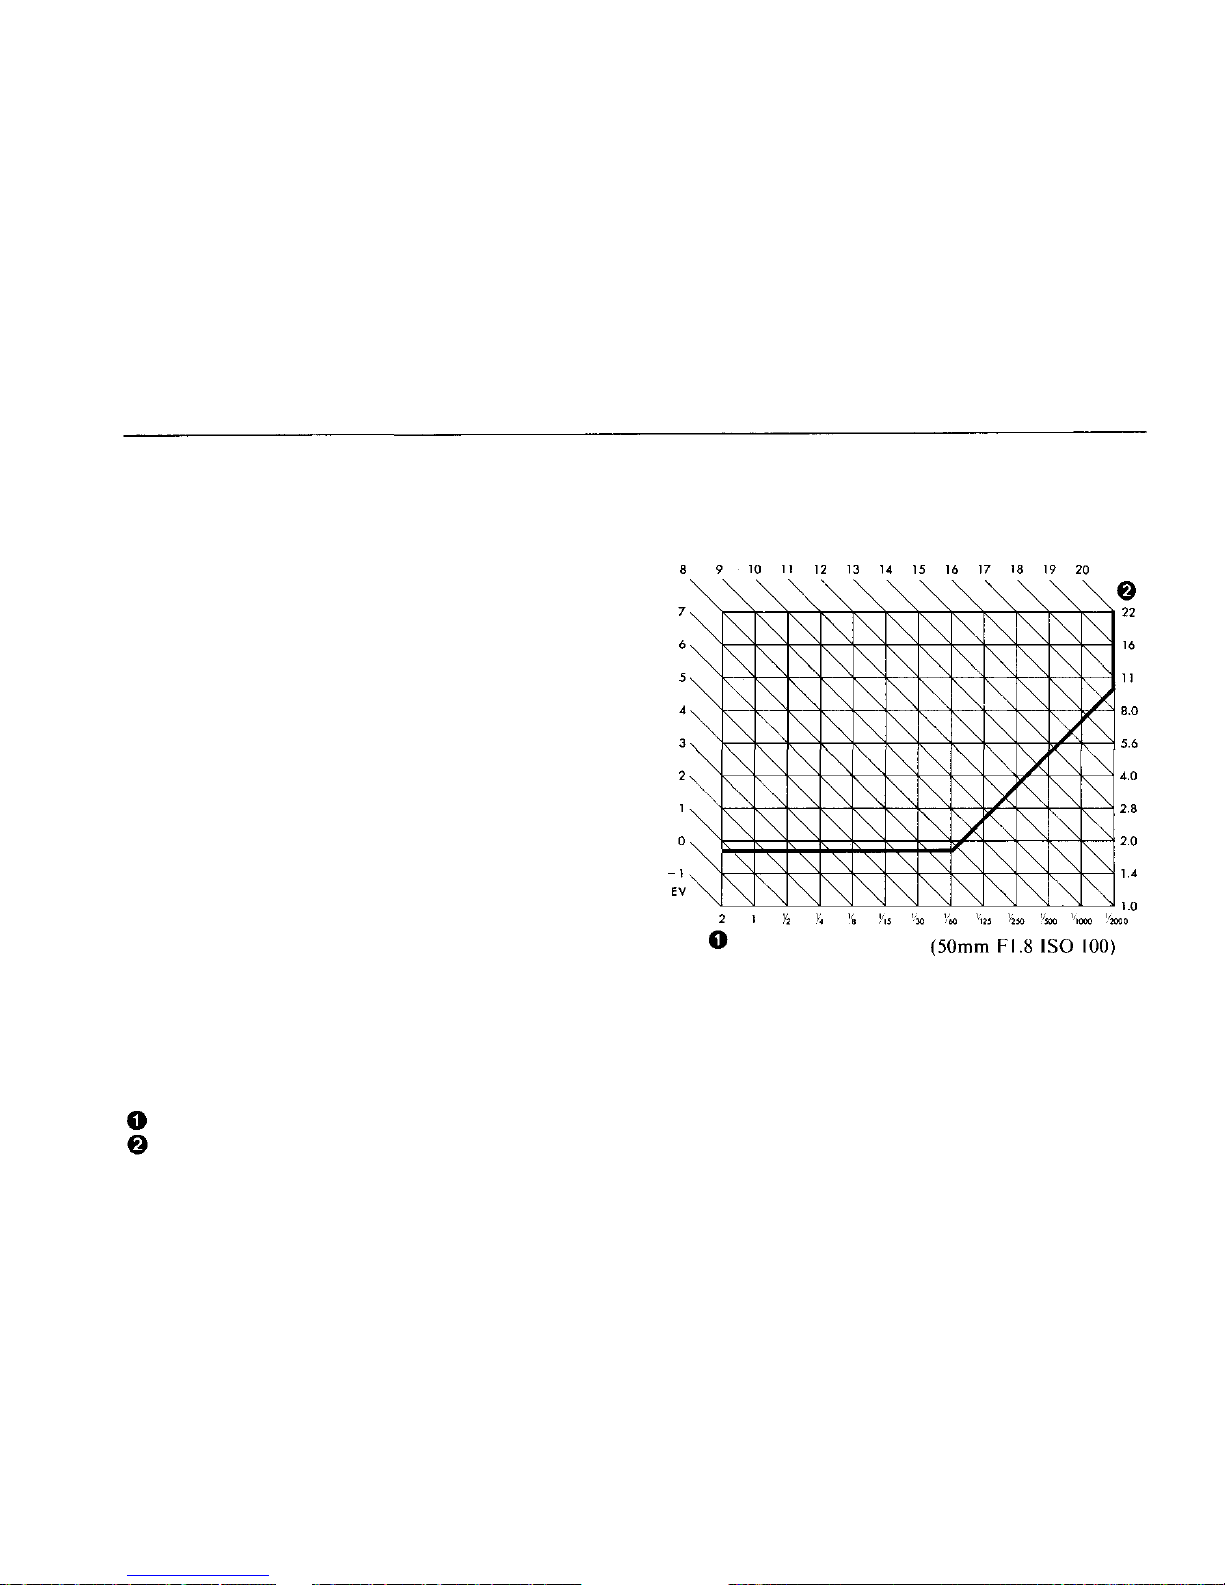
Standard program diagram
The OM-88 permits programmed exposure
only when an Olympus AF or PF Lens is
mounted on it. The standard program
diagram shows that while the aperture is
fixed at the maximum aperture (1.8) with
shutter of 1/60 sec. or slower, the aperture
and shutter speed va ry a t a 45 slope with
shutter speeds faster than 1/60 sec.
[E ] Shutter speed
[E] Aperture
35
Page 37
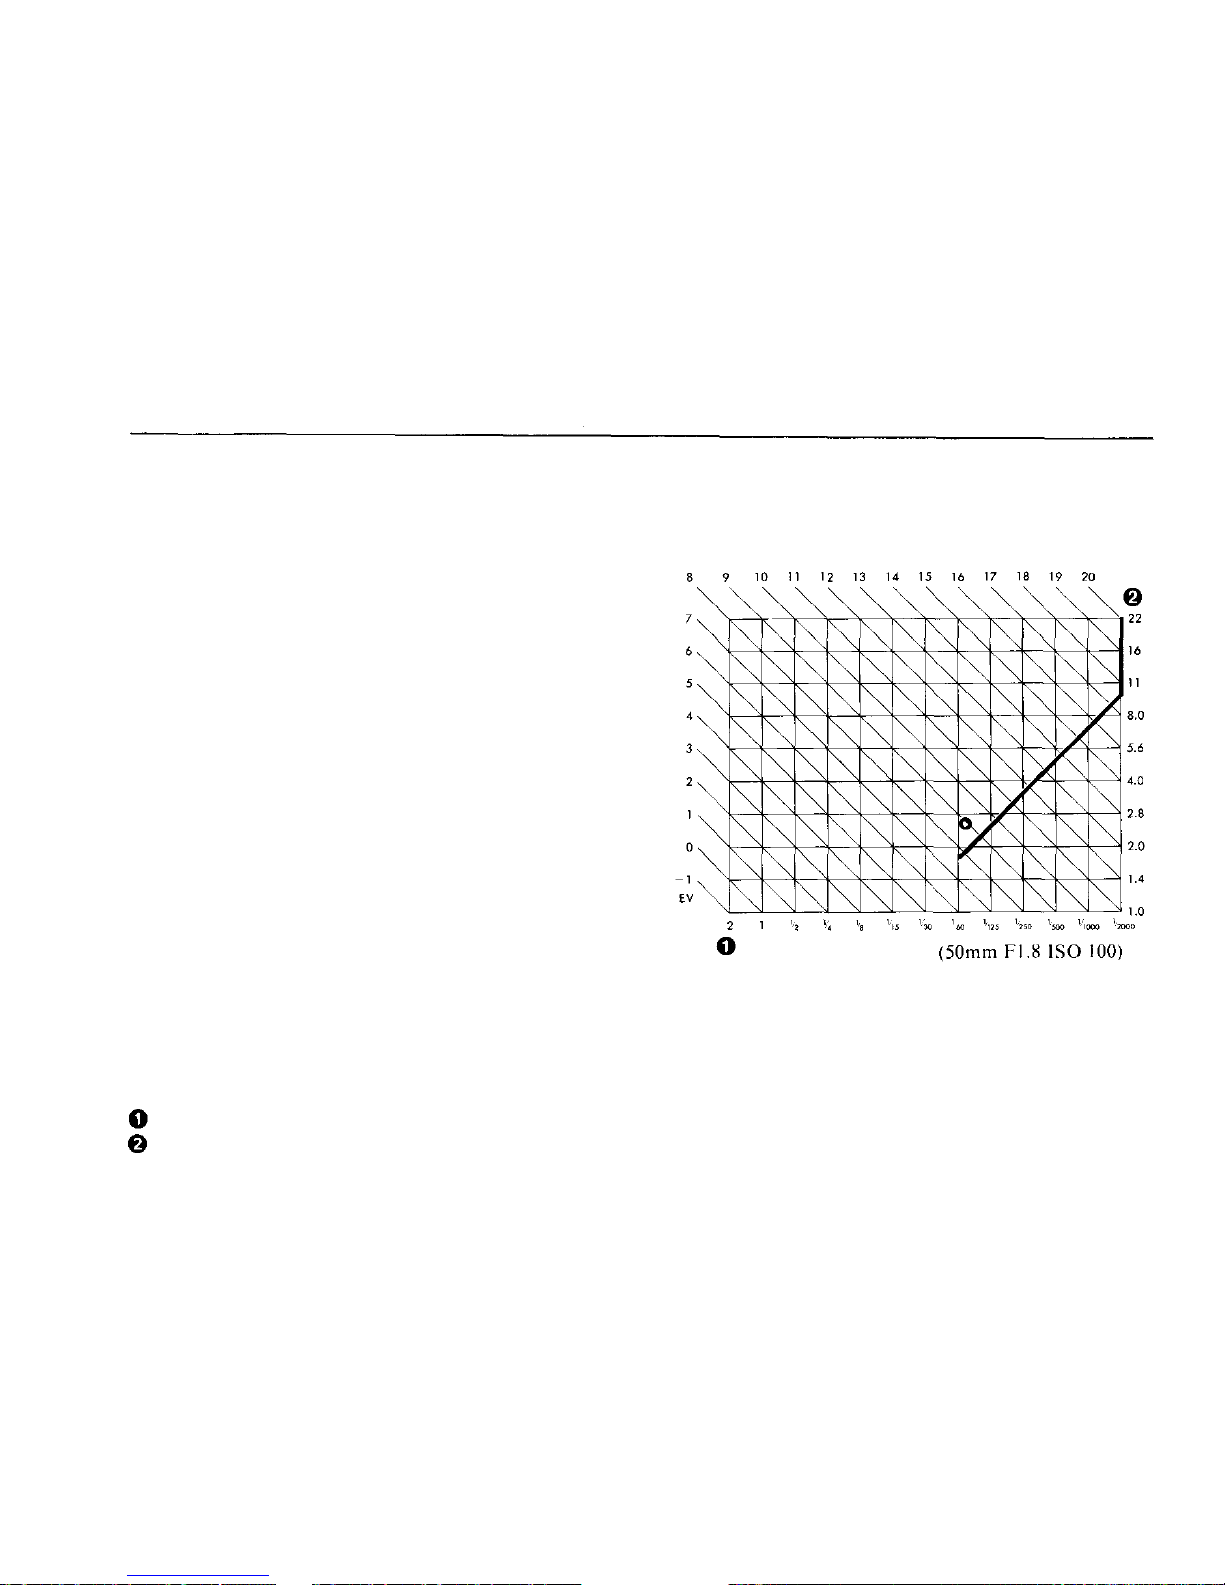
Diagram of the programmed flash control
Used with a T-series flash (T18, T20, or T32
etc.) or Full-Synchro Flash F280, th e OM
-88 is designed to control the flash on the
basis of the direct "OTF" program.
If a shutter speed faster than 1/60 sec. has
been selected b y the cam era according to the
brightness of the subject, it will take picture
in the ordinary programmed exposure mode
without firing the flash. If it selects a shutter
speed of 1/60 sec. or slower, the aperture
will be automatically shifted 1 stop below
the maximum aperture of the lens used and
the shutter speed will be fixed at 1/80 sec.
The flash will then be controlled by the
direct "OTF" method. This method allows
an easier operation of sophisticated
photographic techniques such as bounce and
diffused flash.
[E] Shutter speed
[E] Aperture
36
Page 38

TTL Direct "OTF" Light Metering
The OM-88 uses a direct "OTF" metering method which is suited for metering on a wide
range of subjects. It can measure the brightness of the subject directly on the film plane and
control the exposure on a real time basis. This method was pioneered by Olympus. Since it
can quickly react to any change s of light during exposure, it is convenient for shooting not
only stationary objects, but also fast-moving objects. It also simplifies macro photography
which has been considered difficult with regard to exposure determinations. Further, in
combination with T-series flash units (T18, T20 and T32 etc.) or an F280, it allows you to
tak e flash pictu res easily in a fully automatic manner, including such sophisticated
technologies as bounce or diffuse flash pictures.
37
Page 39
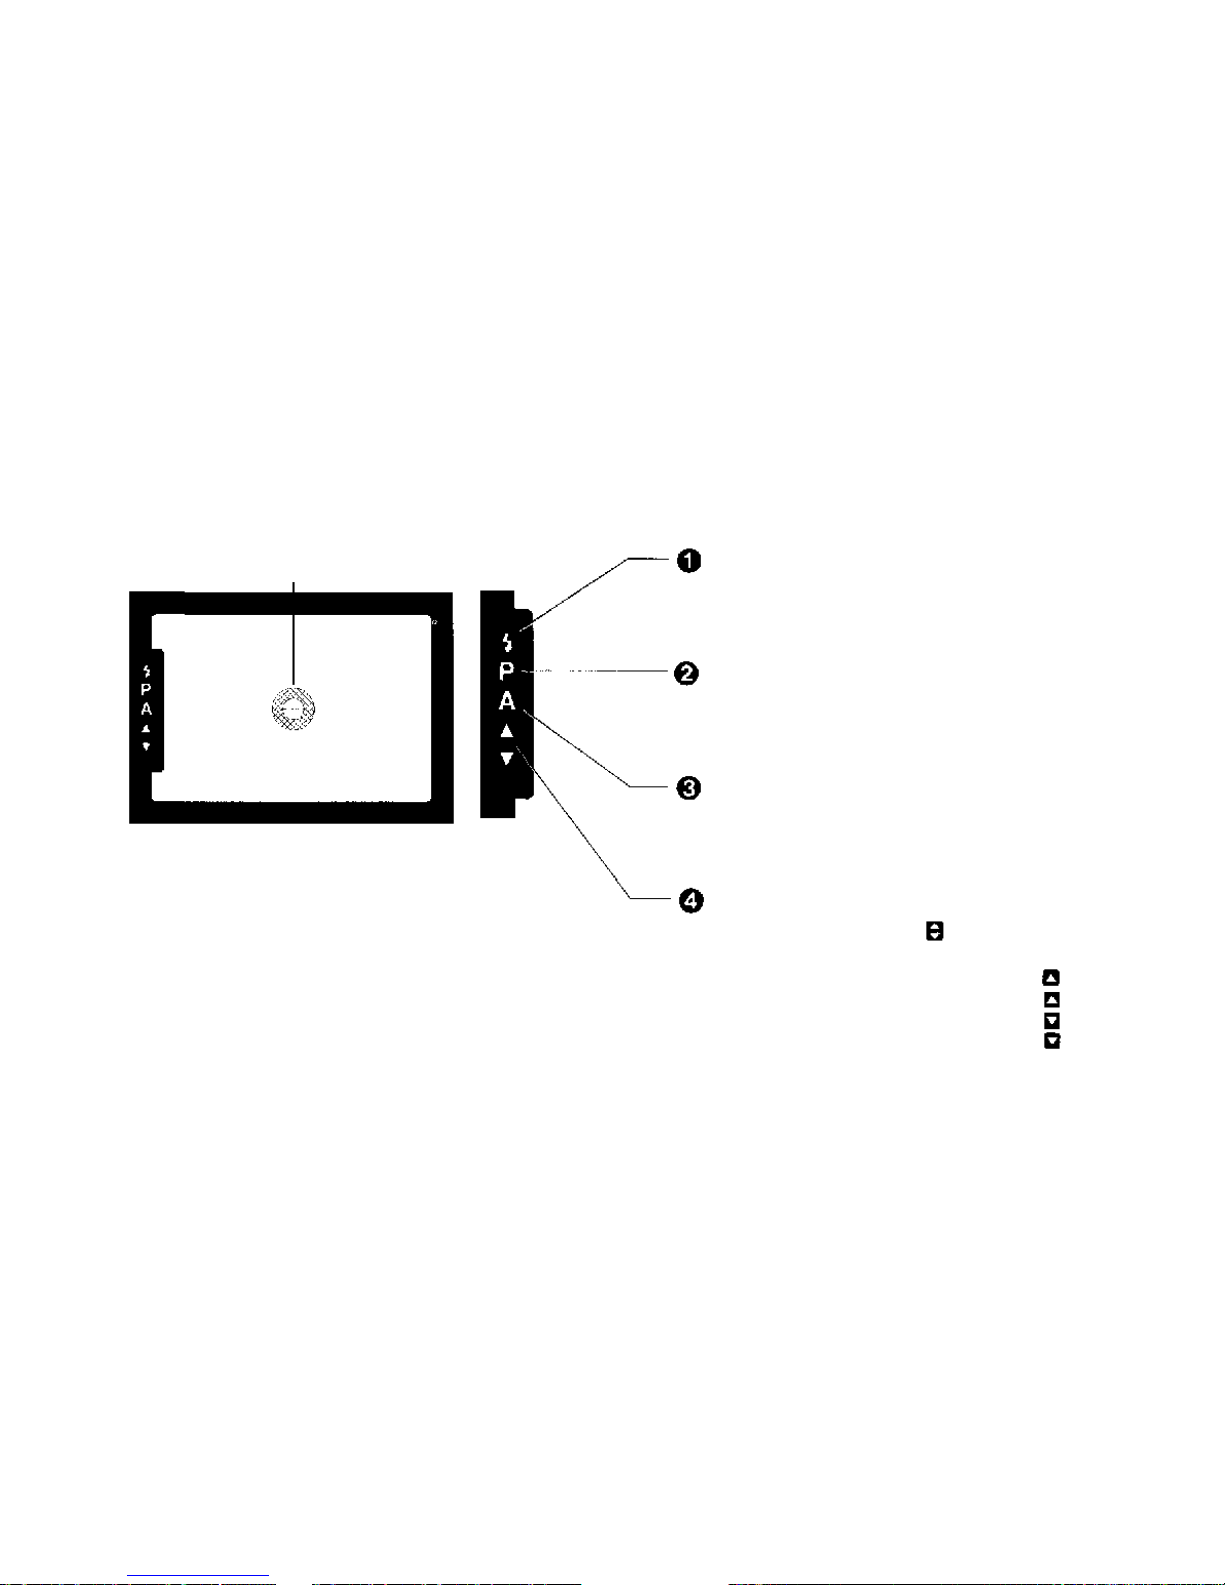
Microprism/split-image circle
Display in the viewfinder
Flash ready light (turns on)
Correct exposure (blinking
signal)
Programmed mode (turns on)
Camera shake warning
(blinks)
Auto mode (turns on)
Camera shake warning
(blinks)
Manual mode
Correct exposure ( turns on)
Overexposure +0.5 — +1.5 EV (
ov er + l.5 E V (
Underexposure-0.5 — -1.5 EV(
under-l.SEV (
turns on)
blinks)
turns on)
blinks)
38
Page 40

Using the Manual Adapter 2
The OM-88 permits aperture-priority auto exposure and manual exposure in combination
with an optional Manual Adapter 2.
Procedure for aperture-priority auto exposure
In this mode, the photographer chooses a desired aperture according to the shooting
conditions and the camera automatically sets a shutter speed whic h provides correct
exposure. You need only set the mode dial at "A" and select yo ur desired aperture. This
mode provides for more creative composition by utilizing the depth-of-field control of a lens.
If you want a blurred background, for example, open up the aperture; and if y ou want that
your picture turns out sharp all the way to the background, stop down the aperture. Further,
if you use a T-series flash (T18, T20 or T32 etc.) or an F280, y ou can choose your desired
aperture even in flash photography because the flash is controlled by the camera in the direct
"OTF" auto mode.
39
Page 41

Procedure for manual exposure
If you set the mode dial at "M", yo u can choose you r desired shutter speed and aperture for
manual exposure. To set exposure, tu rn the shutter speed and aperture dials while checking
correct exposure in the viewfinder. You can enjoy various photographic effects such as
blurred effects with slow shutter speeds, action-freezing effects with high shutter speeds, and
aperture effects (depth-of-field effects) for portraits on a blurred background.
Whe n a T-series flash (T18, T20 or T32 etc.) or an F280 is used in the manual mode, the
direct "OTF" auto flash function is not available.
40
Page 42
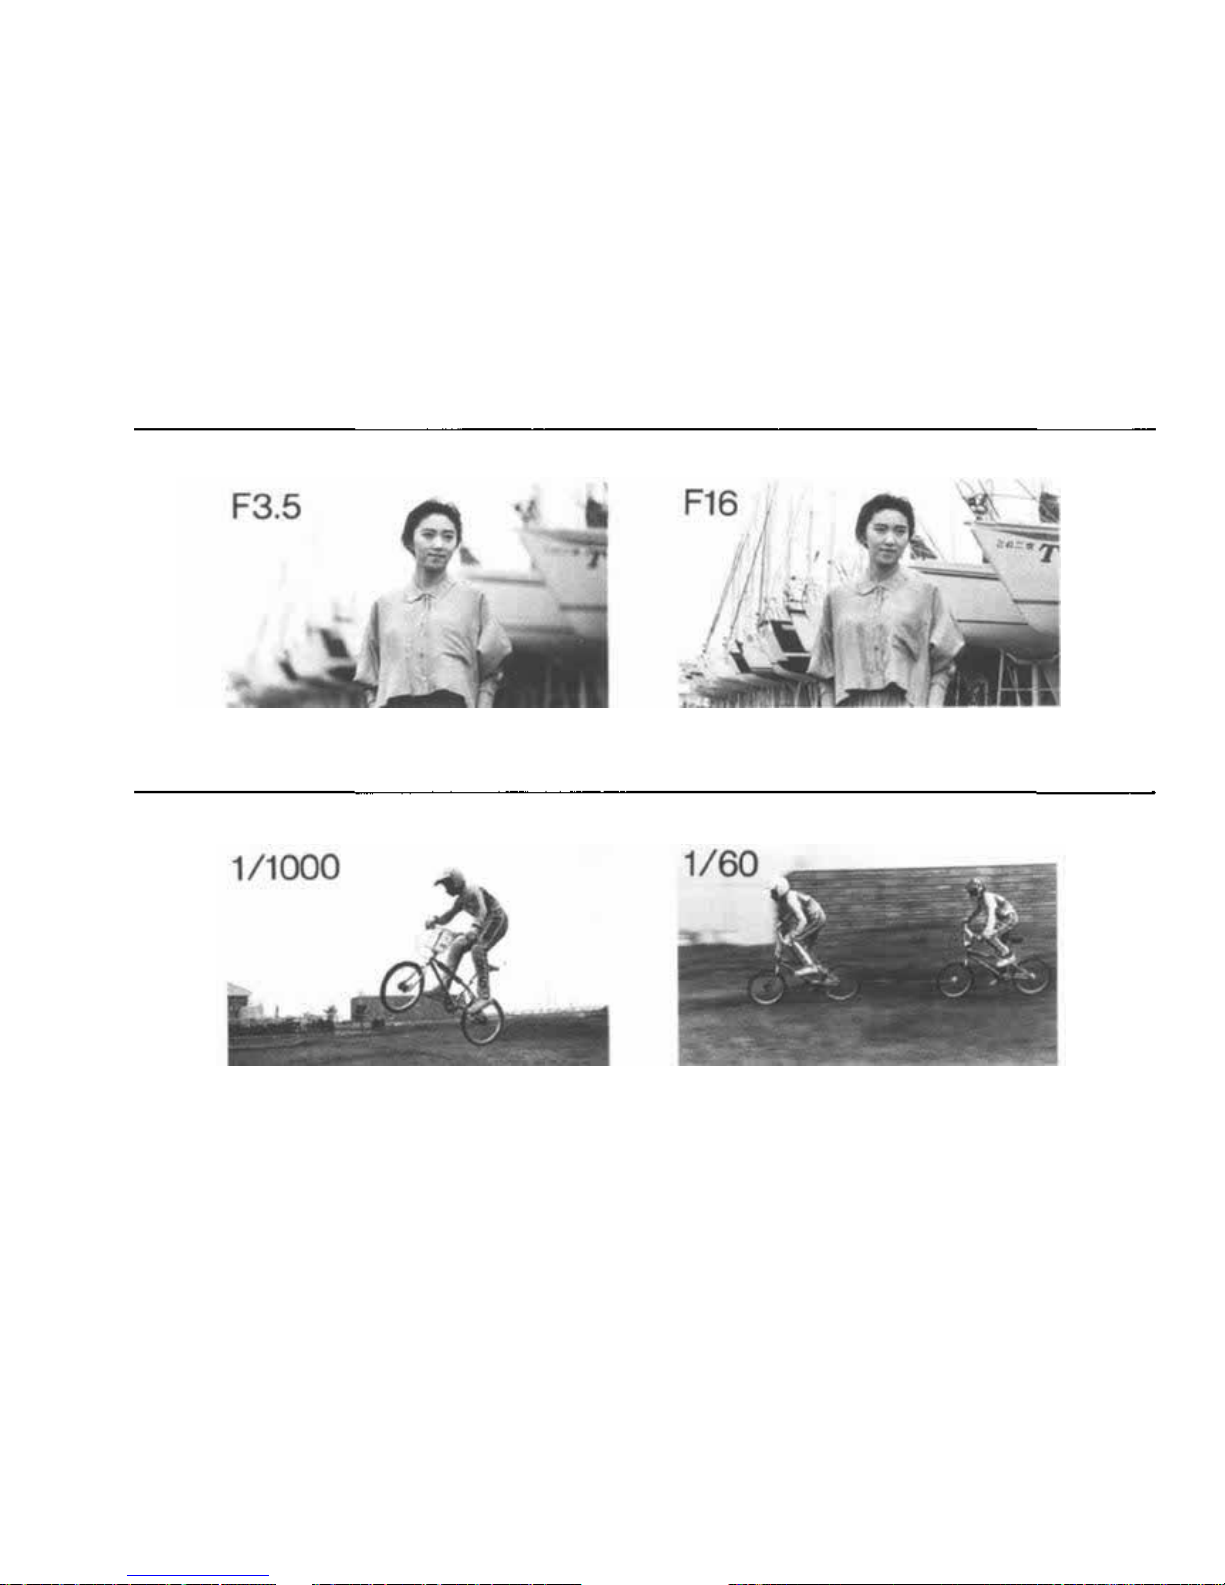
Using aperture effects
If you want a blurred background, open up the aperture; and on the contrary, if you want a
sharp background, stop down the aperture.
Using shutter speed effects
If you want an action-freezing effect on a fast-moving object, choose a faster shutter speed;
and if you want to express a sense of motion by a blurring effect, choose a slower shutter
speed.
41
Page 43
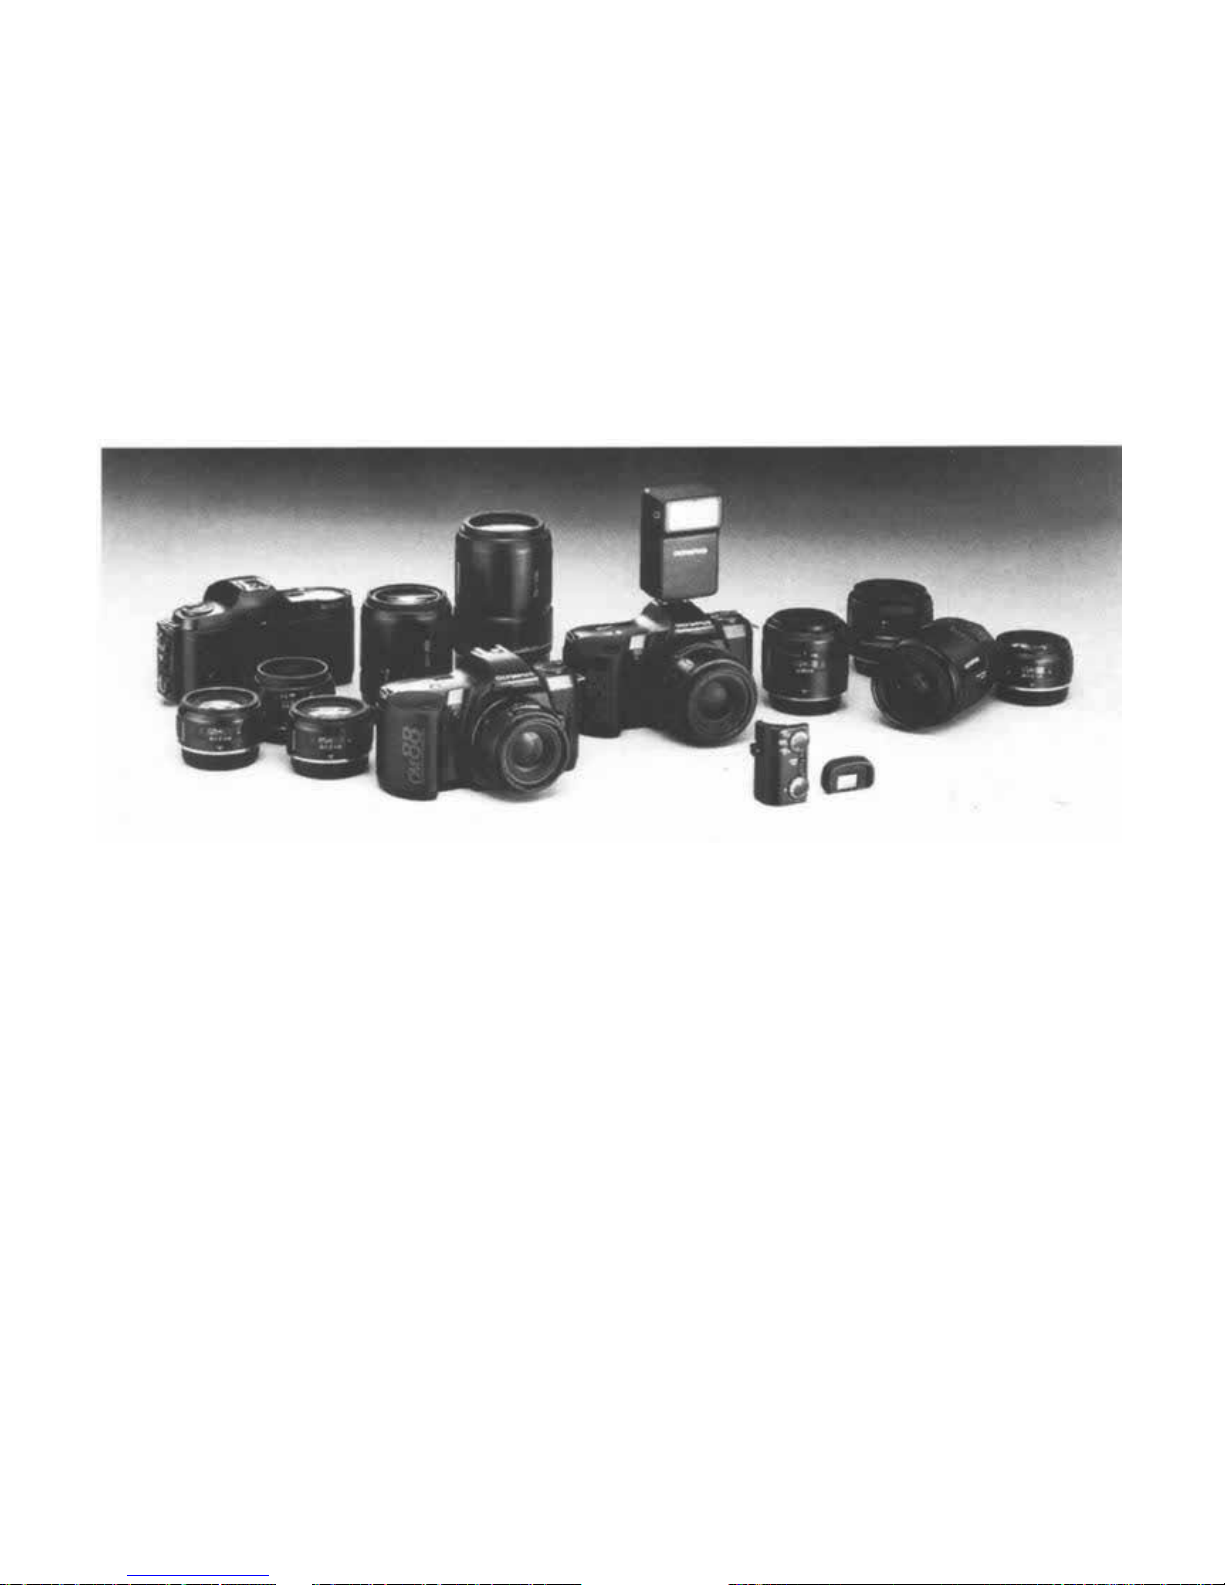
OM-88 system
AF 24mm F2.8
AF 28mm F2.8
AF 50mm F1.8
50mm F2.0 PF
AF Macro 50mm F2.8
AF Zoom 35-70mm F3.5-4.5
AF Zoom 28-85mm F3.5-4.5
AF Zoom 35-105mm F3.5-4.5
AF Z oo m 70-210mm F3.5-4.5
Manu al Adapter 2
Electronic Flash T18
Full-Synchro Flash F280
Recordata Back
TTL Auto Cord F 0.6m
Eyecup 2
Dioptric Correction Lens 2 (with Eyecup 2)
+2, +1,-1,-2, -3, -4, -5
Case
42
Page 44

Notes on t h e OM-88 with current OM System Units
* Auto Extension Tube 7/14/25 and Telescopic A ut o Extension Tube 65-116 can b e us ed
only with OM lenses, focused in the conventional manner.
* When using the Telescopic Aut o Extension Tube 65/116 the tripod mount should first be
removed.
* The following units cannot be used:
The Zuiko Reflex 500 mm F8, Zuiko 600 mm F6.5, Zuiko 1000 mm Fl 1, and Zuiko Shift
24 mm F3.5/35 mm F2.8 lenses; all Mo tor Drive Grou p units; the Aut o Bellows; TTL
Auto Cord TO.3/0.6/2/5 m; TTL Auto Multi Connector; TTL Auto Connector T20, Slide
Copier; Roll Film Stage a nd Trans-Illuminator Base X-DE; the Electronic Flash T45;
Interchangeable Focusing Screens; Recordata Backs for other OM cameras.
* T10 R in g Flash 1, T8 Rin g Flash 2 a nd Macro Flash Shoe Ri ng can be used in
combination with a conventional OM lens or AF Macro 50 mm F2.8.
43
Page 45

Conventional OM Lenses
The OM-88 accepts not only Olympus AF Lenses but also most of th e conventional OM
Lenses, including such special lenses as fisheye, super telephoto, macro, and teleconverter
lenses. If you use a conventional OM Lens on the OM-88 , it will automatically select t he
aper tur e-pr ior ity aut o exposure mode. If you choose yo ur desired aperture on the aperture
rin g of t he lens, the OM-88 will au tomatically set a shutter speed which provides correct
exposure according to the brightness of the subject. An d, if you use a Manual Adapter 2, (1)
you can take pictures in the manual exposure mode, so you can choose y our desired sh utter
speed. (2) The aperture which is set on the lens will always prevail and the setting on the
adapter will be ignored. (3) The camera will take pictures in the aperture-priority auto
exposure mode, even if the mode dial is set at "P" (programmed exposure).
With an OM Lens on the camera, you will not see the display in the viewfinder and the
power focus system will not operate.
Whe n using a T-series flash or F280 and OM Lens:
If you do not use a Manual Adapter 2, the flash will fire in the "OTF" auto mode wh en the
shutter speed is 1/6 0 sec. or slower, regardless of the position of the mode dial. However,
you cannot see in the viewfinder that the flash will fire.
(The same applies whe n you use a Manual Adapter 2 and operate in the "A" or "P" mode.)
Taking flash pictures in the"M"mode in combination with the Manual Adapter 2:
In this case, the flash will fire in the manual mode with its full capacity. Set the shutter speed
dial at "X". Flash will not fire with a shutter speed of 1/125 sec. or faster. Calculate the
proper aperture from the flash guide number and subject distance and set it on the lens.
Using a flash unit other than T-series flashes and F280 and an OM Lens
in combination:
Use the Manual Adapter 2 and set the mode dial at "M". Set the shutter speed dial at "X".
Set the aperture on the lens according to the aperture mode on the flash.
44
Page 46
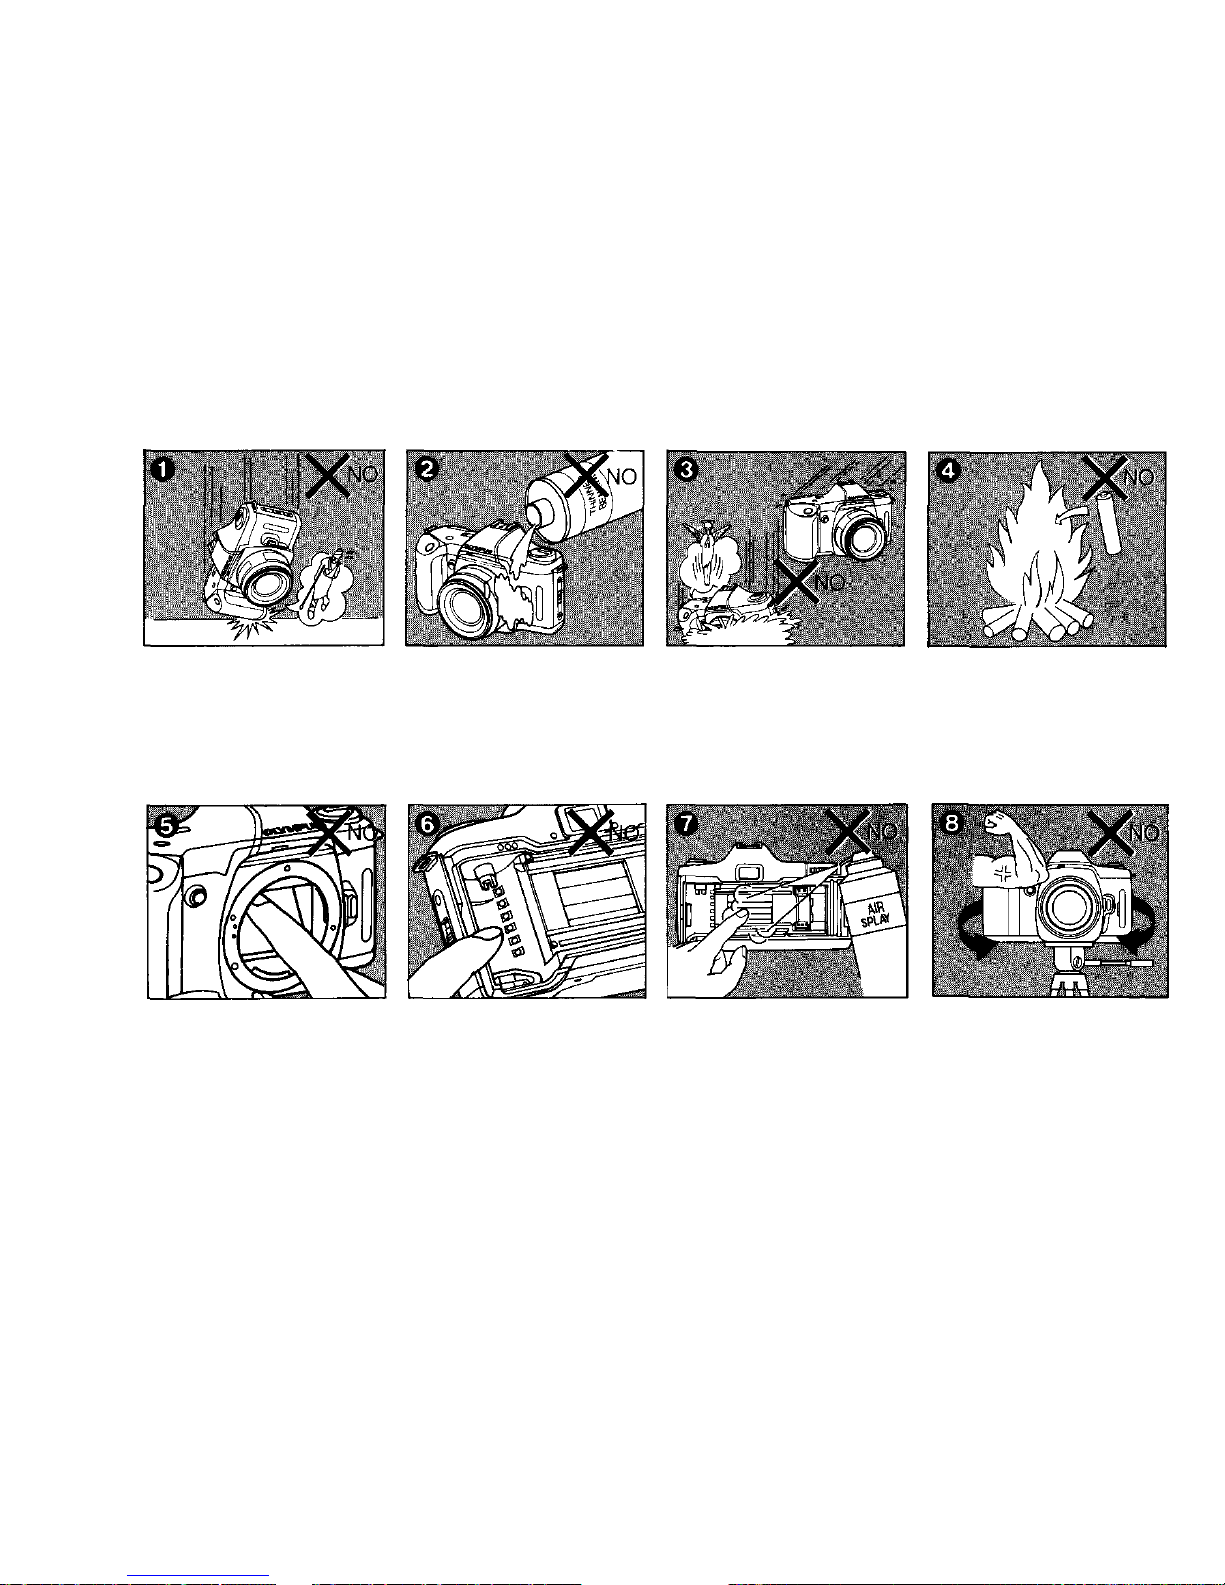
Care and Storage
Do not drop the
camera to the hard
surface.
Do not use thinner,
benzine or organic
solvents to clean the
camera.
Do not expose t he
camera to rain shower
and water.
Do not put the used
battery into fire and
do not heat, disassemble and short it.
Do not tighten the
tripod screw too much.
Do not touch the
shutter curtain.
Do not use an air spray
to remove dust on it.
Do not touch on the
DX read-off contacts.
Do not allow fingers
to contact the mirror.
45
Page 47
In case of malfunction, take the camera to
yo ur nearest Olympus service station.
Do not apply excessive
force to the flash unit.
Do not put heavy object
on the camera.
Do not put the camera in the extreme heat
(over 50° C or 122° F) like inside the car under
hot summer whether and in the extreme cold
(below -10°C or 14°)
Do not leave the camera
near the magnetic fields,
like on the top of TV set,
or radio
Avoid sudden temper-
ature changes.
46
Page 48

Questions an d Answers
Q: Wha t kind of batteries can I use?
A: Use four AAA-size alkaline-manganese
batteries. You cannot use different kinds of
batteries or use new and old batteries at the
same time. Always change all four batteries at
th e same t ime. The bat te rie s whi ch com e wit h
you r camera are intended for operation check
at the time of the purchase.
Q: The camera does not operate.
A: Make sure batteries are loaded correctly. Also,
check to see that the mode dial is not set at
OFF.
Q: W hen I loaded the film, I heard a "beep-beep"
after the camera made blank shots. When I
then depressed the shutter release, I also heard
the audible signal after the film was wound.
A: The film is not advancing correctly. Open the
camera back and load the film correctly again.
Q: When I depressed the shutter release, I heard
only a beeping sound bu t th e camera did not
operate.
A: There are t wo possible causes:
1) Have you used up the film? Check on the
exposure counter. If the film has been used
up, rewind it.
2) The batteries have been exhausted. Replace
wit h new ones.
Q: The display in the viewfinder turned off when I
was shooting.
A: The display will automatically tu rn off in 30
seconds because t he OM-88 is designed to
save power. If y ou wan t to turn it on again,
depress the shutter release l ightly.
Q: Can I turn the rotary part at the front edge of
the lens with my hand?
A: Do not try to tur n it by force, because the
internal gear may be damaged. Y ou can tur n
the hood, however.
Q: The flash does not fire.
A: There are two possible causes. (1) Wh e n you
take flash pictures, the camera will
automatically switch off the flash with faster
shu tt e r speeds than 1 / 6 0 sec. (2) A re you
trying to fire the flash before the unit has been
recharged?
Q: When I used the T20 in the ordinary auto
mode, the mark " " d id not bli nk.
A: In the ordinary auto mode, it will not blink
even w hen yo u use a T-series flash. Please
check the display on the flash.
Q: W hen is it necessary t o check the batteries?
A: Check the batteries in the following cases:
47
Page 49
cent er to t he edges.
Q: How do I clean the camera?
A: Dust, moisture and salt are the enemies of the
camera and lens. After carrying the camera in
the rain or in a fog, wipe it dry. After taking
pictures at the seaside, soak a cloth in fresh
water, wring it free of water and wipe off salt
on the camera, then clean it thoroughly.
Q: Why is the film sometimes scratched?
A: The cause may be pieces of film in the camera
work. If the camera is used for a long time, the
film chamber may have fragments of film in it.
Do not forget to clean the camera.
Q: If the camera is to be stored in a humid
climate, what can I do to prevent it from
possible moisture damage?
A: Remove the camera f rom its case and keep it
in a polyethylene bag together wit h a
desiccant. Do not use desiccants containing
moth repellents.
Caution
If you use lenses, flashes and accessories of
other brands, caution is required because t hey
may n ot assigned to be mounted on this
camera or they may cause incorrect exposure
or malfunction of the camera even if they can
be mounted on it.
48
Page 50
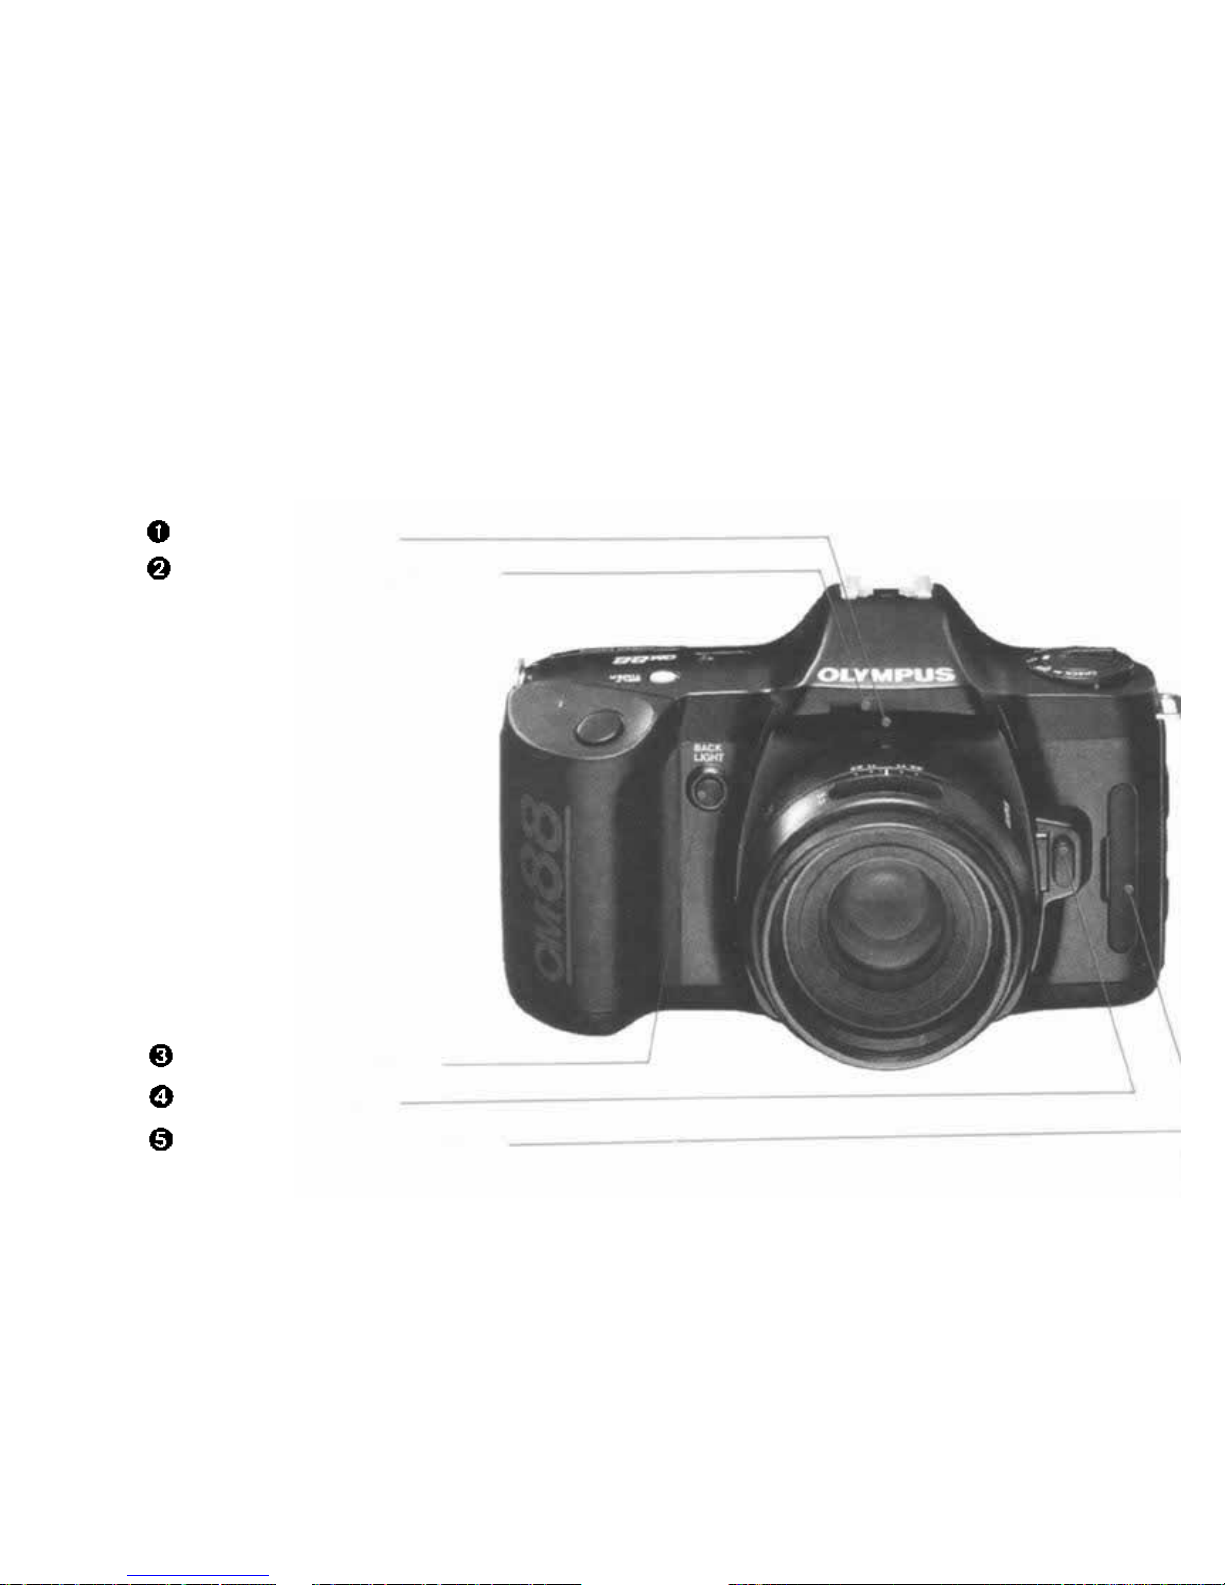
Description of Controls
Battery Check Beeper
Selftimer/ Battery Check Signal
Backlight Control Button
Lens Locking Button
Manual Adapter Contact Cover
49
Page 51
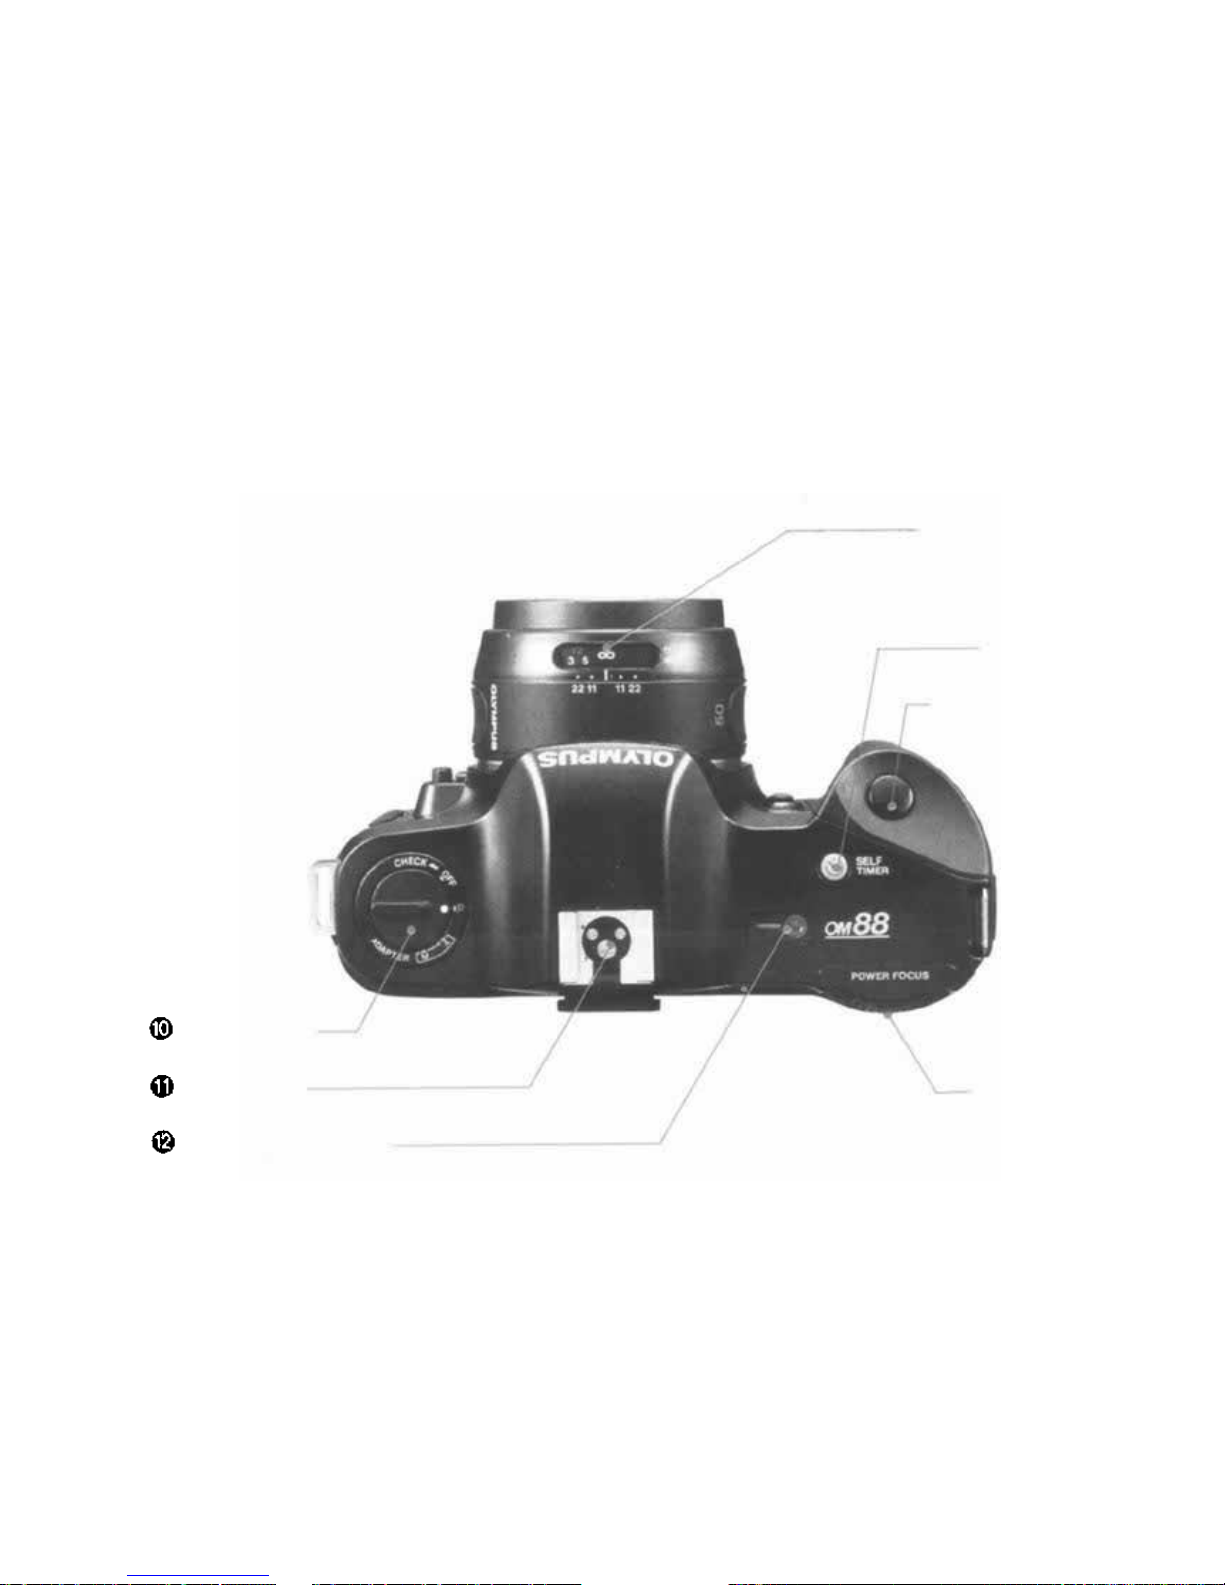
Power Focus Dial
Self-Timer Button
Shutter Release Button
Distance-Scale window
Mode Dial
Hot Shoe
Exposure Counter
50
Page 52
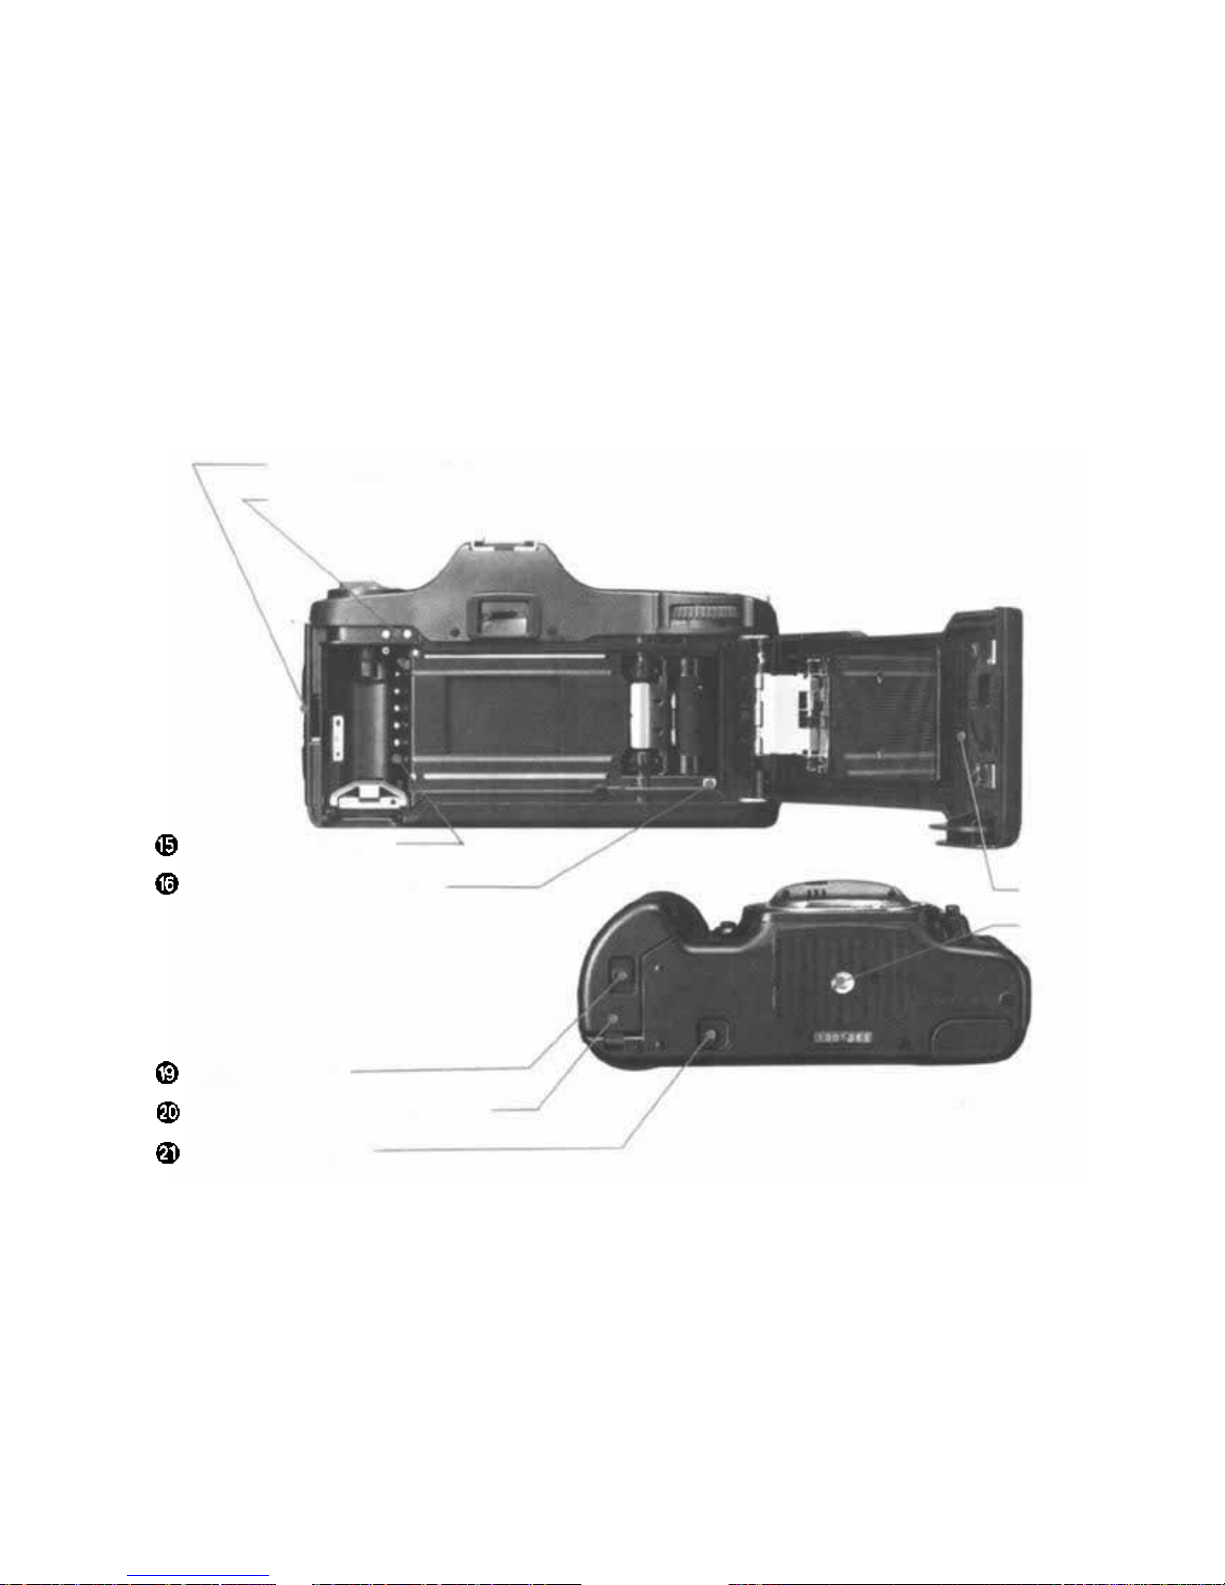
Camera Back Release Knob
Databack Contacts
Film Window
Tripod Socket
Release Kn ob
Battery Compartment Cover
Rewind Button
DX Code Reader
Film Loading Indicator
51
Page 53

Specifications
Type: TTL auto-exposure 35mm SLR camera.
Fil m Format: 24 x 36mm
Lens Mount: Olympus OM Mount (designed for
Olympus AF Lenses and 50mm F2.0 PF
lens).
Lens: Olympus AF Lenses, 50mm F2.0 PF lens,
and OM Lenses.
Shutter: Electronically controlled, vertical-travel
focal plane shutter; Shutter speed: 2 —
1/2000 sec. (bulb exposure is possible with
Manual Adapter).
Focusing: Olympus AF Lenses and 50mm F2.0
PF lens: Power focus wi th dial (lens drive is
controlled by sensing the operation speed).
OM Lenses: with focusing ring.
Light Metering Method: TTL Direct "OTF" Light
Metering (center-weighted, average light
measurement.)
Exposure Modes: (1) Programmed exposure
(2) Aperture-priority auto exposure (with
Manual Adapter)
(3) Manual exposure (with Manual
Adapter).
Automatic switchover to aperture-priority
auto exposure with OM Lenses.
Programmed Automatic Exposure Control:
Electronic shutter with automatic control of
aperture and shutter speed; Light measuring
range: EV1 — 20 (ISO 100, 50mm F1.8)
Backlight Compensation: +1.5 EV (with backlight
control button)
Flash Control: TTL Direct "OTF" auto flash
(when using T Series flashes and FullSynchro Flash F280)
Synchronization: Through accessory shoe
(X contact)
Film Speeds: IS O 2 5 — 3200; au tomatic setting
with DX-coded film.
Viewfinder: Focusing screen: Fixed, Super Lumi
Micron Matte with split-image and
microprism. Field of view: 93% (vertical and
horizontal).
Magnification: 0.8X (with 50mm standard
lens at )
Viewfinder information: LED display
Contents: flash ready and correct exposure
signal, exposure modes, camera shake
warning, manual exposure guide.
Film Loading: Auto loading (the film
automatically advances to first frame);
52
Page 54
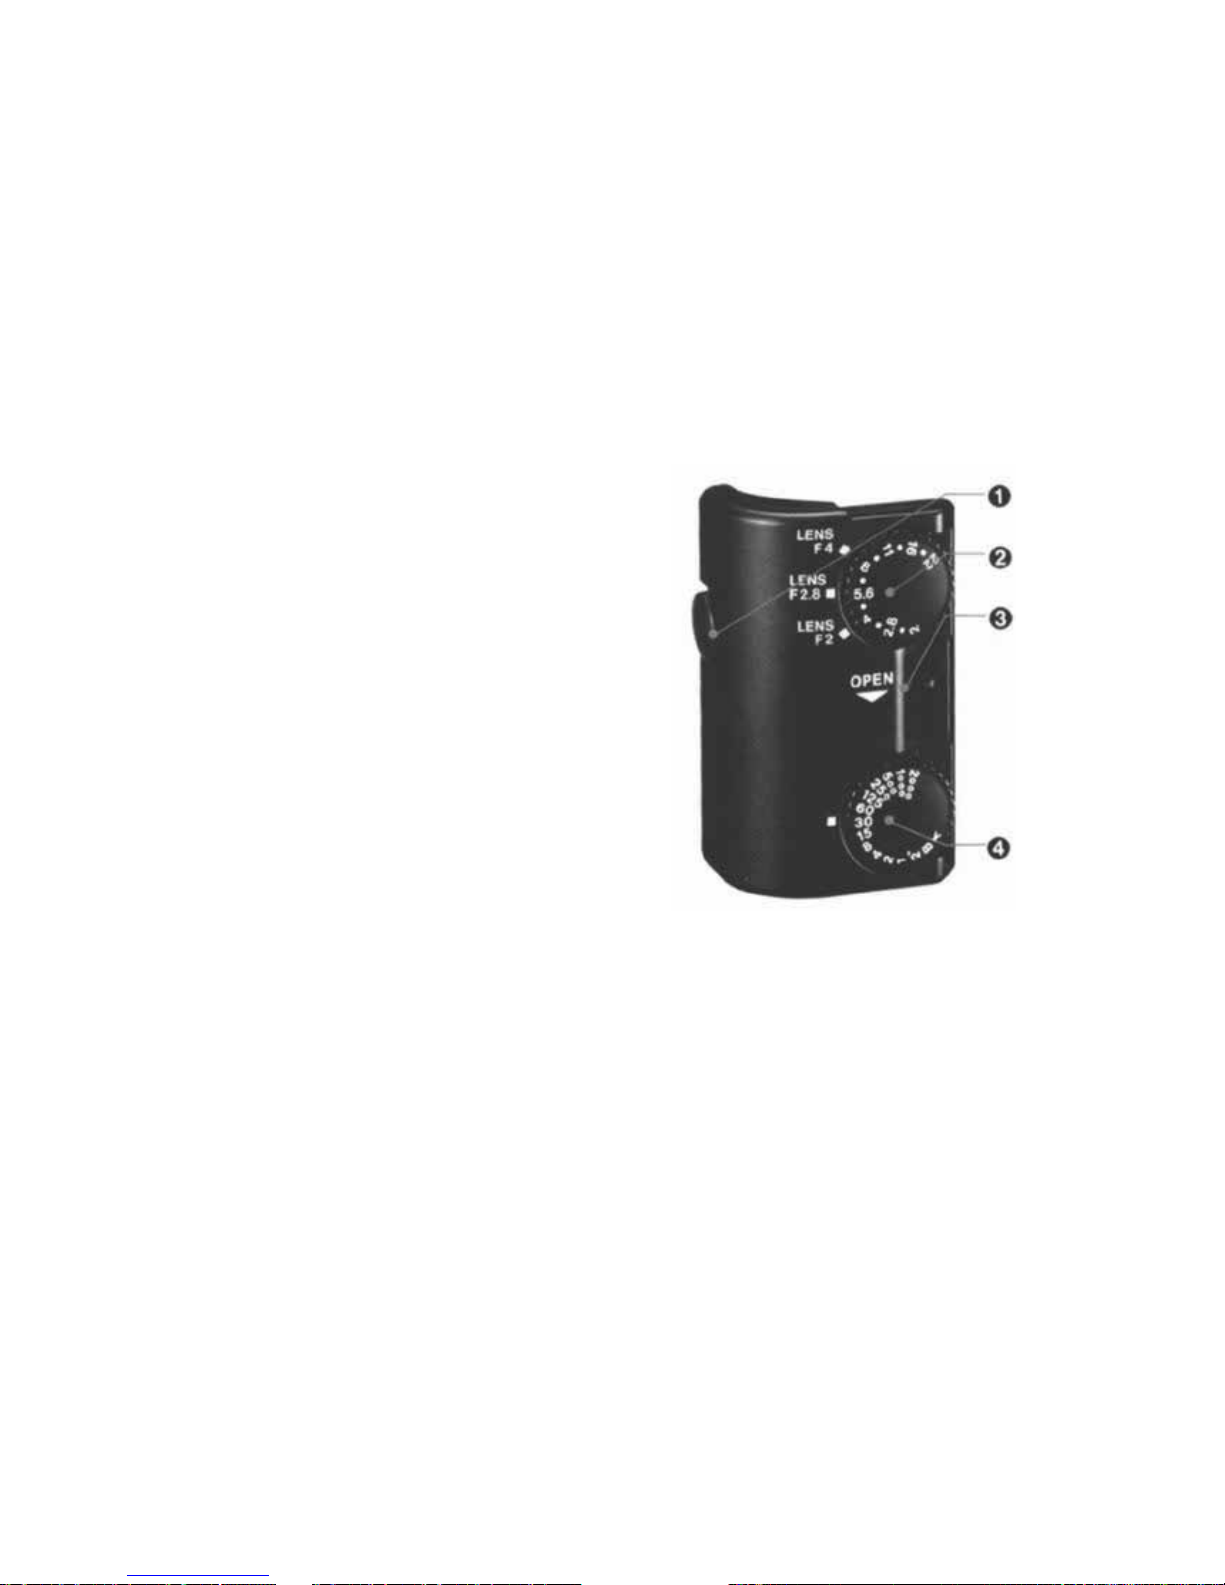
Manual Adapter 2
Description of Controls
Mounting Screw
Aperture Setting
Dial
Camera Back
Release Knob
Shutter Speed
Setting Dial
53
Page 55

Manual Adapter 2 Specifications
System application: OM-88
Mounting: Screwed onto the camera.
Electrical Connection w ith Camera: Cordless,
direct contact.
Shutter Speed Setting: By rotary dial.
Setting range: X (1/ 8 0 sec.), B, 2 — 1/2000
sec. (1-step increments)
(Automatic flash switch-off with shutter
speeds of 1 / 1 2 5 sec. or faster in manual
mode.)
Aperture Setting: By rotary dial.
Setting range: F 2 — 22 (0.5-step increments)
Dimensions: 26(W) x 56(H) x 33(D)mm
(1"x2.2"x 1.3")
Height: 18g(0.63oz)
54
Page 56

OLYMPUS
OLYMPUS OPTICAL CO.,LTD.
San-Ei Building, 22-2, Nishi Shinjuku 1-chome, Shinjuku-ku, Tokyo, Japan. Tel. 03-340-2211
OLYMPUS CORPORATION
Crossways Park, Woodbury, New fork 11797, U.S.A. Tel. 516-364-3000
OLYMPUS OPTICAL CO. (EUROPA) GMBH
Po s tf ac h 104908. Wendenstrasse 14-16, 2000 Hamburg 1, West Germany. Tel: 040-23773-0
OLYMPUS OPTICALCO.(U.K.) LTD.
2-8 Honduras Street, London EC1Y OTX, England. Tel. 01-253-2772
Printed in Japan 1287-1
 Loading...