

Page 1

INSTRUCTIONS
Page 2

Thank
you for
purchasing
the
Olympus
OM77AF.
The
OM77AF
is a
fully
automatic
SLR
camera which incorporates the very latest in photographic technology in an incredibly
compact form. Autofocus, programmed exposure modes and an optional Power Flash
Grip 300 all facilitate problem-free photography. In addition, connected to a FullSynchro Flash F280, the world's first flash unit capable of synchronizing with any
shutter
speed
up to
1/2000
sec.,
the
OM77AF
offers
the
user a simple,
error-free
method
of
attaining
professional-level results
in
areas
such a fill-in
flash
photography.
Before using
the
camera,
please
study
this
instruction
manual
carefully
with
the
OM77AF
in front of you, so that you can get the very best performance and service life from your
new camera.
The following symbols are used during explanation of operating procedures.
Correct
Incorrect
Operation
Operation order
Automatic
operation
Attention
Press lightly
Lamp on
Lamp blinking
1
Page 3

Table of Contents
Preparations before Taking Pictures
........
3
• Loading the Power Flash Grip 300
Batteries
......................
4
• Loading the Power Grip 100 Batteries
.....
7
•
Mounting an AF
Lens
.............. 9
Taking Photographs
I
................11
•
Turning on the
Power
..............
12
•
Loading the
Film ................
13
•
Taking Photographs
.............. 16
•
Rewinding the Film
...............
20
Taking Photographs
II
................
22
• Taking a Continuous Series of Shots
....
23
•
Using
the
Power Focus
............ 24
•
Using
the
Program
Shift
............ 27
•
Using
the
Focus
Lock System
........ 30
•
Using the
AE Lock ............... 32
•
Using the
Reset
Button ............
34
•
Using the Self-Timer ............... 35
•
Using an OM Lens
................. 37
Taking Photographs
III
.............. 40
•
Using
the
Power
Flash
Grip
300
....... 41
• Using the Full-Synchro Flash F280
......
44
• Using the T20 and T32 Electronic
Flashes
...................... 48
•
Using a Conventional Auto
Flash
....... 51
To
Take Better Photographs
........... 54
•
Autofocus (AF) .................
55
•
Program .....................
57
• TTL Direct "OTF" Light Metering
.......
63
•
Viewfinder Display
...............
64
• LCD
Panel .....................
65
• OM Lenses
.................... 66
• OM AF System
.................. 67
•
Notes
on
Using
the
OM77AF with Previous
OM System Units
................ 68
Handling
Care
.................... 69
Storage
Care
.................... 70
Questions
and
Answers
.............. 71
Description
of
Controls
.............. 73
Main Specifications
of the
OM77AF
.......
76
Main Specifications of Power Grip 100
.......
78
Main Specifications of Power Flash
Grip
300
.......................
78
2
Page 4

Preparations before Taking Pictures
3
Page 5

Loading the Power Flash Grip 300 Batteries
Remove the battery cover on the bottom of the
grip.
Do not use different types of batteries, or new and old batteries at the same time. Remove the
batteries if you are not likely to use the camera for a long time.
1
4
Page 6

2
Insert the batteries in the correct directions and
replace the cover.
To remove the grip, slide the grip lock knob and
push down on the grip.
4 LR03 (AAA) batteries
5
Page 7

and and then push up until it locks.
Note: Slide the power switch OFF when loading batteries or replacing the grip.
6
To replace the grip, align with the indicators
Page 8

Remove the battery cover on the bottom of the
grip.
Loading the Power Grip 100 Batteries
1
2
Insert the batteries in the correct directions and
replace the cover.
7
4 LR03 (AAA) batteries
Page 9

To remove the grip, slide the grip lock knob and
push down on the grip.
To replace the grip, align with the indicators
and and then push up until it locks.
8
Page 10

Mounting an AF Lens
To mount an OM lens, refer to page 37.
Remove the rear lens cap and the body cap.
1
9
Page 11

2
3
it locks. Do not touch the lens release button
when mounting the lens.
Remove the front lens cap.
Removing the Lens:
Press the lens release button and turn the lens
counterclockwise.
10
Align the red dots and slowly rotate the lens until
Page 12

Taking Photographs I
With autofocus and programmed exposure, the OM77AF puts the fascinating world of SLR
photography at your fingertips; a perfect shot is only a press of the shutter release away.
11
Page 13

Turning on the power
Slide the power switch ON.
1
Film speed and battery condition are shown for
1.5 sec.
OK
Battery power below 50 %
Change the batteries.
When power is switched ON, the lens is set to and all functions reset (see page 28).
12
Page 14

Loading the Film
Loading
and
film-speed
selection
for DX
film
are
automatic.
Use only lSO 100 when using non-
DX film.
Make sure film is DX type.
To open the back, press the locking button and
slide the release knob.
2
1
13
Page 15

3
Avoiding direct sunlight, insert the film cartridge.
Take care not to touch the shutter curtain with
your finger or the film leader.
4
5
Align the film leader with the mark and gear the
sprocket teeth to the film perforations.
Close the camera back and ....
14
Page 16

The film is automatically wound on until the exposure counter
reads 1.
When the film is incorrectly loaded, blinks. Reload the film.
Film type confirmation is possible through the
window in the camera back.
15
Page 17

Taking Photographs
Press the shutter release halfway to activate the
viewfinder display.
1
(The display continues for 30 sec.)
Frame your subject.
2
Do not touch the front-most part of the lens.
16
Page 18

Place your subject in the center of the autofocus
frame.
3
Press the shutter release halfway to focus.
4
Under-exposure
warning:
blinks.
Over-exposure
warning:
blinks.
17
A green light indicates the subject is in focus. (A
red light indicates autofocus is not possible.)
Page 19

5
Press down on the shutter release.
The
film
is
automatically
advanced
one
frame.
In poor light conditions, the autofocus illuminator
is automatically activated to determine the correct
distance. However, there are some cases depending
on the type of lenses used in which it cannot be
used. Even in these conditions the subject distance
can be determined when using the F280.
18
Page 20

When battery power falls below 50 %, blinks after each shot, and charge time is increased
when using the Power Flash Grip 300; therefore, changing the batteries is recommended.
19
Page 21

Rewinding the Film
1
Film rewind is also automatic.
Confirm that you have reached the end of the film.
R blinks.
While sliding locking knob , press the rewind
button .
2
20
Page 22

On completion of rewind, the shutter is released, flashes and the
frame counter reads "0".
Open the camera back and remove the film.
The film is completely rewound into the cartridge.
3
21
Page 23

Taking Photographs II
With a Continuous AF mode, and a Program Shift that lets you choose at any time to shift
within the program in an aperture or shutter-preferred manner, the OM77AF provides for the
expression of every photographic idea.
22
Page 24

Taking a Continuous Series of Shots
Continuous
focusing
and
shooting
is
especially
useful
whan shooting moving
subjects.
As
soon
as the subject is in focus, the picture is taken and the film wound to the next frame. This
process Is repeated as long as the shutter release is held down.
Press
the
DRIVE
button
to
enter
the
mode.
Press the shutter release.
23
Page 25

Using the Power Focus
Useful when autofocusing on a subject is difficult
. (Refer to page 51.)
Press
the
AF/PF
selection
button
to
enter
the
"PF" mode.
blinks.
Slide the shift knob.
1
2
24
Green LED in the viewfinder blinks during powerfocusing.
Page 26
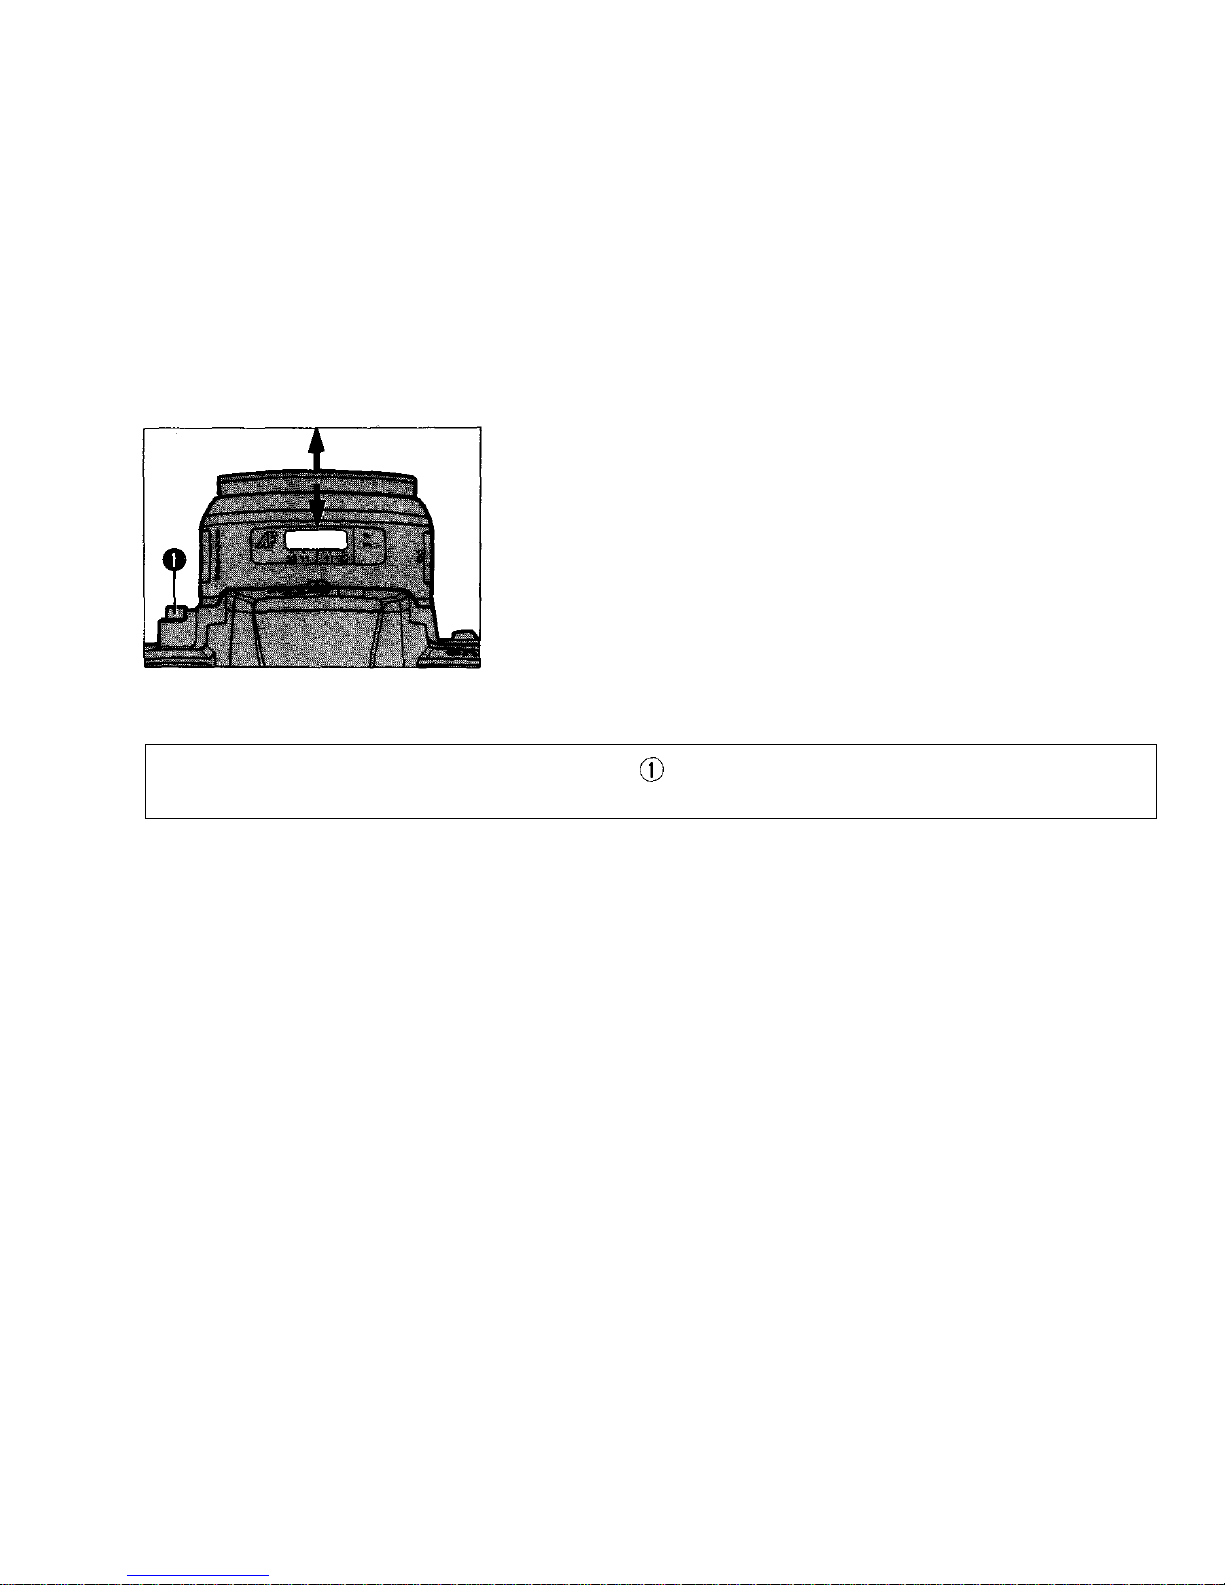
When the knob is shifted to the right, the lens focuses on closer
subjects.
When
shifted to the
left,
the
lens
focuses
on
farther
subjects.
Be sure not to press the lens locking button while using the power focus as this will put the
camera into autofocus mode.
25
Page 27
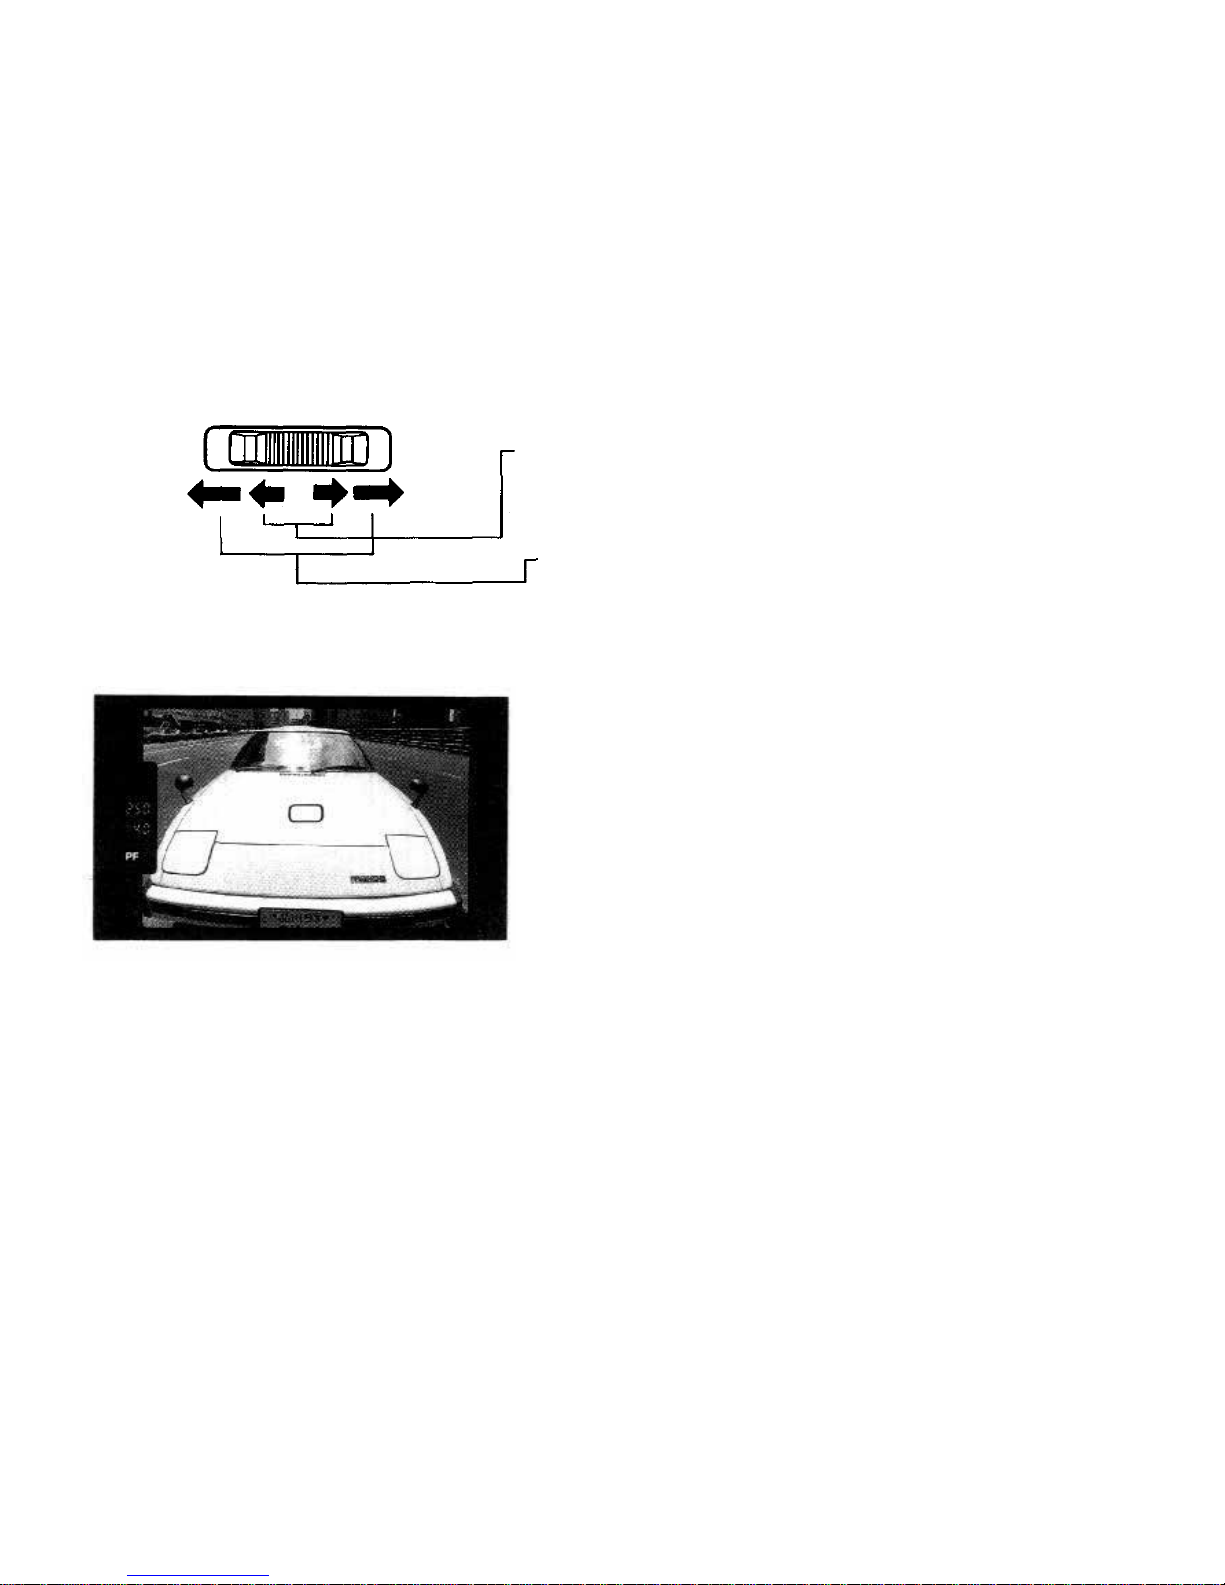
Light pressure: Fine adjustment.
Firm pressure: High speed adjustment.
When the subject within the focusing screen is in
focus, press the shutter release.
3
26
Page 28
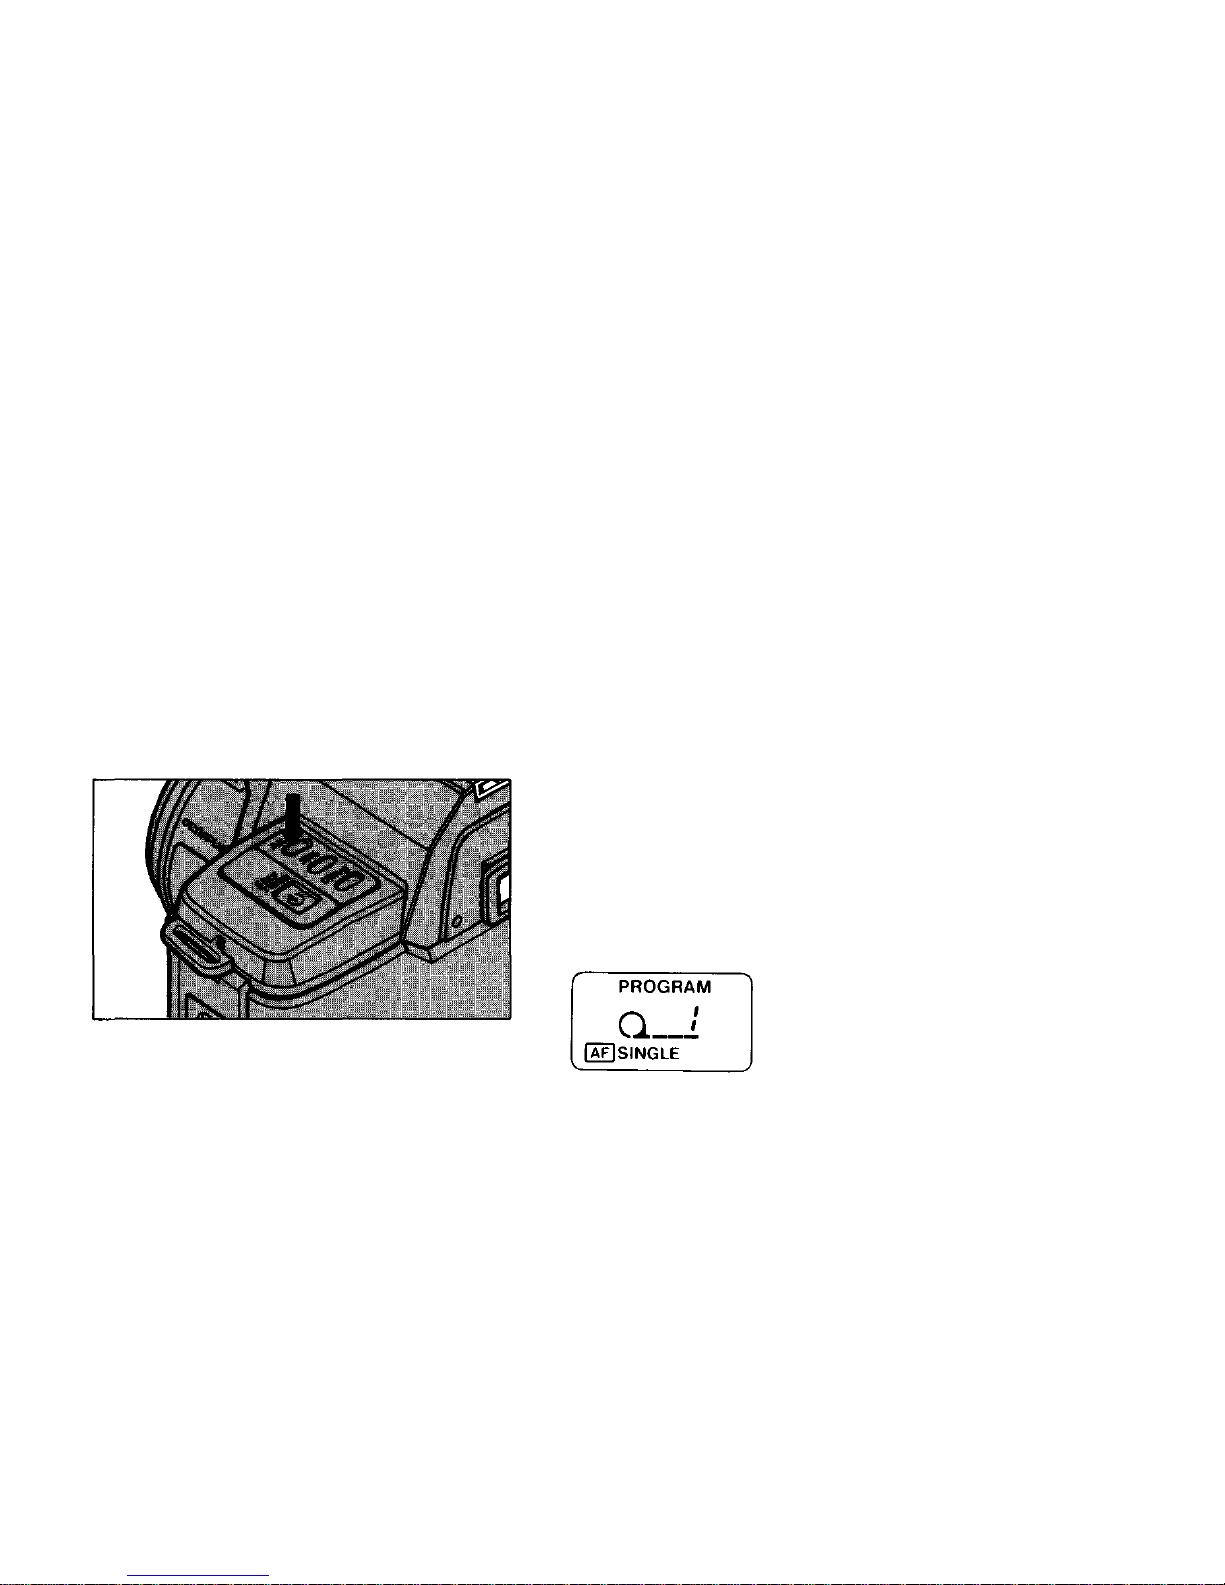
Using the Program Shift
Aperture and shutter speed can be set freely while maintaining correct exposure.
Press the AF/PF selection button to enter the AF
mode.
1
27
Page 29
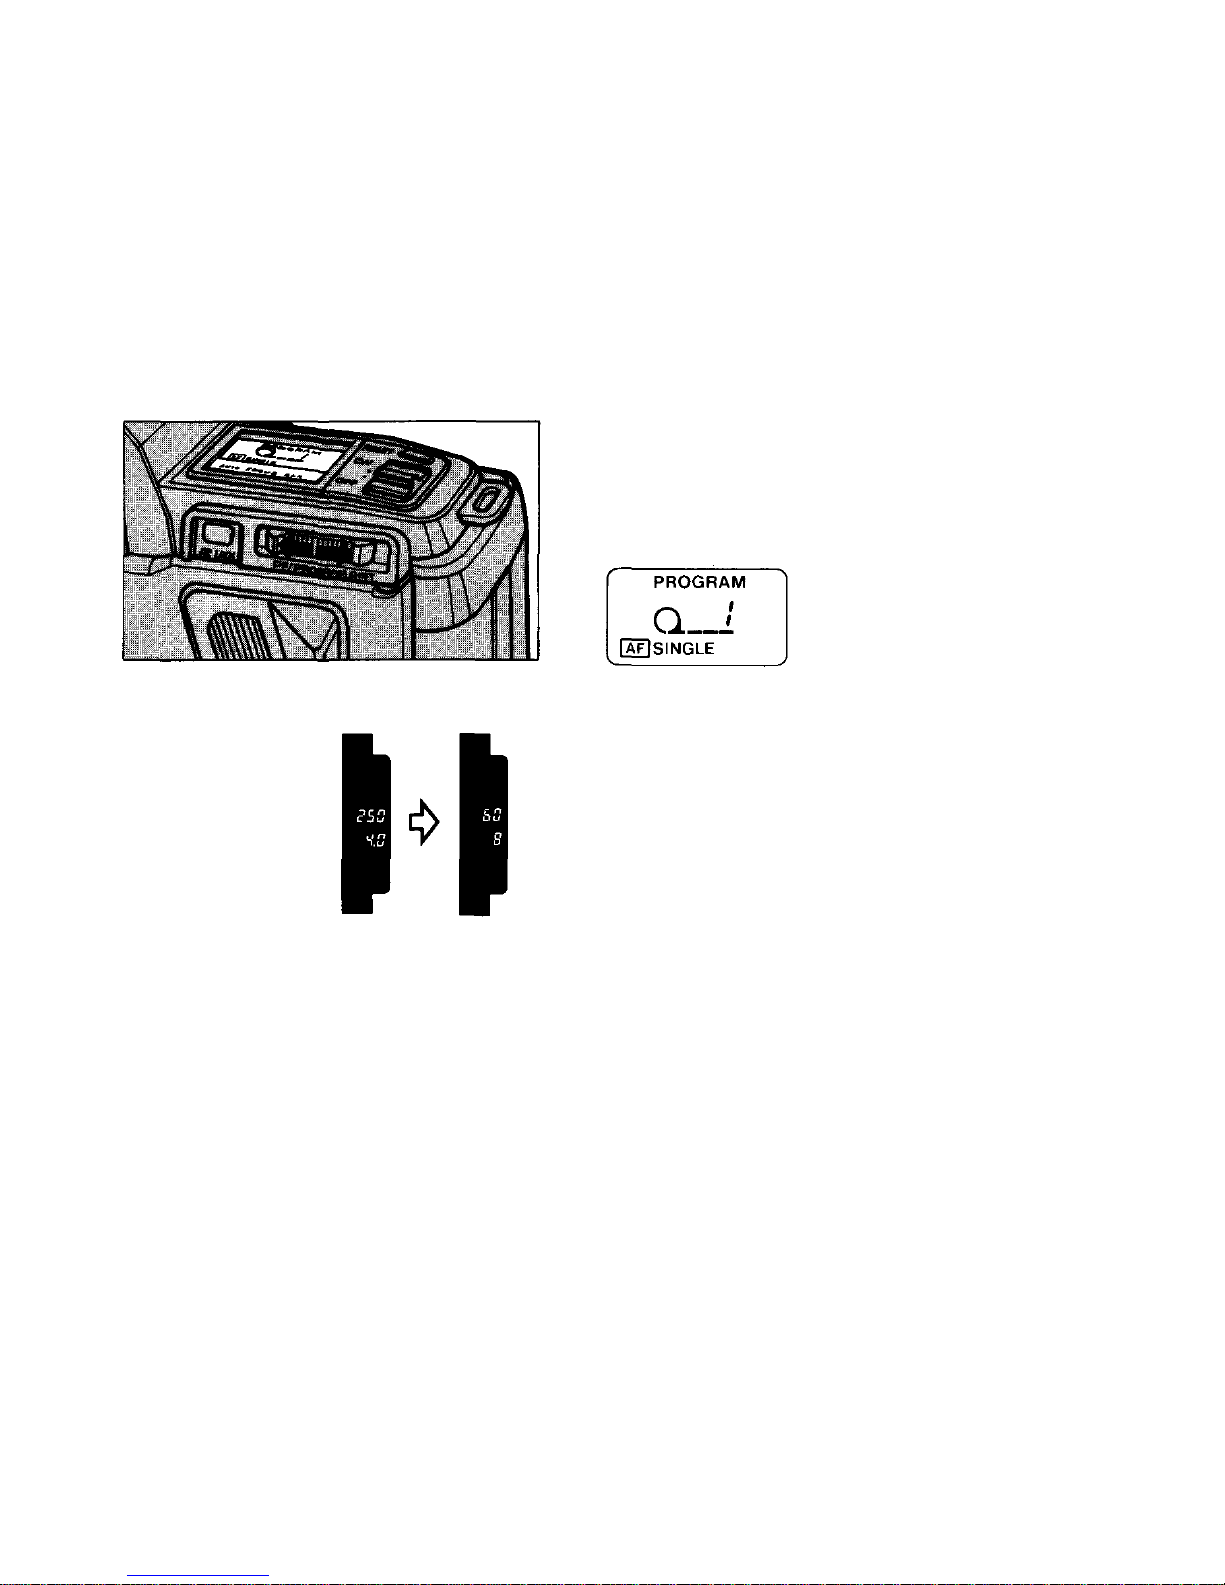
Slide the shift knob.
2
PROGRAM blinks.
Continue
pressure
on the
knob until
the
desired
shutter speed/aperture combination appears in the
viewfinder.
28
Page 30
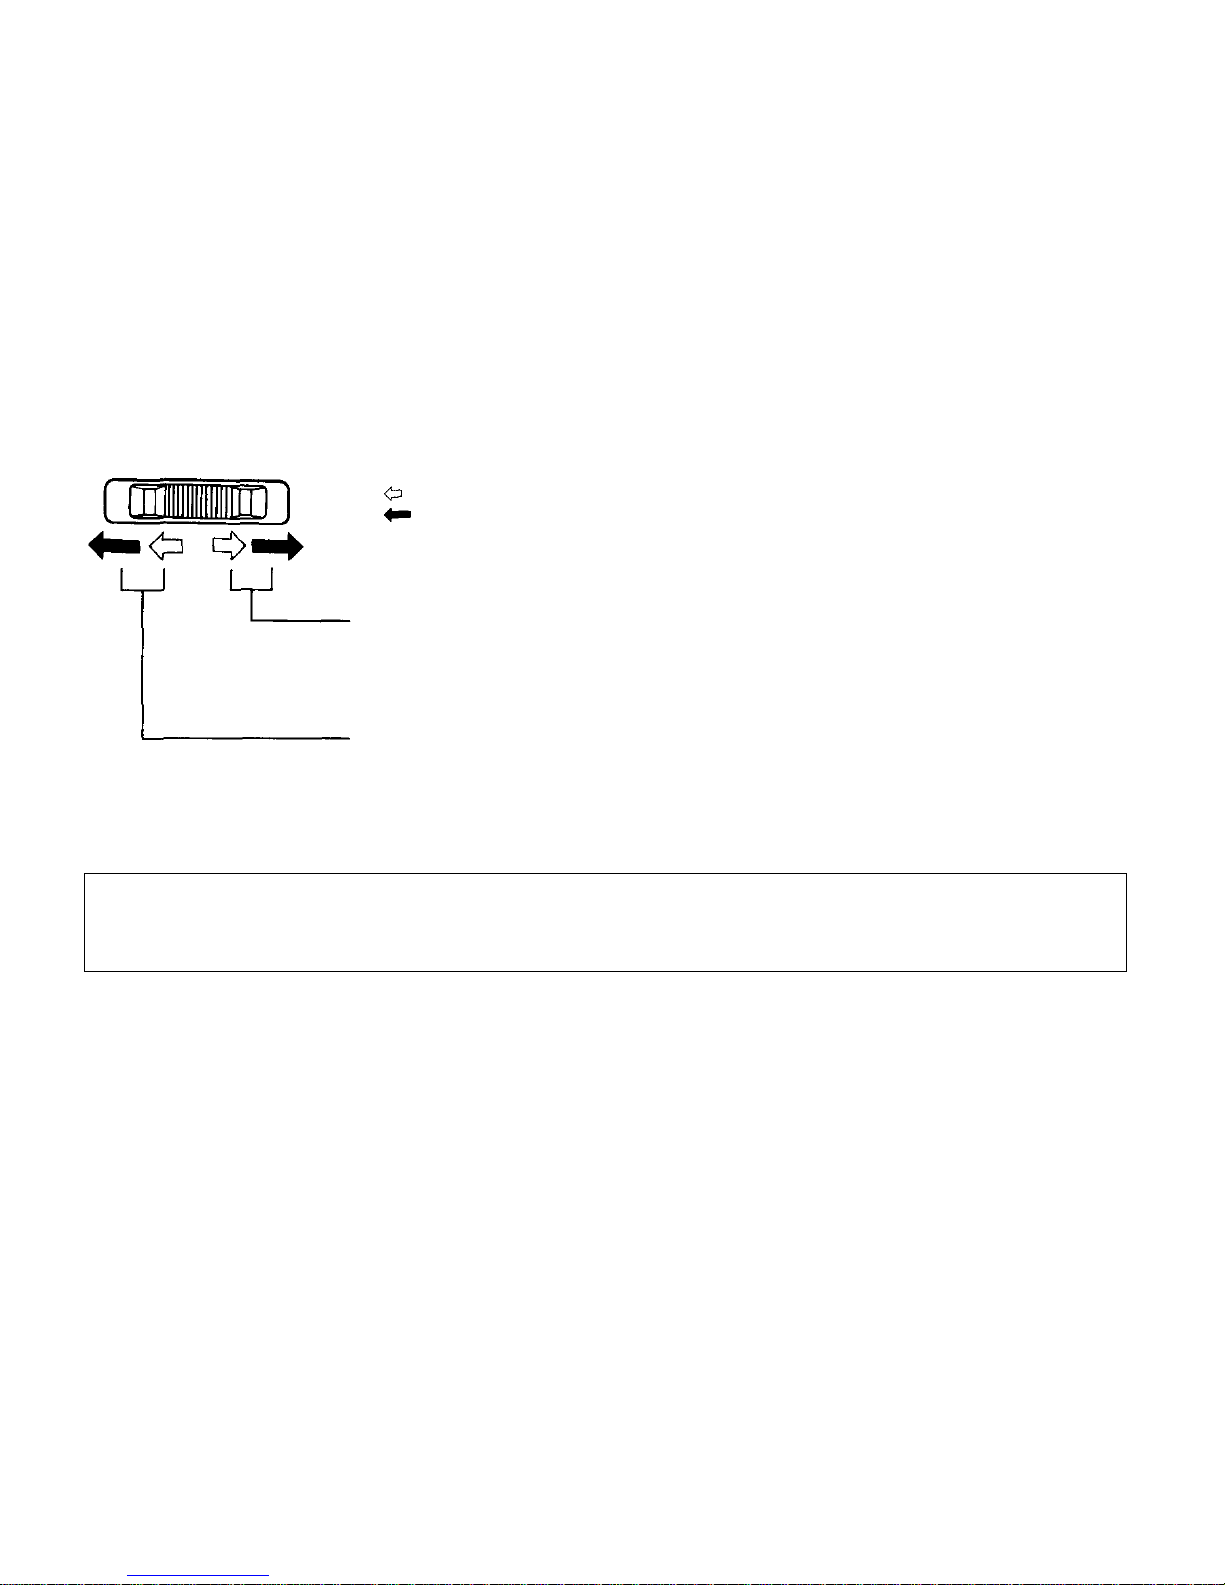
Light pressure: 1/2-stop shifts.
Firm pressure: Continuous change.
Shutter speed increases.
Shutter speed decreases.
Faster shutter speeds will stop action. Large apertures will keep your subject sharp and back-
ground out of focus. Smaller apertures will maximize sharpness throughout your picture.
29
Page 31
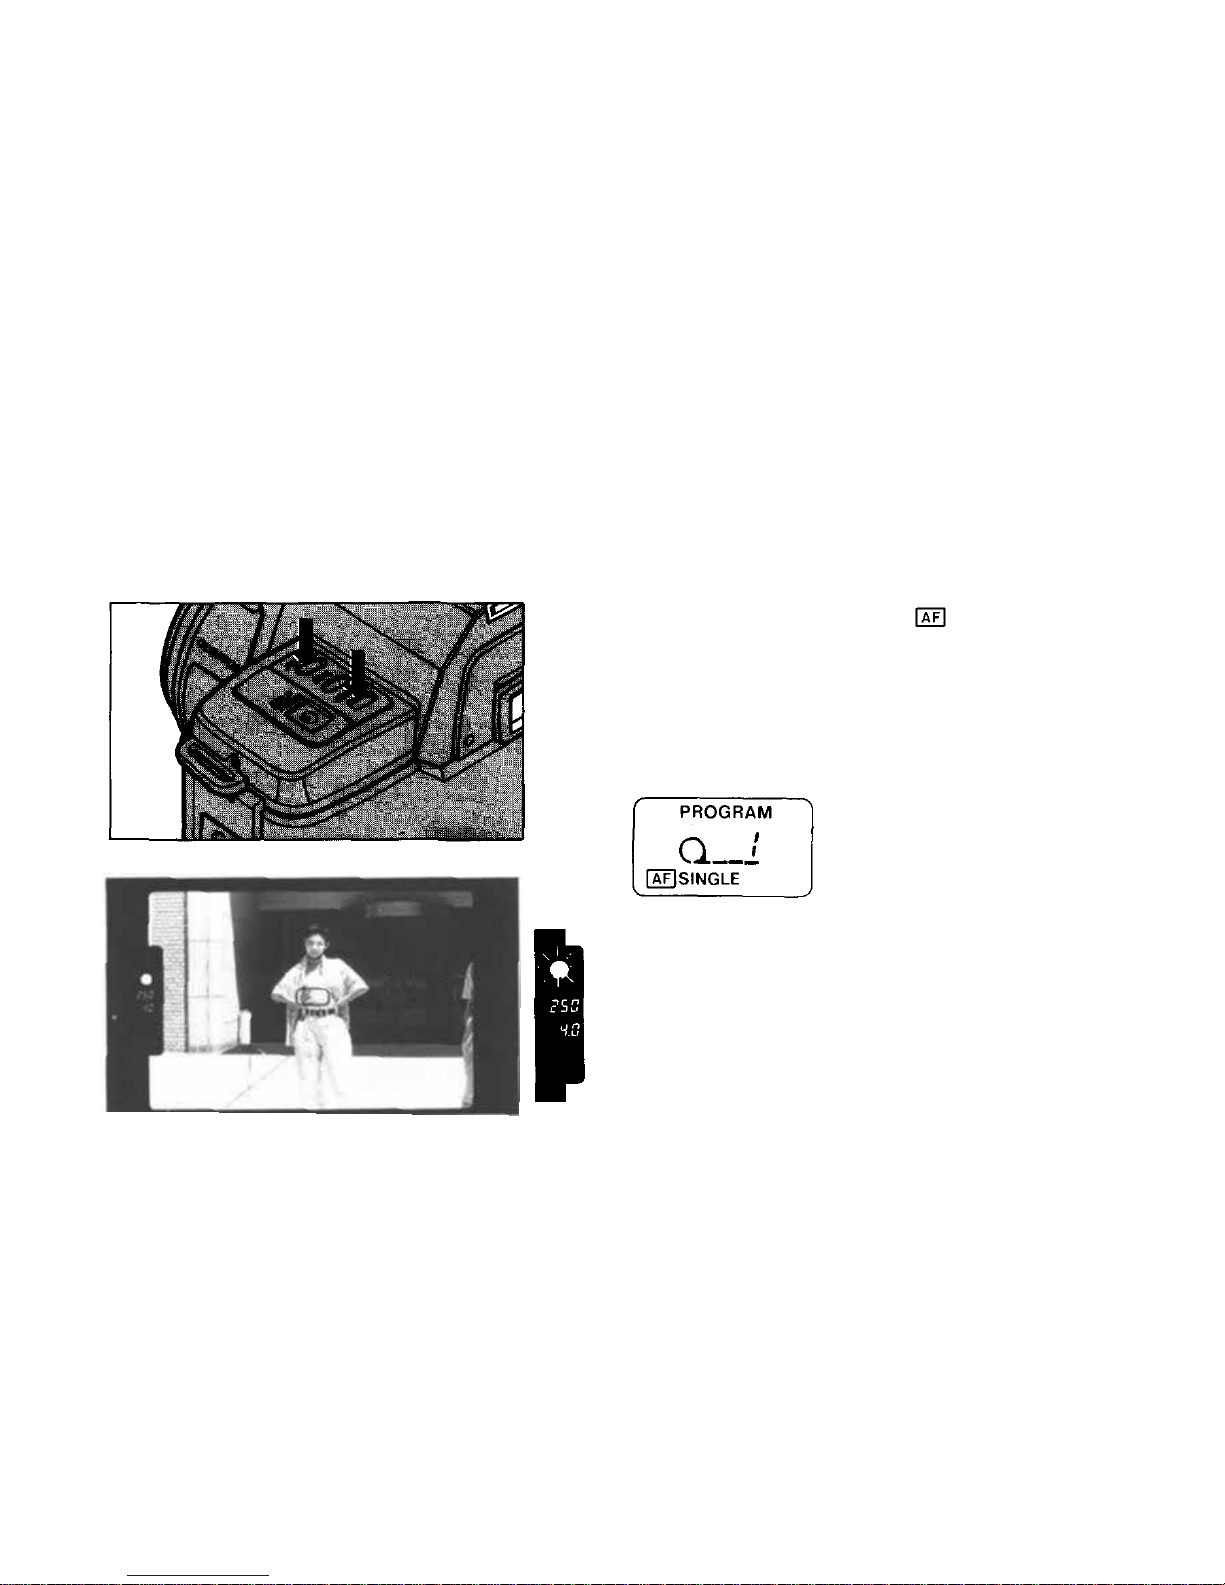
Using the Focus Lock System
Press
the
button
to
enter
the
/SINGLE
mode.
1
2
Press
the shutter release lightly, making
sure
the
center subject is in focus (green LED lights).
30
Page 32
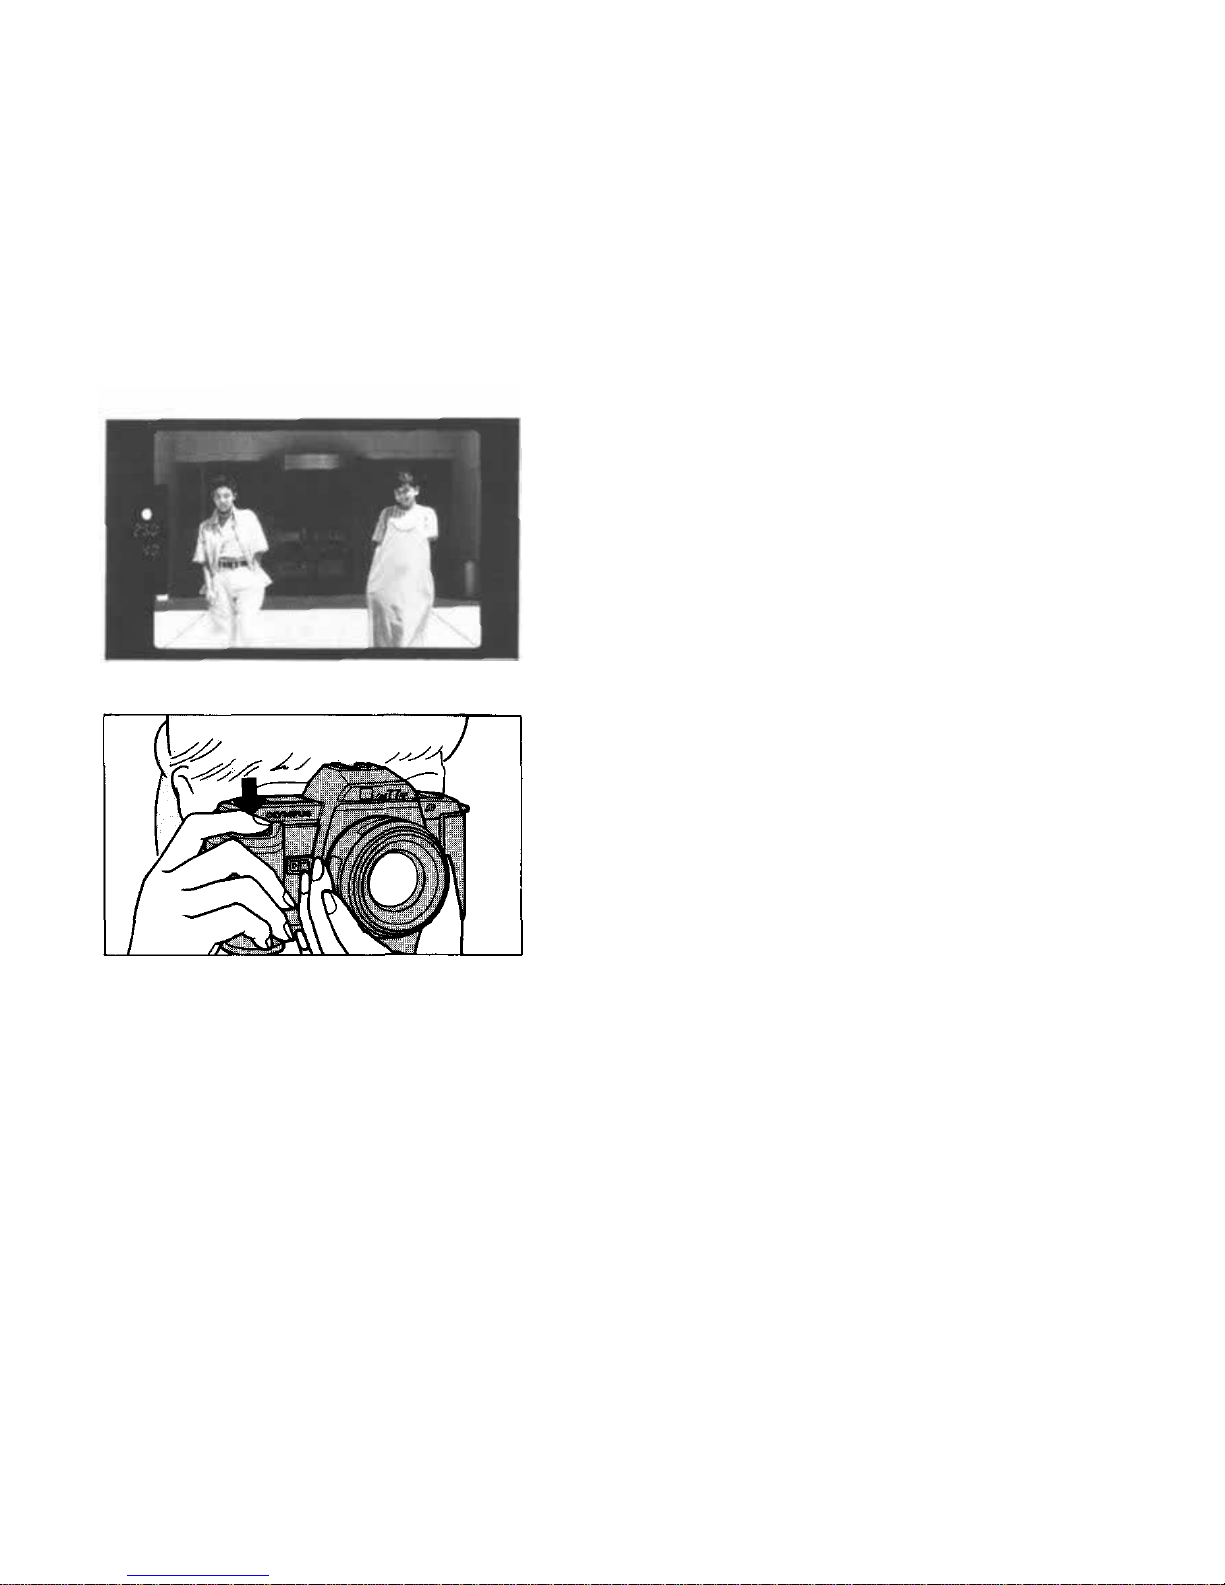
3
While
pressing
the
shutter
release lightly,
change
the composition of the picture as you like.
Press
the
release fully to take
the
photograph.
4
31
Page 33
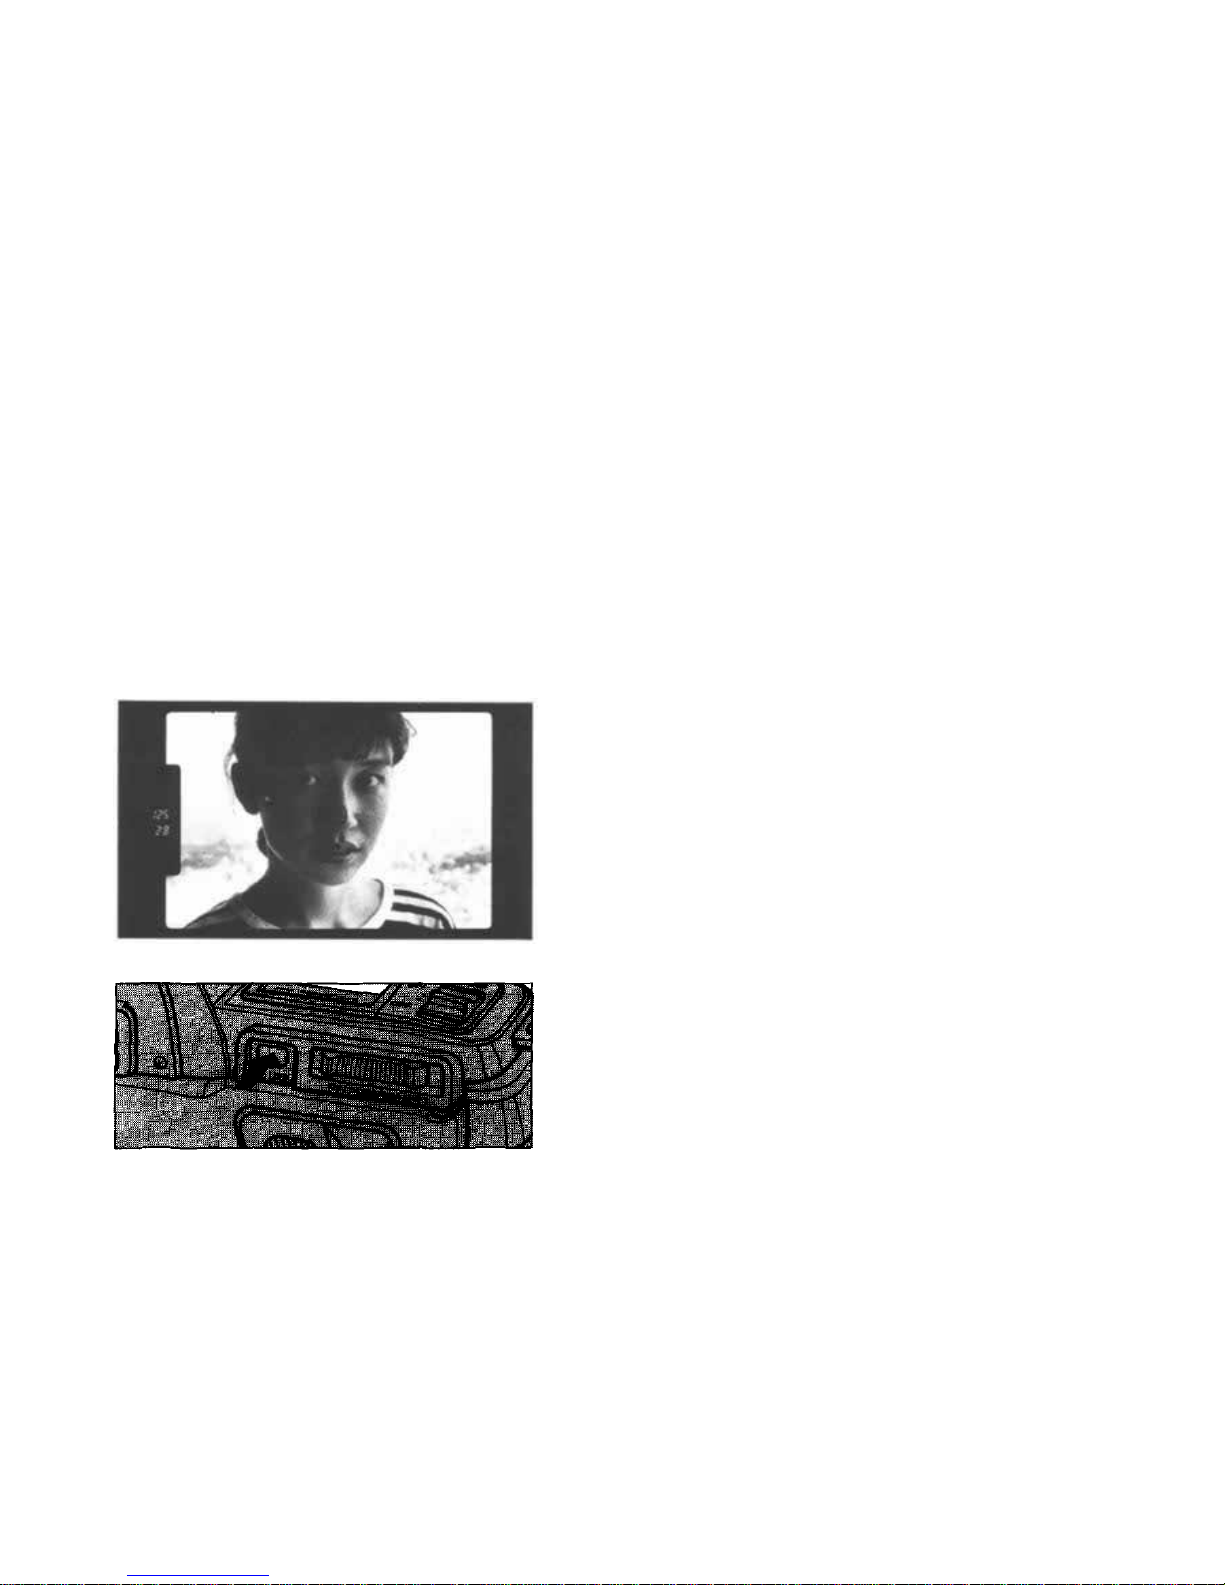
Using the AE Lock
Useful for shooting against strong backlight. The AE and AF locks can be used together on the
same subject.
1
2
To eliminate extraneous light, approach the subject
so that it fills the viewfinder.
Press
the AE
lock
button.
32
Page 34
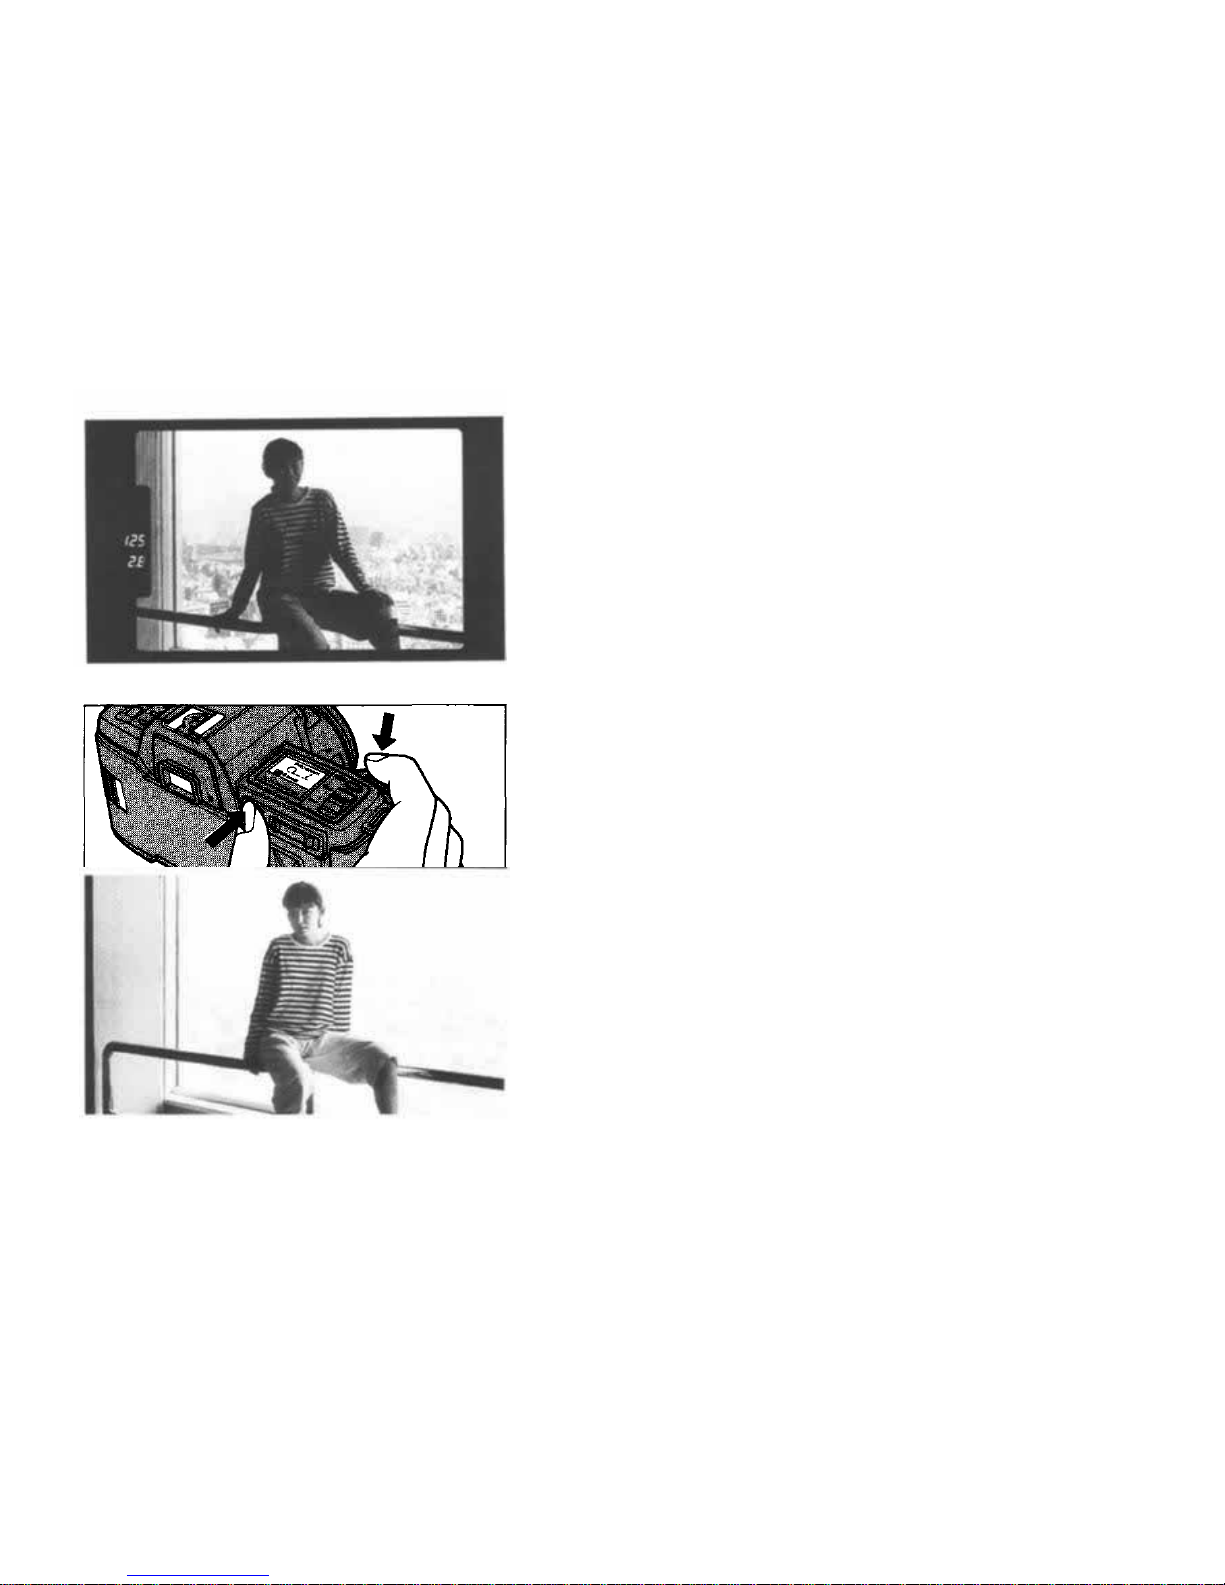
3
While continuing to hold in the AE lock button,
change the composition of the photograph as
desired.
4
Still
holding
in the AE
lock
button,
press
the
shutter release.
Using the AE lock, the subject is properly exposed
no matter what the background lighting conditions.
33
Page 35
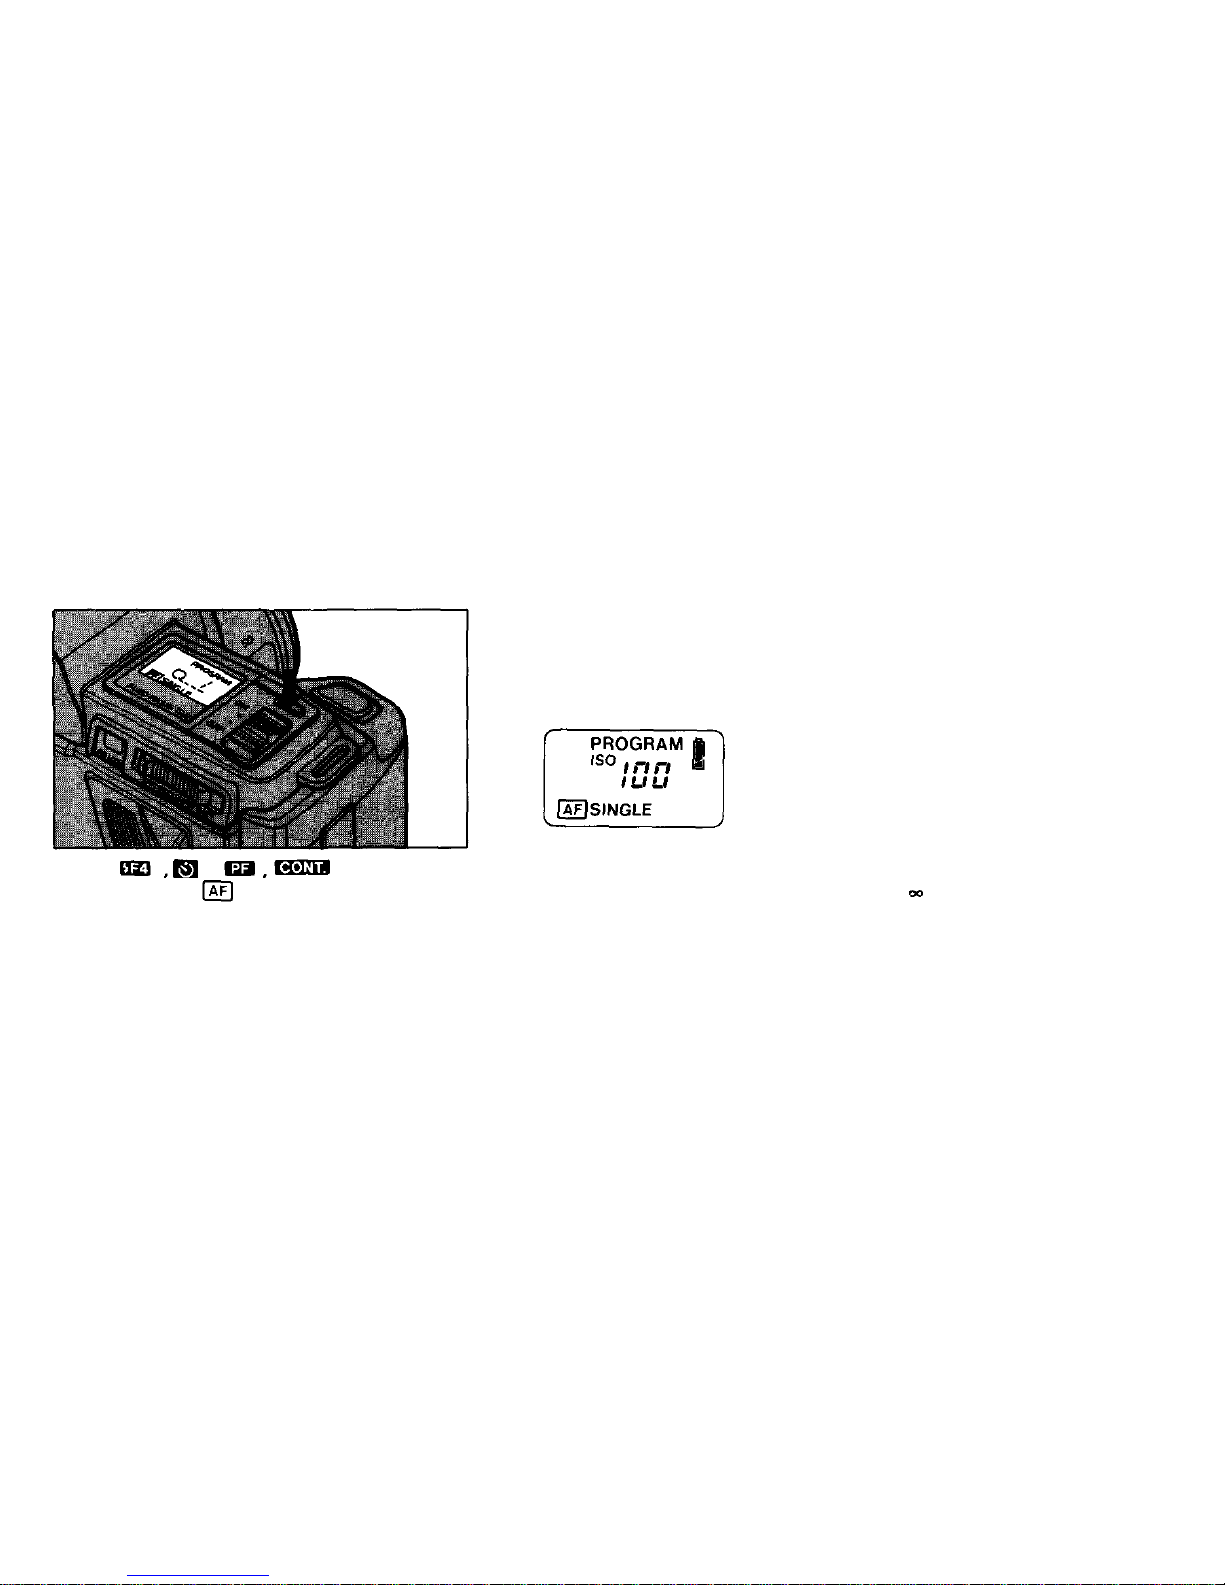
Using the Reset Button
Press
the
reset button.
1. _ modes and any program shift will be cancelled and the mode set to PROGRAM,
/SINGLE.
2. The
lens
will
be
reset
to .
3. The ISO speed will be displayed. 4. The battery condition will be displayed.
34
Page 36
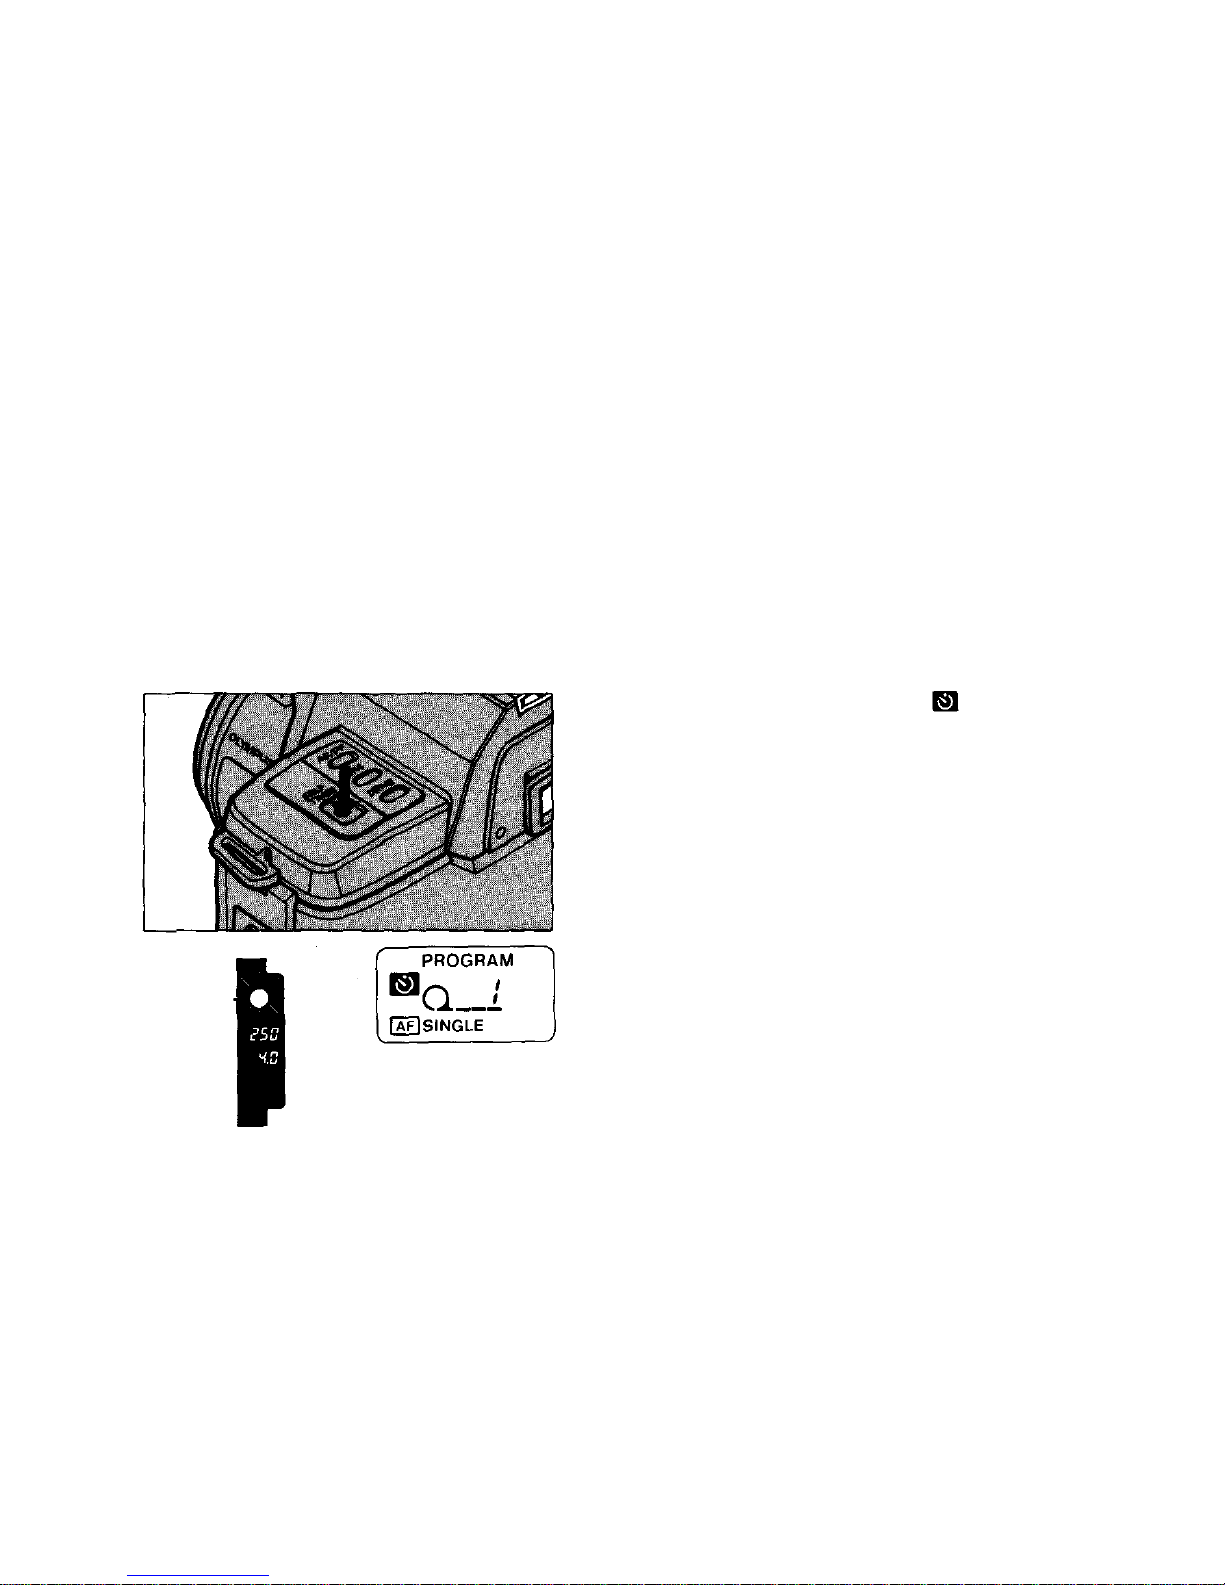
Using the Self-Timer
The camera should be fixed firmly, for example, on a tripod.
Press
the
self-timer
button.
indicates
self-timer
activation.
Press
the
shutter
release lightly to focus
on
your
subject (green LED lights).
1
35
Page 37
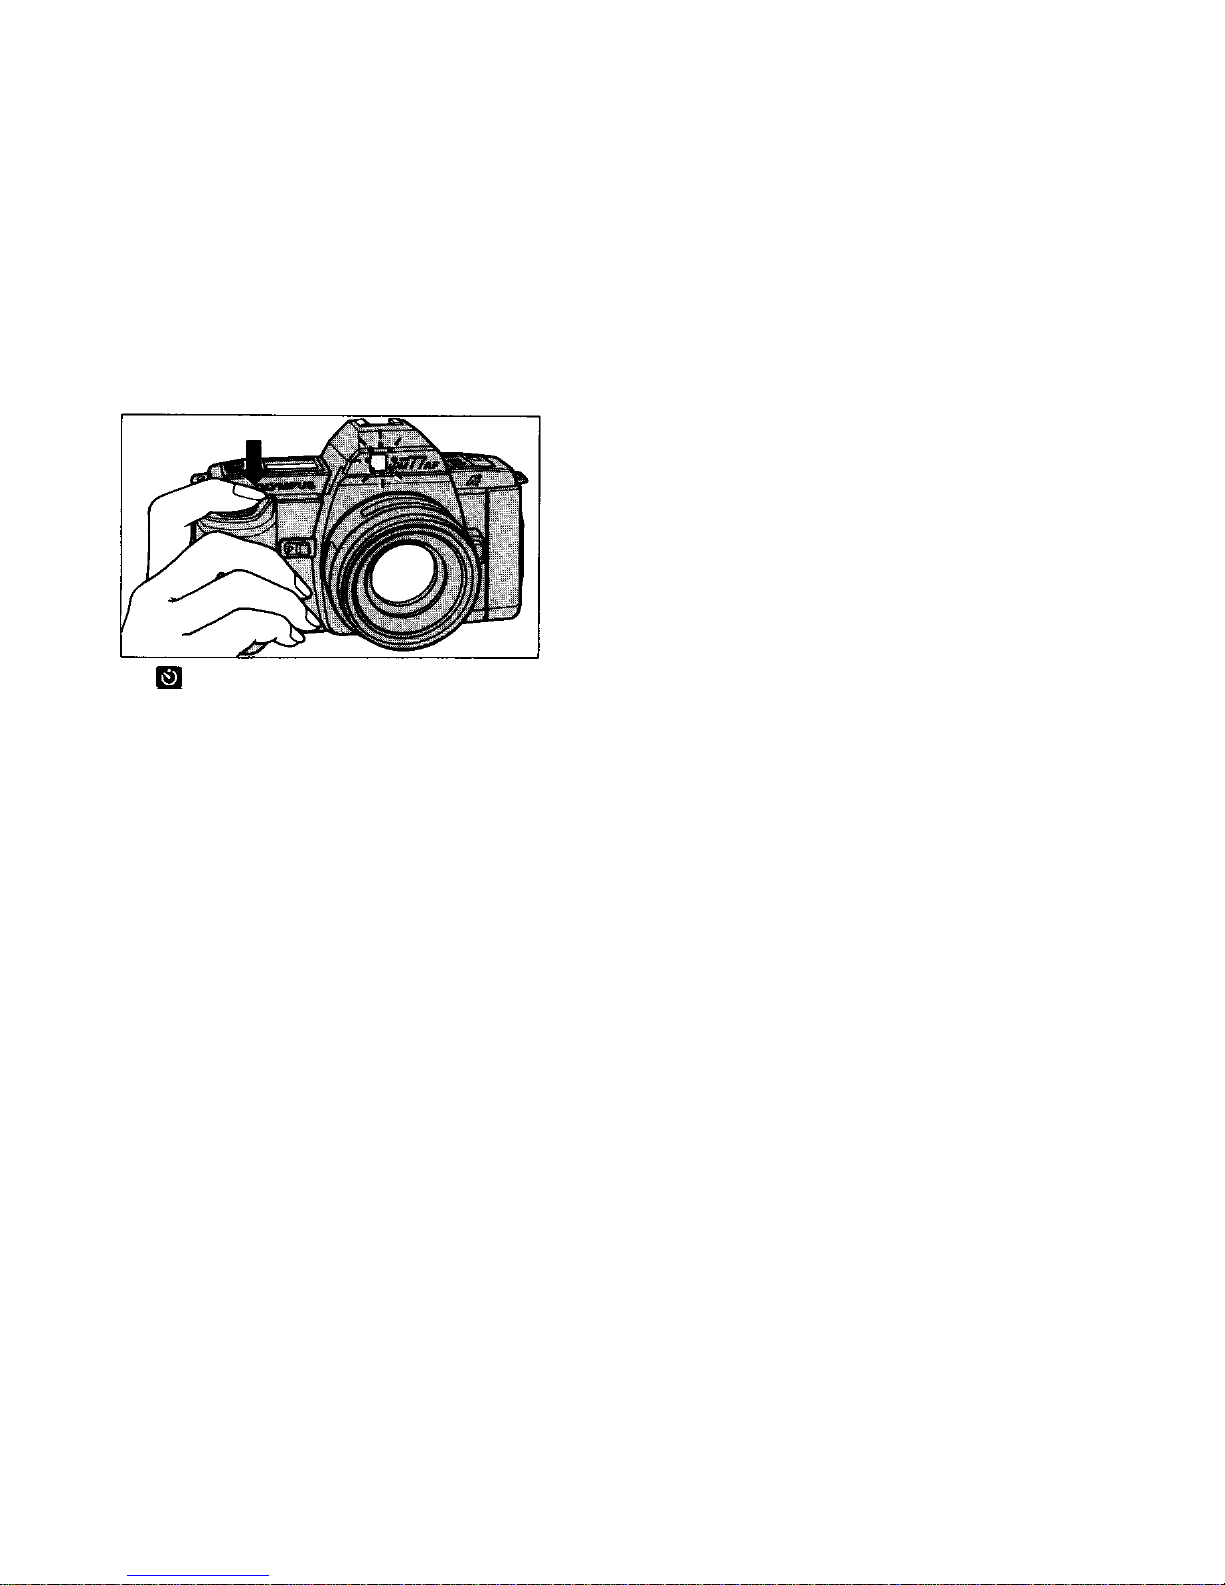
2
Press
the
shutter
release fully to start
the 12
sec.
self-timer.
blinks.
(The
shutter
will
fire
in 12
seconds
and the
self-timer
mode
will
be
released.)
To avoid incorrect exposure in the self-timer mode, ensure that strong light does not enter through the
viewfinder.
The self-timer can be cancelled by any of the following methods:
1.
Pressing
the
self-timer
button
again.
2.
Pressing
the
reset button. 3. Turning
the
power
OFF.
36
Page 38
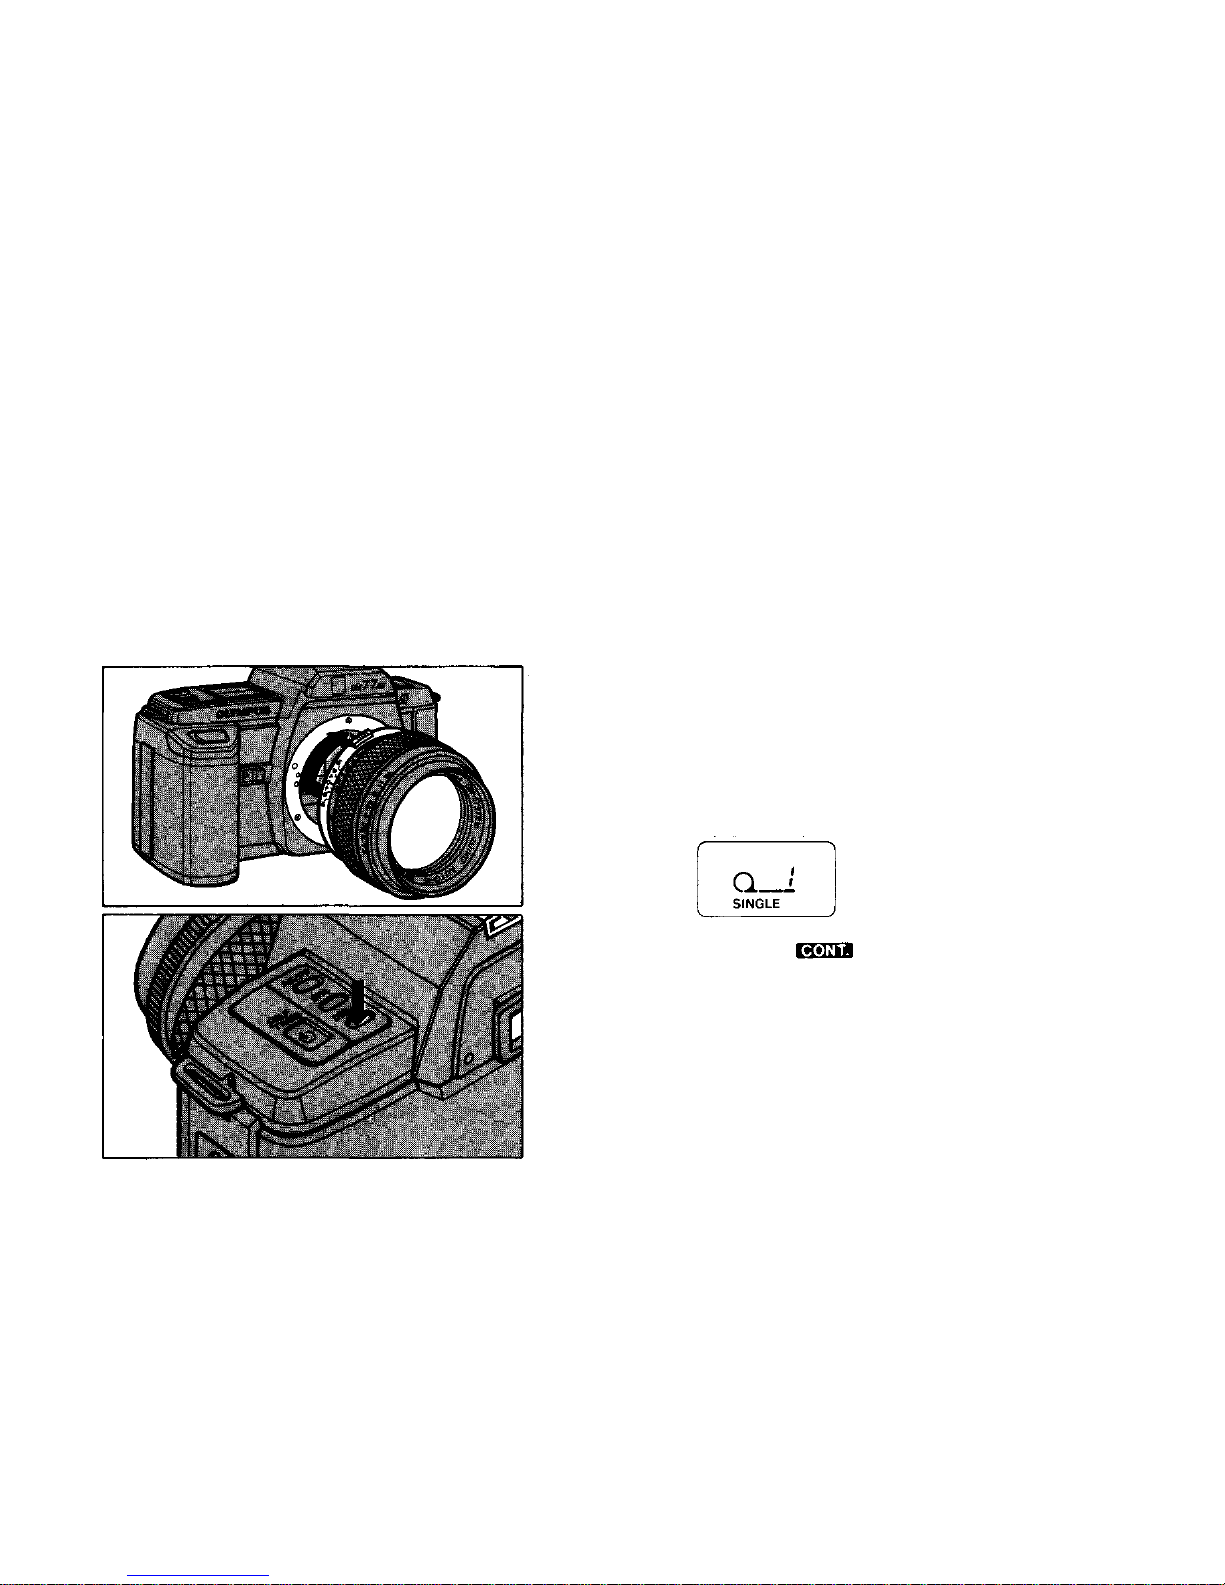
Using an OM Lens
The OM77AF
switches
to
aperture-preferred
auto
mode.
Autofocus
is not
available.
1
Align the red dots and rotate the lens until it locks.
Select either SINGLE mode (for single frame
winding) or mode (for continuous
winding).
2
37
Page 39
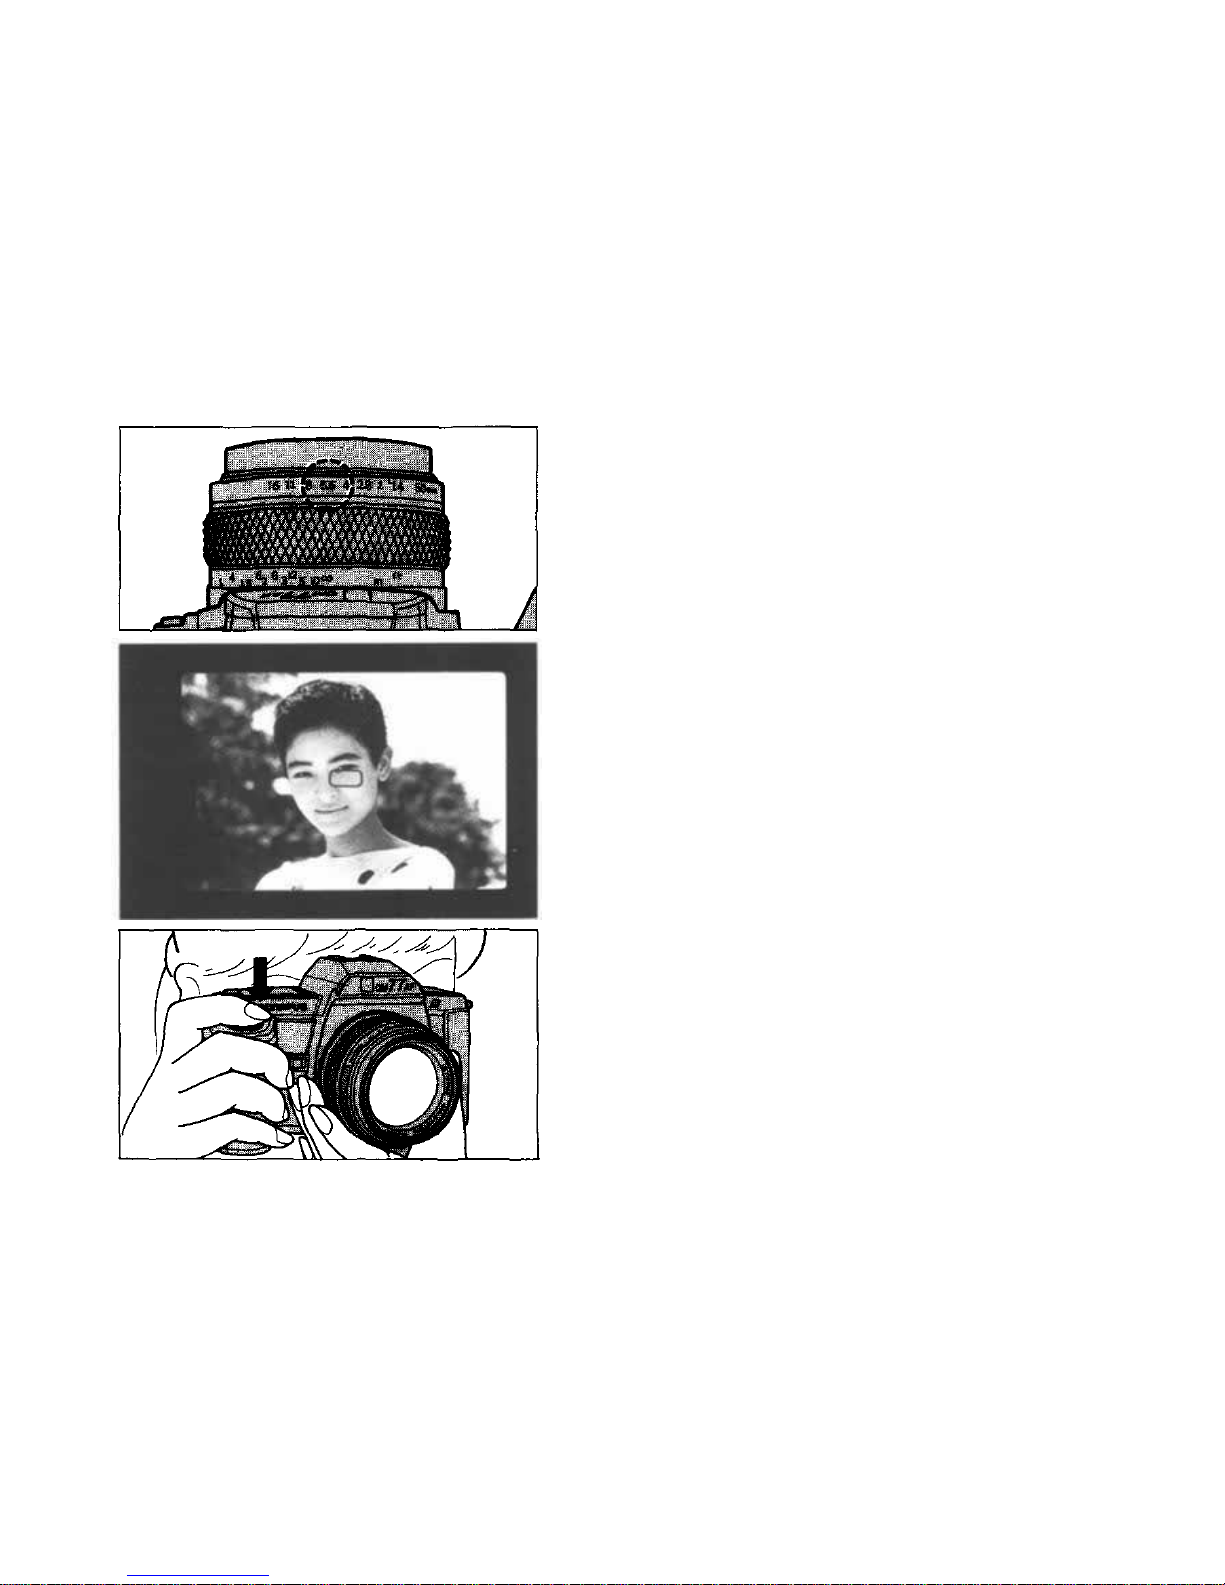
3
Select an appropriate aperture.
Turn the focus ring to focus on the subject.
4
5
Compose the shot and press the shutter release.
38
Page 40
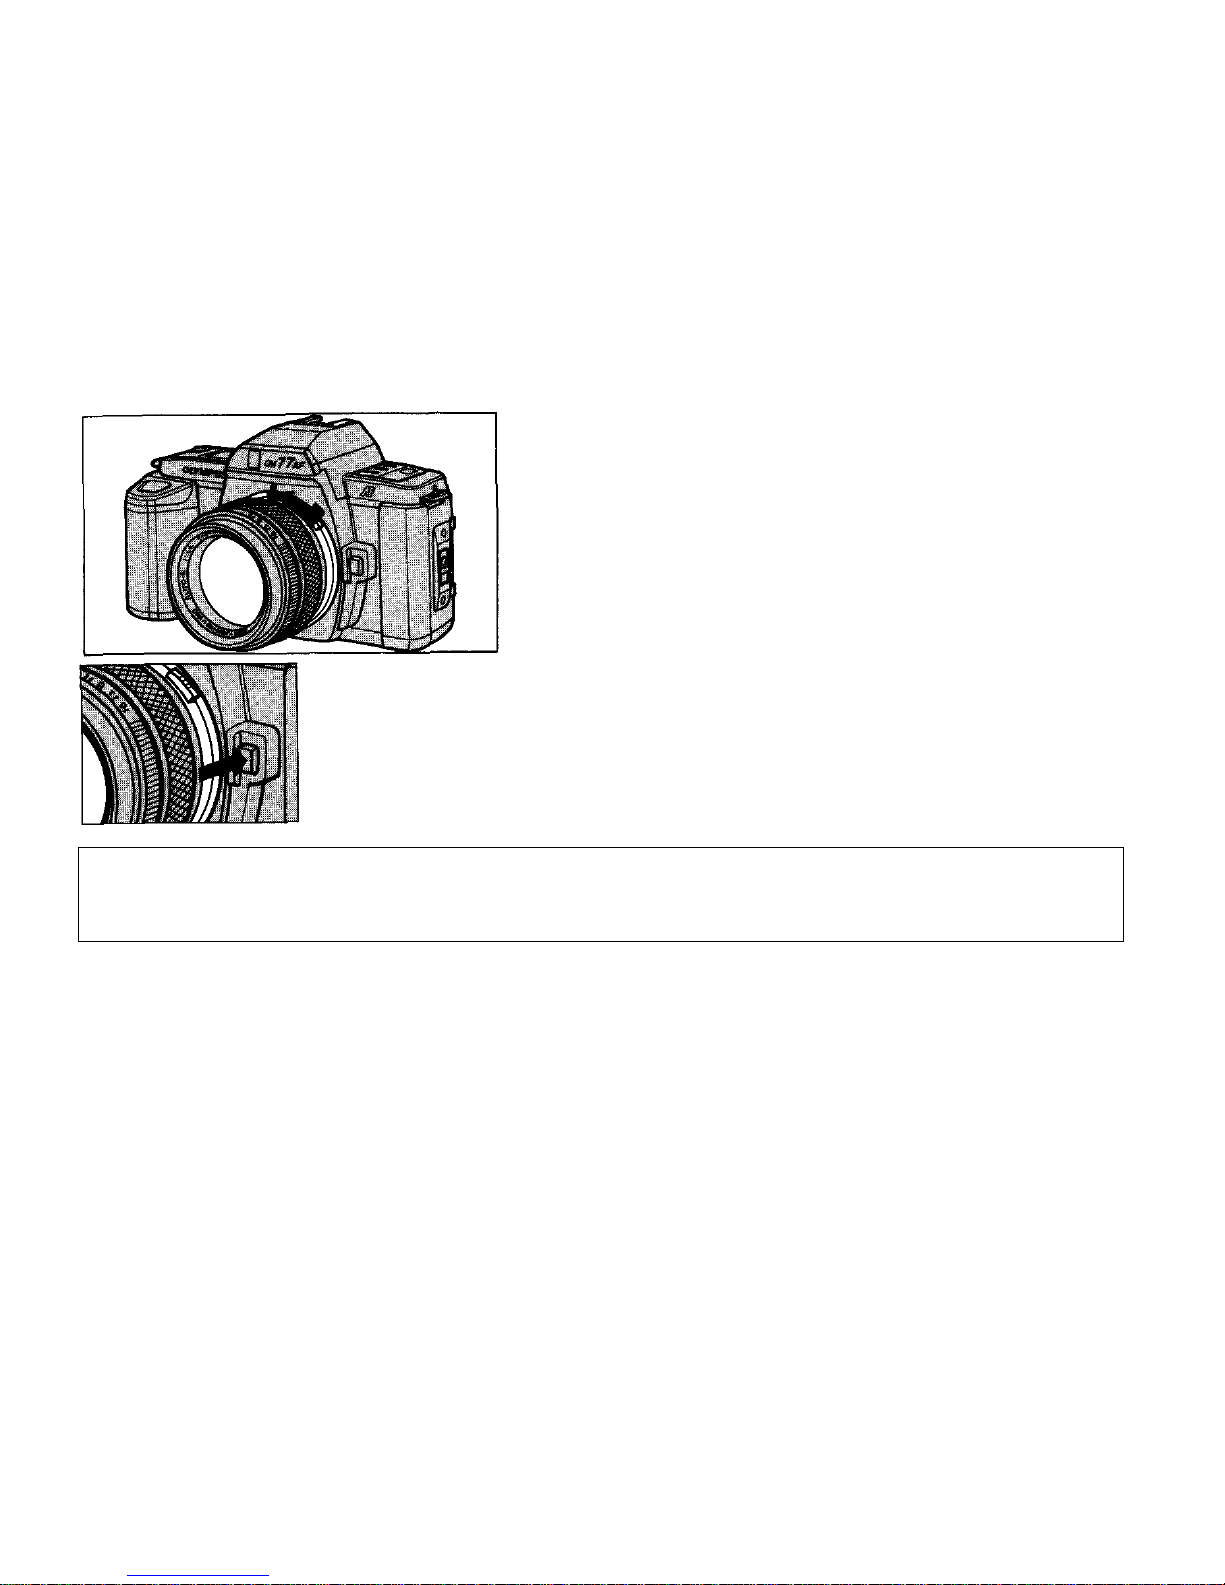
6
To detach the lens, press the ribbed button on the
side of the lens and turn counter-clockwise until it
is free.
CAUTION: The lens cannot be removed by pressing the lens locking button on the camera's body.
In-Focus/Focus Impossible LED, shutter speed or aperture indication will not appear in the view-
finder, the self-timer will be inoperable and the Super FP Flash mode of the F280 will not be available.
39
Page 41

Taking Photographs III (Flash Photography)
With
the
Power
Flash
Grip
300
mounted,
the
OM77AF
is the
world's
first
autofocus
SLR
with
a
built-in flash. When connected to the Full-Synchro Flash F280, the first electronic flash in the
world capable of synchronizing with all shutter speeds up to 1/2000 sec., it can be used in any
light
conditions
to
provide
for
simple
fill-in
flash
photography
at a
touch
of the
shutter
release.
40
Page 42
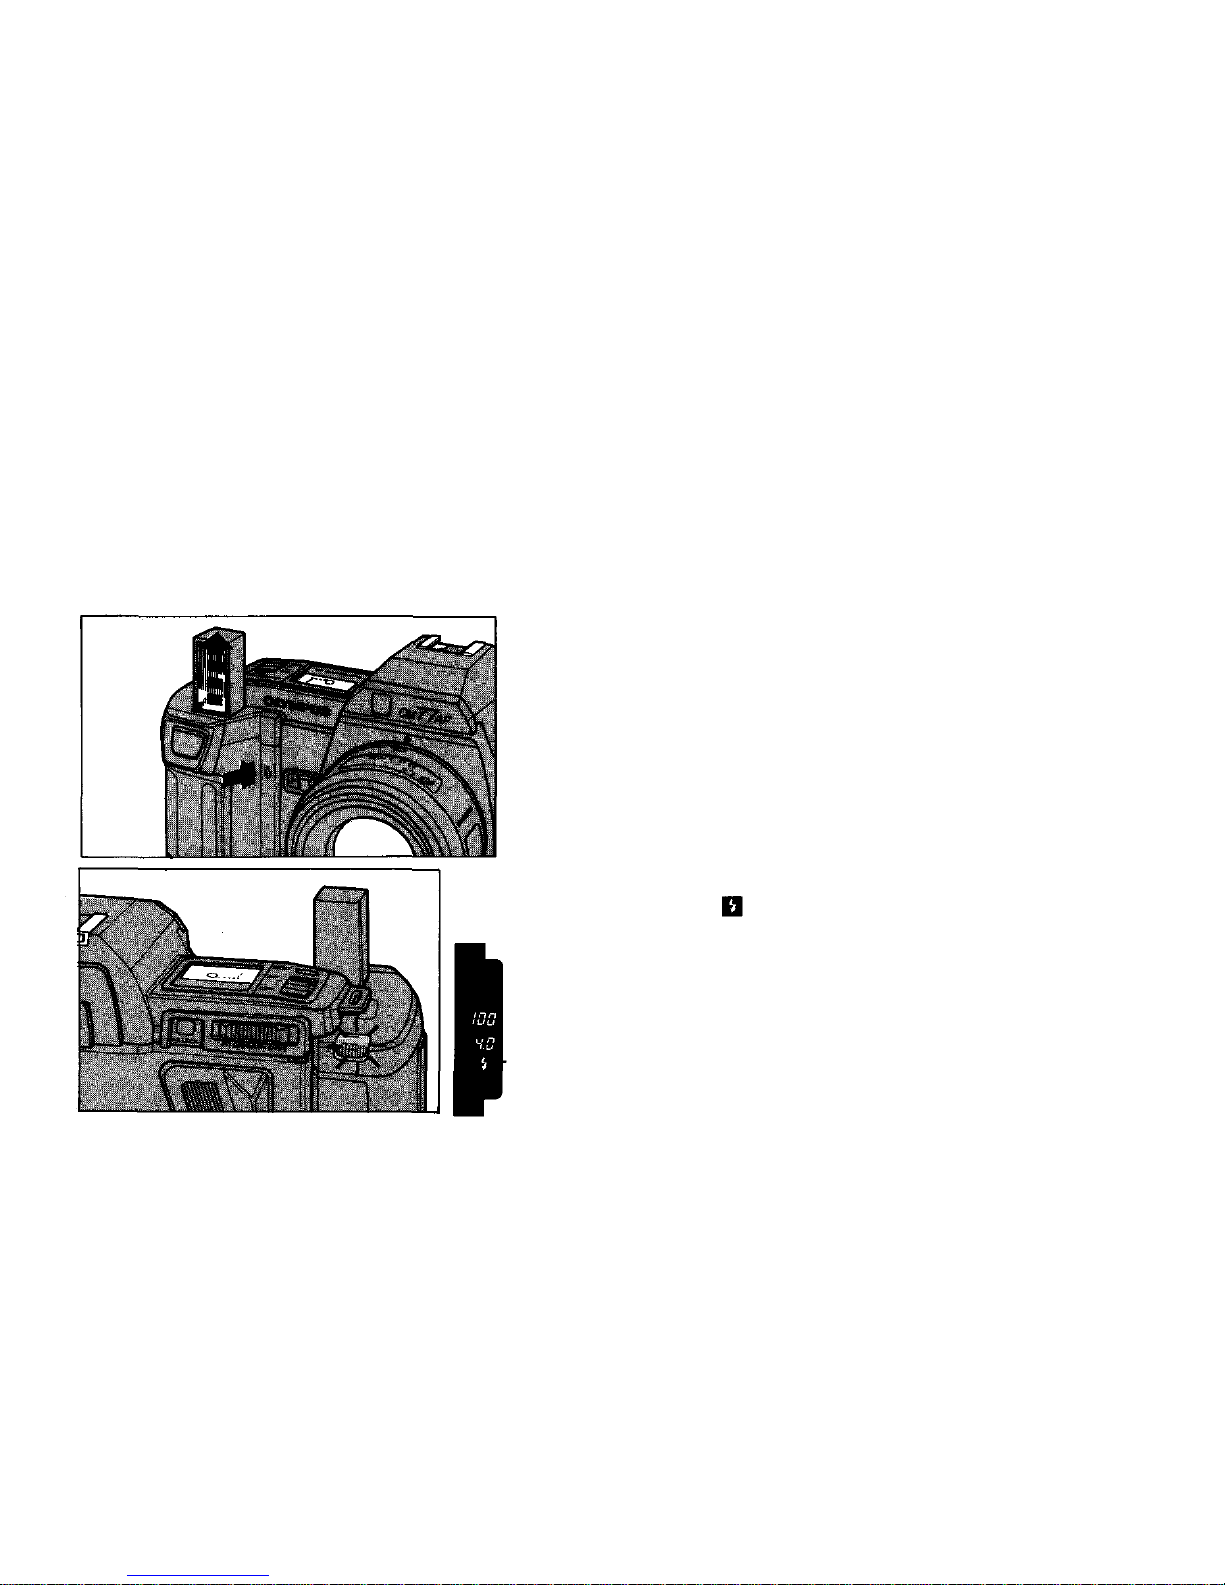
Using the Power Flash Grip 300
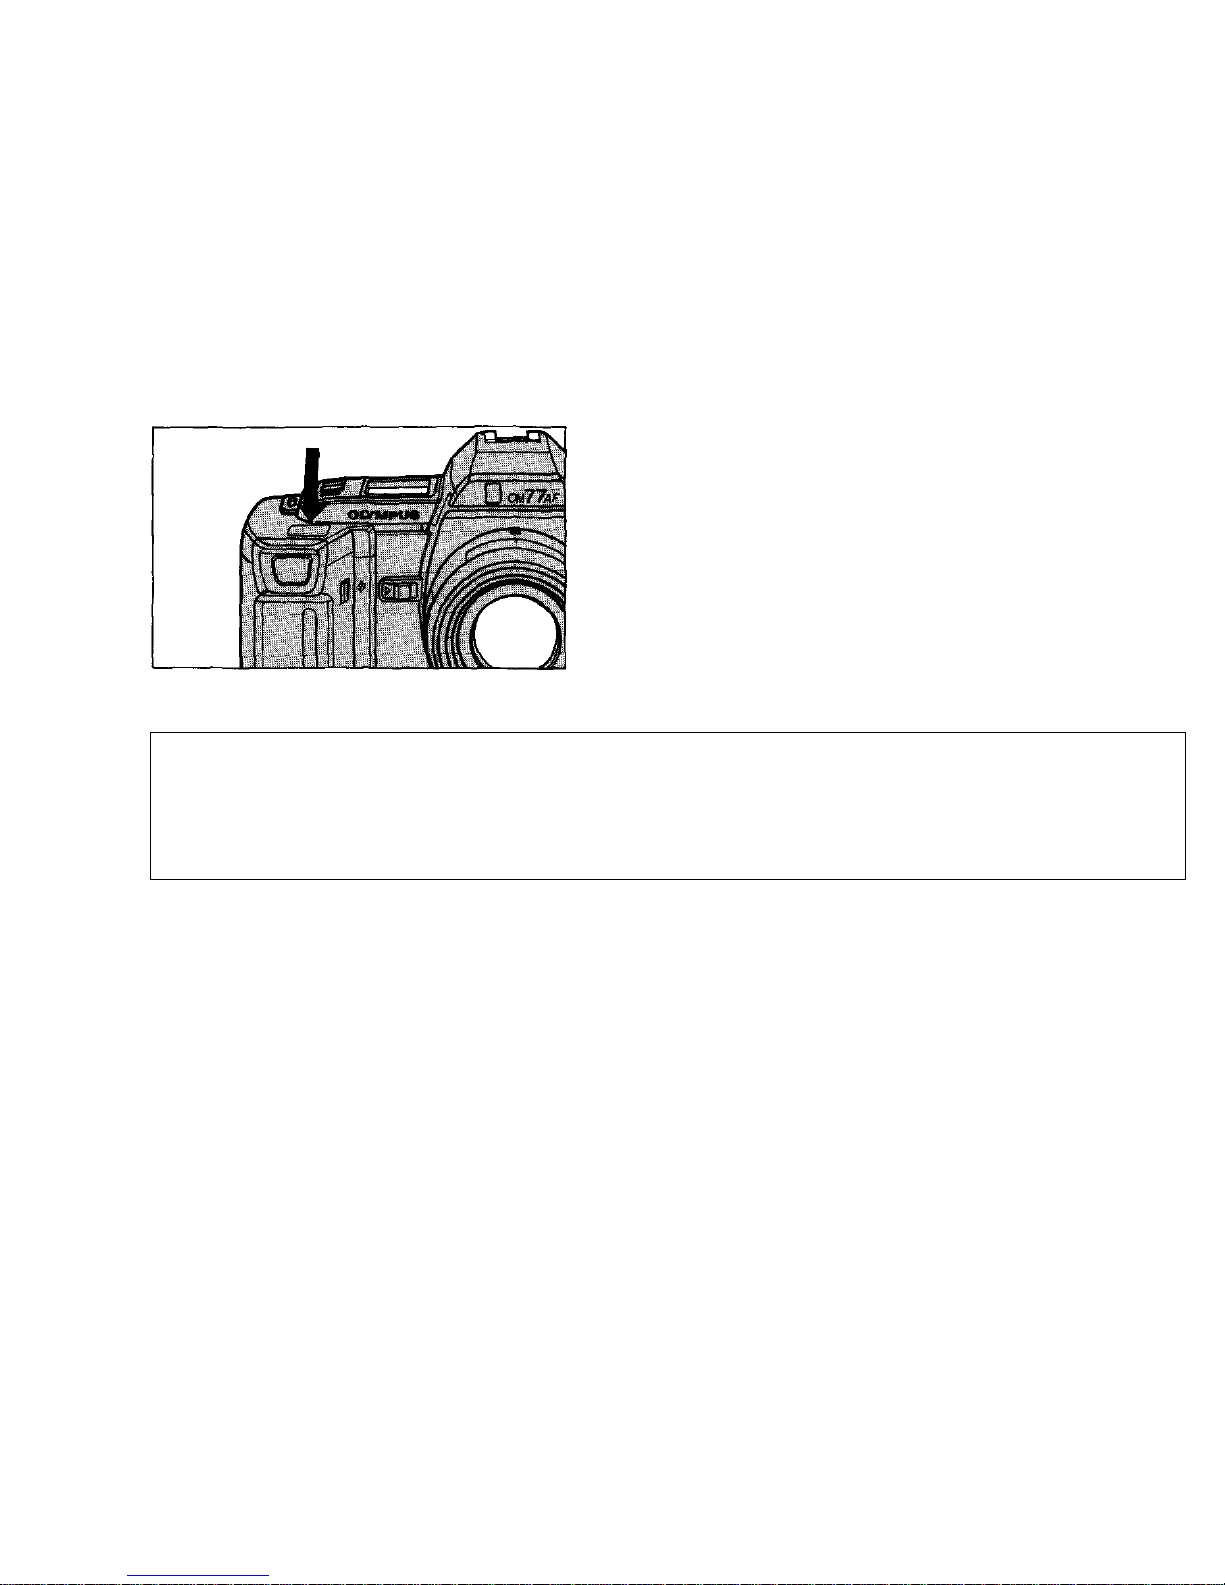
Press the flash pop-up lever to release the flash and
begin charging.
1
2
back or the indicator in the viewfinder.
41
Check the charge indicator on the Power Grip's
Page 43
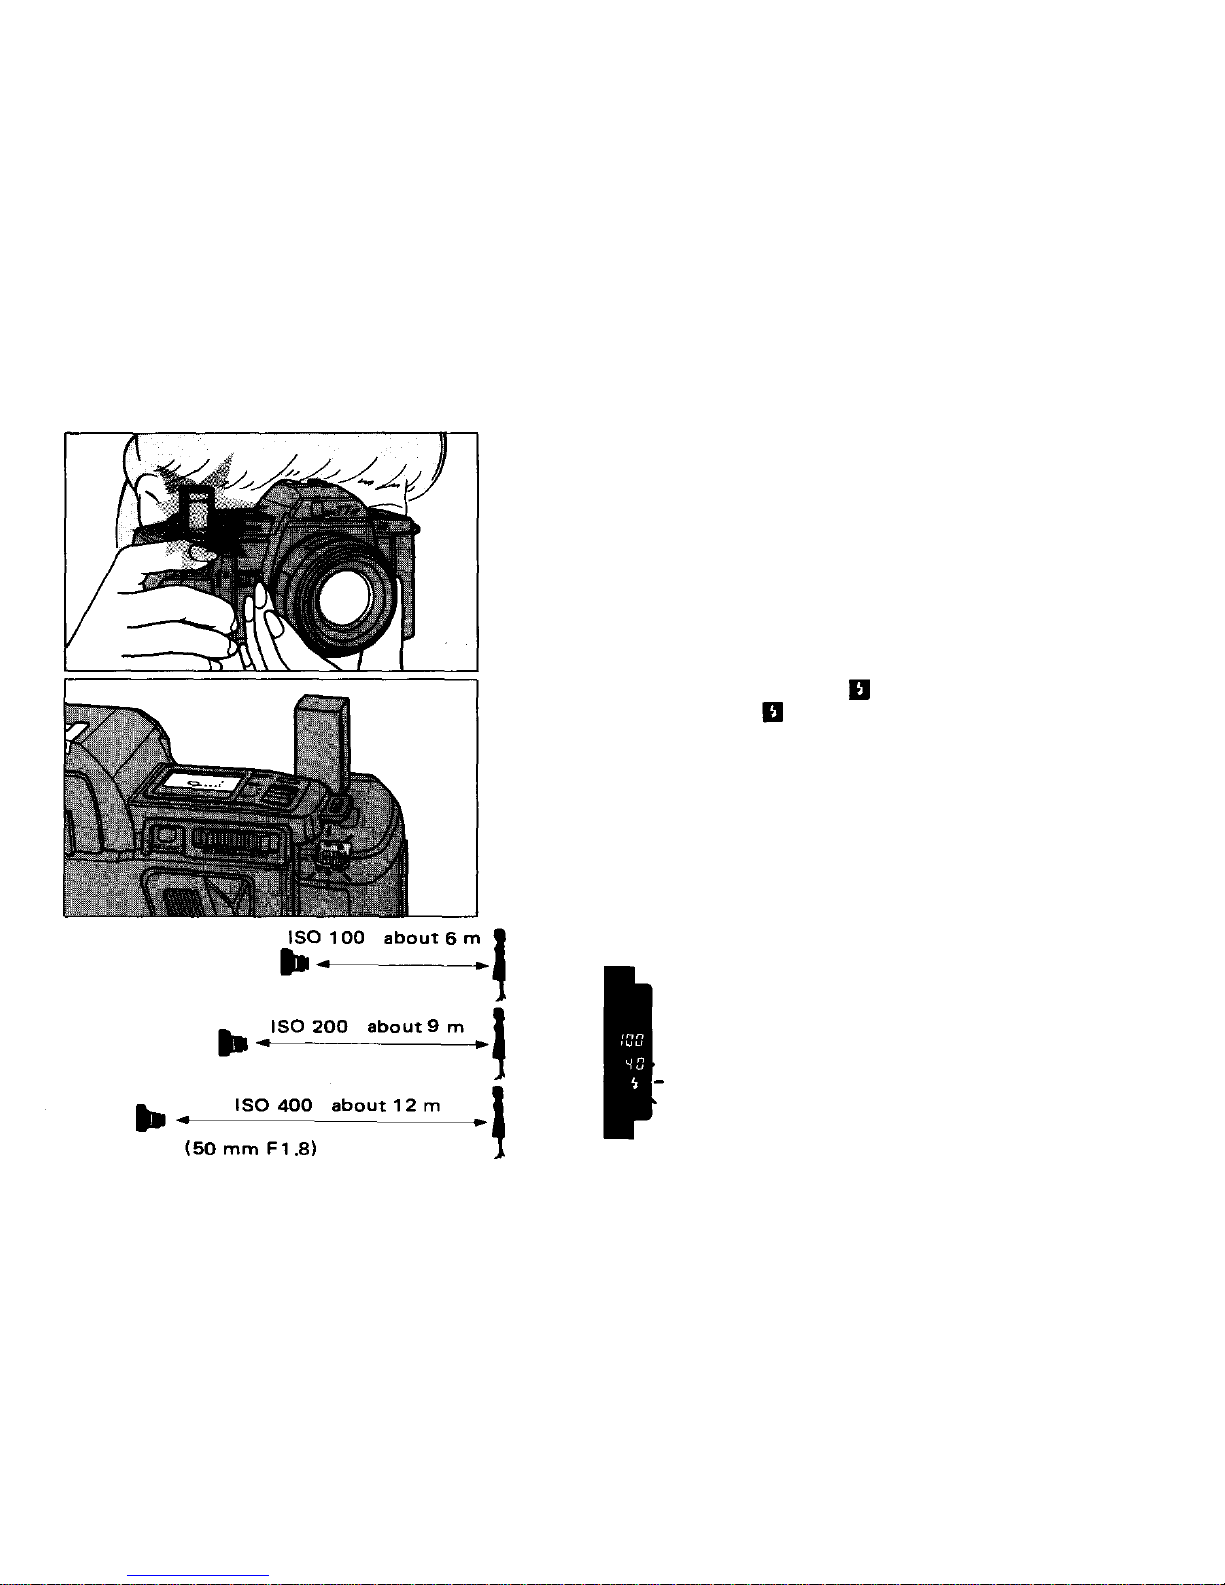
Press the shutter release.
3
Check the flash indicators. will blink to indicate
correct exposure. does not appear if the subject
was underexposed.
4
42
Page 44
Push in the flash reflector after use, and slide the
power switch OFF.
5
• Do not cover the flash reflector with your fingers.
• The flash area is sufficient for lenses as wide as 36 mm.
• The
flash
will
not
operate
at
speeds
greater
than
1/100
sec.,
or
before
completing
recharge.
• Charging stops when the power switch is turned OFF, or when the viewfinder display disappears.
(Refer to page 16.)
43
Page 45
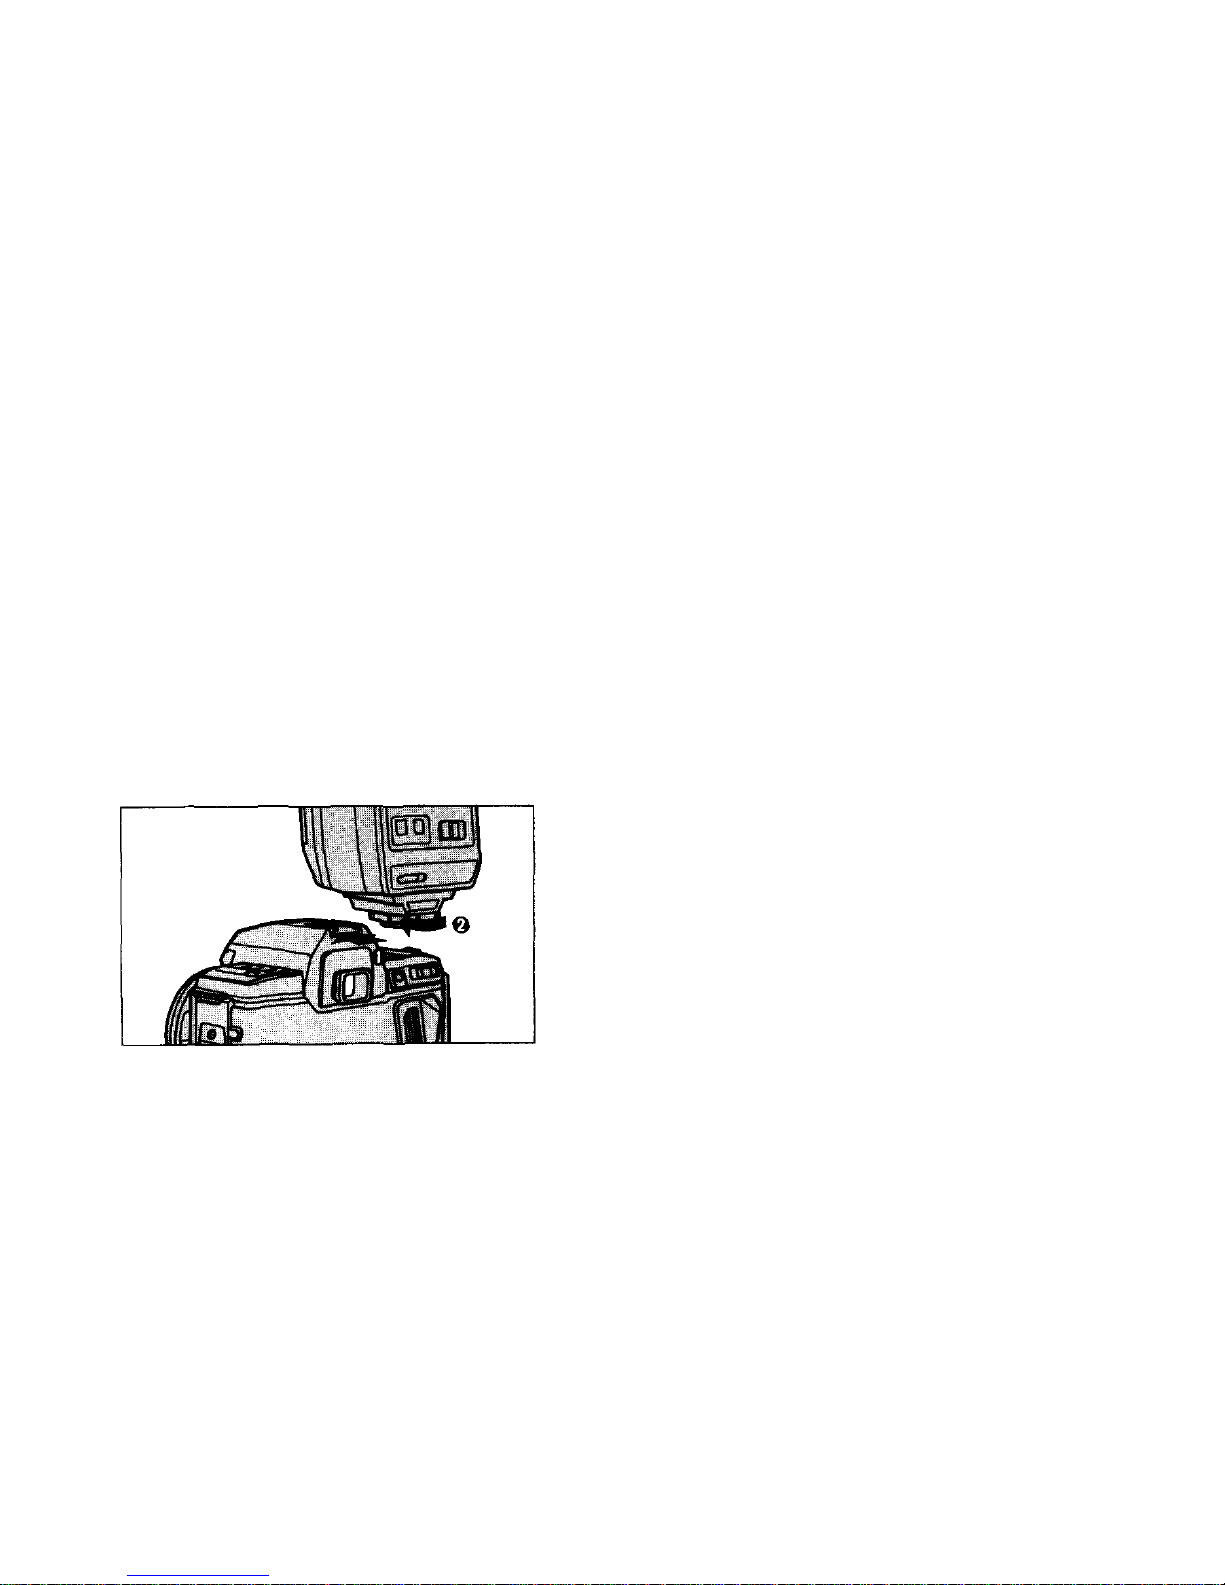
Using the Full-Synchro Flash F280
A fully synchronized flash that is useful for fill-in flash photography as well as at night.
Slide the F280 into the shoe and secure it with the
lock-screw.
44
1
Page 46
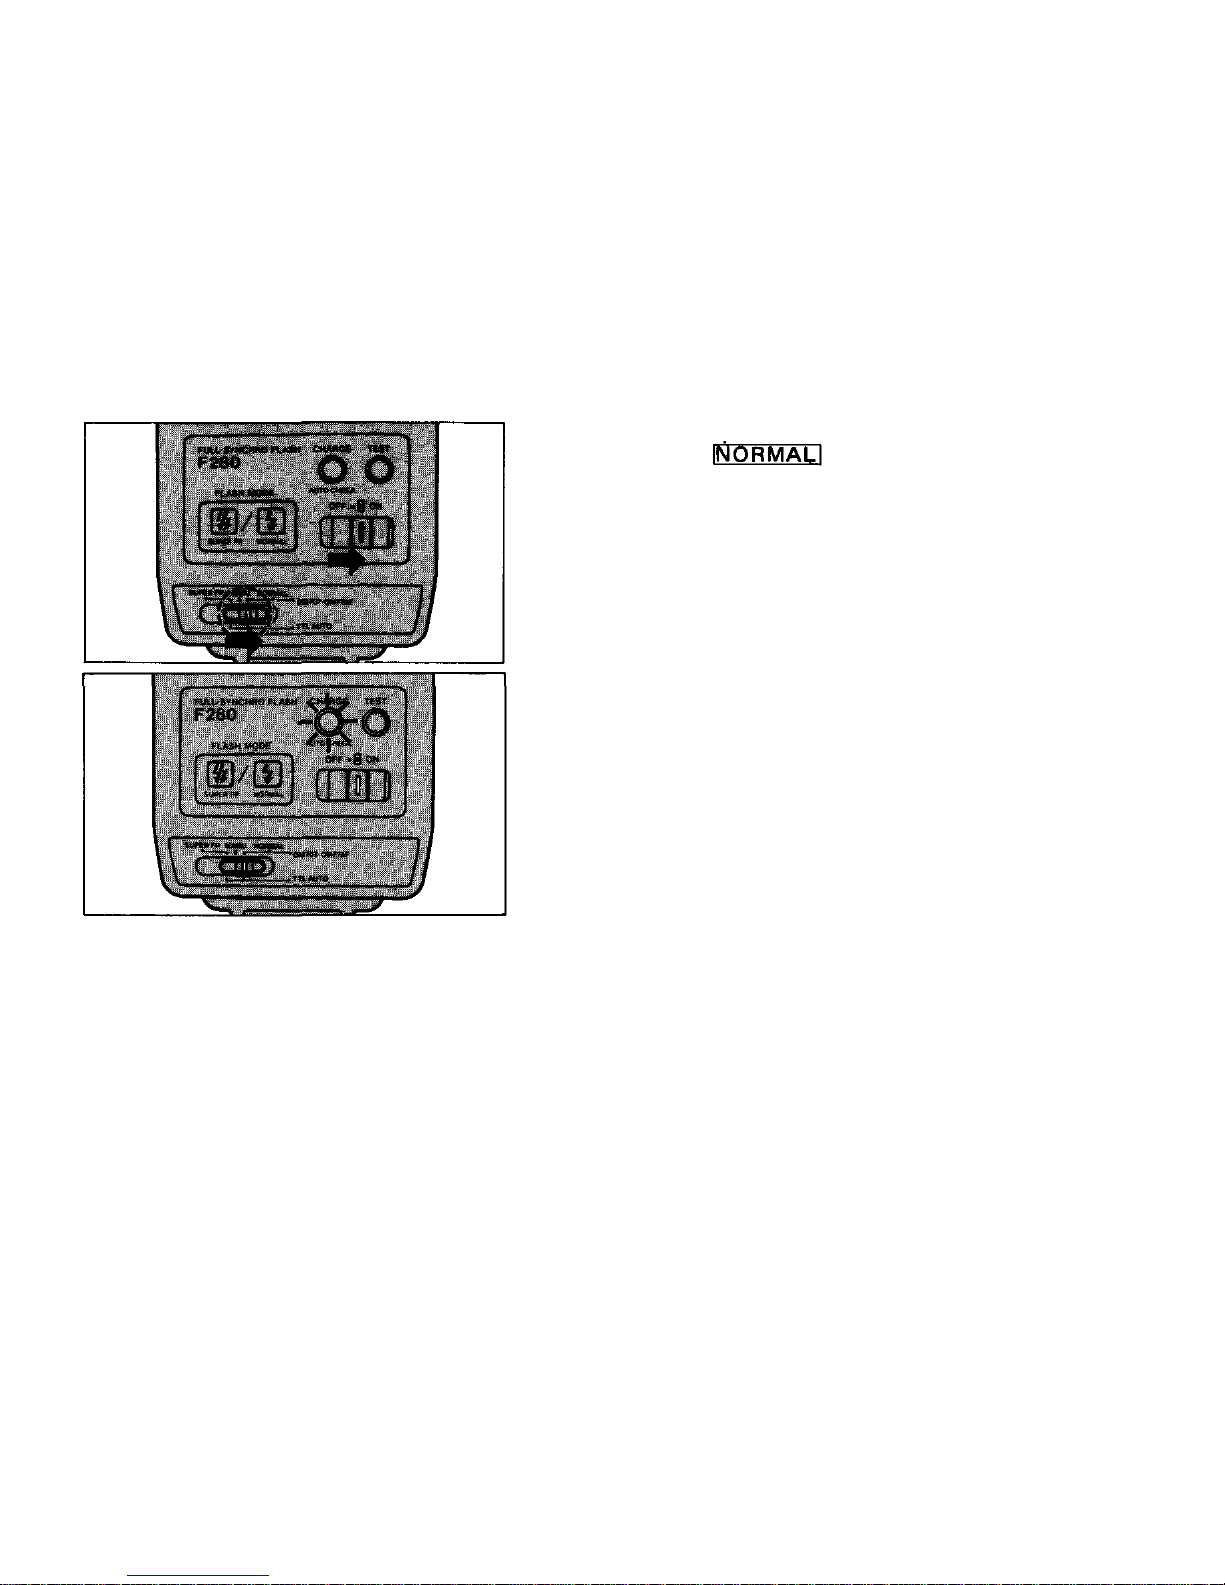
2
Turn the power switch ON, and set the mode
switch to (OM-707/OM-77AF).
A Super FP or Normal "OTF" Flash will be selected
automatically depending on the subject brightness.
3
Check the charge indicator.
45
Page 47
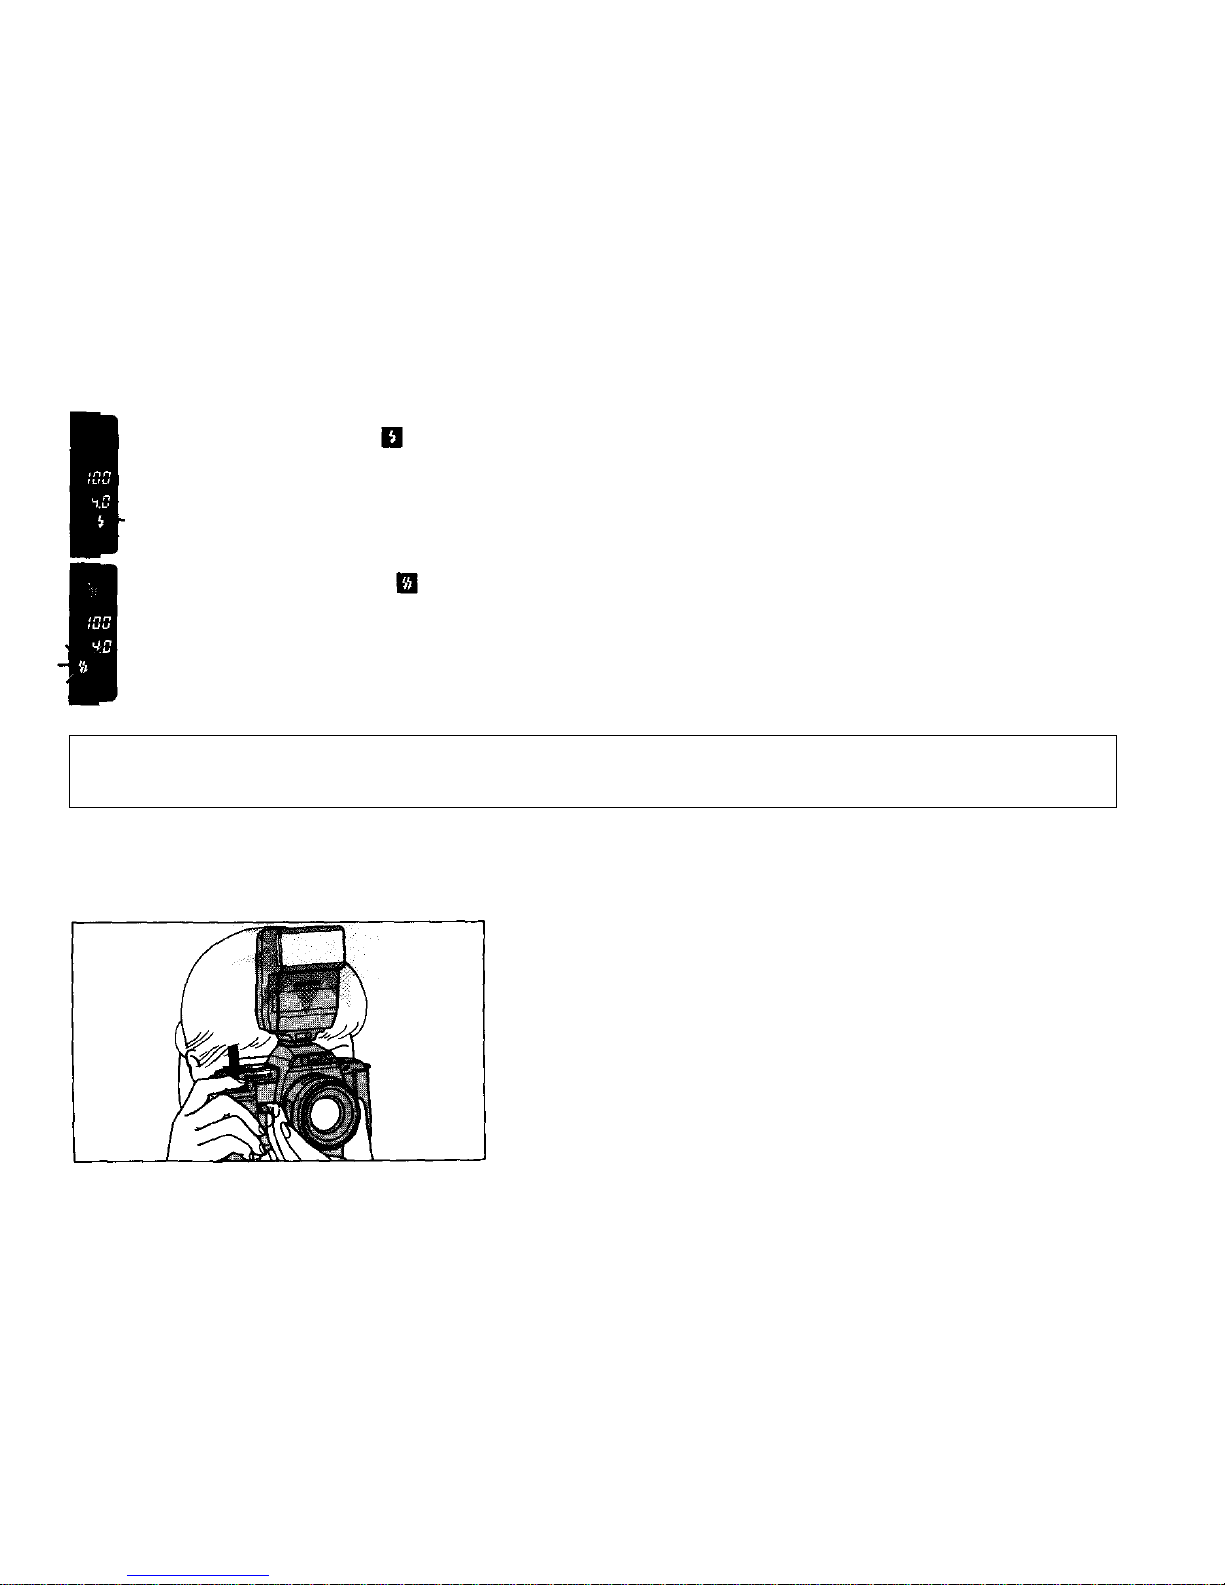
When in dark places, lights and the unit fires in the Normal "OTF" Flash mode.
In the Normal "OTF" Flash mode the working range is 1 m — 7 m (3.3 — 23 ft) (50 mm F1.8
lens). You should consult the flash instruction manual for full details.
Press the shutter release.
4
When in bright places, lights and the unit fires in the Super FP Flash mode.
46
Page 48
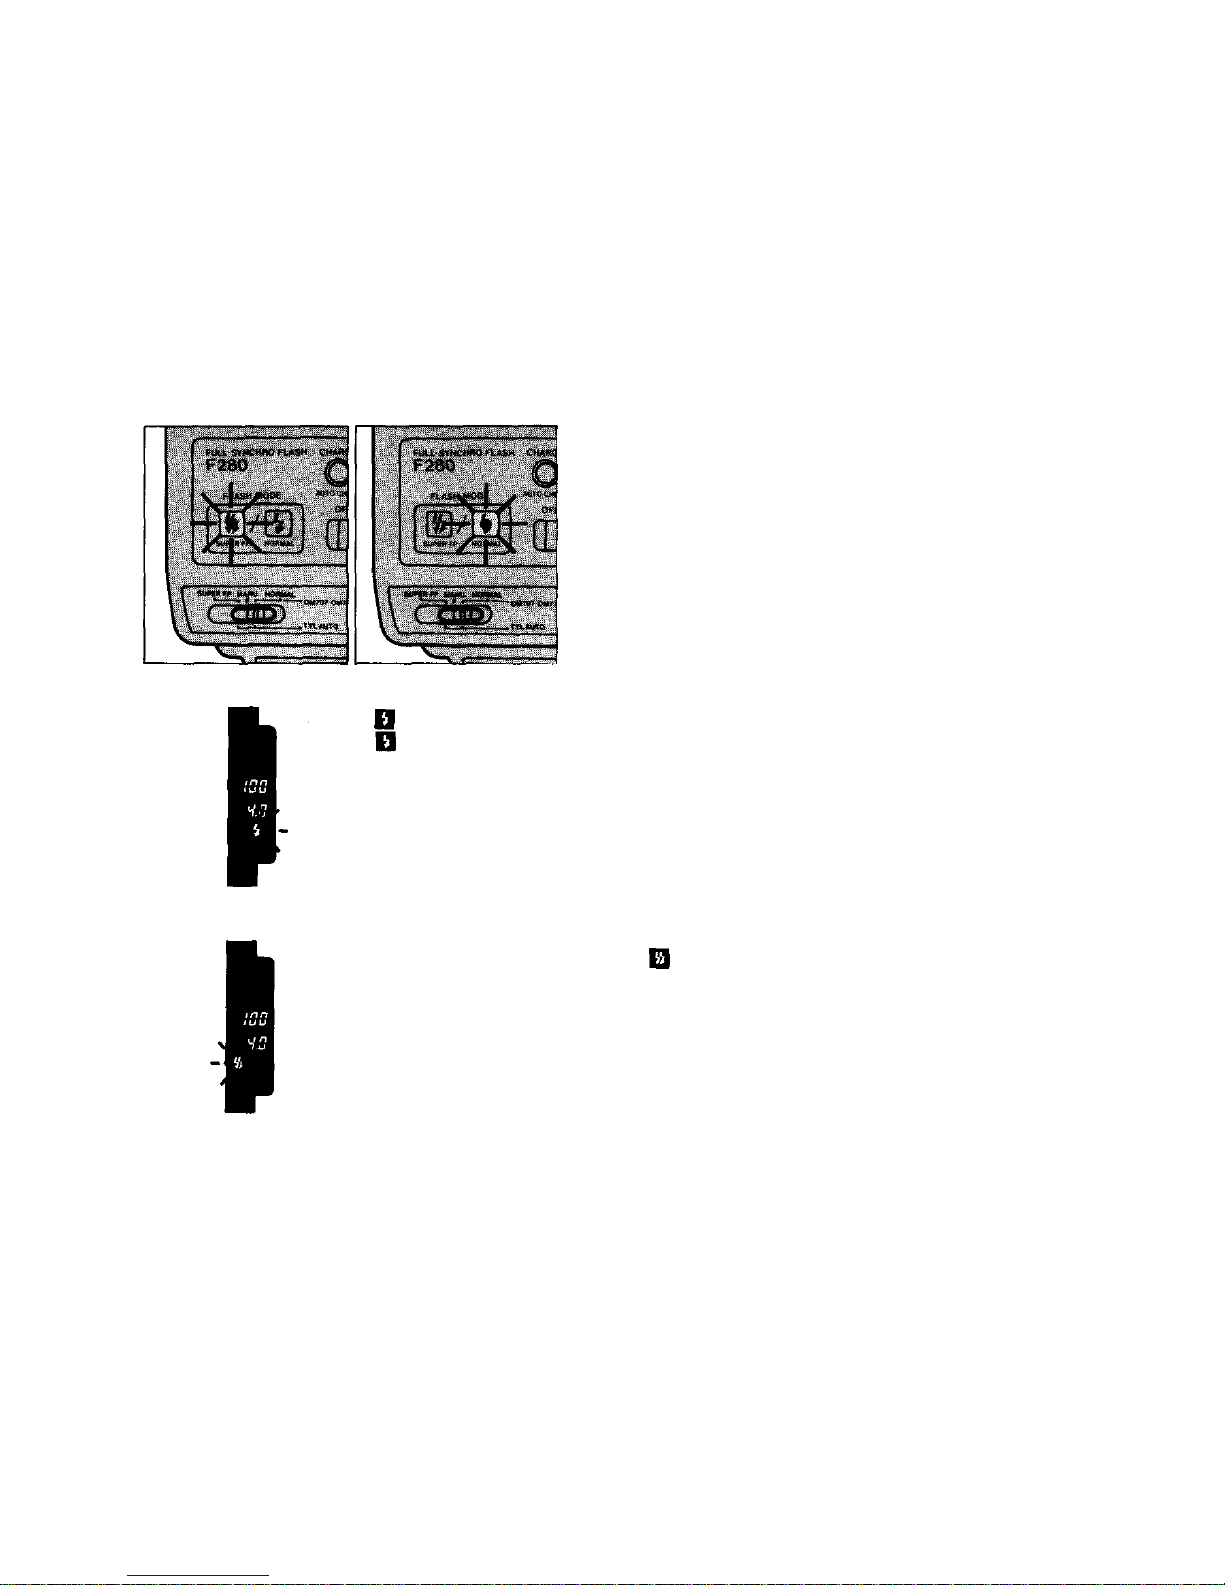
5
Check the flash emission.
blinks to indicate correct exposure in the Normal "OTF" Flash mode.
turns off to indicate under-exposure.
In the Super FP Flash mode, blinks to confirm a Super FP Flash.
47
Page 49
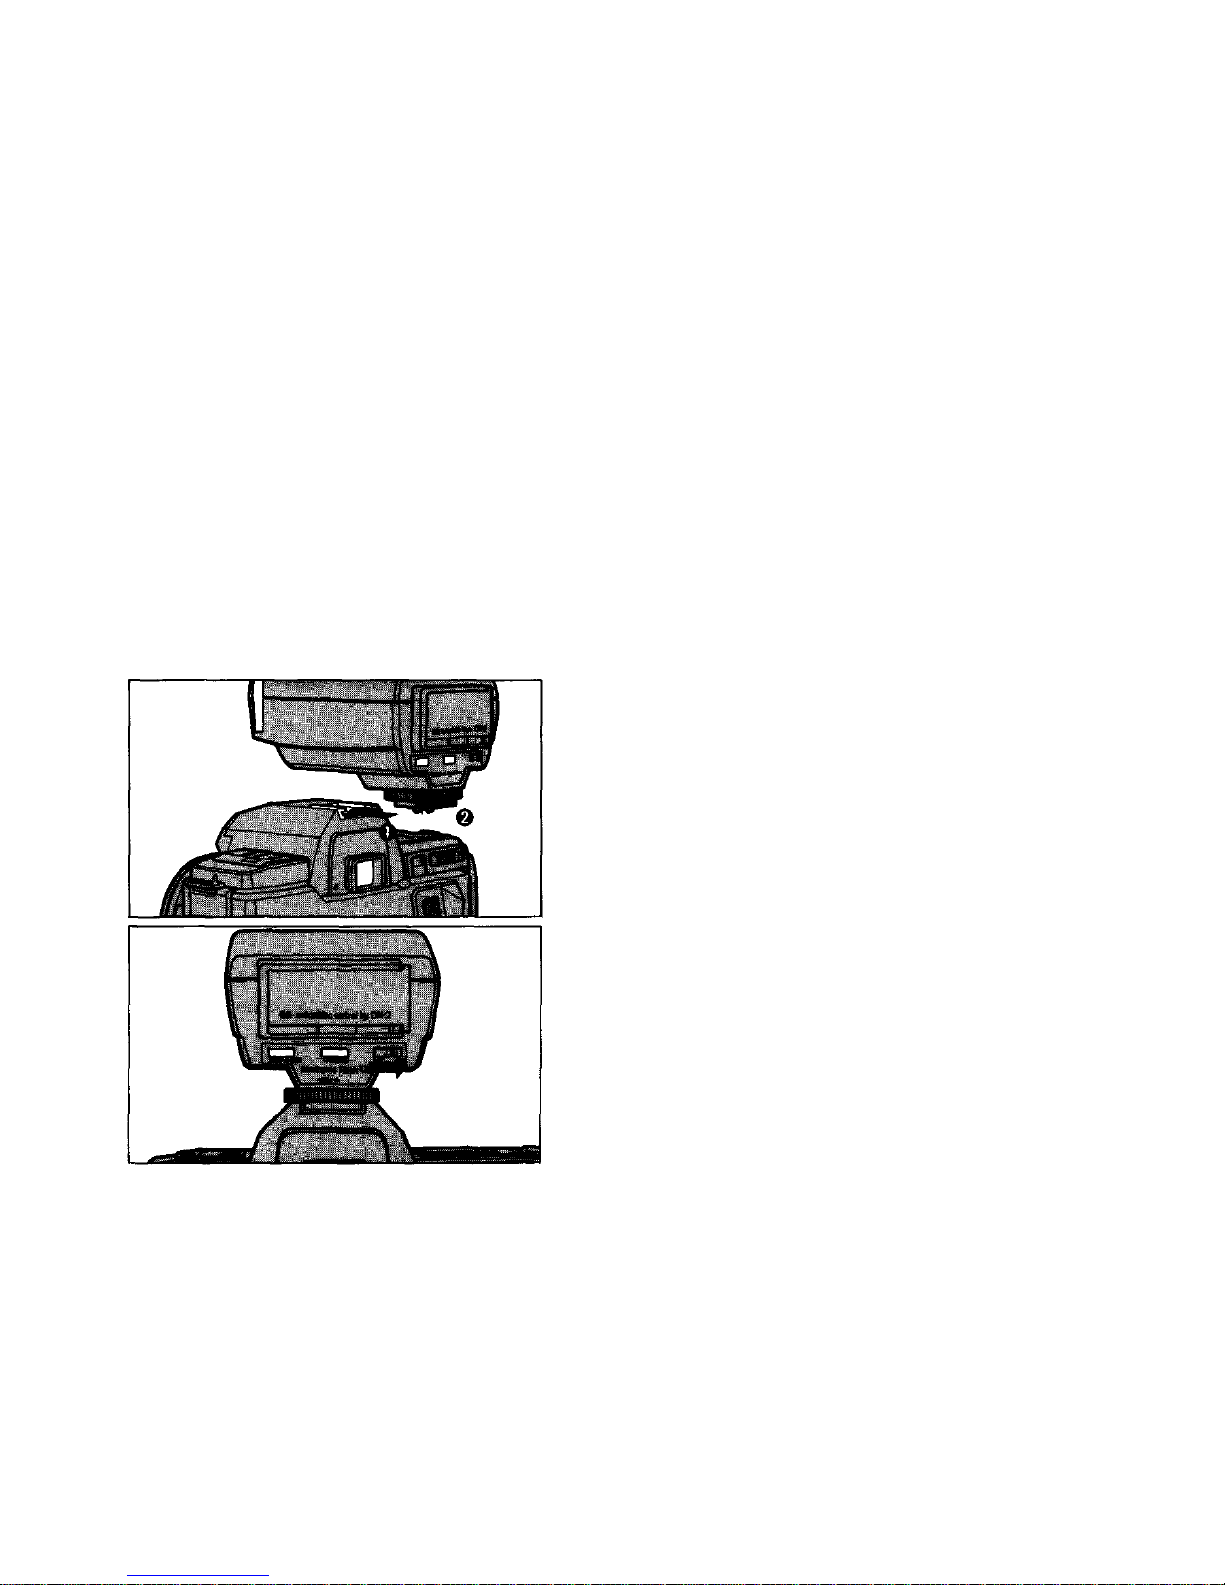
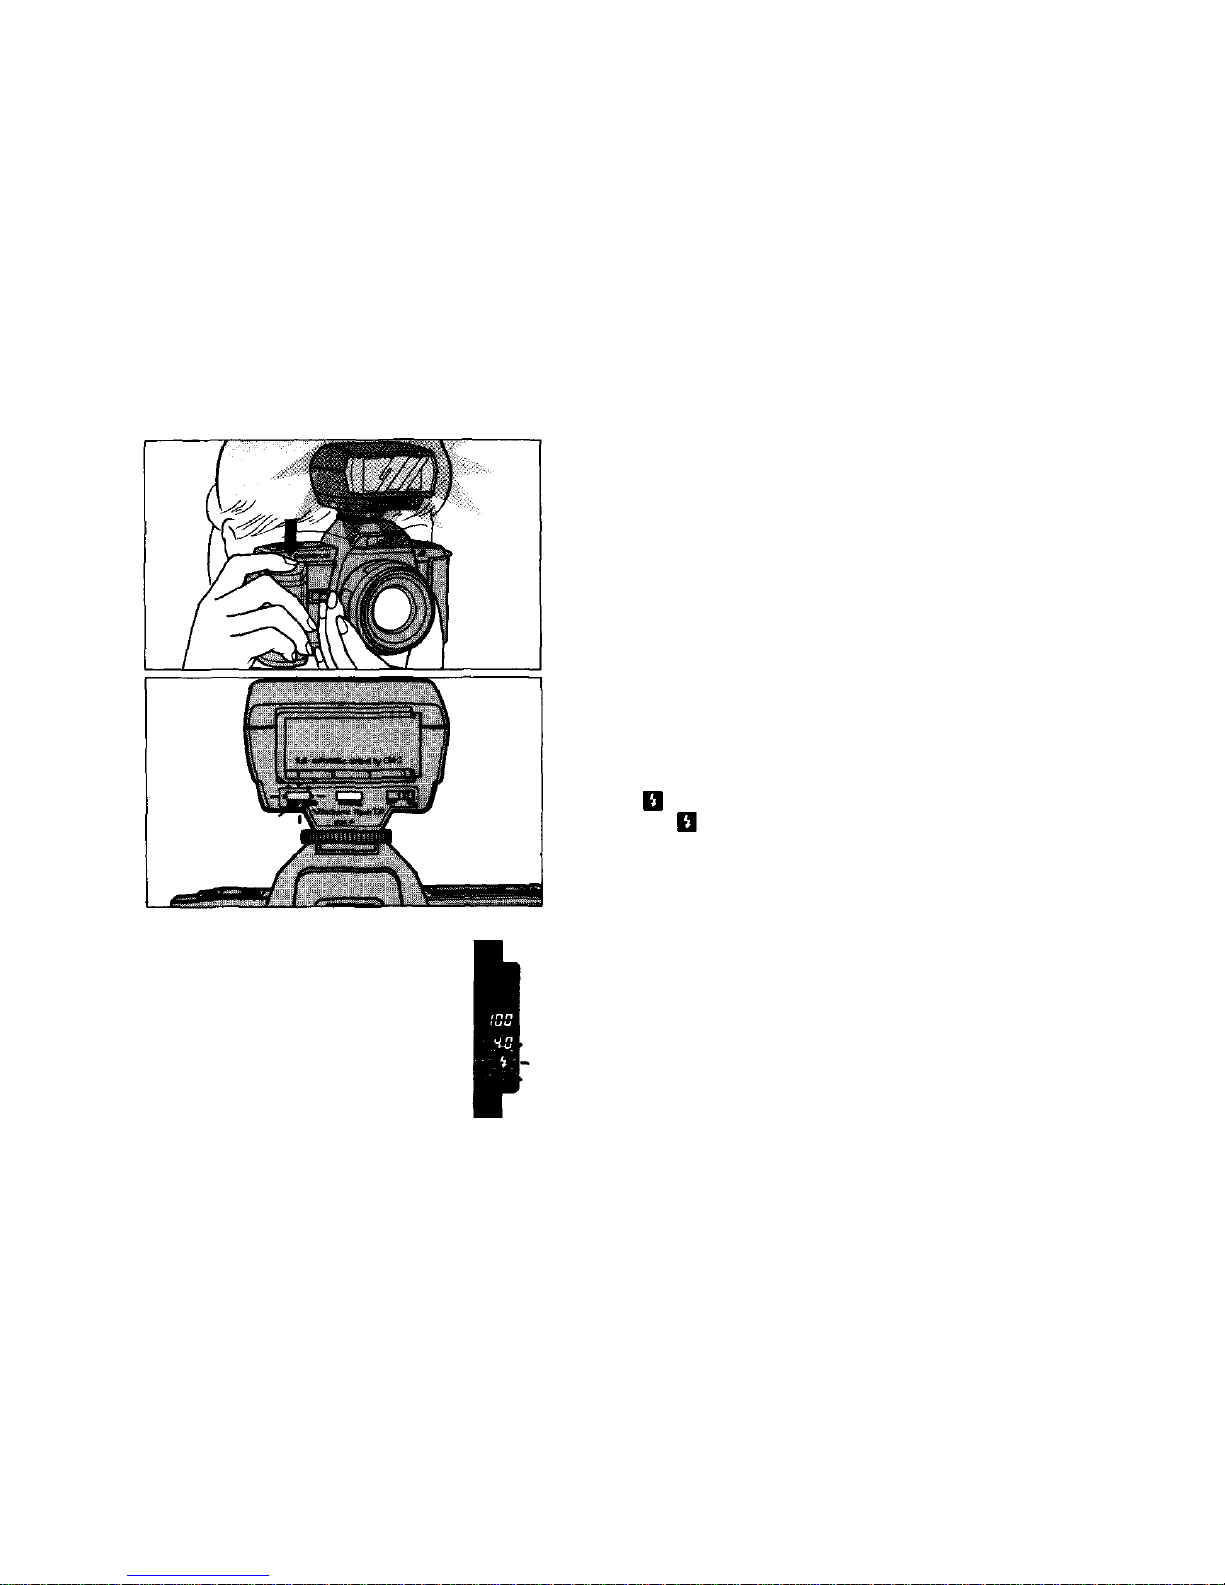
Using the T20 and T32 Electronic Flashes
Can be used In "OTF" AUTO flash mode.
1
Slide the unit into the shoe, secure it with the
lock-screw, and ensure that the calculator panel is
inserted
so
that "full automatic control by OM-2"
is displayed.
2
Turn the power switch ON.
48
Page 50
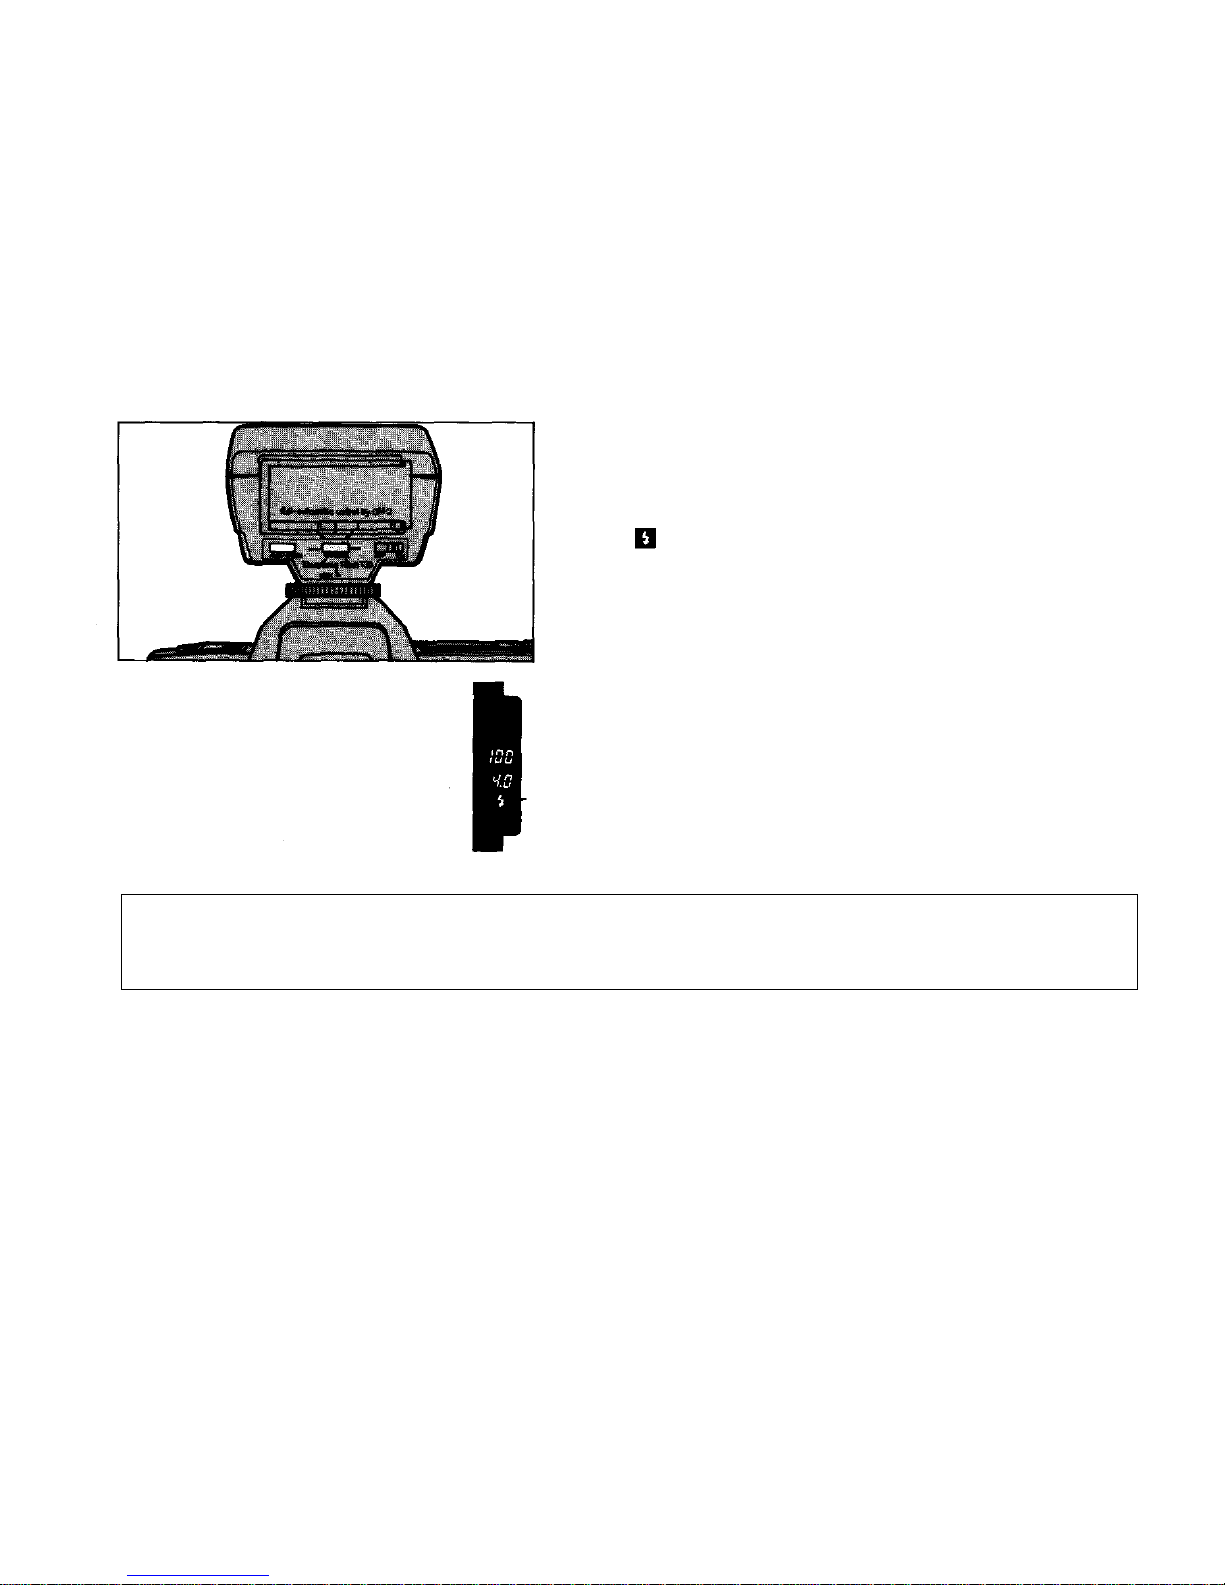
3
Check the charge indicator.
lights
up and the
flash
will
fire
when a shutter
speed slower than 1/100 sec. is required.
The flash working distance varies according to the lens' maximum aperture and the shooting
environment.
49
Page 51
4
Press
the
shutter
release button.
5
Check for correct exposure.
blinks to indicate correct exposure.
No indicates under-exposure.
50
Page 52
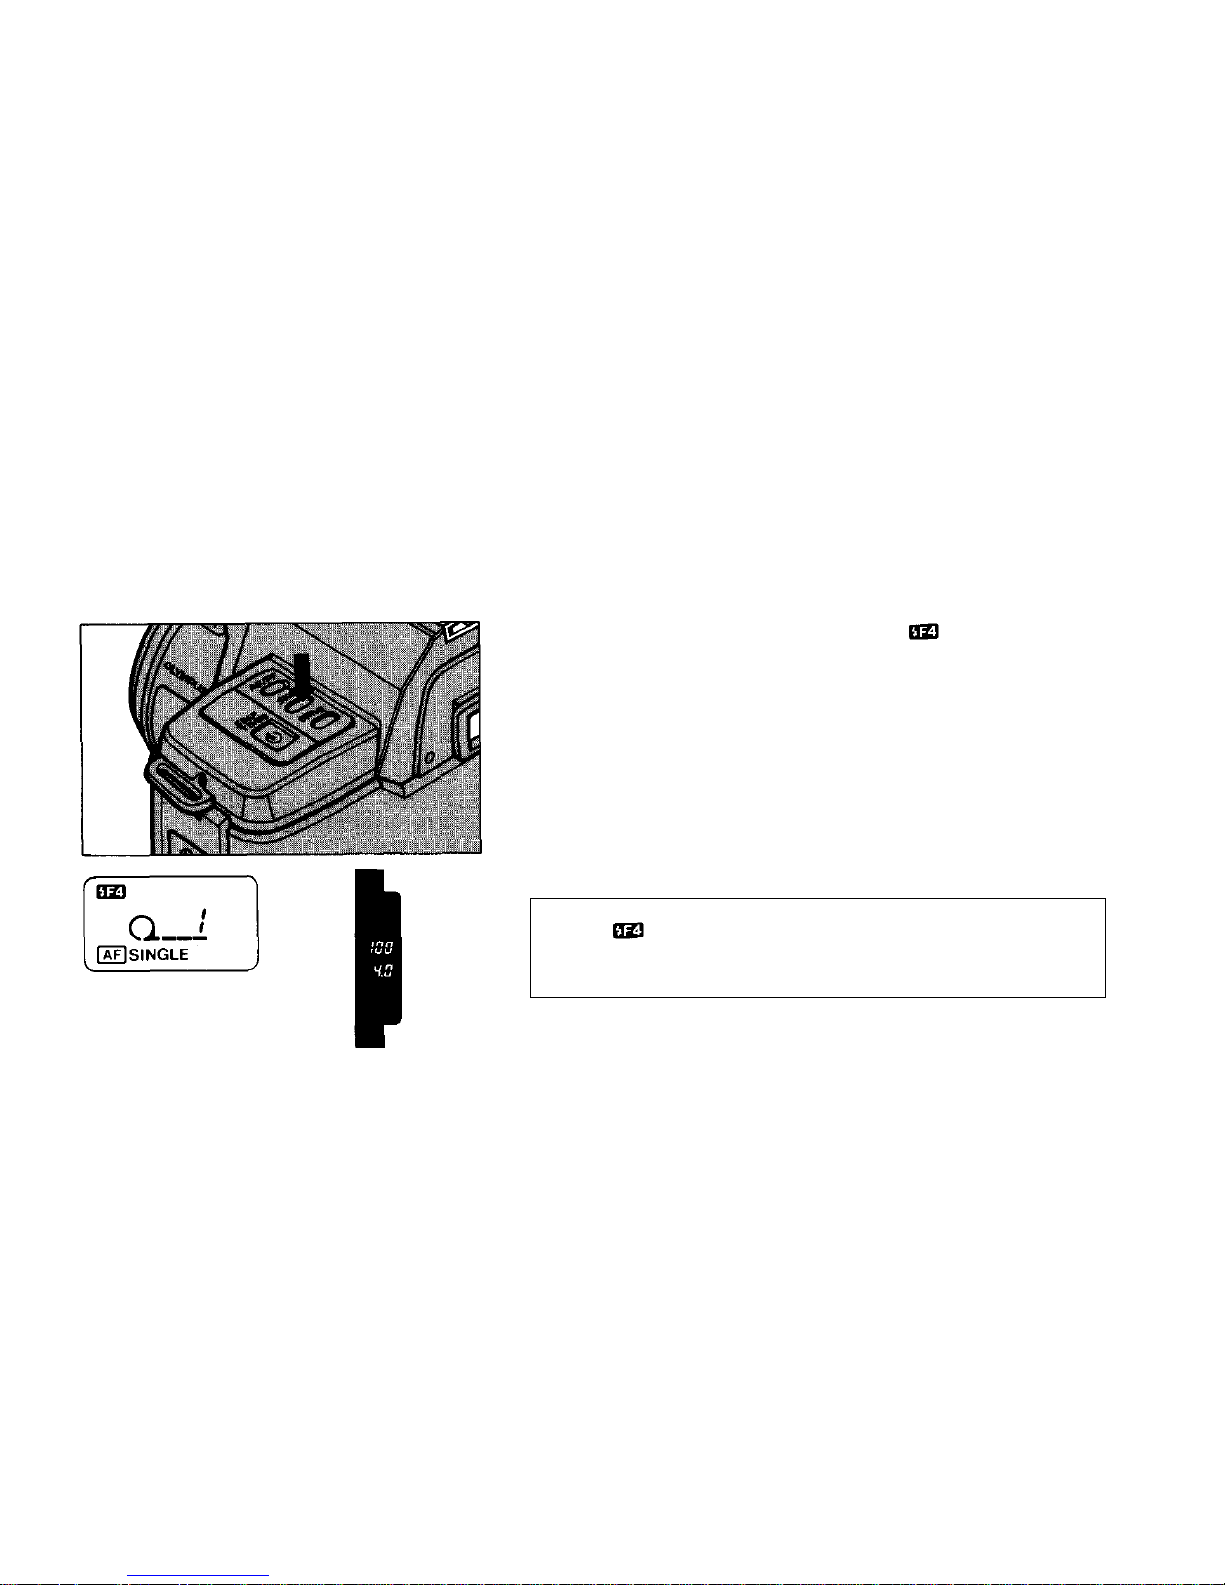
Using a Conventional Auto Flash
Press the button to enter the mode. The
camera is set to f4 at 1/100 sec.
The mode is not available when using the
T20, T32, F280 or the Power Flash Grip 300.
1
51
Page 53
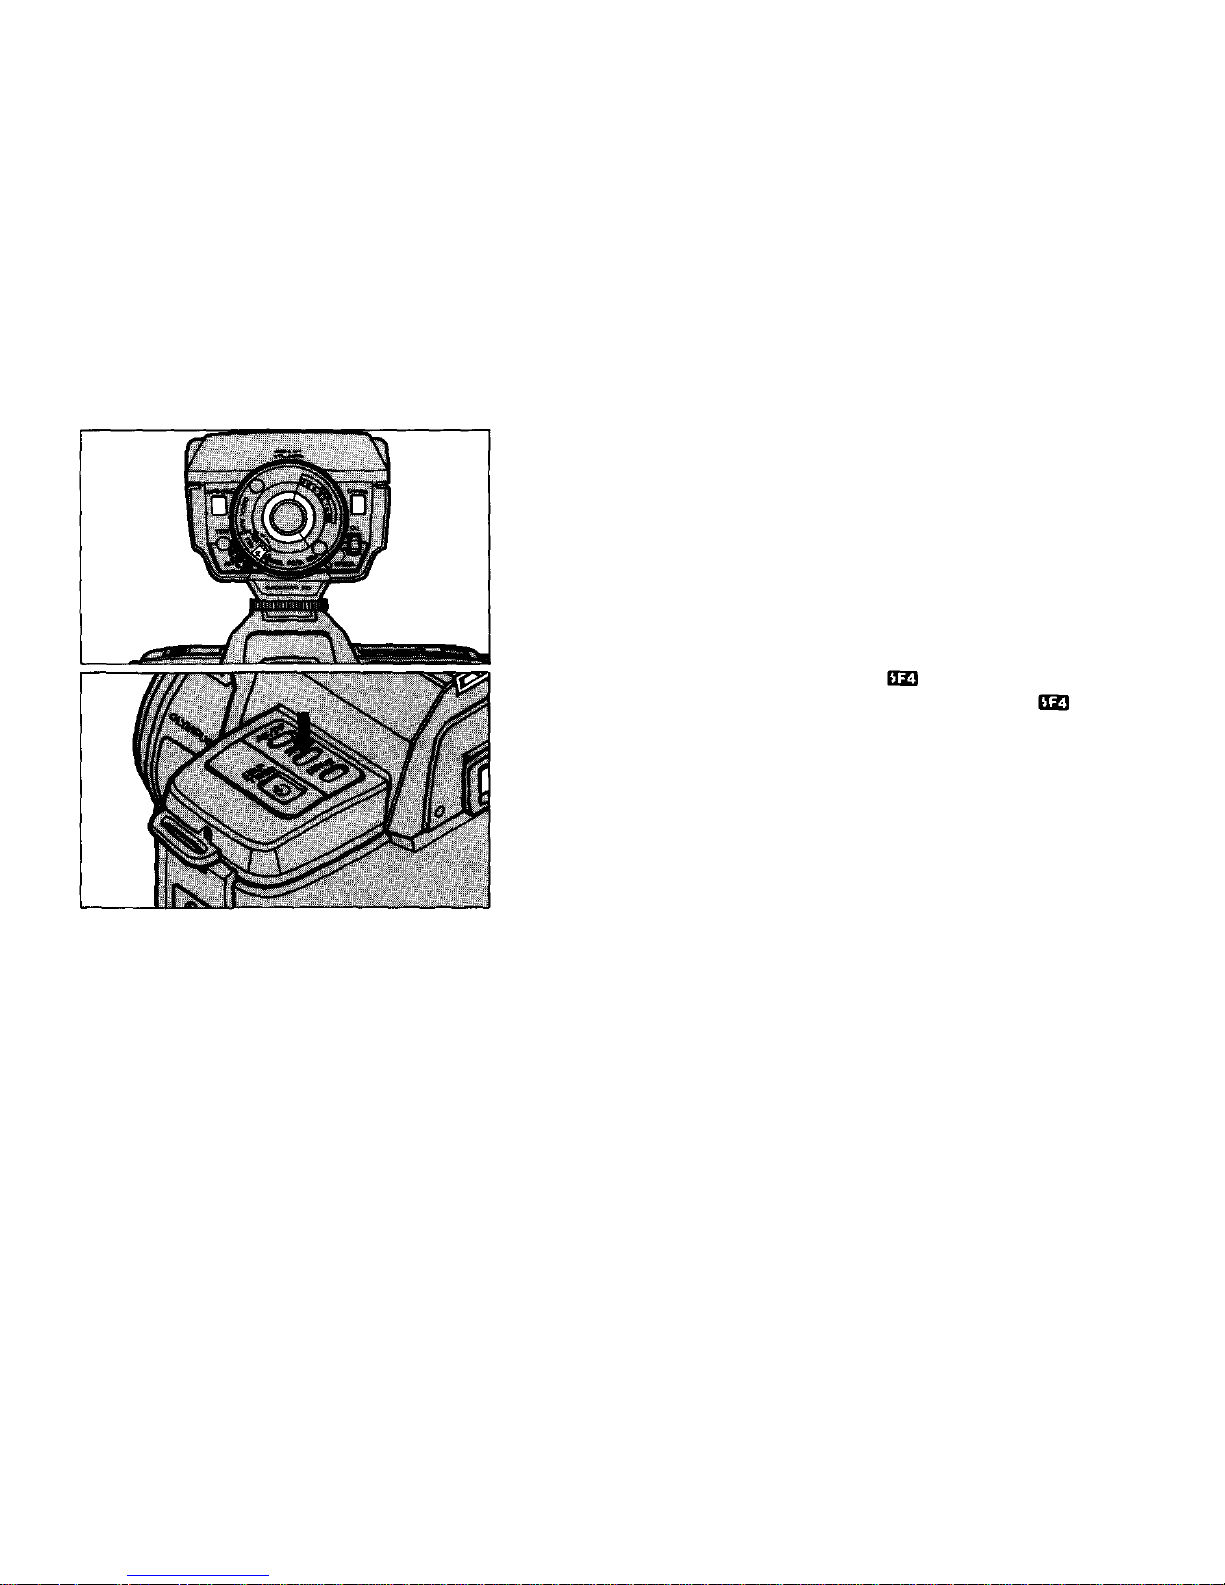
2
Set the flash to work at f4.
Press
the
button
to
cancel
the
mode after use.
(Pressing the reset button also cancels the
mode.)
3
52
Page 54

• Auto flash units without an "F4" mode cannot be used.
• If a
lens
with a maximum
aperture
smaller
than
f4 is
used,
slight
under-exposure
will
resuIt.
•
When
using a non-AF
OM
lens,
set the
aperture
to f4. The
shutter
will
be set at
1/100 sec.
53
Page 55

To Take Better Photographs
The following pages are presented to assist those who wish to improve their photographic technique. Please read them carefully, apply the techniques and expand your creative horizons.
54
Page 56
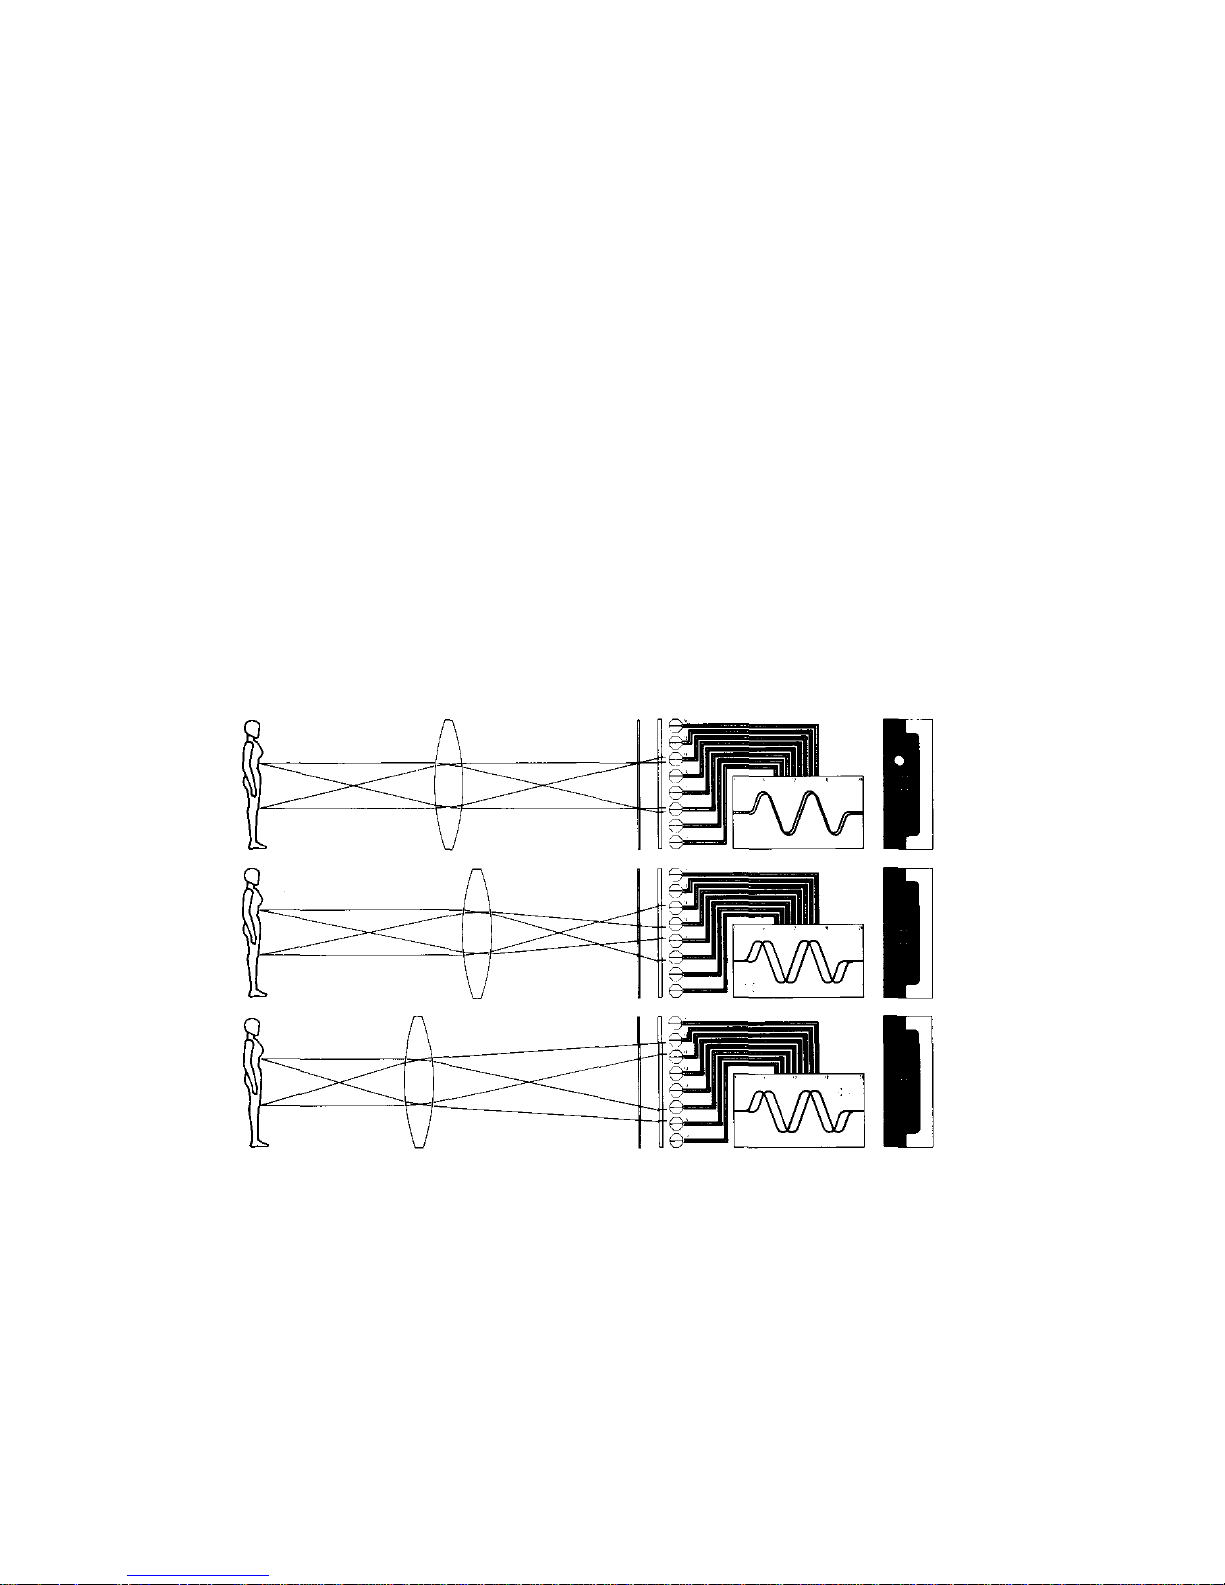
Autofocus (AF)
TTL "Zero-In" System
An exceptionally accurate TTL "Zero-In" electronic focusing system, which works on the princi-
ple that image discrepancy is zero when an object
is
correctly
focused,
is
employed
by the
OM77AF.
Light passing through the focus-mirror is passed
through
an
infrared
cut
filter, a correction
lens
and
then projected onto a CCD "Zero-In" sensor where
it is converted into electrical signals. Using these
signals to determine the image discrepancy, a CPU,
by reference to a lens-mounted ROM, calculates
the appropriate lens rotation and transfers this
information to an AF motor. This single calcula-
tion/focus correction sequence results in quick and
accurate focusing. Additionally, when the Power
flash Grip 300 is connected, the focus information
is used to provide precise distance information for
perfect flash-exposure control.
55
Page 57
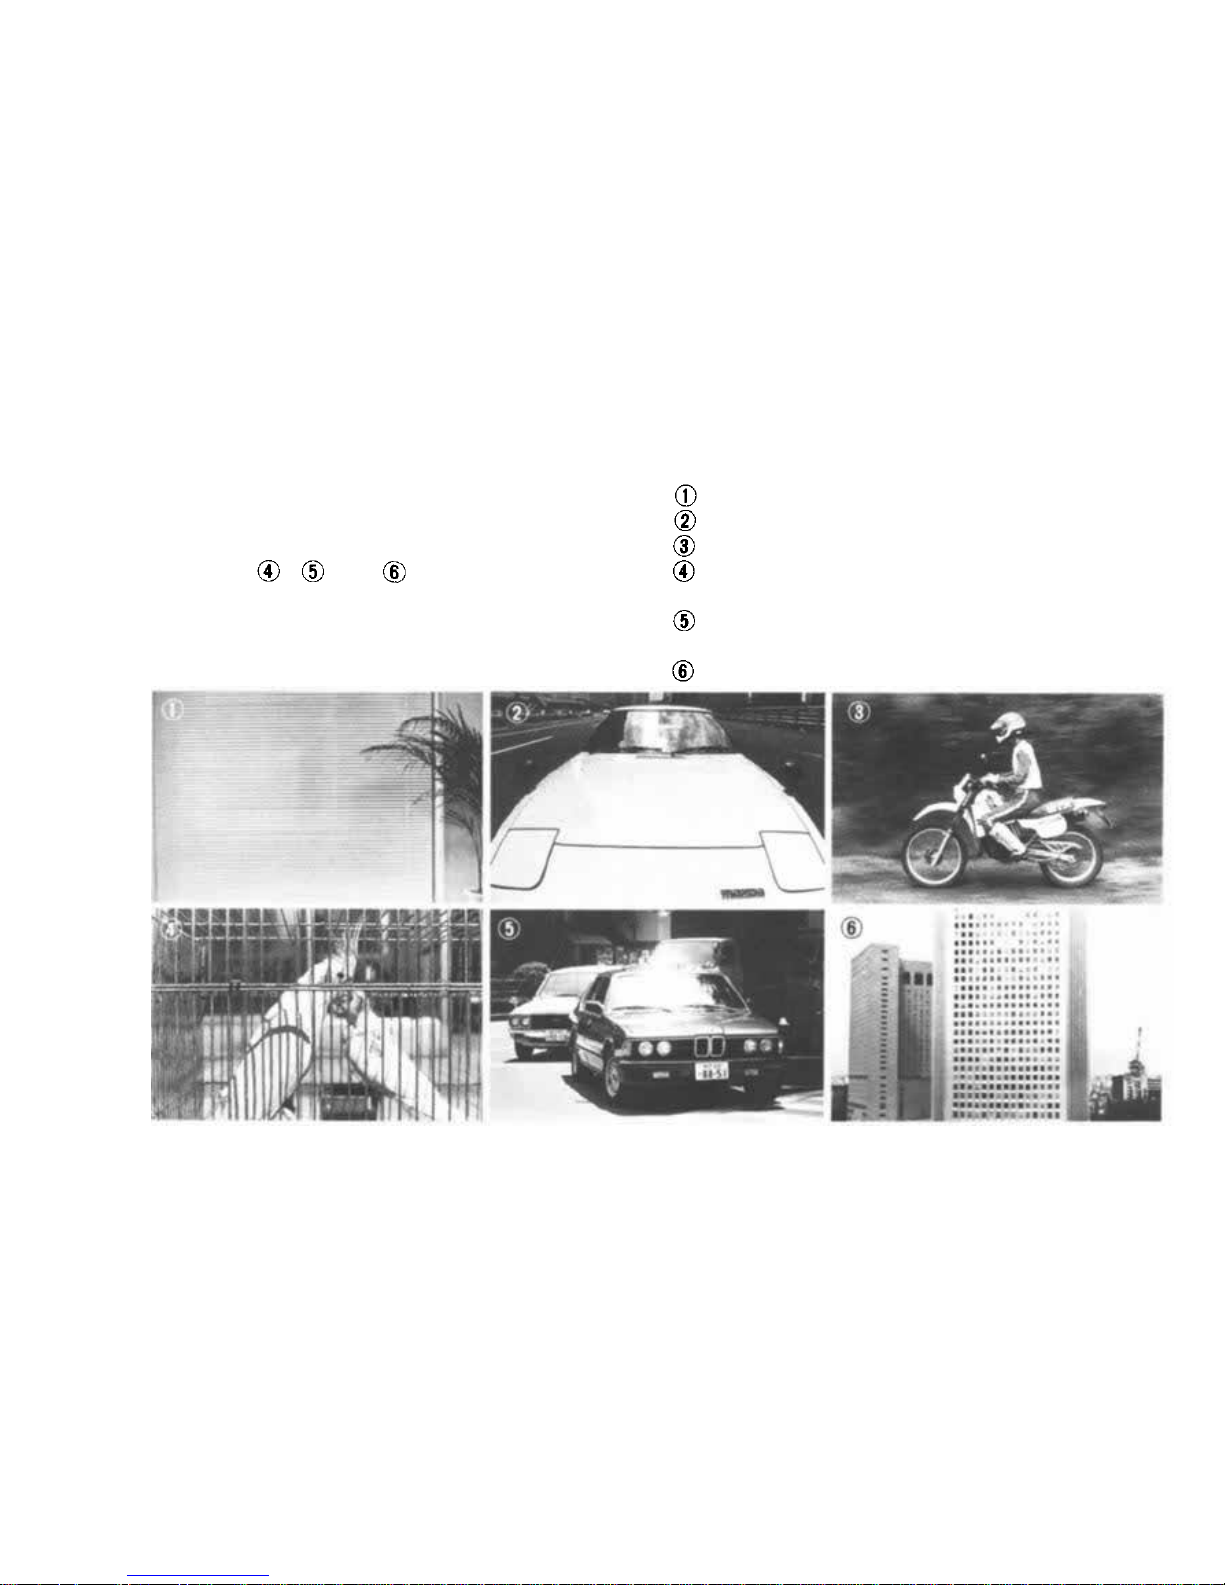
Subject difficult for autofocus
Although
the
OM77AF
can
focus
in
almost
any
situation, there are certain conditions, illustrated
below, in which it may be impossible to obtain
correct focus. A red LED in the viewfinder will
situations , and , the green LED in the
viewfinder may illuminate even though the lens is
incorrectly focused. In any of these situations, you
can try focusing on a subject at a similar distance
and then, using the Focus Lock (pages 30 — 31),
recompose your picture, or you can use the Power
Focus mode (pages 24 — 26) to focus manually.
Subject without vertical lines.
Subject without contrast.
Rapidly moving subjects.
Two subjects within the focusing frame at
different distances.
Excessively bright light at the center of the
focusing frame.
Subject with repeated pattern.
56
usually indicate these conditions, however, in
Page 58
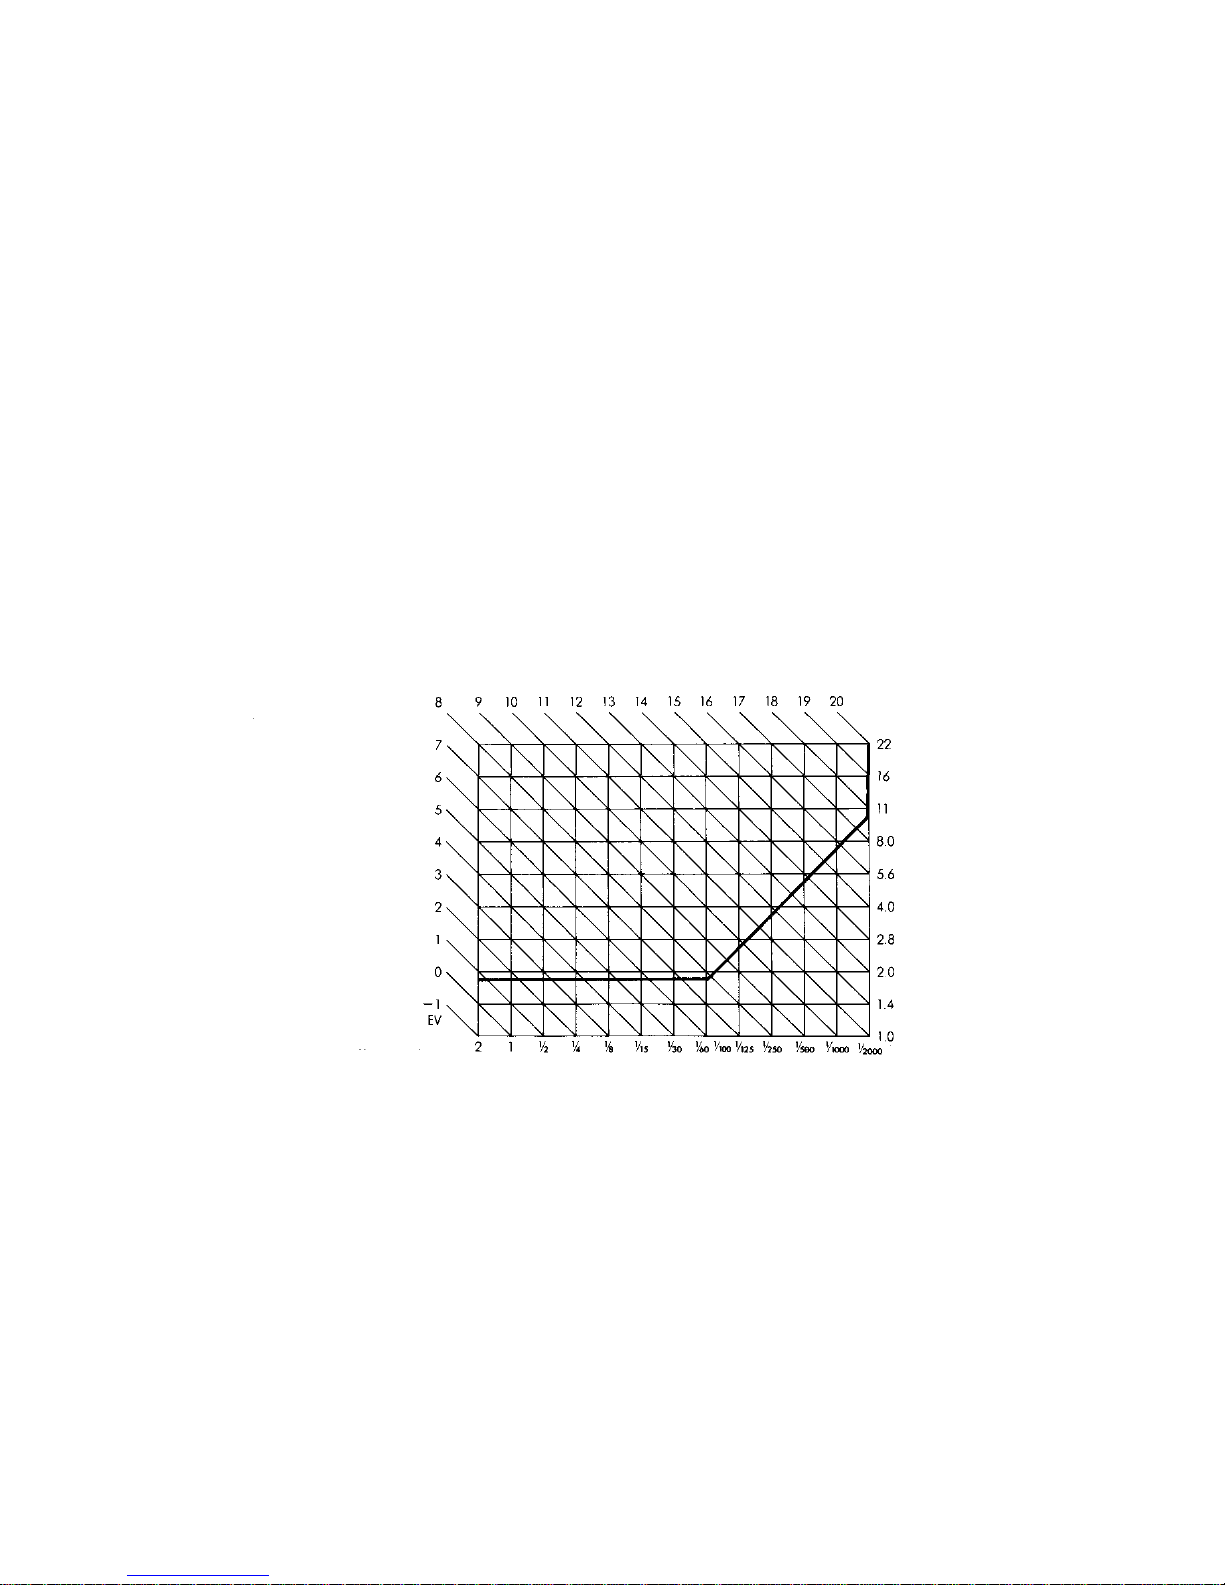
Program
The
OM77AF
programs
offer
the
optimum
balance
between aperture and shutter-speed settings to
enable quick response to every photographic op-
portunity. Also, the Auto Program Shift selects
automatically a program appropriate to the present
focal length of the mounted lens, while the Manual
Program Shift lets the user shift shutter speed and
aperture at any time and employ the program as an
aperture or shutter speed-preferred auto-exposure
program. These two functions combine to produce
a camera that can satisfy the demands of the beginner as easily as those of the more advanced SLR
user.
57
Shutter speed
(50 mm
F1.8)
Aperture
Page 59
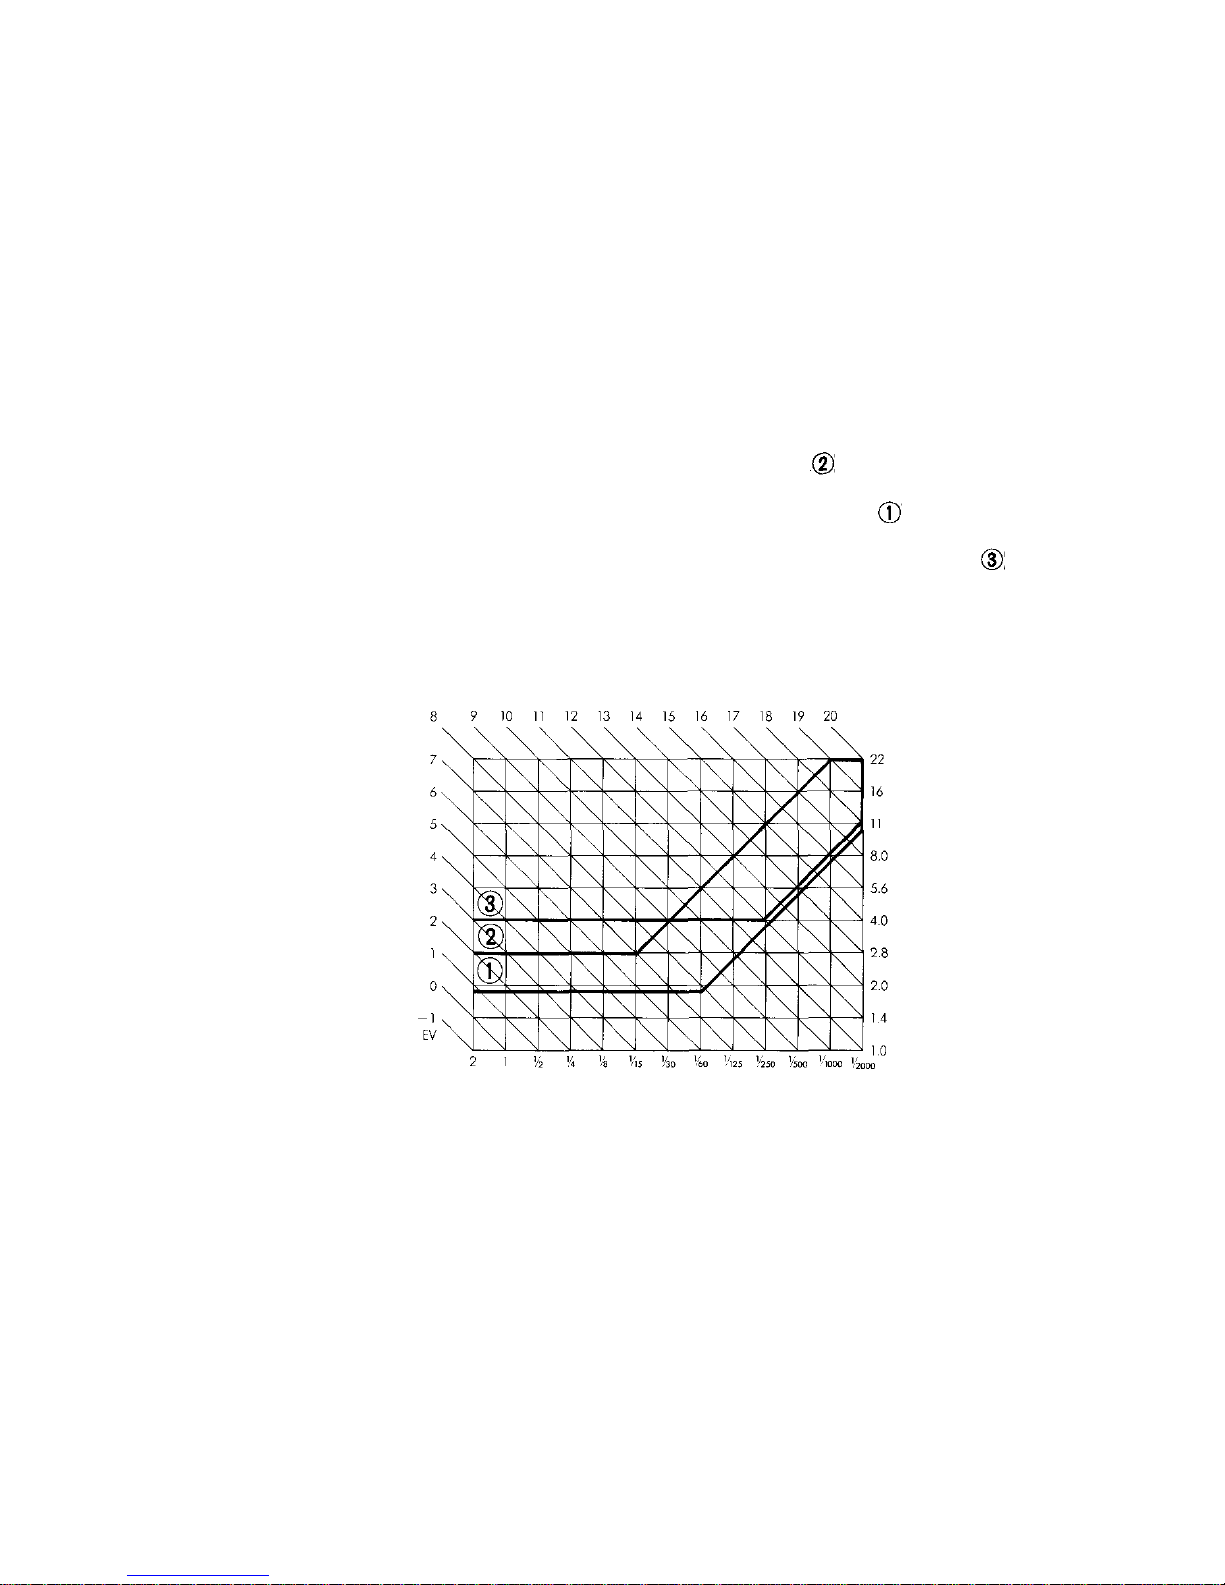
Auto Program Shift
The
OM77AF
has
been
programmed
to
automatically select a program mode appropriate to the focal
length of the lens to be used. There are individual
programs for telephoto, standard and wide angle
lenses, with the capacity to automatically shift
programs in line with the focal length changes of
zoom lenses. In the wide-angle program mode
(Program chart ), for lenses below 35 mm, depth
of field is given priority. The standard program
mode (Program chart ) is used for lenses in the
90 mm and above, gives higher priority to the
shutter speeds needed to avoid camera shake.
58
Shutter speed
Aperture
35 — 89 mm focal-length range. The telephoto
program mode (Program chart ), for lenses of
Page 60
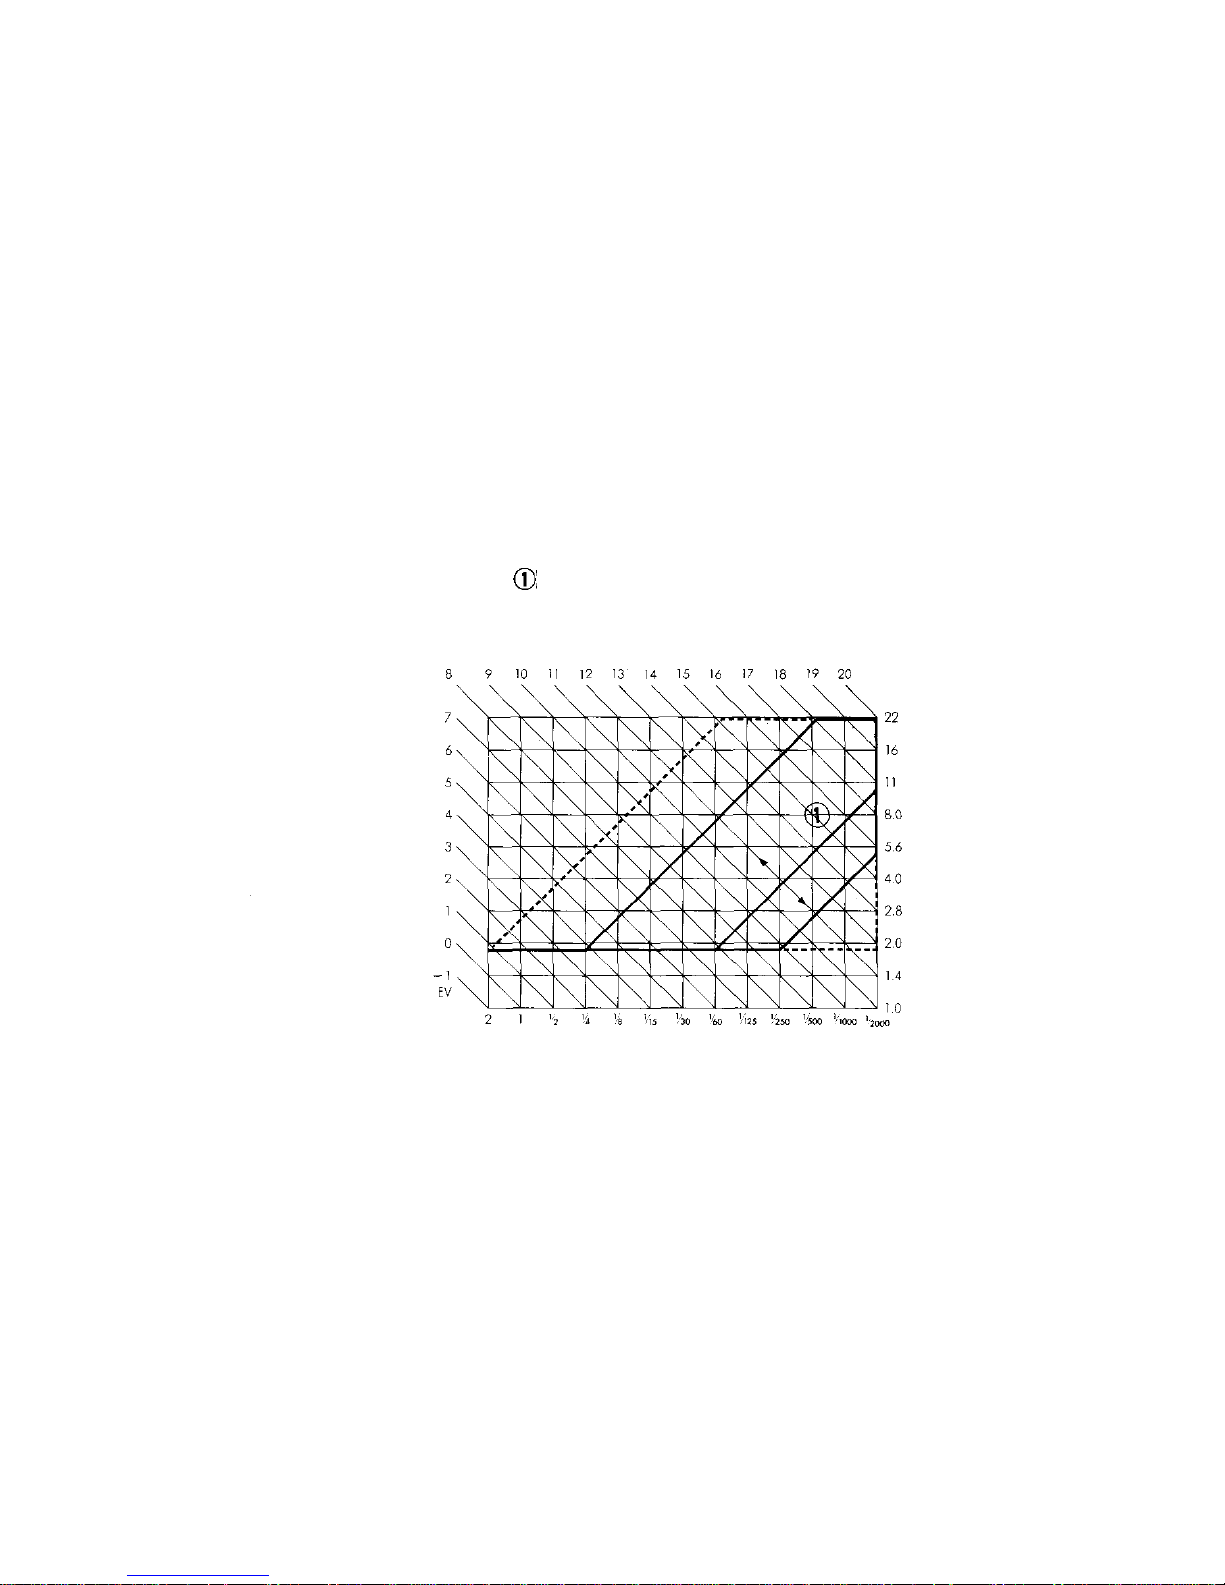
Manual Program Shift
With
the
OM77AF,
the
photographer
is
free
to
select
a desired aperture or shutter speed with the assurance of a perfect exposure. For instance, when
using a 50 mm F1.8 AF lens, the initial setting of
aperture and shutter speed is in accordance with
the Standard Program (Program chart ). By using
the shift-knob, the photographer is free to shift the
program line by 1/2-stops to reach a desired shutter
speed or aperture. In this way, and with no need of
any physical adjustment, the program can be used
as an aperture or a shutter speed-preferred program,
depending on the photographer's intention.
59
Shutter speed
Aperture
Page 61
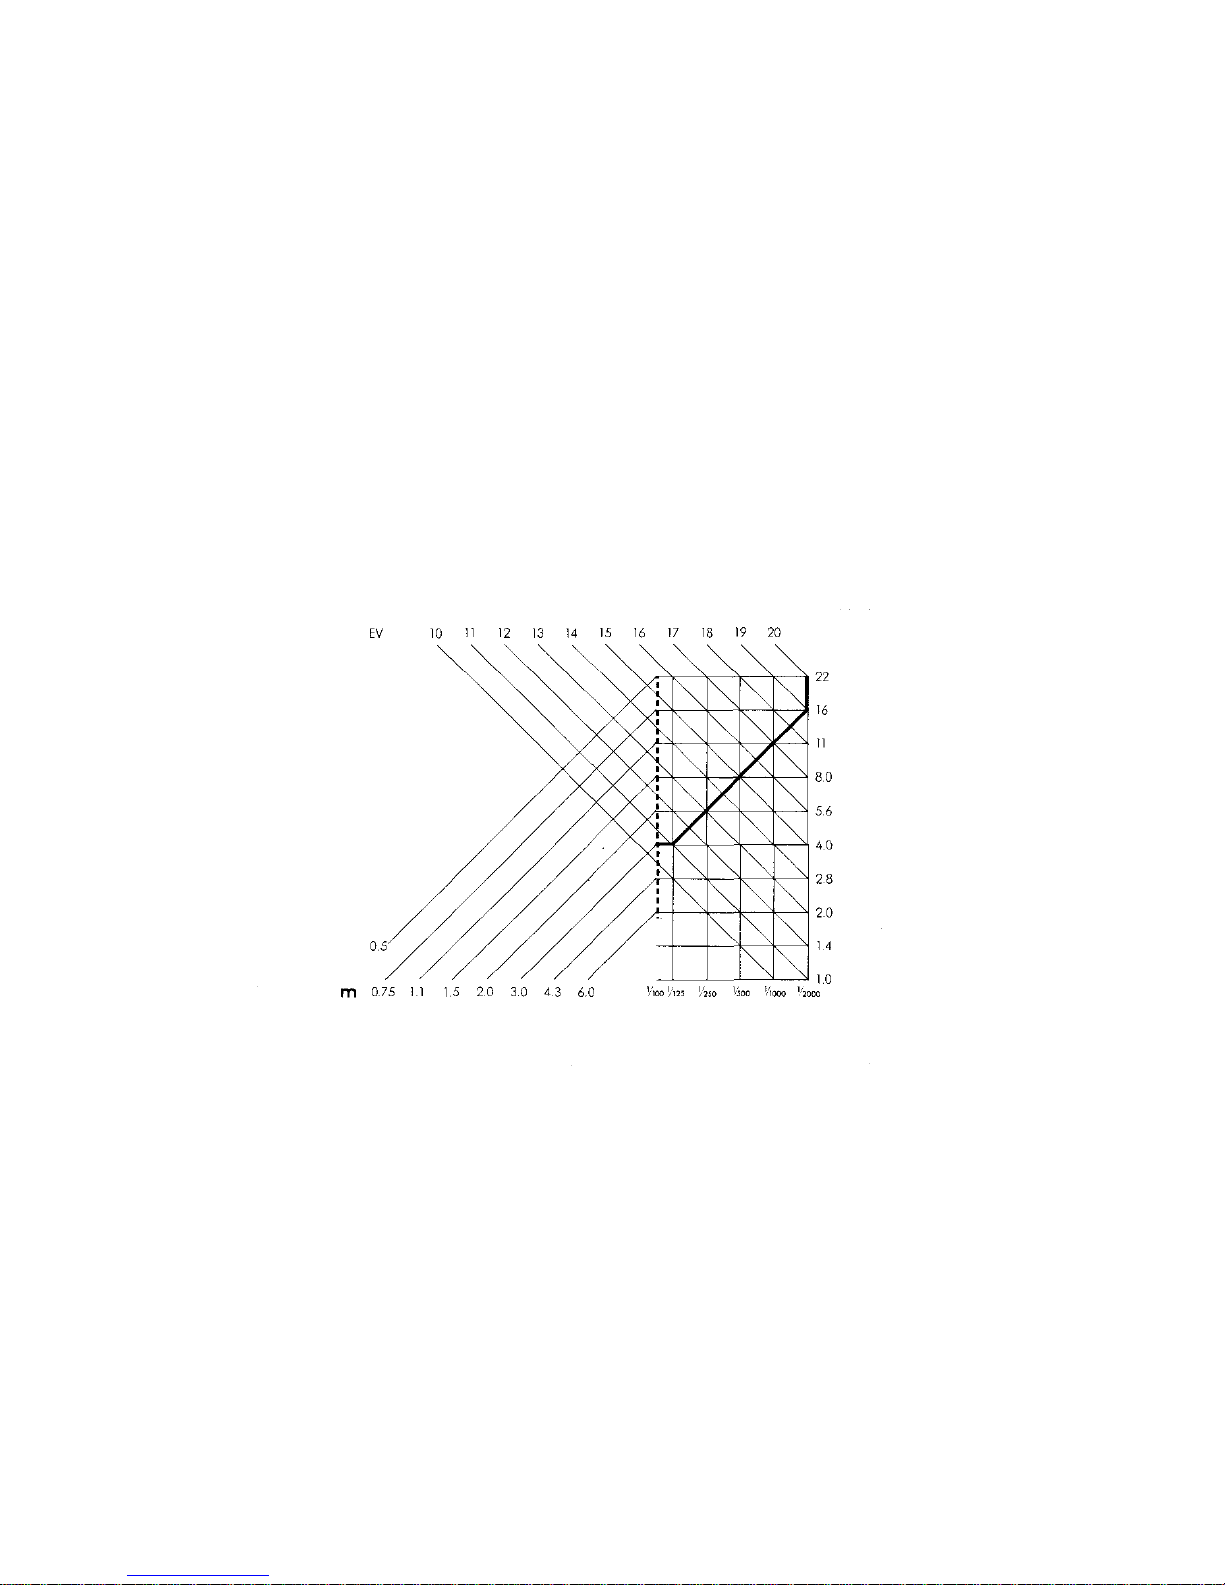
Power Flash Grip 300
By using the Power Flash Grip 300, you are always
ready for problem-free flash photography. With the
flash reflector up, the unit will fire automatically
only when natural light requires a shutter speed of
1/100 sec. or slower. The shutter speed will be set
at 1/100 sec. in this case, and the aperture determined by the AF CPU on the basis of the absolute
distance of the subject (Flashmatic method), as
illustrated by the dotted line in the chart.
60
(ISO
100)
Shutter speed
Aperture
Page 62
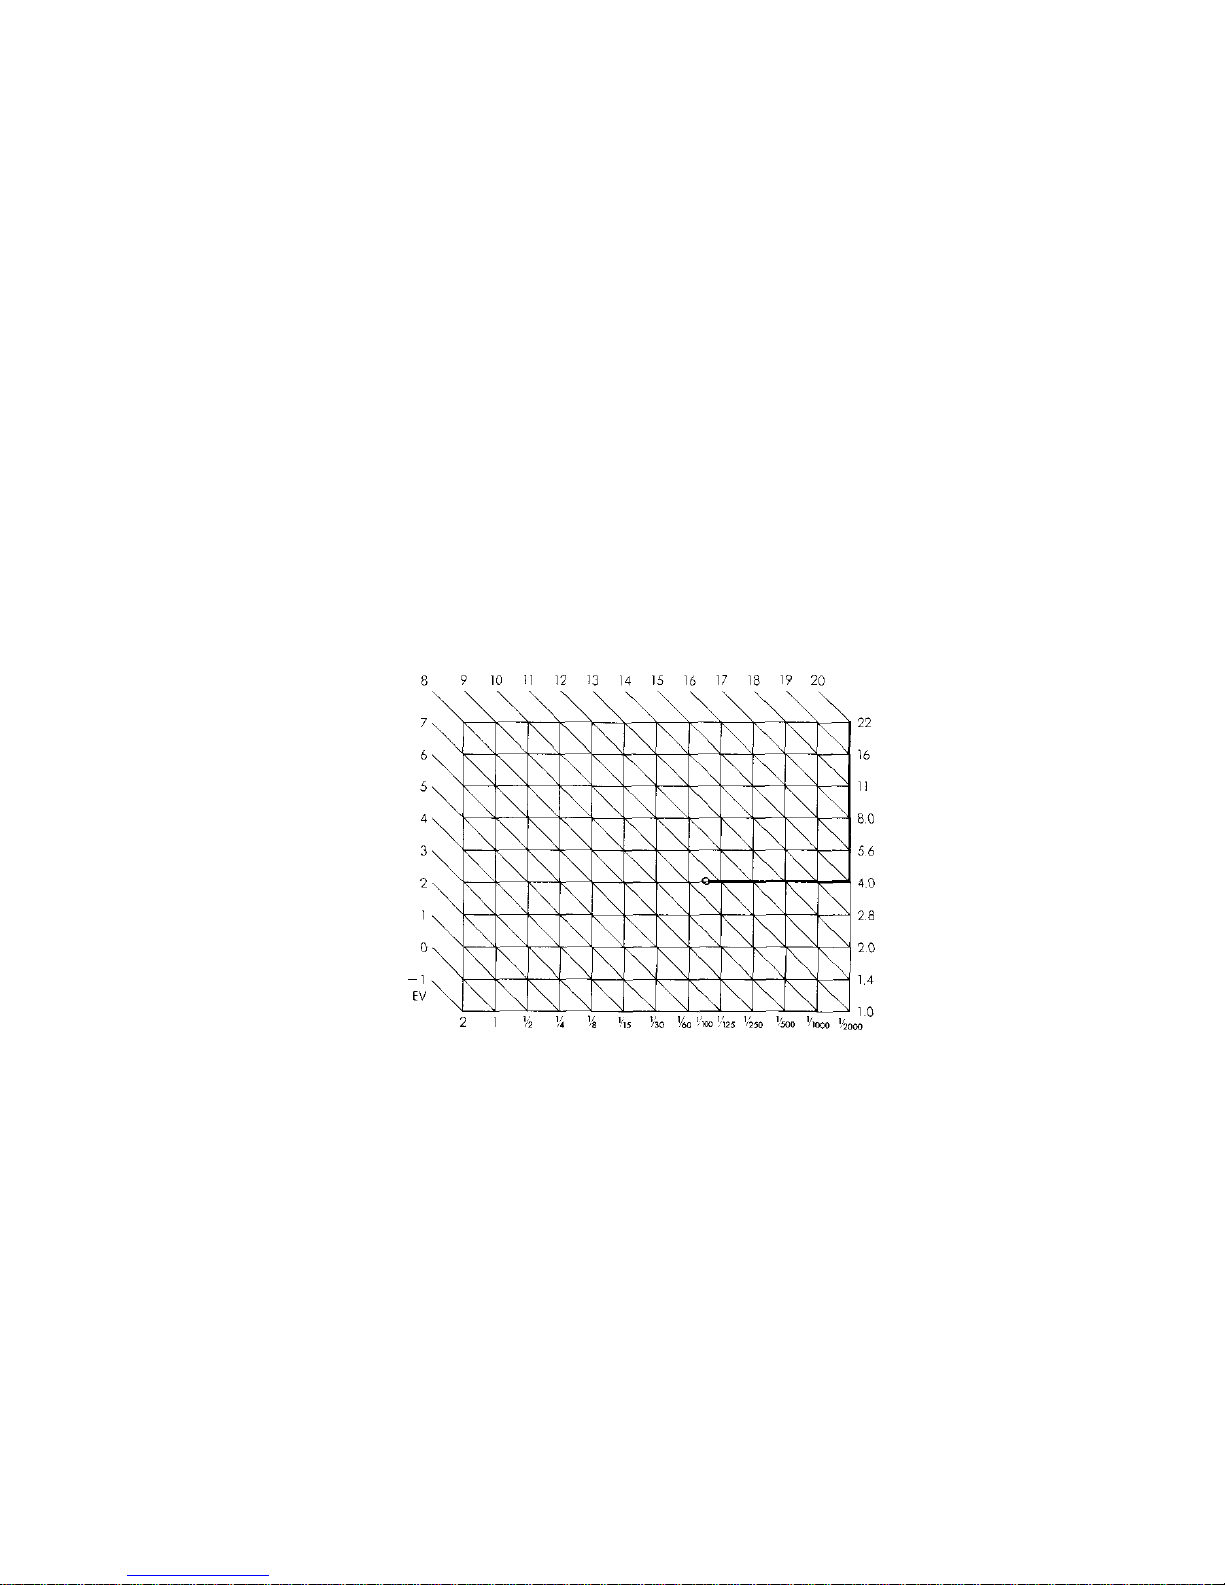
Full-Synchro Flash F280
Combined
with
the
F280,
the
OM77AF
can syn-
chronize with the flash unit at all shutter speeds,
resulting in a flexible program that can cope with
fill-in flash photography as easily as it can
the more usual poor light situation. The aper-
ture is set at f4 (or if this is not available, the maxi-
mum aperture of the lens), and when natural light
requires a speed of 1/100 sec. or slower a Normal
"OTF" Flash is produced; when a higher speed is
required, a Super FP Flash is produced auto-
matically. After the shutter speed reaches 1/2000
sec., the aperture is adjusted to provide correct
exposure.
61
Shutter speed
Aperture
Page 63
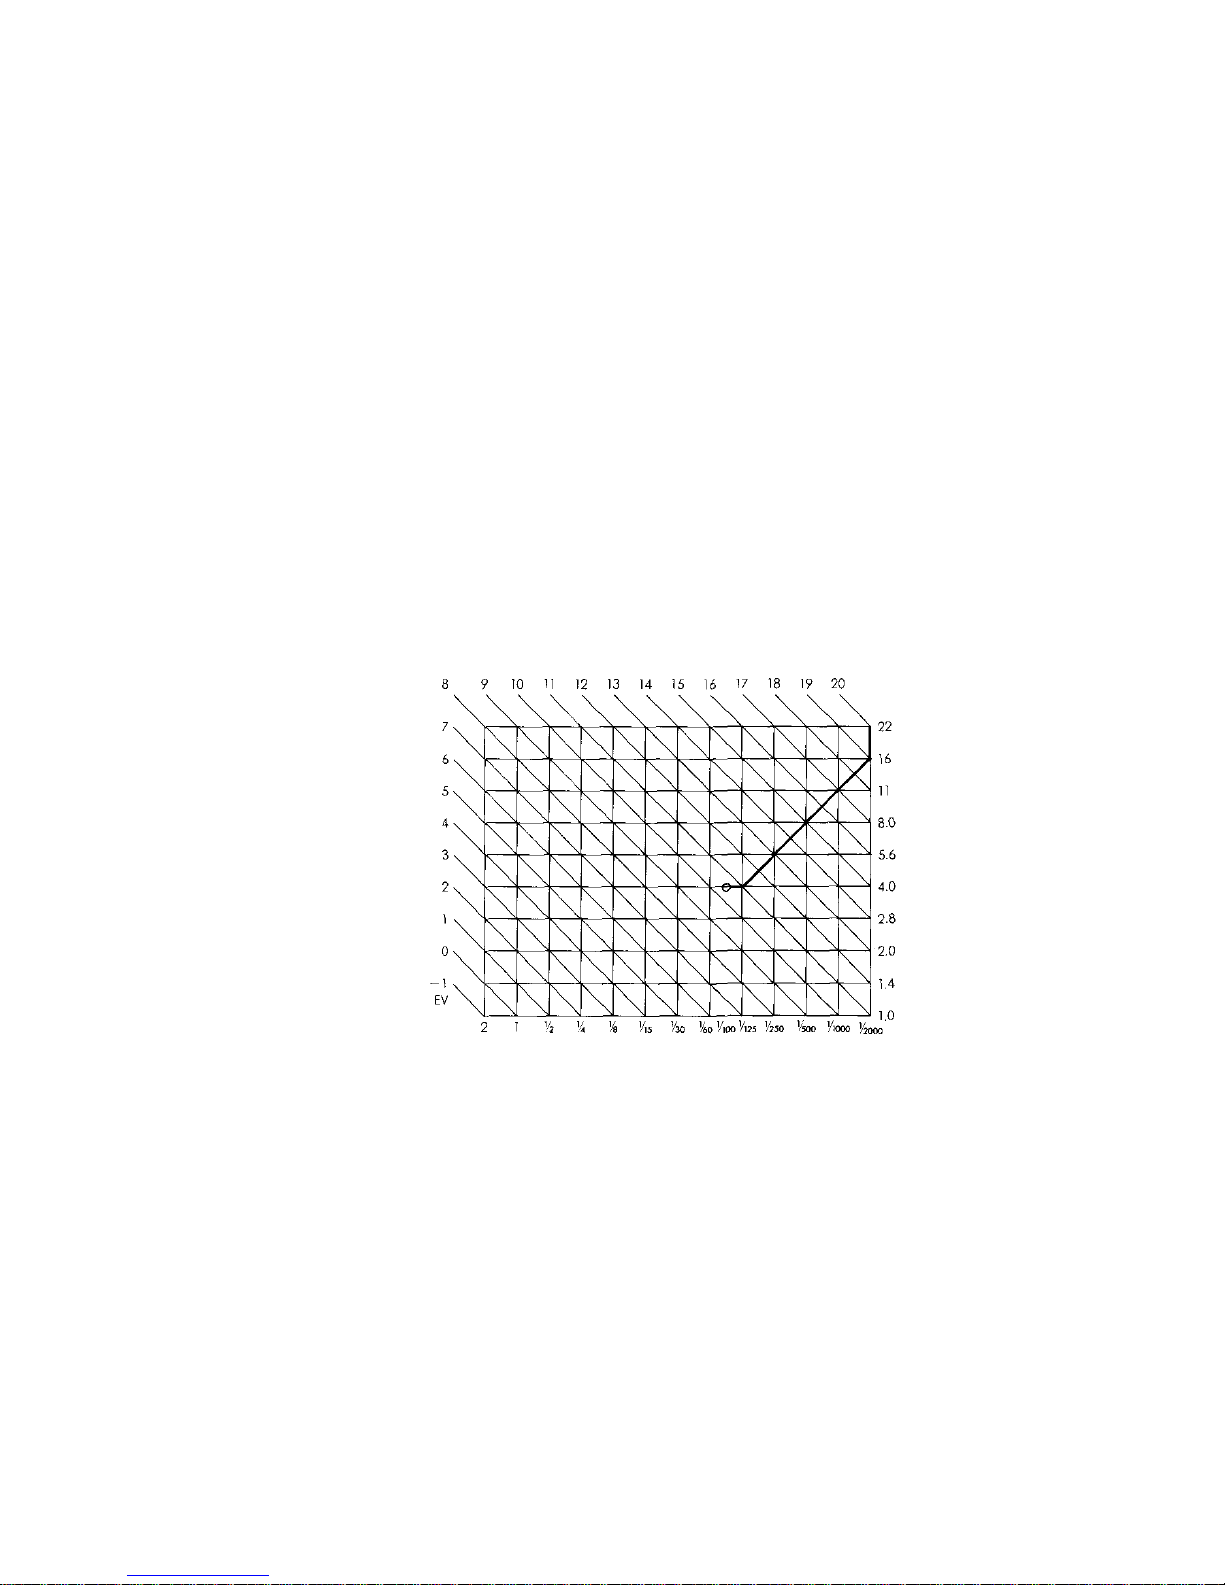
T-Series Flash
Combined with a T-Series flash (except the T-45),
the OM77AF can be used for a variety of advanced
flash techniques, bounce or diffused lighting for
example, while correct exposure is assured by the
camera's TTL Direct "OTF" program, which con-
trols the amount of light emitted in accordance
with the distance of the subject. When using a
T-Series Flash, the aperture is set at f4, the shutter
speed is set at 1/100 sec., and a flash fired only
when a shutter speed of 1/100 sec. or slower is
required.
62
Shutter speed
Aperture
Page 64
TTL Direct "OTF" Light Metering
(Center-weighted, Averaged Light
Metering)
The
OM77AF
employs
the
famous
TTL
Direct
"OTF" (Off-The-Film) light metering system. An
Olympus first, this system which measures the light
as it falls on the film surface and controls the exposure accordingly, results in superbly accurate
automatic exposure even when there are sudden
changes in illumination during the exposure, or
when it is difficult to determine the light condi-
tions beforehand, as is the case in macro photo-
graphy. When a flash unit is employed, metering
requires no effort whatsoever, even when you
employ T-Series units for bounce or diffused-light
techniques. In addition, when combined with the
Full-Synchro Flash F280, the camera can make use
of speeds of up to 1/2000 sec. for perfectly
exposed all-condition shooting.
63
Page 65
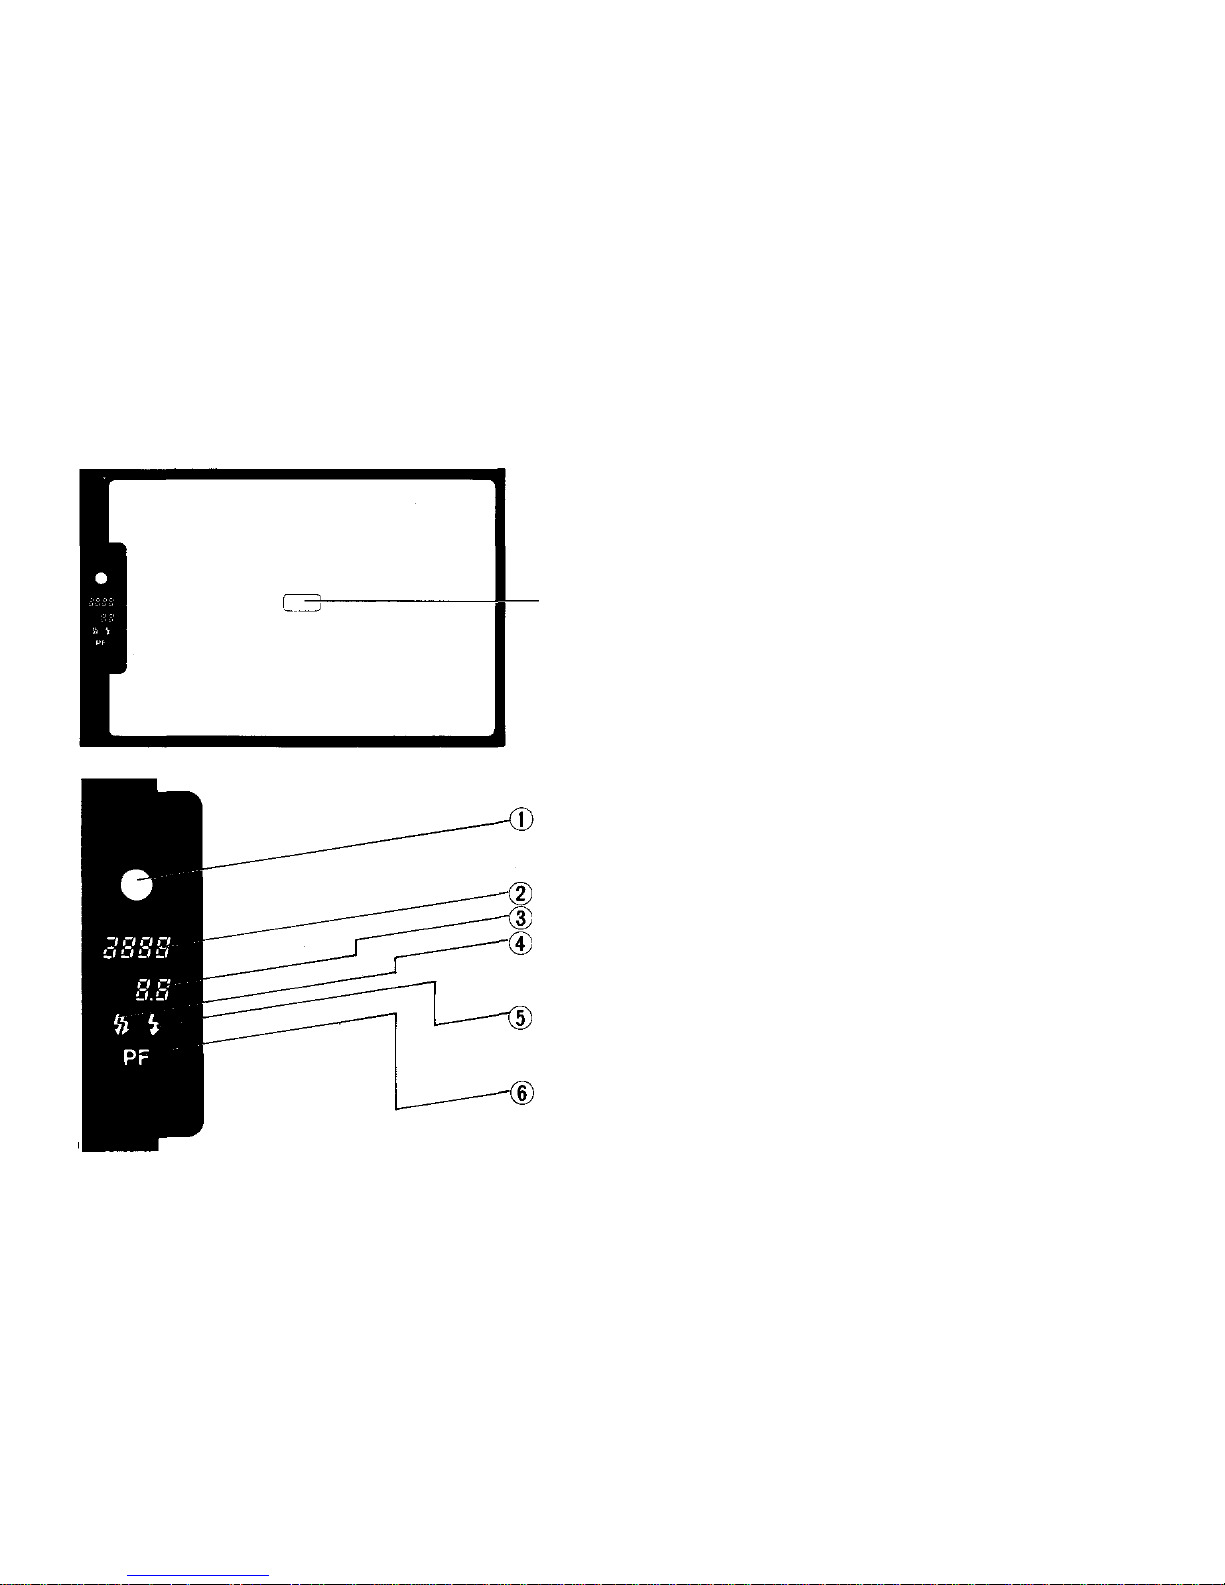
Viewfinder Display
Autofocus Frame
In-Focus/Focus Impossible LED:
Green LED: in-focus
Red LED: autofocus is not possible
Shutter Speed Indicator
Aperture Setting Indicator
Super FP Flash Indicator
Lights: charged
Blinks: to indicate use of Super FP Flash
Normal "OTF" Flash Indicator
Lights: charged
Blinks: correct Normal "OTF" exposure
Power-Focus Indicator
64
Page 66
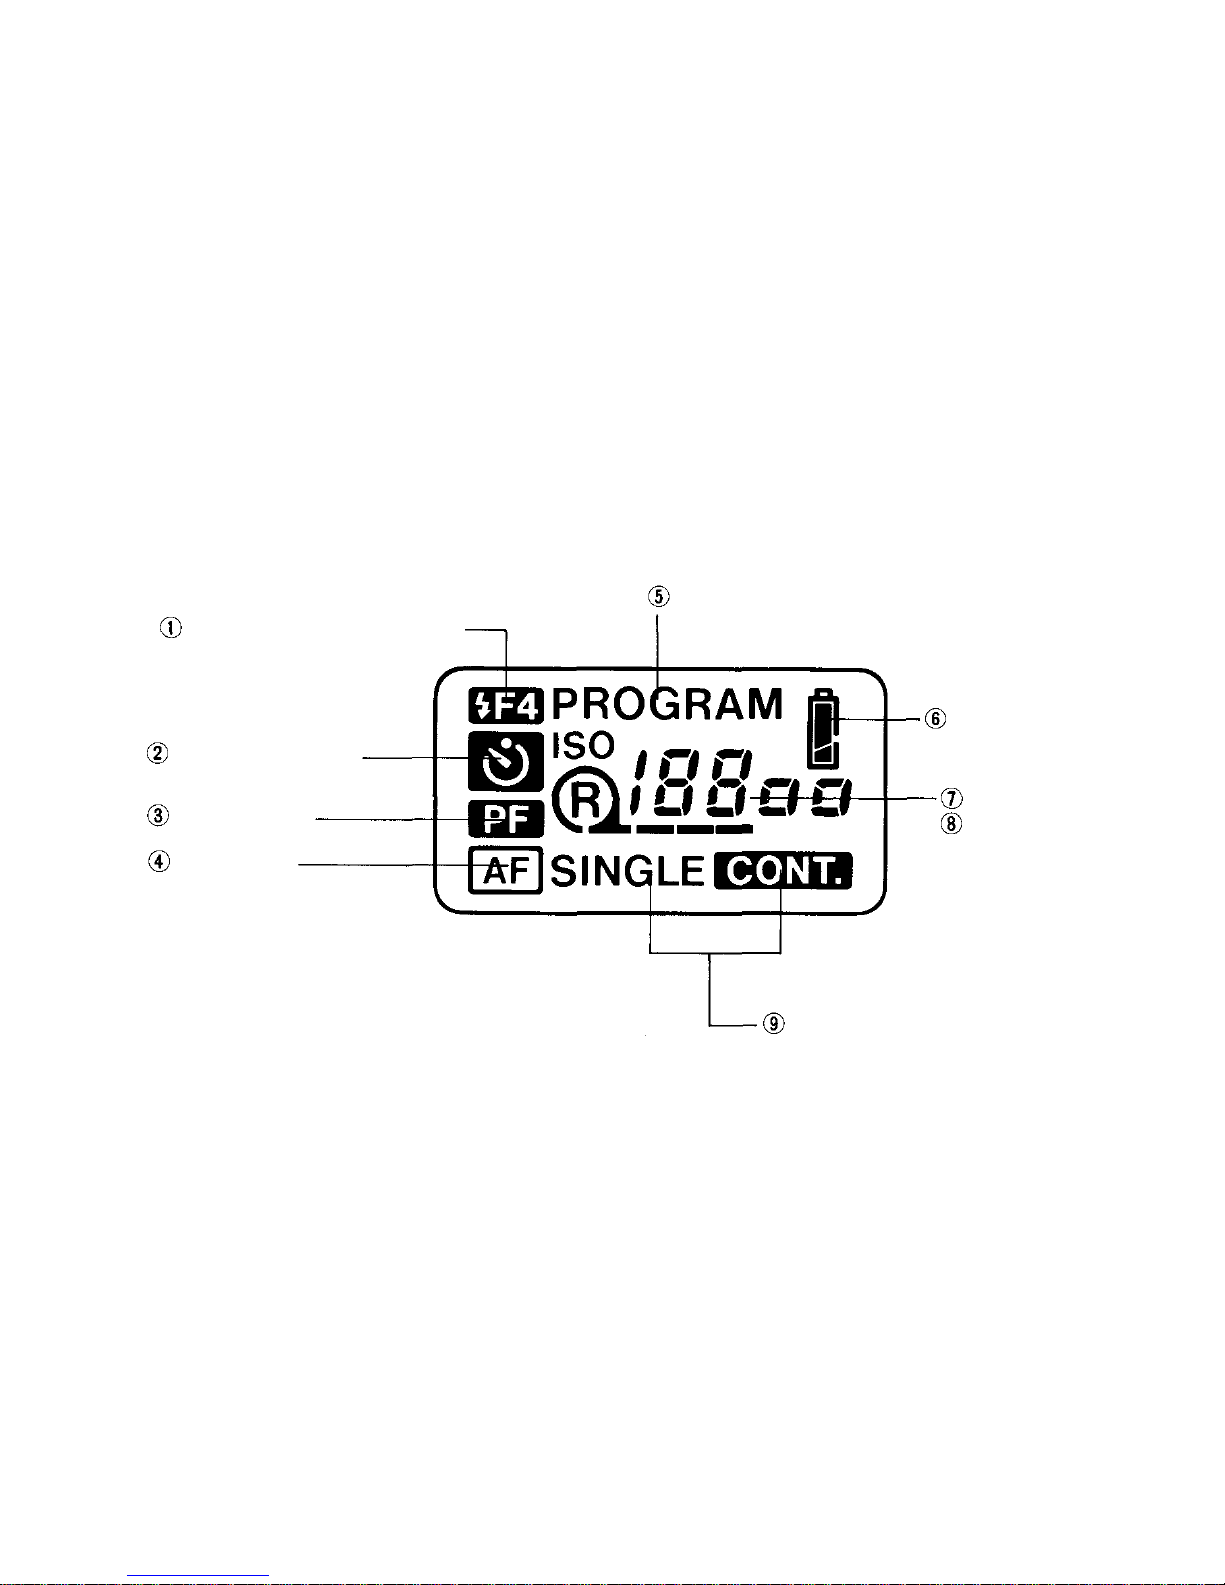
LCD Panel
The
OM77AF
employs a large
interactive
LCD
panel
that
can "reply"
to the
photographers
adjustments
with information on the camera's operating condition. The following information is displayed at the
appropriate time:
Normal Flash mode display
Self-timer display
Power focus
Autofocus
Exposure mode
Battery condition
ISO speed
Exposure counter
Drive mode selected
65
Page 67
OM Lenses
While designed for a new series of Olympus AF
lenses,
the
OM77AF
can be
used
with
non-AF
OM
lenses (although not in the AF mode), with the
result that most Zuiko lenses, from the Fisheye to
the tele-converters, can be mounted on the camera.
The
camera
will
automatically
select
the
aperturepreferred AUTO mode and a shutter speed appropriate for the aperture selected by the photo-
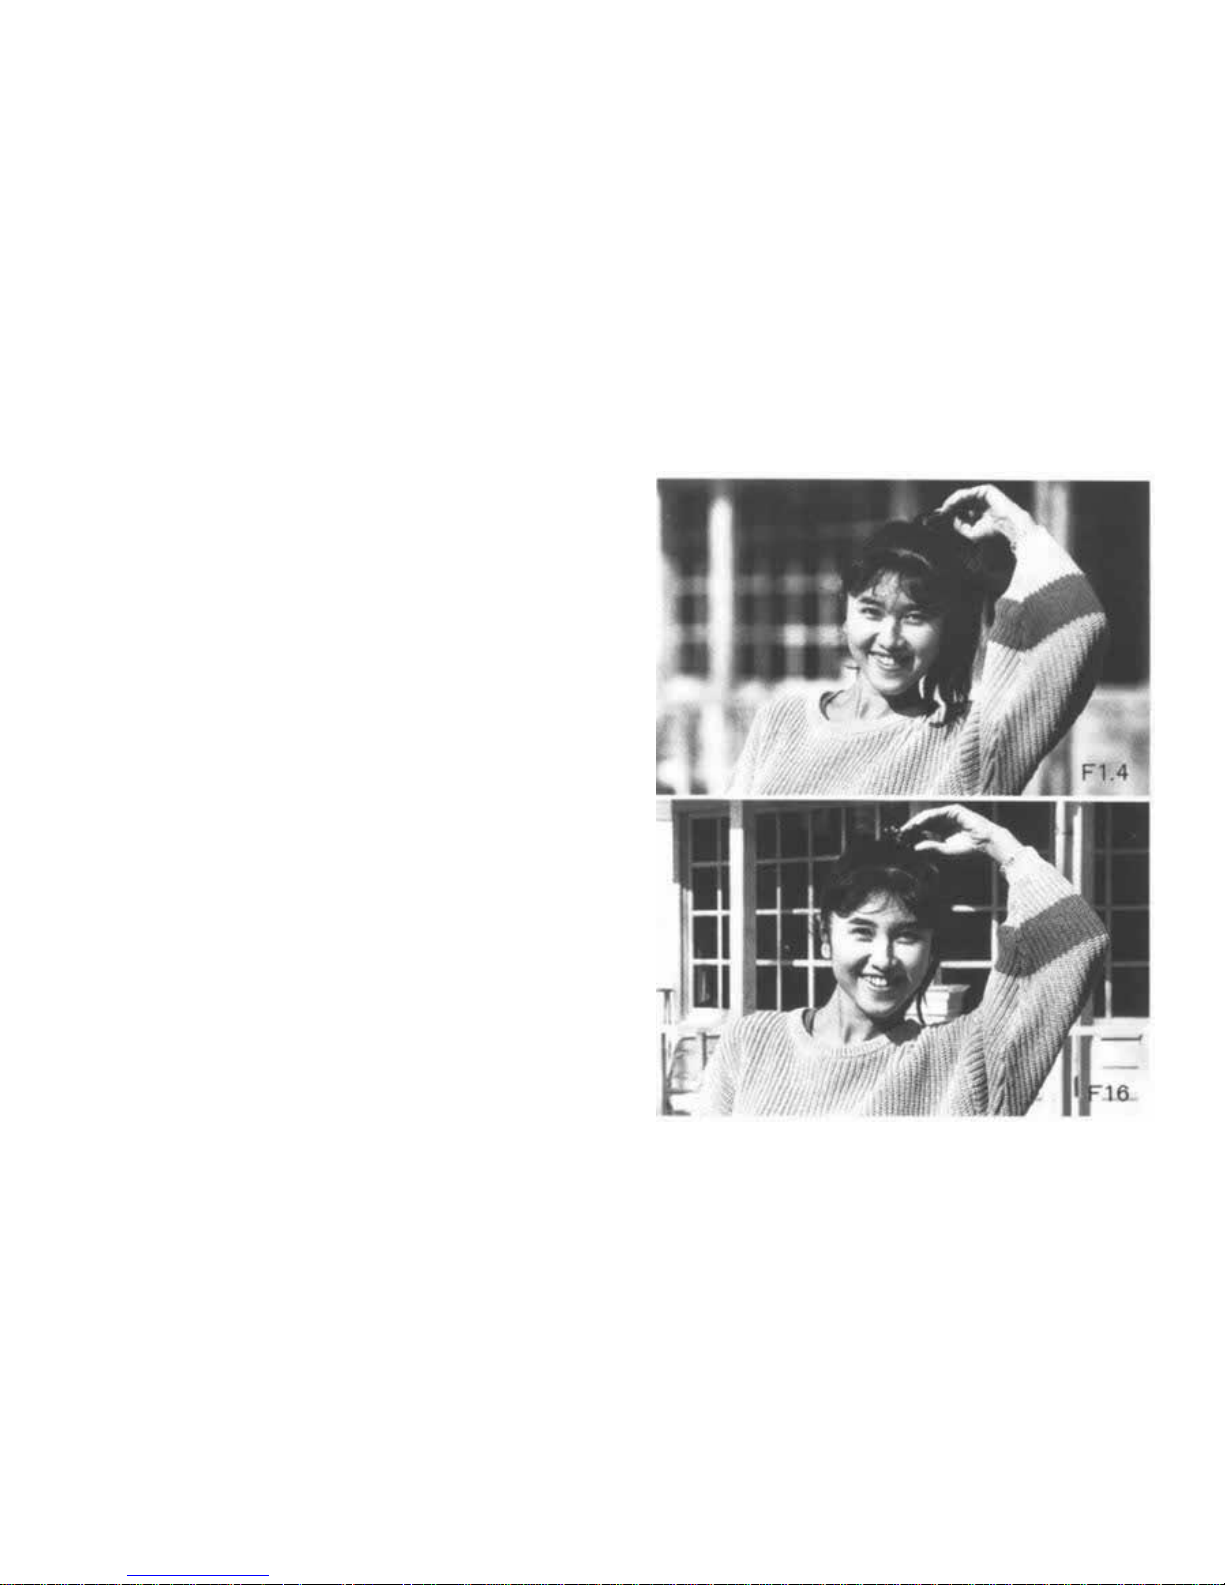
grapher. This allows the user to vary depth of field
for a variety of creative effects: a small aperture
for a photograph in which everything is sharply
defined, or a large aperture which, by blurring the
back- and foreground, emphasizes the subject.
There is no viewfinder display for in-focus/focus
impossible, shutter speed or aperture when using
OM lenses.
66
Page 68
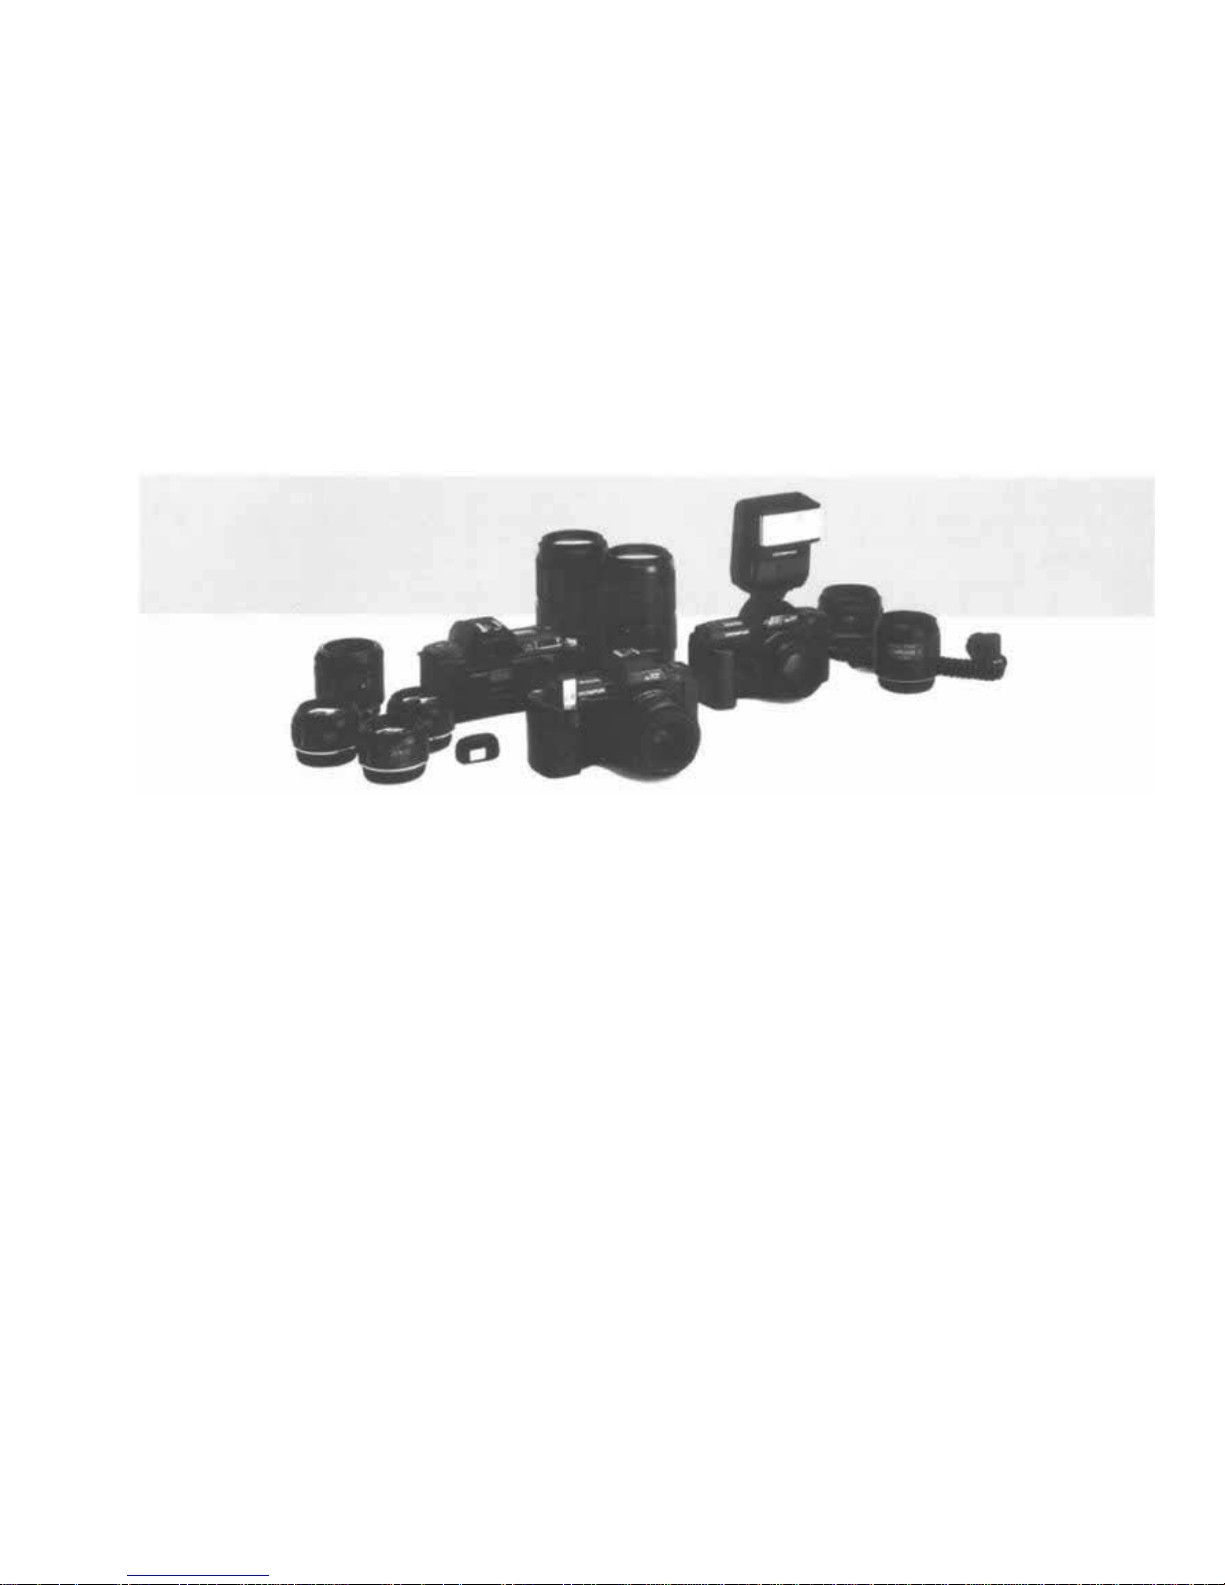
OM AF System
OM AF System Lenses OM AF System Accessories
AF 50 mm F1.8 Full-Synchro Flash F280
AF 28 mm F2.8 Power Flash Grip 300
AF Zoom 35 - 70 mm F3.5 - 4.5 Power Grip 100
AF Zoom 28 - 85 mm F3.5 - 4.5* Dioptric Correction Lens 2 (with Eyecup)
AF Zoom 70 - 210 mm F3.5 - 4.5 Eyecup 2
AF Macro 50 mm F2.8* Recordata Back 100
AF 24 mm F2.8* TTL AUTO Cord F 0.6 m
AF Zoom 35 - 105 mm F3.5 - 4.5*
* Available in near future.
67
Page 69

Notes on Using the
OM77AF
with Previous OM System Units
• Auto Extension Tube 7/14/25 and Telescopic Auto Extension Tube 65-116 can be used only with
OM lenses when autofocus is not available.
• When using the Telescopic Auto Extension Tube 65-116 the tripod mount should first be removed.
• The following units cannot be used:
The Zuiko Reflex 500 mm F8, Zuiko 600 mm F6.5, and Zuiko 1000 mm F11 lenses; all Motor
Drive Group units; the Auto Bellows, TTL Auto Cord T0.3/0.6/2/5 m, TTL Auto Multi Connector,
TTL Auto Connector T20, Slide Copier, Roll Film Stage and Trans-llluminator Base X-DE; the
Electronic Flash T45; Interchangeable Focusing Screens; Recordata Backs for other OM cameras;
Polarizing Filter POL; Filter R60 (R1).
• T10 Ring Flash 1, T8 Ring Flash 2 and Macro Flash Shoe Ring cannot be used in combination with
AF zoom lenses.
•
Olympus
Auto
Focus
lenses
are
exclusively
designed
for the
Olympus
OM77AF.
68
Page 70
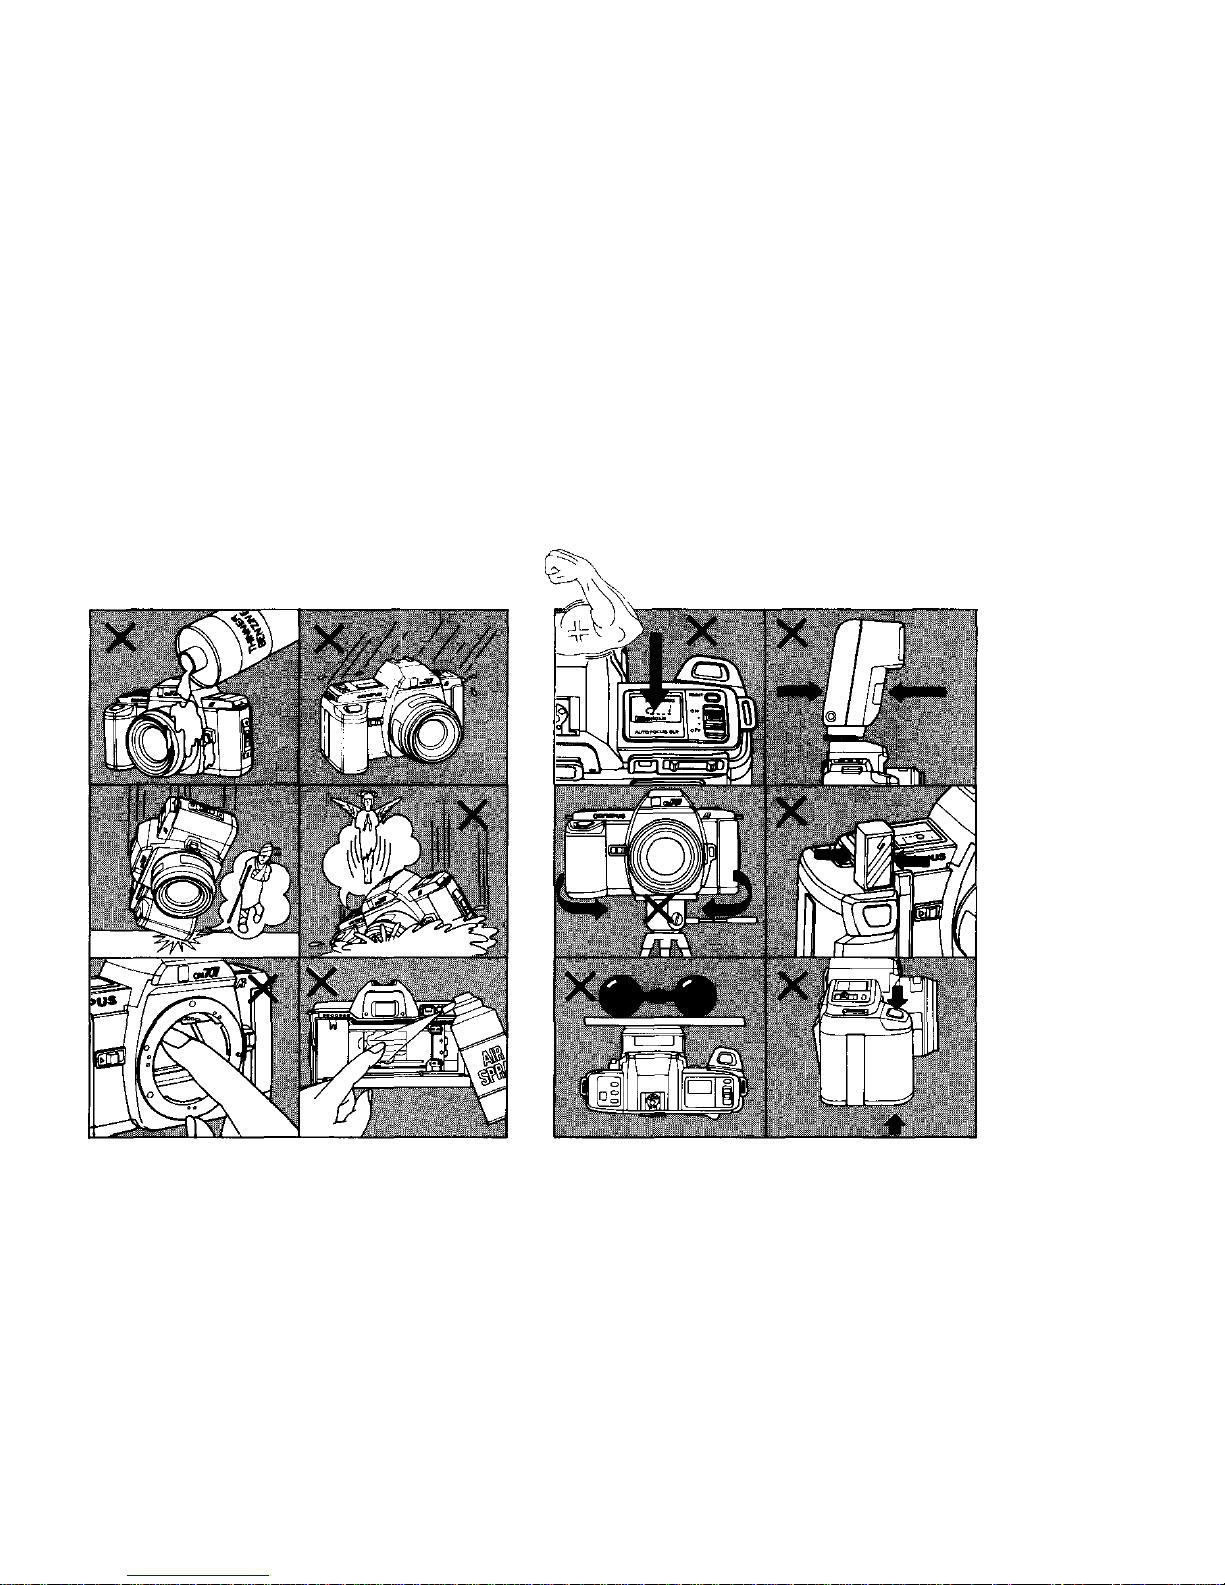
Handling Care
Take care in handling the camera.
Do not use extra force.
69
Page 71
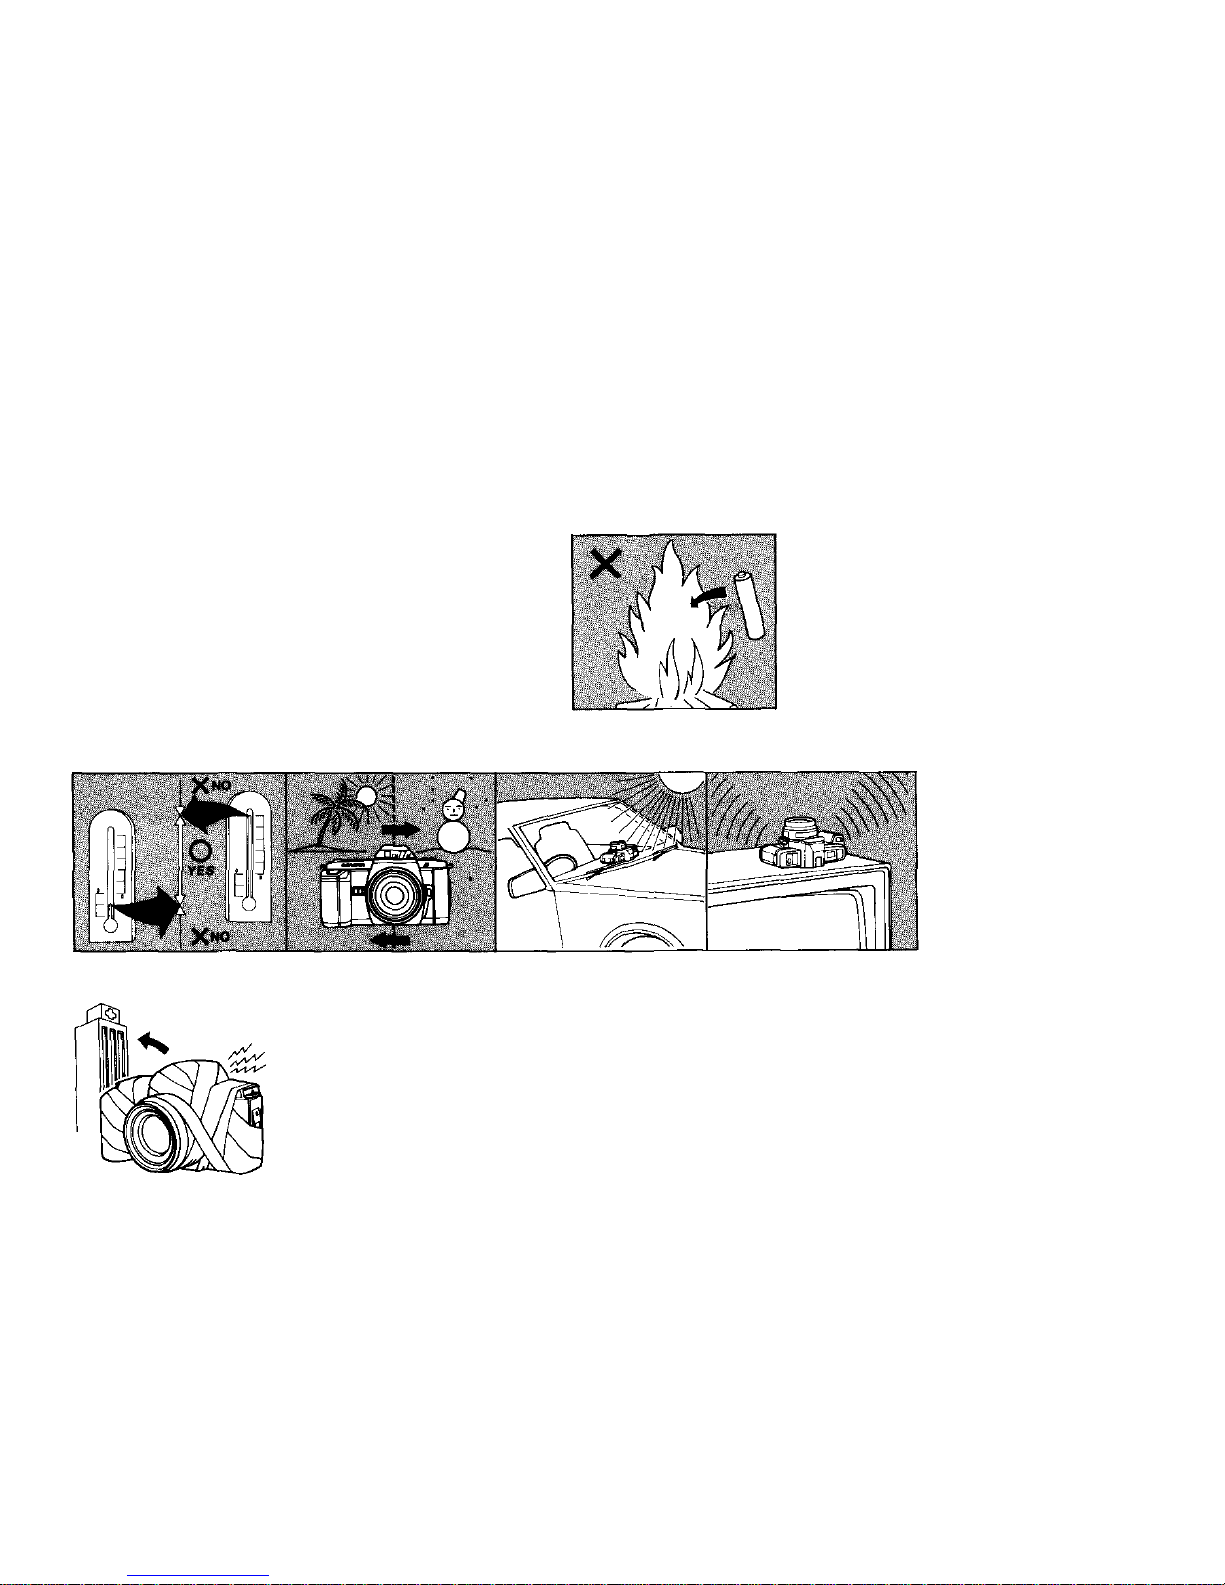
Storage Care
Battery Precautions
Guard against high temperatures and magnetic
field.
In case of malfunction, take the camera to your nearest Olympus
service station.
70
Page 72

Questions and Answers
Q: What kind of batteries should I use?
A: Use four LR03 (AAA) alkaline manganese bat-
teries. Don't mix various kinds of batteries, or
install new with old. Change all batteries at one
time. The provided batteries are for testing
operation at the time of purchase.
Q: The camera does not work.
A: (1) Try sliding the power switch OFF and ON
again. (2) If the low battery indication remains
on even when the shutter release is pressed halfway, the camera will not work.
Q: The lens moves to infinity after it is mounted
on the body.
A: The
lens
is
automatically
reset
to infinity
for
coordination of lens control. If the lens is not
reset, press the reset button or turn the power
switch OFF and ON again.
Q: Why doesn't the camera focus on the image?
A: The camera may not focus in some cases. Focus-
ing is difficult when, for example, the subject
is moving quickly, the camera is being violently
shaken, or the subject is of a kind difficult to
focus on (see "Subject difficult for autofocus",
page 56).
Q: The indicators in the viewfinder disappear while
shooting.
A: They automatically disappear after appearing
for 30 seconds, in order to save battery power.
To re-display them, lightly touch the shutter
release button.
Q: The AF illuminator lights, but the camera does
not focus.
A: It may not focus even when the subject is close,
if the subject reflects little light (as when
colored blue or black).
Q: Can the front-most ring be manually rotated?
A: Do not forcibly turn it. This may damage an
inside gear, and the flash control may not
operate. If you happen to move it, press the
reset button to move the Iens back to .
Q: Why won't the shutter fire when I press the
release button?
A: It is probably unfocused. Check the LED in the
viewfinder. Also, it may be out of film. Or the
batteries may be exhausted.
Q: The lens locking button is pressed while shoot-
ing.
A: If this button is fully pressed, resetting may
occur. So be careful.
Q: The Power Flash Grip 300 does not recharge.
A: Are the batteries exhausted? Press the reset
button to check the batteries. Also note that
the flash unit cannot be recharged during auto
focusing, winding, and exposure.
71
Page 73

Q: Why doesn't the flash fire?
A: There are two possible reasons. (1) Flash firing
is automatically inhibited at shutter speeds
faster than 1/100 sec. (when using T-series
flashes and the Power Flash Grip 300). (2) Are
you trying to fire before the unit has been
recharged?
Q: When should I check the batteries?
A: (1) When new batteries are inserted. (2) After
the camera has not been used for a long time.
(3) Before beginning a prolonged period of use.
(4) When it is very cold.
Q: In the finished print, a peripheral portion of the
picture is cut, though I framed it inside the
viewfinder.
A: In some color prints and color slides, a periph-
eral portion of the picture may be eliminated in
the laboratory. It is recommended, therefore,
to leave some margin in composing your picture.
Q: How do I clean the lens?
A: Use a soft, clean, cotton cloth (preferably a
washed one) and a small quantity of pure
alcohol. Slowly wipe the lens with a spiral
motion, from the center outward.
Q: How do I clean the camera?
A: Dust, moisture, and salty air are harmful to
cameras and lenses. Wipe the camera surfaces
clean and let dry after using it in rain or mist.
When used near the sea, wipe it off with a
cloth moistened with clean water, then clean
and store it.
Q: Why are there sometimes scratches on the
film?
A: The cause may be a soiled film passage. The
film compartment may be soiled by film debris
during long use of the camera. Be sure to dust
off the camera periodically.
Q: How can I preserve the camera in a humid
environment, and prevent the growth of
mildew on it?
A: Take it out of the case and store it in a poly-
ethylene bag, together with a dessicant such as
silica gel. However, do not use a dessicant that
includes insecticide.
Other cautions
• When other companies' lenses are used, correct
exposure may not be obtained or they may cause
malfunctioning, so do not use them.
• This camera cannot be used for infrared photography.
72
Page 74
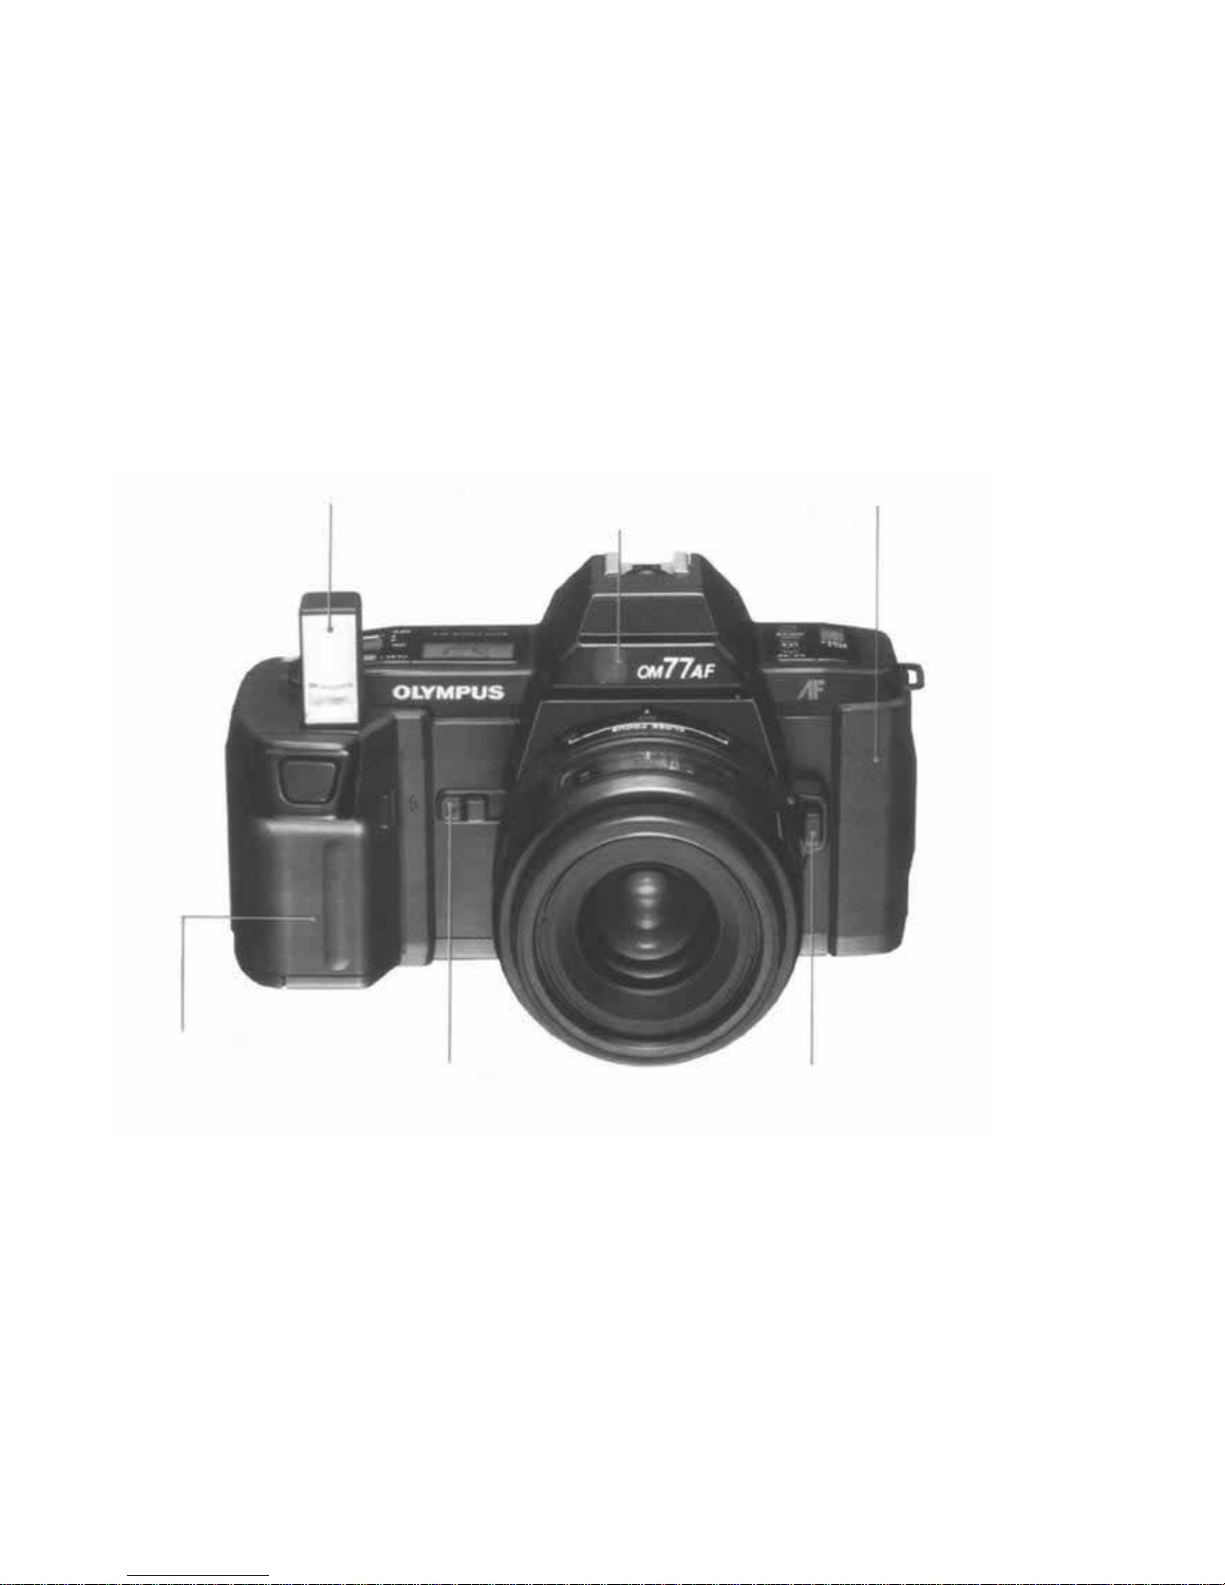
Description of Controls
1. Pop-Up Flash
6. Autofocus Illuminator
5. Rubber Grip Section
2. Power Flash Grip
300
3. Grip Lock Knob
4. Lens Locking Button
73
Page 75
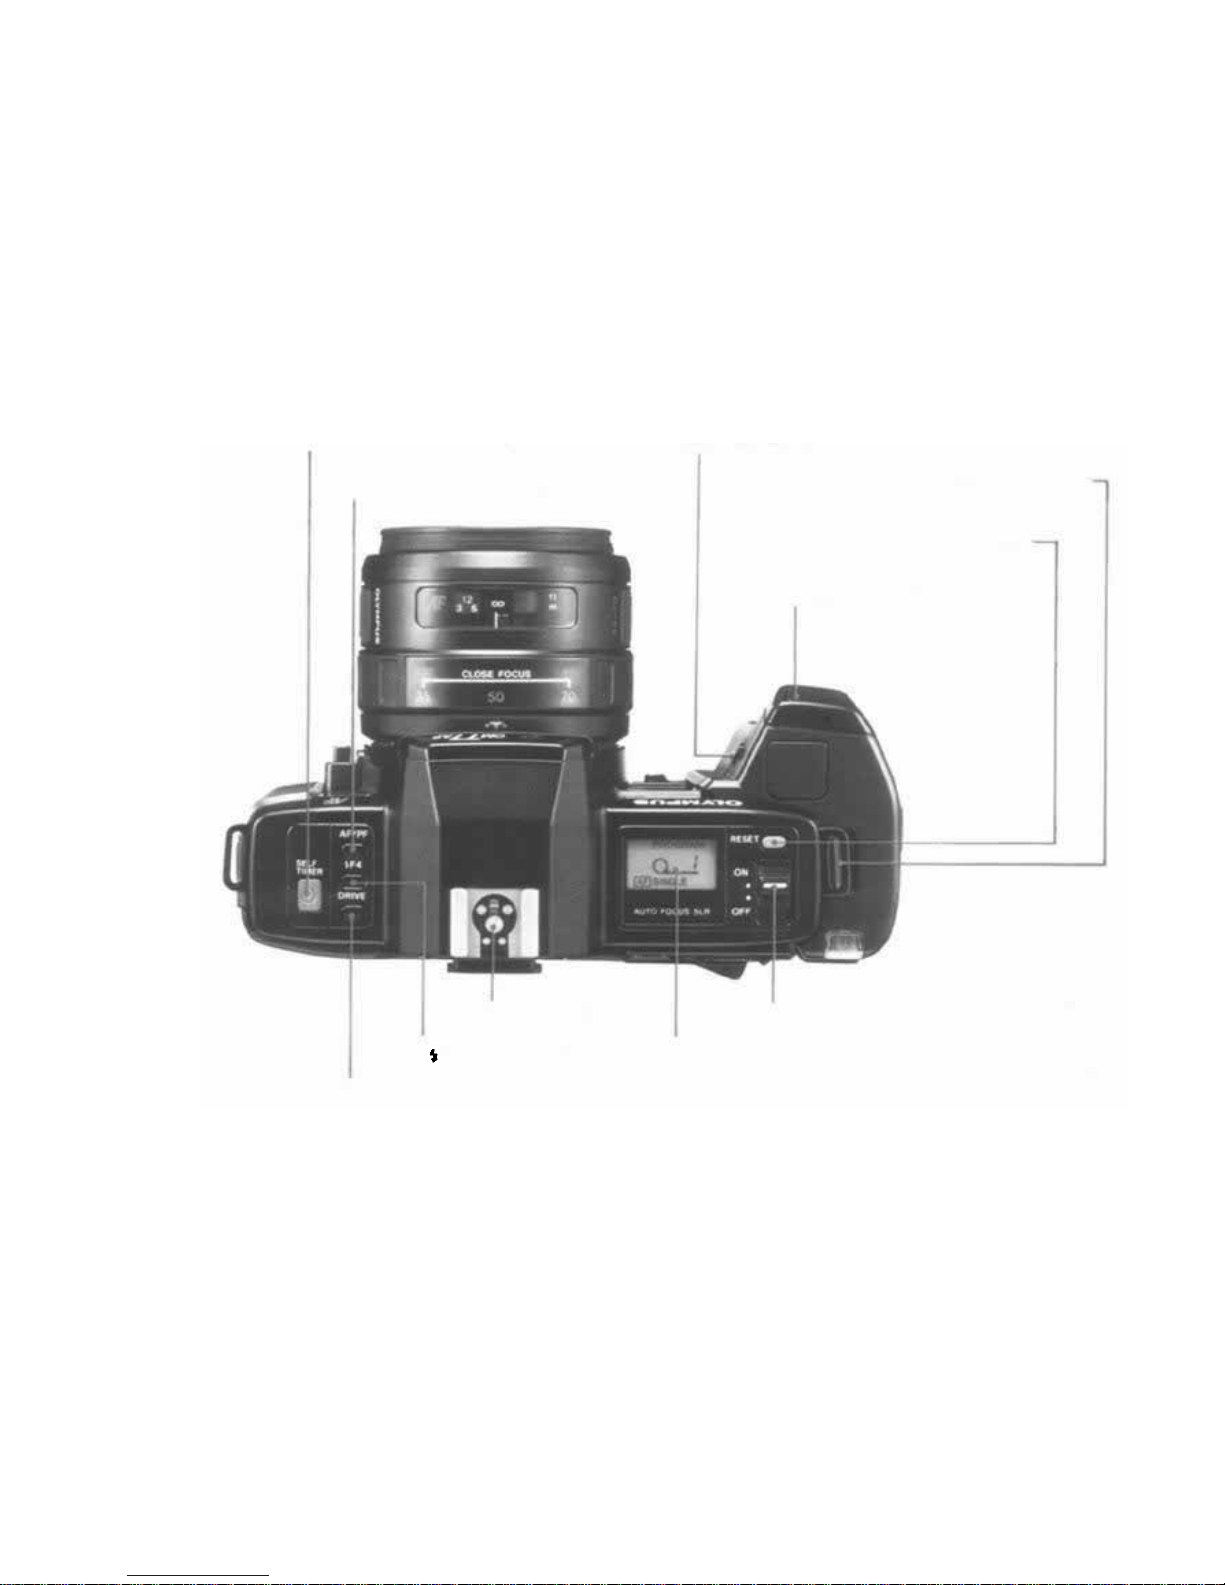
7. Self-Timer Button
17. Flash Pop-Up Lever
8. AF/PF Switching Button
16. Shoulder Strap Eyelet
15. Reset Button
14. Shutter Release Button
11. Hot Shoe
13. Main ON/OFF Switch
12. LCD Panel
10. F4 Mode Button
9. Single/Continuous Switching
Button
74
Page 76
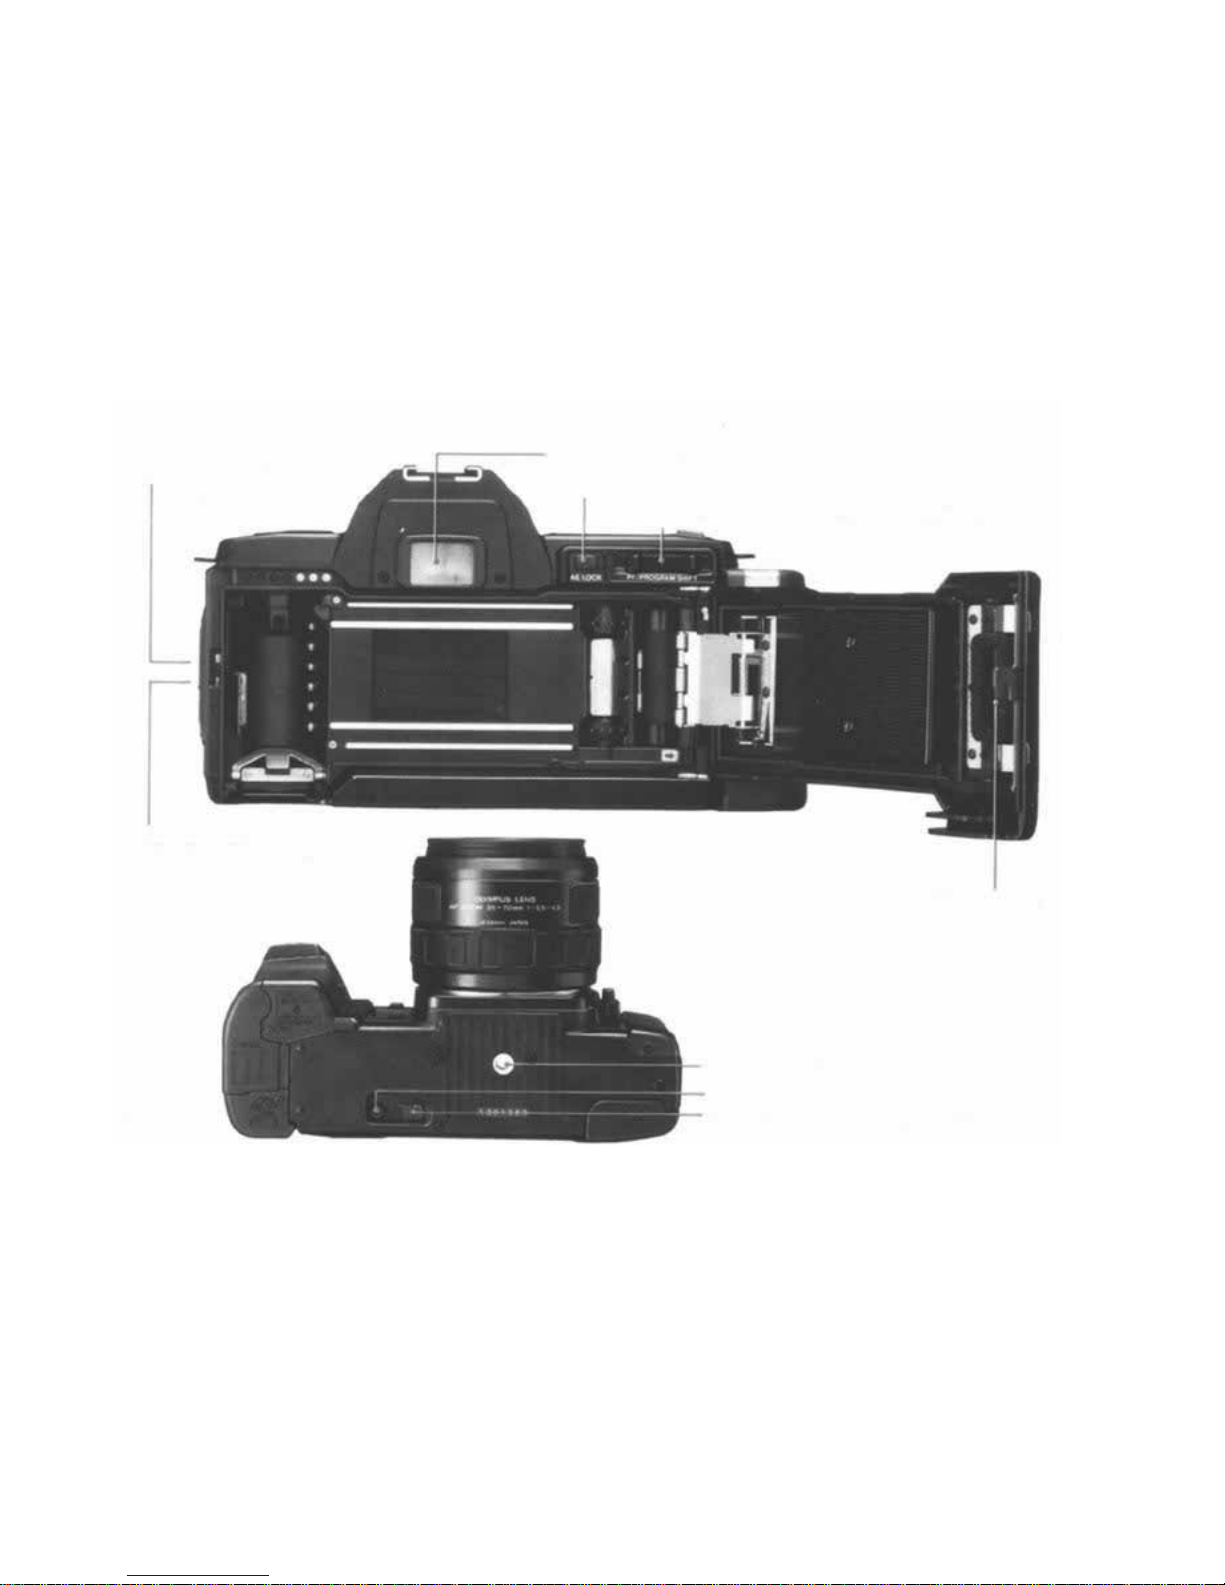
19. Camera Back
Release Locking
Button
20. Eyepiece
21. AE Lock Button
22. Shift Knob (Power Focus/Program Shift)
18. Camera Back
Release Knob
23. Film Window
24. Tripod Socket
25. Rewind Button
26. Rewind Locking Knob
75
Page 77

76
Main Specifications of the OM77AF
Type: Autofocus, auto-exposure 35mm SLR
camera.
Film format: 24 x 36 mm.
Lens mount: Olympus OM mount (designed for
AF lenses).
Lens: (1) Olympus AF lenses. (2) OM lenses.
Shutter: Electronically controlled vertical-travel
focal-plane shutter. Shutter speed: 2 — 1/2000
sec.
Synchronization: Hot shoe: Super FP Flash con-
tact; X contact; T-Series Flash contact.
Autofocus: Method: TTL phase detection system
with CCD Zero-In sensor.
Focusing sensitivity range: EV 4 — 18 (ISO 100).
Actuation method: Single or continuous. Focus
lock possible.
Indication: Single-point 2 color LED in viewfinder; focused: green lamp; autofocus impos-
sible: red lamp.
AF illuminator: Automatic actuation in low light.
Manual focus: Olympus AF lenses: By shift knob,
OM lens: By focus ring.
Light metering method: Exposure control: TTL
Direct "OTF" Metering (center-weighted,
average light measurement).
Exposure modes: Multi-program: (1) Program.
(2) Program shift by shift/power focus knob.
(3) Automatic program shift based on focal
length of lens. (4) Aperture preferred AE when
using OM lens.
Program auto-exposure: Type: Electronic shutter
with automatic control of shutter speed and
aperture.
Light measuring range: EV 1 — 20 (ISO 100
AF 50mm F1.8).
AE lock: By AE-lock button.
Flash control: Full-Synchro Flash F280: Auto-
matic selection of Normal "OTF" Flash or
Super FP Flash.
Power Flash Grip 300: Flashmatic.
T-Series Flash: TTL Direct "OTF" flash.
Regular flash units: Normal Auto flash with
F4 mode.
Automatic film speed setting: Automatic setting
for film with DX code; Range: ISO 25 — 3200.
Viewfinder: Focusing screen: Fixed, Super Lumi-
Micron Matte with autofocus frame.
Finder view-field: 93 % of actual picture field.
Magnification: 0.8X
at infinity with 50 mm
standard lens.
Page 78

77
Viewfinder information: Type: LCD display, back
illumination by LED.
Contents: (1) Focus display. (2) Shutter speed/
Aperture display. (3) Over/Under exposure
warning. (4) Flash display. (5) Power focus display.
Display limiter: Approx. 30 sec.
LCD panel information: Various mode informa-
tion in large LCD panel.
Film loading: Auto-loading (automatically wound
to first frame).
Film wind: Automatic wind; Single/Continuous
switchable.
Max. wind speed: approx. 1.5 frames per sec.
Automatically stopped at film end.
Battery life: With Power Flash Grip 300: 8 rolls
or more (using flash for 50 % of exposures).
With Power Grip 100: 25 rolls or more.
Using LR03 (AAA) (alkaline manganese) batteries, normal temperatures, 24EX film.
Exposure counter: Progressive type, displayed on
LCD panel.
Film rewind: Automatic rewind with rewind but-
ton. Automatic stop at film end.
Self-timer: 12 sec. delay electronic self-timer.
Power source: Supplied by Power Flash Grip 300
or Power Grip 100; Four LR03 (AAA) alkaline
manganese batteries.
Battery check: 3-step display in LCD panel.
Data hold: Static memory for necessary functions.
Dimensions: 141(W) x 89(H) x 52(D) mm (5.55"
x 3.50" x 2.05") (without grip).
Weight: 555 g (19.6 oz.) (without grip).
Page 79

78
Main Specifications of Power Grip 100
System application: OM77AF
Type: Separable power-source grip.
Power switch: After mounting, controlled by
camera's power switch.
Shutter release: Electromagnetic shutter release for
OM77AF.
Battery life: Sufficient for 25 rolls or more
(alkaline-manganese, normal temperatures, 24
Ex. film).
Camera mount: Exclusive slide-bayonet mount.
Electrical connection with camera: Cordless, direct-
contact.
Power source: LR03 (AAA) alkaline-manganese
battery x 4.
Facing: Rubber pad.
Dimensions: 35(W) x 64(H) x 61(D) mm (1.4" x
2.5" x 2.4") increases camera width by 5.7 mm
(0.2").
Weight: 43 g (1.5 oz.) without batteries.
Main Specifications of Power Flash
Grip 300
System application: OM77AF
Type: Separable power-source grip with built-in
flash.
Power switch: After mounting, controlled by
camera's power switch.
Shutter release: Electromagnetic shutter release for
OM77AF.
Battery life: Sufficient for 8 rolls or more (using
flash for 50 % of exposures, alkaline-manga-
nese, normal temperatures, 24 Ex. film).
Camera mount: Exclusive slide-bayonet mount.
Electrical connection with camera: Cordless, direct-
contact.
Guide number: 12 (ISO 100, meters).
Exposure control: Flashmatic.
Coverage angle: Equivalent to angle of view of
35 mm lens.
Recycling time: 4 sec. with LR03 (AAA) alkaline-
manganese batteries.
Flash duration: Approx. 1 /2000 sec.
Flash power-source switch: Power ON: pop-up
lever, Power OFF: flash reflector pushed in.
Power source: LR03 (AAA) alkaline-manganese
battery x 4.
Facing: Rubber pad.
Dimensions: 49(W) x 64(H) x 67(D) mm (1.9" x
2.5" x 2.6") increases camera width by 19 mm
(0.7").
Weight: 80 g (2.8 oz.) without batteries.
Specifications subject to change without notice.
Page 80
Page 81

OLYMPUS OPTICAL CO.,LTD.
San-Ei Building, 22-2, Nishi Shinjuku 1-chome, Shinjuku-ku, Tokyo, Japan. Tel. 03-340-2211
OLYMPUS CORPORATION
Crossways Park, Woodbury, New York 11797, U.S.A. Tel. 516-364-3000
OLYMPUS OPTICAL CO. (EUROPA) GMBH
Postfach 104908, Wendenstrasse 14-16, 2000 Hamburg 1, West Germany. Tel: 040-23773-0
OLYMPUS OPTICAL CO. (U.K.) LTD.
2-8 Honduras Street, London EC1Y OTX, England. Tel. 01-253-2772
PRINTED IN JAPAN 1186-15MS
 Loading...