


Page 1
Ol^MPUS'
DIGITAL CAMERA
5tglus710//^ 710
Stglus 700//^ 700
Advanced
Manual
• Thank you for purchasing an Olympus digital camera. Before you start to use your new
camera, please read these instructions carefuHy to enjoy optimum performance and a
longer service life. Keep this manual in a safe place for future reference.
• We recommend that you take test shots to get accustomed to your camera before taking
important photographs.
• In the interest of continually improving products, Olympus reserves the right to update or
modify information contained in this manual.
• The screen and camera illustrations shown In this manual were produced during the
development stages and may differ from the actual product. Unless otherwise specified,
the explanation about these illustrations is provided in Stylus710/p710,
Detailed explanations of all the functions
including camera buttons and menus are
provided. Use them according to your
purpose.
Page 2

How to use this manual
^Seatxhforatop|^^>^Tabl^
Contents
How So use this manual. ..
Contents
.................................
-a" K'H by' -'I'-.V-'' ■> ll’H
Shutter button
...................................................................
Mode dial
................
Switching between shooting and playbaclc modes
l"l.........................................................................Shooting still piotures
(iflS)
..........................
SCN . Shoot pictures ty selecting a scene according to the situation
Search for a term i ■ ■ Index
Index
Red-eye reduction flash
4 Fill-in flash
...........................................
® Flash off
............................................
Super macro mode...........................13
ft Macro mode ....................................... 13
[D, button (print) .....................................14
/\|g button (exposure compensation)
........................................................
S70 button (self-timer)
t>^ button (flash mode)
<jft button (macro) ..................................13
^ button
...................................................
ii|) button (OKfFUNC) .............................10
button (erase)
..................................
Shooting pictures using image blur reduction
................
13
13
13
...........................
13
13
13
15
14
............................
Battery compartmerst/card cover... 78
BEEP ......................................................34
Beep sound »i)).......................................34
BGM........................................................24
BLACK & WHITE
BRIGHTNESS ........................................27
CALENDAR
Calendar display
Card
Card access lamp
CCD
Close-up playback Q,
Shooting pictures
...................................
......................................
.....................................
..................................................
.....................
................................................
54, 65, 79
.............................
26,27
33,77
35, 73
26
12
12
^*Seaich^'objertivrH>>Shootingli^‘andln^^
5 Getting to know your camera better
Shooting tips <md information
Tips .betoro.you start taking pictures .
I The camera does not turn on even when a battery is loaded
The batteiv is not fuiiy charged
• Charge the battery with the charger.
The battery is temporariiy unable to function because of the coid
• Battery performance declines in tow temperatures, and the charge may not be
suffident to turn on the camera. Remove the battery and warm it by putting it
in your pocket for a while.
[No picture is taken when the shutter button is pressed
Page 3

Contents
How to use this manual
Contents
.........................
Test out the. f.ynctlbhs of the camera buttons.by following the iliustrations.
/ahciiactuaiiy tryinig them ol.it on the canierai: t 111111 t .■ .■ .■ .■ .■ .■ .■ .■ .■ .■ .■ .■:
POWER button
Shutter button
Mode dial
rt
.................................................................
((sflj)
SCN
GUIDE...............................Follow the shooting guide for setting 9
H......................................................................Recording movies 9
B..........................Viewing stiil pictures/Selecting piayback mode 10
Arrow pad (AVO[>)
(g) button (OK/FUNC)............................................................................. 10
P/AUTO.......................Shooting pictures with automatic settings 10
MENU button (MENU)............................................................................ 11
Zoom button....................Zooming whiie shooting/dose-up playback 11
[>^ button......................................................................Flash shooting 13
<]A button................................Shooting pictures dose to the subject 13
'v’ci) button..............................................................Self-timer shooting 13
AH button
button.....................................................................Erasing pictures 14
iOj button
^ button .Changing the information on dispiay/Display the menu guide 15
iLbarn ayerythirig aboiiitheuTiferlu.s;, from ba.sic opefatiphs to the fu.ncjipns)
) of each:mentt'and:fheir-various. S.ettingS::'
About the menus............................................................................................ 16
Using the menus............................................................................................ 17
Shooting mode menu
IMAGE QUALITY....................................Changing the image quality 19
...................................
........................................................
.............
Switching between shooting and playback modes 9
......................
.....
Shoot pictures by selecting a scene according to the situation 9
...............................................
....................................................................
Shooting pictures using image blur reduction 9
.................................................................................
....................................................................................
Turning the camera on and off 8
Shooting pictures 8
Shooting still pictures 9
Changing picture brightness 13
Printing pictures 14
10
19
Page 4

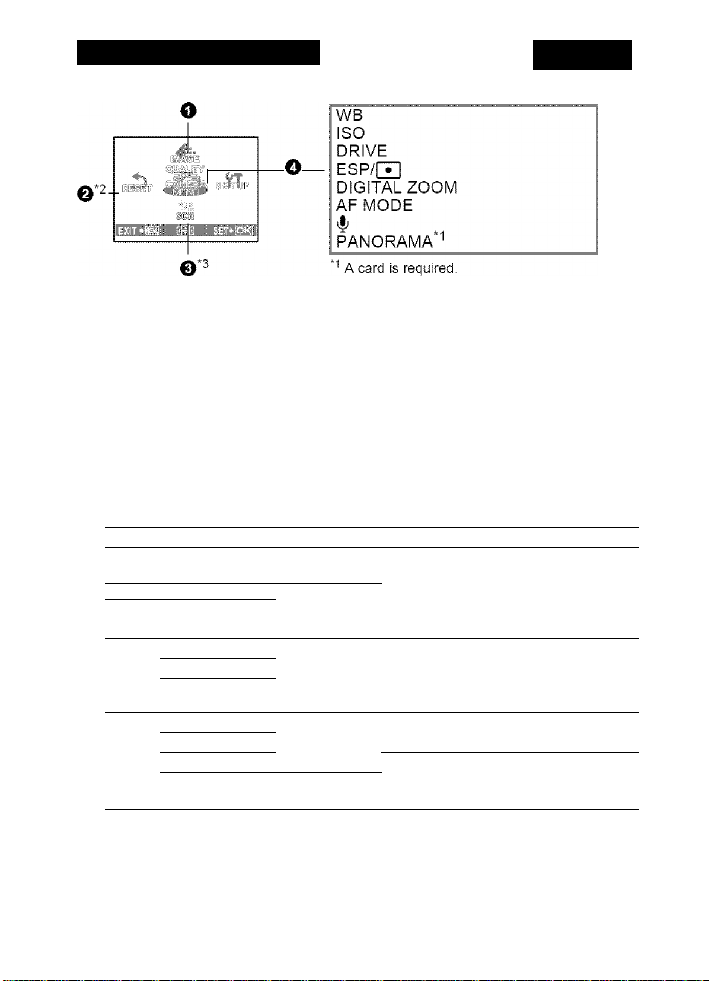
RESET
.........
Change the shooting functions back to default settings 20
SCN (Scene)
CAMERA MENU
WB................................................Adjusting the color of a picture 21
ISO..................................................Changing the ISO sensitivity 21
DRIVE..........................................................Continuous shooting 22
ESP/I » I,...Changing the area for measuring the brightness of a subject 22
DIGITAL ZOOM
AF MODE
PANORAMA
Playback mode menu................................................................................. 24
SLIDESHOW
MOVIE PLAY......................................................Playing back movies 25
CALENDAR
INDEX........................................Viewing the pictures as a thumbnaii 26
EDIT.................................................................................................... 26
pg....................................................Changing the size of pictures 26
REDEYE FIX..................................Fixing the red-eye in pictures 26
BLACK & WHITE
SEPIA
FRAME
TITLE
CALENDAR
BRIGHTNESS
SATURATION......................Change the vividness of the picture 27
INDEX..............................Making an index picture from a movie 27
PRINT ORDER.............................Making print reservations (DPOF) 28
PLAYBACK MENU................................................................................. 28
O-n..................................................................Protecting pictures 28
S........................................................................Rotating pictures 28
ALBUM ENTRY...............................Adding pictures to an album 29
ERASE..............................Erase selected pictures/Erase all pictures 30
SEL, IMAGE.........................Erase by selecting the single-frame 30
ALL ERASE,, Erase all the pictures in the internal memory and the card 30
ALBUM
Album playback menus................................................................................. 31
SEL. ALBUM.............................................................See other album 31
PLAYBACK MENU................................................................................. 32
UNDO ENTRY
SELECT JACKET
....
Shooting pictures by selecting a scene according to the situation 20
.................................................................................
...............................
.........................................
............................................Recording sound with still pictures 23
....................................................Adding sound to still pictures 28
...............................
..................................
.....................................
...............
....................................
.............................
....................................
Playing back the pictures in a calendar format 26
..............
...............
Synthesize the calendar using the picture 27
...................
See the pictures registered in the album 30
.........................................
.........................................
Changing pictures to black and white 26
Synthesize the frame and the picture 26
Zooming in on your subject 22
Changing the focusing area 23
Creating a panoramic picture 23
Playing back pictures automatically 24
Changing pictures to a sepia tone 26
Synthesize the title and the picture 27
Change the brightness of the picture 27
Undoing album entries 32
Selecting the jacket 32
21
Page 5

SETUP menus............................................................................................ 33
MEMORY FORMAT (FORMAT) Formatting the internal memory or card 33
BACKUP
PW ON SETUP...............Setting the startup screen and volume 34
SCREEN SETUP Registering a picture as the startup screen 34
COLOR
BEEP
■)))
SHUTTER SOUND
VOLUME
REC VIEW
FILE NAME
PIXEL MAPPING
Si
(35
DUALTIME.........Setting the date and time in another time zone 36
ALARM CLOOK
VIDEO OUT
133.............................................................Display the histogram 38
FRAME ASSIST
.....
Copying pictures in the internal memory to the card 33
..............................................Selecting a display language 34
............................
.......
Adjusting the volume of beep when button is pressed 34
.........................
..........................
.....................................
..........................
...............................................
........................................................
....................................................
.................................
..........
Setting the color of the menu screens 34
Adjust the volume of camera warning sound 34
.....
Selecting the sound of the shutter button 34
Adjusting the volume during playback 35
Viewing pictures immediately 35
.........
Resetting the file names of pictures 35
Adjusting the image processing function 35
Adjusting the monitor brightness 36
Setting the date and time 36
Setting alarms 37
Playing back pictures on a TV 38
Display the frame assist/Decide the type 38
i Learn ;hpw TO pfInTpictuires/ypu iTaye taken;
Direct printing (PictBridge)
Using the direct printing function............................................................ 40
EASY PRINT.......................................................................................... 40
Other print modes and print settings (CUSTOM PRINT)
Print settings (DPOF).................................................................................... 45
How to make print reservations.............................................................. 45
Single-frame reservation
All-frame reservation............................................................................... 46
Resetting print reservation data
............................................................................
........................................................................
.............................................................
iililllM
.......................
40
42
46
47
Page 6

■ L^aiB'hfiW to trarisfer pictures to a -cbmputer bnd save thern.
Fiow............................................................................................................... 48
Using OLYMPUS Master............................................................................... 48
What is OLYMPUS Master?................................................................... 48
Instaii the OLYMPUS Master software................................................... 49
Connecting the camera to a computer....................................................... 52
Start up the OLYMPUS Master software
Displaying camera images on a computer.................................................... 54
Downloading and saving images
Viewing stiil pictures and movies................................................................... 56
Printing pictures............................................................................................. 57
To download and save images to a computer without using OLYMPUS Master... 58
Find out rtiore about your camera andlearii: whattoi do v7h:en you.have:a .^
.questro.h. regarding.operations.:. . . . . . . . . . . .. . . . . . .. . . . . . .. . . . . . . . .
Shooting tips and information........................................................................ 59
Tips before you start taking pictures
The camera does not turn on even when a battery is loaded
No picture is taken when the shutter button is pressed
The date and time have not been set........................................... 60
Shooting tips........................................................................................... 60
Focusing on the subject................................................................... 60
Subjects that are difficult to focus on
Taking pictures without blurring.................................................... 61
Taking pictures without the flash.................................................. 62
The picture is too grainy................................................................... 62
Taking pictures with the correct color
Taking pictures of a white beach or snow scene
Taking pictures of a subject against backlight
Additional shooting tips and information
Increasing the number of pictures that can be taken
Using a new card............................................................................. 64
Lamp indicators................................................................................ 65
Extending the useful life of the battery......................................... 65
Functions that cannot be selected from menus........................... 65
......................................................
...........................................................
...................................................
.....
...............
...........................................
..............................................
.........................
.............................
................................................
..................
53
54
59
59
59
61
62
63
63
63
63
Page 7

Selecting the optima! record mode
To return the settings of functions to default settings
..............................................
..................
66
66
Confirming the exposure when the monitor is difficult to see outdoors... 66
Playback help......................................................................................... 66
The red-eye cannot be fixed............................................................ 66
The picture cannot be registered in the album............................. 66
Playback tips........................................................................................... 67
Playing back the picture in the internal memory
..........................
67
Understanding the settings and other information of pictures taken . 67
Quickly displaying a desired picture
Erasing sound recorded to still pictures
Viewing pictures on a computer
Viewing the entire picture on a computer screen
When you get an error message on the camera
Functions available in shooting modes and scenes
Glossary of terms
..........................................................................................
................................................
...........................................
.............................................................
.........................
.......................................
..................................
67
67
68
68
69
71
73
b MIS
. Redd a.boutxohyen.i.e.rit;funGfiohs:ahdrSaf6itY fir^cautions on^ hovi to.ude ^
iyour. pa.rhefa nid.Fe.effeptiye ;■ ;■ ;■ ;■ ;■ ;■ ;■ ;■ ;■ ;■ ;■ ;■ ;■ ;■ ;■ ;■ ;■ ;■ ;■ ;■ ;■ ;■ ;■ ;■ ;■ ;■ ;■ ;■
Camera care.................................................................................................. 75
Battery and charger....................................................................................... 76
Useful use of the accessories
.......................................................................
77
The card.................................................................................................. 77
AC adapter.............................................................................................. 79
Safety Precautions
........................................................................................
80
index........................................................................................................................ 83
Page 8
1 Button operations
oo
o
2
0
CL
O
O POWER button
e
o
Power on: Shooting mode
ZJ
CQ
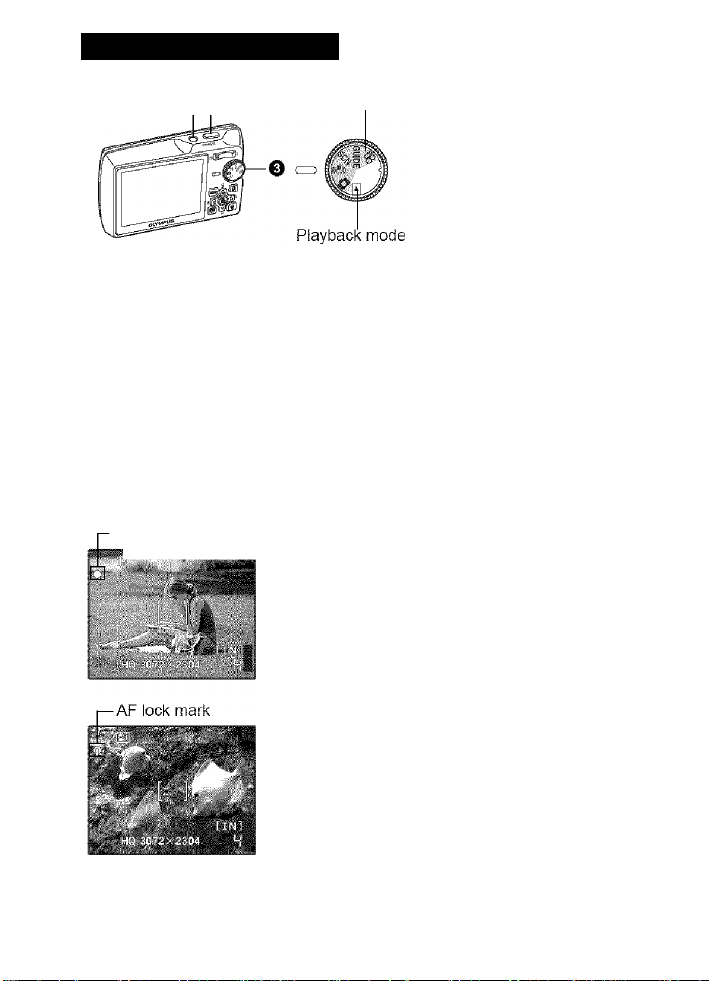
O Shutter button Shooting pictures
Shooting still pictures
Set the mode dial to (¡fjl) or SCN, and lightly press the shutter button
(halfway). The green lamp lights when the focus and exposure are locked (focus
lock). Now press the shutter button all the way (fully) to shoot a picture.
-Green lamp
mmmm
• Monitor turns on
• Lens extends
Shooting modes
Tumiiicj tho c.iriicrii on itnd off
Playback mode
• Monitor turns on
Locking the focus and then composing the shot (focus lock)
Compose your picture with the focus locked, and
then fully press the shutter button to shoot a picture.
• When the green lamp blinks, the focus and
exposure are not adjusted properly. Try locking
the focus again.
Shooting mode
pwj--
i
Locking the focus position (AF lock)
When the scene is or O«, you can lock the focus
position by pressing Press ^ again to cancel
the AF lock.
DS'“SCN Shooting pictures by selecting a scene
according to the situation” (P. 20)
Page 9

Recording movies
Set the mode dial to ©, and lightly press the shutter button to lock the focus, and
then press the shutter button fully to start recording. Press the shutter button
again to stop recording.
o Mode dial Switching between shooting and playback modes
Set the mode dial to the desired shooting or playback mode.
I O Shooting still pictures
The camera determines the optimum settings and shoots the picture.
Shooting pictures using image blur reduction
This function reduces the blur incurred by a moving subject or camera movement
when taking pictures.
• By switching to the other mode, most settings will be changed to the default
settings of each mode.
fSCN Shoot pictures by selecting a scene according to the situation
You can shoot pictures by selecting a scene according to the situation.
Select the scene/change the scene to another one
• Press the MENU button to select [SCN] from the top menu, and change it to
another scene.
• By switching to the other scene, most settings will be changed to the default
settings of each scene.
[guide Follow the shooting guide for setting
GJIJI S iC CI NG 1'3
7, 4hr> oSu'g nto -
fs A rijuMiviq «lie in foctSH .
Hi S ET *
I g? Recording movies
Audio is recorded with the movie.
Follow the shooting guide displayed on the screen to
set the target items.
' >
iOKi
■a
CD
c
o
3
o
CD
s
o
■ This lights red during movie recording.
. The remaining recording time is displayed.
When the remaining recording time reaches 0,
recording stops.
Page 10

Shooting modes
I H Viewing still pictures/Selecting playback mode
o
2
The last picture taken is displayed.
0
CL
• Press the arrow pad to view other pictures.
O
• Use the zoom button to switch among close-up playback, index display and
e
o
calendar display.
ZJ
CQ
Movie playback “MOVIE PLAY Playing back movies” (P. 25)
O Arrow pad
Use the arrow pad to select scenes, playback picture, and the items on the
menus.
button (OK/FUNC)
Displays the function menu and sets the functions often used in shooting mode.
This button is also used to confirm your selection.
The functions you can set with the function menu
P/AUTO.
Select the shooting mode when you have set the mode dial to Q.
AUTO (Full auto mode) The camera automatically sets white balance and ISO
CS“” “WB Adjusting the color of a picture" (P. 21)
...
............................................Shooting pictures with automatic settings
P (Program auto) The camera automatically sets the optimum aperture value
“ISO Changing the ISO sensitivity" (P. 21)
“DRIVE Continuous shooting” (P. 22)
“ESP/r«l Changing the area for measuring the brightness of a subject”
(P. 22)
and shutter speed for the brightness of the subject.
sensitivity in addition to the aperture and shutter speed.
10
Page 11

A
Select the setting items.
O MENU button (MENU)
Displays the top Tienu.
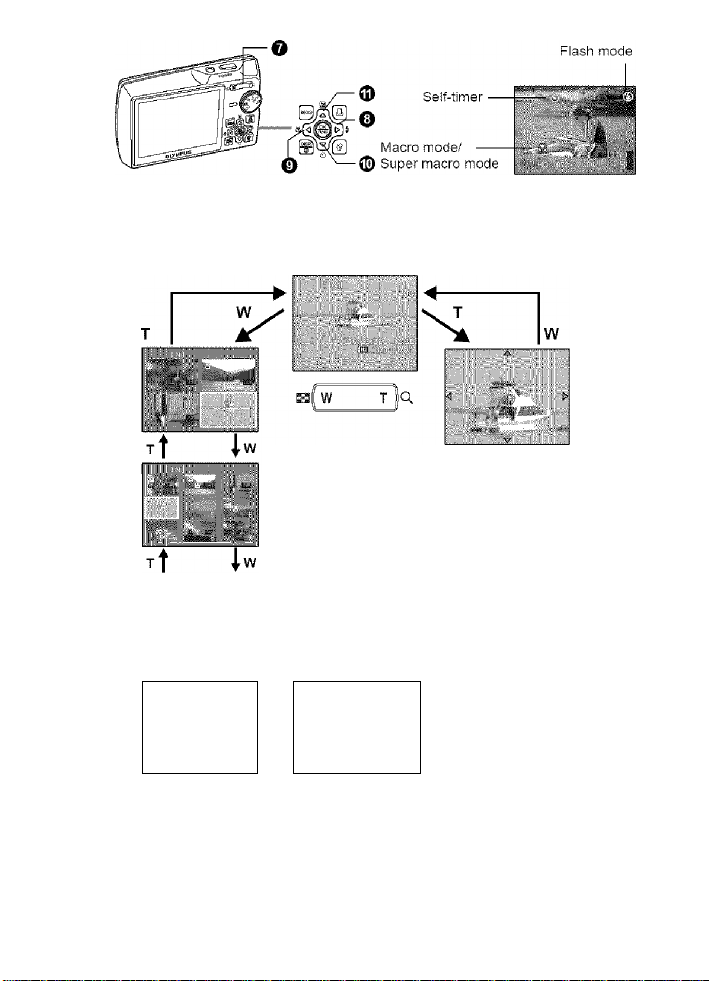
O Zoom button Zooming while shooting.'close-up playbuck
Shooting mode: Zooming in on your subject
Select a setting, and press (§).
Optical zoom: 3x
Zoom out:
Press W on the
zoom button.
-
__
s[v
Zoom in:
Press T on the
zoom button.
CD
C
o
Z3
o
T3
CD
s
o
11
Page 12
Playback mode: Switching the picture display
o
2
0
CL
O
e
o
ZJ
CQ
Single-frame playback
• Use the arrow pad to browse pictures.
12
Index display
• Use the arrow pad
(AV<3t>) to select a
picture for playback, and
press @ to play back the
single-frame of the
picture selected.
■t
W
—►
Close-up playback
• Press T to Incrementaiiy
enlarge the picture up to 10
times the original size. Press
W to reduce the size.
• Press the arrow pad
(Z!^‘^<]D>) during close-up
playback to scroll the picture
in the indicated direction.
• When returning to the single
frame playback, press @-
Calendar display
■ Use the arrow pad (¿^‘^<3D>)
to select the date, and press
@l or T of the zoom button to
display the picture on the date
selected.
Page 13

O button Flash shooting
Press the [>^ button in shooting mode to select the flash mode.
Press @ for setting.
AUTO (Auto-flash) The flash fires automatically in low light or backlight
<g> Red-eye reduction flash This emits pre-flashes for red-eye reduction.
i Fill-in flash The flash fires regardless of the available light.
® Flash off The flash does not fire even in low light conditions.
O button
Press the button in shooting mode to select the macro mode.
Press @ for setting.
^ Macro mode This mode lets you shoot from as close as
s!li Super macro mode
Press the button in shooting mode to select on and off of the self-timer.
Press @ for setting.
Ci) ON
Ci)OFF Cancel the self-timer.
The self-timer lamp lights for approximately 10 seconds, blinks for
approximately 2 seconds, and then the picture is taken.
To cancel the self-timer, press the ‘^ci) button.
Self-timer shooting is automatically canceled after one shot.
conditions.
Shootino pictures close to the subject
20cm/7.8 in. (when the zoom is set for the
zoom-out angle) and as close as 50cm/19.6
in. (when the zoom is set for the zoom-in
angle) to your subject.
This mode lets you shoot from as close as
8cm/3.1 in. to your subject.
After the setting, press the shutter button fully.
■a
CD
c
o
3
o
CD
s
o
® -''''2 button
Activate the setting
contents.
Ctuinging picture brightness
Press the button in shooting mode to adjust the
exposure.
Adjustable from - 2.0EV to -r2.0 EV
-[>: Brighten
<C): Darken
13
Page 14

0
©
® ' button Erasing pictures :
in playback mode, select the picture you want to erase, and press the button.
0
CL
• Once erased, pictures cannot be restored. Check each picture before erasing
O
e
to avoid accidentally erasing pictures you want to keep.
o
ll3=“On Protecting pictures" {P. 28}
ZJ
CQ
0 LI- button Printing pictures
Display a picture to print out in playback mode, and press the ¡Oj outton
C3=“EASY PRINT” (P. 40)
14
Page 15

© a- button Clicnging the ^rarmatior d spiajs D epiay the netii. guide
Changing the information displays
Press the ®|r button to change the display in the following order.
Shooting mode
-----------
^
« •
1
Normal display
r-,:. r; . . . *1
Simple display '
Piayback mode
Normal display
Detailed display
itP^Si
TO
c
o
O
TD
CD
S
O
1
mmxf
BHiiiS'
FRAME
ASSIST*’'*2
(Horizontal and
vertical lines or
diagonal lines)
1
-
1
Histogram
display*'**^
■
J
Not displayed in case of gj.
^ Not displayed when the mode is set [OFF] in the menu.
‘‘ESI Display the histogram” (P. 38)
■'FRAME ASSIST Display the frame assist/Decide the type” (P. 33)
Displaying the menu guide
With menu items selected, hold down the button to
display the menu guide. Release the button to
close the menu guide.
J
display
Histogram
display*’'
15
Page 16
2 Menu operations
MENU
button
-Mode Dial
Arrow pad
{AV<IO)
Shooting modes
Playback mode
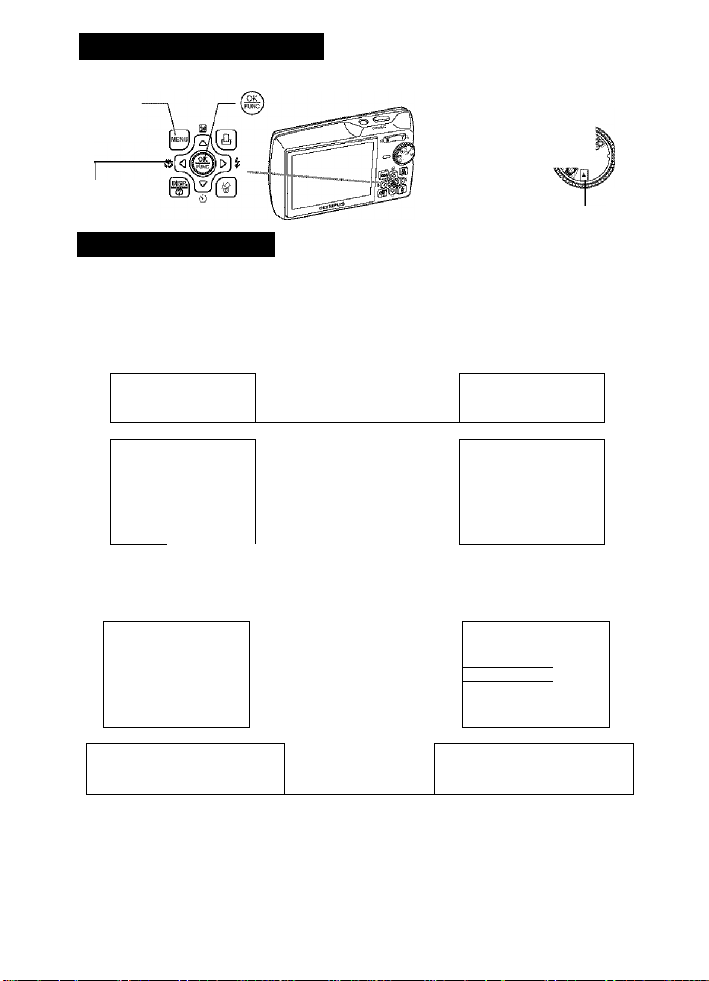
About the menus
Press the MENU button to display the top menu.
The contents displayed on the top menu differ according to the mode.
• When the mode dial is set at GUIDE, press the MENU button to display the
0)
Q.
shooting guide screen.
o
Top menu in the
shooting mode
When [CAMERA MENU], [PLAYBACK .. :
MENU], [EDIT]. [ERASE], or [SETUP] is
selected, the screen for selecting the menu
item !s displayed in addition. . .
1
P
>AUT0
SJllilSiÄ
Top menu in the
piayback mode ^
• 7 - ITU
¡1 . T ^ 17
1
Ot< > OFF 1
III..:
...................
1
aiilg
Lca
16
When [CAMERA MENU] When [PLAYBACK MENU]
is selected
.......
is selected
.......
.....
Page 17

Using the menus
Use the arrow pad (¿2^^<][>) and (§) to set menu items.
This explains how to use the menus with the [AF MODE] setting as an example.
Set the mode dial to the desired mode.
• In this case, set the mode dial to
Press the MENU button to
display the top menu, and
then press (S).
• [AF MODE! is on a menu in
[CAMERA MENU]. Press @).
• To display other menus, use the
arrow pad i/\^<][>i to select a
menu, and press @.
• To dose the top menu, press the
MENU button.
Top menu
MENU button
A'v’<3D>on
the arrow pad
Press AS7 to select a setting,
and press
• [AF MODE] is the sixth menu
item, so press'^ five times, and
then press (g).
• Unavailable settings cannot be
selected.
displayed when
there are more
menu items on
the next page.
It
o
T3
(D
17
Page 18

Press to select a setting, and press
• Select the [AF MODE] from
[iESP] and [SPOT] and then
0)
Q.
O
press
• The menu item is set and the
previous menu is displayed.
-----Page display
,lj IWB ■ AyrO
i L'?.°..........................
fORivE
[esp/q
IDiGlf/si ZOOM
.................
>AUTO
SI
>ESP
When there are more menu items on the next
page, press <] on the procedure 2 screen to
move the cursor to the page display.
Press /\^ to change the page.
To return to the previous page, press [> or @.
18
Page 19
Shooting mode menu
CAMERA MENU
^ [RESET] cannot be selected when the mode dial is set to SCN Ikfll.
‘^SCN can be selected when the mode dial is set to SCN
m" “SETUP menus” (P. 33)
• Some functions are not available according to the selected mode.
CS“” “Functions available in shooting modes and scenes” (P. 71)
• The factory default settings are displayed in gray ( ).
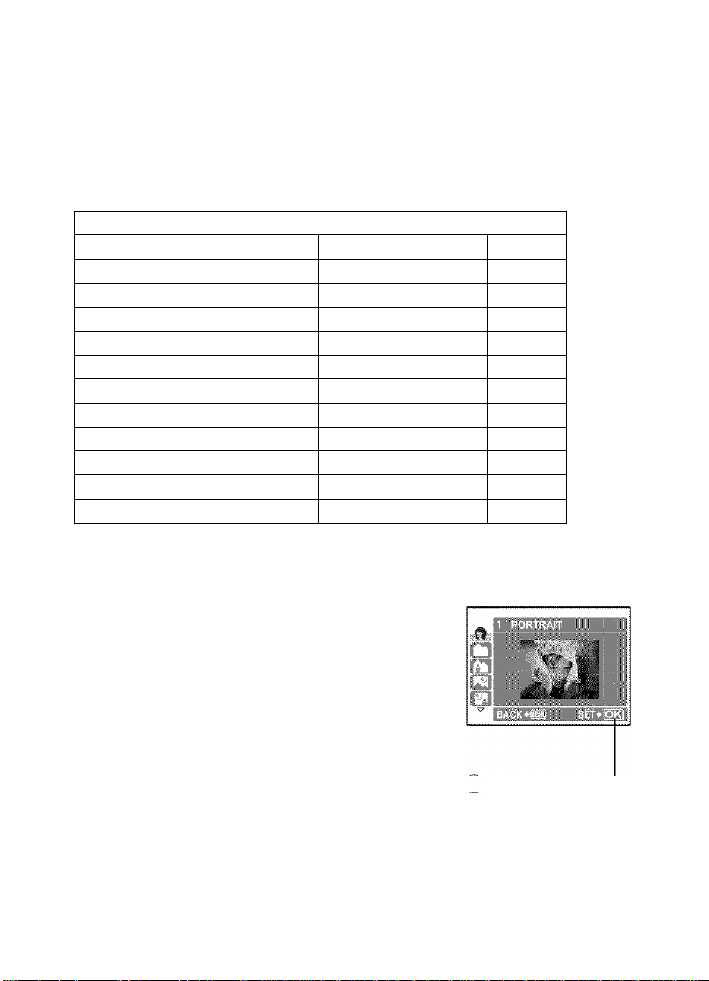
O IMAGE QUALITY Changing the image qLiaiity
Still picture image quality and their applications
Image quality/lmage size Compression Application
SHQ 3072 2304 Low • This is useful for printing large images
HQ 3072 X 2304 standard
2560 X 1920
SQ1
2304 X 1728
2048 X 1536
1600 X 1200
SQ2
1280 X 960
1024 X 768
640 X 480
Movie image quality
Image quality/lmage size
SHQ 640 X 480
HQ 320 X 240 ^
SQ 160x120
compression
compression image processing, such as contrast
standard • This is usefljl for postcard-sized prints.
compression
standard • This is useful for viewing pictures on a
compression
Low
compression
on full-size paper.
• This is useful for perfoiming computer
adjustment and red-eye correction.
• This is useful for computer editing
such as rotating or adding text to a
picture.
computer.
• This is useful for sending as e-mail
attachments.
SCN S9
19
TD
o
a
Page 20
O RESET
NO A'ES
Restore shooting functions back to default settings. The mode dial has to be set
to O (P or AUTO) in order to restore default settings.
Functions for returning the settings to the original when the reset
function is executed
. .. . . . . . . . Function . . . . . . . . . Factory dcfuult sotting Rcf. Pago
Flash AUTO P. 13
.ili.
M
IMAGE QUALITY HQ P. 19
0)
Q.
O
Ci)
WB AUTO P. 21
ISO AUTO P. 21
DRIVE
ESP/Q
DIGITAL ZOOM OFF P. 22
AF MODE SPOT P. 23
>1
0
SCN (Scene) Sliao;iii:j pic:jr;c uy -lilccti 'ij r, occ-ic .iccoidi-g :o tlio siM.r on
The scene selection screen displays sample images scene selection
and the shooting mode to best suit the situation.
• By switching to the other scene, most settings will be
changed to the default settings of each scene.
Chunge the shooting functions bsck to default settings
OFF P. 13
0.0 P. 13
i)OFF P. 13
n
ESP P. 22
OFF P. 23
P. 22
20
Press (S) to decide the scene.
Page 21

Shoot & Select!] / [53 Shoot & Select2]
• Press and hold the shutter button to shoot pictures. After shooting pictures, select
the ones you want to erase, put the's/' to them, and press'S’button to erase them.
Selected picture
— Press <J> to scroll through the pictures.
Pictures with a V mark are erased.
Select the pictures to be erased.
O CAMERA MENU
WB...........................................................................Adjusting the color of a picture
TD
o
(D
AUTO : The white balance is adjusted automaticaiiy for natural
Sunny day For shooting under a clear sky.
Cloudy day For shooting under a cloudy sky.
4-
iii
#2
EÌ3
ISO
AUTO :
64/100/200/ A low value lowers the sensitivity for daylight shooting of clear,
400/800/ sharp pictures. The higher the value, the better the camera’s
1600 light sensitivity and ability to shoot with a fast shutter speed and
Tungsten light For shooting under tungsten lighting.
Fluorescent
lamp 1
Fluorescent
lamp 2
Fluorescent
lamp 3
Sensitivity is automaticaiiy adjusted according to the conditions
of the subject.
in low light conditions. However, high sensitivity introduces noise
into the resulting picture, which may give it a grainy appearance.
color, regardless of the light source.
For shooting under daylight fluorescent lighting. (This
type of lamp is mainly used in homes.)
For shooting under a neutral white fluorescent lamp.
(This type of lamp is mainly used in desk lamps.)
For shooting under a white fluorescent lamp. (This type
of lamp is mainly used in offices.)
....................................Changing the ISO sensitivity
21
Page 22

DRIVE.......................................................................................Continuous shooting
□
Shoots 1 frame at a time when the shutter button is pressed.
Qj Focus, exposure and white balance are locked at the first frame.
The sequential shooting speed varies depending on the record
mode setting.
tJilj Pictures can be taken at a faster speed than normal sequential
shooting.
You can take a sequence of pictures at one time while holding down the shutter
button. The camera will take pictures in sequence until you release the shutter
button.
• In speed sequential shooting, [IMAGE QUALITY] will be limited to below
[2048 1536].
0)
Q.
ESP/Q, . Changing the area for measuring the brightness of a subject
o
£0
0)
ESP Meiers the brightness at the center of the monitor and the
surrounding area separately to create a picture with balanced
brightness. When taking pictures against strong backlight, the
center of the picture may appear dark.
Q] Only the center of the monitor is metered. Suitable for taking a
picture of the subject in the center of the monitor against backlight.
DIGITAL ZOOM
............................................................
Zooming in on your subject
OFF /ON
The digital zoom can be used to take close-up shots with stronger magnification
when combined with optical zoom. (Optical Zoom x Digital Zoom : the maximum
15x)
Optical zoom Digital zoom
^ ----------------------, 1
22
h| w
Zoom bar
White area: The optica! zoom area
Red area: The digital zoom area
Page 23

AF MODE
......................................................................
Changing the focusing area
¡ESP The camera determines which subject within the screen to focus
on. Even when the subject is not in the center of the screen,
focusing is possible.
SPOT
.........
Focus selection is based on the subject within the AF target mark.
i|t
......................................................................
Recording sound with still pictures
OFF /ON
Recording starts about 0.5 seconds after the shutter button is released and lasts
about 4 seconds.
When recording, aim the camera microphone at the source of the sound you
want to record.
PANORAMA
...............................................................
Creating a panoramic picture
Panorama shooting lets you create a panoramic picture, using the OLYMPUS
Master software from the provided CD-ROM. An Olympus xD-Picture Card is
required for panorama shooting.
Connects pictures from
ieft to right
(j>: The next picture is connected at the
right edge.
<]: The next picture is connected at the
ieft edge.
Connects pictures from
bottom to top
/\: The next picture is connected at the
top.
The next picture is connected at the
bottom.
Use the arrow pad t/\^<ir>t to specify at which edge you want to connect the
pictures, and then compose your shots so that the edges of the pictures overlap.
The part of the previous picture where it will be joined to the next picture does
not remain in the frame. You have to remember what the part in the frame looked
like and take the next picture so it overlaps.
TD
o
(D
Panorama shooting is possible for up to 10 pictures. Press MENU button to exit
panorama shooting. 23
Page 24
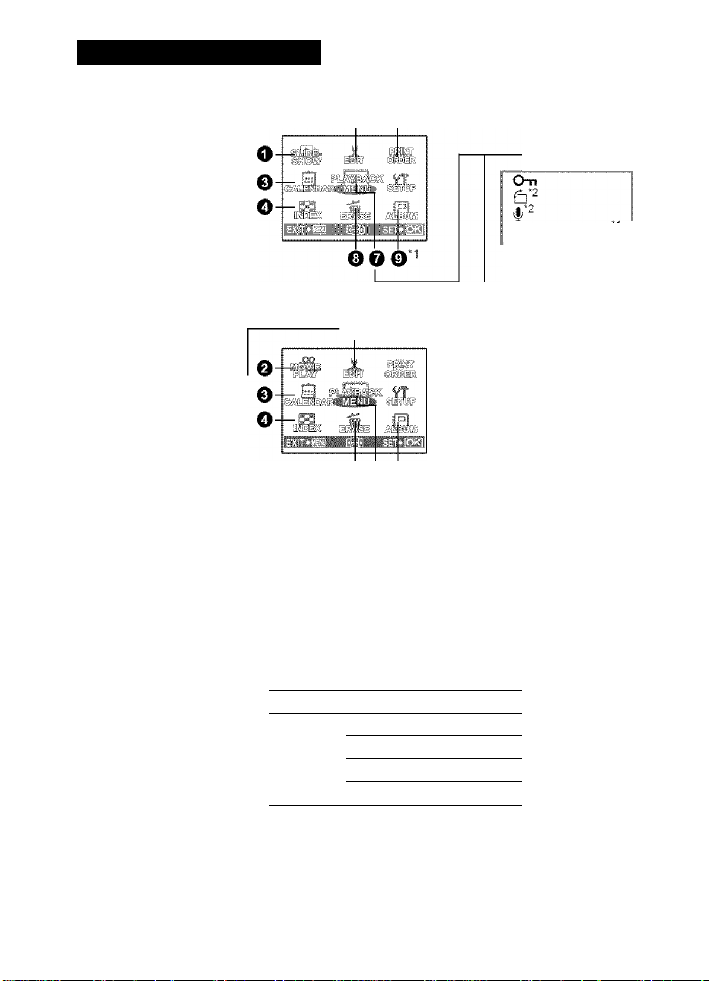
Playback mode menu
When a still picture is selected
--------------------
EDIT
REDEYE FIX
BLACKS WHITE
SEPIA
FRAME
TITLE
CALENDAR
BRIGHTNESS
SATURATION
0)
Q.
O
INDEX ^
’'I A card is required.
EDIT
When the move is selected
“SETUP menus" (P. 33)
• The factory default settings are displayed in gray (
O SLIDESHOW Pldylng back pictures automatically
Set [BGM] to [ON] or [OFF].
Select the transition effect between pictures from
[TYPE].
e 0*1*3
e
ooo
.........
ALBUM ENTRY
*2This is not
*3This is not
).
PLAYBACK
MENU
displayed when a
movie is selected.
selected when the
movie is selected.
BGM ON /OFF
TYPE NORMAL
FADER
SLIDE
ZOOM
‘ Only the first frame of each movie is displayed.
‘ After setting [BGM] and [TYPE], press @ to start the slideshow.
■ Press (® or MENU button to cancel the slideshow.
24
Page 25

O MOVIE PLAY P!iiying biick movies
Select [MOVIE PLAY] from the top menu, and press (S) to play back the movie.
Another option is to select a picture with the movie icon (®), and press (®) to
play back the movie.
Operations during movie playback
Playing time/Total recording time
P : Increases the volume.
~ I—I S7 Reduces the volume.
r
[> : Each time you press the button, the playback speed changes
in the following order: 2x; 20x; and back to 1 x.
<]: Plays the movie in reverse. Each time you press the button, the
playback speed changes in the following order: 2x; 20x; and
back to 1X.
Press (
Operations during pause
to pause the playback.
TD
o
(D
. : Displays the first frame.
^N7 : Displays the last frame.
Displays the next frame.
Ld>:
Displays the previous frame.
0:
To resume the movie, press (
To cancel the playback of the movie in the middle of it or during pause, press
the MENU button.
25
Page 26

o CALENDAR Playing buck the pictures in u culendur formut :
This function lets you play back the pictures in a calendar format by the date of
recording.
C3“ “Zoom button Zooming while shooting/close-up playback” {P. 11)
O INDEX . :: . : ; Viewing the pictures <is a thumbnail
This function lets you view the pictures in 9 frames at the same time.
US“’ “Zoom button Zooming while shooting/close-up playback” (P. 11)
0 EDIT
This function lets you edit still pictures saved on a card and store them as new
pictures.
0)
Q.
O
. Changing the size of pictures
640 X 480
This changes the image size of a picture and saves it as a new file.
REDEYE FIX
This function corrects the red-eye look that often occurs when taking pictures
with a flash.
BLACK & WHITE
This changes the picture to black and white and saves it as a new file.
SEPIA..................................................................Changing pictures to a sepia tone
This changes the picture to sepia and saves it as a new file.
FRAME...........................................................Synthesize the frame and the picture
This function lets you select the frame, and synthesize the frame and the picture,
and store it as a new picture.
...........................................................
/320 X 240
...Fixing the red-eye in pictures
.........................................
■ Select a frame with <J> and press (^.
• Select the picture to be synthesized with the frame with
Changing pictures to black and white
<X>, and press Press to turn the picture 90
degrees clockwise or 90 degrees counterclockwise.
’ Press the arrow pad or zoom button, adjust
the position and size of the picture, and press (S).
26
Page 27

TITLE.................................................................Synthesize the title and the picture
This function lets you select the title, synthesize the title and the picture, and store
it as a new picture.
> Select the picture with <D>. and press
> Select the title with <](>, and press (§. Press ¿^S7 to turn
the title 90 degrees clockwise and 90 degrees
counterclockwise.
• Press the arrow pad or zoom button, adjust
the position and size of the title, and press
• Set the color of the title with the arrow pad (/W7<3[>).
and press
CALENDAR
..........................................Synthesize the calendar using the picture
This function lets you select the calendar, synthesize the calendar and the
picture, and store it as a new picture.
> Select the picture with <][>, and press
> Select the calendar with <][)>, and press @. Press
to turn the picture 90 degrees clockwise and 90 degrees
counterclockwise.
• Set the date of the calendar, and press i§).
•
o
TD
(D
BRIGHTNESS
...............................................Change the brightness of the picture
This function lets you adjust the brightness of the picture, and store it as a new
picture.
• Select the picture with <][>, and press
• Adjust the brightness with /\^ and press @.
SATURATION
................................................
Change the vividness of the picture
This function lets you adjust the vividness of the picture, and store it as a new
picture.
' Select the picture with <X>, and press (§).
' Adjust the vividness with and press (S).
INDEX
..........................................................
Making an index picture from a movie
This extract 9 frames from a movie and saves them as a new picture (INDEX).
27
Page 28

0 PRINT ORDER Mdking print reservations (DPOF) ;
This function allows you to save printing data {the number of prints and the date
and time information) with the pictures stored on the card.
C3“'‘Print settings (DPOF)” (P. 45)
O PLAYBACK MENU
On
..........................................
OFF /ON
ti)
Q.
O
Protected pictures cannot be erased, but they are aii
erased by formatting.
• Select the picture with <J>, and protect it by selecting [ON]
with /\V7 You can protect several frames in succession.
.Protecting pictures
fn
+90° / 0° / -90°
Pictures taken with the camera held vertically are displayed horizontally. This function
lets you turn such pictures so that they are displayed vertically. New picture
orientations are saved even when the power is turned off.
m
___
+90°
i
Sound is recorded for about 4 seconds.
• When [START] is displayed, aim the camera microphone
Wm
.Adding sound to still pictures
at the source of the sound you want to record, and press
Recording starts and the [BUSY] bar is displayed during
recording.
28
.Rotating pictures
Page 29

ALBUM ENTRY............................................................Adding pictures to an album
Pictures recorded to the card can be organized by sorting them into albums.
Pictures stored in the internai memory cannot be entered in albums.
C3^“Album playback menus" (P. 31)
Select the album
entry method
Select an album to
add the pictures
[SEL. IMAGE]
[SET CALENDAR]
[SET ALL]
Select one frame at a time for entry
• Press the arrow pad
and press @ to add v .
• Press @ again to cancel the
selection.
• When the selection is
completed, press (§) for a
to select a picture,
while.
Add pictures taken on the
same day
Use the arrow pad {¿2t>V<]D>)
to select the date with pictures
to enter in the album, and
press (S).
Select all images Select all
still Images, all protected
images, or all movies.
o
TD
(D
29
Page 30

O ERASE Erase selected pictures'Erase all pictures
Protected pictures cannot be erased. Cancel protection before erasing such
pictures. Once erased, pictures cannot be restored. Check each picture before
erasing to avoid accidentally erasing pictures you want to keep.
• When erasing the picture in the internal memory, do not insert the card into the
camera.
• When erasing the picture from the card, insert a card into the camera in
advance.
SEL. IMAGE
0)
Q.
o
ALL ERASE
• Select [YES], and press (gi.
...............
..............
O ALBUM
Use the arrow pad
{¿2i>V<]C>) to select an
album, and press g.
1
-----------------
f‘ 1
!___________
.....................................Erase by selecting the singie-frame
> Use the arrow pad f/\^<ir>f to select the picture, and
press @ to put
• To cancel the selection, press @ again.
• When the selection is compieted, press button.
■ Select [YES], and press
.......Erase all the pictures in the internai memory and the card
See the pictures registered in the aibum
Use the arrow pad {A VOO) to
display picture you want.
1
30
Page 31

Album playback menus
■ A card is required.
When the still picture is selected
“SLIDESHOW Playing back pictures automatically" (P. 24)
“MOVIE PLAY Playing back movies” (P. 25)
“Print settings (DPOF)” (P. 45)
“SETUP menus” (P. 33)
“ERASE Erase selected pictures/Erase all pictures (P. 30)
O SEL. ALBUM See other album
To switch albums, select the desired album from [SEL. ALBUM],
B3”’ “ALBUM See the pictures registered in the album” (P. 30)
TD
o
(D
31
Page 32

O PLAYBACK MENU
UNDO Undoing aibum entries
Even if a picture is removed from an album, the picture remains in the card.
SEL. IMAGE
.
..... [ ' . . j
Select one frame at a time to undo.
• Press the arrow pad t/\^<T>t to select a picture,
and press @ to add V.
m ^
m^i^m
• Press @ again to cancel the selection.
• When the selection is completed, press (S) for a
while.
0)
Q.
O
UNDO ALL
SELECT JACKET..
^ i..
Title image (first frame in the album)
Other album menus
eg» “On Protecting pictures” (P. 28)
“S Rotating pictures” (P. 28)
Undo all pictures in the album
.Selecting the Jacket
You can change the jacket (first frame in the album) to be
displayed on the album selection screen.
32
Page 33

the mode dial is set to g?.
*5 You cannot select this Item in
playback mode.
■a
o
CD
MEMORY FORMAT (FORMAT)
Ali existing data, including protected pictures, are erased when the internal
memory or card is formatted. Make sure that you save or transfer important data
to a computer before formatting the card.
• Make sure there is no card inserted in the camera when formatting the internal
memory.
• When the internal memory is formatted, the data of the frames and titles
downloaded with the provided OLYMPUS Master software will be deleted.
• Be sure that the card is inserted in the camera when formatting the card.
• Before using non-Olympus cards or cards which have been formatted on a
computer, you must format them with this camera.
BACKUP..............................Copying pictures in the internal memory to the card
Insert the optional card into the camera. Copying data does not erase the picture
in the internal memory.
• It takes some time to back up data. Check if the battery is not empty before
starting the copy, or use the AC adapter.
..............
Formatting the internal memory or card
33
Page 34

..................................................
You can select a language for on-screen display. Available languages vary
depending on the area where you purchased this camera.
You can add other ianguages to your camera with the provided OLYMPUS
Master software.
PW ON SETUP...........................................Setting the startup screen and volume
......................
Selecting a display language
SCREEN OFF (No picture is displayed.)/1/2 (The picture registered with
VOLUME OFF (No sound) / LOW / HIGH
You can select the volume level and the picture displayed when the camera is
turned on. If [SCREEN] is set to [OFF], [VOLUME] cannot be set.
0)
Q.
O
SCREEN SETUP
Still pictures in the internal memory or the card can be registered to screen [2] for
[PW ON SETUP].
If a picture is already registered, the [IMAGE EXISTING] screen is displayed
asking if you want to cancel the currently registered picture and register a new one.
COLOR
........................................................
NORMAL /BLUE /BLACK /PINK
BEEP. . Adjust the volume of operation sound when the button is pressed
OFF (No sound)/ LOW /HIGH
OFF (No sound)/ LOW /HIGH
SHUTTER SOUND
OFF (No sound)/
1 LOW 7 HIGH
2 LOW / HIGH
3 LOW / HIGH
.................................
................................
Registering a picture as the startup screen
.Adjust the volume of camera warning sound
Selecting the sound of the shutter button
[SCREEN SETUP] is displayed.)
Setting the color of the menu screens
34
Page 35

VOLUME
.....................................................
Adjusting the volume during playback
OFF (No sound) / LOW /HIGH
REC VIEW.. ............................................................Viewing pictures immediately
OFF The picture being recorded is not displayed. This is useful when you
want to prepare for your next shot while the previous picture is being
recorded.
ON ■ The picture being recorded is displayed. This is useful for making a
brief check of the picture you have just taken. You can resume
shooting while the picture is still being displayed.
FILE NAME
RESET
.................................................
Resetting the file names of pictures
This method is useful when grouping files on separate cards.
The file number and folder number are reset every time a new card
is inserted in the camera. The folder number returns to [No. 100]
and the file number returns to [No. 0001].
AUTO
This method is useful when you want to manage all your files
with sequential numbers.
Even if a new card is inserted, the foider number and file number are
retained from the previous card. This helps you to manage multiple
cards.
File names and their folder names for recorded pictures are automatically
generated by the camera. File names and folder names respectively include file
numbers (0001 to 9999) and folder names (100 to 999), and are named as
follows.
Folder name
_____I______
г
\DCIM\^
Folder No,
(100-999)
Month: Jan. - Sep. = 1-9, Oct. = A, Nov. = B, Dec. = C
—[ I
OLYMPtPmdd’
Month (1 -C)
---------------
File name
_____I____
■ j pg
I
File No.
(0001 -9999)
Day (01 -31)
О
T3
(D
PIXEL MAPPING
....................................
Adjusting the Image processing function
The pixel mapping feature allows the camera to check and adjust the CCD and
image processing functions. It is not necessary to operate this function
frequently. Approximately once a year is recommended. Wait at least one minute
after taking or viewing pictures to allow the pixel mapping function to perform
properly. If you turn the camera off during pixel mapping, start again.
Select [PIXEL MAPPING], When [START] is displayed, press
35
Page 36

.....................................................................
■ Press (g) after setting is complete.
/\ Brightens the monitor. Darkens the monitor.
....................................................................................Setting the date and time
The date and time is saved with each image, and is used in the file name.
0)
Q.
o
• The first two digits of the year are fixed.
• The time is displayed in the 24-hour format.
• For a more accurate setting, press @ when the time signai hits 00 seconds.
: Select the date format (Y-M-D, M-D-Y, D-M-Y).
<][> : Moves to the previous or next setting.
ZIyV' : Sets the date and time.
Adjusting the monitor brightness
DUALTIME
‘ The date format is the same as that set with [©]■
' The first two digits of the year are fixed.
■ The time is displayed in the 24-hour format.
■ For a more accurate setting, press @) when the time signal hits 00 seconds.
....................................
OFF Switches to the date and time set in [©].
ON Switches to the date and time set in [DUALTiME], When setting the
dual time, select [ONJ, and then set the time.
Setting the date and time in another time zone
■ <31^ ■ Moves to the previous or next setting.
■ AV : Sets the date and time.
36
Page 37

ALARM CLOCK
OFF
ONE TIME Alarm is activated once.
DAILY Alarm is activated daily at the set time.
■ When [<0)] has not been set, [ALARM CLOCK] is not available.
■ When [DUALTIME] is set to [ON], the alarm sounds according to the dual time
date and time setting.
Setting an alarm
TIME Sets the alarm time.
SNOOZE OFF No snooze is set.
ALARM SOUND 1 LOW/MID/HIGH
Operating, shutting off and checking the alarm
• Operating the alarm:
Turn off the camera. The alarm only operates when the camera is off.
• Shutting off the alarm:
While the alarm is sounding, press any button to shut off the alarm and turn off
the camera. Note that pressing the POWER button will turn the camera on.
When [SNOOZE] is set to [ON] at this time, the setting will be canceled. When
[SNOOZE] is [OFF], the alarm stops automatically and the camera turns off
after 1 minute of no operation.
• Checking the alarm settings:
While the camera is off, press the button to display the set alarm time and
the current time for 3 seconds.
...................................................................................
............
No alarm is set or alarm is canceled.
Select [ONE TIME] or [DAILY], and set the alarm time.
You can set snooze (alarm intervals) or alarm
sounds and volume.
ON Alarm is activated every 5 minutes,
up to 7 times.
2 LOW/MID/HIGH
3 LOW/MID/HIGH
Setting aSarms
TD
о
(D
37
Page 38

VIDEO OUT................................................................Playing back pictures on a TV
NTSC / PAL
The factory default settings differ according to the region where the camera
is sold.
To play back camera images on a TV, set the video output according to your TV’s
video signal type.
• TV video signal types by country/region Check the video signal type before
connecting the camera to the TV.
NTSC: North America, Taiwan, Korea. Japan
PAL: European countries, China
Playing back pictures on a TV
Turn off the camera and the TV before connecting.
0)
Q.
O
Settings on the camera
Set the mode dial to and press
the POWER button to turn the camera
on.
• The last picture taken is displayed
on the TV. Use the arrow pad
(A'^OO) to select the picture you
want to display.
OFF / ON
Set the display or nondisplay of the histogram when button is pressed in
shooting mode.
FRAME ASSIST
OFF /
Set the display or nondisplay and the type of frame assist to be displayed when
......................................
/1^
Settings on the TV
Turn the TV on. and set it to video
input mode.
• For details of switching to video
input, refer to your TV’s instruction
manual.
. Display the histogram
Display the frame assist/Decide the type
38 button is pressed in shooting mode.
Page 39

3 Printing pictures
You can print out the pictures you have taken.
If you print the pictures at home, you can either connect the camera directly to
the printer or you can connect the camera to a computer and download the
pictures to the computer first.
If you go to a photo store, it is a good idea to store the print reservation data on
the card first. With print reservation, you can print out pictures easily either at
home using a personai DPOF-compatible printer or at a photo store that supports
DPOF. DPOF is a standard format used to record automatic print information
from digital cameras, it allows you to store data such as which pictures you want
to print and the number of prints so that you can print pictures automatically at
home or at a photo store.
This chapter explains direct printing and print reservations.
u
Select the pictures
you \.vant to print
at the store .
Printing at the store
Use the camera to
select the pictures
e '
you want to print
39
(Q
•o
O
c
Page 40

: Using the direct printing function
By connecting the camera to a PictBridge-compatible printer, you can print out
pictures directly. Select the pictures you want to print and the number of prints
on the camera’s monitor.
To find out if your printer is oompatibie with PictBridge, refer to the printer’s
instruction manual.
What is PictBridge?
A standard for connecting digitai cameras and printers of different makers and printing out
pictures directly.
• Available printing modes, paper sizes etc., vary depending on the printer you
use. Refer to the instruction manual for your printer.
• For details of printing paper types, ink cassettes, etc., refer to the printer’s
instruction manual.
EASY PRINT
[EASY PRINT] can be used to print out the picture displayed on the monitor.
The selected picture is printed using the standard settings of your printer. The
date and file name are not printed.
STANDARD
All printers that support PictBridge have standard print settings. If ¡STANDARD] is selected
on the settings screens (P.42 to 43), pictures are printed according to these settings. Refer
to the printer’s instruction manual for its standard settings or contact the printer
manufacturer.
1 Display the picture you want to print out on the LCD monitor in
the playback mode.
2 Turn the printer on and plug the USB cable provided with the
camera into the multi-connector of the camera and the printer’s
USB port.
Multi-connector USB cable
40
The [EASY PRINT START] screen is displayed.
For details of how to turn the printer on and the position of the USB port,
refer to the printer’s instruction manual.
Page 41

3 Press [0] button.
• Printing starts.
• When printing is finished, the picture
selection screen is displayed. To print
another picture, press <][> to select a
picture, and press ¡0; button.
• When you are finished, disconnect the
USB cable from the camera with the
picture selection screen displayed.
Remove the USB cable from the camera.
ir.--
5 Remove the USB cable from the
printer.
You can use [EASY PRINT] even when the camera Is turned off or In shooting
mode. With the camera turned off or in shooting mode, connect the USB cable.
The selection screen for the USB connection is displayed. Select [EASY
PRINT],
CS= “EASY PRINT” Step 3 (P. 41), “CUSTOM PRINT” Step 2 (P. 42)
(Q
•o
u
O
c
s
41
Page 42

other print modes and print settings (CUSTOM PRINT)
1 Display the screen being indicated
on the right according to the
procedure 1 and 2 in P. 40, and
press @).
Select [CUSTOM PRINT], and
press @).
Operation guide
3 Make the print settings according
to the operation guide.
Selecting the picture to print (available only when a card is
inserted)
Selecting a print mode
42
ALL IMAGES Allows you to select from all pictures in the
card to print.
ALBUM Select an album and the pictures in the
album to print
lode
PRINT Prints the selected picture.
ALL PRINT Prints all the pictures stored in the
internal memory or the card.
MULTI PRINT Prints one picture in multiple layout
format.
ALL INDEX Prints an index of all the pictures stored
in the internal memory or the card.
PRINT ORDER Prints the pictures according to the print
reservation data on the card. If no print
reservations have been made, this
option is not available.
KyPrint settings (DROP)” (P. 45)
Page 43

Setting the print paper
SIZE
BORDERLESS
OFF(H)
ON(n)
PICS/SHEET
H Note
• If the [PRINTPAPER] screen is not displayed, [SIZE], [BORDERLESS] and
[PICS/SHEET] are set to [STANDARD].
Selecting the picture to print
PRINT
SINGLE PRINT
MORE Sets the number of prints and data to be
Press <][> to select the picture you v/ant to print. You can also use the zoom
button and select a picture from the index display.
Setting the number of prints and data to be printed
Choose from the available paper sizes on
your printer.
Select framed or unframed, in [MULTI
PRINT] mode, you cannot select the
frame.
The picture is printed inside a blank frame.
The picture is printed filling the entire
page._____________________________
Available in [MULTI PRINT] mode only.
The number of prints that can be printed
vary depending on the printer.
Prints one copy of the selected picture.
When [SINGLE PRINT] or [MORE] has
been selected, a single copy or more
copies are printed.
Makes a print reservation for the
displayed picture.
printed for the displayed picture.
(Q
•o
u
O
c
s
iQi^
: ■ ■
1^* WITHOUT
iisaEsersiiiiBBiii
Select [OK], and press
• Printing starts.
• When printing is finished, the [PRINT MODE
SELECT] screen is displayed.
DATE(©) If you select [WiTH], pictures are printed
FILE NAME } If you select [WiTH], pictures are printed
Sets the number of prints. You can
select up to 10 prints.
with the date.
with the file name.
43
Page 44

To cancel printing
TRANSFERRING
- Press @
Screen during data transfer
5 In the [PRINT MODE SELECT] screen, press
MENU button.
• A message is displayed.
6 Disconnect the USB cable from the
O)
c
(X • The camera turns off.
camera.
7 Disconnect the USB cable from the
printer.
Select
CANCEL],
and press
44
Page 45

li
How to make print reservations
Print reservation allows you to save printing data (the number of prints and the
date and time information) with the pictures stored on the card.
Only the images stored on the card can be reserved to print. Insert a card with
recorded pictures into the camera before making print reservations.
Pictures with print reservations can be printed using the following procedures.
Printing using a DPOF-compatible photo store.
You can print the pictures using the print reservation data.
Printing using a DPOF-compatible printer.
Printing is possible directly from a card containing print reservation data,
without using a computer. For more details, refer to the printer’s instruction
manual. A PC card adapter may also be necessary.
H Note
• DPOF reservations set by another device cannot be changed by this camera.
Make changes using the original device. If a card contains DPOF reservations
set by another device, entering reservations using this camera may overwrite
the previous reservations.
• Not ail functions may be available on a!i printers, or at ali photo stores.
To use print services without using DPOF
• Pictures stored in the internal memory cannot be printed at a photo store. The
pictures need to be copied to a card before taking them.
cy’BACKUP Copying pictures in the internal memory to the card” (P. 33)
(Q
u
O
C
s
45
Page 46

Single-frame reservation
Follow the operation guide to make a print reservation for a selected picture.
1 Press the MENU button in the playback mode and display the
top menu.
0
13
o
Q.
O)
4
5
TIME The seiected pictures are printed with the
shooting time.
Select [SET], and press (S).
All-frame reservation
Reserves all the pictures stored on the card. The number of prints is set at one
print per picture.
1 Press the MENU button in the playback mode and display the
top menu.
2 Select [PRINT ORDER] ► [,1^^, and press (g).
46
• Playing back the albumTop menu ► [PRINT ORDER] ►
Page 47

3 Select the date and time setting, and press
NO The pictures are printed without the date and time.
DATE Ail pictures are printed with the shooting date.
TIME Ail pictures are printed with the shooting time.
4 Select [SET], and press @).
Resetting print reservation data
You can reset all the print reservation data or just for selected pictures.
1 Select top menu ► [PRINT ORDER], and press (£).
• Playing back the album:Top menu ► [PRINT ORDER]
To reset the print reservation data for all the pictures
2 Select [fl] or [¡t^^], and press
3 Select [RESET], and press @).
To reset the print reservation data for a selected picture
2 Select