

Page 1
DIGITAL CAMERA
C-5050ZOOM
REFERENCE MANUAL
<Click Here>
Explanation of digital camera functions and operating instructions.
Explanation of how to download images between your digital camera and PC.
DIGITAL CAMERA - PC CONNECTION
OPERATION MANUAL
CAMERA OPERATION MANUAL
Page 2
Thank you for purchasing an Olympus digital camera. Before you
start to use your new camera, please read these instructions carefully to enjoy optimum performance and a longer service life. Keep
this manual in a safe place for future reference.
We recommend that you take test shots to get accustomed to your
camera before taking important photographs.
Screen and camera illustrations shown in this manual were pro-
duced during the developmental stages and may differ from those
of the actual product.
DIGITAL CAMERA
C-5050ZOOM
REFERENCE MANUAL
Page 3
2
For customers in North and South America
For customers in Europe
Trademarks
• IBM is a registered trademark of International Business Machines Corporation.
• Microsoft and Windows are registered trademarks of Microsoft Corporation.
• Macintosh is a trademark of Apple Computer Inc.
• All other company and product names are registered trademarks and/or
trademarks of their respective owners.
• The standards for camera file systems referred to in this manual are the “Design
Rule for Camera File System/DCF” standards stipulated by the Japan Electronics
and Information Technology Industries Association (JEITA).
“CE” mark indicates that this product complies with the European
requirements for safety, health, environment and customer protection.
“CE” mark cameras are intended for sales in Europe.
For customers in USA
Declaration of Conformity
Model Number : C-5050ZOOM
Trade Name : OLYMPUS
Responsible Party : Olympus America Inc.
Address : 2 Corporate Center Drive, Melville, New York
11747-3157 U.S.A.
Telephone Number : 631-844-5000
Tested To Comply With FCC Standards
FOR HOME OR OFFICE USE
This device complies with Part 15 of the FCC rules. Operation is subject to
the following two conditions:
(1) This device may not cause harmful interference.
(2) This device must accept any interference received, including
interference that may cause undesired operation.
For customers in Canada
This Class B digital apparatus meets all requirements of the Canadian
Interference-Causing Equipment Regulations.
Page 4
3
INDEX
1
2
3
4
5
6
7
8
9
10
11
Introduction of the
camera’s functions
This section guides you
through the basic operations
from taking pictures to
playing them back.
Advanced Photography
To get that particular shot
using various effects or for
fine-tuning the settings.
Getting started
Shooting and playback basics
Mode dial and direct button
functions
Using the menus and tabs
Flash
Advanced shooting
Playback
Useful functions
Print setting
Miscellaneous
For playing back and
arranging pictures
Settings that make the
camera easier to operate.
Printing pictures
Troubleshooting and other
information
Contents
Names of parts
P.4
P.10
P.20
P.39
P.59
P.69
P.79
P.91
P.125
P.147
P.164
P.195
P.205
Adjusting the image quality
and exposure
Page 5
4
Contents
INDEX . . . . . . . . . . . . . . . . . . . . . . . . . . . . . . . . . . . . . . . . . . . . 3
Contents . . . . . . . . . . . . . . . . . . . . . . . . . . . . . . . . . . . . . . . . . . 4
Names of parts . . . . . . . . . . . . . . . . . . . . . . . . . . . . . . . . . . . . 10
Camera . . . . . . . . . . . . . . . . . . . . . . . . . . . . . . . . . . . . . . . 10
Control panel indications. . . . . . . . . . . . . . . . . . . . . . . . . . 13
Monitor indications . . . . . . . . . . . . . . . . . . . . . . . . . . . . . . 15
Memory gauge . . . . . . . . . . . . . . . . . . . . . . . . . . . . . . . . . 18
Battery check . . . . . . . . . . . . . . . . . . . . . . . . . . . . . . . . . . 18
How to use this manual . . . . . . . . . . . . . . . . . . . . . . . . . . . . . . 19
1 Getting started 20
Attaching the strap. . . . . . . . . . . . . . . . . . . . . . . . . . . . . . . . . . 20
Loading the batteries . . . . . . . . . . . . . . . . . . . . . . . . . . . . . . . . 21
Selecting optional batteries or an AC adapter. . . . . . . . . . 23
Inserting a card . . . . . . . . . . . . . . . . . . . . . . . . . . . . . . . . . . . . 25
Card basics . . . . . . . . . . . . . . . . . . . . . . . . . . . . . . . . . . . . 25
Ejecting the card . . . . . . . . . . . . . . . . . . . . . . . . . . . . . . . . 27
Switching cards . . . . . . . . . . . . . . . . . . . . . . . . . . . . . . . . . 29
Power on/off . . . . . . . . . . . . . . . . . . . . . . . . . . . . . . . . . . . . . . 31
Startup/Shutdown screen . . . . . . . . . . . . . . . . . . . . . . . . . 32
If the card is not recognized (card check) . . . . . . . . . . . . . 33
Selecting a language . . . . . . . . . . . . . . . . . . . . . . . . . . 34
Setting the date and time . . . . . . . . . . . . . . . . . . . . . . . . 36
Adjusting the viewfinder. . . . . . . . . . . . . . . . . . . . . . . . . . . . . . 38
2 Shooting and playback basics 39
Holding the camera . . . . . . . . . . . . . . . . . . . . . . . . . . . . . . . . . 39
Taking still pictures . . . . . . . . . . . . . . . . . . . . . . . . . . . . . . . . . 40
Taking still pictures using the viewfinder. . . . . . . . . . . . . . 40
Taking still pictures using the monitor . . . . . . . . . . . . . . . . 42
Comparison of the viewfinder & monitor . . . . . . . . . . . . . . 45
If correct focus cannot be obtained . . . . . . . . . . . . . . . . . . . . . 46
Page 6
5
Contents
Determine the position of the subject
after focusing (Focus Lock). . . . . . . . . 46
Subjects that are difficult to focus on . . . . . . . . . . . . . . . . 47
Recording movies . . . . . . . . . . . . . . . . . . . . . . . . . . . . . . . 48
Zoom . . . . . . . . . . . . . . . . . . . . . . . . . . . . . . . . . . . . . . . . . . . . 50
Using the optical zoom . . . . . . . . . . . . . . . . . . . . . . . . . . . 50
Using the digital zoom. . . . . . . . . . . . . . . . . . . . . . . . . . . . 51
Viewing still pictures . . . . . . . . . . . . . . . . . . . . . . . . . . . . . 53
Quick View . . . . . . . . . . . . . . . . . . . . . . . . . . . . . . . . . . . . 54
Viewing movies . . . . . . . . . . . . . . . . . . . . . . . . . . . . . . . . . 55
Protecting pictures . . . . . . . . . . . . . . . . . . . . . . . . . . . . . . . 57
Erasing pictures (Single-frame erase) . . . . . . . . . . . . . . . . 58
3
Mode dial and direct button functions
59
Mode dial . . . . . . . . . . . . . . . . . . . . . . . . . . . . . . . . . . . . . . . . . 59
Setting-related modes . . . . . . . . . . . . . . . . . . . . . . . . . 59
Situation-related modes . . . . . . . . . . 61
Playback mode . . . . . . . . . . . . . . . . . . . . . . . . . . . . . . 62
Direct Buttons . . . . . . . . . . . . . . . . . . . . . . . . . . . . . . . . . . . . . 63
Direct buttons and the jog dial. . . . . . . . . . . . . . . . . . . . . . 63
Flow of direct button operations . . . . . . . . . . . . . . . . . . . . 64
Direct button functions . . . . . . . . . . . . . . . . . . . . . . . . . . . 65
4 Using the menus and tabs 69
About the menus . . . . . . . . . . . . . . . . . . . . . . . . . . . . . . . . . . . 69
How to use the menus. . . . . . . . . . . . . . . . . . . . . . . . . . . . . . . 70
Shortcut menus . . . . . . . . . . . . . . . . . . . . . . . . . . . . . . . . . . . . 72
Mode Menus . . . . . . . . . . . . . . . . . . . . . . . . . . . . . . . . . . . . . . 74
5 Flash 79
Flash shooting . . . . . . . . . . . . . . . . . . . . . . . . . . . . . . . . . . . . . 79
Page 7
6
Contents
Using the slow synchronization flash . . . . . . . . . . . . . . 84
Flash intensity control . . . . . . . . . . . . . . . . . . . . . . . . . . . . 85
External flash (optional). . . . . . . . . . . . . . . . . . . . . . . . . . . . . . 86
Using the FL-40 external flash . . . . . . . . . . . . . . . . . . . . . 86
Using commercially available external flashes . . . . . . . . . 88
Compatible commercially available external flashes. . . . . 89
Using a slave flash mode . . . . . . . . . . . . . . . . . . . . . . . . . 90
6 Advanced shooting 91
Aperture priority shooting . . . . . . . . . . . . . . . . . . . . . . . . . . 91
Shutter priority shooting . . . . . . . . . . . . . . . . . . . . . . . . . . . 92
Manual shooting . . . . . . . . . . . . . . . . . . . . . . . . . . . . . . . . . 93
Using My Mode . . . . . . . . . . . . . . . . . . . . . . . . . . . . . . . . . 95
Focusing applications . . . . . . . . . . . . . . . . . . . . . . . . . . . . . . . 96
AF MODE - Changing the focus range . . . . . . . . . . . . . . . 96
FULLTIME AF - A reliable time-saving way to focus. . . . . 97
Changing the position of the AF target mark. . . . . . . . . . . 98
AF illuminator . . . . . . . . . . . . . . . . . . . . . . . . . . . . . . . . . . 99
Manual focus. . . . . . . . . . . . . . . . . . . . . . . . . . . . . . . . . . 100
Metering , . . . . . . . . . . . . . . . . . . . . . . . . . . . . . . . . . 102
Spot metering . . . . . . . . . . . . . . . . . . . . . . . . . . . . . . . . . 102
Multi-metering . . . . . . . . . . . . . . . . . . . . . . . . . . . . . . . . . 103
AE Lock - Locking the exposure . . . . . . . . . . . . . . . . . 105
Macro mode shooting . . . . . . . . . . . . . . . . . . . . . . . . . . . . 107
Super macro mode shooting . . . . . . . . . . . . . . . . . . . . . . 108
Self-timer shooting . . . . . . . . . . . . . . . . . . . . . . . . . . . . . 109
Remote control shooting . . . . . . . . . . . . . . . . . . . . . . . . . . . 110
Sequential shooting , , , . . . . . . . . . 112
High speed sequential shooting, sequential shooting
and AF sequential shooting. . . . . . . . 112
Auto bracketing . . . . . . . . . . . . . . . . . . . . . . . . . . . . . . . . 113
Panorama shooting . . . . . . . . . . . . . . . . . . . . . . . . . . . . . . . . 116
Taking two-in-one pictures . . . . . . . . . . . . . . . . . . . . . 119
Page 8
7
Contents
FUNCTION - Adding special effects to pictures . . . . . . . . . . 121
Recording sound with still pictures . . . . . . . . . . . . . . . . . . 122
Recording sound with movies . . . . . . . . . . . . . . . . . . . . . . 124
7
Adjusting the image quality and exposure
125
Record mode . . . . . . . . . . . . . . . . . . . . . . . . . . . . . . . . . 125
Selecting a record mode . . . . . . . . . . . . . . . . . . . . . . . . . 127
3:2 Resolution . . . . . . . . . . . . . . . . . . . . . . . . . . . . . . . . . 129
ENLARGE SIZE . . . . . . . . . . . . . . . . . . . . . . . . . . . . . . . 129
RAW Data . . . . . . . . . . . . . . . . . . . . . . . . . . . . . . . . . . . . 129
ISO sensitivity . . . . . . . . . . . . . . . . . . . . . . . . . . . . . . . . . . . . 130
Exposure compensation . . . . . . . . . . . . . . . . . . . . . . . . . . 131
White balance . . . . . . . . . . . . . . . . . . . . . . . . . . . . . . . . 133
Auto white balance . . . . . . . . . . . . . . . . . . . . . . . . . . . . . 133
Preset 1 white balance . . . . . . . . . . . . . . . . . . . . . . . . . . 134
Preset 2 white balance . . . . . . . . . . . . . . . . . . . . . . . . . . 134
Custom white balance . . . . . . . . . . . . . . . . . . . . . . . . . . . 135
One-touch white balance . . . . . . . . . . . . . . . . . . . . . 136
White balance adjustment . . . . . . . . . . . . . . . . . . . . . . 138
Sharpness . . . . . . . . . . . . . . . . . . . . . . . . . . . . . . . . . . . . . . . 139
Contrast . . . . . . . . . . . . . . . . . . . . . . . . . . . . . . . . . . . . . . . . . 140
Saturation . . . . . . . . . . . . . . . . . . . . . . . . . . . . . . . . . . . . . . . 141
Scene modes. . . . . . . . . . . . . . . . . . . . . . . . . . . . . . . . . . . . . 142
Noise reduction . . . . . . . . . . . . . . . . . . . . . . . . . . . . . . . . . . . 142
Histogram display . . . . . . . . . . . . . . . . . . . . . . . . . . . . . . 144
8 Playback 147
Close-up playback . . . . . . . . . . . . . . . . . . . . . . . . . . . . . . 147
Index display . . . . . . . . . . . . . . . . . . . . . . . . . . . . . . . . . . 148
Selecting the number of pictures. . . . . . . . . . . . . . . . . . . 149
Slideshow . . . . . . . . . . . . . . . . . . . . . . . . . . . . . . . . . . . . 150
Playback on a TV . . . . . . . . . . . . . . . . . . . . . . . . . . . . . . . . . 151
Page 9
8
Contents
Picture rotation . . . . . . . . . . . . . . . . . . . . . . . . . . . . . . 152
Recording sound . . . . . . . . . . . . . . . . . . . . . . . . . . . . . . . . 153
Editing still pictures . . . . . . . . . . . . . . . . . . . . . . . . . . . . . . . . 154
Resizing . . . . . . . . . . . . . . . . . . . . . . . . . . . . . . . . . . 154
Trimming . . . . . . . . . . . . . . . . . . . . . . . . . . . . . . . . . 155
RAW editing . . . . . . . . . . . . . . . . . . . . . . . . . . . . . . . . . . 156
Editing movies . . . . . . . . . . . . . . . . . . . . . . . . . . . . . . . . . . . . 158
Creating an index . . . . . . . . . . . . . . . . . . . . . . . . . . . . . . 158
Editing a movie . . . . . . . . . . . . . . . . . . . . . . . . . . . . . . . . 160
Copying pictures . . . . . . . . . . . . . . . . . . . . . . . . . . . . . . . . . . 162
All-frame erase . . . . . . . . . . . . . . . . . . . . . . . . . . . . . . . . 163
9 Useful functions 164
All Reset - Saving the camera’s settings . . . . . . . . . . . . . . . . 164
Custom button . . . . . . . . . . . . . . . . . . . . . . . . . . . . . . . . . 166
Setting the custom button . . . . . . . . . . . . . . . . . . . . . . . . 167
Using the custom button . . . . . . . . . . . . . . . . . . . . . . . . . 168
Shortcut . . . . . . . . . . . . . . . . . . . . . . . . . . . . . . . . . . . . . . . . . 169
Setting the shortcut menu . . . . . . . . . . . . . . . . . . . . . . . . 170
Using the shortcut menu . . . . . . . . . . . . . . . . . . . . . . . . . 171
MY MODE SETUP . . . . . . . . . . . . . . . . . . . . . . . . . . . . . 172
Formatting cards . . . . . . . . . . . . . . . . . . . . . . . . . . . . . . . 175
Information display . . . . . . . . . . . . . . . . . . . . . . . . . . . 177
Dual control panel display . . . . . . . . . . . . . . . . . . . . . . . . . . . 178
Monitor brightness adjustment . . . . . . . . . . . . . . . . . . . . 180
Rec View . . . . . . . . . . . . . . . . . . . . . . . . . . . . . . . . . . . . . . . . 181
Beep sound adjustment . . . . . . . . . . . . . . . . . . . . . . . . . 182
Button operation beep . . . . . . . . . . . . . . . . . . . . . . . . 183
Shutter sound . . . . . . . . . . . . . . . . . . . . . . . . . . . . . . . . . . . . 184
Playback volume . . . . . . . . . . . . . . . . . . . . . . . . . . . . . . . . . . 185
Power on/off display setting. . . . . . . . . . . . . . . . . . . . . . . . . . 186
Screen setup . . . . . . . . . . . . . . . . . . . . . . . . . . . . . . . . . . . . . 187
File name. . . . . . . . . . . . . . . . . . . . . . . . . . . . . . . . . . . . . . . . 189
Page 10
9
Contents
Pixel mapping . . . . . . . . . . . . . . . . . . . . . . . . . . . . . . . . . . . . 190
Measurement units . . . . . . . . . . . . . . . . . . . . . . . . . . . . 191
Video output selection . . . . . . . . . . . . . . . . . . . . . . . . . . . . . . 192
Initializing the settings . . . . . . . . . . . . . . . . . . . . . . . . . . . . . . 193
10 Print setting 195
How to print pictures . . . . . . . . . . . . . . . . . . . . . . . . . . . . 195
All-frame reservation . . . . . . . . . . . . . . . . . . . . . . . . . . . . 197
Single-frame reservation . . . . . . . . . . . . . . . . . . . . . . . . . 199
Canceling reservations . . . . . . . . . . . . . . . . . . . . . . . . . . 201
Trimming . . . . . . . . . . . . . . . . . . . . . . . . . . . . . . . . . . . . . 202
Resetting print reservation data . . . . . . . . . . . . . . . . . . . . 204
11 Miscellaneous 205
Error codes . . . . . . . . . . . . . . . . . . . . . . . . . . . . . . . . . . . . . . 205
Troubleshooting. . . . . . . . . . . . . . . . . . . . . . . . . . . . . . . . . . . 207
List of menus . . . . . . . . . . . . . . . . . . . . . . . . . . . . . . . . . . . . . 213
List of factory default settings . . . . . . . . . . . . . . . . . . . . . . . . 218
List of items by shooting mode . . . . . . . . . . . . . . . . . . . . . . . 221
Camera maintenance . . . . . . . . . . . . . . . . . . . . . . . . . . . . . . 224
Specifications . . . . . . . . . . . . . . . . . . . . . . . . . . . . . . . . . . . . 225
Glossary of terms . . . . . . . . . . . . . . . . . . . . . . . . . . . . . . . . . 227
index . . . . . . . . . . . . . . . . . . . . . . . . . . . . . . . . . . . . . . . . . . . 231
Indications used in this manual
l
Important information on factors which may lead to a
malfunction or operational problems. Also warns of operations
that should be absolutely avoided.
Useful information and hints that will help you get the most out
of your camera.
Reference pages describing details or associated information.
Note
Page 11
10
Names of parts
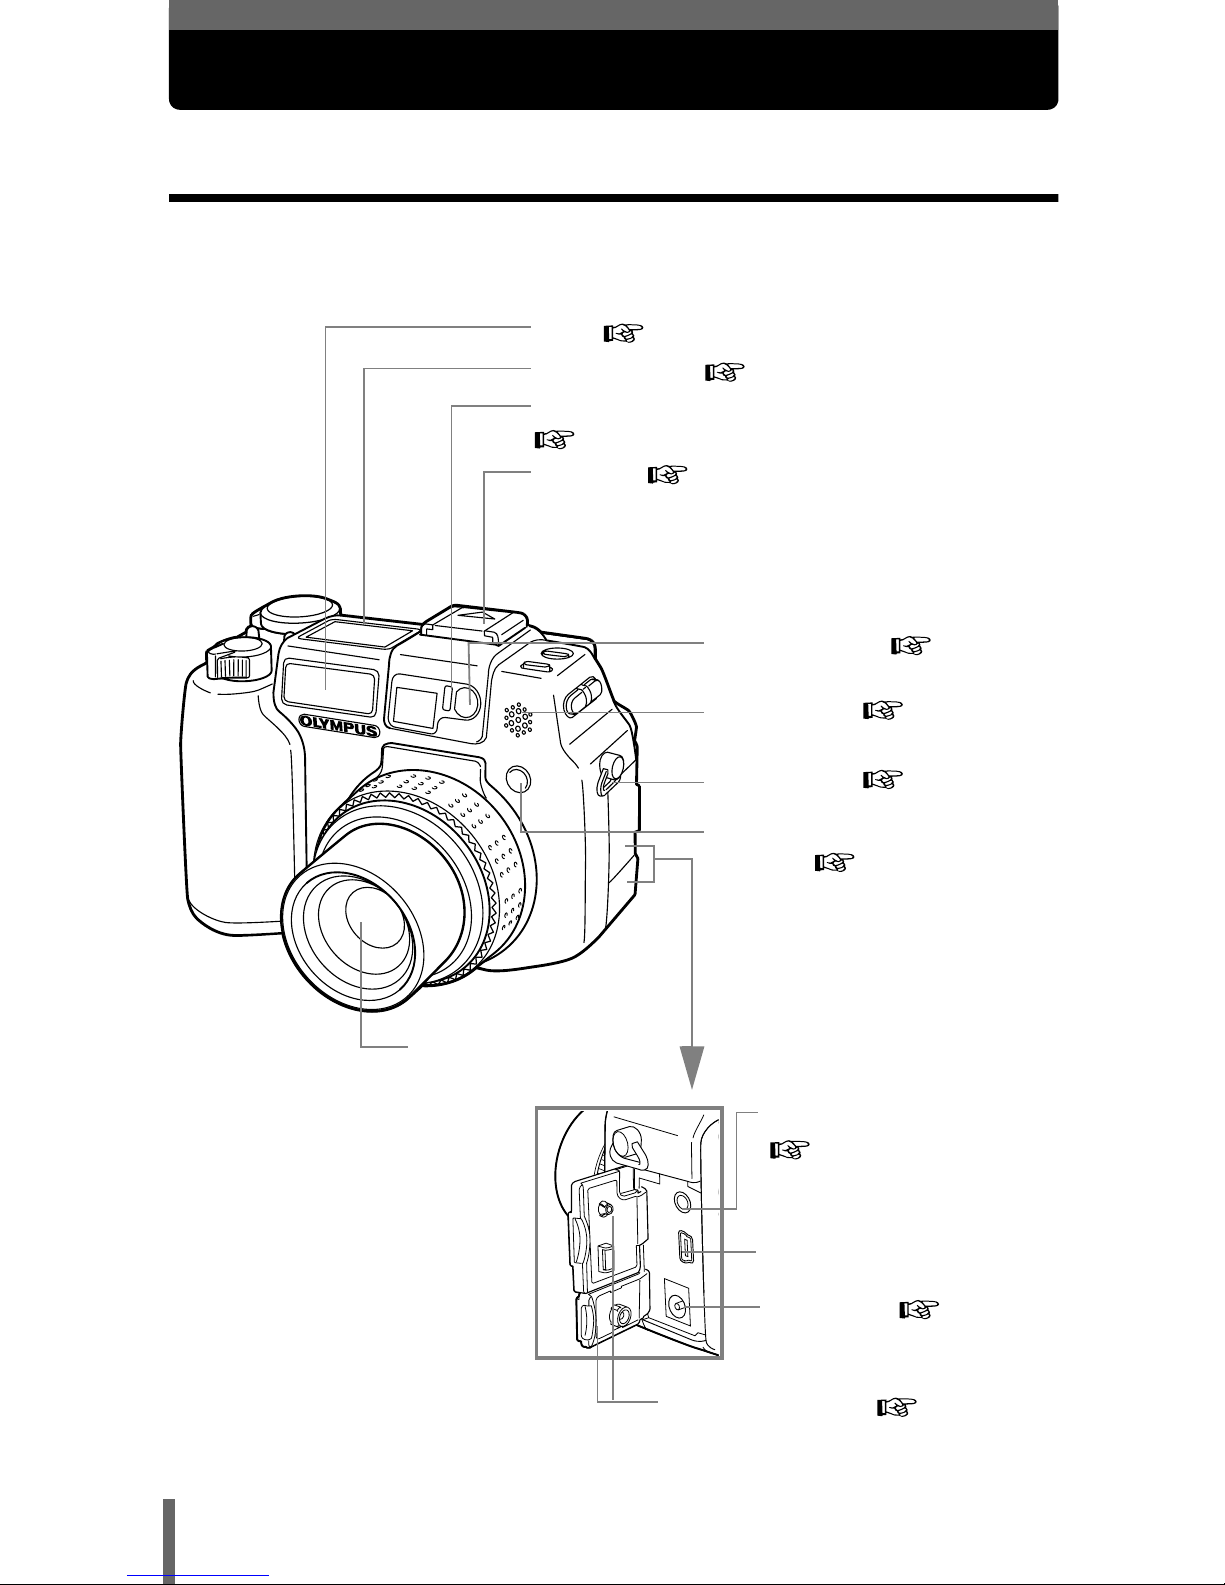
Camera
Lens
AF illuminator
P.99
Strap eyelet
P.20
Remote control
receiver
P.110
Self-timer/Remote control lamp
P.109, 110
Control panel
P.13
Hot shoe
P.86
Microphone
P.122,
124, 153
A/V OUT jack (MONO)
P.151
Flash
P.79
Connector cover
P.23, 151
USB connector
DC-IN jack
P.23
Page 12
11
Names of parts
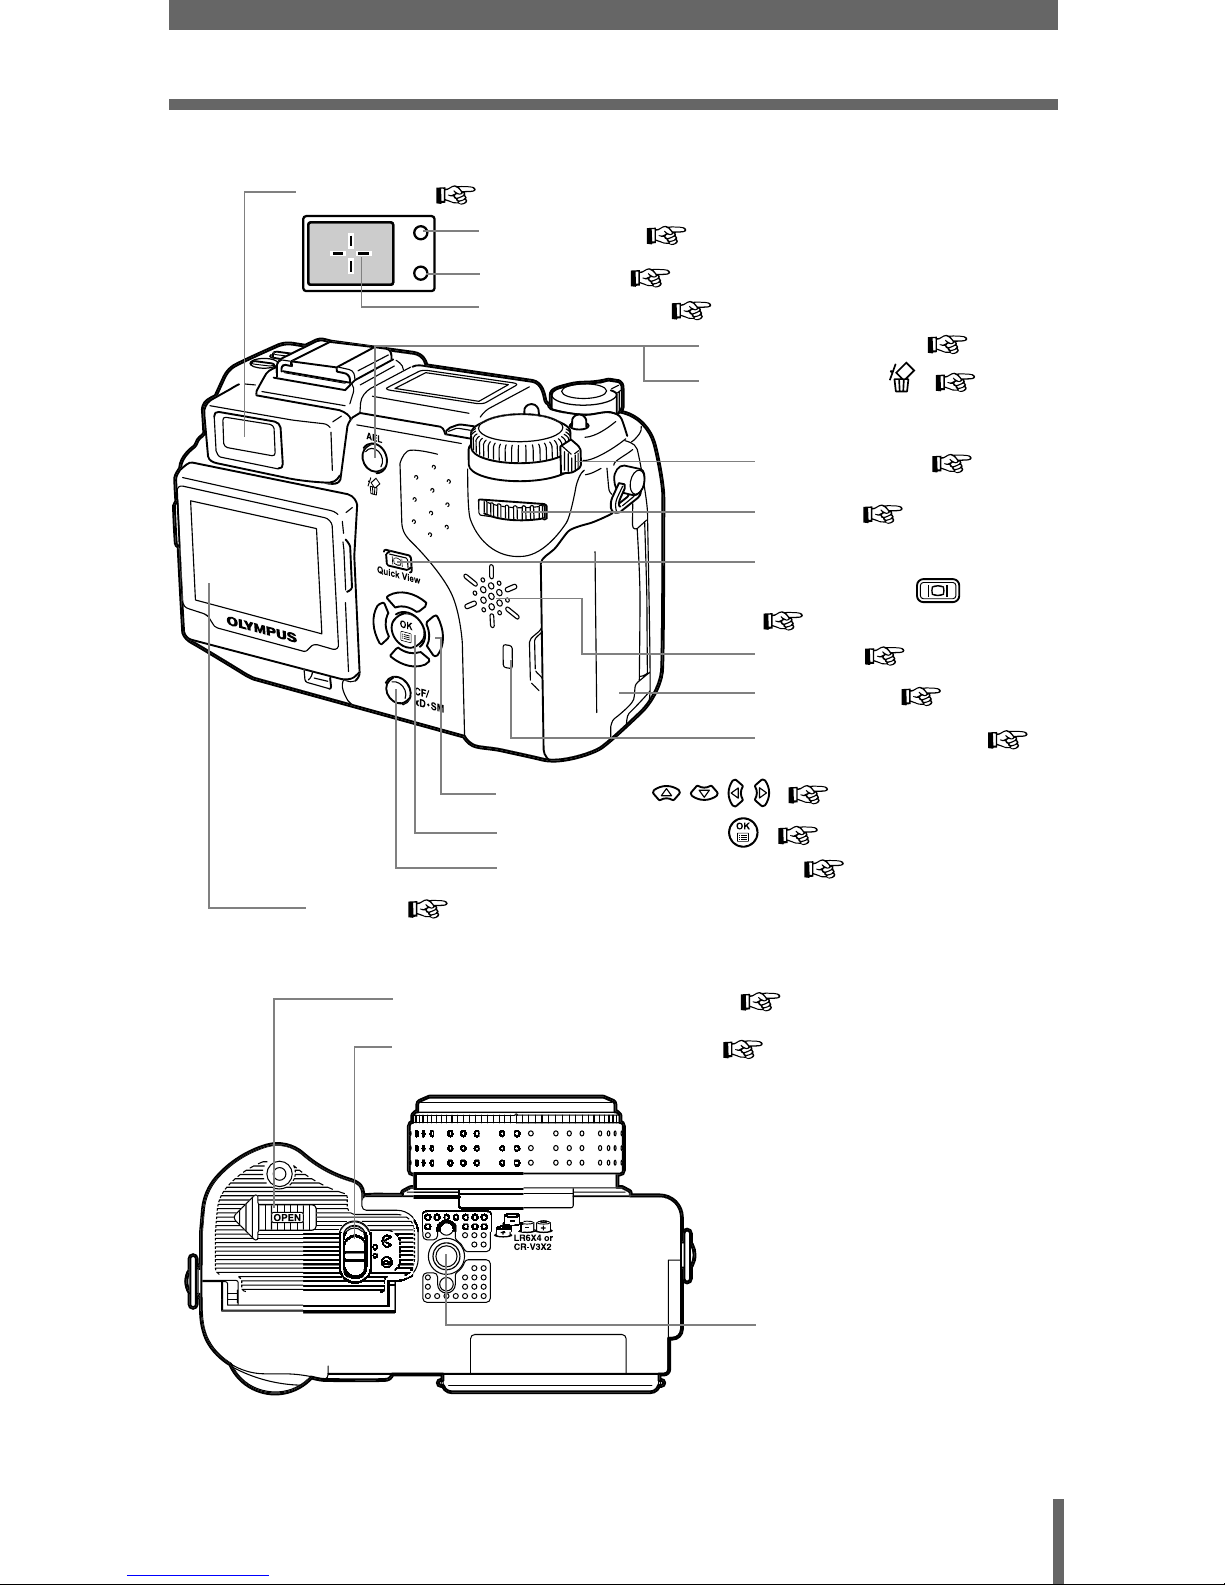
Viewfinder
P.38
AF target mark
P.40
Green lamp
P.40
Orange lamp
P.40
AEL button (AEL)
P.105
Erase button ( )
P.58
Power switch
P.31
Jog dial
P.63
Monitor button
(Quick View )
P.42, 54
Speaker
P.185
Card cover
P.26
Card access lamp
P.40
Arrow pad ( )
P.53, 69
OK/Menu button ( )
P.69
Card button (CF/xD•SM)
P.29
Monitor
P.15, 43
Battery compartment cover
P.21
Battery compartment lock
P.21
Tripod socket
Page 13
12
Names of parts
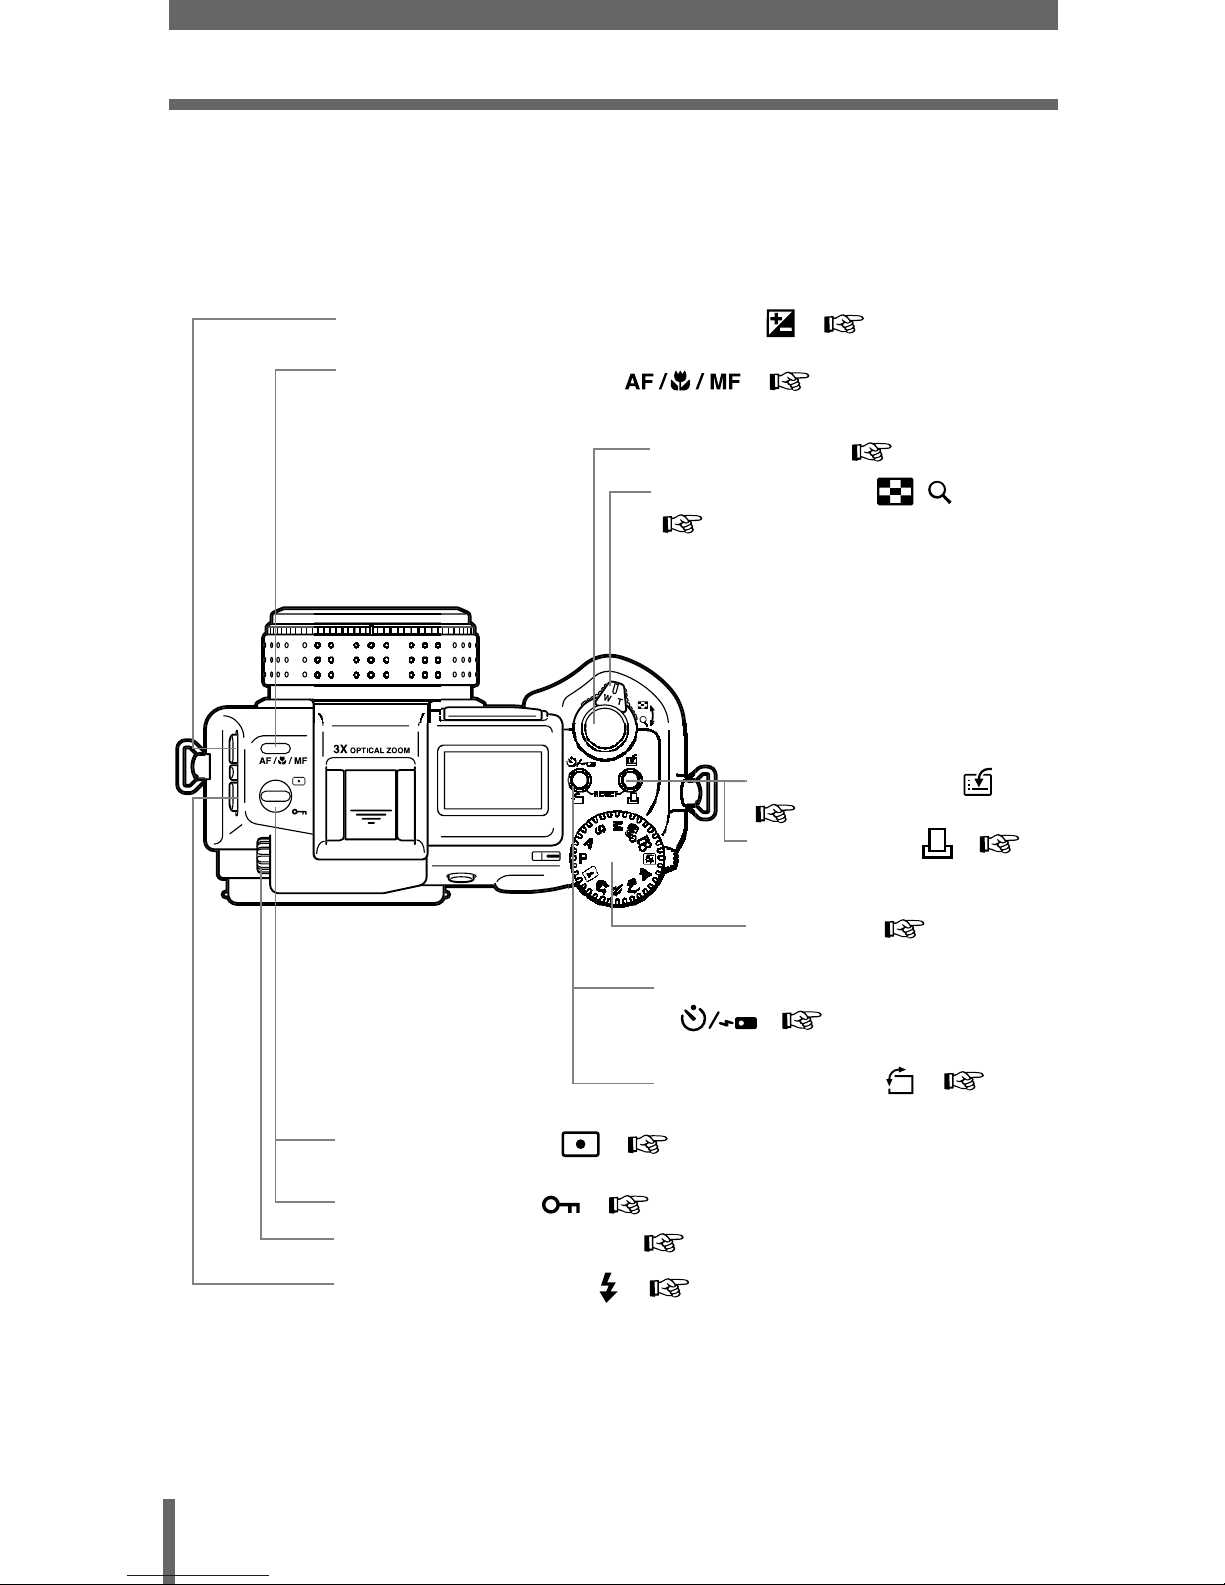
Exposure compensation button ( )
P.93, 131
AF/Macro/MF button ( )
P.100, 107
Diopter adjustment dial
P.38
Mode dial
P.59
Self-timer/Remote control button
()
P.109, 110
Rotation button ( )
P.152
Zoom lever (T/W· )
P.50, 147, 148
Shutter button
P.40
Custom button ( )
P.166
Print button ( )
P.197
Flash mode button ( )
P.79
Metering button ( )
P.102
Protect button ( )
P.57
Page 14
13
Names of parts
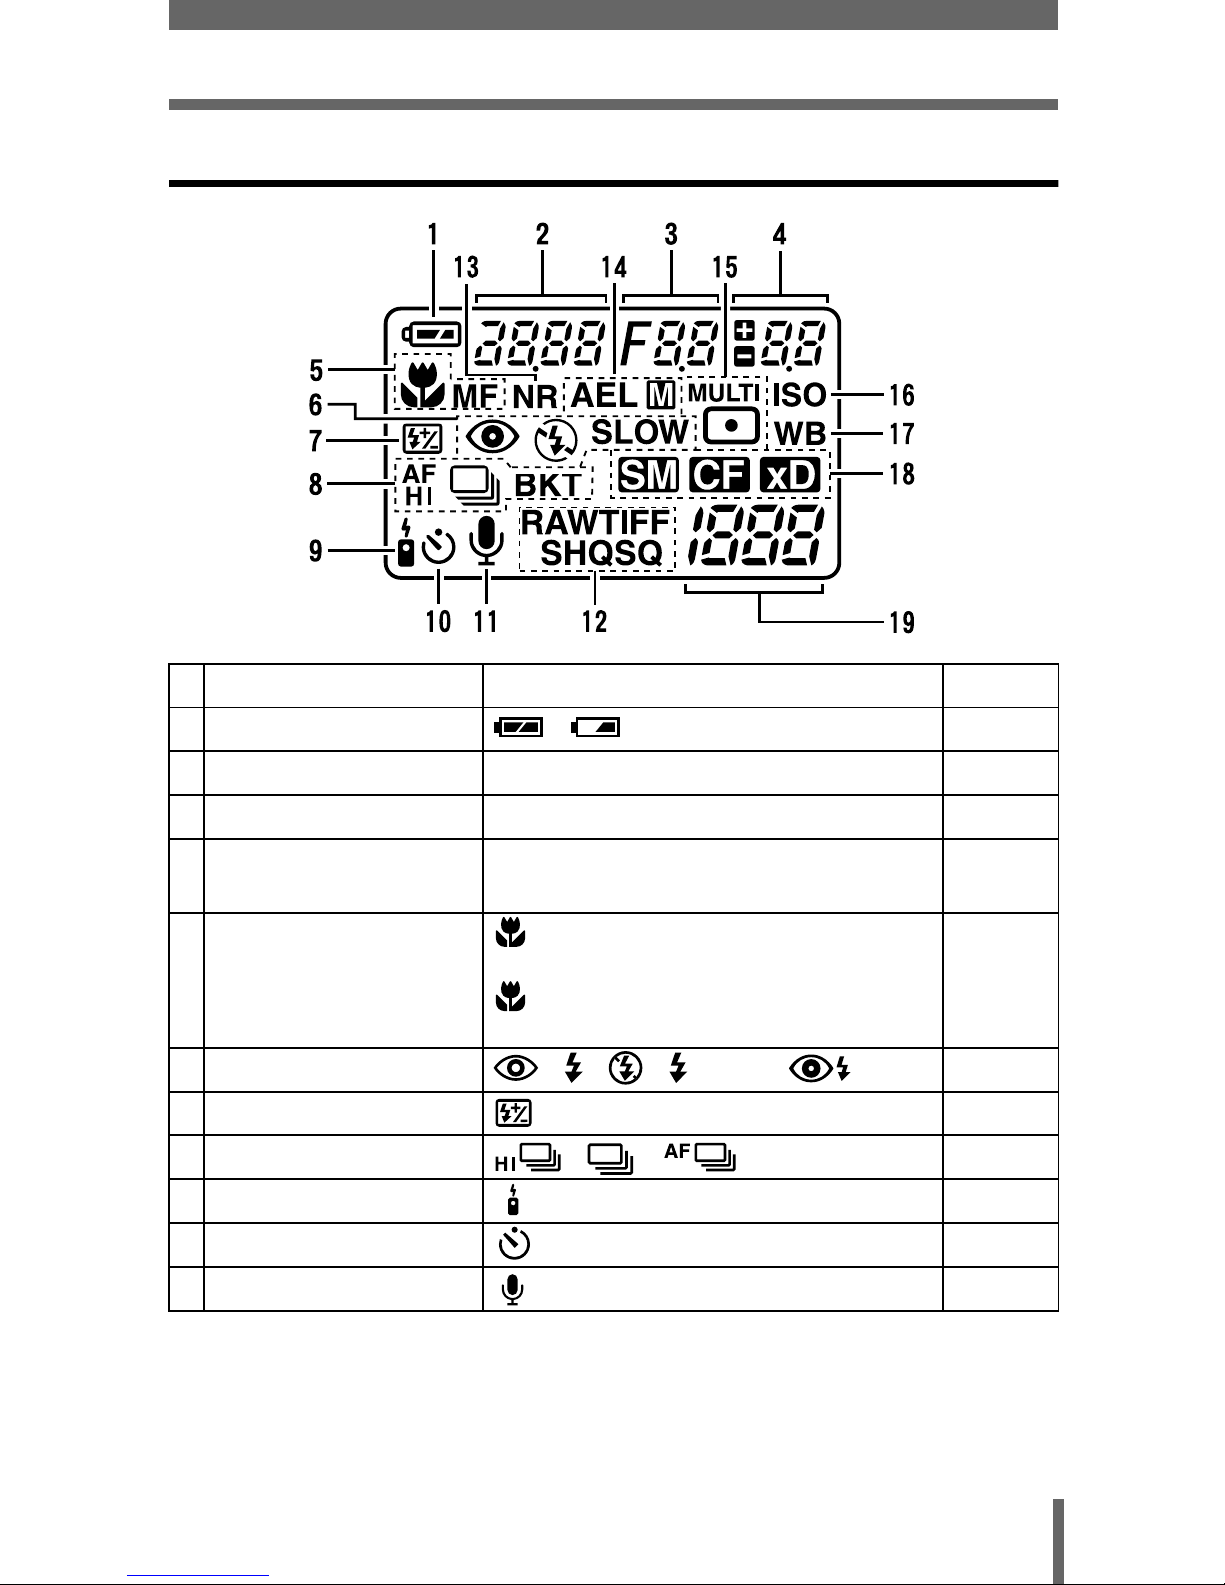
Control panel indications
Items Indications Ref. Page
1 Battery check , P.18
2 Shutter speed 2ooo (1/2000 sec.), 2.5'' P.92
3 Aperture value F1.8 P.91
4 Exposure compensation
Flash intensity control
+2.0, +1.0, 0.0, -1.0, -2.0 P.131
P.85
5 Macro mode
Manual focus
Super macro mode
Super macro MF mode
(Lights)
MF (Lights)
(Blinks)
MF
(Blinks)
P.107
P.100
P.108
P.108
6 Flash mode , , , SLOW , SLOW P.79
7 Flash intensity control P.85
8 Sequential shooting mode , , , BKT P.112
9 Remote control P.110
10 Self-timer P.109
11 Sound record
P.122, 124
Page 15
14
Names of parts
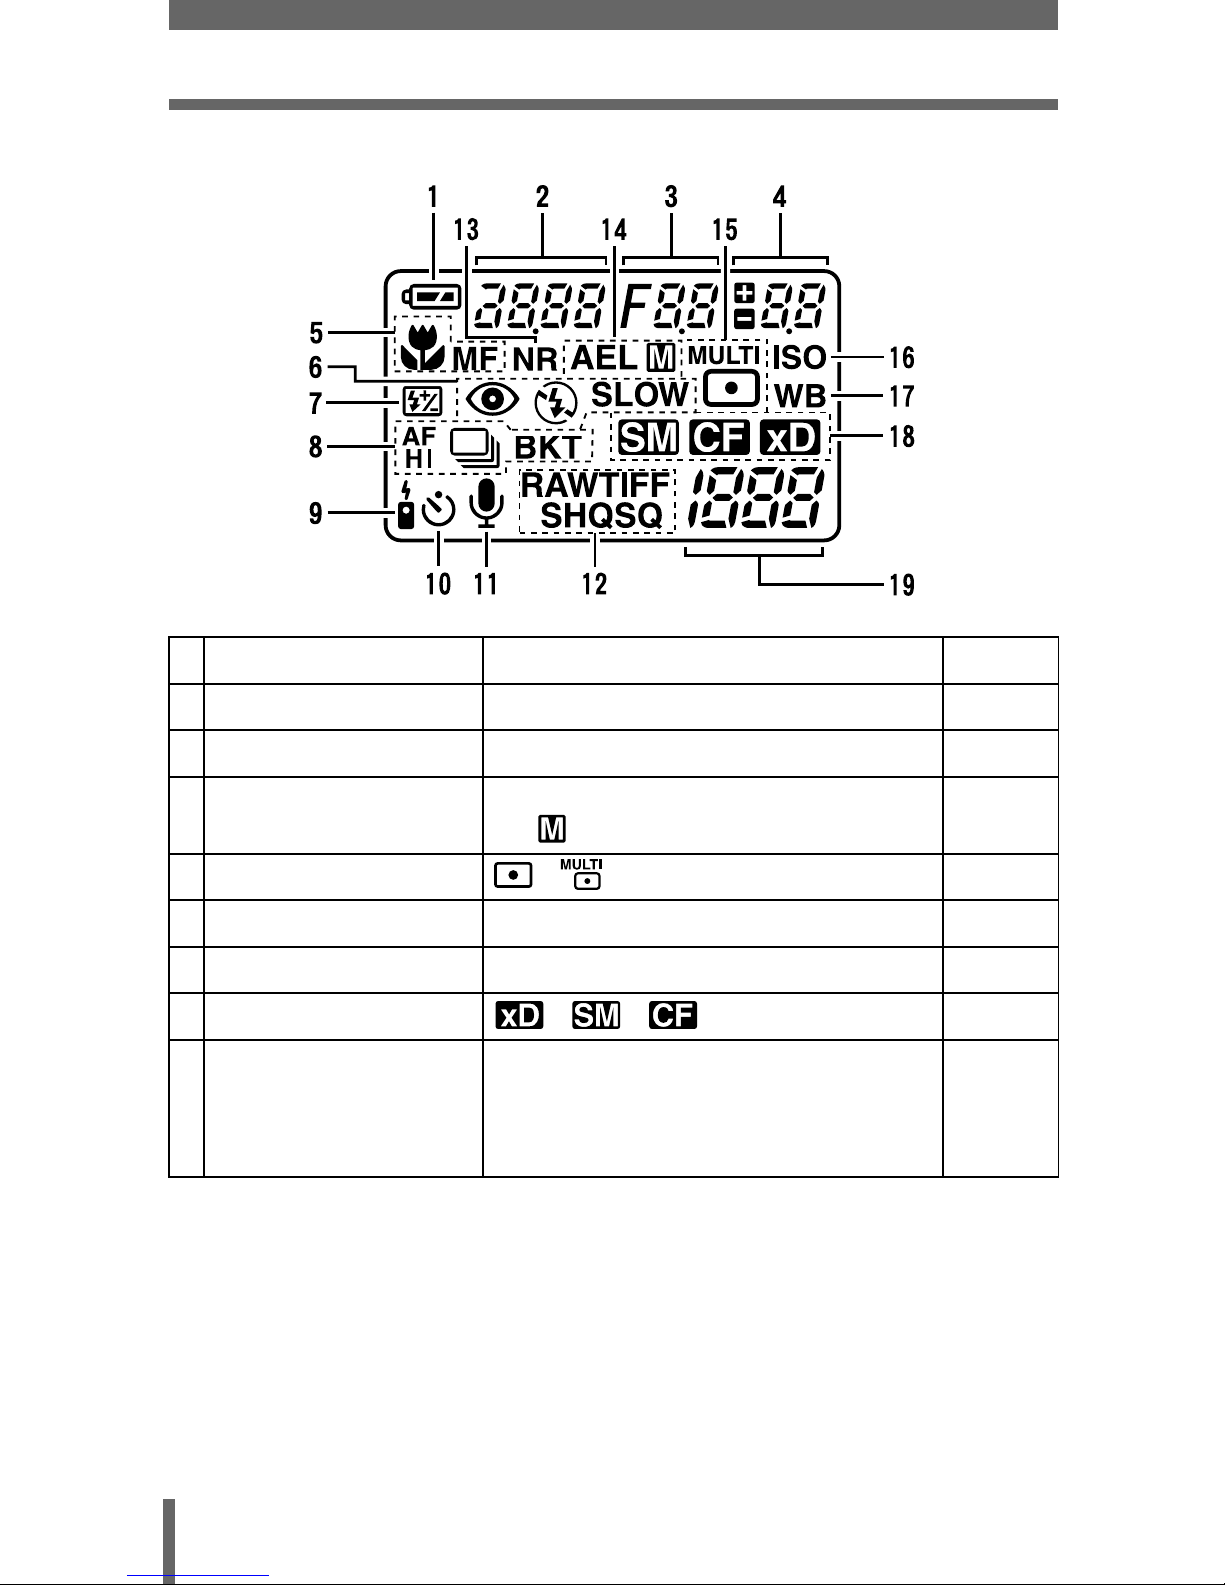
Items Indications Ref. Page
12 Record mode RAW, TIFF, SHQ, HQ, SQ (SQ1, SQ2) P.125
13 Noise reduction NR P.142
14 AE lock
AE memory
AEL
AEL
P.105
P.106
15 Metering , P.102
16 ISO ISO P.130
17 White balance WB P.133
18 Selected card , , P.29
19 Number of storable still
pictures/Seconds
remaining
Error code
30
-E-
P.48, 126
P.205
Page 16
15
Names of parts
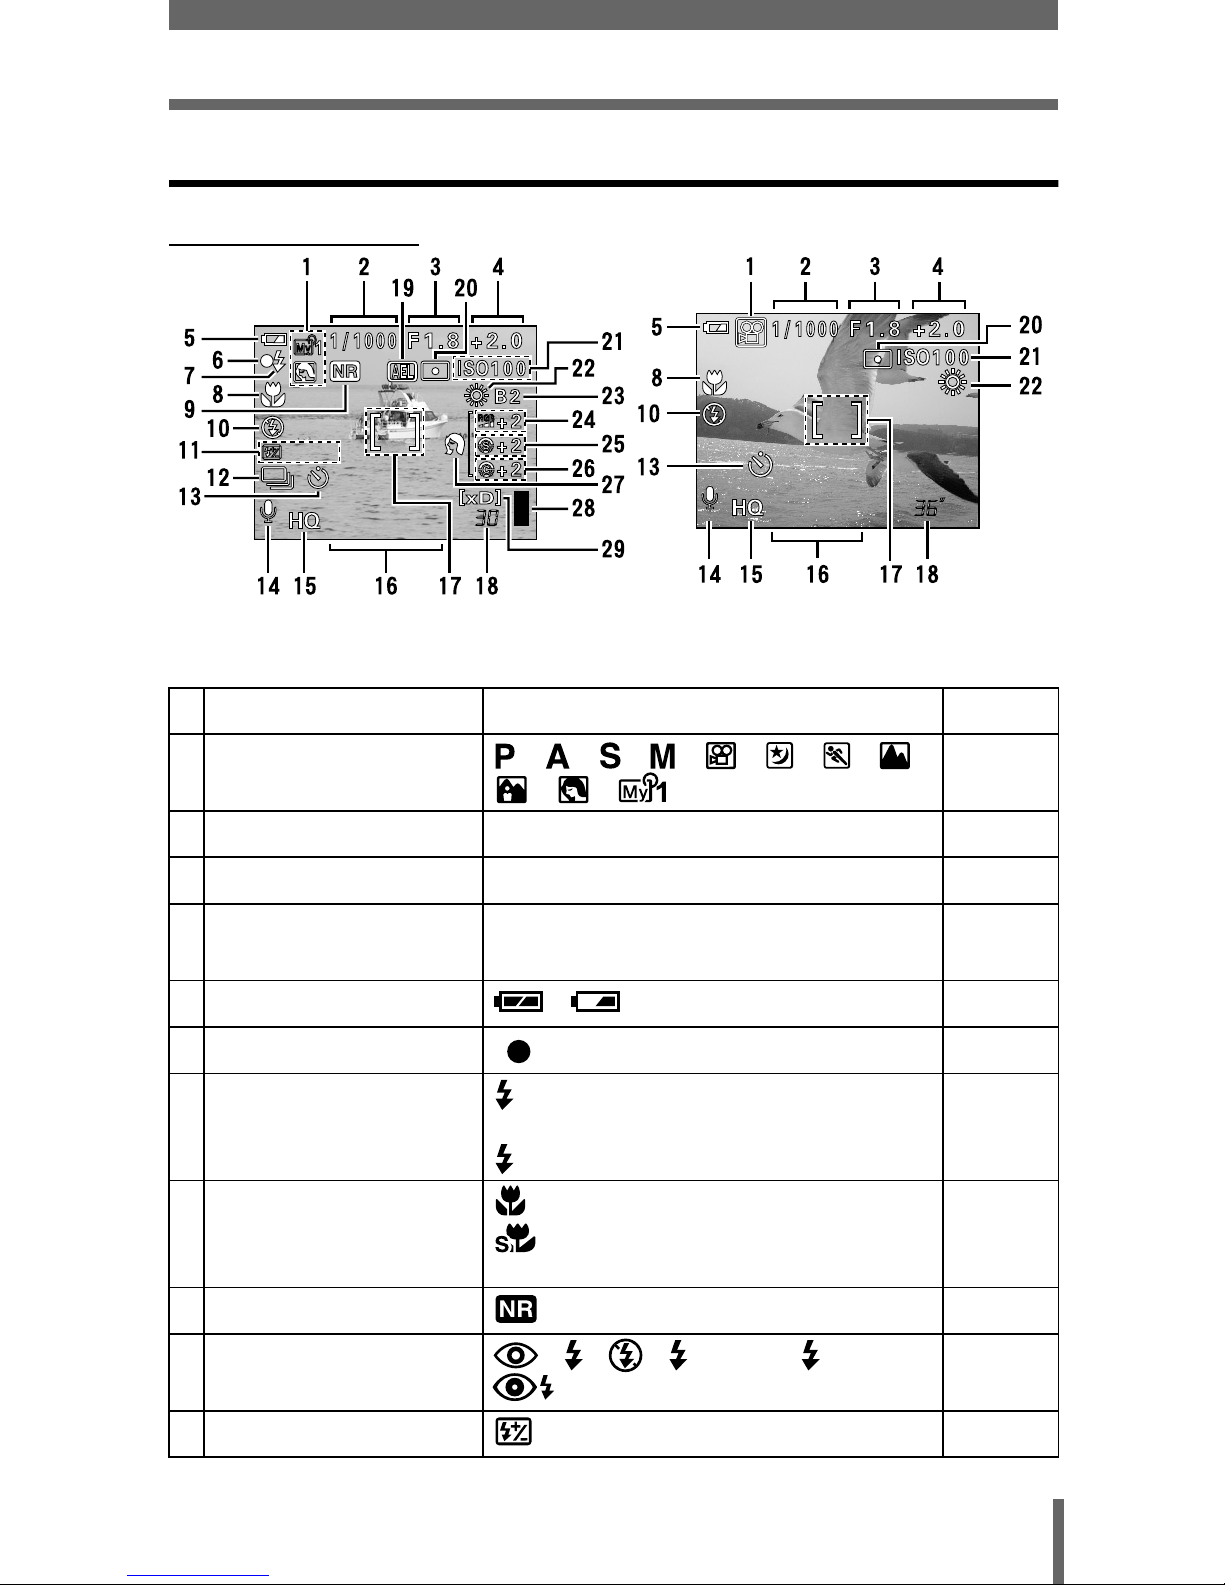
Monitor indications
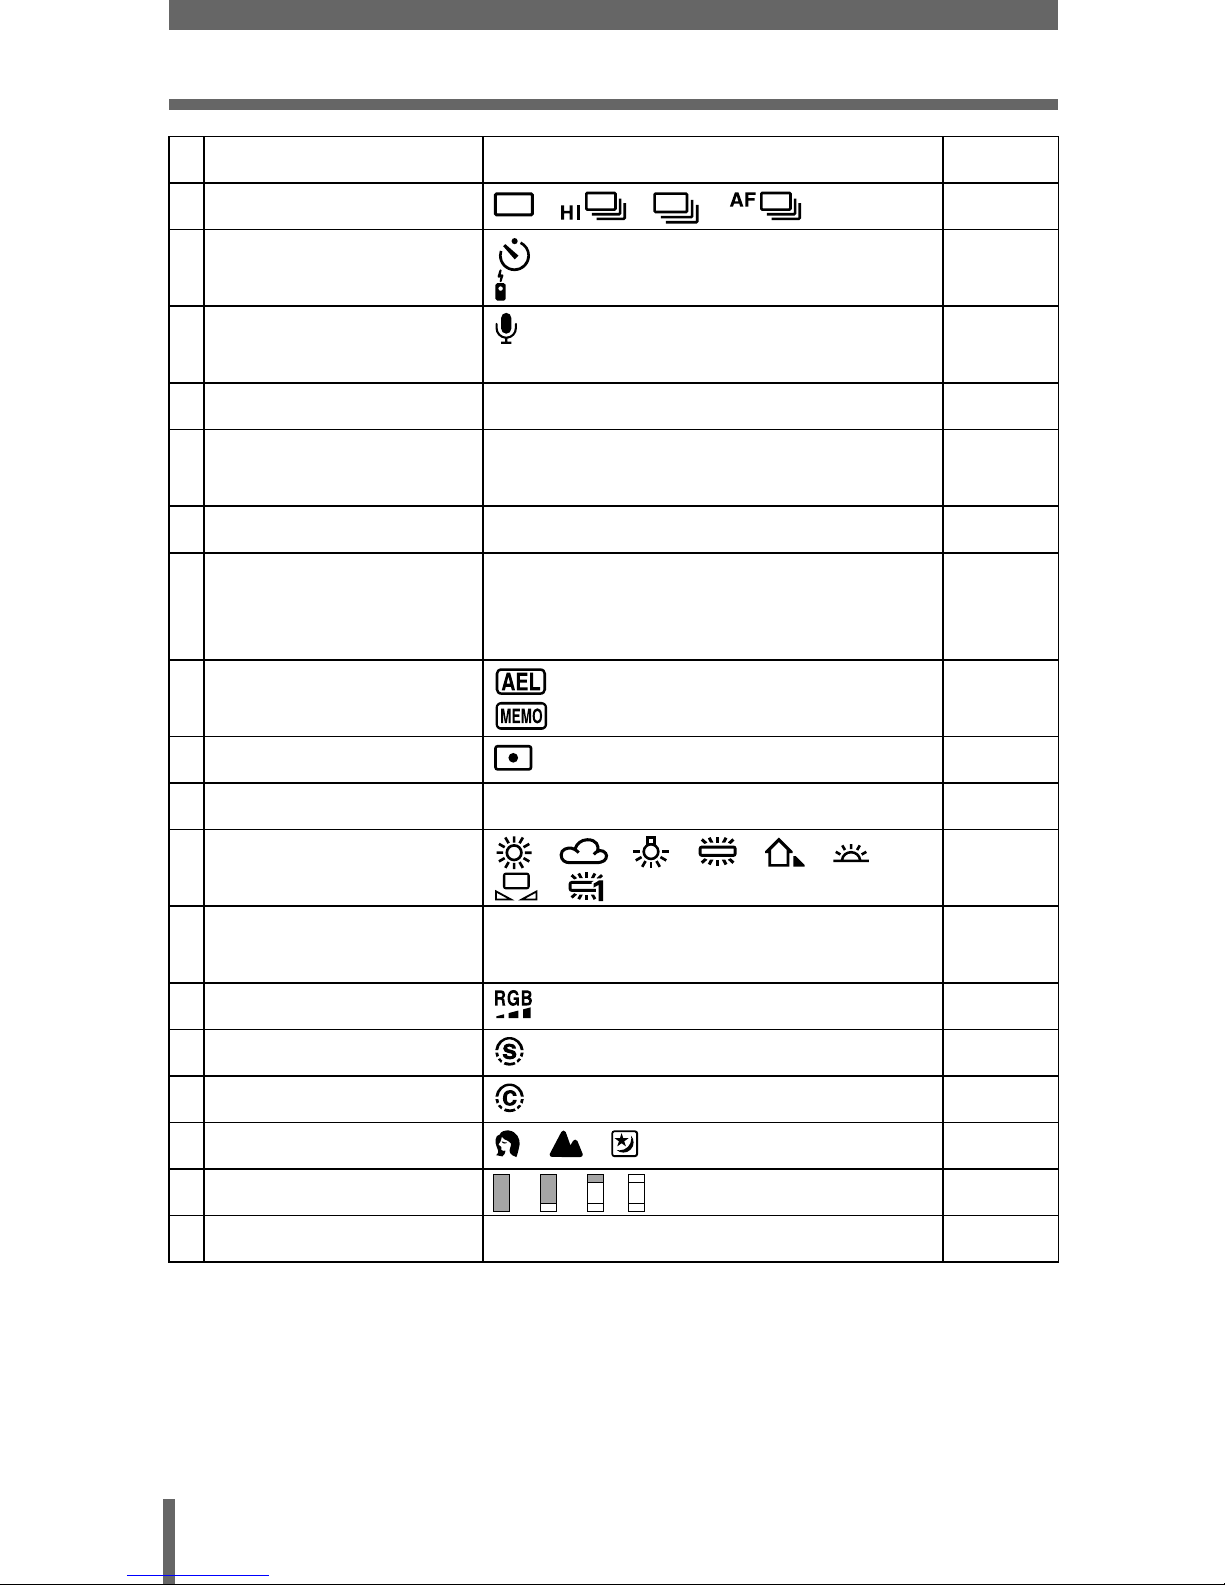
Shooting mode
Items Indications Ref. Page
1 Shooting mode , , , , , , , ,
, ,
P.59
2 Shutter speed 16 – 1/2000 P.92
3 Aperture value F1.8 – F8.0 P.91
4 Exposure compensation
Exposure differential
-2.0 – +2.0
-3.0 – +3.0
P.131
P.93
5 Battery check , P.18
6 Green lamp P.42
7 Flash stand-by/Camera
movement warning
Flash charge
(Lights)
(Blinks)
P.80
8 Macro mode
Super macro mode
Manual focus
MF
P.107
P.108
P.100
9 Noise reduction P.142
10 Flash mode , , , SLOW 1, SLOW 2,
SLOW
P.79
11 Flash intensity control -2.0 – +2.0 P.85
Still picture
Movie
Page 17
16
Names of parts
12 Drive , , , , BKT P.112
13 Self-timer
Remote control
P.109
P.110
14 Sound record
P.122, 124,
153
15 Record mode RAW, TIFF, SHQ, HQ, SQ1, SQ2 P.125
16 Resolution 2560 × 1920, 2560 × 1696, 1280 × 960,
640 × 480, 320 × 240
P.126
17 AF target mark [ ] P.42
18 Number of storable still
pictures
Seconds remaining
30
36''
P.126
P.48
19 AE lock
AE memory
P.105
20 Spot metering P.102
21 ISO ISO64, ISO100, ISO200, ISO400 P.130
22 White balance , , , , , ,
, ,
AWB, CWB
P.133
23 White balance
compensation
B1 – B7, R1 – R7 P.138
24 Saturation -5 – +5 P.141
25 Sharpness -5 – +5 P.139
26 Contrast -5 – +5 P.140
27 Scene modes , , P.142
28 Memory gauge , , , P.18
29 Selected card [xD], [SM], [CF] P.29
Items Indications Ref. Page
Page 18
17
Names of parts
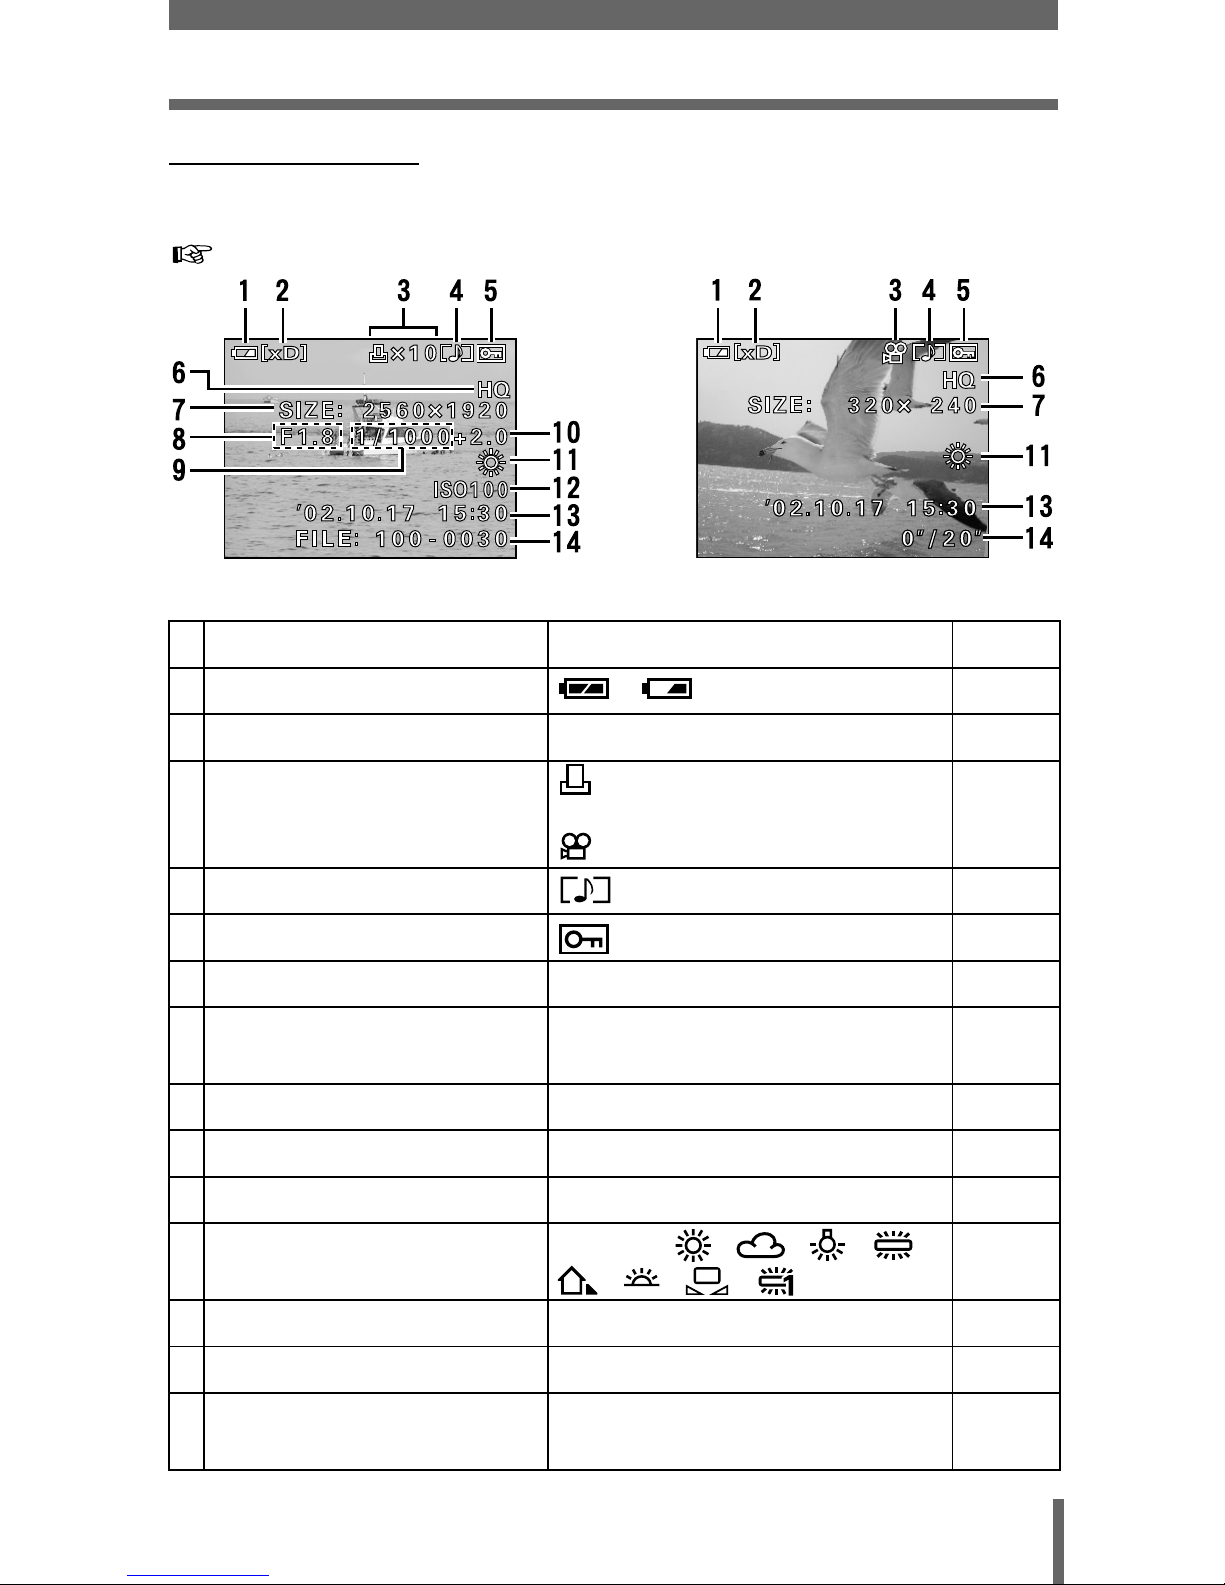
Playback mode
INFO setting allows you to select how much information to display on the
screen. Screens with the Information display set to ON are shown below.
“Information display” (P.177)
Items Indications Ref. Page
1 Battery check , P.18
2 Selected card [xD], [SM], [CF] P.29
3 Print reservation,
Number of prints
Movie
x 10 P.197
P.55
4 Sound record P.123
5Protect P.57
6 Record mode RAW, TIFF, SHQ, HQ, SQ1, SQ2 P.125
7 Resolution 2560 × 1920, 2560 × 1696, 1280 × 960,
640 × 480, 320 × 240
P.126
8 Aperture value F1.8 – F8.0 P.91
9 Shutter speed 16 – 1/2000 P.92
10
Exposure compensation
-2.0 – +2.0 P.131
11 White balance
WB AUTO, , , , ,
, , , , AWB, CWB
P.133
12 ISO ISO64, ISO100, ISO200, ISO400 P.130
13 Date and time '02.10.17 15:30 P.36
14 File number
Playing time/total recording time
FILE : 100 – 0030
0'' / 20''
P.189
Movie (during playback)
Still picture
Page 19
18
Names of parts
• The indications that appear on a movie picture that has been
selected and displayed from the index display are different from
those that appear when the movie picture is displayed using the
movie playback function.
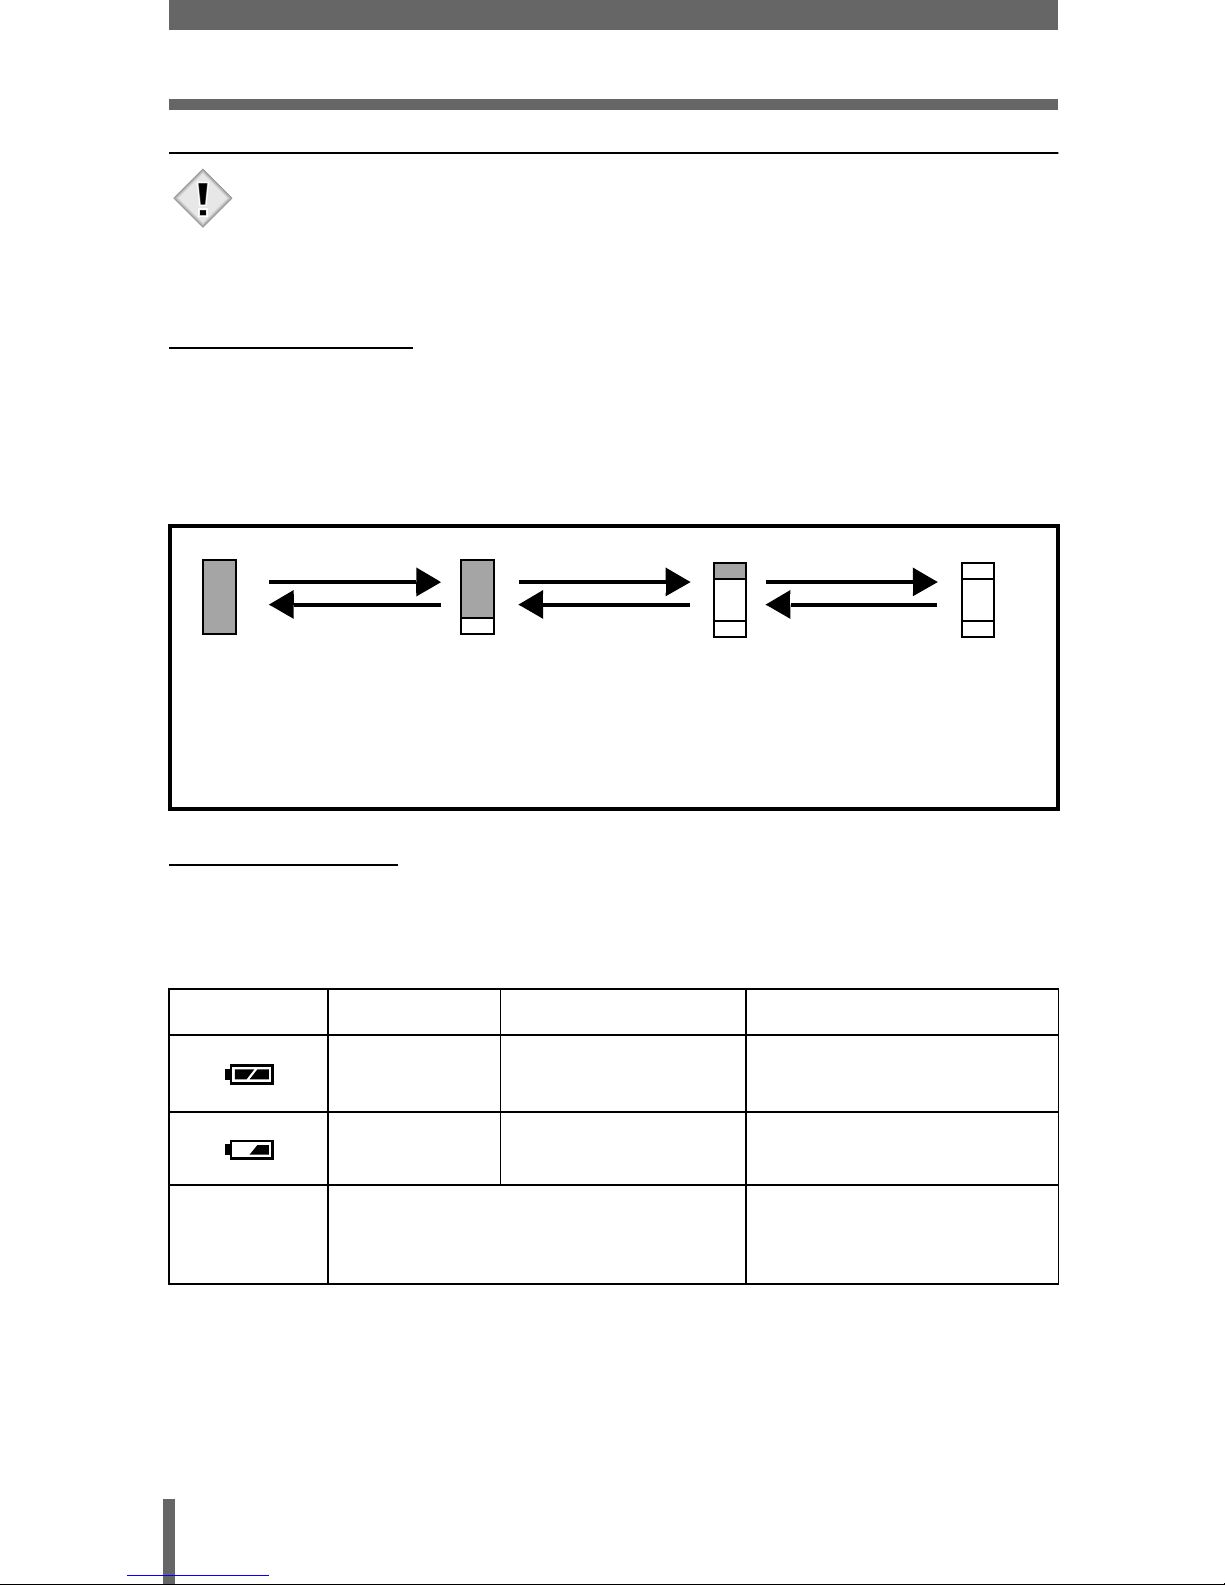
Memory gauge
The memory gauge lights up when you take a still picture. When the gauge is
lit, the camera is saving a picture to the card. The memory gauge indication
changes as shown below depending on the shooting status. The indication is
not displayed during movie recording.
Battery check
If the remaining battery power is low, the battery check indication on the
control panel and monitor changes as follows when the camera is turned on
or while the camera is in use.
Battery check Control panel Monitor Status
Lights
Lights (green)
(Goes off after a while)
Remaining power level: high
Blinks Blinks (red)
Remaining power level: low
Replace with new batteries.
No indication
The green lamp and orange lamp at the
side of the viewfinder blink. (The control
panel turns off automatically.)
Remaining power level:
exhausted
Replace with new batteries.
Note
Before shooting
(Gauge is off)
No more pictures
can be taken
(Fully lit)
Wait a while before
taking the next shot.
One picture
taken
(Lit)
More than
two taken
(Lit)
Shoot Shoot Shoot
Wait
Page 20
19
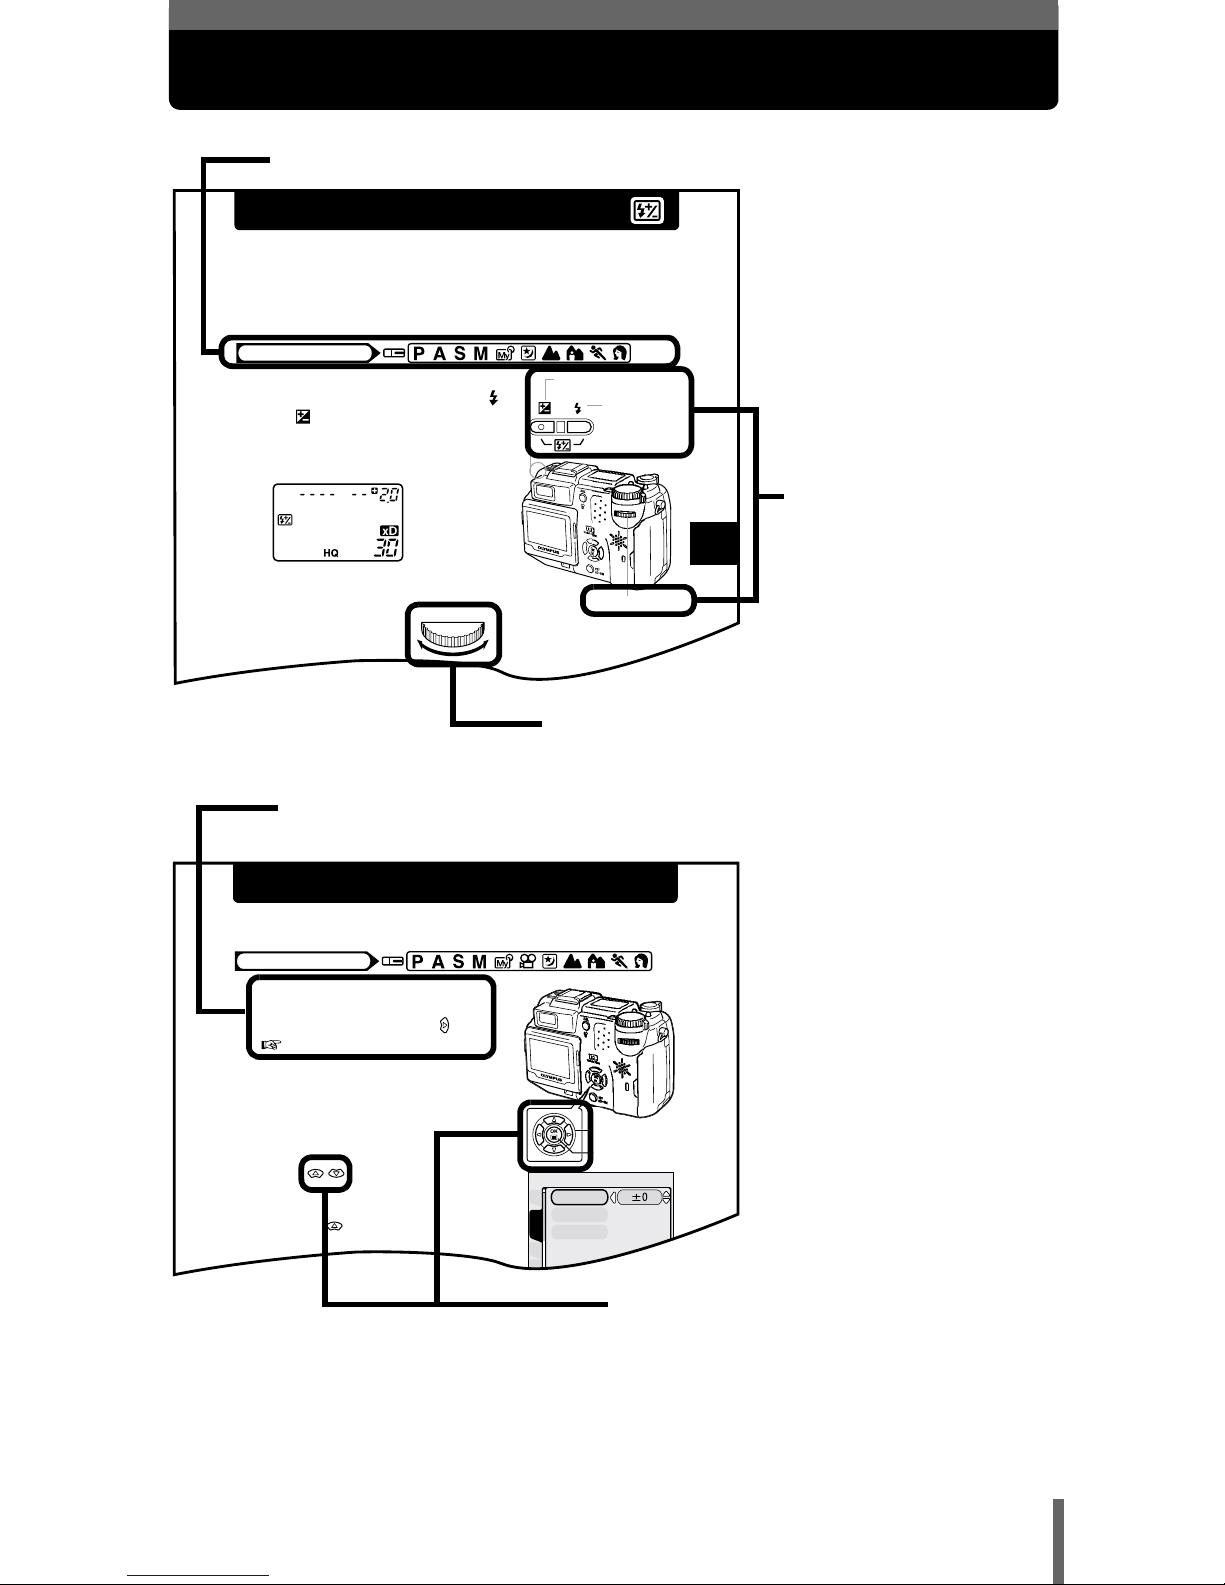
How to use this manual
• This sample page is only for your reference. It may differ from the actual page in
this manual.
5
Flash
Flash intensity control
You can adjust the amount of light emitted by the flash.
In some situations, you may get better results by adjusting the light emission.
Examples include small subjects, distant backgrounds, or situations when
increased contrast is desired. You can adjust the brightness in the range of
±2.0 in 1/3 EV steps.
1
Adjust the brightness by turning
the jog dial while holding down
and at the same time.
• The exposure value is displayed on the
control panel while the flash intensity
control function is set.
Mode dial
Exposure compensation
button
Flash mode
button
Jog dial
Turning to the left
decreases light emission in
steps of 1/3 EV.
Turning to the right
increases light emission in
steps of 1/3 EV.
(EV : Expo
Turning to the left
decreases light emission in
steps of 1/3 EV.
Set the mode dial to any of the marks shown here.
The buttons for the
function and their
location are clearly
illustrated.
This shows jog dial operations.
Sharpness
This function adjusts the sharpness of the image.
1
In the top menu, select MODE
MENU
→→→→
PICTURE
→→→→
SHARPNESS, and press .
“How to use the menus” (P.xx)
2
Press to adjust the
sharpness between +5 and -5.
• To increase the sharpness (+) :
Press . The image contours are
emphasized, making the image appear
d. Use this setting
Mode dial
Arrow pad
OK button
CARDSEt
CAM
PICtURE
SHARPNESS
CONtRASt
SAtURAtION
Follow the arrows to perform menu operations. For details on operating
procedures, see “How to use the menus” (P.70).
This represents the arrow pad. Only arrows
applicable to the operation are shown.
Page 21
20
1
Getting started
1 Getting started
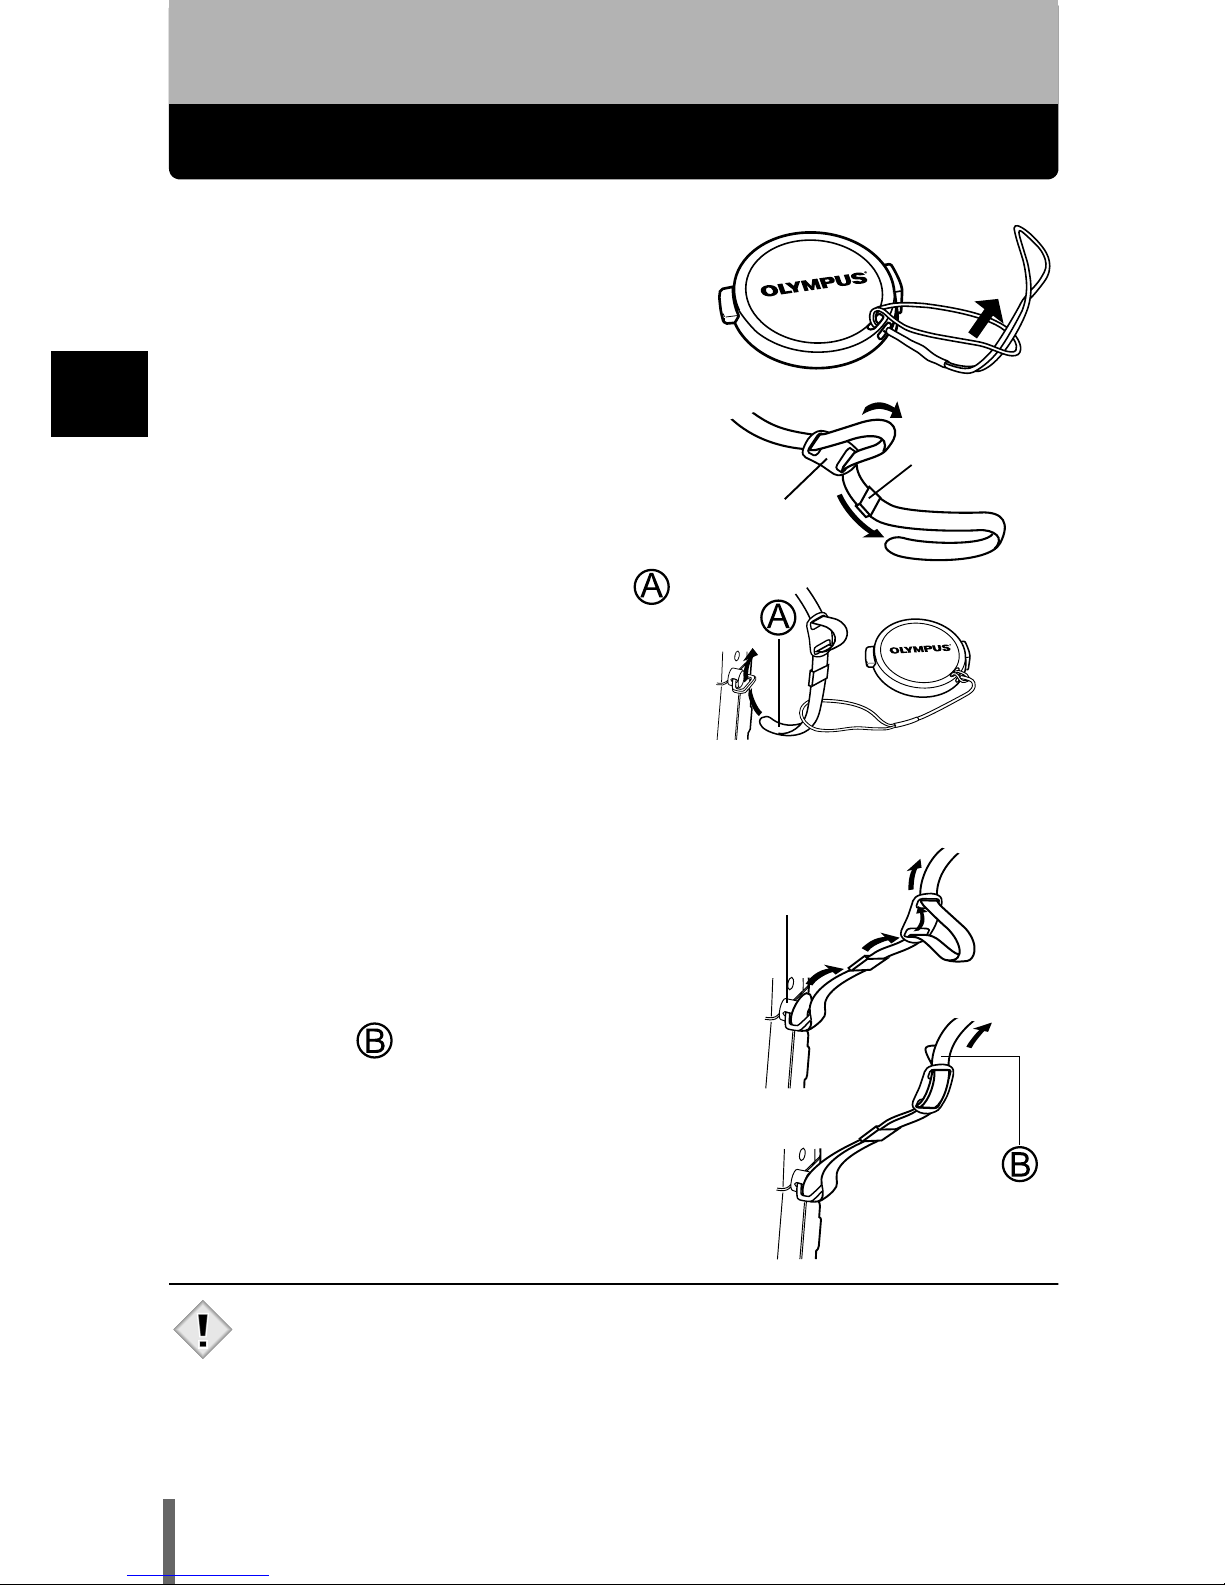
Attaching the strap
1
Pass the lens cap string through
the hole in the lens cap, then
pass the other end through the
loop and pull tight.
2
Pull the ends of the strap out of
the stopper and ring.
3
Thread one end of the strap
through the string loop
(attached to the lens cap in step
1). Then thread it through the
strap eyelet on the camera.
4
Thread the end of the strap
back through the ring and
stopper as indicated by the
arrows. Adjust the strap to the
desired length.
5
Pull the strap through the
stopper ( ) to make sure it is
fastened securely.
6
Attach the strap to the other
eyelet following steps 3 to 5.
• Be careful with the strap when you carry the camera, as it can easily
catch on stray objects, causing injury or damage.
• Attach the strap correctly as shown above so that the camera does not
fall off. If the strap is attached incorrectly and the camera falls off,
Olympus is not responsible for any damages.
Stopper
Ring
Strap eyelet
Note
Page 22
21
1
Getting started
Loading the batteries
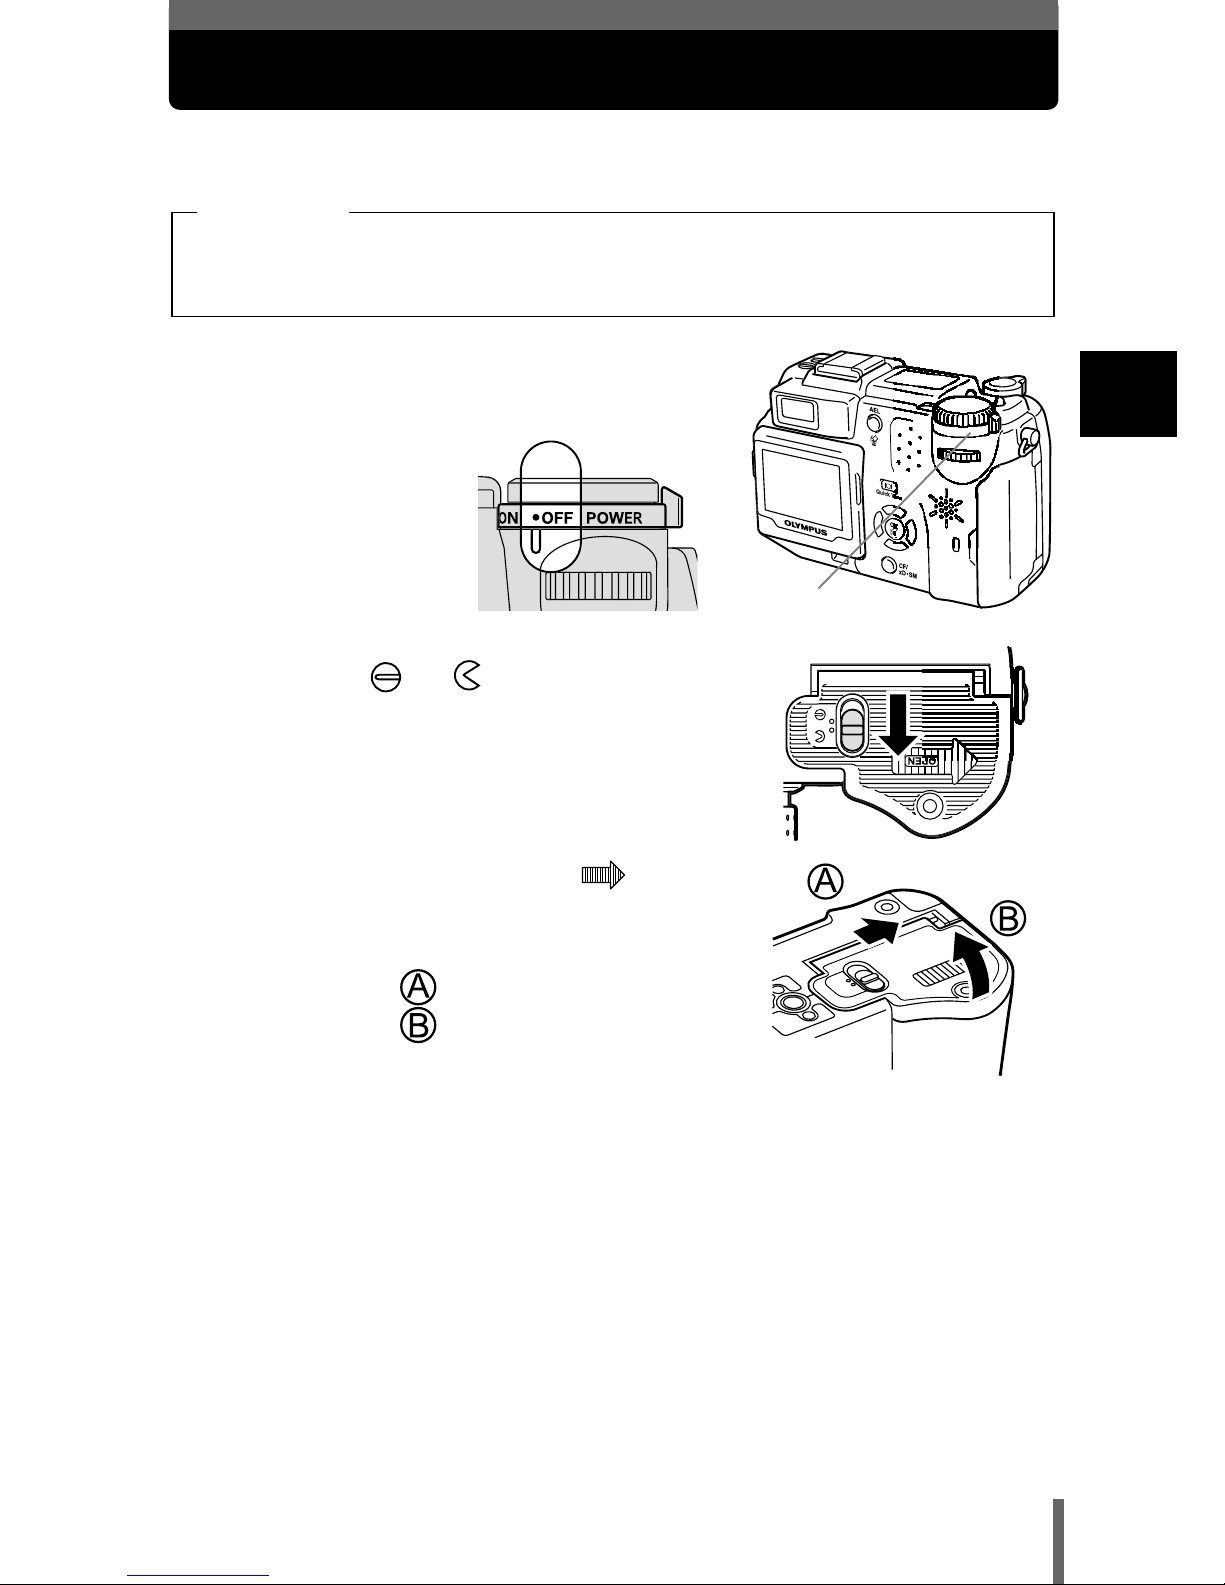
This camera uses two CR-V3 lithium battery packs or four AA (R6) NiMH
batteries, NiCd batteries, alkaline batteries or lithium batteries.
1
Make sure the power switch is set
to OFF.
2
Slide the battery compartment
lock from to .
3
Place your finger on the
mark and slide the battery
compartment cover in the
direction of , then lift in the
direction of .
• Use the ball of your finger to slide the
cover. Do not use your fingernail as this
could result in injury.
• CR-V3 lithium batteries cannot be recharged.
• Do not peel off the label from a CR-V3 lithium battery pack.
Important
Power switch
Page 23
22
Loading the batteries
1
Getting started
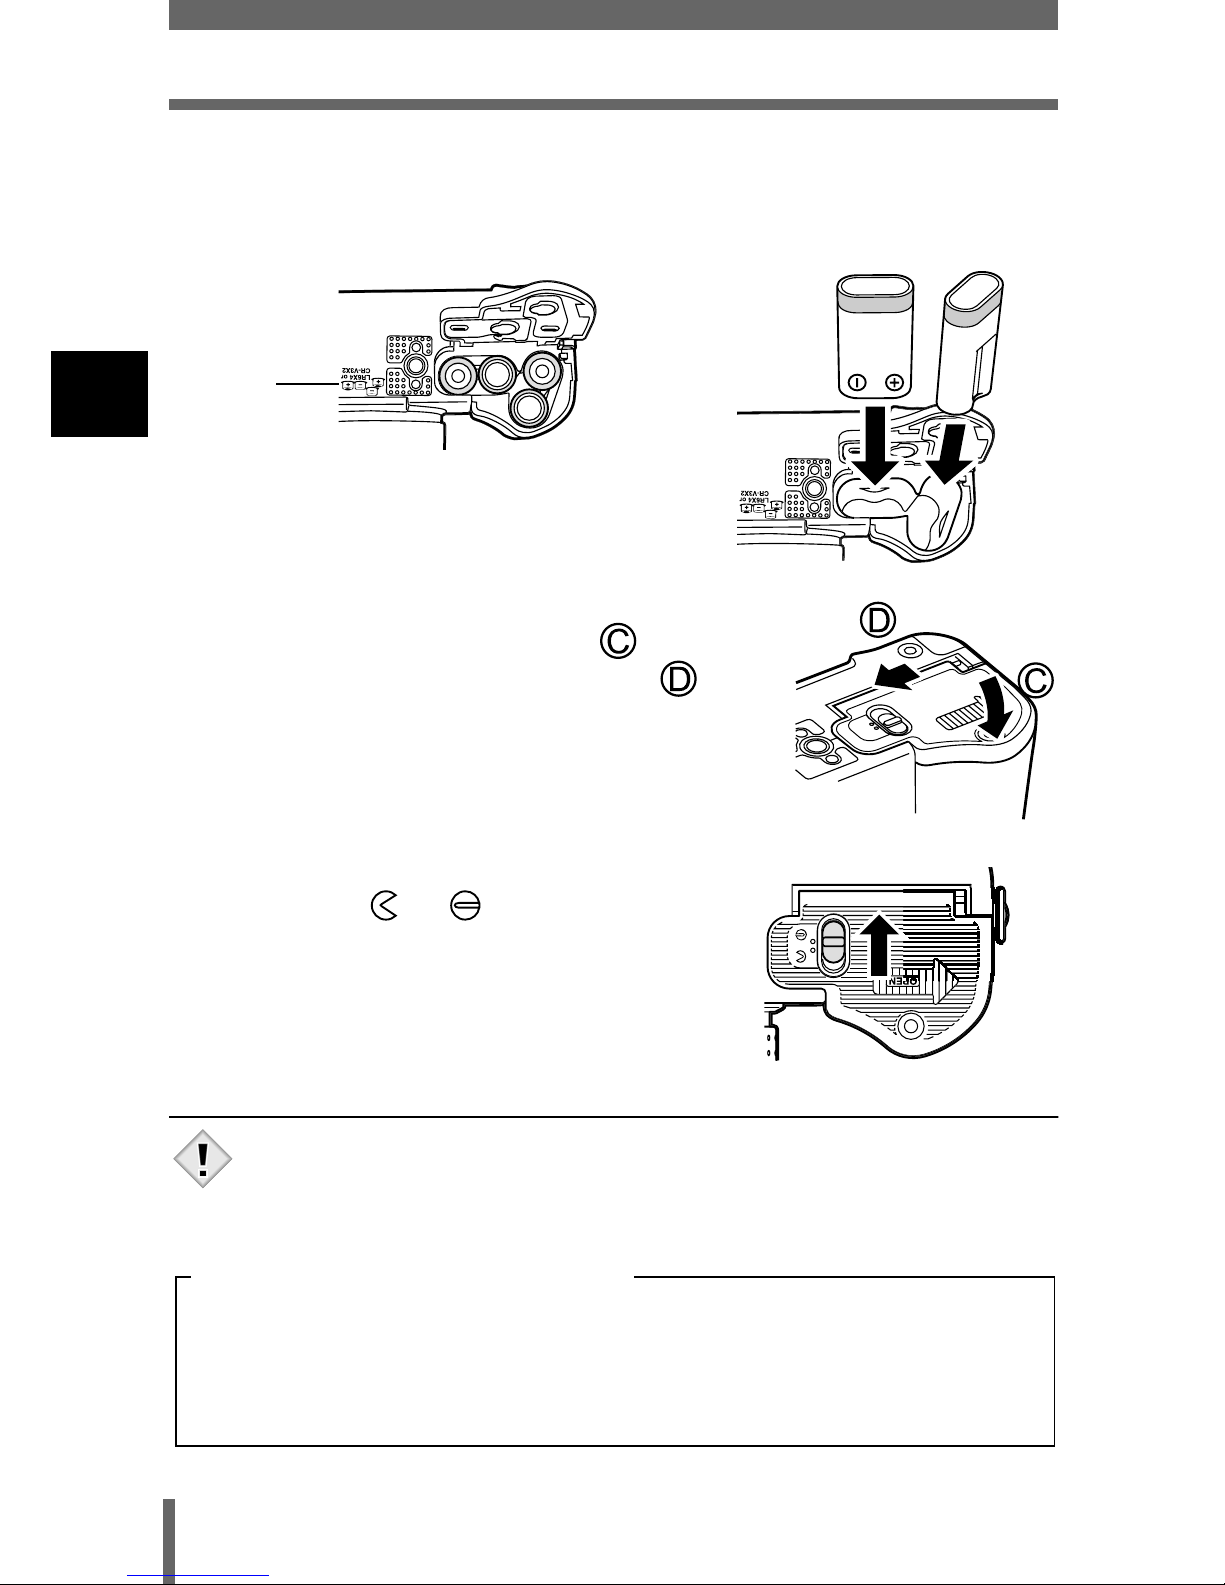
4
Insert the batteries, making sure that they are correctly
oriented as shown in the illustration.
5
Close the battery compartment
cover, then press it down and
slide it in the direction shown .
• Press the center of the cover, as it may
be difficult to close properly by pressing
the edge.
• Make sure the cover is closed securely.
6
Slide the battery compartment
lock from to .
• If the camera is left for about 1 hour with the batteries removed,
some of the internal settings may revert to the factory default
settings.
Battery
alignment
The correct way to insert the AA batteries
is indicated on the bottom of the camera.
When using CR-V3 lithium
battery packs
When using AA (R6) batteries
Note
The amount of power consumed varies considerably depending on the
operations performed on the digital camera. If you use exhausted
batteries or alkaline batteries, the camera may turn off without displaying
the battery level warning (P.18).
Precautions when using batteries
Page 24
23
Loading the batteries
1
Getting started
Selecting optional batteries or an AC adapter
In addition to the batteries provided with the camera, the following types of
battery or AC adapter can be used. Choose the power source best suited to
the situation.
CR-V3 lithium battery packs (Not rechargeable)
Since the CR-V3 lithium battery pack has a long service life, it is convenient
when traveling.
NiMH batteries (Rechargeable)
Olympus NiMH batteries are rechargeable and economical. Their lowtemperature resistance makes them a good choice for cold areas.
AA (R6) alkaline batteries
When you need batteries in a hurry, you can use AA (R6) alkaline batteries,
which are easy to obtain anywhere. However, the number of pictures that you
can take may vary considerably depending on the battery manufacturer,
shooting conditions, etc. Turn off the monitor whenever possible to save
power.
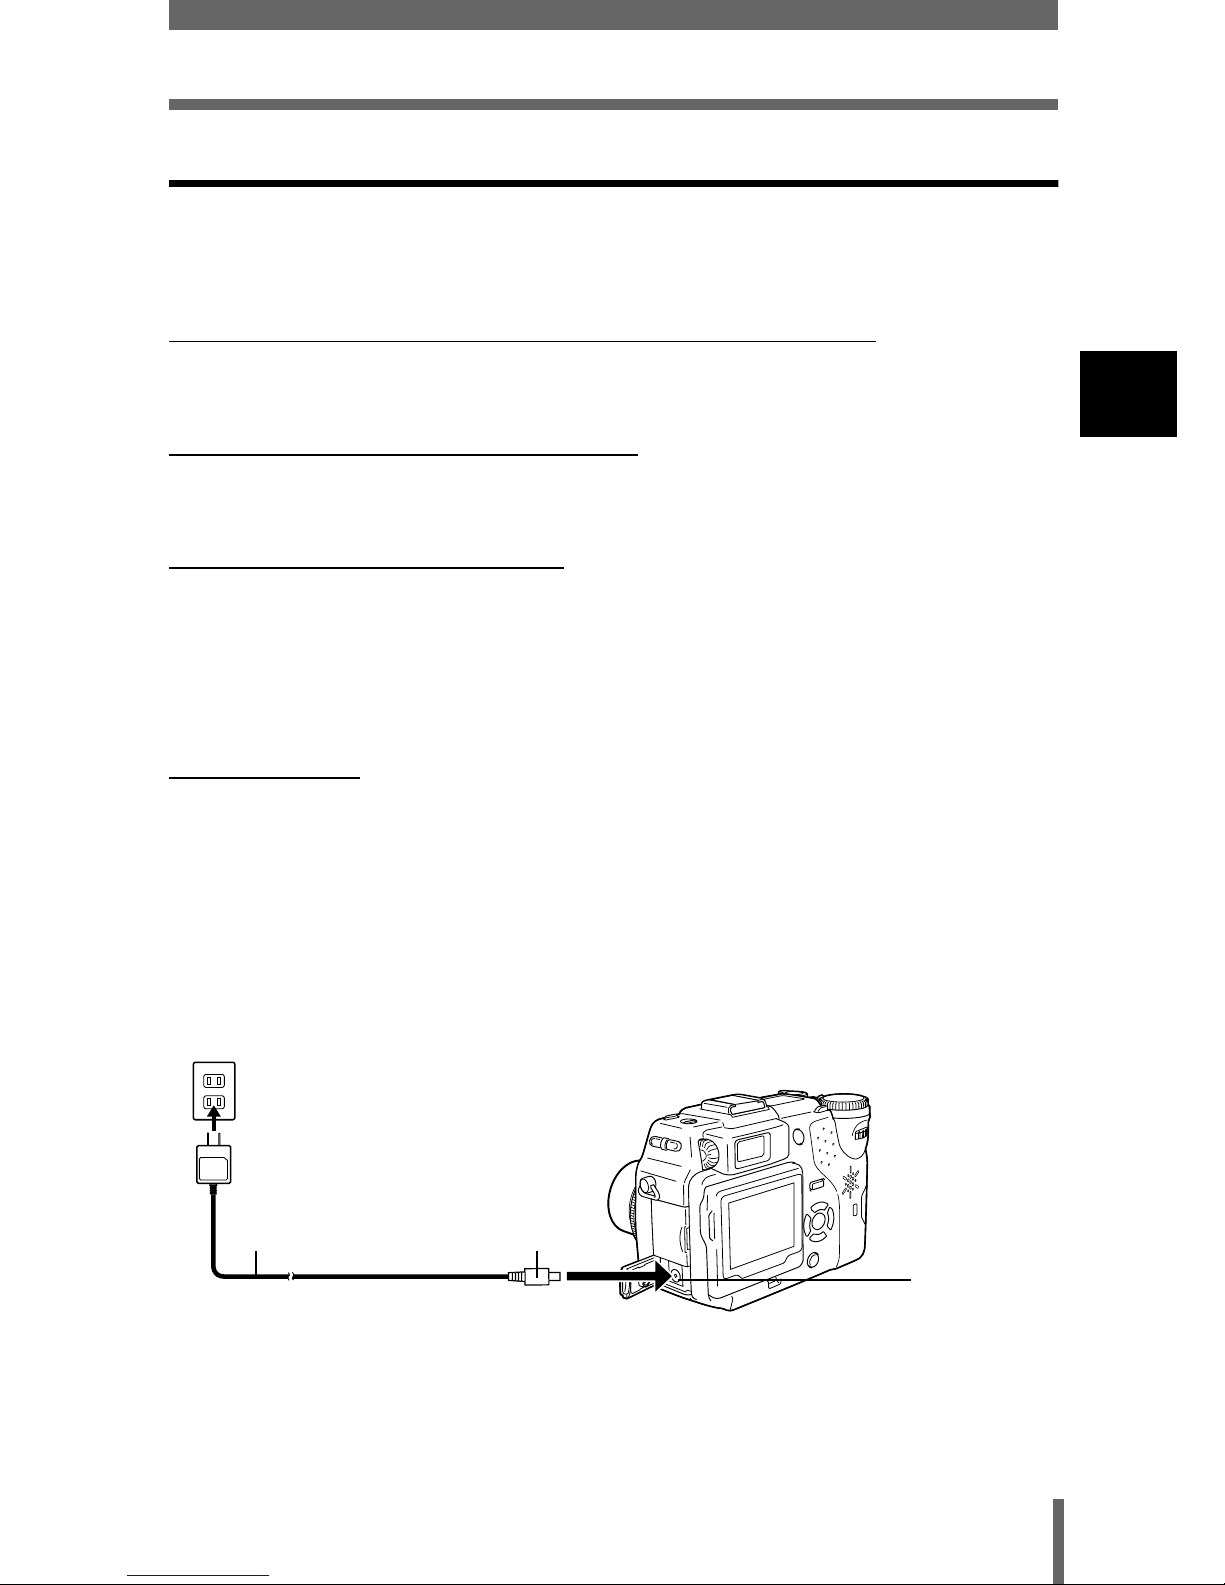
AC adapter
An optional Olympus CAMEDIA-brand AC adapter allows you to power your
digital camera from a common AC wall outlet. Be sure to use the specified AC
adapter. An AC adapter is useful for time-consuming tasks such as image
downloads.
Use an AC adapter designed to operate on the AC voltage in the area the
camera is being used.
Consult your nearest Olympus dealer or Service center for details.
DC-IN jack
(black)
AC wall outlet
Power plug
AC adapter
Connection
cord plug
Page 25

24
Loading the batteries
1
Getting started
• Manganese (zinc-carbon) batteries cannot be used.
• If the battery power runs out while the camera is connected to a PC,
the image data may be lost or damaged. You are recommended to
use the AC adapter when transferring images to a PC. Do not
connect or disconnect the AC adapter while the camera is
communicating with the PC.
• Do not remove or load the batteries or connect or disconnect the AC
adapter while the camera is turned on. Doing so could affect the
camera’s internal settings or functions.
• The life of battery may vary according to the type of battery,
manufacturer, shooting conditions, etc.
• Power is consumed continuously during the conditions described
below. This could reduce the number of pictures that can be taken.
• When the monitor is turned on.
• When the monitor is in the playback mode for an extended
period of time.
• Repeated zoom adjustments.
• Repeated auto-focus by depressing the shutter button
halfway.
• When the FULLTIME AF mode is turned on.
• When the camera is connected to a PC.
• Carefully read the AC adapter’s instructions before use.
• When using an AC adapter, power is supplied to the camera by the
AC adapter even if batteries are loaded in the camera. The AC
adapter does not charge batteries in the camera.
Note
Page 26
25
1
Getting started
Inserting a card
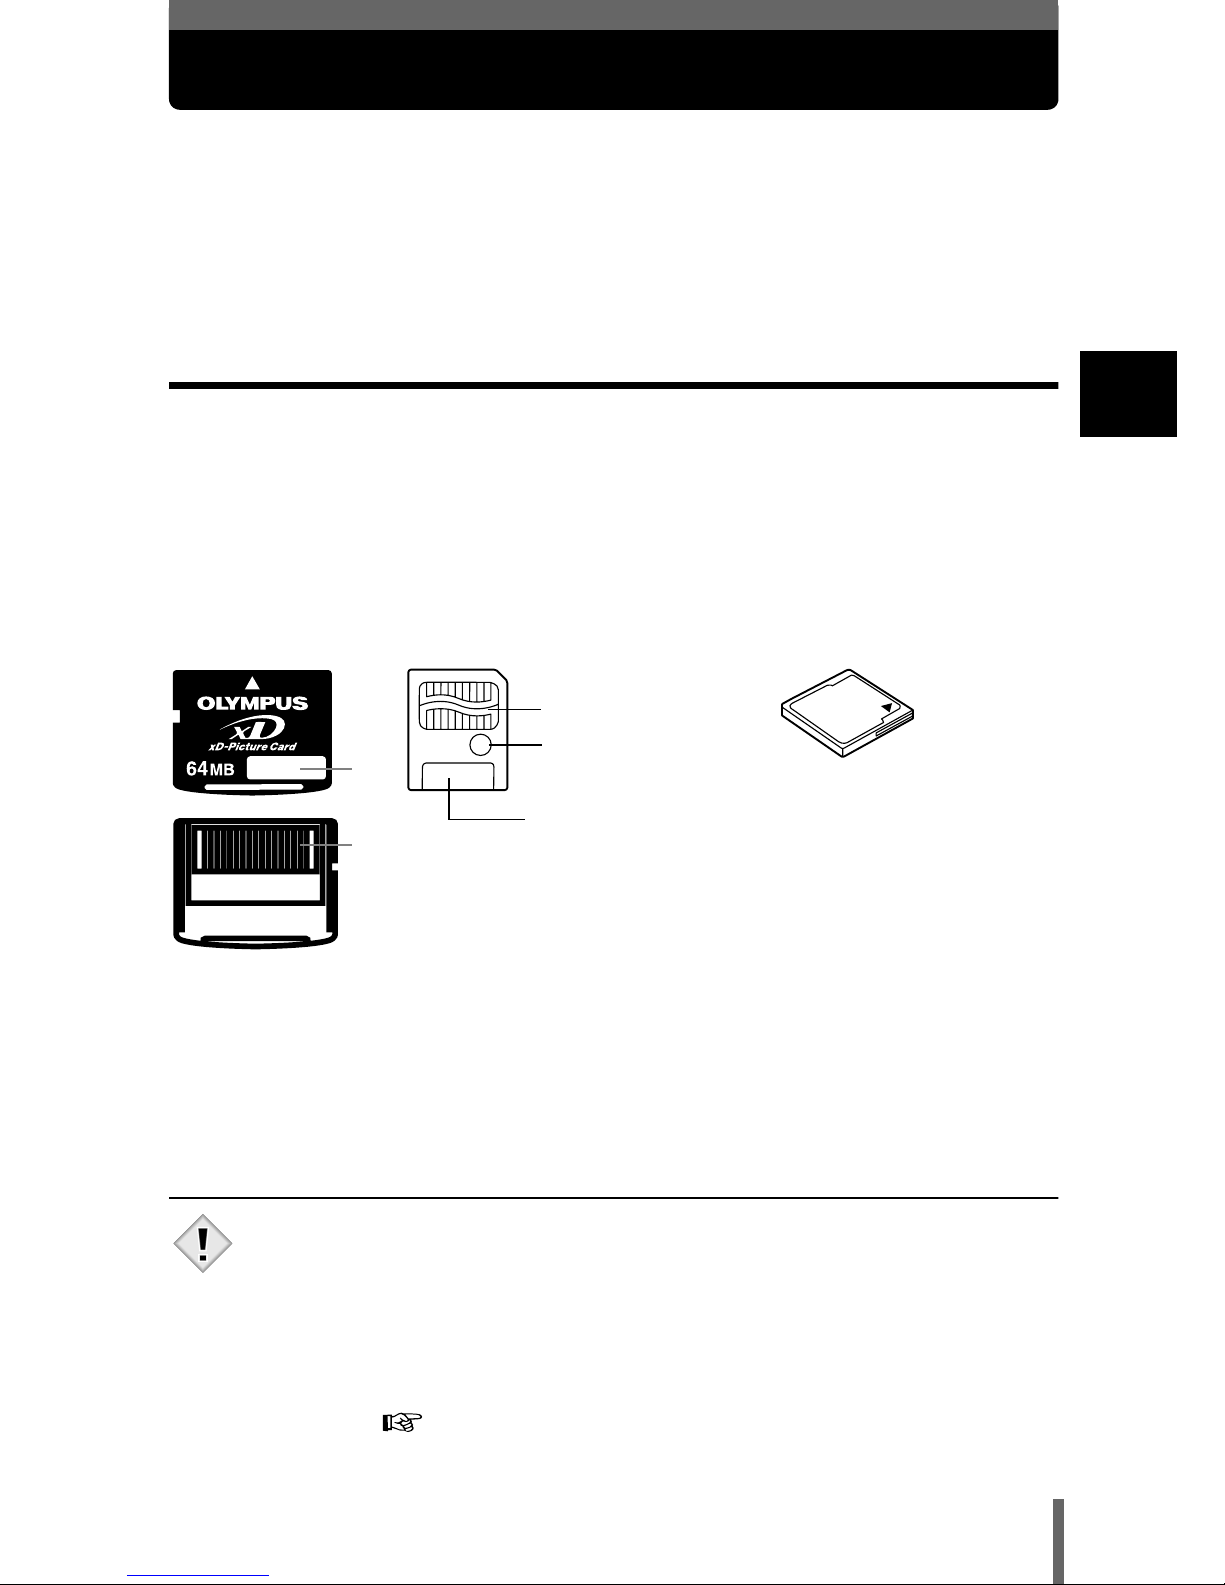
“Card” in this manual refers to the xD-Picture Card, SmartMedia, Compact
Flash and Microdrive. The camera uses the card to record pictures.
The xD-Picture Card and SmartMedia use the same slot, as do Compact
Flash and Microdrive. Cards used in the same slot cannot be inserted at the
same time.
Card basics
The card corresponds to normal camera film for recording the pictures you
have taken. Pictures recorded and stored on the card can easily be erased,
overwritten, and/or edited on a PC.
The following cards can be used: Read the instructions for the card carefully
before use.
• 2 MB SmartMedia cannot be used.
• Commercially available 5 V SmartMedia cannot be used.
• 340 MB Microdrive cannot be used.
• This camera may not recognize a non-Olympus card (such as a 3 V
(3.3 V) SmartMedia), or a card that was formatted on another device
(such as a PC, etc.). Before use, be sure to format the card on this
camera. “Formatting cards” (P.175)
xD-Picture Card
(provided)
• 16 to 128 MB
SmartMedia (SM)
(optional)
•4 to 128 MB
Compact Flash (CF) (optional)
• You can use small flash memory cards
and commercially available cards.
Microdrive (optional)
• You can use Microdrive that supports
CF+Type II (Compact Flash expansion
standard). Microdrive is a compact hard
disk drive. Be sure to read the
“Precautions for using Microdrive”
(P.29).
cContact area
Comes into contact with the camera’s signal read contacts.
dWrite-protect area
Attach the provided write-protect seal when you want to protect your data from
accidental erasure or overwriting. xD-Picture Card does not have a write-protect area.
eIndex area
Use the provided index label to indicate the card’s contents.
c
e
c
d
e
Note
Page 27
26
Inserting a card
1
Getting started
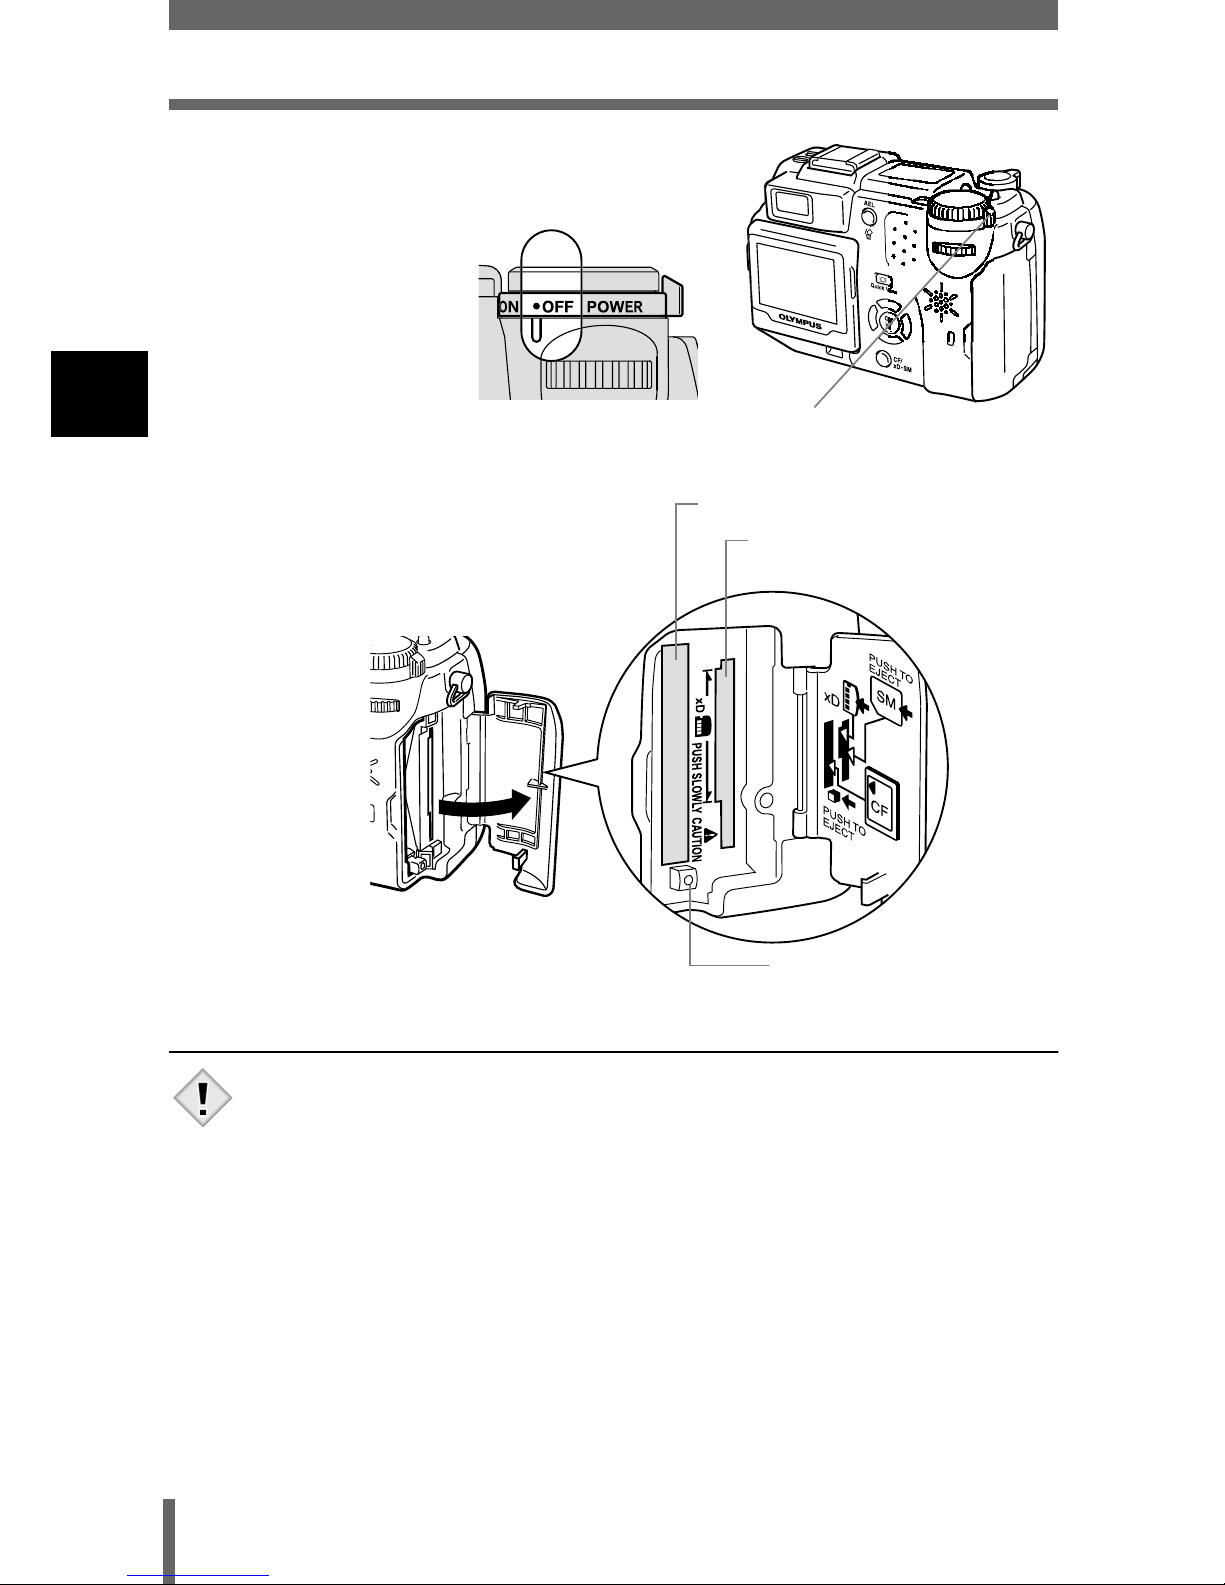
1
Make sure the power switch is set
to OFF.
2
Open the card cover.
• The xD-Picture Card and SmartMedia use the same slot, as do
Compact Flash and Microdrive. Two cards cannot be inserted in the
one slot at the same time.
Power switch
xD-Picture Card/
SmartMedia slot
Compact Flash/Microdrive slot
Eject button
Note
Page 28
27
Inserting a card
1
Getting started
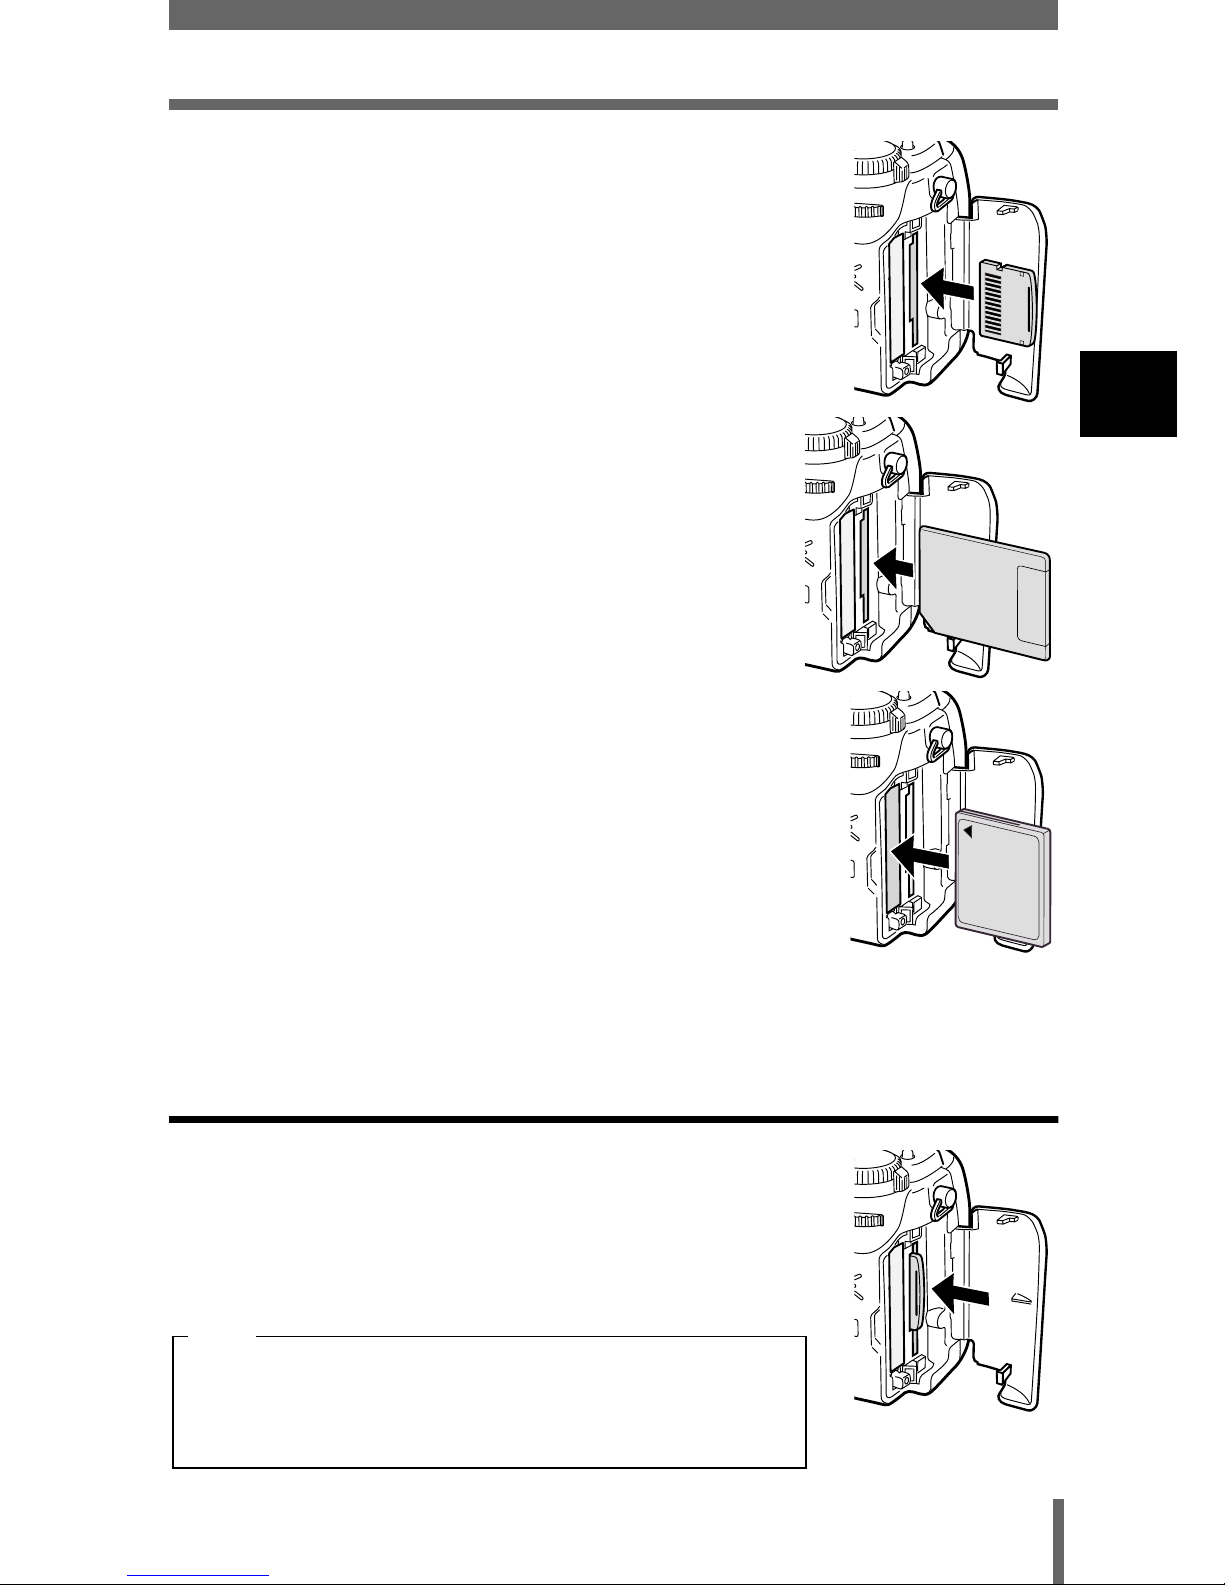
3
Insert a card.
xD-Picture Card
• Hold the card straight and insert it correctly into the
xD-Picture Card/SmartMedia slot, as shown.
• An illustration showing the position for inserting the
xD-Picture Card is next to the slot.
SmartMedia
• Hold the card straight and insert it correctly into
the xD-Picture Card/SmartMedia slot, as shown.
Compact Flash/Microdrive
• Hold the card straight and insert it correctly into the
Compact Flash/Microdrive slot.
4
Close the card cover securely until it clicks.
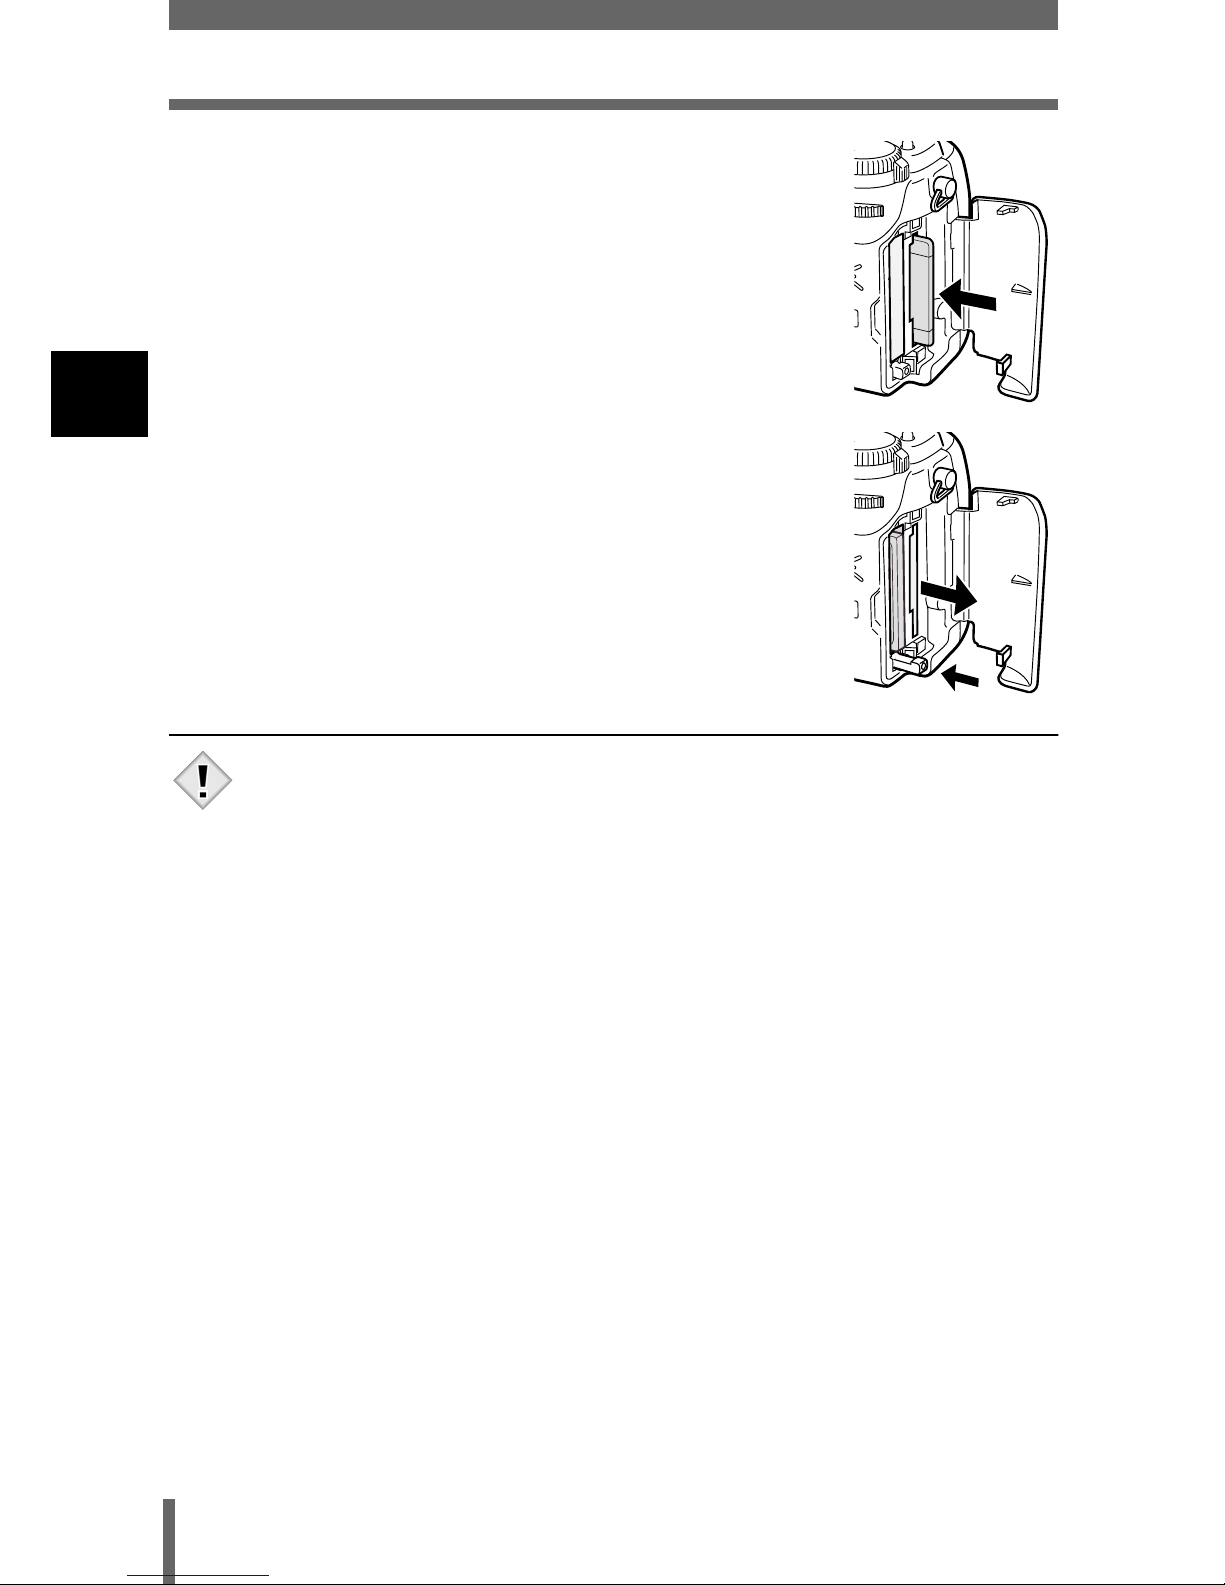
Ejecting the card
xD-Picture Card
• Push the card all the way in to unlock it, then let it
return slowly.
The card is ejected a short way and then stops.
Hold the card straight and pull it out.
Releasing your finger quickly after pushing the card
all the way in may cause it to eject forcefully out of
the slot.
Note
Page 29
28
Inserting a card
1
Getting started
SmartMedia
• Push the card in, then release it. The card will be
ejected a short way to enable you to pull it out.
Compact Flash/Microdrive
• Press the eject button gently and allow it to pop out,
then press it again all the way in.
The card will be ejected a short way to enable you to
pull it out.
• Never open the card cover, or remove the card or the batteries while
the camera is turned on. Doing so could destroy the data stored on
the card. Once destroyed, data cannot be restored.
Note
Page 30
29
Inserting a card
1
Getting started
Switching cards
Pictures are recorded on the card displayed on the control panel or monitor.
Choose the card you want to record the picture on before taking the picture.
The factory default setting is the card inserted in the xD-Picture Card/
SmartMedia slot. If only one card is inserted, that card is automatically
selected. Card selection can also be made in Playback mode.
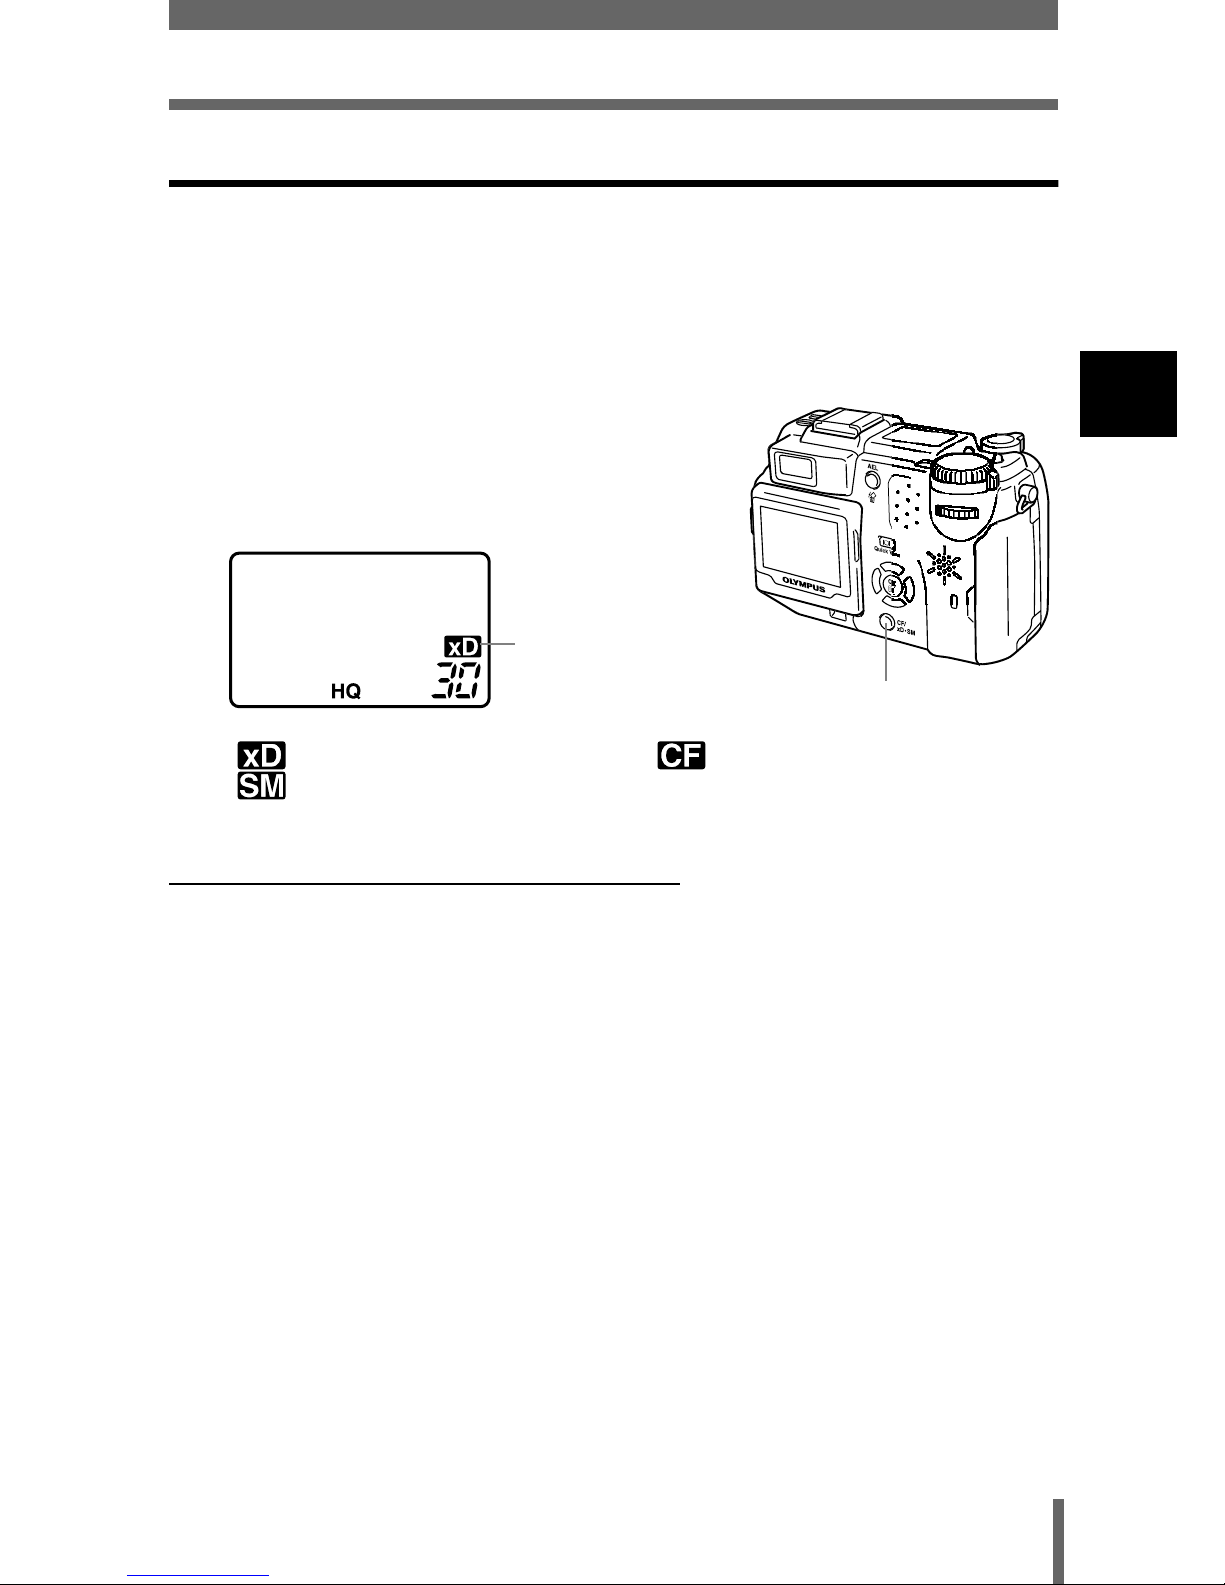
1
Press the card button repeatedly
to select the card you want to use.
• The indication on the control panel
alternates between the two slots.
Precautions for using Microdrive
The following restrictions apply when using Microdrive. Read the instructions
provided with your Microdrive.
You are recommended to use an xD-Picture Card, SmartMedia or Compact
Flash card when taking important pictures.
Operating environment
Microdrive is a compact hard disk drive. As it is a rotating recording medium,
it is not as resistant to vibration or impact as the solid recording medium of
other cards.
When using Microdrive, be careful not to subject the camera to vibration or
impact. (Special care is needed during recording and playback.)
• Do not bang the camera down on the table during recording.
• Be careful not to hit the camera against anything when carrying it on your
shoulder.
• Do not use the camera where the ground is likely to vibrate, such as a
construction site.
• Do not use the camera in the car while driving along a bumpy road where
the camera will be badly shaken.
: xD-Picture Card
: SmartMedia
: Compact Flash or
Microdrive
Card button
Selected card
Page 31

30
Inserting a card
1
Getting started
Precautions regarding Microdrive
• Do not write on the label.
• Do not remove the label.
• Do not stick another label on top of the label.
• It is advisable to keep Microdrive in its case for storage or transportation.
• Microdrive may become hot if used for an extended period of time. Care
should be taken when handling Microdrive.
• Do not take close to where there is strong magnetism.
• Do not apply strong pressure to the cover.
Camera operations
Using Microdrive may shorten the life of the batteries. To reduce consumption
of the batteries, observe the following.
• Whenever possible, refrain from using the monitor during shooting.
• Unless there is a particular need, do not use an xD-Picture Card or
SmartMedia at the same time as Microdrive. Remove the xD-Picture Card
or SmartMedia when using Microdrive.
• Use large capacity batteries, such as CR-V3 lithium battery packs.
• If nothing happens when the buttons are pressed, remove the batteries,
then put them back again.
• If you use Microdrive when the battery power is low, the camera may not
turn on.
If CARD ERROR is displayed
• If no pictures can be recorded or downloaded, run SCANDISK on a PC.
“Error codes” (P.205)
Page 32
31
1
Getting started
Power on/off
When shooting pictures
1
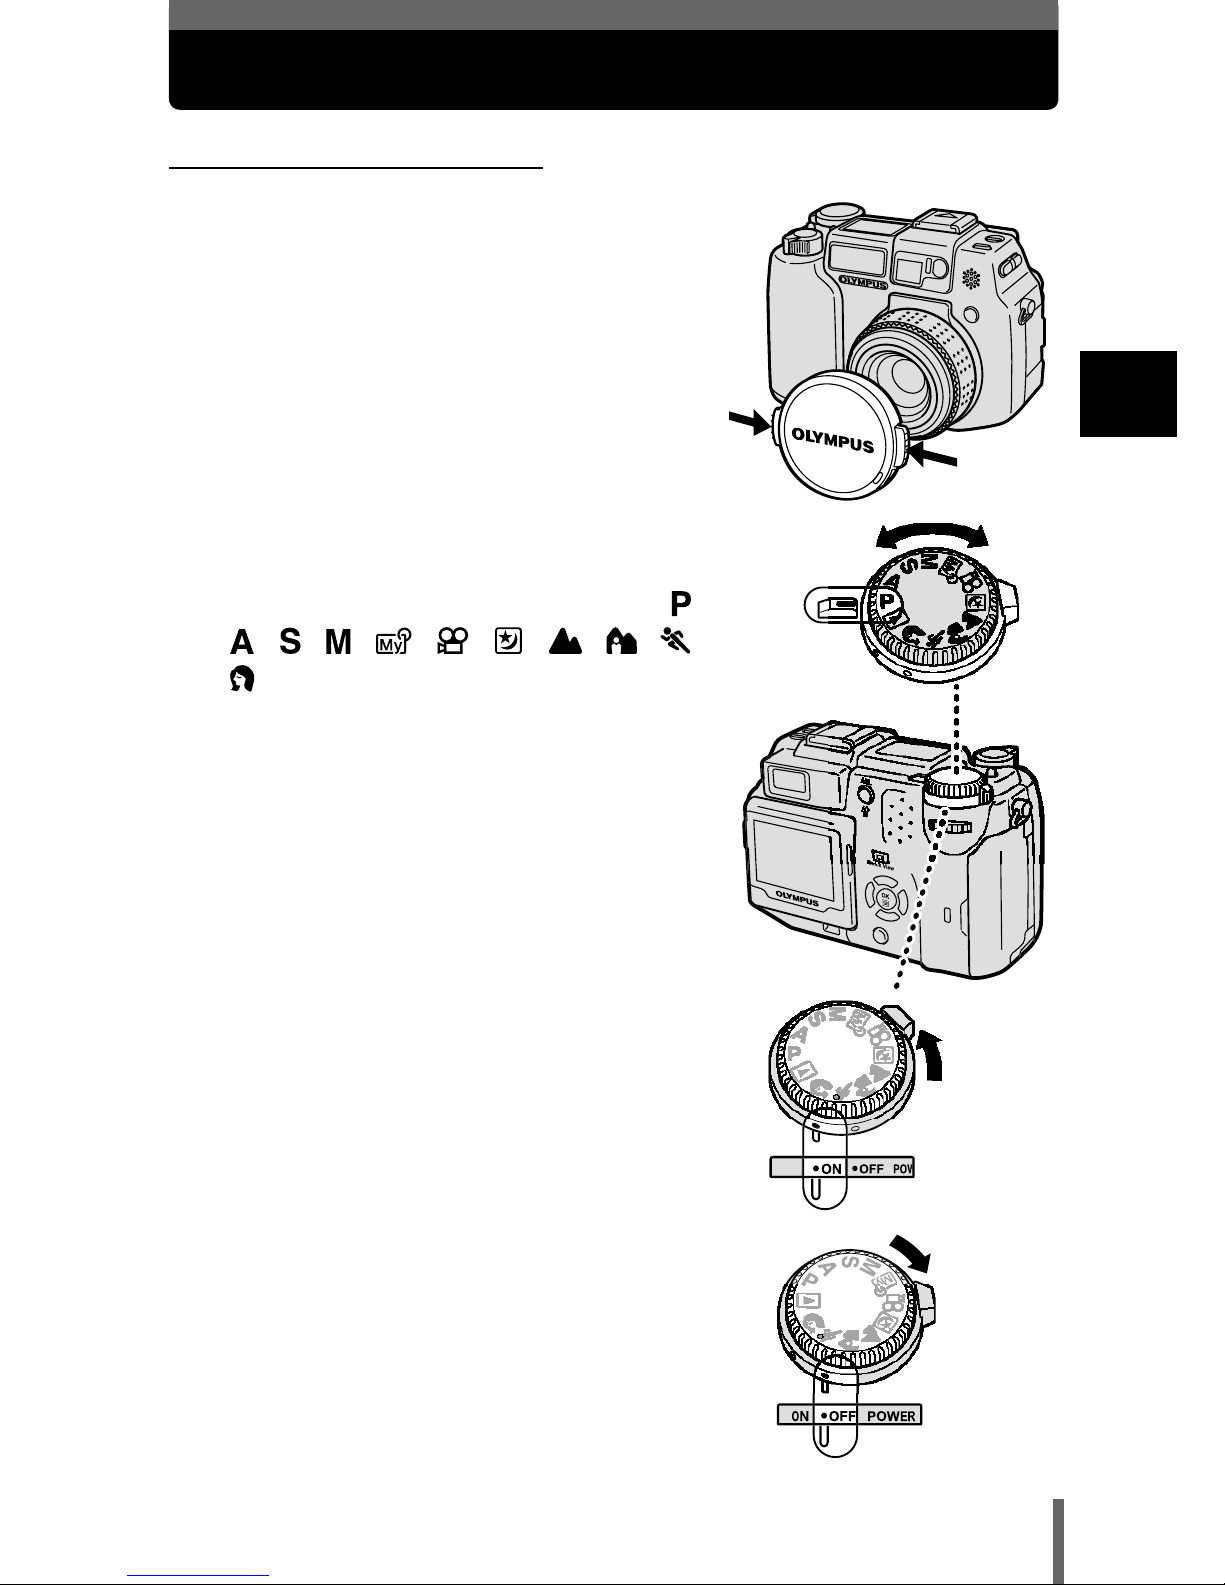
Press the tabs on the lens cap as
indicated by the arrows and
remove the lens cap.
2
Turn the mode dial until the
mode you want to use is aligned
with the red line. Choose from /
/// / // ///
.
3
Turn the power switch so that ON
is aligned with the white line.
• The camera turns on and the lens
extends.
• If the lens cap has not been removed,
the warning beep sounds and the
camera does not turn on. Be sure to
remove the lens cap first.
4
To turn the power off, turn the
power switch so that OFF is
aligned with the white line.
Mode dial
Power switch
Page 33
32
Power on/off
1
Getting started
When playing back pictures
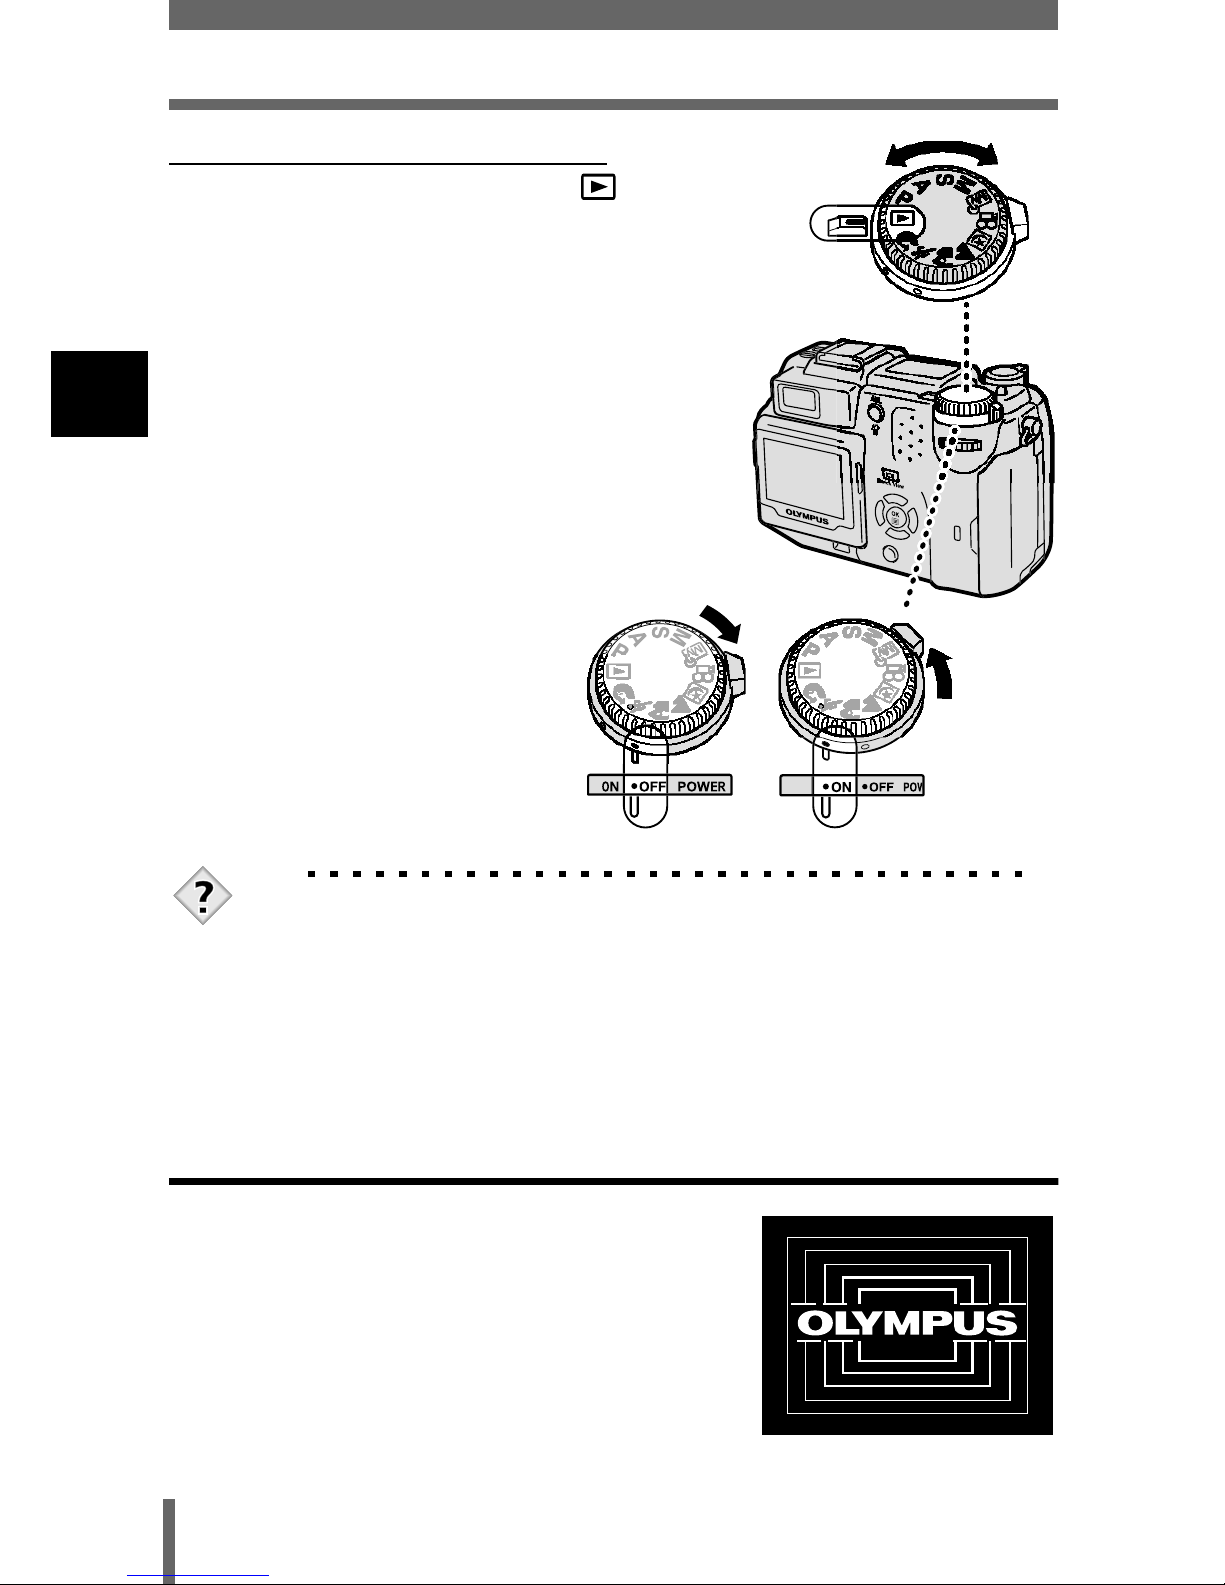
1
Turn the mode dial until is
aligned with the red line.
2
Turn the power switch so that ON
is aligned with the white line.
• The monitor turns on.
3
To turn the power off, turn the
power switch so that OFF is
aligned with the white line.
• The monitor also turns off.
TIPS
• To save battery power, the camera automatically enters the sleep
mode after about 3 minutes of non-operation. The camera activates
again as soon as you touch the shutter button or zoom lever.
• To save power, the camera turns off automatically and retracts the
lens after about 4 hours of non-operation. To resume operation,
turn the camera on again.
Startup/Shutdown screen
You can register a picture that will be displayed
on the monitor and sound that will be played
when turning the camera on or off. (P.186) You
can also adjust the volume of the sound. (P.185)
Startup/Shutdown screen (Factory default setting)
Page 34
33
Power on/off
1
Getting started
If the card is not recognized (card check)
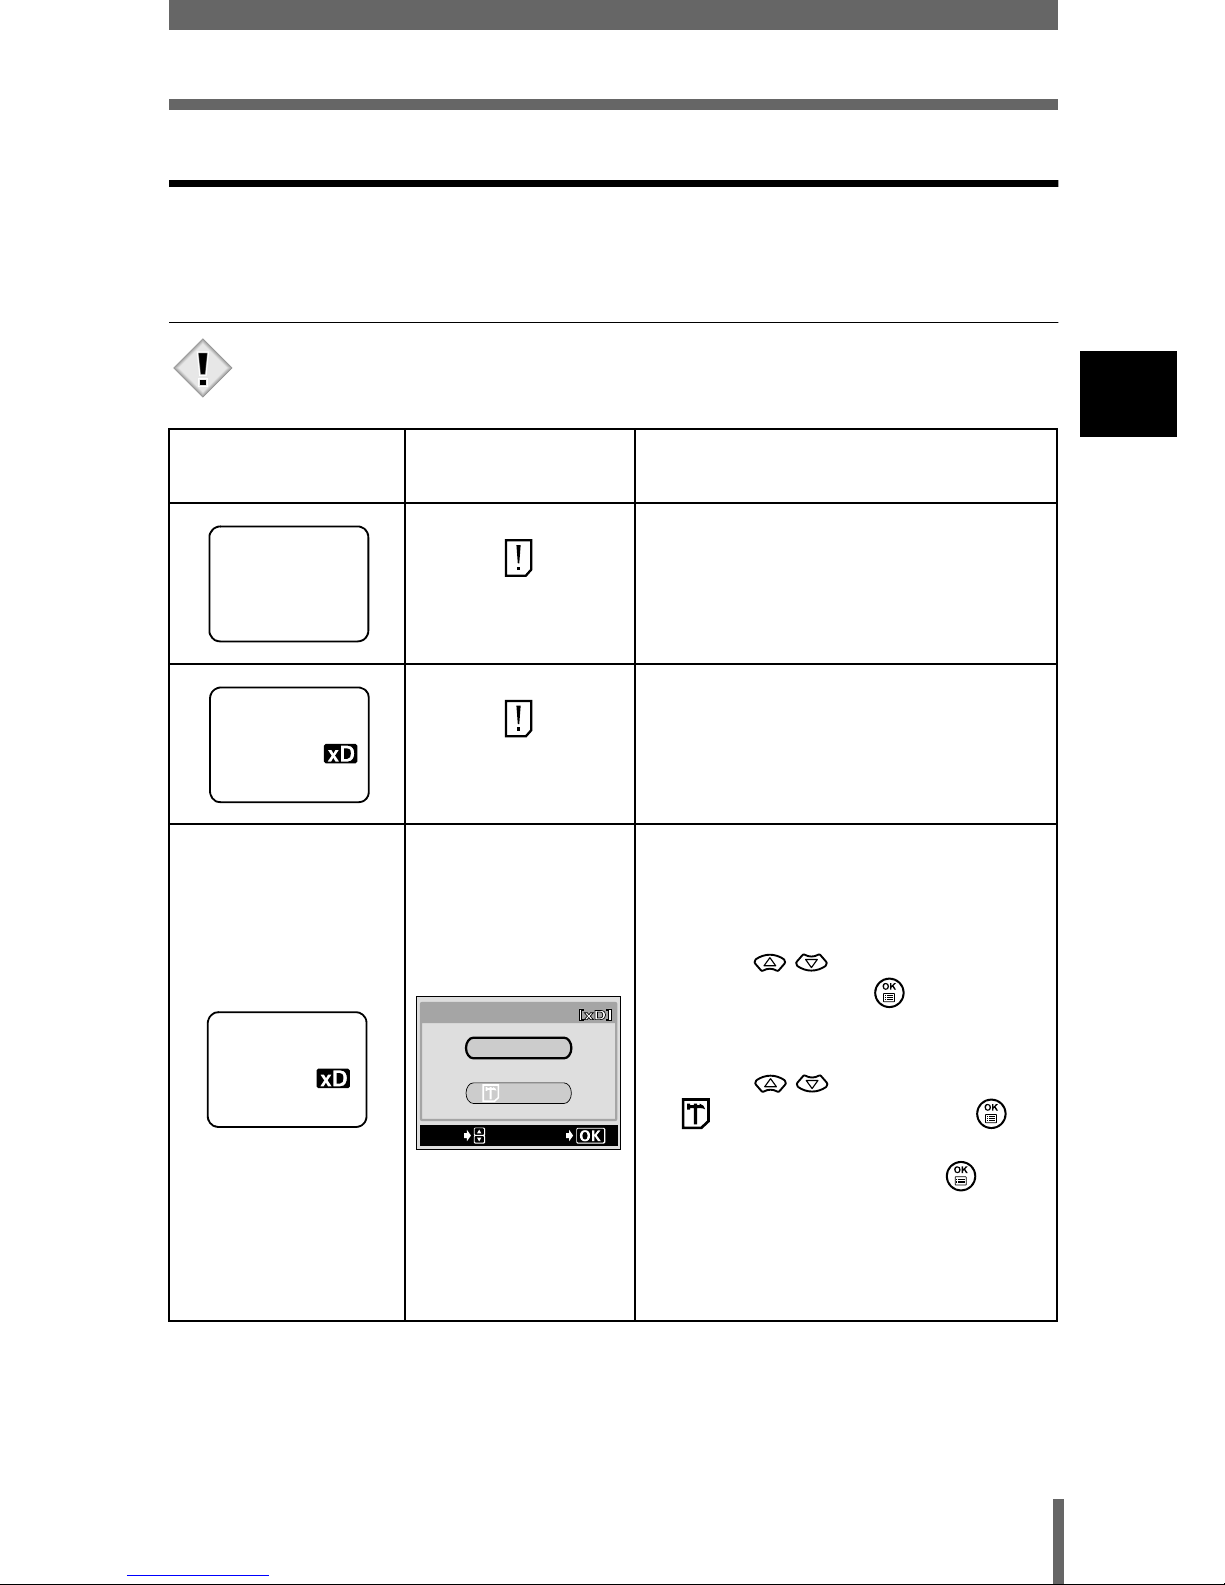
When the power is turned on, the camera checks the card automatically. If
there is no card in the camera or a card that is not supported by this camera
is inserted, the following screen is displayed.
• All data stored on the card is erased when the card is formatted.
Control panel
Monitor
indication
Corrective action
NO CARD
There is no card in the camera or
the card is not inserted properly.
→ Insert a card. If a card is already
inserted, remove it and insert it
again correctly.
CARD ERROR
There is a problem with the card.
→ Use a different card. Insert a
new card.
The card cannot record, play back
or erase pictures.
Format the card or replace it with a
new one.
→ Press to select POWER
OFF, then press . Replace it
with a new one.
→ Format the card.
Press to select
FORMAT, then press to
display the confirmation screen.
Select YES and press .
Formatting starts. If the card
was successfully formatted, the
camera is ready to take
pictures.
Note
- - -
- E-
- F -
POWER%OFF
FORMAt
CARD%SEtUP
SELECt
GO
Page 35
34
1
Getting started
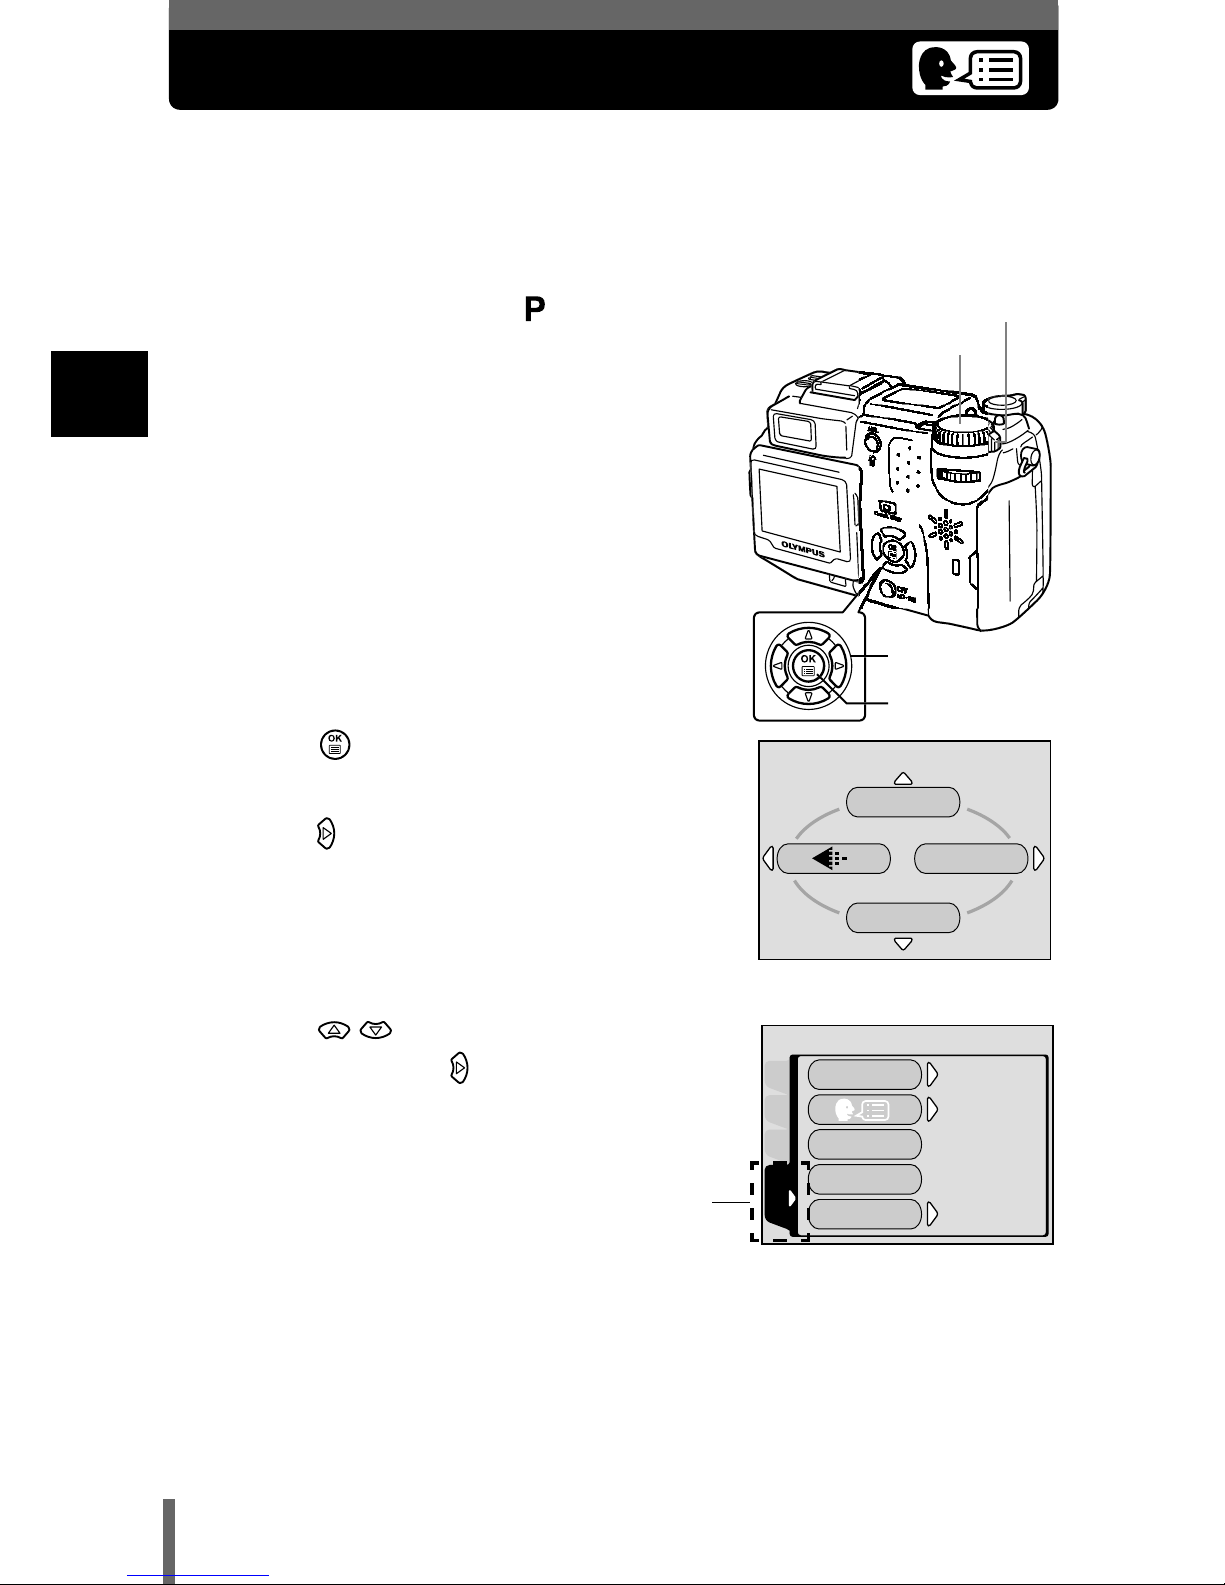
Selecting a language
You can select a language for on-screen display. This reference manual
shows the English on-screen display in the illustrations and explanations.
Available languages vary depending on the area where you purchased this
camera.
1
Set the mode dial to and turn
the camera on.
• Be sure to remove the lens cap before
you turn the camera on.
• You can select the language in all modes.
2
Press .
• The top menu is displayed.
3
Press on the arrow pad to select
MODE MENU.
4
Press to select the SETUP
tab, then press .
Arrow pad
OK button
Power switch
Mode dial
WB
DRIVE
MODE MENU
Top menu
PLAYEDItCARD
SEtUP
ALL RESEt
ON
ENGLISH
ON
REC VIEW
PW ON SEtUP
PW OFF SEtUP
SETUP tab
Page 36
35
Selecting a language
1
Getting started
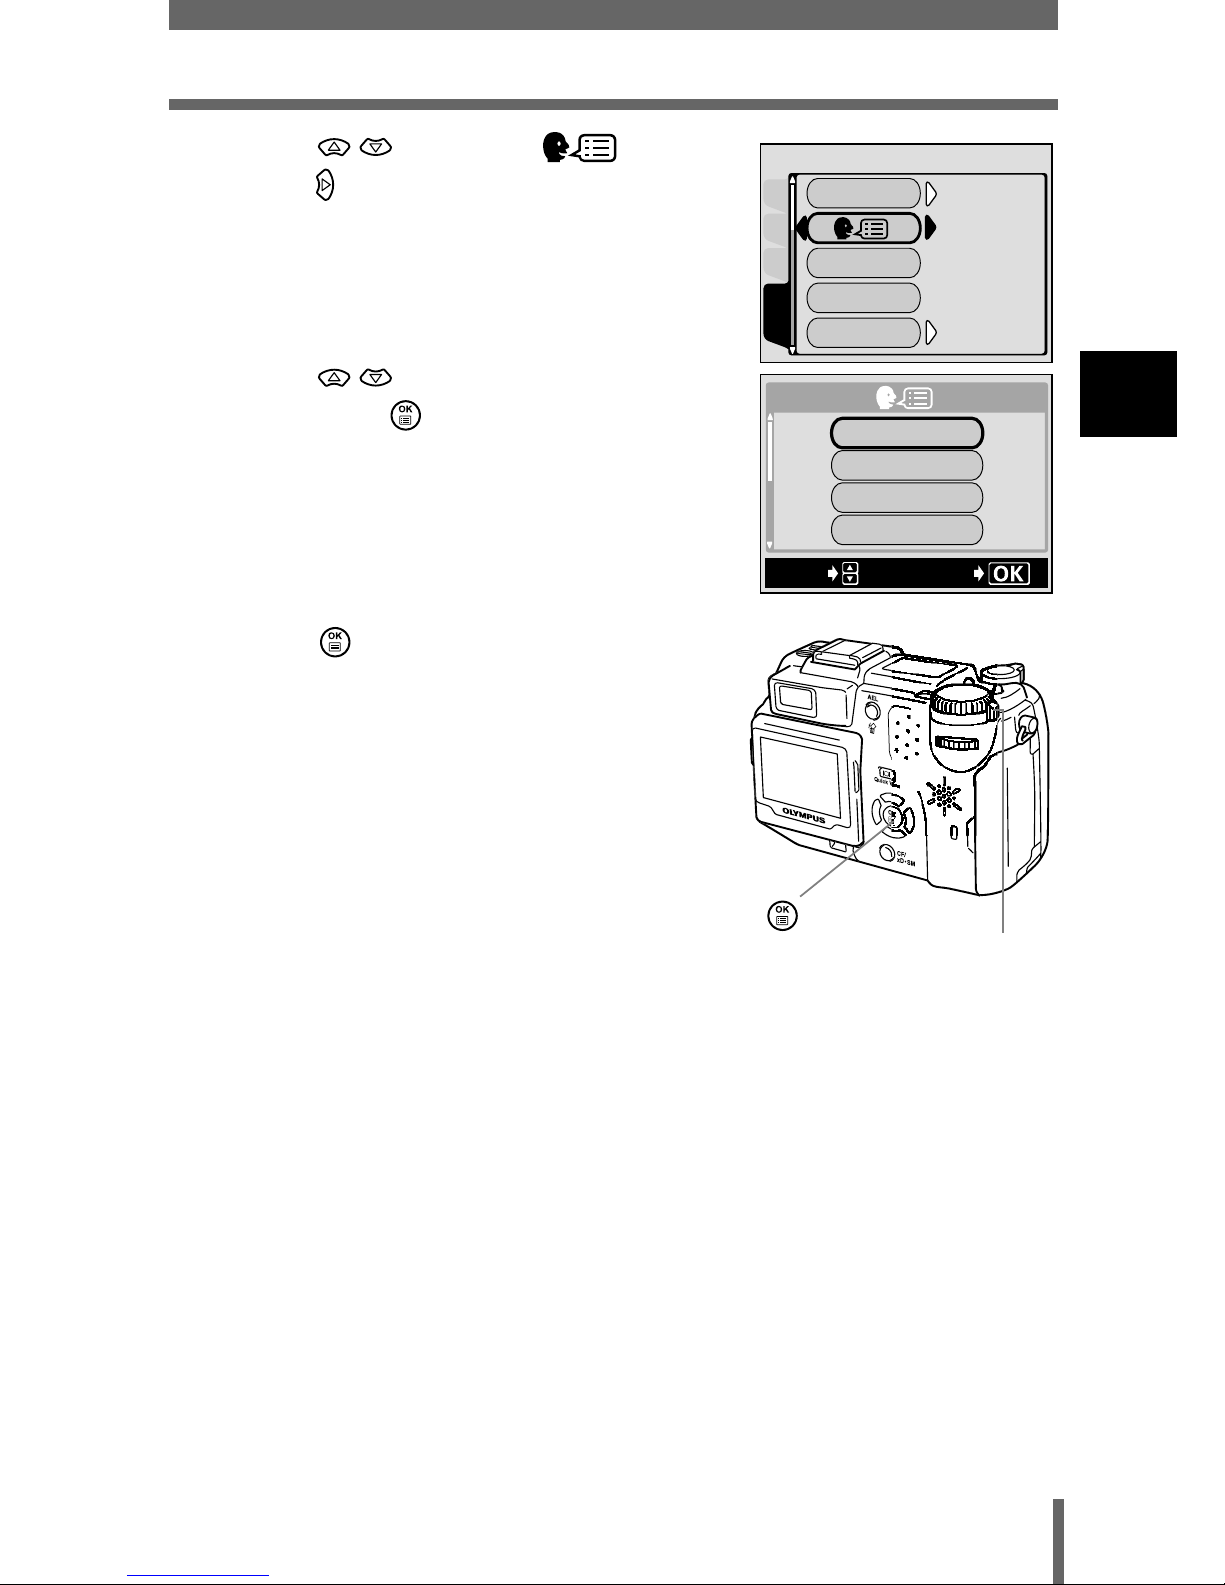
5
Press to select , then
press .
6
Press to select a language,
then press .
7
Press again to exit the menu.
8
To turn the camera off, set the
power switch to OFF.
PLAYEDItCARD
SEtUP
ALL RESEt
ON
ON
ENGLISH
ENGLISH
ON
ON
REC VIEW
PW ON SEtUP
PW OFF SEtUP
ENGLISH
DEUtSCH
SELECt
GO
FRANÇAIS
ESPAÑOL
Power switch
Page 37
36
1
Getting started
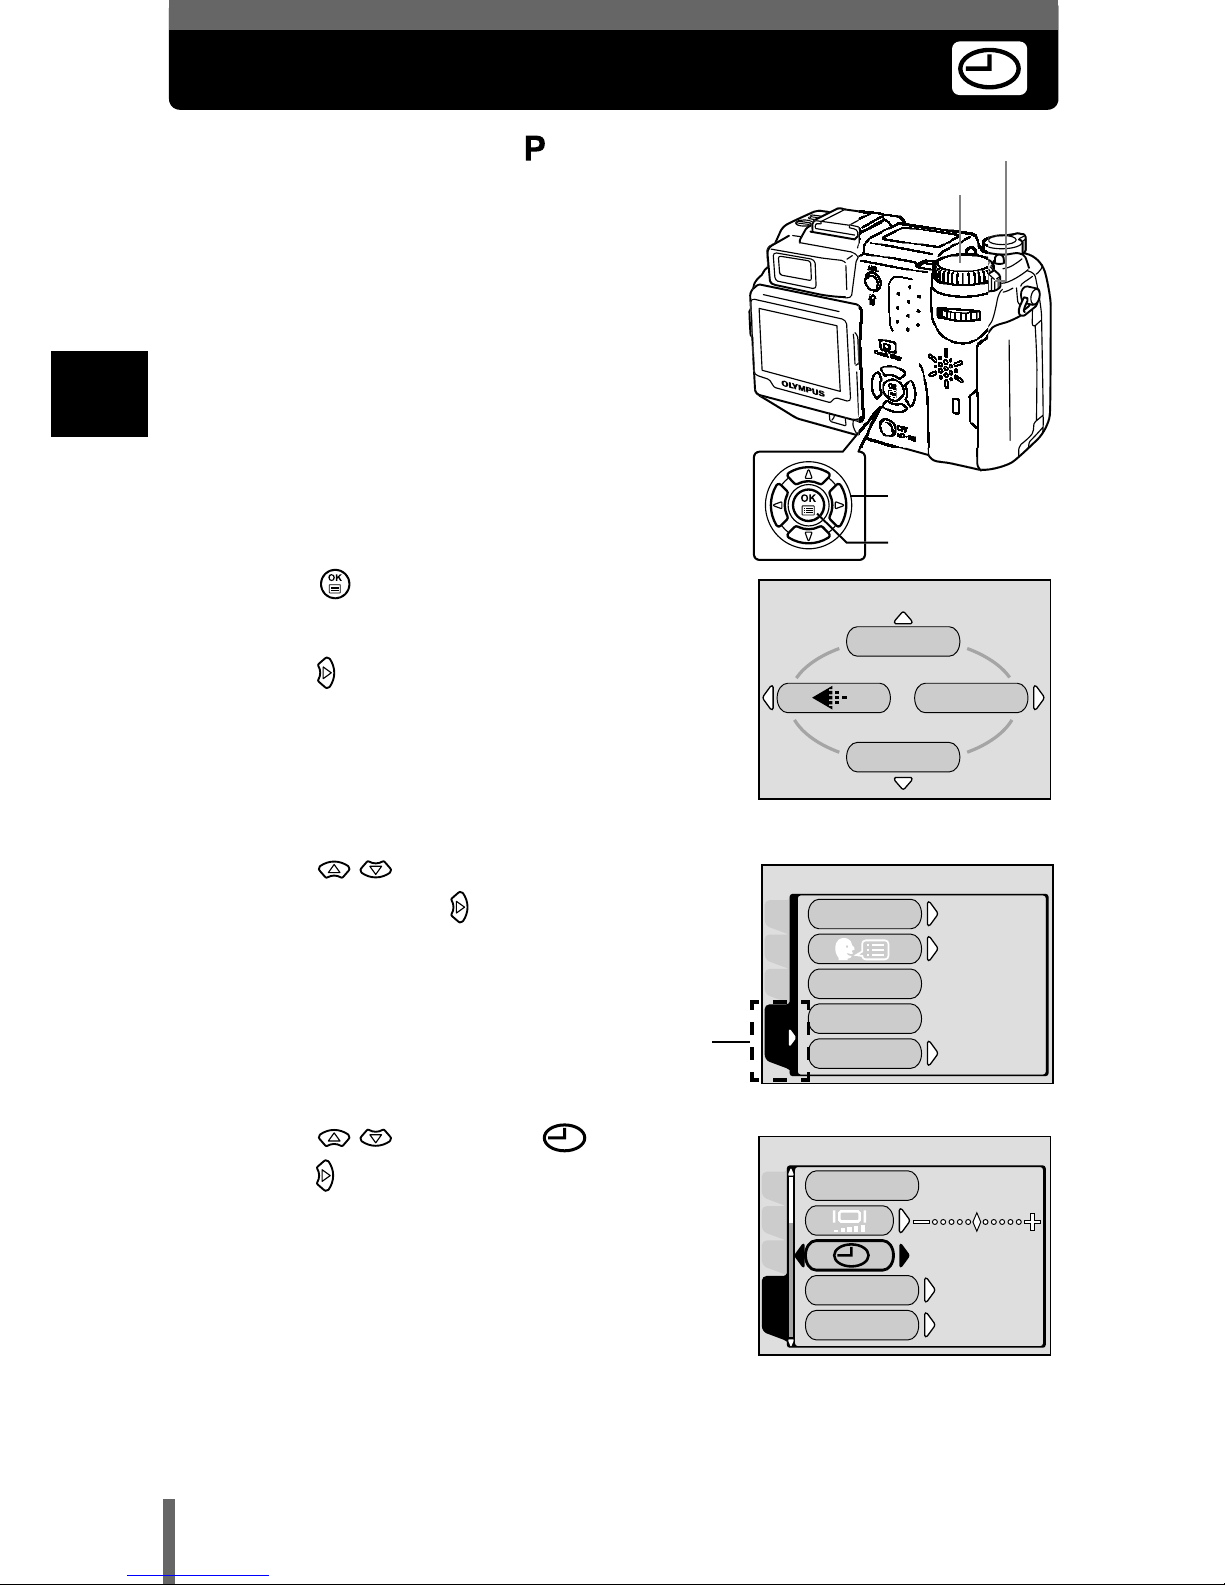
Setting the date and time
1
Set the mode dial to and turn
the camera on.
• Be sure to remove the lens cap before
you turn the camera on.
• You can set the date and time in all
modes.
2
Press .
• The top menu is displayed.
3
Press on the arrow pad to select
MODE MENU.
4
Press to select the SETUP
tab, then press .
5
Press to select , then
press .
• The green frame moves to the selected
item.
Arrow pad
OK button
Power switch
Mode dial
WB
DRIVE
MODE MENU
Top menu
PLAYEDItCARD
SEtUP
ALL RESEt
ON
ENGLISH
ON
REC VIEW
PW ON SEtUP
PW OFF SEtUP
SETUP tab
PLAYEDItCARD
SEtUP
'02.01.01
'02.01.01
00.00
00.00
NtSC
NtSC
m
m/ft
PIXEL MAPPING
VIDEO OUt
Page 38
37
Setting the date and time
1
Getting started
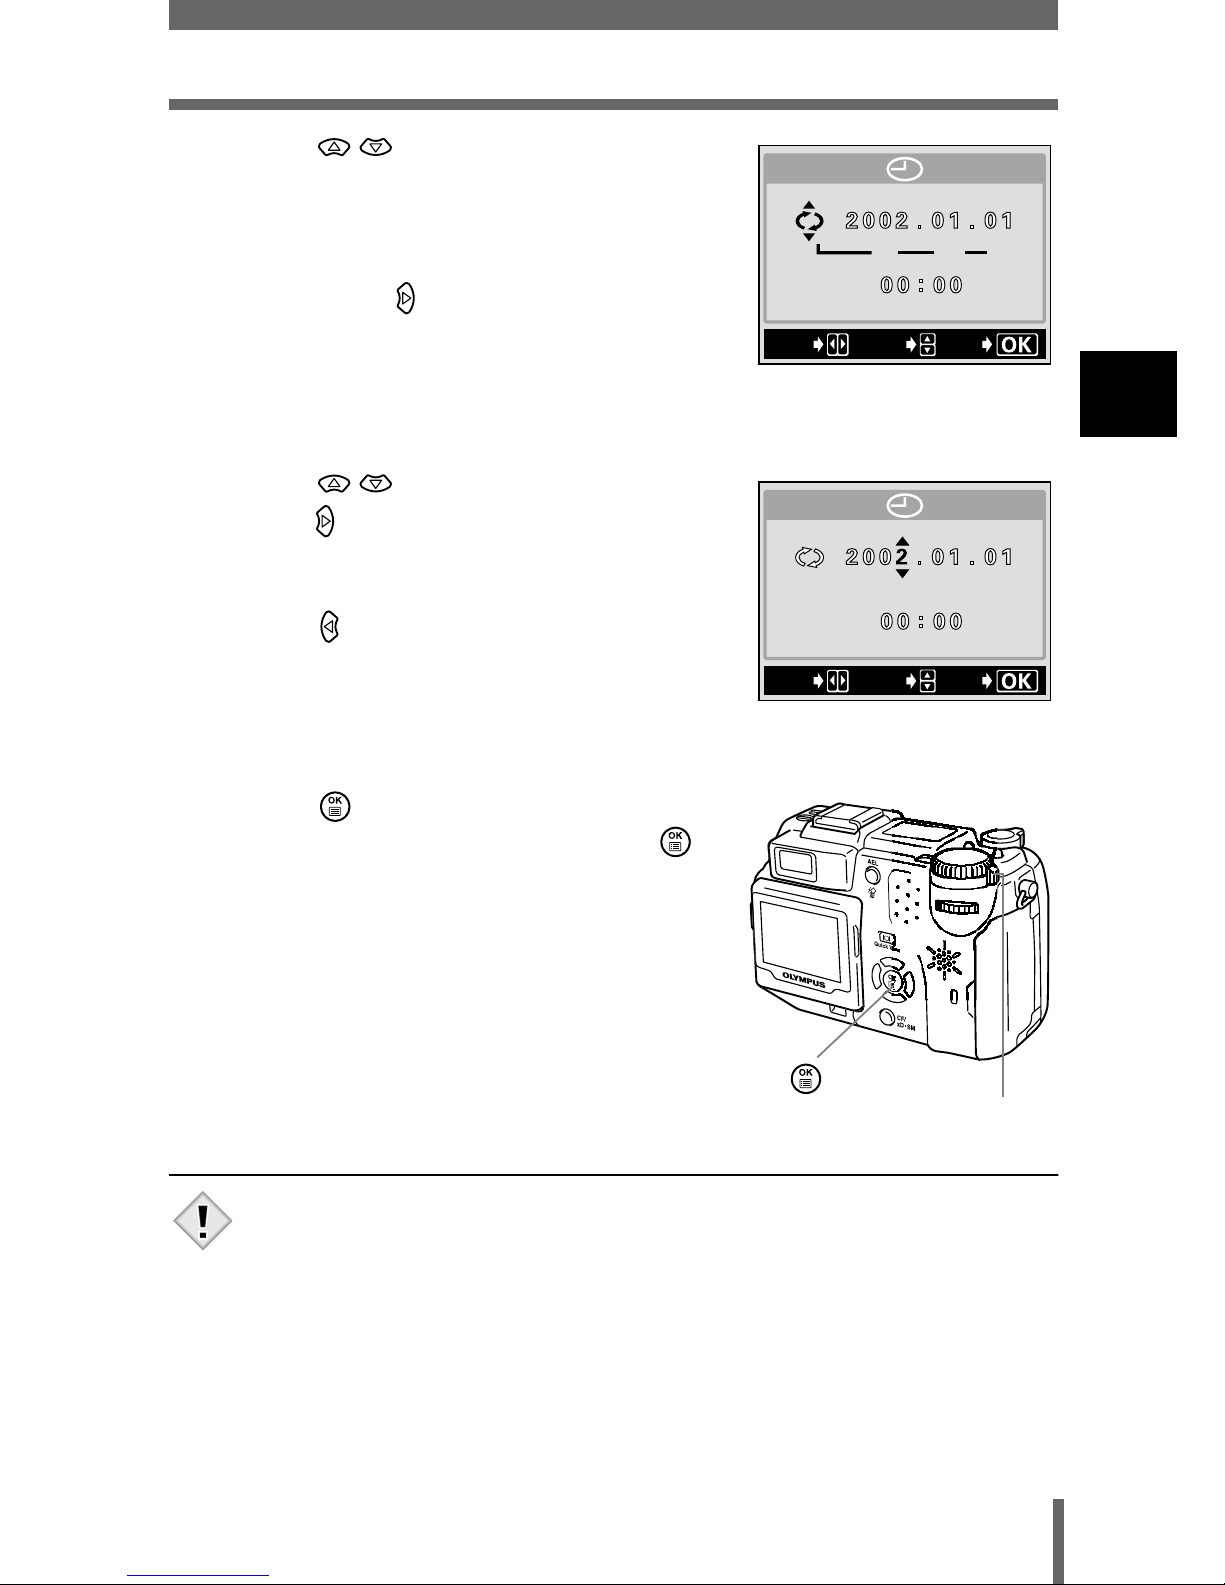
6
Press to select one of the
following date formats: Y-M-D
(Year/Month/Day), M-D-Y (Month/
Day/Year), D-M-Y (Day/Month/Year).
Then press .
• Move to the year setting.
• The following steps show the procedure
used when the date and time settings are
set to Y-M-D.
7
Press to set the year, then
press to move to the month
setting.
• To move back to the previous setting,
press . The first two digits of the year
are fixed.
8
Repeat this procedure until the
date and time are completely set.
9
Press .
• For a more accurate setting, press
when the time signal hits 00 seconds.
The clock starts when you press the
button.
10
To turn the camera off, set the
power switch to OFF.
• The current settings are retained even when the power is turned off,
unless they are readjusted.
• The date and time settings will be canceled if the camera is left
without batteries for approximately 1 hour. The settings will be
canceled more quickly if the batteries were only loaded in the
camera for a short time before being removed. Before taking
important pictures, check that the date and time settings are correct.
Y M D
SELECt
GO
SEt
SELECt
GO
SEt
Power switch
Note
Page 39
38
1
Getting started
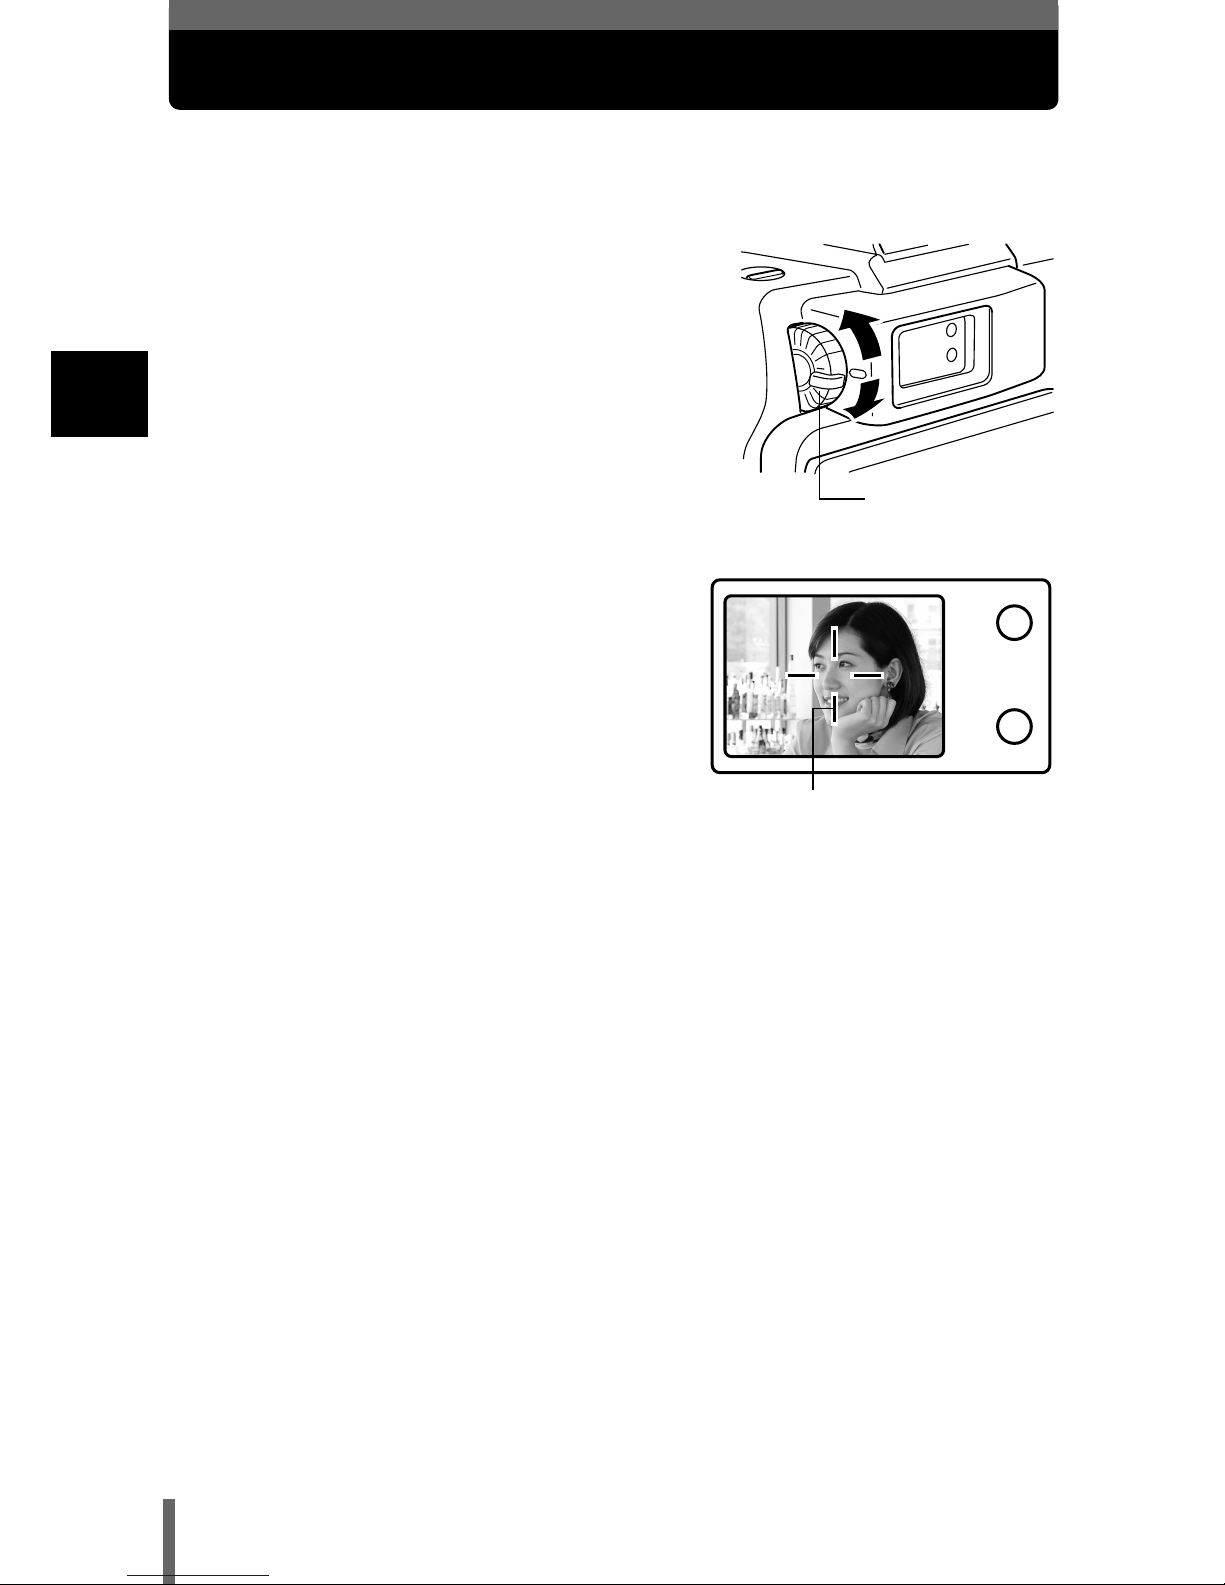
Adjusting the viewfinder
To make the camera easier to use, adjust the viewfinder to match the
eyesight (visual acuity) of the person using the camera.
1
While looking through the
viewfinder, slowly turn the diopter
adjustment dial.
2
Turn the dial until the AF target
mark can be seen clearly.
Diopter
adjustment dial
AF target mark
Page 40
39
2
Shooting and playback basics
2 Shooting and playback basics
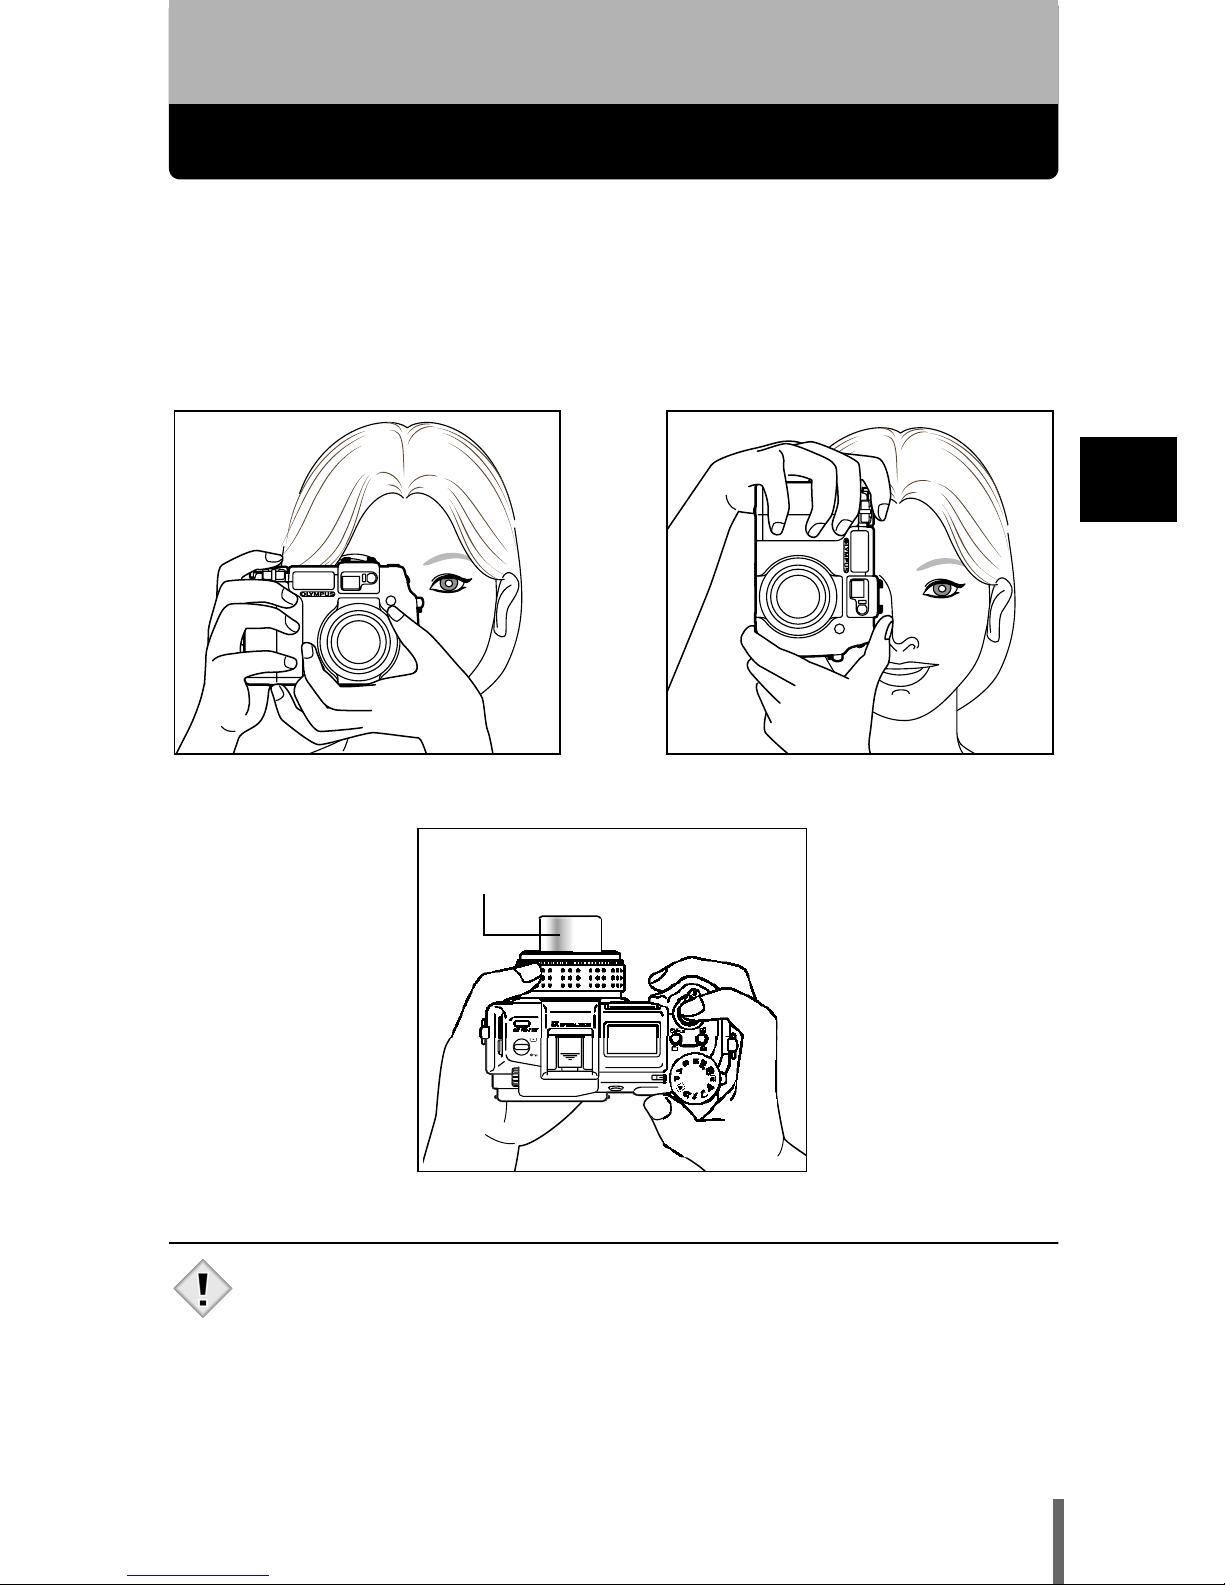
Holding the camera
Hold the camera firmly with both hands while keeping your elbows at your
sides to prevent the camera from moving. When taking pictures in the vertical
position, hold the camera so that the flash is at the top.
Keep your fingers and the strap away from the lens and flash.
Top view
• Clear pictures cannot be obtained if the camera moves as the
shutter button is pressed. Hold the camera correctly, and press the
shutter button gently.
Horizontal grip Vertical grip
Do not hold this part of the lens.
Note
Page 41
40
2
Shooting and playback basics
Taking still pictures
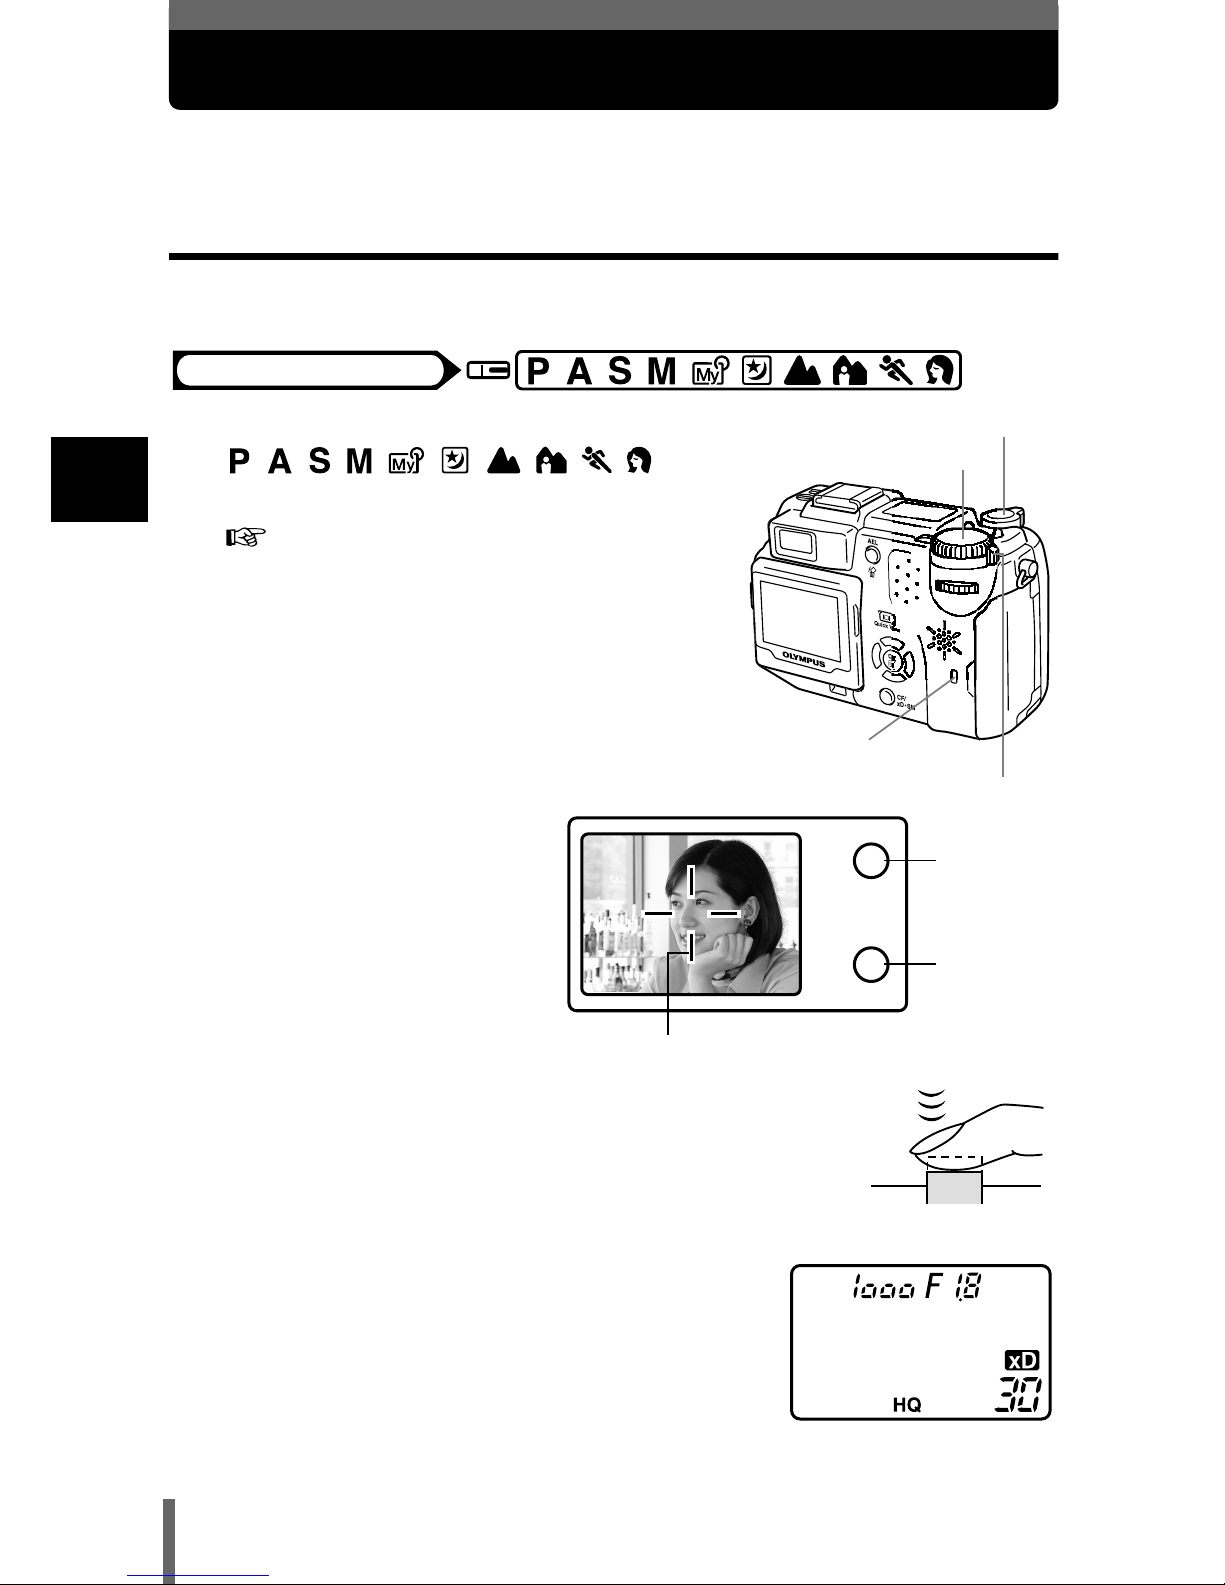
You can take still pictures using either the viewfinder or the monitor.
Taking still pictures using the viewfinder
The camera actually records a wider area than the picture you compose while
looking through the viewfinder.
1
Set the mode dial to
and turn the camera on.
“Power on/off” (P.31)
2
Position the AF target
mark in the viewfinder
on the subject.
3
Press the shutter
button gently (halfway) to adjust the
focus.
• When the focus and exposure are locked, the
green lamp lights.
• If the orange lamp lights, the flash fires
automatically.
• The shutter speed and aperture value
automatically set by the camera are
displayed on the control panel.
Mode dial
Mode dial
Power switch
Shutter button
Card access lamp
AF target mark
Orange
lamp
Green
lamp
P mode
Page 42
41
Taking still pictures
2
Shooting and playback basics
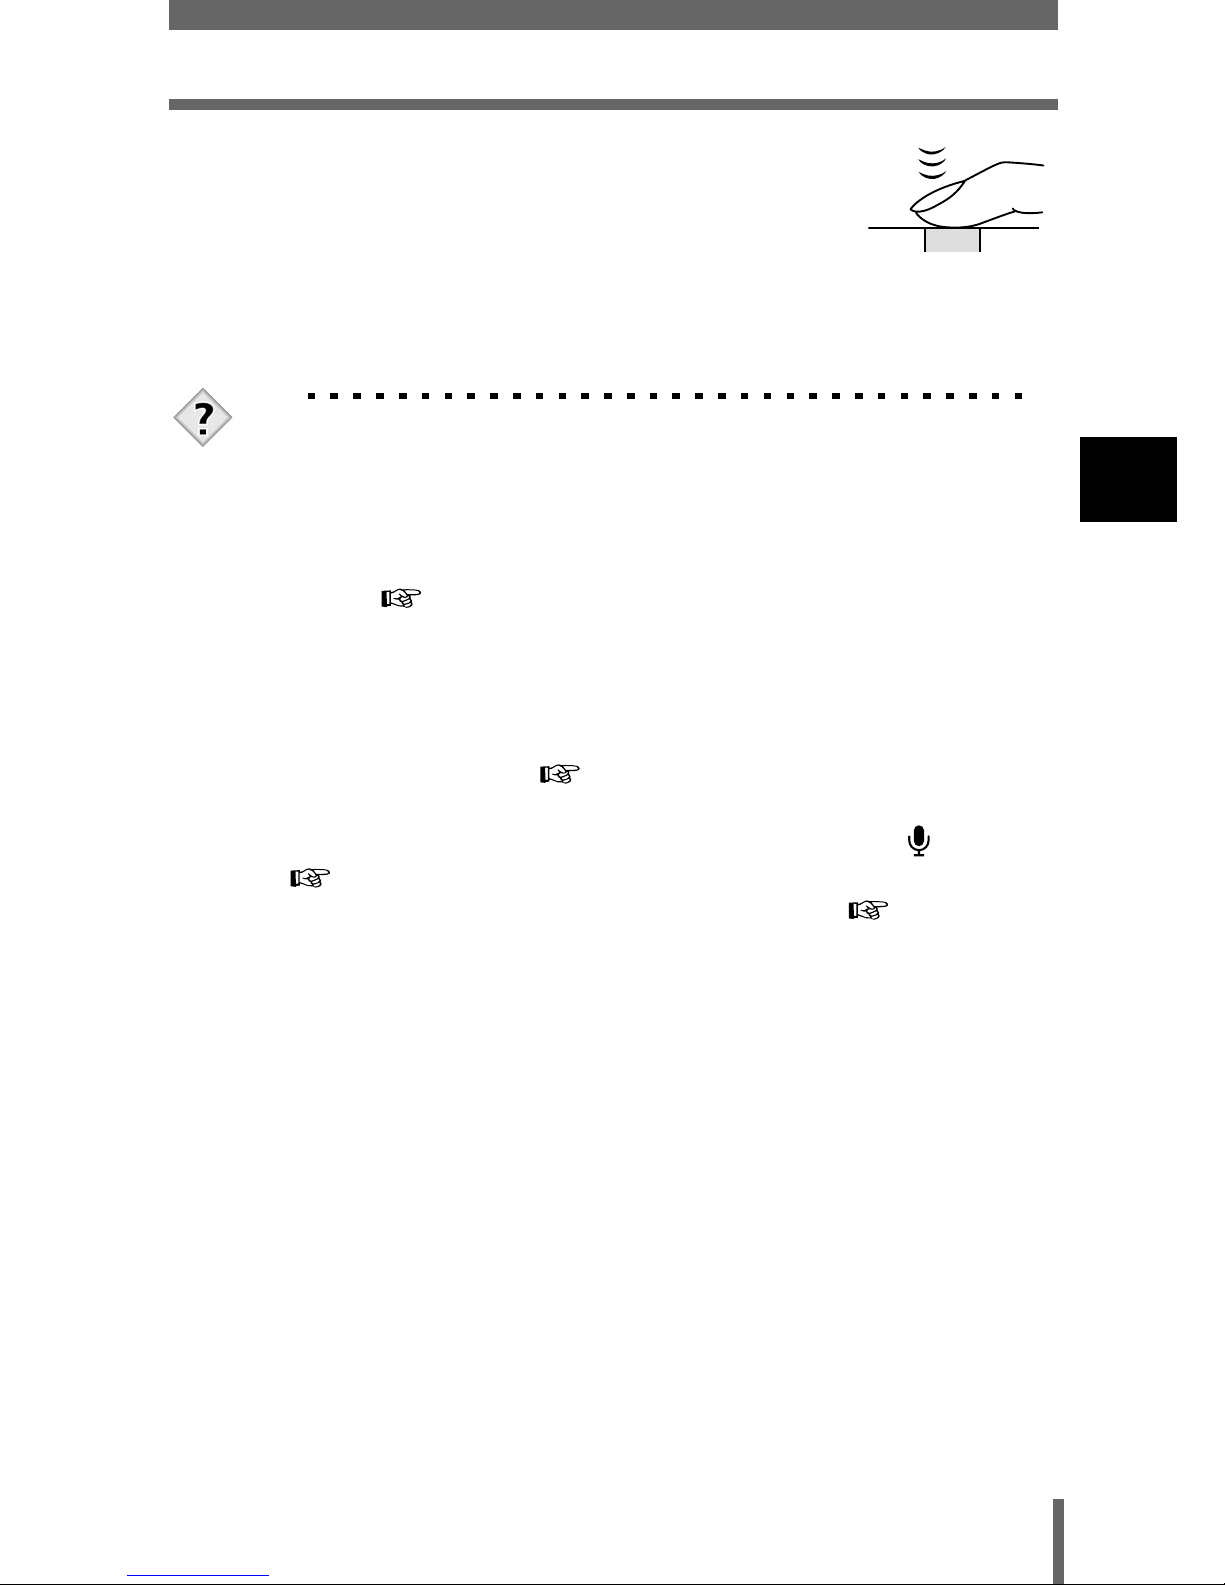
4
Press the shutter button all the way
(fully).
• The camera takes the picture.
• The card access lamp blinks while the picture is
stored on the card.
• When the green lamp stops blinking, you can take the next picture.
TIPS
The green lamp blinks.
→ You are too close to the subject. Take the picture at least 20 cm
away from the subject. If you use the super macro mode, you can
take pictures as close as 3 cm/1.2'' from the subject. (P.108)
→ Depending on the subject, the focus and exposure may not be
locked. “Subjects that are difficult to focus on” (P.47)
The orange lamp blinks when the shutter button is pressed
halfway.
→ The flash is charging. Wait until the lamp goes off.
To check the picture you have just taken immediately.
→ Set Rec View to ON. “Rec View” (P.181)
To record sound when taking pictures.
→ You can record sound when taking still pictures. Set to ON.
“Recording sound with still pictures” (P.122) You can also add
sound to a picture that has already been taken. “Recording
sound” (P.153)
Page 43
42
Taking still pictures
2
Shooting and playback basics
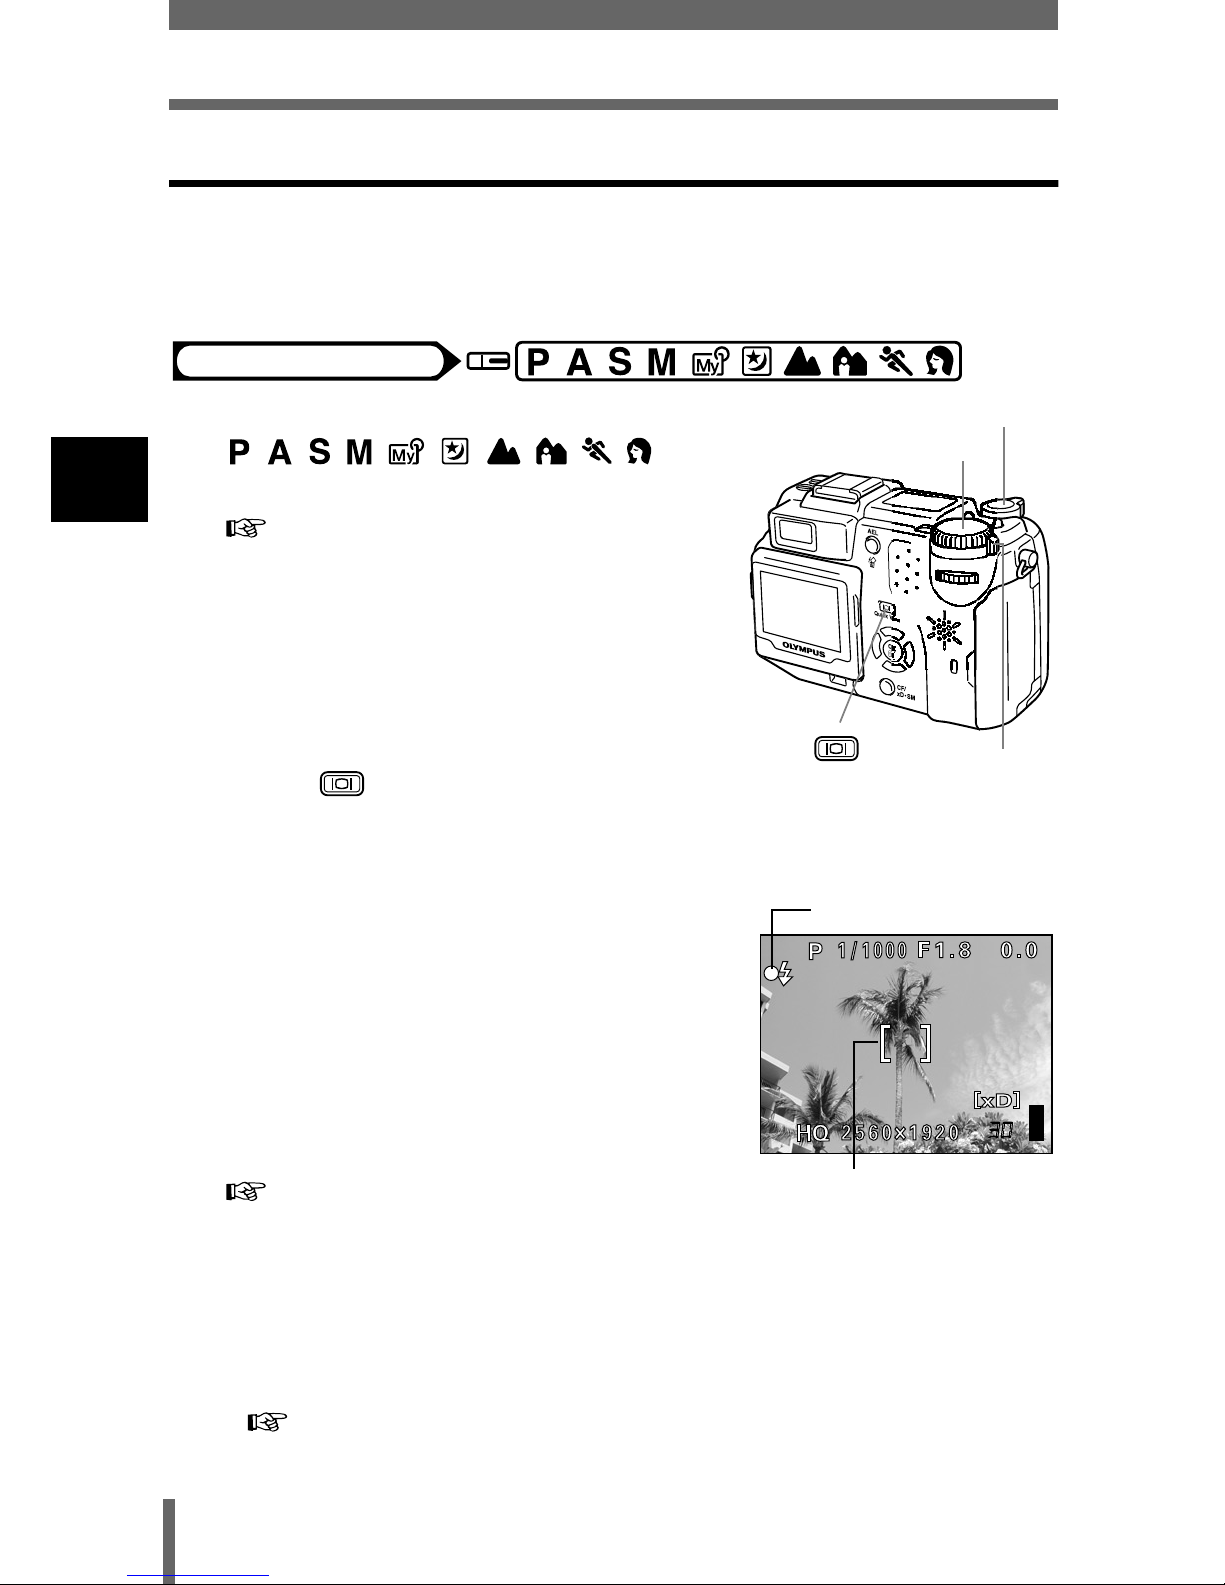
Taking still pictures using the monitor
With the monitor, you can shoot while checking the picture area that the
camera actually records. You can also check the shooting status, such as the
aperture value and shutter speed.
1
Set the mode dial to
and turn the camera on.
“Power on/off” (P.31)
2
Press to turn the monitor on.
• You can also change the angle of the monitor when taking pictures.
3
Position the AF target mark on the
subject while looking at the image
on the monitor. Decide the
composition of the picture.
4
Take the picture by following the
same procedure as for shooting
using the viewfinder.
“Taking still pictures using the
viewfinder” (P.40)
• When the focus is locked by pressing the shutter button halfway, the
green lamp on the monitor lights. The AF target mark moves to the
focused position. If you cannot focus on the subject, select SPOT for
the AF mode and then shoot.
“AF MODE - Changing the focus range” (P.96)
Mode dial
Mode dial
Shutter button
Power switch
Green lamp
AF target mark
Page 44
43
Taking still pictures
2
Shooting and playback basics
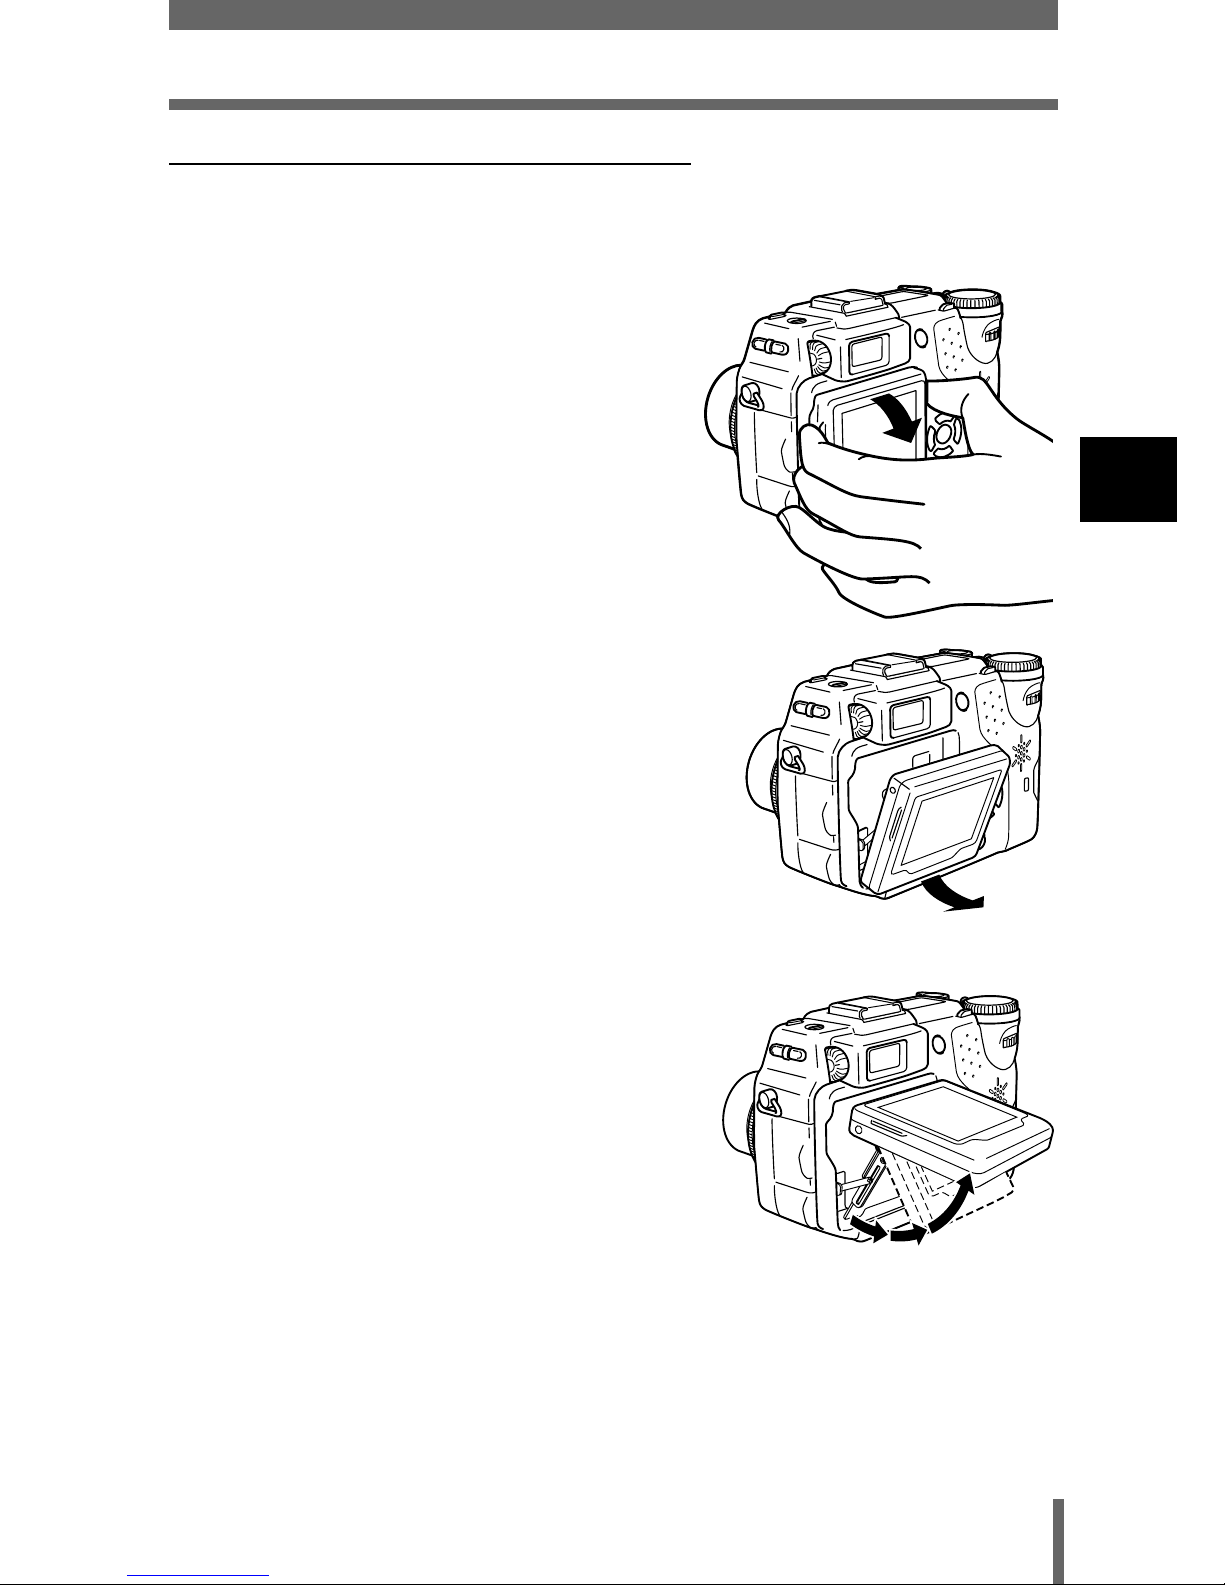
Changing the angle of the monitor
It is useful to pull the monitor out when taking pictures at an angle where the
viewfinder or monitor is hard to see, such as low angle shots.
1
Grip the monitor at the position
shown and pull the top of the
monitor out.
2
If you want to use the monitor
with it facing upward, pull out the
bottom of the monitor as shown
and change the angle.
• The monitor locks into position at the
following angles: -20; +20; +45; +90
degrees.
• If you want to take high angle shots, it is
useful to use the monitor as shown on
the right.
Page 45
44
Taking still pictures
2
Shooting and playback basics
TIPS
The monitor does not turn on.
→ If the camera is not used for over 3 minutes, the monitor turns off
automatically. Touch the shutter button or zoom lever to turn the
monitor on.
Vertical lines on the monitor screen make it hard to see the
image.
→ Bright light, such as direct sunlight, may cause vertical lines to
appear on the monitor screen. In this case, use the viewfinder.
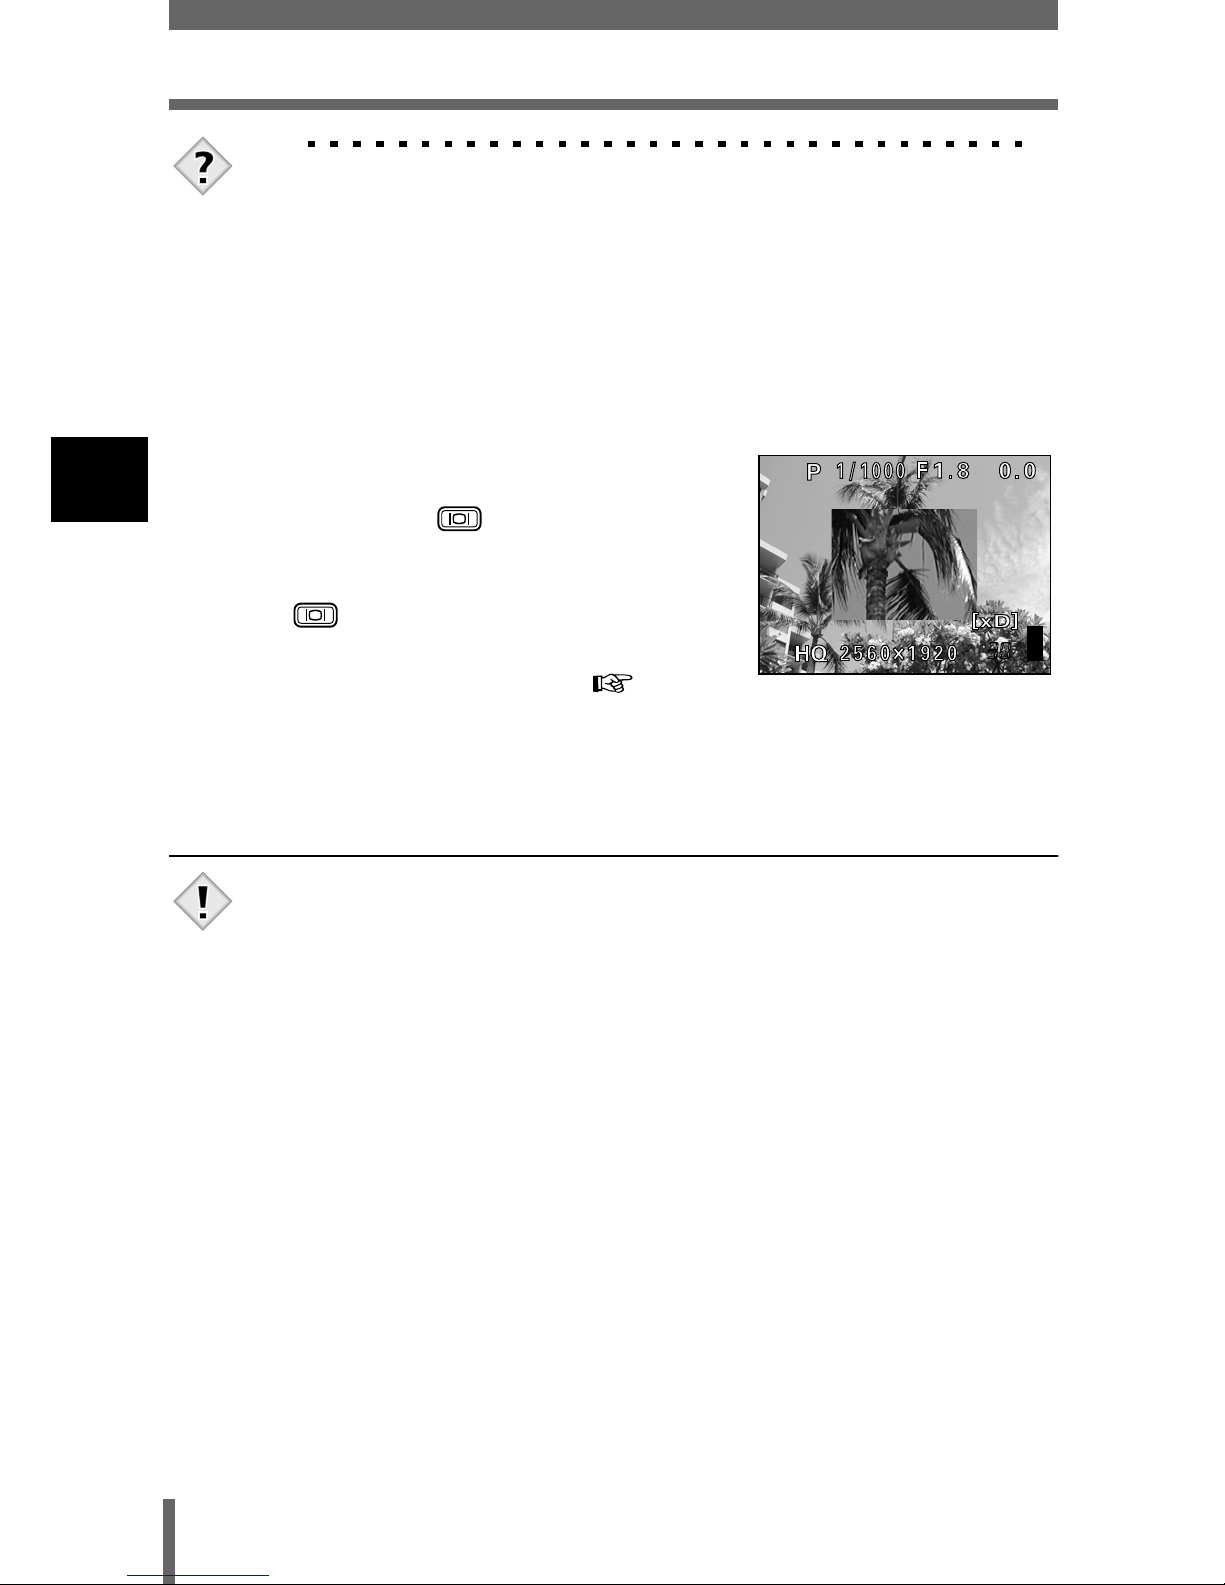
To check the area the camera is
focusing on
→ If you press while pressing the
shutter button halfway, the area you
are focusing on is enlarged. Pressing
once more returns the size to
normal. This function is not available
in the digital zoom range. “Using
the digital zoom” (P.51)
Also see the TIPS on “Taking still pictures using the viewfinder”
(P.40).
• Press the shutter button gently using the ball of your finger. If it is
pressed hard, the camera may move and pictures may come out
blurred.
• Recorded pictures will be saved on the card regardless of whether
the camera is turned off or the batteries are replaced or removed.
• Never open the card cover, remove the batteries or disconnect the
AC adapter while the card access lamp is blinking. Doing so could
destroy stored pictures and prevent storage of pictures you have
just taken.
• When taking pictures against strong backlight, the area of the
picture in shadow may appear colored.
• When you point the camera lens toward a bright subject, smears
(lines like beams of light) may appear on the image in the monitor.
This does not affect recorded pictures.
Note
Page 46
45
Taking still pictures
2
Shooting and playback basics
Comparison of the viewfinder & monitor
Viewfinder Monitor
Advantages Camera movement does
not occur easily and
subjects can be seen
clearly even in bright
places.
Little battery power is used.
You can check the picture area
that the camera actually
records more accurately.
Disadvantages When close to a subject,
the image in the viewfinder
is a little different from the
picture that the camera
actually records.
Camera movement can occur
easily and subjects may be
difficult to see in bright/dark
places. The monitor uses
more battery power than the
viewfinder.
Tips Use the viewfinder for
general snapshots
(landscape pictures,
casual shots, etc.).
(Approx. 0.8 m/2.6 ft. to
)
Use the monitor when you
want to shoot while checking
the picture area that the
camera actually records, or
take pictures when the subject
is less than 0.8 m/2.6 ft. away,
such as close-up shots of
people or flowers (macro
shooting).
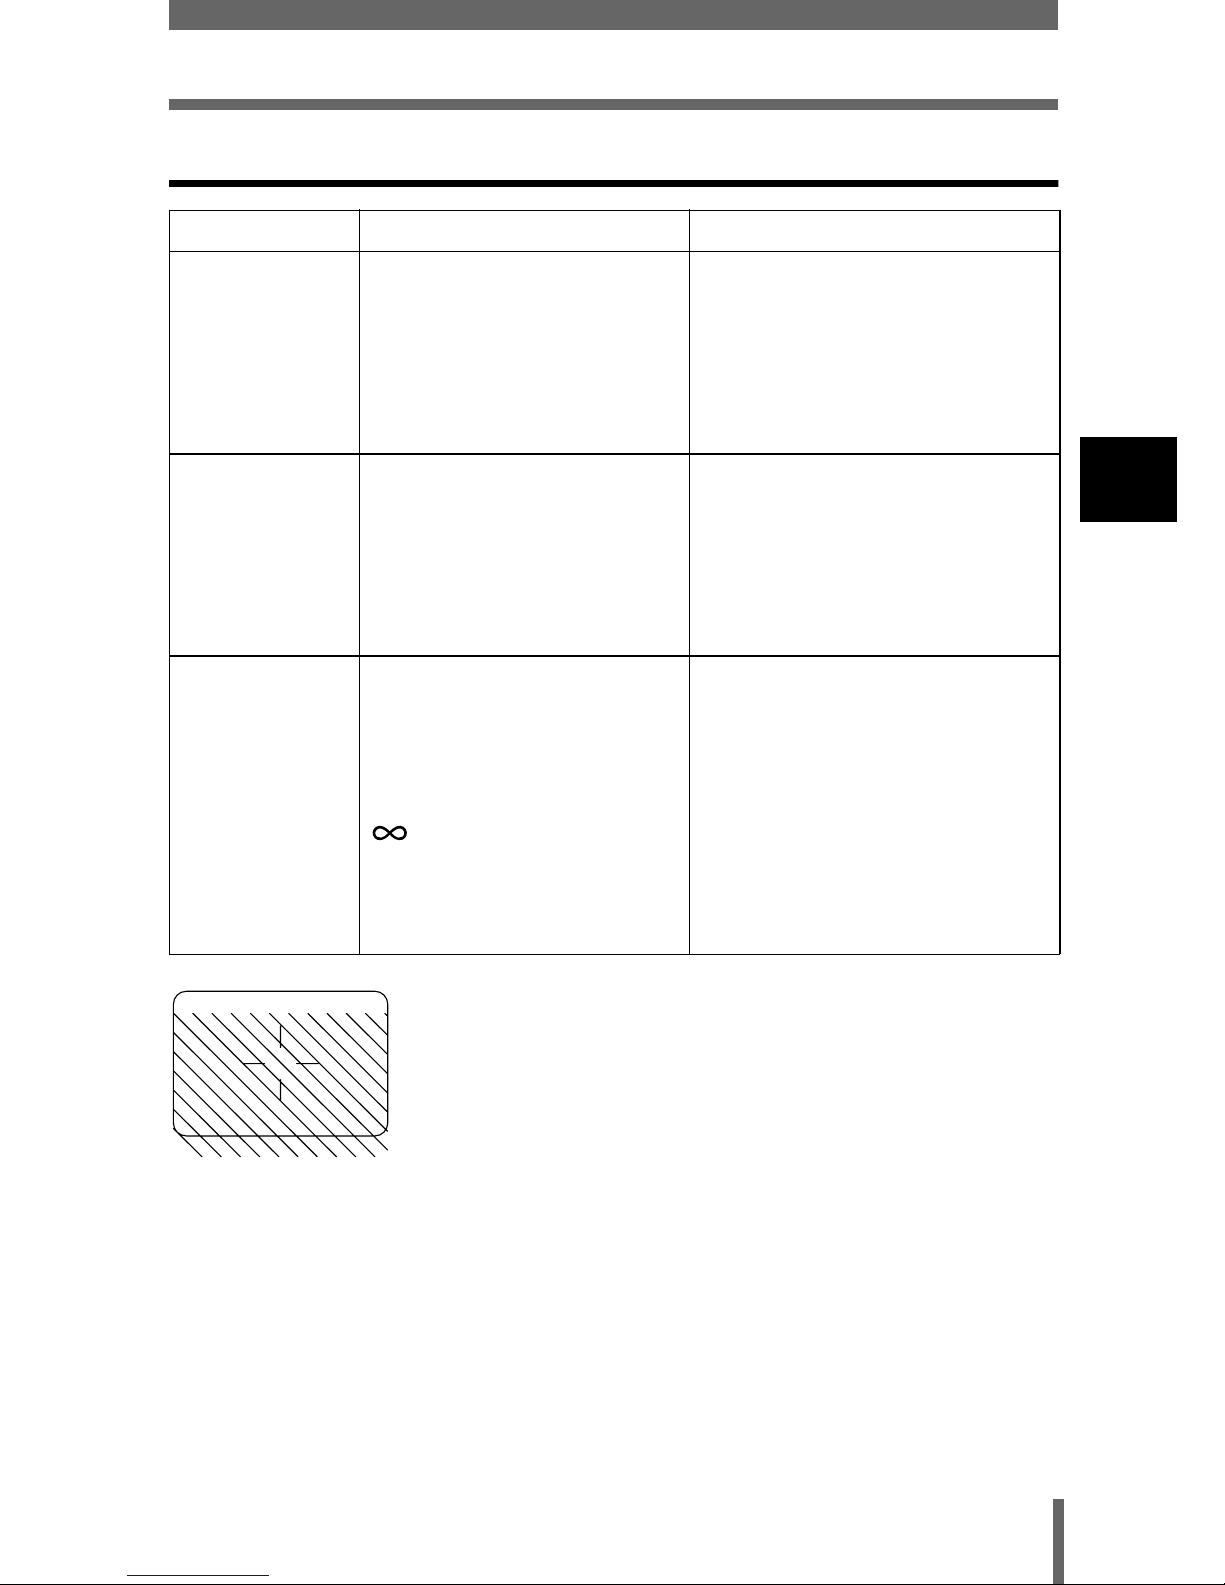
• The camera records a wider area than the image in the
viewfinder.
• As you get closer to the subject, the actual image recorded
becomes lower than the one in the viewfinder (see left).
Page 47
46
2
Shooting and playback basics
If correct focus cannot be obtained
When the subject you want to focus on is not in the center of the frame and
you cannot position the AF target mark on it, you can focus the camera on
another point at roughly the same distance (focus lock) and take the picture
as explained below.
Determine the position of the subject after focusing
(Focus Lock)
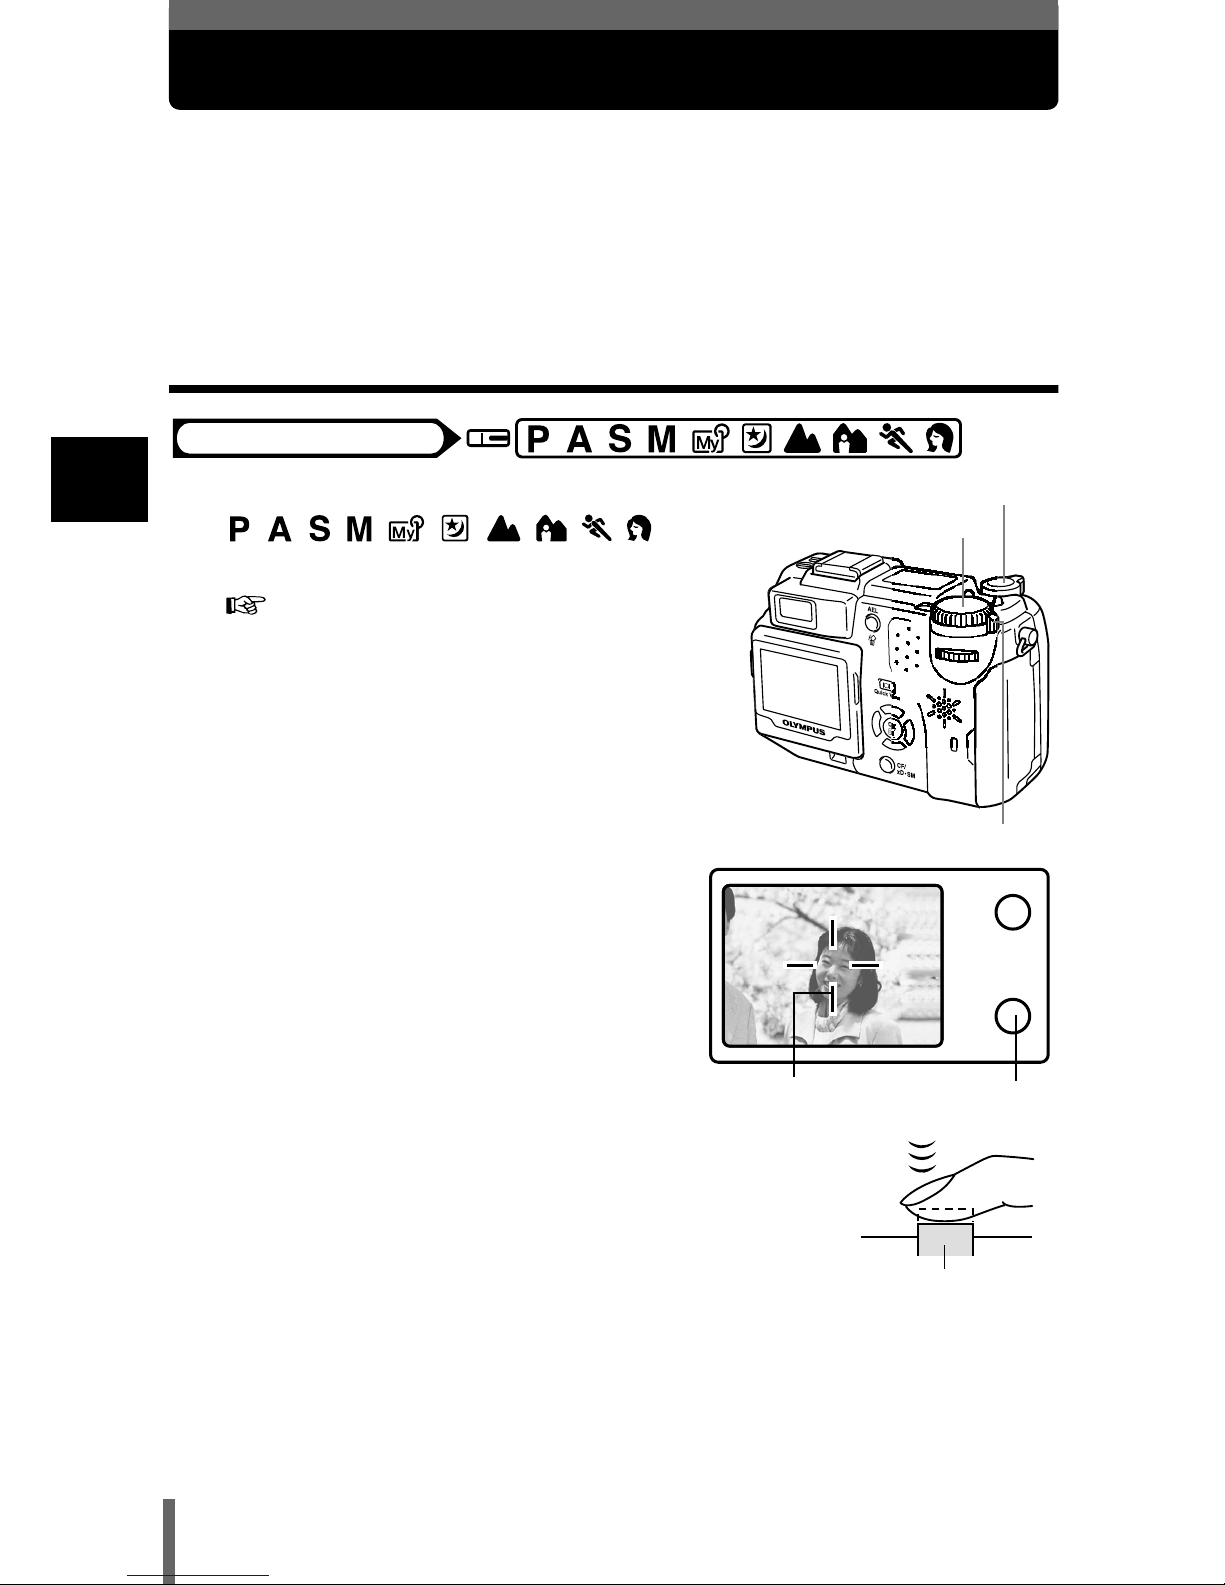
1
Set the mode dial to
and turn the camera on.
“Power on/off” (P.31)
2
Position the AF target mark on
the subject you want to focus
on.
• When shooting a hard-to-focus
subject or a fast-moving subject, point
the camera at an object about the
same distance away as the subject.
3
Press the shutter button
halfway until the green lamp lights.
• When the focus and exposure are locked, the
green lamp lights.
• If the monitor is turned on, the AF target mark
moves to the focused position.
• When the green lamp blinks, the focus and exposure are not locked.
Release your finger from the shutter button, re-position your subject
and press the shutter button halfway again.
Mode dial
Mode dial
Power switch
Shutter button
Green lampAF target mark
Shutter button
Page 48
47
If correct focus cannot be obtained
2
Shooting and playback basics
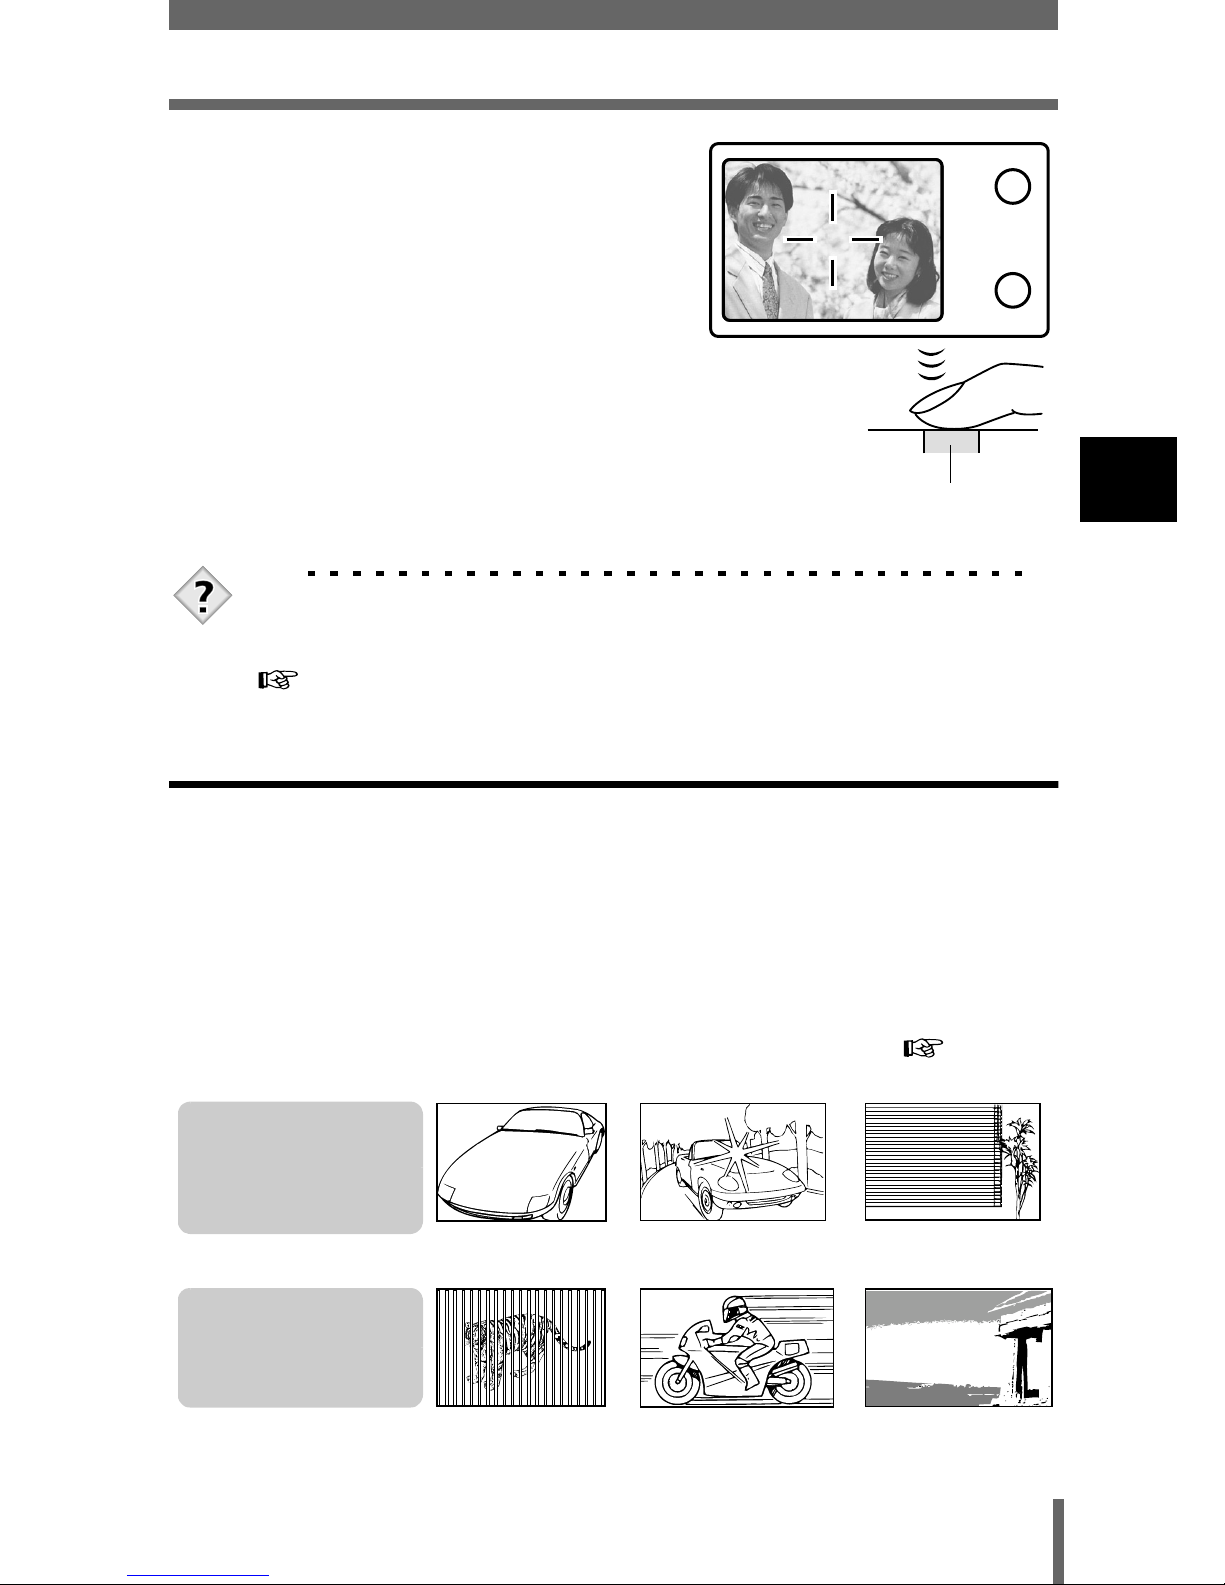
4
Keeping the shutter button
pressed halfway, recompose
your shot.
5
Press the shutter button fully.
TIPS
The frame in which you focus on a subject is different from the
frame in which you lock the exposure.
“AE Lock - Locking the exposure” (P.105)
Subjects that are difficult to focus on
Under certain types of conditions, the auto focus may not work properly. If this
happens, focus on an object with high contrast at the same distance as the
intended subject (focus lock), recompose your shot and then take the picture.
If the subject has no vertical lines, hold the camera vertically and focus the
camera using the focus lock function by pressing the shutter button halfway,
then return the camera to the horizontal position while keeping the button
pressed halfway and take the picture.
If the subject still cannot be focused on, use the manual focus. “Manual
focus” (P.100)
Shutter button
The green lamp
blinks.
The subject cannot be
brought into focus.
Subject with an
extremely bright area in
the center of the frame
Subject without
vertical lines
Subjects at different
distances
Fast-moving subject The subject to be
focused on is not in the
center of the frame.
The green lamp lights,
but the subject cannot
be brought into focus.
Subject with low
contrast
Page 49
48
2
Shooting and playback basics
Recording movies
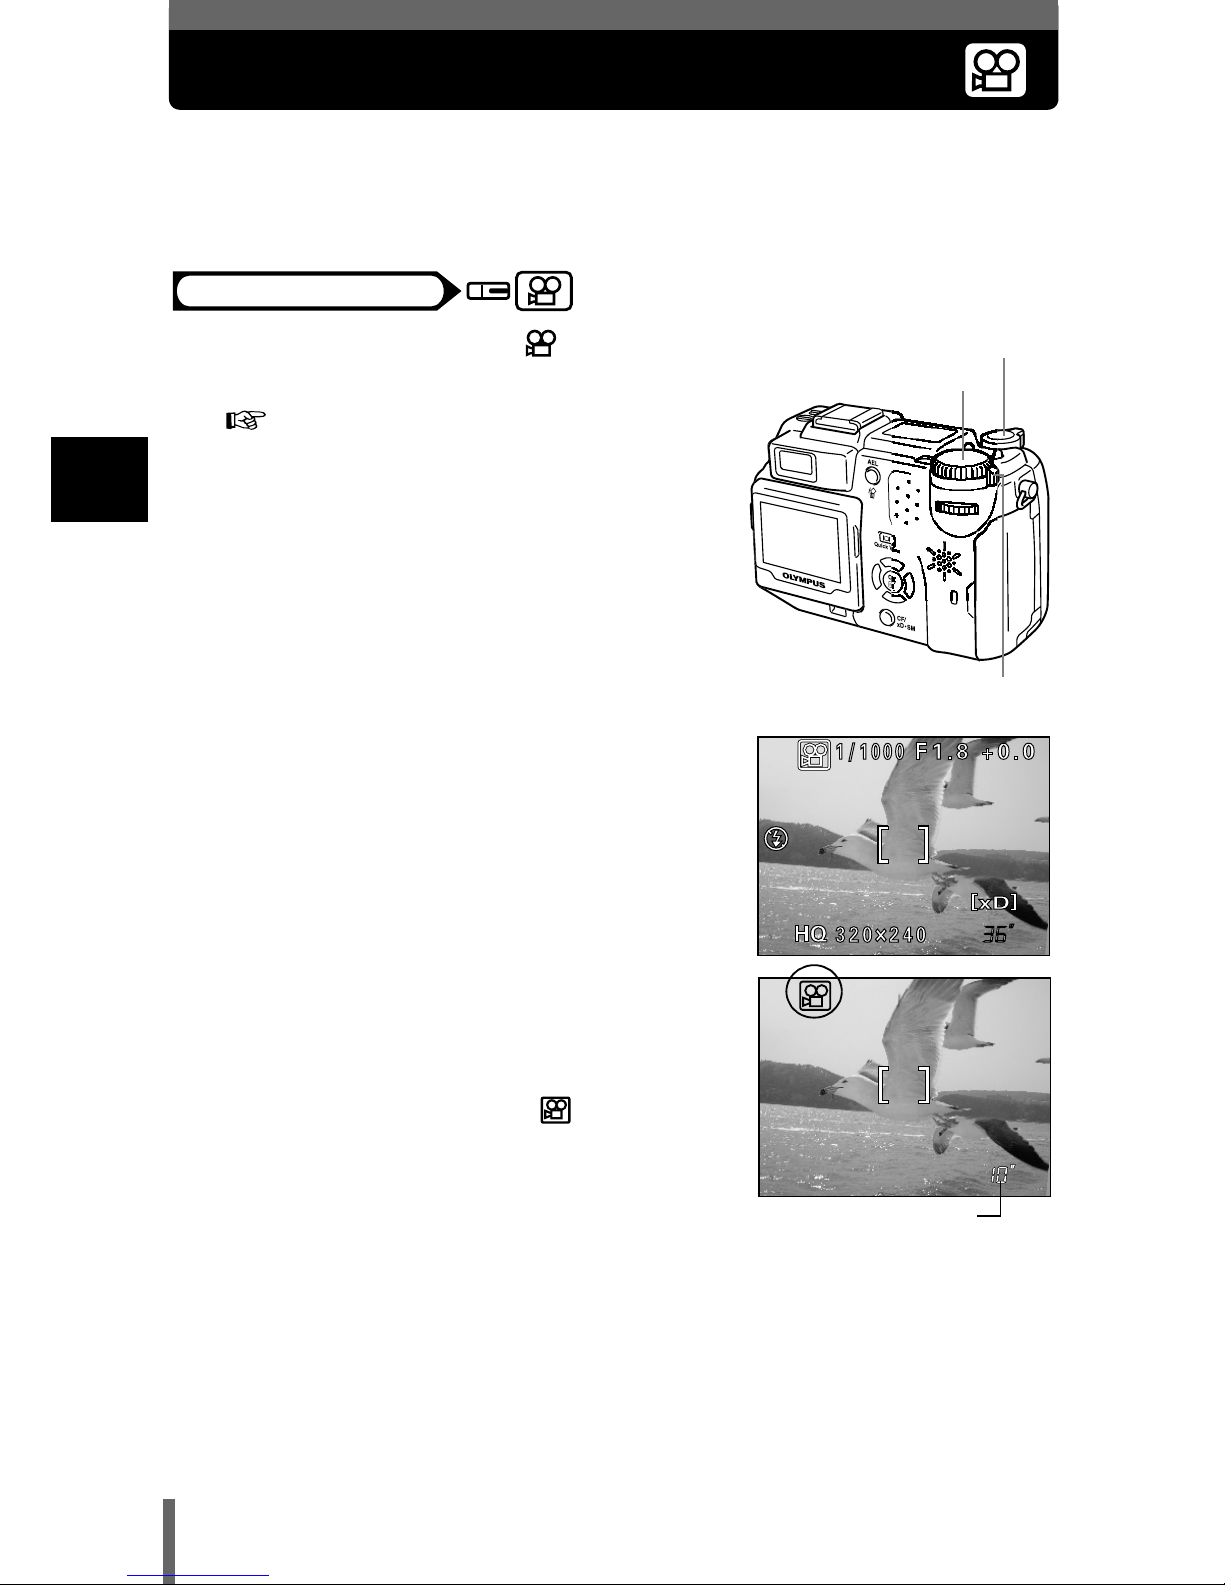
Even if the distance between the camera and the subject changes while you
are recording a movie, the FULLTIME AF is set to on to maintain the correct
focus and exposure (factory default setting).
1
Set the mode dial to and turn
the camera on.
“Power on/off” (P.31)
• The monitor turns on and the available
recording time on the card that you are
using is displayed.
2
Decide the composition while
looking at the image on the
monitor.
3
Press the shutter button fully to
start recording.
• The orange lamp on the right of the
viewfinder lights.
• During movie recording, lights red.
4
Press the shutter button again to stop recording.
• The card access lamp blinks while the movie is stored on the card.
• When the remaining recording time has been used up, recording stops
automatically.
• When there is space in the card memory, the remaining recording time
is displayed, and the camera is ready to shoot.
Mode dial
Mode dial
Power switch
Shutter button
Seconds remaining
Page 50
49
Recording movies
2
Shooting and playback basics
TIPS
To record sound with the movie
→ You can record sound when recording a movie. Set to ON.
“Recording sound with movies” (P.124)
• Depending on the card, the remaining recording time may drop
rapidly during recording. Try using the card again after formatting it
with your camera. “Formatting cards” (P.175)
• When is set to ON, the optical zoom cannot be used during
movie recording. To use the zoom during recording, set DIGITAL
ZOOM to ON. “Using the digital zoom” (P.51)
• When is set to ON, the movie is recorded with the focus and
exposure that were set when the shutter button was pressed in step
3. Care should be taken as it may be difficult to achieve the correct
focus.
• In mode, the flash, manual focus (MF) cannot be used. In
addition, WHITE BOARD and BLACK BOARD cannot be selected
in FUNCTION.
Note
• Recording will continue until the card is full unless stopped by pressing
the shutter button.
• A long recorded movie cannot be edited. (P.158)
• If a single movie recording uses up all of the card’s memory, create
space on the card by deleting the movie or downloading it to a PC.
Notes for recording movies over a long time
Page 51
50
2
Shooting and playback basics
Zoom
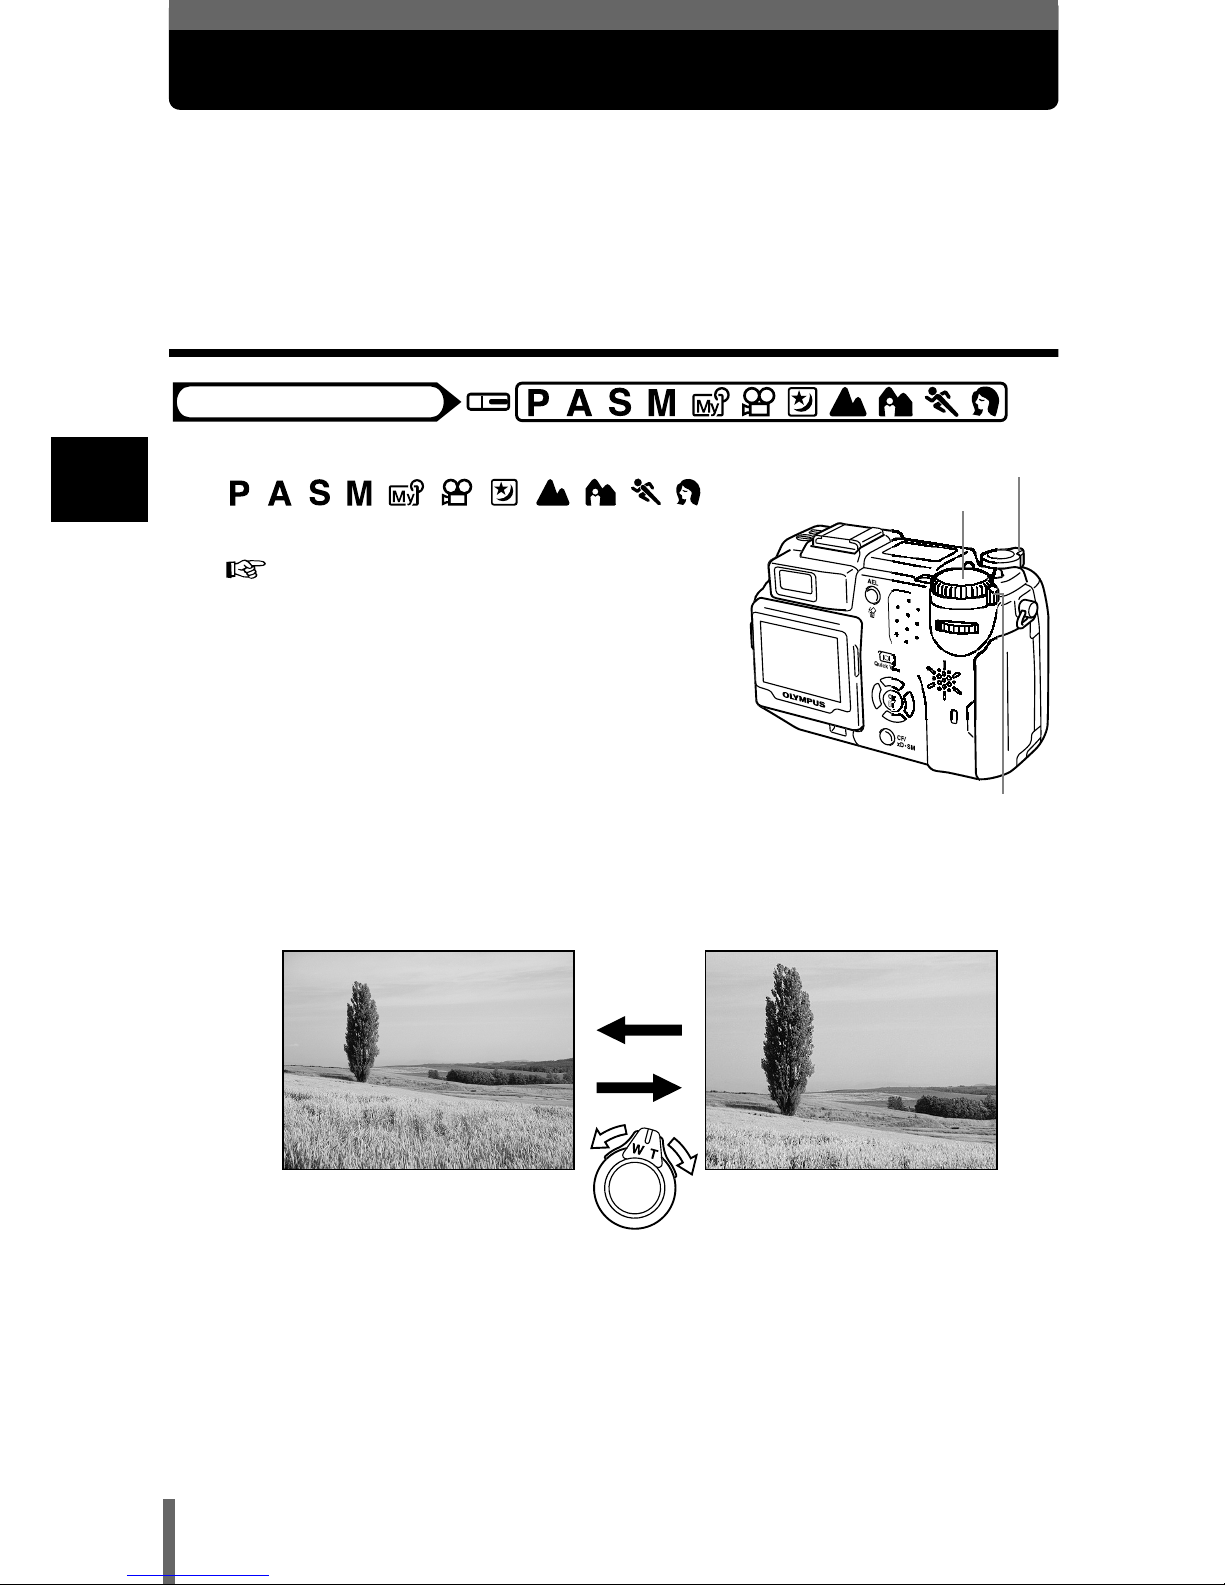
Telephoto and wide-angle shooting are possible at 3x magnification (the
optical zoom limit, equivalent to 35 mm – 105 mm on a 35 mm camera). By
combining the optical zoom with the digital zoom, zoom magnification can be
increased to a maximum of approximately 10x.
Using the optical zoom
1
Set the mode dial to
and turn the camera on.
“Power on/off” (P.31)
2
Turn the zoom lever.
Mode dial
Mode dial
Zoom lever
Power switch
Wide-angle: Turn the zoom lever
toward W to zoom out.
Telephoto: Turn the zoom lever
toward T to zoom in.
Page 52
51
Zoom
2
Shooting and playback basics
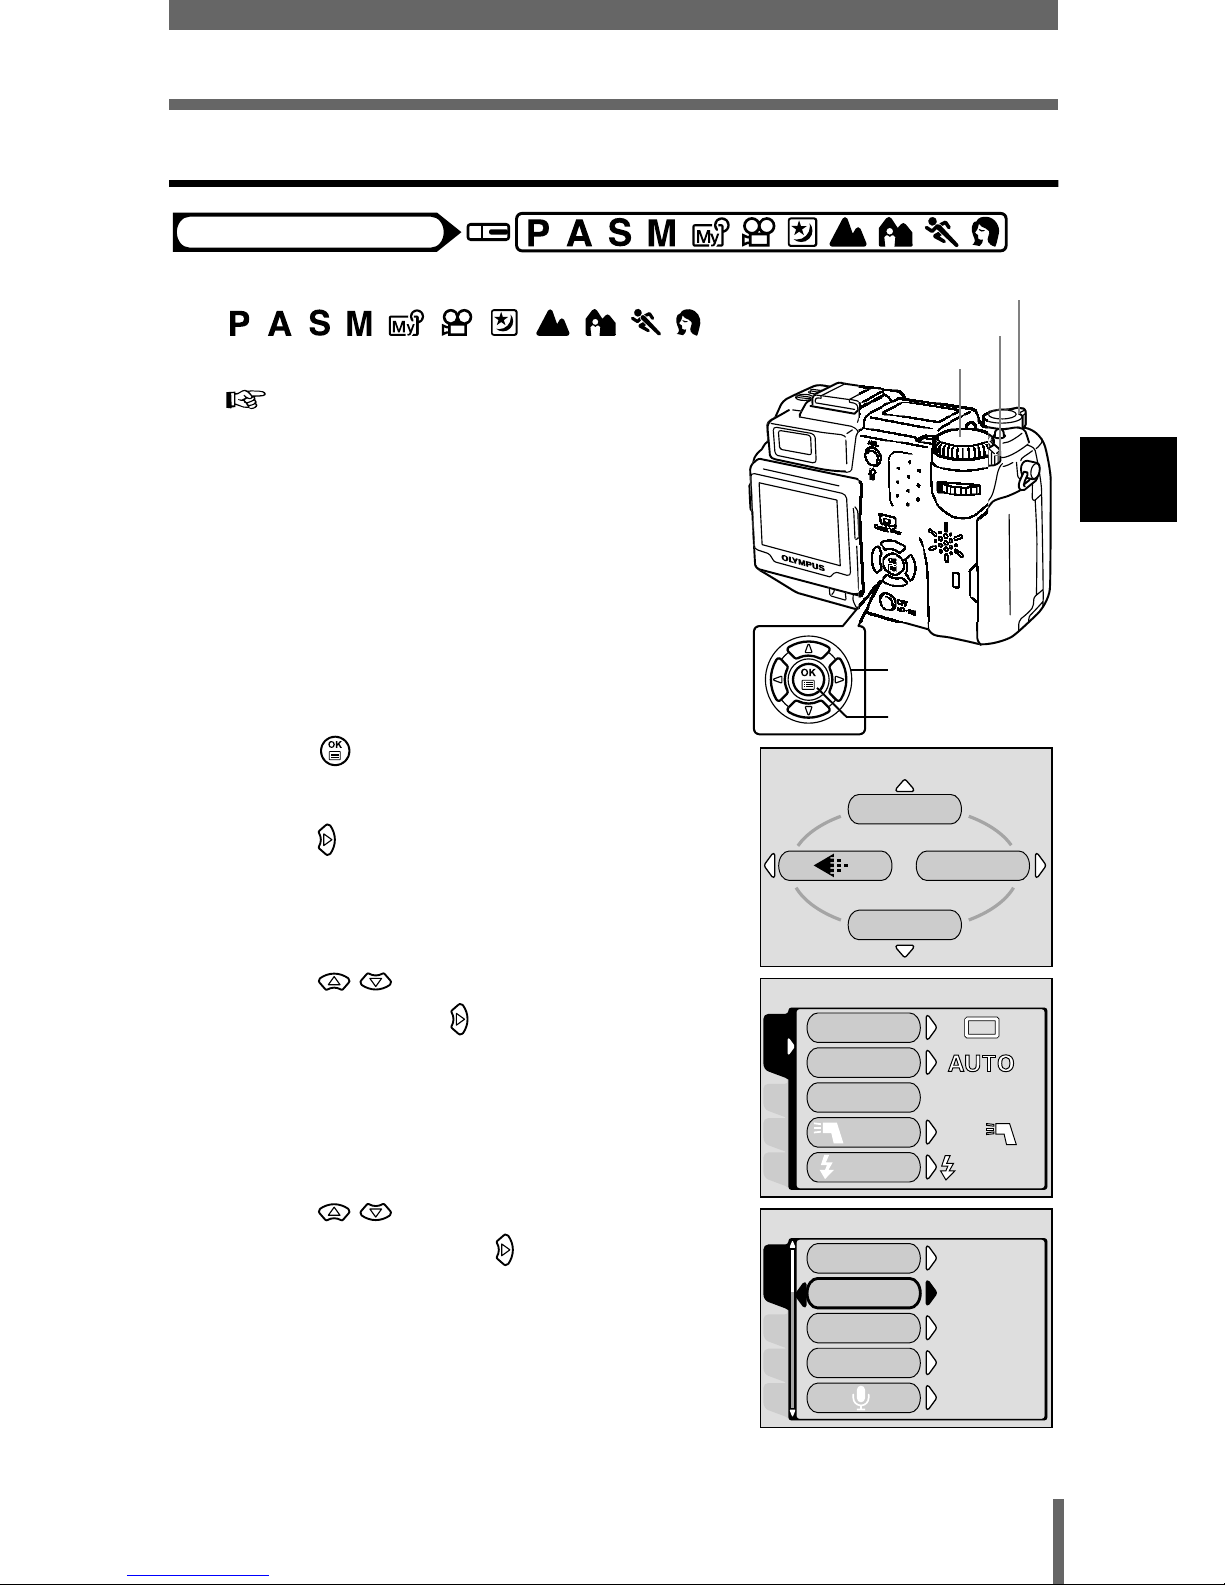
Using the digital zoom
1
Set the mode dial to
and turn the camera on.
“Power on/off” (P.31)
2
Press .
• The top menu is displayed.
3
Press to select MODE MENU.
4
Press to select the CAMERA
tab, then press .
5
Press to select DIGITAL
ZOOM, then press .
Mode dial
Arrow pad
OK button
Zoom lever
Power switch
Mode dial
WB
DRIVE
MODE MENU
CARDSEt PIC
CAMERA
DRIVE
ISO
MY MODE
FLASH
IN+
IN+
SLOW
SLOW1
SLOW1
CARDSEt PIC
CAMERA
NOISE REDUCtION
DIGItAL ZOOM
FULLtIME AF
AF MODE
iESP
iESP
OFF
OFF
OFF
OFF
OFF
OFF
OFF
OFF
Page 53
52
Zoom
2
Shooting and playback basics
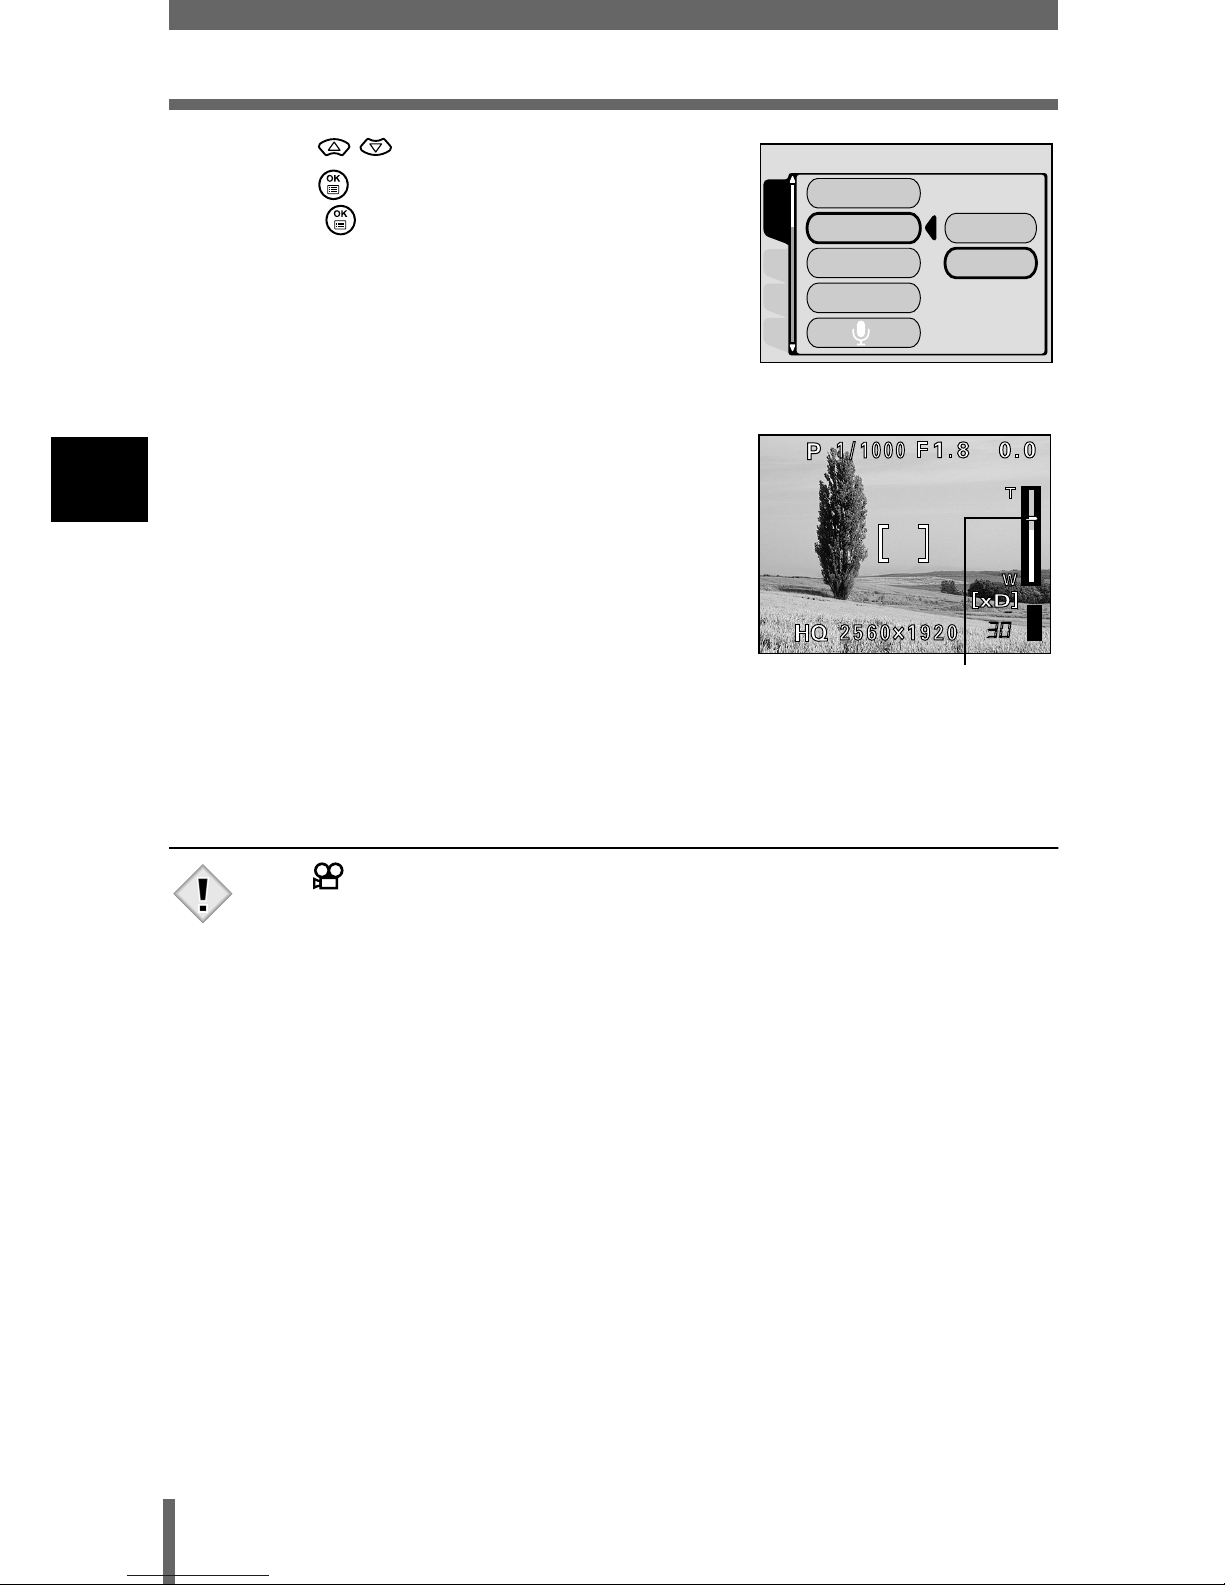
6
Press to select ON, then
press .
• Press again to exit the menu and the
subject is displayed on the monitor.
7
Turn the zoom lever toward T.
• The white area of the zoom indicator
indicates the optical zoom. If the digital
zoom is set to ON, a red area appears on
the zoom indicator. When you reach the
limit of the optical zoom, the digital zoom is
enabled.
• In mode, the maximum digital zoom magnification is 2.5x.
• Pictures taken with the digital zoom may appear grainy.
• Camera movement is likely to occur at higher magnifications.
Stabilize the camera with a tripod, etc. to avoid camera movement.
• Turning the monitor off cancels the digital zoom. However, if the
digital zoom is set to ON, it will be automatically enabled the next
time you turn the monitor on.
CARDSEt PIC
CAMERA
NOISE REDUCtION
DIGItAL ZOOM
FULLtIME AF
AF MODE
OFF
ON
The cursor moves up and down on
the zoom indicator according to the
zoom magnification.
The cursor turns orange when
inside the digital zoom field.
Note
Page 54
53
2
Shooting and playback basics
Viewing still pictures
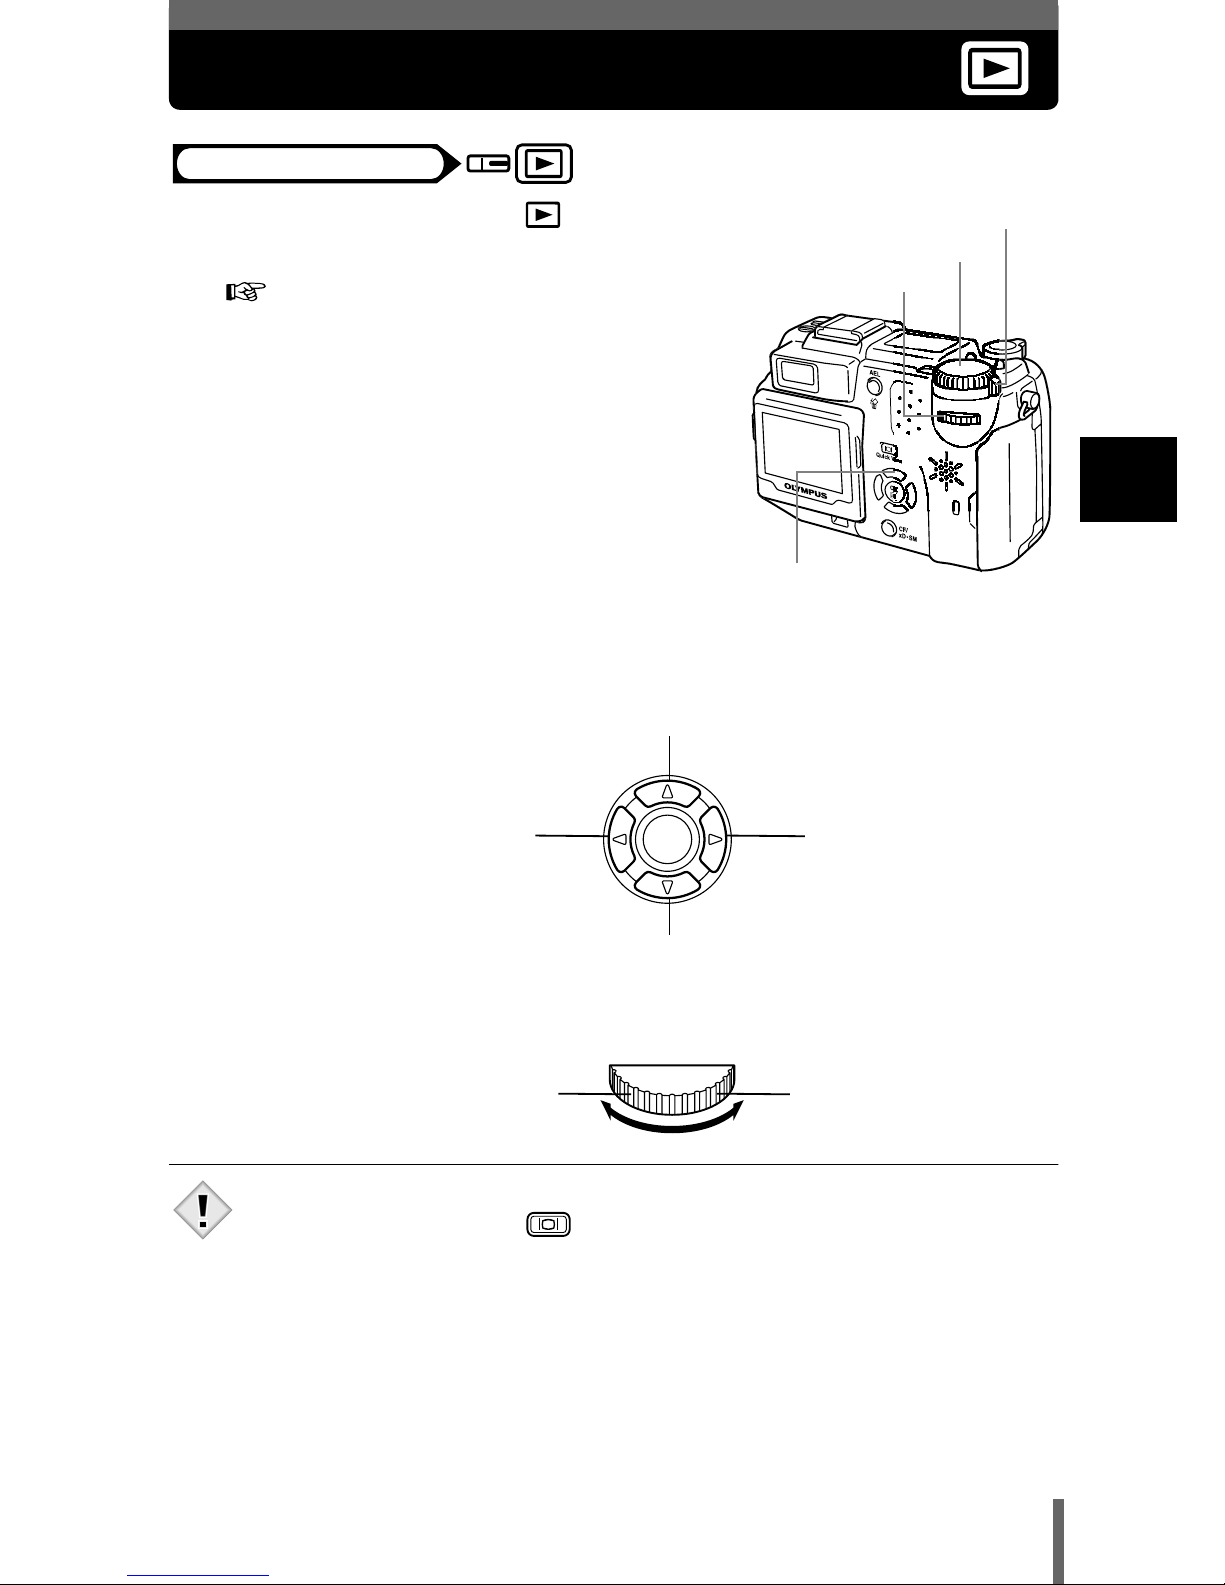
1
Set the mode dial to and turn
the camera on.
“Power on/off” (P.31)
• The monitor turns on and displays the last
picture taken. (Single-frame playback)
2
Use the arrow pad or jog dial to play back other pictures.
• Arrow pad
• Jog dial
• If the camera is not used for over 3 minutes, the monitor turns off
automatically. Press or any button to turn the monitor on.
Mode dial
Mode dial
Power switch
Jog dial
Arrow pad
Displays the next
picture.
Displays the previous
picture.
Jumps to the picture 10 frames back.
Jumps to the picture 10 frames ahead.
Displays the next
picture.
Displays the previous
picture.
Note
Page 55
54
Viewing still pictures
2
Shooting and playback basics
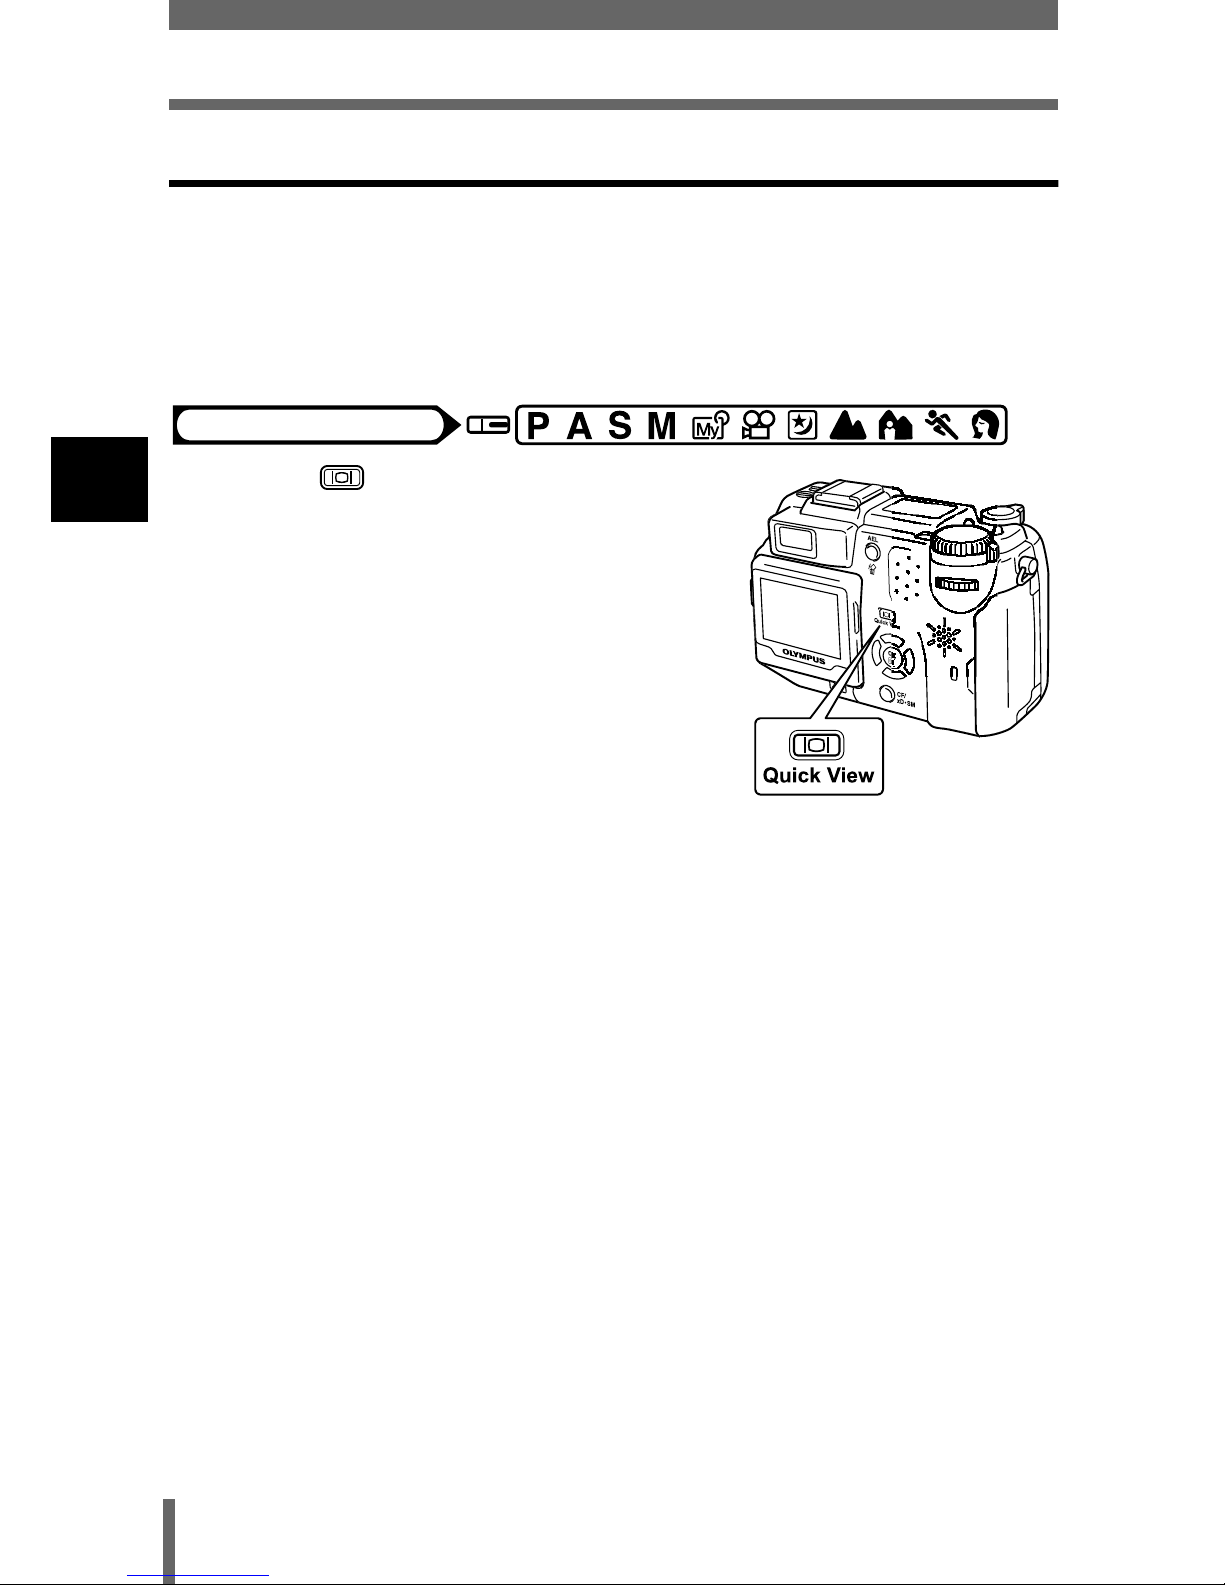
Quick View
This function lets you play back pictures while the camera is in the shooting
mode. This is useful when you want to check shooting results and resume
shooting quickly.
Functions available in normal playback mode are also available in Quick
View.
1
Press twice quickly (doubleclick) while in the shooting mode.
• The camera immediately enters the
playback mode and displays the last
picture taken. (Single-frame playback)
2
Press the shutter button halfway to return to the shooting
mode.
Mode dial
Page 56
55
2
Shooting and playback basics
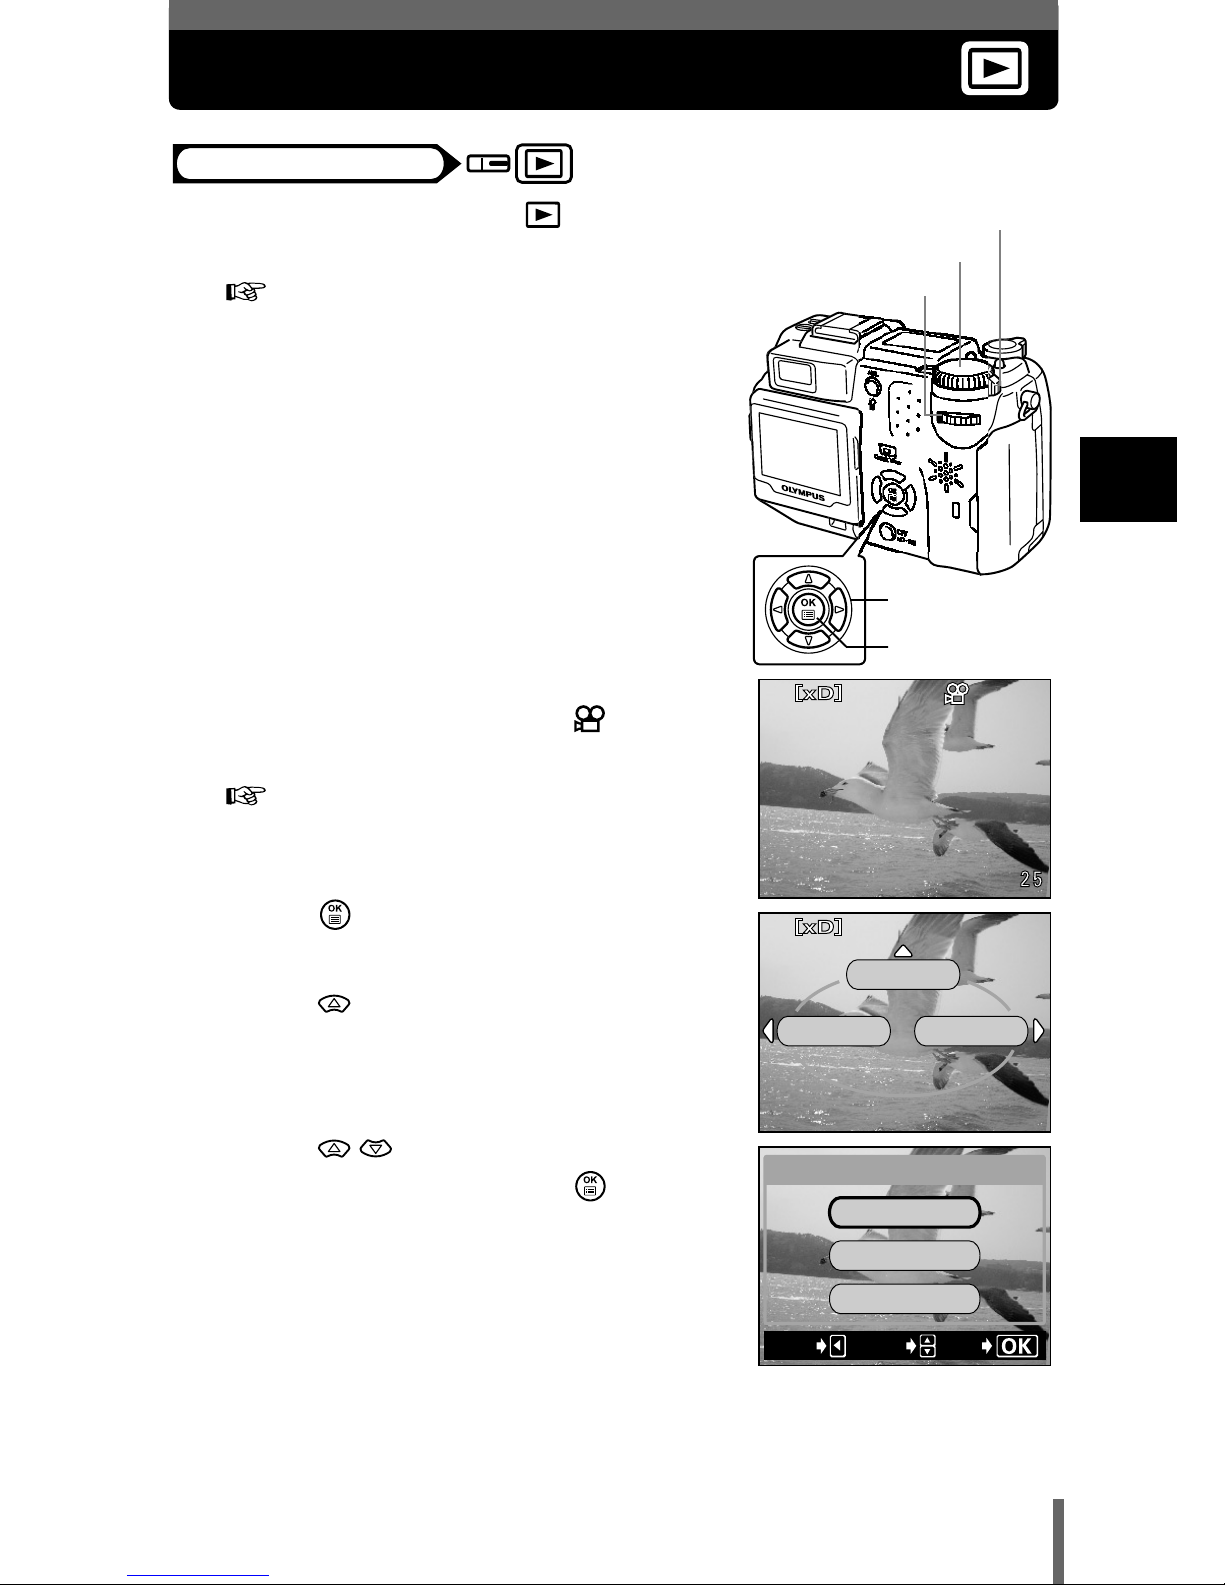
Viewing movies
1
Set the mode dial to and turn
the camera on.
“Power on/off” (P.31)
• The monitor turns on.
2
Use the arrow pad or jog dial to
display the picture with you
want to play back.
“Viewing still pictures” (P.53)
3
Press .
• The top menu is displayed.
4
Press to select MOVIE PLAY.
5
Press to select MOVIE
PLAYBACK, then press .
• The movie is played back. When playback
ends, the display automatically returns to
the beginning of the movie.
Mode dial
Arrow pad
OK button
Power switch
Mode dial
Jog dial
MOVIE PLAY
INFO
MODE MENU
CANCELGOSELECt
MOVIE PLAYBACK
MOVIE PLAY
INDEX
EDIt
Page 57
56
Viewing movies
2
Shooting and playback basics
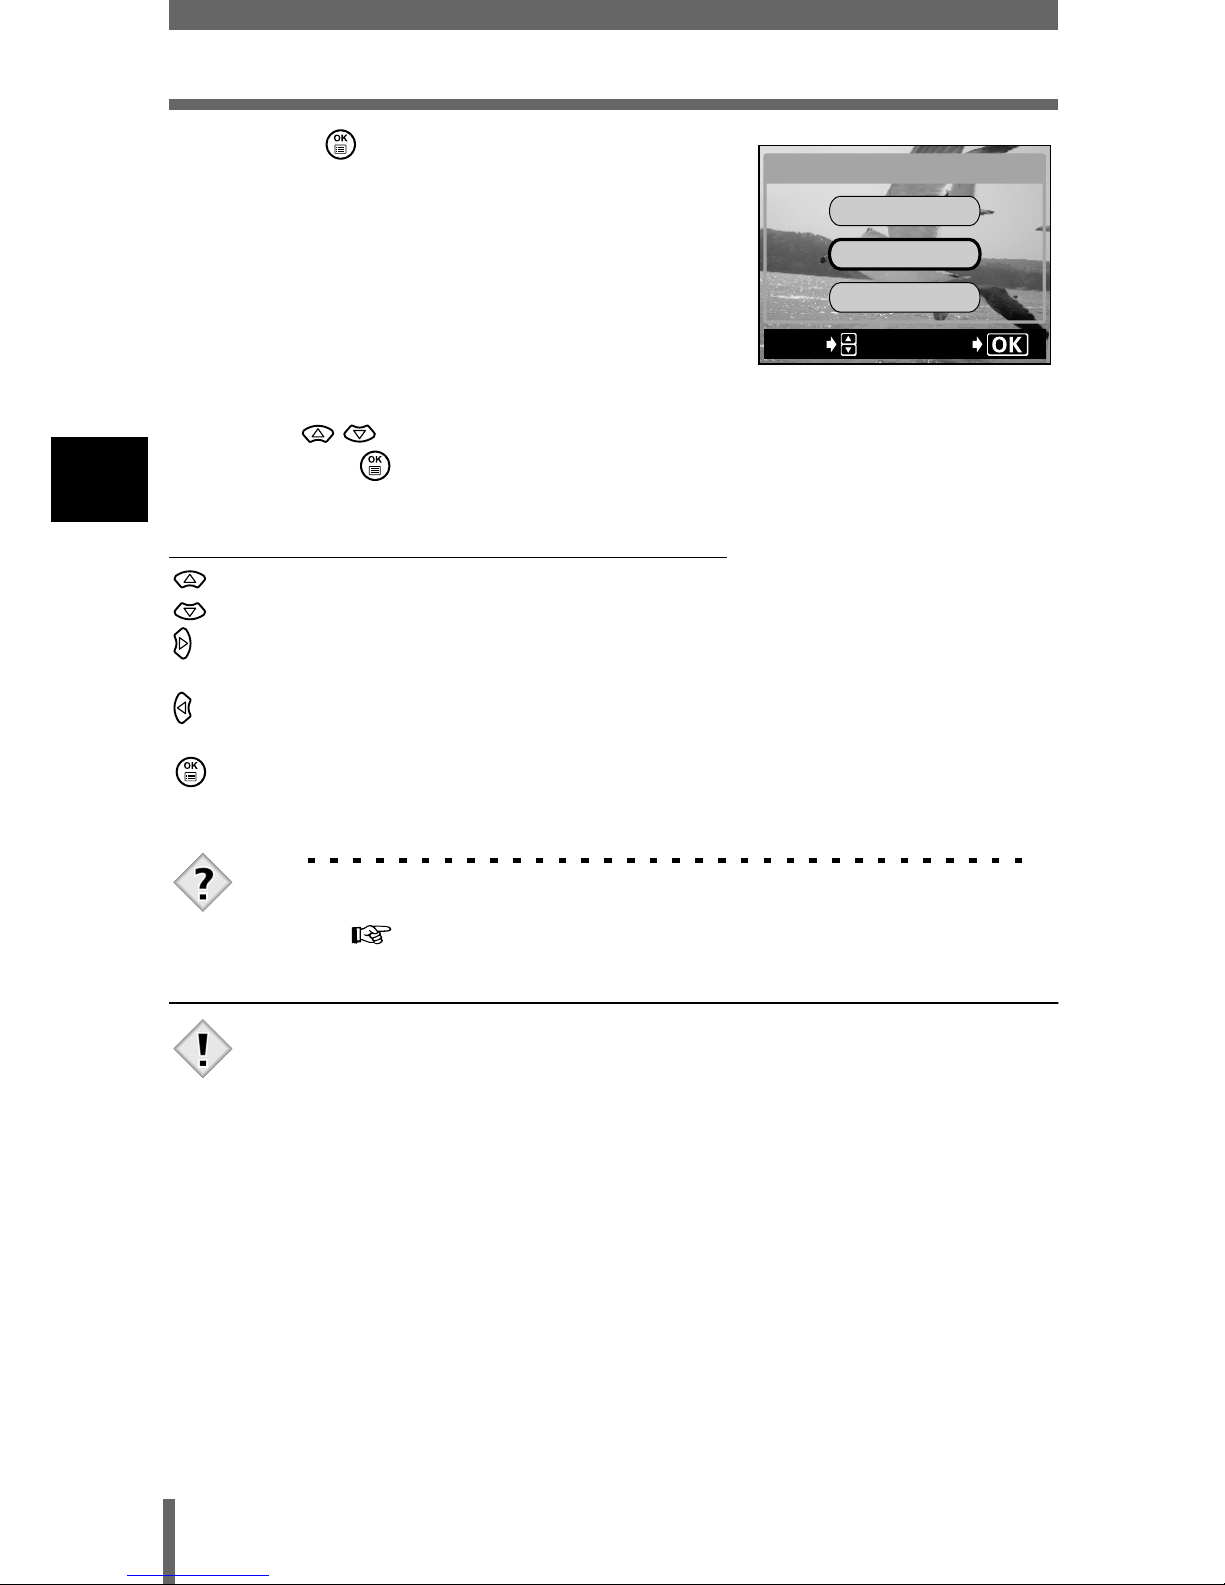
• Press again after playback ends to
display the menu.
PLAYBACK : Plays back the entire
movie again.
FRAME BY FRAME :
Plays back the movie
manually one frame at a
time.
EXIT : Leaves the movie playback mode.
Press to select from PLAYBACK, FRAME BY FRAME, or EXIT,
then press .
When FRAME BY FRAME is selected
: Displays the first frame of the movie.
: Displays the last frame of the movie.
: Displays the next frame. The movie can be played continuously by
holding the button down.
: Displays the previous frame. The movie can be played continuously in
reverse by holding the button down.
: Displays the MOVIE PLAYBACK menu.
TIPS
• Movies can also be played back in the shooting mode using Quick
View. “Quick View” (P.54)
• While the card access lamp blinks, the camera is reading the movie
from the card. Reading of movies may take considerable time. Do
not open the card cover while the card access lamp is blinking, as
this may cause not only the data on the card to be damaged, but
may also render the card unusable.
FRAME%BY%FRAME
EXIt
MOVIE%PLAYBACK
PLAYBACK
SELECt
GO
Note
Page 58
57
2
Shooting and playback basics
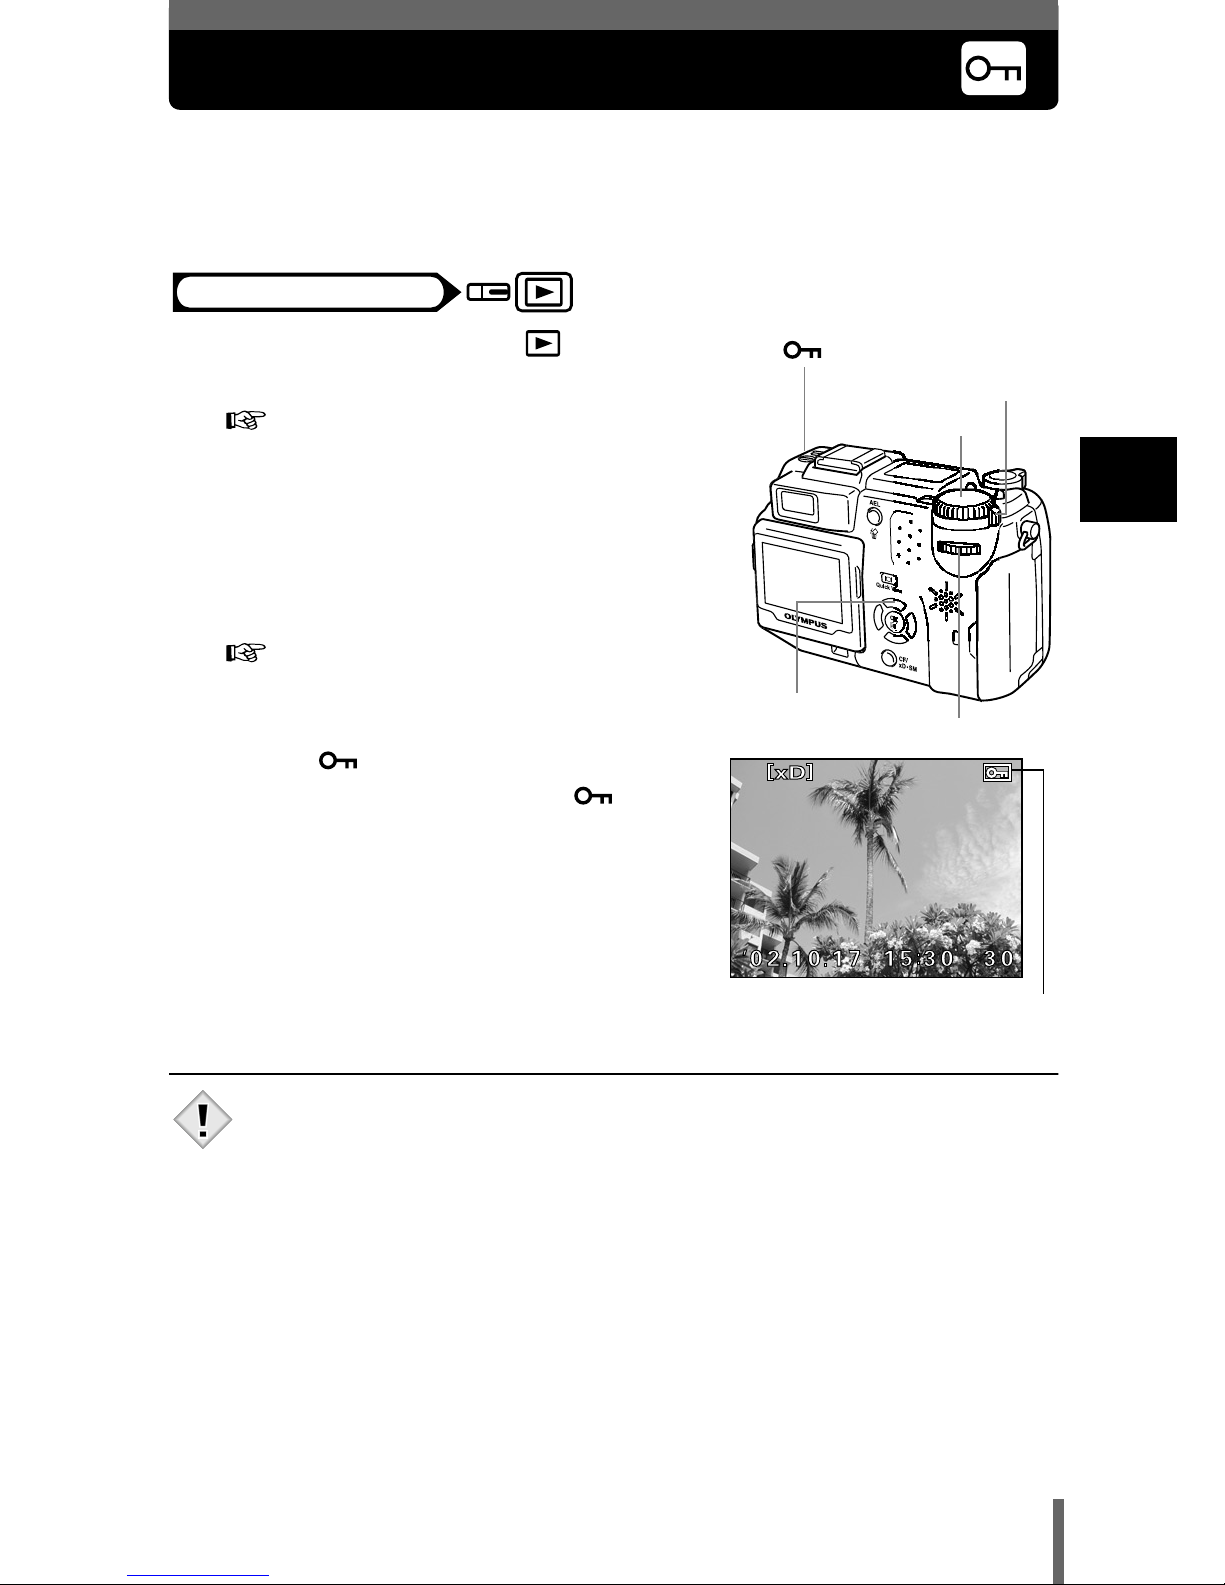
Protecting pictures
You are recommended to protect important pictures to avoid accidentally
erasing them. Protected pictures cannot be erased by the single-frame/allframe erase function.
1
Set the mode dial to and
turn the camera on.
“Power on/off” (P.31)
• The monitor turns on.
2
Use the arrow pad or jog dial to
display the picture you want to
protect.
“Viewing still pictures” (P.53)
3
Press .
• To cancel protection, press again.
• Protected pictures cannot be erased by the single-frame/all-frame
erase function, but they are all erased by formatting.
• Protection cannot be applied to pictures stored on a card
(SmartMedia) with a write-protect seal attached.
Mode dial
Protect button
Power switch
Jog dial
Arrow pad
Mode dial
Displayed when a picture is
protected.
Note
Page 59
58
2
Shooting and playback basics
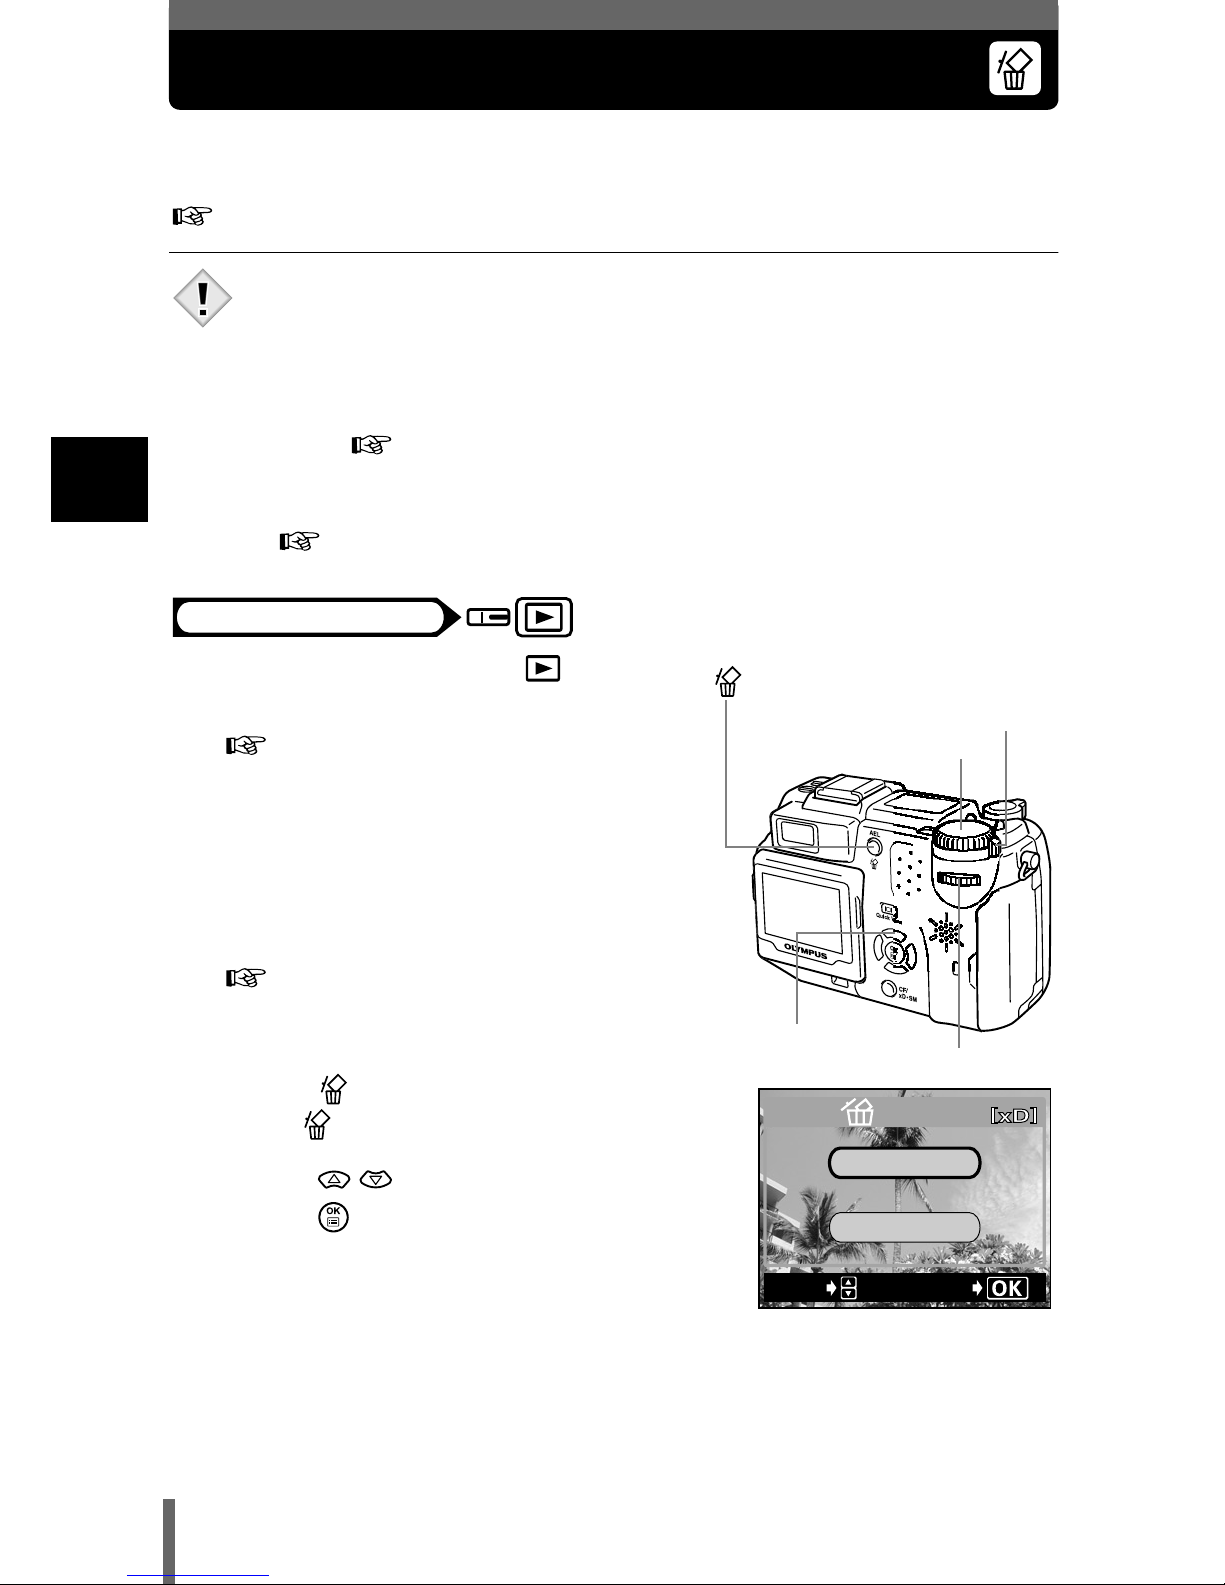
Erasing pictures (Single-frame erase)
This function erases only the picture displayed on the monitor. The all-frame
erase function can be used to erase all the pictures on the card at once.
“All-frame erase” (P.163)
• You cannot erase pictures that are protected or stored on a writeprotected SmartMedia card. Cancel protection or remove the writeprotect seal before erasing such pictures.
• Once erased, pictures cannot be restored. Check each picture
before erasing to avoid accidentally erasing pictures you want to
keep. “Protecting pictures” (P.57)
• Pictures protected (read only) by the PC are also erased. To prevent
erasure, the pictures have to be protected on the camera.
“Protecting pictures” (P.57)
1
Set the mode dial to and
turn the camera on.
“Power on/off” (P.31)
• The monitor turns on.
2
Use the arrow pad or jog dial to
display the picture you want to
erase.
“Viewing still pictures” (P.53)
3
Press .
• The ERASE screen is displayed.
4
Press to select YES, then
press .
• The picture is erased and the menu is
closed.
Note
Mode dial
Mode dial
Power switch
Jog dial
Arrow pad
Erase button
YES
NO
SELECt
GO
ERASE
Page 60
59
3
Mode dial and direct button functions
3 Mode dial and direct button functions
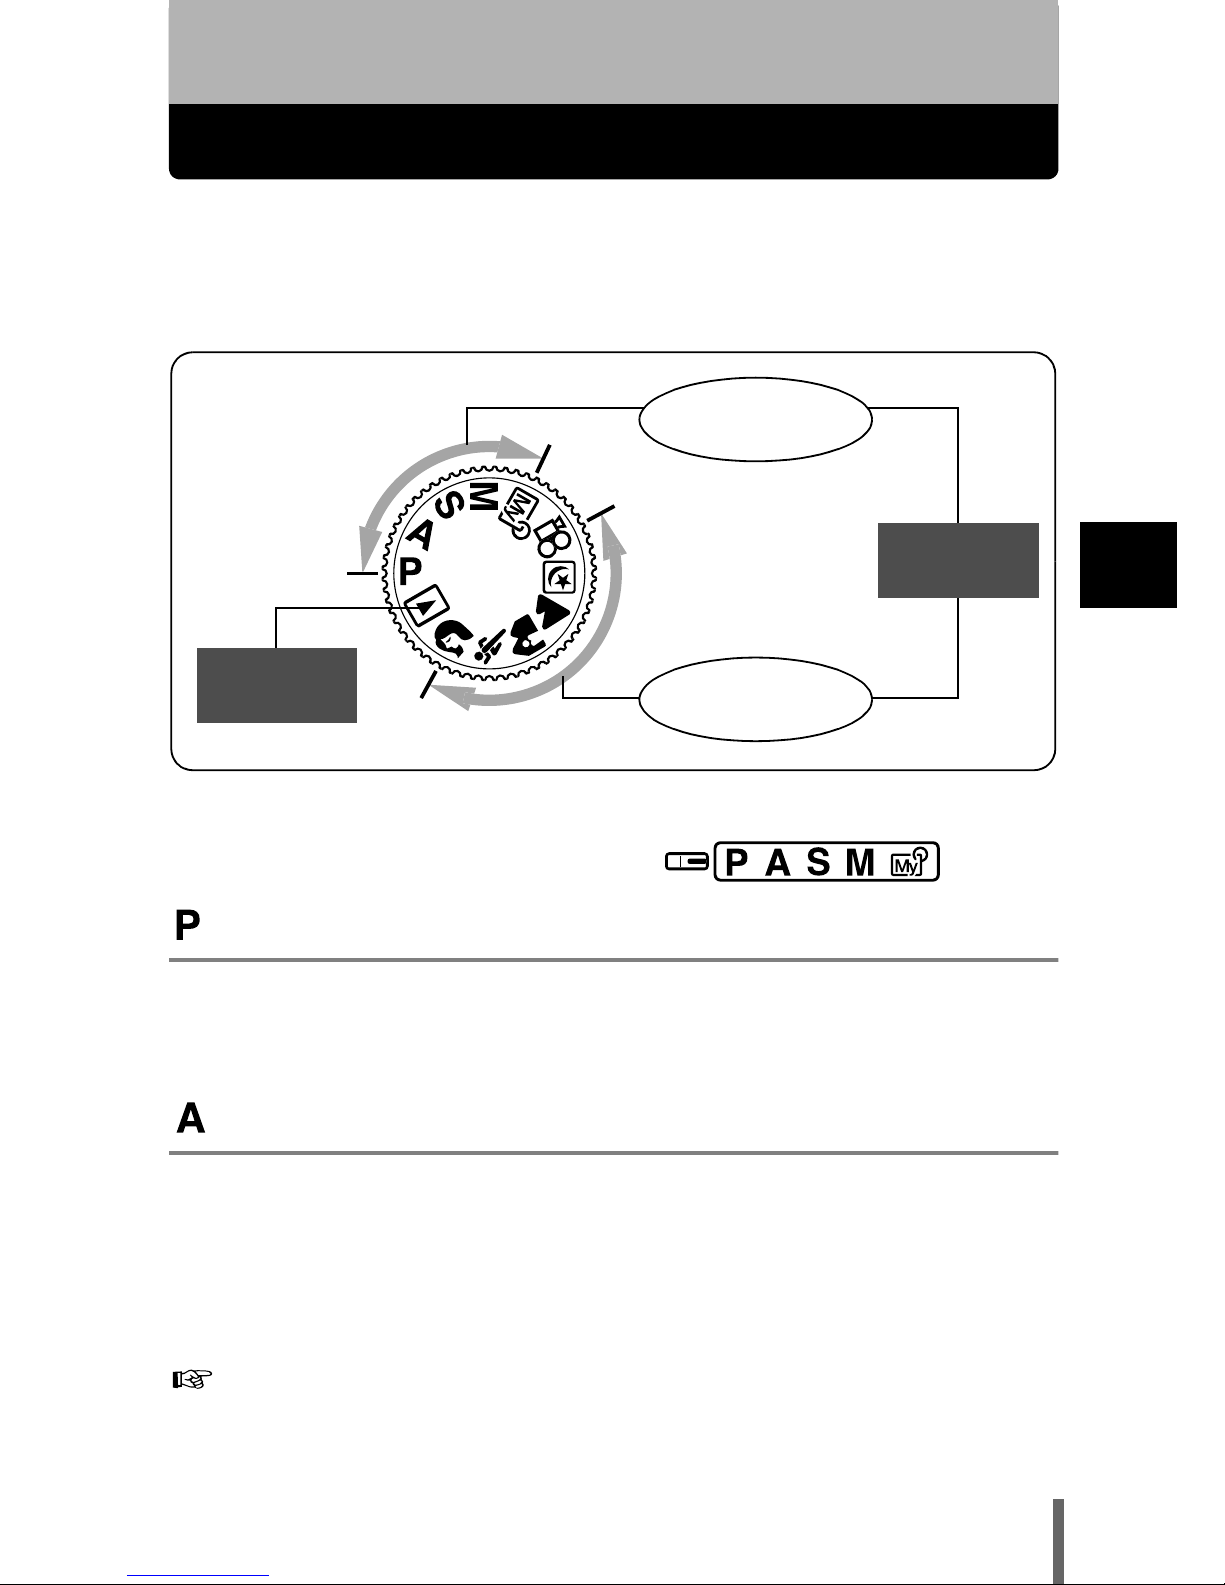
Mode dial
The mode dial is used to select a shooting or playback mode. The shooting
modes include modes where the optimal settings for the situation are
automatically selected, and modes where you can select the settings best
suited to the shooting conditions and the effect you wish to achieve.
Setting-related modes
Program shooting
Allows you to take still pictures. The camera sets the aperture and shutter
speed. Other functions, such as flash modes and drive modes, can be
adjusted manually.
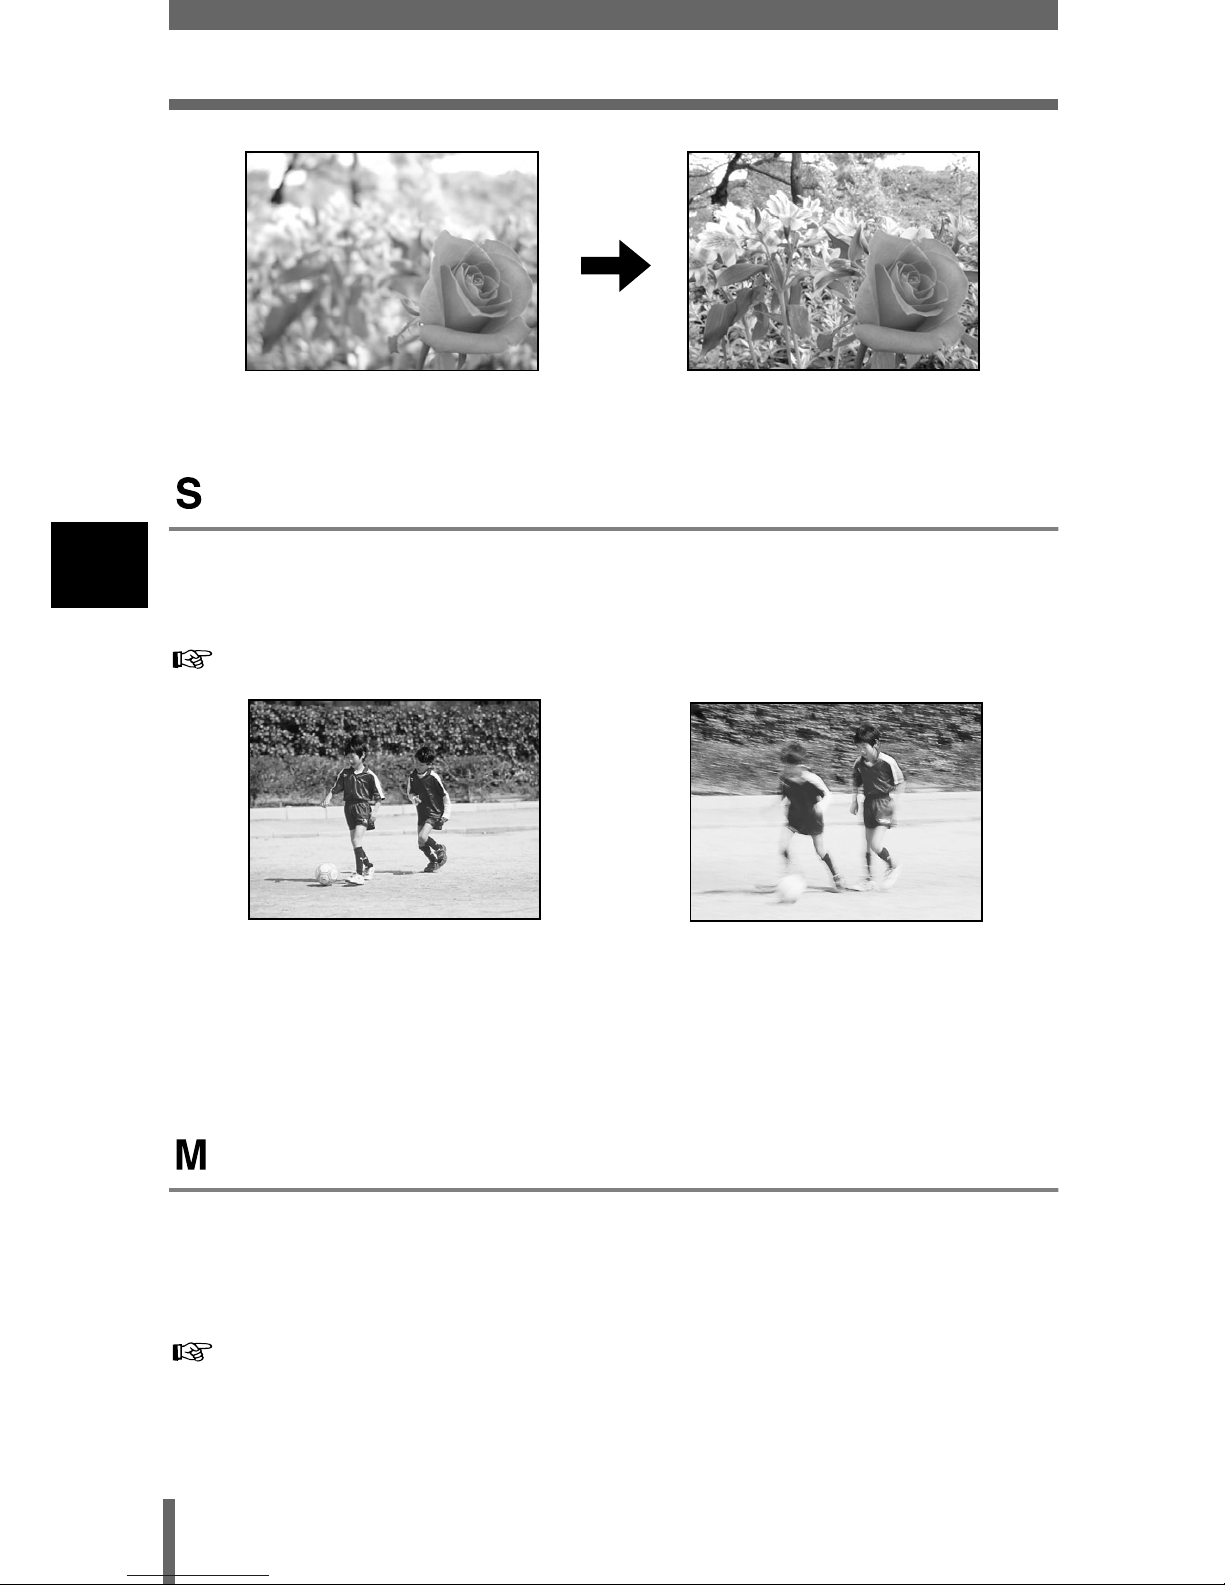
Aperture priority shooting
Allows you to set the aperture manually. The camera sets the shutter speed
automatically. By decreasing the aperture value (F-number), the camera will
focus within a smaller range, producing a picture with a blurred background.
Increasing the value forces the camera to focus over a wider range in the
forward and backward directions, resulting in a picture in which both the
subject and the background are in focus.
“Aperture priority shooting” (P.91)
Playback
mode
Setting-related
modes
Shooting
modes
Situationrelated modes
Page 61
60
Mode dial
3
Mode dial and direct button functions
Shutter priority shooting
Allows you to set the shutter speed manually. The camera sets the aperture
automatically. Set the shutter speed according to the subject and the type of
effect you want.
“Shutter priority shooting” (P.92)
Manual shooting
Allows you to set the aperture and shutter speed manually. To check the
exposure, refer to the exposure differential. This mode gives you more
creative control, allowing you to make the settings you need to get the type of
picture you want, regardless of optimum exposure.
“Manual shooting” (P.93)
Aperture (F-number) is
decreased.
Aperture (F-number) is
increased.
Setting the shutter speed
higher lets you capture fastmoving action without blur.
The subject will be clear and
sharp, as if it is not moving.
Setting the shutter speed
lower blurs a moving subject,
giving the impression of
movement.
Page 62
61
Mode dial
3
Mode dial and direct button functions
My Mode
Allows you to save your favorite settings as your own personal mode and use
these customized settings when taking pictures. Current settings can also be
saved for retrieving by this mode. “MY MODE SETUP” (P.172)
“Using My Mode” (P.95)
Situation-related modes
Movie record
Allows you to record movies. The camera sets the aperture and shutter speed
automatically. The camera maintains the correct focus and exposure even if
the distance between your subject and the camera changes (when the
FULLTIME AF is on (factory default setting)).
“Recording movies” (P.48)
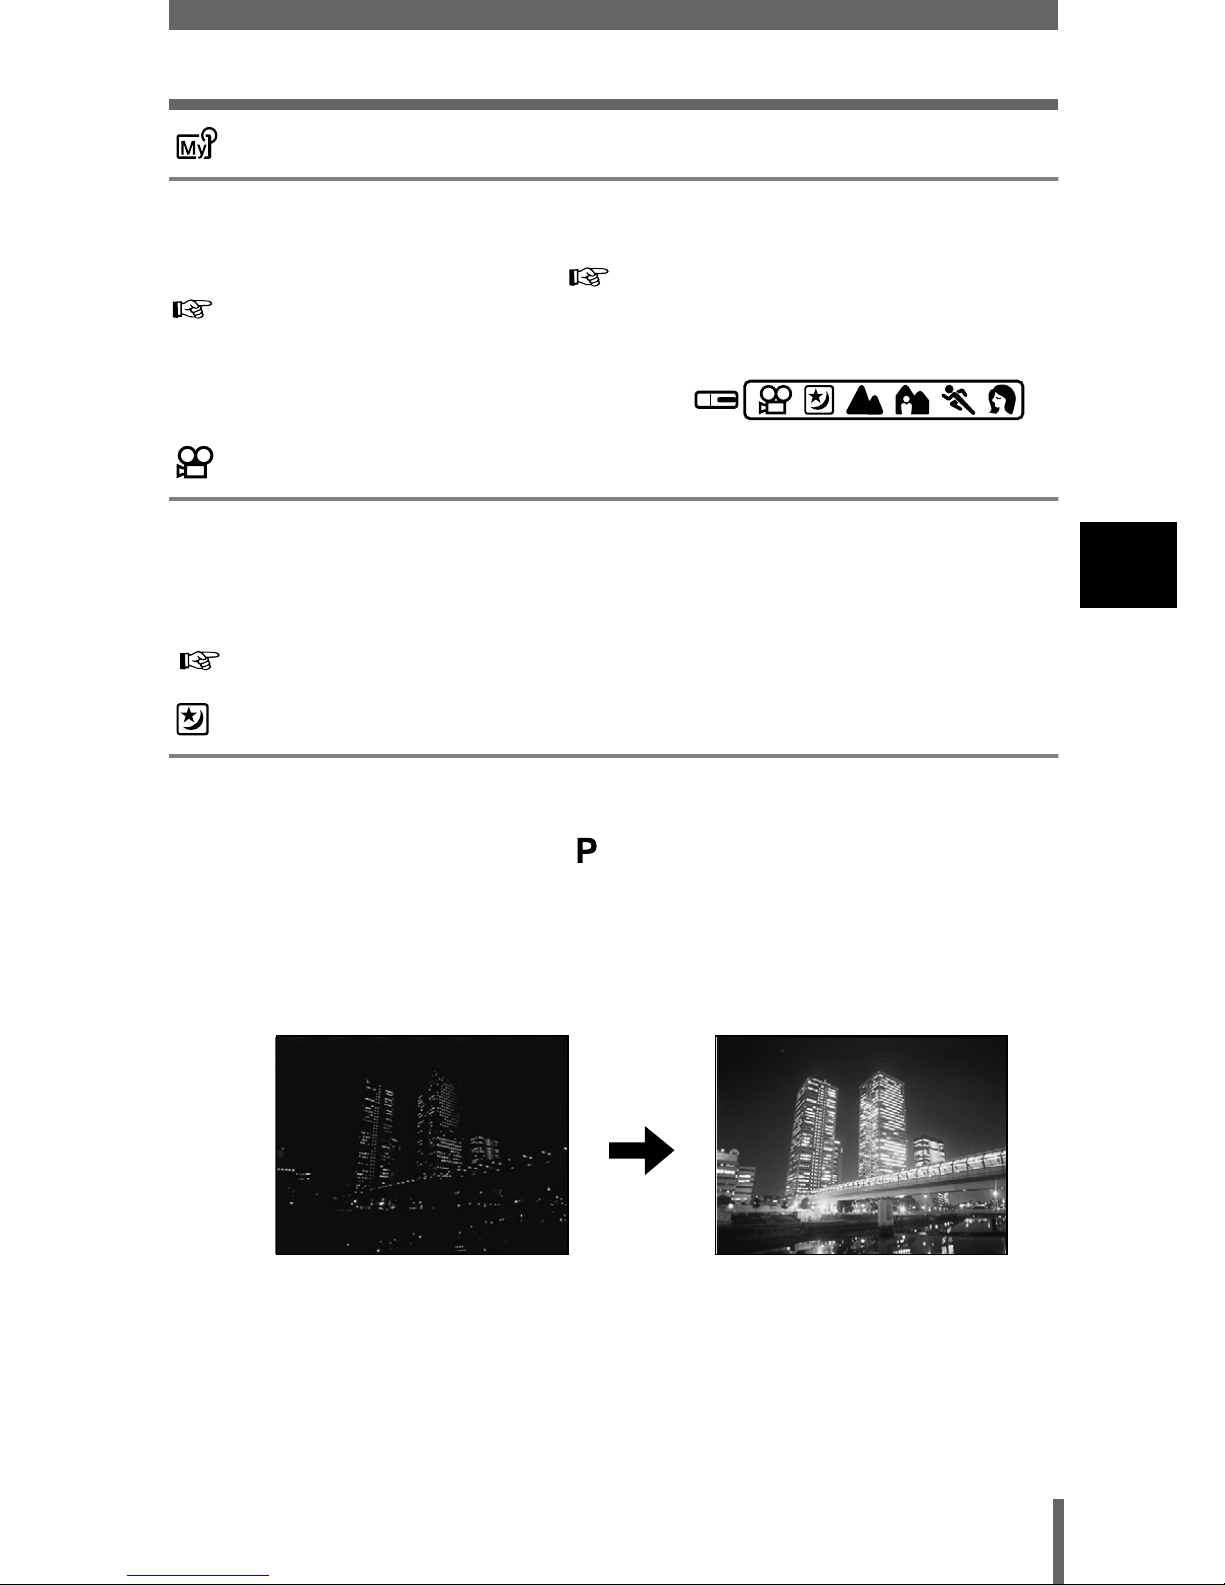
Night Scene shooting
Suitable for shooting pictures in the evening or at night. The camera sets a
slower shutter speed than is used in normal shooting. For example, if you
take a picture of a street at night in mode, the lack of brightness will result
in a dark picture with only dots of light. In the Night Scene shooting mode, the
true appearance of the street is captured. The camera automatically selects
the optimal settings for this type of shooting condition. Since the shutter
speed is slow, make sure you stabilize the camera by using a tripod.
Page 63
62
Mode dial
3
Mode dial and direct button functions
Landscape shooting
Suitable for taking pictures of landscapes and other outdoor scenes. Both the
foreground and the background are in focus. Since blues and greens are
vividly reproduced in this mode, it is excellent for shooting natural scenery.
The camera automatically sets the optimal shooting conditions.
Landscape+Portrait shooting
Suitable for taking pictures of both your subject and the background. The
picture is taken with the background as well as the subject in the foreground
in focus. You can take pictures of your subject against a beautiful sky or
landscape. The camera automatically sets the optimal shooting conditions.
Sports shooting
Suitable for capturing fast-moving action (such as sports) without blur. Even
a fast-moving subject will be clear and sharp, as if it is not moving, enabling
you to capture facial expressions and detailed activity. The camera
automatically sets the optimal shooting conditions.
Portrait shooting
Suitable for taking a portrait-style shot of a person. This mode features an infocus subject against a blurred background. The camera automatically sets
the optimal shooting conditions.
Playback mode
Allows you to play back still pictures and movies. Pictures are edited and print
reservation settings are made in this mode.
Use this mode when connecting the camera to a PC.
• The available settings vary depending on the mode. “List of
items by shooting mode” (P.221)
Note
Page 64
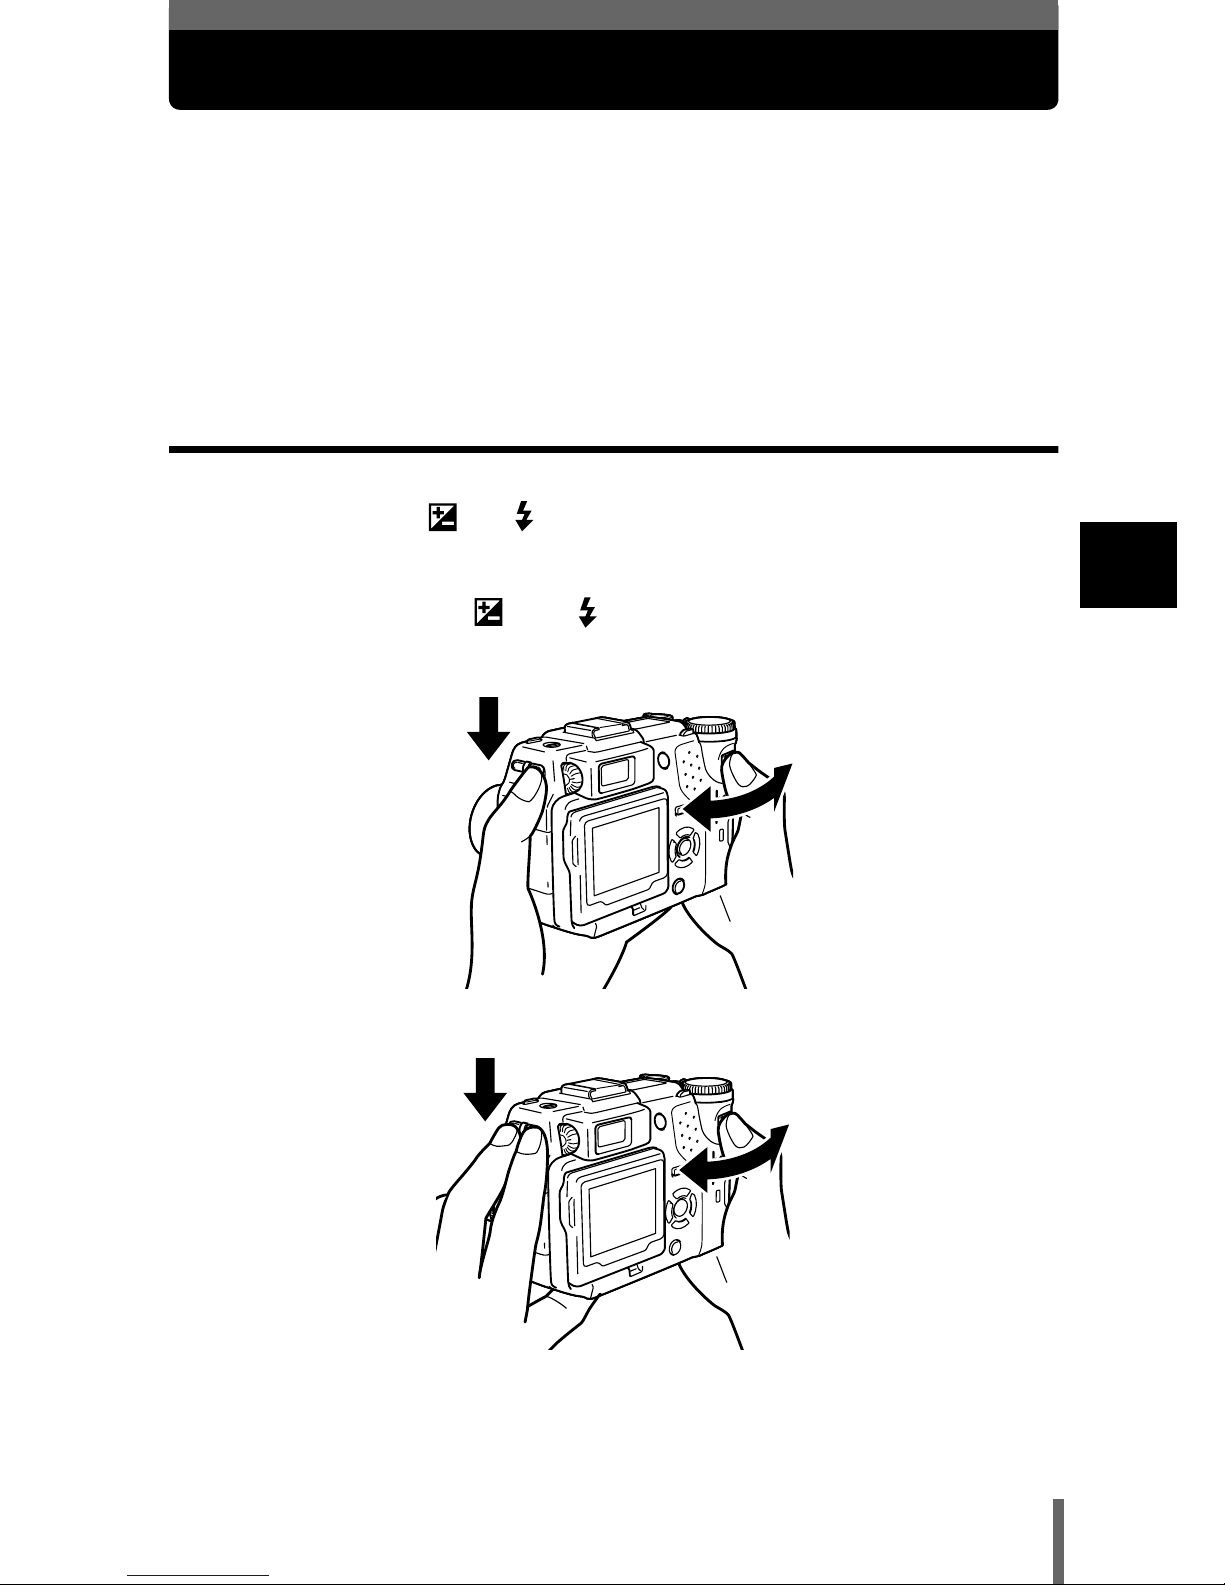
63
3
Mode dial and direct button functions
Direct Buttons
This camera is equipped with direct buttons for quick operation and setting of
various shooting and playback-related functions. The direct buttons have
different functions in the shooting mode and in the playback mode. Holding
down one or two direct buttons and turning the jog dial allows you to make
settings for each function (such as selecting menu items or changing setting
values).
Certain function settings require the direct button to be pressed repeatedly.
Direct buttons and the jog dial
You can change the function settings by turning the jog dial while pressing a
direct button such as or .
This can be achieved smoothly by pressing the direct buttons with the left or
right hand while turning the jog dial with the right thumb. The flash intensity
control is set by pressing and simultaneously while turning the jog
dial.
Pressing 2 direct buttons simultaneously
Turn the jog dial.
Keep the direct
buttons pressed.
Page 65
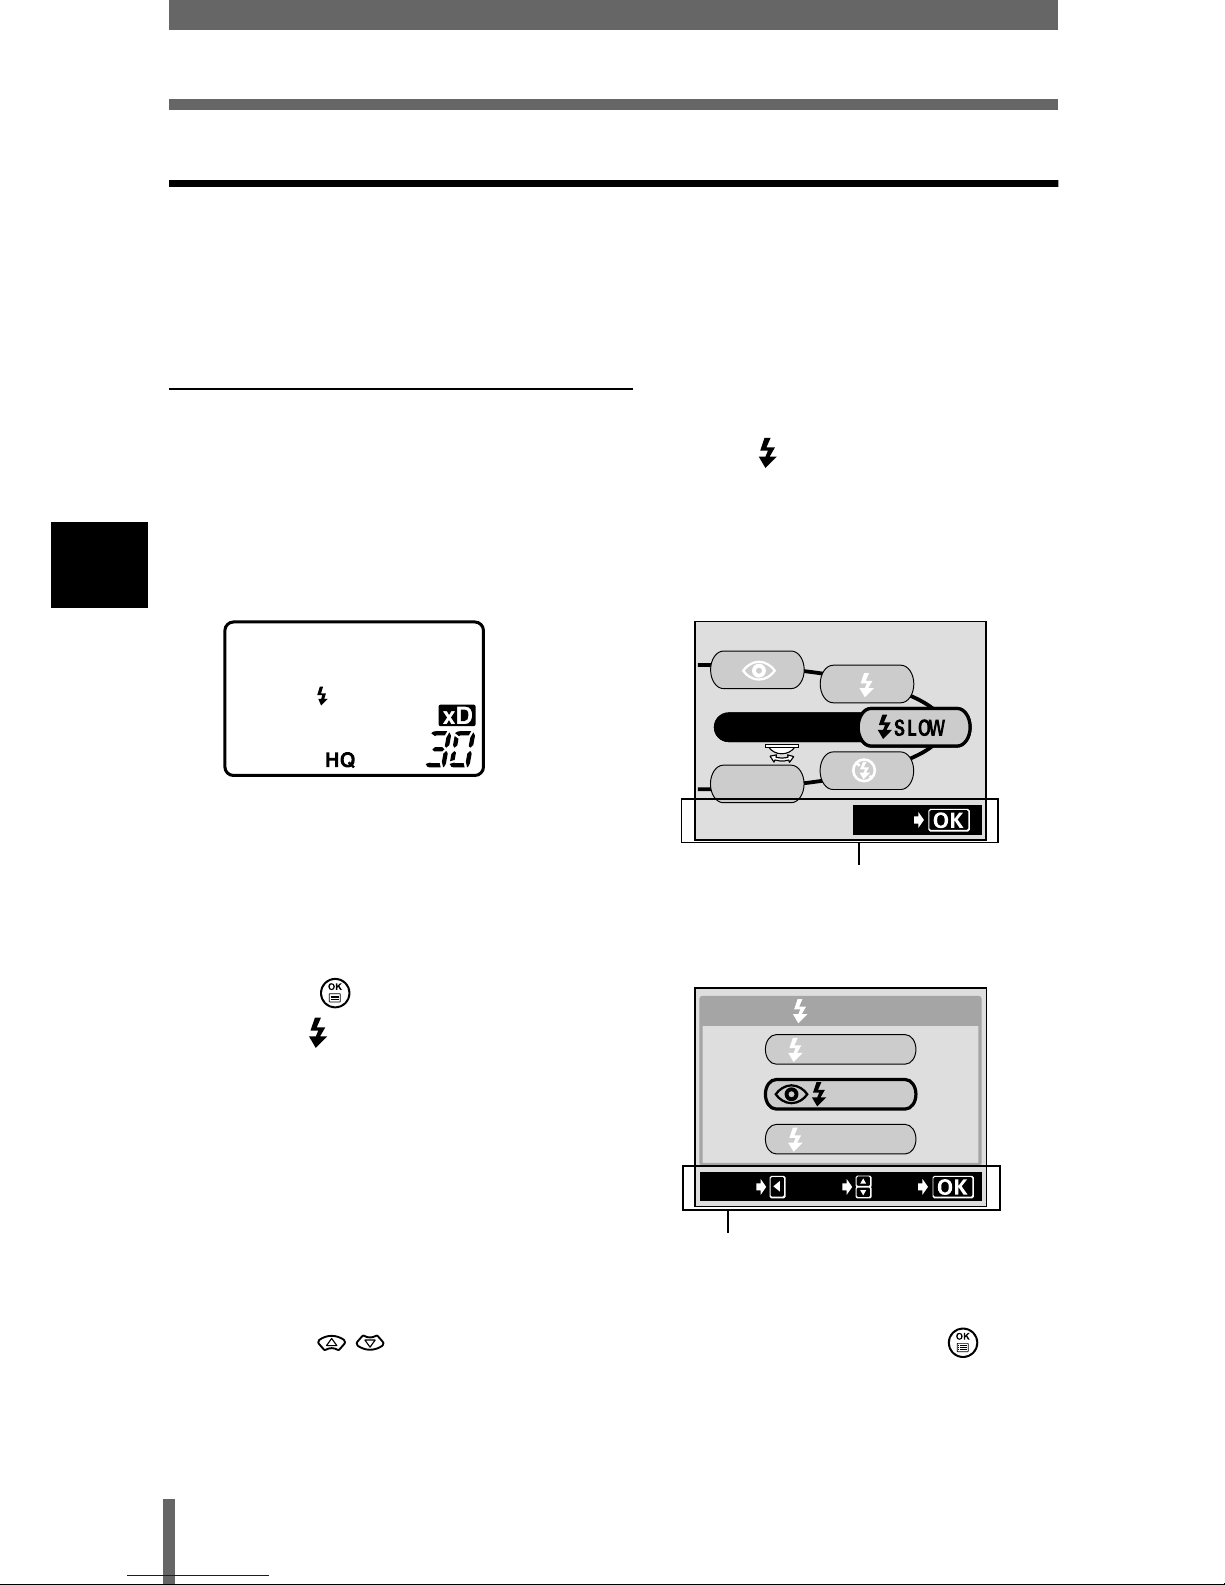
64
Direct Buttons
3
Mode dial and direct button functions
Flow of direct button operations
The procedure for making settings using the direct buttons and jog dial is
shown below. As the setting screens are displayed on the monitor when
pressing the direct button, settings can be made by following the operation
guide displayed at the bottom of the screen.
Ex: Using the flash mode button
1
Turn the jog dial while holding down to select the flash
mode.
• The monitor turns on and the setting screen is displayed.
• The setting is made at the moment you release your finger from the
direct button, and the monitor turns off.
2
Press while holding
down to display the
menu.
Release the direct
button after the menu is
displayed.
3
Press to select the desired item, then press .
FLASH MODE
AUtO
SEt
Operation guide:
Displayed when further options are
available.
GO
SELECt
SLOW
SLOW1
SLOW
SLOW2
CANCEL
Operation guide:
Possible operations are displayed.
Page 66
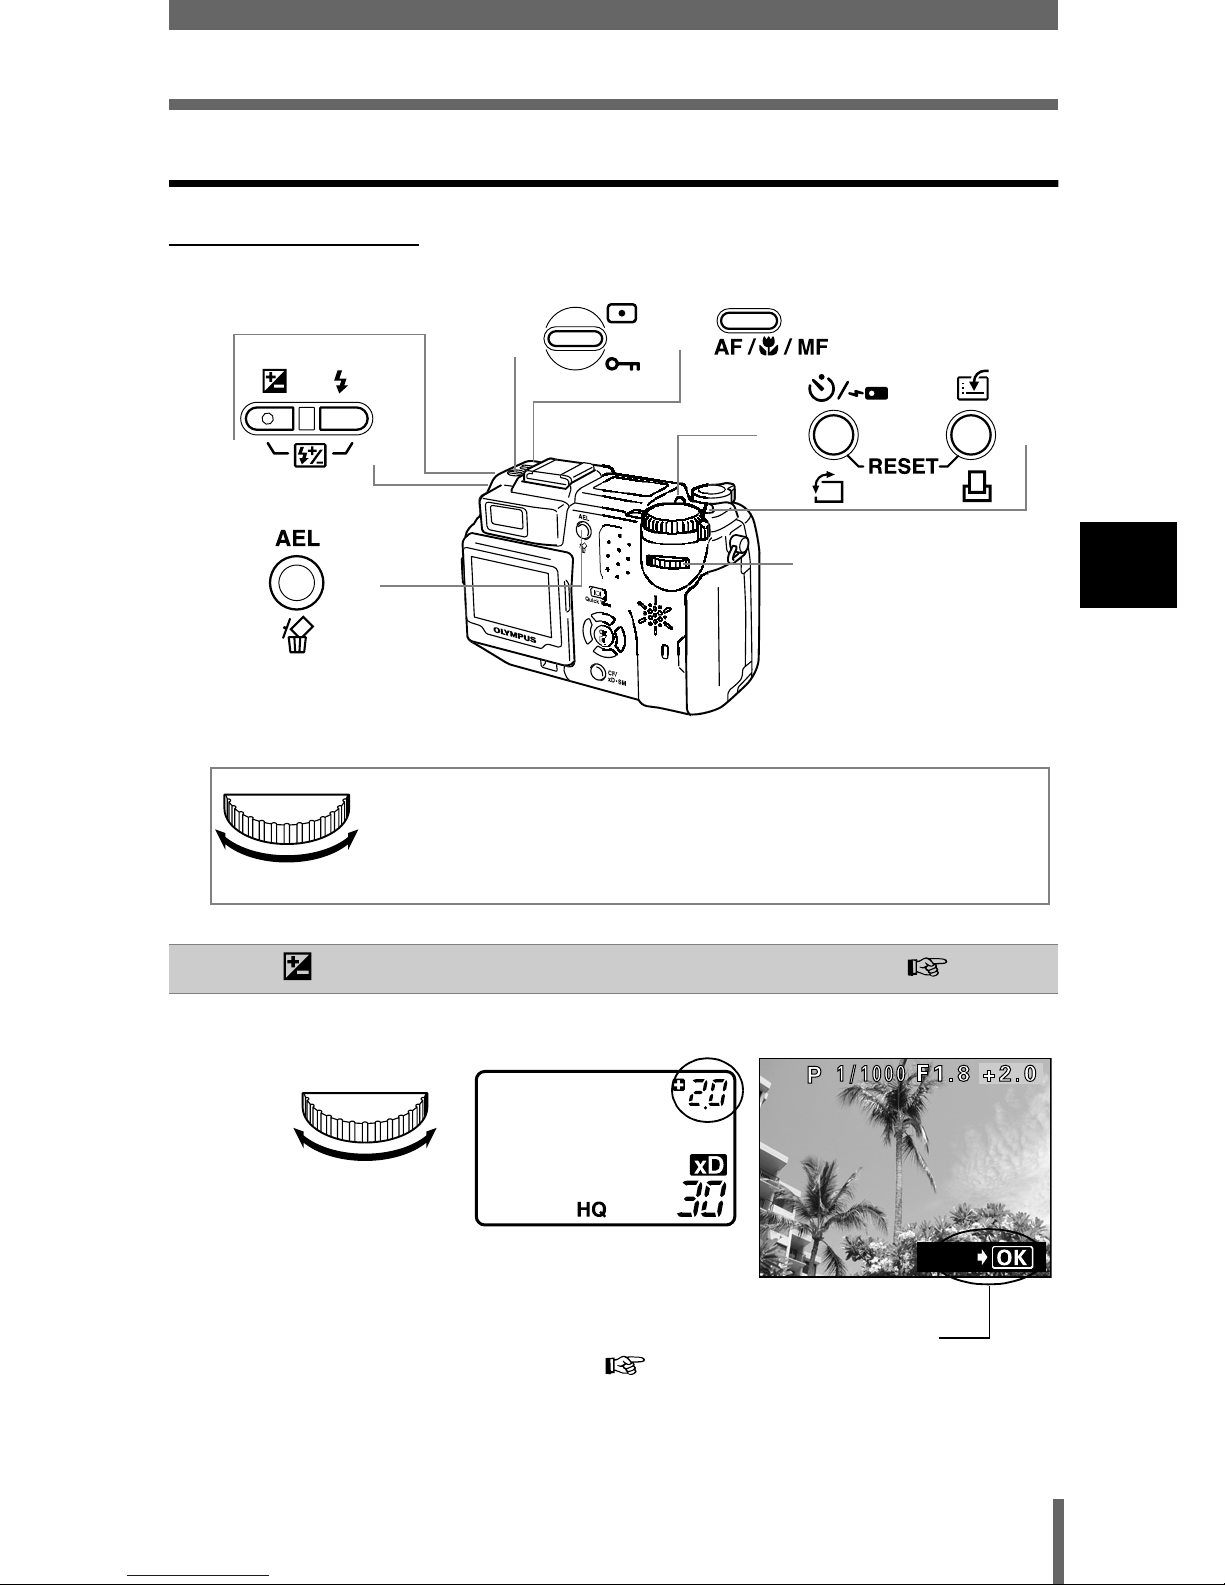
65
Direct Buttons
3
Mode dial and direct button functions
Direct button functions
Shooting mode
c
(exposure compensation) button P.131
Changes the exposure compensation value.
Jog dial
c
d
e
f
g
h
i
Jog dial
This means to turn the jog dial while holding down the
direct button to make function settings.
Jog dial
SEt
The histogram display can be set.
P.144
Page 67
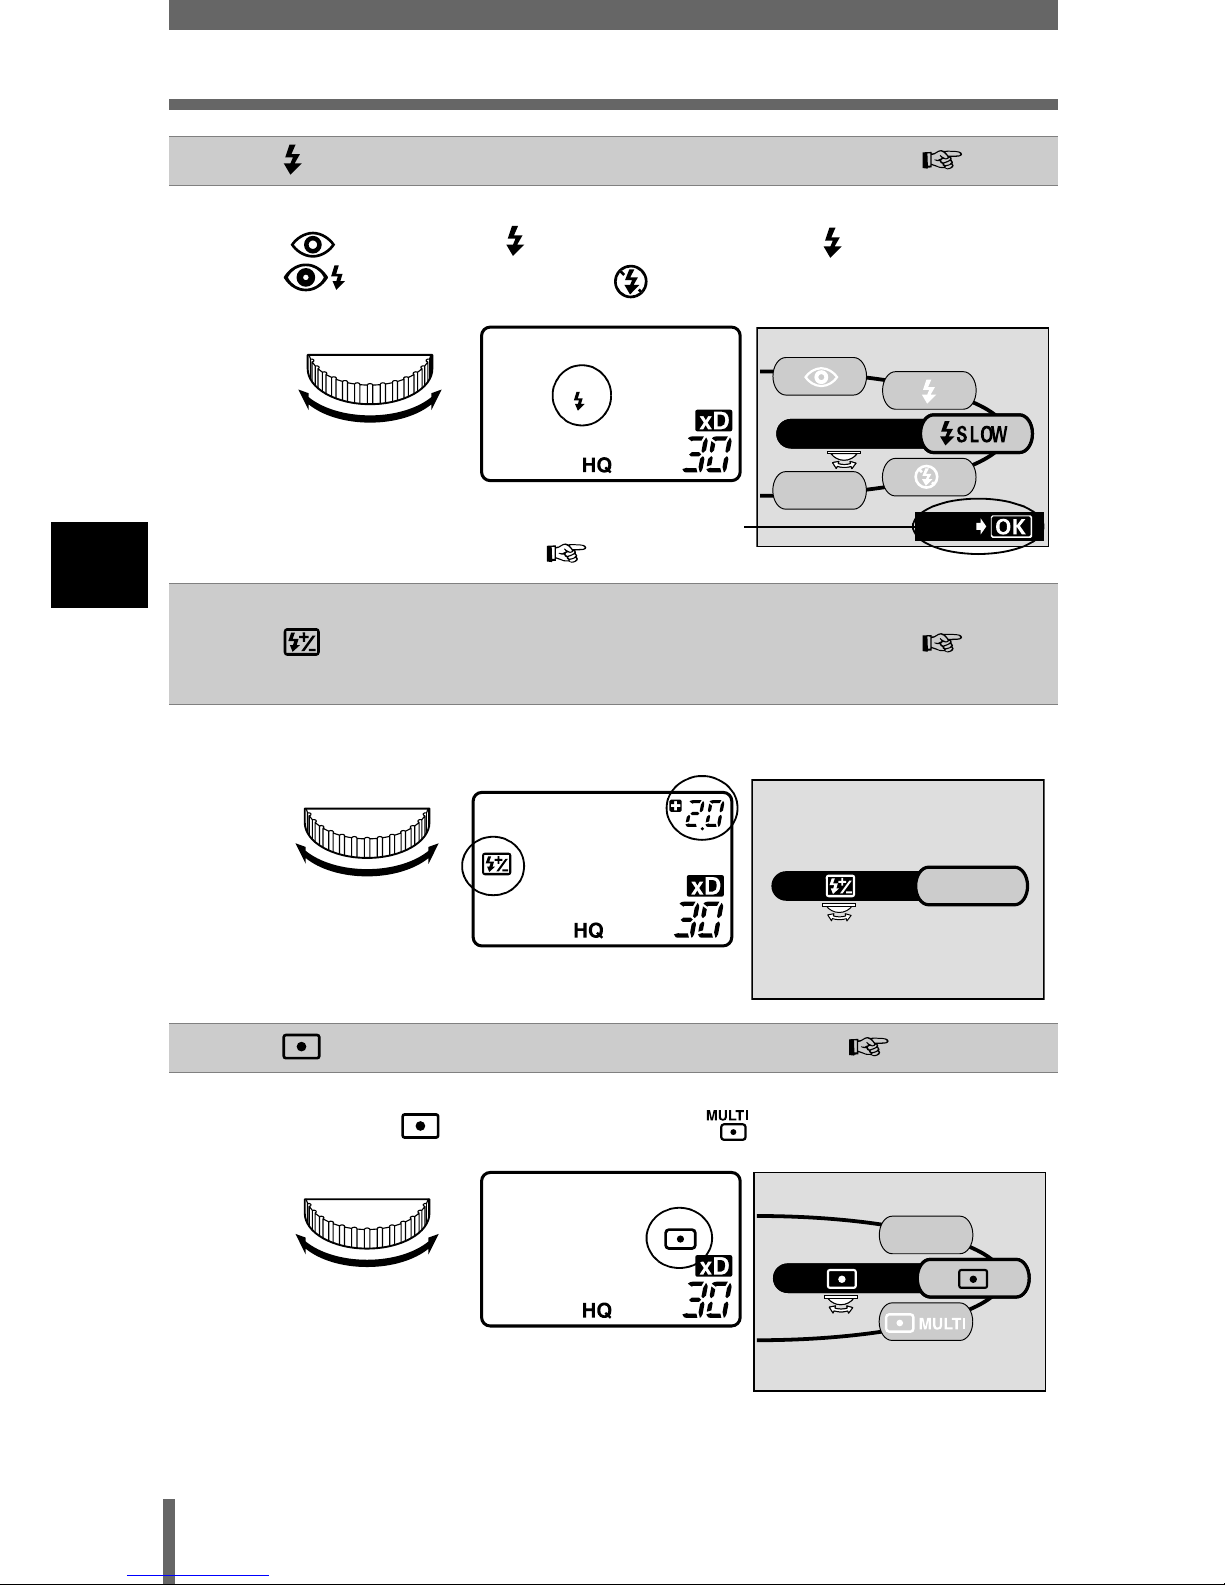
66
Direct Buttons
3
Mode dial and direct button functions
d
(flash mode) button P.79
Selects a flash mode from auto (no indication), red-eye reduction
( ), fill-in flash ( ), slow synchronization ( SLOW/
SLOW) and flash off ( ).
Jog dial
c+d
Press at
the same
time
(flash intensity control) button P.85
Adjusts the amount of light emitted by the flash.
Jog dial
e
(metering) button P.102, 103
Selects the metering method from ESP (no indication), spot
metering ( ) and multi-metering ( ).
Jog dial
FLASH MODE
AUtO
SEt
Slow synchronization can
be set.
P.84
+2.0
ESP
Page 68
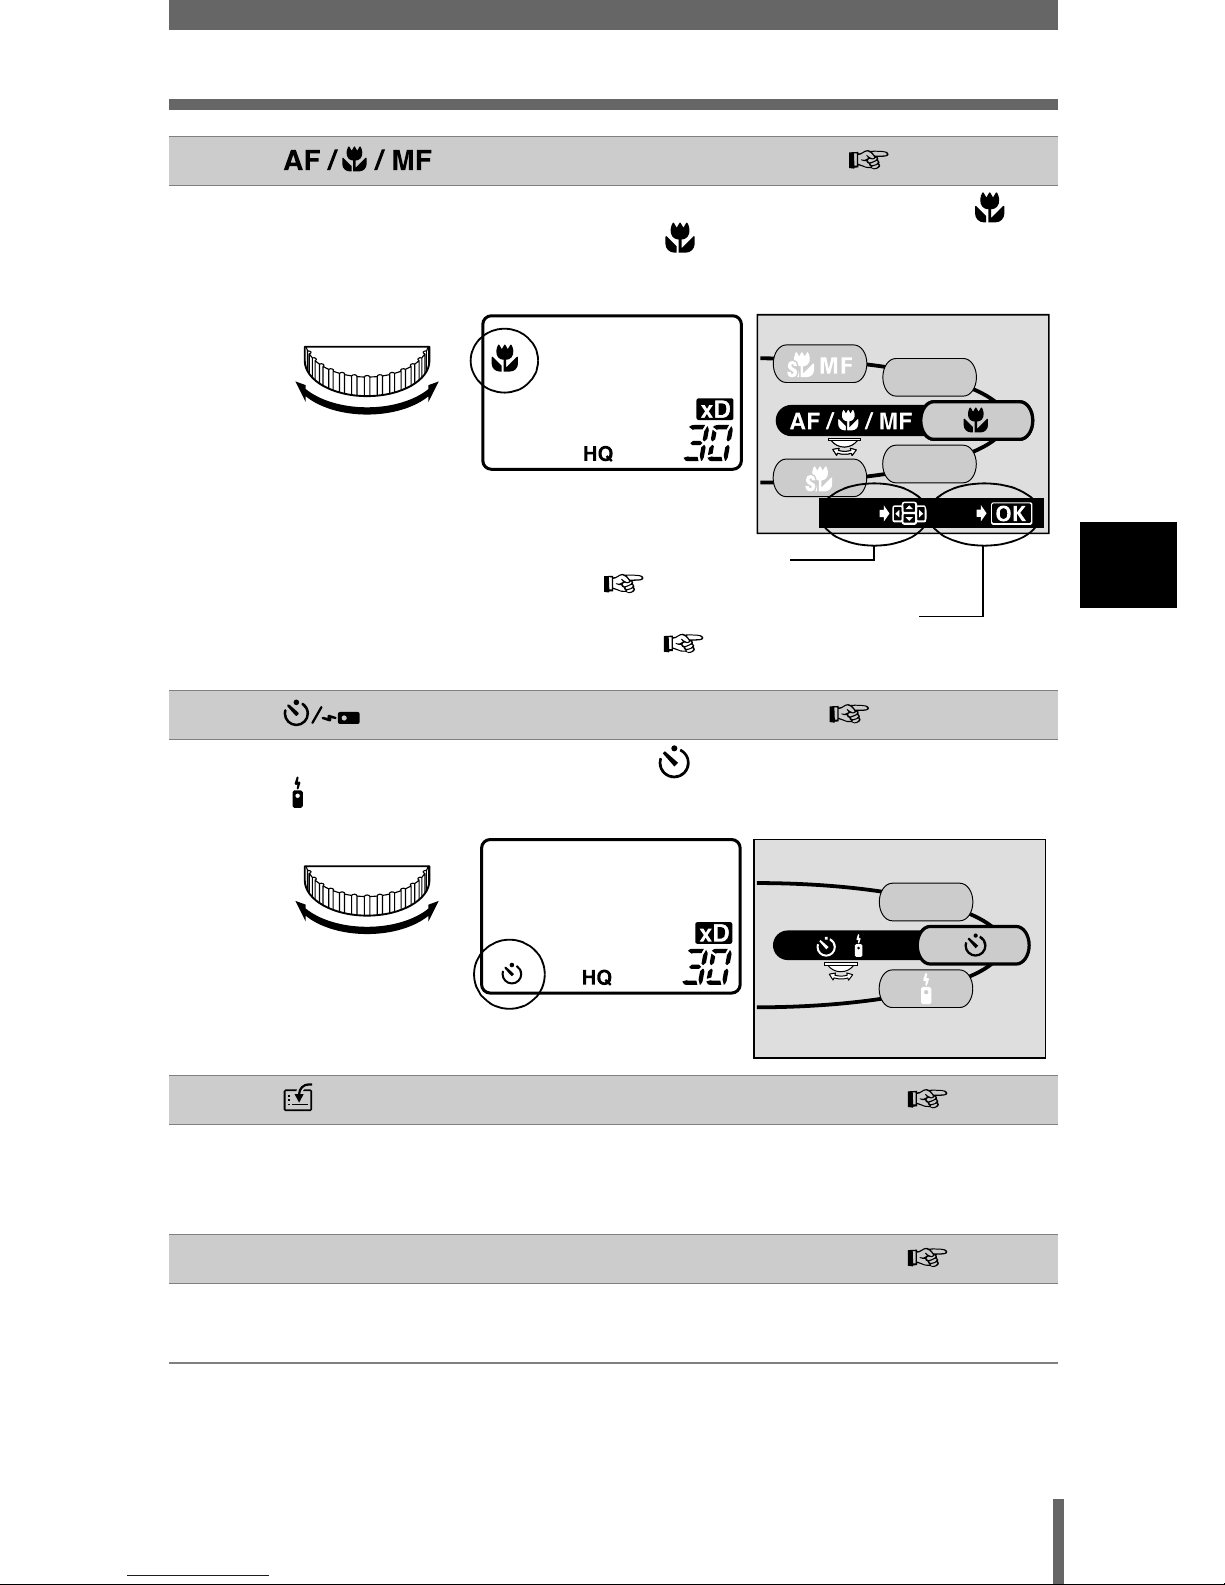
67
Direct Buttons
3
Mode dial and direct button functions
f
(AF/Macro/MF) button P.100, 107
Selects a focus mode from auto-focus (no indication), macro ( ),
manual focus (MF), super macro ( blinks) and super macro MF
(MF blinks).
Jog dial
g
(self-timer/remote control) button P.109, P.110
Enables the self-timer function ( ) or remote control function
().
Jog dial
h
(custom) button P.166
Activates the function registered on the custom button.
See “Custom button” (P.166) for details of how to register a function
and use the button.
i
AEL (AE Lock) button P.105
Fixes the exposure. The lock function is alternately activated and
canceled each time you press the button.
MF
AF
SEt
MOVE
The AF mode can be set.
P.96
The AF target mark can be
moved.
P.98
OFF
/
Page 69
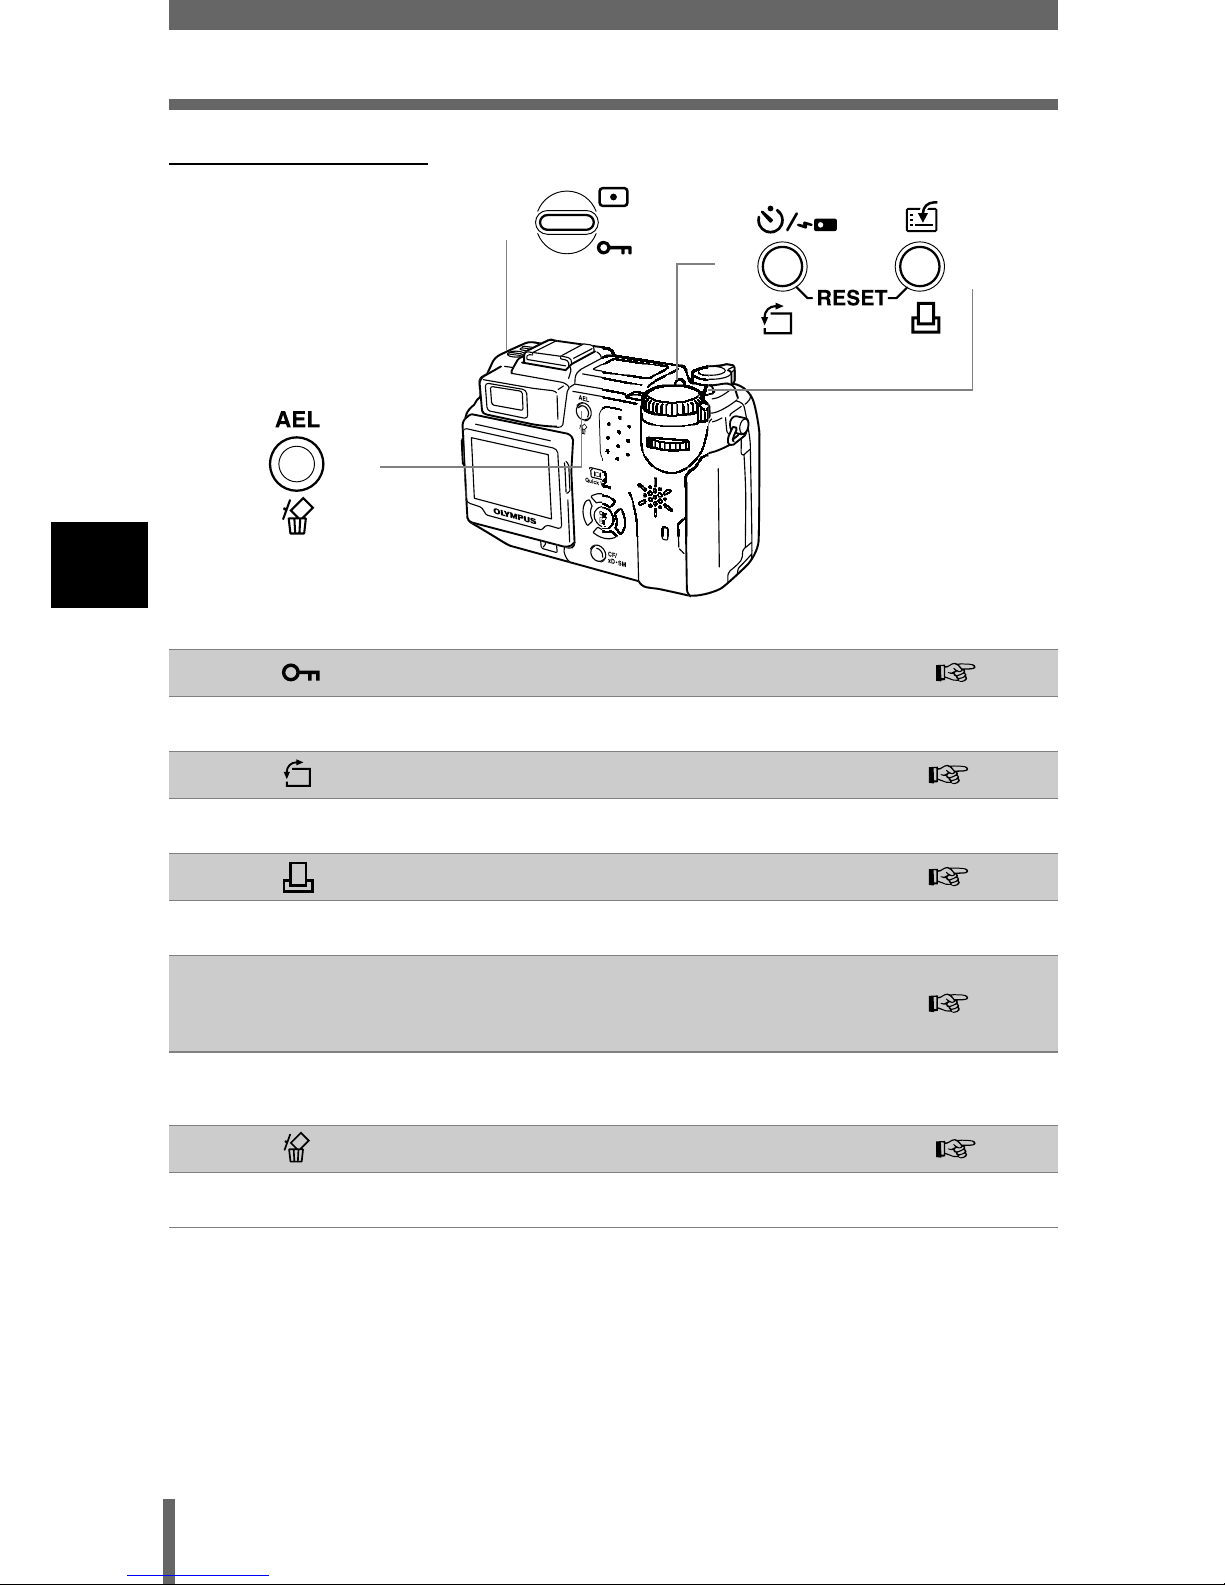
68
Direct Buttons
3
Mode dial and direct button functions
Playback mode
c
(protect) button P.57
Protects important pictures from accidental erasure.
d
(rotation) button P.152
Rotates pictures 90 degrees clockwise or counterclockwise.
e
(print) button P. 197
Stores print reservation data on the card.
d+e
Press at
same time
RESET button P. 193
When pressed simultaneously for at least 3 seconds, resets the
camera’s internal settings.
f
(erase) button P.58
Erases a selected picture.
c
d
e
f
Page 70
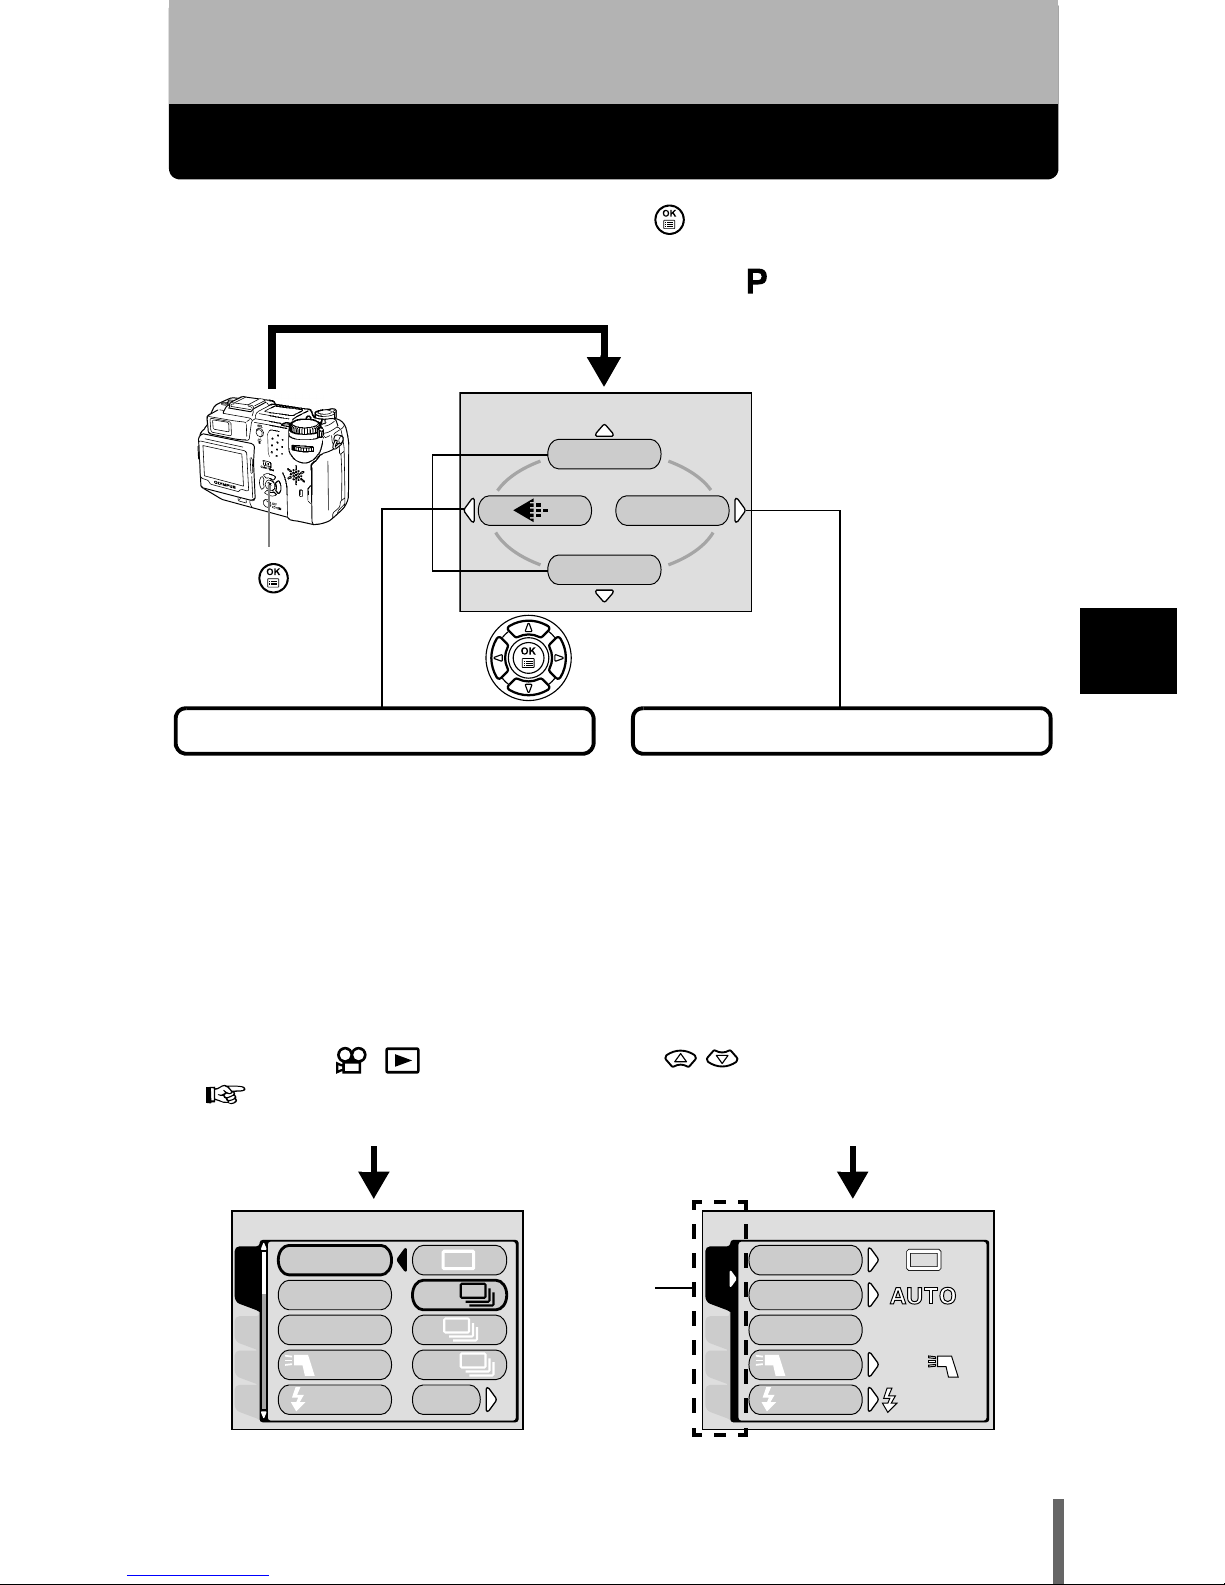
69
4
Using the menus and tabs
4 Using the menus and tabs
About the menus
When you turn on the camera and press , the top menu is displayed on
the monitor. The functions of this camera are set from the menus. This
chapter explains how the menus work, using the mode screens.
CARDSEt PIC
CAMERA
DRIVE
ISO
MY MODE
FLASH
SLOW
AF
BKt
HI
CARDSEt PIC
CAMERA
DRIVE
ISO
MY MODE
FLASH
IN+
IN+
SLOW
SLOW1
SLOW1
WB
DRIVE
MODE MENU
• Take you directly to the setting
screens.
• Display operational buttons at the
bottom of the screen.
• The functions registered in the
shortcut menus can also be
accessed from the MODE
MENU.
• You can change shortcut menus
other than modes.
“Setting the shortcut menu”
(P.170)
• Lets you access the menu
selections to set the ISO,
sharpness, etc.
• Categorizes the settings into 4
tabs.
• Displays the CAMERA,
PICTURE, CARD and SETUP
tabs. Select the desired tab on
the left of the screen by pressing
.
Use the arrow pad
to select a menu.
Press .
Tab
MODE MENU
SHORTCUT MENUS
The top menu is displayed.
Page 71
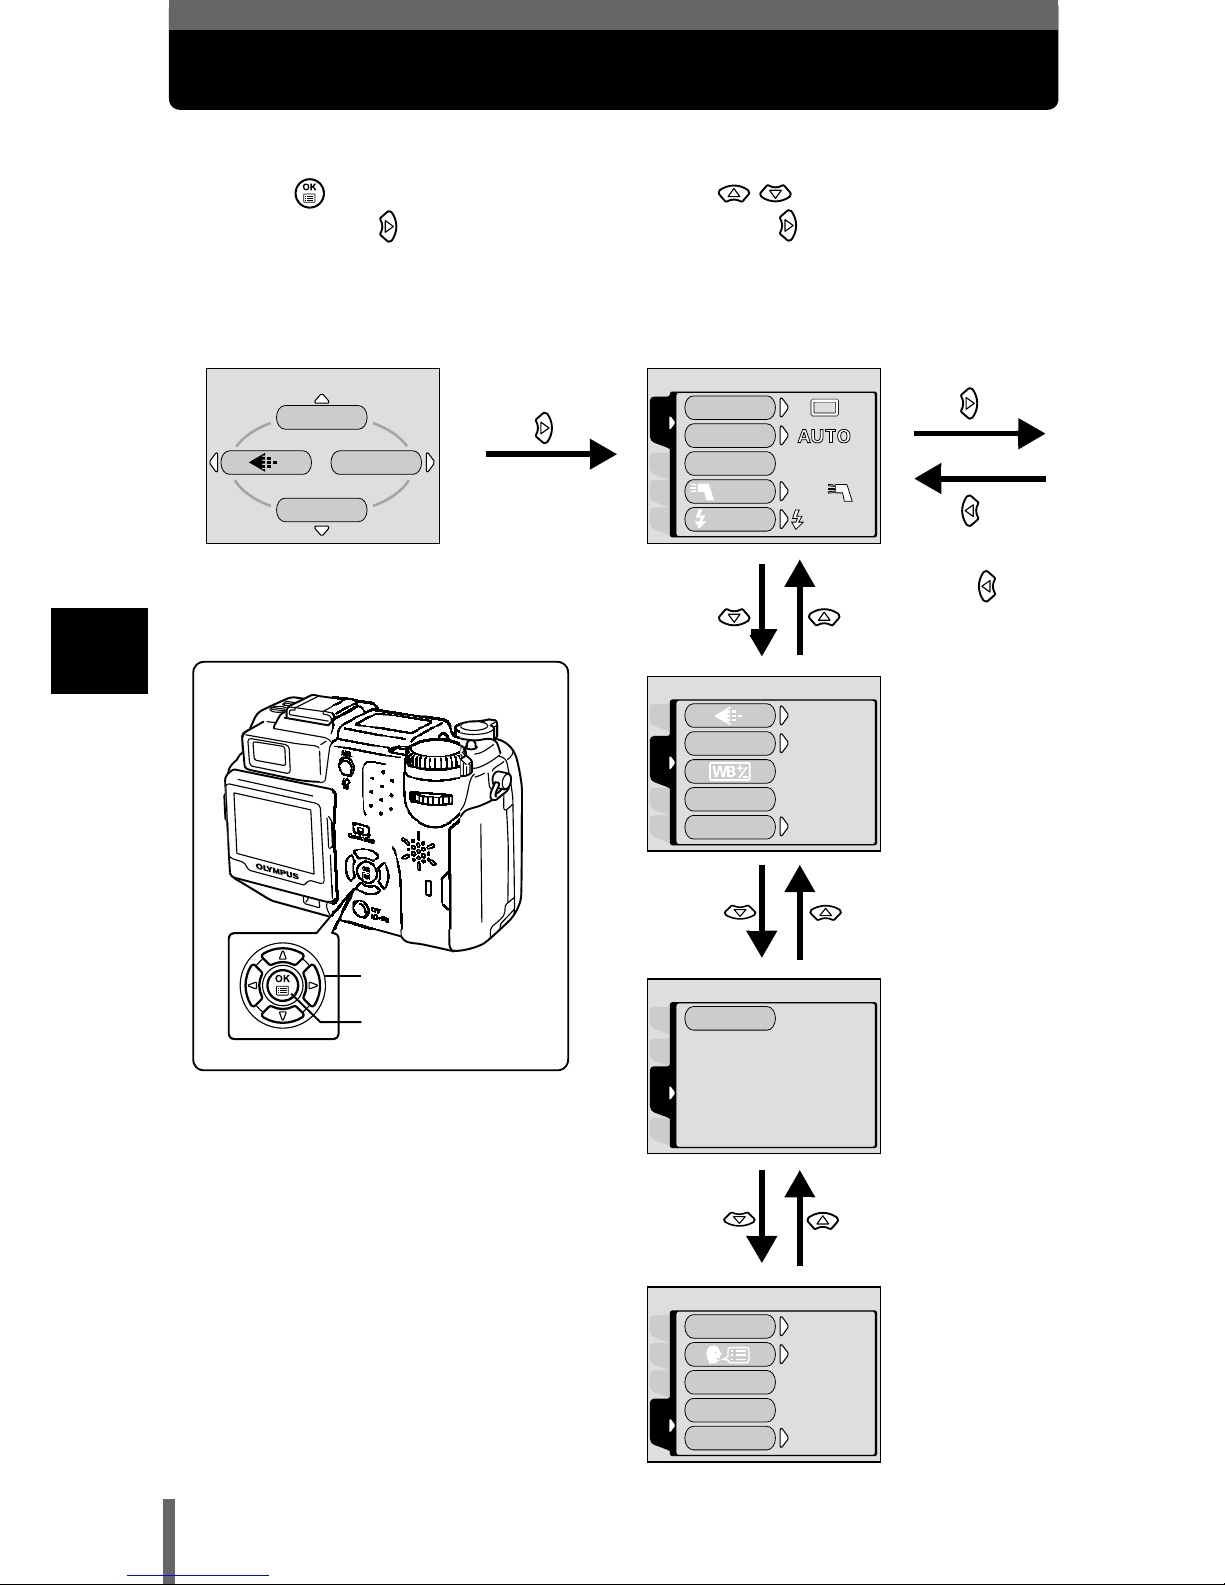
70
4
Using the menus and tabs
How to use the menus
WB
DRIVE
MODE MENU
CARDSEt PIC
CAMERA
DRIVE
ISO
MY MODE
FLASH
IN+
IN+
SLOW
SLOW1
SLOW1
CARDSEt
CAM
PICtURE
HQ
HQ
WB
CUStOM WB
AUtO
AUtO
NORMAL
NORMAL
SCENE MODES
SEt
CAM
PIC
CARD
CARD%SEtUP
PLAYEDItCARD
SEtUP
ALL RESEt
ON
ENGLISH
ON
REC VIEW
PW ON SEtUP
PW OFF SEtUP
1
Press to display the top
menu. Press .
Top menu
CAMERA tab
PICTURE tab
CARD tab
SETUP tab
2
Press to select a tab,
then press .
Press to
return to the
tab selection
screen.
Arrow pad
OK button
Page 72
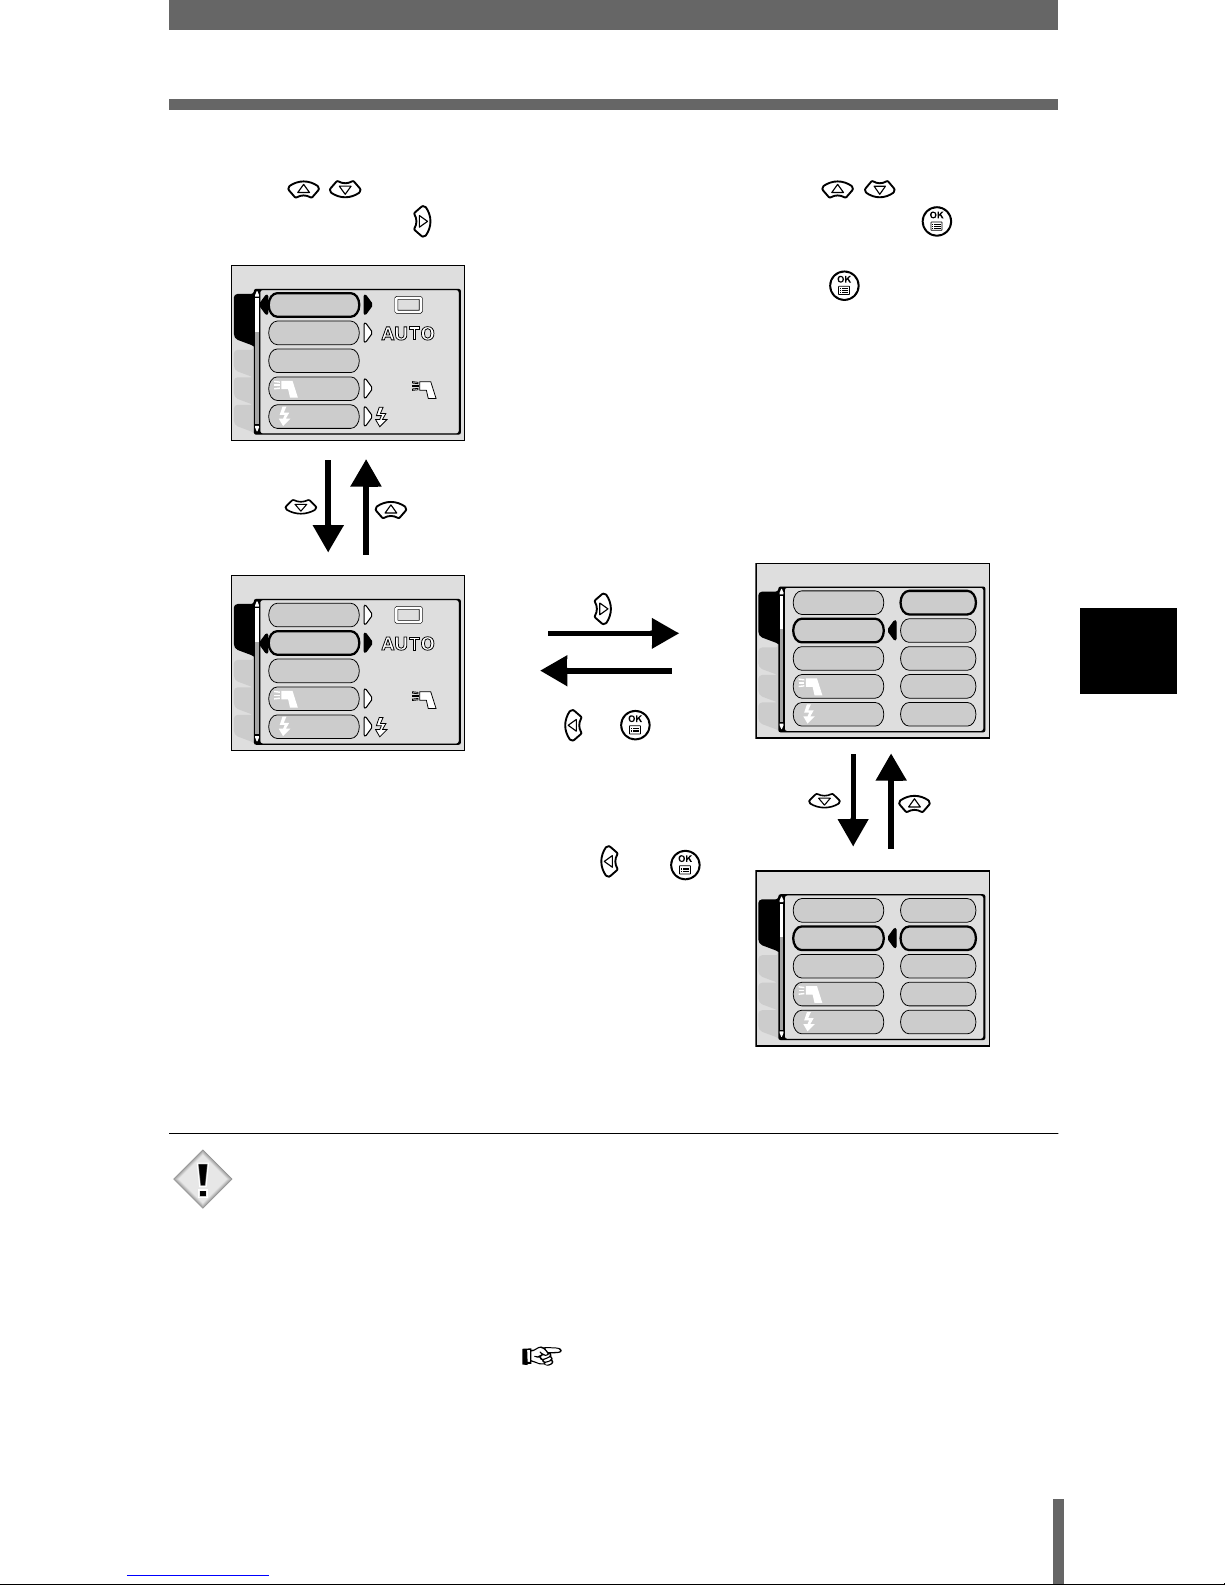
71
How to use the menus
4
Using the menus and tabs
• Not all items can be selected depending on the status of the camera
and the settings performed.
• Pressing the shutter button with a menu other than the SETUP
menu open allows you to take pictures using the settings currently
selected.
• If you want to save the settings after the camera is turned off, set
ALL RESET to OFF. “All Reset - Saving the camera’s settings”
(P.164)
4
Press to select a
setting. Press to
complete setting.
Press again to exit
the menu and return to
shooting status.
The green frame
moves to the
selected item.
or
3
Press to select an
item, then press .
To return to
select an item,
press or .
CARDSEt PIC
CAMERA
DRIVE
ISO
MY MODE
IN+
IN+
FLASH
SLOW
SLOW1
SLOW1
CARDSEt PIC
CAMERA
DRIVE
ISO
IN+
IN+
MY MODE
FLASH
SLOW
SLOW1
SLOW1
CARDSEt PIC
CAMERA
DRIVE
ISO
MY MODE
SLOW
AUtO
FLASH
400
100
64
200
CARDSEt PIC
CAMERA
DRIVE
ISO
MY MODE
FLASH
SLOW
AUtO
400
100
64
200
Note
Page 73
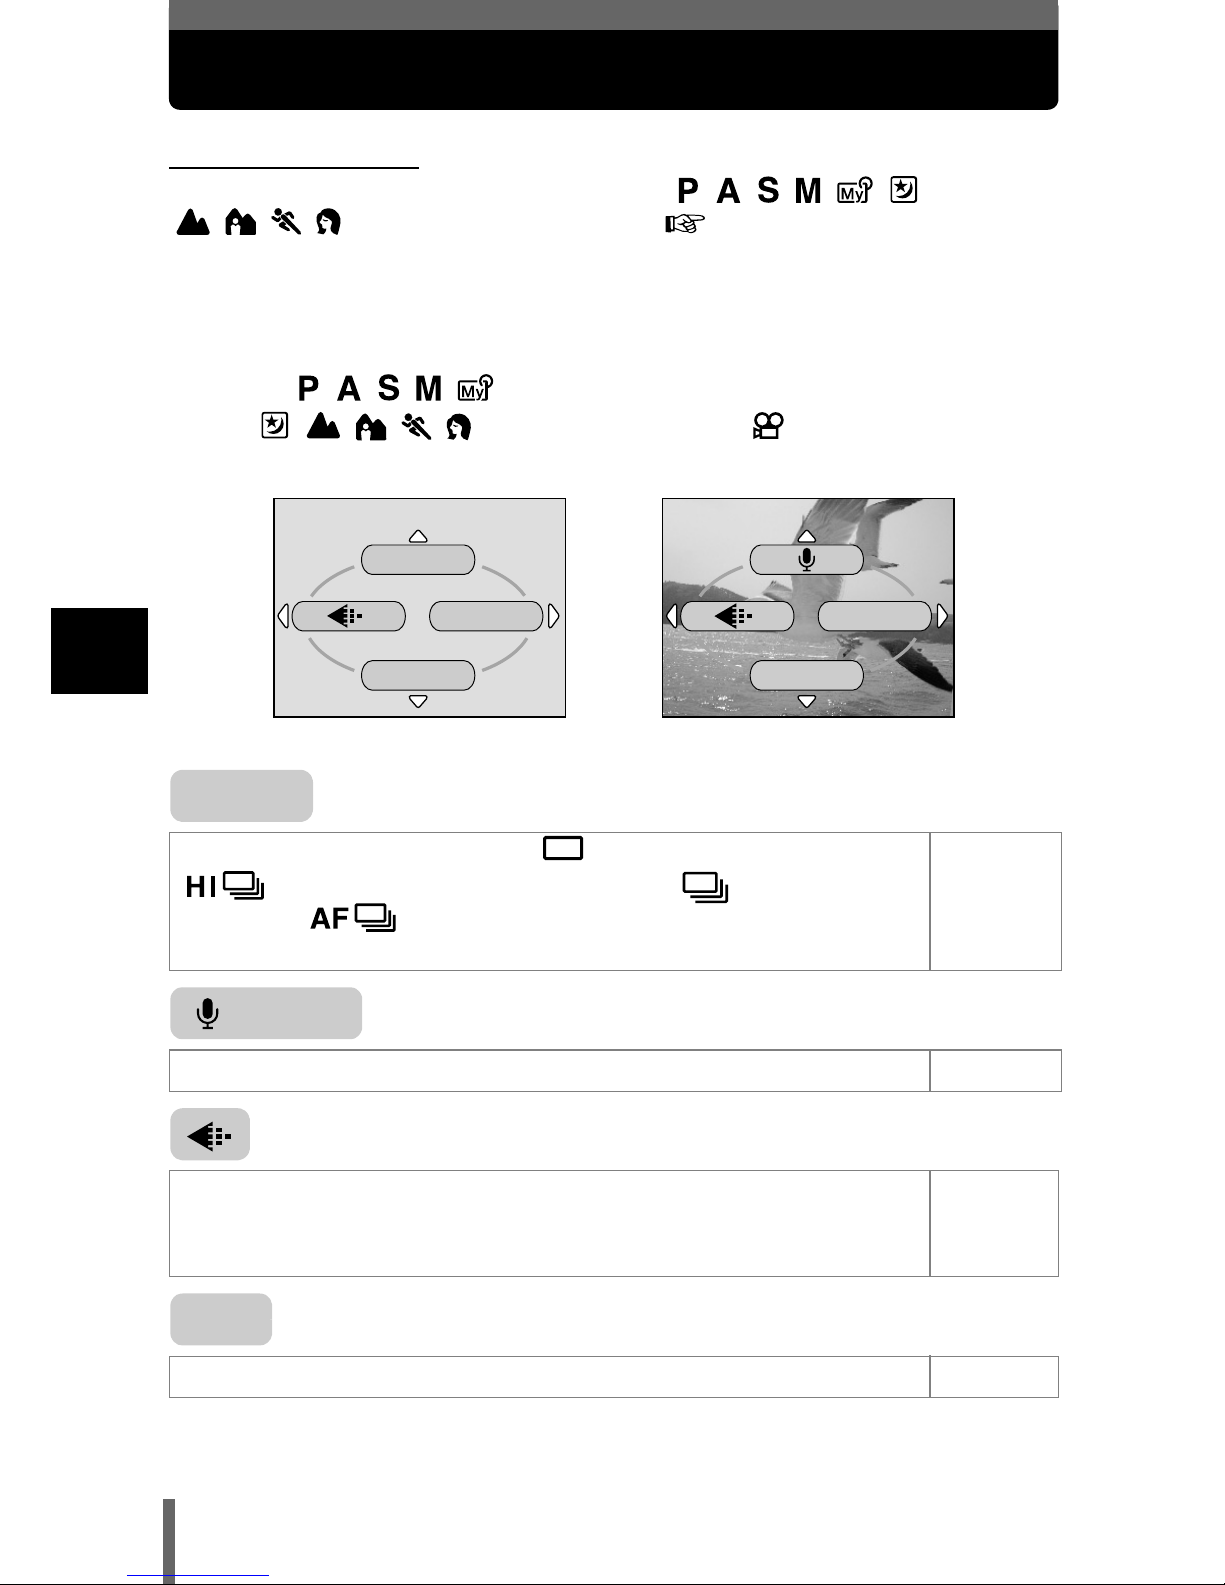
72
4
Using the menus and tabs
Shortcut menus
Shooting mode
You can change the shortcut menus in the
modes to other functions. “Setting the shortcut menu”
(P.170)
You can also access the functions set in the shortcut menus from the MODE
MENU.
The shortcut menus set in the default settings are explained below.
Selects a shooting mode from (single-frame shooting),
(high speed sequential shooting), (sequential
shooting), (AF sequential shooting) and BKT (auto
bracketing).
P.112
Records sound when shooting a movie. P.124
Sets the image quality and resolution.
Still picture : RAW, TIFF, SHQ, HQ, SQ1, SQ2
Movie : HQ, SQ
P.125
Sets the appropriate white balance according to the light source. P.133
MODE MENU
WB
(Factory default setting)
mode
(for movies)
mode
(for still pictures)
WB
DRIVE
MODE MENU
DRIVE
(movies)
WB
Page 74
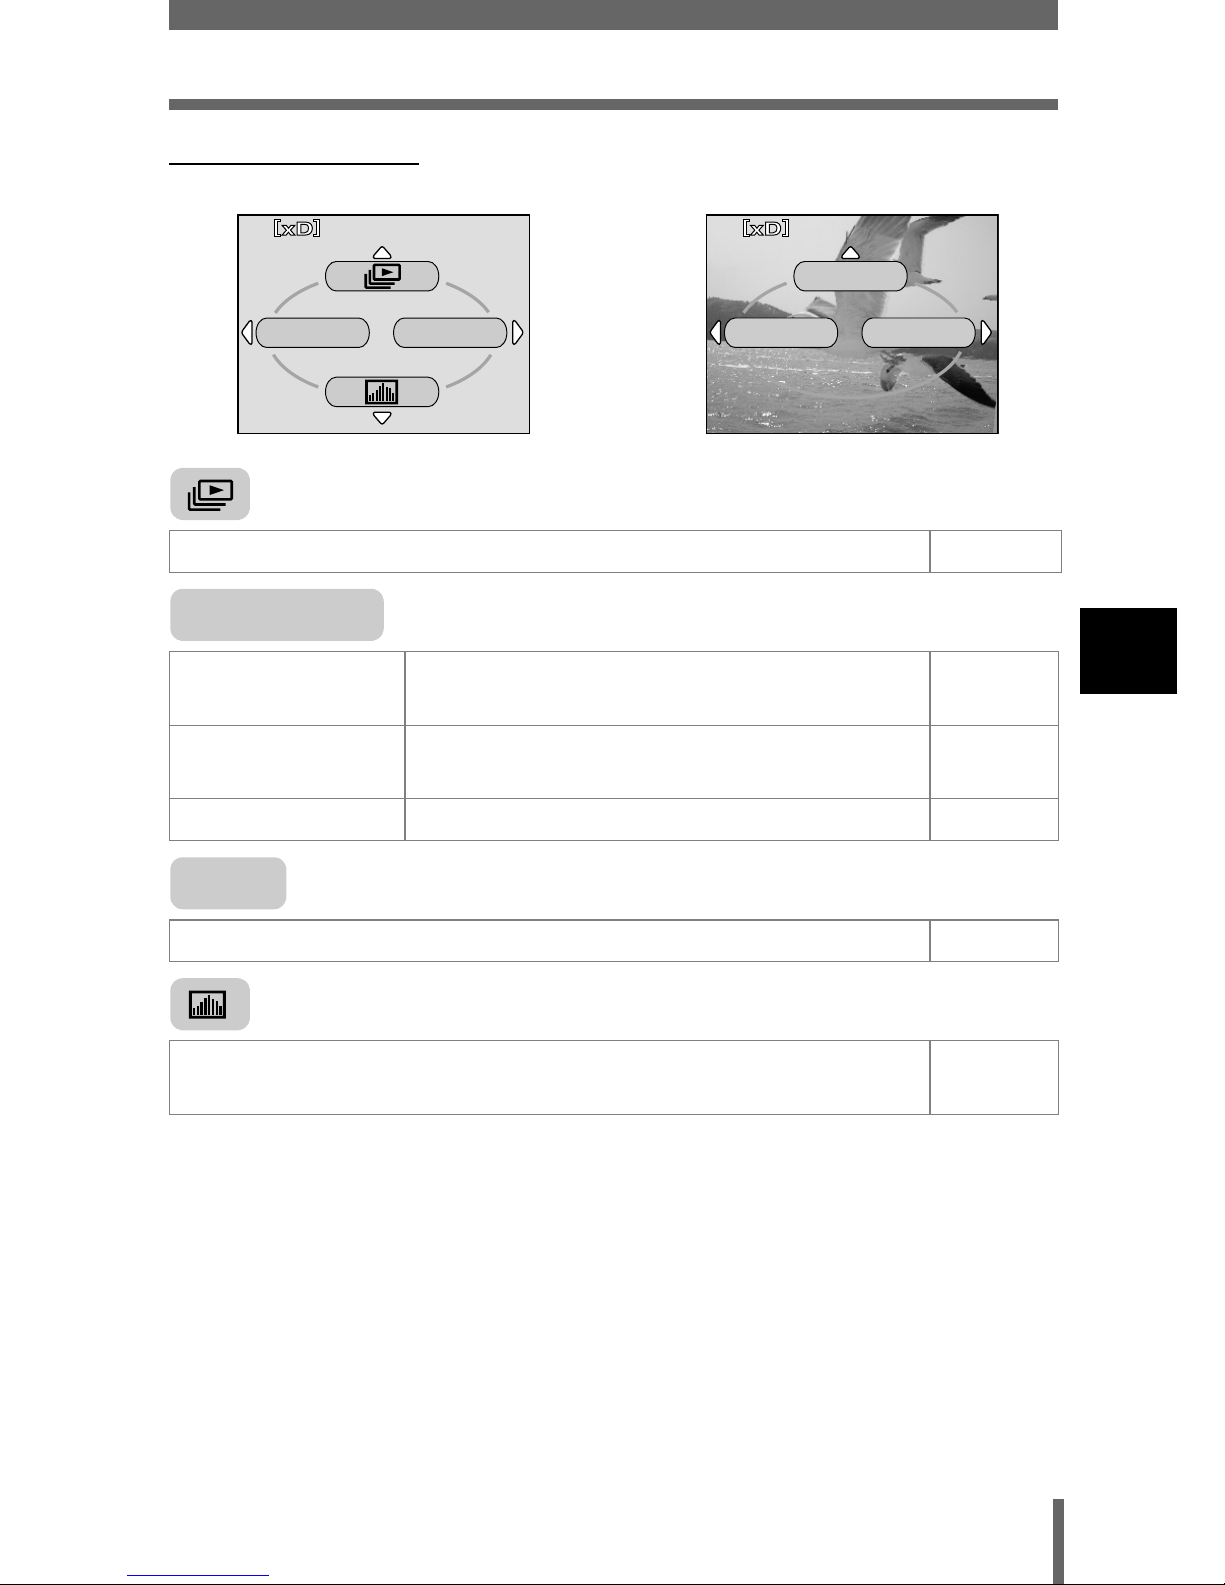
73
Shortcut menus
4
Using the menus and tabs
Playback mode
Runs through all saved pictures one after another. P.150
MOVIE
PLAYBACK
Plays back movies. P.55
INDEX Creates an index picture of a movie in 9
frames.
P.158
EDIT Edits a movie. P.160
Displays all the shooting information on the monitor. P.177
Displays a histogram showing the luminance distribution of still
pictures.
P.144
INFO
MODE MENU
MOVIE PLAY
INFO
MODE MENU
Still picture Movie
MOVIE PLAY
INFO
Page 75
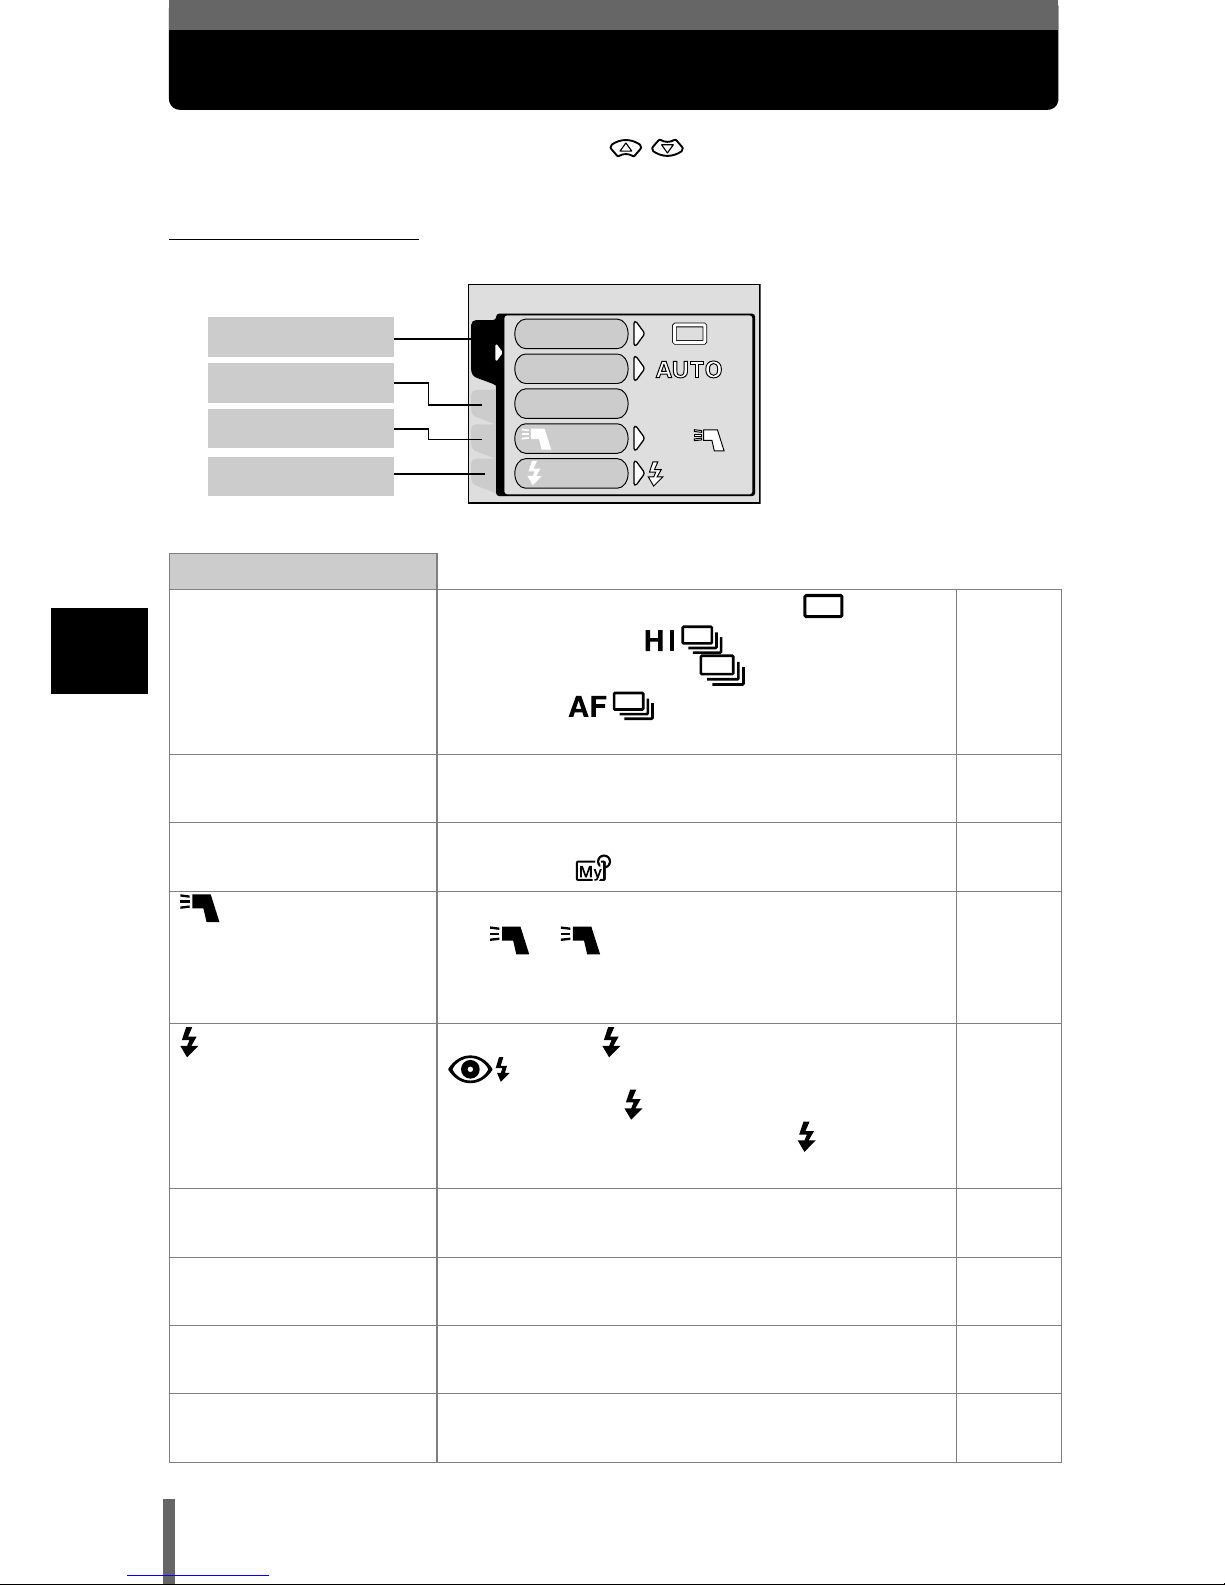
74
4
Using the menus and tabs
Mode Menus
The MODE MENU has 4 tabs. Press to select a tab and display the
associated menu items.
Shooting mode
CAMERA tab
DRIVE Selects a shooting mode from (single-
frame shooting), (high speed
sequential shooting), (sequential
shooting), (AF sequential shooting)
and BKT (auto bracketing).
P.112
ISO Selects the ISO sensitivity from AUTO, 64,
100, 200 and 400.
P.130
MY MODE Selects a mode to be activated when taking
pictures in mode.
P.95
FLASH When using an external flash, selects from
IN+ , and SLAVE. When “SLAVE”
is selected, adjusts the intensity of the main
flash.
P.86
SLOW Selects from SLOW 1 (1st curtain),
SLOW (1st curtain with red-eye
reduction) and SLOW 2 (2nd curtain)
when the flash mode is set to SLOW
(slow synchronization).
P.84
NOISE REDUCTION Reduces the noise that affects pictures
during long exposures.
P.142
DIGITAL ZOOM Extends the maximum optical zoom, making
possible up to approx. 10x zoom.
P.51
FULLTIME AF Keeps the image in focus at all times without
having to press the shutter button halfway.
P.97
AF MODE Selects the auto focus method (iESP or
SPOT).
P.96
CARDSEt PIC
CAMERA
DRIVE
ISO
MY MODE
FLASH
IN+
IN+
SLOW
SLOW1
SLOW1
CAMERA tab
PICTURE tab
CARD tab
SETUP tab
Page 76
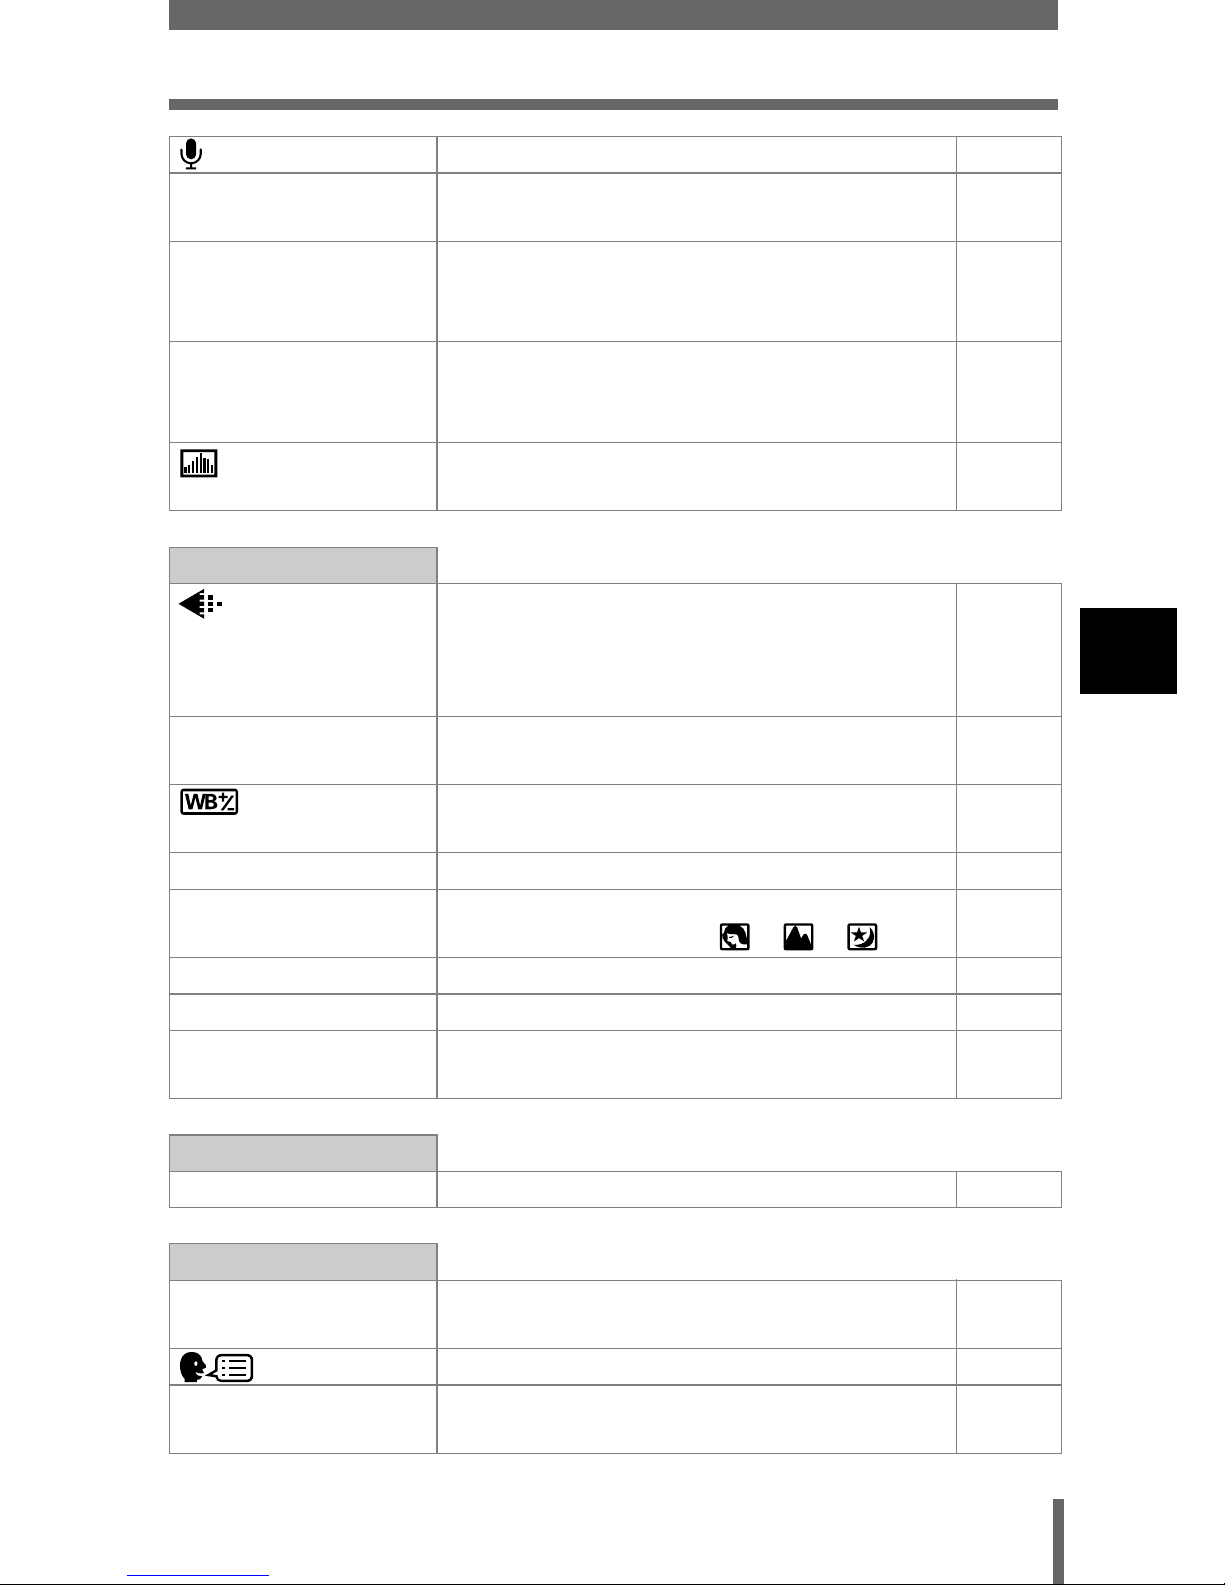
75
Mode Menus
4
Using the menus and tabs
Records sound when taking a still picture. P.122
PANORAMA Allows panorama pictures to be taken with
Olympus CAMEDIA-brand cards.
P.116
2 IN 1 Combines two still pictures taken in
succession and stores them as a single
picture.
P.119
FUNCTION Lets you add special effects to pictures
(BLACK & WHITE, SEPIA, WHITE BOARD,
BLACK BOARD).
P.121
Displays a histogram showing the
luminance distribution of still pictures.
P.144
PICTURE tab
Sets the image quality and resolution.
Still picture : RAW, TIFF, SHQ, HQ, SQ1,
SQ2
Movie : HQ, SQ
P.125
WB Sets the appropriate white balance
according to the light source.
P.133
Lets you make fine changes to the white
balance.
P.138
CUSTOM WB Stores your preferred white balance setting. P.135
SCENE MODES Lets you take pictures suited to the situation
and the desired effect ( , , ).
P.142
SHARPNESS Adjusts the sharpness of the image. P.139
CONTRAST Adjusts the contrast of the image. P.140
SATURATION Adjusts the level of color depth without
changing the tint.
P.141
CARD tab
CARD SETUP Formats a card. P.175
SETUP tab
ALL RESET Selects whether to keep the current camera
settings when you turn off the power.
P.164
Selects a language for on-screen display. P.34
PW ON SETUP Sets the picture displayed on the monitor
when the power is turned on.
P.186
Page 77
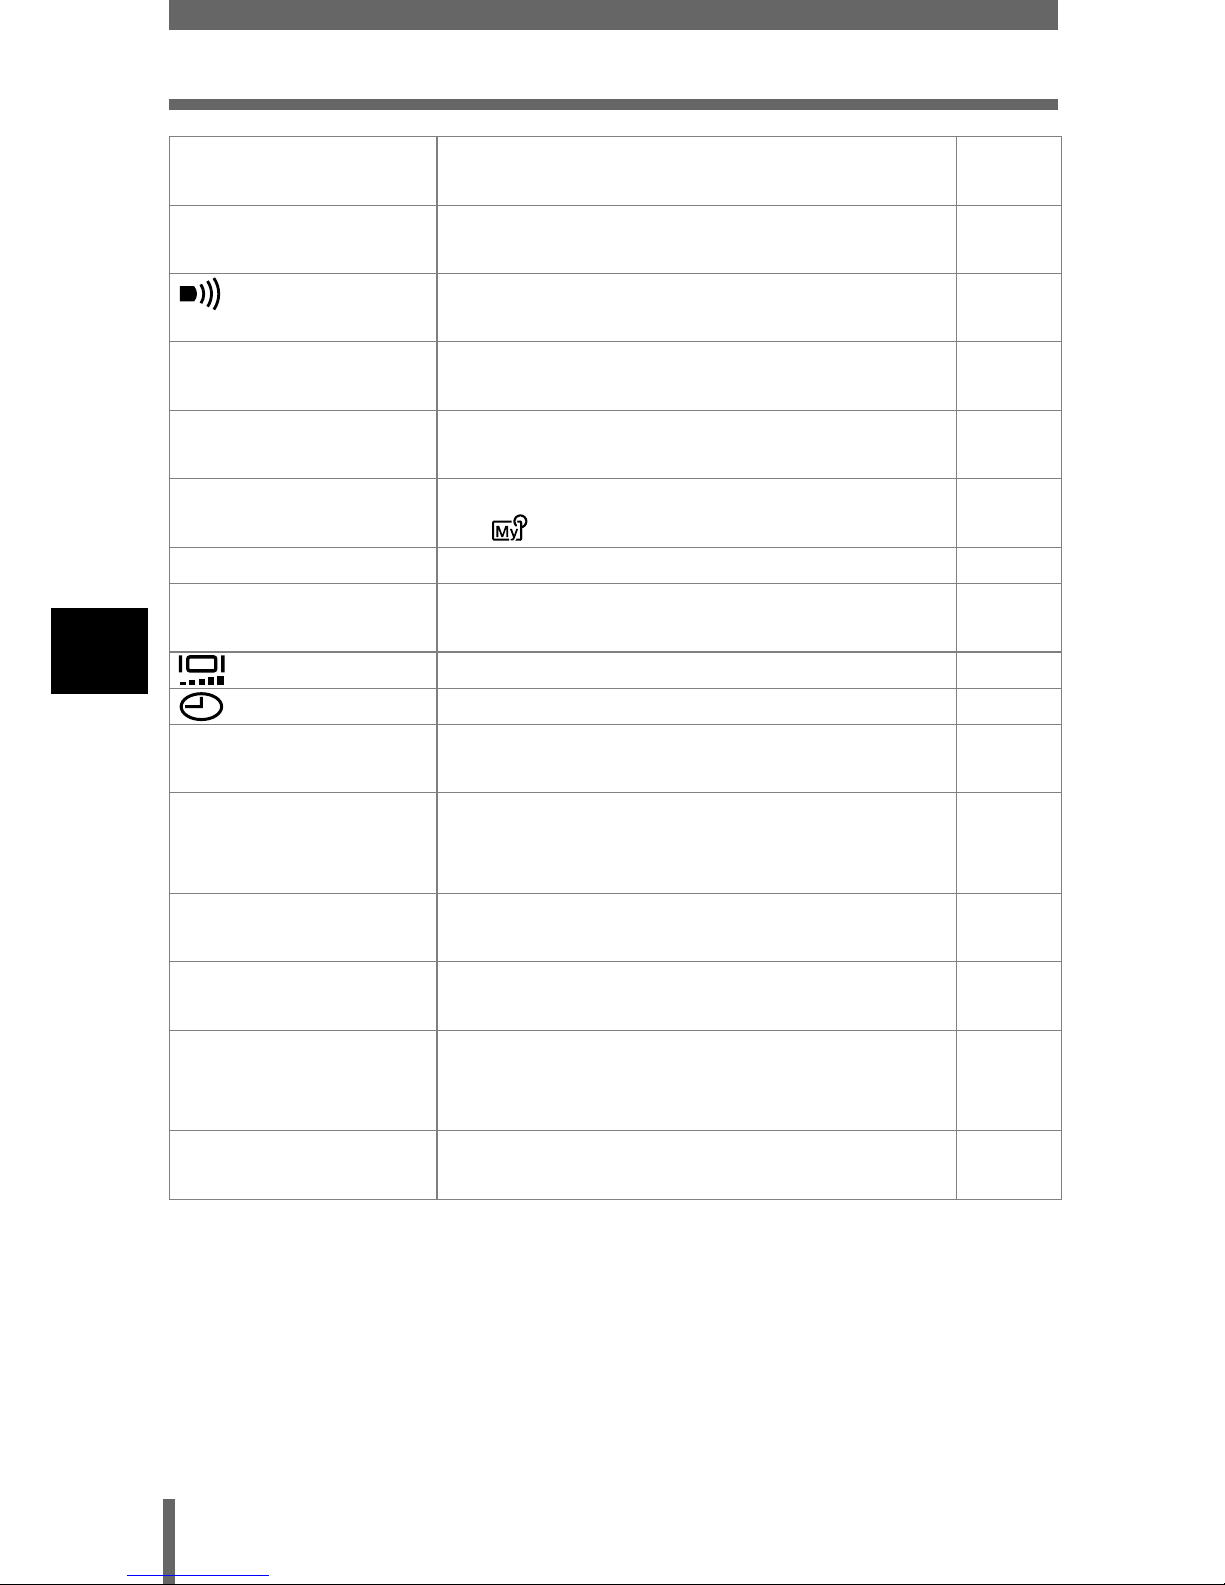
76
Mode Menus
4
Using the menus and tabs
PW OFF SETUP Sets the picture displayed on the monitor
when the power is turned off.
P.186
REC VIEW Selects whether to display pictures on the
monitor while saving them to a card.
P.181
Sets the beep sound used for warnings and
adjusts the volume.
P.182
BEEP Sets the beep sound used for button
operations and adjusts the volume.
P.183
SHUTTER SOUND Sets the sound made when the shutter
button is pressed and adjusts the volume.
P.184
MY MODE SETUP Customizes settings which are activated in
the mode.
P.172
FILE NAME Changes how file names are assigned. P.189
PIXEL MAPPING Checks the CCD and image processing
functions for errors.
P.190
Adjusts the brightness of the monitor. P.180
Sets the date and time. P.36
m/ft Sets the measurement unit (m/ft) used
during manual focus.
P.191
VIDEO OUT Selects NTSC or PAL according to your TV’s
video signal type. TV video signal types
differ depending on the region.
P.192
SHORT CUT Lets you assign frequently used functions as
shortcut menus.
P.169
CUSTOM BUTTON Lets you assign a frequently used function to
the camera’s custom button.
P.166
DUAL CONTROL
PANEL
Displays the same information on the control
panel as on the monitor when the monitor is
not in use.
P.178
AF ILLUMINATOR Turns on the AF illuminator to illuminate a
dark subject.
P.99
Page 78
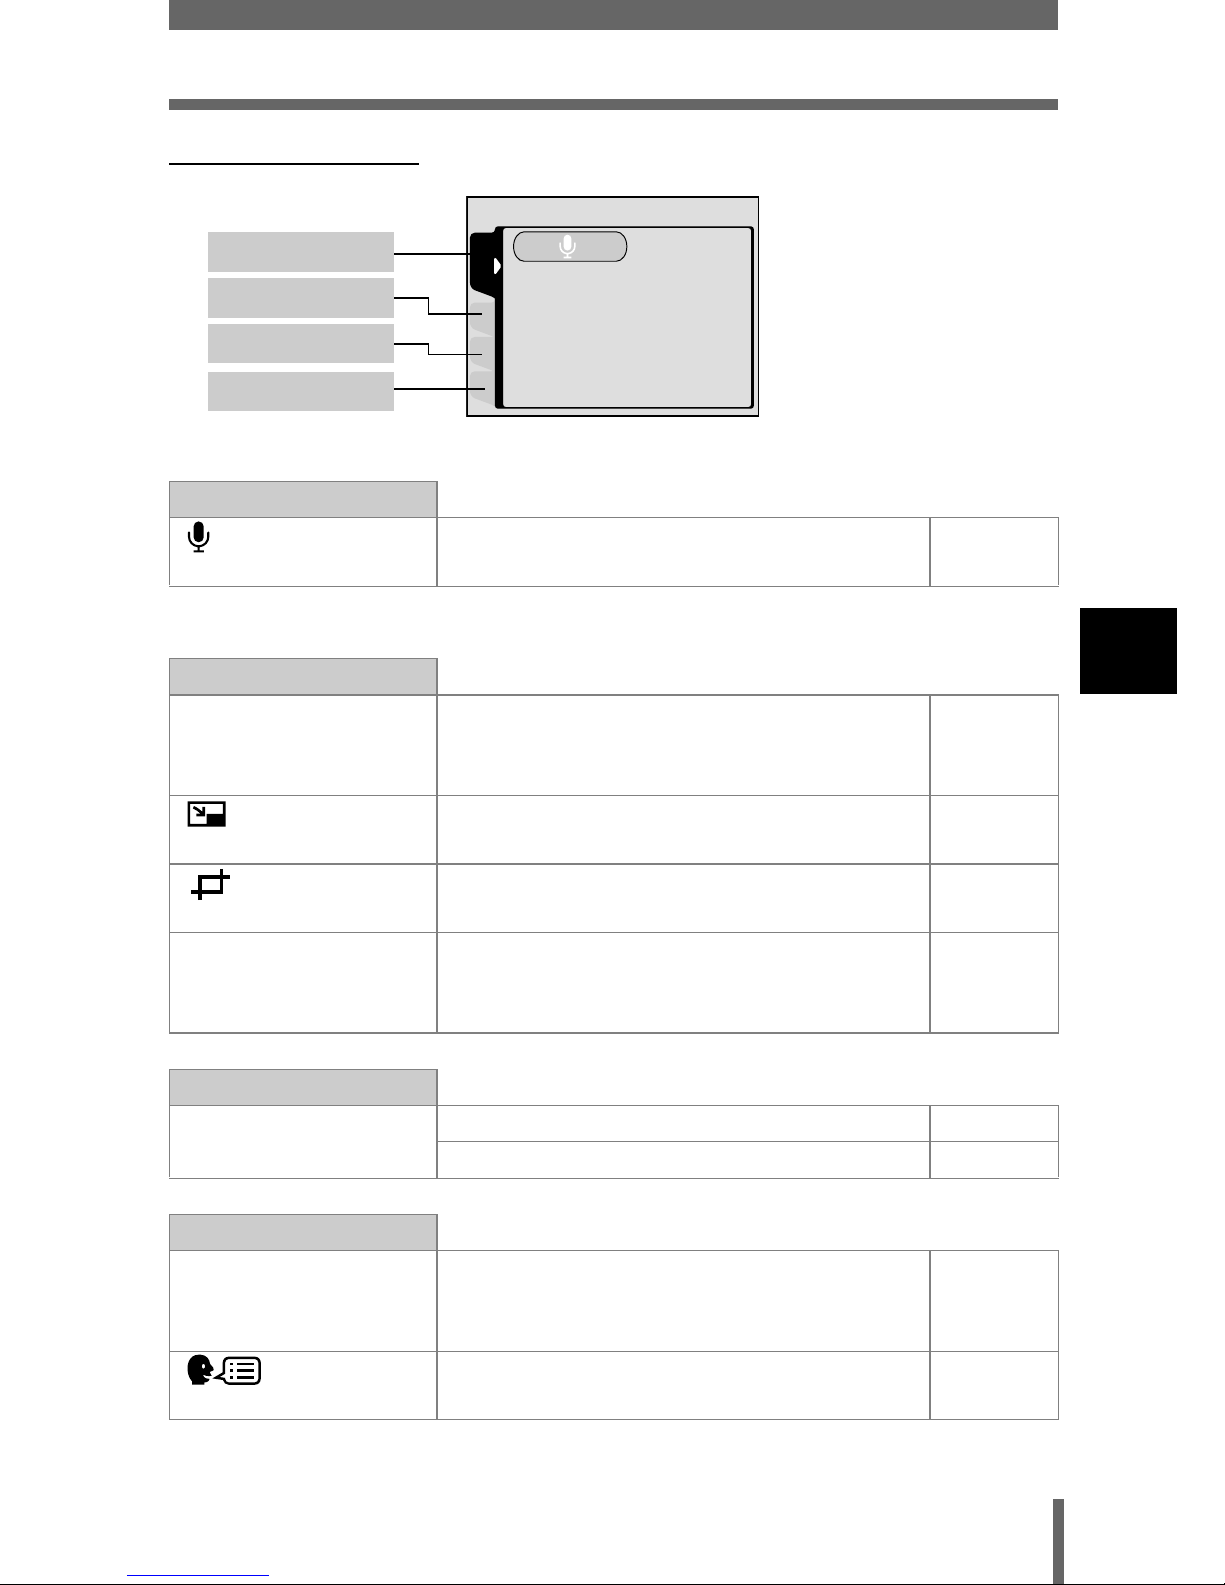
77
Mode Menus
4
Using the menus and tabs
Playback mode
PLAY tab
Adds sound to a still picture already
taken.
P.153
* The PLAY tab is not displayed during movie playback.
EDIT tab
RAW DATA EDIT Sets the image quality, white balance,
etc. of pictures taken in RAW data format
and saves them as new files.
P.156
Makes the file size smaller and saves it
as a new file.
P.154
Crops part of a picture and saves it as a
new file.
P.155
COPY Copies pictures to and from cards. Lets
you select whether to copy all frames or
only a selected frame.
P.162
CARD tab
CARD SETUP Formats a card. P.175
Erases all image data stored on the card. P.163
SETUP tab
ALL RESET Selects whether to keep the current
camera settings when you turn off the
power.
P.164
Selects a language for on-screen
display.
P.34
CARDSEt EDIt
PLAY
PLAY tab
EDIT tab
CARD tab
SETUP tab
Page 79
78
Mode Menus
4
Using the menus and tabs
PW ON SETUP Sets the picture displayed on the monitor
when the power is turned on.
P.186
PW OFF SETUP Sets the picture displayed on the monitor
when the power is turned off.
P.186
SCREEN SETUP Registers a stored picture for use as the
picture displayed when the power is
turned on or off.
P.187
VOLUME Adjusts the sound volume during
playback. Also adjusts the volume of the
sound selected in PW ON SETUP and
PW OFF SETUP.
P.185
Sets the beep sound used for warnings
and adjusts the volume.
P.182
BEEP Sets the beep sound used for button
operations and adjusts the volume.
P.183
Adjusts the brightness of the monitor. P.180
Sets the date and time. P.36
VIDEO OUT Selects NTSC or PAL according to your
TV’s video signal type. TV video signal
types differ depending on the region.
P.192
Selects the number of frames in the
index display.
P.149
Page 80
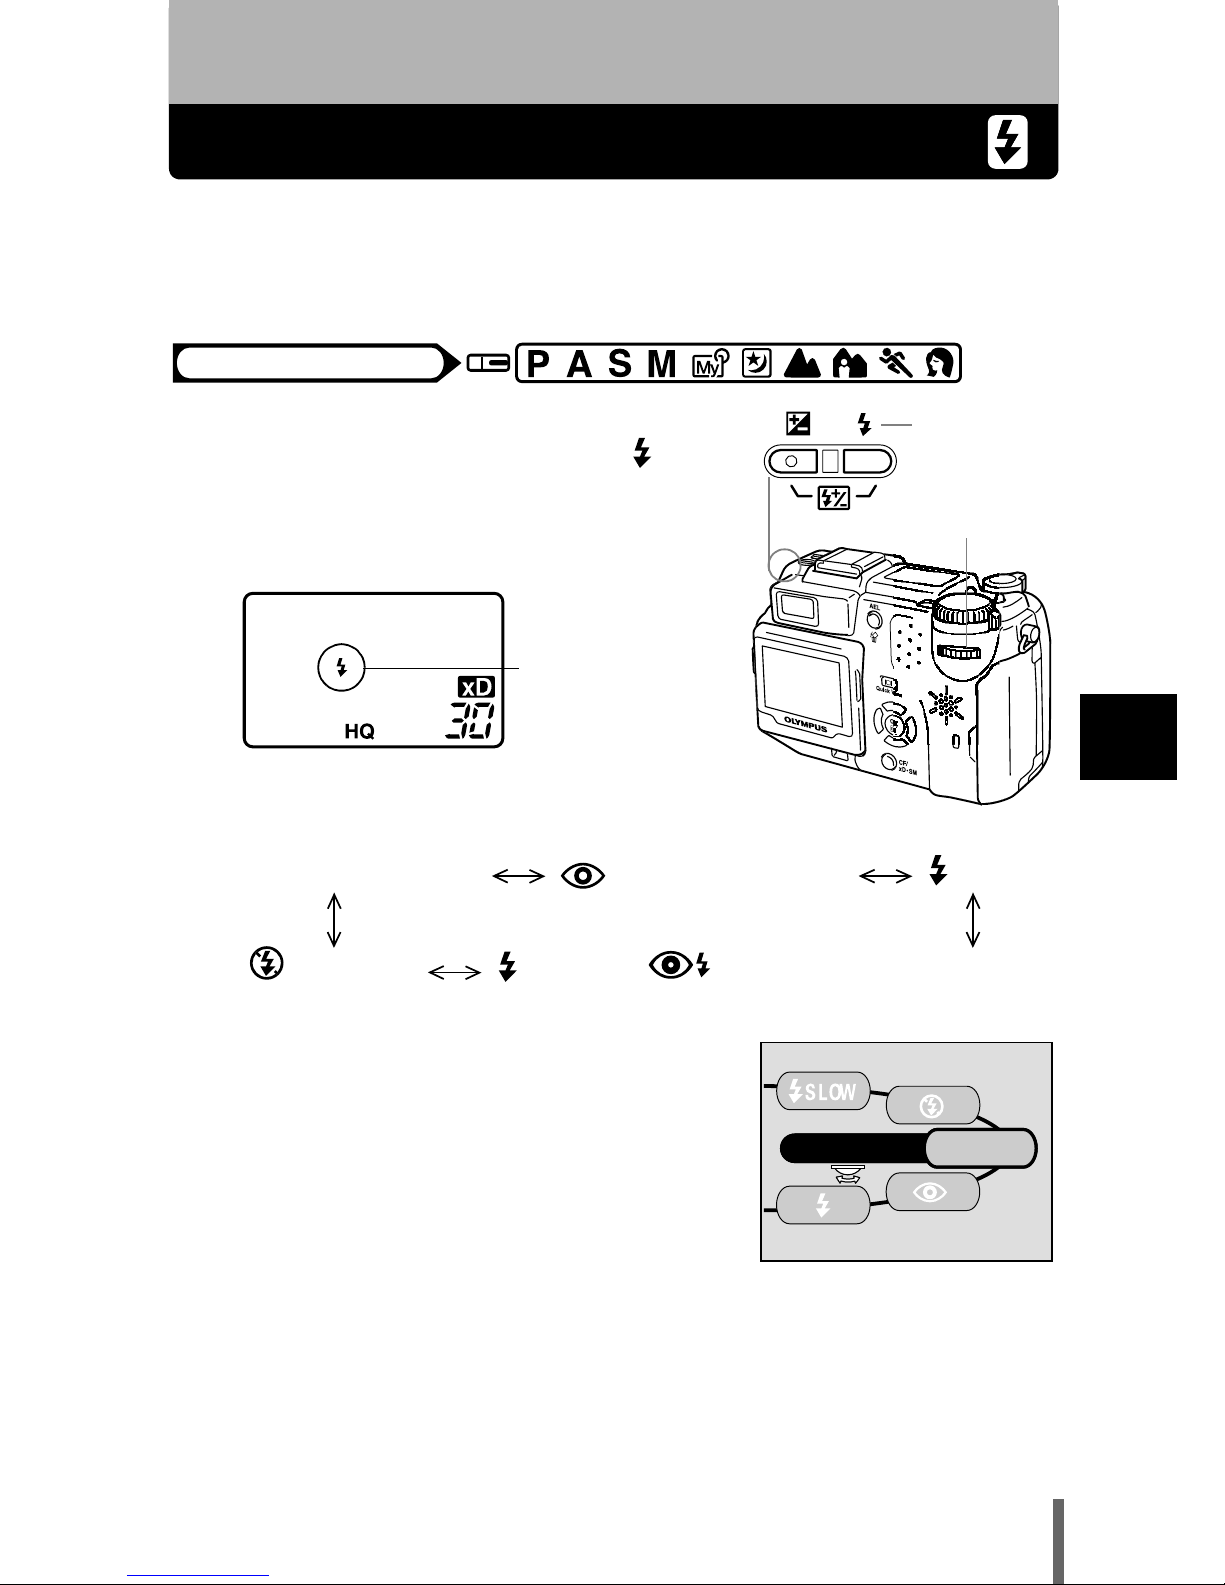
79
5
Flash
5 Flash
Flash shooting
Select the flash mode best suited to the light conditions and the effect you
want to achieve. You can also adjust the amount of light emitted using the
flash intensity control.
1
Set the flash mode by turning the
jog dial while holding down .
• The flash mode changes as follows and
the selected mode is displayed on the
control panel (if all modes are available):
2
Press the shutter button halfway.
• When the flash is ready to fire, the orange
lamp lights steady.
3
Press the shutter button fully.
Flash working range
W (max.): Approx. 0.8 m to 5.6 m (2.6 ft. to 18 ft.)
T (max.) : Approx. 0.2 m to 3.8 m (0.7 ft. to 12 ft.)
Mode dial
Flash mode
button
Jog dial
Flash mode
No indication (Auto-flash)
(
Red-eye reduction flash) (Fill-in flash)
(Flash off)
SLOW or SLOW (slow synchronization)
FLASH MODE
AUtO
Page 81
80
Flash shooting
5
Flash
TIPS
The orange lamp or the (flash standby) indication blinks.
→ The flash is charging. Wait until the orange lamp goes off.
Camera movement warning (Auto-flash, red-eye reduction, fill-in
flash)
→ When the orange lamp or (camera movement warning) lights,
the shutter speed locks at its current level. This helps prevent
camera shake problems (shutter speeds that are too slow can
cause blur). However, if the zoom magnification is increased, the
camera will increase the locked shutter speed accordingly.
• AUTO, , , and SLOW are not available in
mode.
• The flash does not fire in the following situations:
When shooting a bright subject (AUTO, ), in the movie
record mode, during sequential shooting (
,
,
, BKT), during super-macro shooting, when
FUNCTION is set to WHITE BOARD/BLACK BOARD, during
Panorama shooting.
• The flash may not give you the optimum result in macro mode,
especially with wide-angle shooting. Check the resulting picture on
the monitor.
• If a conversion lens is attached to the camera, do not use the flash.
Zoom position Shutter speed
W (max.) 1/30 sec.
T (max.) 1/100 sec.
Note
Page 82
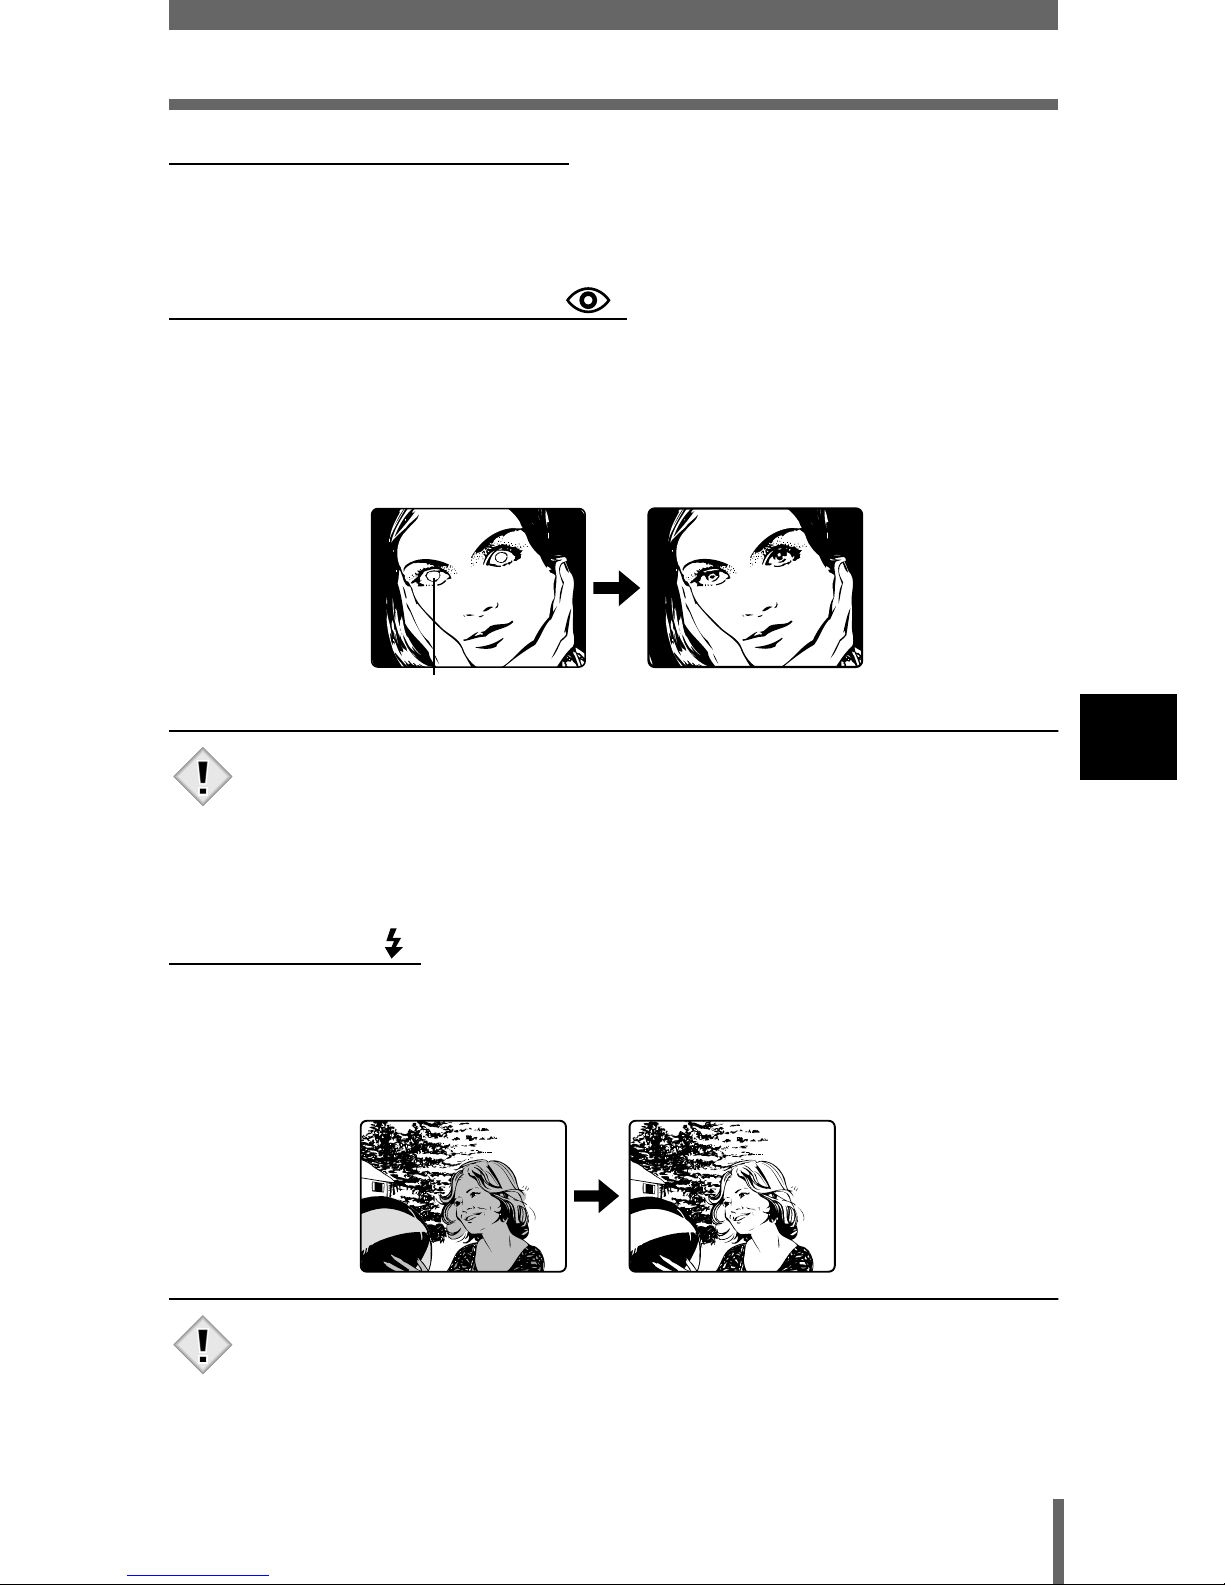
81
Flash shooting
5
Flash
Auto-flash (No indication)
The flash fires automatically in low light or backlight conditions.
To shoot a subject with backlight, position the AF target mark over the
subject.
Red-eye reduction flash ( )
The light from the flash may make the subject’s eyes appear red in the
picture. The red-eye reduction flash mode significantly reduces this
phenomenon by emitting pre-flashes before firing the regular flash. This helps
accustom the subject’s eyes to the bright light and minimizes the red-eye
phenomenon.
• After the pre-flashes, it takes about 1 second before the shutter is
released. Hold the camera firmly to avoid camera movement.
• Effectiveness may be limited if the subject is not looking directly at
the pre-flashes, or if the shooting range is too far. Individual physical
characteristics may also limit effectiveness.
Fill-in flash ( )
The flash fires regardless of the available light. This mode is useful for
eliminating shadows on the subject’s face (such as shadows from tree
leaves), in a backlight situation, or for correcting the color shift produced by
artificial lighting (especially fluorescent light).
• The fill-in flash may not have the desired effect under excessively
bright light.
The subject’s eyes appear red.
Note
Note
Page 83
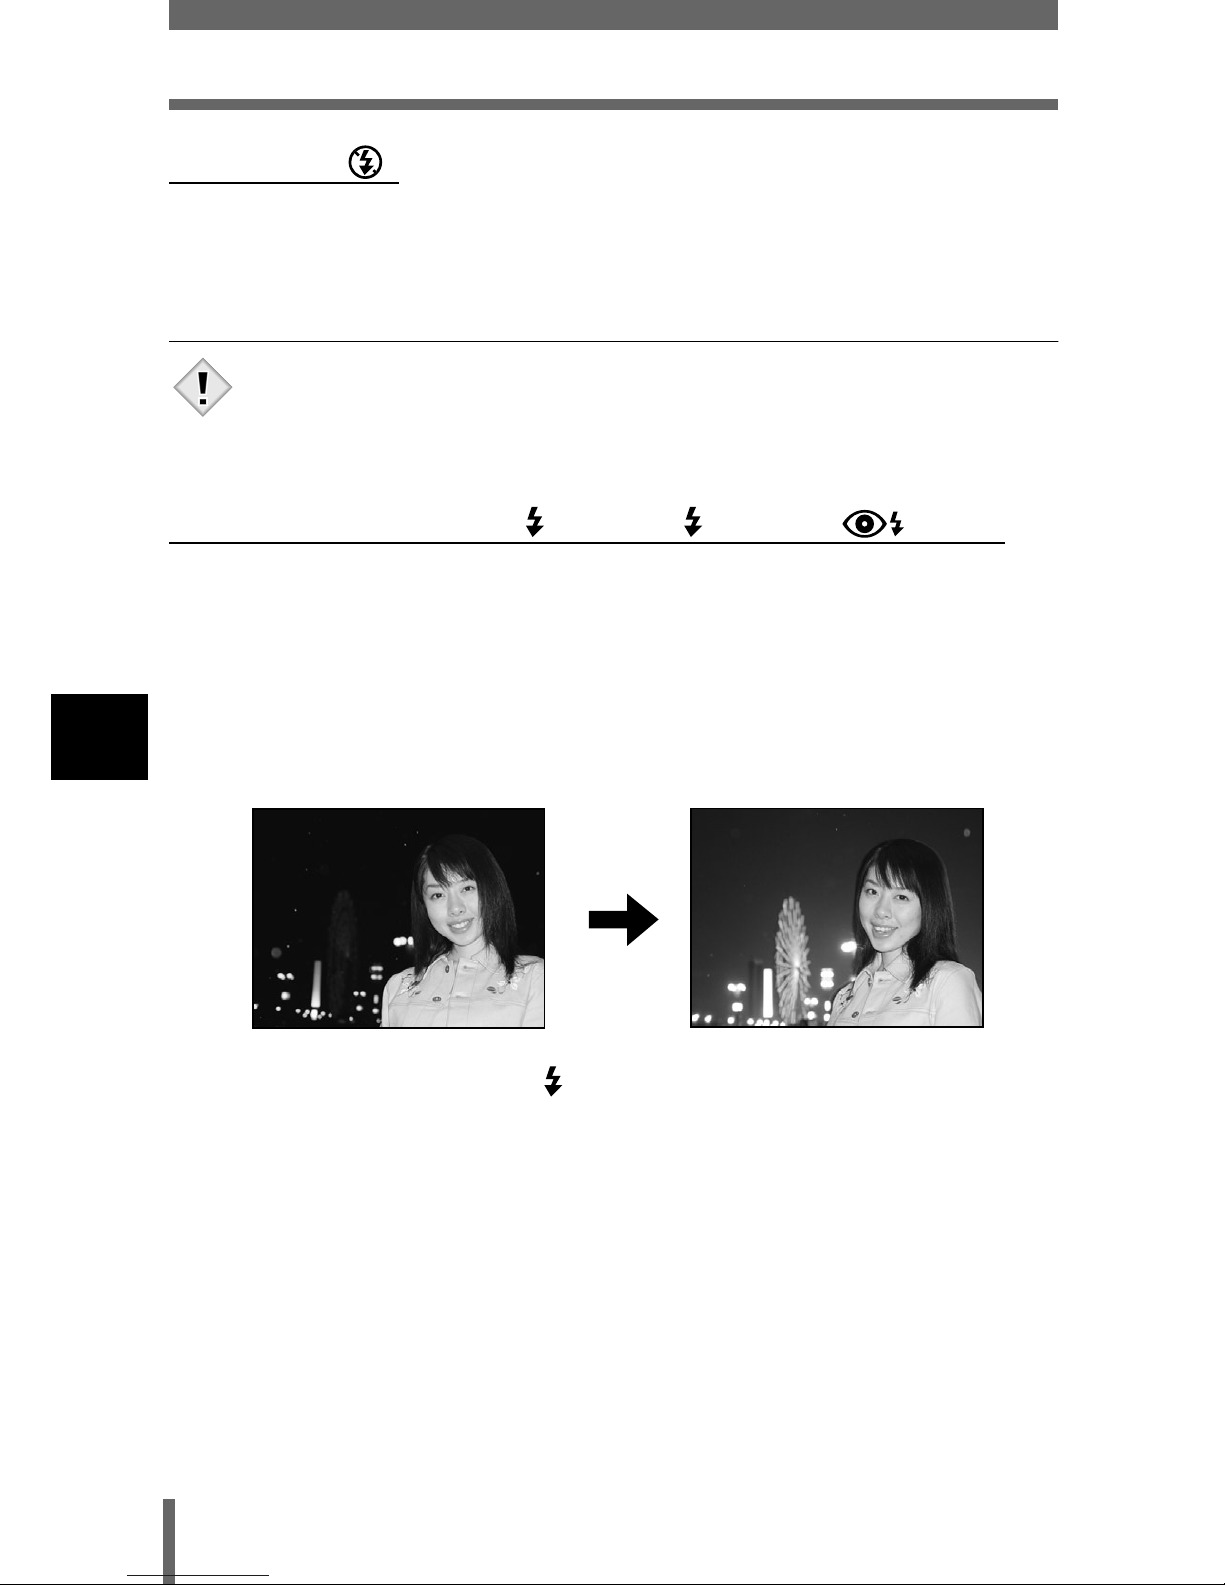
82
Flash shooting
5
Flash
Flash off ( )
The flash does not fire even in low light conditions. Use this mode in situations
where flash photography is not desired or is prohibited, such as in an art
museum. You can also use this mode when you want to shoot a naturallooking twilight or night scene.
• Since a slow shutter speed is automatically selected in low light
situations when in the flash off mode, the use of a tripod is
recommended to prevent your pictures from being blurred by
camera movement.
Slow synchronization SLOW 1 SLOW 2 SLOW
The slow synchronization flash is designed for slow shutter speeds. Normally,
when shooting with a flash, shutter speeds cannot go below a certain level to
prevent camera movement. But when shooting a night scene background,
fast shutter speeds can make the background too dark. Slow synchronization
flash allows both a slow shutter speed for the background and a flash for the
subject. Since the shutter speed is slow, make sure you stabilize the camera
by using a tripod. Otherwise, camera movement may cause the picture to be
blurred.
1st curtain (front curtain) SLOW 1
Usually, regardless of the shutter speed, the flash fires right after the shutter
fully opens. This is called 1st curtain. Unless you change it, this is how the
flash always fires.
Note
Page 84
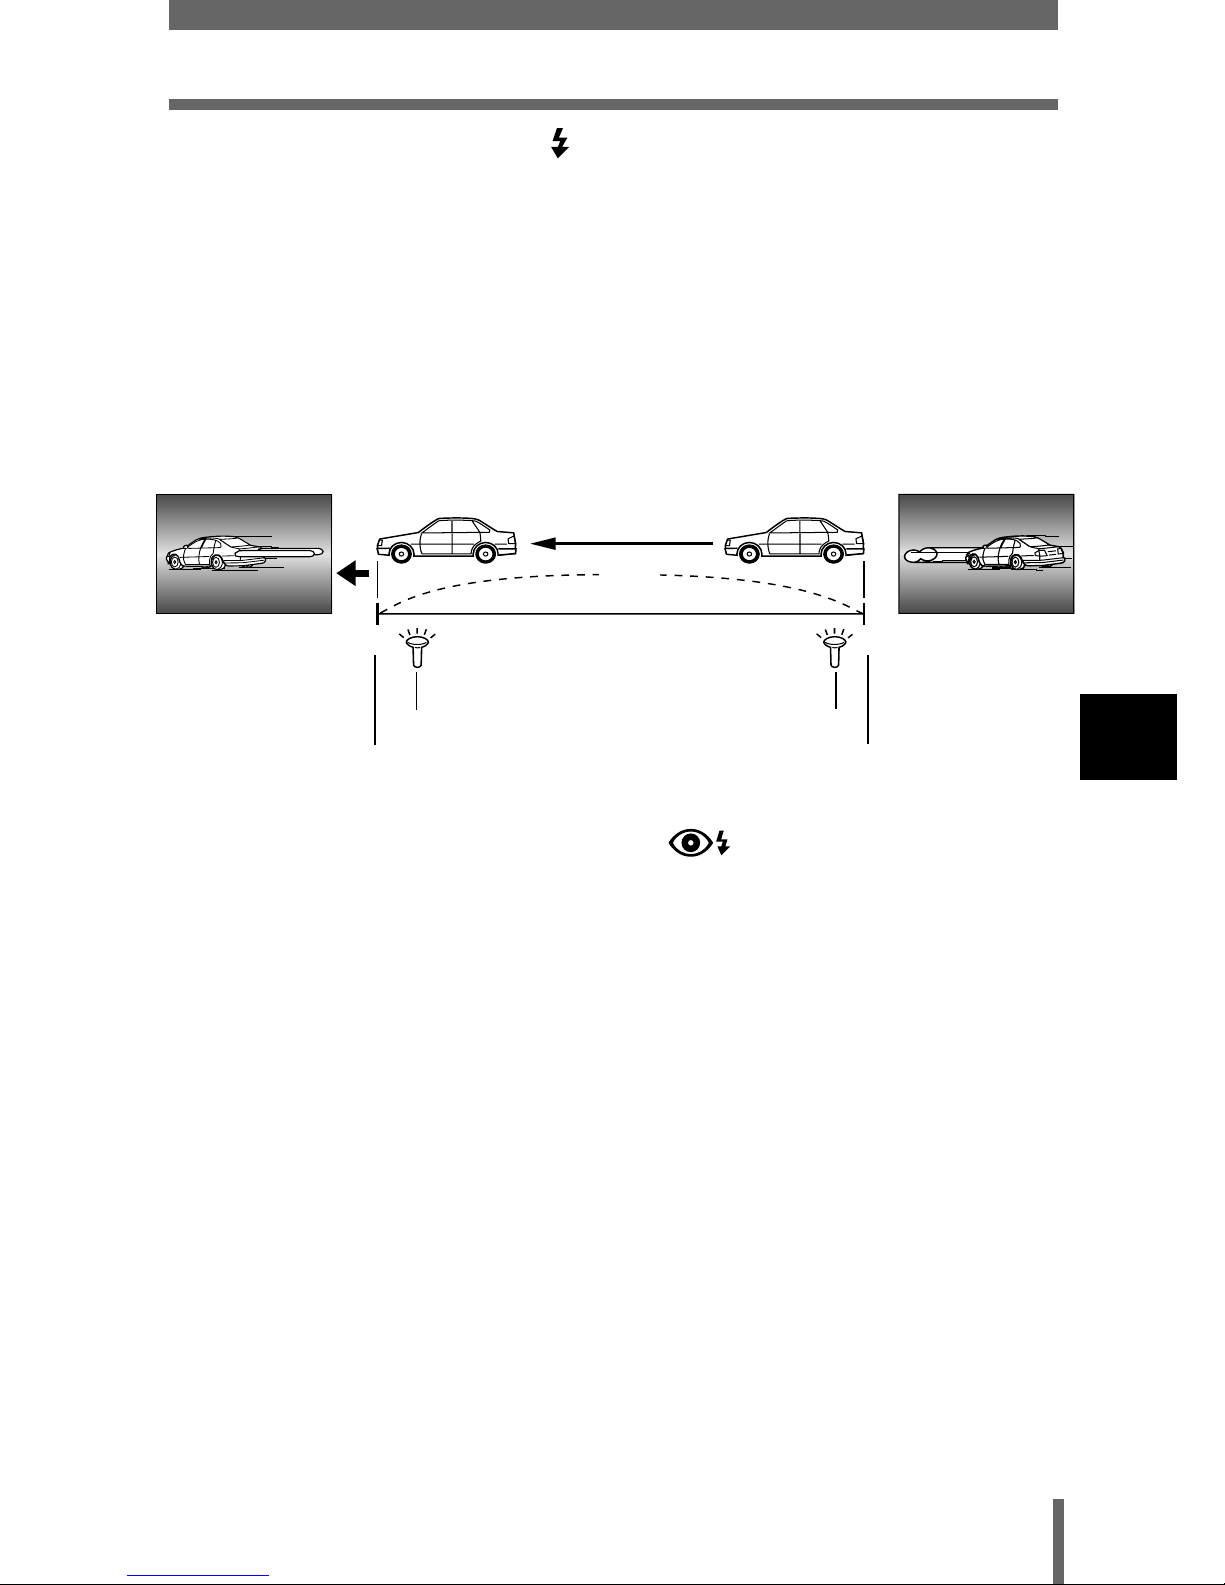
83
Flash shooting
5
Flash
2nd curtain (rear curtain) SLOW 2
In contrast to 1st curtain, 2nd curtain fires the flash just before the shutter
closes. Changing the flash timing can create interesting effects in your
picture, such as expressing the movement of a car by showing the tail-lights
streaming backwards. The slower the shutter speed, the better the effects
turn out.
The slowest possible shutter speed depends on the shooting mode:
M mode : 16 sec.
P/A/S mode : 1 sec.
1st curtain with red-eye reduction SLOW
This mode is for when you want to use slow synchronization, yet also reduce
the red-eye phenomenon. For instance, when shooting a person against a
brightly lit night background. A normal flash might make the person’s eyes
red, but 1st curtain with red-eye reduction lets you capture the background
correctly and reduce the red-eye phenomenon at the same time. 2nd curtain
with red-eye reduction is not available.
2nd curtain flash fires
Shutter closes
1st curtain flash fires
Shutter fully opens
When the shutter speed is set to 4 sec.
front curtainrear curtain
4 sec.
4 sec.
0
Page 85
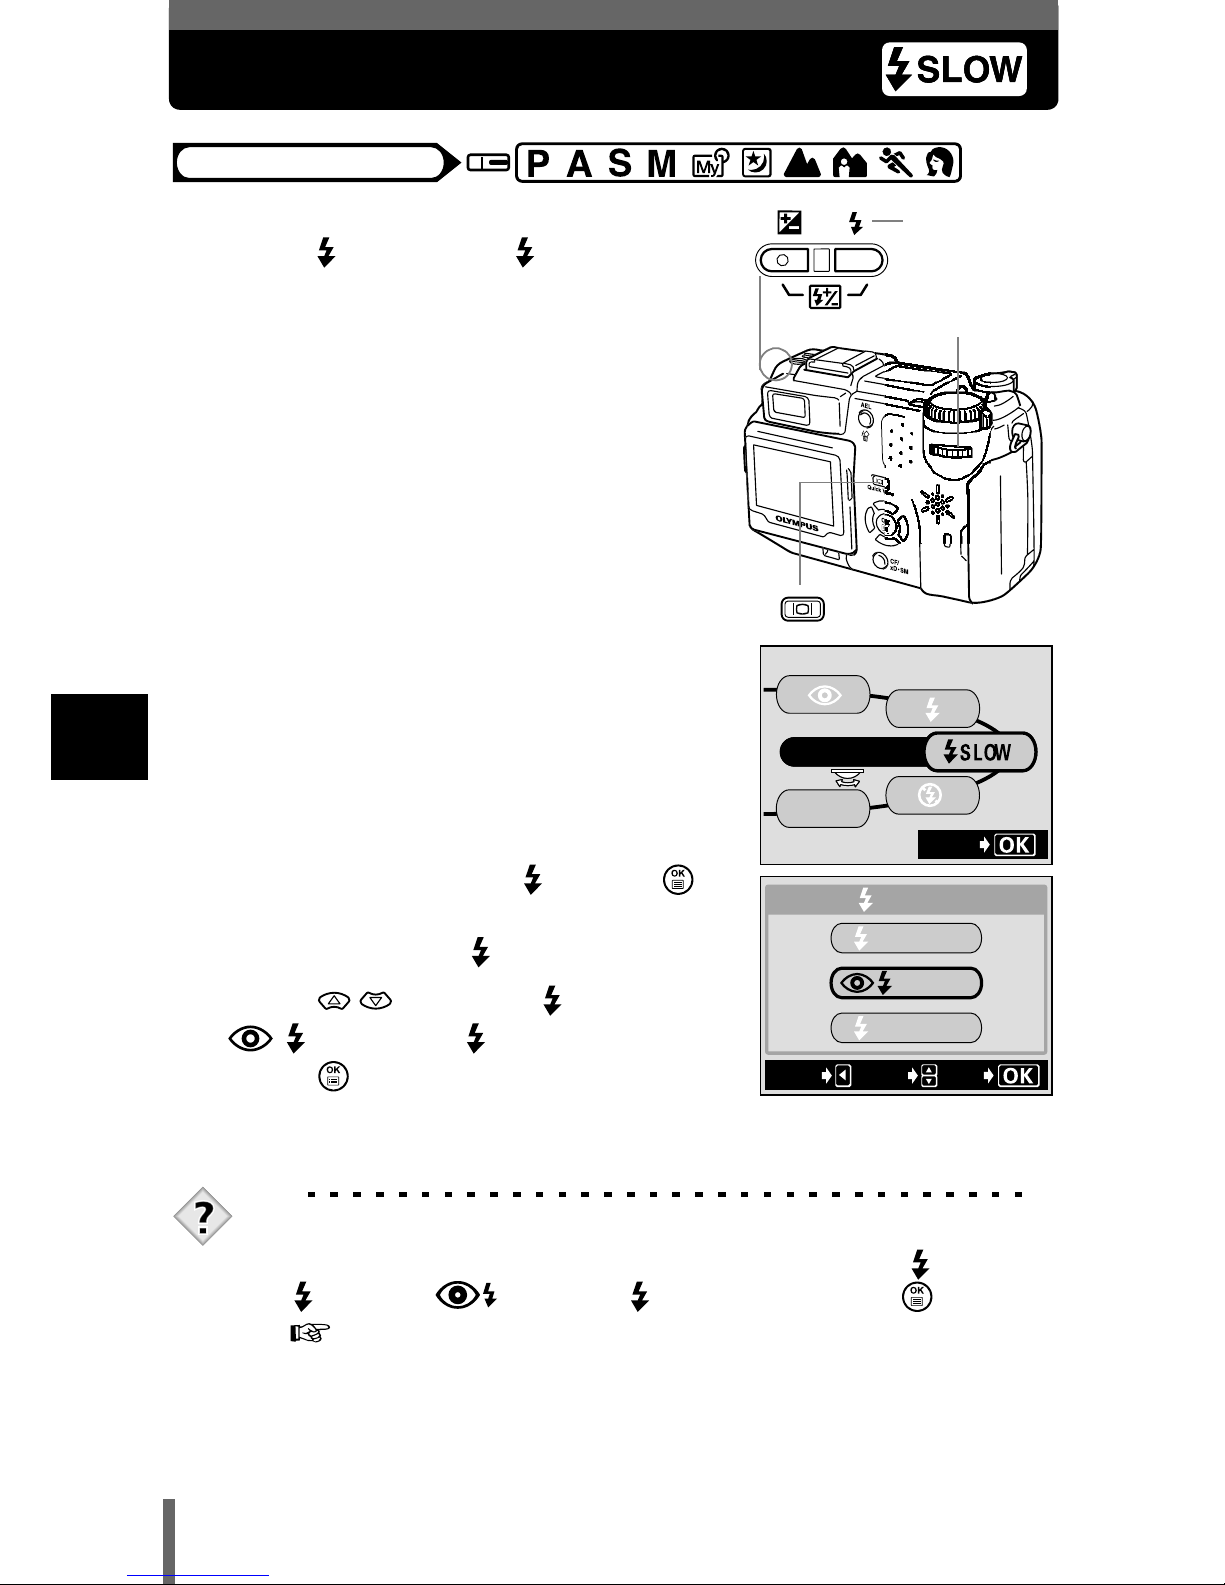
84
5
Flash
Using the slow synchronization flash
1
Turn the jog dial while holding
down and select SLOW.
2
While holding down , press .
• After the slow synchronization menu is
displayed, release .
3
Press to select SLOW1,
SLOW, or SLOW2, then
press .
TIPS
Slow synchronization can also be set from the MODE MENU.
→ In the top menu, select MODE MENU → CAMERA → SLOW →
SLOW1, SLOW or SLOW2, then press .
“How to use the menus” (P.70)
Mode dial
Flash mode
button
Jog dial
FLASH MODE
AUtO
SEt
GO
SELECt
SLOW
SLOW1
SLOW
SLOW2
CANCEL
Slow synchronization menu
Page 86
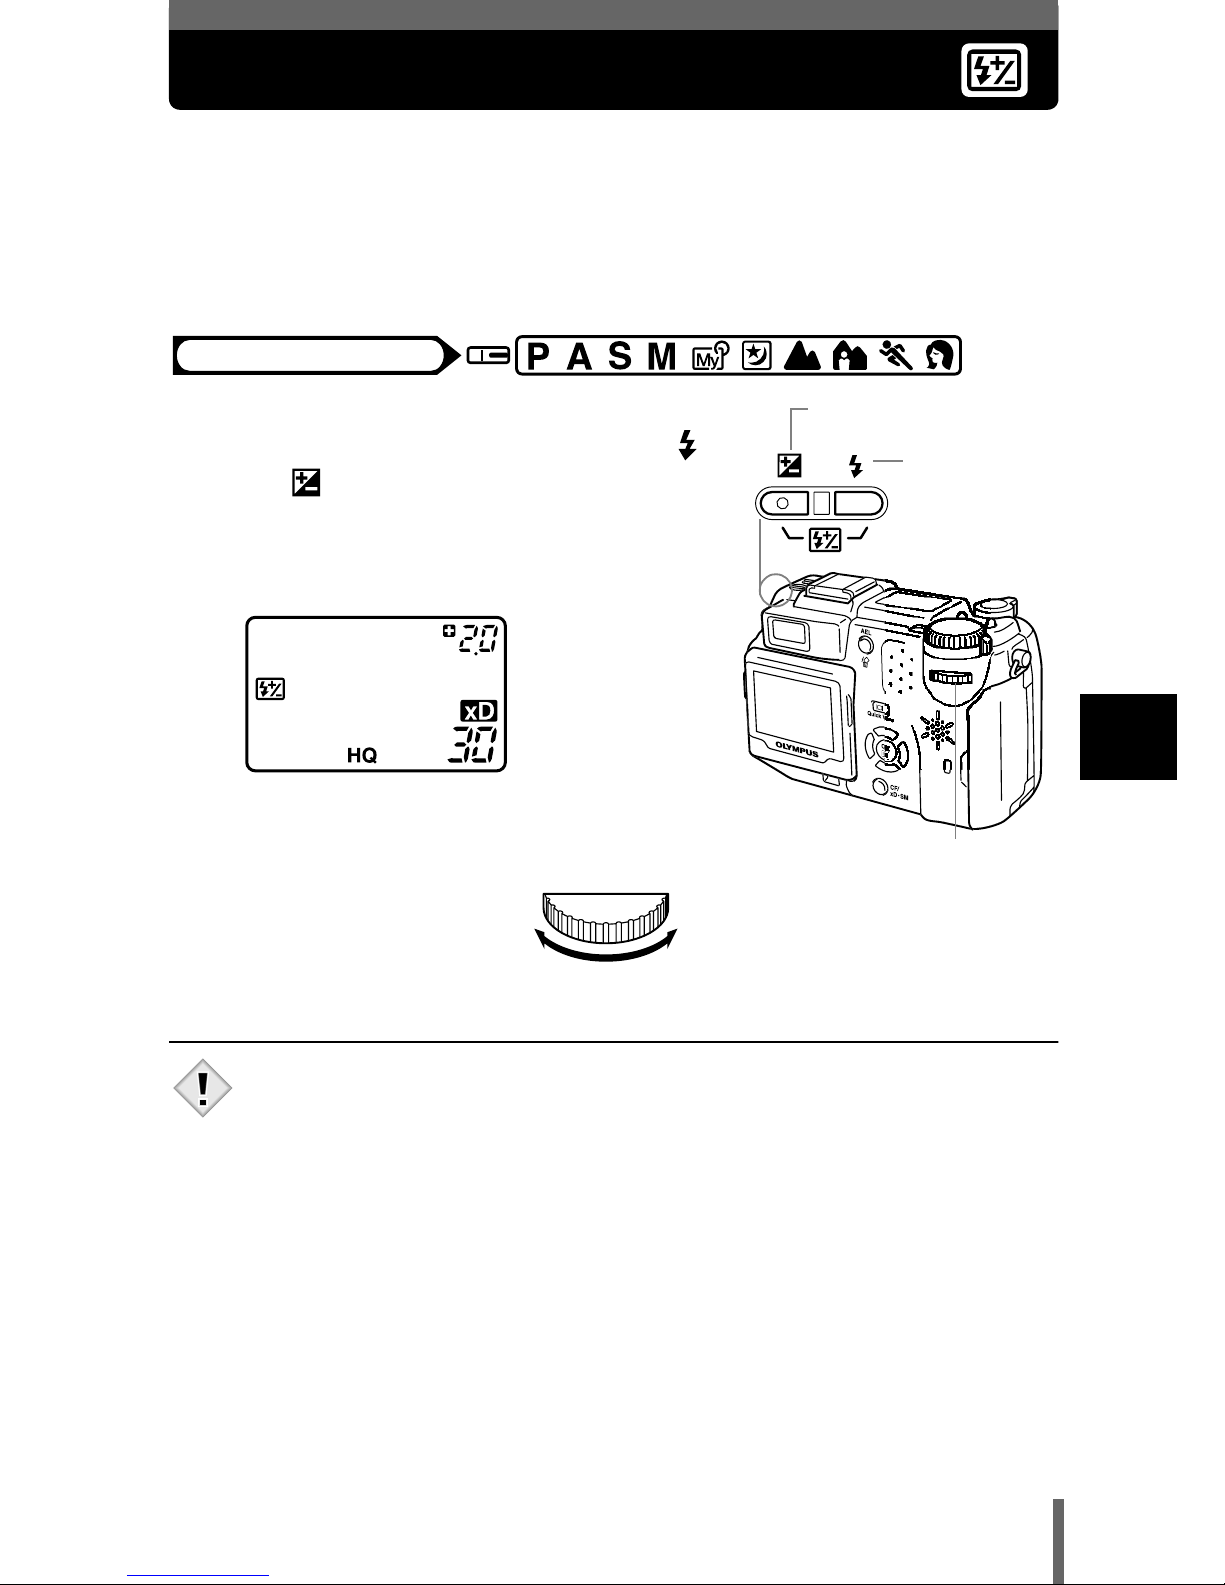
85
5
Flash
Flash intensity control
You can adjust the amount of light emitted by the flash.
In some situations, you may get better results by adjusting the light emission.
Examples include small subjects, distant backgrounds, or situations when
increased contrast is desired. You can adjust the brightness in the range of
±2.0 in 1/3 EV steps.
1
Adjust the brightness by turning
the jog dial while holding down
and at the same time.
• The exposure value is displayed on the
control panel while the flash intensity
control function is set.
• The flash adjustment effect may not be sufficient if the shutter speed
is too fast.
Mode dial
Exposure compensation
button
Flash mode
button
Jog dial
Turning to the left
decreases light emission in
steps of 1/3 EV.
Turning to the right
increases light emission in
steps of 1/3 EV.
(EV : Exposure Value)
Note
Page 87
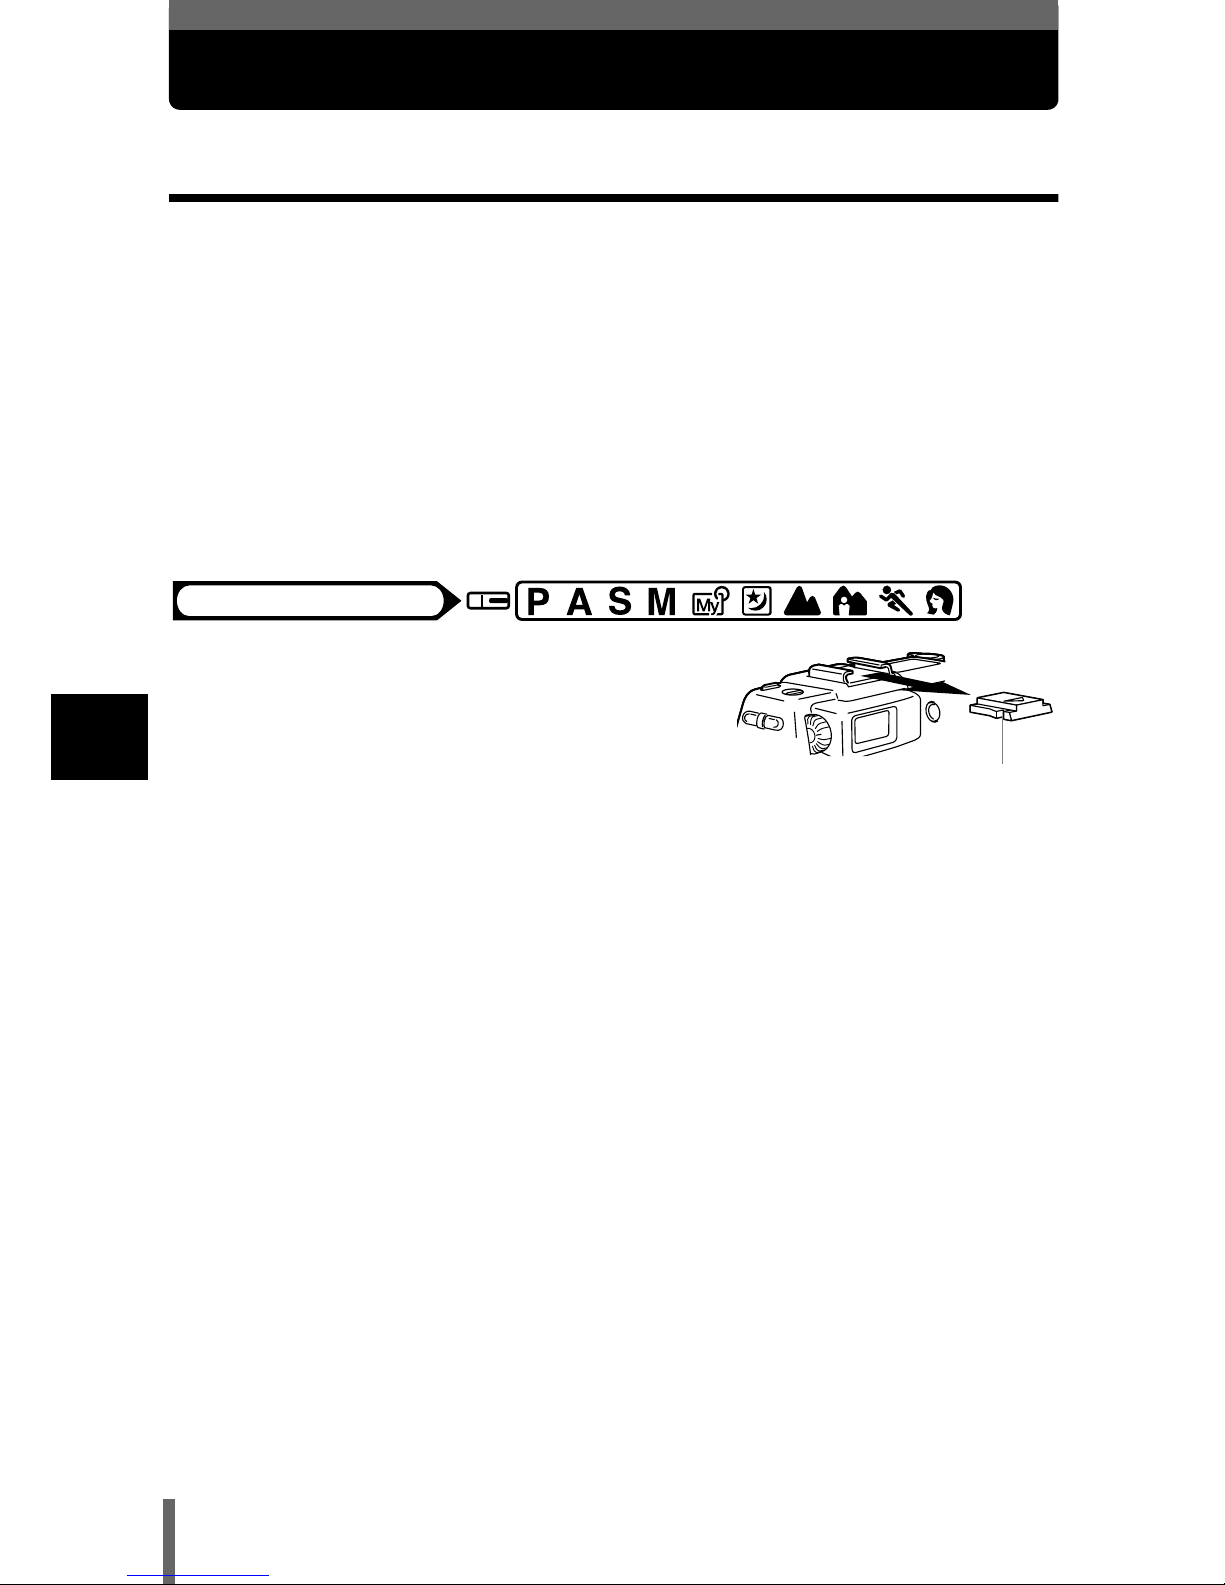
86
5
Flash
External flash (optional)
Using the FL-40 external flash
Various types of flash shooting are possible with the FL-40 external flash,
which can be used either by itself or together with the main flash.
If the FL-40 is used, flash mode and exposure compensation will be detected
automatically by the camera, allowing the main flash and external flash to
function together.
Using the two flashes together allows for more sophisticated lighting, such as
catch lighting.
The FL-40 can be mounted on the camera by attaching it to the hot shoe on
the top of the camera, or by using the exclusive FL-BK01 flash bracket
(optional) and FL-CB02 bracket cable (optional).
1
Slide the shoe cover off in the
direction of the arrow and attach
the external flash.
• For instructions on how to attach the
flash, refer to the manual for the FL-40
external flash.
• Keep the shoe cover in a safe place to
prevent it getting lost, and replace it on the
camera when you have finished using the
external flash.
Mode dial
shoe cover
Page 88
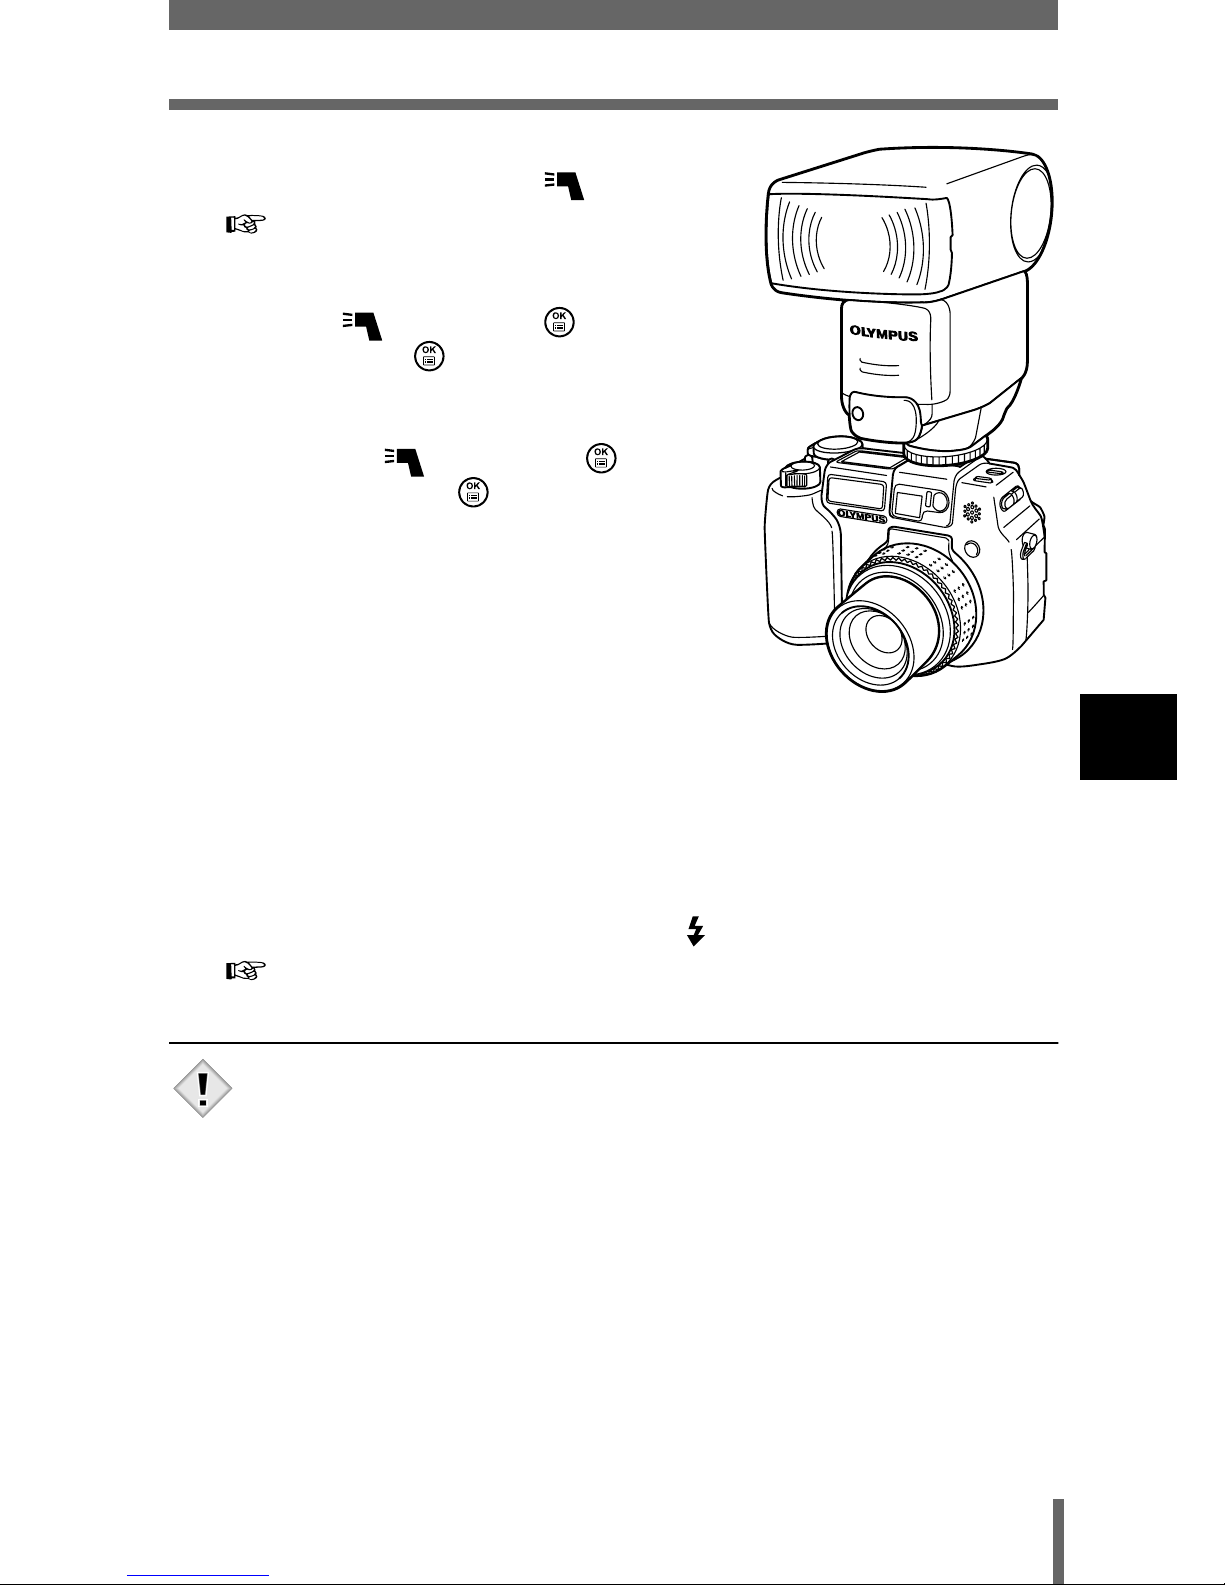
87
External flash (optional)
5
Flash
2
In the top menu, select MODE
MENU
→→→→
CAMERA
→→→→
FLASH.
“How to use the menus” (P.70)
To use the external flash only
→ Select , then press . To exit the
menu, press again.
To use the external flash together with
the main flash
→ Select IN+ , then press . To exit
the menu, press again.
3
Turn on the external flash.
• The mode for the external flash is TTLAUTO.
• When the shutter button is pressed
halfway, the external flash begins
communicating with the camera and
automatically switches to TTL-AUTO.
During communication, the camera’s
monitor is turned on and TTL-AUTO is
displayed.
4
Select the flash mode by turning
the jog dial while holding down .
“Flash shooting” (P.79)
• If close-up pictures are overexposed, try using the main flash by
itself.
• When the main flash and the FL-40 are used together, the main
flash is used as the compensating light source. This means that if
the amount of light from the FL-40 is insufficient (beyond its working
range), the resulting pictures may be underexposed.
Note
Page 89
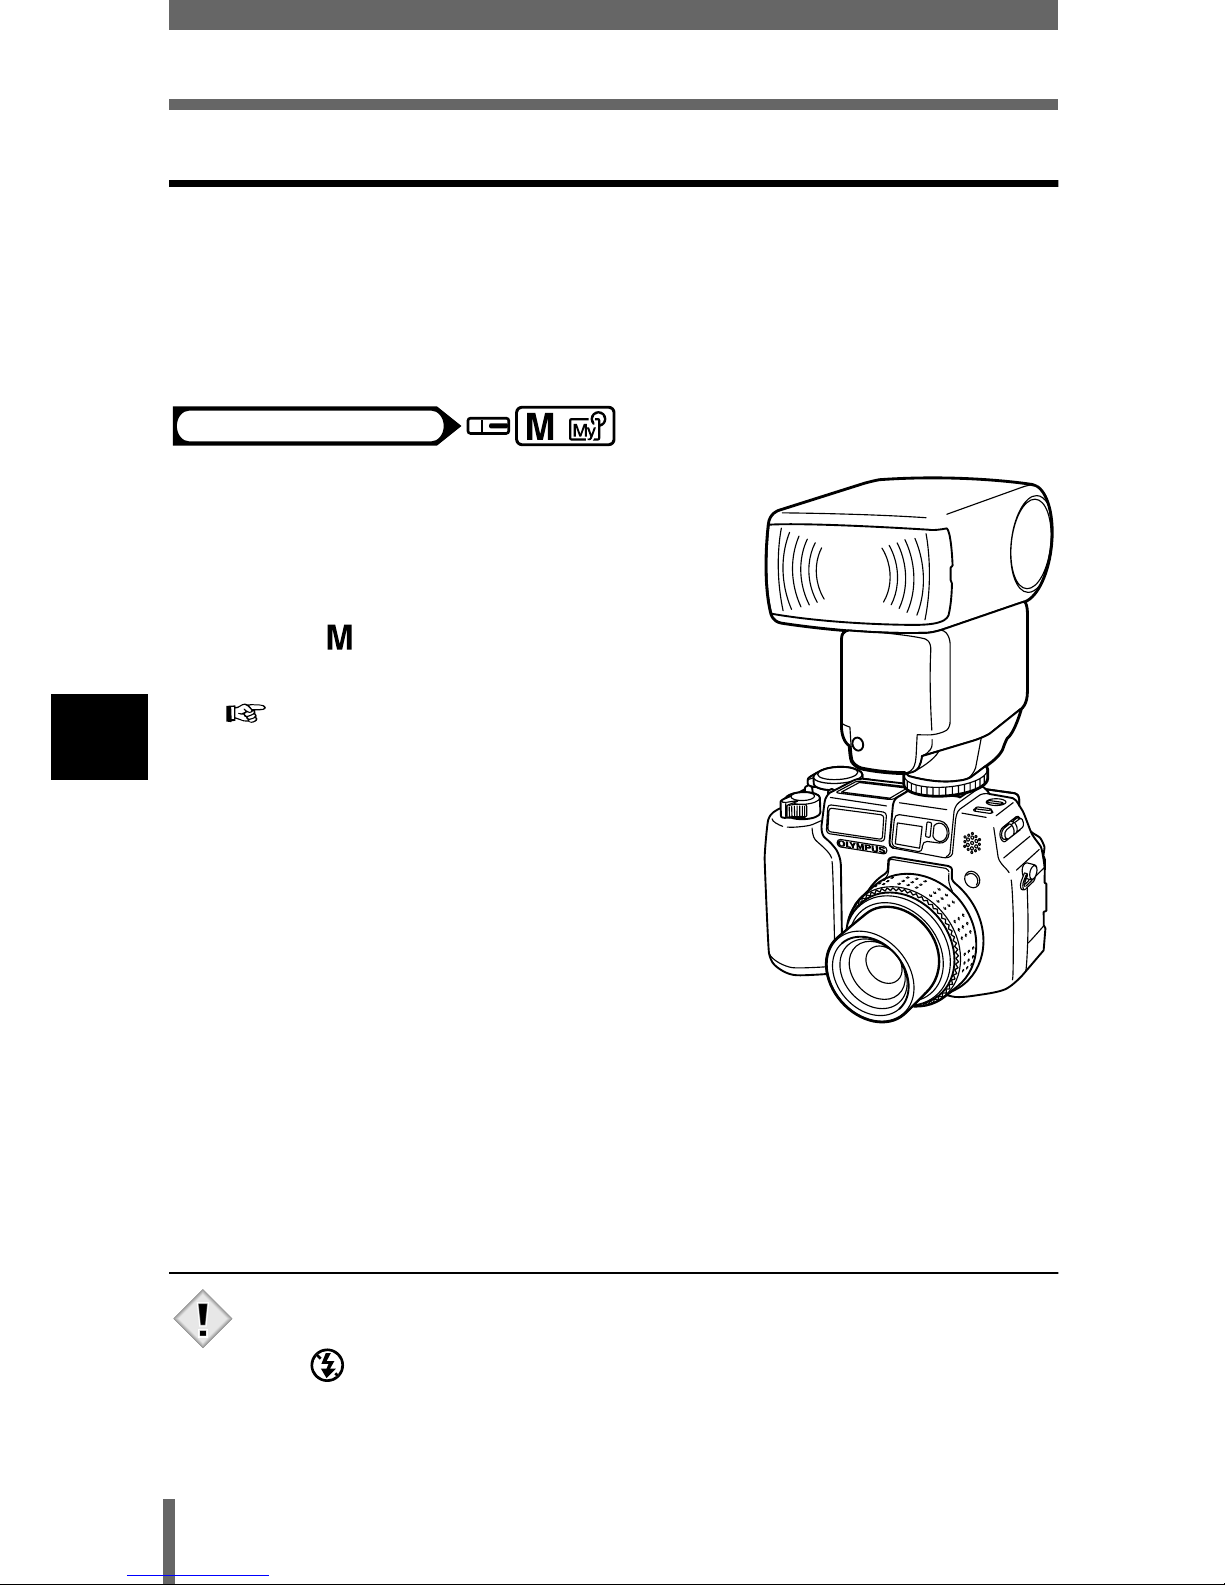
88
External flash (optional)
5
Flash
Using commercially available external flashes
Provided that the flash can be connected to the hot shoe, a commercially
available external flash may be used. (Unlike the FL-40, the amount of light
emitted cannot be adjusted on commercially available external flashes.)
For details on compatible commercially available external flashes, refer to the
next page.
1
Attach the external flash to the hot
shoe and connect it to the camera.
• For instructions on how to attach the flash,
refer to the manual for the external flash.
2
Select mode. Adjust the shutter
speed and aperture.
“Manual shooting” (P.93)
• Remember that a slow shutter speed can
produce blurred images. For the best
results, we recommend that you set the
shutter speed from 1/200 to 1/300
seconds.
3
Turn on the external flash.
4
Set the mode that automatically controls the amount of
light emitted by the external flash. Also set the ISO
sensitivity and aperture on the external flash to match the
camera’s settings.
• Refer to the user’s manual for the external flash to select its mode.
• The camera’s flash mode will have no effect on the external flash.
The external flash will fire even when the camera’s flash mode is set
to (off).
• Confirm in advance that the external flash you are using is
synchronized with the camera.
Mode dial
Note
Page 90

89
External flash (optional)
5
Flash
Compatible commercially available external flashes
When selecting an external flash, use products which meet the
following basic conditions.
(1) Some flashes available on the market operate with a high voltage synchro
terminal. If one of these is used, it may damage the camera, and/or the
camera may not function normally. Contact the manufacturer of the flash
you are using concerning the specifications of the flash’s synchro
terminal.
(2) Some flashes available on the market have the polarity of the synchro
terminal reversed. In this case, even if the flash is connected, it will not
fire. Contact the manufacturer of the flash for more information.
(3) Exposures when using an external flash require that adjustments be
made on the external flash unit. If an external flash is used in the auto
mode, match it with the F value and ISO sensitivity settings on the
camera.
(4) Even if the auto F value and ISO sensitivity of the external flash are set to
the same conditions as those on the camera, depending on the
photographic conditions, it is possible that the correct exposure may not
be obtained anyway. In such a case, adjust the auto F value or ISO value
on the external flash unit or calculate the distance in the manual mode
and use it that way. Generally, however, the auto F value and ISO value
can only be adjusted 1 step and beyond that, exposure compensation
cannot be made. (Exposure compensation in the camera is made invalid
in external flash photography.)
(5) Use a flash which is capable of covering an illumination angle for a 35 mm
or larger lens when calculated for 35 mm film. However, in close-up
photography with the lens on the wide setting, the bottom of the image
may not expose correctly. The ideal is to have a wide angle adapter to fit
on the flash and spread the illumination angle so it is wider.
(6) Use a flash unit with a flash time of 1/200 sec. or less when using the flash
at full strength. For devices with a long flash time, such as a ring flash, a
portion of the light emitted will not contribute to the exposure.
(7) If a flash unit or other accessory TTL flash that has additional
communications functions other than the FL-40 is used, it may not
only fail to function normally, but may also cause damage to the
camera’s circuitry. Do not use such a device.
Page 91
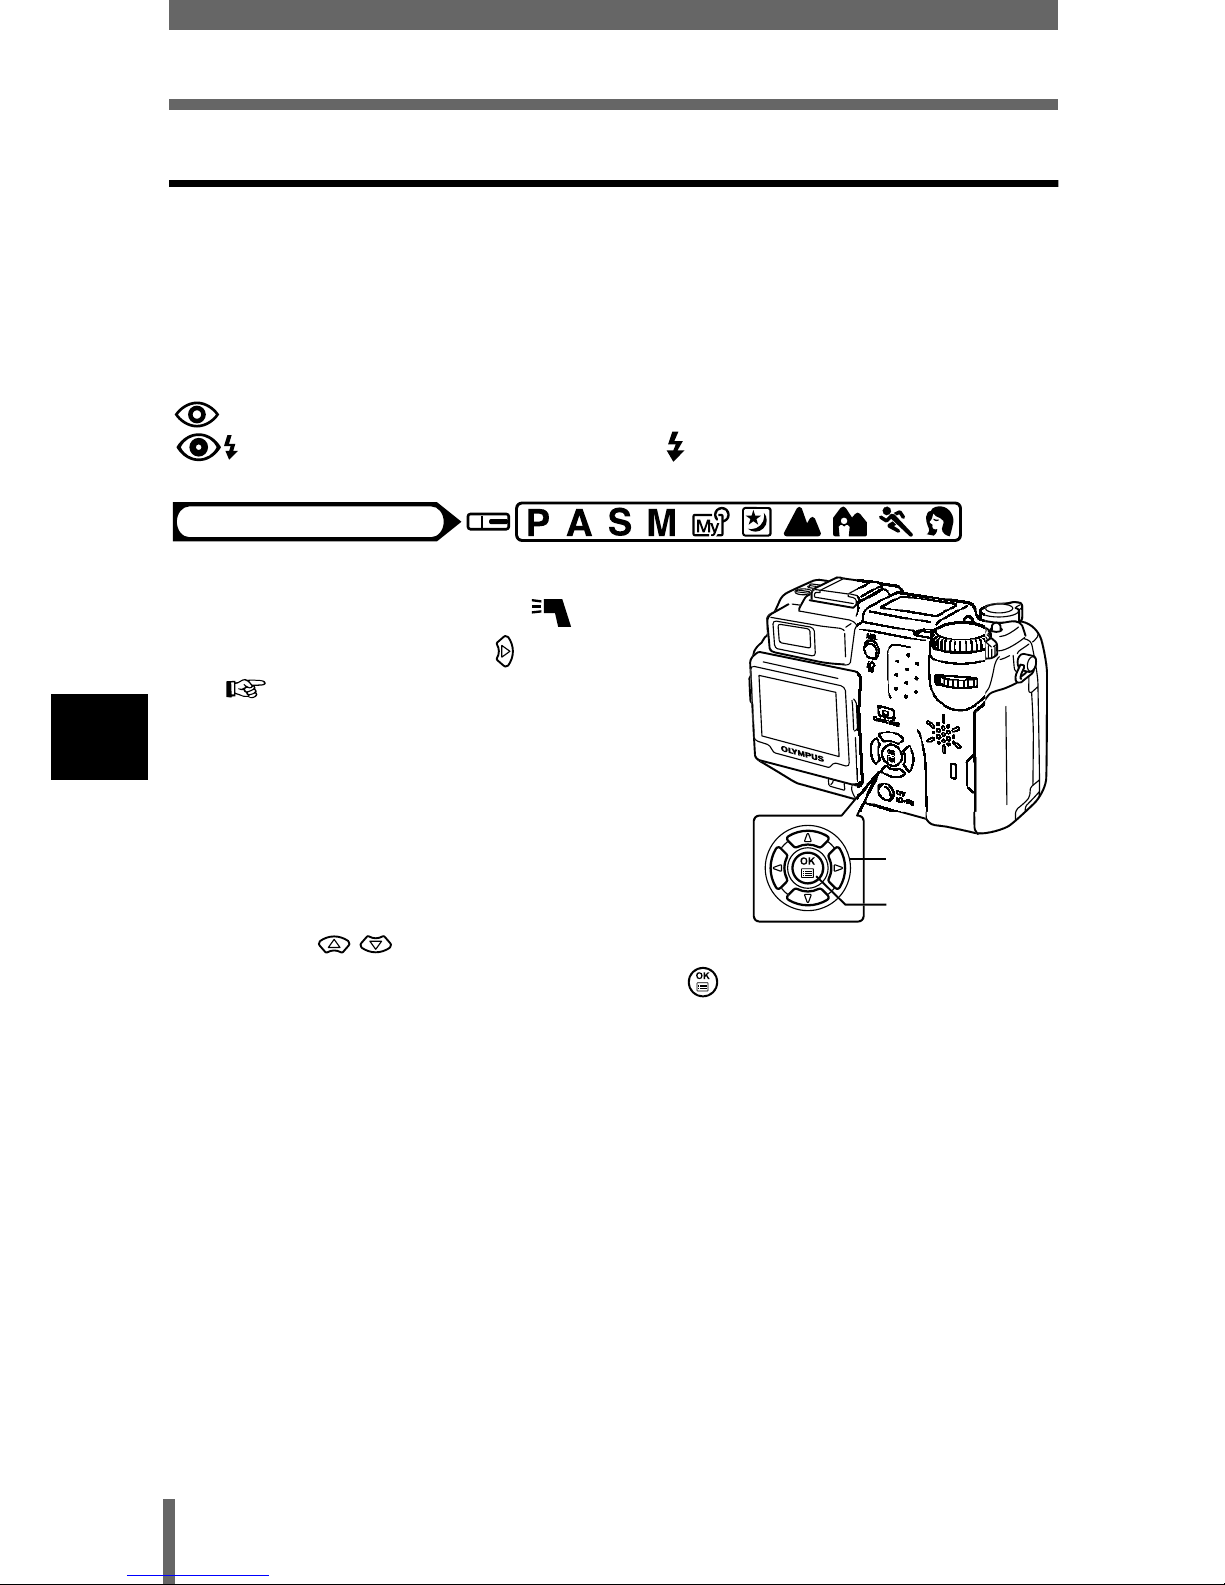
90
External flash (optional)
5
Flash
Using a slave flash mode
This setting is for using a commercially available slave flash.
This lets you adjust and fix the amount of light emitted by the commercially
available slave flash. If you set a low amount, the flash will fire during
sequential shooting. The following restrictions apply to the slave flash mode
depending on the selected flash mode.
: The setting is changed to AUTO.
SLOW : The setting is changed to SLOW 1.
1
In the top menu, select MODE
MENU
→→→→
CAMERA
→→→→
FLASH
→→→→
SLAVE, and press .
“How to use the menus” (P.70)
2
Press to select the amount
of light from 1 to 10, then press .
Mode dial
Arrow pad
OK button
Page 92
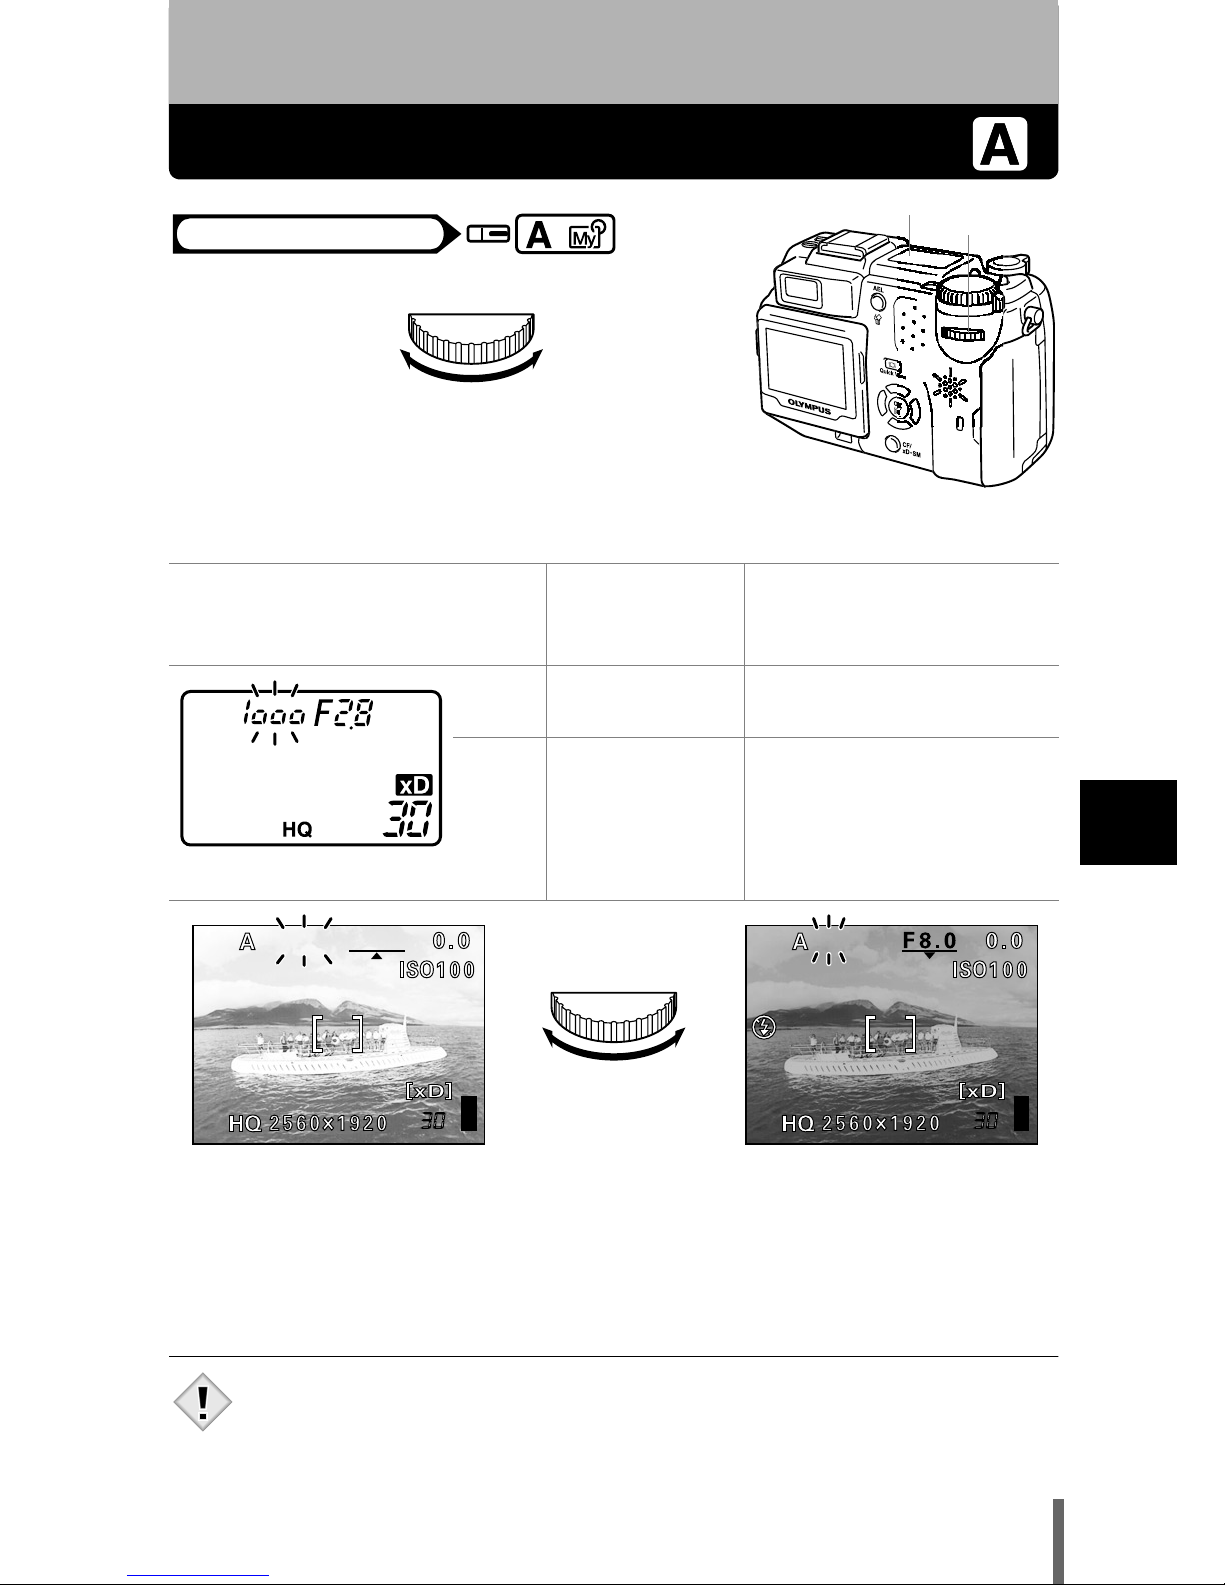
91
6
Advanced shooting
6 Advanced shooting
Aperture priority shooting
1
Turn the jog dial to set the aperture value.
appears : The image is overexposed.
Turn the jog dial to the right to increase the aperture value.
appears : The image is underexposed.
Turn the jog dial to the left to reduce the aperture value.
Aperture range :Toward W : F1.8 to F8.0
Toward T : F2.6 to F8.0
• When the flash is set to the auto-flash mode, the shutter speed is
fixed at 1/30 sec. in the maximum wide angle, or 1/100 sec. in the
maximum telephoto, and will not go slower.
Control panel
Aperture value
indication on
the monitor
Meaning
Lights Displayed in
green
The aperture setting is
suitable for the conditions.
Blinks Displayed in
red
The aperture setting is
unsuitable for the
conditions. Take the
following steps when the
monitor is turned on.
Mode dial
Jog dial
Control panel
Turn to the right
to increase the
aperture value
(F number).
Turn to the left
to decrease the
aperture value
(F number).
• Pressing the shutter button halfway
displays the shutter speed on the control panel.
• If the image is underexposed or overexposed when the shutter button
is halfway pressed, the shutter speed indication blinks.
F2.8F2.8
1/1000
1/1000
4"
4"
Note
Page 93
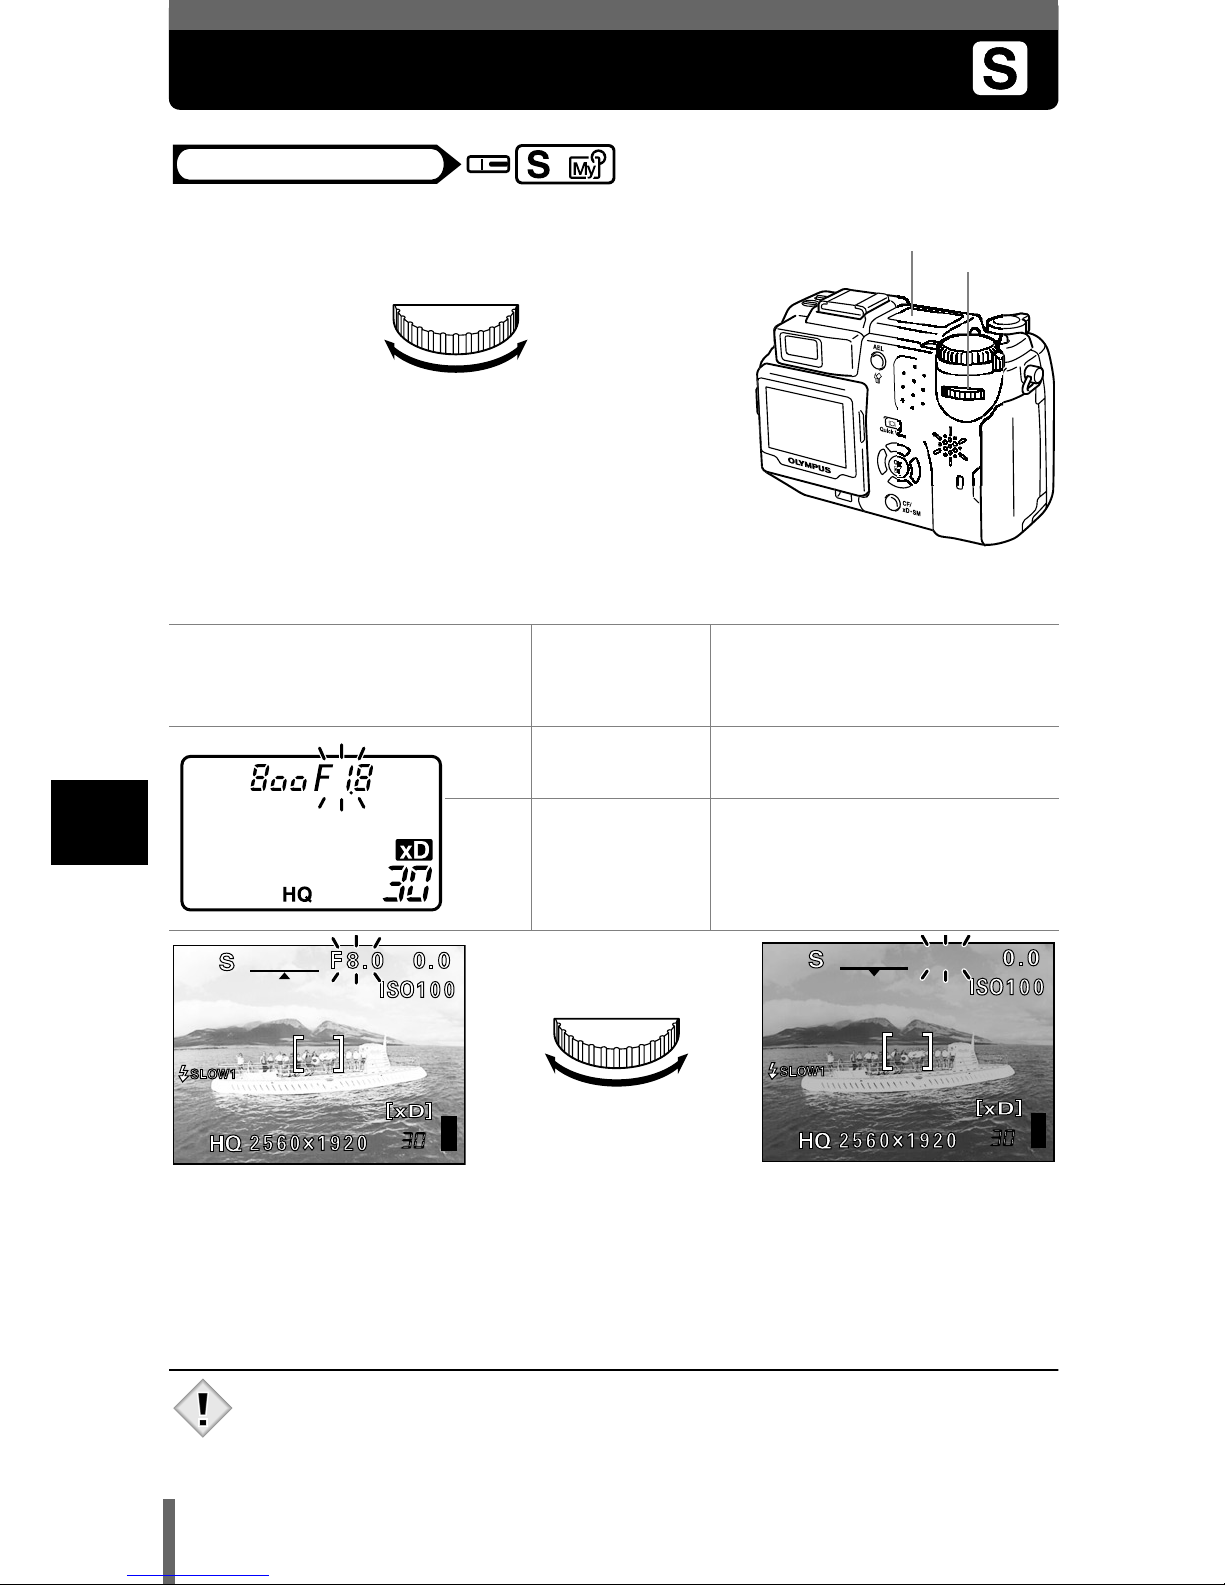
92
6
Advanced shooting
Shutter priority shooting
1
Turn the jog dial to set the shutter
speed.
appears : The image is overexposed.
Turn the jog dial to the right to set the shutter speed faster.
appears : The image is underexposed.
Turn the jog dial to the left to set the shutter speed slower.
Shutter speed range : 4 to 1/1000 sec.
• Shutter speeds that can be set differ according to the flash setting.
Control panel
Shutter speed
indication on
the monitor
Meaning
Lights Displayed in
green
The shutter speed setting is
suitable for the conditions.
Blinks Displayed in
red
The shutter speed setting is
unsuitable for the conditions.
Take the following steps when
the monitor is turned on.
Mode dial
Jog dial
Control panel
Turn to the
right to set a
faster shutter
speed.
Turn to the left
to set a slower
shutter speed.
• Pressing the shutter button halfway displays
the aperture value on the control panel.
• If the image is underexposed or
overexposed when the shutter button is
halfway pressed, the aperture value
indication blinks.
F1.8
F1.8
1/800
1/50
Note
Page 94
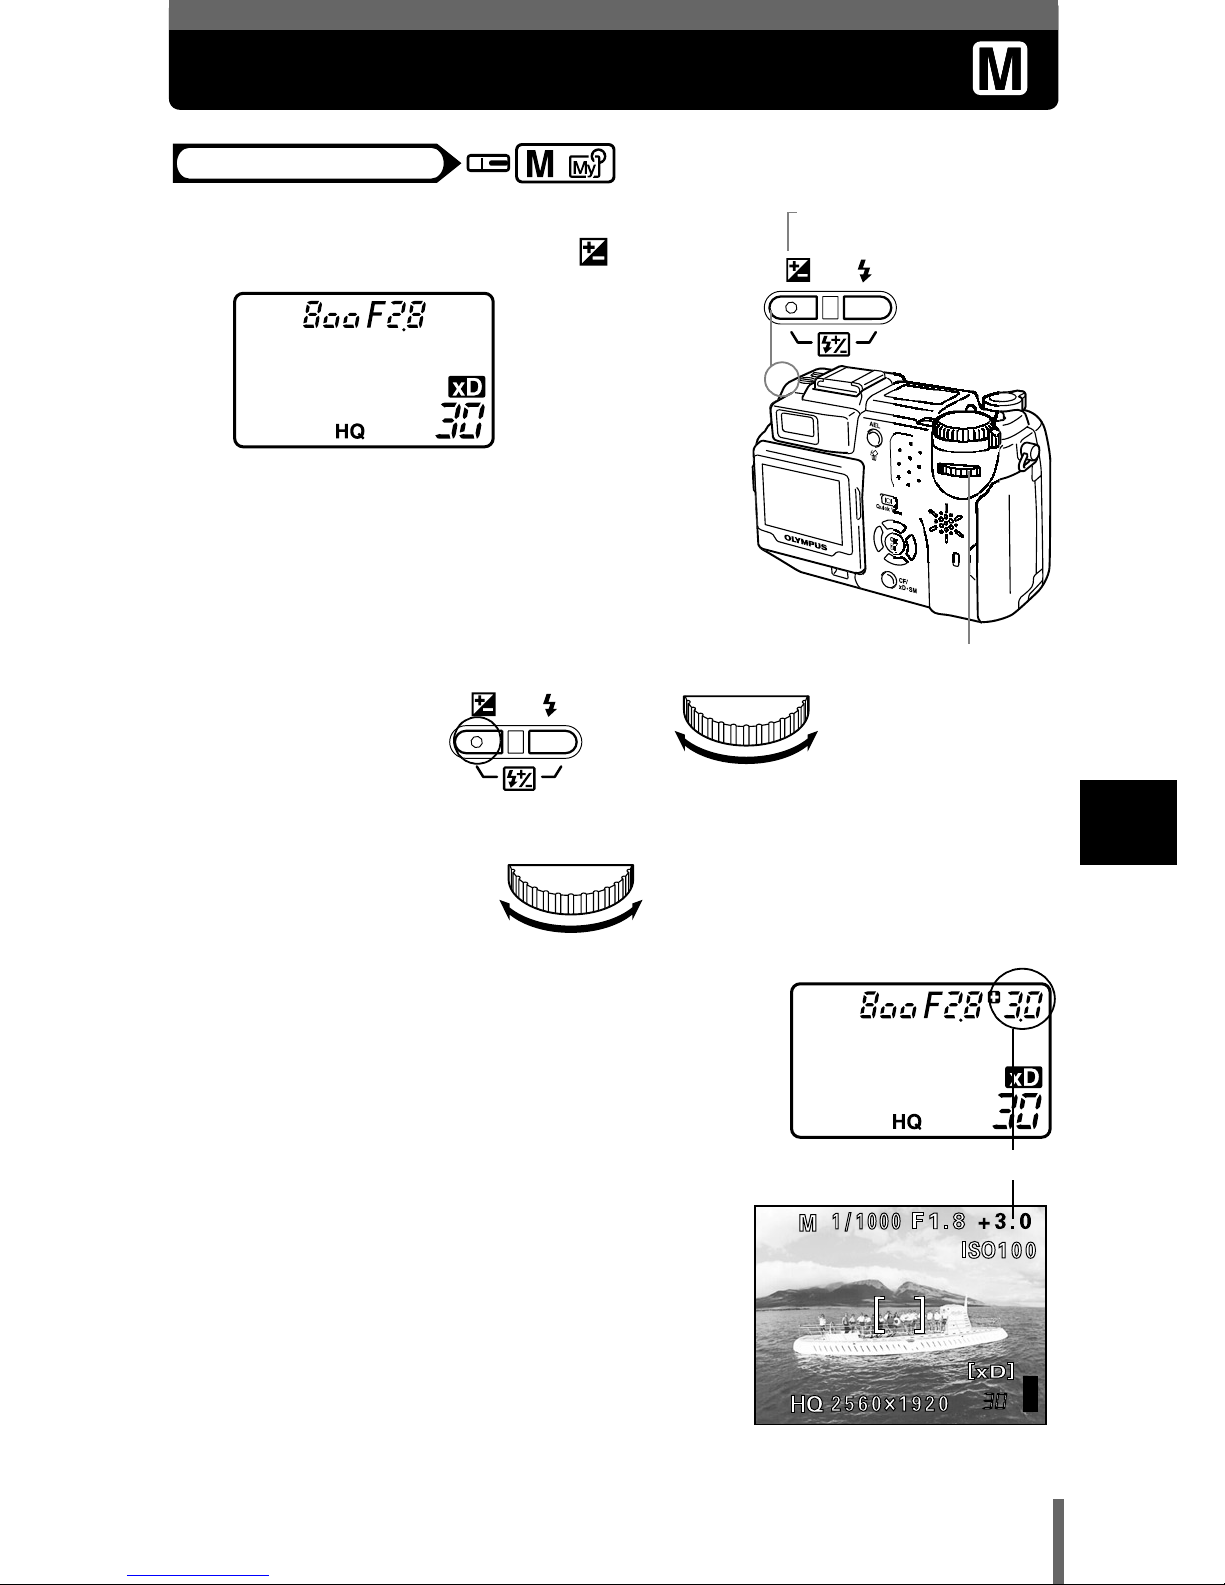
93
6
Advanced shooting
Manual shooting
1
Set the aperture by turning the jog
dial while holding down .
Turn the jog dial to set the shutter speed.
• When the shutter button is halfway
pressed, the difference (ranging from -3.0
to +3.0 EV) between the exposure
determined by the currently selected
aperture and shutter speed compared to
the exposure level considered optimal by
the camera is displayed.
• If the exposure differential appears in red
on the monitor, it indicates that the
exposure differential is less than -3.0 EV
or more than +3.0 EV.
Mode dial
Exposure compensation
button
Jog dial
Turn to the right to
increase the aperture
value (F number).
+
Turn to the left to
decrease the aperture
value (F number).
Turn to the right to set a
faster shutter speed.
Turn to the left to set a
slower shutter speed.
Exposure differential
Page 95
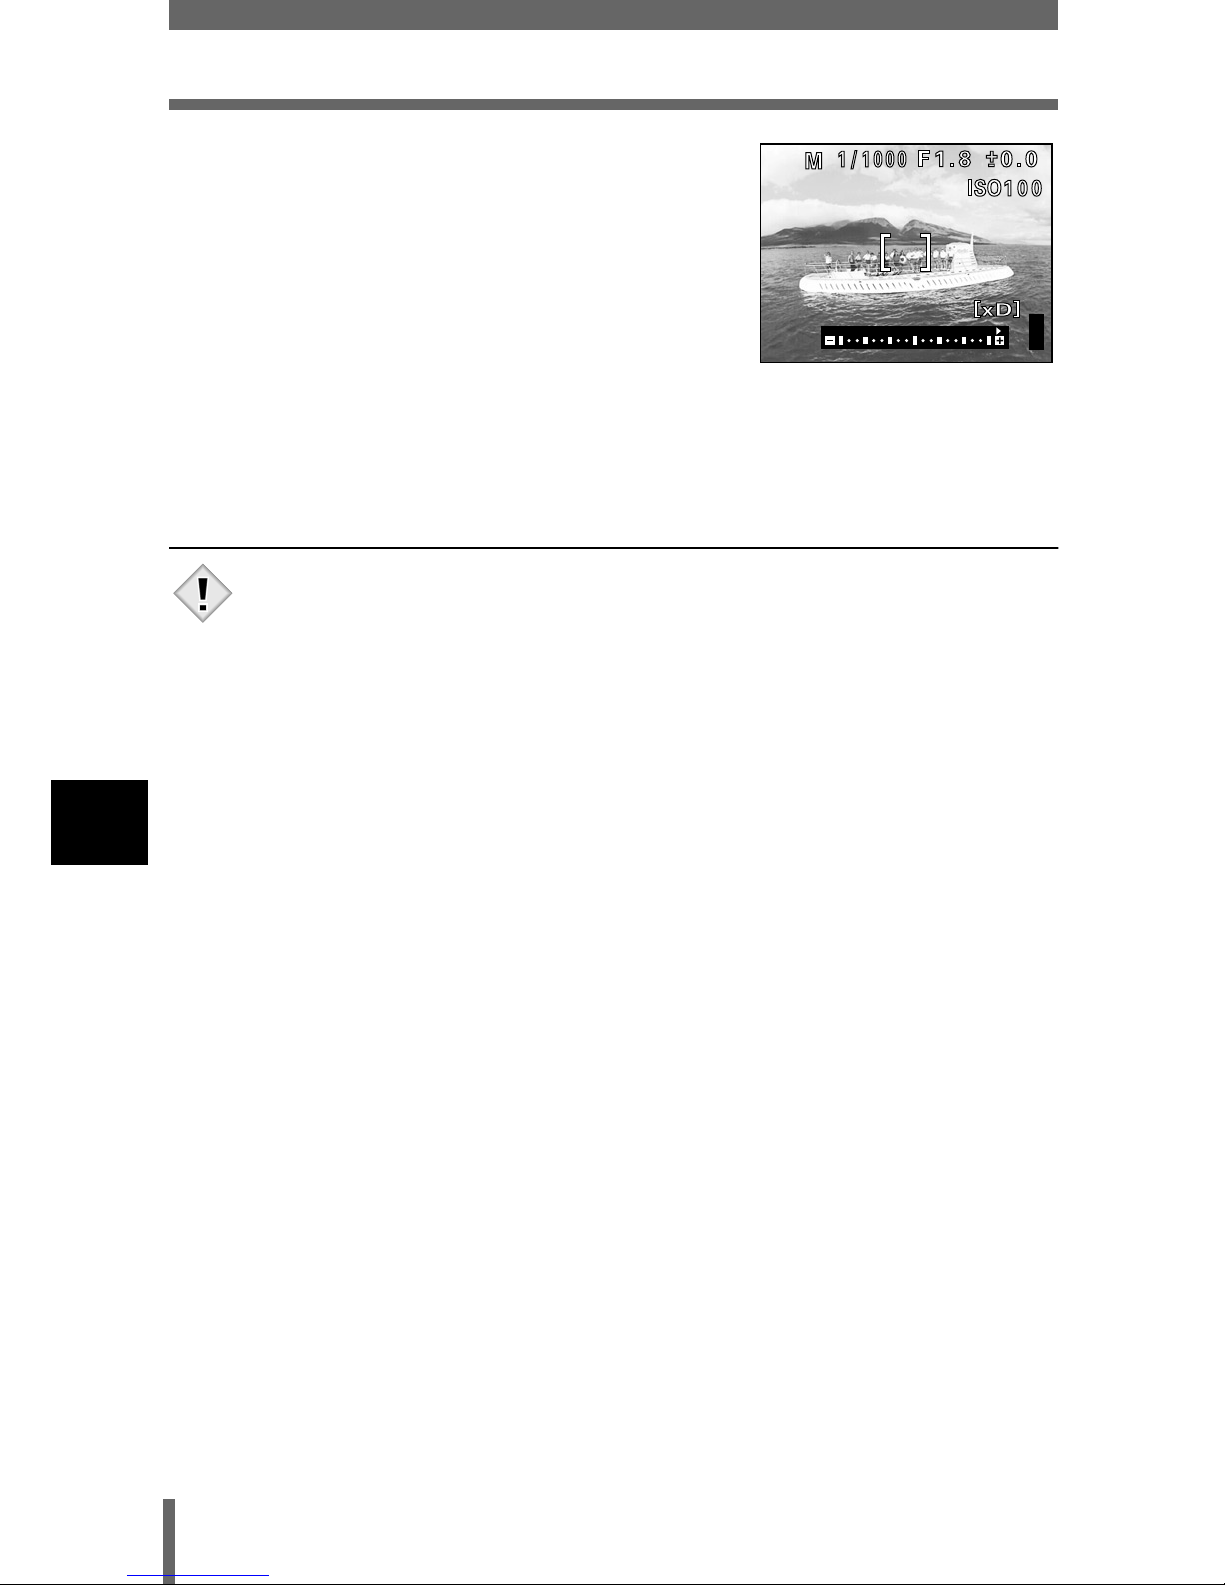
94
Manual shooting
6
Advanced shooting
• When you press the AEL (AE Lock)
button, the screen on the right appears
with the bar indicating current exposure
settings. Pressing the shutter button
halfway shows how much the current
exposure differs from the correct
exposure.
Aperture value : F1.8 to F8.0
Shutter speed : 16 to 1/1000 sec.
(At F8.0, up to 1/2000 sec.)
• To avoid camera movement, you are recommended to use a tripod
when taking pictures requiring a slow shutter speed.
Note
Page 96
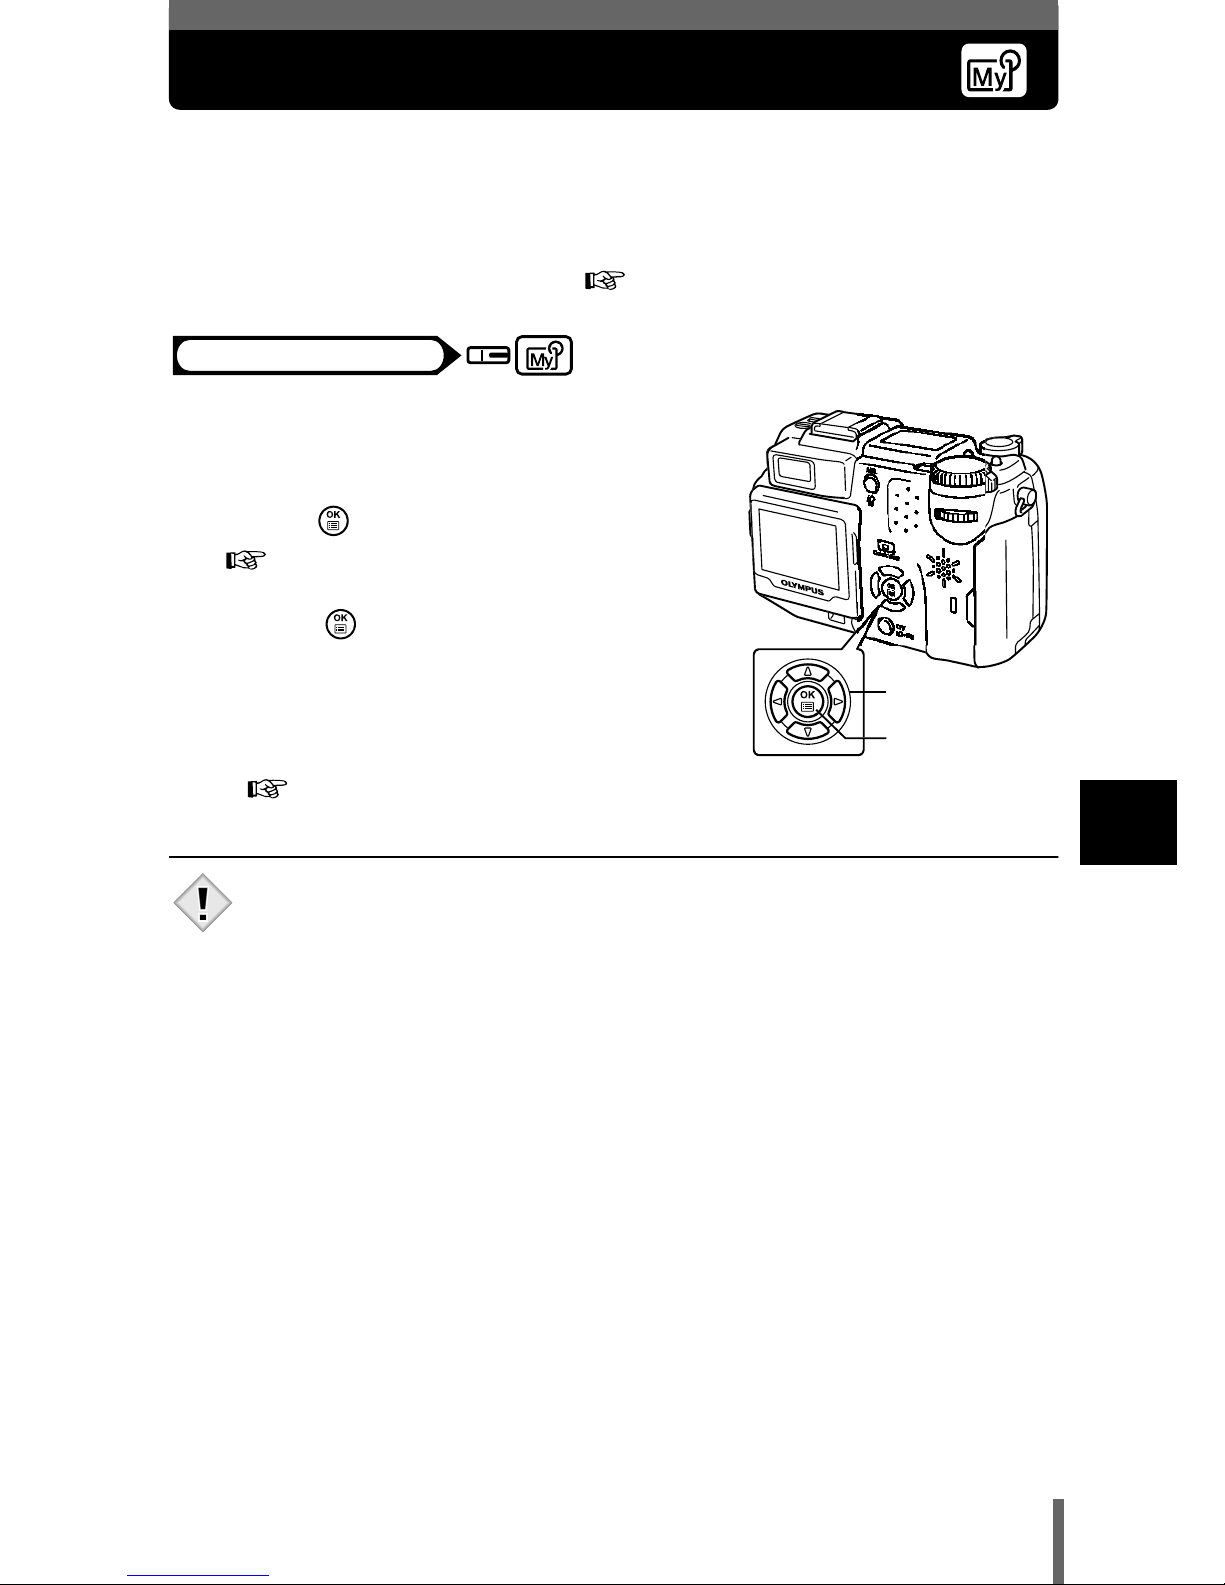
95
6
Advanced shooting
Using My Mode
When you use My Mode, the settings you selected with the menus in My
Mode are activated. Saving the shooting mode or function settings you want
to use in advance lets you shoot with your favorite settings straightaway. You
can also save the settings you are currently using. You can create and save
up to 8 different My Mode settings. “MY MODE SETUP” (P.172)
1
In the top menu, select MODE
MENU
→→→→
CAMERA
→→→→
MY MODE
→→→→
MY MODE 1 to MY MODE 8, and
press .
“How to use the menus” (P.70)
• Press again to exit the menu.
• Only the settings in MY MODE 1 have
already been saved. You cannot select
MY MODE 2 to MY MODE 8 if no settings
have been saved in them.
“MY MODE SETUP” (P.172)
• When you save the settings you are currently using in My Mode and
then activate those settings for taking pictures, the zoom position
may not be the same as the position that was saved.
Mode dial
Arrow pad
OK button
Note
Page 97
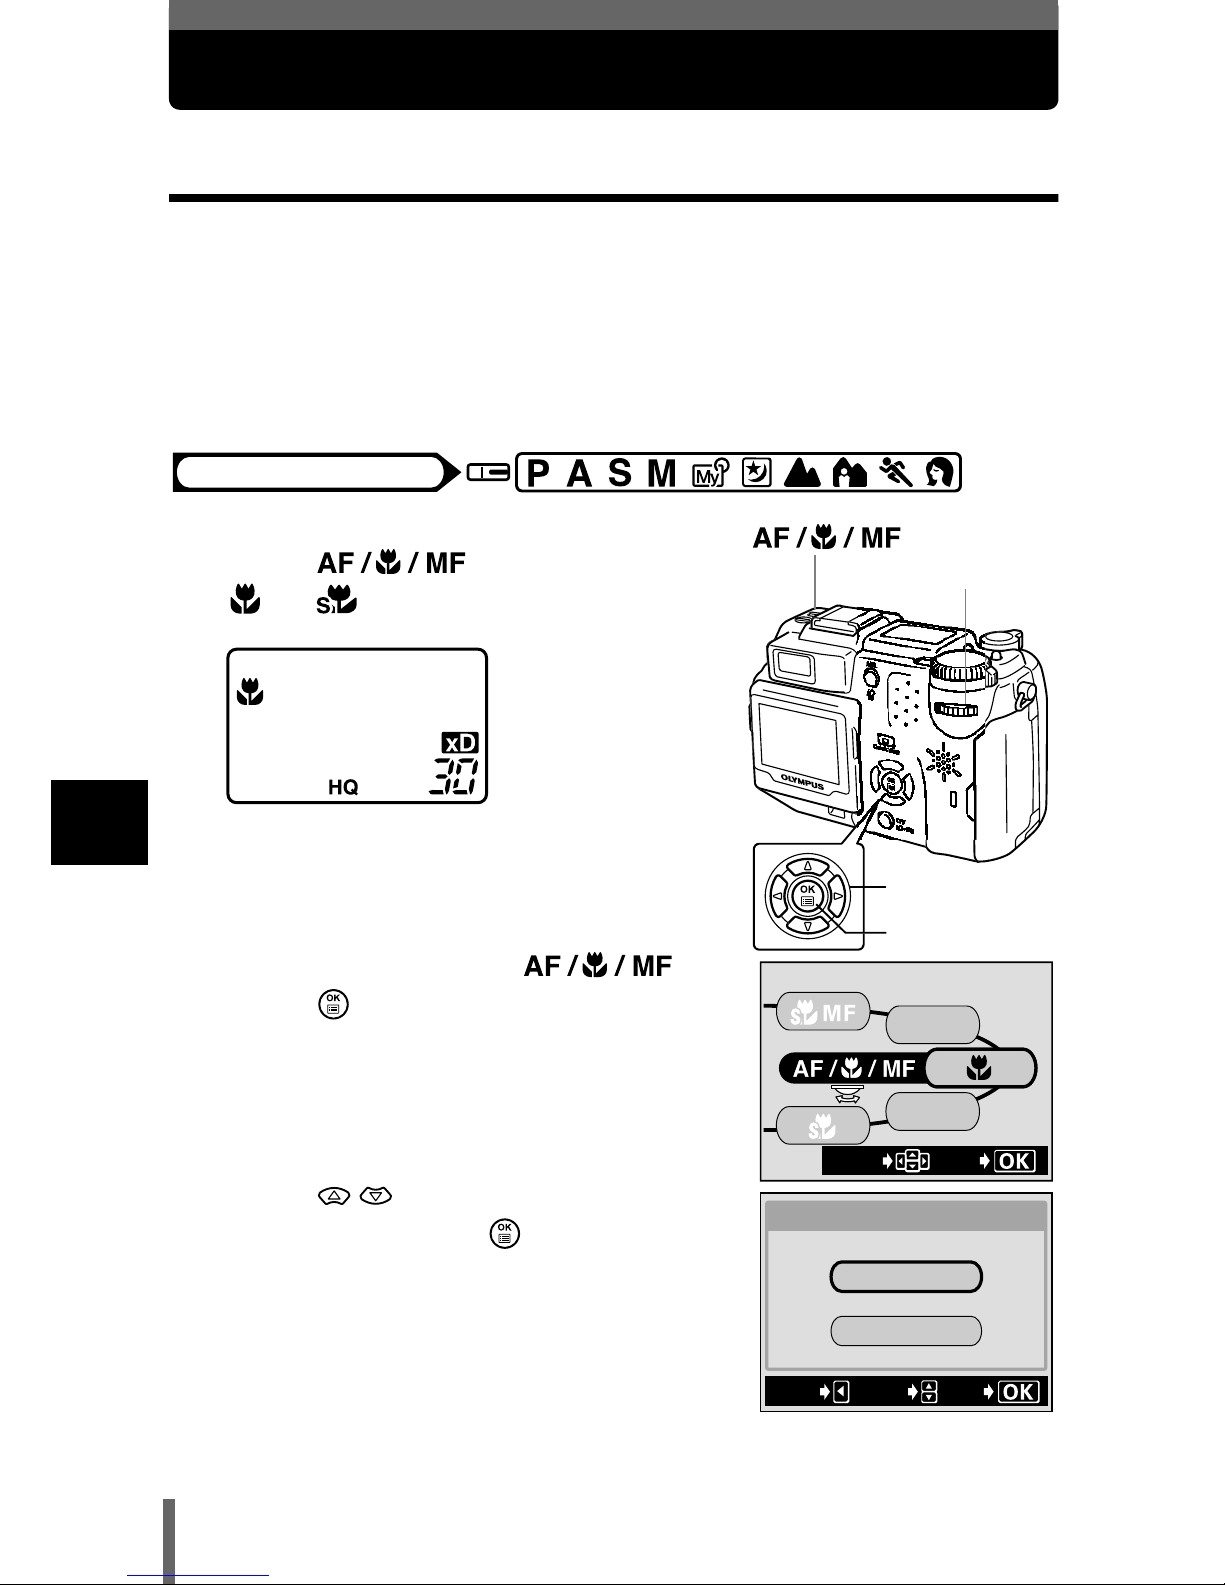
96
6
Advanced shooting
Focusing applications
AF MODE - Changing the focus range
This function allows you to select the focus range of your subject.
iESP : Focus selection is based on the entire picture on the screen. Even
when the subject is not in the center of the screen, focusing is
possible.
SPOT : Focus selection is based on the subject within the AF target mark.
1
Turn the jog dial while holding
down and select AF,
or .
2
While holding down ,
press .
• The AF MODE menu is displayed.
3
Press to select iESP or
SPOT, then press .
Mode dial
Arrow pad
OK button
Jog dial
MF
AF
SEt
MOVE
GO
SELECt
SPOt
iESP
AF MODE
CANCEL
Page 98
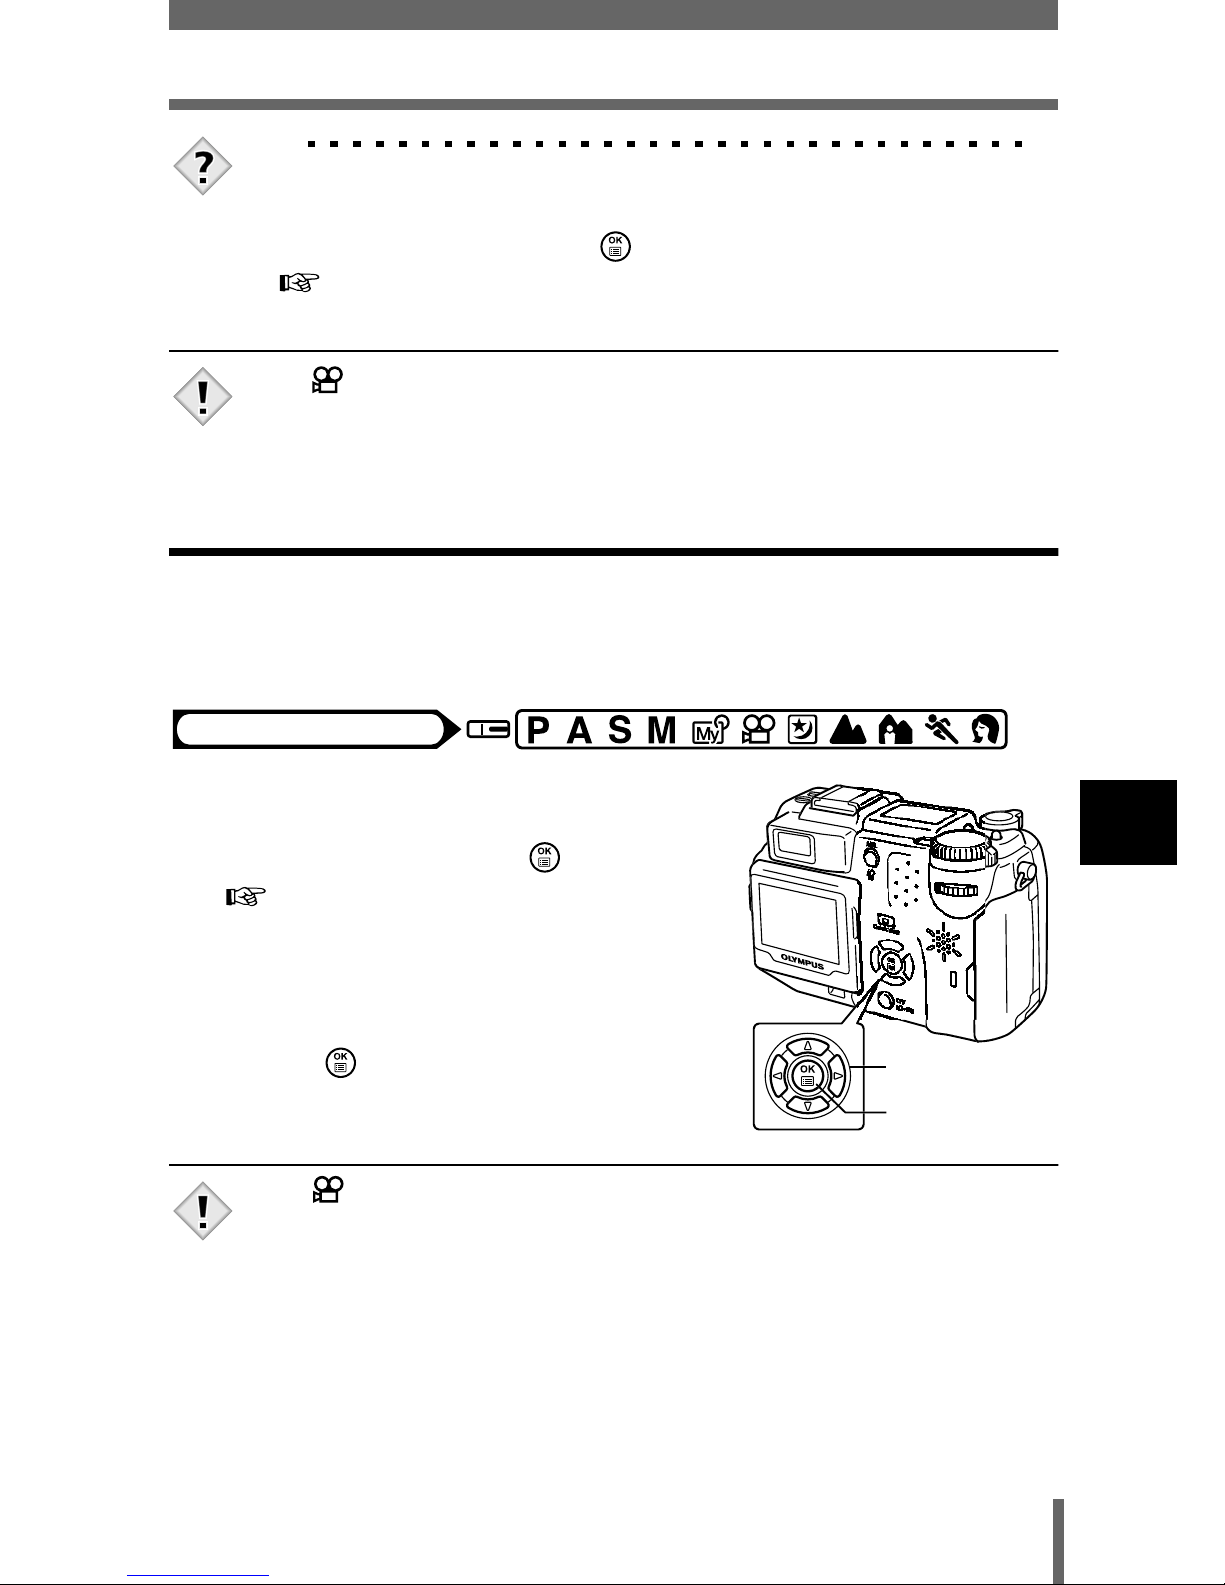
97
Focusing applications
6
Advanced shooting
TIPS
AF MODE can also be set from the MODE MENU.
→ In the top menu, select MODE MENU → CAMERA → AF MODE →
iESP or SPOT, and press .
“How to use the menus” (P.70)
• In mode, the AF MODE is fixed to iESP. The setting cannot be
changed.
FULLTIME AF - A reliable time-saving way to focus
FULLTIME AF keeps the subject in front of the lens in focus at all times,
without having to press the shutter button halfway. When ON is selected, the
focusing time is reduced, letting you take successive snapshots.
1
In the top menu, select MODE
MENU
→→→→
CAMERA
→→→→
FULLTIME
AF
→→→→
ON, and press .
“How to use the menus” (P.70)
• The subject is displayed on the monitor.
• If the monitor is turned off, FULLTIME AF
does not function.
• Press again to exit the menu.
• In mode, FULLTIME AF is set to ON in factory default setting.
• Battery life is reduced when FULLTIME AF is used.
Note
Mode dial
Arrow pad
OK button
Note
Page 99
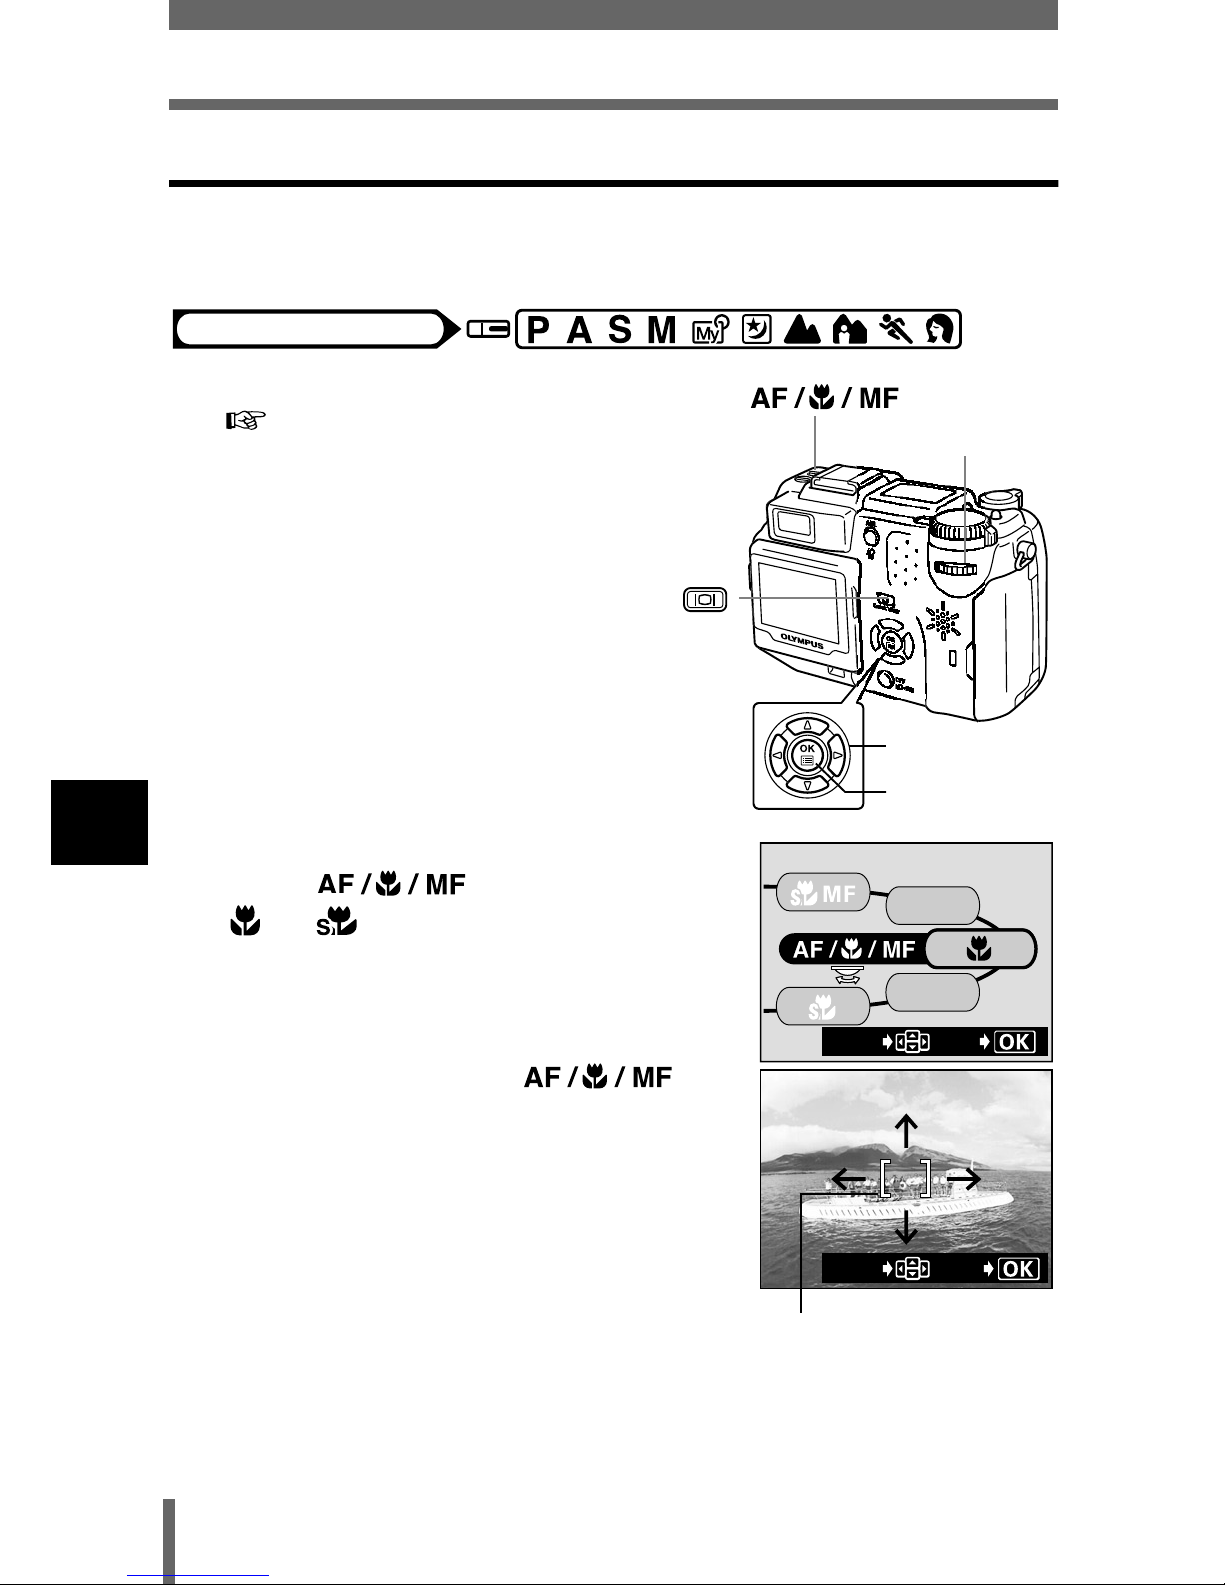
98
Focusing applications
6
Advanced shooting
Changing the position of the AF target mark
This function lets you select the area you want to focus on by changing the
position of the AF target mark.
1
Set the AF mode to SPOT.
“AF MODE - Changing the focus range”
(P.96)
2
Turn the jog dial while holding
down and select AF,
or .
3
While holding down ,
use the arrow pad and move the AF
target mark to the area you want to
focus on.
• The AF target mark at the center of the
screen can be moved vertically or
horizontally.
Mode dial
Arrow pad
OK button
Jog dial
MF
AF
SEt
MOVE
EXIt
MOVE
AF target mark
Page 100
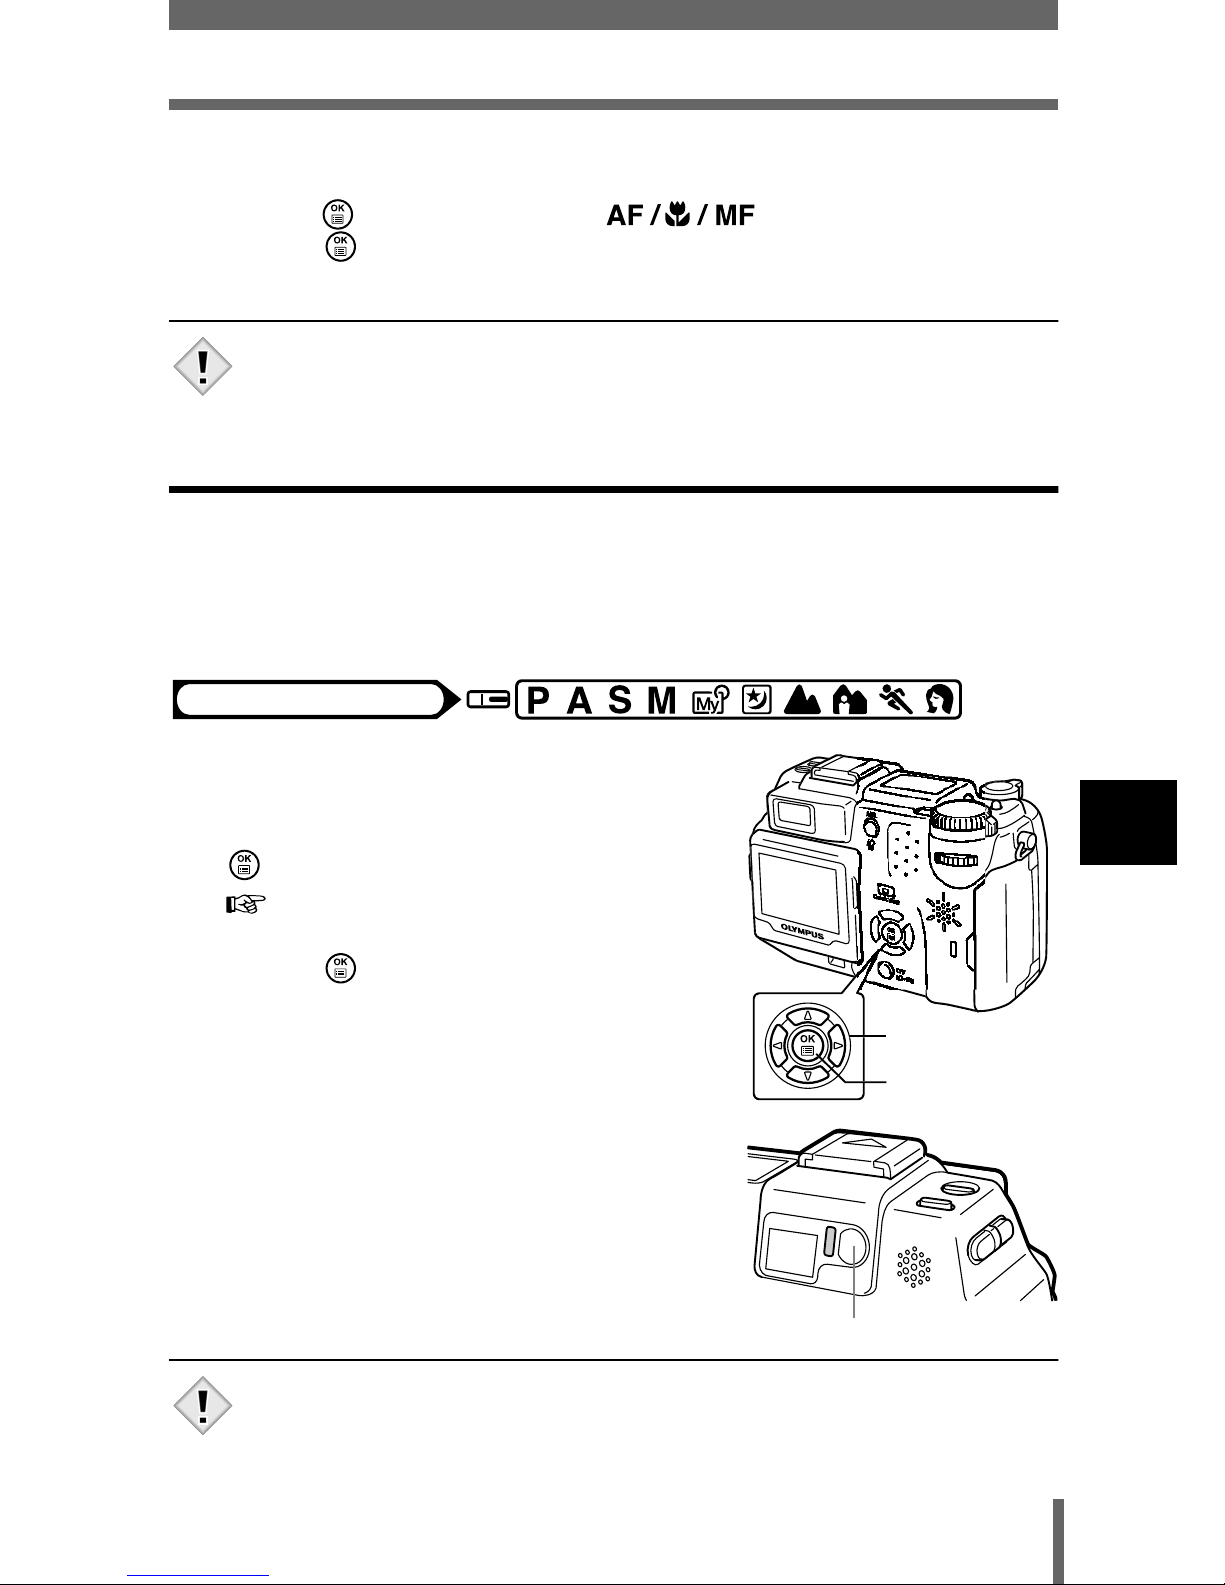
99
Focusing applications
6
Advanced shooting
4
Take the picture.
• To restore the AF target mark to its original position (in the center),
press while holding down .
• Press again to exit AF target mark selection mode.
• The location of the AF target mark cannot be saved.
AF illuminator
The AF illuminator allows the auto focus to focus on dark subjects. When the
shutter button is pressed halfway, the AF illuminator fires automatically,
lighting up the subject. Factory default setting is ON. To turn the AF
illuminator off, follow the procedure below.
1
In the top menu, select MODE
MENU
→→→→
SETUP
→→→→
AF
ILLUMINATOR
→→→→
OFF, and press
.
“How to use the menus” (P.70)
• Press again to exit the menu.
• Even when the AF illuminator is lit, the auto focus may still not be
able to focus properly on subject within 80 cm (2.6 ft.) of the camera.
Note
Mode dial
Arrow pad
OK button
AF illuminator
Note
 Loading...