

DIGITAL CAMERA
MANUAL FOR DIRECT PRINTING
Manual outlining new features added to the camera with firmware upgrade.
z This manual contains guidelines for using Olympus Stylus 300/400
DIGITAL (µ [mju:] 300/400 DIGITAL).
z In the interest of continually improving products, Olympus reserves the
right to update or modify information contained in this manual.
About this manual
Update the camera’s firmware to enable PictBridge on your camera. This will
allow you to print pictures directly from the camera by connecting it to a printer
that supports PictBridge with the USB cable.
This manual explains additional functions, and different operations that are
available when the camera’s firmware has been updated. These functions
and operations are different than what is stated in the Reference Manual that
originally provided with your camera.
What is PictBridge? … It is the standard for connecting digital cameras and
printers of different makers and printing out pictures directly.
Indications used in this manual
Important information on factors which may lead to a
malfunction or operational problems. Also warns of operations that
Note
should be absolutely avoided.
Useful information and hints that will help you get the most out of
your camera.
Reference pages describing details or associated information.
Reference pages describing details or associated information in
the CD reference manual. Available languages: English, French,
German, and Spanish.
2

Contents
Contents . . . . . . . . . . . . . . . . . . . . . . . . . . . . . . . . . . . . . . . . . . 3
1 Functions changed by updating the
firmware 4
Selecting a language . . . . . . . . . . . . . . . . . . . . . . . . . . . 4
Connection to a computer . . . . . . . . . . . . . . . . . . . . . . . . . . . . . 5
Direct printing function. . . . . . . . . . . . . . . . . . . . . . . . . . . . . . . . 6
2 Direct printing 7
Using the direct printing function . . . . . . . . . . . . . . . . . . . . . . . . 7
Connecting the camera to a printer . . . . . . . . . . . . . . . . . . . . . . 8
Printing pictures. . . . . . . . . . . . . . . . . . . . . . . . . . . . . . . . . . . . . 9
PRINT mode/MULTI PRINT mode . . . . . . . . . . . . . . . . . . . 9
ALL PRINT mode . . . . . . . . . . . . . . . . . . . . . . . . . . . . . . . 13
ALL INDEX mode/PRINT ORDER mode . . . . . . . . . . . . . 15
Exiting direct printing . . . . . . . . . . . . . . . . . . . . . . . . . . . . . . . . 17
If an error code is displayed . . . . . . . . . . . . . . . . . . . . . . . . . . 18
Troubleshooting. . . . . . . . . . . . . . . . . . . . . . . . . . . . . . . . . . . . 19
3
1 Functions changed by updating the firmware
Selecting a language
You can change the language in which menus and error messages are
displayed on the monitor.
The choice of languages changes as shown below after updating.
Before updating “Menu List” (P.124 to 127)
Top menu Tab Function Setting
MODE
MENU
After updating
Top menu Tab Function Setting
MODE
MENU
SETUP , ENGLISH,
SETUP ENGLISH, FRANCAIS,
FRANCAIS, DEUTSCH,
ESPAÑOL
DEUTSCH, ESPAÑOL
4
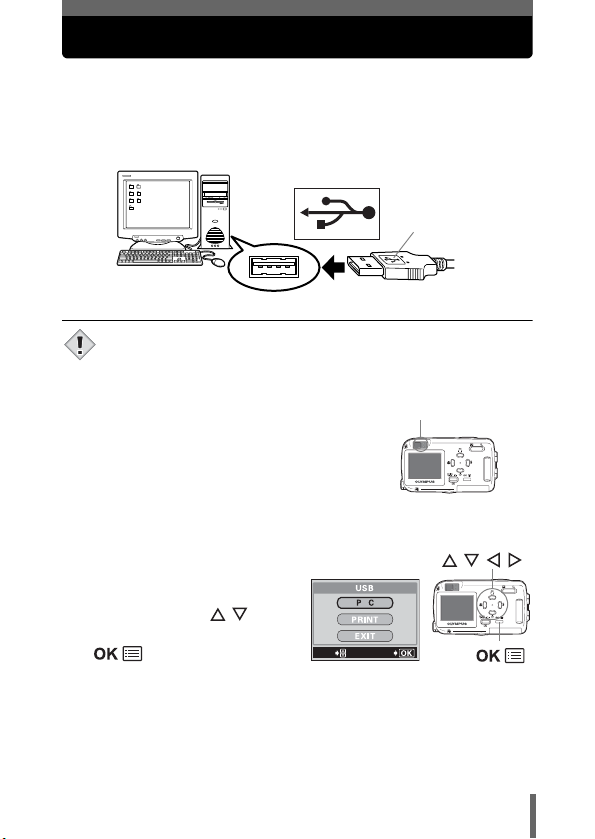
Connection to a computer
When the USB cable is used to connect the camera to a computer, follow
the procedure below to select PC in the camera settings.
1 Insert the marked end of the provided USB cable into the
USB port on your computer as shown below.
Look for this mark.
Terminal
USB port
• The location of the USB port varies depending on the computer.
For details, refer to your computer’s manual.
Note
2 Plug the other end of the USB
cable into the camera’s USB
connector.
• The camera turns on automatically.
• When the camera turns on, the
lamp on the right of the viewfinder
lights up.
Lamp
3 The selection screen for the
USB connection (shown
Arrow pad ( )
right) is displayed on the
monitor. Press
to
select PC and press
.
SELECt
GO
4 The computer recognizes the camera as a new device.
• When you connect the camera to the computer for the first time, the
computer automatically recognizes the camera. Click “OK” when the
message saying that the installation is completed appears.
• The computer recognizes the camera as a “Removable Disk”.
5

Direct printing function
After updating the camera’s firmware to enable PictBridge, pictures can be
printed directly from the camera. By connecting the camera directly to a
printer that supports PictBridge with the USB cable, you can print pictures
stored on the card inside the camera without a need to use a computer.
For details of printing instructions, see “Direct printing” ( P.7).
6
 Loading...