

Page 1

INSTRUCTIONS
• Before using your camera, read this manual carefully to
ensure correct use.
• We recommend that you take test shots to get
accustomed to your camera before taking important
photographs.
Page 2
Ignoring this warning may result in the death or serious injury of the
user.
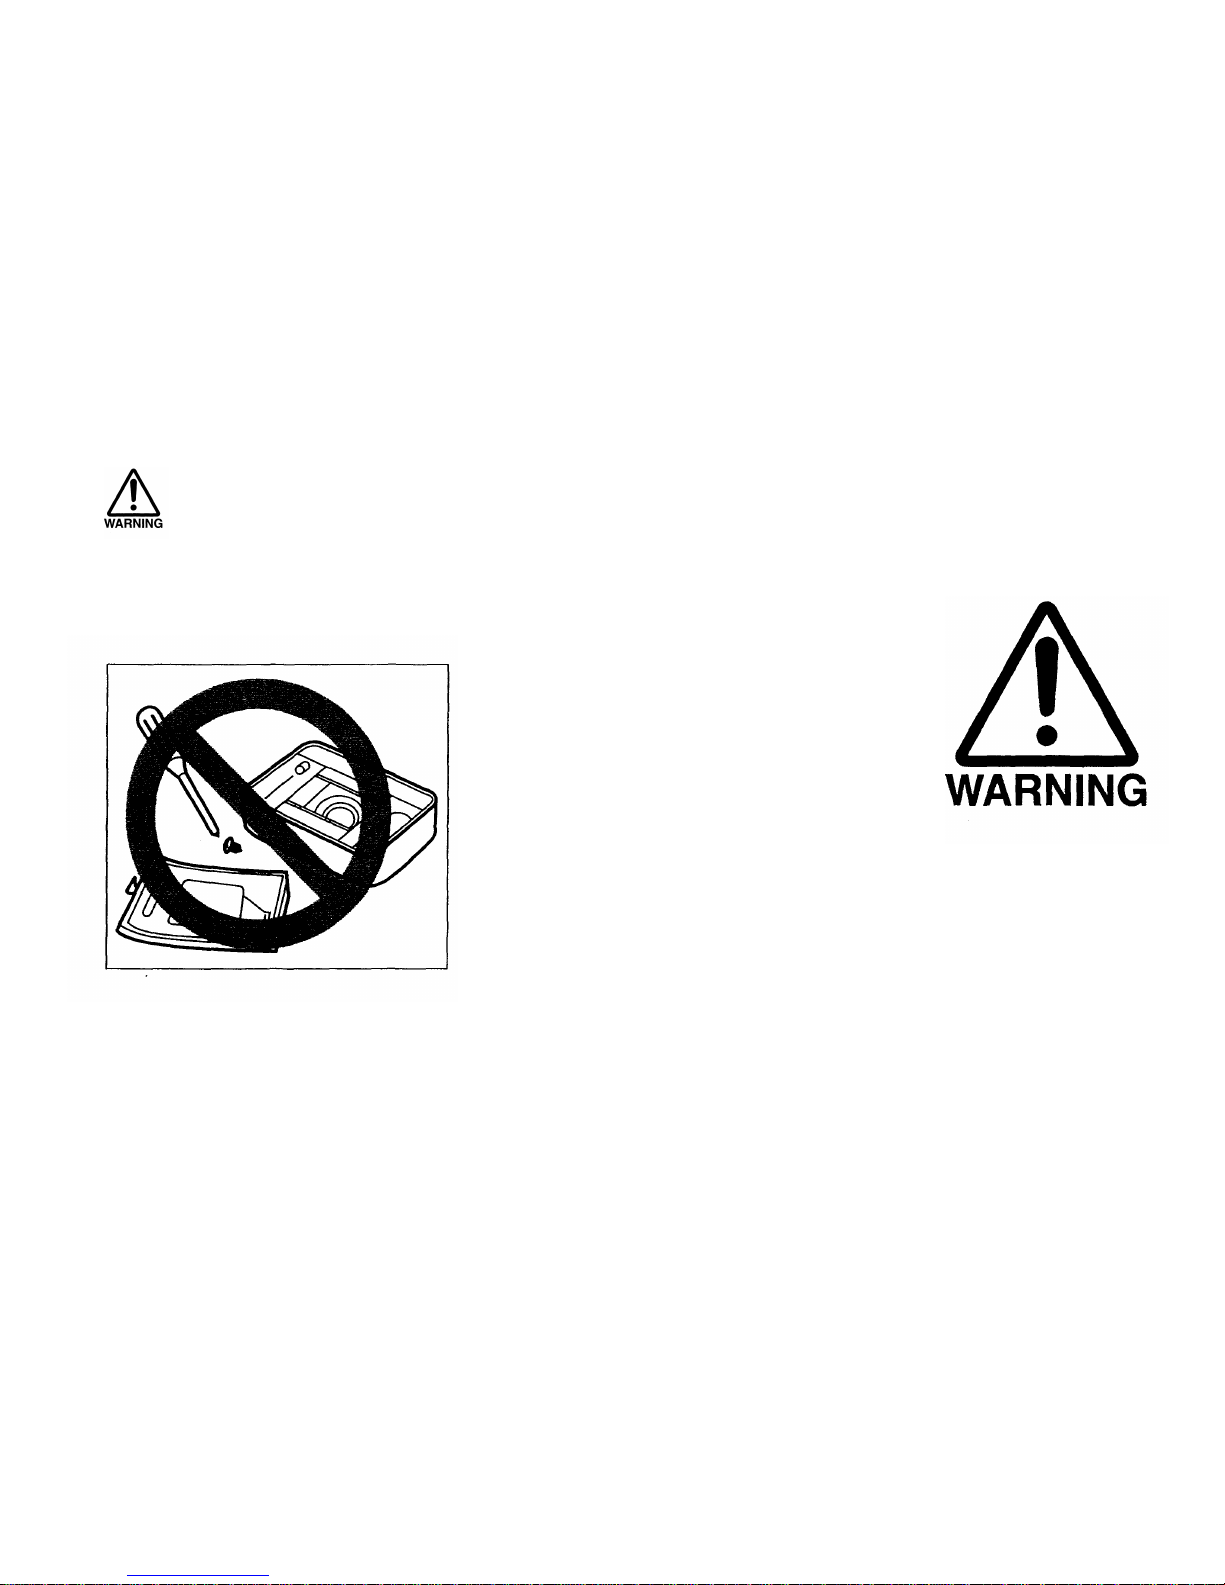
NEVER ATTEMPT TO DISASSEMBLE
THE CAMERA; IT CONTAINS A HIGHVOLTAGE CIRCUIT. IN CASE OF
MALFUNCTION, CONSULT YOUR
NEAREST OLYMPUS DEALER OR
OLYMPUS SERVICE CENTER.
3
Page 3
MAIN FEATURES
Built-in 28mm~110mm approx. 4X-class zoom le n s for increased shooting range.
Powerful flash with GN 25 at maximum f or telephoto needs. Increased luminance
capability enables extended-distance flash photography.
SLR lens ensures that what you see in the viewfinder is what you get on film.
Direct Mode Select buttons let you easily set/choose the right exposure mode for
any shooting purpose.
Exposure compensation dia l allows you to adjust for available light.
Predictive autofocus helps achieve accurate focusing on moving subjects.
Super FP Flash f o r synchronization as fast as 1/2,000-sec.
Flash fires automatically to prevent fluorescent light from affecting the picture.
Pay particular attention to items in this manual enclosed in boxes
Products shown in pictures and illustrations may be slightly different from the actual unit.
Symbols used in this manual:
4
Incorrect
Order
Manual
operation
Operation
order
Automatic
operation
Beep
Indicator on
Indicator
blinking
Attention
Depress
halfway
Page 4

PREPARATIONS
Names
and
functions
of
parts
............
6
Viewfinder
display
.............................
8
LCD panel .......................................... 9
Diopter
adjustment .......................... 10
Using
the
strap/soft
case* ...............
11
BASIC
OPERATIONS
*IS-30 DLX only
Loading the film ....................................................................................................... 19
Taking pictures ............................................................................................................. 22
Using the focus lock .................................................................................................... 25
Unloading the film .................................................................................................... 26
ADDITIONAL
FUNCTIONS
Taking panorama pictures‡ .............. 27
Flash photography ........................... 29
Selftimer .......................................
35
Using the exposure modes .............. 36
Restoring the standard shooting mode ...
43
† QD models only ‡ Panorama model only
TAKING BETTER
PICTURES
Effects of zoom and its advantages ... 52
Autofocus (AF) ...............................
54
Exposure ...................................... 56
CAMERA
MAINTENANCE
Questions and answers ........................................................................................... 61
Care and storage ..................................................................................................... 62
Battery handling ....................................................................................................... 64
Troubleshooting
....................................................................................................... 65
Specifications .......................................................................................................... 68
Outline
of operations .....................
12
Loading
the
batteries ......................
14
Checking the batteries..................... 15
Points
to
remember
.........................
16
Re-mounting the cap when it comes off ....
18
Spot metering .................................. 44
Exposure
compensation
..................
46
Remote control ................................ 48
Correcting
the
data† .........................
50
Printing
the
date
and
time† ...............
51
Film speed ....................................... 58
Metering
the
amount
of
light
............
58
Accessories (optional) ..................... 60
5
Page 5
NAMES AND FUNCTIONS OF PARTS
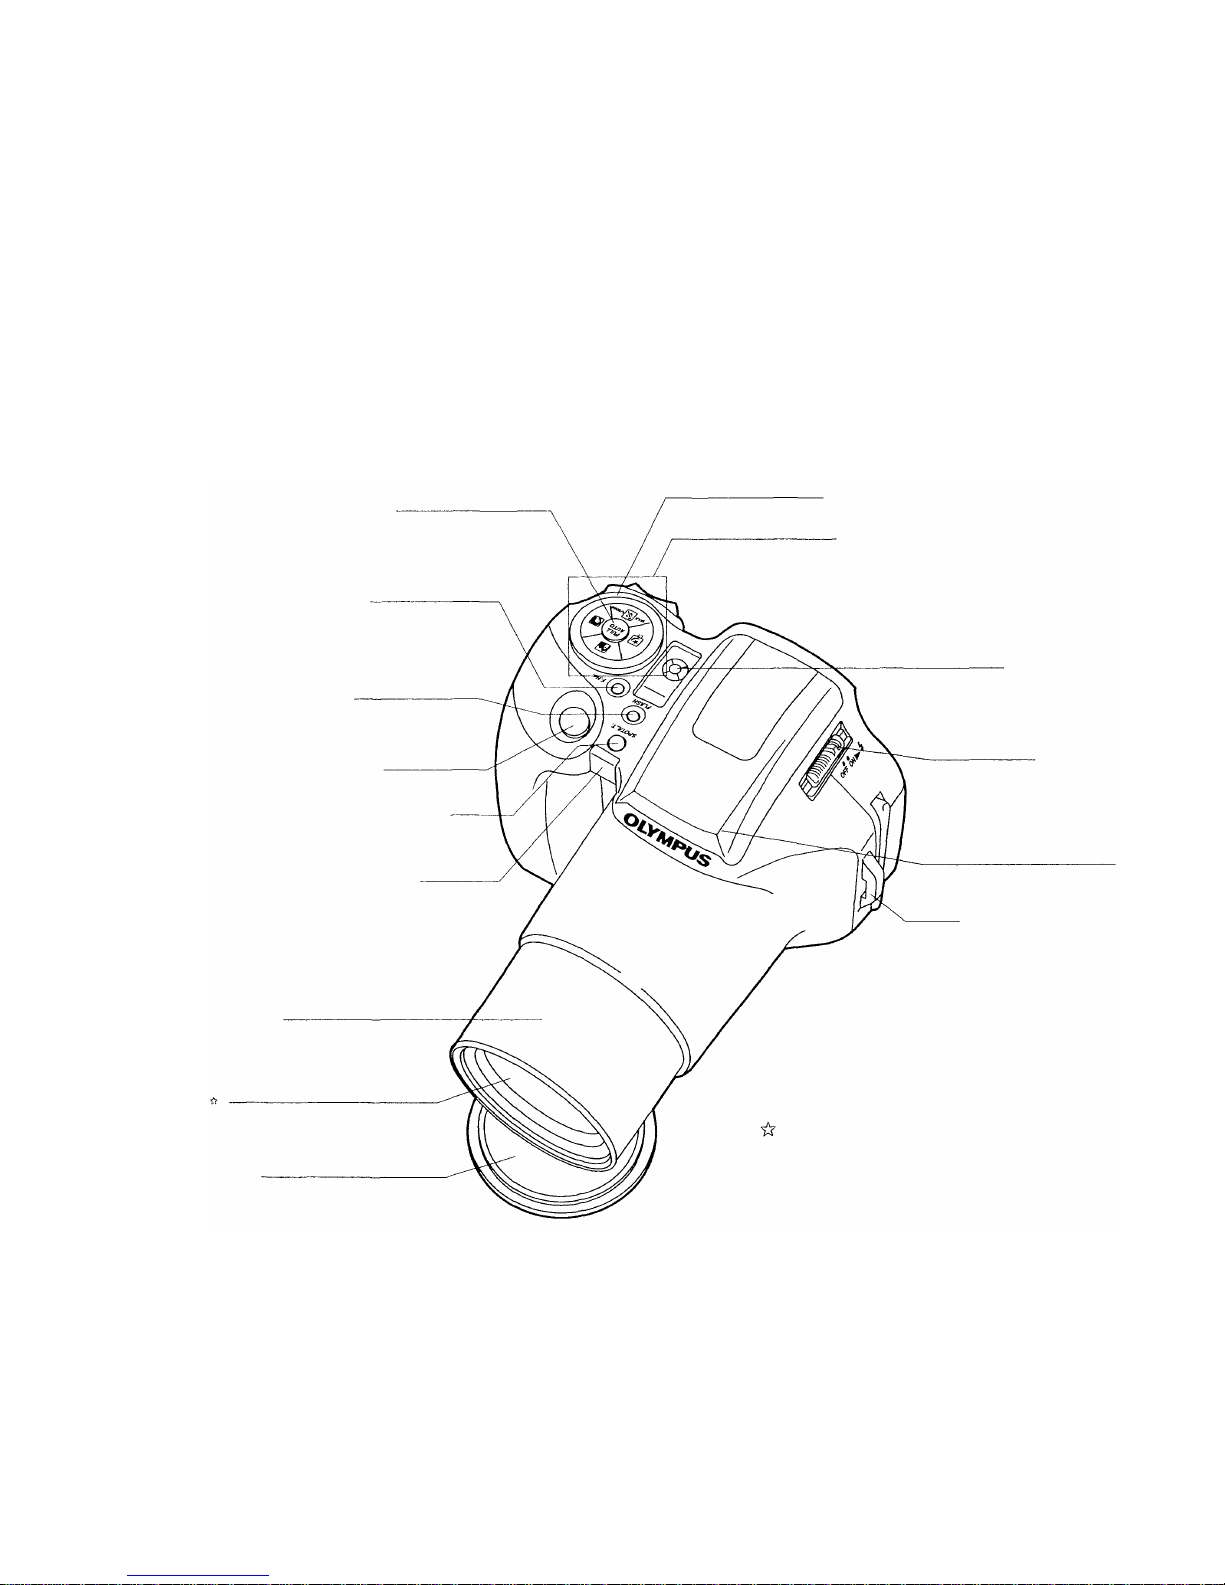
Full Auto button (p. 43)
Restores the standard shooting mode.
LCD panel (p. 9)
Power switch/
flash release
Strap attachment stud
F. No. button (p. 41)
Selects the aperture in the
Aperture-Preferred Aut o mode.
Flash mode button
Shutter release button
Spot/L.T. (Long Time) button
(p. 44/42)
Selftimer indicator (p. 35)
Remote control sensor (p. 49)
Flash
Lens barrel
Lens
Lens cap
Keep lens surface free of finger smudges
or other marks, as sharpness can be
affected. Carefully clean any such marks
with lens cleaning tissue.
Exposure compensation dial (p. 46)
Direct Mode Select buttons (p. 36)
Selects exposure modes: Stop Action,
Portrait, Landscape and Night Scene.
6
PREPARATIONS
Page 6
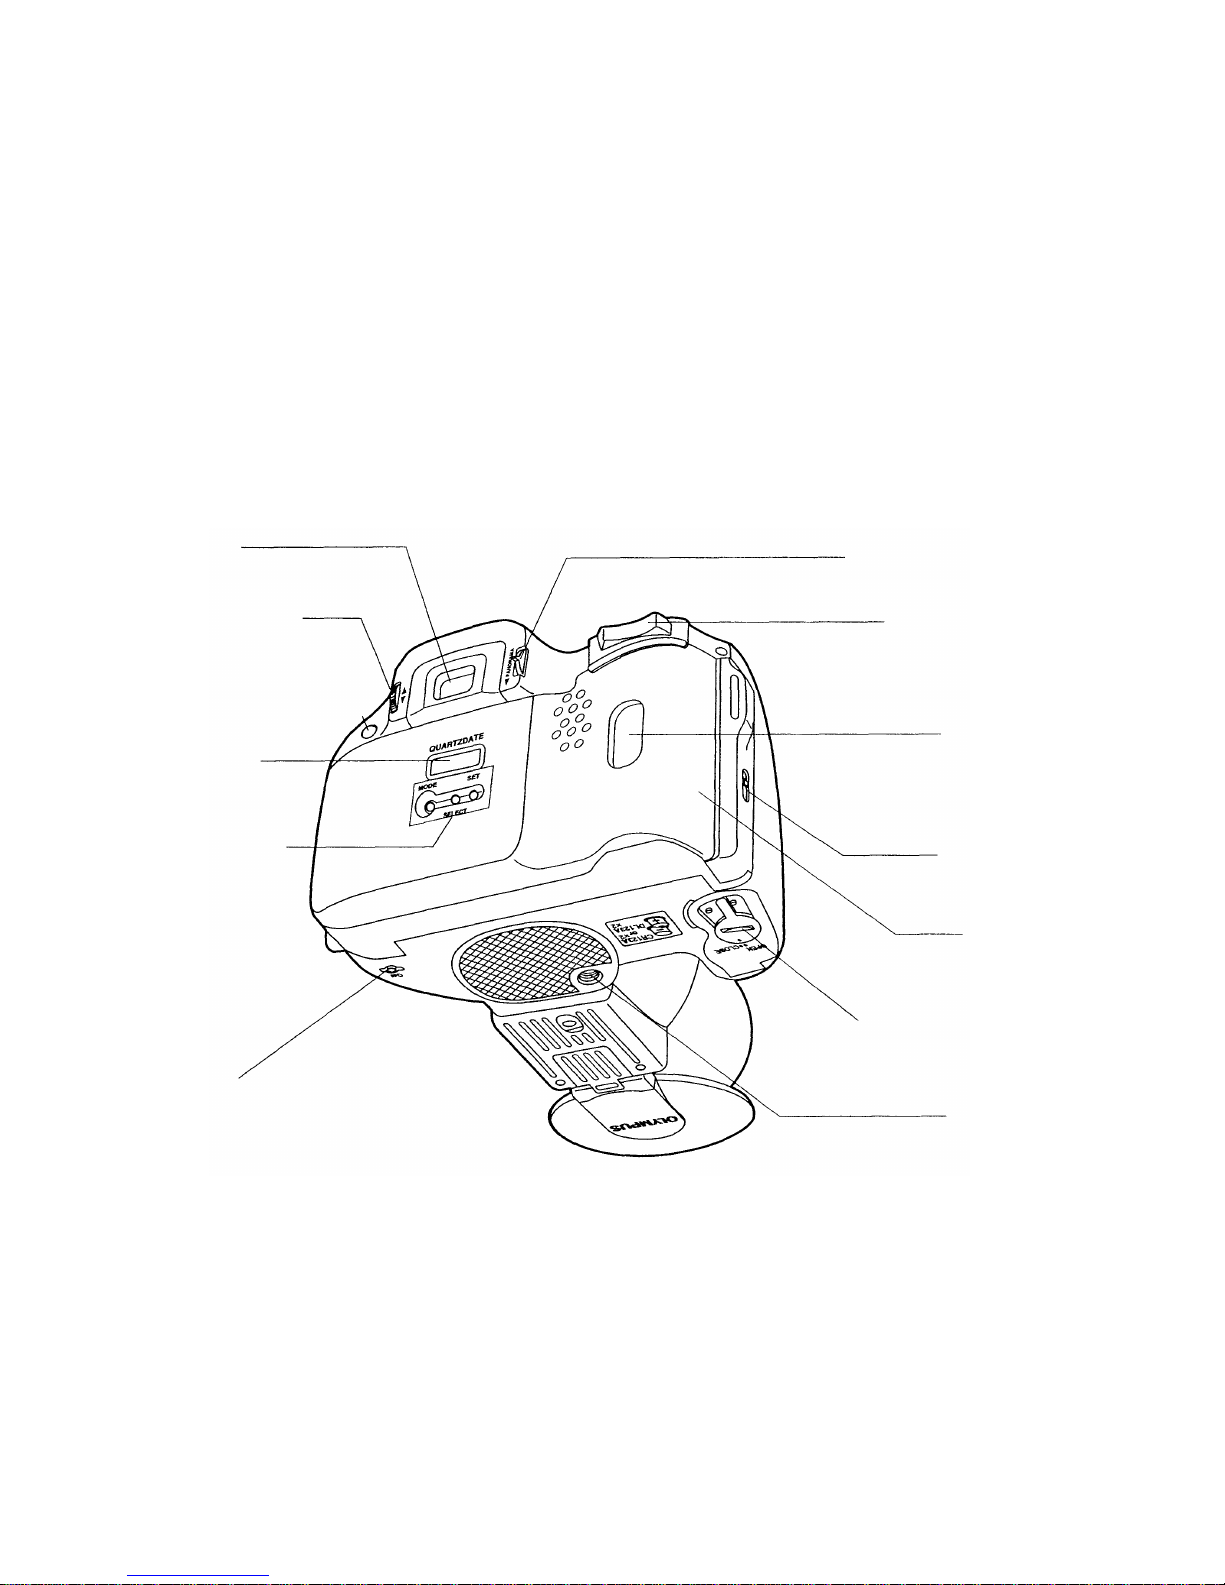
Viewfinder (p. 8)
Diopter adjustment dial
(p. 10)
Selftimer/remote control button
(p. 35/48)
Date/time indicator
QUARTZDATE buttons
(p. 51)
MODE button
SELECT button
SET button
Mid-roll rewind button (p. 26)
Panorama swi tc h (p. 27)
Zoom (T/W) buttons
(p. 22)
Film window
Fo r confirmation of
film ISO speed
Back cover
release (p. 19)
Back cover
X
Battery compartment cover
(p. 14)
Tripod socket
7
Page 7
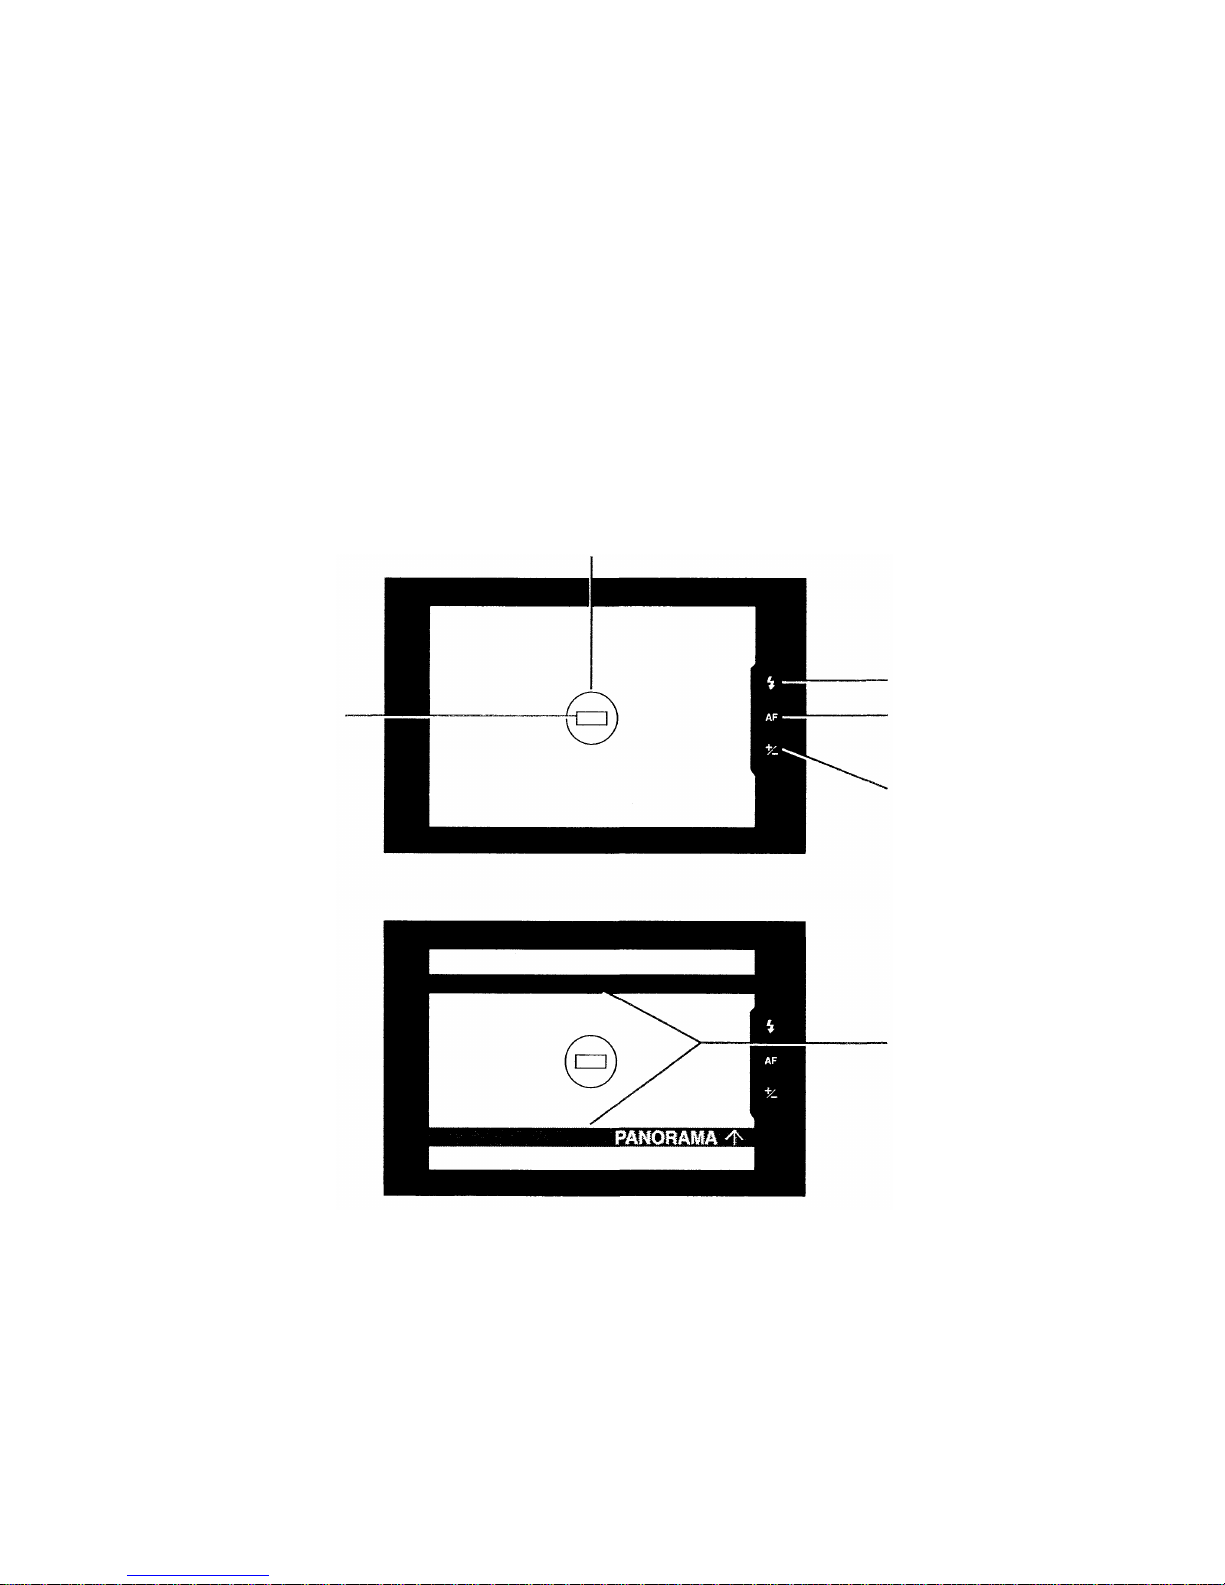
VIEWFINDER DISPLAY
Standard
mode
Spot frame
The area used by the Spot Metering mode to set
exposure.
Autofocus frame
Position your subject within
the autofocus frame.
Panorama
mode
Panorama frame
Exposure compensation/
overexposure-
underexposure (p. 46&47/41)
Flash (p. 30/31)
Autofocus (p. 17/24)
Lights when the subject is
in focus.
8
Page 8
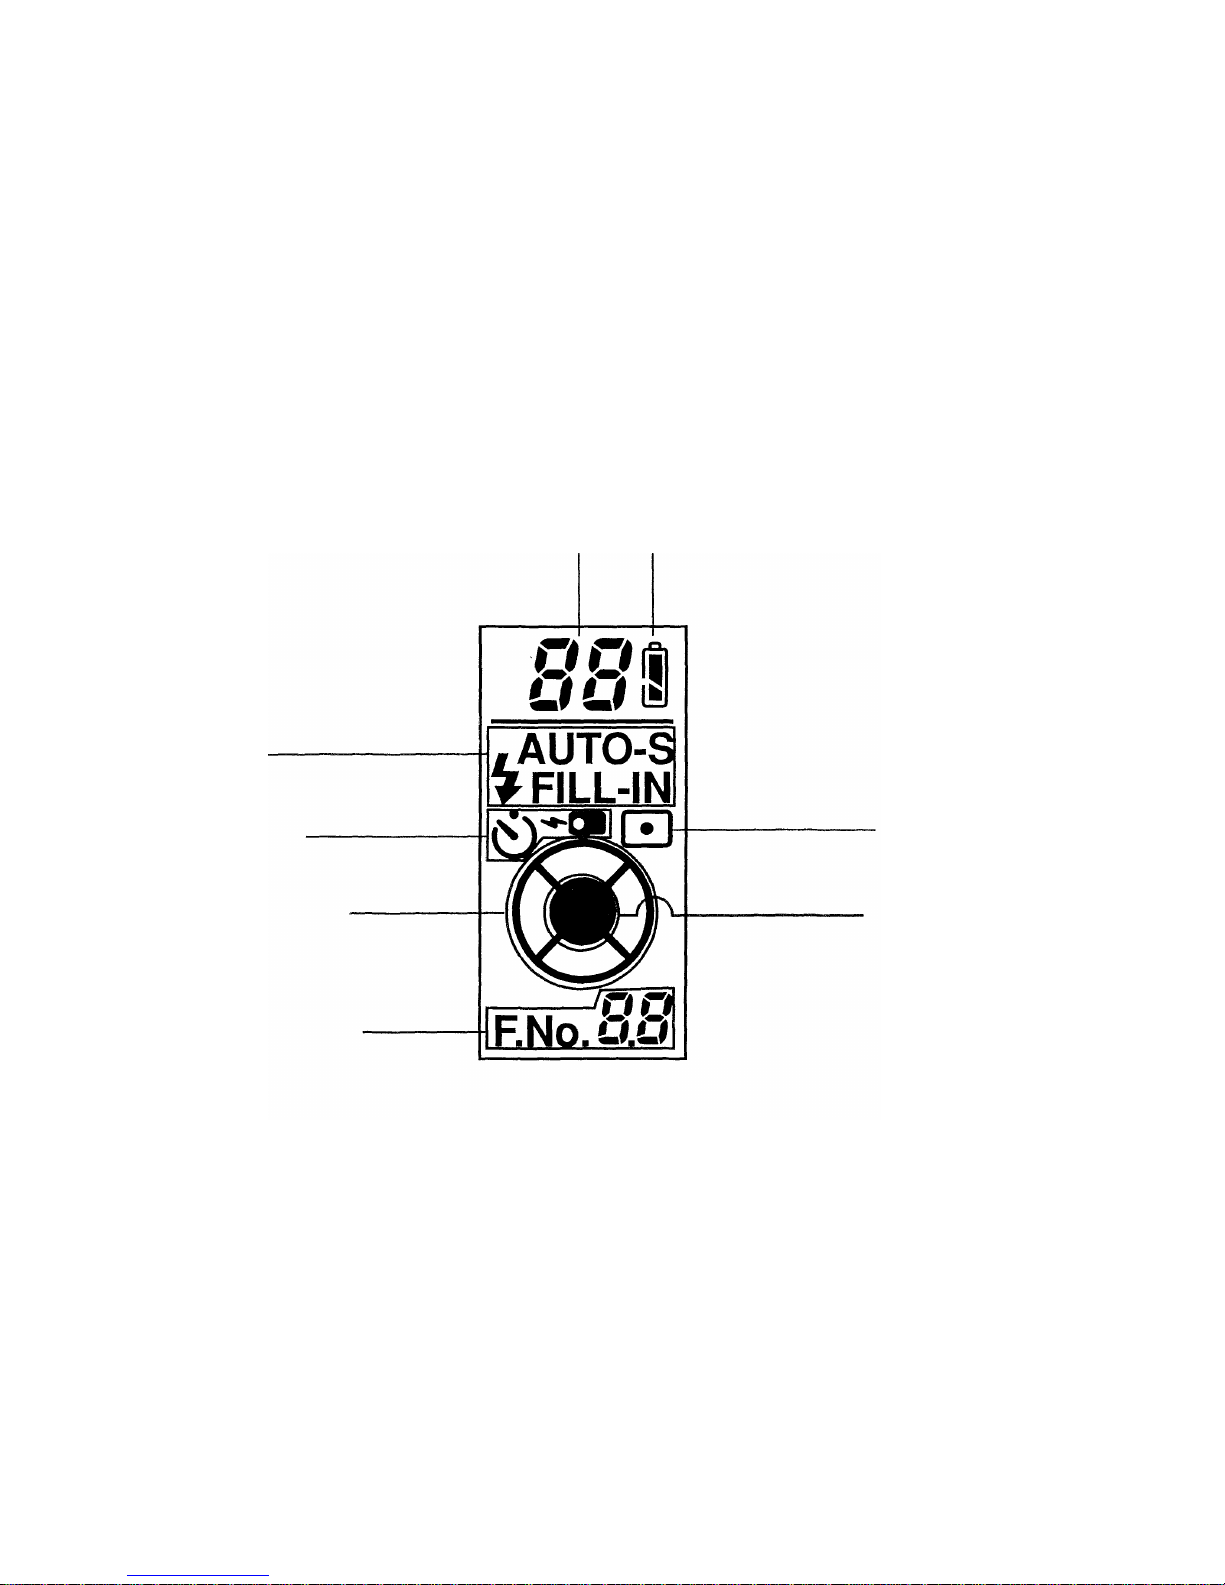
LCD PANEL
Exposure counter (p. 21) Battery check (p. 15)
Flash modes (p. 29)
Selftimer/remote control
(p. 35/48)
Mode status indicator (p. 36)
Displays the mode selected for use.
Aperture setting/shutter speed
(p. 41/42)
Shutter speed shown when using the
Long Time mode.
Spot Metering mode
(p. 44)
Full-Auto mode (p. 43)
The camera does everything
automatically in this mode.
Note: The LCD panel d oes not
actually display all indications
simultaneously as shown.
9
Page 9
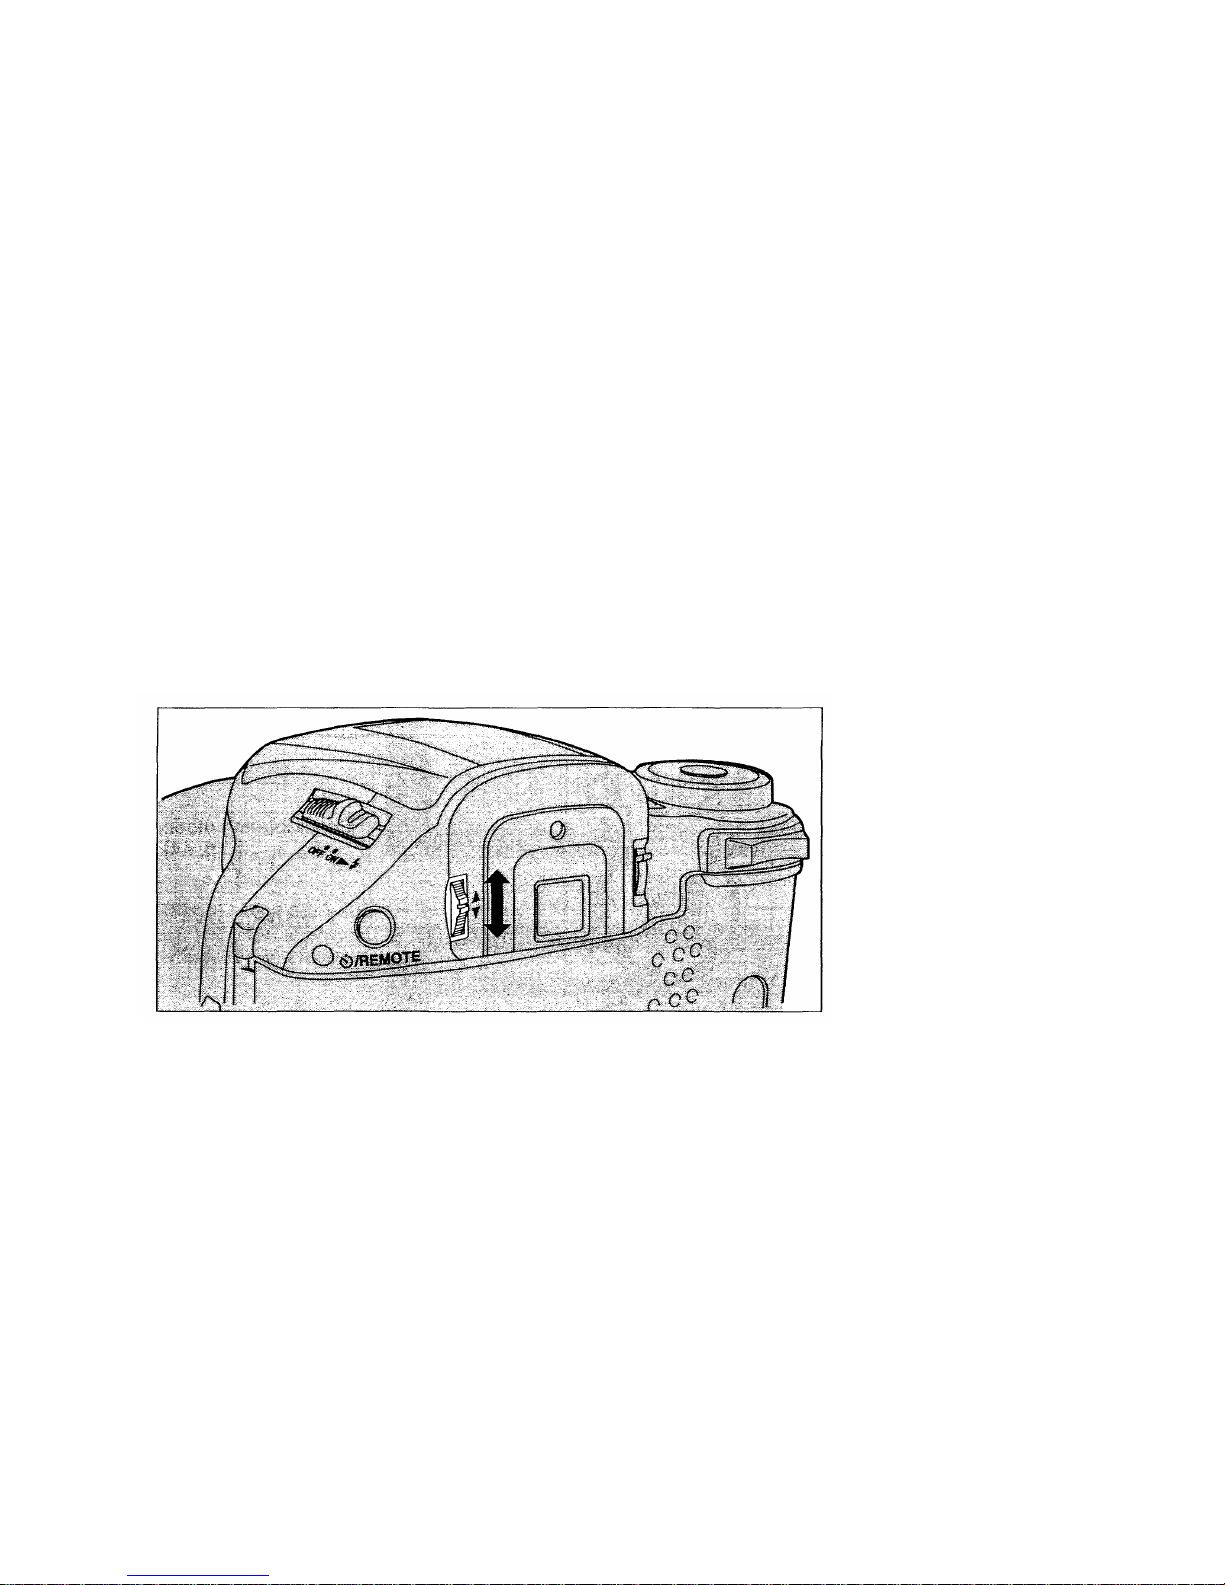
DIOPTER ADJUSTMENT
To adjust the viewfinder to compensate for near and farsighted vision.
Turn t he diopter adjustment dial until
the autofocus frame becomes clear.
Turn up if y ou are
nearsighted or down if you
are farsighted.
10
Page 10
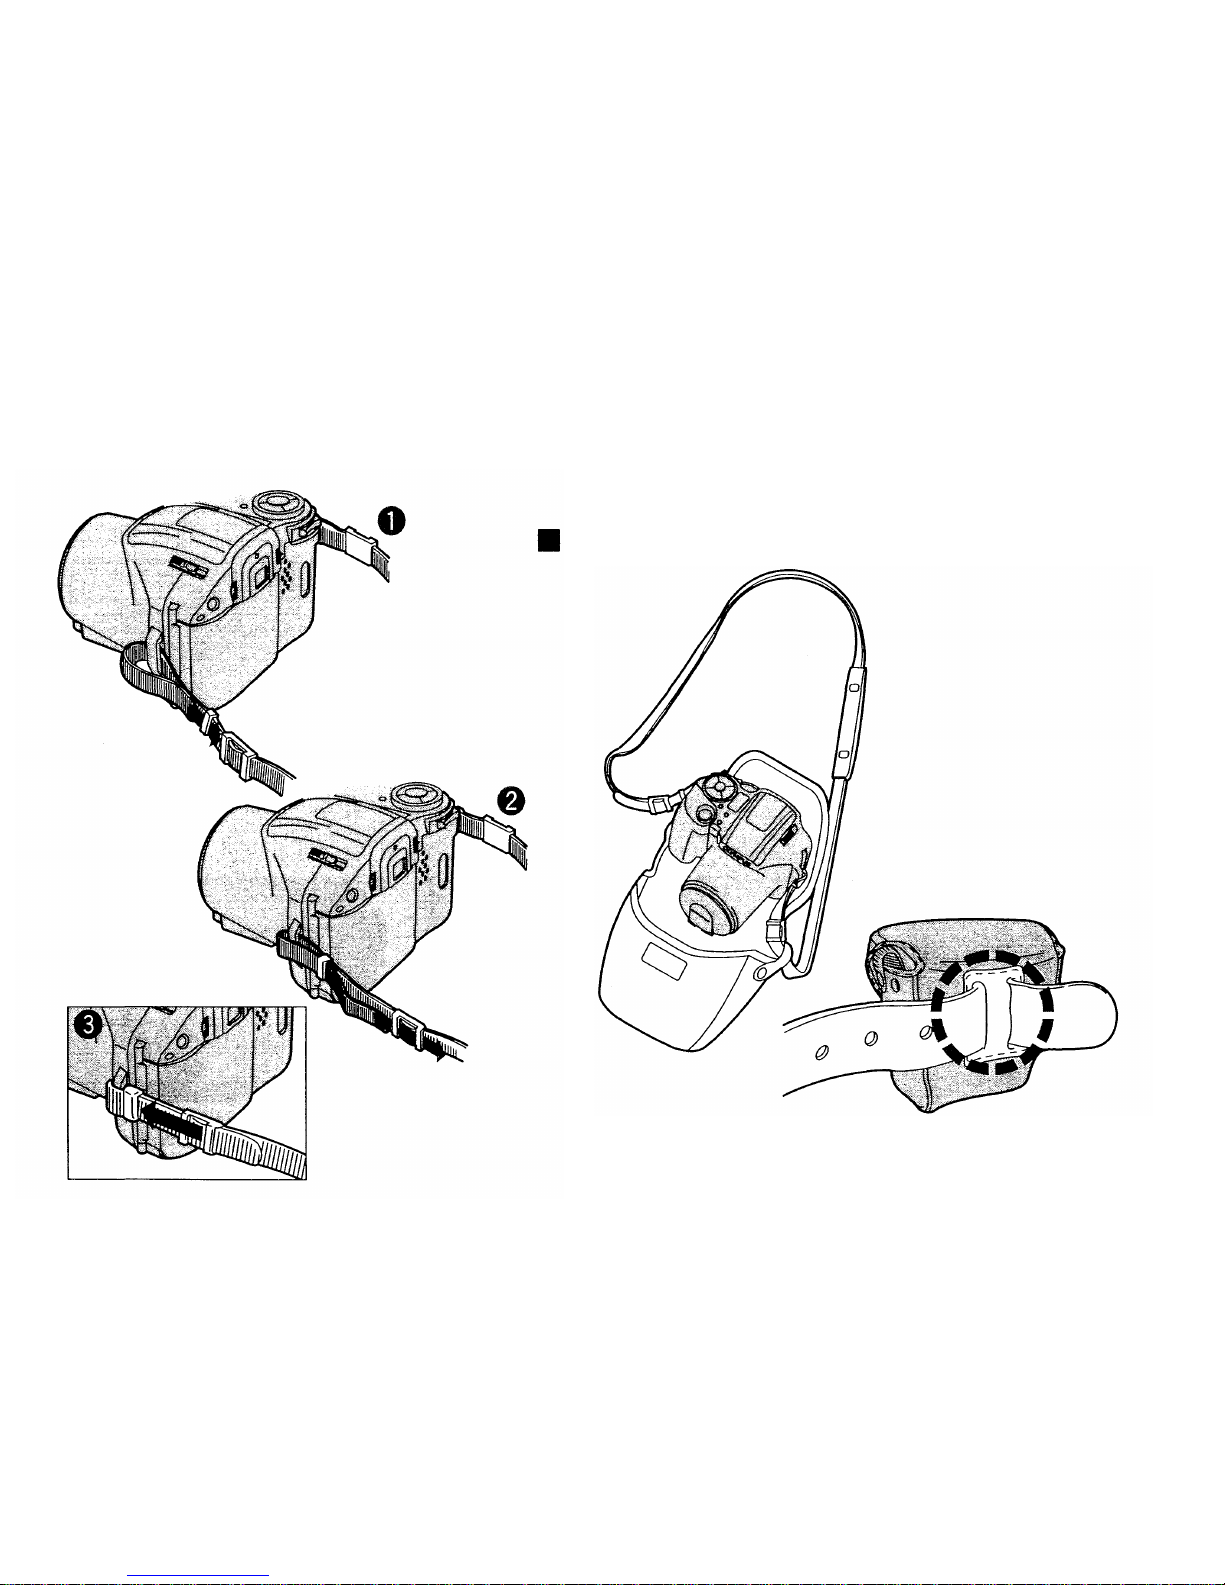
USING THE STRAP/SOFT CAS E
SOFT CASE
(* IS-30 DLX only)
The sof t case can be attached to
a belt with the belt loop.
11
Page 11
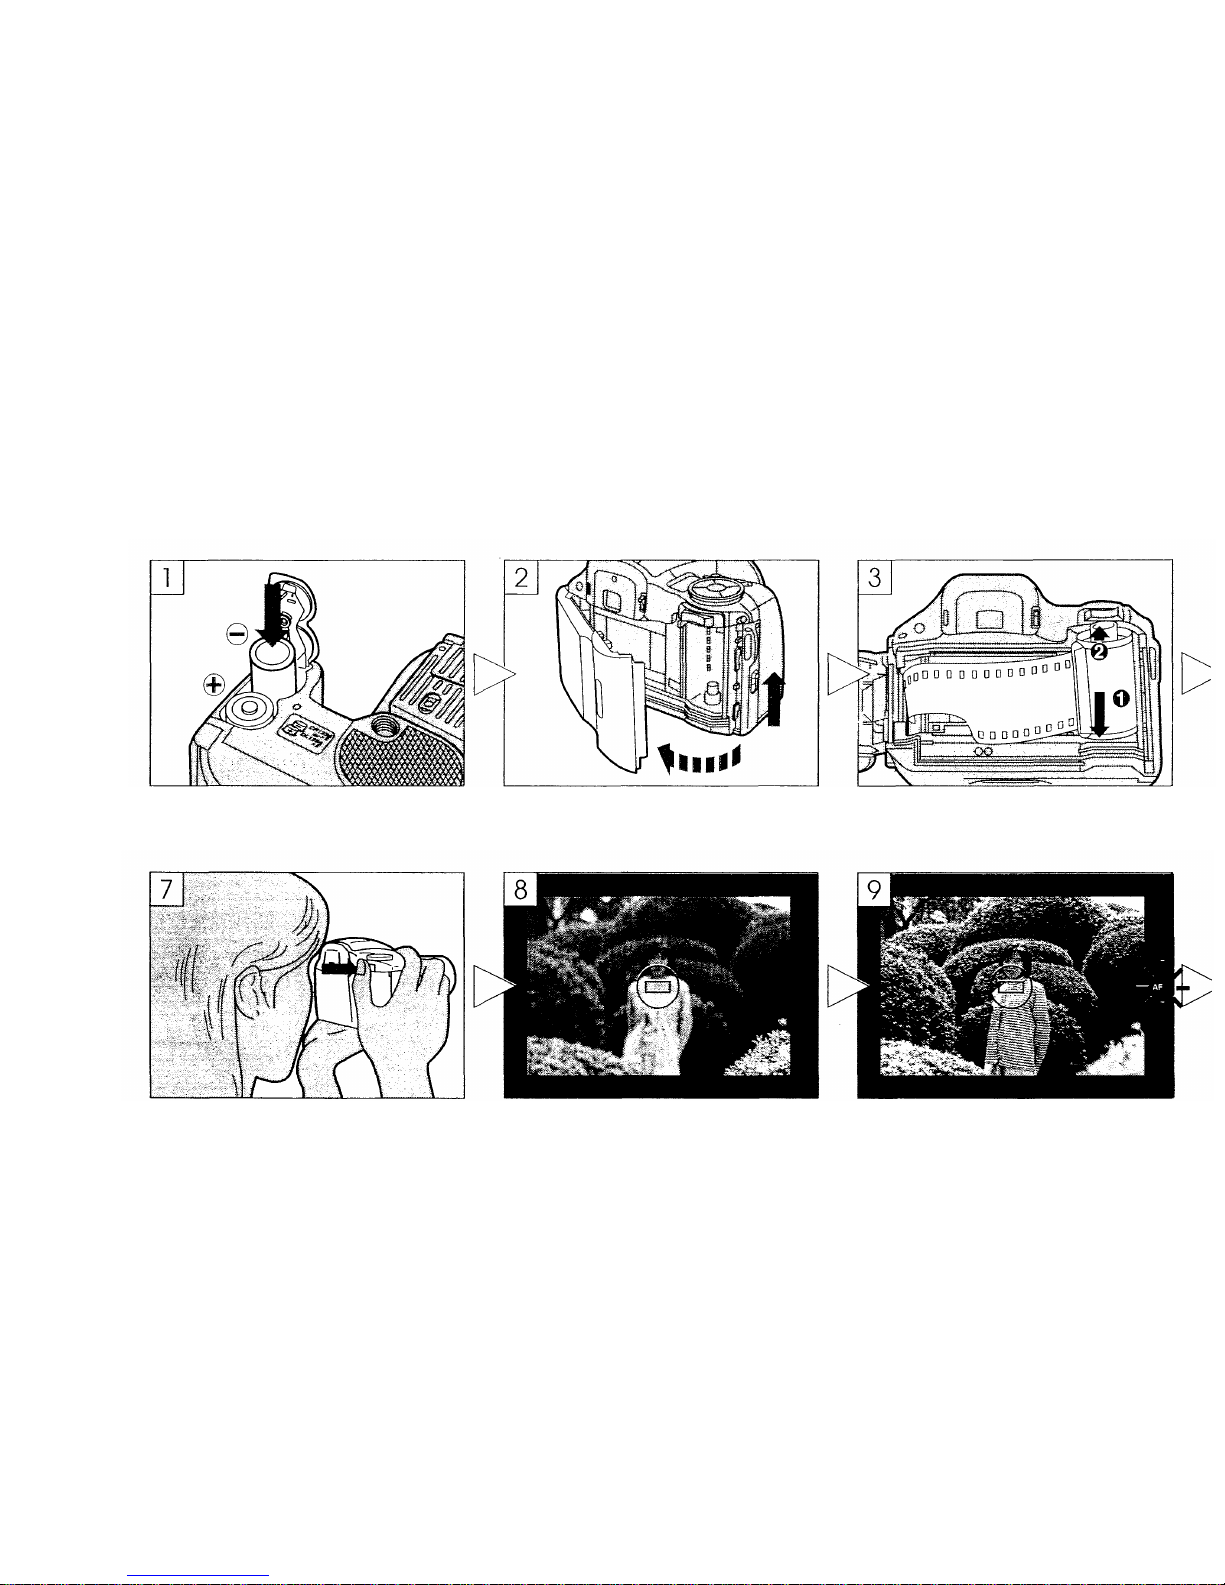
OUTLINE OF OPERATIONS
Basic Shooting Procedures
Load the batteries (p. 14).
Open the back cover (p. 19).
Load the film (p. 19 ).
Press the zoom button to determine
the composition (p. 22).
Place the au to focus frame on the
subject you want to focus on (p. 23).
Depress the shutter release button
halfway, making sure the green
autofocus indicator in the viewfinder
lights and the autofocus beep is
heard (p. 24).
12
Page 12
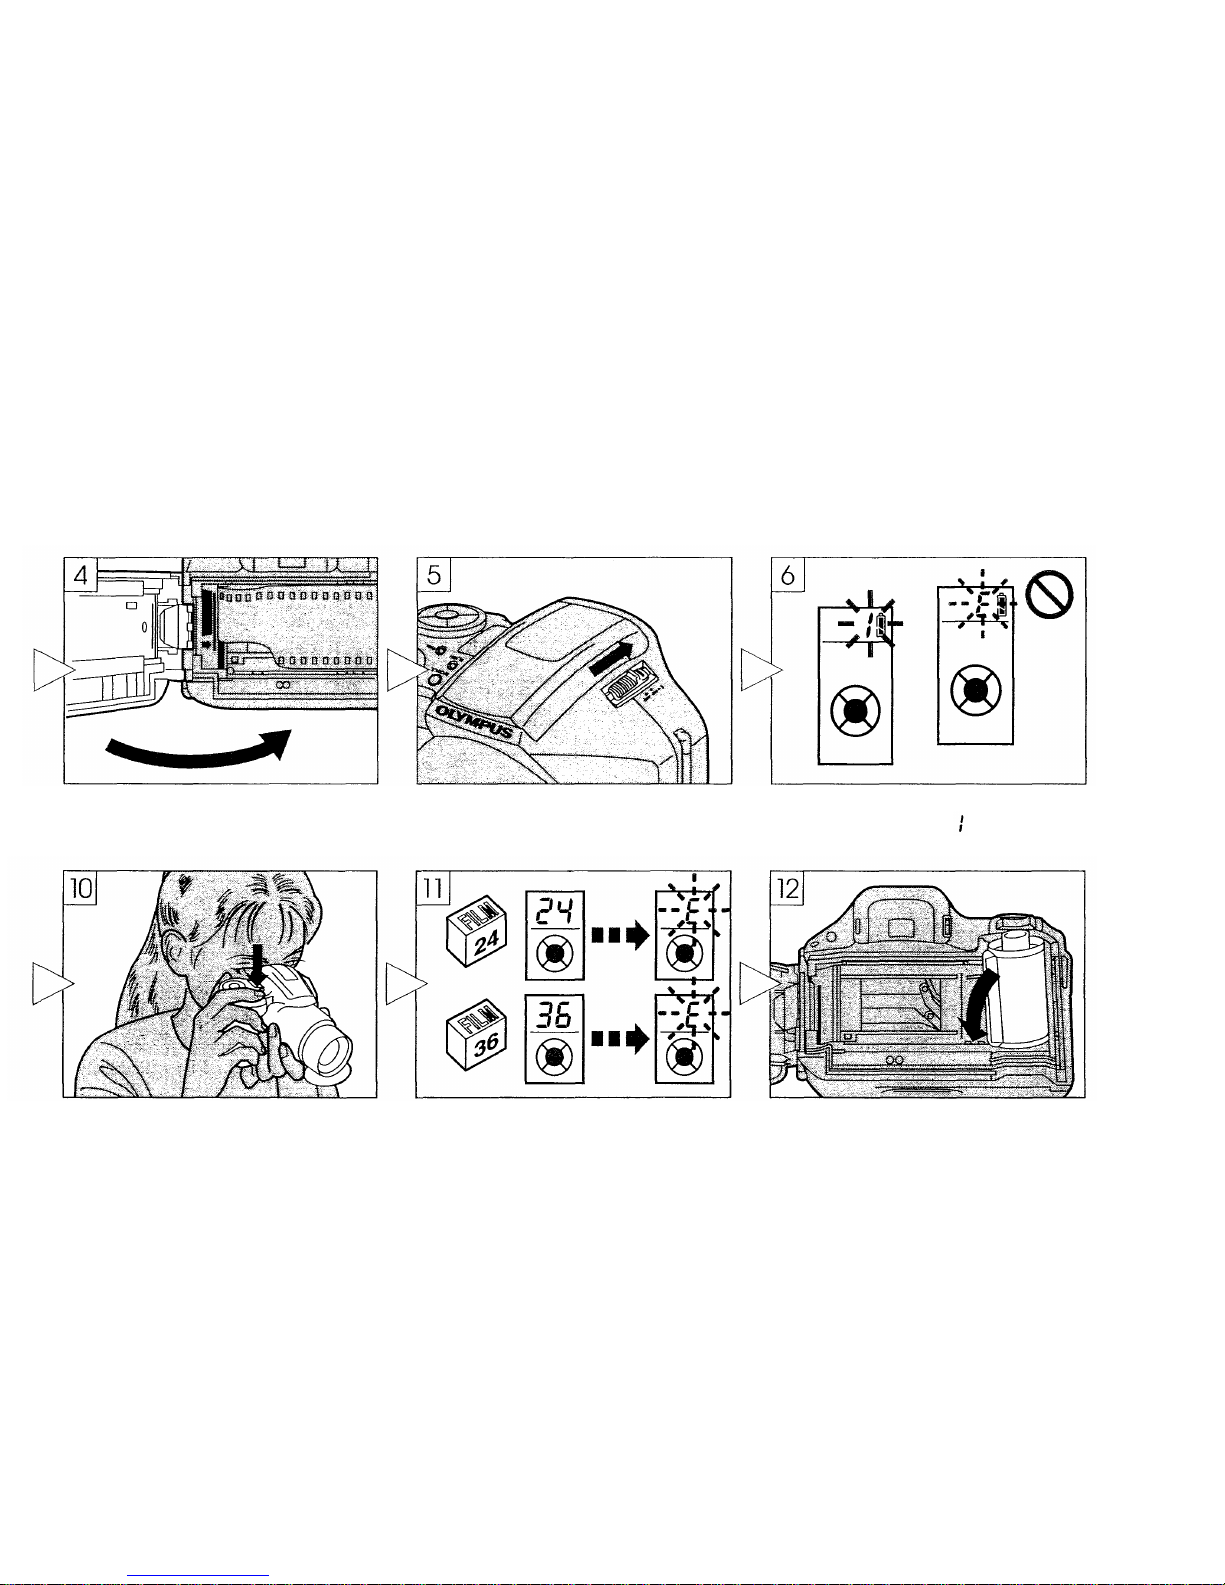
Close the back cover (p. 20).
Turn the power switch ON (p. 21).
Make sure the exposure counter on
th e LCD panel reads (p. 21).
Depress the shutter release button
fully to take a picture (p. 24).
When the film reaches the end, it will
automatically rewind (p. 26).
Open the back cover to remove the
rewound film (p. 26).
13
Page 13
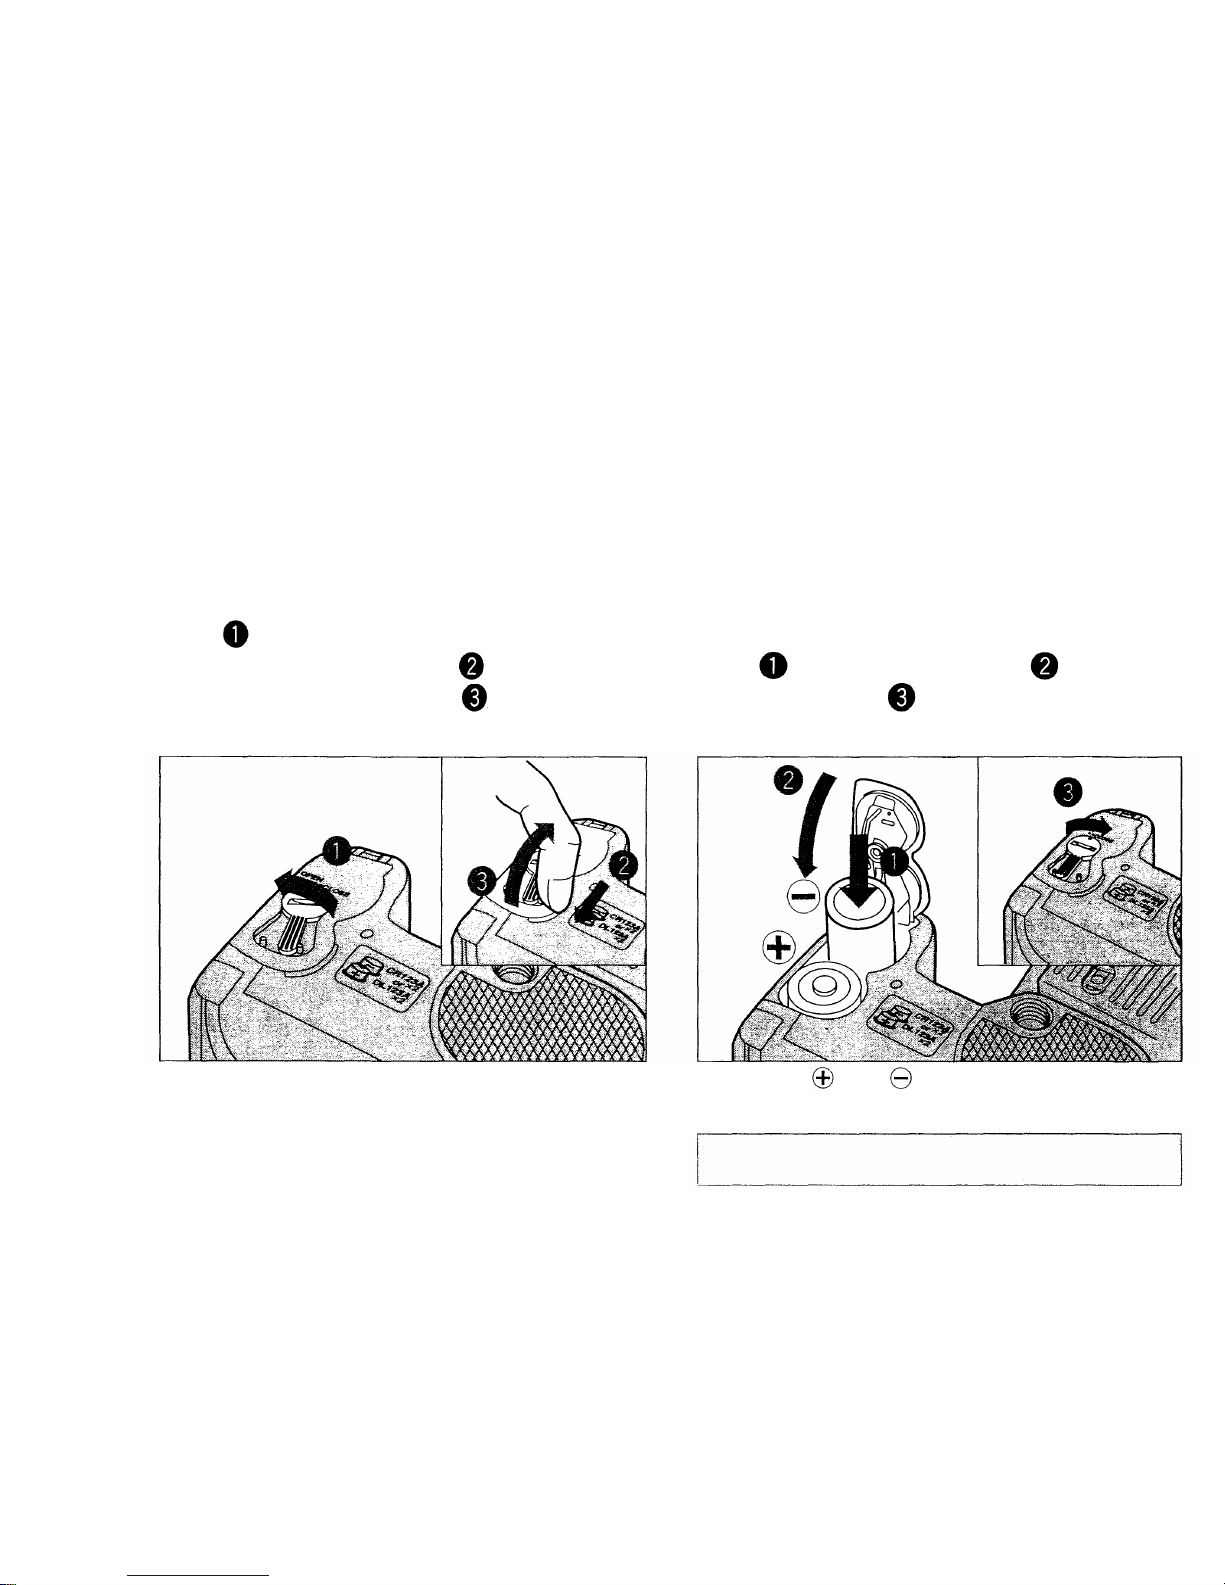
LOADING THE BATTERIES
Use two 3V lithium batteries (DL123A or CR123A).
Use your finger or a coin to turn the
lock screw to OPEN. Place your
fingertip in the notch. And open the
battery compartment cover.
2.
Insert the batteries. And close
the cover. Turn the lock screw
to CLOSE.
•When replacing the batteries, be sure to turn
the power switch OFF before unloading the
batteries.
•Take care not to injure your fingernail when
opening the battery cover.
•Align the and dir e ct io ns of th e batteries
correctly as shown.
Rea d "Battery Handling" on page 64.
14
1.
Page 14
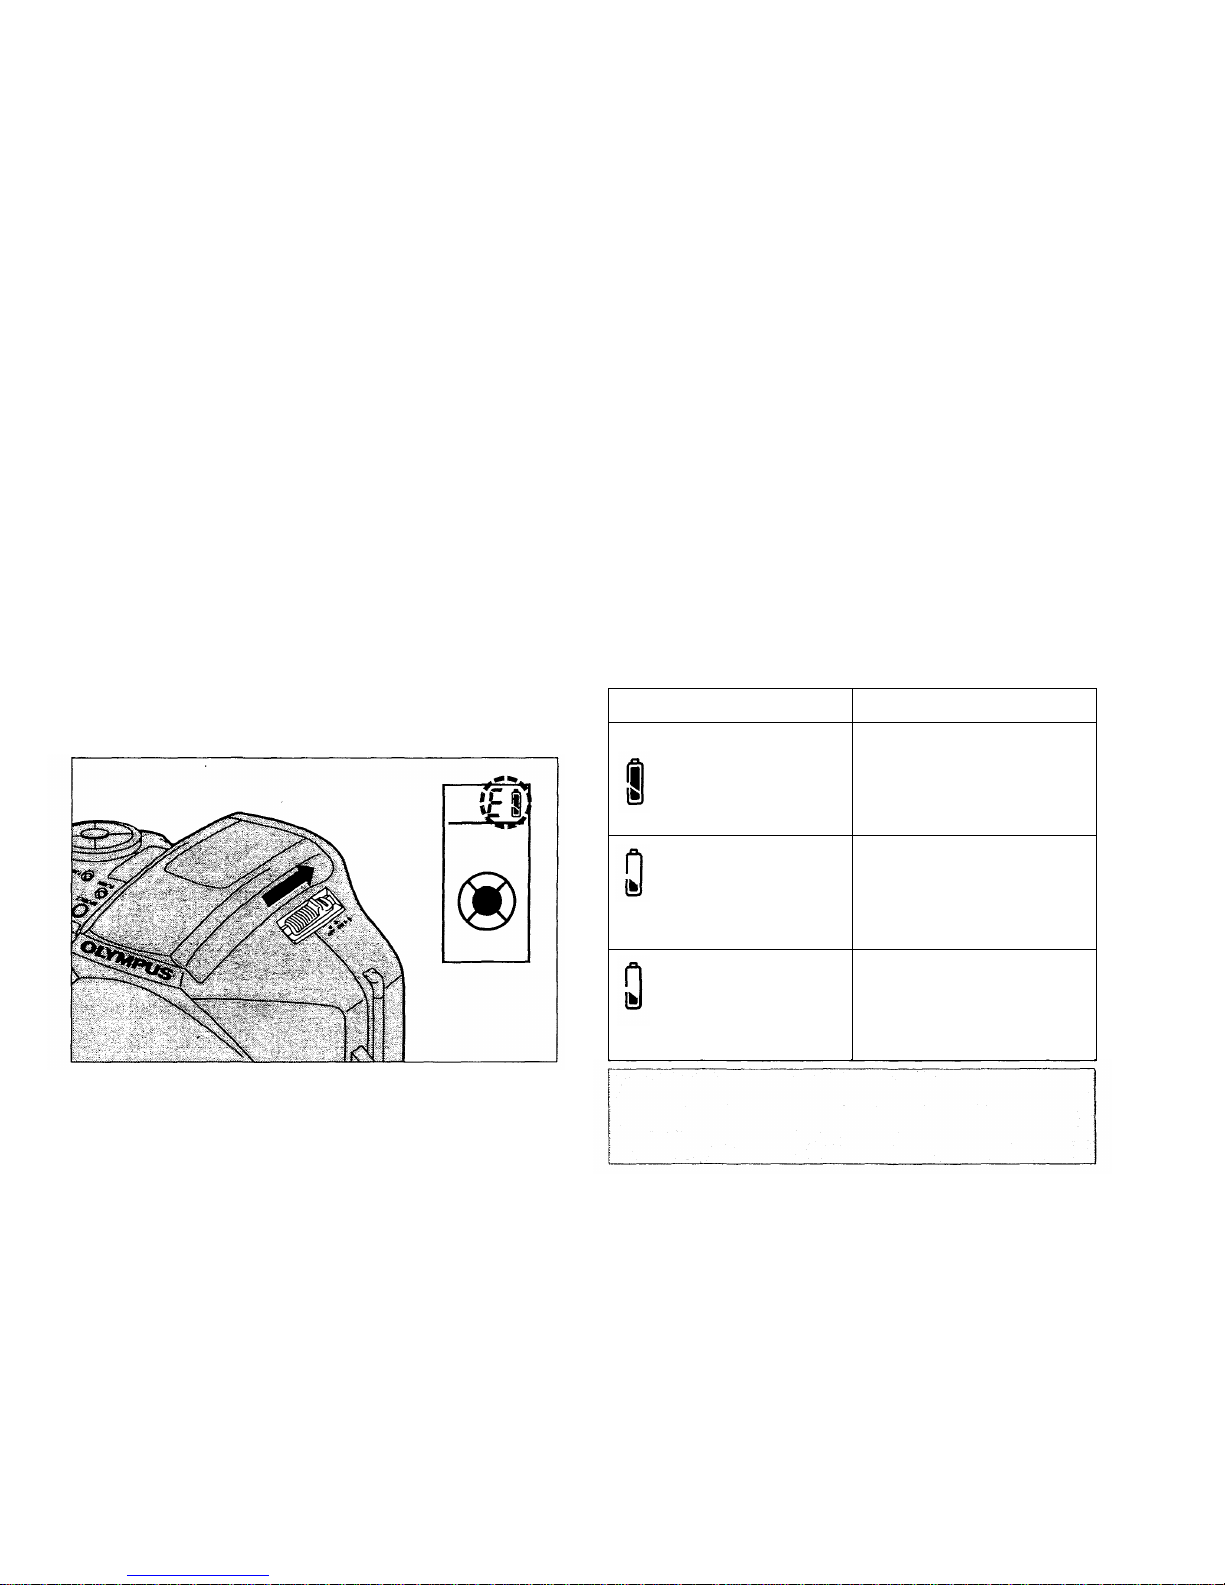
CHECKING THE BATTERIES
1.
Turn the power switch ON. Be
sure to check th e batteries as well.
When replacing the batteries, make sure to
turn the power switch OFF before unloading
the batteries.
Display
lights (turns off
automatically).
blinks and other
indicators on the
LCD panel are
displayed normally.
blinks and other
indicators on the
LCD panel go out.
Meaning
Batteries are OK.
You can shoot.
Bat ter ie s ar e lo w a n d
should be replaced.
Batteries are dead
and should be
replaced immediately.
Keep spare batteries on hand when going on
a long trip or when using the camera in cold
weather.
15
Page 15
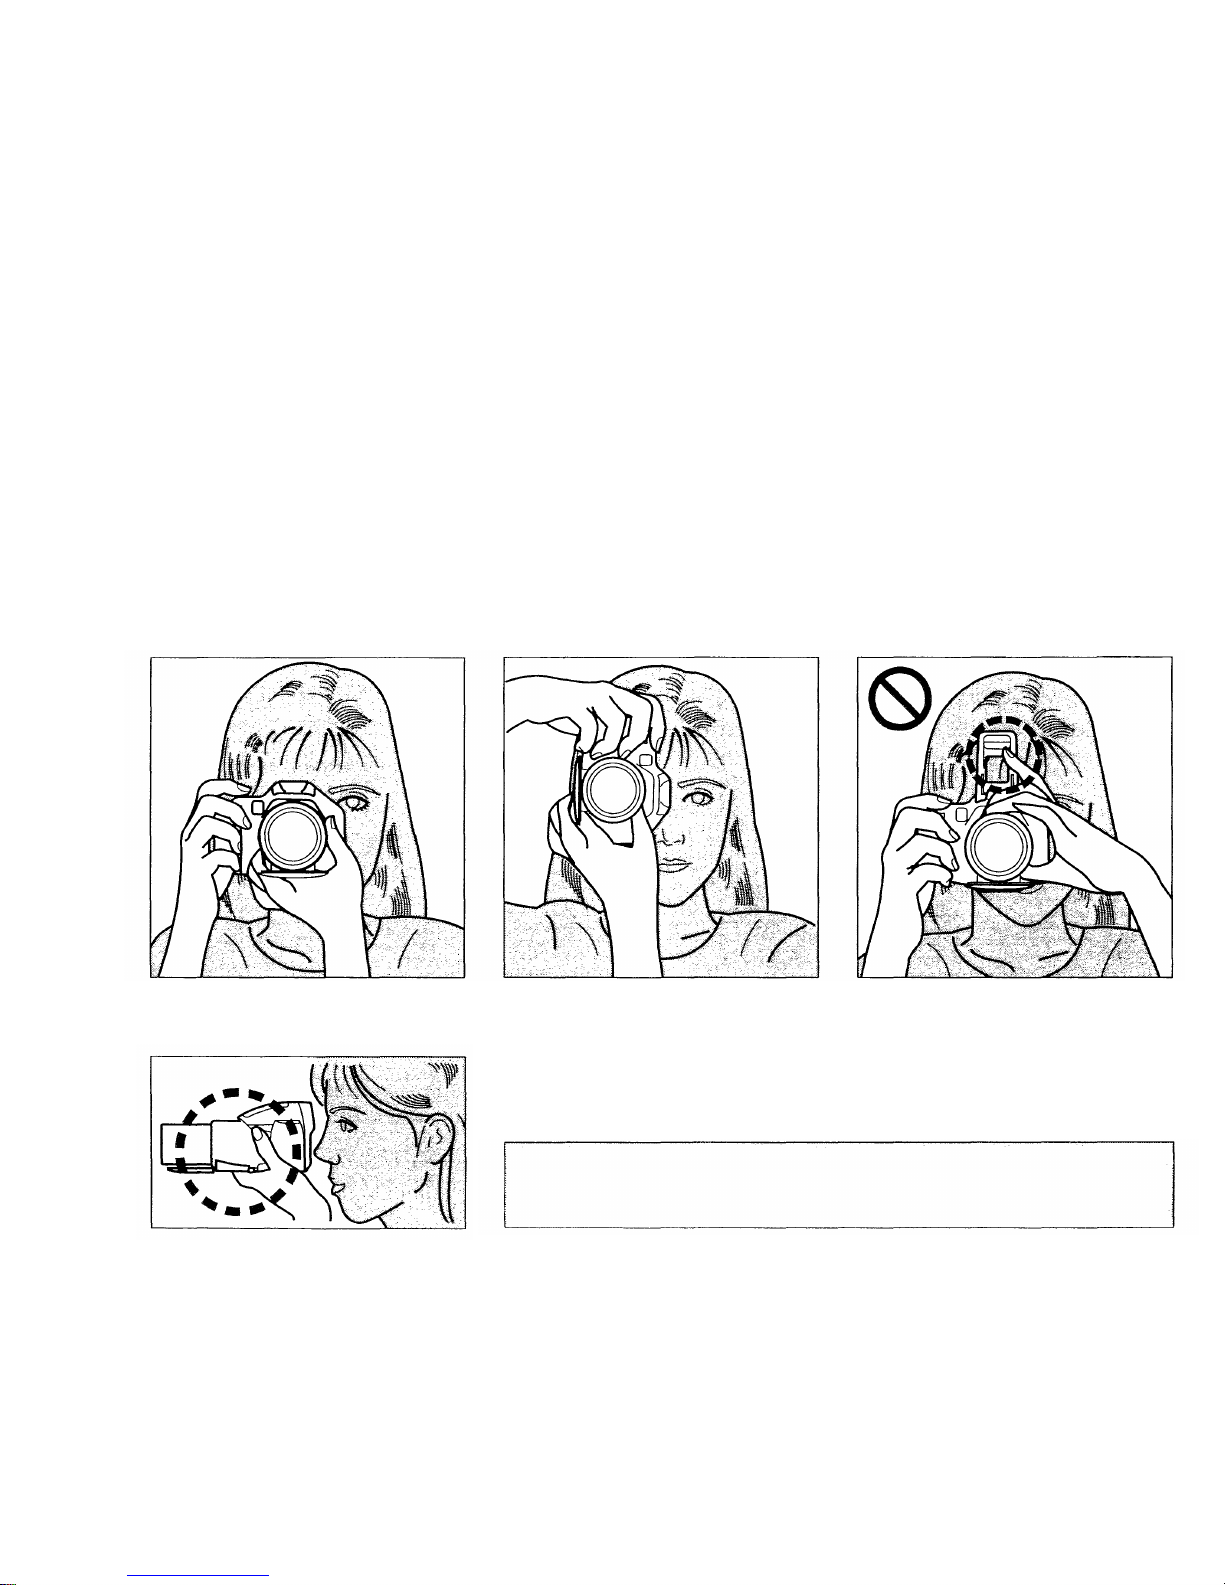
POINTS TO REMEMBER
Hold t he Camera Correctly.
Correct
Correct
Incorrect
Note: As the focal length becomes larger, shaking the camera
becomes more noticeable. Hold the camera firmly with both hands
while keeping elbows at sides to prevent the camera from shaking.
Cautions:
•Try not to hold the lens barrel.
•Keep your fingers and the strap away from t h e lens and flash.
16
Page 16
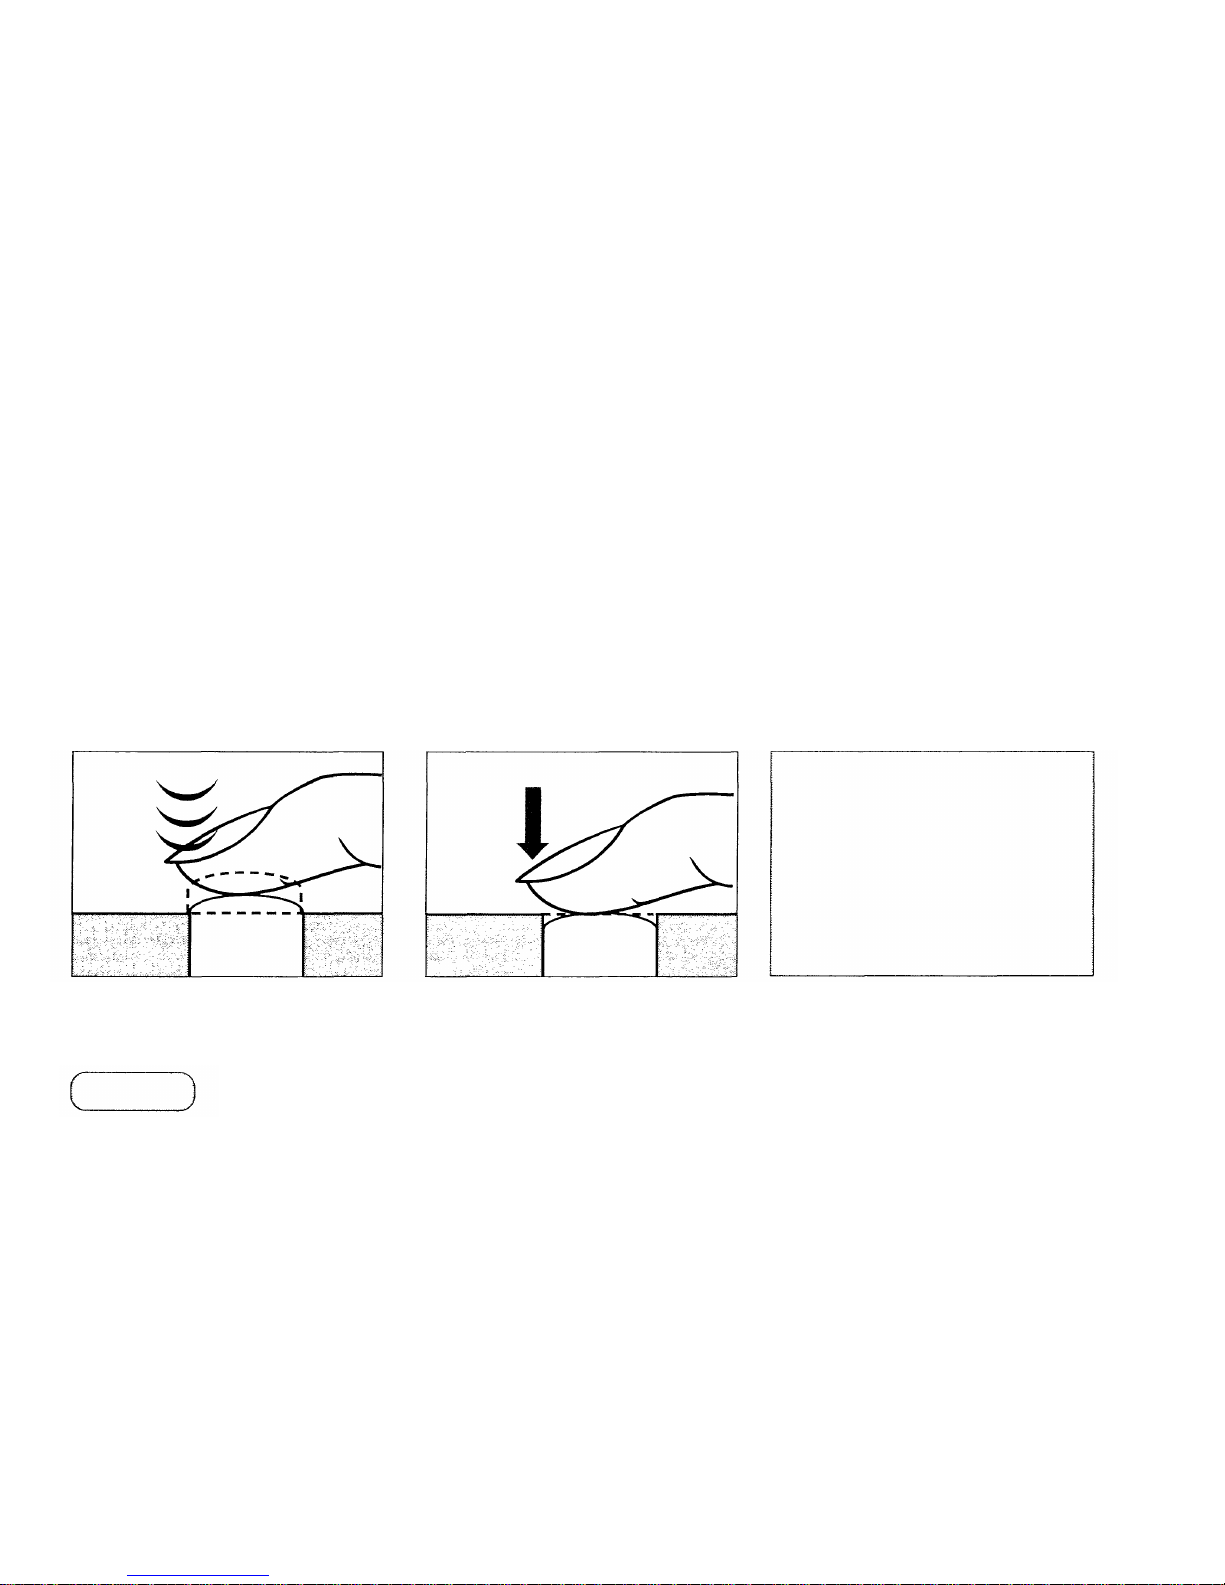
Proper Shutter Release.
1.
Keep the shutter
release button
depressed halfway.
The shutter release button has two clicks. Practice
before loading the film.
2.
Depress the shutter
release button fully.
To lock the focus.
To release the shutter and
take the picture.
The image is clear, the
autofocus beep is heard, and
the autofocus indicator lights
in the viewfinder.
Note: When the autofocus
indicator is blinking, the
shutte r won't rel ease. (p. 54)
Cautions:
• Press the shutter release
button gently.
•Avoid shaking the camera
when pressing the shutter
release button to prevent
blurry pictures.
Make sure
17
Page 17
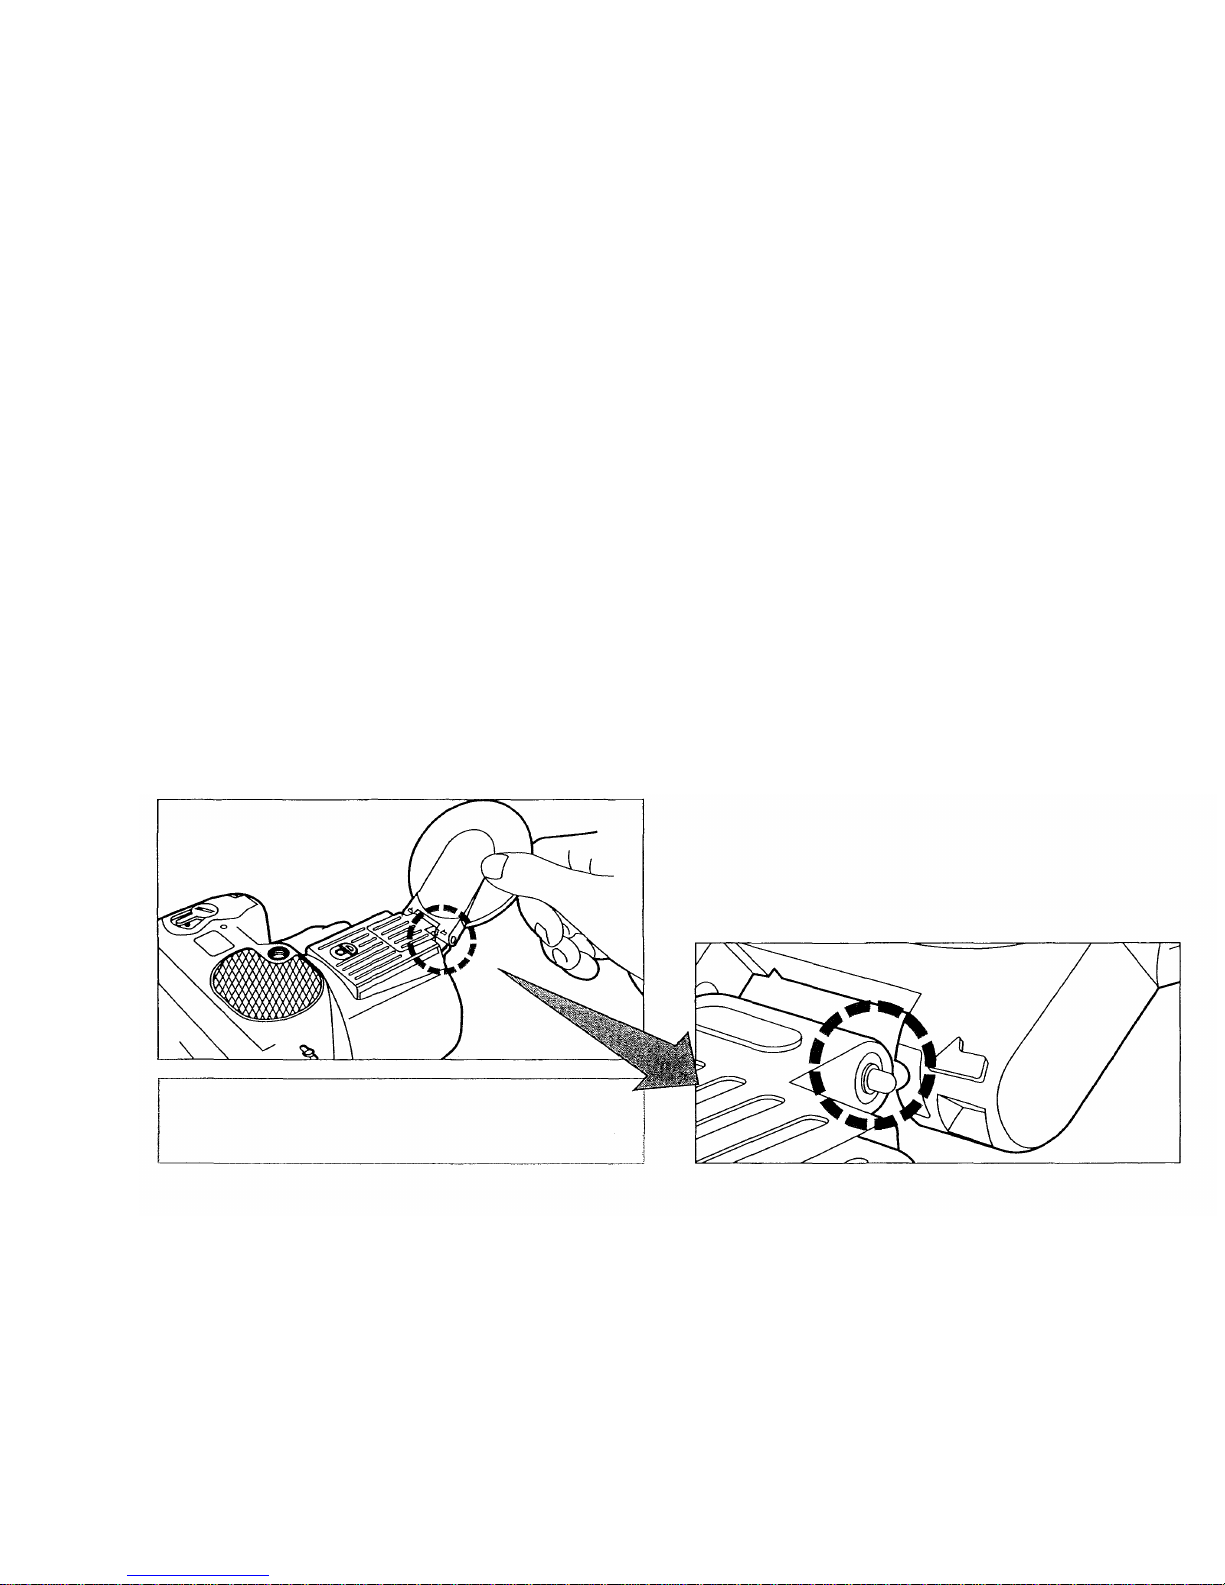
RE-MOUNTING THE CAP WHEN IT COMES OF F
To prevent the hinge joint from breaking, the cap will come off if
too much force is used when opening it.
(Do not attempt to remove the cap deliberately as repeated disconnection of the cap will
loosen the hinge joint, increasing the likelihood that the cap will come off.)
If the cap comes off, re-mount it as instructed below.
1.
Turn the camera, so that the
bottom is facing up.
2.
Align the arrow-pointed recesses on
the cap's hinge joint with the
protrusions (silver parts) on the bottom
tip of the lens barrel. While aligning
them on both the left and right, press
the cap firmly against the lens.
O p e n a n d c lo s e t he c a p to m a k e sur e t he
hinge joint ha s been engaged securely.
18
Page 18
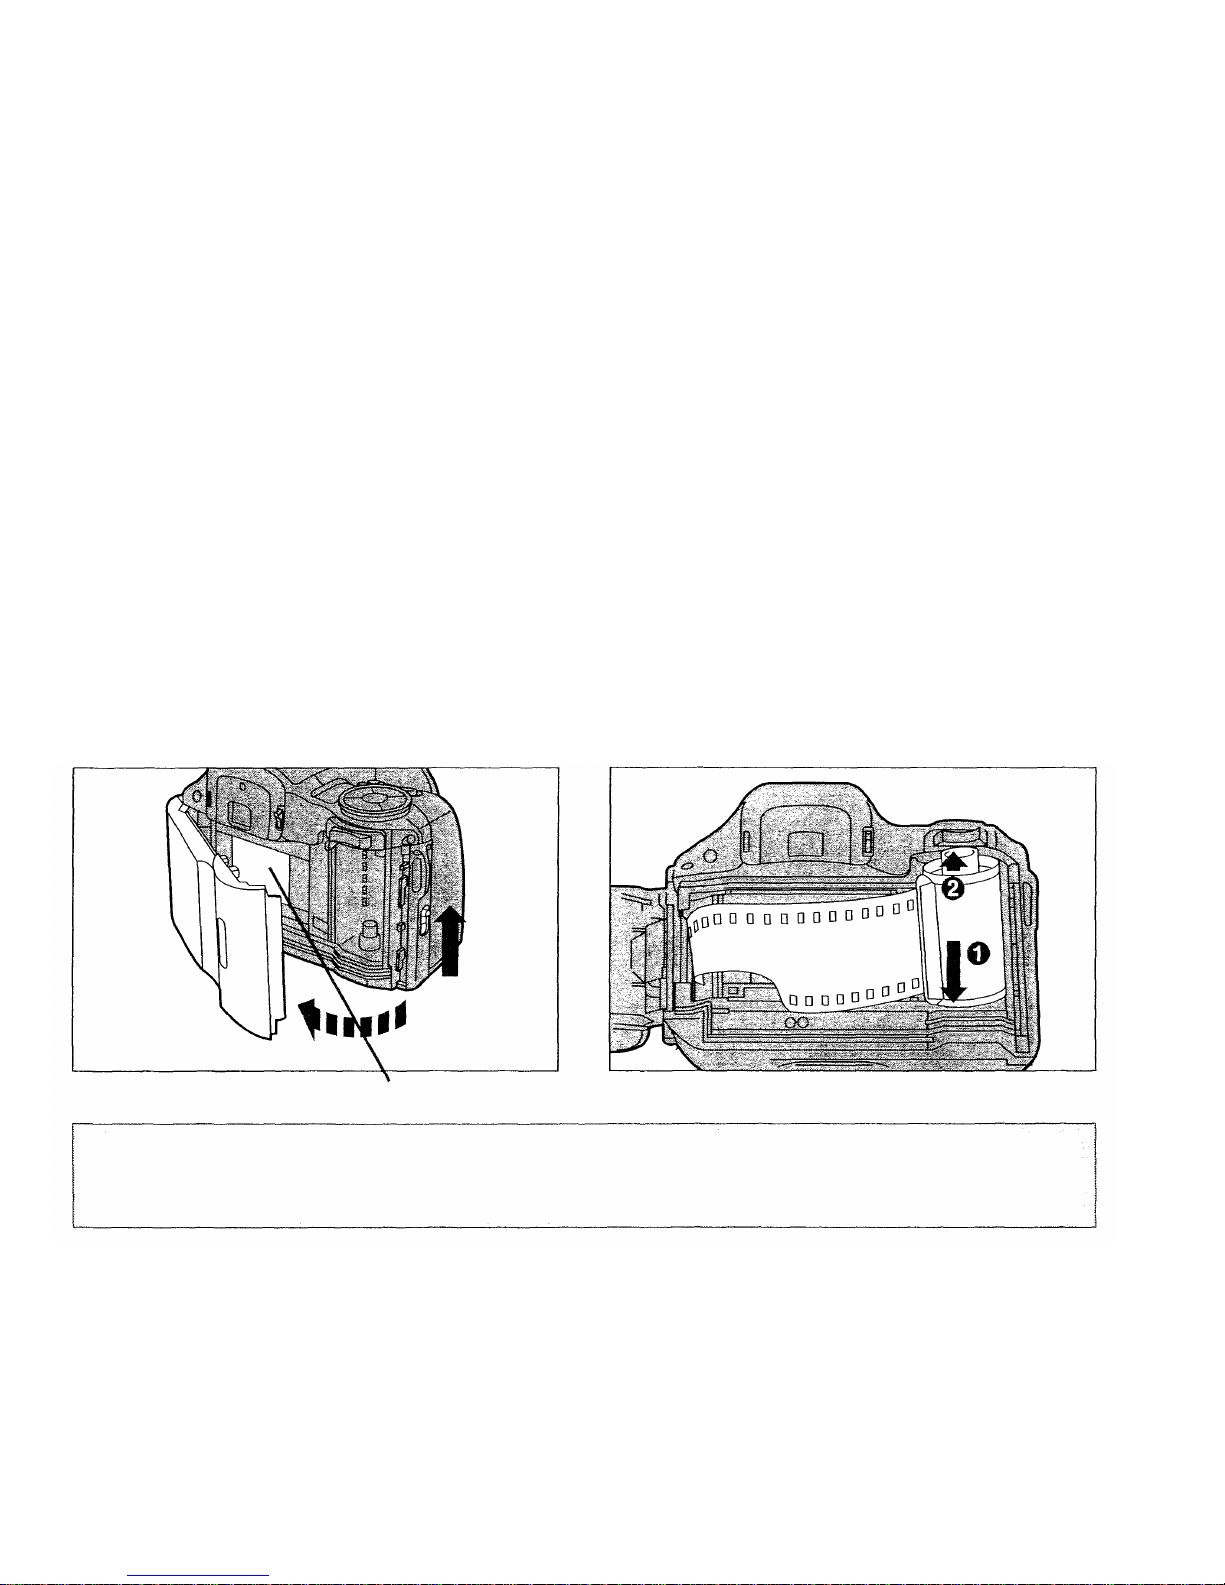
LOADING THE FILM
1.
Slide the back cover release
upward to open the back cover.
2.
Lo ad the film.
Caution: Be sure never to let anything touch the shutter curtains as they are extremely thin and
have a high-precision design. Any contact with your fingers or film m ay damage or permanently
deform the shutter curtains.
Shutter curtains
19
BASIC OPERATIONS
Page 19
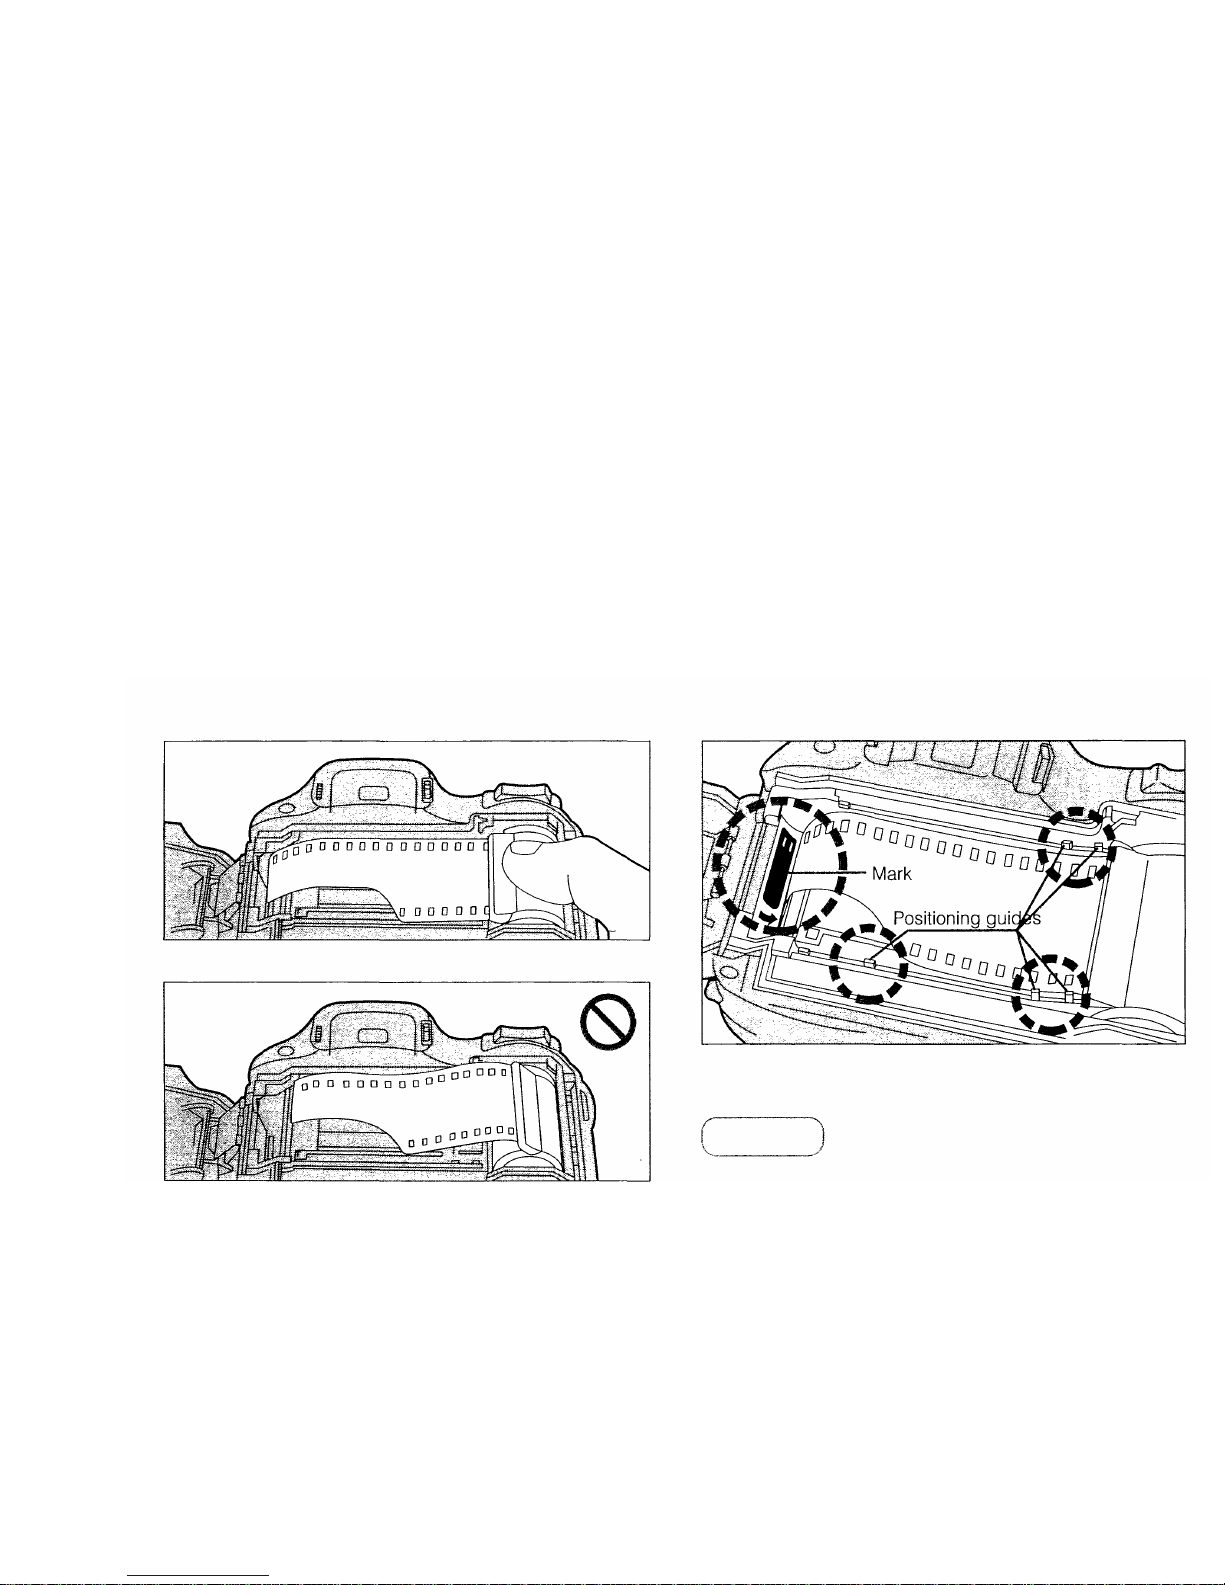
3.
Align the tip of the film leader with
the mark as shown, and close the
back cover.
The film automatically advances to the first
frame.
Make sure
The film does not overlap any of the
positioning guides shown above.
Note: Make sure the film is lying flat.
Correct
Incorrect
20
Page 20
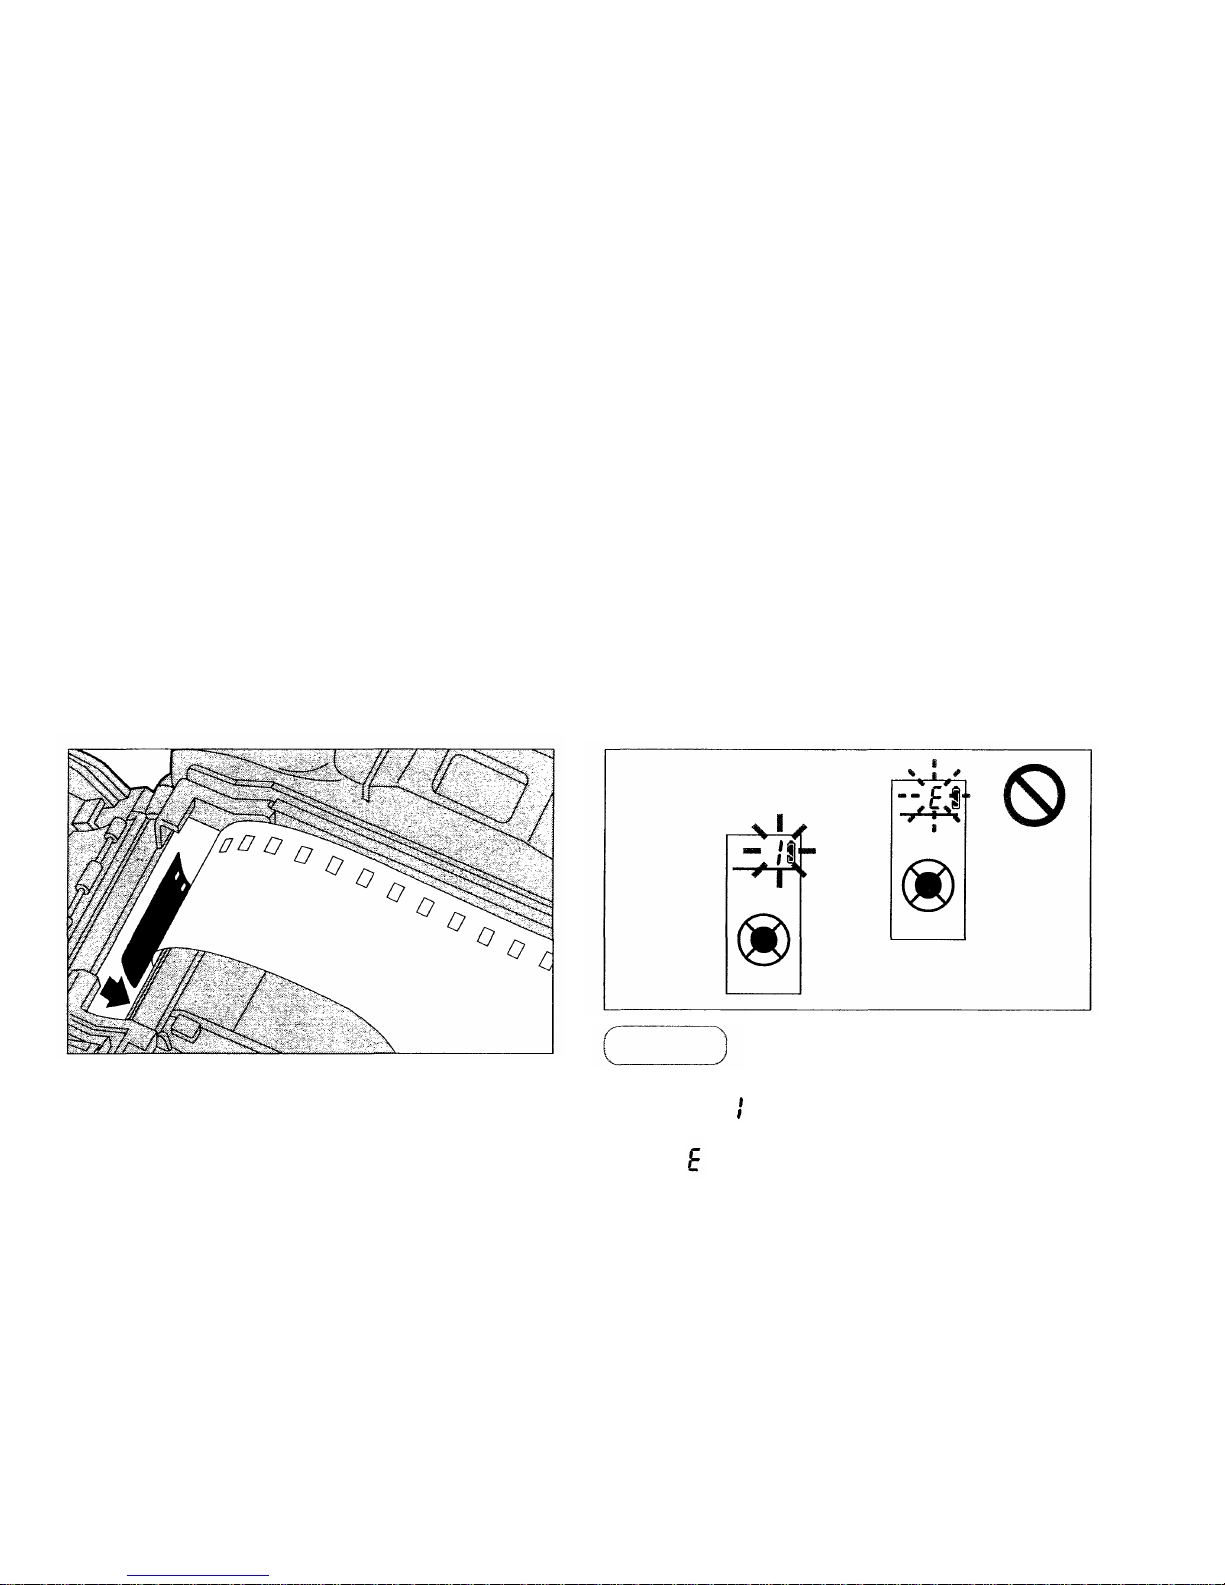
4.
Turn the power switch ON.
Notes:
• Place the film leader along th e arrow as
shown.
• Film information can be checked through the
film window.
The exposure counter on the LCD
panel reads .
Note:lf blinks in the exposure counter, as
shown above, reload the film.
Make sure
21
Page 21
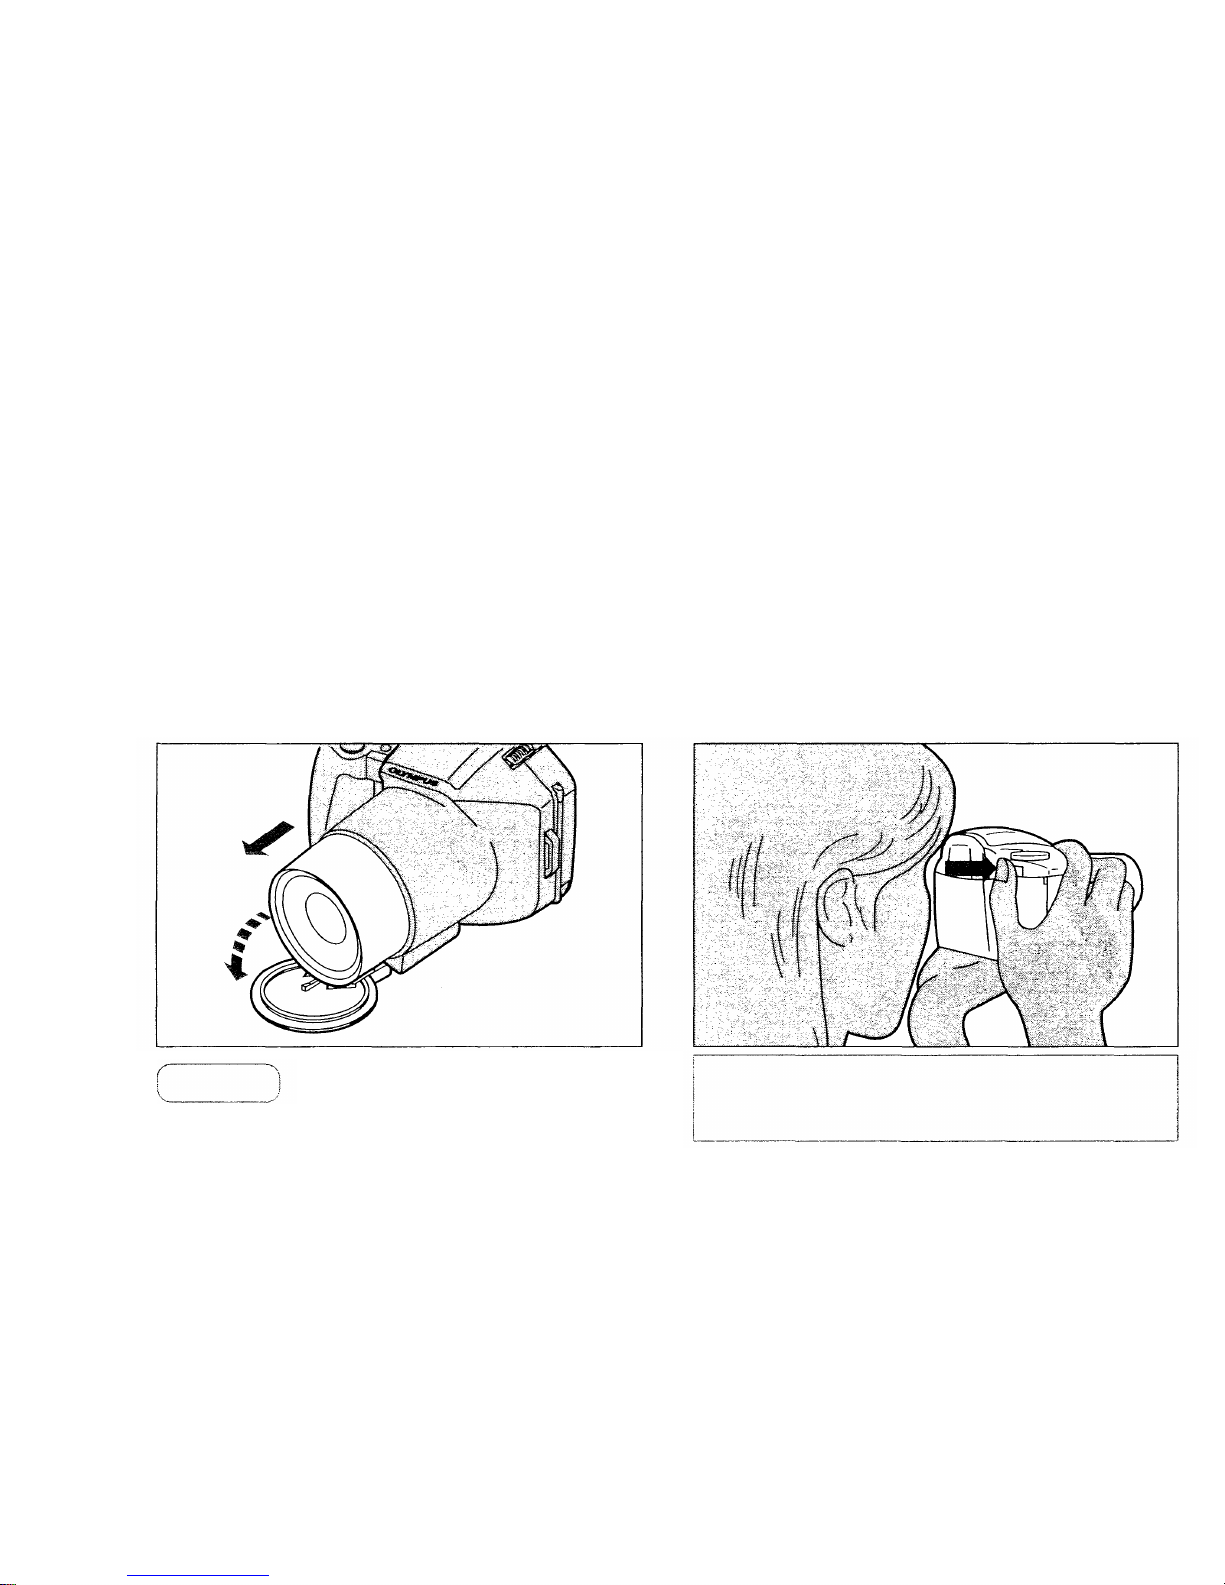
TAKING PICTURES
Follow this procedure for normal photography. When the power
switch is turned ON, the camera is in the Full-Auto mode. (p. 4 3 )
1.
Turn the power switch ON.
2.
While looking through the
viewfinder, press the zoom button
to determine the composition.
While the lens moves forward,
the lens cap opens, and the LCD panel lights.
Note: If no operation is made for approx. 30
seconds, the LCD panel goe s out and will
come on again w h en th e operation is resumed.
Make sure
DANGER: DO NOT LOO K AT THE SU N
DIRECTLY THROUGH THE VIEWFINDER.
22
Page 22
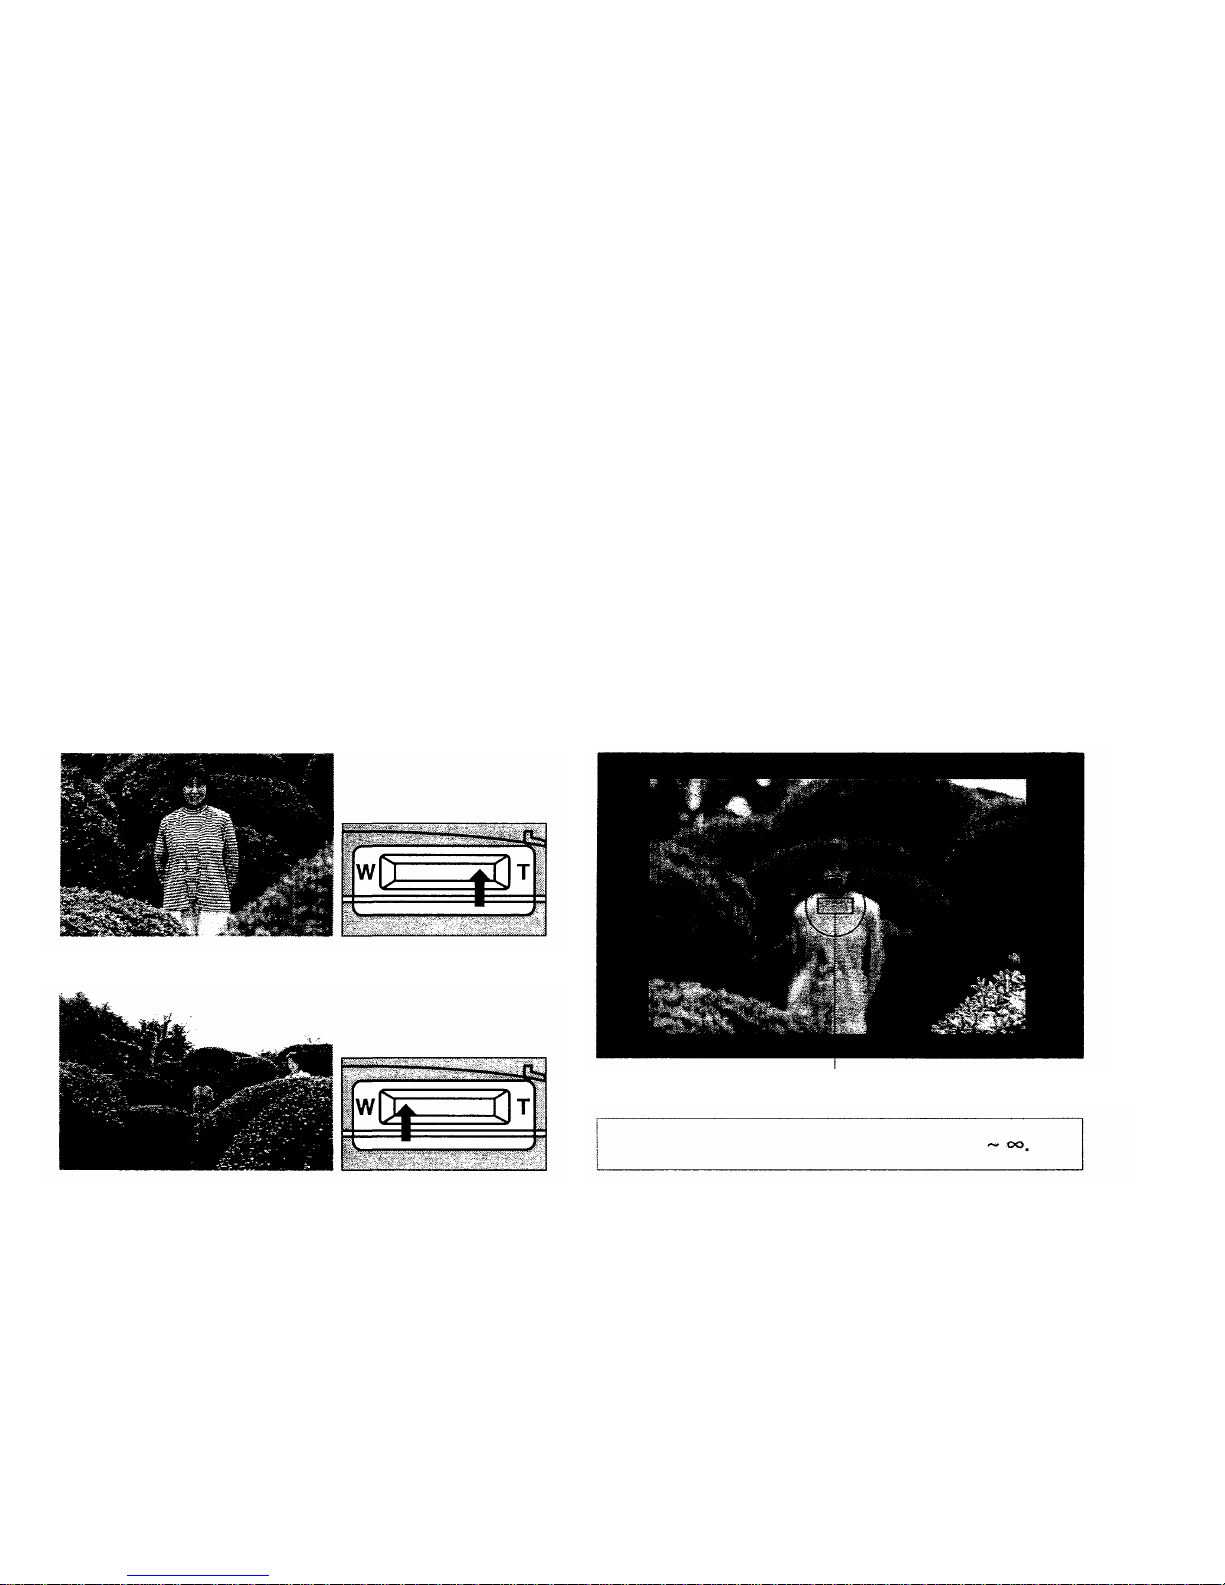
How to Use th e Zoom Buttons
3.
Position the autofocus frame on
your subject.
Telephoto: Press the (T) button t o zoom in.
Max. telephoto focal
length: 110 mm
Wide-angle: Press the (W) button to zoom out.
Max. wide-angle focal
length: 28 mm
Autofocus frame
Working distance: 75 cm. (2.5 ft)
23
Page 23
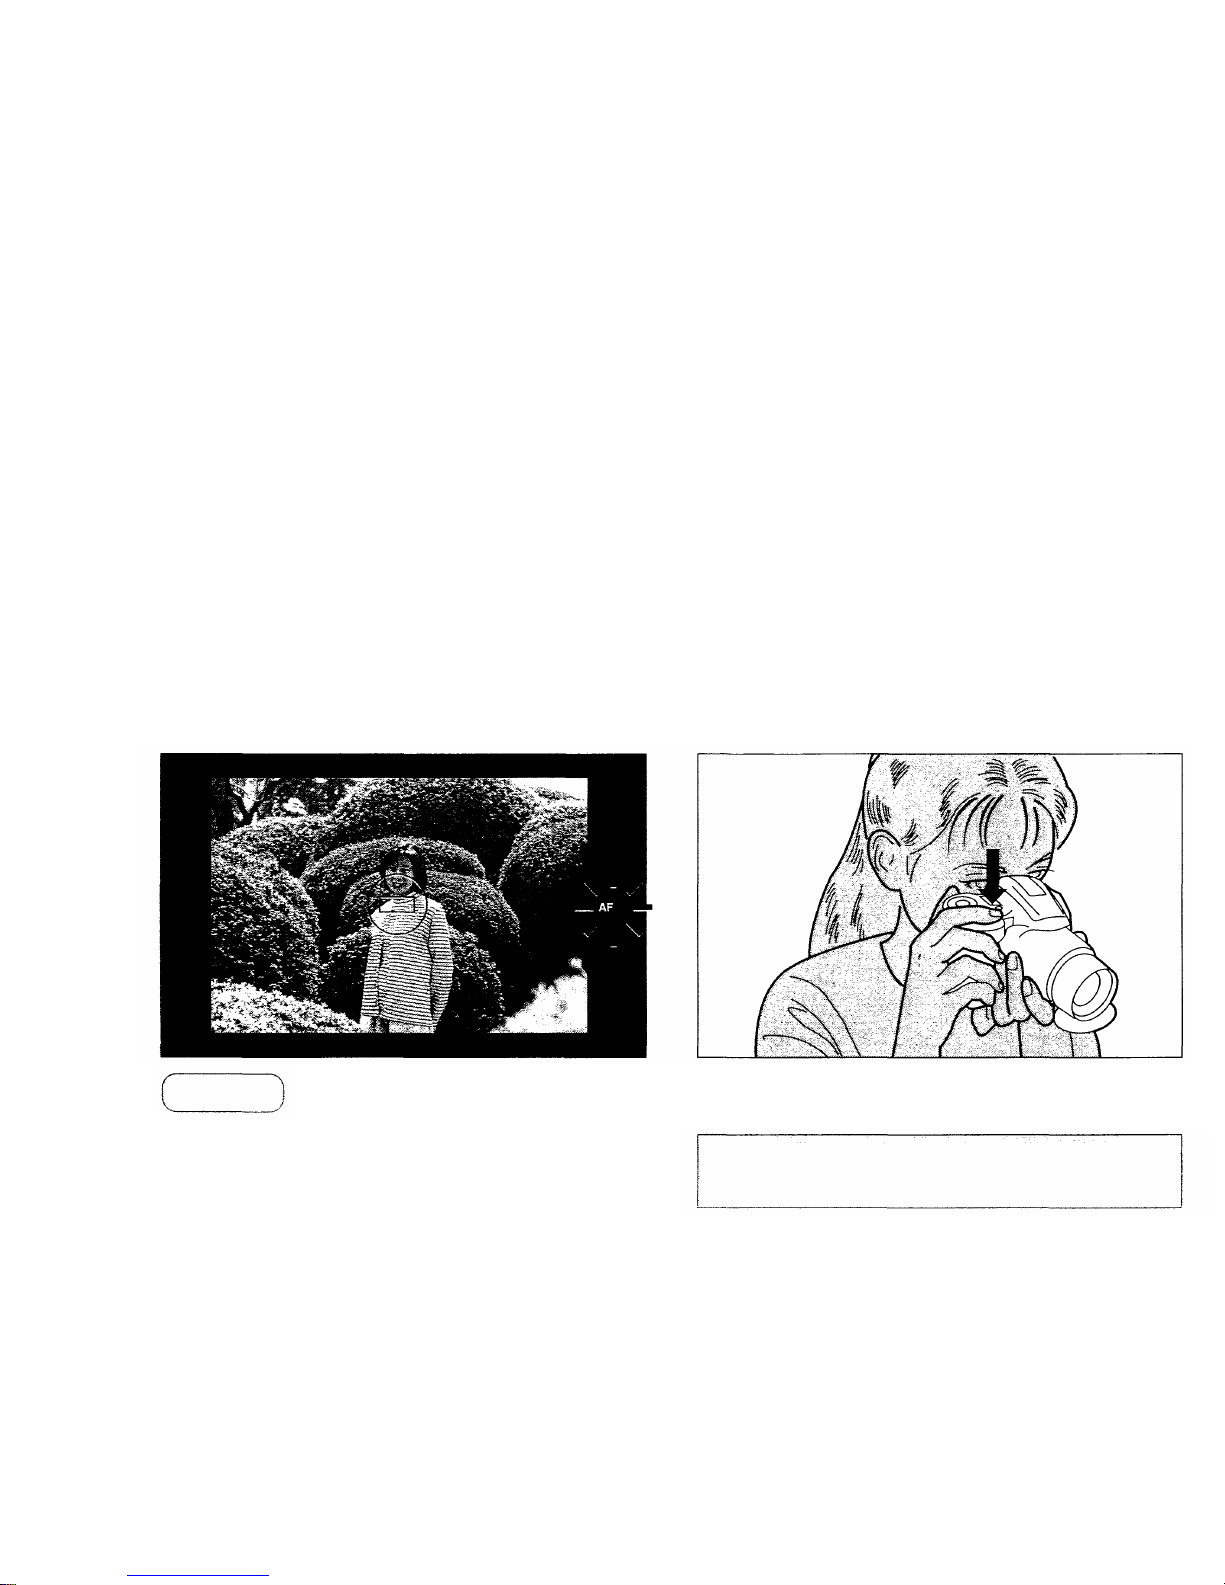
4.
Depress the shutter release
button halfway.
5.
Without removing your finger from
the shutter release button,
depress fully to take the picture.
The shutter releases and the film
automatically advances to the next frame.
The autofocus beep is heard and the
auto focus indicator lights whe n the subject is in focus. It
will blink if the subject is difficult for the autofocus to lock
on to, and when the subject is too close.
Note: Whe n th e autofocus indicator blinks, the shutter
won't release. (p. 54)
Make sure
When you've finished shooting, turn the
power switch OFF, and close the lens cap.
24
Page 24
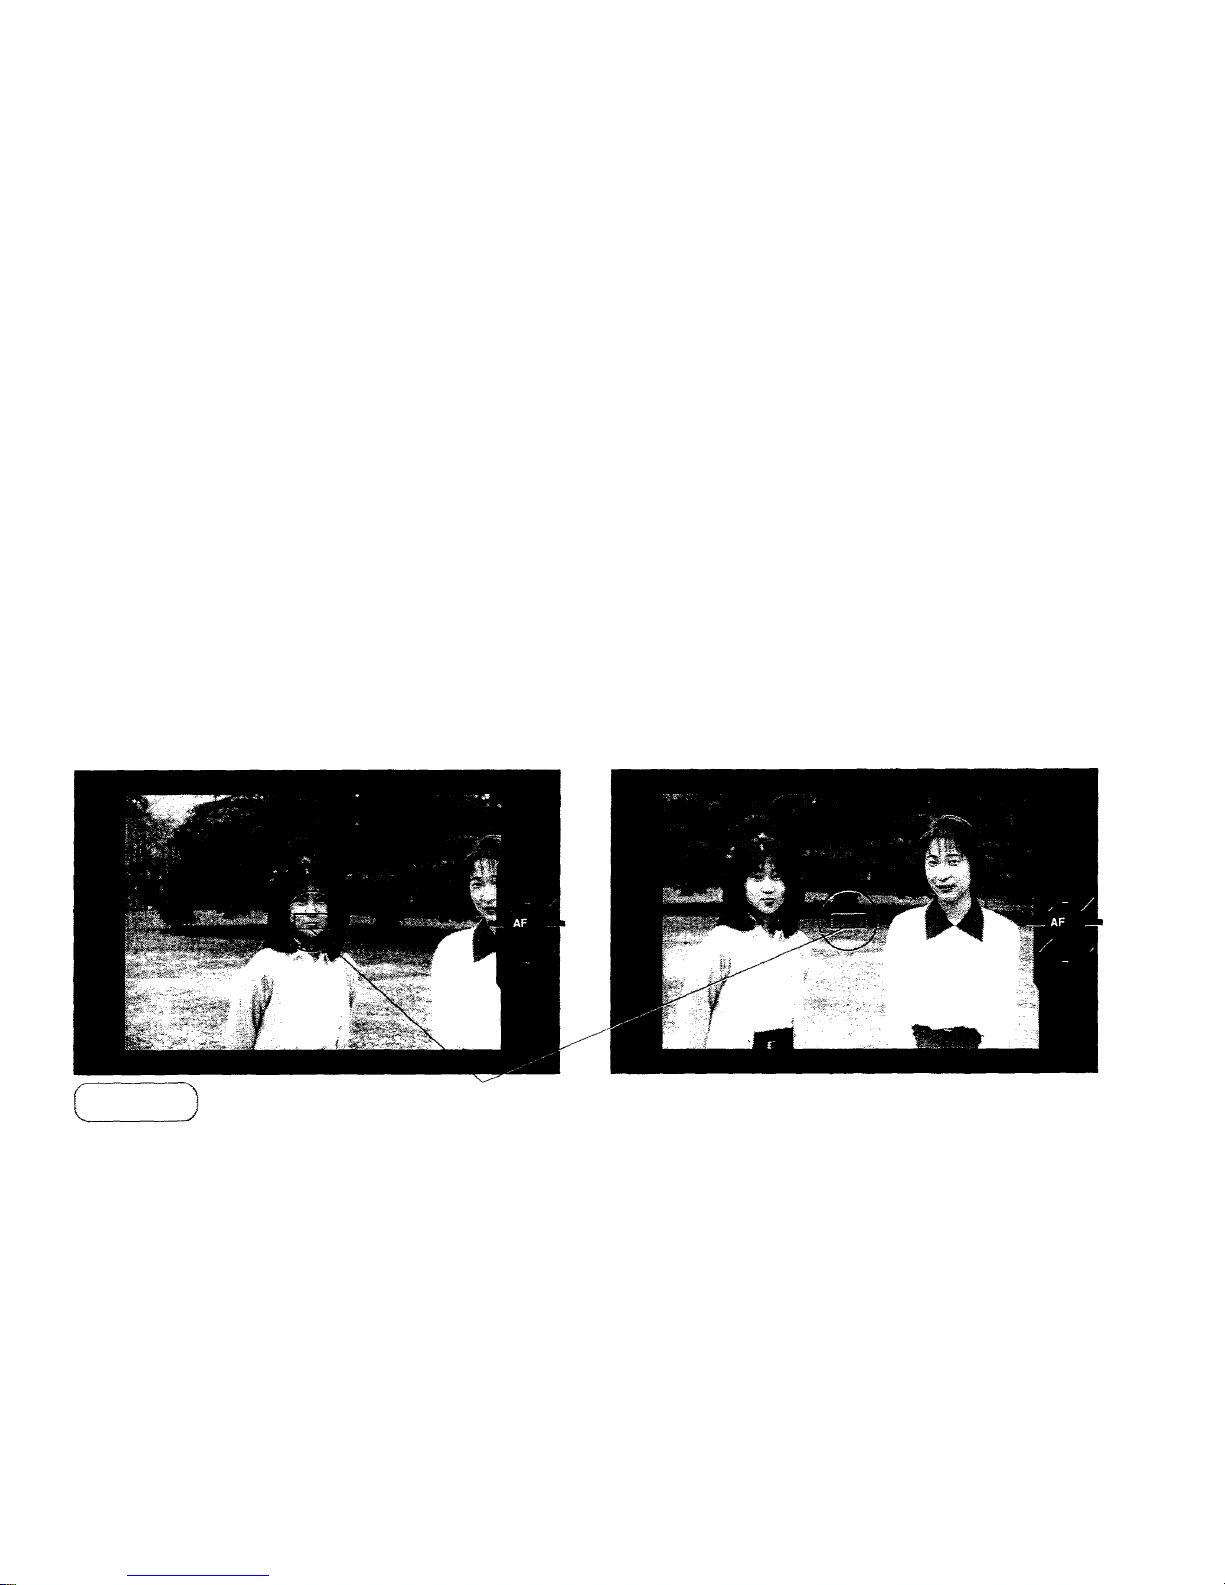
USING THE FOCUS LOCK
When the main subject is not in the center of the autofocus frame,
follow the procedure below. Th is is called focus lock.
1.
Position the autofocus frame on
your subject and press the shutter
release button halfway.
2.
Reposition you r subjects in the picture
frame while keeping the shutter release
button depressed halfway. Then press
the shutter release button fully.
The autofocus beep is heard, and the
autofocus indicator lights in the viewfinder.
Autofocus frame
In focus lock the focus is locked in the center
of the viewfinder and the expos ure is also
locked (AE lock) and averages the exposure
for the entire viewfinder.
Make sure
25
Page 25
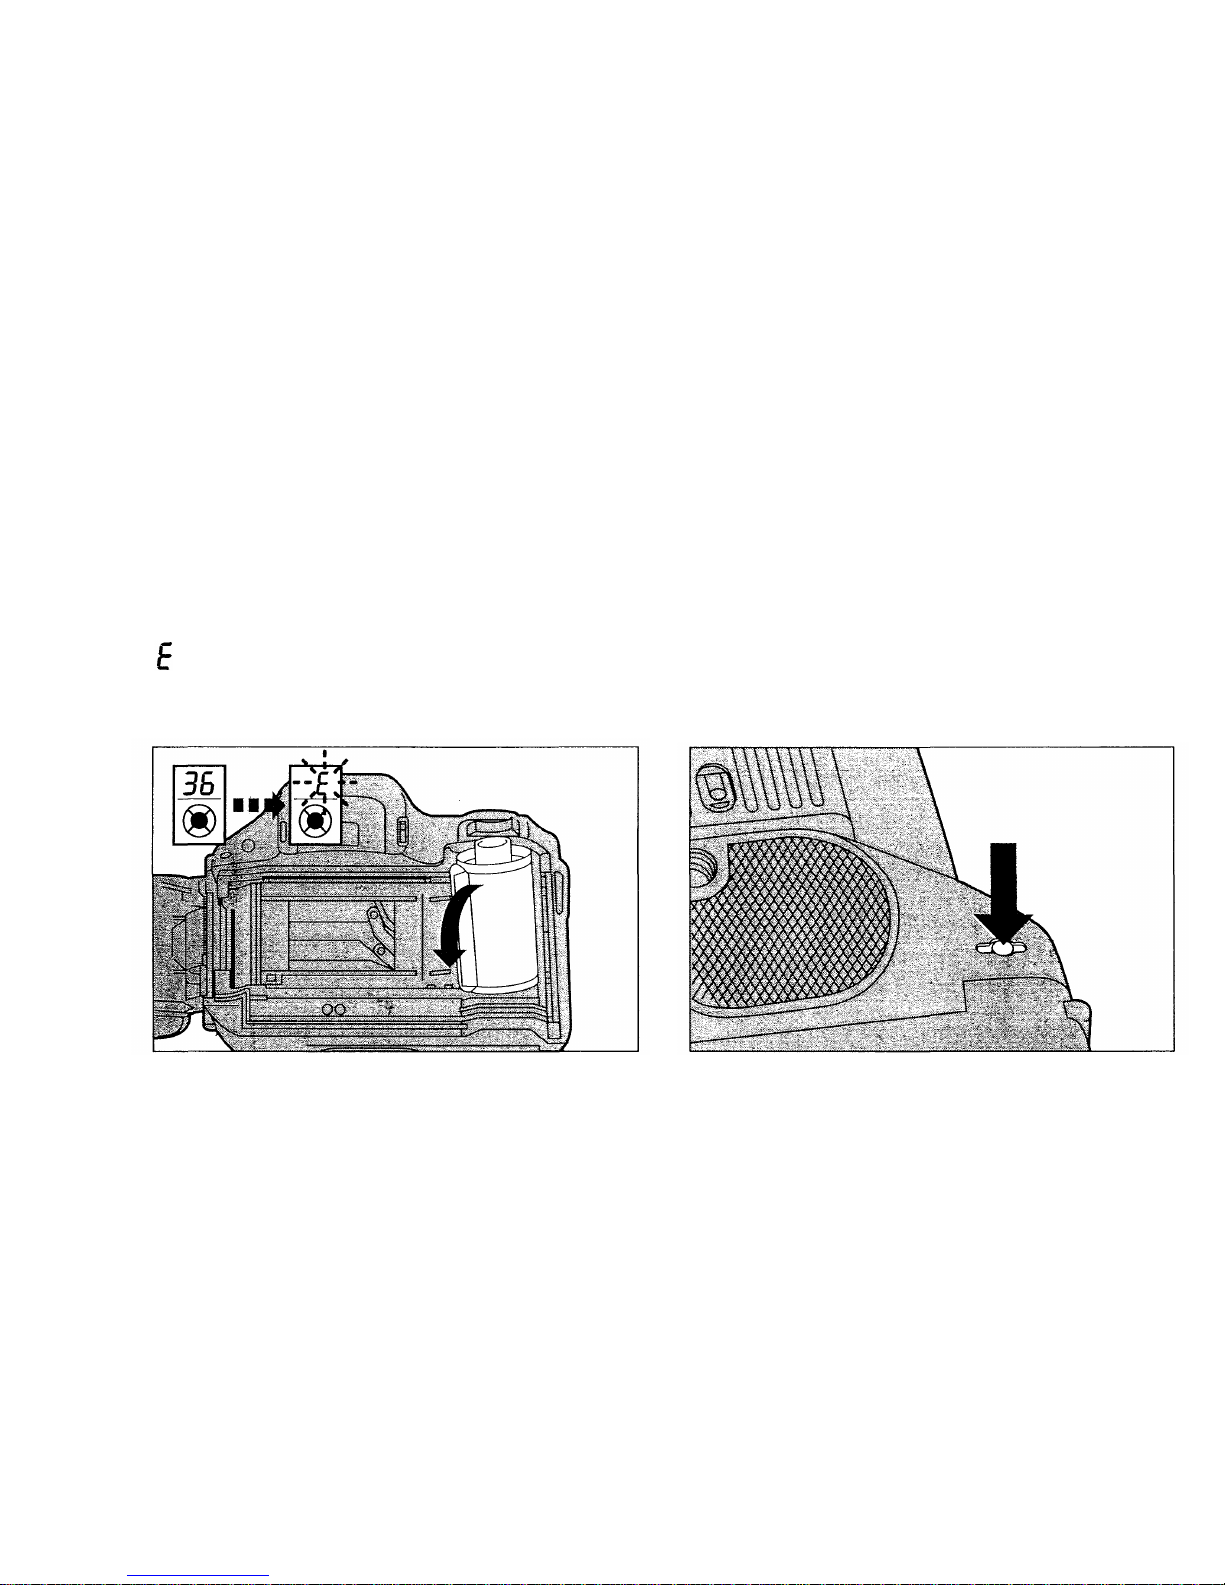
UNLOADING THE FILM
The camera automatically rewinds the film when y ou reach the end
of a roll.
Make sure the motor has stopped and
is blinking on t he LCD panel before
opening th e back cover and removing
the film.
Rewinding the film before the
end of the roll
Notes: • The number of exposures will
decrease during rewinding. •The final number
of exposures may sometimes exceed the
number of exposures specified on the film.
•The film leader will be wound back inside the
cassette.
To rewind the film before the end of the roll,
press the mid-roll rewind button with your
fingernail. Do not use an instrument with a
sharp tip.
26
Page 26
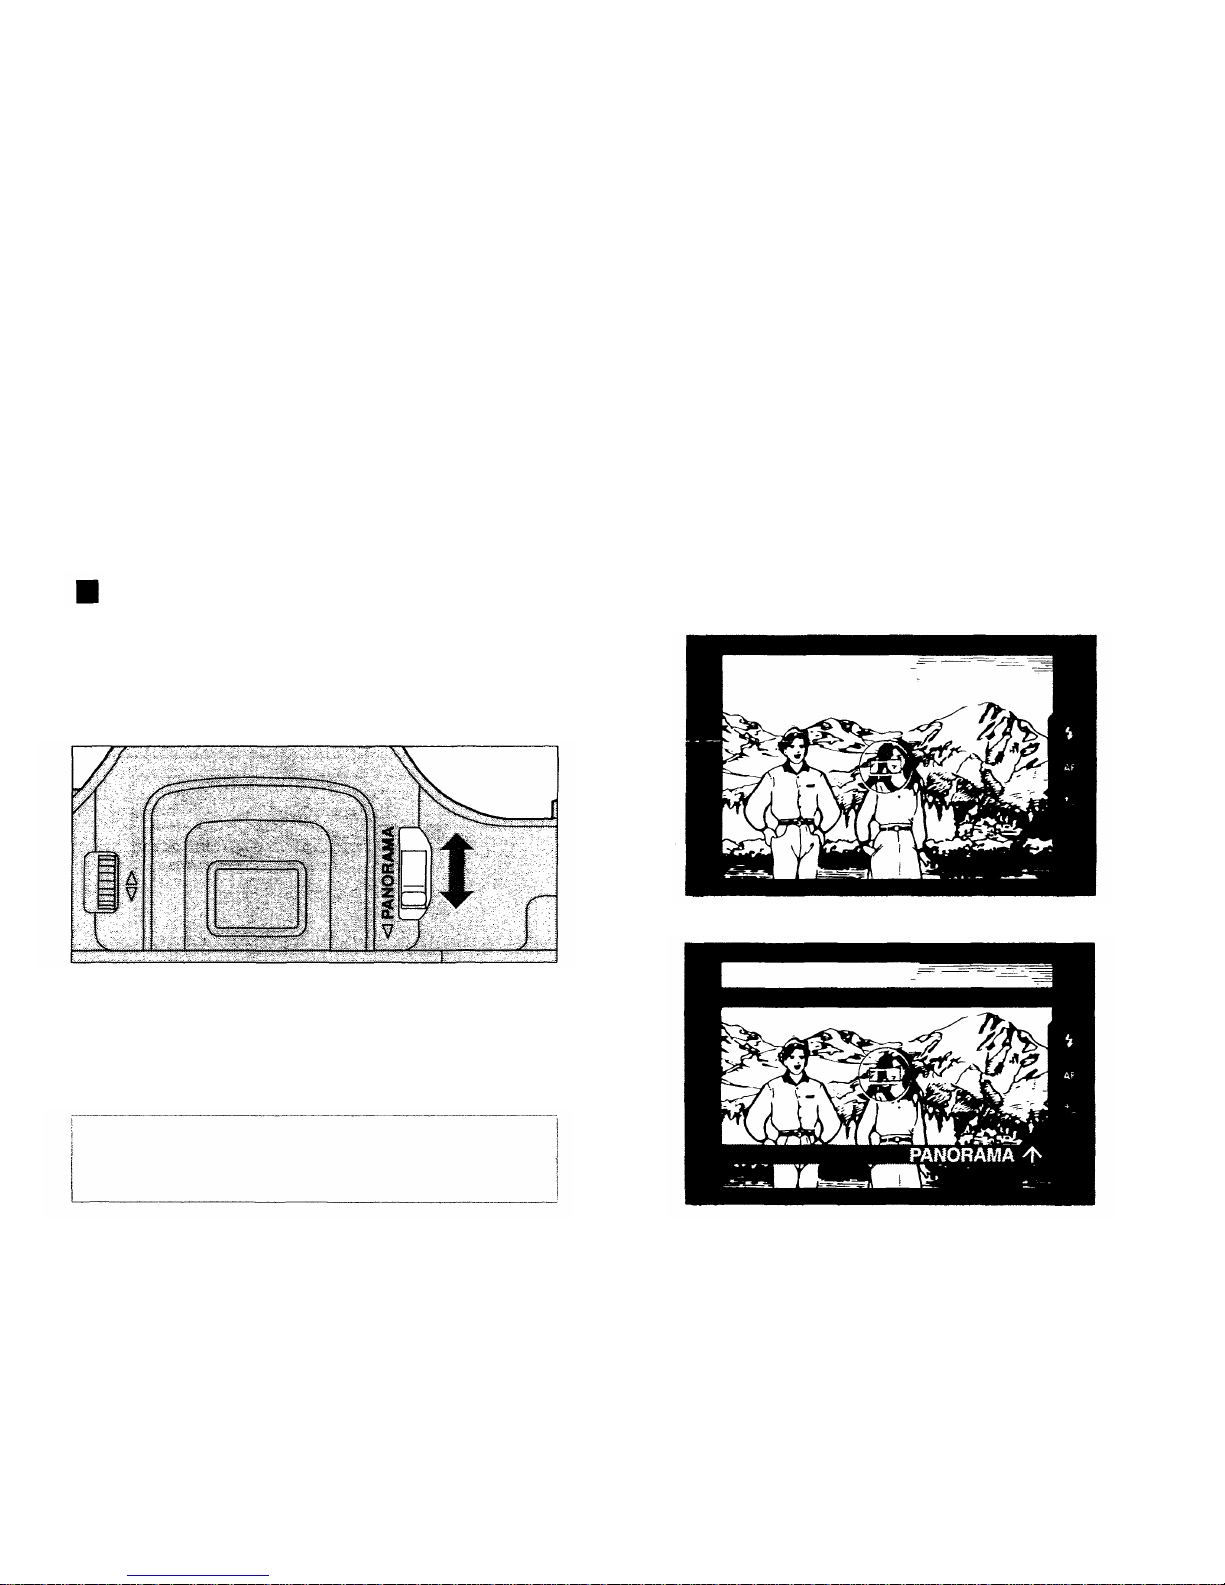
TAKING PANORAMA PICTURES
Panorama model only
Selecting the Panorama Mode
Push the panorama s w itch up to
change to the Panorama mode. Push
the switch down to return to the
Standard mode.
Notes:
• Push the switch all th e way ; don't stop it
halfway.
•T he date and ti m e are not printed on
Panorama format prints.
Viewfinder in the Standard mode
Viewfinder in the Panorama mode
Do not ope n t he ba c k cover an d touch the
panorama mask in the Panorama mode.
Otherwise the camera may malfunction.
ADDITIONAL
FUNCTIONS
27
Page 27
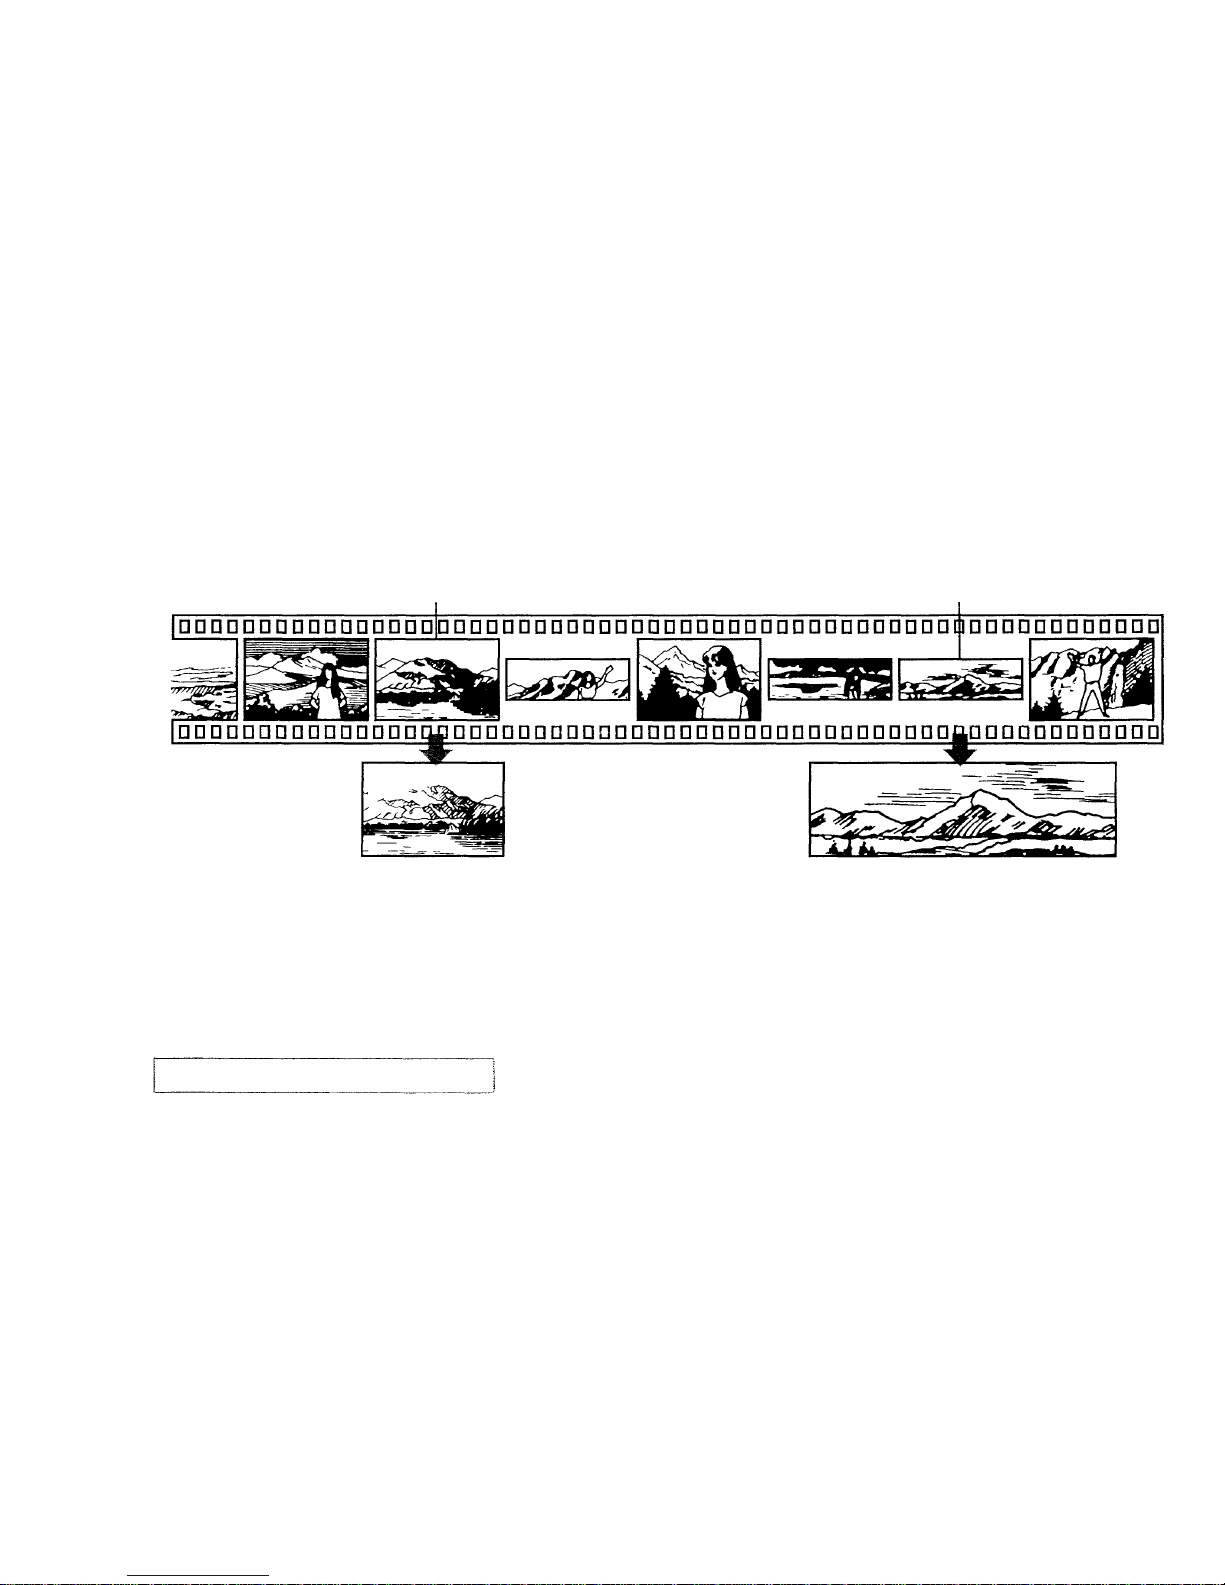
Printing Panorama Pictures
Film
Shot in the Standard mode
Shot in the Panorama mode
Standard-size print
Panorama print
When you tak e a picture in the Panorama mode, only the middle portion (approx.
12 x 35 mm) of the frame of 35-mm film is exposed (as shown). This portion will be
enlarged to the Panorama size (89 x 254 mm). The number of exposures is the
same as with the standard size.
When having Panorama mode pictures developed and printed, make sure you tell
your film processor that the pictures were taken in the Panorama mode.
How to Get Panorama Prints
When printed
28
Page 28
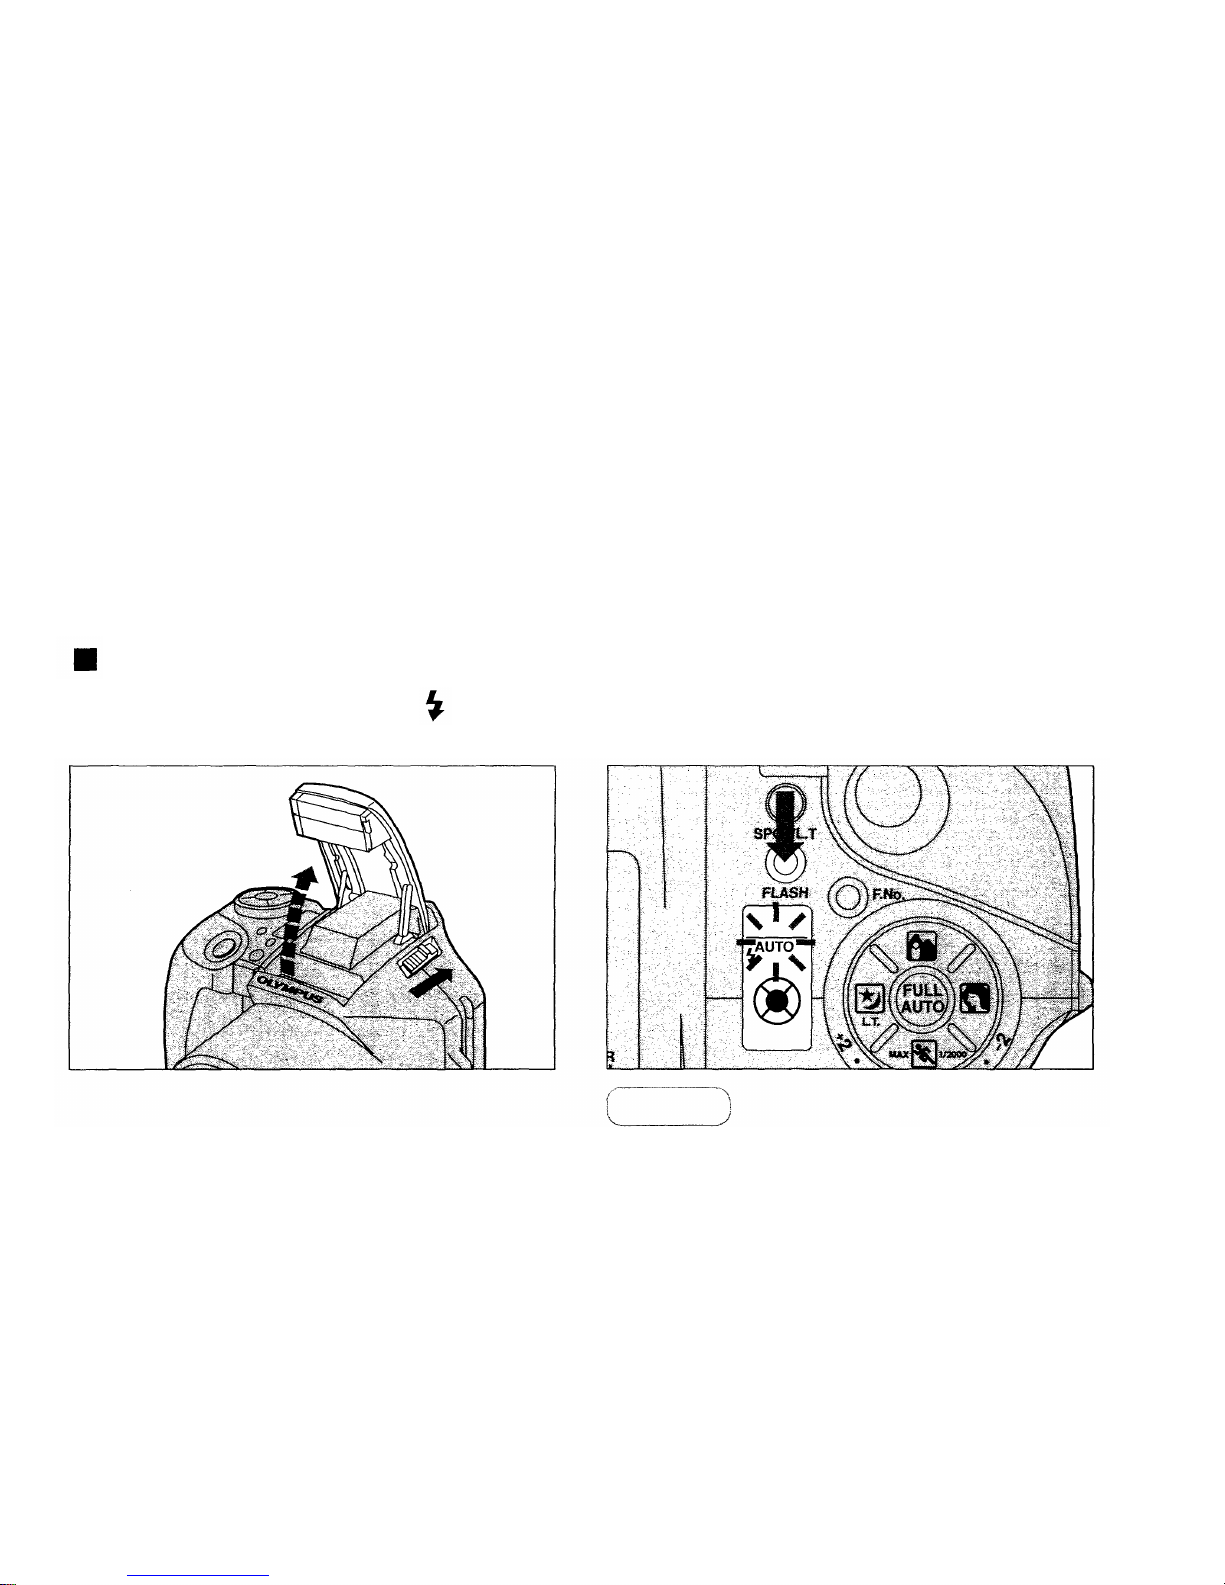
FLASH PHOTOGRAPHY
Three flash modes are available to suit different requirements.
How to Select the Flash Mode
1.
Set the power switch to to flip up
the flash.
2.
Press the FLASH button to select
the flash mode.
The camera will recharge the flash, and the
flash will be ready to use.
Note: Recharging takes 0.2~3.9 seconds.
The selected mode is displayed on the LCD
panel.
Make sure
29
Page 29
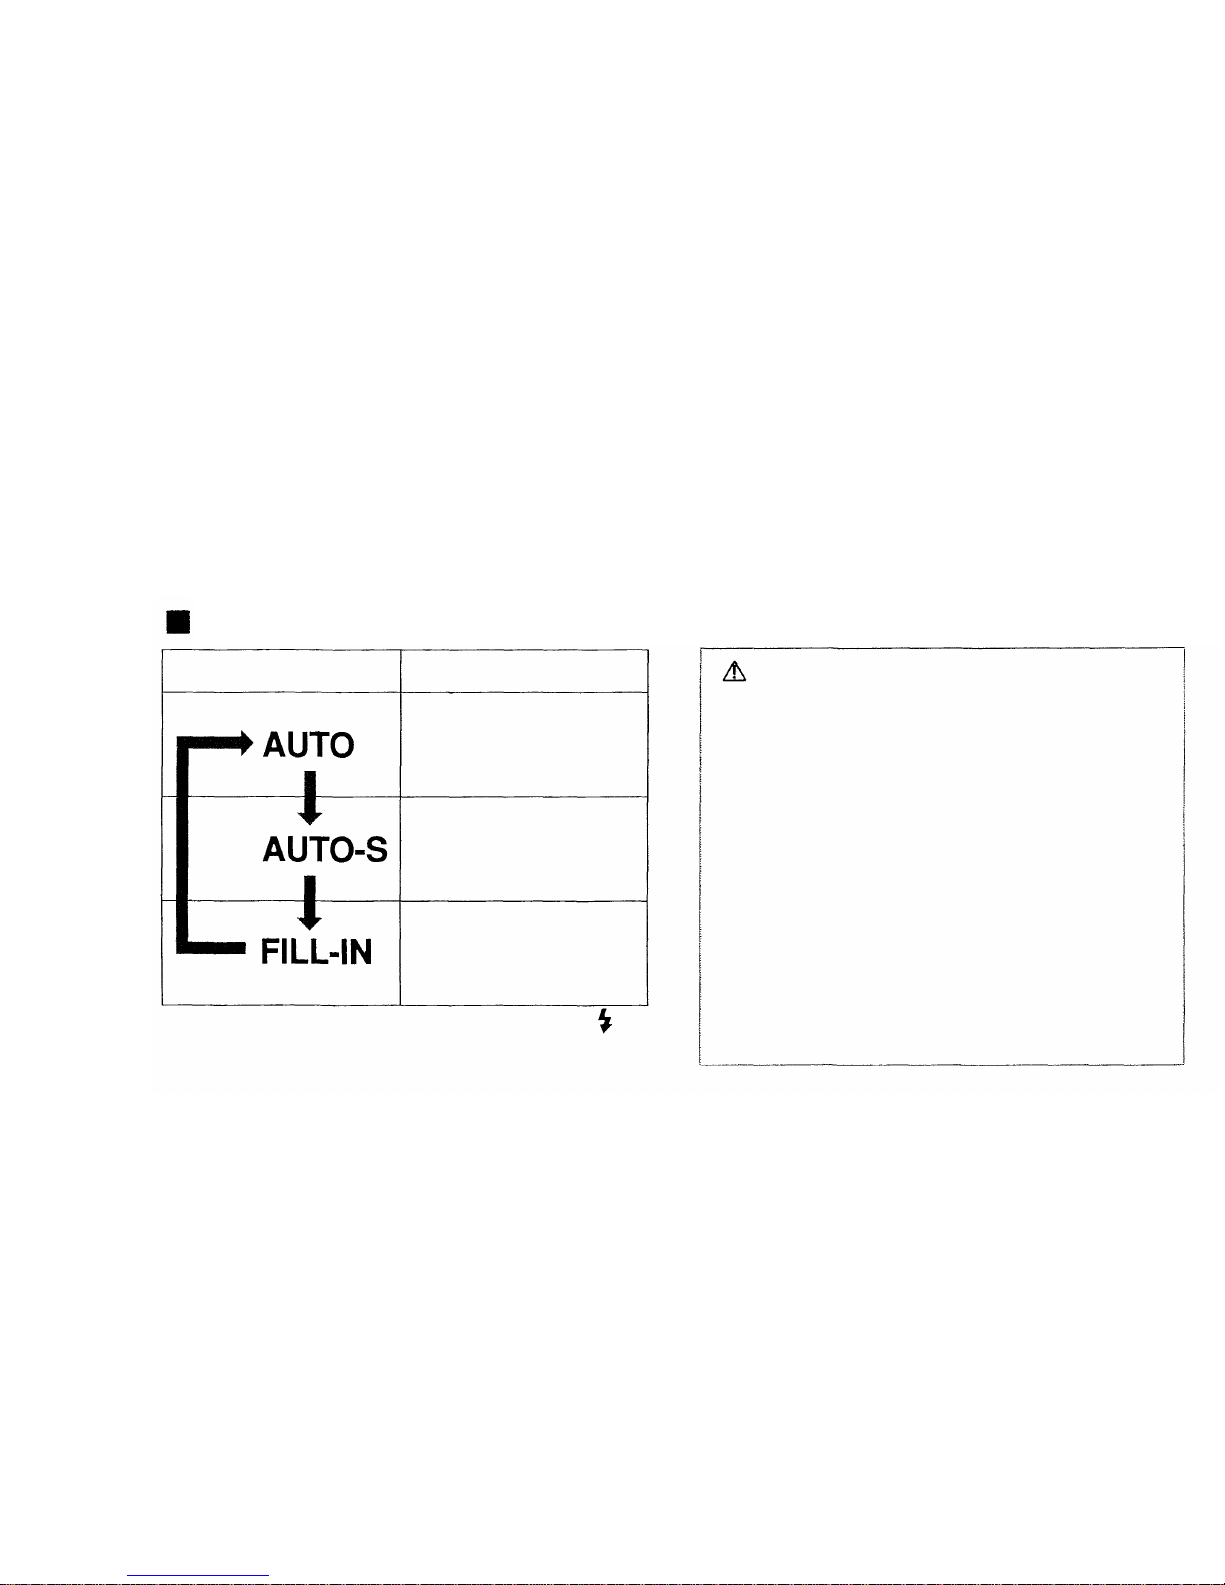
Flash Modes
Mode
Function
Automatically fires in dark
places, with backlighting
and under fluorescent
lighting (p. 31).
Significantly reduces the
phenomenon of "red-eye"
(when a subject's eyes
appear red) (p. 33).
Fires re gar dle ss of
available light (p. 34) .
There is danger of temporarily
affecting vision when the flash is
fired very close to a person or
animal.
In the dark, th e flash also functions
as an autofocus illuminator. Whe n
the shutter release button is
pressed halfway, the flash emits
several brief pre-flashes. When the
shutter release button is pressed
fully, the flash fires to take the
picture. Hold the camera firmly until
the picture is taken.
Note: Use of the flash is recommended if
blinks in t he viewfinder when the flash isn't
flipped up. Otherwise, the camera will select a
long exposure and pictures may be blurred
due to camera shake.
30
Page 30
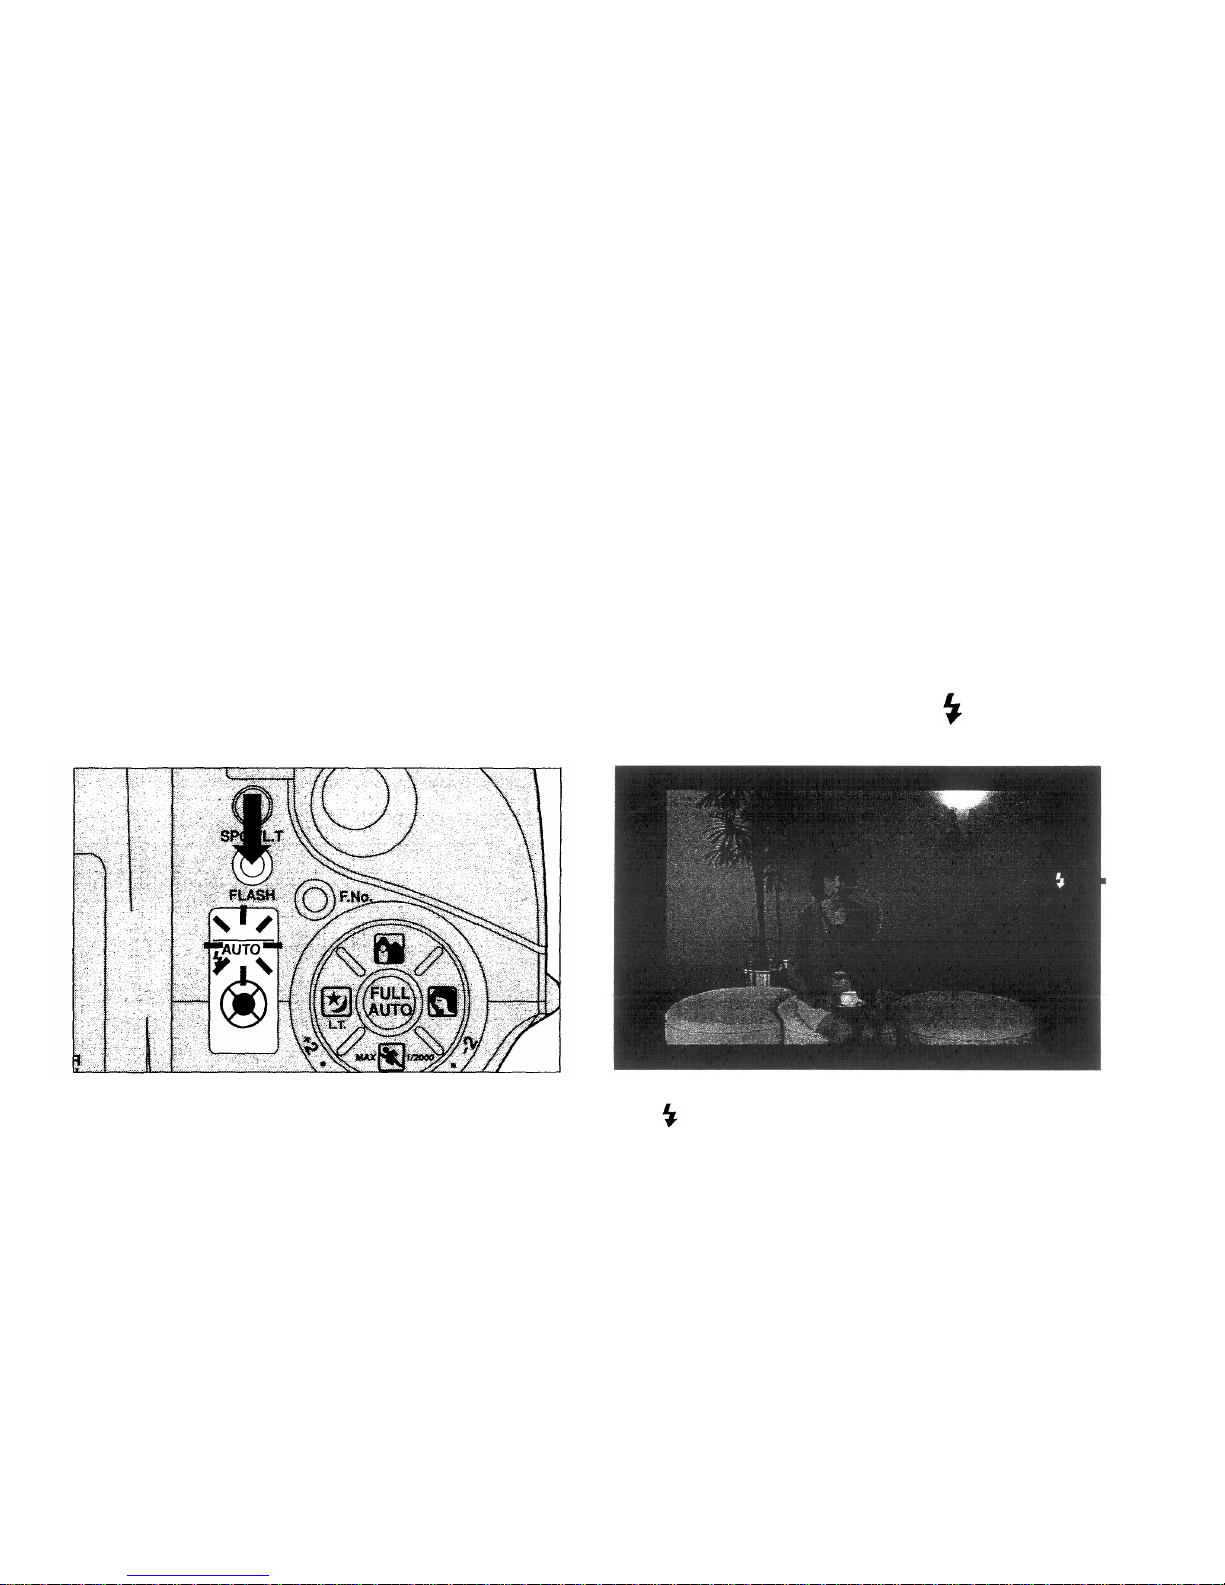
Auto Flash
The flash fires automatically in dark places, with backlighting and
under fluorescent lighting.
Set the fl ash mode to AUTO.
2.
Press the shutter release button
halfway to make sure lights in
the viewfinder.
In certain conditions, t he flash may not fire
under fluorescent lighting.
Note: If yo u press the shutter release but t o n
with blinking in the viewfinder, the shutter
won't release. This is because the flash is
being recharged. Remove your finger from the
shutter release button, and wait until
recharging finishes.
AUTO
31
1.
Page 31
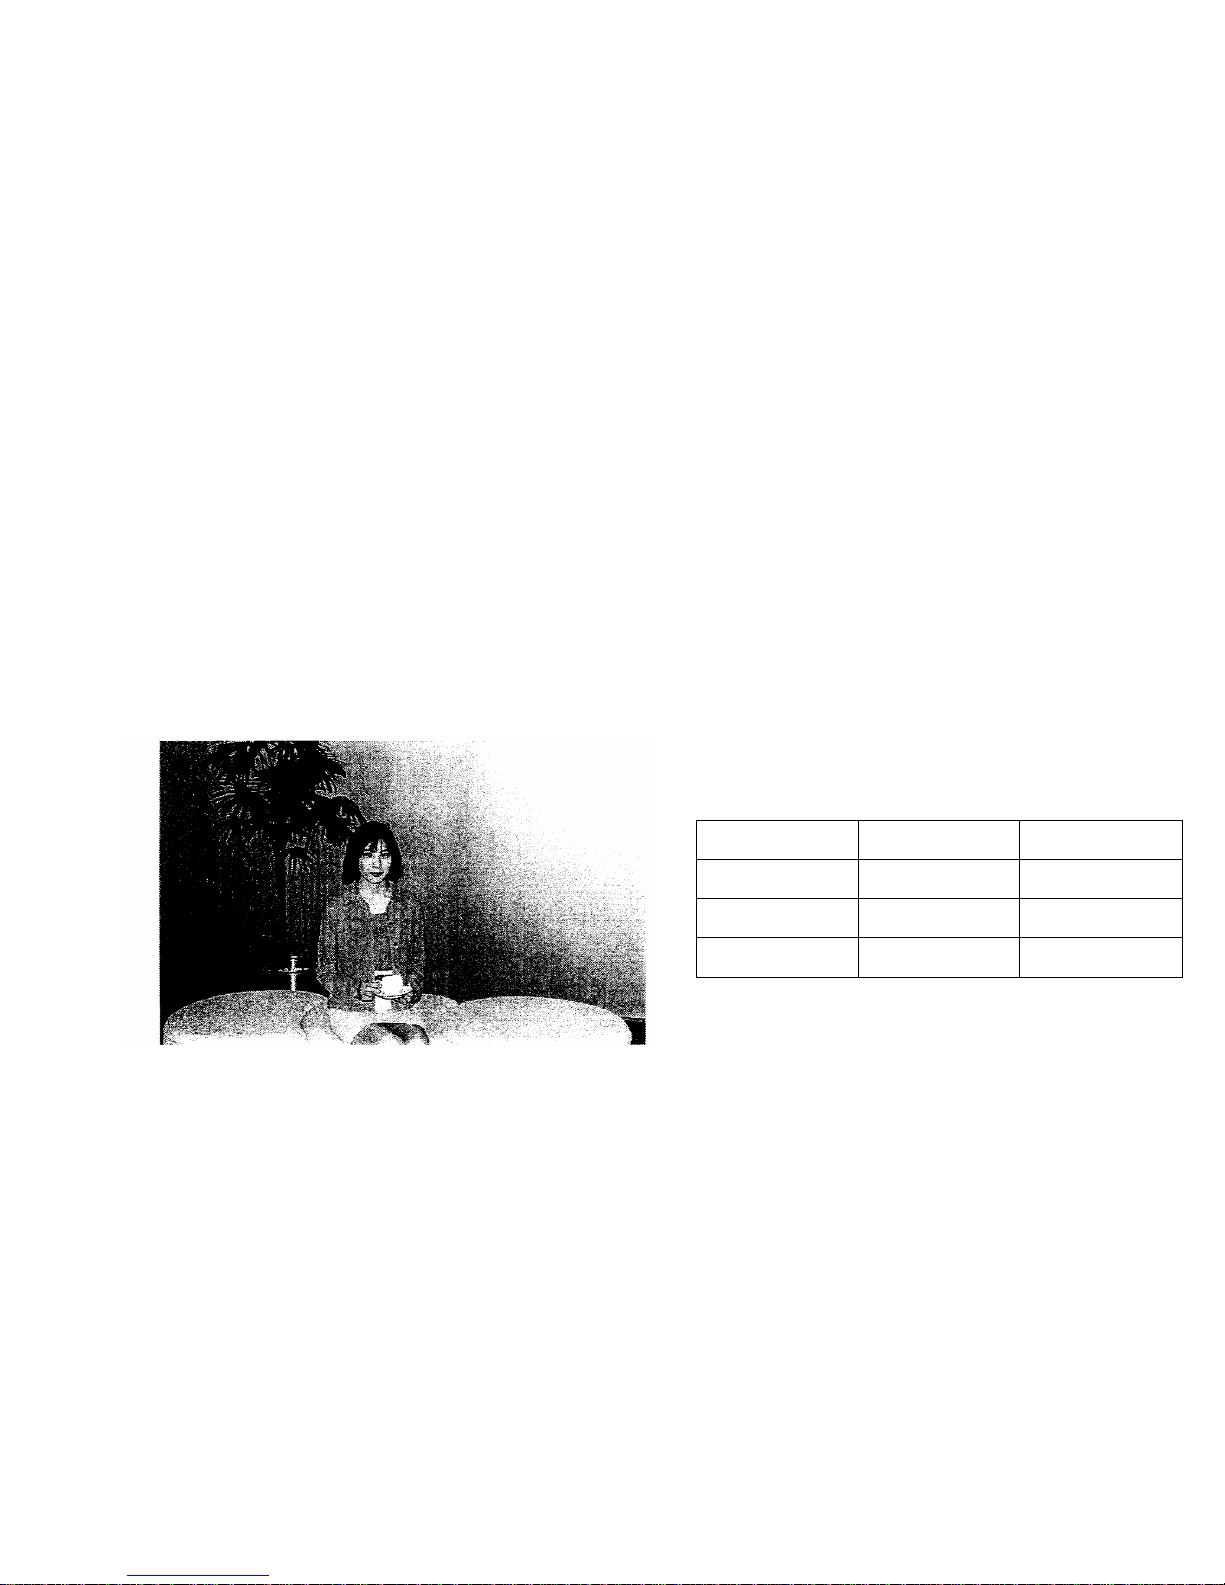
3.
Press the shutter release button
fully.
Au to Flash Range
(with color negative film)
Maximum distance is about 70% when using
reversal color film.
Note: The shutter speed is automatically set at 1/100-sec. wh en the flash fires. The flash will not
fire if the existing light level requires a shutter speed greater than 1/100-sec.
Focal length
ISO 100
ISO 200
ISO 400
Telephoto
6.3 m
(21 ft)
8.8 m
(28.9
ft)
12.6 m (41 ft)
Wide angle
5.0 m
(16.4
ft)
7.1 m (23.3 ft)
10.0 m (32.8
ft)
32
Page 32
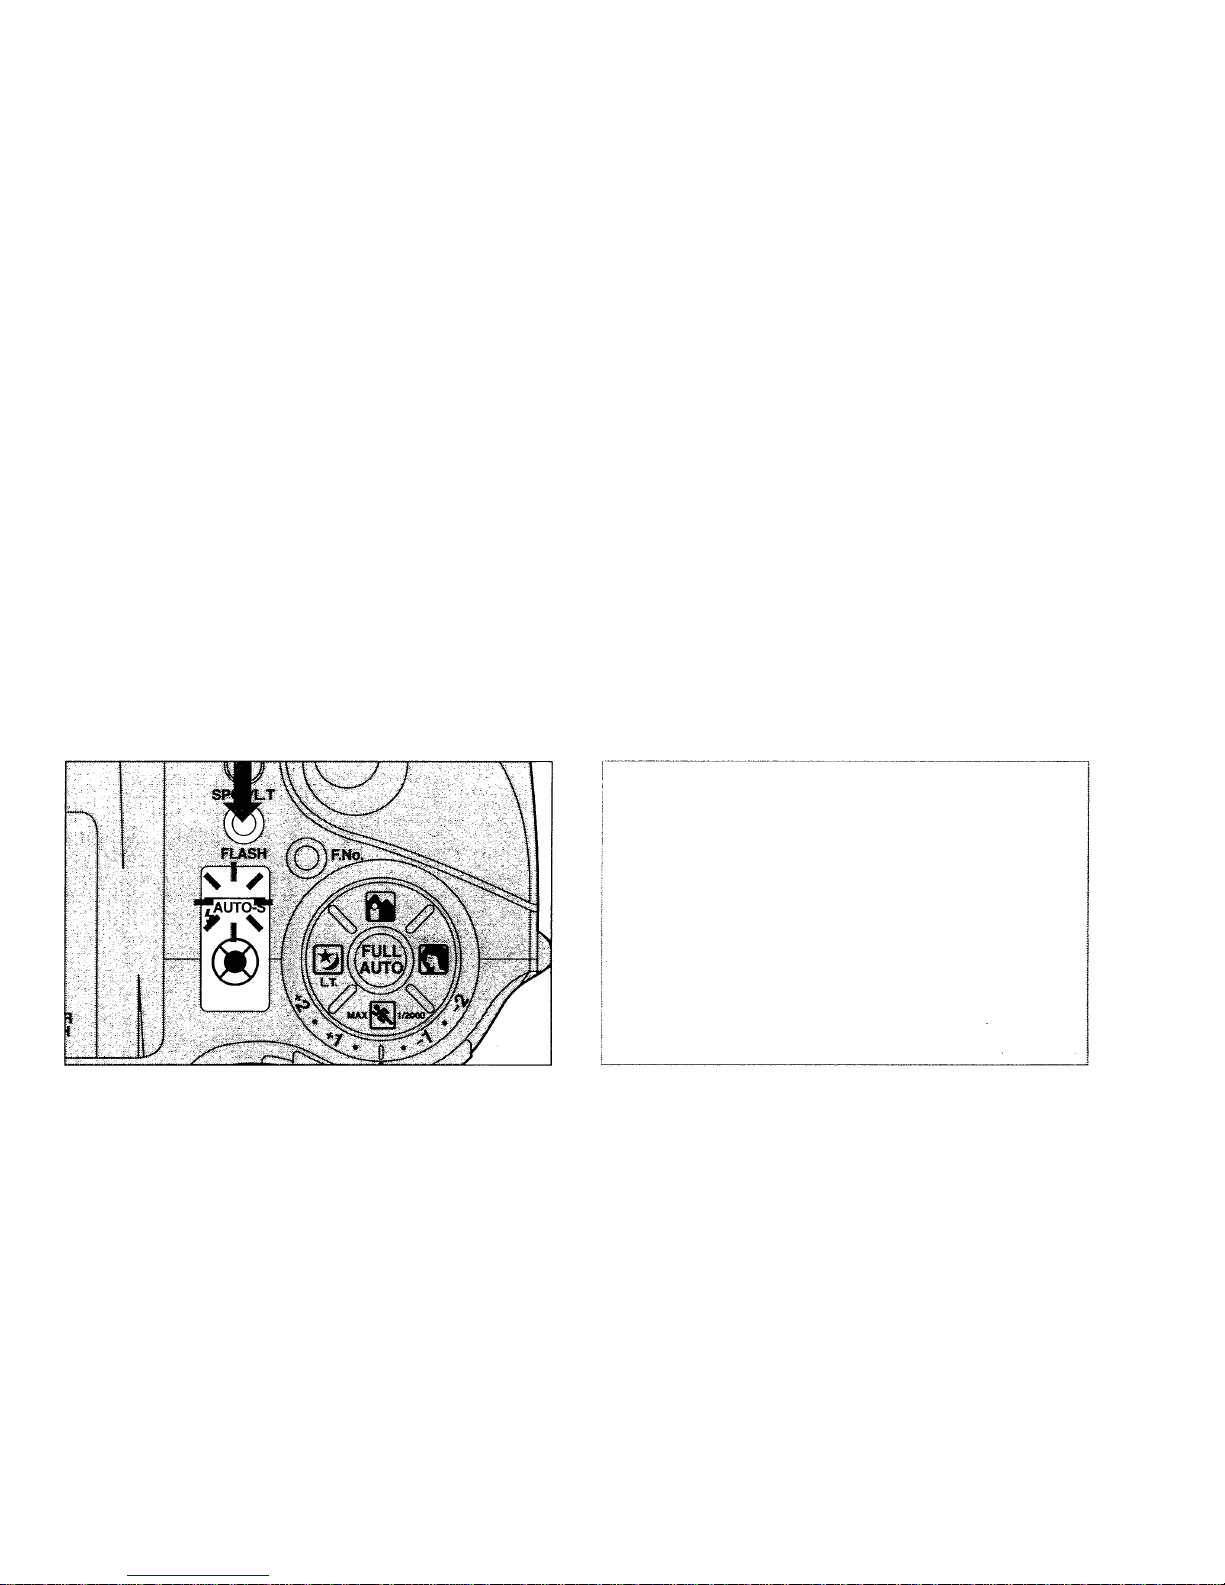
Red-Eye Reducing Flash
AUTO-S
Approximately 20 pre-flashes are emitted before the main flash
fires, significantly reducing th e phenomenon of "red-eye" (when a
subject's eyes appear red). This mode is t he same as Auto Flash
except fo r the pre-flashes.
1.
Flip up the flash, and select the Auto-S mode. Press the shutter release
button.
Red-eye reduction may not be effective
when the subject:
1 . Wasn't looking at the flash from right
front.
2. Wasn't watching the pre-flashes.
3. Was too far from the camera.
Did not respond to the pre-flashes
due to particular characteristics of
the individual.
Notes:
•After pressing the shutter release button, hold t he camera securely until th e shutter has been
released.
•T o cancel the Auto-S mode, select another mode following the procedure on page 29 .
33
Page 33
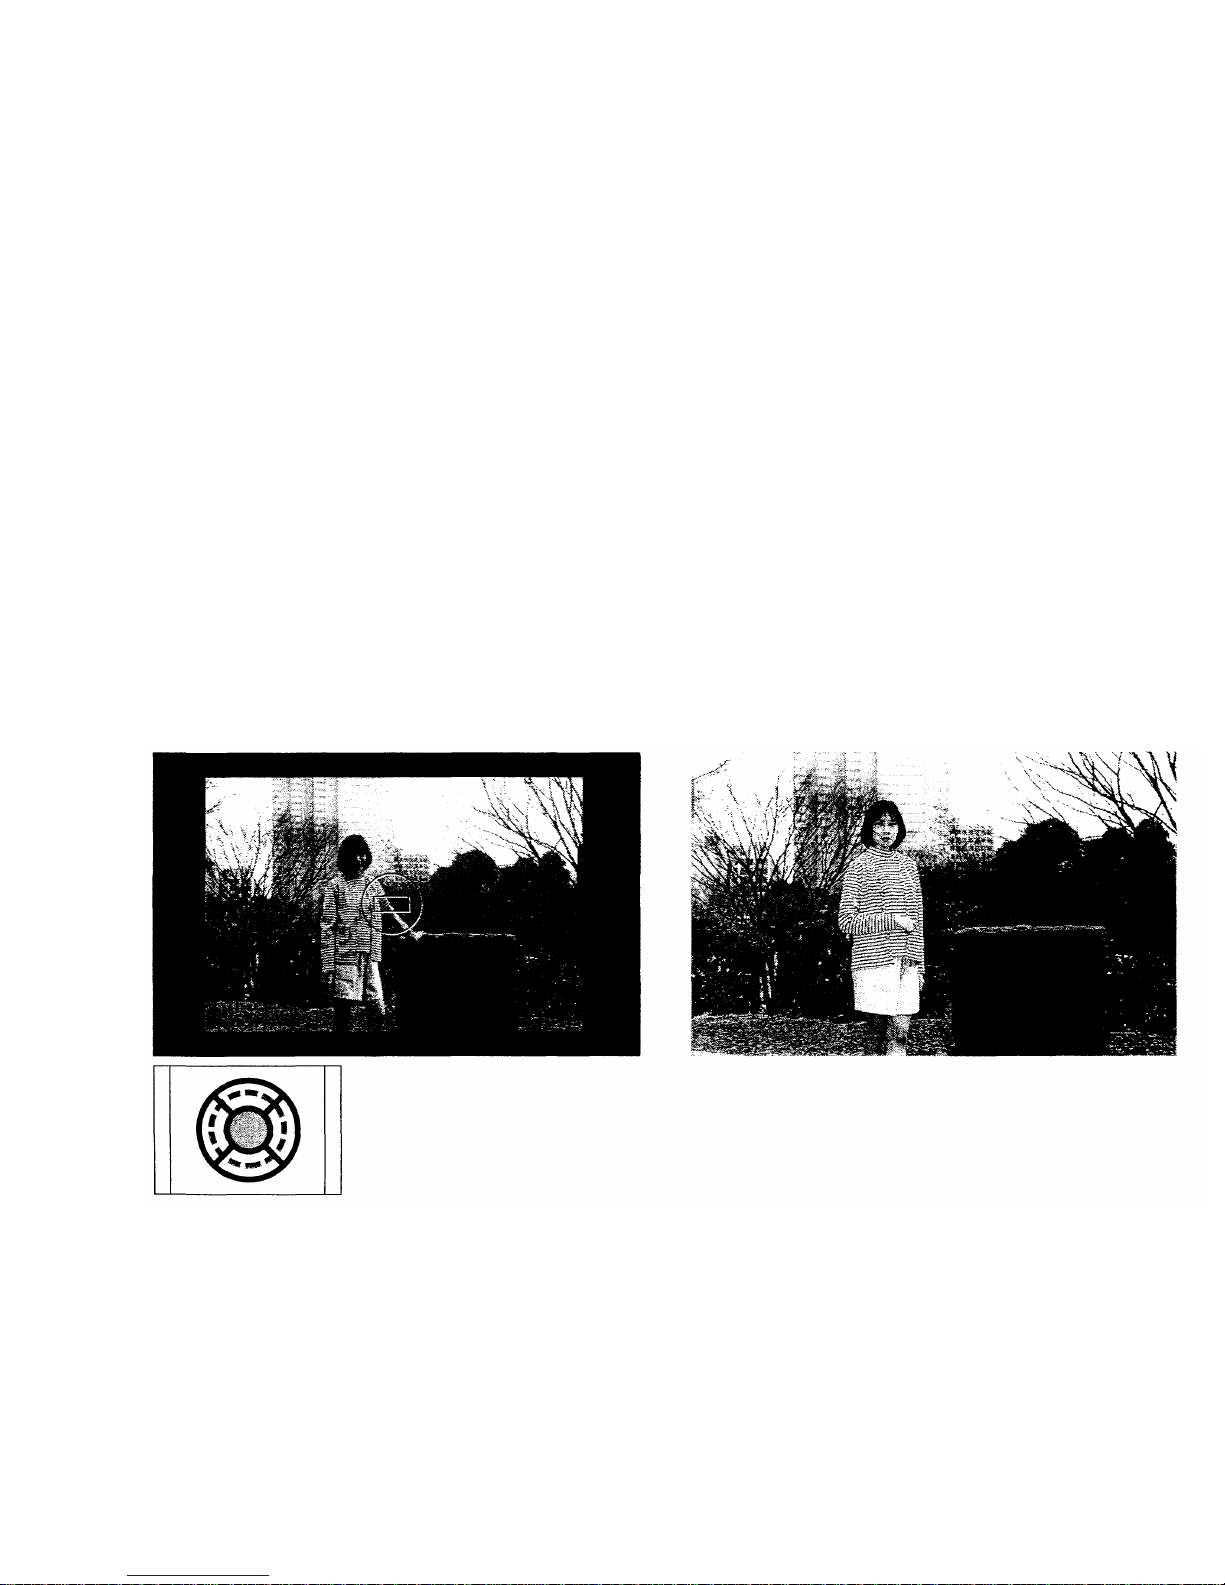
Forced Activation
FILL-IN
In this mode, the flash always fires. Even in backlighting, both the
subject and background can be shot clearly. And portraits look
lively by reducing shadows on the subject's face.
1.
Make sure the exposure mode is
set to FULL AUTO.
2.
Select the Fill-in Flash mode, and
press the shutter release button.
Note: In exposure modes
other than Full Auto and
Aperture-Preferred Auto,
the Fill-in Flash mode
cannot be engaged.
Note: The shutter speed is automatically set at
1/100-sec. Aperture and flash output will
adjust for correct exposure.
34
Page 34
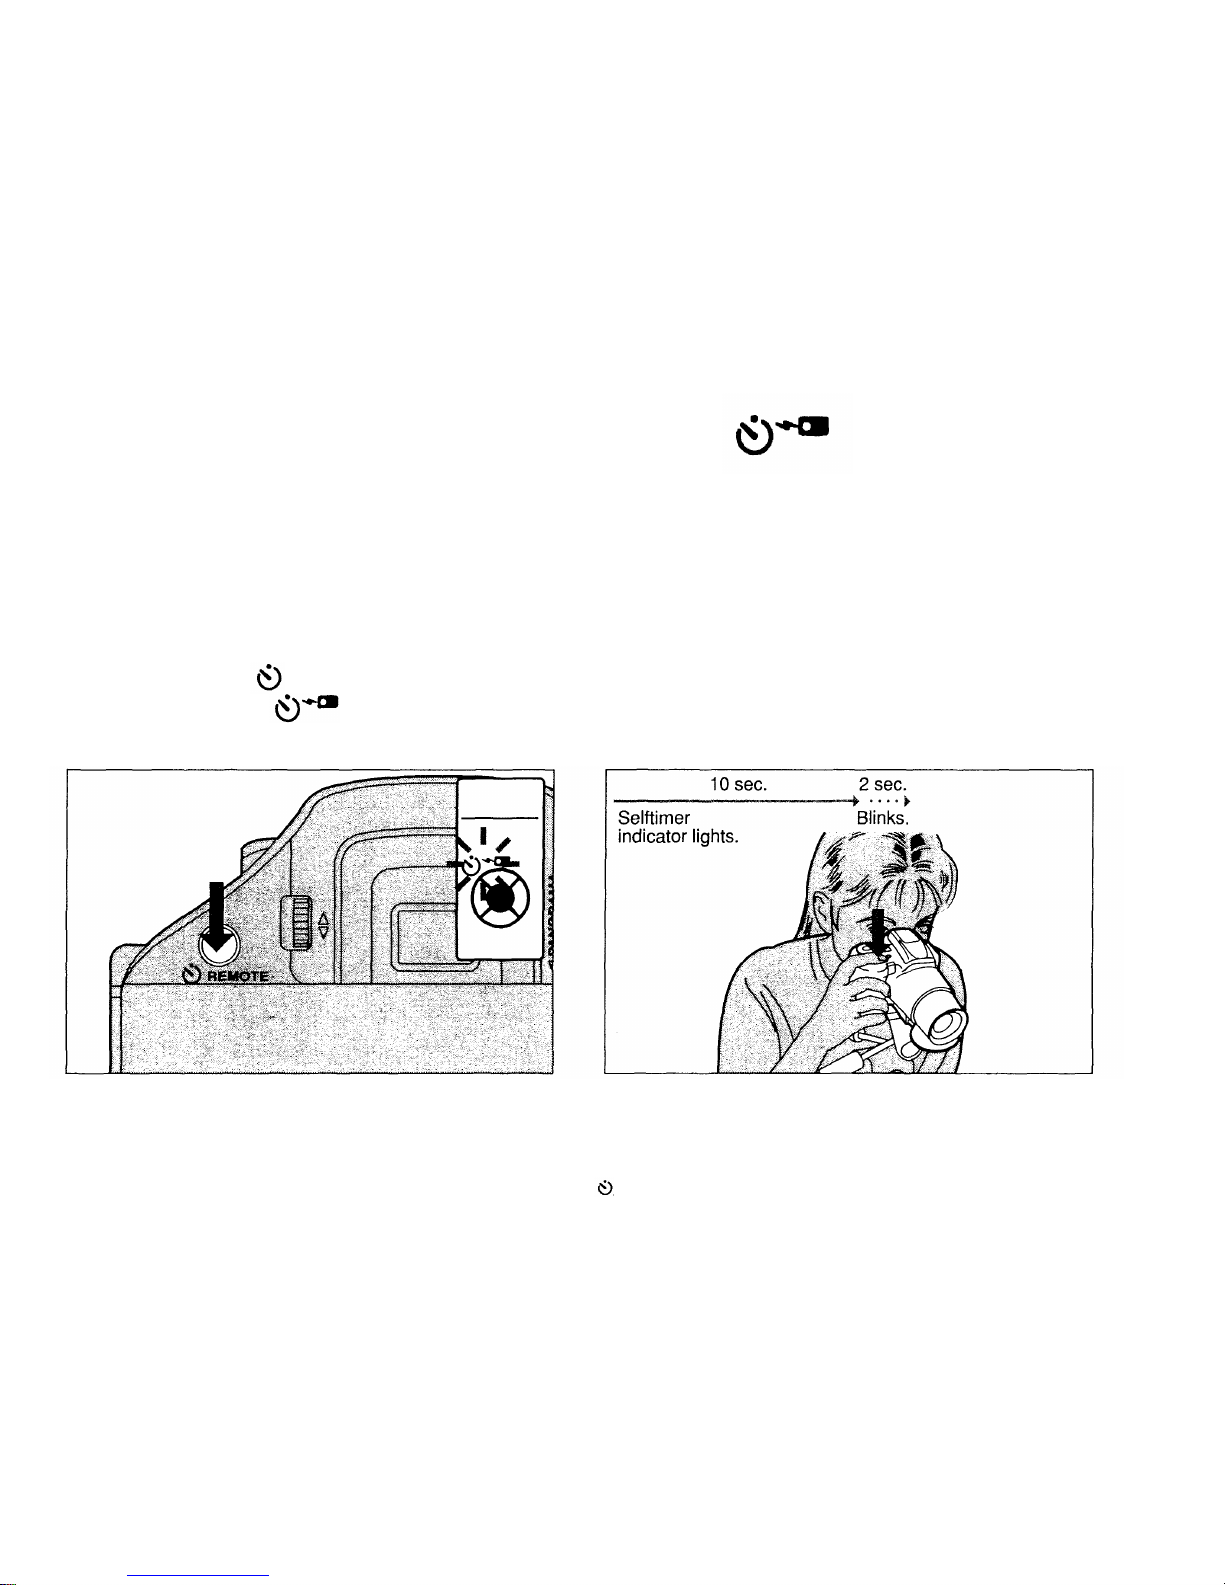
SELFTIMER
1.
Press the /REMOTE control
button until is displayed on
the LCD panel.
Press the shutter release button.
Fi x the camera firmly on a tripod or other support.
The shutter will be released 12 seconds later.
Notes:
• Do not press the shutter release button fro m right in front of the camera. Correct focus and exposure cannot be achieved.
• The Selftimer mode is canceled after the shutter releases.
• To cancel the selftimer in the middle of operation, press the /REMOTE button again.
• Do not remove your eye from the viewfinder until after the shutter release button has been fully depressed.
This prevents light from entering through the viewfinder.
35
2.
Page 35
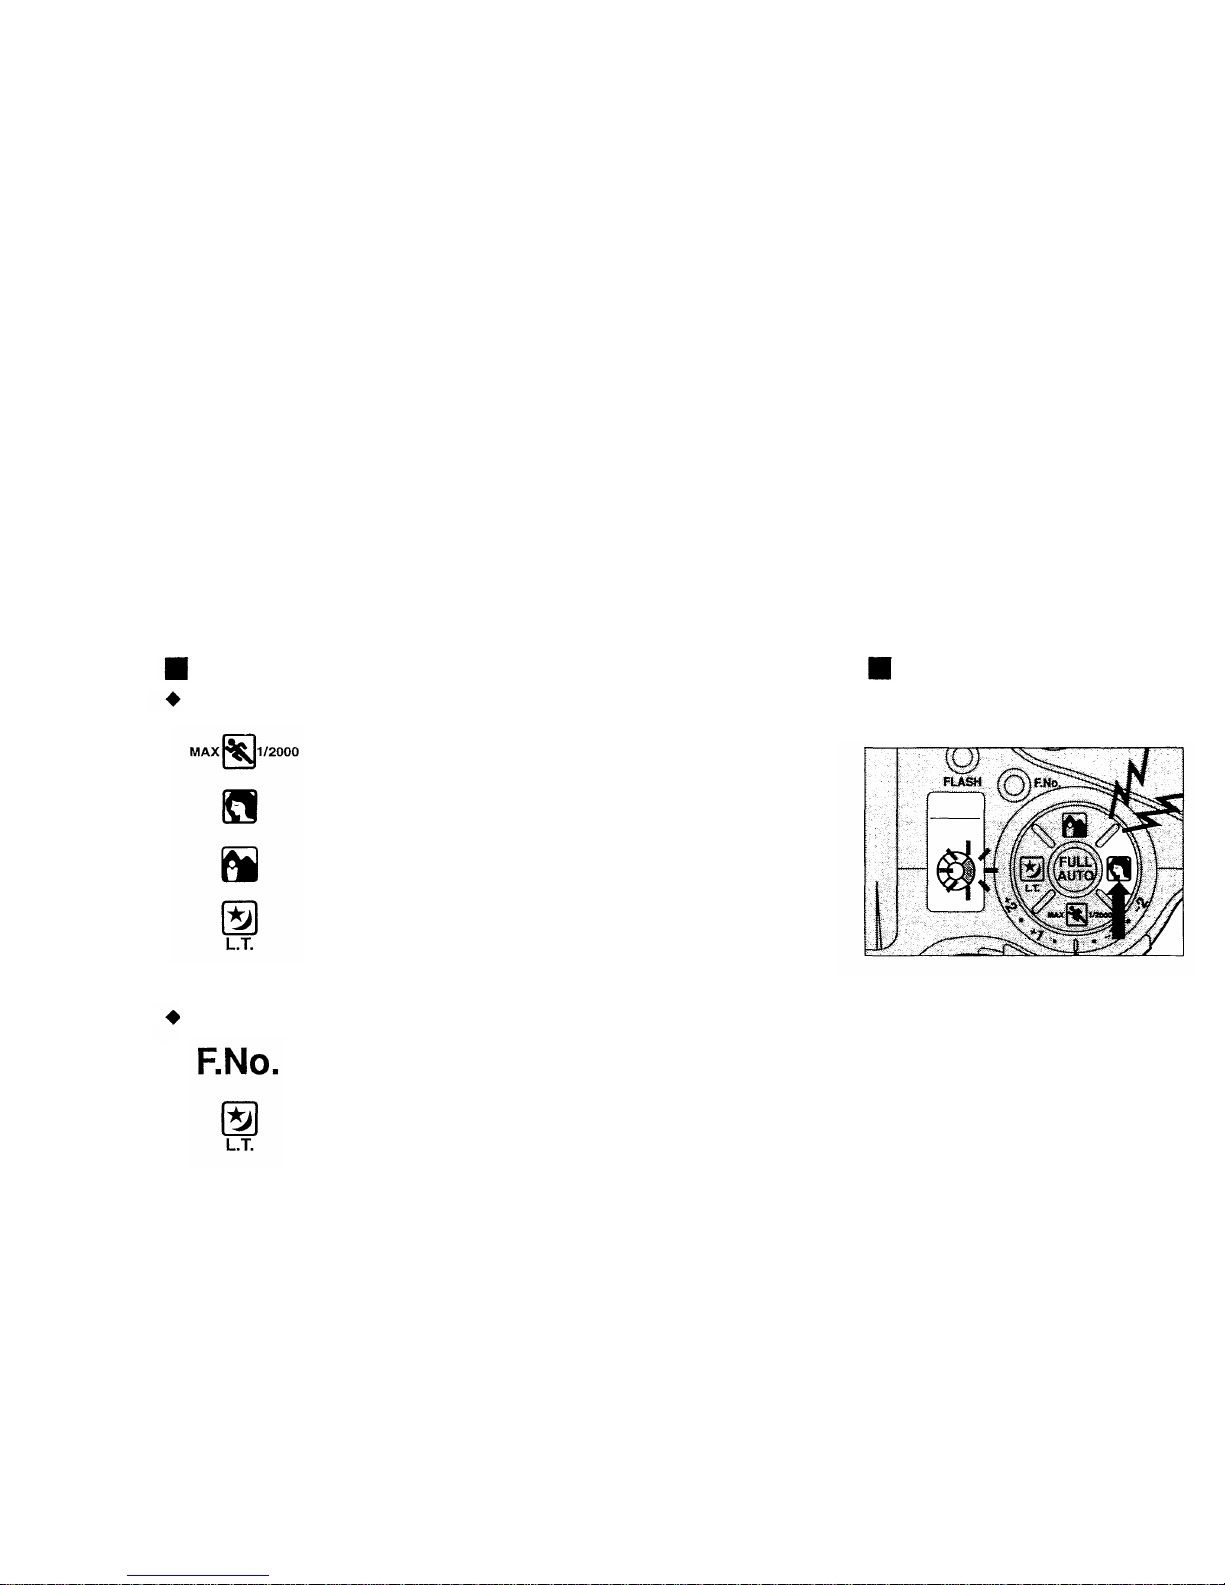
USING THE EXPOSURE MODES
There are four preset settings f or easy shooting in various
common situations, as well as an Aperture-Preferred Auto mode
and Long Time mode that allow you to select your own settings.
Exposure Modes
For easy, effective shooting in various common situations:
Stop Action (p. 37)
To freeze moving subjects.
Portrait (p. 38)
For pictures with blurred background for "portrait" effect.
Landscape (p. 39)
For pictures with extended in-focus background.
Night Scene (p. 40)
For night scenes or night scenes with subjects in the
foreground, using the flash.
How to Select the
Exposure Mode
Press one of the icons.
For more creative lighting effects:
Aperture-Preferred Auto (p. 41)
Set the aperture manually. The camera will automatically select the correct shutter speed.
Long Time (p. 42)
Allows you to set the shutter speed manually from 1 to 60 seconds . The ap e r tu r e is automatically
set to F8.
36
Page 36
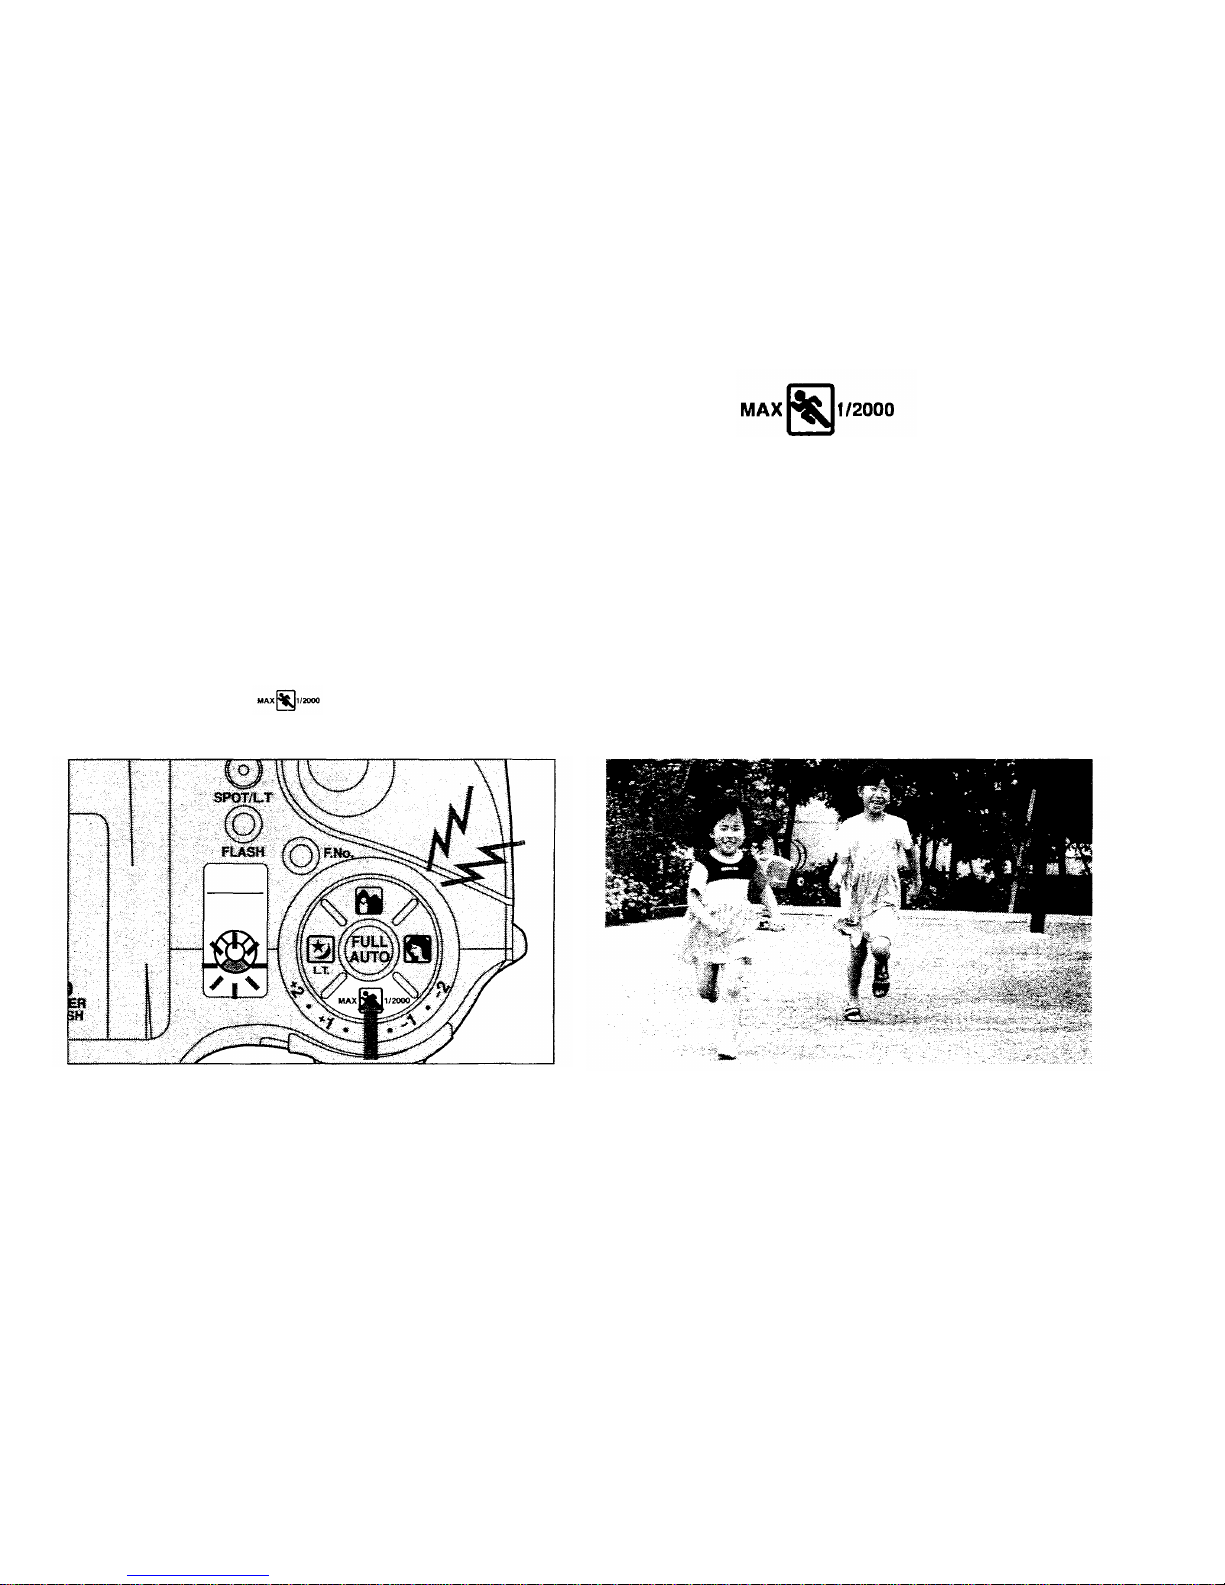
STOP ACTION
To freeze moving subjects.
In this mode, the c a me r a automatically selects a faster shutter
speed to reduce blurring of moving subjects. (Max. shutter speed:
1/2000-sec.) Also in this mode, the predictive autofocus helps
achieve more precise focusing on moving subjects.
1.
Press the button.
2.
Press the shutter release button.
When you use flash in this mode, we
recommend that you choose the Auto Fla s h
mode. If you select the Auto-S mode, pre-
flashes may cause you to miss the photo
opportunity.
Notes:
•The camera keeps focusing on the subject
as long as the shutter release button is kept
depressed halfway.
• Correct focus may not be achieved when the
subject is moving too fast.
37
Page 37
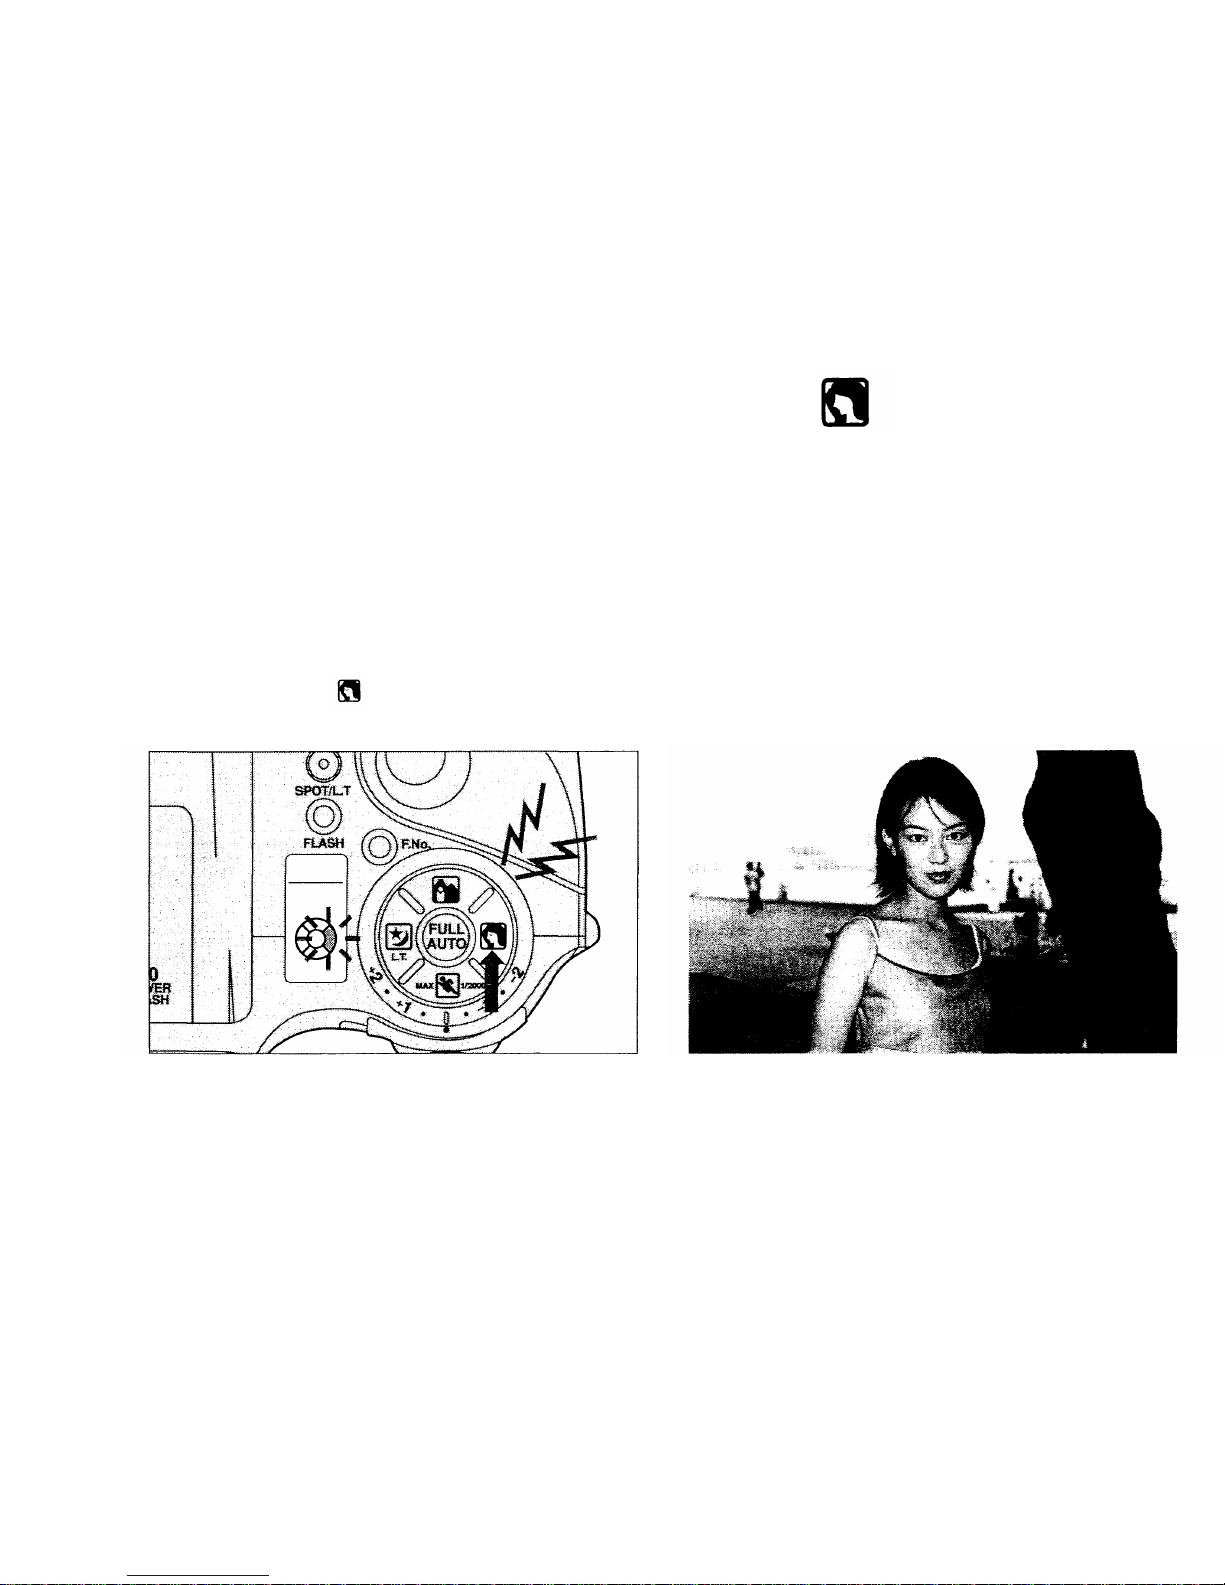
PORTRAIT
To take pictures with blurred backgrounds for "portrait" effect.
The portrait mode lets yo u take beautiful portrait photographs. This is
especially effective when the lens is at the telephoto setting and/or when
there is a great distance between the subject a nd th e background. In this
mode, the Super FP Flash enables synchronization as fast as 1/2,000-sec.
1.
Press the button.
2.
Press the shutter release button.
Note: The aperture is wide-open.
Note: When the flash is flipped up, it always
fires regardless of the amount of available
light to highligh t y ou r subject.
38
Page 38
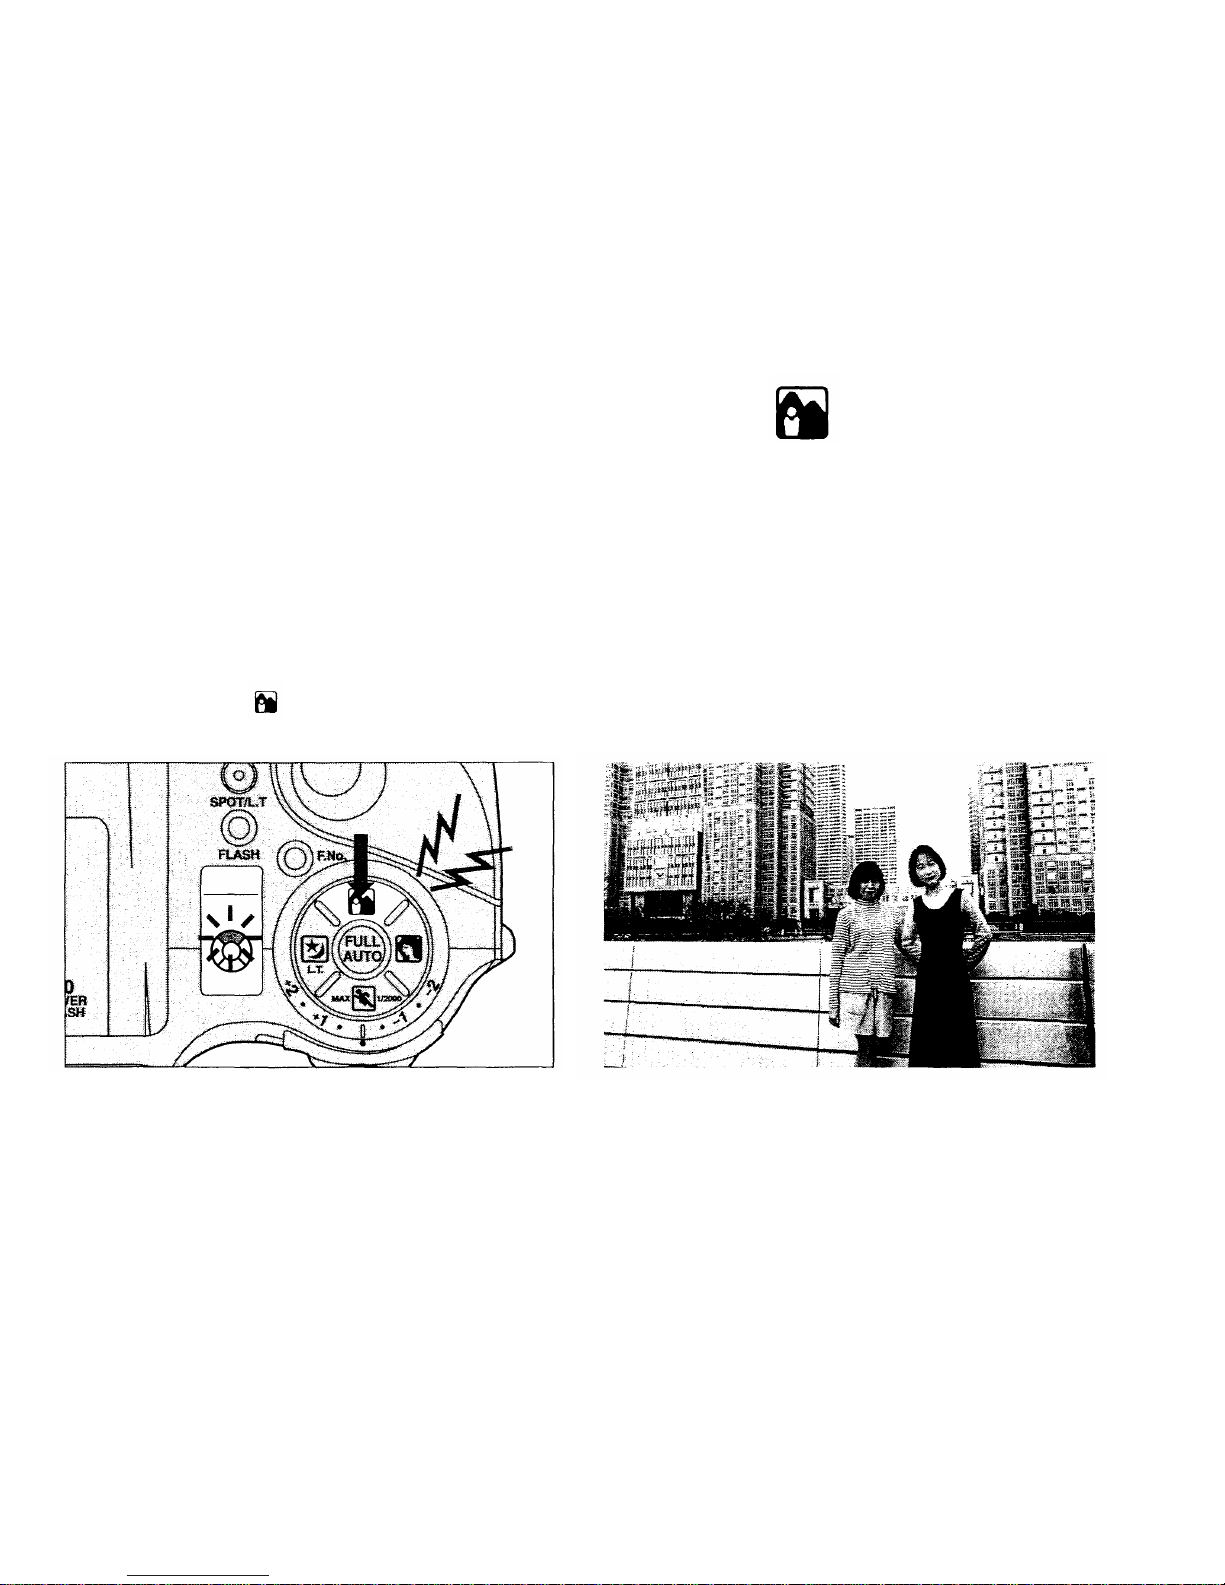
LANDSCAPE
T o take pictures with extended in-focus backgrounds.
When shooting landscapes or landscapes with subjects in the
foreground, all objects near and far are sharply in focus.
2.
Press the shutter release button.
Press the button.
Note: Set the lens at wide angle for optimal
results.
39
1.
Page 39
2.
1.
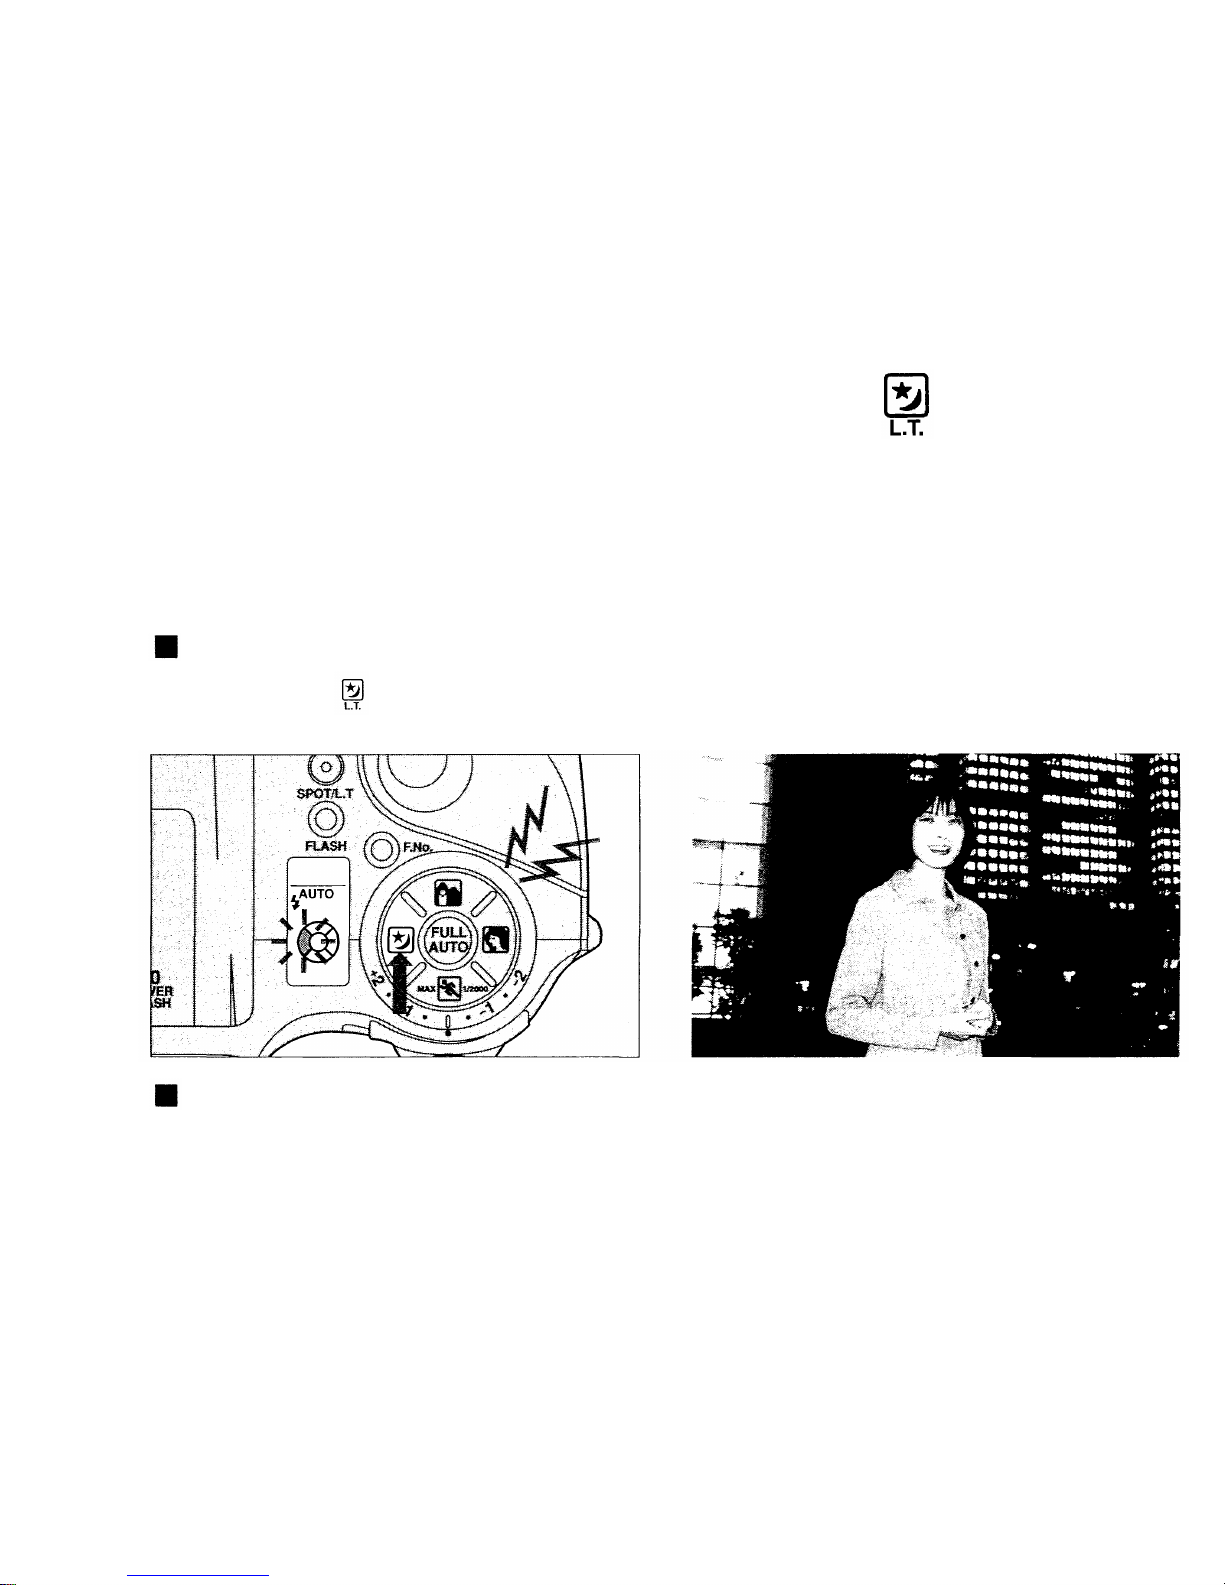
In this mode, the camera automatically selects the ideal exposure
for shooting night scenes, and for shooting night scenes with
subjects in the foreground.
When subjects are in the foreground, flip up the flash.
Press the shutter release button.
Press the
button.
NIGHT SCENE
To shoot properly-lit night scenes.
When there are no foreground subjects, do not flip up the flash.
Notes:
•When the flash is flipped up, flash power is automatically adjusted according to the subject.
•Since the camera may select a shutter speed as slow as 4-sec maximum, use of a tripod is
recommended to prevent camera shake.
40
Page 40
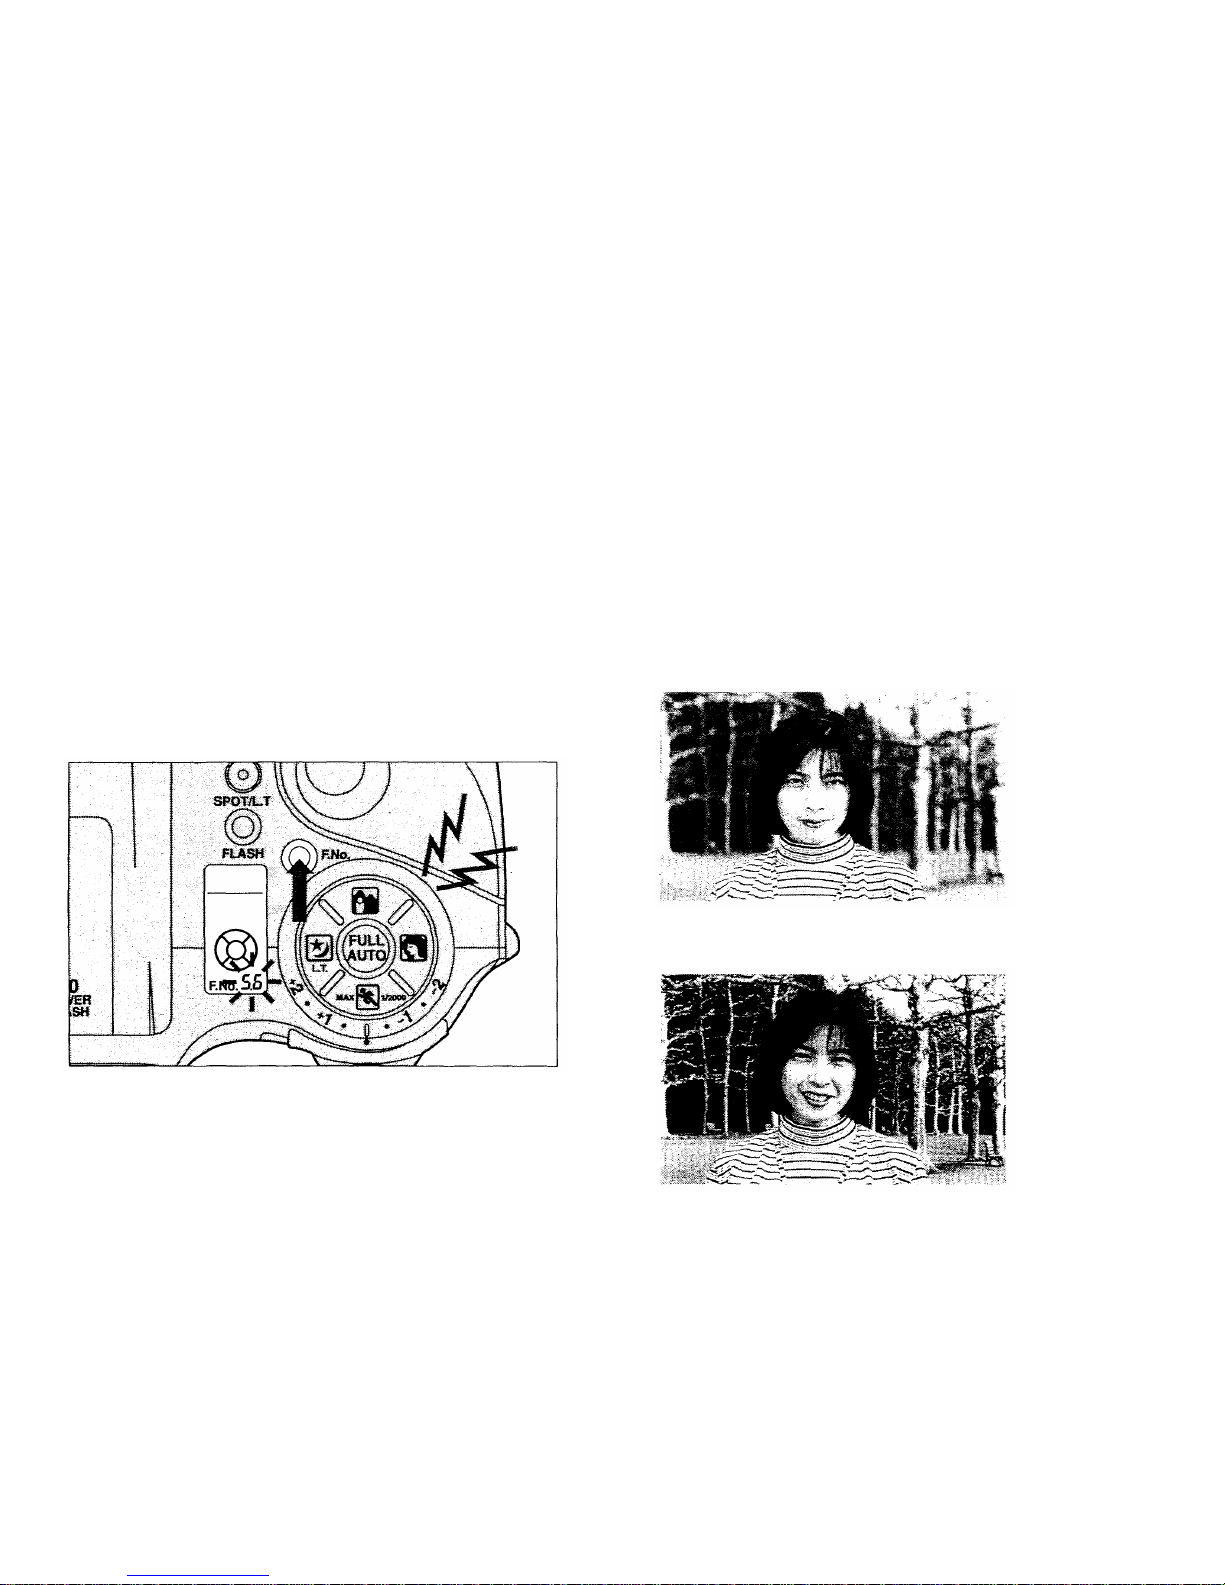
APERTURE-PREFERRED AUTO
F.No.
The background blur can be controlled by adjusting the aperture
setting. The shutter speed will be selected automatically.
Press the F.No. button to enter the
Aperture-Preferred Auto m ode.
Notes: •Additional pressing o f the F.No. button stops
down the aperture. Once the camera has passed
the smallest available aperture setting, it will return
to the largest available aperture setting.
•Blinking +/- i n the viewfinder indicates the subject
is under- or overexposed. Change the aperture
setting until it stops blinking.
Smaller aperture (larger value)
fo r a sharper background
Larger aperture (smaller value)
for a blurred background
1.
41
Page 41
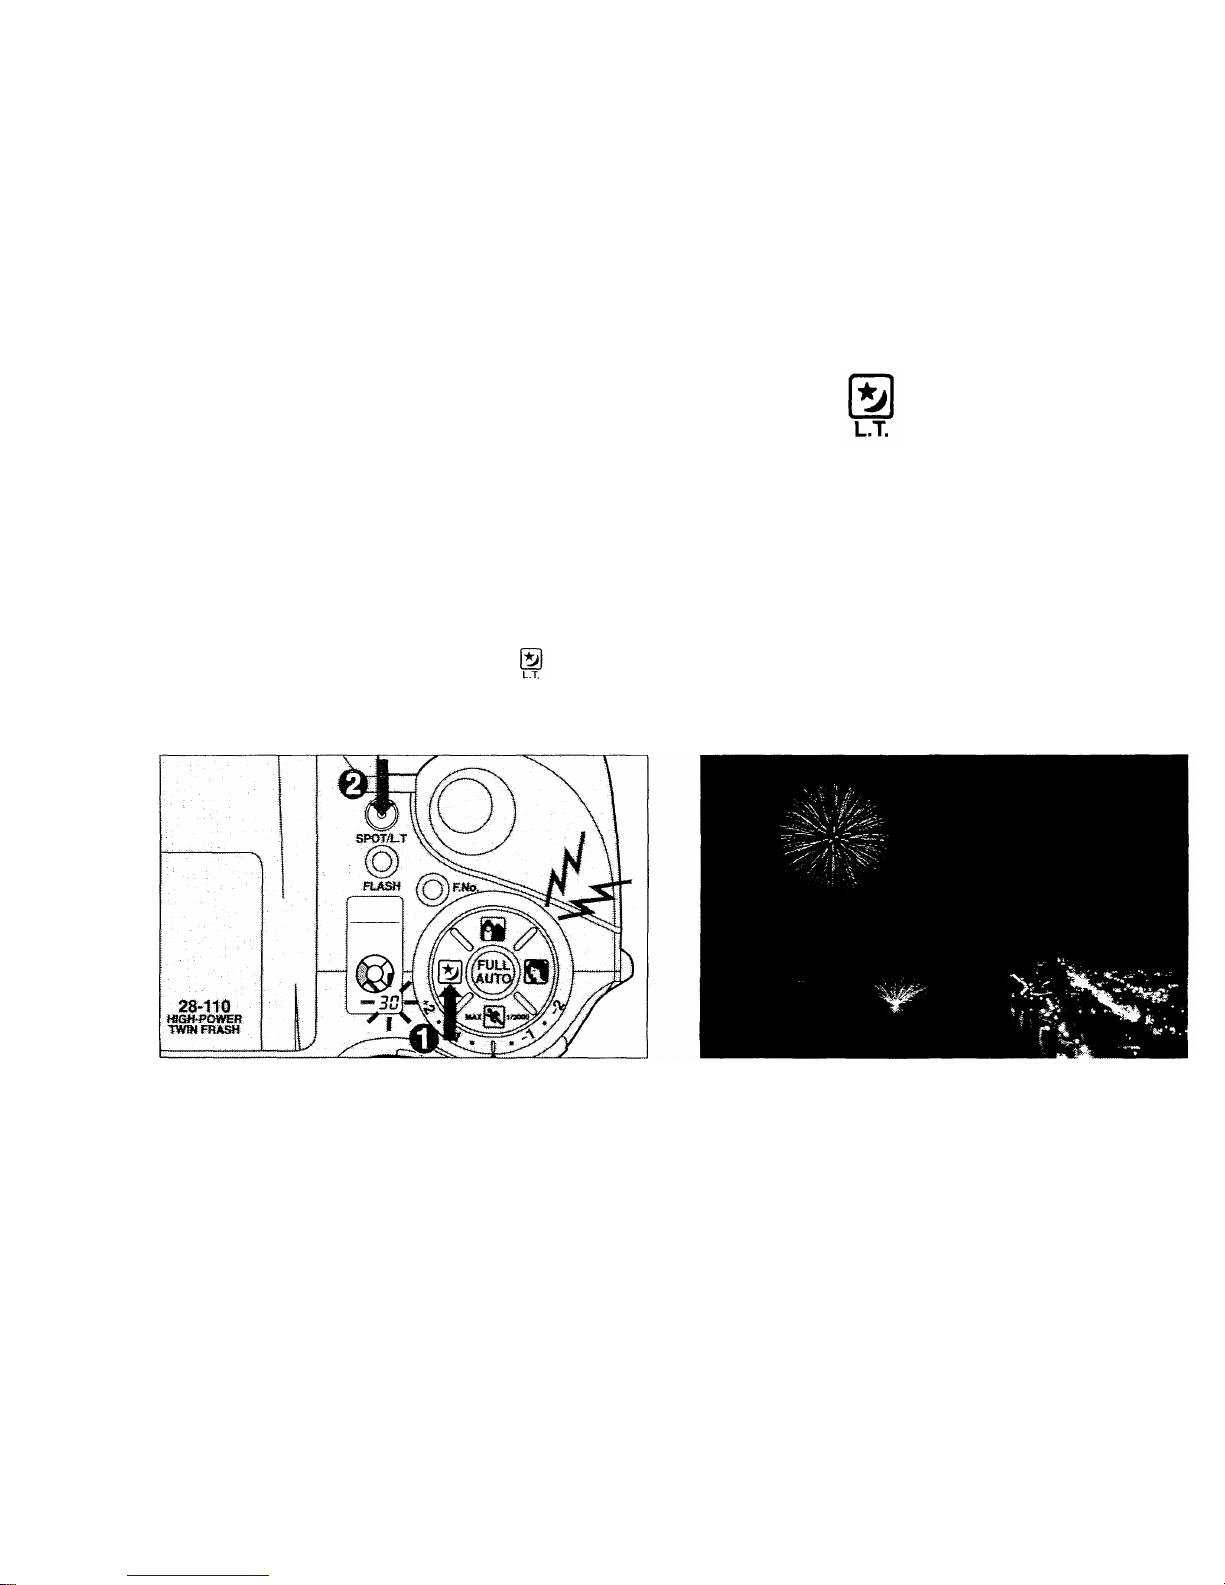
LO NG TIME
To shoot fireworks.
For a dramatic shot of fireworks or similar nighttime lights, set the
shutter speed as desired (1 to 60 sec.). The aperture is
automatically set to F8.
While holding down the butt on,
press the SPOT/L.T. button to
choose shutter speed.
Press the shutter release button.
Shutter speed is shown on the LCD panel (page 9).
Notes:
• Eac h time you press the SPOT/L.T. button, the shutter speed changes in the following
sequences: 1, 2, 4, 8, 15, 30, and 60 sec.
• Because the selected shutter speed will be very slow, to prevent blurring hold the camera firmly
in position. Use of a tripod is recommended.
2.
42
1.
Page 42
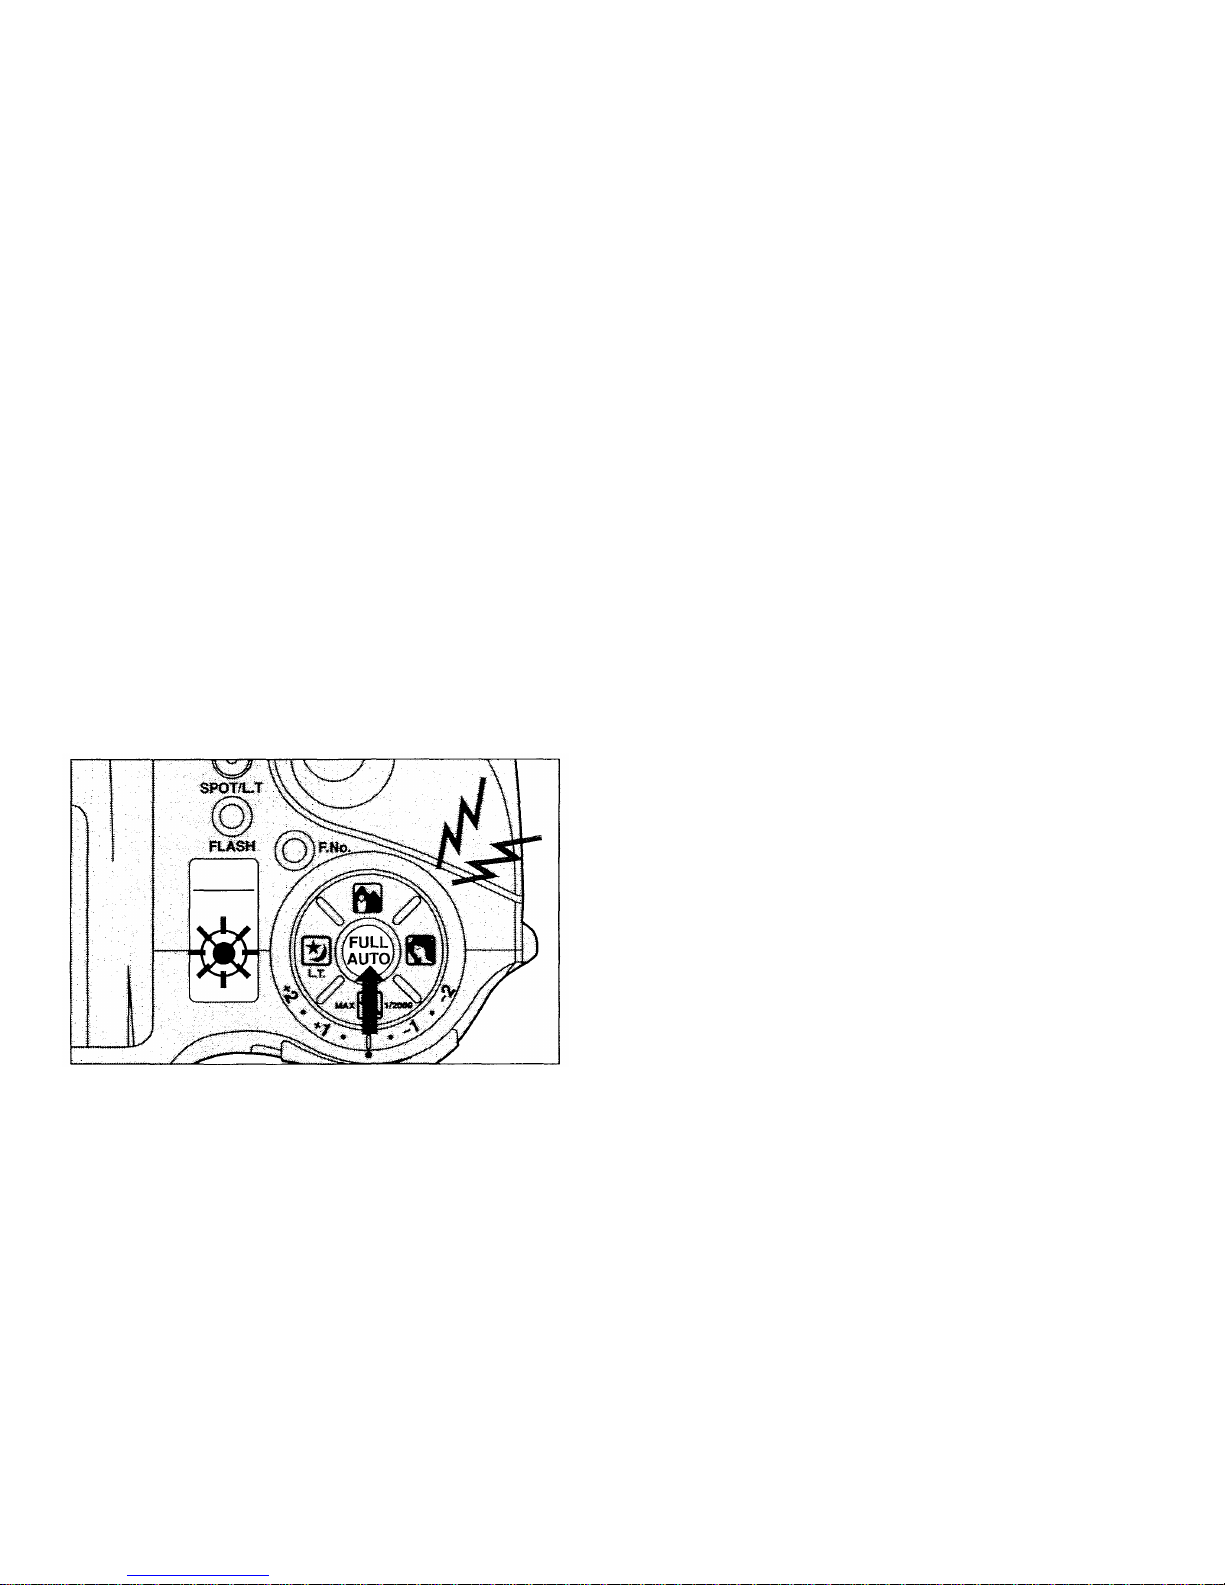
1.
Press the FULL AUTO button.
Standard Shooting Mode
Settings for the standard shooting
mode are as follows:
Exposure mode — Programmed Aut o
Flash mode — Auto or Auto-S
Selftimer/remote control — Canceled
Spot metering — Canceled
Note: The exposure compensation setting is
not canceled even w hen the FULL AUTO
button is pressed.
The camera will also return to the standard
shooting mode if the power is switched off and
on again.
Restore the standard shooting mode fo r easy, worry-free
photography.
FULL
AUTO
RESTORING T H E STANDARD SHOOTING MODE
43
Page 43
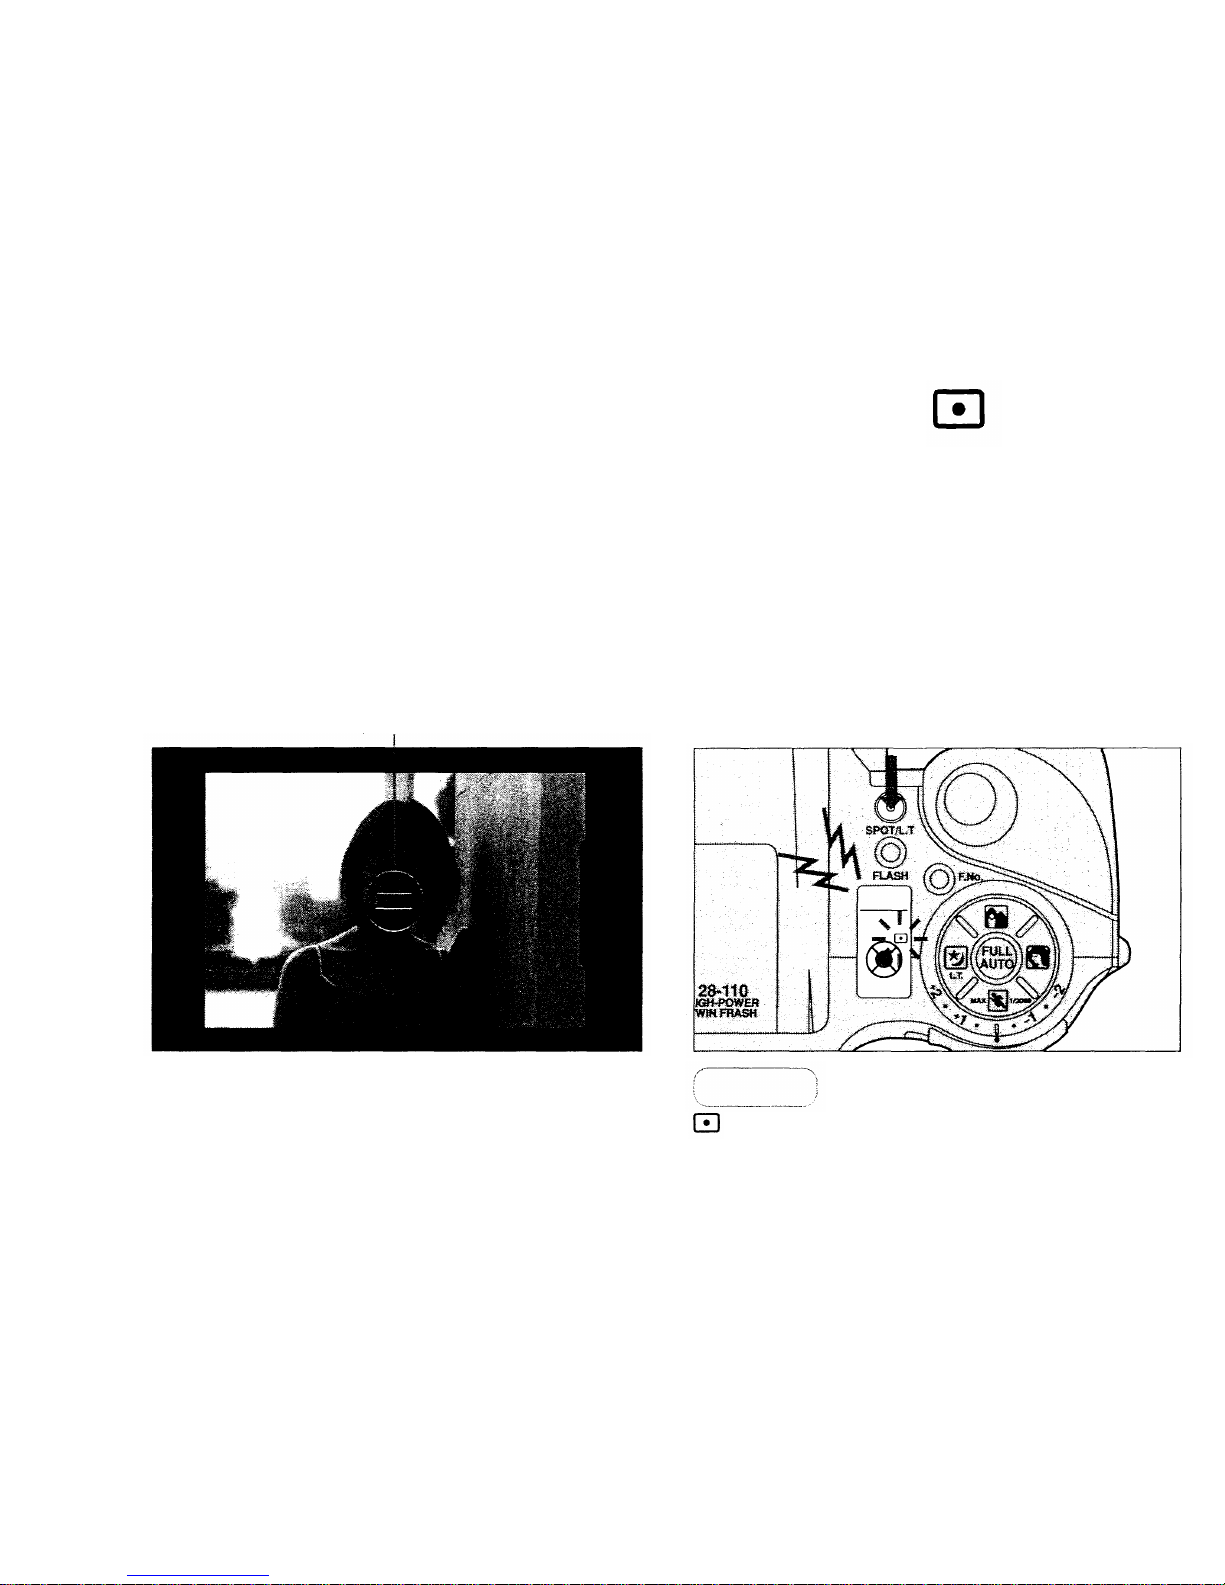
Spot frame
In situations like the one illustrated above, the
subject will be dark because of backlighting.
Position the subject fo r spot
metering within the spot frame,
and press the SPOT/L.T. button.
is displayed on the LCD panel and the
exposure is locked.
1.
Make s ur e
SPOT METERING
In this mode, the camera limits light metering to a particular area,
such as a subject's face, and sets the correct exposure.
44
Page 44
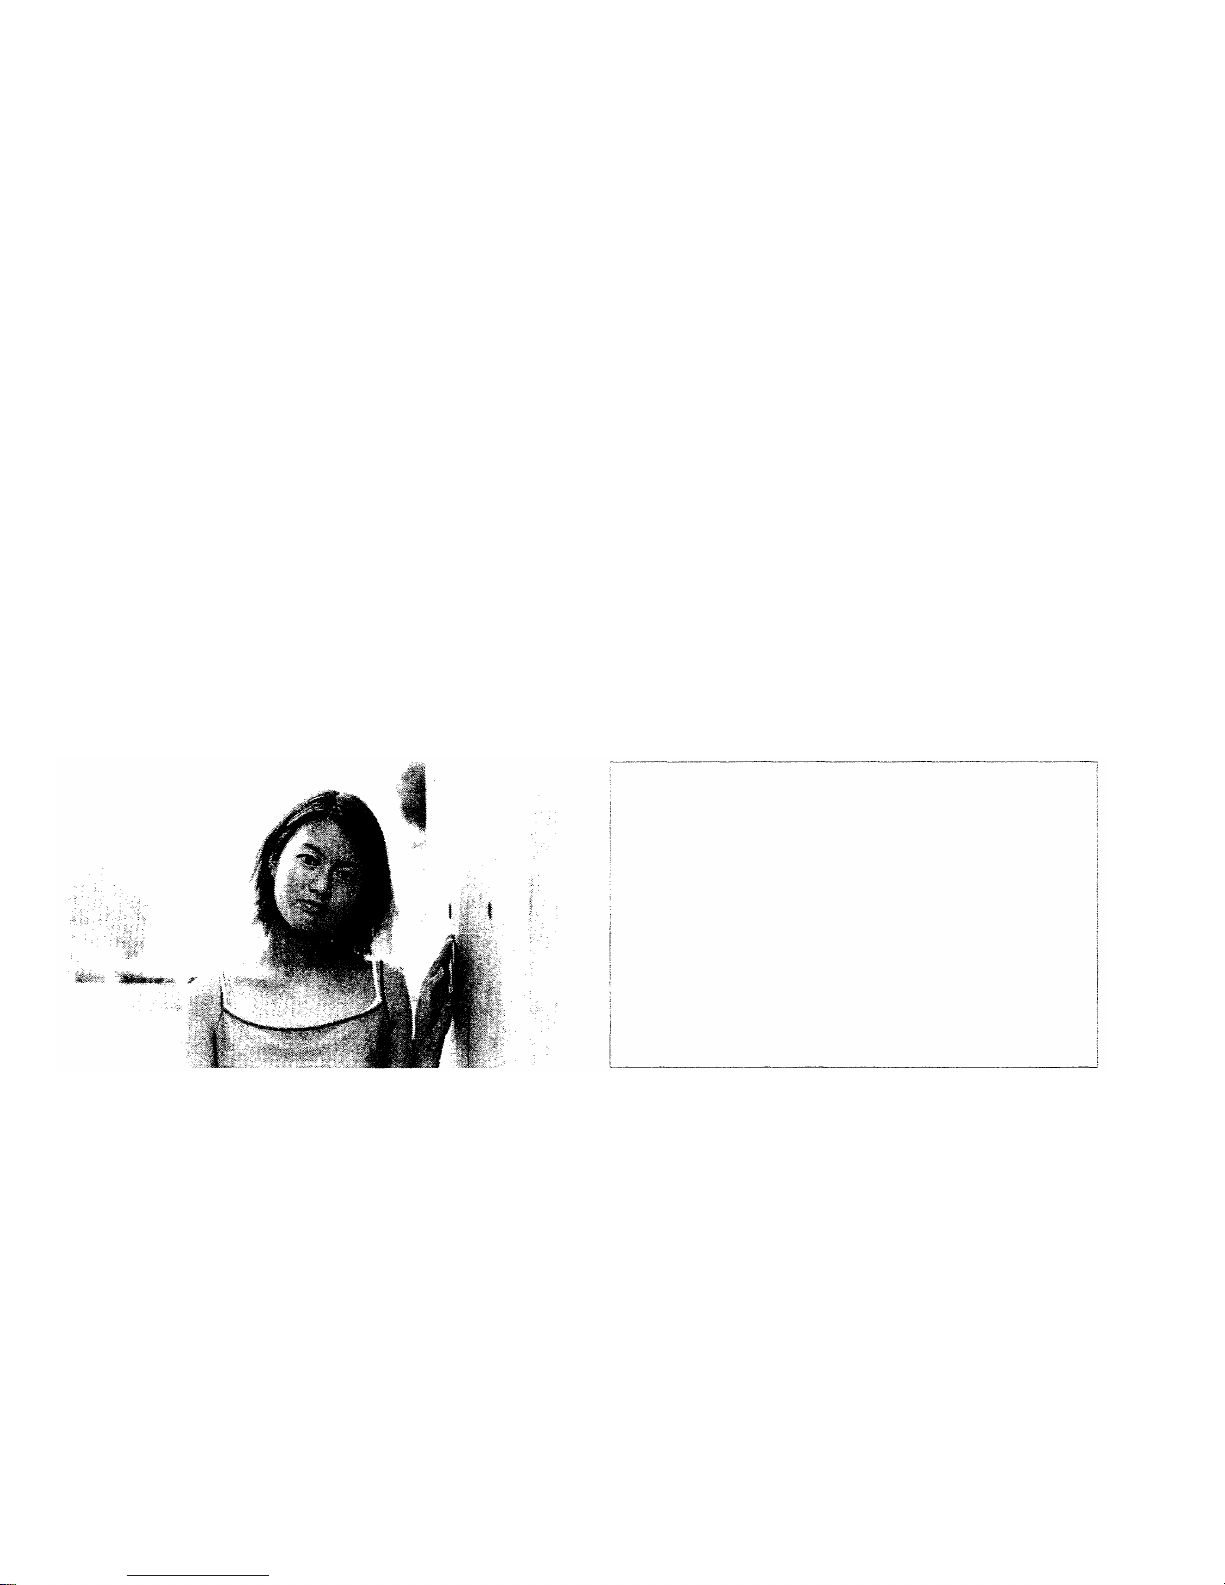
Recompose the shot, then press
the shutter release button to take
the picture.
Notes:
• When the flash is flipped up, or the Night Scene
or Long Time mode is engaged, the camera does
not perform spot metering.
• After the shot, the Spot Metering mode is
canceled. To cancel the mode without taking a
shot, press the SPOT/L.T. button again.
2.
Use the Spot Metering mode in the
following situation:
• When there is a big difference
between subject and background
brightness (e.g., backlighting).
45
Page 45
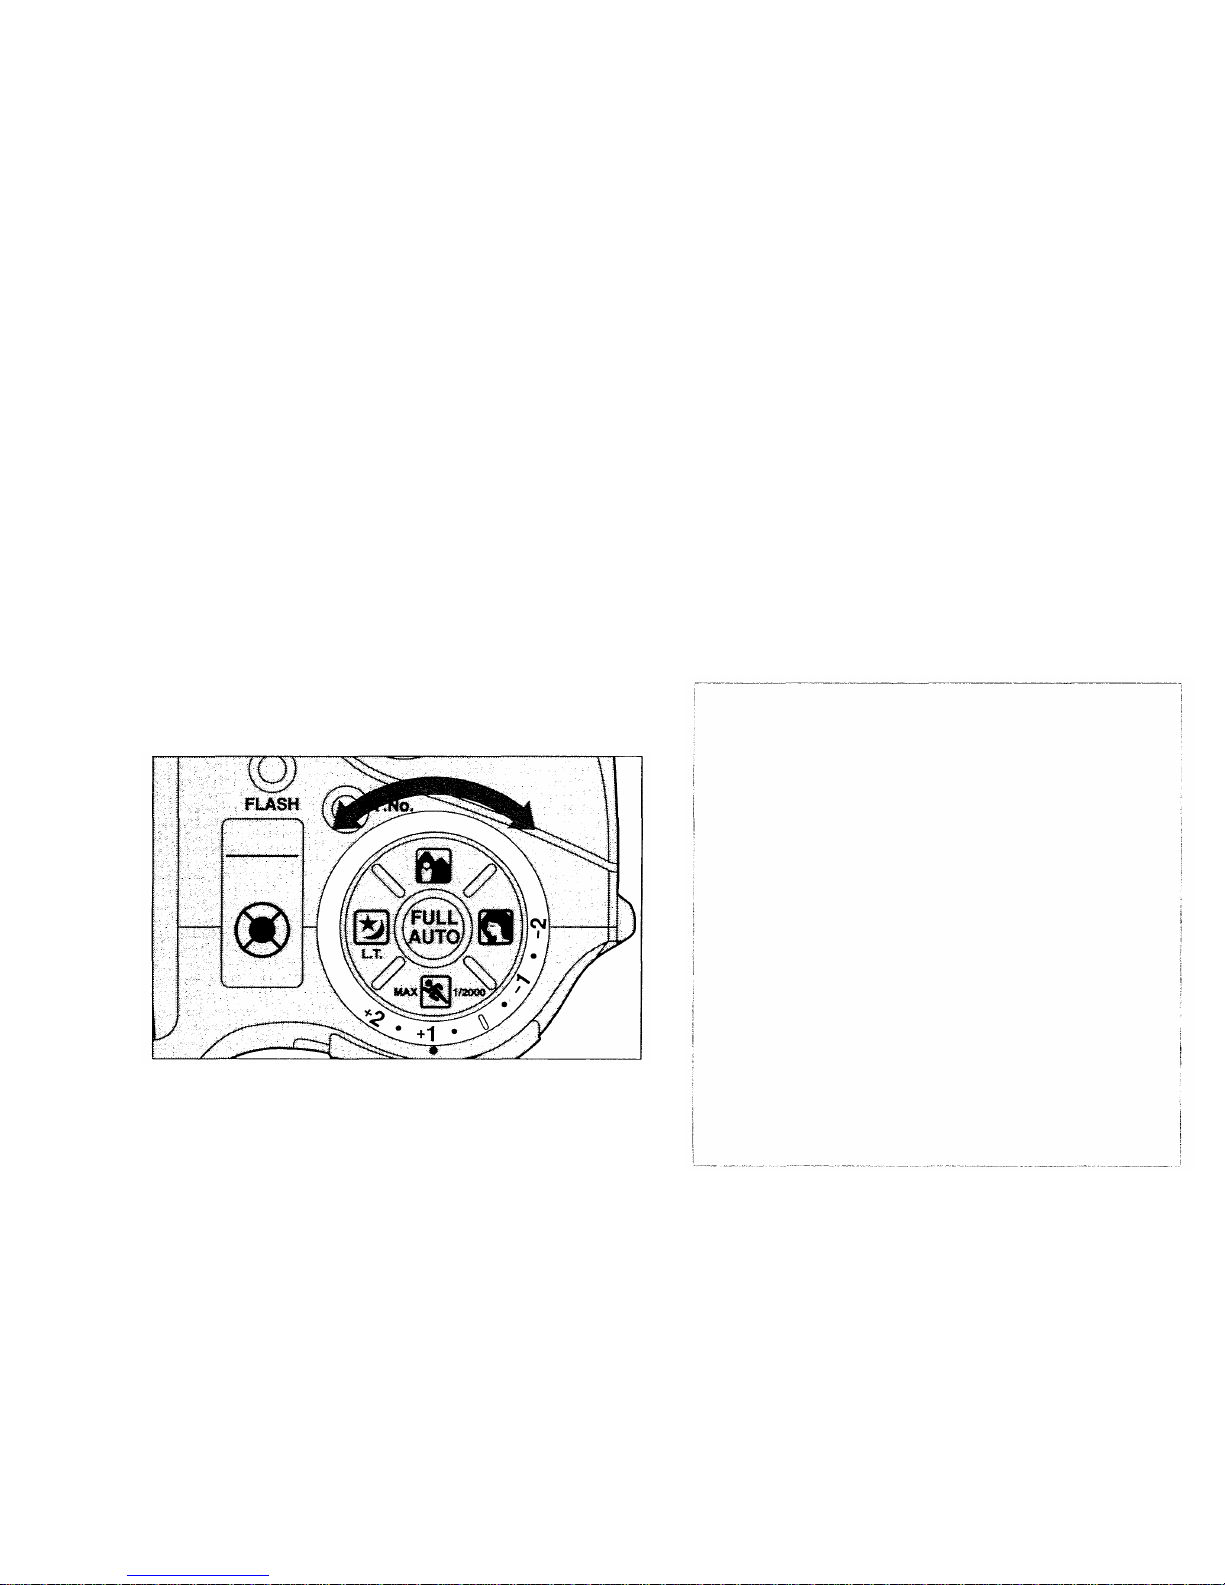
Notes:
•When the shutter release button is pressed
halfway, +/- will be displayed in the viewfinder.
• Exposure compensation is possible up to ±2
EV in 1/2-EV increments.
Set the exposure compensation
dial to the desired setting.
When you deliberately want to make your shot brighter or darker,
turn the exposure compensation dial instead of using the c a mera's
standard automatic exposure.
EXPOSURE COMPENSATION
• When the exposure compensation setting
is adjusted in the Long Time mode, only
flash emission is corrected.
• Pressing the FULL AUTO button does not
restore the exposure compensation dial's
±0 setting. Always be su re t o turn back the
dial after using exposure compensation.
• The flash power is also compensated
according to the selected exposure
compensation setting.
• When negative color film is used, th e
exposure compensation effect may be
almost indistinguishable in prints.
• I n the Aperture-Preferred Auto mode, +/-
blinks when the subject is outside the
range within which exposure can be
compensated.
46
1.
Page 46
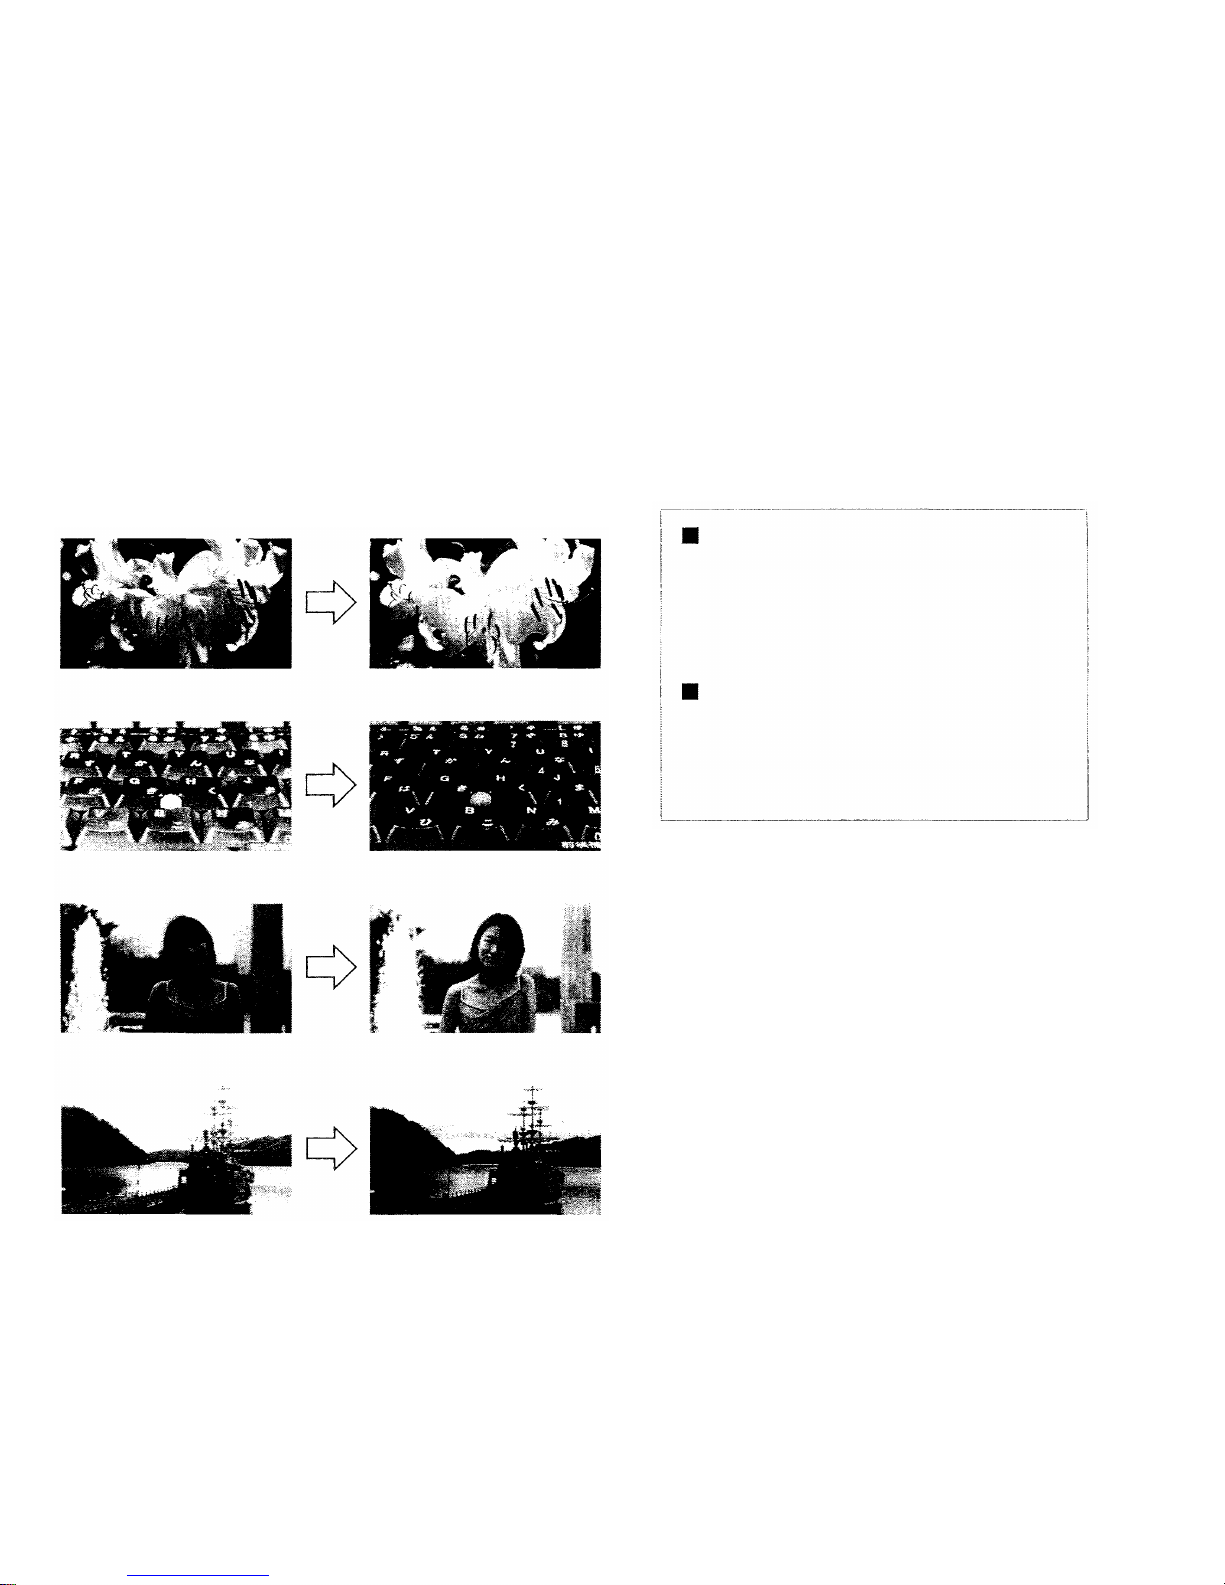
"+" Compensation
Renders the entire frame brighter.
• Backlit subject
• Whitish subject
• Snowscape
"-" Compensation
Renders the entire frame darker.
• Spotlighted subject
• Subject with a black background
• Blackish subject
To make a whitish subject brighter (Compensated to +2 EV)
To make a blackish subject blacker (Compensated to -2 EV)
To make a backlit subject brighter (Compensated to +1 EV)
To turn a daytime scene into a virtual nighttime scene (Compensated to -2 EV)
47
Page 47
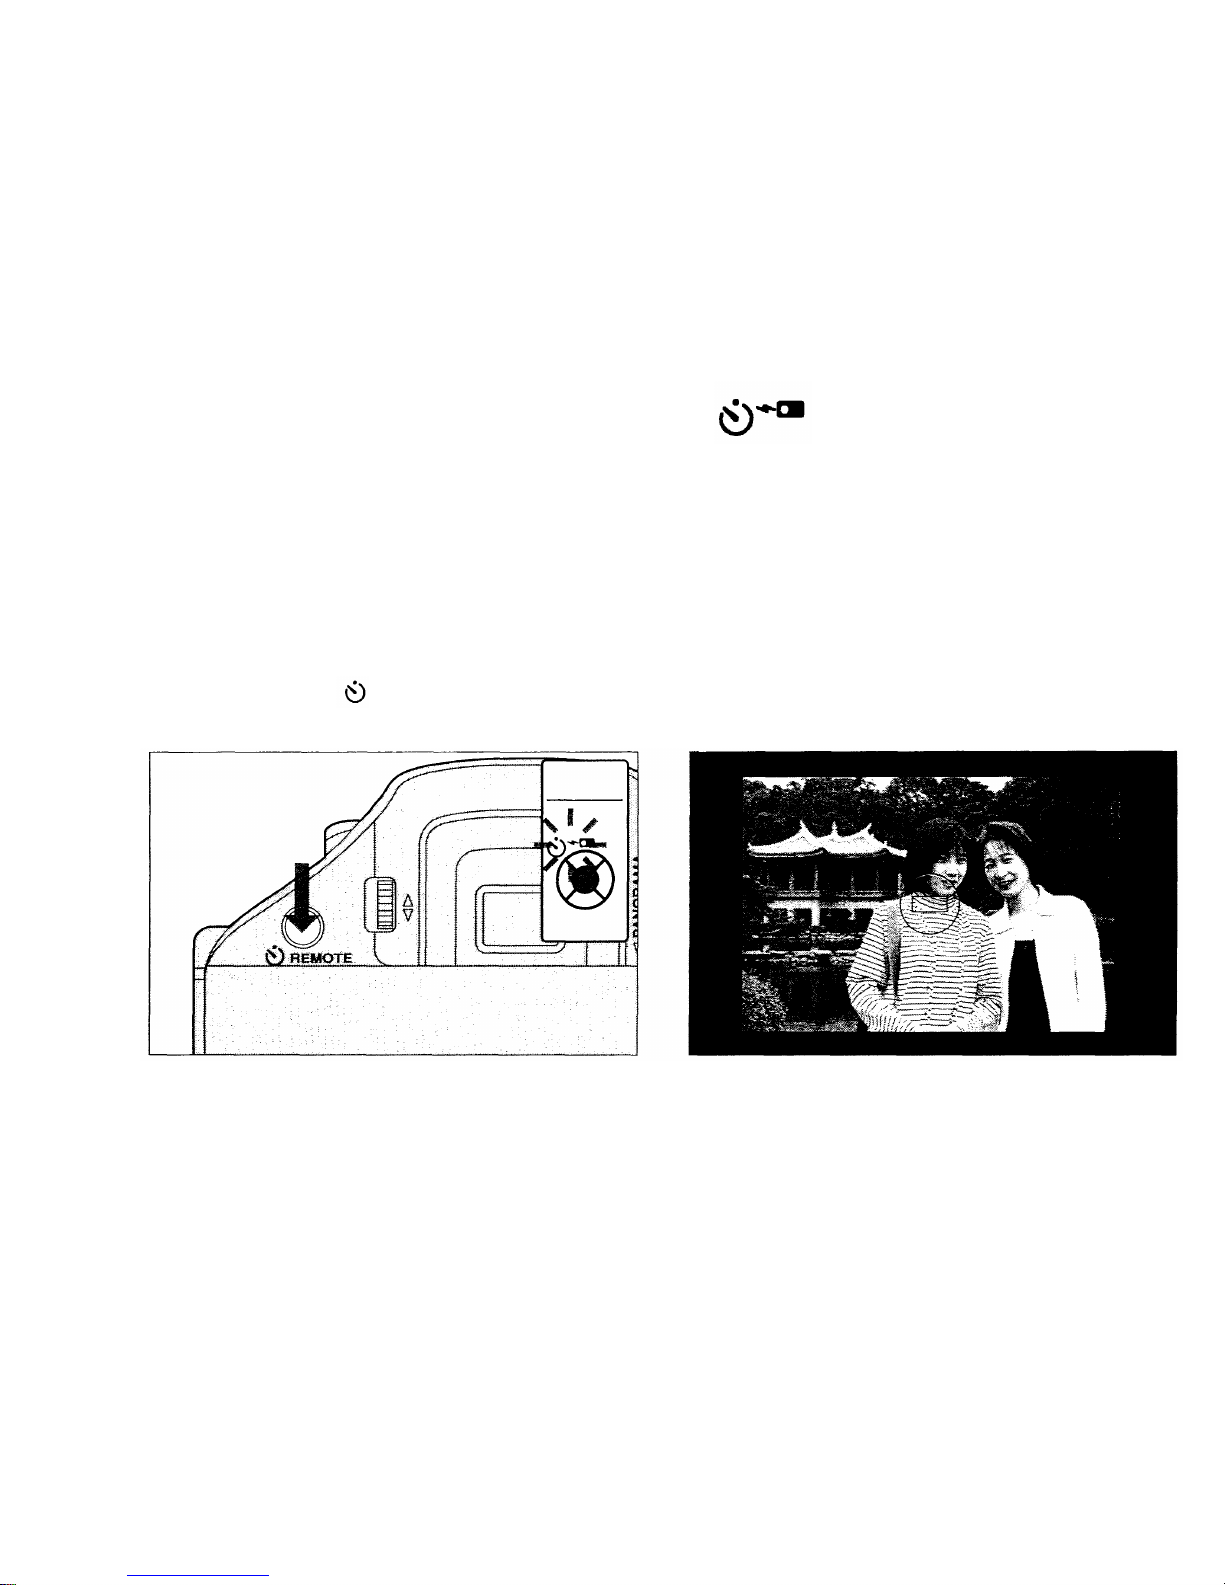
REMOTE CONTROL
The optional RC-200 Remote Control is required.
(OPTIONAL)
Position the autofocus frame on
the subject.
Press the /REMOTE button to
engage the Remote Control mod e
.
2.
1.
48
Page 48
CAUTIONS:
Keep the remote control out of the reach of
children. In case it is swallowed,
immediately consult a doctor.
Keep the remote control away fro m fir e and
extreme heat. Never try to disassemble it.
Operating temperature is -10°C (14°F) ~
40°C (104°F).
Observe the precautionary remarks written
on the battery.
Dispose of a used battery as general waste
according to local regulations.
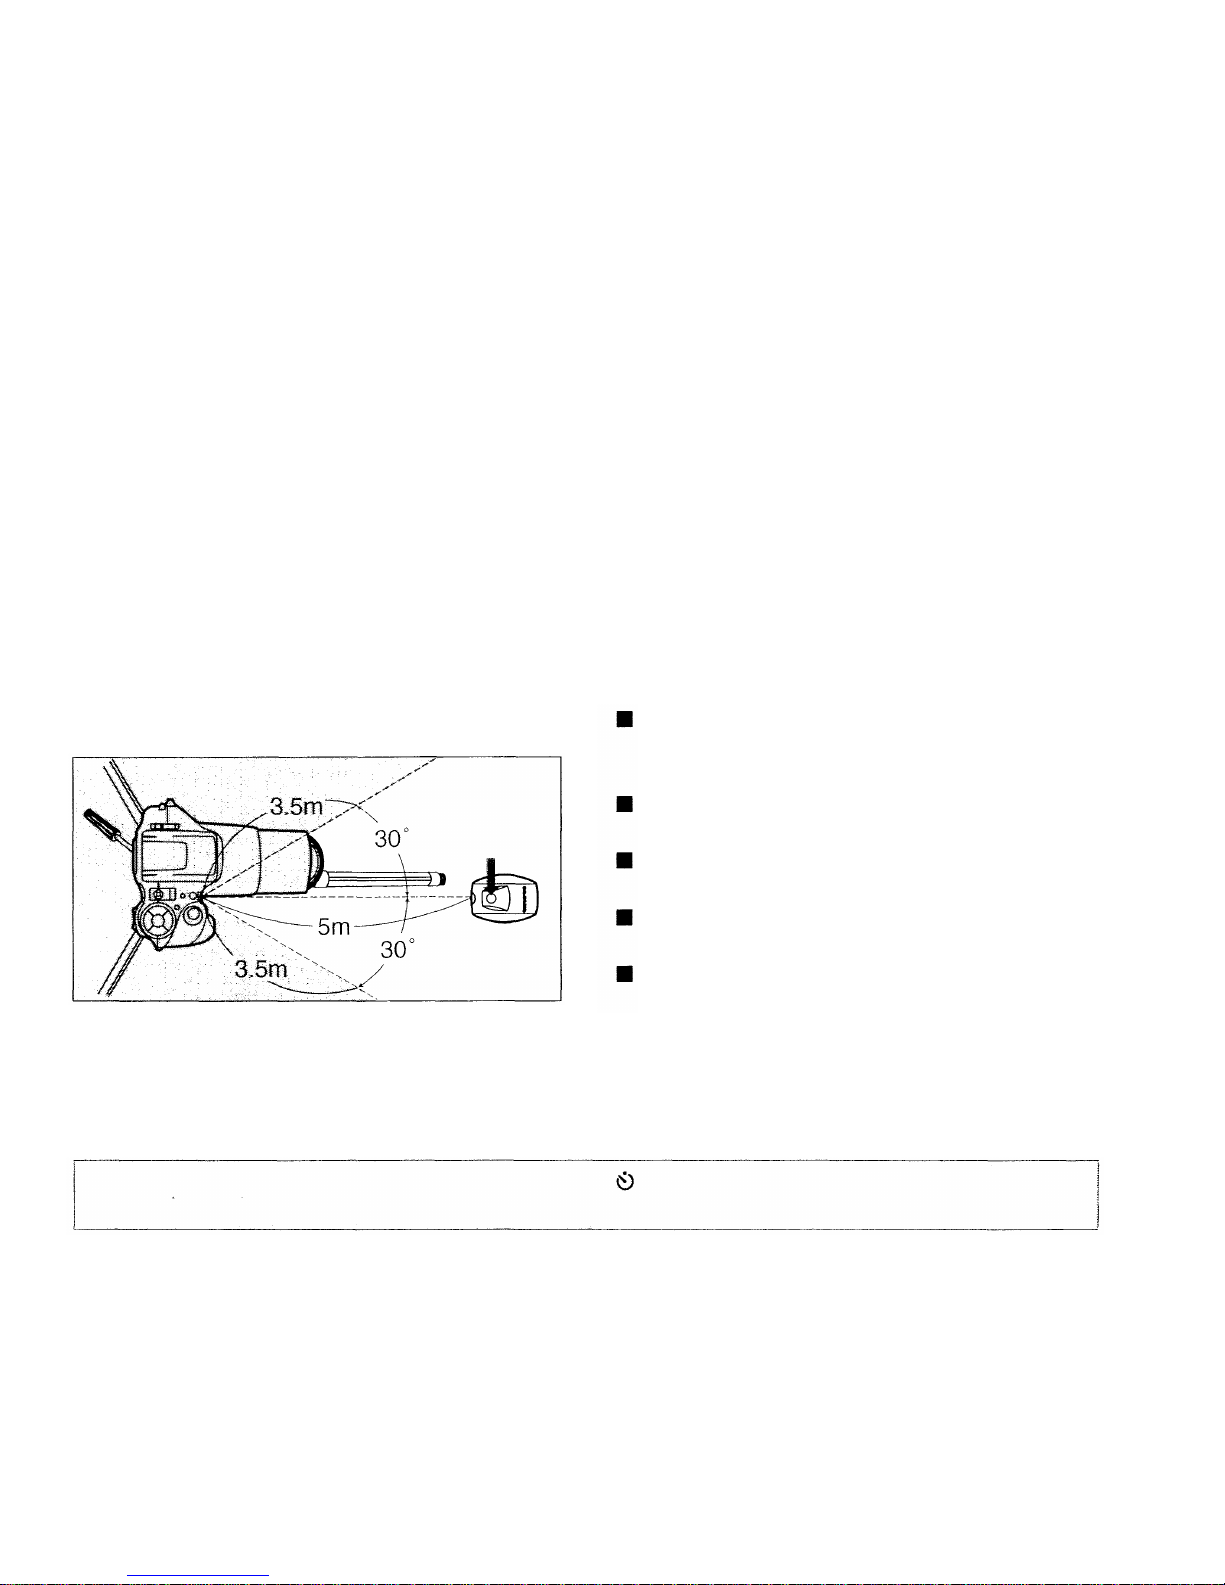
Aim the remote control at the
camera, and press the button.
The shutter will be released about 3 seconds
after the beep.
Notes:
• Us e selftimer outside the above range.
• The remote control may not work when there is
backlighting and w h en aut o f ocusing is difficult. (p. 54)
3.
Important: After th e shot(s), be sure to press the /REMOTE button again to cancel the Self-
timer/Remote Control mode .
49
Page 49
1.
2.
CORRECTING THE DATA
QD models only
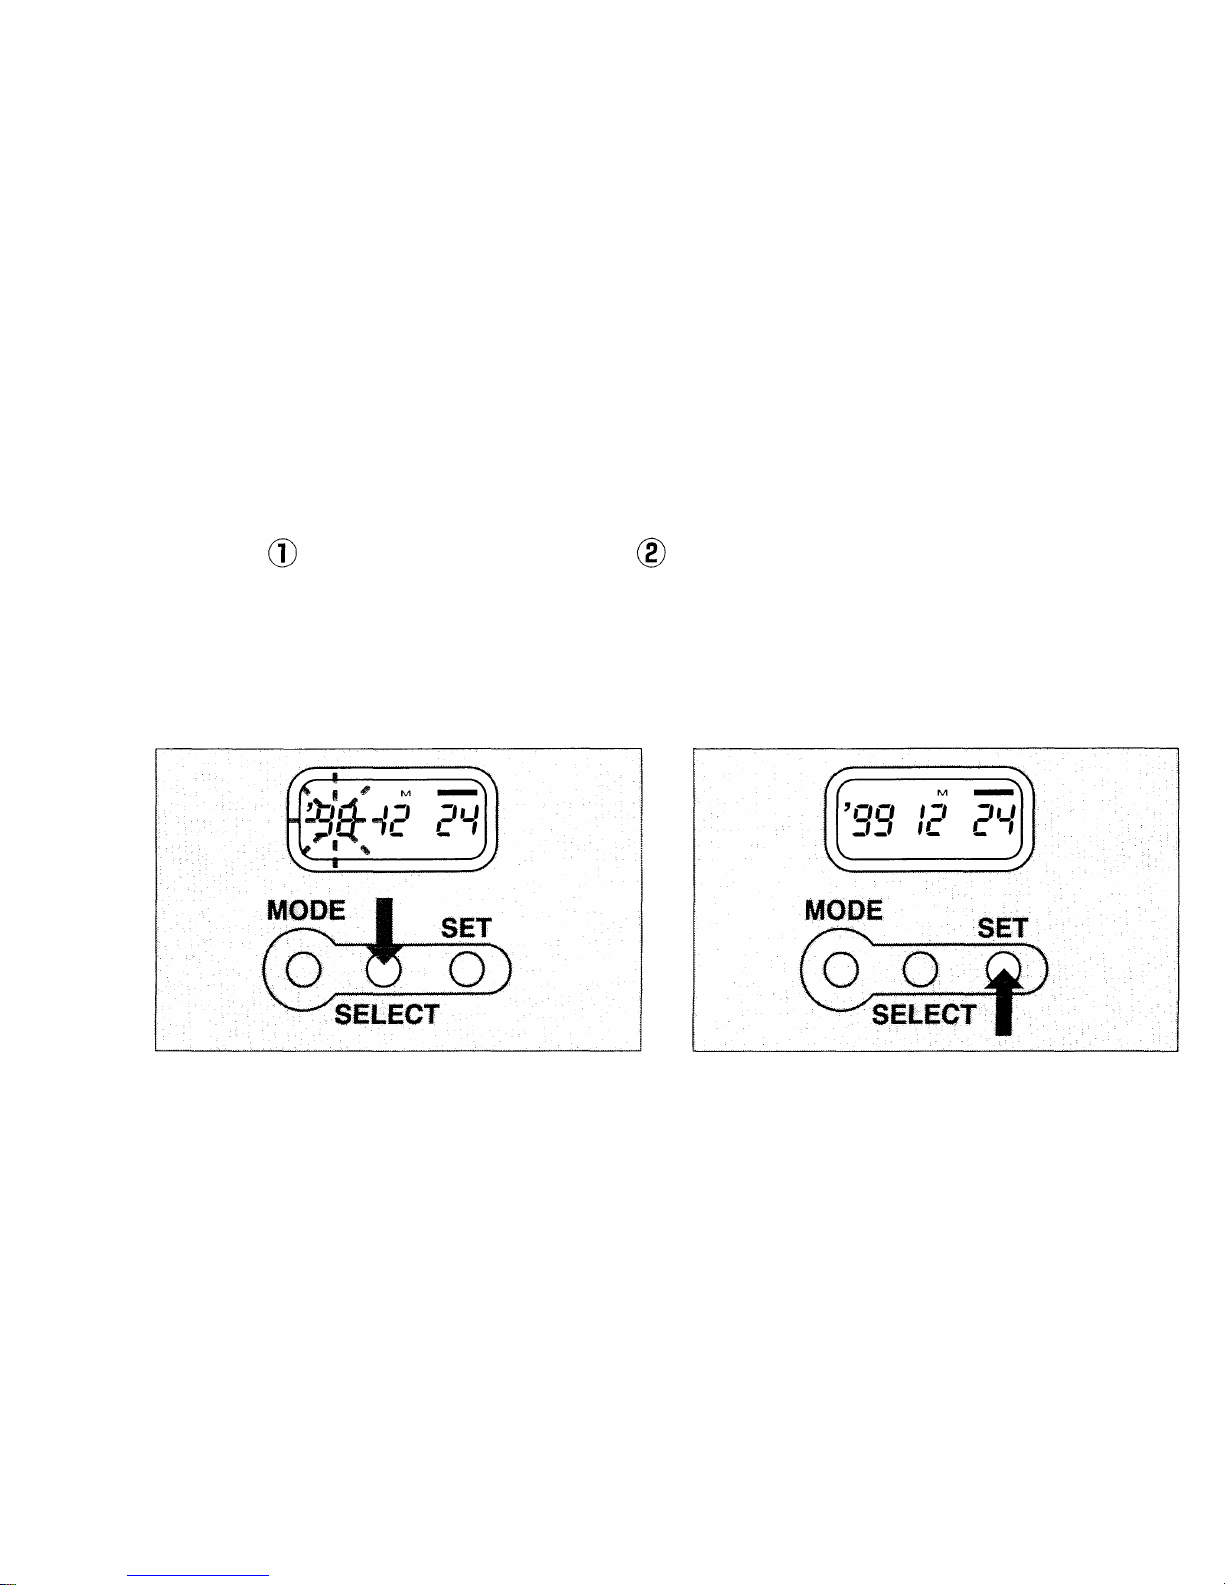
Press the SELECT button to switch to the data correction status to
adjust year-month-day and day-hour-minute.
Note: As you press the SELECT button, t he blinking indication c ha nge s in th e order of year, month, day,
hour, minute and ":" (second). Data correction ends when you press the mode button again.
Press the SELECT button until the
indication you want to change
starts blinking.
Press the SET button to correct
the data.
Do not press the buttons with a mechanical
pencil or similar pointed instrument.
If you press the button once, the number on the
display will advance by 1. If you hold the button
down, the numbers will run in rapid succession.
50
Page 50
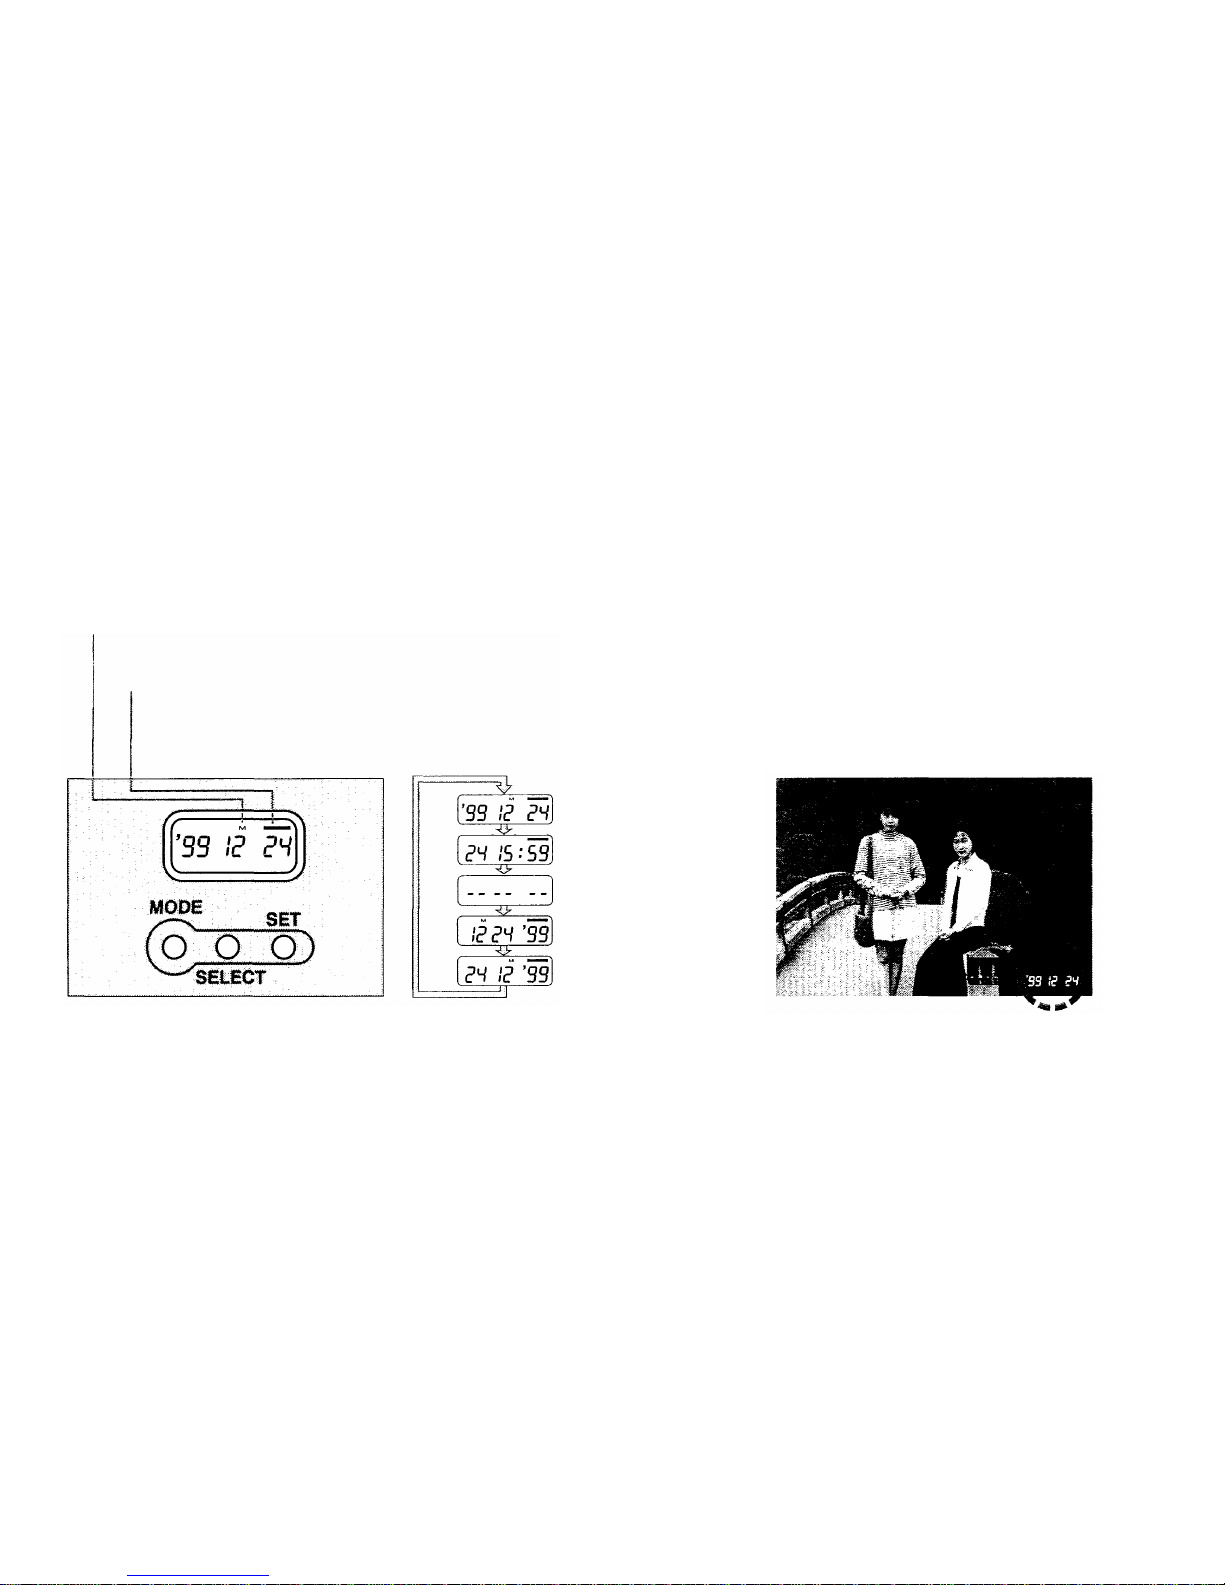
MODE button: Chooses date
and time.
SELECT button: Chooses the
indication to be changed.
SET button: Adjusts figures.
• Date and time are not imprinted in
the Panorama mode.
• If there is anything whitish or
tinged with orange in the area of
the picture where the data is
imprinted, the data may not be
legible.
• Data may not be imprinted on
black-and-white film.
PRINTING THE DATE AND TIME
QD models only
This camera has f ive data imprinting modes. Press the MODE
button to choose the mode you wan t to use.
As you press the MODE button,
the mode will switch in the order
show n below.
Month indicator ( "M" stands for month.)
Imprinting confirmation indicator
Blinks fo r about 3 seconds after shooting to make
sure the data has been imprinted.
(These indicators will not be printed on the picture.)
Year-month-day
Day-hour-minute
No data
Month-day-year
Day-month-year
51
Page 51
TAKING
BETTER
PICTURES
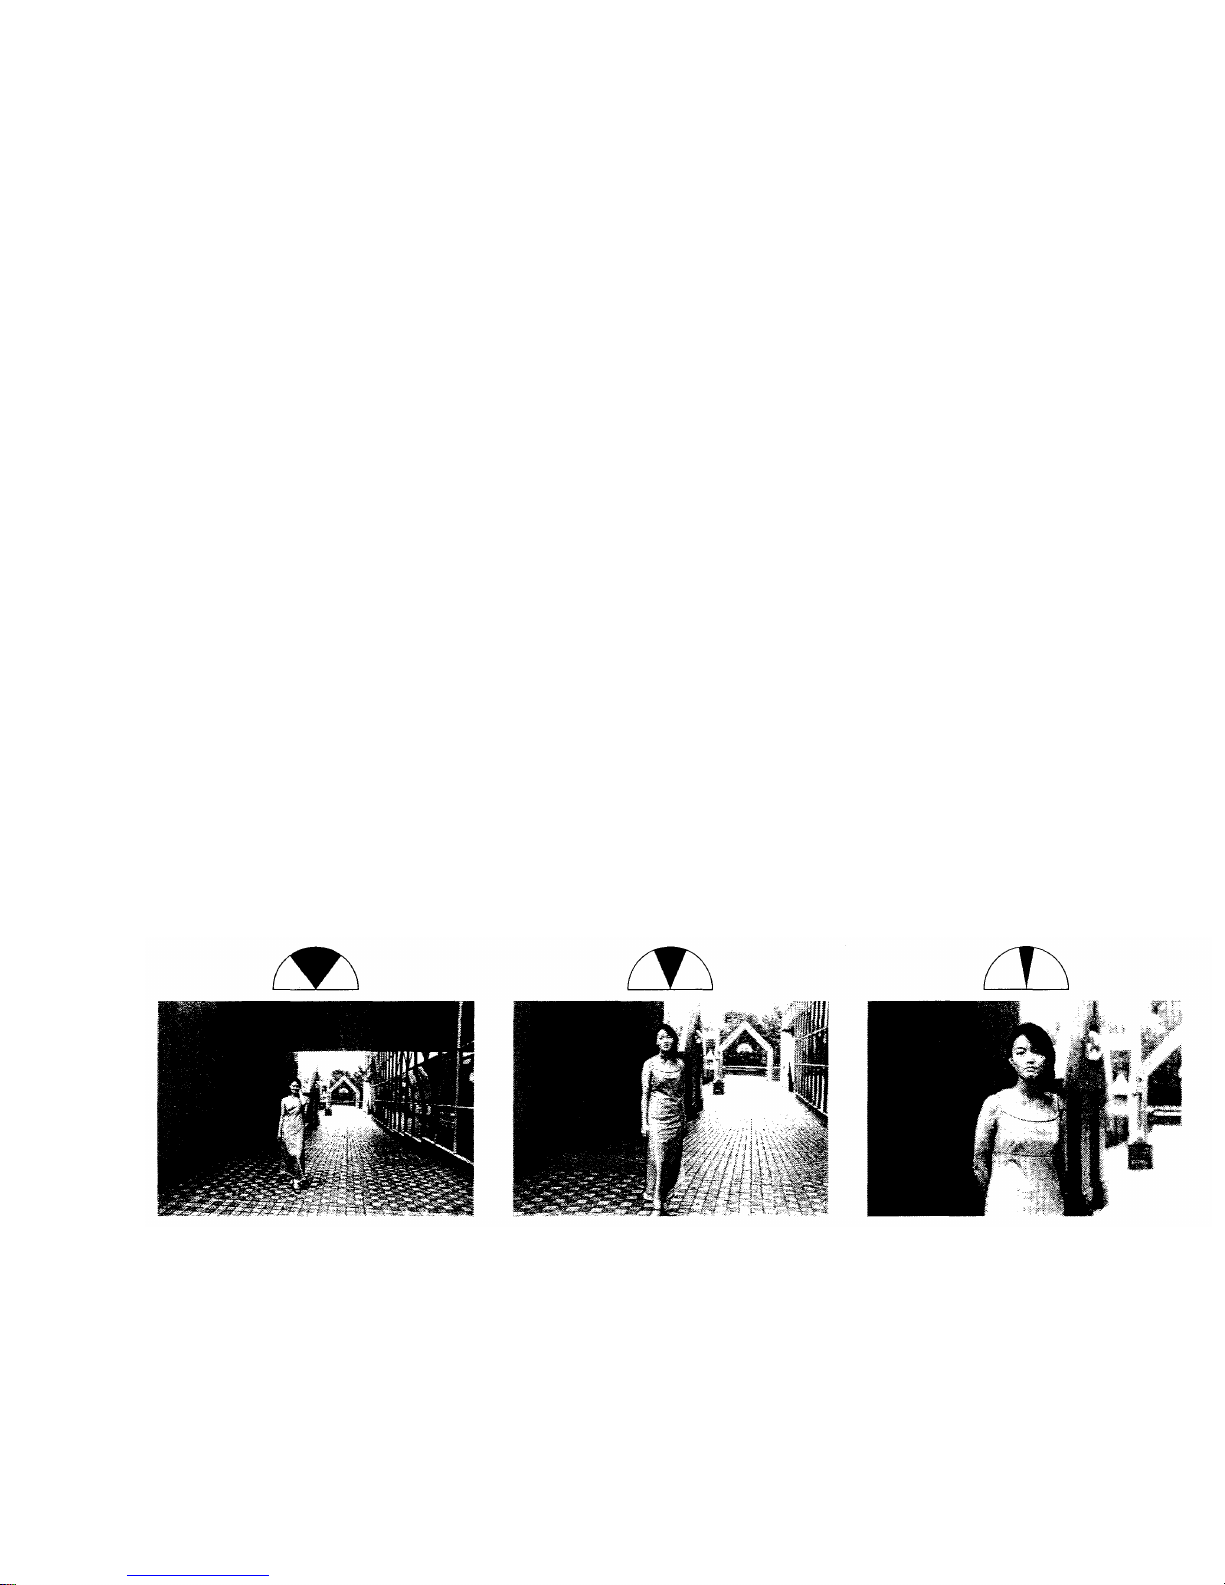
EFFECTS OF ZOOM AND ITS ADVANTAGES
Zoom lens focal length is changed by moving
part of the lens. With this camera, you can
select any focal length between 28 mm and
110 mm.
• 28 mm wide-angle
Because the angle of view is wide and the
depth of field is large, you can take sharp
photographs with enhanced perspective and
contrast. This is ideal fo r shooting landscapes,
skylines, crowds at a party, etc.
• 50 mm (approx.)
This range is the standard angle of view and
has moderate background blurring. It is
suitable for most types of shot including
portraits.
• 110 mm
At its maximum focal length, the built-in lens
offers a telephoto effect. The depth of field is
shallower, and the effects of aperture settings
are more apparent. In telephoto shooting, use
a tripod or hold the camera firmly to prevent
the camera from shaking.
• 160 mm telephoto (optional)
When the optional teleconverter IS/L LENS C-
160 H.Q. CONVERTER 1.45X is used, you
can extend the telephoto range up to 160 mm.
• 210 mm telephoto (optional)
When the optional teleconverter IS/L LENS C -
210 H.Q. CONVERTER 1.9X is used, you can
extend the telephoto range up to 210 mm.
28 mm
75°
50 mm
46°
110 mm
22°
52
Page 52
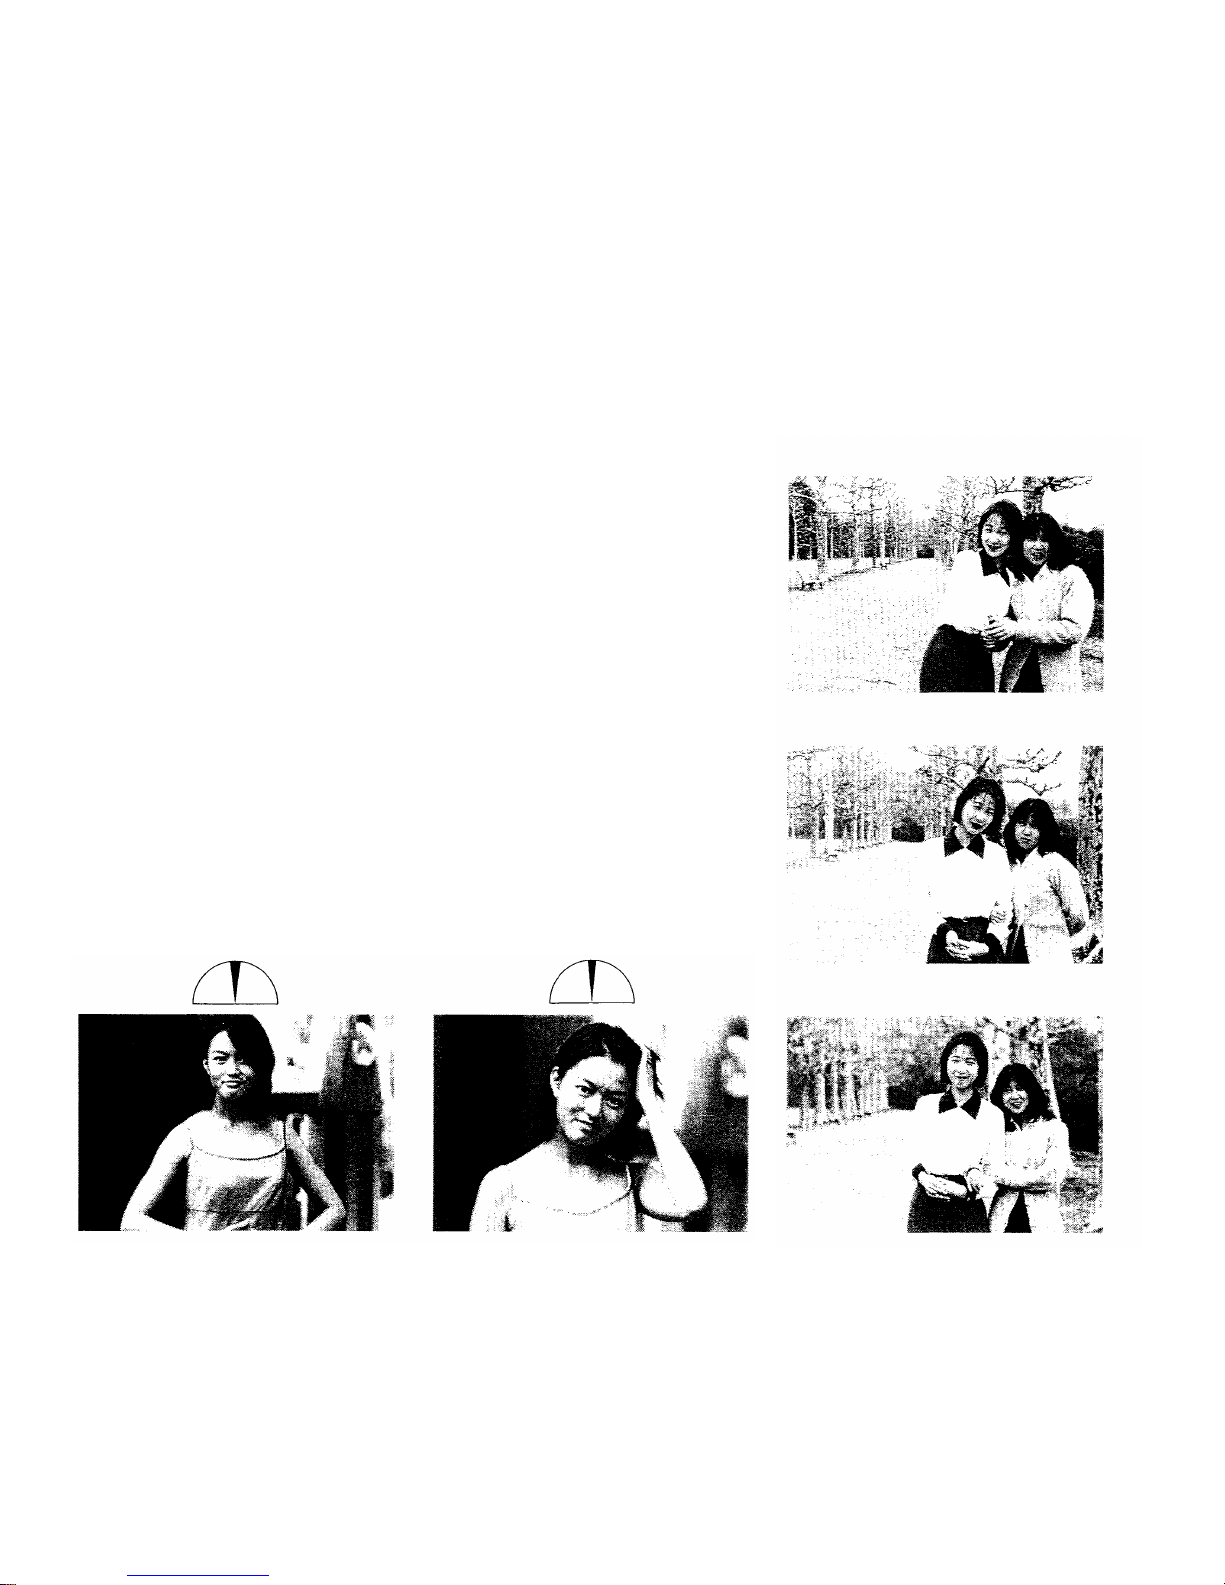
Angle of view and depth of field
Angle of view is directly related to the focal
depth of field (the distance in fron t of and
behind the subject that the camera is able to
bring into focus). The greater the angle of view
(wide angle), the greater the depth of field.
When t he angle of view is narrow (telephoto),
the depth of field decreases.
IS/L LENS C-160 H.Q. CONVERTER 1.45X
160 mm
15°
210 mm
12°
28 mm
50 mm
110 mm
F.No.5.6
F.No.5.6
F.No.5.6
53
Page 53
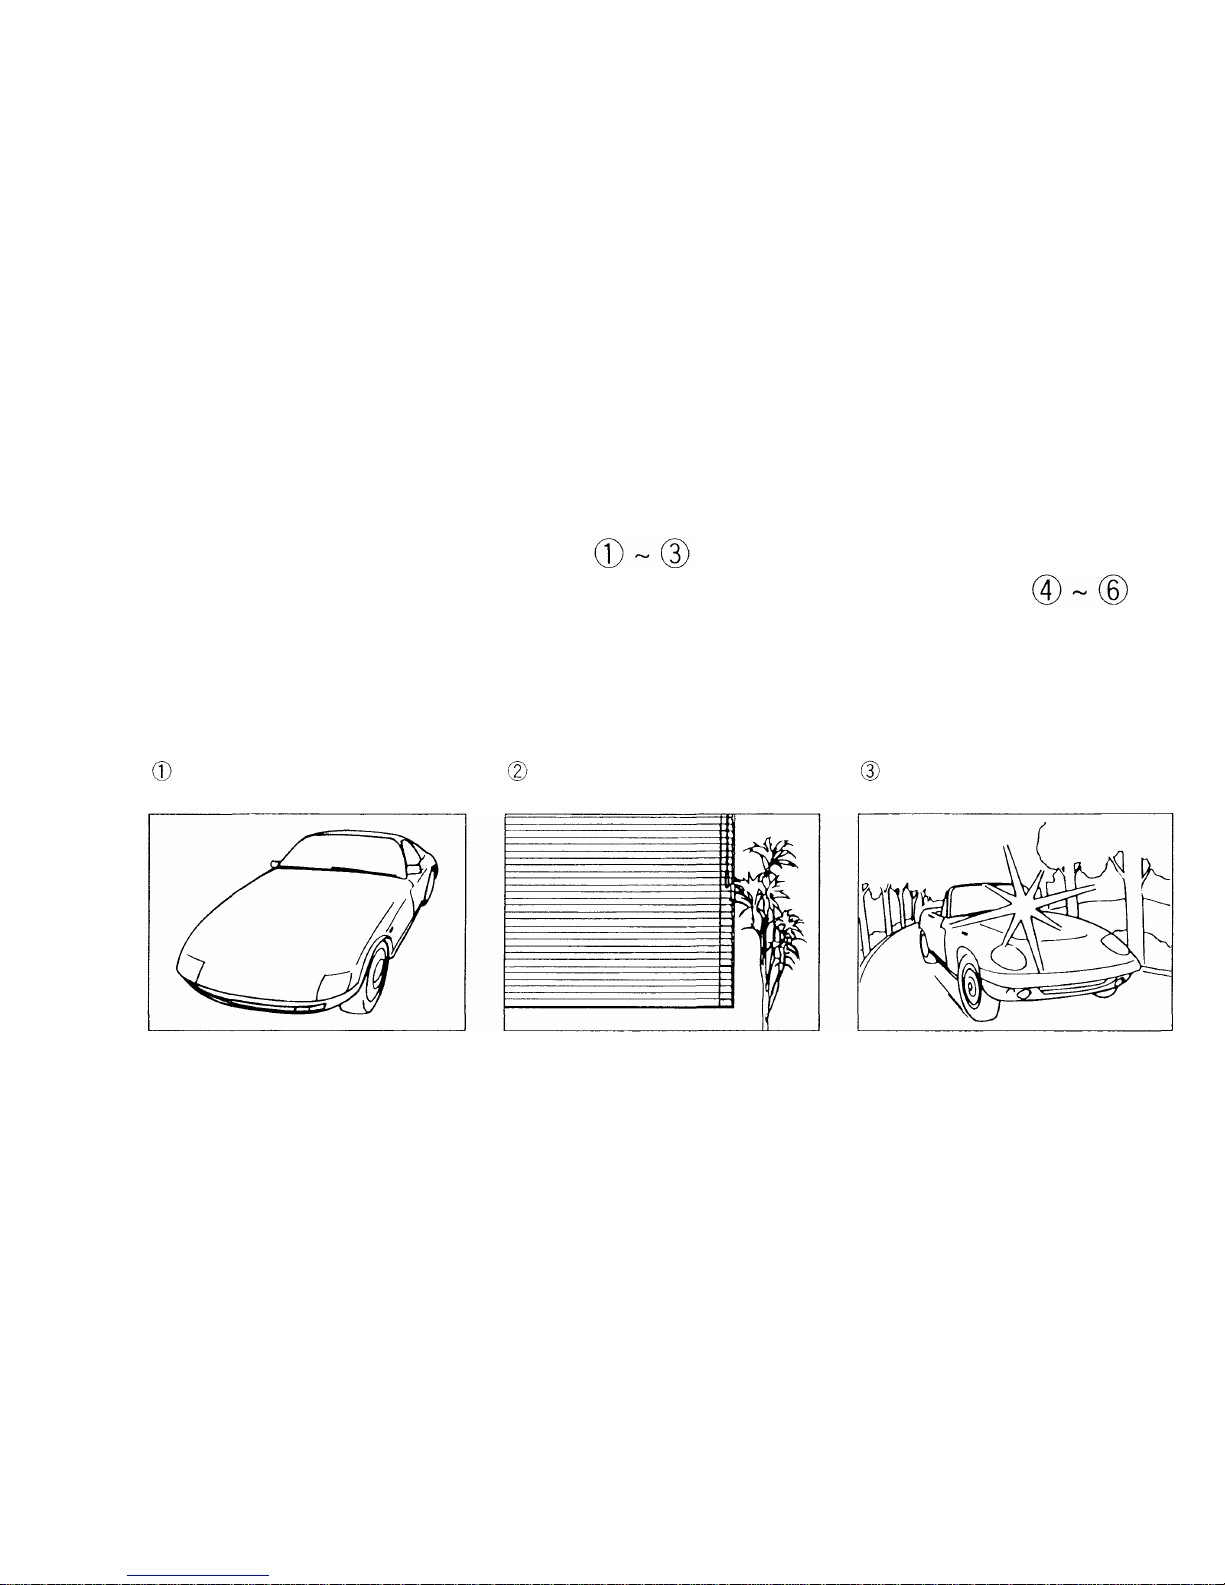
AUTOFOCUS (AF)
Although this camera's autofocus can lock on virtually any subject, there
are certain conditions, such as shown below, where it may not be
possible to obtain the correct focus. In the situations shown in on
the next page, autofocus may not lock on the correct subject even
though the autofocus indicator lights and the shutter releases.
Subjects with low contrast
Subjects that do not contain
vertical lines
Subjects in excessively bright
light
• Use the focus lock by fi r st
focusing on something at the
same distance as the subject
you wis h to take a picture of,
and then aim at the subject.
• Use the f o c u s lock first while
holding the camera vertically.
Then switch the camera to the
horizontal position to take the
photograph.
• Use the focus lock by first
focusing on something at the
same distance as the subject
you wish to take a picture of,
and then aim at the subject.
54
Page 54
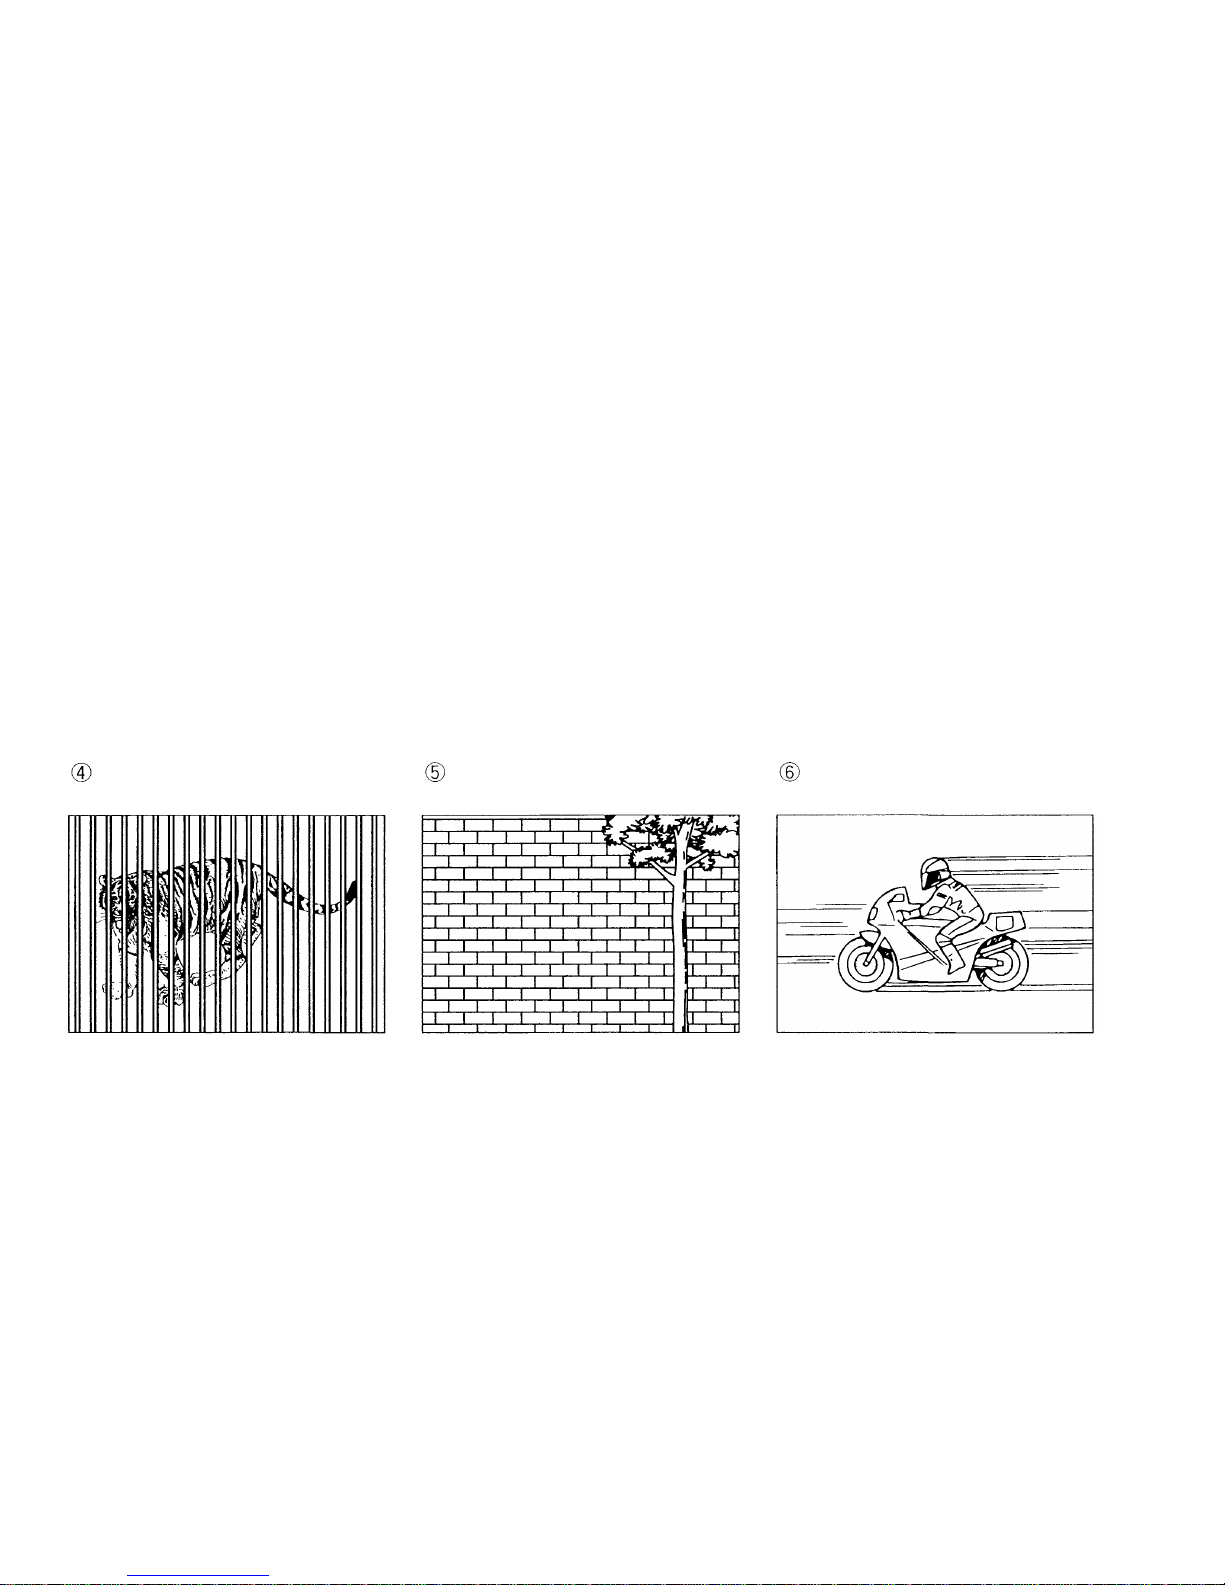
• Focu s on another subject at the
desired camera-to-subject
distance first. Then recompose
the frame to take the picture.
•When the subject locks out-of-
focus although the autofocus
indicator lights, focus on
another subject at the desired
camera-to-subject distance first.
Then recompose the frame to
take the picture.
•When the subject locks out-of-
focus although the autofocus
indicator lights, focus on
another subject at the desired
camera-to-subject distance first.
Then recompose the frame to
take the picture.
Two subjects at different
distances
Subjects with repetitive
patterns
High-speed subjects at close
range
55
Page 55
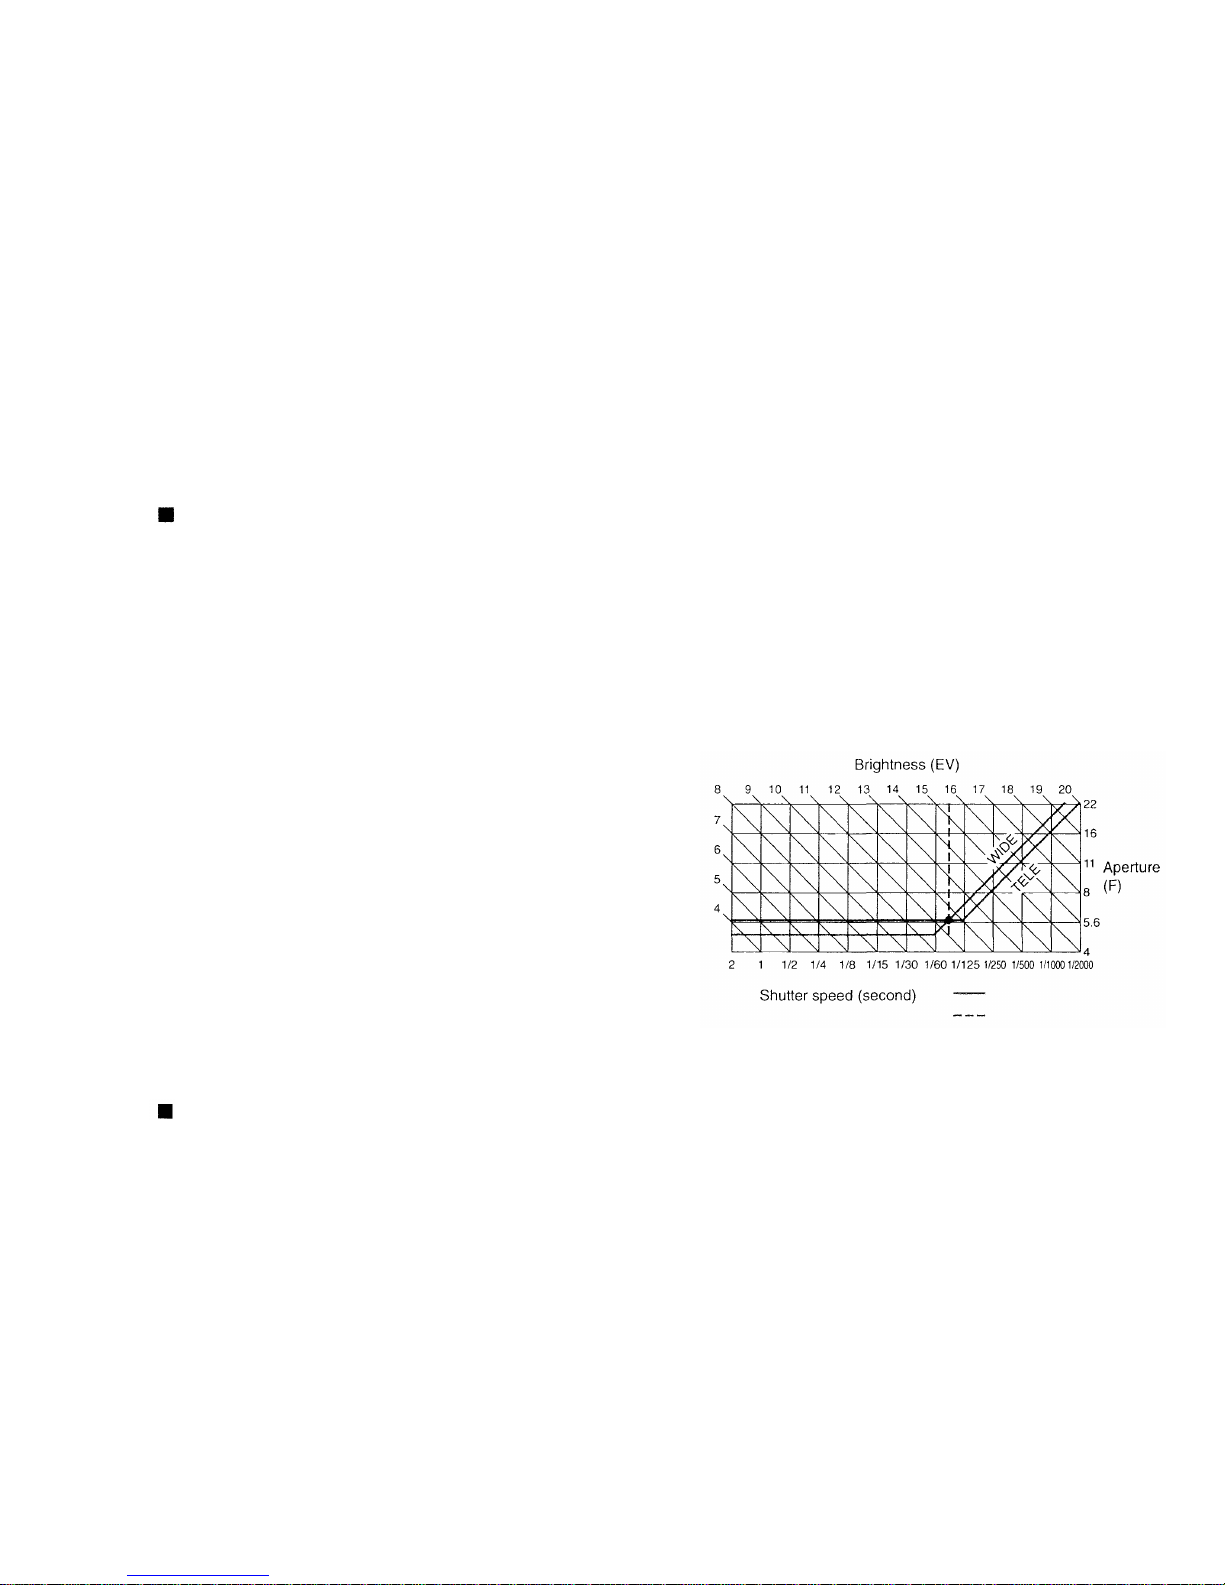
Programmed Chart (FULL AUTO)
The following program chart is for 28 mm wideangle and 110 mm telephoto focal lengths.
According to the focal length, the camera's
program itself changes. When the subject is
Automatic Exposure Mode
Exposure refers to the amount of light which
strikes the film, and is controlled by a combination
of aperture size and shutter speed. The correct
amount of light, called correct exposure, depends
on the film speed (indicated on the fi lm package,
e.g., ISO 100 or ISO 200).
The automatic exposure function automatically
sets the correct exposure. This camera employs
two types of automatic exposure modes,
programmed auto-exposure and aperture-
preferred auto exposure.
With programmed auto exposure, the camera
automatically selects the most suitable
combination of F stop and shutter speed for the
existing lighting conditions. This lets you
concentrate on composing your shot and
releasing the shutter at just the right time.
With aperture-preferred auto, you select the
desired F stop, and the camera automatically
selects the correct shutter speed. Aperturepreferred auto gives more artistic freedom of
expression and creativity by selecting a desired F
stop to control the blur of the background.
EXPOSURE
brightly lit, the F stop and shutter speed change
simultaneously. When the lighting is darker, the
aperture remains wide-open and only the shutter
speed changes to as slow as 2 sec. to match the
available light (ISO 100).
In the standard shooting mode (refer to p. 43), if
the built-in flash has been flipped up, it will
automatically fir e in dark lighting or backlit
conditions. The shutter speed will be fixed at
1/100-sec.
Flash OFF
Flash FILL-IN
56
Page 56

Portrait Mode
In this mode, the camera chooses a wide aperture
for a shallow depth of field. This results in a softly
blurred subject background, against which your
subject stands out in sharp focu s. This mode also
prevents camera-shake from happening because
a faster shutter speed is selected.
Night Scene Mode
Allows you to capture beautiful nighttime scenes
just as they are. The camera automatically adjusts
exposure compensation f or optimum night scene
photography - extending exposure time for up to 4
seconds (ISO 100). W hen shooting a subject
against a nighttime background, use of the flash is
recommended. In this case, the camera optimizes
exposure compensation for both the subject and
the background. Since the selected shutter speed
may be very slow, hold the camera firmly in
position (with a tripod for example) to prevent
blurring.
Stop Action Mode
This mode is ideal for capturing high-speed photo
opportunities such as sports scenes and children
at play. A fas t shutter speed is automatically
selected to "freeze" the action on film.
Exposure Compensation
When you shoot ordinary subjects, the camera
automatically selects the most appropriate
exposure to give you the best shot. However,
when shooting a backlit or whitish subject
(including a snowscape) we recommend you
correct exposure to +1 ~ +2 (to make your picture
brighter). For a spotlighted, darkish, or blackish
subject, correct exposure to -1 ~ -2 for (to make
your picture darker).
Long Time Mode
To obtain trailing effects when shooting fireworks
or car lights, a long shutter speed is required. The
Long Time mode is ideal for this type of shot since
it allows you to choose a shutter speed of up to 60
seconds with a fixed aperture of F8. Since the
selected shutter speed will be very slow, use of a
tripod is recommended to prevent blurring.
Landscape Mode
This mode is ideal when you want to focus on both
the subject and the background or when you want
to shoot natural scenery with low contrast. The
camera automatically stops down the aperture to
make the range of focus as large as possible. In
shooting conditions for this mode, the subjects are
likely to be at a distance of (infinity), so the
autofocus function in this mode starts from the
position.
57
Page 57

Film Speed
Film speed is indicated on the back of film
packages. ISO 100, ISO 200, and ISO 400 are the
most common. High-speed f i l m (ISO 400), as
implied by its name, is for taking photos of fastmoving subjects in action shots, for example.
However, there are also other advantages. With
high-speed film, such as ISO 400, it is possible to
take pictures in lower light. An d the distance
covered by the flash will be greater. Generally, the
higher the film speed, the grainier the picture.
With this camera, we recommend the use of "DX"
film cartridges: ISO 25 ~ 3200. In the c a s e of non-
DX-coded film, the camera will automatically be
set to film speed ISO 32.
FILM SPEED
METERING THE AMOUNT OF LIGHT
Light Metering
Light metering can measure the brightness of the
framed subject in various ways. This camera
employs three metering systems: ( 1 ) ESP light
metering, (2) center-weighted average light
metering, and (3) spot metering. You can select
the light metering system most suitable to the
conditions. The camera also uses TTL (through-
the-lens) light metering to automatically measure
the light that enters the lens. This lets you get very
accurate light readings that are unaffected by
changes in the distance between the subject and
the camera.
Fuzzy Logic ESP (Electro-Selective Pattern)
Light Metering
ESP light metering measures the brightness of the
central portion and peripheral portion of the frame
separately in order to determine the proper
exposure. The calculation program used is based
on programmed data to properly compensate for
backlighting. ESP light metering is used
automatically when in the Full-Auto mode.
Center-Weighted Average Light Metering
Center-weighted average light metering is the
most widely used light metering system (Fig. A).
This system measures the light available
throughout the frame with special emphasis on the
center of the frame. When in the Aperture-
58
Page 58
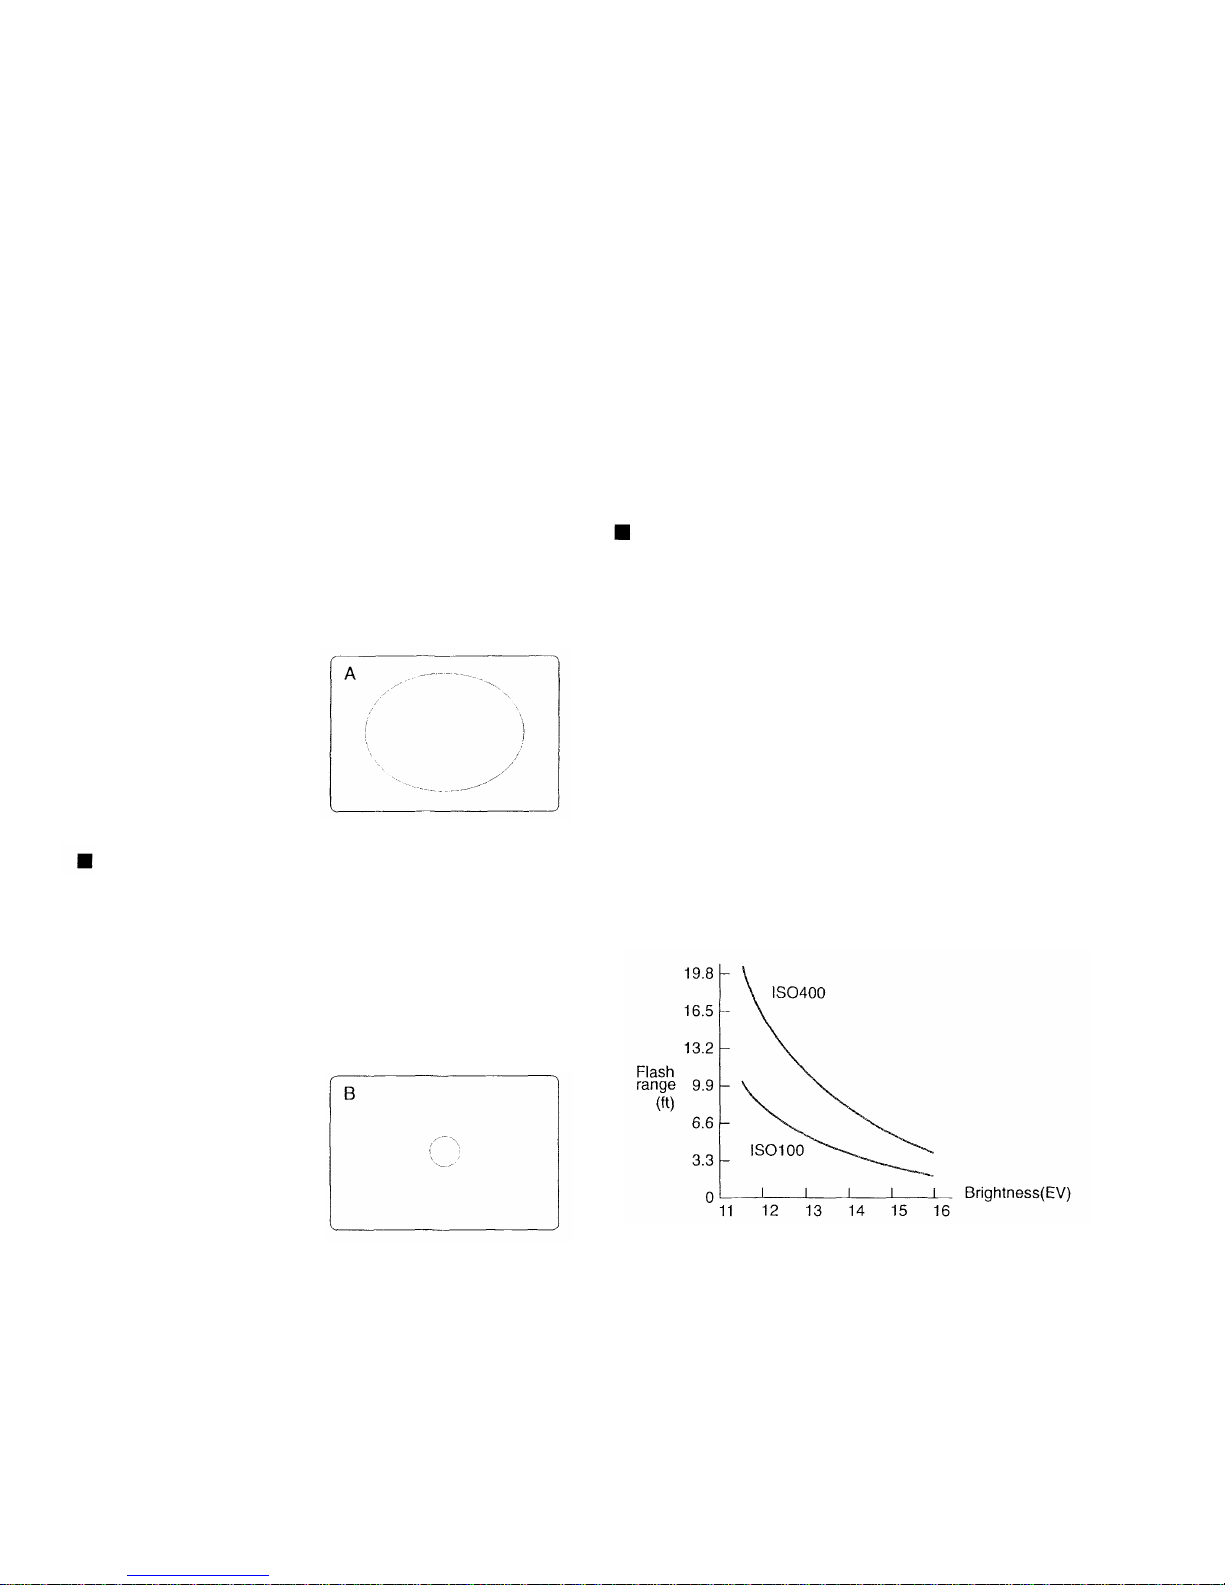
Preferred Auto mode, this light metering system is
automatically activated. When the contrast
between bright and dark areas is not too extreme
outside the center of the frame, this system offer s
excellent results.
Spot Metering
Spot metering (Fig. B) measures the brightness at
the center of the frame only. Because this
metering system calculates the correct exposure
fo r only one point, it is convenient when the
subject is backlit or the picture contains strong
contrasts. When shooting a subject in front of an
extremely bright background, you should use spot
metering on the subject's face.
Super FP Flash
The duration of a conventional flash is extremely
short. With SLR cameras equipped with focal
plane shutters, the flash can normally only be
synchronized at shutter speeds where the shutter
opens fully. In this camera's Portrait mode, the
flash duration has been extended, so
synchronization is possible even when the shutter
is not fully open. This system is called Super FP
Flash and is especially effective for daylight sync
photography with backlit scenes. Subjects can be
made to stand out by opening the lens aperture
fully to blur the background. Since flash output is
never overpowering, it is easy to take naturallooking daylight sync pictures can with lighting
similar to that used by professionals for SLR
photography.
59
Page 59
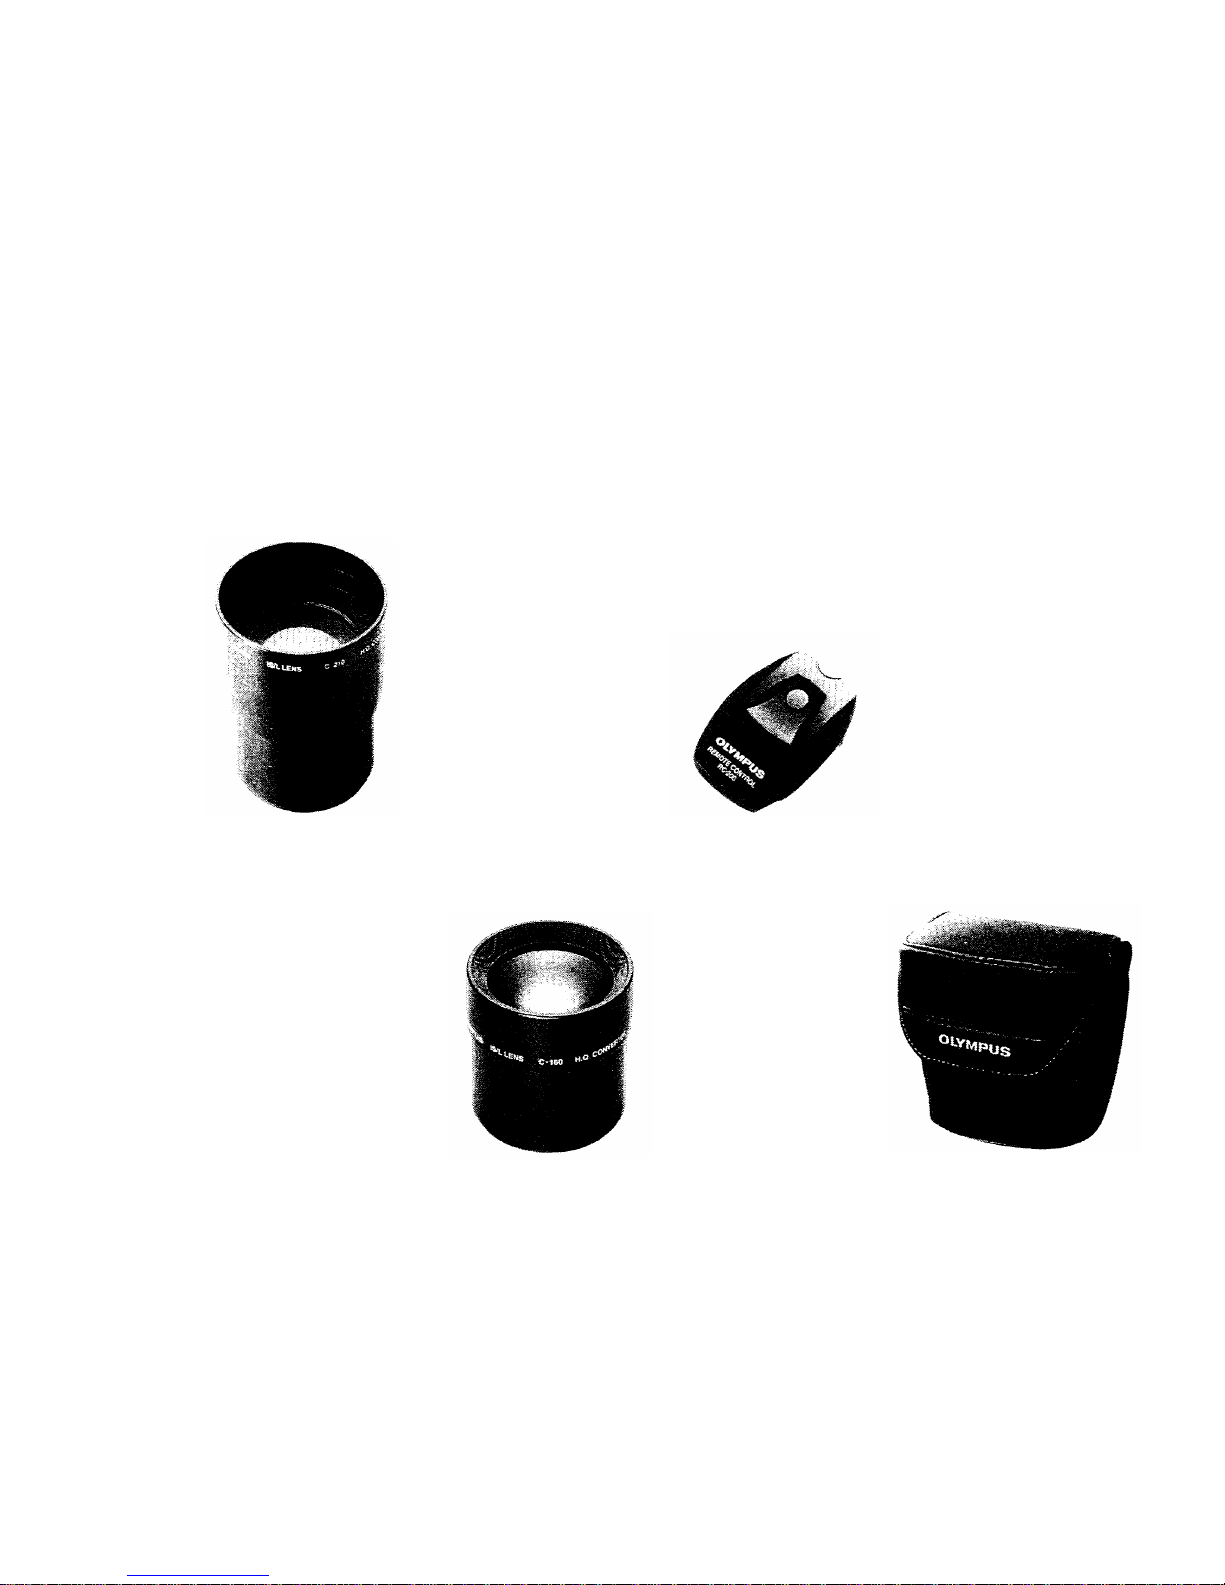
IS/L LENS C-210 H.Q.
CONVERTER 1.9X
REMOTE CONTROL
RC-200
ACTION CASE C
IS/L LENS C-160 H.Q.
CONVERTER 1.45X
ACCESSORIES (OPTIONAL)
60
Page 60

CAMERA
MAINTENANCE
QUESTIONS A ND ANSWERS
Q: H ow long will the batteries last?
A: Two new 3V lithium batteries will last f o r
roughly 20 rolls of 24-exposure film on
which the flash was used on half of all
the shots (determined under Olympus
test conditions). If you do not use the
flash and zoom very often, the batteries
will last much longer.
Q: How should I store the camera?
A: Cameras are susceptible to damage
caused by dust, moisture, and salt.
Wipe and dry the camera thoroughly
before storing it. Af ter using it at the
beach, wipe it wi th a cloth that has
been moistened with fresh water and
then wrung out. Do not use mothballs.
Q: W h e n does th e camera measure and
set the exposure?
A: When the shutter release button is
pressed halfway, the camera measures
both the exposure and the focus and
then locks them as long as the shutter
release button remains halfway
depressed. In the Spot Metering mode,
the exposure is locked when the spot
button is pressed.
Q: How should I clean the lens?
A: Wi pe the lens gently with lens cleaning
tissue that has been moistened with a
small amount of lens cleaning fluid.
Q: Can I use a filter?
A: Yes, you can. Use one with a diameter
of 52 mm. When you use a thick one,
like a C-POL (circular-polarizing) filter,
the edges of the picture plane
sometimes become dark or the lens
cap may not close. Be sure to turn off
the power before mounting or removing
a filter. When doing so, even with the
power off , sometimes the lens rotates
and the motor operates. This is not a
malfunction.
Q: Can I use infrared film?
A: No.
61
Page 61
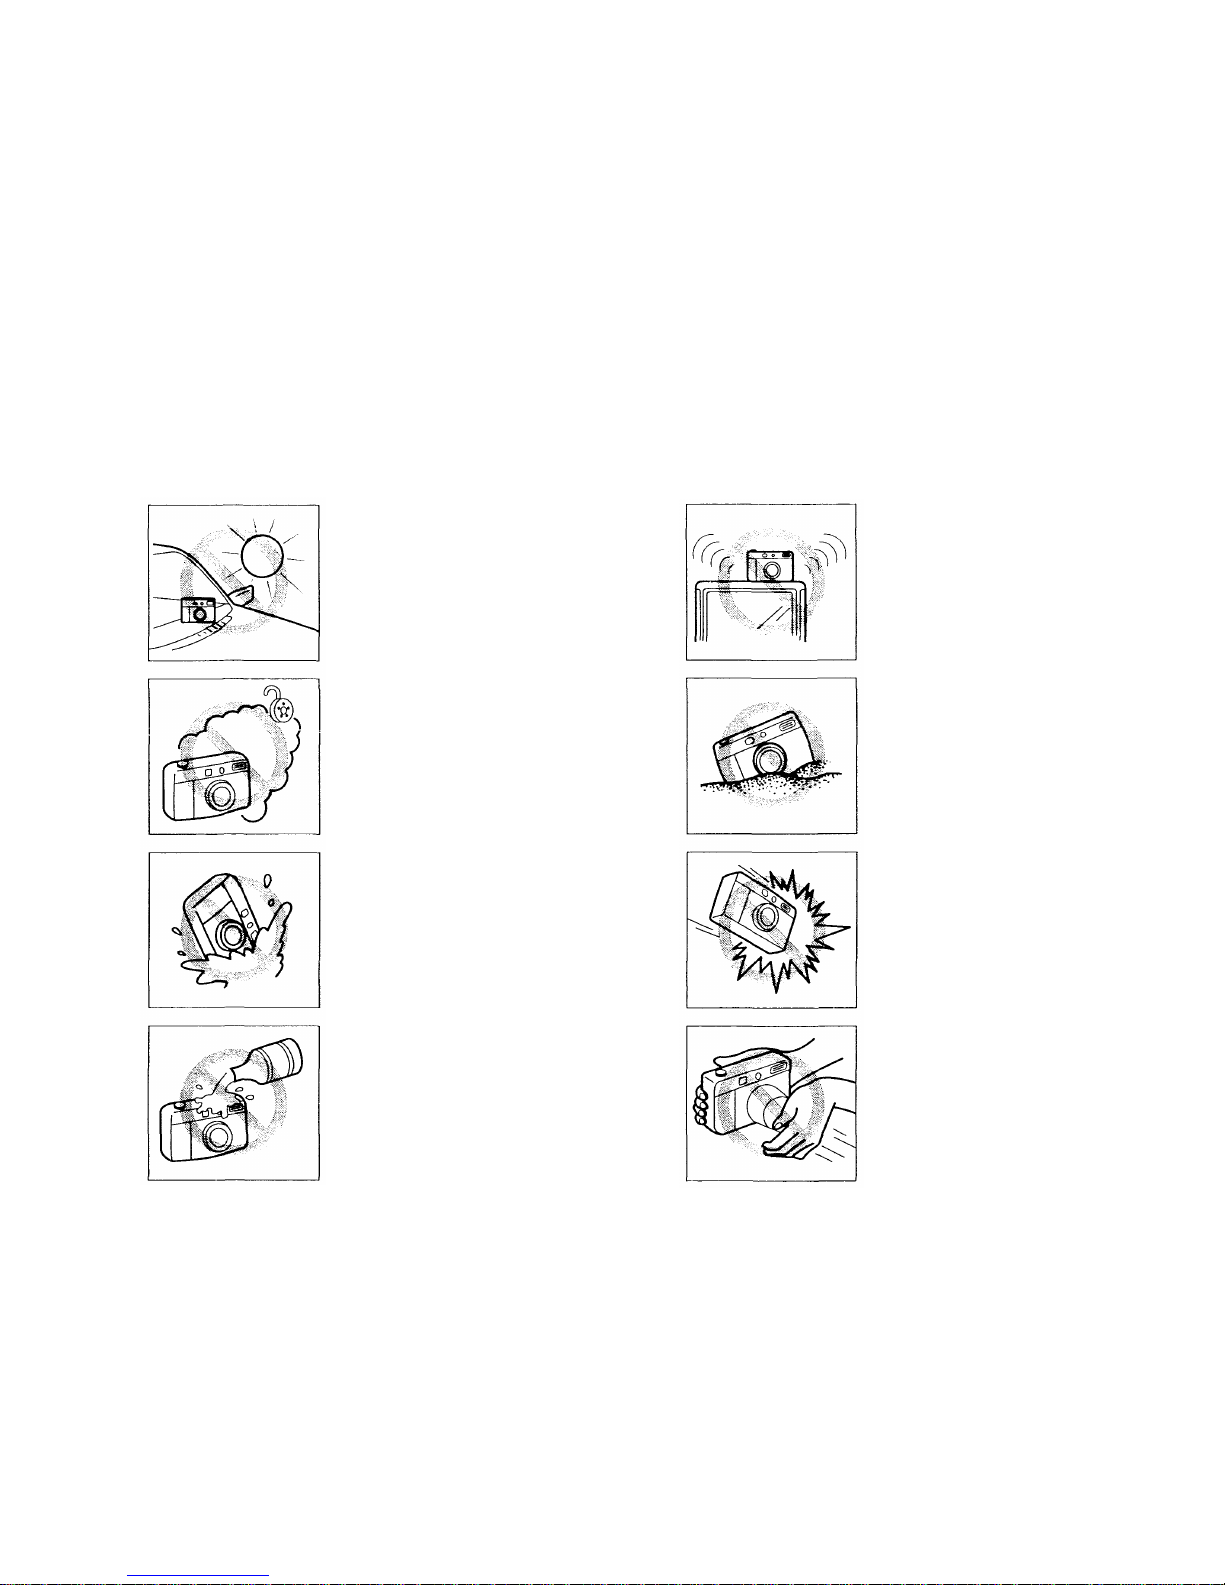
CARE AND STORAGE
Do not leave the camera in
any place exposed to
excessive heat, humidity, or
direct sunlight - for example,
in a car or on the beach.
Do not expose the camera
to formalin or naphthalene.
If the camera gets wet, wipe
it with a dry towel
immediately. The salt in
seawater can be especially
damaging.
Do not use organic solvents
such as alcohol or paint
thinner when cleaning the
camera.
Do not leave the camera on
a television, refrigerator, or
speaker.
Do not expose the camera
to dust or sand as this could
cause serious damage.
Do not shake or shock the
camera.
Do not apply excessive force
to the zoom lens.
62
Page 62

• Keep the camera in a well-ventilated place.
• Do not expose the camera to extreme heat
(over 40°C/104°F) or to extreme cold (below
-10°C/14°F). Low temperatures, even within
this range, may sometimes cause
deterioration in battery performance,
temporarily disabling the camera.
• When transporting the camera from a cold
place to a wa rm place or in the event of a
sudden temperature change, put the camera
into a plastic bag. This allows the camera's
temperature to change slowly. Once the
camera has adjusted to the new temperature,
you can remove it from the bag and use it.
• Keep your hair, hands, strap, etc., away from
the autofocus window, lens, A E sensor and
flash.
• Avoid leaving the camera unused for a long
period of time. This can cause mold to grow
on the camera as well as other problems. Try
to press the shutter release button and check
the operation of the camera before use.
• B e careful when moving the camera on a
tripod.
• Do not allow your film to pass through airport
X-ray machines.
• Do no t touch the contact points inside th e
camera.
• This camera is controlled by a
microcomputer. Problems with the
microcomputer can affect or stop camera
operation. If this happens, remove th e
batteries, then reload them and try the
camera again. Strong electrical fields can
also interfere with the operation of this
camera, so try to avoid places or objects that
generate such fields.
• This camera is not suitable for use under
severe conditions.
• Do not touch the front surface of the flash
after using th e flash continuously in a short
time as the flash may be hot.
63
Page 63

• Do not short, disassemble or charge the
batteries. Never throw batteries into fir e
because this can result in splitting or
explosion.
• S tore batteries out of the reach of children. If
a battery is swallowed, consult a doctor
immediately.
• Continuous use of the flash can cause battery
temperature to rise. This may activate the
safety circuit inside th e batteries and cause
the camera to stop working. In such case,
allow the batteries to cool before using t he
camera again.
• Use the batteries correctly. Incorrect usage
can result in leaking, heat and damage.
When replacing the batteries, make sure the
plus and minus terminals are correctly
aligned.
• Whe n replacing, never mix old and new
batteries, or batteries of different types. Make
sure both terminals are of the same type and
same brand (DL123A or CR123A).
• Battery performance will drop temporarily at
lower temperatures. In cold areas, protect the
camera by using pro tective gear or placing it
inside your clothing. Even whe n performance
drops due to low temperature, it will be
restored at normal temperatures.
• Sweat or oil on the plus and minus
terminals can cause poor contact. Wipe
batteries carefully with a dry cloth before use.
• We recommend that you carry spare batteries
on long trips, especially in foreign countries
where availability is questionable.
• Insulate used batteries by affixing tape over
electrical contacts, and dispose of them as
general waste according to local regulations.
• If you are not going to use the camera for an
extended period of time, remove the batteries
from the camera and store them in a cool, dry
(low humidity) place at 20°C (68°F) or less.
• Observe the precautionary remarks written on
the batteries.
BATTERY HANDLING
64
Page 64
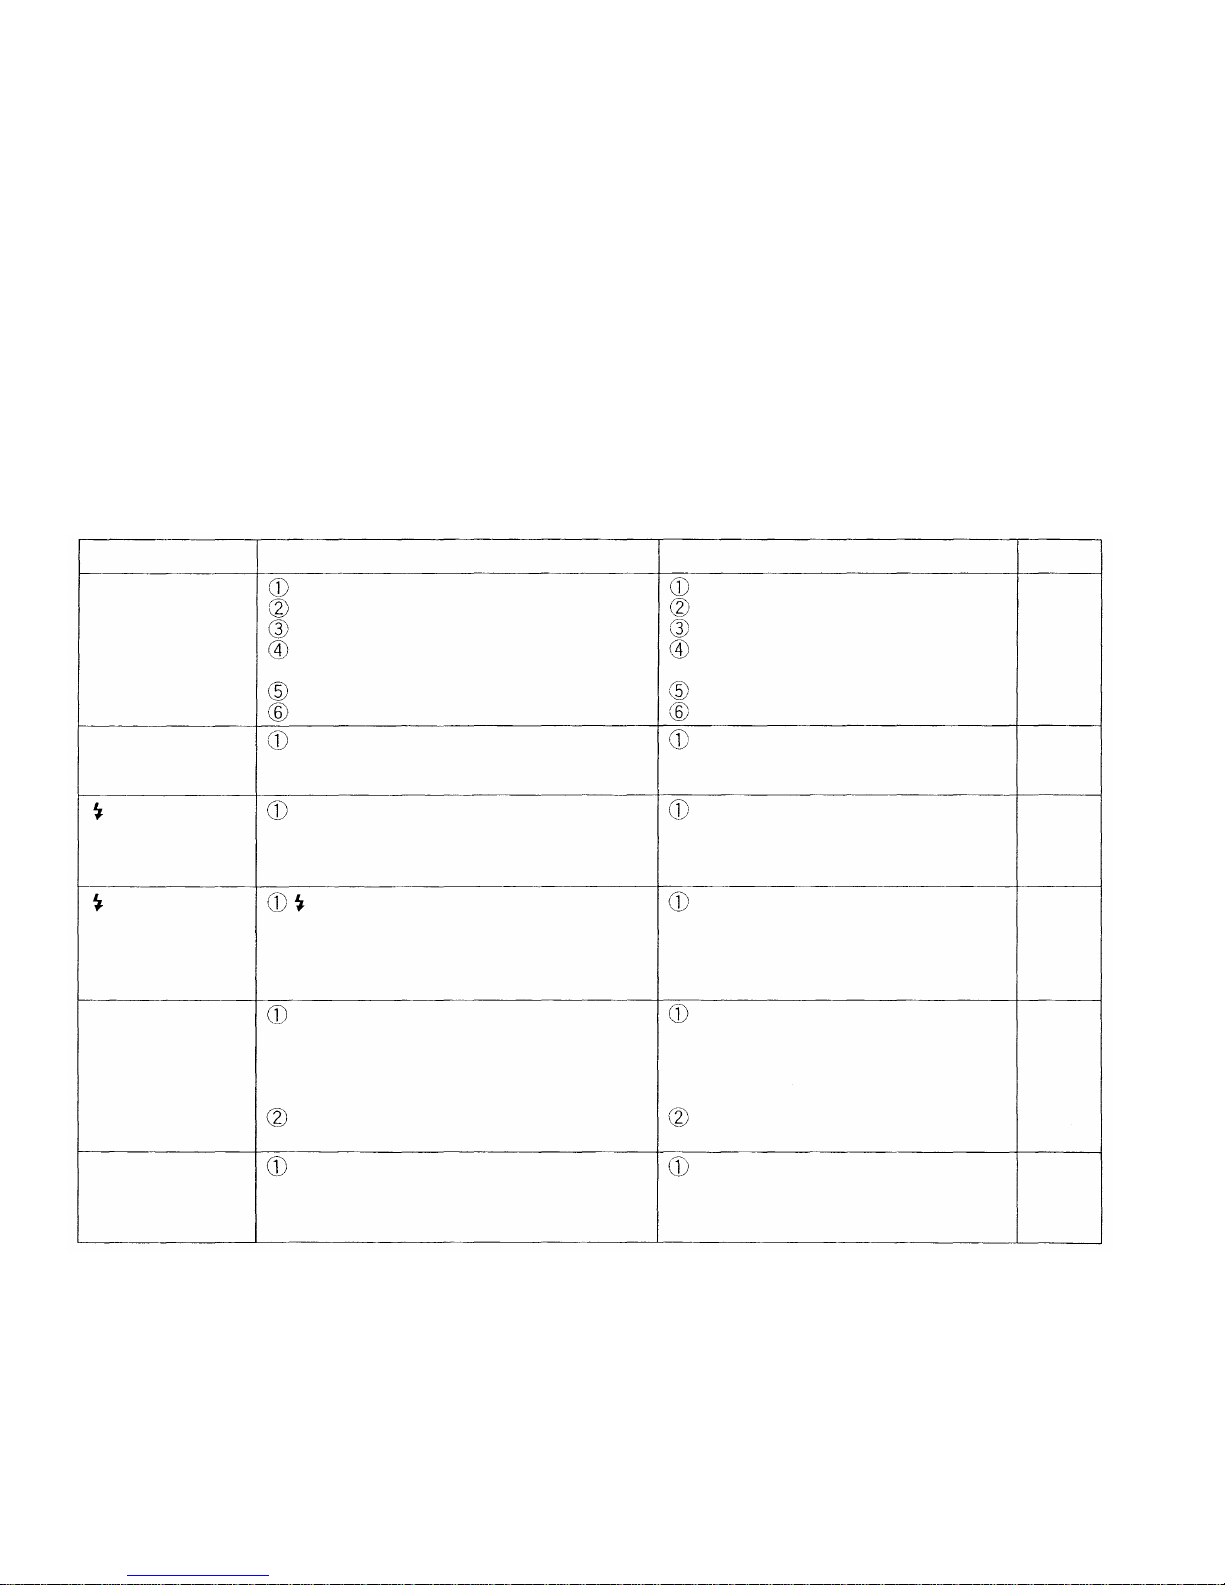
TROUBLESHOOTING
Operating Problems
Symptom
The camera does
not work.
The LCD panel
turn o ff suddenly.
blinks and the
shutter cannot be
released.
blinks even
when the flash is
not flipped up .
The autofocus
indicator blinks
and the shutter
cannot be
released.
The camera doesn't
focus on the subject
even though the
auxiliary flash lights.
Cause
The power is OFF.
The batteries are loaded incorrectly.
The batteries are exhausted.
The batteries are temporarily unable to
function.
The loaded film has been rewound.
The film is incorrectly loaded.
The LCD panel turns off automatically if
none of the camera's functions have been
used fo r about 30 seconds.
The flash has not finished recharging.
blinks to wa rn you that camera-shake is
likely to occur due to insufficient light and
to recommend that you use the flash to
get a better result (for example, when
shooting under fluorescent light).
The autofocus system may not work when
the subject is moving too fast, when the
camera is shaking, or when the subject is
difficult for autofocus to lock onto (refer to
p. 54).
The subject is closer than the camera's
minimum working distance (75 cm/2.5 ft).
The autofocus may not work when the
subject is out of the auxiliary flash's
working distance (approx. 75 cm ~ 5
m/2.5 ft ~ 16.4 ft).
Remedy
Set the power switch to ON.
Reload the bat ter ie s correctly.
Replace the batteries wi th new ones.
Keep the camera w a r m while using
it.
Remove the film.
Reload the film.
Press the FULL AUTO button, or
press the shutter release button
halfway.
Remove your finger from the shutter
release button and wait for several
seconds until recharging is
completed.
Flip up the flash.
First focus on something at the same
distance as the subject, then
recompose the frame to take the
picture.
Move 75 cm/2.5 ft or more away fro m
the subject.
Move the camera closer to the
subject.
See
22
14
15
63
26
20
24
43
31
30
25
54
23
65
Page 65
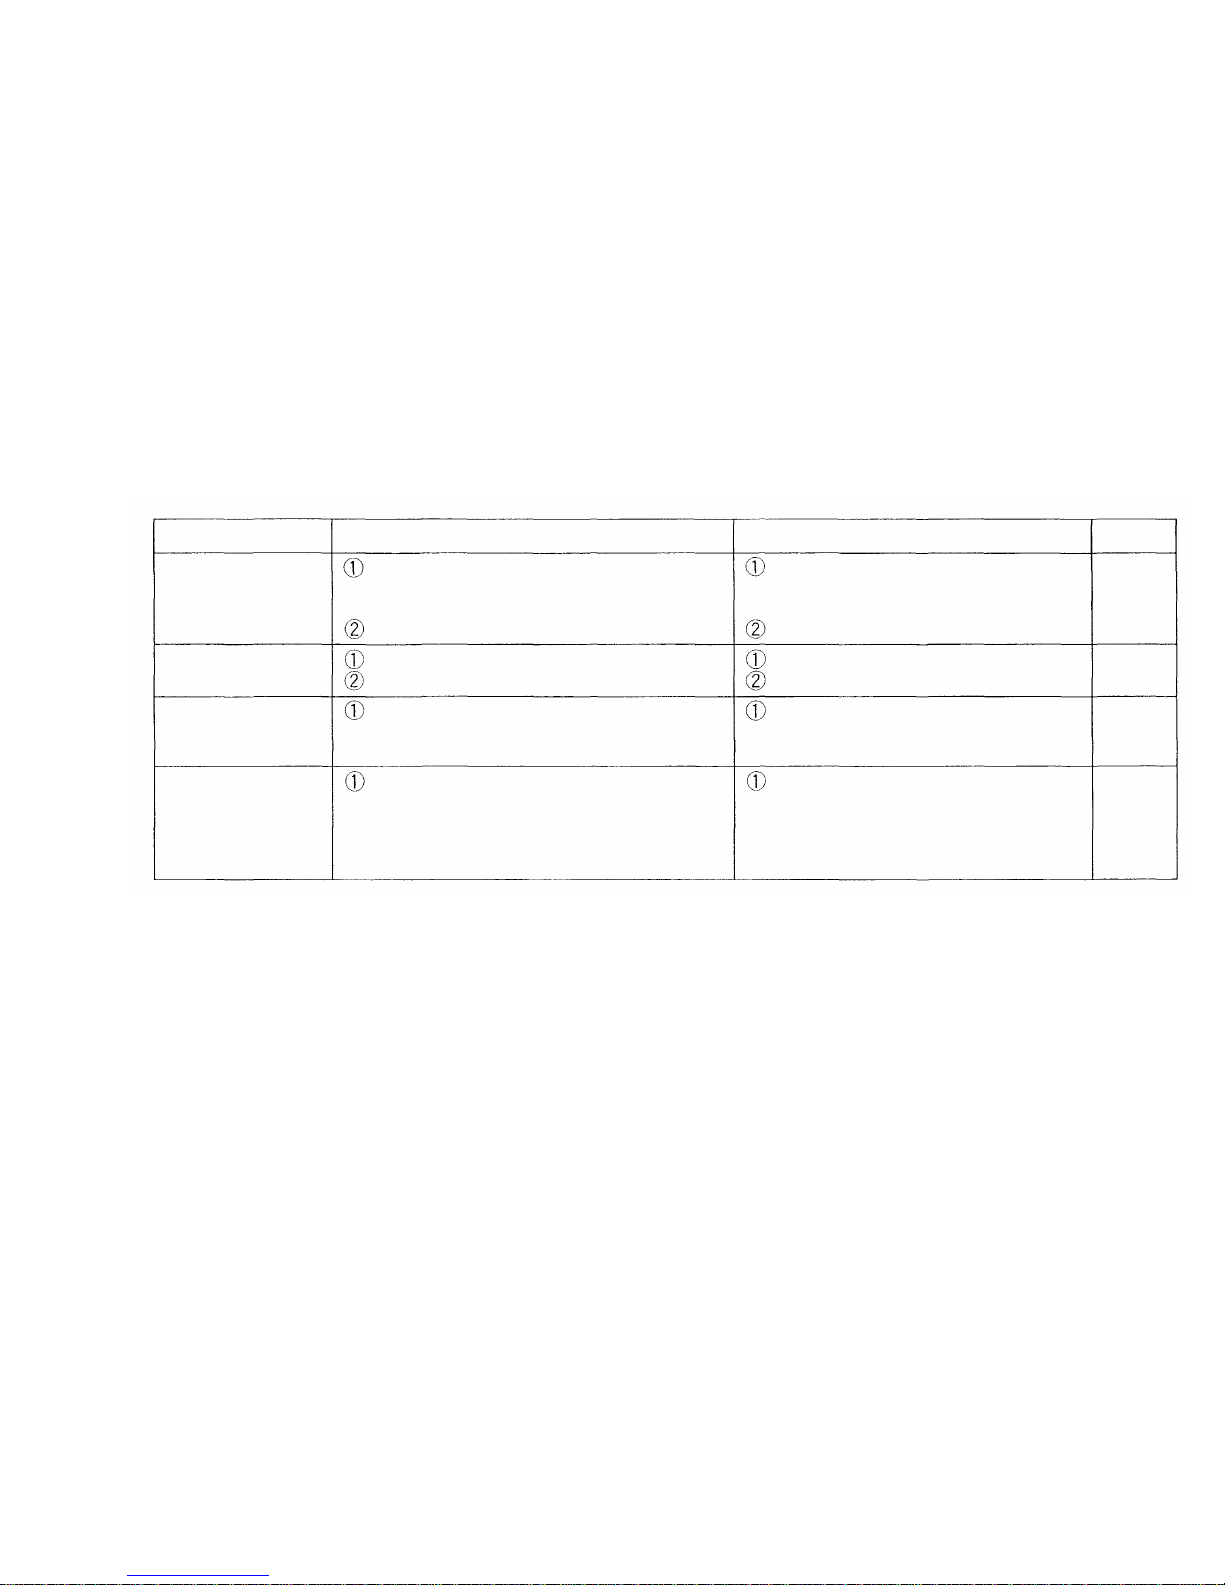
Symptom
The shutter doesn't
release even when
the shutter release
button is pressed.
The flash doesn't
fire.
+/-
blinks in the
viewfinder.
The shutter cannot
be released by
remote control.
Cause
The subject is not in focus.
The rewound film is still loaded.
Ambient light is to o bright.
High-speed film is used.
Exposure is incorrect in the AperturePreferred Auto mode.
If no operations have been carried out in
the Selftimer/Remote Control mode f or
about 20 minutes, the LCD panel turns off
and the shutter can't be released with the
remote control.
Remedy
Make sure the subject is in focus and
the autofocus indicator in the
viewfinder lights.
Remove the film.
Set the flash mode to Fill-In.
Set the flash mode to Fill-In.
Change the aperture until +/- stops
blinking. Use the flash when
available light is insufficient.
Press the FULL AUTO button to turn
on the LCD panel, and engage the
Selftimer/Remote Control mode
again.
See
24
26
34
34
41
66
Page 66
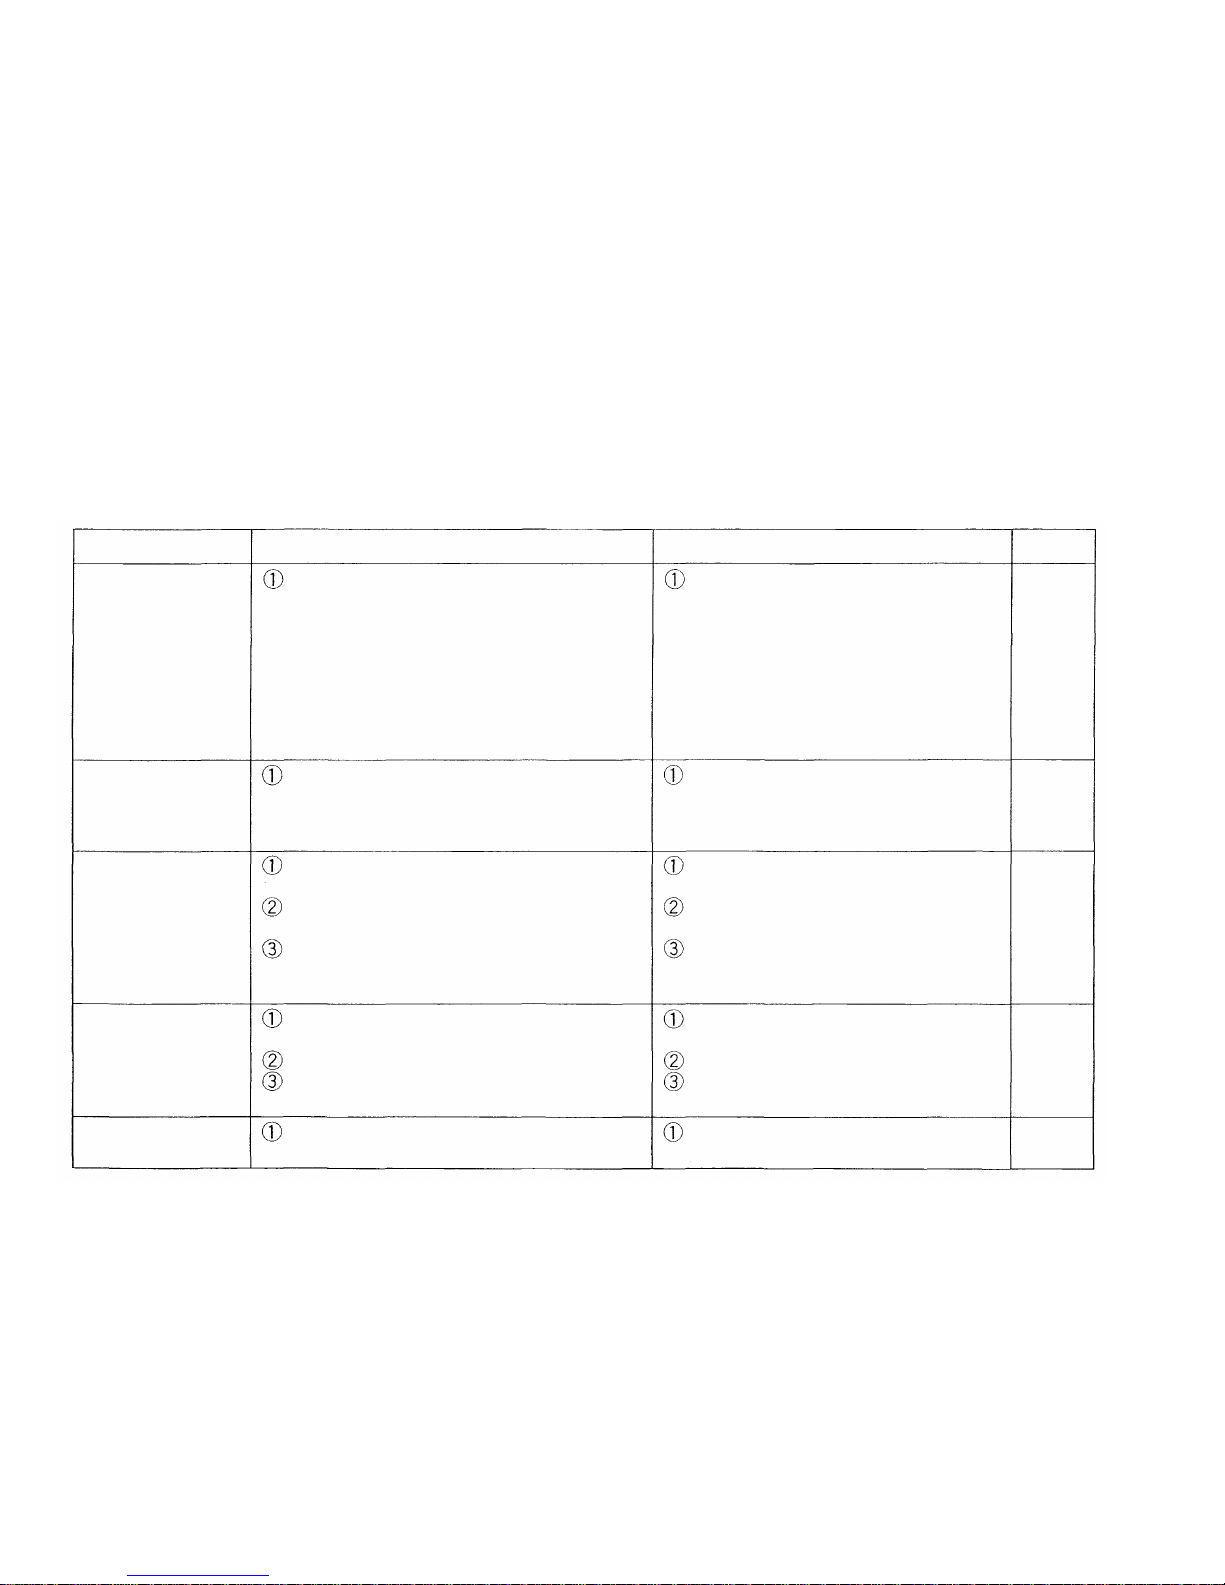
Problems with Printed Pictures
Symptom
The subjects' eyes
appear red in
printed pictures.
The subject was within
the frame of the
viewfinder, but its edges
are missing on the print.
The picture is out
of focus.
The picture is too
dark.
The colors of pictures taken
indoors look unnatural.
Cause
This "red-eye phenomenon" occurs with
all cameras when a flash is used. It is
caused by light from the flash reflecting off
the retina at the back of the eye. Red-eye
varies depending on the individual and
shooting conditions such as ambient
lighting. It is also more likely to occur
wh en using 110 mm telephoto than when
using wide-angle focal lengths.
When a negative is enlarged, sometimes
the edge of the frame is not printed.
The camera moved when the shutter
release button wa s pressed.
The viewfinder's autofocus frame was not
positioned on the subject.
The shutter release button was pressed
from right in front of the camera in the
Selftimer mode.
The subject was backlit.
The exposure compensation setting has
been adjusted.
The lighting fixture(s) affected the picture.
Remedy
Use the Auto-S Flash mode to
significantly reduce red-eye
phenomenon.
Leave some room on the edges of
the frame when you compose your
shots.
Ho ld the camera correctly, and press
the shutter release button gently.
Position the autofocus frame on the
subject, or use the focus lock.
Press the shutter release button
while looking into the viewfinder, not
while standing in front of the camera.
Shoot within the working range of the
flash.
Set the flash to Fill-In mode.
Reset the exposure compensation
dial to the "0" position.
Set the fl a sh mode t o Fill-In.
See
33
16
25
35
32
34
46
34
67
The subject was out of the working range
of the flash.
Page 67

SPECIFICATIONS
Type: Fully automatic 35 mm autofocus single-lens
reflex camera with built-in 28 mm ~ 110 mm
zoom lens.
Film format: 35 mm standard DX-coded film (24 X
36 mm) switchable to Panorama format‡.
Lens: Olympus lens (filter available, 52 mm filter
diameter), 28 mm ~ 110 mm F4.5 ~ 5.6, 11
elements in 9 groups (5-group zoom
construction).
Shutter: Electronic control system vertical focal
plane shutter. Shutter speed 1/2000-sec. ~
4-sec. Manual F8, 1 sec ~ 60 sec.
Flash-shutter synchronization: Under 1/100 sec.
(1/2,000 ~ 1/100 sec. in Portrait mode).
Focusing: TTL phase-difference detection system
autofocus with focus lock. Autofocus beep
available. Auxiliary flash activation in low
light. (Available at distances up to 8 m (26.2
ft), determined under Olympus test
conditions.) Focusing range — 0.75 m (2.5
ft) ~ (infinity). Provided with predictive
autofocus (in Stop Action mode only).
Exposure compensation: ±2 EV (1/2-step).
Viewfinder: Standard/panorama switchable‡ single-
lens reflex system, magnification ratio 0.72
(at 50 mm). Finder view-field — 85% of
actual view-field.
Viewfinder information: Autofocus frame, spot
frame, panorama frame‡ , autofocus
indicator, flash indicator (to be used as flash
warning), overexposure/underexposure
indicator.
Diopter adjustment: -2 ~ +1.
Light metering system: TTL light metering system.
Fuzzy logic ESP light metering, center-
weighted average light meterin g, spot
metering.
Exposure modes: Program AE (Full-Auto, Stop
Action, Portrait, Night Scene, Landscape).
Aperture-Preferred Auto. Long Time
(manual).
Exposure counter: Progressive type, displayed on
LCD panel.
Exposure counter: Progressive type, displayed on
LCD panel.
Film speed range: Automatic setting with DX-
coded film (ISO 25, 32, 50, 64, 100, 125,
200, 250, 400, 500, 800, 1000, 1600, 2000,
3200). Other intermediate f ilm speeds w ill
be
automatically set for next lower speed.
Film loading: Automatic loading (automatically
advances to first frame when camera back
is closed).
Film advance: Automatic film winding.
68
Page 68
Film rewind: Automatic film rewind (automatic
rewind activated at end of film, automatic
rewind stop). Rewind is possible at any
point with rewind button.
Selftimer: Electronic selftimer with 12-sec. delay.
Remote control (optional): Infrared remote control
unit, 3-sec. delay.
Flash: Built-in IVP (Intelligent Variable-Power) flash
system, recycling t ime of about 0.2 ~ 3.9
sec. (at normal temperature).
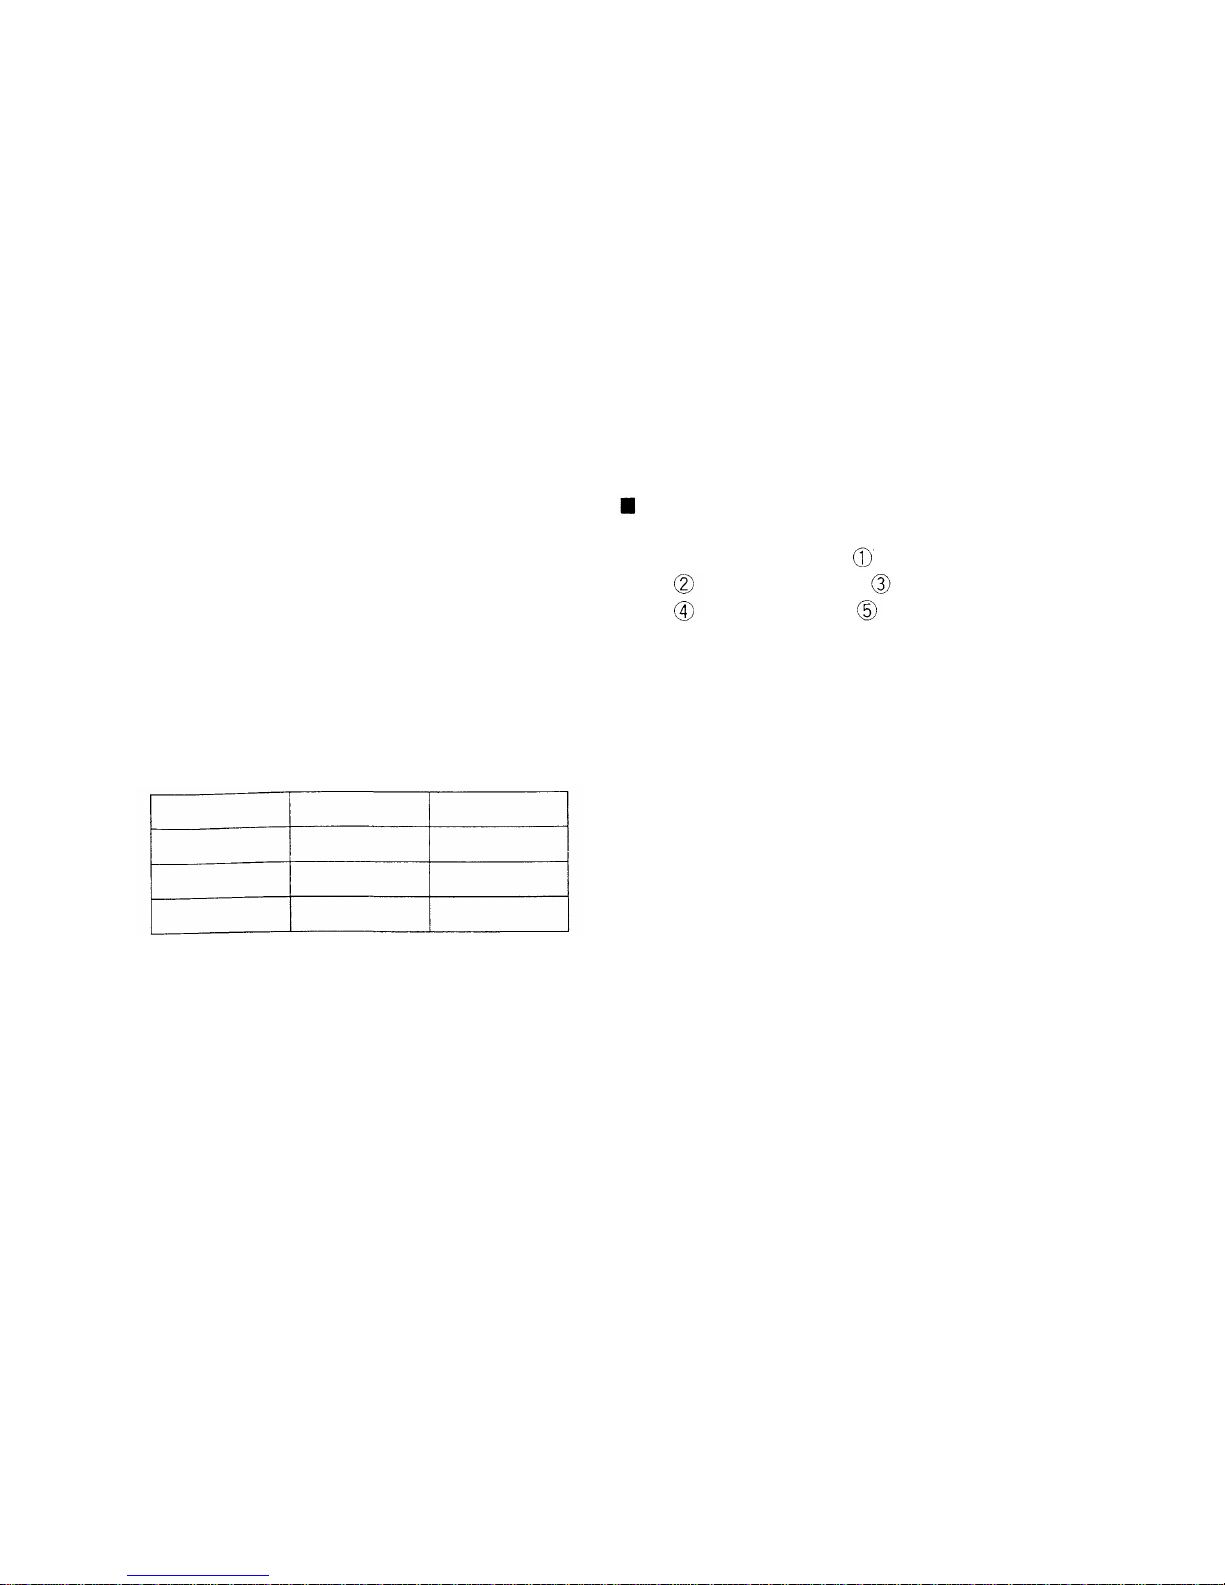
Flash range:
Flash modes: A uto (automatic flash activation in
low-light, backlight, fluorescent light). Auto-S
(red-eye reducing, same as Auto otherwise),
Fill-In (forced activation), Off (when flash is
retracted).
Battery check: Displayed on LCD panel.
Power source: Two 3V lithium batteries (DL123A
or CR123A) (replaceable).
Dimensions: 123 (W) X 88 (H) X 115 (D) mm (4.8
X 3.5 X 4.5 in) (excluding protrusions).
Weight: 650 g (22.9 oz) (without batteries)
‡ Panorama model only
SPECIFICATIONS AR E SUBJECT TO CHANGE
WITHOUT ANY NOTICE OR OBLIGATION ON
THE PART OF THE MANUFACTURER.
Quartz Date Specifications
Data recording system: Imprinting from behind film.
Types of data recording: Year-month-day,
Day-hour-minute, No data,
Month-day-year, Day-month-year.
External display of recorded data:
Continuous LCD panel display.
Automatic calendar function:
To year 2049, self-adjusting.
Power source: One 3V lithium battery (CR2025).
Focal length
ISO 100
ISO 200
ISO 400
Telephoto
6.3 m (21 ft)
8.8 m
(28.9 ft)
12 . 6 m ( 41
ft)
Wide angle
5.0 m (16.4 f t)
7.1 m (23.3 ft)
10.0 m (32.8 ft)
69
Page 69

CZ9459—
A 0899 6.2MJ
This camera complies with EU directive 89/336/EEC for CE marking.
Die CE-Marke zeigt an,daß diese Kamera die EG-Richtlinie 89/336EWG erfüllt.
Cet appareil photo est conforme à la directive UE89/336/CEE pour le marquage CE.
Esta cámara cumple con la directiva de la Union Europ e a 89/336/EEC para la marca de CE.
This device complies with part 15 of the FCC Rules. Operation is subject
to the conditions that this device does not cause harmful interference.
This Class B digital apparatus meets all requirements of the Canadian interference-Causing Equipment Regulations.
Cet appareil numérique de la classe B respecte toutes les exigences du Règlement sur le matériel brouilleur du Canada.
OLYMPUS OPTICAL CO.,LTD.
OLYMPUS AMERICA INC.
OLYMPUS OPTICAL CO.(EUROPA) GMBH.
OLYMPUS OPTICAL CO.(U.K.) LTD.
San-Ei Building, 22-2, Nishi Shinjuku 1-chome, Shinjuku-ku, Tokyo, Japan. Tel. 03-3340-2211
Two Corporate Center Drive, Melville, NY 11747-3157, U.S.A. Tel. 516-844-5000/1-800-622-6372
(Premises/Goods delivery) Wendenstrasse 14-16, 20097 Hamburg, Germany. Tel. 040-237730
(Letters) Postfach 10 49 08, 20034 Hamburg, Germany.
2-8 Honduras Street, London EC1Y0TX, United Kingdom. Tel. 0171-253-2772
 Loading...