


Revised December 2014
UCL Institute of Child Health
User guide
Olympus 1X71
Dr Bertrand Vernay
Light Microscopy Facility Manager
Wellcome building, Office W2.09
Tel Office: 42224
Tel Mobile: 07582249337
Email: b.vernay@ucl.ac.uk

Table of contents
page 3 ......... Ownership
page 3 ........ Access Rules
page 3 ......... Olympus Customer Support Contact
page 4 ........ General Specifications
Microscopy Techniques Available
Objectives
Filter Cubes
Camera
Fluorescence Illumination
Pixels to Microns Calibration
Consumables List
page 5 ......... Quick User Guides
Transmitted Light
Epifluorescence
Image Capture
page 6 ......... Halogen Lamp Operation
page 7 .... Kohler Illumination
page 8 ........ Adjusting the Objective Correction Collar
page 9 ........ Prior Lumen200 Metal Halide Lamp Operation
page 10 .. Image Capture with HClmage
page 11 ... Selecting the Right Fluorochrome/Filter Set
page 11 DAPI
page 12 Endow GFP/EGFP Bandpass
page 13 DsRed(TRITC/Cy3)
page 14 Cy5
page 15 Cy7
page 16 ....Prior Lumen200 Spectral Output
page 17 ... Hamamatsu ORCA-R2 Spectral Response

Ownership
Prof. Jane Sowden, Developmental Biology Unit (Purchased in 2011)
Access Rules
No access without prior training by the Light Microscopy Facility Staff
Free of hourly charge for Sowden and Ferretti groups, £1 hourly charge for
all other users towards the cost of the consumables is expected
Prof. Sowden team has priority over other users.
Users must always record their activity in the Log book
Problem(s) with the microscope should be reported as soon as they are
noticed
Olympus customer support service: http://www.olympus.co.uk/microscopy
The system is not covered by a maintenance contract
Olympus requires a PO number before sending an engineer

General specifications
Microscopy techniques available
Brightfield
Phase contrast
Epitluorescence
Objectives
O ly m pu s U P l a n F L N 1 0 x P h 1 NA 0 . 3 W D 1 0 . 0 mm
Olym p u s LUC P lanFL N 20x P h 1 NA 0 . 45 W D 6.6 - 7.8 w i t h cor r ection collar
Ol y mpu s L U CP l an F LN 4 0 x P h 2 N A 0 . 6 W D 3 . 0- 4.2 wit h c o rr e cti o n c o lla r
Z e i s s o bj e ct i ve s c a n a l s o be us e d
Filter cubes (see p11-15)
Position
Filter set name
Exciter
Beamsplitter
Emitter
1
DAPI
350/50x
400LP
ET460/ 5 0m
2
GFP
ET470/ 4 0x
495LP
ET 52 5 / 50m
3
DsRed (TRITC/Cy3)
ET545/30x
T570LPXR
ET620/ 6 0m
4
Cy5
ET620/ 6 0x
T660LPXR
ET700/ 7 5m
5
Cy7
ET710/75x
T760LPXR
ET810/ 9 0m
6
empty (brightfield)
Camera (see p16)
Hamamat su ORCA R2 CCD Came r a with HClma g e Capture So f tware
Fluorescence illumination (see p16)
Prior Lumen 200 Metal Halide Light Source ( 2 0 0 0 h o u r s / b u lb)
Pixels to Microns calibration
5x obje c tive binnin g 1 x 1 1 pixel = 1.88 um
10x obje c tive binning 1x1 1 pixel = 1.03 um
20x obj e c t ive binning 1x1 1 pi x e l = 0.514 um
40x objective binning 1x1 1 pixel = 0.25 6 um
Calibr a t ion with a micrometer unde r tr ansmitted white li gh t
Consumables list
Price correct as of November 2013
Prior Lum e n 200 bulb LM375 ( £ 550, Prior Scientific Instr u ments Ltd)
Prior Lumen 20 0 light gu ide LM587 ( £400, Prior Scientif i c Instrum ents Ltd)
Halogen bulb 12 V/100W (£1 .8, Techn ical Lam p Supplies UK)

Quick user guides
Users must always record their activity in the Log book
Transmitted light
1. H al og en La mp Po we r S u p pl y U ni t TH 4 " O N "
2. L i g ht Pa th se le ct o r on " O cu la r "
3. K o hl er i l lu mi na ti on a dj u s t ed
4. C orr e ct p hase rin g in p osi t ion (10x & 20 x Ph 1 , 40 x Ph2 )
5. F i lt e r c u be o n p o s it io n # 6
Epifluorescence
Warnings:
Do not shut the unit down within 30 minutes of powering up the unit.
After shutting down the unit allow 30 minutes before re-powering up
After shutting down the unit allow 30 minutes before changing the bulb.
Failure to do so is likely to result in damage to the bulb.
1. P rior Lu men 200 mo d ule on
2. P ri or Lu me n 2 00 i n te ns ity k no b > 0%
3. L igh t Pa th s ele cto r le ver on "Oc u lar "
4. C or re c t fi l te r c ub e in p o si ti o n
5. F luo r esc enc e sh utt er o pen
Image Capture
1. S tart Cam e ra c ont r o lle r (pr ess u nti l L ED t u rns gree n)
2. C om put er on ( Lo gi n : Ja n e / P as s wo rd : J a* e)
3. H Cl ma g e so f tw ar e o pe n
4. L ig ht Pa th se le cto r le ve r o n C am er a
5. C orre ct tra n smi tte d li ght / ep i flu ore s ce n ce set - up
6. " L i v e " m o d e
7. Adjust exposure time accordingly. Make use of the Histogram and the Saturatio n
options
8. " A b o r t "
9. " C a p t u r e l "
1 0 . Sa v e a s i n M y D o cu m e n t s > U s e r N a m e _ U n i t > F i l e N a m e . t i f
1 1 . Shut-down: exit HClmage, log out windows session, camera on stand -by (press
until LED turns orange)
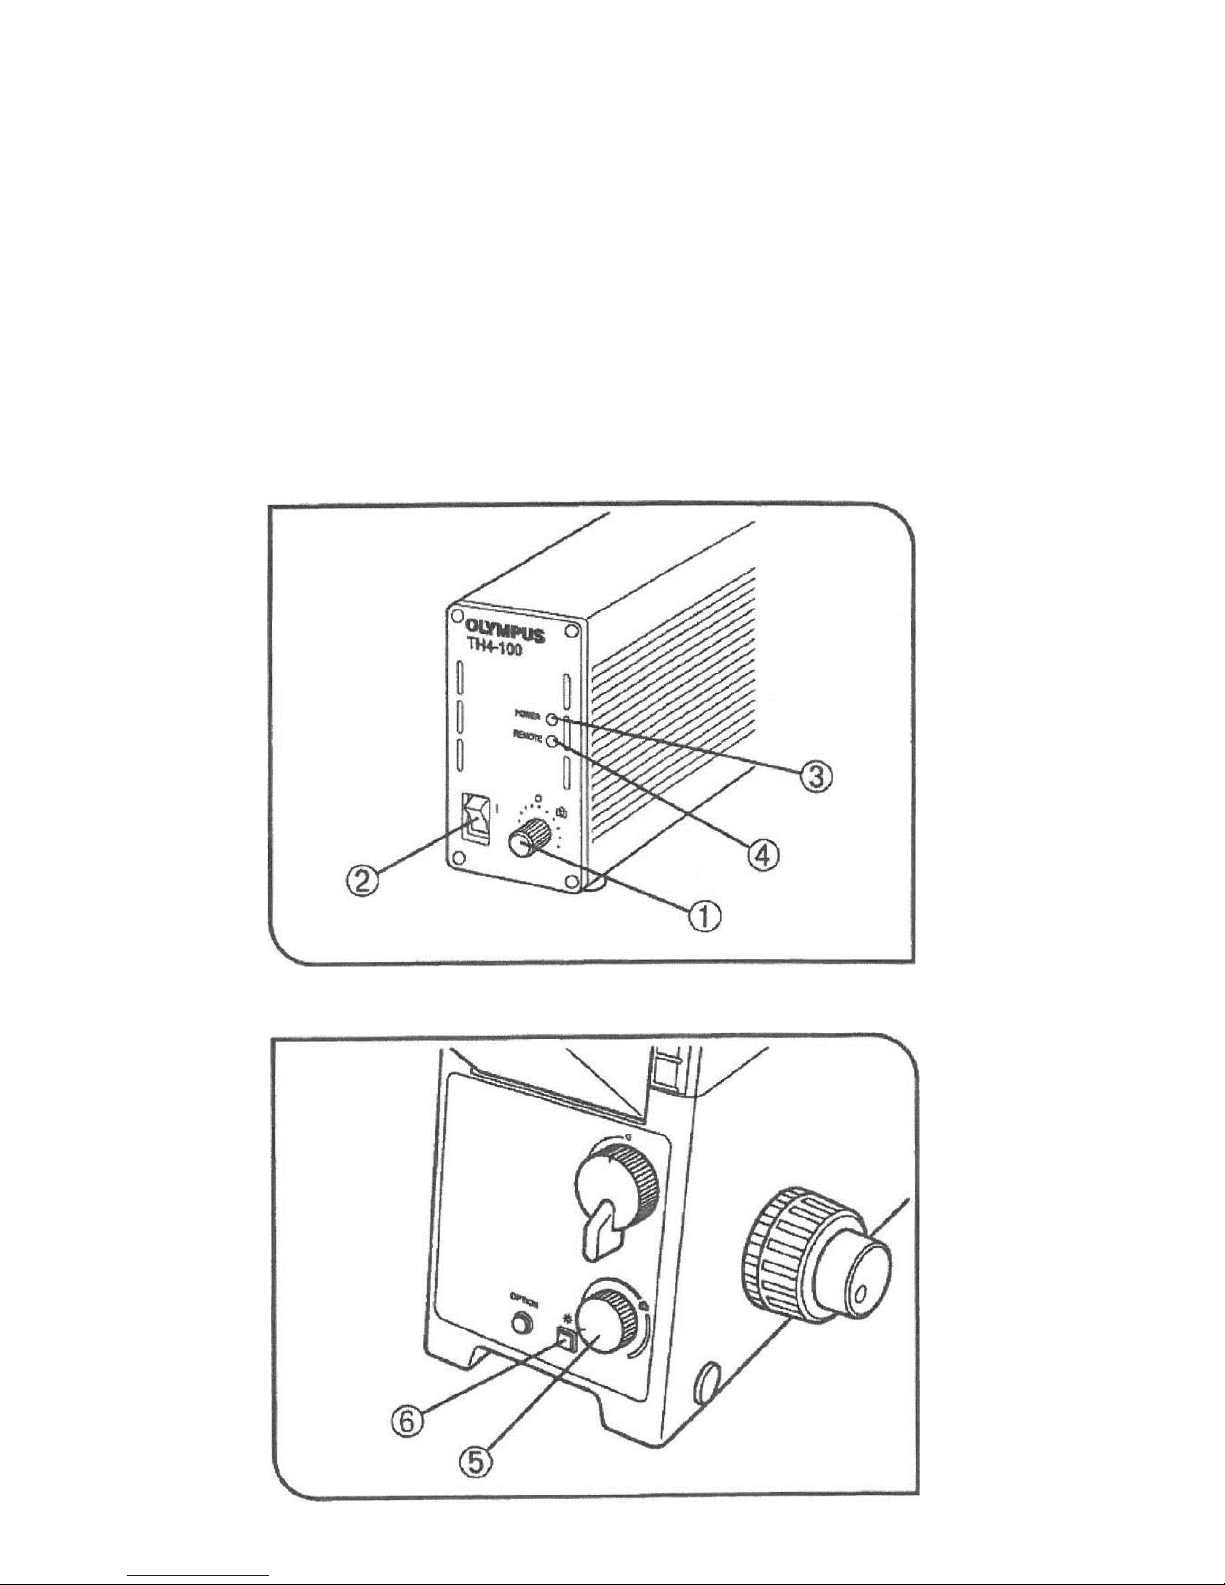
Halogen lamp operation:
Turning on the lamp
6
1. Make sure the light intensity control knob
(5)
is in the MIN (minimum intensity)
position on the microscope frame.
2. Make sure the light intensity control knob
(1)
is in the MIN (minimum intensity)
position on the TH4 module.
3. Set the main switch
(2)
to
"I"
(ON) on the TH4 module.
4. On the microscope front, press the transmitted light ON-OFF button
(6)
so that
the button is illuminated.
5. Adjust the brightness with the light intensity control knob
(5).
6. To turn OFF, set the transmitted light ON-OFF button
(6)
to OFF
 Loading...