

Page 1

Page 2

To an OM-10 Owner
We appreciate very much that you have acquired
an OM-10, a c amera designed to allow you to take
good pic tur es aut omat ical ly and wi th the greatest
ease.
The Olympus OM-10 is a single lens reflex camera
of the finest quality in which the automation of
photographic functions has been made possible
by employing the most advanced electr onics. To
its acceptability of Olympus interchangeable lenses, a special film winder, a flash, and a host of
other accessories are added to make it a complete
system of photography. With the OM-10 you can
gradually widen your enjoyment of the photographic art.
We sincerely wish that it will become fo r you a
source of unending satisfaction. To this effect,
please read this instruction manual c arefu lly before using the camera, so that you may be sure
of taking correct, beautiful pictures every time
you use your OM-10.
1
Page 3

TABLE OF CONTENTS
Description of Controls .. . 3
Preparations before
Taking Pictures . . . . 6 to 15
Mounting and Detaching
the
Lens
..........
7
Inserting the Batteries . . . 9
Checking the Batteries . .. 10
Loading
the
Film
......
11
Setting the ASA Film Speed . 15
The Way to Automatic
Photography .... 16 to 25
Setting the Aperture .... 17
Taking Pictu r e A uto-
matically
.........
19
The OM-10: Designed to Save
Battery Consumption ... 22
Switching the Camera O ff . 23
Rewinding the Film . .. . 23
Unloading th e Film .... 24
The Use of the Self-Timer . 25
Photographic Techniques
.............
26 to 42
Controlling the-Exposure .27
Photography with Shutter-
Speed
Priority
......
28
Exposure Compensation . . 29
Long
Exposures
......
30
Flash Photography .. ... 31
Using the Winder 2 ..... 33
From General Photography
to the Use of Interchange-
able
Lenses
........
35
Making Use of the Depth o f
Field
............
37
Manual Exposure Control . 39
Care and Storage of the
Camera
...........
43
Questions and Answers . .. 45
Main Specifications ..... 47
2
Page 4
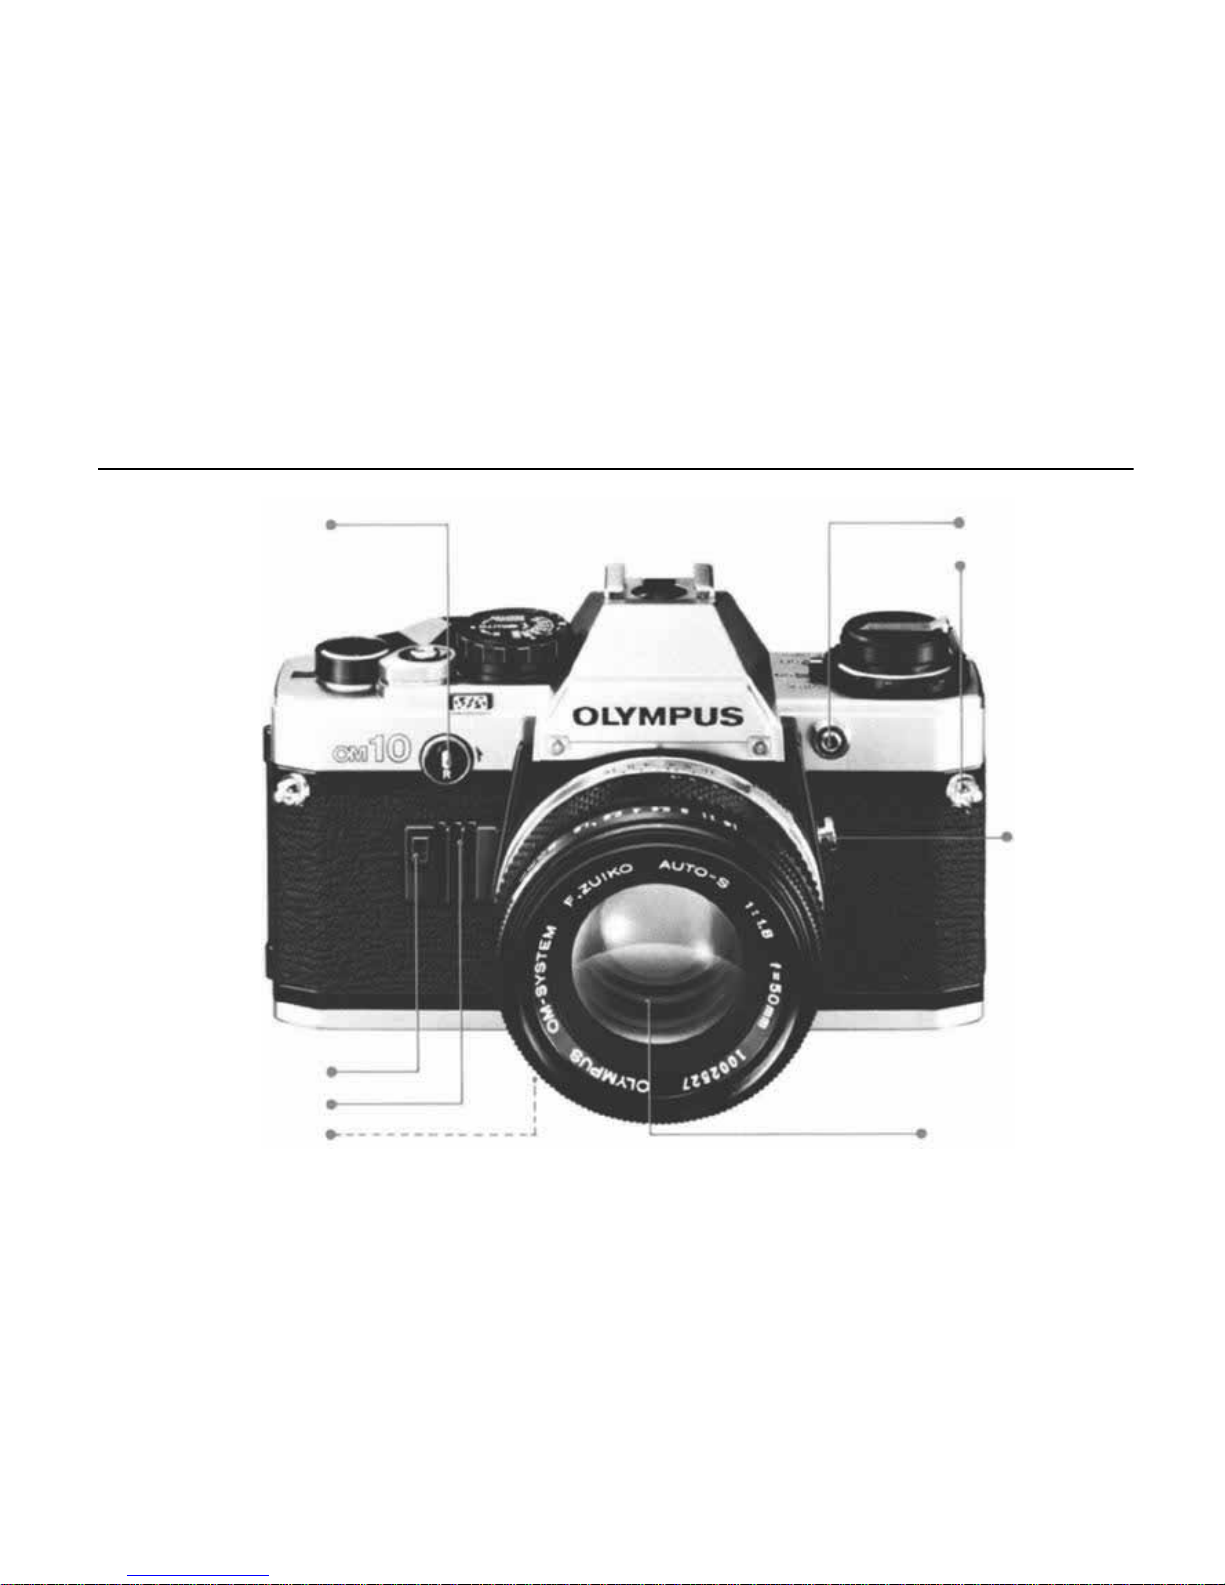
DESCRIPTION OF CONTROLS
Rewind Release Lever
(P. 23)
(P. 10,
P.25)
Self-Timer/
Battery Check Light
Self-Timer/
Battery Check Beeper
Preview Button
(P. 39)
Manual Adapter
Socket
Shoulder Strap
Eyelet
(P. 39)
Manual Adapte
Guide Knob
Standard Lens
3
Page 5
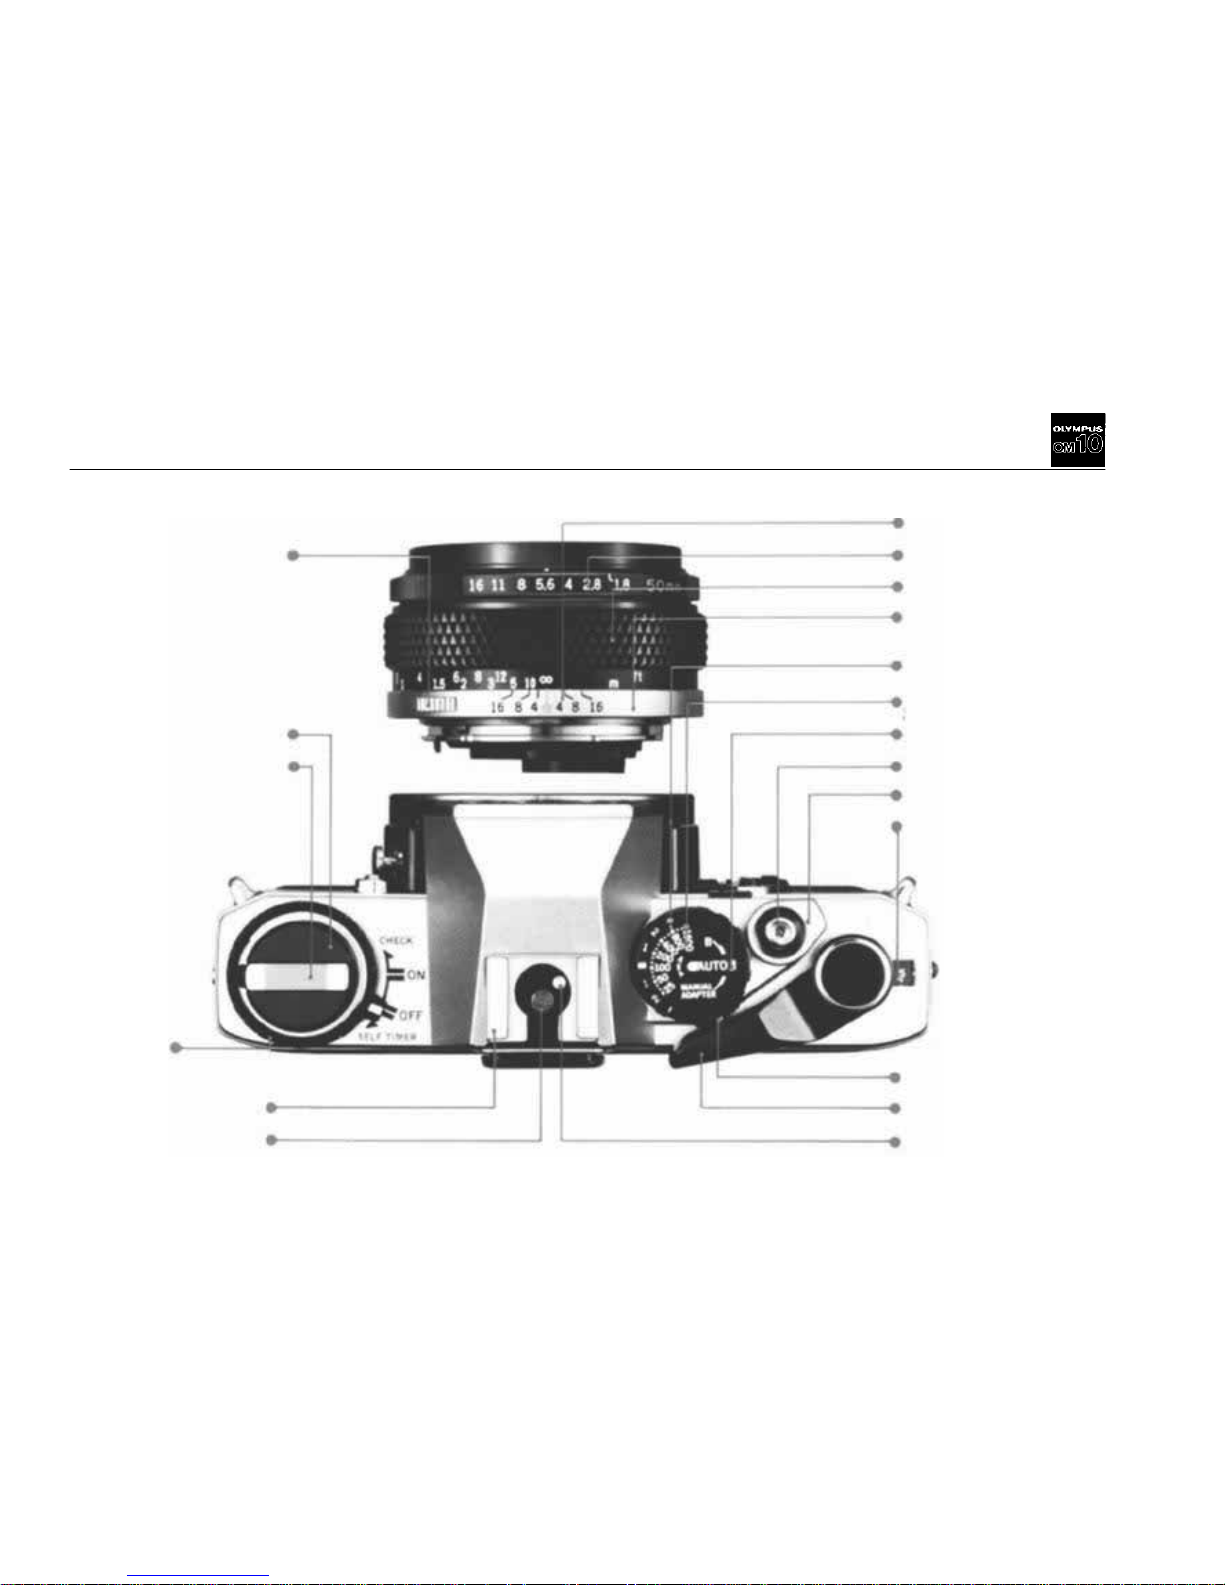
Th e photo indicates O M-10 camera body with the 50mm F 1.8 standard lens.
Depth of Field Scale
Aperture Ring
Focusing Ring
Lens Mount Ring
Exposure
Compensation Dial
Mode/ASA Film
Speed D ial
Mode Index
Shutter Rele ase Button
Activator Switch
Exposure Counter
(P. 14)
(P. 37)
(P. 17, P. 27)
(P. 19)
(P. 29)
(P. 15)
(P. 30)
(P. 22)
(P. 22)
Lens R elease Button
(P. 8)
Rewind Knob/
Camera Back Release
Rewind Crank
(P. 24)
Selector Dial
(P. 17,
P.23,
P.25)
(P31)
Accessory Shoe
X Contact
(P.30, P.39, P.49)
Mode Selector Lever
Film Advance Lever
Flash Charge/Auto
Check Contact
(P. 11,
P.24)
4
Page 6
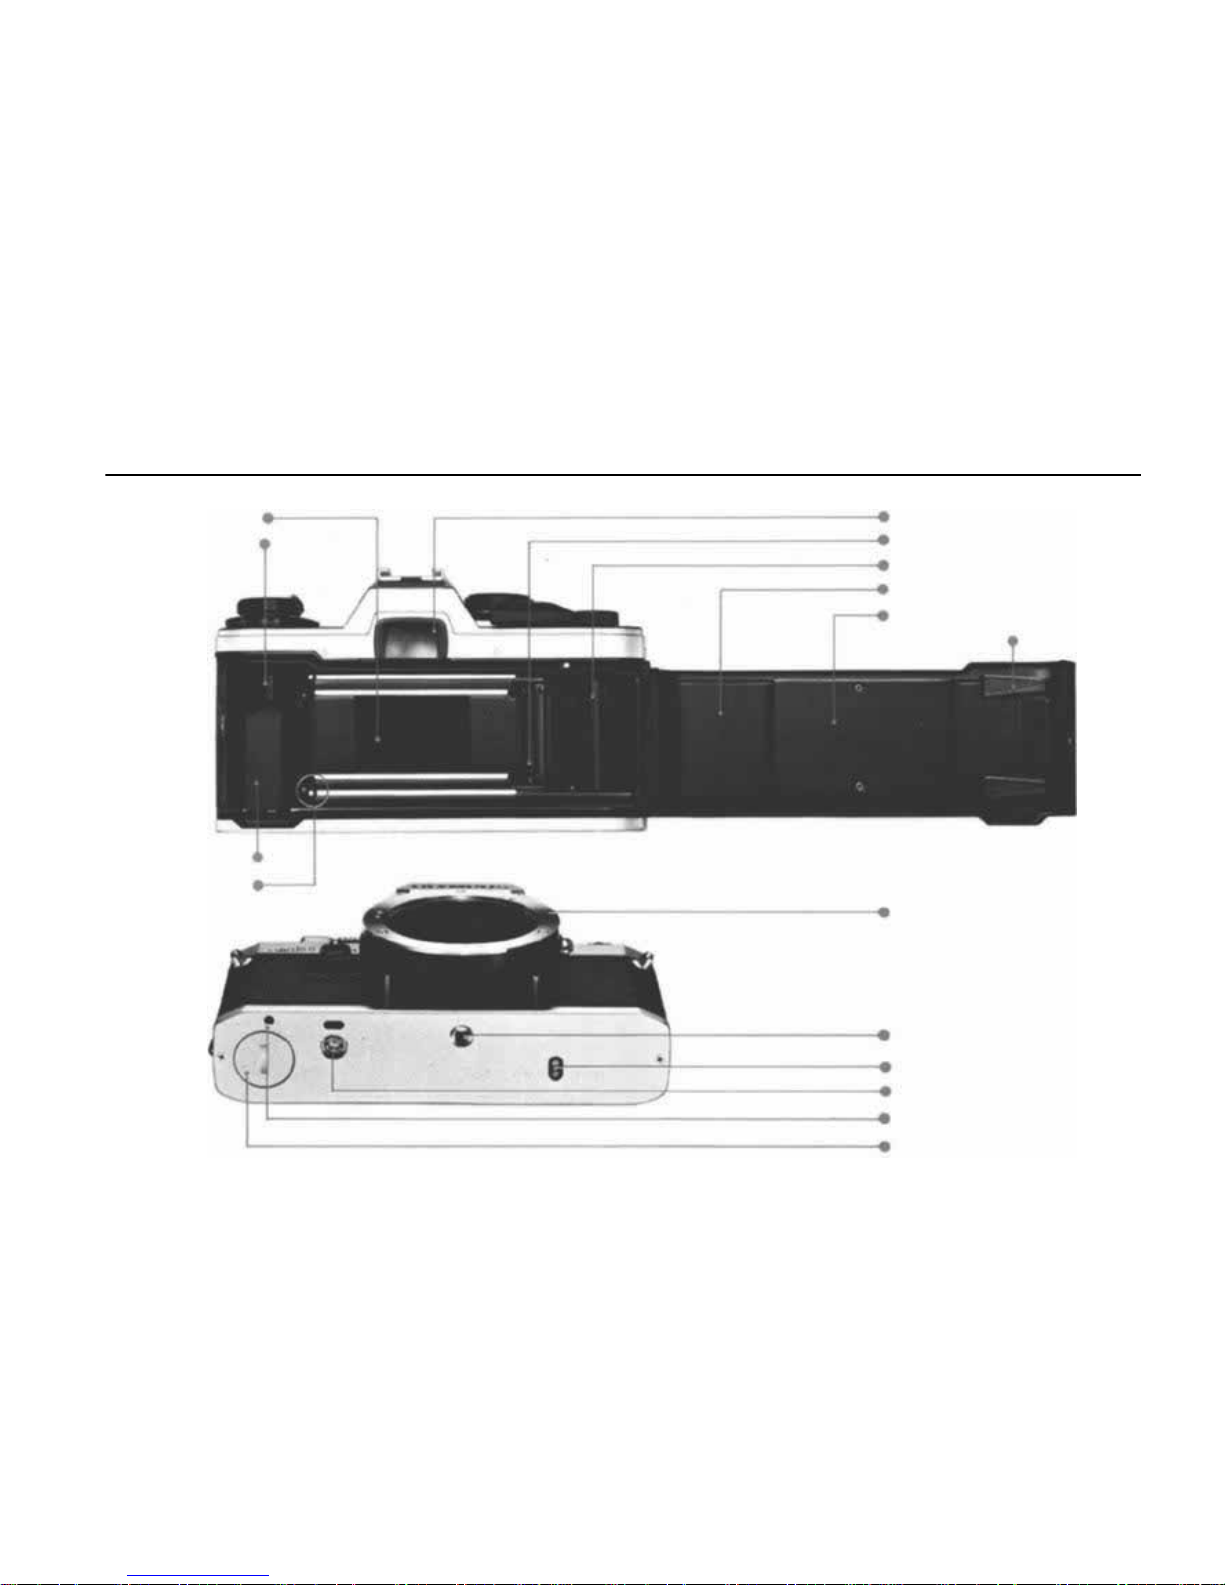
Tripod Socket
Winder Coupling Terminal
Winder Coupling Socke t
Guide Pin Ho le
Battery Chamber
Body Mount Rin g
(P. 33)
(P. 33)
(P. 33)
(P. 33)
(P.9)
Shutter Curtain
Film Rewind
Shaft
(P.11)
Film Chamber
Film Guide Pi ns
Viewfinder Eyepiece Frame
Sprocket
Film Take-up Spool
Camera Back
Film Pressure Plate
Film Cartridge
Pressure Spring
(P. 18)
(P. 13)
(P. 12, P. 13)
(P.11)
5
Page 7

PREPARATIONS BEFORE TAKING PICTURES
The OM-10's circuits
are powered by two 1.5V alkaline-manganese or silver oxide batteries.
Without them, the shutter of this electronic
single lens reflex camera will not function.
This section
is devoted to explaining the preparations
which you must go through before proceeding to take pictures.
Please keep in mind th at they are indispensable
for obtaining good results.
6
Page 8
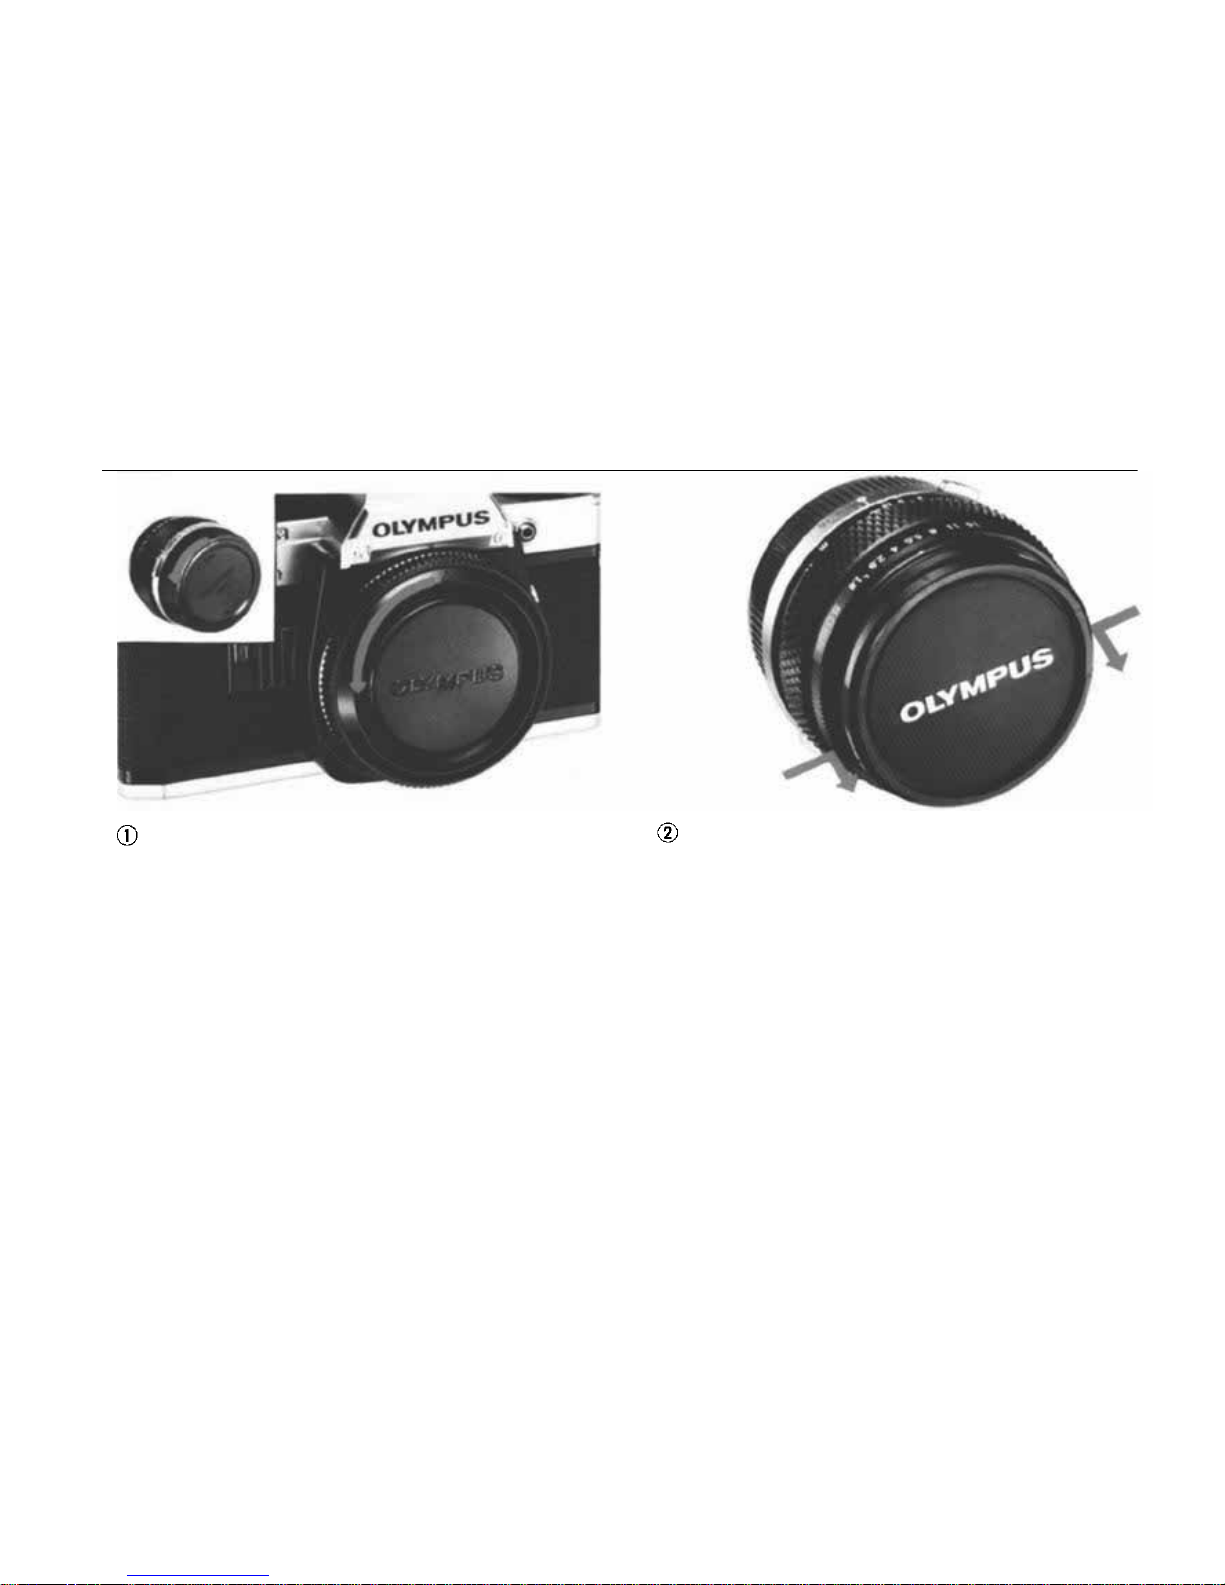
* If you have purchased an OM-10 in conjunction
with a lens, the body cap and rear lens cap are
not provided.
Remove the front lens cap.
Remove the body cap and the rear lens cap.*
MOUNTING AND DETACHING THE LENS
7
Page 9
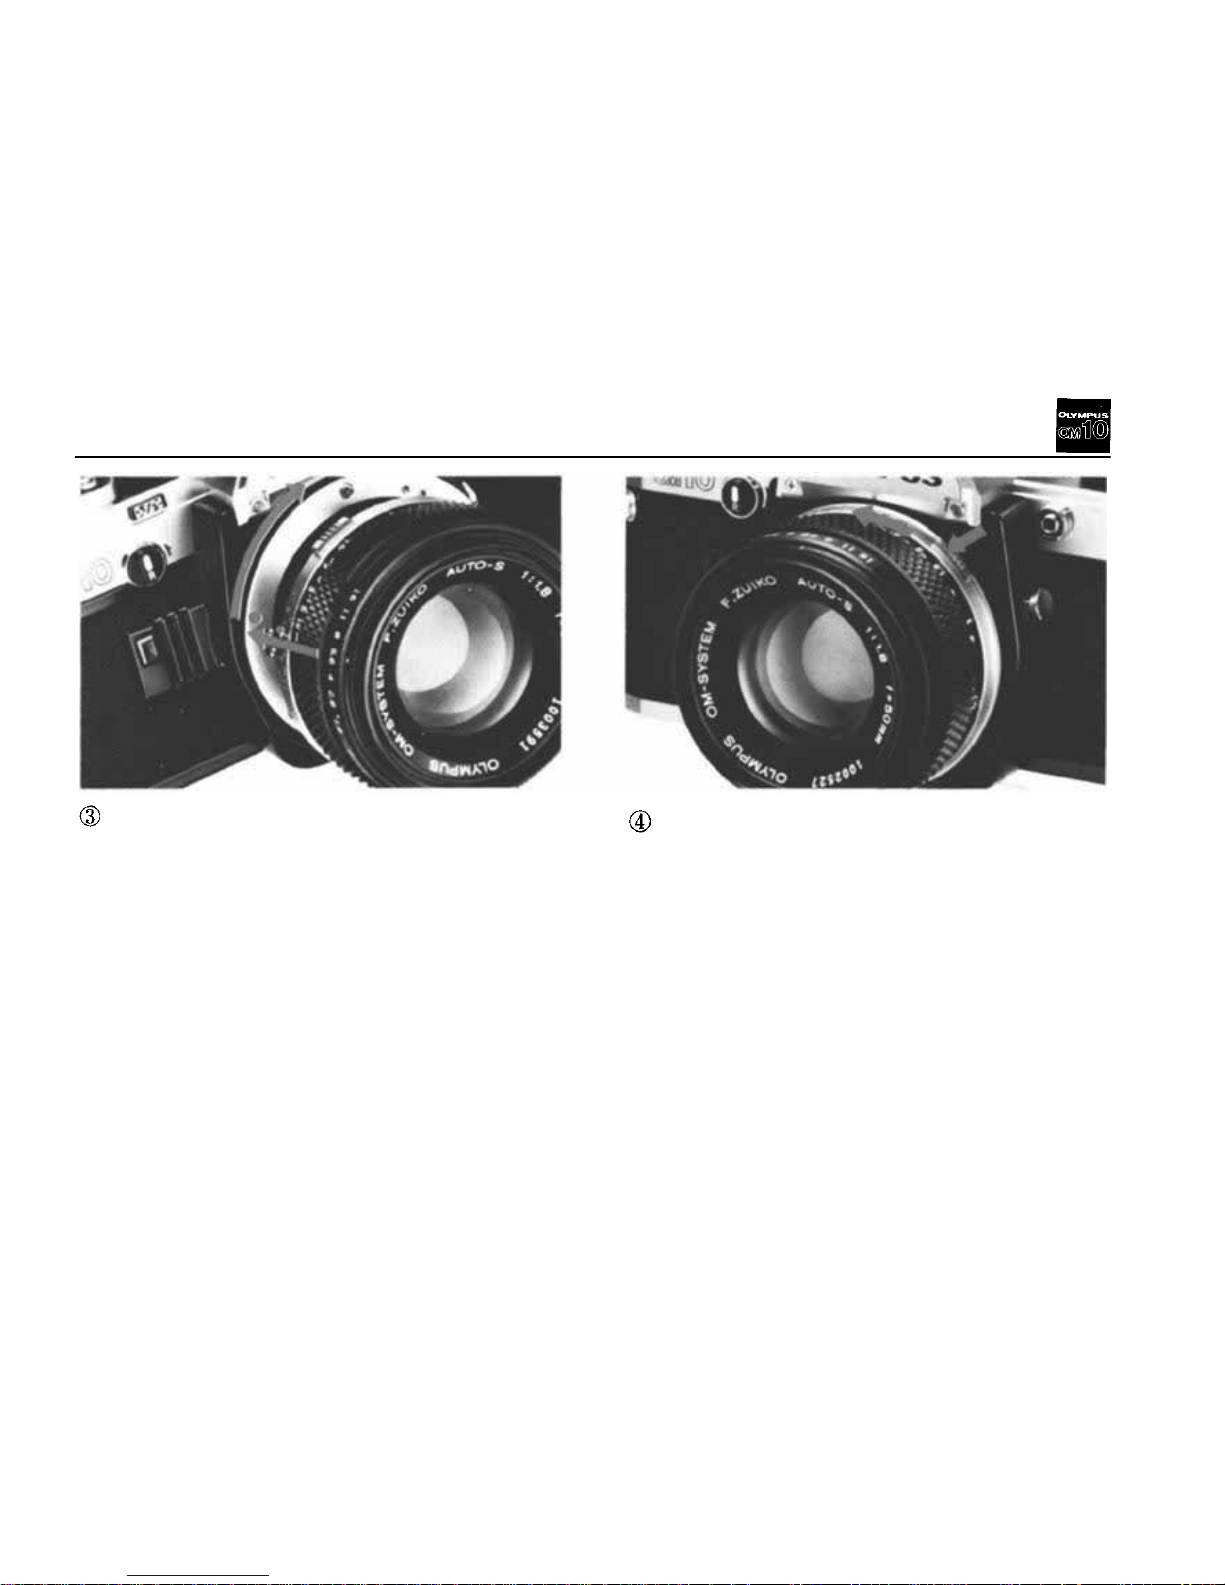
Detach the lens.
Mount t h e lens.
8
Page 10
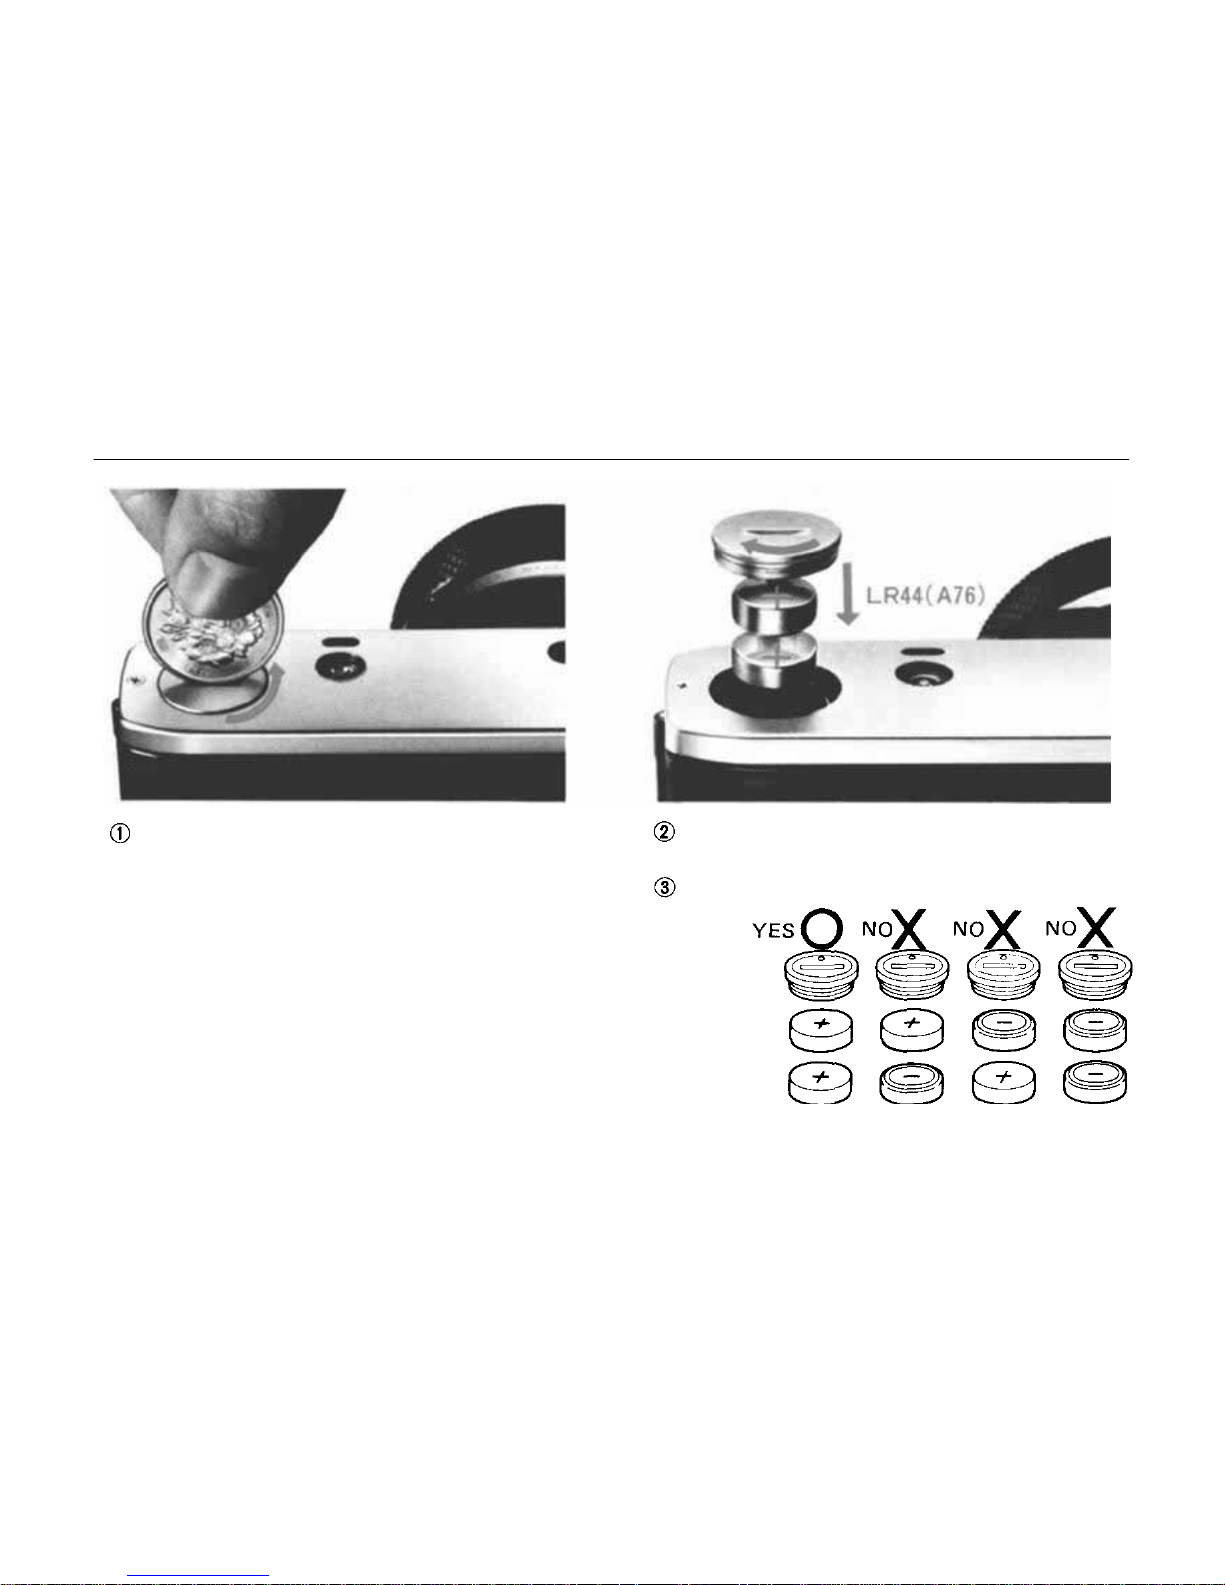
INSERTING THE BATTERIES
Remove the cover of the battery chamber.
Insert two 1.5V alkaline-manganese batteries
LR44 (A76).
Replace the cover.
(NOTE)
Two 1.5V silver oxide batteries SR44 (Eveready
EPX-76) or equivalents can be also used.
9
Page 11
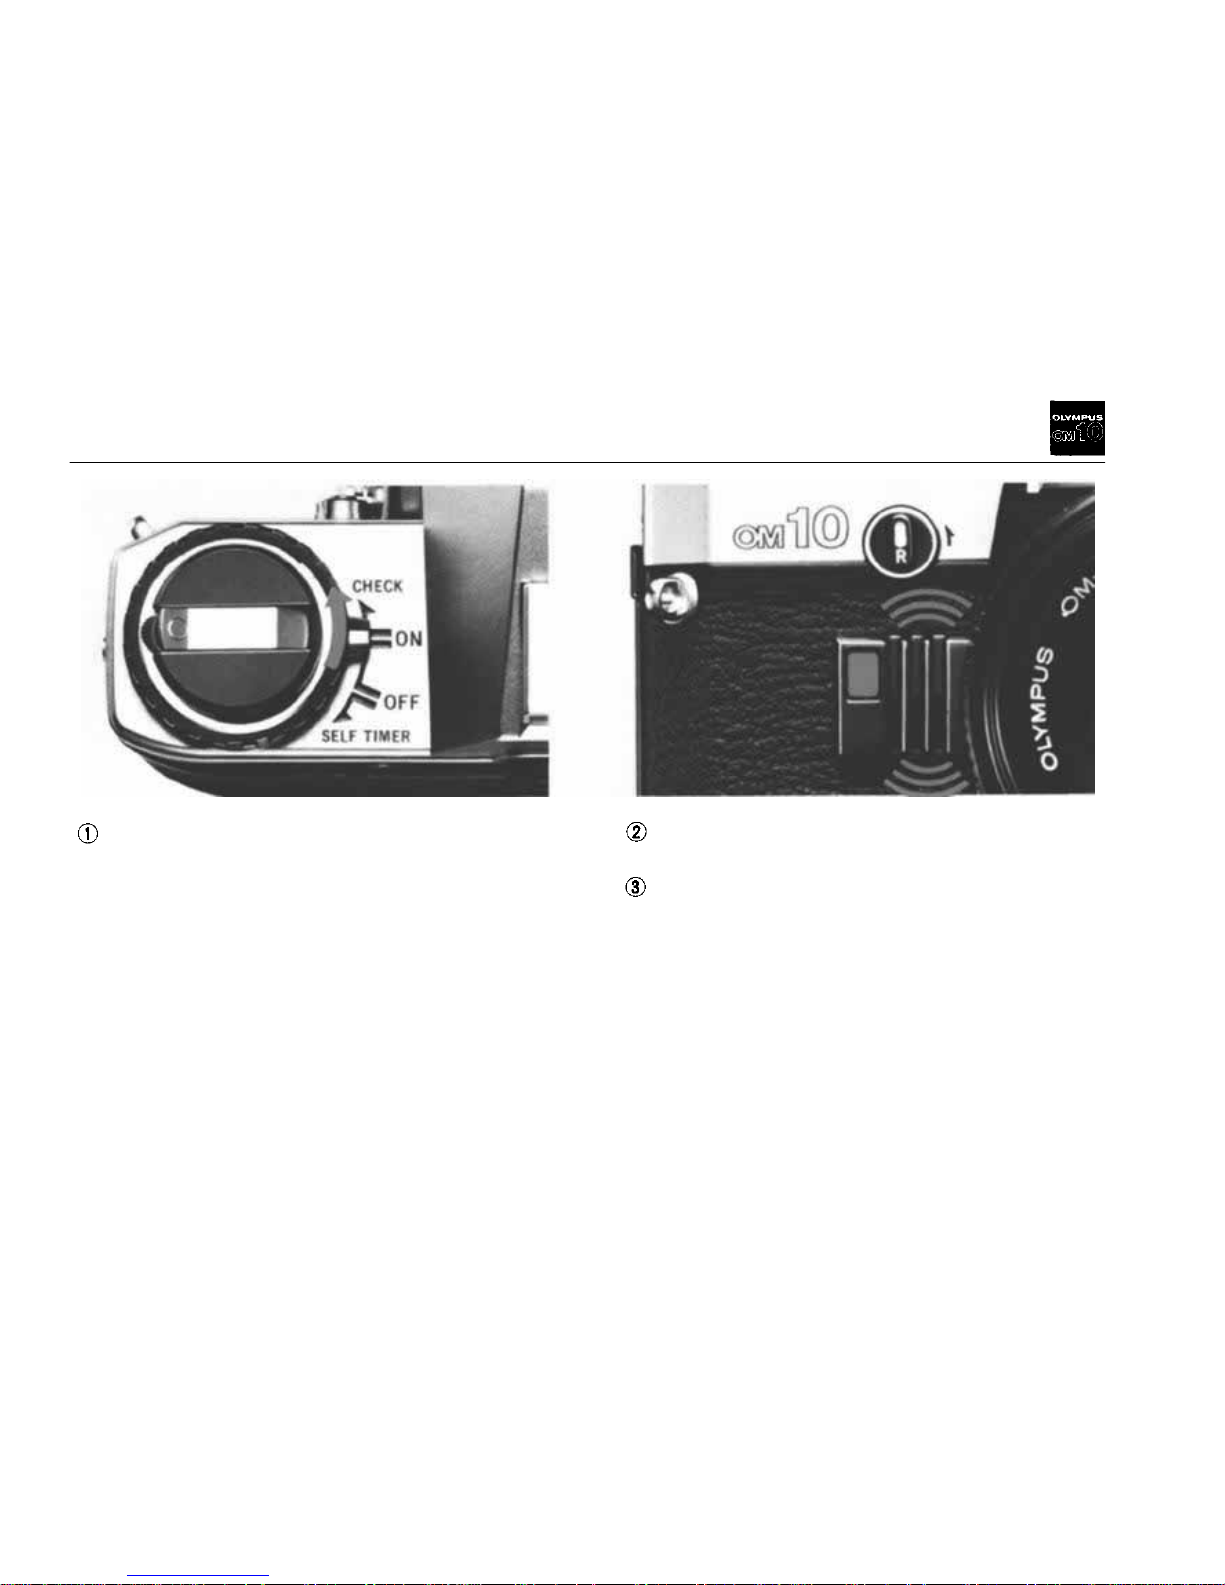
(Attention)
If no sound is heard and the light does not turn
on, the batteries have not been correctly inserted,
or their charge is exhausted. In this cas e they mus t
be replaced.
A beeping sound is heard and the battery check
light turns on.
After th e check set bac k the dial.
Move the selector dial to "CHECK".
CHECKING THE BATTERIES
10
Page 12

LOADING THE FILM
Load the film.
Open the camera back.
(Never load or unload
the camera in direct su n-
light.)
11
Page 13
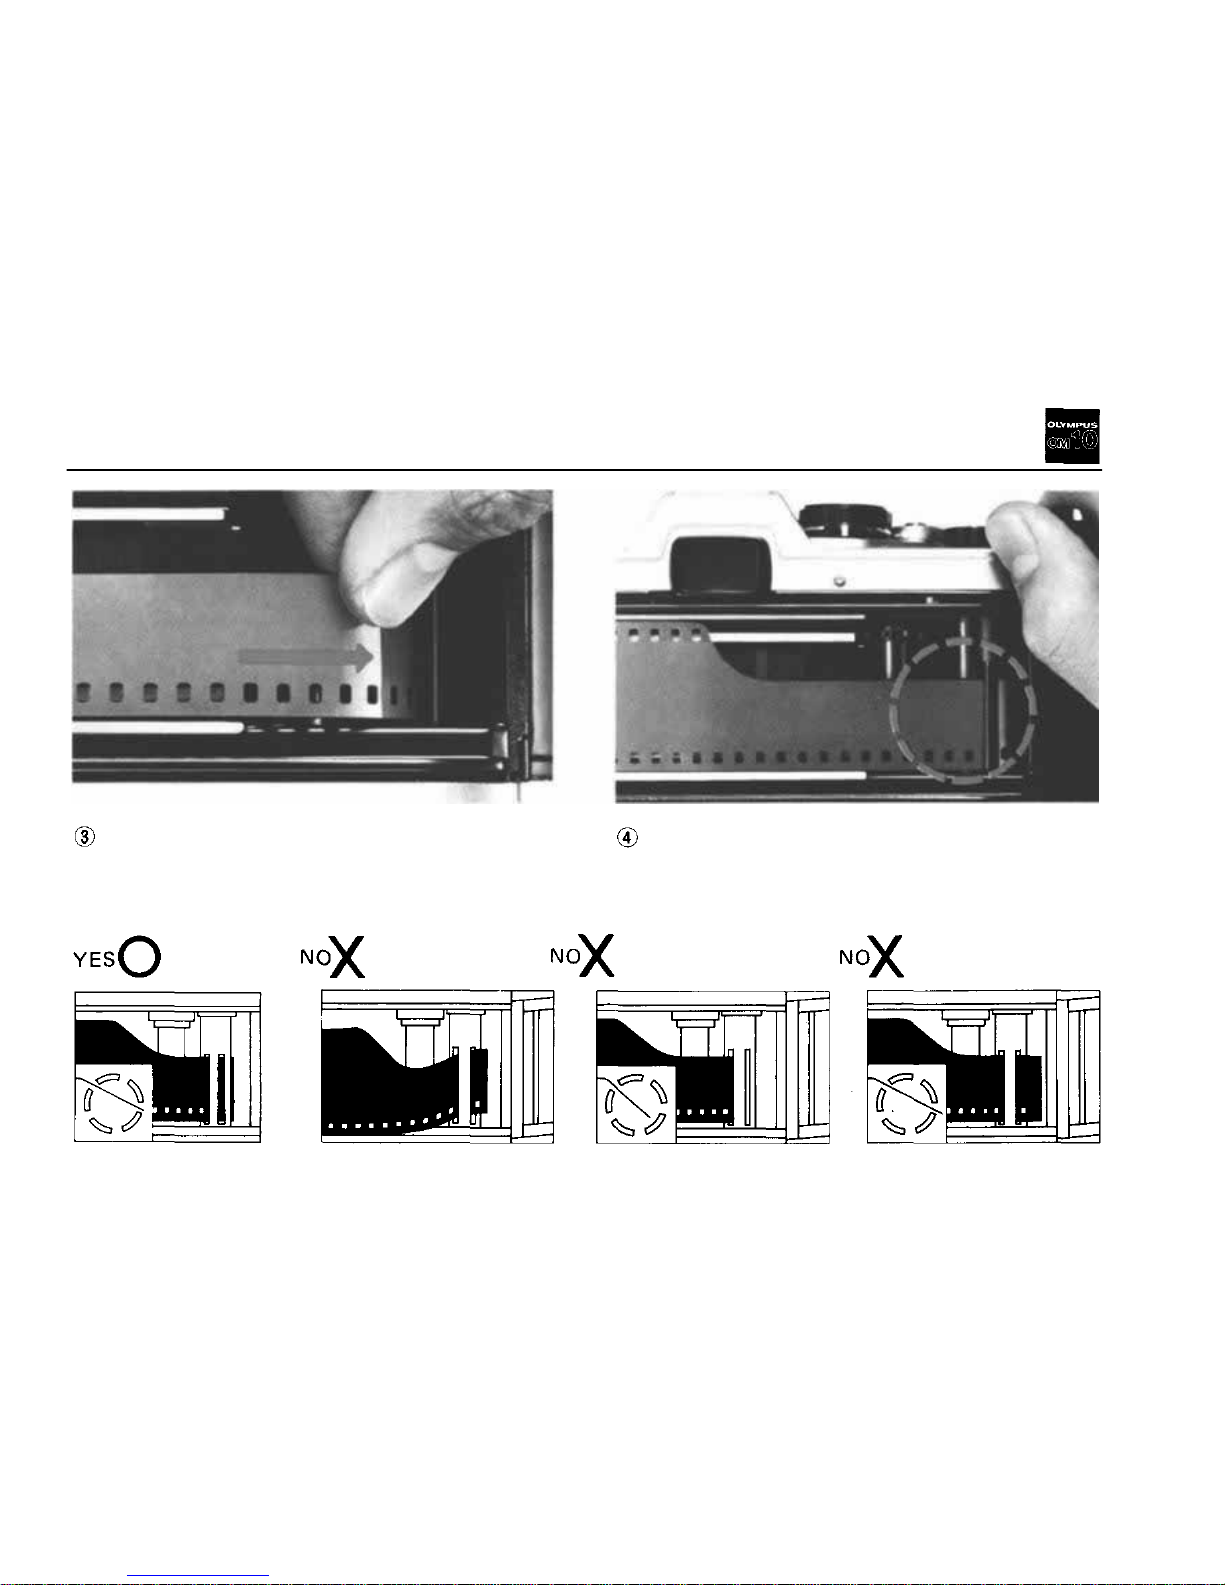
Insert the fi l m leader in one of the s lot s of t h e
take-up spool.
The film leader must not be excessively drawn
out.
(The film leader does
not enter completely.)
(The film leader is
excessively drawn out.)
(The film leader is
twisted.)
12
Page 14
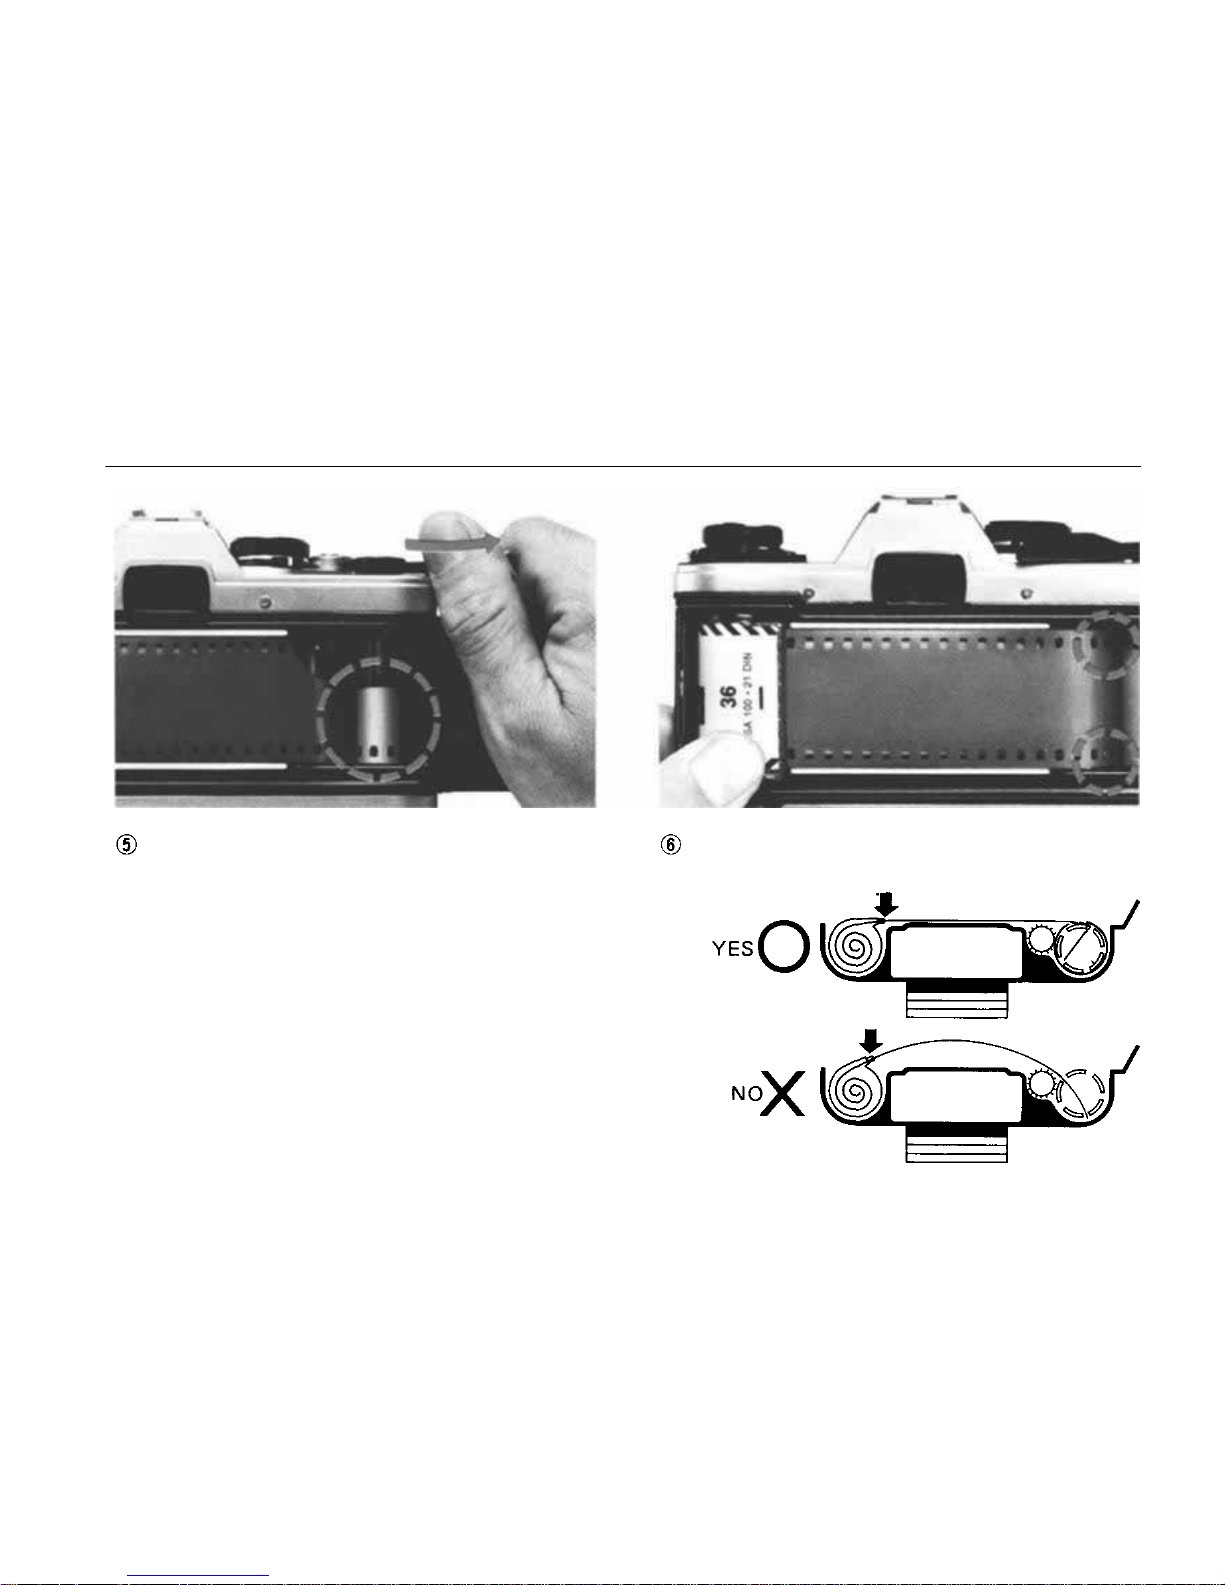
The perforations of the film mus t engage with
the sprocket teeth. Make sure it is well tense,
and cl ose the back
Wind the film once.
13
Page 15
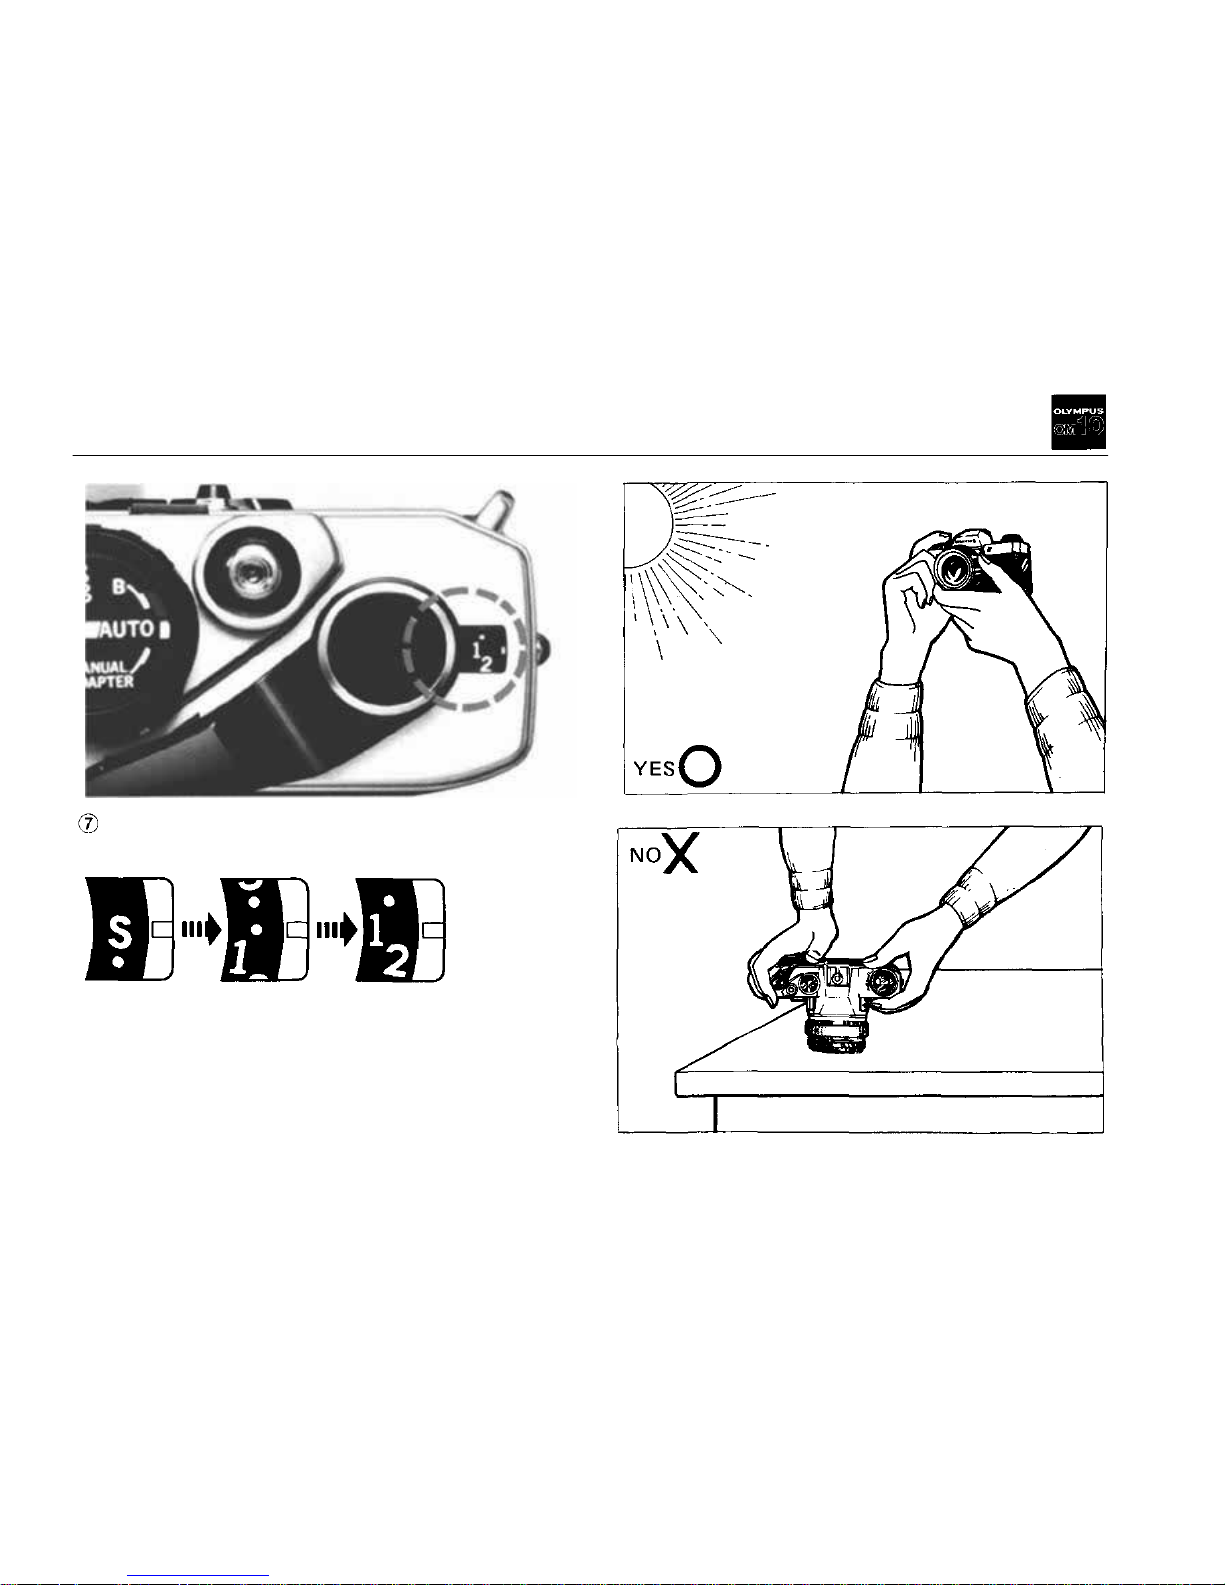
Take blank shots until the exposure counter
shows "1".
(Ways of taking blank shots)
This instance is not suitable for taking blank shots
since the automatic ex-
posure control built in the
OM-10 prolongs the ex-
posure time.
14
Page 16
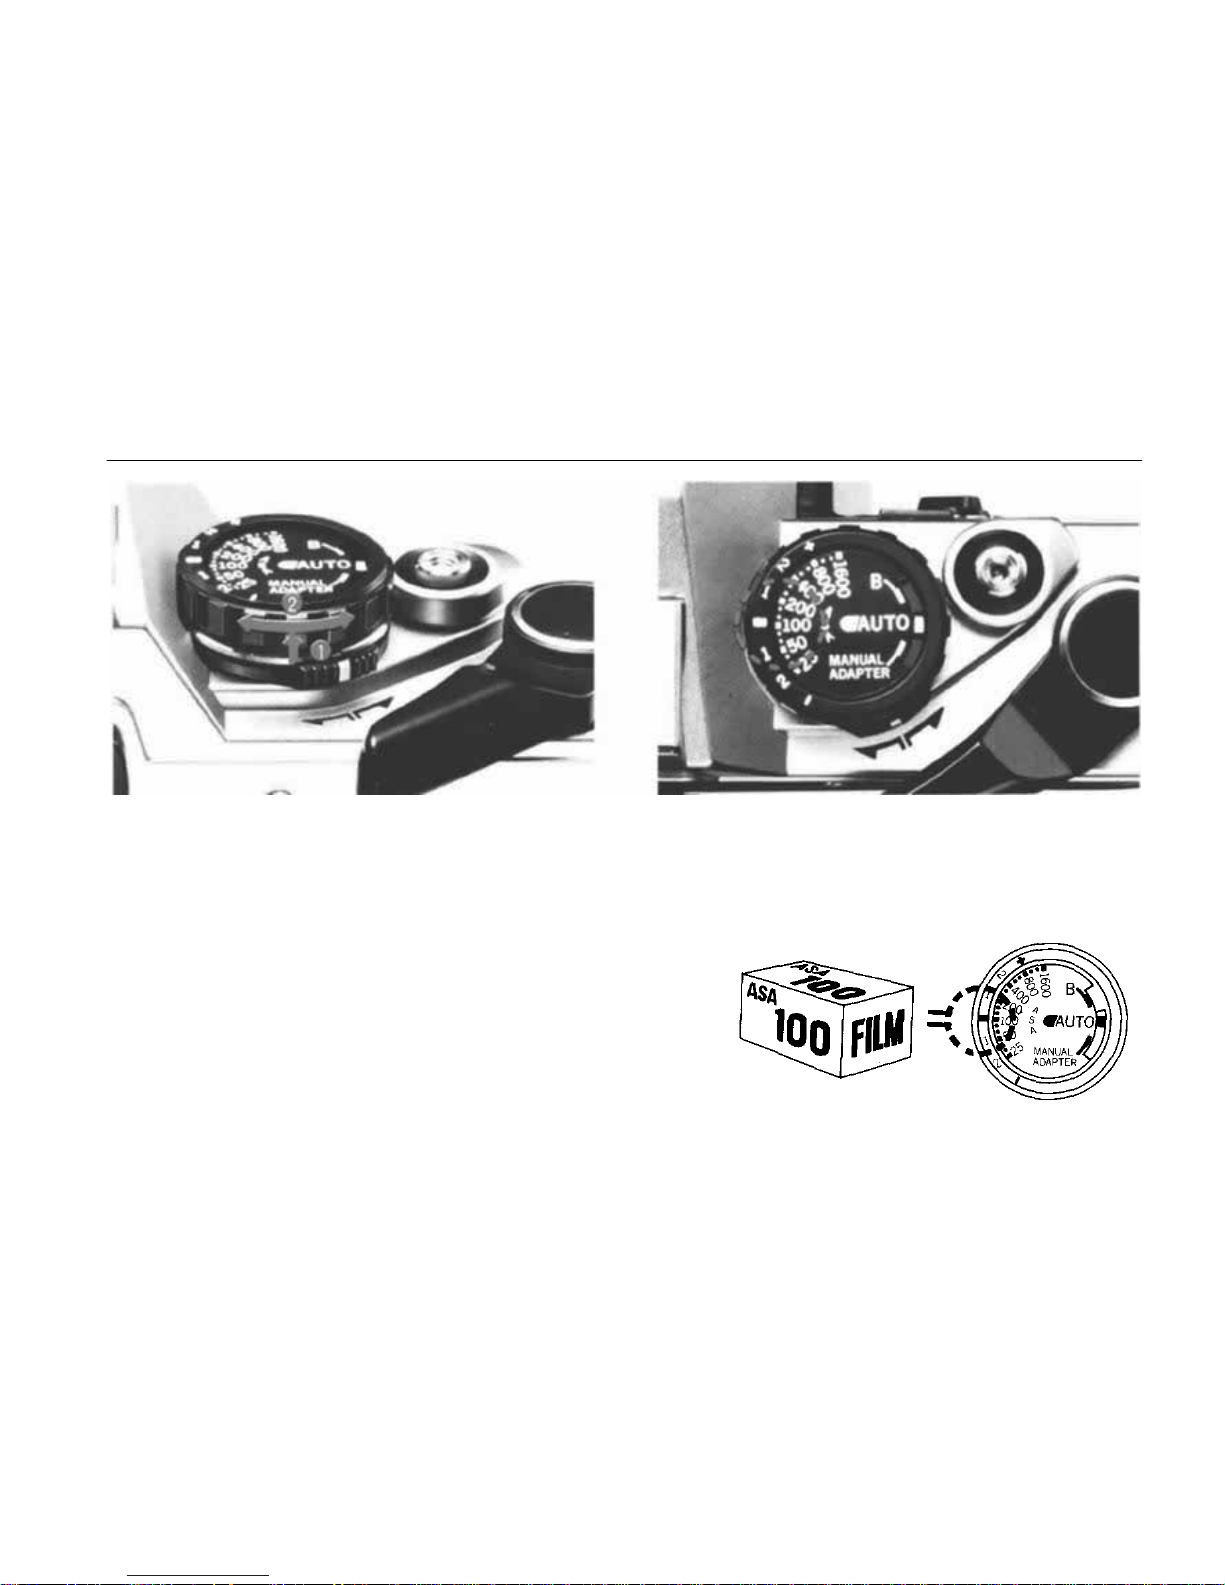
SETTING THE ASA FILM SPEED
Se t the ASA film speed.
(The ASA film speed dial is set at ASA 100.)
15
Page 17

THE WAY TO AUTOMATIC PHOTOGRAPHY
All the problems
of exposure are electronically taken care
by the OM-10.
It is a single lens reflex camera
which can be set for automatic control of exposure,
an d when s et so taking correctly exposed,
beautiful pictures could not
be simpler.
16
Page 18
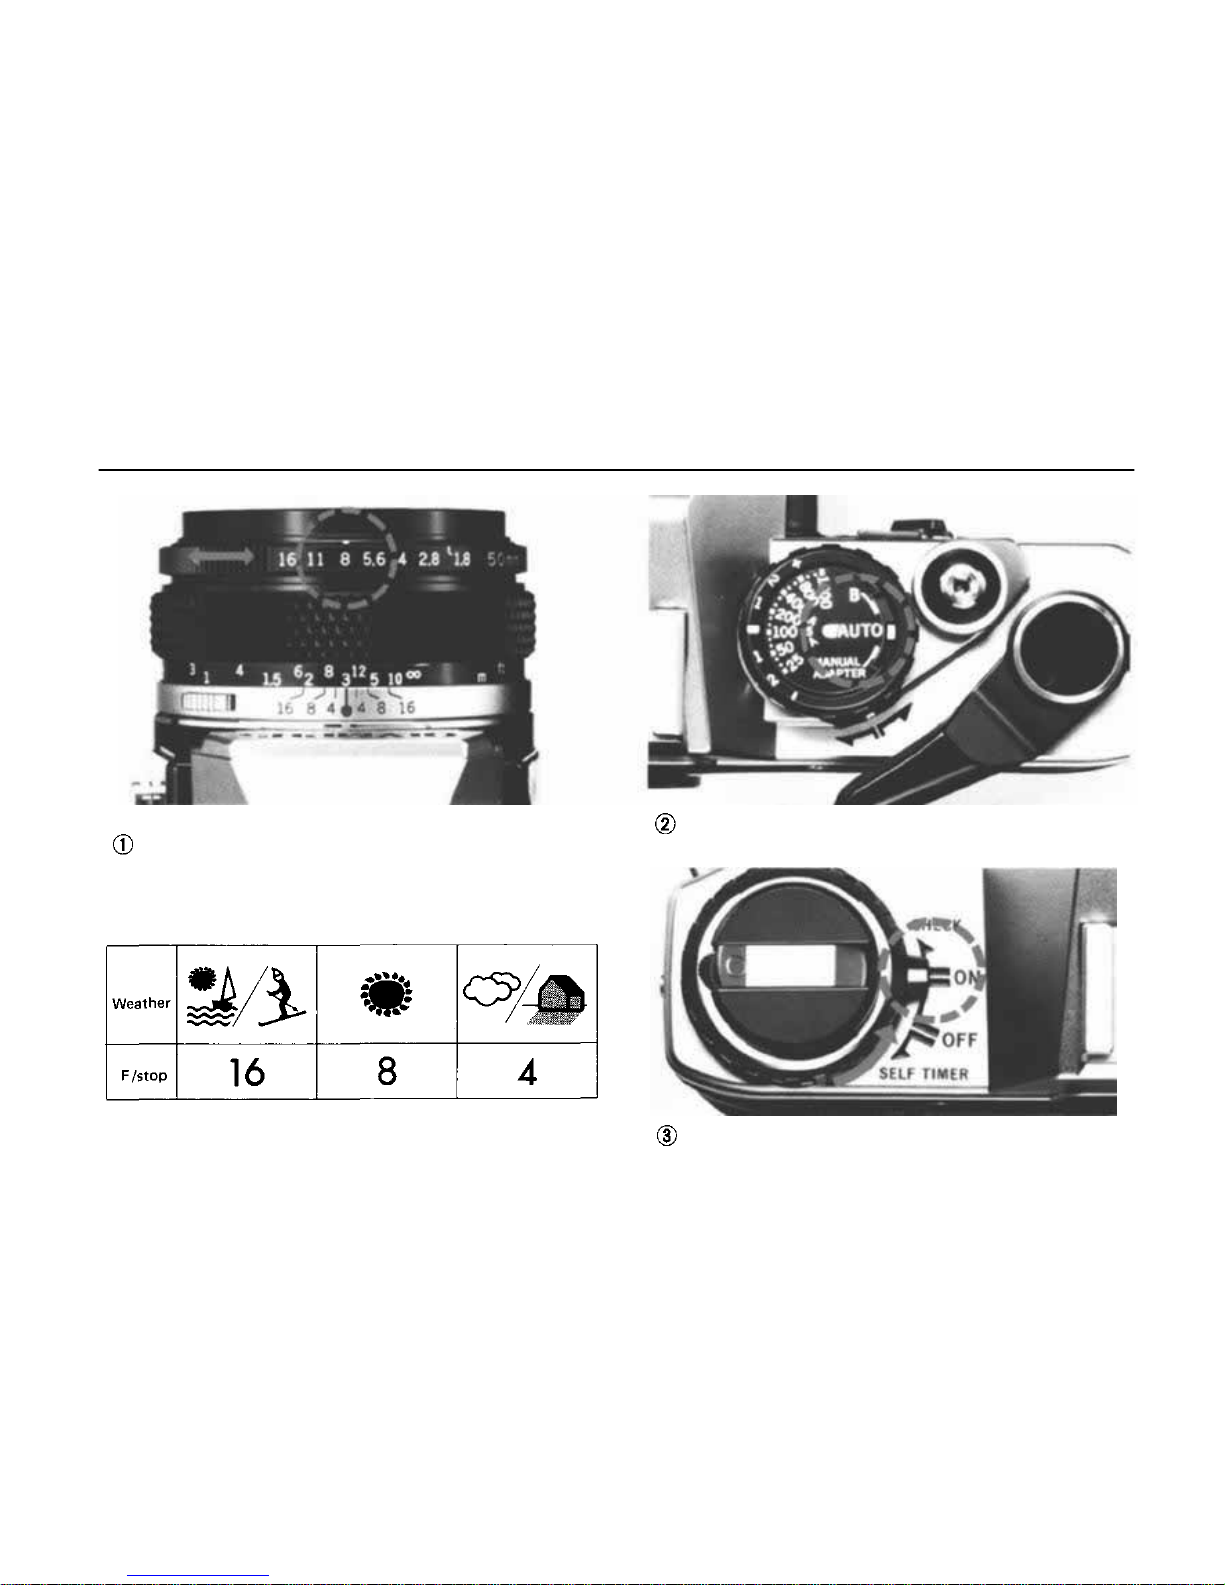
Set the desired aperture.
(Aperture guideline)
Confirm that the camera is se t at the "AUTO"
position.
Set the selector dial at the "ON" position.
NOTE: To make full use of the aperture ring, read
page 27.
SETTING THE APERTURE
17
Page 19
The proper shutter speed ligh ts up in t he vi ewfinder.
18
Page 20
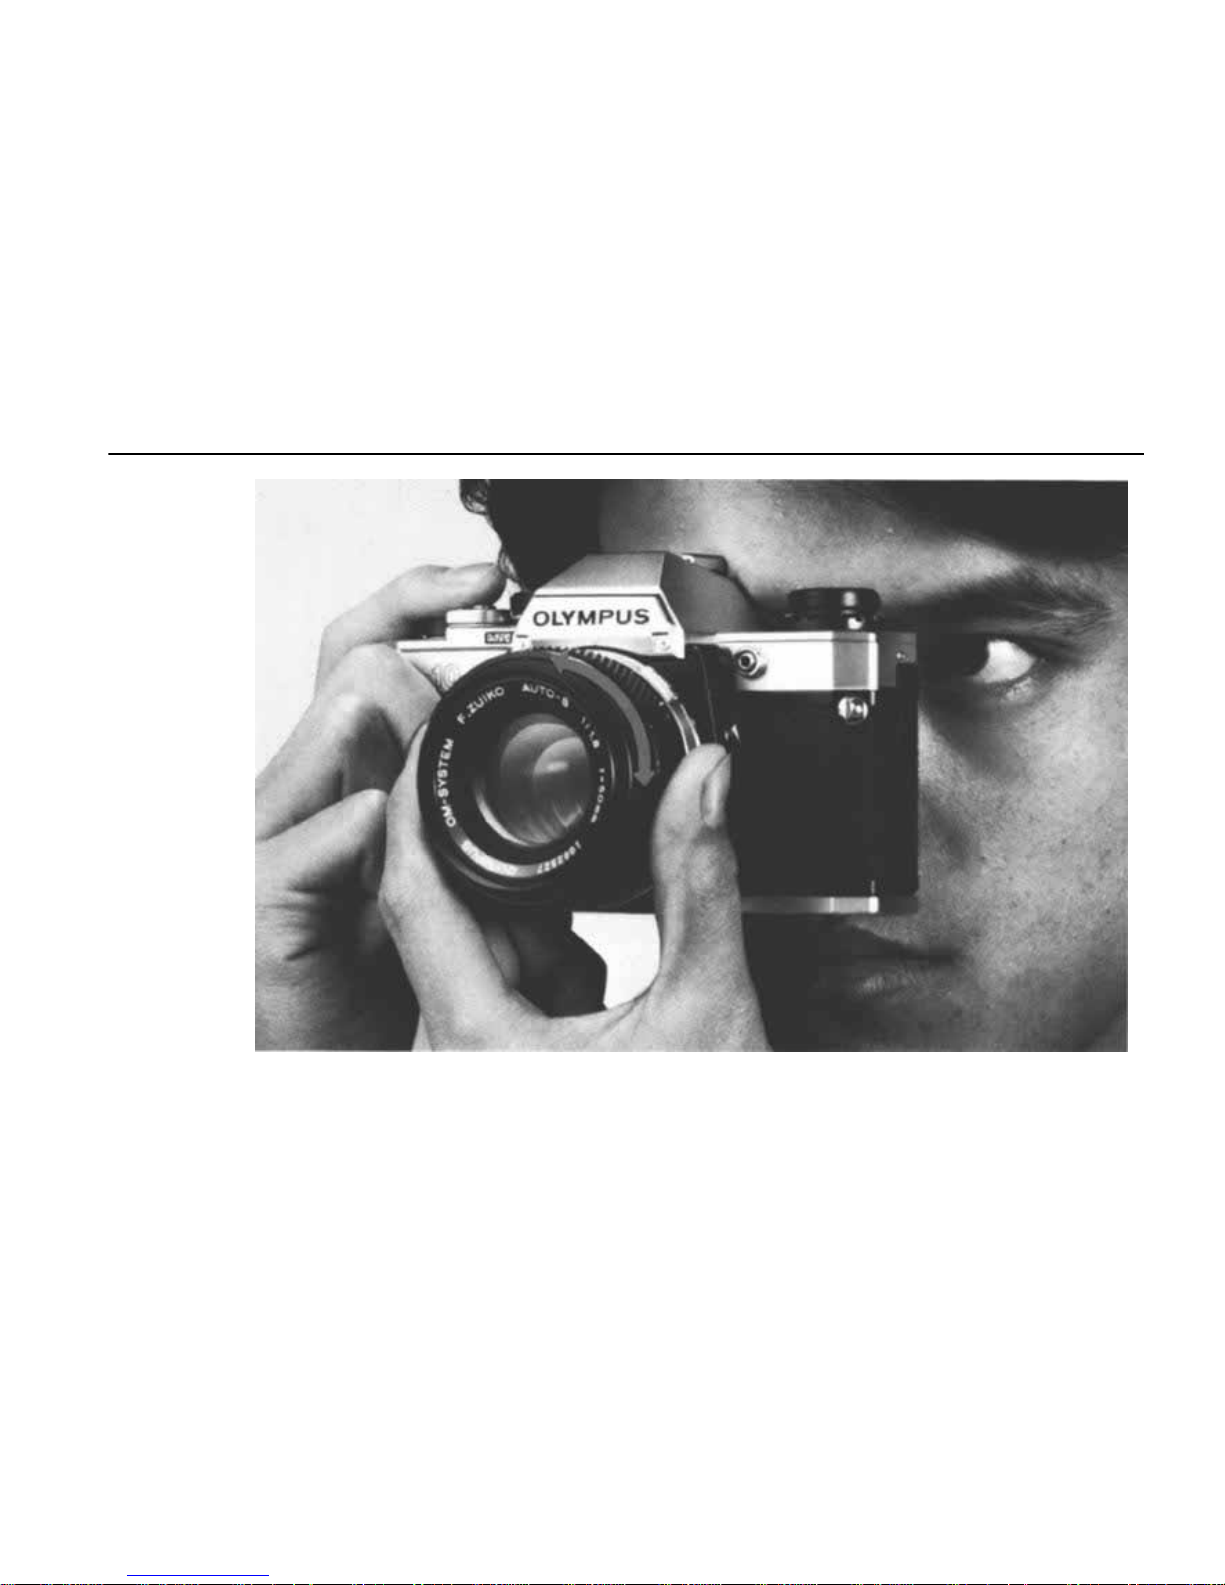
TAKING PICTURES AUTOMATICALLY
Focus.
19
Page 21
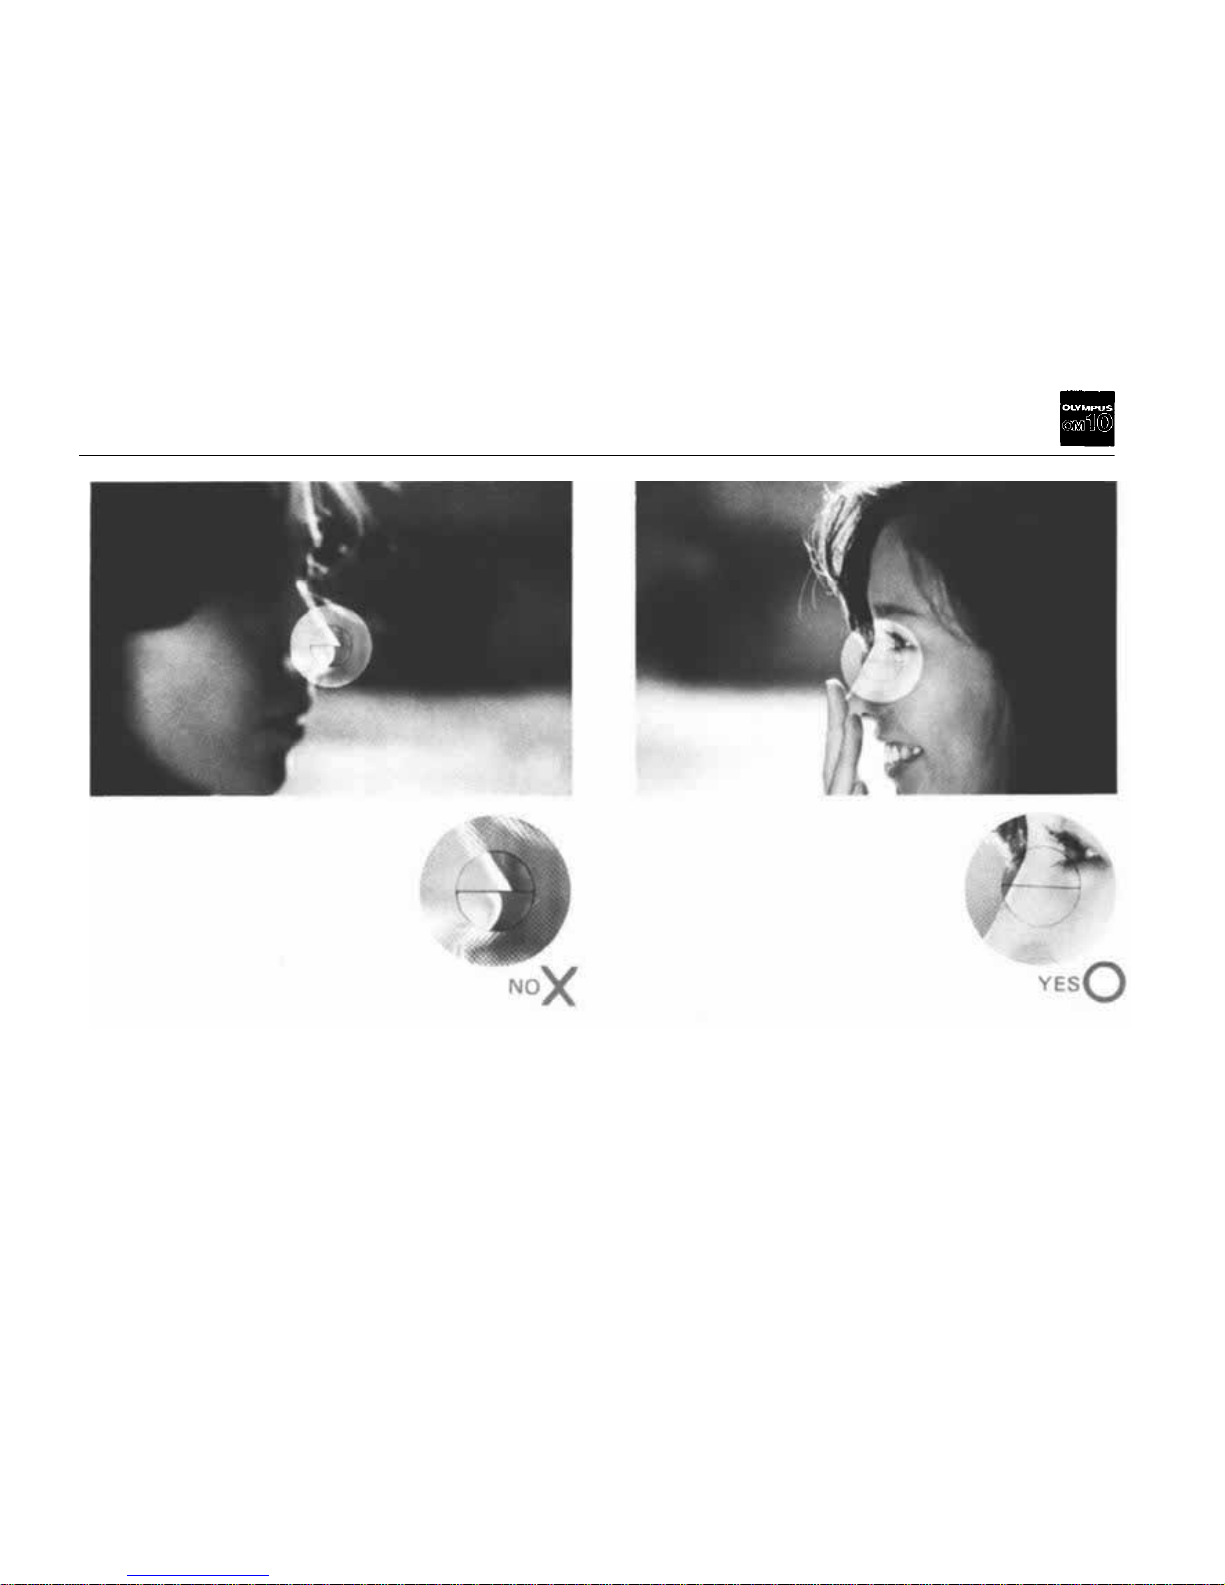
Out of focus.
Correct focus.
20
Page 22
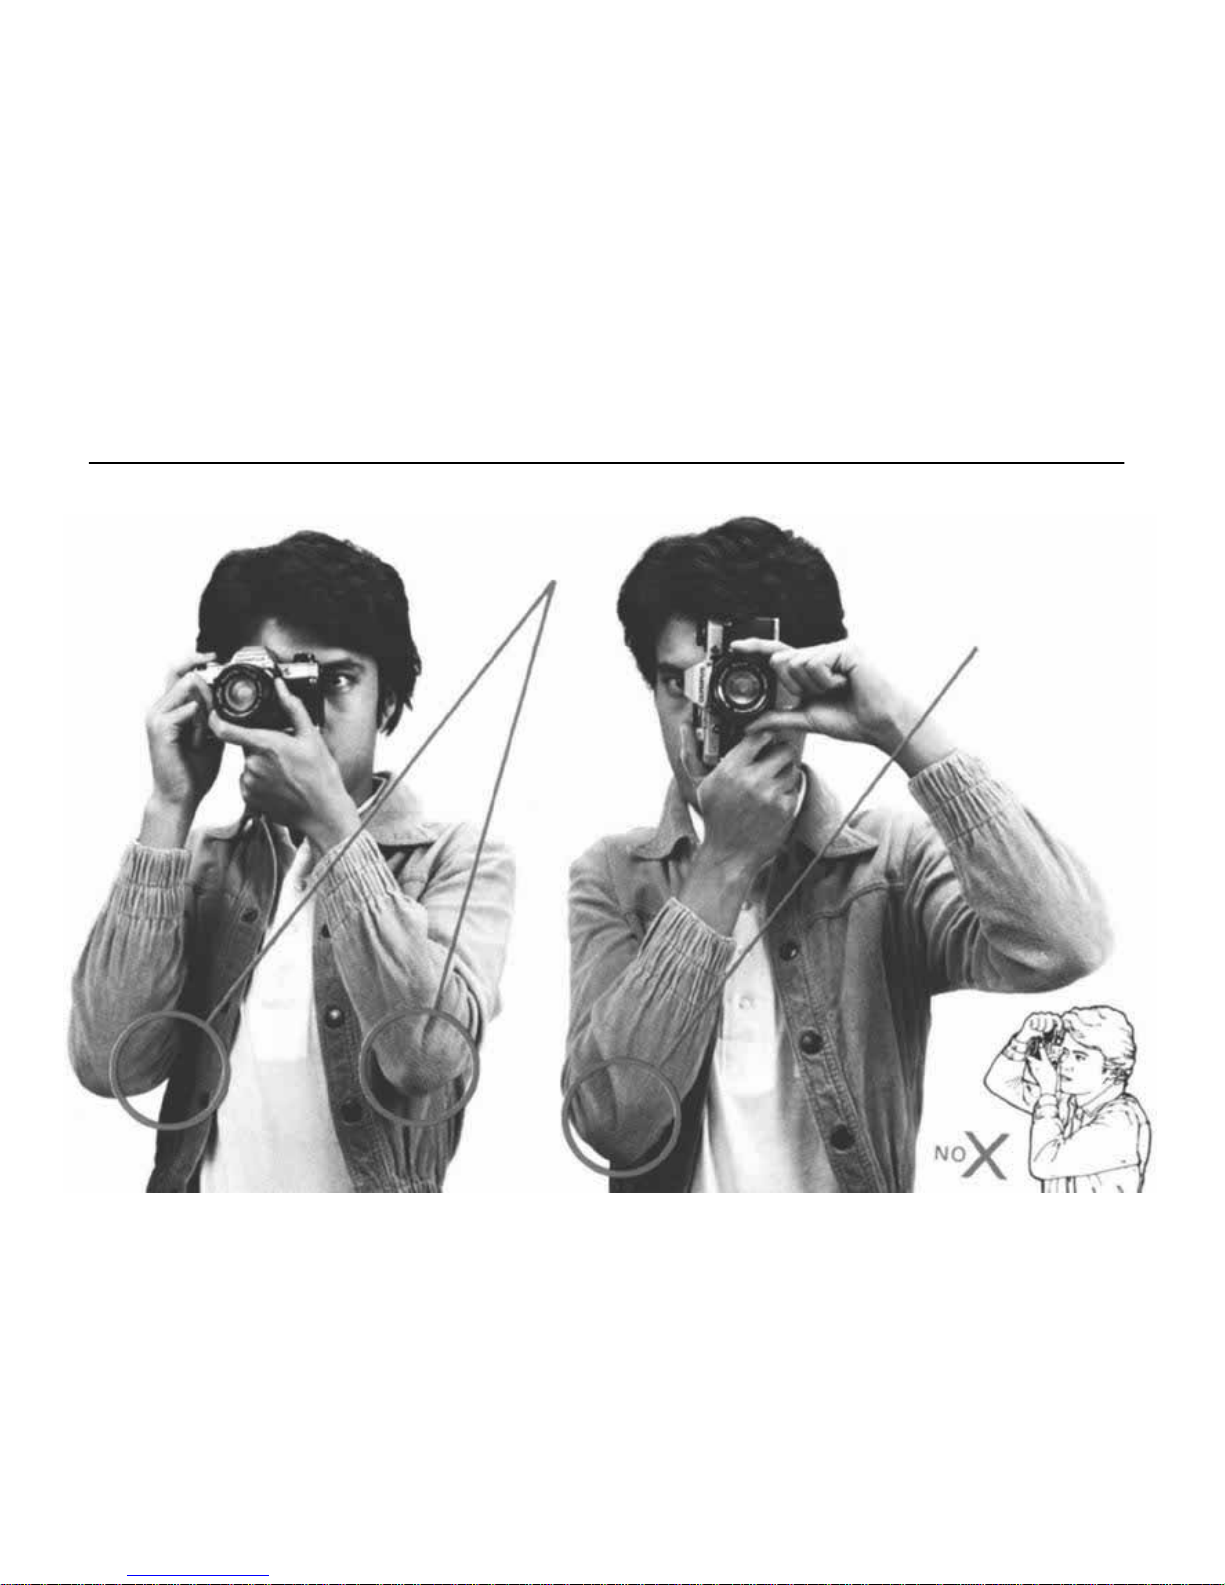
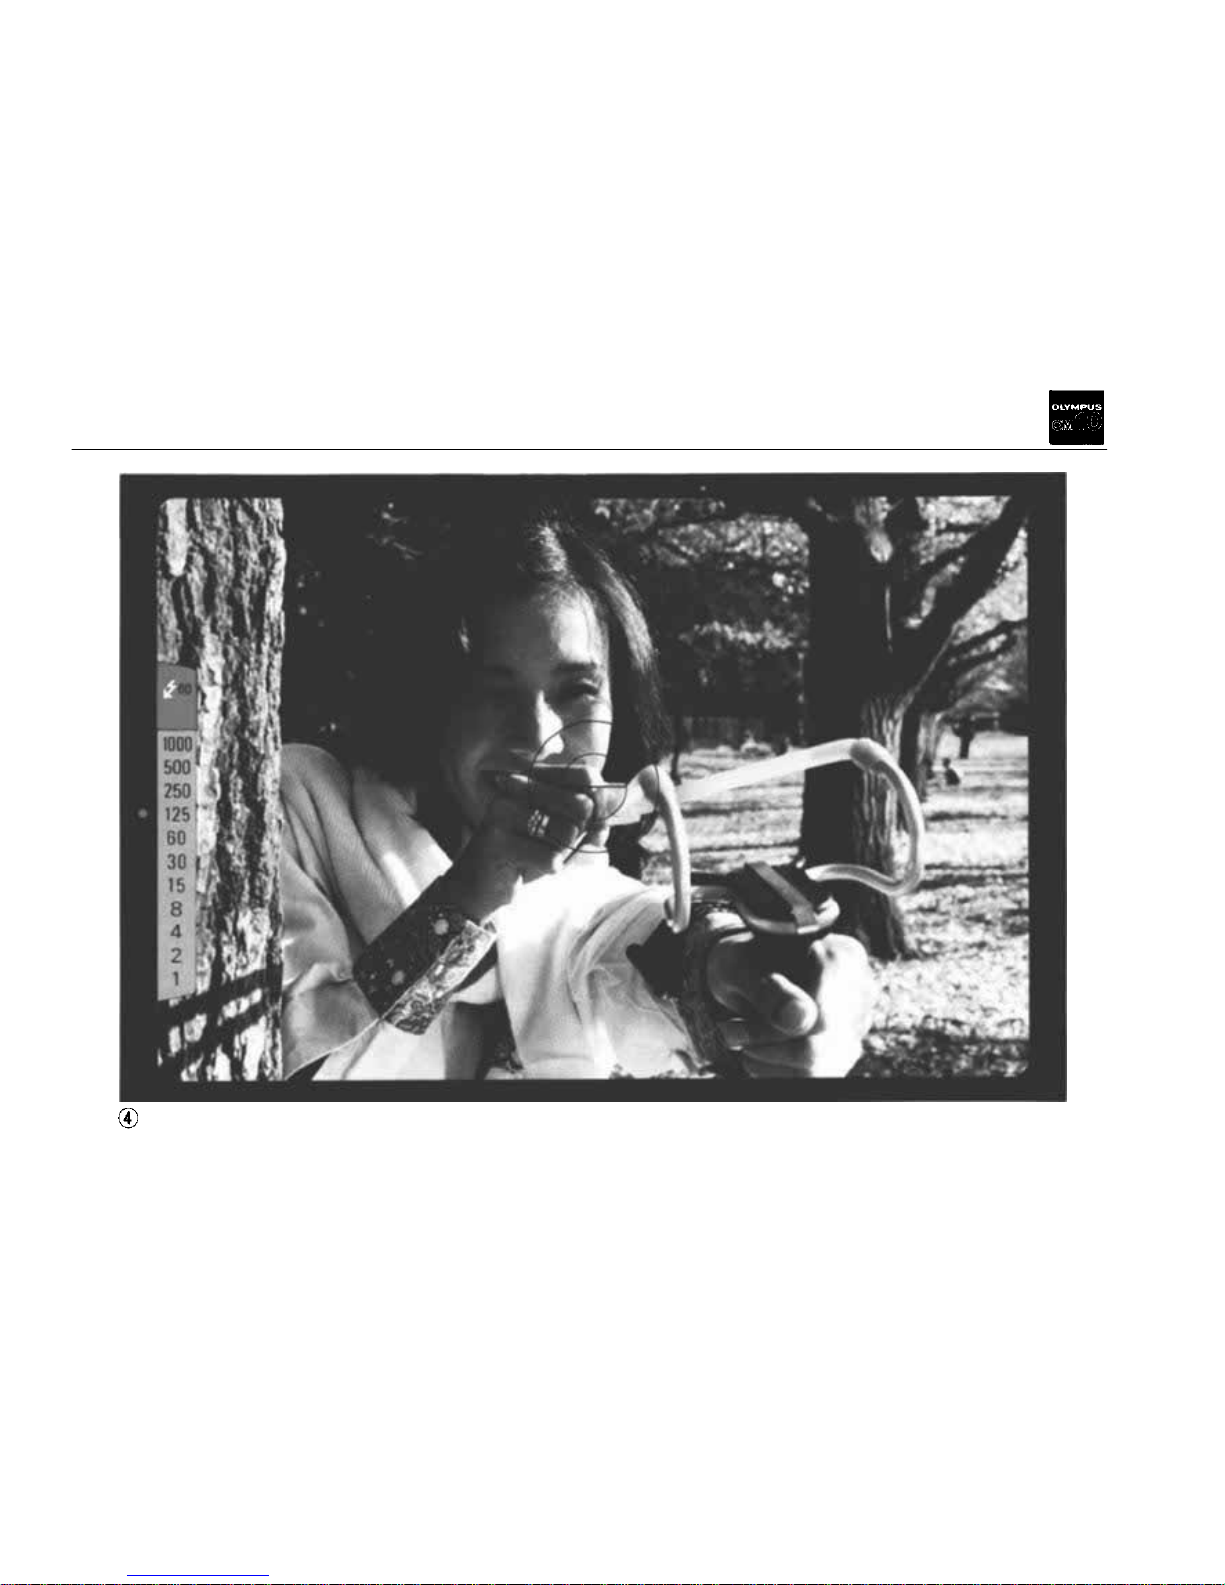
When holding the camera
horizontally, make sure
to press your elbows
against yo u r body.
Have your elbow pressed
against your body when
holding the camera vertically, too.
Page 23
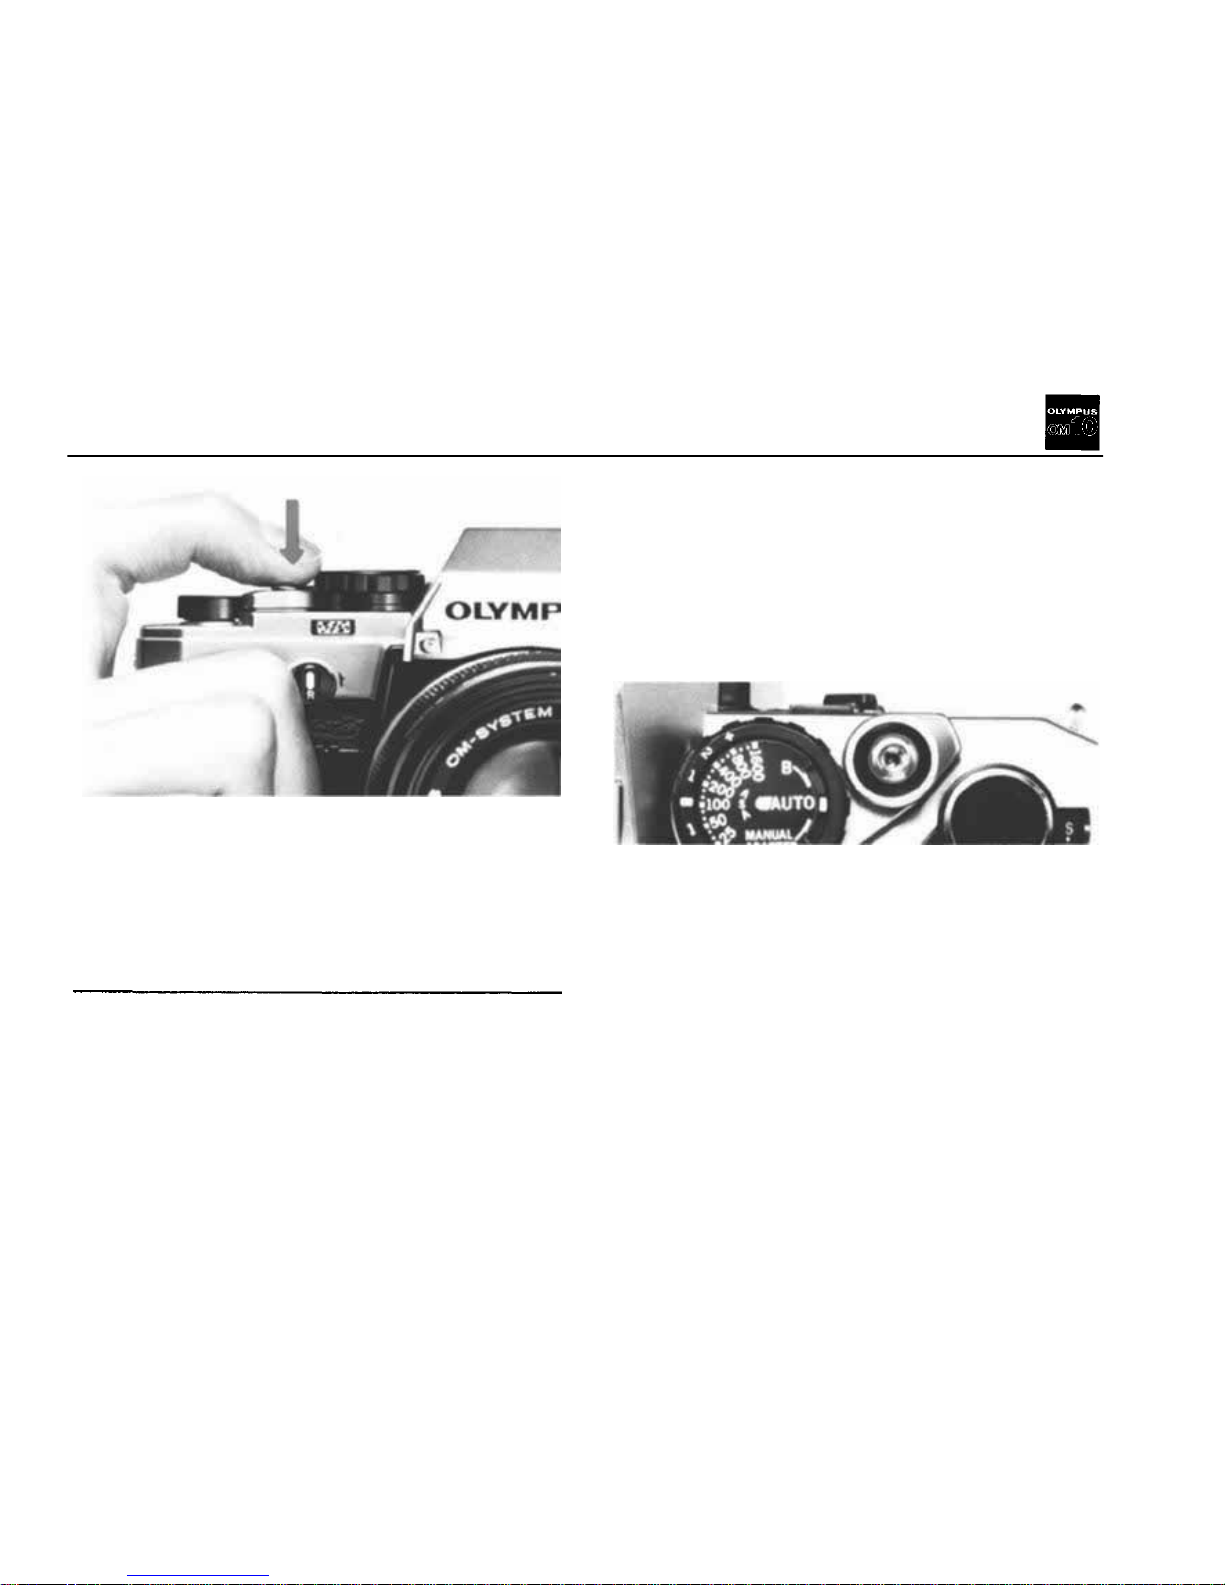
THE OM-10: DESIGNED TO SAVE
BATTERY CONSUMPTION
this light will go off automatically after 90 seconds, to prevent unnecessary battery consumption.
< When the activator switch is touched ... >
With a light touch on the activator switch, energy
wi ll begin flowing again, and the light which had
gone
out
after
90
seconds
will
turn
on
again.
Gently
press
the
shutter
release
button.
< When the selector dial is turned to the "ON"
position... >
Energy flows from the alkaline-manganese or
silver oxide batteries and a light appears by the
shutter speed scale in the viewfinder. However,
< When the selector dial is set at the "OFF"
position... >
No energy will be supplied to the camera's circuits
and th e light will not tur n on. However, if you
forget to turn the selector dial to the "ON" position
and
suddenly
you
press
the
shutter
release
button, energy will flow only during the time the
shutter is open, and properly exposed photographs
can be taken. Once the picture is taken, all circuits are disconnected as a safety measure to prevent unnecessary battery consumption.
22
Page 24
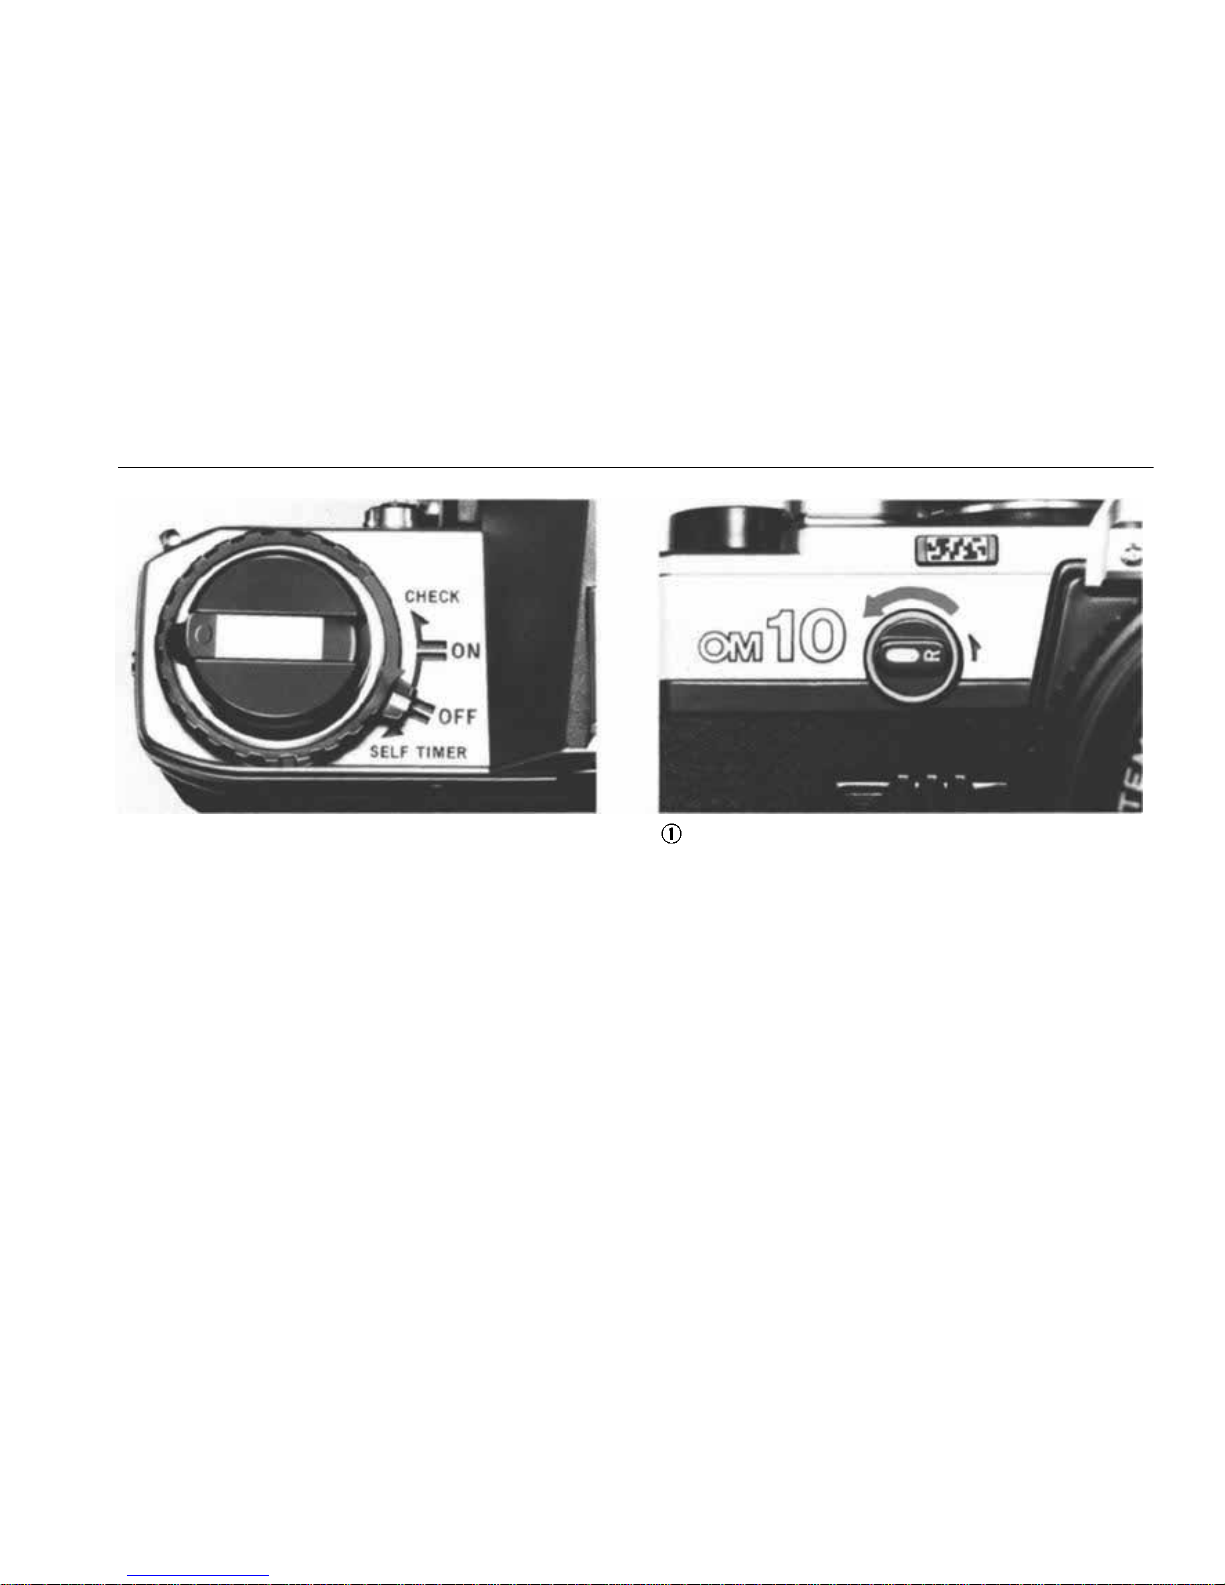
when you are not going to take any more pictures.
ends.
Turn the rewind release lever when the film
Move the selector dial to the "OFF" position
SWITCHING THE CAMERA OFF REWINDING THE FILM
23
Page 25
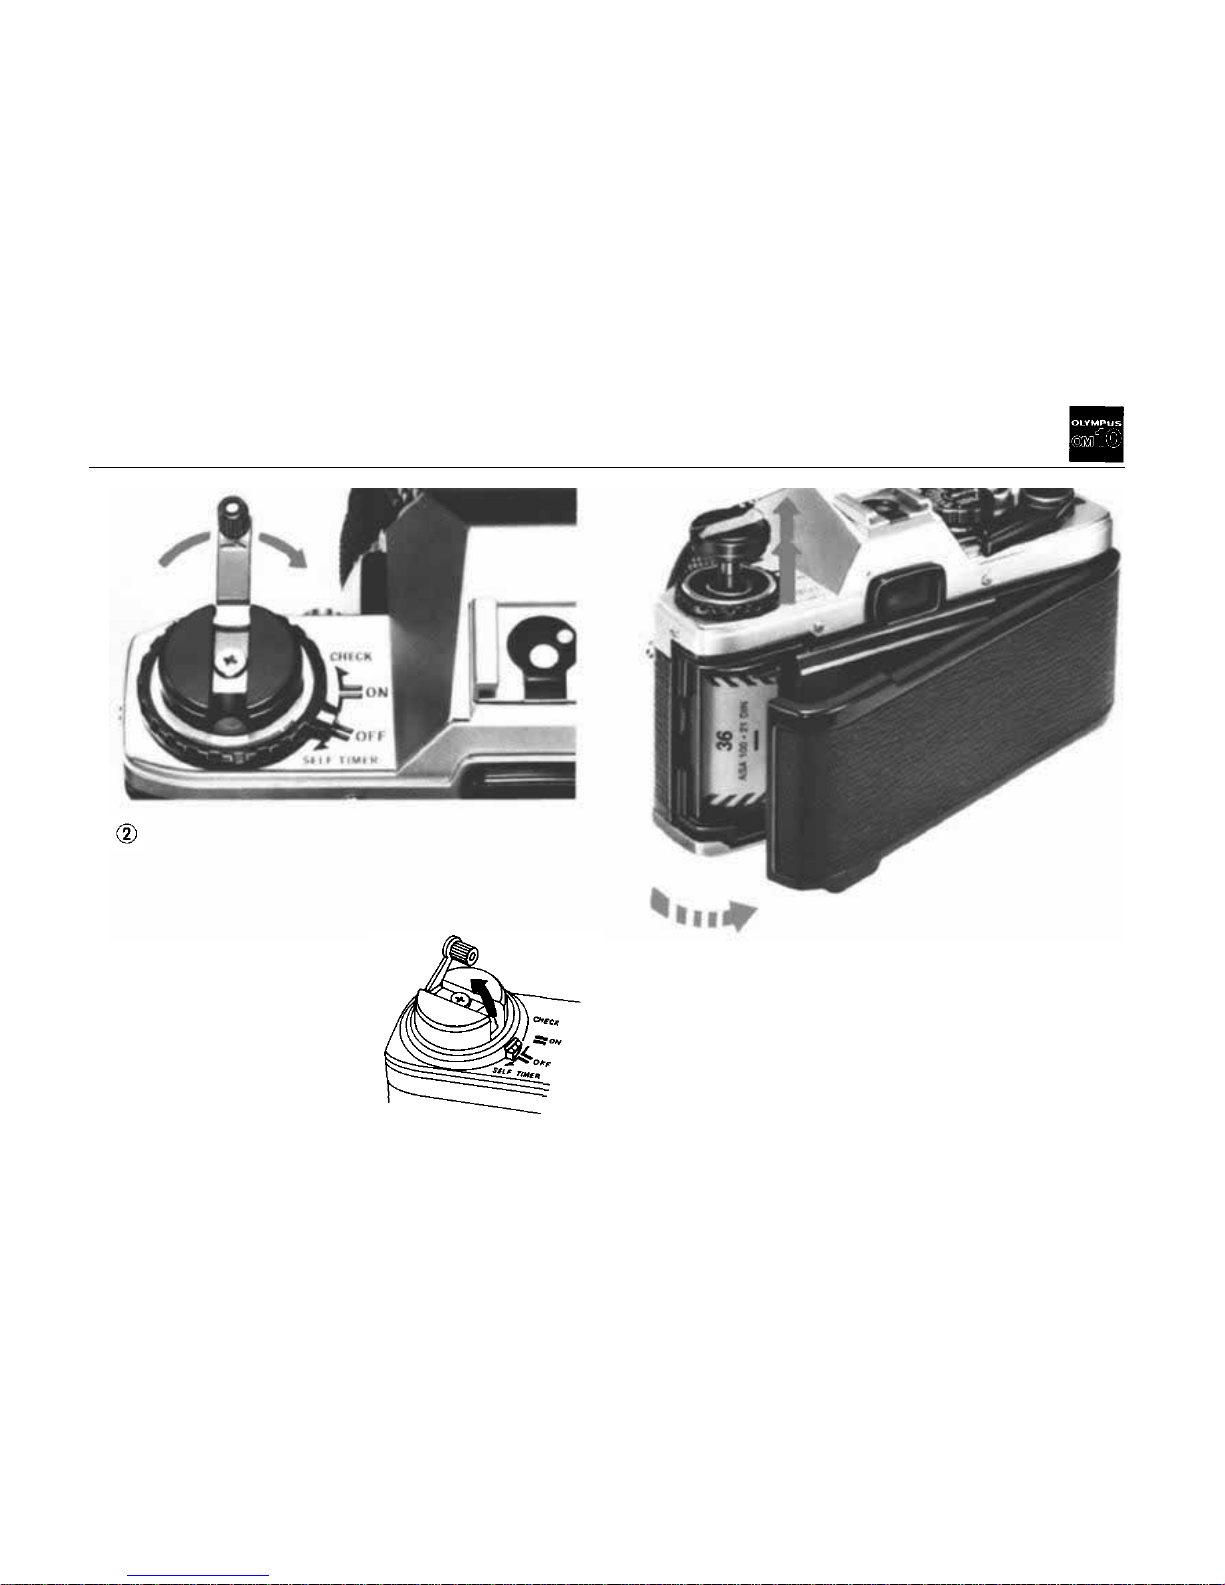
film.
and unload the
resistance.
Open the back
Keep rewinding the film until you feel no more
UNLOADING THE FILM
24
Page 26
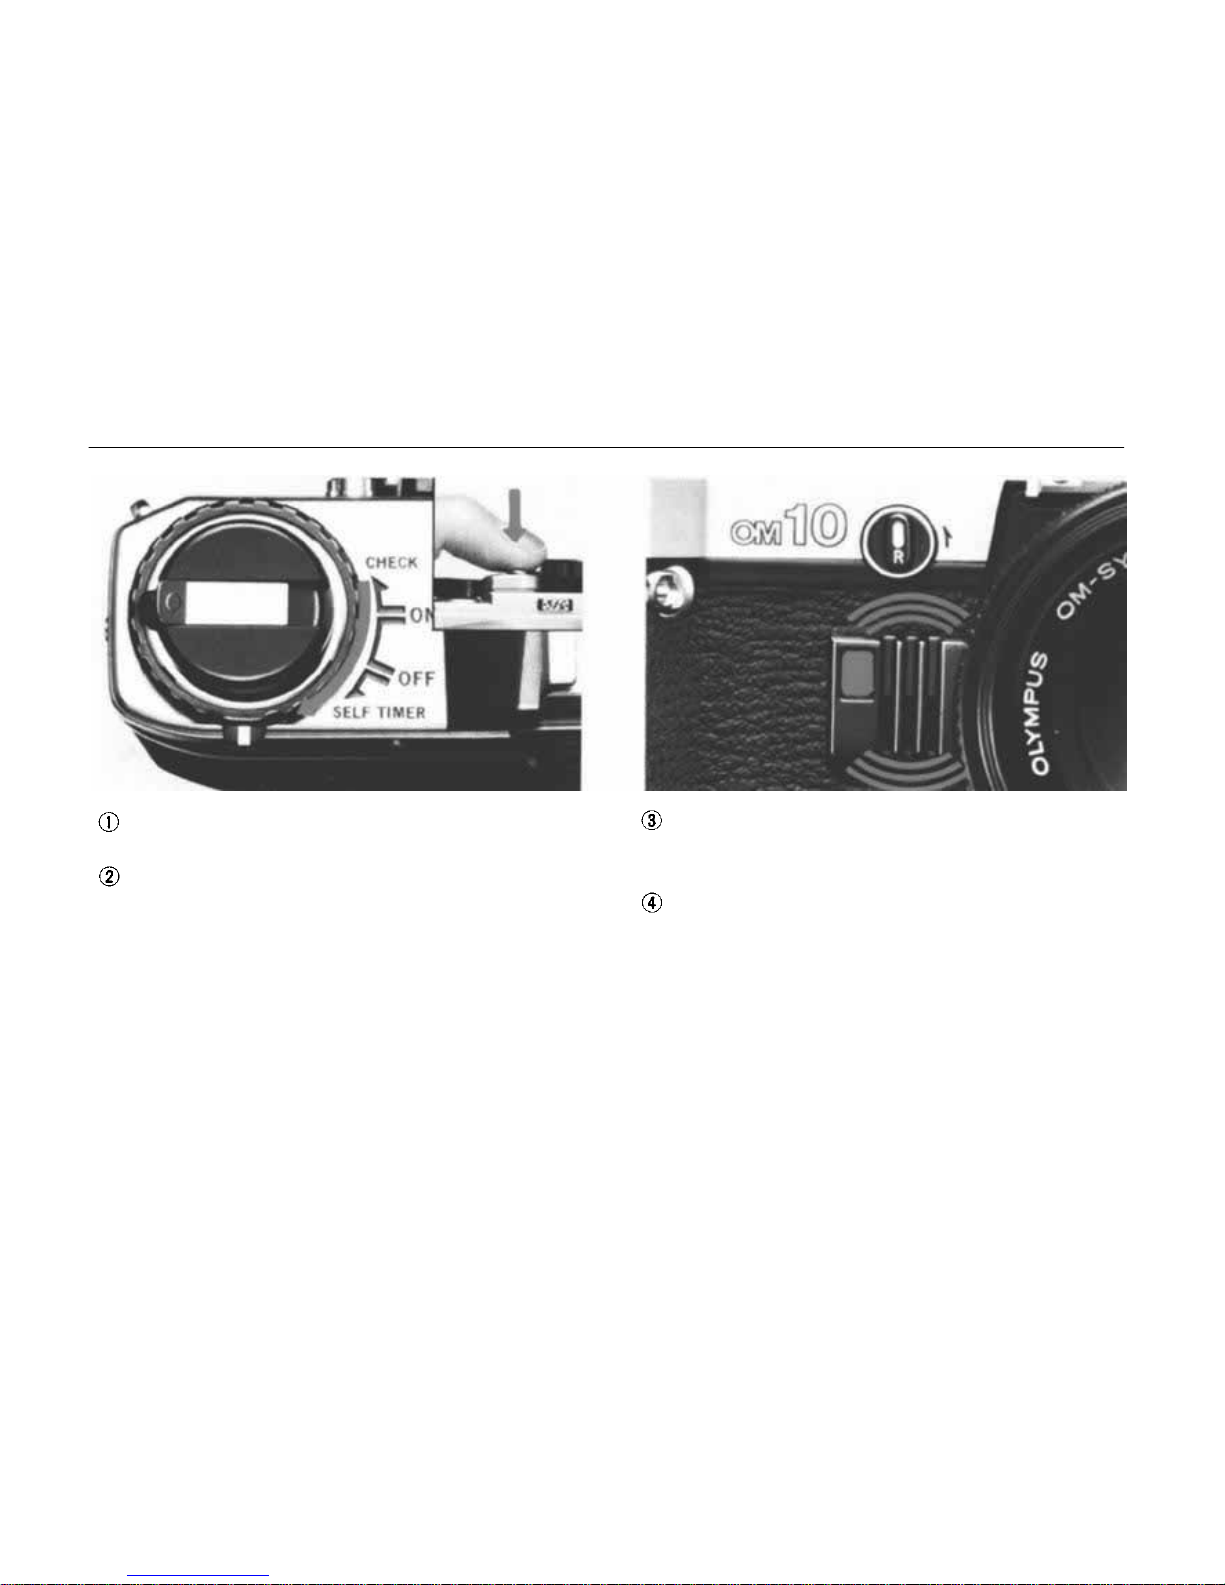
THE USE OF THE SELF-TIMER
Click the selector dial to the position "SELF
TIMER".
Press
the
shutter
release
button.
A beeping sound is heard and the self-timer
light
blinks.
The
shutter
will
be
released
after
about 12 seconds.
Return the selector dial to its original position.
25
Page 27

PHOTOGRAPHIC TECHNIQUES
The various functions of the OM-10 and
the wide variety of lenses, flash, winder, and
system accessories which can be used with it
allow you to fully master all the techniques
which automatic photography can
make possible.
We shall devote the following section
to some of these photographic
techniques.
26
Page 28
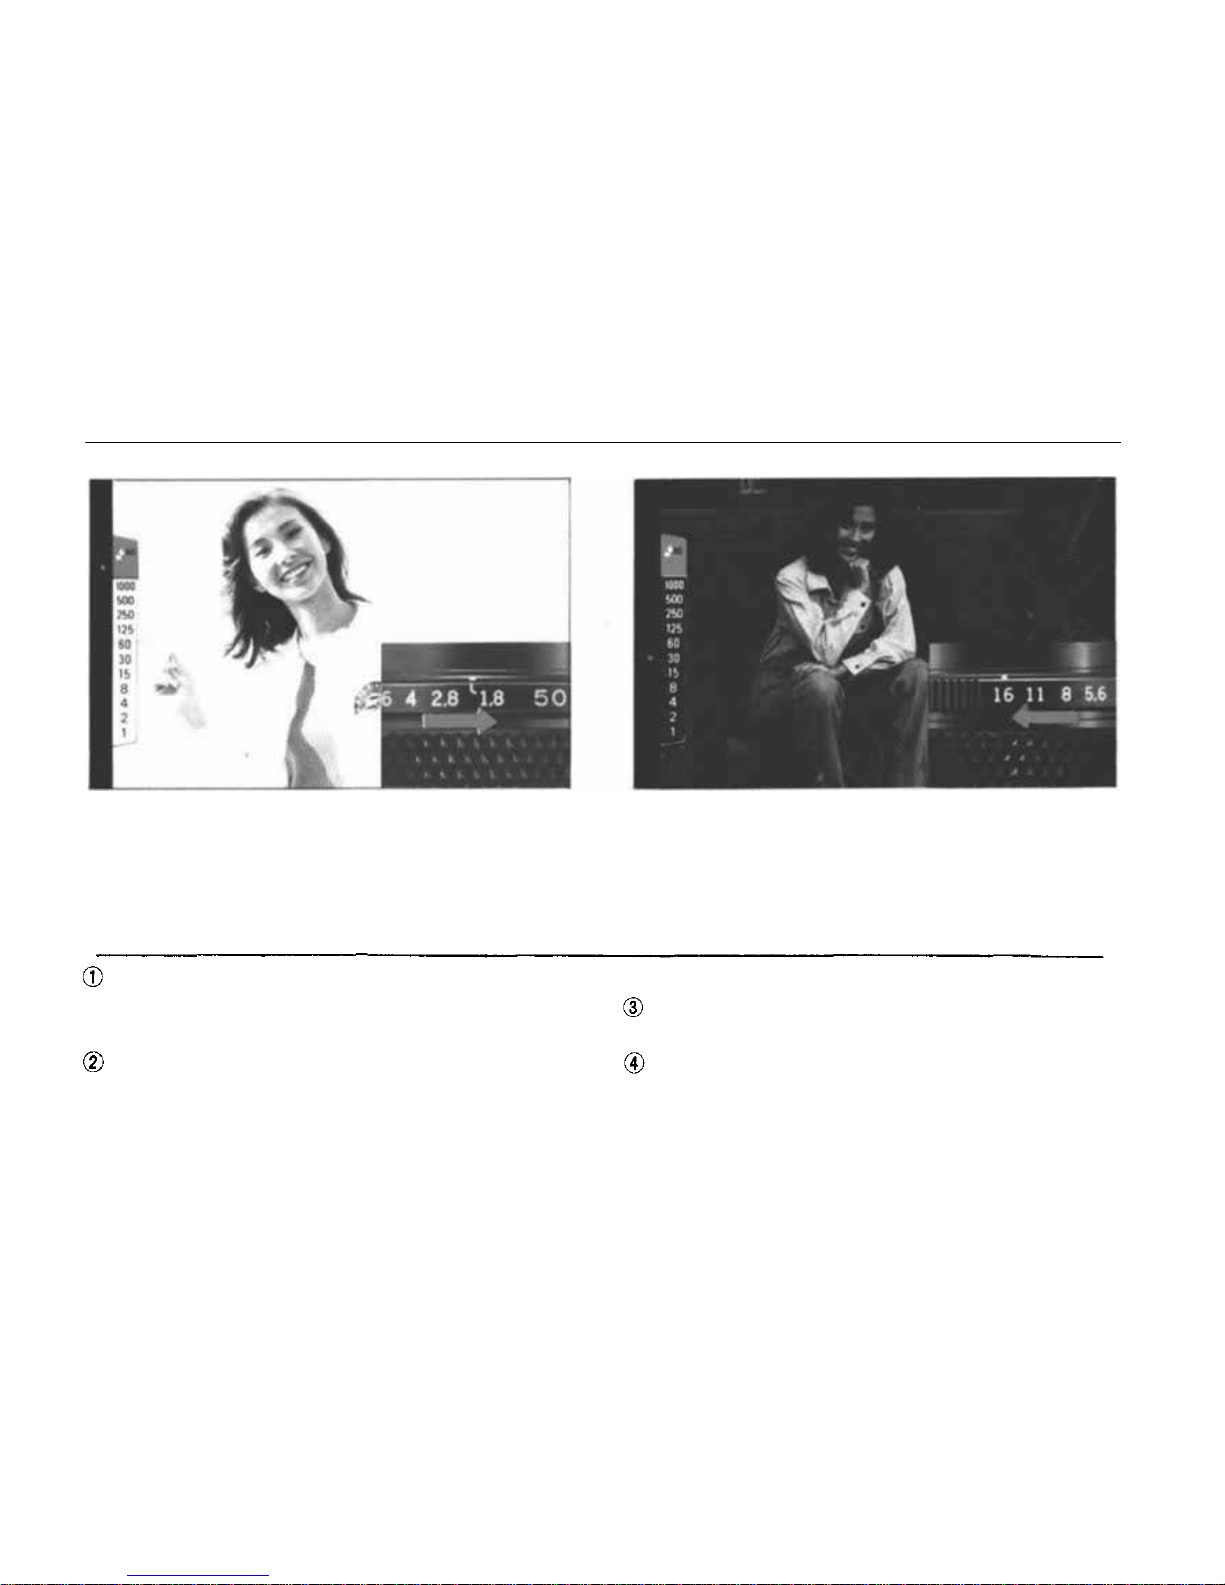
CONTROLLING THE EXPOSURE
When taking pictures in a place which is either
too dark or too bright, even if you follow the
aperture guidelines given on page 17, there will
be a tendency to result in whitish photographs
(overexposure), or darkened ones (underex-
posure), or even blurred images. In these circumstances, make full use of the aperture r ing i n order
to control exposure so as to obtain properly ex-
posed photographs.
When
a red
light
turns
on in the red
zone
at
the top of the shutter speed scale in the view-
finder it indicates overexposure.
In such a case, turn the aperture ring to the
higher f-numbers (toward F16) until the light
appears within the proper exposure range, and
then proceed to tak e the picture.
When the light appears below "30" (1/30 of
a second), blur may easily occur.
In this case, use a tripod or turn the aperture
ring to the lower f-numbers (toward F1.8)
until the light goes higher within a range in
27
Page 29
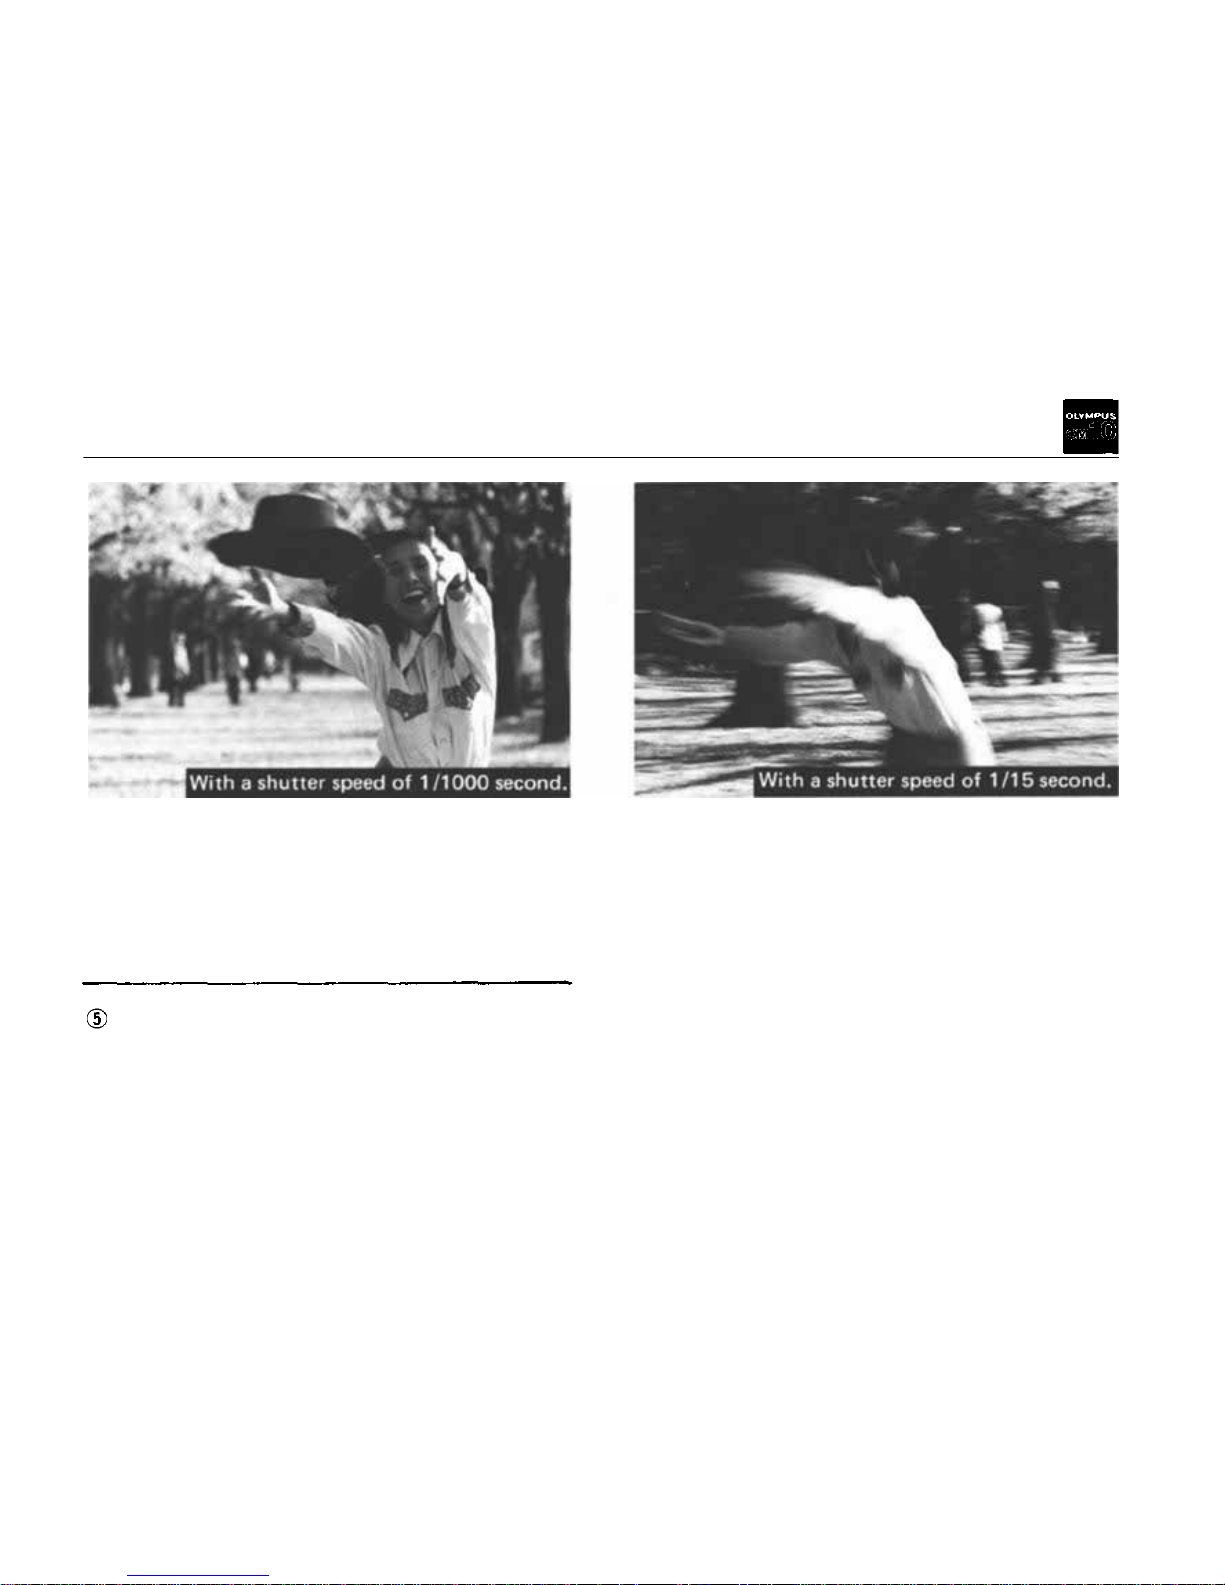
When photograhing fast moving subjects, there is
a marked tendency to obtain a blurred image of
the subject. This can be made use of as a technique to gi ve t he impression of movement, by intentionally allowing the image to be blurred, while
making use of the shutter speed priority function.
Pictures taken with this technique off er an interesting challenge. Turn the aperture ring until the
light in the viewfinder appears by the shutter
speed value suitable for the photographic situation,
and
then
press
the
shutter
release
button.
which blur is not likely to occur.
When the light appears at "1" (1 sec.), the
shutter speed is 1 s ec . or longer. In su ch a case
it is recommended t o tu r n t he aperture ring to
the lower f-numbers within the proper ex-
posure range.
PHOTOGRAPHY WITH SHUTTER-SPEED PRIORITY
28
Page 30
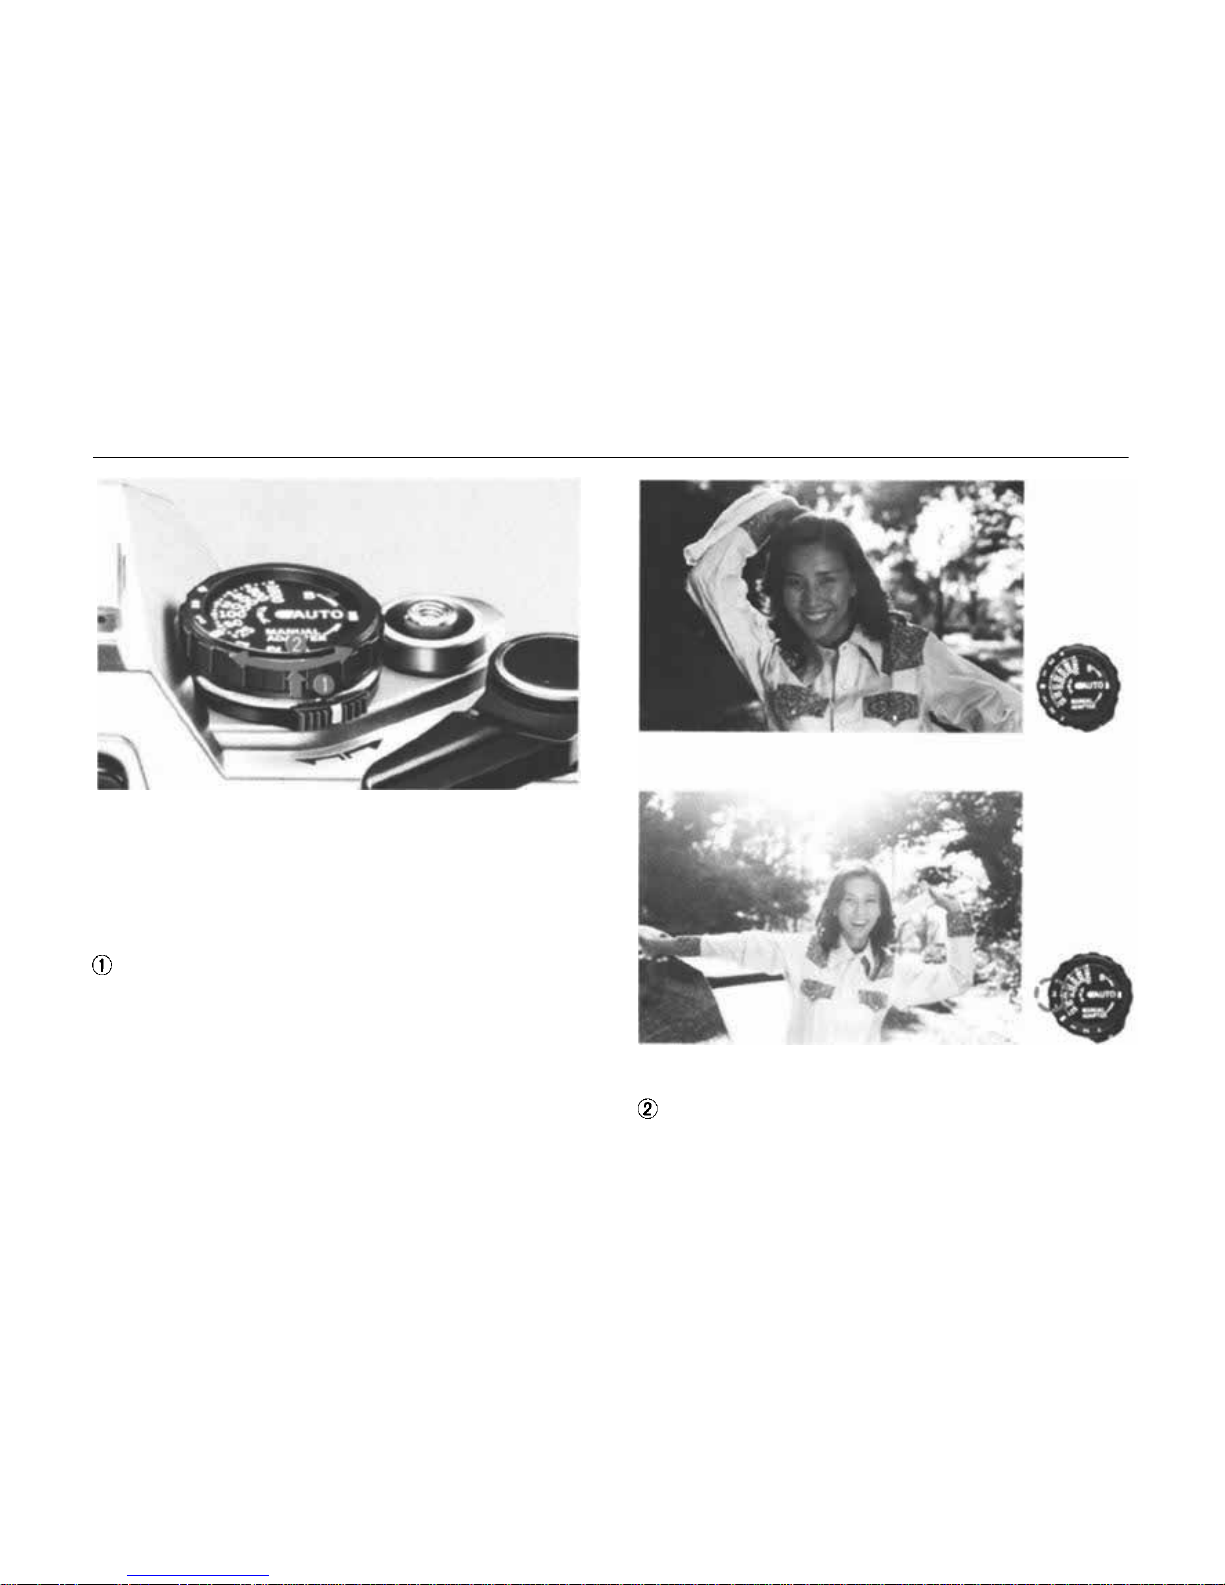
When shooting against t he light, or if the subject
is standing before a window, the face tends to ap-
pear dark on the image. In this case, use the ex-
posure compensation dial to obtain a correctly
exposed photograph.
Lift the compensation dial and change the
film speed set on the dial (within ±2).
By thi s means, it is possible to obtain high or
low key effects. (+) is for high key (overex-
posure) and (—) is for low key (underex-
posure). However it is not possible to obtain
(-) compensation for ASA 1600 or the (+)
Before compensation
Compensated
+ 2 full stops.
(For example, ASA 100 compensated +2 full stops.)
compensation for ASA 25.
When you finish taking the picture, r eturn the
compensation dial to its original position.
EXPOSURE COMPENSATION
29
Page 31
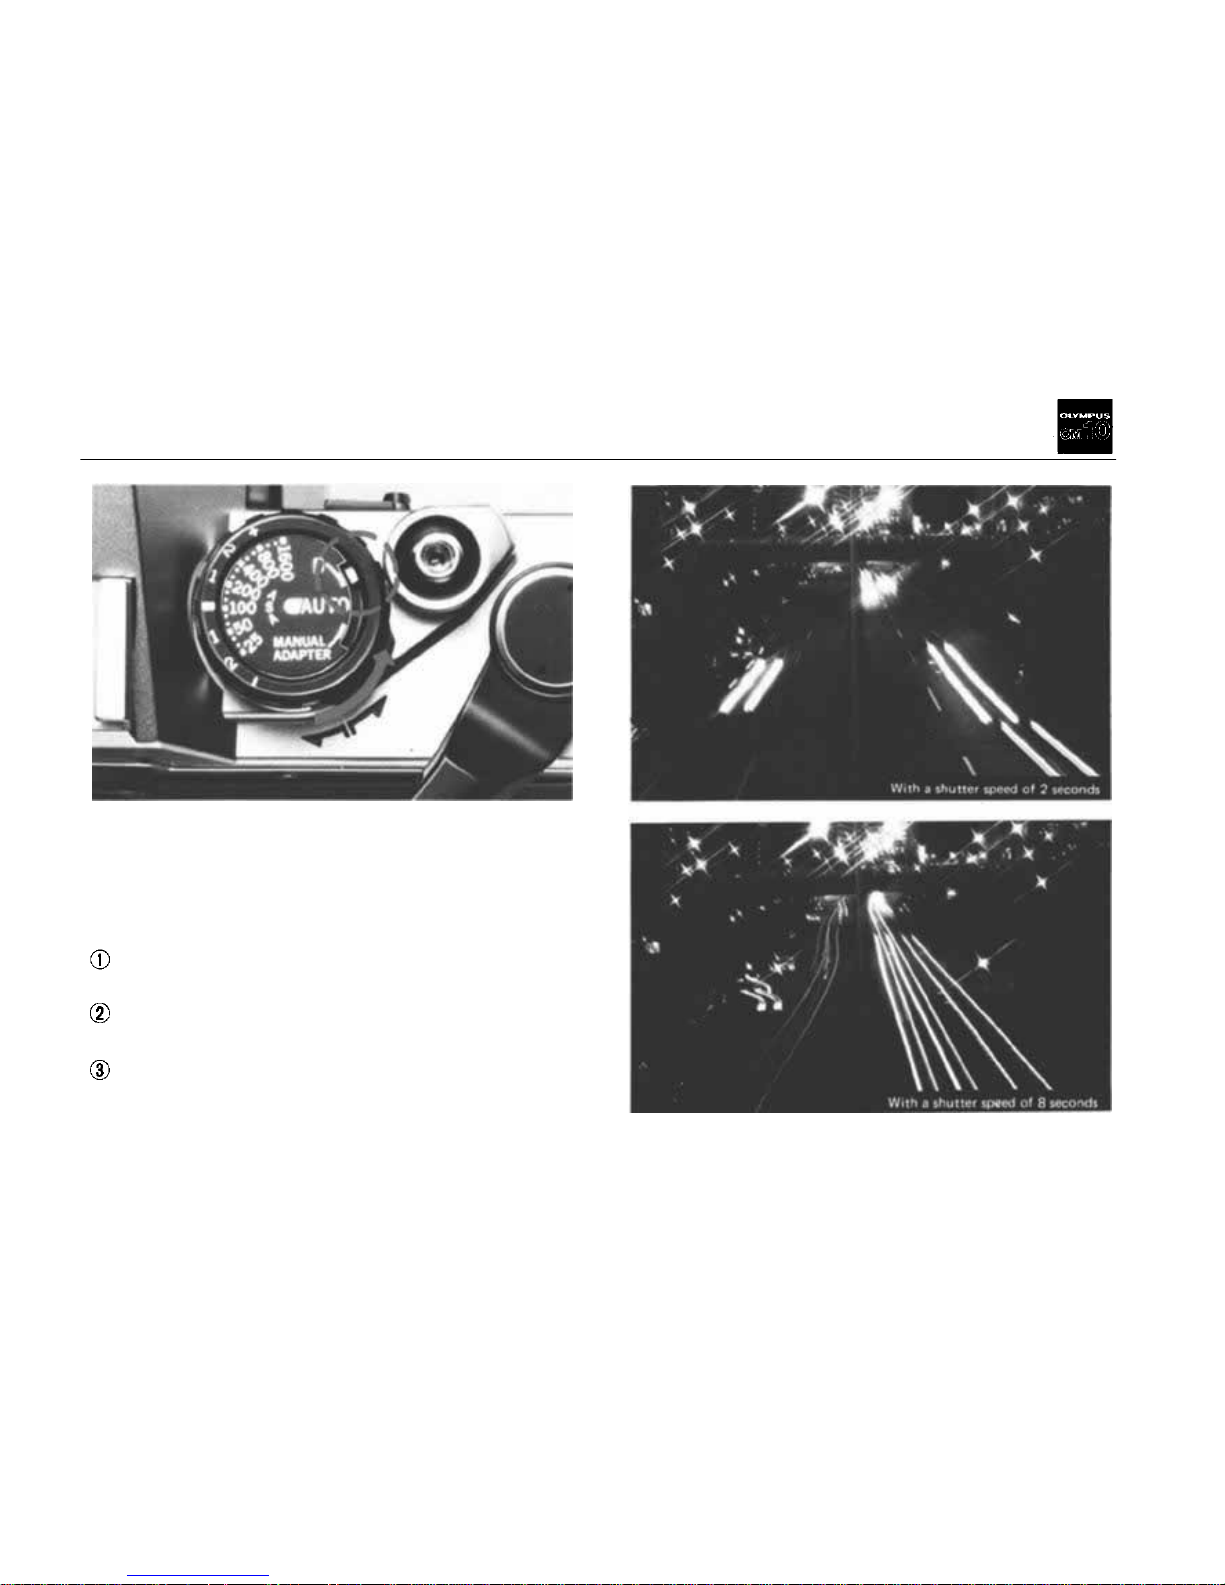
LONG EXPOSURES
Indoors when it is dark, or when photographing
at night, use the "BULB" setting and take the
pictures by resorting to long exposures. Of course,
blur can easily occur in long exposures so it is re-
commended to use a tripod and a cable release.
Set the mode selector lever to B, and press the
shutter release button.
The shutter will remain open a s long as t he
shutter button is being pressed.
Do not
forget
to
reset
at the
"AUTO"
position
after you finish taking pictures.
(Continued on page 49)
30
Page 32
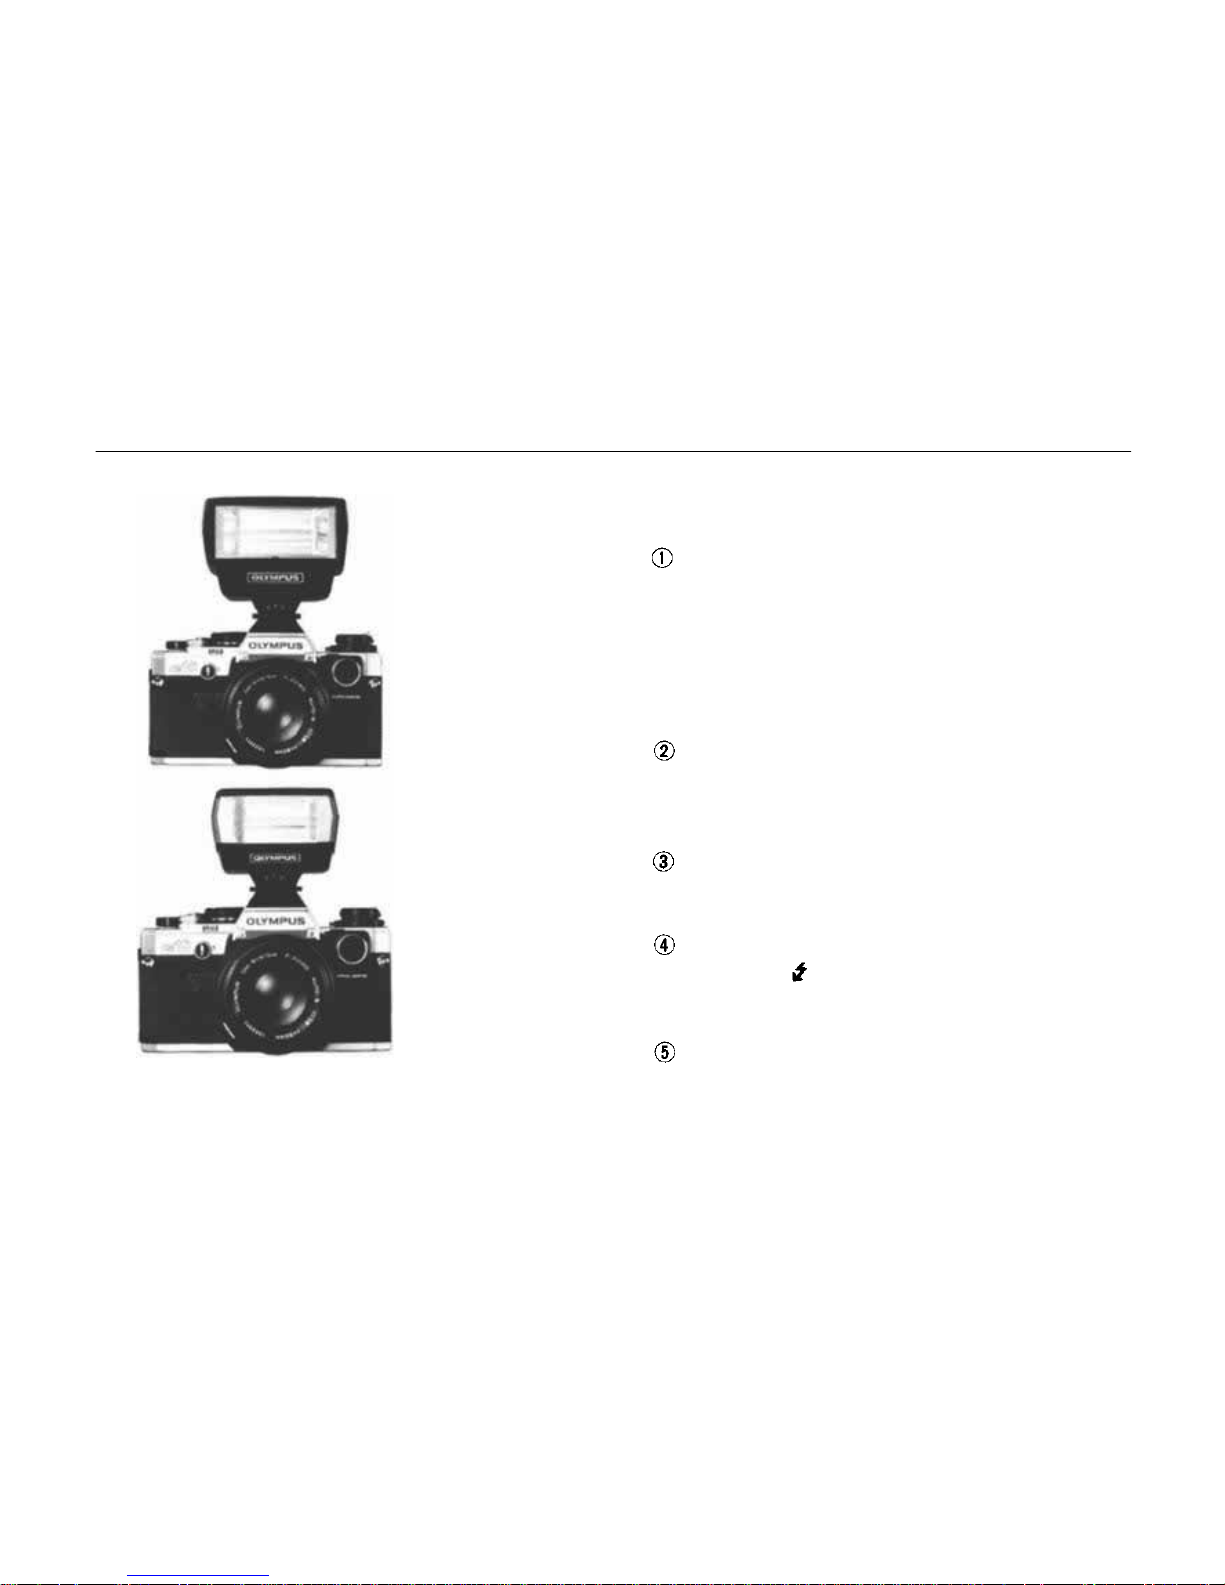
FLASH PHOTOGRAPHY
Electronic
Flash T32
Electronic
Flash T20
The T32 and T20 electronic flash units specifically designed for OM cameras provide artificial
illumination when you take pictures at night or
indoors.
< Characteristics of flash photography using the
T32•T20 >
Mount the Electronic Flash T32 (or T20) on
the accessory shoe of the camera. When the
ON-OFF switch of the T 32 (or T2 0) is turned
on, the normal auto flash control begins working. W hen turned off , it reverts to the camera's
AE photography. It takes but a flick of a
finger to change it from one to the other.
When the ON-OFF switch of the T32 (or
T20) is turned on, the flash will be automati-
cally synchronized at the shutter speed o f the
camera.
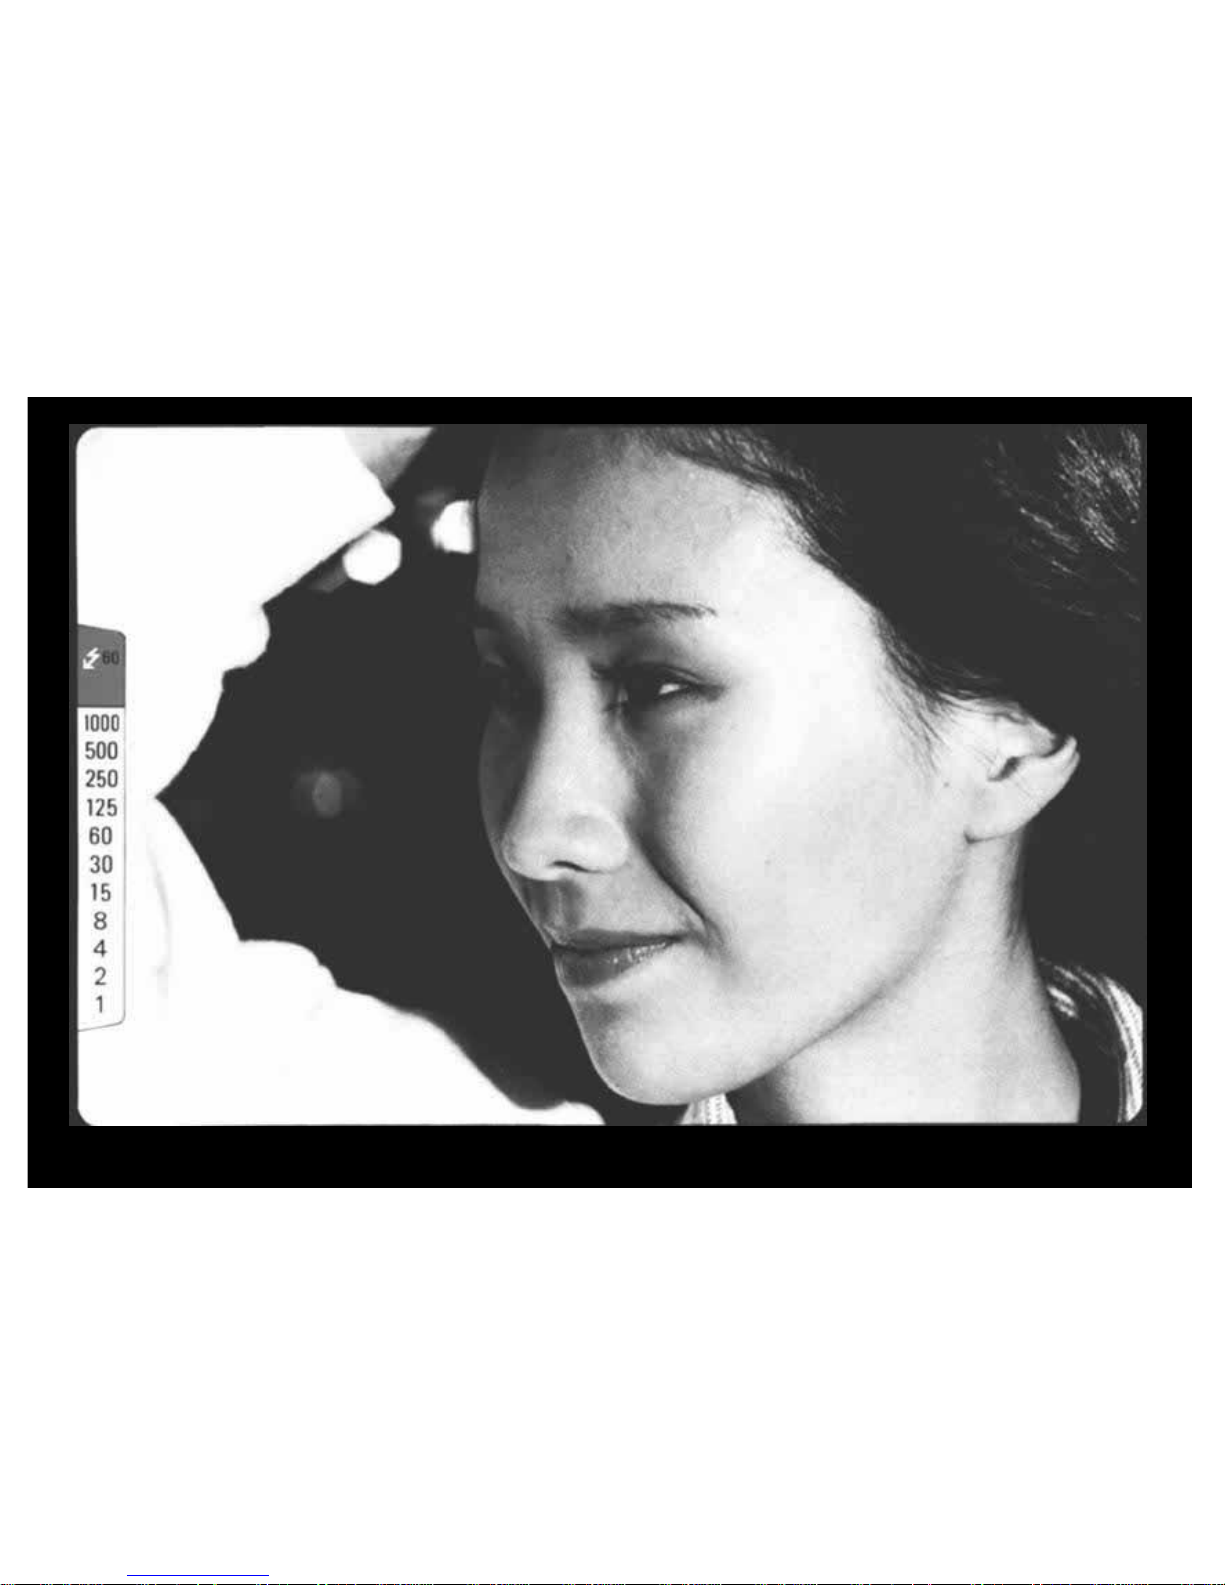
It is possible to verify when the flash is ready
because a full charge signal lights in the viewfinder.
In addition to the charge signal automaticall y
lighting at you can refer to the shutter speed
indicated by another red light in the view-
finder as required by the available light.
It is possible to check a correct flash exposure
in the viewfinder if the signal light blinks.
(Continued on page 49)
31
Page 33
32
•
•
Page 34
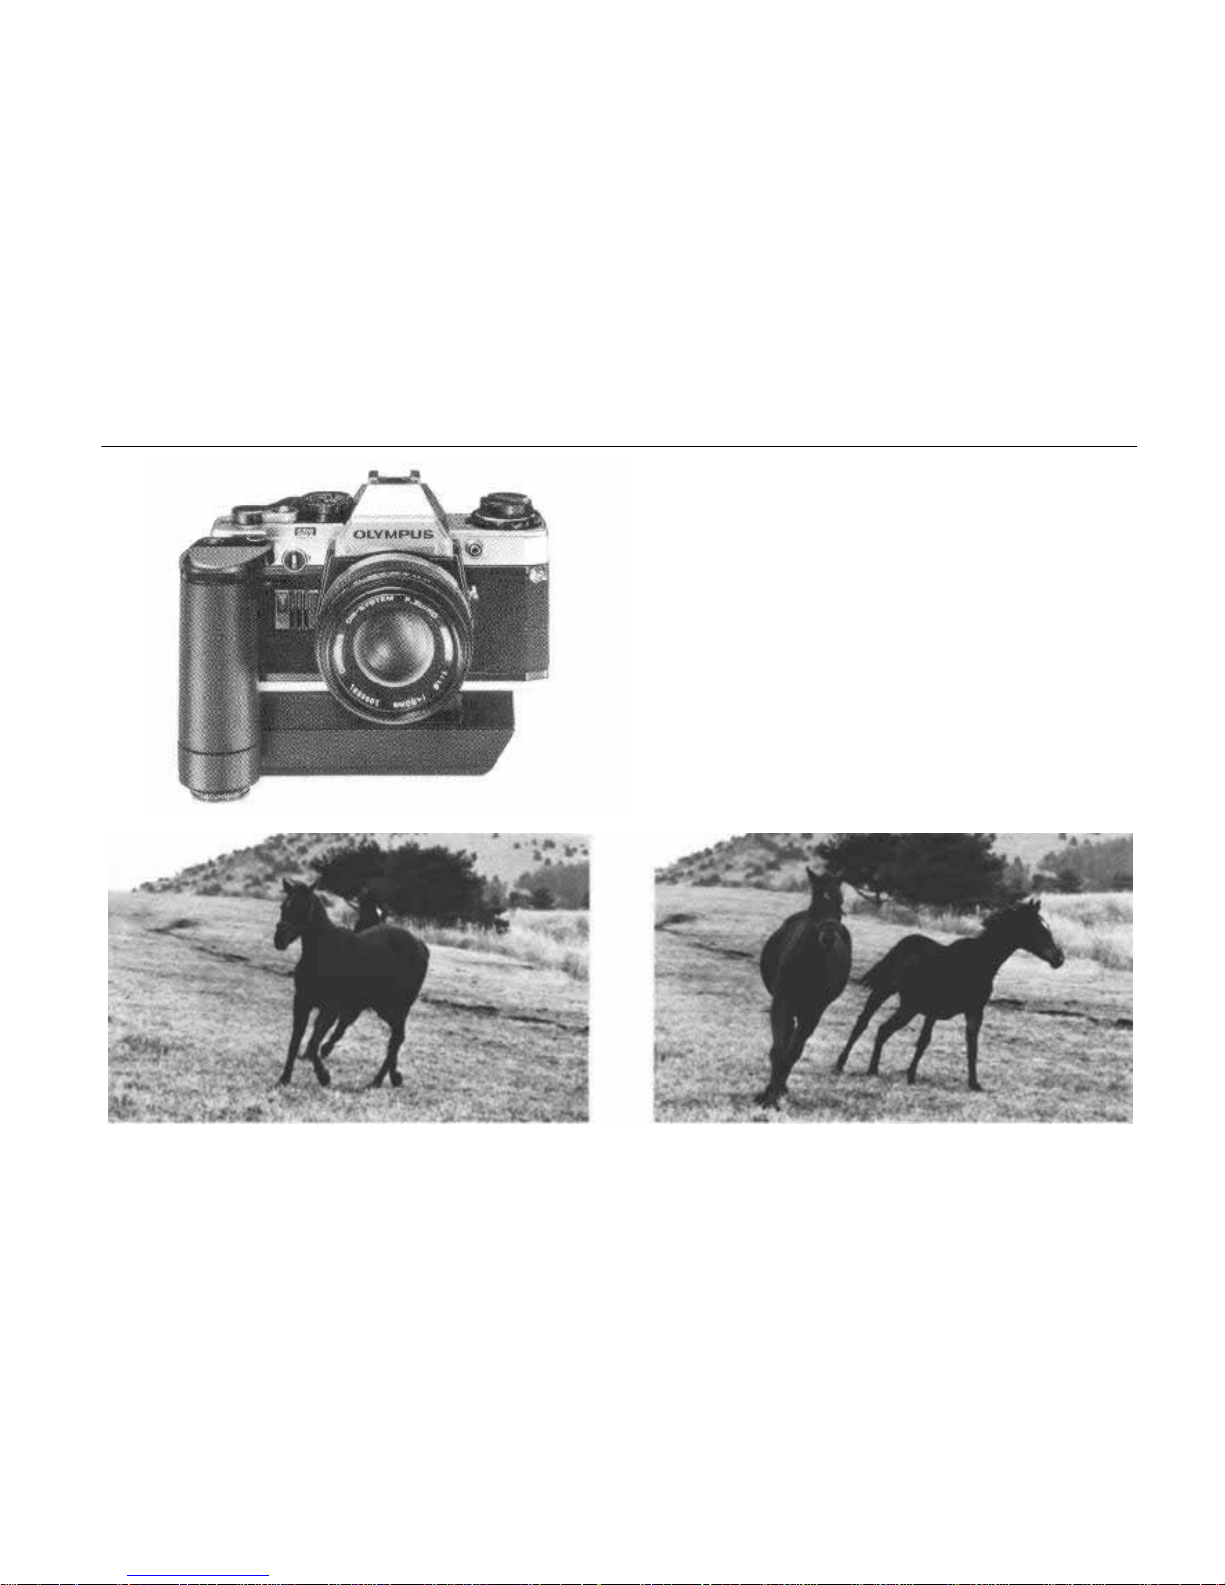
USING THE WINDER 2
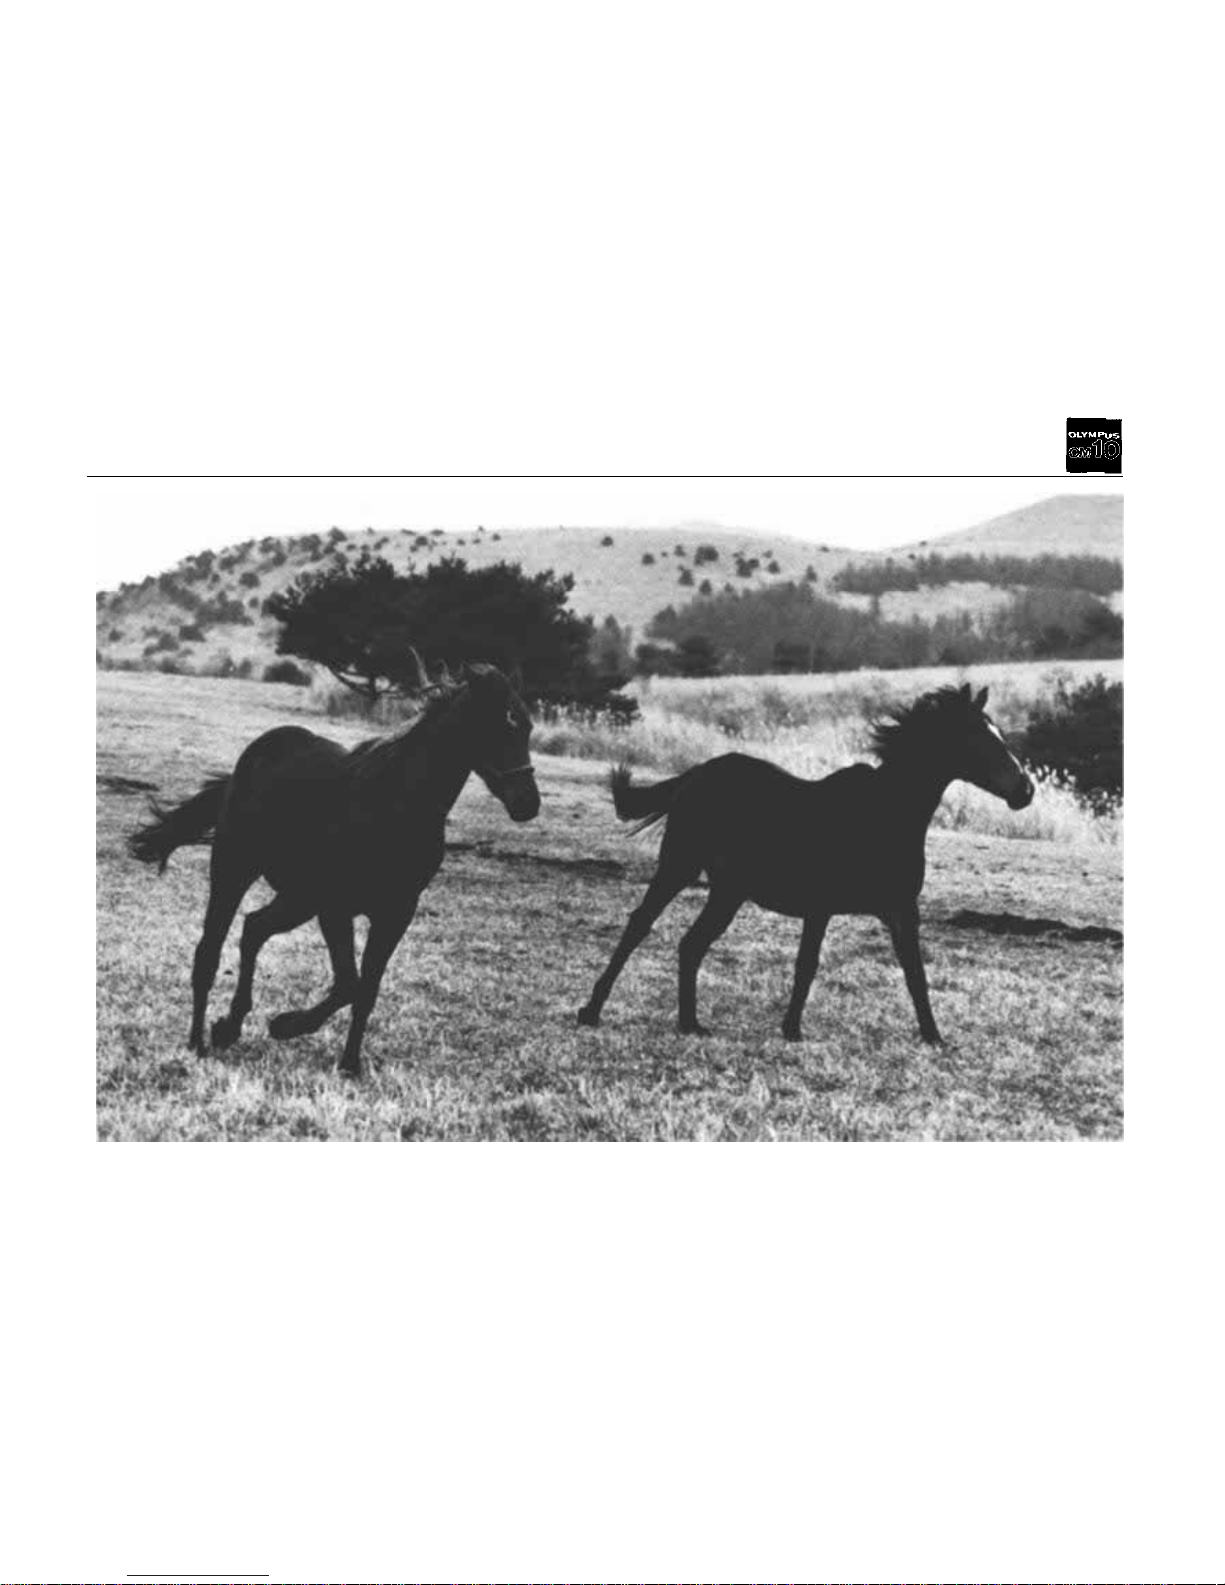
Fast moving subjects, such as in sports, car racing,
and the like, make you wish to take pictures at a
faster pace.
The time spent winding the film may mean that a
great chance is lost. In these cases, an accurate,
reliable power winder for automatic film winding
can well be the perfect answer, such as the
Olympus Winder 2 which can be attached on th e
OM-10 very simply, and switched to the single or
sequence mode photography. On single mode, it
can wind fi lm immediately a fte r exposure, ready
for next chance to release the shutter at a ny moment, and on sequence mode, it can make sequential
filming
as
fast
as 2.5
frames
per
second.
(Continued on page 49)
33
Page 35
34
Page 36
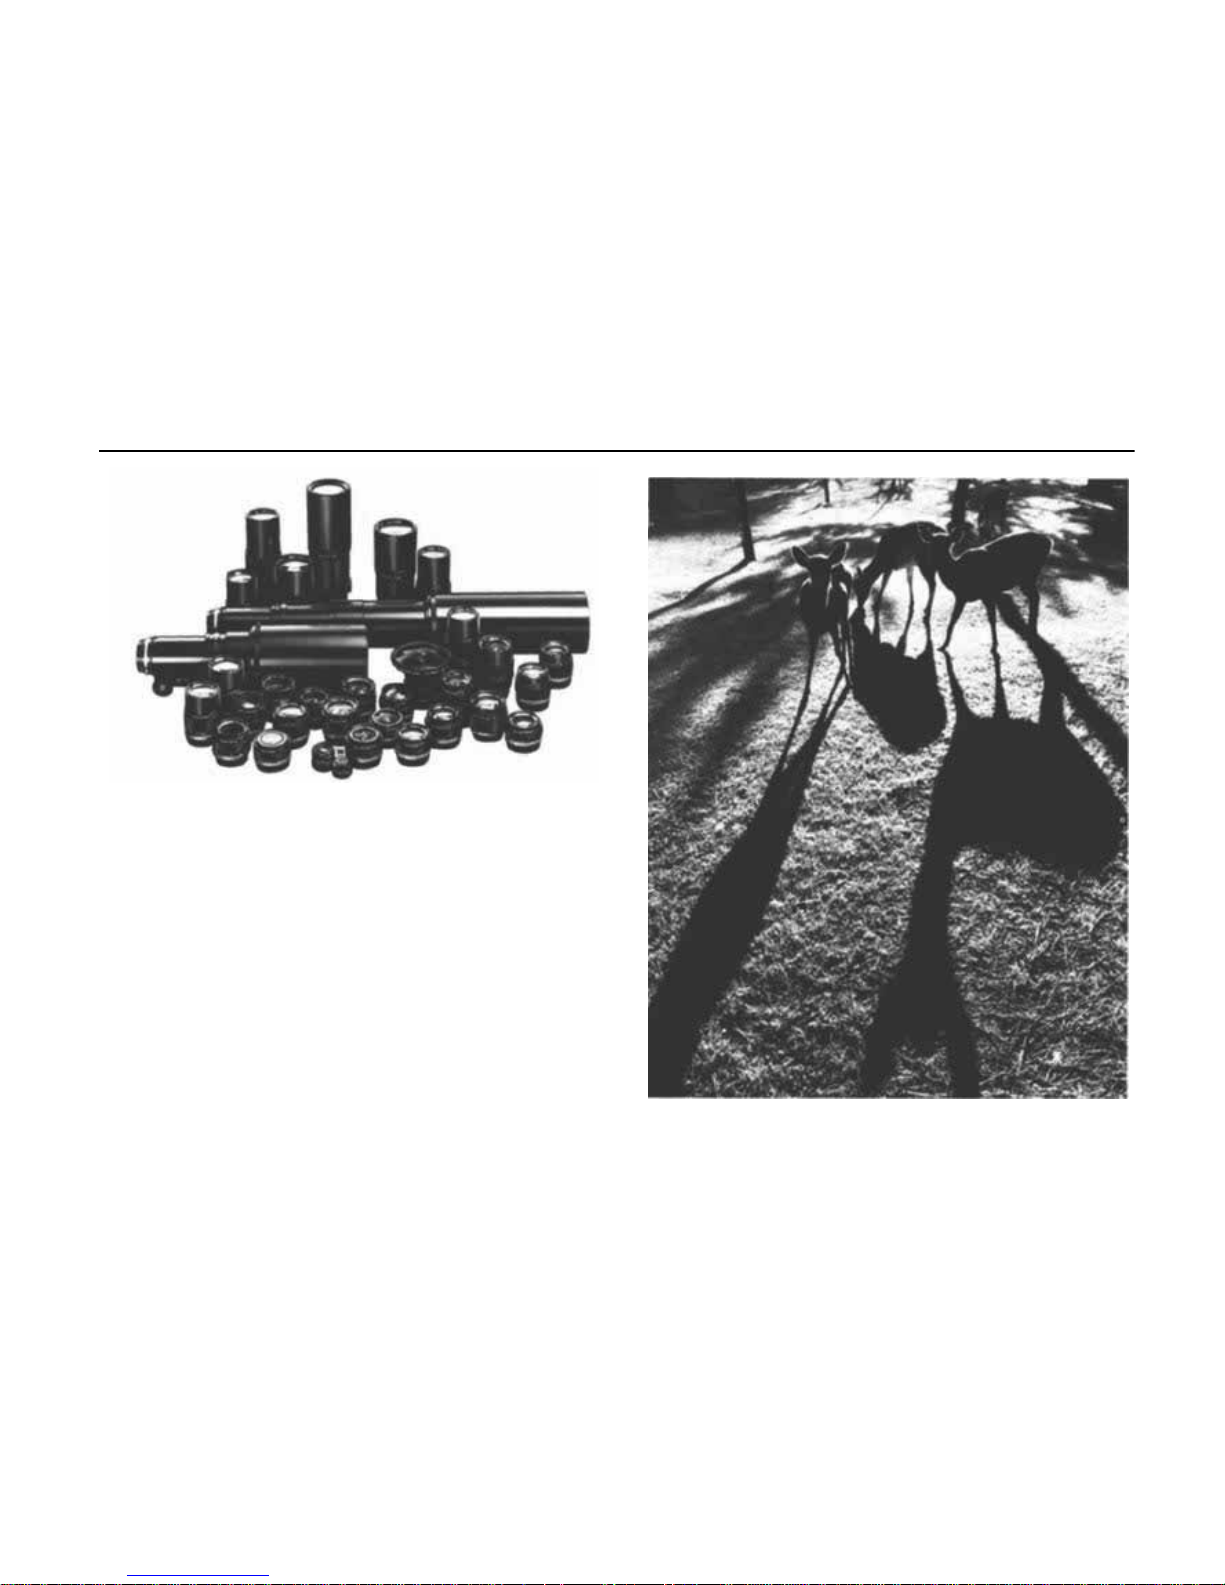
FROM GENERAL PHOTOGRAPHY TO THE USE OF INTERCHANGEABLE LENSES
The main characteristic of the single lens reflex
camera is the possibility of using a plurality of
different lenses on the same body. From photography with a standard lens to the feeling obtained with a telephoto lens by blurring the background or, on the other hand, by stressing the
perspective, giving a special effect to the background by means of a wide angle lens, the world
of images which unfolds before you with the
OM-10 becomes richer and wider. Olympus Zuiko interchangeable lenses included in the OM
System are highly reputed for their sharpness and
resolving power.
Wide angle 28mm
35
Page 37
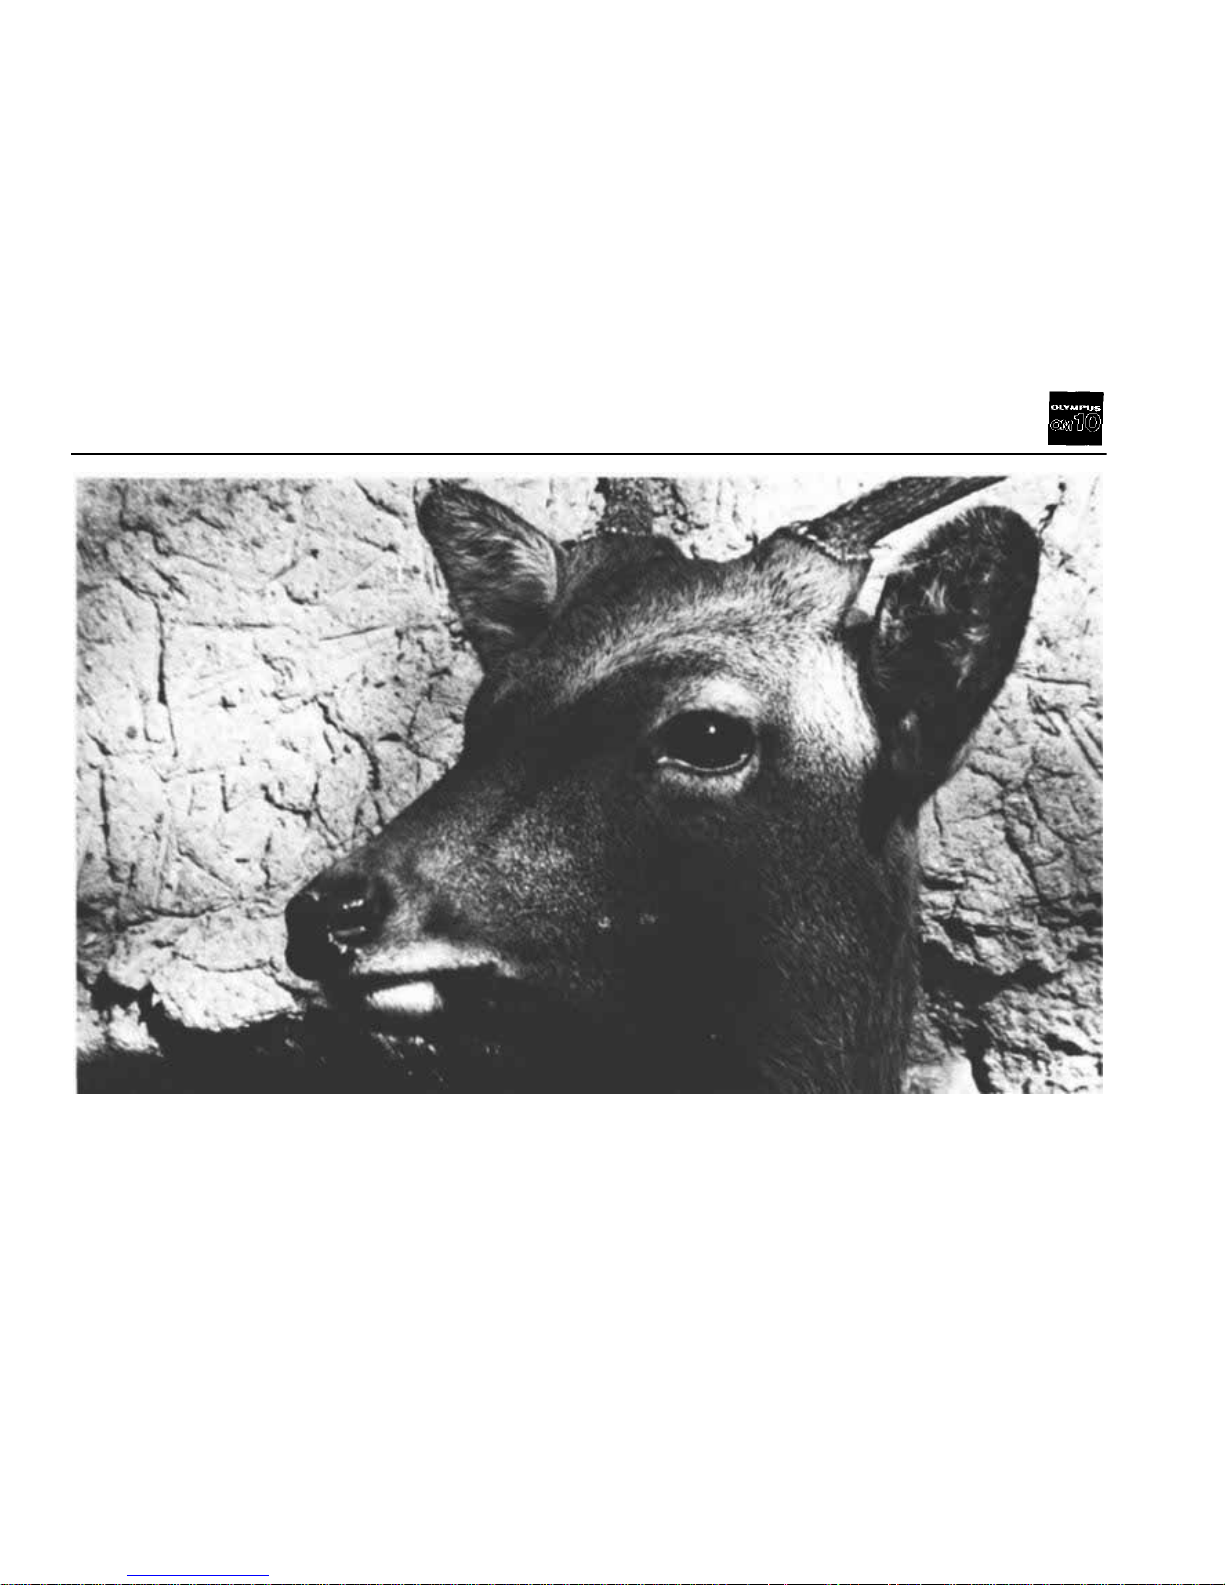
Telephoto 200mm
36
Page 38
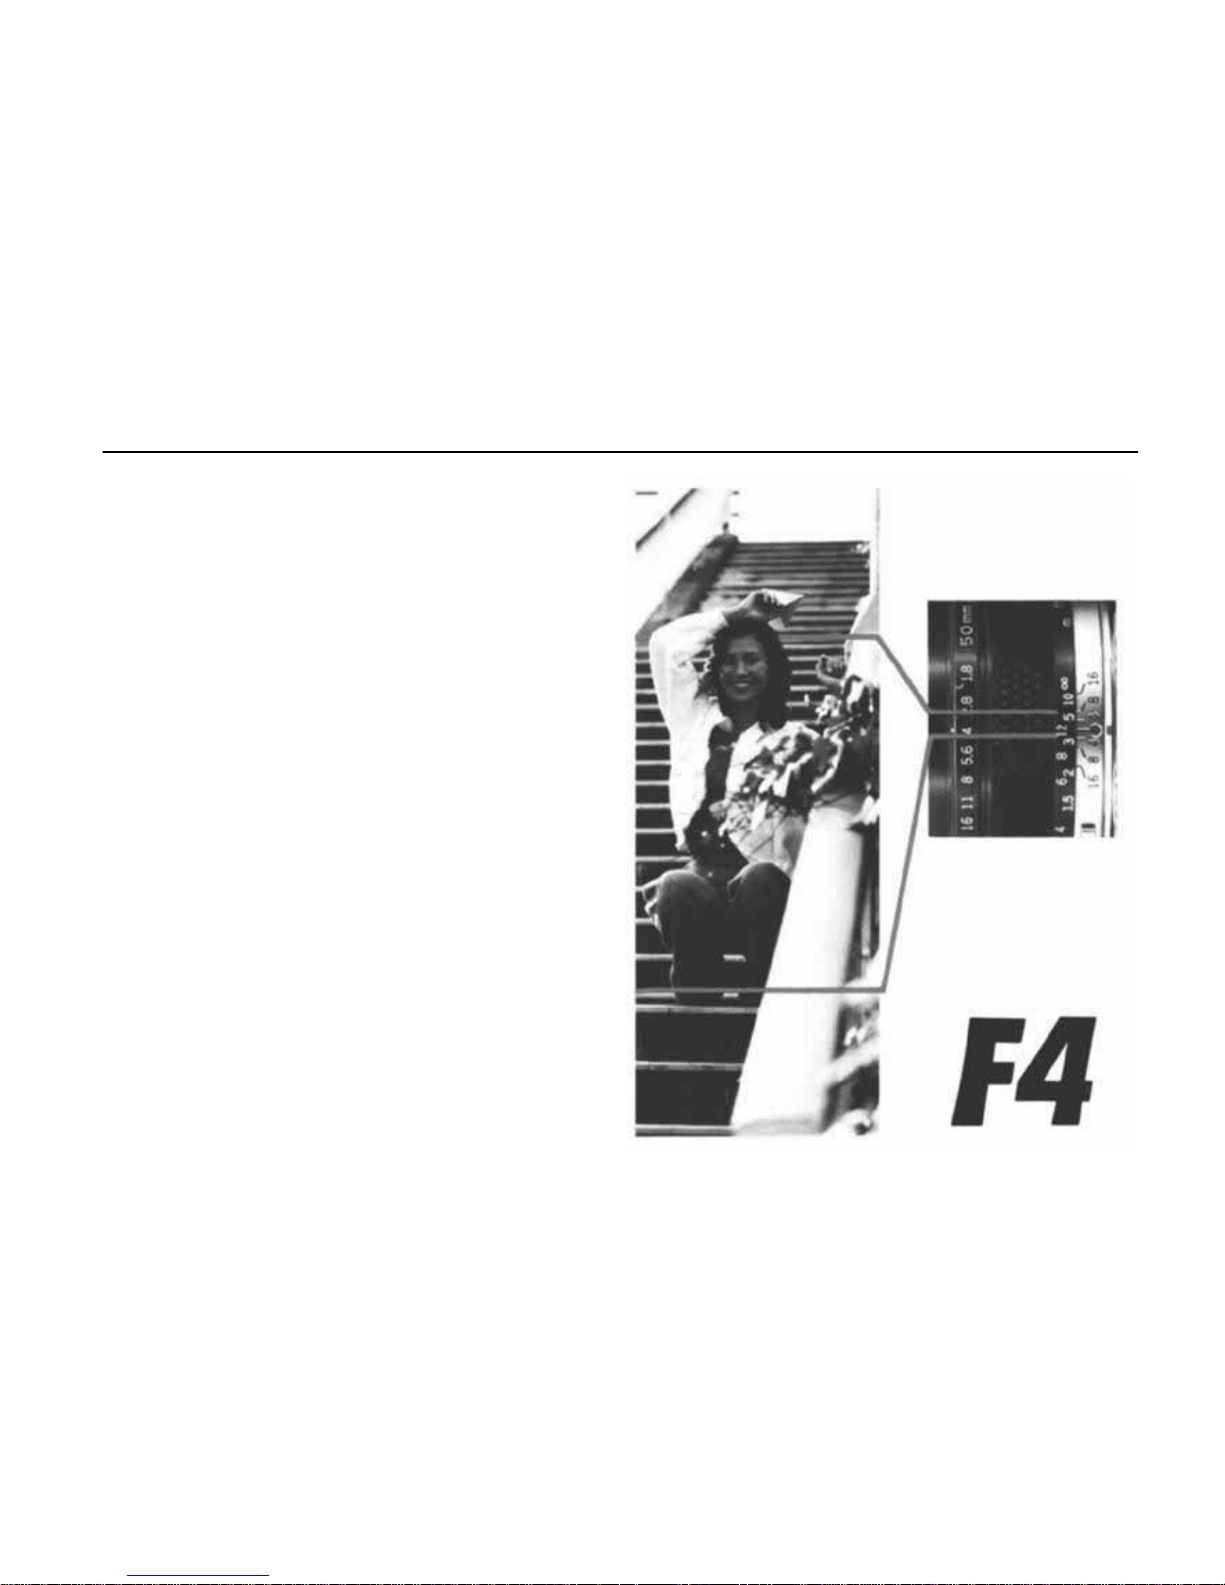
MAKING USE OF THE DEPTH OF FIELD
When y ou have a subject in focus, there is a range
in the fore and the background which is clearly
defined in the picture. This range is call ed depth
of field. The larger the F number becomes, the
wider this clearly defined range becomes, and
the background becomes sharper. On the contrary, the smaller the F number becomes, this
range
becomes
less
wide,
while
the
background
loses contrast and out of focus. By using these
properties of the depth of field with creativity
and imagination, you will be able to take pic-
tures
which
will
have
your
own
personal
im-
print.
37
Page 39
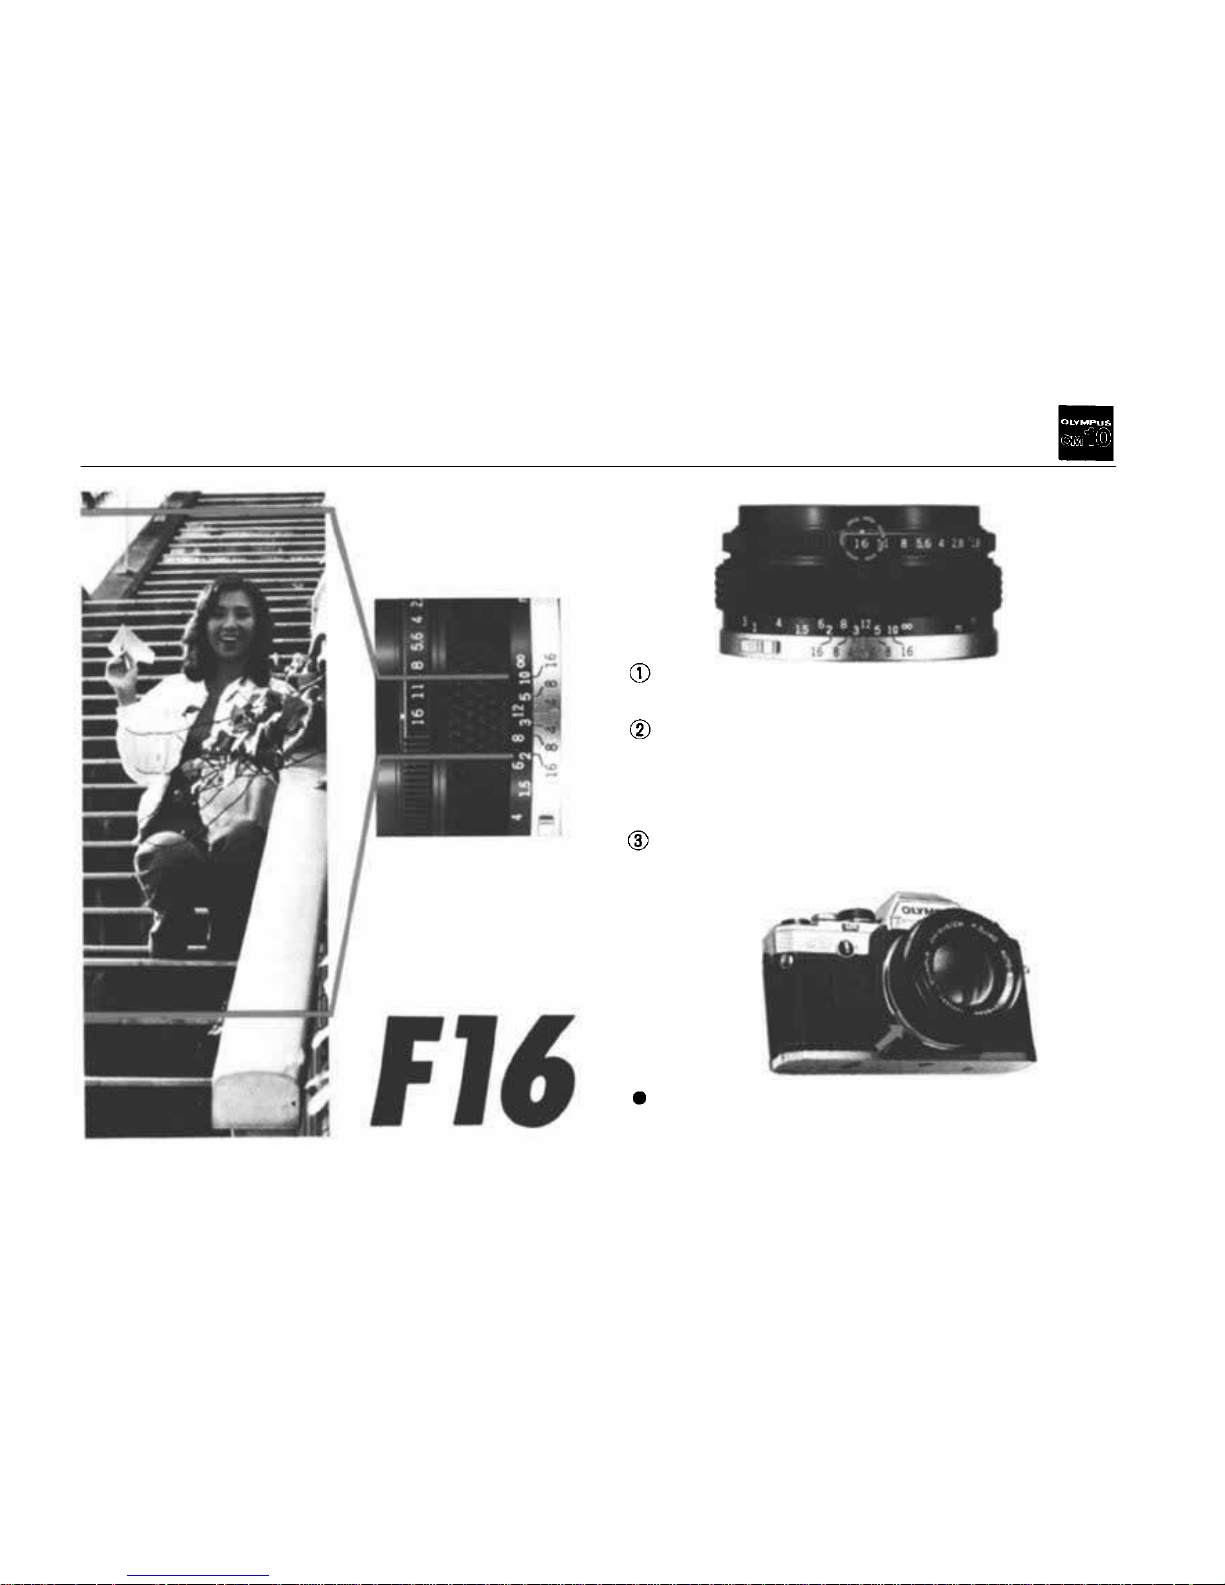
< How to check the depth of field >
The photograph is focused at a distance of
about 4m (13 ft).
In this case, if the aperture is set at F 4, the
range which appears clearly defined will be
approximately from 3m (10 ft) to about
4.5m (15ft).
If an F16 is used, the range w ill be ap proximately between about 2m (6.6 ft) and 10m
(33
ft).
When you want to check inside the viewfinder
the correct focusing range, it simply requires
pressing this preview button.
38
Page 40
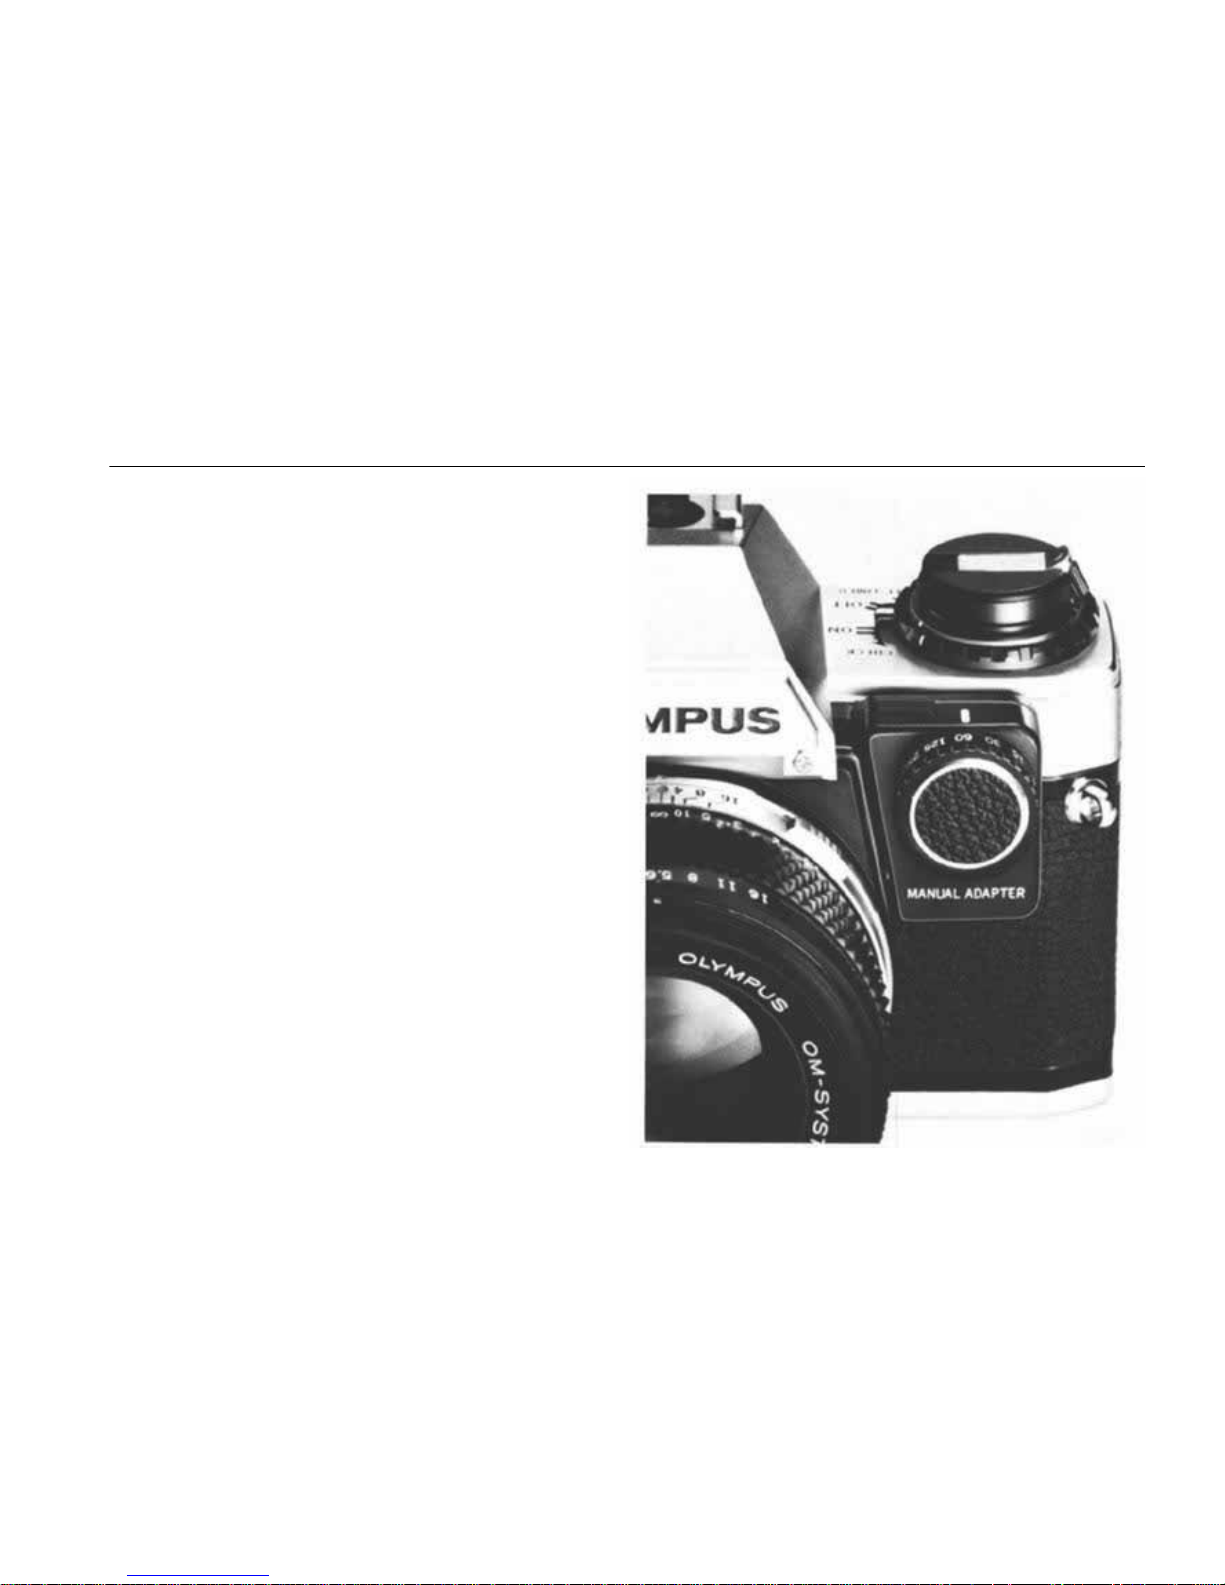
MANUAL EXPOSURE CONTROL
When the optional Manual Adapter is attached to
the OM-10, it is possible to revert to manual exposure control. When photographing fast moving
subjects, when there is a possibility of camera
shake, or when you want to capture the subject
in its natural tones no matter what the illumination behind may be, this accessory proves to be
very useful. In order to control exposure in such
a way as to obtain special effects to match the
photographic situation or your own intentions,
you must rely on your own expertise and practice.
In photography with manual control of exposure,
the mode selector lever must be set at the "MAN-
UAL ADAPTER" position.
To use the electronic flash T32 or T20 with the
Manual Adapter attached on, you must set the
mode selector lever to AUTO and the flash unit
automatically synchronizes at the shutter speed
of the camera.
(CAUTION) If an electronic flash other than the
T32 or T20 is used with the Manual Adapter,
sometimes the shutter is not released at the speed
you set on the Adapter due to the noise of the
flash.
39
Page 41
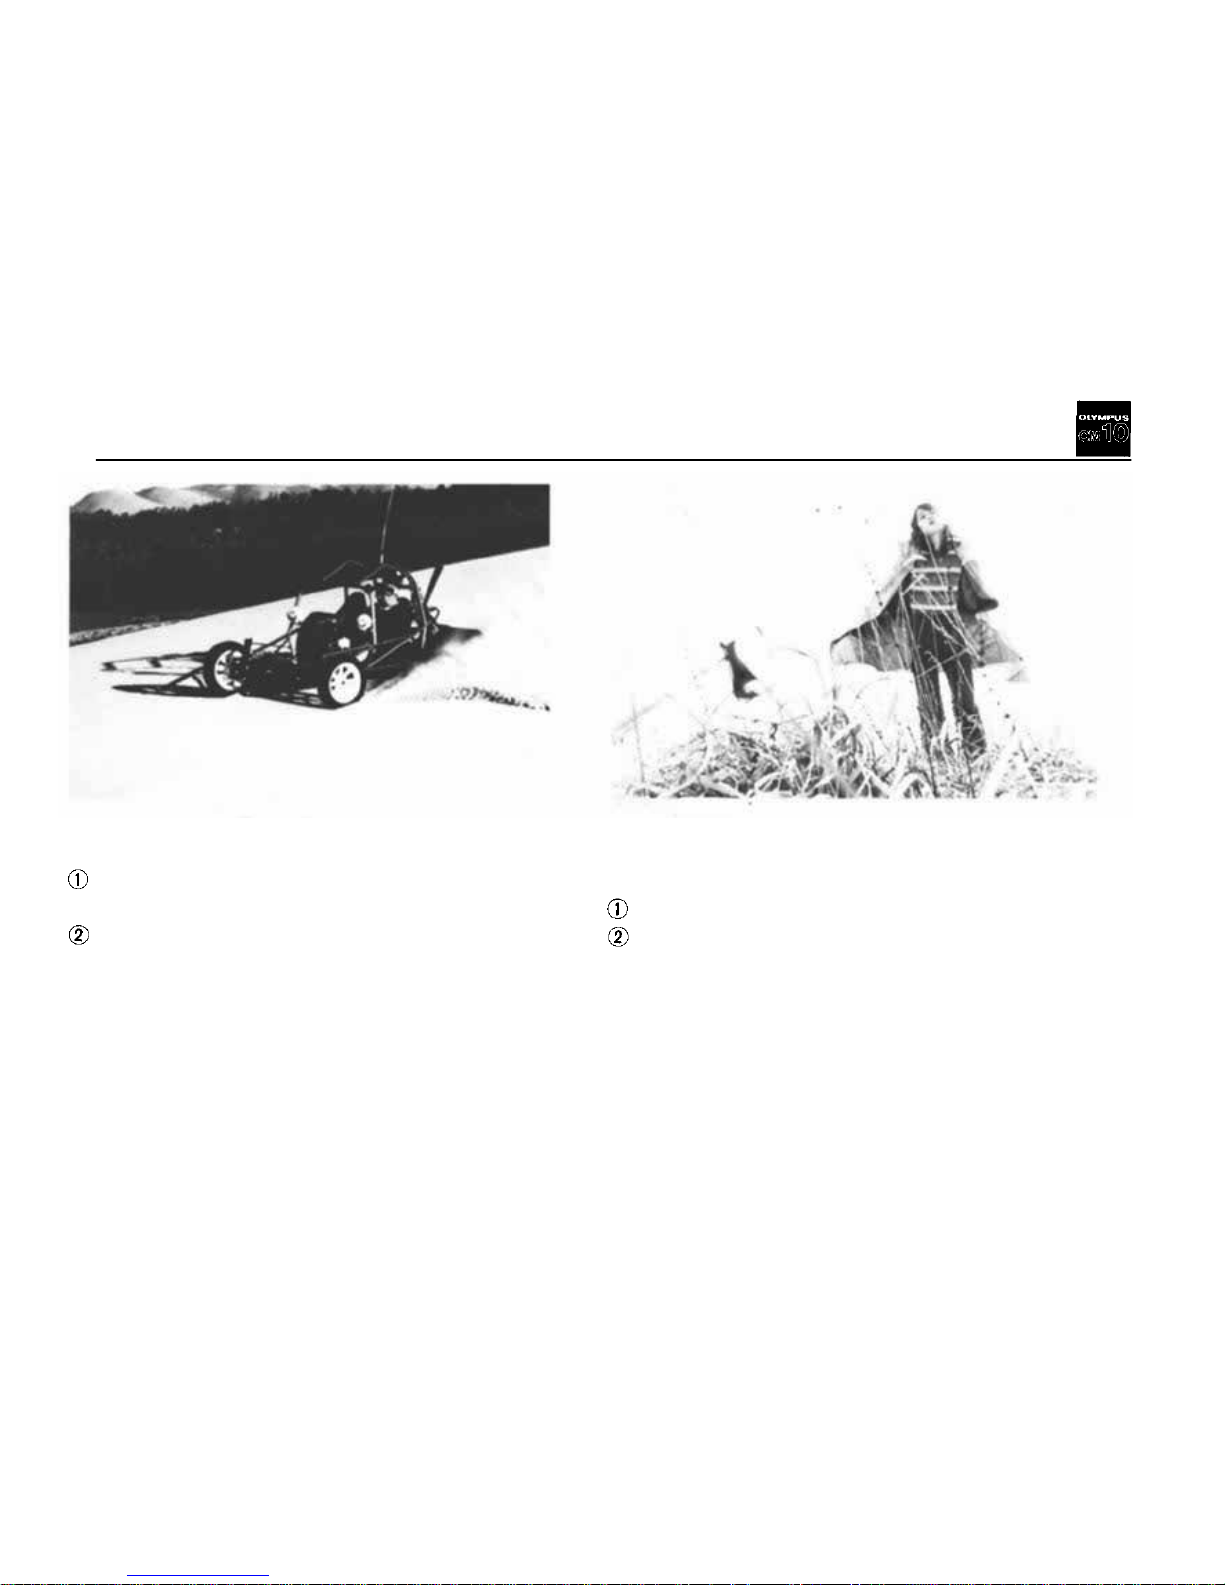
Shutter-speed priority at 1/1000 sec.
< When shutter-speed priority is advisable >
Set the necessary shutter speed in the Manual
Adapter.
Turn the aperture ring while looking through
the viewfinder until the light on the shutter
speed scale turns on at the shutter speed which
was set in the Manual Adapter. Then, press
the shutter release button.
Aperture priority, high keyed
< How to apply aperture priority to your photo-
graphic needs >
Set the aperture as preferred.
Look through the viewfi nder to see the shut-
ter speed which the light indicates, and set
that speed in the Manual Adapter. Then, press
the shutter release button.
* B y intentionally ignoring the indicated shut-
ter speed, and setting a different one in the
Manual Adapter it is possible to obtain high
key or low key results as desired.
40
Page 42
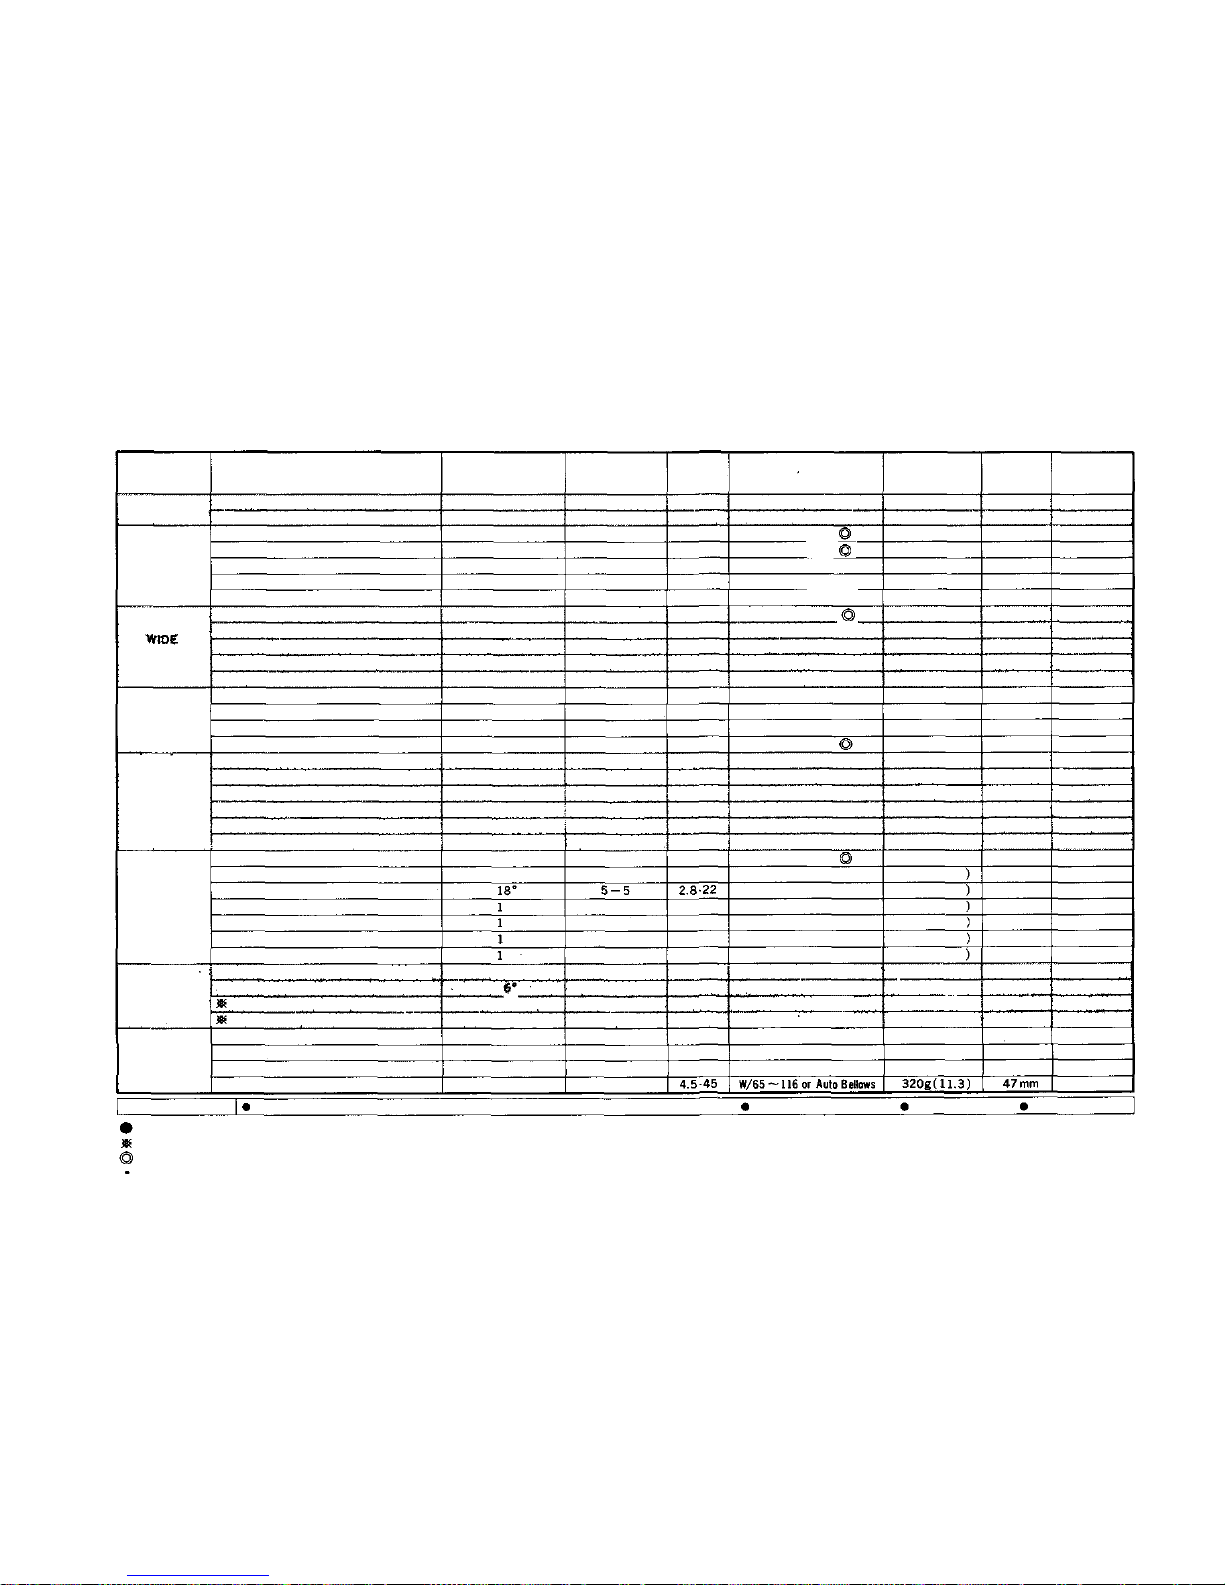
TABLE OF INTERCHANGEABLE LENSES
MC stands for multicoating.
Picture image may be cut off slightly when OM-10 is used with th e 600mm and 1000mm lenses.
Automatic correction design against close distance aberrations.
Make it a point to use the Zuiko MC Macro 135mm F4.5 with th e hood provided.
TYPE
FISHEYE
SUPER WIDE
ANGLE
ANGLE
STANDARD
ZOOM
TELEPHOTO
SUPER
TELEPHOTO
SPECIAL USE
INTERCHANGEABLE LENSES
ZUIKO FISHEYE
ZUIKO MC FISHEYE
ZUIKO MC
ZUIKO MC
ZUIKO MC
ZUIKO MC
ZUIKO MC
ZUIKO MC
ZUIKO MC
ZUIKO MC
ZUIKO MC
ZUIKO SHIFT
ZUIKO
ZUIKO MC
ZUIKO MC
ZUIKO MC MACRO
S ZUIKO ZO OM
ZUIKO MC ZOOM
S ZUIKO MC ZOOM
ZUIKO ZOOM
8mm F 2.8
16mm F3.5
18mm F3.5
21mm F2
21mm F3.5
24mm F2
24mm F2.8
28mm F2
28mm F2.8
35mm F2
35mm F2.8
35mm F2.8
55mm F1.2
50mm F1.4
50mm F1.8
50mm F3.5
28-48mm F4
35-70mm F3.6
35-70 m m F4
75-150 mm F4
S ZUIKO ZOOM 100-200 mm F5
ZUIKO MC ZOOM
ZUIKO MC
ZUIKO MC
ZUIKO MC
ZUIKO
ZUIKO MC
ZUIKO MC
ZUIKO MC
ZUIKO MC
ZUIKO MC
ZUIKO MC MACRO
ZUIKO MC MACRO
85-250mm F5
85 mm F2
100mm F2.8
135mm F2.8
135mm F3.5
180mm F2.8
200mm F4
200mm F5
300mm F4.5
400mm F6.3
600mm F6.5
1000mm F11
20mm F3.5
38mm F3.5
ZUIKO MC 1:1 MACRO 80mm F4
ZUIKO MC MACRO
135mm F4.5
ANGLE OF VIEW
180° (circle)
180°
100°
92°
92°
84°
84°
75°
75°
63°
63°
63°(83° at max. shift)
43°
47°
47°
47°
75°-49°
63°-
34°
63°-34°
32°-
16°
24°-12°
29°-10°
29°
24°
8°
4°
2°
12°
8°
4°
2.5-
9° at highest mag.
9° at highest mag.
9° at highest mag.
18°
OPTICAL
CONSTRUCTION
ELEMENT-GROUP
11–7
11–8
11–9
11–9
7–7
10–8
8–7
9–8
7–6
8–7
7–6
8–7
7–6
7–6
6–4
5–4
8–8
10–8
7–7
15–11
9–6
15–11
5–4
5–5
5–4
5–5
5–4
6–5
6–4
5–5
6–4
5–5
4–3
5–4
6–4
5–4
F-STOP
RANGE
2.8-22
3.5 22
3.5-16
2-16
3.5-16
2-16
2.8-16
2-16
2.8-22
2-16
2.8-16
2.8-22
1.2-16
1.4-16
1.8-16
3.5-22
4-22
3.6-22
4-22
4-22
5-32
5-32
2-16
2.8-22
3.5-22
2.8-32
4-32
5-32
4.5-32
6.3-32
6.5-32
11-45
3.5-16
3.5-16
4-32
MIN,
FOCUS
0.2 m
0.2
m
0.25m
0.2 m
0.2 m
0.25m
0.25m
0.3 m
0.3 m
0.3 m
0.3 m
0.3 m
0.45m
0.45m
0.45m
0.23m
0.65m
0.8 m
0.75m
1.6 m
2.4 m
2 m
0.8 m
1 m
1.5 m
1.5 m
2 m
2.5 m
2.5 m
3.5 m
5 m
11 m
30 m
(ft)
(0.7)
(0.7)
(0.8)
(0.8)
(0.7)
(0.8)
(0.8)
(1.0)
(1.0)
(1.0)
(1.5)
(1.5)
(1.5)
(0.8)
(2.0)
(2.7)
(2.5)
(5.2)
(7.9)
(6.0)
(2.8)
(3.3)
(4.9)
(4.9)
(6.0)
(8.2)
(8.2)
(11.5)
(16.4)
(36.1)
(98.4)
W/Auto Bellows & PM-MT ob
W/Auto Belows & PM-MT ob
W/65~116 or Auto Bellows
WEIGHT (oz.)
640g(22.6)
180g (6.3)
250g (8.8)
250g (8.8)
180g (6.3)
275g (9.9)
185g (6.5)
245g (8.5)
1708 (6.0)
240g (8.5)
175g (6.2)
310g(10.9)
310g(10.9)
230g (8.1)
165g (5.8)
200g (7.1)
300g(10.6)
420g(14.8)
385g(13.6)
445g(16.1)
570g(20.1)
905g(31.9)
260g (9.5)
235g (8.3
360g(12.7)
290g(10.2)
700g(24.7)
515g(18.2)
385g(13.6)
1020g(35.0)
1300g(46.0)
2800g(98.8)
4150g(146.5)
70g
(2.5)
90g
(3.2)
170g (6.0)
LENGTH
83mm
31mm
43mm
44mm
31mm
48mm
31mm
43 mm
32
mm
43mm
33mm
59mm
48mm
40mm
32mm
40mm
54mm
74mm
71 mm
115mm
148mm
196
mm
48mm
48mm
80mm
73mm
125mm
127mm
105mm
181mm
256
mm
377mm
662mm
20mm
28mm
31mm
FILTER
Built-in
Built-in
72mm
55mm
49mm
55mm
49mm
49mm
49mm
35
mm
49mm
49
mm
55mm
49mm
49mm
49mm
49mm
55mm
55mm
49mm
49mm
55mm
49mm
49mm
55 mm
49 mm
72 mm
55 mm
49 mm
72mm
72mm
100mm
100
mm
21mm Slide-on
32mm Slide-on
49mm
55 mm Slide-on
TELECONVERTER
2X-A
APPLICABLE LENSES : 100mm F2.8, 135mm F2.8. 135mm F3.5, 200mm F4. 200mm F5. 100-200mm F5
OPTICAL CONSTRUCTION : 6-6
WEIGHT : 215g(7.6oz)
LENGTH : 48mm(1.9")
(Specifications subject to change without notice.)
ZUIKO MC
ZUIKO MC
(1.0)
(1.0)
Page 43
42
Page 44

CARE AND STORAGE OF THE CAMERA
General
Dust and moisture are primary harmful agents
affecting your camera. When you do not use
the camera, remove it from the case and store
in a dry, ventilated place, making sure that the
shutter is set f re e fro m tension and the selector
lever at the OFF position.
When storing the camera for a long period of
time, remove the batteries. Wipe all battery sur-
faces with a dry cotton cloth before re-insert-
ing them into the camera.
Avoid dropping or hitting the camera.
Never store the camera where temperatures exceed 50°C (122°F). When you use the camera
in temperatures under — 20°C (—4°F), it may
sometimes fail to operate properly. To avoid
this, warm the camera before use. Protect
against excess moisture by using silica gel or
other desiccant.
Generally speaking, a battery voltage may be
reduced when an ambient temperature lowers.
As the batteries that activate the camera at nor-
mal temperature regularly, sometimes f ail to in
low temperature, it is recommended to use fresh
batteries in a cold district.
Take care not to permit water to enter the cam-
era when taking pictures in the rain or snow, es-
pecially near sea-water spray, as water drops
may easily have a chance to enter the camera
through small orifices.
After use near the ocean, wipe the camera surfaces clean with a soft cloth; never leave salt on
the camera. (Salt may be airborne near the
ocean and collect on the camera even though it
has not been in direct contact with water.)
Avoid areas exposed to salt water, radios, TV
sets, or magnets.
Have all repairs performed by an authorized
OLYMPUS Service Center. You may send it
directly or through the store where you bought
your camera.
Parts
Do not press the release button at random.
Do not touch any part t hat moves at high speed
such as the shutter, instant return mirror, dia-
phragm, etc.
Avoid touching the surfaces of the lens. Clean
43
Page 45

onl y w ith a n air brush, antistatic brush, or wipe
it lightly with a camel hair brush or lens tissue.
In EXTREME cares, use a clean, soft cotton
cloth moistened with denatured alcohol. NE V-
ER rub the lens surfaces with your finger, clothing or other abrasive material.
If dust or fingerprints collect on the mirror,
focusing screen, or prism, take the camera to
an authorized OLYMPUS Service Center. It
needs professional attention.
Avoid excessive force when mounting on a
tripod.
44
Page 46

QUESTIONS AND ANSWERS
Q : I can neither release the shutter even by press-
ing the shutter release button, nor advance
the film. Why?
A : Because no batteries are loaded. Load fresh
batteries.
Q : Why is the field of vi ew dark and the image
obscure?
A : Because the batteries are exhausted. Replace
them.
Q : Why can't I move the film advance lever?
A : The self-timer may be set, or the shutter re-
lease may be cocked and ready but it has
not been pressed yet. If you press the shut-
ter
release
button,
film
will
advance
to the
next frame. Has the film reached its end?
Check the exposure counter and, if it shows
that the film has ended, rewind the film. Are
the alkaline-manganese or silver oxide batteries charged? Check the batteries, and if
yo u hear the beeping sound and see the red
light flashing, but cannot move the lever,
take your camera to an authorized OLYM-
PUS Service Center.
Q : W hy doesn't the rewind kn ob rotate when I
try to advance the film?
A : The
film
leader
is not
properly
engaged
on
the film take-up spool. Insert the film leader
again.
Q : Why won't the rewind crank turn?
A : Set the rewind release lever once more in
the direction of the arrow, and the problem
will be solved.
Q : Is infrared photography also possible with
the OM-10?
A : Yes, it is if you use the manual adapter and
set the mode selector lever to the MANUAL
ADAPTER position. Then, t a ke the follow-
ing steps:
Focus without a filter. Move
the focusing ring to coincide with the infrared mark. Mount a filter for infrared photography, and proceed to take the picture.
Q : When should I check the ba tteri es?
A : When new batteries are inserted.
After the camera has been stored for a
long time.
When you think batteries may be exhausted.
The alkaline-manganese batteries should
45
Page 47

last for about a half year, and the silver
oxide batteries fo r about one year.
When the temperature is extremely low.
Q : I pressed the shutter release button with the
selector dial at the "OFF" position. Wi l l the
photograph be properly exposed?
A : Even at the "OFF" position, the camera's
circuits will be activated for a proper e xposure. Recommended to develop the fi lm
and
see.
Q : When set at the "AUTO" position, the actual
shutter speed is much slower than the one
indicated in the viewfinder. Why does this
happen?
A : If film is not loaded or the film surface is
not properly positioned behind t he shutter,
the
speed
will
be
slower
than
that
indicated
in the viewfinder.
Q : What batteries should I use?
A : Use two 1.5V alkaline-manganese batteries
LR44 (A76) or two silver oxide batteries
SR44 (Eveready EPX-76 or equivalents).
Batteries of a different type (1.3V mercury
batteries) cannot be used, though t he y may
be of the same size.
Q : A shadow appears darkening the central area
of the viewfinder. Why does this happen?
A : Th is is quite usual when a lens with a maxi-
mum aperture smaller than F5 is mounted
on the camera, and the preview button is
pressed with the diaphragm closed down
beyond F5. There is nothing wrong with
the microprism.
Q : If I return the selector lever to the ON posi-
tion, while the self-timer in operation, wha t
will become of the shutter?
A : The shutter will be released. After the use of
the self-timer, make it a point to ret urn the
selector lever to original position.
Q : While I was operating the Winder 2, the light
in the viewfinder went out... why?
A : The
light
goes
out in 90
sec.
even
the
selector
lever is ON, in order to save the batteries from
unnecessary consumption. Touch the activator switch lightly, and the light is on
again.
46
Page 48

MAIN SPECIFICATIONS
Camera type: 35mm single lens reflex camera
with electronic control automatic exposure
and focal plane shutter.
Image format: 24 x 36mm.
Lens mount: Olympus OM Mount, bayonet type.
Shutter: Electronically controlled focal plane
shutter.
Flash synchronization: X contact. Direct contact
only.
Automatic exposure control: Aperture-priority
electronically controlled shutter. TTL direct
light measuring system. Light measuring range:
EV-0.5 to 18 from 2 sec. to 1/1000 sec . at
normal temperatures and humidity w ith A SA
100 and F1.2 standard lens.
Exposure compensation: ±2EV.
Automatic flash exposure: Normal auto flash
(at 2 aperture settings F4 and F8 with ASA
100 film) is automatically set to X synch. (1/
60 sec.) in conjunction with the electronic
flash T20.
Manual exposure control: The optional Manual
Adapter attached to the OM-10 permits a full
range of 11 manual shutter speeds. (1 to 1/
1,000
sec.)
By setting the mode selector lever to the manual mode, t he shutter speed c a n be set t o 1/60
sec.
Film speed range: ASA 25 to 1600.
Battery checker: Battery voltage can be checked
by both LED and PCV. Mirror lock to limit
drainage.
Power source: Two 1.5V alkaline-manganese bat-
teries LR44 (A76), or two 1.5V silver oxide
batteries SR44 (Eveready EPX-76 or equivalents).
Viewfinder: Pentaprism type.
Focusing screen: Microprism/sprit image-matte
type.
Finder view-field: 93% of actual picture field.
Viewfinder magnification: 0.92X with the 50mm
lens at infinity.
Viewfinder information: 12-step shutter speed
scale and flash charge indicated by LEDs.
Mirror: Oversize, quick return mirror.
Film advance: Lever type with 130° angle, It
can be wound wi th one lo ng or several short
strokes. 30° pre-advance angle. Power wind-
47
Page 49

ing is possible with the Olympus OM System
Winder 2.
Self-timer: Electronic self-timer with about 12
second delay.
Accessory shoe: Built-in type, w ith direct contact.
Dimensions and weights: Body only: 135(W) x
84(H) x 50(D) mm (5.3" x 3.3" x 2") 430gr.
(15.2 oz)
With F1.8 lens: 135(W) x 84(H) x 81(D)mm
(5.3" x 3.3" x 3.2") 600gr. (21.2 oz).
With F1.4 lens: 135(W) x 84(H) x 86(D)mm
(5.3" x 3.3" x 3.4") 660gr. (23.3 oz).
(Specifications subject to change without notice.)
48
Page 50

Long Exposure
(From page 30)
For long exposure photography within 2 sec.
(with ASA 100 film) however, you ca n ta ke
pictures on AUTO mode.
Flash Photography
(From page 3 1)
(CAUTION)
If any electronic flash other than the T32 and
T20 i s used, set the mode selector lever to the
"MANUAL ADAPTER" position. (If the mo de
selector lever is set to "AUTO", the shutter
speed responds to available light and may some-
times not synchronize with flash.)
In this case, the viewfinder does not indicate
the full flash charge and correct flash exposure.
For further information, refer to the instruction manual supplied with your electronic flash
unit.
If an electronic flash is used while the optional
Manual Adapter is attached, set the shutter
speed at 1 /30 sec. or slower. For details, read
the instruction manual supplied with the Man-
ual Adapter.
Using t he Winder 2
(From page 33)
It is not possible to use a Motor Drive 1 with the
OM-10.
The viewfinder lights may turn off when using
Winder 2 with your OM-10. This is due to the
special energy saving circuits built into the OM-10.
Simply touch the activator switch (collar sur-
rounding the shutter release), and the lights w i l l
turn on. See page 22 for further explanation.
49
Page 51

0894. 2MM
OLYMPUS OPTICAL CO ., LTD.
OLYMPUS AMERICA INC.
OLYMPUS OPTICAL CO. ( E UROPA) GMBH.
OLYMPUS OPTICAL CO. (UK.) LTD.
 Loading...