

Page 1
Olympia Business Systems Vertriebs GmbH
Weg zum Wasserwerk 10 D-45525 Hattingen
http://www.olympia-vertrieb.de
(05.05.2009)
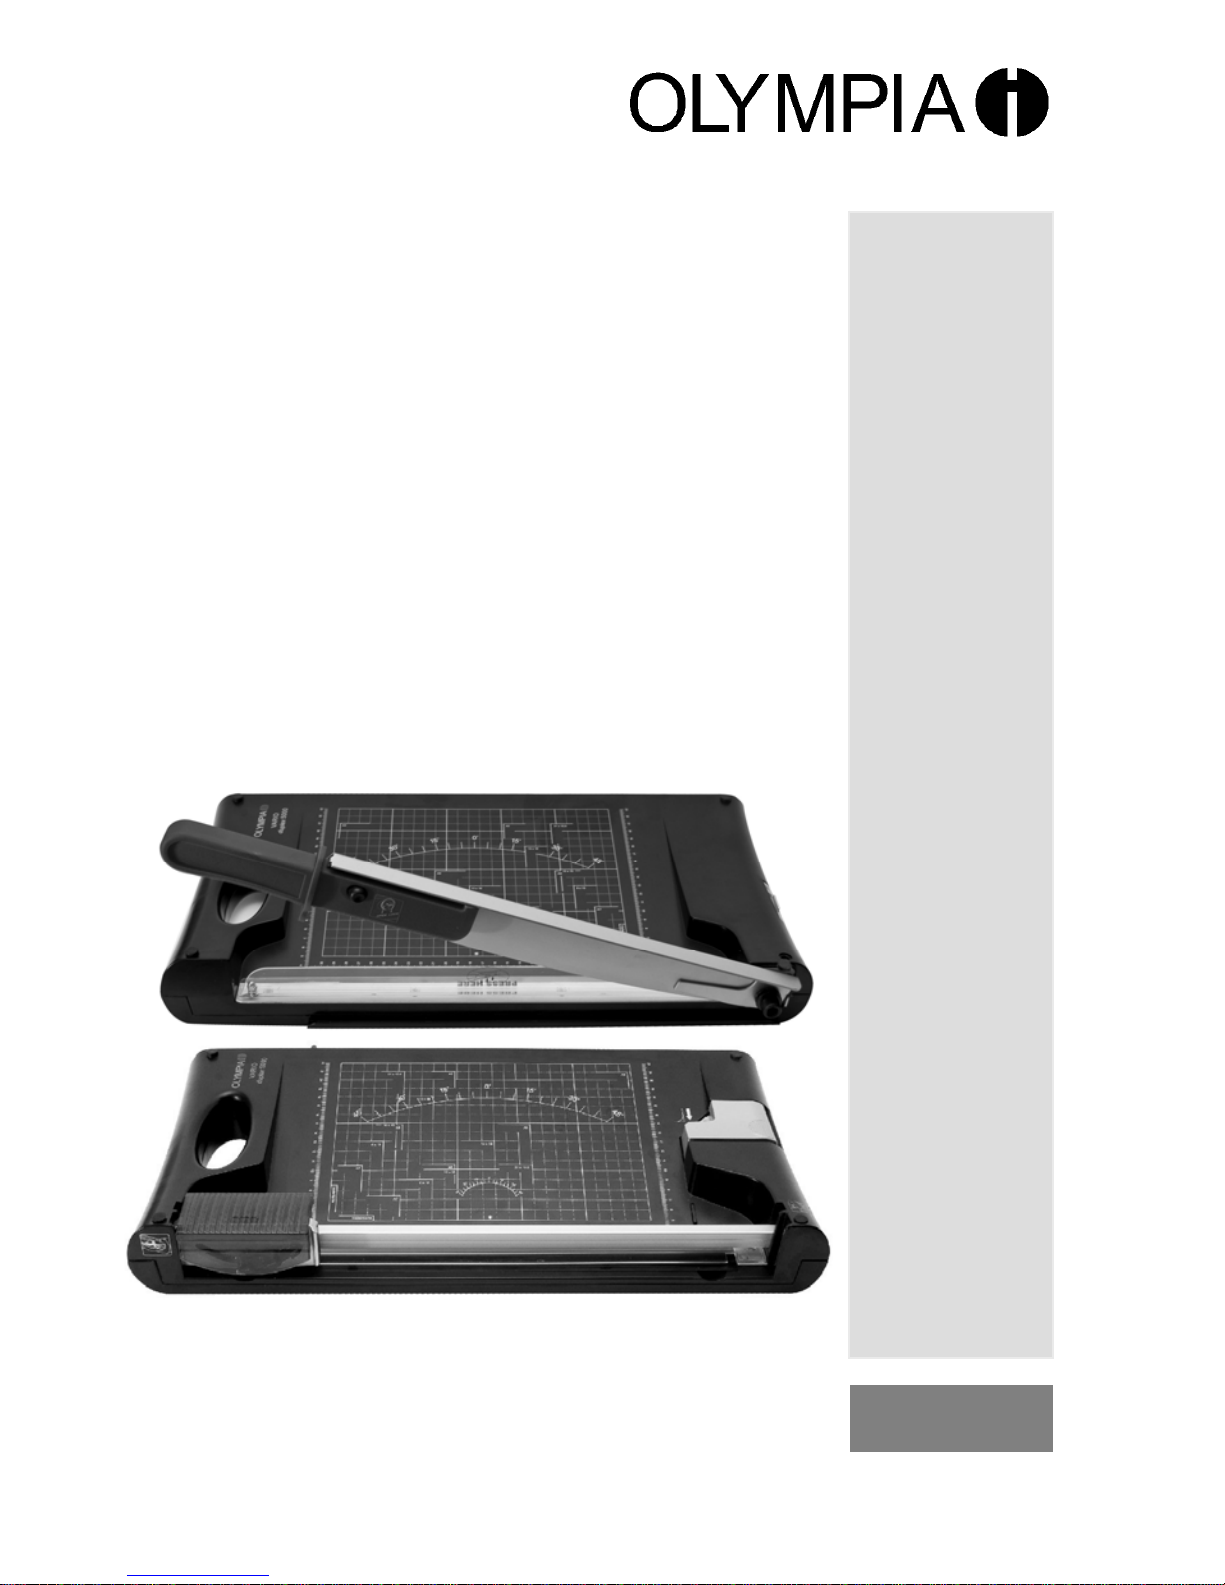
OLYMPIA Vario duplex 5000
Doppelseitiges
Schneidebrett
# Reversible Paper Cutter
Massicot double face
Base de corte
de dos lados
Dubbelzijdige snijplaat
Refilatore a doppia faccia
Oboustranná řezací deska
Page 2

2
Page 3

3
Deutsch
Wichtige Sicherheitshinweise ...........................................................................6
Haftungsausschluss...........................................................................................7
Bestimmungsgemäße Verwendung ..................................................................7
Leistungsmerkmale ............................................................................................8
Hebelschneider ...................................................................................................8
Wahl des Schnittbildes.....................................................................................10
Ersetzen des Schneidekopfes .........................................................................11
Eckenrunder......................................................................................................11
Garantie ...........................................................................................................12
English #
Important Safety Information...........................................................................13
Exemption From Liability .................................................................................14
Intended Use .....................................................................................................14
Features ...........................................................................................................15
Guillotine ...........................................................................................................15
Selecting the Type of Cut.................................................................................17
Replacing the Cutting Head .............................................................................18
Corner Cutter.....................................................................................................18
Guarantee ..........................................................................................................19
Français
Consignes de sécurité importantes ................................................................20
Exclusion de la garantie...................................................................................21
Utilisation conforme à son usage....................................................................21
Caractéristiques de puissance ........................................................................22
Bras de coupe ...................................................................................................22
Sélection du profil de coupe............................................................................24
Remplacement de la tête de coupe .................................................................25
Arrondisseur d'angles ......................................................................................25
Garantie ...........................................................................................................26
Page 4

4
Español
Advertencias de seguridad importantes.........................................................27
Exclusión de responsabilidad .........................................................................28
Uso previsto ......................................................................................................28
Características prestacionales ........................................................................29
Cortador de palanca .........................................................................................29
Selección de la figura de corte ........................................................................31
Sustituir el cabezal cortador............................................................................32
Redondeador de esquinas ...............................................................................32
Garantía ...........................................................................................................33
Nederlands
Belangrijke veiligheidsinformatie....................................................................34
Aansprakelijkheid .............................................................................................35
Bedoeld gebruik................................................................................................35
Kenmerken ........................................................................................................36
Hefboomsnijmachine........................................................................................36
Snede kiezen .....................................................................................................38
Snijkop vervangen ............................................................................................39
Hoekafronder.....................................................................................................39
Garantie ...........................................................................................................40
Italiano
Importanti indicazioni di sicurezza..................................................................41
Esclusione di responsabilità ...........................................................................42
Impiego conforme agli usi previsti..................................................................42
Caratteristiche di prestazione..........................................................................43
Taglierina a leva ................................................................................................43
Scelta del tipo di taglio.....................................................................................45
Sostituzione della testina di taglio ..................................................................46
Arrotondangoli..................................................................................................46
Garanzia ...........................................................................................................47
Page 5

5
Česky
Důležité bezpečnostní pokyny.........................................................................48
Vyloučení záruky...............................................................................................49
Používání pro daný účel...................................................................................49
Výkonové znaky................................................................................................50
Páková řezačka .................................................................................................50
Volba vzhledu řezu ...........................................................................................52
Výměna řezací hlavy.........................................................................................53
Zaoblovačka rohů .............................................................................................53
Záruka ...........................................................................................................54
Page 6

6
Wichtige Sicherheitshinweise
Um ein zuverlässiges Arbeiten mit dem Schneidegerät zu gewährleisten,
beachten Sie bitte Folgendes:
1
Lesen Sie diese Anweisungen bitte sorgfältig durch und beachten
Sie sie bei der Handhabung Ihres Geräts.
2
Bedienungsanleitung für zukünftige Benutzung aufbewahren
.
3 Vor der Verwendung stellen Sie das Gerät auf einen ebenen und
stabilen Arbeitsplatz auf.
4 Lose Teile von Bekleidung, Krawatten, Schmuck, langes Haar oder
andere lose Gegenstände von dem Schneidebrett fernhalten. Verletzungsgefahr!
5 Vor dem Schneiden entfernen Sie bitte die Heft- sowie Büroklam-
mern vom Dokument.
6 Bedienen Sie das Gerät auf einem stabilen Arbeitsplatz mit zwei
Händen.
7 Das Gerät ist nur fürs Schneiden von Papier vorgesehen.
8 Lassen Sie das Gerät unzugänglich für die Kinder.
9 Sie sollen die Schneider weder schmieren noch schleifen.
10 Wenn ein Schneider oder das Gehäuse eines Schneiders beschä-
digt ist, darf das Gerät nicht betrieben werden.
11 Wenn der Messerschutz nicht richtig eingesetzt wird, darf das Ge-
rät nicht betrieben werden.
12 Achten Sie darauf, dass die Finger beim Austausch des Schnei-
ders nicht geschnitten werden. Kontakte mit den Messern sind
grundsätzlich zu vermeiden.
13 Beim Bewegen oder Wegstellen des Geräts darf nicht am Messer
angefassen werden.
14 Kinder oder Minderjährige dürfen das Gerät nur unter Aufsicht ei-
nes Erwachsenen betreiben.
15 Das Gerät ist nicht fürs Schneiden von Fingernägeln vorgesehen.
Page 7

7
Haftungsausschluss
Wir übernehmen keine Garantie für die Richtigkeit der Informationen, die
sich auf technische Eigenschaften sowie die hier vorliegende Dokumentation beziehen. Das in dieser Dokumentation beschriebene Produkt und ggf.
dessen Zubehör unterliegen einer ständigen Verbesserung und Weiterentwicklung. Aus diesem Grund behalten wir uns das Recht vor, Komponenten,
Zubehör, technische Spezifikationen sowie die hier vorliegende Dokumentation des Produkts ohne vorherige Ankündigung jederzeit zu ändern.
Bestimmungsgemäße Verwendung
Dieses Schneidegerät darf nur zum Zuschneiden vom Papier, Karten, Fotopapier und Laminierfolien benutzt werden. Jede andere Verwendung gilt als
nicht bestimmungsgemäß. Eigenmächtige Veränderungen oder Umbauten
sind nicht zulässig.
Page 8
8
Leistungsmerkmale
Perfektes Zuschneiden von Fotos, Karten, Ausdrucken oder
laminiertem Papier.
• Hebelschneider + Andruckleiste mit Fingerschutz
• Rollenschneider mit 3 Schneidefunktionen
(Gerader Schnitt, Perforation und Wellenschnitt)
• Eckenrunder mit herausziehbarem Auffangbehälter
• Visuelle Positionshilfe in cm (Linien, Winkel, Skala)
• Integrierter Tragegriff
• Gummifüße für sicheren Halt
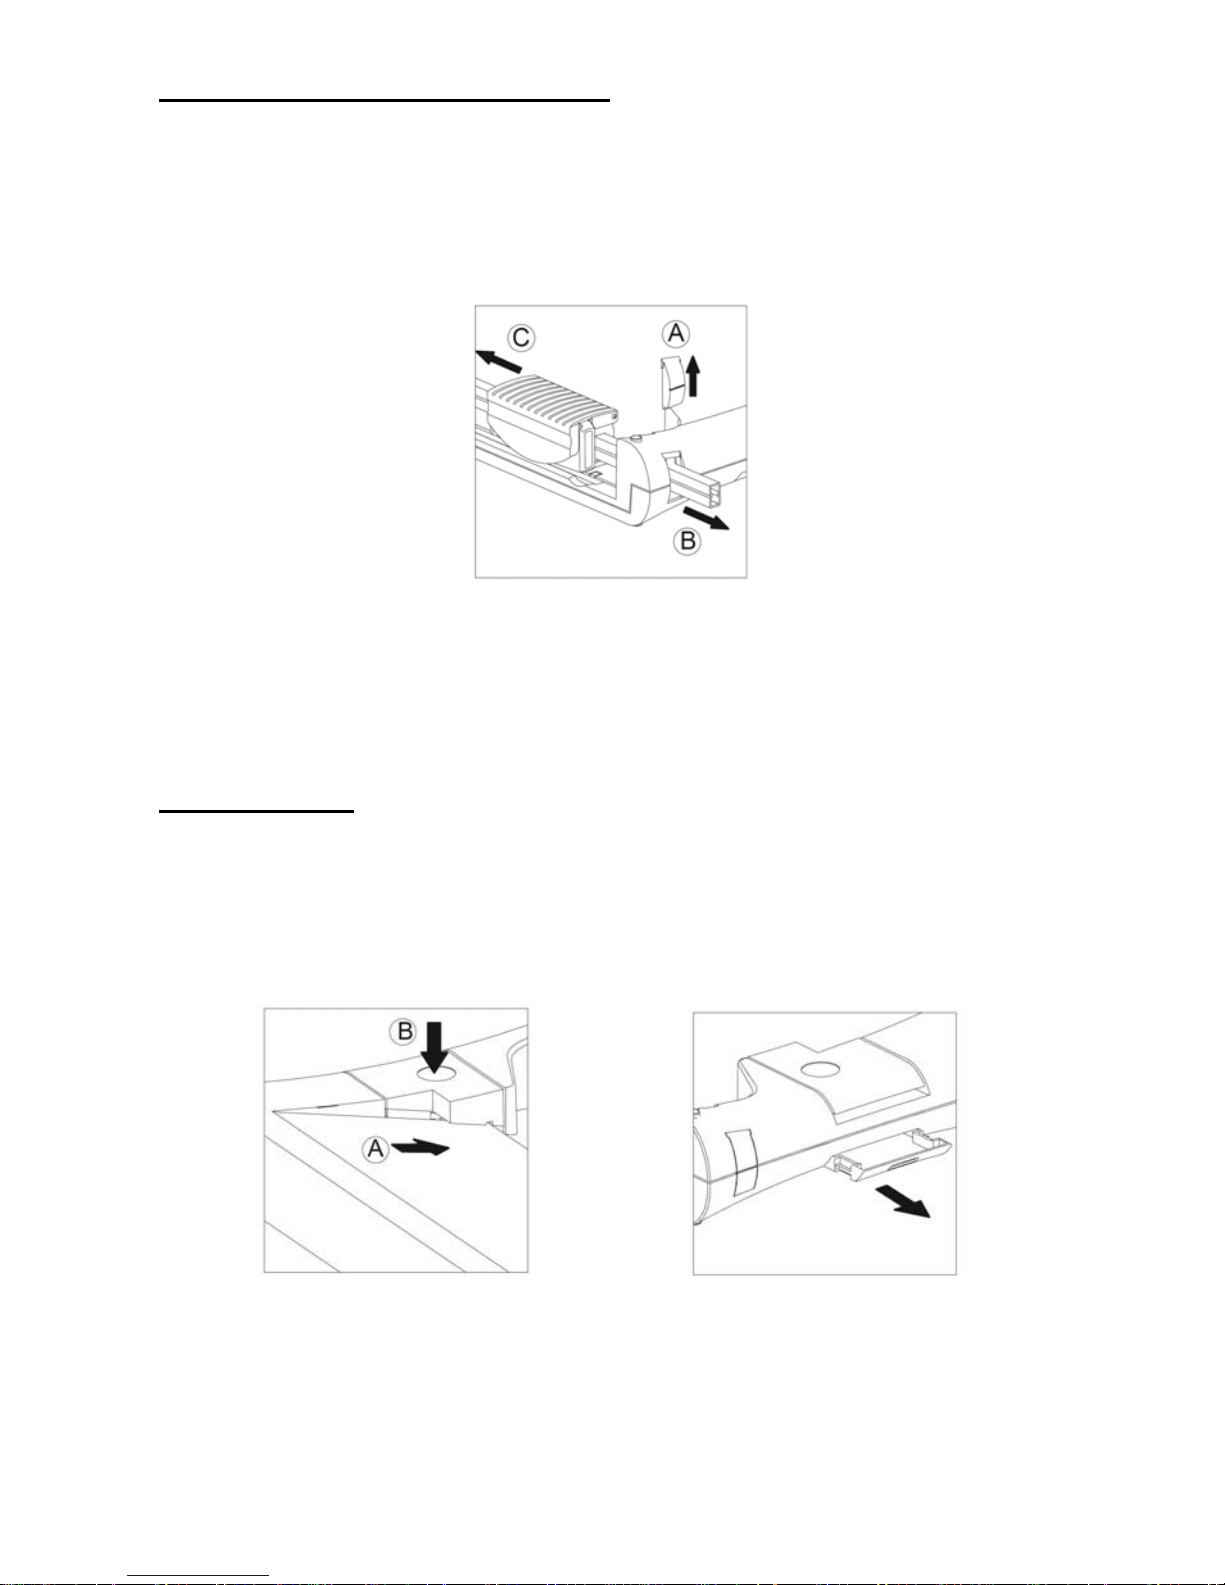
Hebelschneider
Auflagefläche: 334 x 253 mm (A4)
Schnittleistung: max. 10 Blatt (80g/m²)
Andruckleiste mit Fingerschutz
Klinge aus rostfreiem Stahl
Ausziehbarer Griff mit Sicherung in gummierter Oberfläche
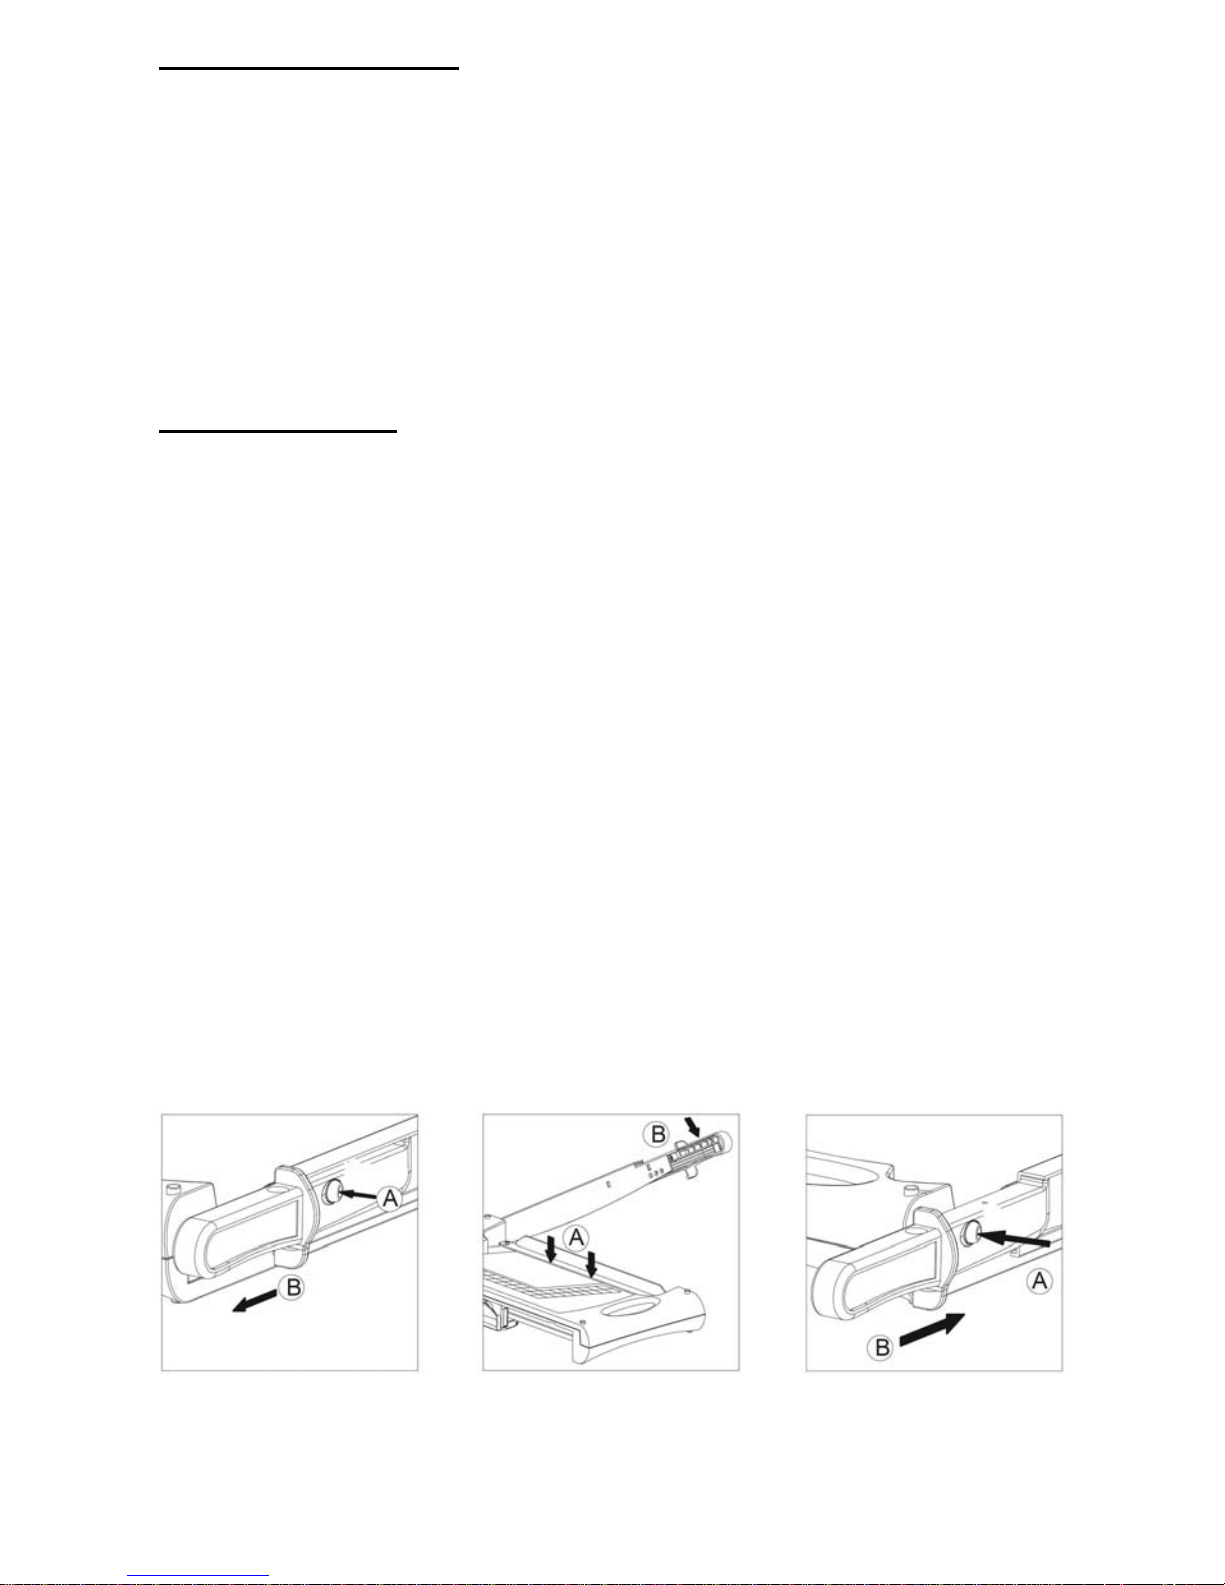
1 Platzieren Sie das Schneidebrett mit der Hebelschneiderseite nach
oben auf eine stabile und ebene Oberfläche.
2 Drücken Sie den Sicherungsknopf (Bild 1, A), um die Fixierung zu lö-
sen und ziehen Sie den Griff heraus (Bild 1, B).
3 Bewegen Sie den Hebel des Schneidebretts nach oben.
4 Legen Sie das zu schneidende Material an die gewünschte Position
unter die Andruckleiste und drücken Sie diese nach unten (Bild 2, A).
5 Drücken Sie den Hebel zum Schneiden nach unten (Bild 2, B).
6 Drücken Sie nach Abschluss der Arbeit den Sicherungsknopf und
schieben Sie den Griff hinein (Bild 3).
Bild 1 Bild 2 Bild 3
Page 9
9
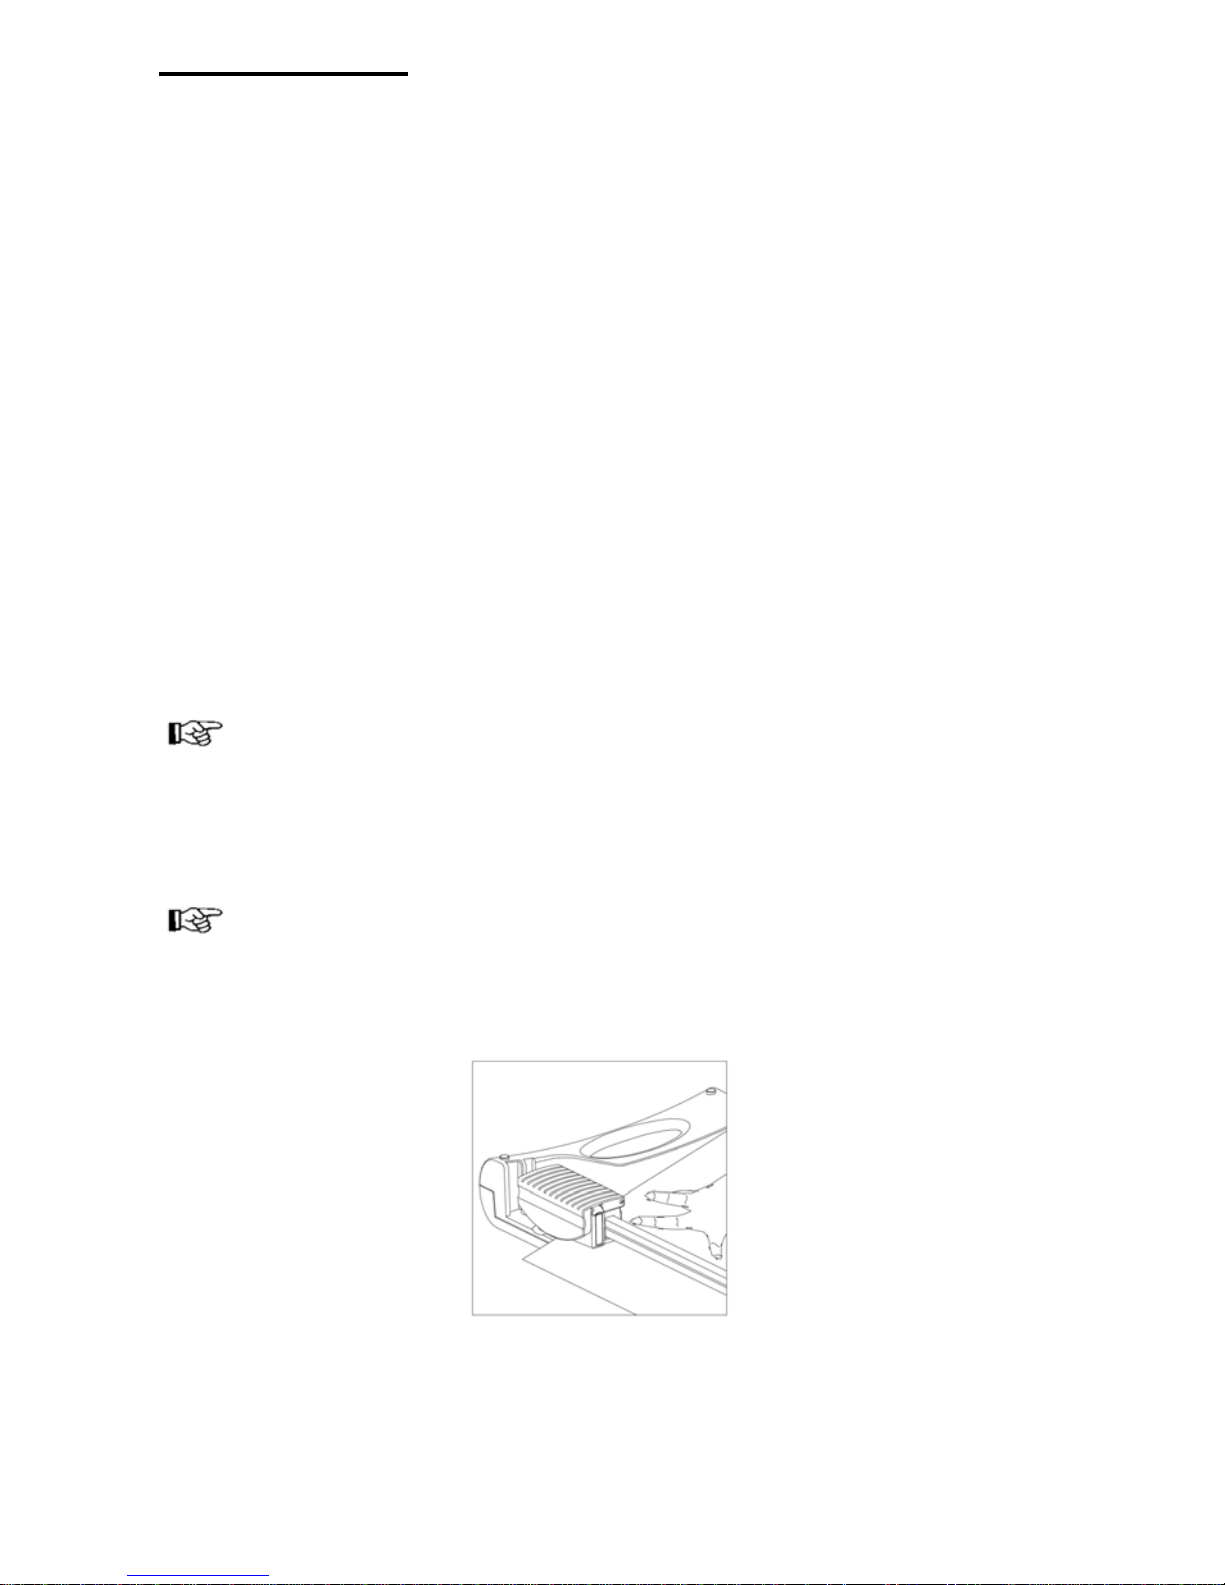
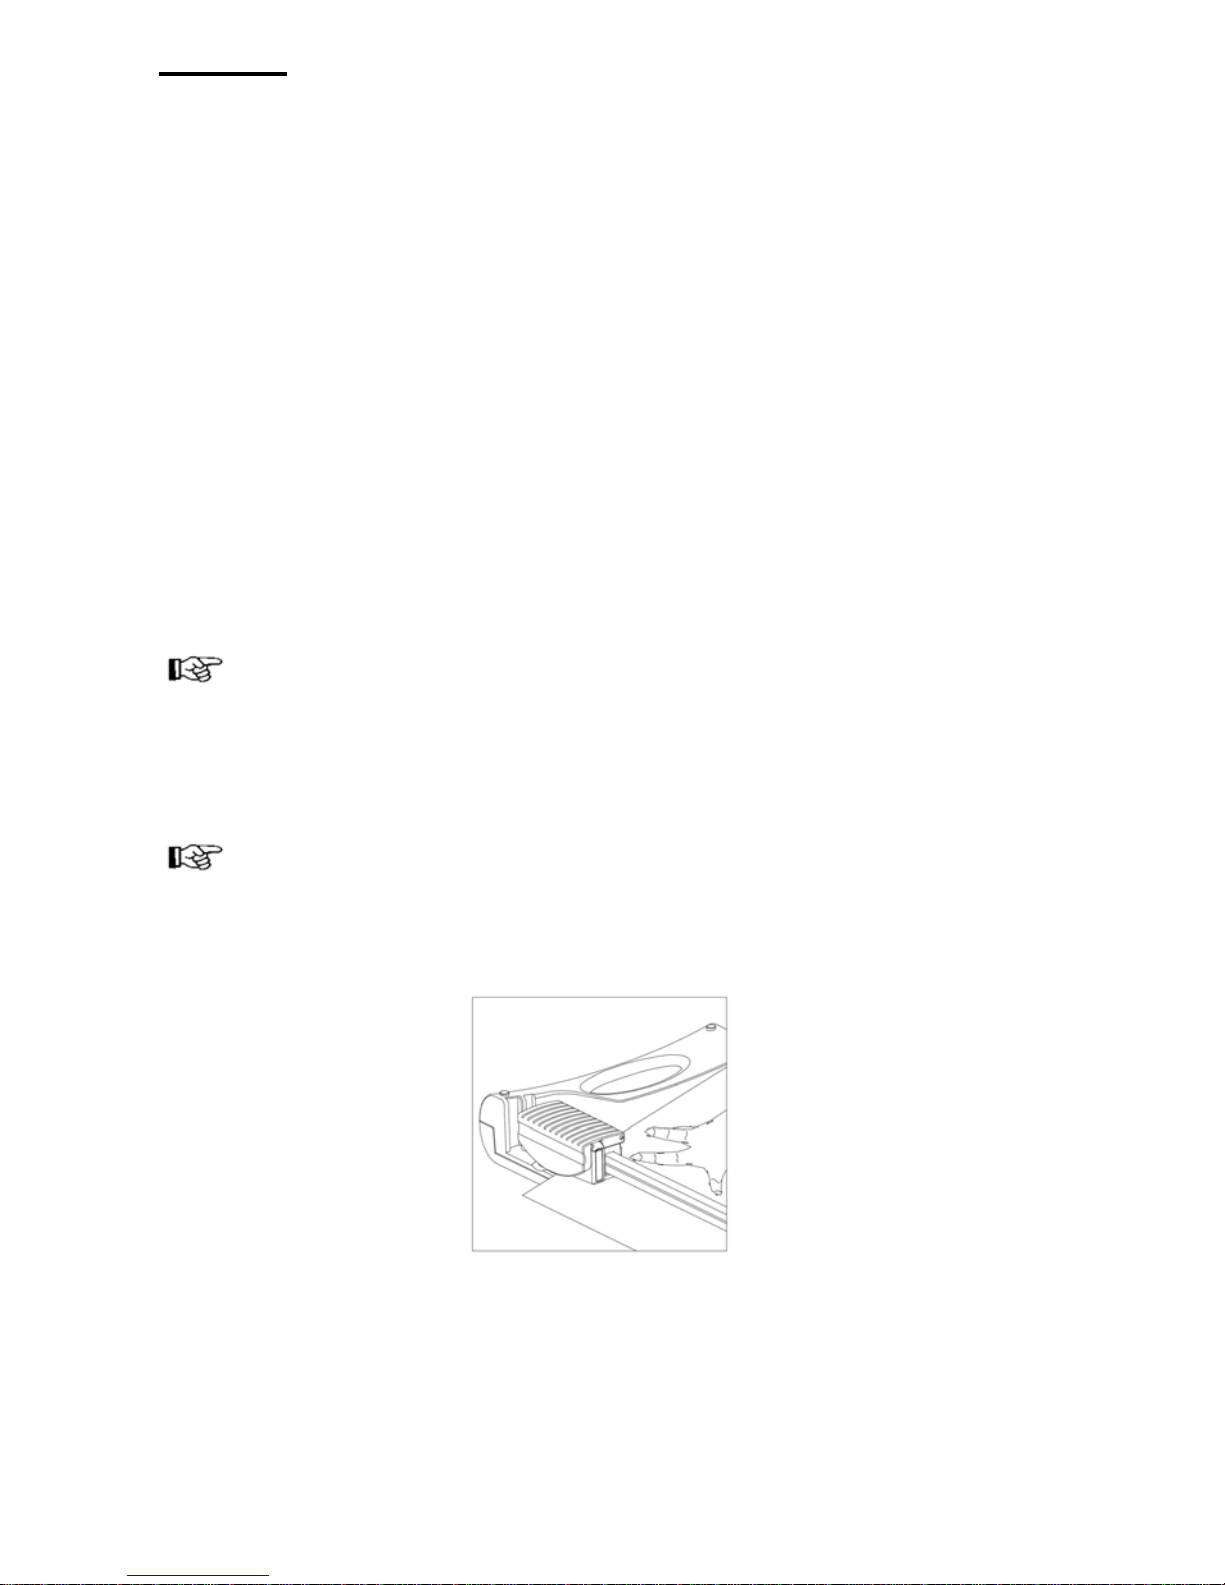
Rollenschneider
Auflagefläche: 334 x 240 mm (A4)
Rollenschneider mit integriertem Wahlschalter und Verstellsicherung
Schneidefunktionen:
1. Gerader Schnitt Schnittleistung: max. 5 Blatt (80g/m²)
2. Perforation Schnittleistung: max. 3 Blatt (80g/m²)
3. Wellenschnitt Schnittleistung: max. 3 Blatt (80g/m²)
Die Messer befinden sich in einem geschützten Gehäuse.
Eine Ersatz-Schneideleiste befindet sich im Aufbewahrungsfach.
1 Platzieren Sie das Schneidebrett mit der Rollenschneiderseite nach
oben auf eine stabile und ebene Oberfläche.
2 Schieben Sie den Schneidekopf an eine Seite der Führungsschie-
ne (Bild 4).
3 Legen Sie das zu schneidende Material an die gewünschte Position
unter die Andruckleiste und halten Sie das Material mit einer Hand
fest, während Sie schneiden.
Hinweis: Halten Sie das platzierte Material sicher fest, da es sonst zu
Ungenauigkeiten kommen kann. Die Rasterung und die Messeinrich-
tungen auf dem Schneidebrett können als Positionshilfe dienen.
4 Drücken Sie den Schneidekopf nach unten und ziehen Sie diesen ü-
ber die Führungsschiene.
Hinweis: Um eine fehlerhafte Schnittkante zu vermeiden, führen Sie
den Schneidekopf NICHT zurück, sondern entfernen Sie nach dem
Schneiden das eingelegte Material.
Bild 4
Page 10
10
Wahl des Schnittbildes
Der Rollenschneider ist mit drei verschiedenen Schnittbildern ausgestattet.
Der Benutzer kann das Schnittbild abhängig von der Anwendung wählen.
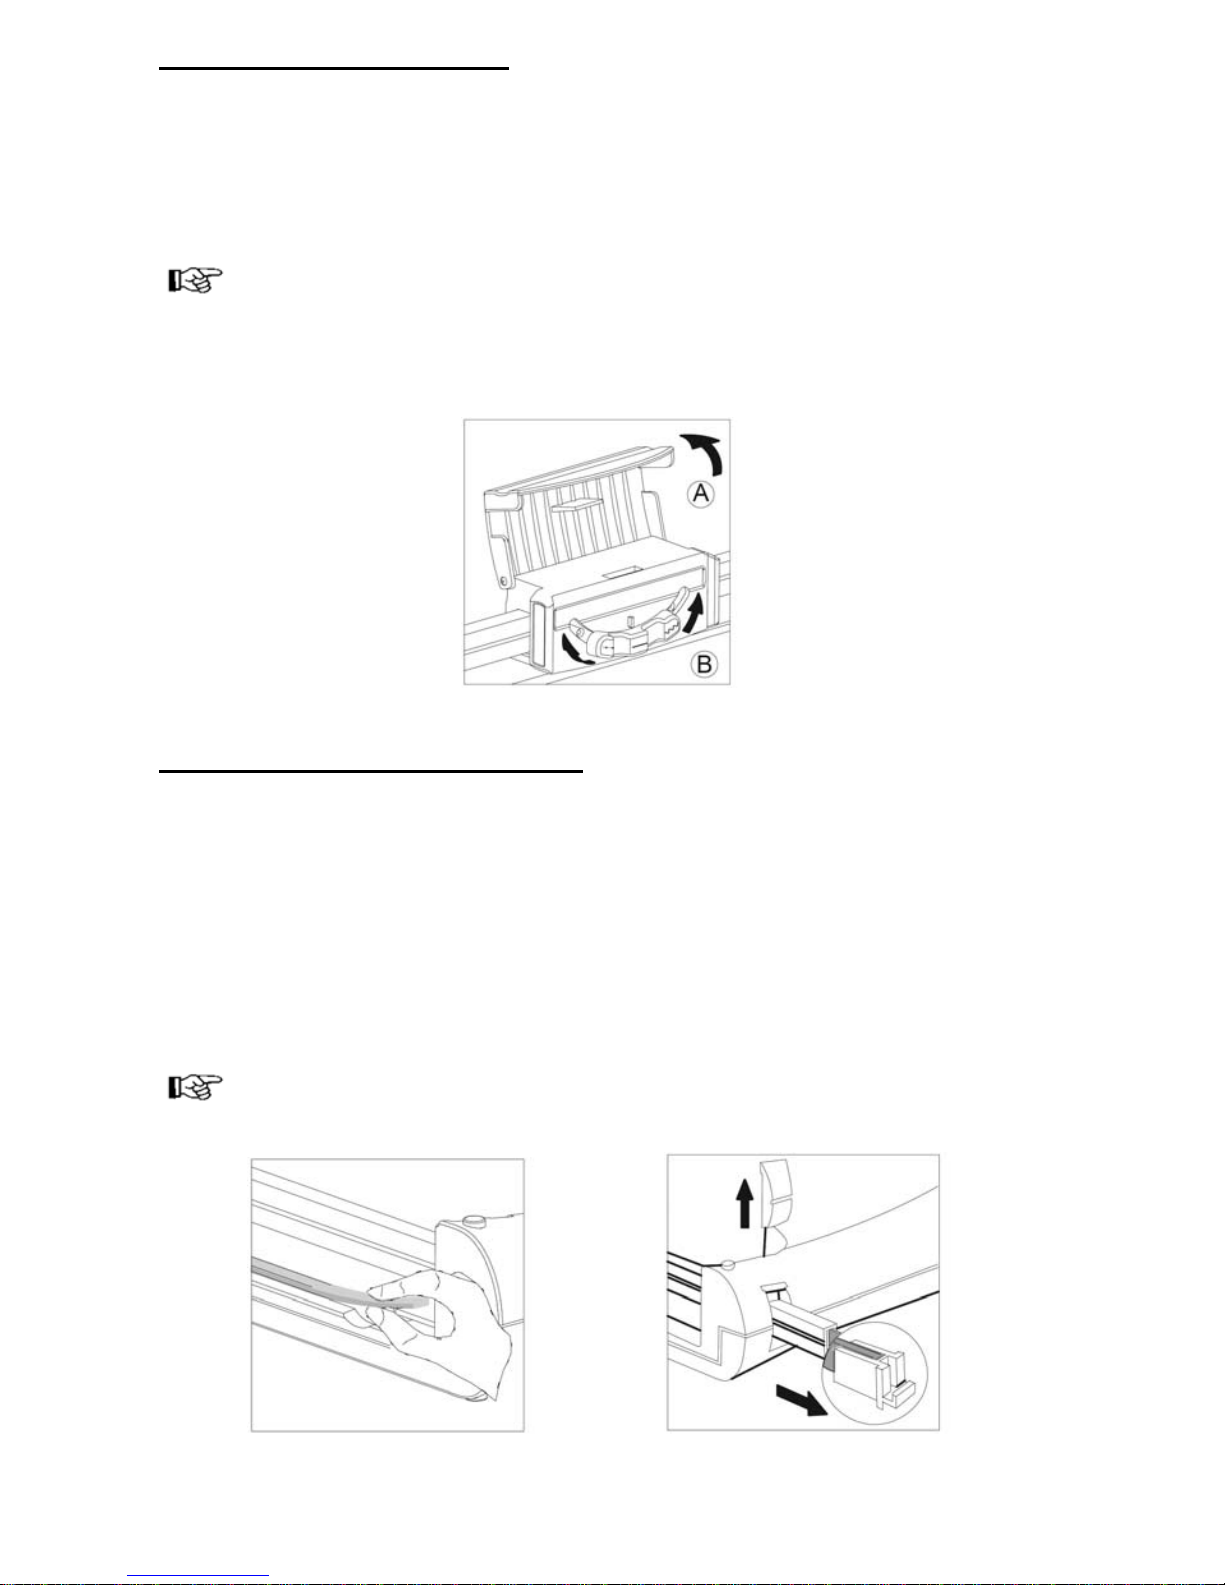
1 Öffnen Sie die Abdeckung am Schneidekopf (Bild 5, A).
2 Bewegen Sie den Auswahlschalter, um das gewünschte Schnittbild zu
erhalten (Bild 5, B).
Hinweis: Auf dem Schalter können Sie die verschiedenen Schnittbil-
der erkennen. Bewegen Sie den Schalter nach links für den Wellen-
schnitt oder bewegen Sie den Schalter nach rechts für die Perforation.
3 Schließen Sie die Abdeckung am Schneidekopf.
Bild 5
Ersetzen der Schneideleiste
Die Schneideleiste hat vier Schnittkanten (2 je Seite). Wenn das Schnittbild
unsauber wird, sollten Sie die Schneideleiste so drehen, dass eine der unbenutzten Schnittkanten zum Einsatz kommt. Wenn die Schneideleiste verbraucht ist, dann ersetzen Sie diese:
1 Schieben Sie den Schneidekopf an das Ende der Führungsschiene.
2 Entnehmen Sie die Schneideleiste an der anderen Seite aus der
Nut (Bild 6).
3 Schieben Sie die neue Schneideleiste in die Nut.
Hinweis: Eine Ersatz-Schneideleiste befindet sich im Aufbewah-
rungsfach in der Führungsschiene (Bild 7).
Bild 6 Bild 7
Page 11
11
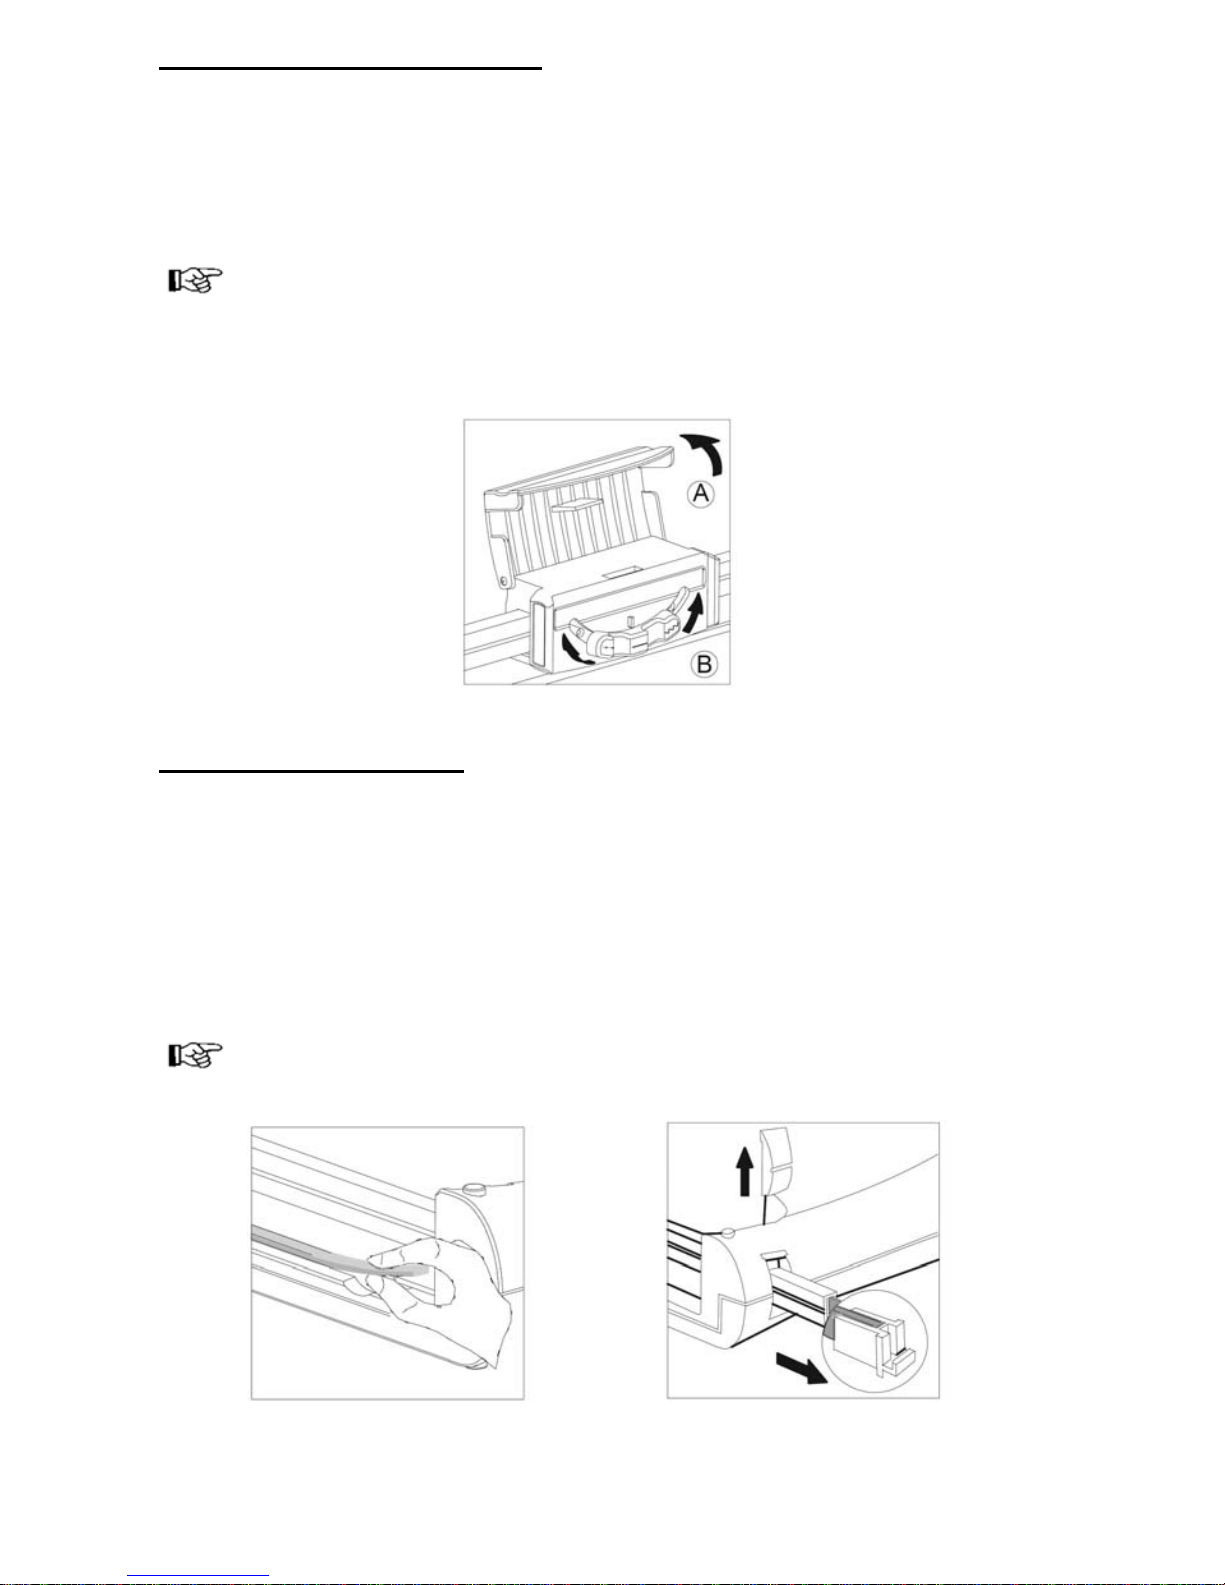
Ersetzen des Schneidekopfes
Wenn die Klinge des Schneidekopfes beschädigt oder abgenutzt ist, muss
sie getauscht werden.
1 Entfernen Sie die Endkappe aus der Grundplatte (Bild 8, A).
2 Entnehmen Sie die Führungsschiene aus der Grundplatte (Bild 8, B).
3 Ersetzen Sie den alten durch einen neuen Schneidekopf (Bild 8, C).
Bild 8
4 Schieben Sie die Führungsschiene in die Grundplatte.
5 Setzen Sie die Endkappe in die Grundplatte.
Eckenrunder
1 Legen Sie das zu schneidende Material in den Eckenrunder
(max. 1 Blatt) (Bild 9, A).
2 Drücken Sie den Ausführungsknopf (Bild 9, B).
3 Entnehmen Sie nach dem Vorgang den Auffangbehälter und leeren
Sie ihn (Bild 10).
Bild 9 Bild 10
Page 12

12
Garantie
Bitte unbedingt aufbewahren!
Lieber Kunde,
wir freuen uns, dass Sie sich für das Olympia Schneidebrett entschieden
haben. Sollte sich an Ihrem Gerät wider Erwarten ein technisches Problem
ergeben, beachten Sie bitte folgende Punkte:
• Die Garantiezeit für Ihr Gerät beträgt 24 Monate.
• Bewahren Sie unbedingt den Kaufbeleg und die Originalverpackung auf.
• Sollte ein Problem auftreten, rufen Sie bitte zuerst unsere Hotline an:
0180 5 007514 (0,14 € pro Minute aus dem dt. Festnetz)
Oft kann unser Fachpersonal telefonisch helfen.
• Kann jedoch der Fehler telefonisch nicht beseitigt werden, bitten wir Sie,
das Gerät in der Originalverpackung an folgende Anschrift zu senden:
Service-Center Hattingen
Weg zum Wasserwerk 10
D-45525 Hattingen
Garantiereparaturen können nur mit beigefügtem Kaufbeleg erfolgen.
Herzlichen Dank für Ihr Verständnis.
Mit freundlichen Grüßen
Ihre Olympia Business Systems
Vertriebs GmbH
Verbrauchsmaterial
Sollte der Rollenschneider oder die Schneideleiste abgenutzt sein, wenden
Sie sich bitte an die Hotline.
Page 13

13
Important Safety Information
Please observe the following information to ensure reliable operation of
the cutting unit:
1
Read this manual thoroughly and observe the instructions and
information in it when operating the unit.
2
Keep the operating instruction manual available for future reference
.
3 Before using the device, set it down on a solid, level worktop.
4 Keep loose clothing, ties, jewellery, long hair and other loose
objects away from the cutting unit. Risk of injury!
5 Before starting to cut, please remove any staples or paper clips
from the document.
6 Only operate the device when it is set down on a solid worktop us-
ing both hands.
7 The device is only intended for cutting paper.
8 Keep the device out of the reach of children.
9 Do not grease or grind the cutting blades.
10 Do not use the device if a blade or the blade housing is damaged.
11 Do not use the device if the knife protection has not been installed
correctly.
12 Pay attention that you do not cut your fingers when replacing the
blades. Prevent direct contact with the knives.
13 Do not use the knife as a handle to move the device or put it away.
14 Children and minors may only use the device when supervised by
a responsible adult.
15 Do not use the device to cut fingernails.
Page 14

14
Exemption From Liability
We cannot guarantee that the information which relates to the technical
properties of the product or to the product itself contained in this document is
correct. The product and, where applicable, its accessories, described in this
document are subject to constant improvement and further development.
For this reason, we reserve the right to modify components, accessories,
technical specifications and related documentation of the product described
herein at any time without notice.
Intended Use
This cutting unit may only be used to cut paper, card, photo paper and laminating foil. Any other use is considered unintended use. Unauthorised modifications or reconstructions are not permitted.
Page 15

15
Features
For cutting photos, card, printouts or laminated paper perfectly to size.
• Guillotine + pressing rail with finger protection
• Trimmer with 3 types of cut
(straight cut, perforation and wave cut)
• Corner cutter with pull-out clippings tray
• Visual positioning aids in cm (lines, angles, scale)
• Integrated handle
• Rubber footpads for secure, non-slip base
Guillotine
For paper dimensions: 334 x 253 mm (A4)
Cutting capacity: Max. 10 sheets (80g/m²)
Pressing rail with finger protection
Cutting blade made of stainless steel
Pull-out, rubber-coated handle with lock
1 Place the cutting unit on a stable, level base with the guillotine side
facing up.
2 Press the locking button (Fig. 1, A) to release the locking mechanism
and pull out the handle (Fig. 1, B).
3 Move the guillotine arm up.
4 Place the material to be cut in the required position under the pressing
rail and press the pressing rail down (Fig. 2, A).
5 Move the guillotine arm down to complete the cut (Fig. 2, B).
6 After completing the work, press the locking button and push the han-
dle back in (Fig. 3).
Fig. 1 Fig. 2 Fig. 3
Page 16
16
Trimmer
For paper dimensions: 334 x 240 mm (A4)
Trimmer with integrated cut selector switch and setting lock.
Cutting functions:
1. Straight cut Cutting capacity: max. 5 sheets (80g/m²)
2. Perforation Cutting capacity: max. 3 sheets (80g/m²)
3. Wave cut Cutting capacity: max. 3 sheets (80g/m²)
The blades are accommodated in a protected housing.
A spare blade is contained in the integrated storage compartment.
7 Place the cutting unit on a stable, level base with the trimmer side fac-
ing up.
8 Slide the cutting head to one side of the guide rail (Fig. 4).
9 Place the material to be cut in the required position under the pressing
rail and hold the material in place with one hand when cutting.
Note: Hold the material to be cut securely, otherwise it could shift and
be cut inaccurately. The raster and measuring system on the trim-
mer's working surface serve as positioning aids.
10 Press the cutting head down and draw it to the other side of the guide
rail.
Note: To prevent a faulty cutting edge, DO NOT run the cutting head
back again but remove the cut material directly after completing the
cut.
Fig. 4
Page 17
17
Selecting the Type of Cut
The trimmer is equipped to complete three types of cut. The user can select
the type of cut according to the job at hand.
1 Open the hinged cover over the cutting head (Fig. 5, A).
2 Move the selector switch according to the type of cut re-
quired (Fig. 5, B).
Note: The different types of cut are clearly indicated on the rotary se-
lector switch. Turn the switch to the left to select the wave cut or to the
right for perforation.
3 Close the hinged cover over the cutting head.
Fig. 5
Replacing the Blade
The blade has four cutting edges (2 on each side). When the quality of the
cut is no longer clean, turn the blade so that one of the unused cutting edges
will be used. When all four cutting edges have become worn, replace the
blade:
1 Slide the cutting head to one end the guide rail.
2 Remove the blade out of the slot from the other side (Fig. 6).
3 Slide the new blade in the slot.
Note: There is a spare blade in the storage compartment in the guide
rail (Fig. 7).
Fig. 6 Fig. 7
Page 18

18
Replacing the Cutting Head
When the blade of the cutting head is damaged or worn, it must be replaced.
1 Remove the end cap from the base plate (Fig. 8, A).
2 Remove the guide rail from the base plate (Fig. 8, B).
3 Replace the old cutting head with a new one (Fig. 8, C)
Fig. 8
4 Slide the guide rail in the base plate.
5 Insert the end cap in the base plate.
Corner Cutter
1 Place the material to be cut in the corner cutter
(max. 1 sheet) (Fig. 9, A).
2 Press the button (Fig. 9, B).
3 When the process is completed, remove the clippings tray and empty
it (Fig. 10).
Fig. 9 Fig. 10
Page 19

19
Guarantee
It is essential to retain this guarantee!
Dear Customers,
We are pleased that you have chosen the reversible guillotine/trimmer from
Olympia. Should a technical problem arise with regard to the equipment,
please observe the following points:
• The period of guarantee for the equipment is 24 months.
• It is essential to keep the purchase receipt and original packing.
• The first line of action if a problem occurs is to contact our hotline.
+49 180 5 007514
Our expert personnel can frequently provide help over the phone.
• However, if the problem cannot be solved via telephone, please send the
equipment to the following address in its original packing:
Service-Center Hattingen
Weg zum Wasserwerk 10
D-45525 Hattingen
Repairs under the terms of guarantee can only be completed when the purchase receipt is enclosed.
We are sorry for any inconvenience.
Yours faithfully
Olympia Business Systems
Vertriebs GmbH
Consumables
If the trimmer or blade becomes worn, please contact the hotline.
Page 20

20
Consignes de sécurité importantes
Afin de garantir un travail fiable avec le massicot double face, veuillez
observer les points suivants :
1
Lisez attentivement ces instructions et tenez-en compte lorsque
vous manipulez votre appareil.
2
Conservez le mode d'emploi pour une utilisation future
.
3 Posez l'appareil sur une surface de travail plane et stable avant
son utilisation.
4 N'approchez pas du massicot des parties de vêtement volantes,
cravates, bijoux, cheveux longs ou autres objets non attachés.
Risque de blessures !
5 Retirez les agrafes et trombones du document avant de couper
celui-ci.
6 Utilisez l'appareil sur une surface de travail stable en vous servant
de vos deux mains.
7 L'appareil n'est prévu que pour couper du papier.
8 L'appareil ne doit pas être accessible aux enfants.
9 Ne graissez ni aiguisez la lame du massicot.
10 Vous ne devez pas faire fonctionner le massicot si celui-ci ou
son boîtier est endommagé.
11 Vous ne devez pas faire fonctionner le massicot si la protection de
la lame n'est pas posée correctement.
12 Lorsque vous remplacez la lame, veillez à ne pas vous coupez les
doigts. Évitez impérativement de toucher celle-ci.
13 Ne saisissez pas l'appareil par la lame lorsque vous déplacez ou
rangez celui-ci.
14 Les enfants ou les mineurs ne doivent utiliser l'appareil que sous la
surveillance d'un adulte.
15 Ne pas vous servir de l'appareil pour vous couper les ongles.
Page 21

21
Exclusion de la garantie
Nous n'assurons pas de garantie en ce qui concerne l'exactitude des informations qui se rapportent aux propriétés techniques ainsi qu'à la présente
documentation. Le produit décrit dans cette documentation et, le cas
échéant, ses accessoires sont soumis à une amélioration et à un perfectionnement technique constants. C'est pourquoi nous nous réservons le droit de
modifier, en tout temps et sans avertissement préalable, des composants,
des accessoires, des spécifications techniques ainsi que la présente documentation du produit.
Utilisation conforme à son usage
N'utilisez ce massicot que pour découper du papier, des cartes, du papier
photo et des feuilles plastifiées. Toute autre utilisation est considérée comme non conforme à son usage. Vous n'êtes pas autorisé à apporter des modifications et des transformations sans concertation préalable.
Page 22

22
Caractéristiques de puissance
Découpe parfaite de photos, cartes, sorties sur papier ou de papier plastifié
• Bras de coupe + barre de pression avec protection des doigts
• Lame de coupe rotative avec 3 types de coupe
(coupe droite, perforation et coupe vague)
• Arrondisseur d'angles avec tiroir à chutes amovible
• Marquage visuel en cm (lignes, angles, graduation)
• Poignée intégrée
• Pieds en caoutchouc anti-dérapants
Bras de coupe
Base de coupe : 334 x 253 mm (A4)
Capacité de coupe : max. 10 feuilles (80g/m²)
Barre de pression avec protection des doigts
Lame en acier inoxydable
Poignée télescopique avec dispositif de sécurité à surface caoutchoutée
1 Placez le massicot avec le côté bras de coupe vers le haut sur une
surface stable et plane.
2 Appuyez sur le bouton de sécurité (Fig. 1, A) pour desserrer la fixation
et retirez la poignée (Fig. 1, B).
3 Relevez le levier du massicot.
4 Posez le document à couper sous la barre de pression à la position
voulue et appuyez sur celle-ci (Fig. 2, A).
5 Abaissez le levier et coupez (Fig. 2, B).
6 Appuyez en fin de coupe sur le bouton de sécurité et réinsérez la
poignée (Fig. 3).
Fig. 1 Fig. 2 Fig. 3
Page 23

23
Lame de coupe rotative
Base de coupe : 334 x 240 mm (A4)
Lame de coupe rotative avec sélecteur intégré et dispositif de sûreté du
réglage
Profils de coupe :
1. Coupe droite Capacité de coupe : max. 5 feuilles (80g/m²)
2. Perforation Capacité de coupe : max. 3 feuilles (80g/m²)
3. Coupe vague Capacité de coupe : max. 3 feuilles (80g/m²)
Les lames se trouvent dans un coffret protégé
Une bande de réserve se trouve dans le rangement.
1 Placez le massicot avec le côté lame de coupe rotative vers le haut
sur une surface stable et plane.
2 Poussez la tête de coupe sur un côté du rail de guidage (Fig. 4).
3 Posez le document à couper sous la barre de pression à la position
voulue et maintenez-le avec une main pendant que vous le coupez.
Remarque : maintenez-le bien fixement afin d'éviter les inexactitudes.
Le quadrillage et les tracés sur la base de coupe servent d'aide à la
position.
4 Abaissez la tête de coupe et glissez-la sur le rail de guidage.
Remarque : afin d'éviter une arête de coupe incorrecte, NE faites
PAS revenir la tête de coupe mais retirez le document introduit après
l'avoir coupé.
Fig. 4
Page 24

24
Sélection du profil de coupe
La lame de coupe rotative est équipée de trois profils. L'utilisateur peut en
sélectionner un en fonction de l'application.
1 Ouvrez le couvercle de la tête de coupe (Fig. 5, A).
2 Déplacez le sélecteur pour obtenir le profil de coupe désiré (Fig. 5, B).
Remarque : vous reconnaissez les différents profils. Déplacez le
sélecteur vers la gauche pour la coupe vague ou vers la droite pour la
perforation.
3 Fermez le couvercle de la tête de coupe.
Fig. 5
Remplacement de la bande de coupe
La bande a quatre faces (2 par côté). Lorsque le profil est imprécis ou mal
dessiné, il est conseillé de tourner la bande de telle sorte que vous vous serviez de l'une des faces non utilisées. Si la bande est usée, remplacez-la :
1 Poussez la tête de coupe à l'extrémité du rail de guidage.
2 Retirez la bande de la rainure sur l'autre extrémité (Fig. 6).
3 Introduisez la nouvelle bande dans la rainure.
Remarque : une bande de réserve se trouve dans le rangement du
rail de guidage (Fig. 7).
Fig. 6 Fig. 7
Page 25

25
Remplacement de la tête de coupe
Lorsque la lame de la tête de coupe est endommagée ou usée, vous devez
la remplacer.
1 Retirez le cache de la plaque de base (Fig. 8, A).
2 Retirez le rail de guidage de la plaque de base (Fig. 8, B).
3 Remplacez l'ancienne tête de coupe par la nouvelle (Fig. 8, C).
Fig. 8
4 Introduisez le rail de guidage dans la plaque de base.
5 Replacez le cache dans la plaque de base.
Arrondisseur d'angles
1 Placez le document à couper dans l'arrondisseur d'angles
(max. 1 feuille) (Fig. 9, A).
2 Appuyez sur le bouton d'exécution (Fig. 9, B).
3 Après l'opération, retirez le tiroir à chutes et videz-le (Fig. 10).
Fig. 9 Fig. 10
Page 26

26
Garantie
À conserver impérativement !
Cher client,
nous nous réjouissons que votre choix se soit porté sur le massicot d'Olym-
pia. Si, contre toute attente, vous deviez avoir un problème technique, veuillez tenir compte des points suivants :
• La durée de la garantie est de 24 mois pour votre appareil.
• Conservez absolument le bon d'achat et l'emballage d'origine.
• En cas de problème, appelez tout d'abord notre ligne directe.
+49 180 5 007514
Souvent, notre personnel spécialisé peut vous aider par téléphone.
• Si, contre toute attente, le défaut ne pouvait pas être éliminé par téléphone, veuillez nous envoyer le massicot dans son emballage d’origine à
l’adresse suivante :
Service-Center Hattingen
Weg zum Wasserwerk 10
D-45525 Hattingen
Les réparations sous garantie ne peuvent être effectuées que sur présentation du bon d'achat.
Nous vous remercions de votre compréhension.
Veuillez agréer nos salutations distinguées
Olympia Business Systems
Vertriebs GmbH
Matériel d'usage
Si la lame de coupe rotative ou la bande était usée, veuillez vous adresser à
notre ligne directe.
Page 27

27
Advertencias de seguridad importantes
Tenga en cuenta los aspectos siguientes a fin de garantizar un trabajo
fiable con el aparato cortador:
1
Lea las presentes instrucciones detenidamente y tenga las mismas en cuenta a la hora de manejar el aparato.
2
Guardar el manual de instrucciones para cualquier utilización
posterior
.
3 Previamente a la utilización coloque el aparato sobre un puesto de
trabajo plano y estable.
4 Las partes sueltas de la ropa, corbatas, bisutería, pelo largo u
otros objetos sueltos deben mantenerse alejados de la base de
corte. ¡Peligro de lesiones!
5 Antes de cortar retire todas las grapas y todos los clips del
documento.
6 Maneje el aparato sobre un puesto de trabajo estable y con ambas
manos.
7 El aparato sólo está previsto para cortar papel.
8 El aparato debe encontrarse fuera del alcance de los niños.
9 No se deben lubricar ni afilar los cortadores.
10 No se debe utilizar el aparato cuando un cortador o la carcasa de
un cortador hayan sufrido algún daño.
11 No se debe utilizar el aparato cuando la protección de los cuchillos
no está insertada correctamente.
12 Preste atención a no cortarse los dedos al sustituir el cortador.
Evite cualquier contacto con los cuchillos.
13 No coger el aparato por el cuchillo cuando quiera moverlo o
guardarlo.
14 Niños o menores de edad sólo deben utilizar el aparato bajo la
supervisión de un adulto.
15 El aparato no está previsto para cortarse las uñas.
Page 28

28
Exclusión de responsabilidad
No asumimos garantía alguna para la integridad de las informaciones que
se refieren a características técnicas, así como a la presente documentación. El producto descrito en la presente documentación y, en caso dado, sus
accesorios están sujetos a la mejora continua y al desarrollo ulterior. Por este motivo nos reservamos el derecho de modificar en cualquier momento y
sin previa notificación los componentes, accesorios, especificaciones técnicas, así como la presente documentación del producto.
Uso previsto
Este aparato cortador sólo se debe usar para el corte de papel, tarjetas, papel fotográfico y películas transparentes de laminación. Cualquier otro uso
se considera no conforme al objetivo previsto. Se prohibe expresamente
cualquier modificación o transformación.
Page 29

29
Características prestacionales
Perfecto corte de fotos, tarjetas, copias impresas o
papel laminado.
• Cortador de palanca y regleta de apriete con protección para los
dedos
• Cortador de rodillos con 3 funciones de corte
(corte recto, perforación y corte ondulado)
• Redondeador de esquinas con depósito de recogida extraible
• Ayuda de posicionamiento visual en cm (líneas, ángulos, escala)
• Manija de transporte integrada
• Apoyo seguro gracias a las patas de goma
Cortador de palanca
Superficie de apoyo: 334 x 253 mm (A4)
Capacidad de corte: como máximo 10 hojas (80 g/m²)
Regleta de apriete con protección para los dedos
Filo de acero inoxidable
Manija extraible con protección en superficie engomada
1 Posicione la base de corte con el lado del cortador de palanca hacia
arriba sobre una base estable y nivelada.
2 Pulse el botón de protección (figura 1, A) para soltar la fijación y
extraiga la manija (figura 1, B).
3 Mueva la palanca de la base de corte hacia arriba.
4 Coloque el material a cortar en la posición deseada debajo de la
regleta de apriete y empuje la misma hacia abajo (figura 2, A).
5 Empuje la palanca para cortar hacia abajo (figura 2, B).
6 Después de finalizar el trabajo, pulse el botón de protección e intro-
duzca la manija (figura 3).
Figura 1 Figura 2 Figura 3
Page 30

30
Cortador de rodillos
Superficie de apoyo: 334 x 240 mm (A4)
Cortador de rodillos con selector integrado y protección contra desajustes
Funciones de corte:
1. Corte recto Capacidad de corte: como máximo 5 hojas (80 g/m²)
2. Perforación Capacidad de corte: como máximo 3 hojas (80 g/m²)
3. Corte ondulado Capacidad de corte: como máximo 3 hojas (80 g/m²)
Los cuchillos se encuentran dentro de una carcasa protegida.
Una regleta de corte de recambio se encuentra en el compartimento.
1 Posicione la base de corte con el lado del cortador de rodillos hacia
arriba sobre una base estable y nivelada.
2 Acerque el cabezal cortador a un lado del riel de guía (figura 4).
3 Coloque el material a cortar en la posición deseada debajo de la
regleta de apriete y sujete el material con una mano mientras realice
el corte.
Nota: Sujete el material posicionado con firmeza para evitar que se
produzcan irregularidades. La reticulación y los dispositivos de medi-
ción de la base de corte pueden servir de ayuda de posicionamiento.
4 Empuje el cabezal cortador hacia abajo y páselo por encima del riel
de guía.
Nota: Para evitar un canto de corte defectuoso, NO SE DEBE hacer
retroceder el cabezal cortador, sino retirar el material colocado despu-
és del corte.
Figura 4
Page 31

31
Selección de la figura de corte
El cortador de rodillos está equipado con tres diferentes figuras de corte. El
usuario puede elegir la figura de corte en función de la aplicación.
1 Abra la cubierta del cabezal cortador (figura 5, A).
2 Mueva el selector para obtener la figura de corte desea-
da (figura 5, B).
Nota: Las diferentes figuras de corte figuran en el interruptor. Mueva
el interruptor a la izquierda para el corte ondulado o mueva el inter-
ruptor a la derecha para la perforación.
3 Cierre la cubierta del cabezal cortador.
Figura 5
Sustituir la regleta de corte
La regleta de corte tiene cuatro cantos de corte (2 en cada lado). Cuando la
figura de corte deje de ser impecable, debe girarse la regleta de corte de tal
modo que se pueda utilizar uno de los cantos de corte sin utilizar. Sustituya
la regleta de corte cuando esté gastada:
1 Acerque el cabezal cortador al extremo del riel de guía.
2 Retire la regleta de corte en el otro lado de la ranura (figura 6).
3 Introduzca la nueva regleta de corte en la ranura.
Nota: Una regleta de corte de recambio se encuentra en el compar-
timento en el riel de guía (figura 7).
Figura 6 Figura 7
Page 32

32
Sustituir el cabezal cortador
El filo del cabezal cortador debe sustituirse cuando esté dañado o desgastado.
1 Retire la cubierta final de la placa base (figura 8, A).
2 Retire el riel de guía de la placa base (figura 8, B).
3 Sustituya el cabezal cortador antiguo por uno nuevo (figura 8, C).
Figura 8
4 Introduzca el riel de guía en la placa base.
5 Coloque la cubierta final en la placa base.
Redondeador de esquinas
1 Coloque el material a cortar en el redondeador de esquinas
(como máximo 1 hoja) (figura 9, A).
2 Pulse el botón de ejecución (figura 9, B).
3 Retire y vacíe el depósito de recogida después del proce-
so (figura 10).
Figura 9 Figura 10
Page 33

33
Garantía
¡Guardar en un sitio adecuado!
Estimado cliente,
nos alegramos que usted se haya decidido por una base de corte de Olym-
pia. Si en contra de lo esperado se produce un problema técnico en el aparato, se deben tener en cuenta los siguientes puntos:
• El periodo de garantía del aparato es de 24 meses.
• Resulta imprescindible guardar el justificante de compra y el embalaje
original.
• En caso de surja cualquier problema, debe llamar primero a la línea de
asistencia telefónica:
+49 180 5 007514
En muchas ocasiones nuestro personal especializado puede solucionar
el problema por teléfono.
• No obstante, si no fuera posible eliminar el error por teléfono, rogamos
que se nos envíe el aparato en su embalaje a la siguiente dirección:
Centro de Servicio Técnico Hattingen
Weg zum Wasserwerk 10
D-45525 Hattingen
Sólo se pueden realizar reparaciones bajo garantía si se adjunta el justificante de compra.
Muchas gracias por su comprensión.
Muy atentamente
Olympia Business Systems
Vertriebs GmbH
Material de consumo
Póngase en contacto con la línea de asistencia telefónica si se ha producido
un desgaste del cortador de rodillos o de la regleta de corte.
Page 34

34
Belangrijke veiligheidsinformatie
Neem het volgende in acht om er zeker van te zijn dat u het snijapparaat
op de juiste manier gebruikt:
1
Lees deze instructies aandachtig door en volg ze op bij het gebruik
van het apparaat.
2
Gebruikshandleiding voor toekomstig gebruik bewaren
.
3 Vóór gebruik plaatst u het apparaat op een vlakke en stabiele
ondergrond.
4 Loszittende delen van kleding, stropdassen, sieraden, lang haar of
andere losse voorwerpen uit de buurt van de snijplaat houden.
Gevaar voor persoonlijk letsel!
5 Vóór het snijden verwijdert u alle nietjes en paperclips uit het
document.
6 Bedien het apparaat op een stabiele ondergrond en altijd met twee
handen.
7 Het apparaat is alleen bedoeld voor het snijden van papier.
8 Houd het apparaat buiten bereik van kinderen.
9 U mag de snijders niet slijpen of smeren.
10 Als een snijder of de behuizing ervan beschadigd is, mag het
apparaat niet worden gebruikt.
11 Als de mesbeveiliging niet op de juiste manier erin gezet is, mag
het apparaat niet worden gebruikt.
12 Zorg ervoor dat uw vingers bij vervanging van de snijder geen
snijletsel oplopen. Aanraking van de messen moet altijd worden
vermeden.
13 Bij het verplaatsen of wegzetten van het apparaat mag het mes
niet worden vastgepakt.
14 Kinderen en minderjarigen mogen het apparaat alleen onder
toezicht van een volwassene gebruiken.
15 Het apparaat is niet bedoeld voor het knippen van vingernagels.
Page 35

35
Aansprakelijkheid
Wij aanvaarden geen enkele aansprakelijkheid voor de juistheid van deze
gebruikshandleiding en van de informatie die betrekking heeft op technische
eigenschappen van het product. Het in deze documentatie beschreven product en de bijbehorende accessoires worden voortdurend verder ontwikkeld
en verbeterd. Daarom behouden wij ons het recht voor om componenten,
accessoires, technische specificaties en deze gebruiksaanwijzing zonder
voorafgaande aankondiging op elk gewenst moment te wijzigen.
Bedoeld gebruik
Dit snijapparaat mag alleen worden gebruikt voor het op maat snijden van
papier, kaarten, fotopapier en lamineerfolies. Elk ander gebruik is in strijd
met de voorschriften. Eigenmachtige wijzigingen of ombouw zijn niet toegestaan.
Page 36

36
Kenmerken
Nauwkeurig op maat snijden van foto's, kaarten, prints of gelamineerd papier
• Hefboomsnijmachine inclusief aandruklijst met vingerbescherming
• Rollensnijder met 3 snijfuncties
(rechte snede, perforatie en gegolfde snede)
• Hoekafronder met uittrekbare opvangbak
• Visuele positioneringshulp in cm (lijnen, hoeken, schaal)
• Geïntegreerde draaggreep
• Rubber pootjes voor stabiele plaatsing
Hefboomsnijmachine
Oplegvlak: 334 × 253 mm (A4)
Snijcapaciteit: Maximaal 10 bladen (80 g/m²)
Aandruklijst met vingerbescherming
Mes van roestvast staal
Uittrekbare greep met bescherming in rubberen oppervlak
1 Plaats de snijplaat met de hefboomsnijkant naar boven op een stabie-
le en vlakke ondergrond.
2 Druk de veiligheidsknop (afb. 1, A) in om de fixatie los te draaien en
trek de greep uit (afb. 1, B).
3 Beweeg de hefboom van de snijplaat naar boven.
4 Leg het te snijden materiaal op de gewenste positie onder de
aandruklijst en druk deze naar onderen (afb. 2, A).
5 Druk de hefboom voor het snijden naar onderen (afb. 2, B).
6 Druk na afronding van de werkzaamheden de veiligheidsknop in en
schuif de greep in (afb. 3).
Afb. 1 Afb. 2 Afb. 3
Page 37

37
Rollensnijder
Oplegvlak: 334 × 240 mm (A4)
Rollensnijder met geïntegreerde keuzeschakelaar en verstelbeveiliging
Snijfuncties:
1. Rechte snede Snijcapaciteit: Maximaal 5 bladen (80 g/m²)
2. Perforatie Snijcapaciteit: Maximaal 3 bladen (80 g/m²)
3. Gegolfde snede Snijcapaciteit: Maximaal 3 bladen (80 g/m²)
De messen bevinden zich in een beschermende behuizing.
Een reserve-snijlijst bevindt zich in het opbergvak.
1 Plaats de snijplaat met de rollensnijkant naar boven op een stabiele
en vlakke ondergrond.
2 Schuif de snijkop naar één kant van de geleidingsrail (afb. 4).
3 Leg het te snijden materiaal op de gewenste positie onder de
aandruklijst en houd het materiaal met één hand vast terwijl u snijdt.
Opmerking: Houd het geplaatste materiaal goed vast, omdat anders
onnauwkeurigheden kunnen ontstaan. Het raster en de meetinrichtin-
gen op de snijplaat kunnen als positioneringshulp dienen.
4 Druk de snijkop naar onderen en trek hem over de geleidingsrail.
Opmerking: Om een foutieve snijkant te voorkomen leidt u de snijkop
NIET terug maar verwijdert u na het snijden het geplaatste materiaal.
Afb. 4
Page 38

38
Snede kiezen
De rollensnijder kan drie verschillende sneden maken. De gebruiker kan de
snede afhankelijk van de toepassing kiezen.
1 Open de afdekking aan de snijkop (afb. 5, A).
2 Beweeg de keuzeschakelaar om de gewenste snede te verkrij-
gen (afb. 5, B).
Opmerking: Op de schakelaar zijn diverse sneden zichtbaar. Beweeg
de schakelaar naar links voor gegolfde snede en naar rechts voor per-
foratie.
3 Sluit de afdekking aan de snijkop.
Afb. 5
Snijlijst vervangen
De snijlijst heeft vier snijkanten (2 per kant). Als de snede onnauwkeurig
wordt, moet u de snijlijst zodanig draaien dat een van de ongebruikte snijkanten wordt gebruikt. Als de snijlijst versleten is, vervangt u hem als volgt:
1 Schuif de snijkop naar het einde van de geleidingsrail.
2 Neem de snijlijst aan de andere kant uit de groef (afb. 6).
3 Schuif de nieuwe snijlijst in de groef.
Opmerking: Een reserve-snijlijst bevindt zich in het opbergvak in de
geleidingsrail (afb. 7).
Afb. 6 Afb. 7
Page 39

39
Snijkop vervangen
Als het lemmet van de snijkop beschadigd of versleten is, moet het worden
vervangen.
1 Verwijder de eindkap uit de grondplaat (afb. 8, A).
2 Neem de geleidingsrail uit de grondplaat (afb. 8, B).
3 Vervang de oude snijkop door een nieuwe (afb. 8, C).
Afb. 8
4 Schuif de geleidingsrail in de grondplaat.
5 Zet de eindkap in de grondplaat.
Hoekafronder
1 Leg het te snijden materiaal in de hoekafronder
(maximaal 1 blad) (afb. 9, A).
2 Druk de uitvoeringsknop in (afb. 9, B).
3 Neem na het snijden de opvangbak uit en maak hem leeg (afb. 10).
Afb. 9 Afb. 10
Page 40

40
Garantie
Beslist goed opbergen!
Geachte klant,
Het verheugt ons dat u voor de snijplaat van Olympia hebt gekozen. Als het
apparaat tegen de verwachting in een technisch probleem heeft, verzoeken
wij u op de volgende punten te letten:
• De garantieperiode voor het apparaat bedraagt 24 maanden.
• Bewaar beslist de aankoopbon en de originele verpakking.
• Als er een probleem optreedt, verzoeken wij u eerst onze hotline te bel-
len:
+49 180 5 007514
Ons vakbekwaam personeel kan u vaak al telefonisch verder helpen.
• Als de fout echter niet telefonisch kan worden verholpen, verzoeken wij u
om het apparaat in de originele verpakking naar het volgende adres te
zenden:
Servicecenter Hattingen
Weg zum Wasserwerk 10
45525 Hattingen (D)
Reparaties in het kader van de garantie kunnen alleen worden uitgevoerd
als de aankoopbon wordt meegezonden.
Wij danken u voor uw begrip.
Met vriendelijke groet,
Olympia Business Systems
Vertriebs GmbH
Verbruiksmateriaal
Als de rollensnijder of de snijlijst versleten zijn, neem dan contact op met de
hotline.
Page 41

41
Importanti indicazioni di sicurezza
L'esercizio affidabile della taglierina richiede l'osservanza di quanto
segue:
1
Leggere attentamente le presenti istruzioni ed osservarle
scrupolosamente durante l'utilizzo dell'apparecchio.
2
Conservare le istruzioni per l'uso per gli utilizzi futuri.
3 Prima dell’esercizio, posizionare l’apparecchio in un punto di lavo-
ro fisso e piano.
4 Tenere lontano dal refilatore lembi di abbigliamento, cravatte,
gioielli, capelli lunghi o altri oggetti liberi. Pericolo di lesioni!
5 Prima di procedere al taglio, rimuovere eventuali graffette o clip dal
documento.
6 Adoperare l’apparecchio posizionato in un punto di lavoro fisso con
entrambe le mani.
7 L’apparecchio va adoperato unicamente per tagliare carta.
8 Tenere lontano l’apparecchio dalla portata dei bambini.
9 Il refilatore non richiede alcun intervento di lubrificazione o rettifica.
10 In caso di danneggiamento di una lama o dell’alloggiamento di una
lama non è consentito utilizzare ulteriormente l'apparecchio.
11 In caso di errato posizionamento della protezione lama non è con-
sentito utilizzare ulteriormente l'apparecchio.
12 Fare attenzione a non ledere le dita in sede di sostituzione delle
lame. Evitare in linea generale qualsiasi contatto con le lame.
13 Durante le operazioni di movimentazione o conservazione
dell’apparecchio non è consentito entrare in contatto con le lame.
14 L’utilizzo dell’apparecchio da parte di bambini o minori è consentito
solo alla presenza di adulti.
15 L’apparecchio non va adoperato per il taglio delle unghie delle
mani.
Page 42

42
Esclusione di responsabilità
In qualità di costruttore non rispondiamo per l'esattezza delle informazioni
relative alle caratteristiche tecniche e della presente documentazione. Il prodotto e gli eventuali accessori descritti nel presente manuale sono soggetti a
continue migliorie e sviluppi. Pertanto ci riserviamo il diritto di modificare in
qualsiasi momento e senza preavviso alcuno componenti, accessori, specifiche tecniche e la presente documentazione di prodotto.
Impiego conforme agli usi previsti
La presente taglierina va usata esclusivamente per tagliare carta, cartoline,
carta fotografica e pellicole di plastificazione. Qualsiasi altro impiego è da ritenersi non conforme alle disposizioni. Non sono ammesse modifiche o variazioni arbitrarie.
Page 43

43
Caratteristiche di prestazione
Perfetto taglio di fotografie, cartoline, stampe o carta laminata.
• Taglierina a leva + profilo pressore con paramano
• Taglierina a rullo con 3 funzioni di taglio
(taglio diritto, perforazione e taglio ondulato)
• Arrotondangoli con recipiente di raccolta estraibile
• Dispositivo visivo di posizionamento in cm (linee, angoli, scala)
• Impugnatura integrata
• Piedini in gomma per una tenuta sicura
Taglierina a leva
Superficie di appoggio: 334 x 253 mm (A4)
Spessore di taglio: max. 10 fogli (80g/m²)
Profilo pressore con paramano di protezione
Lama in acciaio inossidabile
Leva estraibile con protezione in superficie gommata
1 Posizionare il refilatore con taglierina a leva rivolta in alto su una su-
perficie piana e compatta.
2 Premere il tasto di arresto (figura 1, A) per rilasciare il blocco ed
estrarre la leva (figura 1, B).
3 Spostare quindi in alto la leva del refilatore.
4 Allineare il materiale da tagliare nella posizione di taglio desiderata
sotto al profilo pressore che va quindi spinto in basso (figura 2, A).
5 Abbassare la leva per tagliare (figura 2, B).
6 Una volta concluso il taglio, premere il tasto di arresto facendo rientra-
re la leva (figura 3).
figura 1 figura 2 figura 3
Page 44

44
Taglierina a rullo
Superficie di appoggio: 334 x 240 mm (A4)
Taglierina a rullo con selettore integrato e pressino bloccabile
Funzioni di taglio:
1. Taglio diritto Spessore di taglio: max. 5 fogli (80g/m²)
2. Perforazione Spessore di taglio: max. 3 fogli (80g/m²)
3. Taglio ondulato Spessore di taglio: max. 3 fogli (80g/m²)
Le lame si trovano all'interno di un involucro protetto.
Un sistema a lama di ricambio si trova nel vano di conservazione.
1 Posizionare il refilatore con taglierina a rulli rivolta in alto su una su-
perficie piana e compatta.
2 Spingere la testina di taglio contro un lato della guida di posiziona-
mento (figura 4).
3 Allineare il materiale da tagliare nella posizione desiderata sotto al
profilo pressore e tenere il materiale fermo con una mano durante il
taglio.
Nota: Tenere saldamente il materiale posizionato altrimenti la lavora-
zione può risultare imprecisa. La griglia e le marcature di misurazione
presenti sul refilatore possono aiutare il corretto posizionamento.
4 Spingere la testina di taglio in basso facendola scorrere lungo la guida
di posizionamento.
Nota: Per evitare delle imperfezioni dello spigolo di taglio, NON fare
scorrere la testina di taglio indietro ma rimuovere prima il materiale in-
serito subito dopo il taglio.
figura 4
Page 45

45
Scelta del tipo di taglio
La taglierina a rullo consente tre tipi di taglio differenti. L'operatore ha così
modo di scegliere il tipo di taglio in base alle esigenze.
1 Aprire la copertura presso la testina di taglio (figura 5, A).
2 Spostare il selettore fino ad ottenere il taglio desiderato (figura 5, B).
Nota: Sul selettore sono riportati i vari tipi di taglio che è quindi possi-
bile individuare con facilità. Spostare il selettore a sinistra per il taglio
ondulato oppure spostare il selettore a destra per la perforazione.
3 Chiudere la copertura presso la testina di taglio.
figura 5
Sostituzione del sistema a lama
Il sistema a lama ha quattro spigoli di taglio (2 per lato). Nel caso in cui il
taglio risultasse impreciso, girare la lama in modo da impiegare uno degli
spigoli di taglio non utilizzati. Non appena il sistema a lama risulta usurato,
sostituirlo come segue:
1 Spingere la testina di taglio alla fine della guida di posizionamento.
2 Rimuovere il sistema a lama dalla rispettiva giunzione a maschio sfi-
landolo dal lato opposto (figura 6).
3 Spingere quindi il nuovo sistema a lama nella giunzione a maschio.
Nota: Un sistema a lama di ricambio di trova all'interno del vano di
conservazione nella guida di posizionamento (figura 7).
figura 6 figura 7
Page 46

46
Sostituzione della testina di taglio
Non appena la lama della testina di taglio risulta danneggiata o usurata, procedere a sostituzione come segue:
1 Rimuovere l'estremità terminale dalla piastra di fondo (figura 8, A).
2 Rimuovere la guida di posizionamento dalla piastra di fon-
do (figura 8, B).
3 Sostituire la testina di taglio vecchia con un pezzo nuovo (figura 8, C).
figura 8
4 Spingere la guida di posizionamento nella piastra di fondo.
5 Riposizionare l'estremità terminale nella piastra di fondo.
Arrotondangoli
1 Posizionare il materiale da tagliare nell'arrotondangoli
(max. 1 foglio) (figura 9, A).
2 Premere il tasto per eseguire l'operazione (figura 9, B).
3 Rimuovere quindi il recipiente di raccolta per svuotarlo (figura 10).
figura 9 figura 10
Page 47

47
Garanzia
Conservare assolutamente!
Gentile cliente,
ci congratuliamo con Lei per la scelta del refilatore Olympia. In caso di im-
previsti problemi tecnici con l'apparecchio, si prega di tenere conto di quanto
segue:
• Il periodo di garanzia per l'apparecchio ricopre 24 mesi.
• Conservare necessariamente lo scontrino di acquisto e la confezione ori-
ginale.
• In caso di problemi, rivolgersi innanzitutto al nostro servizio telefonico di
assistenza chiamando al numero:
+49 180 5 007514
Spesso il nostro personale tecnico è in grado di offrire aiuto al telefono.
• Non sempre è comunque possibile eliminare l'errore telefonicamente; in
tal caso può rendersi necessario inviare l'apparecchio all'interno della
confezione originale al seguente indirizzo:
Service-Center / Centro di assistenza Hattingen
Weg zum Wasserwerk 10
D-45525 Hattingen
Riparazioni eseguite nel periodo di garanzia sono possibili soltanto in virtù
dello scontrino d'acquisto accluso all'apparecchio.
Grazie per la collaborazione.
Cordiali saluti
Olympia Business Systems
Vertriebs GmbH
Materiale di consumo
Con taglierina a rullo o sistema a lama usurati, si prega di rivolgersi al nostro
servizio telefonico di assistenza.
Page 48

48
Důležité bezpečnostní pokyny
Aby byla zaručena spolehlivá práce s řezacím přístrojem, respektujte
prosím následující:
1
Pozorně si prosím pročtěte tyto pokyny a dodržujte je při
manipulaci s Vaším přístrojem.
2
Návod k obsluze uschovejte pro pozdější použití
.
3 Před použitím postavte přístroj na rovné a stabilní pracovní místo.
4 Volné části oděvu, kravaty, šperky, dlouhé vlasy nebo jiné volné
předměty udržujte v bezpečné vzdálenosti od přístroje. nebezpečí
zranění!
5 Před řezáním odstraňte z dokumentu sešívací svorky, příp.
kancelářské sponky.
6 Přístroj obsluhujte dvěma rukama na stabilním pracovním místě.
7 Přístroj je určen pouze k řezání papíru.
8 Zabraňte dětem v přístupu k přístroji.
9 Řezačka by se neměla mazat ani brousit.
10 Přístroj nelze provozovat tehdy, pokud je poškozena řezačka nebo
těleso řezačky.
11 Přístroj nelze provozovat tehdy, pokud není správně nasazena
ochrana nože.
12 Dejte pozor na to, aby při výměně řezačky nedošlo k pořezání
prstů. Zásadně je nutné vyhnout se kontaktu s noži.
13 Př
i přemístění nebo odstavení přístroje nelze sahat na nůž.
14 Děti a nezletilí smějí přístroj provozovat pouze pod dohledem
dospělé osoby.
15 Přístroj není určen ke stříhání nehtů.
Page 49

49
Vyloučení záruky
Nepřebíráme žádnou záruku za správnost informací, vztahujících se na
technické vlastnosti a tuto dokumentaci. Výrobek a popř. jeho příslušenství,
popsané v této dokumentaci, podléhají stálému zlepšování a dalšímu vývoji.
Z tohoto důvodu si vyhrazujeme právo, bez předchozího oznámení kdykoliv
změnit komponenty, příslušenství, technické specifikace i tuto dokumentaci
výrobku.
Používání pro daný účel
Tento řezací přístroj smí být používán pouze pro přiříznutí papíru, pohlednic,
fotopapíru a laminovacích fólií. Každé jiné použití platí jako používání pro
jiný než daný účel. Svémocné provádění změn nebo přestaveb není
přípustné.
Page 50

50
Výkonové znaky
Perfektní přiříznutí fotografií, pohlednic, výtisků nebo laminovaného papíru.
• páková řezačka + přítlačná lišta s prstovou ochranou
• kotoučová řezačka s 3 řezacími funkcemi
(přímý řez, perforace a zvlněný řez)
• zaoblovačka rohů s vysouvatelnou zachycovací nádobkou
• vizuální polohovací pomůcka v cm (čáry, úhly, stupnice)
• integrovaná nosná rukojeť
• pryžové patky pro bezpečnou oporu
Páková řezačka
Dosedací plocha: 334 x 253 mm (A4)
Řezný výkon: max. 10 listů (80 g/m²)
Přítlačná lišta s prstovou ochranou
Čepel z nerezové oceli
Teleskopická rukojeť s pojistkou v pogumovaném povrchu
1 Řezací desku umístěte na stabilní a rovný povrch, stranou pákové
řezačky směrem nahoru.
2 Pro uvolnění fixace stiskněte pojistný knoflík (obr. 1, A) a rukojeť
vytáhněte ven (obr. 1, B).
3 Pákou řezací desky pohybujte směrem nahoru.
4 Materiál, který chcete řezat, uložte pod přítlačnou lištu do požadované
polohy, a lištu stlačte dolů (obr. 2, A).
5 Řezací páku stlačte dolů (obr. 2, B).
6 Po ukončení práce stiskněte pojistný knoflík a rukojeť zasuňte
dovnitř (obr. 3).
Obr. 1 Obr. 2 Obr. 3
Page 51

51
Kotoučová řezačka
Dosedací plocha: 334 x 240 mm (A4)
Kotoučová řezačka s integrovaným volícím spínačem a přestavitelnou
pojistkou
Řezací funkce:
1. přímý řez řezný výkon: max. 5 listů (80 g/m²)
2. perforace řezný výkon: max. 3 listy (80 g/m²)
3. zvlněný řez řezný výkon: max. 3 listy (80 g/m²)
Nože jsou uloženy v chráněném pouzdru.
Náhradní řezná lišta se nachází v úložné přihrádce.
1 Řezací desku umístěte na stabilní a rovný povrch, stranou kotoučové
řezačky směrem nahoru.
2 Řezací hlavu zasuňte na jednu stranu vodící kolejničky (obr. 4).
3 Materiál, který chcete řezat, uložte pod přítlačnou lištu do požadované
polohy, a během řezání jej jednou rukou přidržte.
Upozornění: Umístěný materiál držte pevně, protože jinak by mohlo
dojít k nepřesnostem. Rastr a měřící zařízení na řezací desce mohou
sloužit jako polohovací pomůcka.
4 Řezací hlavu stlačte dolů a veďte ji přes vodící kolejničku.
Upozornění: Pro zamezení vadné řezné hrany NIKDY neveďte řezací
hlavu zpět, ale po řezání vytáhněte vložený materiál.
Obr. 4
Page 52

52
Volba vzhledu řezu
Kotoučová řezačka je vybavena třemi různými vzhledy řezu. Uživatel si
může vzhled řezu volit v závislosti na použití.
1 Na řezací hlavě otevřete kryt (obr. 5, A).
2 Volícím spínačem pohybujte tak dlouho, dokud se neobjeví
požadovaný vzhled řezu (obr. 5, B).
Upozornění: Na spínači uvidíte různé vzhledy řezu. Pro zvlněný řez
pohybujte spínačem doleva, nebo pro perforaci doprava.
3 Zavřete kryt na řezací hlavě.
Obr. 5
Výměna řezné lišty
Řezná lišta má 4 řezné hrany (2 na každé straně). Pokud je vzhled řezu
nečistý, měli byste řeznou lištu otočit tak, abyste použili jednu
z nepoužívaných řezných hran. Po spotřebování řezné lišty tuto pak
vyměňte takto:
1 Zasuňte řezací hlavu až na konec vodící kolejničky.
2 Řeznou lištu vyjměte na druhé straně z drážky (obr. 6).
3 Do drážky zasuňte novou řeznou lištu.
Upozornění: Náhradní řezná lišta se nachází v úložné přihrádce ve
vodící kolejničce (obr. 7).
Obr. 6 Obr. 7
Page 53

53
Výměna řezací hlavy
Je-li čepel řezací hlavy poškozena nebo opotřebena, musí být vyměněna.
1 Ze základní desky sejměte koncovou čepičku (obr. 8, A).
2 Ze základní desky vytáhněte vodící kolejničku (obr. 8, B).
3 Vyměňte starou řezací hlavu za novou (obr. 8, C).
Obr. 8
4 Vodící kolejničku zasuňte do základní desky.
5 Nasaďte koncovou čepičku do základní desky.
Zaoblovačka rohů
1 Do zaoblovačky rohů vložte materiál, který má být řezán
(max. 1 list) (obr. 9, A).
2 Stiskněte prováděcí knoflík (obr 9, B).
3 Po provedení práce vyjměte zachycovací nádobku a tuto
vyprázdněte (obr. 10).
Obr. 9 Obr. 10
Page 54

54
Záruka
Bezpodmínečně uschovejte!
Vážený zákazníku,
těší nás, že jste se rozhodl pro řezací desku Olympia. Pokud by se na
Vašem přístroji proti očekávání vyskytl nějaký technický problém,
respektujte prosím následující body:
• Záruční doba u Vašeho přístroje činí 24 měsíců.
• Bezpodmínečně uschovejte doklad o koupi a originální obal.
• Pokud by se vyskytl problém, zavolejte prosím nejprve naši horkou linku:
+49 180 5 007514
Často Vám může náš odborný personál poradit telefonicky.
• Pokud by však nebylo možné závadu telefonicky odstranit, vložte prosím
Váš přístroj do originálního obalu a zašlete na následující adresu:
Service-Center Hattingen
Weg zum Wasserwerk 10
D-45525 Hattingen
Záruční opravy mohou být provedeny pouze s přiloženým dokladem o koupi.
Srdečně děkujeme za Vaše porozumění.
S přátelskými pozdravy
Vaše společnost Olympia Business Systems
Vertriebs GmbH
Opotřebovaný materiál
Pokud je kotoučová řezačka nebo řezná lišta opotřebována, obraťte se
prosím na horkou linku.
Page 55

55
Page 56

56
 Loading...