

Page 1
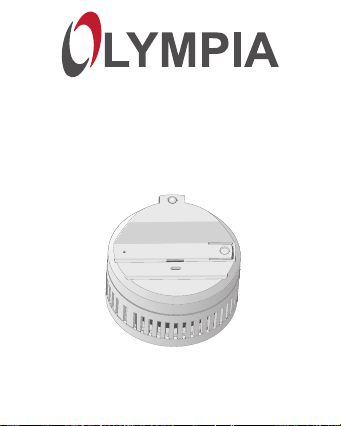
Rauchwarnmelder RM 30
mit 10-Jahres-Batterie
RM 30 Smoke Alarm Device
Détecteur avertisseur de fumée RM 30
with 10-year battery
avec pile d’une durée de vie de 10 ans
Rivelatore di fumo RM 30
a batteria con 10 anni di durata
Bedienungsanleitung
Operating Manual
Mode d‘emploi
Istruzioni d’uso
Page 2

Inhaltsverzeichnis
Sicherheitshinweise � � � � � � � � � � � � � � � � � � � � � � � � � � � � �6
Bestimmungsgemäße Verwendung � � � � � � � � � � � � � � � �7
Verpackungsinhalt � � � � � � � � � � � � � � � � � � � � � � � � � � � � � � � �8
Hinweise zur Benutzung � � � � � � � � � � � � � � � � � � � � � � � � � � �8
Übersicht � � � � � � � � � � � � � � � � � � � � � � � � � � � � � � � � � � � � � �9
Rauchwarnmelder montieren � � � � � � � � � � � � � � � � � � � �10
Montageort auswählen � � � � � � � � � � � � � � � � � � � � � � � � � � �10
Rauchwarnmelder an Decke montieren � � � � � � � � � � � � � �11
Rauchwarnmelder einschalten � � � � � � � � � � � � � � � � � � �12
Im Alarmfall � � � � � � � � � � � � � � � � � � � � � � � � � � � � � � � � � � � �12
Echter Gefahrenfall � � � � � � � � � � � � � � � � � � � � � � � � � � � � � �13
Unechter Gefahrenfall � � � � � � � � � � � � � � � � � � � � � � � � � � � �13
Rauchwarnmelder auf Funktion prüfen � � � � � � � � � � � � � �14
Lautlos-Modus einschalten � � � � � � � � � � � � � � � � � � � � � �14
Anhang � � � � � � � � � � � � � � � � � � � � � � � � � � � � � � � � � � � � � � �15
Garantie� � � � � � � � � � � � � � � � � � � � � � � � � � � � � � � � � � � � � � �15
Entsorgung � � � � � � � � � � � � � � � � � � � � � � � � � � � � � � � � � � � �16
Technische Daten � � � � � � � � � � � � � � � � � � � � � � � � � � � � � � �17
Wartung und Pege � � � � � � � � � � � � � � � � � � � � � � � � � � � � �17
2
Page 3

Contents
Safety Instructions � � � � � � � � � � � � � � � � � � � � � � � � � � � � �18
Intended Use � � � � � � � � � � � � � � � � � � � � � � � � � � � � � � � � � �19
Package Contents � � � � � � � � � � � � � � � � � � � � � � � � � � � � � � �20
Notes on Use � � � � � � � � � � � � � � � � � � � � � � � � � � � � � � � � � �20
General View � � � � � � � � � � � � � � � � � � � � � � � � � � � � � � � � � �21
Installing the Smoke Alarm Device � � � � � � � � � � � � � � � �22
Selecting the Installation Location � � � � � � � � � � � � � � � � � �22
Installing the Smoke Alarm Device on a Ceiling � � � � � � � �23
Switching On the Smoke Alarm Device � � � � � � � � � � � �24
In the Event of an Alarm � � � � � � � � � � � � � � � � � � � � � � � � � �24
Direct Recognition of Danger � � � � � � � � � � � � � � � � � � � � � �25
No Direct Recognition of Danger � � � � � � � � � � � � � � � � � � �25
Smoke Alarm Device Function Test � � � � � � � � � � � � � � � � �26
Activating Silent Mode � � � � � � � � � � � � � � � � � � � � � � � � � �26
Appendix � � � � � � � � � � � � � � �� � � � � � � � � � � � � � � � � � � � � �27
Guarantee � � � � � � � � � � � � � � � � � � � � � � � � � � � � � � � � � � � � �27
Disposal� � � � � � � � � � � � � � � � � � � � � � � � � � � � � � � � � � � � � � �28
Technical Data � � � � � � � � � � � � � � � � � � � � � � � � � � � � � � � � � �29
Maintenance and Service � � � � � � � � � � � � � � � � � � � � � � � � �29
3
Page 4

T able de matières
Consignes de sécurité � � � � � � � � � � � � � � � � � � � � � � � � � �30
Utilisation conforme à l'usage prévu � � � � � � � � � � � � � �31
Contenu du coffret � � � � � � � � � � � � � � � � � � � � � � � � � � � � � � �32
Remarques concernant l'utilisation � � � � � � � � � � � � � � � � � �32
Vue d'ensemble � � � � � � � � � � � � � � � � � � � � � � � � � � � � � � � �33
Installer le détecteur avertisseur de fumée � � � � � � � � �34
Où xer votre détecteur de fumée � � � � � � � � � � � � � � � � � �34
Positionner le détecteur de fumée au plafond � � � � � � � � �35
Activer le détecteur de fumée � � � � � � � � � � � � � � � � � � � �36
En cas d'alarme � � � � � � � � � � � � � � � � � � � � � � � � � � � � � � � �36
Cas de danger réel � � � � � � � � � � � � � � � � � � � � � � � � � � � � � �37
Cas de danger non réel � � � � � � � � � � � � � � � � � � � � � � � � � �37
Comment vérier le bon fonction. de votre détecteur� � � �38
Activer le mode silencieux � � � � � � � � � � � � � � � � � � � � � � �38
Annexe � � � � � � � � � � � � � � � � � � � � � � � � � � � � � � � � � � � � � � �39
Garantie� � � � � � � � � � � � � � � � � � � � � � � � � � � � � � � � � � � � � � �39
Élimination � � � � � � � � � � � � � � � � � � � � � � � � � � � � � � � � � � � � �40
Données techniques � � � � � � � � � � � � � � � � � � � � � � � � � � � � �41
Entretien et maintenance � � � � � � � � � � � � � � � � � � � � � � � � �41
4
Page 5

Indice
Indicazioni di sicurezza � � � � � � � � � � � � � � � � � � � � � � � � �42
Impiego conforme agli usi previsti � � � � � � � � � � � � � � � �43
Contenuto della confezione � � � � � � � � � � � � � � � � � � � � � � �44
Note sull’utilizzo � � � � � � � � � � � � � � � � � � � � � � � � � � � � � � � �44
Panoramica � � � � � � � � � � � � � � � � � � � � � � � � � � � � � � � � � � �45
Montaggio del rivelatore di fumo � � � � � � � � � � � � � � � � �46
Punto di ubicazione � � � � � � � � � � � � � � � � � � � � � � � � � � � � � �46
Montaggio del rivelatore di fumo al softto � � � � � � � � � � � �47
Attivazione del rivelatore di fumo � � � � � � � � � � � � � � � � �48
In caso di allarme � � � � � � � � � � � � � � � � � � � � � � � � � � � � � � �48
Pericolo effettivo � � � � � � � � � � � � � � � � � � � � � � � � � � � � � � � �49
Pericolo presunto � � � � � � � � � � � � � � � � � � � � � � � � � � � � � � �49
Verica del funzionamento � � � � � � � � � � � � � � � � � � � � � � � �50
Attivazione della modalità silenziosa � � � � � � � � � � � � � �50
Appendice � � � � � � � � � � � � � � � � � � � � � � � � � � � � � � � � � � � �51
Garanzia � � � � � � � � � � � � � � � � � � � � � � � � � � � � � � � � � � � � � �51
Smaltimento � � � � � � � � � � � � � � � � � � � � � � � � � � � � � � � � � � �52
Dati tecnici � � � � � � � � � � � � � � � � � � � � � � � � � � � � � � � � � � � � �53
Manutenzione e cura � � � � � � � � � � � � � � � � � � � � � � � � � � � �53
5
Page 6
Sicherheitshinweise
Lesen Sie die Bedienungsanleitung aufmerksam
durch und beachten Sie die Hinweise bei der
Handhabung des Rauchwarnmelders� Bewahren
Sie die Bedienungsanleitung für eine spätere
Verwendung auf�
Achten Sie auf dieses Symbol� Die mit diesem
Symbol gekennzeichneten Texte geben Ihnen
nützliche Hinweise�
Warnung! Dieses Gerät kann von Kindern ab 8
Jahren und Personen mit verringerten
physischen, sensorischen oder mentalen
Fähigkeiten oder Mangel an Erfahrung und Wissen
benutzt werden, wenn sie beaufsichtigt oder entsprechend
unterwiesen wurden und die daraus resultierenden
Gefahren verstehen� Kinder dürfen nicht mit dem Gerät
spielen� Reinigung 0nd Wartung dürfen nicht von Kindern
ohne Beaufsichtigung durchgeführt werden�
Warnung! Erstickungsgefahr! Kinder können
Kleinteile, Verpackungs- oder Schutzfolien
verschlucken� Halten Sie Kinder vom Produkt
und dessen Verpackung fern!
Warnung! Gefährdung von Gesundheit und
Umwelt durch Akkus und Batterien! Unsachge-
mäßer Umgang mit Batterien kann Ihre
6
Page 7
Gesundheit und die Umwelt gefährden� Batterien nie
öffnen, beschädigen, verschlucken oder in die Umwelt
gelangen lassen� Batterien können giftige und
umweltschädliche Schwermetalle enthalten�
Vorsicht! Gehörschaden durch lautes
Warnsignal! Das laute Warnsignal kann das
Gehör schädigen� Verwenden Sie das Produkt
nur an den empfohlenen Montageorten� Testen Sie das
Produkt nicht in der Nähe Ihrer Ohren� Halten Sie sich im
Alarmfall nicht über einen längeren Zeitraum in der Nähe
des Warnsignals auf�
Wichtig! Sachschaden durch Umwelteinüsse! Ungünstige Umwelteinüsse wie z. B. Rauch, Staub, Erschüt-
terungen, Chemikalien, Feuchtigkeit, Hitze oder direkte
Sonneneinstrahlung können das Produkt beschädigen�
Umwelteinüsse wie z. B. Rauch, Staub, Erschütterungen,
Chemikalien, Feuchtigkeit, Hitze oder direkte Sonneneinstrahlung vermeiden�
Bestimmungsgemäße Verwendung
Der Rauchwarnmelder RM 30 dient zur Erkennung von
Rauch in Innenräumen, um dann ein lautes akustisches
Signal abzugeben� Voraussetzung für eine bestimmungsgemäße Verwendung ist die sachgemäße Installation
sowie die Beachtung und Einhaltung der Hinweise dieser
7
Page 8

Bedienungsanleitung� Jede andere Verwendung gilt als
nicht bestimmungsgemäß� Eigenmächtige Veränderungen oder Umbauten sind nicht zulässig� Verwenden Sie
den Rauchwarnmelder ausschließlich in geschlossenen
Innenräumen�
Verpackungsinhalt
Bitte prüfen Sie den Verpackungsinhalt genau� Sollte
etwas fehlen oder durch den Transport beschädigt sein,
dürfen Sie den Rauchwarnmelder NICHT in Betrieb
nehmen!
• Rauchwarnmelder RM 30
• Montagematerial (2 x Schrauben und 2 x Dübel)
• Einschalt-Pin
• Bedienungsanleitung
Hinweise zur Benutzung
• Der Rauchwarnmelder darf nicht mit Farbe überstri-
chen und die Raucheingangsöffnungen nicht überklebt
werden�
• Der Rauchwarnmelder erkennt den Rauch eines
Brands und nicht die Flamme selbst�
• Die Batterie ist fest im Rauchwarnmelder verbaut und
kann nicht gewechselt werden�
• Menschen unter Alkohol-, Medikamenten- oder
Drogeneinuss werden von dem Warnsignal möglicherweise nicht geweckt�
8
Page 9
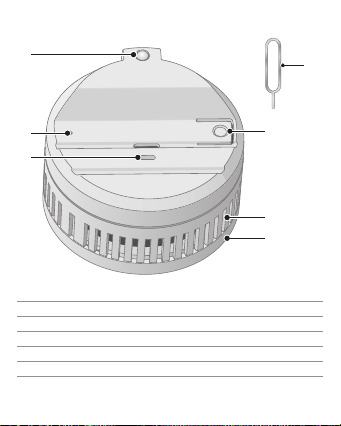
Übersicht
1
7
2
3
1 LED
2 Taste Einschalten
3 Lautsprecher
4 Taste Test/Stumm
5 Raucheintrittsöffnungen
6 Sockel
7 Einschalt-Pin
4
5
6
9
Page 10

Rauchwarnmelder montieren
Bevor Sie den Rauchwarnmelder montieren, lesen Sie
die folgenden Hinweise, die Ihnen helfen, den richtigen
Montageort zu wählen�
Montageort auswählen
Montieren Sie den Rauchwarnmelder
• im Flurbereich zwischen dem Wohn- und
Schlafbereich (zur Überwachung von
Fluchtwegen), je einen Rauchwarnmelder
in jedem Wohn- und Schlafzimmer und
bei mehrstöckigen Häusern mindestens
einen Rauchwarnmelder pro Etage im
Flurbereich
• möglichst zentral in einem Raum
• nur an fugenlosen, rauchundurchlässigen Decken
• immer in waagerechter Ausrichtung
Montieren Sie den Rauchwarnmelder nicht
• in Räumen, in denen unter normalen
Bedingungen starker Dampf, Staub oder
Rauch entsteht (bspw� Werkstatt, Küche,
Bad)
• in der Nähe von offenen Feuerstellen
• außerhalb der zulässigen Umgebungsbe-
dingungen (siehe Technische Daten)
10
Page 11

Rauchwarnmelder an Decke montieren
Achten Sie bei der Montage darauf, wenigstens
50 cm Abstand zu elektrischen Geräten, Türen,
Belüftungsschächten oder sonstigen Objekten
einzuhalten�
Das notwendige Montagematerial ist im Lieferumfang bereits
enthalten�
1 Drehen Sie den Sockel vorsich-
tig gegen den Uhrzeigersinn
und nehmen Sie den Sockel
vom Rauchwarnmelder ab�
2 Schrauben Sie den Sockel am
vorgesehenen Montageort mit
zwei Schrauben an die Decke�
Nutzen Sie die
gegenüberliegenden
Langlöcher im Sockel als
Schablone und verwenden Sie je
nach Montageuntergrund Dübel
als zusätzliche Befestigung�
3 Stecken Sie den Rauchwarn-
melder auf den Sockel und
drehen Sie den Rauchwarnmelder im Uhrzeigersinn fest�
11
Page 12
Rauchwarnmelder
einschalten
1 Drücken Sie mit dem
Einschalt-Pin für etwa
2 Sekunden auf die Taste
Einschalten�
2 Sie hören einen Signalton
und die LED blinkt ungefähr alle 6 Minuten�
Die eingebaute Batterie hat eine Lebensdauer
von etwa 10 Jahren nach dem ersten
Einschalten�
3 Der Rauchwarnmelder ist jetzt betriebsbereit.
Im Alarmfall
Was muss ich tun, wenn der Rauchwarnmelder
auslöst?
• Bewahren Sie Ruhe�
• Gehen Sie stets davon aus, dass es sich um einen
echten Gefahrenfall handelt�
12
Page 13

Ist im überwachten Bereich Geruchs-, Rauch- oder
Feuerentwicklung wahrzunehmen, gehen Sie wie
folgt vor:
• Retten Sie sich und gefährdete Personen aus dem
Gefahrenbereich� Halten Sie sich bei starker Rauchentwicklung in Bodennähe auf und schützen Sie die Atemwege� Folgen Sie ggf� gekennzeichneten Fluchtwegen�
Schließen Sie zugängliche Fenster und Türen, um
weitere Rauch- bzw� Feuerausbreitung zu verhindern�
• Verständigen Sie die Feuerwehr� Bleiben Sie ruhig und
antworten Sie auf die Fragen: Wer? Wo? Was? Warten
Sie auf Anweisungen�
• Versuchen Sie, Entstehungsbrände mit vorhande-
nen geeigneten Löschmitteln wie Feuerlöscher oder
Löschdecken zu löschen� Bringen Sie sich und andere
niemals in Gefahr�
Ist im überwachten Bereich KEINE Geruchs-, Rauchoder Feuerentwicklung wahrzunehmen, gehen Sie wie
folgt vor:
• Vergewissern Sie sich, dass im überwachten Bereich
KEINE verdächtigen Gerüche, Rauch oder Feuer zu
erkennen sind�
• Deaktivieren Sie den Alarm, indem Sie den Raum aus-
lüften, in dem der Rauchwarnmelder ausgelöst hat�
13
Page 14
Rauchwarnmelder
auf Funktion prüfen
Prüfen Sie den Rauchwarnmelder regelmäßig - spätestens einmal pro Jahr - auf
Funktion�
1 Drücken und halten Sie
die Taste Test/Stumm� Die LED blinkt schnell und Sie
hören einen durchgängigen Signalton�
Beachten Sie, dass nach dem Drücken der Taste
Test/Stumm der Lautlos-Modus für 9 Minuten
eingeschaltet ist� In dieser Zeit ist das
Alarmsignal ausgeschaltet�
Lautlos-Modus einschalten
Schalten Sie den Lautlos-Modus ein, wenn Sie das Alarmsignal des Rauchwarnmelders vorübergehend ausschalten
möchten� Der Lautlos-Modus wird automatisch nach
9 Minuten beendet�
1 Drücken und halten Sie die Taste Test/Stumm� Die
LED blinkt regelmäßig und Sie hören einen durchgängigen Signalton�
2 Möchten Sie den Lautlos-Modus manuell beenden,
drücken Sie die Taste Test/Stumm� Sie hören einen
kurzen Signalton und die LED blinkt ungefähr alle
6 Minuten� Der Lautlos-Modus ist ausgeschaltet�
14
Page 15

Anhang
In diesem Abschnitt erhalten Sie weitere Informationen zu
Garantie, Entsorgung, Technische Daten, Wartung und
Pege und Konformität.
Garantie
Die Garantiezeit beträgt 24 Monate� Die Garantiezeit
beginnt ab Kaufdatum� Bitte bewahren Sie den Kaufbeleg
und die Originalverpackung auf� Sollte ein Problem
auftreten, besuchen Sie unser Retouren-Portal (RMA) im
Bereich Support auf unserer Internetseite
www�olympia-vertrieb�de
Bei weiteren Fragen steht Ihnen unsere Hotline unter der
Nummer 0180 5 007514 (Kosten aus dem dt� Festnetz
bei Drucklegung: 14 ct/Min., mobil maximal 42 ct/Min.) zur
Verfügung�
Ihre Olympia Business Systems Vertriebs GmbH
Zum Kraftwerk 1
45527 Hattingen
15
Page 16

Entsorgung
Wollen Sie Ihr Gerät entsorgen, bringen Sie Ihr
Gerät zur Sammelstelle Ihres kommunalen
Entsorgungsträgers (z. B. Wertstoffhof). Nach
dem Elektro- und Elektronikgerätegesetz sind
Besitzer von Altgeräten gesetzlich verpichtet, alte
Elektro- und Elektronikgeräte einer getrennten
Abfallerfassung zuzuführen� Das Symbol bedeutet, dass
Sie Ihr Gerät auf keinen Fall in den Hausmüll werfen
dürfen! Gefährdung von Gesundheit und Umwelt durch
Batterien! Batterien nie öffnen, beschädigen, verschlucken
oder in die Umwelt gelangen lassen� Batterien können
giftige und umweltschädliche Schwermetalle enthalten�
Entfernen Sie die Batterien aus dem Gerät, bevor Sie das
Gerät entsorgen. Sie sind gesetzlich verpichtet, Batterien
beim batterievertreibenden Handel bzw� über die vom
zuständigen Entsorgungsträger bereitgestellten Sammelstellen zu entsorgen� Die Entsorgung ist unentgeltlich� Das
Symbol bedeutet, dass Sie Batterien auf keinen Fall in den
Hausmüll werfen dürfen und Batterien über Sammelstellen
der Entsorgung zugeführt werden müssen�
Verpackungsmaterialien entsorgen Sie
entsprechend den lokalen Vorschriften�
16
Page 17

Technische Daten
Merkmal
Batterie 3 V, 1500 mA (Varta CR 2/3 AH)
zulässige Umge-
bungsbediungen
optische Anzeige LED
angewandte
Normen
Abmessungen 69 x 44,5 mm
Gewicht 80 g (inkl. Batterie)
0 °C - 50 °C,
10 % - 90 % rel� Luftfeuchte
EN 14604:2005 + AC1:2008
Wartung und Pege
Staubablagerungen und Spinnengewebe können die
Funktion des Rauchwarnmelders beeinträchtigen
und zu Fehlfunktionen führen� Ggf� kann Rauch nicht mehr
detektiert werden�
1 Reinigen Sie die Gehäuseoberäche regelmäßig mit
einem leicht feuchten, weichen und fusselfreien Tuch�
2 Reinigen Sie die Raucheintrittsöffnungen mit einem
Pinsel�
3 Führen Sie regelmäßig, spätestens einmal im Jahr,
einen Funktionstest aus�
17
Page 18

Safety Instructions
Read the operating manual thoroughly and
observe all the information contained when using
the smoke alarm device� Keep the operating
manual in a safe place for future reference�
Pay attention to this symbol� This symbol
indicates passages of text providing useful
information�
Warning! This device may be used by children
from eight years of age and persons with
restricted physical, sensory or mental capabilities
or a lack of experience and knowledge when they are
supervised or have received the relevant instructions and
been informed of the risks if they are not observed�
Children must never play with the device� Cleaning and
servicing must not be performed by children without
supervision�
Warning! Risk of suffocation! Children can
swallow small parts, packaging and protective
foils� Keep the product and packaging out of
reach of children!
Warning! Risks to health and the environment
from batteries! Improper handling of batteries
can put your health and the environment at risk�
Never open, damage or swallow batteries or allow them to
18
Page 19

pollute the environment. Batteries may contain toxic,
ecologically hazardous heavy metals�
Caution! Hearing damage through loud alarm
signal! The alarm signal is loud and could cause
hearing damage� Only use the product in the
recommended installation locations� Do not hold the
product near your ears to test it� Do not remain in the
vicinity of the acoustic alarm for a longer period when it
has been triggered�
Important! Property damage through environmental
inuences! Harmful environmental inuences such as
exposure to smoke, dust, vibration, chemicals, moisture,
heat and direct sunlight, could damage the product�
Prevent exposing the device to environmental inuences
such as smoke, dust, vibration, chemicals, moisture, heat
or direct sunlight�
Intended Use
The RM 30 smoke alarm device serves for the detection of
smoke indoors and to issue a loud acoustic signal if smoke
is detected� A condition for complying with the intended
use is that the equipment is installed correctly and the
information in the manual is observed and maintained�
Any other use is considered unintended use� Unauthorised
modications or reconstructions are not permitted. Only
use the smoke alarm device indoors�
19
Page 20

Package Contents
Please check the contents of the package carefully� If
anything is missing or has been damaged during transport,
DO NOT put the smoke alarm device into operation!
• RM 30 smoke alarm device
• Assembly material (2 screws, 2 dowels)
• Activation pin
• Operating manual
Notes on Use
• The smoke alarm device must not be painted over and
the air vents must not be covered�
• The smoke alarm device detects smoke from a re, not
the ames themselves.
• The battery is permanently installed in the smoke alarm
device and cannot be changed�
• People under the inuence of alcohol, medication or
drugs may not be alerted/woken by the alarm signal�
20
Page 21

General View
1
7
2
3
1 LED
2 On button
3 Loudspeaker
4 Test/Silent button
5 Smoke inlets
6 Base
7 Activation pin
4
5
6
21
Page 22

Installing the Smoke Alarm Device
Before starting to install the smoke alarm device, read
the following information to ensure you choose a sensible
installation location�
Selecting the Installation Location
Install the smoke alarm device
• in the hall area between the living and
sleeping areas (to monitor escape routes),
install a smoke alarm device in each living
room and bedroom and, in the case of
multi-storey buildings, at least one smoke
alarm device in the hall of each oor,
• as centrally as possible in the room,
• only on jointless, smoke-impervious
ceilings,
• aligned horizontally�
Do not install the smoke alarm device
• in rooms where concentrations of steam,
dust or smoke develop under normal con-
ditions (e.g. workshop, kitchen, bathroom),
• near open hearths,
• outside the permissible ambient conditions
(refer to Technical Data)
22
Page 23

Installing the Smoke Alarm Device on a
Ceiling
During installation, pay attention to maintain at
least 50 cm clearance to electrical devices,
doors, ventilation shafts or other objects.
The assembly material
required is contained in the package contents�
1 Turn the base anticlockwise
carefully and remove the base
from the smoke alarm device�
2 Screw the base on the ceiling
at the intended installation
location with two screws�
Use the facing slots in
the base as a template
and use the dowels for
additional xation strength
according to the ceiling properties�
3 Fit the smoke alarm device on
the base and screw the smoke
alarm device clockwise until
rmly xed.
23
Page 24

Switching On
the Smoke Alarm
Device
1 Press the On button for
about 2 seconds using the
activation pin�
2 You will hear an acoustic
signal and the LED ashes
approximately every 6 minutes.
The battery installed has a service life of
approximately 10 years from the moment it is
rst switched on.
3 The smoke alarm device is now operational�
In the Event of an Alarm
What should I do when the smoke alarm device alarm
sounds?
• Keep calm�
• Always assume that is a real emergency situation�
24
Page 25

Proceed as follows if a smell, smoke or re has developed in the area being monitored:
• You and others at risk must move away from the dan-
ger area� If there is a great deal of smoke, keep near
the near the oor and protect your respiratory tract.
Follow the escape routes indicated� Close all doors and
windows which can be accessed to prevent the smoke
and re spreading further.
• Inform the re service. Remain calm and answer
questions: Who is calling? Where is the re? What has
happened? Wait for instructions�
• Try and extinguish the initial res using the appropriate
extinguishing agents available, such as re extinguishers and re blankets. However, never put yourself and
others at risk�
Proceed as follows if NO smell, smoke or re is perceptible in the area being monitored:
• Ensure that there are NO suspicious smell, smoke or
re developments in the area being monitored.
• Deactivate the alarm by ventilating the room in which
the smoke alarm device has been triggered�
25
Page 26

Smoke Alarm Device
Function Test
Complete a function test of
the smoke alarm device at
regular intervals - at least
once a year�
1 Press and hold the Test/
Silent button. The LED ashes quickly and you will
hear a continuous acoustic signal�
Please note that after you have pressed the
Test/Silent button, Silent mode is activated for
9 minutes� The acoustic alarm signal is switched
off for this period�
Activating Silent Mode
You can activate Silent mode when you want to switch off
the alarm signals for a time� Silent mode is automatically
deactivated after 9 minutes�
1 Press and hold the Test/Silent button. The LED ashes
regularly and you will hear a continuous acoustic signal�
2 If you want to deactivate Silent mode manually, press
the Test/Silent button� You will hear a short acoustic
signal and the LED ashes approximately every 6 min-
utes� Silent mode is deactivated�
26
Page 27

Appendix
This section contains further information on the guarantee,
disposal, specications, maintenance, servicing and
conformity�
Guarantee
Dear Customer,
we are pleased that you have chosen this equipment�
In the case of a defect, please return the device together
with the receipt and original packing material to the pointof-sale�
27
Page 28

Disposal
In order to dispose of your device, take it to a
collection point provided by your local public
waste authorities (e.g. recycling centre).
According to laws on the disposal of electronic
and electrical devices, owners are obliged to dispose of
old electronic and electrical devices in a separate waste
container� The symbol indicates that the device must not
be disposed of in normal domestic waste! Risks to health
and the environment from batteries! Never open, damage
or swallow batteries or allow them to pollute the
environment. Batteries may contain toxic, ecologically
hazardous heavy metals�
Remove the batteries from the equipment before disposing
of the device� Y ou are legally obliged to dispose of batteries at shops which sell batteries or at collection points
provided by the public waste authorities� Disposal is free
of charge� The symbol indicates that batteries must not be
disposed of in normal domestic waste and that they must
be brought to collection points provided by local public
waste authorities�
Packaging materials must be disposed of
according to local regulations�
28
Page 29

Technical Data
Feature
Battery 3 V, 1500 mA (Varta CR 2/3 AH)
Permissible
ambient conditions
Visual indicator LED
Applicable standards EN 14604:2005 + AC1:2008
Dimensions 69 x 44.5 mm
Weight 80 g (including battery)
0 °C - 50 °C,
10% - 90% rel� humidity
Maintenance and Service
Accumulations of dust and cobwebs could impair the
function of the smoke alarm device
and lead to malfunctions� It is possible that smoke can no
longer be detected�
1 Clean the surface of the housing regularly with a soft,
moistened, lint-free cloth�
2 Clean the smoke inlet with a brush�
3 Complete a function test at regular intervals, once a
year at the latest�
29
Page 30

Consignes de sécurité
Veuillez lire attentivement ce mode d'emploi et
respecter les consignes lorsque vous manipulez
le détecteur de fumée� Conservez le mode
d'emploi pour une utilisation future�
Soyez attentif à cette icône. Les textes
caractérisés par ce symbole vous donnent des
informations utiles concernant le détecteur�
Avertissement ! Cet appareil peut être utilisé
par des enfants à partir de 8 ans et des
personnes présentant une diminution de leurs
aptitudes physiques, sensorielles ou mentales ou un
manque d'expérience et de connaissances si elles sont
sous surveillance ou si on leur a enseigné l'utilisation en
sécurité de l'appareil et si elles comprennent les dangers
résultant de ce dernier. Les enfants ne doivent pas jouer
avec l'appareil� Les enfants sans surveillance ne doivent
pas nettoyer l'appareil ou effectuer son entretien�
Avertissement ! Risque d'étouffement ! Les
enfants peuvent avaler des petites pièces, des
lms d'emballage ou de protection. Tenez les
enfants à l'écart du produit et de son emballage !
Avertissement ! Mise en danger de l’homme et
l’environnement causée par les piles et les piles
rechargeables ! Une manipulation des piles
30
Page 31

incorrecte peut nuire à votre santé et à l'environnement�
Ne jamais ouvrir, endommager, avaler les piles ou ne
jamais faire pénétrer leur contenu dans l'environnement.
Elles peuvent contenir des métaux lourds toxiques et
nuisibles pour celui-ci�
Prudence ! Lésions du système auditif dues au
signal sonore bruyant ! Celui-ci peut entraîner
des pertes d'acuité auditive Utilisez ce produit
uniquement sur les emplacements de montage
recommandés. Ne le testez pas à proximité de vos
oreilles. En cas d'alarme, ne séjournez pas trop longtemps
à proximité du signal sonore.
Important ! Dommage matériel causé par les impacts
environnementaux ! Des impacts environnementaux défavorables tels que fumée, poussière, vibrations, produits
chimiques, humidité, grande chaleur ou ensoleillement
direct peuvent endommager le produit� Éviter les impacts
environnementaux tels que fumée, poussière, vibrations,
produits chimiques, humidité, grande chaleur ou ensoleillement direct�
Utilisation conforme à l'usage
prévu
Le détecteur avertisseur de fumée RM 30 est un appareil
permettant de vous alerter d’un début d’incendie dans le
logement grâce à l’émission d’un signal sonore� L'utili-
31
Page 32

sation conforme à l'usage prévu requiert une installation
appropriée, ainsi que l'observation et le respect des
remarques mentionnées dans le présent mode d'emploi�
Toute autre forme d'utilisation n'est pas conforme à l'usage
prévu. Il est interdit d'effectuer des modications ou des
changements sur l'appareil de son propre gré� Utilisez le
détecteur uniquement dans des espaces clos�
Contenu du coffret
Veuillez vérier minutieusement le contenu du coffret.
Si un élément manque ou a été endommagé pendant le
transport, NE PAS mettre en marche le détecteur avertisseur de fumée !
• Détecteur avertisseur de fumée RM 30
• Matériel prévu pour son installation (2 vis et 2 chevilles)
• Broche d'activation
• Mode d'emploi
Remarques concernant l'utilisation
• Ne pas peindre le détecteur avertisseur de fumée et ne
rien coller sur les ouvertures d'entrée de fumée�
• Le détecteur reconnaît la fumée d'un incendie mais pas
la amme elle-même.
• La pile est scellée et ne peut pas être remplacée�
• Les personnes sous l'emprise de l'alcool, de médica-
ments ou de drogues peuvent ne pas être réveillées
par le signal sonore�
32
Page 33

Vue d'ensemble
1
7
2
3
1 LED
2 Touche activation
3 Haut-parleur
4 Touche test/muet
5 Ouvertures d'entrée de fumée
6 Socle
7 Broche d'activation
4
5
6
33
Page 34

Installer le détecteur avertisseur
de fumée
Avant d'installer votre détecteur, veuillez lire les informations suivantes, elles vous aideront à le positionner
à l'endroit exact.
Où xer votre détecteur de fumée
Installez le détecteur
• dans le couloir menant aux chambres et
à la salle de séjour (pour la surveillance
des issues de secours), un détecteur
par chambre et salle de séjour et si votre
logement possède plusieurs niveaux, il
est recommandé de xer au moins un
détecteur par étage dans le couloir
• le plus possible au centre d'une pièce
• à un plafond ne présentant pas de joint, non per-
méable à la fumée et toujours à l'horizontale
N'installez pas le détecteur
• dans les pièces ou règnent habituellement une forte
vapeur, de fortes poussières ou de la fu-
mée (p. ex. atelier, cuisine, salle de bains,
buanderie, etc.)
• à proximité de feux ouverts
• hors des conditions ambiantes tolérées
(cf. données techniques)
34
Page 35

Positionner le détecteur de fumée au
plafond
Lors de l'installation du détecteur, veillez à
respecter au moins une distance de 50 cm par
rapport à des appareils électriques, des portes,
des conduits d'aération
ou d'autres objets.
Le matériel de montage fait partie
du contenu du coffret�
1 Tournez le socle avec précau-
tion dans le sens antihoraire et
retirez-le du détecteur�
2 Vissez le socle au plafond à
l'emplacement prévu à l'aide de
deux vis.
Utilisez les trous oblongs
se trouvant dans le socle
comme gabarit et utilisez
les chevilles comme xation
supplémentaire selon le support�
3 Placez le détecteur sur le socle
et tournez-le dans le sens
horaire�
35
Page 36

Activer le détecteur de fumée
1 Appuyez environ 2 se-
condes avec la broche
d'activation sur la touche
Activation�
2 Vous entendez un bip et la
LED clignote toutes les 6
minutes environ�
Une fois le détecteur activé, la pile scellée a une
durée de vie d'environ 10 ans�
3 Le détecteur est maintenant prêt à fonctionner�
En cas d'alarme
Que dois-je faire quand l'alarme du détecteur avertisseur de fumée se déclenche ?
• Gardez votre calme�
• Partez toujours du principe qu'il y a un réel danger.
36
Page 37

Si une odeur de brûlé, de la fumée ou un départ d'incendie sont présents dans la zone sous surveillance,
suivez ces consignes :
• Fuyez la zone de danger en mettant à l'abri avec vous
les personnes menacées� En cas de fumée épaisse,
tenez-vous au niveau du sol et protégez vos voies
respiratoires. Évacuez les lieux en empruntant, le cas
échéant, le parcours d'évacuation éché. Fermez la
porte de la pièce en feu et celle de votre appartement,
cela retardera la propagation du feu et des fumées�
• Appelez les sapeurs-pompiers� Restez calme et répon-
dez aux questions : Qui appelle ? Où est l'incendie ?
Que faire ? Attendez les instructions.
• Essayez d'éteindre l'incendie naissant avec des
moyens disponibles appropriés comme un extincteur
ou des couvertures anti-feu. Ne mettez jamais les
autres ni vous-même en danger�
Si AUCUNE odeur de brûlé, de la fumée ou un départ
d'incendie sont présents dans la zone sous surveillance, procédez comme suit :
• Assurez-vous qu'il n'y a AUCUNE odeur suspecte, pas
de fumée ni d'incendie dans la zone sous surveillance�
• Désactivez l'alarme en aérant la pièce dans laquelle le
détecteur s'est déclenché�
37
Page 38

Comment véri er
le bon fonction� de
votre détecteur
Contrôlez régulièrement
le bon fonctionnement du
détecteur - au moins une fois
par an�
1 Appuyez longuement sur la touche test/muet� La LED
clignote rapidement et vous entendez un bip sonore
permanent�
Veuillez noter qu'après avoir appuyé sur la
touche test/muet, le mode silencieux est activé
pendant 9 minutes� Pendant ce temps, l'alarme
est désactivée�
Activer le mode silencieux
Activez le mode silencieux si vous voulez désactiver
provisoirement l'alarme du détecteur. Le mode silencieux
s'arrête automatiquement au bout de 9 minutes�
1 Appuyez longuement sur la touche test/muet� La LED
clignote rapidement et vous entendez un bip sonore
permanent�
2 Si vous voulez terminer le mode silencieux à la main,
appuyez sur la touche test/muet� Vous entendez un
bip et la LED clignote toutes les 6 minutes environ� Le
mode silencieux est désactivé.
38
Page 39

Annexe
Cette section vous procure de plus amples informations
sur la garantie, la mise au rebut, les données techniques,
la maintenance et l'entretien, ainsi que sur la conformité�
Garantie
Cher client,
nous sommes très heureux que vous ayez choisi cet
appareil�
En cas de défaut, veuillez retourner l’appareil dans son
emballage d’origine et accompagné du bon d’achat au
magasin où vous l’avez acheté�
39
Page 40

Élimination
Si vous ne voulez plus vous servir de
votre appareil, veuillez l'apporter au
centre de collecte de l'organisme
commune (par ex. centre de recyclage). D'après la loi
relative aux appareils électriques et électroniques, les
propriétaires d'appareils usagés sont tenus d'apporter tous
les anciens appareils électriques et électroniques dans un
collecteur séparé. L'icône ci-contre signie que vous ne
devez en aucun cas jeter votre appareil dans les ordures
ménagères ! Mise en danger de l'homme et pollution de
l'environnement causées par les piles ! Ne jamais ouvrir,
endommager, avaler les piles ou ne jamais faire pénétrer
leur contenu dans l'environnement� Elles peuvent contenir
des métaux lourds toxiques et nuisibles pour celui-ci.
Retirez les piles de l'appareil avant de l'éliminer� V ous êtes
tenu par la loi d’éliminer les piles en les déposant chez un
revendeur ou en les déposant dans les collecteurs correspondants de l’organisme d’élimination des déchets local�
L’élimination des piles est gratuite. Le symbole signie
que vous ne devez en aucun cas jeter les piles dans les
ordures ménagères, mais que vous devez les apporter à
un centre de collecte�
40
d'élimination des déchets de votre
Éliminez les matériaux d'emballage
conformément aux réglementations locales.
Page 41

Données techniques
Caractéristique
Pile 3 V, 1500 mA (Varta CR 2/3 AH)
Conditions am-
biantes tolérées
Signal visuel LED
Normes appli-
quées
Dimensions 69 x 44,5 mm
Poids 80 g (pile incluse)
0° C à 50° C
10 % à 90% d'humidité relative
EN 14604:2005 + AC1:2008
Entretien et maintenance
Des dépôts de poussière et des toiles d'araignée peuvent
inuer sur le bon fonctionnement du détecteur
et provoquer des dysfonctionnements� Le cas échéant, il
est possible que le détecteur ne puisse plus détecter de
la fumée�
1 Nettoyez régulièrement la surface du boîtier avec un
chiffon légèrement humide, doux et non pelucheux.
2 Nettoyez les orices d'entrée de fumée avec un pinceau.
3 Effectuez un test de bon fonctionnement régulièrement
au moins une fois par an�
41
Page 42

Indicazioni di sicurezza
Leggere attentamente le istruzioni per l'uso e
osservare le rispettive indicazioni durante
l'utilizzo del rivelatore di fumo� Conservare le
istruzioni per l'uso per riferimento futuro�
Osservare questo simbolo! I testi contrassegnati
con questo simbolo forniscono indicazioni
importanti�
Avvertenza! L'apparecchio può essere utilizzato
da bambini di età superiore agli 8 anni e da
persone con ridotte capacità siche, sensoriali o
intellettive, o con mancanza di esperienza e/o
conoscenza, se sorvegliati o istruiti circa l'uso sicuro
dell'apparecchio e i pericoli da esso derivanti� Ai bambini
non è consentito giocare con l'apparecchio. Non afdare i
lavori di pulizia e cura ai bambini se non sorvegliati�
Avvertenza! Pericolo di soffocamento! I bambini
possono ingerire parti piccole, materiali d’imballo
o pellicole protettive� Tenere il prodotto e la
confezione lontani dalla portata dei bambini!
Avvertenza! Batterie e pile possono provocare
danni alla salute e all'ambiente! Un uso improprio
delle batterie può provocare danni alla salute e
all’ambiente� Non aprire, danneggiare, ingerire o
42
Page 43

disperdere mai nell'ambiente le batterie� Le batterie
possono contenere metalli pesanti nocivi e dannosi per
l'ambiente�
Attenzione! Pericolo di danni all’udito dovuti
all’emissione di forti segnali acustici di allarme! Il
segnale acustico di allarme può provocare danni
all’udito� Utilizzare il prodotto solo nei punti di ubicazione e
montaggio indicati� Non testare il prodotto nelle immediate
vicinanze delle orecchie dell’utilizzatore� In caso di allarme,
non sostare a lungo in prossimità del segnale acustico di
allarme�
Importante! Danni materiali dovuti a inussi ambientali!
Inussi ambientali dannosi come ad es. fumo, polvere,
vibrazioni, sostanze chimiche, umidità, calore o raggi
solari diretti possono danneggiare il prodotto� Evitare
un’esposizione agli inussi ambientali quali ad es. fumo,
polvere, vibrazioni, sostanze chimiche, umidità, calore o
raggi solari diretti�
Impiego conforme agli usi previsti
Il rivelatore di fumo RM 30 è preposto a rivelare la presenza di fumo in ambienti interni, lanciando in tal caso un
forte segnale acustico� Requisito per un impiego conforme
è la corretta installazione come anche l’osservanza delle
indicazioni fornite nelle presenti istruzioni d’uso. Qualsiasi
43
Page 44

altro impiego è considerato improprio� Non sono ammesse
modiche o variazioni arbitrarie. Utilizzare il rivelatore di
fumo esclusivamente in ambienti chiusi�
Contenuto della confezione
Vericare il contenuto della confezione. In caso dovesse
mancare qualcosa o risultare danneggiato dal trasporto,
NON mettere in funzione il rivelatore di fumo!
• Rivelatore di fumo RM 30
• Materiale di montaggio (2 viti e 2 tasselli)
• Pin di attivazione
• Istruzioni d’uso
Note sull’utilizzo
• Il rivelatore di fumo non va verniciato né vanno incolla-
te le fessure di aerazione�
• Il rivelatore di fumo è in grado di rivelare la presenza di
fumo da incendio, non invece la amma.
• La batteria è saldamente montata nel rivelatore di fumo
e non va sostituita�
• Persone sotto l’inusso di alcol, farmaci o stupefacenti
potrebbero eventualmente non avvertire il segnale di
allarme e non essere svegliate in tempo�
44
Page 45

Panoramica
1
7
2
3
1 LED
2 Tasto Attivazione
3 Altoparlante
4 Tasto Test/Silenzioso
5 Fessure di penetrazione fumo
6 Base
7 Pin di attivazione
4
5
6
45
Page 46

Montaggio del rivelatore di fumo
Prima di montare il rivelatore di fumo, leggere le seguenti
indicazioni, utili nell'individuazione del punto di ubicazione
idoneo�
Punto di ubicazione
Montare il rivelatore di fumo
• nel corridoio che divide la zona giorno dal-
la zona notte (per sorvegliare le vie fuga),
un rivelatore di fumo rispettivamente in
ogni soggiorno e ogni camera da letto e,
in caso di abitazioni su più piani, un rivelatore di fumo per piano rispettivamente
nella zona corridoio
• possibilmente al centro del vano
• solo su softti esenti da giunti e resistenti alla
penetrazione di fumo
• sempre in posizione orizzontale
Non montare il rivelatore di fumo
• in ambienti esposti in condizioni normali a
forte vapore, polvere o fumo (ad esempio
in ofcine, cucina, bagno)
• nelle vicinanze di fuoco aperto
• fuori delle condizioni ambientali previste
(vedi Dati tecnici)
46
Page 47

Montaggio del rivelatore di fumo al
softto
Osservare durante il montaggio una distanza
minima di 50 cm da apparecchi elettrici, porte,
condotti verticali o altri oggetti�
Il materiale di montaggio
richiesto è accluso alla confezione�
1 Ruotare con cautela la base in
senso antiorario e rimuovere la
base dal rivelatore di fumo�
2 Avvitare la base al softto nel
punto di ubicazione previsto
utilizzando due viti�
Servirsi dei due fori
oblunghi della base
come sagoma, quindi
utilizzare i tasselli
all'occorrenza�
3 Montare il rivelatore di fumo
sulla base e girare saldamente
il rivelatore di fumo in senso
orario�
47
Page 48

Attivazione del
rivelatore di fumo
1 Premere con il pin di atti-
vazione per circa 2 secondi sul tasto Attivazione�
2 Si avverte un segnale acu-
stico e il LED lampeggia
all'incirca ogni 6 minuti�
La batteria integrata ha una durata utile di circa
10 anni a partire dalla prima attivazione�
3 Il rivelatore di fumo è ora pronto al funzionamento�
In caso di allarme
Cosa devo fare nel caso in cui il rivelatore di fumo
lanci un allarme?
• Innanzitutto mantenere la calma�
• È sempre indispensabile considerare che si possa
trattare di un pericolo vero�
48
Page 49

Avvertendo odore, fumo o fuoco nello spazio sorvegliato, procedere come segue:
• Salvare se stessi e altre persone in pericolo allontanan-
dosi dall’area di pericolo� Mantenersi in caso di forte
sviluppo di fumo il più vicino possibile al suolo e proteggere le vie respiratorie� Seguire le eventuali vie di fuga
contrassegnate. Chiudere tutte le nestre e porte in
modo da evitare che il fumo o fuoco possano propagarsi
ulteriormente�
• Informare i vigili del fuoco� Rimanete calmi e rispondete
alle domande: Chi chiama? Dove è successo? Cosa è
successo? Rimanete in attesa di istruzioni�
• Tentare di estinguere i focolai d’incendio con agenti
antincendio idonei come estintori o coperte d’amianto�
Non esporre se stessi e altre persone a pericolo�
NON avvertendo odore, fumo o fuoco nello spazio
sorvegliato, procedere come segue:
• Assicurarsi che nello spazio sorvegliato NON vi siano
odori sospetti, fumo o fuoco�
• Disattivare quindi l’allarme e ventilare l’ambiente in cui
il rivelatore di fumo è scattato�
49
Page 50

Veri ca del funzio-
namento
Veri care regolarmente -
minimo una volta all'anno il corretto funzionamento del
rivelatore di fumo�
1 Premere e tenere premuto
il tasto Test/Silenzioso�
Il LED lampeggia rapidamente e si avverte un segnale
di allarme continuo�
Si tenga presente che, una volta premuto il tasto
Test/Silenzioso, la modalità silenziosa risulta
attivata per 9 minuti� Durante questo periodo il
segnale di allarme rimane disattivato�
Attivazione della modalità silenziosa
Attivare la modalità silenziosa volendo disattivare temporaneamente il segnale di allarme del rivelatore di fumo�
La modalità silenziosa si conclude automaticamente dopo
9 minuti�
1 Premere e tenere premuto il tasto Test/Silenzioso�
Il LED lampeggia in intervalli regolari e si avverte un
segnale di allarme continuo�
2 Volendo concludere la modalità silenziosa, premere
il tasto Test/Silenzioso� Si avverte un breve segnale
acustico e il LED lampeggia all'incirca ogni 6 minuti� La
modalità silenziosa è disattivata�
50
Page 51

Appendice
In questa sezione si riportano ulteriori informazioni relative
a garanzia, smaltimento, dati tecnici, manutenzione e cura
e conformità dell'apparecchio�
Garanzia
Caro cliente,
ci congratuliamo con Lei per aver scelto questo apparecchio�
In caso di difetti la preghiamo di ritornare l‘apparecchio,
completo di imballo originale e scontrino di acquisto, al
punto vendita dove è stato effettuato l‘acquisto�
51
Page 52

Smaltimento
Per smaltire l'apparecchio, consegnarlo in un
punto di raccolta istituito dalla propria società di
smaltimento riuti comunale (ad es. centro di
riciclo materiali). Secondo quanto previsto dalla
legge sugli apparecchi elettrici ed elettronici, i proprietari di
apparecchi esauriti sono per legge tenuti alla consegna di
tutti gli apparecchi elettrici ed elettronici a un centro di
rilievo riuti in raccolta differenziata. Il simbolo indica che
non è assolutamente consentito smaltire l'apparecchio
assieme ai normali riuti domestici! Batterie e pile possono
provocare danni alla salute e all'ambiente! Non aprire,
danneggiare, ingerire o disperdere mai nell'ambiente le
batterie� Le batterie possono contenere metalli pesanti
nocivi e dannosi per l'ambiente�
Eliminare le batterie dall'apparecchio prima di procedere
allo smaltimento dello stesso apparecchio� Per legge
sussiste l'obbligo di consegnare batterie presso rivenditori
di batterie o centri di riciclo utilizzando gli appositi contenitori di raccolta e provvedendo in tal modo al corretto
smaltimento� Lo smaltimento è gratuito� Il simbolo indica
che non è assolutamente consentito gettare batterie nei
riuti domestici, consegnandole ai ni dello smaltimento
nei rispettivi punti di raccolta�
Smaltire confezioni ed imballaggi in base a
quanto indicato dalle norme in vigore a livello
locale�
52
Page 53

Dati tecnici
Caratteristica
Batteria 3 V, 1500 mA (Varta CR 2/3 AH)
Condizioni ambiente
consentite
Segnalazione ottica LED
Norme applicate EN 14604:2005 + AC1:2008
Dimensioni 69 x 44,5 mm
Peso 80 g (incl. batteria)
0 °C - 50 °C, 10% - 90%
umidità dell'aria relativa
Manutenzione e cura
La presenza di polvere e ragnatele può inuire sul corretto
funzionamento del rilevatore di fumo e causare malfunzionamenti� Eventualmente potrebbe anche non essere
ulteriormente possibile rivelare la presenza di fumo�
1 Pulire la supercie dell’involucro esterno regolarmente
con un panno umido, morbido e antipilling�
2 Pulire le fessure di penetrazione fumo con un pennello�
3 Prevedere regolarmente, minimo una volta all'anno, un
test funzionale�
53
Page 54

Bedienungsanleitung RM 30
Art� Nr� 5990, Version 31�05�2017
Weitere Informationen nden Sie unter:
Further information can be found on:
Plus de renseignements sur:
Per maggiori informazioni consultare il sito:
http://productip�com/?f=59f4f
0786-CPR-21542G217048
 Loading...