

Page 1
Bedienungsanleitung
Operating Instructions
Mode d’emploi
Istruzioni per l’uso
Manual de instrucciones
Gebruiksaanwijzing
Návod k obsluze
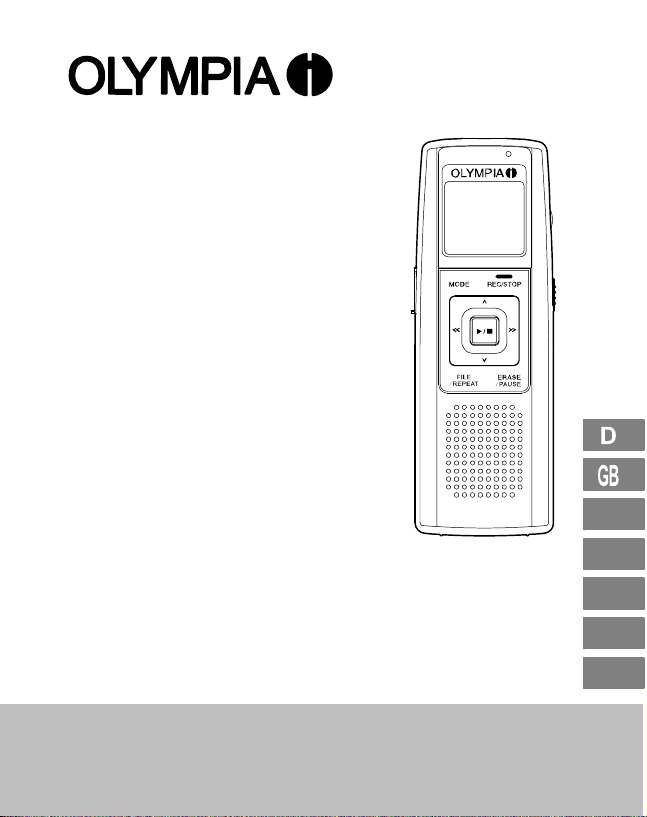
MEMO 99II
FR
IT
ES
NL
CZ
Page 2

Ihr neues Gerät funktioniert nicht?
Geben Sie das Gerät bitte nicht gleich zurück, sondern rufen Sie uns zuerst
an.
Probleme an technischen Geräten haben oft nur geringe Ursachen, die sich
unkompliziert und schnell lösen lassen.
Unser Fachpersonal kennt Ihren Gerätetyp und wird Ihnen mit wertvollen
Tipps helfen.
Sie erreichen unsere Service−Experten unter der Nummer
0180 5 007514 (1 Minute = 0,14 )
Hinweis: Sollte der Fehler telefonisch nicht beseitigt werden können,
erfahren Sie bei Ihrem Anruf eine Service−Adresse und alle weiteren
notwendigen Informationen.
Lieber Kunde,
wir freuen uns, dass Sie sich für dieses Gerät entschieden haben. Beachten
Sie bitte folgende Punkte:
Die Garantiezeit für Ihr Gerät beträgt 24 Monate.
Bewahren Sie unbedingt den Kaufbeleg und möglichst die
Originalverpackung auf. Nur so kann innerhalb der Garantiezeit
eine kostenfreie Reparatur oder ein Austausch stattfinden.
Mit freundlichen Grüßen
Ihr Olympia Team
2
Page 3

1
Inhaltsverzeichnis
1 Sicherheitshinweise 4. . . . . . . . . . . . . . . . . . . . . . . . . . . . . . . . . . . .
Bestimmungsgemäße Verwendung 4. . . . . . . . . . . . . . . . . . . . . . . . . . . . . . . . . . . .
Verwendung in extremer Umgebung 4. . . . . . . . . . . . . . . . . . . . . . . . . . . . . . . . . . .
Batterien 4. . . . . . . . . . . . . . . . . . . . . . . . . . . . . . . . . . . . . . . . . . . . . . . . . . . . . .
Aufladbare Akkus 4. . . . . . . . . . . . . . . . . . . . . . . . . . . . . . . . . . . . . . . . . . . . . . . .
Medizinische Geräte 4. . . . . . . . . . . . . . . . . . . . . . . . . . . . . . . . . . . . . . . . . . . . . .
Entsorgung 5. . . . . . . . . . . . . . . . . . . . . . . . . . . . . . . . . . . . . . . . . . . . . . . . . . . .
2 Displayanzeigen 6. . . . . . . . . . . . . . . . . . . . . . . . . . . . . . . . . . . . . . .
3 Bedienelemente 7. . . . . . . . . . . . . . . . . . . . . . . . . . . . . . . . . . . . . . .
4 In Betrieb nehmen 8. . . . . . . . . . . . . . . . . . . . . . . . . . . . . . . . . . . . .
Einlegen der Batterien 8. . . . . . . . . . . . . . . . . . . . . . . . . . . . . . . . . . . . . . . . . . . . .
Mikrofon 8. . . . . . . . . . . . . . . . . . . . . . . . . . . . . . . . . . . . . . . . . . . . . . . . . . . . . .
Kopfhörer 8. . . . . . . . . . . . . . . . . . . . . . . . . . . . . . . . . . . . . . . . . . . . . . . . . . . . .
5 Einstellungen 9. . . . . . . . . . . . . . . . . . . . . . . . . . . . . . . . . . . . . . . . .
Datum und Zeit einstellen 9. . . . . . . . . . . . . . . . . . . . . . . . . . . . . . . . . . . . . . . . . .
Gerät einschalten (TIME−Modus) 10. . . . . . . . . . . . . . . . . . . . . . . . . . . . . . . . . . . . .
Gerät ausschalten 10. . . . . . . . . . . . . . . . . . . . . . . . . . . . . . . . . . . . . . . . . . . . . . .
Betriebsarten 10. . . . . . . . . . . . . . . . . . . . . . . . . . . . . . . . . . . . . . . . . . . . . . . . . . .
6 Bedienung 11. . . . . . . . . . . . . . . . . . . . . . . . . . . . . . . . . . . . . . . . . . .
Aufnahmequalität 11. . . . . . . . . . . . . . . . . . . . . . . . . . . . . . . . . . . . . . . . . . . . . . . .
Nachrichten verwalten 12. . . . . . . . . . . . . . . . . . . . . . . . . . . . . . . . . . . . . . . . . . . . .
Aufnahme−Empfindlichkeit 12. . . . . . . . . . . . . . . . . . . . . . . . . . . . . . . . . . . . . . . . . .
Hold−Funktion (Tastensperre) 13. . . . . . . . . . . . . . . . . . . . . . . . . . . . . . . . . . . . . . . .
Lautstärke 13. . . . . . . . . . . . . . . . . . . . . . . . . . . . . . . . . . . . . . . . . . . . . . . . . . . . .
Speicherkartenfunktion 13. . . . . . . . . . . . . . . . . . . . . . . . . . . . . . . . . . . . . . . . . . . .
VOX (Spracherkennung) aktivieren/deaktivieren 14. . . . . . . . . . . . . . . . . . . . . . . . . . .
Aufnehmen 14. . . . . . . . . . . . . . . . . . . . . . . . . . . . . . . . . . . . . . . . . . . . . . . . . . . .
Sprachgesteuerte Aufnahme (VOX) 15. . . . . . . . . . . . . . . . . . . . . . . . . . . . . . . . . . .
Nachrichten abspielen 16. . . . . . . . . . . . . . . . . . . . . . . . . . . . . . . . . . . . . . . . . . . . .
Nachricht(en) wiederholen 17. . . . . . . . . . . . . . . . . . . . . . . . . . . . . . . . . . . . . . . . . .
Nachrichten wiederholen (Ausschnitt) 18. . . . . . . . . . . . . . . . . . . . . . . . . . . . . . . . . .
Wiederholen abbrechen 18. . . . . . . . . . . . . . . . . . . . . . . . . . . . . . . . . . . . . . . . . . . .
Wiedergabe unterbrechen 18. . . . . . . . . . . . . . . . . . . . . . . . . . . . . . . . . . . . . . . . . .
Nachricht löschen 18. . . . . . . . . . . . . . . . . . . . . . . . . . . . . . . . . . . . . . . . . . . . . . . .
Alle Nachrichten löschen 19. . . . . . . . . . . . . . . . . . . . . . . . . . . . . . . . . . . . . . . . . . .
Nachrichten bearbeiten (Teilen) 19. . . . . . . . . . . . . . . . . . . . . . . . . . . . . . . . . . . . . .
Nachrichten bearbeiten (Schneiden) 20. . . . . . . . . . . . . . . . . . . . . . . . . . . . . . . . . . .
Gerät formatieren (ALLES löschen) 20. . . . . . . . . . . . . . . . . . . . . . . . . . . . . . . . . . .
7 Technische Daten 21. . . . . . . . . . . . . . . . . . . . . . . . . . . . . . . . . . . . . .
Technische Daten 21. . . . . . . . . . . . . . . . . . . . . . . . . . . . . . . . . . . . . . . . . . . . . . . .
3
Page 4
Sicherheitshinweise
1 Sicherheitshinweise
Lesen Sie diese Bedienungsanleitung sorgfältig durch.
Bestimmungsgemäße Verwendung
Dieses Diktiergerät ist geeignet zum Aufzeichnen jeder Art von Sprache.
Jede andere Verwendung gilt als nicht bestimmungsgemäß. Bitte beachten
Sie, dass das Überspielen aufgenommener Nachrichten ohne Erlaubnis, außer für private Zwecke, verboten ist. Bitte das Gerät nicht während der Fahrt
mit einem Auto, Motorrad, etc. verwenden, die Unfallgefahr durch Ablenkung
wird erhöht. Eigenmächtige Veränderungen oder Umbauten sind nicht zulässig. Öffnen Sie das Gerät in keinem Fall selbst und führen Sie keine eigenen
Reparaturversuche durch.
Verwendung in extremer Umgebung
Vermeiden Sie Belastungen durch Rauch, Staub, Erschütterungen, Chemikalien, Feuchtigkeit, Hitze oder direkte Sonneneinstrahlung.
Batterien
Achtung: Das Gerät wird ausschließlich über Batterien betrie-
ben. Jede andere Art von Stromversorgung ist untersagt.
Aufladbare Akkus
Achtung bei der Verwendung von Akkus: Werfen Sie Akkus
nicht ins Feuer. Verwenden Sie nur Akkus des gleichen Typs!
Achten Sie auf die richtige Polung! Bei verkehrter Polung der Akkus besteht beim Aufladen Explosionsgefahr.
Medizinische Geräte
Achtung: Benutzen Sie das Diktiergerät nicht in der Nähe von
medizinischen Geräten. Eine Beeinflussung kann nicht völlig
ausgeschlossen werden.
4
Page 5

Sicherheitshinweise
Entsorgung
Wollen Sie Ihr Gerät entsorgen, bringen Sie es zur Sammelstelle Ihres kommunalen Entsorgungsträgers (z. B. Wertstoffhof). Das nebenstehende Symbol bedeutet, dass Sie das Gerät auf keinen Fall
in den Hausmüll werfen dürfen! Nach dem Elektro− und Elektronikgerätegesetz sind Besitzer von Altgeräten gesetzlich gehalten, alte
Elektro− und Elektronikgeräte einer getrennten Abfallerfassung zuzuführen. Verpackungsmaterialien entsorgen Sie entsprechend
den lokalen Vorschriften.
Akkus/Batterien nicht im Hausmüll entsorgen. An vielen Orten (Supermarkt, Elektrogeschäft) gibt es spezielle Behälter zur richtigen
Entsorgung der Batterien.
5
Page 6

Displayanzeigen
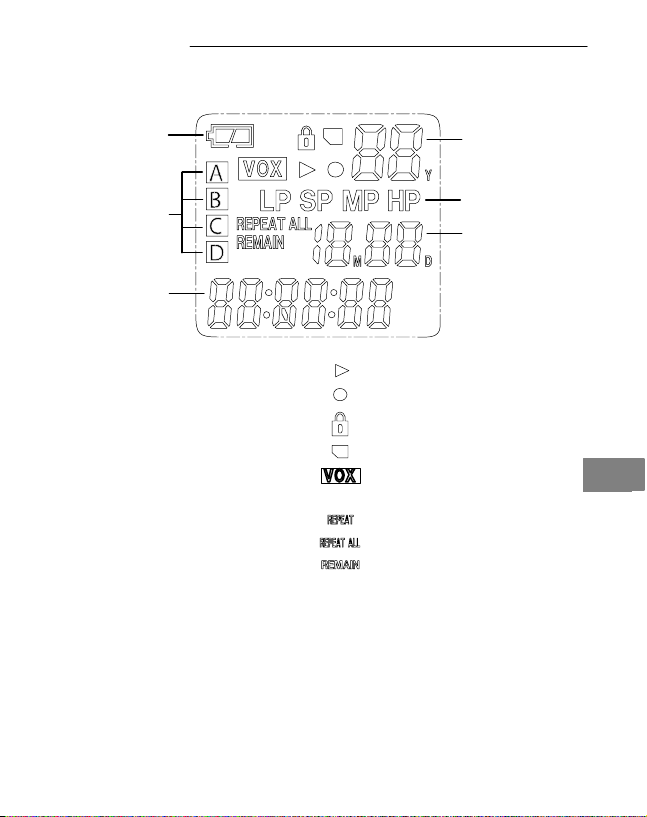
2 Displayanzeigen
LOCATION OF INDICATORS
A
B
F
E
D
C
A Batteriestatusanzeige Abspielen
B Speicherplätze (Ordner) Aufnehmen
C Stunden/Minuten/Sekunden HOLD (Tastensperre)
D Monat/Tag SD−Speicherkarte, Seite 13
E Aufnahmequalität VOX (sprachgesteuerte
F Jahr/Nachrichten Wiederholen (Aktuelle Nachricht)
Aufnahme)
Wiederholen (Alle Nachrichten
eines Ordners)
Verbleibende Zeit während der
Aufnahme
6
Page 7
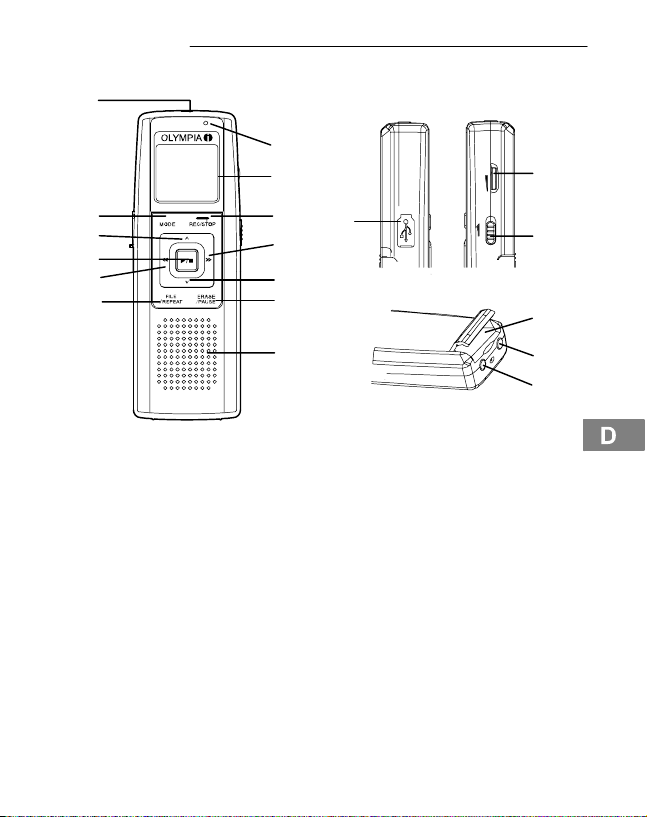
3 Bedienelemente
1
11
10
Bedienelemente
VOLVOL
17
2
3
4
5
68
9
12
5
HOLDHOLD
16
3
15
7
14
13
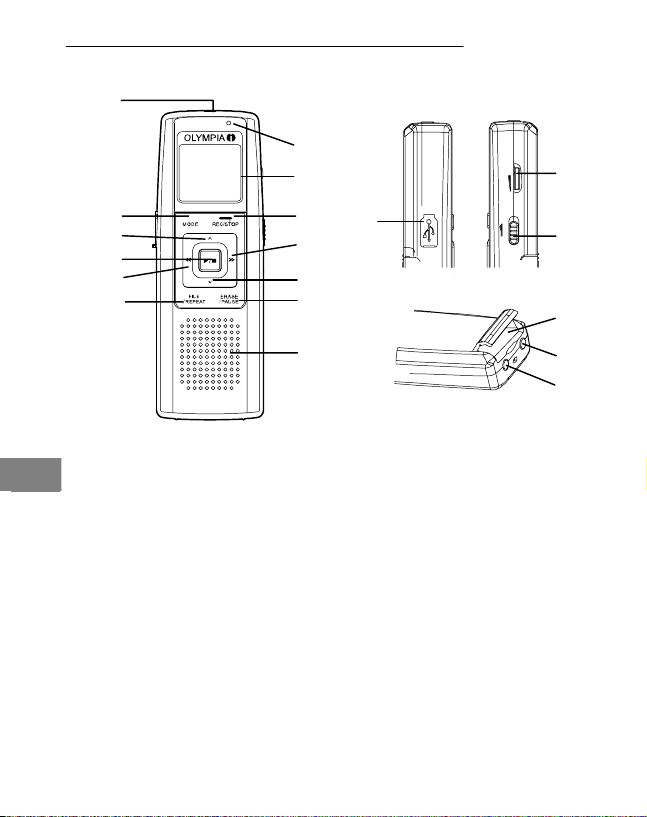
1 Mikrofon 10 LCD−Display
2 MODE (Auswahl)−Taste 11 Aufnahme aktiv (Anzeige)
3 OBEN−/UNTEN−Taste 12 USB−Anschluss
4 ABSPIELEN/STOPP−Taste 13 MIC (Mikrofon)−Buchse
5 VORLAUF−/RÜCKLAUF−Taste 14 EAR (Ohrhörer)−Buchse
6 FILE/REPEAT
(Ordner/Wiederholen)−Taste
7 Lautsprecher 16 HOLD,Tastensperre An/Aus
8 ERASE/PAUSE
(Löschen/Pause)−Taste
9 AUFNAHME/STOPP−Taste
15 Speicherkartenfach
17 Lautstärkerädchen
7
Page 8
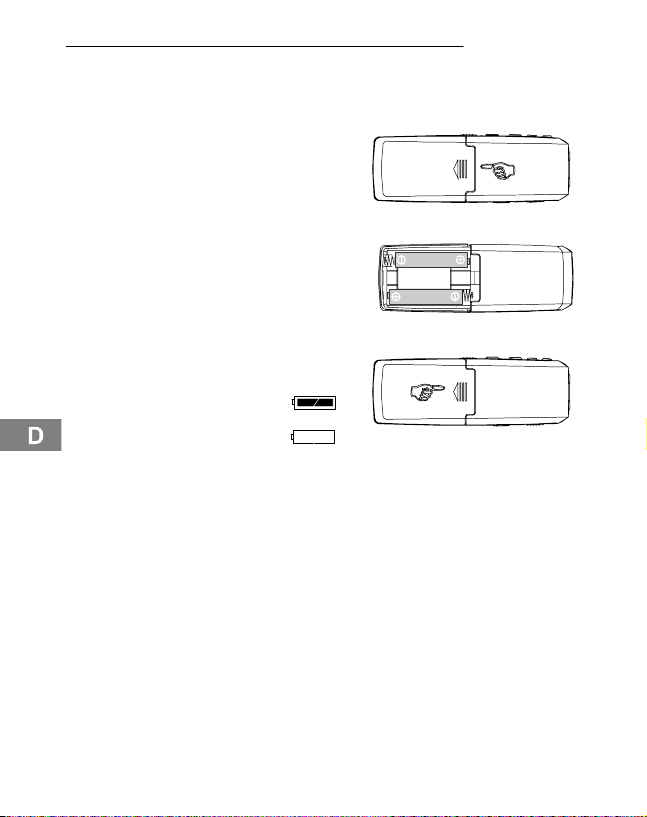
In Betrieb nehmen
4 In Betrieb nehmen
Einlegen der Batterien
Öffnen Sie das Batteriefach durch
Herausziehen und Abnehmen der
Abdeckung.
Einsetzen von 2 AAA Batterien
(nicht enthalten). Achten Sie auf
die richtige Polung.
Batteriefach wieder schließen.
Die Batterien sind voll.
Die Batterien sind leer.
Der Ladezustand der
Batterien wird im Display
angezeigt.
Hinweis: Beim Austausch der Batterien bleiben die aufgenommenen Nachrichten erhalten. Datum und Zeit müssen neu eingestellt werden.
Mikrofon
Sie können ein externes Mikrofon an die MIC−Buchse des Geräts anschließen. Sobald das Mikrofon angeschlossen ist, wird das integrierte Mikrofon
deaktiviert.
Kopfhörer
Sie können einen Kopf−/Ohrhörer an die EAR−Buchse des Geräts anschließen. Sobald der Kopf−/Ohrhörer angeschlossen ist, wird der Lautsprecher automatisch deaktiviert.
8
Page 9
Einstellungen
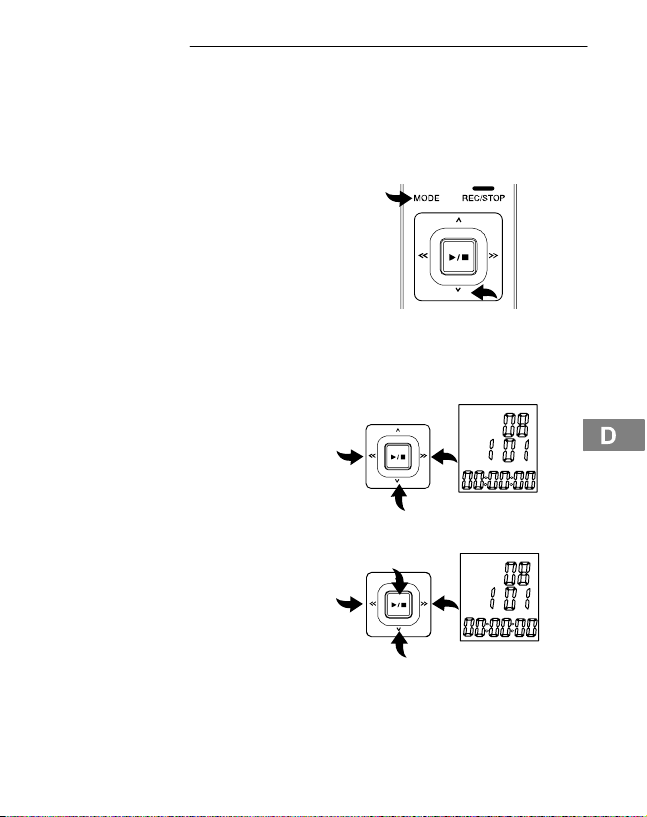
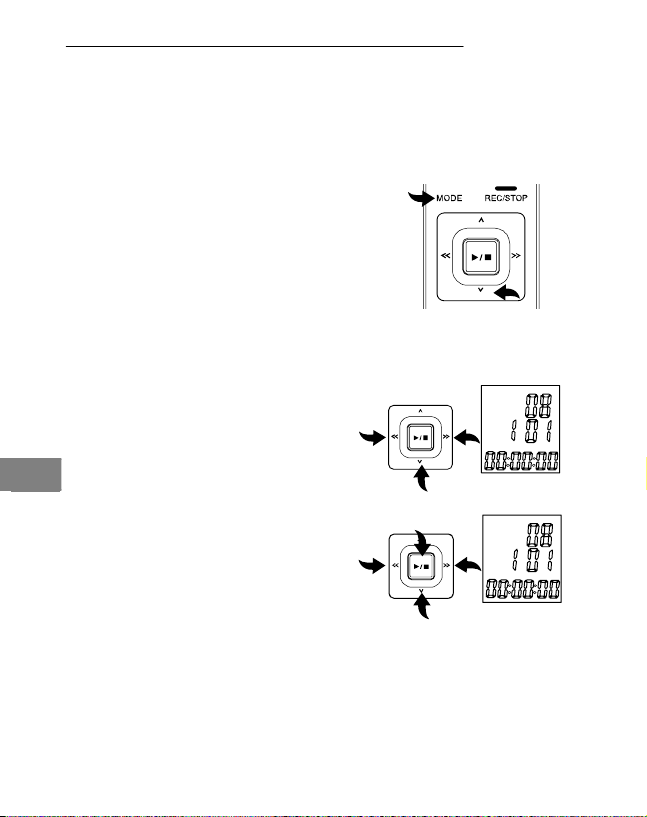
5 Einstellungen
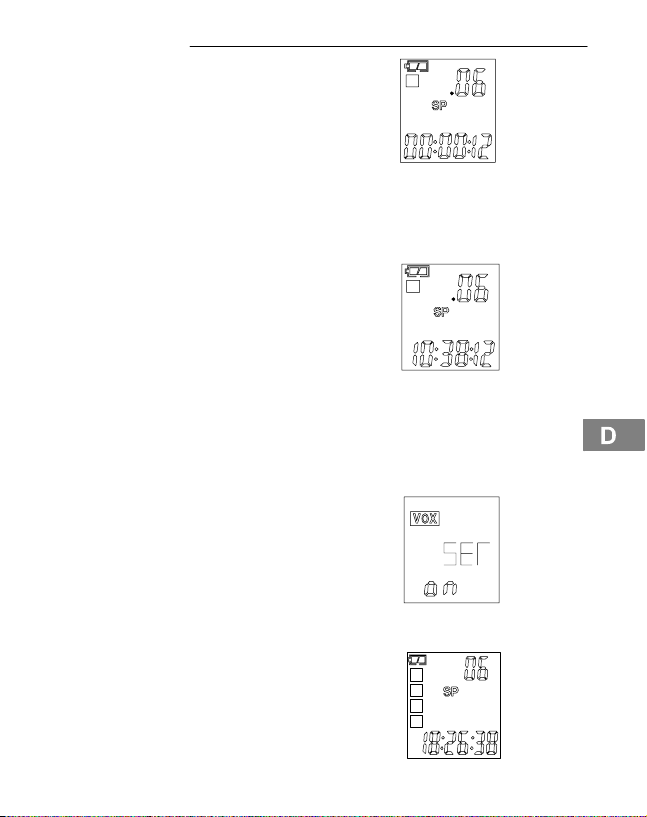
Datum und Zeit einstellen
Wenn die Batterien eingelegt sind, befindet sich das Gerät im TIME−
Modus. Es erscheinen 1
Jahreszahl im Display. Datum und Zeit wie folgt einstellen:
Solange Datum und Zeit im Display angezeigt werden (TIME−
Modus), drücken Sie die MODE−
Taste, um den TIME−Modus zu verlassen. Nachrichtenanzahl, Qualität, Dauer der Nachricht etc.
erscheinen im Display. Halten
Sie die MODE−Taste ein zweites Mal gedrückt, um die Datums− und Zeiteinstellungen aufzurufen. Drücken Sie die UNTEN−Taste fünfmal, bis das Jahr
(09 voreingestellt) angezeigt wird.
Drücken Sie die VORLAUF− oder
RÜCKLAUF−Taste zum Einstellen
des Jahres. Um die Änderungen
zu übernehmen, drücken Sie die
ABSPIELEN/STOPP−Taste.
Drücken Sie die UNTEN−Taste.
Wählen Sie mit der VORLAUF−
oder RÜCKLAUF−Taste den Monat
aus und bestätigen Sie mit der ABSPIELEN/STOPP−Taste. Drücken
Sie die VORLAUF− oder RÜCKLAUF−Taste, um den Tag einzustellen. Um die Uhrzeit einzustellen, gehen Sie wie zuvor beschrieben (Monat) vor.
01D (Monat, Tag), 00:00:00 (Std., Min.,Sek.) und die
M
Y
DM
Y
DM
9
Page 10
Einstellungen
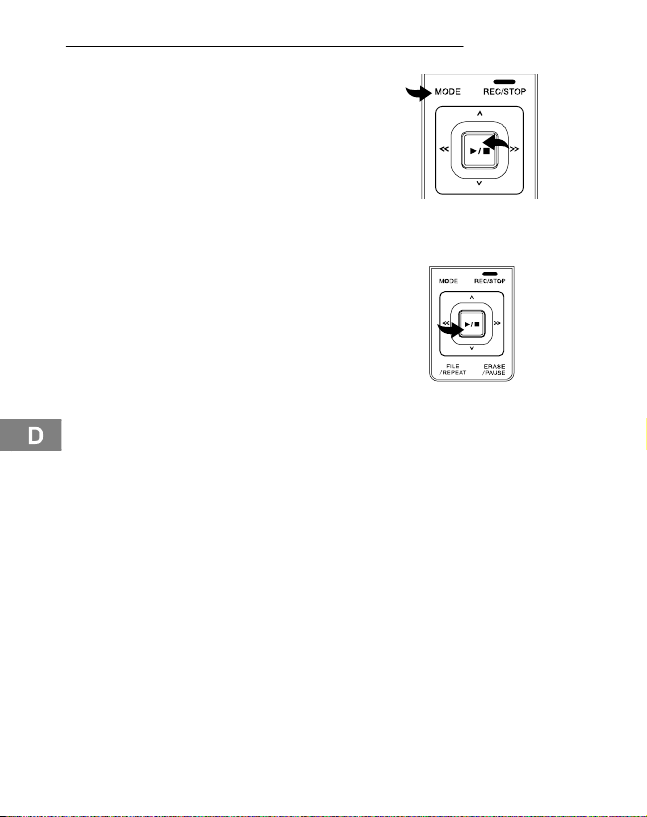
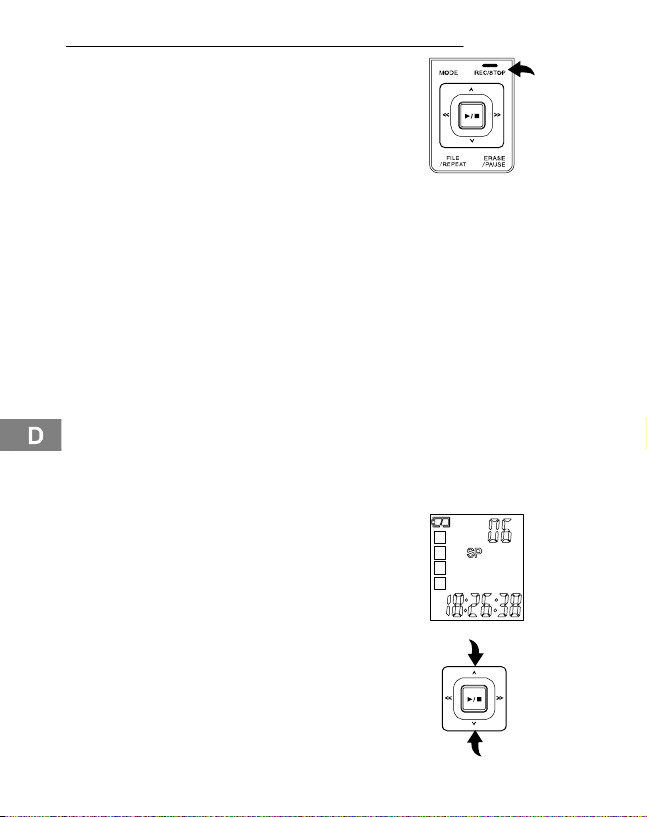
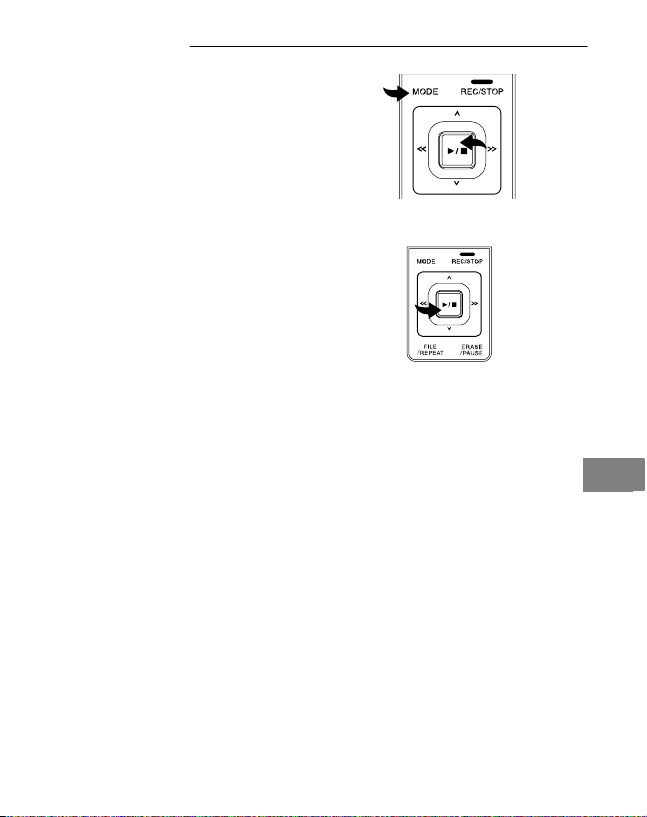
Gerät einschalten (TIME−Modus)
Um das Gerät einzuschalten und
in den TIME−Modus zu gelangen,
drücken Sie die ABSPIELEN/
STOPP−Taste. Datum und Zeit
werden angezeigt.
Drücken Sie die MODE−Taste, um
vom TIME−Modus in den Stand−by-Modus zu wechseln.
Gerät ausschalten
2
Wenn Sie sich im Stand−by−Modus
befinden, drücken Sie die
ABSPIELEN/STOPP−Taste, bis
Sie sich im TIME−Modus befinden.
Hinweis: Betätigen Sie eine Minute
lang keine Taste, schaltet sich das
Gerät automatisch ab.
Betriebsarten
Die verschiedenen Betriebsarten werden wie folgt im Display angezeigt:
10
Stand−by−Modus
− Anzahl der Nachrichten
− Aufnahmequalität
− Monat/Tag
− Batteriekapazität
− Speicherplatz
− Dauer der aktuellen Nachricht
Hinweis: Alle folgend aufgeführten Einstellungen gehen davon aus, dass Sie
sich im Stand−by−Modus befinden.
Hinweis: Um alle in diesem Kapitel beschriebenen Einstellungen zu verlassen, drücken Sie die MODE−Taste.
TIME−Modus
− Batteriekapazität
− Jahr
− Monat/Tag
− Uhrzeit
Page 11

6 Bedienung
Aufnahmequalität
Sie können zwischen vier verschiedenen Aufnahmequalitäten für die
Sprachaufzeichnung wählen.
3
Bedienung
Aufnahmemodus
HP (High Play) Bestmögliche 11 Std.
MP (Medium Play) Sehr gute 17 Std.
SP (Standard Play) Gute 34 Std.
LP (Long Play) Für lange Aufnahme 136 Std.
Schalten Sie das Gerät in den
Stand−by−Modus und drücken Sie
die MODE−Taste, bis SET" im Display angezeigt wird. Wählen Sie
mit der VORLAUF− oder RÜCKLAUF−Taste die gewünschte Qualität aus.
Bestätigen Sie die gewählte Einstellung mit der ABSPIELEN/
STOPP−Taste.
Aufnahmequalität Max. Aufnahmedauer
11
Page 12

Bedienung
Nachrichten verwalten
Dieses Gerät bietet 4 Ordner (A, B, C, D) zum Speichern der Nachrichten. Sie
können insgesamt 396 Nachrichten oder 136 Stunden im LP−Modus (siehe
Aufnahmequalität Seite 11) speichern. Ein Ordner kann max. 99 Nachrichten
aufnehmen. Um einen Ordner auszuwählen:
Drücken Sie die FILE/REPEAT−Taste, um den gewünschten Ordner/
Speicherplatz (A, B, C, D) zu wählen. Die Zahl in der rechten oberen
Ecke im Display zeigt die Gesamtzahl der aufgenommenen Nachrichten im jeweiligen Ordner an.
Die Zeit unten im Display zeigt
die Gesamtaufnahmezeit der aus−
gewählten Nachricht an.
Hinweis: Immer wenn Sie eine Nachricht aufnehmen, erzeugt das Gerät eine
fortlaufende Nummer, angefangen bei 1. Wenn kein Speicher mehr zur Verfügung steht, zeigt das Display ’’FULL’’ an. Wie Sie Nachrichten löschen, erfahren Sie auf Seite 18.
Aufnahme−Empfindlichkeit
Um die Aufnahme−Empfindlichkeit
einzustellen, halten Sie die MODETaste gedrückt, bis SET" im Display erscheint. Drücken Sie die
OBEN− oder UNTEN−Taste, bis
MIC:LO/HI im Display erscheint.
Stellen Sie die Funktion mit der
VORLAUF− oder RÜCKLAUF Taste auf LO, wenn Sie Geräusche aufnehmen, die sehr nah am Mikrofon sind. Wenn Sie Geräusche aufnehmen, die
weiter weg sind, stellen Sie die Funktion mit der VORLAUF− oder RÜCKLAUF−Taste auf HI. Bestätigen Sie die Einstellungen mit der ABSPIELEN/
STOPP−Taste.
4
A
B
C
D
12
Page 13
Bedienung
Hold−Funktion (Tastensperre)
Schieben Sie den HOLD−Regler
nach oben (rechts), um alle Tasten
zu deaktivieren. Im Display wird ein
Schloss−Symbol angezeigt. Um die
Tasten zu aktivieren, schieben Sie
den HOLD−Regler wieder zurück.
Hinweis: Auch wenn die HOLD−Funktion aktiviert ist, kann das Gerät ausgeschaltet werden.
Lautstärke
Drehen Sie das Laustärkerädchen
in die gewünschte Richtung, um
die Geräuschausgabe lauter oder
leiser zu stellen.
5
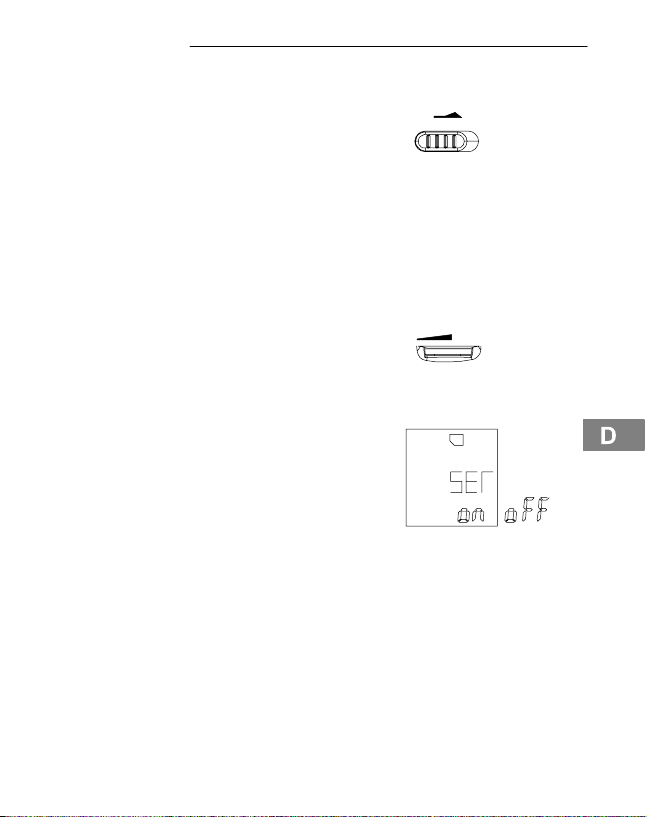
Speicherkartenfunktion
Das Gerät kann eine Speicherkarte (SD oder SDHC) aufnehmen.
Drücken Sie die MODE−Taste so
lange, bis SET im Display erscheint. Drücken Sie die UNTEN−
Taste 3x, bis das Speicherkartensymbol erscheint. Sie haben die
Möglichkeit, diese Funktion mit der
VORLAUF− oder RÜCKLAUF−Taste zu aktivieren oder zu deaktivieren (ON/OFF).
Bestätigen Sie die gewählte Einstellung mit der ABSPIELEN/
STOPP−Taste.
HOLDHOLD
VOLVOL
13
Page 14
Bedienung
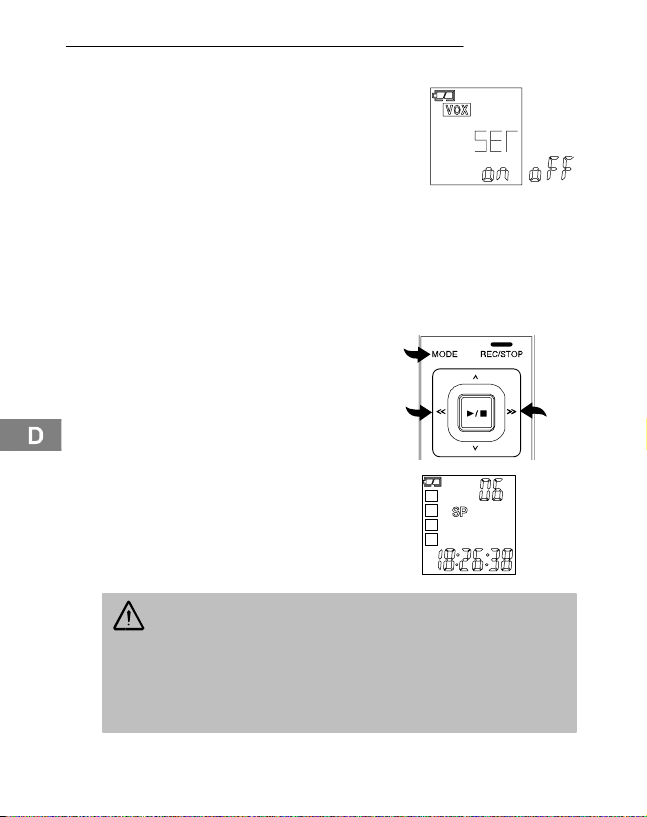
VOX (Spracherkennung) aktivieren/deaktivieren
Um VOX" zu aktivieren/deaktivieren, halten Sie die MODE−Taste
gedrückt, bis SET erscheint. Drü−
cken Sie die OBEN− oder UNTEN−
Taste, bis im Display VOX" erscheint. Mit der VORLAUF− oder
RÜCKLAUF−Taste stellen Sie die
VOX"−Funktion Ein oder Aus. Bestätigen Sie mit der ABSPIELEN/STOPP−
Taste.
Aufnehmen
Das Gerät ist mit einer automatischen Spracherkennung (VOX) ausgestattet
(siehe Sprachgesteuerte Aufnahme Seite 15). Ist VOX" deaktiviert (siehe
oben), können Sie normale Aufnahmen tätigen.
Versetzen Sie das Gerät in den
Stand−by−Modus und wählen Sie
die gewünschte Aufnahmequalität
(siehe Aufnahmequalität Seite 11).
Wählen Sie einen Ordner/Speicherplatz durch Betätigen der
FILE/REPEAT−Taste (siehe Nachrichten verwalten Seite 12).
6
A
B
C
D
Wenn Sie während der Aufnahme die Batterien entfernen,
wird die Aufnahme unterbrochen. Die aktuelle Aufnahme kann
eventuell beschädigt oder gelöscht werden. Das Diktiergerät benötigt einige Minuten, um den Normalbetrieb wieder aufzunehmen. Im
Display wird solange ......" angezeigt.
Es wird empfohlen, Ihre Aufnahmen auf dem PC oder externen Datenträgern zu sichern.
14
Page 15
Bedienung
Während Sie sich im Stand−by−
Modus befinden, drücken Sie die
AUFNAHME/STOPP−Taste. Die
LED leuchtet rot und die mitlaufende Zeit erscheint. Sprechen Sie
in das integrierte Mikrofon oder
schließen Sie ein Sie ein externes
Mikrofon an die MIC−Buchse an und sprechen Sie mit normaler Lautstärke.
Drücken Sie die AUFNAHME/STOPP−Taste erneut, um die Aufnahme zu
beenden.
Drücken Sie die ABSPIELEN/
STOPP−Taste, um die verbleibende Zeit während des Aufnehmens anzuzeigen. REMAIN"
erscheint im Display und die verbleibende Zeit wird angezeigt.
Sprachgesteuerte Aufnahme (VOX)
7
Wenn VOX" aktiv ist, nimmt das Gerät nur auf, wenn Sie sprechen. Machen
Sie eine Pause, unterbricht das Gerät die Aufnahme und setzt sie erst fort,
wenn Sie weitersprechen.
"VOX" muss aktiviert sein (siehe
VOX aktivieren/deaktivieren
Seite 14). Schalten Sie das Gerät
ein und wählen Sie die gewünschte Aufnahmequalität (siehe
Aufnahmequalität Seite 11).
A
A
REMAIN
Während Sie sich im Stand−by−Modus befinden, wählen Sie mit der
FILE/REPEAT−Taste einen Ordner
(A, B, C, D) aus, in dem die Nachricht gespeichert werden soll.
A
B
C
D
15
Page 16
Bedienung
Drücken Sie die AUFNAHME/
STOPP−Taste, das Aufnahmesymbol und die Zeitanzeige für die aktuelle Aufnahme werden im
Display angezeigt. Die LED leuchtet rot. Sprechen Sie in das integrierte Mikrofon oder schließen Sie
ein externes Mikrofon an die MIC−Buchse an. Sobald Sie anfangen zu sprechen, beginnt das Gerät die Aufnahme. Wenn das Gerät die Aufnahme unterbricht, blinkt die LED am Gerät, bis die Aufnahme fortgesetzt wird. Drücken
Sie die AUFNAHME/STOPP−Taste, um die Aufnahme zu beenden.
Hinweise:
Die ersten Geräusche aktivieren den Rekorder und werden eventuell
nicht mit aufgenommen.
Bei einer Veränderung der Lautstärke der Sprache unterbricht das Gerät
nicht die Aufnahme.
Die Aufnahme wird bereits nach 2 Sekunden Stille unterbrochen.
Durchgängiges Aufnehmen siehe Seite 14.
Bei einer normalen Lautstärke (Sprechen) ist eine Entfernung von
ca. 10 cm angemessen.
Nachrichten abspielen
Schalten Sie das Gerät ein, wechseln Sie in den Stand−by−Modus
und drücken Sie die FILE/REPEAT−Taste und wählen Sie einen
Ordner (A, B, C, D).
A
B
C
D
16
Drücken Sie die OBEN− oder
UNTEN−Taste, um die gewünschte
Nachricht auszuwählen. Die Nummer und Länge der Nachricht werden im Display angezeigt.
Page 17
Bedienung
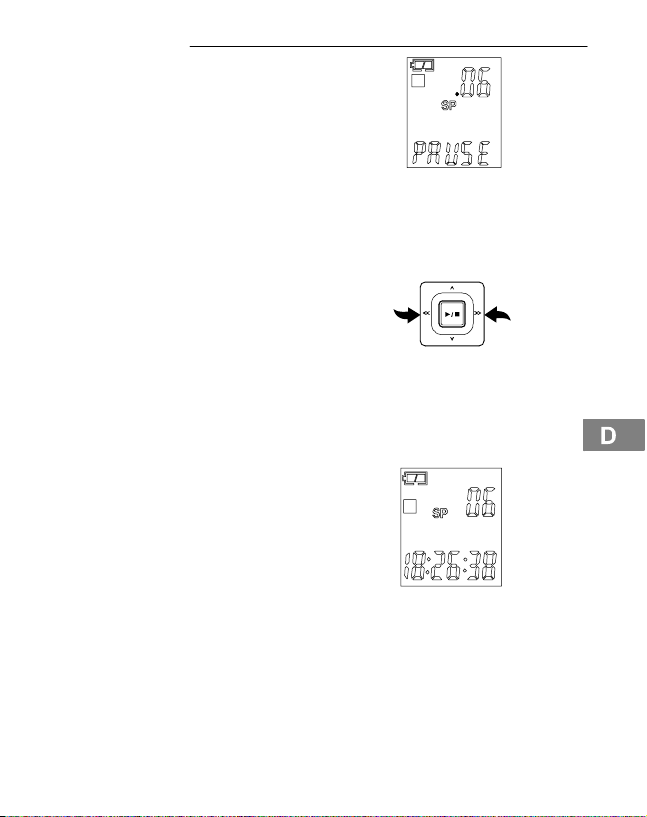
Drücken Sie die ABSPIELEN/
STOPP−Taste, um die aktuelle Nachricht abzuspielen. Während der Wiedergabe drücken Sie die
AUFNAHME/STOPP−Taste, um die
Uhrzeit und das Datum der
Aufnahme zu überprüfen. Während
des Abspielens können Sie durch Drücken der ERASE/PAUSE−Taste die Wiedergabe anhalten und wieder fortsetzen. Die Nachricht wird nicht gelöscht.
Für den Vor− oder Rücklauf während der aktuellen Wiedergabe
drücken Sie die VORLAUF− oder
RÜCKLAUF−Taste. Die Wiedergabe läuft dann mit 10 Sekunden/s. An gewünschter Stelle die
ABSPIELEN/STOPP−Taste
drücken.
Nachricht(en) wiederholen
Wenn Sie eine oder alle Nachrichten wiederholen möchten, halten
Sie während der Wiedergabe einer
Nachricht die FILE/REPEAT−Taste
gedrückt, bis REPEAT" (Eine
Nachricht) im Display angezeigt
wird. Halten Sie die FILE/REPEAT−
Taste erneut gedrückt, bis REPEAT ALL" (Alle Nachrichten wiederholen) angezeigt wird. Das Gerät wiederholt eine oder alle Nachrichten des angezeigten Ordners. Um das Wiederholen zu deaktivieren, halten Sie die
FILE/REPEAT−Taste gedrückt.
A
B
REPEAT ALL
17
Page 18
Bedienung
Nachrichten wiederholen (Ausschnitt)
Um einen bestimmten Teil einer
Nachricht zu wiederholen, drücken
Sie während der Wiedergabe die
FILE/REPEAT−Taste einmal. A" wird
im Display angezeigt, somit haben
Sie den Startpunkt markiert. Drücken
Sie an gewünschter Stelle der Wiedergabe die FILE/REPEAT−Taste erneut. b" wird im Display angezeigt, womit Sie
den Endpunkt markiert haben.
Wiederholen abbrechen
Um das Wiederholen abzubrechen, drücken Sie die
ABSPIELEN/STOPP−Taste.
Wiedergabe unterbrechen
Um die Wiedergabe zu unterbrechen, drücken Sie die ERASE/
PAUSE−Taste. PAUSE" wird im
Display angezeigt. Zum weiteren
Abspielen drücken Sie die ERASE/
PAUSE−Taste erneut. Die Nachricht wird nicht gelöscht.
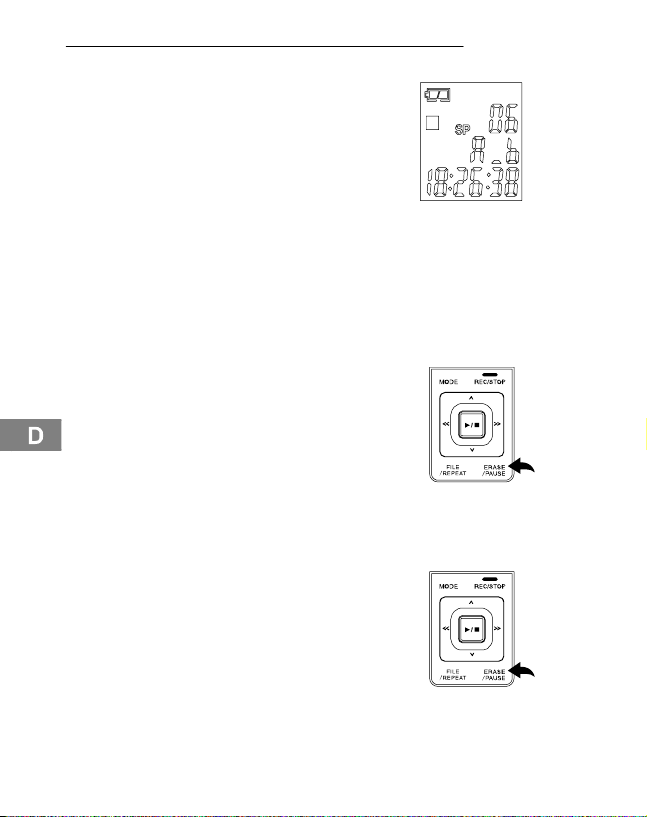
Nachricht löschen
Wählen Sie die zu löschende
8
Nachricht aus und drücken Sie die
ERASE/PAUSE−Taste. DEL" erscheint im Display und die Nachricht wird abgespielt. Drücken Sie
während der Wiedergabe die
ERASE/PAUSE−Taste erneut, um
die Nachricht zu löschen.
B
18
Page 19

Alle Nachrichten löschen
Wählen Sie den zu löschenden
9
Ordner aus (A, B, C, D), halten Sie
die ERASE/PAUSE−Taste gedrückt, bis No dEL ALL" im Display erscheint. Drücken Sie die
OBEN− oder UNTEN−Taste bis
YES" im Display erscheint. Drükken Sie die ABSPIELEN/STOPP−
Taste, um alle Nachrichten im ausgewählten Ordner zu löschen.
Hinweis: Das Löschen der Nachrichten kann nicht rückgängig gemacht
werden.
Nachrichten bearbeiten (Teilen)
Wählen Sie den gewünschten Ordner aus und halten Sie zuerst die
UNTEN−Taste (1) gedrückt, bis
"Edt" im Display angezeigt wird.
Wählen Sie eine Nachricht aus.
Drücken Sie die ABSPIELEN/
STOPP−Taste (2) zur Wiedergabe
der Nachricht.
Drücken Sie währenddessen die
FILE/REPEAT−Taste (3), um einen
Schnitt zu setzen. Die Nachricht
wurde an der Marke geteilt.
Drücken Sie die ABSPIELEN/
STOPP−Taste (2), um zu bestätigen. Aus einer vorhandenen Nachricht wurden zwei erzeugt.
3
B
Bedienung
2
1
4
19
Page 20
Bedienung
Nachrichten bearbeiten (Schneiden)
Wählen Sie den gewünschten Ordner aus. Drücken und halten Sie die UNTEN−Taste (1), bis Edt" im Display angezeigt wird. Wählen Sie eine Nachricht aus und drücken Sie die ABSPIELEN/STOPP−Taste (2), um die Nachricht wiederzugeben.
Während des Abspielens drücken Sie die ERASE/PAUSE−Taste (4), um einen Startpunkt festzulegen. A St" wird im Display angezeigt. Drücken Sie die
ERASE/PAUSE−Taste (4), um den Endpunkt festzulegen. bEd" wird im Display angezeigt. Drücken Sie die ABSPIELEN/STOPP−Taste (2), um den Vorgang zu bestätigen. Die Nachricht zwischen Start− und Endpunkt wird geschnitten.
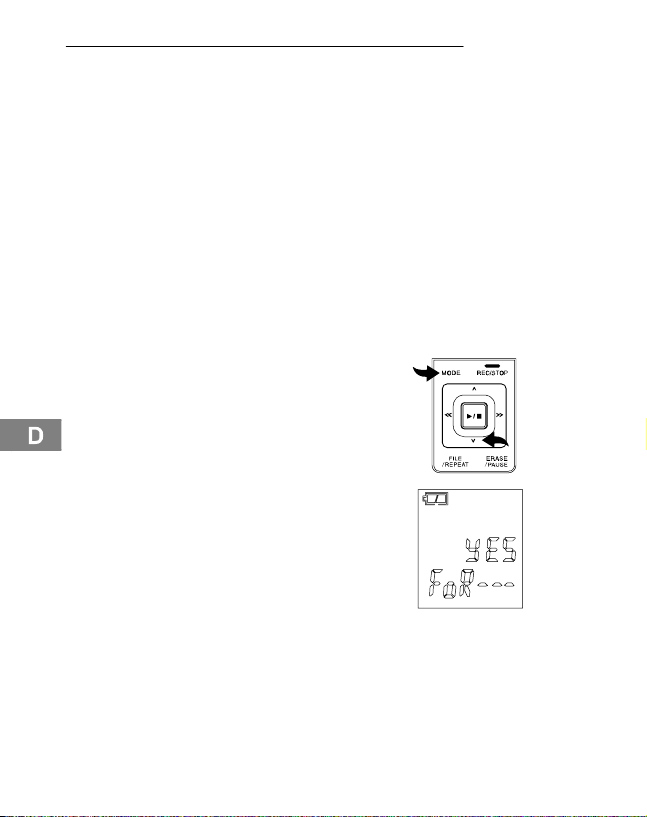
Gerät formatieren (ALLES löschen)
Halten Sie die MODE−Taste gedrückt, bis SET" im Display erscheint. Drücken Sie die UNTEN−
Taste, bis FoR" im Display
erscheint.
Benutzen Sie die VORLAUF−
oder RÜCKLAUF−Taste, um ’’Yes’’
auszuwählen. Drücken und halten
Sie anschließend die ABSPIELEN/
STOPP−Taste. Alle Daten und
Nachrichten auf dem Gerät werden
gelöscht.
20
Hinweis: Wählen Sie No", wenn Sie das Gerät nicht formatieren wollen.
Hinweis: Das Formatieren des Geräts kann nicht rückgängig gemacht
werden.
Hinweis: Das Formatieren dauert ca. 20 Sekunden; währenddessen sind alle
Tasten ohne Funktion.
Hinweis: Das Löschen der Daten kann nicht rückgängig gemacht werden.
Page 21

7 Technische Daten
Technische Daten
Technische Daten
Speicherart 512 MB integrierter Flash−Speicher,
Max. Aufnahmedauer 136 Std. im LP−Modus
Lautsprecher 0,2 W (8 Ohm)
Ausgangsleistung 100 mW
Stromquelle 3 V, 2 x AAA Batterien
Laufzeit 15 Stunden bei Aufnahme
Maße 115 (H) x 40 (B) x 20 (T) mm
Gewicht (ohne Batterien) 50 g
USB 2.0
Die Aufnahmen werden als *.mp3−Dateien gespeichert. Sie können das Gerät mithilfe des USB−Kabels mit einem Computer verbinden und die Aufnahmen sichern, bearbeiten, komprimieren etc.
Geeignete Software können Sie aus dem Internet herunterladen.
Olympia übernimmt keine Garantie für Programme von Fremdanbietern.
SD− und SDHC−Speicherkarten verwendbar (bis zu 8 GB)
12 Stunden bei Wiedergabe mit
halber Lautstärke
21
Page 22

Contents
1 Safety Information 23. . . . . . . . . . . . . . . . . . . . . . . . . . . . . . . . . . . . .
Intended use 23. . . . . . . . . . . . . . . . . . . . . . . . . . . . . . . . . . . . . . . . . . . . . . . . . . .
Use in extreme conditions 23. . . . . . . . . . . . . . . . . . . . . . . . . . . . . . . . . . . . . . . . . .
Batteries 23. . . . . . . . . . . . . . . . . . . . . . . . . . . . . . . . . . . . . . . . . . . . . . . . . . . . . .
Rechargeable battery pack 23. . . . . . . . . . . . . . . . . . . . . . . . . . . . . . . . . . . . . . . . .
Medical equipment 23. . . . . . . . . . . . . . . . . . . . . . . . . . . . . . . . . . . . . . . . . . . . . . .
Disposal 24. . . . . . . . . . . . . . . . . . . . . . . . . . . . . . . . . . . . . . . . . . . . . . . . . . . . . .
2 Display Indicators 25. . . . . . . . . . . . . . . . . . . . . . . . . . . . . . . . . . . . . .
3 Operating Elements 26. . . . . . . . . . . . . . . . . . . . . . . . . . . . . . . . . . . .
4 Putting Into Operation 27. . . . . . . . . . . . . . . . . . . . . . . . . . . . . . . . . .
Inserting the batteries 27. . . . . . . . . . . . . . . . . . . . . . . . . . . . . . . . . . . . . . . . . . . . .
Microphone 27. . . . . . . . . . . . . . . . . . . . . . . . . . . . . . . . . . . . . . . . . . . . . . . . . . . .
Headset 27. . . . . . . . . . . . . . . . . . . . . . . . . . . . . . . . . . . . . . . . . . . . . . . . . . . . . .
5 Settings 28. . . . . . . . . . . . . . . . . . . . . . . . . . . . . . . . . . . . . . . . . . . . .
Setting the date and time 28. . . . . . . . . . . . . . . . . . . . . . . . . . . . . . . . . . . . . . . . . . .
Switching on (TIME mode) 29. . . . . . . . . . . . . . . . . . . . . . . . . . . . . . . . . . . . . . . . .
Switching off 29. . . . . . . . . . . . . . . . . . . . . . . . . . . . . . . . . . . . . . . . . . . . . . . . . . .
Operating modes 29. . . . . . . . . . . . . . . . . . . . . . . . . . . . . . . . . . . . . . . . . . . . . . . .
6 Operation 30. . . . . . . . . . . . . . . . . . . . . . . . . . . . . . . . . . . . . . . . . . . .
Recording quality 30. . . . . . . . . . . . . . . . . . . . . . . . . . . . . . . . . . . . . . . . . . . . . . . .
Managing messages 31. . . . . . . . . . . . . . . . . . . . . . . . . . . . . . . . . . . . . . . . . . . . . .
Recording sensitivity 31. . . . . . . . . . . . . . . . . . . . . . . . . . . . . . . . . . . . . . . . . . . . . .
Hold function (key lock) 32. . . . . . . . . . . . . . . . . . . . . . . . . . . . . . . . . . . . . . . . . . . .
Volume 32. . . . . . . . . . . . . . . . . . . . . . . . . . . . . . . . . . . . . . . . . . . . . . . . . . . . . . .
GB
Memory card function 32. . . . . . . . . . . . . . . . . . . . . . . . . . . . . . . . . . . . . . . . . . . . .
Activating/Deactivating the VOX feature (voice detection) 33. . . . . . . . . . . . . . . . . . . .
Recording 33. . . . . . . . . . . . . . . . . . . . . . . . . . . . . . . . . . . . . . . . . . . . . . . . . . . . .
Voice−activated recording (VOX) 34. . . . . . . . . . . . . . . . . . . . . . . . . . . . . . . . . . . . . .
Playing messages 35. . . . . . . . . . . . . . . . . . . . . . . . . . . . . . . . . . . . . . . . . . . . . . .
Replaying message(s) 36. . . . . . . . . . . . . . . . . . . . . . . . . . . . . . . . . . . . . . . . . . . . .
Replaying message(s) (excerpt) 37. . . . . . . . . . . . . . . . . . . . . . . . . . . . . . . . . . . . . .
Stopping repeat playback 37. . . . . . . . . . . . . . . . . . . . . . . . . . . . . . . . . . . . . . . . . .
Interrupting repeat playback 37. . . . . . . . . . . . . . . . . . . . . . . . . . . . . . . . . . . . . . . . .
Erasing messages 37. . . . . . . . . . . . . . . . . . . . . . . . . . . . . . . . . . . . . . . . . . . . . . .
Erasing all messages 38. . . . . . . . . . . . . . . . . . . . . . . . . . . . . . . . . . . . . . . . . . . . .
Editing messages (splitting) 38. . . . . . . . . . . . . . . . . . . . . . . . . . . . . . . . . . . . . . . . .
Editing messages (cutting) 39. . . . . . . . . . . . . . . . . . . . . . . . . . . . . . . . . . . . . . . . . .
Formatting the device (delete everything) 39. . . . . . . . . . . . . . . . . . . . . . . . . . . . . . .
7 Technical Data 40. . . . . . . . . . . . . . . . . . . . . . . . . . . . . . . . . . . . . . . .
Technical data 40. . . . . . . . . . . . . . . . . . . . . . . . . . . . . . . . . . . . . . . . . . . . . . . . . .
22
Page 23
Safety Information
1 Safety Information
Please read this operating instruction manual thoroughly.
Intended use
This digital voice recorder is designed to record all kinds of vocal communication.
Any other use is considered unintended use. Please note that dubbing recorded messages without authorisation is prohibited except for private purposes.
Do not use the device while driving a vehicle, motorcycle etc. to prevent the
increased risk of an accident through being distracted. Unauthorised modification or reconstruction is not permitted. Under no circumstances open the
device or complete any repair work yourself.
Use in extreme conditions
Prevent excessive exposure to smoke, dust, vibration, chemicals, moisture,
heat and direct sunlight.
Batteries
Attention: The equipment is designed to be operated by
batteries. Any other form of power supply is forbidden.
Rechargeable battery pack
Attention when using batteries: Never throw batteries into a
fire. Only use batteries of the same type! Pay attention to correct
polarity. Incorrect polarity of the batteries represents a risk of
explosion during charging.
Medical equipment
Attention: Do not use the voice recorder in the vicinity of medical
equipment. Effects on such equipment cannot be fully ruled out.
GB
23
Page 24

Safety Information
Disposal
In order to dispose of your device, bring it to a collection point provided by your local public waste authorities (e.g. recycling centre). The
adjacent symbol indicates that the device must not be disposed of in
normal domestic waste! According to laws on the disposal of electronic and electrical devices, owners are obliged to dispose of old elec-
tronic and electrical devices in a separate waste container. Pakkaging materials must be disposed of according to local
regulations.
Batteries must not be disposed of in domestic waste. Special collec-
tion containers are provided at certain sites (supermarkets, electric
shops).
GB
24
Page 25
Display Indicators
2 Display Indicators
LOCATION OF INDICATORs
A
B
C
A Battery status indicator Play
B Memory locations (files) Recording
C Hours/Minutes/Seconds HOLD (key lock)
D Month/Day SD memory card; page 32
E Recording quality VOX (voice−activated
F Year/Messages Replay (current message)
recording)
Replay (all messages in a file)
Remaining time during
recording
F
E
D
GB
25
Page 26
Operating Elements
3 Operating Elements
1
11
10
VOLVOL
17
GB
26
2
3
4
5
68
9
12
5
HOLDHOLD
16
3
15
7
14
13
1 Microphone 10 LCD display
2 MODE (selection) button 11 Recording active (indicator)
3 UP/DOWN button 12 USB connection port
4 PLAY/STOP button 13 MIC (microphone) jack
5 FORWARD/BACK button 14 EAR (earphone) jack
6 FILE/REPEAT
(file/replay) button
7 Loudspeaker 16 HOLD, key lock on/off
8 ERASE/PAUSE
(erase/pause) button
9 RECORD/STOP button
15 Memory card compartment
17 Volume control
Page 27

Putting Into Operation
4 Putting Into Operation
Inserting the batteries
Open the battery compartment by
sliding out the cover and removing
it.
Insert 2 AAA batteries (not supplied). Pay attention to correct polarity.
Close the battery compartment
again.
Batteries are fully charged.
Batteries are empty.
The charge status of the
batteries is indicated in the display.
Note: The recorded messages are retained when the batteries are replaced.
However, the date and time must be set again.
Microphone
You can connect an external microphone to the MIC jack on the device. As
soon as the microphone is connected, the integrated microphone is deactivated.
Headset
Headset/Earphones can be connected to the EAR jack on the device. As
soon as the headset/earphone is connected, the loudspeaker is automatically
deactivated.
GB
27
Page 28
Settings
5 Settings
Setting the date and time
After inserting the batteries, the device is in TIME mode. 1M 01D (month, day),
00:00:00 (hr., min., sec.) and year appear in the display. Set the date and time
as follows:
While the date and time appear in
the display (TIME mode), press the
MODE button to close TIME mode.
The number of messages, recording quality, duration of message,
etc. appear in the display. Press
and hold the MODE button to open
the date and time setting process. Press the DOWN button five times until the
year appears (09 is preset).
Press the FORWARD or BACK
button to set the year. Press the
PLAY/STOP button to save the
changes.
GB
Press the DOWN button. Use the
FORWARD or BACK button to select the month and confirm it by
pressing the PLAY/STOP button.
Press the FORWARD or BACK
button to set the day. Proceed as
above (month) to set the time.
Y
DM
Y
DM
28
Page 29
Switching on (TIME mode)
Press the PLAY/STOP button to
switch the device on and activate
TIME mode. The date and time are
displayed.
Press the MODE button to switch
from TIME mode to Standby mode.
Switching off
If Standby mode is active, press
10
and hold the PLAY/STOP button
until TIME mode is activated.
Note: The device switches off
automatically if no button is pressed
over a period of one minute.
Operating modes
The operating mode displays differ as follows:
Settings
Standby mode
− Number of messages
− Recording quality
− Month/Day
− Battery capacity
− Memory location
− Length of the current message
Note: All the following operations for programming settings assume that the
device is in Standby mode.
Note: Press the MODE button to exit from the programming mode defining all
the settings described in this chapter.
TIME mode
− Battery capacity
− Year
− Month/Day
− Time
GB
29
Page 30

Operation
6 Operation
Recording quality
There are four different recording qualities available for selection to record
the voice messages.
11
GB
Recording mode
HP (High Play) Best quality possible 11 hours
MP (Medium Play) Very good 17 hours
SP (Standard Play) Good 34 hours
LP (Long Play) For long recording 136 hours
Switch the device to Standby mode
and press the MODE button until
SET" appears in the display.
Select the required quality using
the FORWARD or BACK buttons.
Confirm the setting selected by
pressing the PLAY/STOP button.
Recording quality Max. recording time
30
Page 31

Operation
Managing messages
The device has 4 files (named A, B, C and D) in which to store the messages.
You can store a total of 396 messages or 136 hours in LP mode using all the
files (refer to Page 30 Recording quality"). A max. of 99 messages can be recorded in one file. Proceed as follows to select a file:
Press the FILE/REPEAT button to
select the required file/memory location (A, B, C, D). The number in
the top right corner of the display
indicates the total number of messages recorded in the respective
file. The time at the bottom of the
display indicates the total recording time of the message selected.
Note: When a message is recorded, the device automatically generates a
consecutive number for it, starting with 1. When no more memory space is
available, FULL’’ appears in the display. Refer to Page 37 to learn how to
erase messages.
Recording sensitivity
To set the recording sensitivity,
press and hold the MODE button
until SET" appears in the display.
Press the UP or DOWN button until MIC:LO/HI appears in the display. Press the FORWARD or
BACK button to set the function to
LO to record sounds the sources of which are near the microphone. Press the
FORWARD or BACK button to set the function to HI if you want to record
sounds which are further away. Confirm the setting by pressing the PLAY/
STOP button.
12
A
B
C
D
GB
31
Page 32

Operation
Hold function (key lock)
Slide the HOLD control upwards to
deactivate all the buttons. A padlock
icon appears in the display. Slide the
HOLD control back to activate all the
buttons again.
Note: The device can still be switched off even if the HOLD function is activated.
Volume
Turn the volume control in the required direction to increase or reduce the volume of the recordings
when played.
13
Memory card function
A memory card (SD or SDHC) can
be plugged into the device. Press
GB
and hold the MODE button until
SET appears in the display. Press
the DOWN button three times until
the memory card icon appears.
This function can be activated or
deactivated (ON/OFF) using the
FORWARD or BACK buttons.
Confirm the setting selected by
pressing the PLAY/STOP button.
HOLDHOLD
VOLVOL
32
Page 33

Activating/Deactivating the VOX feature (voice detection)
To activate/deactivate VOX",
press and hold the MODE button
until SET" appears in the display.
Press the UP or DOWN button until VOX" appears in the display.
Use the FORWARD or BACK button to switch the VOX" function on
or off. Confirm the setting by pressing the PLAY/STOP button.
Recording
14
The device is equipped with an automatic voice activity detector (VOX) (refer
to Page 34 Voice activity detector (VOX)"). If VOX" is deactivated (see
above), you can record in the normal way.
Set the device to Standby mode
and select the recording quality required (refer to Page 30 Recording quality").
Select a file/memory location by
pressing the FILE/REPEAT button
(refer to Page 31 Managing messages").
A
B
C
D
If you remove the batteries while recording, the recording
is interrupted. The current recording may be impaired or erased.
The dictation machine requires a few minutes to be able to start re-
cording again in normal operation. ......" appears in the display du-
ring this period.
It is recommended to save your recordings on a PC or external data
media.
Operation
GB
33
Page 34

Operation
When in Standby mode, press the
RECORD/STOP button. The LED
lights up red and the recording timer appears. Speak into the integrated microphone or connect an
external microphone to the MIC
jack and speak at a normal volume. Press the RECORD/STOP button again to end recording.
Press the PLAY/STOP button to
display the time remaining for recording. REMAIN", together with
the remaining time for recording,
appears in the display.
Voice−activated recording (VOX)
15
When VOX" is activated, the device only records when you speak. If you
pause, the device interrupts recording and only resumes when you start
speaking again.
"VOX" must be activated (refer to
Activating/Deactivating VOX,
GB
Page 33). Switch the device on
and select the required recording
quality (refer to Page 30 Recording quality").
When the device is in Standby
mode, press the FILE/REPEAT
button to select a file (A, B, C, D) in
which the message should be stored.
A
A
REMAIN
A
B
C
D
34
Page 35

Operation
Press the RECORD/STOP button,
the recording icon lights up and the
time indicator for the current recording appears. The LED lights up
red. Speak into the microphone integrated or connect an external microphone to the MIC jack. The device begins to record the moment you start to speak. If recording is
interrupted, the red LED flashes until recording is resumed. Press the RECORD/STOP button again to end recording.
NOTE:
The first noise activates the recorder and it is possible it will not be
recorded.
The device does not interrupt recording should the volume of the speaker
change.
Recording is interrupted following 2 seconds silence.
For information on continuous recording, refer to Page 33.
A distance of approx. 10 cm from the device is considered reasonable for
recording at a normal volume (speaking).
Playing messages
Switch the device on, activate
Standby mode and press the FILE/
REPEAT button to select a file (A,
B, C, D).
A
B
C
D
GB
Press the UP or DOWN button to
select the required messages. The
message number and length appear in the display.
35
Page 36

Operation
Press the PLAY/STOP button to play
the current message. Press the RECORD/STOP button during playback
to check the time and date of recording. While the message is being
played back, press the ERASE/
PAUSE button to interrupt playback
and press again to resume. The messages is not deleted.
To wind forward or back while
playing the current message, press
the FORWARD or BACK button,
respectively. Playback is then
speeded up to 10 seconds/s.
Press the PLAY/STOP button at
the required position to resume
playback.
Replaying message(s)
If you want to replay one or all the
GB
messages, press and hold the
FILE/REPEAT button while a message is being played until REPEAT" (replay one message) appears in the display. Press and
hold the FILE/REPEAT button
again until REPEAT ALL" (replay all messages) appears in the display. The
device replays one or all the messages from the file displayed. To deactivate
the replay function, press and hold the FILE/REPEAT button.
A
B
REPEAT ALL
36
Page 37

Replaying message(s) (excerpt)
In order to replay a specific excerpt
from a message, press the FILE/REPEAT button while a message is
being played. A" appears in the display indicating you have marked a
starting point. Press the FILE/REPEAT button again at the end of the
excerpt of the message. B" appears in the display indicating you have marked
the end point.
B
Stopping repeat playback
To stop the message being replayed, press the PLAY/STOP button.
Interrupting repeat playback
To interrupt playback, press the
ERASE/PAUSE button. PAUSE"
appears in the display. Press the
ERASE/PAUSE button again to resume playback. The messages is
not deleted.
Erasing messages
16
Select the message to be deleted
and press the ERASE/PAUSE button. DEL" appears in the display
and the messages is played. Press
the ERASE/PAUSE button again
while the message is playing in order to delete the messages.
Operation
GB
37
Page 38

Operation
Erasing all messages
Select the file to be deleted (A, B,
17
C, D), press and hold the ERASE/
PAUSE button until No dEL ALL"
appears in the display. Press the
UP or DOWN button until YES"
appears in the display. Press the
PLAY/STOP button to delete all the
messages in the selected file.
Note: Deleted messages cannot be restored.
Editing messages (splitting)
Select the required file and then
press and hold the DOWN button (1) until Edt" appears in the
display. Select a message. Press
the PLAY/STOP button (2) to play
the message.
While it is playing, press the FILE/
GB
REPEAT button (3) to set a cut.
The messages is cut at this point.
Press the PLAY/STOP button (2) to
confirm the action. Two messages
are thus produced from one message.
2
3
B
1
4
38
Page 39

Operation
Editing messages (cutting)
Select the required file. Press and hold the DOWN button (1) until Edt" appears in the display. Select a message and press the PLAY/STOP button (2)
to play the message.
While the message is playing, press the ERASE/PAUSE button (4) to define a
starting point. A St" appears in the display. Press the ERASE/PAUSE button (4) to define an end point. bEd" appears in the display. Press the PLAY/
STOP button (2) to confirm the process. The part of the message between the
start and end points is cut.
Formatting the device (delete everything)
Press and hold the MODE button
until SET" appears in the display.
Press the DOWN button until
FoR" appears in the display.
Use the FORWARD or BACK button to select Yes’’. Then press and
hold the PLAY/STOP button. All
the data and messages stored on
the device are deleted.
Note: Select No" if you do not want to format
the device.
Note: Formatting the device cannot be reverted.
Note: Formatting takes approx. 20 seconds; none of the buttons function
during this period.
Note: Deleted data cannot be restored.
GB
39
Page 40

Technical Data
7 Technical Data
Technical data
Type of memory 512 MB integrated Flash memory, SD
Max. recording time 136 hours in LP mode
Loudspeaker 0.2 W (8 Ohm)
Output power 100 mW
Current source 3 V, 2 x AAA batteries
Runtime 15 hours for recording
Dimensions 115 (H) x 40 (W) x 20 (D) mm
Weight (without batteries) 50 g
USB 2.0
Recordings are stored as *.mp3 files. You can connect the device to a compu-
GB
ter with the aid of a USB cable and save, edit, compress, etc. the recordings.
The necessary software can be downloaded from the Internet.
Olympia accepts no guarantee in respect of programmes from third−party
suppliers.
and SDHC memory cards can be used
(up to 8 GB)
12 hours for playback at half volume
40
Page 41

Table des matières
1 Consignes de sécurité 42. . . . . . . . . . . . . . . . . . . . . . . . . . . . . . . . . .
Utilisation conforme à son usage 42. . . . . . . . . . . . . . . . . . . . . . . . . . . . . . . . . . . . .
Utilisation dans un environnement nuisible 42. . . . . . . . . . . . . . . . . . . . . . . . . . . . . . .
Piles 42. . . . . . . . . . . . . . . . . . . . . . . . . . . . . . . . . . . . . . . . . . . . . . . . . . . . . . . . .
Piles rechargeables 42. . . . . . . . . . . . . . . . . . . . . . . . . . . . . . . . . . . . . . . . . . . . . .
Appareils médicaux 42. . . . . . . . . . . . . . . . . . . . . . . . . . . . . . . . . . . . . . . . . . . . . .
Élimination des déchets 43. . . . . . . . . . . . . . . . . . . . . . . . . . . . . . . . . . . . . . . . . . . .
2 Affichages à l’écran 44. . . . . . . . . . . . . . . . . . . . . . . . . . . . . . . . . . . .
3 Éléments de manipulation 45. . . . . . . . . . . . . . . . . . . . . . . . . . . . . . .
4 Mise en service 46. . . . . . . . . . . . . . . . . . . . . . . . . . . . . . . . . . . . . . . .
Mise en place des piles 46. . . . . . . . . . . . . . . . . . . . . . . . . . . . . . . . . . . . . . . . . . . .
Microphone 46. . . . . . . . . . . . . . . . . . . . . . . . . . . . . . . . . . . . . . . . . . . . . . . . . . . .
Écouteur 46. . . . . . . . . . . . . . . . . . . . . . . . . . . . . . . . . . . . . . . . . . . . . . . . . . . . . .
5 Paramètres 47. . . . . . . . . . . . . . . . . . . . . . . . . . . . . . . . . . . . . . . . . . .
Régler la date et l’heure 47. . . . . . . . . . . . . . . . . . . . . . . . . . . . . . . . . . . . . . . . . . .
Allumer l’appareil (mode TIME) 48. . . . . . . . . . . . . . . . . . . . . . . . . . . . . . . . . . . . . .
Éteindre l’appareil 48. . . . . . . . . . . . . . . . . . . . . . . . . . . . . . . . . . . . . . . . . . . . . . . .
Modes de fonctionnement 48. . . . . . . . . . . . . . . . . . . . . . . . . . . . . . . . . . . . . . . . . .
6 Manipulation 49. . . . . . . . . . . . . . . . . . . . . . . . . . . . . . . . . . . . . . . . .
Qualité d’enregistrement 49. . . . . . . . . . . . . . . . . . . . . . . . . . . . . . . . . . . . . . . . . . .
Gérer les messages 50. . . . . . . . . . . . . . . . . . . . . . . . . . . . . . . . . . . . . . . . . . . . . .
Sensibilité d’enregistrement 50. . . . . . . . . . . . . . . . . . . . . . . . . . . . . . . . . . . . . . . . .
Fonction Hold (verrouillage des touches) 51. . . . . . . . . . . . . . . . . . . . . . . . . . . . . . . .
Volume sonore 51. . . . . . . . . . . . . . . . . . . . . . . . . . . . . . . . . . . . . . . . . . . . . . . . . .
Fonction carte mémoire 51. . . . . . . . . . . . . . . . . . . . . . . . . . . . . . . . . . . . . . . . . . . .
Activer / désactiver VOX (reconnaissance vocale) 52. . . . . . . . . . . . . . . . . . . . . . . . .
Enregistrement 52. . . . . . . . . . . . . . . . . . . . . . . . . . . . . . . . . . . . . . . . . . . . . . . . .
Enregistrement commandé par la voix (VOX) 53. . . . . . . . . . . . . . . . . . . . . . . . . . . . .
Reproduire des messages 54. . . . . . . . . . . . . . . . . . . . . . . . . . . . . . . . . . . . . . . . . .
Répéter le(s) message(s) 55. . . . . . . . . . . . . . . . . . . . . . . . . . . . . . . . . . . . . . . . . .
Répéter des messages (extrait) 56. . . . . . . . . . . . . . . . . . . . . . . . . . . . . . . . . . . . . .
Interrompre les répétitions 56. . . . . . . . . . . . . . . . . . . . . . . . . . . . . . . . . . . . . . . . . .
Interrompre la reproduction 56. . . . . . . . . . . . . . . . . . . . . . . . . . . . . . . . . . . . . . . . .
Effacer un message 56. . . . . . . . . . . . . . . . . . . . . . . . . . . . . . . . . . . . . . . . . . . . . .
Effacer tous les messages 57. . . . . . . . . . . . . . . . . . . . . . . . . . . . . . . . . . . . . . . . . .
Gérer les messages (fragmenter) 57. . . . . . . . . . . . . . . . . . . . . . . . . . . . . . . . . . . . .
Gérer les messages (couper) 58. . . . . . . . . . . . . . . . . . . . . . . . . . . . . . . . . . . . . . . .
Formater l’appareil (TOUT effacer) 58. . . . . . . . . . . . . . . . . . . . . . . . . . . . . . . . . . . .
7 Données techniques 59. . . . . . . . . . . . . . . . . . . . . . . . . . . . . . . . . . . .
Données techniques 59. . . . . . . . . . . . . . . . . . . . . . . . . . . . . . . . . . . . . . . . . . . . . .
FR
41
Page 42

Consignes de sécurité
1 Consignes de sécurité
Lisez attentivement ce mode d’emploi.
Utilisation conforme à son usage
Ce dictaphone convient à l’enregistrement de tout type de langue.
Toute autre utilisation est considérée comme non conforme à son usage.
Veuillez tenir compte du fait qu’il est interdit de transférer des messages enregistrés sans autorisation, sauf à des fins personnelles. N’utilisez pas l’appareil quand vous conduisez en voiture, en moto etc. car la distraction fait augmenter le risque d’accident. Vous n’êtes pas autorisé à apporter des
modifications et des transformations sans concertation préalable. N’ouvrez
en aucun cas l’appareil vous−même et n’essayez pas de le réparer.
Utilisation dans un environnement nuisible
Évitez toutes sortes de nuisances comme la fumée, la poussière, les vibrations, les produits chimiques, l’humidité, la grande chaleur ou l’ensoleillement
direct.
Piles
Attention : L’appareil fonctionne uniquement avec des piles.
Tout autre type d’alimentation en courant est interdit.
Piles rechargeables
FR
Attention en utilisant des piles rechargeables : Ne les jetez
pas dans le feu. Utilisez uniquement des piles rechargeables du
même type ! Veillez à ce que la polarité soit correcte ! Une polarité inversée des piles rechargeables peut être source d’explosion lors de leur chargement.
Appareils médicaux
Attention : Ne vous servez pas du dictaphone à approximité
d’appareils médicaux, son influence sur ceux−ci ne pouvant pas
être entièrement exclue.
42
Page 43

Consignes de sécurité
Élimination des déchets
Si vous voulez vous séparer de votre appareil, veuillez l’apporter au
centre de collecte de l’organisme d’élimination des déchets de votre
commune (par exemple centre de recyclage). L’icône ci−contre signifie que vous ne devez en aucun cas jeter l’appareil dans les ordures
ménagères ! D’après la loi relative aux appareils électriques et électroniques, les propriétaires d’appareils usagés sont tenus de mettre
tous les appareils électriques et électroniques dans un collecteur
séparé. Veuillez éliminer les fournitures d’emballage conformément aux prescriptions locales.
Ne pas éliminer les piles/piles rechargeables dans les ordures ménagères. Vous trouverez dans beaucoup d’endroits (supermarchés,
magasins d’électroménager) des collecteurs spéciaux destinés à
l’élimination des piles.
FR
43
Page 44

Affichages à l’écran
2 Affichages à l’écran
FR
LOCATION OF INDICATORS
A Affichage de l’état des piles Reproduction
B Places de mémoire (dos-
siers)
C Heures/Minutes/Secondes HOLD (verrouillage des tou-
D Mois/Jour Carte mémoire SD, page 51
E Qualité d’enregistrement VOX (enregistrement com-
F Année/Messages Répéter (message actuel)
A
B
F
E
D
C
Enregistrement
ches)
mandé par la voix)
Répéter (tous les messages d’un
dossier)
Temps restant pendant l’enregistrement
44
Page 45

3 Éléments de manipulation
1
11
10
Éléments de manipulation
VOLVOL
17
2
3
4
5
68
9
12
5
HOLDHOLD
16
3
15
7
14
13
1 Microphone 10 Écran à CL
2 Touche MODE (de sélection) 11 Enregistrement actif (affi-
3 Touche HAUT/BAS 12 Raccordement USB
4 Touche REPRODUCTION/STOP 13 Prise MIC (microphone)
5 Touche AVANCE/RECUL 14 Prise EAR (écouteur d’o-
6 Touche FILE/REPEAT
(dossier/répéter)
7 Haut−parleur 16 HOLD, verrouillage des tou-
8 Touche ERASE/PAUSE
(effacer/pause)
9 Touche ENREGISTREMENT/
STOP
chage)
reille)
15 Emplacement de la carte
mémoire
ches act./désact.
17 Molette de réglage de vo-
lume
FR
45
Page 46

Mise en service
4 Mise en service
Mise en place des piles
Ouvrez le compartiment à piles en
tirant et en soulevant le cache.
Insérez 2 piles AAA (ne sont pas
fournies avec l’appareil). Veillez à
ce que la polarité soit correcte.
Refermez le compartiment à piles.
Les piles sont pleines.
Les piles sont vides.
L’état de chargement des
piles s’affiche à l’écran.
FR
46
Remarque : Les messages enregistrés sont conservés pendant le remplacement des piles. Vous devez régler à nouveau la date et l’heure.
Microphone
Vous pouvez raccorder un microphone externe à la prise MIC de l’appareil.
Dès que le microphone est raccordé, le microphone intégré est désactivé.
Écouteur
Vous pouvez raccorder un casque d’écoute / écouteur d’oreille à la prise EAR
de l’appareil. Dès que le casque d’écoute / l’écouteur d’oreille est raccordé, le
haut−parleur est automatiquement désactivé.
Page 47

Paramètres
5 Paramètres
Régler la date et l’heure
Quand les piles sont insérées, l’appareil se trouve en mode TIME. 1M 01
(mois, jour), 00:00:00 (heures, min., sec.) apparaissent à l’écran ainsi que
l’année. Régler comme suit la date et l’heure :
Tant que la date et l’heure apparaissent à l’écran (mode TIME),
appuyez sur la touche MODE pour
quitter le mode TIME. Le nombre
de messages, la qualité, la durée
du message etc. apparaissent à
l’écran. Maintenez la touche MODE
une deuxième fois appuyée pour appeler les paramétrages de la date et de
l’heure. Appuyez cinq fois sur la touche BAS jusqu’à ce que l’année (09 préréglé) soit affichée.
Appuyez sur la touche AVANCE ou
RECUL pour régler l’année. Pour
reprendre des modifications, appuyez sur la touche REPRODUCTION/STOP.
Appuyez sur la touche BAS. À
l’aide de la touche AVANCE ou
RECUL, sélectionnez le mois et
confirmez avec la touche REPRODUCTION/STOP. Appuyez sur la
touche AVANCE ou RECUL pour
régler le jour. Pour régler l’heure,
procédez comme décrit auparavant (mois).
D
Y
DM
FR
Y
DM
47
Page 48

Paramètres
Allumer l’appareil (mode TIME)
Pour allumer l’appareil et parvenir
au mode TIME, appuyez sur la touche REPRODUCTION/STOP. La
date et l’heure s’affichent.
Appuyez sur la touche MODE pour
passer du mode TIME au mode d’attente.
Éteindre l’appareil
Quand vous vous trouvez en mode
18
d’attente, appuyez sur la touche
REPRODUCTION/STOP jusqu’à
ce que vous vous trouviez en
mode TIME.
Remarque : Si vous n’actionnez
aucune touche pendant une minute, l’appareil s’éteint automatiquement.
Modes de fonctionnement
Les différents modes de fonctionnement s’affichent comme suit à l’écran :
FR
48
Mode d’attente
− Nombre de messages
− Qualité d’enregistrement
− Mois/Jour
− Capacité des piles
− Espace mémoire
− Durée du message actuel
Remarque : Tous les réglages expliqués ci−dessous partent du principe que
vous vous trouvez en mode d’attente.
Remarque : Pour quitter tous les réglages décrits dans ce chapitre, appuyez
sur la touche MODE.
Mode TIME
− Capacité des piles
− Année
− Mois/Jour
− Heure
Page 49

Manipulation
6 Manipulation
Qualité d’enregistrement
Vous pouvez sélectionner entre les quatre qualités d’enregistrement différentes pour l’enregistrement de la langue.
19
Mode d’enregistrement
HP (High Play) La meilleure possible 11 heures
MP (Medium Play) Très bonne 17 heures
SP (Standard Play) Bonne 34 heures
LP (Long Play) Pour de longs enregis-
Mettez l’appareil en mode d’attente
et appuyez sur la touche MODE
jusqu’à ce que SET" s’affiche à
l’écran. Sélectionnez la qualité
désirée avec la touche AVANCE
ou RECUL.
Confirmez le paramètre sélectionné avec la touche REPRODUCTION/STOP.
Qualité d’enregistrement
trements
Durée max. d’enregistrement
136 heures
FR
49
Page 50

Manipulation
Gérer les messages
Cet appareil offre 4 dossiers (A, B, C, D) pour l’enregistrement des messages. Vous pouvez sauvegarder en tout 396 messages ou 136 heures en
mode LP (voir qualité d’enregistrement à la page 49). Un dossier peut enregistrer 99 messages max. Pour sélectionner un dossier :
Appuyez sur la touche FILE/REPEAT pour sélectionner le dossier /
l’espace mémoire (A, B, C, D) désiré. Le nombre situé dans l’angle
supérieur droit de l’écran indique
le nombre total de messages enregistrés dans le dossier correspondant. L’heure située en bas de
l’écran indique le temps total d’enregistrement du message sélectionné.
Remarque : À chaque fois que vous enregistrez un message, l’appareil crée
un numéro en continu, commençant par 1. S’il n’y a plus de place en mémoire disponible, l’écran indique ’’FULL’’. Pour effacer les messages, consultez la page 56.
Sensibilité d’enregistrement
Pour régler la sensibilité d’enregistrement, maintenez la touche
FR
MODE appuyée jusqu’à ce que
SET" apparaisse à l’écran. Appuyez sur la touche HAUT ou BAS
jusqu’à ce que MIC:LO/HI apparaisse à l’écran. Réglez la fonction
sur LO à l’aide de la touche AVANCE ou RECUL si vous enregistrez des
bruits qui sont très près du microphone. Si vous enregistrez des bruits plus
éloignés, réglez la fonction sur HI au moyen de la touche AVANCE ou RECUL. Confirmez les paramètres avec la touche REPRODUCTION/STOP.
20
A
B
C
D
50
Page 51

Fonction Hold (verrouillage des touches)
Poussez la glissière de régulation
HOLD vers le haut (à droite) pour
désactiver toutes les touches. Une
icône en forme de cadenas s’affiche
à l’écran. Pour activer les touches,
repoussez la glissière de régulation
HOLD.
Remarque : Même quand la fonction HOLD est activée, il est possible
d’éteindre l’appareil.
HOl DHOl D
Volume sonore
Tournez la molette de réglage de
volume dans la direction désirée
pour augmenter ou diminuer la
restitution de bruits.
Fonction carte mémoire
21
L’appareil peut enregistrer sur une
carte mémoire (SD ou SDHC). Appuyez sur la touche MODE jusqu’à
ce que "SET" apparaisse à l’écran.
Appuyez sur la touche BAS 3x
jusqu’à ce que l’icône de la carte
mémoire apparaisse. Vous avez la
possibilité d’activer cette fonction
avec la touche AVANCE ou RECUL ou de la désactiver (ON/
OFF).
Confirmez le paramètre sélectionné avec la touche REPRODUCTION/STOP.
Manipulation
VOlVOl
FR
51
Page 52

Manipulation
Activer / désactiver VOX (reconnaissance vocale)
Pour activer / désactiver VOX",
maintenez la touche MODE appuyée jusqu’à ce que "SET" apparaisse. Appuyez sur la touche
HAUT ou BAS jusqu’à ce que
VOX" apparaisse à l’écran. À
l’aide de la touche AVANCE ou
RECUL, régler la fonction VOX"
sur Marche ou Arrêt. Confirmez avec la touche REPRODUCTION/STOP.
Enregistrement
FR
L’appareil est équipé d’une reconnaissance vocale automatique (VOX) (voir
Enregistrement commandé par la voix à la page 53). Si VOX" est désactivé
(voir ci−dessus), vous pouvez enregistrer normalement.
Mettez l’appareil en mode d’attente
et sélectionnez la qualité d’enregistrement désirée (voir Qualité
d’enregistrement à la page 49).
Sélectionnez un dossier/espace
mémoire en appuyant sur la touche FILE/REPEAT (voir Gérer les
messages à la page 50).
Si vous retirez les piles pendant l’enregistrement, celui−ci
22
sera interrompu. L’enregistrement actuel peut éventuellement
être endommagé ou effacé. Le dictaphone a besoin de quelques
minutes pour reprendre son fonctionnement normal. Pendant ce
temps, ......" est affiché à l’écran.
Il est recommandé de sauvegarder vos enregistrements sur le PC
ou sur des supports de données externes.
A
B
C
D
52
Page 53

Manipulation
Pendant que vous vous trouvez en
mode d’attente, appuyez sur la
touche ENREGISTREMENT/
STOP. La diode électroluminescente rouge s’allume et le temps
qui s’écoule s’affiche. Parlez dans
le microphone intégré ou raccordez un microphone externe à la prise MIC et parlez avec un volume sonore
normal. Appuyez à nouveau sur la touche ENREGISTREMENT/STOP pour terminer l’enregistrement.
Appuyez sur la touche REPRODUCTION/STOP pour faire afficher
le temps qui reste, pendant l’enregistrement. REMAIN" apparaît à
l’écran et le temps qui reste s’affiche.
Enregistrement commandé par la voix (VOX)
23
Si VOX" est activé, l’appareil enregistre uniquement quand vous parlez. Si
vous faites une pause, l’appareil interrompt l’enregistrement et ne le reprend
que lorsque vous continuez à parler.
"VOX" doit être activé (voir Activer /
désactiver VOX à la page 52). Allumez l’appareil et sélectionnez la
qualité d’enregistrement désirée
(voir Qualité d’enregistrement à la
page 49).
A
A
REMAIN
FR
Pendant que vous vous trouvez en
mode d’attente, sélectionnez, à
l’aide de la touche FILE/REPEAT,
un dossier (A, B, C, D) dans lequel
le message doit être sauvegardé.
A
B
C
D
53
Page 54

Manipulation
Appuyez sur la touche ENREGISTREMENT/STOP ; l’icône d’enregistrement et l’affichage du temps
de l’enregistrement actuel s’affichent à l’écran. La diode électroluminescente rouge est allumée.
Parlez dans le microphone intégré
ou raccordez un microphone externe à la prise MIC. Dès que vous commencez à parler, l’appareil commence l’enregistrement. Quand l’appareil interrompt l’enregistrement, la DEL clignote sur l’appareil jusqu’à ce que l’enregistrement soit poursuivi. Appuyez sur la touche ENREGISTREMENT/STOP
pour terminer l’enregistrement.
Remarques :
Les premiers bruits activent le dictaphone et ne seront éventuellement
pas enregistrés.
Quand vous modifiez le volume sonore de la langue, l’appareil
n’interrompt pas l’enregistrement.
L’enregistrement s’interrompt au bout de 2 secondes de silence.
Pour l’enregistrement constant, voir à la page 52.
Pour un volume sonore normal (parole), une distance d’env. 10 cm est
convenable.
Reproduire des messages
FR
Allumez l’appareil, passez en
mode d’attente, appuyez sur la
touche FILE/REPEAT
et sélectionnez un
dossier (A, B, C, D).
Appuyez sur la touche BAS ou
HAUT pour sélectionner le message désiré. Le numéro et la longueur du message s’affichent à
l’écran.
A
B
C
D
54
Page 55

Manipulation
Appuyez sur la touche REPRODUCTION/STOP pour écouter le message. Pendant la reproduction, appuyez sur la touche
ENREGISTREMENT/STOP pour
contrôler l’heure et la date de l’enregistrement. Pendant l’écoute, vous
pouvez arrêter la reproduction et la poursuivre en appuyant sur la touche ERASE/
PAUSE. Le message ne sera pas effacé.
Pour l’avance ou le recul pendant
la reproduction actuelle, appuyez
sur la touche AVANCE ou RECUL.
Le défilement se fait à la vitesse de
10 secondes d’enregistrement/seconde de temps actuel. À l’endroit
désiré, appuyez sur la touche REPRODUCTION/STOP.
Répéter le(s) message(s)
Si vous désirez répéter un ou tous
les messages, maintenez la touche
FILE/REPEAT appuyée pendant la
reproduction d’un message jusqu’à
ce que REPEAT" (répéter un message) s’affiche à l’écran. Maintenez à nouveau la touche FILE/REPEAT appuyée jusqu’à ce que REPEAT ALL" (répéter tous les messages)
soit affiché. L’appareil répète un ou tous les messages du dossier affiché.
Pour désactiver la reproduction, maintenez la touche FILE/REPEAT appuyée.
A
B
REPEAT ALL
FR
55
Page 56

Manipulation
Répéter des messages (extrait)
Pour répéter une certaine partie d’un
message, appuyez une fois sur la
touche FILE/REPEAT pendant la reproduction. A" s’affiche à l’écran ;
ainsi vous avez marqué le point de
départ. Appuyez à nouveau sur la
touche FILE/REPEAT à l’endroit désiré de la reproduction. b" s’affiche à l’écran ; ce en quoi vous avez marqué le
point d’arrivée.
Interrompre les répétitions
Pour interrompre les répétitions, appuyez sur la touche REPRODUCTION/
STOP.
Interrompre la reproduction
Pour interrompre la reproduction,
appuyez sur la touche ERASE/
PAUSE. PAUSE" s’affiche à
l’écran. Pour continuer la reproduction, appuyez à nouveau sur la
touche ERASE/PAUSE. Le message ne sera pas effacé.
FR
Effacer un message
Sélectionnez le message à effacer
24
et appuyez sur la touche ERASE/
PAUSE. DEL" apparaît à l’écran et
le message est reproduit. Appuyez
de nouveau sur la touche ERASE/
PAUSE pendant la reproduction
pour effacer le message.
B
56
Page 57

Effacer tous les messages
Sélectionnez le dossier à effacer
25
(A, B, C, D), maintenez la touche
ERASE/PAUSE appuyée jusqu’à
ce que No dEL ALL" apparaisse à
l’écran. Appuyez sur la touche
BAS ou HAUT appuyée jusqu’à ce
que YES" apparaisse à l’écran.
Appuyez sur la touche REPRODUCTION/STOP pour effacer tous
les messages du dossier sélectionné.
Remarque : L’effacement des messages ne peut pas être annulé.
Gérer les messages (fragmenter)
Sélectionnez le dossier désiré et
maintenez d’abord la touche
BAS (1) appuyée jusqu’à ce que
"Edt" soit affiché à l’écran. Sélectionnez un message. Appuyez sur
la touche REPRODUCTION/
STOP (2) pour la reproduction du
message.
Pendant ce temps, appuyez sur la
touche FILE/REPEAT (3) pour faire
une coupe. Le message a été fragmenté au niveau de la marque.
Appuyez sur la touche REPRODUCTION/STOP (2) pour confirmer. Deux messages ont été créés
à partir d’un message existant.
3
B
Manipulation
2
1
4
FR
57
Page 58

Manipulation
Gérer les messages (couper)
Sélectionnez le dossier désiré. Appuyez sur la touche BAS (1) et maintenez−la appuyée jusqu’à ce que Edt" apparaisse à l’écran. Sélectionnez un
message et appuyez sur la touche REPRODUCTION/STOP (2) pour reproduire le message.
Pendant la reproduction, appuyez sur la touche ERASE/PAUSE (4) pour fixer
un point de départ. A St" s’affiche à l’écran. Appuyez sur la touche ERASE/
PAUSE (4) pour fixer le point d’arrivée. bEd" s’affiche à l’écran. Appuyez sur
la touche REPRODUCTION/STOP (2) pour confirmer l’opération. Le message sera coupé entre le point de départ et celui d’arrivée.
Formater l’appareil (TOUT effacer)
Maintenez la touche MODE appuyée jusqu’à ce que "SET" apparaisse à l’écran. Appuyez sur la
touche BAS jusqu’à ce que FoR"
apparaisse à l’écran.
Servez−vous de la touche AVANCE
ou RECUL pour sélectionner
FR
’’Yes’’. Appuyez ensuite sur la touche REPRODUCTION/STOP et
maintenez−la appuyée. Toutes les
données et tous les messages se
trouvant sur l’appareil seront effacés.
58
Remarque : Sélectionnez No" si vous ne voulez pas formater l’appareil.
Remarque : Le formatage de l’appareil ne peut pas être annulé.
Remarque : Le formatage dure env. 20 secondes ; pendant ce temps, toutes
les touches sont sans fonction.
Remarque : L’effacement des données ne peut pas être annulé.
Page 59

7 Données techniques
Données techniques
Données techniques
Type de mémoire Mémoire flasch de 512 MB intégrée,
cartes mémoire SD und SDHC utilisa-
bles (jusqu’à 8 GB)
Durée max. d’enregistrement 136 heures en mode LP
Haut−parleur 0,2 W (8 Ohms)
Puissance de sortie 100 mW
Source de courant 3 V, 2 x piles AAA
Durée d’action 15 heures d’enregistrement
12 heures de reproduction à volume
sonore moyen
Mesures 115 (H) x 40 (B) x 20 (T) mm
Poids (sans piles) 50 g
USB 2.0
Les enregistrements sont sauvegardés sous la forme de fichiers *.mp3. Vous
pouvez raccorder l’appareil à un ordinateur à l’aide du câble USB et sauvegarder, traiter, comprimer les enregistrements etc.
Vous pouvez télécharger un logiciel approprié sur Internet.
Olympia ne se porte pas garant pour les programmes venant d’autres four-
nisseurs.
FR
59
Page 60

Indice
1 Indicazioni di sicurezza 61. . . . . . . . . . . . . . . . . . . . . . . . . . . . . . . . . .
Destinazione d’uso 61. . . . . . . . . . . . . . . . . . . . . . . . . . . . . . . . . . . . . . . . . . . . . . .
Impiego in condizioni estreme 61. . . . . . . . . . . . . . . . . . . . . . . . . . . . . . . . . . . . . . .
Batterie 61. . . . . . . . . . . . . . . . . . . . . . . . . . . . . . . . . . . . . . . . . . . . . . . . . . . . . . .
Accumulatori ricaricabili 61. . . . . . . . . . . . . . . . . . . . . . . . . . . . . . . . . . . . . . . . . . . .
Apparecchiature mediche 61. . . . . . . . . . . . . . . . . . . . . . . . . . . . . . . . . . . . . . . . . .
Smaltimento 62. . . . . . . . . . . . . . . . . . . . . . . . . . . . . . . . . . . . . . . . . . . . . . . . . . .
2 Visualizzazioni di display 63. . . . . . . . . . . . . . . . . . . . . . . . . . . . . . . .
3 Elementi di comando 64. . . . . . . . . . . . . . . . . . . . . . . . . . . . . . . . . . .
4 Messa in funzione 65. . . . . . . . . . . . . . . . . . . . . . . . . . . . . . . . . . . . . .
Inserire le batterie 65. . . . . . . . . . . . . . . . . . . . . . . . . . . . . . . . . . . . . . . . . . . . . . . .
Microfono 65. . . . . . . . . . . . . . . . . . . . . . . . . . . . . . . . . . . . . . . . . . . . . . . . . . . . .
Auricolare 65. . . . . . . . . . . . . . . . . . . . . . . . . . . . . . . . . . . . . . . . . . . . . . . . . . . . .
5 Impostazioni 66. . . . . . . . . . . . . . . . . . . . . . . . . . . . . . . . . . . . . . . . . .
Impostare data e orario 66. . . . . . . . . . . . . . . . . . . . . . . . . . . . . . . . . . . . . . . . . . . .
Inserire l’apparecchio (modalità TIME) 67. . . . . . . . . . . . . . . . . . . . . . . . . . . . . . . . .
Spegnere l’apparecchio 67. . . . . . . . . . . . . . . . . . . . . . . . . . . . . . . . . . . . . . . . . . . .
Modalità di esercizio 67. . . . . . . . . . . . . . . . . . . . . . . . . . . . . . . . . . . . . . . . . . . . . .
6 Funzionamento 68. . . . . . . . . . . . . . . . . . . . . . . . . . . . . . . . . . . . . . .
Qualità di registrazione 68. . . . . . . . . . . . . . . . . . . . . . . . . . . . . . . . . . . . . . . . . . . .
Gestire i messaggi 69. . . . . . . . . . . . . . . . . . . . . . . . . . . . . . . . . . . . . . . . . . . . . . .
Sensibilità di registrazione 69. . . . . . . . . . . . . . . . . . . . . . . . . . . . . . . . . . . . . . . . . .
Funzione HOLD (blocco tasti) 70. . . . . . . . . . . . . . . . . . . . . . . . . . . . . . . . . . . . . . .
Volume 70. . . . . . . . . . . . . . . . . . . . . . . . . . . . . . . . . . . . . . . . . . . . . . . . . . . . . . .
Funzione scheda memoria 70. . . . . . . . . . . . . . . . . . . . . . . . . . . . . . . . . . . . . . . . . .
Attivare/Disattivare la funzione VOX (riconoscimento vocale) 71. . . . . . . . . . . . . . . . . .
Registrare 71. . . . . . . . . . . . . . . . . . . . . . . . . . . . . . . . . . . . . . . . . . . . . . . . . . . . .
Registrazione con guida vocale (VOX) 72. . . . . . . . . . . . . . . . . . . . . . . . . . . . . . . . .
Riprodurre i messaggi 73. . . . . . . . . . . . . . . . . . . . . . . . . . . . . . . . . . . . . . . . . . . . .
IT
Ripetere i(l) messaggi(o) 74. . . . . . . . . . . . . . . . . . . . . . . . . . . . . . . . . . . . . . . . . . .
Ripetere i messaggi (sequenza) 75. . . . . . . . . . . . . . . . . . . . . . . . . . . . . . . . . . . . . .
Interrompere la ripetizione 75. . . . . . . . . . . . . . . . . . . . . . . . . . . . . . . . . . . . . . . . . .
Interrompere la riproduzione 75. . . . . . . . . . . . . . . . . . . . . . . . . . . . . . . . . . . . . . . .
Cancellare il messaggio 75. . . . . . . . . . . . . . . . . . . . . . . . . . . . . . . . . . . . . . . . . . . .
Cancellare tutti i messaggi 76. . . . . . . . . . . . . . . . . . . . . . . . . . . . . . . . . . . . . . . . . .
Modificare i messaggi (dividere) 76. . . . . . . . . . . . . . . . . . . . . . . . . . . . . . . . . . . . . .
Modificare il messaggio (tagliare) 77. . . . . . . . . . . . . . . . . . . . . . . . . . . . . . . . . . . . .
Formatta apparecchio (cancella TUTTO) 77. . . . . . . . . . . . . . . . . . . . . . . . . . . . . . . .
7 Specifiche tecniche 78. . . . . . . . . . . . . . . . . . . . . . . . . . . . . . . . . . . .
Specifiche tecniche 78. . . . . . . . . . . . . . . . . . . . . . . . . . . . . . . . . . . . . . . . . . . . . . .
60
Page 61

Indicazioni di sicurezza
1 Indicazioni di sicurezza
Leggere le istruzioni per l’uso con attenzione.
Destinazione d’uso
Il presente dittafono si presta alla registrazione di qualsiasi tipo di segnale vocale.
Qualsiasi altro impiego è da ritenersi non conforme alle disposizioni. Si prega
di tenere presente che senza precedente autorizzazione non è consentito riversare messaggi registrati, tranne se destinati a scopo privato. Evitare l’uso
dell’apparecchio alla guida di un’autovettura, di una motocicletta ecc. visto il
rischio di incidenti causati dalla possibile distrazione. Non sono ammesse
modifiche o variazioni arbitrarie. Non è consentito per nessun motivo aprire
l’apparecchio autonomamente per eseguire interventi di riparazione.
Impiego in condizioni estreme
Evitare sollecitazioni causate da fumo, polvere, vibrazioni, sostanze chimiche, umidità, calore o irradiazioni solari dirette.
Batterie
Attenzione: L’apparecchio è alimentato esclusivamente da bat-
terie. Non è ammesso un qualsiasi altro tipo di alimentazione
elettrica.
Accumulatori ricaricabili
Attenzione in caso di impiego di accumulatori: Non gettare
gli accumulatori nel fuoco. Utilizzare sempre accumulatori dello
stesso tipo! Osservare la corretta polarità! Pericolo di esplosione
durante il caricamento degli accumulatori in caso di errata polarità.
Apparecchiature mediche
Attenzione: Evitare di utilizzare il dittafono in prossimità di ap-
parecchiature mediche. Non è infatti possibile escludere del
tutto il rischio di possibili interferenze.
IT
61
Page 62

Indicazioni di sicurezza
Smaltimento
Procedere allo smaltimento dell’apparecchio consegnandolo presso
uno dei punti di raccolta istituiti dalla propria società di smaltimento
rifiuti comunale (ad es. centro di riciclo materiali). Il simbolo riportato
qui a lato indica che non è assolutamente consentito smaltire l’apparecchio assieme ai normali rifiuti domestici! Secondo quanto previsto
dalla legge sugli apparecchi elettrici ed elettronici, i proprietari di apparecchi esauriti sono per legge tenuti alla consegna di tutti gli ap-
parecchi elettrici ed elettronici presso un centro di rilievo rifiuti in
raccolta differenziata. Smaltire confezioni ed imballaggi in base a
quanto indicato dalle norme in vigore a livello locale.
Non smaltire accumulatori/batterie assieme ai rifiuti domestici.
Sono numerosi i punti (supermercati, rivendite di articoli elettronici)
in cui sono installati appositi contenitori di raccolta per il corretto
smaltimento delle batterie esauste.
IT
62
Page 63

Visualizzazioni di display
2 Visualizzazioni di display
LOCATION OF INDICATORS
A
B
C
A Stato di carica batterie Riprodurre
B Posti memoria (cartelle) Registrare
C Ore/Minuti/Secondi HOLD (blocco tasti)
D Mese/Giorno Scheda memoria SD;
E Qualità di registrazione VOX (registrazione
F Anno/Messaggi Ripetere (messaggio attuale)
pagina 70
con guida vocale)
Ripetere (tutti i messaggi di una
cartella)
Tempo residuo durante la registrazione
F
E
D
IT
63
Page 64

Elementi di comando
3 Elementi di comando
1
11
10
VOLVOL
17
IT
64
2
3
4
5
68
9
12
5
HOLDHOLD
16
3
15
7
14
13
1 Microfono 10 Display LCD
2 Tasto (di selezione) MODE 11 Registrazione attiva (dis-
3 Tasto SOPRA/SOTTO 12 Porta USB
4 Tasto RIPRODUCI/STOP 13 Presa MIC (microfono)
5 Tasto AVANTI/INDIETRO 14 Presa EAR (auricolare)
6 FILE/REPEAT
Tasto Cartella/Ripeti
7 Altoparlante 16 HOLD, blocco tasti ON/OFF
8 ERASE/PAUSE
Tasto Cancella/Pausa
9 Tasto REGISTRA/STOP
play)
15 Slot scheda memoria
17 Rotella volume
Page 65

Messa in funzione
4 Messa in funzione
Inserire le batterie
Aprire il vano batterie sfilando e rimuovendo il coperchio.
Inserire 2 batterie tipo AAA (non
accluse). Osservare la corretta polarità!
Richiudere quindi il vano batterie.
Le batterie sono cariche.
Le batterie sono scariche.
Lo stato di carica delle
batterie è visualizzato
sul display.
Nota: In caso di sostituzione delle batterie i messaggi registrati sono memorizzati. Data e orario vanno invece reimpostati.
Microfono
È possibile collegare un microfono esterno alla presa MIC dell’apparecchio.
Non appena il microfono è collegato, il microfono integrato è disattivato automaticamente.
Auricolare
È possibile collegare una cuffia/un auricolare alla presa EAR dell’apparecchio. Non appena la cuffia/l’auricolare è collegato/a, l’altoparlante è disattivato automaticamente.
IT
65
Page 66

Impostazioni
5 Impostazioni
Impostare data e orario
Una volta inserite le batterie, l’apparecchio è in modalità TIME. Sul display
sono visualizzati 1
numero relativo all’anno. Per impostare data e orario procedere come segue:
Fintanto che data e orario sono visualizzati sul display (modalità
TIME), premere il tasto MODE per
uscire dalla modalità TIME. Il display visualizza il numero di messaggi, la qualità e la durata del
messaggio ecc. Tenere premuto il
tasto MODE una seconda volta per richiamare le impostazioni di data e orario. Premere il tasto SOTTO cinque volte, fino ad ottenere la visualizzazione
dell’anno (09 è preimpostato).
Premere il tasto AVANTI o INDIETRO per impostare l’anno. Per assumere la modifica, premere il tasto RIPRODUCI/STOP.
Premere il tasto SOTTO. Scorrere
IT
con il tasto AVANTI o INDIETRO il
mese e confermare quindi la selezione con il tasto RIPRODUCI/
STOP. Premere il tasto AVANTI o
INDIETRO per impostare il giorno.
Per impostare l’orario, procedere
secondo quanto descritto precedentemente (mese).
01D (mese, giorno), 00:00:00 (ore, minuti, secondi) ed il
M
Y
DM
Y
DM
66
Page 67

Inserire l’apparecchio (modalità TIME)
Per inserire l’apparecchio e passare alla modalità TIME, premere il
tasto RIPRODUCI/STOP. Data e
orario sono visualizzati.
Premere il tasto MODE per passare alla modalità di stand−by.
Spegnere l’apparecchio
Trovandosi in modalità di stand−by,
26
premere il tasto RIPRODUCI/
STOP fino a ritrovarsi in modalità
TIME.
Nota: Non premere alcun tasto per la
durata di un minuto in modo da
consentire all’apparecchio di spegnersi automaticamente.
Modalità di esercizio
Le varie modalità di esercizio sono visualizzate sul display come segue:
Impostazioni
Modalità di stand−by
− Numero di messaggi
− Qualità di registrazione
− Mese/Giorno
− Stato di carica della batteria
− Posizione di memoria
− Durata del messaggio attuale
Nota: Tutte le impostazioni riportate qui di seguito si riferiscono all’apparecchio in modalità di stand−by.
Nota: Per uscire da tutte le impostazioni descritte nel presente capitolo, premere il tasto MODE.
Modalità TIME
− Stato di carica della batteria
− Anno
− Mese/Giorno
− Orario
IT
67
Page 68

Funzionamento
6 Funzionamento
Qualità di registrazione
Per la registrazione vocale è possibile scegliere tra quattro qualità di registrazione differenti.
27
IT
Modalità di registrazione
HP (High Play) migliore possibile 11 ore
MP (Medium Play) ottima 17 ore
SP (Standard Play) buona 34 ore
LP (Long Play) lunghe registrazioni 136 ore
Passare l’apparecchio in modalità
di stand−by e premere il tasto
MODE fino a quando sul display è
visualizzato SET". Selezionare
con il tasto AVANTI o INDIETRO la
qualità desiderata.
Confermare l’impostazione selezionata con il tasto RIPRODUCI/
STOP.
Qualità di registrazione
Max. durata di registrazione
68
Page 69

Funzionamento
Gestire i messaggi
L’apparecchio offre 4 cartelle (A, B, C, D) per la memorizzazione dei messaggi. È possibile salvare complessivamente 396 messaggi o 136 ore in modalità LP (vedi Qualità di registrazione a pagina 68). In un file ovvero in una
cartella è possibile memorizzare fino a max. 99 messaggi. Per selezionare
una cartella:
Premere il tasto FILE/REPEAT per
selezionare la cartella/il posto memoria (A, B, C, D) desiderata/o. Il
numero visualizzato nell’angolo in
alto a destra sul display indica il
numero complessivo dei messaggi
registrati nella cartella selezionata.
La durata visualizzata in basso sul display
indica la durata di registrazione complessiva
del messaggio selezionato.
Nota: Ogni volta che si registra un messaggio, l’apparecchio assegna un numero progressivo partendo da 1. Con spazio memoria a disposizione esaurito, sul display è visualizzata la dicitura ’’FULL’’. Per cancellare messaggi,
consultare pagina 75.
Sensibilità di registrazione
Per impostare la sensibilità di registrazione, tenere premuto il tasto
MODE fino a quando sul display è
visualizzato SET". Premere il tasto
SOPRA o SOTTO, fino a quando
sul display è visualizzato MIC:LO/
HI. Passare con la funzione tramite
tasto AVANTI o INDIETRO alla modalità LO se si tratta di voler riprendere rumori molto vicini al microfono. Se si tratta invece di riprendere rumori più distanti, passare con la funzione tramite tasto AVANTI o INDIETRO su HI. Confermare quindi le impostazioni con il tasto RIPRODUCI/STOP.
28
A
B
C
D
IT
69
Page 70

Funzionamento
Funzione HOLD (blocco tasti)
Fare scorrere il regolatore HOLD
verso sopra (destra) per disattivare
tutti i tasti. Sul display è quindi visualizzato il simbolo di un lucchetto. Per
attivare i tasti, scorrere con il regolatore HOLD di nuovo indietro.
Nota: È possibile spegnere l’apparecchio anche con funzione HOLD attivata.
Volume
Girare la rotella volume nella direzione desiderata per aumentare o
ridurre il volume di quanto riprodotto.
29
Funzione scheda memoria
L’apparecchio offre la possibilità di
inserire una scheda memoria (SD
o SDHC). Premere il tasto MODE
fino a quando sul display è visualizzato SET. Premere il tasto
SOTTO 3x fino a quando non si ottiene la visualizzazione del sim-
IT
bolo relativo alla scheda memoria.
È dato modo di attivare o disattivare questa funzione con il tasto
AVANTI o INDIETRO (ON/OFF).
Confermare l’impostazione selezionata con il tasto RIPRODUCI/
STOP.
HOLDHOLD
VOLVOL
70
Page 71

Funzionamento
Attivare/Disattivare la funzione VOX (riconoscimento vocale)
Per attivare o disattivare VOX", tenere premuto il tasto MODE fino a
quando sul display è visualizzato
SET. Premere il tasto SOPRA o
SOTTO fino a quando sul display è
visualizzato VOX". Con il tasto
AVANTI o INDIETRO è ora possibile
attivare o disattivare la funzione VOX". Premere il tasto RIPRODUCI/STOP.
Registrare
30
L’apparecchio è dotato di riconoscimento vocale automatico (VOX) (vedi Registrazione con guida vocale a pagina 72). Se VOX" risulta disattivato (vedi
sopra), sarà possibile procedere alla normale registrazione.
Passare con l’apparecchio in modalità di stand−by e selezionare la
qualità di registrazione desiderata
(vedi Qualità di registrazione a pagina 68).
Selezionare una cartella/un posto
memoria premendo il tasto FILE/
REPEAT (vedi Gestire i messaggi
a pagina 69).
A
B
C
D
Dovendo rimuovere le batterie con registrazione in corso,
l’operazione di registrazione sarà interrotta. La registrazione
attuale può peraltro subire danni o essere addirittura cancellata. Il
dittafono richiede alcuni minuti, prima di riprendere a funzionare in
modalità di esercizio normale. Nel frattempo sul display è visualiz-
zato ......".
Si consiglia di salvare le proprie registrazioni su un PC o supporto
dati esterno.
IT
71
Page 72

Funzionamento
Premere in modalità di stand−by il
tasto REGISTRA/STOP. Il LED si
accende di rosso e rimane acceso
per l’intera durata della registrazione. Parlare rivolti verso il microfono o collegare un microfono
esterno alla presa MIC e parlare a
volume normale. Premere di nuovo il tasto REGISTRA/STOP per concludere la
registrazione.
Premere il tasto RIPRODUCI/
STOP per ottenere con registrazione in corso la visualizzazione
del tempo residuo. Sul display è visualizzato REMAIN" insieme al
tempo residuo.
Registrazione con guida vocale (VOX)
31
Una volta attivato VOX", l’apparecchio compie una registrazione soltanto se
si parla. Facendo una pausa, anche l’apparecchio interrompe la registrazione
e la riprende non appena si continua a parlare.
"VOX" deve risultare attivato (vedi
Attivare/Disattivare la funzione
VOX a pagina 71). Inserire l’apparecchio e selezionare la qualità di
IT
registrazione desiderata (vedi
Qualità di registrazione a pagina 68).
A
A
REMAIN
72
Mentre ci si trova in modalità di
stand−by, selezionare con il tasto
FILE/REPEAT la cartella (A, B, C,
D) in cui si intende salvare il messaggio.
A
B
C
D
Page 73

Funzionamento
Premere il tasto REGISTRA/STOP
per ottenere sul display la visualizzazione del simbolo di registrazione e l’indicazione sulla durata
della registrazione attuale. Il LED
si accende di rosso. Parlare rivolti
verso il microfono integrato oppure
utilizzare un microfono esterno collegato alla presa MIC. Non appena si incomincia a parlare, l’apparecchio inizia la registrazione. Se si interrompe la registrazione, il LED sull’apparecchio lampeggia fino a quando la registrazione
non è proseguita. Premere sul tasto REGISTRA/STOP per concludere la registrazione.
Nota:
I primi rumori attivano il registratore e molto probabilmente sono anch’essi
registrati.
Se il volume del parlato cambia, l’apparecchio non interrompe la
registrazione.
La registrazione è interrotta soltanto dopo 2 secondi di silenzio.
Registrazione continua vedi a pagina 71.
Con un volume normale (parlando) è ritenuta opportuna una distanza di
ca. 10 cm.
Riprodurre i messaggi
Inserire l’apparecchio, passare alla
modalità di stand−by e premere il
tasto FILE/REPEAT per selezionare una cartella (A, B, C, D).
A
B
C
D
IT
Premere il tasto SOPRA o SOTTO
per selezionare il messaggio desiderato. Sul display sono visualizzati il numero e la lunghezza del
messaggio.
73
Page 74

Funzionamento
Premere il tasto RIPRODUCI/STOP
per procedere alla riproduzione del
messaggio attuale. Premere con riproduzione in corso il tasto REGISTRA/STOP per verificare l’orario e
la data della registrazione. Con riproduzione in corso è possibile interrompere e proseguire la riproduzione premendo il tasto ERASE/PAUSE. Il messaggio non è cancellato.
Per saltare in avanti o indietro
nella riproduzione attualmente in
corso, premere il tasto AVANTI o
INDIETRO. La riproduzione scorre
quindi ad una velocità di 10 secondi. Una volta raggiunta la posizione desiderata, premere il tasto
RIPRODUCI/STOP.
Ripetere i(l) messaggi(o)
Volendo ripetere la riproduzione di
uno o tutti i messaggi, tenere premuto durante la riproduzione di un
messaggio il tasto FILE/REPEAT
IT
fino a quando sul display è visualizzato REPEAT" (un messaggio).
Tenere premuto di nuovo il tasto
FILE/REPEAT fino a quando sul display è visualizzato REPEAT ALL" (ripetere tutti i messaggi). L’apparecchio ripete uno o tutti i messaggi della cartella
selezionata. Per disattivare la funzione di ripetizione, tenere premuto il tasto
FILE/REPEAT.
A
B
REPEAT ALL
74
Page 75

Funzionamento
Ripetere i messaggi (sequenza)
Per ripetere una determinata parte di
un messaggio, premere con riproduzione in corso una volta il tasto FILE/
REPEAT. Sul display è visualizzato
A" a definire il punto iniziale della
sequenza. Premere nel punto in cui
si intende iniziare la riproduzione di
nuovo il tasto FILE/REPEAT. Sul display è visualizzato b" a definire il punto finale.
Interrompere la ripetizione
Per interrompere la ripetizione, premere il tasto RIPRODUCI/STOP.
Interrompere la riproduzione
Per interrompere la riproduzione,
premere il tasto ERASE/PAUSE.
Sul display è visualizzato
PAUSE". Per procedere la riproduzione, premere di nuovo il tasto
ERASE/PAUSE. Il messaggio non
è cancellato.
Cancellare il messaggio
32
Selezionare il messaggio da cancellare e premere il tasto ERASE/
PAUSE. Sul display appare DEL"
ed il messaggio è riprodotto. Premere con riproduzione in corso di
nuovo il tasto ERASE/PAUSE per
cancellare il messaggio.
B
IT
75
Page 76

Funzionamento
Cancellare tutti i messaggi
Selezionare la cartella che si in-
33
tende cancellare (A, B, C, D) e tenere premuto il tasto ERASE/
PAUSE fino a quando sul display è
visualizzato No dEL ALL". Premere il tasto SOPRA o SOTTO
fino a quando sul display è visualizzato YES". Premere il tasto RIPRODUCI/STOP per cancellare
tutti i messaggi dalla cartella selezionata.
Nota: Una volta eseguita la cancellazione di tutti i messaggi non sarà possibile ripristinarli.
Modificare i messaggi (dividere)
Selezionare la cartella desiderata
e tenere premuto prima il tasto
SOTTO (1) fino a quando sul display è visualizzato "Edt". Selezionare un messaggio. Premere il tasto RIPRODUCI/STOP (2) per
ottenere la riproduzione del messaggio.
IT
Premere contemporaneamente il
tasto FILE/REPEAT (3) per eseguire un taglio. Il messaggio risulta
quindi diviso nel punto evidenziato.
Premere il tasto RIPRODUCI/
STOP (2) per confermare. Dal
messaggio preesistente ne sono
stati creati due.
2
3
B
1
4
76
Page 77

Funzionamento
Modificare il messaggio (tagliare)
Selezionare la cartella desiderata. Premere e tenere premuto il tasto
SOTTO (1) fino a quando sul display è visualizzato Edt". Selezionare un
messaggio e premere il tasto RIPRODUCI/STOP (2) per riprodurre il messaggio.
Premere con riproduzione in corso il tasto ERASE/PAUSE (4) per definire il
punto iniziale. Sul display è visualizzato A St". Premere il tasto ERASE/
PAUSE (4) per definire il punto finale. Sul display è visualizzato bEd". Premere il tasto RIPRODUCI/STOP (2) per confermare la procedura. Il messaggio è tagliato tra punto iniziale e punto finale.
Formatta apparecchio (cancella TUTTO)
Tenere premuto il tasto MODE fino
a quando sul display è visualizzato
SET". Premere il tasto SOTTO
fino a quando sul display è visualizzato FoR".
Servirsi del tasto AVANTI o INDIETRO per selezionare ’’Yes’’. Premere e tenere quindi premuto il tasto RIPRODUCI/STOP. Tutti i dati
e i messaggi memorizzati sull’apparecchio sono cancellati.
Nota: Selezionare No" nel caso non si intendesse formattare l’apparecchio.
Nota: Una volta eseguita la formattazione dell’apparecchio non è possibile ri-
pristinare dati e messaggi.
Nota: La formattazione dura all’incirca 20 secondi; durante tale operazione
tutti i tasti non rispondono ad alcuna funzione.
Nota: I dati così cancellati non possono essere ripristinati.
IT
77
Page 78

Specifiche tecniche
7 Specifiche tecniche
Specifiche tecniche
Tipo di memoria Memoria flash integrata da 512 MB, si
Max. durata di registrazione 136 ore in modalità LP
Altoparlante 0,2 W (8 Ohm)
Potenza di uscita 100 mW
Alimentazione 3 V, 2 x batterie tipo AAA
Autonomia 15 ore in caso di registrazione
Misure 115 (H) x 40 (L) x 20 (P) mm
Peso (senza batterie) 50 g
USB 2.0
Quanto registrato è salvato come file *.mp3. L’apparecchio può essere collegato ad un computer con l’ausilio del cavo USB in modo da consentire eventuali operazioni di back−up, modifica, compressione ecc. delle registrazioni.
Un software idoneo allo scopo va eventualmente scaricato da Internet.
IT
Olympia non fornisce alcuna garanzia per i programmi di altri produttori.
consiglia l’uso di schede memoria SD
e SDHC (fino a 8 GB)
12 ore in caso di riproduzione a
metà volume
78
Page 79

Índice de materias
1 Advertencias de seguridad 80. . . . . . . . . . . . . . . . . . . . . . . . . . . . . . .
Uso previsto 80. . . . . . . . . . . . . . . . . . . . . . . . . . . . . . . . . . . . . . . . . . . . . . . . . . .
Utilización en un entorno extremo 80. . . . . . . . . . . . . . . . . . . . . . . . . . . . . . . . . . . . .
Pilas 80. . . . . . . . . . . . . . . . . . . . . . . . . . . . . . . . . . . . . . . . . . . . . . . . . . . . . . . . .
Baterías recargables 80. . . . . . . . . . . . . . . . . . . . . . . . . . . . . . . . . . . . . . . . . . . . . .
Aparatos médicos 80. . . . . . . . . . . . . . . . . . . . . . . . . . . . . . . . . . . . . . . . . . . . . . . .
Eliminación 81. . . . . . . . . . . . . . . . . . . . . . . . . . . . . . . . . . . . . . . . . . . . . . . . . . . .
2 Indicaciones de la pantalla 82. . . . . . . . . . . . . . . . . . . . . . . . . . . . . . .
3 Elementos de manejo 83. . . . . . . . . . . . . . . . . . . . . . . . . . . . . . . . . . .
4 Puesta en servicio 84. . . . . . . . . . . . . . . . . . . . . . . . . . . . . . . . . . . . .
Colocación de las pilas 84. . . . . . . . . . . . . . . . . . . . . . . . . . . . . . . . . . . . . . . . . . . .
Micrófono 84. . . . . . . . . . . . . . . . . . . . . . . . . . . . . . . . . . . . . . . . . . . . . . . . . . . . .
Auriculares 84. . . . . . . . . . . . . . . . . . . . . . . . . . . . . . . . . . . . . . . . . . . . . . . . . . . .
5 Ajustes 85. . . . . . . . . . . . . . . . . . . . . . . . . . . . . . . . . . . . . . . . . . . . . .
Ajustar la fecha y la hora 85. . . . . . . . . . . . . . . . . . . . . . . . . . . . . . . . . . . . . . . . . . .
Conectar el aparato (modo TIME) 86. . . . . . . . . . . . . . . . . . . . . . . . . . . . . . . . . . . . .
Desconectar el aparato 86. . . . . . . . . . . . . . . . . . . . . . . . . . . . . . . . . . . . . . . . . . . .
Modos de servicio 86. . . . . . . . . . . . . . . . . . . . . . . . . . . . . . . . . . . . . . . . . . . . . . .
6 Manejo 87. . . . . . . . . . . . . . . . . . . . . . . . . . . . . . . . . . . . . . . . . . . . . .
Calidad de grabación 87. . . . . . . . . . . . . . . . . . . . . . . . . . . . . . . . . . . . . . . . . . . . .
Administrar mensajes 88. . . . . . . . . . . . . . . . . . . . . . . . . . . . . . . . . . . . . . . . . . . . .
Sensibilidad de grabación 88. . . . . . . . . . . . . . . . . . . . . . . . . . . . . . . . . . . . . . . . . .
Función HOLD (bloqueo de teclas) 89. . . . . . . . . . . . . . . . . . . . . . . . . . . . . . . . . . . .
Volumen 89. . . . . . . . . . . . . . . . . . . . . . . . . . . . . . . . . . . . . . . . . . . . . . . . . . . . . .
Función de tarjeta de memoria 89. . . . . . . . . . . . . . . . . . . . . . . . . . . . . . . . . . . . . . .
Activar/desactivar VOX (detección de voz) 90. . . . . . . . . . . . . . . . . . . . . . . . . . . . . .
Grabación 90. . . . . . . . . . . . . . . . . . . . . . . . . . . . . . . . . . . . . . . . . . . . . . . . . . . . .
Grabación controlada por voz (VOX) 91. . . . . . . . . . . . . . . . . . . . . . . . . . . . . . . . . . .
Reproducir mensajes 92. . . . . . . . . . . . . . . . . . . . . . . . . . . . . . . . . . . . . . . . . . . . .
Repetir mensaje(s) 93. . . . . . . . . . . . . . . . . . . . . . . . . . . . . . . . . . . . . . . . . . . . . . .
Repetir mensajes (extracto) 94. . . . . . . . . . . . . . . . . . . . . . . . . . . . . . . . . . . . . . . . .
Cancelar la repetición 94. . . . . . . . . . . . . . . . . . . . . . . . . . . . . . . . . . . . . . . . . . . . .
Cancelar la reproducción 94. . . . . . . . . . . . . . . . . . . . . . . . . . . . . . . . . . . . . . . . . . .
Borrar mensaje 94. . . . . . . . . . . . . . . . . . . . . . . . . . . . . . . . . . . . . . . . . . . . . . . . .
Borrar todos los mensajes 95. . . . . . . . . . . . . . . . . . . . . . . . . . . . . . . . . . . . . . . . . .
Editar mensajes (dividir) 95. . . . . . . . . . . . . . . . . . . . . . . . . . . . . . . . . . . . . . . . . . .
Editar mensajes (cortar) 96. . . . . . . . . . . . . . . . . . . . . . . . . . . . . . . . . . . . . . . . . . .
Formatear el aparato (borrar TODO) 96. . . . . . . . . . . . . . . . . . . . . . . . . . . . . . . . . . .
7 Datos técnicos 97. . . . . . . . . . . . . . . . . . . . . . . . . . . . . . . . . . . . . . . .
Datos técnicos 97. . . . . . . . . . . . . . . . . . . . . . . . . . . . . . . . . . . . . . . . . . . . . . . . . .
ES
79
Page 80

Advertencias de seguridad
1 Advertencias de seguridad
Lea detenidamente este manual de instrucciones.
Uso previsto
Este dictáfono sirve para grabar cualquier tipo de voz.
Cualquier otro uso se considera no conforme al objetivo previsto. Por favor,
tenga en cuenta que sin permiso previo no está permitido borrar los mensajes grabados, a no ser que sea para fines privados. No utilice el aparato
mientras esté conduciendo un coche, una moto, etc., ya que la distracción
aumenta el peligro de sufrir un accidente. Se prohibe expresamente cualquier modificación o transformación. No abra el aparato bajo ningún concepto ni intente repararlo usted mismo.
Utilización en un entorno extremo
Evite cualquier carga producida por humo, polvo, vibraciones, sustancias
químicas, humedad, calor o radiación solar directa.
Pilas
Atención: el aparato funciona exclusivamente con pilas.
Queda prohibido cualquier otro tipo de alimentación eléctrica.
Baterías recargables
Atención en caso de utilizar baterías recargables: no tire las
baterías recargables al fuego. ¡Utilice sólo baterías recargables
del mismo tipo! ¡Preste atención a la polaridad correcta! En caso
de una polaridad invertida de las baterías recargables existe peligro de explosión durante la carga.
Aparatos médicos
ES
Atención: no utilice el dictáfono cerca de aparatos médicos. No
se pueden descartar por completo posibles repercusiones.
80
Page 81

Advertencias de seguridad
Eliminación
Si desea desechar el aparato, llévelo a un punto de recogida de su
municipio (por ejemplo, un centro de reciclaje). ¡El símbolo que aparece a continuación indica que el aparato no debe desecharse
nunca junto con la basura doméstica! De acuerdo con la ley sobre
aparatos eléctricos y electrónicos, los propietarios de aparatos antiguos están obligados a desechar los aparatos eléctricos y
electrónicos viejos en un contenedor separado de la basura
doméstica. Los materiales de embalaje se pueden eliminar según
las prescripciones locales.
No eliminar las baterías recargables/pilas a través de las basuras
domésticas. En muchos sitios (supermercado, tienda de aparatos
eléctricos) existen recipientes de recogida para la correcta eliminación de las baterías.
ES
81
Page 82

Indicaciones de la pantalla
2 Indicaciones de la pantalla
LOCATION OF INDICATORS
A
B
C
A Indicación del estado de la
batería
B Puestos de memoria (car-
peta)
C Horas/minutos/segundos HOLD (bloqueo de teclas)
D Mes/día Tarjeta de memoria SD;
E Calidad de grabación VOX (grabación
F Año/mensajes Repetición (mensaje actual)
ES
F
e
D
Reproducción
Grabación
página 89
controlada por voz)
Repetición (todos los mensajes
de una carpeta)
Tiempo restante durante la
grabación
82
Page 83

3 Elementos de manejo
1
11
10
Elementos de manejo
VOLVOL
17
2
3
4
5
9
12
5
HOLDHOLD
3
68
7
1 Micrófono 10 Pantalla LCD
2 Tecla MODE (selección) 11 Grabación activa (indica-
3 Tecla ARRIBA/ABAJO 12 Conexión USB
4 Tecla DE REPRODUCCIÓN/IN-
TERRUPCIÓN
5 Tecla DE AVANCE/RETRO-
CESO
6 Tecla FILE/REPEAT
(carpeta/repetición)
7 Altavoz 16 HOLD, bloqueo de teclas
8 Tecla ERASE/PAUSE
(borrar/pausa)
9 Tecla GRABACIÓN/INTERRUPCIÓN
ción)
13 Hembrilla MIC (micrófono)
14 Hembrilla EAR (auriculares)
15 Compartimento de tarjeta de
memoria
activado/desactivado
17 Ruleta de volumen
16
15
14
13
ES
83
Page 84

Puesta en servicio
4 Puesta en servicio
Colocación de las pilas
Abra el compartimento de pilas sacando y retirando la cubierta.
Introduzca 2 pilas AAA (no incluidas en el volumen de suministro).
Preste atención a la polaridad correcta.
Vuelva a cerrar el compartimento
de pilas.
Las pilas están cargadas.
Las pilas están vacías.
Se muestra el nivel de carga
de las pilas en la pantalla.
Advertencia: en caso de sustitución de las pilas se guardan los mensajes
grabados. La fecha y la hora deben volver a ajustarse.
Micrófono
ES
Se puede conectar un micrófono externo a la hembrilla MIC del aparato. Una
vez conectado el micrófono, se desactiva el micrófono integrado.
Auriculares
Se pueden conectar auriculares a la hembrilla EAR del aparato. Una vez conectados los auriculares, se desactiva el altavoz automáticamente.
84
Page 85

5 Ajustes
Ajustar la fecha y la hora
Una vez introducidas las pilas, el aparato se encuentra en el modo
TIME. En la pantalla aparecen 1
segundos.) y el año. Ajustar la fecha y la hora como sigue:
Mientras se muestra la fecha y la
hora en la indicaciones de la pantalla (modo TIME), pulse la tecla
MODE para salir del modo TIME.
En la pantalla aparecen el número
de mensajes, la calidad, la duración del mensaje, etc. Mantenga
pulsada la tecla MODE para visualizar los ajustes de la fecha y de la hora.
Pulse la tecla ABAJO cinco veces hasta que se visualice el año (preajuste 09).
Pulse la tecla AVANCE o RETROCESO para ajustar el año. Pulse la
tecla REPRODUCCIÓN/INTERRUPCIÓN para aceptar las modificaciones.
Pulse la tecla ABAJO. Seleccione
el mes con la tecla AVANCE o RETROCESO y confirme su selección con la tecla REPRODUCCIÓN/INTERRUPCIÓN. Pulse la
tecla AVANCE o RETROCESO
para ajustar el día.
Proceda según la descripción anterior para ajustar la hora (mes).
01D (mes, día), 00:00:00 (horas, minutos,
M
Ajustes
Y
DM
Y
DM
ES
85
Page 86

Ajustes
Conectar el aparato (modo TIME)
Pulse la tecla REPRODUCCIÓN/
INTERRUPCIÓN para conectar el
aparato y acceder al modo TIME.
Se muestran la fecha y la hora.
Pulse la tecla MODE para cambiar
del modo TIME al modo de reposo.
Desconectar el aparato
Estando en el modo de reposo,
34
pulse la tecla REPRODUCCIÓN/
INTERRUPCIÓN hasta que se encuentre en el modo TIME.
Advertencia: si durante un minuto
no se pulsa ninguna tecla, el aparato
se desconecta automáticamente.
Modos de servicio
Los diferentes modos de servicio se muestran de la siguiente manera en la
pantalla:
Modo de reposo Modo TIME
− Número de mensajes
− Calidad de grabación
− Mes/día
− Capacidad de pila
ES
− Puesto de memoria
− Duración del mensaje actual
− Capacidad de pila
− Año
− Mes/día
− Hora
86
Advertencia: para todos los ajustes que figuran a continuación se da por
sentado que se encuentra en el modo de reposo.
Advertencia: pulse la tecla MODE para salir de cualquiera de los ajustes
que se describen en este capítulo.
Page 87

6 Manejo
Calidad de grabación
Se puede elegir entre cuatro calidades de grabación diferentes para la
grabación verbal.
35
Manejo
Modo de grabación
HP (High Play) La mejor posible 11 horas
MP (Medium Play) Muy buena 17 horas
SP (Standard Play) Buena 34 horas
LP (Long Play) Para grabaciones lar-
Conmute el aparato al modo de reposo y pulse la tecla MODE hasta
que aparezca SET" en la pantalla.
Seleccione la calidad deseada con
la tecla AVANCE o RETROCESO.
Confirme el ajuste seleccionado
con la tecla REPRODUCCIÓN/INTERRUPCIÓN.
Calidad de grabación Máxima duración de
grabación
136 horas
gas
ES
87
Page 88

Manejo
Administrar mensajes
Este aparato ofrece 4 carpetas (A, B, C, D) para guardar los mensajes. Se
puede grabar un total de 396 mensajes o 136 horas en el modo LP (ver calidad de grabación, página 87). La capacidad de cada carpeta es de 99 mensajes. Proceda como sigue para seleccionar una carpeta:
Pulse la tecla FILE/REPEAT para
seleccionar la carpeta deseada o
el puesto de memoria deseado (A,
B, C, D). El número en la esquina
superior derecha de la pantalla
muestra el número total de mensajes grabados en la correspondiente carpeta. El tiempo en la
parte inferior de la pantalla indica
el tiempo de grabación total del mensaje seleccionado.
Advertencia: cada vez que se graba un mensaje, el aparato genera un
número correlativo, comenzando por 1. Cuando la memoria está llena, la
pantalla muestra ’’FULL’’. En la página 94 se le informa sobre cómo borrar
mensajes.
Sensibilidad de grabación
Mantenga pulsada la tecla MODE
hasta que aparezca SET" en la
pantalla para ajustar la sensibilidad de grabación. Pulse la tecla
ARRIBA o ABAJO hasta que aparezca MIC:LO/HI en la pantalla.
ES
Ajuste la función a LO con la tecla
AVANCE o RETROCESO cuando quiera grabar ruidos que se encuentren
muy cerca del micrófono. Cuando grabe ruidos que se encuentran más alejados, ajuste la función a HI con la tecla AVANCE o RETROCESO. Confirme
los ajustes con la tecla REPRODUCCIÓN/INTERRUPCIÓN.
36
A
B
C
D
88
Page 89

Función HOLD (bloqueo de teclas)
Desplace el regulador HOLD hacia
arriba (a la derecha) para desactivar
todas las teclas. En la pantalla aparece el símbolo de un candado.
Vuelva a desplazar el regulador
HOLD a su posición anterior para
activar las teclas.
Advertencia: también es posible apagar el aparato con la función HOLD activada.
HOLDHOLD
Volumen
Gire la ruleta de volumen en el
sentido deseado para subir o bajar
el volumen de la emisión de ruido.
37
Función de tarjeta de memoria
El aparato puede alojar una tarjeta
de memoria (SD o SDHC). Pulse
la tecla MODE hasta que aparezca
SET en la pantalla. Pulsa tecla ABAJO 3x hasta que aparezca el
símbolo de la tarjeta de memoria.
Tiene la posibilidad de activar o
desactivar esta función con la tecla
AVANCE o RETROCESO (ON/
OFF).
Confirme el ajuste seleccionado
con la tecla REPRODUCCIÓN/INTERRUPCIÓN.
VOLVOL
Manejo
ES
89
Page 90

Manejo
Activar/desactivar VOX (detección de voz)
Mantenga pulsada la tecla MODE
hasta que aparezca SET para activar/desactivar VOX". Pulse la tecla ARRIBA o ABAJO hasta que
aparezca VOX" en la pantalla. La
tecla AVANCE o RETROCESO
permite activar o desactivar la función VOX". Confirme su selección con la tecla REPRODUCCIÓN/INTERRUPCIÓN.
Grabación
38
El aparato está equipado con una detección de voz automática (VOX) (ver
grabación controlada por voz, página 91). Si la función VOX" está desactivada (ver arriba), pueden efectuarse grabaciones normales.
Ponga el aparato en el modo de
reposo y seleccione la calidad de
grabación deseada (ver calidad de
grabación, página 87).
Selecciona una carpeta o un puesto de memoria pulsando la tecla
FILE/REPEAT (ver administrar
mensajes, página 88).
A
B
C
D
ES
90
Si durante la grabación se sacan las pilas, la grabación se
interrumpirá. La grabación actual puede dañarse o borrarse. El
dictáfono necesita algunos minutos para restablecer el servicio nor-
mal. Durante esta fase se visualiza ......" en la pantalla.
Se recomienda guardar las grabaciones en un PC o en soportes de
datos externos.
Page 91

Pulse la tecla GRABACIÓN/PARADA mientras se encuentra en el
A
modo de reposo. El LED se ilumina en rojo y aparece el tiempo
que está transcurriendo. Hable a
través del micrófono integrado o
conecte un micrófono externo a la
hembrilla MIC y hable con un volumen normal. Vuelva a pulsar la tecla GRABACIÓN/PARADA para finalizar la grabación.
Pulse la tecla REPRODUCCIÓN/
INTERRUPCIÓN para visualizar el
A
tiempo restante durante la grabación. En la pantalla aparece RE-
REMAIN
MAIN" y se visualiza el tiempo restante.
Grabación controlada por voz (VOX)
39
Cuando está activada la función VOX", el aparato sólo graba cuando usted
está hablando. Cuando hace una pausa, el aparato interrumpe la grabación y
sólo la continúa cuando usted siga hablando.
La función "VOX" debe estar activada (ver activar/desactivar VOX,
página 90). Conecte el aparato y
seleccione la calidad de grabación
deseada (ver calidad de grabación, página 87).
Mientras se encuentra en el modo
de reposo, seleccione una carpeta
(A, B, C, D) con la tecla FILE/REPEAT en la que se debe guardar el
mensaje.
A
B
C
D
Manejo
ES
91
Page 92

Manejo
Después de pulsar la tecla GRABACIÓN/PARADA aparecerán en
la pantalla el símbolo de grabación
y la indicación de tiempo para la
grabación actual. Los LED se iluminan en rojo. Hable a través del
micrófono integrado o conecte un
micrófono externo a la hembrilla MIC. El aparato inicia la grabación en
cuanto usted comience a hablar. Cuando el aparato interrumpe la grabación,
parpadea el LED del aparato hasta que la grabación continúe. Pulse la tecla
GRABACIÓN/PARADA para finalizar la grabación.
Advertencias:
Los primeros ruidos sirven para activar la grabadora, por lo que es
posible que no sean grabados.
Un cambio del volumen de la voz no significa que el aparato interrumpa
la grabación.
La grabación se interrumpe al cabo de un silencio de 2 segundos.
Grabación continua, ver la página 90.
Con un volumen normal (hablar) resulta adecuada una distancia de unos
10 cm.
Reproducir mensajes
Conecte el aparato, cambie al
modo de reposo, pulse la tecla
FILE/REPEAT y seleccione una
carpeta (A, B, C, D).
ES
A
B
C
D
92
Pulse la tecla ARRIBA
ABAJO para seleccionar el mensaje deseado. En la pantalla se
muestra el número y la duración
del mensaje.
Page 93

Pulse la tecla REPRODUCCIÓN/INTERRUPCIÓN para reproducir el
A
mensaje actual. Pulse la tecla GRABACIÓN/INTERRUPCIÓN durante
la reproducción para comprobar la
hora y la fecha de la grabación. Durante la reproducción puede detener
y continuar la reproducción pulsando la tecla ERASE/PAUSE. El mensaje no se
borrará.
Pulse la tecla AVANCE o RETROCESO para activar el avance o el retroceso durante la reproducción actual. La reproducción se inicia
entonces con 10 segundos. Pulsar la
tecla REPRODUCCIÓN/INTERRUPCIÓN en el momento deseado.
Repetir mensaje(s)
Si desea repetir uno o todos los
mensajes, mantenga pulsada la tecla FILE/REPEAT durante la reproducción de un mensaje hasta que
aparezca REPEAT" (un mensaje)
en la pantalla. Vuelva a mantener
pulsada la tecla FILE/REPEAT hasta que aparezca REPEAT ALL" (repetir todos los mensajes). El aparato repite uno o todos los mensajes de la carpeta mostrada. Mantenga pulsada la
tecla FILE/REPEAT para desactivar la repetición.
B
REPEAT ALL
Manejo
ES
93
Page 94

Manejo
Repetir mensajes (extracto)
Pulse una vez la tecla FILE/REPEAT
durante la reproducción para escuchar una determinada parte de un
mensaje. En la pantalla aparece una
A" para indicar que se ha marcado
el punto de inicio. Vuelva a pulsar la
tecla FILE/REPEAT en el punto deseado de la reproducción. En la pantalla aparece una b" para indicar que se ha
marcado el punto final.
Cancelar la repetición
Pulse la tecla REPRODUCCIÓN/INTERRUPCIÓN para cancelar la repetición.
Cancelar la reproducción
Pulse la tecla ERASE/PAUSE para
cancelar la reproducción. En la
pantalla aparece PAUSE". Vuelve
a pulsar la tecla ERASE/PAUSE
para continuar con la reproducción. El mensaje no se borrará.
Borrar mensaje
40
Pulse la tecla ERASE/PAUSE para
seleccionar el mensaje a borrar. En
la pantalla aparece DEL" y se re-
ES
produce el mensaje. Vuelva a pulsar
la tecla ERASE/PAUSE durante la
reproducción para borrar el mensaje.
B
94
Page 95

Borrar todos los mensajes
Seleccione la carpeta que desea
41
borrar (A, B, C, D) y mantenga pulsada la tecla ERASE/PAUSE hasta
que aparezca No dEL ALL" en la
pantalla. Pulse la tecla ARRIBA
ABAJO hasta que aparezca YES"
en la pantalla. Pulse la tecla REPRODUCCIÓN/INTERRUPCIÓN
para borrar todos los mensajes en
la carpeta seleccionada.
Advertencia: no se puede deshacer el borrado de mensajes.
Editar mensajes (dividir)
Seleccione la carpeta deseada y
mantenga pulsada primero la tecla
ABAJO (1) hasta que aparezca
"Edt" en la pantalla. Seleccione un
mensaje. Pulse la tecla REPRODUCCIÓN/INTERRUPCIÓN (2)
para reproducir el mensaje.
Pulse en cualquier momento la tecla FILE/REPEAT (3) para insertar
el corte. El mensaje se divide en
este punto.
Pulse la tecla REPRODUCCIÓN/
INTERRUPCIÓN (2) para confirmar su acción. Se han generado
dos mensajes en base a un mensaje disponible.
3
Manejo
2
1
4
B
ES
95
Page 96

Manejo
Editar mensajes (cortar)
Seleccione la carpeta deseada. Pulse y mantenga pulsada la tecla ABAJO (1) hasta que aparezca Edt" en la pantalla. Seleccione un mensaje y
pulse la tecla REPRODUCCIÓN/INTERRUPCIÓN (2) para reproducir el
mensaje.
Pulse la tecla ERASE/PAUSE (4) durante la reproducción para definir el
punto de inicio. En la pantalla aparece A St". Pulse la tecla ERASE/
PAUSE (4) para definir el punto final. En la pantalla aparece bEd". Pulse la
tecla REPRODUCCIÓN/INTERRUPCIÓN (2) para confirmar la acción. Se
corta el mensaje entre el punto de inicio y el punto final.
Formatear el aparato (borrar TODO)
Mantenga pulsada la tecla MODE
hasta que aparezca SET" en la
pantalla. Pulse la tecla ABAJO hasta que aparezca FoR" en la pantalla.
Utilice la tecla AVANCE
o RETROCESO para seleccionar
’’Yes’’. A continuación pulse y
mantenga pulsada la tecla REPRODUCCIÓN/INTERRUPCIÓN.
Se borrarán todos los datos y men-
ES
sajes en el aparato.
Advertencia: seleccione No" si no desea formatear el aparato.
Advertencia: no se puede deshacer el proceso de formatear del aparato.
Advertencia: el proceso de formatear dura unos 20 segundos. Todas las te-
clas están sin función durante este tiempo.
Advertencia: no se puede deshacer el borrado de los datos.
96
Page 97

7 Datos técnicos
Datos técnicos
Datos técnicos
Tipo de memoria Memoria flash integrada de 512 MB,
posibilidad de utilizar tarjetas de me-
moria SD y SDHC (hasta 8 GB)
Máxima duración de grabación 136 horas en el modo LP
Altavoz 0,2 W (8 ohmios)
Potencia de salida 100 mW
Fuente de corriente 3 V, 2 pilas AAA
Tiempo de funcionamiento 15 horas de grabación
12 horas de reproducción con
medio volumen
Dimensiones 115 (altura) x 40 (anchura) x 20
(fondo) mm
Peso (sin pilas) 50 g
USB 2.0
Las grabaciones se guardan como archivos *.mp3. El cable USB permite conectar el aparato a un ordenador para guardar, editar, comprimir, etc. las grabaciones.
Un software adecuado puede descargarse en Internet.
Olympia no asume ninguna garantía para programas de otros fabricantes.
ES
97
Page 98

Inhoudsopgave
1 Veiligheidinstructies 99. . . . . . . . . . . . . . . . . . . . . . . . . . . . . . . . . . . .
Bedoeld gebruik 99. . . . . . . . . . . . . . . . . . . . . . . . . . . . . . . . . . . . . . . . . . . . . . . . .
Gebruik onder extreme omstandigheden 99. . . . . . . . . . . . . . . . . . . . . . . . . . . . . . . .
Batterijen 99. . . . . . . . . . . . . . . . . . . . . . . . . . . . . . . . . . . . . . . . . . . . . . . . . . . . . .
Oplaadbare accu’s 99. . . . . . . . . . . . . . . . . . . . . . . . . . . . . . . . . . . . . . . . . . . . . . .
Medische apparatuur 99. . . . . . . . . . . . . . . . . . . . . . . . . . . . . . . . . . . . . . . . . . . . .
Milieuverantwoord afvoeren 100. . . . . . . . . . . . . . . . . . . . . . . . . . . . . . . . . . . . . . . . .
2 Informatie op het display 101. . . . . . . . . . . . . . . . . . . . . . . . . . . . . . .
3 Bedieningselementen 102. . . . . . . . . . . . . . . . . . . . . . . . . . . . . . . . . .
4 In gebruik nemen 103. . . . . . . . . . . . . . . . . . . . . . . . . . . . . . . . . . . . .
Batterijen plaatsen 103. . . . . . . . . . . . . . . . . . . . . . . . . . . . . . . . . . . . . . . . . . . . . . .
Microfoon 103. . . . . . . . . . . . . . . . . . . . . . . . . . . . . . . . . . . . . . . . . . . . . . . . . . . . .
Hoofdtelefoon 103. . . . . . . . . . . . . . . . . . . . . . . . . . . . . . . . . . . . . . . . . . . . . . . . . .
5 Instellingen 104. . . . . . . . . . . . . . . . . . . . . . . . . . . . . . . . . . . . . . . . .
Datum en tijd instellen 104. . . . . . . . . . . . . . . . . . . . . . . . . . . . . . . . . . . . . . . . . . . . .
Apparaat inschakelen (TIME−modus) 105. . . . . . . . . . . . . . . . . . . . . . . . . . . . . . . . . .
Apparaat uitschakelen 105. . . . . . . . . . . . . . . . . . . . . . . . . . . . . . . . . . . . . . . . . . . . .
Modi 105. . . . . . . . . . . . . . . . . . . . . . . . . . . . . . . . . . . . . . . . . . . . . . . . . . . . . . . . .
6 Bediening 106. . . . . . . . . . . . . . . . . . . . . . . . . . . . . . . . . . . . . . . . . . .
Opnamekwaliteit 106. . . . . . . . . . . . . . . . . . . . . . . . . . . . . . . . . . . . . . . . . . . . . . . . .
Berichten beheren 107. . . . . . . . . . . . . . . . . . . . . . . . . . . . . . . . . . . . . . . . . . . . . . .
Opnamegevoeligheid 107. . . . . . . . . . . . . . . . . . . . . . . . . . . . . . . . . . . . . . . . . . . . .
Hold−functie (toetsenblokkering) 108. . . . . . . . . . . . . . . . . . . . . . . . . . . . . . . . . . . . . .
Volume 108. . . . . . . . . . . . . . . . . . . . . . . . . . . . . . . . . . . . . . . . . . . . . . . . . . . . . . .
Geheugenkaartfunctie 108. . . . . . . . . . . . . . . . . . . . . . . . . . . . . . . . . . . . . . . . . . . . .
VOX (spraakherkenning) inschakelen/uitschakelen 109. . . . . . . . . . . . . . . . . . . . . . . . .
Opnemen 109. . . . . . . . . . . . . . . . . . . . . . . . . . . . . . . . . . . . . . . . . . . . . . . . . . . . .
Spraakgestuurde opname (VOX) 110. . . . . . . . . . . . . . . . . . . . . . . . . . . . . . . . . . . . .
Berichten afspelen 111. . . . . . . . . . . . . . . . . . . . . . . . . . . . . . . . . . . . . . . . . . . . . . .
Bericht(en) herhalen 112. . . . . . . . . . . . . . . . . . . . . . . . . . . . . . . . . . . . . . . . . . . . . .
Berichten herhalen (fragment) 113. . . . . . . . . . . . . . . . . . . . . . . . . . . . . . . . . . . . . . .
Herhalen afbreken 113. . . . . . . . . . . . . . . . . . . . . . . . . . . . . . . . . . . . . . . . . . . . . . .
Weergave onderbreken 113. . . . . . . . . . . . . . . . . . . . . . . . . . . . . . . . . . . . . . . . . . . .
Bericht wissen 113. . . . . . . . . . . . . . . . . . . . . . . . . . . . . . . . . . . . . . . . . . . . . . . . . .
NL
Alle berichten wissen 114. . . . . . . . . . . . . . . . . . . . . . . . . . . . . . . . . . . . . . . . . . . . .
Berichten bewerken (splitsen) 114. . . . . . . . . . . . . . . . . . . . . . . . . . . . . . . . . . . . . . .
Berichten bewerken (knippen) 115. . . . . . . . . . . . . . . . . . . . . . . . . . . . . . . . . . . . . . .
Apparaat formatteren (ALLES wissen) 115. . . . . . . . . . . . . . . . . . . . . . . . . . . . . . . . .
7 Technische gegevens 116. . . . . . . . . . . . . . . . . . . . . . . . . . . . . . . . . .
Technische gegevens 116. . . . . . . . . . . . . . . . . . . . . . . . . . . . . . . . . . . . . . . . . . . . .
98
Page 99

Veiligheidinstructies
1 Veiligheidinstructies
Lees deze gebruiksaanwijzing aandachtig door.
Bedoeld gebruik
Dit dicteerapparaat is geschikt voor het opnemen van alle soorten spraak.
Elk ander gebruik is in strijd met de voorschriften. Houd er rekening mee dat
het overnemen van opgenomen berichten zonder toestemming, behalve voor
privé doeleinden, verboden is. Gebruik het apparaat nooit gedurende het besturen van een auto, motor, enzovoort; de kans op ongevallen door afleiding
neemt toe. Eigenmachtige wijzigingen of ombouw zijn niet toegestaan. Open
het apparaat in geen geval zelf en probeer het niet zelf te repareren.
Gebruik onder extreme omstandigheden
Voorkom belastingen door rook, stof, schokken, chemicaliën, vocht, hitte of
directe zonnestraling.
Batterijen
Let op: Het apparaat werkt alleen op batterijen. Elke ander type
voeding is verboden.
Oplaadbare accu’s
Let op bij gebruik van accu’s: Gooi accu’s nooit in het vuur.
Gebruik alleen accu’s van hetzelfde type! Let op de juiste aansluiting van de polen! Als de accu’s verkeerd worden geplaatst,
bestaat bij het opladen explosiegevaar.
Medische apparatuur
Let op: Gebruik het dicteerapparaat niet in de buurt van medi-
sche apparaten. Beïnvloeding kan niet volledig worden uitgesloten.
NL
99
Page 100

Veiligheidinstructies
Milieuverantwoord afvoeren
Als u het apparaat wilt afvoeren, brengt u het naar een inzamelingspunt in uw gemeente. Het nevenstaande pictogram betekent dat u
het apparaat in geen geval bij het huisvuil mag gooien! Volgens de
wet op elektrische en elektronische apparaten zijn eigenaars van
oude apparaten verplicht om oude elektrische en elektronische
apparaten naar een gescheiden afvalinzameling te brengen.Verpakkingsmaterialen voert u af volgens de lokale voorschriften.
Gooi accu’s/batterijen niet bij het huisvuil. Op diverse plaatsen (su-
permarkt, winkel in elektrische apparatuur) staan speciale bakken
om batterijen op de juiste manier af te voeren.
NL
100
 Loading...