

Page 1
April 16/2019
Assembly Instructions for Automatic Watering System
(To Be Added to your Garden in a Box Kit)
You will need the following items to complete the assembly:
1) Pliers
2) Pencil
3) 3/4” Spade Bit (See Step 3)
4) Screw Driver / Screw Gun with square bit.
5) 2 AA batteries
Note - The irrigation system works best if the psi is between 10 and 80. If the psi is greater than 80, then a
pressure regulator (not included) should be installed before connecting the water source to the garden.
Preparation
Remove the timer, connected fittings and all other parts from the box and review the timer instructions.
Page 2
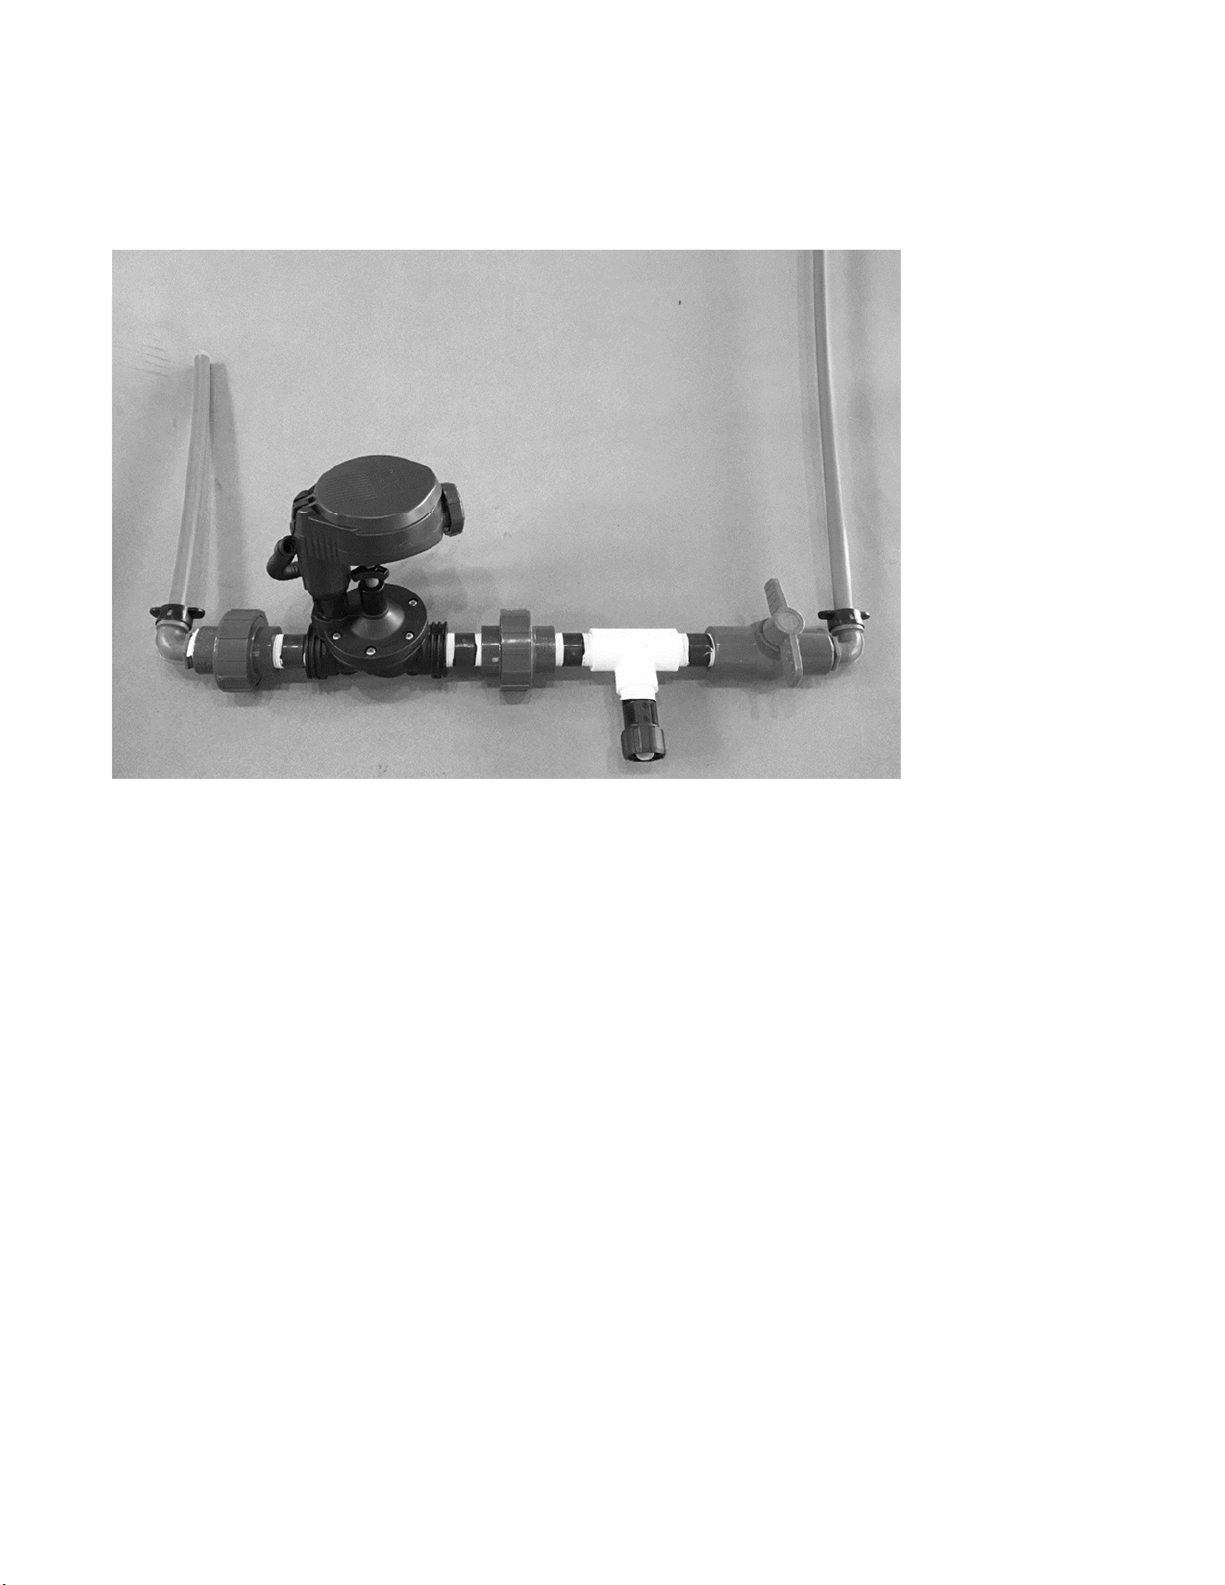
Step 1 - Locate the two pieces of tubing. Connect the 4” piece to the blue fitting on the left by firmly pressing
the tubing into the blue fitting. Connect the 48” piece of blue tubing into the blue fitting that is on the right, by
the shut-off valve, again firmly pressing the tubing into the blue fitting.
Step 2 - The timer assembly can be attached to either the right or left side of your garden structure. The coil
hose will be mounted near the top of the raised bed, inside the walkway. It will be necessary to drill three holes
through the lumber in order to install the automatic watering system. See Page 3 illustrations indicating where
holes need to be drilled.
2
Page 3
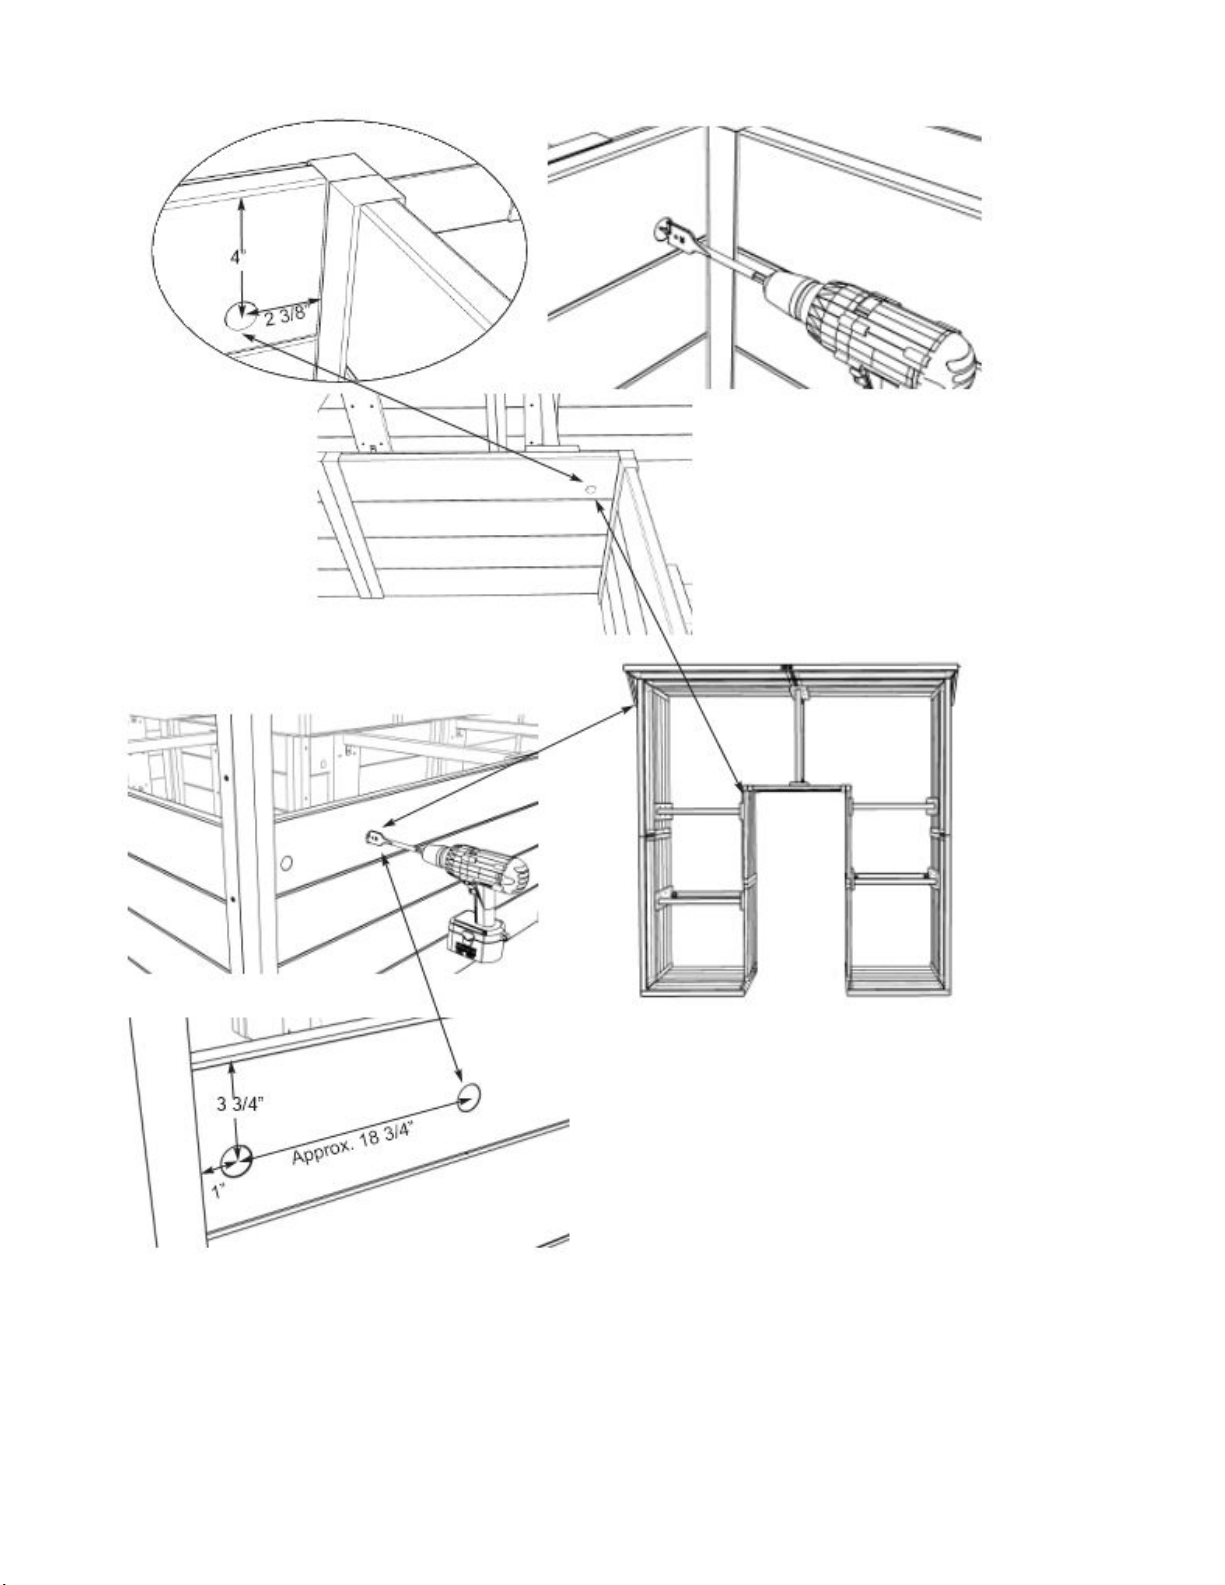
Step 3 – Start with the interior panel first, with a ¾” Space Bit, drill 4” down and 2 3/8” from the end.
Now drill the outside panel holes following the illustration above. One hole will be drilled 1” from the inside of
the 2x2 frame and second is approximately 18 ¾” from that mark. Hole location is important so mark holes first
with a pencil and then hold the timer assembly up to confirm.
3
Page 4
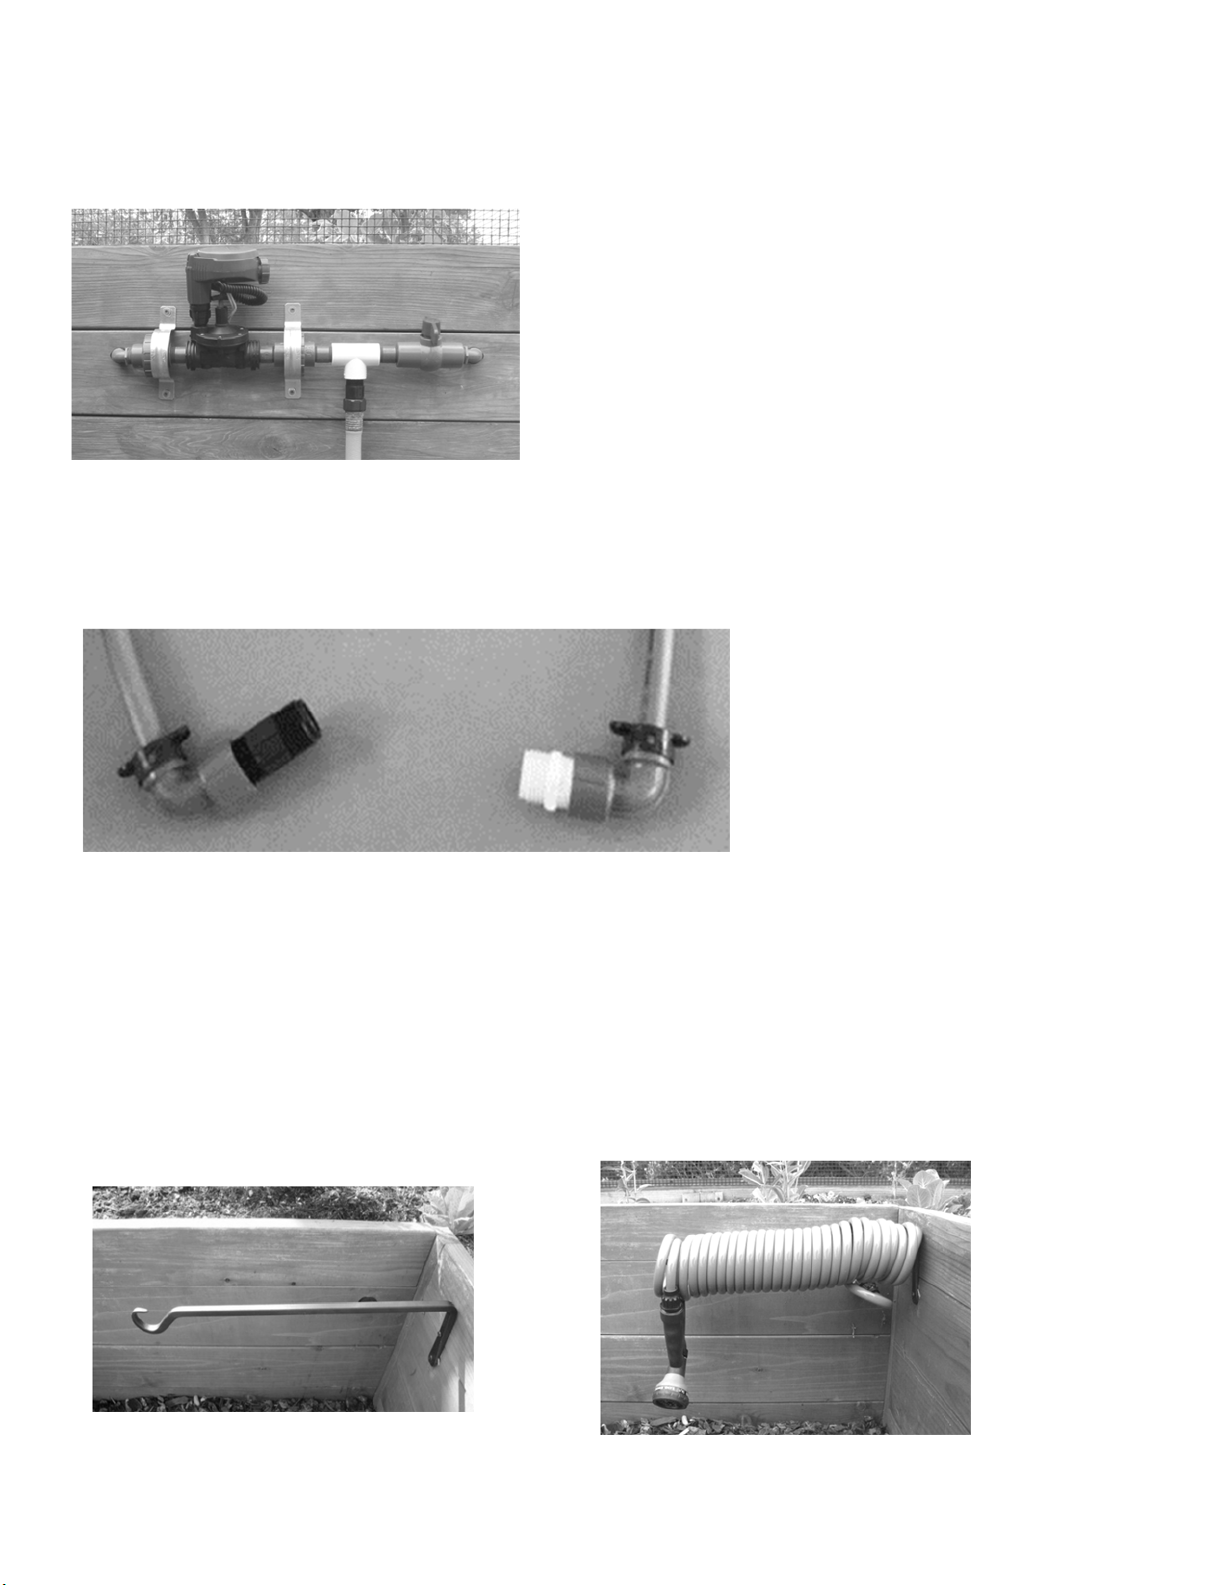
Step 4 - Put the tubing through the circular holes on the outside panel. Locate the two straps and place them
around the unions. Use the straps with washers and 1-1/4” screws to secure the irrigation unit to the outside
of the garden structure. Don’t overtighten!
Step 5 – The long hose will feed through the other ¾” hole on the inside panel. Long hose may need to be cut
shorter so it extends 1” past inside panel. Attach 90 degree elbow with hose nipple to each blue hose end on
the inside. See picture below.
Step 6 – Next attach the hose holder at the location shown in picture below.
Standing inside the garden, measure 6" down and 6" from the end of the applicable board and mark the spot.
Attach the hose holder to the board just marked.
Place the coil hose around the hose holder. Then connect the female end of the coil hose to the black hose
adaptor that is attached to the 48” piece of tubing. Attach the vegetable sprayer to the male end of the coil
hose.
4
Page 5
Step 7 - Place two AA batteries (not included) in the controller and set the controller according to the
manufacturer’s instructions. We recommend watering the garden twice a day for 2 - 4 minutes each time.
Connect a garden hose to the garden hose adaptor at the T-fitting to test the system. Twist the shut off valve
open to flush out any rocks or debris that might have gotten into the pipes. Briefly turn the water on from the
water source to make sure there are no leaks. Then, close the shut off valve. Turn the water on again from
the water source and press the manual system button on the controller to make sure water comes out of the
blue fitting with the 4” tubing. Correct any leaks by tightening fittings as necessary, before moving on to the
next step. The shut off valve should remain in the closed position except while the coil hose is being
used.
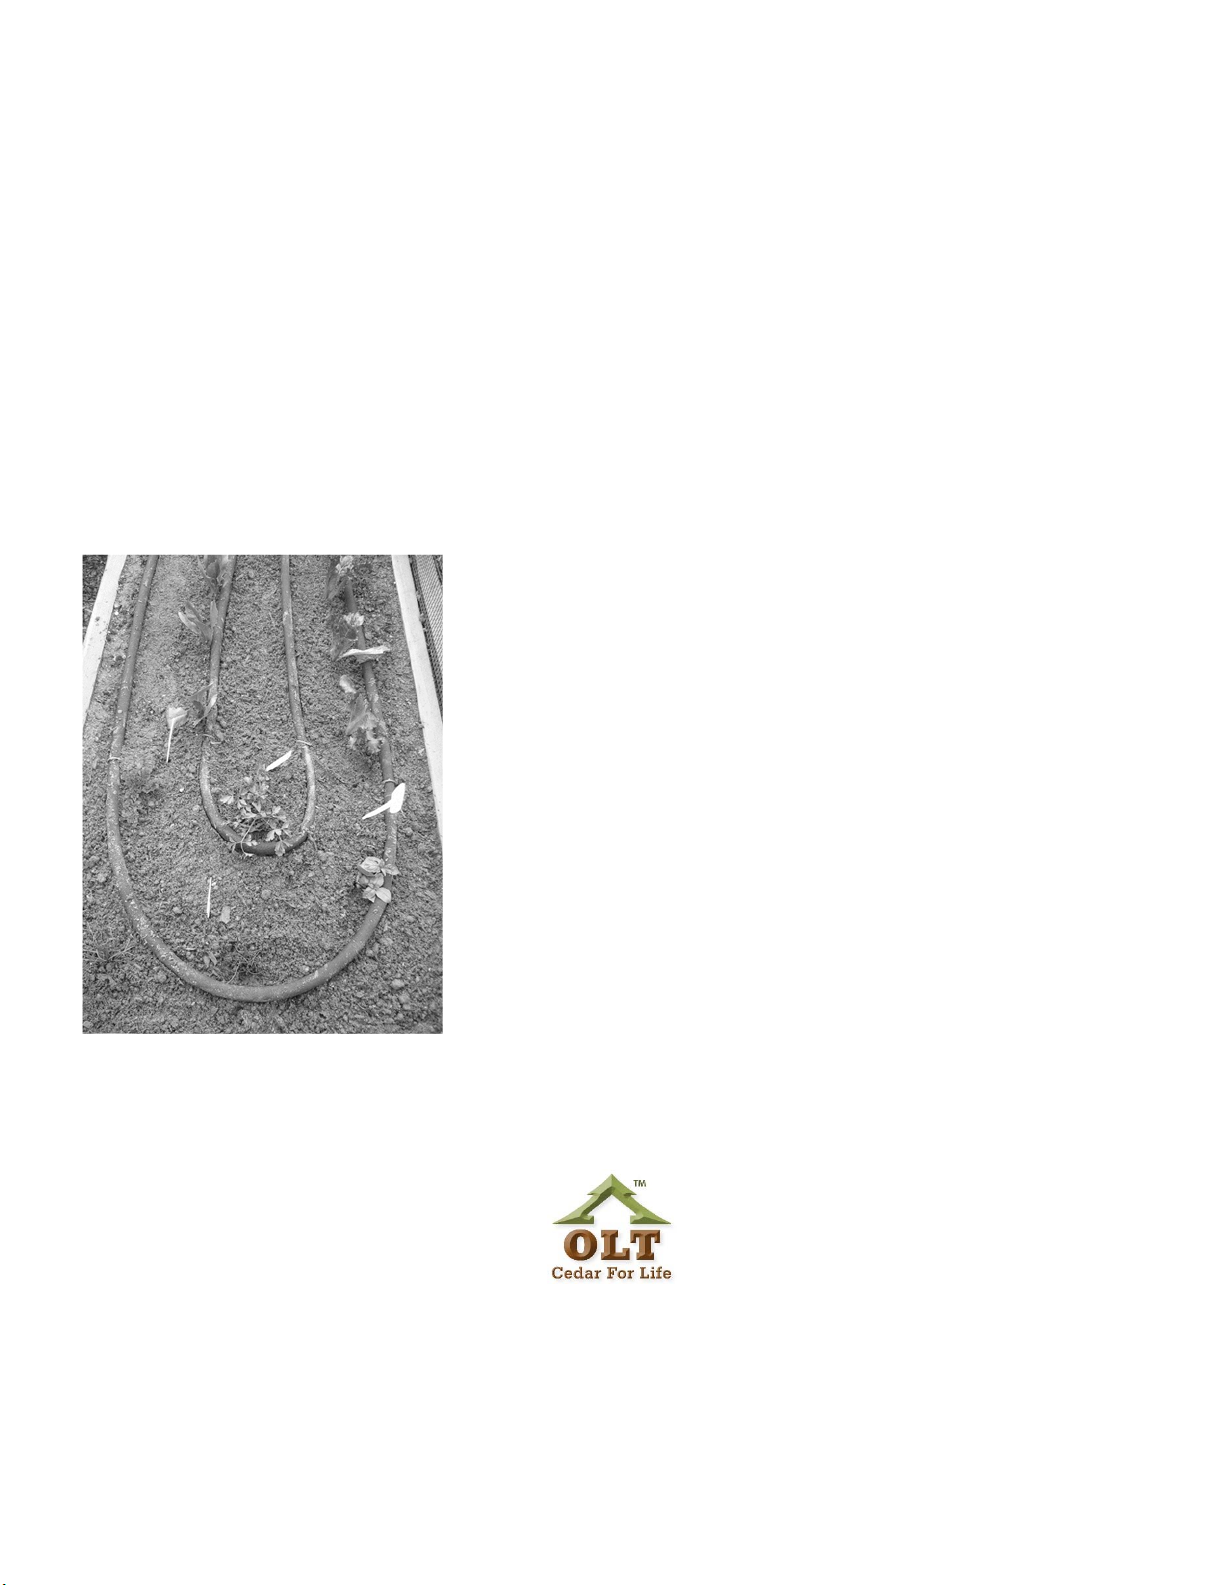
Step 8 - After the garden bed has been filled with soil, unwind the soaker hose. Then, attach one end to the
soaker hose adaptor to the 90 degree elbow. Place the soaker hose on top of the soil so that it winds through
the garden beds. Use the earth staples to hold the hose in place. Plant vegetables close to the soaker hose to
ensure they will receive adequate water. Enjoy your garden!
The soaker hose is ideal for the 8x12 model. The hose can be cut shorter for the 8x8 model if needed.
Outdoor Living Manufacturing Ltd.
9393 -287
Maple Ridge, British Columbia
Tel: (888) 658-1658 www.outdoorlivingtoday.com
th
Street
V2W 1L1
5
Page 6

ONE YEAR PRO-RATED LIMITED WARRANTY AND TERMS AND CONDITIONS
1. LIMITED WARRANTY & REMEDIES
1.1 LIMITED WARRANTY. For a period of one year from the date of purchase, Outdoor Living Manufacturing
Ltd. (OLM Ltd.) warrants the Garden Product against defects in materials or workmanship, which occur during
normal use. During the warranty period, OLM Ltd. will replace or repair any defective materials. This warranty
excludes all cosmetic damage and other damage caused by accident, misuse, abuse or other causes not
arising out of defects in materials or workmanship. This warranty is extended only to the original purchaser.
1.2 NO OTHER WARRANTIES. Except as set forth above, Purchaser accepts the Garden Product WITHOUT
RECOURSE AND WITHOUT ANY FURTHER WARRANTIES, EXPRESS OR IMPLIED, AS TO THE VALUE,
DESIGN, CONDITION, MERCHANTABILITY, OR FITNESS FOR A PARTICULAR PURPOSE.
1.3 DAMAGES FOR BREACH BY OLM Ltd. If OLM Ltd. is found liable for breach of this Limited Warranty, the
maximum damages for which OLM Ltd. may be liable is the amount of money paid by Purchaser. OLM Ltd. will
not be liable for incidental or consequential damages, expenses, lost profits, lost savings or other damages
arising out of the sale of the Garden Product sold to Purchaser.
2. JURISDICTION/GOVERNING LAW. In the event of a dispute relating to or arising out of the Garden
Product, the laws of the Province of British Columbia shall apply and jurisdiction shall be in Maple Ridge,
British Columbia.
Packing List
(1) Coil hose
(1) Sprayer
(1) Hose holder
(1) 75’ soaker hose (8’x12’ kit) or (1) 50’ soaker hose (for 8’x8’ kit).
(30) Earth staples (8’x12’ kit) or (20) earth staples (for 8’x8’ kit)
(2) 2.5” straps with (4) washers and (4) screws
(1) Controller
(1) Blue tubing 4”
(1) Blue tubing 48”
(2) 90 degree elbows.
6
 Loading...