


d-Copia 3501 / 3501MF d-Copia 4501 / 4501MF
Operation Manual
Be sure to become thoroughly familiar with this manual to gain the maximum benefit from the product. Before installing this product, be sure to read the installation requirements and cautions sections.
Be sure to keep all operation manuals handy for reference including this manual, the "Operation manual (for general information and copier operation)" and operation manuals for any optional equipment which has been installed.

PUBLICATION ISSUED BY:
Olivetti S.p.A.
Gruppo Telecom Italia
Via Jervis, 77 - 10015 Ivrea (ITALY) www.olivetti.com
Copyright © 2006, Olivetti
All rights reserved
The mark affixed to the product certifies that the product satisfies the basic quality requirements.
The manufacturer reserves the right to carry out modifications to the product described in this manual at any time and without any notice.
ENERGY STAR is a U.S. registered mark.
The ENERGY STAR program is an energy reduction plan introduced by the United States Environmental Protection Agency in response to environmental issues and for the purpose of advancing the development and utilization of more energy efficient office equipment.
Your attention is drawn to the following actions which could compromise the conformity attested to above, as well as the characteristics of the product:
•incorrect electrical power supply;
•incorrect installation, incorrect or improper use or use not in compliance with the warnings provided in the User’s Manual supplied with the product;
•replacement of original components or accessories with others of a type not approved by the manufacturer, or performed by unauthorised personnel.
All rights reserved. No part of this material may be reproduced or transmitted in any form or by any means, electronic or mechanical, including photocopying, recording or by any information storage and retrieval system, without permission in writing from the Publisher.

In some areas, the "POWER" switch positions are marked "I" and " " on the copier instead of "ON" and "OFF".
The symbol " " denotes the copier is not completely de-energized but in a stand-by condition at this "POWER" switch position.
If your copier is so marked, please read "I" for "ON" and " " for "OFF".
Caution!
For a complete electrical disconnection, pull out the main plug.
The socket-outlet shall be installed near the equipment and shall be easily accessible.
|
|||||||||||||
|
|
|
|
|
|
|
|
|
|
|
|
|
|
|
Required in IEC-950 (EN 60 950) - Europe |
|
|
|
|
|
|||||||
|
|
|
|
|
|
|
|
||||||
|
|
• The equipment should be installed near an accessible socket outlet for easy disconnection. |
|
||||||||||
|
|
|
|
|
|
|
|
||||||
|
|
|
|
|
|
|
|
||||||
|
|
Required in Appendix ZB of BS 7002 (En 60 950) — United Kingdom |
|
||||||||||
|
|
|
MAINS PLUG WIRING INSTRUCTIONS |
|
|||||||||
|
|
The mains lead of this equipment is already fitted with a mains plug which is either a non-rewireable |
|
||||||||||
|
|
(moulded) or a rewireable type. Should the fuse need to be replaced, a BSI or ASTA approved fuse |
|
||||||||||
|
|
to BS1362 marked |
or |
|
|
|
and of the same rating as the one removed from the plug must |
|
|||||
|
|
|
|
|
|||||||||
|
|
be used. |
|
|
|
|
|
|
|
|
|
|
|
|
|
Always refit the fuse cover after replacing the fuse on the moulded plug. Never use the plug without |
|
||||||||||
|
|
the fuse cover fitted. |
|
|
|
|
|
|
|
|
|
|
|
|
|
In the unlikely event of the socket outlet in your home not being compatible with the plug supplied |
|
||||||||||
|
|
either cut-off the moulded plug (if this type is fitted) or remove by undoing the screws if a rewireable |
|
||||||||||
|
|
plug is fitted and fit an appropriate type observing the wiring code below. |
|
||||||||||
|
|
DANGER: The fuse should be removed from the cut-off plug and the plug destroyed immediately |
|
||||||||||
|
|
and disposed of in a safe manner. Under no circumstances should the cut-off plug be inserted |
|
||||||||||
|
|
elsewhere into a 13A socket outlet as a serious electric shock may occur. |
|
||||||||||
|
|
To fit an appropriate plug to the mains lead, follow the instructions below: |
|
||||||||||
|
|
IMPORTANT: The wires in this mains lead are coloured in accordance with the following code: |
|
||||||||||
|
|
|
|
GREEN-AND-YELLOW: Earth |
|
||||||||
|
|
|
|
BLUE: |
Neutral |
|
|||||||
|
|
|
|
BROWN: |
Live |
|
|||||||
|
|
As the colours of the wires in this mains lead may not correspond with coloured markings |
|
||||||||||
|
|
identifying the terminals in your plug, proceed as follows: |
|
||||||||||
|
|
The wire which is coloured GREEN-AND YELLOW must be connected to the terminal in the plug |
|
||||||||||
|
|
which is marked with the letter E, or by the safety earth symbol |
Å@ |
, or coloured green or green- |
|
||||||||
|
|
and-yellow. |
|
|
|
|
|
|
|
|
|
|
|
|
|
The wire which is coloured BLUE must be connected to the terminal which is marked with the letter |
|
||||||||||
|
|
N or coloured black. |
|
|
|
|
|
|
|
|
|
|
|
|
|
The wire which is coloured BROWN must be connected to the terminal which is marked with the |
|
||||||||||
|
|
letter L or coloured red. |
|
|
|
|
|
|
|
|
|
|
|
|
|
If you have any doubt, consult a qualified electrician. |
|
|
|
|
|
|
|||||
|
|
WARNING: THIS APPARATUS MUST BE EARTHED. |
|
|
|
|
|
|
|||||
|
|
|
|
|
|
|
|
||||||
|
|
||||||||||||
Warning:
This is a Class A product. In a domestic environment this product may cause radio interference in which case the user may be required to take adequate measures.
Warranty
While every effort has been made to make this document as accurate and helpful as possible, Olivetti S.p.A. makes
no warranty of any kind with regard to its content. All information included herein is subject to change without notice. Olivetti is not responsible for any loss or damages, direct or indirect, arising from or related to the use of this operation manual. © Copyright Olivetti S.p.A. 2006. All rights reserved. Reproduction, adaptation or translation without prior written permission is prohibited, except as allowed under copyright laws.

DIRECTIVE 2002/96/CE ON THE TREATMENT, COLLECTION, RECYCLING AND DISPOSAL OF ELECTRIC AND ELECTRONIC DEVICES AND THEIR COMPONENTS
INFORMATION
1. FOR COUNTRIES IN THE EUROPEAN UNION (EU)
The disposal of electric and electronic devices as solid urban waste is strictly prohibited: it must be collected separately.
The dumping of these devices at unequipped and unauthorized places may have hazardous effects on health and the environment.
Offenders will be subjected to the penalties and measures laid down by the law.
TO DISPOSE OF OUR DEVICES CORRECTLY:
a)Contact the Local Authorities, who will give you the practical information you need and the instructions for handling the waste correctly, for example: location and times of the waste collection centres, etc.
b)When you purchase a new device of ours, give a used device similar to the one purchased to our dealer for disposal.
The crossed dustbin symbol on the device means that:
- when it to be disposed of, the device is to be taken to the equipped waste collection centres and is to be handled separately from urban waste;
- The producer guarantees the activation of the treatment, collection, recycling and disposal procedures in accordance with Directive 2002/96/CE (and subsequent amendments).
2. FOR OTHER COUNTRIES (NOT IN THE EU)
The treatment, collection, recycling and disposal of electric and electronic devices will be carried out in accordance with the laws in force in the country in question.

Part 1: General Information


NOTES
●Considerable care has been taken in preparing this manual. If you have any comments or concerns about the manual, please contact your nearest Olivetti Service Department.
●This product has undergone strict quality control and inspection procedures. In the unlikely event that a defect or other problem is discovered, please contact your dealer or nearest Olivetti Service Department.
●Aside from instances provided for by law, Olivetti is not responsible for failures occurring during use of the product or its options, or failures due to incorrect operation of the product and its options, or other failures, or for any damage that occurs due to use of the product.
The display screens, messages, and key names shown in the manual may differ from those on the actual machine due to product improvements and modifications.
PRODUCT CONFIGURATIONS
The table below shows the product models covered by this manual.
(As of March 2006)
Model |
Product configuration |
|
|
Olivetti d-Copia 3501/d-Copia 3501MF |
Laser printer |
Olivetti d-Copia 4501/d-Copia 4501MF |
Laser printer |
|
|
OPERATION MANUALS
The following operation manuals are provided for the machine. Please read the appropriate manuals as needed for the features you wish to learn about.
● Operation manual (for general information and copier operation) (this manual):
The first half of this manual provides general information about the machine, including safety information, loading paper, removing misfeeds, and regular maintenance.
The second half of the manual explains how to use the copy and document filing functions. ● Key operator's guide:
This primarily explains key operator programs for machine management and copier related functions. Key operator programs for the fax, printer and network scanner functions are explained in the manuals for those functions.
Key operator programs are used by key operators to configure function settings to meet the needs of the customer.
● Operation manual (for facsimile)
This manual explains the procedures for using the machine as a facsimile. To use the fax function, the facsimile expansion kit must be installed.
● Software setup guide (for printer)
This explains how to connect the machine to your computer, install the printer driver for Windows, and configure the printer driver settings.
● Operation manual (for printer)*
This manual explains the procedures for using the machine as a printer. ● Operation manual (for network scanner)*
This manual explains the procedures for using the machine as a network scanner when connected to a computer. To use the network scanner function, the NS3 network scanner expansion kit must be installed.
*The operation manual (for printer) and the operation manual (for network scanner) are provided as PDF files in the CD-ROM.
This manual is not provided as printed manual.
0-1
INSTALLATION REQUIREMENTS
Improper installation may damage this product. Please note the following during initial installation and whenever the machine is moved.
1.The machine should be installed near an accessible power outlet for easy connection.
2.Be sure to connect the power cord only to a power outlet that meets the specified voltage and current requirements. Also make certain the outlet is properly grounded.
For the power supply requirements, see the name plate on the back of the main unit.
3.Do not install your machine in areas that are: damp, humid, or very dusty
exposed to direct sunlight poorly ventilated
subject to extreme temperature or humidity changes, e.g., near an air conditioner or heater.
4.Be sure to allow the required space around the machine for servicing and proper ventilation.
|
30cm |
(11-13/16") |
80cm |
|
60cm |
(31-1/2") |
|
(23-5/8") |
|
60cm |
(23-5/8") |
A small amount of ozone is produced within the machine during operation. The emission level is insufficient to cause any health hazard.
NOTE:
The present recommended long term exposure limit for ozone is 0.1 ppm (0.2 mg/m3) calculated as an 8 hr. timeweighted average concentration.
However, since the small amount that is emitted may have an objectionable odor, it is advisable to place the copier in a ventilated area.
0-2
CAUTIONS
1.Do not touch the photoconductive drum. Scratches or smudges on the drum will cause dirty prints.
2.The fusing unit is extremely hot. Exercise care in this area.
3.Do not look directly at the light source. Doing so may damage your
eyes.
Fusing unit
4.Five adjusters are provided on all optional stand/paper drawer units. These adjusters should be lowered until they contact the floor.
When moving the machine with the optional stand/paper drawer, be sure to raise the adjusters. Also, unlock the two casters at the front of the optional stand/paper drawer. After moving the machine, lower the four adjusters until they reach the floor and lock the two casters.
5.Do not make any modifications to this machine. Doing so may result in personal injury or damage to the machine.
6.Since this machine is heavy, it is recommended that it be moved by more than one person to prevent injury.
7.When connecting this machine to a computer, be sure to first turn both the computer and the machine off.
8.Do not make copies of anything which is prohibited from copying by law. The following items are normally prohibited from printing by national law. Other items may be prohibited by local law.
● Money ● Stamps ● Bonds ● Stocks
● Bank drafts ● Checks ● Passports ● Driver's licences
Adjuster
Lock 
 Release
The part indicated in the illustration is only to be handled by a service technician.
Absolutely do not touch this part.
Some models include the document filling function, which stores document image on the machine's hard disk. Stored documents can be called up and printed or transmitted as needed. If a hard disk failure occurs, it will no longer be possible to call up the stored document data. To prevent the loss of important documents in the unlikely event of a hard disk failure, keep the originals of important documents or store the original data elsewhere.
With the exception of instances provided for by law, Olivetti S.p.A.: bears no responsibility for any damages or loss due to the loss of stored document data.
"BATTERY DISPOSAL"
THIS PRODUCT CONTAINS A LITHIUM PRIMARY MEMORY BACK-UP BATTERY THAT MUST BE DISPOSED OF PROPERLY. PLEASE CONTACT YOUR LOCAL OLIVETTI DEALER OR AUTHORISED SERVICE REPRESENTATIVE FOR ASSISTANCE IN DISPOSING OF THIS BATTERY.
This product utilizes tin-lead solder, and a fluorescent lamp containing a small amount of mercury. Disposal of these materials may be regulated due to environmental considerations.
For disposal or recycling information, please contact your local authorities or the Electronics Industries Alliance: www.eia.org
0-3
CAUTIONS
Laser Information
Wave length |
785 nm |
+10 nm |
|
|
-15 nm |
|
|
|
|
|
|
|
|
|
|
Pulse times |
North America: |
35 cpm model: (4.1 µs ± 4.1 ns)/7 mm |
|
|
|
|
45 cpm model: (5.7 µs ± 5.7 ns)/7 mm |
|
Europe: |
|
35 cpm model: (3.8 µs ± 3.8 ns)/7 mm |
|
|
|
45 cpm model: (4.4 µs ± 4.4 ns)/7 mm |
|
|
|
|
Output power |
0.2 mW - 0.4 mW |
|
|
|
|
|
|
At the production line, the output power of the scanner unit is adjusted to 0.4 MILLIWATT PLUS 8 % and is maintained constant by the operation of the Automatic Power Control (APC).
Caution
Use of controls or adjustments or performance of procedures other than those specified herein may result in hazardous radiation exposure.
For North America:
SAFETY PRECAUTIONS
This Digital Equipment is rated Class 1 and complies with 21 CFR 1040.10 and 1040.11 of the CDRH standards. This means that the equipment does not produce hazardous laser radiation. For your safety, observe the precautions below.
Do not remove the cabinet, operation panel or any other covers.
The equipment's exterior covers contain several safety interlock switches. Do not bypass any safety interlock by inserting wedges or other items into switch slots.
For Europe:
CLASS 1 LASER PRODUCT
LASER KLASSE 1
LUOKAN 1 LASERLAITE
KLASS 1 LASERAPPARAT
CAUTION |
VAROITUS! |
|
INVISIBLE LASER RADIATION |
LAITTEEN KÄYTTÄMINEN |
|
WHEN OPEN INTERLOCKS |
MUULLA KUIN TÄSSÄ |
|
DEFEATED. AVOID EXPOSURE |
KÄYTTÖOHJEESSA |
|
TO BEAM. |
MAINITULLA TAVALLA SAATTAA |
|
VORSICHT |
ALTISTAA KÄYTTÄJÄN |
|
TURVALLISUUSLUOKAN 1 |
||
UNSICHTBARE |
||
YLITTÄVÄLLE |
||
LASERSTRAHLUNG WENN |
||
NÄKYMÄTTÖMÄLLE |
||
ABDECKUNG GEÖFFNET UND |
||
LASERSÄTEILYLLE. |
||
SICHERHEITSVERRIEGELUNG |
||
|
||
ÜBERBRÜCKT. NICHT DEM |
VARNING |
|
STRAHL AUSSETZEN. |
||
OM APPARATEN ANVÄNDS PÅ |
||
|
||
ADVARSEL |
ANNAT SÄTT ÄN I DENNA |
|
USYNLIG LASERSTRÅLNING |
BRUKSANVISNING |
|
VED ÅBNING, NÅR |
SPECIFICERATS, KAN |
|
SIKKERHEDSBRYDERE ER |
ANVÄNDAREN UTSÄTTAS FÖR |
|
UDE AF FUNKTION. UNDGÅ |
OSYNLIG LASERSTRÅLNING, |
|
UDSAETTELSE FOR |
SOM ÖVERSKRIDER GRÄNSEN |
|
STRÅLNING. |
FÖR LASERKLASS 1. |
|
|
|
CLASS 1
LASER PRODUCT
LASER KLASSE 1
|
|
|
|
|
|
|
|
CAUTION AVOID EXPOSURE TO BEAM. |
|
|||||
|
|
|
|
|
|
|
|
|
INVISIBLE LASER RADIATION WHEN OPEN AND INTERLOCKS DEFEATED. |
|
||||
|
|
|
|
|
|
|
|
VORSICHT |
UNSICHTBARE LASERSTRAHLUNG WENN ABDECKUNG GEÖFFNET UND |
|
||||
|
|
|
|
|
|
|
|
ADVARSEL |
SICHERHEITSVERRIEGELUNG ÜBERERÜCKT. NICHT DEM STRAHL AUSSETZEN. |
|
||||
|
|
|
|
|
|
|
|
UDE AF FUNKTION. UNDGÅ UDSAETTELSE FOR STRÅLNING. |
|
|||||
|
|
|
|
|
|
|
|
ADVERSEL |
USYNLIG LASERSTRÅLING VED ÅBNING, NÅR SIKKERHEDSAFBRYDERE ER |
|
||||
|
|
|
|
|
|
|
|
UNNGÅ EKSPONERING FOR STRÅLEN. |
|
|||||
|
|
|
|
|
|
|
|
|
|
USYNLIG LASERSTRÅLING NÅR DEKSEL ÅPNES OG SIKKERHEDSLÅS BRYTES. |
|
|||
|
|
|
|
|
|
|
|
|
OSYNLIG LASERSTRÅLNING NÄR DENNA DEL ÄR ÖPPNAD OCH SPÄRRAR ÄR |
|
||||
|
|
Laserstrahl |
|
|
|
|
VARNING URKOPPLADE. STRÅLEN ÄR FARLIG. BETRAKTA EJ STRÅLEN. |
|
||||||
|
|
|
|
|
|
VARO! |
AVATTAESSA JA SUOJALUKITUS OHITETTAESSA OLET ALTTIINA NÄKYMÄTÖNTÄ |
|
||||||
|
|
|
|
|
|
|
|
LASERSÄTEILYLLE. ÄLÄ KATSO SÄTEESEEN. |
|
|||||
|
|
|
|
|
|
|
|
|
|
|
|
|
|
|
|
|
|
|
|
|
|
|
|
|
|
|
|
|
|
|
|
|
|
|
|
|
|
|
|
|
|
|
|
|
|
|
|
|
|
|
|
|
|
|
|
|
|
|
|
|
|
|
|
|
|
|
|
|
|
|
|
|
|
|
|
|
|
|
|
|
|
|
|
|
|
|
|
|
|
|
|
|
|
|
|
|
|
|
|
|
|
|
|
|
0-4
CONTENTS
|
Page |
PRODUCT CONFIGURATIONS.................................. |
0-1 |
OPERATION MANUALS.............................................. |
0-1 |
INSTALLATION REQUIREMENTS.............................. |
0-2 |
CAUTIONS................................................................... |
0-3 |
Laser Information ................................................. |
0-4 |
CONTENTS ................................................................. |
0-5 |
CHAPTER 1
BEFORE USING THE PRODUCT
INTRODUCTION.......................................................... |
1-2 |
MAIN FEATURES ........................................................ |
1-3 |
PART NAMES AND FUNCTIONS ............................... |
1-9 |
Exterior................................................................. |
1-9 |
Interior .................................................................. |
1-10 |
Part names and functions of peripheral devices .. |
1-11 |
Operation panel.................................................... |
1-13 |
Touch panel ......................................................... |
1-14 |
TURNING THE POWER ON AND OFF....................... |
1-17 |
AUDITING MODE ........................................................ |
1-18 |
Using the machine when the auditing mode is |
|
enabled ................................................................ |
1-18 |
CHAPTER 2
MANAGING THE MACHINE
LOADING PAPER........................................................ |
2-2 |
Loading paper in paper tray 1 .............................. |
2-2 |
Changing the paper size in paper tray 1 .............. |
2-2 |
Specifications of paper trays ................................ |
2-3 |
Setting the paper type and paper size ................. |
2-5 |
Setting the paper size when a special size is |
|
loaded .................................................................. |
2-6 |
Programming and editing paper types ................. |
2-7 |
Loading paper in the multi purpose drawer.......... |
2-8 |
Specifications (multi purpose drawer) .................. |
2-10 |
Loading paper in the stand/3 x 500 sheet paper |
|
drawer .................................................................. |
2-10 |
Specifications (stand/3 x 500 sheet paper |
|
drawer) ................................................................. |
2-10 |
Loading paper in the stand/MPD & 2000 sheet |
|
paper drawer ........................................................ |
2-11 |
Specifications (stand/MPD & 2000 sheet paper |
|
drawer) ................................................................. |
2-11 |
CUSTOM SETTINGS................................................... |
2-13 |
General procedure for custom settings ................ |
2-13 |
About the settings ................................................ |
2-15 |
REPLACING THE TONER CARTRIDGE .................... |
2-16 |
STORAGE OF SUPPLIES ........................................... |
2-17 |
MISFEED REMOVAL................................................... |
2-18 |
Misfeed removal guidance ................................... |
2-18 |
Misfeed in the transport area, fusing area, and |
|
exit area ............................................................... |
2-19 |
Misfeed in the duplex module .............................. |
2-20 |
Misfeed in the paper feed area ............................ |
2-21 |
REMOVING AN ORIGINAL MISFEED ........................ |
2-23 |
Removing a misfed original from the automatic |
|
document feeder .................................................. |
2-23 |
TROUBLESHOOTING ................................................. |
2-24 |
CHAPTER 3 PERIPHERAL DEVICES
DUPLEX MODULE....................................................... |
3-2 |
Part names ........................................................... |
3-2 |
Specifications ....................................................... |
3-2 |
Loading paper in the bypass tray ......................... |
3-3 |
Troubleshooting (concerning the duplex module) .. |
3-4 |
MAIL-BIN STACKER .................................................... |
3-5 |
Part names ........................................................... |
3-5 |
Specifications ....................................................... |
3-5 |
Misfeed in the mail-bin stacker ............................. |
3-6 |
FINISHER..................................................................... |
3-7 |
Part names ........................................................... |
3-7 |
Specifications ....................................................... |
3-7 |
Finisher functions ................................................. |
3-8 |
Using the finisher functions .................................. |
3-9 |
Staple cartridge replacement................................ |
3-10 |
Misfeed in the finisher........................................... |
3-12 |
Troubleshooting finisher problems ....................... |
3-13 |
SADDLE STITCH FINISHER ....................................... |
3-14 |
Part names ........................................................... |
3-14 |
Specifications ....................................................... |
3-14 |
Saddle stitch finisher functions ............................. |
3-15 |
Using the saddle stitch finisher............................. |
3-18 |
Staple cartridge replacement and staple jam |
|
removal................................................................. |
3-19 |
Misfeed in the saddle stitch finisher...................... |
3-22 |
Troubleshooting (concerning the saddle stitch |
|
finisher)................................................................. |
3-24 |
CHAPTER 4
MAKING COPIES
AUTOMATIC DOCUMENT FEEDER ........................... |
4-2 |
Acceptable originals ............................................. |
4-2 |
PLACING ORIGINALS ................................................. |
4-3 |
CHECKING THE SIZE OF A PLACED ORIGINAL ...... |
4-5 |
Manually setting the scanning size....................... |
4-5 |
STORING, DELETING, AND USING ORIGINAL |
|
SIZES ........................................................................... |
4-6 |
Storing or deleting an original size ....................... |
4-6 |
NORMAL COPYING..................................................... |
4-7 |
Making copies with the automatic document |
|
feeder ................................................................... |
4-7 |
Automatic two-sided copying using the automatic |
|
document feeder................................................... |
4-10 |
Copying from the document glass ........................ |
4-11 |
Automatic two-sided copying from the document |
|
glass ..................................................................... |
4-13 |
ADJUSTING THE EXPOSURE .................................... |
4-14 |
REDUCTION/ENLARGEMENT/ZOOM ........................ |
4-15 |
Automatic selection (auto image) ......................... |
4-15 |
Manual selection (preset copy ratios/zoom) ......... |
4-16 |
XY ZOOM ............................................................. |
4-18 |
SPECIAL PAPERS....................................................... |
4-20 |
0-5

CONTENTS
CHAPTER 5
CONVENIENT COPY FUNCTIONS
SPECIAL MODES ........................................................ |
5-2 |
General procedure for using special functions ..... |
5-2 |
Margin shift ........................................................... |
5-3 |
Erase .................................................................... |
5-4 |
Dual page copy..................................................... |
5-5 |
Pamphlet copy...................................................... |
5-6 |
Job build ............................................................... |
5-8 |
Tandem copy........................................................ |
5-9 |
Covers/inserts....................................................... |
5-11 |
Transparency film with insert sheets .................... |
5-22 |
Multi shot .............................................................. |
5-23 |
Book copy............................................................. |
5-25 |
Card shot ................................................................. |
5-26 |
Mirror image ......................................................... |
5-28 |
B/W reverse.......................................................... |
5-28 |
Print menu ............................................................ |
5-29 |
STORING, USING AND DELETING JOB |
|
PROGRAMS ................................................................ |
5-41 |
Storing a job program ........................................... |
5-41 |
Calling up a job program ...................................... |
5-42 |
Deleting a stored job program .............................. |
5-42 |
INTERRUPTING A COPY RUN ................................... |
5-43 |
CHAPTER 6
MACHINE MAINTENANCE (FOR COPYING)
USER MAINTENANCE ................................................ |
6-2 |
Cleaning the document glass and the automatic |
|
document feeder................................................... |
6-2 |
Cleaning the main charger of the |
|
photoconductive drum .......................................... |
6-2 |
TROUBLESHOOTING ................................................. |
6-3 |
CHAPTER 7
DOCUMENT FILING FUNCTION
OVERVIEW .................................................................. |
7-2 |
Document filing function ....................................... |
7-2 |
TO USE THE DOCUMENT FILING FUNCTION .......... |
7-4 |
A look at the operation panel................................ |
7-4 |
Saving files ........................................................... |
7-4 |
Main screen of document filing............................. |
7-5 |
Document filing icons ........................................... |
7-5 |
SAVING A DOCUMENT IMAGE FILE.......................... |
7-6 |
Quick File.............................................................. |
7-6 |
Filing ..................................................................... |
7-7 |
Print jobs............................................................... |
7-9 |
Scan Save ............................................................ |
7-10 |
CALLING UP AND USING A FILE ............................... |
7-13 |
Searching for and calling up a saved file .............. |
7-13 |
Calling up and using a saved file.......................... |
7-15 |
CUSTOM SETTINGS................................................... |
7-21 |
Creating, editing, and deleting user names and |
|
folders................................................................... |
7-21 |
ENTERING CHARACTERS ......................................... |
7-26 |
TROUBLESHOOTING ................................................. |
7-28 |
CHAPTER 8
SPECIFICATIONS
SPECIFICATIONS....................................................... |
8-2 |
LIST OF COMBINATION OF PERIPHERAL DEVICES .. |
8-4 |
INDEX.......................................................................... |
8-5 |
0-6

CHAPTER 1
BEFORE USING THE
PRODUCT
This chapter contains basic information that should be read before using the product.
|
Page |
INTRODUCTION .................................................................................... |
1-2 |
MAIN FEATURES................................................................................... |
1-3 |
PART NAMES AND FUNCTIONS .......................................................... |
1-9 |
Exterior............................................................................................ |
1-9 |
Interior............................................................................................. |
1-10 |
Part names and functions of peripheral devices ............................. |
1-11 |
Operation panel............................................................................... |
1-13 |
Touch panel .................................................................................... |
1-14 |
TURNING THE POWER ON AND OFF.................................................. |
1-17 |
AUDITING MODE ................................................................................... |
1-18 |
Using the machine when the auditing mode is enabled.................. |
1-18 |
1-1

INTRODUCTION
Thank you for purchasing a Olivetti digital multifunction copier.
Please read this manual before using the machine. In particular, be sure to read "INSTALLATION REQUIREMENTS" before using the machine.
Please keep this manual close at hand for reference whenever necessary.
This manual provides general information on using the machine, such as routine maintenance and how to load paper and remove misfeeds. It also explains how to use the copier and document filing functions.
Separate manuals have been provided for the fax function, printer function, and network scanner function.
Original and paper sizes
This machine allows use of standard sizes in both the AB and inch systems.
These are shown in the tables below.
Sizes in the AB system |
|
Sizes in the inch system |
|
|
|
A3 |
|
11" x 17" (LEDGER) |
|
|
|
B4 |
|
8-1/2" x 14" (LEGAL) |
|
|
|
A4 |
|
8-1/2" x 13" (FOOLSCAP) |
|
|
|
B5 |
|
8-1/2" x 11" (LETTER) |
|
|
|
A5 |
|
7-1/4" x 10-1/2" (EXECUTIVE) |
|
|
|
|
|
5-1/2" x 8-1/2" (INVOICE) |
|
|
|
The meaning of "R" in original and paper size indications
Some original and paper sizes can be placed in either the portrait or landscape orientations. To differentiate between landscape and portrait, the landscape orientation size indication will contain an "R". These are indicated as A4R, B5R, 8-1/2" x 11"R, 5-1/2" x 8-1/2"R, etc. Sizes that can be placed only in the landscape orientation (A3, B4, 11" x 17", 8-1/2" x 14", 8-1/2" x 13") do not contain the "R" in their size indication.
Size indication |
|
Landscape |
Size indication |
|
Portrait orientation |
|
|
||||
with "R" |
|
orientation |
without "R" |
|
|
|
|
|
|||
|
|
|
|
|
|
|
|
|
|
|
|
1-2
MAIN FEATURES
The digital multifunction copier is capable of performing a variety of functions. This page shows features related to
the copy function. |
|
|
|
|
|
|
|
|
|
|
|
|
|
|
|
|
|
|
|
|
|
|
|
|
|
|
|||||
● Sort mode |
|
|
|
|
|
See page 1-3 |
● Job programs |
|
|
|
|
See page 1-6 |
|||||||||||||||||||
|
|
|
|
|
|
|
|||||||||||||||||||||||||
|
|
|
|
|
|
|
|||||||||||||||||||||||||
● Group mode |
|
|
|
|
|
See page 1-3 |
● Mirror Image |
|
|
|
|
See page 1-6 |
|||||||||||||||||||
|
|
|
|
|
|
||||||||||||||||||||||||||
|
|
|
|
|
|
||||||||||||||||||||||||||
● 2-sided Copy |
|
|
|
|
See page 1-3 |
● B/W Reverse |
|
|
|
See page 1-6 |
|||||||||||||||||||||
|
|
|
|
|
|||||||||||||||||||||||||||
|
|
|
|
|
|||||||||||||||||||||||||||
(When the duplex module is installed.) |
● Date |
|
|
|
|
See page 1-6 |
|
||||||||||||||||||||||||
|
|
|
|
||||||||||||||||||||||||||||
|
|
|
|
||||||||||||||||||||||||||||
● Exposure Adjustments |
|
|
|
See page 1-3 |
● Stamp |
|
|
|
|
See page 1-6 |
|
||||||||||||||||||||
|
|
|
|
|
|||||||||||||||||||||||||||
|
|
|
|
|
|||||||||||||||||||||||||||
● Reduction/Enlargement |
|
|
|
See page 1-4 |
● Page numbering |
|
|
See page 1-7 |
|||||||||||||||||||||||
|
|
|
|
||||||||||||||||||||||||||||
|
|
|
|
||||||||||||||||||||||||||||
● XY Zoom |
|
|
|
See page 1-4 |
● Text |
|
|
|
See page 1-7 |
|
|||||||||||||||||||||
|
|
|
|
||||||||||||||||||||||||||||
|
|
|
|
||||||||||||||||||||||||||||
● Margin Shift |
|
|
|
|
|
See page 1-4 |
● Interrupting a copy run |
|
See page 1-7 |
||||||||||||||||||||||
|
|
|
|
|
|
||||||||||||||||||||||||||
|
|
|
|
|
|
||||||||||||||||||||||||||
● Erase |
|
|
See page 1-4 |
● Offset mode |
|
|
|
|
See page 1-7 |
|||||||||||||||||||||
|
|
|
|
|||||||||||||||||||||||||||
|
|
|
|
|||||||||||||||||||||||||||
● Dual Page Copy |
|
|
|
See page 1-4 |
(When the Finisher or Saddle stitch finisher is installed.) |
|||||||||||||||||||||||||
|
|
|
||||||||||||||||||||||||||||
|
|
|
||||||||||||||||||||||||||||
● Pamphlet Copy |
|
|
|
|
See page 1-4 |
● Staple sort mode |
|
|
|
See page 1-7 |
||||||||||||||||||||
|
|
|
|
|
||||||||||||||||||||||||||
|
|
|
|
|
||||||||||||||||||||||||||
● Job Build |
|
|
|
|
|
See page 1-5 |
(When the Finisher or Saddle stitch finisher is installed.) |
|||||||||||||||||||||||
|
|
|
|
|
||||||||||||||||||||||||||
|
|
|
|
|
||||||||||||||||||||||||||
● Tandem Copy |
|
|
|
|
|
|
See page 1-5 |
● Saddle stitch |
|
|
|
|
See page 1-7 |
|||||||||||||||||
|
|
|
|
|
|
|
|
|
||||||||||||||||||||||
|
|
|
|
|
|
|
|
|
||||||||||||||||||||||
(Olivetti d-Copia 3501 / d-Copia 4501 version |
(When the Saddle stitch finisher is installed.) |
|||||||||||||||||||||||||||||
or when the document filling function has been added.) |
● Hole punching |
|
|
|
|
|
See page 1-8 |
|||||||||||||||||||||||
|
|
|
|
|
||||||||||||||||||||||||||
● Covers/inserts |
|
|
|
|
See page 1-5 |
|
|
|
|
|
||||||||||||||||||||
|
|
|
(When the Saddle stitch finisher and Punch |
|||||||||||||||||||||||||||
|
|
|
||||||||||||||||||||||||||||
|
|
|
||||||||||||||||||||||||||||
● Transparency Insert |
|
|
See page 1-5 |
Module are installed.) |
|
|
||||||||||||||||||||||||
|
|
|
|
|||||||||||||||||||||||||||
|
|
|
|
|||||||||||||||||||||||||||
● Multi Shot |
|
|
|
|
|
|
See page 1-5 |
● Document filing function |
|
See page 1-8 |
||||||||||||||||||||
|
|
|
|
|
|
|||||||||||||||||||||||||
|
|
|
|
|
|
|||||||||||||||||||||||||
● Book Copy |
|
|
|
|
See page 1-5 |
(Olivetti d-Copia 3501/4501 version or when the |
||||||||||||||||||||||||
|
|
|
|
|||||||||||||||||||||||||||
|
|
|
|
|||||||||||||||||||||||||||
● Card Shot |
|
|
|
|
|
|
See page 1-6 |
document filling function has been added.) |
||||||||||||||||||||||
|
|
|
|
|
|
|||||||||||||||||||||||||
|
|
|
|
|
|
|||||||||||||||||||||||||
1 |
Sort mode |
|
|
See page 4-9 |
2-sided Copy |
|
|
See pages 4-10, 4-13 |
||||||||||||||||||||
|
|
|
|||||||||||||||||||||||||
|
|
|
|
||||||||||||||||||||||||
Copies can be collated. |
|
|
|
Copy onto both sides of the paper using the document |
|||||||||||||||||||||||
|
|
|
|
|
|
glass or the automatic document feeder. |
|||||||||||||||||||||
Original |
Copy |
|
|
Original |
|
|
|
|
|
|
Copy |
||||||||||||||||
|
|
|
|
|
|
|
|
|
|
|
|
|
|
|
|
|
|
|
|
|
|
||||||
|
|
|
|
|
|
|
|
|
|
|
|
|
|
|
|
|
|
|
|
|
|
|
|
|
|
|
|
|
|
|
|
|
|
|
|
|
|
|
|
|
|
|
|
|
|
|
|
|
|
|
|
|
|
|
|
|
|
|
|
|
|
|
|
|
|
|
|
|
|
|
|
|
|
|
|
|
|
|
|
|
|
|
|
|
|
|
|
|
|
|
|
|
|
|
|
|
|
|
|
|
|
|
|
|
|
|
|
|
|
|
|
|
|
|
|
|
|
|
|
|
|
|
|
|
|
|
|
|
|
|
|
|
|
|
|
|
|
|
|
|
|
|
|
|
|
|
|
|
|
|
|
|
|
|
|
|
|
|
|
|
|
|
|
|
|
|
|
|
|
|
|
|
|
|
|
|
|
|
|
|
|
|
|
|
|
|
|
|
|
|
|
|
|
|
|
|
|
|
|
|
|
|
|
|
|
|
|
|
|
|
|
|
|
|
|
|
|
|
|
|
|
|
|
|
|
|
|
|
|
|
|
|
|
|
|
|
|
|
|
|
|
|
|
|
|
|
|
|
|
|
|
|
|
|
|
|
|
|
|
|
|
|
|
|
|
|
|
|
|
|
|
|
|
|
|
|
|
|
|
|
|
|
|
|
|
|
|
|
|
|
|
|
|
|
|
|
|
|
|
|
|
|
|
|
|
|
|
|
|
|
|
|
|
|
|
|
|
|
|
|
|
|
|
|
|
|
|
|
|
|
|
|
|
|
|
|
|
|
|
|
|
|
|
|
|
|
|
|
|
|
|
|
|
|
|
|
|
|
|
|
|
|
|
|
|
|
|
|
|
|
|
|
|
|
|
|
|
|
|
|
|
|
|
|
|
|
|
|
|
|
|
|
|
|
|
|
|
|
|
|
|
|
|
|
|
|
|
|
|
|
|
|
|
|
|
|
|
|
|
|
|
|
|
|
|
|
|
|
|
|
|
|
|
|
|
|
|
|
|
|
|
|
|
|
|
|
|
|
|
|
|
|
|
|
|
|
|
|
|
|
|
|
|
|
|
|
|
|
|
|
|
|
|
|
|
|
|
|
|
|
|
|
|
|
|
|
|
|
|
|
|
|
|
|
|
|
|
|
|
|
|
|
|
|
|
|
|
|
|
|
|
|
|
|
|
|
|
|
|
|
|
|
|
|
|
|
|
|
|
|
|
|
|
|
|
|
|
|
|
|
|
|
|
|
|
|
|
|
|
|
|
|
|
|
|
|
|
|
|
* When the duplex module is installed.
Group mode |
|
See page 4-9 |
Exposure Adjustments |
|
See page 4-14 |
|
|||||
|
|
||||
Copies can be grouped by page. |
|
|
|
|
|
|
The desired image type for the original can be |
||||
|
|
|
selected. |
|
|
|
Text |
Text/Photo |
Photo |
Original |
Copy |
|
|
|
Resolution ABCDE |
|
|
|
|
ABCDE |
|
|
Lighter |
|
Darker |
|
Exposure |
|
|
1-3
MAIN FEATURES
Reduction / Enlargement |
|
See page 4-15 |
|
Copies can be enlarged or reduced to the desired size.
Original |
|
|
Copy |
|
|
|
|
|
|
|
|
Enlargement Reduction
Erase |
|
See page 5-4 |
|
Shadows that appear around the edges of copies of books or thick originals can be erased.
Original Copy
Edge erase
Centre erase
Edge+Centre
erase
XY Zoom |
|
See page 4-18 |
|
Separate ratio settings can be selected for the length and width of a copy.
|
Original |
|
Copy |
|||||
|
|
|
|
|
|
|
|
|
|
|
|
|
|
|
|
|
|
|
|
|
|
|
|
|
|
|
|
|
|
|
|
|
|
|
|
|
|
|
|
|
|
|
|
|
|
|
|
|
|
|
|
|
|
|
|
|
|
|
|
|
|
|
|
|
|
|
|
|
|
|
|
|
|
|
|
|
|
|
|
|
|
|
|
|
|
|
|
|
|
|
|
|
|
|
|
|
|
|
|
|
|
|
|
|
|
|
|
|
|
|
|
|
|
|
|
|
|
|
|
|
|
|
|
|
|
|
|
|
|
|
|
|
|
|
Margin Shift |
|
|
|
|
|
See page 5-3 |
|||||
|
|
|
|
|
|||||||
Margins can be added to copies. |
|
|
|
|
|||||||
One-sided copying |
Image shifted |
|
Image shifted |
||||||||
Original |
to the right |
|
to the left |
||||||||
|
|
|
|
|
|
|
|
|
|
|
|
Margin |
Margin |
Two-sided copying |
|
Original |
|
Image shifted |
Image shifted |
to the right |
to the left |
Or |
|
Margin |
Margin |
Dual Page Copy |
|
See page 5-5 |
|
The left and right pages of a book can be successively copied onto separate sheets.
Book original |
Copy |
||
|
|
|
|
|
|
|
|
Pamphlet Copy |
|
See page 5-6 |
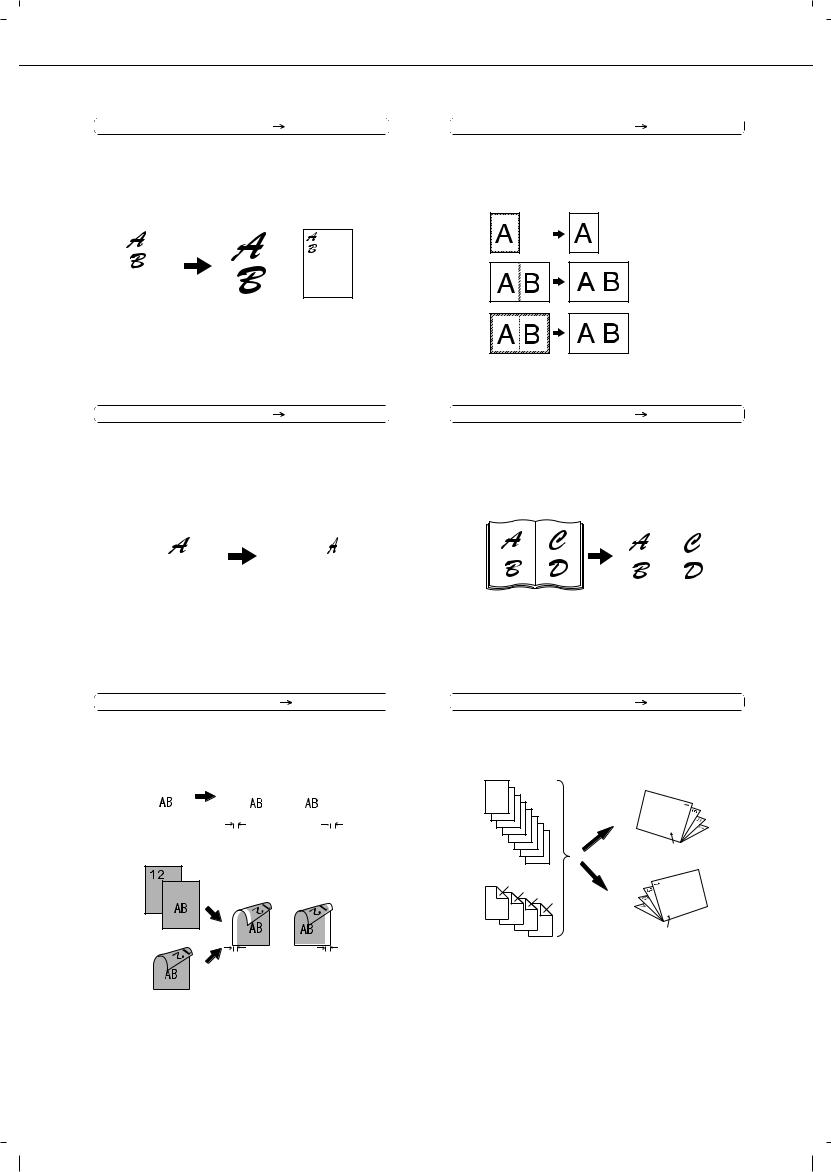
|
One-sided or two-sided pamphlet style copies can be made.
Originals (one-sided) |
Finished copies are |
|
|
folded in two. |
|
1 |
Left binding |
|
2 |
|
|
3 |
|
|
4 |
|
|
5 |
First page |
|
6 |
||
7 |
||
|
||
8 |
|
|
Originals (two-sided) |
|
|
2 |
|
|
4 |
|
|
6 |
|
|
8 |
Right binding |
|
1 |
||
|
||
3 |
|
|
5 |
First page |
|
7 |
1-4
MAIN FEATURES
Job Build |
|
See page 5-8 |
Transparency Insert |
|
|
See page 5-22 |
|
|
|||||
|
|
|
||||
When you have a very large number of originals, the |
Inserts can be automatically inserted between |
|||||
pages can be scanned in sets. |
|
|
transparencies. |
|
|
|
Originals (1-sided)
Copy
100 sheets |
50 sheets |
50 sheets |
Originals (2-sided) |
|
Insert sheets |
||||
|
|
|
1 |
Tandem Copy |
|
See page 5-9 |
Multi Shot |
|
|
See page 5-23 |
|
|
|||||
|
|
|
||||
Two machines can be used to run a large copy job |
Multiple original pages can be copied onto a |
|||||
in parallel. |
|
|
single sheet of paper in a uniform layout. |
|||
Originals Originals
Copy
(1-sided) (2-sided)
|
|
|
|
|
|
|
|
|
|
|
|
|
|
|
|
|
|
|
|
|
|
|
|
|
|
|
|
|
|
|
|
|
|
|
|
|
|
|
|
|
|
|
|
|
|
|
|
|
|
|
|
|
|
|
|
|
|
|
|
|
|
|
|
|
|
|
|
|
|
|
|
|
|
|
|
|
|
|
|
|
|
|
|
|
|
|
|
|
|
|
|
|
|
|
|
|
|
|
|
|
|
|
|
|
|
|
|
|
|
|
|
|
|
|
|
|
|
|
|
100 sets of |
50 sets of |
50 sets of |
|||||||||||||||||
|
|
copies |
|
copies |
|
copies |
|||||||||||||
*Olivetti d-Copia 3501 / 4501 version or when the document filling function has been added.
Covers/inserts |
See page 5-11 |
Book Copy |
See page 5-25 |
Front covers, back covers, and inserts can be |
Books and other bound originals can be copied |
||
added. These can also be copied on. |
pamphlet style. |
|
|
Originals |
|
Original |
Copy |
|
|
|
|
|
Back cover |
|
Left binding |
|
|
|
|
|
|
First page |
First page |
Front cover |
|
|
|
|
Insert sheets |
|
Right binding |
|
|
|
|
|
|
First page |
First page |
1-5
MAIN FEATURES
Card Shot |
|
See page 5-26 |
|
The front and back of a card can be copied onto one sheet of paper.
This function is convenient for making copies for certification purposes and helps save paper.
Original |
|
|
|
Copy |
|
|
|
|
|
|
|
||||||
|
|
|
|
|
|
|
|
|
|
|
|
|
|
|
|
|
|
|
|
|
|
|
|
|
|
|
|
|
|
|
|
|
|
|
|
|
CARD |
|
|
CARD |
|
|
|
|
|
|
|
|
|
||||
|
|
|
|
|
|
|
|
|
|
|
|
|
|
|
|||
|
Front of |
|
|
|
|
|
|
|
CARD |
|
|
|
|
|
|||
|
|
|
|
|
|
|
|
|
|
|
|
|
|||||
|
|
card |
|
|
|
|
|
|
|
|
|
|
|
|
|||
|
|
|
|
|
|
|
|
|
|
|
|
|
|
||||
|
|
|
|
|
|
|
|
|
|
|
|
|
|
||||
|
|
|
|
|
|
|
|
|
|
|
|
|
|
|
|
|
|
|
Back of |
|
|
|
|
|
|
|
|
|
|
|
|
|
|||
|
|
card |
|
|
|
|
|
|
|
|
|
|
|
|
|
||
Example: |
|
Example: |
|||||||||||||||
|
|
|
|
|
|
||||||||||||
|
|
|
|
|
Portrait |
|
Landscape |
||||||||||
|
|
|
|
|
A4 (8-1/2" x 11") size |
|
A4 (8-1/2" x 11") size |
||||||||||
Job programs |
|
See page 5-41 |
|
Various steps of a copy operation can be stored as a program, and up to 10 programs can be stored. Saving frequently used sets of settings in a program saves you the trouble of selecting those settings each time you wish to use them.
JOB PROGRAMS
PRESS PROGRAM NUMBER.
RECALL
Mirror Image |
|
See page 5-28 |
|
A mirror image copy can be made.
Original |
Copy |
|
|
|
|
|
|
|
B/W Reverse |
|
See page 5-28 |
|
White and black can be inverted on a copy to produce a negative image.
Original |
|
Copy |
|
|
|
|
|
|
Date |
|
See page 5-32 |
|
The date can be added to copies.
2004/OCT/1
Stamp |
|
See page 5-33 |
|
Reverse text can be added to copies ("stamp").
CONFIDENTIAL
1-6
MAIN FEATURES
Page numbering |
|
See page 5-34 |
Offset mode |
|
|
See page 3-8 |
|
|
|||||
|
|
|
Page numbers can be added to copies.
Each set of output can be offset slightly from other sets for easy separation.
Offset mode |
Non-Offset mode |
1 |
|
*When the Finisher or Saddle stitch finisher is installed.
Text |
|
See page 5-38 |
Staple sort mode |
|
|
See page 3-8, 3-16 |
|
|
|||||
|
|
|
||||
Entered text can be added to copies. |
Sets of copies can be automatically stapled. |
|||||
|
|
|
Original |
|
|
Copy |
October, 2004 Meeting
*When the Finisher or Saddle stitch finisher is installed.
Interrupting a copy run |
|
See page 5-43 |
|
A copy job in progress can be interrupted for a rush job.
|
INTERRUPT |
||
ORIGINAL |
A4 |
AUTO |
|
ORIGINA |
|||
|
|
||
|
|
AUTO |
|
|
|
EXPOSUR |
|
|
|
AUTO |
|
Saddle stitch |
|
See page 3-14 |
|
When a saddle stitch finisher is installed, copies can be automatically folded in half and stapled at the fold. (Use with the pamphlet function (see page 5-6) or book copy function (see page 5-25).)
Saddle stitch binding
6 |
7 |
*When the Saddle stitch finisher is installed.
1-7
MAIN FEATURES
Hole punching |
|
See page 3-17 |
|
Copies can be punched to add holes.
Original |
Punch positions |
||
|
|
|
|
|
|
|
|
Document filing function  See CHAPTER 7
A document image can be stored on the hard disk. A stored file can easily be called up and printed or transmitted.
|
|
|
Printed |
Document |
|
HDD |
|
|
|
||
Image |
|
|
|
|
Transmitted |
||
|
Save to |
Call up a |
|
|
machine's |
saved file to |
|
|
hard disk |
reuse |
|
* Olivetti d-Copia 3501 / 4501 version or when the document filling function has been added.
*When the saddle stitch finisher and punch module are installed.
ENERGY STAR is a U.S. registered mark.
The ENERGY STAR program is an energy reduction plan introduced by theUnited States Environmental Protection Agency in response to environmental issues and for the purpose of advancing the development and utilization of more energy efficient office equipment.
 Energy saving features
This product has the following two power reducing modes to help conserve natural resources and reduce environmental pollution.
Preheat mode
When the machine remains in the standby state for the amount of time set in the key operator programs, preheat mode automatically reduces the temperature of the fusing unit to save power while the machine is on standby. When a fax or print job is received, or keys are pressed on the operation panel, or an original is placed for a copy, fax, or network scanner job, preheat mode automatically turns off.
Auto power shut-off mode
The auto power shut-off mode is the second level of power reduction. In this mode power is shut off to the fusing unit and the touch panel. In this state more energy is saved than in the preheat mode but the time to recover to the ready condition will be longer. The preset time to enter this mode can be set by a key operator program.
When this product is used as a printer, and either of the above modes is active, the mode will be deactivated automatically by an incoming job and the machine will automatically warm up and start to print when it has reached the ready temperature.
When this product is configured for multi-function operation, and either of the above modes is active, the mode will be deactivated as above by an incoming print job. Either mode will also be deactivated by operation of DOCUMENT FILING, IMAGE SEND or COPY mode key.
1-8

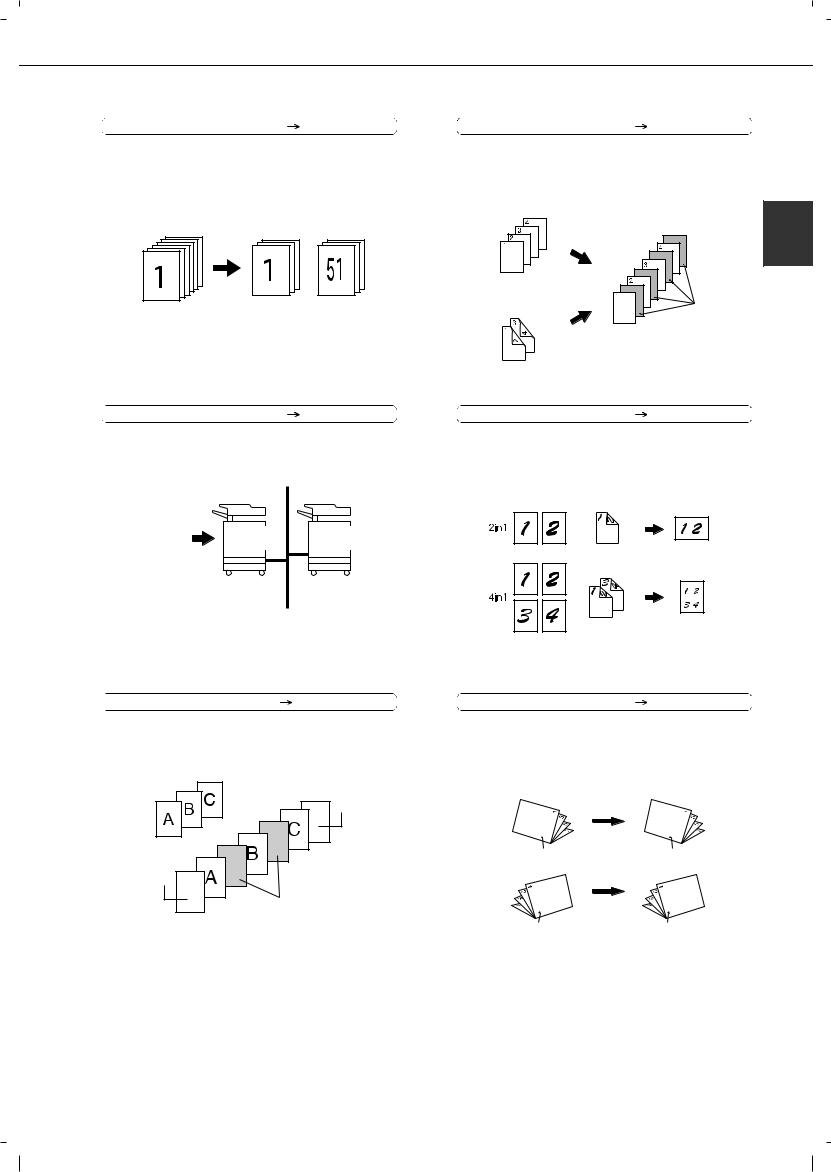
PART NAMES AND FUNCTIONS
Exterior
(1) |
(2) |
(3) |
(4) |
(5) |
(6) |
(7) |
(8) |
(9) |
(10) |
(12) |
|
|
|
|
|
|
|
|
|
(11) |
(13) |
1 |
(1)Bypass tray*
(2)Exit tray*
(3)Automatic document feeder (See page 4-2.)
This automatically feeds and scans multiple sheet originals. Both sides of two-sided originals can be scanned at once.
(4)Duplex module*
Module for two-sided printing
(5)Upper paper output area (Centre tray)
Finished sheets are deposited here.
(6)Upper exit tray extension*
Provides support for large size paper.
(7)Operation panel
(8)Front cover
Open to add toner.
(9)Power switch
Press to turn power on and off.
(10)Paper tray 1
(11)Stand/3 x 500 sheet paper drawer*
(12)Stand/MPD & 2000 sheet paper drawer* (See page 2-11.)
(13)Multi purpose drawer* (See page 2-8.)
*(1), (2), (4), (6), (11), (12) and (13) are peripheral devices. For description of these devices, see page 1-11.
1-9
PART NAMES AND FUNCTIONS
Interior
(14) |
(15) |
(16) |
(17) |
(18) (19)
(14) Duplex module side cover |
(17) Toner cartridge (drum/toner cartridge) |
Open when a misfeed has occurred in the duplex module.
The toner cartridge must be replaced when indicated on the operation panel. (See page 2-15)
(15)Side cover latch
Push up to open the side cover when a misfeed has occurred in the main unit.
(16)Fusing unit
Lift up to open the side cover when a misfeed has occurred in the main unit.
CAUTION
The fusing unit is hot. Take care in removing misfed paper.
(18)Photoconductive drum
Images are formed on the photoconductive drum.
NOTE
Do not touch or damage the photoconductive drum.
(19)Cartridge lock lever
When replacing the drum, toner or developer cartridge, turn down this lever and pull it out.
1-10
PART NAMES AND FUNCTIONS
Part names and functions of peripheral devices
(1) |
(2) |
|
(10)
(9)
(8)
(3)
(7)
1 |
(6)
(1)Upper exit tray extension (AR-TE4)
Mount this unit to the upper paper exit tray. This extension is needed to support large size paper.
(2)Finisher (AR-FN6)
Output sheets can either be sorted in page order or grouped by page. Sorted sets or groups are offset stacked for easy separation when removed. Sorted sets can be delivered either stapled or unstapled.
(3) Mail-bin stacker (AR-MS1)
This unit is an output sorter that has seven receiving bins.
The bin to receive printed output can be selected in the printer driver. Each bin can be assigned to receive printed output by an individual person or by groups of people so that their prints are separated from other users making them easy to retrieve.
When this unit is installed, any copies or facsimile prints will be sent to the top tray and not into the mail bins.
(4) Stand/MPD & 2000 sheet paper drawer (AR-D28)
This paper feed unit contains an upper multipurpose drawer (see item (6)) and a lower drawer which can hold a maximum of 2000 sheets of 80 g/m2 (20 lbs.) paper.
(4)
(5)
(5) Multi purpose drawer (ARMU2)
Up to 500 sheets of 80 g/m2 (20 lbs.) paper can be loaded. Also special papers such as envelopes (standard sizes only) and postcards can be set.
(6) Stand/3 x 500 sheet paper drawer (AR-D27)
This paper feed unit contains an upper multipurpose drawer (see item (6)) and two lower drawers each of which can hold a maximum of 500 sheets of 80 g/m2 (20 lbs.) paper.
(7) Saddle stitch finisher (AR-FN7)
The saddle stitch finisher can automatically place two staples for centreline binding of paper and fold them along the centreline.
An optional punch module is available for installation into the finisher.
(8) Duplex module (AR-DU3)
An optional duplex module must be installed for automatic two-sided printing.
(9) Duplex module/bypass tray (AR-DU4)
This module is basically the same as (9) above with the addition of a manual bypass paper feed unit.
(10) Exit tray (AR-TE3)
Mounted to the paper output port of a duplex module.
1-11

PART NAMES AND FUNCTIONS
■Other optional equipment
●Printer server card (AR-NC7)
This is an NIC card (Network Interface Card) that is required to use the network printer and network scanner functions.
●Printer server card (AR-NC8)
This is an NIC card (Network Interface Card) that is required to use the network printer and document filling functions, and the network scanner function.
●Barcode font kit (AR-PF1)
This kit adds bar code fonts to the machine.
Data security kit ( AR-FR21U, AR-FR22U)
The AR-FR21U is for models that
have a hard disk drive, and the and AR-FR22U is for models without a hard disk drive.
This kit is used to erase electronic data from the hard disk and memory immediately after a document is printed or transmitted.
●PS3 expansion kit (AR-PK6)
This kit provides compatibility of PostScript level 3 to the printer.
●Facsimile expansion kit (AR-FX12)
This kit is required to add fax function.
Additional fax memory (8MB) (AR-MM9)
●Network scanner expansion kit (AR-EF3)
This kit is required to add the network scanning feature.
The network printer function is required to add on the network scanner function. On models that do not have the network printer function as a standard feature, the printer server card is required.
Some peripheral devices cannot be installed together while others may require the installation of one or more others to be functional. See page 8-4, "LIST OF COMBINATION OF PERIPHERAL DEVICES".
Peripheral devices are basically optional, but some are provided as standard equipment for some models.
1-12
PART NAMES AND FUNCTIONS
Operation panel
(1) |
(2) |
(3) |
||||||
|
||||||||
|
|
When the document filing function |
|
|
|
|
|
|
|
|
|
|
|
|
|
|
|
|
|
has not been added. |
|
|
|
|
|
|
|
|
|
|
|
|
|
|
|
|
|
|
|
|
|
|
|
|
|
|
|
|
|
|
|
|
|
|
|
|
|
|
|
|
|
|
|
|
|
|
|
|
|
|
|
1 |
(4) |
(5) |
(6) |
(7) |
(8) |
(9) |
(10) |
(11) |
(1)Touch panel
The machine status, messages and touch keys are displayed on the panel. The document filing*1, copy, network scanner*2, and fax*3 functions are used by switching to the screen for the desired function. See the following page.
(2)Mode select keys and indicators
Use to change modes and the corresponding display on the touch panel.
[DOCUMENT FILING] key
Press to select the document filing mode*1. (See page 7-5.)
When the document filing function has not been added, this key is the [PRINT] key. This key is pressed to change to the print mode screen when the printer function has been added.
[IMAGE SEND] key/LINE indicator/DATA indicator
Press to change the display to network scanner mode*2 or fax mode*3. (See the "Operation manual (for network scanner)") and "Operation manual (for facsimile)".)
[COPY] key
Press to select the copy mode.
(3)PRINT mode indicators
READY indicator
Print data can be received when this indicator is lit.
DATA indicator
Lights up or blinks when print data is being received. Also lights up or blinks when printing is being performed.
*1 When the document filing function has been added.
*2 When the network scanner option is installed.
*3 When the fax option is installed.
(4)[JOB STATUS] key
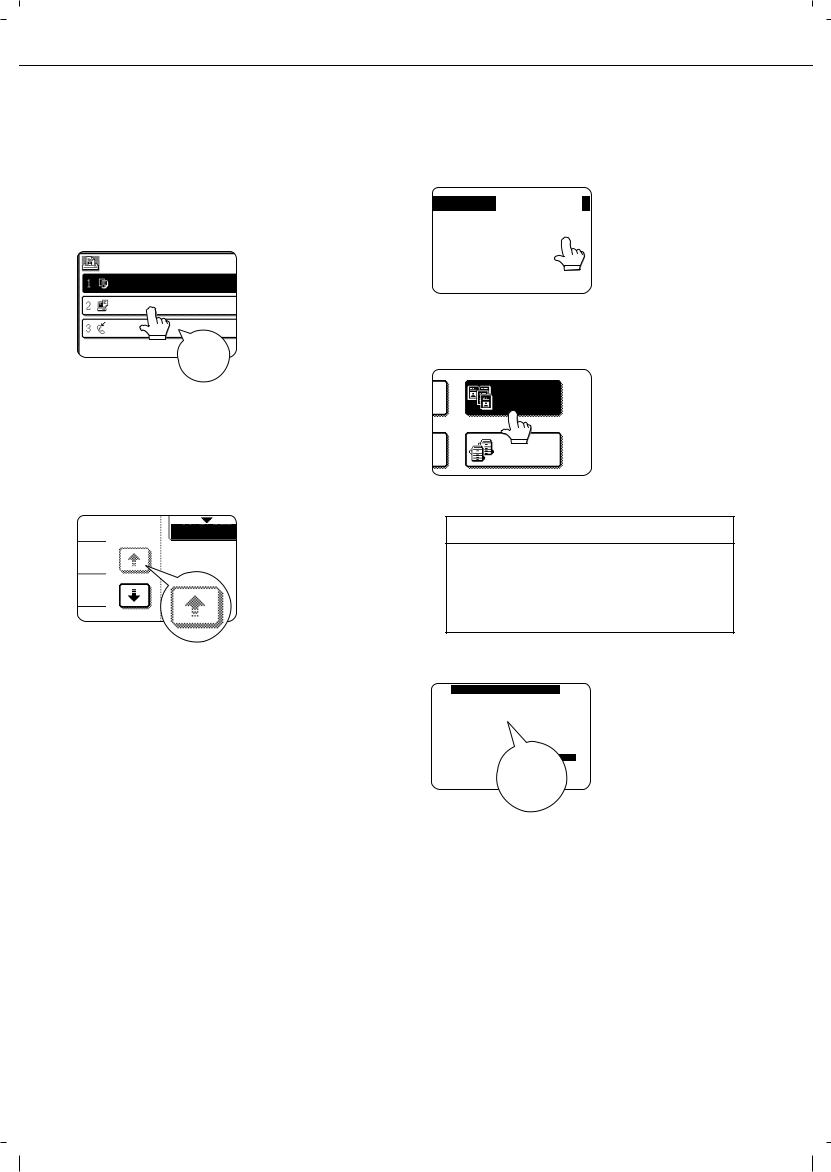
Press to display the current job status. (See page 1-15.)
(5)[CUSTOM SETTINGS] key
This is used to store, edit, and delete user names and folder names for the document filing function*1, and to configure the key operator programs and printer configuration settings. (See page 7-21)
(6)Numeric keys
Use to enter numeric values for various settings.
(7)[ ] key ([ACC.#-C] key)
This key is used in copy mode, document filing mode*1, network scanner mode*2, and fax mode*3.
(8)[#/P] key
This is used as a program key when using the copy function, and to dial when using the fax function*3.
(9)[C] key (Clear key)
This key is used in copy mode, document filing mode*1, network scanner mode*2, and fax mode*3.
(10)[START] key
Use this key to start copying in copy mode, scan a document in network scanner mode*2, or scan a document for transmission in fax mode*3.
(11)[CA] key (Clear all key)
This key is used in copy mode, document filing mode*1, network scanner mode*2, and fax mode*3. Use the key to cancel settings and perform an operation from the initial machine state.
1-13
PART NAMES AND FUNCTIONS
Touch panel
The touch panel screens shown in this manual are printed images, and may appear different from the actual screens.
Using the touch panel
Items on the touch panel are easily selectable by touching the key associ-
ated with the item with a
finger. Selection of an item will be accompanied with a beep tone* to confirm the item was selected.
Also, the key area for the item will be highlighted for visual confirmation.
*If a greyed out key is touched, double beeps will sound.
[Example 2]
Keys which are greyed 1/13 COMPLETE out on any screen are
not selectable.
Selecting a function
[Example 1]
If a key is highlighted in a
PER. |
|
|
0 setting |
screen at |
the |
|
|
|
|||
|
|
OK |
time the screen appears, |
||
|
CANCEL |
OK |
the [OK] key can be |
||
LEFT |
RIGHT |
|
pressed |
to store |
the |
BINDING |
BINDING |
|
|||
|
|
|
|
||
selection without further operation.
[Example 2]
DUAL PAGE
COPY
COPY
A function in the special functions screen is selected by touching the key so that it is highlighted. To cancel the selection, touch the highlighted key once again.
Copier feature
Dual page copy Job build Tandem copy Mirror image B/W Reverse
The confirmation beeps can be disabled by a key operator program. (See page 10 of the key operator's guide.)
A corresponding icon representing the feature will appear on the touch panel and on the main
screen of the mode
selected. If this icon is touched, the setting screen of the function (or a menu screen) will
appear, allowing the settings to be checked or adjusted and the function to be cancelled easily.
1-14
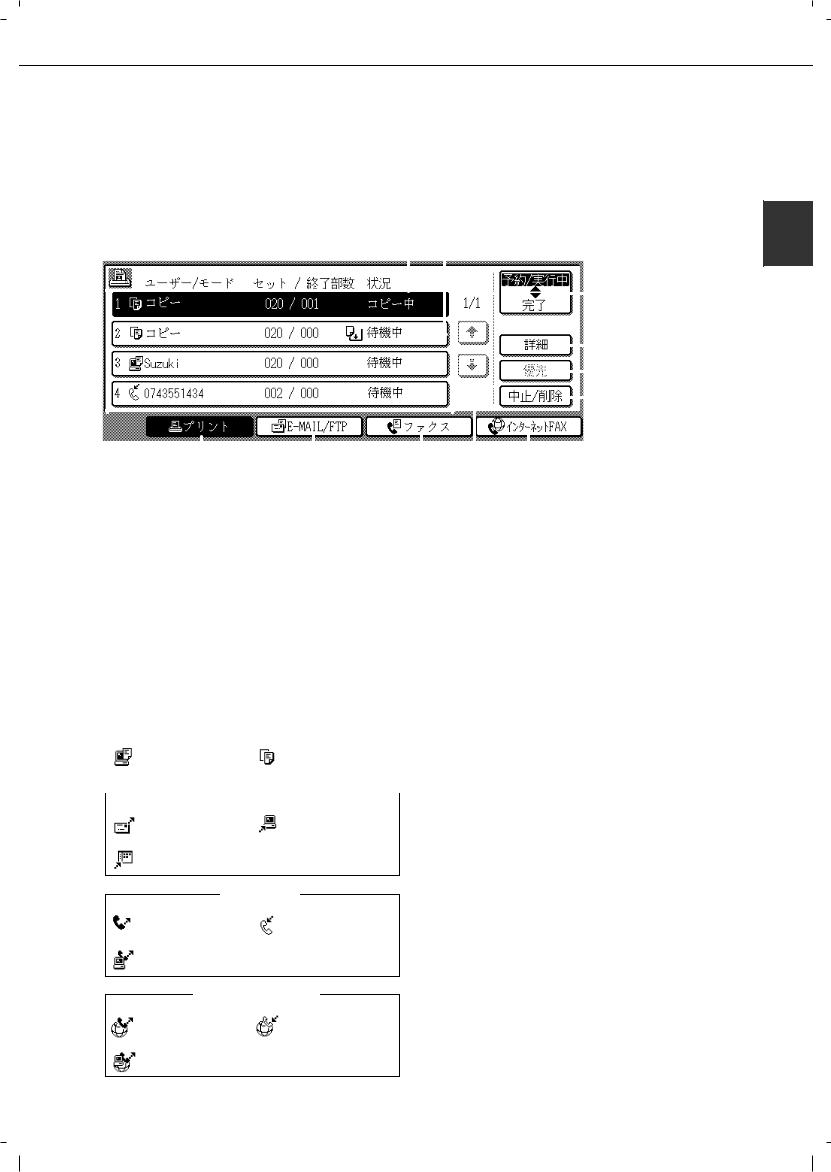
PART NAMES AND FUNCTIONS
■ Job status screen (common to print, copy, fax, network scan and Internet fax)
This screen is displayed when the [JOB STATUS] key on the operation panel is pressed.
This screen can be used to display the "JOB QUEUE" (showing stored jobs and the current job) or the "COMPLETE" job list (showing finished jobs). This screen can be used to check jobs, interrupt a job in progress to perform another job, and cancel a job.
"JOB QUEUE" screen |
|
|
|
|
|
|
|
(1) |
|
|
*1 |
|
|
|
|
|
|
|
|
|
|
|
|
|
|
(2) "COMPLETE" |
|
||||||||||||||||||||
|
|
|
|
|
|
|
|
|
|
|
|
|
|
|
|
|
|
|
|
|
|
|
|
|
|
|
|
|
|
|
|
|
job screen |
|
|||||||||||||
|
|
|
|
|
|
|
|
|
|
|
|
|
|
|
|
|
|
|
|
|
|
|
|
|
|
|
|
|
|
|
|
|
|
|
|
|
|
|
|
|
|
|
|
|
|
|
|
|
|
|
JOB QUEUE |
|
|
SETS / PROGRESS |
|
|
STATUS |
|
|
|
|
|
|
|
|
|
|
|
|
|
|
JOB QUEUE |
|
|
|
|
|
|
JOB QUEUE |
|
|
||||||||||||||
|
|
|
|
|
|
|
|
|
|
|
|
|
|
|
|
|
|
|
|
|
|
|
|
|
|
|
|
|
|
|
|
|
|
|
|
|
|||||||||||
|
|
|
COPY |
|
|
|
|
020 |
/ 001 |
|
|
|
COPYING |
|
|
|
|
|
1/1 |
|
|
|
COMPLETE |
|
|
|
|
|
|
|
COMPLETE |
|
|
||||||||||||||
|
|
|
|
|
|
|
|
|
|
|
|
|
|
|
|
|
|
|
|
|
|
|
|
|
|
|
|
|
|
|
|
|
|
|
|
|
|
|
|
|
|
|
|
|
|
|
|
|
|
|
COPY |
|
|
|
|
020 |
/ 000 |
|
|
|
PAPER EMPTY |
|
|
|
|
|
|
|
|
|
|
|
|
|
|
|
|
|
|
|
|
|
|
|
|
|
|
|
|||||||
|
|
|
|
|
|
|
|
|
|
|
|
|
|
|
|
|
|
|
|
|
|
|
|
|
|
|
|
|
|
|
|
|
|
|
|
|
|||||||||||
|
|
|
|
|
|
|
|
|
|
|
|
|
|
|
|
|
|
|
DETAIL |
|
|
|
|
|
|
|
|
|
DETAIL |
|
|
|
|||||||||||||||
|
|
|
|
|
|
|
|
|
|
|
|
|
|
|
|
|
|
|
|
|
|
|
|
|
|
|
|
|
|
|
|
|
|
|
|
|
|
|
|
|
|
|
|||||
|
|
|
|
|
|
|
|
|
|
|
|
|
|
|
|
|
|
|
|
|
|
|
|
|
|
|
|
|
|
|
|
|
|||||||||||||||
|
|
|
|
|
|
|
|
|
|
|
|
|
|
|
|
|
|
|
|
|
|
|
|
|
|
|
|
|
|
|
|
|
|||||||||||||||
|
|
|
|
|
|
|
|
|
|
|
|
|
|
|
|
|
|
|
|
|
|
|
|
|
|
|
|
|
|
|
|
|
|
|
|
|
|
|
|
|
|
|
|
||||
|
|
|
|
|
|
|
|
|
|
|
|
|
|
|
|
|
|
|
|
|
|
|
|
|
|
|
|
|
|
|
|
|
|
|
|
|
|
|
|
|
|
|
|
|
|
|
|
|
|
|
|
|
|
|
|
|
|
020 |
/ 000 |
|
|
|
|
|
|
|
|
|
|
|
|
|
|
|
|
|
|
|
|
|
|
|
|
|
|
|
|
|
|
|
|
|
|
|
|
|
|
|
Suzuki |
|
|
|
|
|
|
|
WAITING |
|
|
|
|
|
|
|
|
|
|
|
|
|
|
|
|
|
|
|
|
|
|
|
|
|
|
|
|
||||||||
|
|
|
|
|
|
|
|
|
|
|
|
|
|
|
|
|
|
|
PRIORITY |
|
|
|
|
|
|
|
|
|
|
|
|
|
|||||||||||||||
|
|
|
|
|
|
|
|
|
|
|
|
|
|
|
|
|
|
|
|
|
|
|
|
|
|
|
|
|
|
|
|
|
|
|
|
|
|
|
|
|
|
|
|
|
|
|
|
|
|
|
066211221 |
|
|
|
|
|
002 |
/ 000 |
|
|
|
WAITING |
|
|
|
|
|
|
|
|
|
|
|
|
STOP/DELETE |
|
|
|
|
|
|
|
CALL |
|
|
|
|||||||||
|
|
|
|
|
|
|
|
|
|
|
|
|
|
|
|
|
|
|
|
|
|
|
|
|
|
|
|
|
|
|
|
|
|
|
|
|
|
|
|
|
|
|
|
|
|
|
|
|
|
|
|
|
|
|
|
|
|
|
|
|
|
|
|
|
|
|
|
|
|
|
|
|
|
|
|
|
|
|
|
|
|
|
|
|
|
|
|
|
|
|
|
|
|
|
|
|
|
|
|
|
|
|
|
|
|
|
|
|
|
|
|
|
|
|
|
|
|
|
|
|
|
|
|
|
|
|
|
INTERNET-FAX |
|
|
|
|
|
INTERNET-FAX |
|
||||||||
|
|
|
|
PRINT JOB |
|
|
|
|
E-MAIL/FTP |
|
|
|
FAX JOB |
|
|
|
|
|
|
|
|
|
|
|
|||||||||||||||||||||||
|
|
|
|
|
|
|
|
|
|
|
|
|
|
|
|
|
|
|
|
|
|
|
|
|
|
|
|
|
|
|
|
|
|
|
|
|
|
|
|
|
|
|
|
|
|
|
|
1 |
(3) |
(4) |
(5) |
(6) |
(7) |
(8) (9)(10) |
(11) |
(1) Job list |
|
|
*1 "PAPER EMPTY" in the job status display |
|||
The displayed jobs in the job list are themselves operation keys. To cancel printing or to give a job the highest print priority, touch the relevant job key to select the job and execute the desired operation using the keys described in (8) and (9).
This shows the current job and the jobs waiting to be run. The icons to the left of the jobs in the queue show the job mode. The document filing reprint job icon is highlighted.
Note that the icon does not become highlighted during retransmission of a fax/image transmission job.
Print mode |
Copy mode |
 E-MAIL/FTP mode
Scan to e-mail job |
Scan to FTP job |
Scan to Desktop job
Fax mode
Fax send job |
Fax reception job |
PC-Fax send job
Internet Fax mode
i-Fax send job |
i-Fax reception job |
PC-Internet Fax send job
When a job status display indicates "PAPER EMPTY", the specified paper size for the job is not loaded in any of the trays.
In this case, the job will be suspended until the required paper is loaded. Other stored jobs will be printed (if possible) until the required paper is loaded. (Other jobs will not be printed if the paper runs out during printing.) If you need to change the paper size because the specified paper size is not available, touch the current job key to select it and then touch the [DETAIL] key described in (10).
(2)Mode select key
This switches the job list display between "JOB QUEUE" and "COMPLETE".
"JOB QUEUE": Shows stored jobs and the job in progress.
"COMPLETE": Shows finished jobs.
Files saved using the "FILE"*2 and "QUICK FILE"*2 functions and finished broadcast transmission jobs appear as keys in the finished job screen. The "FILE"*2 or "QUICK FILE"*2 job keys in the finished job screen can be touched, followed by the [CALL] key*2, to call up a finished job and print or transmit it. A finished broadcast transmission job key can be touched followed by the [DETAIL] key to check the result of the transmission.
*2 Can only be used on the d-Copia 3501/4501 version, or when the document filling function has been added.
1-15

PART NAMES AND FUNCTIONS
(3)[PRINT JOB] key
This displays the print job list of print mode (copying, printing, fax reception, Internet fax reception, and self printing).
(4)[E-MAIL/FTP] key
This displays the transmission status and finished jobs of scan mode (Scan to e-mail, Scan to FTP, and Scan to Desktop) when the network scanner option is installed.
(5)[FAX JOB] key
This displays the transmission/reception status and finished jobs of fax mode (fax and PC-Fax) when the fax option is installed.
(6)Display switching keys
Use to switch the page of the displayed job list.
(7)[INTERNET-FAX] key
This displays the transmission/reception status and finished jobs of Internet fax mode and PC Internet fax mode when the network scanner option is installed.
(8)[STOP/DELETE] key
Use to cancel or delete the current job or delete the stored job. Note that printing of received faxes and received Internet faxes cannot be cancelled or deleted.
(9)[PRIORITY] key
Touch this key after selecting a stored job in this [JOB QUEUE] list to print the job ahead of the other jobs.
Note that a job in progress cannot be interrupted if it is an interrupt copy job or if it is a list print job.
(10)[DETAIL] key
This shows detailed information on the selected job. Files saved using the "FILE"*2 and "QUICK FILE"*2 functions and finished broadcast transmission jobs appear as keys in the finished job screen. A Quick File in the finished job screen or the [Filing] key*2 can be touched, followed by the [CALL] key*2, to call up a finished job and print or transmit it. A finished broadcast transmission job key can be touched followed by the [DETAIL] key to check the result of the transmission.
(11)[CALL] key*2
When this key is touched after selecting a job in the COMPLETE job status screen (a job stored using the FILE or QUICK FILE keys of the document filing function), the "JOB SETTINGS" menu screen appears to let you resend or reprint the finished job. (See "Document filing function" on page 7-2.)
*2 Can only be used on the Olivetti d-Copia 3501 / 4501 version or when the document filling function has been added.
1-16

TURNING THE POWER ON AND OFF
Use the power switch on the front of the machine to turn the power on or off.
"ON" position
"OFF" position
Power switch
CAUTION
Before turning off the main power switch, make sure that the communication and data indicators are not blinking on the operation panel. Turning off the main power switch or unplugging the power cord while the lights are blinking may damage the hard disk and cause the data being stored or received to be lost.
1 |
NOTES
Turn both switches off and unplug the power cord if you suspect a machine failure, if there is a bad thunderstorm nearby, or when you are moving the machine.
If the fax function has been added, always keep the fax power switch turned on. Faxes cannot be received if the fax power switch is turned off. (Faxes can be received when the main power switch is turned off.)
1-17
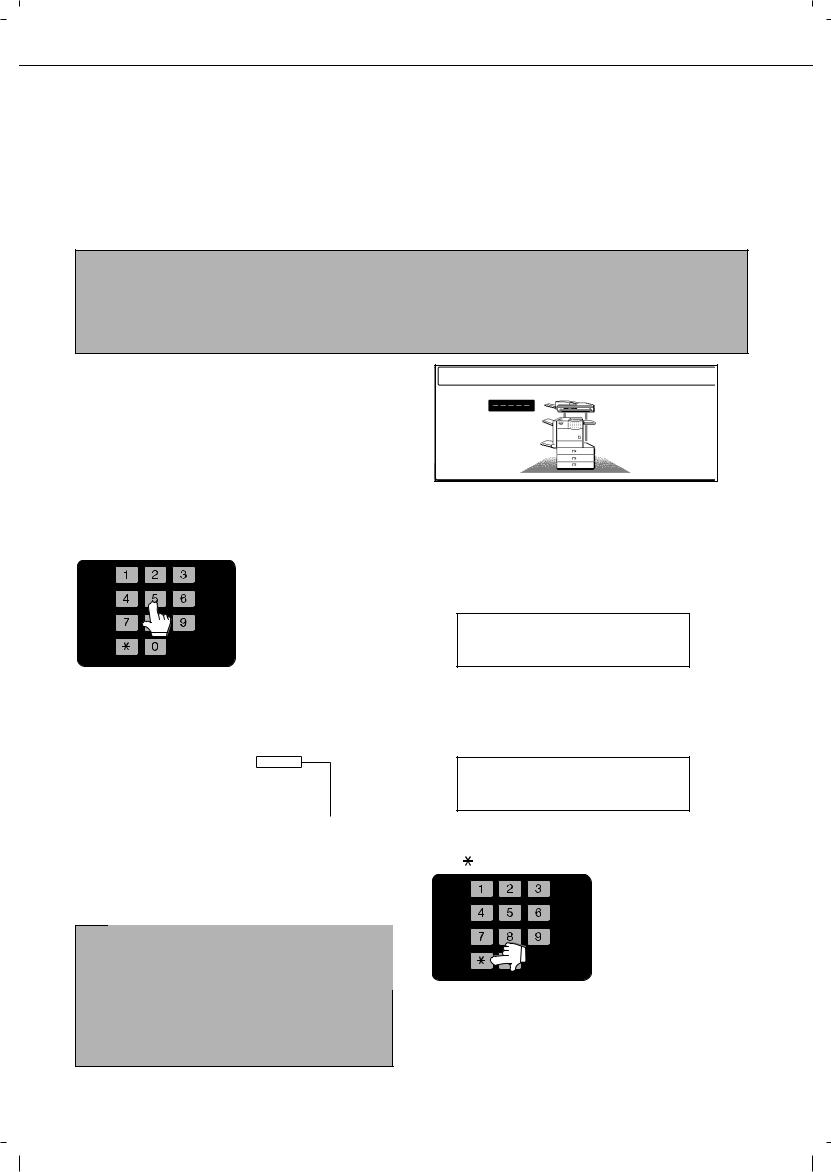
AUDITING MODE
Auditing mode can be enabled to keep track of the number of pages printed and transmitted (scanned) by each account (up to 500 accounts can be established). The page counts can be viewed and totaled as needed.
<This mode is enabled in the key operator programs separately for the copy, printer, fax, Internet fax, network scanner, document filing functions. (Page 7 of the key operator's guide)>
Using the machine when the auditing mode is enabled
The procedure for making copies when auditing mode has been enabled for the copy function is explained below.
NOTES
When auditing mode is enabled for document filing and fax/image transmission, a message will appear asking you to enter your account number each time you switch to the main screen of one of those functions in the touch panel. Enter your account number in the same way as for copy mode, and then begin the scanning procedure.
When the account counter is turned on for the printer function, you must enter your account number in the setting screen of the printer driver on your computer in order to print.
When the auditing mode is turned on, the right message appears on the touch panel.
ENTER YOUR ACCOUNT NUMBER.
When the above screen appears, enter your 5-digit account number and then begin the copying procedure.
1 Enter your account number (5 digits) with the numeric keys.
As you enter your account number, the hyphens (-) change to
asterisks (  ). If you
enter an incorrect digit,
press the [C] (Clear) key


 and re-enter the correct digit.
When a correct account number is entered, the following message will appear.
ACCOUNT STATUS |
:MADE |
/REMAINING |
COPIES |
:00,123,000/00,012,456 |
|
OK
2 Follow the appropriate steps to perform the copy job.
When copying is begun, the following message will appear.
READY TO SCAN FOR COPY.
PRESS [ACC.#-C] WHEN FINISHED.
To perform an interrupt copy job (page 5-43), touch the [INTERRUPT] key and then enter your account number as explained in step 1. The following message will appear.
COPY INTERRUPT MODE.
READY TO SCAN FOR COPY.
If a limit has been set by a key operator program for |
3 When the copy job is finished, press the |
the number of copies that can be made by the |
|
account, the remaining number that can be made is |
[ ] key ([ACC.#-C] key) |
displayed. |
|
Check the number in the display and touch the |
|
[OK] key. |
|
NOTE |
|
If "ACCOUNT NUMBER SECURITY" is enabled in |
|
the key operator programs and an incorrect account |
|
number is entered three times in a row, "PLEASE |
|
SEE YOUR KEY OPERATOR FOR ASSISTANCE." |
|
will appear. (Page 8 of the key operator's guide.) |
|
Operation is not possible while this message |
|
appears (about one minute). |
|
1-18
 Loading...