

Page 1

1
V-GC800
Mobile Phone
Thank you for using our V-GC800 Mobile Phone.
To guarantee the best performance, please read this manual carefully and keep it for further
use.
Olive Telecommunication Pvt. Ltd .reserves the right to make modifications on print errors
and update specifications without prior notice.
Page 2

2
Copyright @ 2010 Olive Telecommunication. All rights reserved.
Olive Telecommunication Private Ltd, Design and technology for the connected World. The Mobile
Original Logos are registered trademarks of olive Telecommunication.
The information contained in this user’s guide is written for Olive V-GC800.Olive
Telecommunication reserves the right to make changes to any of the products described in this
document and also reserves the right to revise this guide at any time without any prior notice.
This device may contain accessories, technology or software subjected to export laws.
Olive Telecommunication
Private Limited
Page 3

3
Table of Contents
1. Safety Instructions ················································· 6
2. Introduction to the Phone ······································ 9
3. Getting Started ······················································· 10
3.1. Insertion and Removal of SIM /UIM Cards ··········· 10
3.2. Insertion and Removal of Memory card ················ 11
3.3. Installing Battery··················································· 11
3.4. Battery Charging ·················································· 13
3.5. Security number ··················································· 15
4. Making calls ···························································· 16
4.1. Making Domestic Calls ········································· 16
4.2. Calling Fixed Line Extensions ······························· 16
4.3. Making International calls ····································· 17
Page 4

4
4.4. Receiving Calls ····················································· 17
4.5. Ending a Call ························································ 18
4.6. Call Options: ························································· 18
5. Icons in Standby State ··········································· 19
6. Use Menu Functions ·············································· 22
6.1. Phonebook ··························································· 22
6.2. Messages····························································· 26
6.3. Call history ··························································· 35
6.4. Settings ································································ 39
6.5. Multimedia···························································· 45
6.6. User Profiles ························································ 49
6.7. Applications ·························································· 50
Page 5

5
6.8. FM radio ······························································· 51
6.9. Bluetooth ······························································ 52
6.10. File Manager ························································ 54
6.11. Organizer ····························································· 55
6.12. Services ······························································· 57
6.13. Extra ·································································· 58
6.14. Shortcuts······························································ 59
6.15. Preloaded Applications/Link ································· 59
Appendix ⅠⅠⅠⅠ ·········································································· 60
Appendix ⅡⅡⅡⅡ ·········································································· 62
Appendix ⅢⅢⅢⅢ ·········································································· 63
Page 6
6
1. Safety Instructions
Before using the phone, please read the safety precautions carefully, so that you can use
your phone correctly and safely.
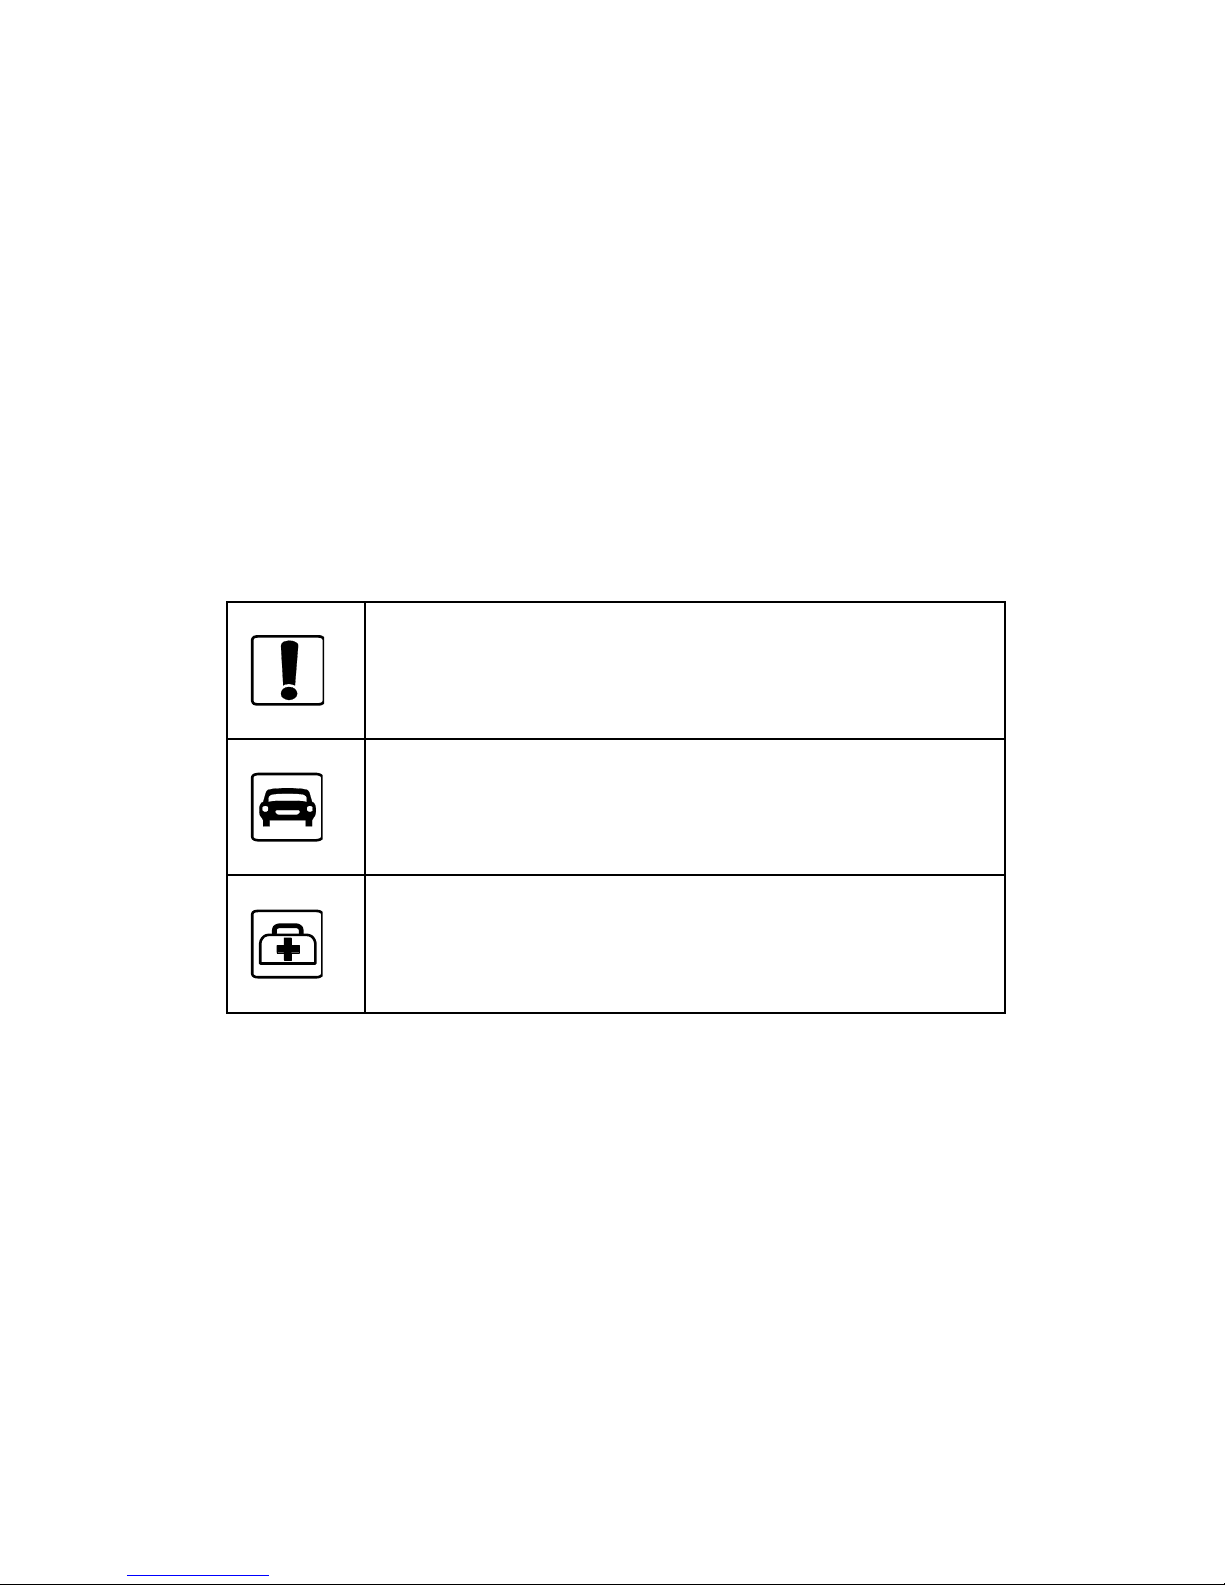
Do not switch on your phone when phone use is
prohibited or when phone use may cause interference or
danger.
Do not use your phone while driv
ing.
Follow the rules or regulations in hospitals and health
care facilities. Switch off your phone near medical
apparatus.
Page 7
7
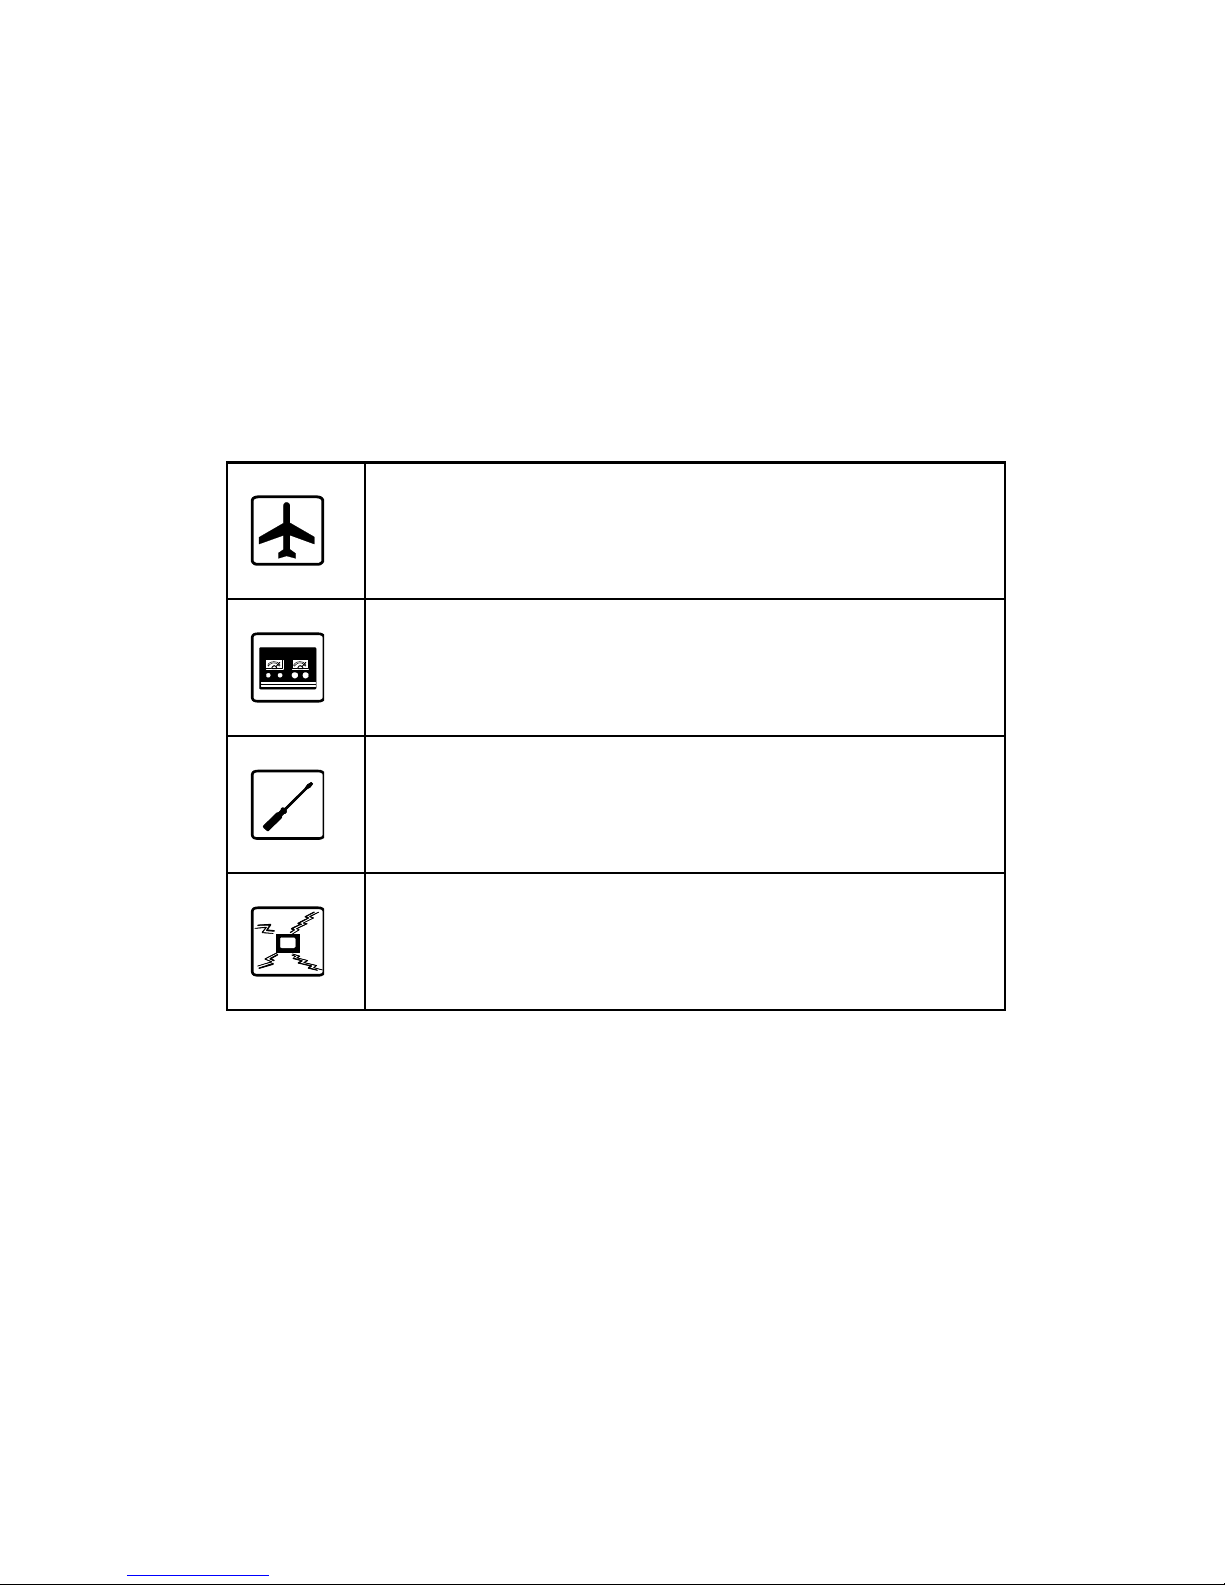
Switch off your phone in an aircraft. The phone may
cause interference to control signals of the aircraft.
Switch off your
phone near high
-
precision electronic
devices. The phone may affect the performance of these
devices.
Do not attempt to disassemble your phone or its
accessories. Only qualified personnel are allowed to
service or repair the phone.
Do not place your p
hone or its accessories in containers
with strong electromagnetic field.
Page 8
8
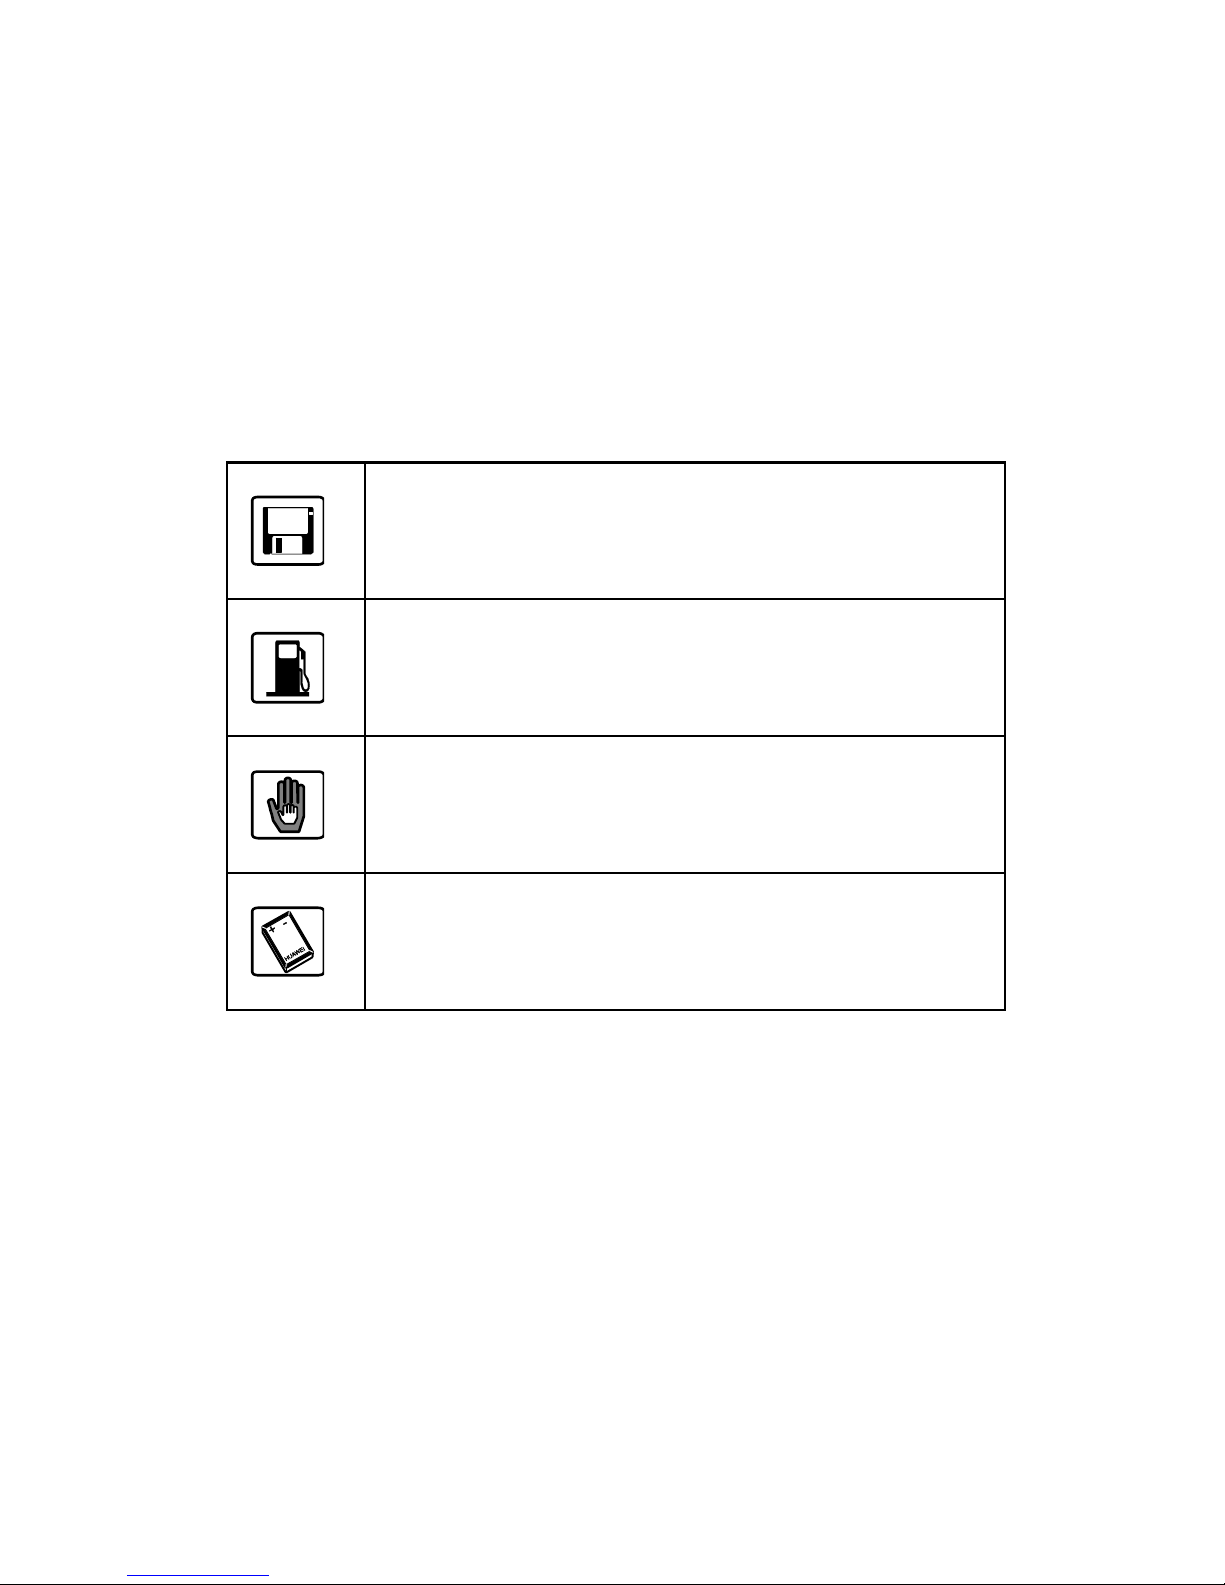
Do not place magnetic storage media near your phone.
Radiation from the phone may delete the information
stored on them.
Do not put your phone in a high
-
temperature place or
use it in a place with flammable material such as a gas
station.
Keep your phone and its accessories away from
children. Do not allow children to use your phone without
guidance.
Use approved batteries and chargers only
, to avoid
explosion.
Page 9
9
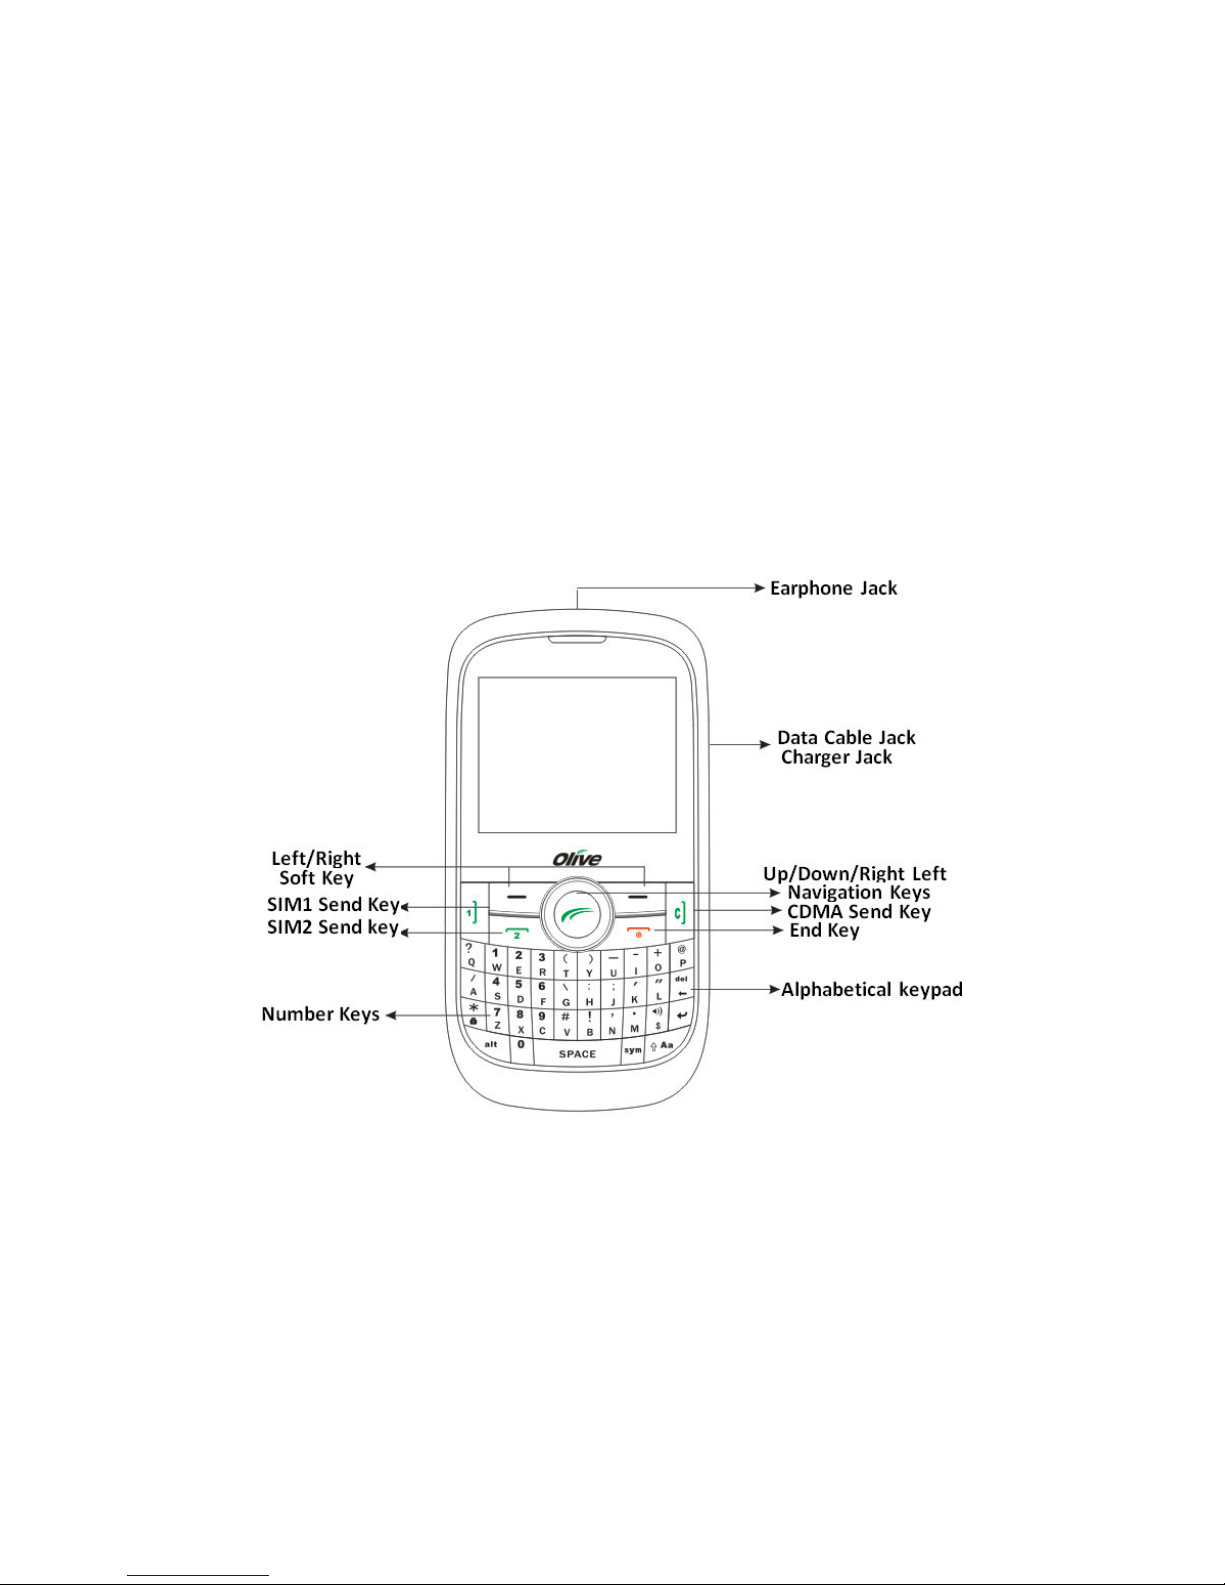
2. Introduction to the Phone
Page 10
10
3. Getting Started
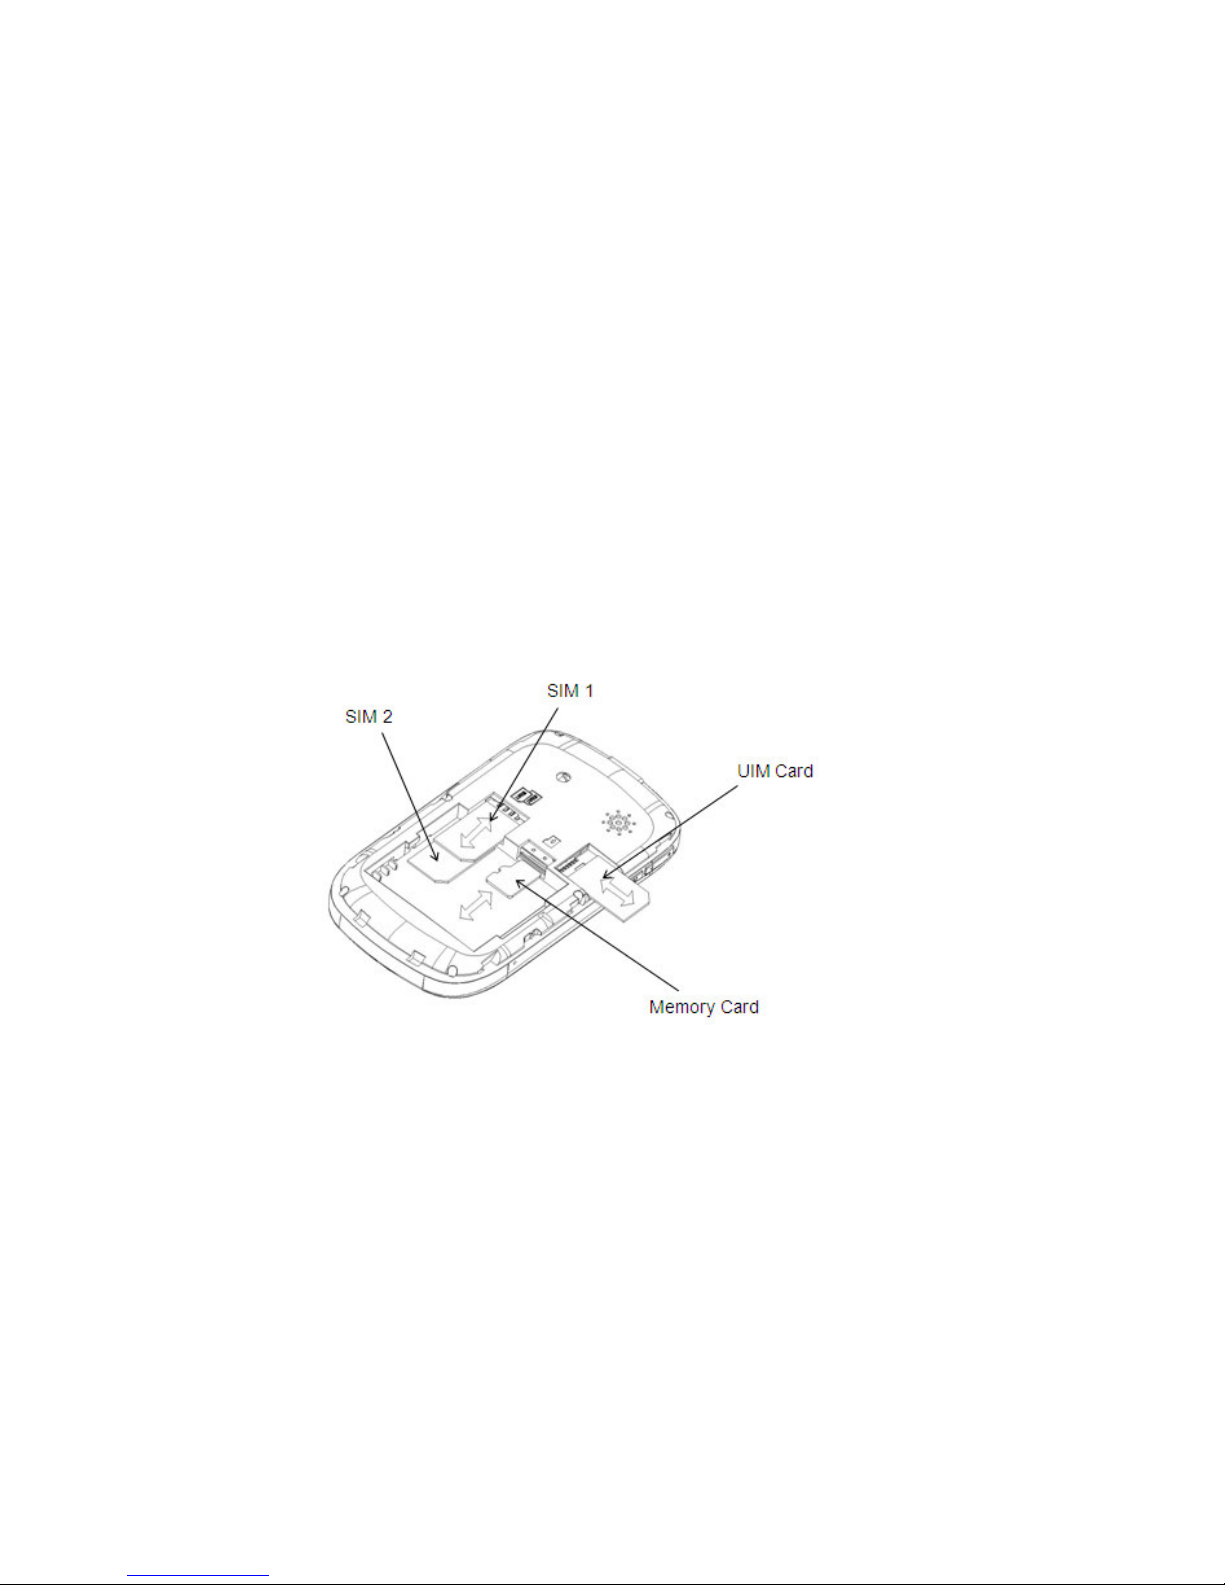
3.1. Insertion and Removal of SIM /UIM Cards
• Turn off the phone; remove the battery and unplug other external power sources.
• Insert the SIM card into the SIM slot as shown in the following picture.
Page 11

11
• When you need to remove the SIM card, please first turn off the phone, remove the
battery, then remove the SIM card
3.2. Insertion and Removal of Memory card
• Turn off the phone; remove the battery and unplug other external power sources.
• Put the Memory Card into the Memory Card trough.
• When you need to remove the Memory card, please first turn off the phone, remove
the battery, then remove the Memory card.
Note: As the T-FLASH card is small object, keep it out of children’s reach to prevent children
gulping it!
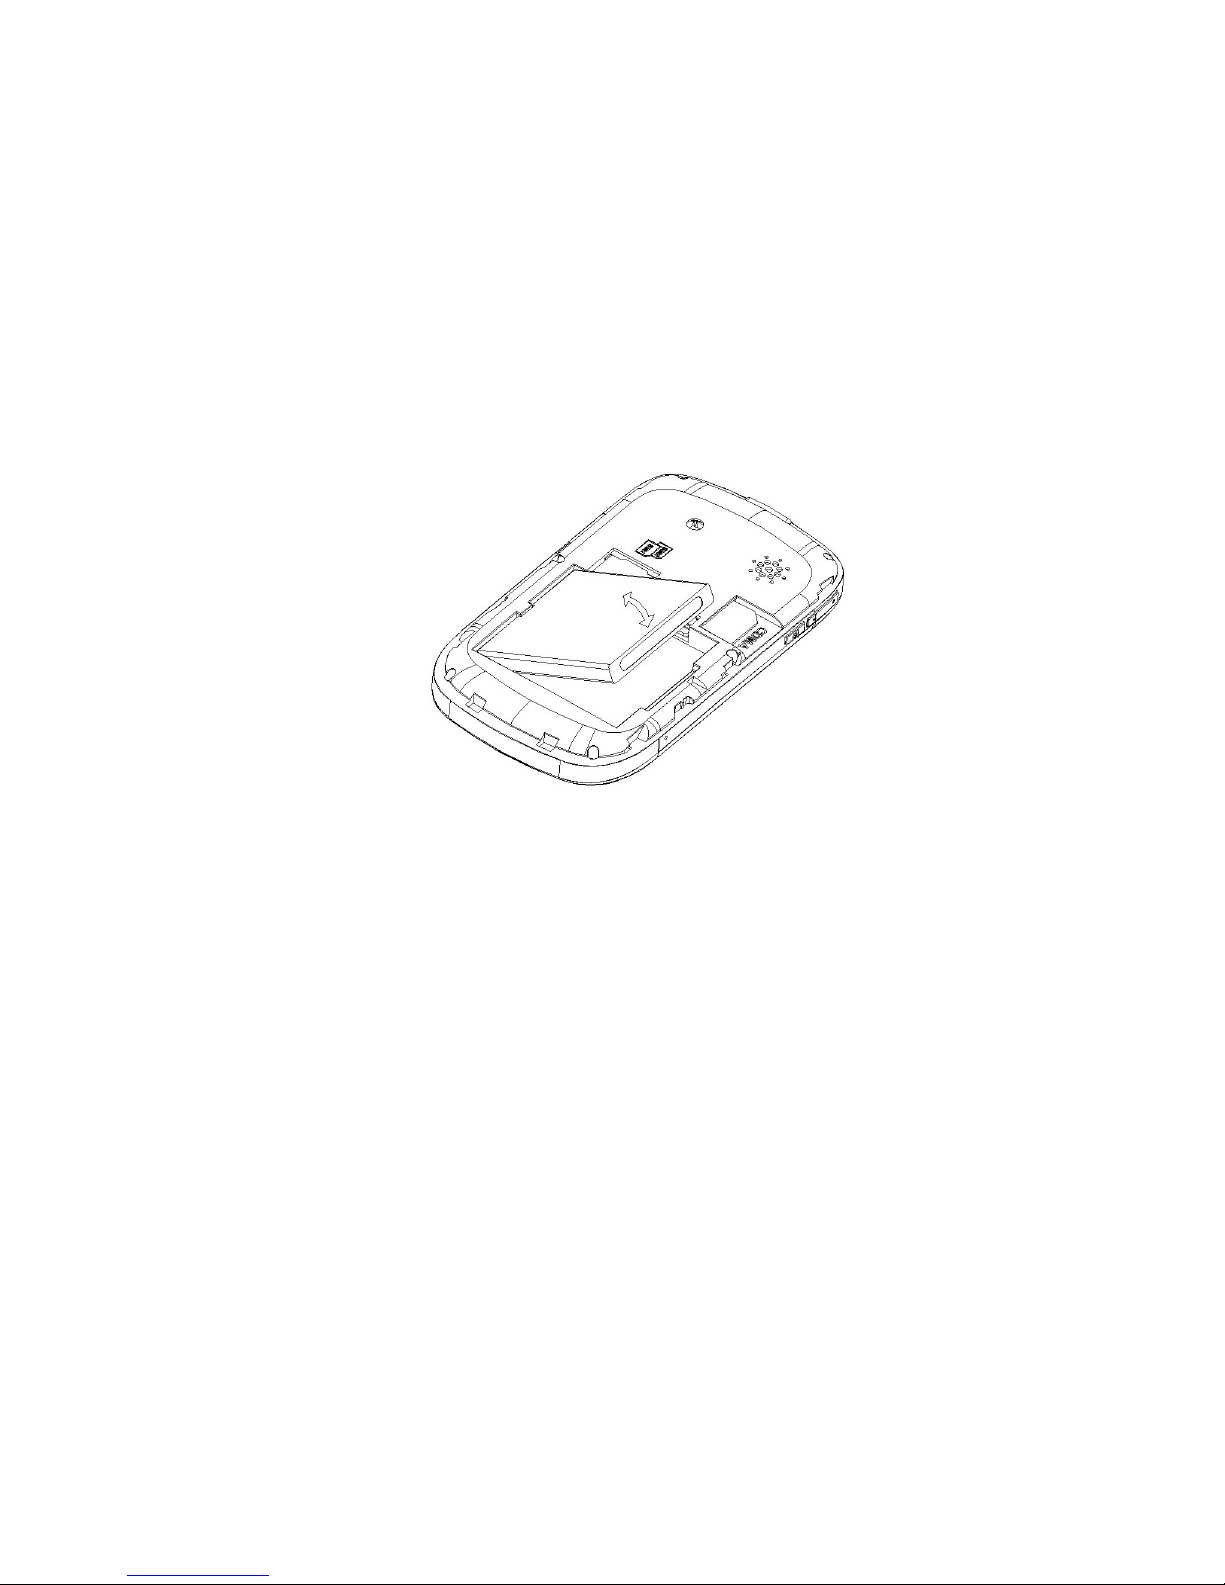
3.3. Installing Battery
• While removing the battery follow the following steps:
i. Push the battery cover towards top;
ii. Take out the battery from the mobile phone.
Page 12
12
• While installing the battery follow the following steps:
i. Put the battery aligned with the metal contacts in the phone.
ii. Put the Battery cover in its place.
iii. Push the battery cover down.
Warning: You must turn off your mobile phone before removing the battery.
Page 13
13
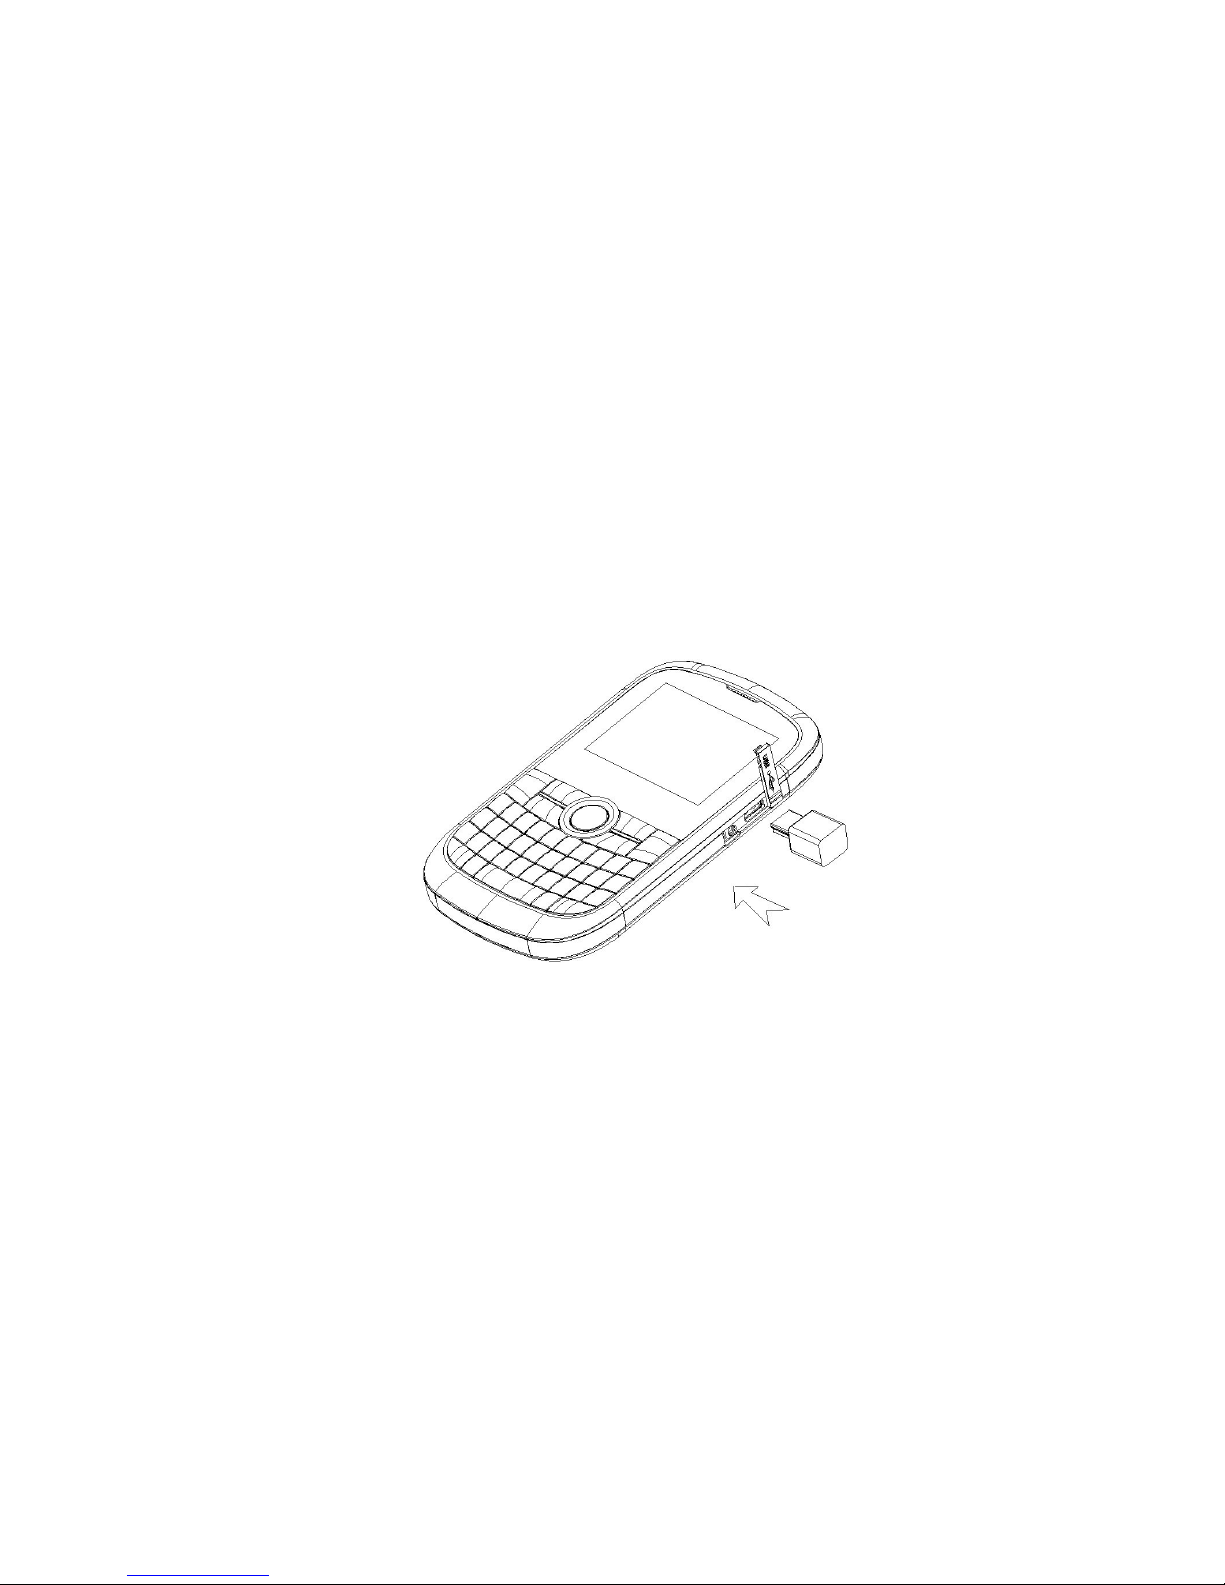
3.4. Battery Charging
• Plug the charger into the electrical outlet.
• Plug the charger connector into the charge interface of the phone.
• When charging is complete, unplug the charger connector from the electrical
outlet and the mobile phone.
Page 14

14
• Charging must be performed in a well-ventilated area with a temperature
between -10°C and +55°C.
• If the mobile phone automatically shuts down, or indicates that the Battery is low
you should immediately charge the battery.
• Please note that you should use only one charger at one time, either the Normal
charger provided in the box or the alternative charger port.
Warnings!
• Do not take the battery out when it is being charged.
• To ensure best performance, please use original accessories.
• Using any unauthorized accessories may affect your mobile phone’s
performance.
• Personal data and settings in your phone and SIM card may be lost when you
take out the battery.
Warning
Charging the mobile phone by improper means can cause to
explosion. Always refer to the related regulations for the disposal
of the battery.
Page 15

15
3.5. Security number
• PIN
PIN (Personal Identity Number), usually provided to a SIM Card by the network
operator.
If you enter the wrong PIN three times in a row, it will be locked. You need to enter
your PUK (Personal Unblocking Key) number to unlock. Please contact your
network operator for more details
• PIN2
PIN2 is provided to some SIM’s. If you enter the wrong PIN for another three times
in a row, it will be locked. You need to enter your PUK2 to unlock. This PUK2 may
be different from previous PUK. Thus, please contact your network operator for
more information.
• PUK
PUK (Personal Unblocking Key) is used to unblock the PIN. PUK is provided to a
SIM card. If you lose or forget the password, contact your network operator.
• Phone code
This code Protects your phone against unauthorized usage. You can turn on the
Phone code for your personal security use. The Phone code is “0000” by default.
Page 16

16
4. Making calls
4.1. Making Domestic Calls
Use the number keys to input the Phone number, and then press the dial key to dial the call
via SIM1/SIM2 or the UIM Card. Use Right soft key or the backspace key to delete a wrong entry.
You can input domestic calls in this order:
i. Area code
ii. Phone number
iii. Press the correct dial key
4.2. Calling Fixed Line Extensions
Some fixed phone extensions cannot be called directly. You must first go through the
switchboard before you can dial the extension, then click the * key to switch, as the screen will
display the letter “P” (Pause), then dial the extension number.
• You can input the switchboard number and the extension number in this order:
i. Area code
ii. Switchboard number
iii. P(Pause)
iv. Extension number
Page 17

17
v. Press dial key
4.3. Making International calls
To make an international call, Enter the + sign using the + key for international
long-distance call appears on the screen.
You can enter international phone number according to following sequence:
i. + Country code (e.g. +91 for India)
ii. Complete phone number
iii. Press Send key
After pre-fix, enter country code and complete phone number you want to dial.
4.4. Receiving Calls
You can select different modes to receive calls. You can press any of the send keys when the
phone is ringing to answer the call. If the earphones are already plugged in, you can use the button
located on the earphones to pick up the phone. If it is inconvenient to press the button, then you
can set the“Automatic Answer” as “On” by doing the following steps.
1. Go to Menu.
2. Select the “User Profiles” option here.
3. Here select the “Headset” Profile and customize it.
Page 18

18
4. Here the sixth option is Answer Mode.
5. Turn the “Auto” option “On”.
Now the call will be picked up automatically when the earphone is plugged in. If you have set
the Answer mode to “Any Key”, you can pick up the call by pressing any key other than the
hang-up key and right soft key.
4.5. Ending a Call
You can press the hang-up key to refuse an incoming call. During a call you can press the
hang-up key to end a call. You can also cancel a call you have just dialled by pressing the
hang-up key or right soft key.
4.6. Call Options:
During call, press Left soft key “Options” to enter call options. Call options can only be seen
in ongoing call, and functions such as call waiting and call conference have to be supported
by network. Please contact your network provider for more information about these
operations.
You can directly enter phone number at current call screen and press Send key to dial new
phone number.
In Call options, you can make following operations:
Page 19

19
Hold/Retrieve Call: Hold current call or retrieve the held call.
End Call: End the call.
New Call: Make a new call.
Phonebook: Enter the Contacts menu.
Messages: Enter the messages menu.
Sound recorder: Record the call.
Background Sound: use this feature to generate call background sounds during call. You
can choose the background sound from a number of pre-loaded sound effects.
Mute: Mute the call if the feature is on the other side will not be able to listen to your voice.
DTMF: Turn On/Off DTMF.
Call history: To view the SIM1/SIM2/UIM call history.
5. Icons in Standby State
These Icons are for reference only, subject to change from phone to phone
SIM 1 RSSI Bars
SIM 2 RSSI Bars
Page 20

20
CDMA RSSI Bars
Alarm activated
SIM 1 SMS is unopened
SIM 2 SMS is unopened
CDMA SMS is unopened
Ring Only Mode
Vibrate then Ring mode
Vibrate and Ring mode
Vibrate Only mode
SIM1 Missed call
SIM2 Missed call
Page 21

21
UIM Missed calls
SIM 1 MMS
SIM 2 MMS
SIM1 All calls diverted
SIM2 All calls diverted
Locked
Bluetooth function has been activated and can be searched
Continuous display indicates the Bluetooth function has been activated and can be
searched; flickering indicates data is under transmission.
Language and Input Mode
Your Mobile Phone comes with 5 international language support viz. English, Hindi, Russian,
Bahasa (Indonesia) and French. English is the default language. You may change the language by
going to the language options in the Phone settings.
Page 22

22
Services:
Services are provided with SIM kit. The mobile phone supports service function. The detailed
menu items depend on SIM card and the network. When the network provides such function and
your SIM card supports such function, the service menu will automatically be posted in the
services of the mobile phone.
6. Use Menu Functions
6.1. Phonebook
You can save names and phone numbers (contacts) in the phone memory or in the SIM/UIM card
memory.
Quick Search
1. Selecting this option will open the contacts list; you can enter the name of desired contact to
see the details. Here you will find the following options in the options menu on the Left soft
key.
● Send text message: Send SMS to the selected contact.
● Send multimedia message: Send MMS to the selected contact.
Page 23

23
● View: To view the details of the contact.
● Edit: To edit the selected contact.
● Delete: To delete the selected contact.
● Copy: copy the contact from current memory location to the other available
destinations e.g.SIM1/2 or Phone.
● Send vCard: Send the contact by SMS, MMS, and Bluetooth or save the contact in a
file.
Search contact
You can search a contact from the contact list by entering the name you want to search, press the
option, select [search], the search result will be displayed.
Add new contact
● You can save a new contact here.
For this you first need to Choose the storage location out of the 3 options viz.
SIM1, SIM2 and Phone.
Page 24

24
Copy All
Using this function you can copy all the contacts from the following memory locations:
● From SIM1 to Phone
● From Phone to SIM1
● From SIM2 to Phone
● From Phone to SIM2
● From SIM1 to SIM2
● From SIM2 to SIM1
● Copy from UIM to Phone
● Copy from UIM to SIM1
● Copy from UIM to SIM2
● Copy from Phone to UIM
● Copy from SIM1 to UIM
● Copy from SIM2 to UIM
Delete
You can delete all the Contacts of SIM1, SIM2, UIM or Phone. You can also delete selected
contacts by selecting one by one option.
Page 25

25
Caller groups
There are 5 caller groups in your phone viz. Friends, Family, VIP, Business, Others.
You will find the following options here.
• Group Name: To edit the name of the group.
• Caller Ringtone: To associate a special ringtone or other sound with the group members.
• Caller picture: To associate a special video clip with the group members.
Group Members: To edit the list of members in a group.
Phonebook Settings
You will find the following options under this sub-menu.
• Memory status: Shows the current memory status of SIM1, SIM2 and Phone.
• Preferred storage: You can set the preferred storage location for new contacts from 3
options viz. SIM1, SIM2 and Phone.
• Fields: You can select the fields to be saved while saving a new contact in the Phone
memory. Please note that the fields selected can not be used with SIM card Memory.
• My vCard: Here you can Edit, send or Reset your Business card. You can send your
Page 26

26
vCard through 3 options viz. SMS, MMS and Bluetooth.
• vCard version: Here you can select the version of vCard. There are two versions viz.
vCard 2.1 and vCard 3.0
Caller Picture: You can set a caller picture using this option. The selected image will be displayed
when the associated contact calls you or you call the associated contact.
6.2. Messages
Your phone is capable of creating, sending and receiving text messages, E-mail messages as well
as multimedia messages.
Text message
Following features are available under the SMS menu:
Write Message
You can create new text message here in the text editing interface. You may send the message
from SIM1 by selecting the option SIM1 done or through SIM2 by selecting SIM2 done or from the
CDMA card by selecting UIM done. You may select any of the sending options from the list of 7
available options viz. Send only, Save and send, Save, Send to many, Send to group.
You may also insert pre-defined templates or EMS objects in the SMS by selecting the Insert
Page 27

27
object option. The Text format can also be changed by selecting the Text format option. In this
menu, you may change the Text size, Text style, Alignment and the Paragraph of the text by using
this option.
Inbox
In the standby mode, press <Menu> to access the Main menu > Messages >Text Message> Inbox;
You can see the messages of SIM1, SIM2 or UIM cards.
While viewing a message, press Options to access the following options:
• Reply: To send a text reply to the sender of the SMS.
• Delete: To Delete the opened item
• Forward: To send the same SMS to other people.
• Copy to SIM/Phone: Use this function to Copy the Message form SIM to Phone memory
or Phone to SIM memory.
• Move to SIM/Phone: Use this function to Move the Message form SIM to Phone memory
or Phone to SIM memory.
• Delete all: To Delete all the messages of the opened folder.
• Copy All: To Copy all the Phone Messages to SIM Memory or Vice-versa.
• Move All: To Move all the Phone Messages to SIM Memory or vice-versa.
• Use number: Using this function, you can extract the numeric characters from the
message. You may call, text or save the number to contacts list.
Page 28

28
• Use URL: Using this function, you may extract any URL from the phone.
• Use USSD: Using this function, you can extract any USSD message from the message
text. USSD Nos. are nos. with less than 3 digits or the numbers ending with the
special character #.
• Use Email address: To use the Email address given in the message text.
• Chat: To chat with the sender of the message by text messages
Outbox
1.In the standby mode, press <Menu> to access the Main menu > Messages>Text message >
Outbox;
While viewing a message, press <Options> to access the following:
• Send from SIM1: To send the message from SIM1.
• Send from SIM2: To send the message from SIM2.
• Send from UIM: To send the message from UIM.
• Edit: To Edit the text message.
• Delete: To Delete the selected message.
• Copy to SIM/Phone: Use this function to Copy the Message from SIM to Phone memory
or Phone to SIM memory.
• Move to SIM/Phone: Use this function to Move the Message from SIM to Phone memory
or Phone to SIM memory.
Page 29

29
• Delete All: To delete all the messages in the folder.
• Copy All: To Copy all the Phone Messages to SIM Memory or vice-versa.
• Move All: To Move all the Phone Messages to SIM Memory or vice-versa.
• Use number: Using this function, you can extract the numeric characters from the
message. You may call, text or save the number to contacts list.
• Use URL: Using this function, you may extract any URL from the phone.
• Use USSD: Using this function, you can extract any USSD message from the message
text. USSD nos. are nos. with less than 3 digits or the numbers ending with the
special character #.
• Use Email address: To use the Email address given in the message text.
Templates
In the standby mode, press <Menu> to access the Main menu > Messages >Text
Message>Templates;
Here you can select the template message you want to use.
You can edit, delete or use the template in message by going to the options on the Left soft key
here.
SMS settings
Here you can edit the message settings: Profile settings, Common settings, Memory status, and
Preferred storage for messages.
Page 30

30
MMS
Write Message
Choose the Write Message option in messages menu. You can send the MMS to a phone number
or an e-mail address by editing the recipients in the To, Cc or BCc options. You may also enter the
subject of the multimedia Message by going to Subject option.
In the Edit content interface, you can enter text, picture, audio, video, attachment, slides before
and after, bookmark preview the message or change the slide timing in the options on LSK. Now
just Press the “Done” on the Right soft key to find the 6 options viz. Send only, Save and send,
Save to Drafts, Save as template, Send options and Exit.
Inbox
All the received MMS are stored in the Inbox folder.Open the MMS you received.Here you will find
Press [options] to view the following things:
• View: To view the content of the MMS.
• Reply: To reply to the sender of the MMS.
• Reply by MMS: To Send a Text message to the sender of the E-Mail.
• Reply all: To send a reply MMS to the sender of MMS as well as all the copied contacts.
• Forward: To Forward the MMS.
• Delete: To delete the opened MMS.
• Delete all: To Delete all the MMS in the Inbox folder.
Page 31

31
• Save as Template: To save the MMS as Template in the Templates folder.
• Properties: To view all the information about the MMS.
• Use Details: To extract any number, Email etc. from the MMS content.
Outbox
All the MMS sent from your Phone will be saved here. Go to any MMS and press Left Soft Key
to find the following options:
• View: To view the content of the MMS.
• Forward: To Forward the MMS.
• Edit: To edit the contents of the MMS.
• Delete: To delete the opened MMS.
• Delete all: To Delete all the MMS in the Outbox folder.
• Save as Template: To save the MMS as Template in the Templates folder.
• Properties: To view all the information about the MMS.
• Use Details: To extract any number, Email etc. from the MMS content.
Drafts
If you select the “Save to Drafts” option after creating an MMS, It will be saved here.Press Options
on the Left soft key after selecting any MMS from the drafts folder to view the following Options:
• View: To view the content of the MMS.
• Send: To Send the MMS.
Page 32

32
• Edit: To edit the contents of the MMS.
• Delete: To delete the opened MMS.
• Delete all: To Delete all the MMS in the Outbox folder.
• Save as Template: To save the MMS as Template in the Templates folder.
• Properties: To view all the information about the MMS.
• Use Details: To extract any number, Email etc. from the MMS content.
Templates
There are 5 default MMS templates in your phone. You can also create your own templates by
selecting the “Save as Template” option after creating an MMS. You can use any of the user
defined or default templates while creating a new MMS.
MMS Settings
Here you can do the all the settings related to MMS. You will be offered two options here.
1. Profiles: In this option, you may set the MMS profile for SIM1 or SIM2. There are a
number of default profiles built in the phone. You may also add a new profile ,if your
desired profile is not there in the Phone. Please contact your operator for more
information about the settings.
2. Common Settings: Here you will find 5 options viz. Compose, Send, Retrieve, Filter
and Memory status.
Page 33

33
Chat
Press the Left soft key to enter chat menu, you can set up two chat rooms. At first, you need to set
My nickname and Remote number in the Chat room info item, then select “Start new” to create
solitary chat room by a short message, for chat person and you. You can use this Chat feature
using SIM1 or SIM2.
Email
Before using the Email feature, you need to set at least one e-mail account in the “E-mail
accounts” menu. Using this menu, you can send/receive E-mails.
Under the E-Mail Menu, you will find the following options.
Send and Receive: You can send/receive the e-mail from the specified mailbox server.
Write Email: You can create new e-mail messages here
Inbox: You will find all the Emails you have received in this folder.
Outbox: You can see the e-mails that have been sent by you, but not delivered.
Sent: Here you can see the Emails that you have sent and delivered.
Drafts: All the Unsent messages are saved in this folder.
Clear mailbox: You can clear the e-mails in the specified mailbox, including inbox, outbox, sent
e-mail box and Drafts, or clear all e-mails;
Page 34

34
Delete Marked emails: You can change the status of all e-mails to deleting status.
Email accounts: Here you may set up new accounts or switch between the existing accounts.
Templates: Here you can select the template message you want to use. You can edit, delete or
use the template in message by going to the options on the Left soft key here.
Voice mail server
Voice mail server is a network dependent feature; you may need application to open this service.
For more details, please inquire with your service provider.
This will automatically direct incoming calls to the voice mail centre when you cannot accept a call
so that the caller can leave a message on the voice mail system of service network. If a message
is left, you can access the message by visiting the voice mail system.
Broadcast message
Broadcast message means the message sent by the operators. With this function, you can receive
SMS on many aspects, such as weather report, taxi, hospitals etc.
Page 35

35
6.3. Call history
Your phone can record the missed Calls, Received Calls and the dialled calls. It can also record
the time of the calls. Under the list of missed call, answered call and dialled call, you can see the
time and date of the call, edit or delete the call in the list, store the number into the phone book.
You can call any number from the Log Menu by just going to that entry by using the up/down
navigation key and pressing the Send (G1 for SIM1 and G2 for SIM2) .When the number of calls
exceeds the maximum, the latest call replaces the oldest.
SIM1/SIM2/UIM call history
• SIM1/2/UIM missed calls: Contains the list of Missed calls on each card.
• SIM1/2/UIM dialled calls: Contains the list of Numbers dialed from SIM1/2/UIM.
• SIM1/2/UIM received calls: Contains the list of numbers from which you have received a
call.
• Delete SIM1/2/UIM call log: To delete all the missed calls, received calls and dialed calls
entries from the phone.
• SIM1/2/UIM call time: Contains the time duration detail of last call, total dialed calls and
total received calls.
Page 36

36
• SIM1/2 GPRS counter: View the quantity of data flow transmitted on the network via
GPRS for SIM card 1/2.
[Call Settings]
SIM1/2 Call setup
Enter the menu to set the following:
Caller ID
If you choose [Hide ID] option, your phone number will not be sent to other side. Please note that
the feature is network dependent and can be used only if your service provider provides the
feature. We suggest you to set the mode to “Set by network”.
Call waiting
If this function is activated, you will receive a prompt during the call, if anybody wants to
contact you, when you are already in call. You can do the following operations with it.
Activate: Activate the Call waiting function.
Deactivate: Deactivate the Call waiting function.
Query Status: Query the status of the function.
Call divert:
Divert the incoming calls to the other phone number. You have option to divert all the calls or to
divert the calls for a special case like if unreachable. If no answer, if busy, all data calls. You can
cancel all the diverts by selecting the following features.
Page 37

37
Call barring:
Use the menu to set the call barring. It contains outgoing calls, incoming calls, Cancel all,
Change barring password.
Line switching:
You can change the line 1 or line 2.
Closed User Group: This is a network dependent feature. Contact your service provider for more
information.
UIM Call Settings:
Call waiting
If this function is activated, you will receive a prompt during the call, if anybody wants to contact
you, when you are already in call. You can do the following operations with it.
Activate: Activate the Call waiting function.
Deactivate: Deactivate the Call waiting function.
Call divert:
Divert the incoming calls to the other phone number. You have option to divert all the calls or to
divert the calls for a special case like if unreachable. If no answer, if busy, all data calls. You can
cancel all the diverts by selecting the following features.
Note: Call waiting and Call divert is a network dependent feature. Please contact your service
provider to get the correct feature code for each function.
Page 38

38
Advance settings
Black List: If the Black List feature is turned On, All calls from the numbers in the black List will be
automatically rejected by the Phone.
Auto Redial: You can set it as on or off. After the first failure of dialing attempt, Phone will auto
redial the number for a maximum 10 times.
Speed Dial: You can set whether to activate this function and edit the related speed dialing
numbers. If this function is “Active”, then you may dial any of the corresponding individual keys
(2-9) on the standby interface to dial the number specified for this key.
Background sound:
Select when making call: If setting it as on, during call, there will be background music coming
out. If setting it as off, you can shield this function.
Playback Settings: You can set volume and continuous play interval.
Effect List: There are 10 kinds of default background music such as Restaurant, Motorcycle and
Pub etc.
Call time Display: You can set whether to display call duration during call conversation.
Call Time Reminder: You can set one alert tone or periodic alert tone during call conversation so
that you can understand call time. You can turn off the alert tone.
Auto quick end: You can set call duration. After the set time expires, the mobile phone will
automatically end the call.
Page 39

39
Auto record: You can set it as On or Off.
Note: Some settings need network support. For example, call barring can not be used unless the
local network and SIM card open it.
6.4. Settings
The settings menu provides you with various setting options to customize the phone to your
preferences and needs. You can also reset the settings to their default status.
SIM settings
All Open: All the 3 Cards will be working in this condition, and the Phone will show networks
for all the 3 Cards.
Dual SIM open: Phone will show network for the Two SIM cards only. The UIM will not work
in this state.
SIM 1/UIM open: Phone will show only SIM 1 and UIM Network. SIM2 will be closed in this
condition.
SIM 2/UIM open: Phone will show only SIM 2 and UIM Network. SIM1 will be closed in this
condition.
Only SIM1 open: Phone will show networks for SIM1 only. SIM2 and UIM will be closed in
Page 40

40
this condition.
Only SIM2 open: Phone will show networks for SIM2 only. SIM1 and UIM will be closed in
this condition.
Only UIM open: Phone will show networks for UIM only. SIM1 and SIM2 will be closed in
this condition.
Flight mode: In this Mode Phone will not show the network of any SIM card but you will be
able to access all the Menu items, like the Audio Player or FM etc.
Phone Setup:
Time and Date
Use the menu to set time and date. You will find five options here viz. Set home city, Set time/date,
Set format, Auto Update of date and Time.
Schedule Power On/Off
Use the menu to schedule the time of power on/off.
Language
Use the menu to set the language. You can set any language out of the five available language
options viz. English, French, Bahasa, Russian and Hindi.
Page 41

41
Preferred input methods
You can change the default input method by selecting one of the 3 available options viz. Multitap
ABC, Multitap abc or 123.
Display characteristic
Wallpaper: You can set wallpaper available in the system or user defined wallpaper e.g. the
images stored on your memory card or phone.
Screen Saver: You can set Screen Saver available in the system or user defined.
Power on and Off Display: You can choose any available picture to be shown during power
on and off animation.
Show Date and Time: After enabling this feature you can have date and time on idle screen.
Themes
You may select any of the available themes. There are 3 options viz. Theme1, Theme2 and
Theme3.
Activate: To activate the theme
Update Period: To set the time, after which the theme will be automatically changed.
Page 42

42
Set Order: To change the order of themes.
Greeting Text
You may write the string of your choice here, and set the status to On. The Greeting text will be
shown, when the Phone powers On.
Dedicated key
The default setting of the dedicated key is :
Up key: Shortcuts
Down key: Audio player
Left key: Write message
Right key: FM Radio
You can change this setting by selecting the “Edit” option on the Left soft key and assign the
shortcut key to any of the available options.
Page 43

43
Misc. settings
Under these settings, you will find the option “LCD Backlight”, where you can change the Backlight
time and Brightness.
Network Setup
SIM1/2 Network Settings: Here you can switch between automatic and manual network
selection mode. In the Preferences options, Press left soft key, you can do the following options:
add from the list, new, change priority, delete.
Security Settings
SIM1/2 Security setup: Use the menu to power on or power off the SIM lock, Fixed dial, Barred
Dial and change the password of SIM PIN. The default PIN code is operator dependent.
UIM security setup: Use the menu to power on or power off the SIM lock, Fixed dial and change
the password of SIM PIN. The default PIN code is operator dependent.
Phone lock: Use the menu to turn the phone lock on/off. The default password is 0000.
Auto keypad lock: Switch on the mode and set the time. The keypad will be automatically locked
Page 44

44
after the time entered.
Change password: Change the password of the phone. The default password of your phone is
“0000”
Loss Protection: if this feature is On, a text message will be sent to the number set by you, each
time the SIM cards are changed. You may change the recipients’ number by going to Edit number
option.
Restore Factory Setting
Use this option restore the relevant settings to the manufacturer’s settings.
Note: Restoring the manufacturer’s settings requires the correct handset lock code
to be entered, and the default password is “0000”. The phone will restart when the
settings are restored as some settings cannot be restored to the manufacturer’s
settings until the phone is restarted.
Audio effect
Here you may select any of the available 8 effects viz. Normal, Bass, Dance, Classical, Treble.
Party, Pop and Rock. You may also edit the Equalizer options by going to settings.
Page 45

45
6.5. Multimedia
[Camera]
Press 1~8 number keys to set some functions, such as Effect settings White balance, Delay time,
Cont. shot, Scene mode, Image Quality, Image size.
# Key: Open/Close the icon on the screen.
Left/Right key: adjust the EV.
Press the Option button to do the following settings:
Photos: To view the saved photos.
Camera Settings: In the camera settings, you can do all settings viz. Shutter Sound, EV, Contrast,
Anti flicker, Delay time, Cont. Shot.
Image settings: Here you can set the Image size and Quality.
White Balance: You can set any of the available options viz. Auto, Daylight, Tungsten, Fluorescent,
Cloudy, Incandescent.
Scene Mode: Can switch between Auto, daylight and Night Mode.
Effect Settings: You can select any of the available options viz. Normal, Grayscale, Sepia, Sepia
green, Sepia blue, Color invert.
Page 46

46
Storage: Select the storage from Phone and memory Card.
Restore Default: Restore the default Camera settings.
[Image viewer ]
All photos taken are saved in the Image viewer. You will find the following options viz. View,
Browse Style, Use As Send, rename, Delete, Delete All files, Sort by, Storage.
[Video Recorder]
Press the OK key to enter into video recording. The duration of recording depends on the
storage. Entering the options, you can have the following settings:
Camcorder Settings: You can set White Balance, EV, Night Mode and Anti-flicker for your
recorder so as to have high-quality videos.
Video Settings: You can set Normal, High, Low.
Effect Settings: There are 6 options available, Normal, Grayscale, Sepia, Sepia Green, Sepia
blue and Color invert.
Storage: Change the storage from Phone and Memory Card.
Restore Default: Restore the default settings for the Video recorder.
[Video player]
It is used to play the videos. Our Phone supports avi, Mp4 and 3gp format of videos.
Here you will find 6 options viz. Play, Send, Rename, Delete, delete All files and Sort by
respectively.
Page 47

47
[Audio Player]
Play the music you stored in the phone or memory card.
Description of audio player options:
Options : Description
Play : Play the selected music.
Details : View the details of the song.
Add to
Ringtones
: Add the song to the ringtones list.
Add : Add the songs from the file manager.
Remove : To remove the selected song.
Remove all : To remove all the songs.
Settings : There are various options in it like:- Pre. Play list, List auto gen., Repeat,
Shuffle, Background play, BT stereo output, BT Stereo headset, Sound effects,
Lyrics display.
[Sound Recorder]
Page 48

48
Used to record the sound. Press “Options” to have the following operations:
New record: You can record new files.
Play: You can play the selected file.
Append: Append the new record to the file that you select.
Rename: You can rename the chosen file.
Delete: You can delete the chosen file.
Delete all files: You can delete all files.
Use as: You can use it in user profiles.
Send: You can send the recorded file to Bluetooth, or as multimedia message.
Settings: You can set the storage position for record files, including phone and memory card. Also
you can set the format of the record file like AMR, WAV and AWB, you can select the audio quality
as Low, High.
[FM Radio]
Your mobile phone supports FM radio. To use the mobile phone to listen to radio, insert the
headset connection cable into the headset port in the mobile phone. The headset connection cable
functions as the antenna of the FM radio, so it should hang freely.
When the FM radio is activated, the mobile phone will display the number and name (if the
radio station has been saved) and frequency of the radio channel. If you have saved some radio
channels (at most 9 channels) in the mobile phone, you can scroll to choose the desired channel
Page 49

49
or press any of number keys 1-9 to choose the corresponding channel.
Option menu
Channel list: You can edit and save 9 channels.
Manual input: You can edit the specified radio frequency band. The frequency of the radio is
between 87.5 MHz and 108.0 MHz.
Auto Search: You can have automatic search and save the searched channels into the list.
Settings: You can set background play, loud speaker, record format, audio quality and record
storage.
Record: Record FM
Append: Append the new record to the file that you select.
File list: List the file of FM record.
[Schedule FM record]
Turn on the function, Schedule the Date, Time, Channel, record settings. FM record will be
activated on schedule.
6.6. User Profiles
Press [options] to set the following:
• Activate: Activate the profile.
Page 50

50
• Customize: The following content can be customized in every profile.
Tone Setup: Allows you to choose a ringing style. Your choices include ringing tones,
alarm tones, power-on tone, power-off tone, cover open, cover close, message tones
and keypad tones.
Volume: Allows you to set the volume of the ringing tones and keypad tones.
Alert Type: You have choices including Ring, Vibrate only, Vibrate and ring, Vibrate
then ring.
Ring Type: Set as Single, Repeat, and Ascending.
Extra Tone: Allows you to turn on/off the Warning and Error tones.
Answer Mode: Here you can select the cover answer or Any key answer option. If
both the modes are disabled, Normal answer will be the default answer mode.
Note: After the headset is inserted into the mobile phone, the mobile phone will automatically
change into headset profile. Unplug the headset to return to the previous profile.
6.7. Applications
[Games]
This mobile phone provides 2 inbuilt games viz. Puzzle and Magic Sushi. Please refer to the
operation instructions attached to the games.
Page 51

51
Game settings
• BGM: On or off background audio.
• Sound effect: On or off audio.
• Volume: You can adjust volume level.
[Applications]
This mobile phone provides inbuilt JAVA Applications like Ebuddy, Opera Mini. You can also
install more Java Games and Applications to the Phone.
6.8. FM radio
Your mobile phone supports FM radio. To use the mobile phone to listen to radio,
insert the headset connection cable into the headset port in the mobile phone. The
headset connection cable functions as the antenna of the FM radio, so it should
hang freely.
When the FM radio is activated, the mobile phone will display the number and name
(if the radio station has been saved) and frequency of the radio channel. If you have
saved some radio channels (at most 9 channels) in the mobile phone, you can
scroll to choose the desired channel or press any of number keys 1-9 to choose the
Page 52

52
corresponding channel.
Option menu
• Channel list: You can edit and save 9 channels.
• Manual input: You can edit the specified radio frequency band. The frequency of the
radio is between 87.5 MHz and 108.0 MHz.
• Auto Search: You can have automatic search and save the searched channels into the
list.
• Settings: You can set background play, loud speaker, record format, audio quality and
record storage.
• Record: Record FM
• Append: Append the new record to the file that you select.
• File list: List the recorded files.
6.9. Bluetooth
The mobile phone supports the Bluetooth function. You can use Bluetooth wireless technology
to set wireless connection with other compatible devices, including mobile phone, computer,
headset, in-car accessories etc. With Bluetooth function, you can send photo, video segment,
audio segment, personal business card and memo. You can also establish wireless connection
Page 53

53
with the compatible PC to transmit files and connect to web by dialing number via SIM.
Bluetooth Menu
Power: Before using Bluetooth function, you need to activate this option. When Bluetooth
function or other functions are being used, allowing this function to operate in the back desk will
consume more power. It is recommended to close this function when it is idle.
Inquiry audio device: With this function, you can inquiry audio device. For other devices,
enter My Devices to search.
My Device: After entering this option, you will see the Bluetooth devices compatible with the
mobile phone. Entering options, you can have necessary operations on the desired Bluetooth
device or search the incompatible Bluetooth devices.
Active Devices: With this function, you can see all devices connected with the mobile phone
and their link service type. You can interrupt the specified link service.
Settings: Before using Bluetooth function, enter this menu to have corresponding settings. If
your mobile phone’s Bluetooth function is not activated, you can have activation confirmation.
• Visibility: After this option is activated, other peripheral devices supporting Bluetooth
wireless technology can see your device and its name via search. After the step audio
play service is activated, this device will be unable to be searched.
• Change Device Name: You can edit my device name.
• Authentication: After this option is activated, matching is needed when peripheral device
Page 54

54
accesses my device via Bluetooth (for matched devices as well). After closing the option,
no matching is needed for the matched devices.
• Audio Path: You can leave the audio on my device or send to other hand-free devices via
Bluetooth. If using Bluetooth to have a call, set this path as hand-free devices.
• Storage: Set the received files store in phone or memory card.
• FTP Settings: You can set the file directory shared by my device and the access right to
online Bluetooth devices.
About: Here, you can see the name of my device, my device’s Bluetooth device address and
the Bluetooth services supported by my device.
Tip: When searching Bluetooth devices, make sure that the peripheral Bluetooth devices are within
the signal cover range and can be searched. To match the searched devices, you need to discuss
with the user of this device about a pair of matching passwords. To match the hand-free device,
you must input its matching password. After matching, this device will be saved in my device view.
.
6.10. File Manager
You can manage the memory space of your Phone and Memory card.
Press <Options> to access the below menu:
Page 55

55
• Open: You can open the files in the Phone memory/memory card.
• New Folder: Under the root directory, you can create a new folder to save more detailed
files.
• Format: You can format all files in the memory card.
• Rename: You can rename the title of your memory card.
• Details: user this option to check details like Name, Total Size & Free Size of memory
card inserted into the phone.
Note: Formatting can clear all files in the mobile phone and memory card.
6.11. Organizer
[Calendar]
In the calendar view, select a date and Press Left soft key to view the following Options:
View: to view the task or event for selected date.
View all: to view all tasks saved.
Add event: Add a new task or event.
Delete event: Delete a task or event by using this option.
Jump to Date: You can move to specified date..
Go to weekly view: Switch between weekly/monthly view of calendar.
Page 56

56
Hijri info: you can view Day details, Festivals, Set Date correction by adding or removing days in
the date.
Indian calendar: you can view Indian calendar here with options like Tithi details, Festival list,
Date of tithi, Yearly tithi
Onscreen prompts: you can select from three options None, Indian, Hijri date to get the prompts
on screen in calendar.
[Tasks]
Choose the task you saved. Press [Option] to set the following:
View: You can view the task details.
Add: Add a new task for Date / Call / Anniversary.
Edit: Edit the task you selected.
Delete: Delete the task that you select.
Delete overdue: use this option to delete the overdue task.
Delete All: Delete all the tasks in the phone.
Send vCalendar: by using this option you can share tasks via sms, mms, email & Bluetooth with
your friends.
Save as file: use this option to save your task as file.
[Alarm]
Page 57

57
Your mobile phone can set five alarms at most. In edit mode, press Edit to set the following: Time,
Repeat, Alarm tone, Snooze (minutes) and Alert type for the alarm.
[World Clock]
Press the left and right navigation keys to view the current time of every country corresponding to
every time zone. New Delhi is the default set time zone.
6.12. Services
STK (SIM Tool Kit)
This is a completely network dependent feature and different facilities provided in this menu
depend upon your operator.
INTERNET SERVICE
Homepage: Phone will open the webpage chosen in the connection settings.
Bookmarks: Allows you to access the WebPages stored by you in the bookmark menu.
Recent Pages: Records of the latest visited pages.
Offline Pages: Shows the list of pages available offline.
Input Address: Input the address of the website you want to visit.
Service Inbox: You can receive service information sent by your service provider (“promotional”
information)
Page 58

58
Settings: Here you can do the settings related to SIM/UIM selection, Profiles, Browser options,
service message settings, Clear Cache & Clear cookies etc.
DATA ACCOUNT
Here you can manage the Data accounts of GSM data and GPRS.
6.13. Extra
[Calculator]
The upper direction key for “+” and the lower direction key for “-”, the left navigation key
for "×" and the right navigation key for "÷";
Press the clear key to clear the latest inputs or results digit by digit; press the clear key
long to clear all content or result;
Press “OK” key to obtain the result.
[Currency Converter]
User this tool to convert currency by firstly entering the exchange Rate. To get the currency
converted enter the sum in Local currency field & get the desired result in Foreign currency.
[Stopwatch]
Enter the menu to use the stopwatch. It provides two options: Typical stopwatch, nWay stopwatch.
[E-Book reader]
Page 59

59
Enter the menu, choose the book saved by you, press [options] to operate the following:
Open E-Book, Clean up bookshelf, Global settings, Book info, Delete, Delete all files, Sort by,
Apply global settings & Help.
6.14. Shortcuts
This mobile phone provides 10 shortcut items. Under this option you can set some features as
Shortcuts. You have option to Add, Edit, Delete, Delete All, Disable & Change order.
6.15. Preloaded Applications/Link
IM’s
Ebuddy(Java Link)
Browser
Opera Mini(Java Link)
Social Networking
Facebook (Internet Link)
Twitter (Internet link)
Search Engine
Google(Internet ink)
Page 60
Yahoo!(Internet Link)
Appendix ⅠⅠⅠⅠ
Troubleshooting
Phenomena Possible Causes
Unable to switch on 1. Does the battery have power?
2. Is the battery placed correctly
SIM failed
1. The SIM card is dirty. Clean it.
2. Reinstall the SIM card.
3. The SIM card is damaged. Replace it.
Poor signals
Check the signal strength icon on the screen. If the icon
contains 4 bars, it indicates the signal is the strongest; if
below 1 bar, it indicates the signal is very poor.
Phone Restart
Unsupported multimedia formats played may cause
phone to restart. This is normal behavior.
60
Page 61

61
Unable to dial out
1. Maybe you have set Hide My Caller ID but
your network operator does not provide this
service for you.
2. Strong interference exists around you.
3. Maybe you have activated the call restriction
function.
4. Maybe you have activated Line 2 but your
network operator does not provide this service
for you.
Unable to charge the battery
1. The battery may discharge too much; so it
cannot be charged until it is connected for
certain time.
2. Its performance has worsened.
Unable to register to the
network
1. Too weak signals or strong interference.
2. SIM card not installed properly.
3. Bad contact with phone or SIM card damaged
4. If the SIM card is broken, please contact the
network operator to replace it.
Page 62
62
Photos taken are too dark
1. Check if the too low photo brightness is set.
2. Check if ambient ray is too dark.
Photos taken are too unclear
1. Check if the object taken is moving.
2. Check if the mobile phone shivers slightly
while you press shutter.
Photos taken is distorted The object taken may be too close to camera lens.
Unable to access service
menus.
Maybe the SIM card does not support service function.
Only part of the photo set as
standby photo can be seen.
The size of the photo may be too big.
Appendix ⅡⅡⅡⅡ
Abbreviations and Definitions
SMS Short Message Services
EMS Enhanced Message Services
SIM Subscriber Identity Module
GSM Global System for Mobile Communication
PIN Personal Identity Number
PUK PIN Unblocking Key
Page 63

63
IMEI International Mobile Equipment Identity
CB Cell Broadcast
GPRS General Packet Radio Service
MMS Multimedia Message services
Card1 Host card (the card inserted in SIM1 slot)
Card2 Slave card (the card inserted in SIM2 slot)
RUIM Removable User Identity Module
Appendix ⅢⅢⅢⅢ
Notices for the use of accessories
Battery
More than 6 hrs charging is needed for the new battery or that idle for long.
Batteries, other than the original one can damage your mobile phone and cause risk! The
short circuit in any form can lead to explosion, fire or personal injury!
For your security and environment protection, do not throw the battery randomly but put it
into the specified recovery place.
Page 64

64
Charger
Do not plug the charger into the mobile phone and charge without battery so as to prevent
the phone being damaged.
Always use the charger in a dry place indoor; never let the charger touch any liquid during
use so as to prevent damaging the phone or even causing explosion, fire or personal injury!
Always use the charger by the original manufacturer so as to prevent damaging the phone
or even causing fire or personal injury etc!
USB
Please insert USB in switch-off status or choose the first option “Mass Storage” in
switch-on status, then the mobile phone can be used as a U-disk.
Please insert USB and choose option “Webcam” in switch-on status, then the mobile
phone can be used as a webcam.
Please insert USB & choose option “COM port” in switch-on status, then the mobile phone
can be used as a modem to access external GPRS on your PC. Please note that you can
use the Phone as a modem in this state, and the function will be carried out with SIM 1
only.
Never insert the USB in reverse, because doing so can short circuit the I/O port.
Never use any other USB except that from the original manufacturer; otherwise, the
mobile phone and the USB port may be damaged.
Page 65

65
T-Flash card
It is recommended to use branded T-Flash card, because the use of ineligible products may
damage the T-Flash memory card slot.
 Loading...