

Page 1

Welcome
to Great
sound.
user manual
oPus
melodY
Page 2

Page 3

user manual | oPus | melodY
1
olive Home audio solution
- user manual edition 5, JanuarY 2009
Welcome!
Congratulations and thank you for purchasing an Olive OPUS and/or MELODY. Your Olive units
will provide you with a whole new concept of high delity listening throughout your home in this
era of innovative technology. Relax and enjoy the ease of your new OPUS and MELODY – and
their beautiful sound!
• To ensure the best possible performance, please read this manual carefully. Keep it in a safe
place for future reference.
• This manual applies for both OPUS and MELODY as they are part of an integrated Home
Audio Solution, though they also stand very well on their own. In many respects they are
similar in their operation, though of course the OPUS includes the storage and CD capabilit-
ies. Additional features or other differences are outlined in the text.
• Since the OPUS and MELODY software continues to be maintained and updated, the
version on your OPUS and MELODY may differ from the one that is referenced here in
screen messages or design. The most current version of this user manual can always be
found on the Olive website (www.olive.us).
Page 4

2
Contents
1 Quick-Start Guide 04
1.1 Adding Music to Your Home 04
1.2 OPUS 06
1.3 MELODY 12
2 Playing Music 19
2.1 Playing a CD on Your OPUS 19
2.2 Playing Music from Your Music Library on both OPUS and MELODY 20
2.3 Listening to Internet Radio 28
2.4 Playing Music from a Networked PC/Mac/NAS 30
2.5 Playing Music from Your Apple® iPod™ 31
2.6 More on Using the Touchscreen and Remote Control 32
3 Making it Your Olive: Settings and System Services 38
3.1 General Settings, Alarm and Sleep Timer 38
3.2 CD Settings 39
3.3 Network Settings 41
3.4 System Services 45
3.5 Information about your Library and OPUS or MELODY 48
4 Editing Your Music Library 50
4.1 Information to Describe Your Music 50
4.2 Maestro Music Management Software (OPUS only) 58
4.3 Making the Most of Your Music: Shared and Private Playlists 62
Page 5

user manual | oPus | melodY
3
5 Importing and Exporting Music on Your OPUS 64
5.1 Importing CDs 64
5.2 Importing From a Computer 65
5.3 Burning CDs 66
6 Tips and Troubleshooting 68
6.1 Icons and messages explained 68
6.2 First aid 70
6.3 Networking Issues 72
7 Further Resources 73
8 Safety and Cleaning 74
9 Regulatory and Environmental Compliance 77
9.1 Legal Notices 77
9.2 Environmental Compliance 84
Page 6

4
1. Quick-start Guide
1.1 Adding Music to Your Home
With Olive’s Home Audio Solution we bring together the components you need to make the
most of your home network and HiFi system in an integrated solution. The key advantage is that
you simplify your music listening:
•
You have one place to keep and manage your music – in high quality.
•
You have your music right with your HiFi system for immediate listening, there’s no
computer to start rst.
•
The way you browse and play music looks the same on the OPUS as well as on the
MELODYs, no new interfaces to learn.
•
OPUS and MELODY are made to work together. Once you have made them part of your
home network and HiFi system, it is all about the music and relaxing.
Layout
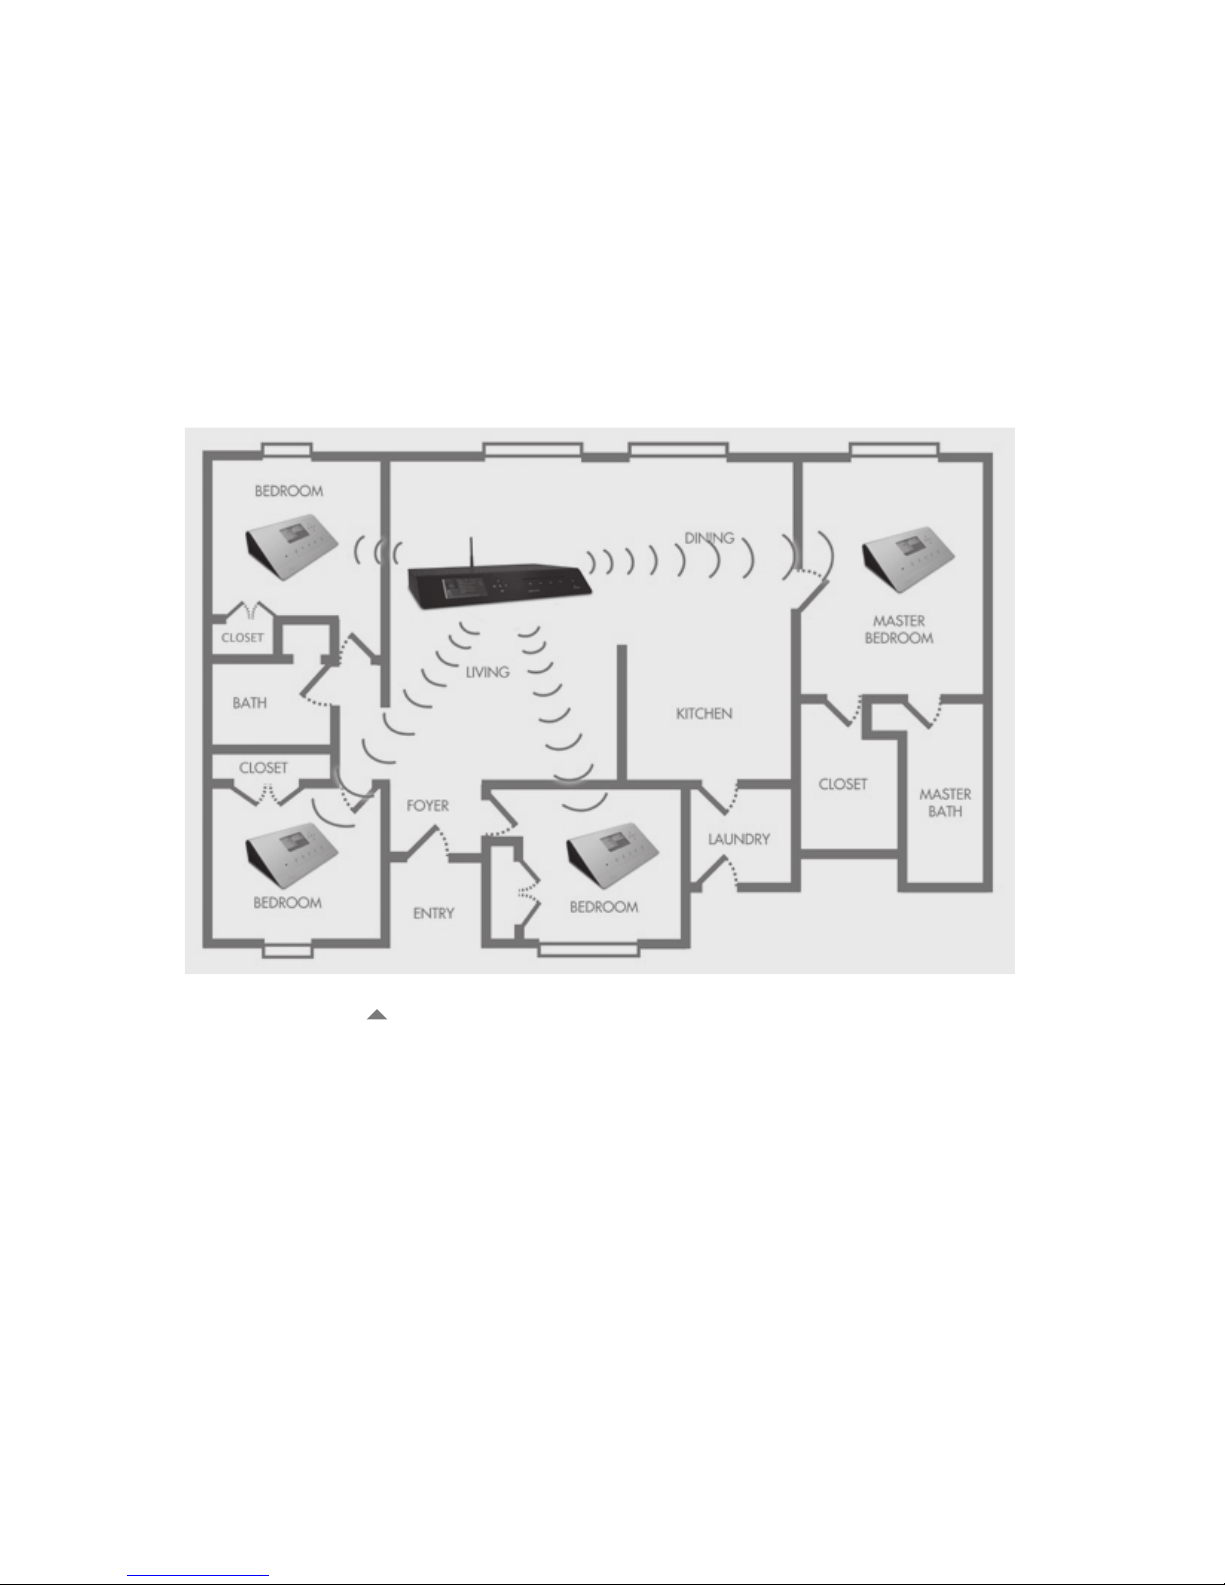
Here is a view of what a typical home setup looks like, with an OPUS to store all your music in
the living room and as part of the HiFi system, and MELODYs around the home to extend your
music library wherever you are:
Page 7
user manual | oPus | melodY
5
Floorplan Layout
Both OPUS and MELODY are intended for use with an existing stereo amplier and/or (active)
speakers, with all the usual analog and digital connections to easily hook them up to your existing equipment. If you are installing both OPUS and MELODY(s), it makes sense to start with the
OPUS.
Page 8

6
How many streams?
We test with standard networking gear available at the usual retailers, and look for reliable
connection build-up and uninterrupted playback as key indicators. In our most recent test we
achieved the following:
•
Wired (Ethernet): 15 MELODYs playing the same album off one OPUS.
•
Wireless: 5 MELODYs playing the same album off one OPUS.
In both cases the OPUS was connected to the router per wired connection. Our benchmark test
involves using a high-denition music stream of 4608 kbit/s throughput, which is equivalent to
music sampled at 96 kHz and recorded with 24 bit depth, without any compression. This goes
way beyond normal bit streams of uncompressed CD quality of 1411 kbit/s, or losslessly (FLAC)
compressed music streams of between 400 to 900 kbit/s, and so depending on the music you
are streaming you will usually have a very safe margin of additional bandwidth.
1.2 OPUS
Step 1: Unpacking your OPUS
Your package includes the following items:
•
OPUS
•
Remote control (w/ batteries)
•
Wireless antenna
Page 9
user manual | oPus | melodY
7
•
Power cable
• Software: Recovery CD, User manual
Step 2: Setting up your OPUS
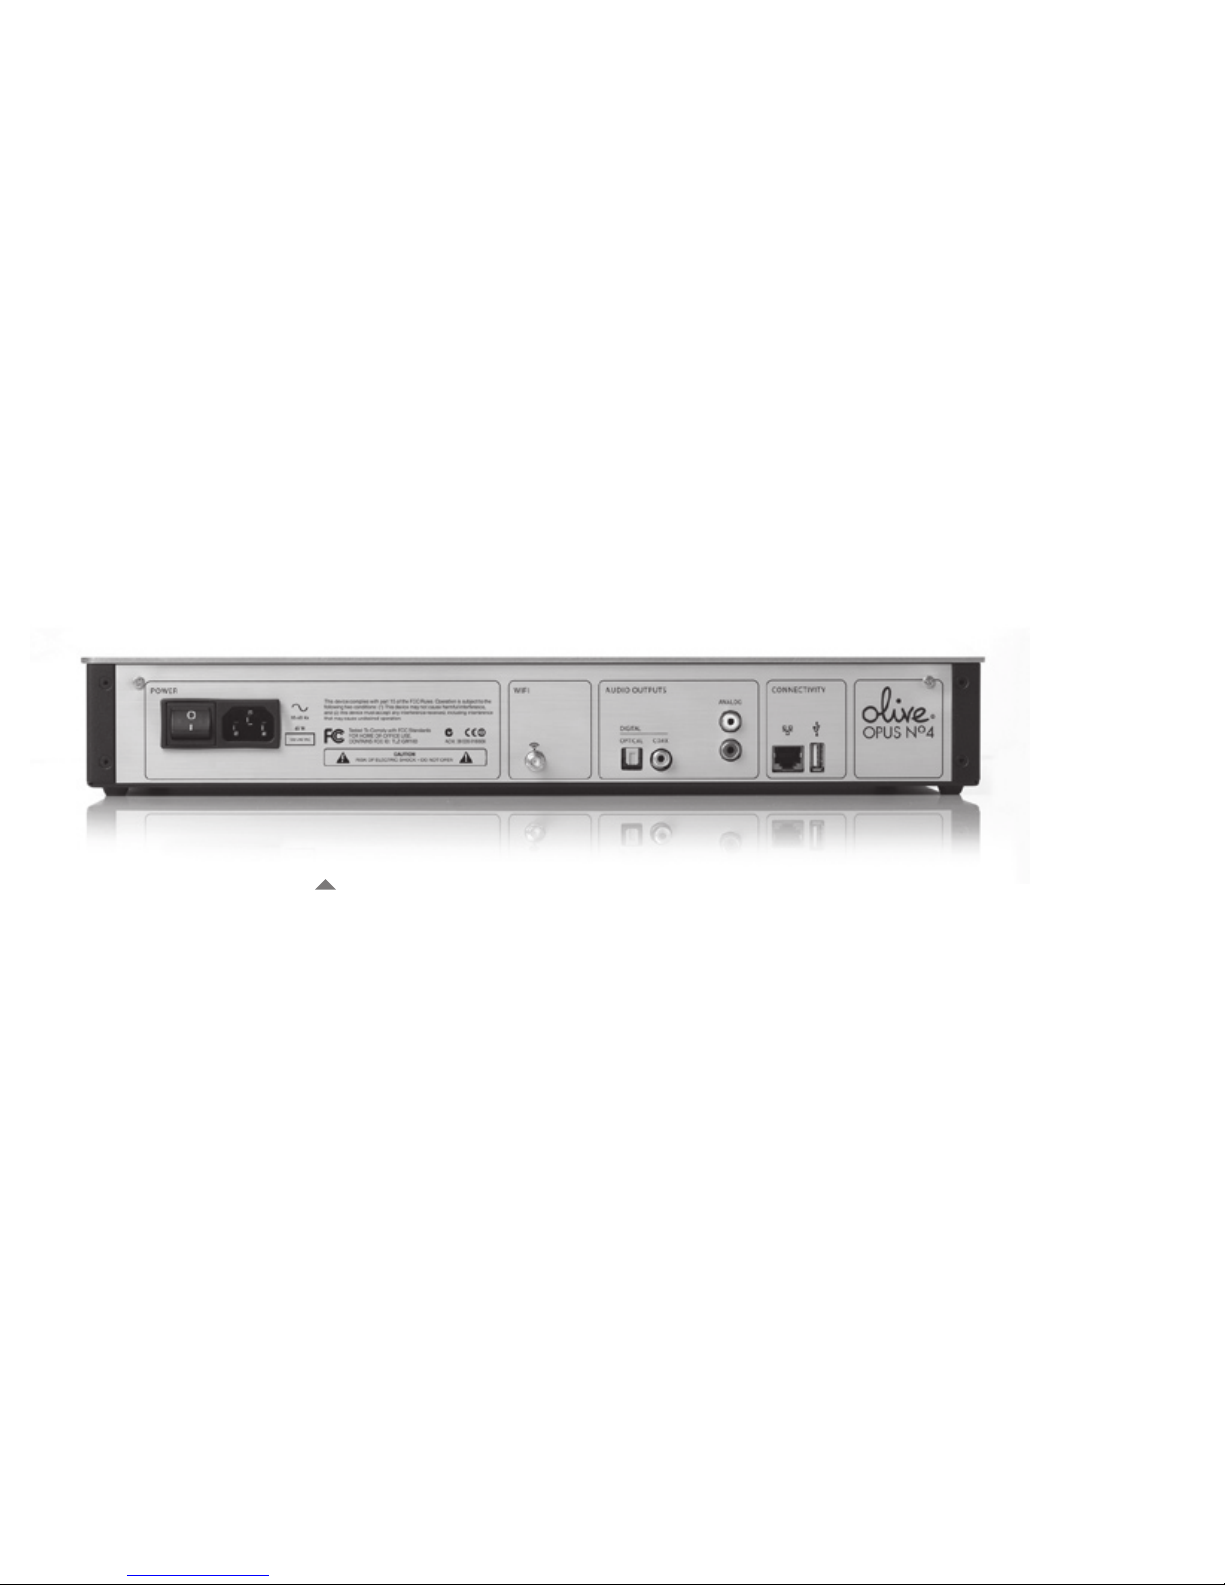
Backpanel OPUS
• Place your OPUS close to your stereo system, in a cool, well-ventilated place.
• Attach the wireless antenna to the back of the OPUS.
• Connect it via its RCA (analog) or digital output to the input of your stereo system.
• Plug the power cable into your OPUS and into the power outlet.
• Turn on the OPUS and your stereo system.
Your OPUS takes about 40 seconds to perform an initial start-up. It should then stay on or be in
Page 10
8
power save mode to be immediately available at any time you wish, with a sophisticated power
saving ensuring that it powers down components that are not needed. Please never unplug your
device while it is turned on or in sleep mode, it might damage your device. Please make sure to
turn off a connected amplier or speakers before disconnecting the audio-out of the OPUS.
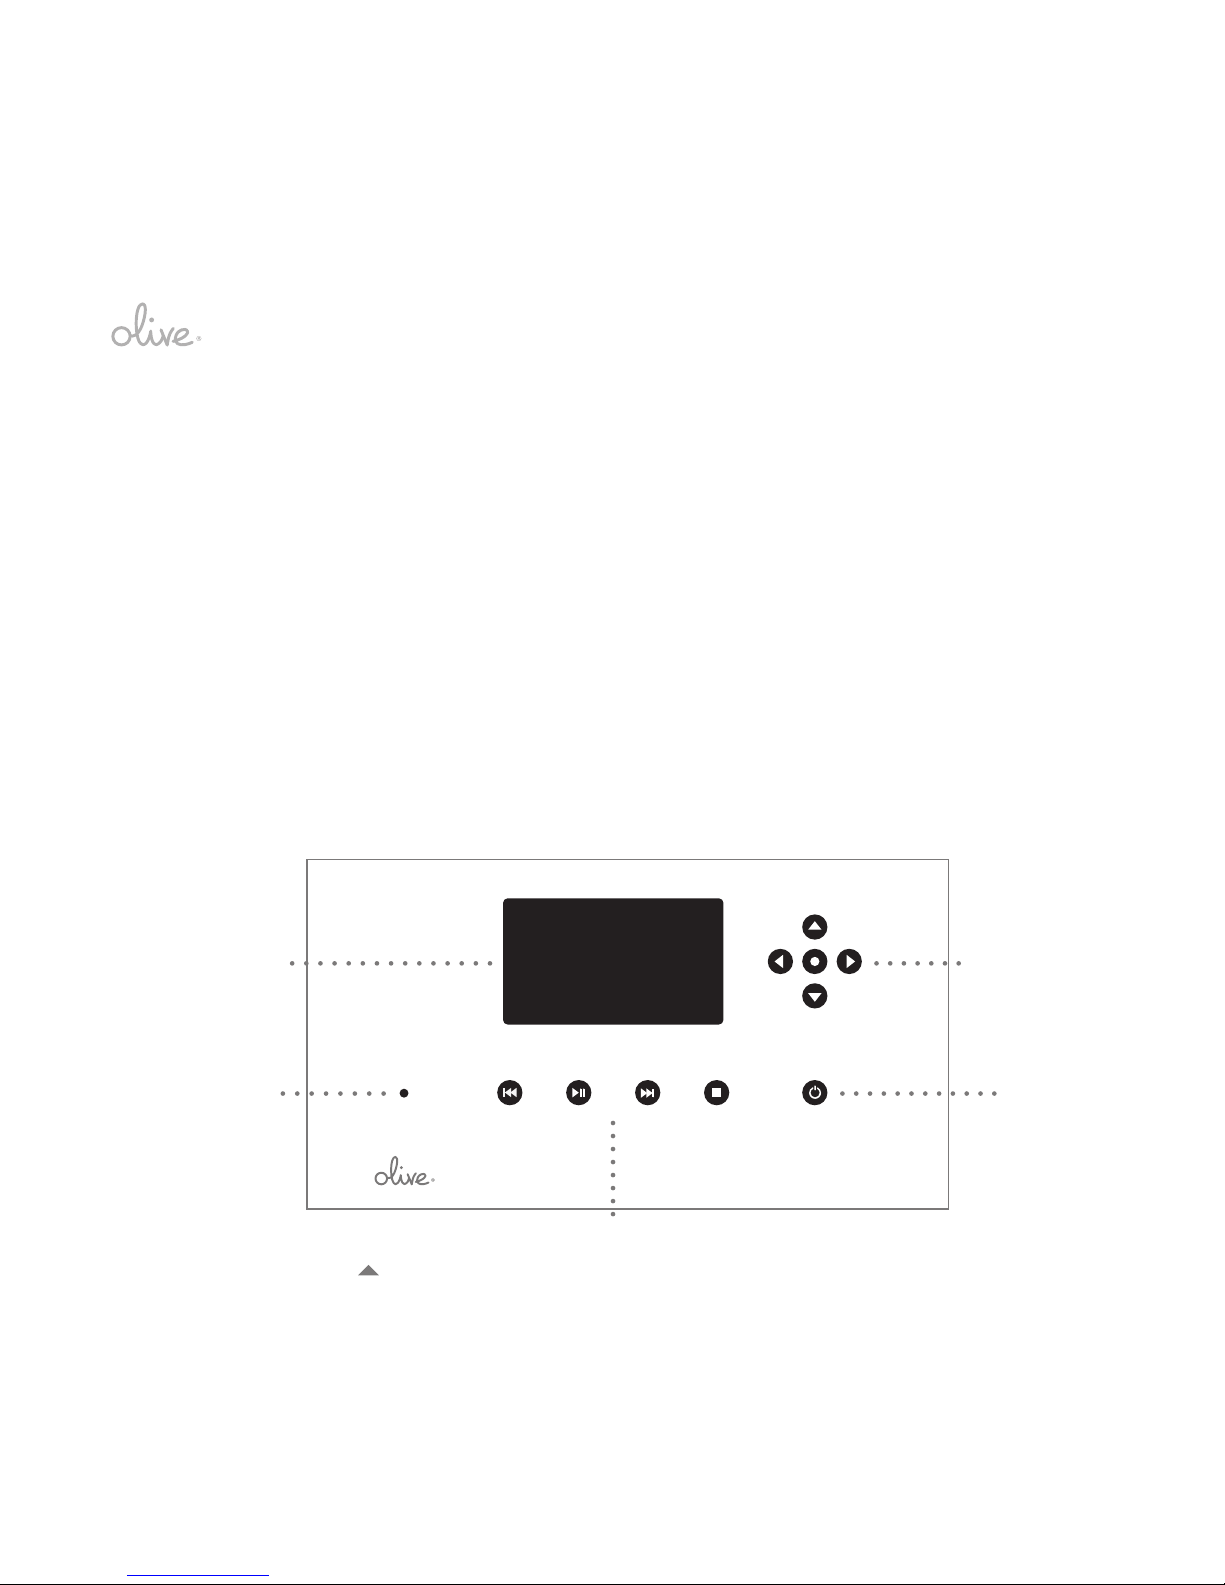
Step 3: Navigating your OPUS
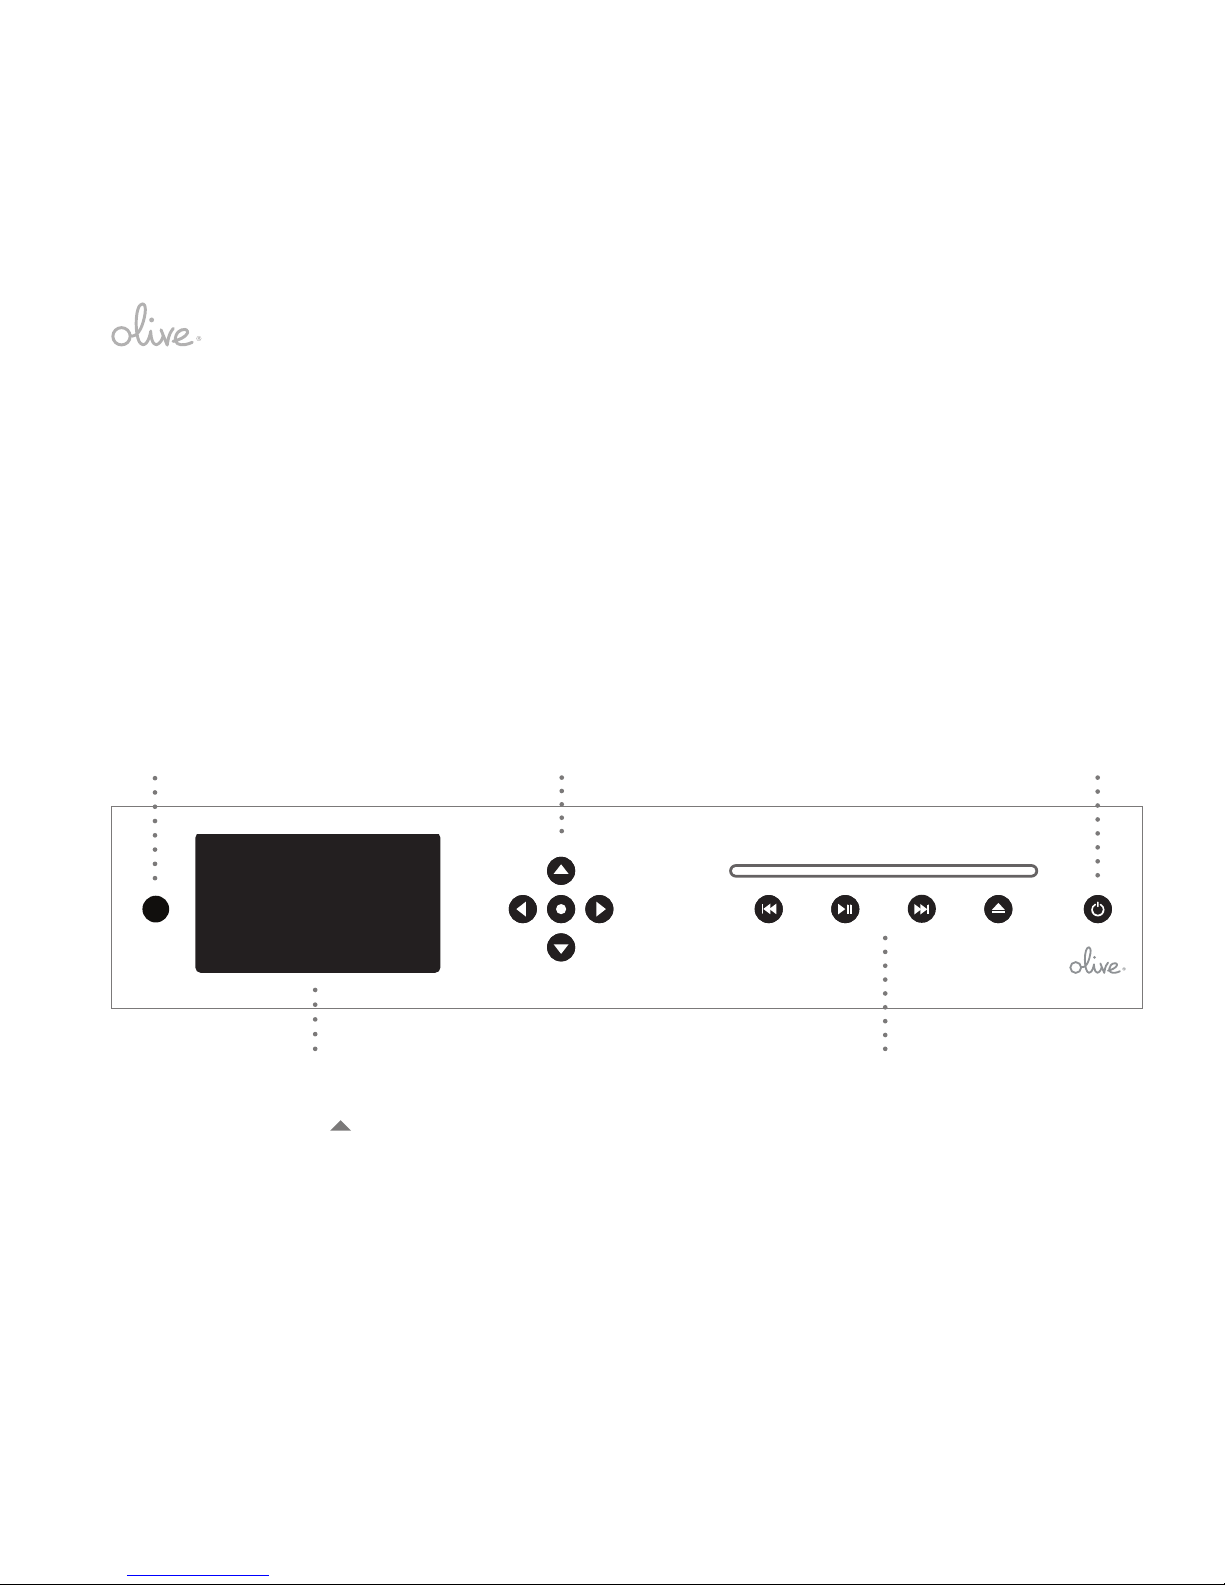
Your OPUS provides the following navigational controls:
OPUS Frontside
•
Once the OPUS is on, you’ll be using the 5 navigation keys to get around the menu
screens, and the play keys to control the actual playback like on any CD-player. Then
there’s the ON/OFF key, that’s about it.
OPUS No4
Touchscreen/Display
Infrared
Navigation Keys
Play Keys
On/Off
Page 11

user manual | oPus | melodY
9
• Tip 1: Use the remote control just like the keys on the OPUS – while sitting down. It doesn’t
get much easier than that.
•
Tip 2: The touchscreen feature allows you to more directly point to what you want the
OPUS to do, the logic of the menu screens stays the same.
•
Tip 3: The menu screens start with the main menu. Then navigating to the right you
get to the music. To get back is to the left again. With the double panel display you can
easily tell where you are going and what options are available. Holding the left arrow
allows to jump back to the top menu (“Home” on the remote control). Holding the pause
button allows to stop current playback.
•
Tip 4: The main musical genres are color coded to easily tell them apart. Some of the
information that is shown on the track detail screen is different per genre to allow you to nd
out more about what you are listening to.
•
Tip 5: The lower part of the display consists of a status bar that allows you to quickly
view play mode (pause, repeat, shufe, etc.), alarm or timer set, track progress, volume
level, background progress and network status.
To put your OPUS to sleep, just press the ON/OFF button shortly. When you press it again (or
any other key) the OPUS will turn on again in a couple of seconds and return to the spot where
you left off.
Note: Within this user manual we will refer to screen menu options in CAPITAL letters for easier
readability. Starting point will always be the main menu, the top most menu to which you can
always return by navigating all the way to the left.
Page 12

10
Step 4: Play a CD
Insert a CD into the slot and choose play from the pop-up menu.
Step 5: Connecting your OPUS to a home network
This is an important step to access music stored elsewhere on your network, listen to Internet
radio, use the web browser on a computer or PDA to browse your music, use the Maestro application to manage your music or to be able to receive online system updates:
•
Go to SETTINGS > NETWORK SETTINGS > NETWORK SETUP.
•
Select the mode that applies to your network, whether wired or wireless, automatic or
manual hookup, and press SAVE to continue. In the wired case you are usually done at this
point and will see a conrmation. In the wireless case you will have to choose the right
network, WEP or WPA encryption and enter a KEY if your network is protected. Often
wireless networks are quirky to set up, so be patient. If you experience problems we are
always happy to help, please call us toll-free at 1.877.BY.OLIVE.
Your OPUS is now integrated into your home network.
Step 6: Getting music into your OPUS and start listening
To add and listen to music to your OPUS you can …
• … import from CD: Just insert an audio CD and select IMPORT CD from the pop-up menu.
The CD is ripped, tagged and archived automatically. You can import CDs in different
qualities/formats. Go to SETTINGS > CD SETTINGS > CD IMPORT QUALITY and choose
Page 13

user manual | oPus | melodY
11
the format you want. We recommend FLAC to retain CD quality audio but reduce size at
what is called “lossless” compression for the best compromise between quality and le size.
To leave the music in its original format, choose WAV.
•
… transfer music from a PC: Under NETWORK SETTINGS > NETWORK INFORMATION
you will nd the current IP-address of your OPUS. Use it on your PC to open a network
connection to the import folder that is shown, and simply drag & drop music to the OPUS.
Note: Only music formats that are supported by your OPUS can be imported (WAV, FLAC,
MP3, AAC). The OPUS does not play stored music protected by Digital Rights
Management (DRM).
•
… look under MUSIC SOURCES to nd other UPnP supported servers to browse and play
music from these.
•
… listen to Internet radio: In the main menu select INTERNET RADIO and choose from
a wide variety of stations that are sorted by genre, regions, public & information or favorites
you have added (play will start immediately, you might have to wait a few seconds until their
current stream information is loaded to the OPUS via the network).
Step 7: Creating playlists
Now that you have music on your OPUS, you can easily create playlists for every mood or occasion. There are two ways:
1) On the OPUS:
o
Go to MUSIC LIBRARY > PLAYLISTS, ADD PLAYLIST and enter the name of your play
list and save it.
Page 14

12
o
Browse your music library and play the tracks you want to add to the playlist. Once a
song is playing you press the OK button to get a pop-up that allows you to rst rate and
delete a track, then on second press to add the track to a playlist, which you select from
the list of available playlists. Or just hit the ADD button on the remote control.
2) Via the Maestro library management application: 1) Simply enter the IP-address of your
OPUS into a browser on your PC/Mac replacing the x’s:
o http://xxx.xxx.xxx.xxx:8163/maestro.php
The Maestro application allows you to conveniently create new playlists and drag & drop single
tracks, albums or works to your list of playlists. The Maestro application is discussed in more
detail further down in this manual.
Step 8: Burn your music to CD
Choose the playlist that you want to burn and press the OK button for a popup menu that allows
you to initiate the burning process. Insert an audio CD and choose CONTINUE.
1.3 MELODY
Step 1: Unpacking your MELODY
Your package includes the following items:
•
MELODY networked player
•
Remote control (w/ batteries)
Page 15
user manual | oPus | melodY
13
•
Wireless antenna
•
DC power supply
•
User manual
Step 2: Setting up your MELODY
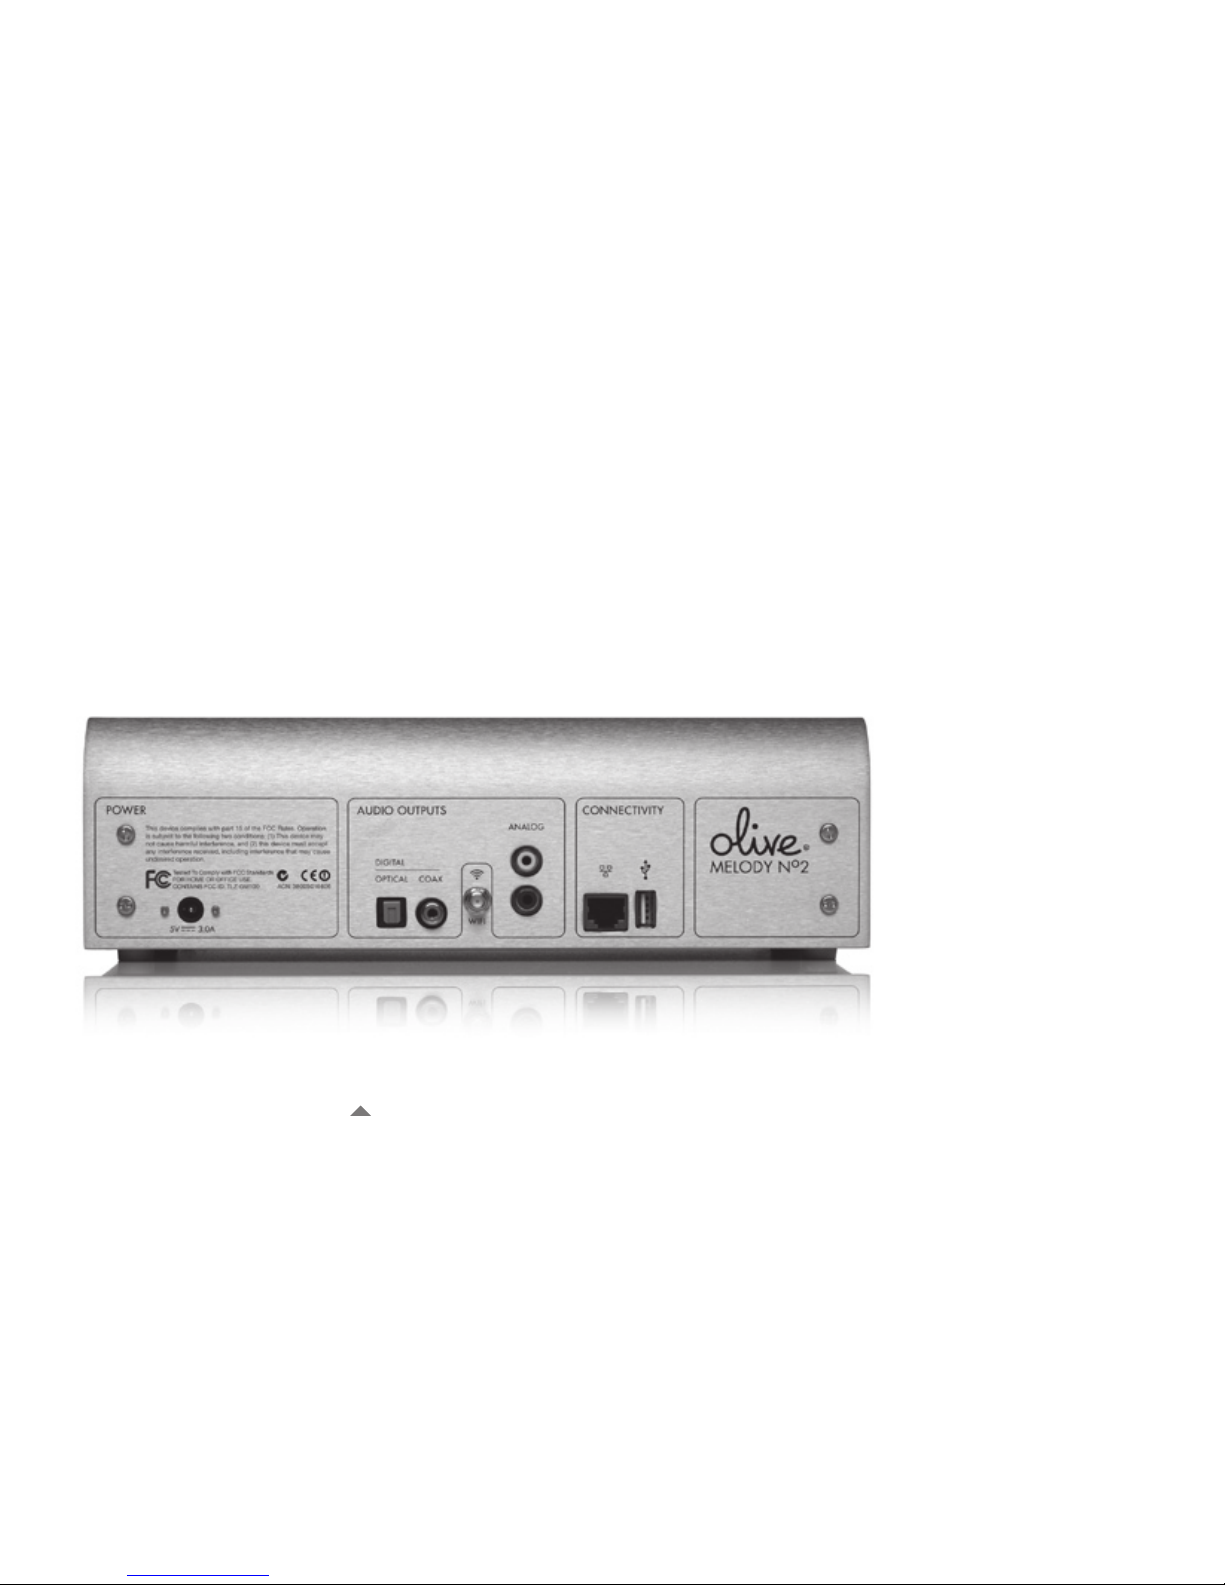
Backpanel MELODY
•
Place your MELODY close to your stereo system, in a cool, well-ventilated place.
•
Attach the wireless antenna to the back of the MELODY.
Page 16
14
•
Connect it via its RCA or digital output to the input of your amplier or active speakers.
•
Connect the power supply to the MELODY and the power outlet.
•
Turn on the MELODY and your amplier or active speakers.
Your MELODY takes about 40 seconds to perform an initial start-up. It should then stay on or be
in power save mode to be immediately available at any time you wish. Please make sure to turn
off a connected amplier or speakers before disconnecting the audio-out of the MELODY.
Step 3: Navigating your MELODY
Your MELODY provides the following navigational controls:
MELODY Frontside
MELODY No2
Touchscreen/Display
Infrared
Navigation Keys
Play Keys
On/Off
Page 17

user manual | oPus | melodY
15
• Once the MELODY is on, you’ll be using the 5 navigation keys to get around the menu
screens, and the play keys to control the actual playback like on any CD-player. Then
there’s the ON/OFF key, that’s about it.
•
Tip 1: Use the remote control just like the keys on the MELODY – while sitting down. It
doesn’t get much easier than that.
•
Tip 2: The touchscreen feature allows you to more directly point to what you want the
MELODY to do, the logic of the menu screens stays the same.
•
Tip 3: The menu screens start with the main menu. Then navigating to the right you get to
the music. To get back is to the left again. With the double panel display you can easily tell
where you are going and what options are available. Holding the left arrow allows to jump
back to the top menu (“Home” on the remote control).
•
Tip 4: The main musical genres are color coded to easily tell them apart. Some of the
information that is shown on the track detail screen is different per genre to allow you to nd
out more about what you are listening to.
•
Tip 5: The lower part of the display consists of a status bar that allows you to quickly view
play mode (pause, repeat, shufe, etc.), alarm or timer set, track progress, volume level,
background progress and network status.
To put your MELODY to sleep, just press the ON/OFF button shortly. When you press it again the
MELODY will turn on again and return to the spot where you left off.
Note: Within this user manual we will refer to screen menu options in CAPITAL letters for easier
Page 18

16
readability. Starting point will always be the main menu, the top most menu to which you can
always return by navigating all the way to the left.
Step 4: Connecting your MELODY to a home network
This is an important step to access music stored on your OPUS, elsewhere on your network,
listen to Internet radio, use the web browser on a computer or PDA to browse your music, or be
able to receive online system updates:
•
Go to SETTINGS > NETWORK SETTINGS > NETWORK SETUP.
•
Select the mode that applies to your network, whether wired or wireless, automatic or
manual hookup, and press SAVE to continue. In the wired case you are usually done at this
point and will see a conrmation when successful. In the wireless case you will have to
choose the right network, WEP or WPA encryption and enter a KEY if your network is
protected. Often wireless networks are quirky to set up, so be patient. If you experience
problems we are always happy to help, please call us toll-free at 1.877.BY.OLIVE.
Your MELODY is now integrated into your home network.
Step 5: Listening
To listen to music you can …
•
… browse the music stored on your OPUS: If there is an OPUS in your home network the
MELODY will automatically select it as the main source. Simply select MUSIC LIBRARY and
browse and play your music as if you were directly navigating your OPUS.
Page 19

user manual | oPus | melodY
17
• … look under MUSIC SOURCES to nd other UPnP supported servers to browse and play
music from these.
• … listen to Internet radio: In the main menu select INTERNET RADIO and choose from a
wide variety of stations that are sorted by genre, regions, public & information or favorites
you have added (play will start immediately, you might have to wait a few seconds until their
current stream information is loaded to the MELODY via the network).
Step 6: Creating playlists
Now that you have your MELODY connected, you can easily create playlists based on your
library in the OPUS for every mood or occasion. There are two ways:
•
On the MELODY:
o Go to MUSIC LIBRARY > PLAYLISTS, ADD PLAYLIST and enter the name of your
playlist and save it.
o Browse your music library and play the tracks you want to add to the playlist. Once a
song is playing you press the OK button to get a pop-up that allows you to rst rate and
delete a track, then on second press to add the track to a playlist, which you select from
the list of available playlists.
•
Via the Maestro library management application that looks onto your OPUS: 1) Enter the
IP-address of your OPUS into a browser on your PC/Mac replacing the x’s:
o http://xxx.xxx.xxx.xxx:8163/maestro.php
Page 20

18
The Maestro application allows you to conveniently create new playlists and drag & drop
single tracks, albums or works to your list of playlists.
All playlists created on the OPUS are available for all MELODYs or other networked receivers
to see. Playlists created on the MELODY are private in that they are only relevant for that room
and only seen on that MELODY, e.g. if you have the MELODY in the bedroom you could have a
special “wake-up” or “sleepy” playlist there that you don’t need in the living or other rooms.
Keep in touch
Please register your Olive products online at our website (www.olive.us) to activate your warranty
and stay up-to-date with our latest product releases.
Great, now you can get back to your music!
Page 21

user manual | oPus | melodY
19
2. PlaYinG music
2.1 Playing a CD on Your OPUS
When inserting a CD a pop-up menu will appear giving you the options to either play the CD,
select a particular track from the CD, or to import the CD. If you choose to play the CD it will be
played back directly from the CD drive. The top menu will change to include an additional item
CD IN DRIVE, which allows you at a later time to go back to your CD.
The OPUS takes a couple of seconds to recognize the CD and to look up the matching metadata as to album, track titles etc., which is not stored on the CD itself:
•
In almost all cases the metadata is available in the OPUS-internal CD reference database and
taken from there. Sometimes several CD information are returned for one CD, in this case an
additional online check can often nd the right one, so being online is an advantage. Even then in
rare cases you may end up with the wrong information being pulled for the CD you have entered.
•
If the CD can’t be found in the internal database and your OPUS is connected to the Internet,
the information is searched for in the online database.
•
If the CD cannot be found at all, generic titles for the album and titles are assigned, e.g.
“CD_08c342g” and “Track 01”, other elds are lled with “Unknown”. This information can
then be added manually via the Maestro application (see further down in this manual).
The CD is then listed on the main menu as the top item CD IN DRIVE, ready for play. As on any
Page 22

20
CD player, the play keys below the CD slot give you the options to play, skip forwards or backwards, pause or stop play. The Eject button returns the CD to you.
2.2 Playing Music from Your Music Library
on both OPUS and MELODY
Your music library at your ngertips
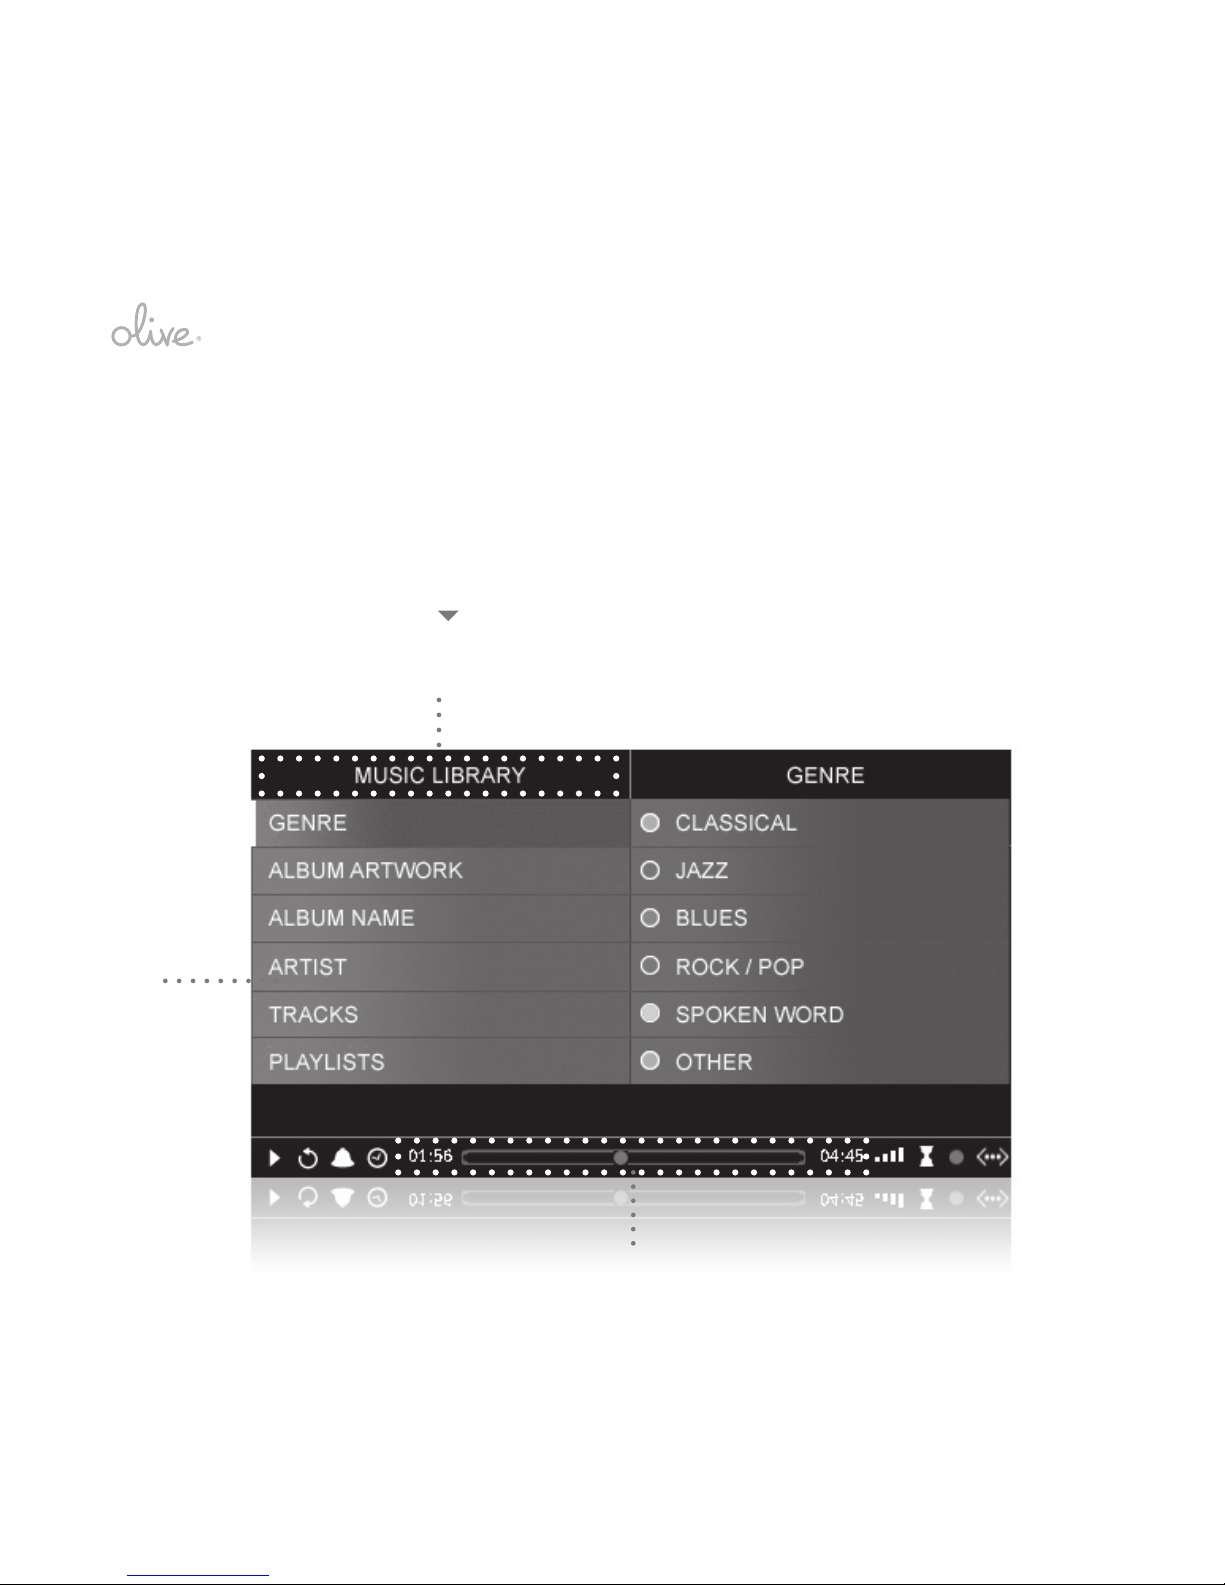
There are different powerful navigation options available under MUSIC LIBRARY to quickly nd
the artists, composers, albums/works, playlists or track(s) you want to play.
•
GENRES: Here you will nd your music organized or classied by musical genre. There
can be up to three levels of hierarchy to each main genre, e.g. you could start with
“Classical”, have “Opera” and “Symphonic” underneath, and have “French Opera” and
“Italian Opera” underneath “Opera” again. This takes a little more navigation until you get to
your music, but it is very worthwhile as with large collections this classication rewards you
with only a short list of relevant artists or composers.
Once you have reached the end of the genre hierarchy the screen will then show
available artists, then albums and then tracks. Classical by its nature will show available
composers, works and then movements.
•
ALBUM ARTWORK: Flip through the album covers to nd the album you are looking for,
just like in old times.
•
ALBUM NAME: Get an alphabetical list of all albums, and drill down to nd the tracks of a
specic album.
Page 23

user manual | oPus | melodY
21
•
ARTISTS: This option reveals an alphabetical list of all artists in your music library. Under
each artist you will nd the list of his/her albums and the respective tracks.
•
TRACKS: Here you nd an alphabetical list of all tracks.
•
PLAYLISTS: Here are all the playlists you’ve dened in alphabetical order. Choose the one
you like, or use your cursor to select the tracks to be played.
Tip: For long lists such as all artists, albums and tracks, press and hold the OK button to make
use of the “Alphabet Jump”, where you point to the rst letter of what you are looking for and the
menu screen will show you the selection of relevant items.
Starting playback
Pressing the play button starts the music playback, with the result depending on what you are
currently highlighting on the menu screen:
•
A track: The specic track will start to play and if the track is part of an album or work the
rest of the album or work will complete.
•
An album or work: The complete album or work will play. If you have merged a set of CDs
(e.g. greatest hits compilations) into one album, tracks will be played back by CD number
and then by original track number. The CD number needs to be maintained by you as part
of the metadata before merging.
•
An artist or composer: All of the albums of an artist or all the works of a composer will play.
•
All albums: When on the ALBUM NAME selection, pressing play will start playback of all
Page 24

22
albums. As all music is sorted into an album in some way, this is an opportunity to play your
whole music library from beginning to end!
Gapless playback
For WAV and FLAC les as well as for CD playback the OPUS and MELODY recognize if tracks
are meant to be jointed – such as e.g. in an Opera where one scene reaches into the next – and
will play back the audio tracks as if they were one as intended.
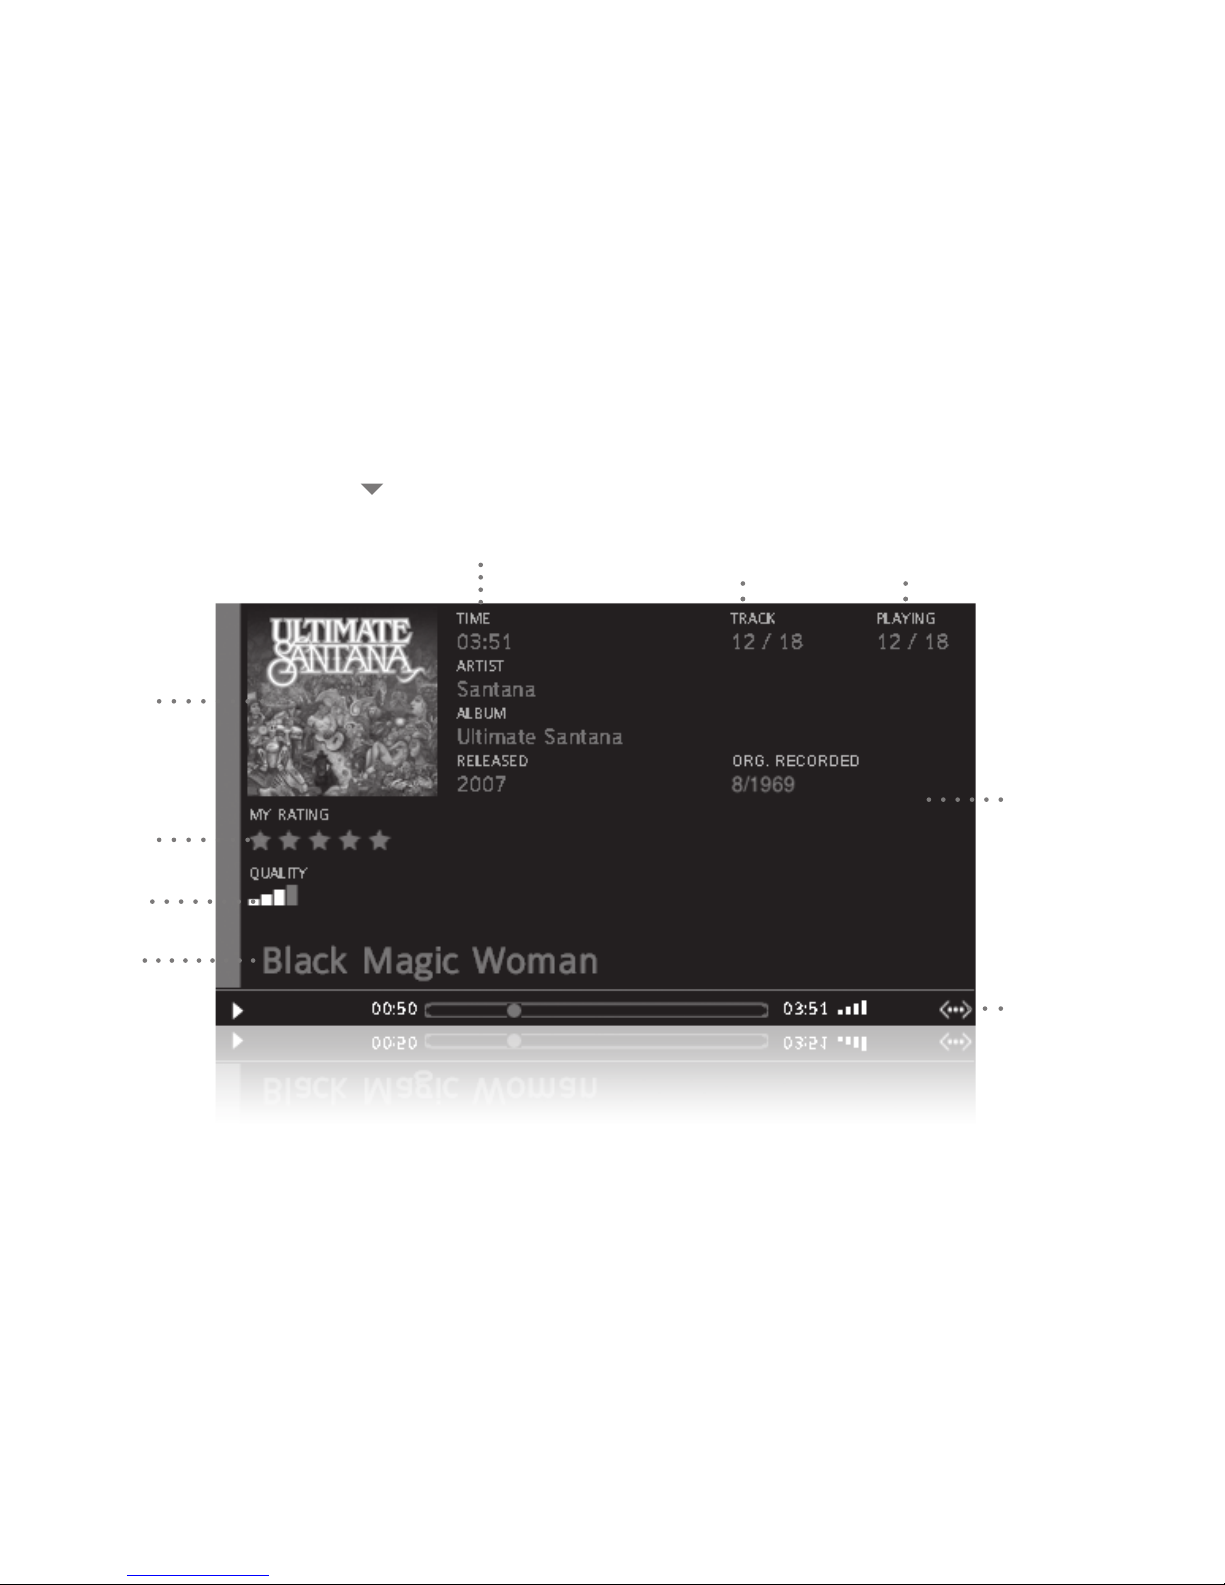
Screens during playback
Once you are playing back a song or movement two screens are used to show you all relevant
information about your music. When you rst come to a track as part of your selection process,
a rst screen shows as much metadata as is available about the music. It serves to conrm you
have arrived at what you were looking for with the whole range of metadata and album artwork,
it shows the sound quality, your personal rating if you’ve added one, which track it is as part of
its original album, and which part it is of your current selection.
Sound quality is determined by a combination of bit depth, sample rate and bit rate:
•
One bar: compressed audio of low quality
•
Two bars: compressed audio of acceptable quality
•
Three bars: CD quality, either in FLAC lossless encoding or WAV
•
Four bars: HD music of higher resolution than the CD standard, in general with a sample
rate of 96 kHz and a bit depth of 24, either in FLAC lossless encoding or WAV
Page 25
user manual | oPus | melodY
23
Play Screen With Details
Personal
Rating
Album
Artwork
Main Body
Metadata
Status Bar
Track Duration Track as part of
original album
Track as part of
current selection
Quality
Track
Title
Page 26

24
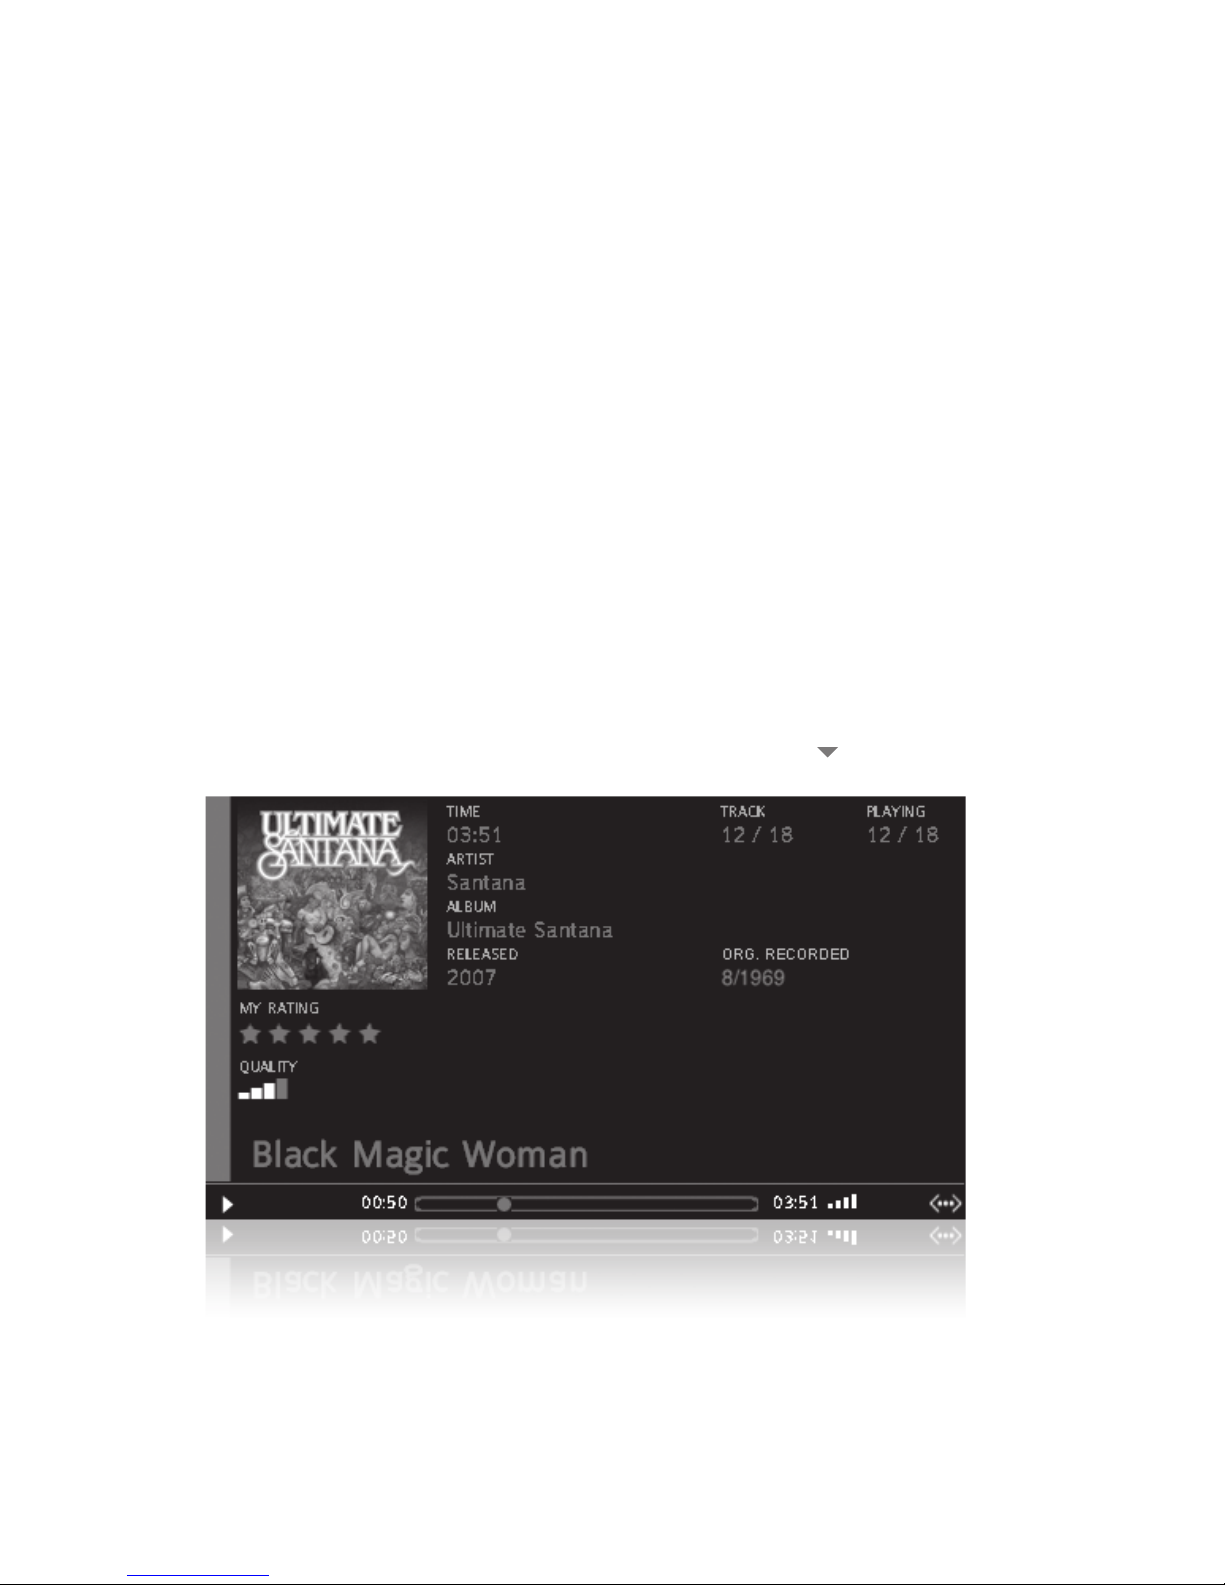
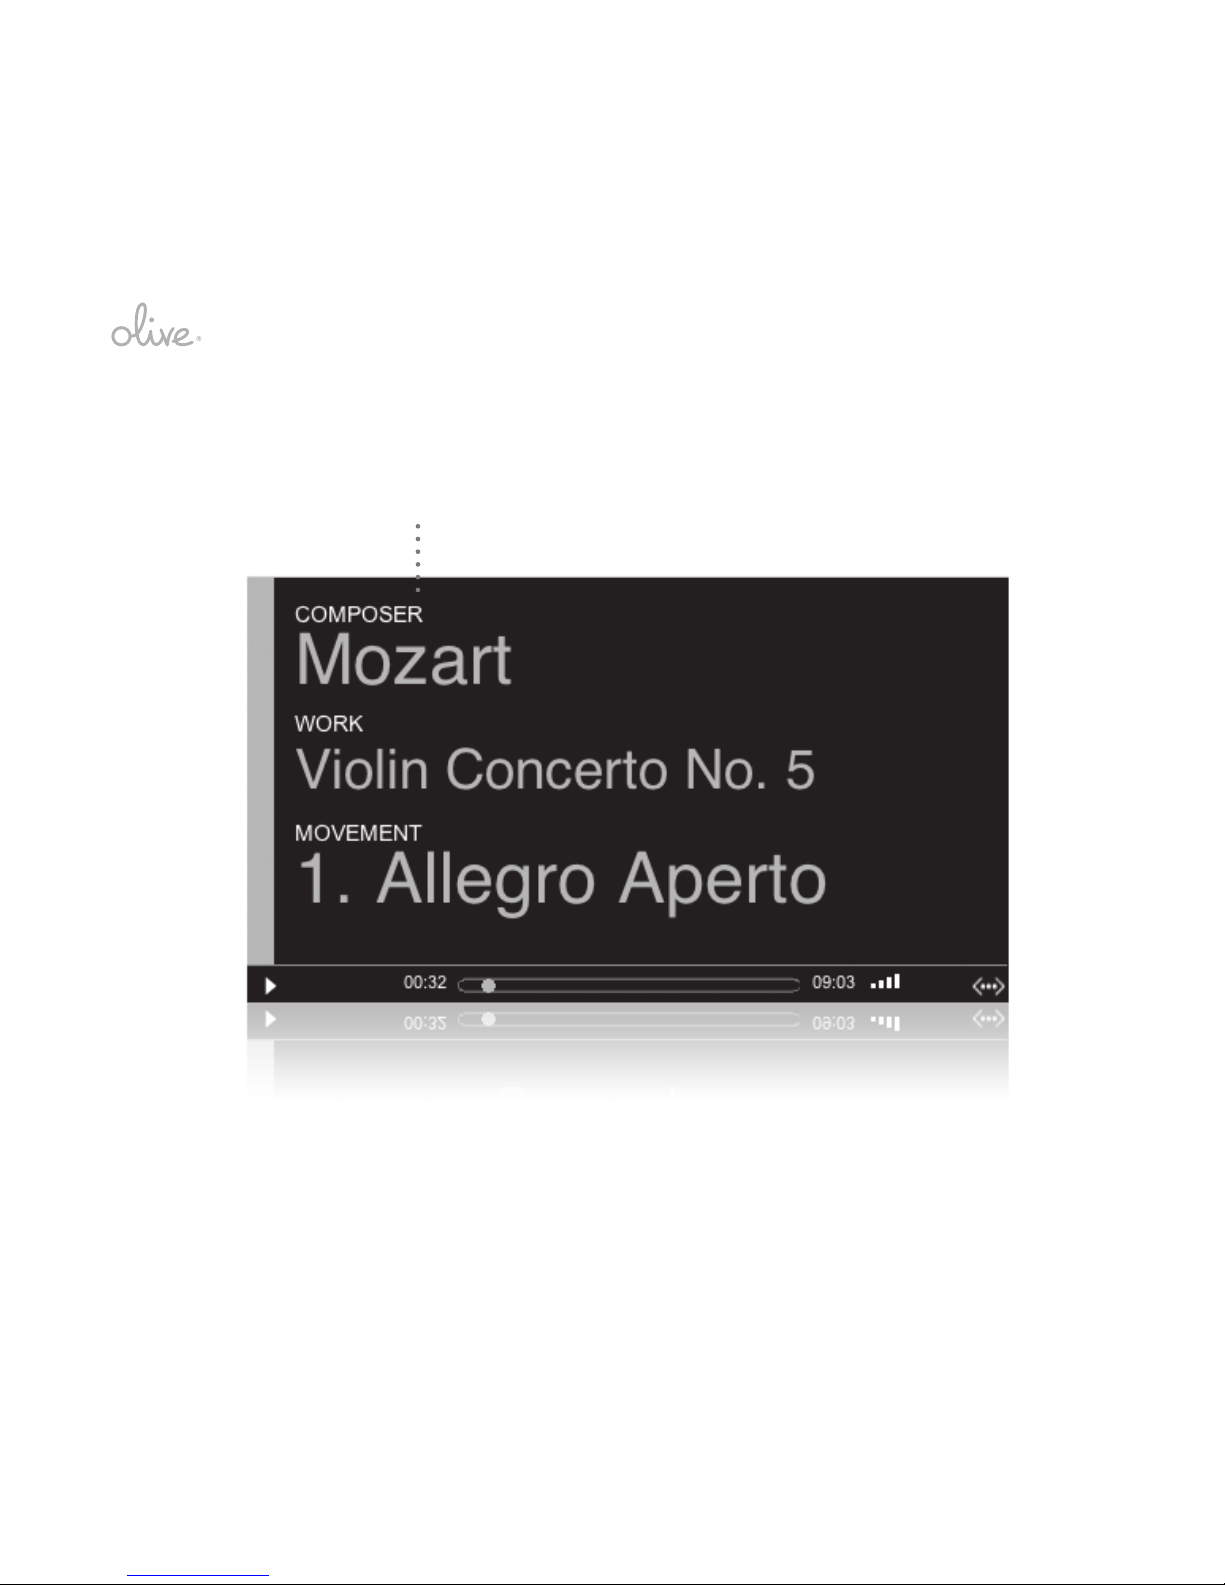
Long names may be truncated. After 8 seconds this screen is replaced with one that has large
letters and is intended to show just the key information from further away, like from your couch,
once your selection is made and conrmed:
Play Screen - Couch View
Page 27
user manual | oPus | melodY
25
What is shown on each genre screen
Each music genre is different. That is why your OPUS and MELODY provide music context information specic to each genre, and in a much more detailed level than available from mainstream
music databases:
•
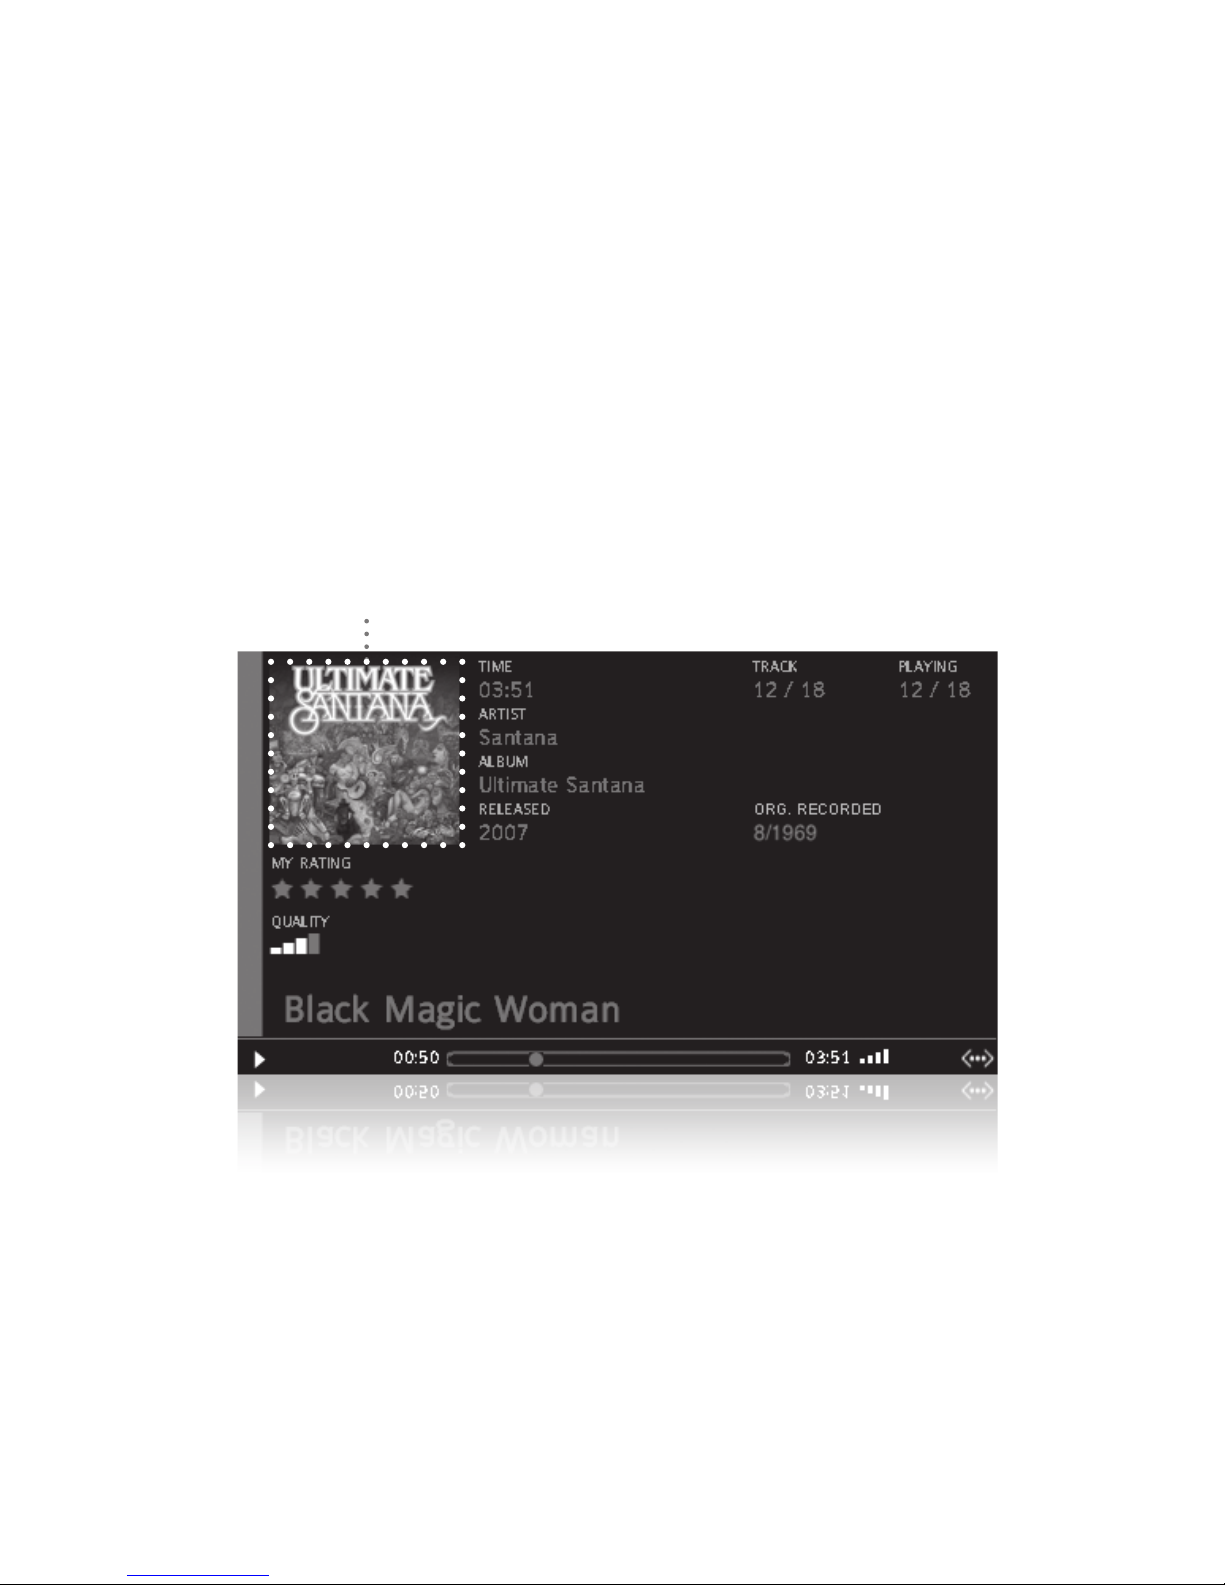
ROCK/POP, BLUES, SPOKEN WORD, OTHER: This can be considered the minimum
available metadata, with information on artist, album, and when the album was published
and originally recorded.
Rock/Pop/Blues/Spoken Word/Other Play Screen With Details
Page 28
26
•
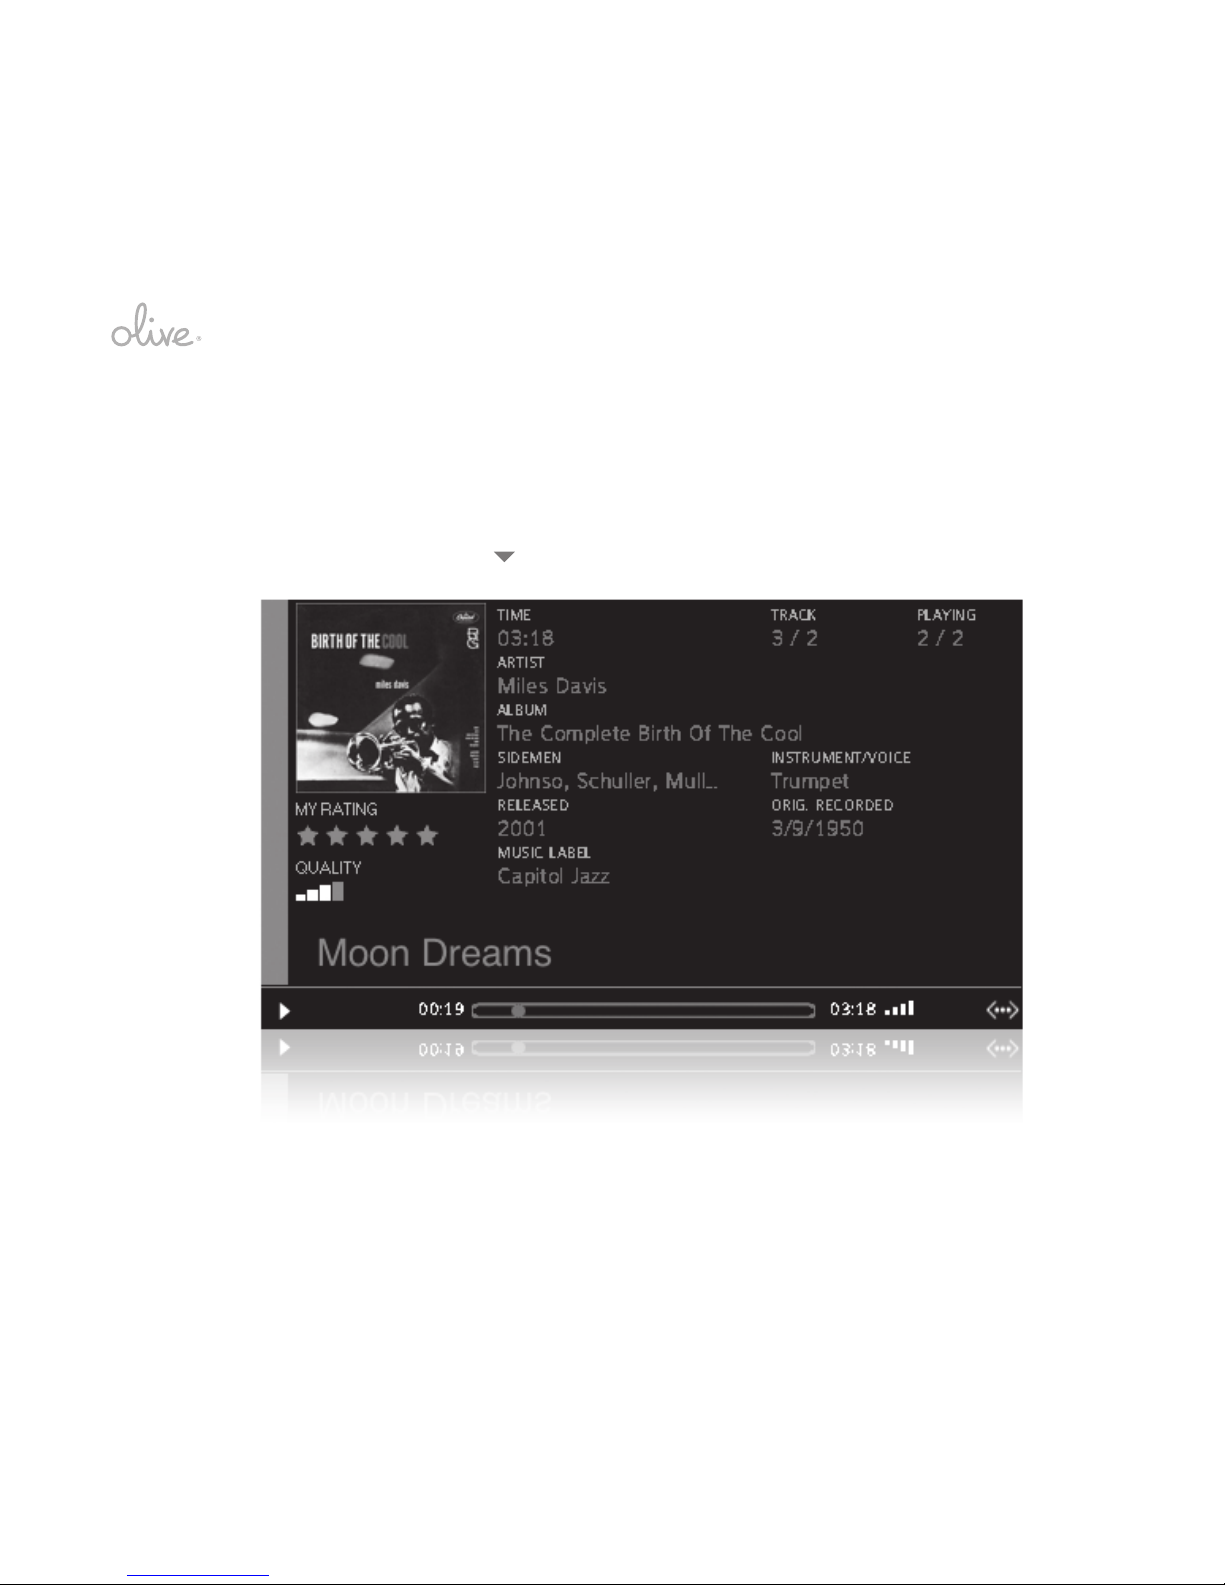
JAZZ: In addition to the above, for the Jazz genre there are elds for the featured instru ment, additional important artists that are playing as sidemen, as well as the record label
that produced the music:
Jazz Play Screen with Details
•
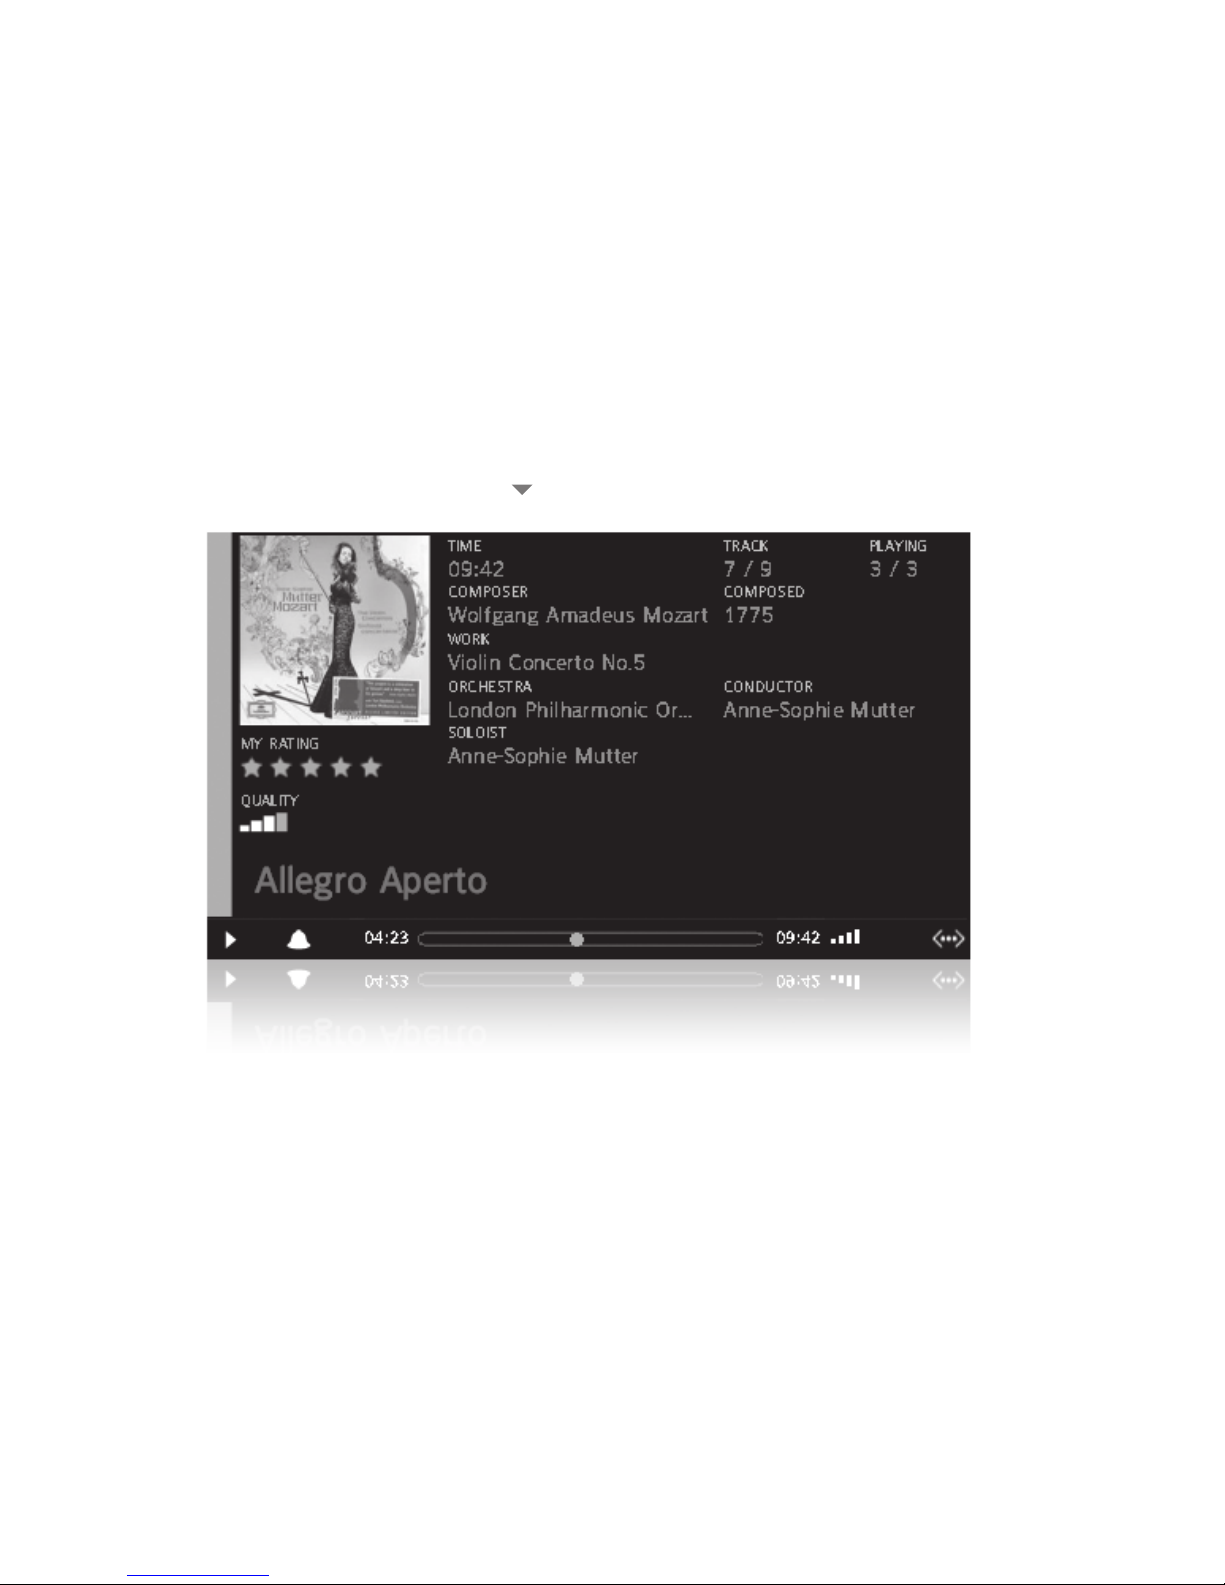
CLASSICAL: In addition to the above, classical shows the composer of the piece, and
replaces the album eld with the work eld to focus on how the music was intended to be
heard instead. Then there is the year the piece was composed. Further there are elds for
the orchestra, conductor, whereas the soloist eld is reused for the normal artist eld.
Page 29
user manual | oPus | melodY
27
Classical Play Screen with Details
While some information will always show, even if e.g. the track title is not known, some elds
will only show up if they are lled either from the internal CD database or by you via the Maestro
application.
Tip: Should you navigate away from the currently playing selection but not actually start a new
one, the menu screens will return to the current play screens (or Internet radio play screen) automatically after 20 seconds.
Page 30

28
Play modes
Once you have started to play music and are on the large-letter play screen, the OK button
allows you to ip through context pop-ups that let you change its rating, delete the track, add
the current track to a playlist, or change the play mode, eventually returning you to the currently
playing track. As shown on the second context pop-up, here are the play mode options that will
then apply to the rest of the selection being played:
•
Repeat THIS TRACK: the selected track is repeated until you stop the loop.
•
Repeat ALL TRACKS: all tracks of the album, work or playlist are repeated until you stop
the loop.
•
SHUFFLE: The tracks from the selection of album, albums etc. are played in random order
until all tracks in the selection are played.
Repeat and shufe can be combined to e.g. repeat a particular album and shufe through in a
different order each time.
2.3 Listening to Internet Radio
If your OPUS or MELODY is connected to the Internet, selecting INTERNET RADIO from the
main menu opens an additional world of unlimited music. If your unit is connected to the Internet
through a rewall, you may have to open the necessary ports in the rewall. The web pages of
the Internet radio stations usually will provide more information on how to do this.
A long list of predened stations is available from the start: They are sorted into larger categories
Page 31

user manual | oPus | melodY
29
to power up your search:
•
FAVORITES: Your own list of favorite online stations. Once you have found a radio station
you like, hit the OK key to be able to add the current station to the list (or to be able to take
it off).
•
GENRES: The radio stations by their main genre (these are the same as the default genres
that come with your OPUS/MELODY).
•
REGIONS: Especially with the online radio stations it is fun and exciting to explore the whole
world by regions and the very different music that people all over the globe listen to.
•
PUBLIC & INFO: There are many publicly nanced and run radio stations, such as National
Public Radio in the US, which offer great programming. Also there are many college,
community or other public stations of interest. Finally there are many news and other
information stations that t into this category.
•
ADD NEW STATION: Here you can add stations you were not able to nd in the other lists:
1. First enter the name of the radio station
2. Then enter the URL of this station
OPUS/MELODY support two kinds of URLs (web addresses):
o Direct URLs, which allow to stream the MP3 or AAC les immediately after the
connection has been established.
o URLs with sufxes like “.pls” or “.m3u”. The second type provides a list of music servers,
which are tried one after another until a connection is established.
Page 32

30
The listings of the stations are preceded by a quality indicator that is based on the bit rate (resolution per second) the stations are streaming:
•
1 bar: up to 96 kbit/s
•
2 bars: up to 128 kbit/s
•
3 bars: up to 320 kbit/s
•
4 bars: greater than 320 kbit/s
Please note that the streams are ongoing and will usually play right away, whereas the metadata
is part of the stream and is picked up as soon as possible and can take a few seconds.
2.4 Playing Music from a Networked PC/Mac/NAS
Through your home network and the Universal Plug and Play (UPnP) protocol your OPUS and
MELODY can discover, browse and stream music from other connected music sources such as
PCs, Macs or Networked-Attached Servers (NAS) – as long as they support the UPnP standard and have the relevant software running. Music sources that broadcast themselves on the
home network are displayed on the OPUS and MELODY under the main menu option MUSIC
SOURCES, if they meet the following conditions:
•
they are connected to the network
•
turned on
•
they support the UPnP/AV (DLNA) standards
Page 33

user manual | oPus | melodY
31
•
their music libraries are published and open to be shared
Choose the source you want to listen from, and you should nd the complete library of the
remote PC/Mac/NAS available right on your OPUS or MELODY and with your controls. Playback
from your OPUS library stops (background encoding or import processes will continue), and the
screen header changes to reect the name of the remote music server. Remember the browsing
may be organized differently as you will be seeing the library structure as it is organized on the
connected music source. When you want to return to your OPUS library, just navigate back to
MUSIC LIBRARY and that is it.
We have tested the OPUS and MELODY against the following UPnP server softwares: Tversity
Media Server, TwonkyMedia, Windows Media Connect, NERO MediaServer, Nokia Home Media
Server. If you encounter any difculties with another UPnP server, please let us know and we will
test it also.
Note: The other way round works also, allowing you to use other UPnP networked receivers to
browse and play music off the OPUS.
2.5 Playing Music from Your Apple® iPod™
This is a feature that will be enabled by a special accessory connector that links your iPod to
either the MELODY or OPUS for browsing and playback of iPod content. Please check online for
announcements as to availability.
Page 34
32
2.6 More on Using the Touchscreen and Remote Control
Your music library literally at your ngertips
Just about all of the logic of driving the menu screens works just the same when using the
touchscreen, however there are some differences:
Touchscreen Navigation
Track screen
Back to the higher
level / left
Each menu
item directly
Page 35
user manual | oPus | melodY
33
And when you are in playback, this is how you can navigate via the touchscreen:
Tap the artwork to get
back to the higher level
Page 36
34
Warning: Please only use your ngers or something other that will not scratch the glass surface
when using the touchscreen. Please also only tap the touchscreen lightly to avoid damage to the
display.
Tap anywhere to get to the detailed play screen
Page 37
user manual | oPus | melodY
35
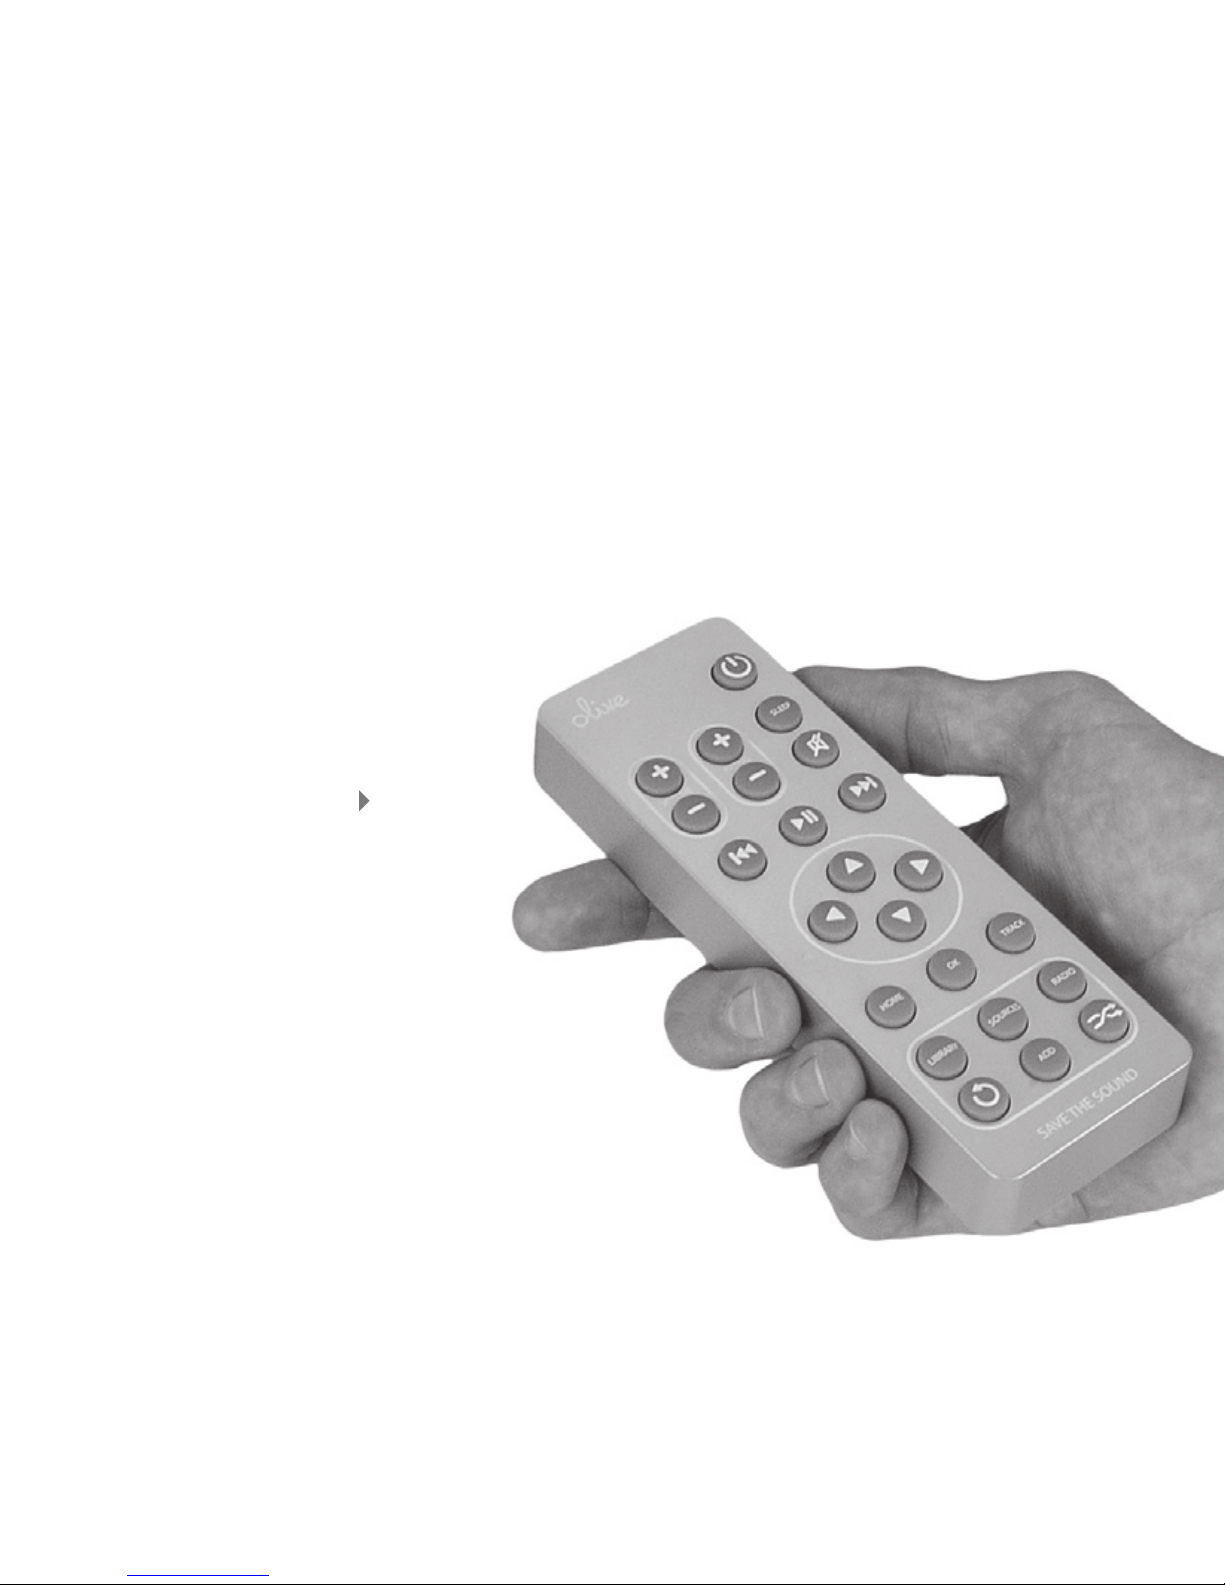
The couch perspective with the remote control
The remote control is a good way to control the functions of the OPUS and MELODY from a
short distance such as a couch. Its keys duplicate the functions of the buttons on the front panel
so there should be no surprises. The following picture shows the available functions of the front
of the remote control.
Remote Control Buttons
Page 38

36
A number of buttons are available on the RC that go beyond those on the OPUS and MELODY,
here is an explanation of what they do:
•
VOLUME (+ and -): Adjusts the level of the analog audio out volume, which is usually
connected to your stereo components.
•
RATING (+ and -): During playback of a track this is a shortcut to the pop-up that allows to
adjust your personal rating of the song.
•
SLEEP: A shortcut to the sleep timer option.
•
MUTE: Toggles the volume of the analog audio out between zero and your preset value.
•
HOME: A shortcut to the main menu of the OPUS/MELODY.
•
TRACK: A shortcut to the track that is currently playing.
•
LIBRARY: A shortcut to your OPUS music library.
•
SOURCES: A shortcut to the list of connected music sources/servers available.
•
RADIO: A shortcut to the Internet radio selection.
•
REPEAT: During playback of a track this is a shortcut to the play mode option pop-up.
•
ADD: During playback of a track this is a shortcut to pop-up that allows to add this track to
a playlist.
•
SHUFFLE: During playback of a track this is a shortcut to the play mode option pop-up.
your stereo components. This feature will be made available with a future software update.
Page 39

user manual | oPus | melodY
37
Your OPUS/MELODY menu screens on any web browser
The OPUS and MELODY menu screens can be accessed on any web browser in your home
network, e.g. on our laptop or PDA. This feature will become available with an upcoming soft-
ware update.
Page 40

38
3. makinG it Your olive:
settinGs and sYstem services
3.1 General Settings, Alarm and Sleep Timer
Following the main menu option SETTINGS you will nd numerous settings to adapt your
OPUS or MELODY to your needs and tastes, which we strongly encourage you to do. First
the GENERAL SETTINGS:
•
SET DATE & TIME: Set the OPUS or MELODY to your date and time.
•
SET ALARM: Wake up to your favorite music. You just need to enter a start and end time
and choose one of your playlists. If for some reason the playlist is not available or the
network is down a normal alarm sound will sound.
•
SET SLEEP TIMER: Go to sleep with music, or otherwise tell your OPUS or MELODY to
stop playback after a period of time. Default is off.
•
SET LANGUAGE: Choose the display language here (English, German, French, Spanish
and Portuguese are available). Default is English.
•
POWER SAVING: Your OPUS and MELODY have a sophisticated power saving logic built
in to turn off the display and hard drive if possible. Often, especially on the OPUS, there
may be processes running in the background such as supporting a music stream to a
MELODY in another room or encoding of a new piece of music, which requires the OPUS
hard-drive to stay on, but the display will turn off. Otherwise depending on the time you
Page 41

user manual | oPus | melodY
39
set here, the OPUS or MELODY will check if music or Internet radio has not been playing
for the specied time, to then turn the units into power saving mode. Default is 30 minutes.
Note: We advise not to turn off power saving completely as it serves to protect the long-
evity especially of the display and hard-drive. We suggest to use the manual power switch
on the back of the OPUS to turn your OPUS off completely when you will not be using it for
an extended period of time.
3.2 CD Settings
Importing from CDs
Under CD IMPORT QUALITY the OPUS allows you to decide in which audio le format you are
storing your music. The format denes quality, size of the stored data and compatibility with other
devices, e.g. your portable player. The OPUS offers ve different formats as shown in the table below.
Higher quality always means that each track needs more space on the internal OPUS storage.
The following table shows rough estimates for how many music CDs can be stored depending
on the encoding used for the les and the hard-drive size. An average music CD stores about 60
minutes of music, and the available space of an OPUS system is calculated from the capacity of
the internal hard drive minus 10 GB needed for the system les and the CD reference database.
Page 42

40
OPUS Capacity Overview
Format Quality 320GB 500GB 750GB 1000GB
WAV:
no compres-
sion
CD: 1411.2
kbit/s
HD: 4608
kbit/s
515
158
812
249
1225
375
1638
502
FLAC:
Lossless com-
pression
CD: ca. 800
kbit/s
HD: ca. 2000
kbit/s
909
364
1433
573
2161
864
2889
1156
AAC 128 kbit/s 5680 8957 13508 18059
MP3 128 kbit/s
320 kbit/s
5680
2272
8957
3583
13508
5403
18059
7224
To achieve the best quality music we suggest to import music with no compression (WAV), or
lossless compression (FLAC) which retains the audio quality at about half the size of uncompressed music. The default import format is set to “FLAC”.
Page 43

user manual | oPus | melodY
41
Exporting to CD
Under CD EXPORT you have a number of options when burning a CD:
•
Audio CD with 2 second gap: this provides you with a standard quality CD that any CD
player should be able to read, with a 2 second gap between tracks at playback. Should
your music be stored in a compressed format (FLAC and MP3, AAC currently not sup-
ported) the OPUS will transcode the les chosen to the audio CD format. Please note that
this can take substantial time.
•
Audio CD with no gap: as above, but without the 2 second gap between tracks. This is the
default export format.
•
MP3 CD: Here the result is a CD with MP3 les on it. Again a transcoding takes place for
WAV and FLAC tracks, which are processed into the MP3 format for burning.
3.3 Network Settings
A stand-alone OPUS is great for storing and listening to music. But as a member of a home network with additional MELODYs or connected music servers or PCs it can do much more. Your
OPUS and MELODY are fully enabled for wireless or wired communication, and the following
settings dene how they connect with the local area network (LAN) router, and via the router with
other computers, laptops or PDAs that may be connected also.
Page 44

42
Connection ports
The antenna for wireless communication (WLAN) is on the back of the OPUS or MELODY, as
well as the port for a wired Ethernet connection.
•
The wireless connection is based on the 802.11g standard, this standard is backwards
compatible with 802.11b. The usual range of wireless signal channels are supported for you
to choose one that works best in your environment.
•
The wired connection is based on the Ethernet standard with speeds up to 1 Gigabit per
second.
The ports automatically adapt to the available bandwidth supplied by the router.
Network conguration
In general there are 2 connection levels, which are also displayed in the status bar for you to
check upon at any time:
•
Home network connection: Your OPUS and MELODY connect to the home network router
directly, and act as DHCP clients that follow the existing network settings. Settings on the
OPUS and MELODY, e.g. concerning security, must correspond to those of the existing
home network for communication to function properly. A successful connection will consist
of an IP address (IP address, subnet mask, router address), but depending on the router
and state this does not have to mean that the connection is currently open. You will see
a wireless icon showing signal strength, or alternatively an Ethernet icon to signify how you
are connected to your home network. This connection icon is colored orange if an IP
address is available.
Page 45

user manual | oPus | melodY
43
•
Internet connection: Reaching out beyond your home network is something your router
does based on the ISP service you have (DSL, cable or satellite). It shares that connection
with all connected devices. If this Internet connection is available to the OPUS and
MELODY this is shown by the connection icon changing color from orange to white.
Network setup
As part of the SETTNGS > NETWORK SETTINGS menu, you manage how the OPUS and
MELODY are part of your home network. Before getting started please make sure that all other
devices such as PCs/Mac are properly networked.
•
CHANGE OPUS NAME (OPUS only, MELODYs are not broadcast on the network): Here
you give the OPUS a name so you can recognize it on your network (default is “Opus
Library”). The new OPUS network name will be effective on the network after a restart of
the OPUS and subsequent reconnect.
•
NETWORK SETUP: Select the connection alternative that applies to your home network.
Primary choice is between wired and wireless:
o Wired: You will connect to your router by hard-wire Ethernet cable.
o Wireless: You will connect wirelessly to your router.
Secondary choice is between automatic or manual IP-address allocation:
o Automatic: Your router has DHCP enabled, which means it dynamically assigns IP
addresses to connected devices. This is the most common way of assigning the IP
address.
Page 46

44
o Manual: You enter the IP address the OPUS or MELODY should use to connect to the
router.
When you enter SAVE, the new settings are saved and the connection is scanned. In the case
of a wired network you are usually done after this step.
In the case of a wireless network the next step concerns choosing the right network. On the
next screen you are presented with the list of available networks, go ahead to select your
home network and proceed with Save.
Finally you need to reect the security settings of your router, this includes choosing the
security protocol, which will be either the Wired Equivalent Privacy (WEP) or Wi- Protected
Access (WPA) protocols. Please enter the security key, which is exchanged between the
OPUS/MELODY and the router to establish identity and secure communication. OPUS
supports:
o WEP keys with 64 and 128 bit WEP encryption (24 bits of the encryption are used as
initialization vector, so sometimes these keys are said to have 40 bit and 104 bit
encryption). Your WEP key must be in hexadecimal form in order to connect to your
home network, which means using regular numbers 0..9 or the letters A..F. Hex key
examples are:
•
using 64 bit encryption (10 characters): 3FF2354AA4
•
using 128 bit encryption (26 characters): 42EEFD49EF8E6C4C2E3299BD39
o WPA and WPA2 keys are always ASCII and can be 8 to 64 characters long. If a choice
of encryption types is offered you should choose TKP, AES is not supported. There are
Page 47

user manual | oPus | melodY
45
known issues with Apple routers in combined WPA/WPA2 auto-switch modes.
Note: It may take up to a minute for the router and OPUS/MELODY to exchange security keys
and establish a secure connection.
•
NETWORK INFORMATION: To ascertain your current connection, here you can check if you
are currently using wired or wireless connection, what your IP address is, and if an Internet
signal is available.
3.4 System Services
The OPUS and MELODY are systems that should be maintained for continuous good performance and enjoyment – a little bit like a car. All necessary features are built right into the units to
make life easy for you. Some are automated; some involve you to guide them as desired in the
menu section SETTINGS > SYSTEM SERVICES.
Automated system services
•
File system integrity: At every 25th start-up the system will perform a regular check of its
internal les and le system, or whenever it otherwise detects an issue.
•
Software ping pong: Your system saves a copy of its own software in case the running
version runs into a problem. In that case the system will automatically roll back to the saved
copy to allow continued operation.
You should be aware and tolerant of these automated services as they keep your OPUS or
MELODY healthy, otherwise you can well ignore them.
Page 48

46
Backing up your music library (OPUS only)
The hard-drives used are of the best quality and from renowned manufacturers, yet still harddrives are known to run into problems and we highly recommend for you to make a backup
copy of your music and metadata to an external hard-drive. Use an external USB hard-drive
that has at least the same capacity as your OPUS, we recommend at least 25% more capacity.
The music, metadata and CD reference database will be packaged into a number of les in true
archiving fashion that can be seen on other computers but not read due to copyright protection.
•
BACKUP: Follow these simple steps:
1. When prompted connect an external hard disk to the USB port on the back of the
OPUS. Note that the hard disk needs to be formatted in FAT32, EXT3 or EXT2 format for
this to work.
2. Continue and the backup will start, the red button in the status bar showing that there is
a background process going on. Please note the backup may take a signicant amount
of time depending on the size of your hard-drive, up to ve or six hours. No music CDs
can be imported at this time, you can though listen to music.
3. When done you will see a pop-up that conrms the successful backup.
•
RESTORE: In the case something should be amiss with your OPUS hard-drive, use
the backup copy to reload your music library to your OPUS:
1.1. When prompted connect the external hard disk to the OPUS, and continue to the next
step, restoring the music library and CD reference database (of course as to when
both were last backed up). Depending on how many les there are, this may take a
Page 49

user manual | oPus | melodY
47
while. At this time no playback or other operation is possible.
2. When done you will see a pop-up that conrms the successful restore.
Keeping your system up to date
While your system will run well with its initial software that is part of the delivery, development at
Olive will continue to add to it with additional features and benets, so it is suggested to check
every 3 months for a new software or CD database release.
•
SOFTWARE UPDATE: For the latest online update follow this option and the OPUS or
MELODY will guide you through this procedure.
•
CD DATABASE UPDATE: For the latest online update follow this option and the OPUS will
guide you through this procedure. In contrast to the software updates, here there may be
a number of updates that you should make us of and download in succession. Please
be aware that the size of these releases can be very signicant (up to 1GB of data), so plan
for extended download times as well as several hours of background activity of your OPUS
to implement the changes internally. This is something that makes sense to trigger before
going to bed.
Calibrating your touchscreen
When delivered to you the touchscreen on your OPUS and MELODY should already be functional. If at anytime you feel the touchscreen may need to be adjusted or otherwise reactivated,
use this service to start the process.
•
CALIBRATE TOUCHSCREEN: As soon as you trigger this process the screen will change and
Page 50

48
you will be asked to touch certain areas of the screen, please be as exact as you can about this.
Once done the menu screens will resume at the Olive logo screen.
Starting fresh
Using this menu option you can restore all settings back to their factory default values. This
affects all parameters of the SETTINGS menu, including e.g. any alarm or sleep timer settings.
Your imported music and metadata are not affected by this action.
•
DEFAULT SETTINGS: Once started you will be asked to conrm this step, then the system
will proceed and restart automatically.
3.5 Information about your Library and OPUS or MELODY
To see key statistics on your music library on the OPUS navigate via SETTINGS > ABOUT YOUR
LIBRARY and you can quickly check up on your music library, each providing the total number in
your library:
•
TRACKS
•
ALBUMS
•
ARTISTS
•
COMPOSERS
•
GENRES
Page 51

user manual | oPus | melodY
49
To see an overview of more technical information about both OPUS and MELODY navigate via
SETTINGS > ABOUT YOUR OPUS / MELODY and you can quickly check up on your unit:
•
NETWORK NAME (OPUS only): Here you see what your OPUS is called within your network.
•
MAC ADDRESS: This is the Media Access Control (MAC) address of either the wireless
networking card or the Ethernet card contained in your unit, depending on which network
mode you have set. Both uniquely identify your unit and are sometimes used for network
security purposes.
•
SERIAL NO: The device serial number, it uniquely identies it. You need it e.g. for registering
your OPUS or MELODY with Olive.
•
STORAGE TOTAL (OPUS only): The total available hard drive capacity.
•
STORAGE USED (OPUS only): The amount of storage you have currently used up,
including about 8 GB for the CD reference database, as well as 5% of the total which
is reserved by the system.
•
SW VERSION: The release level of the software that runs your OPUS or MELODY. To check
online if a newer version software is available go to SETTINGS > SYSTEM SERVICES >
SOFTWARE UPDATE as described above to download and install any available updates.
•
CD DB VERSION (OPUS only): The release level of the CD reference database that provides
CDs that you push into your OPUS with the matching metadata. To check online if a newer
version software is available go to SETTINGS > SYSTEM SERVICES > CD DB UPDATE as
described above to download and install any available updates.
Page 52

50
4. editinG Your music librarY
4.1 Information to Describe Your Music
Metadata / tag information on your OPUS
Metadata, also sometimes referred to as tag information or liner notes, is the information that
goes along with the audio le. It describes a music piece or album, which artist is playing, when
the recording was made, your rating and how often you have listened to it etc. The metadata will
signicantly enhance your knowledge of your music, and your pleasure of listening. Well edited,
the metadata will allow you:
•
to nd particular songs or works so much quicker. The OPUS has very powerful navigation
options, but they are only as good as the data they have to work with.
•
to know more about the music while browsing or listening to it.
•
to understand patterns in the music and in your listening, which can greatly enhance your
music pleasure.
What’s available
Here is a complete list of the elds the OPUS keeps per track in table form:
Label in Maestro Label Display Description
Track Title Track;
Classical:
Movement
Title or Name of the piece of music. In classical music this is
referred to as a movement. Both are used synonymously.
Page 53

user manual | oPus | melodY
51
Track (No.) Orig. Track (No.) Position of track as part of recording when published.
Track (Total)
Orig. Track (Total)
Total number of tracks of recording when published.
Playing Position within currently played selection, dynamically generated.
Playing Total number of tracks currently selected for playback, dynamically
generated.
Time Time Duration of published track.
BPM Number of beats per minute in the main part of the audio.
File Type Refers to the encoding format, e.g. WAV, FLAC
Sample Rate Quality icon Rate at which music is sampled.
Bit Depth Quality icon Depth at which music is recorded, usually 16 or 24 bit.
Bit Rate Quality icon Bit rate as a result of compression, e.g. 128 kbit/s
File Size File size of music in bytes.
Genre Category or type of music.
Featured
Instruments/Voices
Instrument/
Voice
List of instruments or voices of importance, comma separated. In
classical music used e.g. for concerto featured instrument.
Page 54

52
Composer
Firstname
First name of the composer of the piece of music. Only used for
non-classical music.
Lastname Surname of the composer of the piece of music. Only used for
non-classical music.
Arranged By Music may be “re-composed” by someone to suit a different set-
ting etc.
Lyricist Author of the lyrics of the music. In classical (Opera) this is the
Librettist.
Lyrics This is the text that is being sung or otherwise accompanies the
music. In classical or Opera terminology this is the Libretto. As this
can be a larger text it may be stored in a separate location, with a
link to the location here.
Who Would Have
Thought
Interesting or surprising factoid about this music piece.
Album Title Album Title or name of the publishing, recording or performance.
Release Date Released Date the album was published or released. Initially this can be year
only or even the date.
Date Recorded Date the music was recorded, the performance was performed.
Recording Method Method by which the recording was made, can refer to e.g. DDD
or AAD.
Page 55

user manual | oPus | melodY
53
Original Recording Orig. Recording Date the music was rst recorded and subsequently published
on media.
Recording
Location
Place the recording was made.
Published By Music Label Publishing house or music label that brought the recording to
market and also likely holds copyrights.
Publisher
Weblink
Web link to the publishing house / music label.
Produced By Person or comma separated persons who were instrumental
in producing the performance or recording. Can be recording
engineers etc.
Performance
Language
Music can be sung or performed in different languages, sometimes
it is important to know in which.
Album Artwork Artwork that accompanies the music. Usually there is a dedicated
one for the album, or just insert whatever picture you like.
Disc Number Number of the disc as part of a multi-disc publishing or recording.
Total Discs Total number of discs of a multi-disc publishing or recording.
Artist / Soloist Artist. Classical:
Soloist
Band or main performing artist or performer. Can be a soloist in
classical music who is accompanied e.g. by an orchestra.
Artist Weblink Web link to the band or main performing artist website.
Page 56

54
Additional Artists /
Sidemen
Sidemen Sidemen or other signicant artists that are of importance to this
performance or recording, comma separated.
Original Artist Artist or performer who is recognized to initially have performed
this music.
Orchestra Orchestra Name of the performing orchestra.
Orchestra
Weblink
Web link to the website of the performing orchestra.
Choir Choir Name of the performing choir or chorus.
Conductor
Firstname
Conductor First name of the performing conductor.
Lastname Conductor Surname of the performing conductor.
Work Title Work Title or name of the classical composition. Relevant here is the
intent of the composition, not the recording or size of the media to
store it. So a work can be equal to an album, larger than an album
as in case of many operas, or smaller than an album.
Composer
Firstname
Composer For database reasons the classical composers are stored in differ-
ent elds to the non-classical composers. Here the rst name of
the classical composer of the music.
Lastname Composer or database reasons the classical composers are stored in different
elds to the non-classical composers. Here the surname of the
classical composer of the music.
Page 57

user manual | oPus | melodY
55
Date Composed Composed Year or exact date the work was composed.
Premiere Year or exact date the work was rst performed
Scene Scene In an opera or other dramatic work this is the scene number.
Act/Part Act In an opera or other dramatic work this is the total number of act.
Act/Part Total Act In an opera or other dramatic work this is the act number.
Musical Form Especially in classical music there are forms such as sonata, fugue,
minuett etc. that help appreciate what is heard.
Musical Period Especially in classical there are periods such as early, baroque,
classic, romantic or contemporary music.
Work Description Longer description for a better appreciation of the composition.
Cadenza(s) By At the end of the rst movement in concertos often the soloist has
the opportunity to “freestyle” to show off his/her skills. This can
be composed by the soloist or by someone else, e.g. the work
composer or a famous soloist of the past.
Play Count Counter that shows how often you have played this music.
Last Played Date that shows when music was last played.
Date Added Date that shows when music was added to music library.
Date Modied Date that shows when information on music or music itself (le
type, compression level) was last modied.
My Rating Rating stars Personal liking of music on a scale of 1 to 5.
Page 58

56
My Comments Personal comments of any kind associated to the music.
Mood Personal mood you associate with this music for future search
capability.
Event Event such as birthday, holiday or other event you associate with
this music for future search capability.
Genres – they are special
Genres allow to categorize music to provide an easy handle on even the largest music libraries.
There are two ways in which this is enhanced as part of the OPUS and MELODY:
1. The menu screen allows for 3 levels of genre hierarchy, meaning that “Classical” and “Opera”
are not on the same level, but “Opera” can be a sub-genre to “Classical”, as would be
“Chamber Music” or “Orchestral”. And again, not all Opera is the same, and you can use e.g.
“Italian Opera” and “French Opera” to subdivide the overall Opera oeuvre. For small libraries
this may be overkill, for large libraries such a genre index allows to:
•
quickly end up with a small selection of very relevant titles
•
build a view into your music that is distinctly your own, allowing you to understand how
your music ts together or is different, how your tastes have developed
2. As in the animal kingdom you would use very different attributes to describe sh from
mammals, so too in music the attributes needed to capture the core or soul of the musical
kinds are very different. Here are sample attributes for each of the main genres:
Page 59

user manual | oPus | melodY
57
•
Rock/Pop/Blues/Other: In the main this is about an individual artist or a band coming
together to perform a set of music. The artists are usually also the composers. Often the
time of the album release is identical to the recording itself. So the key attributes are “artist”,
“album”, “track”, and “released”.
•
Jazz: Often the people playing together change, and besides the band leader there are
other performers who are as imported to the music and who should be noted. Also with
the attribute “sidemen” important cross-references can be uncovered by seeing who
inuenced which musical style. Then many recordings go back to a certain period that is as
or more relevant than when the current CD pressing was made. As such “orig. recorded” is
an additional important attribute to the “released”. Finally in some cases an instrument is
featured which uniquely qualies the performance, for this there is the “featured instrument”
attribute.
•
Classical: In contrast to most modern music, classical music is very much about the
composer and when a work was composed. The performers are rarely identical to the
creators, though they can be an important aspect in view of the interpretation of a
pre-existing composition. And here the conductor plays an important role as do the
orchestra, chorus and soloists. People who are into classical music will associate as much
with the composer as with the performers, so all this information is very relevant:
“composer”, “composed”, “orchestra”, “conductor” and “soloist”. The OPUS
and MELODY go so far as to sort the music rst by composer and then by work, choosing
to adopt the usual nomenclature of modern classical performance to the mainstream
pop industry notation. For many, for the rst time on a digital music library, they can search
by composer when they are looking for their favorite work. One downside of this is that
often the metadata of composer and work are poorly maintained, and so initially there can
Page 60

58
be more effort involved in editing these attributes to make sure they are correct. See also
the classical music factsheet for a detailed illustration on how this is done most easily.
4.2 Maestro Music Management Software (OPUS only)
Sometimes the internal or Internet CD reference databases don’t offer metadata for your tracks,
or they are in parts incorrect. To enter or change the metadata we offer the Olive Maestro application, which utilizes a browser, keyboard and mouse on your PC or Mac to make the metadata
management and editing so much more comfortable. It comes right with your OPUS, so no
additional installation is necessary.
Note: The Maestro software is currently in a beta stage, meaning that it is a work in progress with
some known issues, please make sure you make a backup of your music before using it.
Getting started
Launch the web browser of your choice, and enter the IP-address of your OPUS into a browser
on your PC/Mac, replacing the x’s as:
•
http://xxx.xxx.xxx.xxx:8163/maestro.php
The Maestro home page of the OPUS appears.
Page 61
user manual | oPus | melodY
59
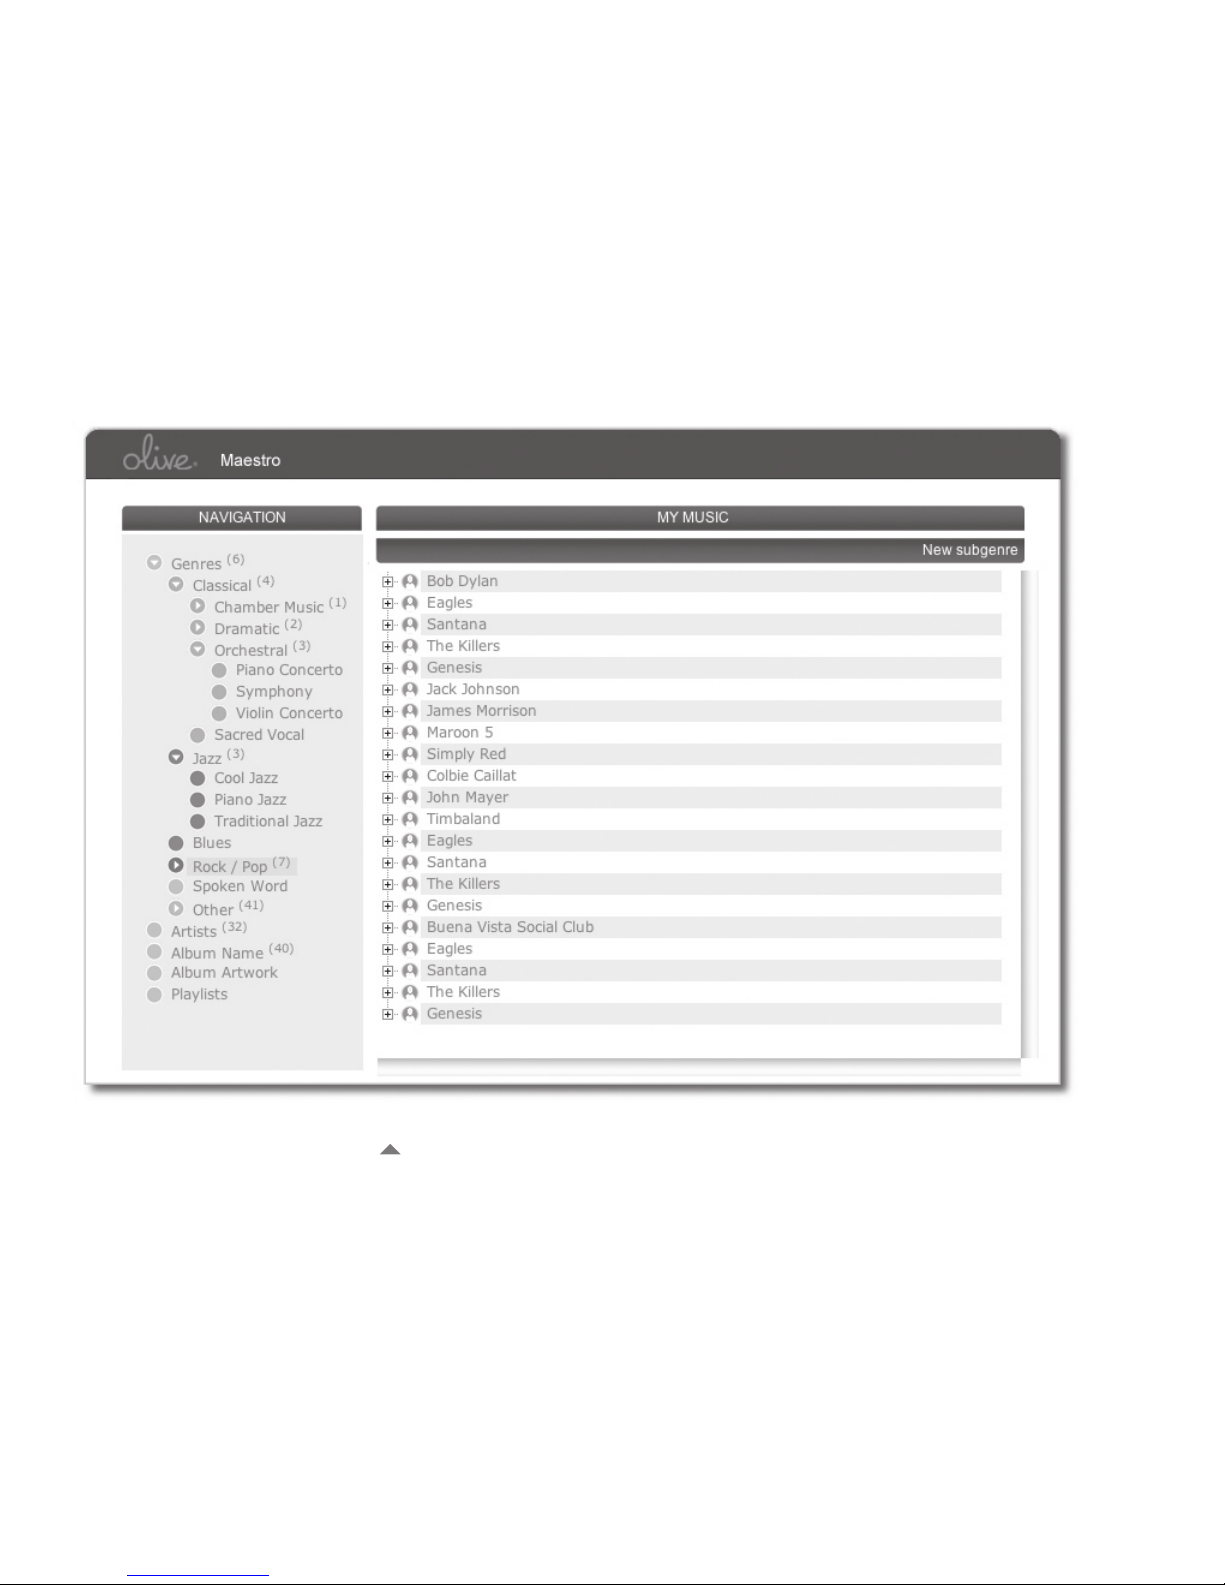
Olive Maestro Layout
Page 62

60
Take a look around, there are four areas to note:
•
The left panel which provides you with a similar overview of your music library navigation
options as on your OPUS or MELODY, but showing all genres and the complete genre
hierarchy. Here you can build your own genre tree or view into your music library, adding
new subgenres as needed. The digits in brackets denote the number of underlying
subgenres, artists and albums.
Further down you are also able to open up the whole list of playlists you have to be able to work
on them in context, change their names, reorder tracks within them etc.
•
The right panel displays the lists of items depending on the view you select on the left, and
changes to the edit overview once you select to edit any of the items. On the top of the
right panel there is a function bar that shows all the functions that are possible depending
on where you are.
Sorting your albums into genres
When you import music to your OPUS each album is automatically sorted into the genre hierarchy based on a default music tree. You now have the opportunity to adapt that music tree to
your own wishes, and to use drag & drop to pick up the albums and drop them into the relevant
genre. The next time you browse your music on the OPUS touchscreen you will already nd the
album in its desired location.
Joining two albums into one
When a collection being published only ts on two CDs, this is understandable from the view-
Page 63

user manual | oPus | melodY
61
point of the CD product, but adds nothing to the listening experience. As such it makes sense to
mark the tracks of one album and push them into the other, they will be appended to the end of
the list of tracks. Before you do, edit the CD number elds for both CDs to ensure playback is in
order of the CDs.
Editing the metadata
Before starting you should decide whether you want to edit tag information for a single track or
for a whole album (changing the tag information of a whole album has the advantage of applying your changes to all tracks at once). Highlight the track or tracks you wish to edit, and then
choose EDIT from the action bar on the upper right. The right panel list display will change to one
allowing editing of each attribute, with the attributes being sorted into tabs to make this easier.
Please note that some elds apply to a whole album or work, and even if only one track is highlighted the new information will be changed to all tracks of that album or work.
To edit cover art browse the existing covers with the “Album Artwork” navigation. Then choose
the album cover you wish to replace. Please note you are limited to le types .jpg, .png, .jpeg,
and each picture to 30kb in size.
Editing classical metadata
As already mentioned it is often necessary to add the composer and work attributes to each
classical piece to be able to navigate by these. Often this information will be available in the “artist” or “track title” elds, and then needs to be cut and pasted to the correct eld. The composer
and work elds may also be prelled with the artist and album title elds respectively during
import from CD or computer to give you something to start with and avoid the cut and paste.
Page 64

62
Please note that the classical work tab only shows for music that is sorted into the classical
genre. Here you will see all other attributes that are only relevant for classical music. There are
drop-down suggestion boxes for the composer, conductor, orchestra and chorus elds based on
the most famous of these, to allow to more quickly add such information.
4.3 Making the Most of Your Music: Shared and Private Playlists
Create playlists for the moods and events of your life
With a playlist you choose which tracks to play and the order in which to play them. You create
a playlist with a name of your choice and assign tracks, albums, or artists to this list. You can
create as many playlists as you want, include as many tracks as you want in each playlist, and
rearrange the tracks in each playlist until the order is just right. You might have one playlist for
exercising, one for a rainy day, another for dozing off in the night, and so on. All playlists created
on the OPUS are available for all MELODYs or other networked receivers to see. Playlists that are
created on the MELODY are “private” playlists that are only relevant for that room.
We’ve built the main part of the playlist management into the Maestro application, as it is much
easier to do this on a big screen.
Playlist management as part of the Maestro application (OPUS only)
Here you can open all playlists in parallel, and use the large screen to more easily nd selections
of music to add to the playlist of your choice by drag & drop.
1. Create a new playlist by using the option from the action bar.
Page 65

user manual | oPus | melodY
63
2. Navigate by genre, artist, or album to nd the selection you want.
3. Drag & drop the selection to the playlist.
4. Adjust the order of the tracks as desired.
Creating playlists and adding tracks in the OPUS/MELODY menu
screens
When playing back music you press the OK button three times to come to the add-to-playlist
pop-up, or use the RC and press ADD to get there even quicker. Choose from the list of existing
playlists by scrolling up and down, and press “right” to add the current track to that playlist.
If you wish to create a new playlist, follow MUSIC LIBRARY > PLAYLISTS > ADD NEW PLAYLIST
to enter a name with the on-screen text editor. Once saved, a new empty playlist is created.
Playback of a playlist
To listen to a playlist, just choose it from the menu option PLAYLISTS and press the play button.
Page 66

64
5. imPortinG and exPortinG music on Your oPus
5.1 Importing CDs
Importing CDs
After inserting a music CD, choose to import it from the pop-up. Should the CD already be in
the drive, hit the OK button to activate the pop-up anew. The recording of a CD happens in two
steps:
1. OPUS rst records the music les onto the hard disk without any compression or encoding
as they are on the CD (WAV format), this takes between 5 to 6 minutes. Available metadata
such as album and track titles, cover art, genre etc. are added. CDs that are not recognized
by the internal or online CD reference databases are labeled generically as e.g. “CD_4f6g664”.
If you want to import a CD already stored in OPUS, you are presented with a choice of
re-importing these or canceling.
2. The second step is the encoding of these les into the compression format that you have
dened in the CD IMPORT QUALITY settings (if you have dened to stay with WAV then you
are done).
Once the rst step is completed the CD will automatically be ejected and you can insert the next
CD for importing. The optional encoding will continue in the background, as denoted by the red
ball in the status bar. This may take considerable time, but the music is already available for you
to play back. During the encoding, the system response times of the OPUS may be slower than
usual.
Page 67

user manual | oPus | melodY
65
Warning: While this background process icon is present, do not edit the metadata of your library
and do not power off the OPUS. This action could end the encoding of the les and result in lost
or corrupt les. You can check import progress via the menu item CD IMPORT STATUS that only
becomes available during import.
Note: Duplication of copy-protected audio CDs may infringe copyright and digital rights laws of
your country.
5.2 Importing From a Computer
Copying music from a PC to your OPUS
By default OPUS is congured as a Windows le server (SMB server) and publishes the folder
“Import” on the home network when it is active – if it is in power saving you will rst need to
wake it up. For the computer name the network name of the OPUS is used, usually using the IP
address is easiest. Open up the “Run” dialog as part of the “Start” menu and enter the following
(in Vista it may be hidden, in this case press the Windows logo button and the R, and the dialog
should come up just the same). Then enter the IP address of the OPUS, which when connected
can always be found under SETTINGS > NETWORK SETTINGS > NETWORK INFORMATION:
•
\\xxx.xxx.xxx.xxx
A window should open containing a folder titled “Import”. You can copy all tracks to your OPUS
that have the supported formats MP3, WAV, FLAC and AAC. You can drag & drop individual les
or even complete folders to this import folder, they are then stored and automatically sorted into
the internal le system of the OPUS. Please note additional enhancements:
Page 68

66
•
For formats that the OPUS does not support les are received and then deleted (this is why
it makes sense to copy les to the OPUS, not to move them there).
•
For formats that the OPUS does not support, les are received but not stored (this is why
it makes sense to copy les to the OPUS, not to move them there).
•
Also, should tracks of the same le name and metadata already exist, these will be skipped,
i.e. the existing tracks on the OPUS are not overwritten nor is an extra copy saved.
•
In the case of albums of the same title being imported, such as e.g. “Greatest Hits”,
the artist name is added as a sufx to the album title to be able to better distinguish
the albums later.
•
When importing classical FLAC les, to facilitate editing and to avoid long “unknown
composer” and “unknown work” lists, the artist eld is mapped to the composer lastname
eld, also the album title is mapped to the work title.
Note: Currently access is limited to Windows PCs, we expect to add the import capability from
Macs in short order.
5.3 Burning CDs
Burning a CD is simple:
1. Choose the playlist you wish to burn to CD, and press the OK button to get to the prompt
for burning.
Page 69

user manual | oPus | melodY
67
2. OPUS will then ask you to insert a fresh CD-R into the CD slot. With your conrmation the
burn process starts. OPUS burns as many tracks as t on the CD, beginning from the start
of the playlist.
3. OPUS will check whether the playlist will t on the empty CD, and if not provide a message
to reduce the list.
4. When done the newly burned CD is ejected.
When stored in another format such as FLAC or MP3, the tracks rst need to be converted to
WAV to be ready for burning. In this case please allow for time for this to happen.
Note: Duplication of copy-protected audio may infringe copyright and digital rights laws of your
country.
Page 70
68
6. tiPs and troublesHootinG
6.1 Icons and messages explained
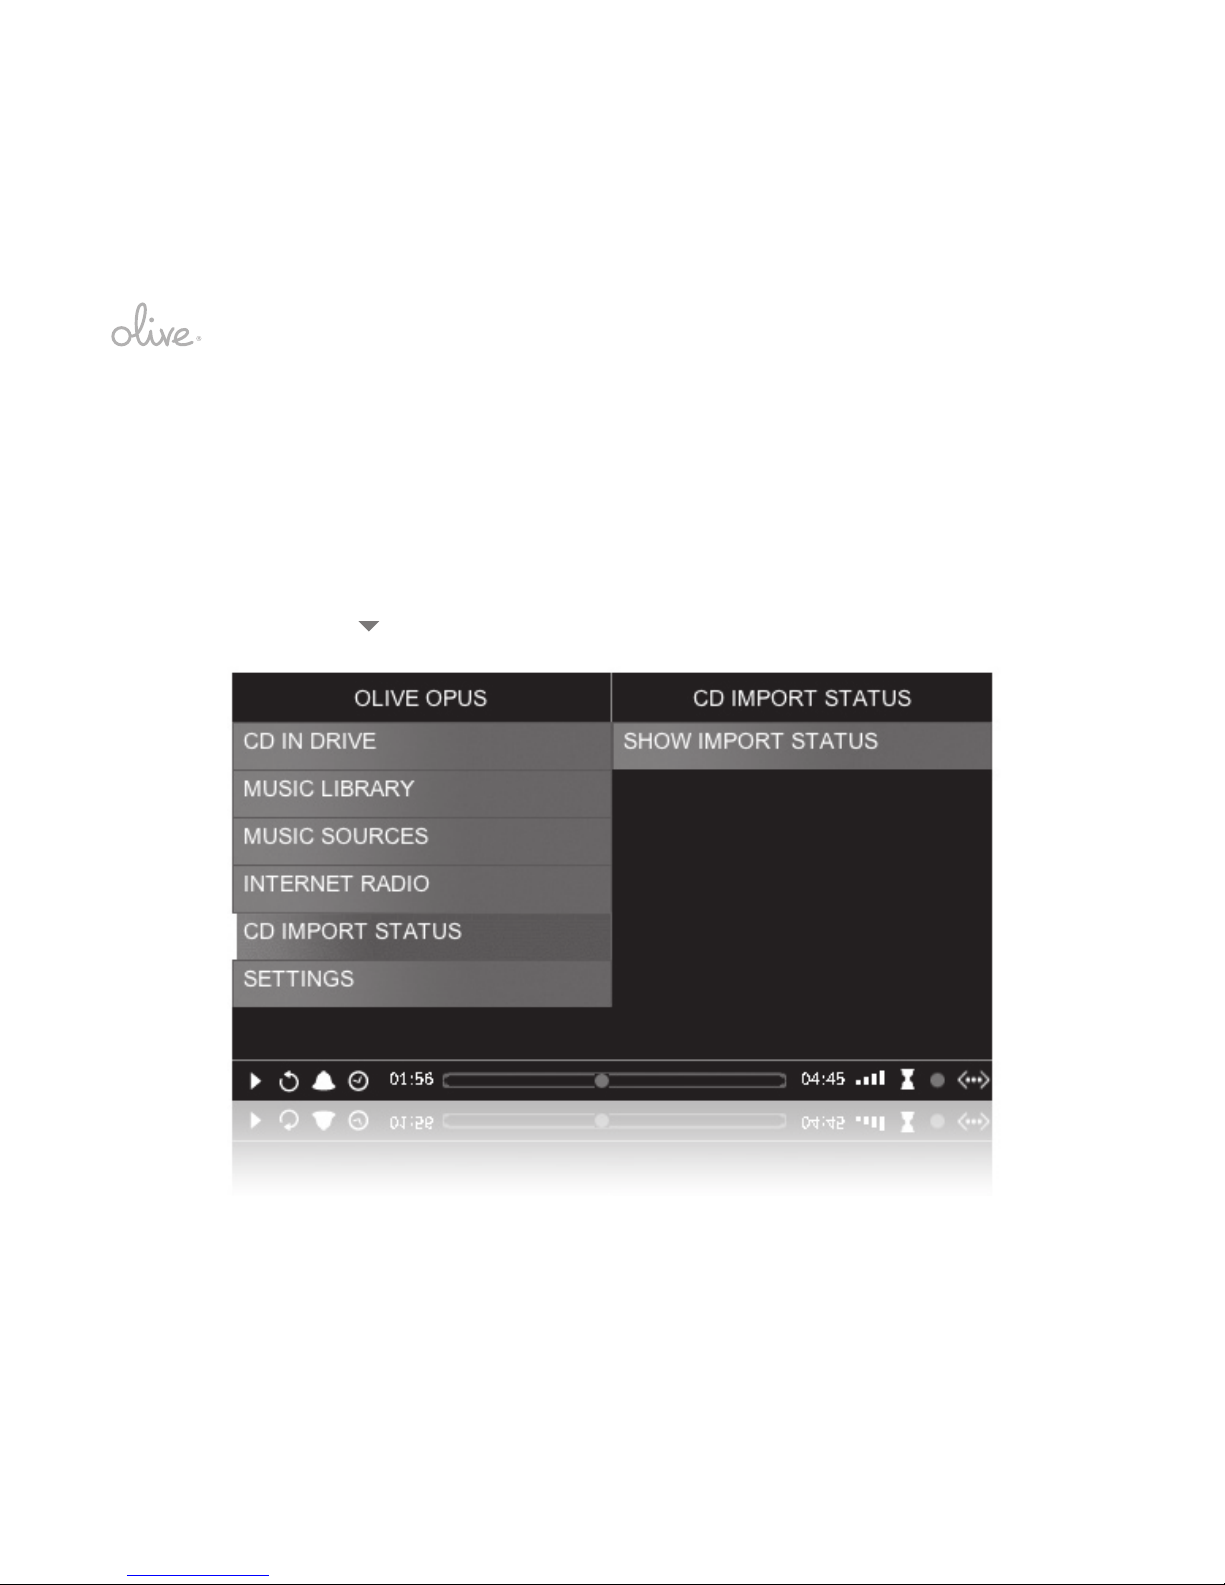
Status bar icons – what is the OPUS/MELODY doing?
Status Bar Icons
Page 71

user manual | oPus | melodY
69
Here is the list of icons that are used in the bottom part of the display and their meaning, from
left to right:
•
Basic play mode: stop, play, pause
•
Added play mode: repeat, shufe
•
Alarm: icon shows when alarm is set
•
Sleep timer: icon shows when sleep timer is set
•
Playback progress bar: time and progress of currently selected track
•
Volume level: as controlled by the remote control
•
Immediate process: system is active processing your request
•
Background process: OPUS is currently encoding music tracks, burning a CD, importing
music via the network, or performing a backup or restore. If a background process is
ongoing, system response times may be slowed, and depending on the process playback
and other functions may be disabled.
•
Network connection status: No connection, Ethernet or wireless LAN connection, orange
for local connection only, white when local and Internet connection
Take it easy with the power cable
In normal operation please never unplug your device while it is turned on or in sleep mode. It
might damage your device.
Page 72

70
It’s not possible to create and save playlists
Playlists are saved in the OPUS, and are based on music that is resident in the OPUS. Should
you be pointing your display and control to a separate UPnP server you will only receive an error
message. At this point make sure you are playing music off the OPUS, and retry.
CD handling precautions
•
Handle discs carefully - grab the outside edges of the disc instead of the top/bottom
surfaces so as not to damage or scratch the front side. Always keep the disc clean.
•
Do not use a disc with a special shape.
•
For best performance when recording from a CD, try to maintain a temperature of 95F or
less in the room where the OPUS is located.
6.2 First aid
The OPUS/MELODY shows no reaction
If pressing buttons, the touchscreen or remote control all don’t produce any reaction of your unit,
please try these rst aid measures:
1. Press and hold the Power On/Off button on the front of your OPUS/MELODY for about 5
seconds, the system will then restart. It needs about 40 second for the initialization process
and then the main menu should be displayed again.
2. Use the manual power switch to fully disconnect the power supply, or on the MELDOY
Page 73

user manual | oPus | melodY
71
unplug the power cord. Wait a few seconds and switch it on again. It will take about 40
seconds for this reboot, then press the On/Off button on the front of your OPUS/MELODY
until the main menu is displayed again. Your stored music is not affected by this restart.
If these actions don’t do the trick, please follow the instructions of the next section.
Recovery CD
The OPUS shipment contains a Recovery CD, which can be used to restore a clean hard-drive
and operating system software to an OPUS. Please note that this process leads to the loss of
your music les, accompanying tag information as well as the CD reference database! If you have
not done a backup yet, now is the time to do it.
1. Power off the OPUS using the manual power switch.
2. Switch the OPUS on with the manual switch, at the same time pressing the OK and “play”
buttons. The display will then show a message asking to insert the Recovery CD.
3. Insert the Recovery CD. The OPUS will then proceed to start up using the operating system of
the CD, to reformat the hard-drive and to re-establish the system software. The initial boot
may take up to 10 minutes in this case.
4. After this process the OPUS is “fresh out of the box” and will start up as usual. though this.
If the Recovery CD is not of the latest release you should also check online for the newest
software release.
5. Now use the backup to restore the music, metadata and CD reference database to
the OPUS.
Page 74

72
6.3 Networking Issues
Wired connections
Take a look at the status or activity lights on your router to see if they are blinking. If not, you
could try using another port on the router, or using a different Ethernet cable.
Router related
Often times it is difcult to know the router options and how to congure them for your network
(usually you log into your router by typing http://192.168.1.1 into your web browser, check the
documentation of your router for exact address and password). Things that you should check if
your OPUS/MELODY cannot make a connection are e.g.:
•
The allocation of the IP-address does not work, check the DHCP or manual settings on
your router, the number and duration of the IP-address leases that are granted.
•
Security protocol and password may have changed, check to see which they are exactly.
•
If no Internet is available, the login to your ISP may not work or may have expired, or may
not be up currently, or the wiring may not be connected properly.
At times it makes sense to reset your router to take some of the possible causes of problems off
the table, and then to rebuild Internet connectivity, security and other options from there.
Wireless interference
A frequent issue is the signal interruption by other devices using the same radio frequency, e.g.
cordless phones or microwaves. See if you can switch these off to check if they are inuencing
your connection.
Page 75

user manual | oPus | melodY
73
Distance
In the case of a wireless connection the connection icon in the status bar will show you the approximate signal strength. If you are only seeing one bar we suggest to either boost the wireless
signal or to move the OPUS/MELODY or router to improve reception for a consistent playback.
7. FurtHer resources
There’s more information about using the OPUS/MELODY available on the web. Please check
the following table that describes where to get more OPUS/MELODY-related software and
service information.
Topic Do this
Latest user manuals, FAQ, tips & tricks, soft-
ware downloads
Go to www.olive.us and navigate to “Support”
OPUS/MELODY service & support [email protected]
Tel. +1 415 908 3870
Fax +1 415 908 3932
The latest information about OPUS/MELODY Go to www.olive.us and select “Products”
Any other question you may have about the
OPUS/MELODY
[email protected] or call us at 415.908.3870
Page 76

74
8. saFetY and cleaninG
Important Safety Instructions
1. Your OPUS/MELODY is designed for recording and playing back encoded digital audio signals
and for the burning of audio CDs. Any other usage is explicitly excluded.
2. Install this unit in a well-ventilated cool, dry and clean place – away from windows, heat
sources, sources of excessive vibration, dust, moisture and cold, which could damage its
components. Avoid sources of humming (transformers, motors). Place the unit on a secure,
level surface and do not put any heavy objects on its top.
3. To prevent re or electrical shock, do not expose the unit to rain or water. Do not use this
product near water – for example near a bathtub, washbowl, kitchen sink, or laundry tub; in a
wet basement or near a swimming pool and the like.
4. Avoid sudden temperature changes. Condensation water may be created inside the device
while moving it from a cold to a warm location or using it in a moist room. The unit may no
longer work properly. Should the situation arise, remove any CD from the unit, switch it off and
wait at least an hour until the moisture evaporates. Caution: This device is not equipped with a
moisture sensor.
5. Do not use force on switches, controls or connection wires. When moving the unit, rst
disconnect the power plug and the wires connected to other equipment. Never pull the wires
themselves, only the plugs. Do not use attachments not recommended by Olive as they may
cause hazards.
6. Before plugging your unit into the AC main supply, make sure that the voltage indicated at the
Page 77

user manual | oPus | melodY
75
back of the unit complies with the local main voltage. If this product is equipped with a three wire grounding type plug, a plug having a third (grounding) pin, it will only work in a grounding
type power outlet. This is a safety feature and should only be used as stated.
7. When planning to not use this unit for long periods of time (i.e. vacation, etc.), disconnect the
AC power plug from the wall outlet. To prevent lightning damage, disconnect the AC power
plug when there is an electrical storm. In doing so, always grab the plug, never the cable itself.
8. This unit is not to be disconnected from the AC power source as long as it is connected to the
wall outlet and the manual power switch on the back of the unit is turned on, even if the unit
itself is turned off. This state is called “power saving”. In this state, the unit is designed to
consume a very small quantity of power. The unit is not to be disconnected from the power
source if it is in power saving, as doing so may damage the OPUS/MELODY.
9. For your own safety do not attempt to open the case of the OPUS/MELODY, or disassemble
it. You run the risk of electric shock and voiding the limited warranty. No user-serviceable parts
are inside. Never push objects of any kind into the product through openings as they may
touch dangerous voltage points that could result in re or electric shock. Never spill liquid of
any kind on the product. Contact Olive support if something drops into the case.
10. Damage Requiring Service – Refer all servicing to qualied service personnel. Servicing is
required when the unit has been damaged in any way or the unit does not operate normally.
Be sure to have read the “Tips and Troubleshooting” section regarding common operating
errors before concluding that the unit is faulty.
Page 78

76
Cleaning
Use a clean, soft and dry cloth. Make sure to unplug the product from the wall outlet before
cleaning.
Do not attempt to clean the unit with aerosol sprays, chemical solvents, alcohol, or abrasives, or
to remove dust with air pressure; this might damage the nish or affect the performance.
Page 79

user manual | oPus | melodY
77
9. reGulatorY and environmental comPliance
9.1 Legal Notices
Music is Intellectual Property
Intellectual property, including music, is subject to worldwide copyright protection. In most countries it is permitted to make a copy of a sound storage medium (e.g. CDs) that has been legally
acquired or of music data (e.g. from the Internet) for personal use, except for CDs with copy
protection. In no case is it permitted to offer these copies for commercial sale or to pass them to
third parties. Always make sure that the music you acquire is properly licensed, i. e. that the party
offering them also possesses the rights to the titles being offered.
This equipment must not be used for unauthorized duplication of CDs or any other works
protected by copyright. No license to infringe copyright is granted by the sale of this equipment.
Recording and playback of some material may require permission.
Data Loss
The manufacturer of this device shall not be liable for damage or loss of data including but not
limited to music recorded to storage devices. It is the customer’s responsibility to maintain the
original media and/or appropriate backup copies within the specic rights of the media’s copy-
right holder.
Manual Disclaimer
At the time of printing, the screen shot images in this manual matched this interface screens.
However, since the OPUS/MELODY have the capability of downloading software updates and
Page 80

78
enhancements on a regular basis, the resulting screen updates may no longer match the images
in this manual. Check the Olive website for more information on software updates.
Trade- and Servicemarks
The Olive logo is a trademark of Olive Media, Inc. Other product names mentioned herein are
used for identication purposes only and may be trademarks of their respective companies.
MPEG Layer-3 audio coding technology licensed from Fraunhofer IIS and Thomson.
Supply of this product does not convey a license nor imply any right to distribute content created
with this product in revenue-generating broadcast systems (terrestrial, satellite, cable and/or
other distribution channels), streaming applications (via Internet, intranets and/or other networks),
other content distribution systems (pay-audio or audio- on-demand applications and the like)
or on physical media (compact discs, digital versatile discs, semiconductor chips, hard drives,
memory cards and the like). An independent license for such use is required. For details, please
visit http://mp3licensing.com
Supply of this implementation of AAC technology does not convey a license nor imply any right
to use this implementation in any nished end-user or ready-to-use nal product. An independent license for such use is required.
Music recognition technology and some data are provided based on FreeDB. For more information, visit www.freedb.org.
Page 81

user manual | oPus | melodY
79
LPGL Library + GPL Package Written Offer
This product contains Linux 2.6.12, which is made available under the GNU GPL license version
2 (hereafter called “The Program”).
Olive Media, Inc. hereby offers to deliver or make available, upon request, for a charge no more
than the cost of physically performing source distribution, a complete machine-readable copy of
the corresponding source code of “The Program” on a medium customarily used for software
interchange.
Please contact: Olive Media, Inc.
555 Howard Street
San Francisco, CA 94105
USA
This offer is valid for a period of three years after the date of purchase of this product.
Olive Limited Hardware Warranty
Olive Media, Inc. (“Olive”) warrants this hardware product against defects in materials and
workmanship for a period of:
•
MELODY: one (1) year from the date of delivery.
•
OPUS: one (1) year from the date of delivery.
If a defect exists, Olive will, at its option:
•
Repair the product at no charge, using new or refurbished replacement parts, or
Page 82

80
•
Exchange the product with a product that is new or which has been manufactured from
new or serviceable used parts and is at least functionally equivalent to the original product.
A Replacement product assumes the remaining warranty of the original product or 90 days,
whichever provides greater coverage. When a product or part is exchanged, any replacement
item becomes your property, while the replaced item becomes Olive’s property.
Following exclusions and limitations apply:
•
Olive is not liable for any damage to or loss of any programs, data, or other information
stored on any media not covered by this warranty.
•
Recovery and reinstallation of system and application software and user data are not
covered under this Olive Limited Hardware Warranty.
•
This warranty does not apply: (a) to damage caused by accident, abuse, misuse,
misapplication, or non-Olive products; (b) to damage caused by service (including upgrades
and expansions) performed by anyone who is not an Olive Authorized Service Provider.
THIS WARRANTY AND REMEDIES SET FORTH ABOVE ARE EXCLUSIVE AND IN LIEU OF
ALL OTHER WARRANTIES, REMEDIES AND CONDITIONS, WHETHER ORAL AND WRITTEN,
EXPRESS OR IMPLIED. OLIVE SPECIFICALLY DISCLAIMS ANY AND ALL IMPLIED WARRANTIES, INCLUDING, WITHOUT LIMITATION, WARRANTIES OF MERCHANTABILITY AND
FITNESS FOR A PARTICULAR PURPOSE. IF OLIVE CANNOT LAWFULLY DISCLAIM IMPLIED
WARRANTIES UNDER THIS LIMITED WARRANTY, ALL SUCH WARRANTIES, INCLUDING
WARRANTIES OF MERCHANTABILITY AND FITNESS FOR A PARTICULAR PURPOSE ARE
LIMITED IN DURATION TO THE DURATION OF THIS WARRANTY.
Page 83

user manual | oPus | melodY
81
OLIVE IS NOT RESPONSIBLE FOR DIRECT, SPECIAL, INCIDENTAL OR CONSEQUENTIAL
DAMAGES RESULTING FROM ANY BREACH OF WARRANTY OR CONDITION, OR UNDER
ANY OTHER LEGAL THEORY, INCLUDING BUT NOT LIMITED TO LOST PROFITS, DOWNTIME, GOODWILL, DAMAGE TO OR REPLACEMENT OF EQUIPMENT AND PROPERTY, ANY
COSTS OF RECOVERING, REPROGRAMMING, OR REPRODUCING ANY PROGRAM OR
DATA STORED IN OR USED WITH OLIVE PRODUCTS, AND ANY FAILURE TO MAINTAIN THE
CONFIDENTIALITY OF DATA STORED ON THE PRODUCT. OLIVE SPECIFICALLY DOES NOT
REPRESENT THAT IT WILL BE ABLE TO REPAIR ANY PRODUCT UNDER THIS WARRANTY
OR MAKE A PRODUCT EXCHANGE WITHOUT RISK TO OR LOSS OF PROGRAMS OR DATA.
Some states and provinces do not allow the exclusion or limitation of incidental or consequential
damages or exclusions or limitation on the duration of implied warranties or conditions, so the
above limitations or exclusions may not apply. This warranty gives you specic legal rights, and
you may also have other rights that vary by state or province.
Copyright
Both the product described in this user manual and the documentation are protected by copyright
law. Copyright remains with the author. Software and documentation may not be copied, reproduced, translated or distributed in any form, not even in part, without prior written consent by the
copyright owner.
The authors decline any liability with regard to the software described herein. They do not make
any warranties for the correctness of the contents of this documentation, nor are they liable for
any direct or indirect damages which may arise from the use of, or the inability to use, either the
software or the accompanying documentation, even if the possibility of such damages may have
Page 84

82
been brought to their attention. The authors do not assume responsibility for any bugs or defects
in the software. This restriction of liability extends also to their distributors and retailers.
5th edition Olive Media, Inc.
© January 2009
Olive Media, Inc.
555 Howard Street
San Francisco, CA 94105
USA
Email: [email protected]
http://www.olive.us
FCC Approval
CAUTION: This product satises FCC regulations when shielded cables and connectors are used
to connect the unit to other equipment. To prevent electromagnetic interference with electric appliances such as radios and televisions, use shielded cables and connectors for connections.
FCC RADIATION EXPOSURE STATEMENT: This equipment complies with FCC radiation exposure limits set forth for an uncontrolled environment. This equipment should be installed and
operated with a minimum distance of 8 inches between the radiator and your body. This transmitter must not be co-located or operating in conjunction with any other antenna or transmitter.
NOTE: This equipment has been tested and found to comply with the limits for a Class B digital
device, pursuant to Subpart J, Part 15 of the FCC rules. These limits are designed to provide
Page 85

user manual | oPus | melodY
83
reasonable protection against harmful interference in a residential installation.
This equipment generates, uses, and can radiate radio frequency energy and, if not installed and
used in accordance with the instructions, may cause harmful interference to radio communications. However, there is no guarantee that interference will not occur in a particular installation.
If this equipment does cause harmful interference to radio or television reception, which can be
determined by turning the equipment off and on, the user is encouraged to try to correct the
interference by one of more of the following measures:
•
Reorient or relocate the receiving antenna.
•
Increase the separation between the equipment and receiver.
•
Connect the equipment into an outlet on a circuit different from that to which the receiver is
connected.
•
Consult the dealer or an experienced radio/TV technician for help.
STATEMENT REQUIRED BY 15.19 AND RSS210
Changes or modications may cause this unit to fail to comply with Part 15 of the FCC Rules and
my void the user’s authority to operate the equipment. This device complies with Part 15 of the
FCC Rules and with RSS-210 of Industry Canada.
Operation is subject to the following two conditions:
•
This device may not cause harmful interference.
•
This device must accept any interference received, including interference that my cause
undesired operation.
Page 86

84
CAUTION
•
Use of controls, adjustments, or performance of procedures other than those specied
herein may result in hazardous radiation exposure.
•
The use of optical instruments with this product will increase eye hazard. Information to
User Alteration or modications carried out without appropriate authorization may invalidate
the user’s right to operate the equipment.
LASER SAFETY: This unit employs a LASER. Due to possible eye injury,
only a qualied person should remove the cover or service the device.
9.2 Environmental Compliance
Disposal and Recycling Information
Your OPUS must be disposed of properly according to local laws and regulations. When your
OPUS reaches its end of life, contact your local authorities to learn about recycling options.
Batteries – even those containing no heavy metal– may not be disposed of in household waste.
Used batteries must be disposed of properly in appropriate waste sites according to local environmental regulations.
Page 87

Page 88

www.olive.us
 Loading...