

Page 1

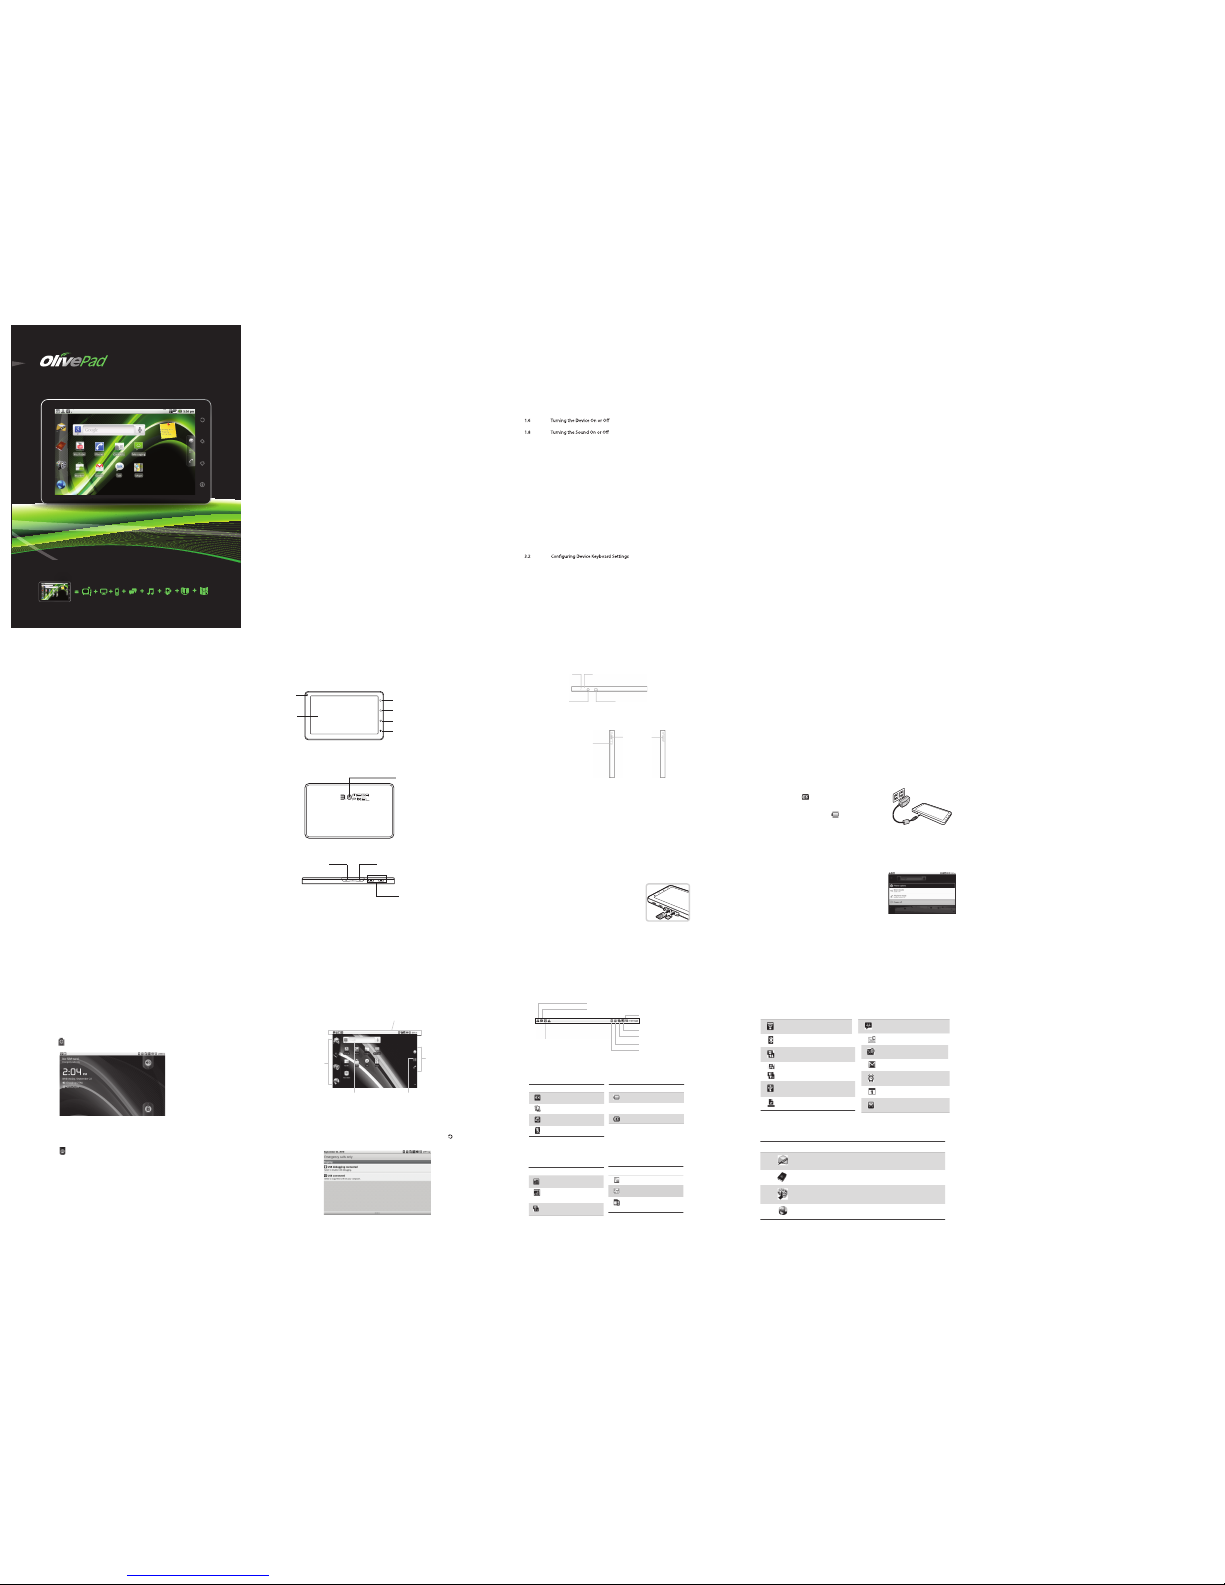
User Manual
Page 2

Copyright @ 2010 Olive Telecommunications. All rights reserved.
Olive Telecommunication Private Ltd, Design and technology for the connected World.
The Mobile Original Logos are registered trademarks of Olive Telecommunication.
The information contained in this User’s Manual is written for Olive V-T 100.
Olive Telecommunication reserves the right to make changes to any of the products
described in this document and also reserves the right to revise this manual at any time
without any prior notice.
This device may contain accessories, technology or software subjected to export laws.
Statement
The contents of this manual maybe dierent with the device please refer to the menu
according to the device.
Olive Telecommunication reserves the right to revise this document or withdraw it at any
time without prior notice.
Olive Telecommunication
Private Limited
USER MANUAL | 1
Page 3
Chapter 1: Getting Started
1.1 Your Device
Front
Back
Top
Down
Side
1.2 Accessories
1.3 Installing SIM/USIM Card and Memory Card
SIM Card/USIM & Memory Card
1.4 Charging Battery
1.5 Using Headset
1.7 Unlocking the Screen
Chapter 2: The Basics
2.1 Home Screen
Status Bar Icons
Home Screen Widgets
Shortcut Menu
Using Widgets
Application Drawer
Setting Wallpaper
2.2 Adjusting the Volume
2.3 Contacts
Adding a Contact
Searching for Contacts
Importing Contacts
Backing Up Contacts
Favorite Contacts
Chapter 3: Entering Information
3.1 On-Screen Keyboard
Using the On-Screen Keyboard
Chapter 4: Email & Messaging
4.1 Text Message
Creating and Sending a Text Message
Receiving and Managing Messages
4.2 Multimedia Message
USER MANUAL | 2
6
6
6
6
7
7
7
7
8
8
8
8
9
9
10
10
12
13
13
14
14
15
16
16
16
17
17
17
18
18
18
20
20
20
21
Page 4

Creating and Sending an MMS
4.3 Voice Message
4.4 Email Accounts
Setting Up an Internet Email Account
Opening Email
4.5 Using Email
Composing and Sending an Email
Receiving Emails
Reading and Replying to Emails
Managing Email Folders
Customizing Email Settings
Chapter 5: Using Internet
5.1 Connecting to Internet
Wi-Fi
Cellular Data Network
Starting a Data Connection
Chapter 6: Using Bluetooth
6.1 Connecting to Bluetooth Devices
Chapter 7: Multimedia Applications
7.1 Videos and Photos
Recording Video
Taking a Photo
Reviewing a Photo or Video
Conguring Camcorder Settings
7.2 Viewing Videos & Photos
Playback Videos in the Album
View Photos in the Album
7.3 Using Music Player
Music Screen
Playing Music
Changing Playback Options
Creating a Playlist
Chapter 8: Programs
8.1 Aldiko
Browsing an ebook
Downloading an ebook
8.2 Browser
8.3 Calculator
8.4 Calendar
8.5 Camcorder
USER MANUAL | 3
21
22
22
22
23
23
23
24
24
24
25
26
26
27
27
28
29
29
29
29
30
31
31
31
32
32
32
32
33
36
36
36
36
36
36
37
Page 5

8.6 Camera
8.7 Clock
8.8 Contacts
8.9 Documents To Go
Word To Go
Sheet To Go
Slideshow To Go
PDF To Go
8.10 Email
8.11 eReader
8.12 Facebook
8.13 File Browser
Managing Files and Folders
8.14 Gallery
8.15 Gmail
8.16 Google Search
8.17 Latitude
8.18 Maps
8.19 Market
8.20 Messages
8.21 Mobile Maps 10
8.22 Music
8.23 Navigation
8.24 News and Weather
8.25 Note Pad
8.26 Phone
8.27 Places
8.28 Rss Reader
8.29 Settings
8.30 SIM Toolkit
8.31 Talk
8.32 Videos
8.33 Voice Dialer
8.34 Voice Note
8.35 Voice Search
8.36 YouTube
8.37 Zenga TV
Chapter 9: Managing Your Device
9.1 Device Settings
Wireless & networks
Call settings
Sound
Display
Location & security
Applications
Accounts & sync
USER MANUAL | 4
37
37
37
37
37
37
38
38
39
39
39
39
40
40
40
41
41
41
42
43
43
43
43
45
45
45
46
46
46
46
46
47
48
49
49
49
49
50
50
51
51
47
47
38
38
Page 6

Privacy
SD card & phone storage
Search
Language & keyboard
Voice input & output
Accessibility
Date & time
About phone
9.2 Changing Basic Settings
Date and Time
Setting Alarms
Display Settings
Ring Settings
9.3 Using Wireless & networks
9.4 Protecting Your Device
Enable or Disable SIM/USIM card PIN
Enabling Screen Lock Protection
9.5 Resetting the Device
Chapter 10: Using PC Tools Application
10.1 Using PC Tools Application
Installing the Driver
Using Your Device as a Storage Device
Using Your Device to Sync with a Computer
Safety Information
Specications
USER MANUAL | 5
51
51
51
52
52
52
52
52
52
53
53
54
54
54
54
55
55
56
56
57
57
58
59
52
Page 7
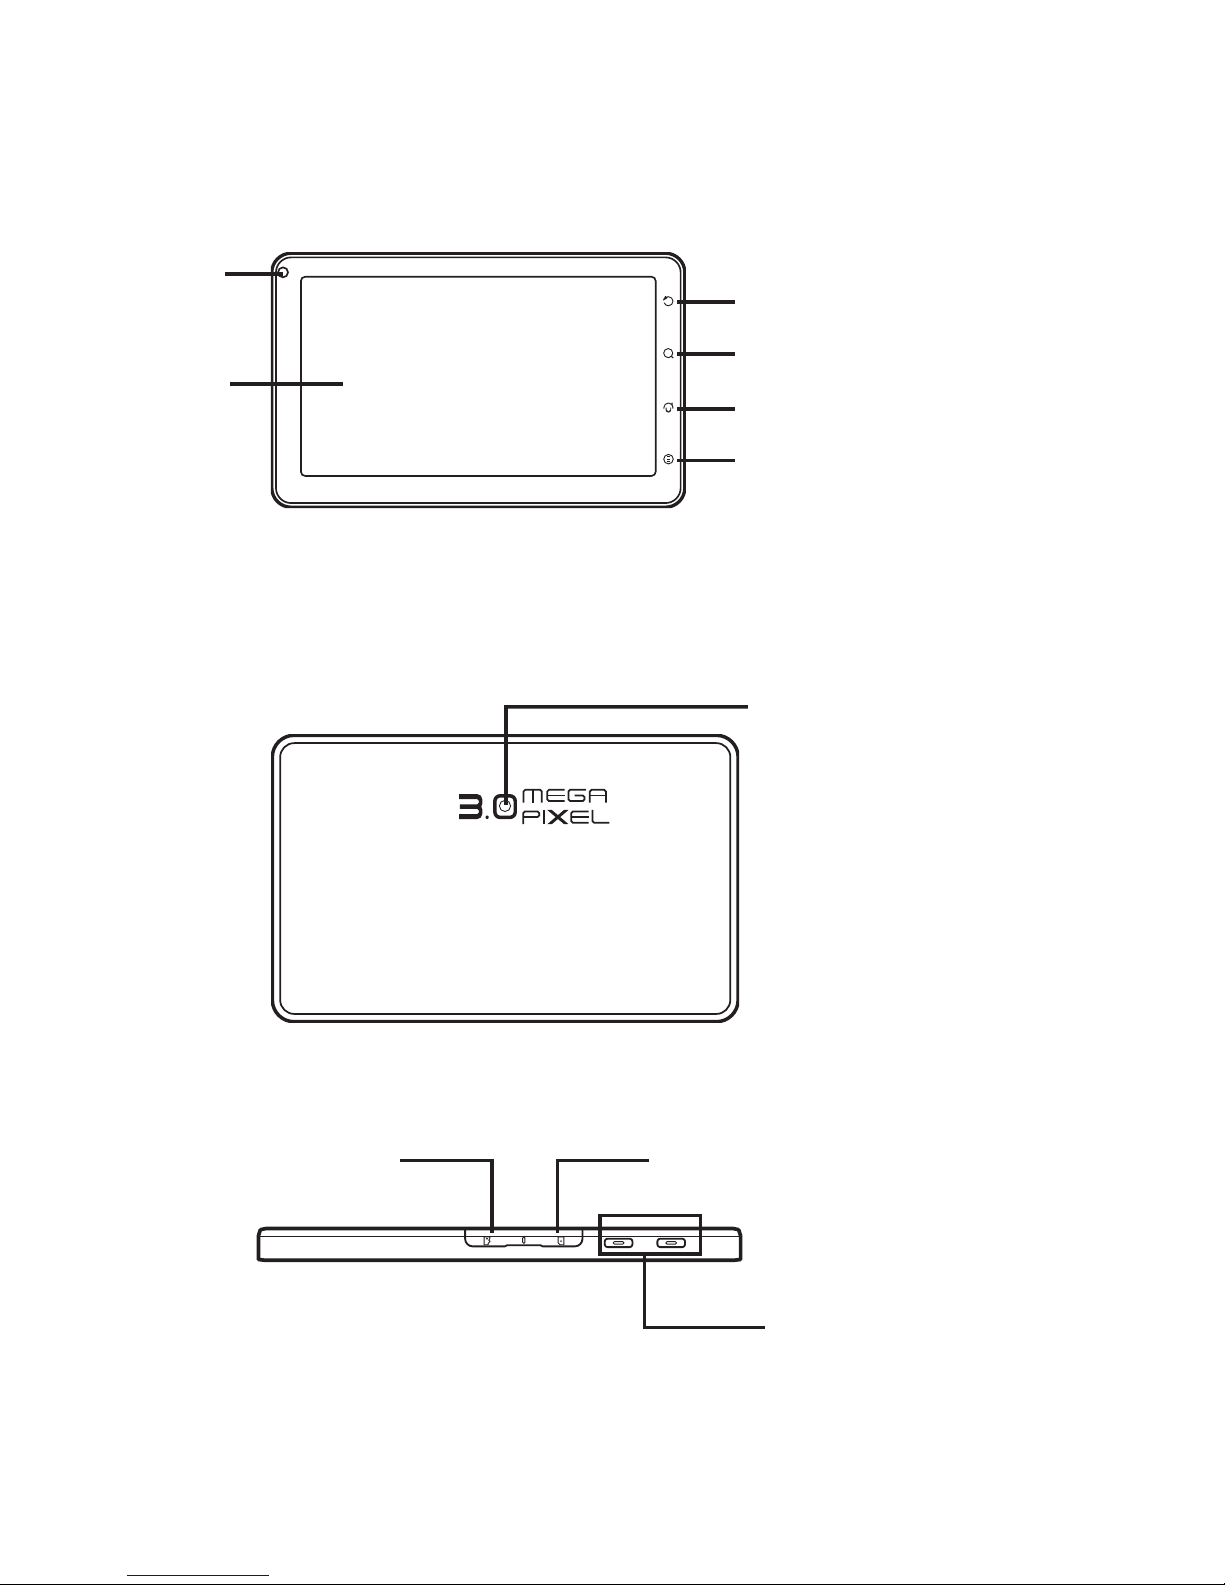
Chapter 1: Getting Started
1.1 Your Device
Front
Back
3 Megapixels camera
Top
Volume: Press the left
volume button to decrease
volume or the right button to
increase volume.
Micro SD card
slot
SIM card slot
USER MANUAL | 6
Touch Screen
Front
Camera
Return
Search
Home
Menu
Page 8
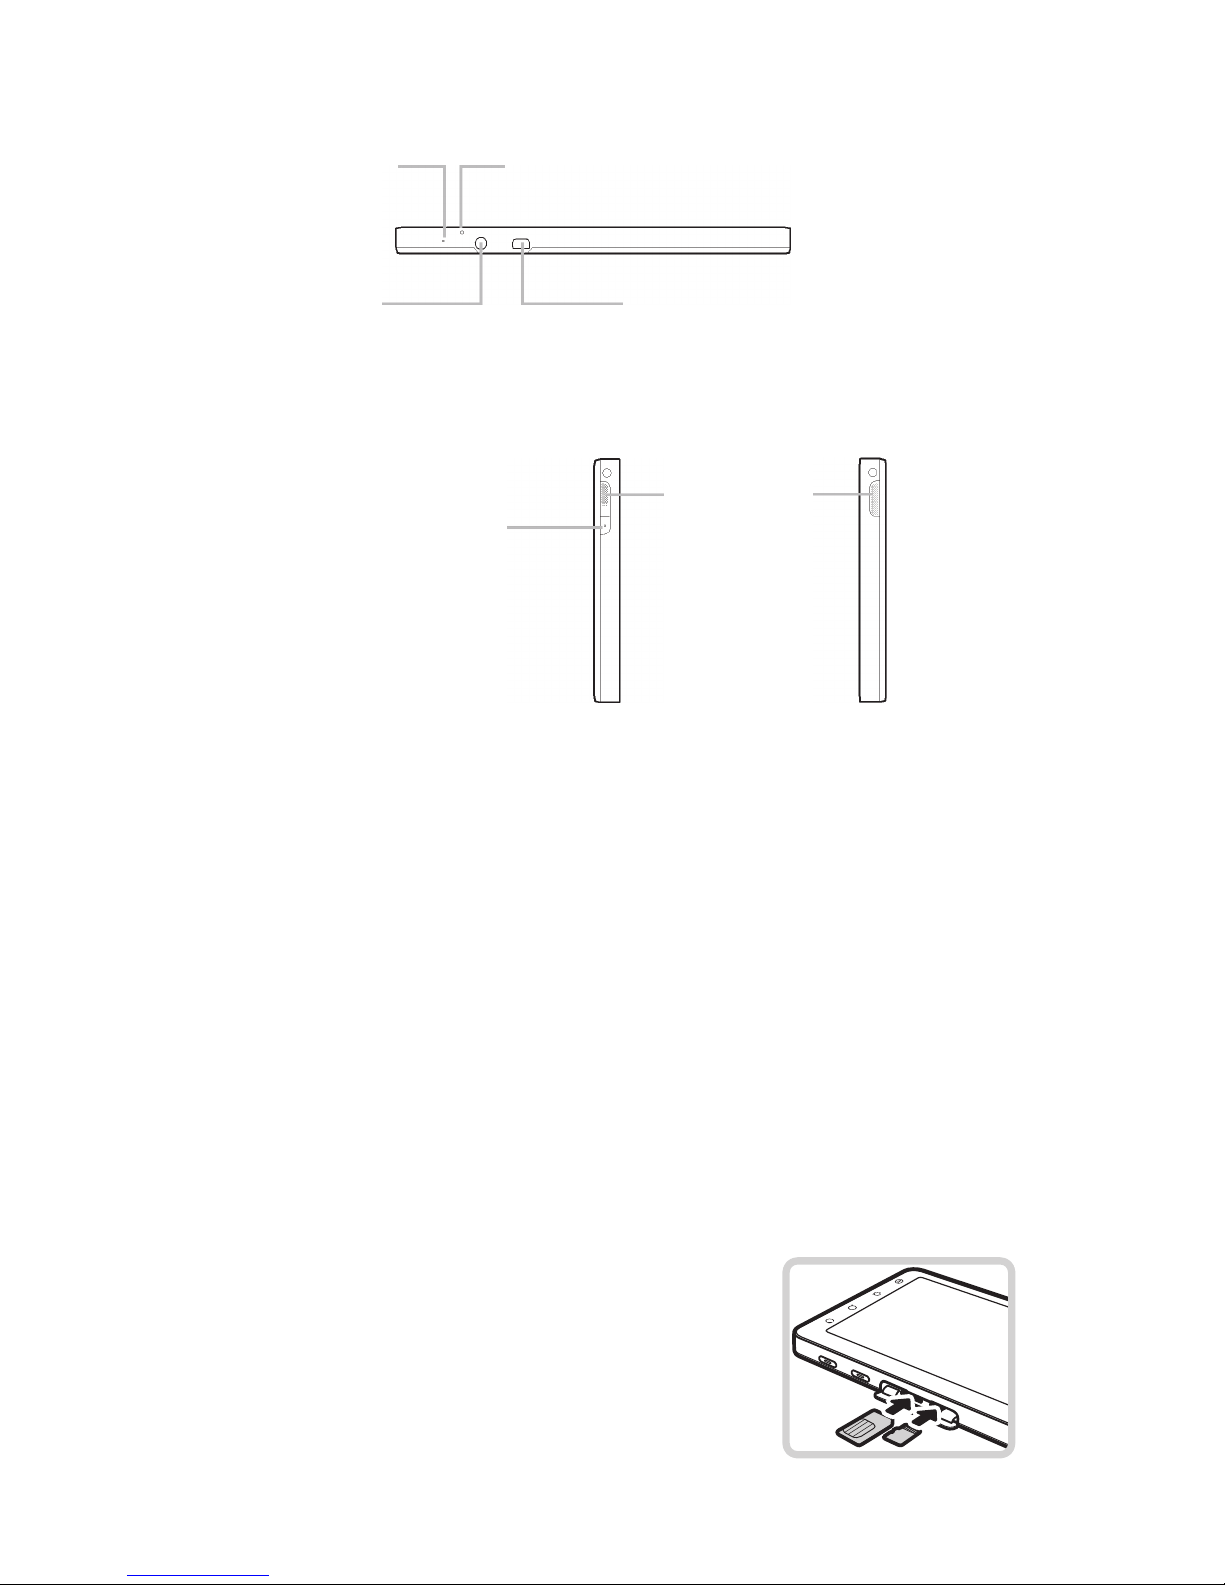
Down
Reset
MIC
Headset jack:
Mini USB port:
Use a headset for
handsfree conversation
••
or listening to music.
Side
Power:
• Press and hold
to turn the
Speakers
device on or o.
• To save battery, press
to temporarily turn the
screen on or o.
1.2 Accessories
Your package comes with the following items. If any of them is missing, please
contact your retailer.
• Olive Pad
• AC adapter
• Mini USB cable
• Headset
• Leather Cover.
• Quick Start Guide
• 16 GB memory card.*
• User Manual.
• Warranty Card
1.3 Installing SIM/US IM Card and
Memory
Card
SIM /USIM
Card & Memory Card
The SIM/USIM card contains your phone number, memory storage, and
network service details. You will
need a microSD card to store photos, music,
videos and other data.
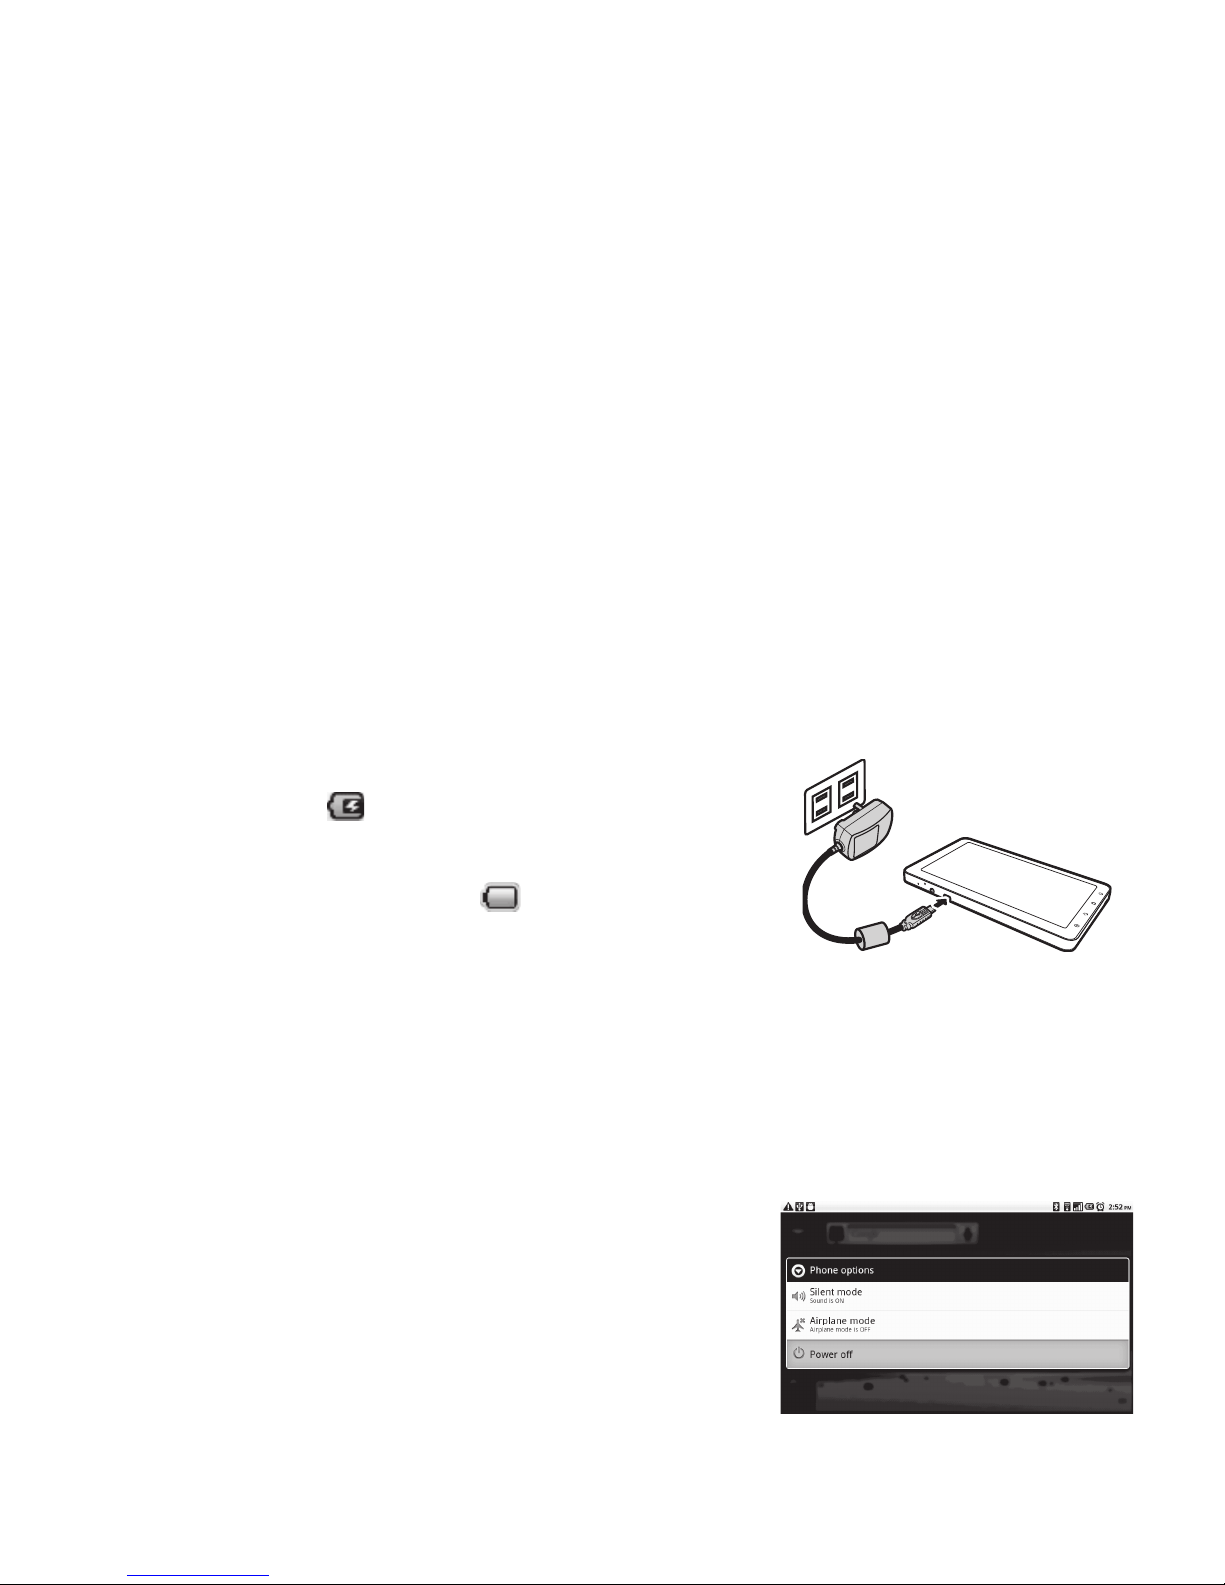
Install the SIM /USIM card/microSD card
1. Open the card cover.
2. Insert SIM /USIM card/microSD card as shown.
Make sure the gold contacts are facing up.
3.
Close the card cover.
Connect device to PC via USB cable
to use it as USB mass storage
Connect the AC adapter to charge the
battery
USER MANUAL | 7
* Conditions applied for the 16GB memory card
Page 9
Remove the SIM
/USIM card
1.
Open the card cover.
2. Push to eject the SIM /USIM
card from the slot.
3.
Close the card cover.
Remove the memory card
1. For safety removal, tap ApplicationDrawer > Settings > SD card & phone storage
>
Unmount SD card
2. Open the card cover.
3.
Push to eject the microSD card to eject it from the slot.
NOTE:
Sudden removal of the
memory card may cause data loss or unpredictable
system hang up.
1.4 Charging Battery
Charge the battery
1. Connect one end of the AC adaptor to the mini
USB connector of the device as shown.
2. Plug the other end of the AC adaptor to the wall outlet to start charging.
When the battery is charging, the red LED is
activated; the
icon is also displayed on the
status bar. When the battery is fully charged, the
red LED disappears and the green LED is activated;
if the device is turned on,
the icon is also displayed
NOTE:
Battery life may vary depending on user usage .
on the status bar.
1.5 Using Headset
For hands - free conversation or listening to music, plug a headset to the headset jack.
1.6 Turning the Device On or O
After installing SIM card and charging the battery the device is ready to turn on.
Turn on your device
Press and hold the power button until the device vibrates.
Turn o your device
1. Press and hold the power button .
2. A pop - up window appears, tap Power o
3. Select OK to conrm.
USER MANUAL | 8
Page 10
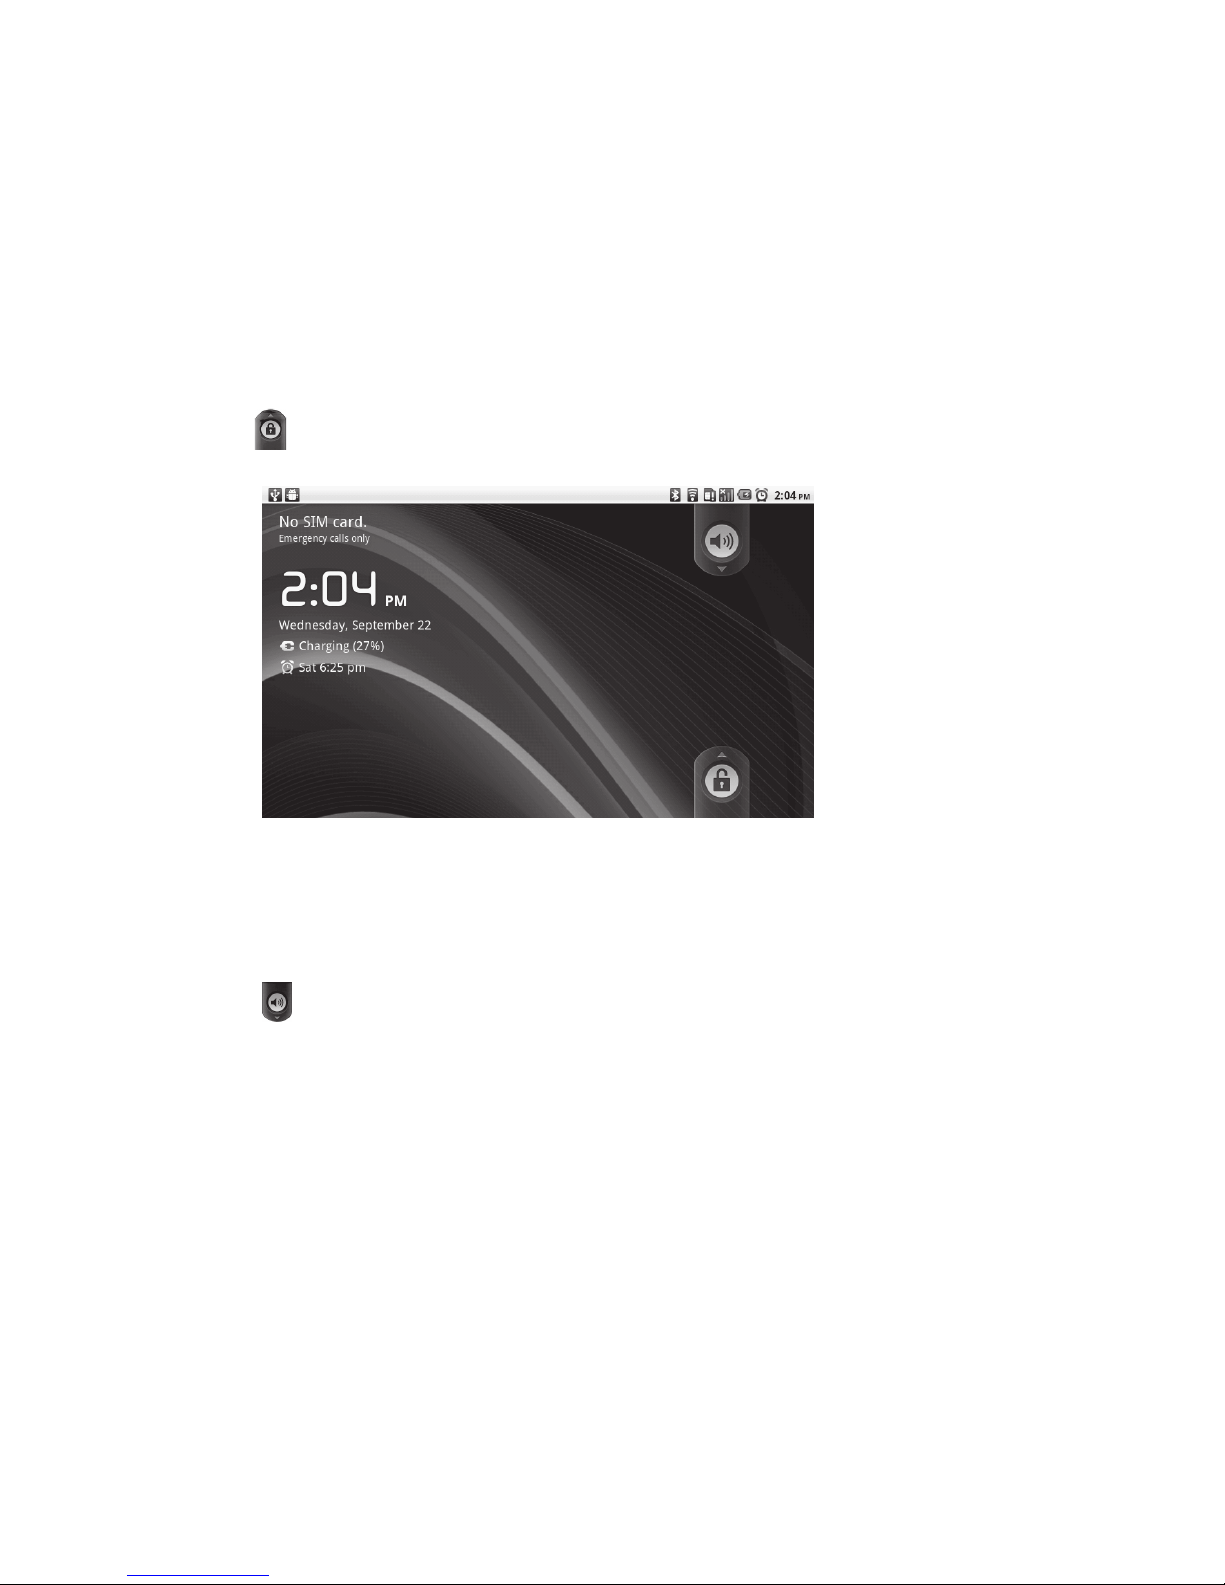
Set your device to Sleep mode
To set the device to sleep mode, press the power button. This turns the display off.
To turn the display on, press the power button again.
1.7 Unlocking the Screen
Unlock the screen
1. Press the po wer button to turn on the display from Sleep mode.
2. Tap unlock slider and swipe upwards to unlock the screen.
1.8 Turning the Sound On or O
Enable/disable the sound
1. Press the power button to turn on the display from Sleep mode.
2.
Tap
and swipe downwards to turn the sound o.
3. To turn on the sound, repeat the steps above.
USER MANUAL | 9
Page 11
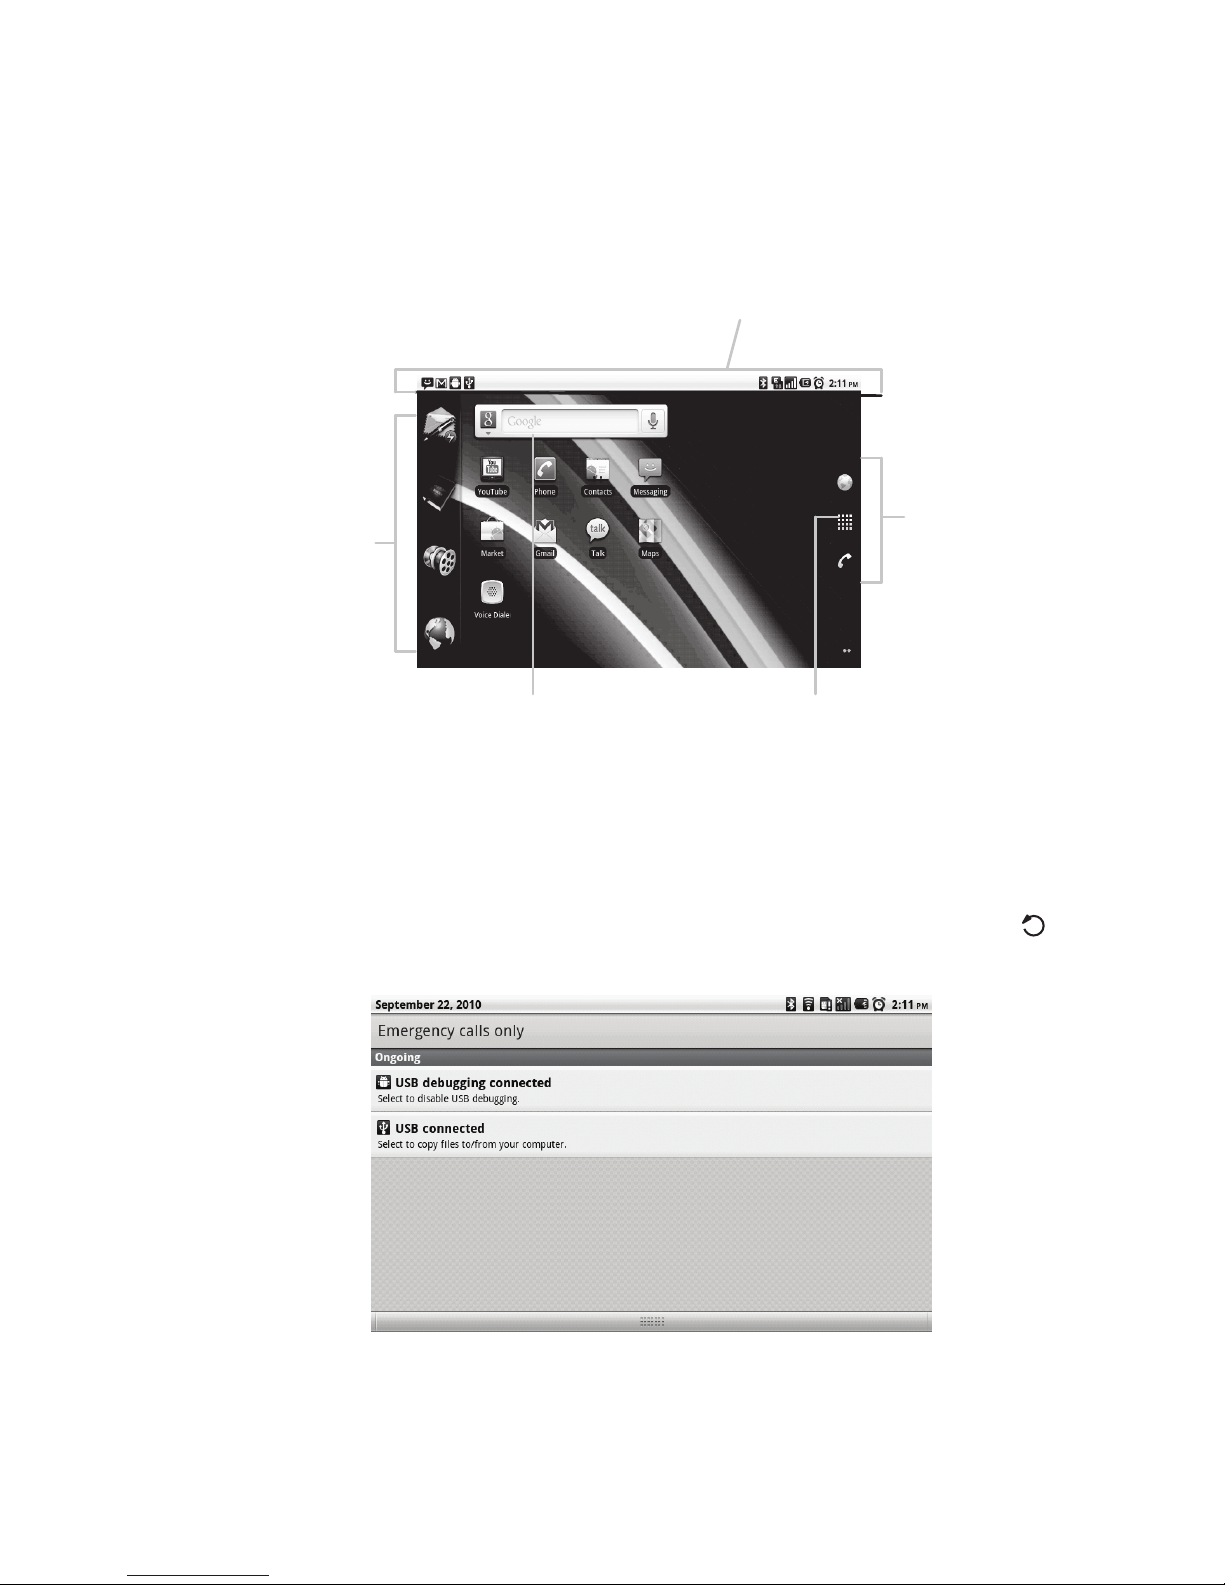
Chapter 2: The Basics
2.1 Home Screen
From Home screen, you can quickly access common features and view notications
and connection status.
Home Screen
Widgets
Tap an icon
to access the
function.
Status bar
•
Displays status and notication
icons and clock.
.
Shortcut Menu
Tap an icon
to access the
function.
Google Search Application Drawer
Enter the text you Tap to view the
want to search in applications and device
the box. settings.
Status Bar Icons
The Status bar icons indicate dierent types of information. Tap the status bar and scroll down
to view ongoing device activities or notications easily. To close the
window, press .
USER MANUAL | 10
Page 12
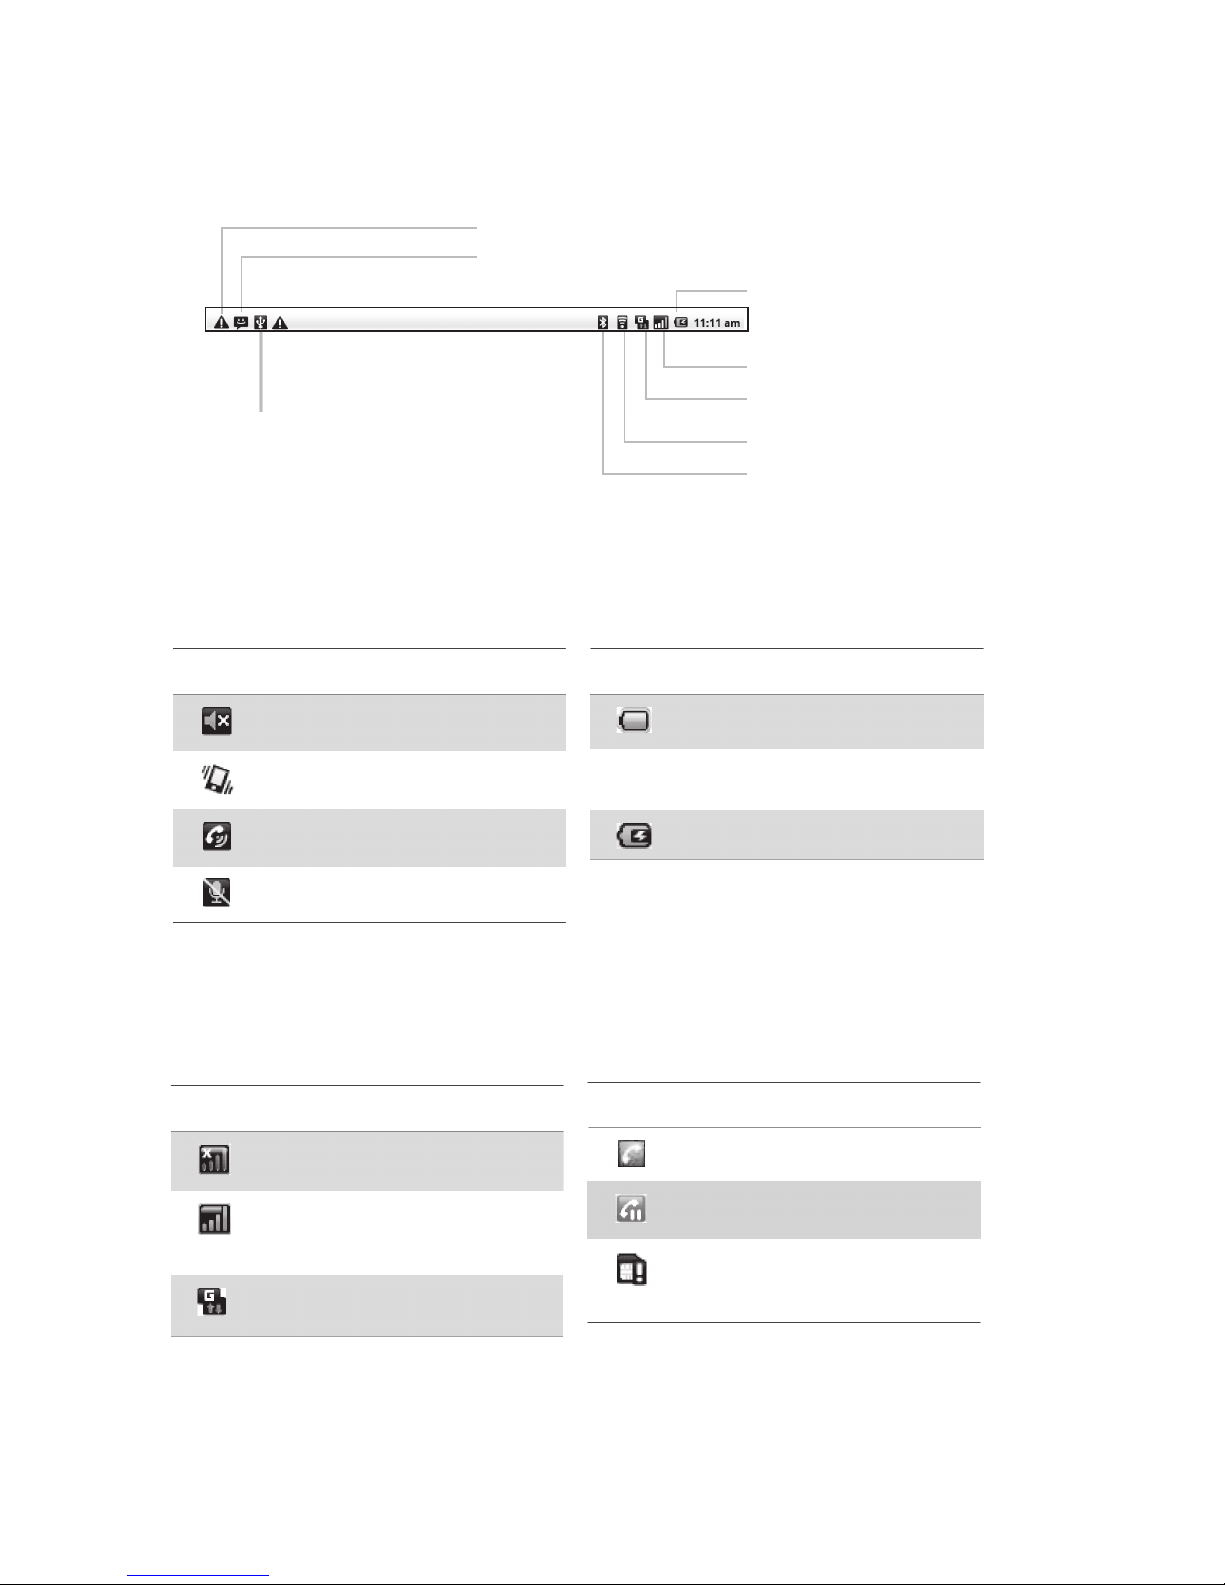
The icons on the status bar indicates the following information:
Notication icon
Text message icon
Battery icon
Signal strength icon
Network icon
USB connection
Wi- icon
icon
Bluetooth icon
Volume icon
Battery icon
The following icons may appear on
the volume icon area.
The following icons may appear on
the battery icon area:
Icon Description
Sound is o.
Vibrate mode is activated.
Speakerphone is on.
Phone is muted.
Phone Network icon
Icon Description
Battery is full.
Battery is charging
The following icons may appear on the phone network icon area.
Icon
Description
Icon Description
No network signal.
Maximum signal strength.
Fewer bars indicate lower
signal strength.
GPRS network is in use.
Call is in progress.
Call is on hold.
No SIM /USIM card
inserted.
USER MANUAL | 11
Page 13
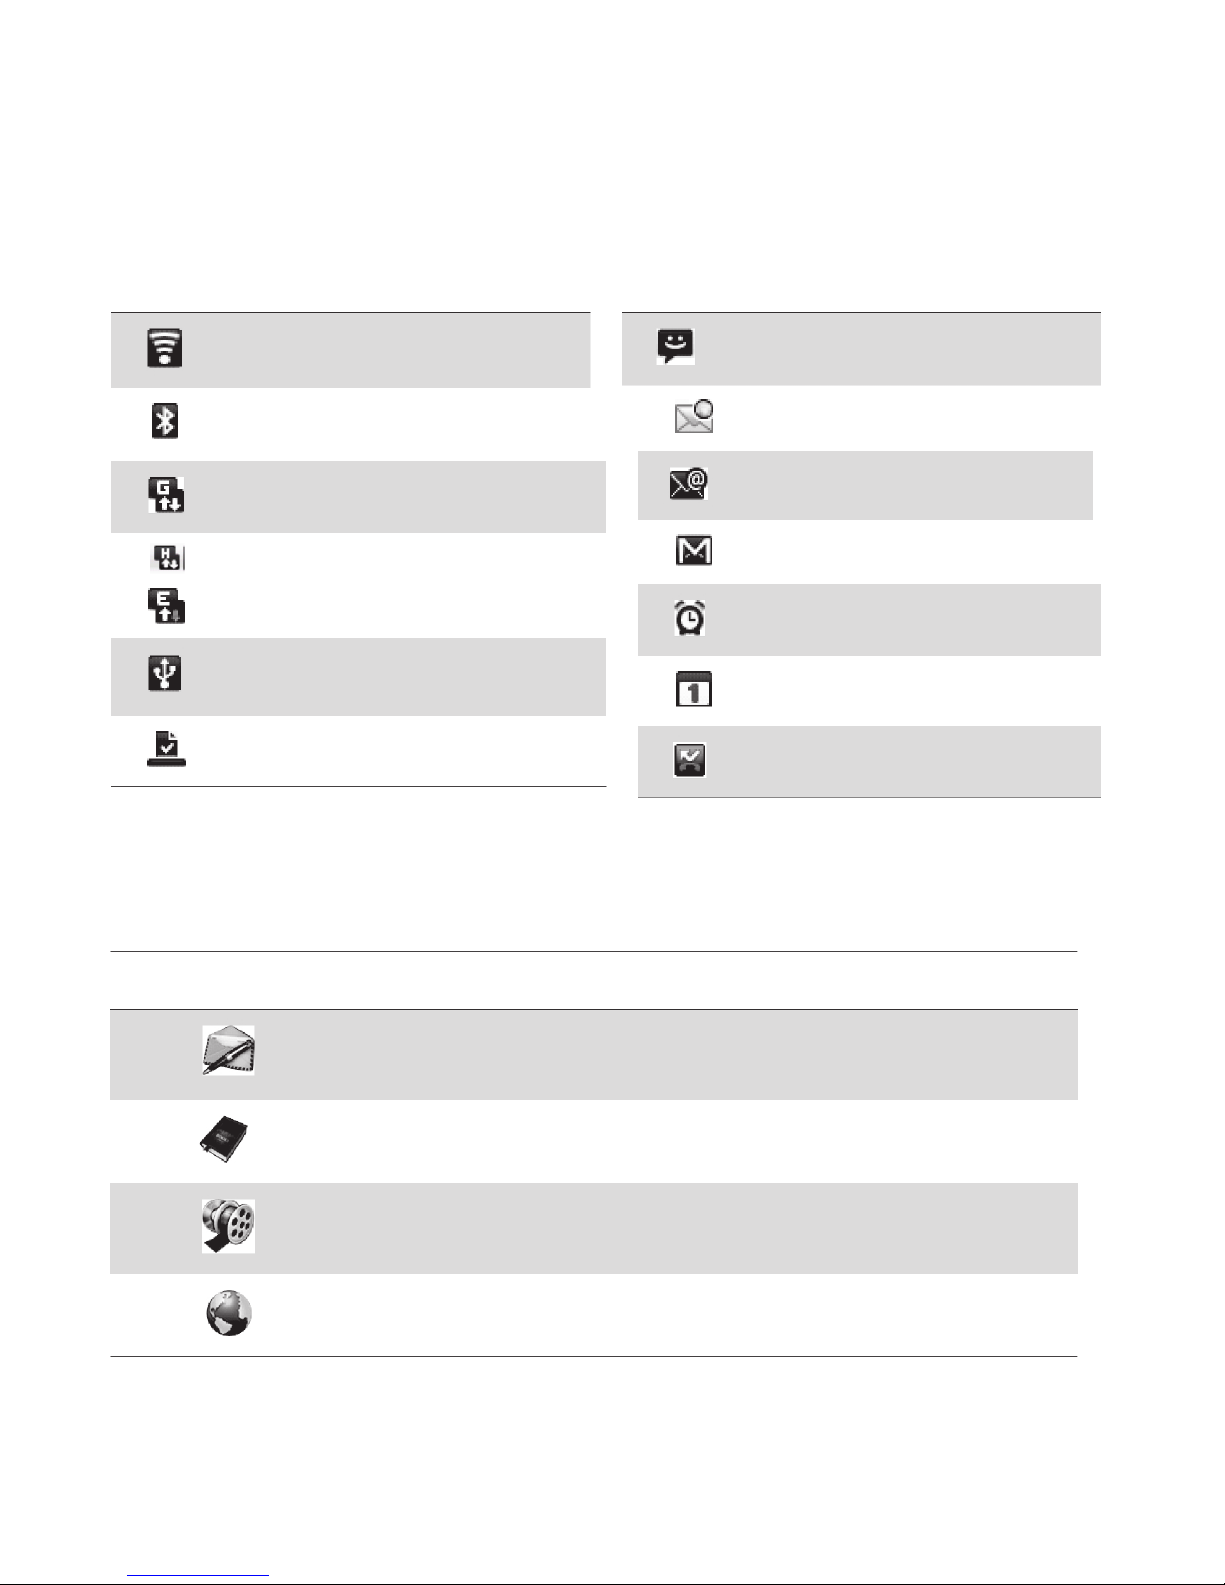
Connection icon Notication icon
The following icons may appear on
the connection icon area.
The following icons may appear on
the notication icon area.
Icon Description Icon Description
WiFi is connected.
Bluetooth connection is active.
GPRS data connection is active.
HSUPA data connection is active
EDGE data connection is
active.
Device is connected to PC
via USB connector.
File has been downloaded.
New text message notication.
New WAP Push notication.
New email notication.
New Google mail notication.
Alarm.
Task notication.
Missed call notication.
Home Screen Widgets
Tap an icon on the Home screen widget to access the function. By default,
the following applications are displayed:
Icon Menu Item Description
Email
Aldiko
Music
Tap to check emails.
Tap to view ebooks
Tap to play audio les saved on
your microSD card.
Browser Tap to browse the web pages.
USER MANUAL | 12
Page 14
Copyright @ 2010 Olive Telecommunications. All rights reserved.
Olive Telecommunication Private Ltd, Design and technology for the connected World.
The Mobile Original Logos are registered trademarks of Olive Telecommunication.
The information contained in this User’s Manual is written for Olive V-T 100.
Olive Telecommunication reserves the right to make changes to any of the products
described in this document and also reserves the right to revise this manual at any time
without any prior notice.
This device may contain accessories, technology or software subjected to export laws.
Statement
The contents of this manual maybe dierent with the device please refer to the menu
according to the device.
Olive Telecommunication reserves the right to revise this document or withdraw it at any
time without prior notice.
Olive Telecommunication
Private Limited
Creating and Sending an MMS
4.3 Voice Message
4.4 Email Accounts
Setting Up an Internet Email Account
Opening Email
4.5 Using Email
Composing and Sending an Email
Receiving Emails
Reading and Replying to Emails
Managing Email Folders
Customizing Email Settings
Chapter 5: Using Internet
5.1 Connecting to Internet
Wi-Fi
Cellular Data Network
Starting a Data Connection
Chapter 6: Using Bluetooth
6.1 Connecting to Bluetooth Devices
Chapter 7: Multimedia Applications
7.1 Videos and Photos
Recording Video
Taking a Photo
Reviewing a Photo or Video
Conguring Camcorder Settings
7.2 Viewing Videos & Photos
Playback Videos in the Album
View Photos in the Album
7.3 Using Music Player
Music Screen
Playing Music
Changing Playback Options
Creating a Playlist
Chapter 8: Programs
8.1 Aldiko
Browsing an ebook
Downloading an ebook
8.2 Browser
8.3 Calculator
8.4 Calendar
8.5 Camcorder
8.6 Camera
8.7 Clock
8.8 Contacts
8.9 Documents To Go
Word To Go
Sheet To Go
Slideshow To Go
PDF To Go
8.10 Email
8.11 eReader
8.12 Facebook
8.13 File Browser
Managing Files and Folders
8.14 Gallery
8.15 Gmail
8.16 Google Search
8.17 Latitude
8.18 Maps
8.19 Market
8.20 Messages
8.21 Mobile Maps 10
8.22 Music
8.23 Navigation
8.24 News and Weather
8.25 Note Pad
8.26 Phone
8.27 Places
8.28 Rss Reader
8.29 Settings
8.30 SIM Toolkit
8.31 Talk
8.32 Videos
8.33 Voice Dialer
8.34 Voice Note
8.35 Voice Search
8.36 YouTube
8.37 Zenga TV
Chapter 9: Managing Your Device
9.1 Device Settings
Wireless & networks
Call settings
Sound
Display
Location & security
Applications
Accounts & sync
Privacy
SD card & phone storage
Search
Language & keyboard
Voice input & output
Accessibility
Date & time
About phone
9.2 Changing Basic Settings
Date and Time
Setting Alarms
Display Settings
Ring Settings
9.3 Using Wireless & networks
9.4 Protecting Your Device
Enable or Disable SIM/USIM card PIN
Enabling Screen Lock Protection
9.5 Resetting the Device
Chapter 10: Using PC Tools Application
10.1 Using PC Tools Application
Installing the Driver
Using Your Device as a Storage Device
Using Your Device to Sync with a Computer
Safety Information
Specications
Chapter 1: Getting Started
1.1 Your Device
Front
Back
3 Megapixels camera
Top
Volume: Press the left
volume button to decrease
volume or the right button to
increase volume.
Micro SD card
slot
SIM card slot
Down
Reset
MIC
Headset jack:
Mini USB port:
Use a headset for
handsfree conversation
•
•
or listening to music.
Side
Power:
• Press and hold
to turn the
Speakers
device on or o.
• To save battery, press
to temporarily turn the
screen on or o.
1.2 Accessories
Your package comes with the following items. If any of them is missing, please
contact your retailer.
• Olive Pad
• AC adapter
• Mini USB cable
• Headset
• Leather Cover.
• Quick Start Guide
• 16 GB memory card.*
• User Manual.
• Warranty Card
1.3 Installing SIM/USIM Card and
Memory
Card
SIM /USIM
Card & Memory Card
The SIM/USIM card contains your phone number, memory storage, and
network service details. You will
need a microSD card to store photos, music,
videos and other data.
Install the SIM/USIM card/microSD card
1. Open the card cover.
2. Insert SIM /USIM card/microSD card as shown.
Make sure the gold contacts are facing up.
3.
Close the card cover.
Remove the SIM
/USIM card
1.
Open the card cover.
2. Push to eject the SIM/USIM
card from the slot.
3.
Close the card cover.
Remove the memory card
1. For safety removal, tap ApplicationDrawer > Settings > SD card & phone storage
>
Unmount SD card
2. Open the card cover.
3.
Push to eject the microSD card to eject it from the slot.
NOTE:
Sudden removal of the
memory card may cause data loss or unpredictable
system hang up.
1.4 Charging Battery
Charge the battery
1. Connect one end of the AC adaptor to the mini
USB connector of the device as shown.
2. Plug the other end of the AC adaptor to the wall outlet to start charging.
When the battery is charging, the r ed LED is
activated; the
icon is also displayed on the
status bar. When the battery is fully charged, the
red LED disappears and the green LED is activated;
if the device is turned on,
the icon is also displayed
NOTE:
Battery life may vary depending on user usage .
on the status bar.
1.5 Using Headset
For hands- free conversation or listening to music, plug a headset to the headset jack.
1.6 Turning the Device On or O
Afterinstalling SIM card and charging the battery the device is ready to turn on.
Turn on your device
Press and hold the power button until the device vibrates.
Turn o your device
1. Press and hold the power button .
2. A pop- up window appears, tap Power o
3. Select OK to conrm.
Set your device to Sleep mode
To set the device to sleep mode, press the power button. This turns the display off.
To turn the display on, press the power button again.
1.7 Unlocking the Screen
Unlock the screen
1. Press the power button to turn on the display from Sleep mode.
2. Tap unlock slider and swipe upwards to unlock the screen.
1.8 Turning the Sound On or O
Enable/disable the sound
1. Press the power button to turn on the display from Sleep mode.
2.
Tap
and swipe downwards to turn the sou nd o.
3. To turn on the sound, repeat the steps above.
Chapter 2: The Basics
2.1 Home Screen
From Home screen, you can quickly access common features and view notications
and connection status.
Home Screen
Widgets
Tap an icon
to access the
function.
Status bar
•
Displays status and notication
icons and clock.
.
Shortcut Menu
Tap an icon
to access the
function.
Google Search Application Drawer
Enter the text you Tap to view the
want to search in applications and device
the box. settings.
Status Bar Icons
The Status bar icons indicate dierent t ypes of information. Tap the status bar and scroll down
to view ongoing device activities or n otications easily. To c lose the
window, press .
The icons on the status bar indicates the following information:
Notication icon
Text message icon
Battery icon
Signal strength icon
Network icon
USB connection
Wi- icon
icon
Bluetooth icon
Volume icon
Battery icon
The following icons may appear on
the volume icon area.
The following icons may appear on
the battery icon area:
Icon Descrip tion
Sound is o.
Vibrate mode is activated.
Speakerphone is on.
Phone is muted.
Phone Network icon
Icon Description
Battery is full.
Battery is charging
The following icons may appear on the phone network icon area.
Icon
Description
Icon Description
No network signal.
Maximum signal strength.
Fewer bars indicate lower
signal strength.
GPRS network is in use.
Call is in progress.
Call is on hold.
No SIM/USIM card
inserted.
Connection icon Notication icon
The following icons may appear on
the connection icon area.
The following icons may appear on
the notication icon area.
Icon Description Icon Description
WiFi is connected.
Bluetooth connection is active.
GPRS data connection is active.
HSUPA data connection is active
EDGE data co nnection is
active.
Device is connected to PC
via USB conn ector.
File has been downloaded.
New text message notication.
New WAP Push notication.
New email notication.
New Google mail notication.
Alarm.
Task notication.
Missed call notication.
Home Screen Widgets
Tap an icon on the Home screen widget to access the function. By default,
the following applications are displayed:
Icon Menu Item Description
Email
Aldiko
Music
Tap to check emails.
Tap to view ebooks
Tap to play audio les saved on
your microSD card.
Browser Tap to browse the web p ages.
Connect device to PC via USB cable
to use it as USB mass storage
Connect the AC adapter to charge the
battery
USER MANUAL | 1
USER MANUAL | 5 USER MANUAL | 6 USER MANUAL | 7 USER MANUAL | 8
USER MANUAL | 9 USER MANUAL | 10 USER MANUAL | 11 USER MANUAL | 12
USER MANUAL | 3
USER MANUAL | 4
21
37
37
37
37
37
37
38
38
39
39
39
39
40
40
40
41
41
41
42
43
43
43
43
45
45
45
46
46
46
46
46
47
48
49
49
49
49
50
50
51
51
47
47
38
38
22
22
22
23
23
23
24
24
24
25
26
26
27
27
28
29
29
29
29
30
31
31
31
32
32
32
32
33
36
36
36
36
36
36
37
* Conditions applied for the 16GB memory card
Touch Screen
Front
Camera
Return
Search
Home
Menu
51
51
51
52
52
52
52
52
52
53
53
54
54
54
54
55
55
56
56
57
57
58
59
52
User Manual
Chapter 1: Getting Started
1.1 Your Device
Front
Back
Top
Down
Side
1.2 Accessories
1.3 Installing SIM/USIM Card and Memory Card
SIM Card/USIM & Memory Card
1.4 Charging Battery
1.5 Using Headset
1.7 Unlocking the Screen
Chapter 2: The Basics
2.1 Home Screen
Status Bar Icons
Home Screen Widgets
Shortcut Menu
Using Widgets
Application Drawer
Setting Wallpaper
2.2 Adjusting the Volume
2.3 Contacts
Adding a Contact
Searching for Contacts
Importing Contacts
Backing Up Contacts
Favorite Contacts
Chapter 3: Entering Information
3.1 On-Screen Keyboard
Using the On-Screen Keyboard
Chapter 4: Email & Messaging
4.1 Text Message
Creating and Sending a Text Message
Receiving and Managing Messages
4.2 Multimedia Message
USER MANUAL | 2
6
6
6
6
7
7
7
7
8
8
8
8
9
9
10
10
12
13
13
14
14
15
16
16
16
17
17
17
18
18
18
20
20
20
21
 Loading...