

Page 1
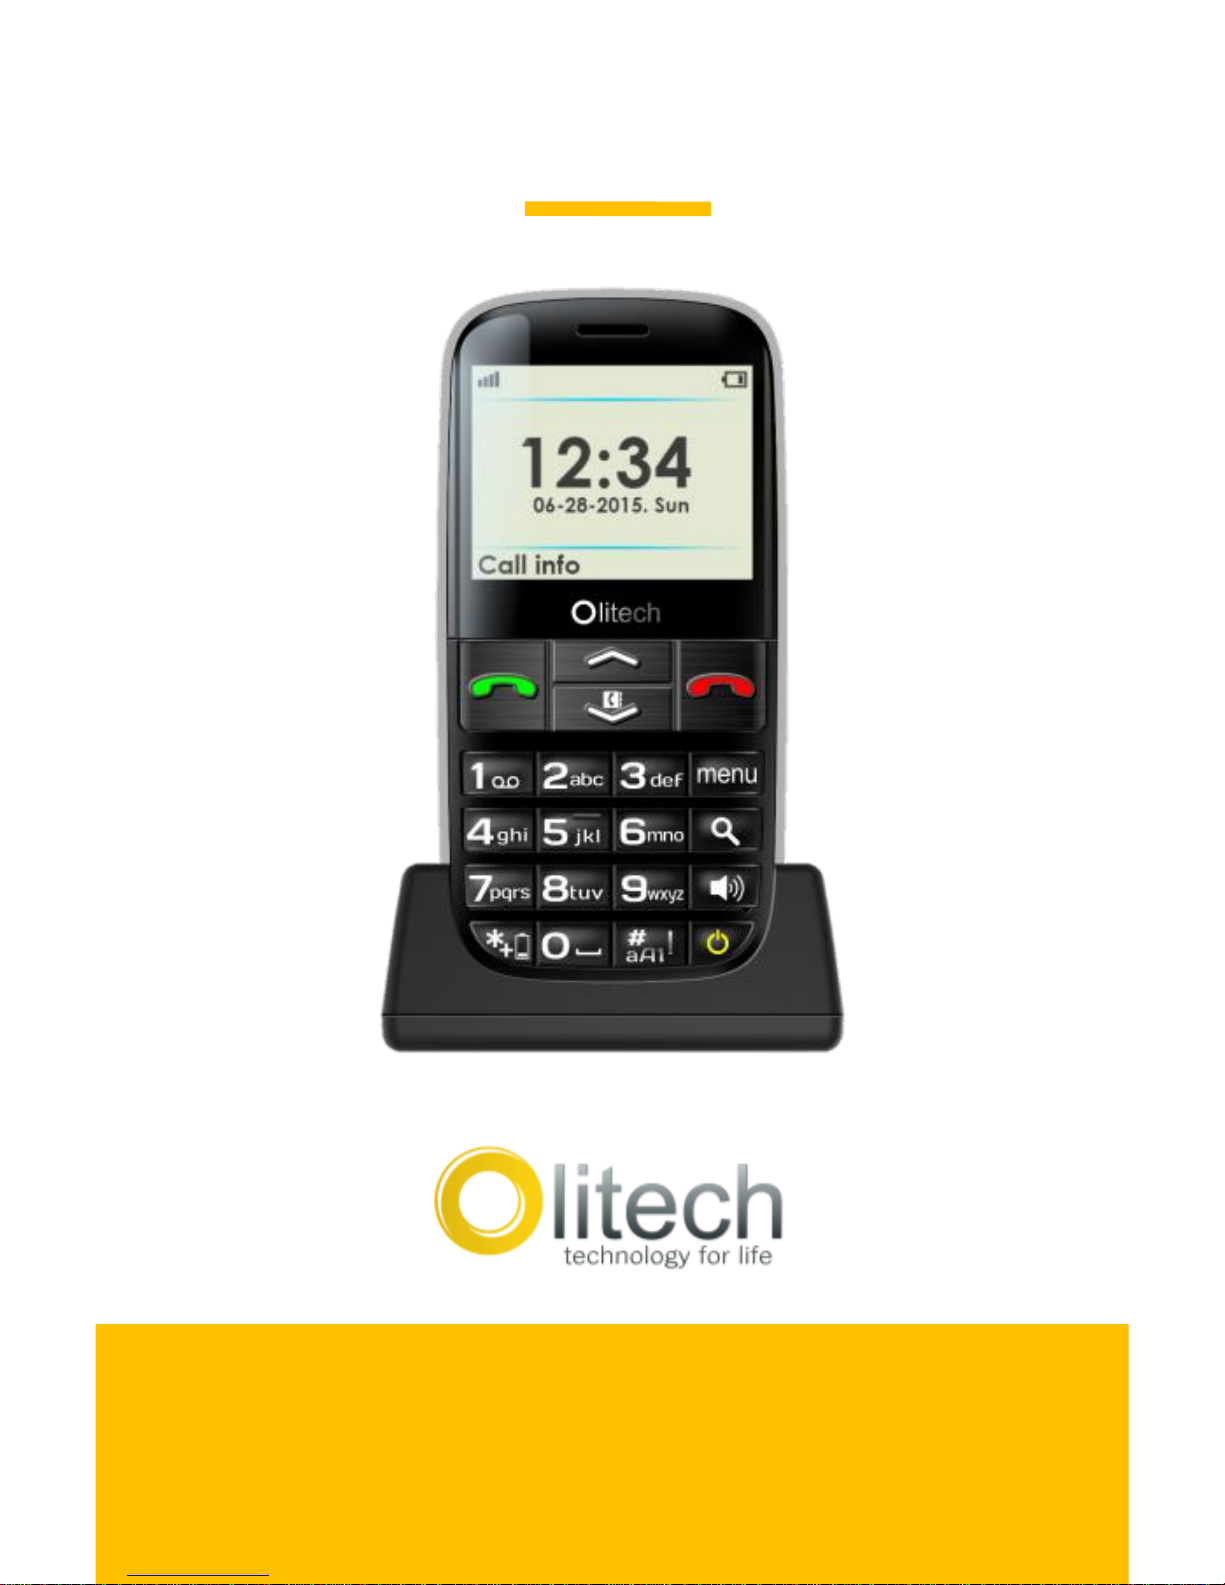
User Manual
Model number: OLT2914
EASY MATE +
Page 2

2
Page 3

3
Olitech Easy Mate+
User Manual
Table of contents
Key descriptions……………………. .. 4
Display icon descriptions……...……6
Specifications ................................... 8
Setting up the phone ........................ 9
Calls……………………………………18
Messages…………………..…………20
Phonebook/Contacts…………...…..24
Emergency/SOS button…………….27
Additional features………………….32
Settings………………………...……..36
USB Data Cable .............................. 43
Troubleshooting ............................. 44
Safety information .......................... 50
Warranty .......................................... 54
Page 4
4
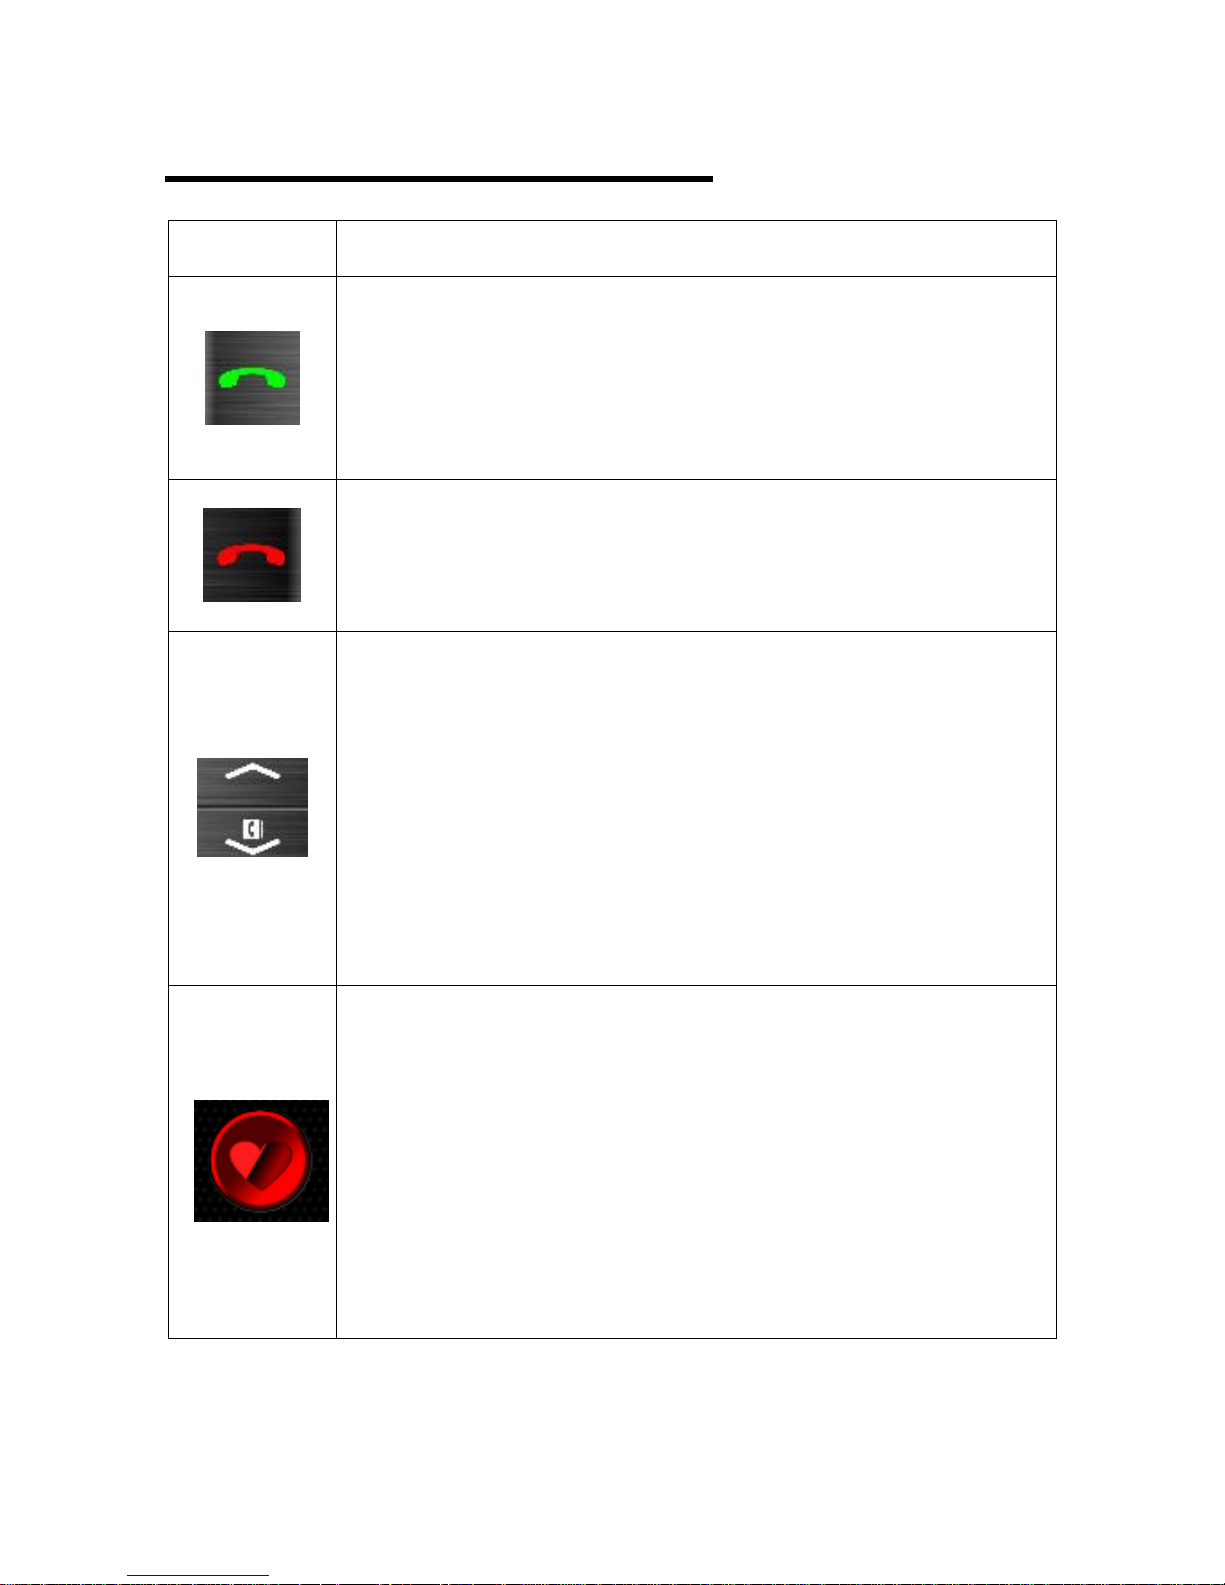
Key descriptions
Keys
Explanation
Green Button:
Used to answer or confirm call
Allows user to select options/
proceed through Menu
Red Button:
Used to end call
Selects “Back” when in Menu
Arrows:
Used to navigate Menu
When on home screen:
1. Down arrow provides
shortcut to Contacts
2. Up arrow provides
shortcut to Alarm
Emergency/SOS Button:
Press and hold red SOS button
(on back of phone) for 3 seconds
to trigger emergency button.
SOS button requires setup – see
“Emergency/SOS button” section
of manual for more details.
Page 5
5
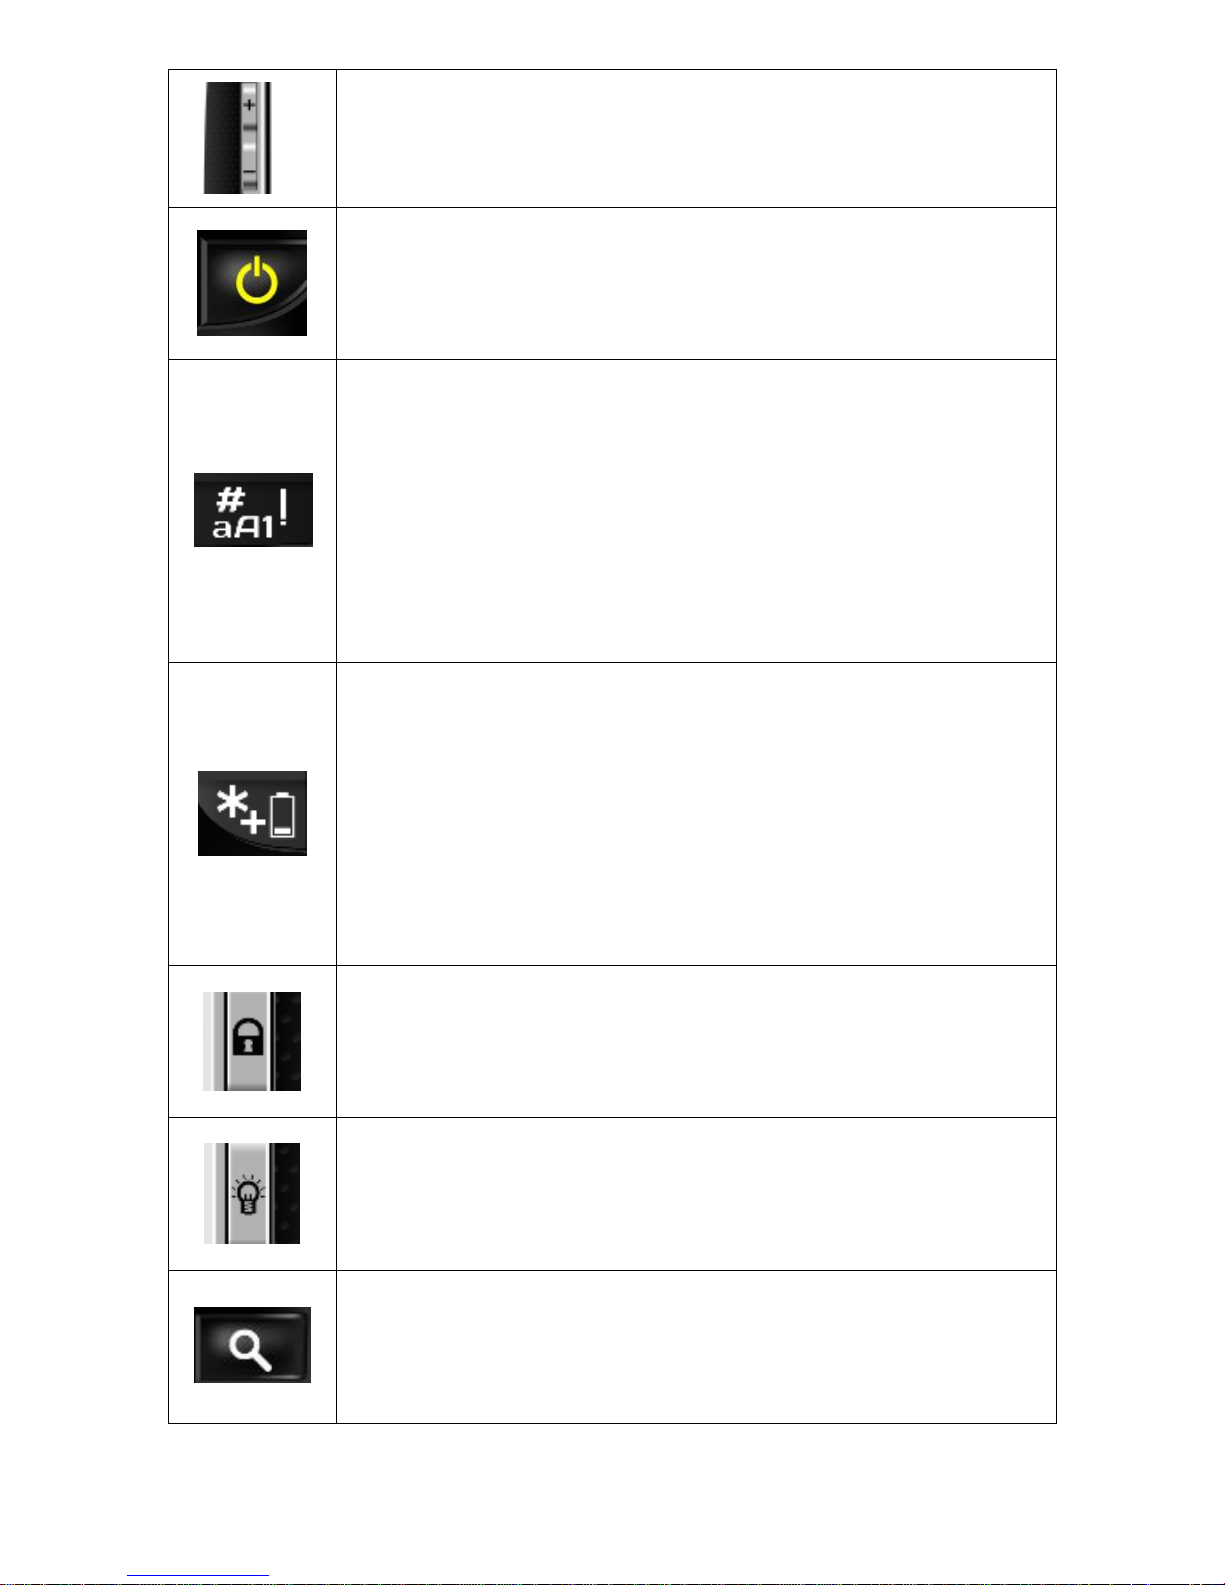
Volume Buttons:
Used to change volume
Power Key:
Press and hold for 3 seconds to
power on / off
Hash (#) Key:
Used to change input methods
(capital/lower case when typing).
When on the home screen, press
and hold hash key for 3 seconds
to activate the silent mode.
Star (*) Key:
Light emitted from key (not always
present) represents battery
charge status. See Charging the
Battery section of the manual for
greater detail.
Keypad Lock:
Press and hold for 3 seconds to
lock or unlock the keypad.
Flashlight Key:
Unlock phone and press button for
3 seconds to turn flashlight on/off.
Magnifier Key:
Press to activate magnifier.
Maximum magnification x3
Page 6
6
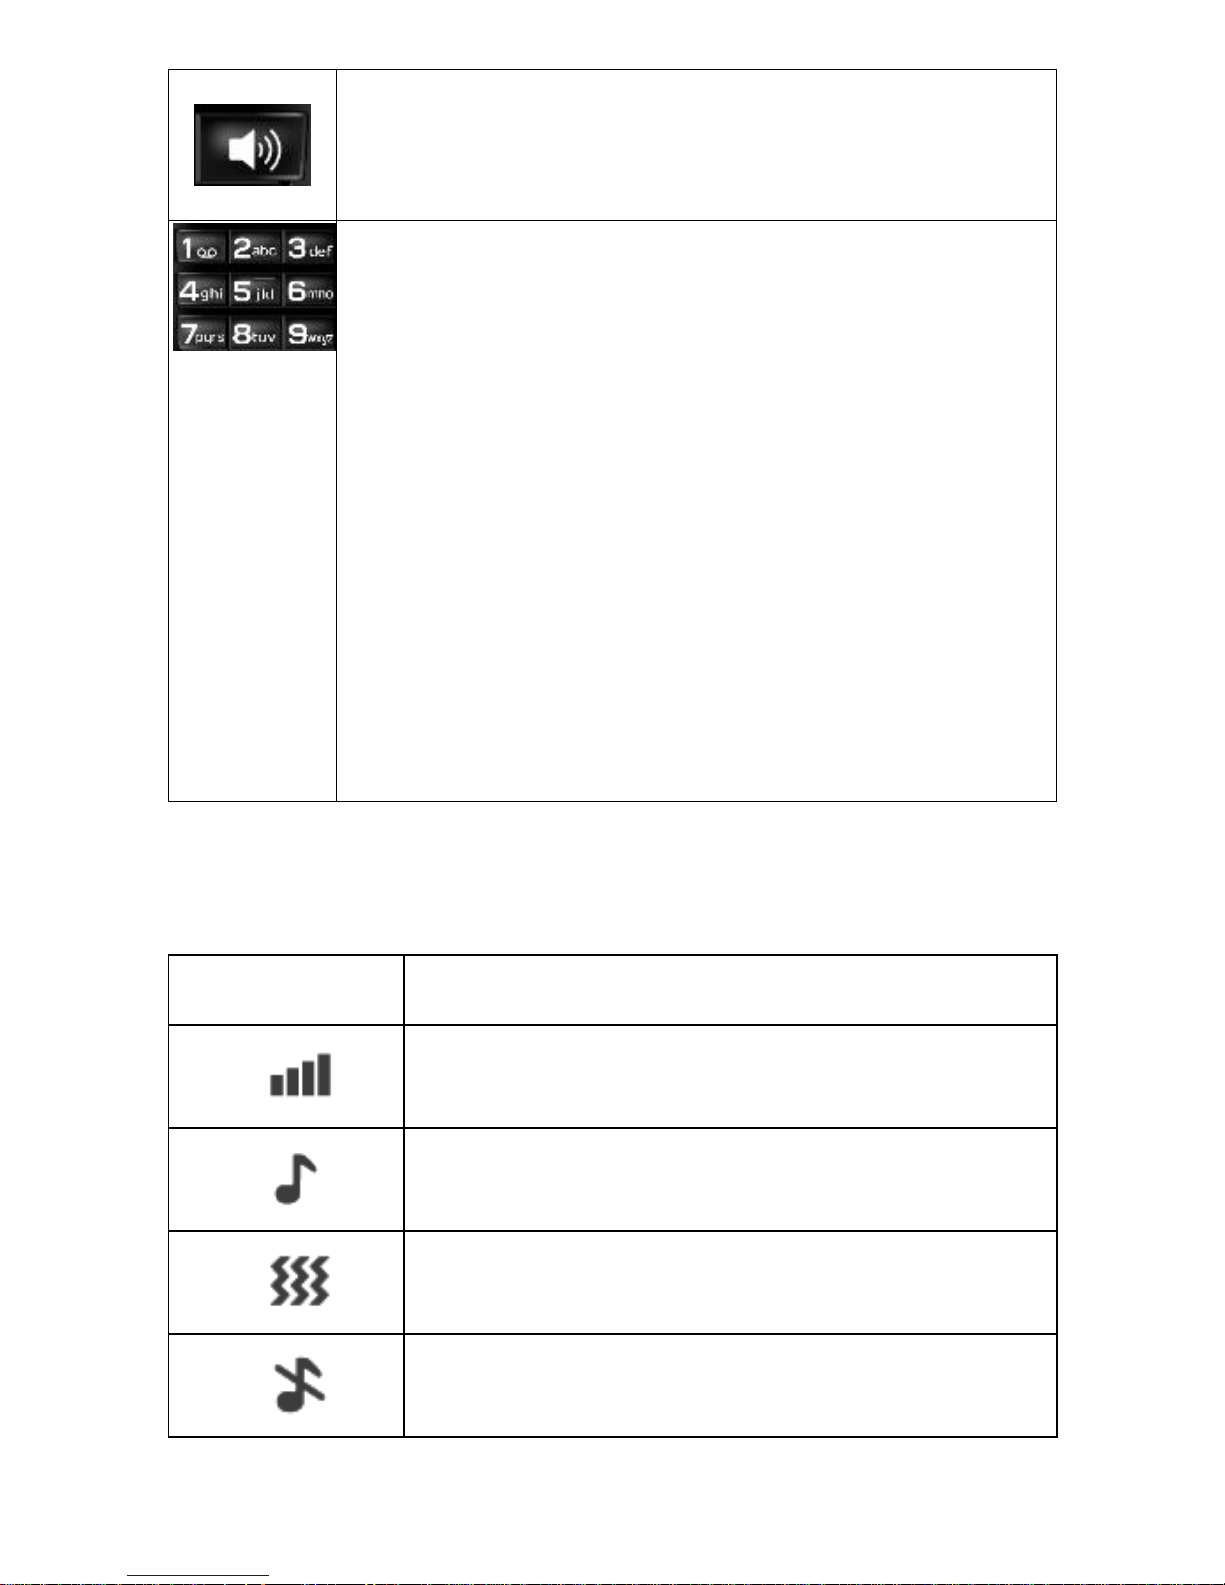
Hands Free/Loud Speaker:
Press to activate the loud speaker
function during call.
Number Keys:
When pressed momentarily, each
number key types their designated
number or letter as displayed on
the key. When “1” is pressed for 3
seconds it links to voicemail.
When 2-9 are pressed for 3
seconds they dial their allocated
speed dial number. (Please note:
users needs to program their own speed
dial numbers and speed dial needs to be
active for this feature to be used).
Display icon descriptions
Symbols
Explanation
Indicates the mobile phone
reception/service strength
Ringtone only (alert for
incoming calls/text messages)
Vibration only (alert for
incoming calls/text messages)
Indicates the Silent / Sleep
Mode is activated
Page 7
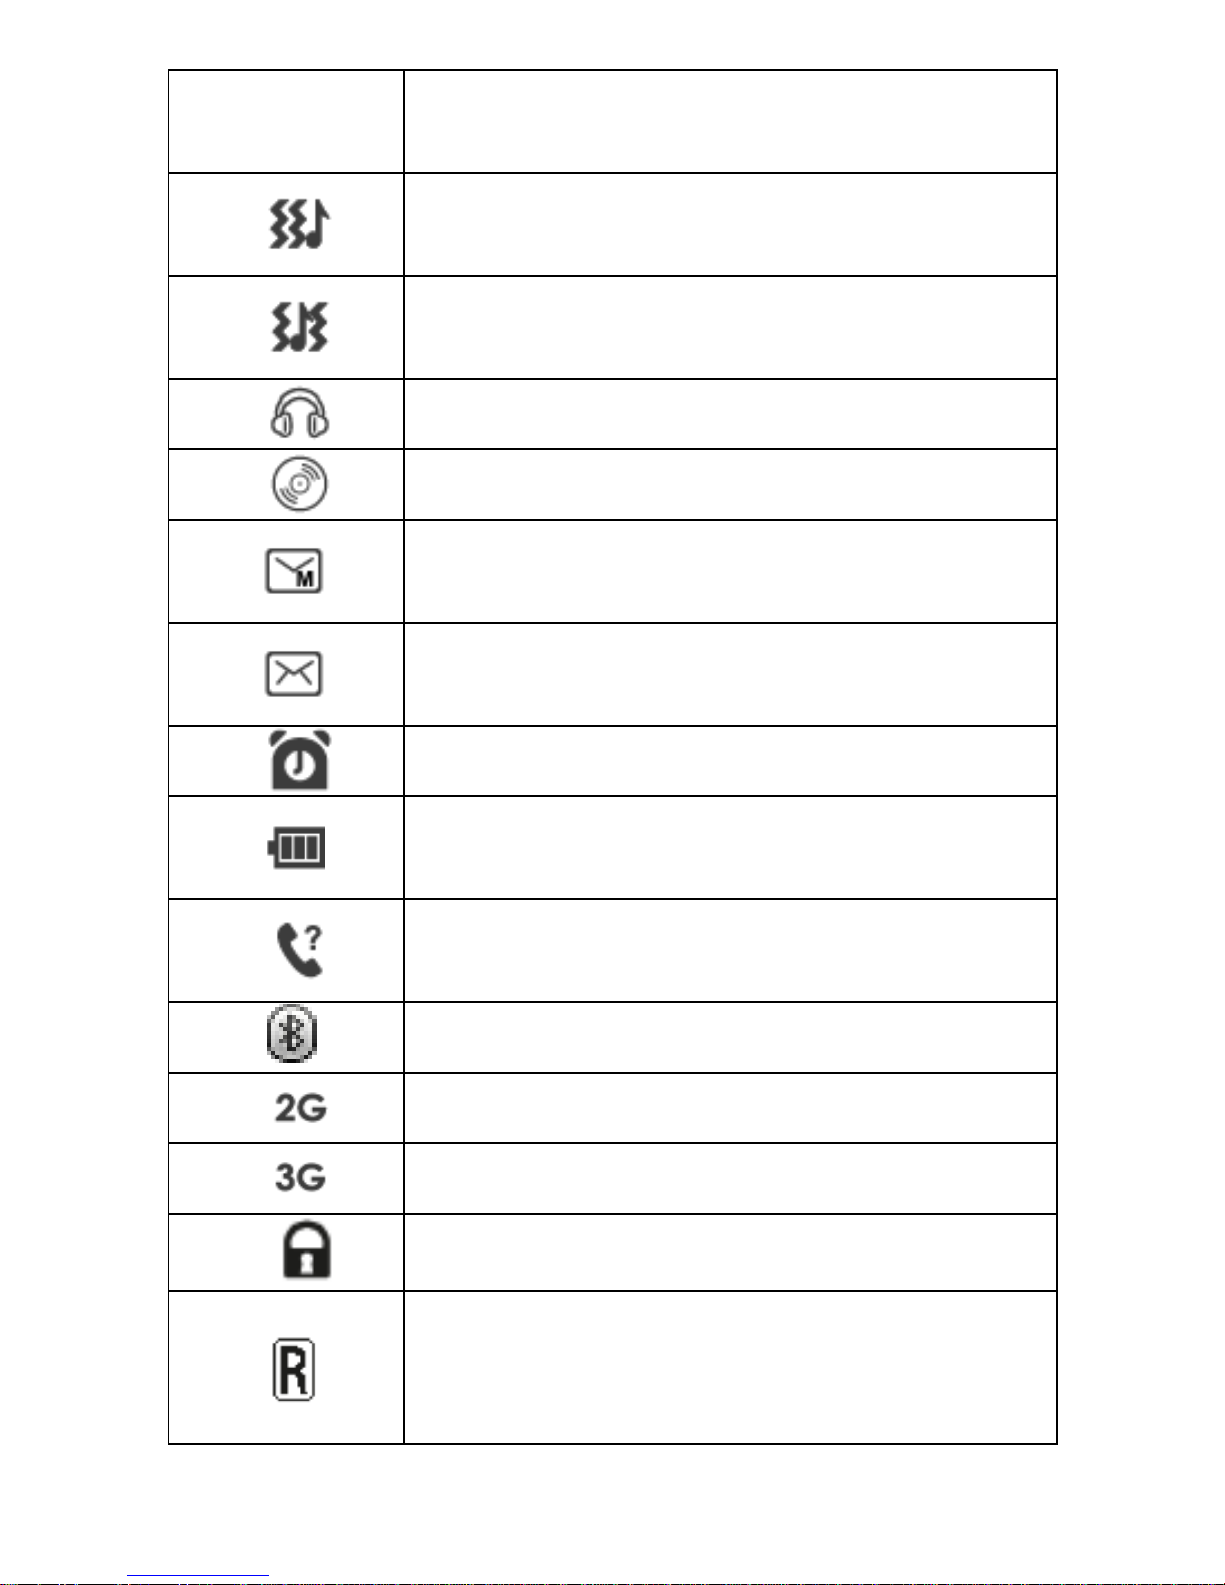
7
(no ringtone or vibration for
incoming calls/text messages)
Phone will vibrate then ring for
incoming calls/text messages
Phone will vibrate and ring for
incoming calls/text messages
Headphones are plugged in
Phone is playing music
You have an unread
multimedia massage (MMS)
You have an unread text
message (SMS)
Alarm is on
Indicates charging status and
battery level
You have an unacknowledged
missed call
Bluetooth function is active
Phone is using the 2G network
Phone is using the 3G network
Keypad lock is on
You are using a foreign
network, additional costs may
apply
Page 8

8
Specifications
Dimensions: 120 mm (height) X 59
mm (width) X 13.3 mm (depth)
Battery capacity: 1000mAh
Standby duration: 225 hours
When in service only. Ongoing searching for
network/service significantly reduces standby
time.
Call duration: 3.8 hours
Call duration (battery life) can differ depending
on network and location.
Page 9
9
Setting up the phone
Insert SIM card
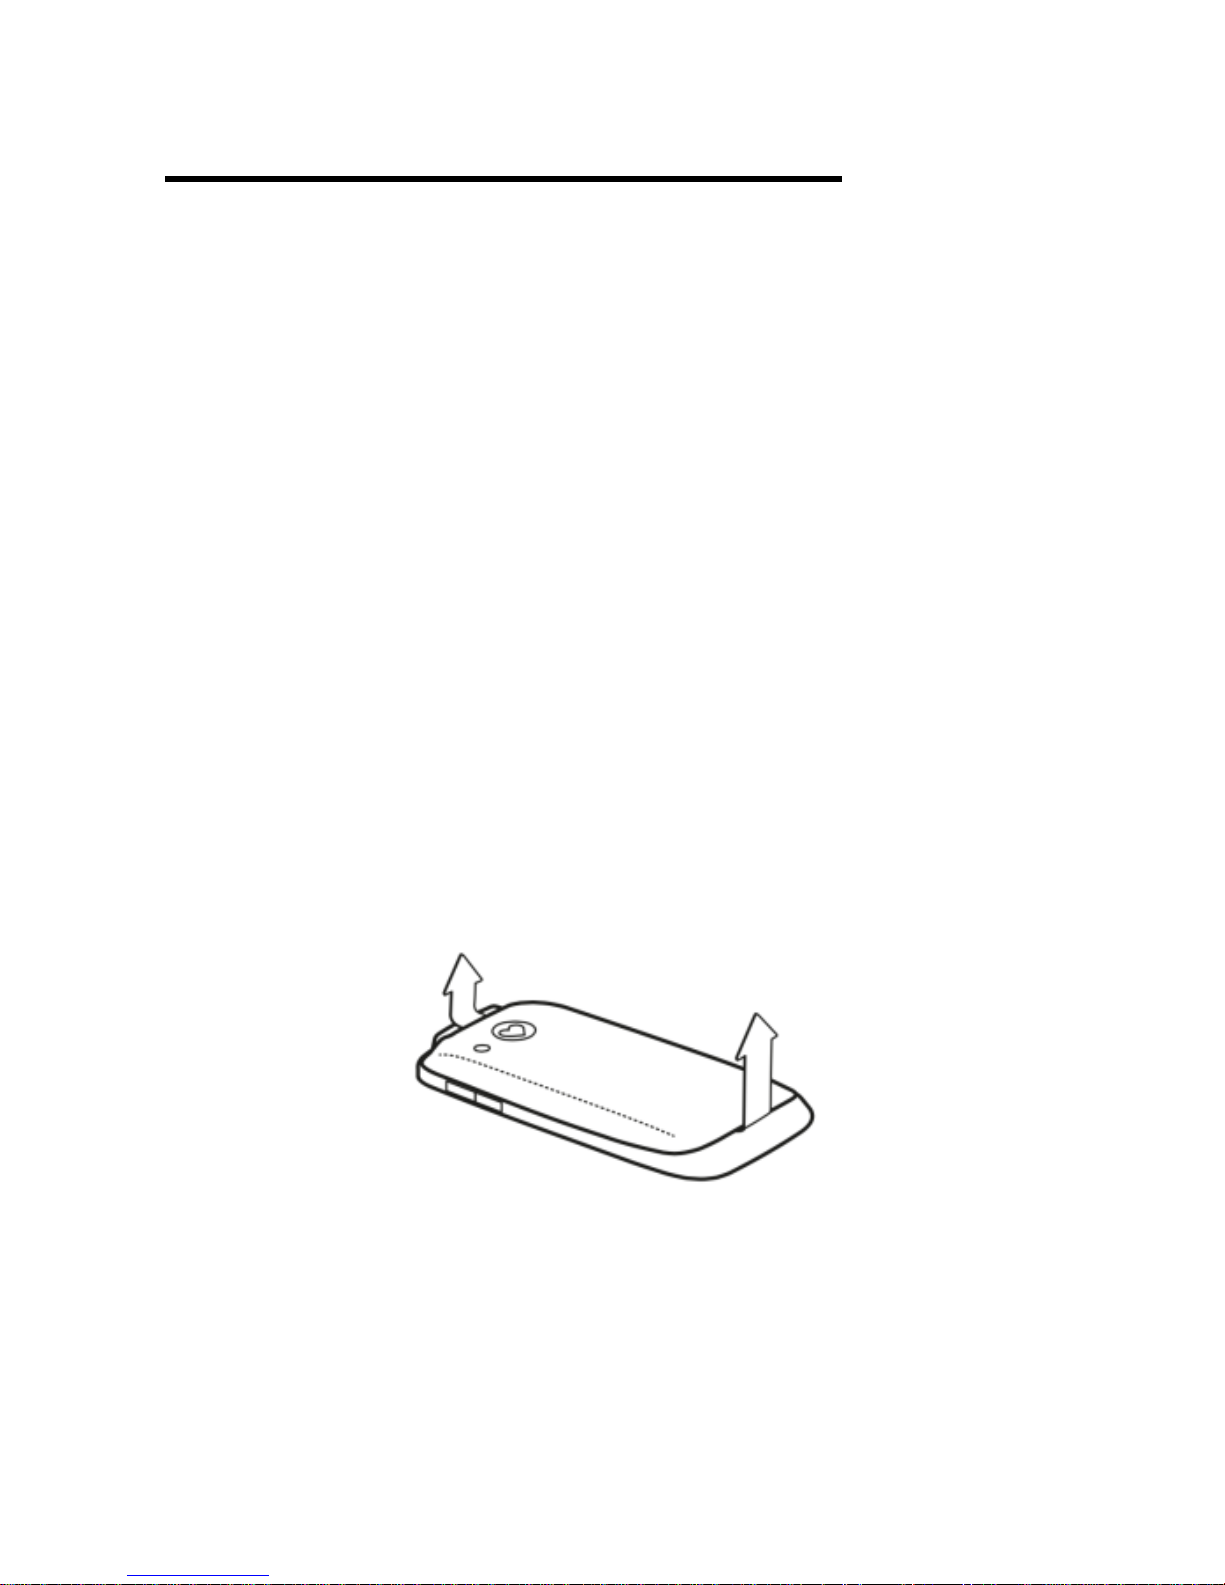
Step 1 - Remove the battery cover on
the back of the phone. To do so, find the
small recess in the top left corner of the
phones back cover. There is a small
raised marking on the back cover
above the camera lens to assist
locating the small recess (top left of
back cover). Lift from the small recess
to remove the back cover. Please note
it may be difficult to initially remove
back cover.
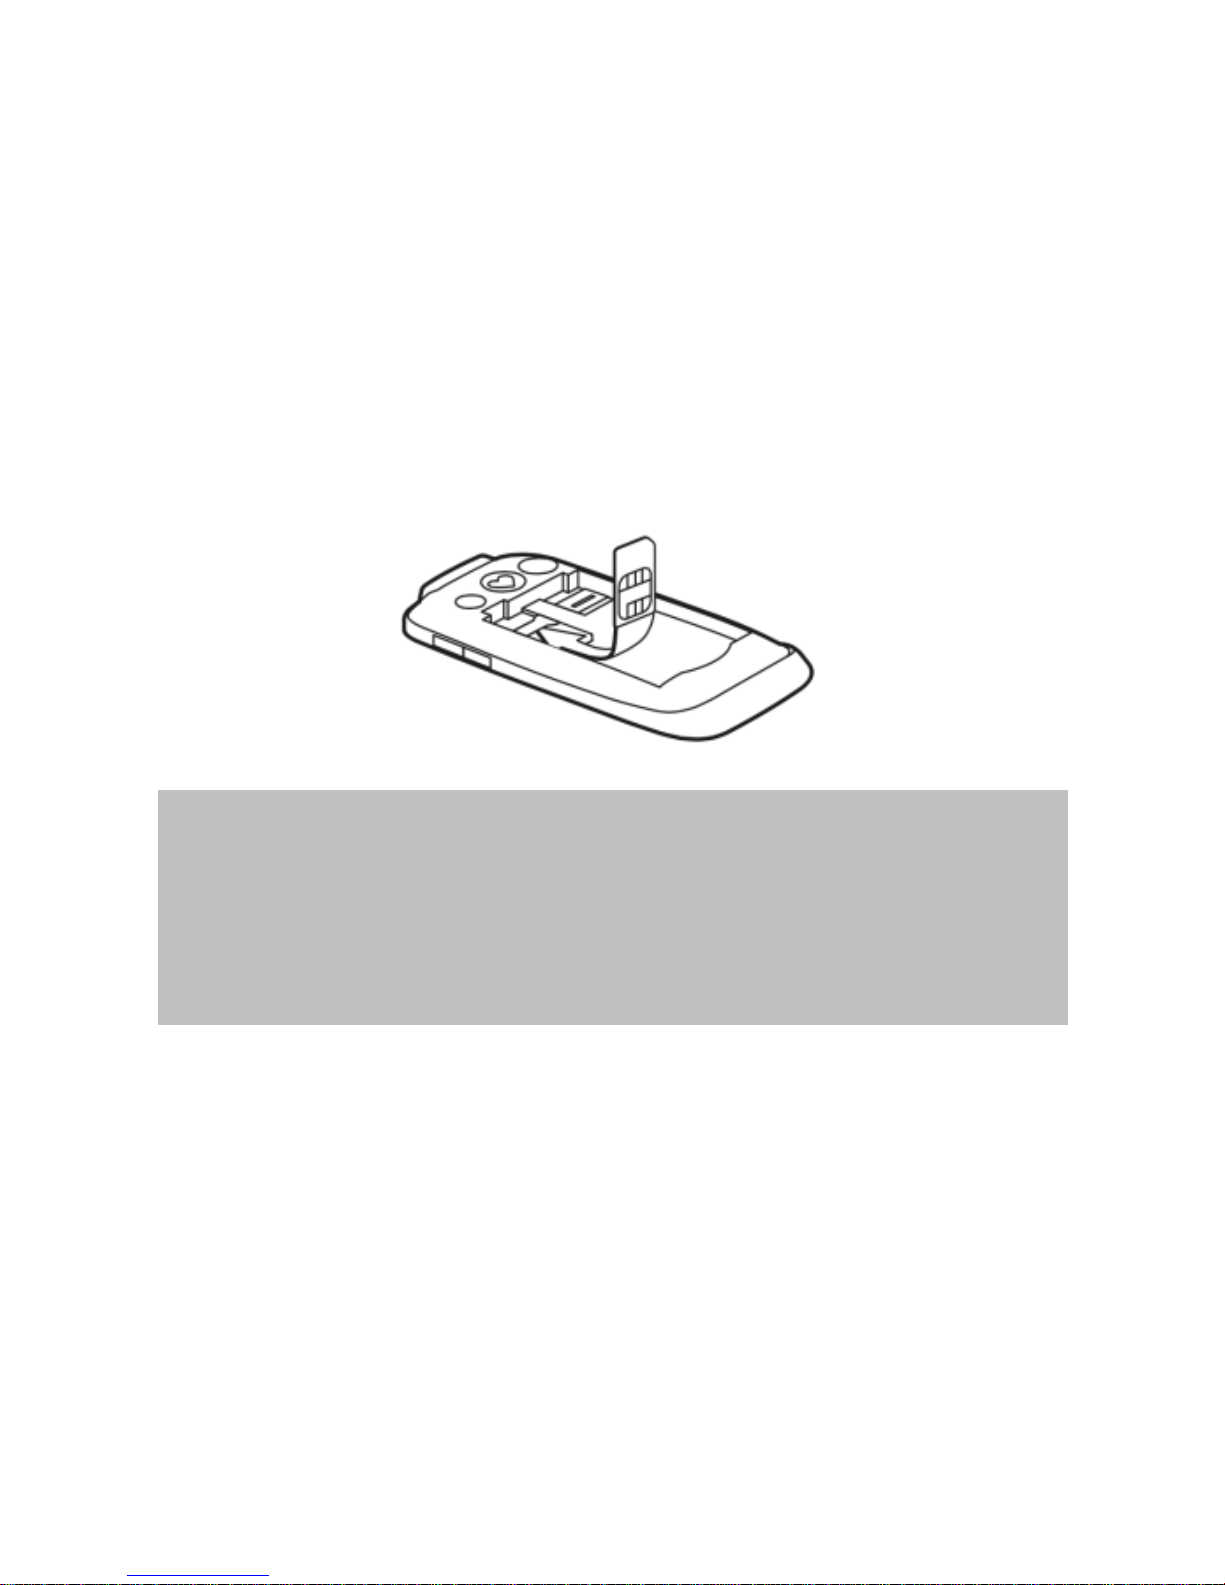
Step 2 – Remove the battery. The
location for the SIM card can now be
seen in the top left corner of the
exposed phone interior.
Page 10
10
Step 3 - Insert the SIM card (standard
size) with the gold chip facing down,
oblique edge to the bottom right. The
SIM card should be positioned under
the large horizontal silver guard and not
be inserted further then the black
barrier on the upper edge of the SIM
slot.
Please note:
Before replacing the phones back cover
please insert the MicroSD card
(optional) and battery.
MicroSD card/Memory card
(Optional – not provided with phone)
A MicroSD card/memory card can be
inserted into the phone to provide
additional memory for the phone.
Page 11

11
The maximum capacity MicroSD
card/memory card that should be used
with this phone is 16Gb.
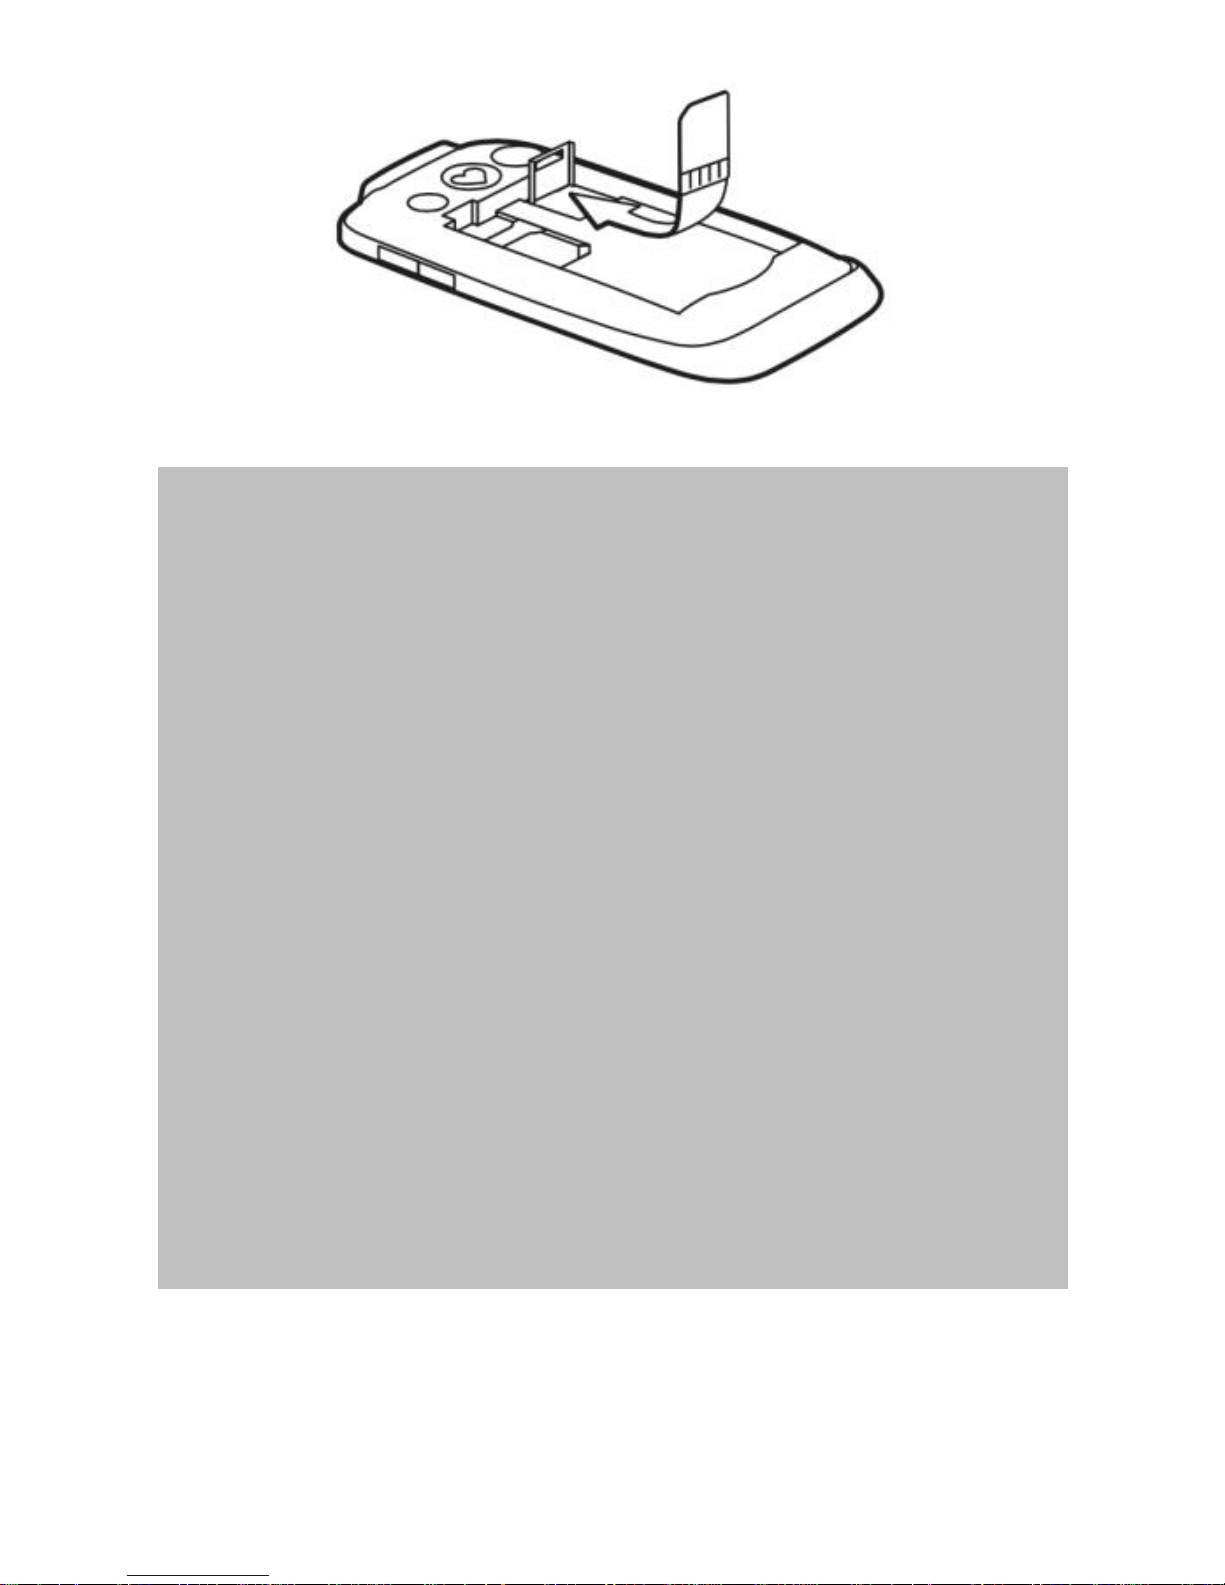
Inserting the MicroSD card:
When the back cover and battery are
removed, the location for the MicroSD
card can be seen in the top right corner
of the exposed phone interior. Slide the
silver, rectangular panel (located above
the MicroSD card holder) towards the
top of the phone (only slides a small
distance – this unlocks it from its stable
position). Lift the rectangular panel
upwards from the bottom so that it is
sitting at a 90 degree angle from the
phone (see image on following page).
Insert the MicroSD card into the panel
with the chip facing forward. Close the
panel with card inserted. Slide the panel
down to lock it into a stable position (it
will only slide a small distance).
Page 12
12
Precautions when inserting SIM card
and MicroSD card:
1. Keep the SIM card and MicroSD card
out of reach of children.
2. Do not touch the gold chip on the
SIM card/MicroSD card.
3. Keep the SIM card/MicroSD card
away from magnets.
4. Avoid putting the SIM card/MicroSD
card under direct heat such as sunlight.
5. Please be gentle with the
mechanisms that hold the SIM card and
MicroSD card. They are delicate and
can break if mishandled.
Page 13
13
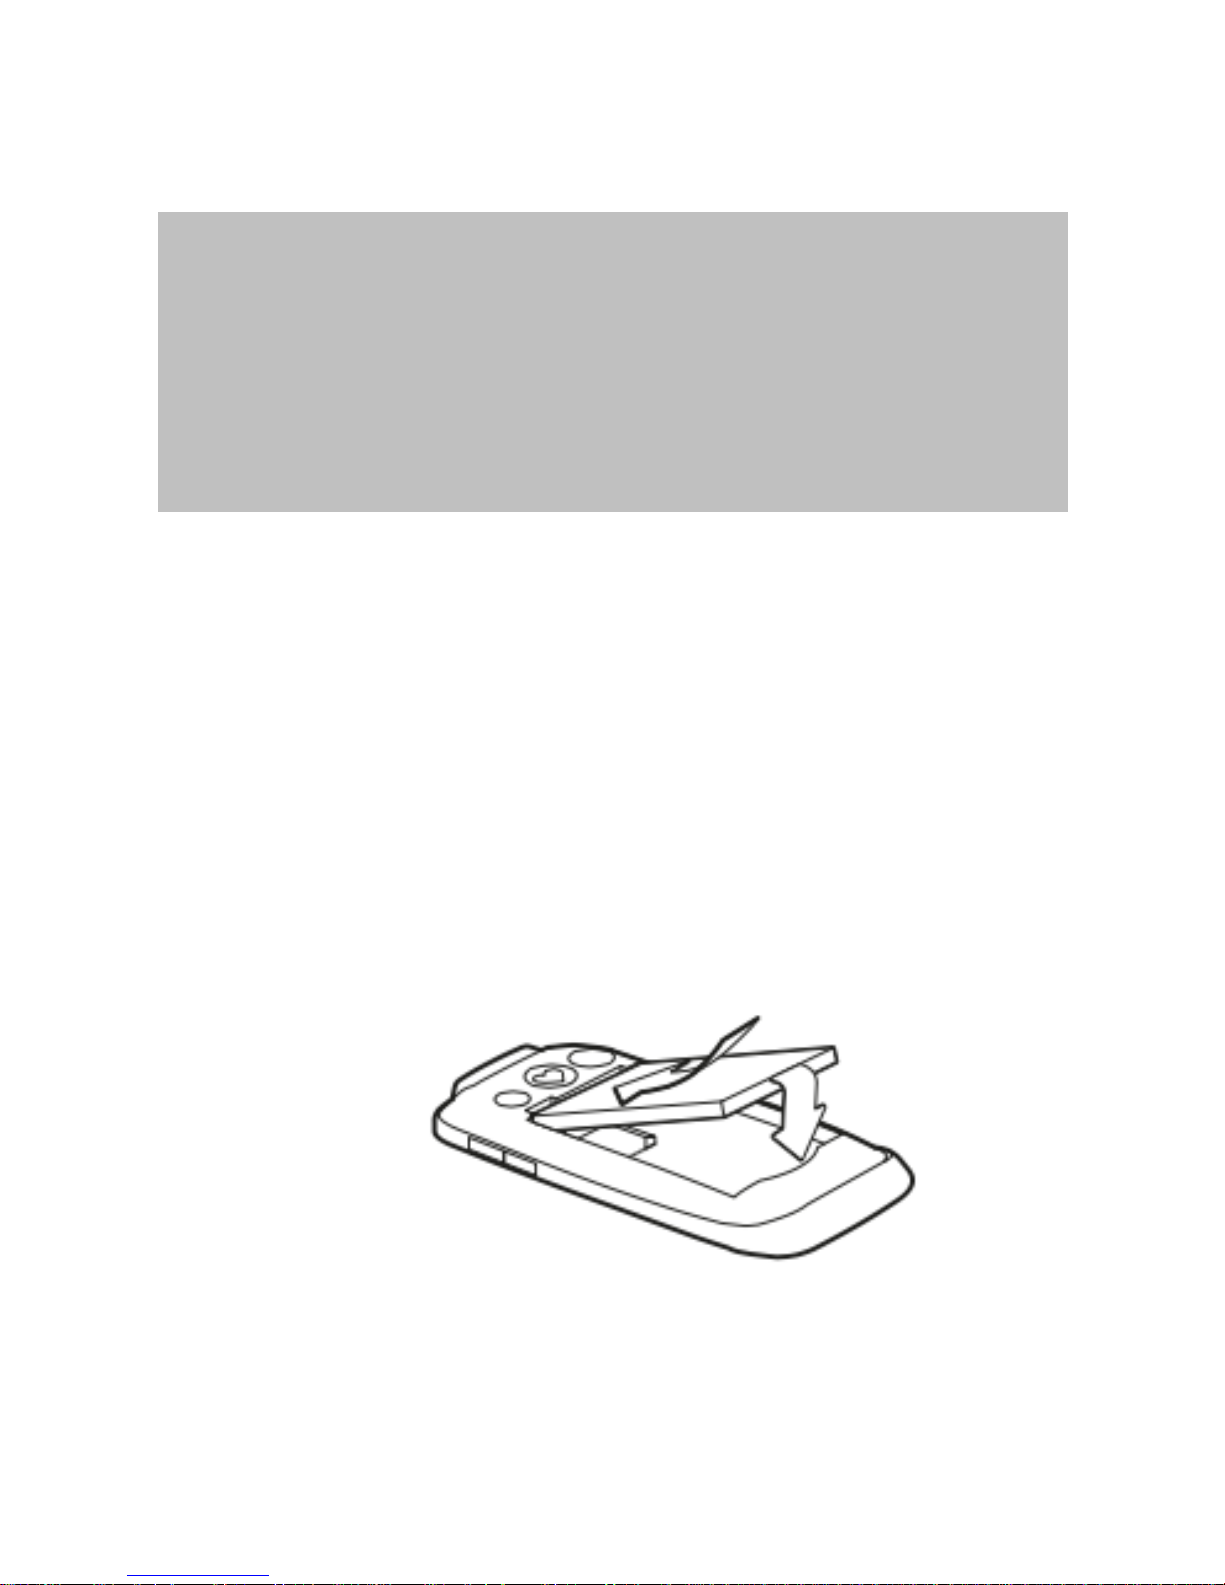
Insert the battery
Warning:Do not remove battery when
the phone is powered on or when the
phone is connected to the charger.
Failure to comply may result in damage
to the phone and attached accessories.
Step 1 - Remove protective tape from
conductors on top right edge of battery.
Step 2 - Insert the battery so the
conductors on the battery line up with
the conductors on the phone’s battery
port. Once inserted, the battery will sit
over the SIM card and MicroSD card (if
inserted).
Step 3 - Secure the battery cover in
place. To do so, first position the
bottom of the cover into place (two clips
Page 14

14
are located on the bottom border of
phone cover, insert these into the two
holes at the bottom of the back
opening). Once the bottom of the cover
is in place, press the top of the cover
into place. Ensure all four corners of
cover are in place prior to use.
Please note:
1.Before using the phone for the first
time please charge the battery for at
least 4 hours. Violation of this charging
time may decrease the battery life.
2.During the charging process, do not
remove the battery from the phone.
Failure to comply may damage the
phone and attached accessories.
3. The phone/charger may be warm
during charging. This is normal.
4.If the battery capacity is exhausted it
may take several minutes into the
charging process before the charging
icon displays on the LCD screen.
Page 15
15
Charging the Battery
Only use the Olitech battery and
charger with the phone. Failure to
comply with this may result in damage
to the phone and loss of warranty.
Do not attempt to insert the charging
cable into the headphone socket. This
could damage the phone/cable.
Battery charging options:
Charge with the wall charging plug
Connect the USB charging cable
to the wall charging plug.
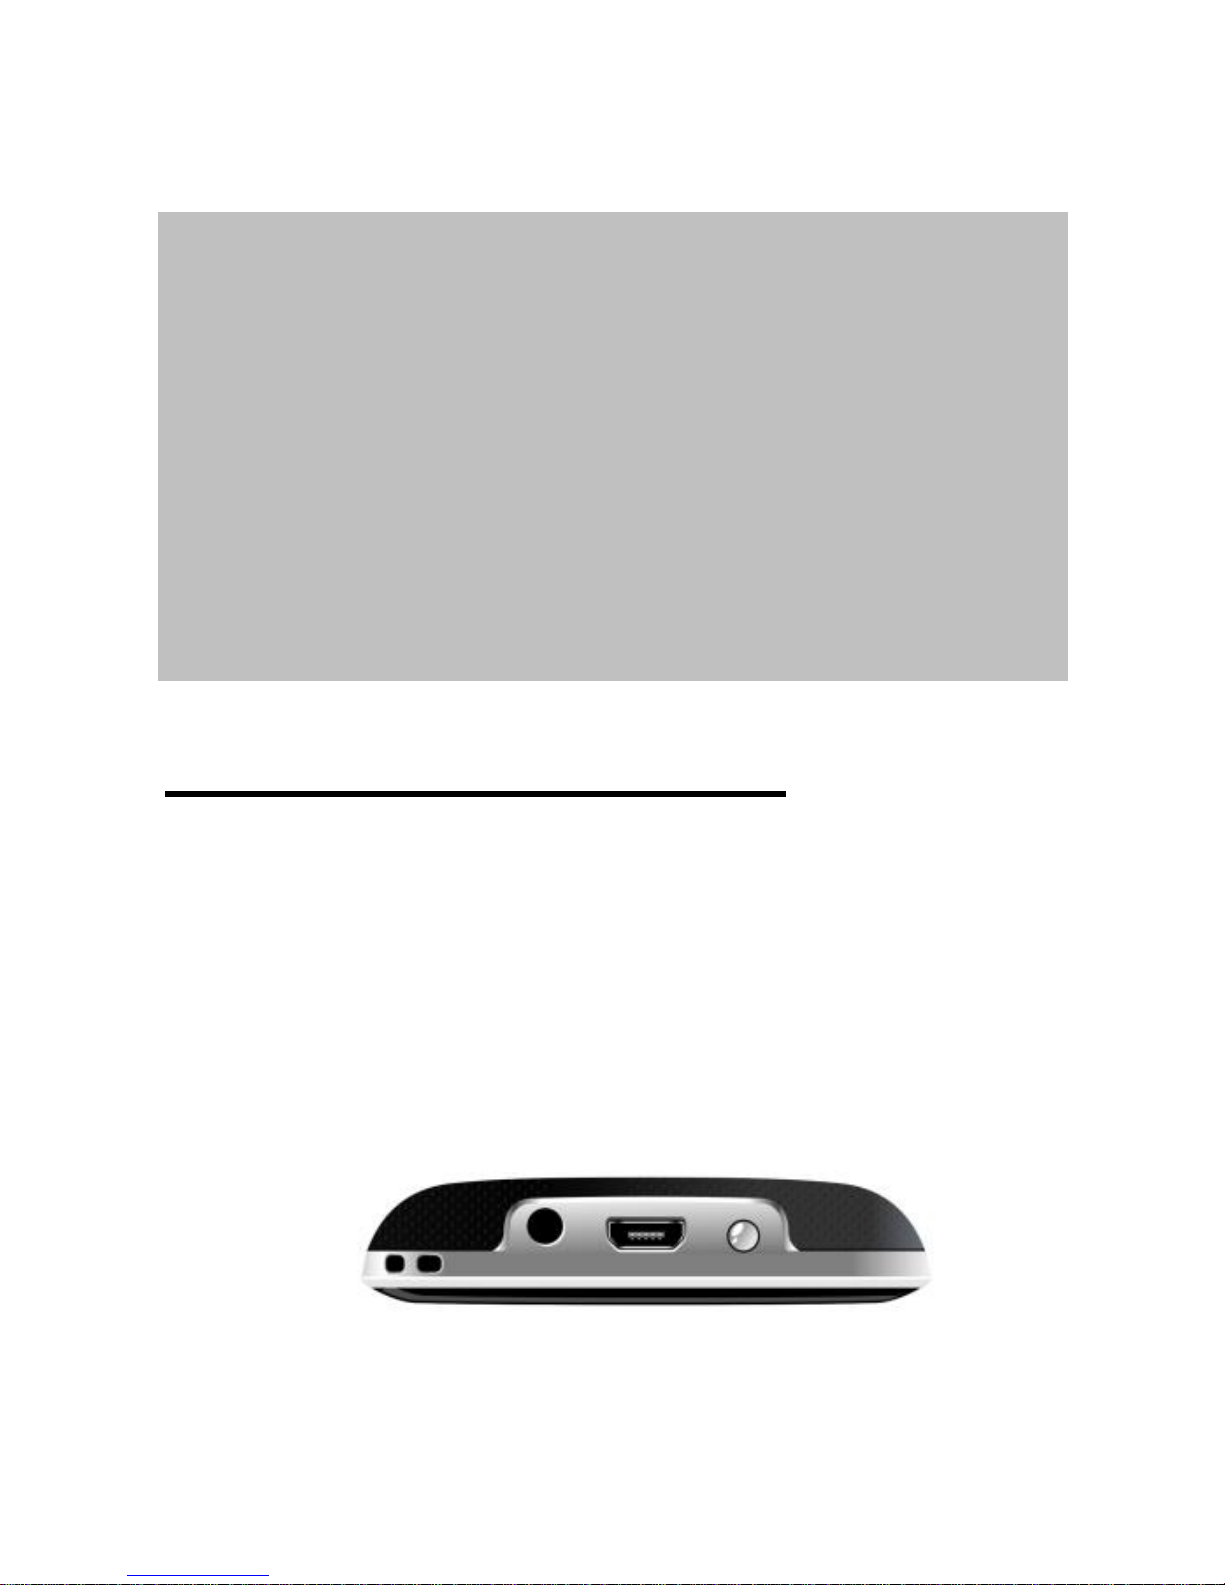
Insert the charging cable into the
charging port on the top of the
phone (middle landmark).
Turn power on at power point.
Page 16

16
Charge with the cradle charger
Connect the cradle charger to the
wall charging plug using the USB
charging cable.
Connect the wall charging plug to
the power point and turn power
point on.
Place/sit the phone into the
cradle charger (see image on
front cover of manual).
Charge using a computer
Connect the phone to your
computer using the USB charging
cable.
If the computer is powered on
charging will commence.
Additional information regarding
charging your phone
During the charging process:
If the phone is powered off, the
battery symbol will be displayed on
Page 17

17
the screen and the star key [*] will
flash. If the phone’s battery is fully
exhausted prior to charging it may
take several minutes for these
indicators to be displayed.
If the phone is powered on, the
battery charge level is seen on the
LCD screen via the battery icon
and the star key (*) flashes.
When is the battery fully charged?
The phone battery is fully charged
when the battery icon shows full
bars and the star key (*) is
continuously lit.
The phone can now be removed
from the charging unit.
Page 18

18
Calls
How to make a call
1. Enter telephone number with the
numeric keys.
2. Press green button to connect the
call. The call recipients name or
phone number will be displayed on
the screen for the duration of the
call.
How to end a call
1. To end a call, press the red button.
How to accept or reject an
incoming call
1. When you receive an incoming call,
the name of the caller (if saved to
your address book) or number of
the caller appears on the screen.
2. To accept the call, press the green
button.
Page 19

19
3. To reject the call, press the red
button.
Hands Free/Loud Speaker
1. If you wish to use the hands
free/loud speaker function, once
the call is active, press the hands
free/loud speaker button
on the main keypad.
2. To return to handset mode press
the hands free/loud speaker button
again.
Missed Call
When you have missed an incoming
call, the message “1 missed call”
appears on the home screen and the
hash key (#) flashes. If you view the
missed call, the message disappears
and the hash key stops flashing. If you
do not view the missed call, the missed
call icon will be displayed on the
screen.
Page 20

20
Messages
With your phone, you can write and
send text messages (SMS) and
Multimedia Messages (MMS). The
messaging feature of this phone is
accessed through pressing the Menu
key then selecting Messaging.
Writing messages
1. To write a text message or
multimedia message, press the
Menu key Messaging Write
message Text message OR
Multimedia message
2. Enter text using the keypad. The
hash key (#) can be used to
change between capital letters,
lower case letters and predictive
text. Press “Options” (green button)
to choose the recipient by
“Entering number” OR “Add from
Phonebook”
Page 21

21
3. If you chose to send a Multimedia
message (MMS), in the options,
you can add pictures, audio or
video files to the text.
Please note:
The attachable/receivable file size for
MMS is very limited. Any high definition
picture, sound or video files may not be
successfully sent/ received if they are
too large. If an error occurs when
sending/receiving a multimedia
message, it may be caused by an
incorrect carrier APN setting. The APN
setting can be changed in Settings
Connectivity Data account. You can
select the proper carrier account or add
a new PS account if your carrier name
does not appear on the list. For more
details, please call your carriers
customer service to obtain the MMS
APN setting.
Page 22

22
Receive and view messages
When you receive a new message your
phone will notify you with a sound/
ringtone and/or vibration (pending your
settings). The message “1 new
message” is also displayed on the
screen. Press the green button to view
the new message.
Once a message is read, unless
deleted, it can be viewed in the Inbox
by pressing the Menu key
Messaging Inbox.
Draft
The Draft folder in Messaging contains
messages that you have written and
“Saved to Drafts” but not yet sent.
Outbox
The Outbox folder in Messaging
contains messages that are waiting to
be sent or have been unsuccessfully
sent.
Page 23

23
Sent messages
The Sent messages folder in
Messaging contains all successfully
sent text messages and multimedia
messages.
Message storage capacity
The phone is capable of storing up to
approximately 250 messages. This
includes messages across all folders
(Inbox, Draft, Outbox, Sent messages).
If the message folders are full, it blocks
new/incoming messages and can
restrict you from sending new
messages. It is therefore recommended
that you regularly delete messages you
no longer require.
Page 24

24
Phonebook/Contacts
Saving new contacts to the
Phonebook
1. Press the Menu key Phonebook
Add new contact Select To
phone.
2. Use the keypad to enter the
contact’s name, phone number
and email address (optional). To
save the contact, select “Options”
then select “Save”.
Please see the Set-up Guide (separate
booklet) if you require additional details.
Please note:
The phone can save up to 300 contacts
in the phonebook.
Edit Contact
To edit an existing contact, select the
desired contact, scroll down to and
Page 25

25
select Edit. Edit as desired.
Search for a saved contact
Contacts in the Phonebook are sorted
alphabetically.
To search for a saved contact:
1. Press the Menu key Phonebook
2. Start typing the name of the
contact. Only the contacts starting
with the typed letters appear in the
displayed list (eg: if “Da” is typed,
only contacts starting with “Da” will
appear).
3. Use the arrow keys to scroll to the
desired contact.
Speed dial
Number keys 2-9 can be set up as
speed dial keys. To set up speed dial:
1. Press the Menu key Phonebook
settings Options (press green
button when “Add new contact” is
highlighted) Phonebook
Page 26

26
settings Speed dial Set
numbers.
2. Select which number key you wish
to allocate to a contact. The
Contacts list will then open. Scroll
through and select the desired
contact. Once selected, the
contact is then allocated to your
chosen speed dial key.
3. To call a contact allocated to a
speed dial key, when on the home
screen press the desired number
key for 3 sec. and the contact’s
phone number will be dialled.
Please note:
1. Only phone numbers saved to the
Phonebook can be used as Speed
dial numbers.
2. A SIM card must be inserted prior
to setting up Speed dial.
3. Please ensure Speed dial is “on”
prior to use
Page 27

27
Emergency/SOS button
This phone is fitted with an
Emergency/SOS button. Once,
activated and programmed,
you can quickly call for assistance by
pressing and holding the Emergency/
SOS button for 3 seconds. If you wish
to use this feature, please carefully
read all related information prior to use.
The Emergency/SOS button is located
on the back of your phone and is red in
colour.
Setting up the Emergency/SOS
button
1. Activating the Emergency/SOS
button:
To activate the Emergency/SOS button,
press the Menu key Settings SOS
setting SOS key On.
Page 28

28
2. Programming phone numbers to
the Emergency/SOS button:
To input numbers to be called when the
Emergency/SOS button is activated, in
the SOS setting menu, select SOS List.
In the list there are four numbers to be
programmed. The phone number
programmed against “1” will be the first
to be called and so on. When you have
selected the number (1-4) you wish to
program, press either “Edit” (if you wish
to manually enter the phone number) or
“Add from contacts” (if you wish to
allocate one of your saved Contacts to
the SOS button). When the phone
number is successfully saved you will
see it appear in the SOS List.
3. Editing the Emergency/SOS text
message:
To edit the Emergency/SOS text
message, when in “SOS setting” select
SMS content Edit, and type your
Page 29

29
desired message.
What will happen when the
Emergency/SOS button is
triggered?
Once triggered, the following will occur:
1. Alarm signal: An alarm sounds
immediately to alert people nearby.
It will also sound between calling
the emergency contacts on the
SOS List.
2. Call emergency contacts: The
emergency call sequence starts.
The first number in the SOS list is
called. If this call is not answered
and accepted the second number
will be called and so on.
3. Emergency SMS: If none of the
four Emergency calls are
answered and accepted, the
phone sends the pre-programmed
SMS to contacts saved in the SOS
list (mobile phone numbers only).
Page 30

30
Please note:
If none of the Emergency calls are
answered and accepted, the user is
required to re- activate the Emergency
/SOS button in order to re-trigger the
Emergency call/SMS sequence.
Important Information
1. The Emergency/SOS button is
disabled in the factory. It must be
activated and programmed in order
to be used.
2. If the Emergency/SOS button is
activated (SOS Key – On) and
triggered (pressed and held for 3
seconds) but no phone numbers
are programmed to the SOS List, it
will automatically call 000.
3. Olitech accepts no liability for
possible costs related to involuntary
Page 31

31
calls or health complications if the
Emergency/SOS button does not
function correctly.
4. Olitech accepts no liability if the
Emergency/SOS button is activated
and triggered but does not connect
to the phone numbers on the SOS
List due to insufficient credit, no
mobile service/reception or being
on a foreign network.
Page 32

32
Additional features
Multimedia
To activate and use the Camera, Video
Recorder or Voice Recorder, press the
Menu key Multimedia Camera OR
Video recorder OR Sound recorder.
Camera
To take a photo, when the Camera is
open press “5” to capture the photo.
To view photos taken on the phone,
press the Menu key Multimedia
Image Viewer.
Video
When the Video recorder is open, press
“5” to start recording. To stop recording
press the red button. To access a
recorded video, press the Menu key
Multimedia Video player. When you
have selected and opened your chosen
video, press “5” to view the video.
Page 33

33
Sound recorder
When the Sound recorder is open,
press the star key (*) to start and pause
recording. To stop recording, press the
red button. To play recorded sound files,
open the Sound recorder, press the
green button to open Options, select
“List” then choose the sound file you
wish to open.
FM radio
To access the FM radio, press the
Menu key Multimedia FM radio.
When the FM radio is open, press the
Hash key (#) to turn the radio on/off.
When the radio is on, the up and down
arrow keys can be used to search for
radio stations.
Please note:
1. If you exit the FM radio when the
radio is still playing, you will need to
re-enter FM radio and press the Hash
Page 34

34
key (#) to turn it off.
2. For clearer sound quality, head-
phones can be used.
3. The volume of the FM radio can be
altered using the volume control on the
left side of the phone.
Alarm
The Alarm can be accessed by
pressing the Menu key Extra
Alarm. To set an alarm, select a time
from the Alarm folder (up to five alarms
can be set). Once selected, the alarm
details (on/off, time, repeat, ringtone)
can be selected. Alarms that are “On”
will sound every day at the set time.
Page 35

35
Bluetooth
To enable Bluetooth, press the Menu
key Settings Connectivity
Bluetooth Power On.
To pair a Bluetooth enabled device:
1. When in the Bluetooth menu,
select My device OK (green
button) to search for new device.
Ensure your phone and the
Bluetooth device you are
attempting to pair with are turned
on and are within range.
2. Devices found are displayed on
the screen.
3. Select the desired device and
press the green button to pair.
4. Follow the instructions on the
screen to complete pairing.
Page 36

36
Settings
Profiles
Profiles allows the user to modify what
audio output/vibration is emitted upon a
new notification/incoming phone call or
when pressing the keypad (exception:
talking keypad feature).
To access Profiles, press the Menu key
Settings Profiles, then select your
option. The Profile options include:
General: All alerts are on
Silent: All alerts are off including
vibration
Meeting: Phone will only vibrate
when there is a new notification
Outdoor: All alerts are set at the
highest level
Page 37

37
Once a profile is selected, it can be
activated, customised or reset.
Phone Settings
To access Phone settings, press the
Menu key Settings Phone settings.
The following settings can be selected
and edited in Phone settings:
Time and date
Settings that can be set/edited include
home city, time/date, format in which
time/date are displayed and update with
time zone.
Language
Language options include English,
Spanish, Italian, Turkish, Greek,
Page 38

38
Chinese and Hindi. Please note this
only changes the written text on the
LCD screen, not the voice output
language.
Preferred input method
The input method can be changed in
either the Phone settings or by pressing
the hash (#) key when typing text. Input
options include upper and lower case
letters (all offered languages) and
predictive text (English only; labelled
“Smart ABC” or “Smart abc”).
Display
Settings that can be edited in the
Display section include wallpaper,
whether the time and date are
Page 39

39
displayed on the screen, LCD backlight
(general) and LCD backlight during
calls.
Themes
The phone has two themes to choose
from; white background with black text
OR black background with white text.
Flight mode
Users can choose to what degree the
phone connects to the mobile network.
Options include:
Normal mode: full network
connection pending service
availability
Flight mode: disconnects all
network connections
Page 40

40
Query when power on: allows
emergency calls only
Call settings
Within Call Settings the following can
be modified: Call waiting, Call divert,
Call barring and Advanced settings.
Advanced settings include Auto redial,
Call time reminder and Answer mode.
Voice setting
The phone offers various voice output
options (English only). These include:
1. Key number voice: when the
phone is on the home screen or
numbers are being inputted (e.g.
when dialling a phone number) the
key being pressed will be audibly
Page 41

41
repeated back.
2. Incoming number voice: phone
number of incoming caller is
sounded prior to user answering the
incoming call. This replaces the
ringtone. If Incoming number voice
is “On” it will override the ringtone.
Network Settings
Within Network settings, the following
details can be viewed/edited: Network
selection, Service selection, Network
information, GPRS connection, GPRS
transfer preferences, HSPA preference.
Security Settings
SIM security: PIN code on/off and
Page 42

42
editing.
Phone security: Phone lock on/off
and editing.
Auto keypad lock: the phone can
be set to automatically lock the
keypad after a specified time left
dormant.
Restore factory settings
This feature restores default settings
and erases all stored information
including contacts.
Please note:
To edit Security settings/restore factory
settings you may be required to input a
PIN. The default PIN is 0000.
Page 43

43
USB Data Cable
The phone is supplied with a USB data
cable. In addition to the cables use for
charging purposes, it can also be used
to link your phone and computer to
view/transfer multimedia files between
your phone and computer.
To use this feature:
1. Connect the phone and computer
using the USB cable.
2. When the phone and computer are
connected, open My Computer (on
your computer) external USB
folder (will be labelled differently
on different computers). Within this
file you can access multimedia
files stored on the phone.
Page 44

44
Troubleshooting
If you are experiencing difficulties with
your phone, please consult the
following information prior to accessing
after-sales support.
The mobile phone will not power on
Ensure the protective tape over
the battery conductors has been
removed prior to inserting the
battery (see page 13 of manual).
Ensure you are pressing and
holding the power button for three
seconds when attempting to turn
your phone on.
Check whether the battery supply
has been exhausted. If you are
unsure, please charge your phone
prior to re-attempting to power on
(see pages 15-17 of manual).
Page 45

45
An error message is displayed when
the mobile phone is powered on
If the automatic lock function is
enabled, you must enter the phone
password before you use the
mobile phone (default password
0000).
If the PIN function is enabled, you
must enter the PIN code every
time you turn the mobile phone on
(default PIN code 0000).
If you have entered the wrong PIN
code three consecutive times the
mobile phone will lock. To unlock it
you must enter the PUK code
provided by the network carrier.
SIM card error
If the chip on the SIM card is dirty
or damaged it can impact the
phones ability to read the SIM card.
Please clean/replace as required.
Please ensure the SIM card is
Page 46

46
installed in accordance with the
instructions provided in this
manual.
Failure to connect to the network
The network signal may be
weak/out of range. Try changing
locations to see if the signal
improves.
The SIM card/network may be
invalid/inactive. Please contact
your network service provider.
Failure to make an outgoing call
Please ensure the phone number
is complete (including area code)
and you have pressed the green
button.
Ensure you have sufficient credit
with your network provider.
Check whether the phone is
registering the SIM card.
Check whether the call restriction
function is enabled (see Flight
mode on page 39 of manual).
Page 47

47
Poor call quality
Please ensure the volume control
is adjusted to your requirements.
Please check the network signal
strength.
The other party cannot call you
Check whether your mobile phone
is switched on and connected to
the network.
Confirm the other party’s number
is not barred on your phone (see
Call settings Call barring).
Check whether the SIM card is
valid.
Check whether the call restriction
function is enabled (Flight mode).
The other party cannot hear you
Check whether the microphone is
enabled.
Keep the microphone (located at
the bottom of the phone) close to
your mouth when speaking.
Page 48

48
Short standby duration
If you are in a low signal area or
are moving in and out of signal
areas and your phone is required
to search for signal more
frequently the battery life will
decrease.
If the phone is active/LCD
backlight is left on, the battery life
will be reduced.
As is the case with all batteries,
over time, the battery’s life will
slowly decrease. Replacement
batteries can be purchased from
your retailer.
Charging failure
The contact may be poor between
the phone and charger or the
phone and the battery. Please
check all connections.
Dirt and dust may be accumulated
in the charging components. Use a
Page 49

49
dry, soft and clean cloth to clear
the connection points. Please
ensure power is off when doing so.
If the environment’s temperature is
below 0 degrees or higher than 45
degrees Celsius charging may be
negatively affected.
The battery or charging unit may
be damaged.
If you have attempted these
troubleshooting tips and are still
experiencing difficulties please contact
Olitech on 03 9755 8885 or email
Page 50

50
Safety Information
Battery
Do not use a damaged charger or
battery.
Only use Olitech approved
accessories/batteries with the
phone. Failure to do so will void
your warranty.
Do not place the battery under
high temperatures or in a fire/flame.
Failure to comply may result in
explosion.
Dispose of used batteries in
accordance with your local
authority’s guidelines.
Over time, battery life gradually
decreases. Please replace as
required.
When the phone is fully charged,
disconnect the phone from the
charger. If the phone is
Page 51

51
continuously connected to an
active charger it may damage the
battery and shorten the battery life.
The charging capacity is
negatively affected in extreme
temperatures.
Traffic Safety
Obey local traffic laws in relation to
mobile phone use when driving.
Keep the mobile phone out of
reach of children
The phone, including all parts and
accessories should be kept out of reach
of children at all times.
Operating Environment
Please be aware of the environment
you are in when carrying/using your
mobile phone and abide by mobile
Page 52

52
phone usage regulations when in all
environments.
The optimal temperature range to use
and store the mobile phone is 0 – 45
degrees Celsius. The phone is not
designed to be used in environments
below -10 degrees Celsius or above 50
degrees Celsius.
This mobile phone is not waterproof.
Keep it dry under all circumstances.
Electronic Devices
Most electronic devices shield radio
information. If you experience
interference on your phone or are
concerned about whether the mobile
phone will interfere with other electronic
devices please consult with their
manufacturer prior to use.
Page 53

53
Professional Service
Please do not attempt to disassemble
the phone yourself (Exception: steps
outlined in the “Setting up the phone”
section of this manual on pages 9-17).
The phone must only be serviced by
authorised organisations. Failure to
comply with this will result in loss of
product warranty.
Important note: If a part is missing or
you believe the phone may be defective,
please contact Olitech on 03 9755 8885
or email [email protected].
Page 54

54
Warranty
The Olitech Easy Mate+ is guaranteed
by a 12 month warranty (6 month
warranty for the battery). The warranty
period commences on the date of retail
sale. Please retain your purchase
receipt/ invoice as proof of purchase for
warranty claim purposes.
The warranty is valid for manufacturing
faults only. The phone must only be
used with original Olitech accessories.
Failure to do so will void the warranty.
The warranty does not cover any
damage (direct/indirect) caused to the
phone. This includes but is not limited
Page 55

55
to breakages, water/temperature
damage, misuse or loss.
Olitech accepts no liability for loss of
data due to a damaged/faulty phone.
If you believe you have a valid warranty
claim please contact your place of
purchase to discuss your concerns. Please
have your purchase receipt/invoice
available at the time of contact to assist in
the assessment of you claim.
 Loading...