

Page 1
DTP-1106-004718_CTP01-2015-06-16_OLISOPRO_SVS_MANUAL_REVA_R2_SIZE:209.2X147.6MM_COLOR:K
reinvented for you™
OLISO
®
PRO™ DUAL SEAL
SMART VACUUM SEALER
VS95A, VS97A
USER MANUAL
SAVE THESE INSTRUCTIONS
MANUAL: www.oliso.com/manuals/smartvacuumsealer
Page 2

Contents Thank You!
Important Safety Instructions ..............................
Introducing the Oliso® PRO™ Smart Vacuum
Sealer ..........................................................................
Simple Steps to Vacuum Sealing .........................
Vacuum Sealing on the MOIST Setting ..............
Vacuum Sealing with the Flexi Tube ...................
Control Panel ............................................................
How to Reuse a Vac-Snap® Bag ..........................
Using the 12Volt DC Cord ......................................
Care and Maintenance ............................................
Quick Shopping Guide ...........................................
Troubleshooting .......................................................
Quick Tips ..................................................................
2
3
4
5
6
7
8
9
10
11
12
13
Thank you for purchasing the Oliso
Smart Vacuum Sealer. You are just a few
steps away from a whole new way of
storing your food.
For more information visit
®
PRO™
www.Oliso.com
QUESTIONS?
Contact Oliso® Customer Service
Call: 1.800.899.5157
Office Hours: Mon-Fri 8:30am-4:30pm PST
E-mail: [email protected]
Warranty ....................................................................
14
Page 3
Read all instructions before using this product.
When using your Smart Vacuum Sealer, the following basic safety precautions should always be observed:
Use the Oliso
1.
2.
To protect against the risk of electric shock, do not immerse the Oliso
®
PRO™ Smart Vacuum Sealer only for its intended purpose.
®
PRO™ Smart Vacuum Sealer, plug or
power cord in water or other liquids.
3.
Never tug cord to disconnect from the outlet. Grasp plug and pull to disconnect. Do not unplug the Oliso
PRO™ Smart Vacuum Sealer when in use. Only unplug the unit when the READY light is illuminated.
4.
To reduce the risk of injury, unplug the Oliso
clean the drip tray and bag sealing area.
5.
Clean the Oliso
®
PRO™ Smart Vacuum Sealer drip tray and bag sealing area after handing raw meats,
®
PRO™ Smart Vacuum Sealer before removing the drip tray to
seafood and poultry to prevent bacterial contamination. Always empty and clean the drip tray between
uses. Do not allow the drip tray to overflow.
6.
See page 10 for instructions on cleaning the drip tray and bag sealing area.
7.
The Oliso
cleaning the bag sealing area.
8.
The Oliso
seconds after use. Please take caution when removing the drip tray immediately after a vacuum cycle.
9.
Keep Vac-Snap
10.
Do not allow children to use the Oliso
appliance being used near children.
11.
To reduce risk of electric shock, the Oliso
®
PRO™ Smart Vacuum Sealer contains a very sharp, concealed blade. Please take caution when
®
PRO™ Smart Vacuum Sealer’s heat coil located in the bag sealing area stays warm for a few
®
bags away from infants and children.
®
PRO™ Smart Vacuum Sealer. Close supervision is necessary for any
®
PRO™ Smart Vacuum Sealer has polarized plugs (one blade is
larger than the other). This is intended to fit in a polarized outlet only one way. If the plug does not fully fit
in the outlet, reverse the plug. If it still does not fit, contact a qualified electrician to install the proper
outlet. Do not alter the plug in any way.
12.
The Oliso
®
PRO™ VS97A Smart Vacuum Sealer comes with a 12 Volt DC cord. Use only the DC cord supplied
with the unit. Make sure your vehicle has a 10 amp rated fuse or higher before using the 12 DC cord option.
While running off of the 12 Volt DC cord, the vehicle should be turned on, with lights, air conditioning and
radio turned off.
13.
Always unplug your Oliso
®
PRO™ Smart Vacuum Sealer when not in use.
®
Page 4
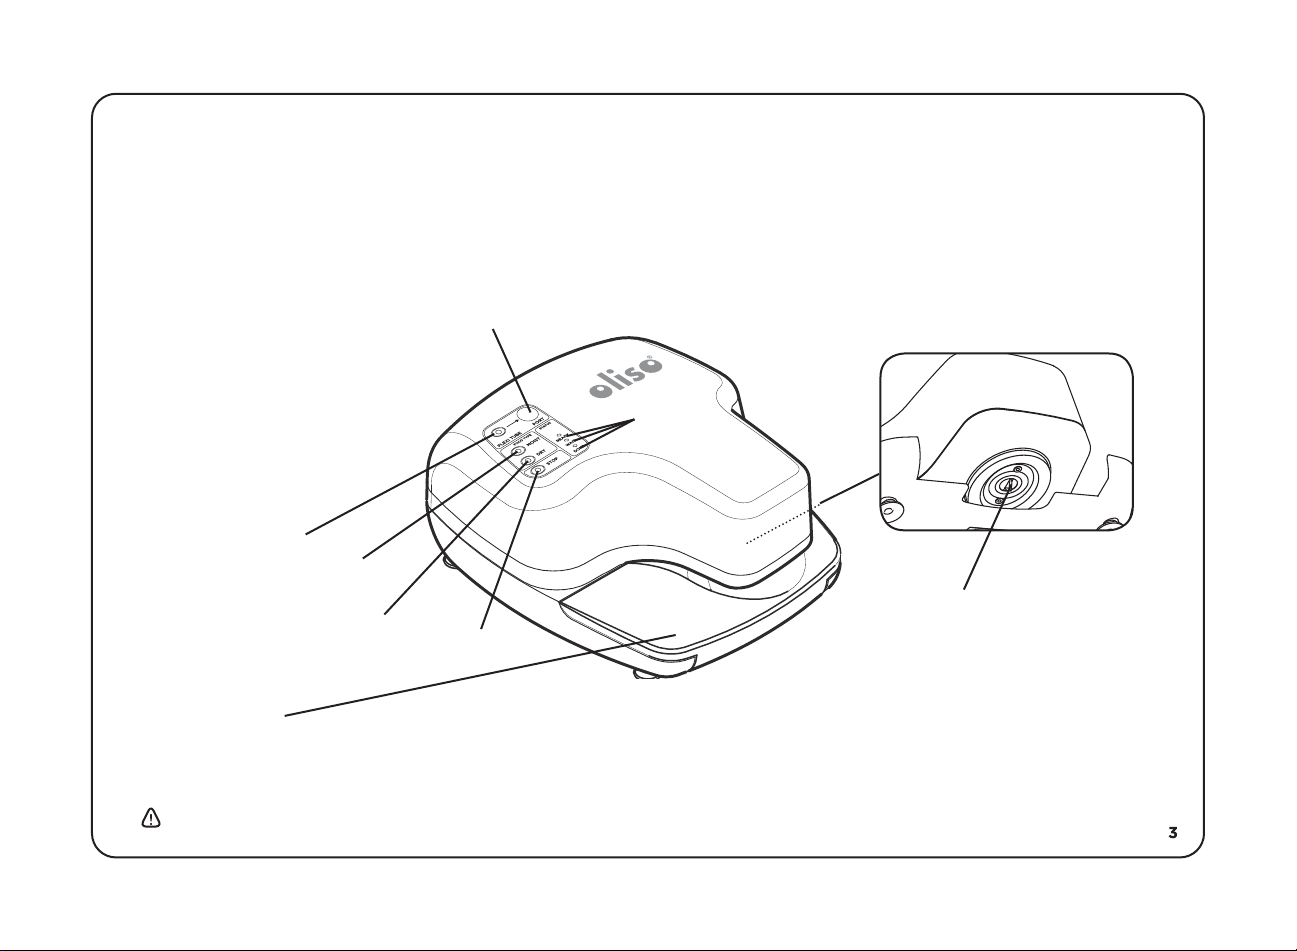
Introducing the Oliso® PRO™ Smart Vacuum Sealer
Flexi Tube Valve Port
This port should only be
used with accessories such
as canisters, bottleguards or
Mason jar attachments. If
you inadvertently plug in the
Flexi Tube and attempt to
vacuum seal a Vac-Snap®
bag, the FLEXI TUBE and
DONE lights will flash. You
must remove the Flexi Tube
before you can vacuum seal
a Vac-Snap® bag.
FLEXI TUBE
Button
Liquid Drip Tray
Your Oliso
vacuum sealing. This tray allows you to vacuum seal moist food such as beef, lamb and some types of fish. The tray and gasket
insert can be hand washed with warm, soapy water. Always empty and clean the tray between uses. Do not allow the drip tray
to overflow. Please refer to Page 10 of this manual for cleaning instructions.
CAUTION: Do not pull on the drip tray while the Oliso
Doing so will cause damage to the drip tray.
®
MOIST FOOD
Button
DRY FOOD
Button
PRO™ Smart Vacuum Sealer has a drip tray that catches liquids pulled and vacuumed out of the bag as you are
Flexi Tube
Valve Port
STOP VACUUM
Button
Indicator
Lights
®
PRO™ Smart Vacuum Sealer is operating.
DUAL SEAL Area
This area contains the cutting blade and
heat seal. We recommend wiping this
area with warm water and antibacterial
soap every time you clean the drip tray.
DUAL SEAL Area
Note: There is a sharp, concealed
cutting blade. Please use caution
when cleaning this area.
Page 5
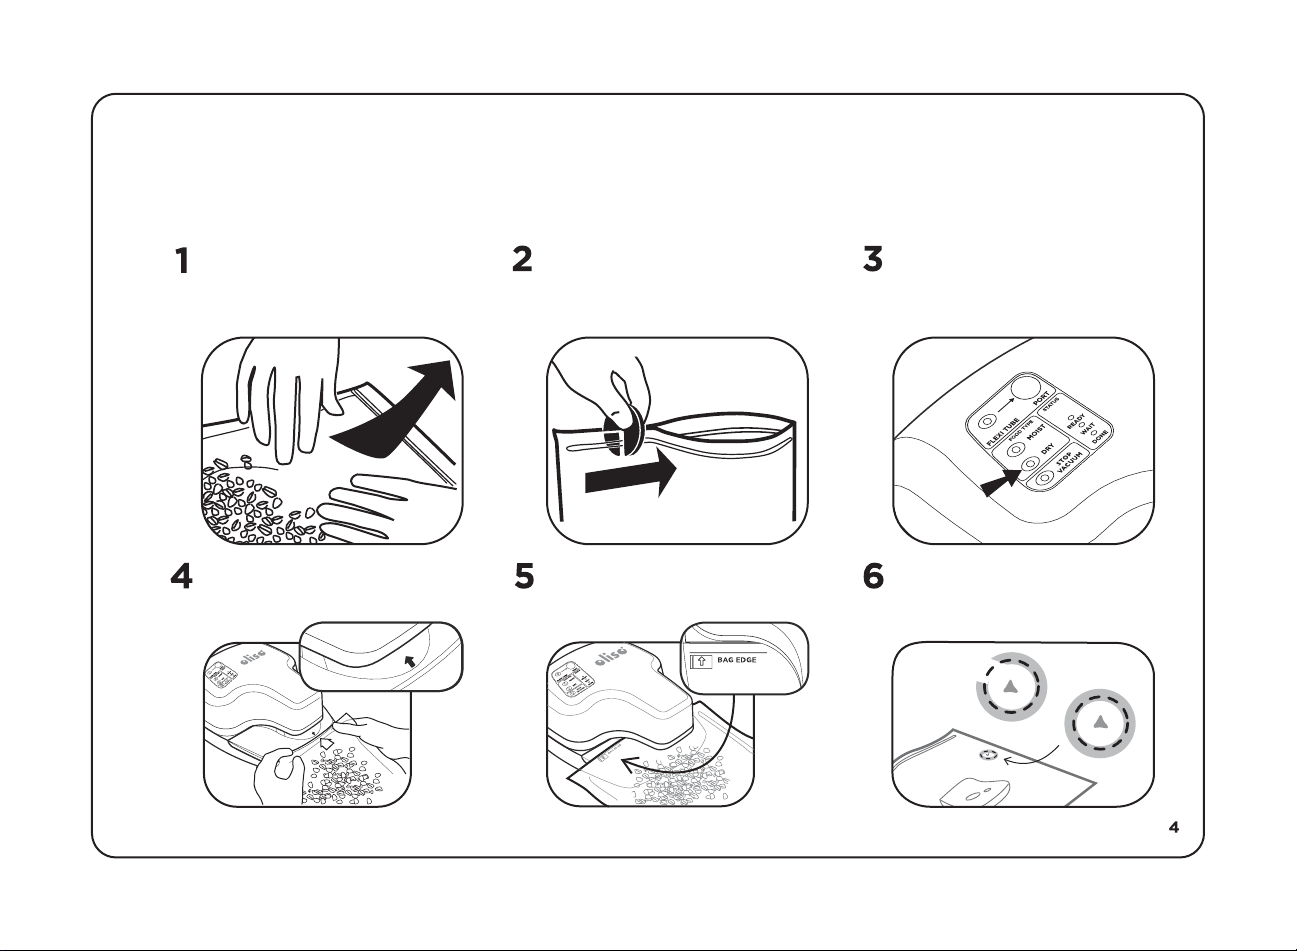
Simple Steps to Vacuum Sealing
INCOMPLETE SEAL
COMPLETE SEAL
AIR
Vac-Snap® bags work with Oliso® PRO™ Smart Vacuum Sealer products. They are specifically designed for vacuum sealing.
Zipper storage or freezer bags are not durable enough for this process.
Press out excess air before closing
bag. Shift food away from the edge
you wish to seal.
AIR OUT
Lay the bag flat, placing the
indicator circle directly over the
arrow on the drip tray.
Zip shut using your Zip Disc®. You can
only get a great vacuum if all the air is
out of the bag, so the zipper must be
perfectly sealed.
Slide bag forward until you reach the
“BAG EDGE” line on the drip tray.
Select MOIST or DRY setting. Note:
®
Smart Vacuum Sealer defaults
Oliso
to the DRY setting for quick vacuum
sealing.
®
When the Oliso
Sealer stops, you will hear two beeps
PRO™ Smart Vacuum
and see the DONE light illuminate.
Remove bag and check seal.
Page 6
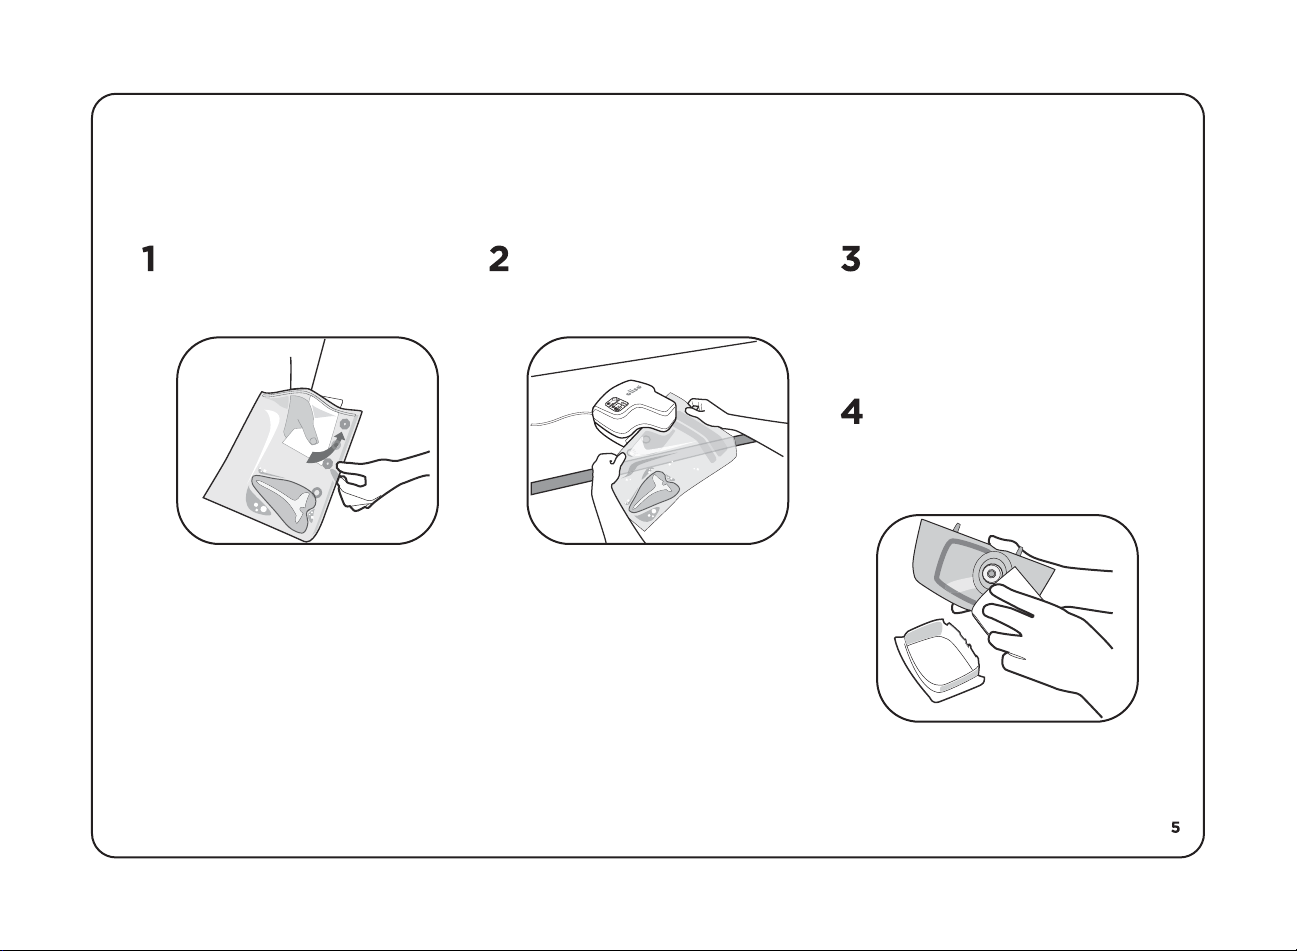
Vacuum Sealing on the MOIST Setting*
Below are tips and tricks to use when sealing items on the MOIST setting. Following directions will ensure an airtight seal and
minimize air bubbles inside the bag.
Seal area should be clean and
dry, with no liquids coating the
area meant for sealing.
Make sure to hold Vac-Snap®
bag in place until vacuum motor
starts.
Useful Tips
Package moist items on a flat surface to prevent vacuum pump damage and poor sealing.
If vacuum sealing moist items, it is best to empty drip tray afterwards to prevent overflow.
®
*NOTE: This feature applies to specific Oliso
PRO™ Smart Vacuum Sealer models.
For Sous Vide users especially:
To prevent air pockets, it is
highly recommended that users
hang the bag over counter edge
while vacuum sealing.
Check to make sure that heat
seal coil is clean. Residue on the
heating coil sometimes prevents
a complete seal.
Page 7
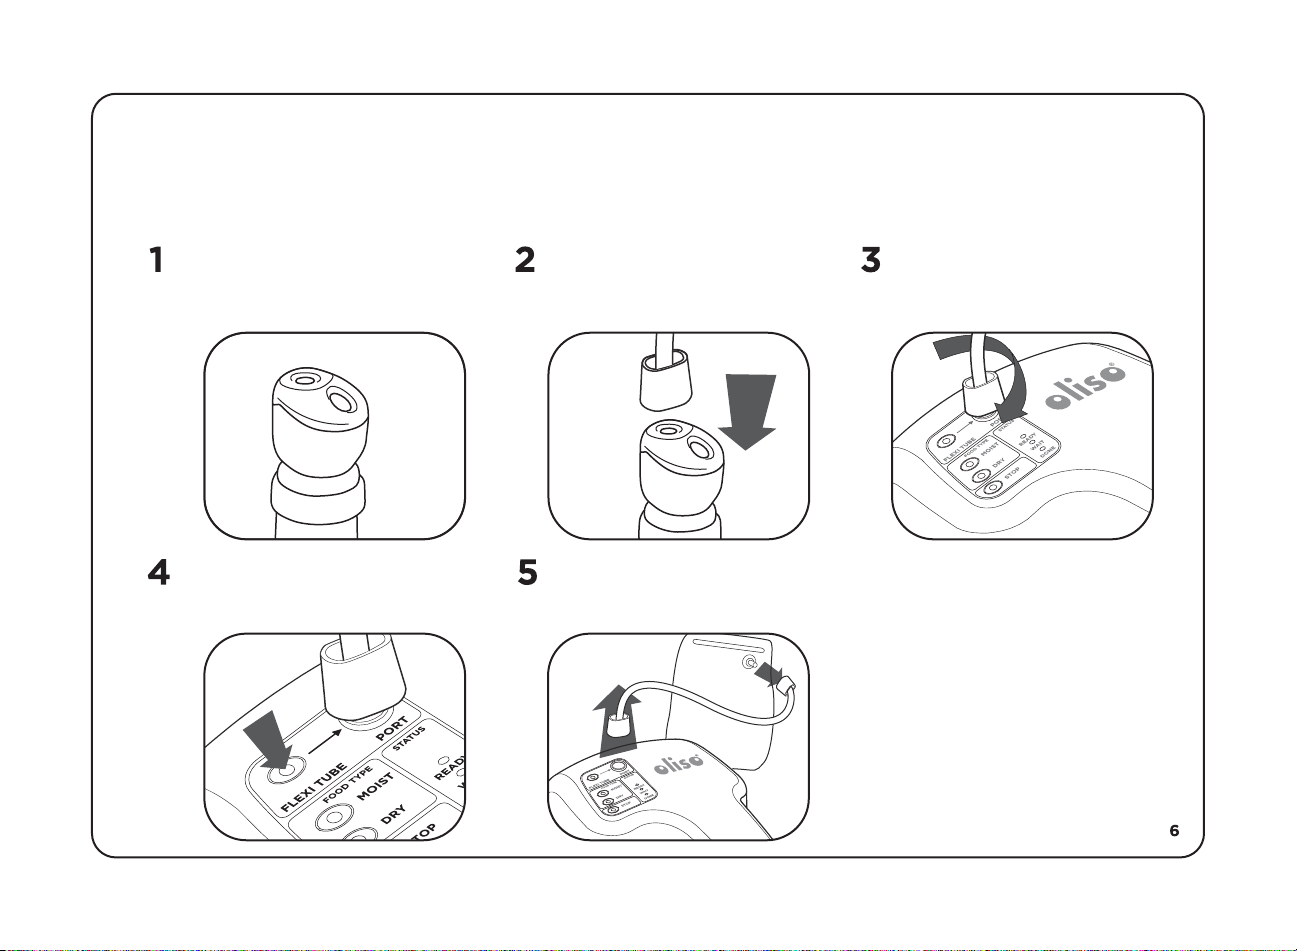
Vacuum Sealing with the Flexi Tube
This hose lets you vacuum seal a variety of Freshkeeper® accessories. Instructions for using a bottleguard are illustrated below.
See the instruction booklet included with your accessory for specific details on that attachment.
®
Insert Freshkeeper
bottleguard into
your bottle of wine or cooking oil.
Connect one end of the Flexi Tube to
the accessory valve port on the
bottleguard.
Connect other end to the FLEXI
TUBE valve port on the Oliso® PRO™
Smart Vacuum Sealer. Press firmly
while twisting slightly.
After the FLEXI TUBE light
illuminates, press the FLEXI TUBE
button to start the vacuum.
When the Oliso
®
PRO™ Smart
Vacuum Sealer stops you will hear
two beeps and see the DONE light
illuminate. Twist to disconnect hose.
NOTE: Keep the Flexi Tube
connected to the Oliso
®
PRO™
Smart Vacuum Sealer if you want
to continue using accessories.
You must disconnect the Flexi
Tube from the vacuum sealer
before using a Vac-Snap® bag.
Page 8
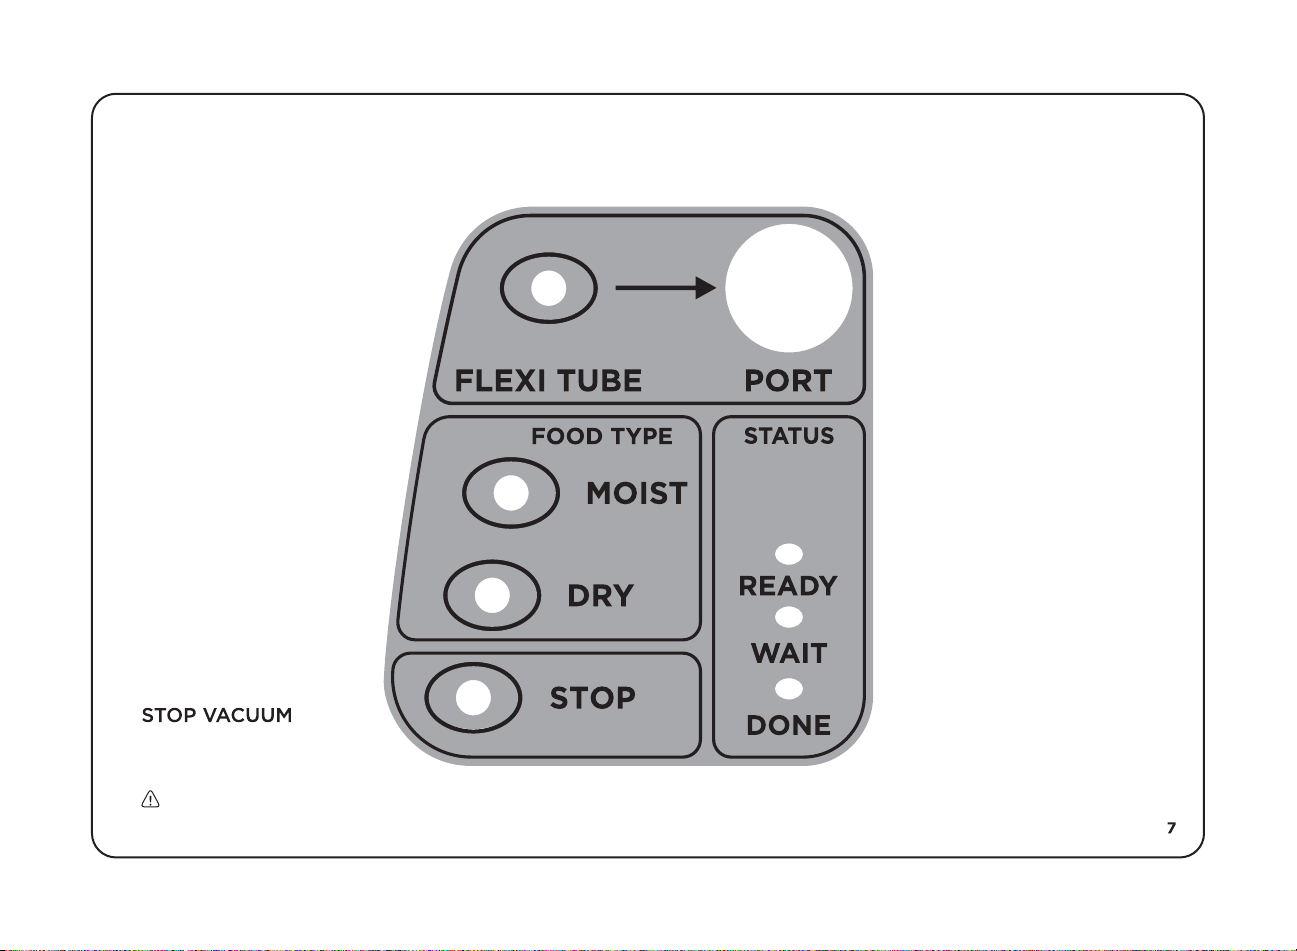
Control Panel
Flexi Tube Button Flexi Tube Valve Port
Press this button to start
the vacuum to the
attached accessory.
NOTE: The Flexi Tube must
be properly inserted in the
flexi tube port for this
button to be activated.
FOOD TYPE
Select MOIST or DRY
before inserting a
Vac-Snap® bag.
MOIST
This button provides a
longer seal time and is
suitable for vacuuming
meat and fish.
DRY
This button provides a
shorter seal time and is
suitable for dry goods.
Press this button to stop
the vacuum immediately.
Caution: Wait until the DONE light illuminates before removing the bag.
To connect the flexi tube,
press firmly while twisting
slightly.
STATUS
(Indicator Lights)
READY
Turns green when Oliso
PRO™ Smart Vacuum Sealer
is ready to use or is able to
be unplugged.
WAIT
Turns amber when Oliso
PRO™ Smart Vacuum Sealer
is operating. DO NOT unplug
the unit when light is
illuminated.
®
®
DONE
Turns red immediately after
®
Oliso
PRO™ Smart Vacuum
Sealer finishes a vacuum
cycle. Two short audible
beeps also let you know the
cycle is finished.
Page 9
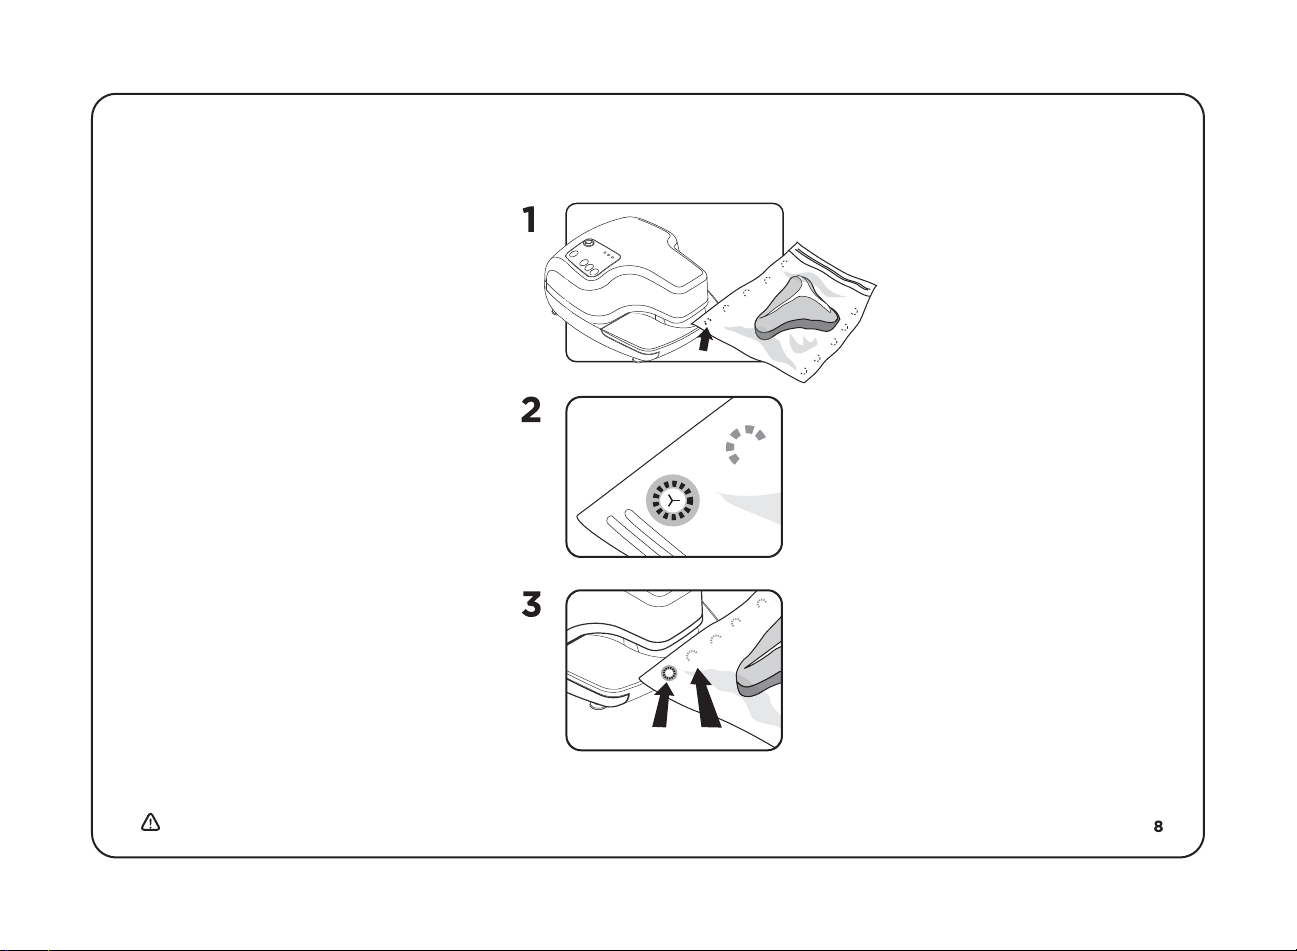
How to Reuse a Vac-Snap® Bag
Reusing a Vac-Snap® bag is one of the
great features of the Oliso® PRO™ Smart
Vacuum Sealer. Thoroughly wash the
inside of the bag between uses. Let the
bag air dry upside down. When the bag
is dry, you can reuse it. You can also
wash the bag in the top rack of your
dishwasher by opening the zipper and
placing it upside down on a cup spindle.
NOTE: when dish washing Vac-Snap
bags, the low heat cycle should be used.
®
THE BASICS
®
Vac-Snap
sizes. Each bag has a series of circles or
arrows that indicate the best sealing
locations along the perimeter of the
bag. Remember, never vacuum along
the zipper edge!
To begin, we recommend starting with a
circle at the bottom of the bag. The next
time you reseal the bag, use the next
closest circle. This will ensure that you
get the maximum volume out of the bag.
bags come in a variety of
USE AN ALIGNMENT
CIRCLE
The first time you use a bag, we
recommend starting with a circle
at the bottom of the bag.
Unused
LINE UP
After vacuum sealing, the bag
will be melted around the
alignment circle, creating an
airtight seal.
USE A NEW ALIGNMENT
CIRCLE
To vacuum seal a bag again, use
a different alignment circle.
Used Unused
Caution: Do not reuse indicator circles or overlap heat seals. Doing so will not allow the bag to be resealed.
Page 10
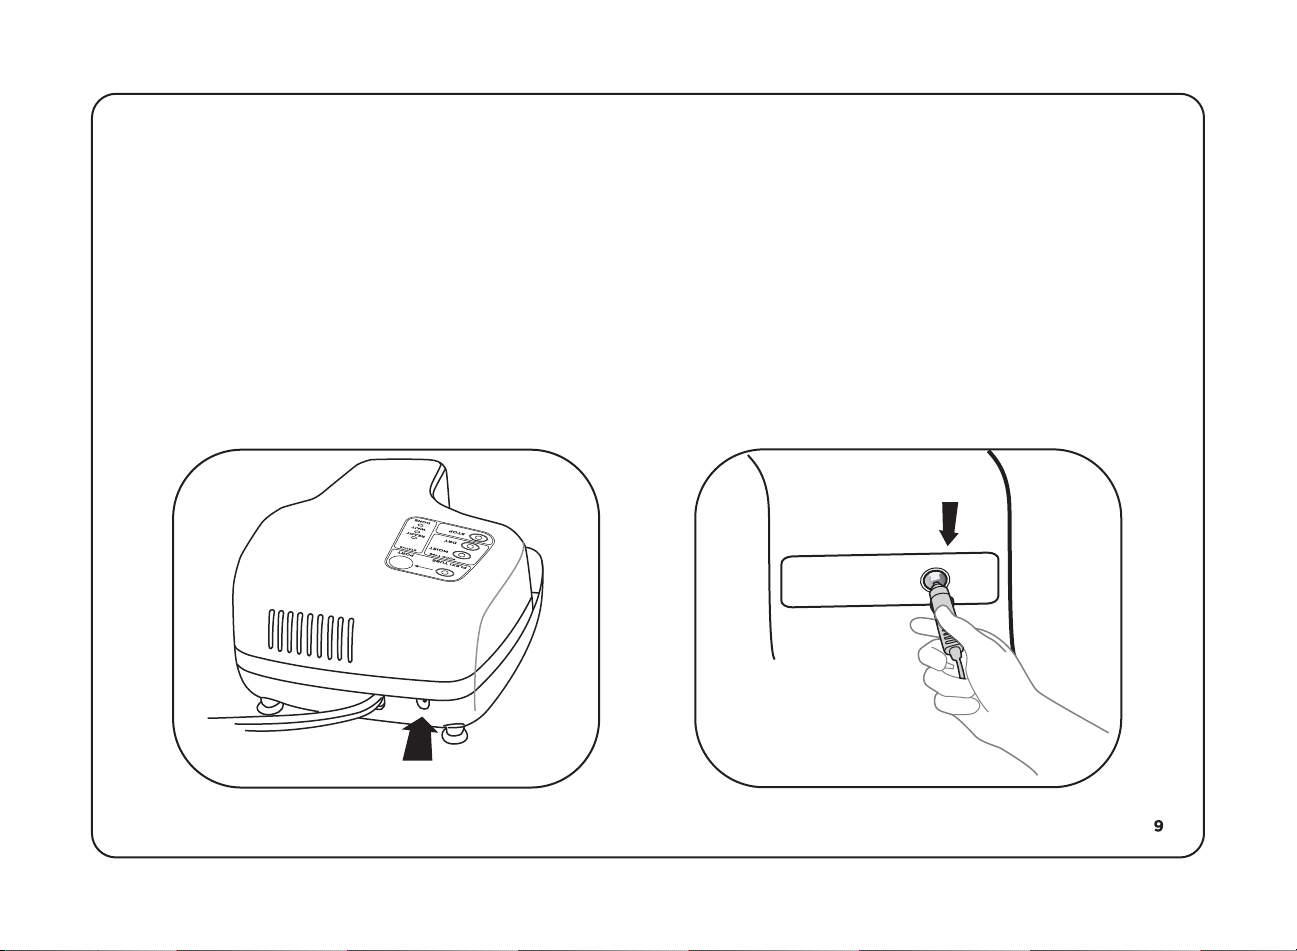
Using the 12 Volt DC Cord (VS97A Only)
Your Oliso® PRO™ VS97A Smart Vacuum Sealer comes with a 12 Volt DC cord for use in cars, RVs, trucks and boats. ONLY use
the 12 Volt DC cord that comes with your vacuum sealer.
Plug the 12 Volt DC cord into the Oliso
2.
Plug the 12 Volt DC cord into the DC power source in your vehicle. Make sure that your vehicle has a 10 amp rated fuse or
higher before use.
3. When using the 12 Volt DC cord, make sure that your vehicle’s engine is on and the lights, radio and air conditioner are off.
DC JACK
NOTE: Only use supplied 12 Volt DC Adapter (Oliso
®
PRO™ VS97A Smart Vacuum Sealer.1.
Insert DC adapter into
car power source
®
part number VSA201)
Page 11
Care and Maintenance
The Oliso® PRO™ Smart Vacuum Sealer is an electrical appliance. Never rinse or submerge the unit in water. Certain removable
plastic parts can be rinsed and washed with warm soapy water.
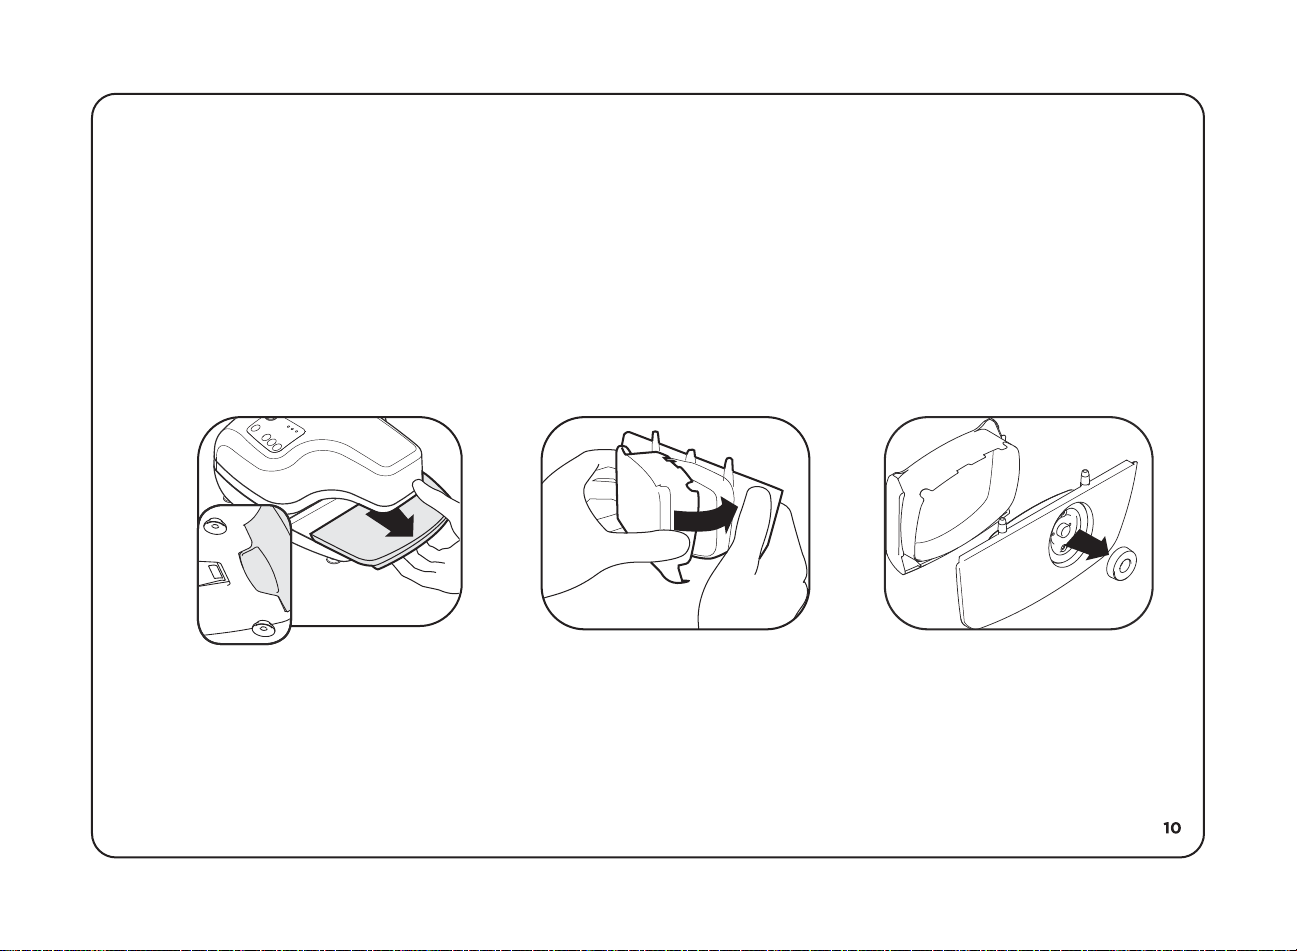
The drip tray catches liquid runoff and should be regularly cleaned after vacuum sealing MOIST food. It is removable and can
be washed with warm, soapy water or in the top rack of the dishwasher. The tray separates into two pieces for easy cleaning.
NOTE: There may be some resistance the first time you disassemble the drip tray.
Unplug the Oliso® PRO™ Smart
Vacuum Sealer. Use the finger
indentation to pull out the drip tray.
It is best to store the Flexi Tube hose in a loose knot (like a pretzel) to avoid pinching or deforming the hose. Remember this
hose is for use with use with canisters, bottle stoppers and Mason jar lid sealers. It is designed for a universal fit and works with
many brands of vacuum sealers.
Take caution not to vacuum any liquid into the Flexi Tube. If you see liquid in the tube, press STOP VACUUM immediately. Clean
the Flexi Tube promptly.
With the back of the drip tray facing
2 31
you, lightly grasp the bottom portion
(do not squeeze). Slowly but firmly lift
up the drip tray lid.
Remove the orange gasket. Do not
remove the black rubber ring. Wash
each piece with warm soapy water.
Dry completely before reassembling.
Storing Your Oliso
®
PRO™ Smart Vacuum Sealer
Always unplug the vacuum sealer when not in use. The Oliso® PRO™ Smart Vacuum Sealer is small enough to stay on your
counter. It can also be stored in a cabinet or drawer.
Page 12

Quick Shopping Guide
These are just some examples of things you can vacuum seal with your Oliso® PRO™ Smart Vacuum Sealer!
Meat & Fish* Firm Vegetables Non-Food Items
Beef*
Chicken (Pieces & Whole)*
Fresh Fish*
Kabobs*
Lamb Chops*
Pork Chops*
Asparagus
Avocado
Beets
Broccoli
Cabbage
Carrots
Celery
Corn of the Cob
Cucumber
Garlic
Iceberg Lettuce
Onions
Squash
Scallions
Zucchini
Potatoes (Cooked)
Camping/Boating Items
Important Documents
Jewelry
Keys
Newspaper Clippings
Photographs
Silver
Vacuum With Care**
Bagels
Bread
Donuts
Cookies
Flaky Cereals
Fresh Berries
Fresh Pasta
Grapes
Muffins
Deli Meats & Dairy Dry Goods Freeze Before Sealing Hard Fruits
Bologna
Cheese (Sliced & Whole)
Ham
Hard Butter
Hard Cheese
Roast Beef
Salami
Turkey
Chocolate Chips
Coffee Beans
Corn Tortillas
Granola
Trail Mix
Nuts
Pasta (Dry)
Raisins
Rice
Lentils
Beans
Ravioli (Dry & Fresh)
Spices
Wanton Skins
Cream Cheese
Juice
Milk
Pudding
Sauces
Soups
Yogurt
Apples (Cut & Uncut)
Cantaloupe/Melon
Papaya
Pear
Pineapple
Miscellaneous
Dog & Cat Treats
Leftovers
NOTE: When vacuum sealing shellfish, freeze before vacuum sealing.
**Stop vacuum early
Olives
Potato Chips
Pretzels
Soft Cheese
Soft Leaf Herbs
Soft Leaf
Lettuce
Spinach
*Blot dry
Page 13

Troubleshooting
Does it matter which side of the bag is facing up when I am vacuum sealing?
No, it does not matter. However, it might be helpful to insert the Vac-Snap® bag with the print side up so you can use the
indicator circles as guides.
What can I do to protect fragile food?
Par-freeze items in an unzipped Vac-Snap
and proceed to sealing. Alternatively, place fragile foods in a sturdy container that will fit inside a Vac-Snap® bag. Close the
container, place it into a Vac-Snap® bag, then seal.
Why is the bag insert area blocked?
If the Oliso® PRO™ Smart Vacuum Sealer was unplugged before the READY light was illuminated, the mechanism in the punch
and seal area may not have fully retracted. Reset the Oliso® PRO™ Smart Vacuum Sealer by unplugging, then replugging. Wait
5 seconds until the READY light is illuminated before proceeding.
®
What do I do if the Oliso
If the Oliso® PRO™ Smart Vacuum Sealer will not release the Vac-Snap® bag, unplug the vacuum sealer and try to remove the
Vac-Snap® bag. This should reset the machine. Wait 3 seconds before plugging the vacuum sealer in again.
PRO™ Smart Vacuum Sealer will not release the Vac-Snap® bag?
®
bag for 15-25 minutes. Check the food to ensure it is semi-solid. Zip the bag shut
Light Sequences
Lights Flashing Problem Solution
DONE
READY
WAIT
DONE
WAIT
Drip tray not inserted
properly
Miscellaneous error
Machine cooling
Replace or reinsert drip
tray
Unplug to reset machine
Wait until READY light
illuminates
Page 14

Quick Tips
Pressing the STOP VACUUM mid-cycle allows you to create a partial vacuum without crushing fragile foods.
®
Vac-Snap
par-frozen before vacuum sealing.
Look at the seal after you finish a cycle to ensure that it shows a uniform melt ring. If this is not the case, line
up the partial seal with the arrow on the drip tray. Slide the bag to the “bag line” and reseal.
bags are for MOIST and DRY goods. Wet items such as soup, marinades or sauces must be
Do not vacuum seal over the zipper edge as you will not be able to completely reseal the bag. Follow the
pre-printed indicator circles on the Vac-Snap
®
Vac-Snap
Always use the Zip-Disc
bags are one-time microwaveable and simmer safe. Do NOT boil Vac-Snap® bags.
®
to ensure that Vac-Snap® bags are securely closed.
To protect fragile foods like soft cheese or bread, you can pre-freeze the items in an unzipped Vac-Snap
®
bag as a guide for sealing. Do not seal over the zipper edge.
®
bag
for 15-25 minutes. When the food is semi-solid, zip the bag shut and proceed to sealing.
You can also protect fragile foods by placing the items in a sturdy container, then inserting it into the
Vac-Snap
®
bag. Proceed to sealing.
Visit Oliso.com for more innovative products & accessories.
Online user manual: www.oliso.com/manual/smartvacuumsealer
Page 15

VS95A
1yr.
Limited
Warranty
One (1) Year Limited Warranty
Oliso, Inc. warrants that for a period of one year from the date of the original purchase, this product will be free from defects in material or workmanship, when utilized for normal
household use. Oliso, Inc. will repair or replace this product or any component of the product found to be defective during the warranty period without charge to the customer. If
a replacement product is sent, it will carry the remaining warranty of the original product. Replacement will be made with new or remanufactured product or component. If the
product is not longer available, replacement may be made with similar product or equal or greater value. This is your exclusive warranty.
This warranty is valid for the original retail purchaser from the date of initial retail purchase and is not transferable. Keep the original sales receipt. Proof of purchase is required
to obtain warranty performance. Oliso, Inc. dealers or retail stores selling Oliso, Inc. products do not have the right to alter, modify or in any way change the terms and conditions
of this warranty.
The liability of Oliso, Inc. is limited solely to the cost of repair or replacement of the product at its option. This warranty does not cover normal wear of parts and does not apply
to any product that has been tampered with or used for commercial purposes. This warranty does not cover damage caused by misuse, abuse, use of improper voltage or current,
use contrary to operating instructions, negligent handling or damage due to faulty packaging or handling in transit. This warranty does not cover damage or defects caused by or
resulting from damages from shipping or repairs, service or alteration to the product or any of its parts, which have been performed by a repair person not authorized by Oliso,
Inc. Further, the warranty does not cover Acts of God such as fire, flood, hurricanes, and tornadoes.
This warranty is extended to the original purchaser of the product and excludes all other legal and/or conventional warranties. The responsibility of Oliso, Inc. is limited to the
specific obligations expressly assumed by it under the terms of the limited warranty. In no event shall Oliso, Inc. be liable for any incidental or consequential damages caused by
breach of any express, implied or statutory warranty or condition.
Except to the extent prohibited by law, any implied warranty or condition of merchantability or fitness for a particular purchase is limited in duration to the duration of the above
warranty. Oliso, Inc. disclaims all other warranties, conditions, or representations, expressed, implied, statutory or otherwise. In no event shall Oliso, Inc. be liable for any indirect,
special, incidental or consequential losses or damages (including but not limited to interruption of business or loss of business profit) resulting from the use of or inability to use
the product, any breach of contract, fundamental or otherwise, or for any claim brought against purchaser by any other party. Some states or jurisdictions do not allow the
exclusion or limitation of incidental or consequential damages or limitations on how long an implied warranty lasts, so the above limitations or exclusion may not apply to you.
If you have any questions regarding this warranty or would like to obtain warranty service, please e-mail Oliso, Inc. at [email protected], and a service center address
will be provided to you. If you have further questions, you may call 1.800.899.5157.
VS97A
3yr.
Limited
Warranty
Three (3) Year Limited Warranty
Oliso, Inc. warrants that for a period of three years from the date of the original purchase, this product will be free from defects in material or workmanship, when utilized for normal
household use. Oliso, Inc. will repair or replace this product or any component of the product found to be defective during the warranty period without charge to the customer. If
a replacement product is sent, it will carry the remaining warranty of the original product. Replacement will be made with new or remanufactured product or component. If the
product is not longer available, replacement may be made with similar product or equal or greater value. This is your exclusive warranty.
This warranty is valid for the original retail purchaser from the date of initial retail purchase and is not transferable. Keep the original sales receipt. Proof of purchase is required
to obtain warranty performance. Oliso, Inc. dealers or retail stores selling Oliso, Inc. products do not have the right to alter, modify or in any way change the terms and conditions
of this warranty.
The liability of Oliso, Inc. is limited solely to the cost of repair or replacement of the product at its option. This warranty does not cover normal wear of parts and does not apply
to any product that has been tampered with or used for commercial purposes. This warranty does not cover damage caused by misuse, abuse, use of improper voltage or current,
use contrary to operating instructions, negligent handling or damage due to faulty packaging or handling in transit. This warranty does not cover damage or defects caused by or
resulting from damages from shipping or repairs, service or alteration to the product or any of its parts, which have been performed by a repair person not authorized by Oliso,
Inc. Further, the warranty does not cover Acts of God such as fire, flood, hurricanes, and tornadoes.
This warranty is extended to the original purchaser of the product and excludes all other legal and/or conventional warranties. The responsibility of Oliso, Inc. is limited to the
specific obligations expressly assumed by it under the terms of the limited warranty. In no event shall Oliso, Inc. be liable for any incidental or consequential damages caused by
breach of any express, implied or statutory warranty or condition.
Except to the extent prohibited by law, any implied warranty or condition of merchantability or fitness for a particular purchase is limited in duration to the duration of the above
warranty. Oliso, Inc. disclaims all other warranties, conditions, or representations, expressed, implied, statutory or otherwise. In no event shall Oliso, Inc. be liable for any indirect,
special, incidental or consequential losses or damages (including but not limited to interruption of business or loss of business profit) resulting from the use of or inability to use
the product, any breach of contract, fundamental or otherwise, or for any claim brought against purchaser by any other party. Some states or jurisdictions do not allow the
exclusion or limitation of incidental or consequential damages or limitations on how long an implied warranty lasts, so the above limitations or exclusion may not apply to you.
If you have any questions regarding this warranty or would like to obtain warranty service, please e-mail Oliso, Inc. at [email protected], and a service center address
will be provided to you. If you have further questions, you may call 1.800.899.5157.
©2015 Oliso®, Inc. All rights reserved. Oliso®, Oliso® PRO™, ZIP-DISC®, FRESHKEEPER®, and VAC-SNAP® are registered
trademarks of Oliso
®
, Inc. U.S. Patent No. 7490452, 7805913. Patents Pending.
Printed in China. A <06/15> p/n 59001336
Page 16
reinvented for you™
Thank you for purchasing the Oliso
Receive an extra 3 months of warranty protection when you register your
product at www.oliso.com/support/registration/vacuumsealer
Visit Oliso.com for more innovative products.
®
PRO™ Smart Vacuum Sealer!
 Loading...