

Page 1

USER MANUAL
SAVE THESE INSTRUCTIONS
IH95A, IH75A
ST95A, ST75A
Page 2

Important Safety Instructions
Special Safety Instructions for Induction Cooking
Introducing the SmartHub
What kind of Cookware Can I use?
Control Panel
How to Use Touch Controls
Technical Information
Cooking Sous Vide
Simple Steps to Cooking Sous Vide
Introduction to Induction Cooking
Simple Steps to Induction Cooking
Quick Tips
Care and Maintenance
Troubleshooting the SmartHub
Troubleshooting Error Codes
Warranty
3.
7.
10.
15.
16.
17.
18.
19.
20.
25.
27.
28.
29.
30.
31.
32.
Contents:
Thank you for purchasing the Oliso®
SmartHub™. You are just a few steps away
from a whole new way of enjoying food.
For more information visit
www.oliso.com
Register your product online:
www.oliso.com/registration
Questions?
Contact Oliso SmartHub™ Customer Service
Call: 1.800.481.7978
Oce Hours: Mon-Fri 8:30am - 4:30pm PST
Email: [email protected]
1200 Harbour Way South, Suite 215
Richmond, CA 94804
Thank you!
Page 3

3
1. Before heating, fill the water bath with water to the fill line at minimum, and do not
allow water to rise above the maximum fill line. Once you fill the Precision Smart Top™
with water, you may test how high the water level will rise by placing the vacuum sealed
food contents you plan to cook with into the water bath.
2. Use the sous vide appliance only for its intended purpose.
3. To protect against the risk of electric shock, do not immerse the induction appliance,
plug or power cord in water or other liquids.
4. Never tug cord to disconnect from the outlet. Grasp plug and pull to disconnect.
Do not unplug the sous vide appliance when in use. Only unplug the appliance during
standby mode.
5. This appliance can be used by children aged from 8 years and above and persons
with reduced physical, sensory or mental capabilities or lack of experience and knowledge
if they have been given supervision or instruction concerning use of the appliance in a safe
way and understand the hazards involved.
6. Children shall not play with the appliance.
7. Cleaning and user maintenance shall not be made by children unless they are older
than 8 and supervised.
8. Keep the appliance and its cord out of reach of children less than 8 years.
9. Always unplug the appliance when not in use. Allow the appliance to cool before
putting on or taking o parts to clean.
10. Do not operate the appliance on an inclined, unstable, or metal surface.
11. Do not move or cover the appliance whilst in operation.
12. Use the appliance well away from walls and curtains, and do not use in confined
spaces.
13. Do not touch any metal surfaces on the appliance while it is in use as they will be hot.
IMPORTANT SAFEGUARDS
Read all instructions before using this product.
When using the SmartHub, basic safety precautions should always be observed, including the following:
SAVE THESE INSTRUCTIONS
Page 4

4
14. Use handles and oven mitts to move the appliance, the cooking pan and the lid when
hot.
15. Do not operate the appliance without liquid in the cooking pan.
16. Be careful when lifting and remove lid of water bath after cooking. Always tilt the lid
away from you as steam is hot and can result in serious burns. Never place face over the
water bath.
17. Do not use the Precision Smart Top™ for food storage or place in the freezer.
18. Do not use the appliance with an extension cord unless this cord has been checked
and tested by a qualified technician or service person.
19. Always use the appliance from a power outlet of the voltage (A.C. only) marked on
the appliance.
20. This appliance is not intended for use by persons (including children) with reduced
physical, sensory or mental capabilities, or lack of experience and knowledge, unless they
have been given supervision or instruction concerning use of the appliance by a person
responsible for their safety.
21. The temperature of accessible surfaces may be high when the appliance is operating.
22. Do not use the appliance for any purpose other than its intended use.
23. Do not place the appliance on or near a hot gas flame, electric element or on a heated
oven.
24. Do not place on top of any other appliance such as a refrigerator.
25. Do not let the power cord of the appliance hang over the edge of a table or bench
top or touch any hot surface. Keep appliance at a distance of at least 6 inches from the
edge of counter top.
Read all instructions before using this product.
When using the SmartHub, basic safety precautions should always be observed, including the following:
IMPORTANT SAFEGUARDS
SAVE THESE INSTRUCTIONS
Page 5

5
26. Do not operate the appliance with a damaged cord or after the appliance has
been damaged in any manner. If damage is suspected, return the appliance to Salter for
examination, repair or adjustment.
27. This appliance is not intended to be operated by means of an external timer or
separate remote control system.
28. This is a high wattage appliance — 2000W at 220VAC to 240VAC, 50-60 Hz. To
avoid a circuit overload, do not operate another high wattage appliance such as a vacuum
sealer or microwave on the same circuit.
29. Never direct fill the appliance from a water tap while the appliance is plugged into a
power source.
30. Avoid placing any objects on or near the keypads in order to prevent accidental
activation of the cooktop controls.
31. Clean the appliance regularly to keep all parts free of grease that could catch fire.
32. Never attempt to dissemble and repair the appliance yourself!
33. This appliance is intended to be used in household and similar applications such as:
34. Sta kitchen areas in shops, oces and other working environments;
35. Farm houses;
36. By clients in hotels, motels and other residential type environments;
37. Bed and breakfast type environments.
38. Only use fresh food, it should be sealed in an airtight plastic bag (Polyethylene or
Polyamide material).
39. Time and temperature are critical in the cooking process because some bacteria can
grow in food in the absence of oxygen and produce toxin. Closely follow the recipes
carefully.
Read all instructions before using this product.
When using the SmartHub, basic safety precautions should always be observed, including the following:
IMPORTANT SAFEGUARDS
SAVE THESE INSTRUCTIONS
Page 6
6
Read all instructions before using this product.
When using the SmartHub, basic safety precautions should always be observed, including the following:
40. If the food will not be consumed within 4 hours, it is beneficial to cook until the food
is pasteurized.
41. Do not misuse product otherwise potential injury may occur.
42. The glass cooking surface is subject to residual heat after use, please use caution.
IMPORTANT SAFEGUARDS
SAVE THESE INSTRUCTIONS
This marking indicates that this product should not be disposed with other household
wastes throughout the EU. To prevent possible harm to the environment or human health
from uncontrolled waste disposal, recycle it responsibly to promote the sustainable
reuse of material resources. To return your used device, please use the return and
collection systems or contact the retailer where the product was purchased. They can
take this product for environmental safe recycling.
Correct Disposal of This Product
Page 7

7
1. Use flat bottomed pans with a bottom in diameter of at least 9cm, and no greater than
24cm. The pan must be large enough for the safety sensor to activate the heating element.
The cooktop will not start if a very small steel or iron utensil (less than the minimum size
across the bottom) is placed on the cooking surface when the unit is turned on—items
such as steel spatulas, cooking spoons, knives, and other small utensils. The pan detection
sensors will not allow the aected Cooking Element to operate without a pan present.
2. Metallic objects such as knives, forks, spoons and lids should not be placed on the
hotplate since they can get hot.
3. If the surface is cracked, switch o the appliance to avoid the possibility of electric
shock.
4. Cookware handles should be turned inward and should not extend over adjacent
cooking elements to reduce the risk of burns, ignition of flammable materials and spillage
due to unintentional contact with the utensil. Wear protective gloves or mitts when
handling a pan handle as it may be hot and burn skin.
5. Always check to see if a magnet will attract to your own cookware before attempting
to use them on the induction hob.
6. Be aware that induction cooktops heat much more rapidly than conventional methods.
7. Never leave food on the cooking elements unattended. Boil overs cause smoking
and greasy spillovers that may ignite, or a pan that has boiled dry may melt or become
damaged.
SPECIAL SAFETY INSTRUCTIONS FOR
INDUCTION COOKING
Read all instructions before using this product.
When using the SmartHub, basic safety precautions should always be observed, including the following:
SAVE THESE INSTRUCTIONS
FOR HOUSEHOLD USE ONLY
Page 8

8
8. Protective liners: Do not use aluminium foil to line any part of the cooktop. Any use of
aluminium foil could result in the risk of electric shock, fire or short circuit.
9. Keep your cookware centered onto the induction cook top at all times.
10. Do not move the induction cooktop during cooking or with hot cookware on top of
it. Do not place any metal objects on the induction cooktop (other than the cookware you
intend to cook in).
11. Do not heat up any unopened cans of food on the induction cooktop. A heated can of
food could explode. Only cook or heat food in induction compatible cookware.
12. Although the surface of the induction cooktop remains cool to the touch because
heat is transferred directly to the pot or pan, please note that the residual heat from the
cookware will eventually warm up the glass cooking surface, especially the area directly
underneath the pot or pan. Be careful when handling the cooktop after use and let it cool
down before storing.
13. Persons with a pacemaker or similar medical device should exercise caution using or
standing near an induction unit while it is in operation, as the electromagnetic field may
aect the working of the pacemaker or similar medical device. We advise consulting your
doctor or the pacemaker or similar medical device manufacturer about your particular
situation.
14. Do not place any magnetized objects like credit cards, cassettes etc. on the glass
surface while the induction cooktop is in operation. The magnetic properties of the unit
can damage these items.
SPECIAL SAFETY INSTRUCTIONS FOR
INDUCTION COOKING
Read all instructions before using this product.
When using the SmartHub, basic safety precautions should always be observed, including the following:
SAVE THESE INSTRUCTIONS
FOR HOUSEHOLD USE ONLY
Page 9

9
15. In order to avoid overheating, do not place any aluminium foil or metal plates on the
cooking surface.
16. Attention: Do not insert any objects like wires or tools into the ventilation slots. This
may cause electric shock.
17. Never use the induction cooktop when it is not functioning properly, shows signs of
damage or if it has been dropped.
18. Do not submerge the induction cooktop in water or other liquids and do not wash it
in the dishwasher.
SPECIAL SAFETY INSTRUCTIONS FOR
INDUCTION COOKING
Read all instructions before using this product.
When using the SmartHub, basic safety precautions should always be observed, including the following:
SAVE THESE INSTRUCTIONS
FOR HOUSEHOLD USE ONLY
Page 10
10
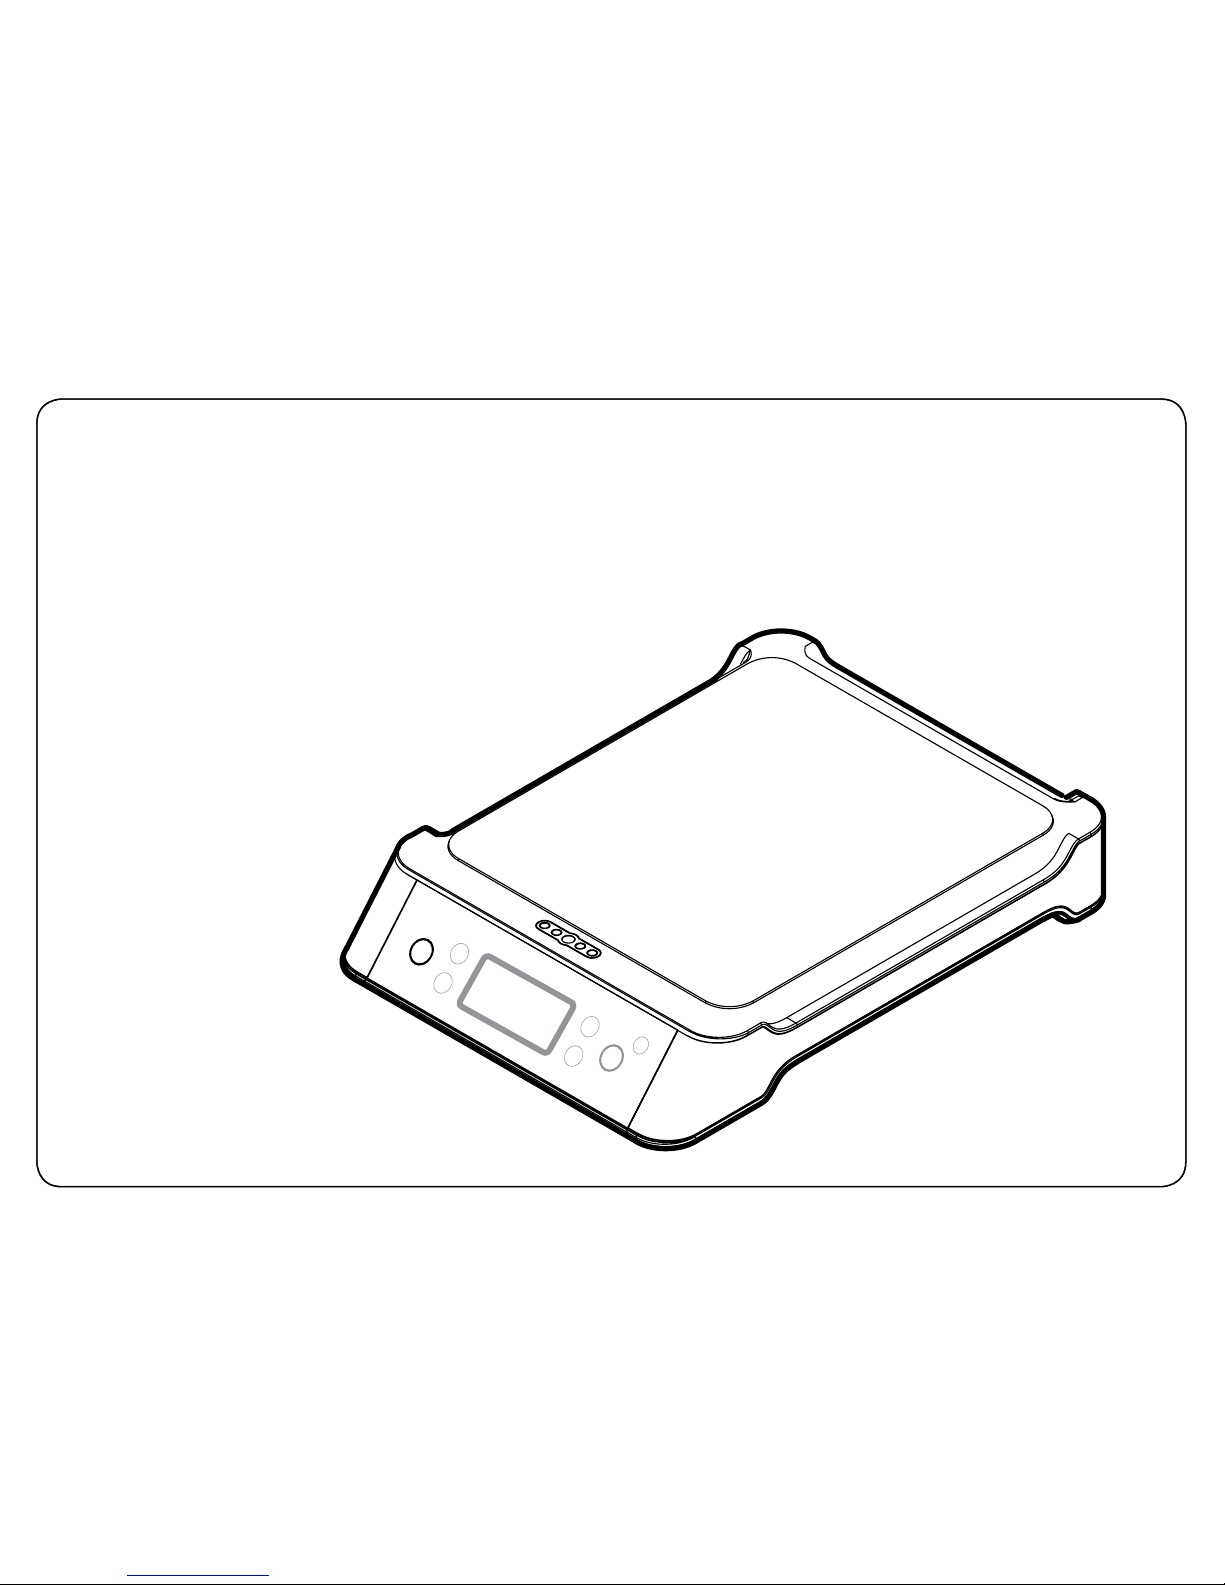
Introducing the Oliso® Induction SmartHub™
The Oliso® SmartHub™ teams with the Precision Smart Top™ to rapidly reach a precise temperature, and
continue to maintain that temperature with minimal energy consumption. Additionally, the Precision
Smart Top™ may be removed, providing you with a cooktop for searing and other use.
models IH95A, IH75A
Page 11
11
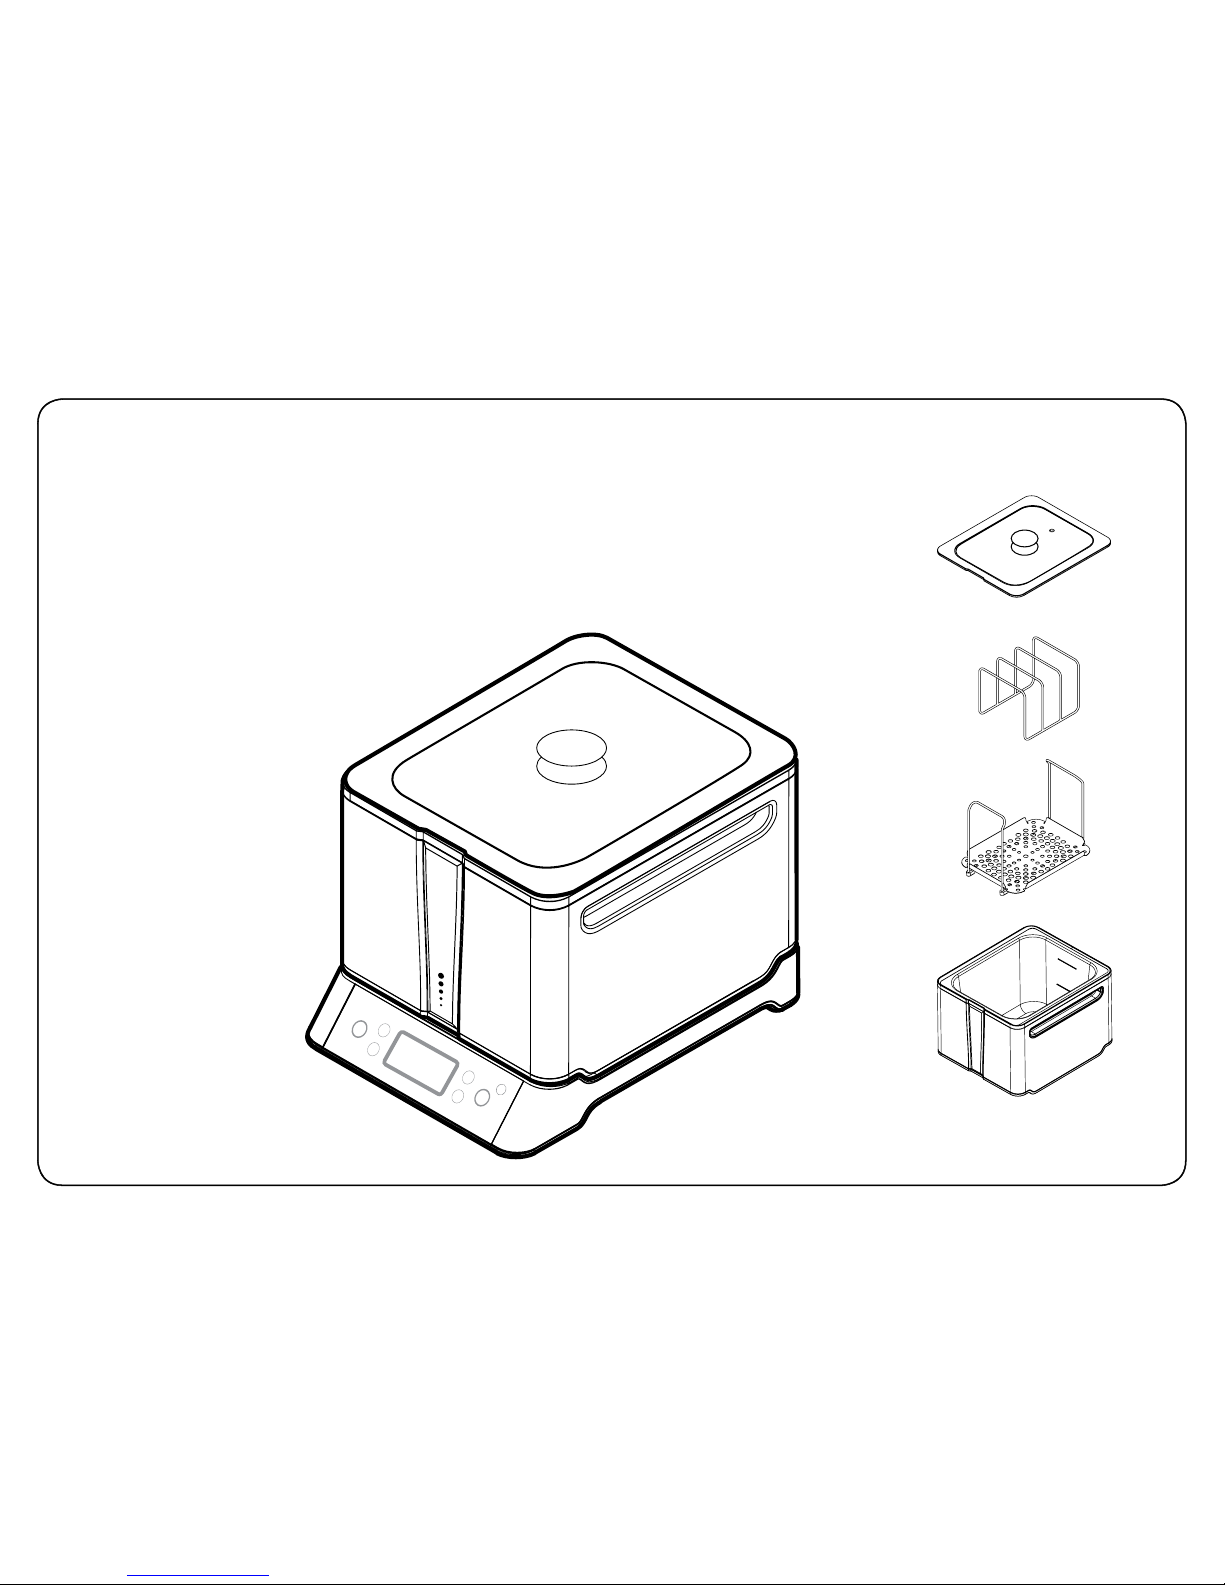
Precision Smart Top™
The Precision Smart Top™ is a removable water bath used for cooking sous vide.
After placing the Precision Smart Top™ onto the induction base, the SmartHub™
will automatically enter sous vide mode when powered on.
m
ax
fill
models ST95A, ST75A
Page 12
12
m
ax
fill
1.
3.
2.
4.
5.
7.
6.
9.
10.
8.
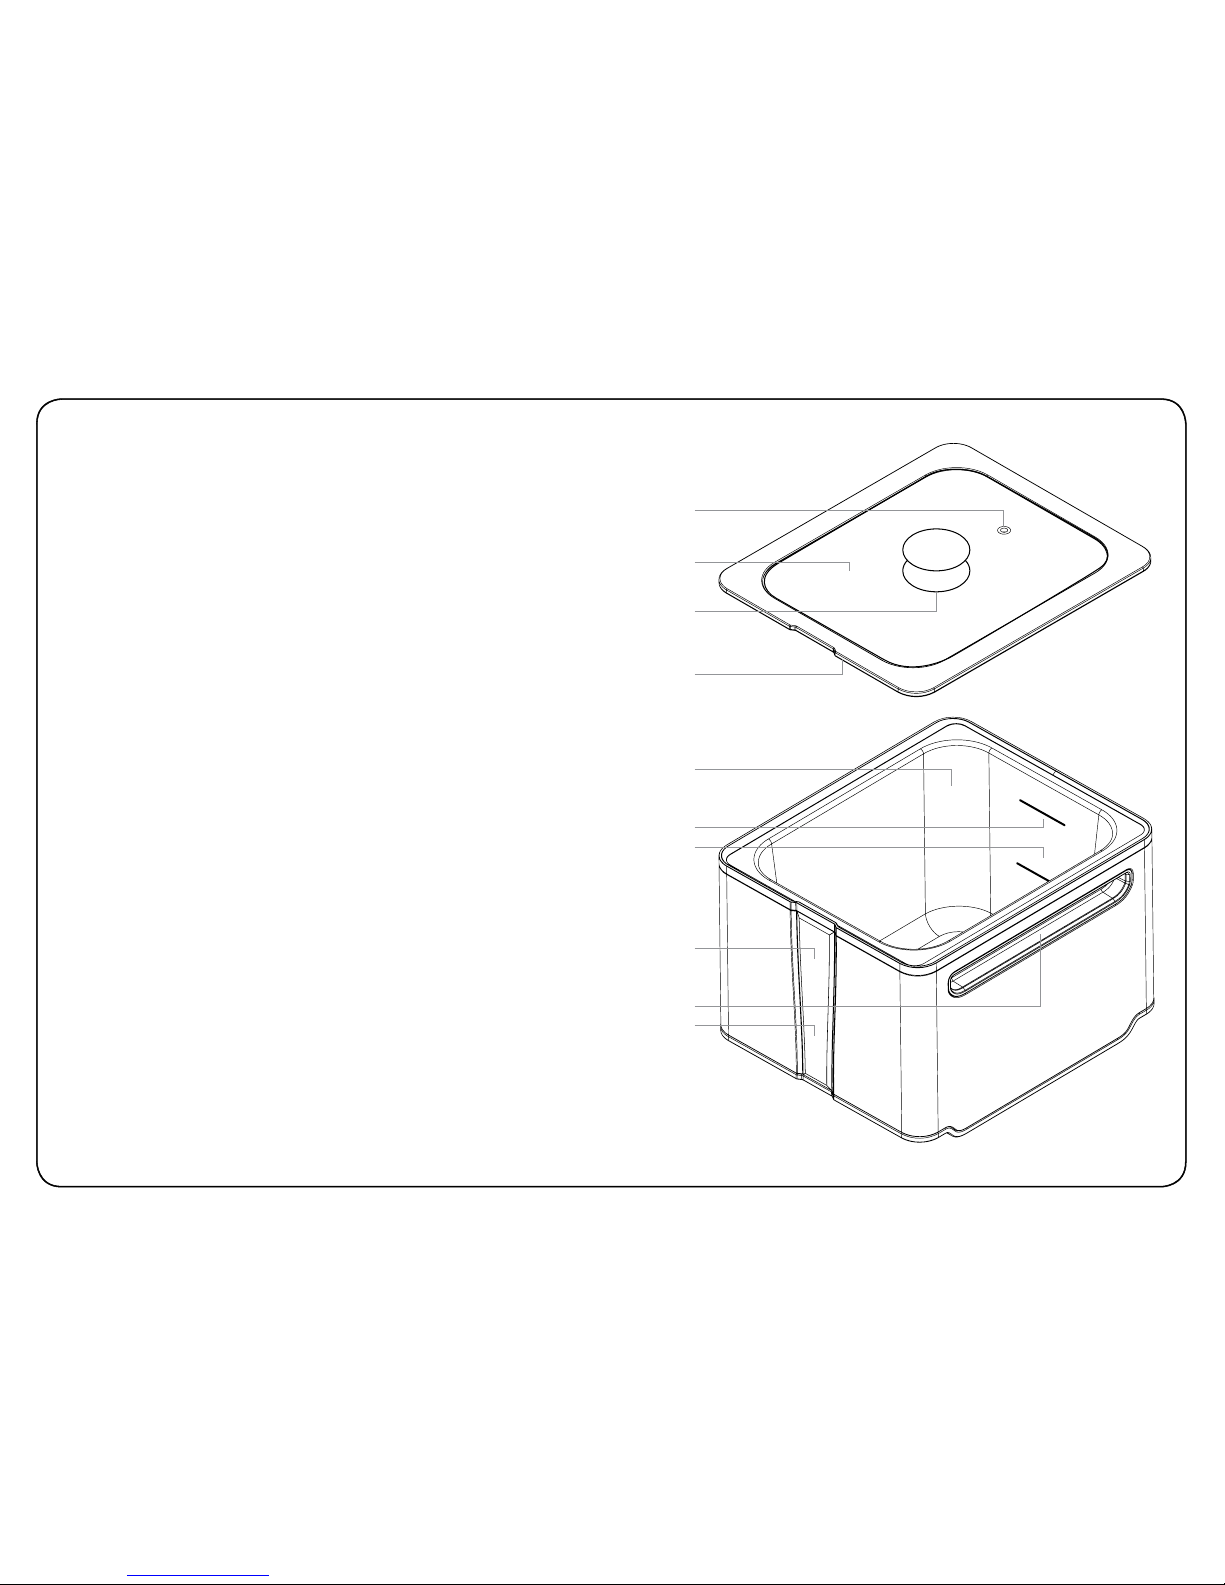
Using the Precision Smart Top™
Lid
The glass lid allows you to easily monitor food contents without
interrupting the cooking process.
DETAILS:
• Soft touch knob: Stays cool to the touch.
• Glass viewing window
• Silicone rim: Has a rib on the underside to capture condensation as
you lift the lid.
• Steam vent
Water Bath
The removable water bath is used for sous vide cooking. When the
water bath is placed onto the SmartHub™, the viewing screen will
automatically enter sous vide mode.
DETAILS:
• Stainless Steel Water bath: Max capacity of approximately 10L when
filled to the max line with food and water.
• Fill line: fill initially to this line
• Max fill line: water to not exceed this line
• Temperature Module: Transfers temperature information from the
water bath to the induction Hob to regulate a precise temperature.
• LED indicator light: This feature helps to inform you when the bath
temperature has reached the set value. The light turns green to indicate
that your set temperature has been reached. Food may then be placed
into the water bath.
• Extended side handles: Extra wide handles oer better handling
and facilitates the pouring of water for either left or right handed users.
Water Bath:
Lid:
*CAUTION: Do not start heating without water in the water bath.
Page 13
13
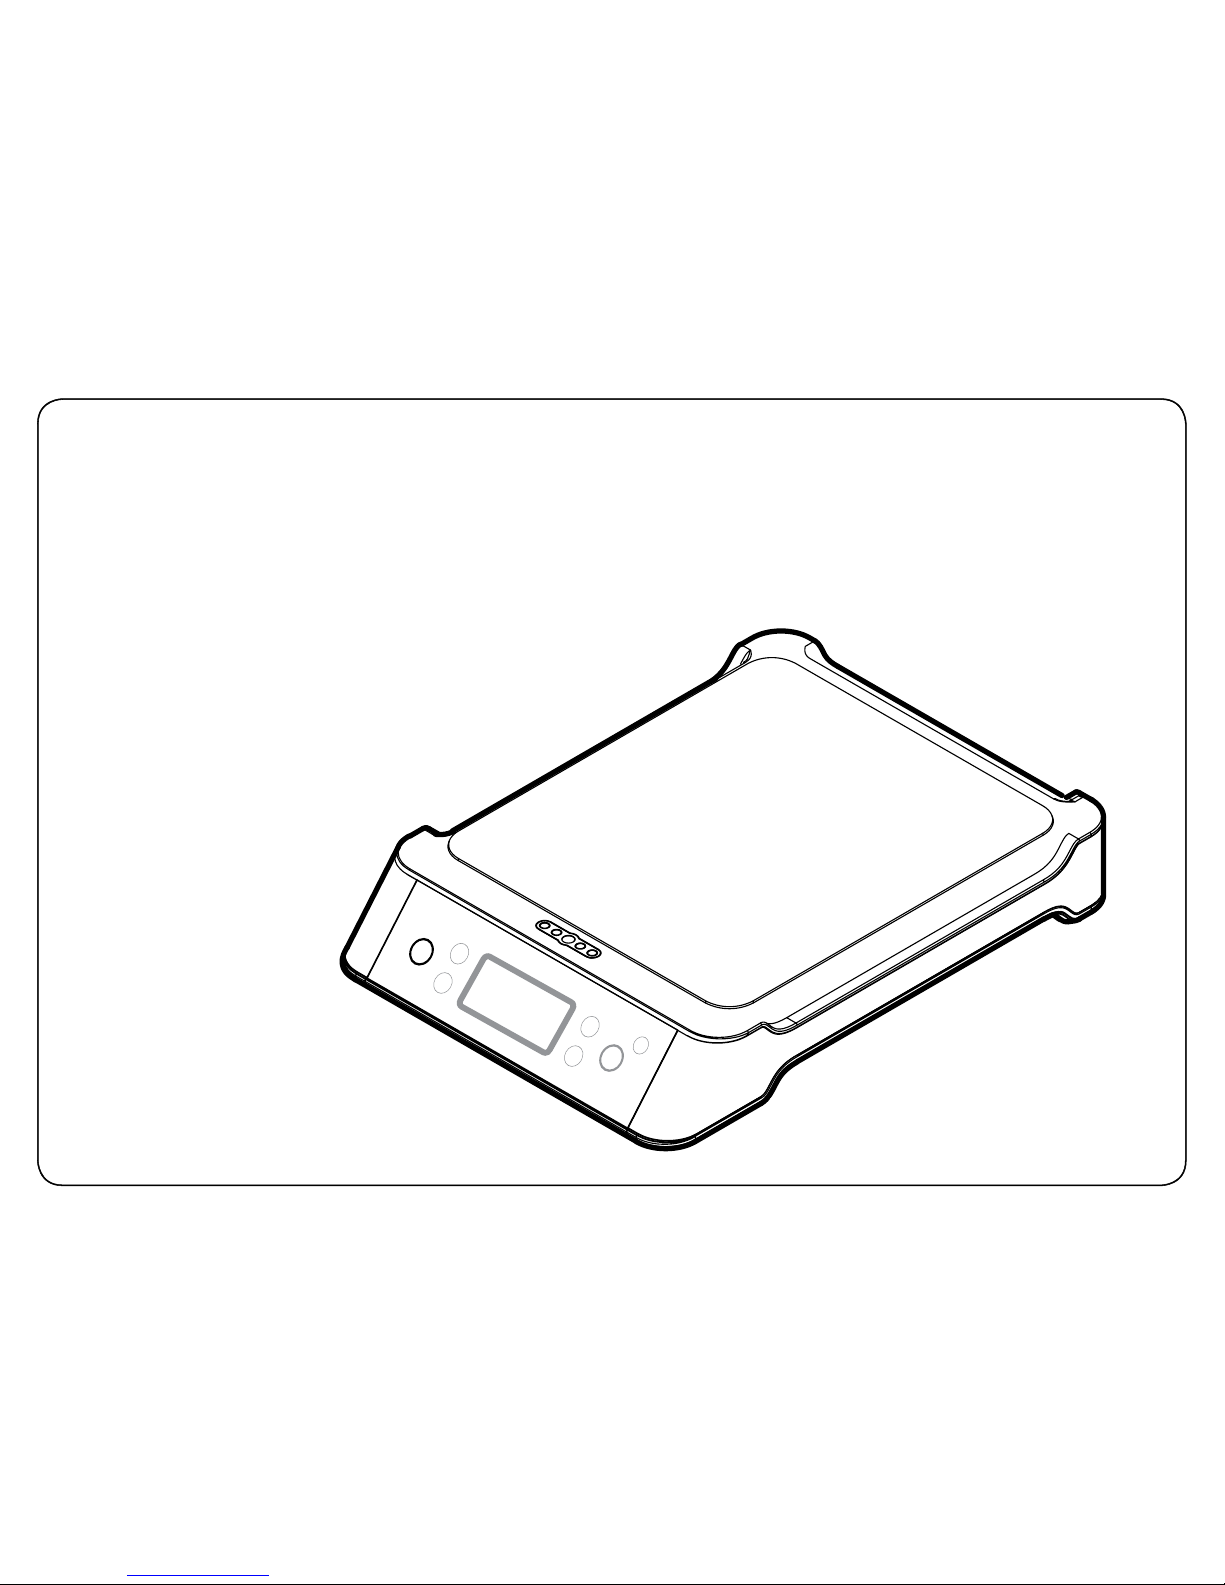
Induction Base:
Induction Base
Used for regular induction cooktop use. The SmartHub™'s Induction Base rapidly heats pans to quickly
achieve searing temperatures.
models IH95A, IH75A
DETAILS:
• Glass cooking plate: Induction ready pans may be used when
placed centrally on this glass plate.
• LED indicator light: Glows red to indicate when the induction
heating coil is active.
• Touch control panel: Contains all necessary buttons and LCD
display. (Detailed instructions on pages 16-17, 24, 26.)
Page 14
14
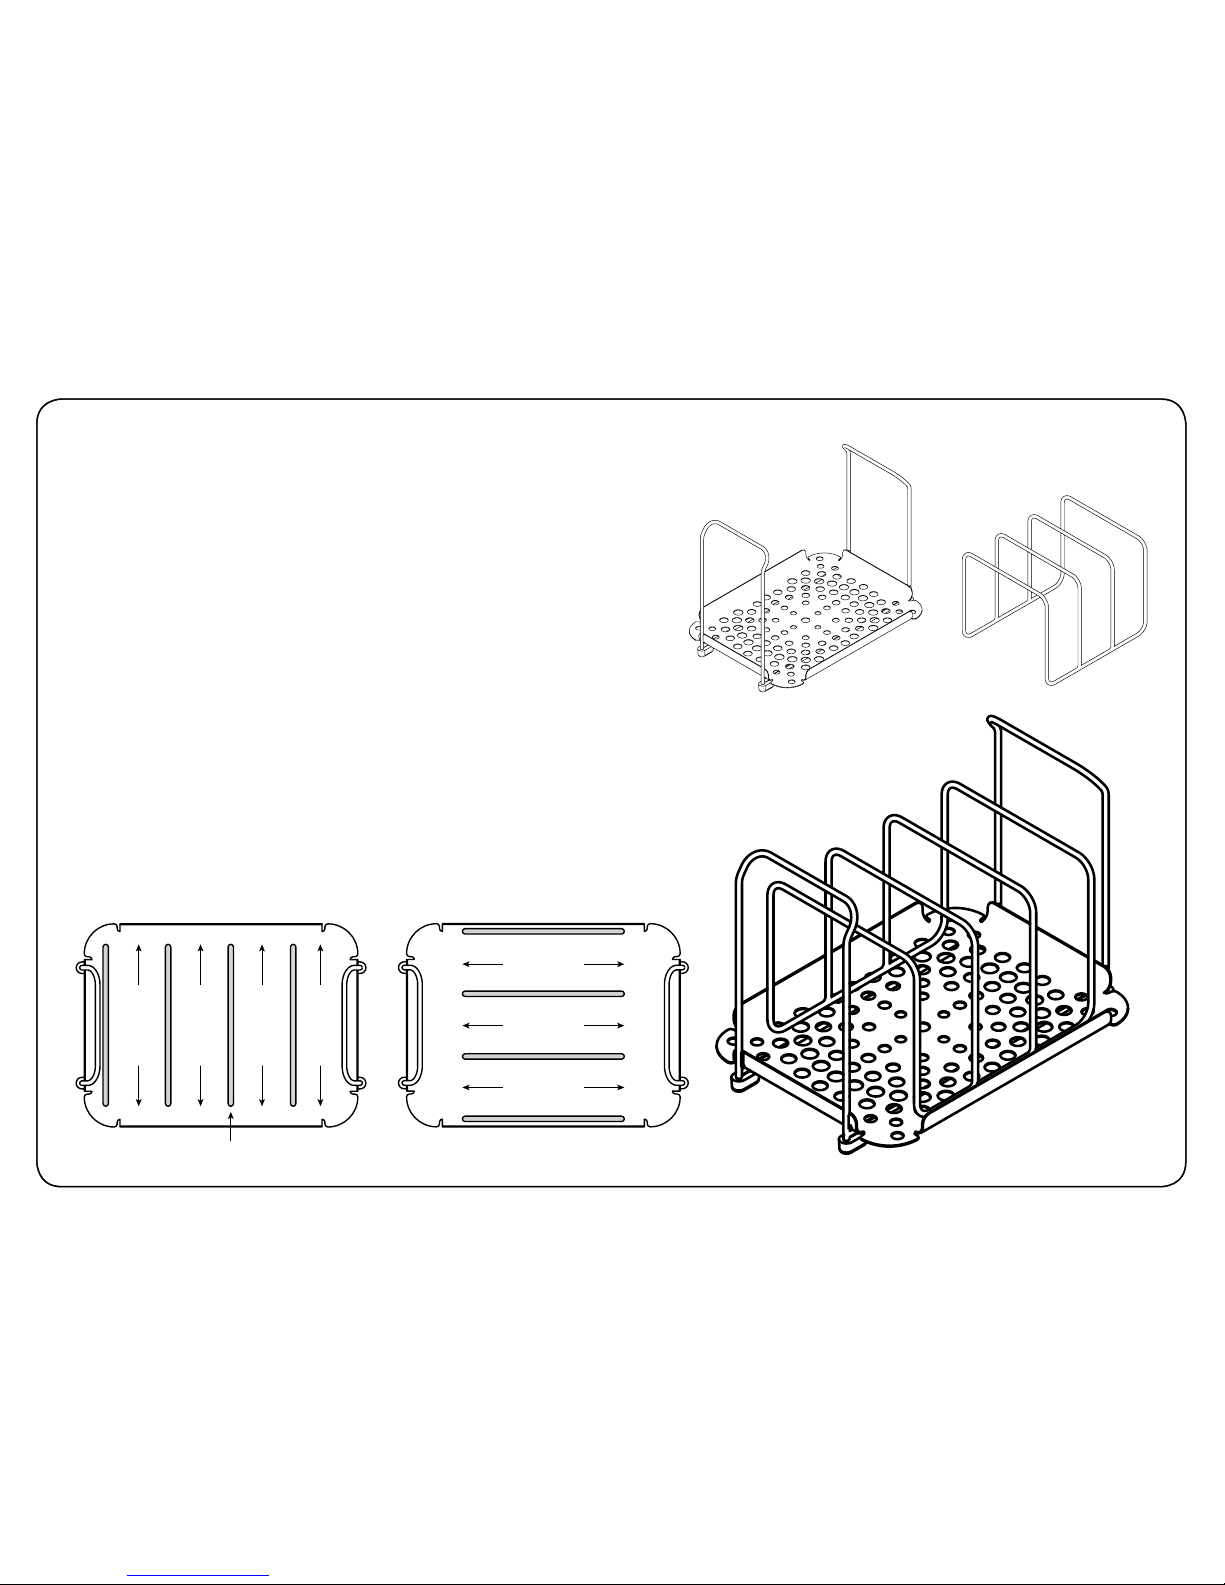
Using the Perforated Spacer Plate
and Slotted Food Rack
Perforated Spacer Plate:
With induction cooking, the bottom of the pan will heat rapidly. The
spacer plate helps ensure food is cooked evenly, by spacing the bags
away from the hotter bottom surface, and allowing the water to evenly
disperse through the perforations. It also has two handles for easy
removal, and silicone feet to protect the metal finish of the water bath.
Slotted Food Rack:
The slotted food rack sits atop the spacer plate, and organizes your
sous vide pouches within the water bath. The rack may be oriented in
dierent positions to accommodate longer or thicker pouches.
Food in sealed Vac-Snap® bags should be placed in the racks allowing
space between each of the bag and so that all sides of the bag are
in contact with the water. Avoid overcrowding of the bath which will
prevent contact with the water and limit the ability for the heat to
transfer during cooking. For larger items remove the rack.
Perforated Spacer Plate: Slotted Food Rack:
Vac Snap
®
bag
Vac Snap
®
bag
Vac Snap
®
bag
Vac Snap
®
bag
Vac Snap® bag
Vac Snap® bag
Vac Snap® bag
4 sections for Vac Snap® Bags t o be placed vertically 3 sections for longer food items
rack divisions
Bird’s Eye View
Page 15

15
How Does Induction Work?
Induction technology uses magnetic coils to directly heat your pots and pans. When active, the coils create a magnetic field that
will heat the metal of the cooking vessel itself.
What are the Benefits of Cooking With an Induction Cooktop?
• Fast: Digital controls make this technology fast and precise. Raising temperature control is immediate, and predictable. Because
of this, the Oliso® SmartHub™ will reach the set temperature in half the time it takes competing units, and maintain that temperature
precisely.
• Energy Ecient: Because energy is focused on heating the pan itself, there is little wasted energy.
• Even heat distribution: The extra thick conductive layer on the underside of the pan helps to evenly disperse the rapid heat. As
heat is produced on the bottom of the water bath, natural convection currents cause the hot water to rise and create an even bath
temperature.
• Easy cleanup: Smooth glass surfaces make spills easy to clean.
What Type of Cookware Can I Use on Induction?
The simple step to determine if your pan is suitable for induction cooking is to use a common refrigerator magnet, and see if it sticks
to the bottom of your pan. Induction technology uses magnetic principles to detect and heat the pan, so suitable cookware must
be ferrous (iron based or magnetic).
*Additional note: Bottom of cookware must be flat and be at least 9cm in diameter to be properly detected.
Warped cookware will not heat evenly.
Non-induction compatible:
• Copper
• Glass
• Aluminum
• Ceramic
Compatible:
• Stainless steel with a magnetic base
• Cast Iron
• Enameled iron and steel
look for the induction ready
symbol on your cookware
*If a magnet will
stick to your cookware,
it should be compatible!
Page 16
16
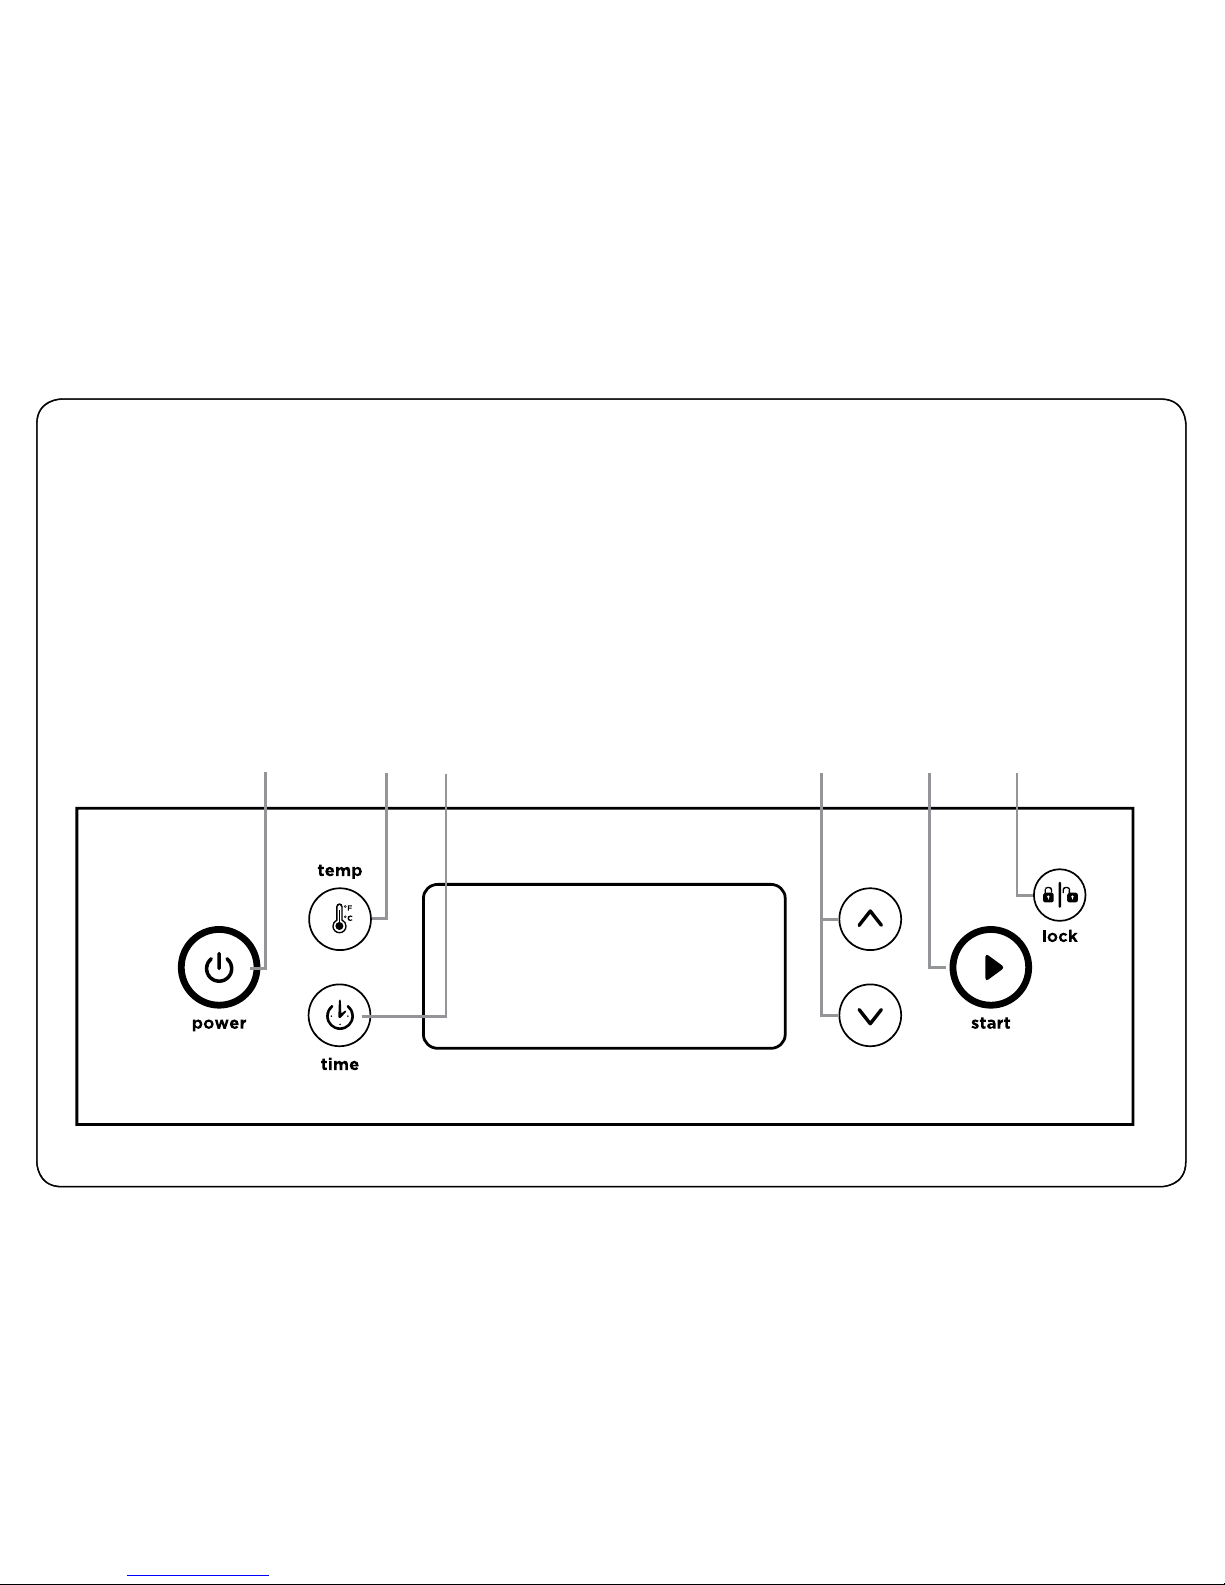
Touch Control Panel
1) POWER: On/O button
2) TEMP: Touch to select and change the temperature settings. (Only necessary in sous vide operation.)
3) TIME: Touch to select and change the timer settings. Press the START button once the SmartHub™ has reached the set
temperature to activate the timer.
4) UP/DOWN: Touch to increase or decrease temperature or time settings. Touch and hold to scroll faster.
5) S TART: When you first touch the start button, the unit will begin heating. You may touch the START button again to activate the
timer function. (Timer will only activate in sous vide mode when the set temperature has been reached.)
6) LOCK: Touch and hold to activate and deactivate the safety lock features. This is to prevent accidental temperature, time, or
power adjustments while cooking.
1.
5.4. 6.2. 3.
Viewing Display
Page 17
17
Touch Control Panel
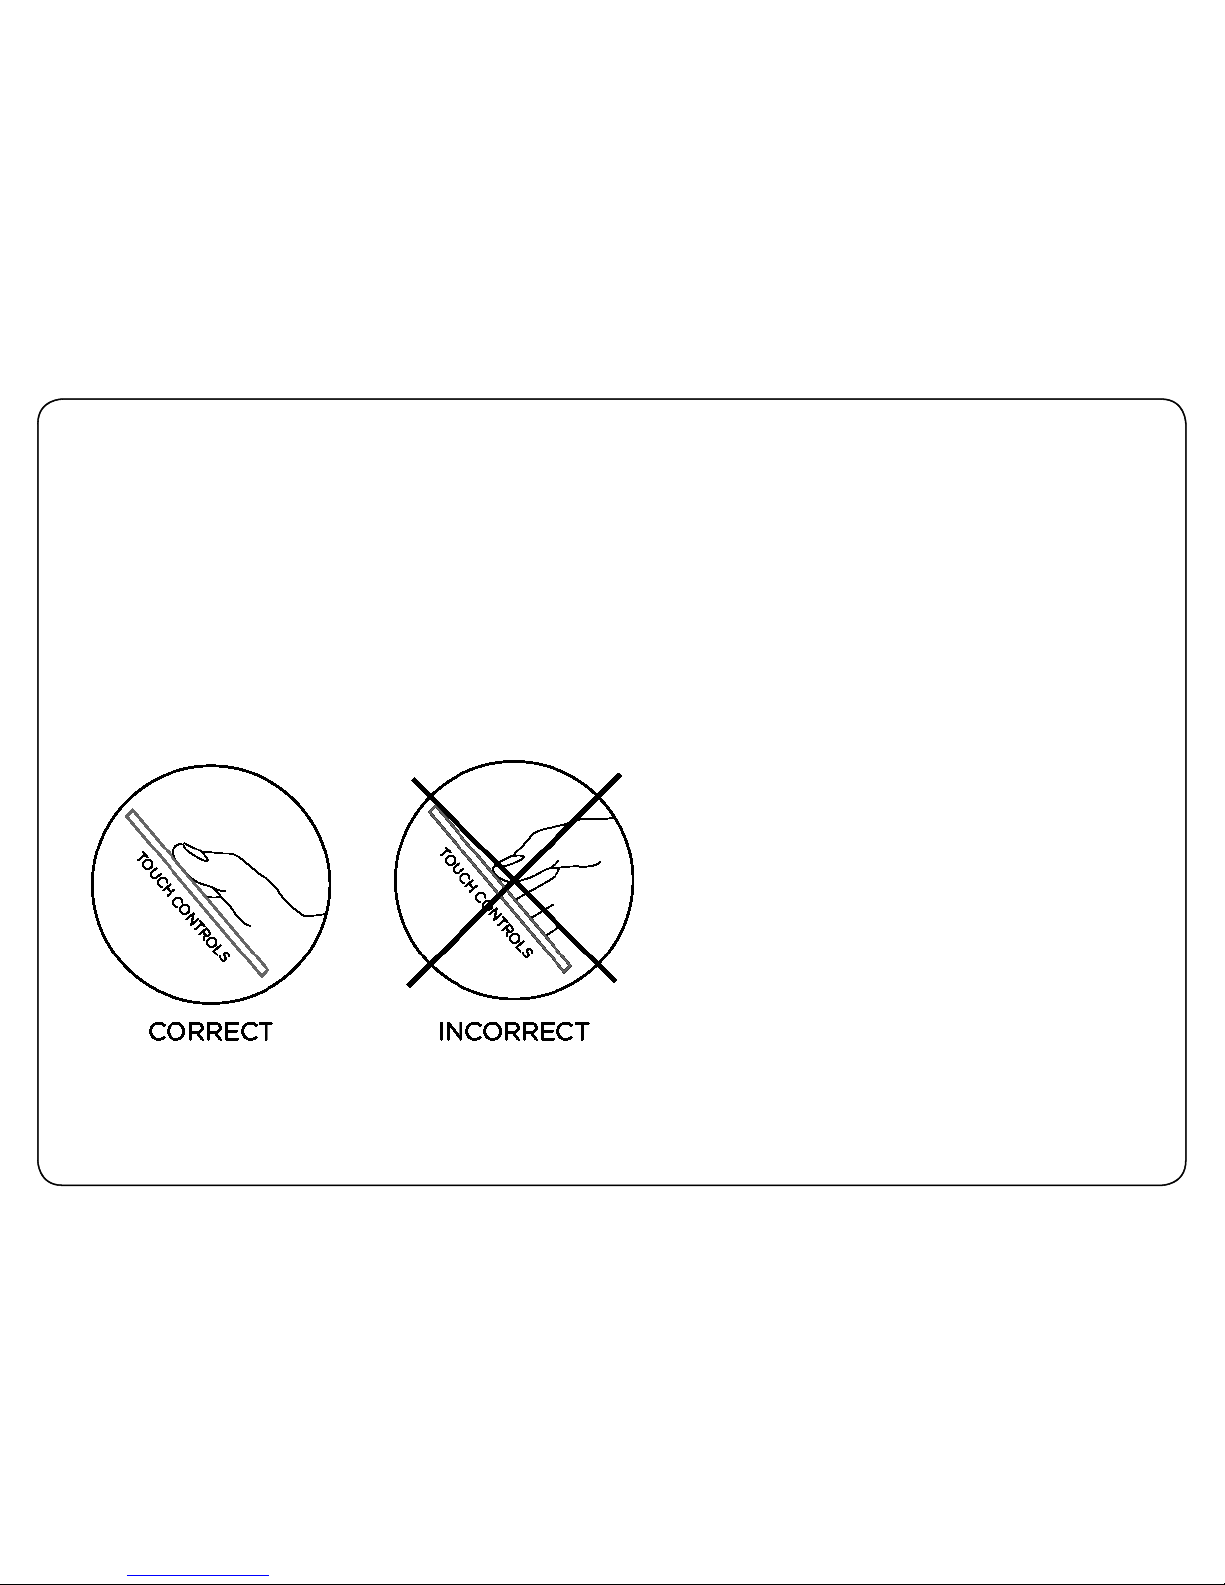
How to use touch controls:
You may find that the touch control buttons are not as sensitive to the touch as other touch screens or touch pads found in
household electronics. This is for safety reasons, to prevent children from turning the cooktop on easily and also to allow spills to
be wiped from the surface without changing the settings.
To use a button, you have to apply a firm tap with the flat of your finger. The buttons will respond better to the surface of your finger
than the pressure you apply. Hold out your thumb or index finger over the button you wish to touch, providing as much contact on
the button as possible, then lift when done. In some cases, such as raising the temperature level, you may want to hold a button for
several seconds to speed up the process. (See image below)
TOUCH CONTROLS: CORRECT, INCORRECT
The buttons will not react if you:
• Use the very tip of your finger or your fingernails
• Slide your finger over it without tapping
• Press it too gently
• Tap outside the area of the button
Page 18

18
Technical Information
Rating Voltage: 220V AC to 240V AC 50-60Hz, 2000W
Settings for Induction Cooking
Power Range: 1-15. The appliance will default to power level 7.
Timer Range: 99:59 (Hours:Mins)
Temperature Range: 80°C to 260°C (175°F to 500°F)
Settings for Sous Vide Cooking
Temperature Range: Default temperature is 60°C Celsius. Temperature range is 30°C
to 90°C (86°F to 194°F).
Timer Range: 99:59 (Hours:Mins)
Page 19

19
Introduction to Cooking Sous Vide
Cooking sous vide allows you to produce food exactly to your preferred done-ness. Water is maintained at a constant
set temperature according to recipe, eliminating the stress of overcooked food. While cooking sous vide, it is
important to be aware of the following basic principles:
• Food thickness is a very important factor in determining the cooking time of your food (particularly with meat).
Please make sure that the food thickness matches with your chosen recipe, or scale the cooking time up. If cooking
a steak that is double the thickness required of a recipe, it is important to note that the actual cooking time may
need to increase by as much as 4 times the specified amount.
• Additionally, tougher and leaner meats will require greater cooking time at the desired serving temperature.
• Food pouches may be held at serving temperature beyond a recipe’s recommended cooking time. Cooking for a
longer period of time will only continue to tenderize foods, without the loss of flavour.
• Fatty cuts held for at least 24 hours at 60°C.
• Tender cuts of meat often will lose ideal texture if cooked longer than the suggested time.
• Poultry is best cooked in individual portions, to avoid trapped air cavities.
• Vegetables generally require higher temperatures of 83°C or more.
Page 20
20
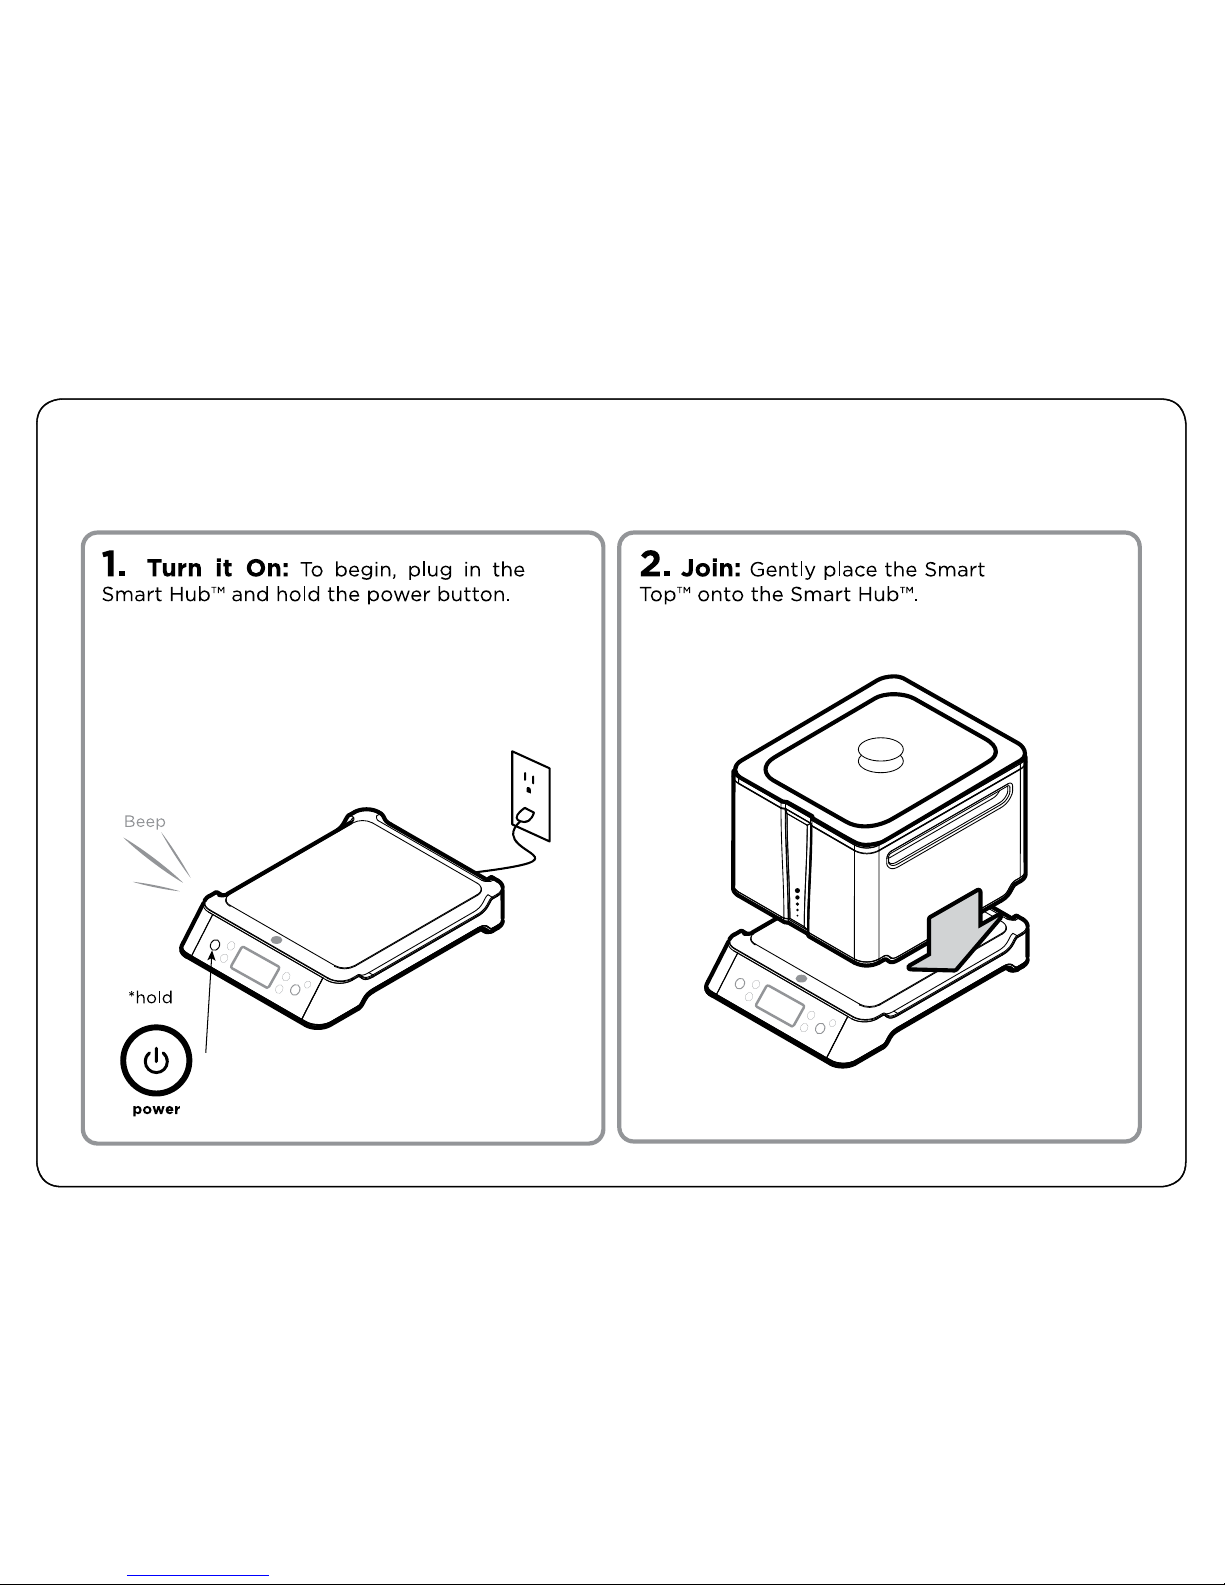
Simple Steps to Sous Vide Cooking
Page 21
21
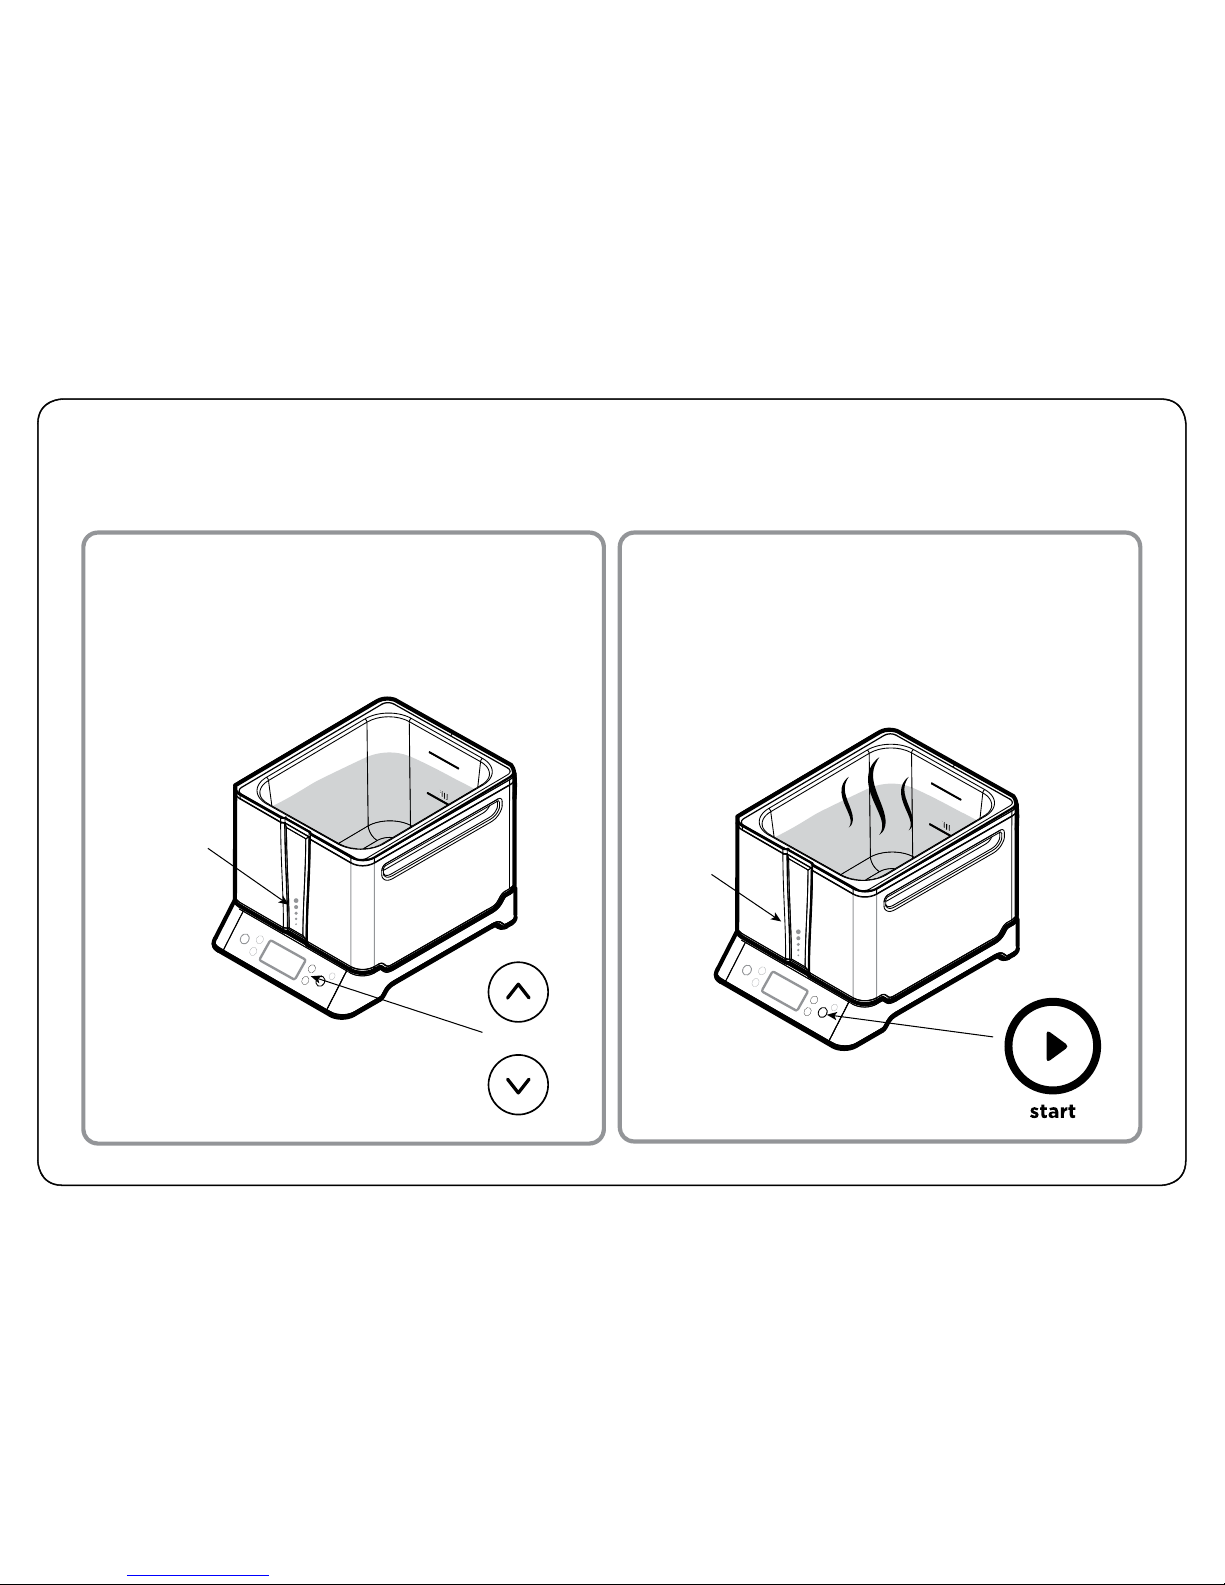
Simple Steps to Sous Vide Cooking
3. Fill, Select Temperature: Fill the Smart
To p™ with water until it reaches at least the fill
line. Toggle to your desired temperature.
4. Start:
Fill the Smart Top™ with water until
it reaches at least the fill line. Toggle to your
desired temperature, and press start to begin
heating the water.
m
a
x
fill
f
i
l
l
*RED glow
in cooking
stage
(heating)
m
ax
fill
f
i
l
l
*WHITE glow
in preparation
stage
(not heating)
Page 22
22
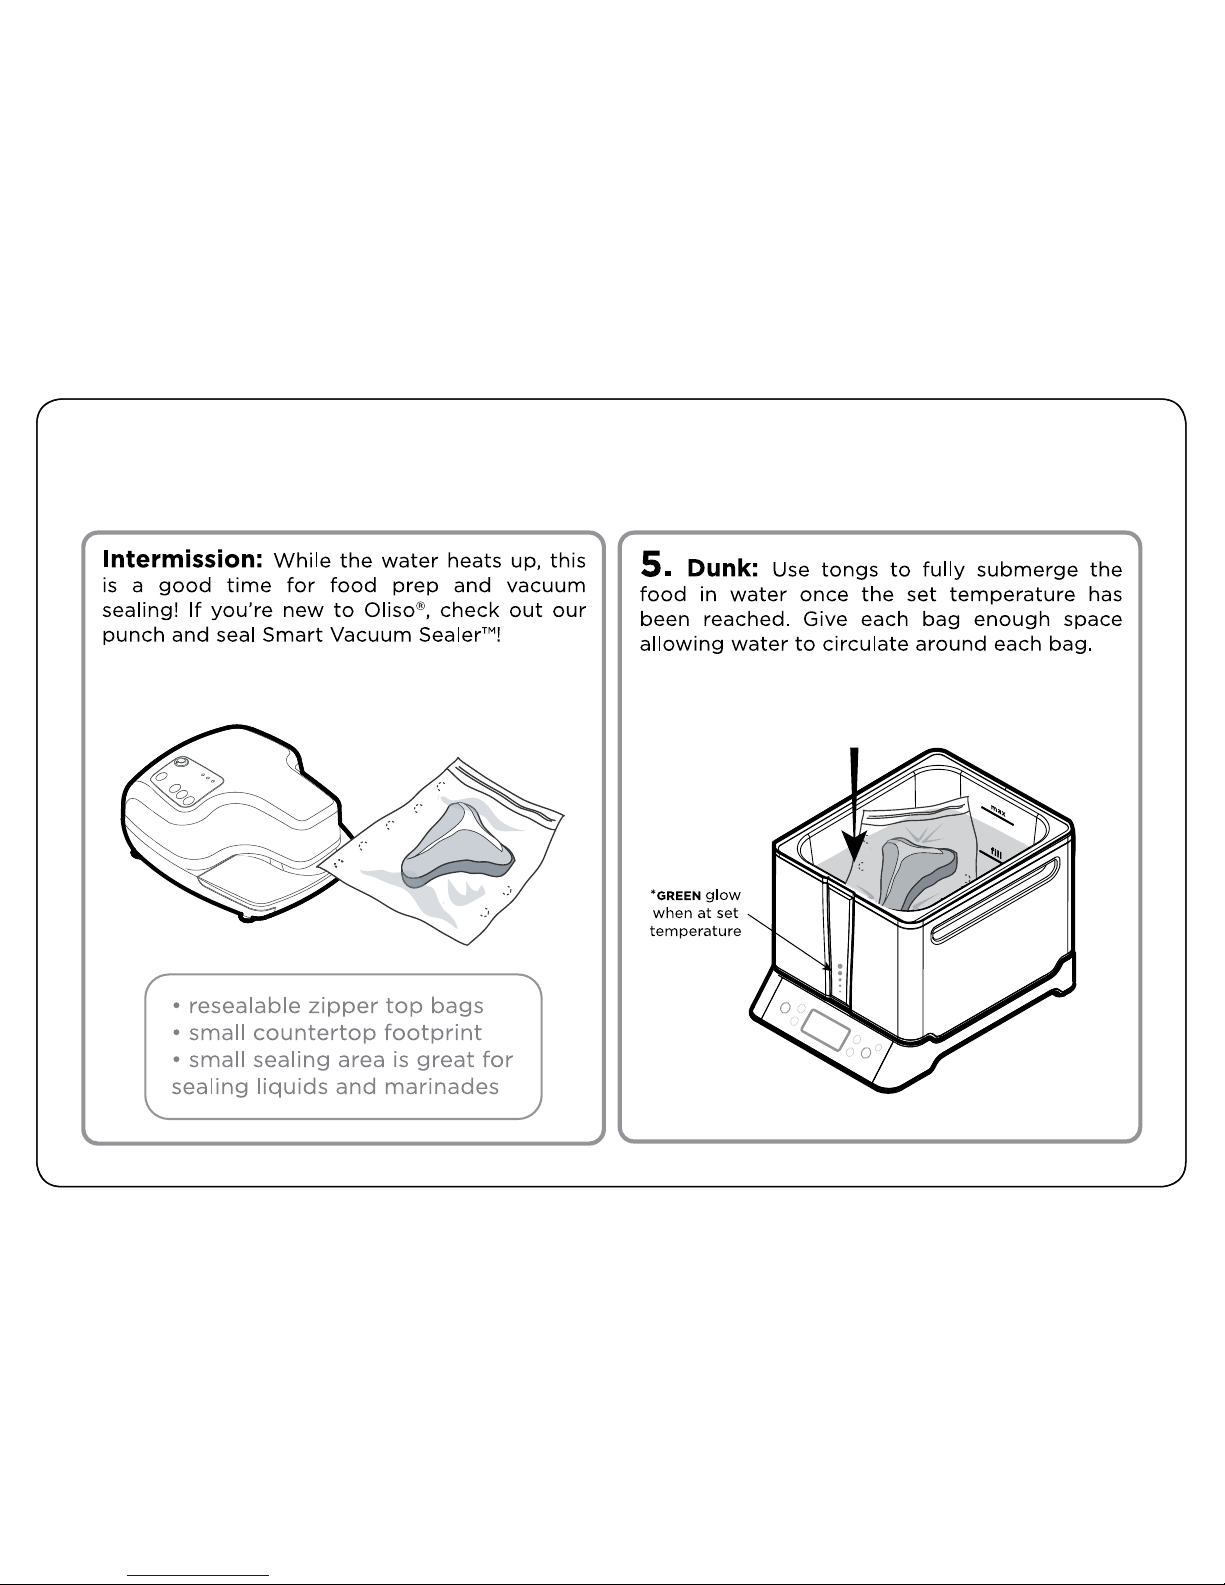
Simple Steps to Sous Vide Cooking
Page 23
23
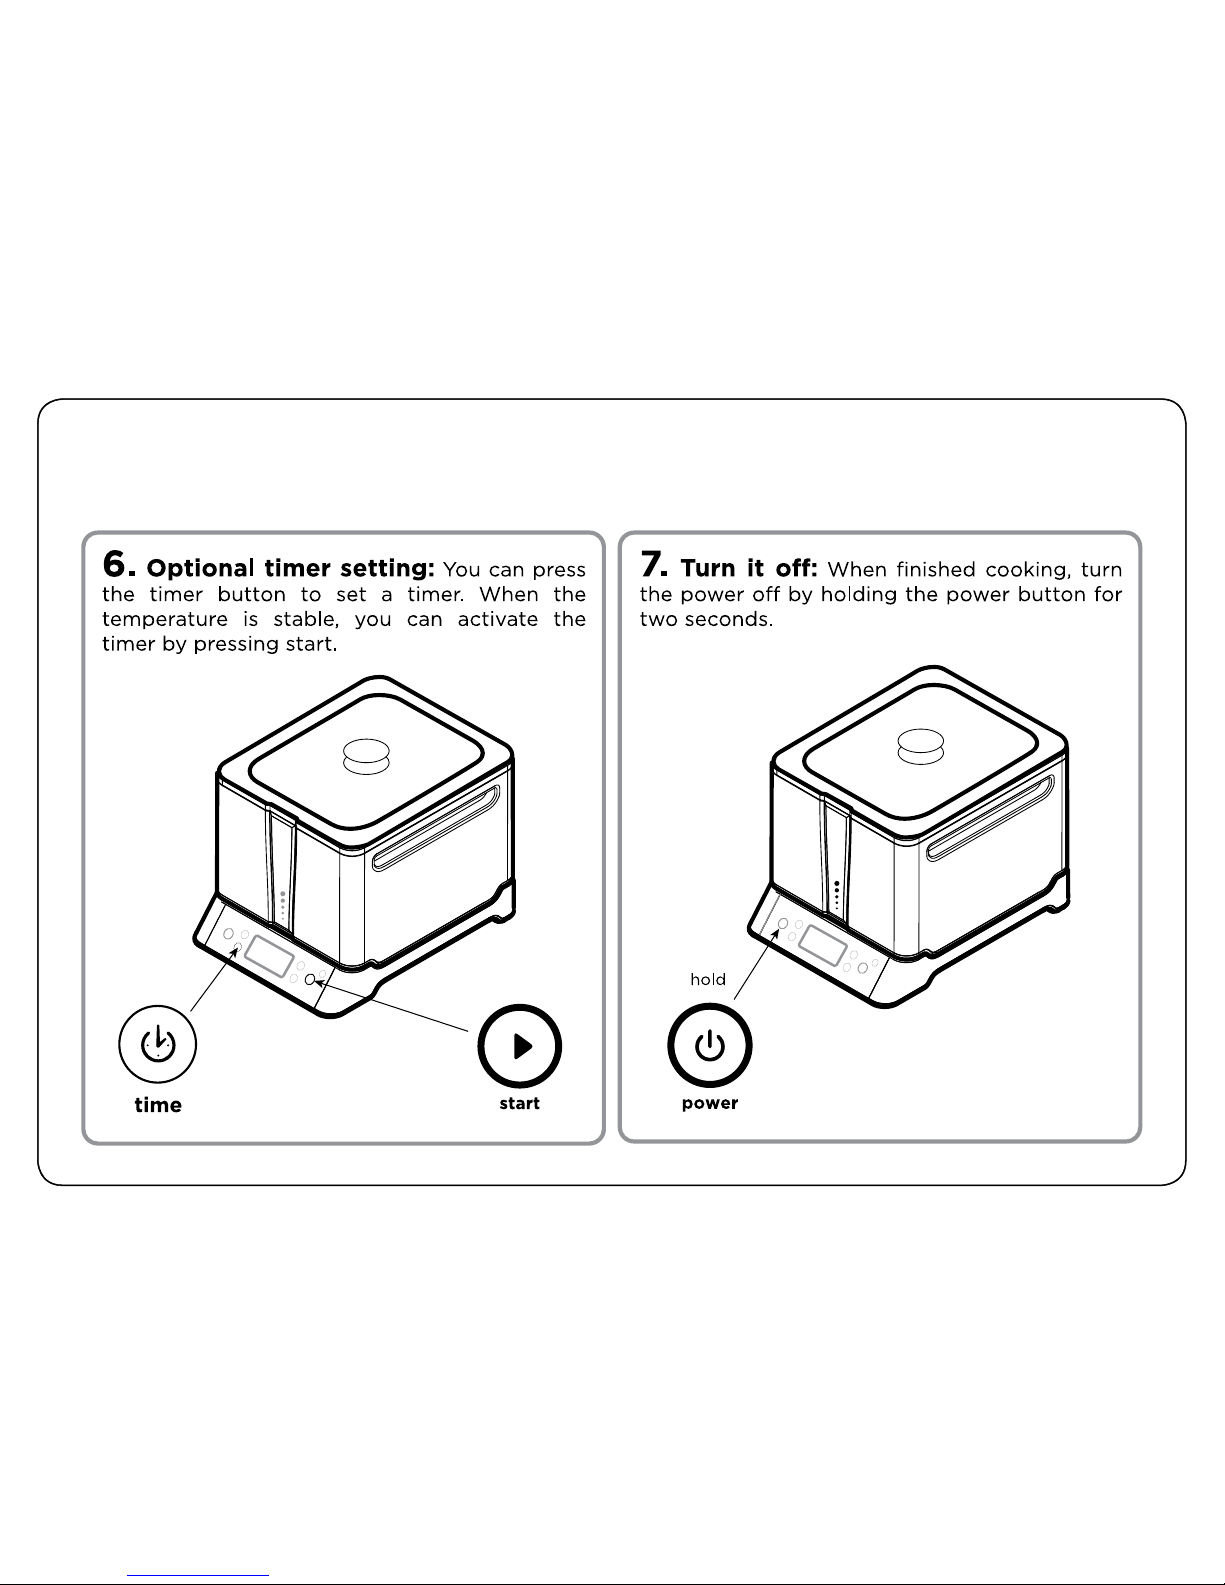
Simple Steps to Sous Vide Cooking
Page 24
24
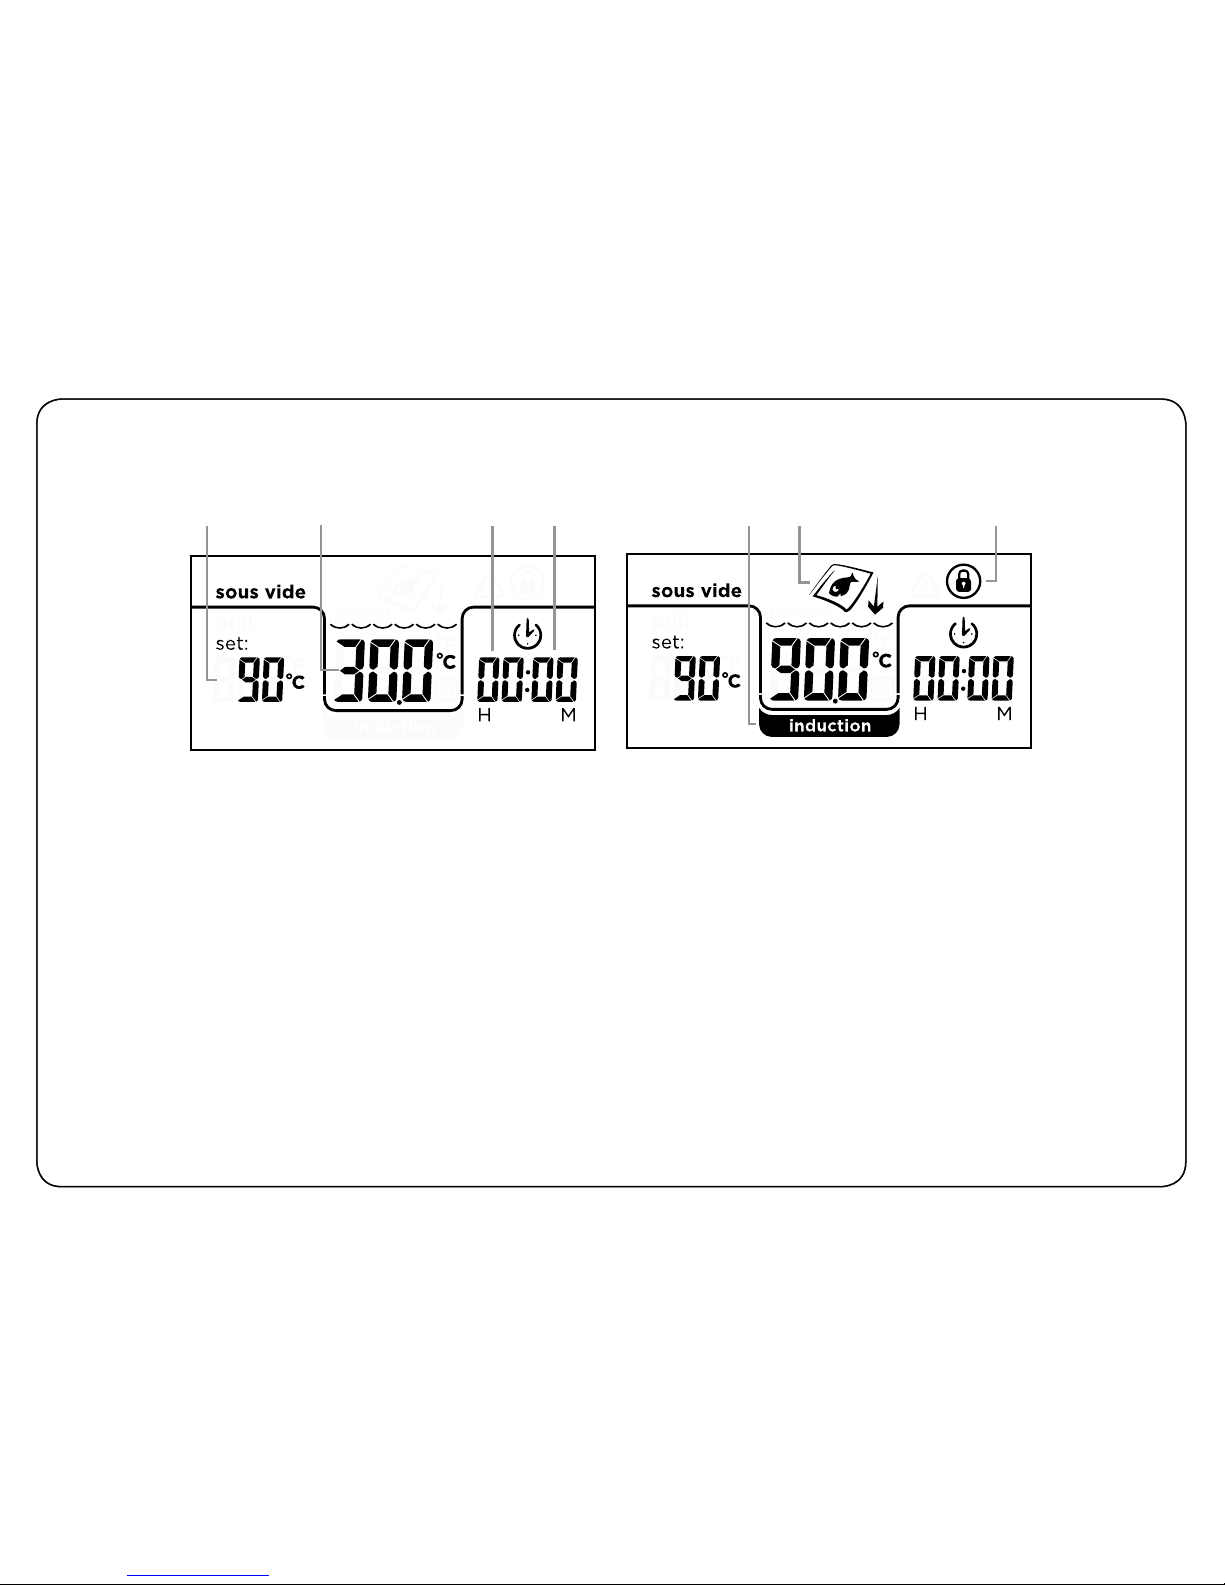
LCD Viewing Display Contents for Sous Vide Cooking
Sous Vide Mode: (Precision Smart Top™ is placed on the SmartHub™)
1. SET TEMP: Displays the current temperature setting
2. BATH TEMP: Displays the actual temperature of the water within the Precision Smart Top™.
3. HOUR: Displays the hour setting of the timer
4. MIN: Displays the minute setting of the timer
5. INDUCTION: This icon is displayed once the START button has been activated, and the unit is heating.
6. PLACE FOOD: Once the set temperature is reached, this icon is displayed to communicate that it is
ready for you to place food into the bath.
7. LOCK: This icon is visible when the child lock feature is active. This feature prevents accidental setting
changes.
Preparation Stage Cooking Stage
3.2. 4.1. 7.6.5.
Page 25

25
Introduction to Induction Cooking
Induction technology uses magnetic coils to directly heat your pots and pans. When active, the coils create a
magnetic field that will heat the metal of the cooking vessel itself.
BENEFITS:
• Fast: Digital controls make this technology fast and precise. Raising temperature control is immediate, and
predictable. Because of this, the SmartHub will reach the set temperature in half the time it takes competing units,
and maintain that temperature precisely.
• Energy Ecient: Because energy is focused on heating the pan itself, there is little wasted energy.
• Even heat distribution: The extra thick conductive layer on the underside of the pan helps to evenly disperse the
rapid heat. As heat is produced on the bottom of the water bath, natural convection currents cause the hot water to
rise and create an even bath temperature.
• Easy cleanup: Smooth glass surfaces make spills easy to clean.
Page 26
26
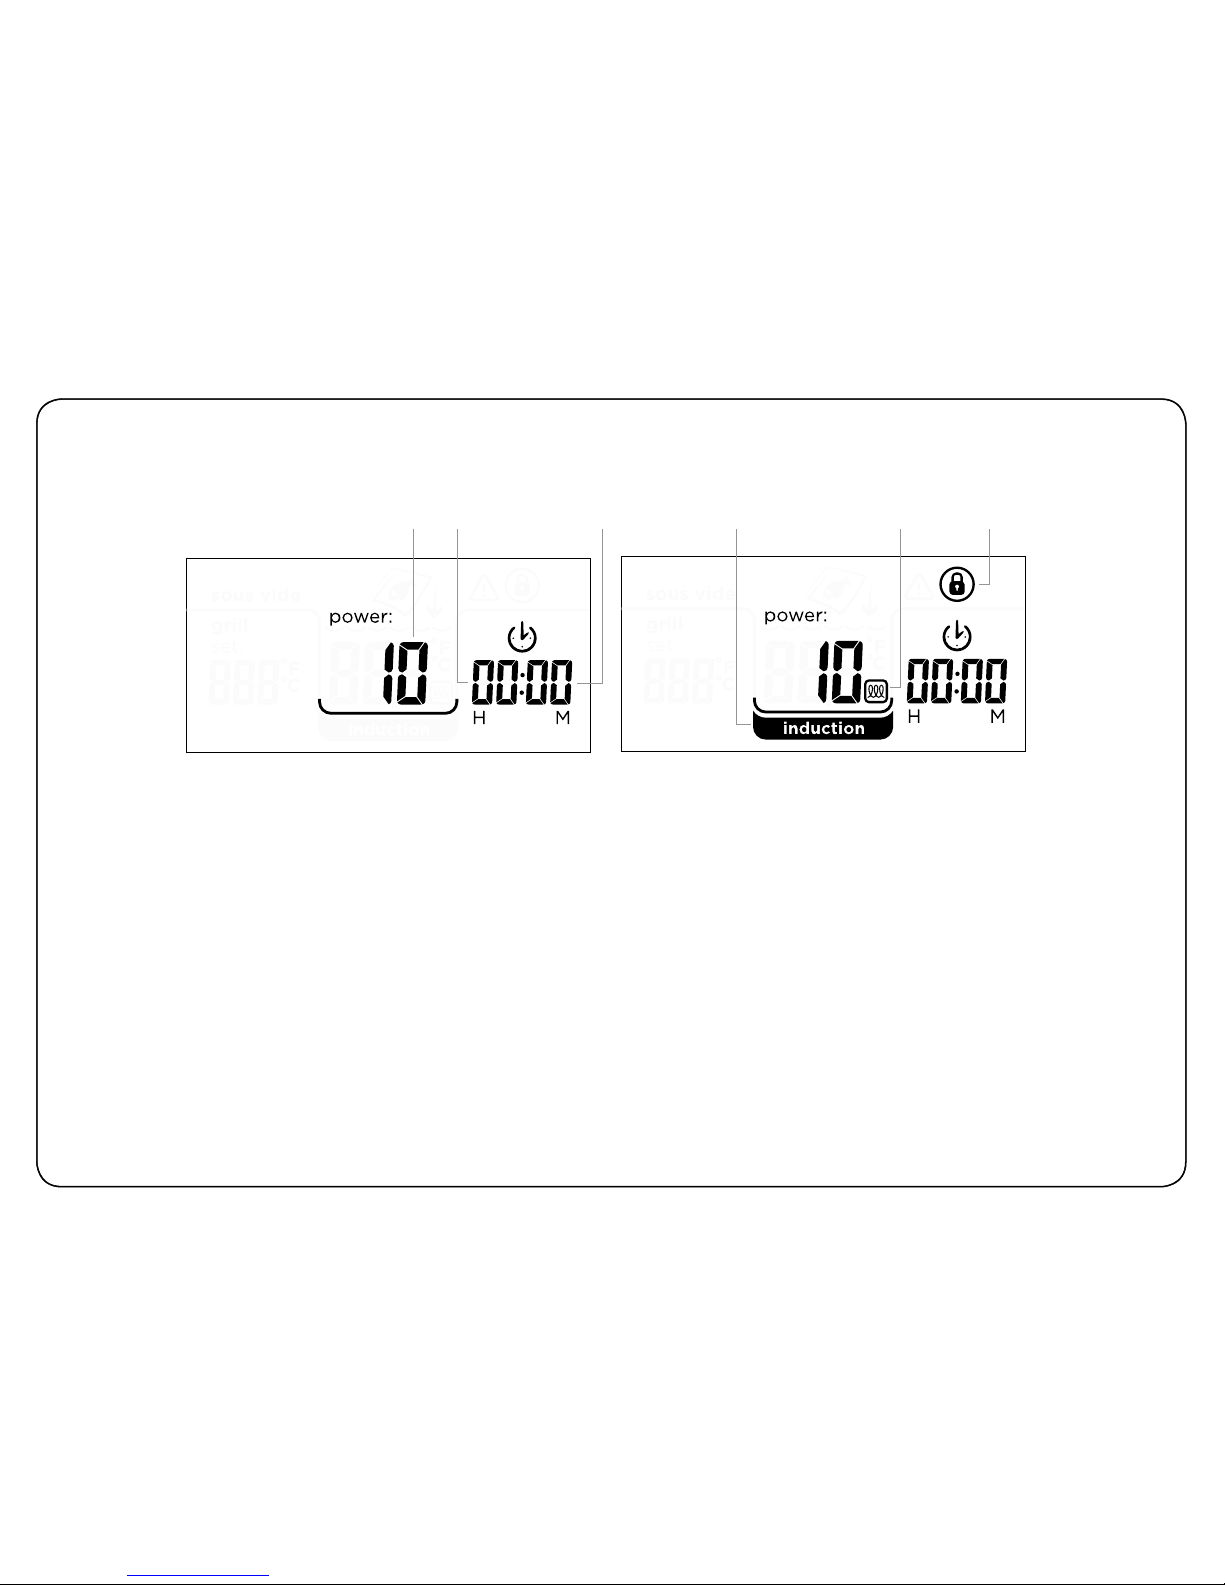
LCD Viewing Display Contents for Induction Cooking
Induction Mode: (cooking with an induction-ready pan)
1. POWER LEVEL: Displays the current power level setting, ranging from 0 to 10 (10 being the most
power). If this icon is flashing, press the START button to confirm setting and start heating the pan.
2. HOUR: Displays the hour variable of the timer. Touch the TIMER button again to change the MIN
value.
3. MIN: Displays the minute value. Touch the START button to activate the timer. When using the sous
vide smart top, timer will only activate when the set temperature has been reached.
4. INDUCTION: This icon is displayed once the START button has been activated, and the unit is heating.
This icon will flash if no pan is detected while trying to heat.
5. COIL: This icon represents the induction heating coil. This icon is inactive while the pan is removed.
6. LOCK: This icon is visible when the child lock feature is active. This feature prevents accidental setting
changes.
Preparation Stage Cooking Stage
4.3. 5.1. 2. 6.
Page 27
27
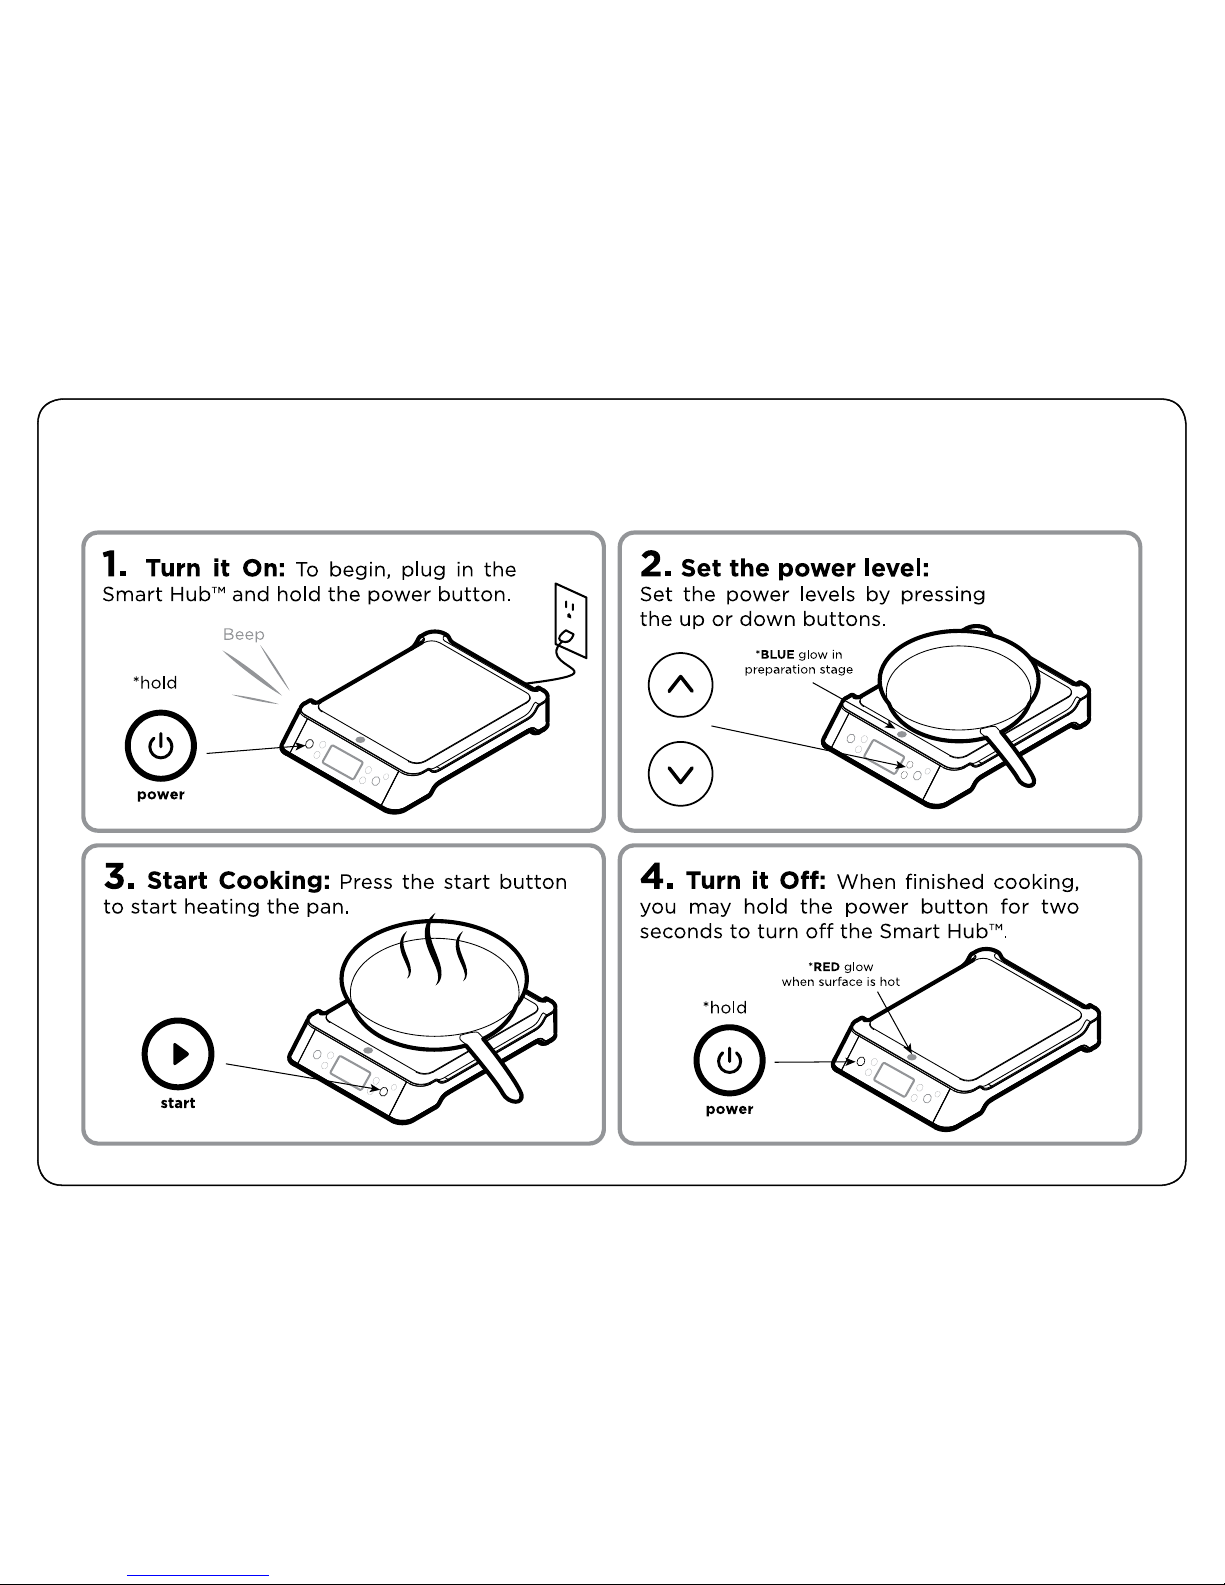
Simple Steps to Induction Cooking
Page 28

28
Quick Tips
• To quickly reset a timer back to ‘00:00’, you can touch and hold the timer button.
• To reduce the time it takes to reach your set temperature, you can start with hot water from the tap.
• Don’t lose your Zip Disc®! The magnet built into the Zip Disc® allows it to be stuck on the metal wrap of the water bath.
• The spacer plate may be disassembled for cleaning. Squeeze the handles to separate the wire handles from the perforated
spacer plate. The silicone feet may be removed as well.
• If transporting the water bath with water inside, the glass lid will help to prevent splashing.
• To help organize your cooking items, you can number or write times directly on the Vac Snap® bags.
• As sous vide cooking is already a low temperature process, it’s best to bring cooked food quickly to the plate, searing surface,
or chilling bath.
• Because it is dicult to overcook food with sous vide cooking, when working with multiple food items, you can often leave the
rest of the Vac-Snap® bags in the water bath and finish one food item at a time.
LED indicator light for reference at a glance (LED light seen above the LCD):
WHILE USING REGULAR INDUCTION READY PAN:
Soft blue glow: Setting mode, heat is not active.
Soft red glow: Heating mode, heat is active.
Bright red glow: Indicates that the cooking surface may be hot to the touch. Will remain active even after the unit is turned o, but
still plugged in.
WHILE USING THE PRECISION SMART TOP™:
White glow: Setting mode, heat is not active.
Red and pulsing: Heating mode, heat is active. Actual temperature does not match the set temperature.
Green glow: Set temperature has been reached. Heat is still active.
Green and pulsing: Set temperature has been reached, and the timer is actively counting. Heat is still active.
EITHER MODE:
Yellow and flashing: Helps indicate an error function. Heat is not active.
Red and Green pulsing: Pan not detected or not suitable for induction.
Page 29

29
Care and Maintenance
• Please remove the power plug prior to cleaning the induction cooktop. Do not use any abrasive
cleaning agents and make sure that water does not enter the induction cooktop.
• Never immerse the induction cooktop, its cables or the plug into water or other liquids
• Wipe o the glass cooktop with a damp cloth or use a mild, non-abrasive soap solution.
• Wipe o the casing and the operating panel with a soft cloth or a mild detergent.
• Do not use any oil based cleansing products in order not to damage the plastic parts or the casing.
• In order to keep your cooktop looking new, make sure that the bottom of your cookware does not
scrape the glass surface, although a scratched surface will not impair the use of the induction cooktop.
• Make sure to properly clean the unit before storing it in a cool, dry place.
• For any other service or maintenance, please visit our website and contact a service representative.
When using the Precision Smart Top®:
• Do not leave water sitting in the bath after use. Allow bath to cool, remove food rack and spacer plate,
and use the extended side handles to lift the sous vide pan o and pour water into the sink. To lessen the
weight, you may scoop some water out using a cup before lifting the Precision Smart Top®.
• Periodically, or if a cooking pouch ruptures, you may need to clean the water bath. Use a soft cloth or
sponge with mild soapy water to wipe out the interior of the water bath. You may then rinse with water,
and pour out the liquid.
Page 30

30
Troubleshooting
I set my food to the correct bath temperature and it started to cook, when I went away and returned
the unit was turned o, what should I do?
Most importantly, DO NOT CONSUME YOUR FOOD – DISCARD IT IF THERE IS ANY QUESTION TO
THE FOOD SAFETY. There seems to be a problem with your power input at the location. Please make
sure to plug the unit back into a circuit that is not overloaded. The unit will also power o if left idle
after timer expires (except when using the water bath).
There is a lot of scale forming at the bottom of my unit, what can I do to clean it?
You can use white vinegar to clean the scale o the bottom of your pan. Make sure not to use abrasive
cleaners or scrubbers as it could damage the coating on the surface. Also make sure after the bath
cools to drain, clean and dry the pan before storing, so that the pan can be kept spick and span.
How can I determine how much water to put in to the water bath, to prevent overflowing?
Fill the water bath to the fill line with water at room temperature. Place the vacuum packaged food
items into the bath. If food contents are not fully submerged, you may add water until the water level
reaches the max line. You may now remove the food items, and start preheating the bath.
Can I drop frozen food in, when the bath is ready?
Please use caution when cooking foods from a frozen temperature. There is no way to know the proper
cooking time using this method. Additionally, there is no way to know if the raw product was of good
quality and safe to eat.
Page 31
31
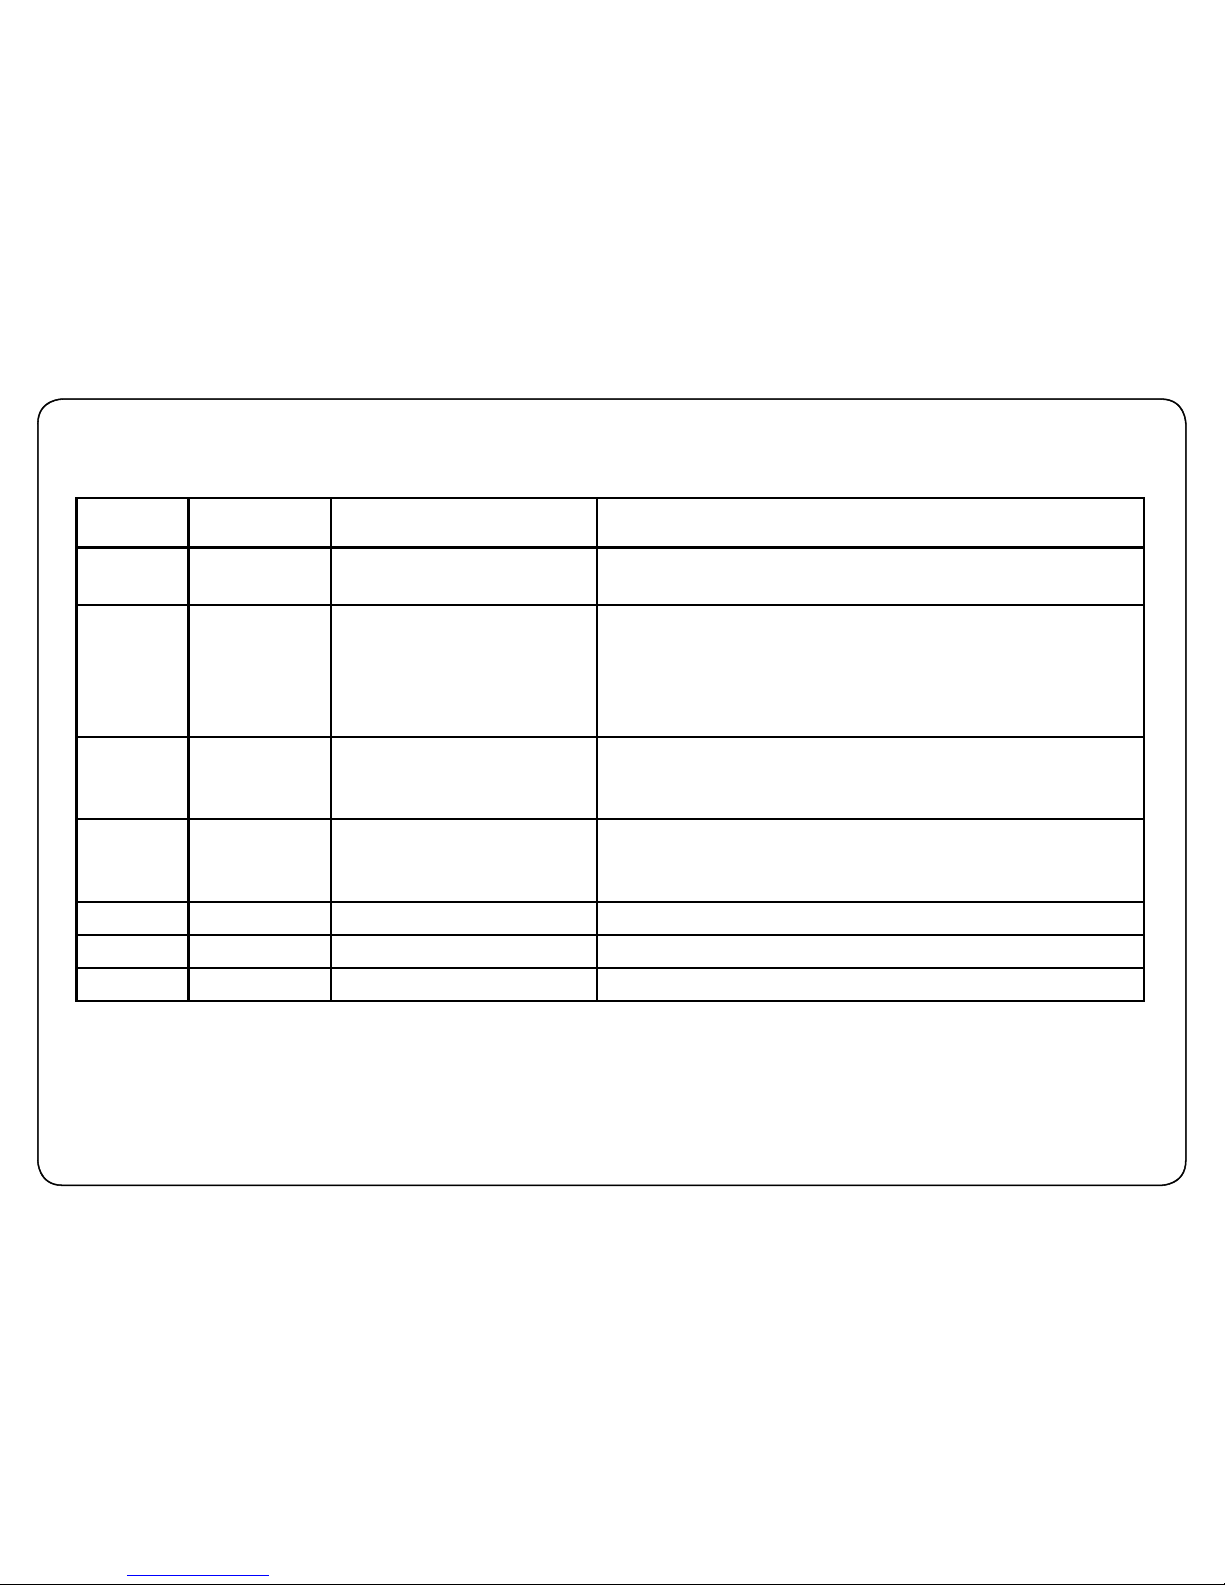
Troubleshooting - Error Codes
Error Code Seen during
which mode?
Cause Solution
- - Induction No pan or unsuitable
pan
Place a suitable pan on the unit.
E01 Both sous
vide &
induction
Temperature is too high
or a component has
shorted
Make sure there is a minimum distance of 5 inches
between the ventilation slot (found at the back of
the induction cooktop) and any obstruction such as
a wall or other appliances. Unplug, let the unit cool
down, plug back in and press the power button.
E02 Both sous
vide &
induction
Component failure Unplug the unit from the outlet. Wait five minutes.
Plug the unit back in and turn on. If error code
persists, contact customer service.
E03 Both sous
vide &
induction
Voltage is either too low
or too high.
Make sure the unit is connected to an outlet with
the correct voltage.
E04 Sous vide Water bath is empty Add water to the fill line
E05 Sous vide Component failure Contact us for further troubleshooting or repair.
E06 Sous vide Programming error Contact us for further trouble-shooting or repair
Page 32

Oliso, Inc. warrants that for a period of one year from the date of the original purchase, this product will be free from defects in material and workmanship,
when utilized for normal household use. Oliso®, Inc. will repair or replace this product or any component of the product found to be defective during
the warranty period without charge to the customer. If a replacement product is sent, it will carry the remaining warranty of the original product.
Replacement will be made with a new or remanufactured product or component. If the product is no longer available, replacement may be made with
a similar product of equal or greater value. This is your exclusive warranty.
This warranty is valid for the original retail purchaser from the date of initial retail purchase and is not transferable. Keep the original sales receipt. Proof
of purchase is required to obtain warranty performance. Oliso, Inc. dealers or retail stores selling Oliso, Inc. products do not have the right to alter,
modify or in any way change the terms and conditions of this warranty.
The liability of Oliso, Inc. is limited solely to the cost of repair or replacement of the product at its option. This warranty does not cover normal wear of
parts and does not apply to any product that has been tampered with or used for commercial purposes. This warranty does not cover damage caused
by misuse, abuse, use on improper voltage or current, use contrary to the operating instructions, negligent handling or damage due to faulty packaging
or mishandling in transit. This warranty does not cover damage or defects caused by or resulting from damages from shipping or repairs, service or
alteration to the product or any of its parts, which have been performed by a repair person not authorized by Oliso, Inc. Further, the warranty does not
cover Acts of God such as fire, flood, hurricanes, and tornadoes.
This warranty is extended to the original purchaser of the product and excludes all other legal and/or conventional warranties. The responsibility of
Oliso, Inc. is limited to the specific obligations expressly assumed by it under the terms of the limited warranty. In no event shall Oliso, Inc. be liable for
any incidental or consequential damages caused by breach of any express, implied or statutory warranty or condition.
Except to the extent prohibited by law, any implied warranty or condition of merchantability or fitness for a particular purchase is limited in duration
to the duration of the above warranty. Oliso, Inc. disclaims all other warranties, conditions, or representations, express, implied, statutory or otherwise.
In no event shall Oliso, Inc. be liable for any indirect, special, incidental or consequential losses or damages (including but not limited to interruption
of business or loss of business or profit) resulting from the use of or inability to use the product, any breach of contract, fundamental or otherwise,
or for any claim brought against purchaser by any other party. Some states or jurisdictions do not allow the exclusion or limitation of incidental or
consequential damages or limitations on how long an implied warranty lasts, so the above limitations or exclusion may not apply to you.
If you have any question regarding this warranty or would like to obtain warranty service, please email Oliso, Inc. at [email protected], and a
service center address will be provided to you. If you have further questions, you may call 1-800-899-5157.
Warranty
Thanks
Thank you for purchasing the Oliso® Smart Hub™, a safer, smarter way to cook.
Please note: Some Oliso® Smart Hubs™ may look slightly dierent than the units illustrated here. For a complete review of current Oliso® Smart Hub™
models, please visit www.oliso.com.
©2016 Oliso, Inc. All rights reserved. Oliso® and Vac Snap® are registered trademarks of Oliso, Inc. Smart Hub™, Smart Top™, and Smart Vacuum
Sealer™ are trademarks of Oliso, Inc. Patents Pending. #69001021 <01/16>A Printed in China
 Loading...