

Page 1
User Manual
Page 2

Oliso, Inc. warrants that for a period of one year from the date of the original purchase, this product will be free from defects in material and
workmanship, when utilized for normal household use. Oliso, Inc. will repair or replace this product or any component of the product found to be
defective during the warranty period without charge to the customer. If a replacement product is sent, it will carry the remaining warranty of the original
product. Replacement will be made with a new or remanufactured product or component. If the product is no longer available, replacement may be made
with a similar product of equal or greater value. This is your exclusive warranty.
This warranty is valid for the original retail purchaser from the date of initial retail purchase and is not transferable. Keep the original sales receipt. Proof
of purchase is required to obtain warranty performance. Oliso, Inc. dealers or retail stores selling Oliso, Inc. products do not have the right to alter, modify
or in any way change the terms and conditions of this warranty.
The liability of Oliso, Inc. is limited solely to the cost of repair or replacement of the product at its option. This warranty does not cover normal wear of
parts and does not apply to any product that has been tampered with or used for commercial purposes. This warranty does not cover damage caused
by misuse, abuse, use on improper voltage or current, use contrary to the operating instructions, negligent handling or damage due to faulty packaging
or mishandling in transit. This warranty does not cover damage or defects caused by or resulting from damages from shipping or repairs, service or
alteration to the product or any of its parts, which have been performed by a repair person not authorized by Oliso, Inc. Further, the warranty does not
cover Acts of God such as fire, flood, hurricanes, and tornados.
This warranty is extended to the original purchaser of the product and excludes all other legal and/or conventional warranties. The responsibility of Oliso,
Inc. is limited to the specific obligations expressly assumed by it under the terms of the limited warranty. In no event shall Oliso, Inc. be liable for any
incidental or consequential damages caused by breach of any express, implied or statutory warranty or condition.
Except to the extent prohibited by law, any implied warranty or condition of merchantability or fitness for a particular purchase is limited in duration to
the duration of the above warranty. Oliso, Inc. disclaims all other warranties, conditions, or representations, express, implied, statutory or otherwise. In no
event shall Oliso, Inc. be liable for any indirect, special, incidental or consequential losses or damages (including but not limited to interruption of business
or loss of business or profit) resulting from the use of or inability to use the product, any breach of contract, fundamental or otherwise, or for any claim
brought against purchaser by any other party. Some states or jurisdictions do not allow the exclusion or limitation of incidental or consequential damages
or limitations on how long an implied warranty lasts, so the above limitations or exclusion may not apply to you.
If you have any question regarding this warranty or would like to obtain warranty service, please email Oliso, Inc. at [email protected], and a
service center address will be provided to you.
If you have further questions, you may call 1-800-899-5157.
Warranty
Thanks
Thank you for purchasing the Oliso® Smart Iron™, a safer, smarter way to iron.
Please note: Some Oliso® Smart Irons™ may look slightly different than the irons illustrated here. For a complete
review of current Oliso iron models, please visit www.oliso.com.
Page 3
1
1 ) Use iron only for its intended use.
2 ) To protect against a risk of electric shock, do not immerse the iron in water or other liquids.
3 ) The iron should always be turned to “Off” before plugging or unplugging from the outlet. Never tug cord to
disconnect from the outlet; instead, grasp plug and pull to disconnect.
4 ) Do not allow cord to touch hot surfaces. Let iron cool completely before putting away. Loop cord loosely around
iron when storing.
5 ) Always disconnect iron from electrical outlet when filling with water or emptying and when not in use.
6 ) Do not operate iron with a damaged cord or if the iron has been dropped or damaged. To avoid the risk of
electric shock, do not disassemble the iron. Take it to a qualified serviceman for examination and repair. Incorrect
reassembly can cause a risk of electric shock when the iron is used.
7 ) Do not allow children to use iron. Close supervision is necessary for any appliance being used near children. Do
not leave iron unattended while connected or on an ironing board.
8 ) Burns can occur from touching hot metal parts, hot water, or steam. Use caution when you turn a steam iron
upside down – there may be hot water in the reservoir.
9 ) If the LED flashes orange (not red or green), the iron is not operating normally. Disconnect from the power
supply and have the iron serviced by qualified service personnel.
IMPORTANT SAFETY INSTRUCTIONS
When using your iron, basic safety precautions should always be followed, including the following:
Read all instructions before using this product.
SPECIAL INSTRUCTIONS
1 ) The iron must be used on a stable surface. When placing the iron on a stand or resting surface, make sure the
stand or surface is stable.
2 ) Oliso irons are high wattage appliances - For EU version is 2000-2400W at 220-240V. For US or Canada version
is 1600W at 120V for models TG1050 or 1800W at 125V for models TG1100, TG1250 or TG1600. To avoid a circuit
overload, do not operate another high wattage appliance on the same circuit.
3 ) If an extension cord is absolutely necessary, a 15A cord should be used. Cords rated for less amperage may
overheat. Care should be taken to arrange the cord so that it cannot be pulled or tripped over.
4) This iron uses hot steam!
5) Never direct fill the iron from a water tap while the iron is plugged into a power source.
6) FOR HOUSEHOLD USE ONLY
SAVE THESE INSTRUCTIONS
Page 4
2
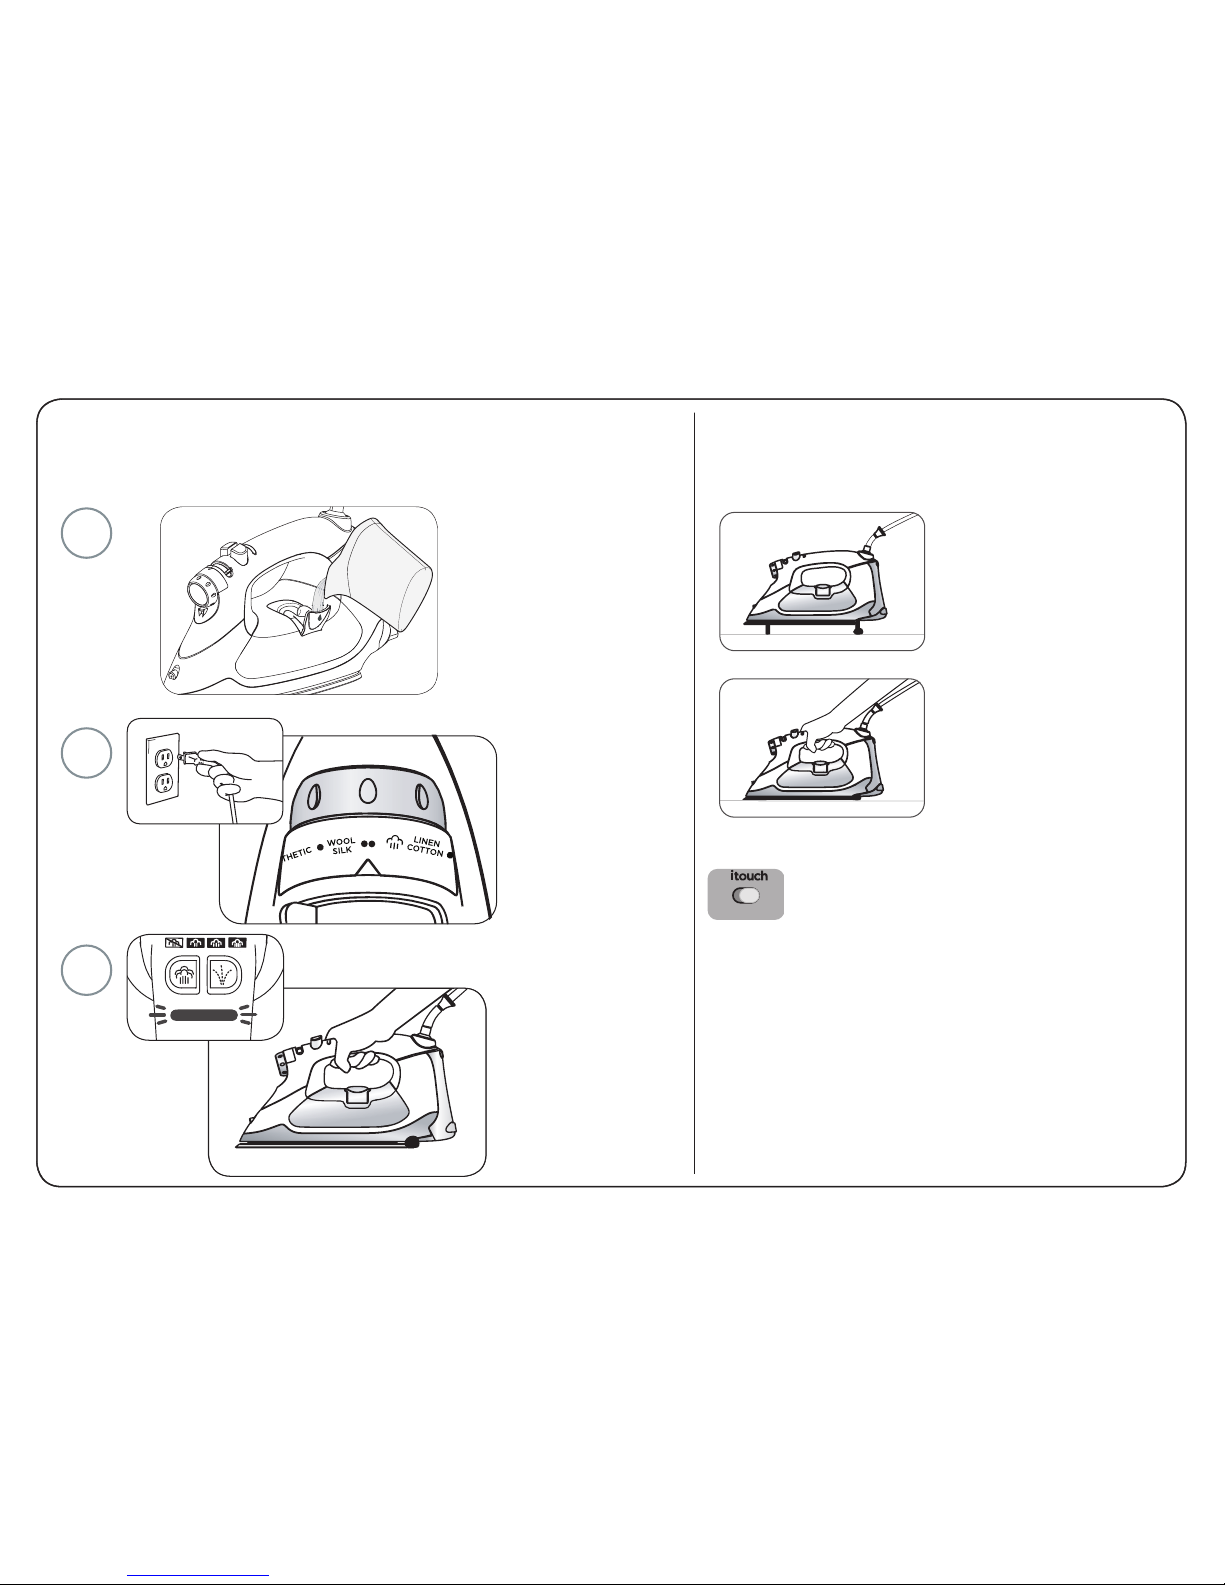
3 Simple Steps To Start
FILL UNPLUGGED
Open the Flip Funnel™
and add water to the
tank with the fill cup or
directly from a faucet.
Note: 2 fill cups equal the max
capacity of the water tank.
Plug in, then
choose a fabric
and steam
settings.
When the green
light stops blinking
and is solid, the iron
is ready for use.
Touch the handle
and begin using.
1
SET UP
2
IRON
3
iTouch™ Technology
To operate, place the
iron, soleplate down, on a
flat surface. Plug the iron
into an outlet and make
sure the iTouch™ switch
is in the ON position.
Simply touch the iron
handle, and the iron will
sense your hand and
lower. Let it go, and the
iron’s scorch guards will
automatically raise the iron
above the fabric.
DEACTIVATING THE ITOUCH™ TECHNOLOGY
If you wish to deactivate the iTouch™ feature,
set the switch on the back of the iron to the
OFF position. The iron will function like a
standard iron. If you wish to reactivate the
iTouch™ feature, set the switch back to the
ON position.
As a safety precaution, when iTouch™ is
deactivated, if the soleplate is left face
down for more than 30 seconds, the scorch
guards will automatically lift the iron off
fabric, preventing scorching and burns. For
more information regarding the auto shut-off
safety feature, see page 5.
OFF ON
Page 5
3
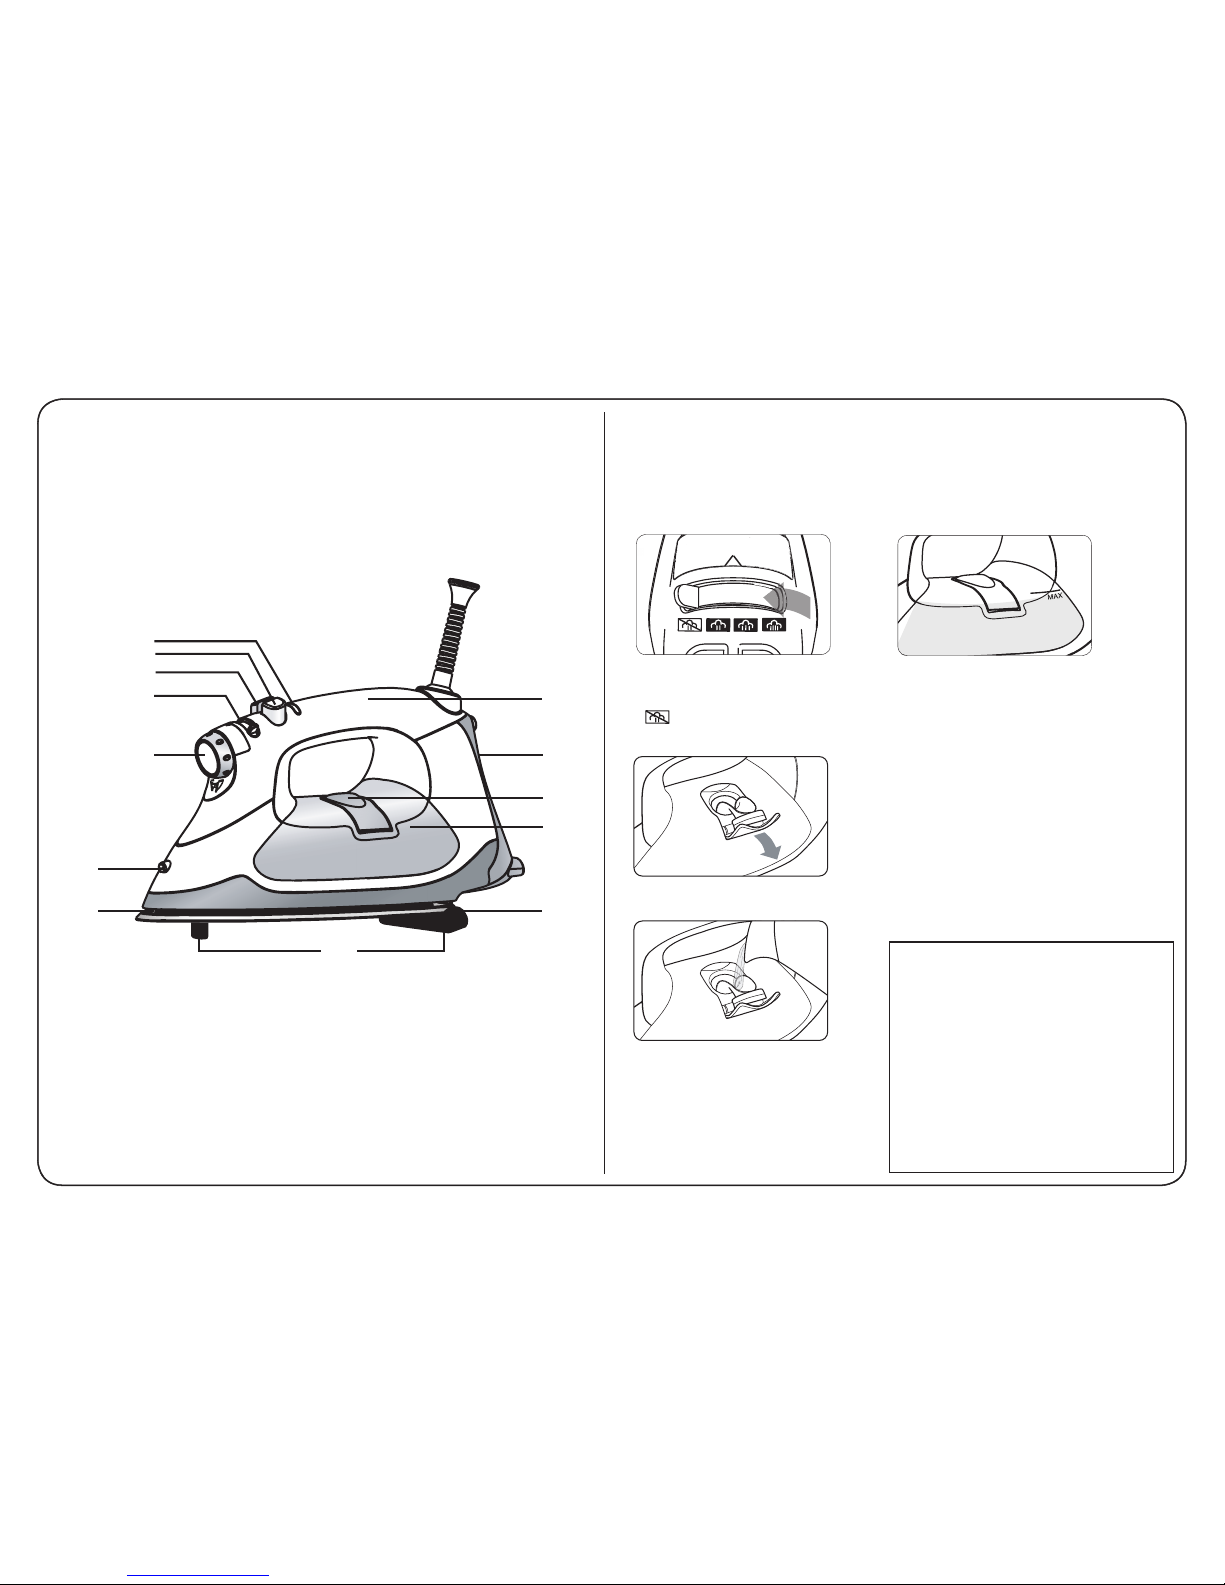
Getting To Know
Your Oliso® Smart Iron™
Alternatively, fill directly from a
faucet holding the iron
horizontally. Do not fill the tank
past the MAX fill line on the
side of the iron. Close the port
when done.
If you need to add water during
ironing, unplug the iron and
repeat the above steps. After
filling, make sure the iron is fully
reheated before ironing.
This iron is designed to be
used with regular tap water.
If your water is over 12 grams
of hardness, we recommend
using either inexpensive bottled
spring water or mixing half tap
water with half distilled water.
Never use 100% distilled water
as this can cause the iron to
spit and leak.
WATER RECOMMENDATIONS
Water Tank
Open the Flip Funnel™.
Leave the iron in a
horizontal position and
fill using the included fill
cup. Two fill cups equal the
maximum capacity of the
water tank.
Before filling, slide the
steam selector to off
( ). Make sure the iron is
unplugged.
1
8
7
6
5
4
3
2
13
12
10
9
11
1. Status Light
2. Steam Burst
3. Spray Mist
4. Steam Selector
5. Fabric Selector
6. Spray Nozzle
7. Detailer
8. iTouch™ Handle
9. iTouch™ over-ride
10. Flip Funnel
11. Water Tank
12. Soleplate
13. Scorch Guards
Page 6
4
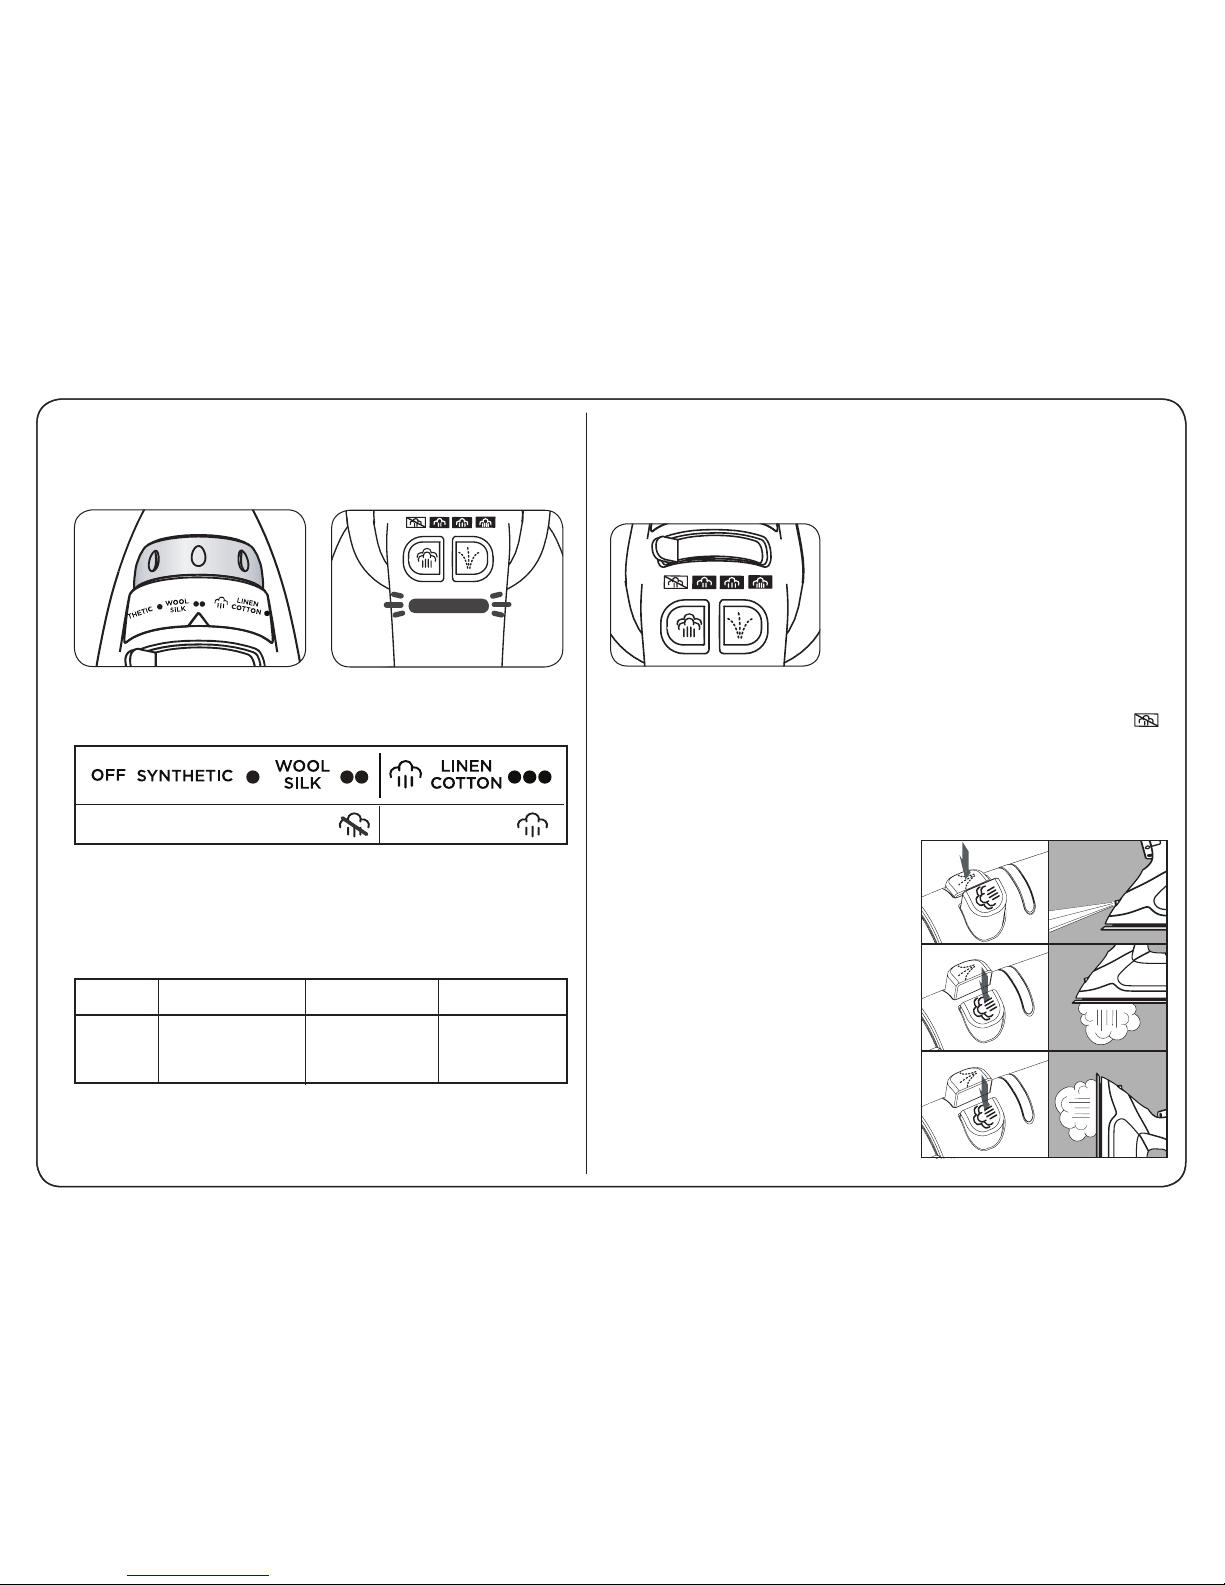
Zero-Drip: The Oliso® Smart Iron™ has a zero-drip feature which
shuts off steam any time the iron’s scorch guards are extended.
Fabric Selector
FABRIC SELECTOR
STATUS LIGHT
dry ironing
steam okay
red flashing green
solid green
flashing red
off
optimizing
temperature
ready
auto off
Turn the fabric selector to select a fabric setting. To
use continous steam or steam burst, the temperature
must be set to the wool, cotton, or linen range.
The Oliso® iron uses a status light to display the
iron’s status. To ensure correct temperature, wait until
the light displays solid green before ironing.
Extreme Steam Triple Play
Steam Selector: Slide the steam selector
to set the amount of continuous steam.
The iron can only produce steam when
the fabric selector knob is set to the
wool ( •• ), cotton, or linen range (•••).
Allow the iron to heat up (solid green
status light) before activating the steam
control. Steam will be produced as soon
as the iron is lowered. Steam will stop
when iron lifts up.
Dry Ironing: To turn off the steam, slide the steam selector off ( ).
1. Spray
• Press spray button for spray mist
• Spray will help remove wrinkles
2. Burst of Steam
• Press steam button for a strong
burst of steam from the soleplate.
• Steam button can only be used
when the iron is heated to the wool
(••), cotton, or linen range (•••).
• Wait at least 3 seconds between
each press of steam button.
3. Vertical Steam
• Press the steam button while
holding the iron upright.
• Use to get creases and wrinkles
out of hanging clothes or curtains.
• Wait at least 3 seconds between
each press of steam button.
STATUS LIGHT
FABRIC SELECTOR
1
2
3
Page 7
5
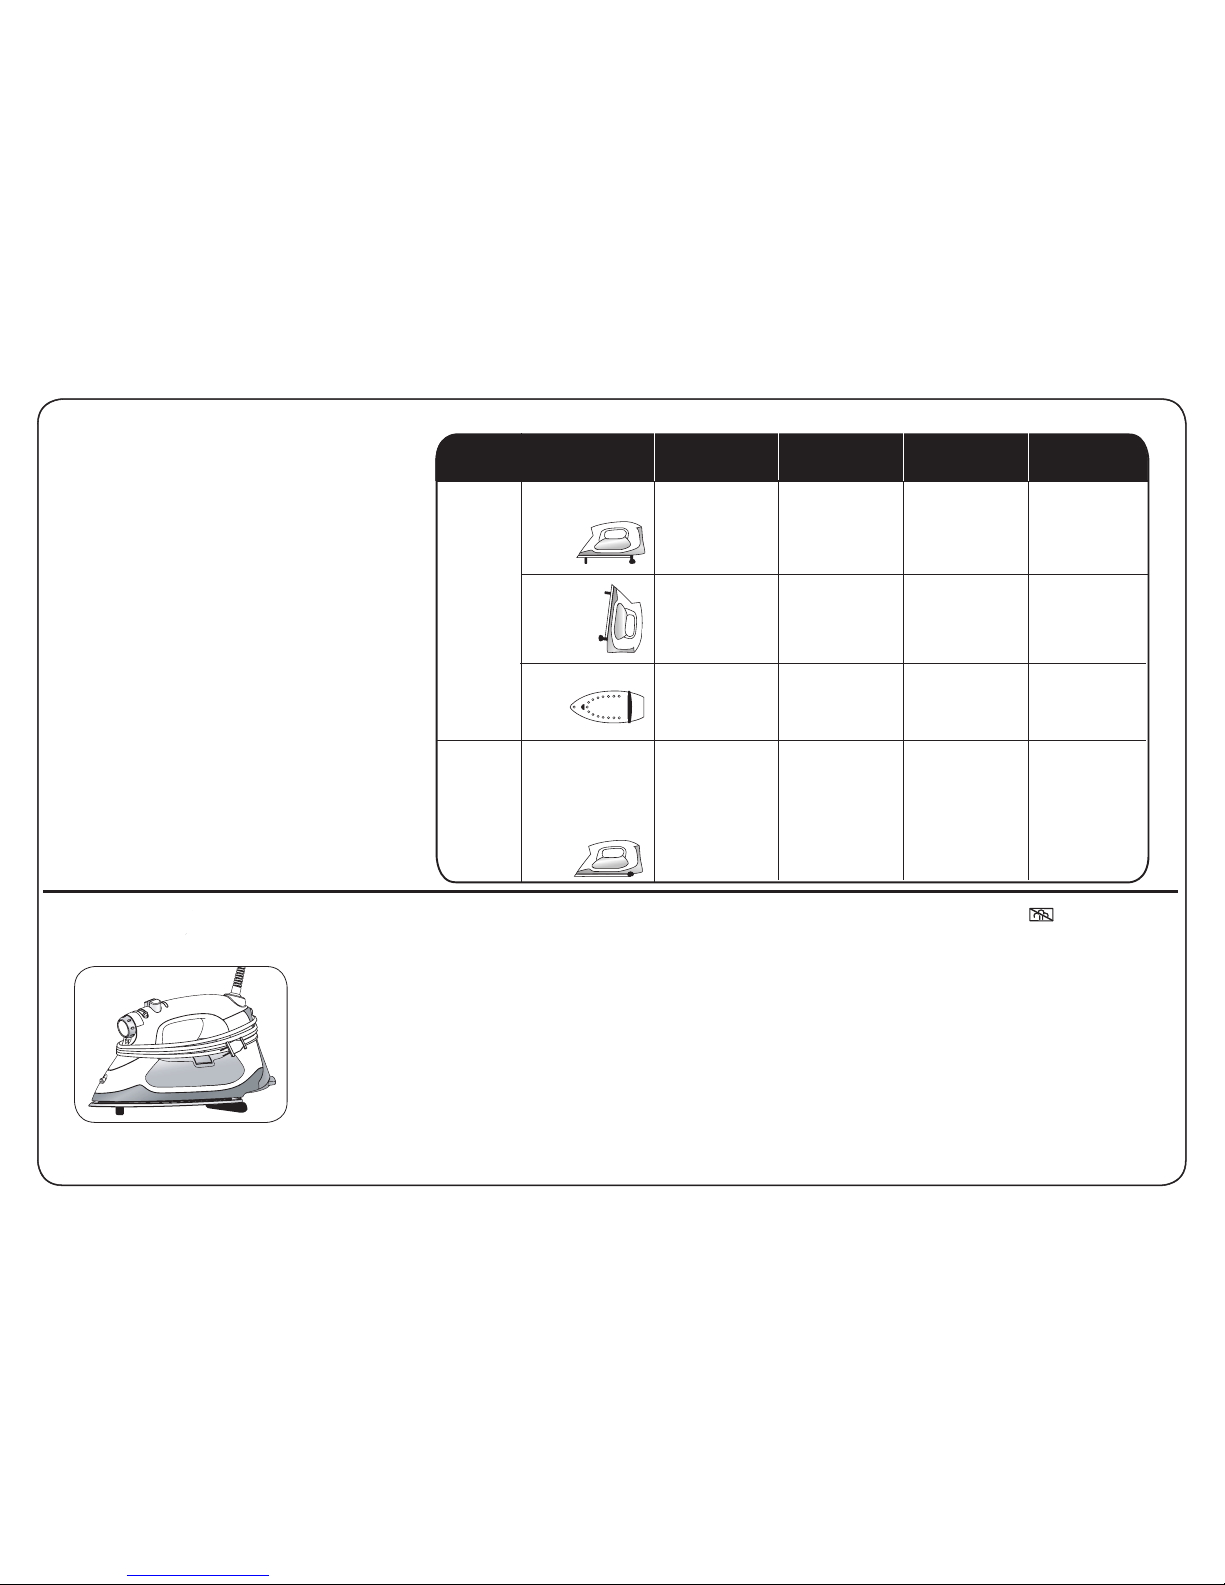
Iron Position
Horizontal,
Lifted
Vertical
Knocked Over
Horizontal,
(scorch guards
will pop out as a
safety feature)
If the Oliso® Smart Iron™ is not
being used while it is plugged in,
the status light will flash red and
the iron will turn itself off.
Simply touch the handle of the
iron to restart it.
Auto Shut-off System
After Ironing
e.
b. Unplug the appliance. (Do not hold iron while unplugging or the
scorch guards will not stay extended. Iron should always be stored with
scorch guards extended to prevent leaking).
c. Allow to cool throughly before storing.
d. Important: Empty water from the water tank after each use. To do this,
open the flip funnel™ and tilt the iron to the left over a water receptacle
until the tank is empty.
e. For easy storage, the power cord can be wound loosely around the iron
once it has cooled.
a. Turn the fabric selector to off. Slide the steam selector to off ( ).
TG1050
8 minutes
8 minutes
30 seconds
30 seconds
TG1250
8 minutes
8 minutes
30 seconds
30 seconds
TG1100
8 minutes
8 minutes
30 seconds
30 seconds
TG1600 PRO
30 minutes
30 minutes
30 seconds
3 minutes
iTouch™
ON
iTouch™
OFF
Page 8
6
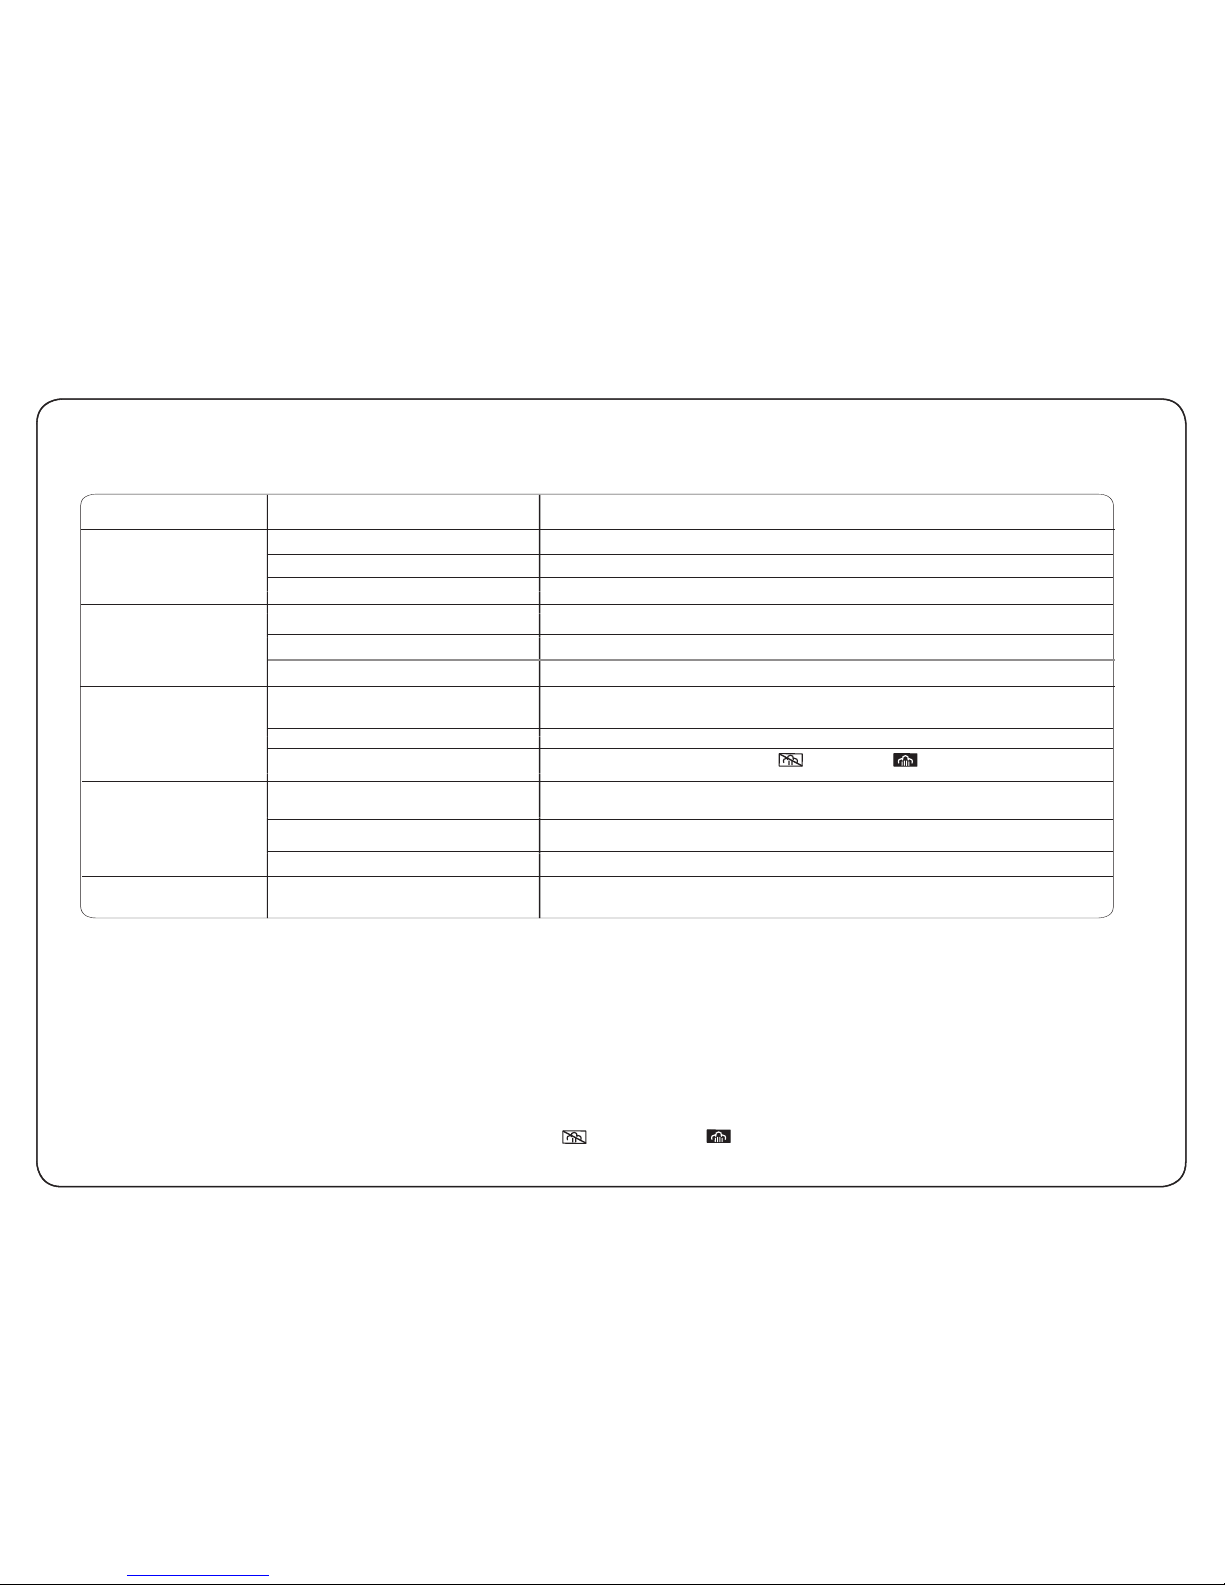
Iron does not heat
PROBLEM
THINGS TO CHECK
SOLUTION
Scorch guards do
not come out
Iron does not
steam
Iron leaks
Iron is emitting a brown
or white substance
Is fabric selector set to off?
Is iron plugged in correctly?
Is Auto shut-off system activated?
Is iTouch™ switch set to off?
Is iron plugged in correctly?
Is handle activated?
Is iron hot enough?
Is steam selector set to off?
Is steam valve clogged?
Is iTouch™ off, and iron is horizontal?
Is iron is hot enough?
Has steam burst button been overused?
Is water hardness too high?
Turn the fabric selector knob to a fabric setting.
Check to make sure the plug is fully plugged into the socket.
Touch the handle.
Set the switch on the back of the iron to the ON position.
Check to make sure the plug is fully plugged into the socket.
Move your hand away from the iron, and the iTouch™ Technology will raise the sole-plate.
The fabric selector must be set to the wool, cotton or linen settings to produce
continuous steam.
Steam selector must be turned to a setting.
Move the steam selector from off ( ) to the max ( ) settings a few times to
unclog.
When the iTouch™ switch is set to OFF, always store the iron in the vertical position. We
recommend turning on the iTouch™ Technology to store the iron.
Make sure the fabric selector knob is set to the cotton or linen range to ensure proper
steam production.
Allow 3 seconds between uses of the steam burst function.
Switch to either spring water or half tap/half distilled water mixture. See the “water
tank” page for more information.
Trouble shooting guide
Maintenance/Cleaning
The soleplate should be cleaned if starch or other residue builds up. When the iron is cool, wipe the soleplate with a soft, damp
cloth. Do not use abrasive cleaners or scouring pads as this will damage the iron’s soleplate.
Mineral deposits from tap water can occur in the soleplate vents. To clean, fill the water tank and heat the iron to the linen fabric
setting. Once the iron is fully heated, unplug the iron and hold over a sink. Press the steam button repeatedly until water begins to
drip out of the soleplate. Be careful, as this creates large amounts of steam.
To ensure optimal steam production, the steam valve should be regularly cleared of accumulated debris and minerals. This is done
by moving the steam selector back and forth from the off ( ) to the max ( ) steam settings several times.
© 2009 Oliso, Inc. All rights reserved. iTouch, Flip Funnel, and Smart Iron are trademarks of Oliso Inc. Oliso is a registered trademark of Oliso Inc. U.S. Patent No. #6,453,587 B1,
#6,925,738 B2. Patent Pending #40000031 <04/09>E Printed in China.
 Loading...