

Page 1

Frisper Freshkeeper 500
instruction manual
TM TM
Smart. Simple. Delightful.
TM
Page 2

Read all instructions before using this product
When using Frisper, basic safety precautions should always be followed, including the following:
.
1 ) Use Frisper only for its intended use.
2 ) To protect yourself against a risk of electric shock, do not immerse Frisper in
water or other liquids.
3 ) Never yank cord to disconnect from the outlet. Grasp plug and pull to disconnect.
Do not unplug Frisper when in use.
4 ) Clean Frisper’s puncture mechanism and drip tray after handling raw meat to
prevent bacterial contamination.
5 ) Frisper’s puncture mechanism is sharp. Please take caution when handling it.
6 ) Frisper’s heat coil stays warm for a few seconds after use. Please take caution
when handling it.
7 ) Protect your fingers while you are closing the Frisper lid.
8 ) Keep the Vac-Snap bag away from babies and children.
TM
9 ) Do not allow children to use Frisper. Close supervision is necessary for any
appliance being used near children.
10) Only use the AC adaptor that was supplied with Frisper.
SAVE THESE INSTRUCTIONS
2
Page 3

Welcome
Thank you for purchasing the Oliso™ Frisper™ Freshkeeper™ Countertop
Storage System. You’re just a few steps away from a whole new way of
storing your food. Follow the instructions in this manual and learn about
Frisper’s features and care. We hope you enjoy it!
Smart. Simple. Delightful.
3
Page 4
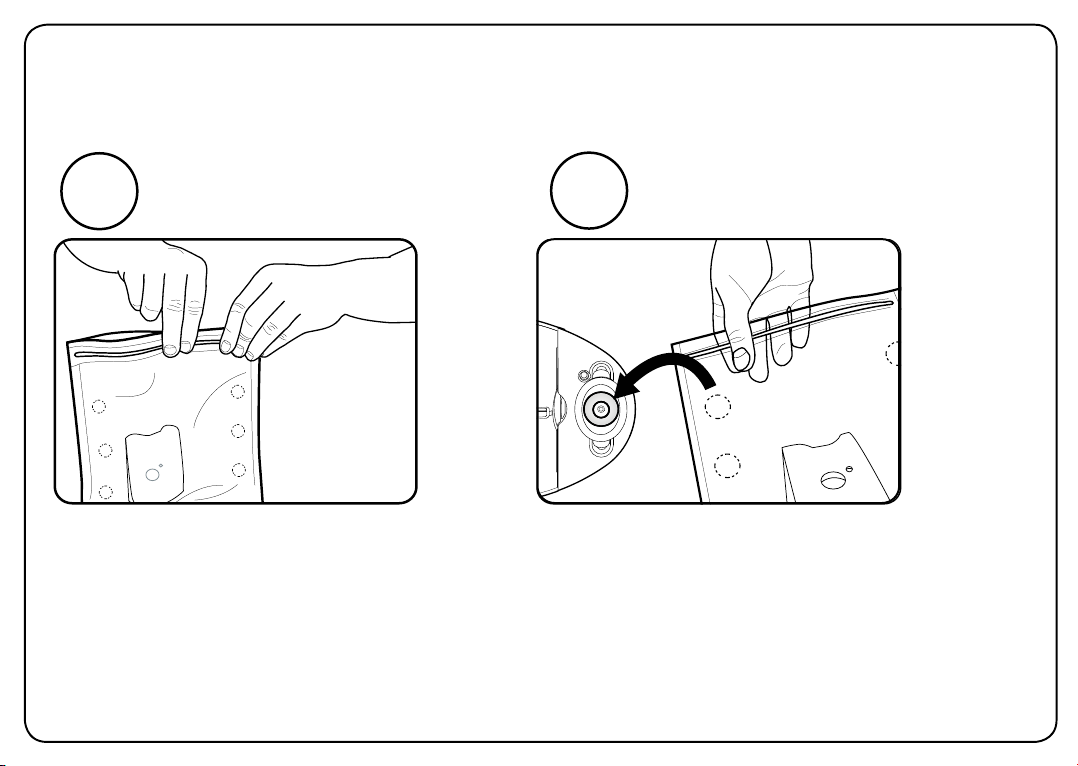
simple steps to start
1
Place the food in the Vac-Snap bag
and close the zipper securely.
If the zipper is not completely
closed, the Frisper will not be able to
draw a vacuum.
4
FILL
2
Line up the sealing circle on the
bag with the orange ring on the
Frisper.
LINE UP
Page 5
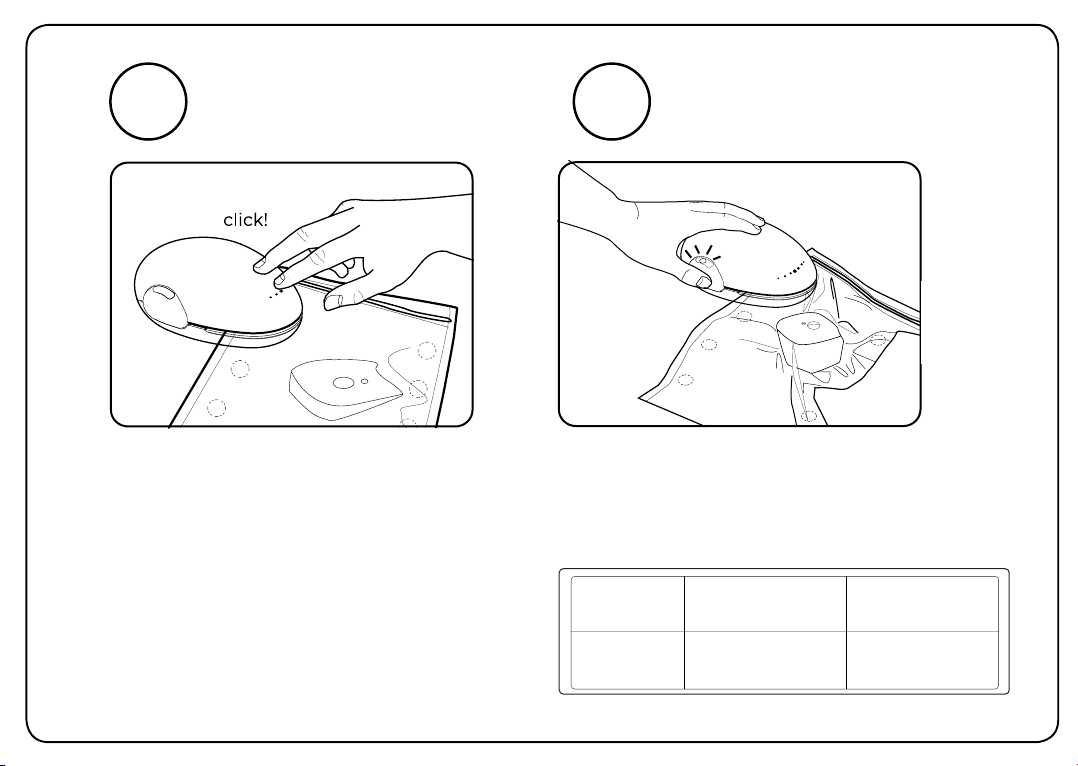
3
Close the lid over the Vac-Snap
bag and press down until you
hear a click. The Frisper vacuum
will start and you can let go of
the lid.
FRISP IT!
4
The process is complete when
the light flashes green. Press the
button to release the bag.
LIGHT SEQUENCE
green orange flashing green
PUSH THE BUTTON
on vacuum & seal done
THE COLOR OF THE LIGHT INDICATES THE STAGES OF THE FRISPING PROCESS.
5
Page 6
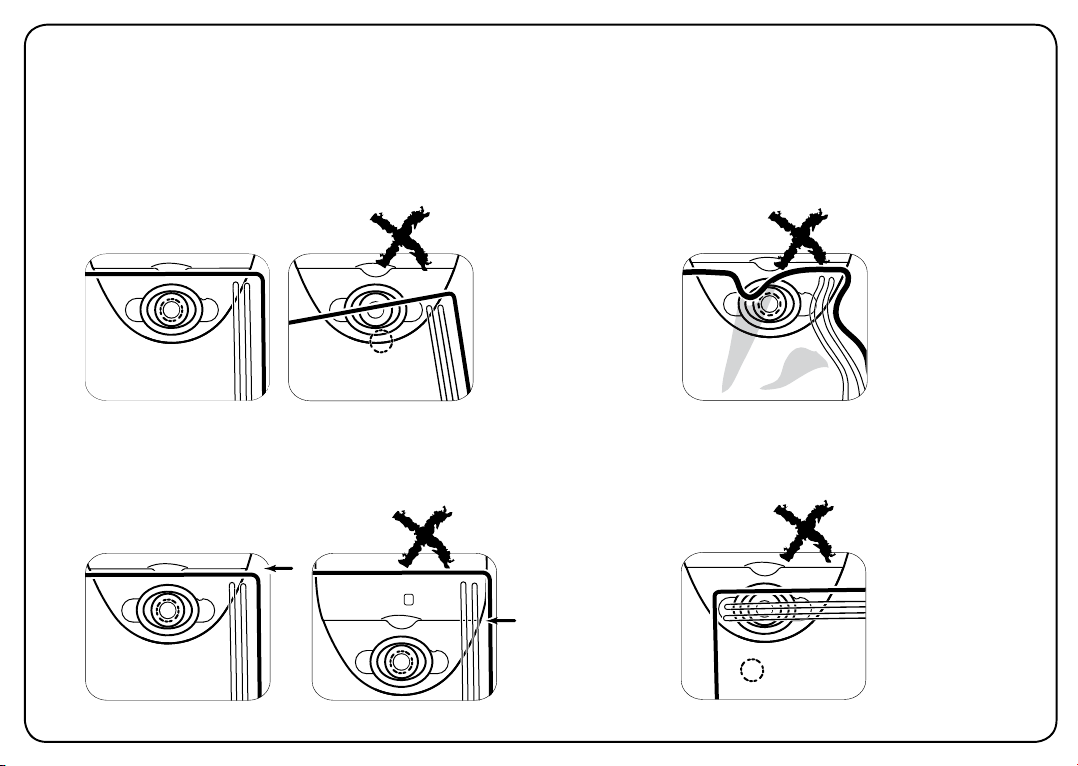
quick tips
a. Use the sealing circles and bag guides
to ensure that the bag is positioned
correctly every time.
good
c. Make sure that the bag is on the Liquid
Catch Tray but does not extend past it.
6
good
bad
bad
b. Position the bag so that it is flat and
smooth over the sealing area.
bad
d. Make sure that the zipper is not
vacuum sealed within the sealing area.
bad
Page 7
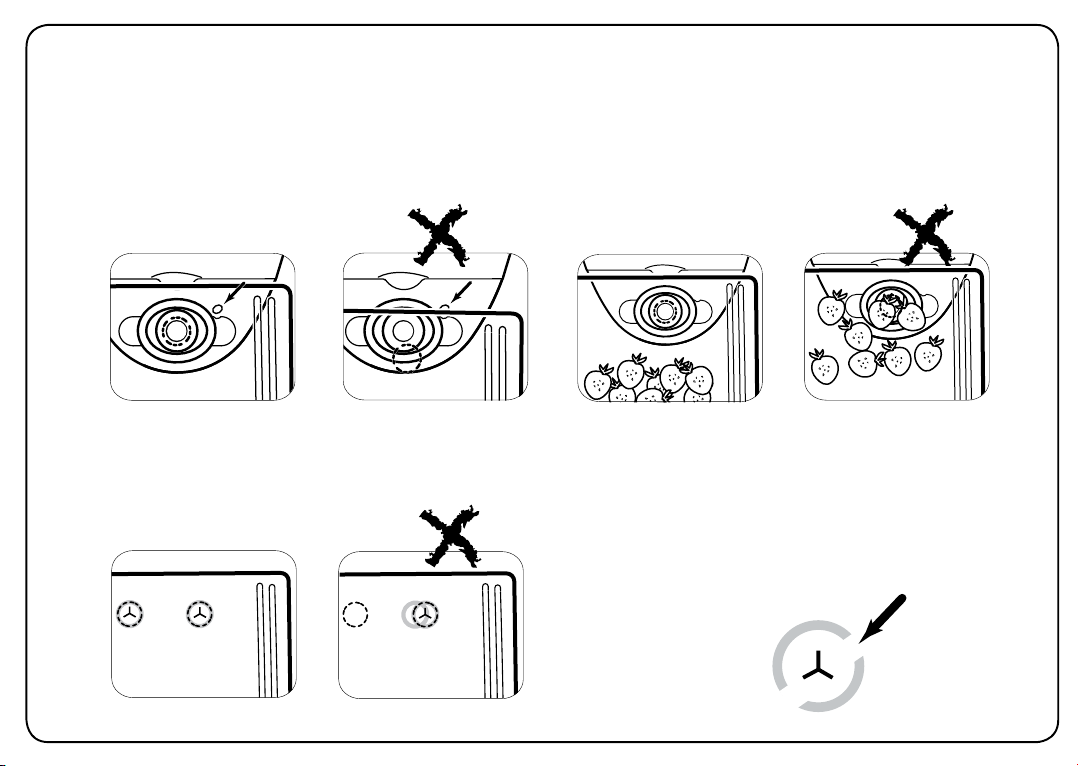
e. Check that the bag is covering the Bag
Sensor.
f. Food should not be in the sealing area
or interfere with the Frisper’s lid.
good
bad
g. Do not overlap the sealing circles.
Each time you reuse a bag, use a new
sealing circle.
good
bad
good
bad
h. If the bag leaks after it has been
sealed, the heat seal may be incomplete.
To fix an incomplete seal, redo the
vacuum seal process on the same
location. Then vacuum seal again on a
new sealing circle.
air leak
7
Page 8
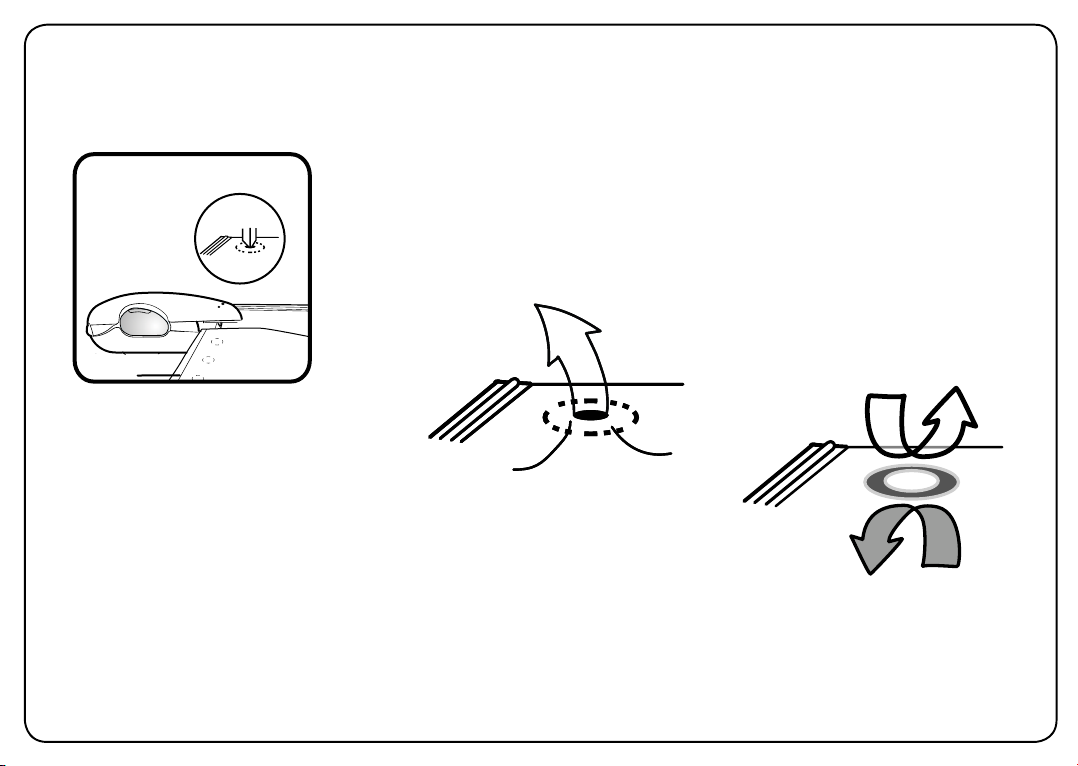
how Frisper works
As you close the lid, Frisper
punctures a small hole in the
bag.
The vacuum removes virtually
all the air inside the bag.
8
AIRAI
AI
R
F
R
E
S
H
The hole is closed by a
circular heat seal. This
creates an airtight
environment to maintain
your food’s freshness.
Page 9
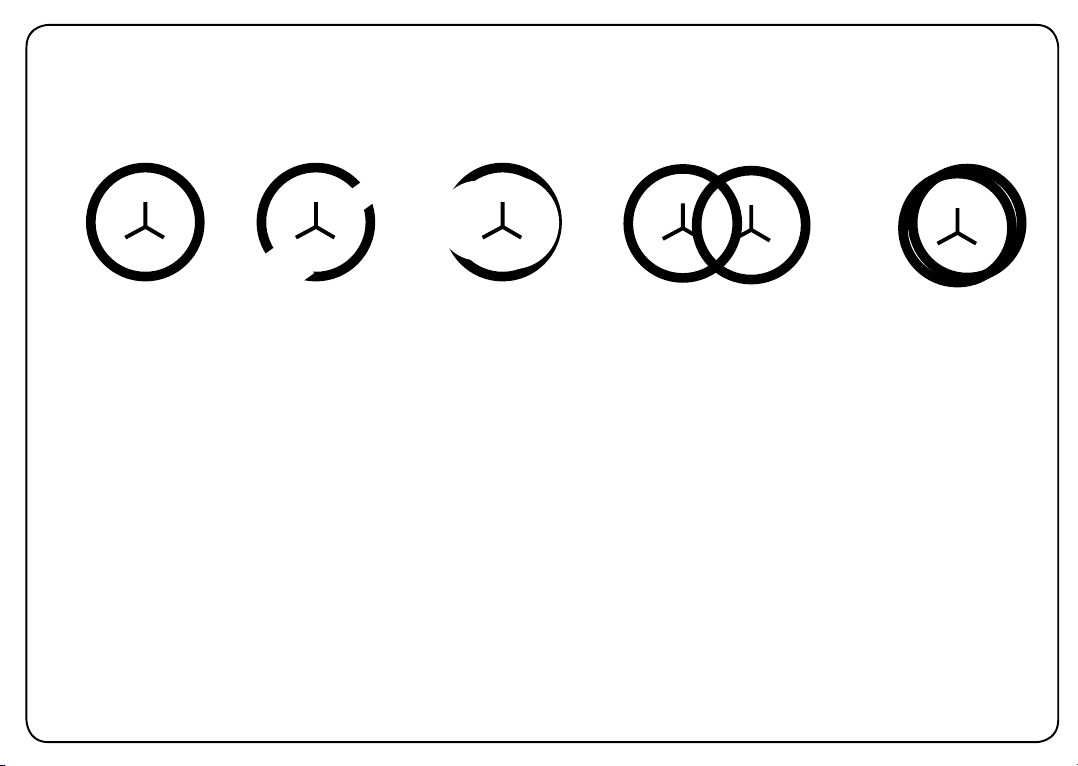
heat seals
GOOD BAD BAD
COMPLETE HEAT SEALS ENSURE THAT
YOUR BAG IS AIRTIGHT.
A good heat seal is a complete
circle with even thickness. If the
seal looks incomplete or deformed, repeat the vacuum sealing process in the exact same
location.
BAD
DO NOT OVERLAP SEALING CIRCLES *
BAD
When you are reusing a bag do
not overlap the sealing circles as
illustrated above. Sealing circles
that are overlapping will not have
an effective airtight seal.
*Note: You may overlap sealing
circles if you are attempting to
fix a broken seal.
9
Page 10
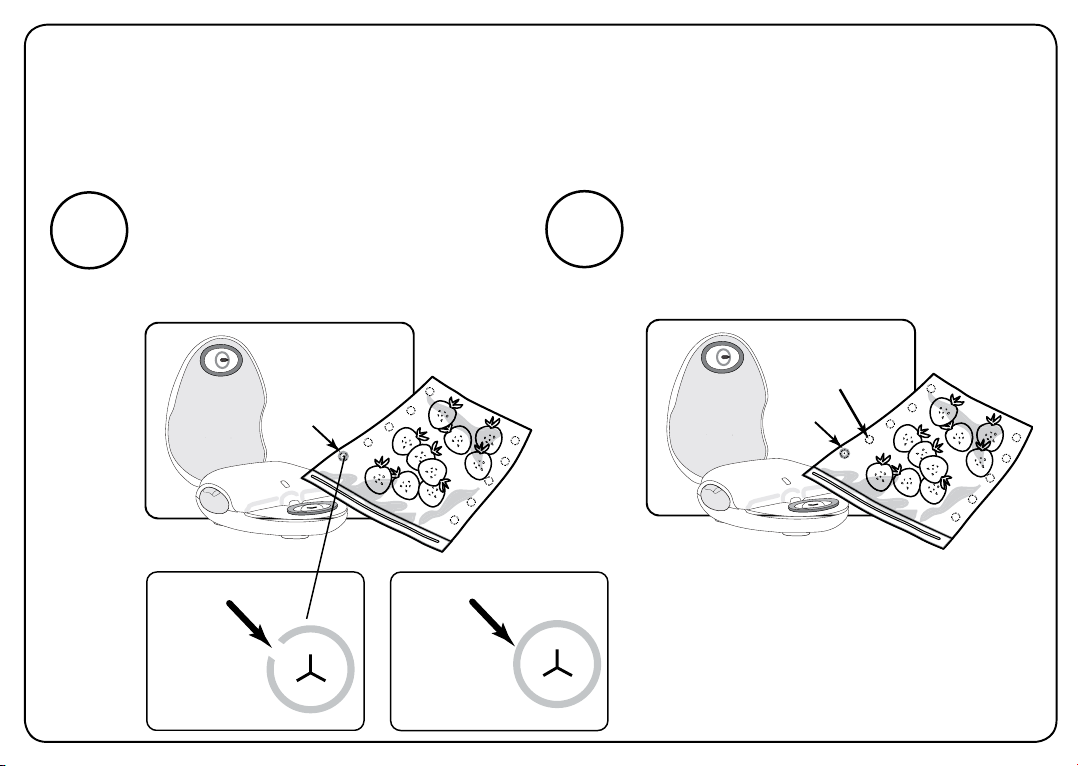
restoring incomplete seals
If the bag leaks after it has been sealed, the heat seal may
be incomplete. To restore an incomplete heat seal:
10
1
REDO SEAL
Redo the vacuum sealing process on the incomplete seal. Note: This step will restore the
incomplete seal but it will not vacuum seal
the bag.
redo
incomplete seal
air leak
fixed
2
START A NEW SEAL
Once you have restored the bad seal, find a
new sealing circle and start a new seal on this
location.
start a
new seal
fixed
Page 11
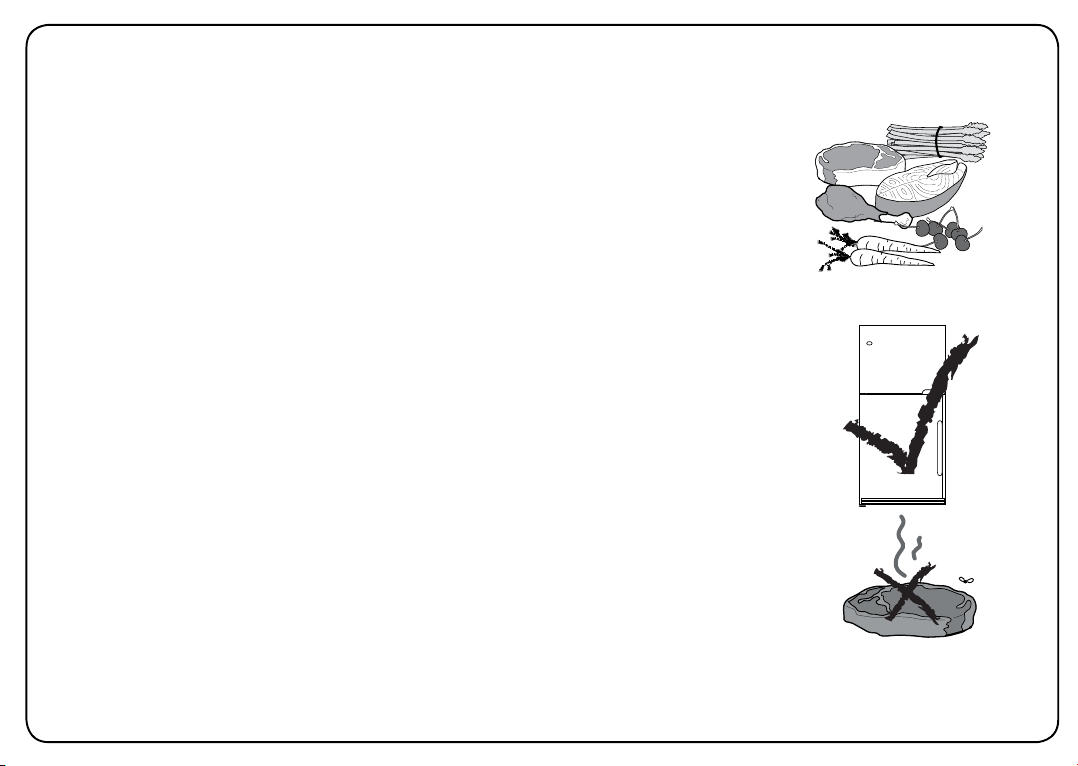
vacuum sealing basics
Vacuum sealing is a great way to preserve food’s quality.
Frisper Freshkeeper, with its small size and one touch
operation, makes the task convenient and easy.
Vacuum sealing is not intended to replace refrigeration
or freezing. Foods that normally require refrigeration (be-
low 40°F/4°C) or freezing (0°F/-17°C) even when vacuum
sealed, should still be refrigerated or frozen. Vacuum
sealing helps food retain flavor, color and texture. It may
not stop the growth of certain kinds of bacteria and yeast
fermentation. Vacuum sealing is not a substitute for heatpreserving or canning.
Vacuum sealers cannot restore or revive food that is past
its prime.
Do not serve or consume food that has the odor, texture,
or appearance of food that has gone bad.
11
Page 12
freezing
Vacuum sealing helps prevent freezer burn by removing
the air in a bag. There are other ways to further extend the
life of food in your freezer.
PLACEMENT
The back of a freezer has a more constant temperature
than areas near the door of a freezer. Delicate foods which
may thaw easily should be kept at the back of the freezer.
THAWING FOOD
For best results, thaw frozen foods in a refrigerator. Never
thaw raw meats, fish, dairy, or poultry at room temperature. Thawing by microwave may affect the texture of
foods. If thawing by microwave, begin cooking process
immediately after thawing, to prevent bacteria growth.
VACUUM SEALING SOUPS AND SAUCES
To vacuum seal soups and sauces, pour liquid in Frisper
bag and leave at least 2” of space at the top of the bag. Do
not vacuum seal at this point. Place filled bag upright in
freezer and allow liquid to freeze. Remove frozen bag and
12
vacuum seal it.
Page 13
fruit
For best results freeze fruit before vacuum sealing. Wash
and dry fruit. Then spread on a tray or cookie sheet. Place
the cooking sheet in the freezer for about 2 hours, then
transfer fruit to a Vac-Snap bag and vacuum seal.
vegetables
Frozen vegetables sometimes turn black if they are not
blanched before freezing. To blanch vegetables, fill a 4-5
quart pot with water and bring to a boil. Also, fill a large
bowl with ice water and have a colander or strainer on
hand. Add vegetable to boiling water and cook for the
times suggested on the next page. Vegetables should
retain a vibrant color and remain crisp and “undercooked”.
Remove from boiling water and plunge into ice water until
completely chilled. Drain as necessary, dry, and transfer to
a Vac-Snap bag for vacuum sealing.
13
Page 14
vegetable blanching guide
FOOD BLANCHING TIME
Broccoli florets - trimmed
Carrots - will depend on size and maturity
Cauliflower florets - trimmed
Corn on the cob
Green beans
Herbs - fresh
Leafy greens such as spinach or Swiss chard
Peas (shelled)
Sugar Snap peas
Summer squash sliced
TM
3-4 minutes
Start checking at 5 minutes
3-4 minutes
6-10 minutes
3-4 minutes
15 seconds
1-2 minutes
1-1.5 minutes
3-4 minutes
3-4 minutes
cruciferous vegetables
Because of the gasses they emit over time, cruciferous
vegetables should be kept in the freezer rather than refrigerator
after vacuum sealing. These vegetables include broccoli,
cabbages and Brussels sprouts, cauliflower, collards, kale,
kohlrabi, rutabagas and turnips.
mushrooms
Mushrooms need to breathe and should never be sealed in
plastic. The best way to store mushrooms is to place them in a
brown paper sandwich bag and keep them in the refrigerator.
14
Sugar Snap is a trademark of Syngenta Seeds, Inc.
TM
Page 15
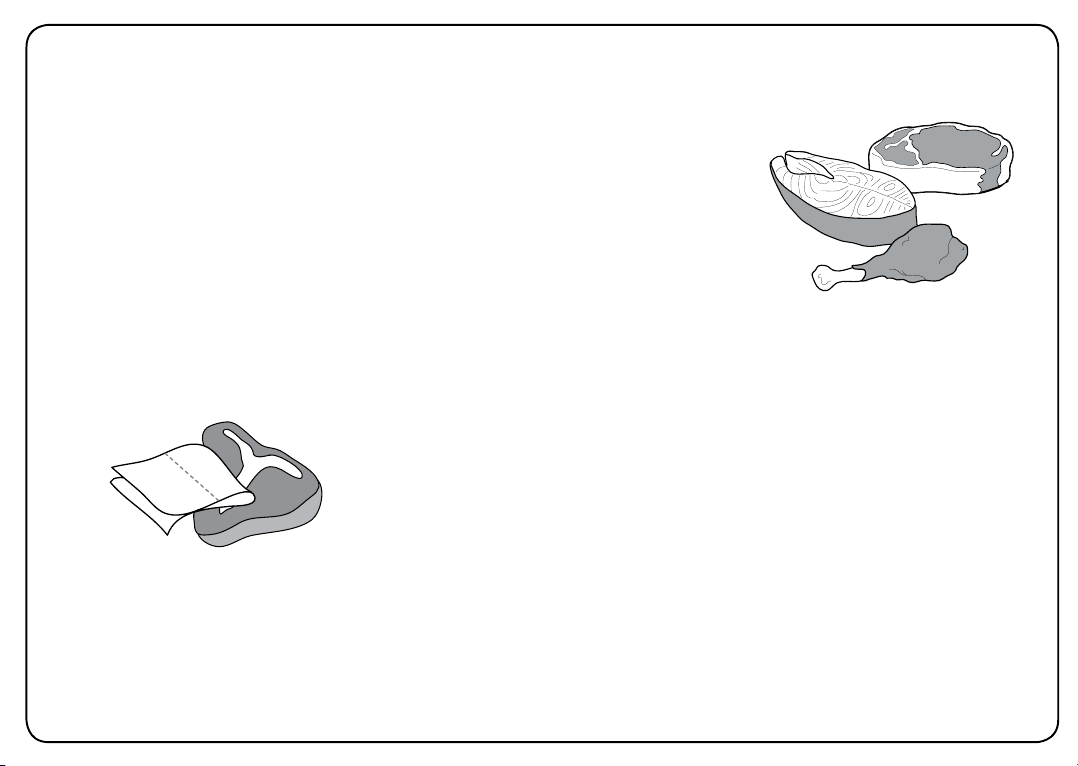
meat, fish, & poultry
For best results, wash and gently pat dry poultry or fish.
Beef, veal, lamb and pork should be patted dry. This extra
step saves you time when you are ready to cook and also
helps to maintain good moisture levels and shape. You
can also insert a paper towel into the bag before vacuum
sealing to absorb excess moisture and juices.
Use a clean paper towel to pat dry raw
meats before Frisping.
15
Page 16
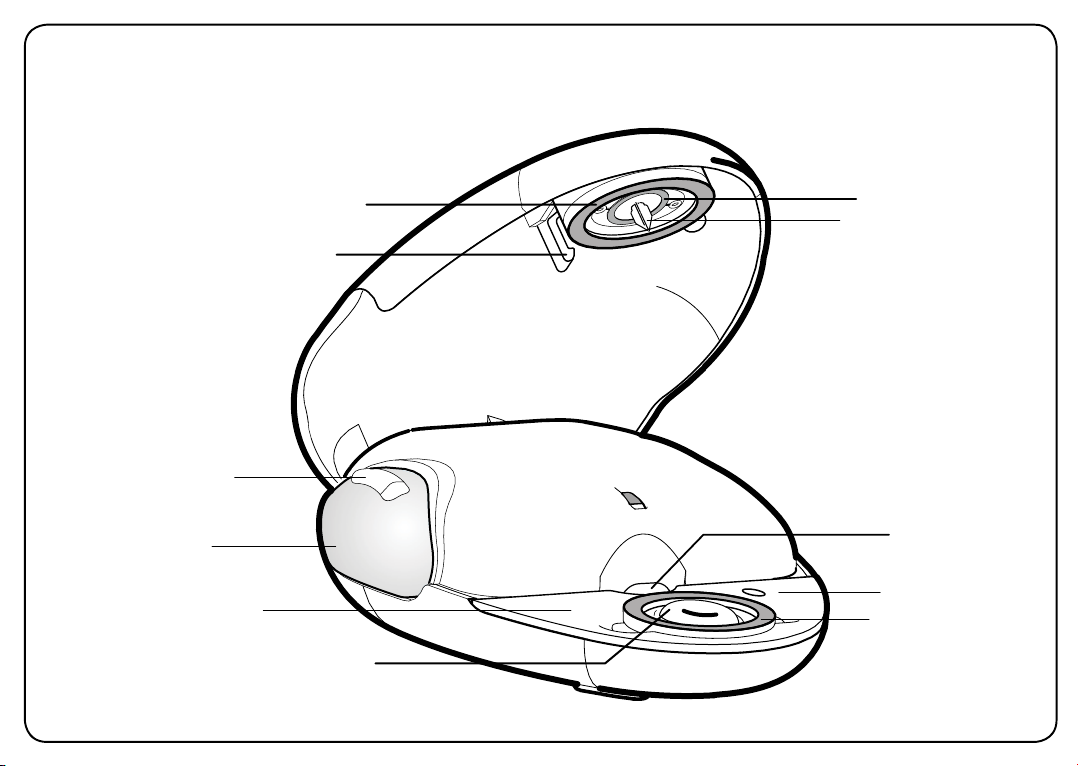
getting to know your Frisper™
foam press pad
latch
light
button
liquid catch tray
orange ring
16
heat seal
puncture
tray release tab
bag sensor
foam press pad
Page 17
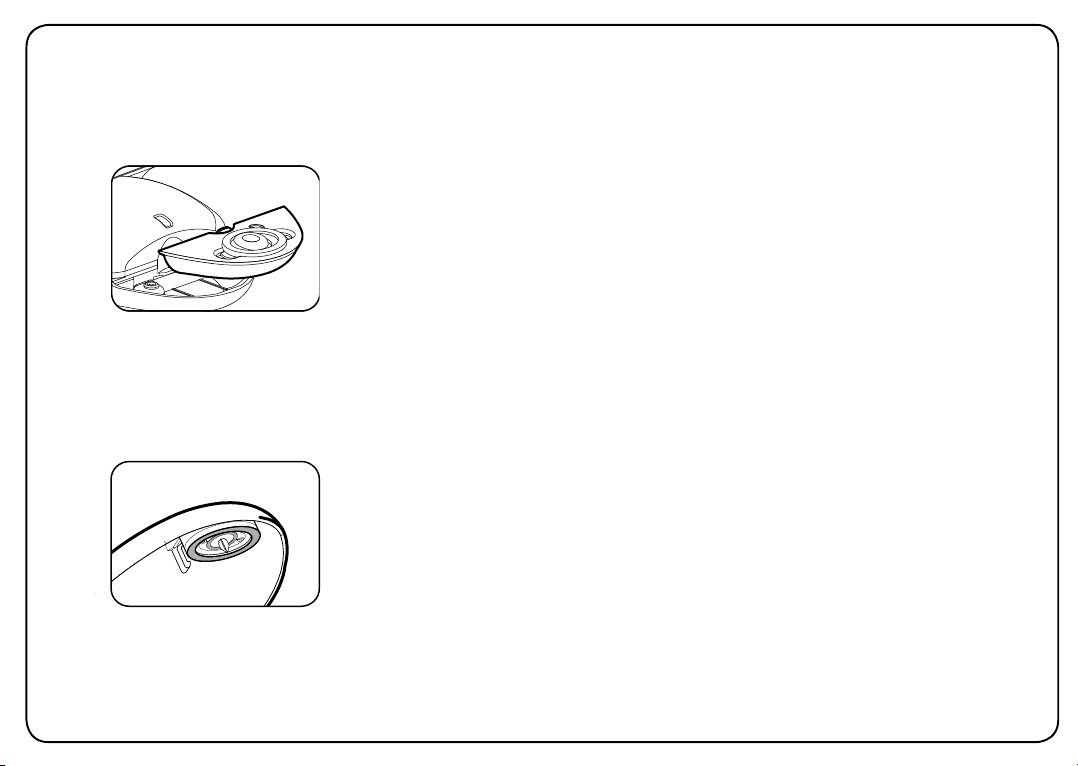
liquid catch tray
Your Frisper has an antibacterial liquid catch tray which
will hold any liquids that have been vacuumed out of
your bag. This allows you to vacuum seal wet foods
like raw meat and fish. It is dishwasher-safe for easy
cleaning.
bag puncture
The bag puncture is made of an antibacterial plastic to
prevent the growth of bacteria and germs. However,
it should still be cleaned with water and soap after
contact with raw meat and other food liquids.
The bag puncture creates a small hole in the Vac-Snap
bag, allowing your Frisper to vacuum out the air. Then
the heat seal permanently closes the hole keeping the
bag airtight.
17
Page 18
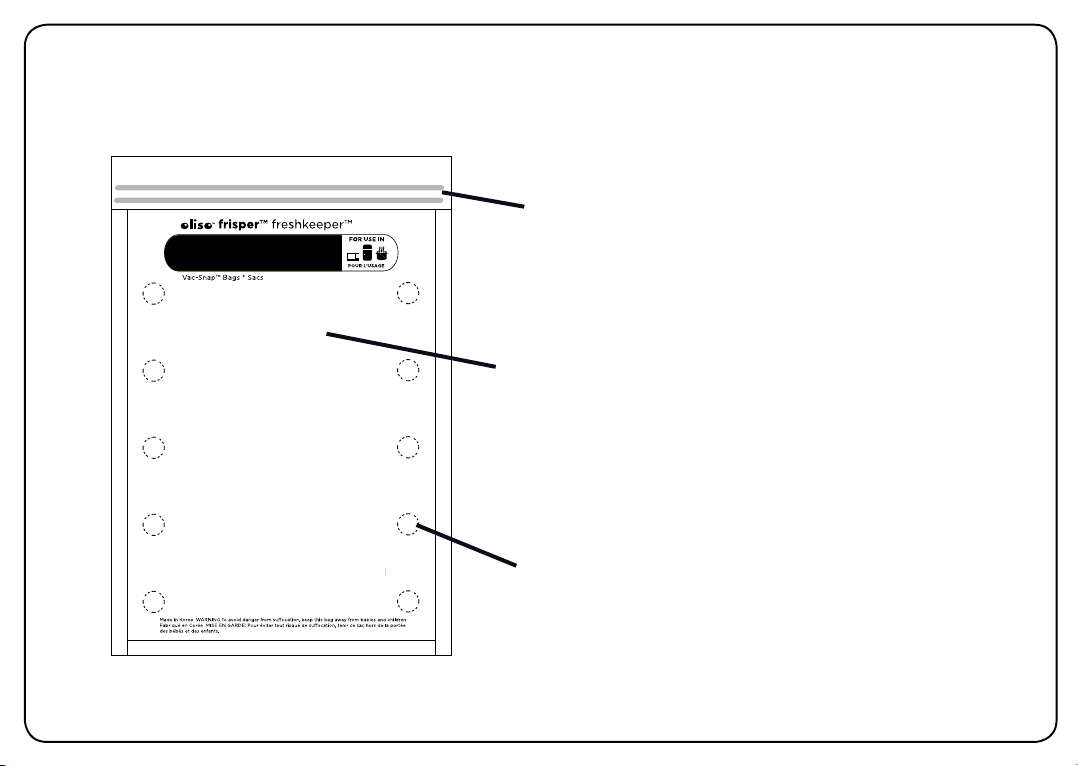
Vac-Snap™ bags
Zipper: Vac-Snap bags have zipper tops for
easy, anytime access to your fresh food. Place
your food in the bag and securely close the
zipper.
Uses:
Vac-Snap bags can be used for the fridge,
freezer, and pantry. Vac-Snap bags can also be
used in the microwave and can be simmered.
Sealing Circle: These circles provide a guide to
aligning the bag for vacuum sealing. Always align
the circle over the orange ring on the Frisper to
insure proper alignment.
18
Page 19
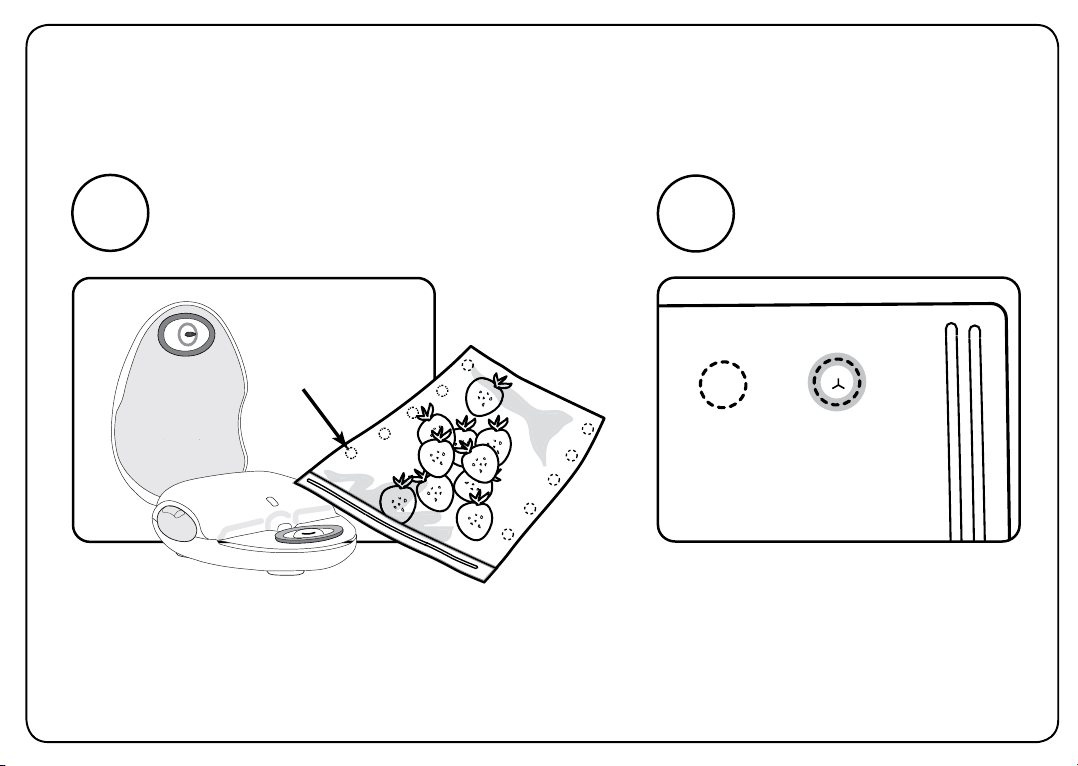
reusing Vac-Snap™ bags
1
The first time you use a bag, use
any sealing circle.
USE A SEALING CIRCLE
2
After vacuum sealing, bag will
be melted around sealing circle,
creating an airtight seal.
LINE UP
19
Page 20
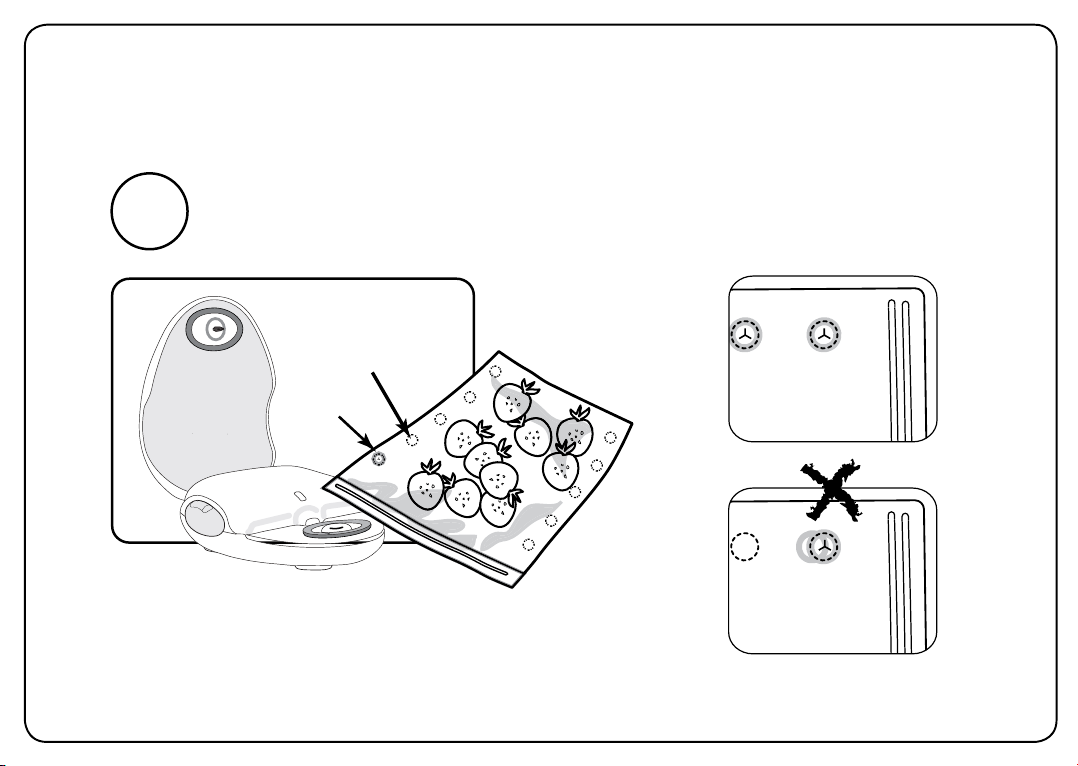
3
USE A NEW SEALING CIRCLE
unused
DO NOT REUSE SEALING CIRCLES OR
OVERLAP HEAT SEALS
20
used
To vacuum seal a bag again,
use a different sealing circle.
good
bad
Page 21
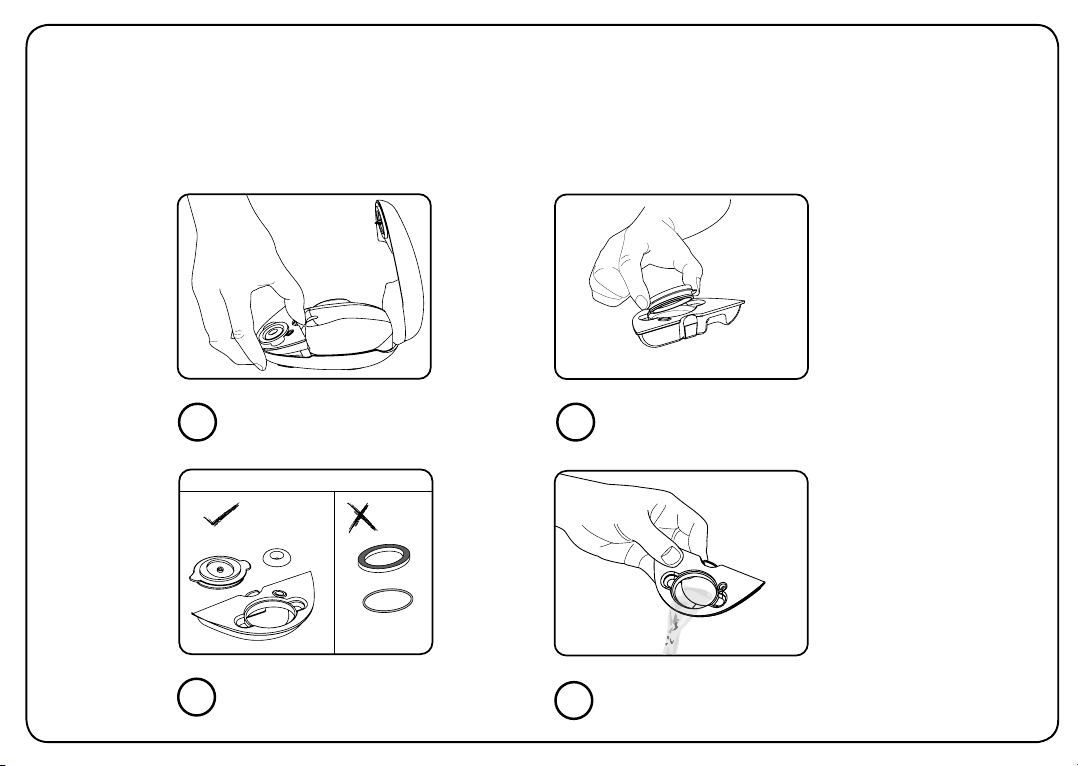
care and maintenance
1) Liquid Catch Tray The liquid catch tray can be removed from your Frisper. It can
be cleaned with warm, soapy water or in the dishwasher.
USE THE RELEASE TAB TO
1
DETACH THE CATCH TRAY.
DISHWASHER SAFE
THE ITEMS ON THE LEFT
ARE DISHWASHER-SAFE.
3
THE ITEMS ON THE RIGHT
ARE NOT.
REMOVE THE TRAY COVER.
2
POUR OUT LIQUIDS.
4
WASH WITH SOAP OR PLACE
IN THE DISHWASHER.
21
Page 22
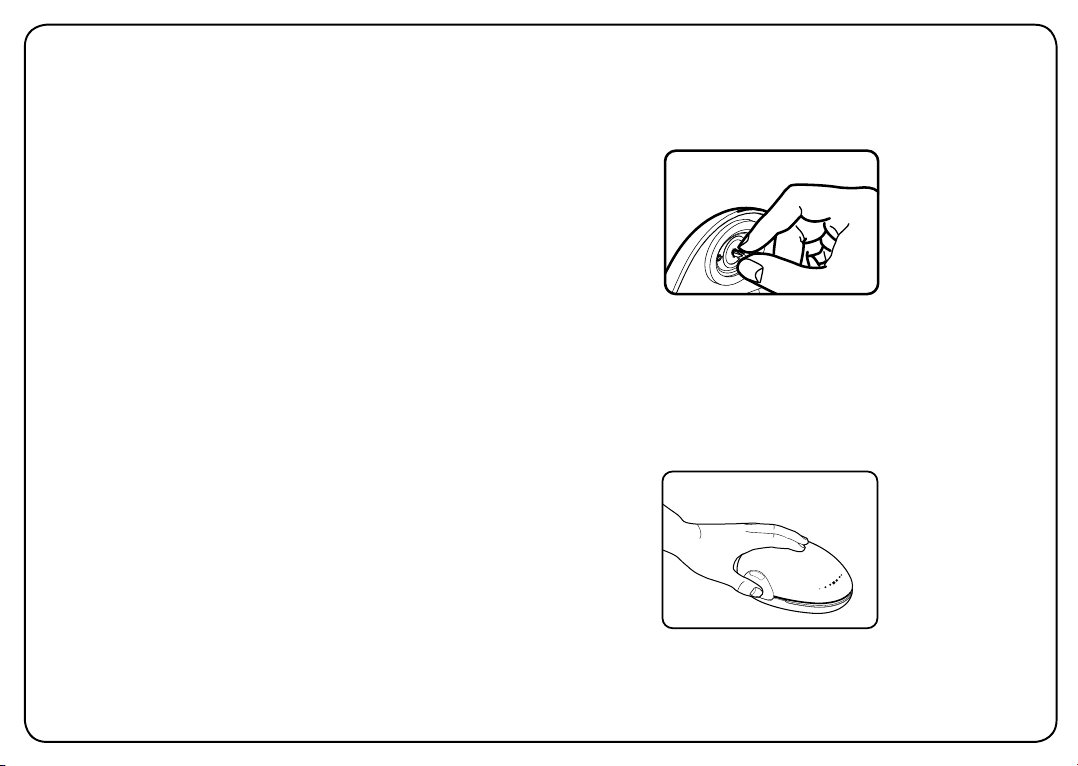
22
care and maintenance
2) Bag Puncture: The bag puncture is removeable,
replaceable, and dishwasher safe.
Removing the Bag Puncture: Unscrew the
puncture counter-clockwise to remove it. The
puncture can be cleaned with warm soapy water.
Your frisper comes with an extra bag puncture.
Replacing the Bag Puncture: Insert it into its slot
and screw it clockwise. Do not over-tighten it.
Note: The puncture is somewhat sharp. Please use
care when handling it.
3) Storing Your Frisper: Frisper is small enough
to stay on your counter. It can also be stored in a
cabinet or drawer.
It is best to store your Frisper with the lid
unlocked. This allows the foam press
pads to retain their original shape and size.
UNSCREW THE BAG PUNCTURE
COUNTERCLOCKWISE TO RELEASE IT.
THE BAG PUNCTURE IS SHARP.
USE CARE WHEN HANDLING IT.
PRESS THE BUTTON TO UNLOCK
THE LID BEFORE STORING
YOUR FRISPER. THIS HELPS KEEP THE
FOAM PADS IN GOOD SHAPE.
Page 23

One (1) Year Limited Warranty
Oliso, Inc. warrants that for a period of one year from the date of the original purchase, this product will be free from defects in material and
workmanship, when utilized for normal household use. Oliso, Inc. will repair or replace this product or any component of the product found
to be defective during the warranty period without charge to the customer. If a replacement product is sent, it will carry the remaining
warranty of the original product. Replacement will be made with a new or remanufactured product or component. If the product is no
longer available, replacement may be made with a similar product of equal or greater value. This is your exclusive warranty.
This warranty is valid for the original retail purchaser from the date of initial retail purchase and is not transferable. Keep the original sales
receipt. Proof of purchase is required to obtain warranty performance. Oliso, Inc. dealers or retail stores selling Oliso, Inc. products do not
have the right to alter, modify or in any way change the terms and conditions of this warranty.
The liability of Oliso, Inc. is limited solely to the cost of repair or replacement of the product at its option. This warranty does not cover
normal wear of parts and does not apply to any product that has been tampered with or used for commercial purposes. This warranty
does not cover damage caused by misuse, abuse, use on improper voltage or current, use contrary to the operating instructions, negligent
handling or damage due to faulty packaging or mishandling in transit. This warranty does not cover damage or defects caused by or
resulting from damages from shipping or repairs, service or alteration to the product or any of its parts, which have been performed by a
repair person not authorized by Oliso, Inc. Further, the warranty does not cover Acts of God such as fire, flood, hurricanes, and tornados.
This warranty is extended to the original purchaser of the product and excludes all other legal and/or conventional warranties. The
responsibility of Oliso, Inc. is limited to the specific obligations expressly assumed by it under the terms of the limited warranty. In no event
shall Oliso, Inc. be liable for any incidental or consequential damages caused by breach of any express, implied or statutory warranty or
condition.
Except to the extent prohibited by law, any implied warranty or condition of merchantability or fitness for a particular purchase is limited
in duration to the duration of the above warranty. Oliso, Inc. disclaims all other warranties, conditions, or representations, express, implied,
statutory or otherwise. In no event shall Oliso, Inc. be liable for any indirect, special, incidental or consequential losses or damages (including
but not limited to interruption of business or loss of business or profit) resulting from the use of or inability to use the product, any breach
of contract, fundamental or otherwise, or for any claim brought against purchaser by any other party. Some states or jurisdictions do not
allow the exclusion or limitation of incidental or consequential damages or limitations on how long an implied warranty lasts, so the above
limitations or exclusion may not apply to you.
If you have any question regarding this warranty or would like to obtain warranty service, please email Oliso, Inc. at customerservice@
frisper.com, and a service center address will be provided to you. If you have further questions, you may call 1-800-481-7978.
23
Page 24

troubleshooting
PROBLEM
Frisper is not working.
Sound is present.
24
THINGS TO CHECK SOLUTION
Sealing circles are overlapping.
Sealing on the same sealing
circle.
Sealing circle is lined up with
the silicone ring.
Existing seals form a full circle
with even thickness. See page 9.
The Liquid Catch Tray is clogged.
Press Pads are obstructed.
Bag is not flat and smooth over
the sealing area.
Zipper is not securely closed.
Parts are missing or incorrectly
installed.
Press Pads are deformed.
Re-seal the overlapped circle. Then find a new
sealing circle to use. See page 10.
Find a new sealing circle to use. See page 10.
Re-seal the overlapped circle. Then find a new
sealing circle to use. See page 10.
If you have perfomed steps on page 10 and you
continue to have air leaks, throw away bag.
Remove the tray and clean it. See page 21.
Clear out any food that is in the sealing area and
reposition the bag. See page 7.
Re-position the bag so that there are no creases
or folds in the sealing area. See page 6.
Close the zipper securely. Run your fingers through
the zipper-top. See page 4.
Assemble the parts as illustrated on page 21.
Remove the press pads and let it sit out for several
hours to return to original shape. See page 21-22.
Page 25

troubleshooting
PROBLEM
Frisper is not working.
Sound is not present.
Heat seal is incomplete.
Bag is leaking.
THINGS TO CHECK SOLUTION
LED is on and green.
Bag sensor is engaged.
Lid is closed and locked.
Using the wrong AC Adaptor
Bag and food is too wet.
Heat seal is too hot.
Existing seals are incomplete or
leaking. See page 9-10.
Zipper is not securely closed.
Plug in the AC Adaptor.
Reposition the bag using the same pucture hole so
that the bag sensor is covered. See page 7e.
Put your finger over the dots on Frisper and push
down until you hear a click. See page 5.
Use the supplied
Minimize food liquids. Pat dry raw meat. See pages
12-15 for recommendations on handling food.
Wait at least 5 seconds between each use of Frisper.
Re-seal the incomplete circle. Then find a new
sealing circle to use. See page 10.
Close the zipper securely. Run your fingers through
the zipper-top. See page 4.
Oliso AC Adaptor.
25
Page 26

index
bag puncture
care and maintenance
replacing
care and maintenance
customer service
contact us
frisper
care and maintenance
how it works
steps for use
parts
storing
heat seals
incomplete seals
restoring
light
indicator
sequence
liquid catch tray
care and maintenance
cleaning
26
17
21
22
21-22
27
27
21-22
8
4-5
16
22
8-10
9-10
10
5
5
17
21
21
safety instructions
vacuum sealing
blanching guide
freezing
fish
fruit
meat
poultry
refrigeration
vegetables
Vac-Snap bag
how to reuse
leaking
overview
position
steps for use
sealing circle
zipper
tips for usage
troubleshooting
warranty
2
11
14
12
15
13
15
15
11
13-14
19-20
10
18
6-7
4-5
4
6-7
6-7
24-25
23
Page 27

For product questions:
Oliso Customer Service
www.oliso.com
www.frisper.com
1-800-481-7978
© 2007 Oliso, Inc. All rights reserved. Frisper™, Frisp™, Freshkeeper™, Vac-Snap™, Oliso™ are
trademarks of Oliso Inc. Printed in China
Patent Pending
Part number: 59001001
27
Page 28

Thanks for shopping Oliso!
Visit www.frisper.com/registration.html to register your frisper
or
www.frisper.com to buy a 5 year warranty
 Loading...