

Page 1
1
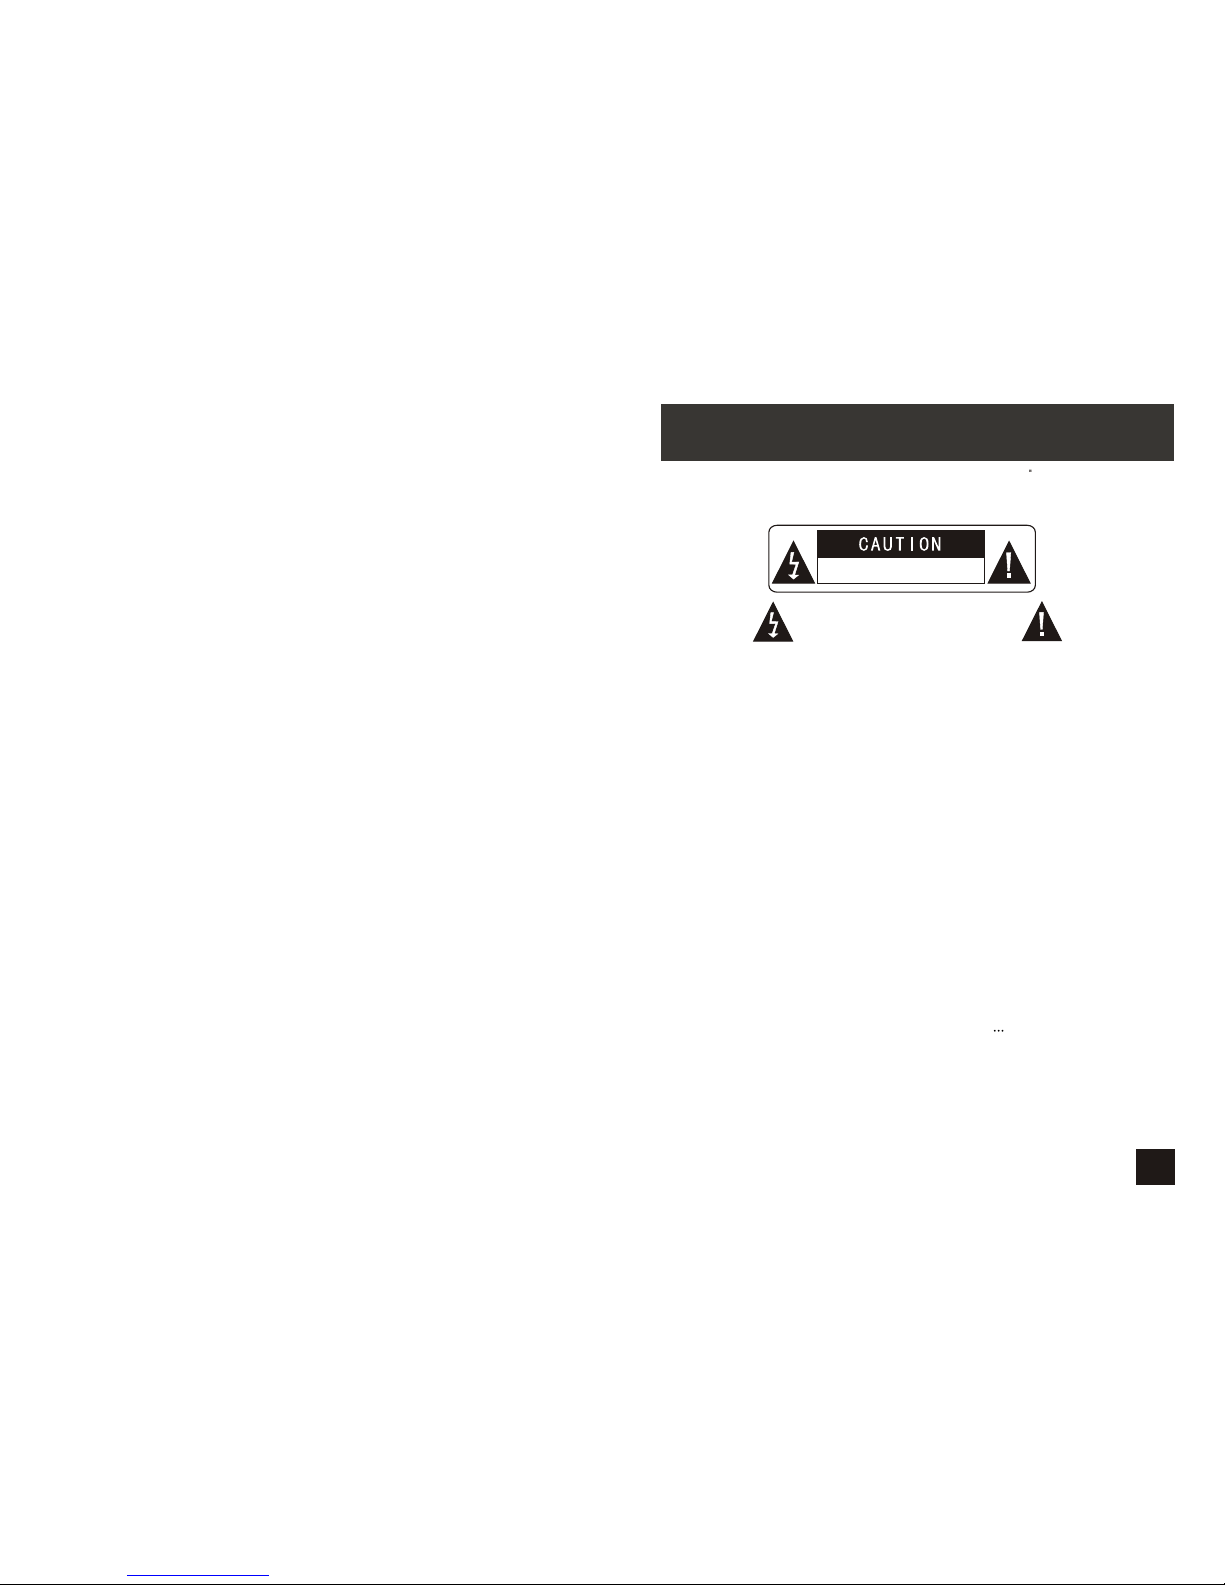
Warning: To reduce the risk of fire or electric shock, do not expose this apparatus to rain
or moisture.
1) Please read the instruction manual carefully and follow all the requirements of safe
operation to operate the device.
2) Do not use this unit near water. Do not place over the unit any container with liquid
inside.
3) Do not install near any heat sources such as radiators, heat registers, stoves, or other
apparatus (including amplifiers) that produce heat.
4) Unplug this unit during lightning storms or when unused for long time.
5) About Cleaning: Unplug the system, use only wet cloth to clean. Do not use liquid
detergent or aerosol.
6) Only use accessories specified by the manufacturer.
7) Refer all servicing to qualified service personnel, servicing is required when the unit
has been damaged in any way, such as power supply cord or plug is damaged, liquid
has been spilled or objects have fallen into the unit, exposed to moisture, does not
operate normally. Don't try to repair the machine by yourself because of the danger of
high voltage and electric shock.
8) Do not use irregular shaped discs such as heart or star-shaped discs as they may
Cause the unit to malfunction.
Hi-voltage, Don't Open it
Remind user to be careful to
avoid electric shock
Thank you for choosing our portable DVD player. It includes a 9 wide screen DVD player.
The unit applies the latest state of art electronics and is designed for use at home, in
hotels and in offices etc for relaxation. The compact size makes carrying easier as well
as installation. Please read the manual carefully prior to use and keep it well for later
consultation.
SAFETY PRECAUTION
9)
)
)
)
)
)
)
)
Please ensure enough clearance around the receiver for good ventilation. Any
objects and the appliance should be at least 10 cm apart.
10 The ventilation should not be impeded by covering the ventilation openings with
items, such as newspapers, table-cloths, curtains, etc
11 No naked flame source, such as lighted candles, should be placed on the apparatus
12
13 Attention should be drawn to the environmental aspects of battery disposal.
14 CAUTION : Danger of explosion if battery is incorrectly replaced. Replace only with
the same or equivalent type.
15 The mains plug is used as the disconnect device, the disconnect devices shall
remain readily operable.
16 Only used with the provided adaptor model no.: HNC090100X.
Battery shall not be exposed to excessive heat such as sunshine, fire or the like.
Page 2

TABLE OF CONTENTS
2
Olin_Portable_DVD_Player_PD-9910_User_Manual_V1
SAFETY PRECAUTION
TABLE OF CONTENTS
PACKAGE CONTENTS/MAIN FEATURES
ABOUT OPTICAL DISCS
MAIN UNIT
SYSTEM CONNECTION
THE REMOTE CONTROL
BASIC OPERATION
PLAYING JPEG FILE
SYSTEM SETUP
SPECIFICATION
BATTERY
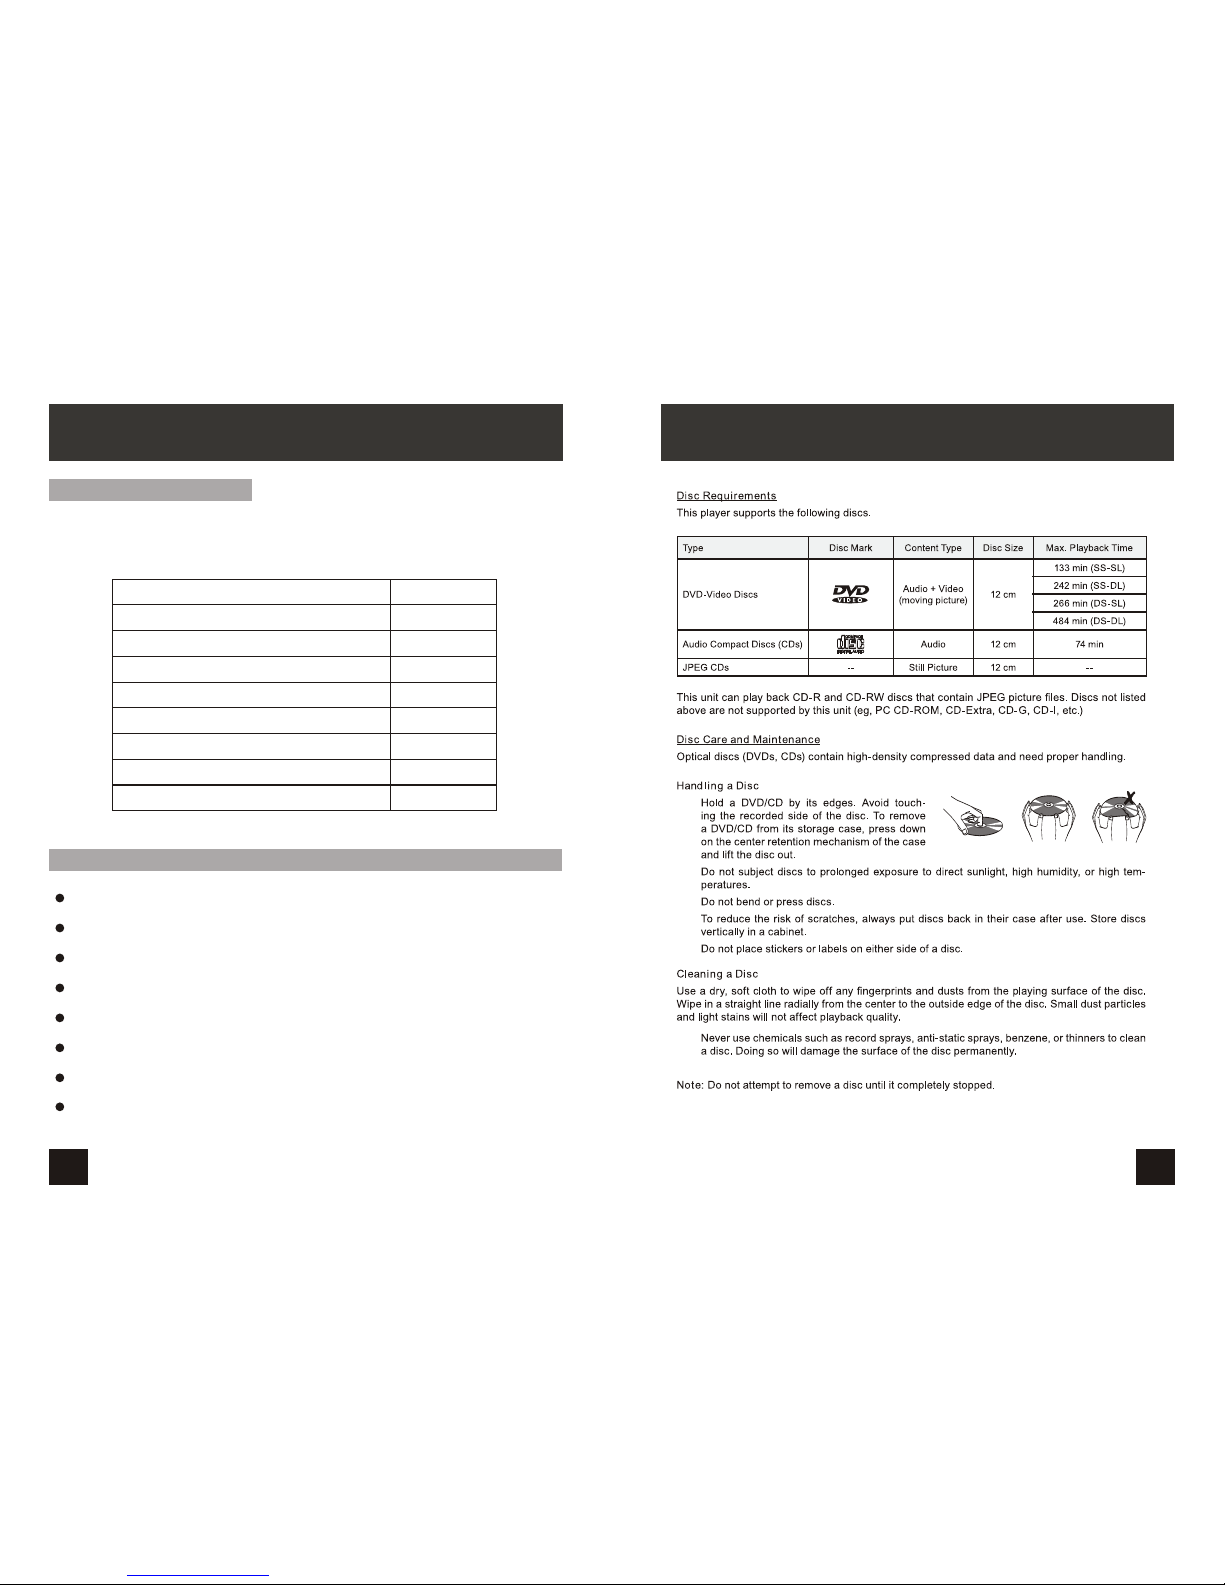
Package contents
Main Features
Disc Requirements
Disc Care and Maintenance
Powering and installation
Connecting to the slave screen
The Use of Remote Control
Fast forward and fast backward
Repeat playing
Repeat playing of favorite scene
Angle
Zoom In/ Out
Playing JPEG file
Playing MP3 files
General Setup Page
Audio Setup page
Video Setup Page
Preference Page
Rechargeable Battery Use
Precautions related to Battery Recharge
Using and Maintaining Rechargeable Battery
TROUBLESHOOTING
1
2
4
4
4
5
5
5
6
8
8
9
11
12
13
14
14
15
15
15
16
16
16
17
17
18
19
19
21
22
22
22
22
24
10
MOUNTING BAG
23
7
SLAVE SCREEN
Audio and video signal output
WARRANTY STATEMENT
26
3
QUICK INSTALLATION GUIDE
Designed to make the device setup procedure easier:
STEP 1
Remove the Main Unit, Monitor and all accessories of the player from packaging.
Pull the tab from the remote control to activate it.
STEP 2
For clear viewing on display panel or to remove the air bubble, users may lift the
clear protection shield off the screen.
STEP 3
Find the DC/AV cable (two ends are identical) from the accessories, plug one end
into DC OUT and AV OUT socket in Main Unit, plug the other end into the DC IN 912V and AV IN socket in Monitor
STEP 4
Plug one end of the power adaptor/car adaptor into the portable DVD Main Unit's
DC IN 9-12V socket, and plug the other end into the power socket/12VDC Car
Cigarette Lighter Socket if you use in car.
STEP 5
Make sure power switch is set to OFF and the battery will start to charge while battery
recharge indicator light turns red. The indicator light will turn Blue if the unit is fully charged.
STEP 6
Activate the power by turning the power switch of both Main Unit and LCD Monitor to
ON, made sure the OLIN welcome screen display on Main Unit and Monitor.
STEP 7
Slide the latch on the top left side of the Main Unit to open the disc cover and insert
a DVD disc into the drive.
STEP 8
You can see the unit is loading DVD and you are ready to watch. More instructions
are in user manual.
STEP 9
To access contents from USB device or SD card, just simply plug in USB device or SD
card, if no DVD disc is in Main Unit, then a window will popup to show all available
Media Sources. Use navigation buttons to highlight the file name and press OK to
confirm/play. If you have multi Media Sources, use MODE buttons from remote or
front panel of Main Unit to select.
WARNING:
THIS MODEL AND ITS ENCLOSED CAR ADAPTOR ARE ONLY
COMPATIBLE WITH 12V VEHICLES.
THIS MODEL IS NOT COMPATIBLE WITH 24V VEHICLES. (TRUCK/BUS)
DO NOT CONNECT THE UNIT TO THE CAR VIA CAR ADAPTOR BEFORE
THE ENGINE HAS BEEN STARTED.
PLEASE NOTE:
THE BATTERY ONLY CAN BE CHARGED WHEN THE SWITCH IS IN OFF POSITION.
DISCONNECT THE CAR ADAPTOR WHEN IT IS NOT IN USE.
THE INTERNAL BATTERY IN MAIN UNIT ONLY SUPPORTS ITSELF BUT
NOT THE MONITOR.
QUICK INSTALLATION GUIDE
3
Page 3
High brightness color 9” LCD screen
Compatible with disc of DVD,VCD,MP3,CD,JPEG,etc
Built-in stereo speakers
Built-in rechargeable Lithium polymer battery
Support PAL or NTSC system
Support speed forward/backward,repeat function
Zoom in/out function
Built-in Low Battery Remind
Main Features
1
1
1
1
1
1
2
Remote Control with battery
AC/DC Power Adapter
Cigarette Lighter Adapter
User Manual
Headphone
1
DC+Audio/Video Cable
DVD Player
9 '' LCD Monitor
4
Mounting Bag
2
PACKAGE CONTENTS/MAIN FEATURES
Please make sure the following items are included in the package. If any
item is missing, contact your dealer.
Package contents
ABOUT OPTICAL DISCS
5
Page 4
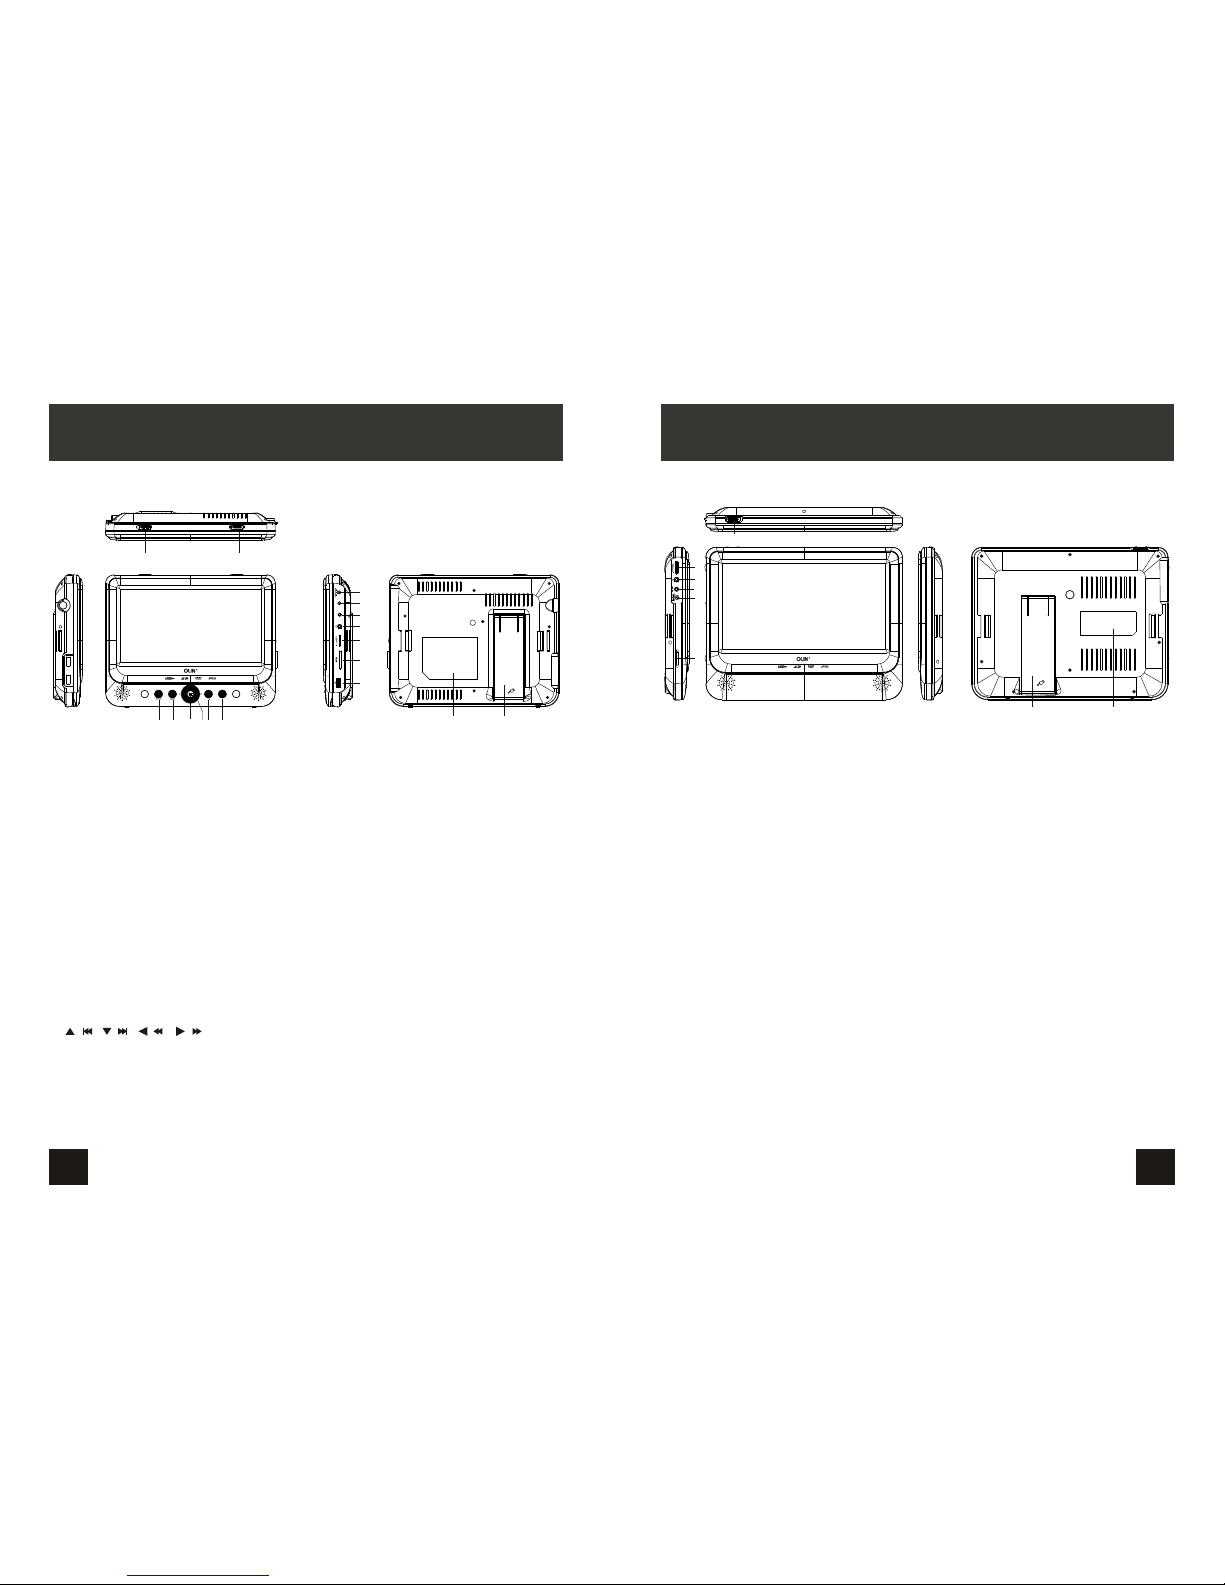
Slave screen
3. Headphone jack
6. Brightness knob
7
8.
. Bracket
Rating label position
1
2
3
4
5
6
1 2
3
4 5 6 7 8
9
10
11
12
13
14
15
1617
7 8
ON OFF
CLOSE
AV OUT
DC OUT
CLOSE
ON OFF
BRIGHTNESS
7
MAIN UNIT
1.Open Knob
Switch the knob to unlock the disc cover
2.Power ON/OFF Switch
Switch the DVD player on/off
3.SETUP Button
Press SETUP to display the system
setup menu
4.MODE Button
Press MODE to circularly change media
source, DVD, USB Flash, or SD Card.
5.OK Button
Press OK to confirm selection
7.PLAY/PAUSE Button
Press Play/Pause to start/hold playback
8.STOP Button
Press STOP to stop playback
9.DC IN 9-12V
Connect to the power outlet
10.DC OUT
Connect to Slave screen DC IN
11.AV OUT
Output audio/ video Signals
Turn the volume up/ down
6.
( )/ ( )/ ( )/ ( )
12. Headphone jack
13. Volume knob
14. SD card slot
15. USB Port
16. Bracket
17. Rating label position
6
1.Power ON/OFF
Switch the Slave screen on/off
2.Volume Knob
Turn the volume up/down
4.AV IN
Input audio/ video signals
5.DC IN 9-12V
Connect to the DVD player DC OUT or the power outlet
Page 5
8
9
BRIGHTNESS
AV OUT
DC OUT
AV OUT
DC OUT
AV OUT
DC OUT
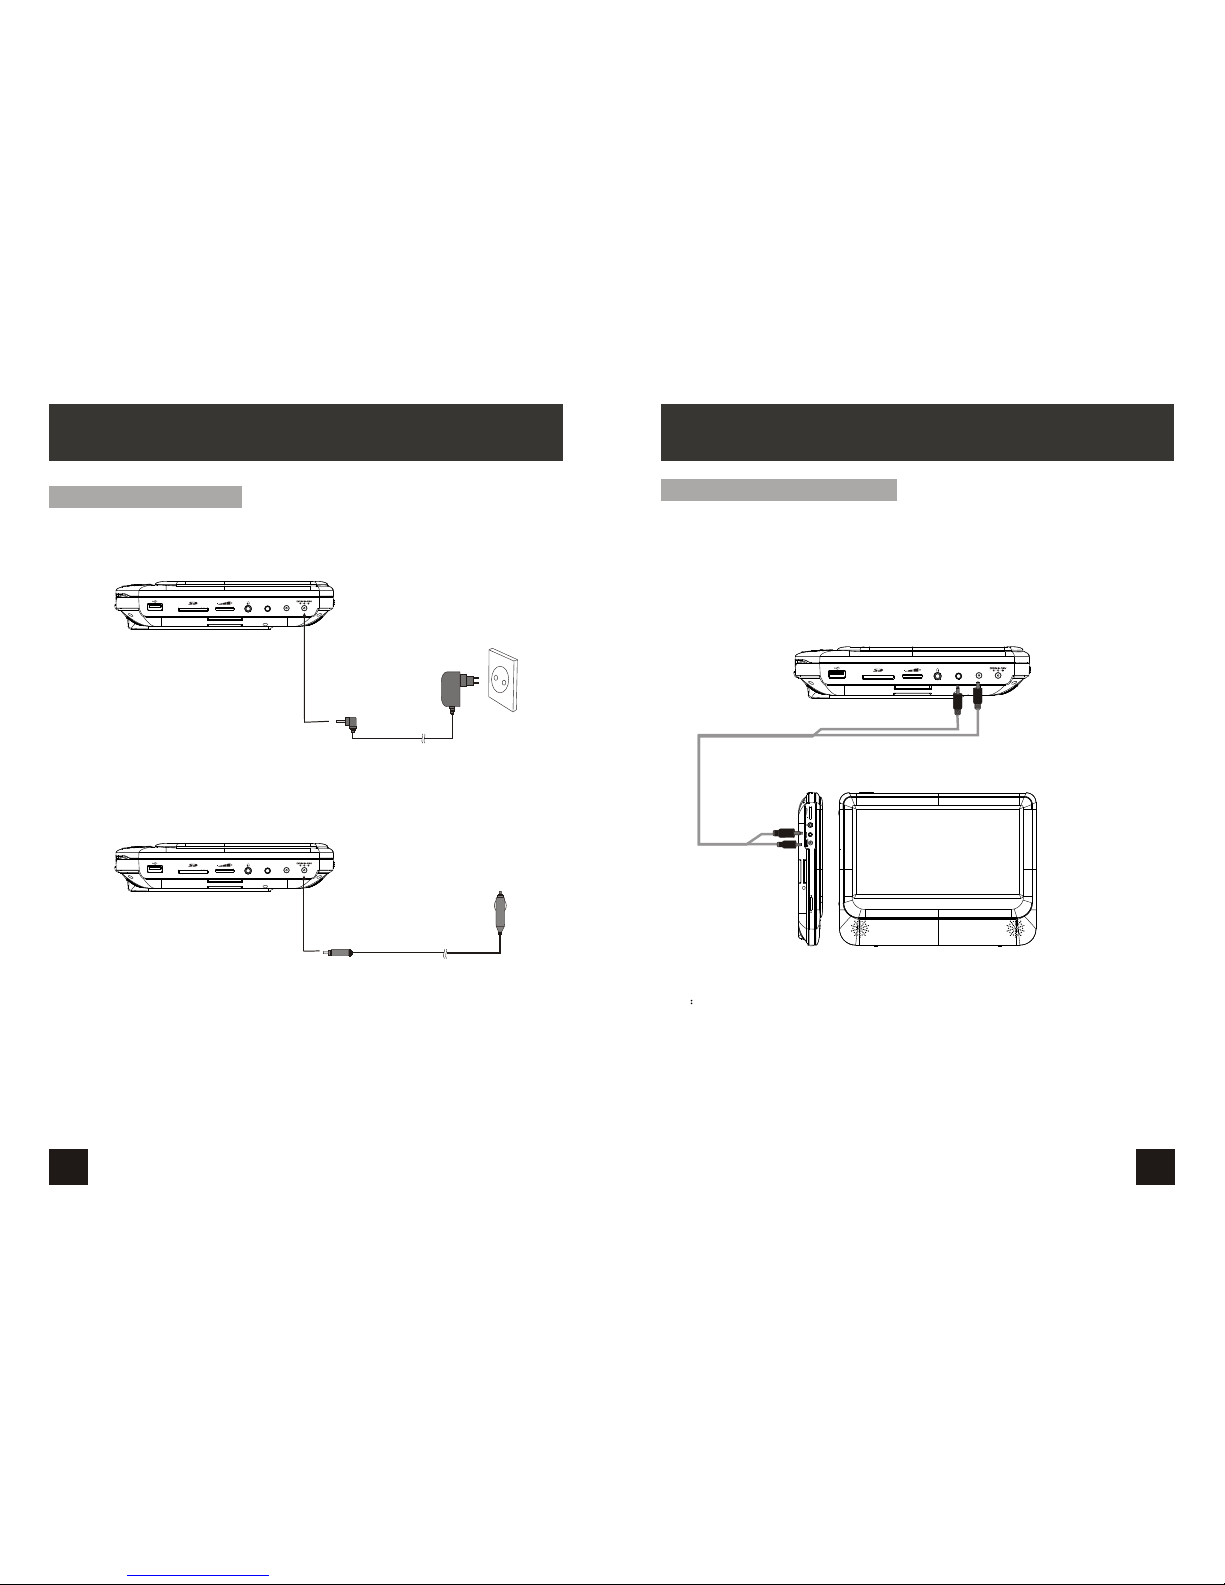
Powering and installation
Plug one end of the AC/DC power adaptor into the DC IN 9-12V jack on the right of the
unit, then plug the other end into the AC power receptacle. Please refer to the following
illustration.
If using car cigarette lighter adaptor to connect to the power:
Plug one end of the cigarette lighter adaptor into the DC IN 9-12V jack on the unit, plug
the other end into the car cigarette lighter socket.See illustration below.
SYSTEM CONNECTION
Connecting to the slave screen
The unit can also be connected to the external LCD monitor.
Connect the unit to power by AC/DC adapter or cigarette lighter adapter.
Then connect the unit DC OUT jack to DC IN 9-12V Jack of the LCD Monitor by a DC/AV
cable. Also use this DC/AV cable to connect the AV OUT jack of the unit to AV IN jack of
the Monitor.
Please refer to the illustration below.
SYSTEM CONNECTION
Notice:
Car cigarette lighter adaptor is not recommended to recharge the battery.
Warning:
This model and its enclosed car adaptor are only compatible with 9~12V vehicles.
It is not compatible with 24v vehicles.
Please note:
Do not connect the unit to the car via car adaptor before the engine has been started.
Disconnect the car adaptor when it is not in use.
Remark:
Users can power off the machine entirely by turning off the power switch and removing
the power plug from main power point. The power-off mechanism is available for user to
operate at any time.
Note
the enclosed AC/DC Power Adaptor and Car Charger are designed for the Master Unit
power supply only.
The AV/DC cable is used to connect the Master Unit to Slave Unit.
Users are not recommended to connect the AC/DC Power Adaptor and Car Charger to
the Slave Unit
Page 6
AV OUT
DC OUT
Audio and video signal output
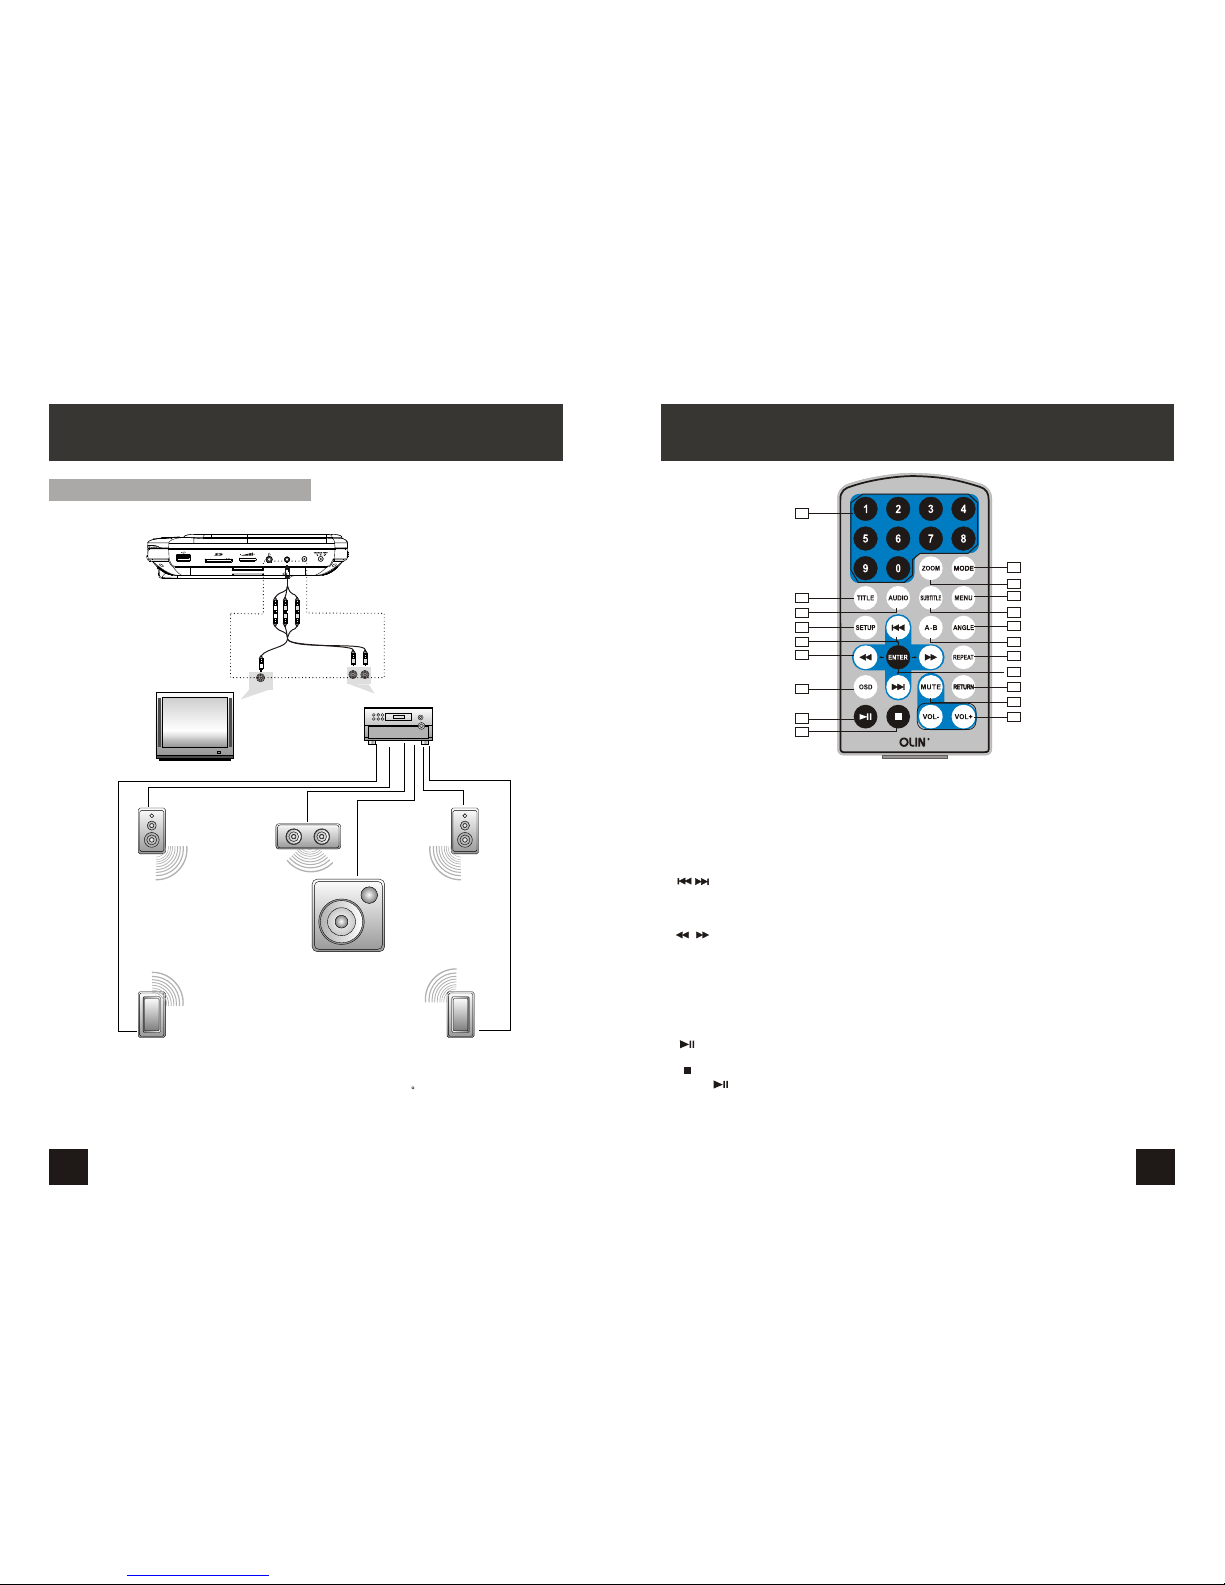
The unit can be connected with external speaker.Please see the following illustration.
AMPLIFIER
TV
SUBWOOFER
Left front speaker
Right front speaker
Center speaker
Left rear speaker
Right rear speaker
AUDIO IN
VIDEO IN
AV CABLE
Not supplied
10
11
SYSTEM CONNECTION
Notice:There is no 5.1 channel in the unit, however, after connecting to APM it is available to
output audio in 5.1 channel
1. Refer the owner's manual of the external receiver as well
2. Make sure all necessary connections have been properly made before connect
the power.
3.If the player will not be used for a long period of time, disconnect the power.
1. Number button
2. TITLE(To display title information)
3. AUDIO(To select audio language)
4. SETUP(To go to or exit setup menu)
5. Previous/Next button(To go
to previous/next chapter or scene
during playing)
6. Fast forward/backward
button(To scan forward/backward
at 2,4,8,16,or 32 times)
7. OSD(To display disc information
during playing such as elapsed and
remaining time)
8. PLAY/PAUSE
9. STOP(press once to stop playback, then
press to resume playback from the
point where you stopped; press stop
button twice to stop playback completely)
10. MODE(To select the source)
THE REMOTE CONTROL
11. ZOOM(To zoom in/out the image
during the playback)
12. MENU(To enter or exit root menu)
13. SUBTITLE(To select subtitle language
when playing DVD disc)
14. ANGLE(To change viewing angle
when playing disc with multi-angle)
15. A-B(Repeat a specific portion from
point A to B, press it again to cancel
repeat playing)
16. REPEAT(To repeat playing title,
chapter or track)
17. RETURN(To return to the main menu)
18. MUTE(To turn to mute)
19. VOL +/- (To adjust the volume)
20. ENTER(To confirm)
PD-9910
1
2
3
4
5
6
7
8
9
10
11
12
13
14
15
16
17
18
19
20
These cables are
not included in package
Page 7
4
13
1
2
CR2025 CR2025
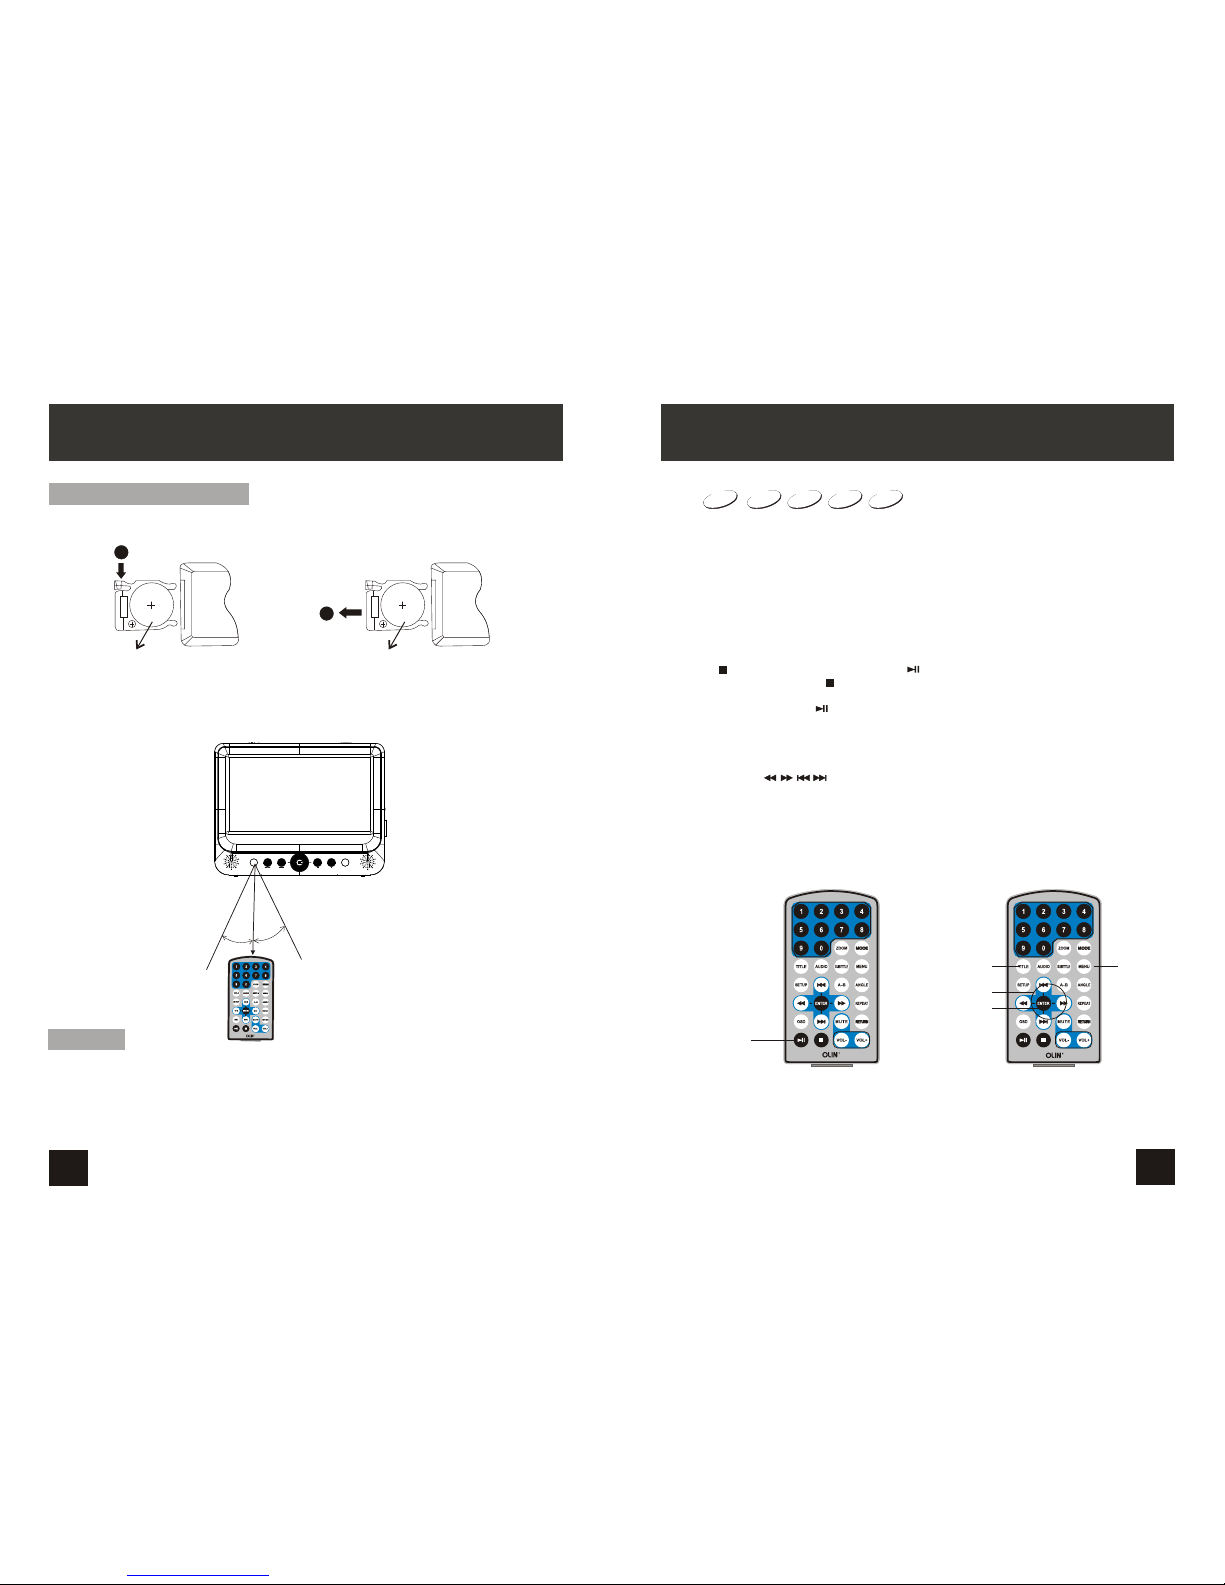
Please put the battery into the remote control as per below illustration.
When using remote control,make sure the infrared window is pointed to infrared receiving
window of the machine.The distance between machine and remote control must be within
3 metres.Please refer to the following illustration.
The Use of Remote Control
0
30
0
30
THE REMOTE CONTROL
12
PD-9910
Notice
3.Please use a new battery to replace old one if the remote control doesn't work.
4.Remove the battery from the remote if it will not be used for a long period of time.
1. Avoid placing the unit in a damp environment or where there is a risk it may fall.
2. Avoid placing the unit in an area where the infrared remote receiving window is
in direct sunlight.
Warning: Keep the battery from children.
BASIC OPERATION
Playing disc of DVD, SVCD, VCD, CD, Mp3.
2. Open the disc door and insert a disc into the door with the label side facing up.
3. Close the disc door.The unit will load the disc and start playing.
4. Press“ ”once to stop playback; press“ ”to resume playback from the point
where you stoped;press“ ” twice to stop playback completely.
5. During playback,press“ ” to pause; press it again to resume playback.
6. When the playing is finished, please turn off the power by sliding ON/OFF switch to OFF.
7. For some DVD disc with Title or Chapter menu, press“MENU”button to enter menu
page, and use“ ”to select. Press ENTER to confirm.
DVD
SVCD
VCD CD
MP3
Note:
Please do not disconnect USB devices or plug out SD/MMC cards while they are working
with the unit.Functional failure may occur in case of wrong operations.
Play/pause
Cursor button
ENTER
Title Menu
PD-9910
PD-9910
1. After connecting power to the unit, turn on the unit by sliding the ON/OFF
switch to
ON to go to DVD source.
Page 8
4
15
14
DVD
SVCD
VCD CD
MP3
DVD
SVCD
VCD CD
2X 4X
8X16X32X
2X 4X
8X
16X32X
Search forward
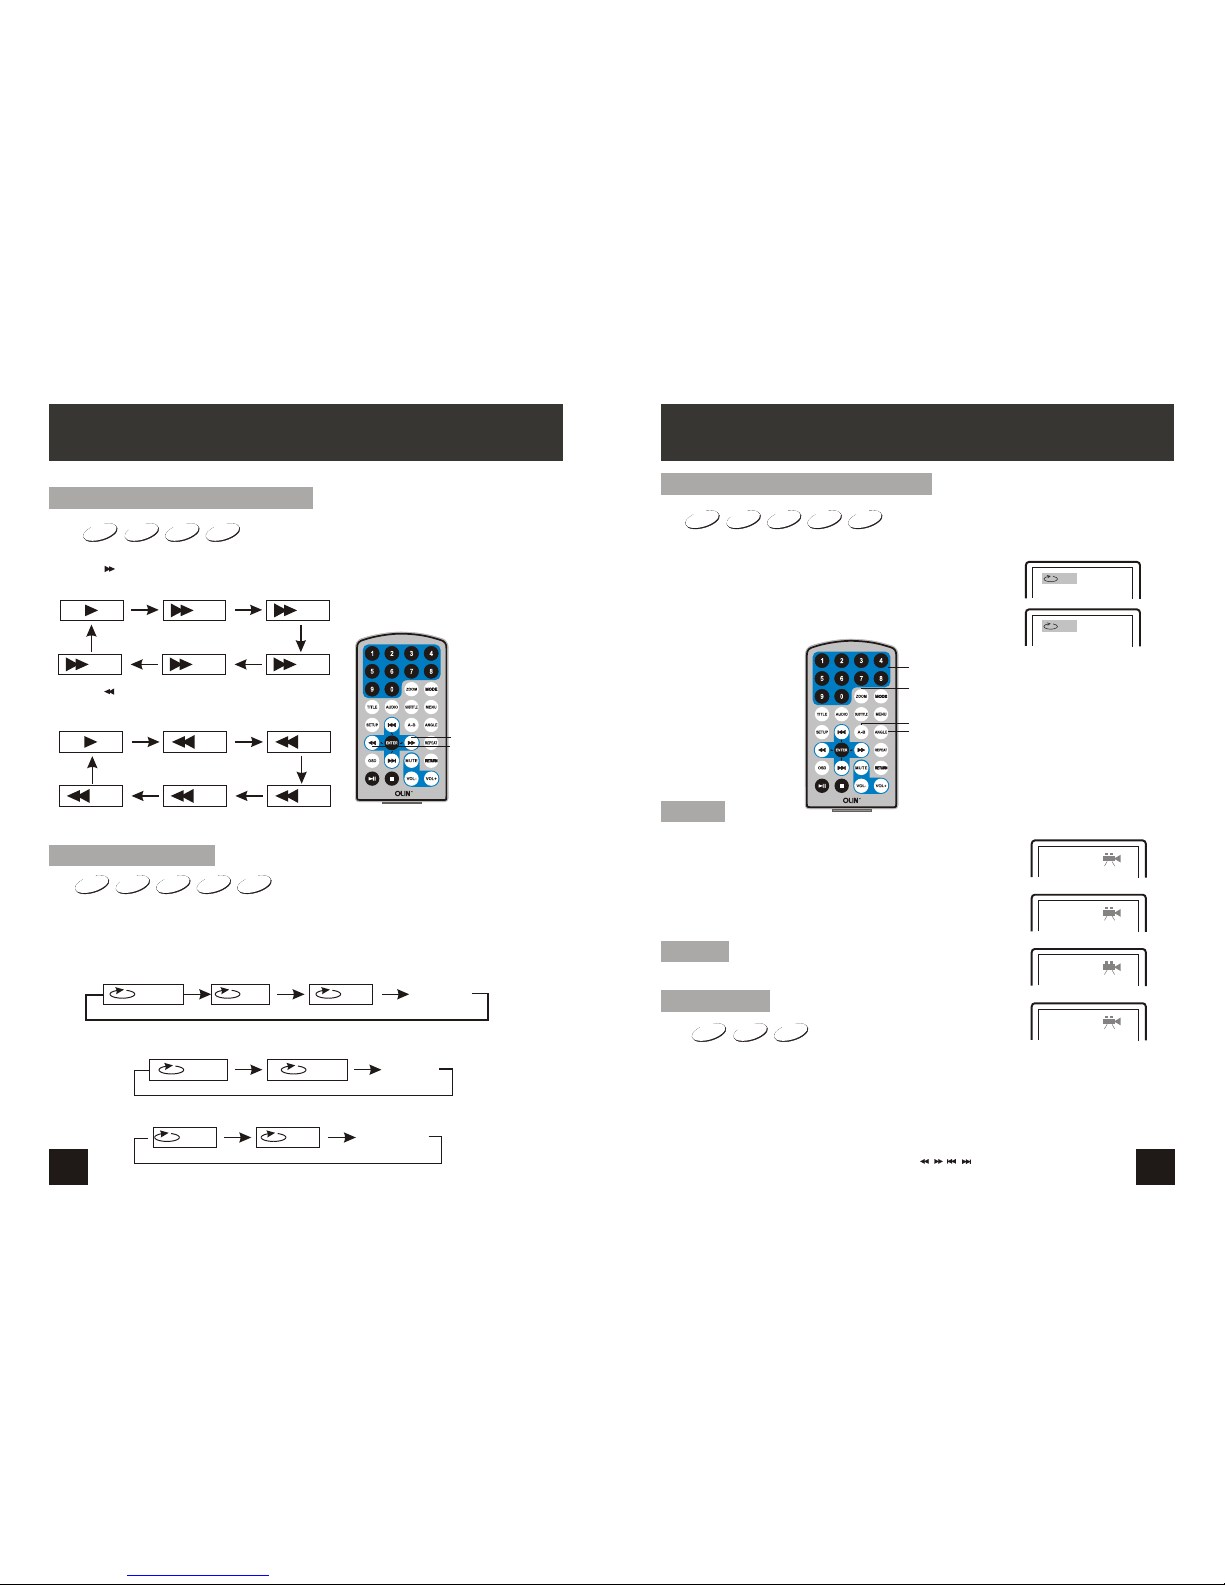
When playing disc of DVD,SVCD,VCD,CD, the machine can search forward or backward.
1. Press“ ”,the unit will search forward. Press it repeatedly ,the machine will play
at 2, 4,8, 16, 32 times of speed.
2. Press“ ”, the unit will search backward.
Press it repeatedly,the machine will play at
2,4,8,16,32 times of speed.
When playing disc of DVD,SVCD,VCD,CD,MP3,user can repeat playing one
chapter,
title or the whole disc.
For DVD disc,press“repeat”button,user can repeat playing one Chapter;press it
again to repeat playing Title;press it the third time to repeat playing the whole disc.
For MP3 disc,press“repeat”button to repeat playing present file;press it again to repeat
playing the folder;press it the third time to cancel repeat function.
Search backward
Chapter Title All
Repeat off
one folder
Repeat off
Fast forward and fast backward
Repeat playing
Track
All
Repeat off
For CD/VCD disc, press repeatedly to repeat the track and the whole disc. “repeat”button
BASIC OPERATION
PD-9910
When playing disc of DVD,SVCD,VCD,CD,MP3,user can repeatedly play a specific
section.
During playback,press“A-B”button at a point A,then press
this button again in point B,the unit will automatically repeat
playing the part between“A-B”
Press it the third time,the unit will return to normal playback.
AB
A
Repeat playing of favorite scene
Angle
A-B
Angle
Number
During playback,press“Zoom”button,the image will be
enlarged;press it again the image will be enlarged again;
press it fourth time,the image will zoom out,press it
repeatedly and the image will return to normal status.
Zoom in/out
When the image is enlarged,user can press“ / / / ”to move the image.
Zoom in/ out
When playing disc of DVD,SVCD,VCD,user canzoom in or
zoom out the image.
MP3
VCD
SVCD
DVD
CD
SVCD
DVD VCD
BASIC OPERATION
PD-9910
Note: Audio will be muted during fast forward and fast backward.
During playing DVD disc with multi-angle, press “Angle”
button, the followings will be displayed on screen:
Press number buttons to select the angle you desire
To return to normal playing, please press “Angle”,
until the unit plays the disc in the default angle.
1 /4
2 /4
3 /4
4 /4
Notice
The function is available only for discs with multi-angle.
Page 9
Mp3
......
\Ctyy\
00 36 03 43
Dir 001
Mp3
TRACK02
TRACK01
Mp3
Mp3
TRACK03
Playing JPEG file
Playing MP3 files
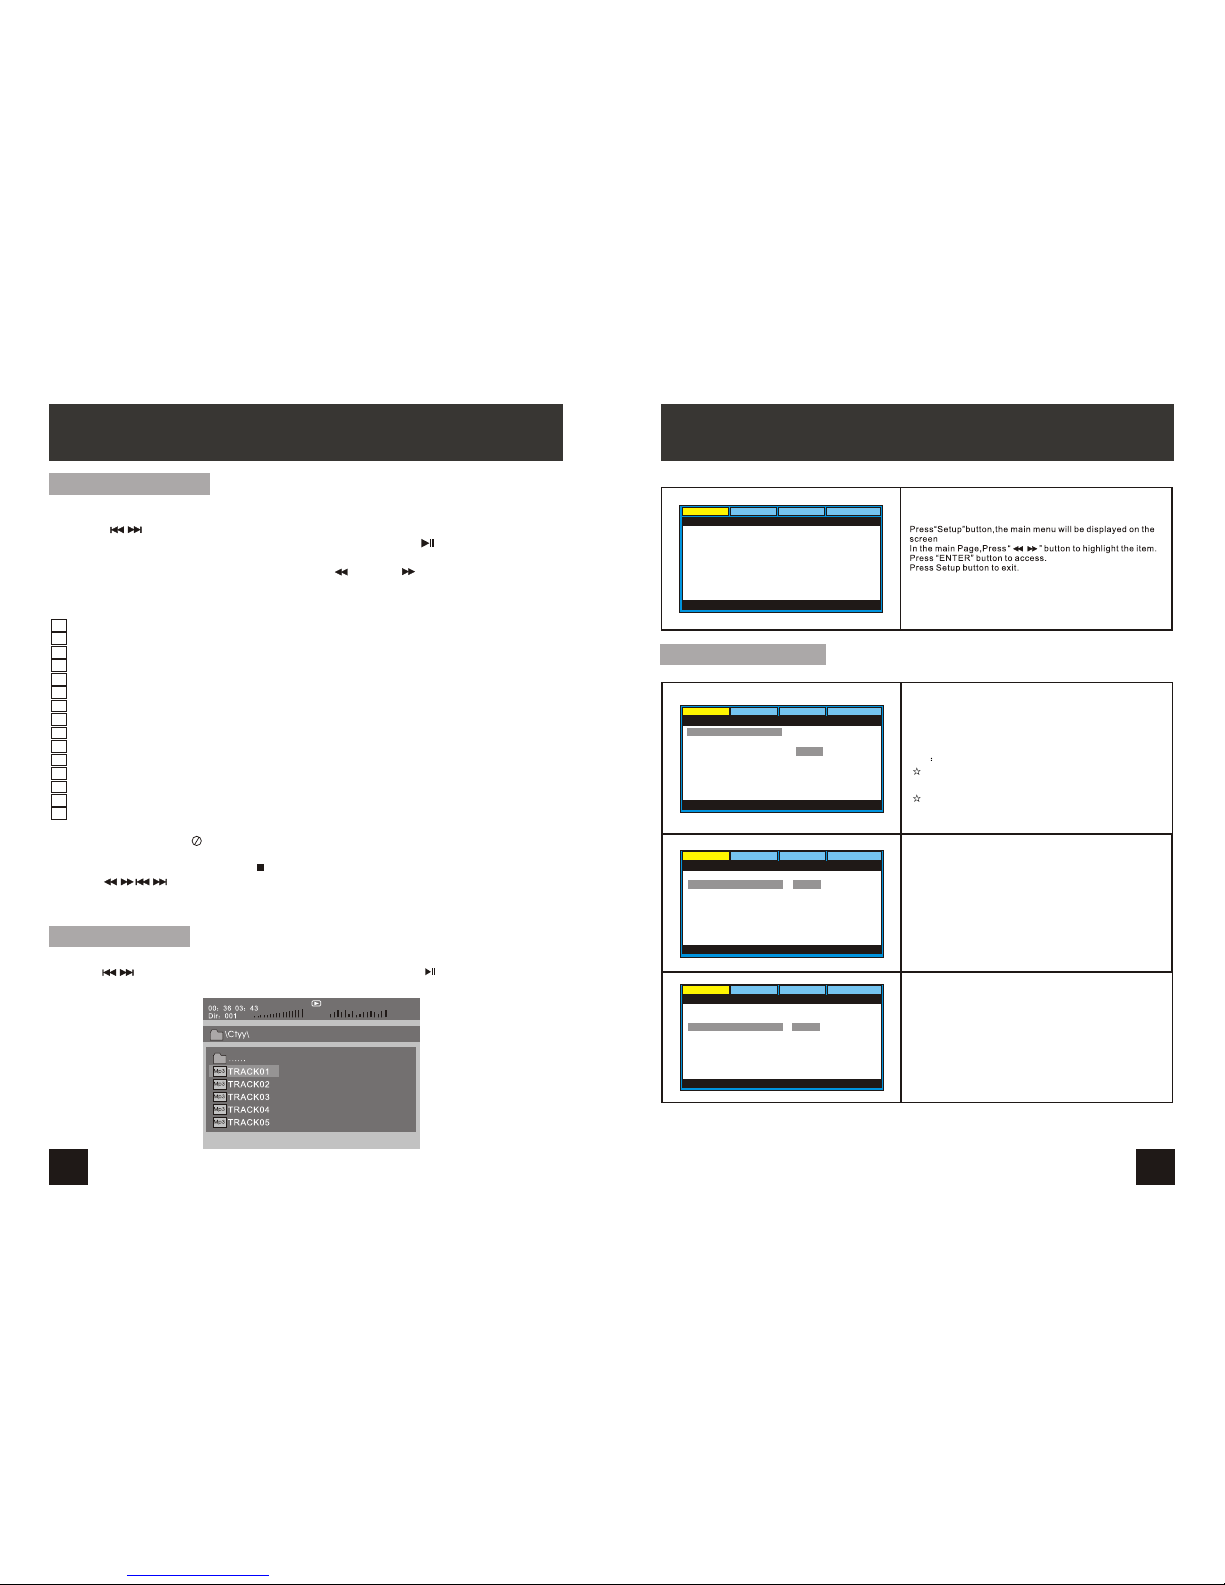
1.Place MP3 disc into the disc door.
Press “ ” or “ENTER”button to choose an MP3 file;Press “ ” or“ENTER”button to
play the file selected.
TRACK05
Mp3
TRACK04
1. Place a JPEG disc into the tray, the unit will start reading and play.
2. Press “ ” to select a JPEG file and press“ENTER”button to confirm.
Note:you can press “MENU” to return to the folder list.Press “ ” or “ENTER” to
preview the file selected.
3. To rotate the picture counter-clockwise,press“ ”;Press “ ”to rotate the picture
clockwise.
4. Press “OSD” button when viewing pictures,you can select different refresh mode as
follows:
1. from top to bottom
2. from bottom to top
3. from left side to right side
4. from right side to left side
5. from left top to right bottom
6. from right top to left bottom
7. from left bottom to right top
8. from right bottom to left top
9. from horizontal center to both sides
10.from vertical center to both sides
11.from top and bottom to center
12.from right and left to center
13.from four window's top side to bottom side
14.from four window's left side to right side
15.from 4 edges to center
5. During viewing files,“ ”may appear when pressing“Angle”or“Subtitle”or “Audio”
or“A-B”or“Title”etc; in this situation these options are unavailable to operate.
6. When viewing JPEG files,press“ ”,pictures will be displayed in thumbnail mode,
press“ ”or“ENTER”button to select one picture to view.
4
17
16
PLAYING JPEG FILE IN DATA DISC
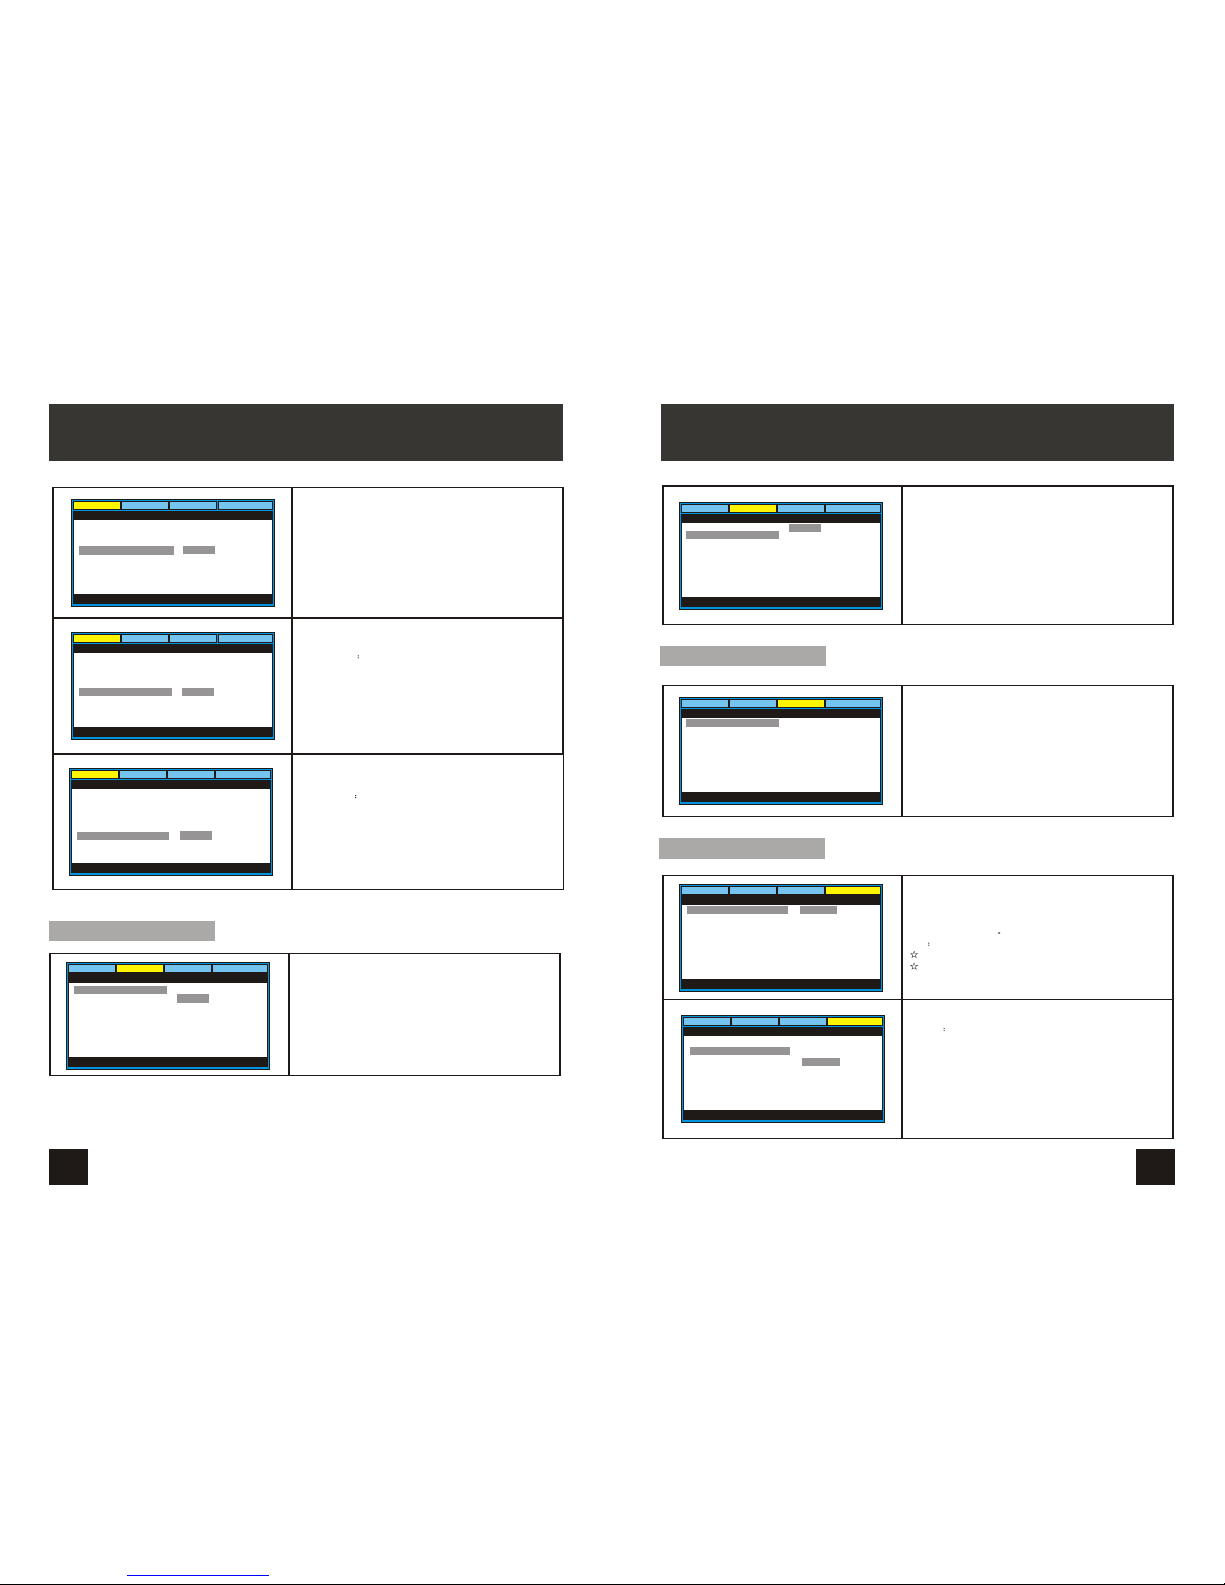
General Setup Page
TV display:
Enter this option,user can set screen display format
(Nomal/PS,Nomal/LB,Wide)
The default is "Wide"
Note
The function depends on the display ratio with which the
DVD disc is recorded.
Please choose “Wide(16:9)"when using a16:9 wide screen
TV set
Video
Preference
General
Audio
- - General Setup Page - -
Set TV Display Modo
Normal/PS
Normal/LB
Wide
TV Display
TV Type
Angle Mark
OSD Lang
Screen Saver
Last Memory On
Wide
PAL
On
ENG
On
TV Type:
Video
Preference
General
Audio
- - General Setup Page - -
Set TV Standard
PAL
NTSC
TV Display
TV Type
Angle Mark
OSD Lang
Screen Saver
Last Memory On
Wide
PAL
On
ENG
On
Angle Mark:
Enter this option to set the angle during playback.
Optional setting: ON, OFF
The default is: ON
Video
Preference
General
Audio
- - General Setup Page - -
Set Anglo Mark
On
Off
TV Display
TV Type
Angle Mark
OSD Lang
Screen Saver
Last Memory On
Wide
PAL
On
ENG
On
Enter this option to select DVD video output signal type. Set
the value to correspond with your TV's Video System type.
PAL is the standard used in Australia.
The default is PAL
SYSTEM SETUP
Video
Preference
General
Audio
- - General Setup Page - -
Wide
PAL
On
ENG
On
TV Display
TV Type
Angle Mark
OSD Lang
Screen Saver
Last Memory On
Go to General Setup Page
Page 10
4
18
19
OSD Language:
In the option user can set OSD menu
language English.
The default:English
Video
Preference
General
Audio
- - General Setup Page - -
Set OSD Languago
English
TV Display
TV Type
Angle Mark
OSD Lang
Screen Saver
Last Memory On
Wide
PAL
On
ENG
On
Last Memory
Video
Preference
General
Audio
- - General Setup Page - -
Set Screen Saver
On
Off
TV Display
TV Type
Angle Mark
OSD Lang
Screen Saver
Last Memory On
Wide
PAL
On
ENG
On
Screen Saver
Video
Preference
General
Audio
- - General Setup Page - -
Set Screen Saver
On
Off
TV Display
TV Type
Angle Mark
OSD Lang
Screen Saver
Last Memory On
Wide
PAL
On
ENG
On
Enter this option to active/ turn-off the screensaver function.
The screensaver prevents burning damage to the player's
screen
The default is ON
Enter this option to turn on or off the Last Memory function.
When it is ON the player can resume playback from where
you stop last time
The default is ON
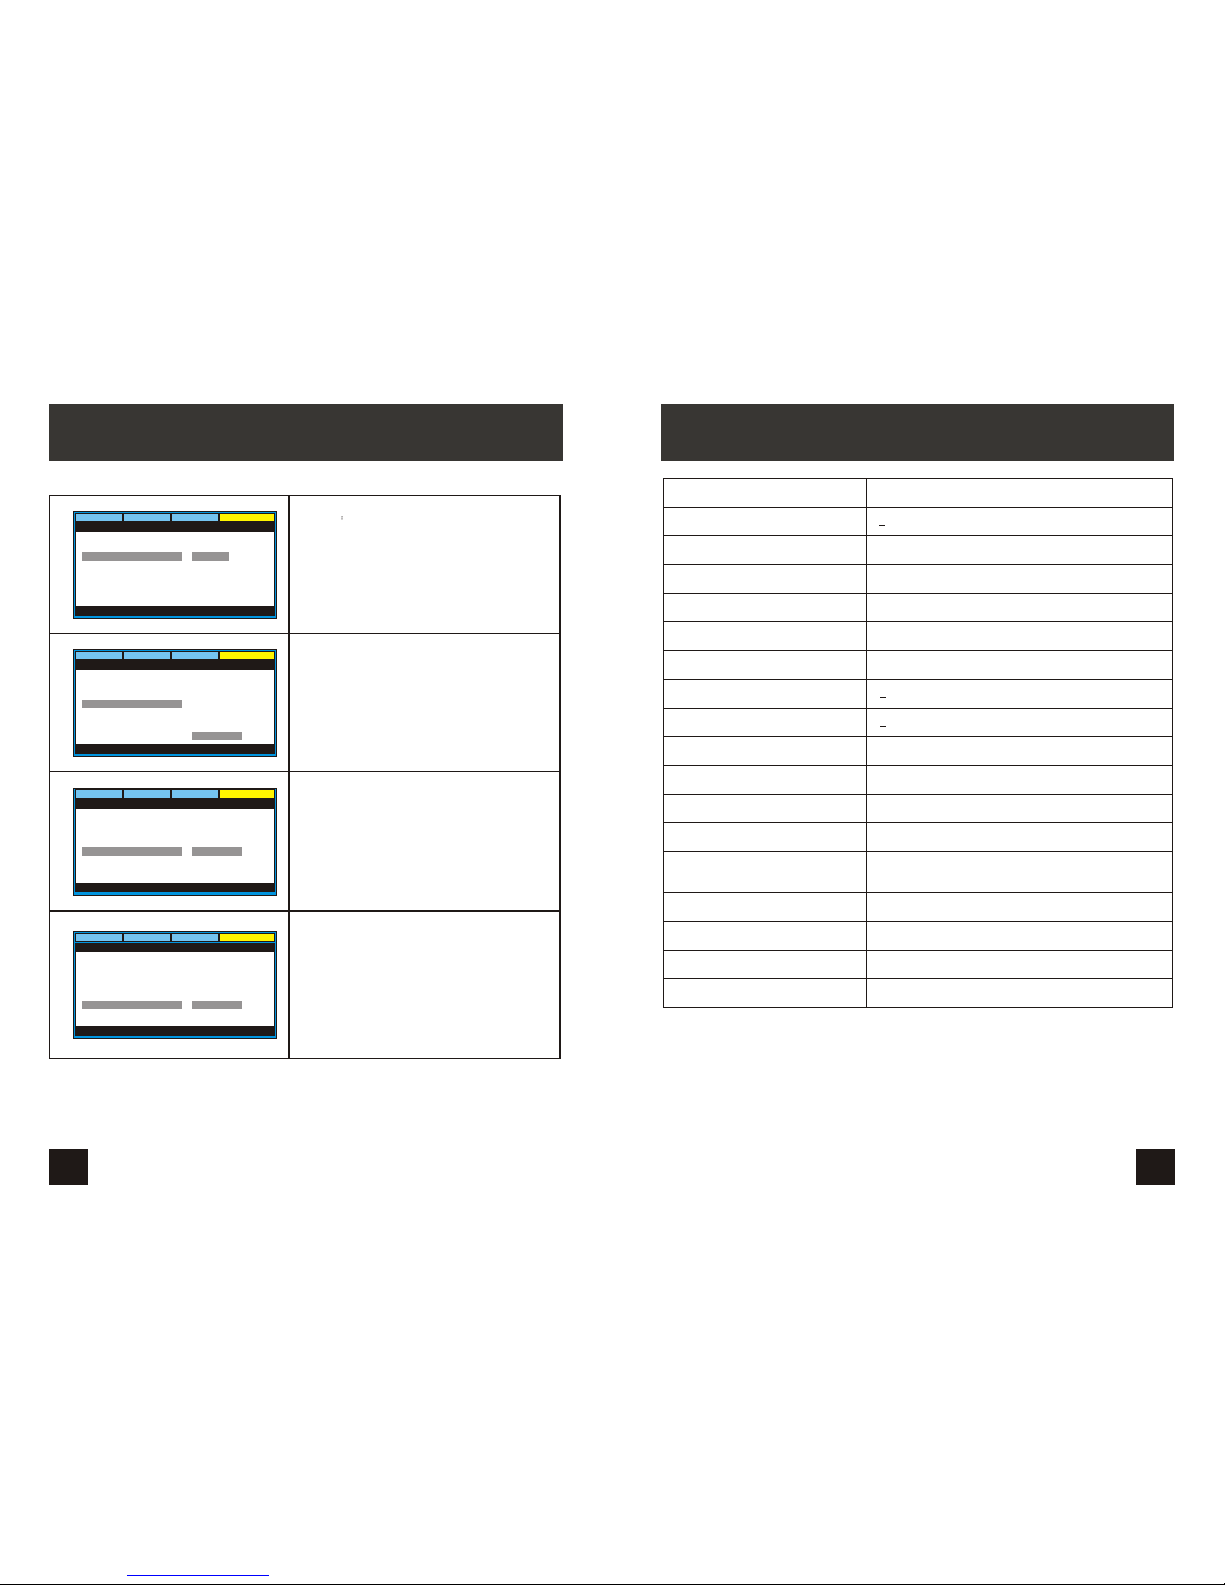
Audio Setup Page
Downmix :
Video
Preference
General
Audio
- - Audio Setup Page - -
Set downmix
LTRT
Stereo
Downmix
EQ type
STR
None
Enter this to select downmix mode, used to mix a number of
distinct audio channels together to produce a lower number
of channels, such as Left-Right (LTRT) channels or Stereo
The default is Stereo.
SYSTEM SETUP
Subtitle
Select your preferred language to show the subtitles
on the screen.
The default is OFF
The subtitle languages depend on the
information available on each disc,You can also change the
subtitle language during playback by press the SUBTITLE
button.
Video
Preference
General
Audio
- - Preference Page - -
Preferred Subtitle Language
Audio ENG
Subtitle OFF
Disc Menu ENG
Parental
Password
Default
English
Off
Video Setup Page
Select EQ type:
Default is none.
Video
Preference
General
Audio
- - Audio Setup Page - -
Select EQ type
None
Rock
POP
Live
Dance
Tenco
Classic
Soft
Downmix
EQ type
STR
None
Video
Preference
General
Audio
- - Video Setup Page - -
Brightness
Brightness
Contrast
Hue
Saturation
00
00
00
00
Enter this option, user can adjust picture quality of video
output. There are items available to be adjusted:
Brightness, contrast, Hue and Saturation.
For all these items the default is 00
Preference Page
Audio:
Enter this option, user can select your preferred audio
language for DVDs.
The default is English
Note
The audio language depend on the material on each disc.
User can also change the audio language during playback
by pressing the Audio button.
Video
Preference
General
Audio
- - Preference Page - -
Preferred Audio Language
Audio ENG
Subtitle OFF
Disc Menu ENG
Parental
Password
Default
English
SYSTEM SETUP
Page 11
20
21
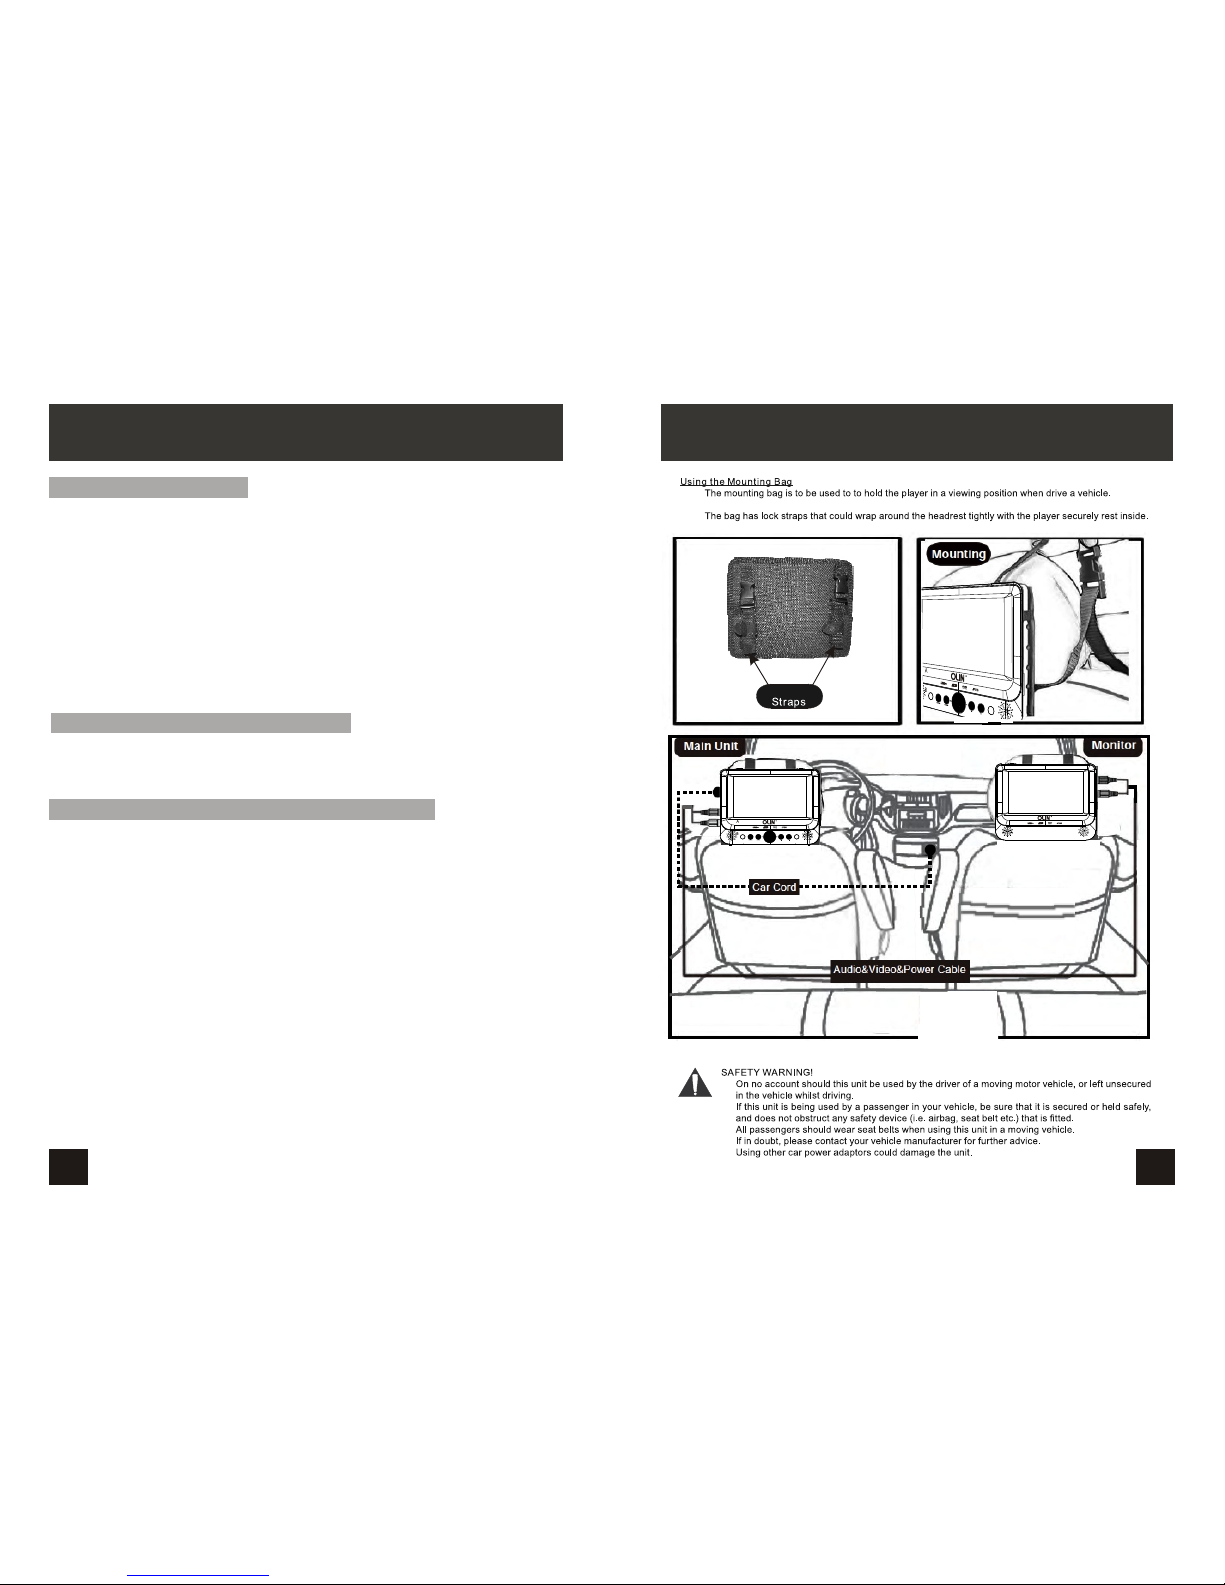
Disc Menu
This function allows you to choose the menu language
stored on the disc.
The default is English.
Note: the disc menu languages depend on the
information available on the disc.
Parental:
Enter this option to set the parental control level to some
unsuitable disc scenes being watched by the children.
Optional parental control levels: KID SAFE, G, PG, PG 13, PGR,
R, Nc17, ADULT.
The default of this option is ADULT.
Video
Preference
General
Audio
- - Preference Page - -
Preferred Menu Language
Audio ENG
Subtitle OFF
Disc Menu ENG
Parental
Password
Default
English
Video
Preference
General
Audio
- - Preference Page - -
Set Parental Control
Audio ENG
Subtitle OFF
Disc Menu ENG
Parental
Password
Default
1 KID SAFE
2 G
3 PG
4 PG 13
5 PGR
6 R
7 NO 17
8 ADULT
Video
Preference
General
Audio
- - Preference Page - -
Change Password
Audio ENG
Subtitle OFF
Disc Menu ENG
Parental
Password
Default
Change
Video
Preference
General
Audio
- - Preference Page - -
Load Factory Setting
Audio ENG
Subtitle OFF
Disc Menu ENG
Parental
Password
Default
Reset
Enter this option,you can set a password(four numbers).
All parental Control features are password protected.
Default:
Select this item and press OK button to reset
all settings to the original factory settings.
Password
The default is 0000
SYSTEM SETUP
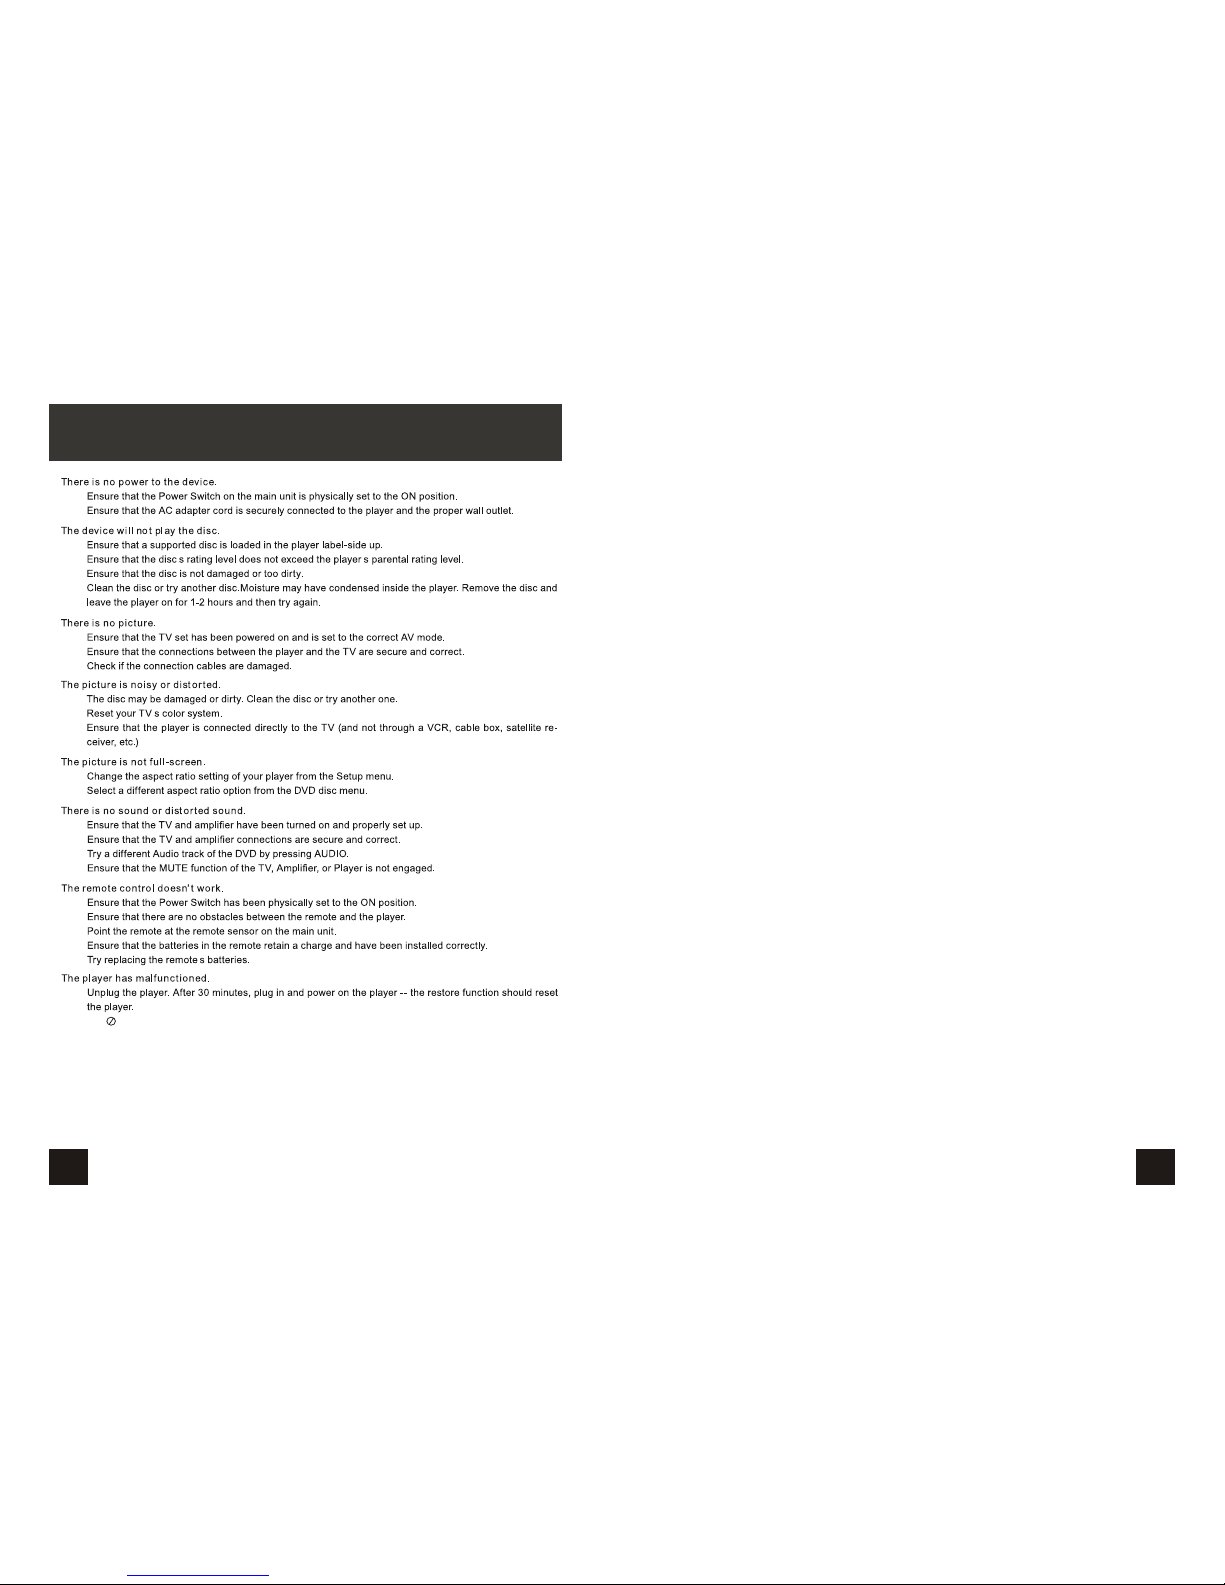
SPECIFICATION
Note:
1.The quality and speed for reading JPEG photos depend on the resolution and
compression ratio of the photos. Some JPEG photo may not be played due to the disc
quality and the formats.
2.Some DVD+R/RW,DVD-R/RW,CD-R/RW disc may not be played due to the quality on
burning conditions.
247x191.8x41.9mm
Slave screen:246.5x191.6x30mm
Power Supply
Power Consumption
Signal System
Video Output
Audio Output
Headphone Terminal
Frequency Response
Signal/Noise(Audio)
Dynamic Range
Panel Size
Laser Wavelength
Operating Conditions
Rechargeable Battery
Dimensions
Weight
DC 9-12V
10W
PAL/NTSC
1 Vp-p/ 75ohm, unbalanced, 3.5mm mini Jack *1
1.4Vrms / 10Kohm, 3.5mm mini Jack *1
3.5mm stereo mini jack *1
20 Hz - 20KHz
80dB
85dB
9 inch
650nm/ 795nm
Temperature: 0~40°C Status: Horizontal
Lithium Polymer
Main Unit:
Main Unit: 1.1kg Slave screen:0.55kg
<
<
<
Support device SD/MMC/Full Speed USB2.0
Device capacity
Up to 8GB SD/8GB MMC/8GB USB
Remark
This model is compatible with 9~12V vehicles
Page 12
22
23
BATTERY
MOUNTING BAG
The unit utilizes long-life Li polymer battery for portable power supply. The battery has
no "Memory Effect" and thus can be recharged safely regardless of whether the battery
is fully or partially discharged. It's enough to recharge no longer than 6H each time, fully
recharged battery can last about 2 hours.
The battery can be only recharged when turning power to OFF state, and keep continuous
power supply, the red light will be on, and the light will turn Green when it's fully charged.
1. The normal working temperature is: 0°C ~40°C ;
2. Always unplug AC/DC power supply for the unit when not in use;
3. It is normal for the unit to produce heat during playback, however, the unit should not
be used for extended periods or left unattended.
4. Avoid having the unit collide with any objects, and place away from all possible heat
sources or damp areas.
Precautions related to Battery Recharge
Rechargeable Battery Use
The unit will access to Standby mode automatically when the battery is low.
If the battery does not work to your expectation, please consult the service centre. Do
not attempt to replace or repair the battery by yourself unless you are qualified service
personnel.
Using and maintaining rechargeable battery supply
Please note:
Battery will not be chareged during playback. This is designed to prolong the battery life
and protect it from being overcharged.
Caution:Danger of explosion if battery is incorrectly replaced.Replace only with the
same or equivalent type.
Page 13
24
25
TROUBLESHOOTING
You can't advance through the opening credits and warning information that appears at the beginning of
movies because the disc is programmed to prohibit that action.
Some discs have sections that prohibit rapid scanning or chapter skip;
If you try to skip through the warning information and credits at the beginning of a movie, you won't be able to.
This part of the movie is often programmed to prohibit skipping through it.
The icon appears on screen
Ensure there is no restriction on the disc's software
Ensure the feature is supported by the disc
Ensure the feature is available at the moment
Ensure requested ttitle or chapter is not out of range
The player can not advance through a movie
No forward or backward scan
Copyright
This manual contains information protected by copyright law.
No part of this document may be used or reproduced in any form or by any means, or
stored in a database/retrieval system without prior written permission from us.
The information of this manual is based on the current version of the product.
We reserve the right to alter the content without prior notice.
All brand names in this manual are the property of their respective owners.
Owing to continuous improvement, no prior notice will be given regarding changes on
above feature and spec.
Page 14

26
12 Month Warranty
Thank you for your purchase from Kmart.
Kmart Australia Ltd warrants your new product to be free from defects in materials and
workmanship for the period stated above, from the date of purchase, provided that the
product is used in accordance with accompanying recommendations or instructions
where provided. This warranty is in addition to your rights under the Australian
Consumer Law.
Kmart will provide you with your choice of a refund, repair or exchange (where possible)
for this product if it becomes defective within the warranty period. Kmart will bear the
reasonable expense of claiming the warranty. This warranty will no longer apply where
the defect is a result of alteration, accident, misuse, abuse or neglect.
Please retain your receipt as proof of purchase and contact our Customer Service Centre
on 1800 124 125 (Australia) or 0800 945 995 (New Zealand) or alternatively, via email at
for any difficulties with your product. Warranty
claims and claims for expense incurred in returning this product can be addressed to our
Customer Service Centre at 690 Springvale Rd, Mulgrave Vic 3170.
Our goods come with guarantees that cannot be excluded under the Australian
Consumer Law. You are entitled to a replacement or refund for a major failure and
compensation for any other reasonably foreseeable loss or damage. You are also
entitled to have the goods repaired or replaced if the goods fail to be of acceptable
quality and the failure does not amount to a major failure.
For New Zealand customers, this warranty is in addition to statutory rights observed
under New Zealand legislation.
WARRANTY STATEMENT
For kmart customers only
 Loading...