

Page 1
Page 2
Warning: To reduce the risk of fire or electric shock, do not expose this apparatus to rain
or moisture.
1) Please read the instruction manual carefully and follow all the requirements of safe
operation to operate the device.
2) Do not use this unit near water. Do not place over the unit any container with liquid
inside.
3) Do not install near any heat sources such as radiators, heat registers, stoves, or other
apparatus (including amplifiers) that produce heat.
4) Unplug this unit during lightning storms or when unused for long time.
5) About Cleaning: Unplug the system, use only wet cloth to clean. Do not use liquid
detergent or aerosol.
6) Only use accessories specified by the manufacturer.
7) Refer all servicing to qualified service personnel, servicing is required when the unit
has been damaged in any way, such as power supply cord or plug is damaged, liquid
has been spilled or objects have fallen into the unit, exposed to moisture, does not
operate normally. Don't try to repair the machine by yourself because of the danger of
high voltage and electric shock.
8) Do not use irregular shaped discs such as heart or star-shaped discs as they may
Cause the unit to malfunction.
Hi-voltage, Don't Open it
Remind user to be careful to
avoid electric shock
Thank you for choosing our portable DVD player. It includes a 7” wide screen and a DVD
player. The unit applies the latest state of art electronics and is designed for use at home,
in hotels and in offices etc for relaxation. The compact size makes carrying easier as
well as installation. Please read the manual carefully prior to use and keep it well for later
consultation.
1
SAFETY PRECAUTION
9)
)
)
)
)
)
)
Please ensure enough clearance around the receiver for good ventilation. Any
objects and the appliance should be at least 10 cm apart.
10 The ventilation should not be impeded by covering the ventilation openings with
items, such as newspapers, table-cloths, curtains, etc
11 No naked flame source, such as lighted candles, should be placed on the apparatus
12 Attention should be drawn to the environmental aspects of battery disposal.
13 CAUTION : Danger of explosion if battery is incorrectly replaced. Replace only with
the same or equivalent type.
14 The disconnect devices shall remain readily operable.
15 Only used with the provided adaptor model no.: FM090010-C.
Page 3
TABLE OF CONTENTS
Olin_Portable_DVD_Player_PD-7755_User_Manual_V2
2
1
2
3
3
3
4
4
4
5
6
7
7
8
9
10
12
13
13
14
14
15
16
16
16
17
17
18
18
18
20
21
21
21
21
22
23
11
TROUBLESHOOTING
SAFETY PRECAUTION
TABLE OF CONTENTS
PACKAGE CONTENTS/MAIN FEATURES
ABOUT OPTICAL DISCS
MAIN UNIT
SLAVE SCREEN
SYSTEM CONNECTION
REMOTE CONTROL
BASIC OPERATION
Repeat playing
PLAYING JPG /MP3 FILE
SYSTEM SETUP
SPECIFICATION
BATTERY
MOUNTING BAG
Main Features
Package contents
Powering and installation
Connecting to the Slave screen
Audio and Video Signal Output
The Use of Remote Control
Fast forward and fast backward
Repeat playing of favorite scene
Angle
Zoom In/ Out
Playing JPG file
Playing MP3 files
General Setup Page
Password Setup Page
Video Setup Page
Preference Page
Precautions related to Battery Recharge
Rechargeable Battery Use
Using and maintaining rechargeable battery supply
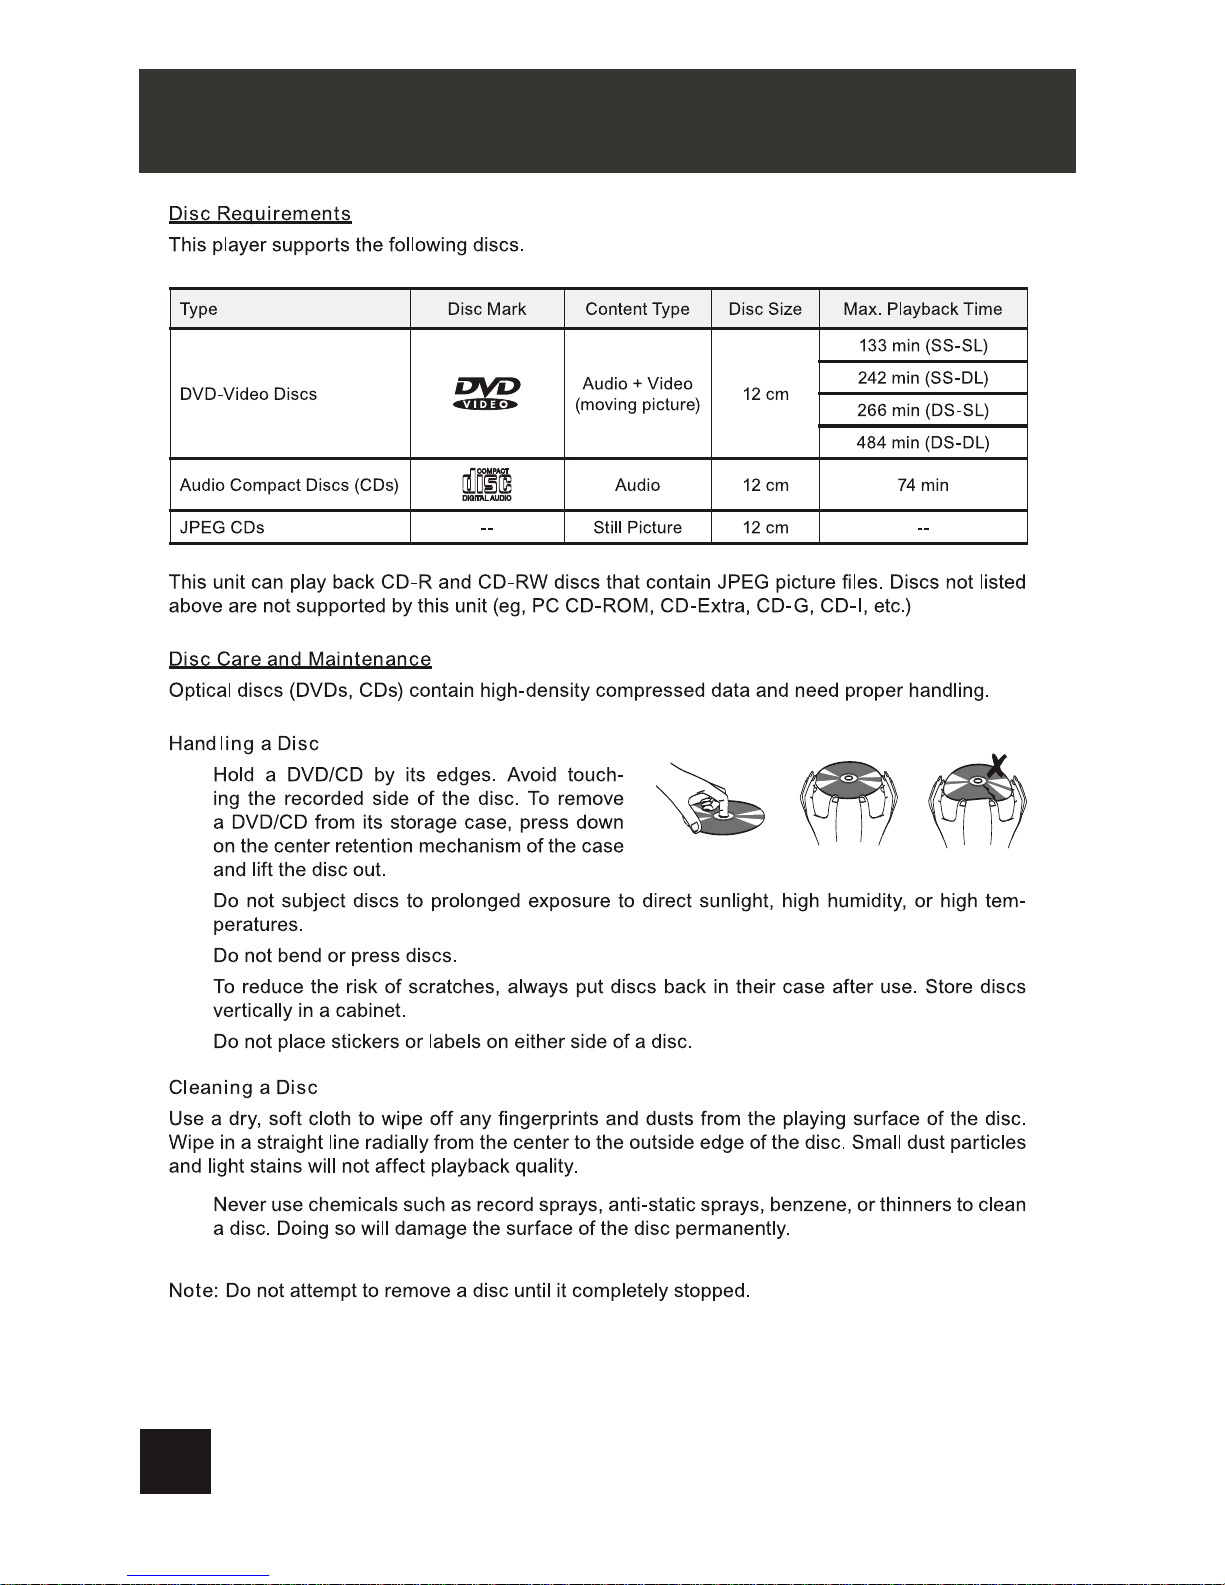
Disc Requirements
Disc Care and Maintenance
Page 4
Main Features
High brightness color 7” LCD screen
Compatible with disc of DVD, VCD, MP3, CD, JPEG, etc.
Built-in stereo speakers
Built-in rechargeable Lithium polymer battery
Support PAL or NTSC system
Support English OSD, speed forward/backward, repeat function
Zoom in/out function
1
1
1
1
1
1
2
Remote Control with battery
Audio/Video Cable
AC/DC Power Adapter
Cigarette Lighter Adapter
User Manual
Headphone
PACKAGE CONTENTS/MAIN FEATURES
7 '' Slave screen & DVD Player
1
DC+Audio/Video Cable
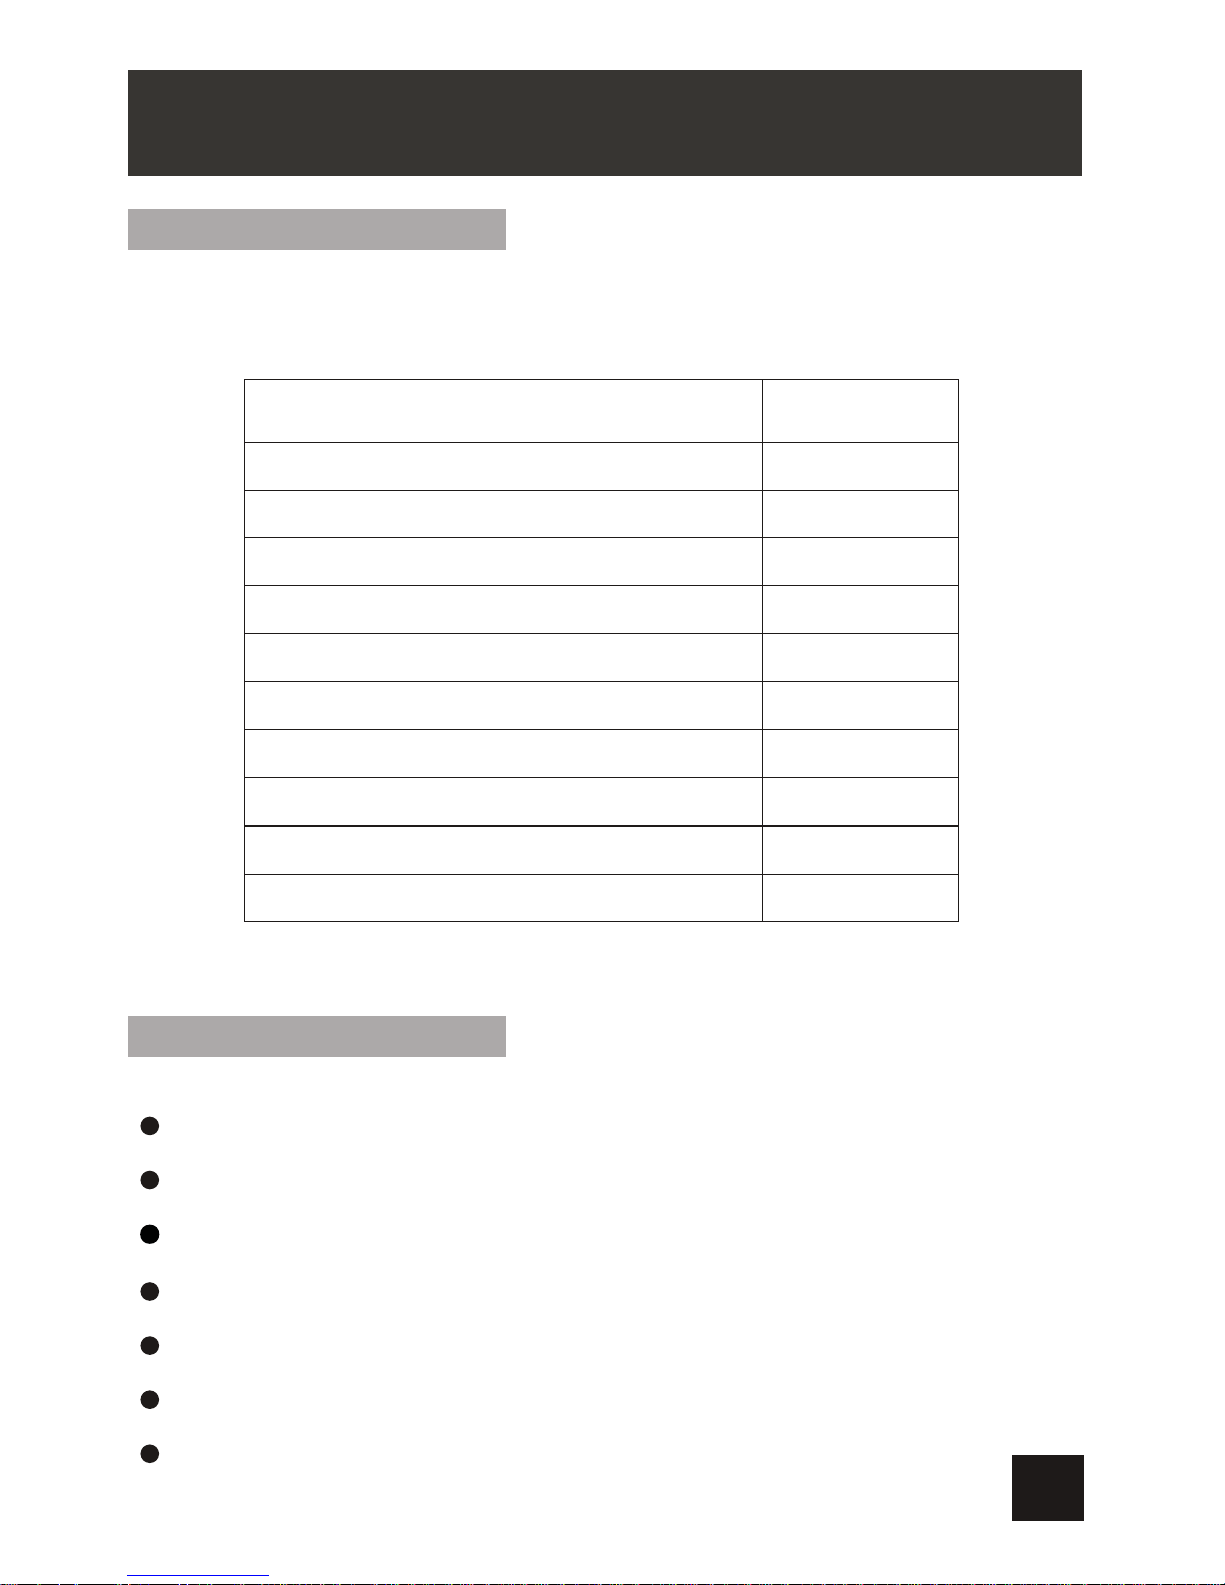
Please make sure the following items are included in the package. If any
item is missing, contact your dealer.
Package contents
Mounting Bag
Quick guide
Warranty card
2
1
1
3
Page 5
ABOUT OPTICAL DISCS
4
Page 6
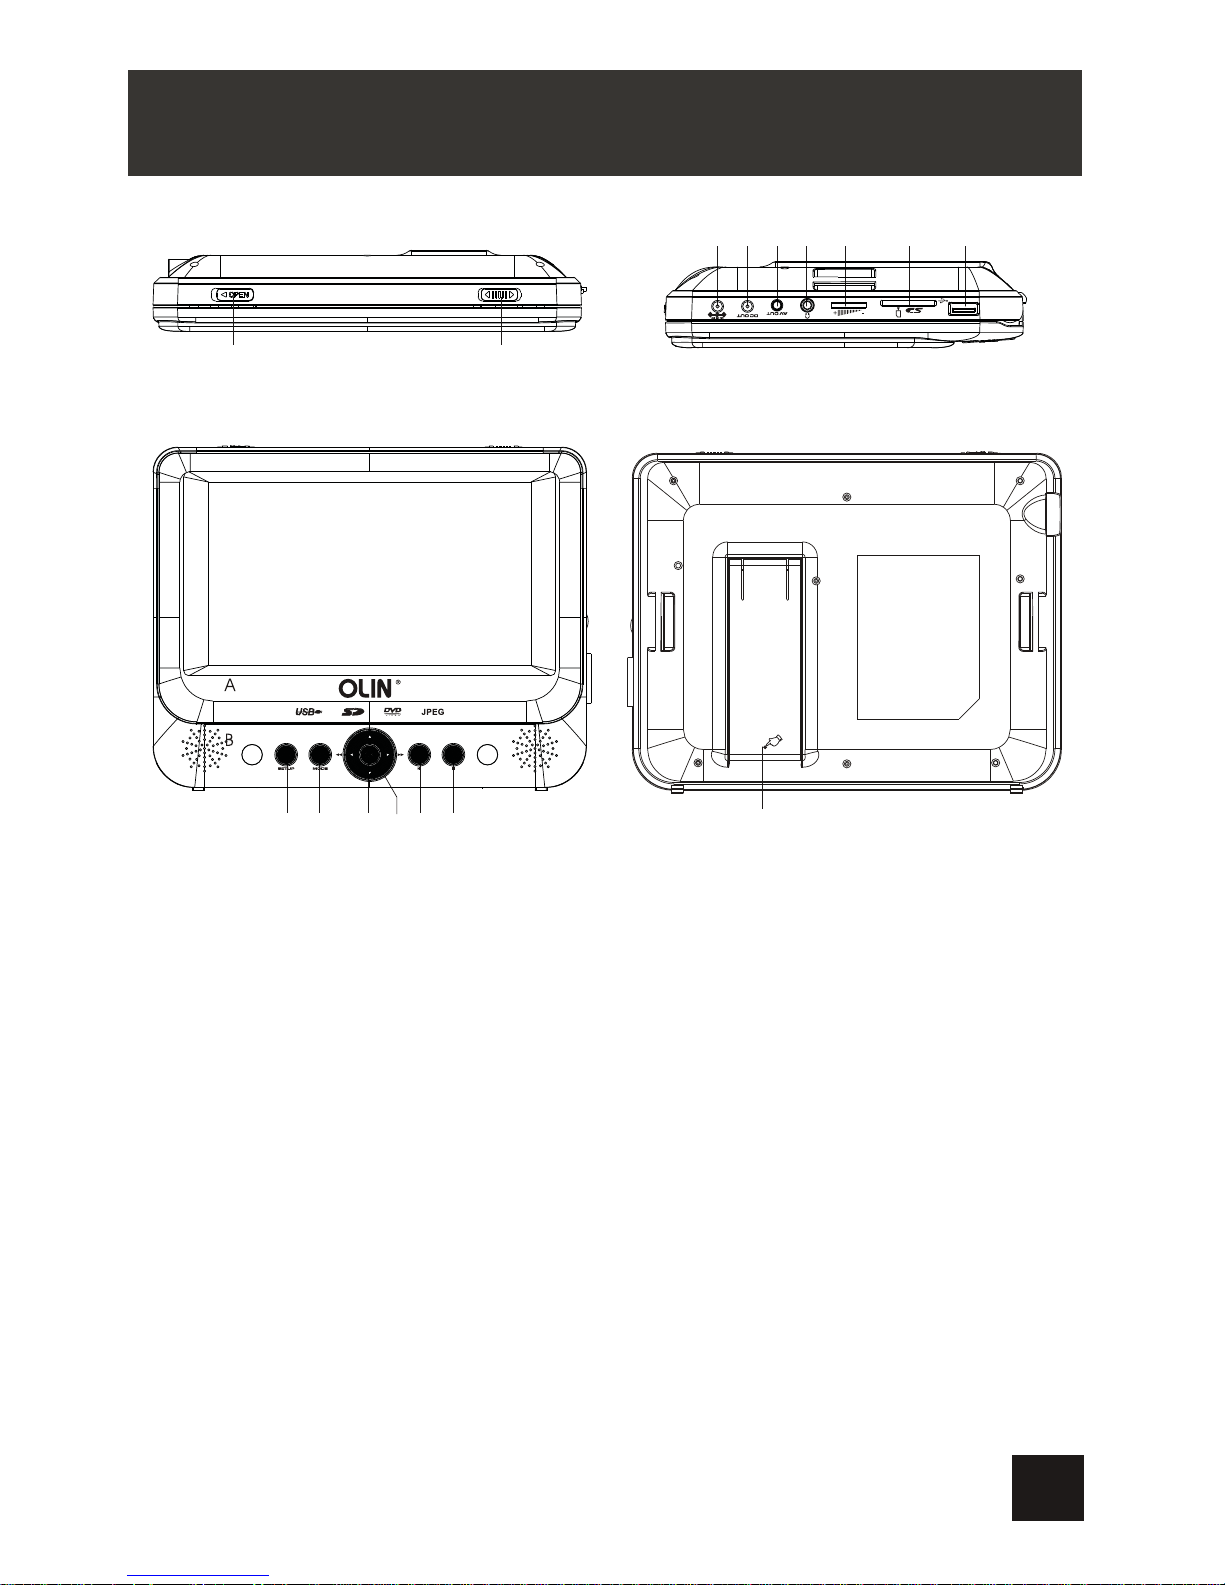
MAIN UNIT
ON OFF
12
CLOSE
16
910111213 14 15
3
4
5678
1.Open Knob
Switch the knob to unlock the disc cover
2.Power ON/OFF Switch
Switch the DVD player on/off
3.SETUP Button
Press SETUP to display the system
setup menu
4.MODE Button
Press MODE to select the source
between DVD and Media
5.Navigation Buttons
6.OK Button
Press OK to confirm selection
7.PLAY/PAUSE Button
Press Play/Pause to start/hold playback
8.STOP Button
Press STOP to stop playback
9.DC IN 9V
Connect to the power outlet
10.DC OUT
Connect to Slave screen DC IN
11.AV OUT
Output audio/ video Signals
12.Headphone Jack
13.Volume Knob
Turn the volume up/ down
14.SD Card Slot
15.USB Port
16.Bracket
5
Page 7
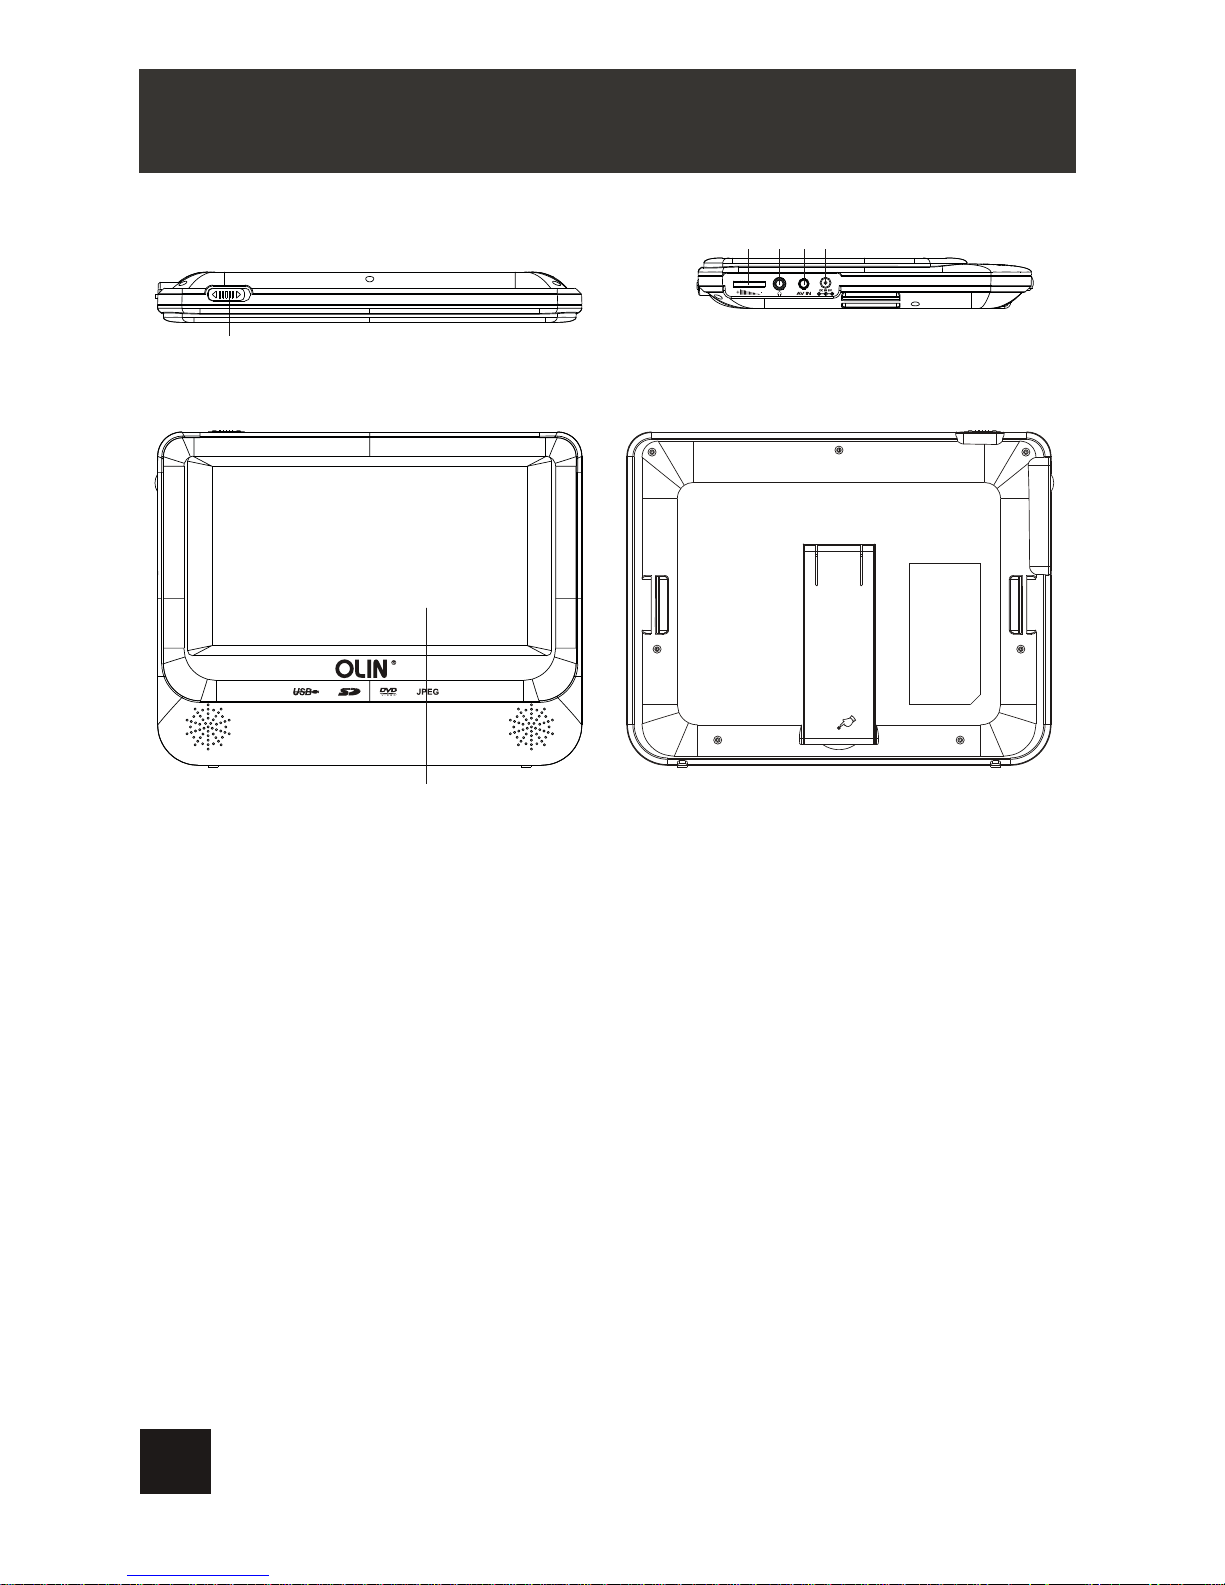
CLOSE
ON OFF
1
2
3
4
5
6
1.Power ON/OFF
Switch the Slave screen on/off
2.Volume Knob
Turn the volume up/down
3.Headphone Jack
4.AV IN
Input audio/ video signals
5.DC IN 9V
Connect to the DVD player DC OUT or the power outlet
6.Slave screen
6
SLAVE SCREEN
Page 8
Notice:
Car cigarette lighter adaptor can't be used to recharge the battery.
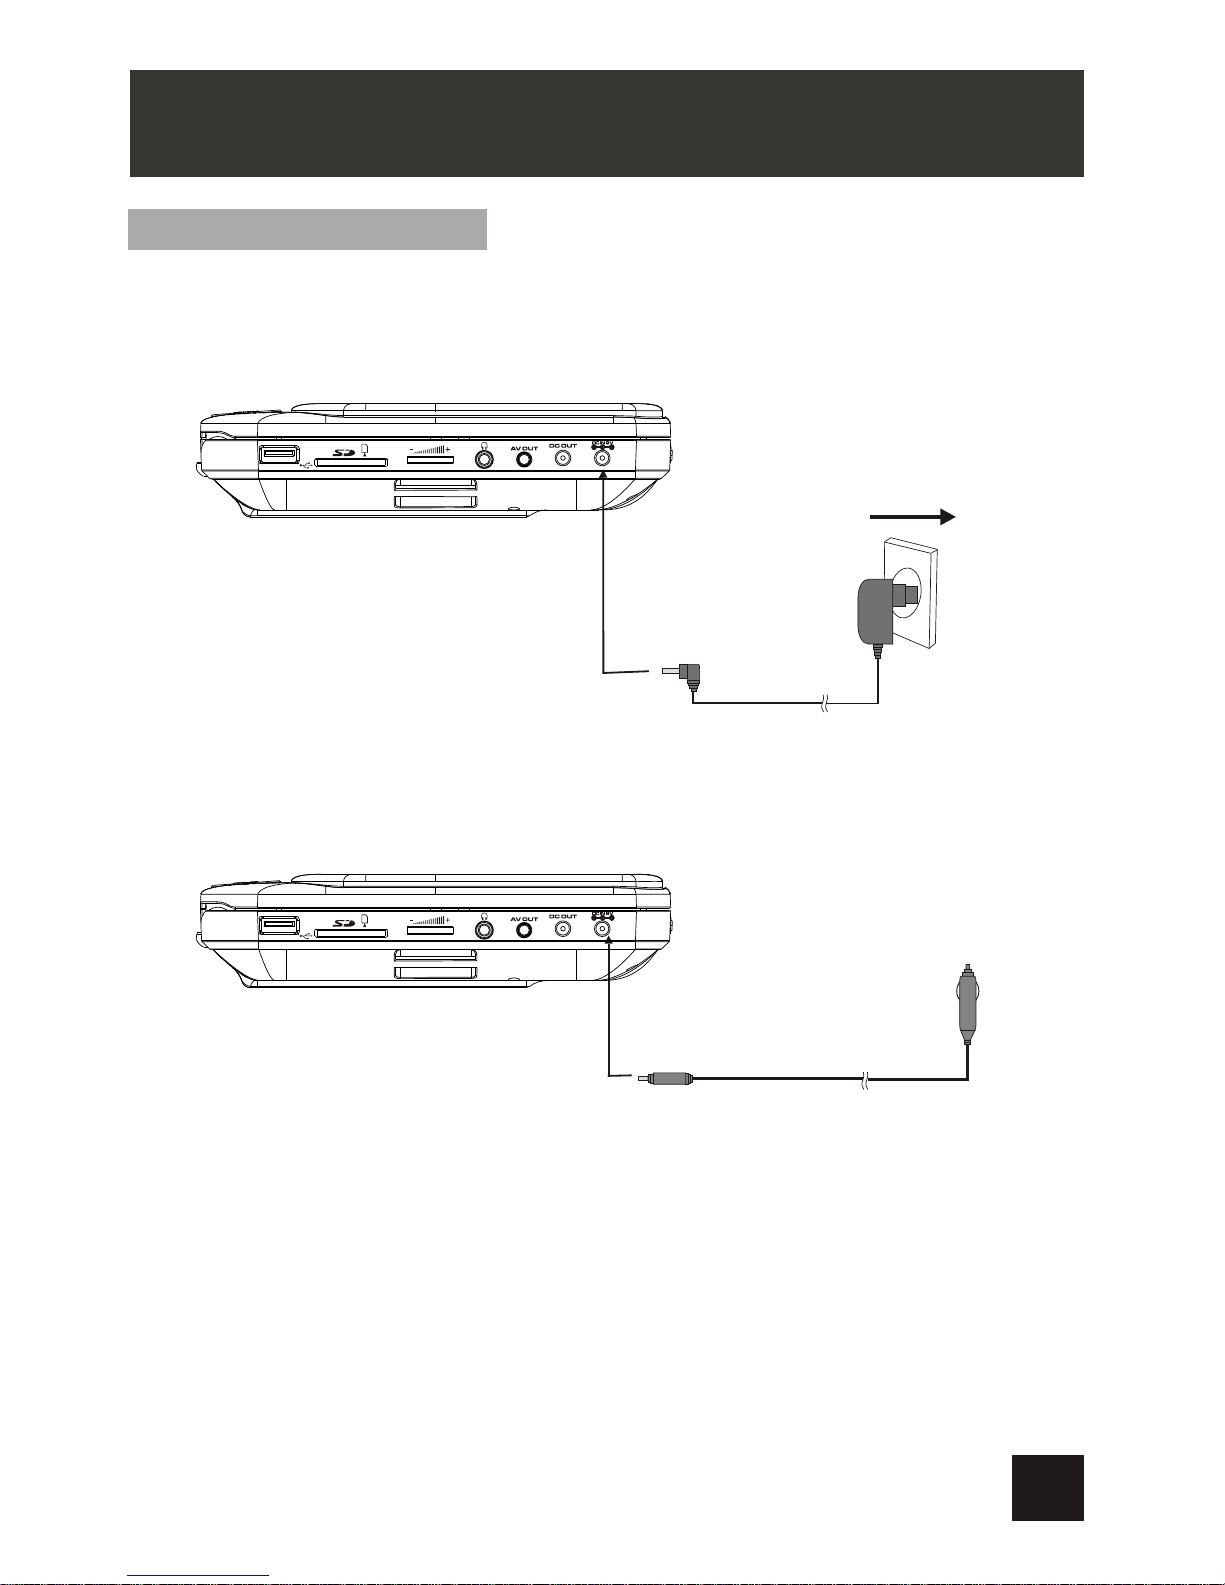
Powering and installation
Plug one end of the AC/DC power adaptor into the DC IN 9V jack on the right of the
main unit, then plug the other end into the AC power receptacle. Please refer to the
following illustration
If using car cigarette lighter adaptor to connect to the power:
Plug one end of the cigarette lighter adaptor into the DC IN 9V jack on the unit, plug
the other end into the car cigarette lighter socket. See illustration below.
SYSTEM CONNECTION
Warning:
This model and its enclosed car adaptor are only compatible with 9~12V vehicles.
It is not compatible with 24v vehicles.
Please note:
Do not connect the unit to the car via car adaptor before the engine has been started.
Disconnect the car adaptor when it is not in use.
7
Page 9
ON OFF
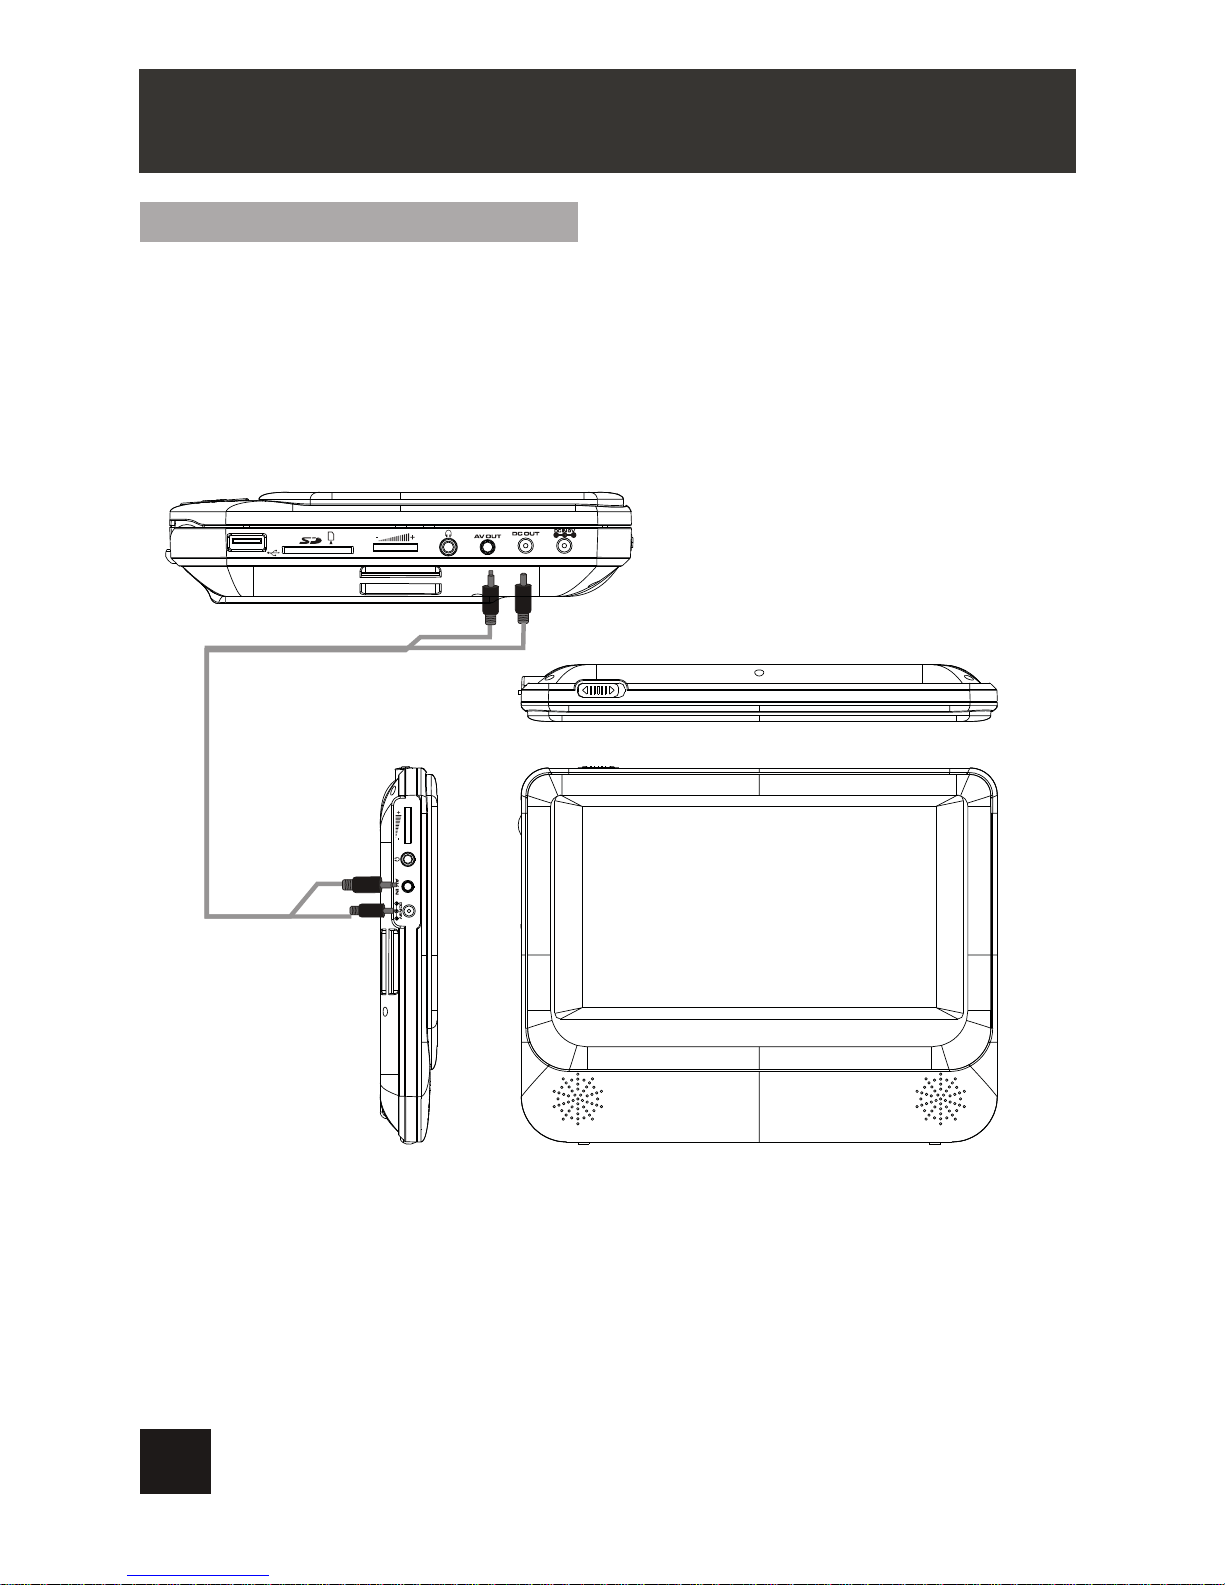
Connecting to the Slave screen
The Main Unit can be connected to the Slave screen.
Connect the Main Unit to power outlet via AC/DC adaptor or cigarette lighter adaptor.
Then connect Main Unit's DC Out jack to Slave screen's DC IN 9V jack with a DC/ AV
cable.
Also use the DC/AV cable to connect Main Unit's AV OUT to Slave screen’s AV IN .
Please refer to the illustration below.
Note:The Slave screen is designed to run off power from the car charger only. The
AC/DC wall adapter is for charging the main screen only.
SYSTEM CONNECTION
8
Page 10
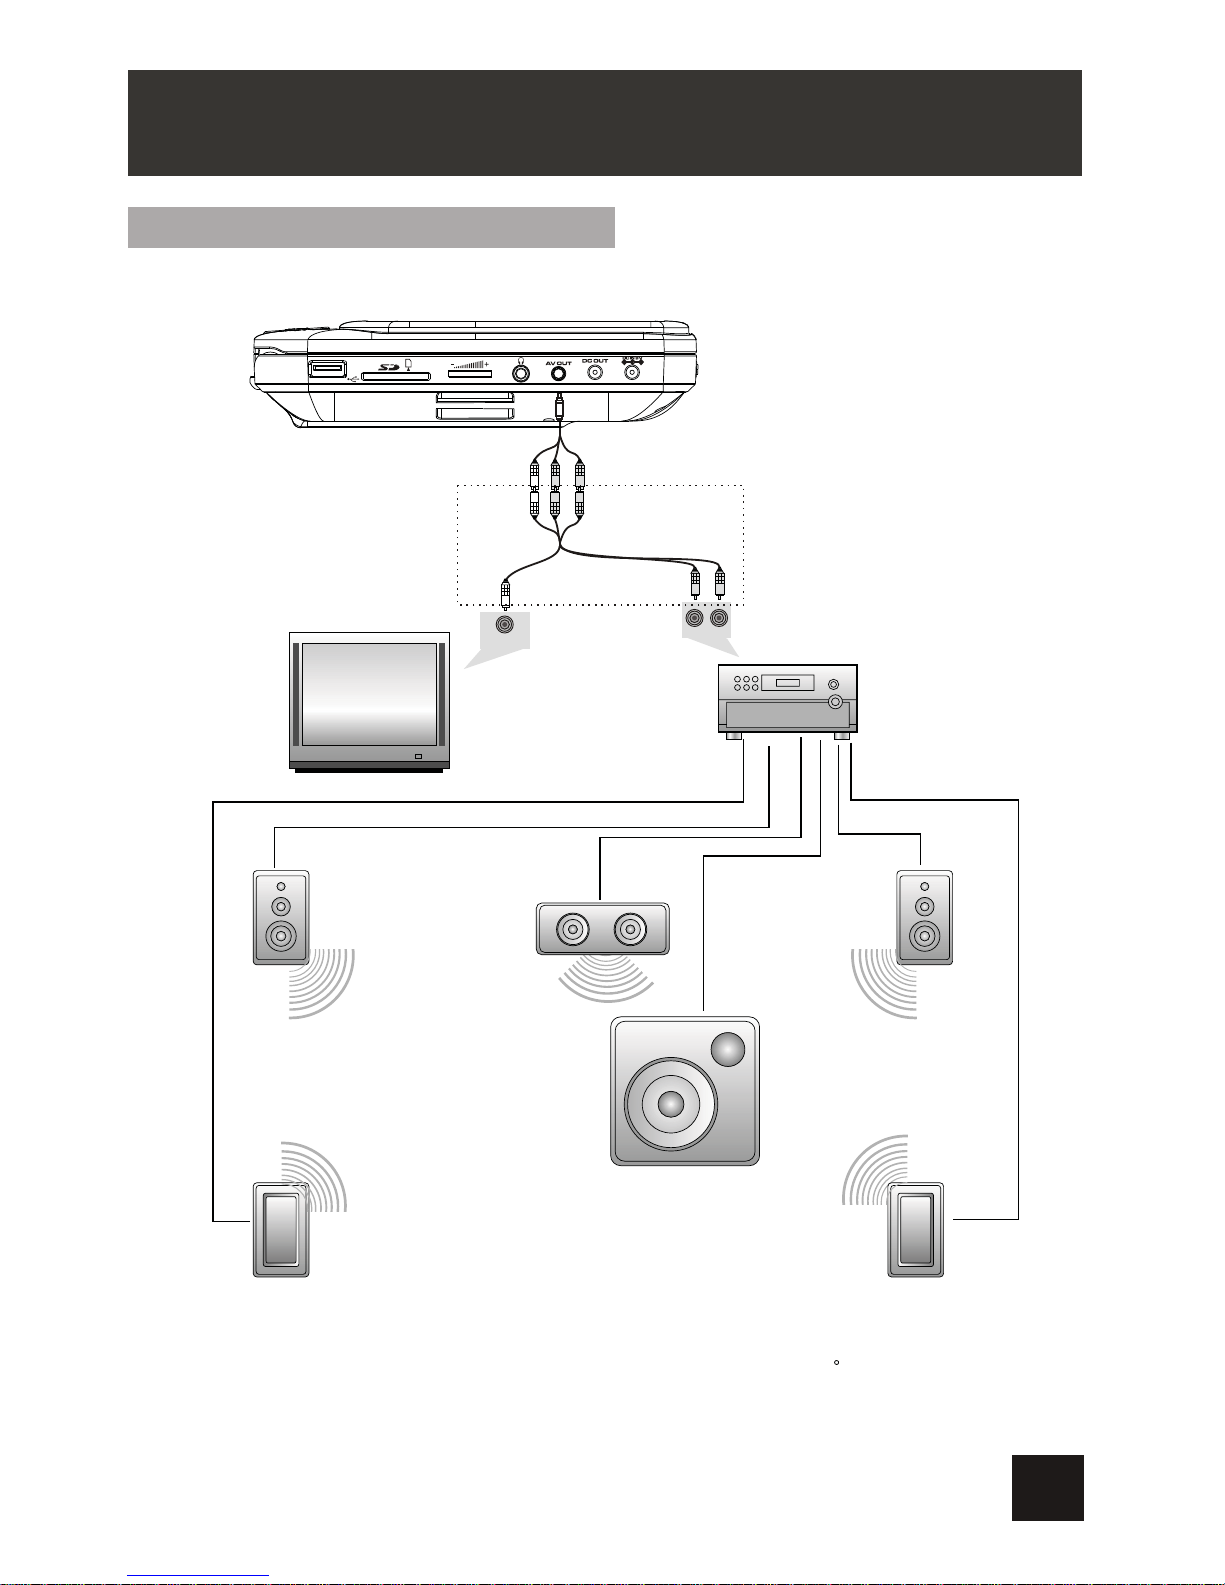
AMPLIFIER
TV
SUBWOOFER
Left front speaker
Right front speaker
Center speaker
Left rear speaker Right rear speaker
Notice:There is no 5.1 channel in the unit, however, after connecting to APM it is available to
output audio in 5.1 channel
AUDIO IN
VIDEO IN
AV CABLE
Audio and Video Signal Output
The Main Unit can transmit audio and video signals to the external receiver,
such as a TV or an amplifier.
1. Refer the owner's manual of the external receiver as well
2. Make sure all necessary connections have been properly made before connect
the power.
3.If the player will not be used for a long period of time, disconnect the power and
remove the battery from the remote control
These cables are
not included in package
SYSTEM CONNECTION
9
Page 11
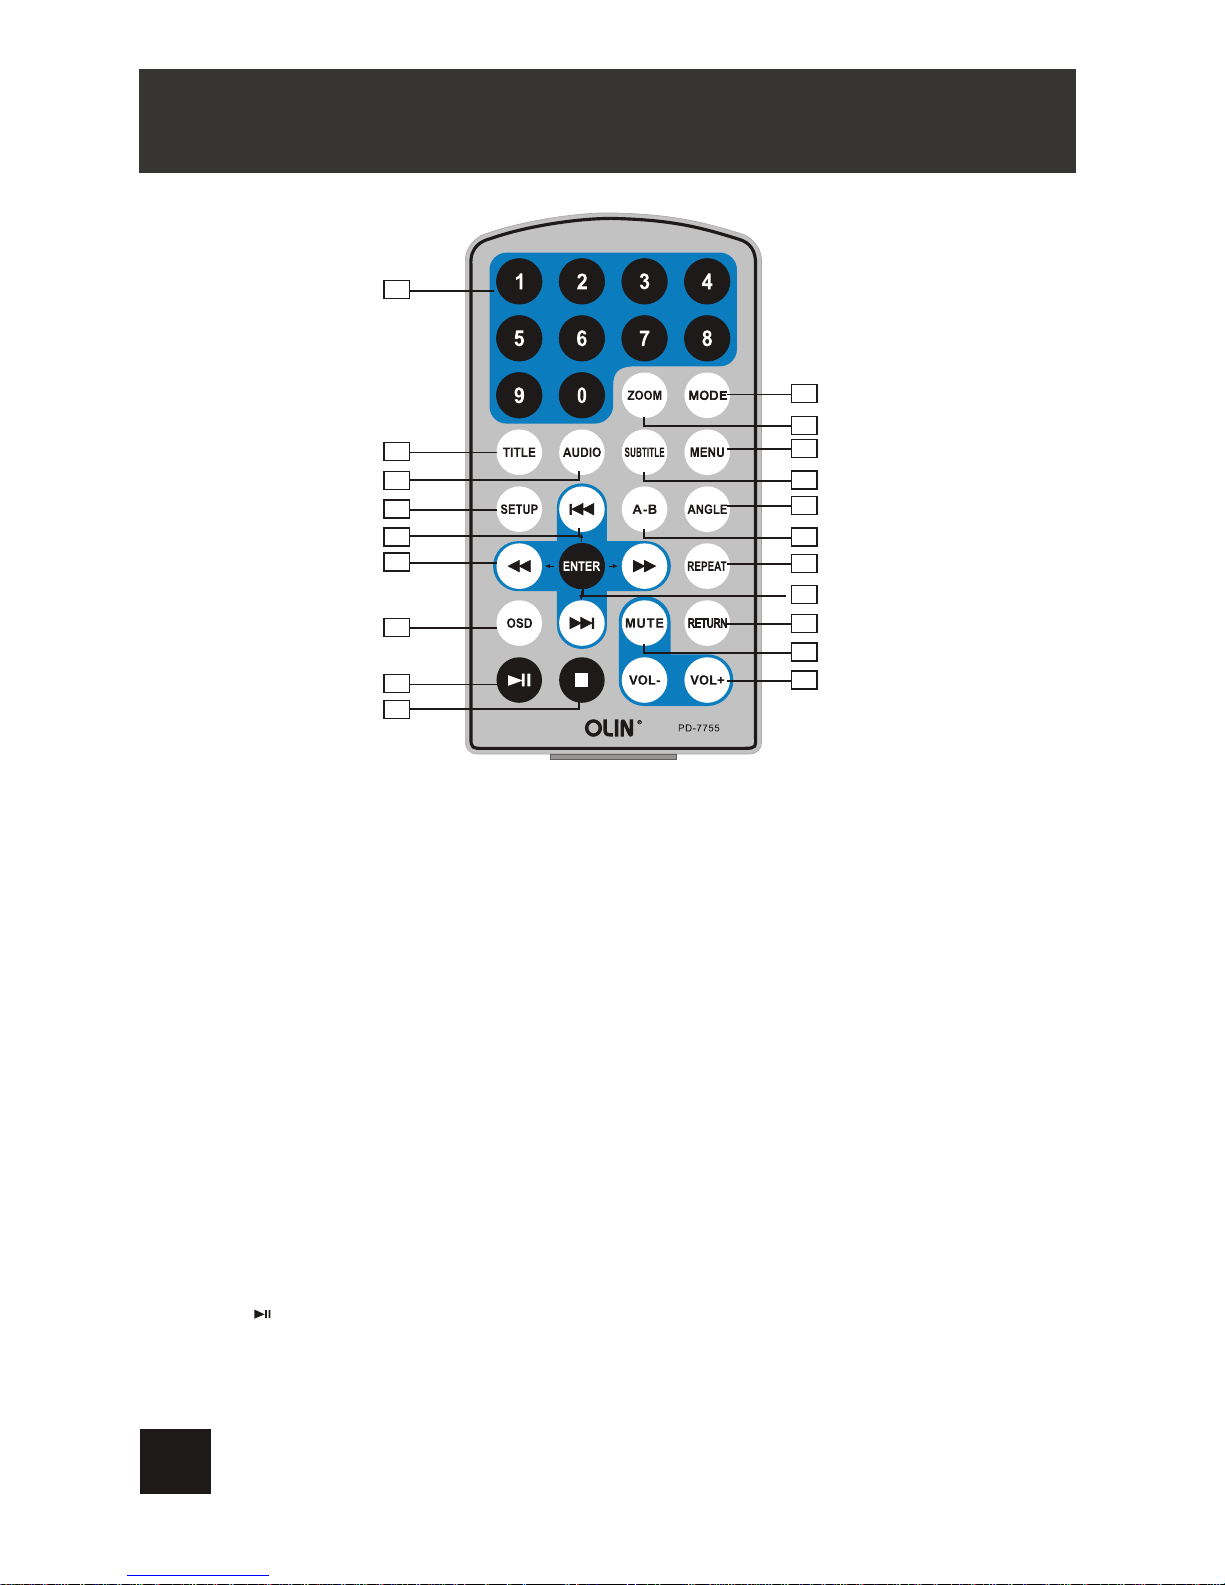
1. Numeric buttons
2. TITLE ( To display title information)
3. AUDIO (To select audio language)
4. SETUP (To go to or exit setup menu)
5. Previous/Next button (To go to
previous/next chapter or scene during
playing)
6. Fast forward/backward button (To
scan forward/backward at 2, 4, 8, 16,
or 32 times )
7.OSD ( To display disc information
during playing ,such as elapsed and
remaining time)
8. Play/Pause
9. Stop ( press once to stop playback, then
press to resume playback from the
point where you stopped; press stop
button twice to stop playback completely)
10. MODE (To select the source)
REMOTE CONTROL
11. ZOOM(To zoom in/out the image during
the playback)
12. Menu (To enter or exit menu root)
13. Subtitle (To select subtitle language
when playing DVD disc)
14. Angle (To change viewing angle when
playing disc with multi-angle)
15. A-B (Repeat a specific portion from
point A to B, press it again to cancel
repeat playing)
16. Repeat (To repeat playing title,
chapter or track)
17. Return (To return to the main menu)
18. MUTE(To turn to mute)
19. VOL +/- (To adjust the volume)
20: Enter ( To confirm)
1
2
3
4
5
6
7
8
9
10
11
12
13
14
15
16
17
18
19
20
10
Page 12
1
2
CR2025 CR2025
0
30
0
30
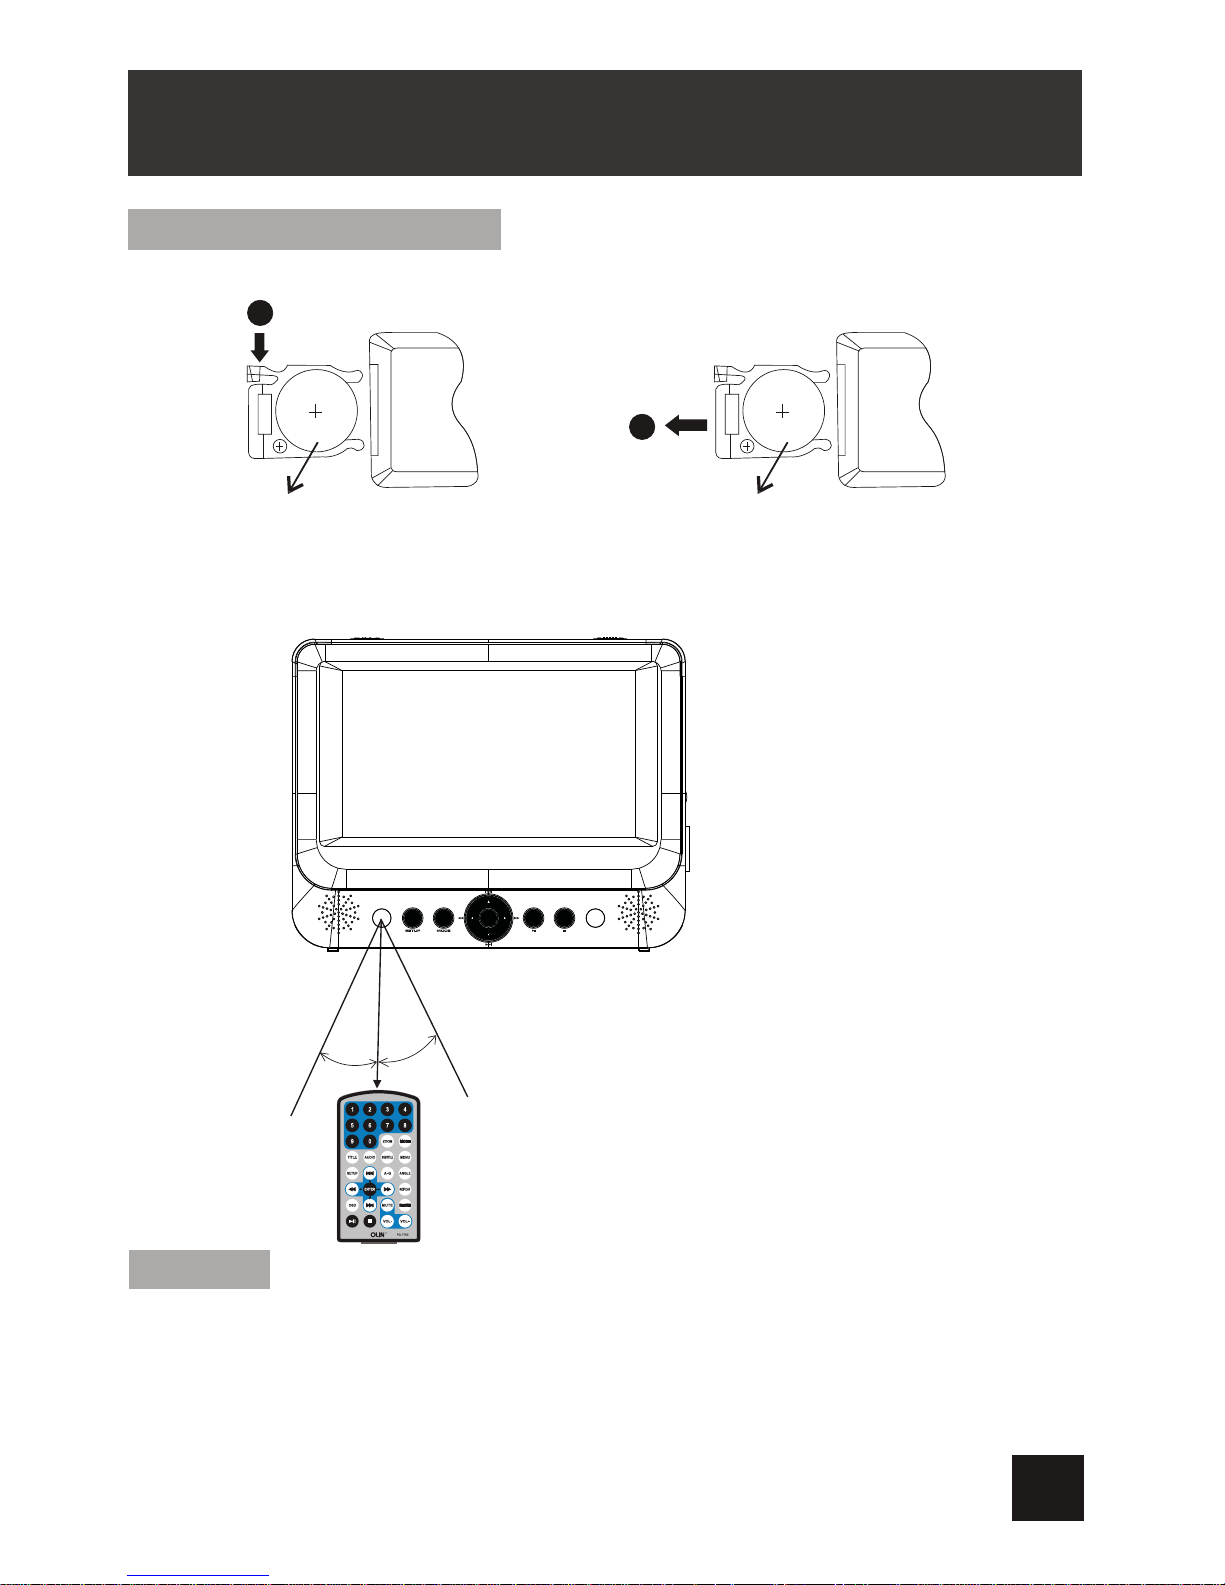
Please put the battery into the remote control as per below illustration
When using remote control, make sure the infrared window is pointed to infrared
receiving window of the main unit. The distance between machine and remote control
must be within 3 metres. Please refer to the following illustration
Notice
3.Please use a new battery to replace old one if the remote control doesn't work.
4.Remove the battery from the remote if it will not be used for a long period of time.
The Use of Remote Control
1. Avoid placing the unit in a damp environment or where there is a risk it may fall.
2. Avoid placing the unit in an area where the infrared remote receiving window is
in direct sunlight.
REMOTE CONTROL
Warning: Keep the battery from children.
11
Page 13
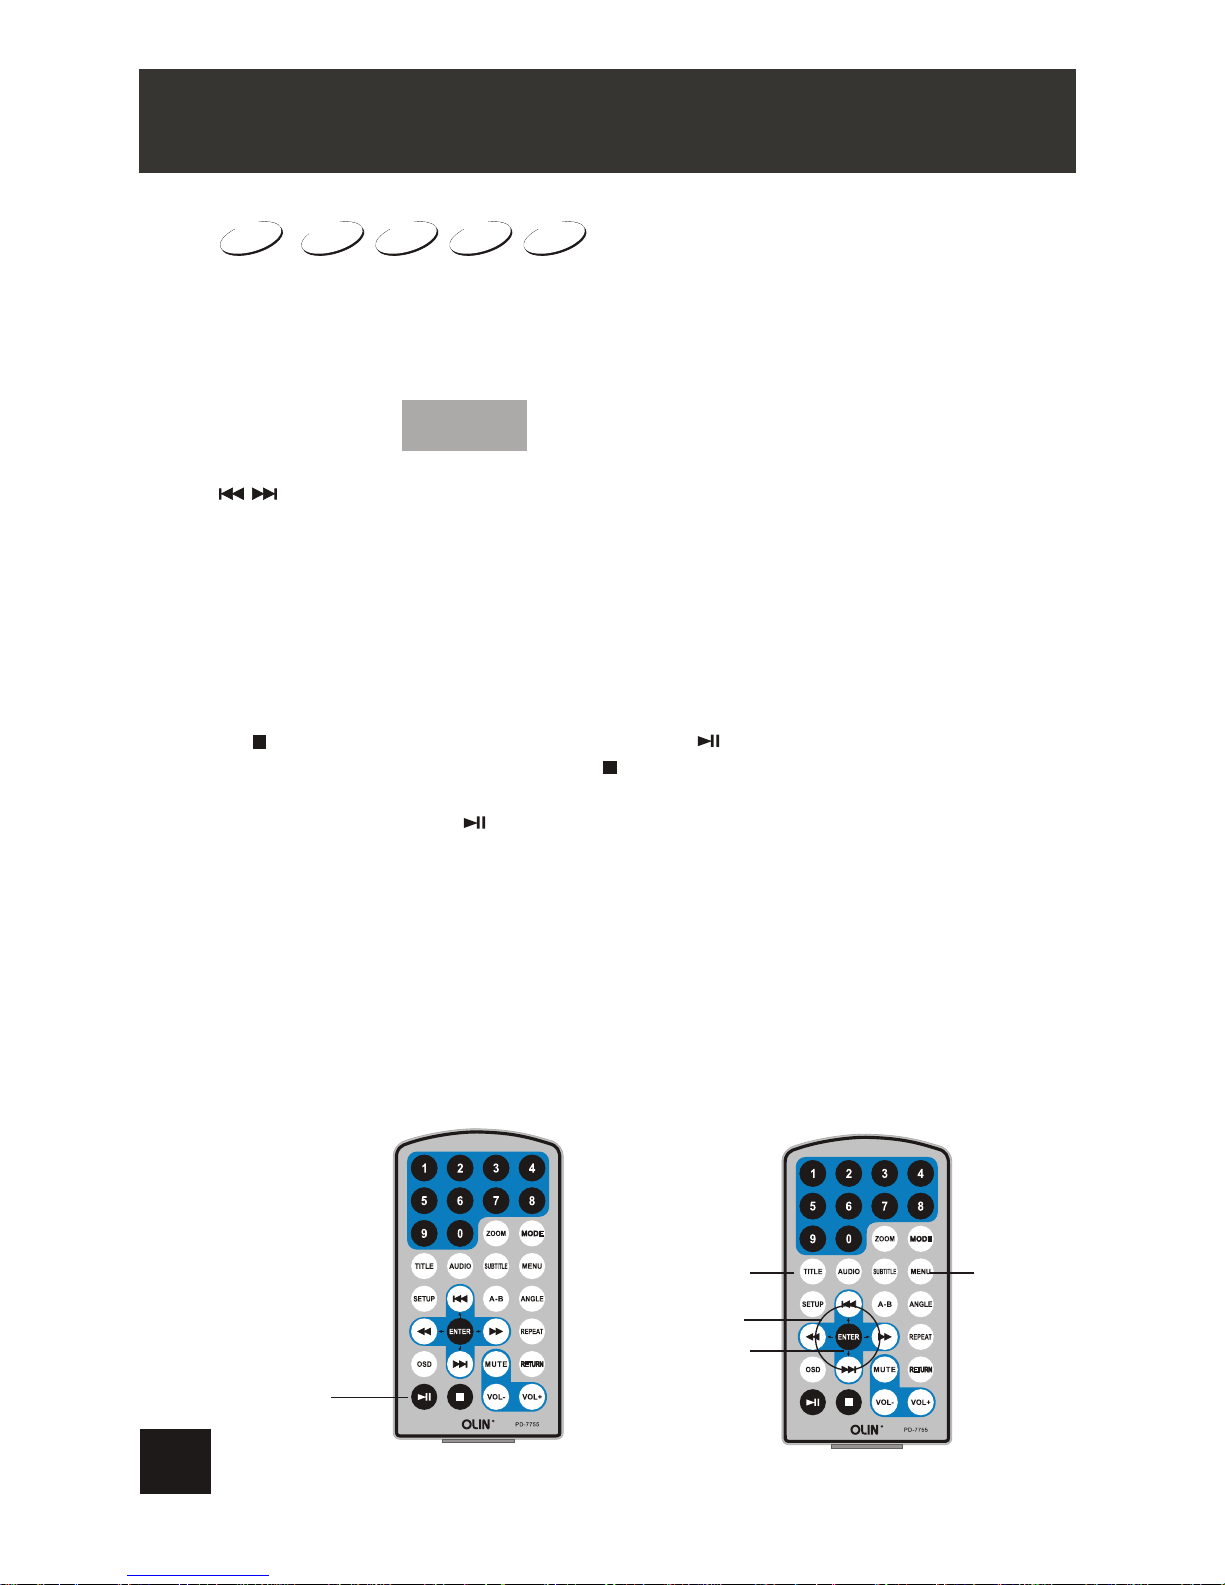
Playing disc of DVD, SVCD, VCD, CD, Mp3,
1. After connecting power to the Main Unit, turn on the unit by sliding the
ON/OFF switch to ON,
2. Open the disc door and insert a disc into the door with the label side facing
up.
3. Close the disc door. The unit will load the disc and start playing.
4. Press once to stop playback; then press to resume playback from
the point where you stoped; press twice to stop playback completely .
5. During playback, press to pause; press it again to resume playback.
6. When the playing is finished, please turn off the power by sliding ON/OFF
switch to OFF.
7. For some DVD disc with Title or Chapter menu, press “ MENU” button to
enter menu page, and use cursor buttons to select. Press ENTER to confirm.
the source menu will be displayed on the screen:
BASIC OPERATION
Press to enter DVD mode or Media mode and press OK button to confirm.
When selecting “Media”, ensure to insert USB or SD/MMC card properly
Play/Pause
DVD
SVCD
VCD CD MP3
DVD
MEDIA
Cursor button
ENTER
Title
Menu
Note: Please do not disconnect USB devices or plug out SD/MMC cards
while they are working with the unit. Functional failure may occur in
case of wrong operations.
12
Page 14
DVD
SVCD
VCD CD
2X 4X
8X16X32X
2X 4X
8X16X32X
DVD
SVCD
VCD CD
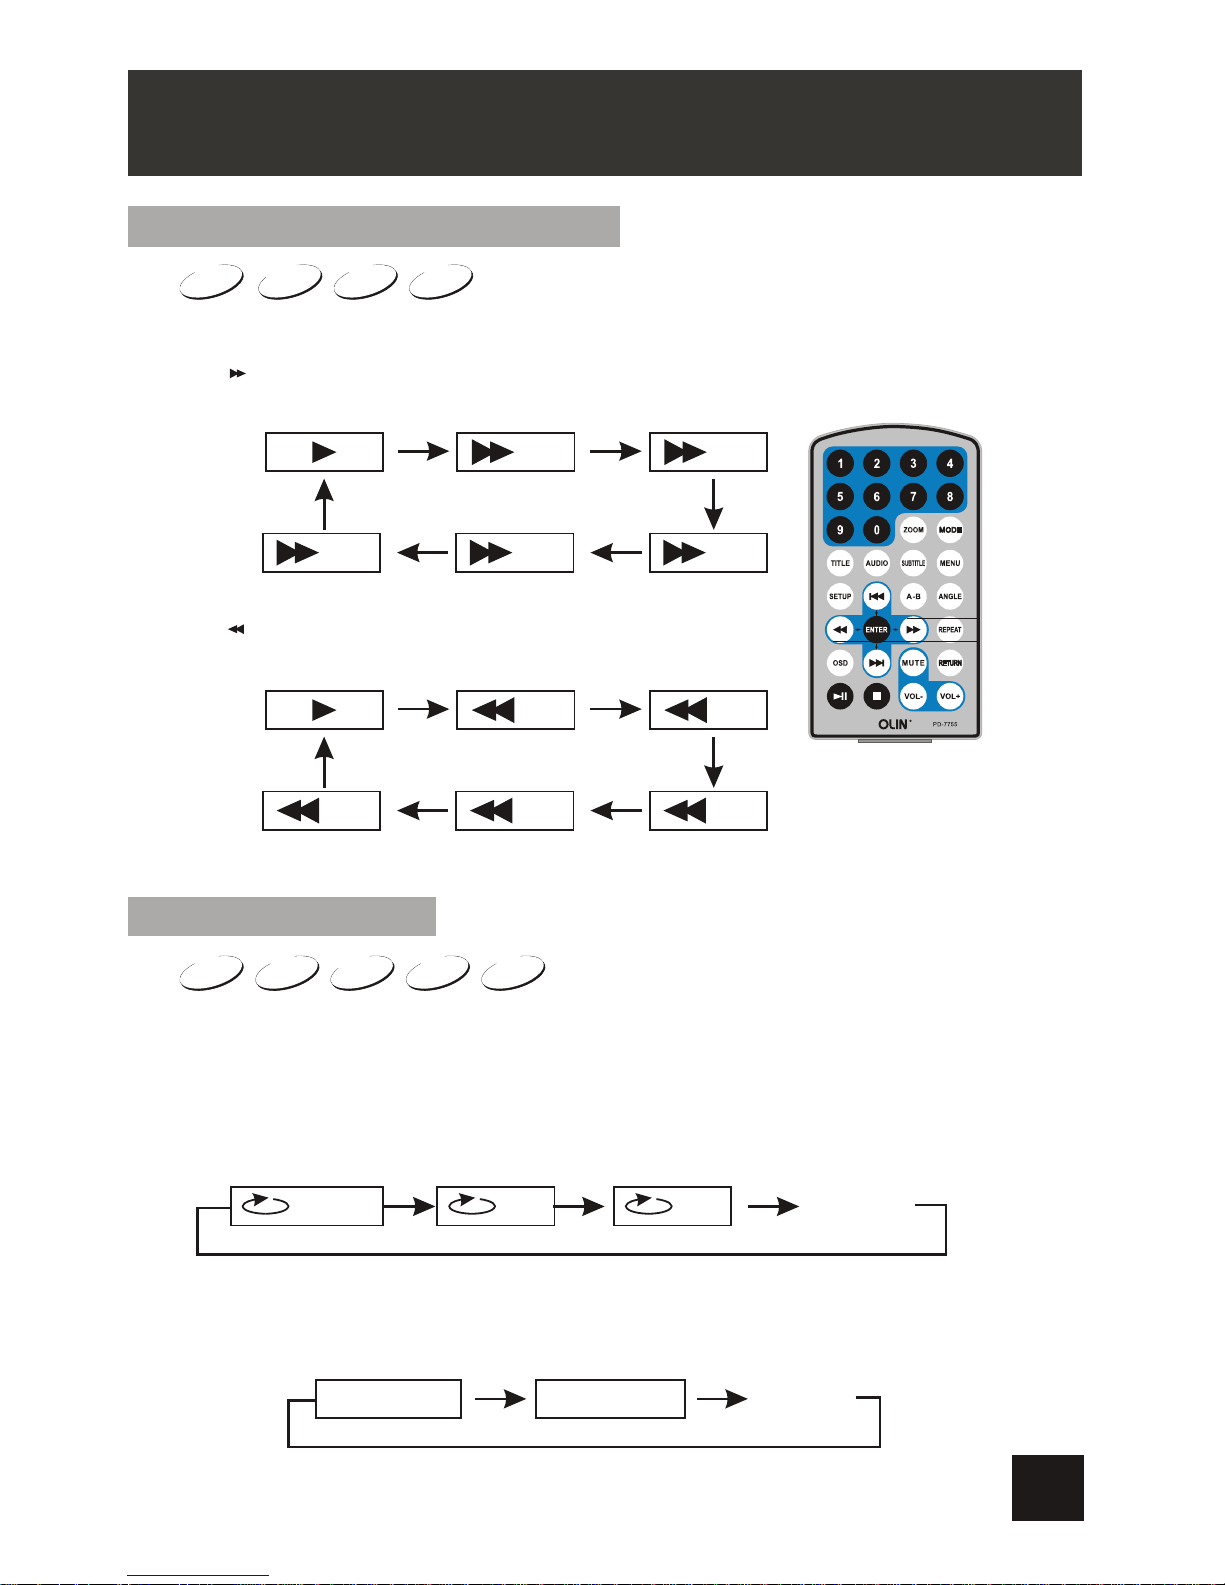
Search forward
Fast forward and fast backward
When playing disc of DVD, SVCD, VCD, CD, the unit can search forward or
backward.
1. Press , the unit will search forward. Press it repeatedly ,the unit will play at 2, 4, 8, 16,
32 times of speed.
2. Press , the unit will search backward. Press it repeatedly ,
the unit will play at 2, 4, 8, 16, 32 times of speed.
Repeat playing
When playing disc of DVD, SVCD, VCD, CD, user can repeat playing onechapter, title
or all the whole disc.
For DVD disc, press “repeat” button, user can repeat playing one Chapter; press it
again to repeat playing Title; press it the third time to repeat playing the whole disc.
For MP3 disc, press “repeat” to repeat playing present file; press it again to repeat
playing the folder; press it the third time to cancel repeat playing.
Search backward
Chapter Title All
Repeat off
Repeat one Repeat folder
Repeat off
MP3
Note: Audio will be muted during fast forward and fast backward.
BASIC OPERATION
13
Page 15
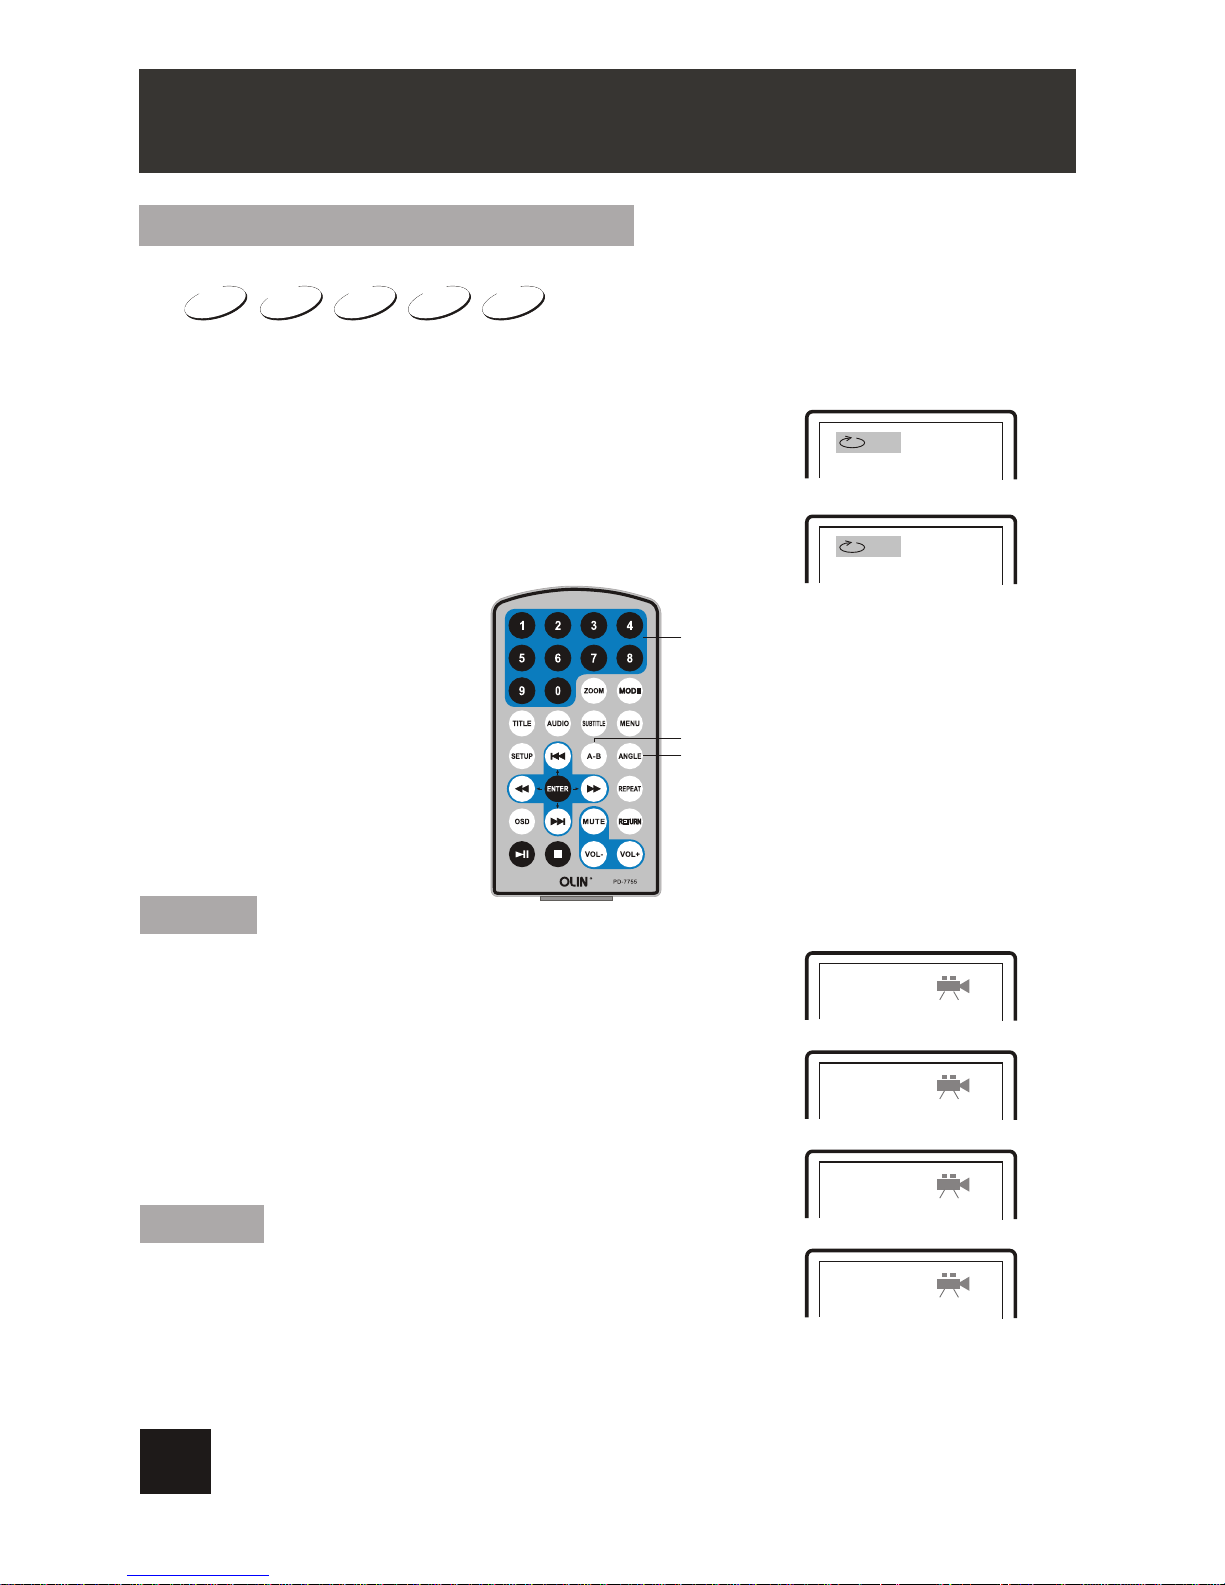
When playing disc of DVD, SVCD, VCD, CD, Mp3, user can repeatedly play a specific
section.
During playback, press “A-B” button at a point A, then press
this button again in point B, the unit will automatically repeat
playing the part between A-B
Press it the third time, the unit will return to normal playback.
1 /4
2 /4
3 /4
4 /4
AB
A
Number
Angle
During playing DVD disc with multi-angle, press “Angle”
button, the followings will be displayed on screen:
Press number buttons to select the angle you desire
To return to normal playing, please press “Angle” .
The unit will play the disc in the default angle.
Notice
The function is available only for discs with multi-angle.
Angle
A-B
Repeat playing of favorite scene
MP3CDVCD
SVCD
DVD
BASIC OPERATION
14
Page 16
DVD
SVCD
VCD
2X
3X
4X
1 /2X
1 /3X
1 /4X
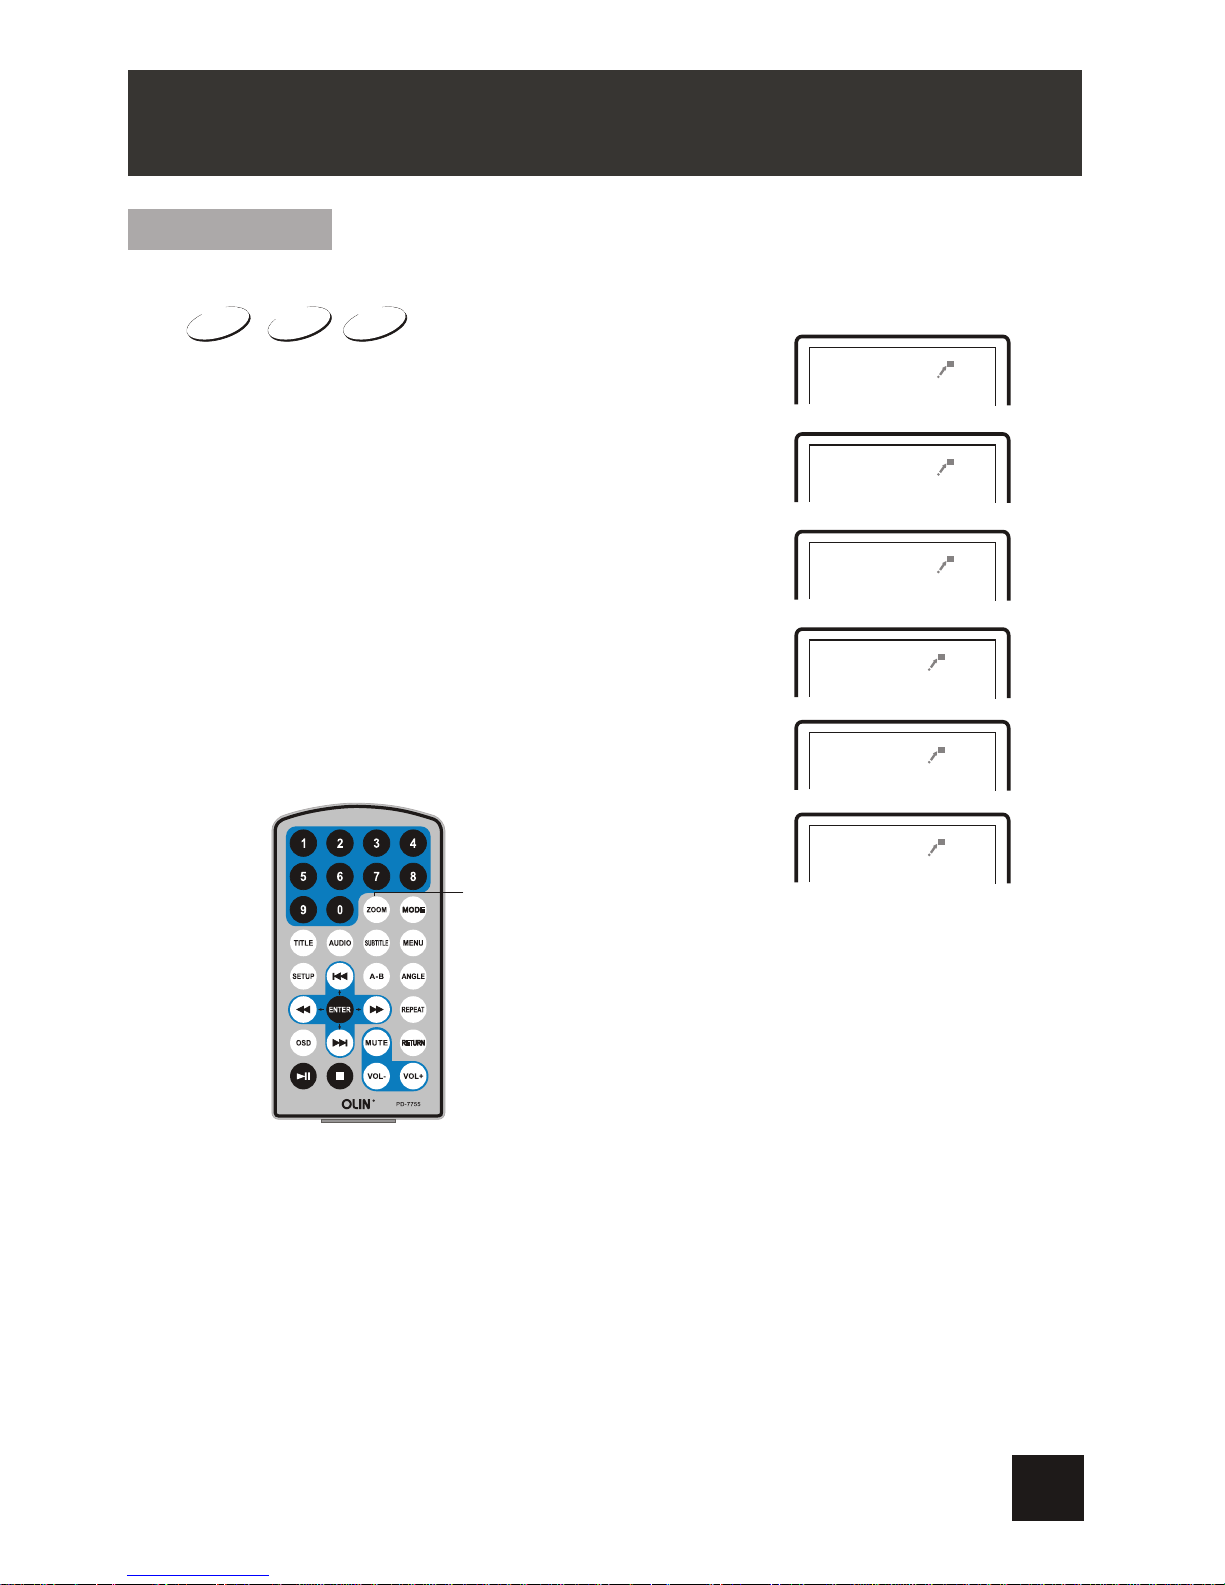
Zoom in/out
Zoom In/ Out
During playback, press “Zoom ” button, the image will be
enlarged; press it again the image will be enlarged again;
press it fourth time, the image will zoom out, press it
repeatedly and the image will return to normal status.
When the magnification level is greater than 1X, use the Navigation buttons to pan
around the magnified picture.
Note: The picture quality may decrease as the zoom level (magnification) increase.
REMOTE CONTROL
15
Page 17
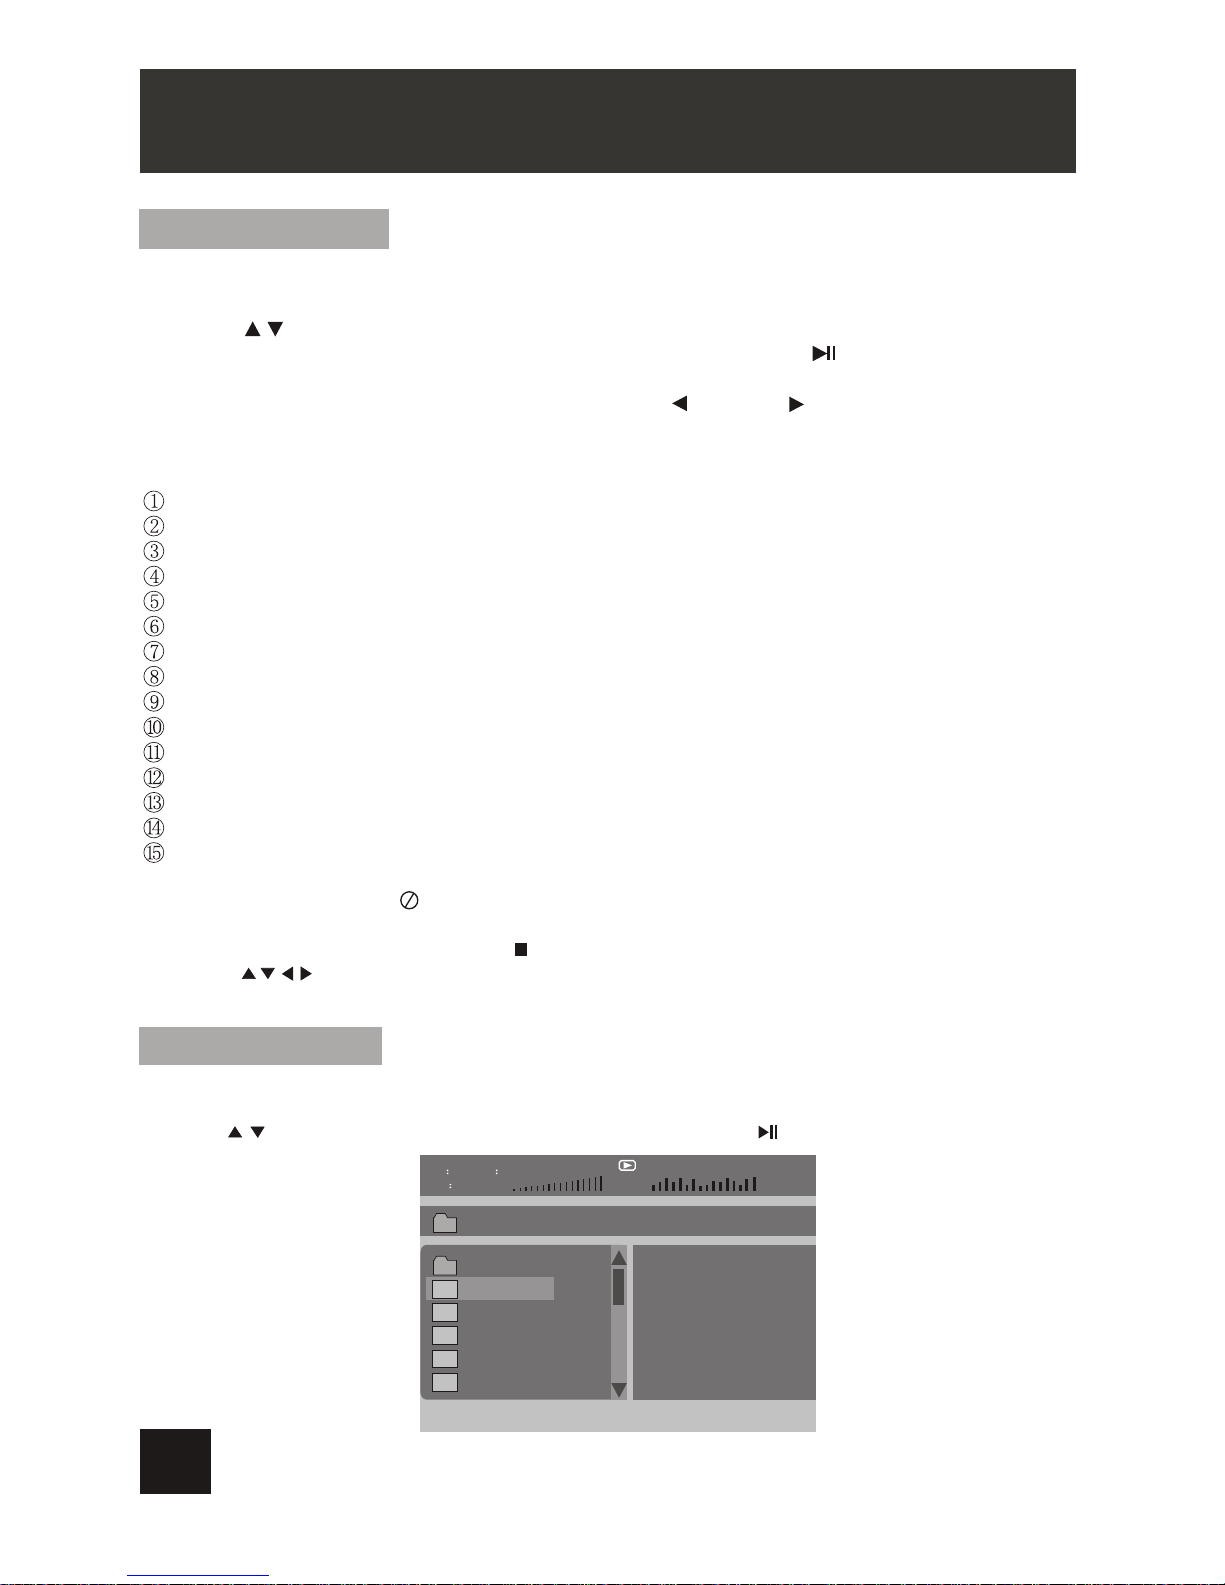
Playing JPG file
1. Place a JPG disc into the tray, the unit will start reading and play.
2. Press “MENU” to browse JPG files.
3. Press to select a JPG file and press “ OK ” button to confirm.
Note: you can press MENU to return to the folder list. Press or “ OK ” to preview
the file selected
4. To rotate the picturecounter-clockwise, press “ “; Press “ “ to rotate the picture
clockwise
5. Press OSD button when viewing pictures, you can select different refresh mode as
follows:
. from top to bottom
from bottom to top
from left side to right side
from right side to left side
from left top to right bottom
from right top to left bottom
from left bottom to right top
from right bottom to left top
from horizontal center to both sides
from vertical center to both sides
from topand bottom to center.
from right and left to center.
from four window's top side to bottom side.
from four window's left side to right side.
from 4 edges to center.
6. During viewing files, “ “ may appear when pressing or "Subtitle" or "Audio"
or "A-B" or "Title" etc; in this situation these options are unavailable to operate.
7. When viewing JPG files, press " " , pictures will be displayed in thumbnail mode,
press or “OK" button to select one picture to view
Playing MP3 files
1.Place MP3 disc into the disc door or insert USB disk, SD card to USB port or SD card slot.
Press “ ” or “OK” button to choose a MP3 file; Press “ ” or “ OK ” button to play the
file selected.
00 36 03 43
Dir 001
\Ctyy\
......
Mp3
TRACK01
Mp3
TRACK02
Mp3
TRACK03
Mp3
TRACK04
Mp3
TRACK05
"Angle”
/
PLAYING JPG /MP3 FILE
wipe top:
wipe bottom:
wipe left:
wipe right:
digonal wipe left top:
digonal wipe right top:
digonal wipe left bottom:
digonal wipe right bottom:
extend from center H:
extend from center V:
compress to center H:
compress to center V:
window H:
window V:
wipe from edge to center:
16
.
.
.
.
.
.
.
.
.
.
.
.
.
.
Page 18
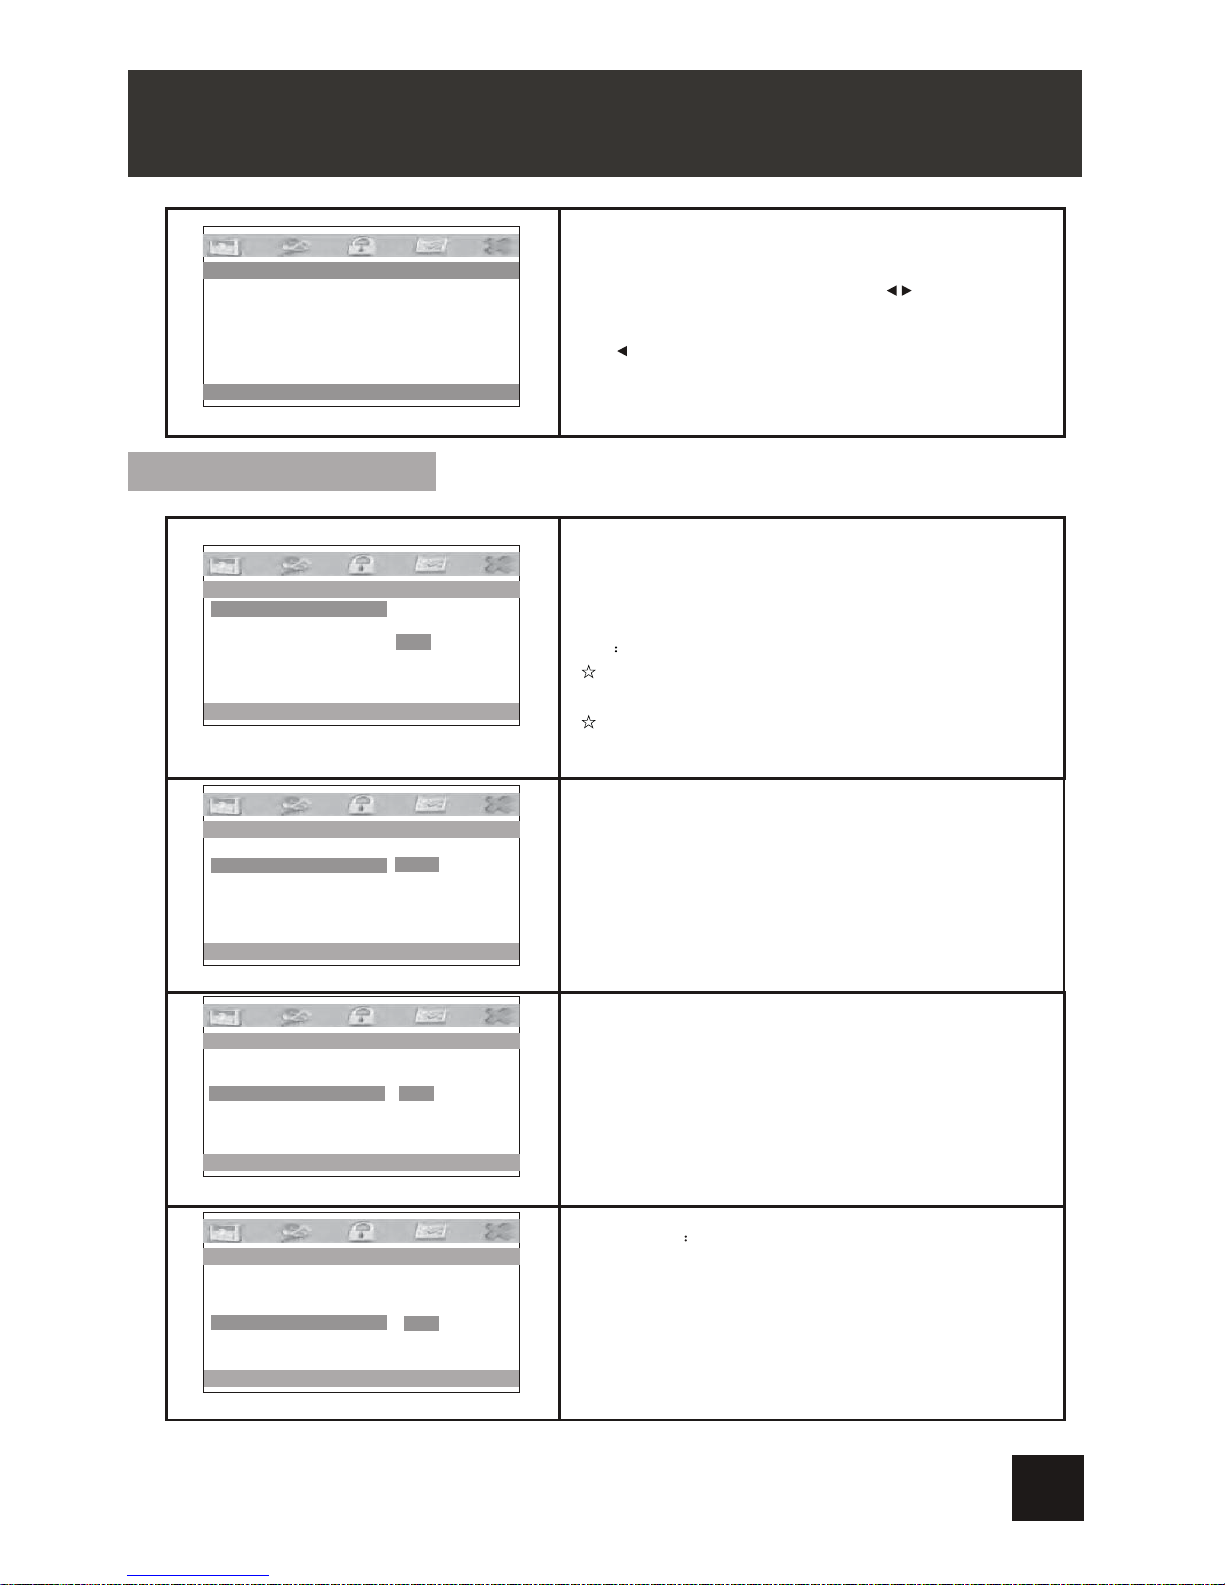
General Setup Page
Angle Mark:
Enter this option to set angle mark during playback.
Optional setting: ON, OFF
The default is: ON
Screen Saver
The default is ON.
--General Setup Page--
TV Display Wide
Angle Mark ON
TV Type PAL
Screen Saver ON
OSD Lang ENG
Normal/PS
Normal/LB
Wide
--General Setup Page--
TV Display Wide
Angle Mark ON
TV Type PAL
Screen Saver ON
OSD Lang ENG
On
Off
--General Setup Page--
TV Display Wide
Angle Mark ON
TV Type PAL
Screen Saver ON
OSD Lang ENG
PAL
NTSC
--General Setup Page-TV Display Wide
Angle Mark ON
TV Type PAL
Screen Saver ON
OSD Lang ENG
On
Off
TV display:
Enter this option,user can set screen display format
(Nomal/PS,Nomal/LB,Wide)
The default is "Wide"
Note
The function depends on the display ratio with which the
DVD disc is recorded.
Please choose “Wide(16:9)"when using a16:9 wide screen
TV set
TV Type:
The default is PAL.
SYSTEM SETUP
--General Setup Page--
TV Display Wide
Angle Mark ON
TV Type PAL
Screen Saver ON
OSD Lang ENG
Press”Setup”button,the main menu will be displayed on the
screen In the General Setup Page, Press button to highlight
this item.
Press OK button to access.
Press button to exit.
Go to General Setup Page
Set TV Display Mode
Set Angle Ma rk
Set TV Standrd
Set Screen Saver
Press SETUP to go back to normal playback.
Enter this option to select DVD video out signal type. Set this
to correspond with your TV's Video System type. PAL is the
standard used in Australia.
Enter this option to active/turnoff the screen saver function.
The screensaver prevents burn in damage to the player's
screen.
17
Page 19
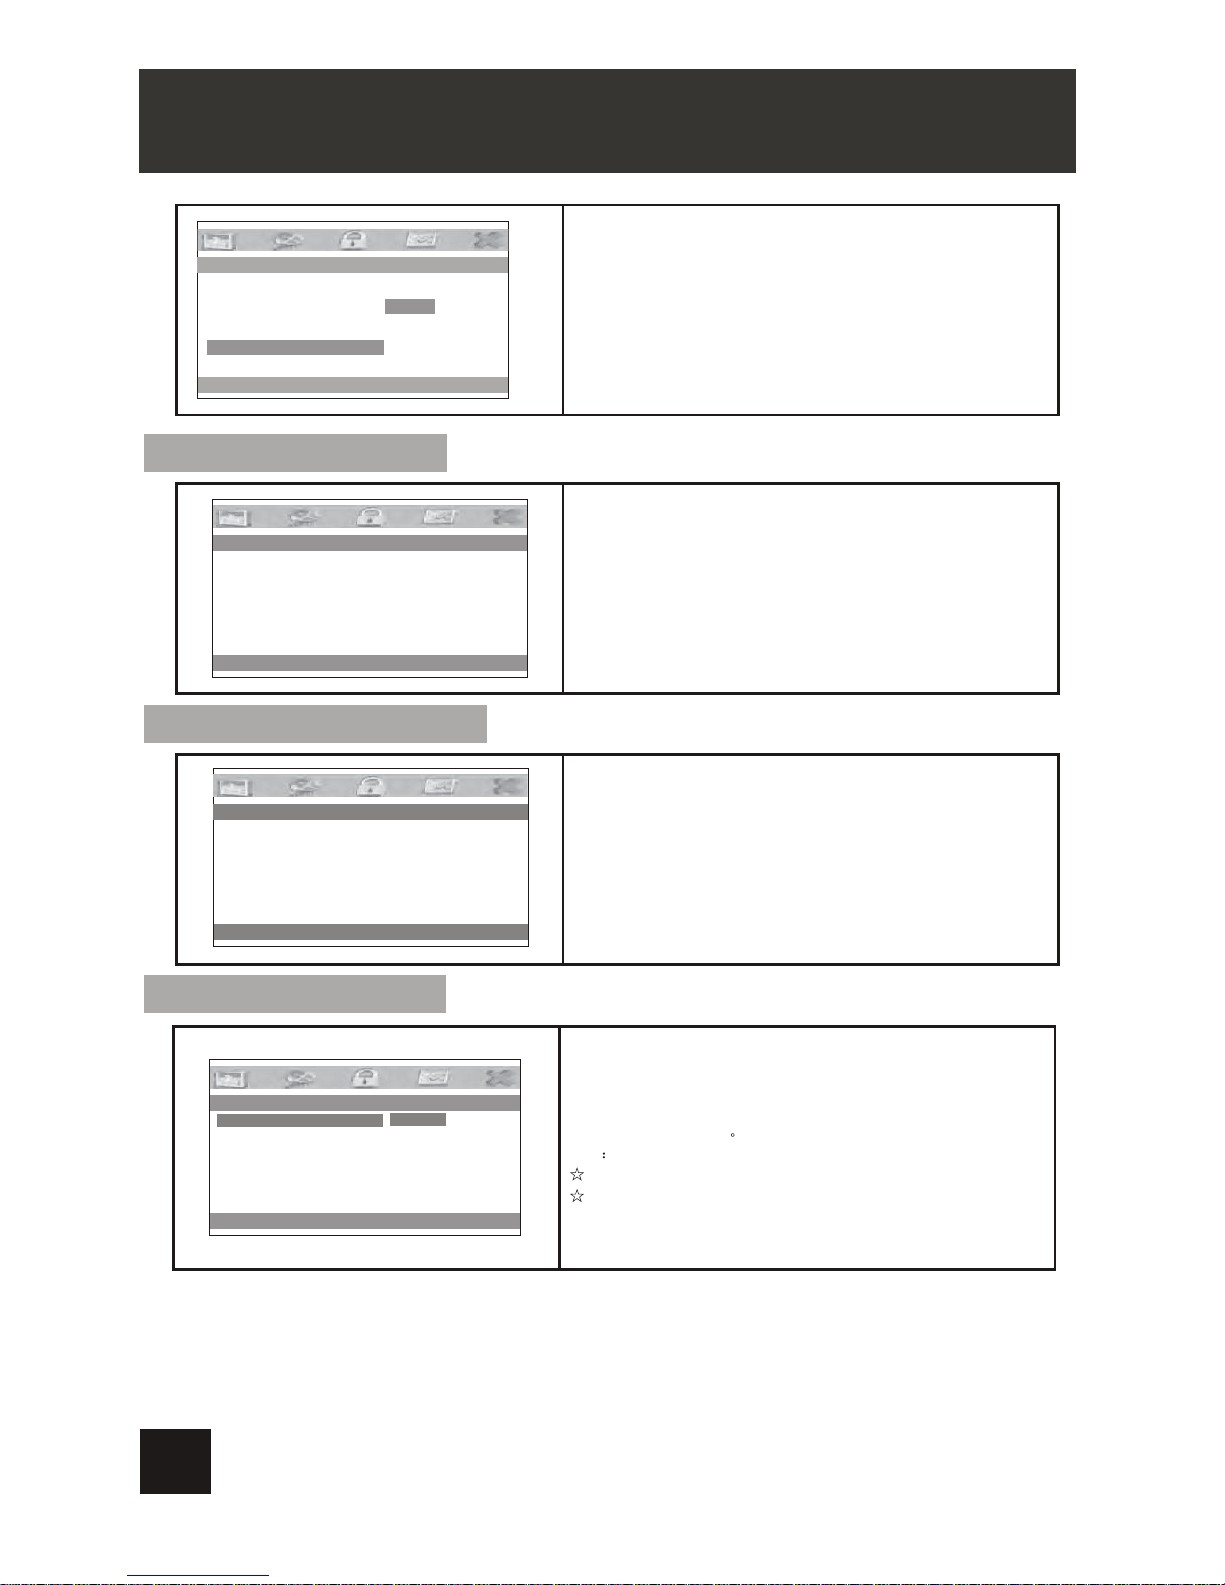
Audio:
Enter this option, user can select your preferred audio
language for DVDs.
The default is English
Note
The audio language depends on the material on each disc.
User can also change the audio language during playback
by pressing the Audio button.
Enter this option, user can adjust picture quality of video
output. There are items available to be adjusted:
Brightness, Contrast, Hue and Saturation.
For all these items the default is 00
Password Setup Page
English
Video Setup Page
Preference Page
--Password Setup Page--
Go To Password Setup Page
--Video Setup Page--
TV Display Wide
Angle Mark ON
TV Type PAL
Screen Saver ON
OSD Lang ENG
Preference Audio Language
Audio ENG
Subtitle OFF
Disc Menu ENG
Parental
Default
Go to Video Setup Page
--General Setup Page--
--Preference Page--
Panel Quality
Password
English
Set OSD Language
OSD Language:
In the option user can set OSD menu language English.
The default:English
SYSTEM SETUP
18
The factory set password is"8888",please remember the
renewed password. In case of forgetting it, please press
default password"8888"
Page 20
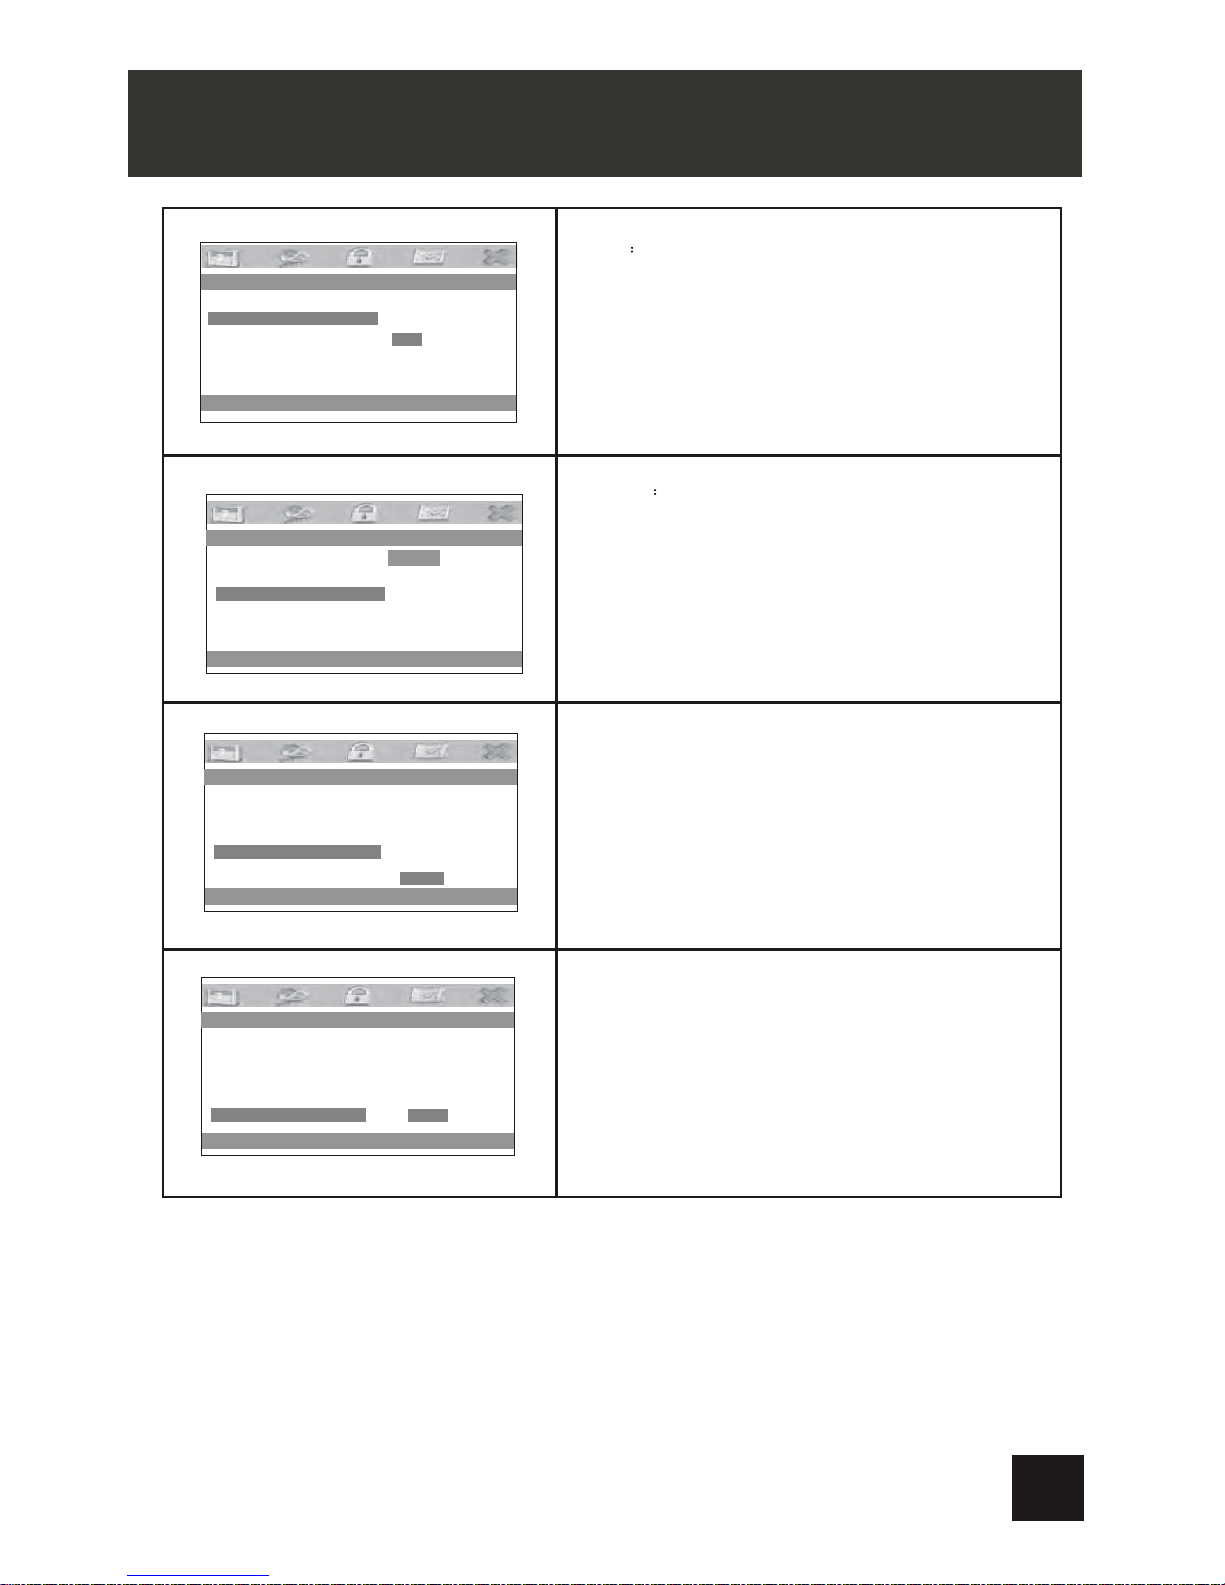
Disc Menu
This function allows you to choose the menu language
stored on the disc.
The default is English.
Note: the disc menu languages depend on the
information available on the disc.
Parental:
Enter this option to set the parental control level to some
unsuitable disc scenes being watched by the children.
Optional parental control levels: KID SAFE, G, PG, PG 13, PGR,
R, Nc17, ADULT.
The default of this option is ADULT.
Default:
--Preference Page--
Preferred Menu Language
Audio ENG
Subtitle OFF
Disc Menu ENG
Parental
Default
--Preference Page--
Set Parental Control
Audio ENG
Subtitle OFF
Disc Menu ENG
Paretal
Default
1 KID SAFE
2 G
3 PG
4 PG 13
5 PGR
6 R
7 NC 17
8 ADULT
--Preference Page--
Load Factory Setting
Audio ENG
Subtitle OFF
Disc Menu ENG
Parental
Default Reset
English
Set all settings to factory default state.
Note: The Parental level setting will not be reset by this
operation.
Subtitle
Select your preferred language to show the subtitles
on the screen.
The default is OFF
The subtitle languages depend on the
information available on each disc,You can also change the
subtitle language during playback by press the SUBTITLE
button.
Preferred Subtitle Language
Audio ENG
Subtitle OFF
Disc Me nu ENG
Parental
Default
--Preference Page--
English
Off
SYSTEM SETUP
19
Page 21
SPECIFICATION
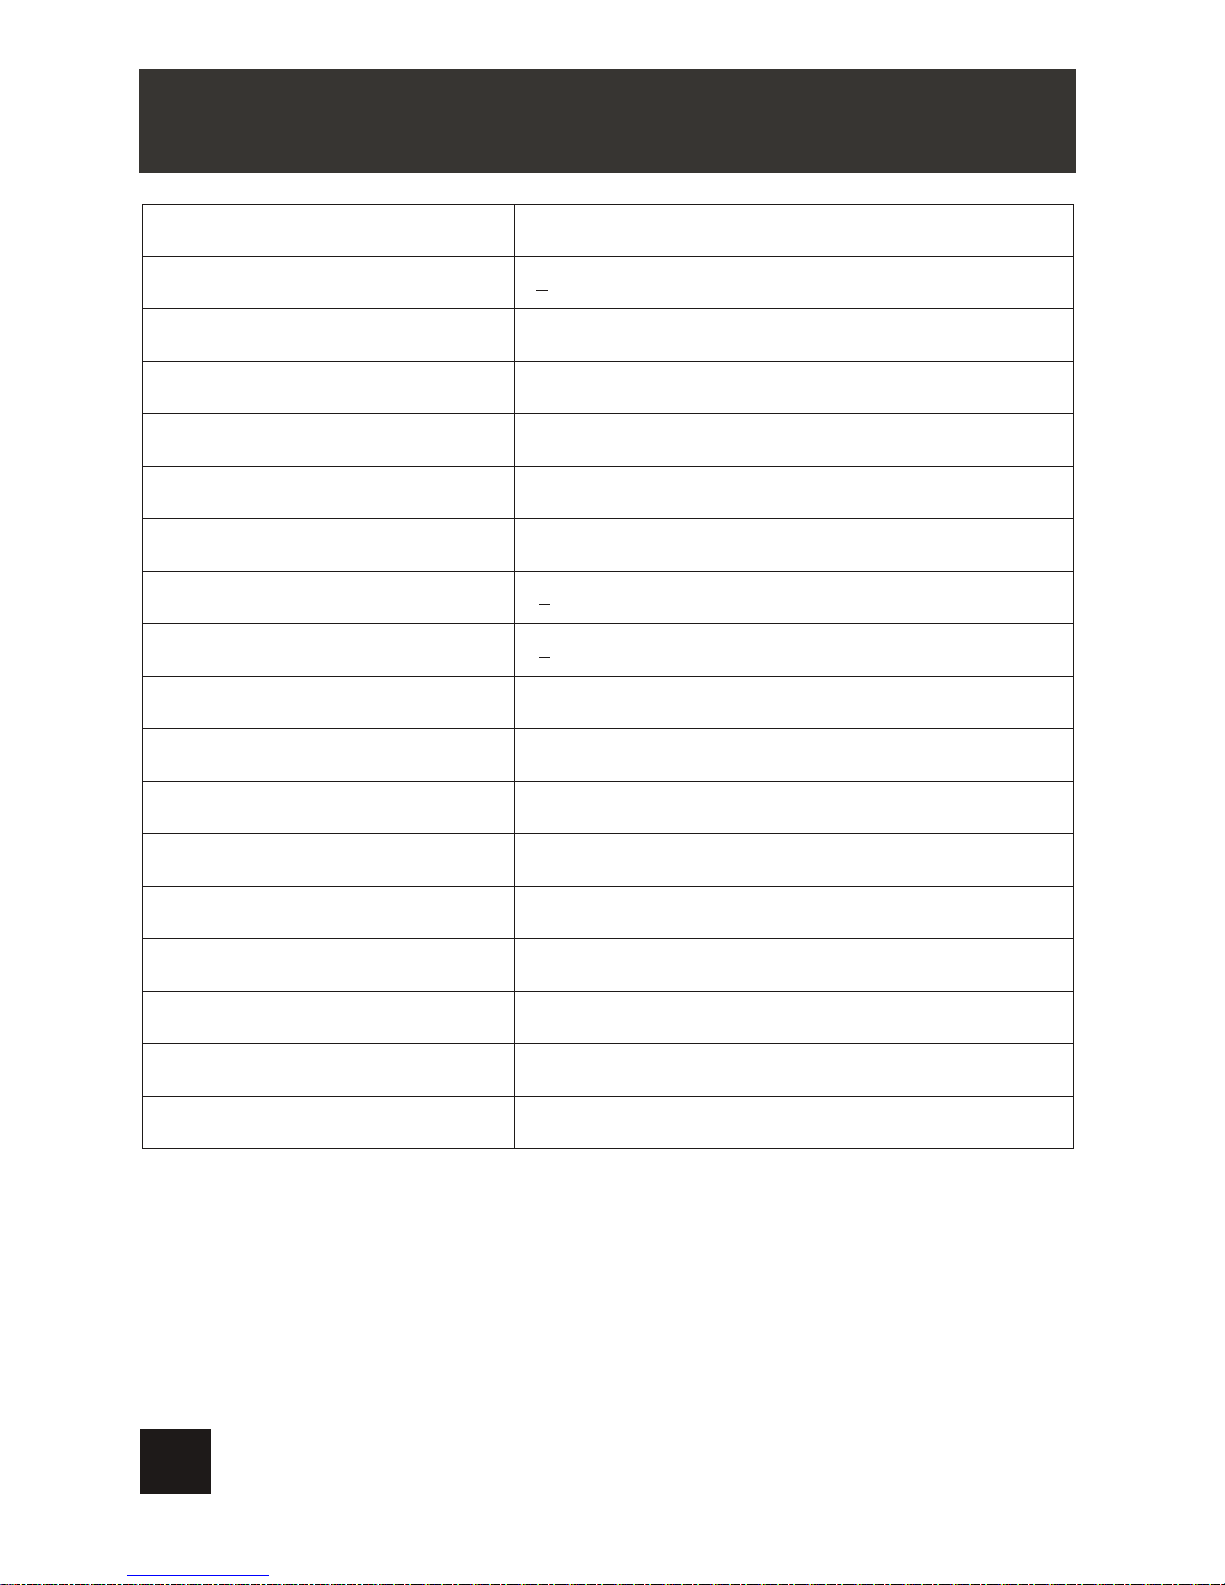
Power Supply
Power Consumption
Signal System
Video Output
Audio Output
Headphone Terminal
Frequency Response
Signal/Noise(Audio)
Dynamic Range
Panel Size
Laser Wavelength
Operating Conditions
Rechargeable Battery
Dimensions
Weight
DC 9-12V
10W
PAL/NTSC
1 Vp-p/ 75ohm, unbalanced, 3.5mm mini Jack *1
1.4Vrms / 10Kohm, 3.5mm mini Jack *1
3.5mm stereo mini jack *1
20 Hz - 20KHz
80dB
85dB
7 inch (16:9)
650nm/ 795nm
Temperature: 0~40°C Status: Horizontal
Lithium Polymer
Main Unit:212x167x40mm Slave screen:212x166.5x25mm
Main Unit: 0.7kg Slave screen:0.36kg
<
<
<
20
Support device SD/MMC/Full Speed USB2.0
Device capacity
Up to 8GB SD/8GB MMC/8GB USB
Remark
This model is compatible with 9~12V vehicles
Page 22

The unit utilizes long-life Li polymer battery for portable power supply. The battery has
no "Memory Effect" and thus can be recharged safely regardless of whether the battery
is fully or partially discharged. It's enough to recharge no longer than 6H each time, fully
recharged battery can last about 2 hours.
The battery can be only recharged when turning power to OFF state, and keep continuous
power supply, the red light will be on, and the light will turn Green when it's fully charged.
1. The normal working temperature is: 0°C ~40°C ;
2. Always unplug AC/DC power supply for the unit when not in use;
3. It is normal for the unit to produce heat during playback, however, the unit should not
be used for extended periods or left unattended.
4. Avoid having the unit collide with any objects, and place away from all possible heat
sources or damp areas.
Precautions related to Battery Recharge
Rechargeable Battery Use
The unit will access to Standby mode automatically when the battery is low.
If the battery does not work to your expectation, please consult the service centre. Do
not attempt to replace or repair the battery by yourself unless you are qualified service
personnel.
Using and maintaining rechargeable battery supply
BATTERY
Please note:
Battery will not be chareged during playback. This is designed to prolong the battery life
and protect it from being overcharged.
21
Page 23
MOUNTING BAG
22
Page 24
TROUBLESHOOTING
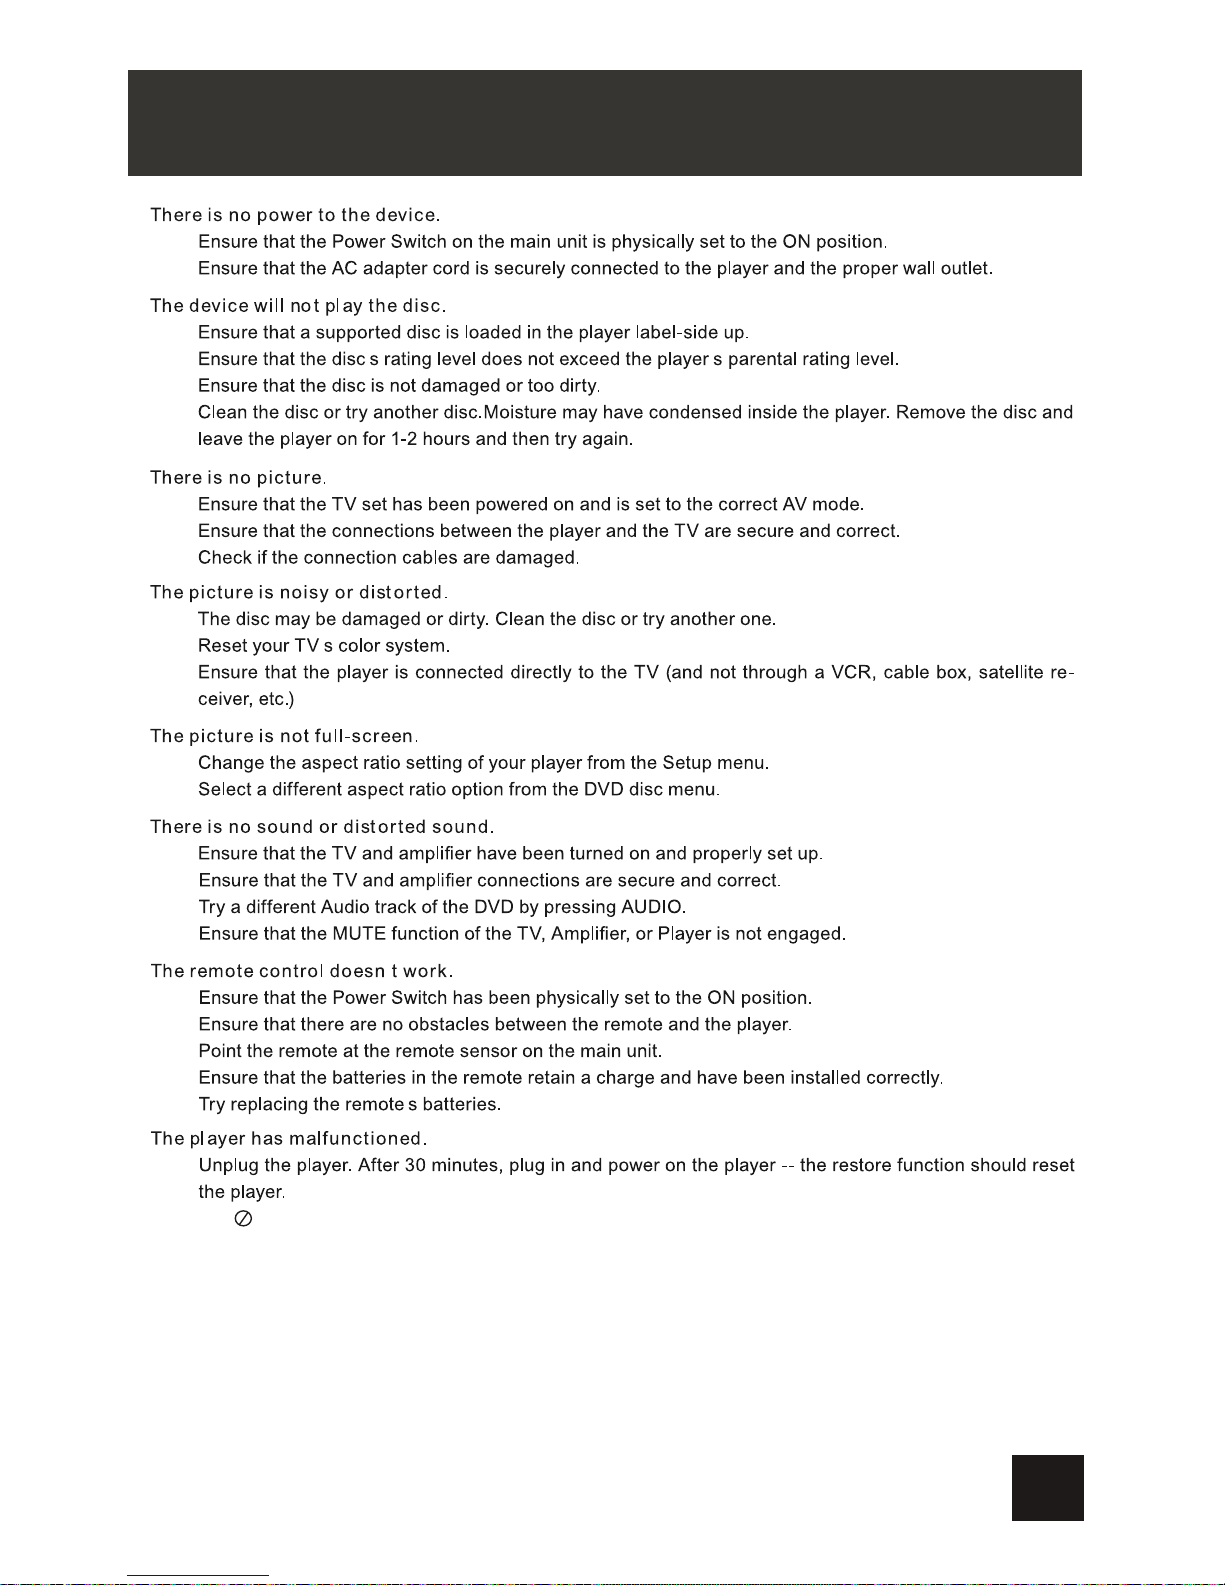
You can't advance through the opening credits and warning information that appears at the beginning of
movies because the disc is programmed to prohibit that action.
Some discs have sections that prohibit rapid scanning or chapter skip;
If you try to skip through the warning information and credits at the beginning of a movie, you won't be able to.
This part of the movie is often programmed to prohibit skipping through it.
The icon appears on screen
Ensure there is no restriction on the disc's software
Ensure the feature is supported by the disc
Ensure the feature is available at the moment
Ensure requested ttitle or chapter is not out of range
The player can not advance through a movie
No forward or backward scan
23
Page 25

Owing to continuous improvement, no prior notice will be given regarding changes on above
feature and spec.
If at any time in the future you should need to dispose of this
product please note that waste electrical products should not
be disposed of with household waste. Please recycle where
facilities exist. Check with your Local Authority or retailer for
recycling advice.(Waste Electrical and Electronic equipment
Directive)
Copyright
This manual contains information protected by copyright law.
No part of this document may be used or reproduced in any form or by any means, or
stored in a database/retrieval system without prior written permission from us.
The information of this manual is based on the current version of the product.
We reserve the right to alter the content without prior notice.
All brand names in this manual are the property of their respective owners.
24
Page 26

 Loading...