

Page 1
Page 2

TABLE OF CONTENTS
To ensure proper use of this product, please read this owner's manual carefully and retain for future
reference.
This manual provides information on the operation and maintenance of your DVD player. Should the
unit require service, contact an authorized service location.
SAFETY PRECAUTIONS ------------------------------------------------------------------------------ 01
IMPORTANT SAFETY INSTRUCTIONS -------------------------------------------------------- 02-03
NOTICES and DISC PROTECTION ------------------------------------------------------------------ 04
PLAYABLE DISCS AND ACCESSORIES ---------------------------------------------------------- 05
VIEW OF MAIN UNIT ------------------------------------------------------------------------------------ 06
BASIC CONNECTION ----------------------------------------------------------------------------------- 07
REMOTE CONTROL ------------------------------------------------------------------------------------- 08
BASIC PLAYBACK --------------------------------------------------------------------------------------- 09
ADVANCED PLAYBACK --------------------------------------------------------------------------- 10-11
SPECIAL FUNCTION PLAYBACK ------------------------------------------------------------------ 12
SYSTEM SETUP ------------------------------------------------------------------------------------ 13-14
TROUBLE SHOOTING -------------------------------------------------------------------------------- 15
SPECIAL FUNCTION OF DVD ---------------------------------------------------------------------- 16
SPECIFICATIONS --------------------------------------------------------------------------------------- 17
Page 3
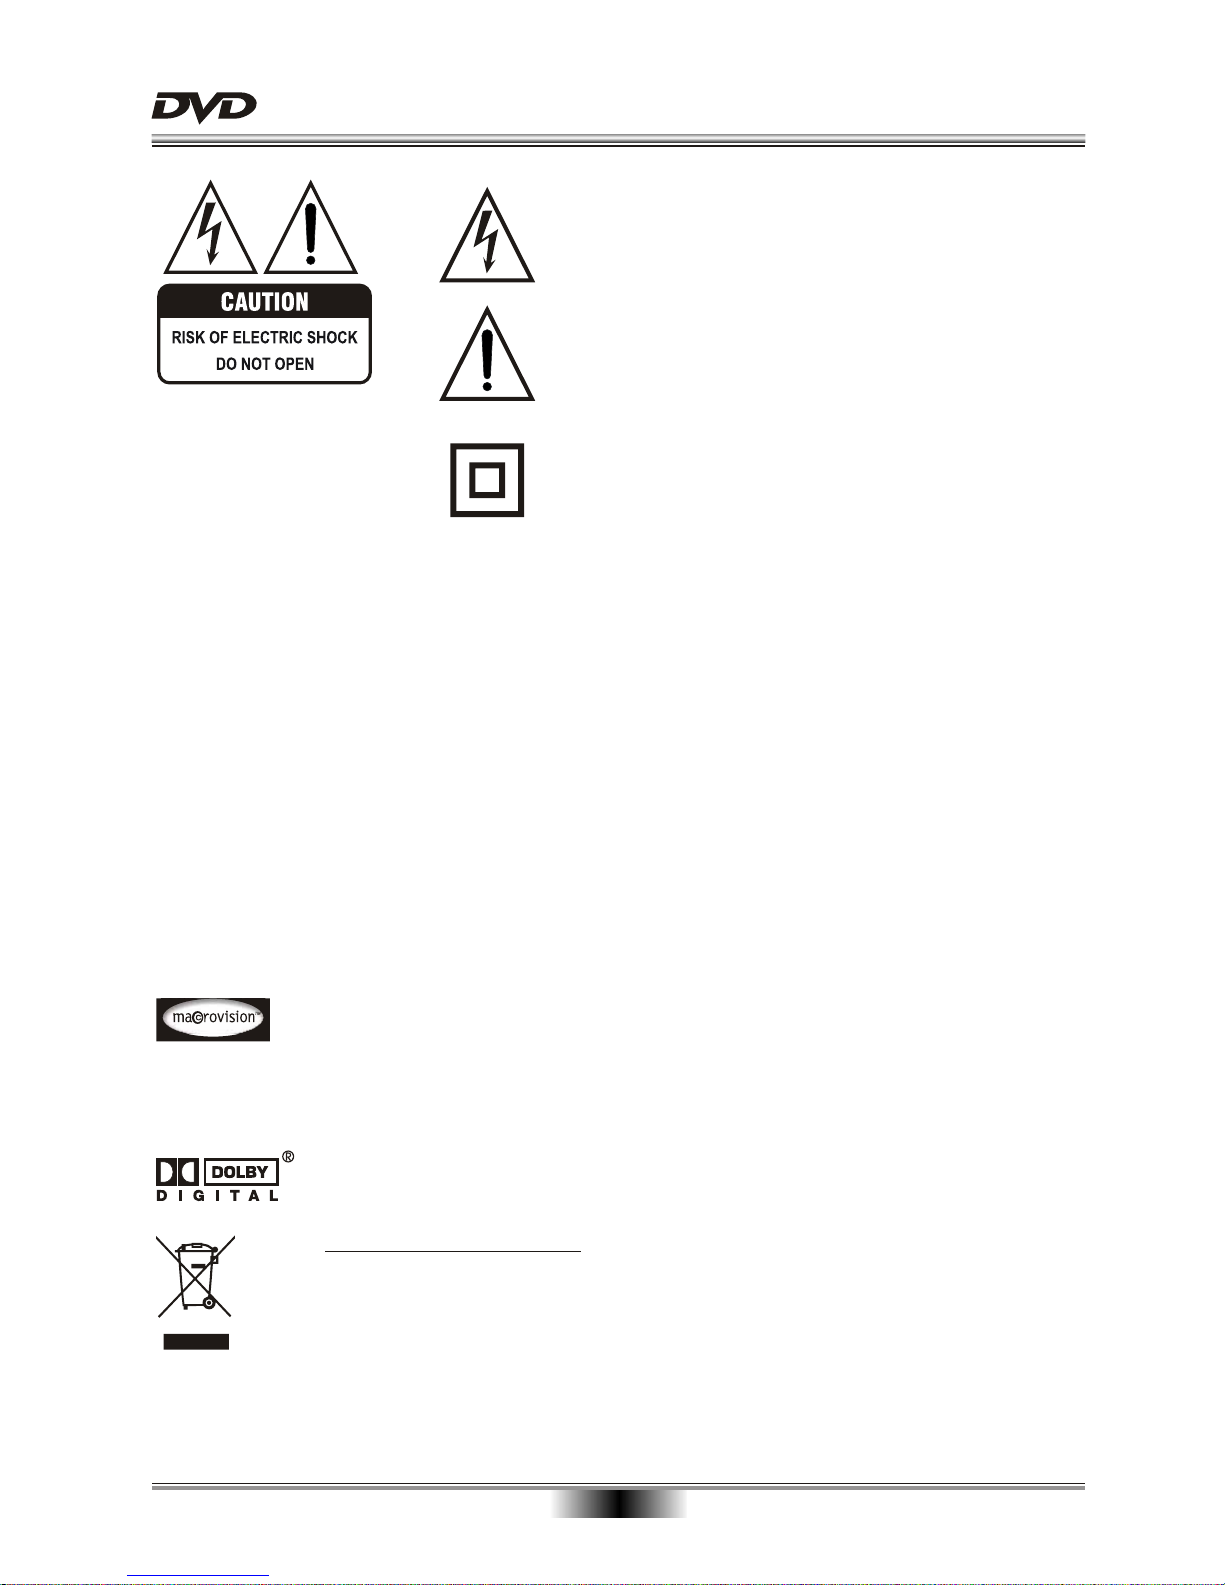
Manufactured under license from Dolby Laboratories. " Dolby " and the double-D symbol
are trademarks of Dolby Laboratories. Confidential unpublished works.
Copyright 1992-1997 Dolby Laboratories. All rights reserved.
The symbol for CLASS II (Double Insulation).
The lightning flash with arrowhead symbol, within an equilateral triangle, is intended to alert the user to the presence
of uninsulated "dangerous voltage " within the product's enclosure that may be of sufficient magnitude to constitute a
risk of electric shock to persons.
SAFETY PRECAUTIONS
01
WARNING:
The exclamation point within an equilateral triangle is
intended to alert the user to the presence of important
operating and maintenance (servicing) instructions in the
literature accompanying the appliance.
TO REDUCE THE RISK OF FIRE OR ELECTRIC SHOCK, DO NOT EXPOSE THIS
APPLIANCE TO RAIN OR MOISTURE, DANGEROUS HIGH VOLTAGES ARE PRESENT
INSIDE THE ENCLOSURE. DO NOT OPEN THE CABINET, REFER SERVICING TO
QUALIFIED PERSONNEL ONLY.
CAUTION:
When replacing the unit's plug or power cord, the replacement must be exactly the same;
or one recommended by the manufacturer.
This Digital Video Disc player employs a laser system.
Use of controls, adjustments or the performance of procedures other than those specified
may result in hazardous exposure to radiation. To prevent direct exposure to laser beam,
do not try to open the enclosure.
DO NOT STARE INTO BEAM.
This product incorporates copyright protection technology that is protected by methods
claim in certain U. S. Patents and other intellectual property rights owned by Macrovision
Corporation and other rights owners. Use of this copyright protection technology must be
authorized by Macrovision Corporation, and is intended for home and other limited
viewing uses only unless otherwise authorized by Macrovision Corporation. Reverse
engineering or disassembly is prohibited.
Disposal of your old appliance
1. When this crossed-out wheeled bin symbol is attached to a product, it means the
product is covered by the European Directive 2002/96/EC.
2. All electrical and electronic products should be disposed of separately from the
municipal waste stream via designated collection facilities appointed by the government
or the local authorities.
3. The correct disposal of your old appliance will help prevent potential negative
consequences for the environment and human health.
4. For more detailed information about disposal of your old appliance, please contact your
city office, waste disposal service or the shop where you purchased the product.
Page 4
02
CAUTION: PLEASE READ AND OBSERVE ALL WARNINGS AND INSTRUCTIONS GIVEN IN THIS MANUAL AND
THOSE MARKED ON THE UNIT. RETAIN THIS BOOKLET FOR FUTURE REFERENCE.
This set has been designed and manufactured to assure personal safety. Improper use can result in electric shock or fire
hazard. The safeguards incorporated in this unit will protect you if you observe the following procedures for installation,
use and servicing. This unit is fully transistorized and does not contain any parts that can be repaired by the user.
DO NOT REMOVE THE CABINET COVER OR YOU MAY BE EXPOSED TO DANGEROUS VOLTAGE. REFER
SERVICING TO QUALIFIED SERVICE PERSONNEL ONLY.
Slots and openings in the cabinet are provided for ventilation and to ensure
correct operation of the product. These
protect it from overheating. These open ings must not be
blocked or covered. The openings shou ld never be blocked
by placing the product
on a bed, sofa, rug or other.
must
must ever
placed
power boards
do this
Page 5
Notes on discs
Do not play discs that are damaged or warped, including discs with cracks, scratches or parts missing discs
with burns; poor quality discs.
Route all cords so that they do not interfere with driving or with entering or exiting the
car
Run the cords so tat they do not wrap around the steering wheel, brake pedal etc. or around your feet. Secure
all the cords together
Use the product at the proper volume setting
Driving while you are unable to hear sounds around you or from outside the car can cause accidents.
Do not touch the color TFT LCD screen
Do not place any heavy objects on the product
Never put any heavy objects on the product. Doing so may cause damage to product.
Do not damage the cords.
Broken wires and short circuits can cause electrical shock or fire. Run the cords so that they do not get tangled
in moving parts. Do not damage, tighten up, twist or work on the cords. Do not place the cords near heat
sources or put heavy objects on the cords.
Do not play discs in the wrong format
For instance, if you add the ".cda" extension to a file that is not formatted as a CD file, a loud noise may be
heard through the speakers. possibly damaging them and hurting your eardrums.
Do not swing from the product or pull it
This may cause an accident. injury and/or malfunction. Be particularly careful that children follow this rule.
Cutting the power only when plug of apparatus is pulled out, so please make sure the plug can be pulled out
from the socket easily.
03
Page 6
04
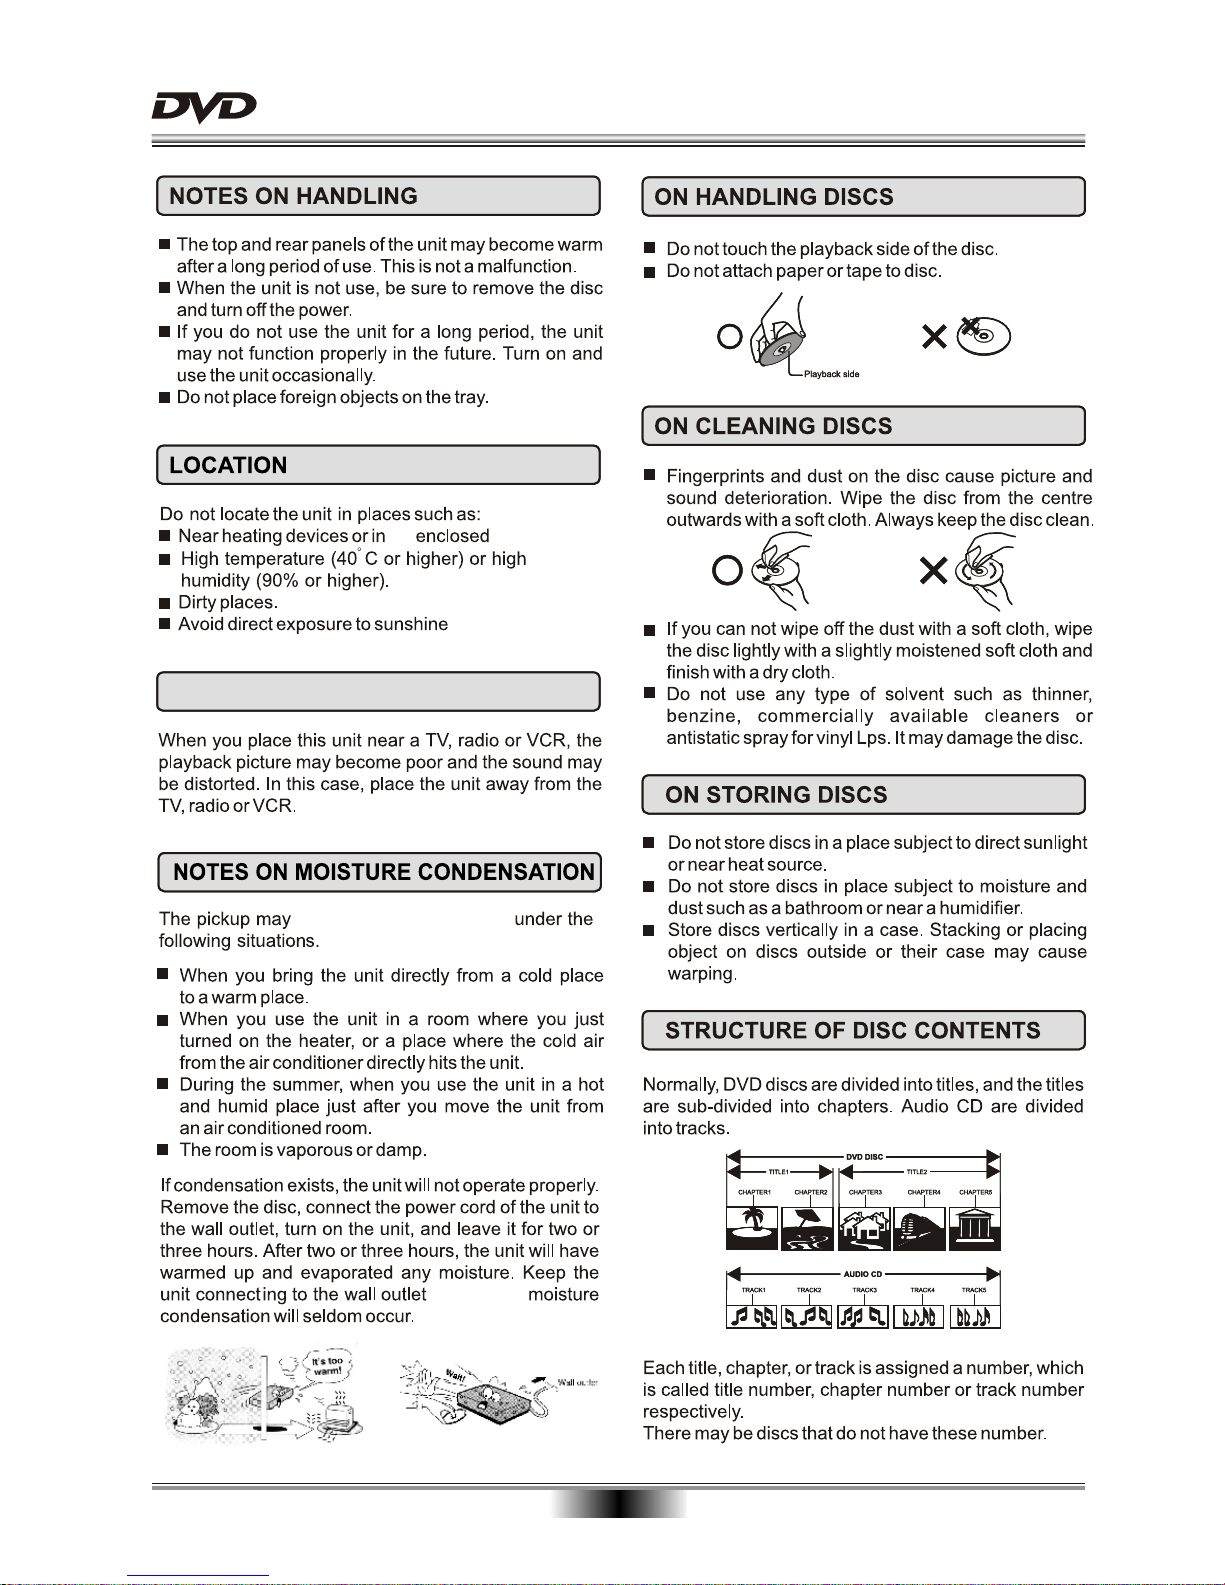
NOTICES and DISC PROTECTION
an vehicle.
Electrical DISTURBANCE
suffer from condensation
will ensure
Page 7
05
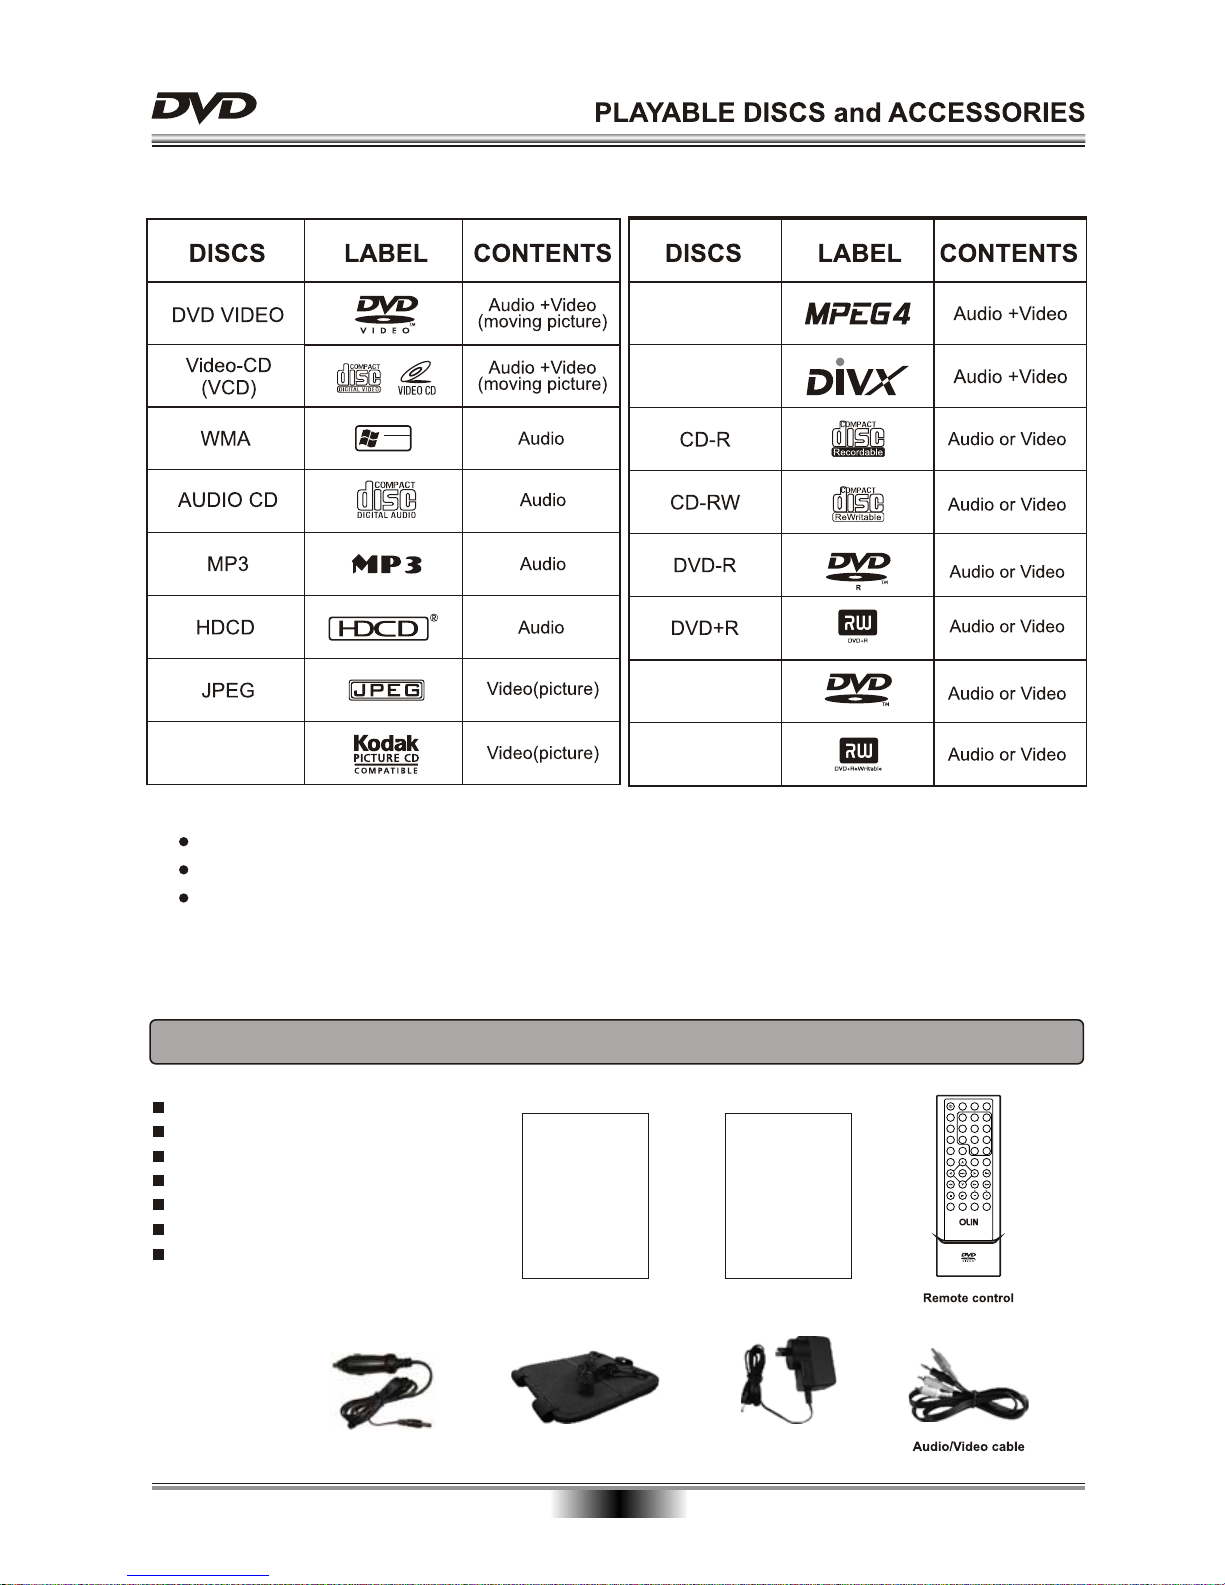
ACCESSORIES
Compatible Disk Type:
The Player does not support discs types which are not listed above.
Non-standardized discs, even if they may be labeled as above can not be played.
The performance of recorded disc is depend on the method and quality of disc-burning. In some cases,
the disc may not be played.
TM
Designed for
TM
Windows
Media
DVD-RW
DVD+RW
RW
KODAK
PICTURE CD
MPEG4
DivX
DVD play manual
DVD PLAYER
MANUAL
Warranty Certificate x 1
DVD play manual x
Adapter x 1
Audio/Video cable x 1
Car charger x 1
1
Remote control x 1
Bag x 1
Warranty Certificate
WARRANTY
CERTIFICATE
Adapter
Bag
VOLUME
SUBTITLE
4
5
6
1 2
3
7 8 9
SEARCH
0
10+
TFT ON/OFF
SETUP
OSDMODESTANDBY
TITLE/PBC
MENU
PROG
ZOOM ANGLE
PREV
NEXTF.FWDF.REV
STOP SLOW
MUTE
REPEAT A-B RPT AUDIO
PD08
Car charger
Page 8
06
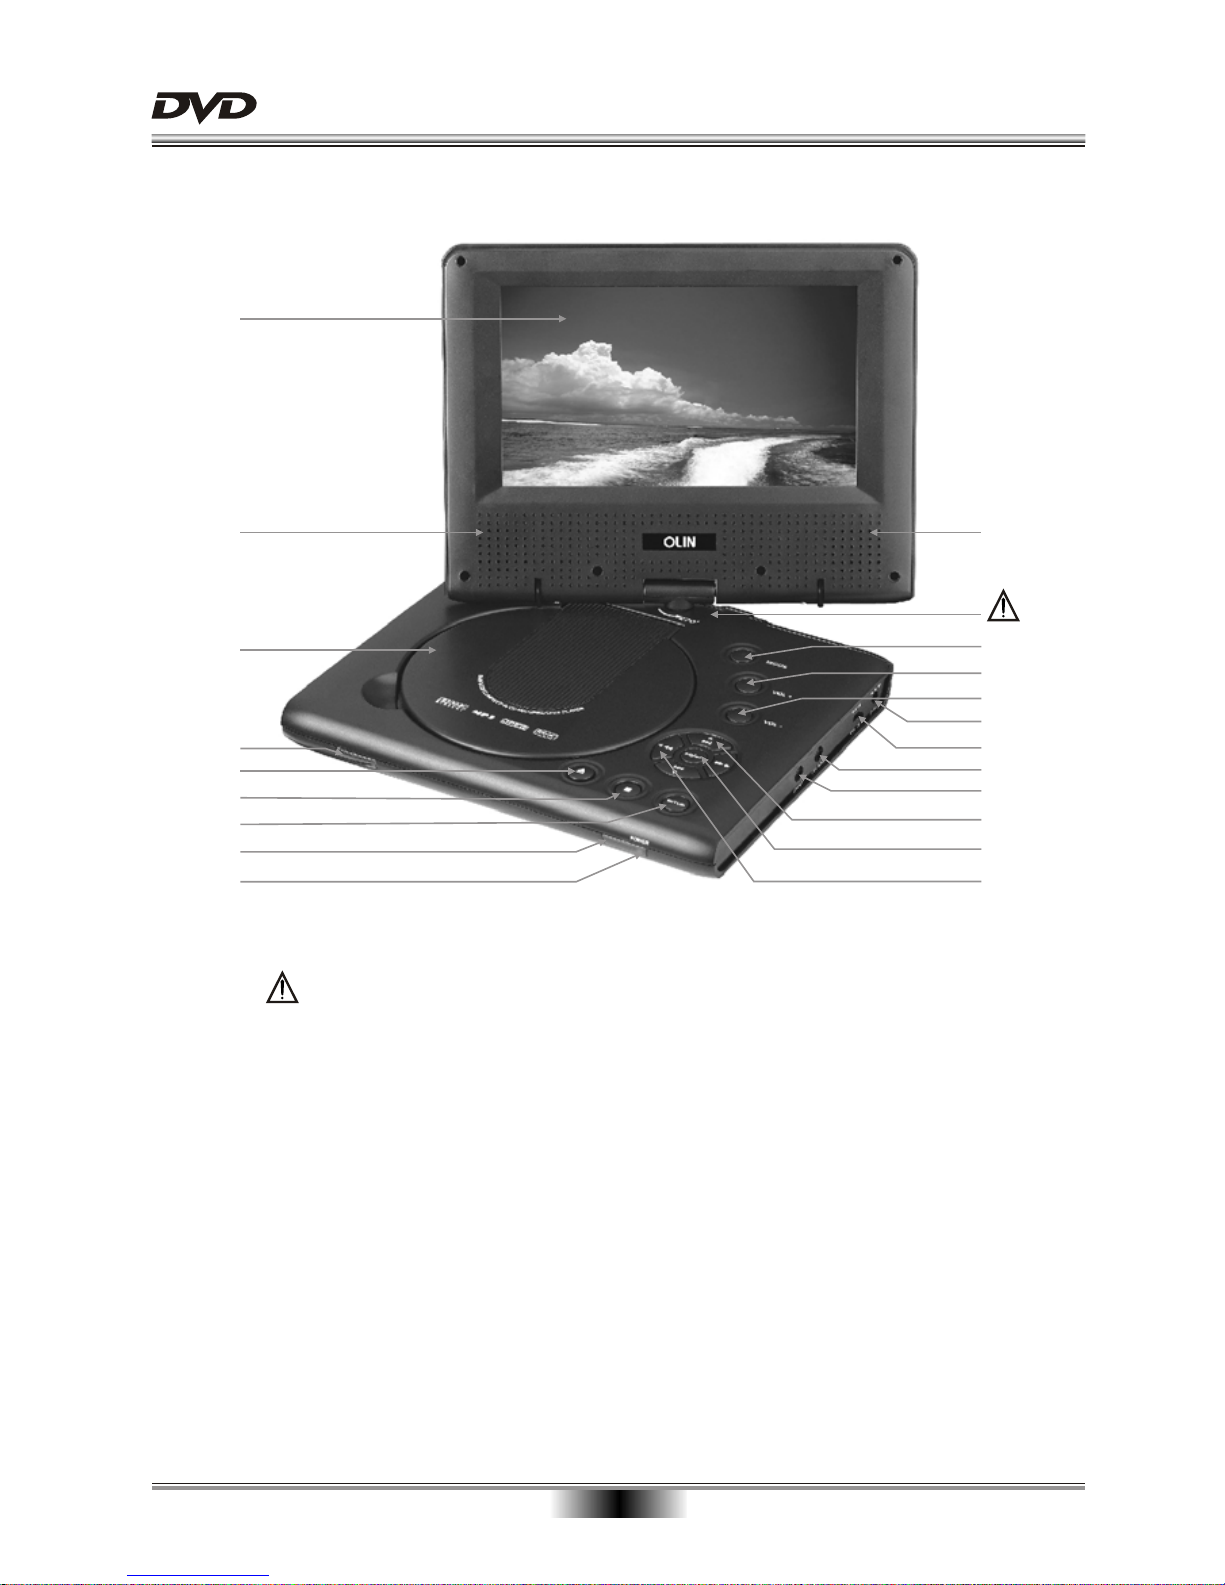
VIEW OF MAIN UNIT
1. TFT SCREEN
2. SPEAKERS
3. DISC LID
4. INDICATOR
5. OPEN
6. STOP
7. SETUP
8. REMOTE CONTROL SENSOR
9. POWER INDICATOR
10. MODE
11. VOLUME +
BATTERY
12. VOLUME -
13. DC IN
14. POWER SWITCH
15. EARPHONE-IN
16. AUDIO/VIDEO OUT
17. NEXT/CURSOR(UP),
PREVIOUS/CURSOR(DOWN)
18. PLAY/PAUSE/ENTER
19. FAST REVERSE/CURSOR(LEFT),
FAST FORWARD/CURSOR(RIGHT)
1
2
3
4
5
6
7
8
10
11
12
13
14
15
16
17
18
2
19
9
O
THE 7’’ TFT PANEL CAN ONLY ROTATE 270
Page 9
07
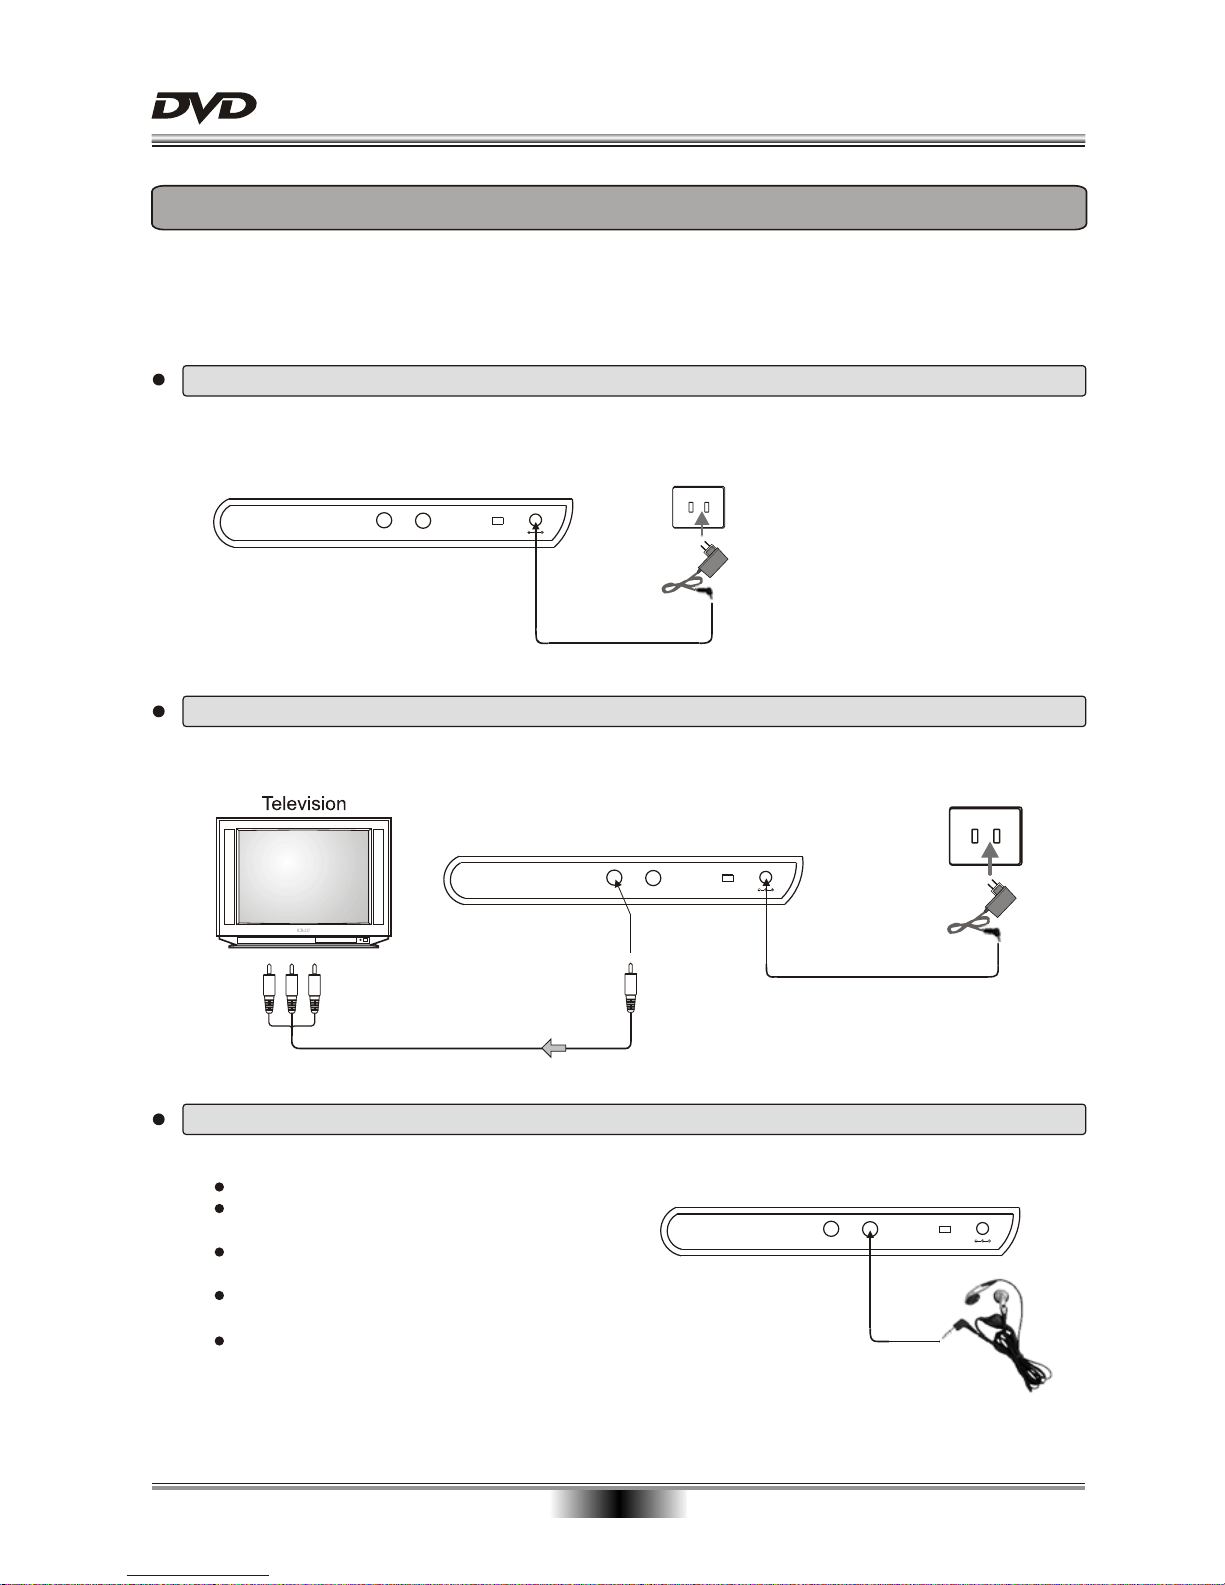
BASIC CONNECTION
BASIC CONNECTION
Note: When the player is connected to TV, to enhance TV's audio quality, please turn down the volume
of the DVD player's loud-speaker.
To save battery power and prolong battery life, you may press TFT ON/OFF key on the remote control
to turn off TFT display when you do not intend to use it.
Connection of the power supply to unit
Connect the power with the 9V adaptor like the picture below.
Connecting to a TV with Audio/Video cable
Connect to earphone
You can avoid disturbing others while enjoy the pleasure this unit brings to you
Note: Never set the volume of your earphone too high.
Long wearing of earphone may result in some
discomfort.
Please turn the volume down before you power
off your device.
Be careful or stop to use if there has any potential
danger.
Your earphone is designed in open style, which
allows you to hear the surrounding sound. However,
extremely high volume may block the surrounding sound.
Adapter
Red WhiteYellow
To video input(yellow)
To audio input (red, white)
EARPHONEAV OUT OFF - ON
DC IN 9V
POWER
EARPHONEAV OUT OFF - ON
DC IN 9V
POWER
EARPHONEAV OUT OFF - ON
DC IN 9V
POWER
Connect the device to a TV as illustrated below:
Page 10
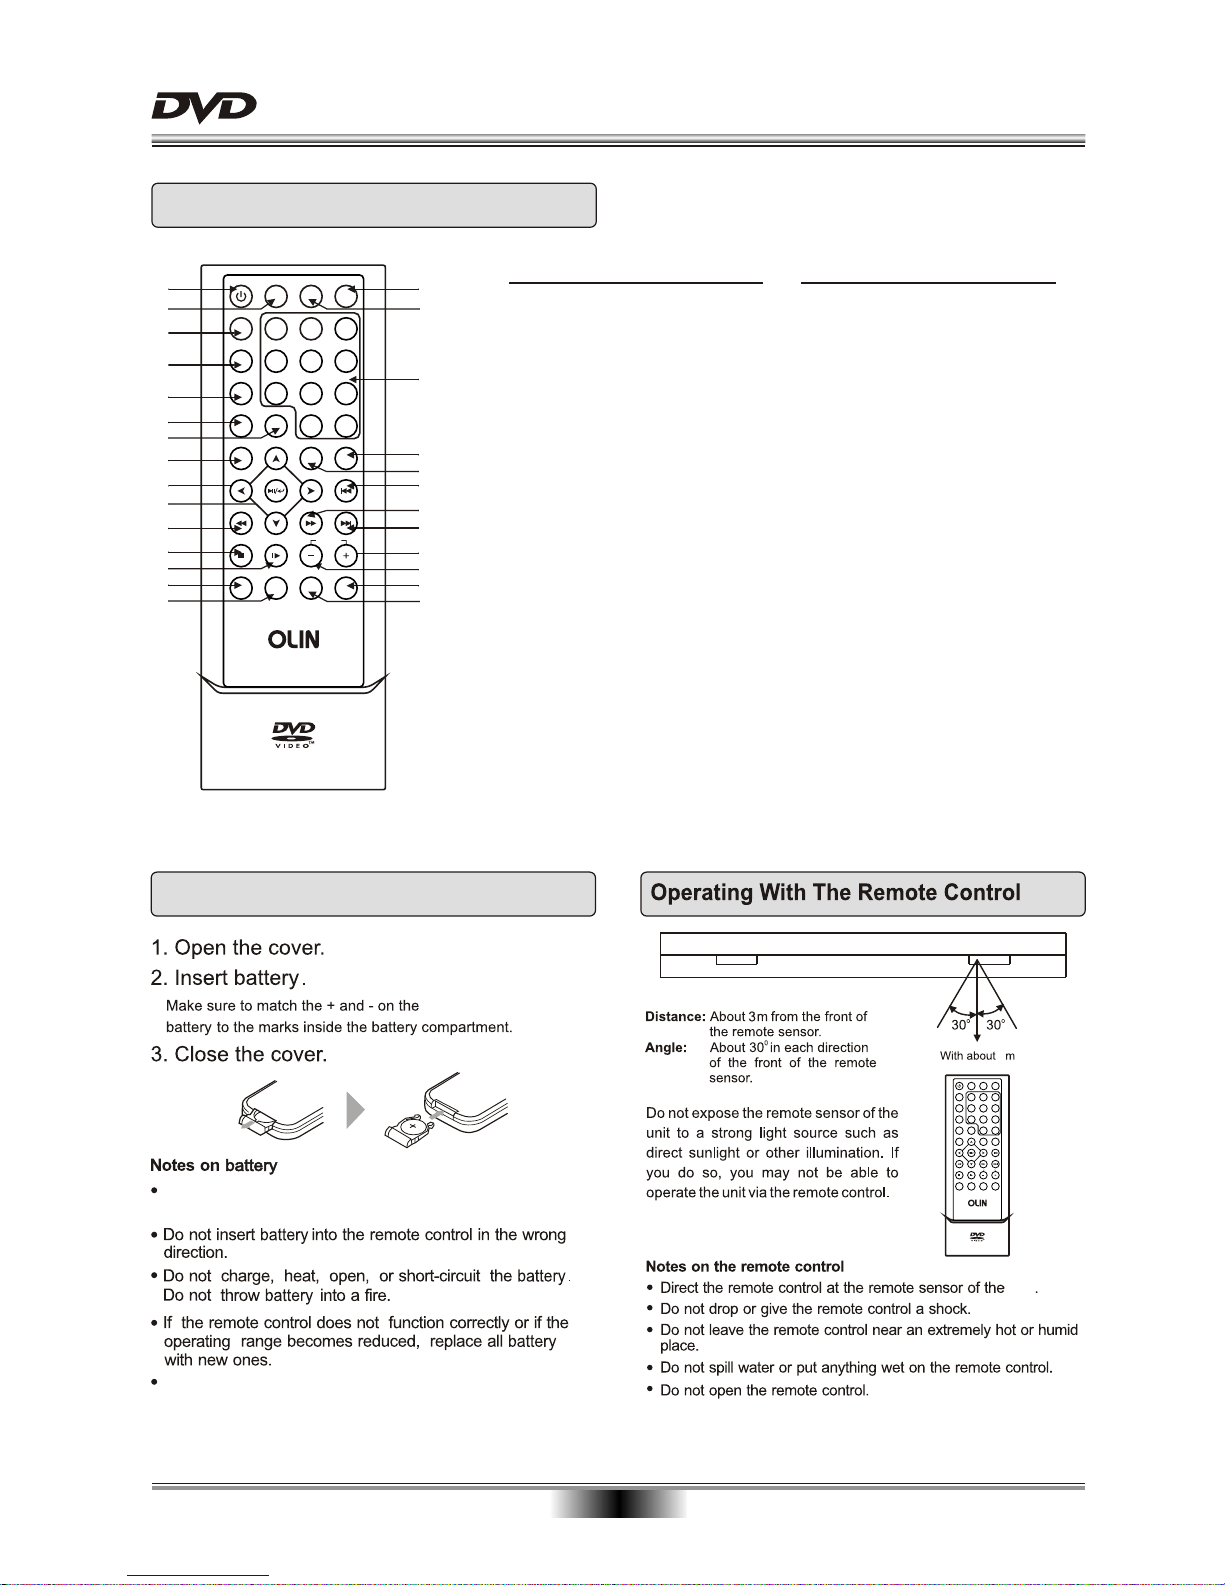
REMOTE CONTROL
REMOTE CONTROL
08
1. STANDBY/ON
2. MODE
3. SUBTITLE
4. TITLE/PBC
5. MENU
6. PROGRAM
7. SEARCH
8. SETUP
9. CURSOR
10. PLAY/PAUSE/ENTER
11. FAST REVERSE
12. STOP
13. SLOW
14. MUTE
Function
15. REPEAT
16. TFT ON/OFF
17. OSD(On Screen Display)
18. DIGITS AND 10+ BUTTONS
19. ANGLE
20. ZOOM
21. PREVIOUS
22. FAST FORWARD
23. NEXT
24. VOLUME+(Volume Control)
25. VOLUME-(Volume Control)
26. AUDIO
27. A-B REPEAT
Function
1
2
3
4
5
7
6
8
10
11
17
18
9
19
20
21
22
23
12
13
25
24
14
15
16
26
27
unit
Loading Battery
Improper replacement of battery may result in explosive
hazard. It will be replaced only by battery with the same
or equivalent type.
Please take out the insulated plastic piece, when you
use the remote for first time.
3
POWER
VOLUME
SUBTITLE
4
5
6
1 2
3
7 8 9
SEARCH
0
10+
TFT ON/OFF
SETUP
OSDMODESTANDBY
TITLE/PBC
MENU
PROG
ZOOM
ANGLE
PREV
NEXTF.FWDF.RE V
STOP SLOW
MUTE
REPEAT A-B RPT AUDIO
VOLUME
SUBTITLE
4
5
6
1 2
3
7
8 9
SEARCH
0
10+
TFT ON/OFF
SETUP
OSDMODESTANDBY
TITLE/PBC
MENU
PROG
ZOOM
ANGLE
PREV
NEXTF.FWDF.REV
STOP SLOW
MUTE
REPEAT A-B RPT AUDIO
PD08
PD08
Page 11
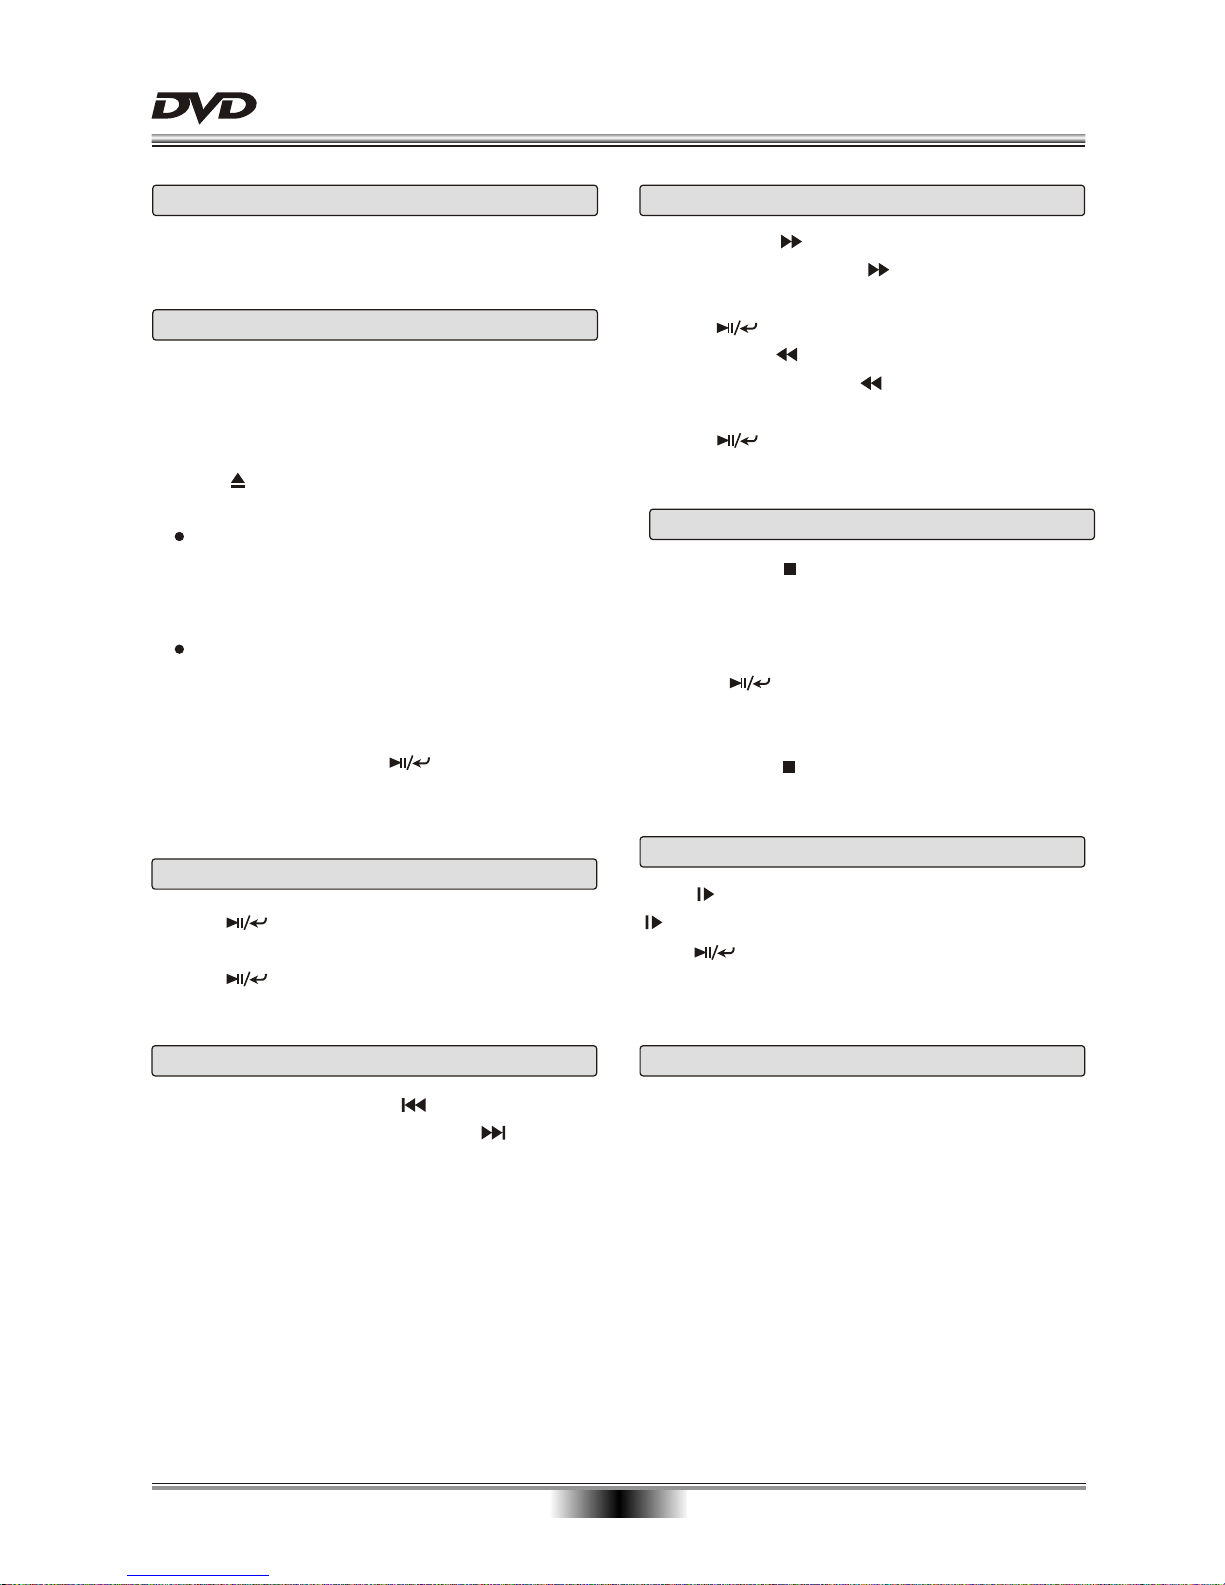
BASIC PLAYBACK
09
Preparations
Prepare the power supply and open the outer cover.
NOTES:
Prompt will pop up to notify invalid operation.
Digit Key
Select file or image by press their corresponding digit
key. When the number is greater than 10, press the
10+ key and then press the corresponding digit key.
When the number is greater than 100, press the 10+
key ten times and then press the corresponding digit
key.
1. Press POWER switch on the right side to ON, the
unit will turn on and TFT screen will display the
start-up screen. If a disc is already in the tray, it will
begin to play at once.
2. Press OPEN on the panel to open the disc tray,
place a disc on the disc tray.
Do not place a disc which is not compatible with
this unit.
3. Close the disc tray lid, the playback will automatically
start.
Some disc may not start automatically, you can
manually start the playback.
4. Some disc may start the playback with a menu, use
the cursor button on the remote controller to select
menu options and press button to start, or press
digits to select a menu options directly.
Basic playback
Previous and Next
During playing, press PREV key to return to the
start of previous chapter; Press NEXT to skip the
current chapter.
Pause playback
1. Press to pause playback (still mode).
The sound will be muted during still mode.
2. Press to resume normal playback.
Slow
Press to play a disc in slow forward. Each time the
button is pressed, the slow motion speed changes.
Press button to resume normal playback.
Note: This function is not available for CD and MP3.
Fast forward and Fast reverse
1. Press F.FWD for fast forward function.
Each time the F.FWD button is pressed, the
fast forward motion speed changes.
2. Press to resume normal playback.
3. Press F.REV for rewind function.
Each time the F.REV button is pressed, the
fast reverse motion speed changes.
4. Press button to resume normal playback.
Stop playback
1. Press STOP button to go to stop mode, the TFT
screen will show the start-up screen. With certain
type of discs, such as DVDs and audio CD, the
device can recall the segment where it stopped.
2. Press button to resume playback from the
segment where it is stopped or from the beginning
of the disc.
3. Press STOP twice to stop completely.
Page 12
ADVANCED PLAYBACK
10
IMPORTANT NOTE:
THE FOLLOWING FUNCTIONS ARE APPLICABLE ONLY TO DVD DISCS. IF OTHER DISC FORMATS ARE
PLAYED, SCREEN DISPLAY AND OPERATIONS MAY BE DIFFERENT.
Press the MENU button during playback and the root
menu will appear on the screen. Press the CURSOR
buttons to select the item you wish to play. Then press
the button to confirm your selection.
MENU
REPEAT
Press this button to zoom in on the incoming AV
signal and to cycle through all the levels.
You can use the cursor buttons to move around the
image. This will display the parts of the image that do
not appear on-screen when the image is zoomed in.
Press this button repeatedly to return to normal
viewing.
ZOOM
SEARCH
Press this button the screen will display "Title --- ",
"Chapter --- " and "Time --:--:-- ".
you can use UP/DOWN cursor button to select item
and press digitals what you wanted, Then press
button to confirm.
If the video on the DVD was recorded with multiple
angles, you have the option to change the camera
angle of the scene you are watching.
Press ANGLE button during playing back that will
display the angle mark on screen.
Note: the angle function will not work if your disc
does not contain the multiple angles.
ANGLE
A-B REPEAT
Press this button once to set the starting point A and
press it again to set the end point B. Then the player
will play the segment between A and B continuously.
Press this button a third time to stop the A-B repeat.
MODE
If you want to check the present playing mode, you
can press the "MODE" key by checking the "PLAY
MODE" menu. Or you can also setup or changing
the playing modes by pressing " " key.
E.g.: When it is playing under Program Mode, you
can set the mode at "Normal" to enter into Normal
Mode playing.
TITLE/PBC
According to some DVD discs, press this button to
display the title menu, you can press digits to select
the chapters preferred.
The PBC allows the user to play Video CDs interactively. If PBC is ON, the user can use the digits
buttons to select track only in the menu, if PBC is
OFF, the user can select the track directly.
Press this button and the screen will display some
information about disc, such as : Title Elapsed, Title
Remain etc.
OSD (On Screen Display)
Press this button and the screen will display "
01/XX", "01" indicates the ordinal number of this
language; "XX" indicates total number of language.
SUBTITLE
PROGRAM
Press PROG key, info window will appear on screen;
press to go into title menu, select the title to
play by UP/DOWN cursor key and press to
confirm. Press RIGHT cursor key and select
“ lay program” on the menu to play all titles in order.
p
“ lear ll” button
“ lay program”
button
P
If you want to cancel PROG, ress PROG key, info
window will appear on screen; use the CURSOR
button and choose C A , press ;
then use CURSOR again and choose P ,
press and exit
TFT ON/OFF
Press to set the TFT screen ON or OFF.this button
To save battery power and prolong battery life, turn
off TFT display when you do not intend to use it.
Press this button:
once Repeat Chapter
twice Repeat Title
the third time Cancel repeat
Page 13
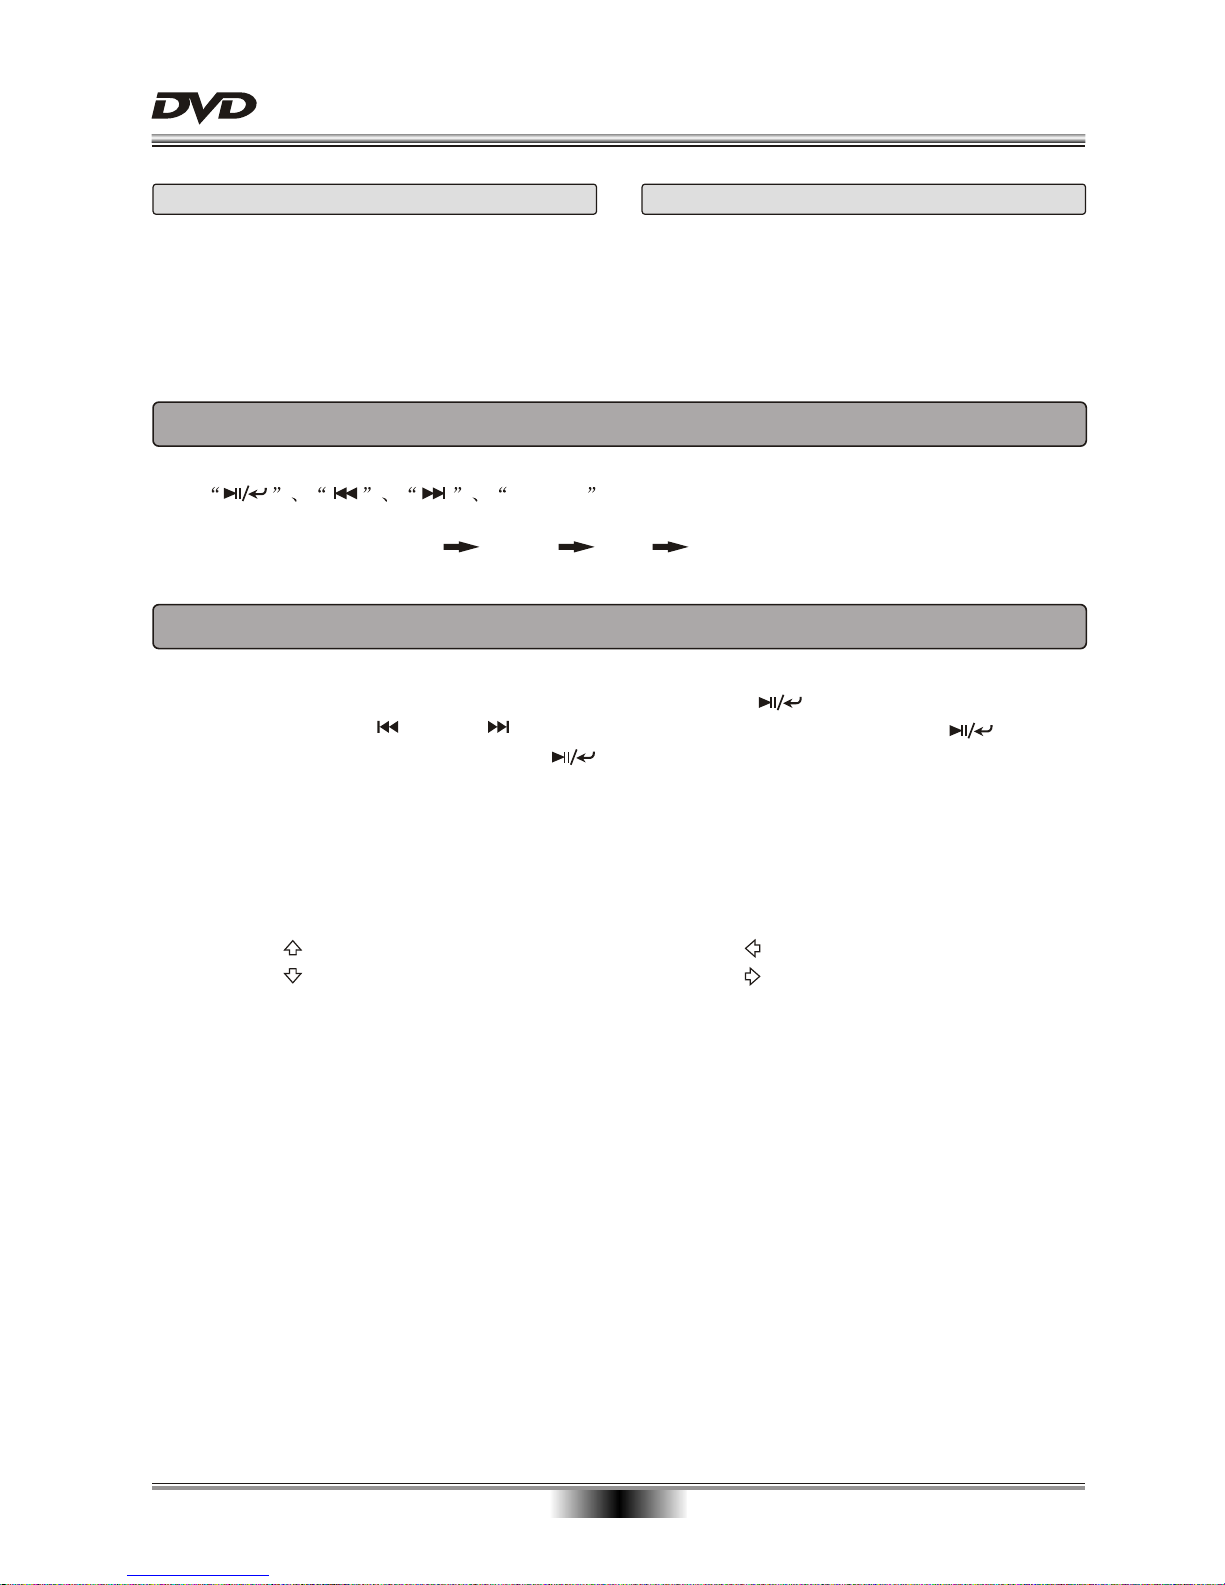
SPECIAL FUNCTION PLAYBACK
11
AUDIO
Press this button on remote control to change the
mode of audio.
Press " VOL+ " at the right of VOLUME to increase
volume, " VOL- " to decrease to volume . Press the
MUTE button to temporarily cancel the audio signal
at any time and screen will display Mute (no voice ),
press the button again to resume normal audio.
VOLUME and MUTE
CD/MP3 PLAYBACK
When a CD/MP3 disc is loaded, the player will play it automatically by the default sequence of the disc.
Press REPEAT etc.buttons to select relevant functions. Press the
AUDIO button to select desired sound effect. Press it repeatedly; the display will be as follows:
LEFT RIGHT MIX STEREO
Image Rotation
There are four modes to rotate a picture: "Invert", "Mirror", Left", and "Right". These operations are allowed
only when a picture is being displayed normally and will be cancelled automatically when a new picture is
displayed. The arrow key is used to select the different rotation modes:
Up - Invert/Normal Left - Turn left
Down - Mirror/Normal Right - Turn right
JPEG DISC PLAYBACK
When playing JPEG disc, a navigation menu will be displayed automatically if the disc is loaded in succession.
In the menu, use UP or DOWN in the cursor to select a file,then press , the file will be play with
aslide-show. press PREV or NEXT to select the previous or the next picture. Press to pause
the current picture for enjoying, when press , it will return to normal playing. Press ZOOM to start
zoom function. You can review the amplificatory image when it is paused. Some slide-show transition modes
are provided, use "ANGLE" key to select.
Page 14
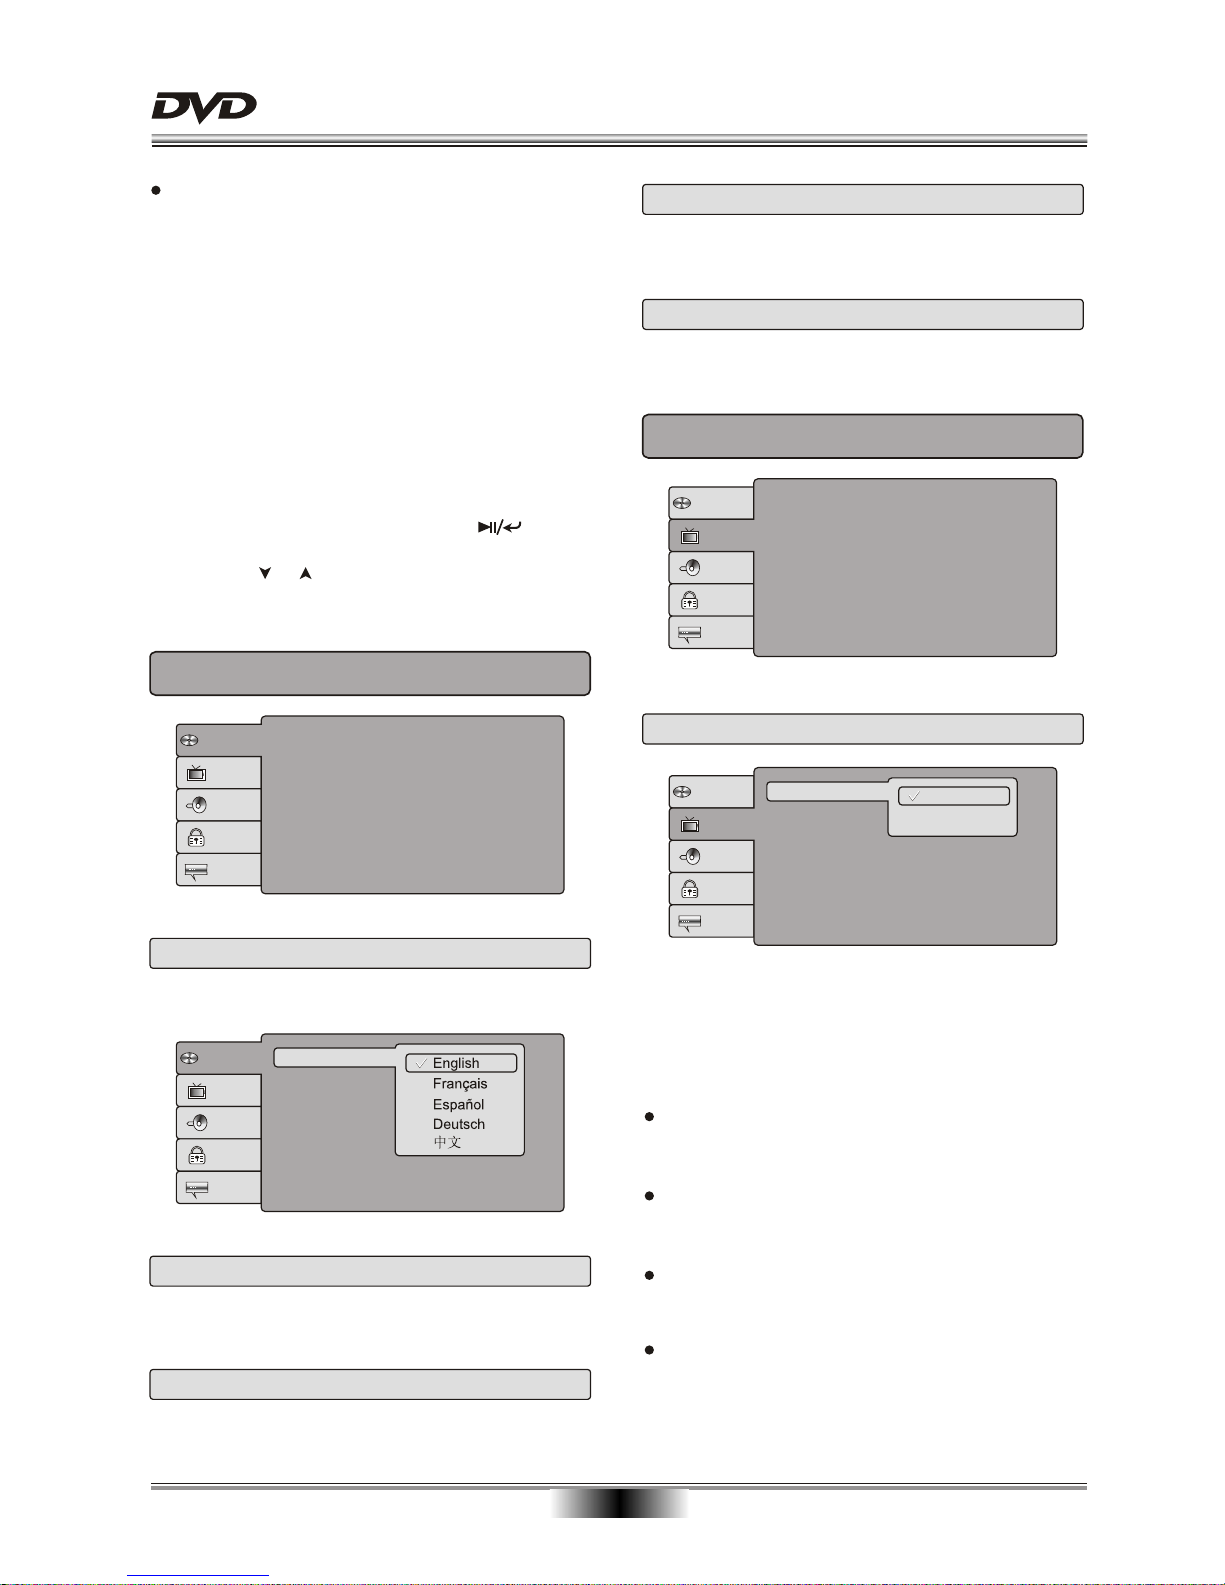
SYSTEM SETUP
12
You can change the default settings of this unit to
customize its performance to your own preference.
Read this section to learn how to set up the system.
Note: the system should only be set up in the
state that no disc is in the DVD drive or the unit is
in the completely stop mode.
Follow the steps below to set up your system:
1. Press the SETUP button on the remote control.
The setup menu will appear on the screen. It includes
Language setup, Video setup, Audio setup, Rating
setup and Misc setup. You can exit from the setup
menu by pressing the SETUP button again at any time
during the setting.
2. Press the direction buttons to select a sub-menu
that you want to set up and press the button
to enter the menu.
3. Press the or button to select the item that you
want to set up in the sub-menu.
1. LANGUAGE SETUP PAGE
Language
Video
Audio
Misc
OSD Language
Subtitle
DivX
Audio
DVD menu
Subtitle
: English
: English
: Unicode
: English
: English
Rating
1.1 OSD Language
Language
: English
: English
: Unicode
Video
Audio
Misc
Rating
OSD Language
Subtitle
DivX
Audio
DVD menu
Subtitle
This item is used to set the OSD (on-screen display)
language.
1.2 Subtitle
This item is used to set the subtitle language.
1.3 DivX Subtitle
This item is used to set the DivX subtitle language.
1.4 Audio
This item is used to set the audio output language.
1.5 DVD menu
This item is used to set the DVD menu language.
2. VIDEO SETUP PAGE
Language
Aspect Ratio
View Mode
TV System
Smart Picture
: 4:3
: Auto Fit
: NTSC
: Standard
Video
Audio
Misc
Rating
2.1 Aspect Ratio
Language
: 4:3
: Fill
: PAL
: Standard
Video
Audio
Misc
Rating
4:3
16:9
Aspect Ratio
View Mode
TV System
Smart Picture
Note:
No matter which display format is selected, a
picture recorded in standard 4:3 format always
displays in the 4:3 aspect ratio.
The display format of DVD titles may vary; please
refer to the information that accompanies your
specific DVD title.
If the DVD title is recorded in 16:9 wide display
format while the TV is a standard 4:3 screen,
horizontal compression of the image will result.
Some DVD titles may be recorded in special
formats. In such cases, the DVD titles will always
appear on the screen in their original format,
regardless of which TV display format you select.
The TV Display which select the different ratio of
display format and the screen of TV, There are
various types of display on screen for different
matches between Disc and TV .
Page 15
SYSTEM SETUP
13
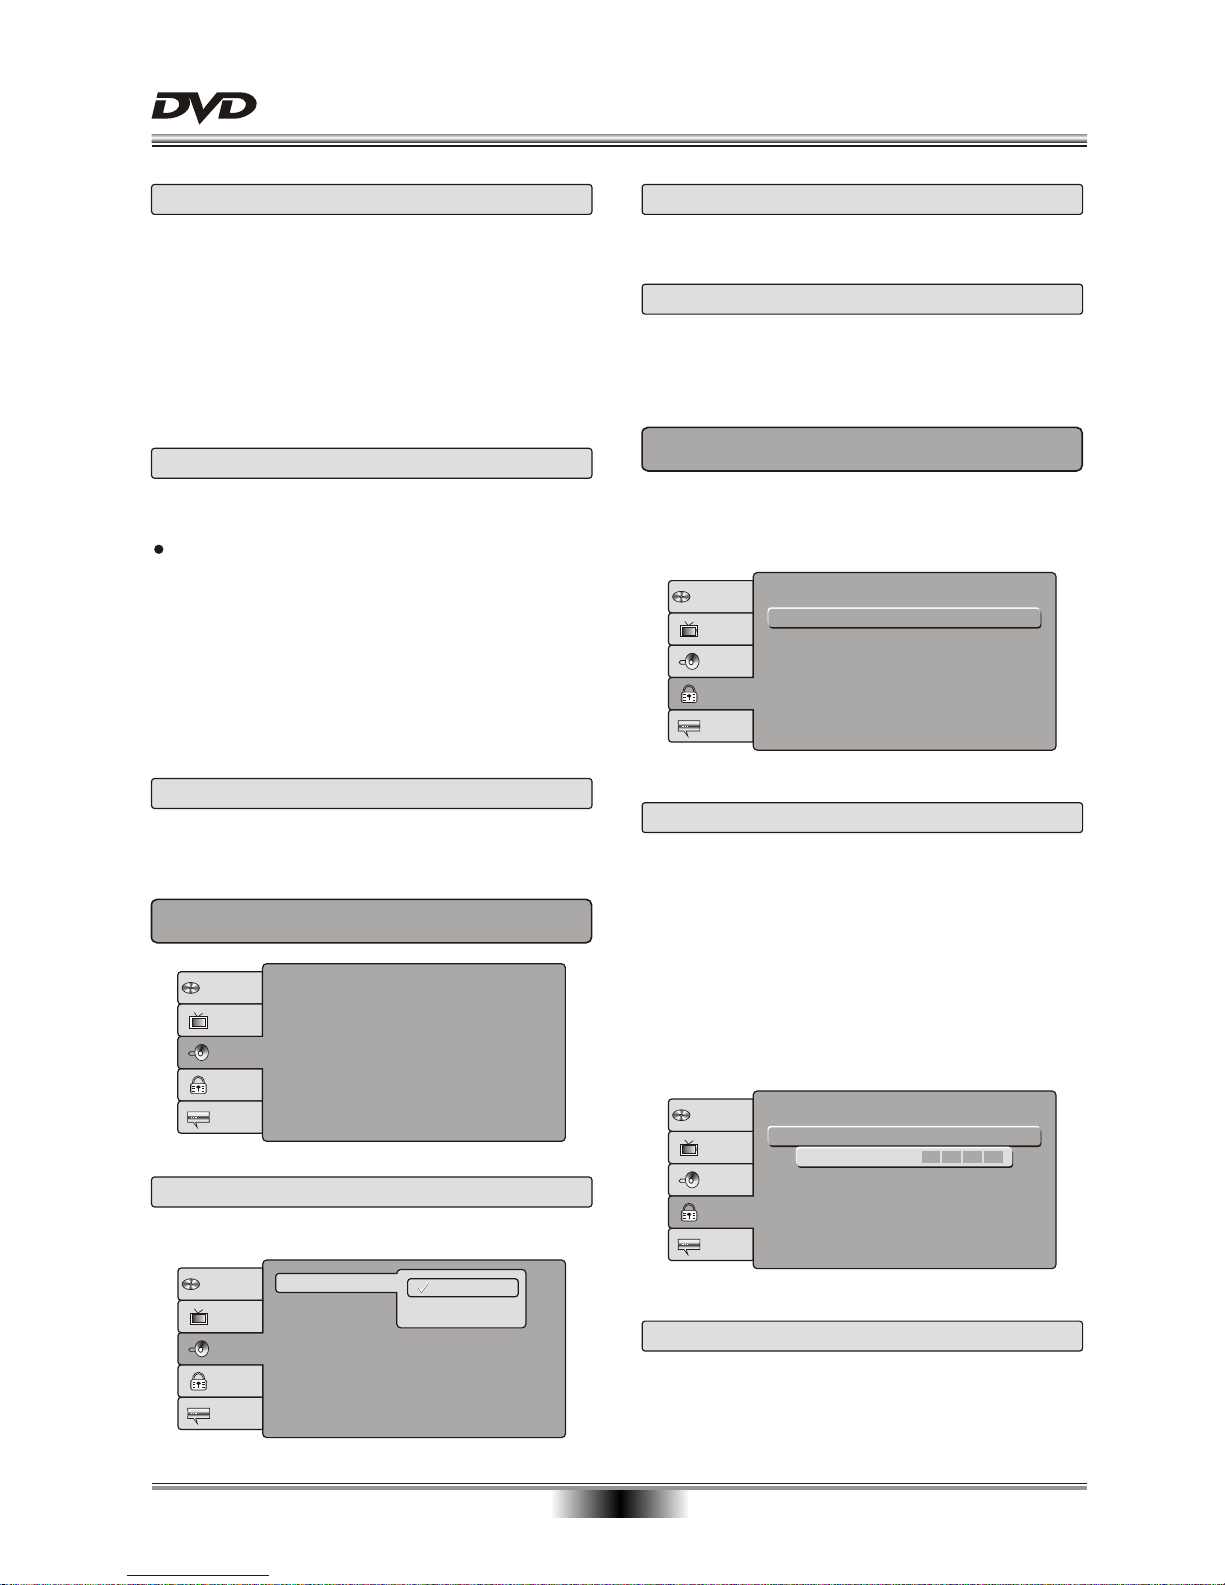
2.4 Smart Picture
This item is used set the Smart Picture.
It includes Standard, Vivid, Cool, Personal.
Language
Night Mode
Down sampling
Smart Sound
: Off
: Off
: Off
Video
Audio
Misc
Rating
3. AUDIO SETUP PAGE
3.1 Night Mode
This item is used set the Night Mode to Off or On.
: Off
: Off
: Off
Off
On
Language
Video
Audio
Misc
Rating
Night Mode
Down sampling
Smart Sound
2.2 View Mode
This item is used to set the view mode.
It includes Fill, Original, Auto Fit and Pan Scan.
Fill: Choose this mode the picture will fill the screen.
Original: Choose this mode the picture will appear in
its original size.
Auto Fit: Choose this mode the picture displayed on
screen is the same size as that in the disc.
Pan Scan: Choose this mode the picture will be
extended horizontally.
2.3 TV System
This player supports different TV output, including
NTSC, and PAL systems.
If your TV support only NTSC or PAL and had you
inadvertently selected the wrong TV type, the TV
screen will become flickering and black-and-white.
In this case, you should press the SETUP button
to set.
Note: The player's default TV system is NTSC, this
enables the machine to display properly under different OSD language. If users wish to connect player
to the TV, depends on your TV system, you may
change this setting to PAL.
3.2 Down sampling
This item is used set the to Off or On.Down sampling
3.3 Smart Sound
This item is used set the audio output to simulate the
various kinds of music effect.
you can change the password, please type 4 digits
as new password
Language
Parental control
: 6.R
Video
Audio
Misc
Rating
Set Password
4. RATING SETUP PAGE
The preference setting is active only when no disc,
and the setting is effective on each time power on till
exchanging the saved setting.
Language
Parental control
: 6.R
Video
Audio
Misc
Rating
Set Password
Enter Password
4.1 Parental control
The parental control function works in conjunction
with the different censorship classes assigned to
DVD. These classes help to control the types of DVD
that the family watches, There are up to 8 censorship
classes for DVD.
Note:
If you change this set, you must input password.
(Initial password : 8888)
4.2 Set Password
Page 16
SYSTEM SETUP
14
Language
Video
Audio
Misc
Rating
Use Default Settings
Screen Saver :On
Use Default Settings
Use Default Settings
Yes No
Language
Video
Audio
Misc
Rating
Use Default Settings
Screen Saver :On
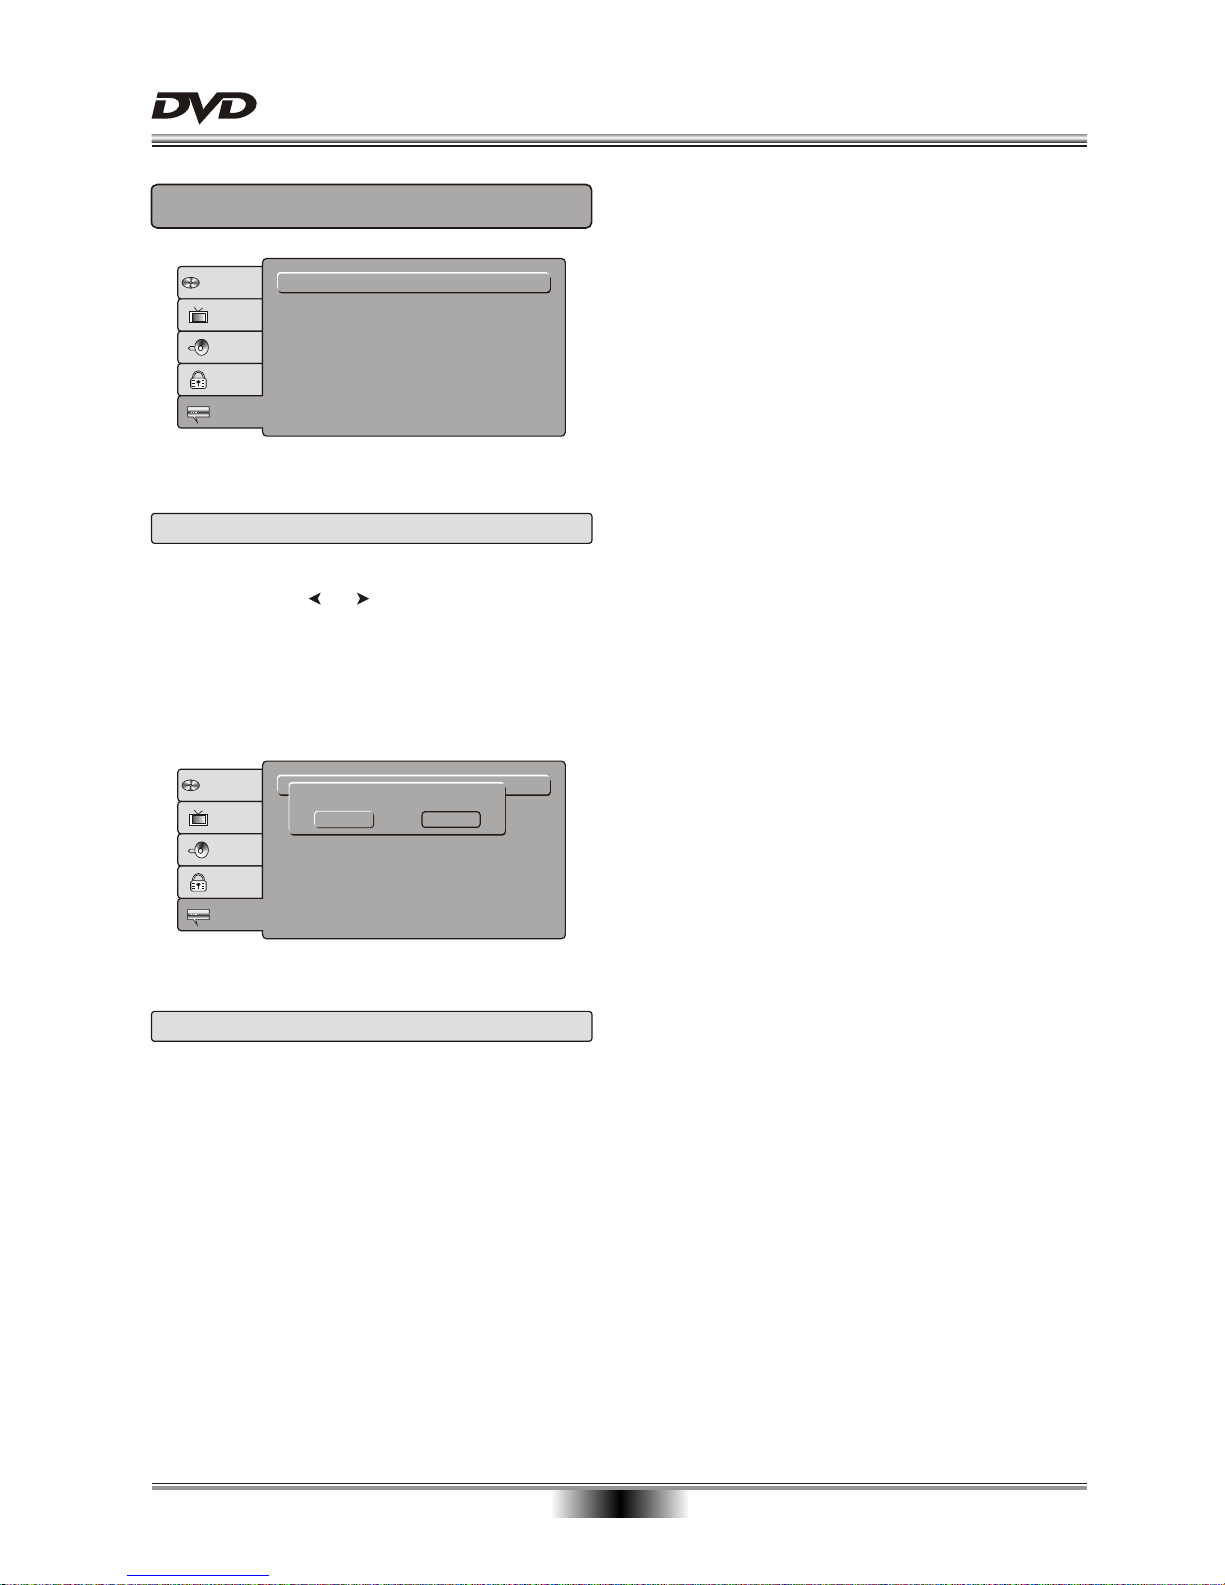
5. MISC SETUP PAGE
5.1 Use Default Settings
This item is used to select to use the default settings
or not. Press the or button to choose YES or
NO. If you choose YES, all the settings of your unit
will return to the original status.
Note: If you operate this function when disc playing,
it will reread the disc.
5.2 Screen Saver
If the screen saver is on, then there will be an
animated picture on the screen whenever the DVD
player is idle for a certain time.
Page 17
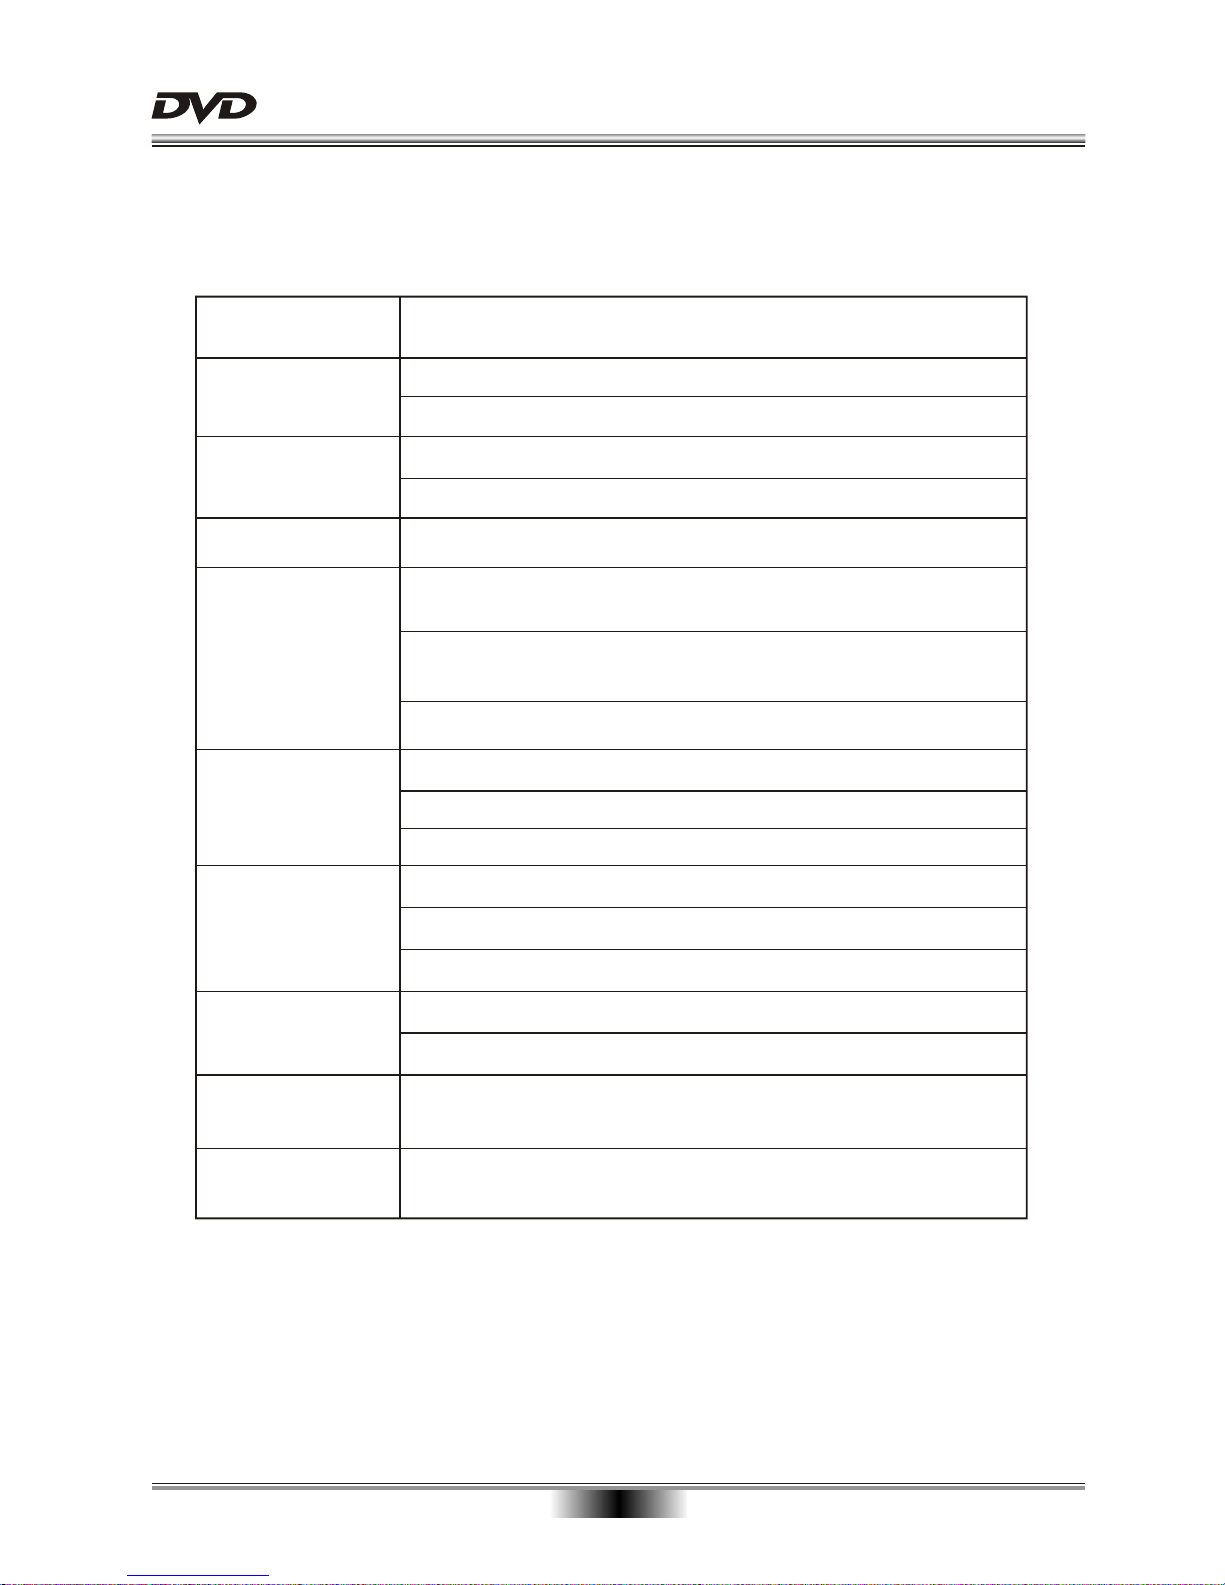
TROUBLE SHOOTING
15
Please check the following guide for the possible cause and solution for a problem before contacting the
nearest service center or dealer for repairs.
SYMPTOMS AND CORRECTIONS
Check to make sure that the power connection is secure.
No power
SYMPTOMS CORRECTIONS
TV No picture
No sound
Failed to Play
Make sure the connection between the player and the TV is secure.
Make sure that the TV is in good working condition.
Make sure that the TV and AMP are in good working condition
and setup properly.
Check that the disc is properly inserted.
Clean the disc.
Failed to respond to
remote control
Remove obstacles between remote control and unit.
Aim remote control at the sensor on the front panel
Check batteries and replace them if necessary.
Picture Disturbance
Check the disc for dirt and scratches. Clean or replace disc.
Shut down the unit, wait for ten seconds, and restart the unit.
Failed to work
with keys
Power surges or other electrical phenomena.
Shut down the unit, wait for ten seconds, and restart the unit.
Make sure the connection between the player and other devices
are secure.
Make sure the volume control that at the unit turn on.
Note: in the event when DVD player incur powerful static electric shock on work, or cause audio&video
freezing by other reason, please disconnect the device from the power source completely, and remove
the battery. Resume the connection again a moment later.
The battery has run out, please recharge the battery.
Cancel the Rating function or change the rating level.
The remote control
does not work properly
Operate the remote control within about 3m
TFT No picture
Make sure that the battery has enough capability.
Page 18
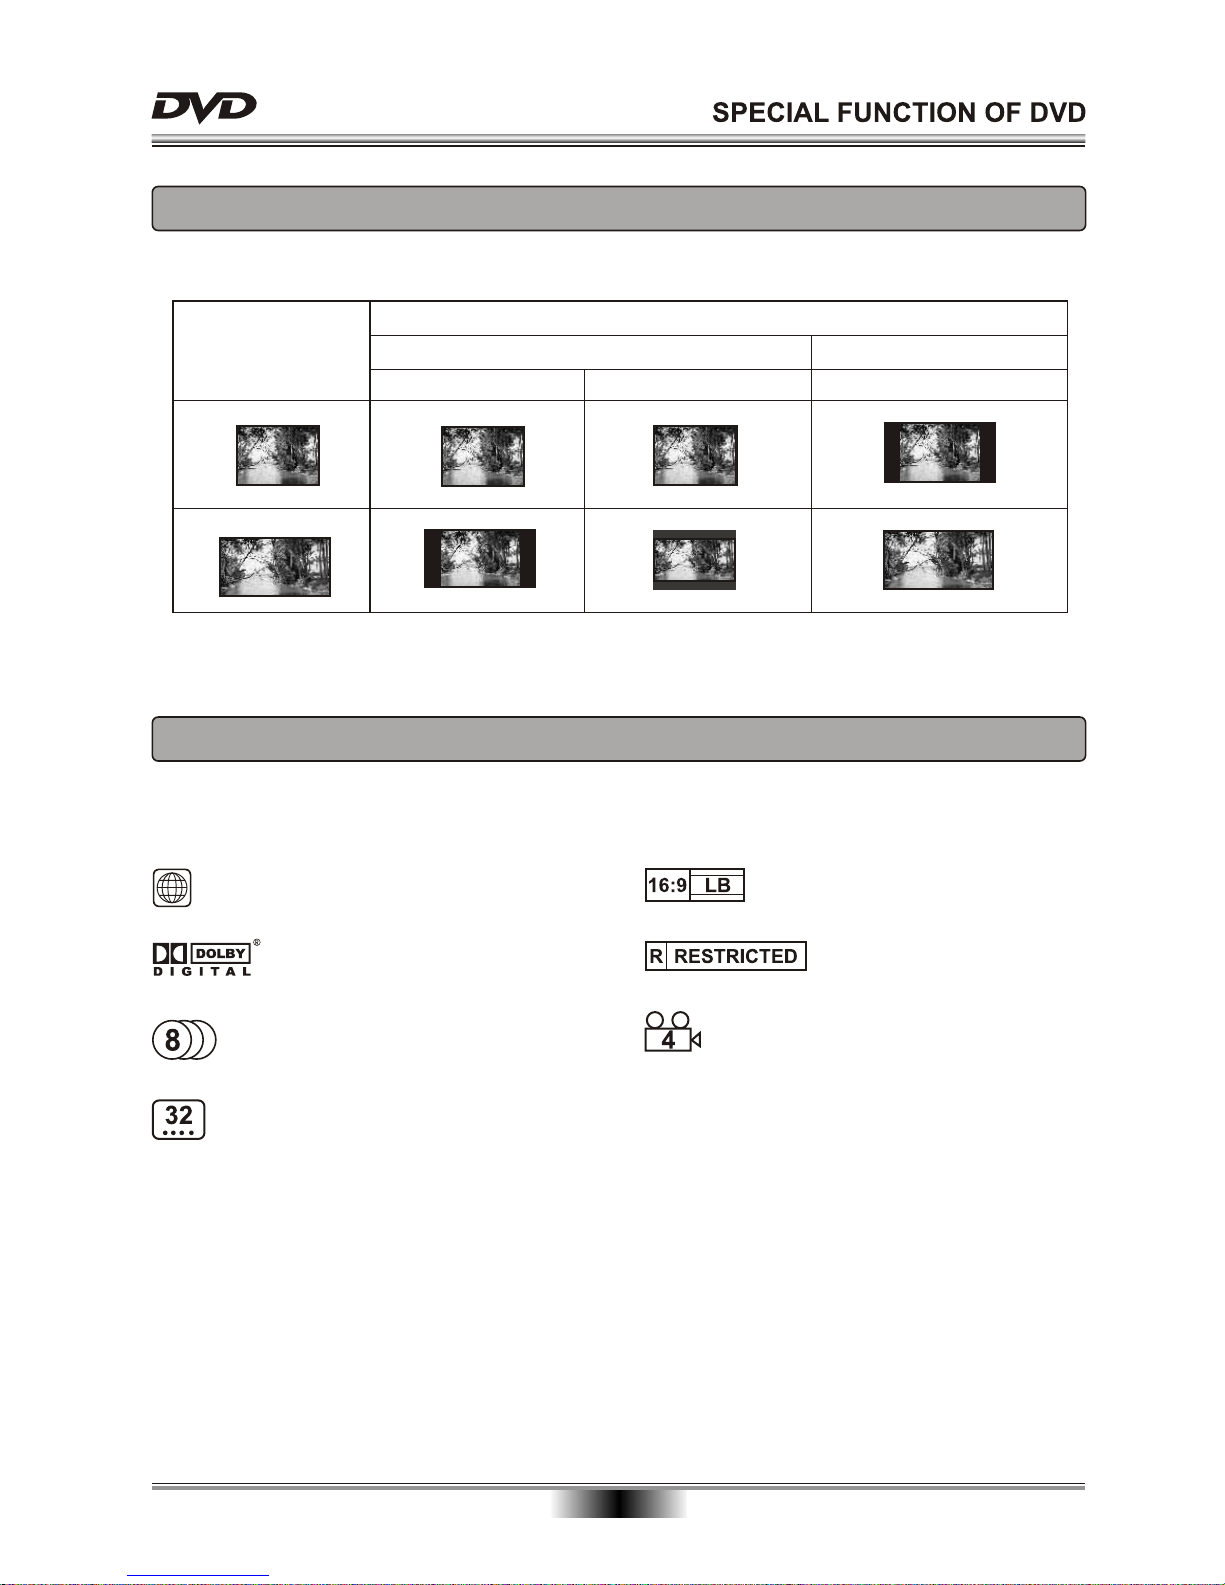
Letter-box Wide Screen
Picture format
on Disc
TV Screen Size
4:3
4:3
16:9
16:9
Pan Scan
16
SETTING THE TV SCREEN SIZE
Multi-aspect ratio suit to different TV screen size.
Function supported by DVD discs
There are many functions available on DVD discs and
the functions vary per player and per manufacturer.
Regional code and signal system
Picture proportion modes
Parent lock
Angles for viewing
Dolby digital surround sound
Number of languages
Subtitle languages
ALL
Page 19
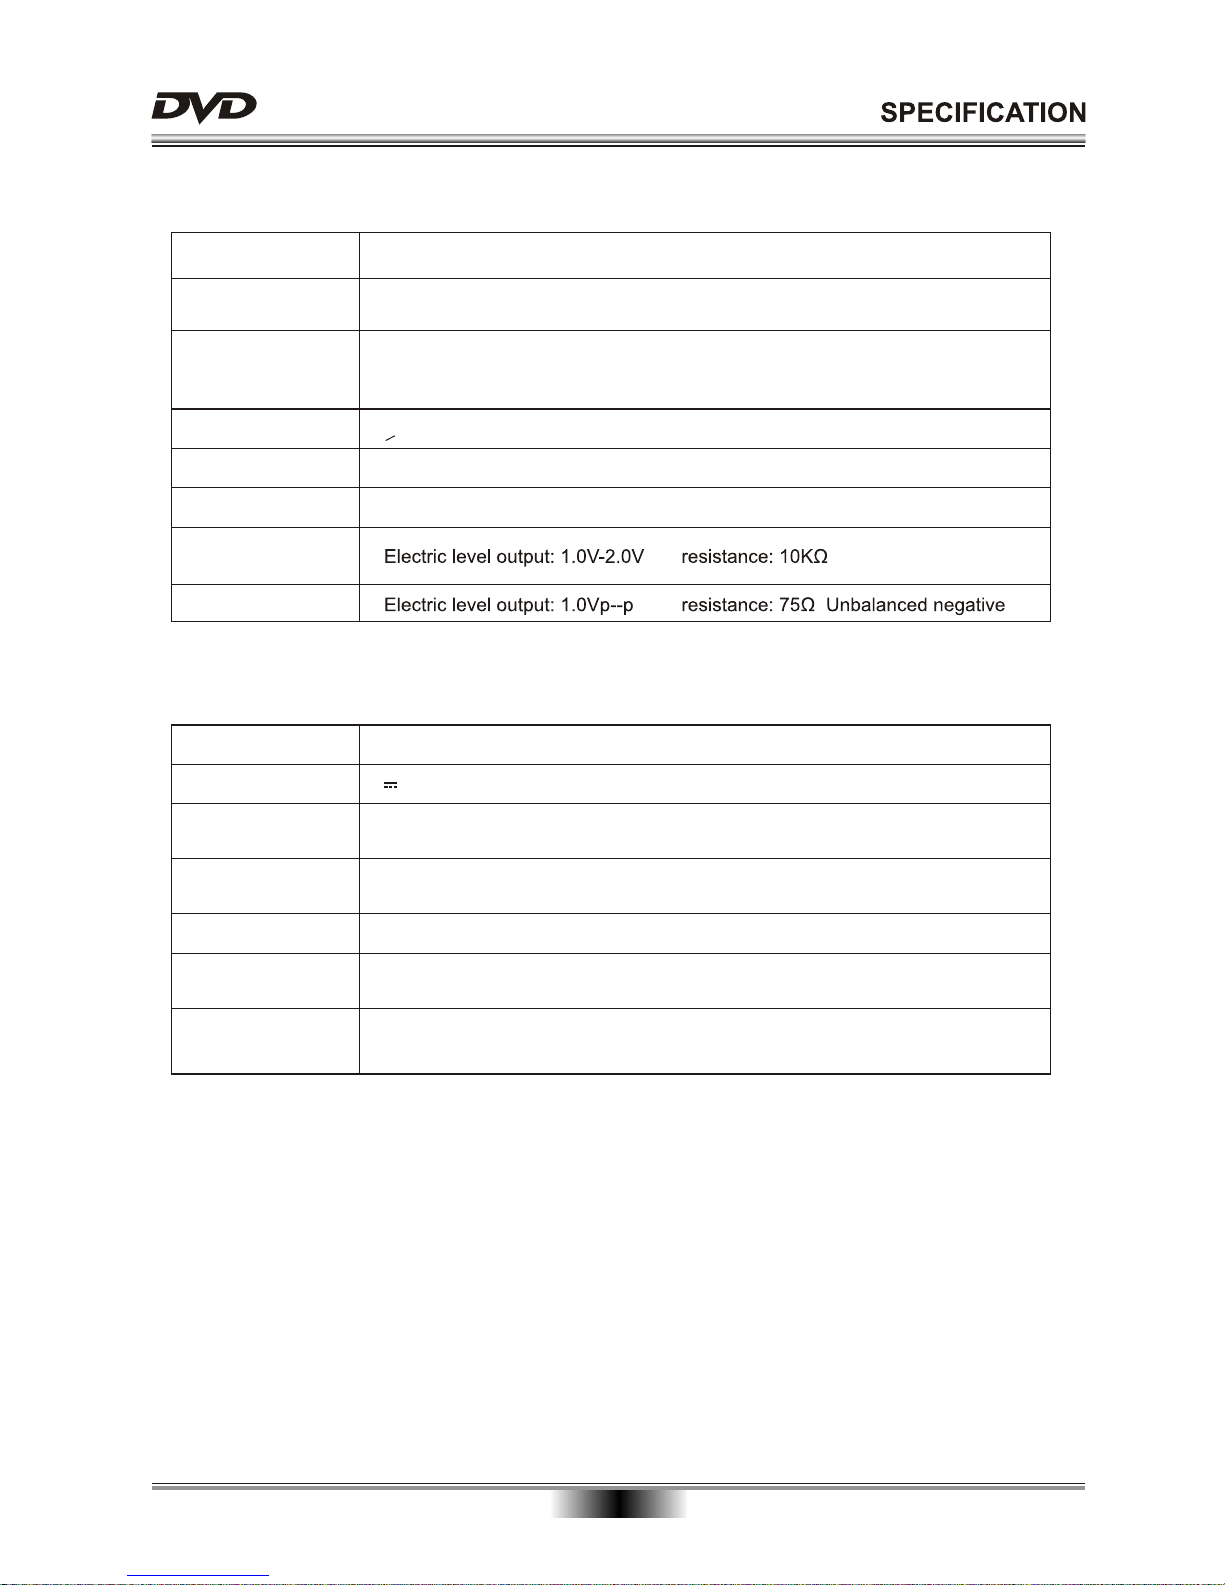
SPECIFICATION
Note: We reserve the right to modify the design and specification without prior notice.
System and Outputs
~ 110V-240V 50/60HzAC Power
Power
consumption
Product
Dimensions
Weight
12W
0.83kg
L: 211mm W: 171mm H: 43mm
Operating
temperature
oooo
5 C to 35 C (41 F to 95 F)
Operating
humidity
5% to 90%
General
9V
DC Power
VF Signal
system
NTSC/PAL
Audio S/N ratio
> 65 dB
Audio output
(analog audio)
Frequence
response
CD: 20Hz-20KHz(EIAJ)
DVD:
20Hz-22KHz(48KHz)(Sample result)
20Hz-44KHz(96KHz)(Sample result)
Video/Picture
MPEG1 V2.0; MPEG2
Audio
MPEG LAYER2 standard
Video output
TFT screen size 7 inch
17
Copyright
This manual contains information protected by copyright law. No part of this document may be
used or reproduced in any form or by any means, or stored in a database/retrieval system without
prior written permission from us.
The information of this manual is base on the current version of the product we reserve the rights
to change without prior notice.
All brand names in this manual are the property of their respective owners.
 Loading...