

Olin PD-02 User Manual
1
CAUTION: USE OF ANY CONTROLS, ADJUSTMENTS, OR PROCEDURES OTHER
THAN THOSE SPECIFIED HEREIN MAY RESULT IN HAZARDOUS RADIATION
EXPOSURE.
POWER SUPPLY:
Connect the supplied adapter to the side of the DVD player in the slot marked “Power
In”. Plug the two-prong end of the power cord to an AC100-240V outlet. If you have
difficulty inserting the plug, turn it over and reinsert it, if the unit will not the used for a
long time, disconnect the plug from the outlet.
NOTE:
Before plugging the power cord into an AC outlet, make sure that all the connections
have been made.
Important Safety
Instructions
CAUTION: TO REDUCE THE RISK OF ELECTRIC SHOCK, DO NOT
REMOVE COVER (OR BACK). NO USE-SERVICEABLE PARTS
INSIDE. REFER SERVICING TO QUALIFIED SERVICE PERSONNEL.
The lightning flash with arrowhead symbol, within an equilateral triangle, is
intended to alert the user to the presence of uninsulated “dangerous
voltage” within the product’s enclosure that may be of sufficient magnitude
to constitute a risk of electric to
p
ersons.
The exclamation point within an equilateral triangle is intended to alert the
user to the presence of important operating and maintenance (servicing)
instructions in the literature accom
panying
the appliance.
WARNING: TO REDUCE THE RISK OF FIRE OR ELECTRIC SHOCK,
DO NOT EXPOSE THIS APPLIANCE TO RAIN OF MOISTURE.
CAUTION: Laser radiation when open. Do not stare into beam.

2
CAUTION: These servicing instructions are for use by qualified service personnel only.
To reduce the risk of electric shock, do not perform any servicing other than that
contained in the operating instructions unless you are qualified to do so.
Refer to service manual for servicing instructions.
1) Read these instructions.
2) Keep these instructions.
3) Heed all warnings.
4) Follow all instructions.
5) Do not use near water.
6) Clean only with dry cloth.
7) Do not block any ventilation openings. Maintain well ventilated conditions around
the product, Do not put product on bed, sofa or anything that blocks ventilation.
Install in accordance with the manufacturer’s instructions.
8) Do not install near any heat sources such as radiators, heat registers, stoves, or
other apparatus (including amplifiers) that produce heat.
9) Do not defeat the safety purpose of the polarized or grounding-type plug. A
polarized plug has two blades with one wider than the other. A grounding type
plug has two blades and a third grounding prong. The wide blade or the third
prong is provided for your safety. If the provided plug does not fit into your outlet,
consult an electrician for replacement of the obsolete outlet.
10) Protect the power cord from being walked on or pinched particularly at plugs,
convenience receptacles, and the point where they exit from the apparatus.
11) Only use attachments/accessories specified by the manufacturer.
12) Use only with the cart, stand, tripod, bracket, or table specified by
the manufacturer, or sold with the apparatus. When a cart is used,
use caution when moving the cart/apparatus combination to avoid
injury from tip-over.
13) Unplug this apparatus during lightning storms or when unused for long periods of
time.
14) Refer all servicing to qualified service personnel. Servicing is required when the
apparatus has been damaged in any way, such as power-supply cord or plug is
damaged, liquid has been spilled or objects have fallen into the apparatus, the
apparatus has been exposed to rain or moisture, does not operate normally, or has
been dropped.
15) Apparatus shall not be exposed to dripping or splashing and no objects filled with
liquids, such as vases, shall be placed on the apparatus.
Note: Do not touch the color TFT LCD screen by hand directly.
Important Safety
Instructions

3
Copyright Protection
This product incorporates copyright protection technology that is protected by U.S.
patents and other intellectual property rights. Use of this copyright protection
technology must be authorized by Macrovision, and is intended for home and other
limited viewing uses only unless otherwise authorized by Macrovision. Reverse
engineering or disassembly is prohibited.
Region code information
DVD players and discs are coded by region. If the region number described on the
DVD disc does not correspond to the region number of this product, this product cannot
play the disc. The region code of this unit is 4.
IMPORTANT FOR LASER PRODUCT
S
1. CLASS 1 LASER PRODUCT
2. DANGER: Visible laser radiation when open and
interlock failed or defeated. Avoid direct exposure to
beam.
3. CAUTION: Do not open the top cover. There are no
user serviceable parts inside the unit. Leave all
servicin
g
to qualified service personnel.
Important Safety
Instructions
4
Special Functions
High-quality audio and video
Advanced Playing Functions
Features
On-Screen Display (OSD): Yo u
can choose English, French, etc.
for the On-Screen Display
language.
Compatibility: Compatible DVD,
CD and JPEG discs, etc.
Particular Performance:
Multi-speed, fast forward, fast
backward, slow playback and
repeated playback.
Search by Time: Search for a
certain track of a disk by selected
time.
Last Memory Playback:
Memorizes the stopped playback
track and continues playing the
disk from this spot when the
power is kept to supplied. (Only
available for DVD and CD disc).
Special Functions: Supports
screen multi-language caption,
multi-angle viewing and zooming
function.
Excellent sound: Dolby Decoder
delivers great sound.
AV input: External Audio, Video
input can be connected to most
external AV sources.
AV O utp ut: Analog audio output
can be connected to external
am
p
lifier.
TV Receiving Function: Able to receive TV programs when connecting to an
external antenna or CATV cable.
5
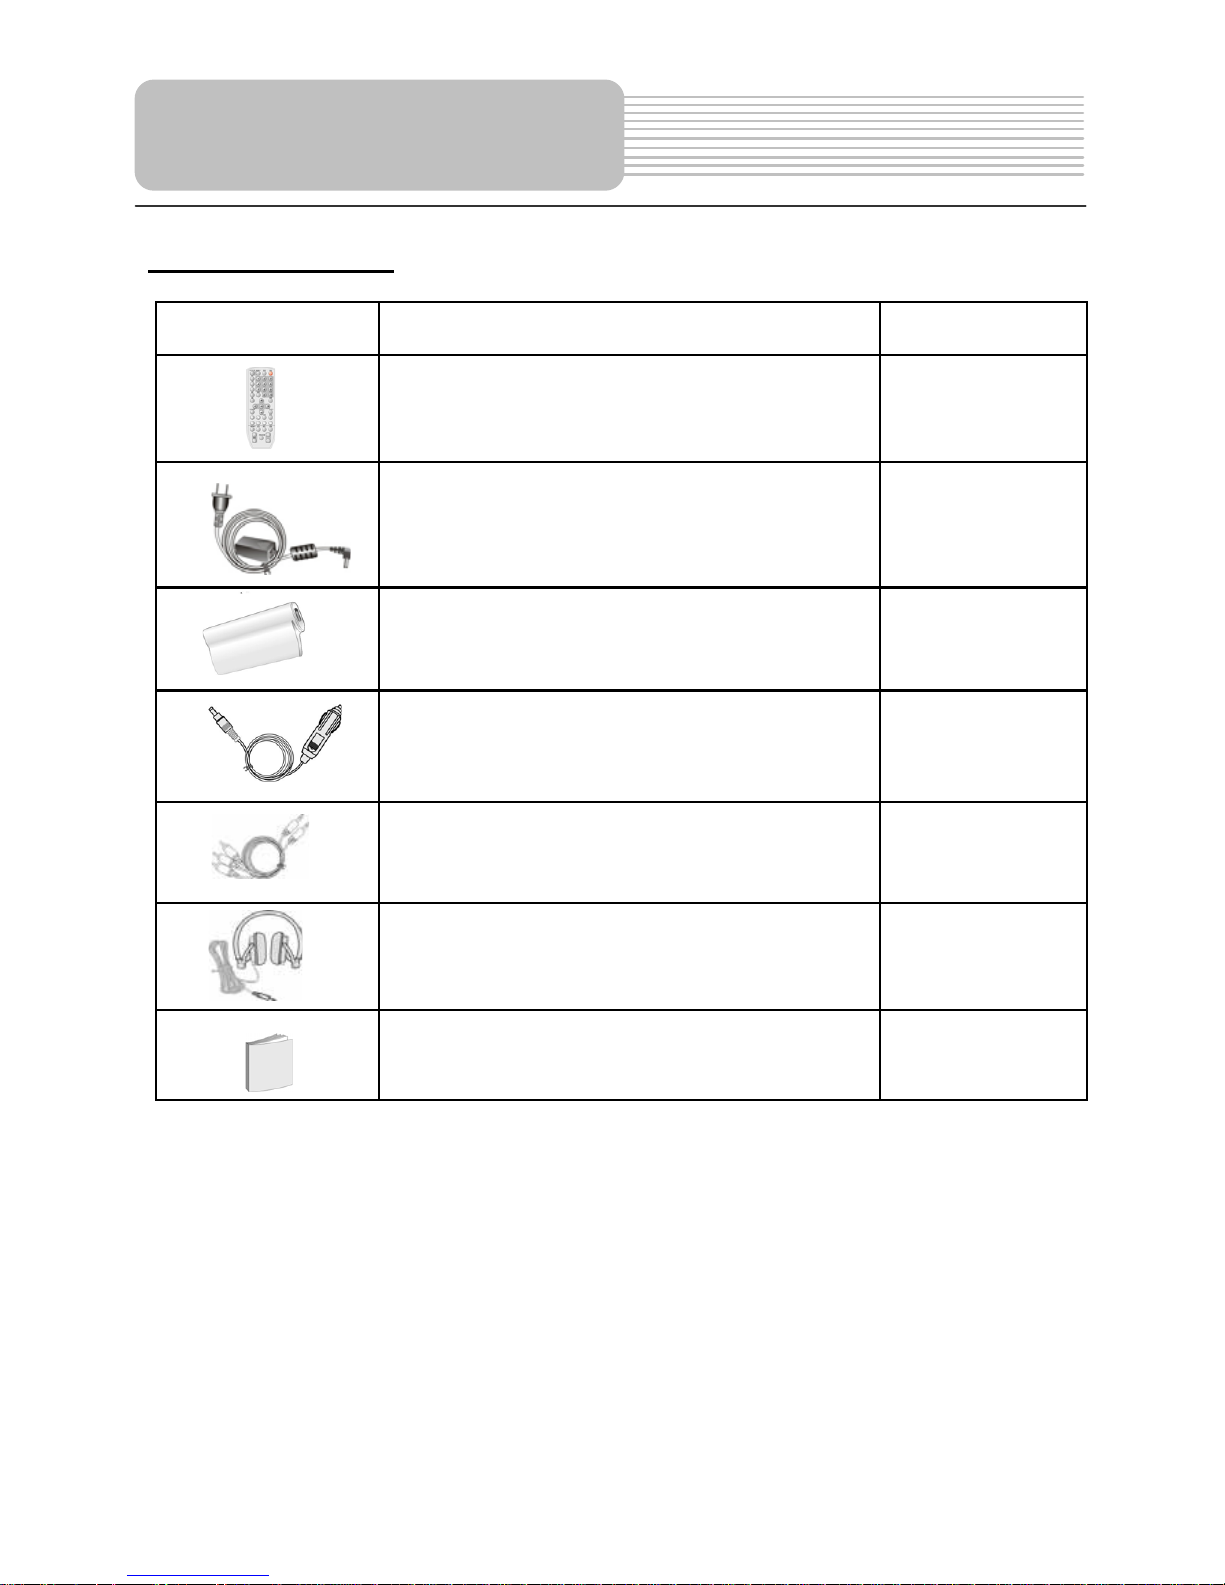
Accessories List
ITEM NAME QTY
Remote Control (with battery) 1
Power Supply Cord with AC Adapter 1
Rechargeable Battery Pack 1
DC Adapter (Car Adapter) 1
Audio/Video Cable 1
Earphone 1
Operation Manual 1
NOTE
˖
Accessories and their parts numbers are subject to change without prior notice.
Accessories

6
.…………………………………………….1
………………………………………….….4
………………………………………….….5
………………………………………..…...7
…………………………………….……….9
…………………………………………....11
…………………………………………....12
…………………………………………....13
…………………………………………....17
…………………………………………....20
……………………………………..……..21
…………………………………..………..24
………………………………………..…..25
…………………………………………... 33
……………………………………….…...40
…………………………………………... 43
…………………………………………... 45
…………………………………………... 46
…………………………………………... 48
Contents
Important Safety Instructions
Features
Notes on Discs
Playback Operation
Remote Control
Power Supply Preparation
Rechargeable Battery
System Connections
Accessories
View of Front Panel
View of Side Panels
View of Bottom Panel
Revolving LCD Screen
Troubleshooting
Specifications
SCREEN/TV Setup
TV Operations
DVD System Setup
Definition
7
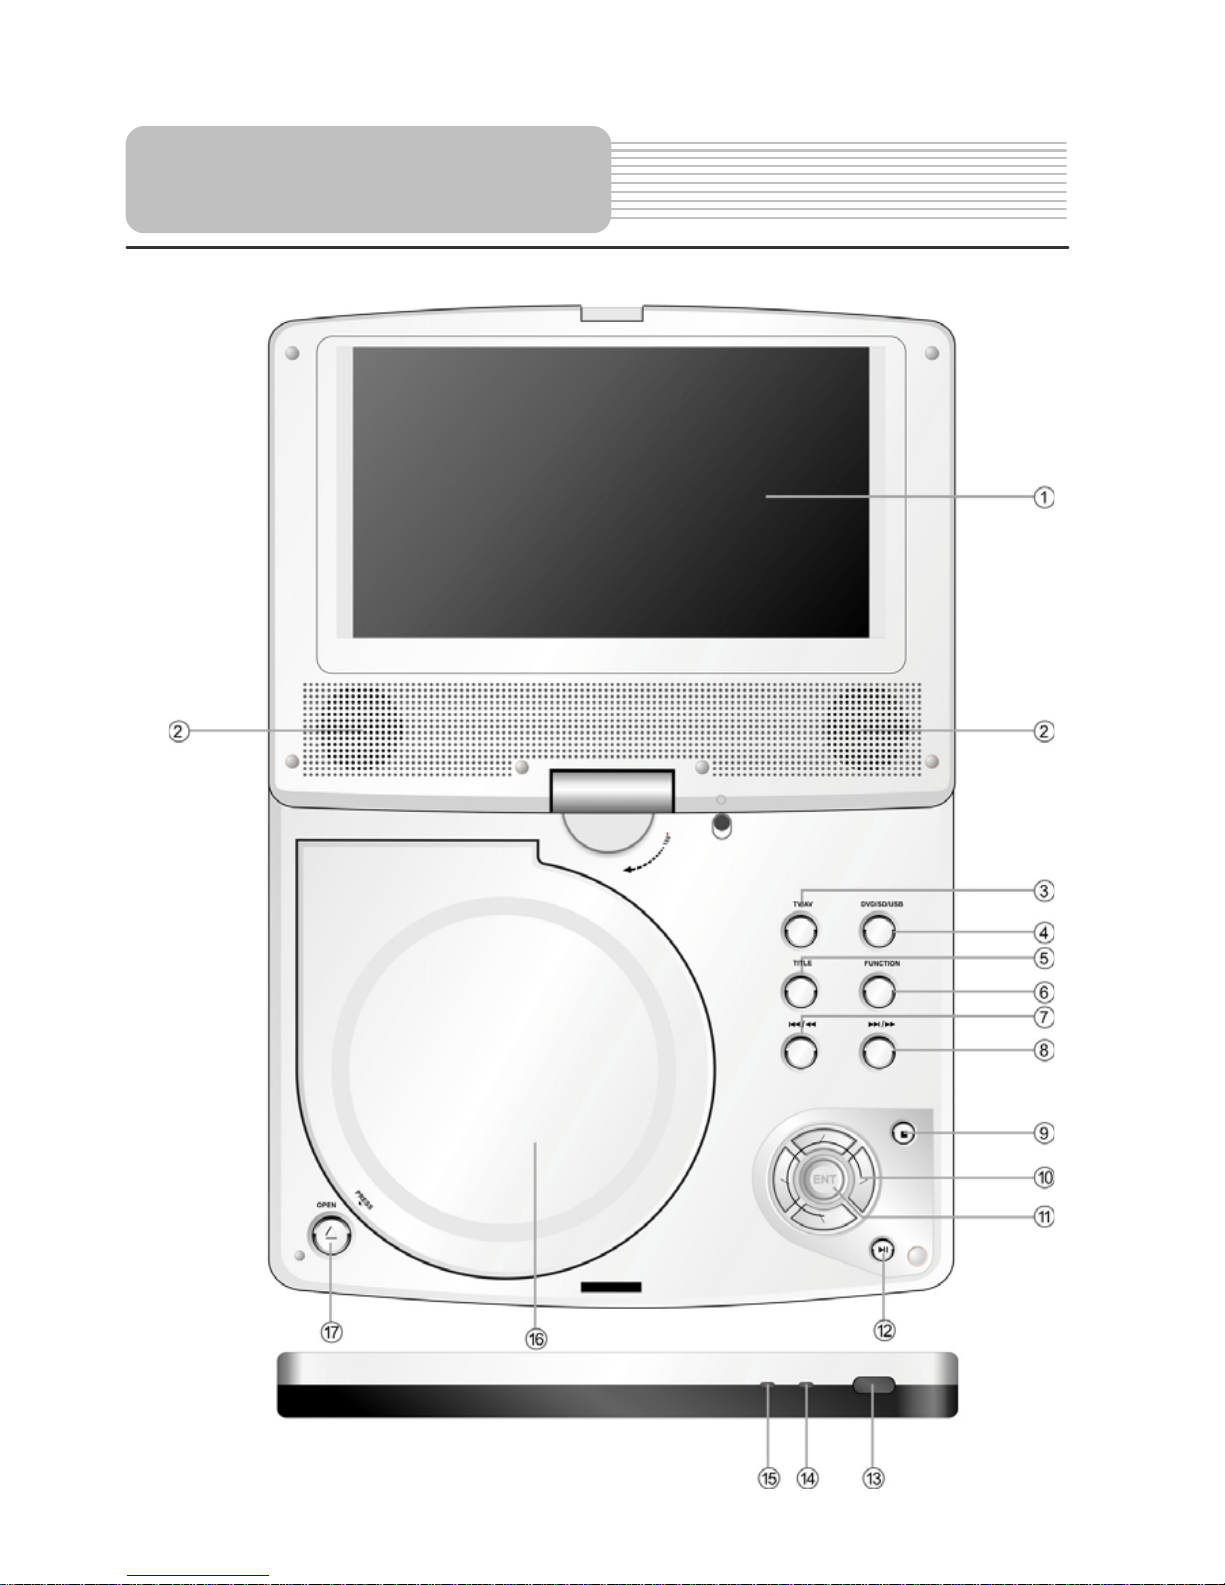
View of Front Panel

8
1. LCD screen
7 inch color LED screen
2. Speaker
3. TV/AV button
Press repeatedly to shift between TV and AV modes.
4. DVD button
Press to enter the DVD mode.
5. TITLE button
In DVD mode, press to access the title menu if exist when playing DVD disc.
6. FUNCTION Button
Press to access to or exit setup menu in TV mode.
7.
/
Button
In DVD mode, press to search backward fast; press for a longer time to return to
the previous list/track/chapter.
8.
/
Button
In DVD mode, press to search forward fast; press for a longer time to return to
next list/track/chapter.
9.
(Stop) Button
In DVD mode, press to stop playback. Then press the
button to resume
playback from the stopped spot. Press this button twice to stop playback
completely.
10. Direction buttons ()
Press to select menu items or settings.
11. ENT button
Press to confirm selection.
12.
(Play/Pause) Button
In DVD mode, press once to pause the playback, and press it again to resume
the playback.
13. Remote Control Sensor
14. Charge Indicator
Light is red when the battery is being charged; green when it is fully charged.
15. Power indicator
Lights green when the player is on work and turns red when the player is in
standby mode.
16. Disc tray cover
When the disc is loaded, press the cover to close.
17. OPEN button
View of Front Panel
9
Press to open the disc tray cover.
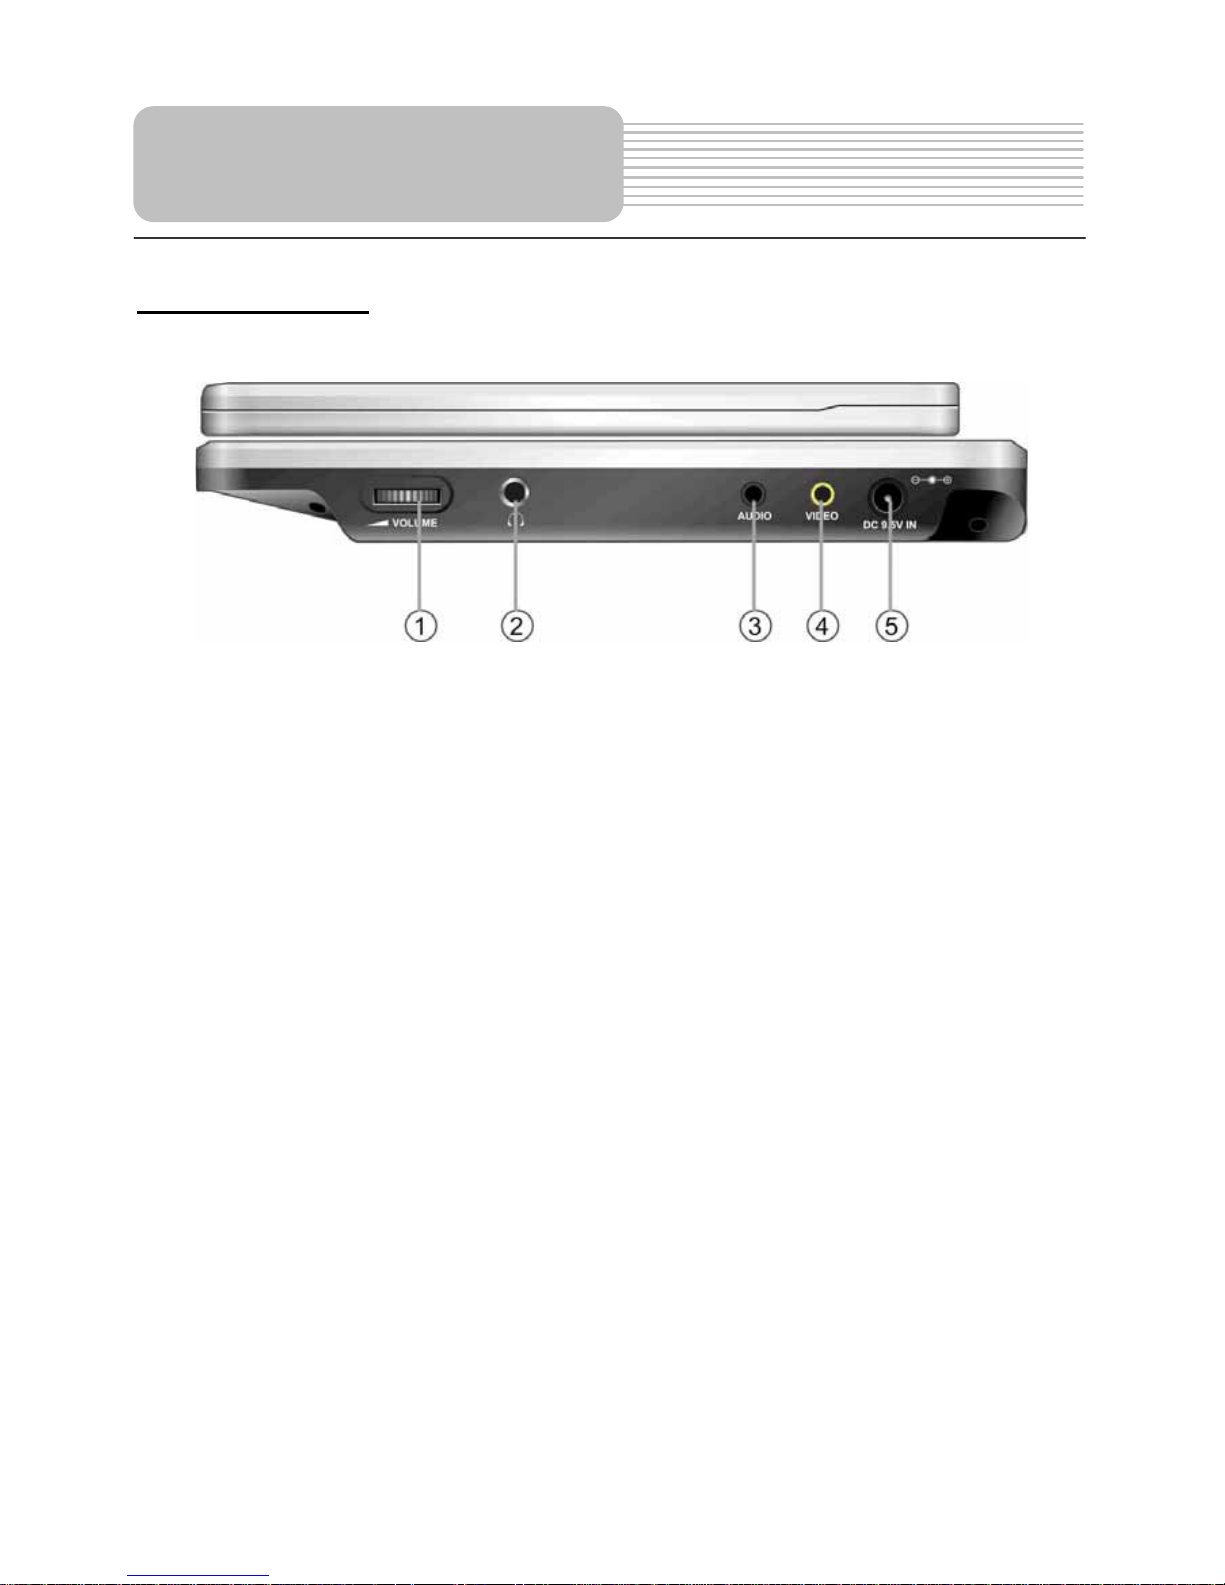
Right Side View
1. Volume Control knob
Used to adjust the volume of the headphone and speaker.
2. Headphone Jack
Used to connect wired headphones for private listening. When headphones are
connected to this jack the speaker will be turned off automatically.
3. Audio Input/Output Jack
Used to connect to an external amplifier or audio source.
4. Video Input/Output Jack
Used to connect an external monitor or video source.
5. DC 9.5V Input Jack
Used to connect the DC power supply, including the car adapter.
View of Side Panels

10
Left Side View
1. Antenna-fixing Jack
Used to fix the external antenna.
2. TV Signal Input Jack
Used to connect to the antenna and the connecting line of CATV.
3. Power ON/OFF Switch
Used to turn the power on or off.
View of Side Panels
11
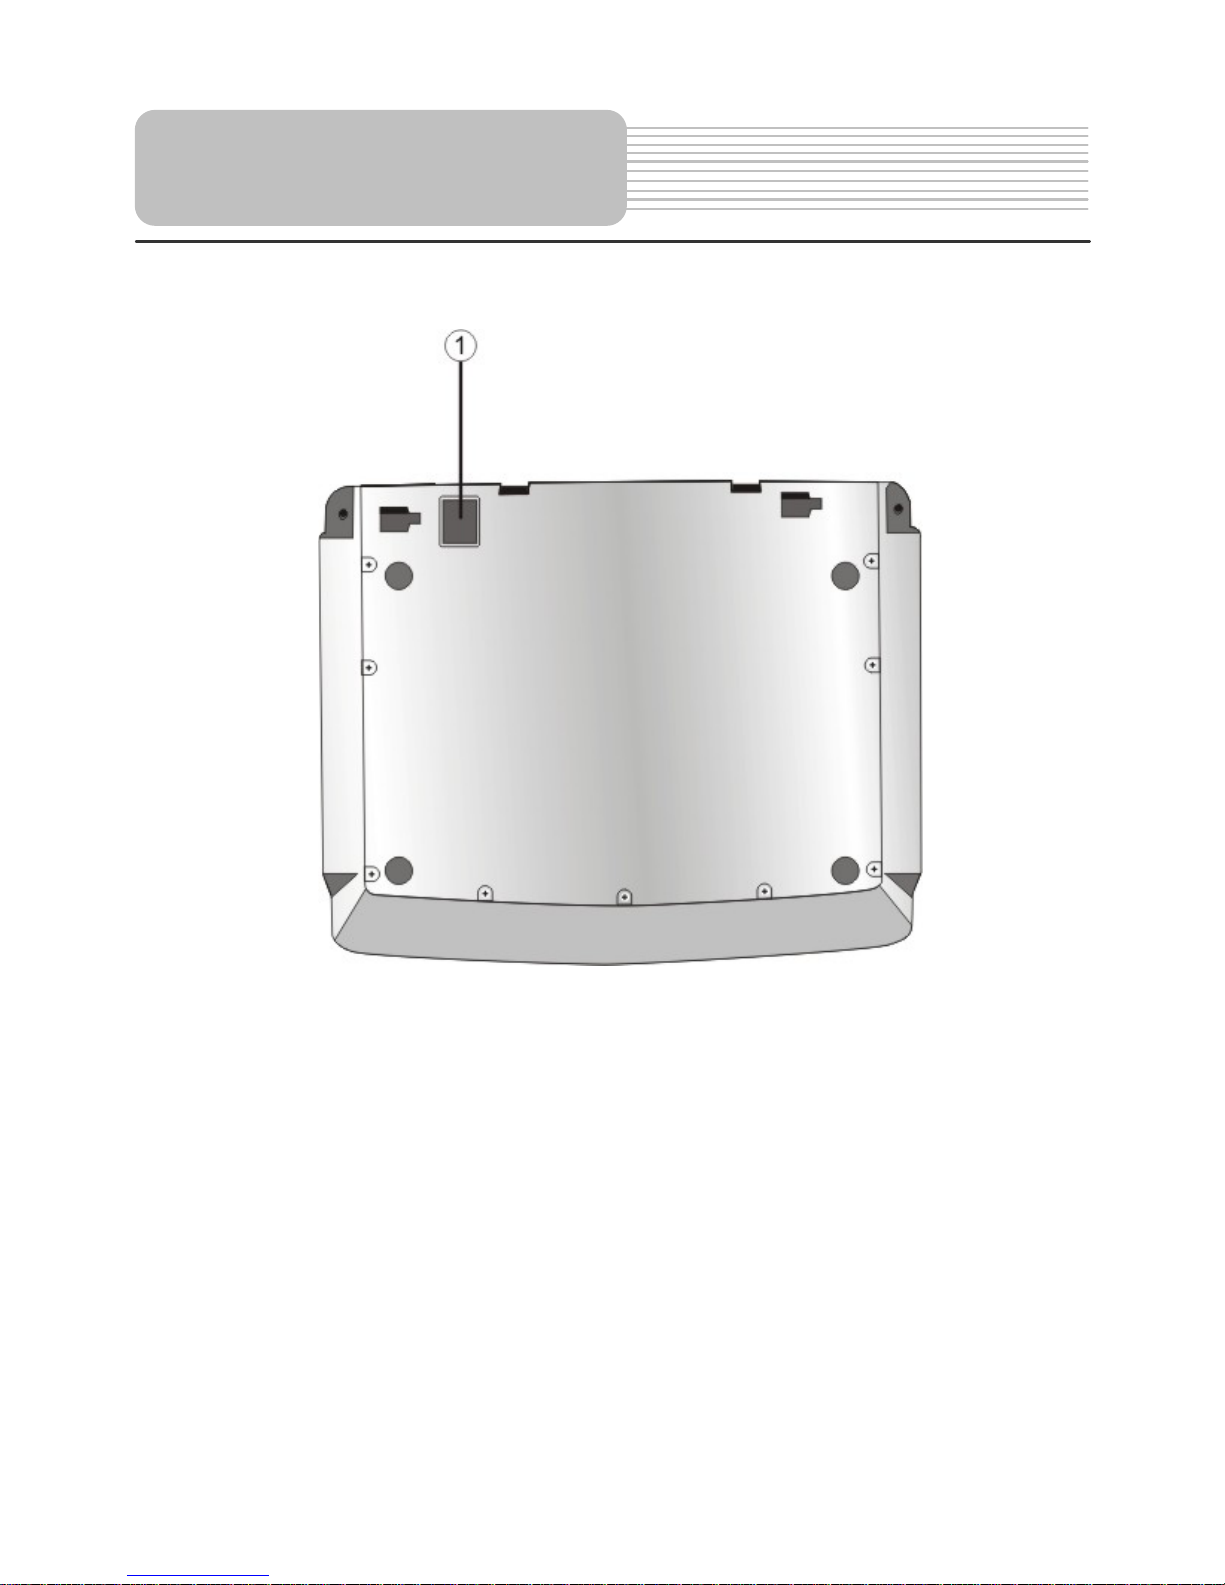
1. Rechargeable Battery Contacts
For connecting the rechargeable battery pack.
View of Bottom Panel
12
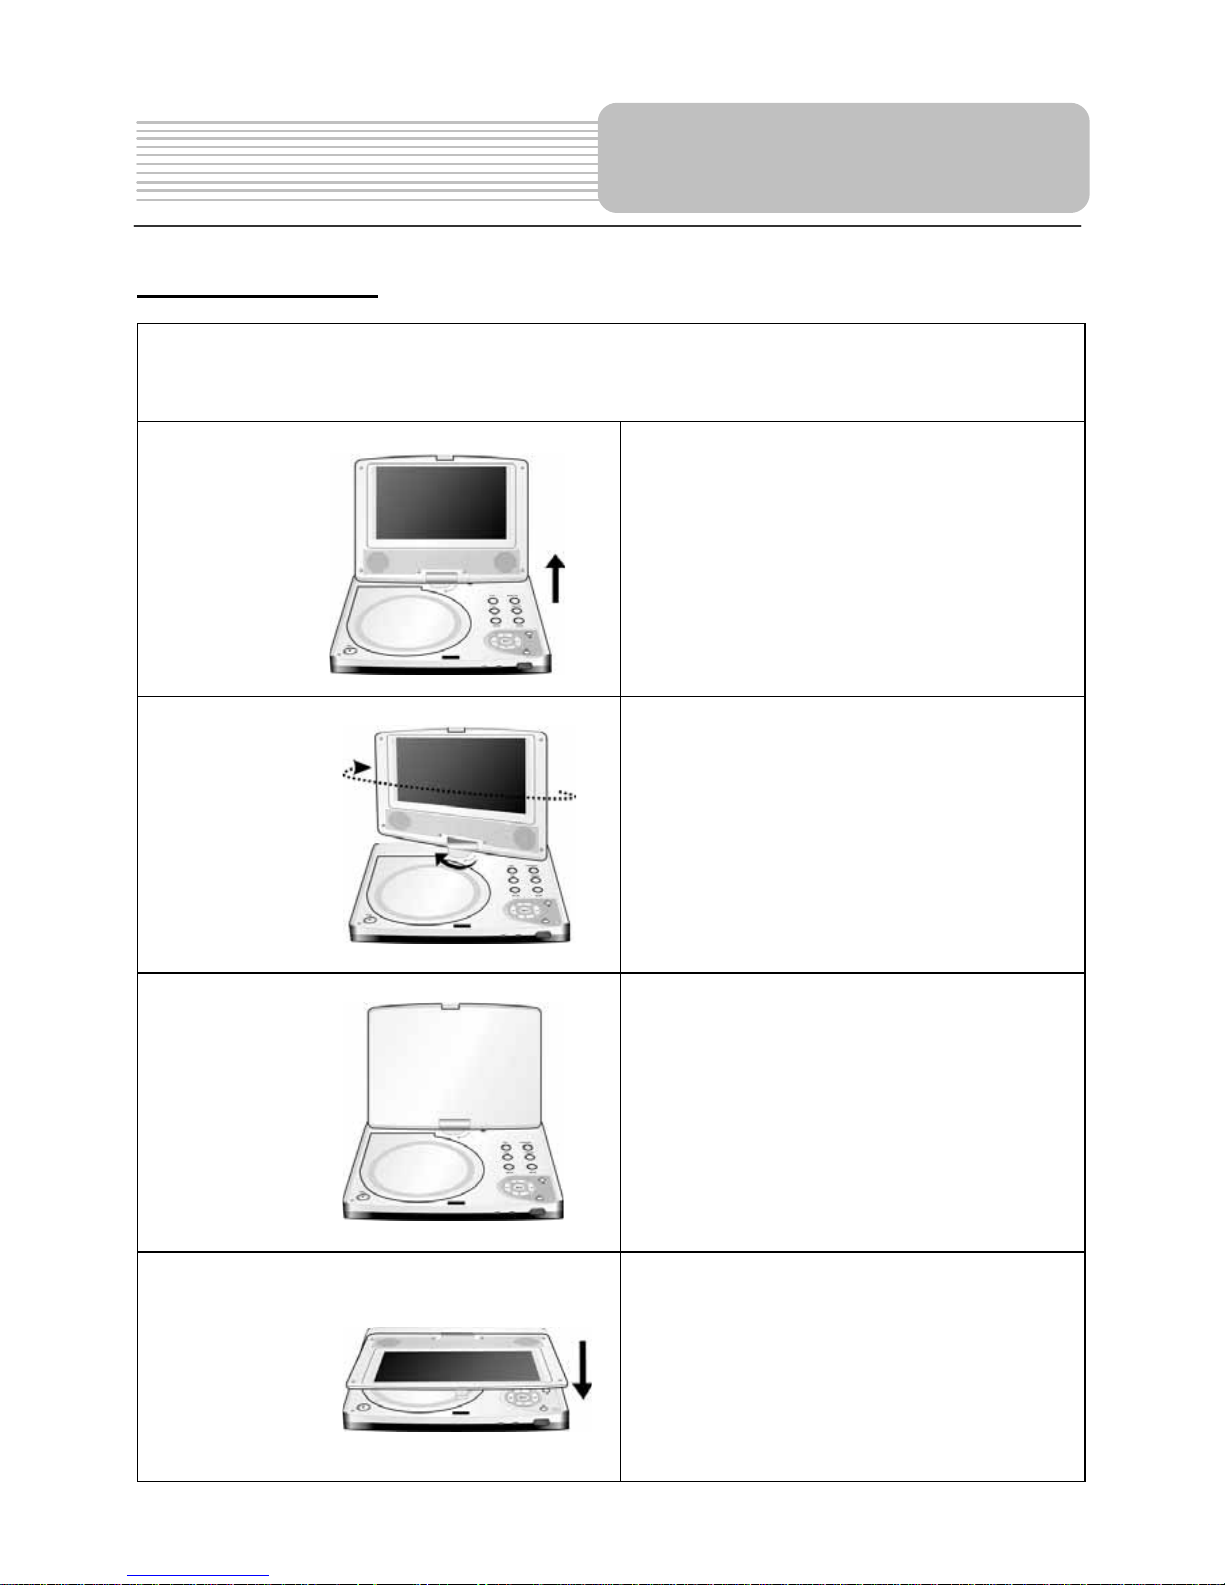
Revolving Steps
The revolving LCD screen is one of the outstanding features about this product.
We’d like to suggest you to take the following steps for proper operation.
Pos. A
1. Open the screen cover to position
(A) as shown in left figure at which
the screen is vertical to the
operation panel.
Pos. B
2. Revolving the screen horizontally
about it’s axis in the clockwise only.
The maximum revolving degree is
180 (position C). If you want to
return to initial position (A), please
revolve screen counter clockwise
until it clicks.
Pos. C
3. You can rotate the screen vertically
from position C to the operation
panel as indicated in left fig.
Pos. D
4. The final rotating position (position
D) at which the screen facing
upward and back to operation panel.
Revolving LCD Screen
13
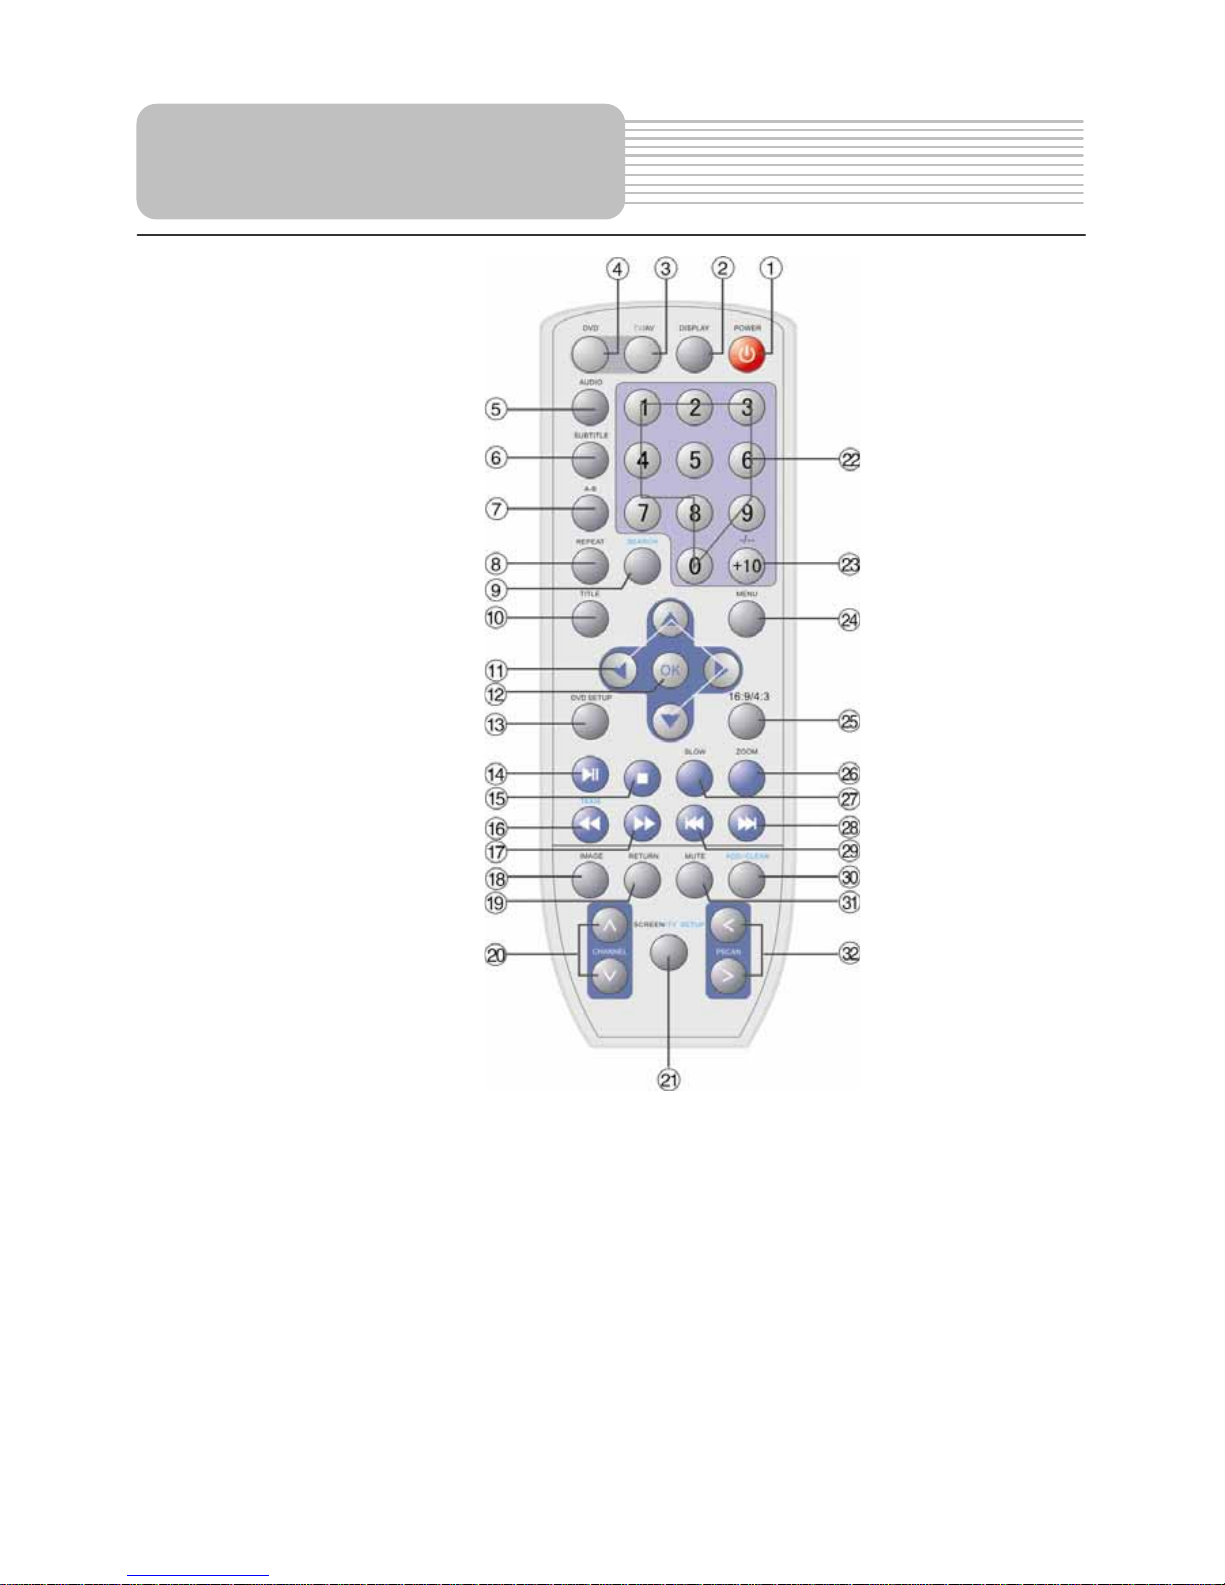
1. POWER button
Press to access standby mode or playback mode.
2. DISPLAY button
Press repeatedly to turn on or turn off the detailed information of the disc or the
current TV channel.
3. TV/AV button
Press repeatedly to shift between TV and AV modes.
4. DVD button
Press to access DVD mode.
5. AUDIO button
In DVD mode, press to select different languages when a DVD disc that
contains multiple audio languages is played; press to select different audio
track when a CD disc is played.
Remote Control

14
6. SUBTITLE button
In DVD mode, press to select different subtitle language when a DVD disc
with multiple subtitle language is played.
7. A-B button
In DVD mode, press to play repeatedly a certain selected content when a disc is
played.
8. REPEAT button
In DVD mode, press to repeat a chapter, a title, a track or the whole disc when a
disc is played.
9. SEARCH button
In DVD mode, press to select the desired disc starting time, track or title.
In TV mode, press to access TV SETUP menu.
10. TITLE button
In DVD mode, press to access the title menu if exist when playing DVD disc.
11. Direction buttons ()
Used to select different items in the menu.
12. OK button
Press to confirm selection.
13. DVD SETUP button
In DVD mode, press to access or exit DVD setup menu.
14.
(PLAY/PAUSE) button
In DVD mode, press once to pause the playback, and press it again to resume
the playback.
15.
(Stop) button
In DVD mode, press to stop playback. Then press the
button to resume
playback from the stopped spot. Press this button twice to stop playback
completely.
16.
button
In DVD mode, press to search backward fast.
17.
button
In DVD mode, press to search forward fast.
18. IMAGE button
Press to change the current picture mode among standard, light, memory and soft.
19. RETURN button
Press to return to the previous channel that you have viewed.
Remote Control
 Loading...