

Olin OPVR-1600, OPVR-1000 User Manual

1
Safety Instructions
x Always read the safety instructions carefully
x Keep this User Manual for future reference
x Keep this equipment away from humidity
x Lay this equipment on a reliable flat surface before setting it up.
x Do not stand it on soft furnishings.
x If any of the following situation arises, get the equipment checked by a service
technician:
- The equipment has been exposed to moisture.
- The equipment has been dropped and damaged.
- The equipment has obvious sign of breakage.
- The equipment has not been working well or you cannot get it work according to User
Manual.
WARNING:
x To prevent the risk of electric shock, do not open the cover or the back of the receiver.
x Do not block the ventilation holes of the device. Leave appropriate gap above and
around it to allow for adequate ventilation.
x Do not place the device in an unventilated cabinet or on top of a unit which emits heat.
x To reduce the risk of fire or electric shock, do not expose this apparatus to rain or colds.

2
Table of Contents
Introduction………………………………………………………………………………….3
Front Panel and Rear Panel Illustration………………………………………………..4
Front Panel……………………………………………………………………………….4
Rear Panel………………………………………………………………………………...4
Remote Control………………………………………………………………..5-6
Installing the Batteries……………………………………………………………7
Connecting to Equipments………………………………………………………8-10
First Time Installation……………………………………………………………11
Basic Operations……………………………………………………………….12-15
Recording Function……………………………………………………………..16
Main Menu……………………………………………………………………..17-18
Menu Tree……………………………………………………………………..18
LIVE TV………………………………………………………………………….19
PVR.…………………………………………………………………………..20-21
Recorded program……………………………………………………………..20
Record timer……………………………………………………………………20
Storage Setting…………………………………………………………………..21
File manager……………………………………………………………………..21
Recording path………………………………………………………………………21
Setting…………………………………………………………………………..22-28
Installation………………………………………………………………………22
Program edit…………………………………………………………………23-24
System setup…………………………………………………………………25-26
User preferences……………………………………………………………….27
Parental control…………………………………………………………………28
Trouble Shooting……………………………………………………………………29
Technical Specification……………………………………………………………30
Version: OPVR-1600_V1.1

3
Introduction
This High Definition Digital Terrestrial Receiver is designed to receive terrestrial free-to-air
TV broadcast in Australia. It supports both HD and SD programs, furthermore a HDMI
output ensuring that the end-user's experience is of the highest performance. HDMI output
enables secure transfer of digital signals to the display. In addition, a fully featured
remote control is included that offers you access to every feature with only just a simple
press.
Main Features
z High Definition Twin Tuner PVR
z External PVR HDD recording via USB
z 500GB internal hard disk
z HDMI Digital Connection
z Simultaneous HD output
z Video output selection: Component (RCA, YPbPr), S-Video, Composite(RCA), HDMI
z 1080i, 720p, 576p, 576i video format support
z 4:3 / 16:9 Pictures
z 7-days Electronic Program Guide(EPG)
z Favorite Channel Editing
z Subtitle support
z Coaxial/Optical Digital Audio Output
z Parental Rating Setting
z Time-Zone and daylight-saving time options
z Time-shift Function (enable to pause live TV)
z Low power consumption
z USB 2.0 Host Interface supports
Package Contents
Before installation, please check the items of the package. The package should contain
the following items:
1. Personal Video Recorder (PVR) x 1
2. Remote control
x 1
3. AAA size battery for the remote control
x 2
4. Instruction manual
x 1
5. AV cable
x 1
6. YPbPr cable
x 1
7. RF cable
x 1
8. Warranty card
x 1
9. Quick guide
x 1

4
Front Panel and Rear Panel Illustration
Front Panel
ķ
STANDBY: To turn the standby mode ON/OFF.
ĸ
MENU: To enter into the main menu. Press again to exit to previous menu.
Ĺ
OK: To confirm the selected menu item.
ĺ
VOL+/-: To control the level of the volume.
Ļ
CH+/-: To change the channel up/down.
Rear Panel
ķ
LOOP IN: RF signal input to connect RF loopback cable.
ĸ
ANT OUT: RF signal output to other reception equipment.
Ĺ
LOOP OUT: RF signal output to connect loop in.
ĺ
ANT IN: To connect the antenna.
Ļ
USB: The port for software upgrade. (Note: This feature is built-in only for
distributor’s customer support team in the event of restoring the system or repairing.
User is not recommended to perform the firmware upgrading by oneself. Attempt of
doing so may result in unit malfunction.)
འ
HDMI Video output used to connect to your HDMI device.
ཡ
OPTICAL/COAXIALGDigital audio output.
ར
AUDIO L/RGAudio output to connect to your TV.(Used with YpbPr)
ལ
AUDIO L/RGAudio output to connect to your TV.(Used with CVBS/S-VIDEO)
ཤ
S-VIDEO S-VIDEO output to connect to you TV.
ཥ
CVBS CVBS output to connect to your TV.
ƻ
12 POWER Switch ON/OFF.
ƻ
13 YPbPr High definition video output to connect to your TV.
5
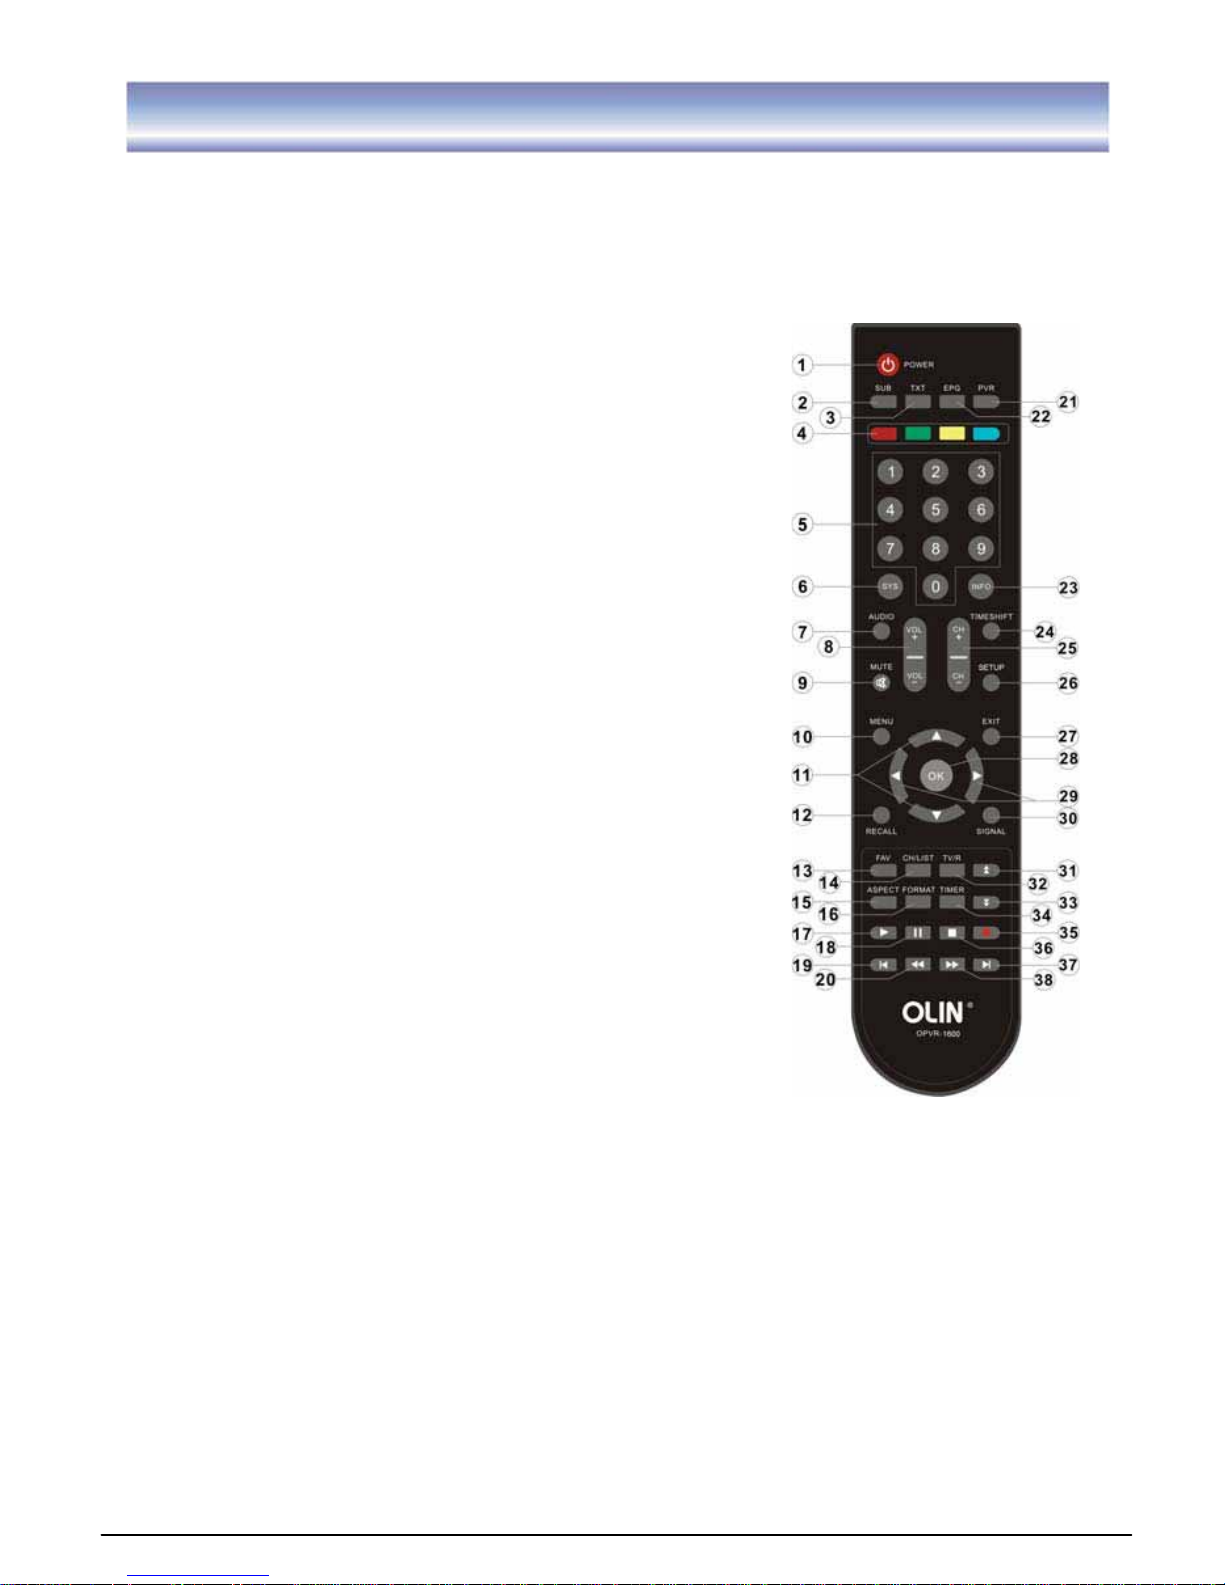
Remote control
Remote key functions:
1. POWER
˖
To turn the standby mode ON/OFF.
2. SUB
˖
To switch the subtitle ON/OFF.
3. TXT: To switch the Teletext service ON/OFF. (The availability of Teletext is subject to
channel broadcasting in each region.)
4. 4 COLOR KEY
˖
To assist the operation of the PVR.
5. Numeric buttons (0-9)
˖
To control the numerical
operation and especially to change program directly.
6. SYS
˖
To view the software/hardware of the unit.
7. AUDIO: To display the Audio info of the selected
program.
8. VOL+/-: To control the level of the volume.
9. MUTE: To mute or recover the sound of the unit.
10. MENU
˖
To enter into the main menu, Press again to
exit to previous menu.
11.
: To change the program up /down or to move the
program up/down in the menu mode.
12. RECALL:
G
To return to view the previous program.
13. FAV: To access and exit the favorite programs list.
14. CH/LIST: To call out the program list.
15. ASPECT: To change aspect ratio(16:9, 4:3 letter box,
Pan Scan).
16. FORMAT
˖
To switch the different resolution (1080i,
720Pˈ576P supported).
17. PLAY: To play a record or resume time shift.
18. PAUSE
˖
To pause the current program when press
once and continue playing when press again.
19. FIRST: To go to the starting point of a program (in
time shift or PVR mode).
20. REW: To rewind playing record or time shift (support
2X, 4X, 8X, 16X, 32X).
21. PVR: To enter record program list.
22. EPG
˖
Electronic Program Guide
23. INFO: To display the current program information.
24. TIMESHIFT: To open / close the time shift.
25. CH+/-: To change the program upward/downward.
26. SETUP: System setup.
27. EXIT: To cancel operation or exit the menu directly.
28. OK
aG
To confirm the selected menu item / to open the program list.
29. ൖ൘: To control the level of the volume/to move left/right in menu mode.
30. SIGNAL: To show the quality / level of signal.
31. PAGE UP: To enter into the next / previous page.

6
Remote control
32. TV/R: To switch the program between TV and Radio.
33. PAGE DOWN: To enter into the next / previous page.
34. TIEMR: To add a new timer.
35. REC
ୖ
To start an instant record on current channel.
36. STOP: To stop the existing program (recording, time shift).
37. END: To go to the end of the program.
38. FF: To forward playing record or time shift (support 2X, 4X, 8X, 16X, 32X).
7
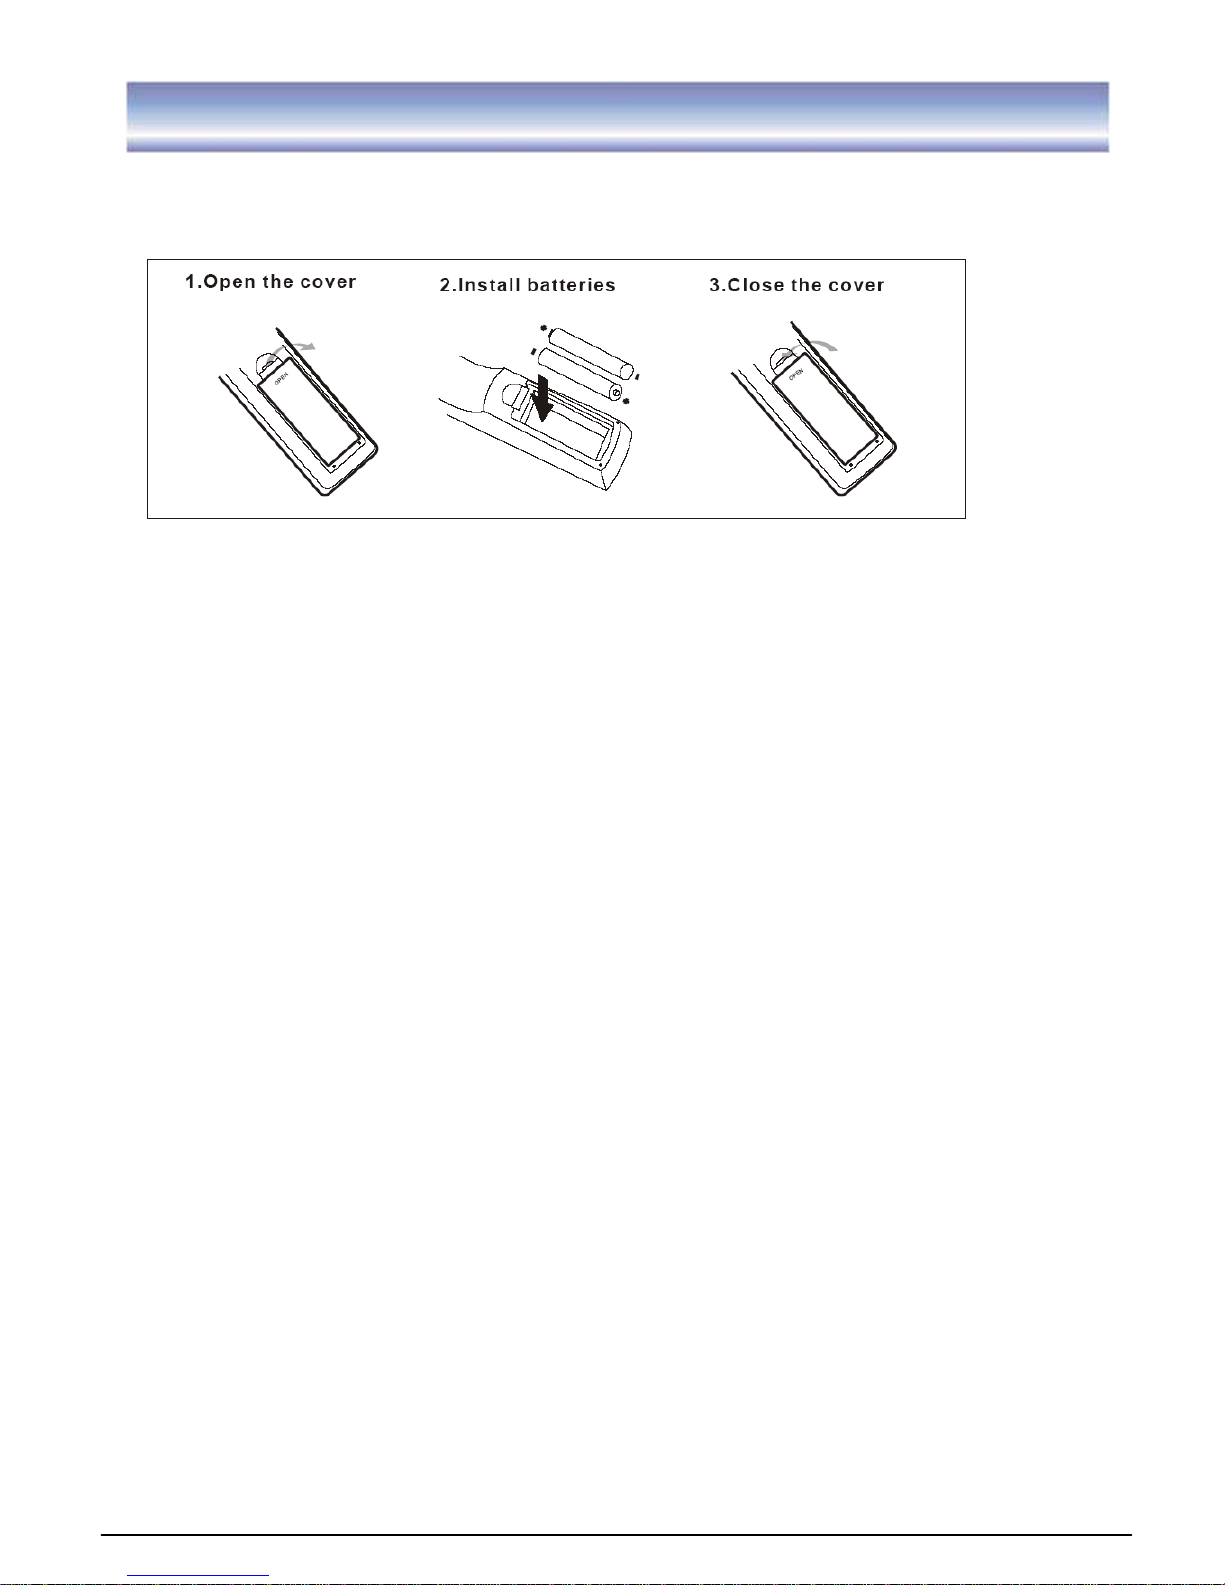
Installing the Batteries
Remove the battery cover from the remote control and put two AAA size batteries inside
the compartment. The diagram inside the battery compartment shows the correct way to
install the batteries.
Caution:
1. Keep batteries out of children’s reach.
2. Don’t attempt to recharge, short-circuit, disassemble heat or throw the batteries into the
fire.
3. Always replace both batteries at the same time. Never mix new and old batteries or
batteries of a different type.
4. If the remote controller is not in use for an extended period, please remove the batteries
to prevent possible leakage and corrosion.
5. Do not drop, apply shock or step on the remote control.
6. Do not spill water on the remote control.
Note: If the unit does not work when using the remote control from a close range, it is
required to replace the batteries.
Using the Remote Control
1. To use the remote control, point it towards the front of this unit.
2. The remote control has a range of up to 7 meters from the PVR at an angle of up to 30
degrees.
3. The remote control will not work if its path is blocked.
Note: Sunlight or very bright light will decrease the sensitivity of the remote control.
8
Connecting to Equipments
How to get good reception
G
ˍG In general you are not required to change the existing antenna. However if your antenna
is not in good condition you should consider replacing them to ensure uninterrupted
digital television viewing.
ˍ Viewers in areas of poor analog reception may need special advice about antenna
requirements for digital reception in their area.
ˍ It’s recommended that viewers use quad shielded cable from the antenna to the
television.
Connections to a TV
There are several ways of connecting this unit to the TV and Hi-Fi System. For high
definition viewing your TV must support 576p, 720p and 1080i resolution. Also the
connection between this unit and TV must be YPbPr component, or HDMI. Other
connection will provide standard definition viewing.
Warning
Please switch OFF the mains power before plugging or unplugging connection cables,
otherwise, it may damage this unit!
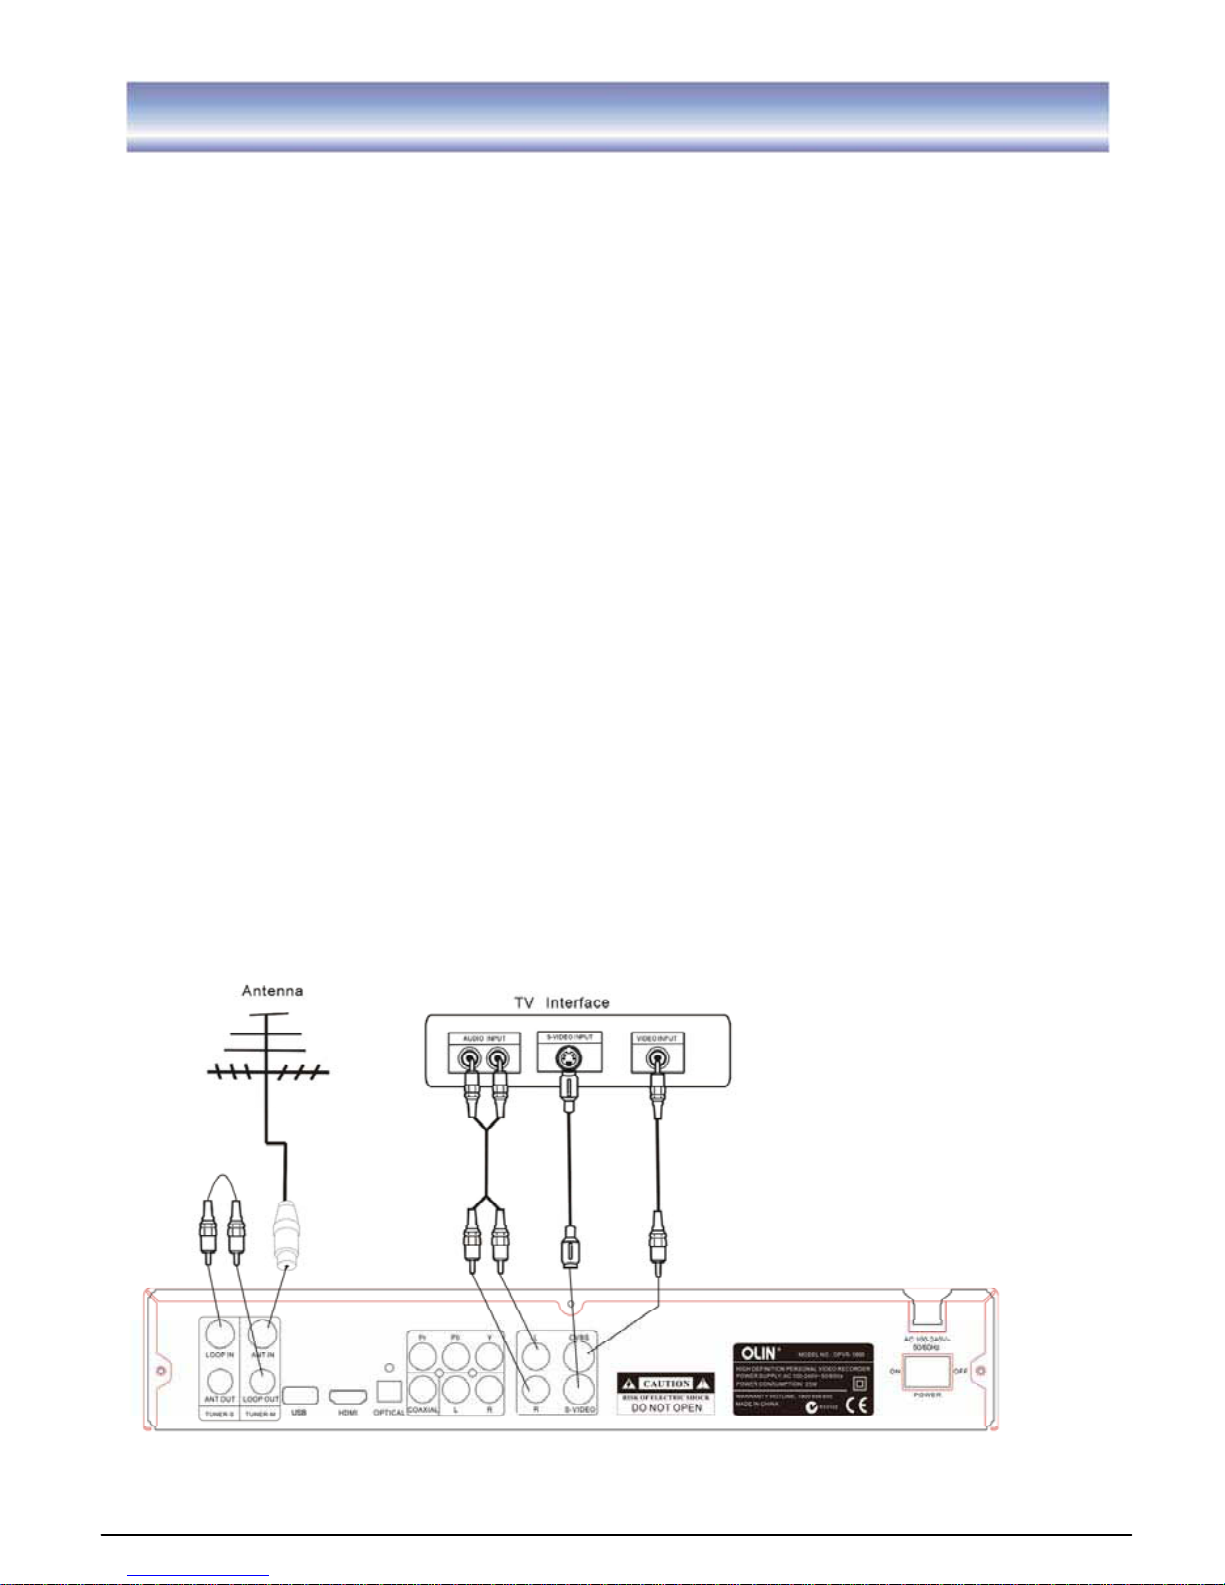
Connect the unit via Audio/CVBS/S-VIDEO
(for standard definition viewing)
1. Connect the antenna with ANT IN of the unit.
2. Connect the RF loop cable via LOOP IN and LOOP OUT.
3. Connect the unit via CVBS/ S-Video/Audio L/R.
9
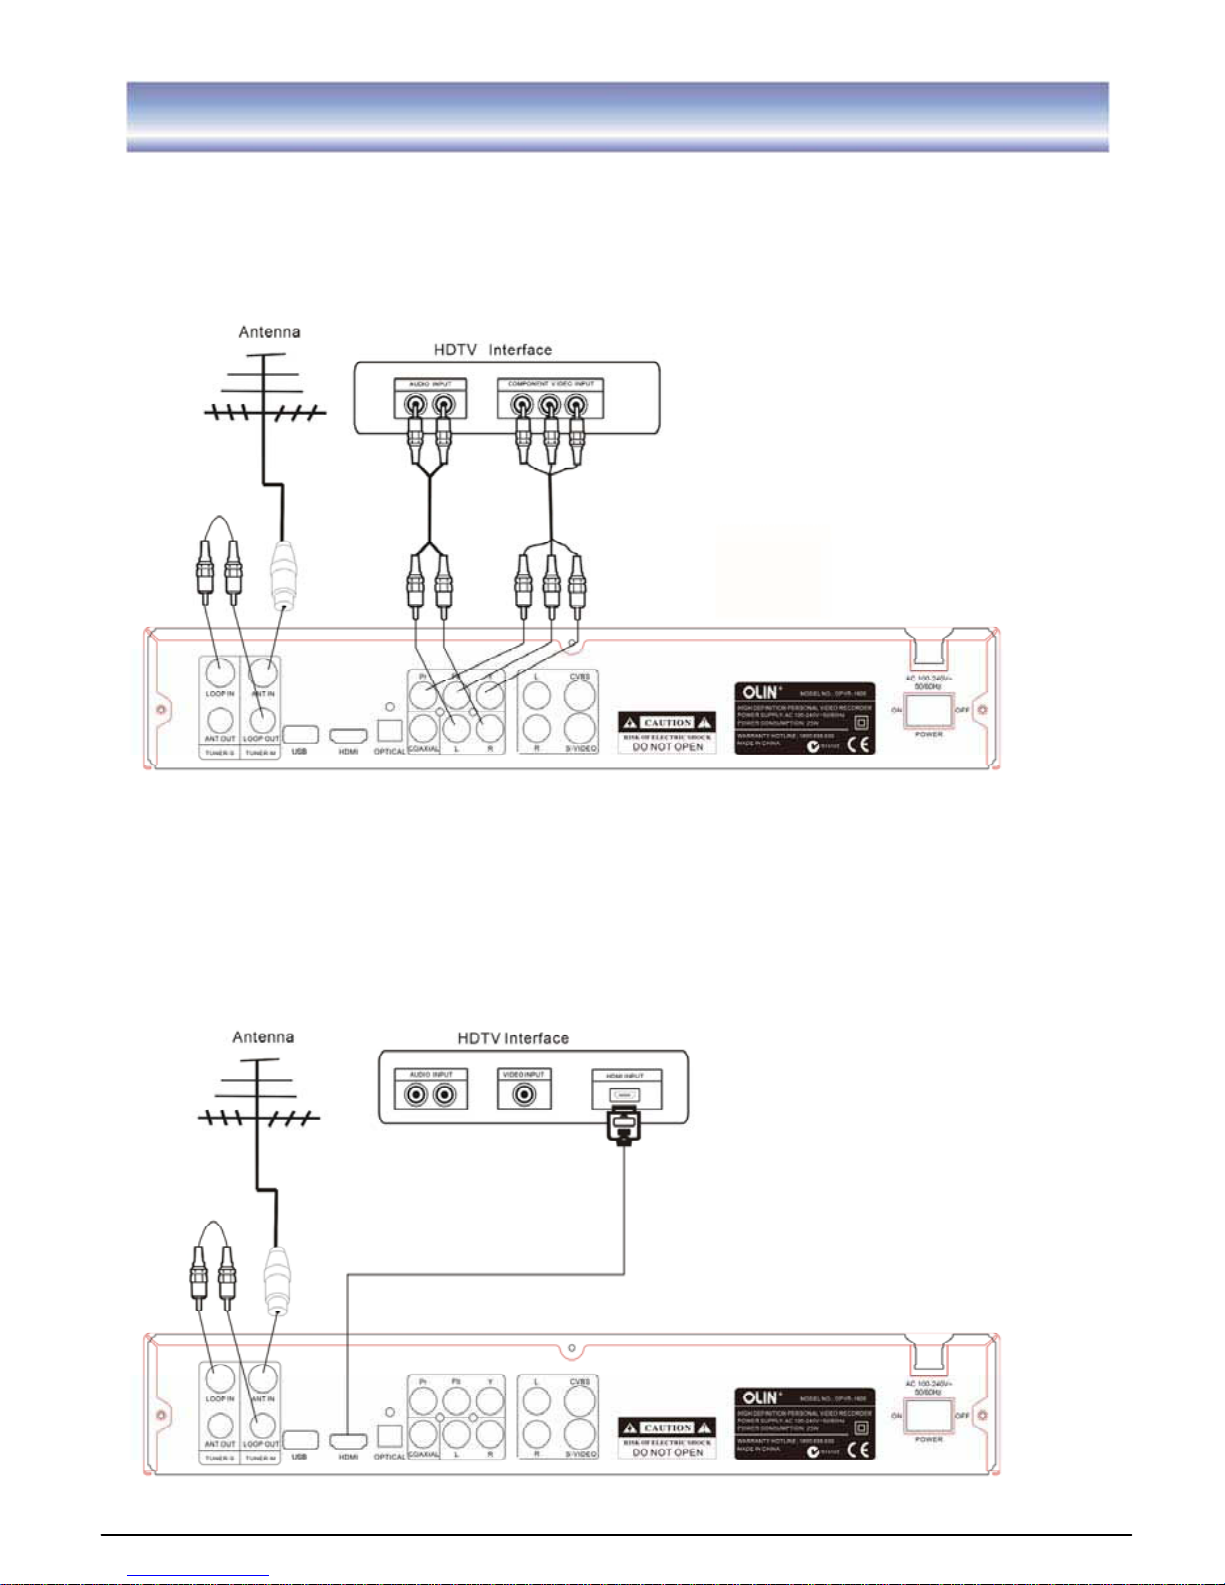
Connecting to Equipments
Connect the unit via YPbPr output and Audio output
(for high definition viewing)
1. Connect the antenna with ANT IN of the unit.
2. Connect the RF loop cable via LOOP IN and LOOP OUT.
3. Connect the unit to TV via YPbPr cable as the following figure.
Connect the unit via HDMI output (for high definition viewing)
1. Connect the antenna with ANT IN of the unit.
2. Connect the RF loop cable via LOOP IN and LOOP OUT.
3. Connect the unit to TV via HDMI Cable as the following figure.
 Loading...