

Page 1
quick start & user guide
Om205
Media Player
This manual contains information protected by copyright law. No part of this document may be used or
reproduced in any form or by any means, or stored in a database / retrieval system without prior written
permission from Linophir International Pty Ltd. The information of this manual is base on the current version of
the product; we reserve the right for change without prior notice. All brand names in this manual are the
property of their respective owners.
01
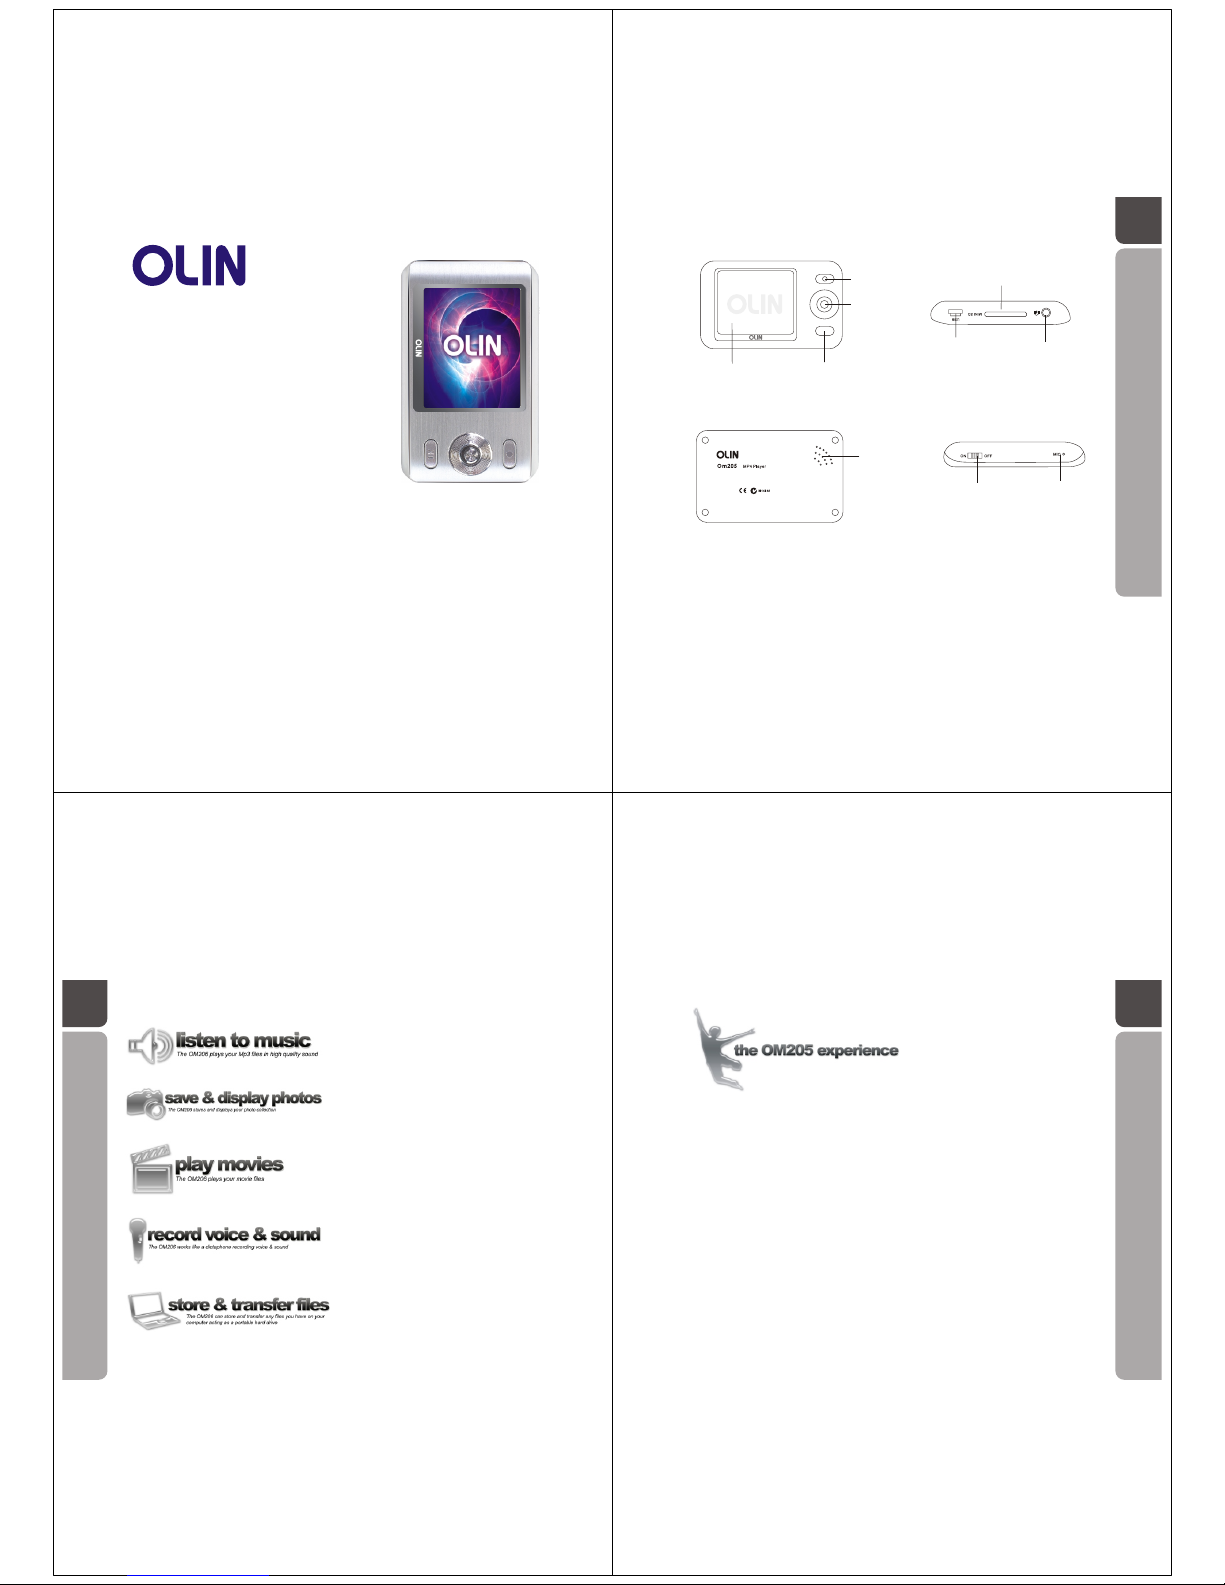
REC key
Five-direction
Key
Power On/Off/play key
Display
MINI SD slot
USB port
Earphone port
Built-in
speaker
Power switch ON/OFF
REC hole
02
The OM205 Media Player works as an external hard drive or storage device via
the USB port on your computer. Windows XP and Vista users will find the
moment they connect the player via the USB cable, the computer recognises a
new device and following a few steps the OM205 is installed.
Unlike other media players, the OM205 will not limit how you interact with the
device by insisting on specific software to communicate with the player when it
is connected to the computer.
The OM205 easily interfaces with your operating system, allowing you to " drag
and drop" your pre-existing music and video collection into its folder. Just like a
USB memory stick or an external hard drive, once the data has been placed in
the OM205 folder, the player can be disconnected from the USB port and your
portable music, video and file experience begins.
03
Page 2
04
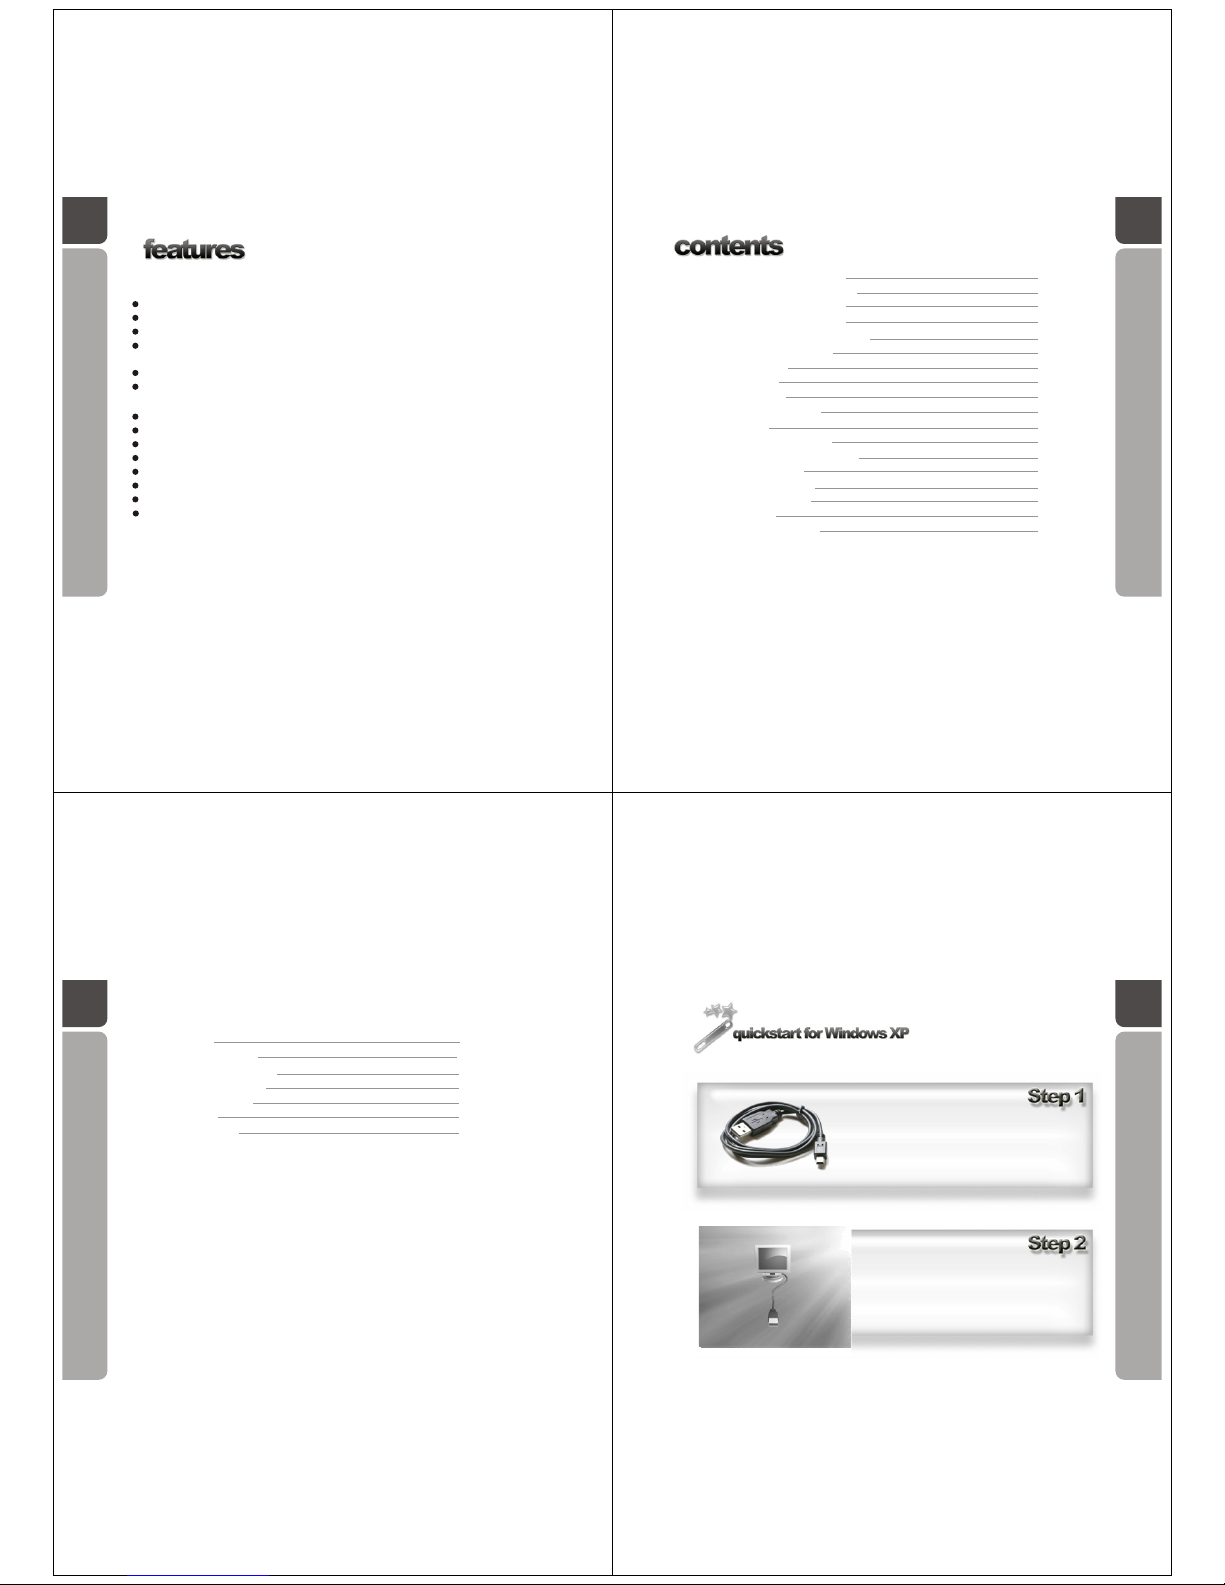
2.0"high resolution (220x176) high contrast TFT display.
External mini SD memory card compatibility up to 2GB.
Music playback.
Playback of ,FLAC,APE(only fast and normal),MPEG 1/2/2.5 Layer I/II/III and
WMA music files.
Video playback
Playback of MPEG4 (AVI) videos trans-coded from AVI, DAT, MPEG, RM, RMVB and
VOB formats.
Digital voice recording and playback.
Recording via a built-in microphone saved as WAV format stored on the player.
JPEG photo viewing with slideshow function.
E-book with background music playback. Bookmark function supported.
Built-in mini-game with background music playback.
Multi-lingual graphic user interface.
Preset equalizer effects (EQ) and 5-band user-defined graphic equalizer.
USB mass storage.
05
Quickstart for Windows XP page 7
Quickstart for Windows Vista page 9
Quickstart for Windows 98 page 11
Charging the media player page 12
Adding files to the media player page 14
Power on/off the player page 15
Playing an Mp3 page 16
Display Lyrics page 17
Display Photos page 19
Playing the mini game page 21
Play a movie page 22
Record voice and sound page 24
Play voice & sound recording page 26
Reading an e-book page 27
Bookmark an e-book page 29
Loading a bookmark page 30
Deleting a file page 31
Keylocking the player page 32
System settings page 34
Using the .avi converter page 35
Installing the .avi converter page 36
Using the .avi converter page 42
Expanding the memory page 49
Troubleshooting page 51
Safety precautions page 52
06
07
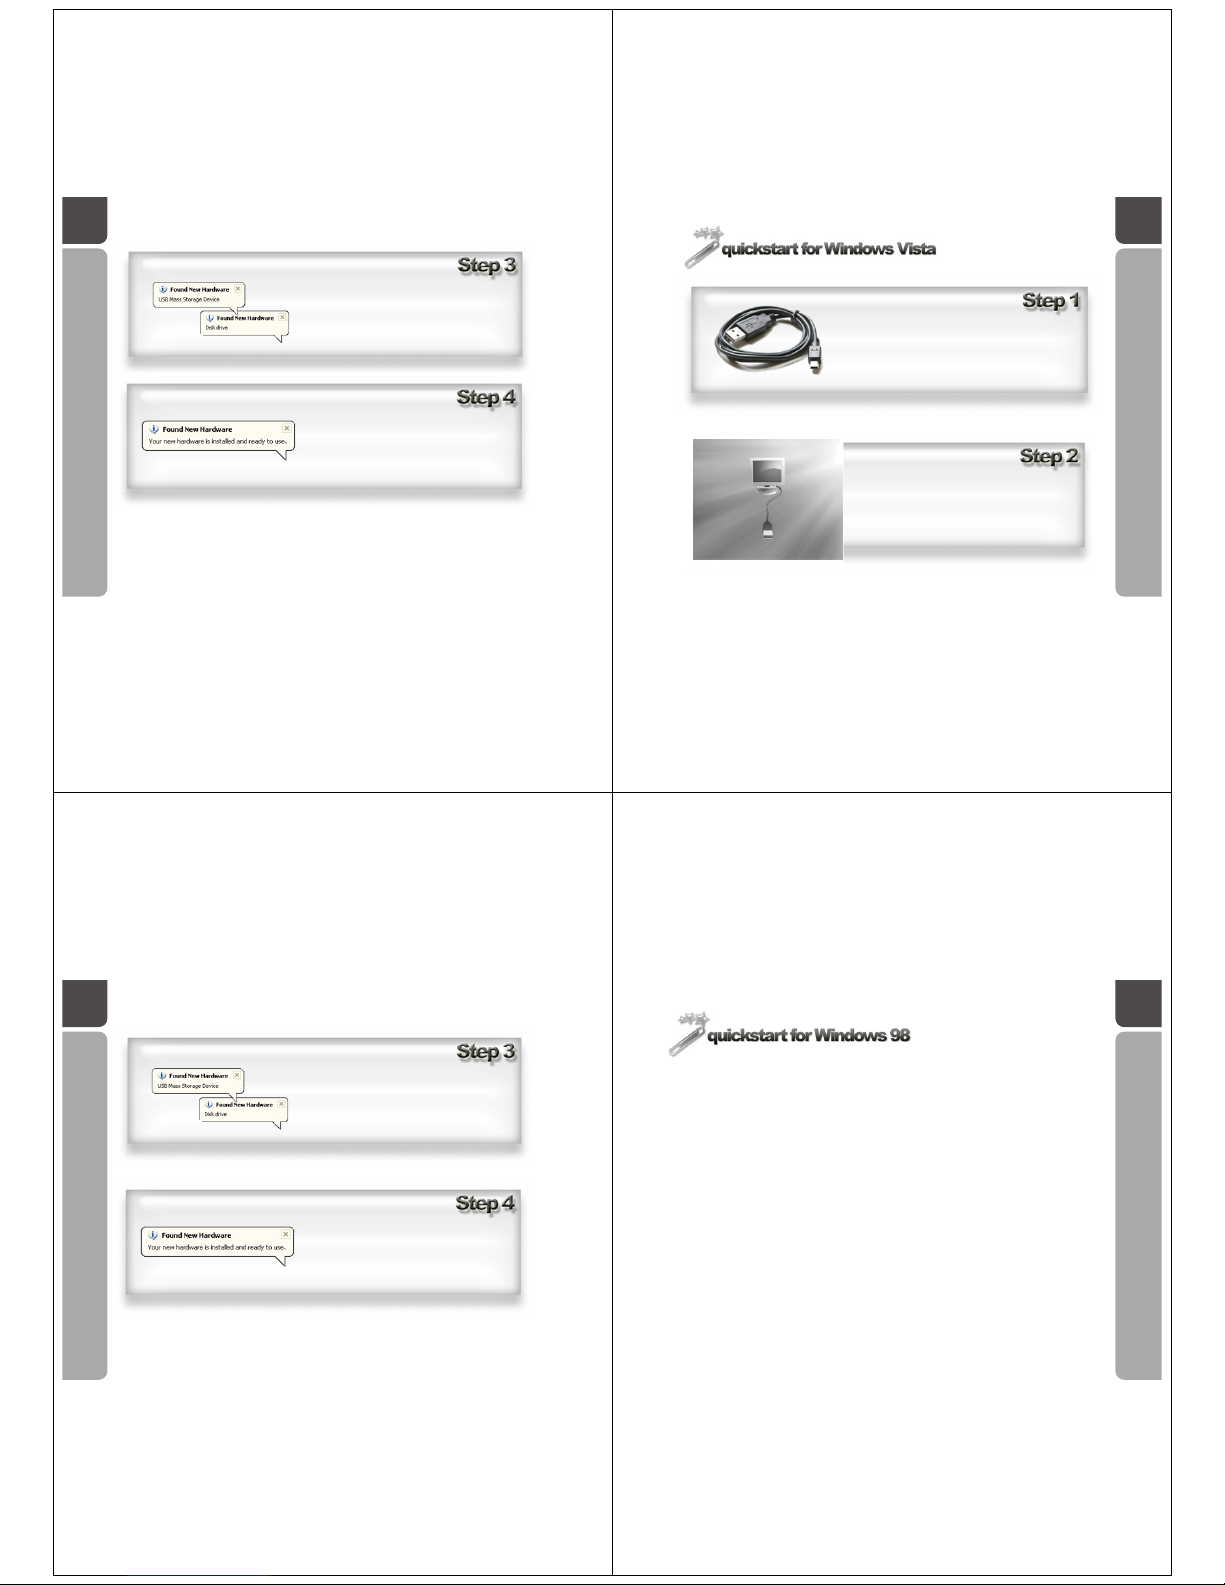
A guide to installing your OM205
Media Player on a computer running
Windows XP.
Connect the USB cable from the bottom of
the OM205 Media Player into the USB
port on your computer
The OM205 Media Player will identify the
connection with the computer by displaying
this screen.
Page 3
08
Windows XP will display a series
messages at the bottom your computer
screen. This will continue until Windows
XP displays "Your new hardware is
installed and ready to use"
Your OM205 Media Player is now installed
Note: to prevent machine malfunction, please always use PC's 'Safely Remove
Hardware' function to terminate USB connection.
09
A guide to installing your OM205
Media Player on a computer
running Windows Vista.
Connect the USB cable from the bottom of
the OM205 Media Player into the USB
port on your computer
The OM205 Media Player will identify the
connection with the computer by displaying
this screen.
10
Windows vista will display a series
messages at the bottom your computer
screen. This will continue until Windows
XP displays "Your new hardware is
installed and ready to use"
Your OM205 Media Player is now installed
11
A guide to installing your OM205
Media Player on a computer
running Windows 98.
Customers who use Window 98 Operating System, please contact
Linophir support team for further instruction and driver download.
Note: to prevent machine malfunction, please always use PC's 'Safely Remove
Hardware' function to terminate USB connection.
Page 4
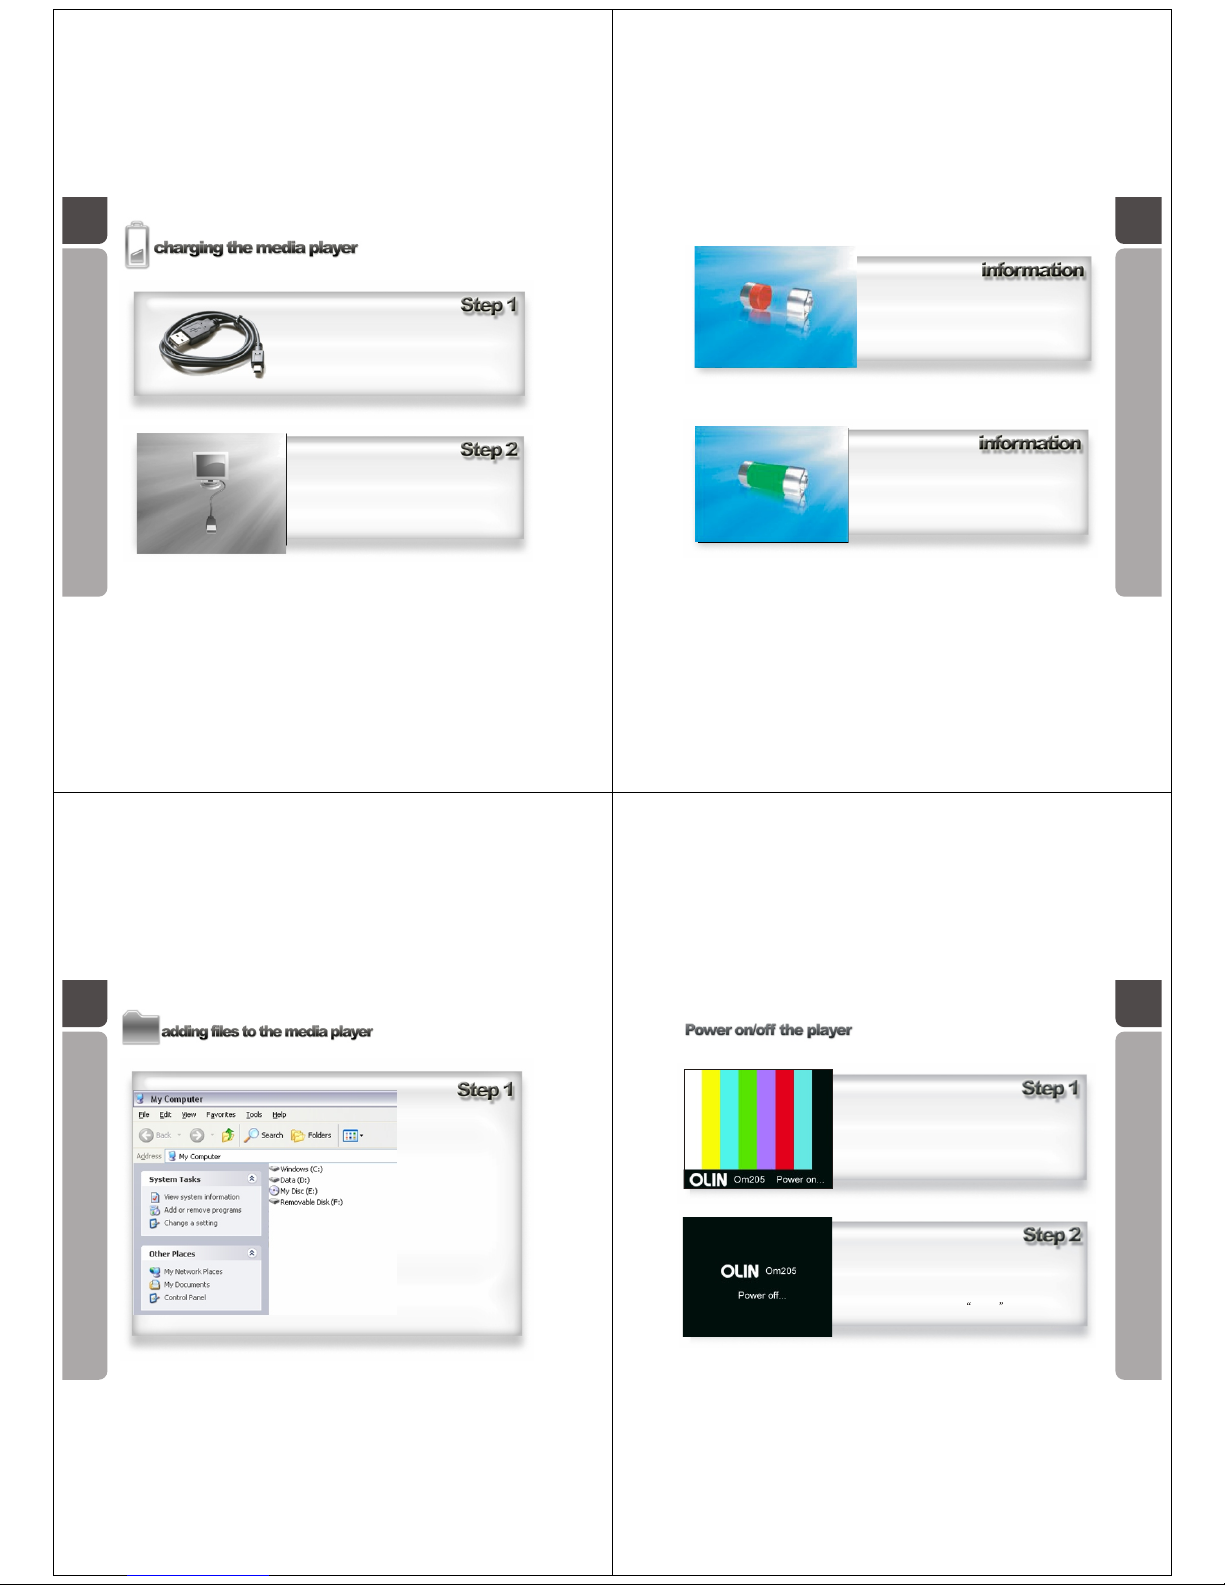
A guide in how to charge the
OM205 Media Player.
Connect the USB cable from the bottom of the
OM205 Media Player and into the USB port on
your computer.
The OM205 Media Player will identify it has
been plugged into a computer by displaying
this picture on its screen. Whilst your player is
connected to your computer, it will charge the
battery.
12 13
The OM205 can be charged from any USB
port without prior installation on the
computers operating system. This screen
will show when the OM205 Media Player is
charging in this manner.
The OM205 Media Player will display this
screen when the battery is fully charged.
14
A guide in adding files to the
OM205 Media Player.
The OM205 Media Player will
be displayed within "My
Computer " .
To open the
OM205 folder, double click on
the removable disc icon.
Drag and drop the files you
wish to store on the OM205
Media Player into their
corresponding sub-folder.
It will appear as a
removable drive.
15
Power on
Push the Power Switch key to ON position.
Press and hold the PLAY key until the screen
shows the start-up display.
Power off
Press and hold the PLAY key until the screen
shows the power-off display.
Push the Power Switch key to OFF position.
This step will prevent accidental operation,
and can also be used as a reset function.
Page 5
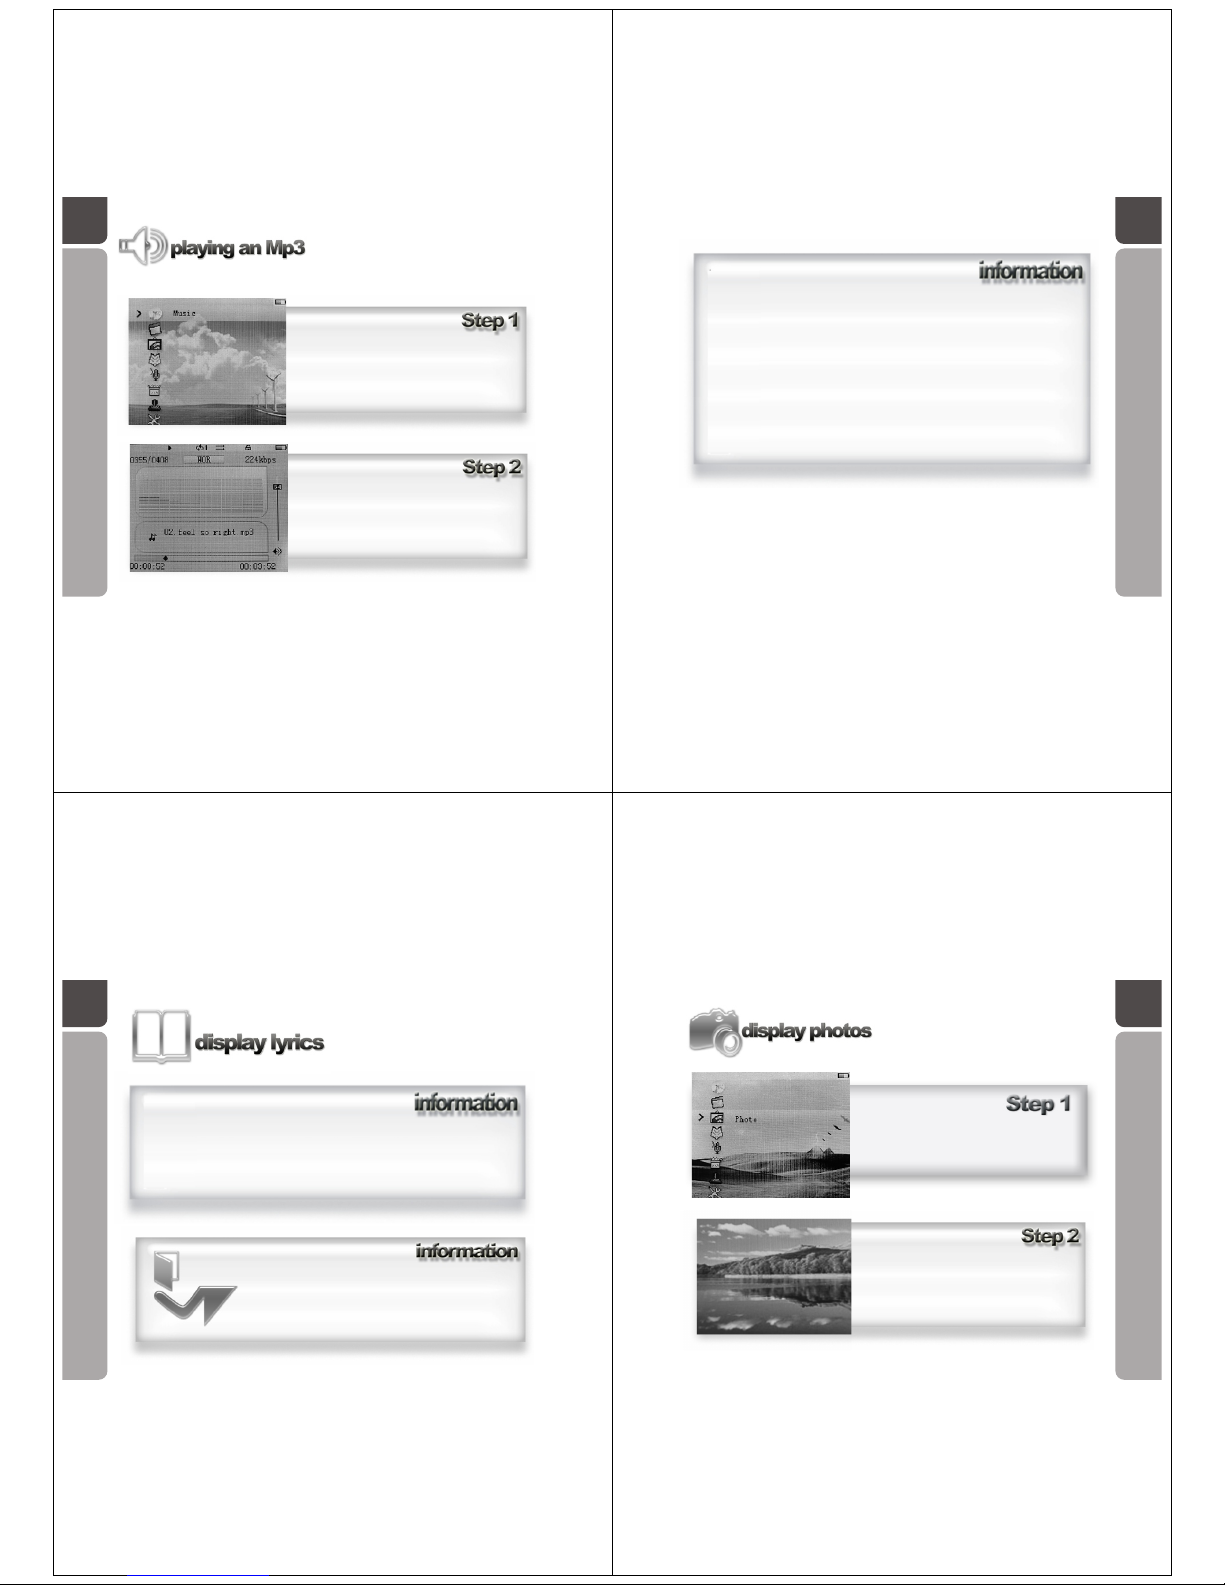
16
A guide in how to play an Mp3 file on the
OM205 media player
In the main menu, use the Five-direction Key to
navigate, scroll to Music icon, press the key
downwards to enter the Music menu.
The OM205 Media Player will begin to play the
first song stored within the OM205 Media
Player folder.
17
Important notes: Whilst an MP3 file is playing, you can use the Five-direction Key to
navigate through your music collection; or to return to the main menu and operate
other function such as Game, Text and setting.
The music can only be stopped under the music menu(pause key); or when you activate
Video or Record function.
Whilst playing the music
How to use the Five-direction Key
Push rightwards - go to the next track
Push rightwards & hold - fast forward
Push leftwards - go to the previous track
Push leftwards & hold - rewind
Push upwards - turn up the volume
Push downwards - turn down the volume
Press downwards - enter/ exit the collection folder (Explorer/Navigation)
Press downwards & hold - return to main menu
How to use the PLAY key (pause key)
Press it in playing state to stop the music playback
Press it in stop state to start the music playback
18
A guide in how to display lyrics on the
screen of the OM205 Media Player
whilst an Mp3 file is playing.
This player supports synchronous lyrics (LRC format) display. If there is a
corresponding lyrics file, it will display on the screen automatically whilst the
music is playing.
The lyrics feature is only recommended for advanced users.
To enable it on the player, an .lrc file containing the lyrics
needs to be saved under the same folder of the matching
MP3 file, and under the same name. For example, the
matching lyrics file for Angel.mp3 should be named Angel.lrc.
19
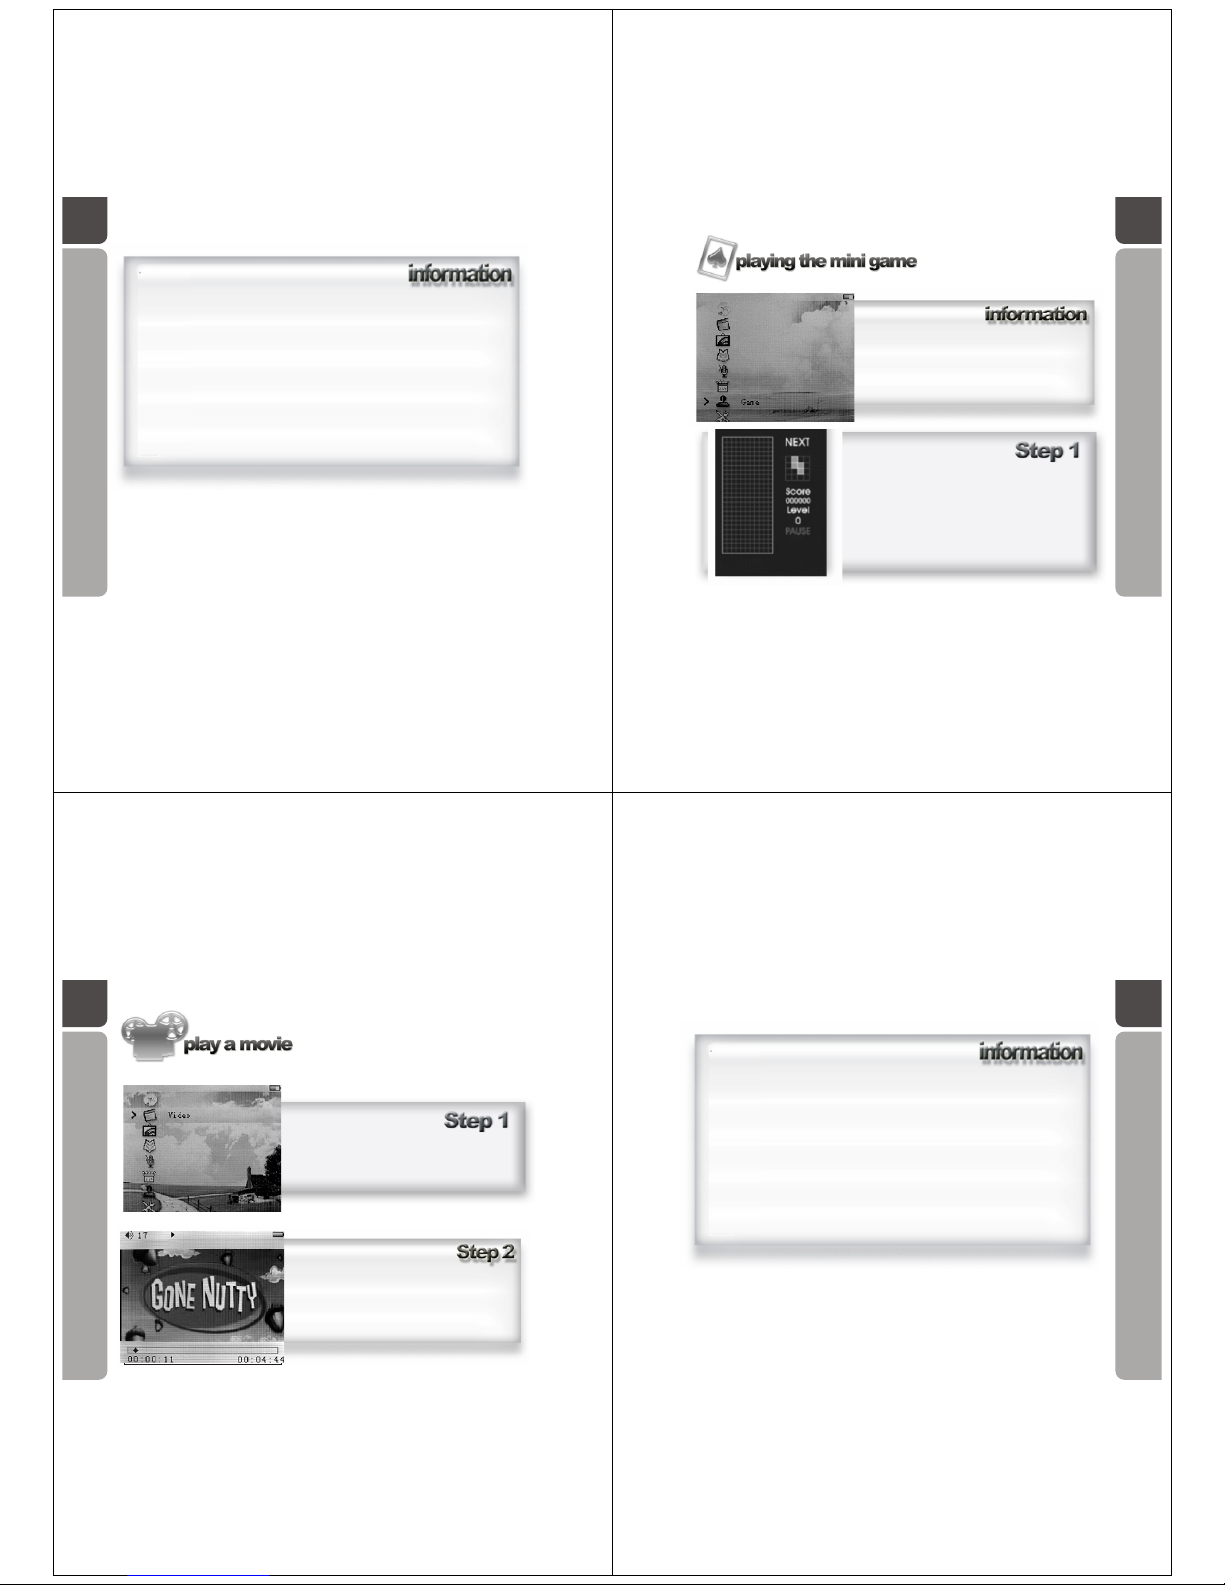
A guide in how to display your .jpg photo
images on the screen of the OM205
Media Player
In the main menu, use the Five-direction
Key to navigate, scroll to Photo icon, press
the key downwards to enter the Photo menu.
Using the Five-direction Key to navigate
among your photo collection, press it
downwards to make your selection, the
photo will then display on the screen.
Page 6
20
Whilst viewing the photo
How to use the Five-direction Key
Push rightwards - go to the next photo
Push leftwards - go to the previous photo
Press downwards - enter/ exit the collection folder (Explorer/Navigation)
Press downwards and hold - return to main menu
How to use the PLAY key (pause key).
Press it to begin the photo slideshow, press it again to stop
21
A guide in controlling the pre loaded
mini game
Press PLAY key to start the game, press it again to
pause the game.
Push the Five-direction Key upwards to rotate the block;
push it downwards to speed up the falling speed; or
push it downwards & hold to make the block fall
immediately.
Push the Five-direction Key leftwards or rightwards to
move the block horizontally. )
In the main menu, use the Five-direction Key to
navigate, scroll to Game icon, press the key
downwards to enter the Game menu. (Note: position
the player vertical for better view of game's interface)
22
A guide in playing .avi format video files on your
OM205 Media Player.
Note: It is recommended that users of this feature
have an understanding of video file size conversion
and understand that .avi format is supported on this
Media Player.
In the main menu, use the Five-direction Key to
navigate, scroll to Video icon, press the key
downwards to enter the Video/Movie menu.
Using the Five-direction Key to navigate among
your video collection, press it downwards to make
your selection, the video will then start to play.
23
Whilst playing the video
How to use the Five-direction Key
Push rightwards - go to the next clip
Push rightwards & hold - fast forward
Push leftwards - go to the previous clip
Push leftwards & hold - rewind
Push upwards - turn up the volume
Push downwards- turn down the volume
Press downwards - enter/ exit the collection folder (Explorer/Navigation)
Press downwards and hold - return to main menu
How to use the PLAY key (pause key)
Press it in playing state to stop the video playback
Press it in stop state to start the video playback
Page 7
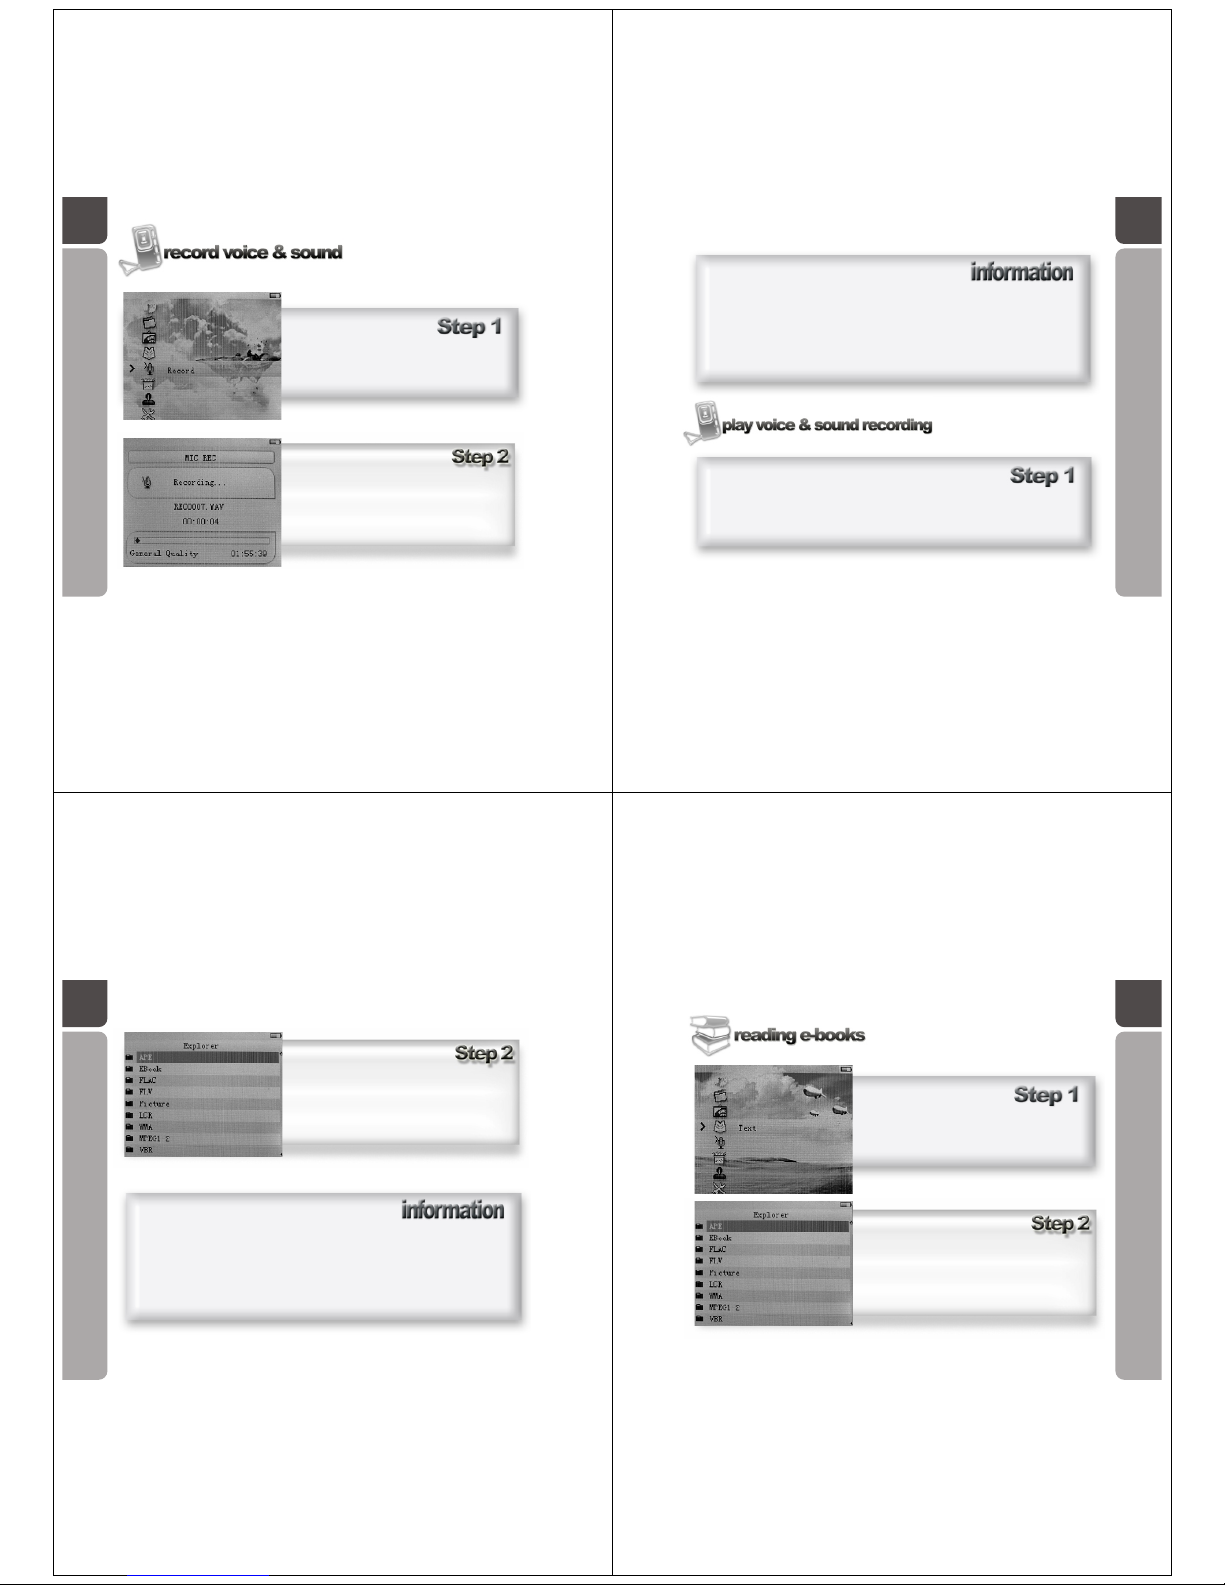
A guide in recording sound and
your voice on the hard drive of the
OM205 Media Player
In the main menu, use the Five-direction Key to
navigate, scroll to Record icon, press the key
downwards to enter the Record menu.
Press REC key to commence recording
Press REC key to pause and restart recording
Press & hold Five-direction key downwards for
3 seconds to stop recording and return to the
main menu. The file will be saved
automatically.
24 25
The microphone is located on the top of the player (see page 01). For best
recording results, do not speak directly into the microphone as the sound may distort.
The
OM205 Media Player microphone is designed to capture all types of sound with the
best possible quality.
A guide in playing back
a pre recorded .wav file
Using the keypad, enter the Music menu. Your recorded file will be played under this
menu.
26
It is recommended when making a recording; remember the file name. This will
assist when finding the file to playback.
Using the Five-direction Key to enter the Explorer/
Navigation interface, scroll down to your recorded
files or the folder they are saved. Press the Fivedirection Key downwards to confirm your
selection.
27
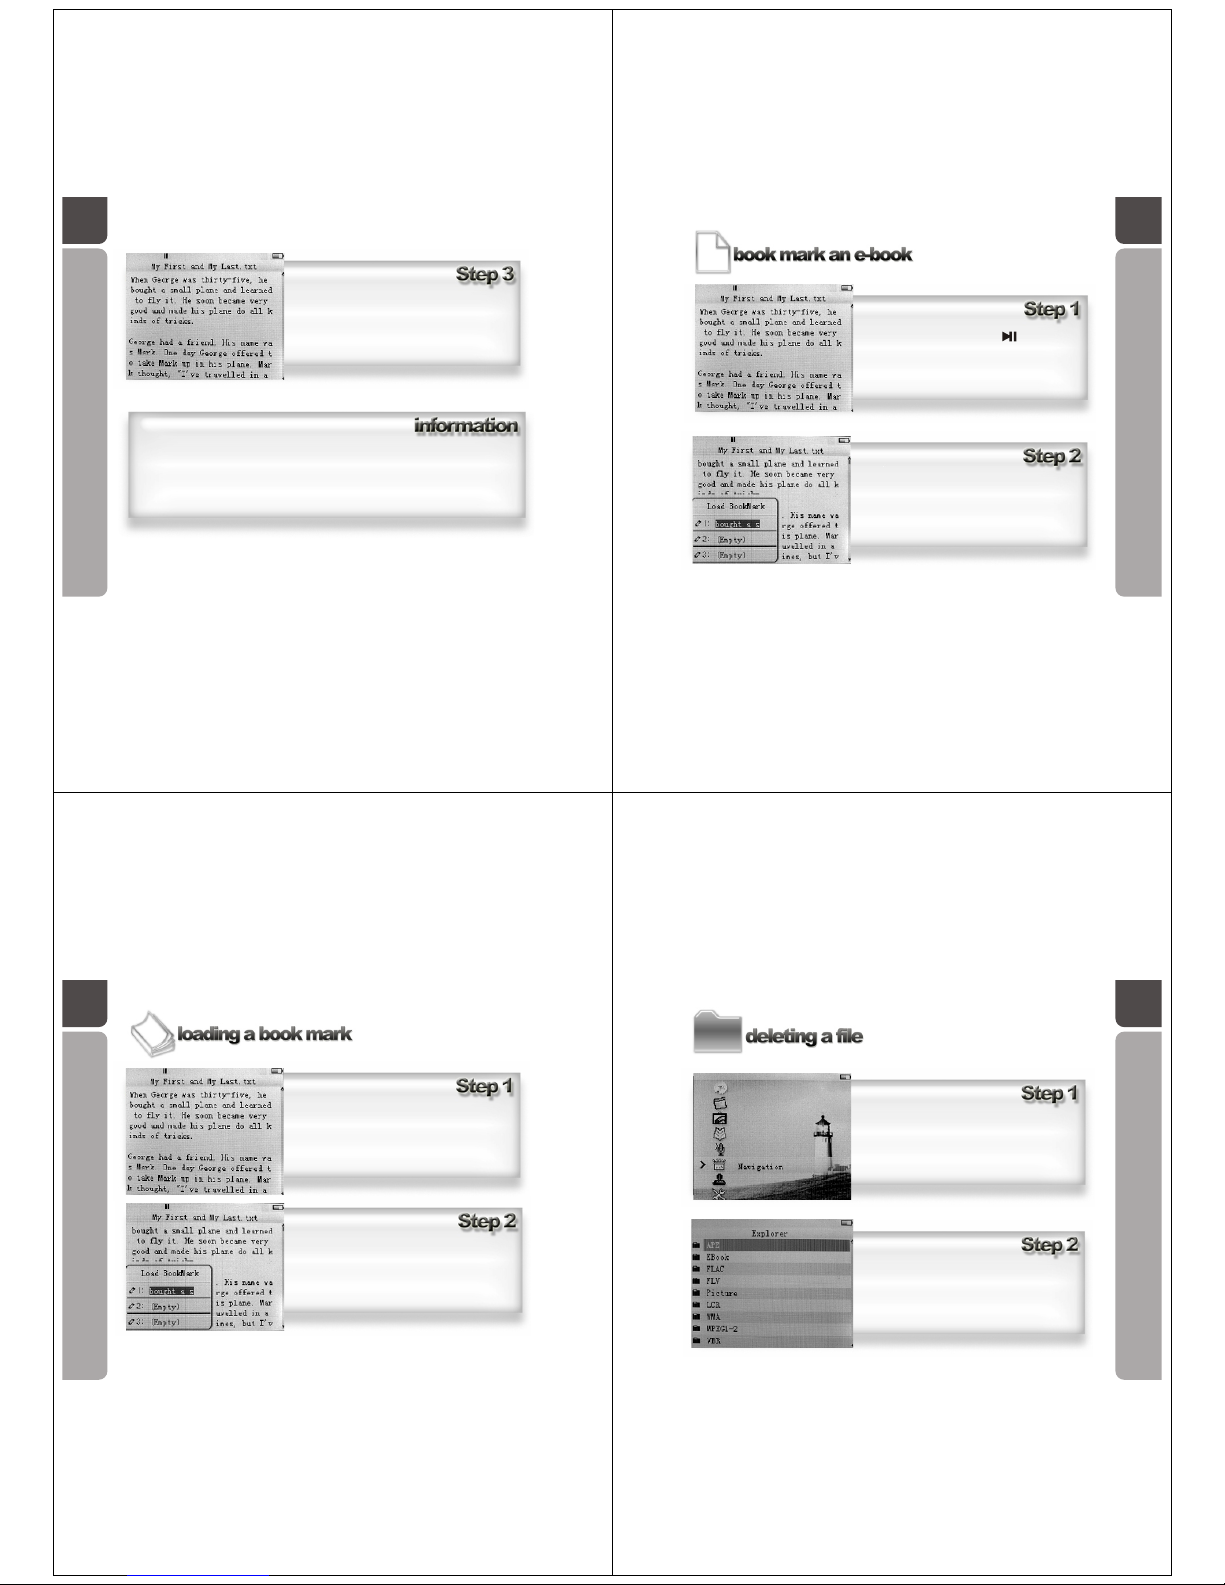
A guide in reading .txt file format on the
OM205 Media Player
In the main menu, use the Five-direction Key
to navigate, scroll to Text icon, press the key
downwards to enter the Text menu.
Using the Five-direction Key to enter the Explorer/
Navigation interface, scroll down to your text(.txt
format) files or the folder they are saved. Press the
Five-direction Key downwards to confirm your
selection.
Page 8
28
Using the keypad, Press upwards or downwards
of Five-direction key to scroll aline at a time
.Press Rightwards or leftwards upwards of Five
-direction key to scroll a page at a time
How to auto browse (Automatic scrolling) the text:
While reading the text, press and hold REC key
The text will scroll automatically according the speed setting set in the Settings menu.
Shortly press REC key again will stop the auto browsing.
29
A guide in book marking a place in
your .txt file for later reading
Whilst reading an e-book, press to pen the
Save BookMark window.
Select the any one of the three bookmark
positions by pushing upwards or downwards of
Five-direction Key.
Then press it downwards to confirm your book
mark position.
30
Select the bookmark position you wish to load by
pushing upwards or downwards of Five-direction Key.
Then press it downwards to confirm your selection.
A guide in finding a bookmark
left on your .txt file
After loading a text e-book, shortly press REC key
to open the Load Book Mark window.
Note: the player can only bookmark one text document at any one time. When a bookmark
has been saved in a text document, the bookmarks record saved on other documents will be cancelled.
31
A guide in deleting a file from your
OM205 Media Player
In the main menu, use the Five-direction Key
to navigate, scroll to Navigation icon, press
the key downwards to enter the
Navigation/Explorer menu.
When you are inside the Navigation/Explorer
menu, use the Five-direction Key to navigate,
scroll to the file you wish to delete. Press
REC key to call out the delete window.
Page 9
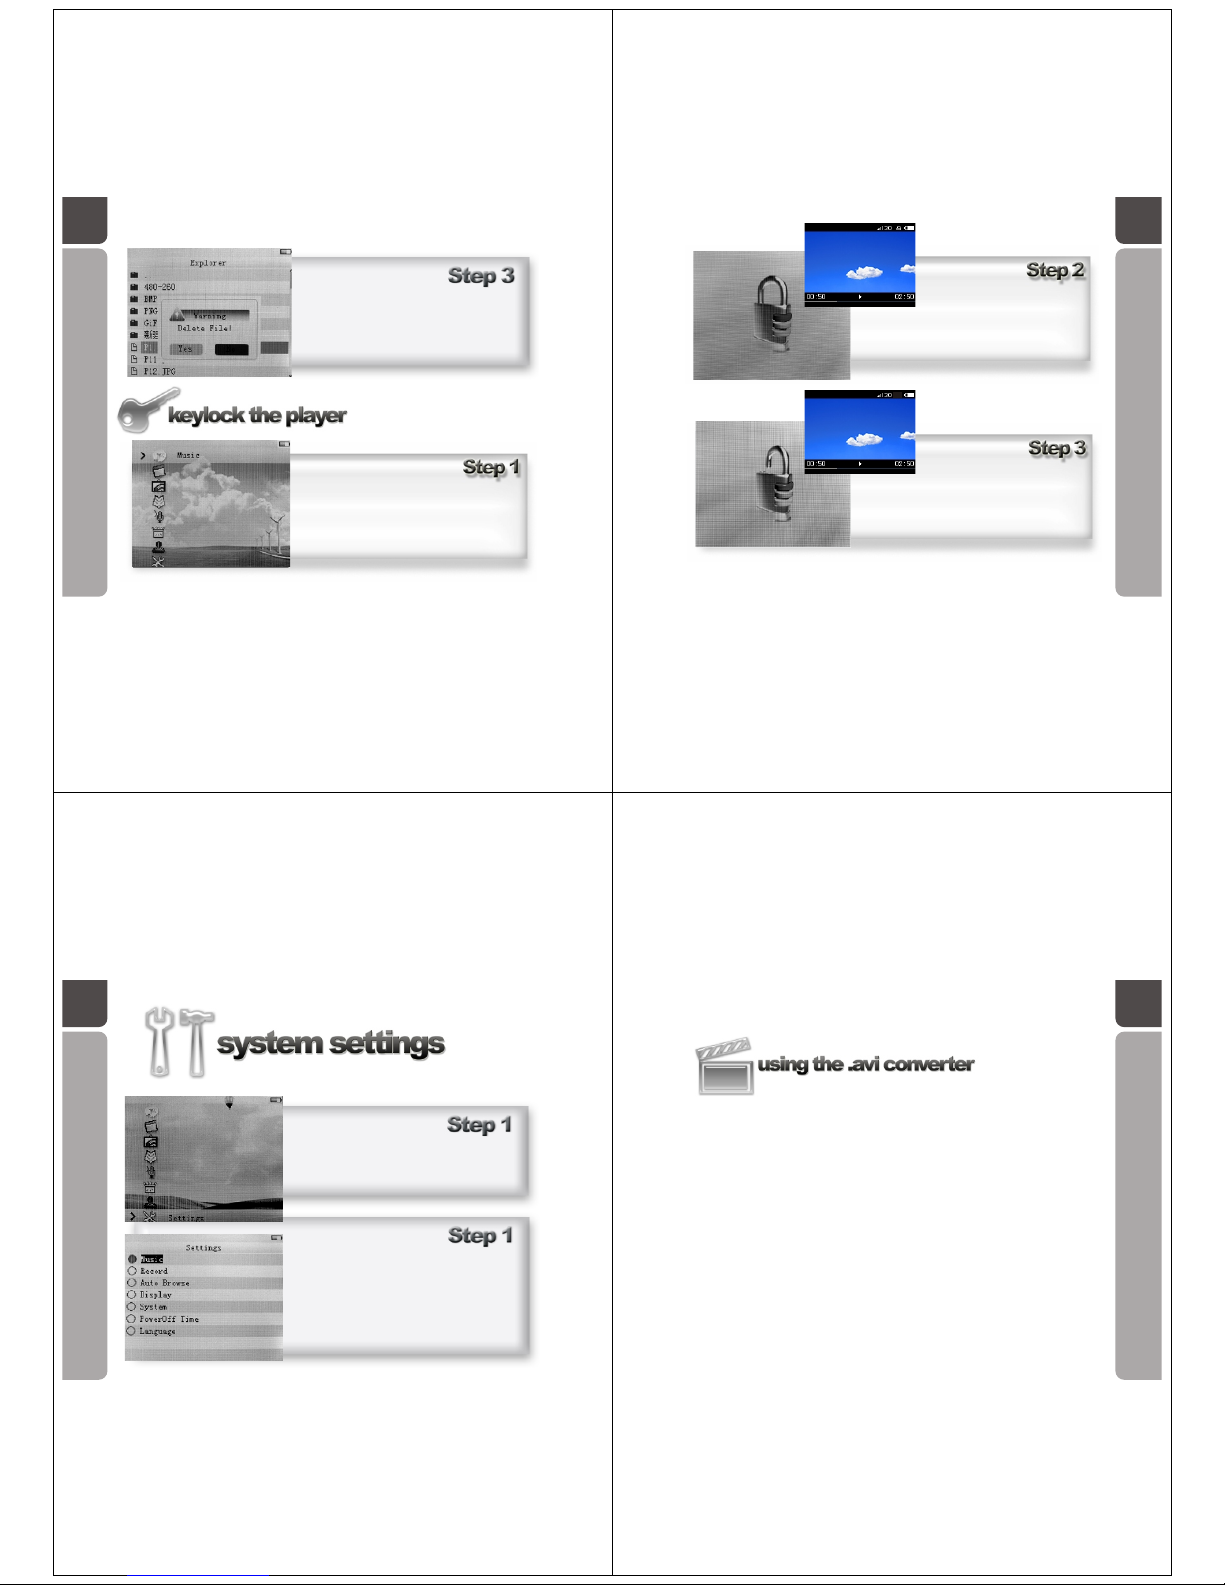
A guide in locking the keypad of your
OM205 Media Player
Push the Five-direction Key leftwards or
rightwards to highlight your selection, press
it downwards to confirm.
In any menu, press and hold both REC key
and PLAY key at the same time to activate the
Key lock function.
32 33
The screen will show that the keypad is locked
by displaying either of these screens
Press and hold both REC key and PLAY key at
the same time to deactivate the Key lock
function.
34
It is recommended that the system settings are only altered by
experienced users of the OM205 Media Player.
In the main menu, use the Five-direction Key to
navigate, scroll to Setting icon, press the key
downwards to enter the Setting menu.
There are 7 categories: Music, Record, Auto Browse,
Display, System, Power off Time and Language.
Each category contains different parameter setting.
Under each setting, use the Five-direction Key to
highlight your choice, press it downwards to confirm
the selection.
Press and hold the Five-direction Key to exit this
menu.
35
The disc supplied with your OM205 Media Player contains a tool that converts most
video files into .avi file format. Always use the .avi converter tool to convert your video
files before transferring them onto your player. The file must be in this format in order
to display on the screen of your media player.
Page 10
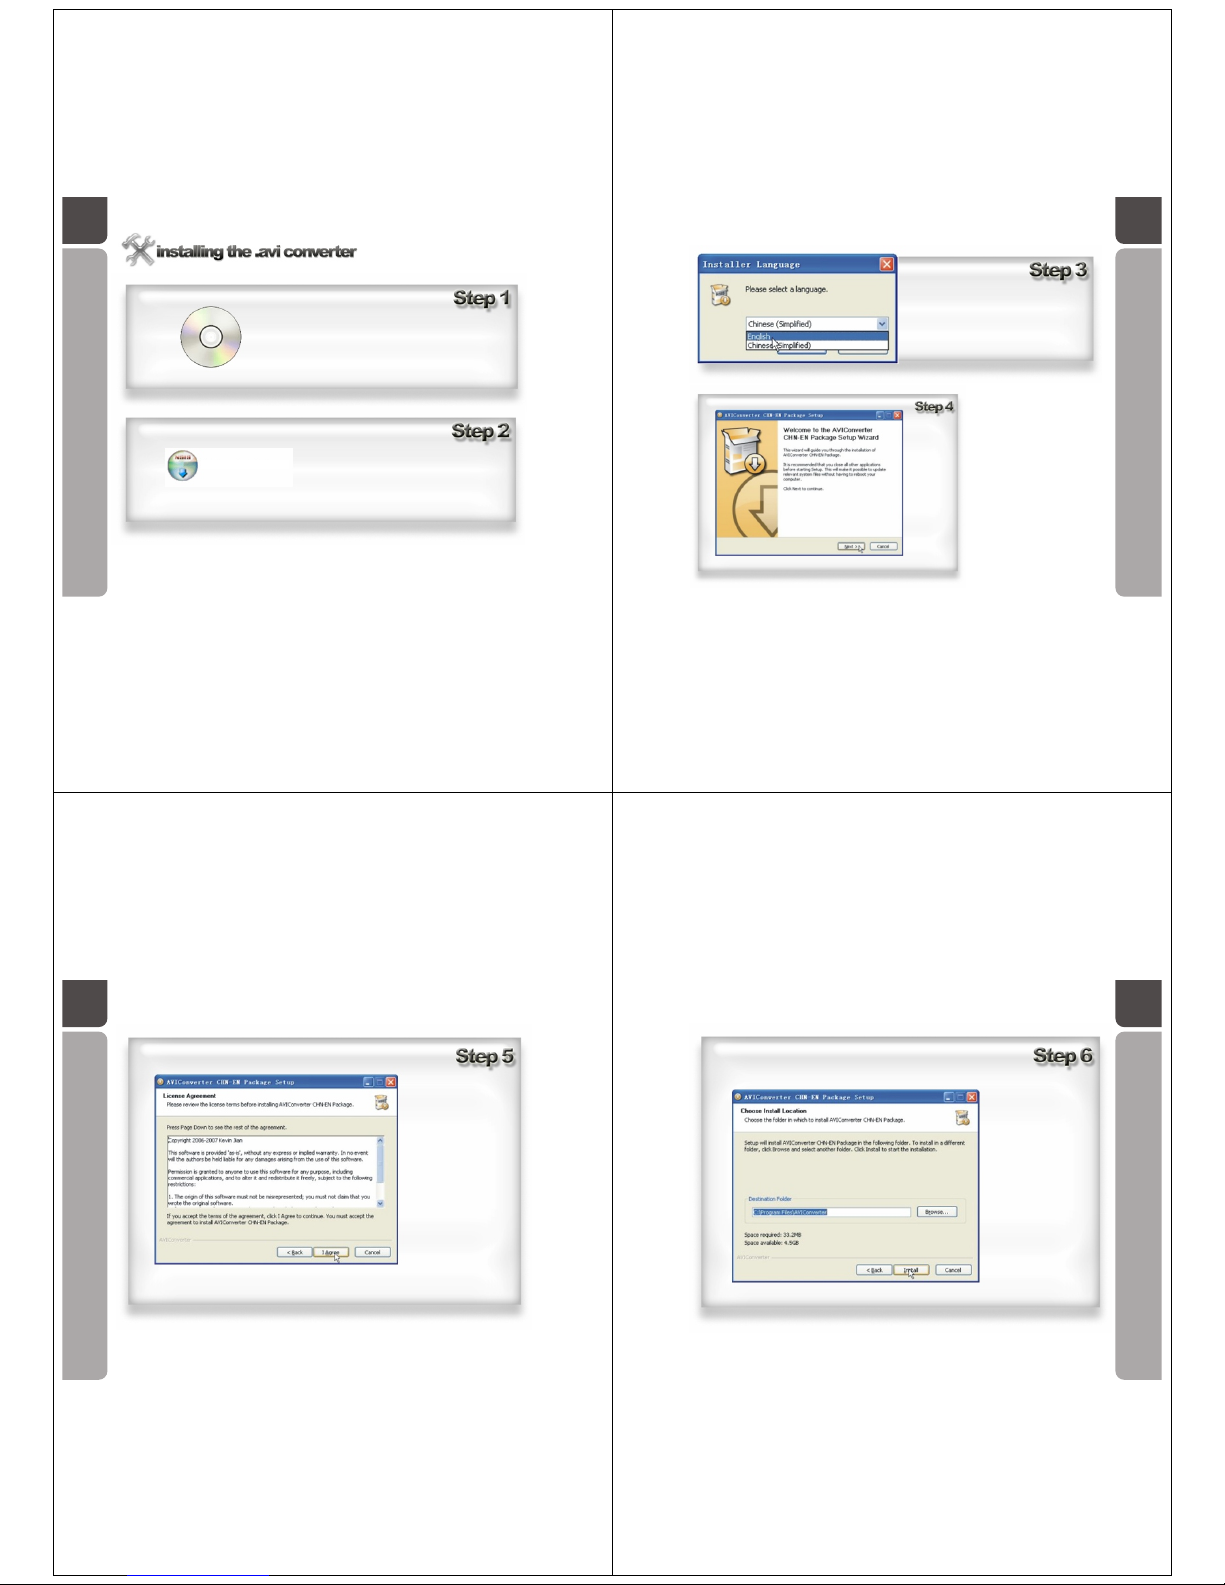
36
A guide in installing the .avi
converter tool on your computer
Insert the OM205 Media Player installation disc in
your computer disc drive
Open the files on the CD in My Computer then
open the folder named " AVI "
Double click the icon called "AVIConverter " to
begin the installation process
AVIConverter V4.0.3.exe
37
When the window "Installer Language"
appears, use the pull down menu to
select English.
Select Next at the bottom
of the window
38
After reading the licence
agreement select I Agree
at the bottom of the
window
39
Select install at the
bottom of the screen.
Page 11
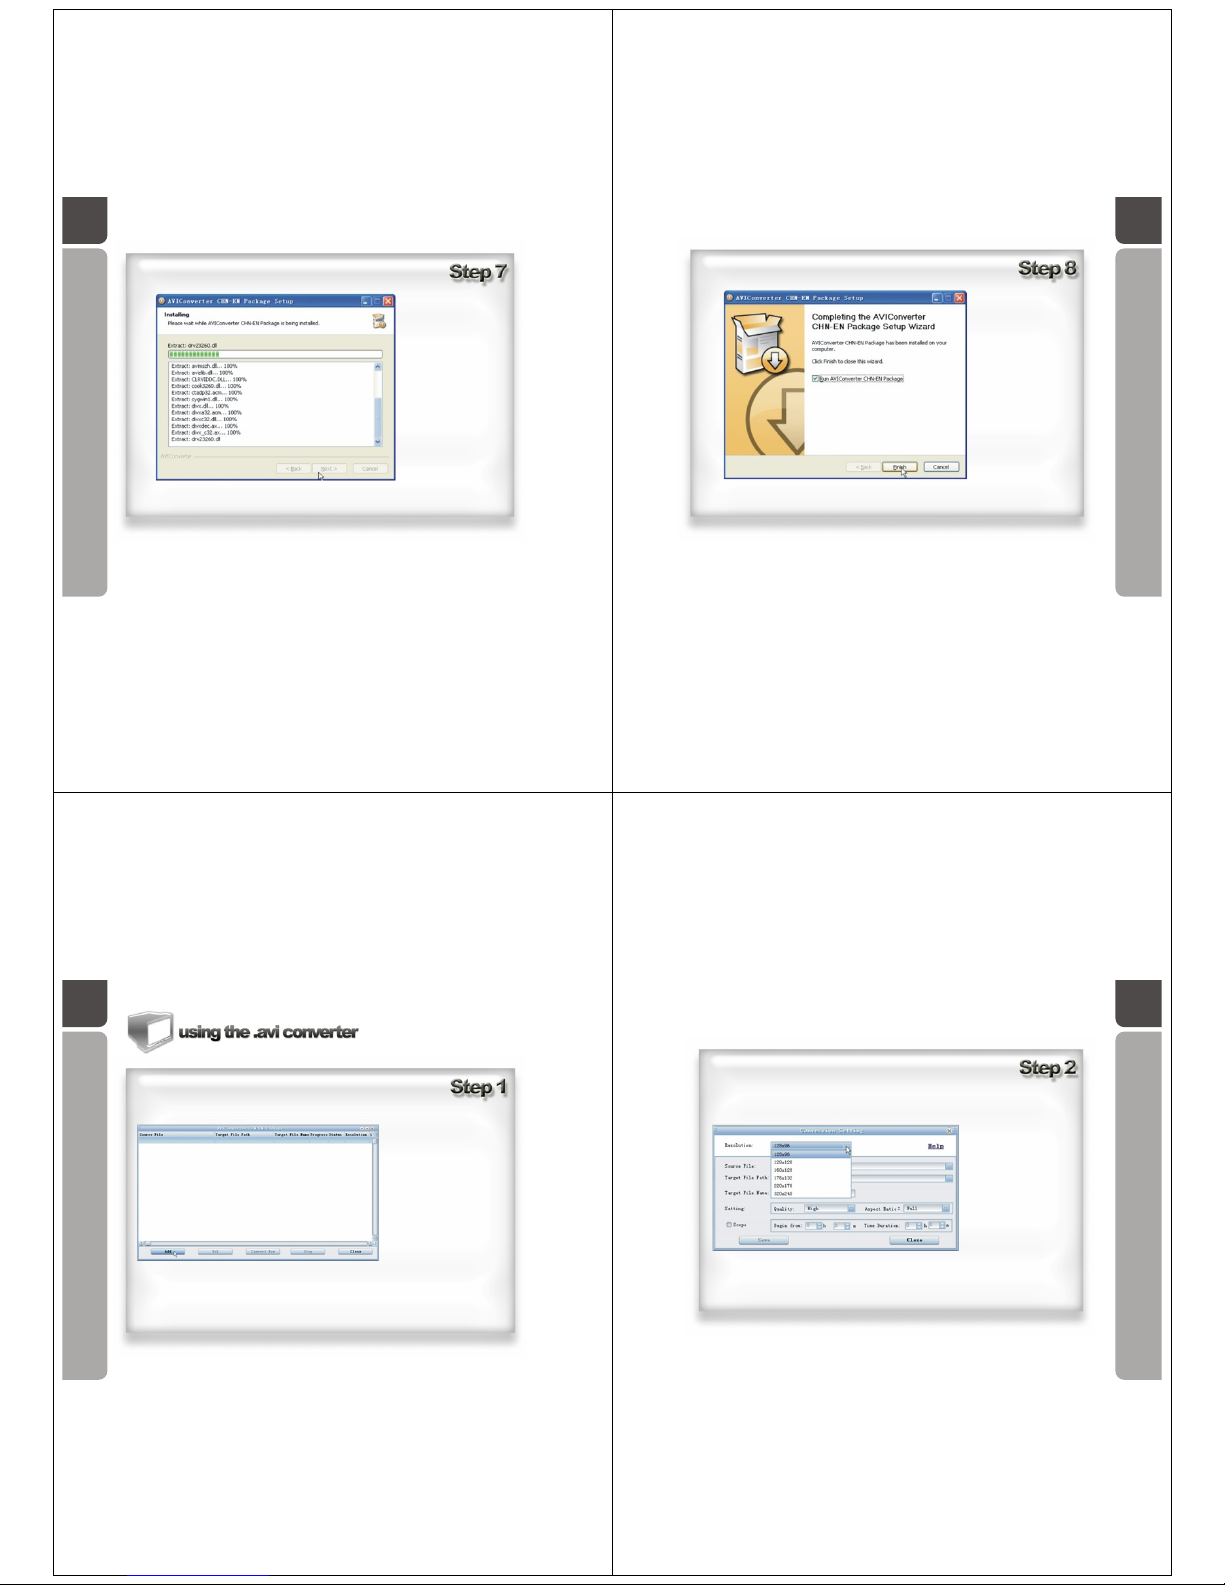
The program will now
be extracted and
installed on your
computer.
40 41
Click finish to complete
the software installation.
42
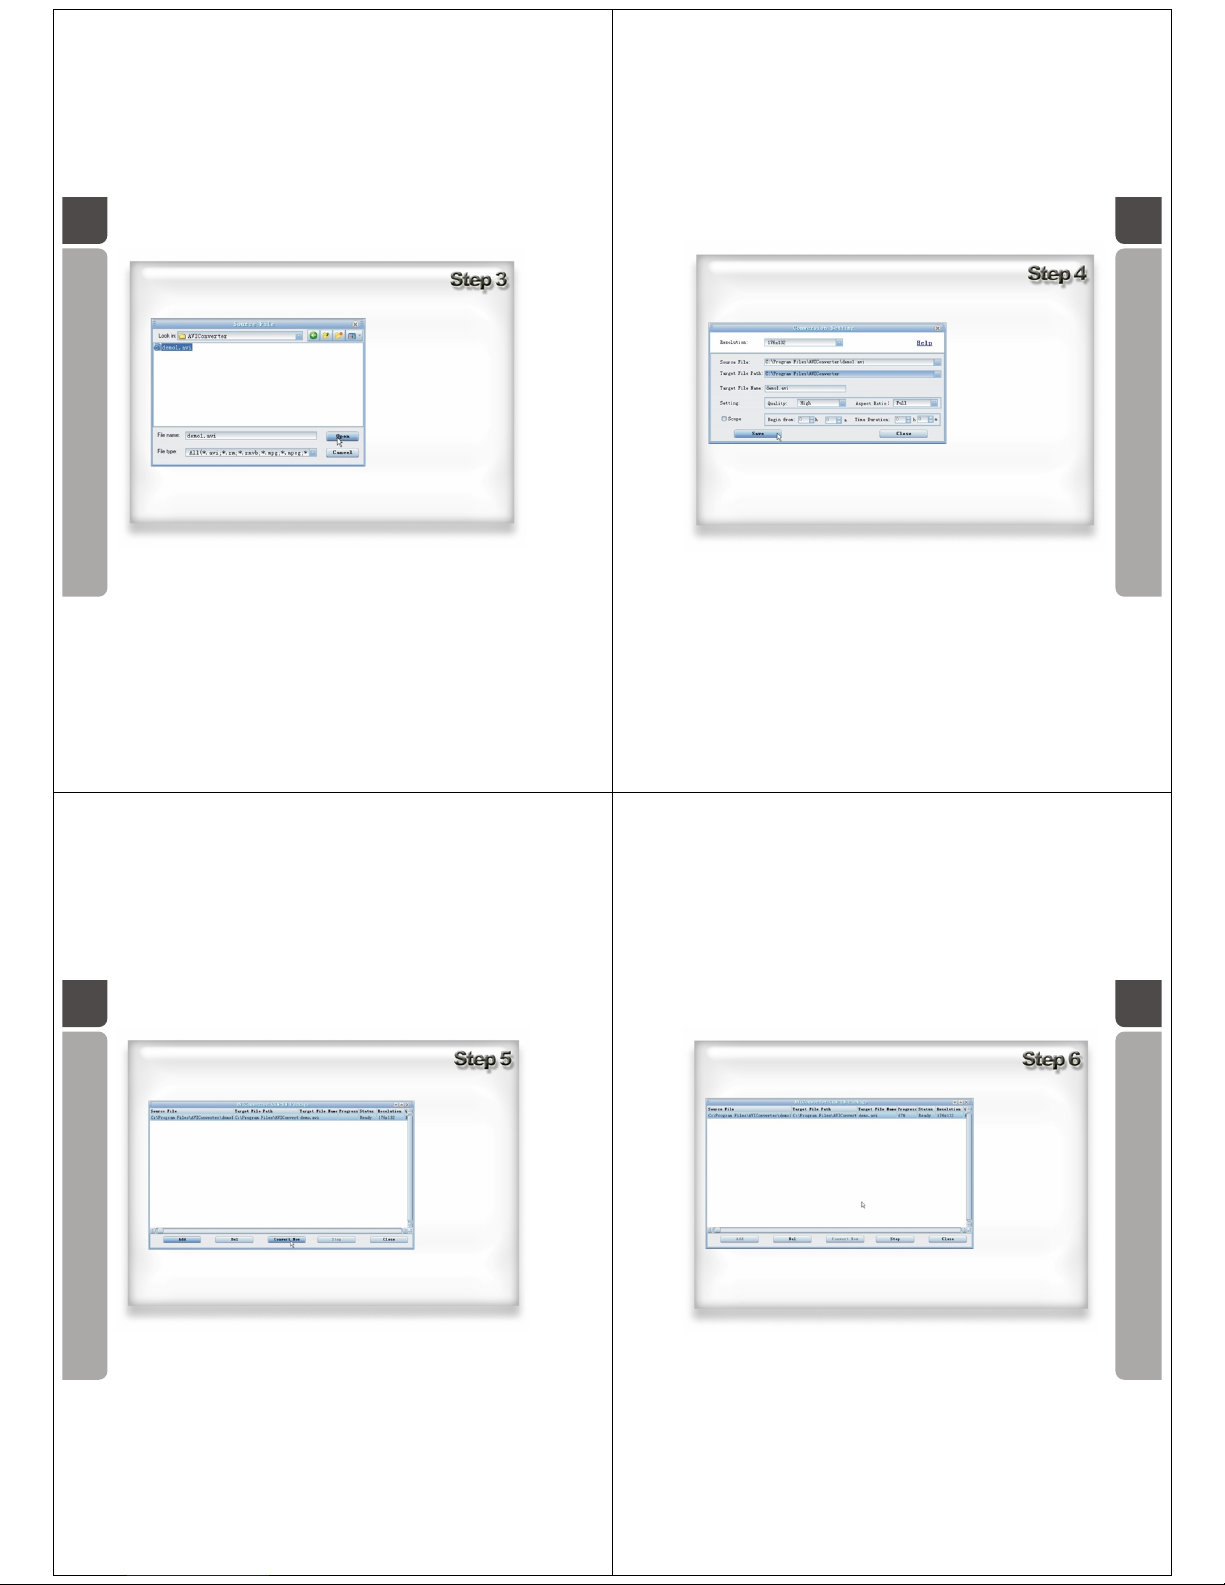
A guide in converting files to .avi
format using the conversion
software.
After starting the .avi
Converter software from
the start menu, select Add
at the bottom left of the first
window
43
Use the resolution pull
down menu to select
the screen resolution
220x176
Then select Source File
Page 12
44
Locate the video file you
wish to convert and click Open
45
Select the location where you
would like the converted file
to be saved in by clicking in
the box beside Target File
Path then press Save
46
Click the Convert
Now button at the
bottom of the window
47
The status of the
conversion will be shown
whilst the software saves
the file as an .avi format
video.
Page 13
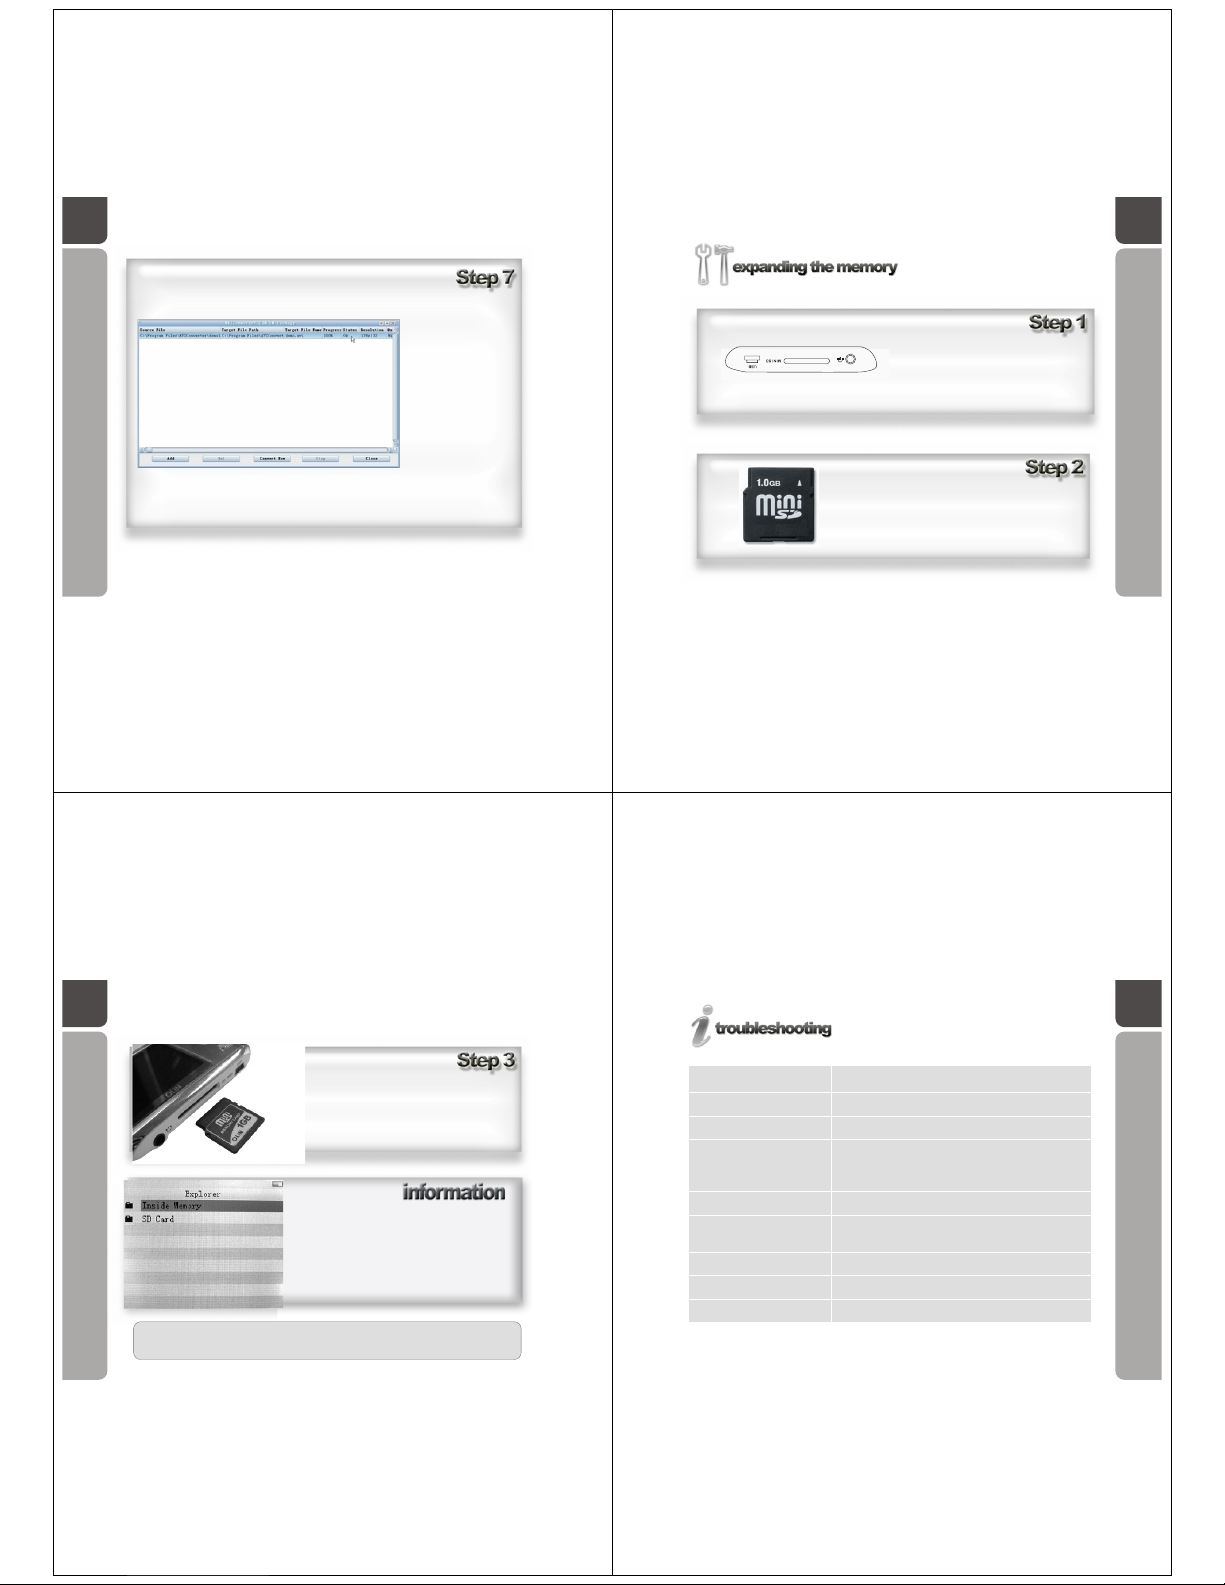
48
Once the file is converted,
the progress column will
show 100% and the status
column will report an OK
status. The file is now
converted successfully. The
software can now be shut
down by clicking Close at
the bottom of the screen.
Alternatively, you can
choose another file to
convert by clicking add and
beginning this procedure
again.
49
A guide in expanding the memory
on the OM205 Media Player.
Locate the mini SD slot on the base of the
OM205 Media Player
Locate the mini-SD card.
Note: Maximum capacity supported by the OM205
Media Player - 2 Gigabyte mini-SD card.
50
Slide the card into the slot as shown.
(Mini-SD metal strips facing down).
Push the card all the way in and then release to
lock it into place.
When using the OM205 Media Player with a mini SD card
inserted, the player will prompt you within different menus for
(built-in) Memory or (mini) SDCard.
When this screen appears, use the Five-direction Key to scroll
to the
device that has your chosen file stored on it, then press the key
downwards to enter.
Note: The Mini SD card will now show as "SD Card" when
exploring the files on the player. The player can now save files
on the Mini SD card and the OM205 Media Player.
WARNING: Only insert and remove the Mini SD card when the OM205 Media
player is powered off.
51
Problem
Possible Causes
Player will not power on
No response when buttons
are pressed
Cannot play music or no
sound during playback
Player will not unlock after
keylock
Cannot upload / download
documents / PC cannot
detect the player
Cannot record voice or sound
Strange characters appear
on the screen
Memory size not correct
Battery may be out of charge.
Power button at the top of the player may not be in the on position
The player may be key locked. Go to page 24 and review the
procedure on key locking the media player
Earphones may be faulty.
Check the earphones plugged in securely.
Battery may be out of charge.
Volume may need to be turned up.
Mp3 file may be faulty
Turn the power off at using the power on / off button at the
top of the player.
The USB cable may not be securely connected.
Memory may be full.
Device driver may need to be reinstalled.
Battery may be out of charge.
Memory may be full.
Incorrect language selected in the settings menu.
Due to the space taken up by the system firmware and FAT, the
usable memory is less than 90-95% of the indicated memory size.
Page 14

The player should not be stored in an area of extreme high temperature particularly
inside a closed area (e.g. in a car).
The player should be kept in the areas free from extreme temperatures, moisture and
dust.
Dropping the player can damage the screen.
Please select an appropriate sound level to avoid a long term auditory disorder.
Do not attempt to dismantle the player.
We do not assume any liability, including but not limited to, data loss arising out of
improper operation or incidental damages.
52
Linophir and its stylized logo are registered in the Australian IP office
OLIN is a registered trademark of Linophir International Pty Ltd
All rights reserved
All promotional materials are offered for reference only
Actual products may vary
Linophir International Pty Ltd
[email protected]
Phone: 1800 656 630
 Loading...