

Page 1
USER MANUAL
OBDP-1000
Blu-Ray
Disc Player
Need some help?
Call our toll free
Customer Helpline today!
Or visit our website
www.westwell.com.au/olin
Westwell Australia Pty Ltd
W
estwell and its stylised logo are registered in the Australian IP office.
OLIN is a registered trademark of Westwell Australia Pty Ltd.
All rights reserved.
All promotional materials are offered for reference only.
Actual products may vary.
USE
R
O
BDP-1
000
u-
R
a
y
FREE
CALL
Customer Helpline
1800 656 630
FREE
CALL
Customer Helpline
1800 656 630
Page 2

SAFETY PRECAUTIONS
01
IMPORTANT SAFETY INSTRUCTIONS
03
NOTICE
04
PLAYABLE DISCS
05
ACCESSORIES AND PANEL
06
REAR PANEL
07
BASIC CONNECTION
08
REMOTE CONTROL
10
BASIC PLAYBACK
11
ADVANCED PLAYBACK
12
SPECIAL FUNCTION PLAYBACK
13
SYSTEM SETUP
17
FREQUENTLY ASKED QUESTIONS
23
TROUBLE SHOOTING
24
SPECIFICATIONS
27
TABLE OF CONTENTS
Page 3
SAFETY PRECAUTIONS
01
TO REDUCE THE RISK OF FIRE OR ELECTRIC SHOCK, DO NOT EXPOSE THIS
APPLIANCE TO RAIN OR MOISTURE, DANGEROUS HIGH VOLTAGES ARE
PRESENT INSIDE THE ENCLOSURE. DO NOT OPEN THE CABINET. REFER
SERVICING TO QUALIFIED PERSONNEL ONLY.
When replacing the unit's plug or power cord, the replacement must be the exactly
the same ;or one recommended by the manufacturer.
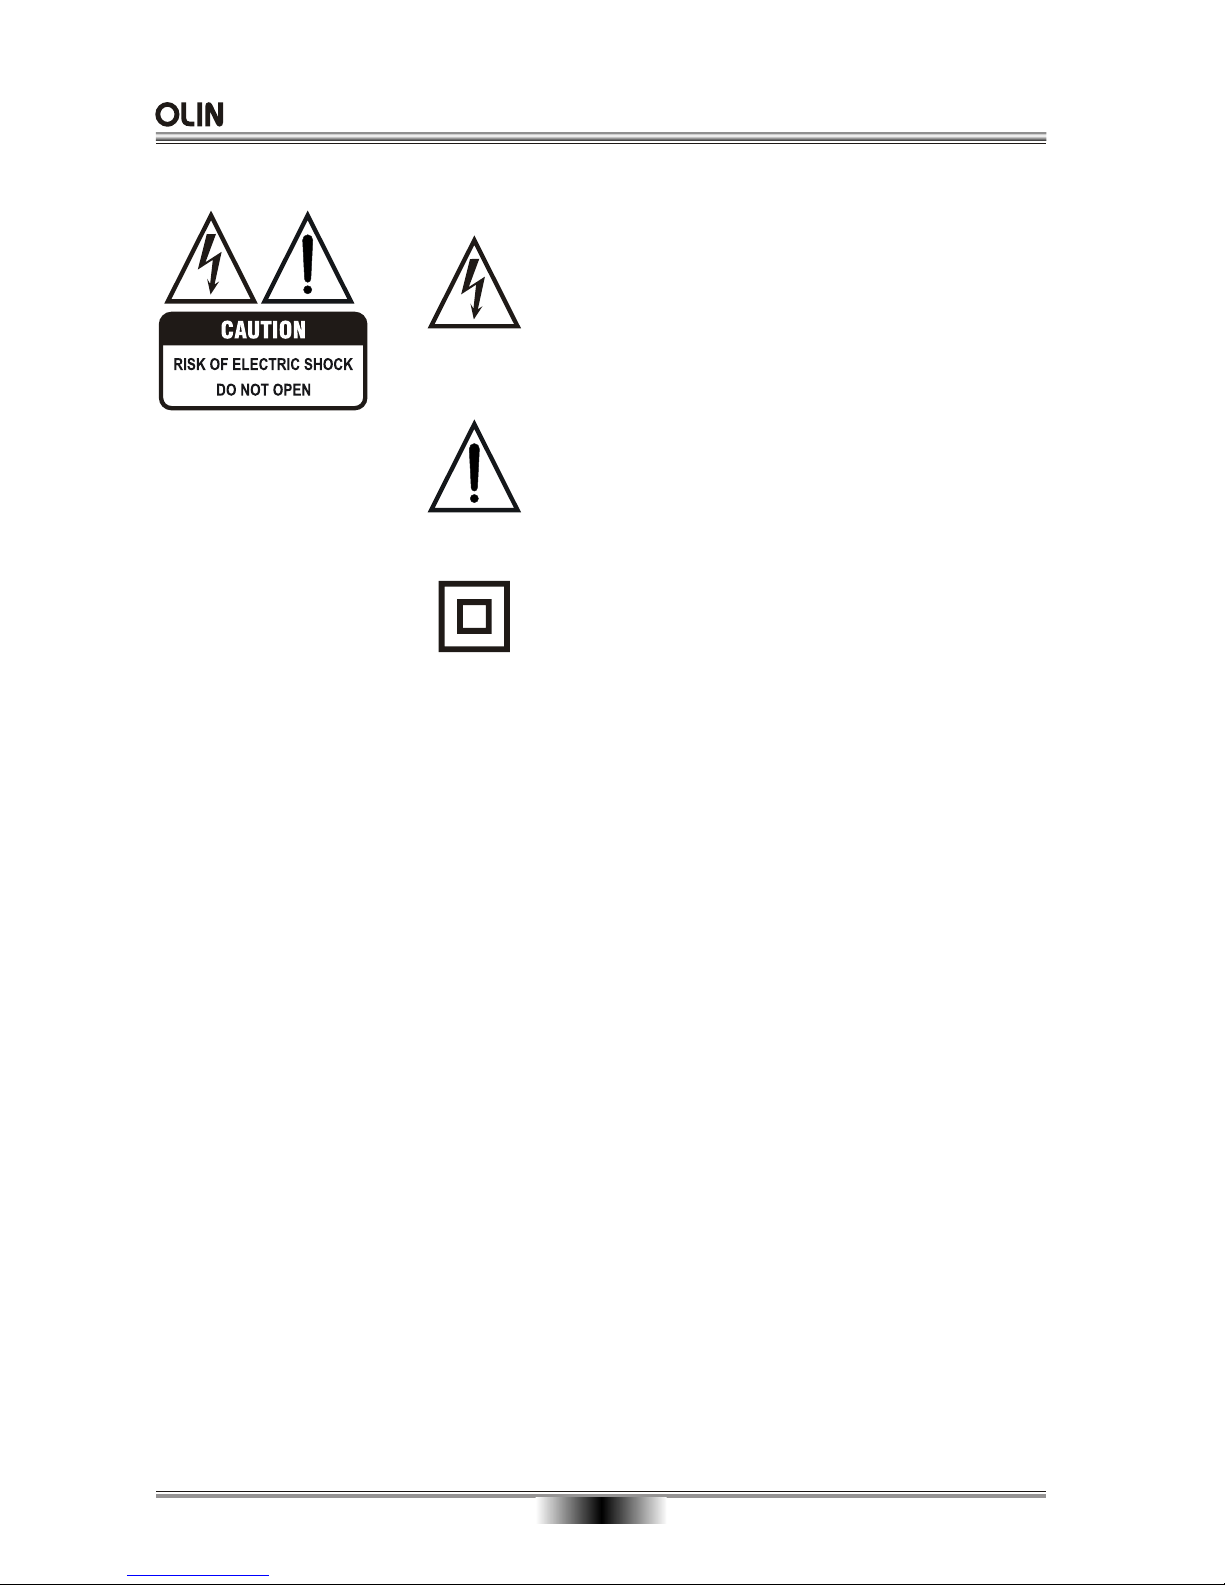
The lightning flash with arrowhead symbol, within an equilateral triangle, is intended to alert the user to the presence
of uninsulated "dangerous voltage " within the product's enclosure that may be of sufficient magnitude to constitute a
risk of electric shock to persons.
The exclamation point within an equilateral triangle is
intended to alert the user to the presence of important
operating and maintenance (servicing) instructions in the
literature accompanying the appliance.
This Digital Video Disc player employs a laser system.
The symbol for CLASS II (Double Insulation).
Use of controls, adjustments or the performance of procedures other than those
specified may result To prevent direct exposure to laser beam, do not try to open the enclosure.
DO NOT STARE INTO BEAM.
in hazardous exposure to radiation.
WARNING:
CAUTION:
Page 4
SAFETY PRECAUTIONS
02
Manufactured under license from Dolby Laboratories. " Dolby " and the double-D
symbol are trademarks of Dolby Laboratories.
This product incorporates copyright protection technology that is protected by
methods claims in certain U. S. Patents and other intellectual property rights owned
by Macrovision Corporation and other rights owners. Use of this copyright protection
technology must be authorized by Macrovision Corporation, and is intended for
home and other limited viewing uses only unless otherwise authorized by Macrovision
Corporation. Reverse engineering or disassembly is prohibited.
Consumers should note that not all high definition television sets are fully compatible
with this product and may cause artifacts to be displayed in the picture.
In case of 525 or 625 progressive scan picture problems, it is recommended that the
user switch the connection to the "standard definition" output. If there are questions
regarding our TV set compatibility with this model 525p and 625p DVD player, please
contact our customer service centre.
Disposal of your old appliance
1. When this crossed-out wheeled bin symbol is attached to a product, it means the
product is covered by the European Directive 2002/96/EC.
2. All electrical and electronic products should be disposed of separately from the
municipal waste stream via designated collection facilities appointed by the government
or the local authorities.
3. The correct disposal of your old appliance will help prevent potential negative
consequences for the environment and human health.
4. For more detailed information about disposal of your old appliance, please contact
your city office, waste disposal service or the shop where you purchased the product.
Manufactured under license under U.S. Patent #’s: 5,451,942; 5,956,674;5,974,380;
5,978,762;6,226,616;6,487,535 & other U.S. and worldwide patents issued & pending.
DTS is a registered trademark & the DTS logos and symbol are trademarks of DTS,
Inc. 1996-2007 DTS, Inc. All rights reserved.
Page 5
03
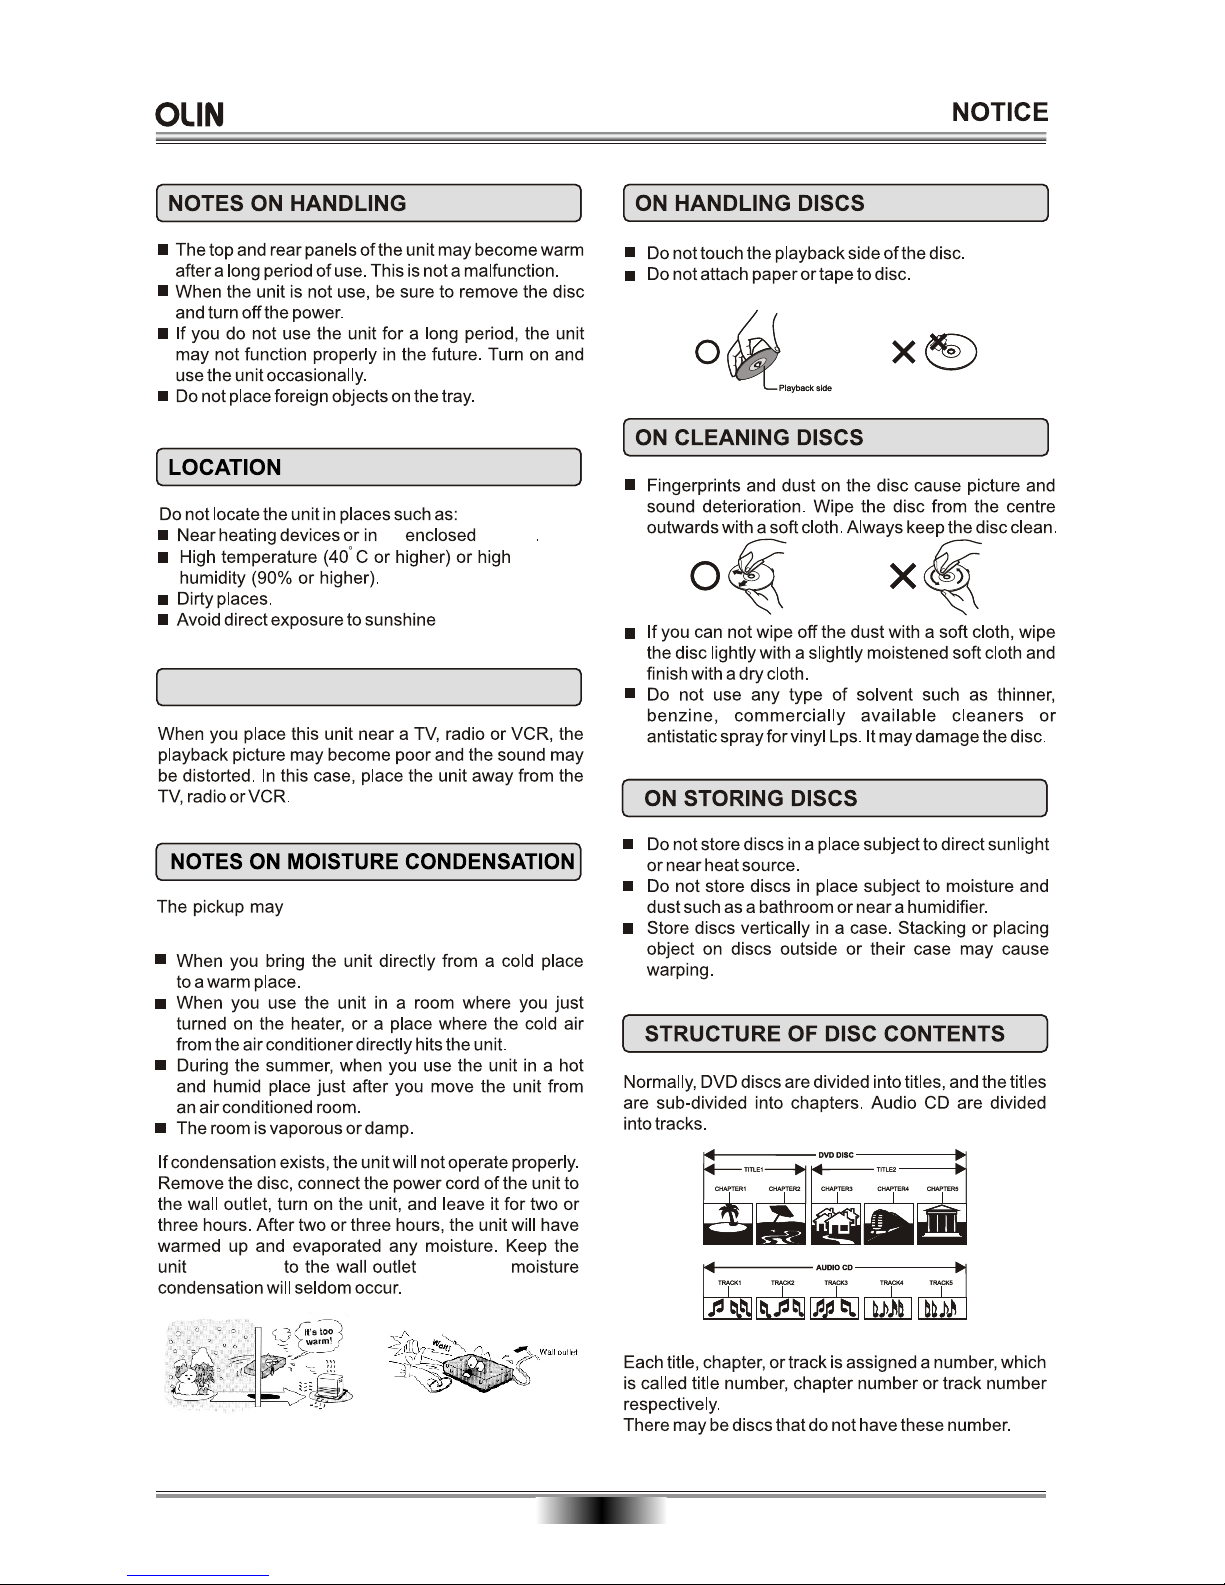
Slots and openings in the cabinet are provided for ventilation
and to ensure correct operation of the product. These protect
it from overheating. These openings must not be blocked or
covered. The openings should never be blocked by placing
the product on a bed, sofa, rug or other.
must
must ever
placed
power boards
do this
Page 6
following situations.
04
an vehicle
ELECTRICAL DISTURBANCE
suffer from condensation under the
connecting
will ensure
Page 7
PLAYABLE DISCS
05
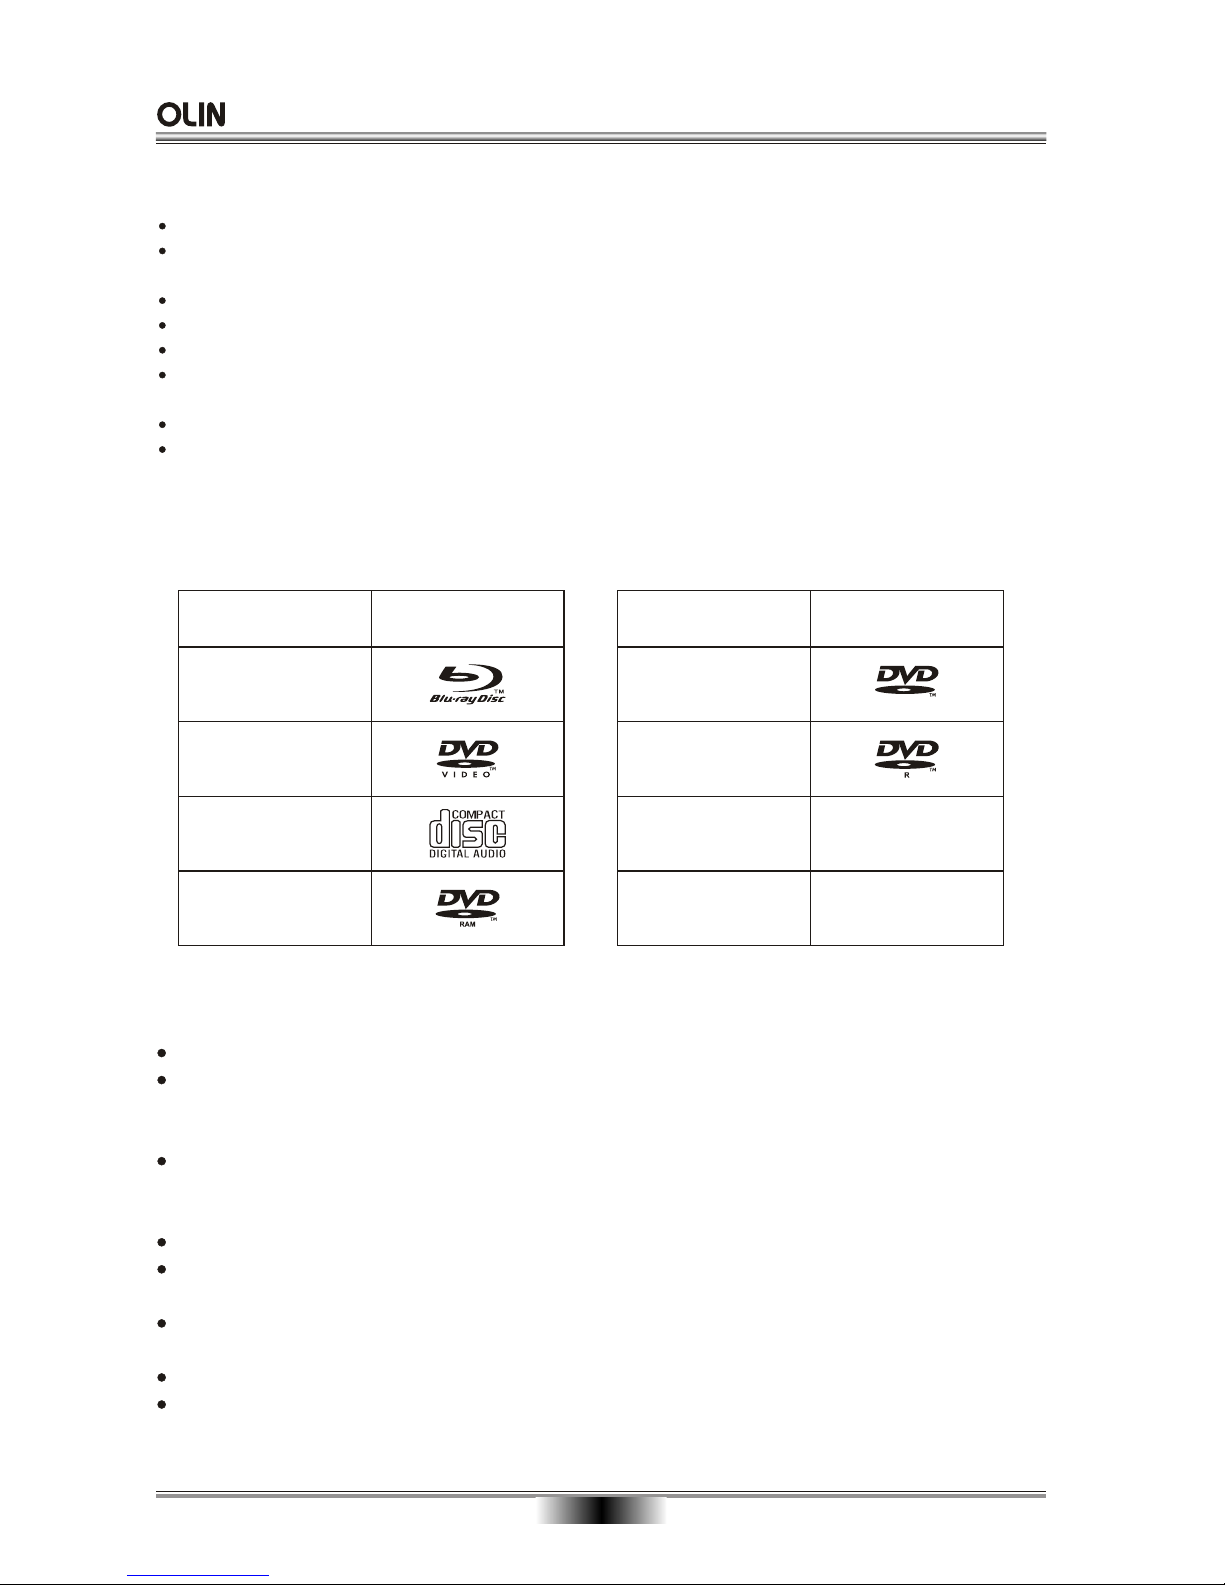
The following types of discs can play in the REF player:
Disc type
Logo
Blu-ray Disc
DVD-video Disc
(DVD-ROM)
Audio CDs
(CDDA)
DVD-RAM
Disc type
Logo
DVD-RW
DVD-R
DTS-CD
MP3/WMA/JPEG
Data CD
RW
Notes:
Writeable DVD disks (DVD-RAM, DVD-RW, DVD-R) must be finalized, VR-mode only.
This Blu-ray disc player supports discs that are compatible with DVD-RAM Standard Version 2.0.
Playback may not work for some types of discs, or when specific operations, such as angle change and
aspect ratio adjustment, are being performed. Information about the discs is written in detail on the box.
Please refer to this if necessary.
Do not allow the disc to become dirty or scratched. Fingerprints, dirt, dust,
scratches or deposits of cigarette smoke on the recording surface may make it impossible to use the disc
for playback.
CD-R/-RW, DVD-RAM/-RW/-R recorded with UDF or ISO9660 format can be played back.
MP3 files must be written to the disk with a .mp3 file extension in order to be recognized and played back
properly.
Windows Media Audio (WMA) files must be written to the disk with a .wma file extension in order to be
recognized and played back properly.
High bitrate or variable bitrate .mp3 and .wma files may not play back correctly.
JPEG picture files must be written to the disk with an .jpeg or .jpg file extension in order to be recognized
and played back properly
Features
Full high-definition video playback at up to 1080p resolution for an amazing viewing experience.
Upconversion of standard definition DVDs for enhanced picture quality at up to 1080p over an HDMI
connection.
Rich multi-channel surround sound.
Easy and simple HDTV connection using a single HDMI cable (cable not included).
Multiple outputs for connecting your home theater system or amplifier.
PIP functionality that lets you display primary and secondary video at the same time (if available on the Blu-ray
Disc).
Pop-up menu display without interrupting playback (if available on the Blu-ray Disc).
HDMI 1080p/fps output (Blu-ray Disc only) that provides smooth playback of video with a frame rate of 60
frames per second (TV must be connected with an HDMI cable and be compatible with an HDMI cable and
be compatible with 1080p 60 frame).
Page 8
STANDBY/ON
OPEN/CLOSE
BLU-RAY DISC PLAYER OBDP-1000
ACCESSORIES and PANEL
06
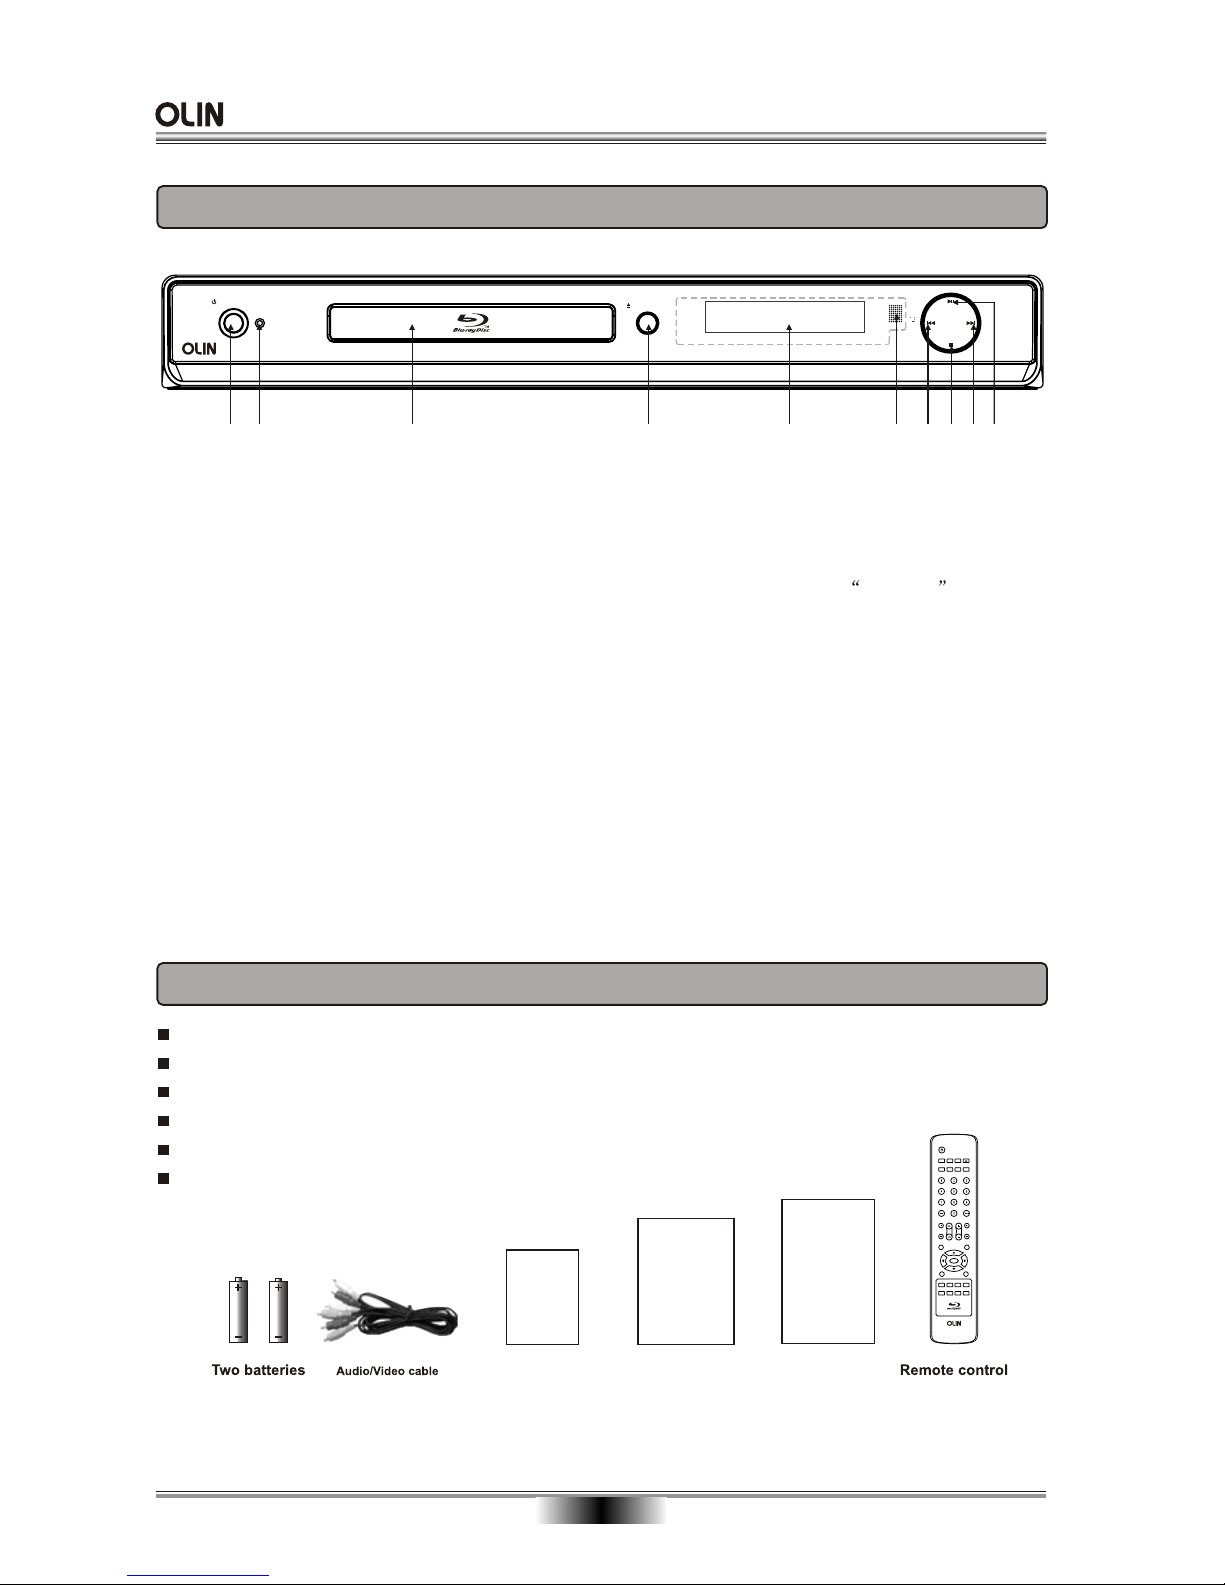
FRONT PANEL
1 2 3 4 5 6 8 97 10
ACCESSORIES
1. STANDBY/ON Turns the Blu-ray disc player on or off.
2. POWER INDICATOR
When the unit is first plugged in, or when the unit is powered off,
this indicator lights. It means that the BD player is plugged in and
will be able to accept the remote control power on command.
3. TRAY Opens to accept a disc.
4. OPEN/CLOSE
Opens or closes the disc tray.
5. VFD SCREEN
Display the playing status, time, etc.
6. REMOTE CONTROL SENSOR Receive the signal from the remote control.
7. PREVIOUS Go back to the previous title/chapter/track.
8. STOP
9. NEXT
Go to the next title/chapter/track.
10. PLAY/PAUSE
Play: playback a disc; Pause:
Stop playback.
Temporarily pauses BD disc playback.
Owner's manual x 1
Batteries x 2
Audio/Video cable x 1
Warranty Certificate x 1
Remote control x 1
Quick Install Guide x 1
Owner's manual
Owner's manual
Warranty Certificate
WARRANTY
CERTIFICATE
Quick Install Guide
Quick Install Guide
MUTE
VOL
RETURN
SETUP
ENTER
DISC MENU
ABCD
REPEATOSD
RESOLUTION
OPEN/CLOSE
POPUP MENU
TITLE MENU
SCAN
SUBTITLESEARCH ANGLEAUDIO
A-B
PIP
SECONDARY
AUDIO
OBDP-1000
Page 9
RISK OF ELECTRIC SHOCK
DO NOT OPEN
CAUTION
Y
CB / PB
CR / PR
VIDEO
COAXIAL
OPTICAL
VIDEO OUT / AUDIO OUT
DIGITAL AUDIO OUT
HDMI ENET
CENTER
SUB-WOOFER
RL
RR
SL
SR FR
FL
7.1-CH AUDIO OUT
CLASS 1 LASER PRODUCT
L
R
MODEL: OBDP-1000 AC: 110V-240V~ 50/60Hz
BLU-RAY DISC PLAYER
Made In China
S/N: POWER: 25W
Manufactured under license under
U.S. Patent #’s: 5,451,942; 5,956,674;
5,974,380; 5,978,762; 6,226,616;
6,487,535 & other U.S. and worldwide
patents issued & pending. DTS is a
registered trademark & the DTS logos
and symbol are trademarks of DTS, Inc.
1996-2007 DTS, Inc. All rights reserved.
This unit plays only the discs with the
same regional code as the unit or discs
with no regional code. Please check
whether both the BD player and the
disc have the same regional code
before playback.
Manufactured under license from Dolby
Laboratories. "Dolby" and the double-D
symbol are trademarks of Dolby
Laboratories.
For Warranty Please Call
1800 656 630
Disconnect the unit from the
mains before removing the cover.
WARNING
This product is covered by one or more
of the following U.S. Patents: 5,060,220 5,
457,669 5,987,417 6,377,524 6,389,570 6,
556,5206,631,110 6,778,755 6,795,637 6,
862,256 6,868,054 6,937,552.
U.S. Patent Nos. 4,631,603; 4,819,
098; 4,907,093; 5,315,448; and
6,516,132.
N14142
REAR PANEL
07
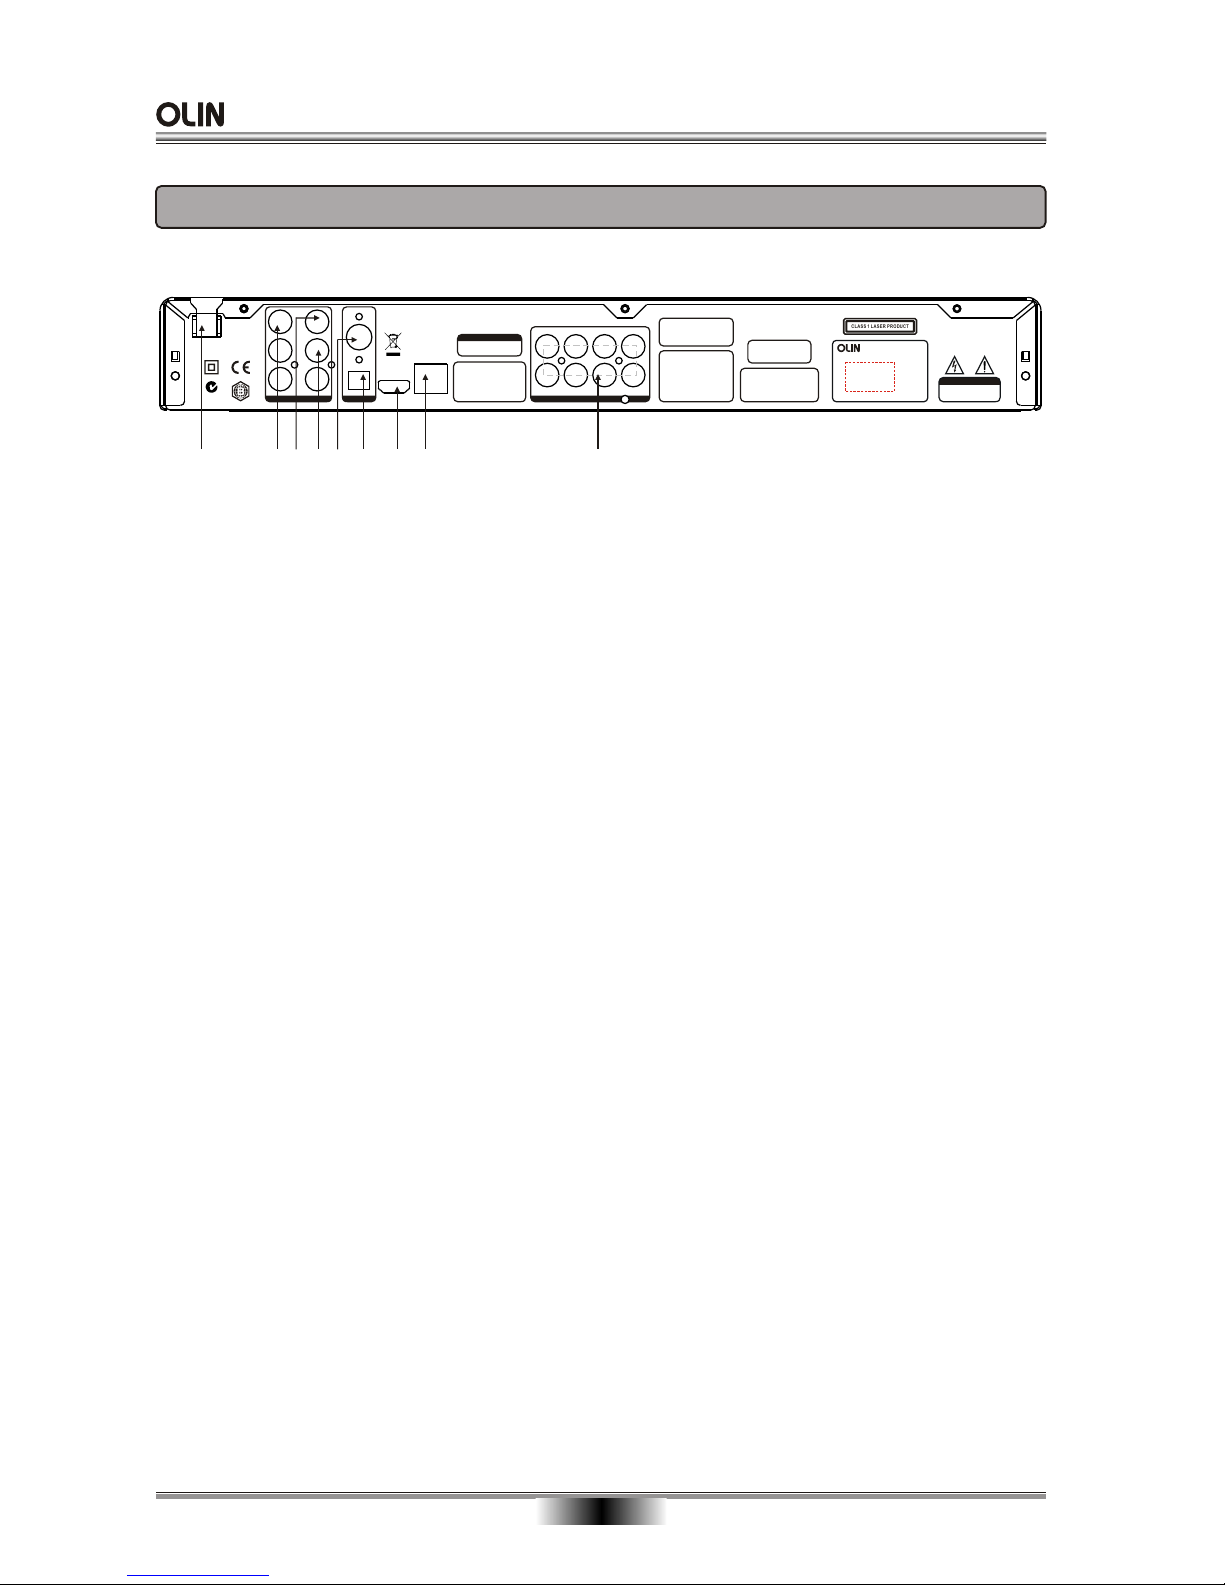
REAR PANEL OUTPUT
72 3 4 658
1. POWER LINE INPUT
Isolates Mains supply
2.Y, CB/PB, CR/PR OUTPUT
Connect these outputs to the YUV inputs of the television, if the television does not have an HDMI input.
NOTE: The component video output has a maximum resolution of 1080p. It is further limited to SD resolution
if the HDMI output is also being used.
3. VIDEO OUTPUT
If your TV does not have component or HDMI video inputs, connect this output to the composite video input
of the HD television.
4. L/R AUDIO OUTPUT
C
5. COAXIAL OUTPUT
This is a digital audio output. If you have a surround-sound receiver with a digital coaxial input, connect this
output to the digital coaxial input of the surround sound receiver.
6. OPTICAL OUTPUT
This is another digital audio output. If you have a surround-sound receiver with a digital optical input, connect
this output to the digital optical input of the surround sound receiver.
7. HDMI OUTPUT
If your surround-sound audio receiver does not have an HDMI input (or if you are not using a surround-sound
receiver), connect this output directly to the HDMI input of the TV. One of the other audio outputs can be
connected to the audio receiver.
Otherwise, connect the HDMI output of the player to the HDMI input of the audio receiver. (You will need to
connect a second HDMI cable from the HDMI output of the audio receiver to the HDMI input of the television)
8. ENET INTERFACE
9. ANALOG 7.1 AUDIO OUTPUTS
Connect these outputs to the analog inputs of a surround sound speaker. (If surround sound speaker is 5.1
channel, leave the surround channels disconnected).
onnection for external equipment using the Red/White Audio (RCA) Cables.
1
Region codes:
If the Region number of a BD or DVD disc does not correspond to the Region number of this Blu-ray disc player,
the Blu-ray disc player cannot play the disc. The region code is called out on the rear panel of the BD player.
9
Page 10
Y
CB / PB
CR / PR
VIDEO
COAXIAL
OPTICAL
VIDEO OUT / AUDIO OUT
DIGITAL AUDIO OUT
HDMI ENET
CENTER
SUB-WOOFERRLRR
SL
SR FR
FL
7.1-CH AUDIO OUT
L
R
This unit plays only the discs with the
same regional code as the unit or discs
with no regional code. Please check
whether both the BD player and the
disc have the same regional code
before playback.
Disconnect the unit from the
mains before removing the cover.
WARNING
Y
CB / PB
CR / PR
VIDEO
COAXIAL
OPTICAL
VIDEO OUT / AUDIO OUT
DIGITAL AUDIO OUT
HDMI ENET
CENTER
SUB-WOOFERRLRR
SL
SR FR
FL
7.1-CH AUDIO OUT
L
R
This unit plays only the discs with the
same regional code as the unit or discs
with no regional code. Please check
whether both the BD player and the
disc have the same regional code
before playback.
Disconnect the unit from the
mains before removing the cover.
WARNING
BASIC CONNECTION
08
BASIC CONNECTION
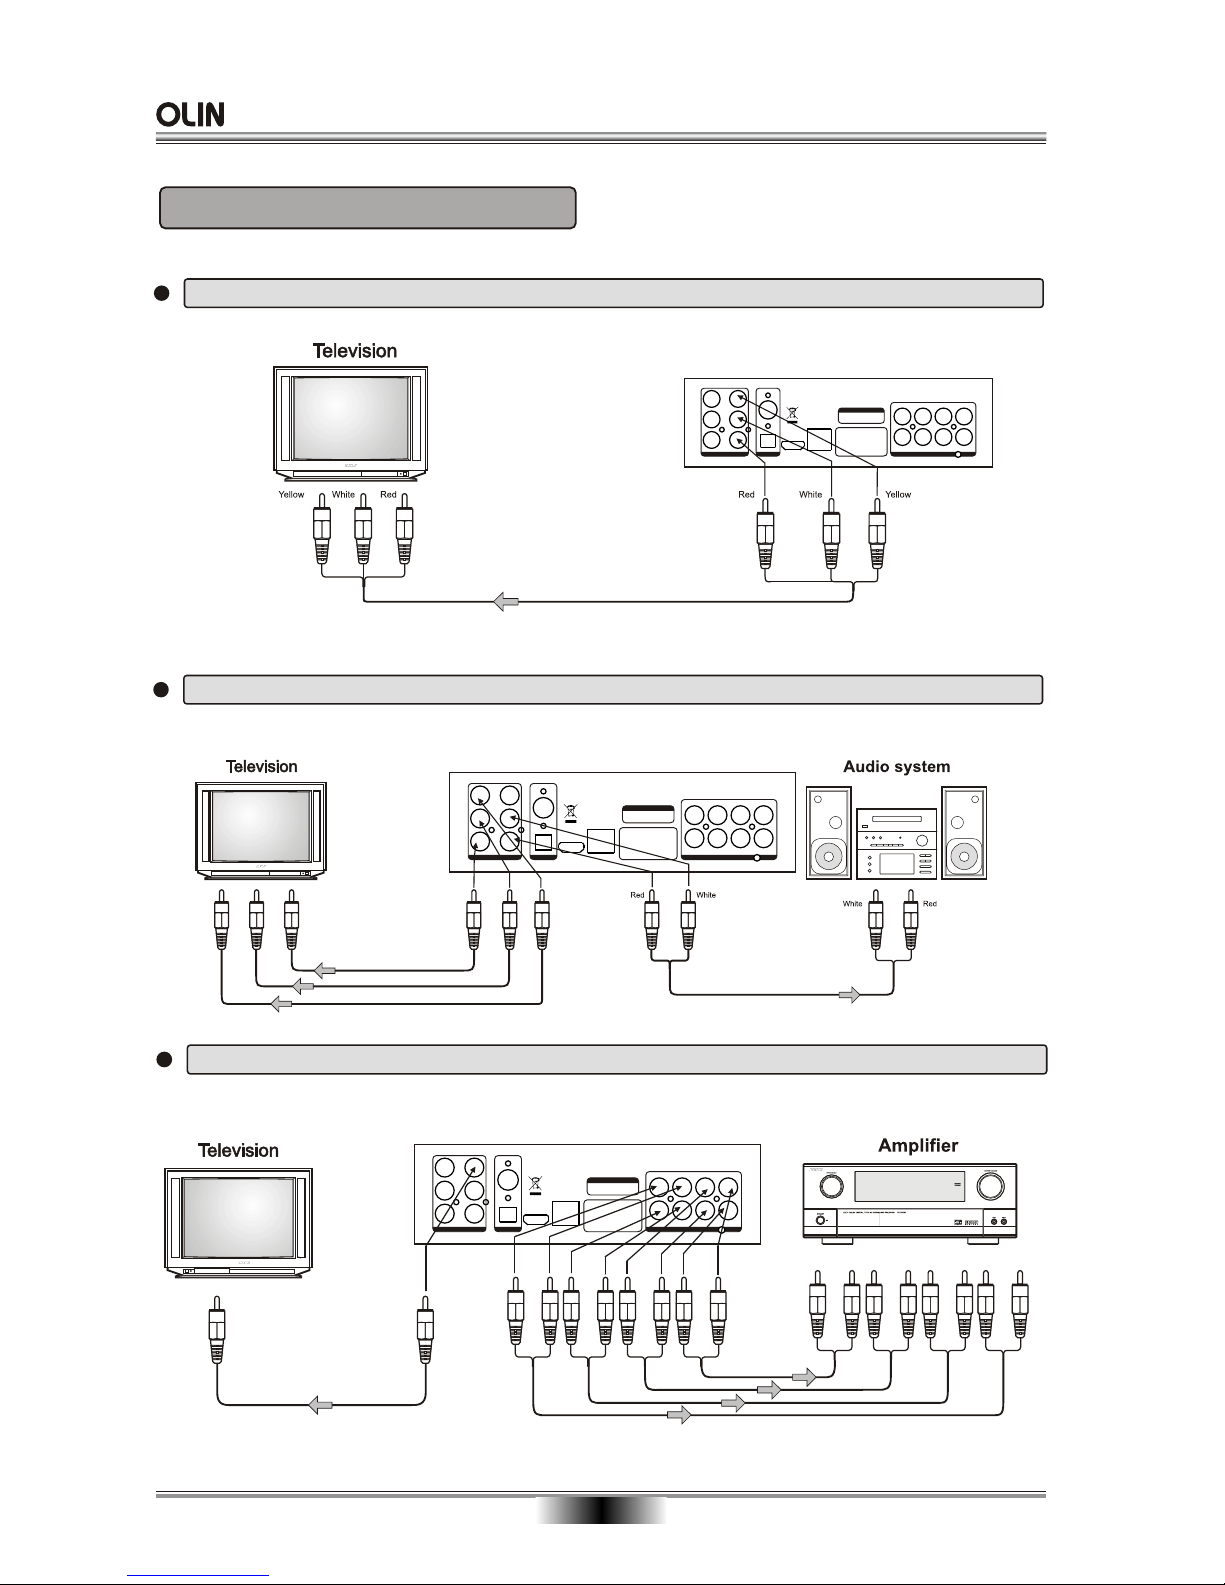
Connecting to a TV with Audio/Video cable
Connecting to a audio system and TV equipped with YUV video input
To video input(yellow)
To audio inputs(red, white)
To audio inputs of the amplifier
To Y video input
To CB/PB video input
To CR/PR video input
To Y video output
To CB/PB video output
To CR/PR video output
Connecting to an amplifier equipped with 7.1ch audio input and TV
To 7.1ch audio inputs
To 7.1ch
audio outputs
Audio cable
BD Player
BD Player
BD Player
Y
CB / PB
CR / PR
VIDEO
COAXIAL
OPTICAL
VIDEO OUT / AUDIO OUT
DIGITAL AUDIO OUT
HDMI ENET
CENTER
SUB-WOOFER
RL
RR
SL
SR
FR
FL
7.1-CH AUDIO OUT
L
R
This unit plays only the discs with the
same regional code as the unit or discs
with no regional code. Please check
whether both the BD player and the
disc have the same regional code
before playback.
Disconnect the unit from the
mains before removing the cover.
WARNING
Page 11
Y
CB / PB
CR / PR
VIDEO
COAXIAL
OPTICAL
VIDEO OUT / AUDIO OUT
DIGITAL AUDIO OUT
HDMI ENET
CENTER
SUB-WOOFERRLRR
SL
SR FR
FL
7.1-CH AUDIO OUT
L
R
This unit plays only the discs with the
same regional code as the unit or discs
with no regional code. Please check
whether both the BD player and the
disc have the same regional code
before playback.
Disconnect the unit from the
mains before removing the cover.
WARNING
BD Player
BASIC CONNECTION
09
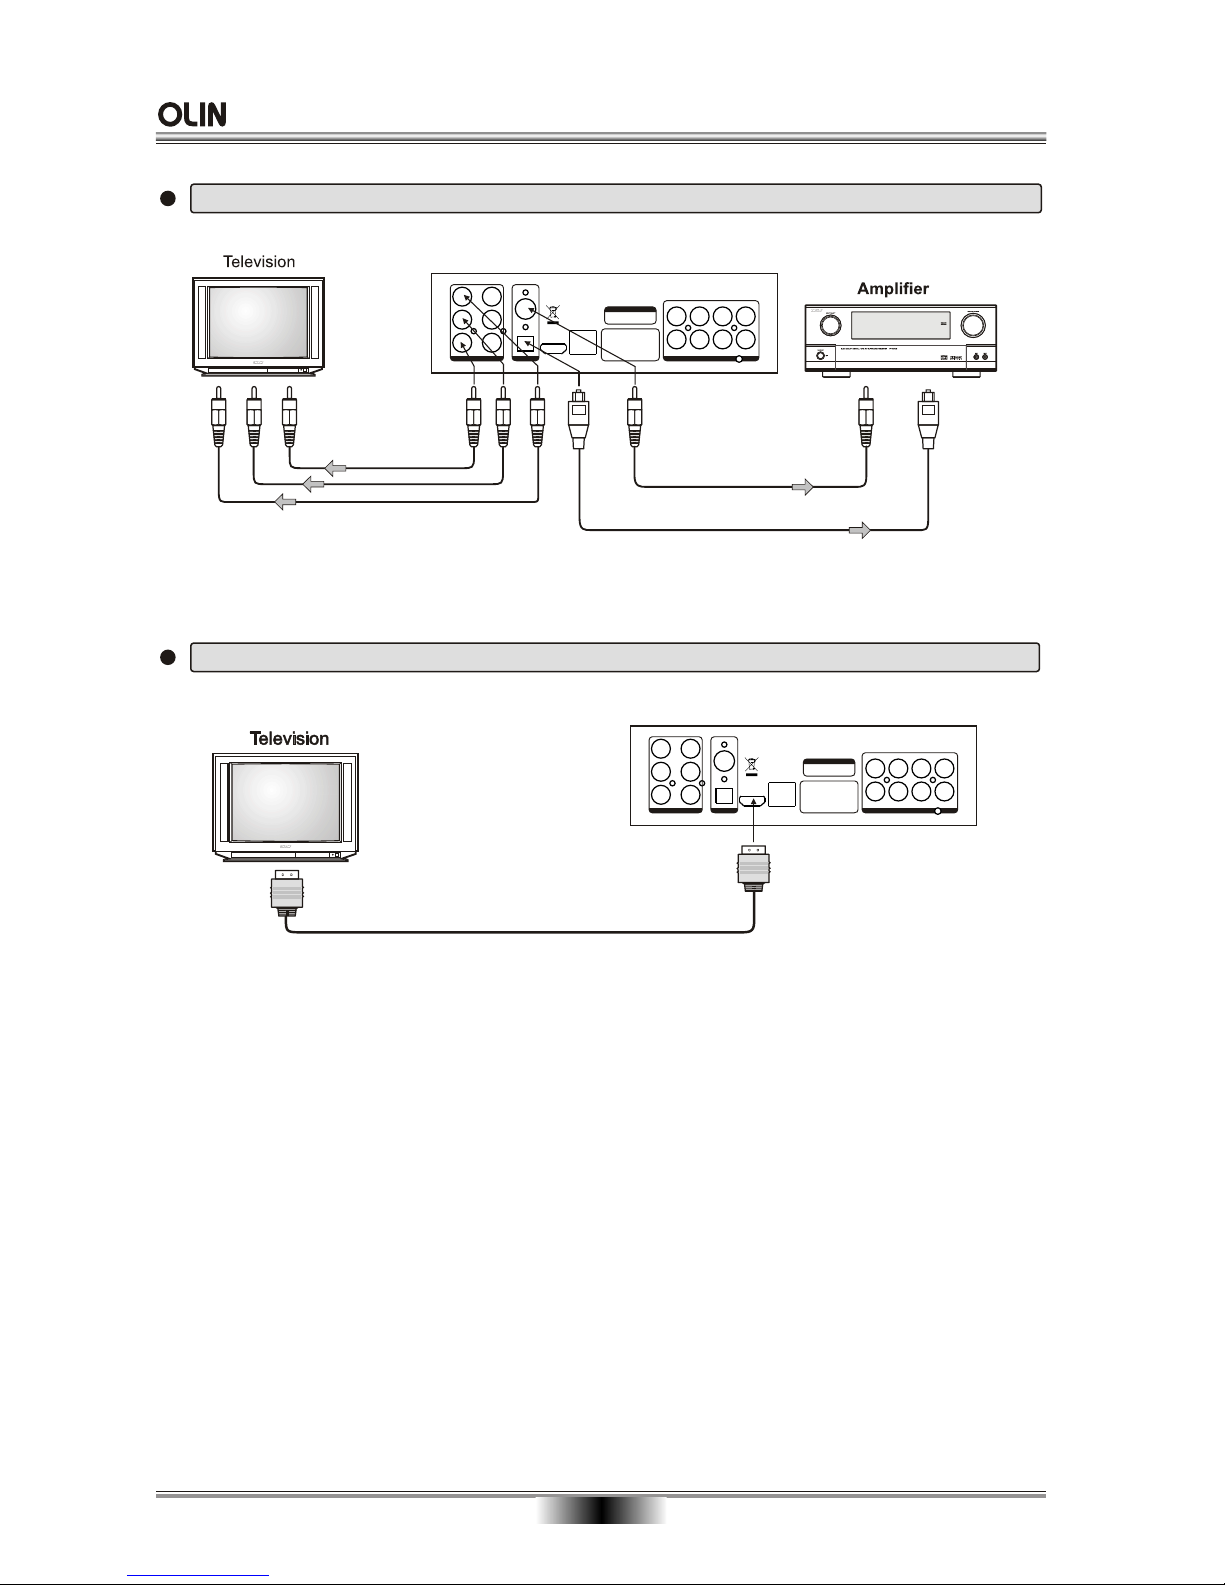
Connecting to a devices with HDMI terminal
Connecting to an amplifier equipped with a digital audio input and TV
Coaxial cable
To COAXIAL
type digital
audio input
To Y vid eo inp ut
To CB/PB video input
To CR/PR video input
To Y video output
To CB/PB video output
To CR/PR video output
To OPTICAL
type digital
audio input
Optical digital cable
BD Player
HDMI (High-Definition Multimedia Interface) setup:
Can only be achieved using HDMI. HDMI is the only REF output capable of 1080i/1080p video, and the
highest definition audio codecs. Connect the HDMI output of the player to the HDMI input of the audio receiver.
(You will need to connect a second HDMI cable from the HDMI output of the audio receiver to the HDMI input
of the television)
Y
CB / PB
CR / PR
VIDEO
COAXIAL
OPTICAL
VIDEO OUT / AUDIO OUT
DIGITAL AUDIO OUT
HDMI ENET
CENTER
SUB-WOOFERRLRR
SL
SR FR
FL
7.1-CH AUDIO OUT
L
R
This unit plays only the discs with the
same regional code as the unit or discs
with no regional code. Please check
whether both the BD player and the
disc have the same regional code
before playback.
Disconnect the unit from the
mains before removing the cover.
WARNING
Page 12
MUTE
VOL
RETURN
SETUP
ENTER
DISC MENU
ABCD
REPEATOSD
RESOLUTION
OPEN/CLOSE
POPUP MENU
TITLE MENU
SCAN
SUBTITLESEARCH
ANGLEAUDIO
A-B
PIP
SECONDARY
AUDIO
OBDP-1000
1
2
3
4
5
6
7
8
9
10
11
12
13
14
15
16
17
19
20
21
22
23
24
26
25
27
28
29
REMOTE CONTROL
REMOTE CONTROL
10
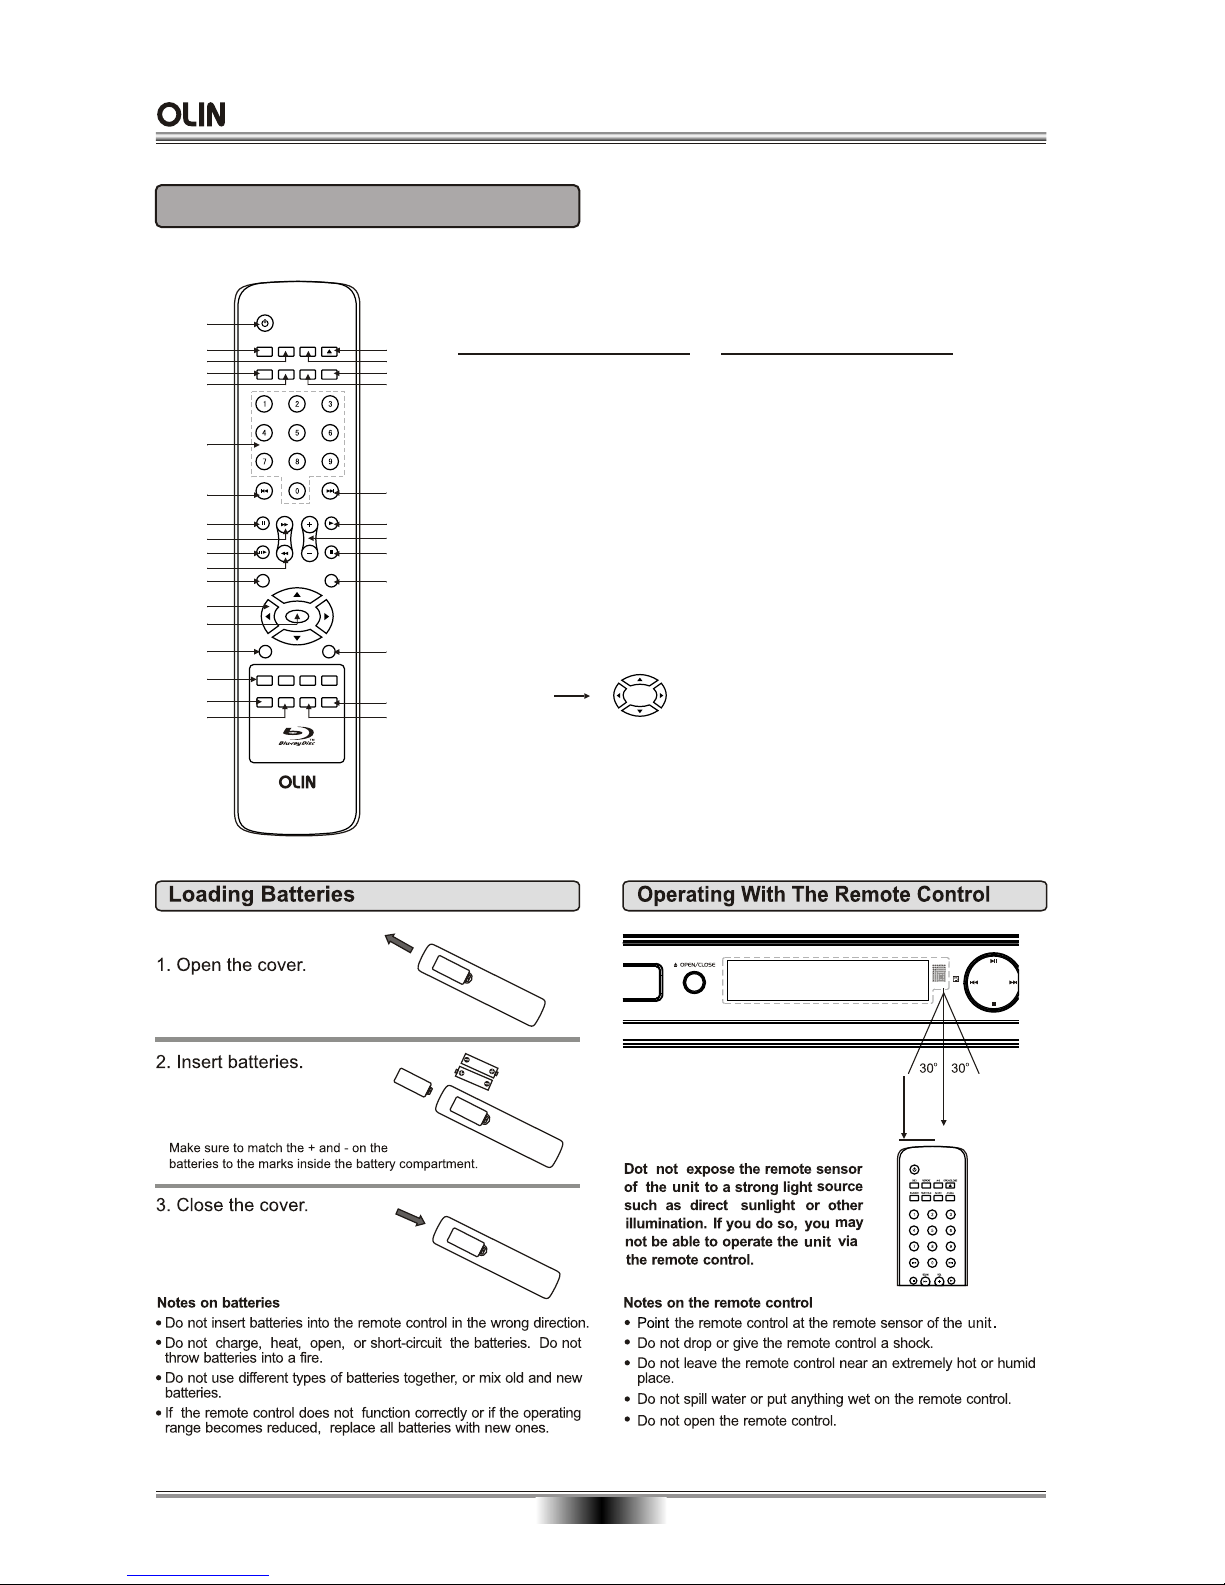
Function Function
1. STANDBY
2. On Screen Display (OSD)
3. REPEAT
4. SEARCH
5. SUBTITLE
6. DIGITS 0-9 BUTTONS
7. PREVIOUS
8. PAUSE
9. FAST FORWARD
10. STEP
11. FAST REVERSE
12. DISC MENU
13. CURSOR
14. ENTER
15. SETUP
16. COLOR Buttons:
RED(A),GREEN(B),YELLOW(C),BLUE(D)
17. RESOLUTION
18. Secondary Video (Picture-in-picture)
19. OPEN/CLOSE DISC TRAY
20. A-B REPEAT
21. ANGLE
22. AUDIO
23. NEXT
24. PLAY
25. VOLUME+/- (Volume Control)
26. STOP
27. POPUP MENU/TITLE MENU
28. RETURN
29. MUTE
30. SECONDARY AUDIO
Distance: About 7m (23 feet) from the
front of the remote sensor.
o
Angle: About 30 in each direction
of the front of the remote
sensor.
About 7m
UP
DOWN
LEFT RIGHT
18
30
Page 13
BASIC PLAYBACK
11
Fast forward and Fast reverse
1. Press F.FWD to fast forward through the disc.
Each time the F.FWD button is pressed, the
fast forward motion speed changes. The speed will
increase through the following sequence: Fast x1,
Fast x2, Fast x3, Fast x4, Fast x5, Fast x6, Fastx7.
2. Press PLAY to resume normal playback.
3. Press F.REV to fast reverse through the disc.
Each time the F.REV button is pressed, the
fast reverse motion speed changes. The speed will
increase through the following sequence: Fast x1,
Fast x2, Fast x3, Fast x4, Fast x5, Fast x6, Fastx7.
4. Press PLAY to resume normal playback.
1. Press STOP button to go to stop mode, the TV
screen will show the start logo. As some disc the
player can recall the location where stopped, such
as BD.
2. Press PLAY to playback to resume playback from
the location where playback is stopped or from the
beginning of the disc.
3. Press STOP twice to stop completely.
Note: Not all Blu-ray Discs support the resume feature.
The resume information is saved even when the power
is turned off.
Stop playback
Previous and Next
During playing, press PREV key can back to start
of the chapter, then each press this key will skip a
chapter still the start of the disc.
Each press of NEXT during playing will skip
the current chapter and play the next one.
key
Pause playback
1. Press PAUSE to pause playback . The sound
will be muted .
2. Press PAUSE or PLAY to resume normal playback.
Basic playback
1. Press STANDBY/ON switch on the front panel or
the remote, your player turns on.
2. Turn on the TV, then select the input setting on the
TV that matches the connection method you used to
connect your player.
3. Press OPEN/CLOSE to open the disc tray.
4. Place a disc on the disc tray with the label facing
up, then press OPEN/CLOSE to close the disc
tray. It may take a few seconds for the disc to load.
5. If the disc does not start playing automatically,
press PLAY .
6. If a Blu-ray Disc or DVD menu opens, press
CURSOR button to select PLAY, then press ENTER.
7. To eject the disc, press OPEN/CLOSE .
Single step playback
1. Press STEP continuous to single step forward
to the next frame in the video.
2. Press PLAY to resume normal playback.
NOTES:
1.
Page 14
ADVANCED PLAYBACK
12
SEARCH
During playback,Press this button repeatedly to select
a search mode, then press digits button into menu,
for example:
first Title - - twice Chapter - - third Time --: -- : -Then press ENTER key on the remote, you could
choose point that you want to play. The fourth pressed
will cancel search.
REPEAT
Press one or more times to select a repeat mode.
Follow this operation :
Repeat off
Repeat Title
Repeat chapter
Press this button repeatedly to display circular the
above operation.
IMPORTANT NOTE:
THE FOLLOWING FUNCTIONS ARE APPLICABLE ONLY TO BD DISCS. IF OTHER DISC FORMATS ARE
PLAYED, SCREEN DISPLAY AND OPERATION WILL BE DIFFERENT.
OSD
Press this button and the screen will display some
information about disc, such as : " Title Elapsed " ,
" Title Remain ", " Chapter Elapsed ", " Chapter
Remain " and " Display Off ".
POPUP MENU/TITLE MENU
During Blu-ray Disc playback, Press POPUP MENU.
To open the pop-up menu opens.
1. Press UP/DOWN/LEFT/RIGHT button to select an
option, then press ENTER.
2. Press POPUP MENU to close the menu.
During DVD playback, press TITLE MENU to open the
disc menu.
During JPEG, MP3, or WMA playback, press TITLE
MENU to open the help information.
AUDIO CHANNEL CHOOSE
Press the AUDIO button on remote control to change
the mode of audio. This screen will display " audio X
of X XXX". The first "X" indicates the current number
of audio; "X" indicates total number of audio "XXX"
indicates the description of the current audio. .
SETUP
Press this button and the screen will display some
information about player, such as : " language menu ",
" display menu ", " audio menu ", " speaker menu"
and so on(The function can be carried out only in the
open situation).
ANGLE
During playback, press this button to change the angle
of the picture. This screen will display
.
" Angle X/X "
the first "X" indicates the current number of angle;
the second "X" indicates total number of angle
COLOR BUTTONS(red, green,yellow,blue)
These buttons are used when operating a BD-Video
disc that includes JavaTM applications (BD-J). For
more information about operating this kind of disc,
please read the instructions that came with the disc.
DISC MENU
During MP3/WMA disc playback, press this button will
display a menu. For more information, see " MP3/
WMA playback" on page 14.
RETURN
Press this button to return to the previous on-screen
menu. (The option is only used with MP3/WMA/JPEG
disc)
A-B
Press " A-B " to begin start-point, press again
to set an end point and complete setting. The
selected section A-B will be repeated. The third
press will cancel this function.
SUBTITLE
Press this button continuously and the screen will
display "SUBTITLE X of XX XXX", and "SUBTITLE
Off", "X" indicates the current number of this language; "XX" indicates total number of language;
"XXX" indicates the language of country. (The
number of language depends on disc).
Page 15
SPECIAL FUNCTION PLAYBACK
13
AUDIO CD PLAYBACK
When playing Audio CD disc, use SEARCH button and digital button on the remote to select one track then
press ENTER button.
Press PREV can back to start of the track, then each press this key will skip a track still
the start of the disc. Each press of NEXT key during playing will skip the current track and play the next track
HDMI FUNCTION
HDMI, High Definition Multimedia Interface supports EDID and DDC2B. This connection operates quickly
and conveniently, providing the best in both audio and video playback.
HDMI can transfer uncompressed, high-resolution picture and multi-channel audio digitally up to speeds of
5 GBps. HDMI can support all ATSC HDTV standards not only meet resolution 1080p,which can supply the
highest picture quality. but also support DVD Audio and other most advanced digital audio format, and support
8 channel 96kHz digital audio transmission. You only need one HDMI line connected, relieve audio connected.
At the same time, the spare space which HDMI standard supplied can apply in the video updating. HDMI can
collocate with HDCP (High-bandwidth Digital Content Protection), avoid copyright film being copyed without
authorization.
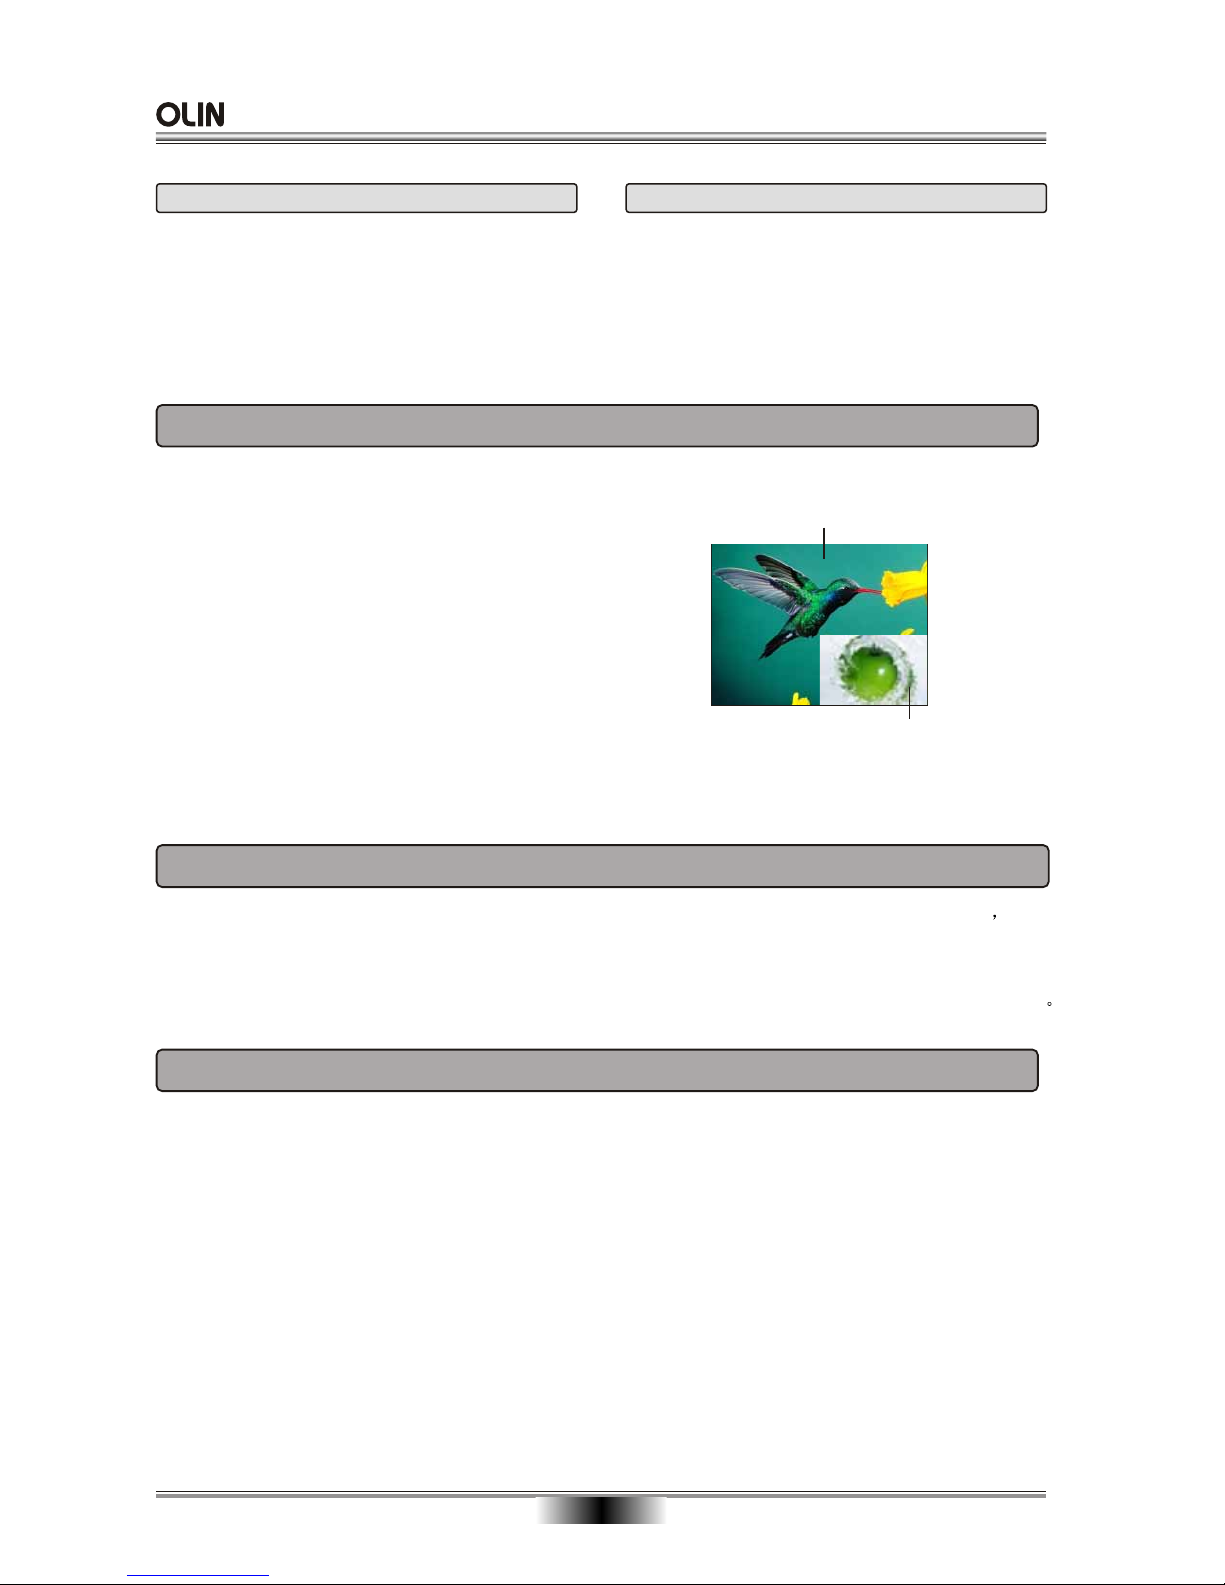
PLAYING SECONDARY VIDEO (PICTURE-IN-PICTURE) AND SECONDARY AUDIO
Secondary video can be played from a disc compatible with the picture-in-picture function.
For the playback method, refer to the instructions for the disc.
To turn on/off secondary video, Press the PIP button.
1. Secondary video is played.
2. PIP ON is displayed.
Press the button to turn it ON and OFF.
To turn on/off audio with the secondary video,
Press the SECONDARY AUDIO button.
The secondary audio is played.
1. Secondary Audio ON is displayed.
2. Press the button to turn it ON and OFF.
Note: Only the primary video is played during search/slow-motion or frame-by-frame.
" "
""
VOLUME and MUTE
Press " + " at the right of VOLUME to increase
volume, " - " to decrease to volume. Pressing MUTE
once will display VOLUME MUTE (no voice), the
second press will display VOLUME MUTE OFF (return
to normal playback).
RESOLUTION
This sets the video output resolution.
PAL: 576p, 720p,1080i, 1080p, HDMI AUTO
NTSC: 480p, 720p, 1080i, 1080p, HDMI AUTO
Primary video
Secondary video
Page 16
SPECIAL FUNCTION PLAYBACK
14
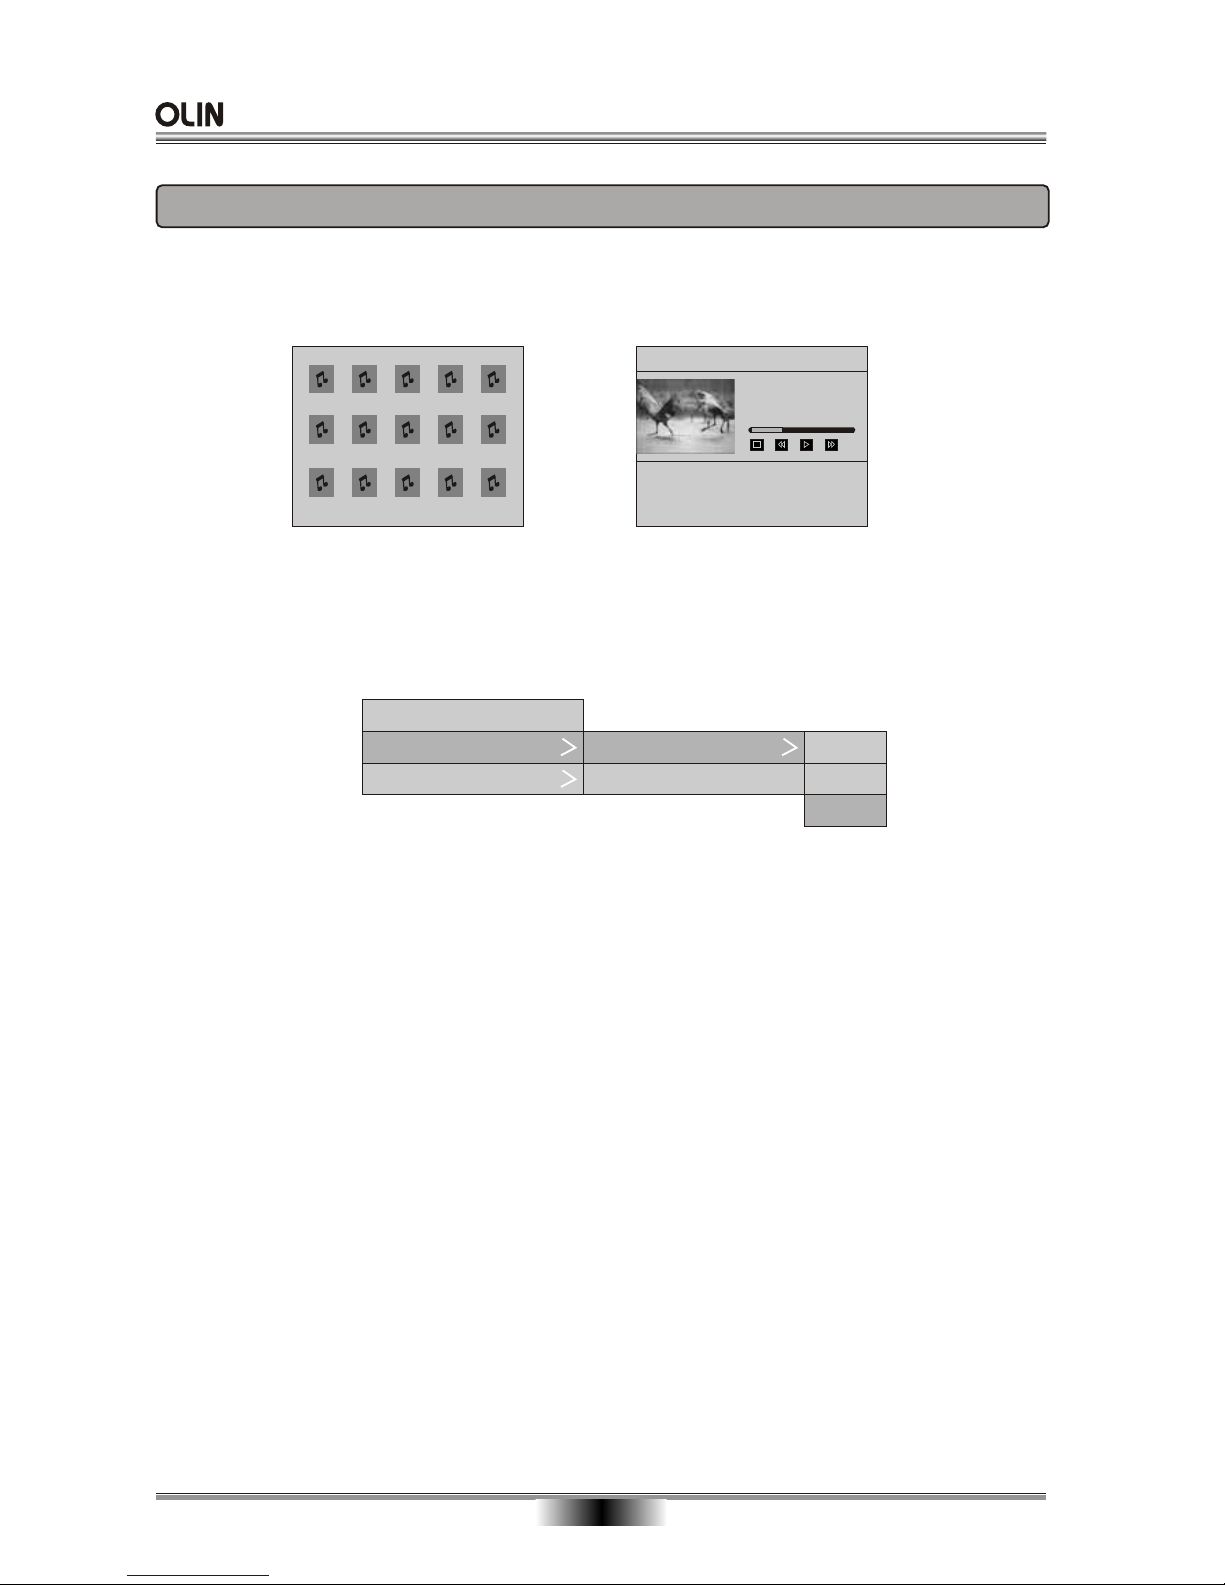
MP3/WMA AUDIO PLAYBACK
When playing a MP3/WMA disc, a menu will be displayed automatically if the disc is loaded in successfully.
In the menu, use the cursor buttons to select a file and then press ENTER to play.
You also can press DISC MENU button to invoke the pop-up menu, select the ‘play’ option in the menu,
playback of the audio file will begin and the ID3 information will be displayed.
001 002 003 004 005
006 007 008 009 010
011 012 013 014 015
1. CREATING AN AUDIO PLAYLIST
Press the DISC MENU key to invoke the pop-up menu for the audio file while viewing the disc contents.
Select the Play List option in the menu and press the RIGHT navigation key. select the Add to play list option
from the sub pop-up and press RIGHT Navigation key. Select This, All or Select option from the third level
pop-up to add files to the Playlist. Adding even a single file to the playlist will create the playlist. Only a single
playlist can exist in the MWJ player.
1.1 Adding files to the play list
This: add the selected file to the play list. All: add all the files to the play list. Select: add the selected files
to the play list.
Play
Add to Play List
Set As BGM
Add to Play List
View Play List
This
All
Select
Note: Press the LEFT navigation key to exit the current level of the pop-up menu. Pressing LEFT on the
first level pop-up will exit from the pop-up view completely.
1.2 Viewing Files in the Play list
Select the view play list option in the sub pop-up and press ENTER button will display all the files added to
the play list. (Note: The files in the play list can only be deleted when viewing the playlist. )
(ID3)
In the play list, Press the DISC MENU key to select the play option from the sub pop-up. playback of the
audio file will begin and the ID3 information will be displayed.
1.3 Playing from the Play list
1.5 Setting the Audio Mode for the Play list
None: this will set the play list in normal mode. The playlist will not loop or repeat during playback. Once the
playback reaches the end of the playlist, playback will stop.
Repeat: This will set the play list in repeat mode. During the play list playback, a single song with which the
playback was started will continuously be played back.
Loop: this will set the play list in loop mode. during the play list playback, all the songs present in the play
list will be played back and once the end of the play list is reached, playback of the first file in the play list
will begin again.
1.4 Setting the Play Mode for the Play list
Normal: This will arrange the songs back in the order that they were added to the play list, During play list
playback the order of the songs will be in the order they were added.
Shuffle: this will arrange the songs randomly in the playlist. During playlist playback the order of the songs
will be shuffled and not in the order they were added to the playlist.
Title: 001 -Mp3
Album
Artist: 001
Genre: Blues
Press ENTER to pause
Press RETURN to return to the previous screen
Use LEFT to play previous track & RIGHT to play next track
Use FRWD to rewind & FFWD to fast-forward
Page 17
JPEG PLAYBACK
Play
Start Slide Show
Properties
SPECIAL FUNCTION PLAYBACK
15
1.6 Removing Files from the Play list
In the play list, Press the DISC MENU key to select the Remove from Play List option from the sub pop-up.
This: remove the selected file from the play list. All: remove all the files to the play list. Select: remove the
selected files to the play list.
Play
This
All
Select
Set Play Mode
Set Audio Mode
Play list
Remove from play list
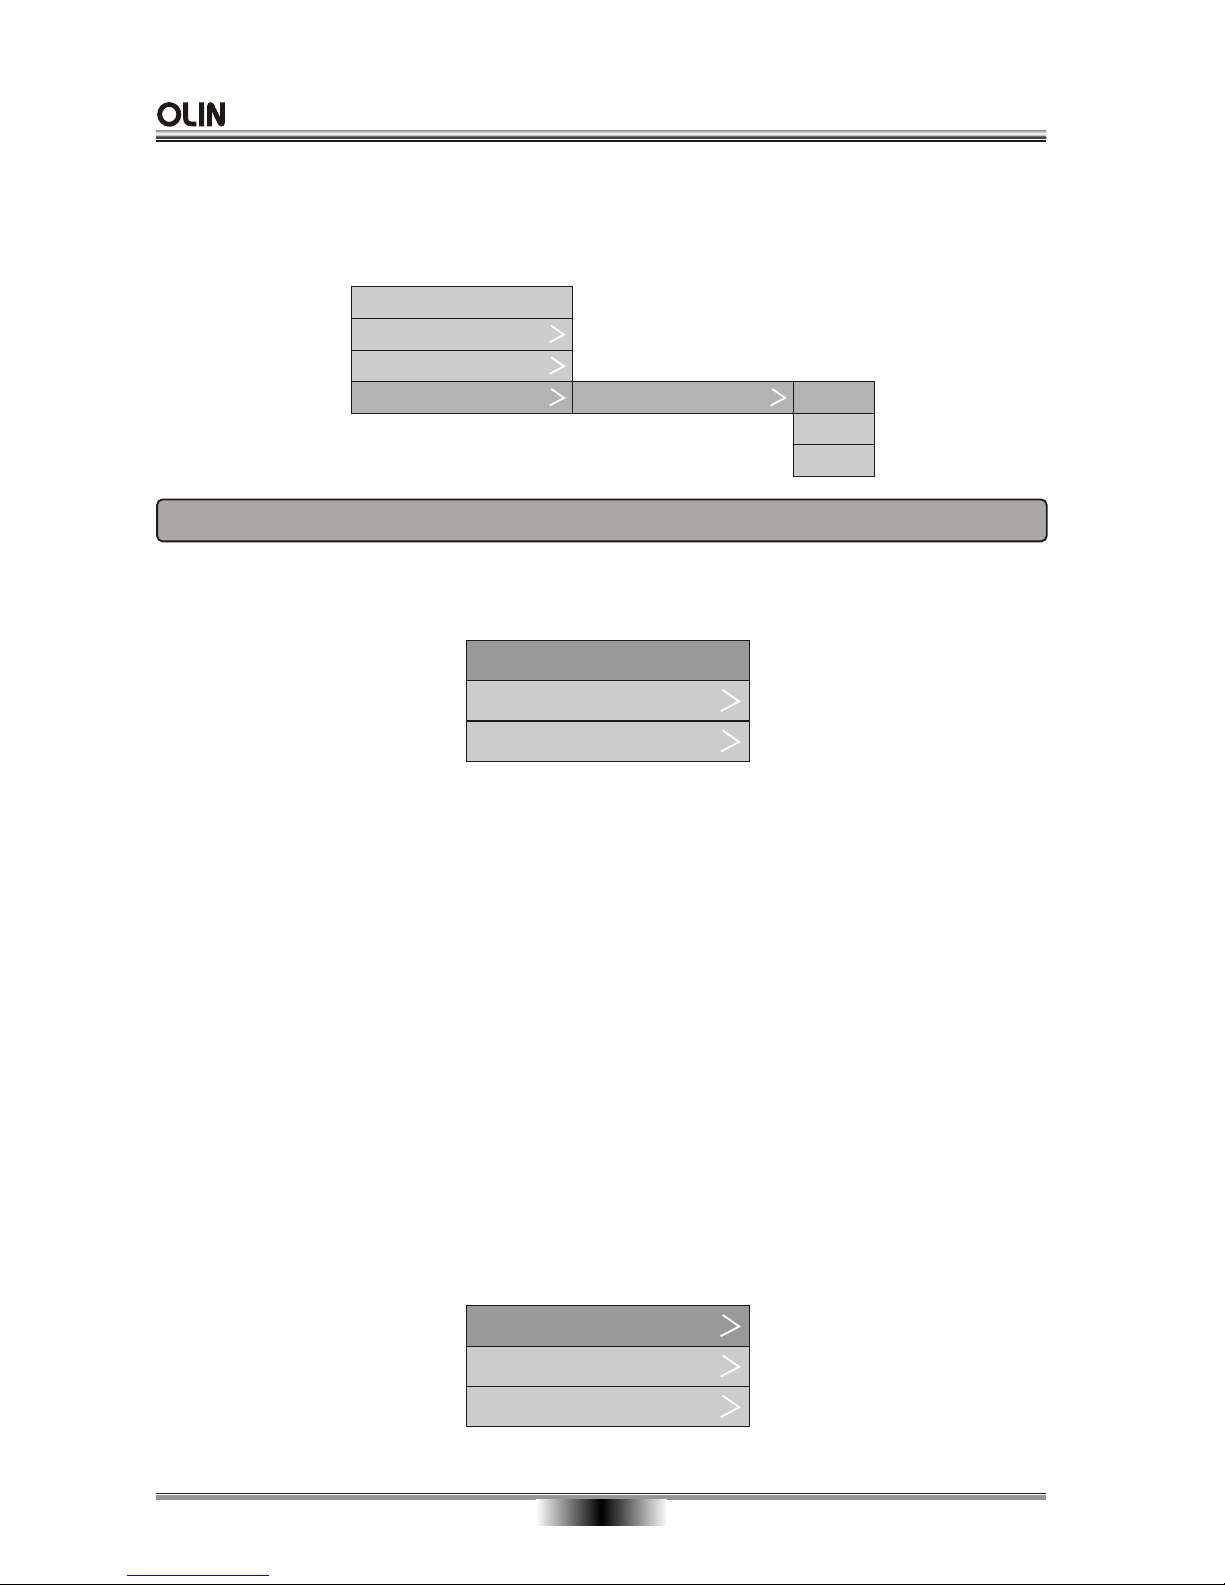
When playing a JPEG disc, a menu will be displayed automatically if the disc is loaded in successfully.
In the menu, use the cursor buttons to select a file and then press ENTER button, You also can press DISC
MENU button to invoke the pop-up menu, select the ‘play’ option in the menu, The image file and the image
number will be displayed.
1. Viewing the Image Properties
Press the DISC MENU key to invoke the pop-up menu,. Select the Properties option in the menu. This will
display the properties of the selected image file, such as camera model, resolution, etc (if this information
is present in the JPEG file).
2. Rotating the Image
The image files can be rotated only while viewing the image.
Right: Rotating the Image Clockwise
Left: Rotating the Image Counterclockwise
3. Skipping an Image
Pressing Next while viewing an image will display the next image. Pressing Prev while viewing an image will
display the previous image.
4. SLIDE SHOW PLAYER MANUAL
4.1 Starting the Slide Show
Press the DISC MENU key to invoke the pop-up menu. Select the Start Slide Show option in the menu,
This will invoke a sub pop-up. Select the any one of the 6 effects options displayed (Blend, Film, Shutter,
Fade, Curtain and None) from the sub pop-up and press OK. This will start the slide show from the next
image file with the effect selected above.
4.2 Changing the Slide Show Transition Effect
While viewing the slide show, press the DISC MENU, Select the Slide Show Effect option in the menu and
Select the any one of the 6 effects options displayed (Blend, Film, Shutter, Fade, Curtain and None) from
the sub pop-up and press ENTER. This will change the slide show effect from the current to the selected
effect.
Slide Show Effect
Slide Show Duration
Slide Show BGM
Page 18
SPECIAL FUNCTION PLAYBACK
16
4.3 Setting the Duration between Images
The first time the image duration is set, the slide show must be running.
The duration: 3s, 5s, 10s, 30s, 1min, 5min, 30min.
Once the duration has been set, the slide show will always start with the selected duration until changed
using the steps above.
4.4 Setting a Background Song for the Slide Show
Press the DISC MENU key to invoke the pop-up menu for the desired audio file. Select the Set as BGM
option in the menu , This will invoke a sub pop-up. Select any one of the 5 places and press ENTER. This
will set the selected audio file to be played back during slide show.
If an audio file already occupies the location, the new selection will replace the old selection. Only 5 songs
can be selected to be set as background songs.
Play
Add to play list
Set As BGM
4.5 Starting the Slide Show with a Background Song
The first time the slide show is started with background music, the slide show must already be in motion.
Select the Slide Show BGM option in the menu , and then Select any one of the displayed songs. Up to 5
songs can be selected.
Once the end of song is encountered, the same song will be played in repeat mode until the slide show is
stopped.
4.6 Turning Off the Background Song During the Slide Show
Select the Slide Show BGM option in the menu and press the RIGHT navigation key. This will invoke a sub
pop-up. Select the NONE option and press ENTER to start the slide show with no background song.
NTOE:
The MWJ System’s Audio Player does not support the playback of any other audio format except MP3 and
WMA files.
The MWJ System’s Image Player only supports the Playback JPEG files.
The MWJ player only supports one playlist.
The image slideshow playlist can have a maximum of 5 songs.
The fast forward and rewind options during music playback only operate at one speed.
MWJ PLAYER -- IMPORTANT THINGS TO REMEMBER
Page 19
SYSTEM SETUP
17
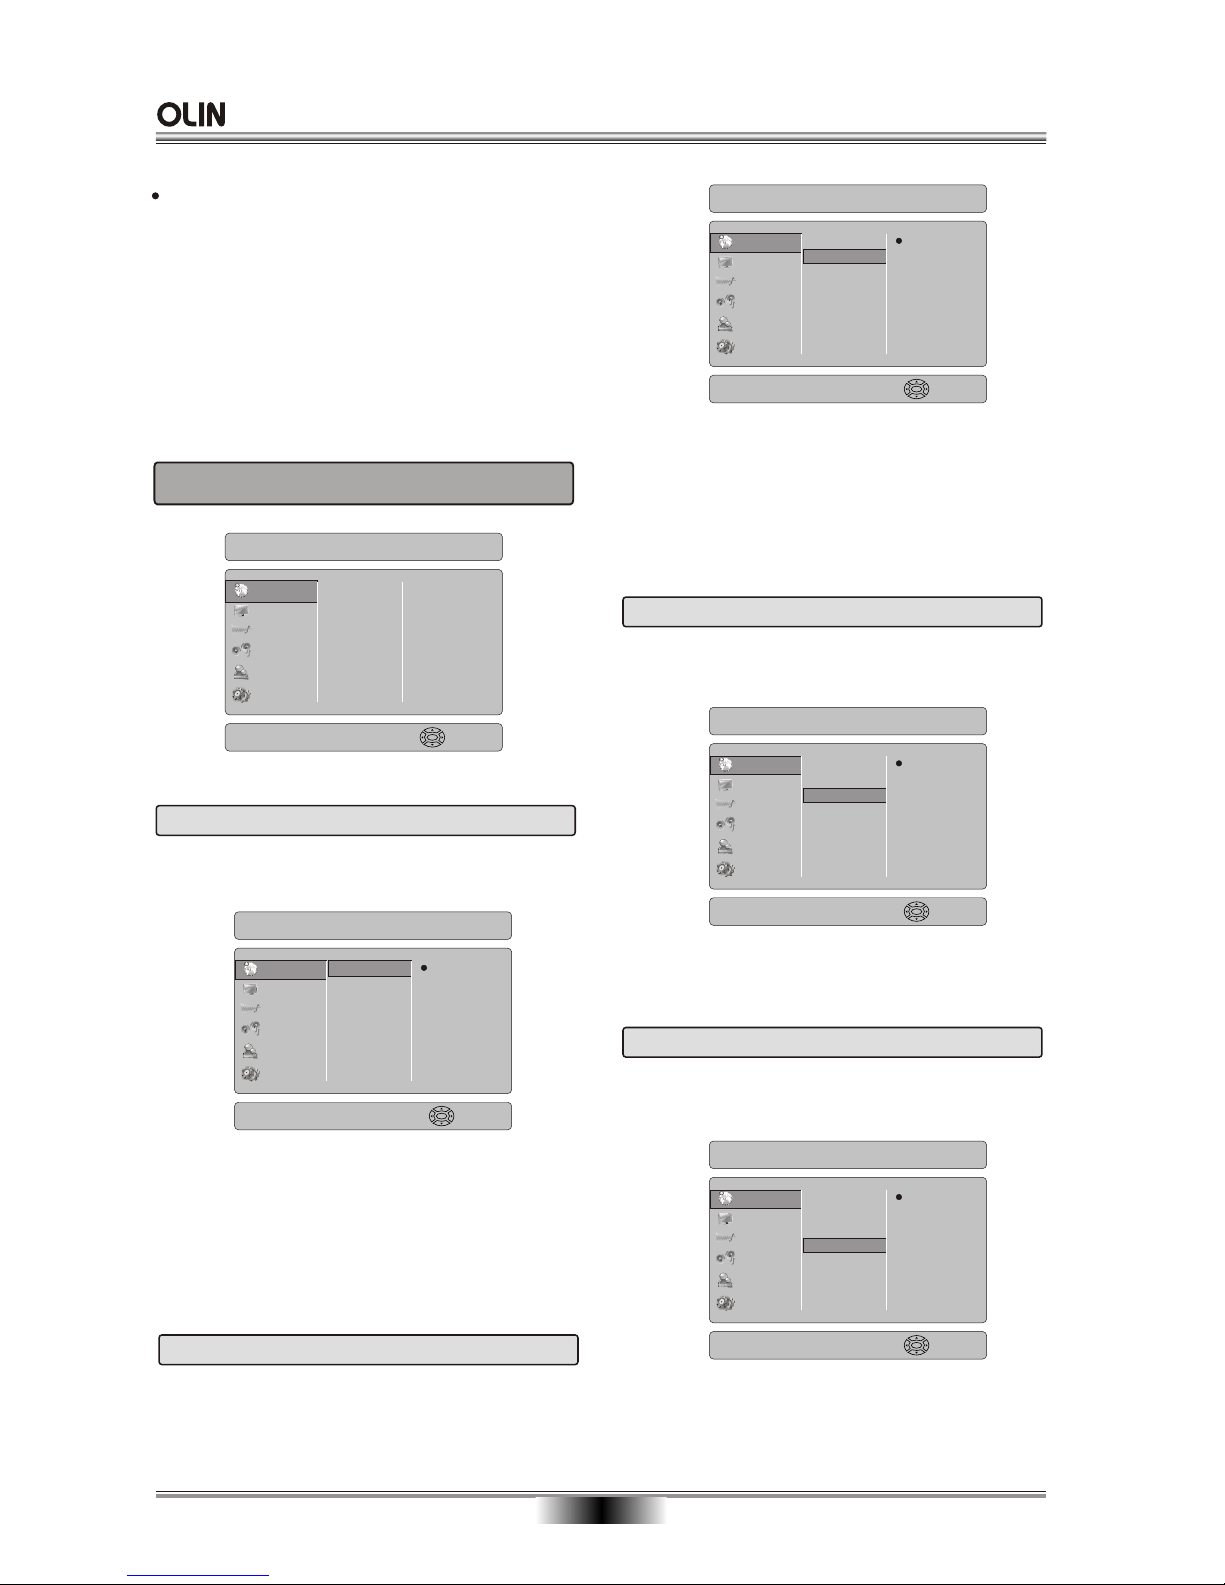
1. LANGUAGE MENU
1.2 Subtitle Language
Subtitle Language: Sets the preferred subtitle
language as the default language for the disc.
1.3 Menu Language
Menu Language: Sets the preferred menu language
as the default language for the disc.
1.4 OSD Language
OSD Language: Users can select the whole setup
menu and on-screen display language.
When you press SETUP button on the remote
control, the setup menu will be displayed. It include
language , display , audio , speaker, parental,
other menu.
1.Within the setup menu, you can use UP, DOWN,
LEFT and RIGHT buttons on the remote control
to move the cursor, and then press the
ENTER button to make your selection.
Press LEFT can return the previous menu.
2.To exit setup menu, you can select the exit
setup menu or press SETUP button.
1.1 Audio Language
Audio Language: Sets the preferred audio language
as the default language for the disc.
Note:
Not all languages are available on all diskc.
Some diskc to not allow the user to select the audio
language from the BD-player setup menus. The audio
language can only be selected from the BD/DVD disc
setup menu. (The menu that appears after the disc
has been inserted)
Setup Menu
Language
Display
Audio
Speaker
Parental
Other
Audio
Subtitle
Menu
OSD
Auto
English
French
Spanish
Chinese
Audio language settings
Navigate left to change.
Setup Menu
Language
Display
Audio
Speaker
Parental
Other
Audio
Subtitle
Menu
OSD
None
English
French
Spanish
Chinese
Japanese
Korean
Subtitle language settings
Navigate left to change.
Note:
Not all languages are available on all disc.
Some disc to not allow the user to select the audio
language from the BD-player setup menus. The audio
language can only be selected from the BD/DVD disc
setup menu. (The menu that appears after the disc
has been inserted)
Setup Menu
Language
Display
Audio
Speaker
Parental
Other
Audio
Subtitle
Menu
OSD
Auto
English
French
Spanish
Chinese
Menu language settings
Navigate left to change.
Note:
Not all languages are available on all discs.
Most discs only have one menu language available.
Setup Menu
Language
Display
Audio
Speaker
Parental
Other
Audio
Subtitle
Menu
OSD
English
OSD language settings: change done immedi...
Navigate left to change.
Setup Menu
Language
Display
Audio
Speaker
Parental
Other
Audio
Subtitle
Menu
OSD
Auto
None
Auto
English
ENTER
ENTER
ENTER
ENTER
ENTER
Page 20
TV TYPE
Correct Resolution
Setting
If your TV is an enhanced-definition
TV (EDTV)
If your TV is a high-definition TV
(HDTV) capable of 720p only
If your TV is a high-definition TV
(HDTV) capable of 1080i only
If your TV is HDMI equipped, and if
your TV is a high-definition TV (HDTV)
capable of 1080p [any frame rate], and
you are connected to your TV via HDMI,
If your TV is HDMI equipped, and you
are connected to your TV via HDMI, and
you wish the BD player to set the output
based on information exchanged between
the TV and the player over the HDMI cable.
480p
720p
1080i
1080p
HDMI auto
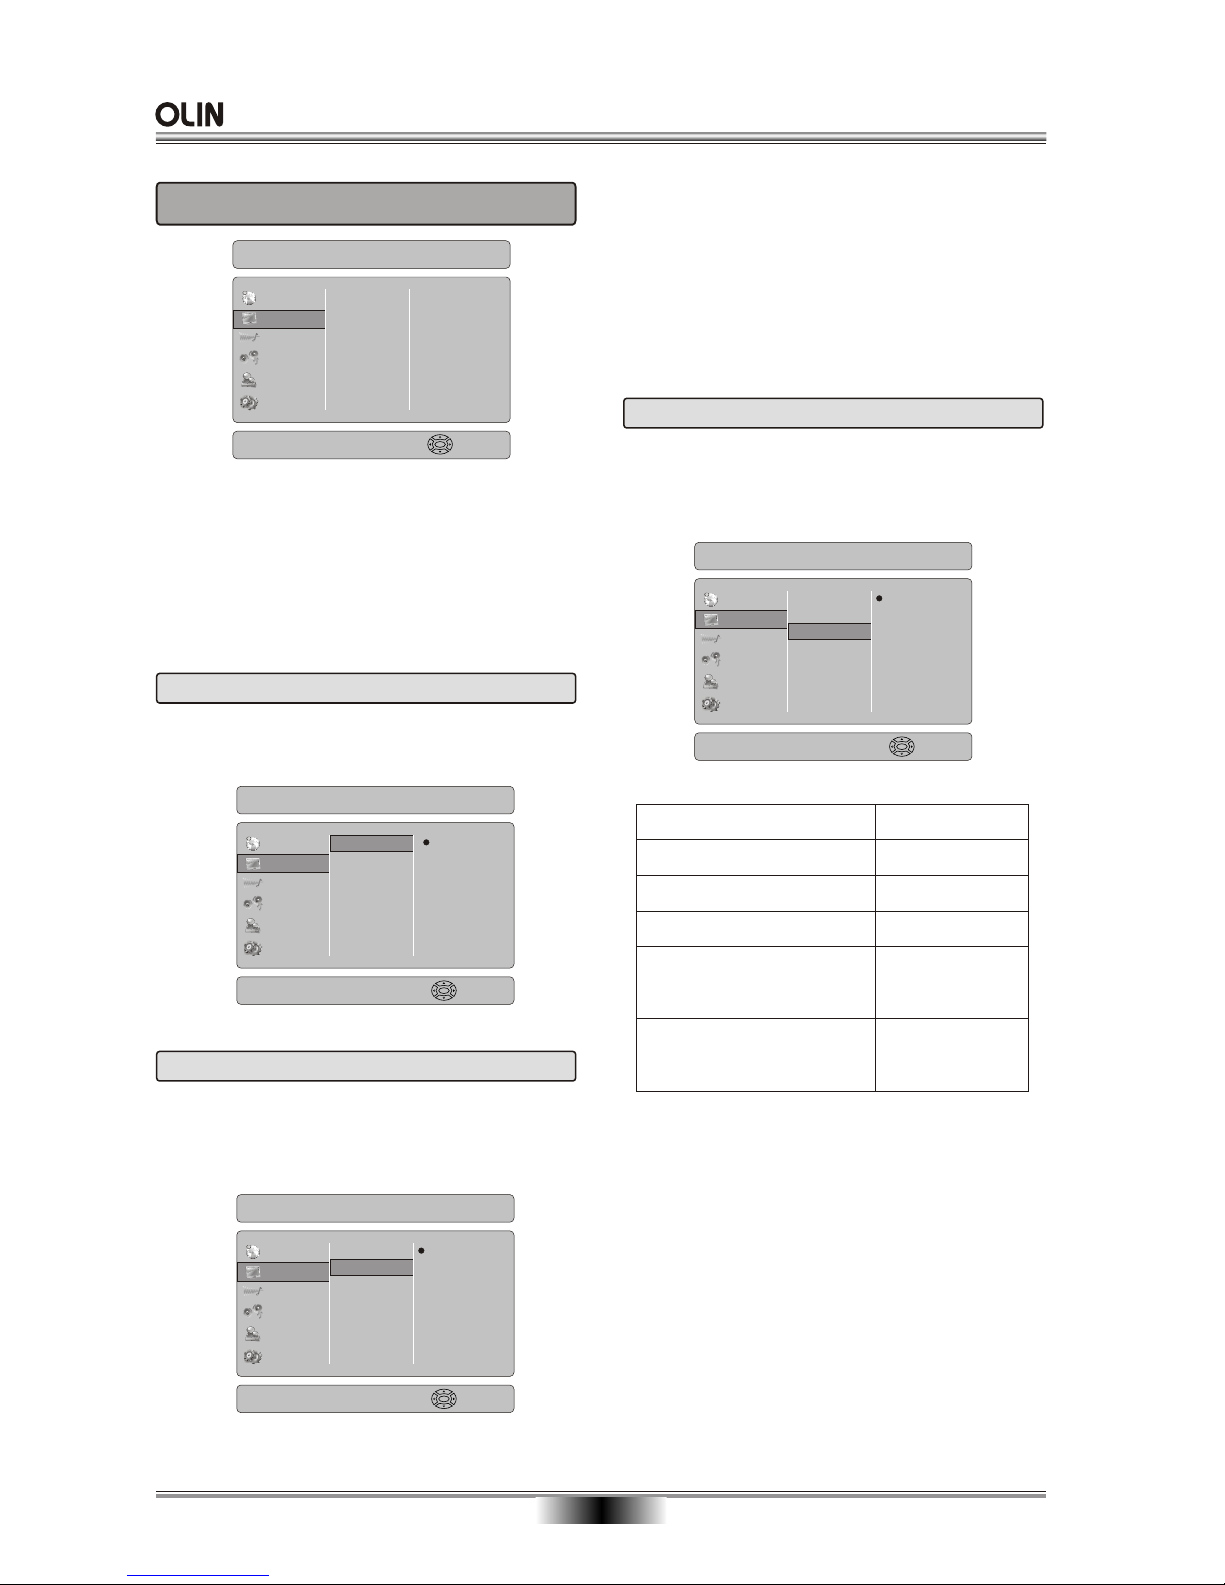
2.3 Resolution
Resolution: select the output resolution based on
the type of TV connected to the player, as described
in the table below:
Note: Setting the player for an output resolution not
supported by your TV will result in unpredictable
results. Only the HDMI output of the player is capable
of supporting 1080p video output at any frame rate.
If the HDMI cable is not connected, the component
outputs are limited to 1080i.
2. DISPLAY MEMU
If your player is connected to the TV via HDMI,setting
the display correctly should not be necessary. The
player and your TV will communicate to each other
and set the display accordingly. This section is
mainly intended for users who have connected their
TV via the component output, or for advanced users
with HDMI Tvs.
Note:
Setup Menu
Language
Display
Audio
Speaker
Parental
Other
TV Type
TV Aspect
Resolution
Color Space
Film Mode
NTSC
16:9 Full
xvYCC
Off
SYSTEM SETUP
18
2.1 TV Type
TV Type: This player supports different TV output,
including NTSC and PAL systems.
Setup Menu
Language
Display
Audio
Speaker
Parental
Other
TV Type
TV Aspect
Resolution
Color Space
Film Mode
NTSC
PAL
TV Type Settings, NTSC/PAL.
Navigate Left to change.
2.2 TV Aspect
If your TV has a very rectangular (16:9) aspect ratio,
you will need to choose one of the 16:9 aspect ratios.
If your TV has a relatively square (4:3) aspect ratio,
you will need to choose one of the 4:3 aspect ratios.
Note: Setting the player for one of the 16:9 settings
when connected to a 4:3 TV, or setting the player for
one of the 4:3 settings when connected to a 16:9 TV
will result in unpredictable results.
Setup Menu
Language
Display
Audio
Speaker
Parental
Other
TV Type
TV Aspect
Resolution
Color Space
Film Mode
16:9 Full
16:9 Pillarbox
4:3 Letterbox
4:3 Pan and Scan
TV Aspect Ratio(16:9/4:3 LB/4:3 PS)
Navigate Left to change.
TV Aspect: Select the picture size according to the
aspect ratio of the connected TV. You can select:
16:9 Pillarbox, 4:3 Pan & Scan, 4:3 Letter Box, 16:9
full.
Setup Menu
Language
Display
Audio
Speaker
Parental
Other
TV Type
TV Aspect
Resolution
Color Space
Film Mode
HDMI Auto
1080i
720p
480p/576p
1080p
Output Resolution: (HDMI Auto)
Navigate Left to change.
ENTER
ENTER
ENTER
ENTER
Page 21
SYSTEM SETUP
19
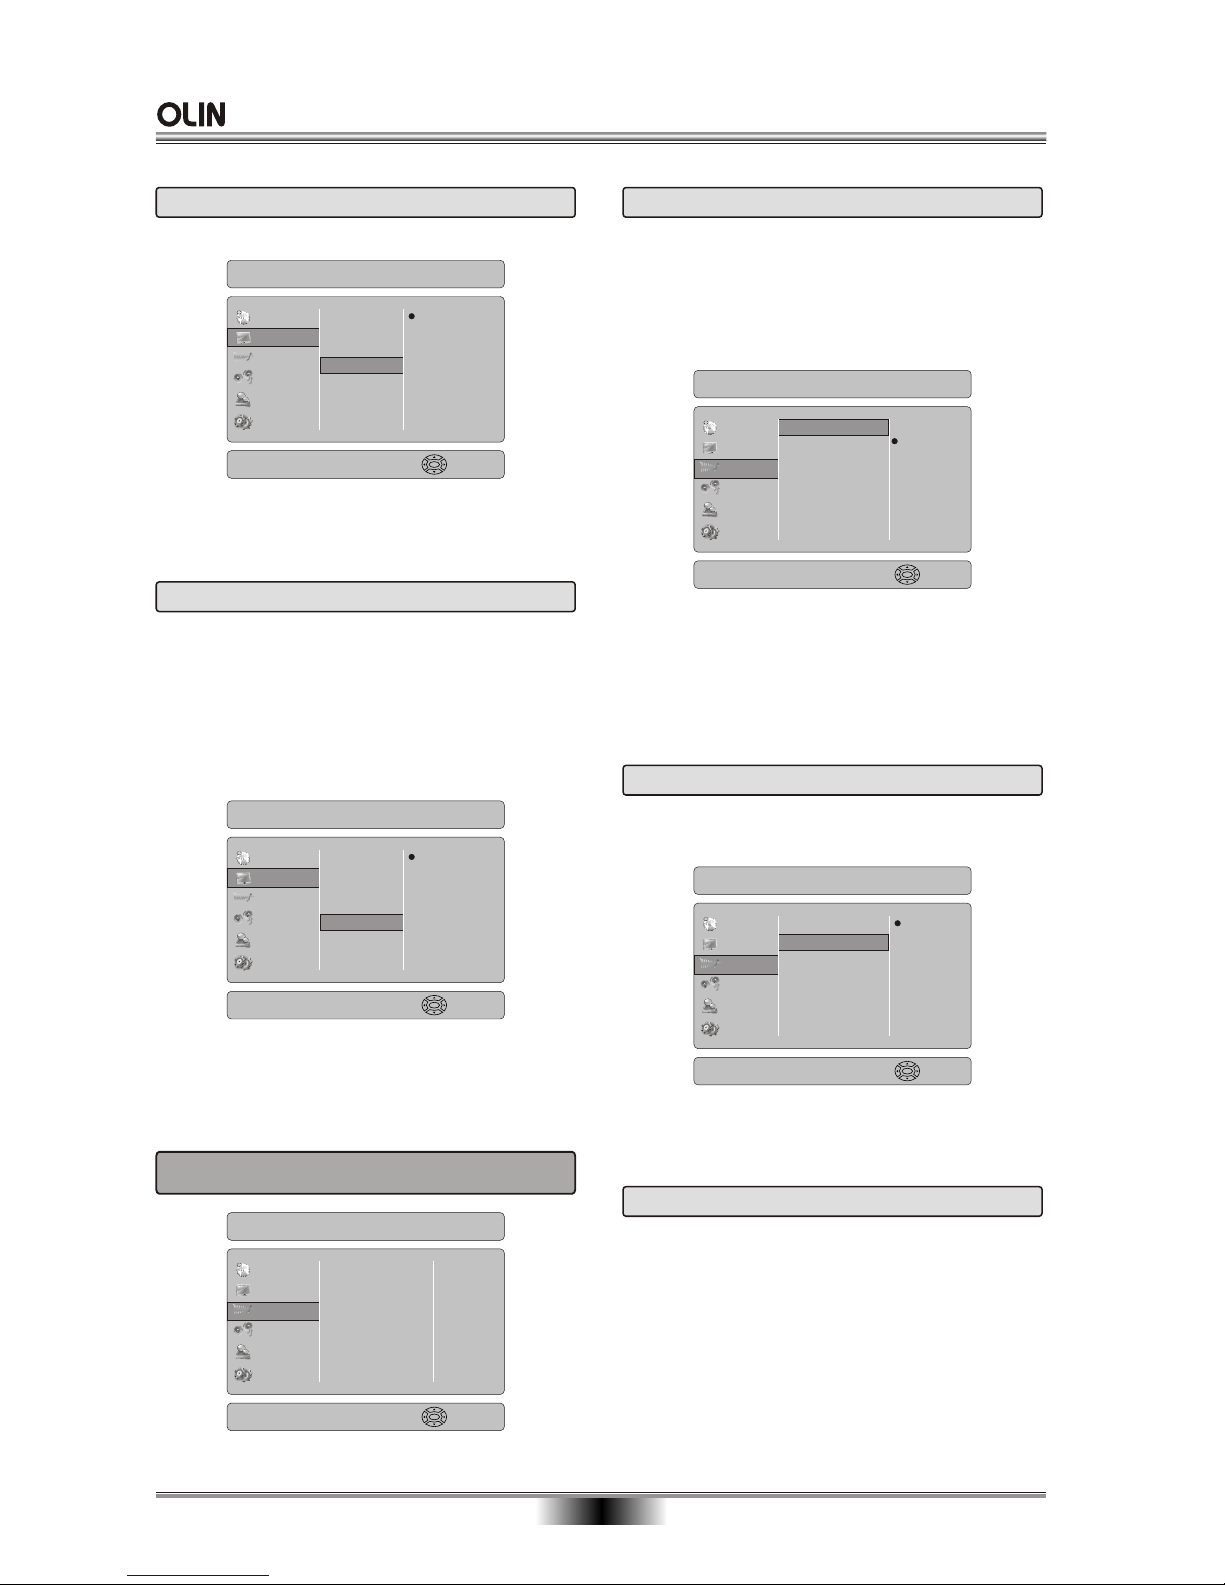
2.4 Color Space
Color Space: set color space output.
xvYCC: Set to xvYCC.
YCC: Set to YCC.
RGB: Set to RGB.
Setup Menu
Language
Display
Audio
Speaker
Parental
Other
TV Type
TV Aspect
Resolution
Color Space
Film Mode
xvYCC
YCC
RGB
Color Space Settings: xvYCC will set output to
optimal colorspace
2.5 Film Mode
Film Mode: Movies are recorded on film at a rate of
24 pictures, or frames, per second. Many of the
movies on BD discs are placed on the disc at this
frame rate. However, not all TVs can display 24
progressive frames/second of video. The left/right
menu keys can then be used to select Off or On for
24 frames/second output format.
Note: Only the HDMI output of the player is capable
of supporting 1080p video output at any frame rate.
The component outputs are limited to 1080i, regardless
of the Film Mode setting.
Setup Menu
Language
Display
Audio
Speaker
Parental
Other
TV Type
TV Aspect
Resolution
Color Space
Film Mode
Off
On
Film Mode can be set to: On/Off.
Default setting: Off.
3. Audio Menu
Setup Menu
Language
Display
Audio
Speaker
Parental
Other
Digital Output
PCM Downsampling
Dynamic Range Control
Dialog Normalization
Bass Crossover Freq.
Passthru
48 Khz
Off
Disable
Off
3.1 Digital Output
Digital Output: set the digital audio outputs, such as
PCM Stereo, Passthru, Passthru Core, RE-Encode
DTS, PCM 5.1, PCM 7.1, Setting these outputs
correctly depends on whether you have a surroundsound receiver connected to the BD player, and the
capabilities of the surround sound receiver.
Note: If you have a 5.1/7.1 audio system and the
receiver does not support bass management (setting
the cutoff frequency of the subwoofer and the size of
the other speakers), you may want to consider using
multichannel analog outputs from the BD player (if
available) in order to benefit from the bass management capabilities of the BD player.
Setup Menu
Language
Display
Audio
Speaker
Parental
Other
PCM Stereo
Passthru
Passthru Core
RE-Encode DTS
PCM5.1
PCM7.1
Digital Output Settings
Navigate left to change.
Digital Output
PCM Downsampling
Dynamic Range Control
Dialog Normalization
Bass Crossover Freq.
3.2 PCM Downsampling
PCM Downsampling: To set the player’s digital output
PCM sampling rate. Such as 48KHz, 96KHz,192KHz.
Note: Incorrectly setting the digital audio output’s
PCM sampling rate may result in unpredictable audio
playback.
Setup Menu
Language
Display
Audio
Speaker
Parental
Other
48KHz
96KHz
192KHz
PCM Downsampling(Off/48KHz/96KHz)
Navigate left to change.
Digital Output
PCM Downsampling
Dynamic Range Control
Dialog Normalization
Bass Crossover Freq.
3.3 Dynamic Range Control
Dynamic Range Control: this is only active when
a Dolby Digital signal is detected.
Off: you can enjoy the movie with the standard
Dynamic Range.
On: When Movie soundtracks are played at low
volume or from smaller speakers, the system can
apply appropriate compression to make low-level
content more intelligible and prevent dramatic
passages from getting too loud.
ENTER
ENTER
ENTER
ENTER
ENTER
Page 22
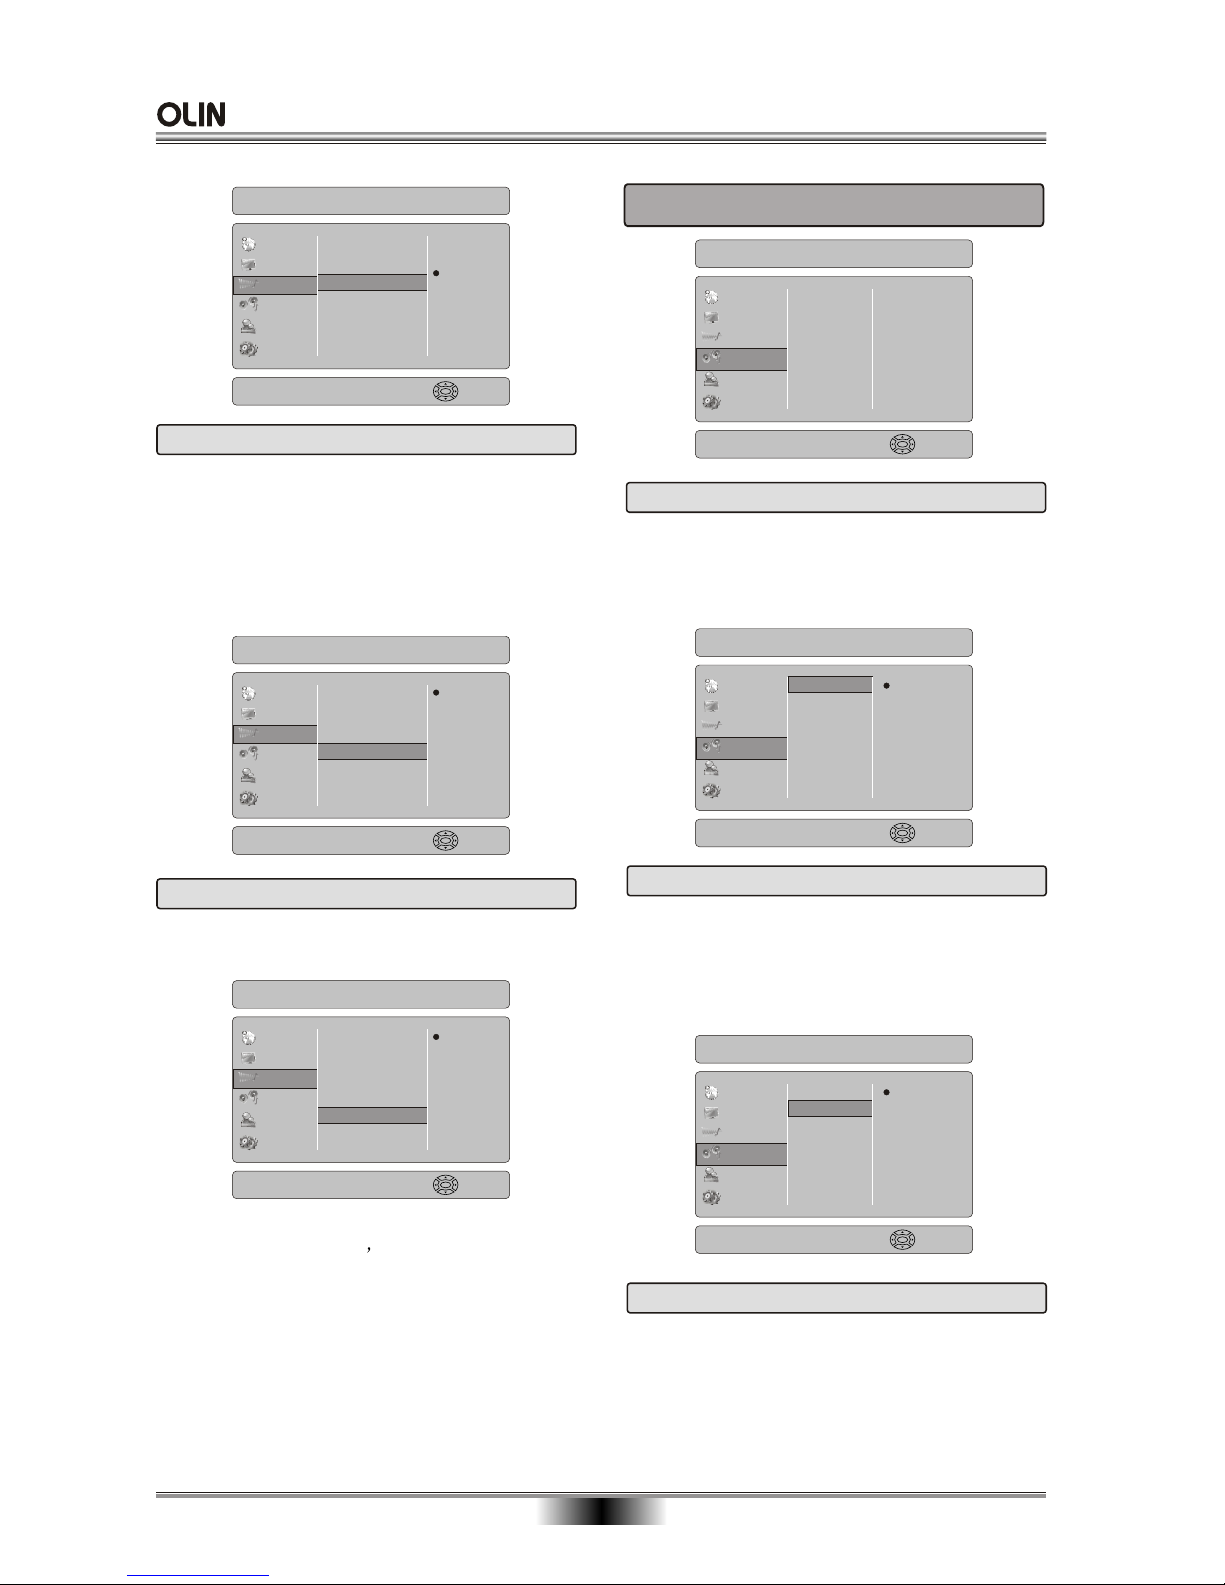
4. Speaker Menu
SYSTEM SETUP
20
Setup Menu
Language
Display
Audio
Speaker
Parental
Other
On
Follow
Off
Dynamic Range Control(On/Follow/Off)
Navigate left to change.
Digital Output
PCM Downsampling
Dynamic Range Control
Dialog Normalization
Bass Crossover Freq.
3.4 Dialog Normalization
Dialog Normalization: To set whether the BD player’s
ignores the dialog normalization setting in a Dolby
soundtrack or not.
This is a piece of non-sound data placed in Dolby
soundtracks so that the dialog in all movies will play
at about the same volume levels, assuming you never
touched the volume controls of the player or the TV.
Setup Menu
Language
Display
Audio
Speaker
Parental
Other
Disable
Default
Enable
Dialog Normalization (Off/On)
Navigate left to change.
Digital Output
PCM Downsampling
Dynamic Range Control
Dialog Normalization
Bass Crossover Freq.
3.5 Bass Crossover Freq.
Bass Crossover Freq.: indicate to the BD player your
Bass (Subwoofer’s) frequency response.
Setup Menu
Language
Display
Audio
Speaker
Parental
Other
Off
80Hz
100Hz
120Hz
Bass Crossover Frequency (Off/80Hz/100Hz/...)
Navigate left to change.
Digital Output
PCM Downsampling
Dynamic Range Control
Dialog Normalization
Bass Crossover Freq.
Note:
If you don’t have a surround sound receiver connected
to the BD player, you don t need to touch this menu
setting. It only applies to multichannel audio.
If you have a surround sound receiver connected to
the BD player, and you have connected to the surround
receiver via the multichannel audio outputs, you can
set the menu to choice.
If you have a surround sound receiver connected to
the BD player via HDMI or SPDIF this menu item has
no effect.
Setup Menu
Language
Display
Audio
Speaker
Parental
Other
Front L-R
Center
Surround L-R
Rear L-R
Subwoofer
Large
Large
Large
Large
On
4.1 Front L-R
Front L-R: Sets the player’s output frequency
response and downmixing characteristics by setting
the front speakers to Small (Front speakers have no
subwoofers) or Large (front speakers have subwoofers).
Setup Menu
Language
Display
Audio
Speaker
Parental
Other
Front L-R
Center
Surround L-R
Rear L-R
Subwoofer
Large
Small
Front left and Right Speaker
Navigate left to change.
4.2 Center
Center: Sets the player’s output frequency response
and downmixing characteristics by setting the center
speaker to Small (Center speaker has no subwoofers)
or Large (center speaker has subwoofers), or Off
(no center speaker).
Setup Menu
Language
Display
Audio
Speaker
Parental
Other
Front L-R
Center
Surround L-R
Rear L-R
Subwoofer
Large
Small
Off
Center Speaker
Navigate left to change.
4.3 Surround L-R
Surround L-R: Sets the player’s output frequency
response and downmixing characteristics by setting
the surround speakers to Small (surround speakers
have no subwoofers) or Large (surround speakers
have subwoofers), or Off (no surround speakers).
ENTER
ENTER
ENTER
ENTER
ENTER
ENTER
Page 23
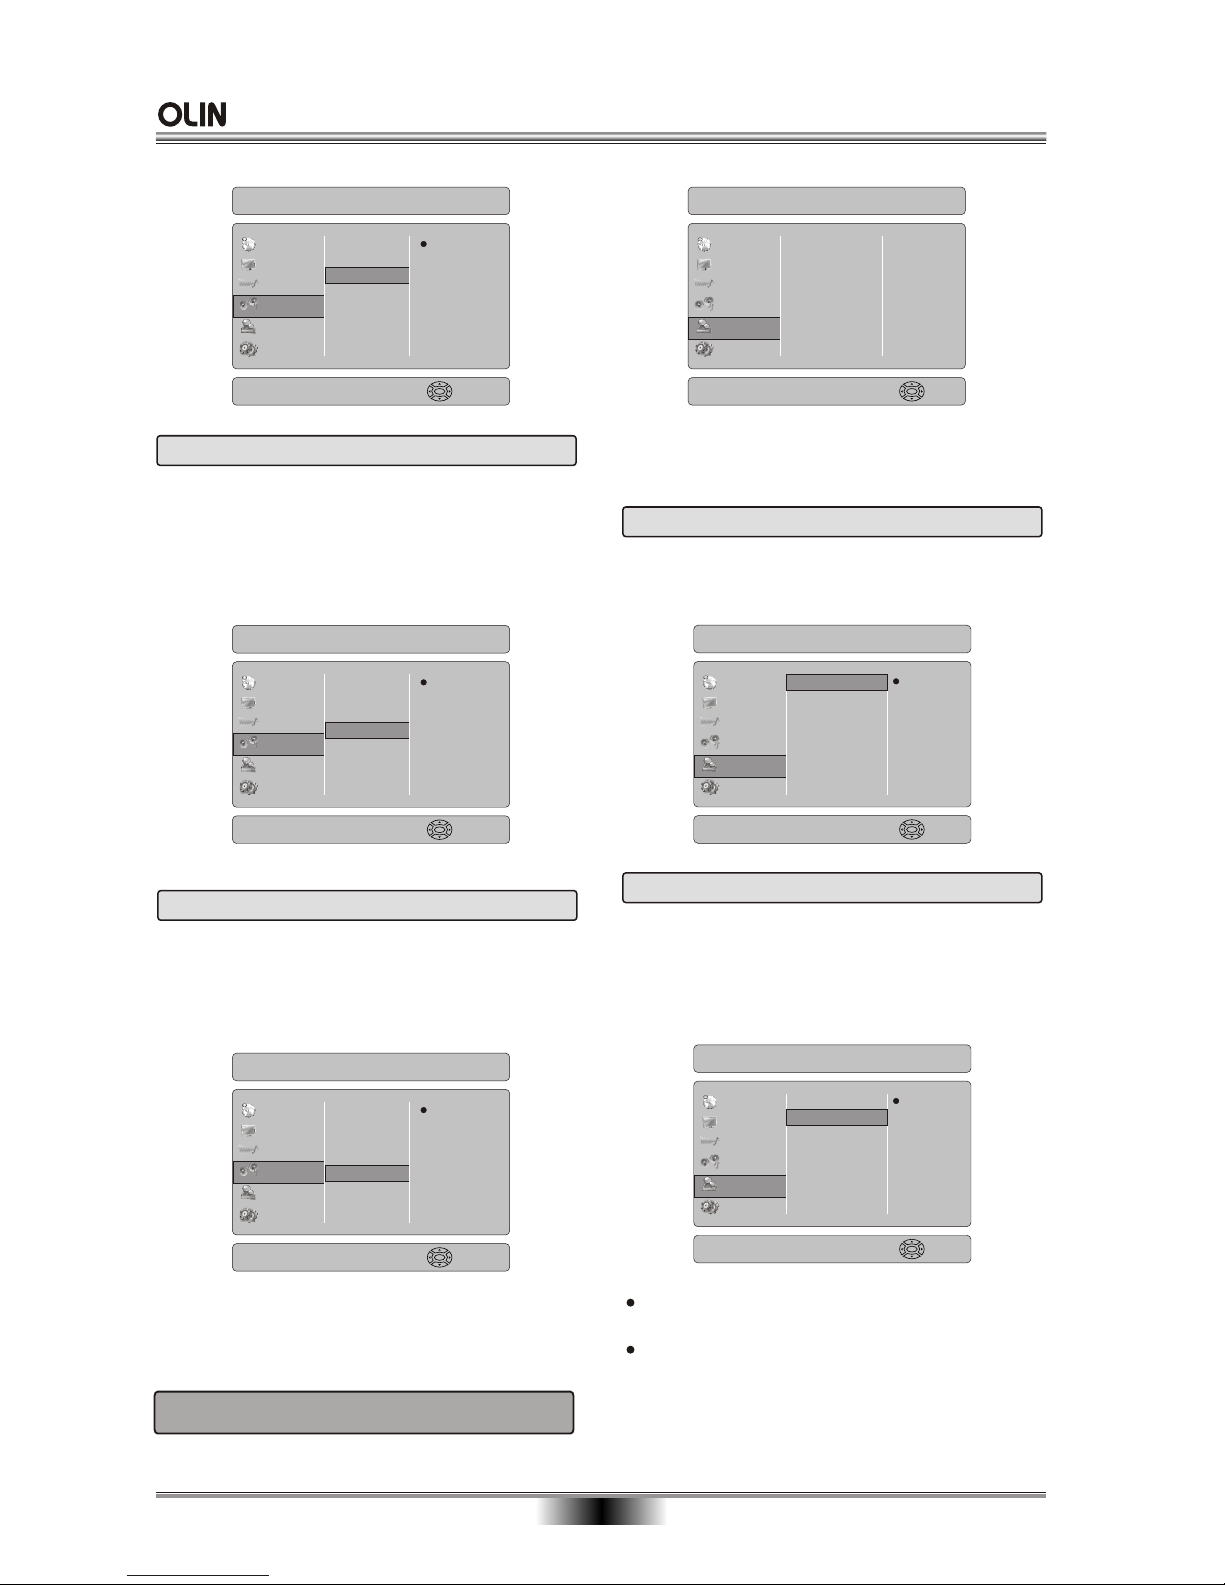
Setup Menu
Language
Display
Audio
Speaker
Parental
Other
Front L-R
Center
Surround L-R
Rear L-R
Subwoofer
Large
Small
Off
Surround left and Right Speaker
Navigate left to change.
SYSTEM SETUP
21
4.4 Rear L-R
Rear L-R: Sets the player’s output frequency
response and downmixing characteristics by setting
the rear speakers to Small (rear speakers have no
subwoofers) or Large (rear speakers have subwoofers),
or Off (no rear speakers).
Setup Menu
Language
Display
Audio
Speaker
Parental
Other
Front L-R
Center
Surround L-R
Rear L-R
Subwoofer
Large
Small
Off
Rear left and Right Speaker
Navigate left to change.
4.5 Subwoofer
Subwoofer: Sets the player’s output frequency
response and downmixing characteristics by setting
the subwoofer to On (Subwoofer Present) or Off (no
subwoofer).
Setup Menu
Language
Display
Audio
Speaker
Parental
Other
Front L-R
Center
Surround L-R
Rear L-R
Subwoofer
On
Off
Subwoofer settings
Navigate left to change.
Note: The subwoofer’s frequency response can be
entered from the Audio Menu’s “Bass Crossover Freq”
menu selection.
5. Parental Control Menu
Setup Menu
Language
Display
Audio
Speaker
Parental
Other
Parental Country
Parental Control
Parental Level
Parental Password
USA
Off
Level1
Default
Please enter the password and then
press ENTER key on the remote. (T
type 4 numerals
he initial password
is 0000) the following setup screen will appear:
5.1 Parental Country
Setup Menu
Language
Display
Audio
Speaker
Parental
Other
USA
International
Parental Country(USA/International)
Navigate left to change.
Parental Country
Parental Control
Parental Level
Parental Password
Parental Country: Sets the preferred country region
language as the default when playing BD disc. ( if
BD disc support these languages)
5.2 Parental Control
Parental Control: The parental control function works
inconjunction with the different censorship classes
assigned to BD. These classes help to control the
types of BD that the family watches, There are up
to 8 censorship classes for BD.
Setup Menu
Language
Display
Audio
Speaker
Parental
Other
Off
On
Parental Control (Off/On)
Navigate left to change.
Parental Country
Parental Control
Parental Level
Parental Password
Note:
The PARENTAL is changeable when PASSWORD
MODE set to OFF.
After setting the level of parental control. please
set the password as ON to perform the lock of
changing.
ENTER
ENTER
ENTER
ENTER
ENTER
ENTER
Page 24
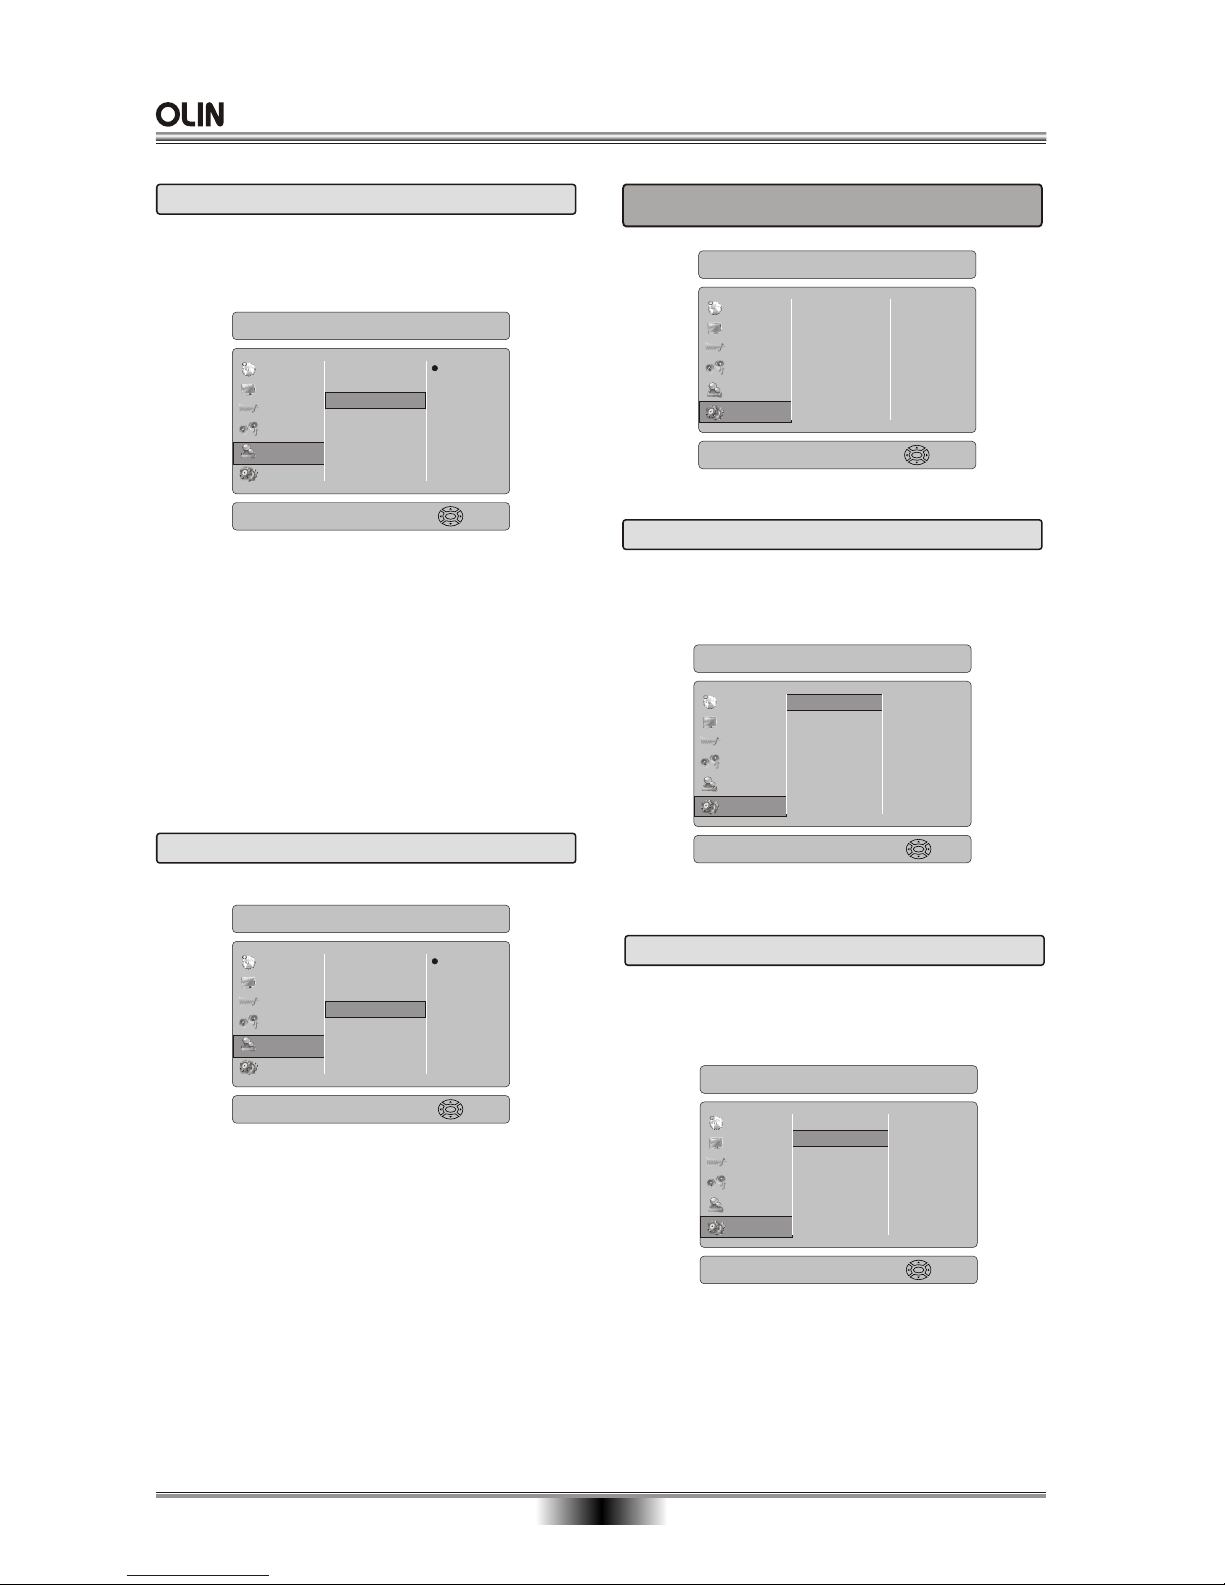
SYSTEM SETUP
5.3 Parental Level
5.4 Parental Password
Level 1[Kid Safe] - Suitable for all children.
Level 2[G] - General audiences.
Level 3[PG] - Parental guidance suggested.
Level 4[PG-13] - Not suitable for anyone under 13.
Level 5[PGR] - Parental guidance recommended.
Level 6[R] - Not suitable for anyone under 17 unless
supervised by a parent or adult guardian.
Level 7[NC-17] - Not suitable for anyone under 17.
Level 8[Audlt] - All DVDs can be played.
Parental Level: sets different censorship classes
assigned to DVDs.
Parental Password: You can change the password,
please type 4 numerals as new password.
Note: (Initial password : 0000)
Be sure remember new password. When set parental
control function you must input new password .
22
Setup Menu
Language
Display
Audio
Speaker
Parental
Other
Level 1
Level 2
Level 3
Level 4
Level 5
Level 6
Level 7
Level 8
Parental Level
Navigate left to change.
Parental Country
Parental Control
Parental Level
Parental Password
ENTER
Setup Menu
Language
Display
Audio
Speaker
Parental
Other
Default
User Define
Parental Country
Parental Control
Parental Level
Parental Password
ENTER
Setup Menu
Language
Display
Audio
Speaker
Parental
Other
Reset Settings
Erase NV Storage
6. Other Menu
ENTER
6.2 Erase Non-volatile storage
A button to bring up the "Erase Non-Volatile Storage"
confirmation dialog, in which if "Ok" is selected will
erase the BD "Application Data Area".
Setup Menu
Reset Settings
Erase NV Storage
Language
Display
Audio
Speaker
Parental
Other
Erase contents of the non-volatile storage
Press enter to open window
ENTER
6.1 Reset Settings
Reset Settings: Resets to all the manufacturer's
original settings for this BD player Select OK option
to perform the reset.
Setup Menu
Language
Display
Audio
Speaker
Parental
Other
Reset Settings
Erase NV Storage
ENTER
Page 25
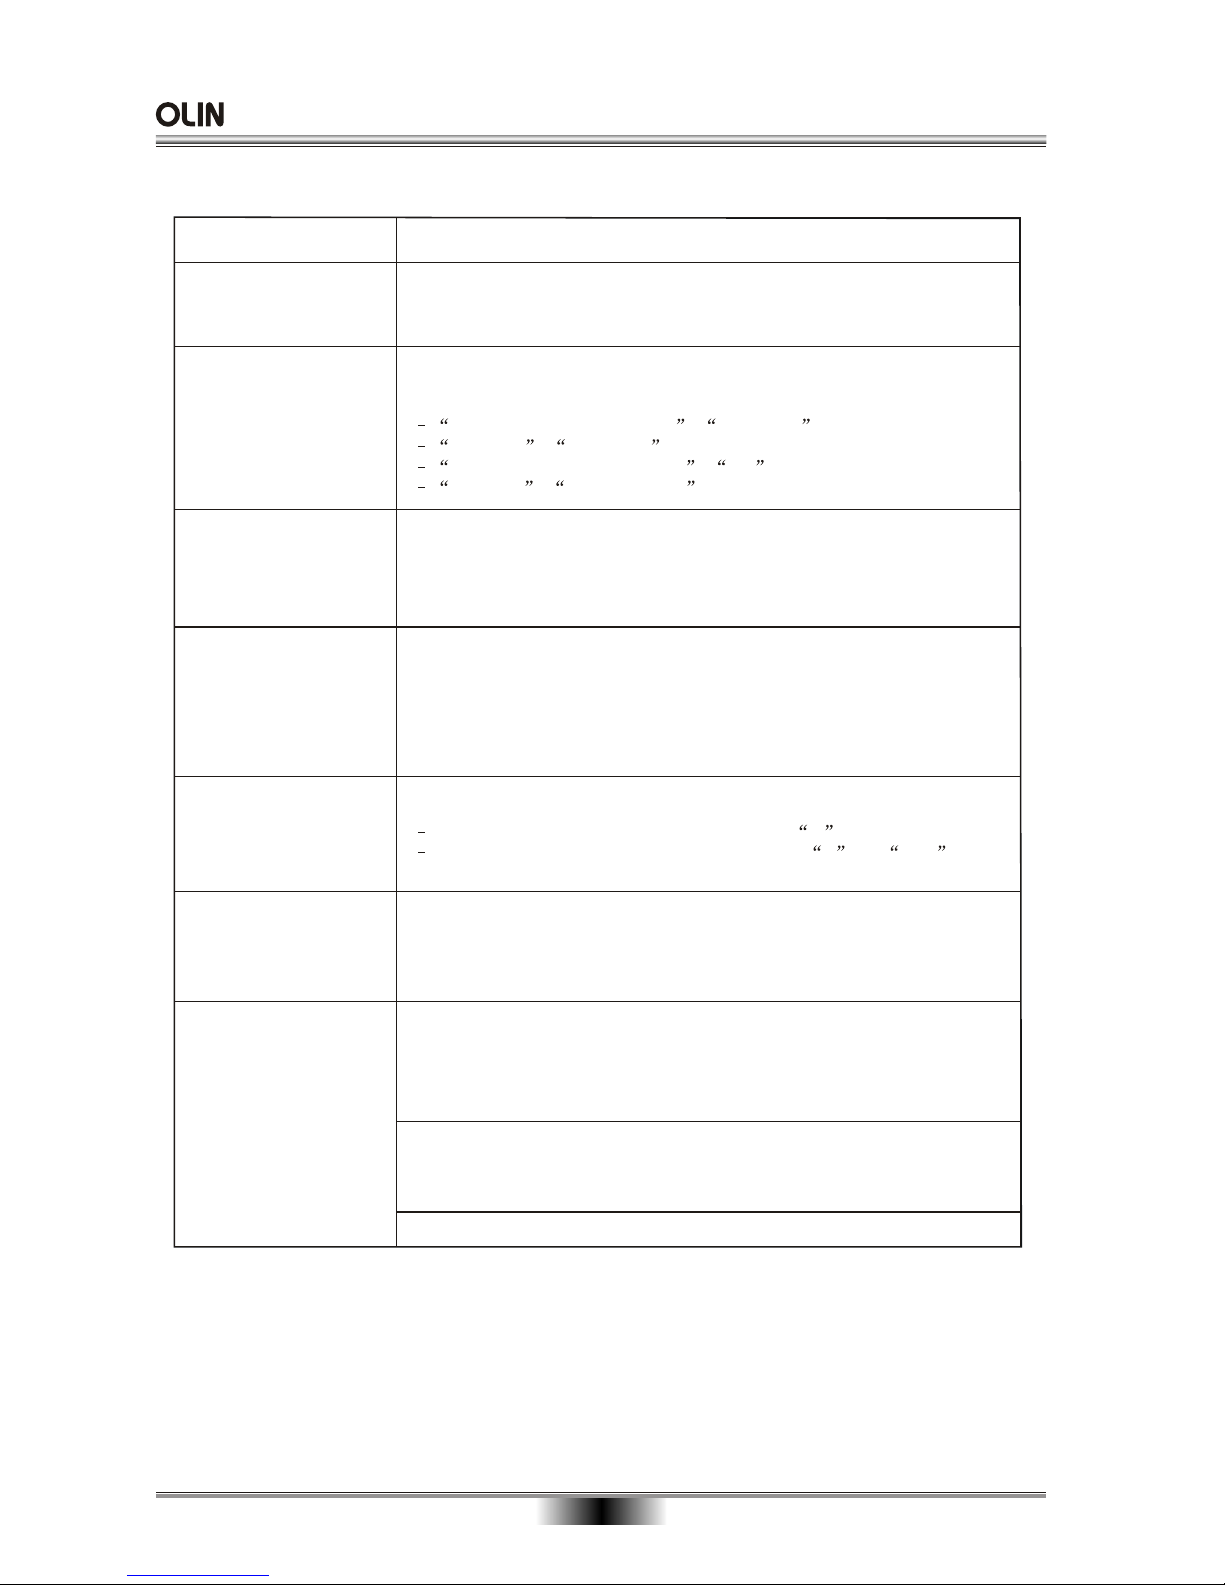
FREQUENTLY ASKED QUESTIONS
23
Questions
How do I set this unit to
play 7.1ch surround
sound?
What do I need to play
multi channel surround
sound?
Connect the appropriate amplifier/receiver to the HDMI terminal,
the DIGITAL AUDIO OUT terminal (OPTICAL, COAXIAL), or the
7.1ch AUDIO OUT terminal on this unit.
Results
After connecting this unit to an amplifier/receiver compatible with
Dolby Digital Plus, Dolby TrueHD, DTS-HD and 7.1ch LPCM using
an HDMI cable, set the items in the Setup menu as follows.
Dolby Digital Plus/TrueHD : Bitstream
DTS-HD : Bitstream
BD-Video Secondary Audio : Off
Speaker : Multi Channel
Can headphones and
speakers be directly
connected to this unit?
You cannot directly connect them to this unit. Connect through the
amplifier/receiver, etc.
My television has
COMPOSITE VIDEO
IN, COMPONENT(YUV)
IN and HDMI IN terminal.
Which should I connect
with?
The different levels of picture quality input are listed below in order
from highest to lowest.
HDMI IN COMPONENT(YUV) IN COMPOSITE VIDEO IN.
However, it will take longer for the picture output to start up when
this unit is connected with the HDMI IN terminal.
Can I play BD-Video
and DVD-Video bought
in another country?
You can play them if the video standard is NTSC, however, you
cannot play:
BD-Video discs that do not include region A .
DVD-Video discs that do not include region 1 or ALL .
Refer to the disc’s jacket for more information.
Can BD-Video/DVDVideo that does not
have a region code/
number be played?
The region management information for BD-Video/DVD-Video
indicates that the disc conforms to industry standards. You cannot
play discs that do not conform to industry standards or do not have
a region code or number.
Please tell me about
disc compatibility with
this unit.
This unit plays BD-Video, DVD-Video, CD, JPEG), DVD-RAM (DVD
Video Recording format/AVCHD format/JPEG), DVD-R/RW (DVDVideo format and DVD Video Recording format ), DVD-R DL (DVDVideo format and DVD Video Recording format ), +R, +RW and +R DL.
You cannot write to a disc with this unit.
This unit also plays CD-R/RW discs which have been recorded in one
of the following standards: CD-DA, MP3 and still pictures (JPEG).
Close the session after recording.
Page 26
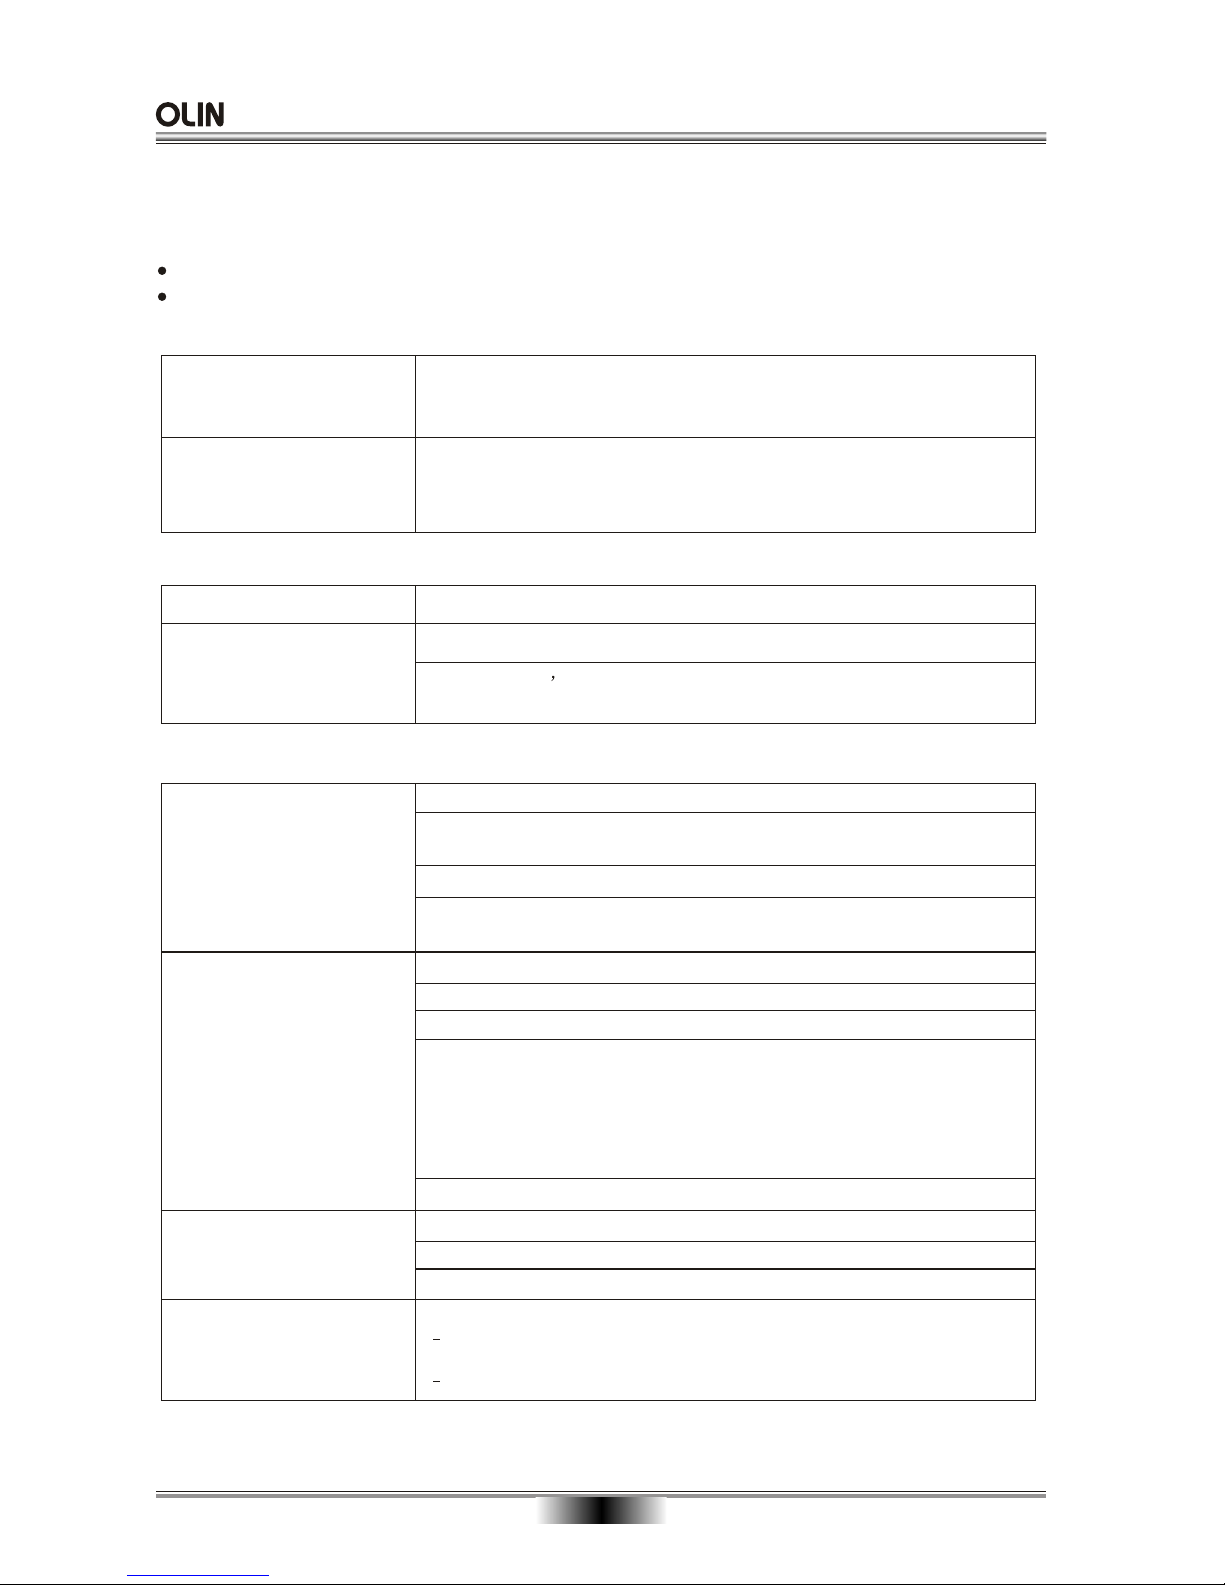
TROUBLE SHOOTING
24
Please check the following guide for the possible cause and solution for a problem before contacting the
nearest service center or dealer for repairs.
To reset this unit
The following do not indicate a problem with this unit:
Regular disc rotating sounds.
Image disturbance during search.
To restore the unit if it freezes
due to one of the safety
devices being activated
Press [STANDBY/ON ] on the main unit.
(The settings remain unchanged.)
To return all settings other
than some settings to the
factory preset
Select Yes in Restore Default Settings in the Setup menu.
This returns all values in the Setup menu and the on-screen
menu, except for DVD-Video Ratings and BD-Video Ratings to
the default settings.
POWER
No power.
Insert the AC power supply cord securely into a known active AC outlet.
The unit switches to standby
mode.
One of the unit s safety devices is activated. Press [STANDBY/ON]
on the main unit to turn the unit on.
This is a power saving feature.
Operation
The remote control doesn’t
work properly.
The batteries are depleted. Replace them with new ones.
You are not pointing the remote control at the main unit’s remote control
signal sensor during operation.
Colored glass may obstruct the signal reception/transmission.
Don’t place the signal sensor in direct sunlight or in areas that may be
subject to sunlight exposure.
The unit is on but cannot be
operated.
Confirm the correct drive is selected.
Some operations may be prohibited by the disc.
One of the unit’s safety devices may have been activated.
Reset the unit as follows:
1.Press [STANDBY/ON] on the main unit to switch the unit to standby.
If the unit doesn’t switch to standby, Alternatively, disconnect the AC
power supply cord, wait one minute, then reconnect it.
2.Press [STANDBY/ON] on the main unit to switch it on. If the unit still
cannot be operated, consult the dealer.
Condensation has formed: Wait 1 to 2 hours for it to evaporate.
Play fails to start even when
(PLAY) is pressed.Play starts
but then stops immediately.
Insert the disc correctly with the label facing up.
The disc is dirty.
You tried to play a blank disc or unplayable disc on this unit.
Startup is slow.
When the unit is turned on,
audio and video output takes
a long time.
Startup takes time in the following situations.
Immediately after a power failure or the AC power supply cord is
connected.
When the unit is connected with an HDMI cable.
Page 27
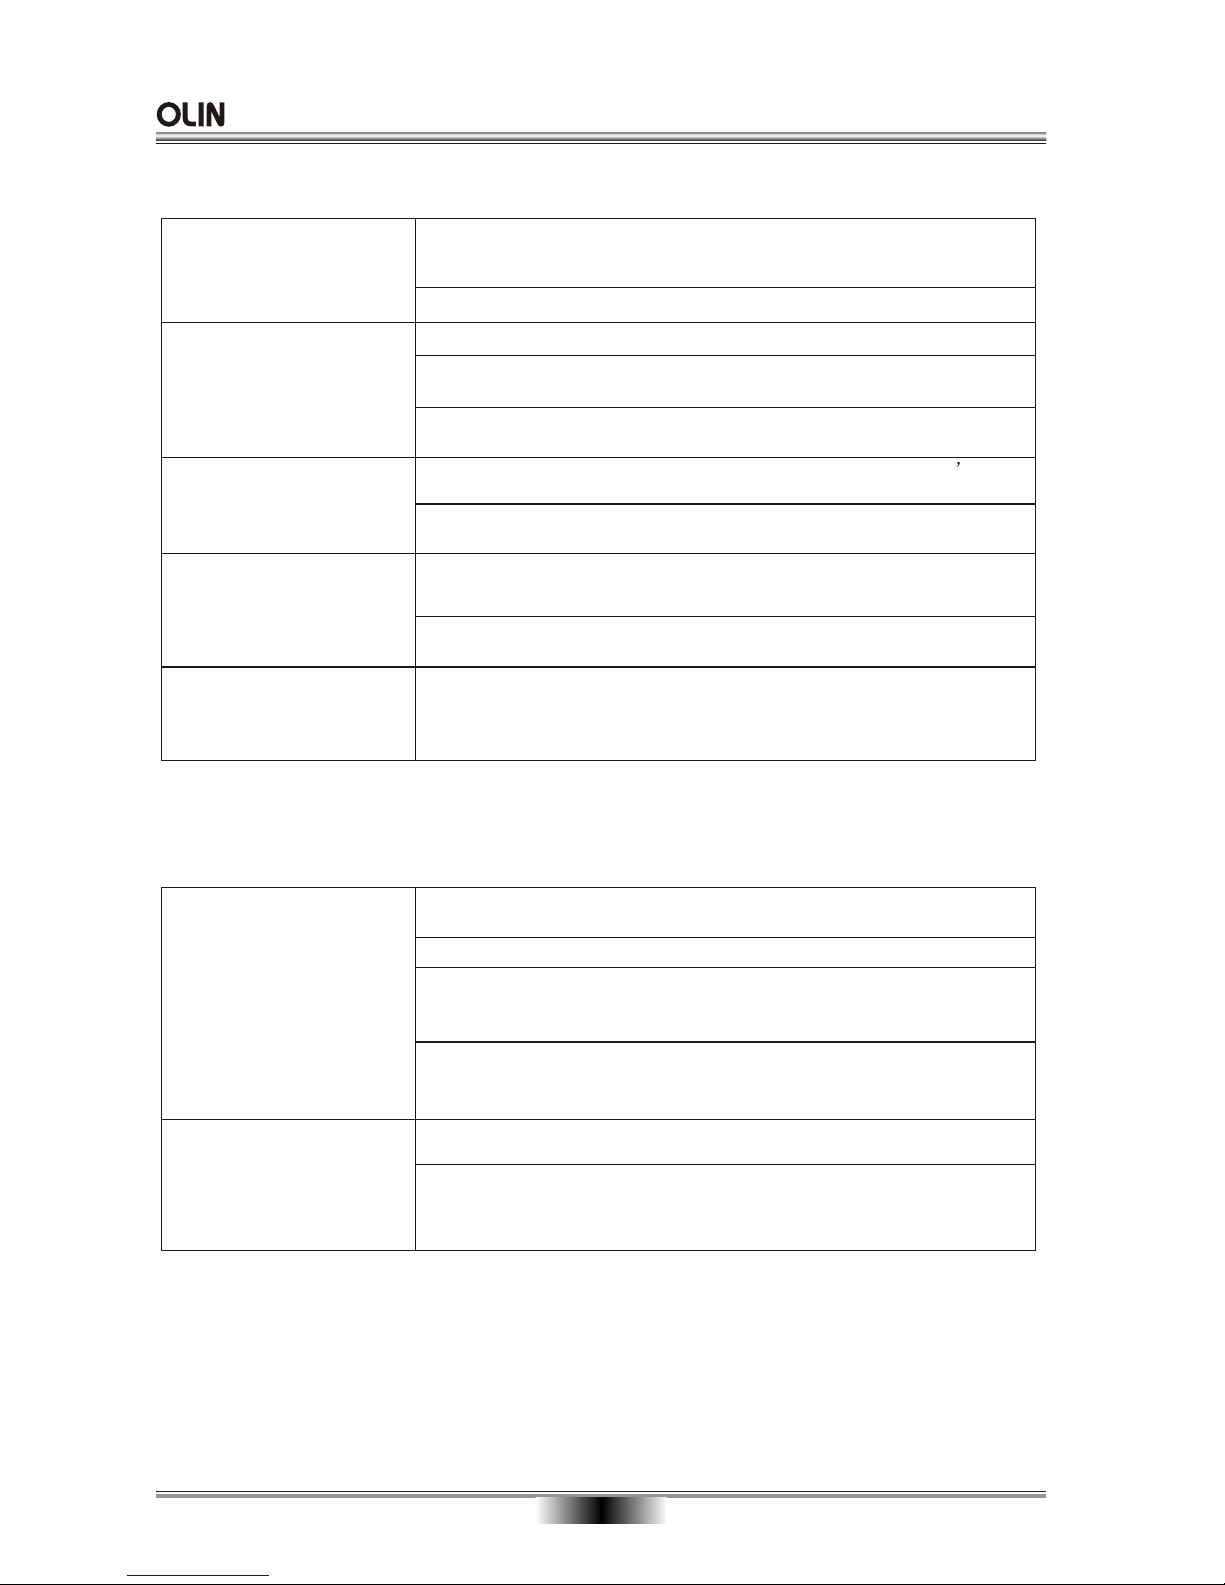
TROUBLE SHOOTING
25
TV screen and video
The images from this unit do
not appear on the television.
Picture is distorted.
Make sure that the television is connected to the VIDEO OUT terminal,
COMPONENT VIDEO OUT terminals or HDMI AV OUT terminal on this
unit.
Make sure that the television’s input setting (e.g., VIDEO 1) is correct.
Video is not output in high
definition.
High definition video cannot be output through the VIDEO OUT.
Confirm that the HDMI Resolution and Component Video Resolution in
the Setup menu are set properly.
Depending on the BD-Video, output from the COMPONENT VIDEO OUT
terminals may be restricted to 480p.
The 4:3 aspect ratio picture
expands left and right.
Screen size is wrong.
Use the television to change the aspect. Refer to your television s
operating instructions.
When using a component video cable, set “ TV Aspect ” to “4:3 Pan &
Scan”.
When playing DVD-Video
using progressive output,
one part of the picture
momentarily appears to be
doubled up.
This problem is caused by the editing method or material used on
DVD-Video, but should be corrected if you use interlace output.
When the unit is connected using HDMI terminal, refer to “HDMI
connections ” .
There is no apparent change
in picture quality when
adjusted with the Video menu
in the on-screen menu.
The effect is less perceivable with some types of video.
Sound
No sound.Low volume.
Distorted sound.
Cannot hear the desired
audio type.
Check the connections and the “Digital Audio Output” settings. Check the
input mode on the amplifier/receiver if you have connected one.
Press [AUDIO] to select the audio.
The sound effects (Re-master, V. Surround, etc.) will not work when the
bitstream signal is output from the HDMI AV OUT terminal or the DIGITAL
AUDIO OUT terminal.
When “BD-Video Secondary Audio” is set to “ Off ”, Dolby Digital Plus,
Dolby TrueHD and DTS-HD are output from the DIGITAL AUDIO OUT
terminal as Dolby Digital or DTS Digital Surround bitstream.
Cannot switch audio.
There are discs for which audio cannot be changed because of how the
disc was created.
When connecting an amplifier/receiver using a coaxial cable, optical
digital audio cable or an HDMI cable, you cannot switch the audio if
“Digital Audio Output ” is set to “ Bitstream ” . Set “ Digital Audio
Output ” to “ PCM ” or connect using audio cables.
Page 28
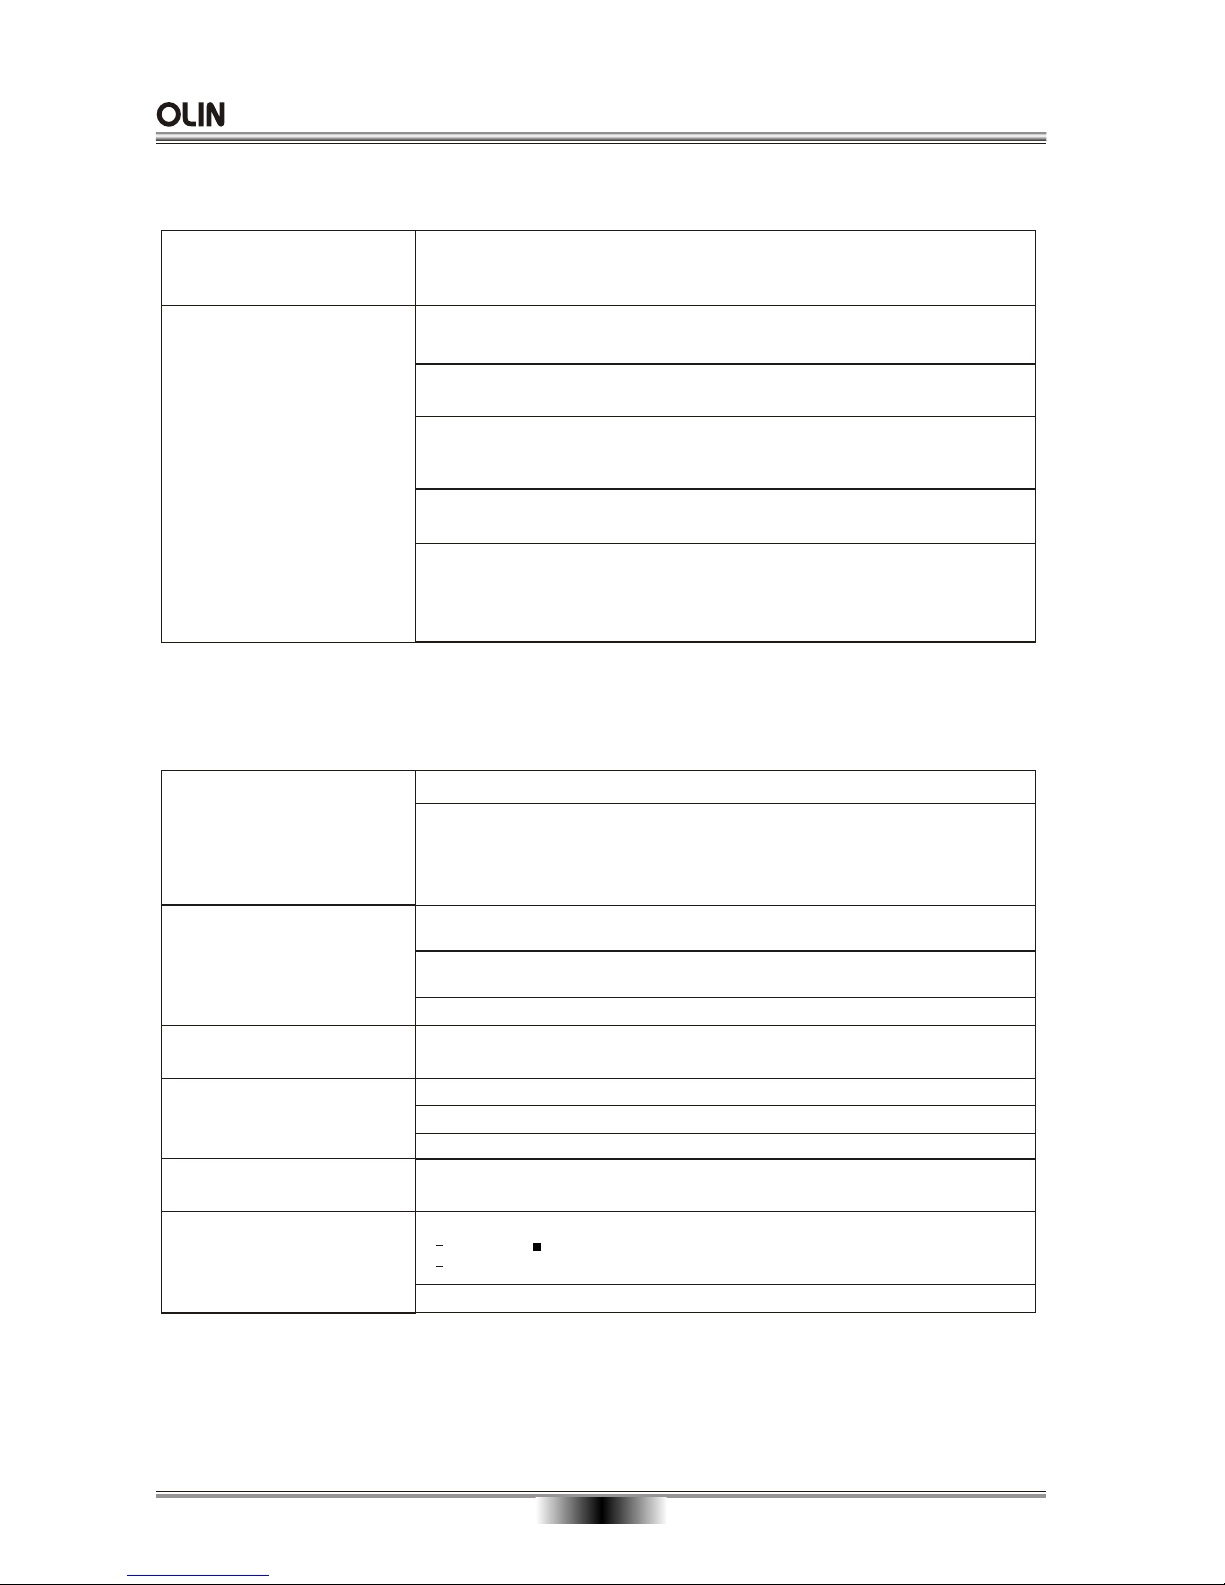
TROUBLE SHOOTING
26
HDMI connections
The 4:3 aspect ratio picture
expands left and right.
Screen size is wrong.
Change “TV Aspect ” type to “ 16:9 ” .
No sound.Low volume.
Distorted sound.Cannot hear
the desired audio type.
Audio may not be heard when more than 4 devices are connected with
HDMI cables.Reduce the number of connected devices.
The sound effects will not work when the bitstream signal is output from
the HDMI AV OUT terminal or the DIGITAL AUDIO OUT terminal.
If the sound is distorted when the unit is connected to an amplifier/
receiver with an HDMI cable, adjust the settings in “ Speaker ” in the
Setup menu to match the connection.
Depending on the connected equipment, the sound may be distorted if
this unit is connected with an HDMI cable.
When “ BD-Video Secondary Audio ” is set to “ On ”, Dolby Digital Plus,
Dolby TrueHD, and DTS-HD are converted to 48 kHz Dolby Digital and
output. LPCM 7.1 channel audio is converted to 5.1 channel audio. In this
case, set the “ BD-Video Secondary Audio ” to “ Off ”.
Other difficulties with playback
Audio and video momentarily
pause.
This occurs between playlist chapters or scenes ([AVCHD]).
When playing a title recorded on both layers, the unit automatically
switches between layers and plays the title in the same way as a normal
program. However, video and audio may momentarily cut out when the
unit is switching layers.
BD-Video or DVD-Video is
not played.
Ensure the disc is for the correct BD-Video region code or DVD-Video
region number, and is not defective.
You have set a ratings level to limit BD-Video or DVD-Video play. Change
this setting.
Some BD-Video can only be output with HDMI.
Picture-in-picture is not
played with BD-Video.
Confirm whether the disc supports picture-in-picture.
No subtitles.
Subtitles are not recorded on the disc.
Turn the subtitles on. Set “Subtitle” on the on-screen menu to “ On ”.
When progressive output is on, closed captions cannot be displayed.
Angle cannot be changed.
Angles can only be changed during scenes where different angles are
recorded.
The resume play function
does not work.
Memorized positions are canceled when
pressing [ ] several times.
opening the disc tray.
The resume play function may not work depending on the disc.
Page 29
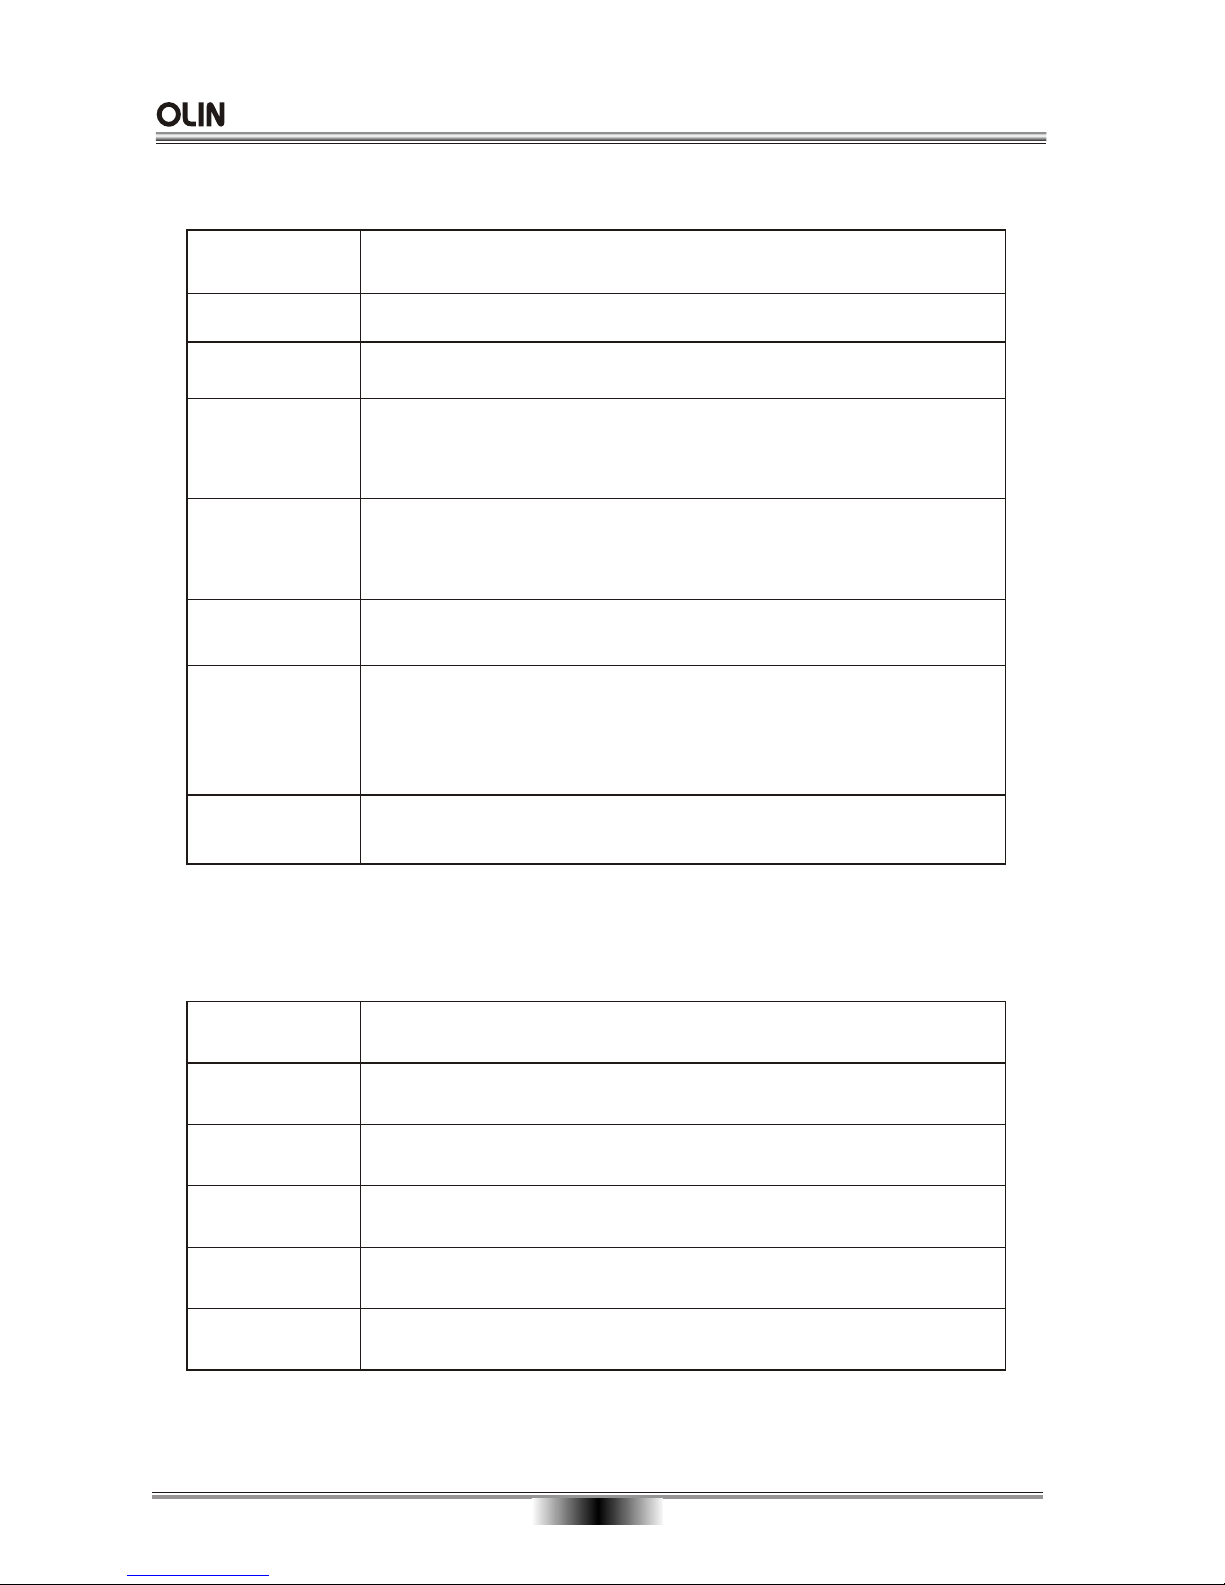
27
SPECIFICATIONS
Note: We reserve the right to modify the design without advice!
VF Signal
system
NTSC/PAL
System and Outputs
Audio output
Audio output
(digital audio)
Video output
Component video
(Y, CB,CR)
Power
Power
consumption
Product
Dimensions
Weight
25W
Output level: 2 Vrms (1 kHz, 0 dB)
Output connector: Pin jack
Number of connectors: 2 channel: 1 system
7.1 channel discrete output: 1 system
Optical digital output: Optical terminal
Coaxial digital output: Pin jack
Operating
temperature
oooo
5 C to 35 C (41 F to 95 F)
Operating
humidity
10% to 80%
General
110V-240V ~ 50/60Hz
L: 430mm W:285mm H: 62mm
3.4kg
HDMI output
Output format: 480p /1080i /720p /1080p
Output Connector: Type A (19 pin)
Media
BD-ROM, BD-JAVA 1.1, DVD-video, DVD+RW/+R,
DVD-RW/-R, CD-RW/-R
Electric level output: 1.0 Vp--p esistance: 75 R
Output connector: Pin jack (1 system)
Y output level: 1.0 Vp-p
PB output level: 0.7 Vp-p
PR output level: 0.7 Vp-p
Output connector: Pin jack (Y: green, PB: blue, PR: red)(1 system)
Resistance: 75
Resistance: 75
Resistance: 75
Audio performance
(Frequency
response:)
DVD (linear audio): 4 Hz to 22 kHz (48 kHz sampling)
4 Hz to 44 kHz (96 kHz sampling)
CD-Audio: 4 Hz to 20 kHz S/N ratio:90 dB
Dynamic range: 80 dB
Total harmonic distortion:0.004 %
 Loading...