

Page 1
Page 2

SYSTEM SETUP
19
SAFETY PRECAUTIONS
01
IMPORTANT SAFETY INSTRUCTIONS
03
NOTICE
04
SPECIFICATIONS
25
PARENTAL LOCK & SCREEN SIZE
24
TROUBLE SHOOTING
23
OPERATIONAL WITH RECORDING
15
SPECIAL FUNCTION PLAYBACK
14
ADVANCED PLAYBACK
12
BASIC PLAYBACK
11
REMOTE CONTROL
10
BASIC CONNECTION
07
REAR PANEL AND ACCESSORIES
06
FRONT PANEL
05
Dear Customers
We would like to thank you for purchasing this unit. It is a progressive scan DVD Recorder.
you the ability to create your own DVD discs from you home movies, favorite TV programs and more. Because of
the outstanding compatibility of DVD + R / RW discs, the discs you create will be suitable for playback in most DVD
Recorders.
This product provides
You can record from the unit's built-in TV tuner or external video source like a video camera. When you
are ready to watch your recordings or commercial DVD movies, you can enjoy them in the highest quality with your
new DVD Recorder.
TABLE OF CONTENTS
Page 3

WARNING:
CAUTION:
The symbol for CLASS II (Double Insulation).
The lightning flash with arrowhead symbol, within an equilateral triangle, is intended to alert the user to the presence
of uninsulated "dangerous voltage " within the product's enclosure that may be of sufficient magnitude to constitute a
risk of electric shock to persons.
The exclamation point within an equilateral triangle is
intended to alert the user to the presence of important
operating and maintenance (servicing) instructions in the
literature accompanying the appliance.
SAFETY PRECAUTIONS
01
TO REDUCE THE RISK OF FIRE OR ELECTRIC SHOCK, DO NOT EXPOSE THIS
APPLIANCE TO RAIN OR MOISTURE, DANGEROUS HIGH VOLTAGES ARE
PRESENT INSIDE THE ENCLOSURE. DO NOT OPEN THE CABINET. REFER
SERVICING TO QUALIFIED PERSONNEL ONLY.
ONLY THE VOLTAGES SPECIFIED IN THIS MANUAL SHOULD BE USED FOR THE
PRODUCT.
- ANY POWER SOURCE OTHER THAN THE SPECIFIED VOLTAGE IN THIS MANUAL
MAY CAUSE FIRE OR ELECTRIC SHOCK.
When replace the direct plug in power supply or a separable, cord-connected power supply,
the replacement must be exact duplicate, or one recommended by the manufacturer.
TO PREVENT ELECTRIC SHOCK, MATCH WIDE BLADE OF PLUG TO WIDE SLOT,
FULLY INSERT.
This Digital Video Disc player employs a laser System.
Use of controls, adjustments or the performance of procedures other than those specified
may result herein hazardous radiation exposure. To prevent direct exposure to laser beam,
do not try to open the enclosure. Visible laser radiation when open and interlocks defeated.
DO NOT STARE INTO BEAM.
This product incorporates copyright protection technology that is protected by method
claims of certain U. S. Patents and other intellectual property rights owned by Macrovision
Corporation and other rights owners. Use of this copyright protection technology must be
authorized by Macrovision Corporation, and is intended for home and other limited viewing
uses only unless otherwise authorized by Macrovision Corporation. Reverse engineering or
disassembly is prohibited.
Page 4
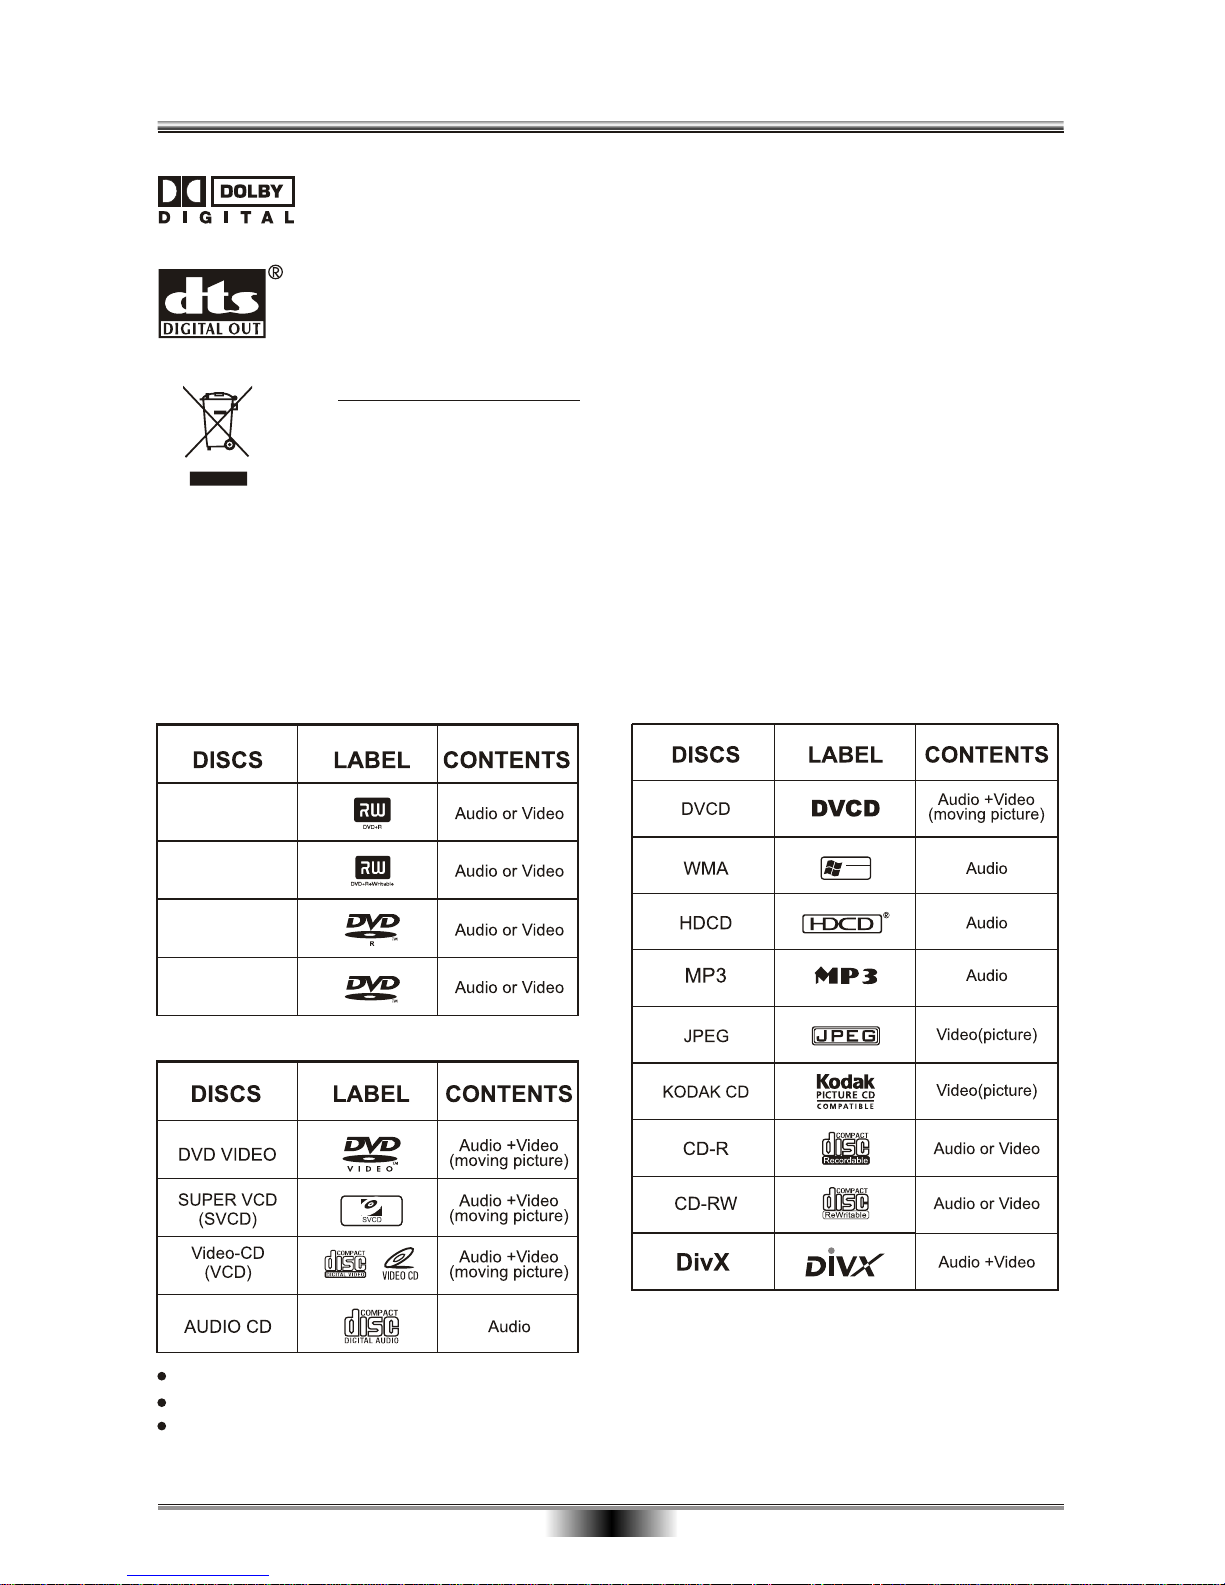
"DTS" and "DTS Digital Out" are trademarks of Digital Theater Systems, Inc.
SAFETY PRECAUTIONS
02
Discs other than those listed above can not be played.
Non-standardized discs, even if they may be labeled as above can not be played.
The performance of recorded disc is depend on the method and quality of disc-burning. In some cases,
the disc may not be played.
Playback and Recording:
Playback only:
DVD+R
DVD+RW
RW
DVD-RW
DVD-R
Playback only:
TM
Designed for
TM
Windows
Media
Manufactured under license from Dolby Laboratories. " Dolby " and the double-D
symbol are trademarks of Dolby Laboratories. Confidential unpublished works. Copyright
1992-1997 Dolby Laboratories. All rights reserved.
Disposal of your old appliance
1. When this crossed-out wheeled bin symbol is attached to a product, it means the product
is covered by the European Directive 2002/96/EC.
2. All electrical and electronic products should be disposed of separately from the municipal
waste stream via designated collection facilities appointed by the government or the local
authorities.
3. The correct disposal of your old appliance will help prevent potential negative conseque nces for the environment and human health.
4. For more detailed information about disposal of your old appliance, please contact your
city office, waste disposal service or the shop where you purchased the product.
Page 5
03
Page 6
04
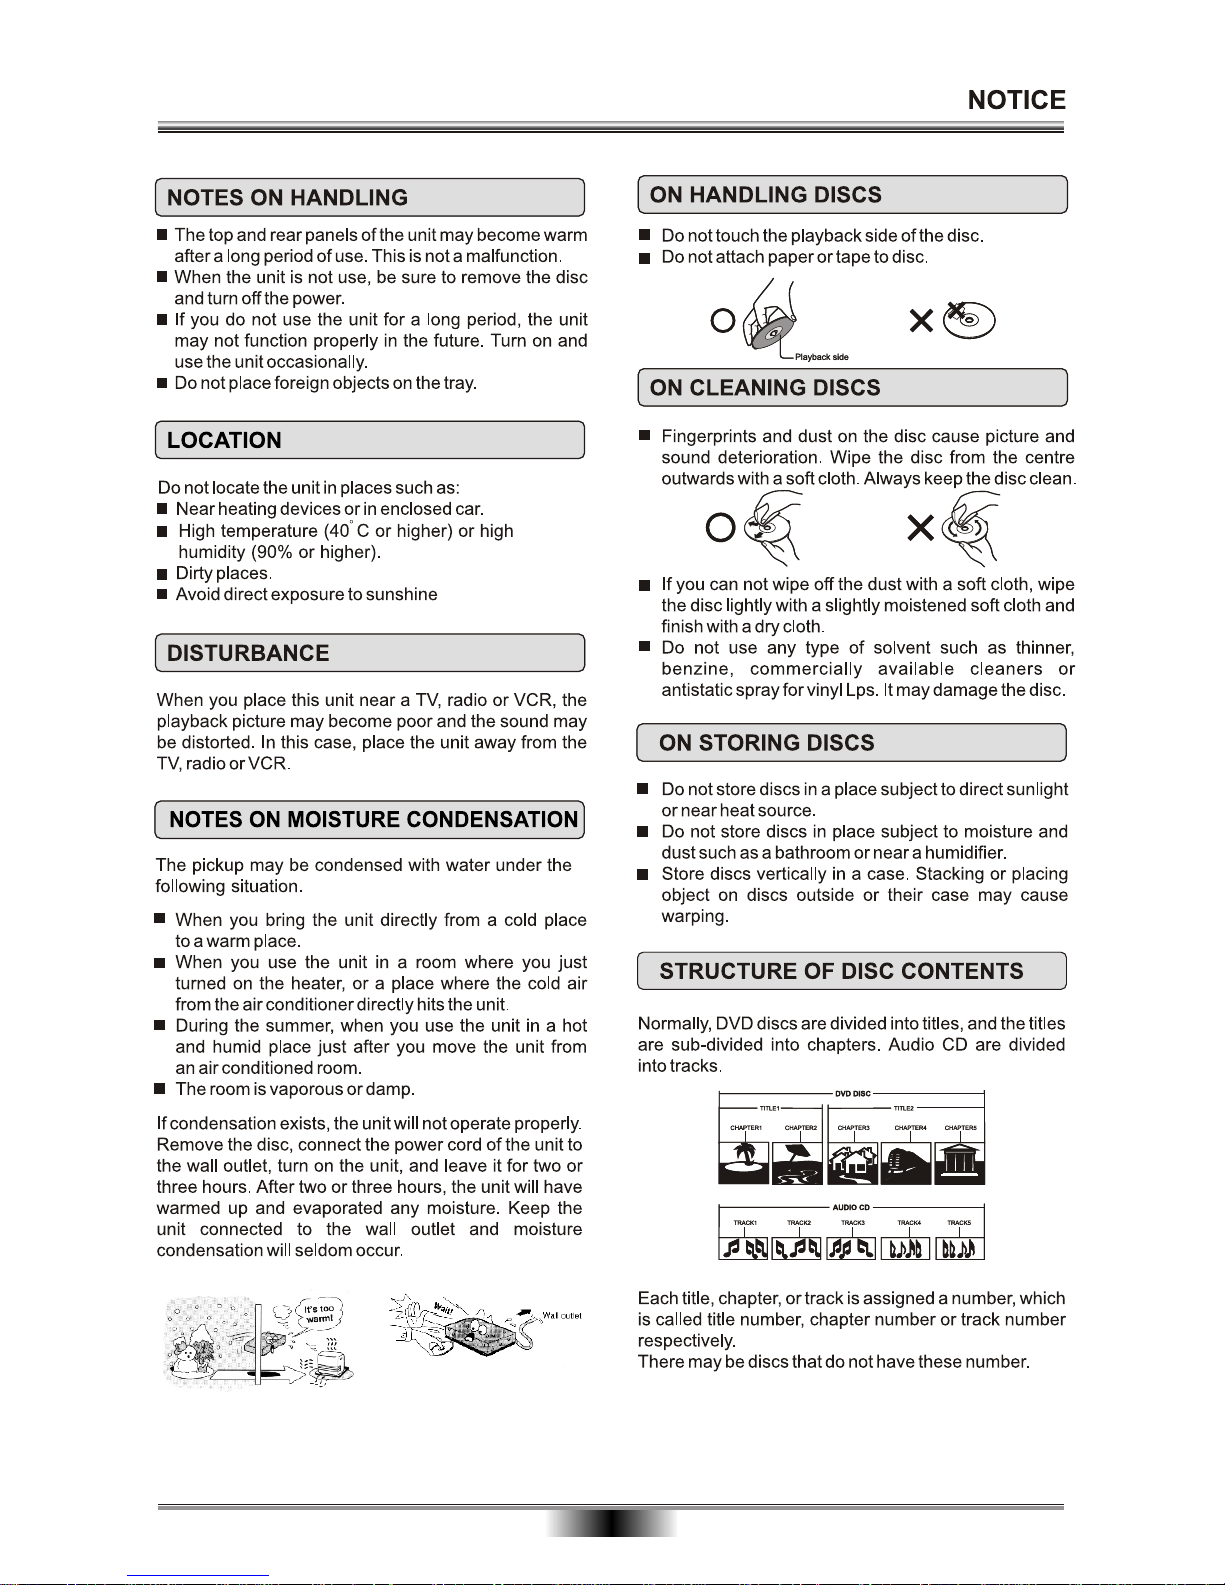
The pickup may be condensed with water under the
following situation.
Page 7
HARD DISC DRIVE RECORDER and DVD RW/DVD R/DVD/CD/MP3/CD-R/CD-RW PLAYER
REC HDDDVD
REC
STANDBY/ON
OPEN/CLOSE
STOP SOURCE
HDD
DVD
DVR-250
PLAY/PAUSE
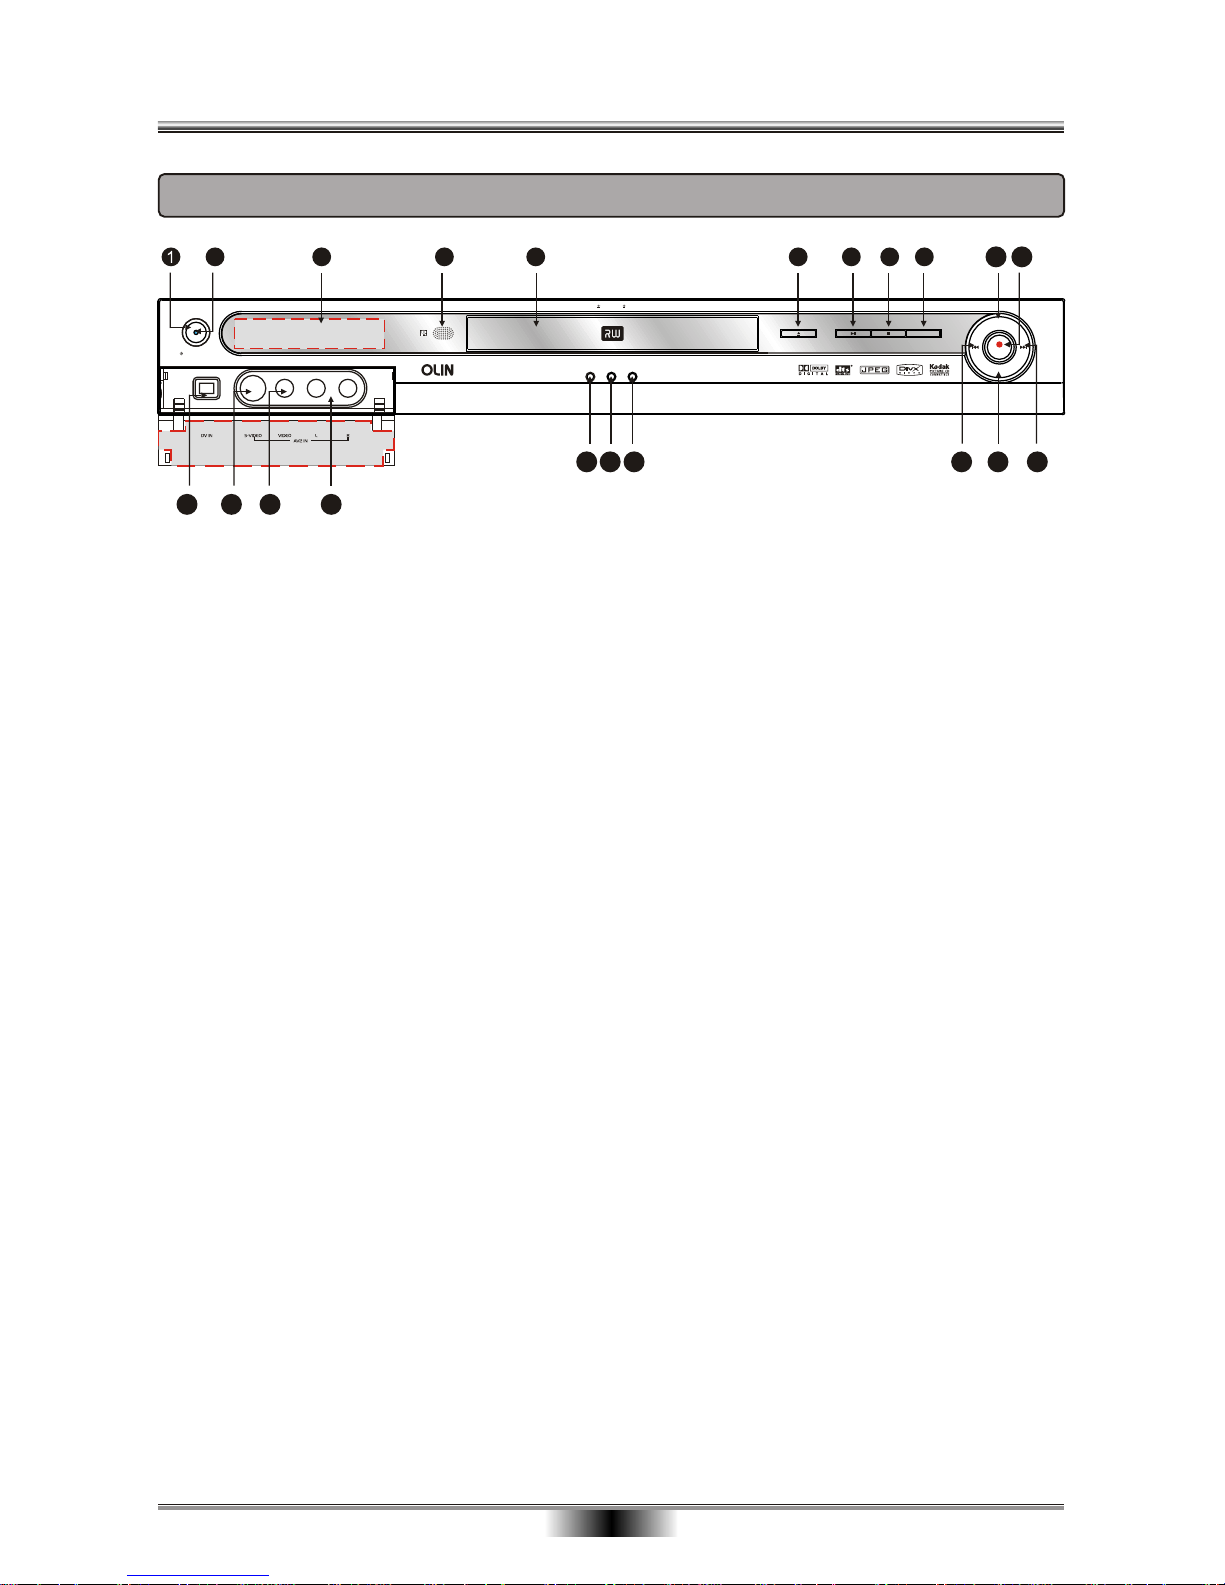
FRONT PANEL
05
FRONT PANEL
NOTES ON POWER STATES
There are 3 power states for this unit:
OFF - The unit draws no power and cannot be turned on by the remote control.
STANDBY -
ON - The STANDBY button on the remote control or the STANDBY / ON button on the front panel has been
pressed. The unit is ready to use.
The unit draws a slight amount of power to enable the remote control receiving circuit and to
retain basic settings such as the Time and Recording Settings.
1. STANDBY/ON Switch on or off: to switch off or on, interrupt a function.
2. POWER INDICATOR Indicator: green (working), red (standby).
3. LED SCREEN Displays information related to the Unit such as Time,
Current Chapter, Disc Tray Status, etc.
4. REMOTE CONTROL RECEIVER Receives the signal from the remote control.
5. TRAY Open to load or eject a disc.
6. OPEN/CLOSE Open/Close: open/close disc tray.
7. PLAY/PAUSE Play/Pause: playback a disc and Temporarily pauses DVD playback
or recording.
8. STOP Stop: Stops playback/recording.
9. SOURCE Source: to select the signal source.
10. HDD Switches the unit to HDD menu.
11. RECORD Record: Records the current source selected to HDD.
12. DV INPUT DV input socket: connection of digital video camera.
13. S-VIDEO INPUT (F-SV) Connection for external equipment using a S-Video Cable.
14. VIDEO INPUT (F-A/V) Connection for external equipment using the Yellow Video (RCA) Cable.
15. L/R AUDIO INPUT (F-SV; F-A/V) Connection for external equipment using the Red/White Audio (RCA) Cables.
16. REC INDICATOR Indicator: Record signal.
17. DVD INDICATOR Indicator: DVD signal.
18. HDD INDICATOR Indicator: HDD signal.
19. PREVIOUS Each press of this key will skip the current chapter and play the previous one.
20. DVD Switches the unit to DVD signal mode.
21. NEXT Each press of this key will skip the current chapter and play the next one.
12
13
14
1
3
4
5
2
6789 10
11
20 211917
18
16
13
14
15
12
Page 8
RF IN
RF OUT
LEFT RIGHT
VIDEO Y CB / PB CR / PR
OPTICALCOAXIAL
110V-240V~ 50/60Hz
5.1-CH AUDIO OUT
FL
FR
SL
SR
CENTER
SUB-WOOFER
S-VIDEO
ONOFF
RISK OF ELECTRIC SHOCK
DO NOT OPEN
CAUTION
CLASS 1 LASER PRODUCT
Apparatus Claims of U.S. Patent Nos.
4,631,603; 4,577,216; 4,819,098 and 4,
907,093 licensed for limited viewing
uses only.
Manufactured under license from Dolby Laboratories. "Dolby" and the double-D symbol are
trademarks of Dolby Laboratories. Confidential
unpublished works. Copyright 1992-1997Dolby
Laboratories. All rights reserved.
" DTS " and " DTS Digital Out " are trademarks
of Digital Theater Systems, Inc.
2-CH AUDIO IN
YUV/P-SCAN and DIGITAL AUDIO OUT
VIDEO
S-VIDEO
VIDEO OUTVIDEO IN
USB
N14142
AC: 110V-240V~ 50/60HzMODEL: DVR-250
HDD and DVD RECORDER
For Warranty Please Call 1800 656 630
S/N:
POWER: 35W
Made In China
S
E
T
U
P
1
0
2
3
4
5
6
789
VOL+
GOTO
E
D
I
T
REC MODE
DISC REC
I/P
CH+
CH VOL
SOURCE
ZOOM
PROG/CLEAR
MUTE
TIMER USB DVDHDD
SLOW
RETURN
QUALITY
ANGLE
REPEAT AUDIO
A-B RPT
SUBTITLE
INFO MENU/PBC
TITLE
DVR-250
STEP
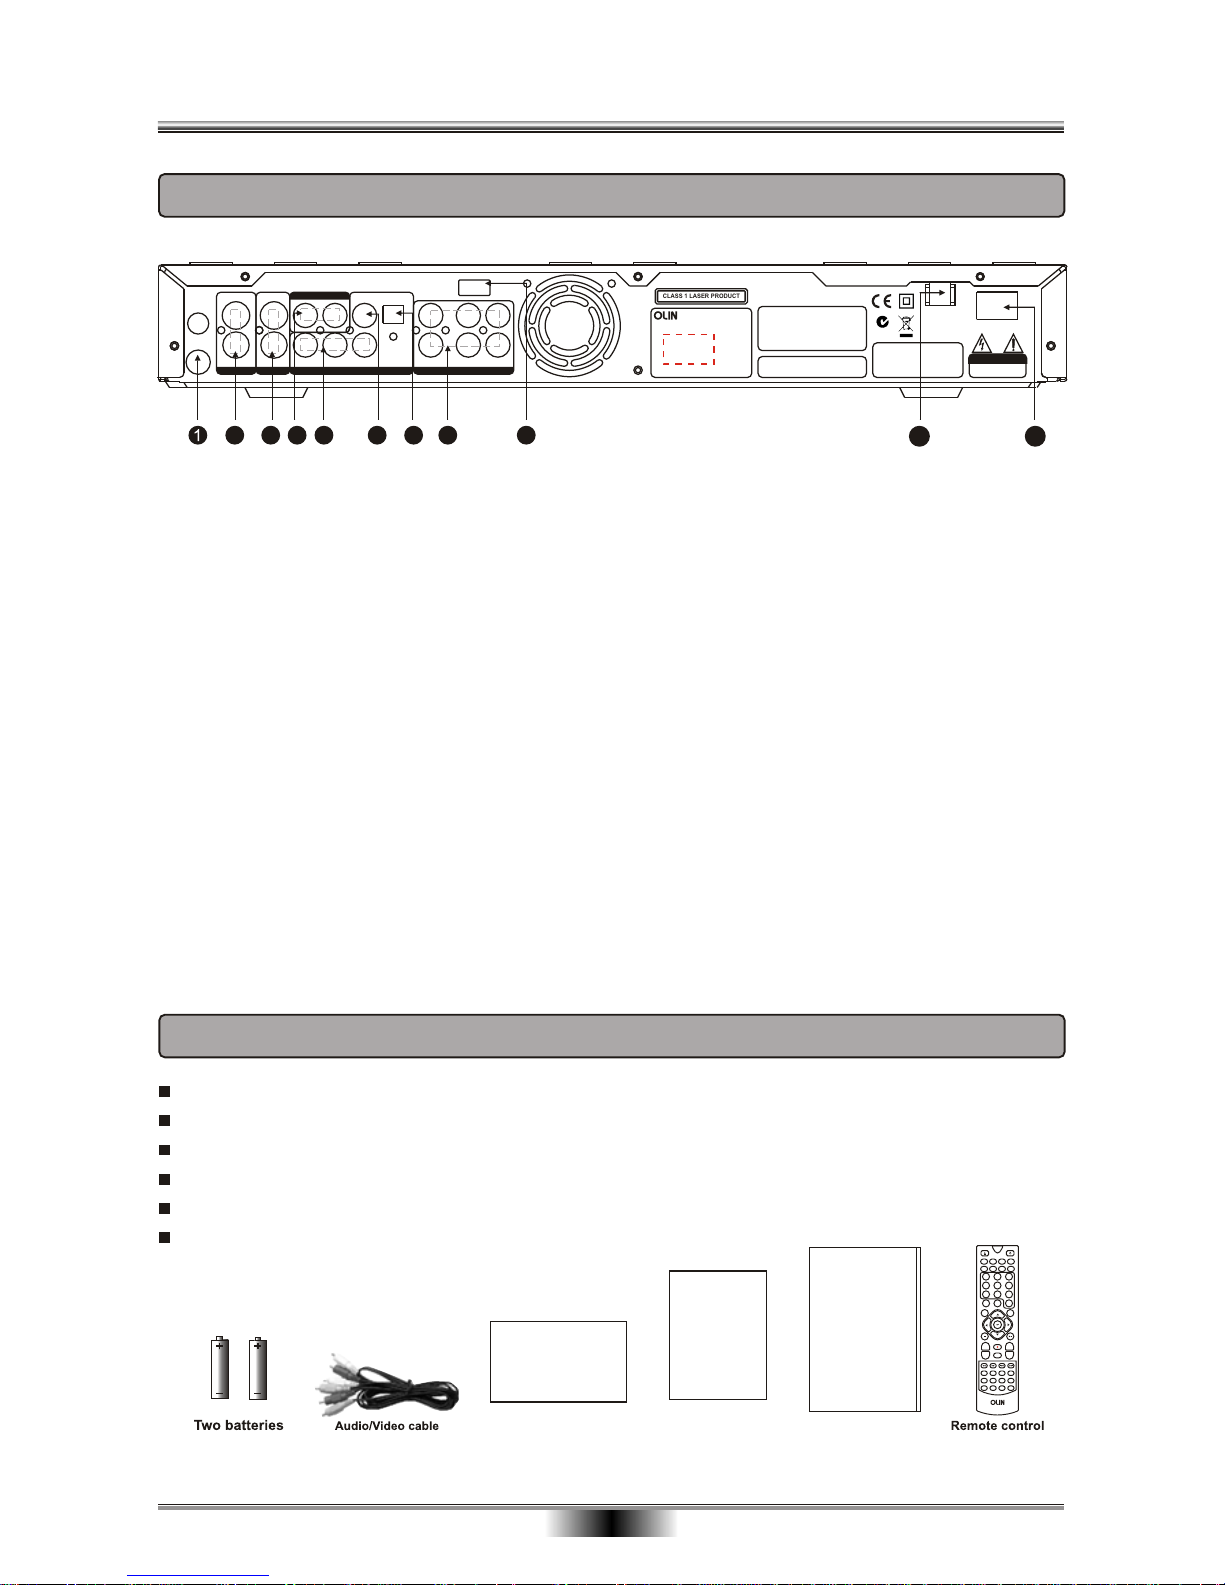
REAR PANEL and ACCESSORIES
06
REAR PANEL OUTPUT
ACCESSORIES
3
21
4
5
6 9
10
11
7
8
1. RF IN/OUT For Antenna or Cable TV.
2. VIDEO INPUT Composite Video input for recording.
3. VIDEO OUTPUT Standard Video Output supported by most TVs.
4. AUDIO INPUT Audio input connection for external audio devices.
5. YUV OUTPUT Use this output with TVs supporting Component Video or
Progressive Scan input for best video quality.
6. COAXIAL OUTPUT Use a special coaxial digital audio connector to send the raw coded
digital signal to devices supporting digital decoding.
7. OPTICAL OUTPUT Use to connect to a receiver or to other device with 5.1CH decoders.
8. 5.1-CH AUDIO OUTPUT Connect to TVs or other Audio equipment supporting 5.1CH audio in.
9. USB USB input socket : connection of device with USB.
10. AC INLET Main socket: connection to the main supply.
11. POWER SWITCH Switch: switch on or off.
Remote control x 1
User x 1
Quick Install Guide x 1
x 1
Batteries x 2
Audio/Video cable x 1
manual
Warranty Certificate
Warranty Certificate
Warranty Certificate
User manual
User manual
Quick Install Guide
Quick Install Guide
Page 9
RF IN
RF OUT
LEFT
RIGHT
VIDEO
Y
CB / PB CR / PR
OPTICALCOAXIAL
5.1 CH AUDIO OUT
FL
FR
SLSRCENTER
SUB-WOOFER
S-VIDEO
2 CH AUDIO IN
YUV/P-SCAN/DIGITAL AUDIO OUT
VIDEO
S-VIDEO
VIDEO OUTVIDEO IN
USB
RF IN
RF OUT
LEFT
RIGHT
VIDEO
Y
CB / PB CR / PR
OPTICALCOAXIAL
5.1 CH AUDIO OUT
FL
FR
SL
SR
CENTER
SUB-WOOFER
S-VIDEO
2 CH AUDIO IN
YUV/P-SCAN/DIGITAL AUDIO OUT
VIDEO
S-VIDEO
VIDEO OUTVIDEO IN
USB
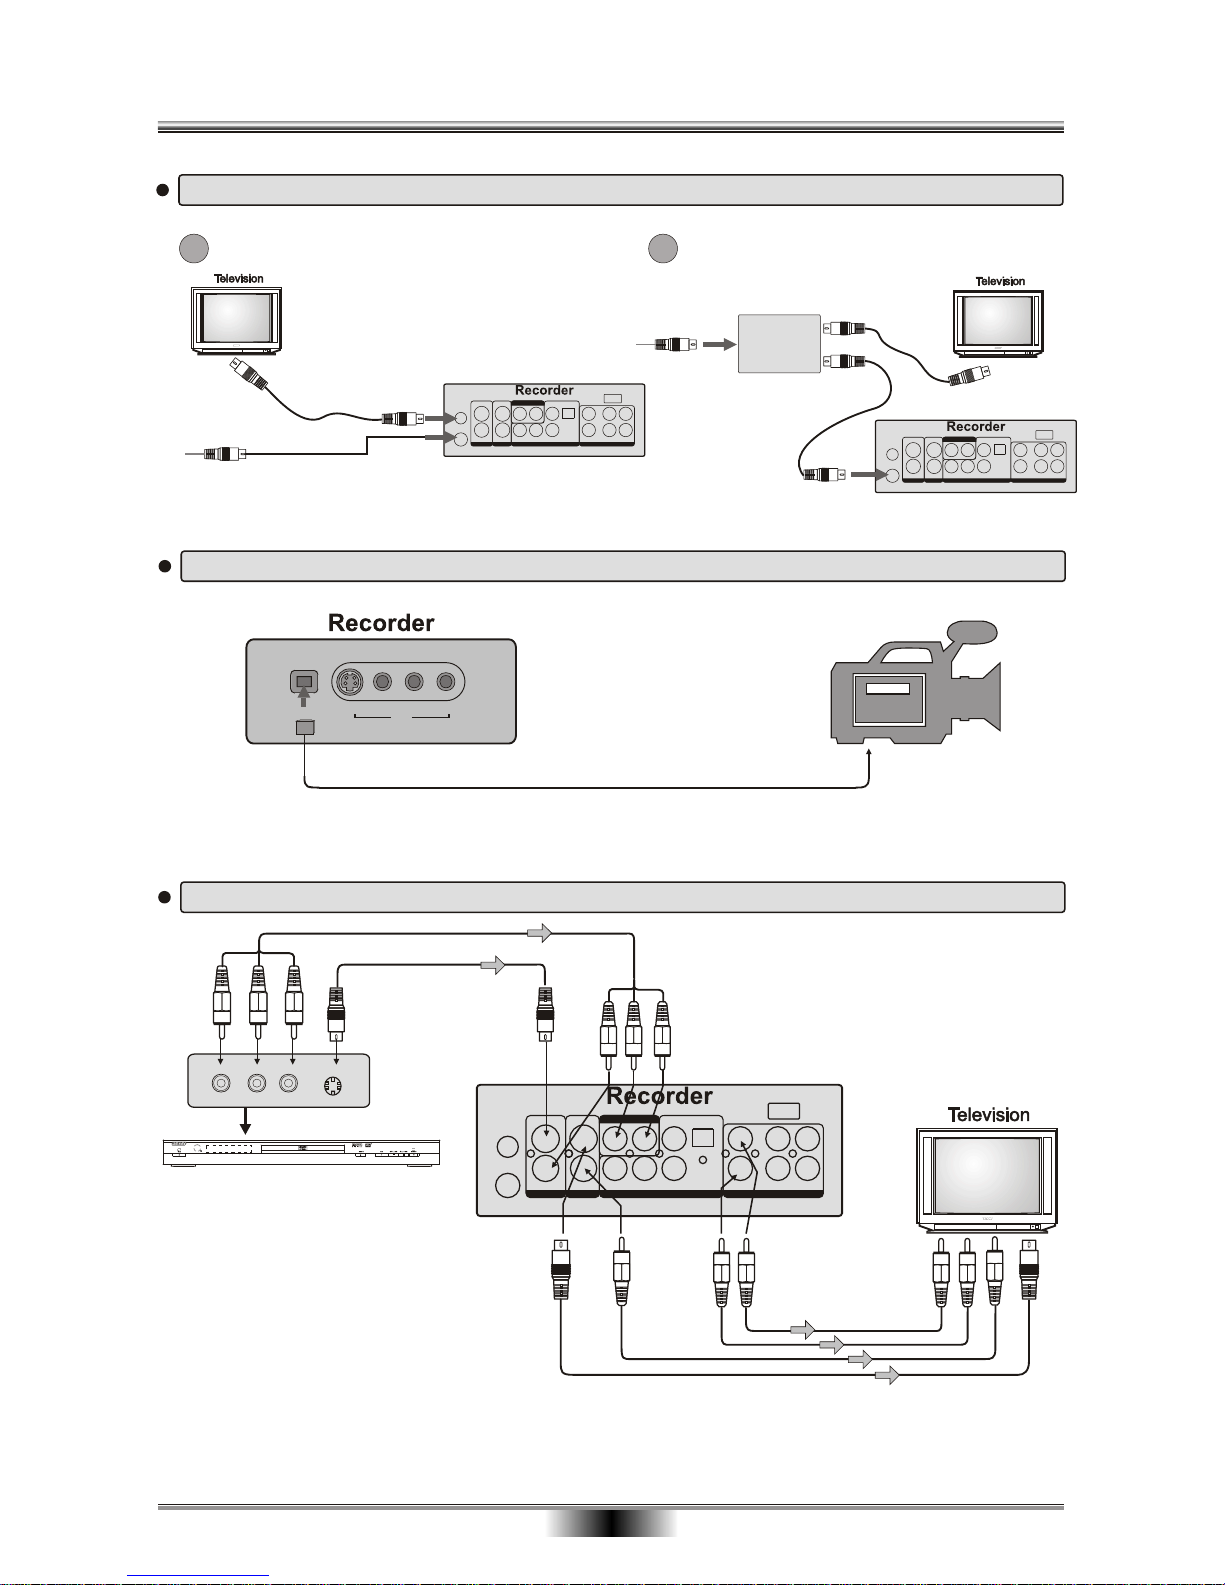
BASIC CONNECTION
07
To record from an analog cable TV signal, connect the cable to the RF In jack.
Note: By this connection, you must set the unit standby when watching TV only(B mode).
ANTENNA or
TV signal cable
A B
SPLITTER
Traditional RF Connection
RF Connection When Using A Splitter Box
To connect devices that you will be recording from DV
DV
S-VIDEO VIDEO
AV2 IN
LR
DV IN
RF IN
RF OUT
LEFT
RIGHT
VIDEO
Y
CB / PB CR / PR
OPTICALCOAXIAL
5.1 CH AUDIO OUT
FL
FR
SL
SR
CENTER
SUB-WOOFER
S-VIDEO
2 CH AUDIO IN
YUV/P-SCAN/DIGITAL AUDIO OUT
VIDEO
S-VIDEO
VIDEO OUTVIDEO IN
USB
If the TV has an S-video input,
When using an S-video cable, do not connect the yellow video cable.
connect the DVD player to the TV with an S-video cable
To record from devices such as DVD Players using the rear connections
Red White Yellow
Red White
DVD PLAYER
DS-N809
DVD Video/DVD Audio/VCD/HDCD/JPEG/MP3 PLAYER
To audio input(red,white)
To video input(yellow)
LR
VIDEO S-VIDEO
Yellow
To audio input(red,white)
To video input(yellow)
To S-video input
To S-video input
Note: In the DV state, when opening the DV camera, you need wait for 15 seconds. The image will appear
on the screen.
Page 10
RF IN
RF OUT
LEFT
RIGHT
VIDEO
Y
CB / PB CR / PR
OPTICALCOAXIAL
5.1 CH AUDIO OUT
FL
FR
SL
SR
CENTER
SUB-WOOFER
S-VIDEO
2 CH AUDIO IN
YUV/P-SCAN/DIGITAL AUDIO OUT
VIDEO
S-VIDEO
VIDEO OUTVIDEO IN
USB
RF IN
RF OUT
LEFT
RIGHT
VIDEO
Y
CB / PB CR / PR
OPTICALCOAXIAL
5.1 CH AUDIO OUT
FL
FR
SL
SR
CENTER
SUB-WOOFER
S-VIDEO
2 CH AUDIO IN
YUV/P-SCAN/DIGITAL AUDIO OUT
VIDEO
S-VIDEO
VIDEO OUTVIDEO IN
USB
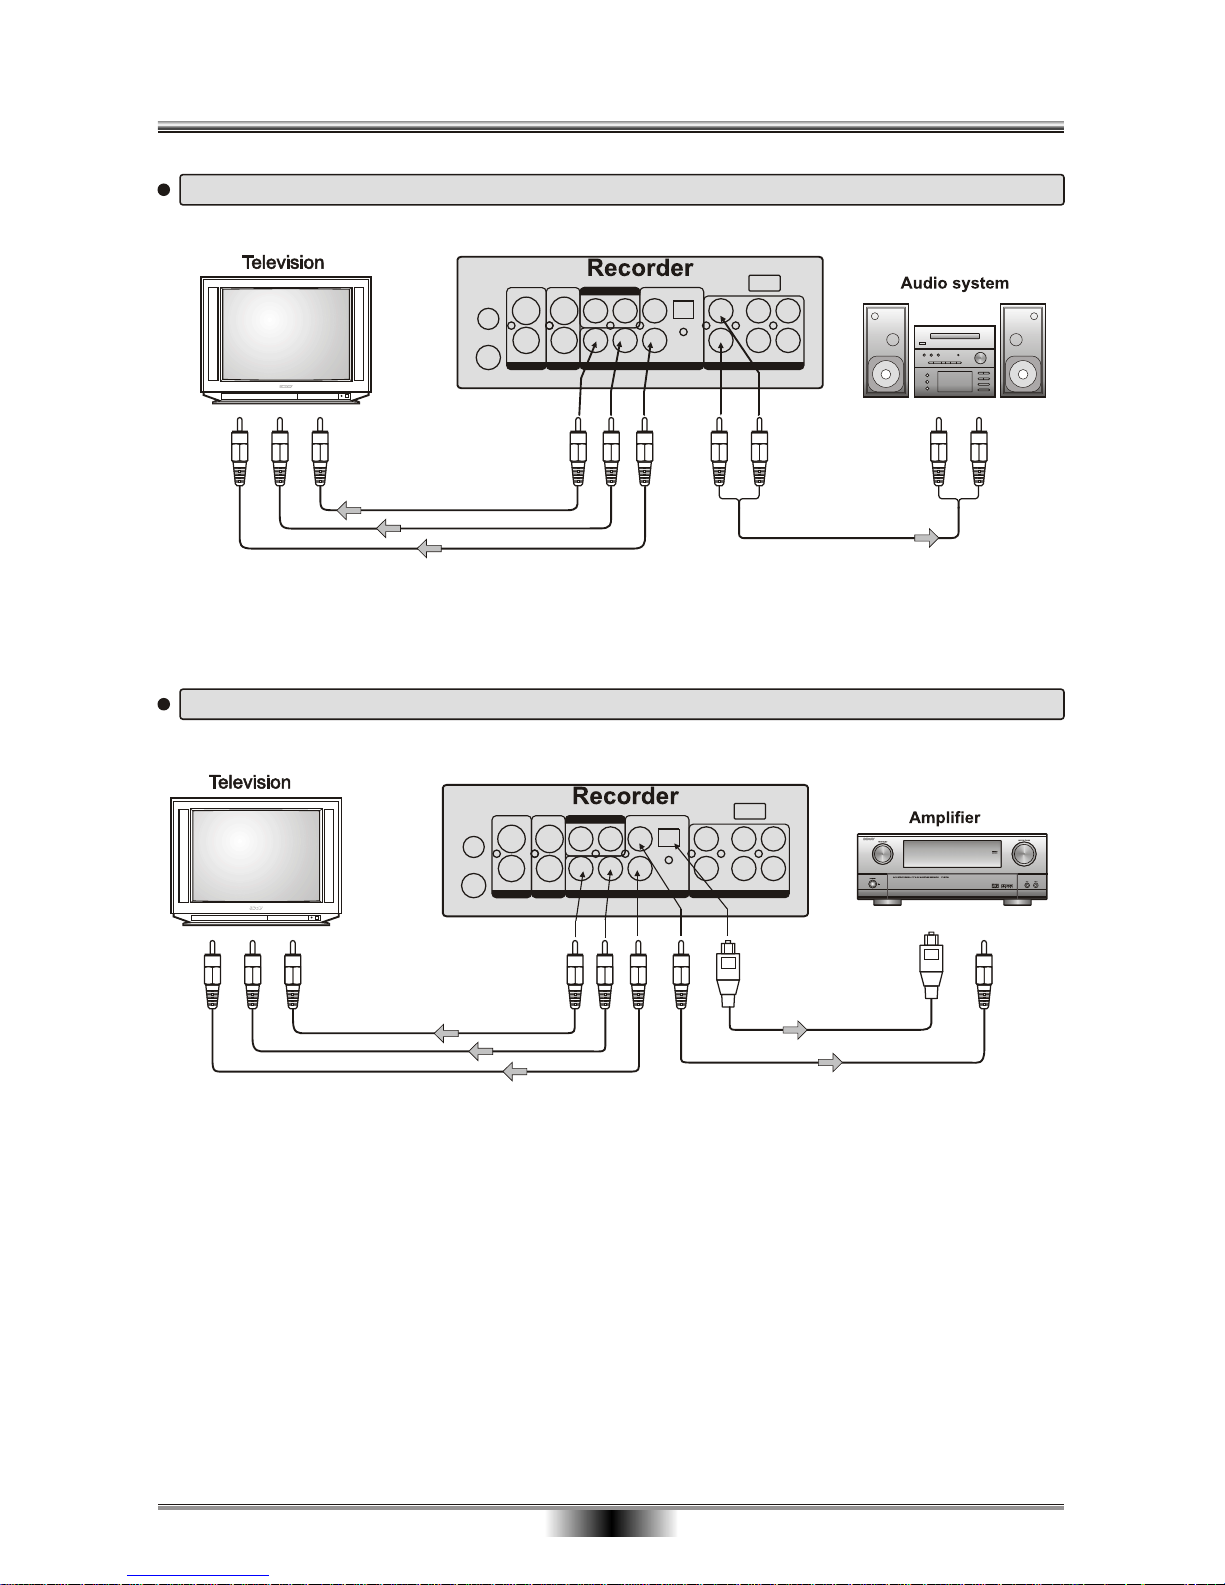
BASIC CONNECTION
08
To audio inputs of the amplifier
Connecting to an audio system and TV equipped with YUV video input
Red
Red
White
White
Connecting to an amplifier equipped with a digital audio input and TV
To OPTICAL
type digital
audio input
To Y video input
To Y video input
To CB/PB video input
To CB/PB video input
To CR/PR video input
To CR/PR video input
To Y video output
To Y video output
To CB/PB video output
To CB/PB video output
To CR/PR video output
To CR/PR video output
Connect either
Optical digital cable
Coaxial cable
To COAXIAL
type digital
audio input
Page 11
RF IN
RF OUT
LEFT
RIGHT
VIDEO
Y
CB / PB CR / PR
OPTICALCOAXIAL
5.1 CH AUDIO OUT
FL
FR
SL
SR
CENTER
SUB-WOOFER
S-VIDEO
2 CH AUDIO IN
YUV/P-SCAN/DIGITAL AUDIO OUT
VIDEO
S-VIDEO
VIDEO OUTVIDEO IN
USB
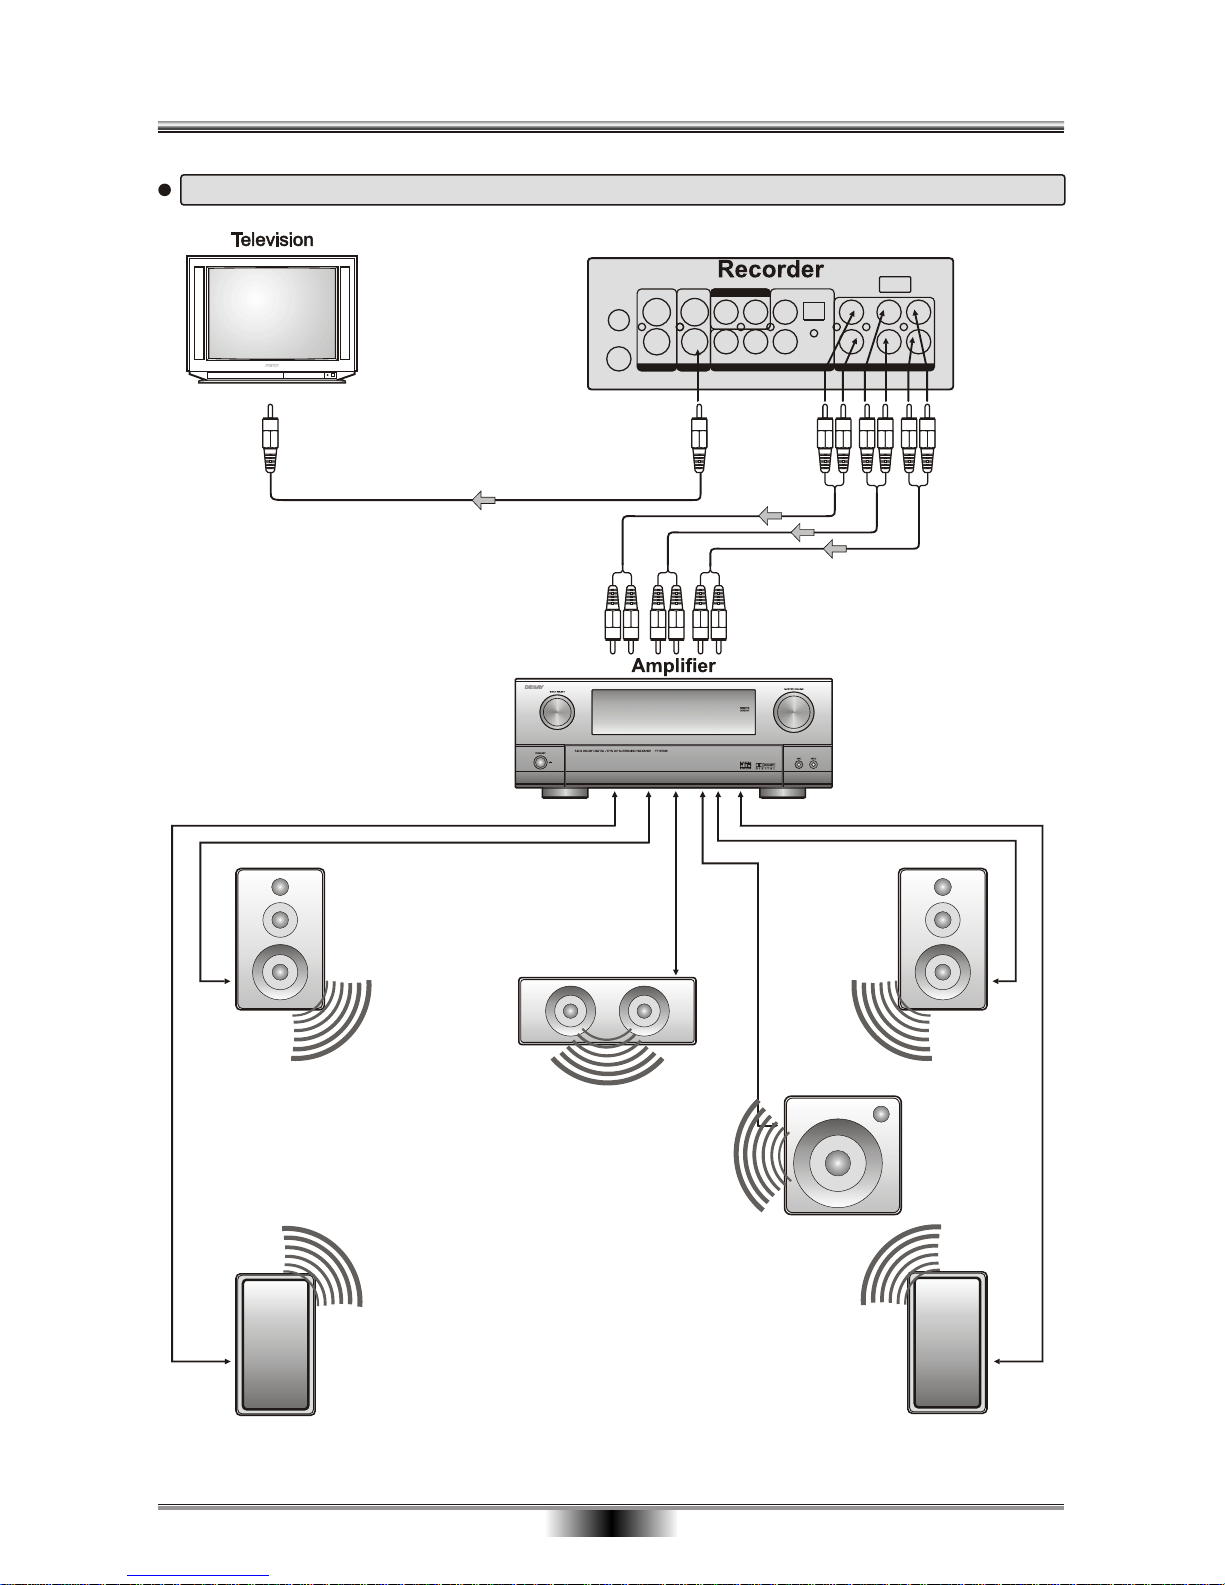
Connecting to an amplifier equipped with 5.1ch audio input and TV
To 5.1ch audio inputs
To video input
To 5.1ch audio outputs
Audio cable
Front (L)
Surround(L)
Surround(R)
Center
Front (R)
BASIC CONNECTION
09
Subwoofer
Page 12
SETU
P
1
0
2
3
4
5
6
789
VOL+
GOTO
EDIT
REC MODE
DISC REC
I/P
CH+
CH VOL
SOURCE
ZOOM
PROG/CLEAR
MUTE
TIMER
USB
DVDHDD
SLOW
RETURN
QUALITY
ANGLE
REPEAT AUDIO
A-B RPT
SUBTITLE
INFO MENU/PBC
TITLE
DVR-250
STEP
1
2
4
6
7
8
9
10
11
12
14
16
18
20
21
22
23
13
15
17
19
3
5
24
25
27
29
30
31
32
33
34
36
38
39
26
28
40
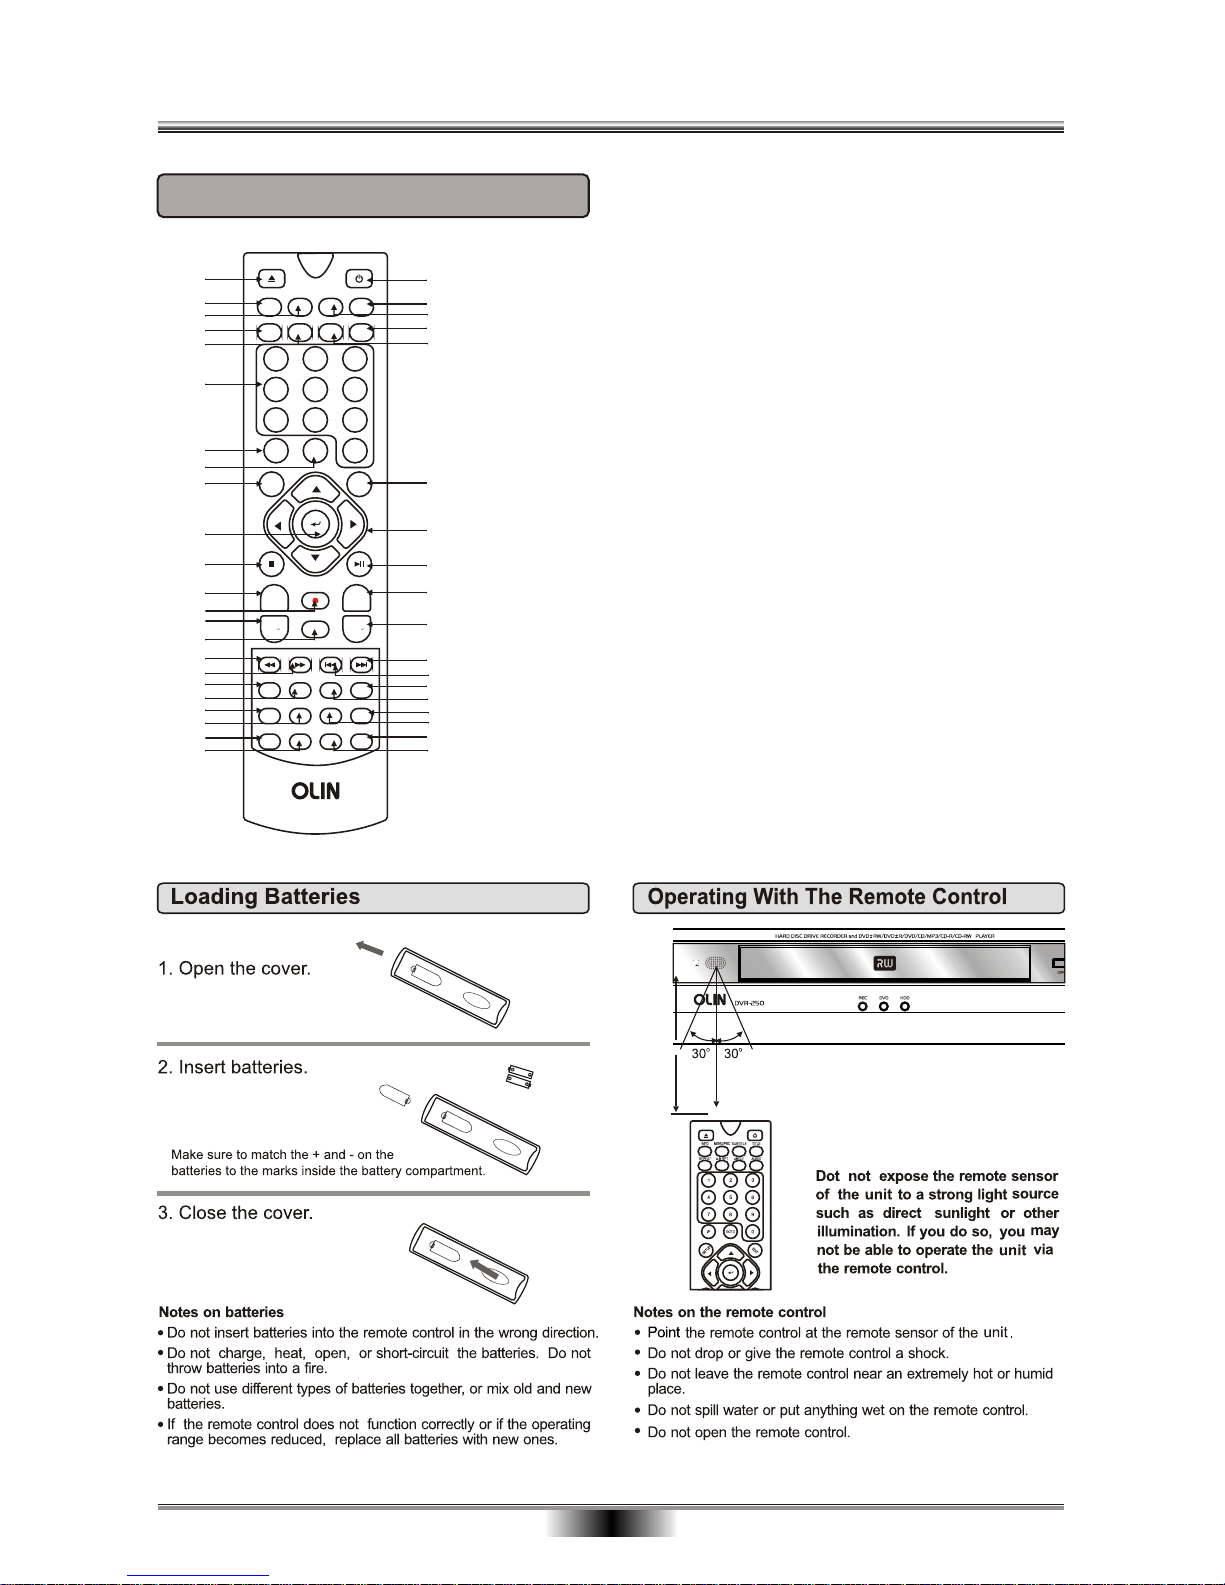
1. OPEN/CLOSE DISC TRAY
2. INFO
3. MENU/PBC
4. REPEAT
5. A-B REPEAT
6. DIGITS 0-9 BUTTONS
7. INTERLACE/
PROGRESSIVE SCAN
8. GOTO
9. SETUP
10. ENTER
11. STOP
12. CHANNEL UP
13. RECORD
14. CHANNEL DOWN
15. RECORD MODE
16. FAST REVERSE
17. FAST FORWARD
18. RECORD QUALITY
19. STEP
20. TIMER
21. USB
22. SOURCE
23. PROGRAM/CLEAR
24. STANDBY
25. TITLE
26. SUBTITLE
27. AUDIO
28. ANGLE
29. EDIT
30. CURSOR
31. PLAY/PAUSE
32. VOLUME +
33. VOLUME -
34. NEXT
35. PREVIOUS
36. RETURN
37. SLOW
38. DVD TITLE SCREEN
39. HDD RECORD
40. MUTE
41. ZOOM
35
37
41
REMOTE CONTROL
REMOTE CONTROL
10
Distance: About 7m (23 feet) from the
front of the remote sensor.
o
Angle: About 30 in each direction
of the front of the remote
sensor.
About 7m
Page 13
BASIC PLAYBACK
11
1. Press power switch on the rear panel to " ON " ,
and the TV screen will display the start-up screen.
If a disc is already in the tray, it will automatically
start the playback.
2. Press OPEN/CLOSE to open the disc tray,
Place a disc on the disc tray.
There are two different disc sizes. Place the
disc in the correct guide on the disc tray. If the
disc is out of the guide, it may damage the disc
and cause the unit to malfunction.
Do not place a disc which is unplayable in this
unit.
3. Press OPEN/CLOSE to close the disc tray,
the playback will automatically start.
Some disc may not playback automatically,
you can press PLAY/PAUSE button to start
playback.
4. Some disc may start playback with a menu,
use the cursor button on the remote control to
select menu options and press PLAY/PAUSE
to start, or press digits to select a menu options
directly.
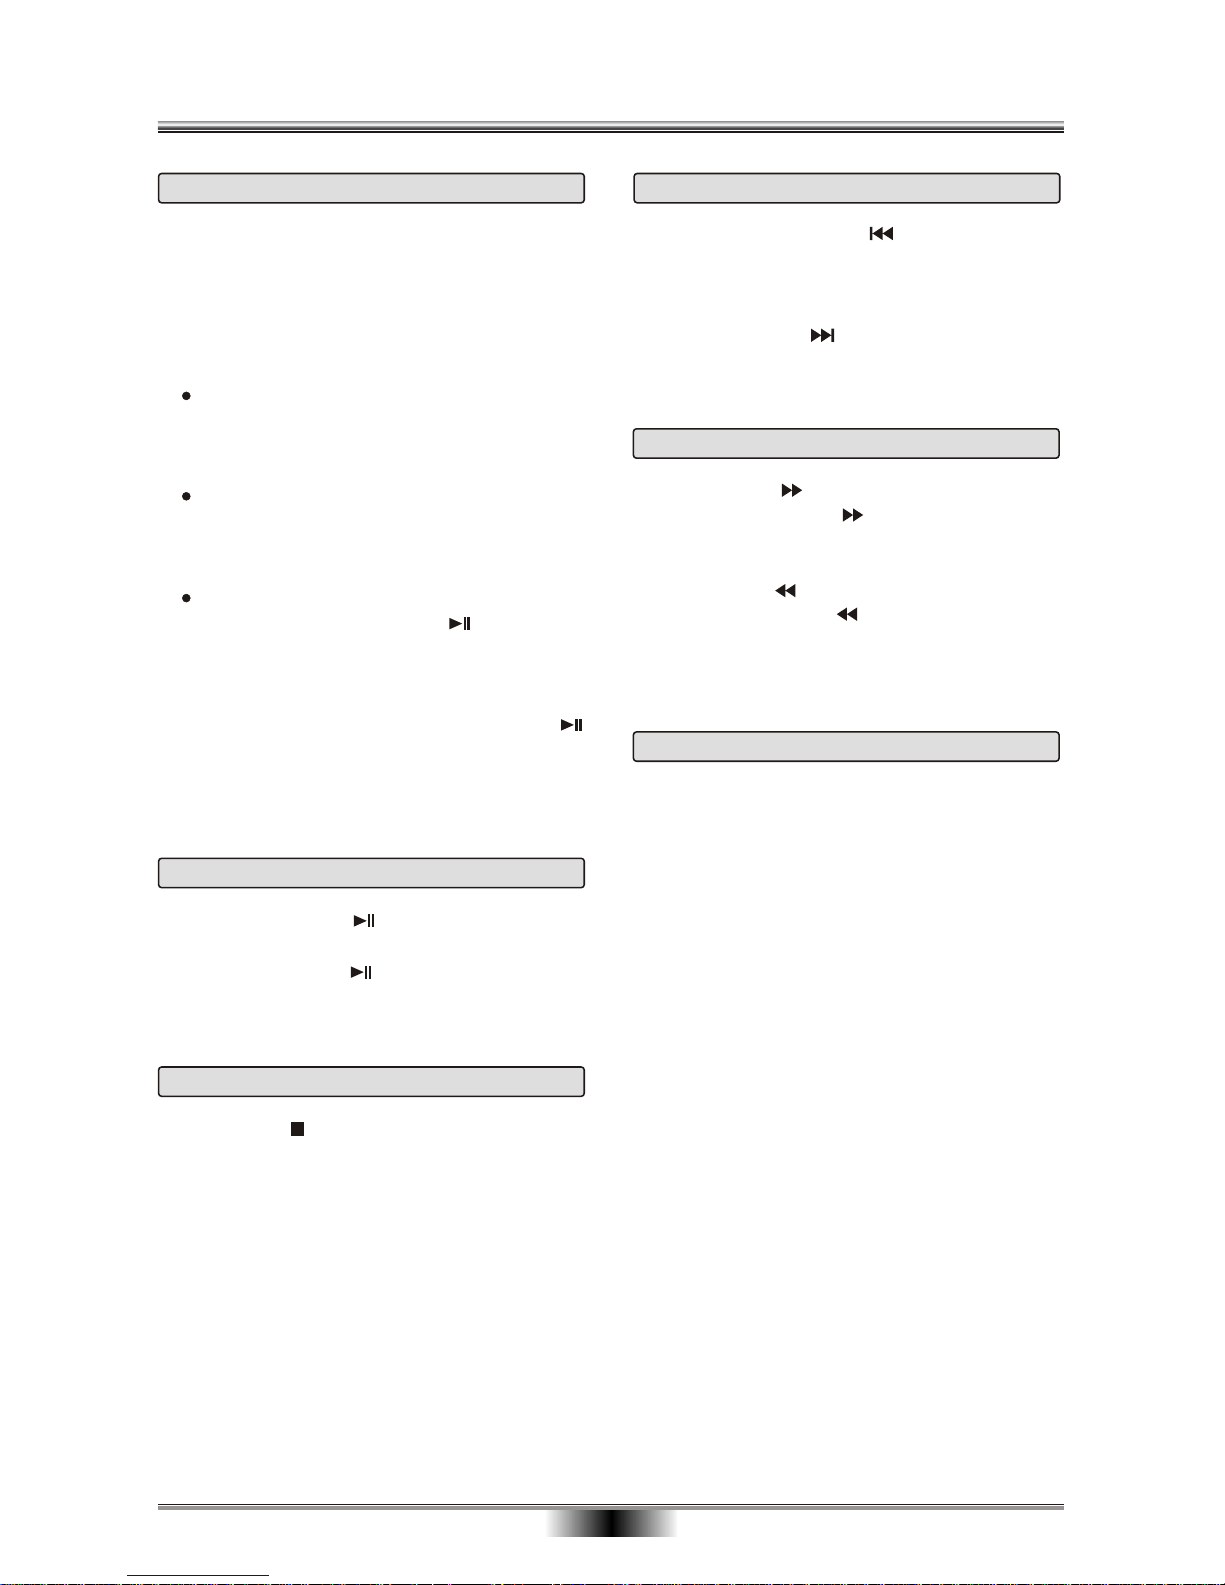
Basic playback
1. Press STOP button to go to stop mode, the TV
screen will show the start logo. As some disc the
unit can recall the location where stopped, such
as DVDs and audio CDs.
2. Press PLAY/PAUSE to playback to resume play back from the location where playback is stopped
or from the beginning of the disc.
3. Press STOP twice to stop completely.
Stop playback
Previous and Next
During playing, press PREV key can
then each press this key will
skip a chapter still the start of the disc. (Note: disc
function will difference that depending on disc format)
Each press of NEXT during playing will skip
the current chapter and play the next one.
back to start
of the previous chapter,
key
Fast forward and Fast reverse
1. Press F.FWD to fast forward through the disc.
Each time the F.FWD button is pressed, the
fast forward motion speed changes.
2. Press PLAY to resume normal playback.
3. Press F.REV to fast reverse through the disc.
Each time the F.REV button is pressed, the
fast reverse motion speed changes.
4. Press PLAY/PAUSE to resume normal playback.
Slow
Press SLOW button to activate the slow motion
function. Each time the SLOW button is pressed,
the slow motion speed changes.
Press PLAY/PAUSE to resume normal playback;
Note: This function is invalid for CD and MP3.
NOTES:
1. Press PLAY/PAUSE to pause playback (still
mode). The sound will be muted during still mode.
2. Press PLAY/PAUSE to resume normal playback.
Play/Pause playback
1. " INVALID "may appear on the TV screen during
operation.
A " INVALID " means that the operation is not
permitted by the unit or the disc.
2. The unit is controlled by CPU, screen saver may
automatically activate according to your setting.
Press any key under screen saver mode to
reactivate the unit. If it doesn't respond properly,
set your SCREEN SAVER mode to OFF from
PREFERENCES of SETUP MENU.
Page 14
TITLE
The this button displays the Title menu from the
DVD disc.
ADVANCED PLAYBACK
12
IMPORTANT NOTE:
THE FOLLOWING FUNCTION DESCRIPTIONS ARE FOR DVDS, OPERATION AND DISPLAY ON SCREEN
MAY BE DIFFERENT FOR OTHER FORMAT DISCS.
ANGLE
If the video on the DVD was recorded with multiple
angles, you have the option to change the camera
angle of the scene you are watching.
Pressing ANGLE button during playback will display
the angle mark on screen.
Note: the angle function will not work if your DVD
disc does not contain the multiple angle features.
Press this button will switch between Interlace or
progressive (a higher quality of video output).
Notes: In order to view progressive scan quality, you
must connect the unit to your TV using the component video output jacks as shown on P9.
This function can only work with Progressive
Scan TV and under connection Picture 1 on P9.
I/P
Press "REPEAT" and Chapter Repeat will be
displayed on screen, the second press will display
title repeat, the third press will cancel repeating. For
CD playing, first press will display track, the second
press will display all repeat, the third press will
cancel repeating.
REPEAT
Press A-B RPT to begin start-point, press again to
set an end complete setting. The selected section
A-B will be repeated. The third press will cancel
this function.
A-B REPEAT
SUBTITLE
Press Subtitle to select up to 32 languages displayed
on screen. (Valid if the discs itself has that function.
Some discs possess two subtitle languages, some
three, some more).
MENU/PBC
According to some DVD discs, Press this button to
display root menu , select item according to your
preference. .
According to some VCD discs, if PBC is ON, the
user can use the digits buttons to select track only
in the menu, if PBC is OFF, the user can select the
track directly.
AUDIO
Press this button on remote control to change the
mode of audio.
For example: [ 1 XX 5.1CH ], "XX" indicates
the language of country.
(the number of language depends on disc).
GOTO
Press GOTO button, the screen will display some
messages, you can use LEFT/RIGHT cursor button
and digits button to select what you wanted and
change message, then press ENTER button to
confirm.
INFO
During playback, Press this button, the title, chapter
and time information will be displayed.
For example: TT 01/02 CH 01/07 00:01:58/01:02:40
press this button again, the language and audio
information will be displayed.
For example: 01/02 ENG 5.1Ch 01/10 ENG
off
(the number of language depends on disc).
QUALITY
The record quality determines the quality of your
recordings as well as the maximum amount of video
you can record on a disc. The higher the quality, the
less video recording time can be recorded.
Press this button and select the record quality, it is
including: HQ, SP, LP, EP, SLP, SEP.
RETURN
The RETURN button will display root menu, select
item according to your preference.
Exit or return to the before menu, such as Setup.
Page 15
13
ADVANCED PLAYBACK
SOURCE
The video input source that will be used for the
recording: TV, Front AV, Front SV, Rear AV,
Rear SV, DV.
DVD
In the general state:
press the DVD button to enter the DVD mode.
In the source state:
1. Press the DVD button on the remote.
2. Press the ENTER button, The system will enter the
DVD mode, if there is a disc in the tray, the disc will
be played automatically.
VOLUME and MUTE
Press " + " at the right of VOLUME to increase
volume , " - " to decrease to volume . Press the
MUTE button to temporarily cancel the audio signal
at any time and will display Mute ( no voice ),
Pressing again will resume normal audio.
PROGRAM/CLEAR
When playing discs, press this button to enter
program mode. Press digits to input the program
number what you want, move the cursor to select the
" CLEAR" to clear the input digits. and when finish,
move the cursor to select the " PLAY " to start
program playback. If you want to cancel this function,
press STOP button .
In the timer recording, press this button to clear the
entry.
ZOOM
The picture can zoom enlarge the picture. Each
time pressed the picture times will be change.
MP3 PLAYBACK
When playing MP3 disc, a navigation menu will be displayed automatically if the disc is loaded in succession.
In the menu, use UP or DOWN button in the cursors to choose folder, then press ENTER button to confirm.
In the folder, use UP or DOWN button in the cursors to select the file, then press ENTER to play this file.
In this page, Press PREV or NEXT Key jump to the previous or next one.
HDD
In the general state:
press the HDD button to enter the HDD mode.
In the source state:
1. Press the HDD button on the remote.
2. Press the ENTER button, when finished, the recorder
system will enter the HDD mode.
JPEG DISC PLAYBACK
When playing JPEG disc, a menu will be displayed auto-matically if the disc is loaded in succession. In the
menu, use UP or DOWN in the cursor to select a file, then press ENTER , the file will be play with a slideshow. press PREV or NEXT to select the previous or the next picture. Press PLAY/PAUSE to pause the
current picture for enjoying, when press PLAY/PAUSE button, it will return to normal playing. Press ZOOM
button to zoom in or out, We provide both zoom in/out and zoom pan function for the pictures. press
CURSOR button can move the enlargement picture.
USB
In the general state:
press the USB button to enter the USB mode.
In the source state:
1. Press the USB button on the remote.
2. Press the ENTER button, when finished, the recorder
system will enter the USB mode.
Page 16

SPECIAL FUNCTION PLAYBACK
14
MPEG4 DISC FUNCTION INTRODUCTION
MPEG-4 is the forth video and audio encoding standard released by MPEG (The abbreviation of " Moving
Pictures Experts Group"). VCD is based on MPEG-1 technology and DVD is based on MPEG-2. MPEG-4
takes advantage of narrow bandwidth, pursue the best picture quality by compress and transmit the data in
frame reconstruct technology. The audio data is compressed by WMA or MP3 standard. MPEG-4 is the most
advanced compression technology standard in AV field. It has the highest compression rate. By MPEG-4
technology, we can encode and compress a DVD film into one or two CD-R disc with pretty good picture quality,
or can burn several films that has same quality as VCD into one CD-R disc, or can burn several films that has
similar quality to DVD into DVD-ROM disc.
Note:
1. The MPEG-4 discs in market now have many different formats, such as XVID, AVI, DIVX, RM etc. But
some discs with "MPEG4" logo in market are not encoded by MPEG technology. It is normal that some of
the discs can't be played well in this player because of the incorrect encoding standard.
2. The MPEG-4 files are displayed as a list in the screen, choose the icon by the cursors and press "ENTER"
button to playback the movie.
Kodak Picture CD DISC PLAYBACK
Playback (Normal)
When a Kodak Picture CD is inserted on the unit, an automatic slide show is launched. Each picture in the
Kodak Picture CD will be displayed consecutively in a slide-show fashion and will be scaled to fit in the whole
TV screen. some slide-show transition modes are provided, use "PROG/CLEAR" key to select. Customer can
set transition effects for each picture.
To display an image indefinitely, press the "PLAY/PAUSE" key. To view the next or previous picture, press
"NEXT" or "PREV" key. To resume the slide-show, press the "ENTER" key.
Image Rotation
There are four modes to rotate a picture: "Invert", "Mirror", Left", and "Right". These operations are allowed
only when a picture is being displayed normally and will be cancelled automatically when a new picture is
displayed. The arrow key is used to select the different rotation modes:
Up - Invert/Normal Left - Turn left
Down - Mirror/Normal Right - Turn right
Zoom
The "ZOOM" key is used to turn on or off this function. When this mode is on, any picture will be displayed at
the last ratio selected by the user. A message on the screen will indicate the current zoom ratio.
If zoom mode is on, "F.FWD" and "F.REV" key are used to control the ratio of zoom in/out. With ZOOM mode
off, a picture is scaled to fit the whole TV screen.
Notes: During zoom function, slide-show transition and image rotation are disabled. To cancel the zoom
function press the "ZOOM" key again to resume the slide-show.
IMPORTANT NOTE: Quality of pictures displayed on the screen is highly dependent on the viewing device.
Page 17
RETURN
ENTER
Select
Exit
Select Setup option
Setup
System
Playing
A/V Set
Recording
TV Tuner
Auto Tuning
Channel Set
15
OPERATIONAL WITH RECORDING
This unit will accept four disc types for Recording :
DVD+RW / DVD+R / DVD-RW / DVD-R.
DVD+R : These discs can only be written once.
Existing recordings can be hidden but not deleted.
Therefore, any disc space already used by a recording
cannot be regained. A recorded DVD+R disc must be
Finalized before it will be compatible with other DVD
recorders. Once a disc is finalized, no further record-
ings can be made. Although DVD + R offers less
recording flexibility than DVD + RW , the lower cost
per disc and the fact that the material can not be
erased or edited make it the best choice for large
distributions of recordings to friends or clients.
DVD+RW DVD+RW discs can be written to and
erased multiple times . Existing recordings can be
deleted and disc space regained. These discs do
not require a finalization procedure.
Note: For a new DVD+R/RW, it will take about a few
minutes to format it before recording.
Introduction to Recording
Recording Quality
The recorder offers six level of recording quality.
Recording time is less if the recording quality is
better.
Please select the Quality you need on SETUP
menu or the QUALITY button on the remote, and
press DISC REC button to record.
Channel Search
To record TV programs, you should search TV
channel first.
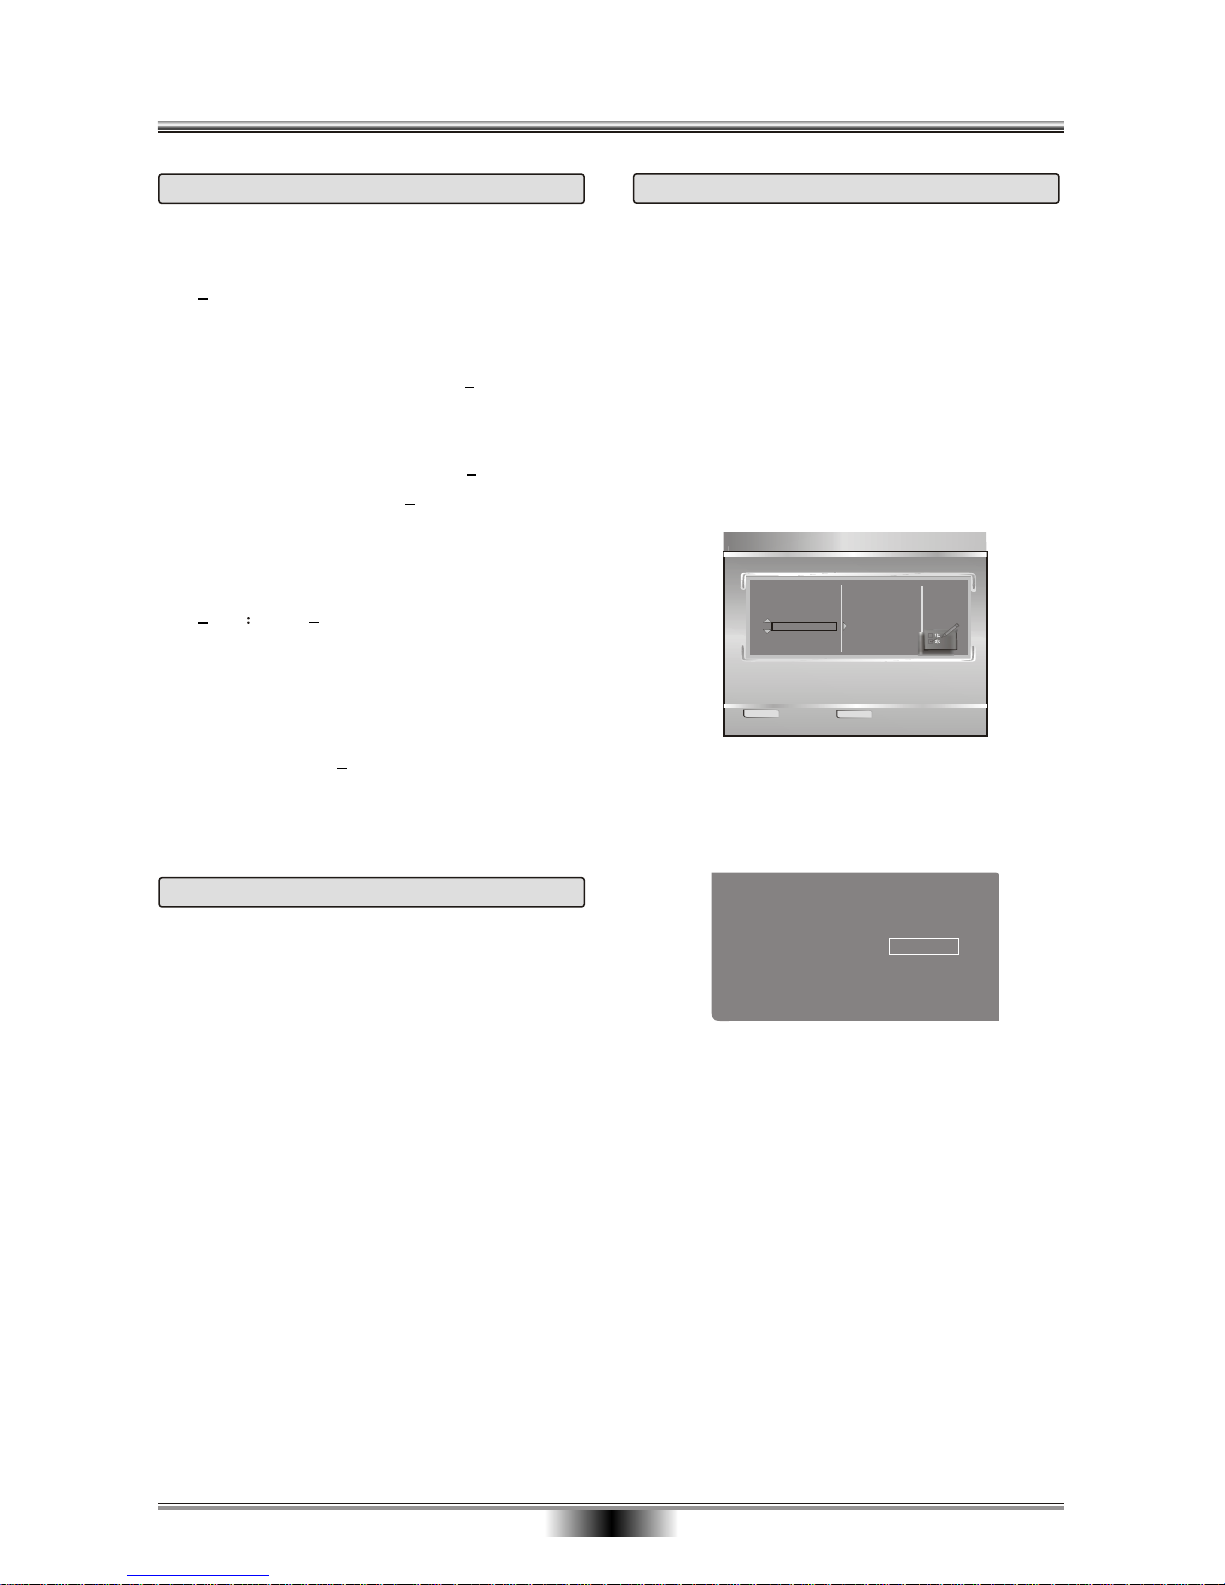
1. Press setup to access the setup menu.
2. Press UP/DOWN to highlight the TV Tuner.
3. Use the CURSOR button to highlight Auto Tuning
and press ENTER button to confirm. Confirm the
system before searching such as PAL-BG.
It will search channels automatically.
During auto-searching, press RETURN button to
stop searching.
4. Use the CURSOR button to highlight Channel Set
and press ENTER button to confirm. A menu will
appear on the screen.
5. In this menu, you could edit Channel Number,
Active, Fine Tune, Audio Format, Swap Channel,
Channel Name .
Channel Number
Active
Fine Tune
Audio Format
Swap Channel
Channel Name
1
Yes
0
PAL-BG
1
Page 18
RETURN
ENTER
Select
Exit
Input recording scheduled
Timer Record
CLEAR
Delete
States Source
Date End
Start
Quality
1. Empty
TV1
06/26
04:11 05:30
HQ
2. Empty
3. Empty
4. Empty
5. Empty
Target
DVD
16
OPERATIONAL WITH RECORDING
Notes:
The unit must be standby mode, If the power is off,
the timer recording will be not worked;
In standby mode, you recorder will be self
re-activated 2 minutes before recording.
The system time can’t be saved after power off, so
it must be set correctly before timer recording.
If any of variable is not set, an error message is
given to the user and recording is disabled.
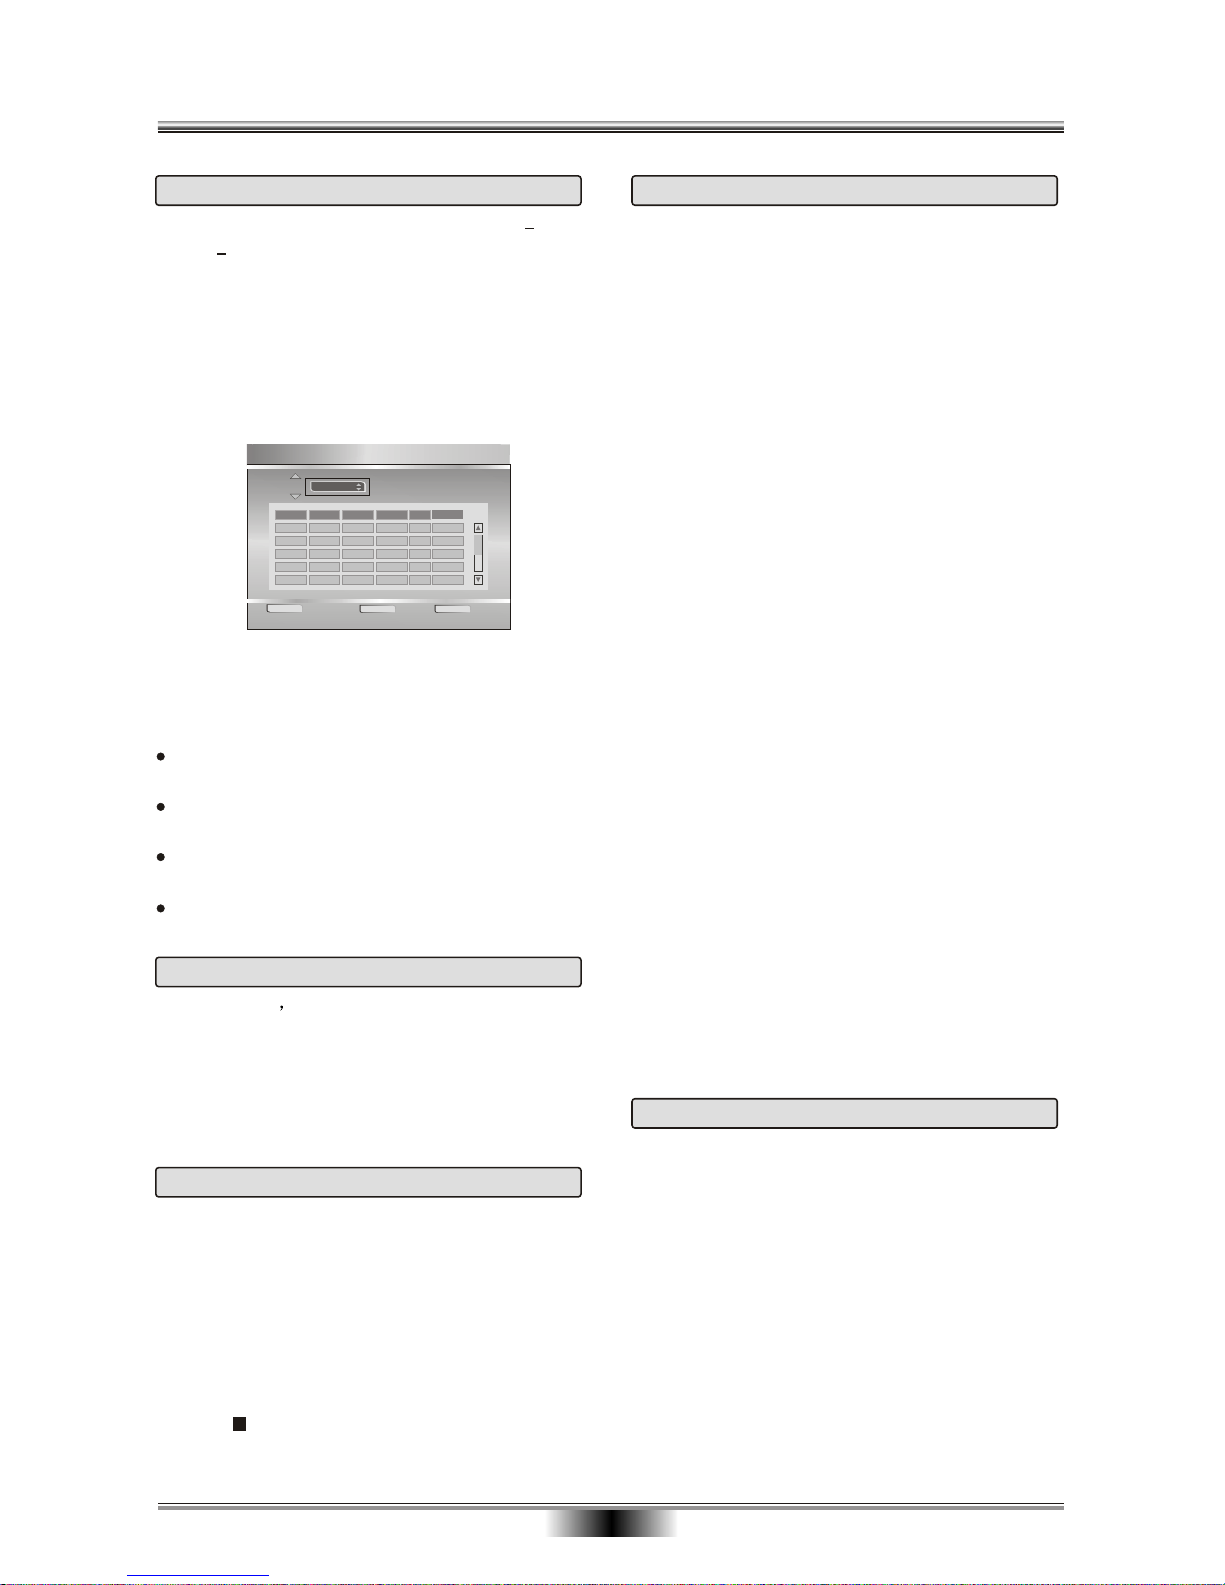
Timer Recording
1. If recording to a optical disc, Insert a DVD+R or
DVD+RW disc into the recorder
2. Press TIMER button in the remote control to start
Timing record function, a Timing record sheet can be
found in the screen. When the highlight is in the blank
row, press ENTER to add timing record, set the related
variable in the jumping window. When the highlight is
in any of the pre-set record, press PROG/CLEAR to
remove the entry.
In each item you can also use cursor button to
highlight and press ENTER to choose your desired
setting.
Recording to HDD
1. Please switch the system to HDD Mode.
2. Press SOURCE on the remote control to select
a signal source.
3. Press QUALITY to select a record quality.
(Default: SP.)
4. Press REC MODE to select a recording format
(+VR or MEG4).
5. Press DISC REC to start recording.
6. Pressing PLAY/PAUSE key will pause the recording.
7. Press STOP to stop the recording. REC STOP
will appear on screen.
Copying and Dubbing to HDD
Through this recorder system, you can copy the files
from an MPEG4-format disc or a USB device to HDD
or dubbing files from a +VR-format disc to HDD.
Thus, you can store your favorite files in the HDD.
1. DISC HDD
(1) The DISC COPY function is only available under
the DVD mode.
(2) Select the file you want to copy and then press
the EDIT key on remote control.
(3) Choose Copy from the pop-up window, OSD will
display as the interface.
(4)Select HDD as the destination and then specify
a directory on HDD for copied files.
(5) After copy finishes, the same file will appear under
the on HDD.
Note:
DISC DUBBING Function for a +VR Disc:
(1) The DISC DUBBING function is only available
under the DVD mode.
(2) Select the file you want to dub and then press the
EDIT key on remote control.
(3) Choose Dubbing from the pop-up window, OSD
will display the interface.
(4) When the file succeeds in dubbing, a same file
will appear under the Video folder on HDD.
2. USB HDD
(1) USB COPY function is only available for USB MODE.
(2) Select the file you want to copy and then press the
EDIT key on the remote.
(3) Choose Copy from the pop-up window, OSD will
display the interface.
(4) Select HDD as the destination and then specify
a directory on HDD for copied files.
(5) After the copy finishes, the same file will appear
under the on HDD.
corresponding folders
The option is only used with MP3, picture and
AVI.
corresponding folders
TIME SHIFT
In the TV state press the PLAY/PAUSE button to
enter the TIME SHIFT mode. The current menu
will be paused. Here, a time bar will appear at the
bottom of the screen. Press the PLAY/PAUSE button
again to begin to play from the current pause time.
Press the STOP button to exit from the TIME SHIFT
mode.
Playing and Editing Files in HDD
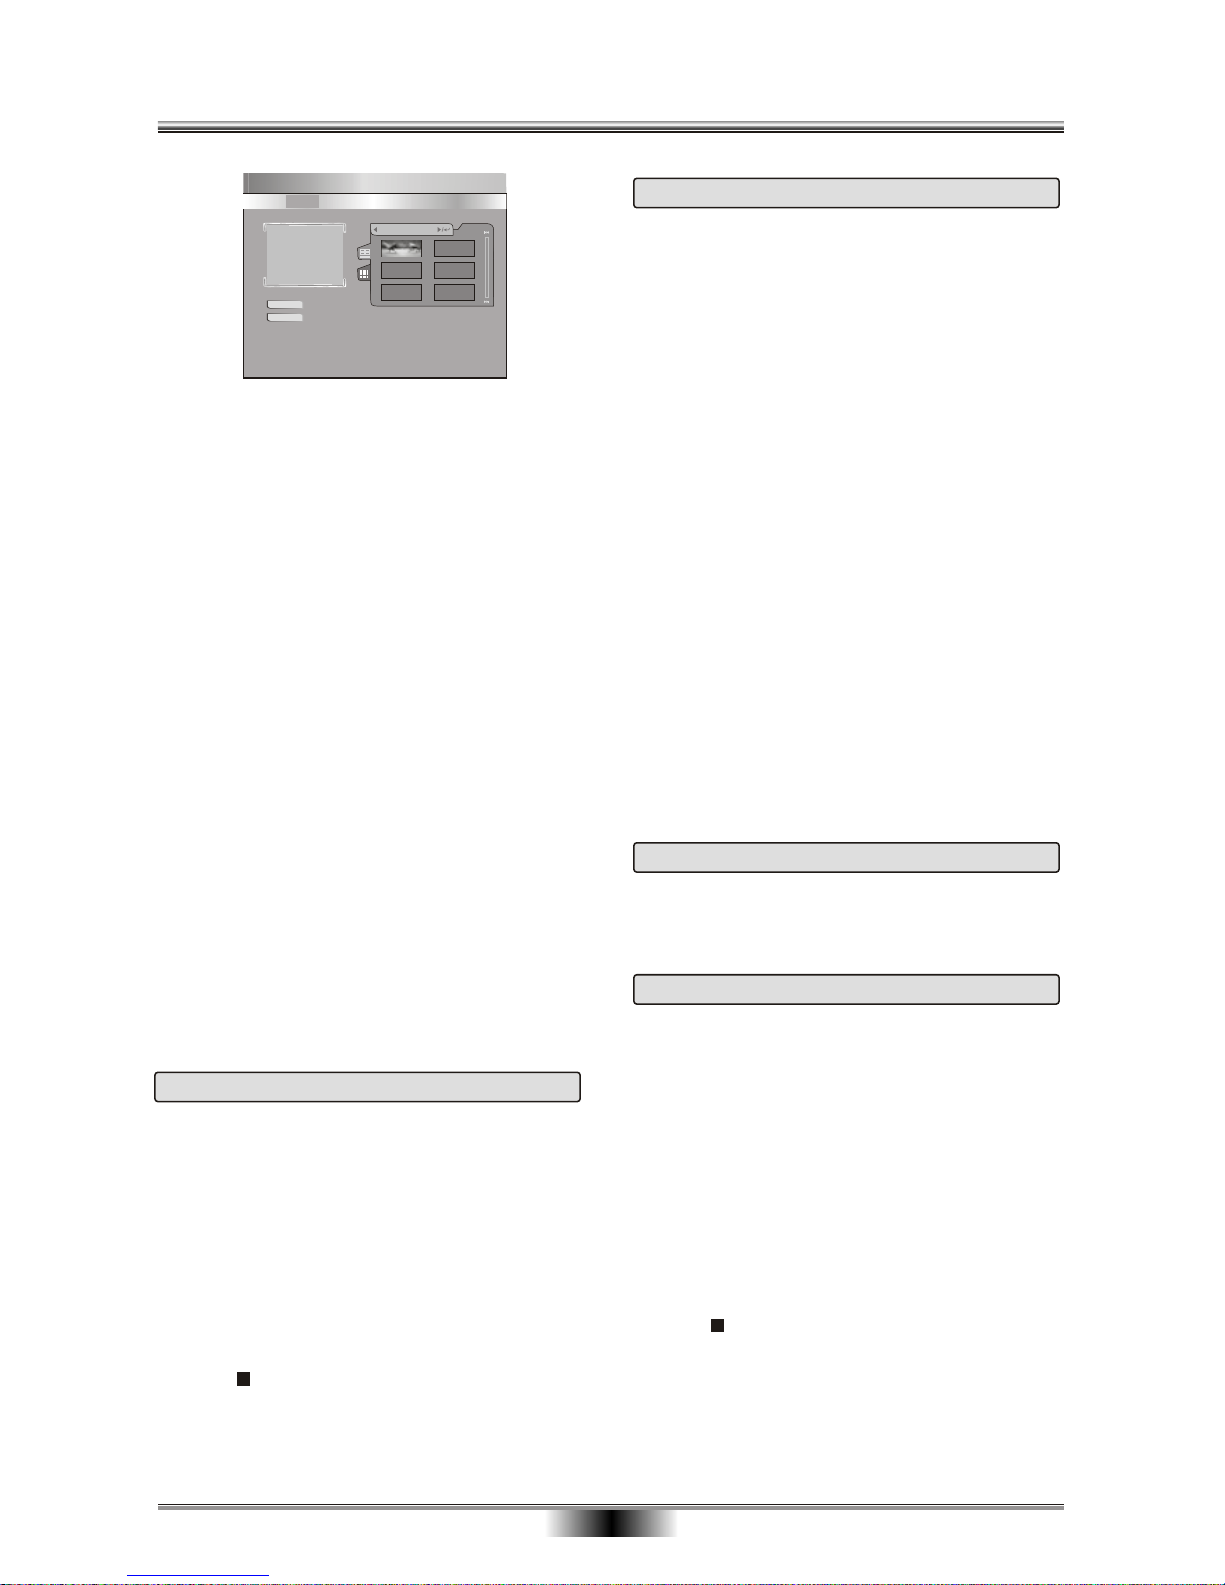
Press HDD button to see the HDD title list:
In the HDD Title List interface, the following four
supported multimedia file folders are displayed.
Video - DVD+VR Video file
MPEG4 - AVI Video file
Audio - MP3/WMA Audio file
Picture Image file..
The files in HDD are stored into different folders
according to their formats. The extended/selected
folder will be highlighted with a yellow rectangle. For
example, if you want to play a Video file, you should
highlight the Video folder, immediately six thumbnails
for this format will appear on the right side. Then you
can ENTER any of them to play.
Page 19
Recording to a DISC
1. Please switch the system to DISC Mode.
2. Press SOURCE on the remote controller to select
a signal source.
3. Press QUALITY to select a record quality.
4. Select a recording mode (+VR or MPEG4).
Currently, the recording mode is the same as that
of disc by default.
5. Press DISC REC key to start recording, and REC
message will appear on OSD.
6. Pressing PLAY/PAUSE key will pause the recording
and you can press it again or press DISC REC to
continue.
7. Press STOP to stop the recording. REC STOP
will appear on OSD.
Note: Circumscribe the Television type of outer signal
sourcing to be comply with this machine, otherwise,
will cause not matching in television type and no
recording.
Recording to a USB device
You can record video/audio files to a USB device.
1. Please switch the system to USB Mode.
2. Press SOURCE on the remote controller to select
a signal source.
3. Press QUALITY to select a record quality.
4. Press DISC REC to start recording, and REC
message will appear on OSD.
5. Pressing PLAY/PAUSE key will pause the recording
and you can press it again or press DISC REC to
continue.
6. Press STOP to stop the recording. REC STOP
will appear on OSD.
Copying to a USB Device
Editing Files in a USB Device
This system supports four edit operations to the files
in a USB device: Rename, Delete, Delete ALL and
Copy.
The system capacitates copying files from HDD/DISC
into a USB device and saving them to corresponding
folders according to
their formats: AVI, MP3, JPEG, etc.
1. DISC USB
(1) DISC COPY function is available only under the
DVD mode.
(2) Select the file to be copied and then press the
EDIT key on a remote control.
(3) Choose Copy from the pop-up window, and OSD
will display the interface.
(4) Select USB as the destination and then specify a
directory on the USB device for the copied files.
(5) After copy finishes, a same file will appear under
the corresponding folders on the USB device.
2. HDD USB
(1) Select the file to be copied and then press the
EDIT key on a remote controller. Note that this
operation is available only when the system is
under the HDD mode.
(2) Choose Copy from the pop-up window, and the
interface will display.
(3) After copy finishes, a same file will appear under
the corresponding folder on the USB device.
17
OPERATIONAL WITH RECORDING
Title List
Enter
Select
Play Play
Video
MPEG4
Audio Picture
(C:/)
Left Capacity:
476588M
001/001
TITLE00001
01/13 23:27
00:00:04 HQ
001~006
In the same way we can display MPEG4, Audio and
Picture files. But for Audio, only text information can
be listed for preview.
Note:
If the files in current folder cannot be listed in one
page, you can switch pages by pressing the PREV
or NEXT key.
Editing Files in an HDD:
This system supports four edit operations to the files
on an HDD: Rename, Delete, Delete ALL and Copy.
Rename
Select a file and press the EDIT key, and select
Rename option,
Highlight OK and then press ENTER to finish this
operation.
elect a
file and press the EDIT key, and select Delete option
This option brings up the on-screen
keyboard, you can type in the title name for the title.
Use the CURSOR to highlight the desired key,
Delete
If a title is not protected or locked, you can s
to delete it. You will be prompted to confirm the
operation.
Page 20
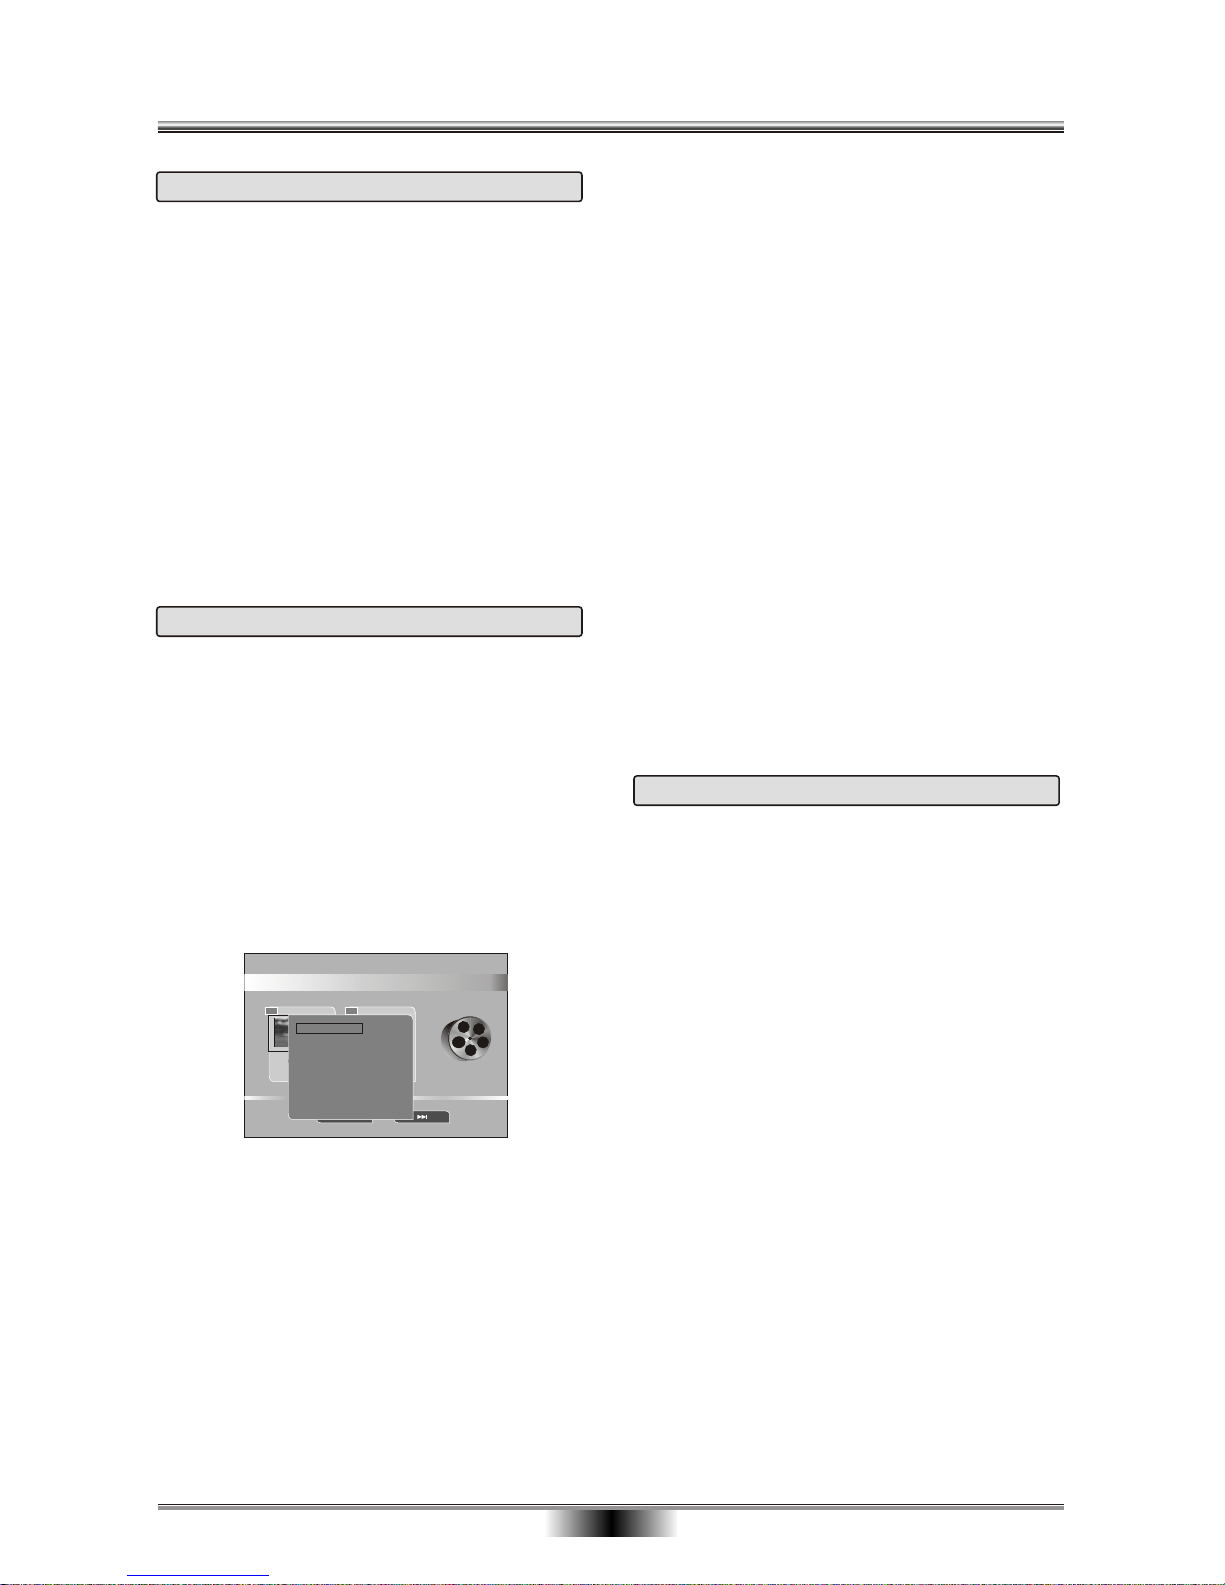
Editing Files in a Disc
The recorder supports two formats of discs:
DVD+VR format disc
MPEG4 format disc
When the disc is in MPEG4 format, you can edit the
files in it such as: Rename, Delete, Delete All and
Copy.
In the Title List Interface, When the disc is in +VR
format, you can edit the files in it such as rename,
protect, delete, merge next title, Delete ALL chapter
Mark, Play Full Title and Dubbing.
18
OPERATIONAL WITH RECORDING
Dubbing to a Disc
The system capacitates dubbing files from HDD
(Video only) to a +VR format disc.
Dubbing files into a +VR disc :
(1) The HDD DUBBING function is available only
under the HDD mode.
(2) Select the file to be dubbed and then press the
EDIT key on the Remote Control. Choose Dubbing
from the pop-up window, and the interface will
appear.
(3) Press ENTER key to start dubbing.
(4) After dubbing finishes, a DUBBING OK banner
will prompt on OSD and a same file will appear
under the +VR folder on the disc.
Protect
Select the Protect command from the menu and then
press ENTER to protect the file. The protected file
can not be delete.
Delete
Select the Delete command from the menu, it cans
delete the select file.
Merge Next Title
Select the Merge Next Title command on the menu,
it cans combine with two titles.
Delete Chapter Mark
During a program playback, select the Delete Chapter
Mark item on the pop-up menu to delete chapter mark .
Note: Selecting the Delete All Chapter Mark item will
delete all the existing chapter marks.
Play Full Title
Select the Play Full Title command on the menu,
it cans play all title.
CD Ripping to HDD/USB
Also, the system is enhanced by a CD Ripping function.
In the DVD mode, during a CD playback, the playing
chapter can be compressed to HDD or a USB device
with mp3 format synchronously.
Following are the steps of ripping a CD file to HDD/USB:
(1) In the DVD mode, during a CD playback, press
DISC DEC the remote, and the following dialog will
come for you to select a ripping target medium.
(2) Press CURSOR and ENTER to select the target
Bitrate, mode or speed. And then select the START
option to begin to ripping function.
(3) If you press STOP, the system will stop ripping.
(4) When the file is played completely, you will see
“ CD RIPPING 100%” banner on the screen and the
system will stop ripping automatically.
(5) After that, the file on CD is recorded as an mp3
file in HDD/USB. You can see it in the HDD/USB
mode.
Title List
TITLE
01
2000/01/13
23:40:01
00:00:04 HQ
TITLE
02
2000/01/13
23:40:01
00:00:04 HQ
Rename
Protect
Delete
Merge Next Title
Delete All Chapter Mark
Play Full Title
Dubbing
Rename
Select Rename from the menu and then press ENTER
to enter the Text Input interface. Input text by UP/
DOWN/LEFT/RIGHT and ENTER keys, and then
press OK button to finish the rename operation.
Page 21
SYSTEM SETUP
19
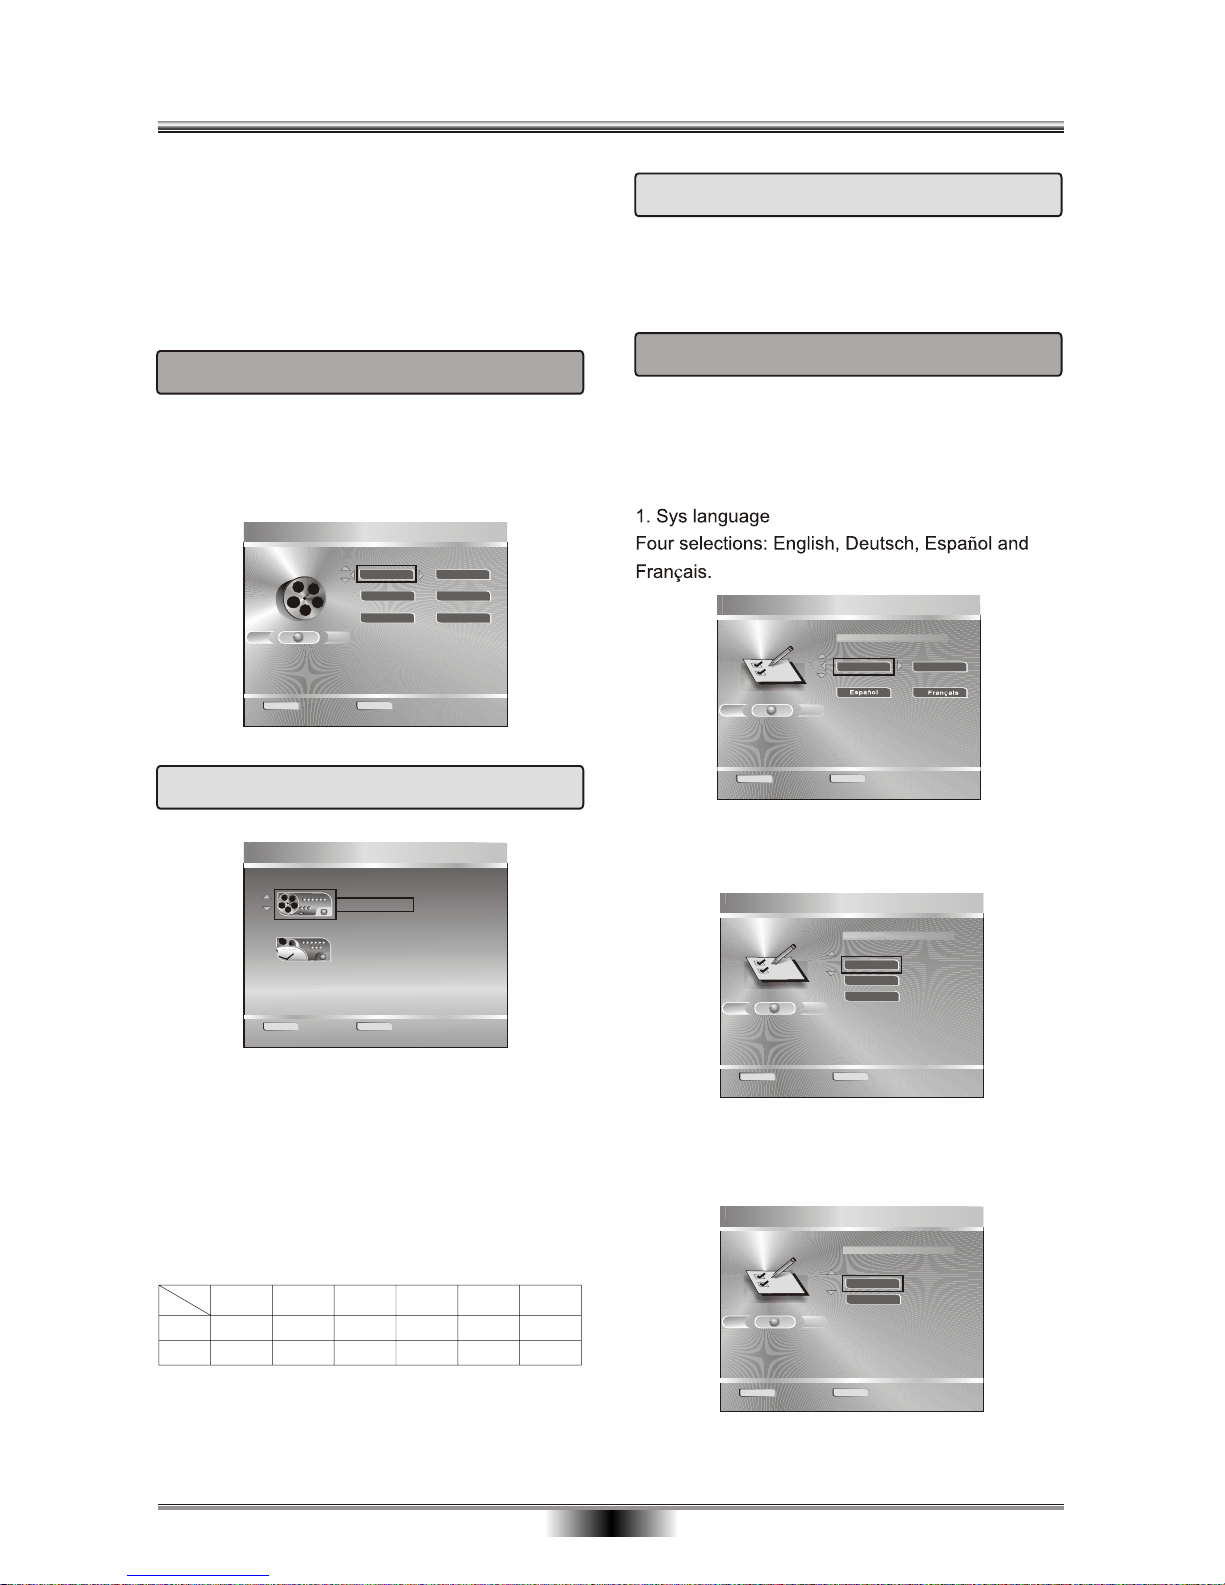
This unit allows you to customize the performance to
your personal preferences. Press SETUP button to
access the setup menu. Press buttons to
(Highlight) a item, then press the ENTER button to
confirm. Press the RETURN button to exit or return
to the upper menu. Press the SETUP button to exit
the SYSTEM menu.
CURSOR
SYSTEM MENU
RETURN
ENTER
Select
Exit
Select one of the buttons
Wizard
Insant Rec
Timer Rec
Intial Setup
Disc Utility
Setup
1. WIZARD
The Wizard is a simple interface that guides you to
record video step by step quickly. In addition, the
wizard provides two recording ways:
Instant Recording and Timer Recording.
1.1 Instant Recording
Wizard
RETURN
ENTER
Next
Provious
Recording Mode
12
1
2
3
1
Instant Recording
Timer Recording
the Instant Recording:
1. choose a record source(TV, AV1, AV2, S-Video,
and DV)
2. Select a destination storage device: DISC, HDD,
or USB.
3. Select a recording quality (1Hr~6Hr, corresponding
to HQ~SEP respectively).
HQ(hour)
+VR
AVI
SP(hour) LP(hour) EP(hour) SLP(hour) SEP(hour)
12
3
4
5
6
1.5
3
4.5 6
7.5
9
1.2 Timer Recording
The Timer Recording provides two recording modes:
Once: only record once.
Repeat: termly record as the recording repeat mode
2. Initial Setup
The Initial Setup item will guide you to initialize the
recorder step by step; you can press UP/DOWN/
LEFT/RIGHT and ENTER keys to select proper
options.
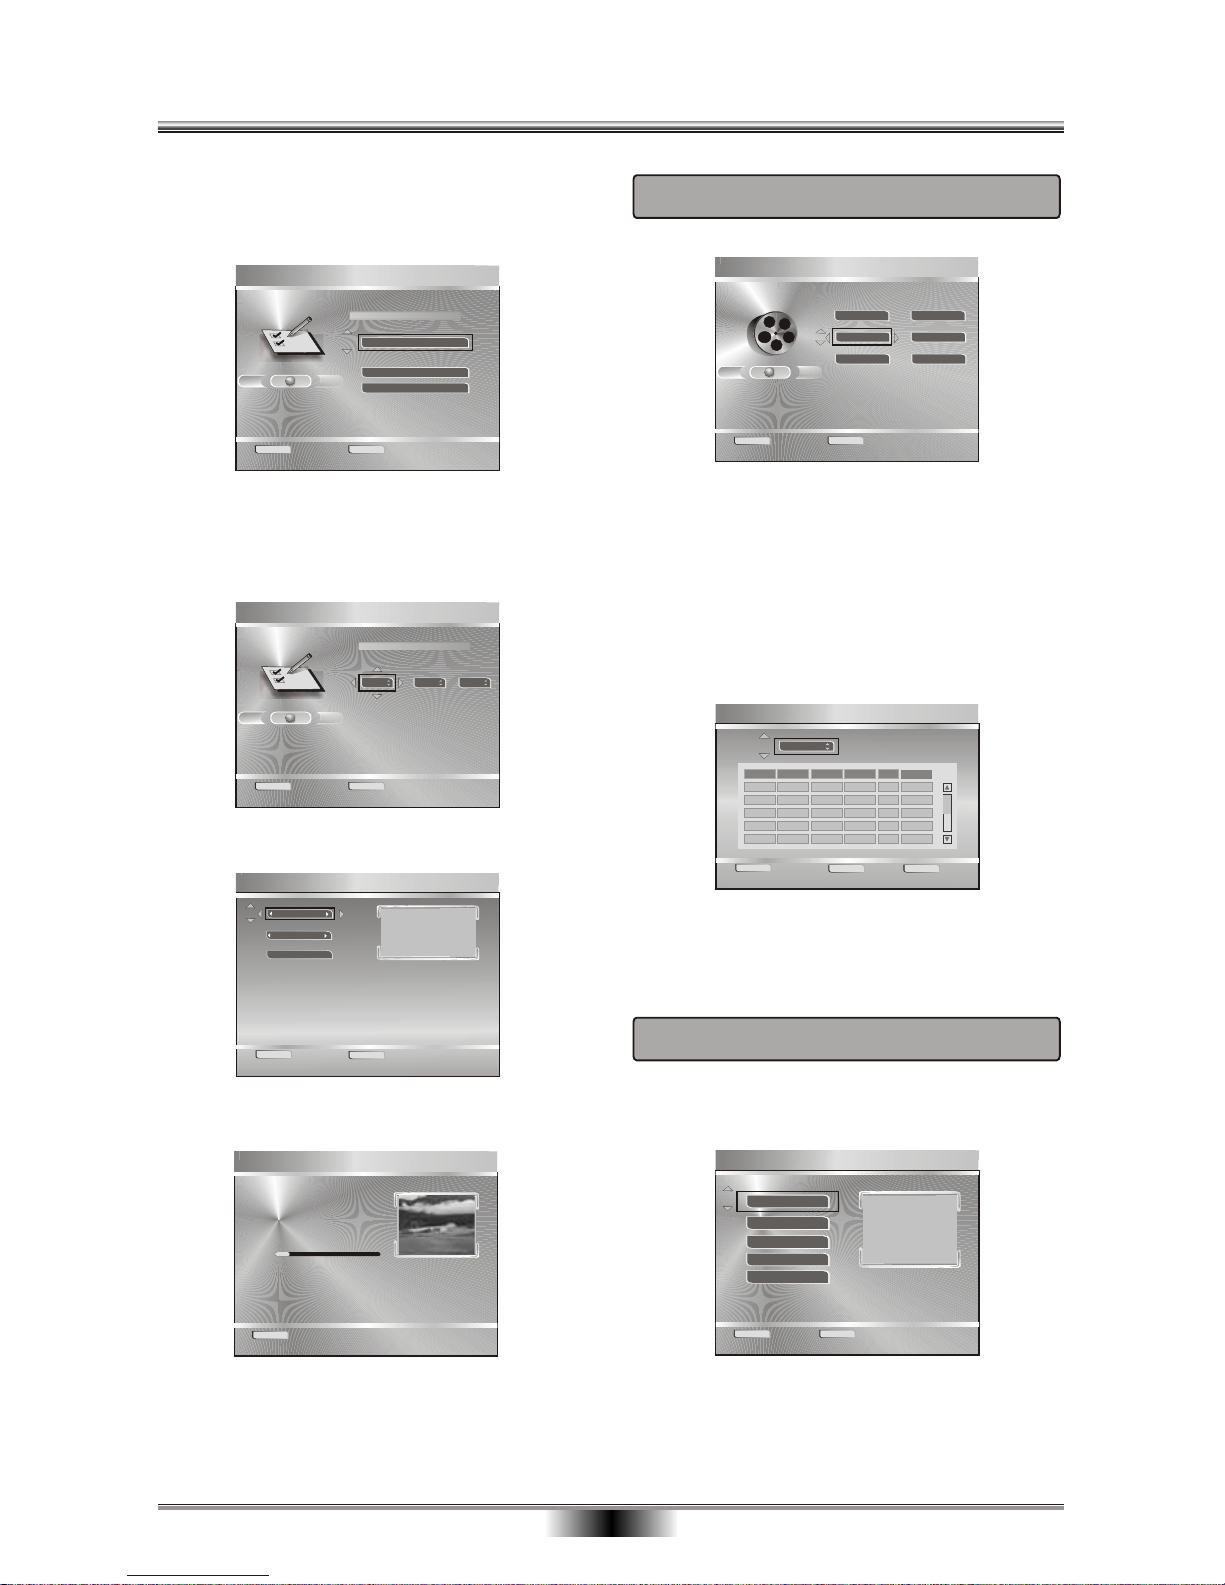
2. TV Type
Three selections: PS 4:3, LB 4:3, 16:9.
RETURN
Previous
PS 4:3
LB 4:3
TV Type
Initial Setup
Next
Select TV type
16:9
ENTER
3. TV Signal
Two selections: (from) Antenna or Cable.
Antenna
Cable
TV Signal
Initial Setup
RETURN
Previous
Next
Select TV signal
ENTER
RETURN
Previous
English
Sys Language
Initial Setup
Next
Select system language
ENTER
Deutsch
Page 22
SYSTEM SETUP
20
RETURN
Previous
Analog Connection or no AMP
RAW
SPDIF Output
Initial Setup
Next
Select digital audio configuration
ENTER
Digital Conneotion
PCM Ouput
5. System Date and Time
Press the LEFT/RIGHT key to move the highlight.
Press ENTER to continue.
RETURN
Previous
Date
Initial Setup
Next
Please input date
ENTER
YY MM DD
2008 06 23
7. Channel Auto Tuning
When finished, press the ENTER key on the remote
to confirm your setup.
RETURN
Cancel
Auto Tuning
Please wait.....
11%
Channel Frequency 248.25MHz
Found Channels 9
3. Timer Rec
Timer Rec: There are four recording modes available:
DVD, HDD-+VR, HDD-MP4, and USB-MP4.
Select Timer Rec option in the system menu or press
TIMER button on the remote to open the following
Timer Record interface.
In Timer Record interface, you also can set Source,
Date, Start, End , Quality
After setup, you can press RETURN to exit the
Timer Record interface.
RETURN
ENTER
Select
Exit
Input recording scheduled
Timer Record
CLEAR
Delete
States Source
Date End
Start
Quality
1. Empty
TV1
06/26
04:11
05:30
HQ
2. Empty
3. Empty
4. Empty
5. Empty
Target
DVD
4. Disc Utility
ENTER
select
Disc Utility
Select one of the buttons
RETURN
exit
Rename
Protect
MakeCompatible
Format
Finalize
Disc name:
Protect:No
Finalize:Yes
You can edit the disc, there are five options.
Rename, protect, MakeCompatible, Format, Finalize.
SYSTEM MENU
RETURN
ENTER
Select
Exit
Select one of the buttons
Wizard
Insant Rec
Timer Rec
Intial Setup
Disc Utility
Setup
4. SPDIF Output
Selections: Analog Connection or no AMP, Digital
Connection, RAW and PCM Output.
6. TV system
RETURN
ENTER
Select
Exit
Select one of the buttons
PAL
TV system
GO!
BG
TV system: PAL
Audio Format: BG
Page 23
5. Insant Rec
SYSTEM MENU
RETURN
ENTER
Select
Exit
Select one of the buttons
Wizard
Insant Rec
Timer Rec
Intial Setup
Disc Utility
Setup
SYSTEM SETUP
21
6. Setup
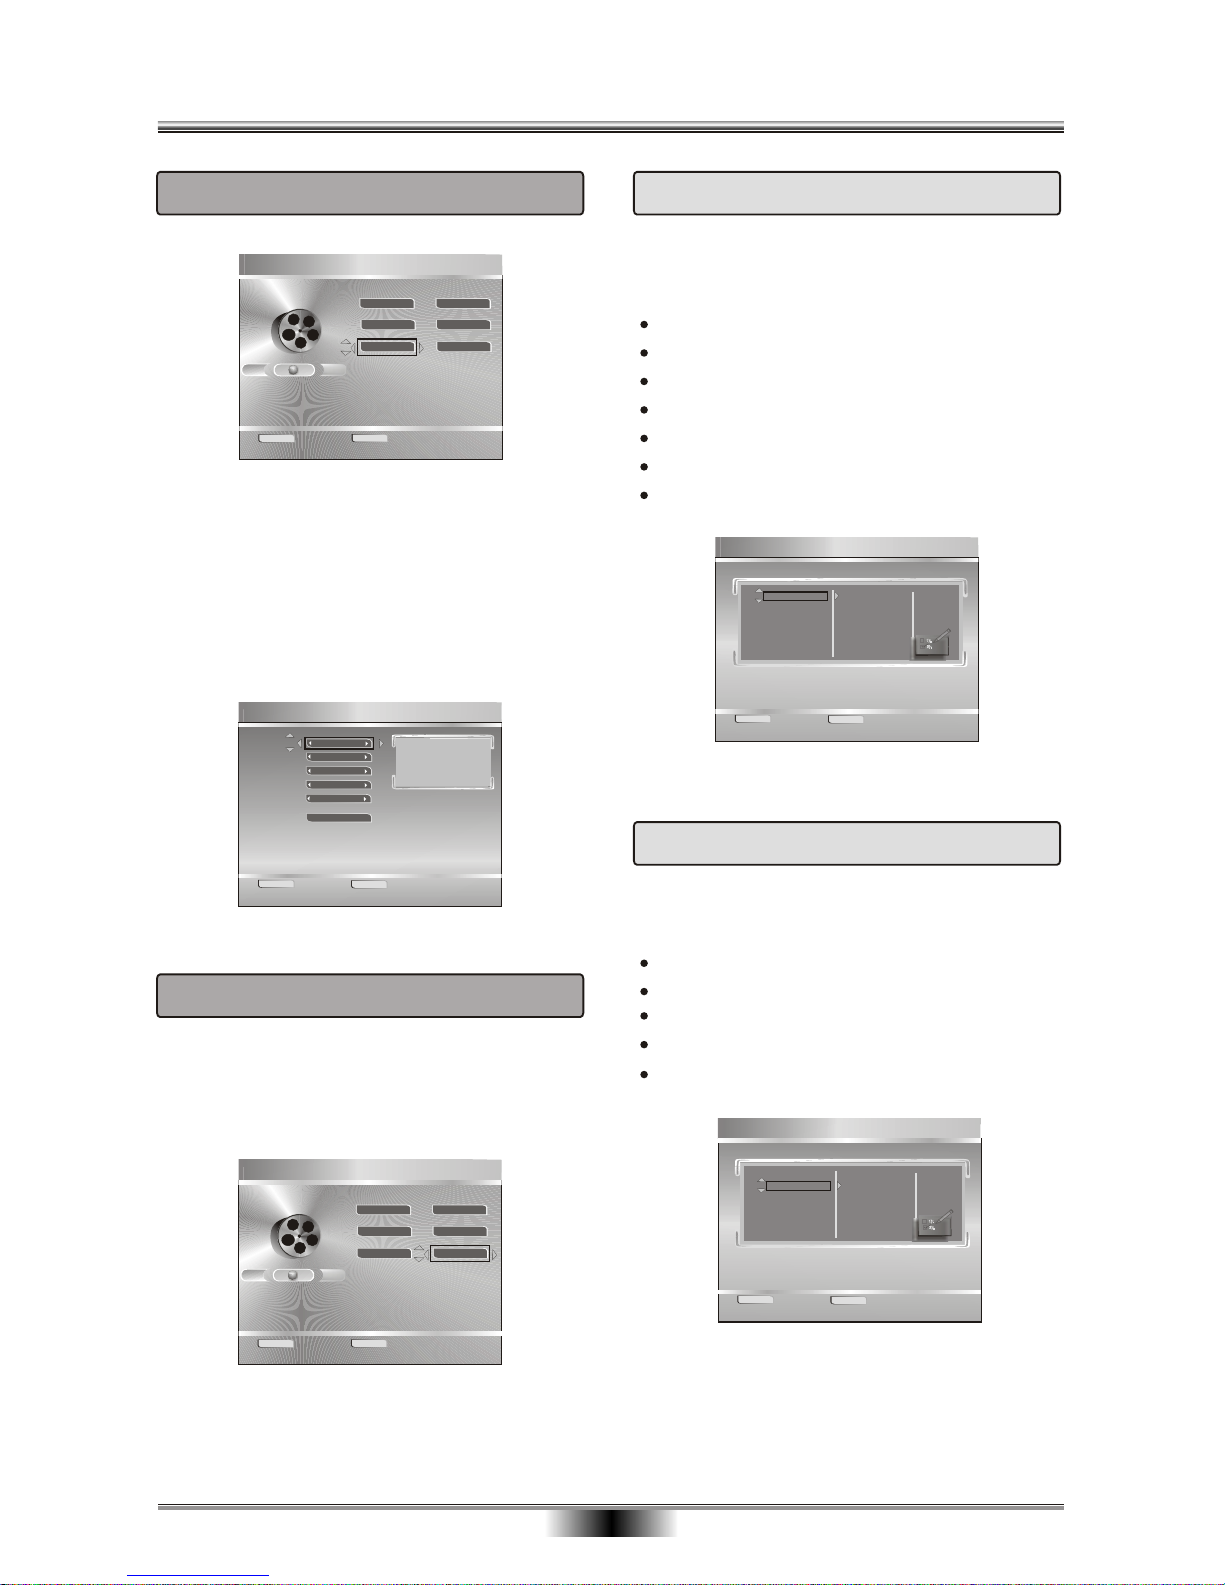
The Setup item is an entry for basic and advanced
system settings. And the advanced settings are
mainly for DVD playback.
RETURN
ENTER
Select
Exit
Select Setup option
Setup
System
Playing
A/V Set
Recording
TV Tuner
TV System
Screen Saver
Sys Language
Time Format
Set Date
Set Time
Reset Setting
6.1 System
Setup TV system, Screen saver, Sys language,
Time format, Set date, Set time, Reset setting etc,
including:
TV system
Screen saver
Sys language
Time format
Set date
Set time
Reset setting
RETURN
ENTER Select
Exit
Select Setup option
Setup
System
Playing
A/V Set
Recording
TV Tuner
Audio Lang
Subtitle Lang
Password
Menu Lang
Rating
6.2 Playing
Setup Audio lang, Subtitle lang, Password, Menu
lang, Rating etc, including:
Audio lang
Subtitle lang
Password
Menu lang
Rating
RETURN
ENTER
Next
Exit
Select recording options
Source:
TV
1
DISC
SP
+VR
Instant Record
Target:
GO!
Quality:
Mode:
Like the Instant Recording item in the Wizard menu,
through the Instant Rec item in System Menu, you
can start to record immediately. But all recording
options are set at one place. The corresponding I
nterface is as follows. After setting source, target,
quality, and mode for recording, you can choose GO!
To start recording.
SYSTEM MENU
RETURN
ENTER
Select
Exit
Select one of the buttons
Wizard
Insant Rec
Timer Rec
Intial Setup
Disc Utility
Setup
Page 24
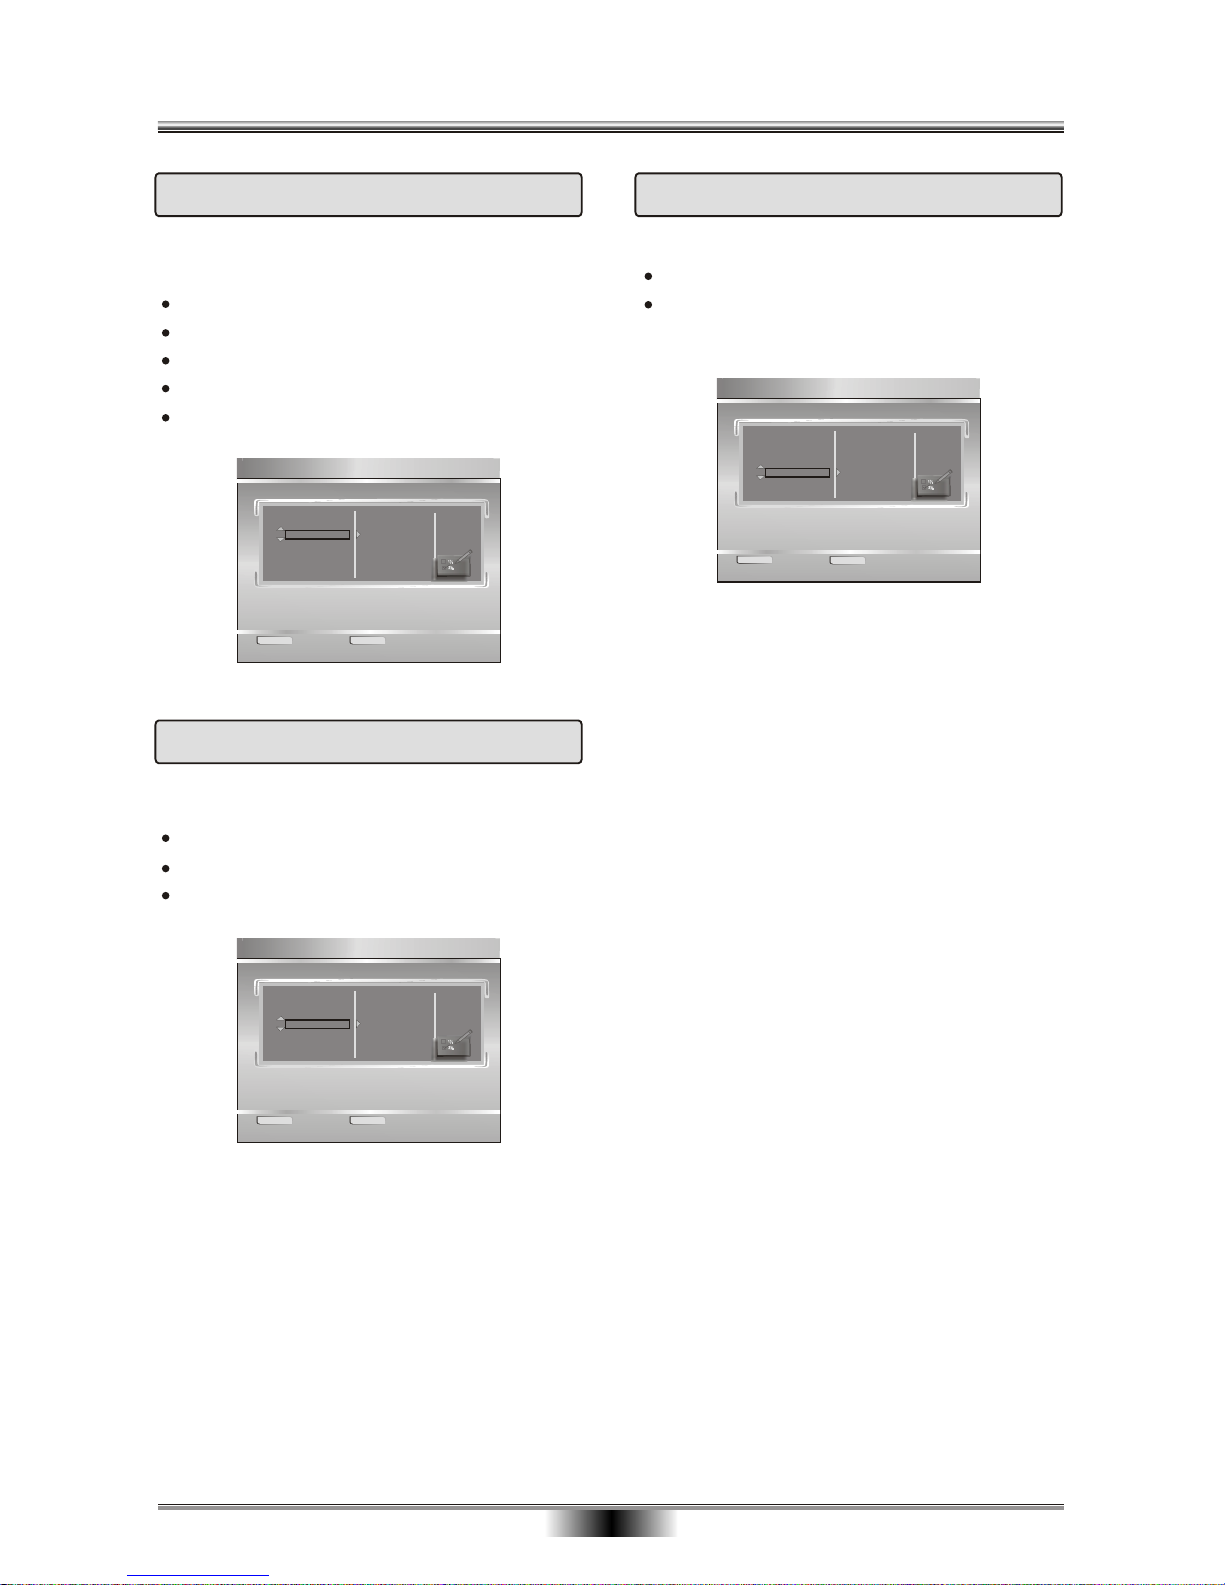
SYSTEM SETUP
22
RETURN
ENTER Select
Exit
Select Setup option
Setup
System
Playing
A/V Set
Recording
TV Tuner
Auto Tuning
Channel Set
6.5 TV Tuner
Setup Auto tuning, Channel set etc, including:
Auto tuning
Channel set
6.3 A/V Set
Setup Video output, TV type, SPDIF output, Downmix
Dual mono etc, including:
Video output
TV type
SPDIF output
Downmix
Dual mono
RETURN
ENTER Select
Exit
Select Setup option
Setup
System
Playing
A/V Set
Recording
TV Tuner
Video Output
TV Type
SPDIF Output
Downmix
Dual Mono
6.4 Recording
Setup DVD quality, MPEG4 quality, Auto chapter etc,
including:
DVD quality
MPEG4 quality
Auto chapter
RETURN
ENTER
Select
Exit
Select Setup option
Setup
System
Playing
A/V Set
Recording
TV Tuner
DVD Quality
MPEG4 Quality
Auto Chapter
Page 25
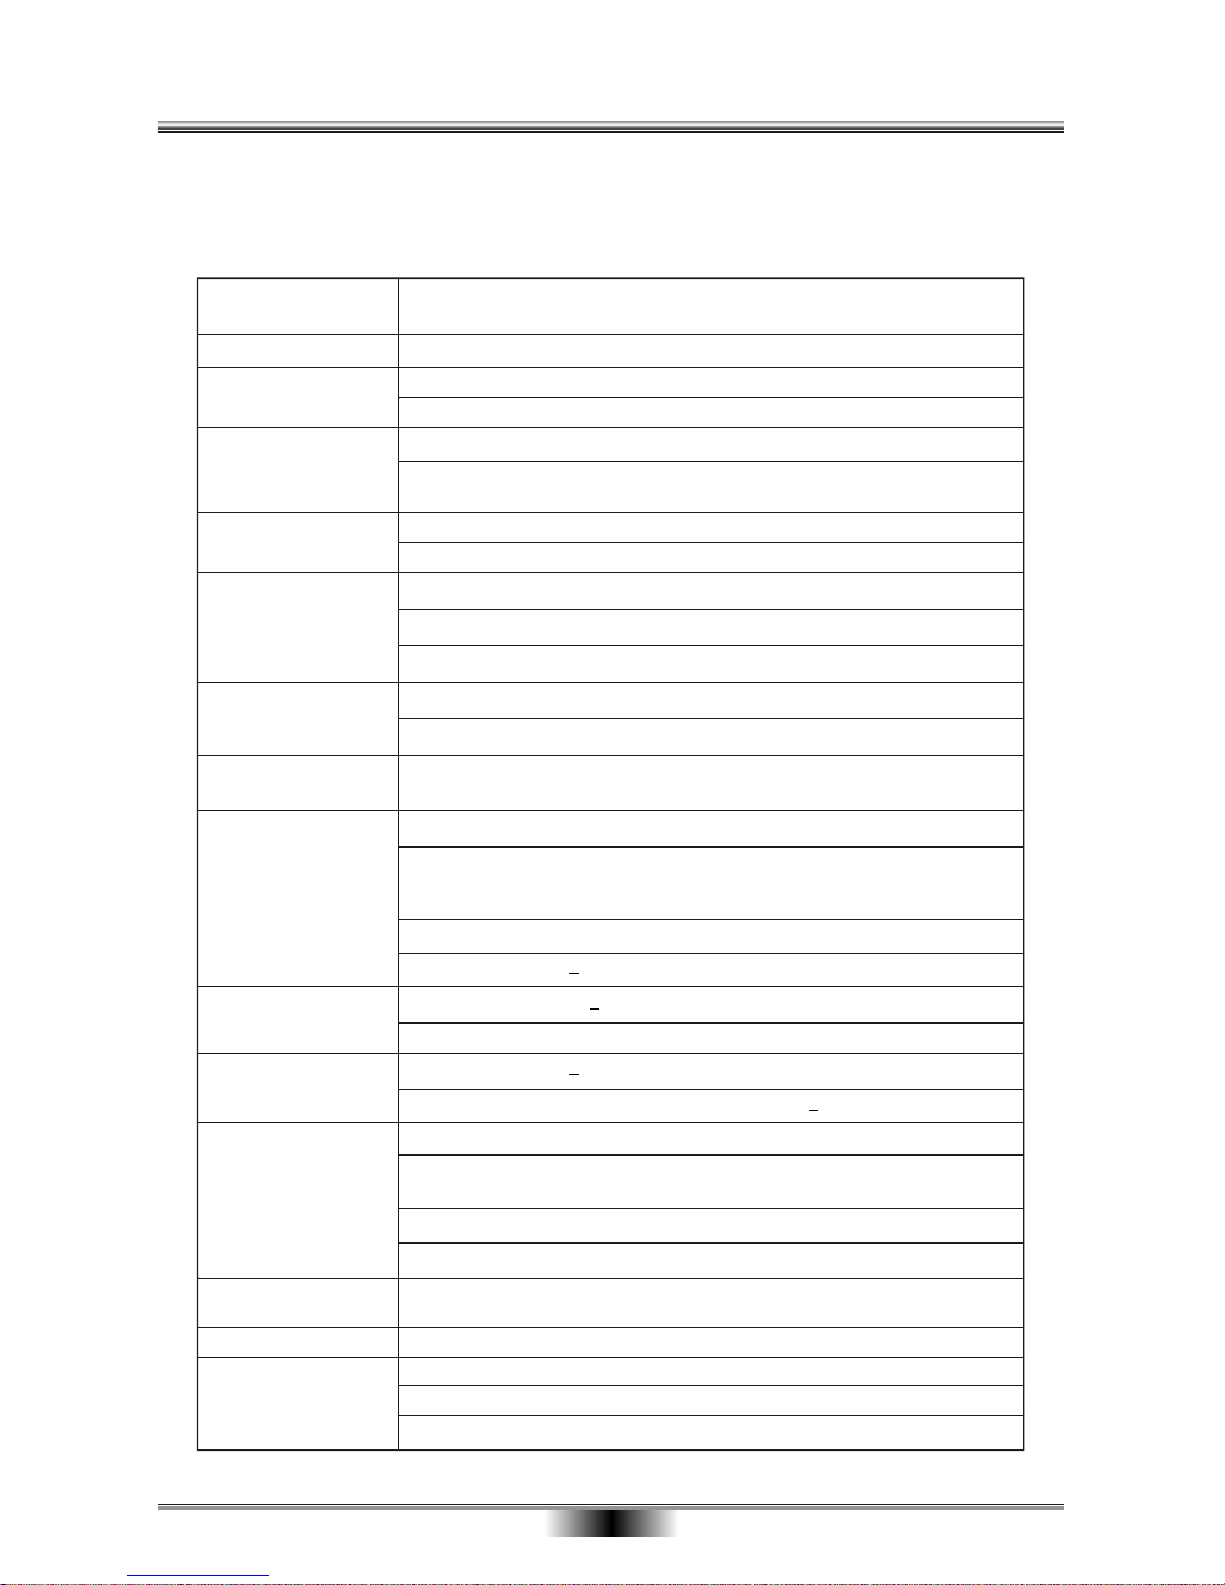
TROUBLE SHOOTING
23
Please check the following guide for the possible cause and solution for a problem before contacting the
nearest service center or dealer for repairs.
SYMPTOMS AND CORRECTIONS
Check to make sure that the power connection is secure.
No power
SYMPTOMS CORRECTIONS
No picture
No sound
Failed to Play
Make sure the connection between the player and the TV is secure.
Make sure that the TV is in good working condition.
Make sure that the TV and AMP are in good working condition and setup
properly.
Check that the disc is properly inserted.
Clean the disc.
Failed to respond to
remote control
Remove obstacles between remote control and unit.
Aim remote control at the sensor on the front panel.
Check batteries and replace them if necessary.
Picture Disturbance
Check the disc for dirt and scratches. Clean or replace disc.
Shut down the unit, wait ten seconds, and restart the unit.
Failed to work
with keys
Power surges or other electrical phenomena.
Shut down the unit, wait ten seconds, and restart the unit.
Make sure the connection between the player and other devices are secure.
Recording will
not start
The Video input source may be protected with Macro Vision Copy Protection.
The disc may already contain recording of a different TV System type - PAL
or NTSC. If the disc already contains a PAL recording, you cannot record
from an NTSC source, and vice versa.
The maximum number of titles - 48 - may have been reached.
If the disc is a DVD+R may already be finalized.
The disc is not a DVD+RW disc.
The disc may be dirty. Try cleaning the disc.
If the disc is a DVD+R, make sure it has been FINALIZED.
The other DVD recorder may not support DVD+R/RW disc.
The disc cannot
be erased
Recording do not play
on other DVD Recorder
The Time/Date is invalid or conflicts with another schedule.
The Time/Date settings of the Recorder are incorrect. Set the Time/Date
in SETUP.
The specified Video input source is unavailable.
The disc is out of space.
Timer recording
does not start
DV image is not
displayed
The DV is off. Power on the DV.
Make sure the DV cable is connected correctly.
The DV link cable may be damaged. Change another one.
The image is distorted
The setup of Interlaced or Progressive is wrong. Press the I/P button to
switch from each other.
Plug USB button ineffective
Press USB button to enter after the banner appears on screen.
Page 26
PARENTAL LOCK
This player lets you set the Parental Lock if the
DVD has a parental lock level recorded on it. With
Parental Lock capable discs, you can block access
to material you feel is inappropriate for your children.
Refer to the DVD disc jacket and the accompanying
documentation to see if a particular disc contains a
parental lock level. The initial password is 3308.
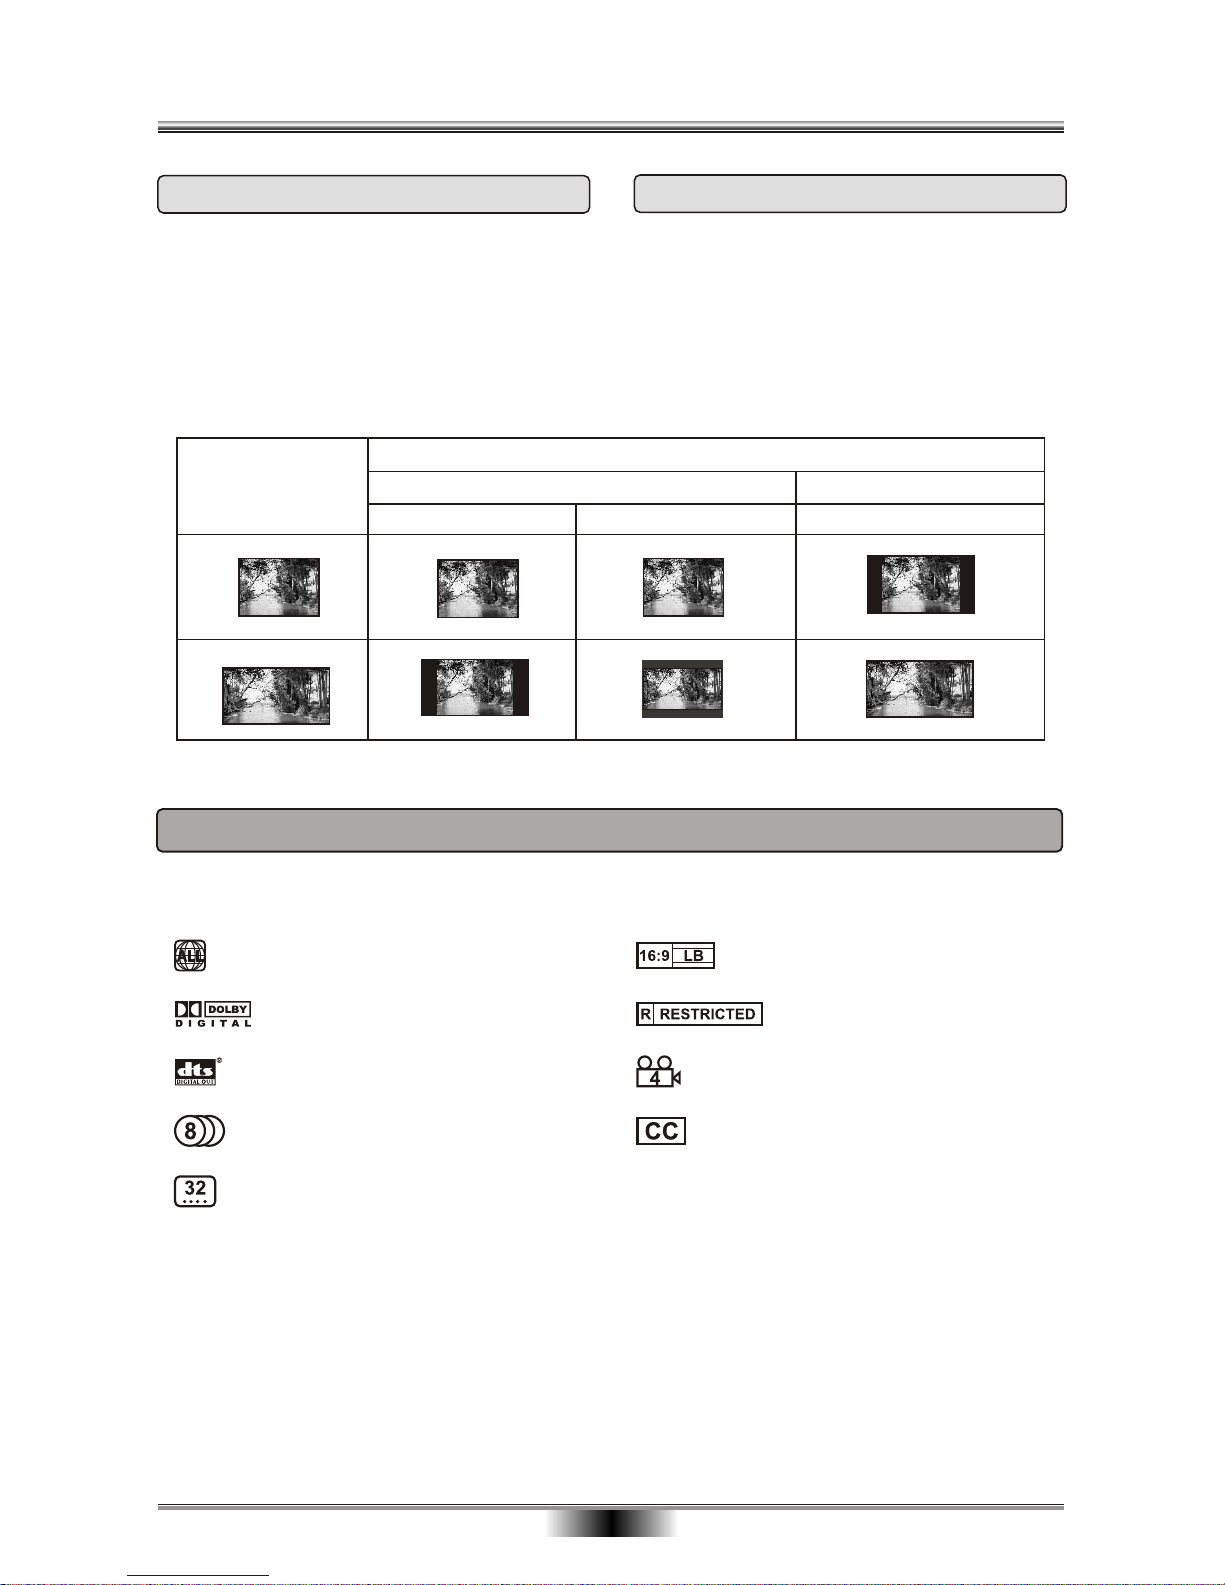
SETTING THE TV SCREEN SIZE
Multi-aspect ratio suit to different TV screen size.
There are many functions available on DVD discs and the functions vary per player and per manufacturer.
Regional code and signal system
Picture proportion modes
Parent lock
Angles for viewing
Closed Caption
Dolby digital surround sound
DTS output
Number of languages
Subtitle languages
24
Letter-box Wide Screen
Picture format
on Disc
TV Screen Size
4:3
4:3
16:9
16:9
Pan Scan
PARENTAL LOCK & SCREEN SIZE
Functions supported by this device
Page 27
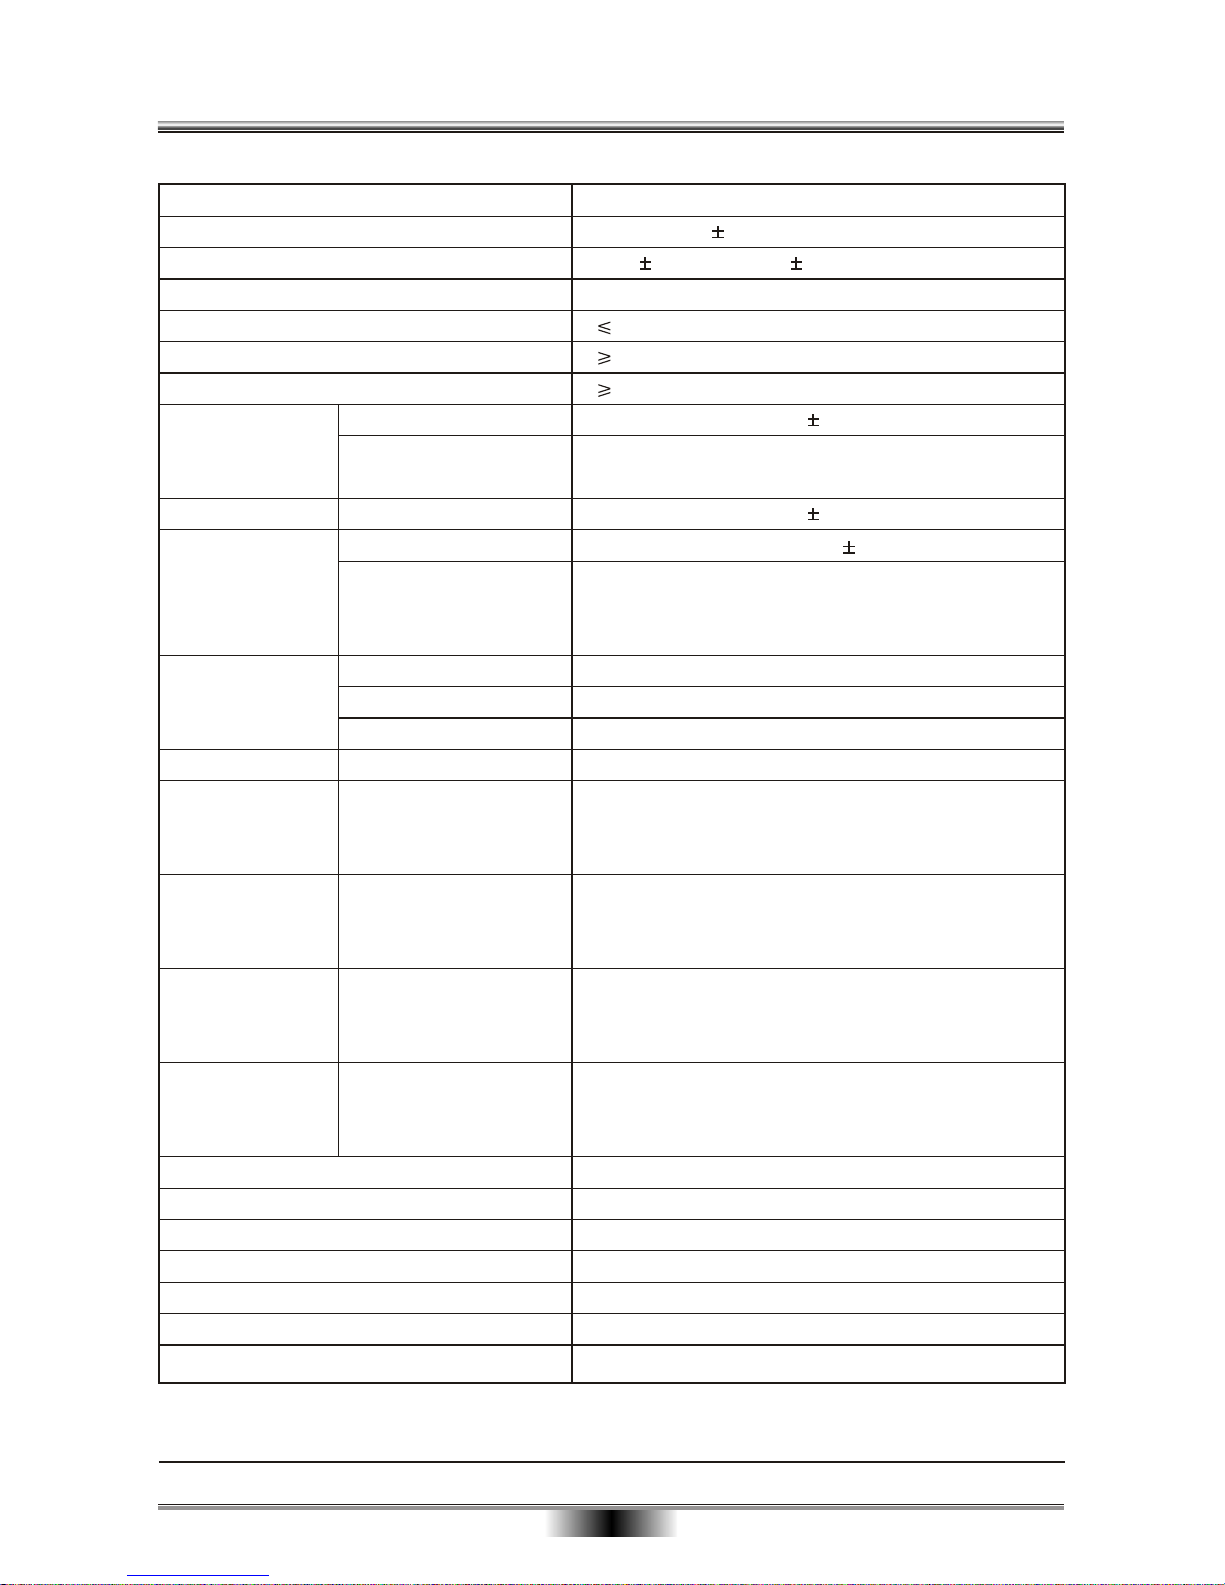
25
SPECIFICATIONS
VF Signal System
NTSC/PAL
Frequence Response
20Hz-20KHz 2.5dB(EIAJ)
Audio S/N ratio
> 90 dB
Audio distortion+Noise
-70dB(1KHz)
Channel Separation
Dynamic Range
Analog Audio Output
Analog Audio Input
Digital Audio Output
CVBS Output/Input
S-Video output/Input
70dB(1KHz)
80dB(1KHz)
Electric level output: resistance: 2V 10K
Electric level Input: 2V 0.2V resistance: 10K
Coaxial:
Optical: -21dBm~-15dBm
Electric level output: 0.5Vp-p resistance: 75
Electric level output: 1Vp-p 0.2 resistance: 75
Electric level output:
brightness(Y)1.0Vp--p,
Chrominance (C): 0.286Vp--p, resistance: 75
resistance: 75
Audio Output
Audio input
Video Output/Input
0.2
1.0
Other
Dimensions (W x D x H): 430 x 300 x 63 mm (height includes feet)
Weight:
4.2 Kg
Receiving System
Input Impedance
Frequency Cover Range
Gain
SECAM L PAL BG PAL DK PAL I
75
45MHz ~ 900MHz
1.5dB(Type)
RF-Input
RF-Output
~ 110V- 240V 50/60Hz
Power
Power Consumption
< 35W
Operating temperature
Operating humidity
oooo
5 C to 35 C (41 F to 95 F)
5% to 90%
Disc types for recording:
DVD R (4.7GB), DVD RW (4.7GB)
DVD+RW HQ/SP
and Pre-recorded
DVD Video:
Horizontal resolution 720 pixels
Vertical resolution 576 lines (for PAL recorder)
480 lines (for NTSC recorder)
DVD+RW LP/EP:
Horizontal resolution 360 pixels
Vertical resolution 576 lines (for PAL recorder)
480 lines (for NTSC recorder)
SVCD (Super
Video-CD):
Horizontal resolution 480 pixels
Vertical resolution 576 lines (for PAL recorder)
480 lines (for NTSC recorder)
Horizontal resolution 352 pixels
Vertical resolution 288 lines (for PAL recorder)
240 lines (for NTSC recorder)
VCD (Video CD):
 Loading...