

Page 1

Page 2

Dear Customers
We would like to thank you for purchasing this unit. It is a progressive scan DVD Recorder. you
the ability to create your own DVD discs from you home movies, favorite TV programs and more.
Because of the outstanding compatibility of DVD + R / RW discs, the discs you create will be suitable for playback in
most DVD Recorders.
This product provides
You can record from the unit's built-in TV tuner or external video source like a video camera.
When you are ready to watch your recordings or commercial DVD movies, you can enjoy them in the highest quality
with your new DVD Recorder.
TABLE OF CONTENTS
PLAYABLE DISCS
05
ADVANCED PLAYBACK
15
LANGUAGE CODE LIST
33
SYSTEM SETUP
23
SAFETY PRECAUTIONS
01
IMPORTANT SAFETY INSTRUCTIONS
03
NOTICE
04
FRONT PANEL
07
REAR PANEL AND ACCESSORIES
08
BASIC CONNECTION
09
REMOTE CONTROL
12
INITIAL SETUP
13
BASIC PLAYBACK
14
SPECIAL FUNCTION PLAYBACK
17
DVD RECORDING
18
TROUBLE SHOOTING
30
PARENTAL LOCK & SCREEN SIZE
31
SPECIFICATIONS
32
Page 3
SAFETY PRECAUTIONS
01
TO REDUCE THE RISK OF FIRE OR ELECTRIC SHOCK, DO NOT EXPOSE THIS
APPLIANCE TO RAIN OR MOISTURE, DANGEROUS HIGH VOLTAGES ARE
PRESENT INSIDE THE ENCLOSURE. DO NOT OPEN THE CABINET. REFER
SERVICING TO QUALIFIED PERSONNEL ONLY.
When replacing the unit's plug or power cord, the replacement must be the exactly
the same ;or one recommended by the manufacturer.
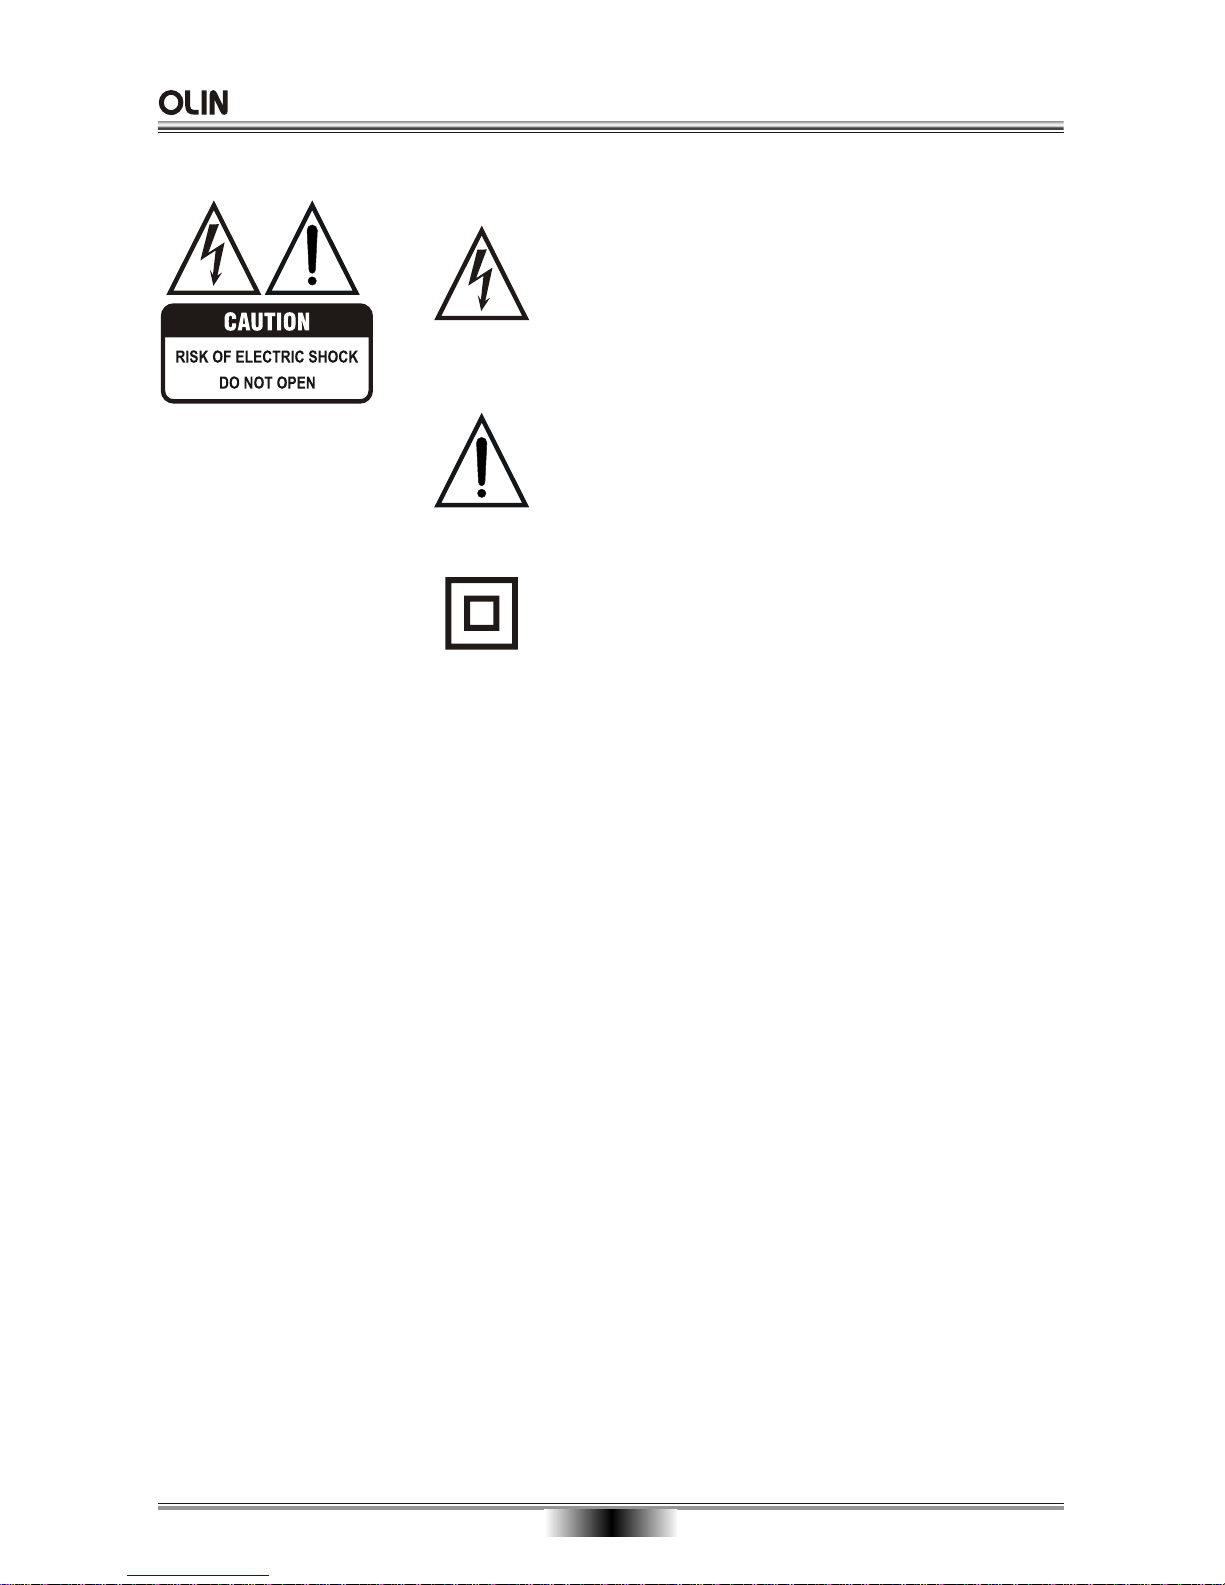
The lightning flash with arrowhead symbol, within an equilateral triangle, is intended to alert the user to the presence
of uninsulated "dangerous voltage " within the product's enclosure that may be of sufficient magnitude to constitute a
risk of electric shock to persons.
The exclamation point within an equilateral triangle is
intended to alert the user to the presence of important
operating and maintenance (servicing) instructions in the
literature accompanying the appliance.
This Digital Video Disc player employs a laser system.
The symbol for CLASS II (Double Insulation).
Use of controls, adjustments or the performance of procedures other than those
specified may result To prevent direct exposure to laser beam, do not try to open the enclosure.
DO NOT STARE INTO BEAM.
in hazardous exposure to radiation.
WARNING:
CAUTION:
Page 4
"DTS" and "DTS Digital Out" are trademarks of Digital Theater Systems, Inc.
SAFETY PRECAUTIONS
02
Manufactured under license from Dolby Laboratories. " Dolby " and the double-D
symbol are trademarks of Dolby Laboratories. Confidential unpublished works.
Copyright 1992-1997 Dolby Laboratories. All rights reserved.
This product incorporates copyright protection technology that is protected by
methods claims in certain U. S. Patents and other intellectual property rights owned
by Macrovision Corporation and other rights owners. Use of this copyright protection
technology must be authorized by Macrovision Corporation, and is intended for
home and other limited viewing uses only unless otherwise authorized by Macrovision
Corporation. Reverse engineering or disassembly is prohibited.
Consumers should note that not all high definition television sets are fully compatible
with this product and may cause artifacts to be displayed in the picture.
In case of 525 or 625 progressive scan picture problems, it is recommended that the
user switch the connection to the "standard definition" output. If there are questions
regarding our TV set compatibility with this model 525p and 625p DVD player, please
contact our customer service centre.
Disposal of your old appliance
1. When this crossed-out wheeled bin symbol is attached to a product, it means the
product is covered by the European Directive 2002/96/EC.
2. All electrical and electronic products should be disposed of separately from the
municipal waste stream via designated collection facilities appointed by the government
or the local authorities.
3. The correct disposal of your old appliance will help prevent potential negative
consequences for the environment and human health.
4. For more detailed information about disposal of your old appliance, please contact
your city office, waste disposal service or the shop where you purchased the product.
Page 5
03
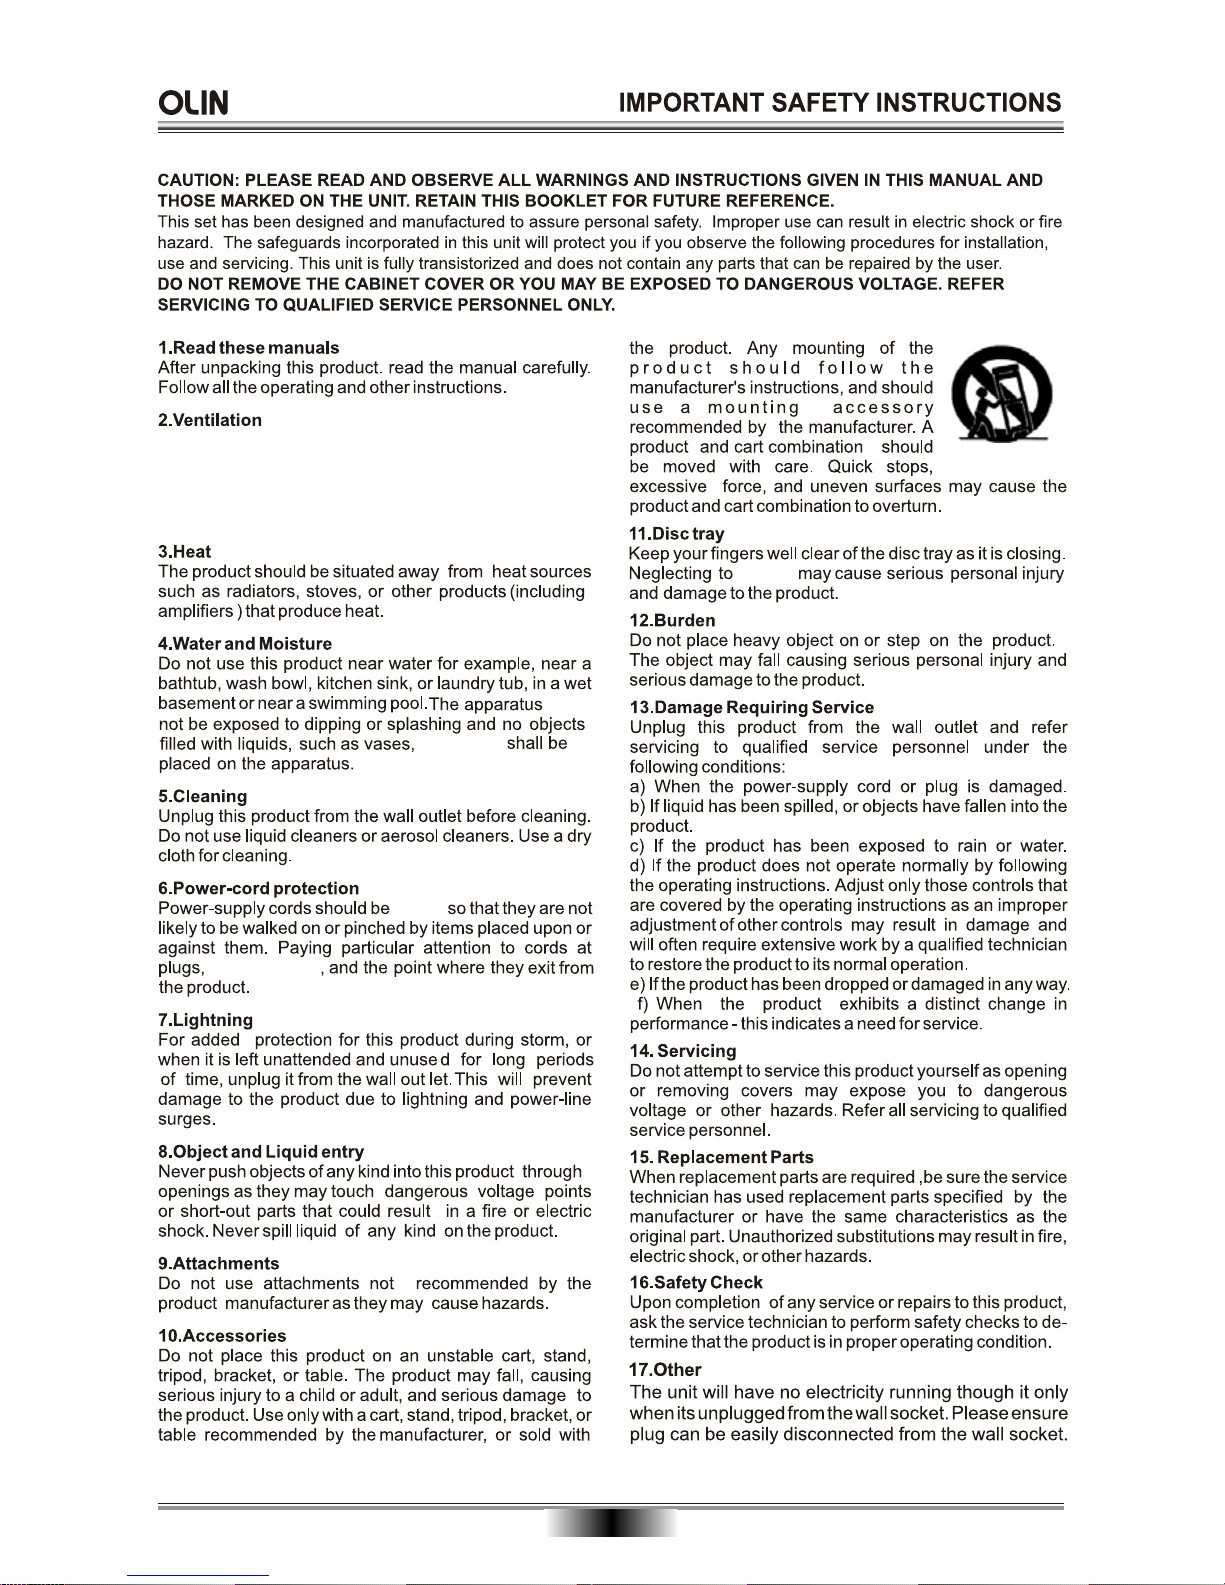
Slots and openings in the cabinet are provided for ventilation
and to ensure correct operation of the product. These protect
it from overheating. These openings must not be blocked or
covered. The openings should never be blocked by placing
the product on a bed, sofa, rug or other.
must
must ever
placed
power boards
do this
Page 6
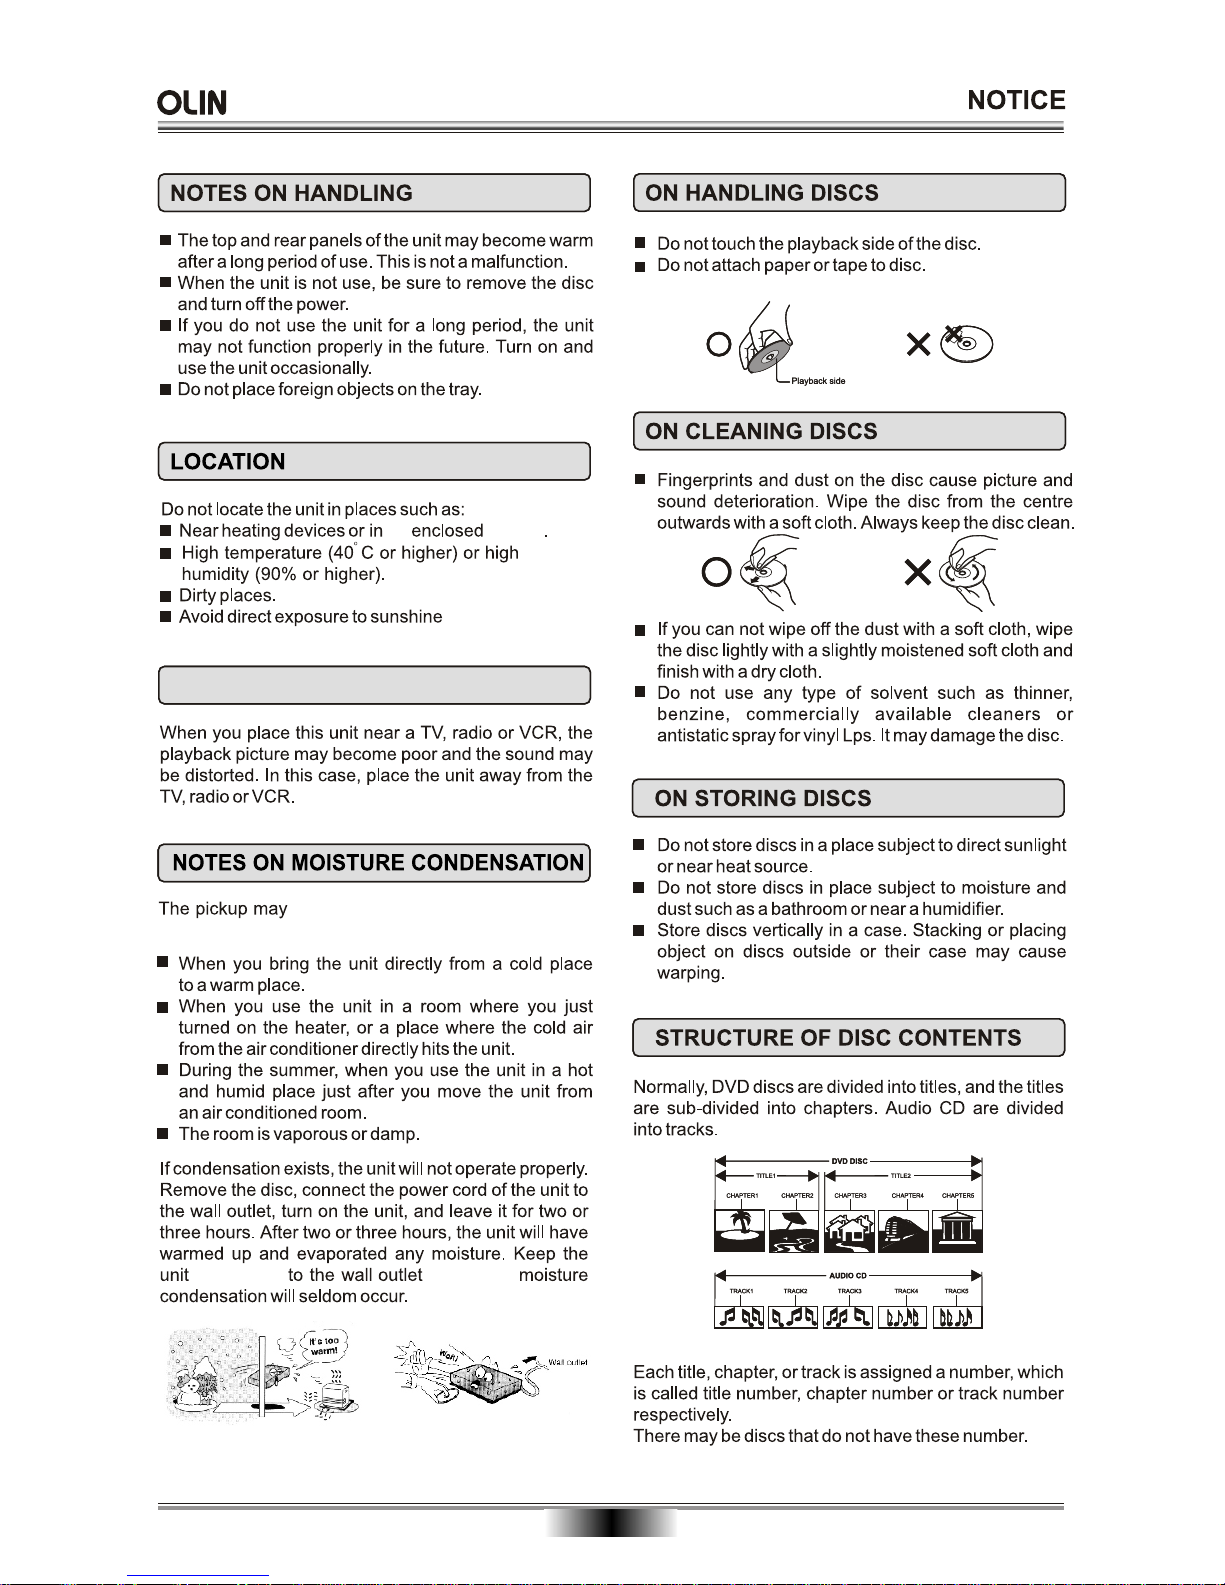
following situations.
04
an vehicle
ELECTRICAL DISTURBANCE
suffer from condensation under the
connecting
will ensure
Page 7
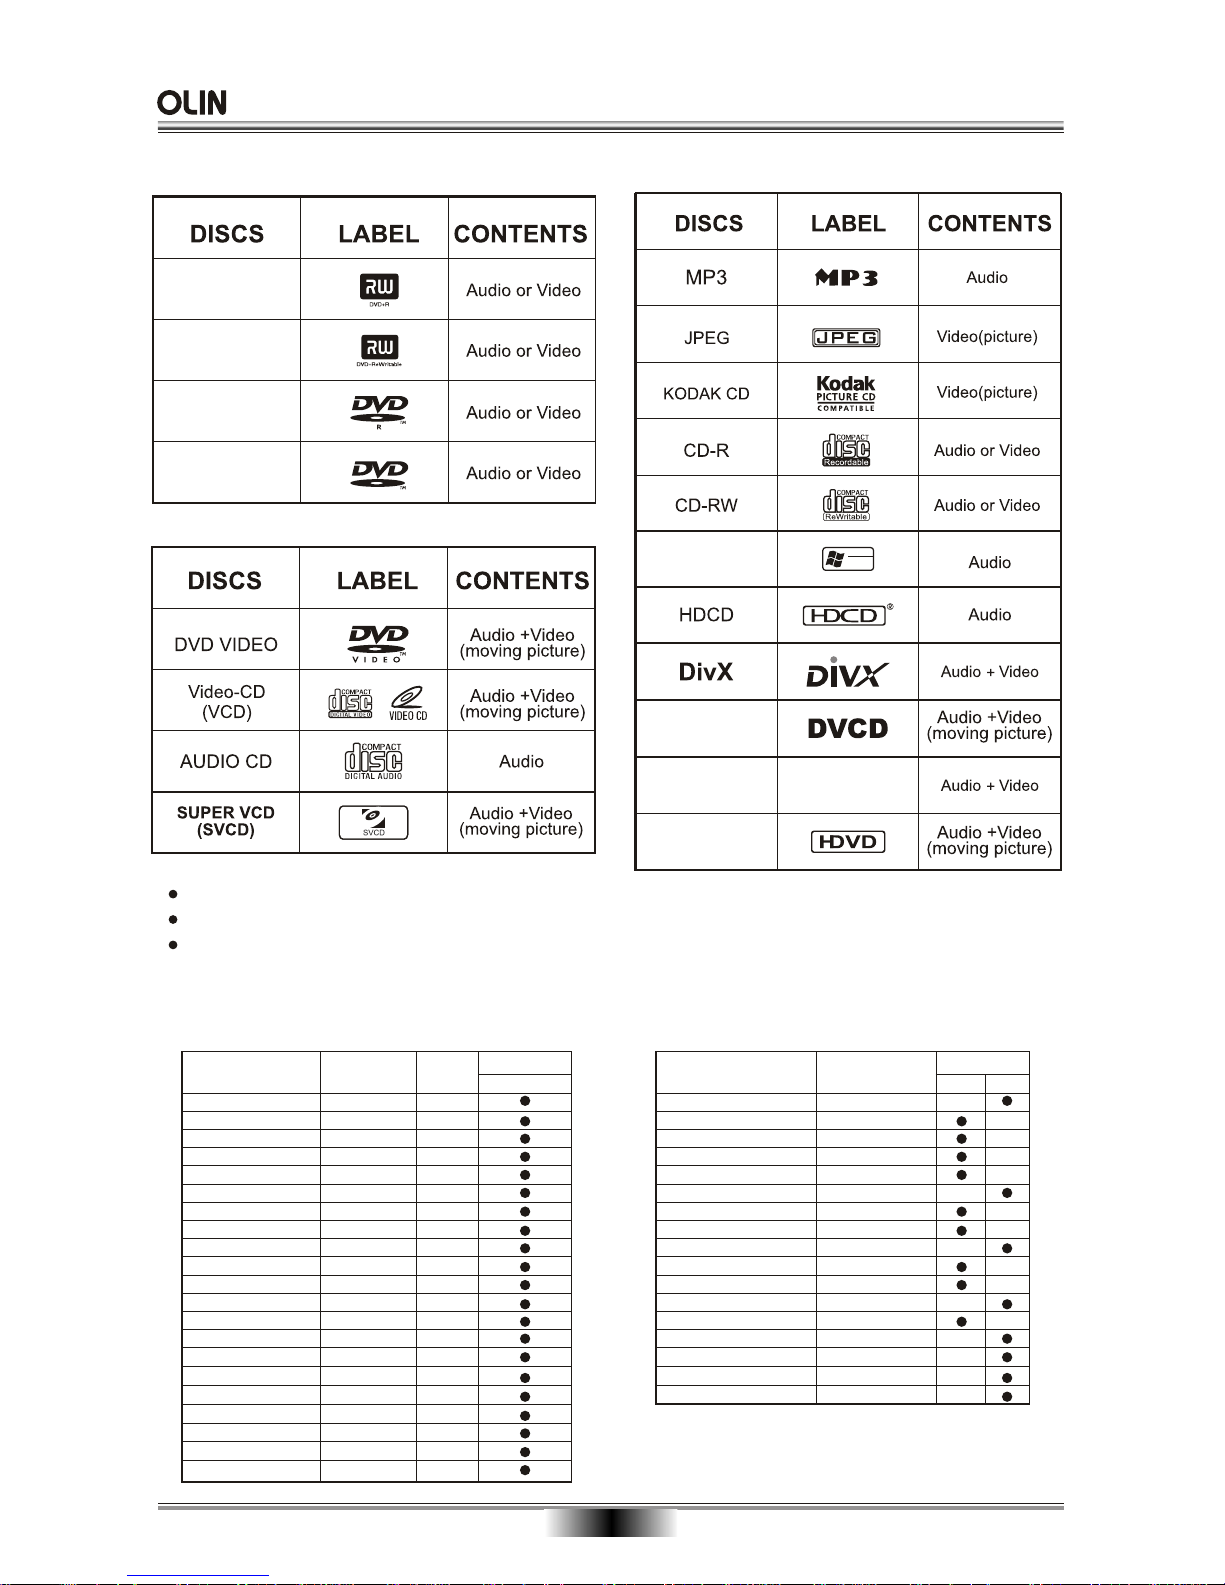
PLAYABLE DISCS
05
Playback and Recording:
Playback only:
DVD+R
DVD+RW
RW
DVD-RW
DVD-R
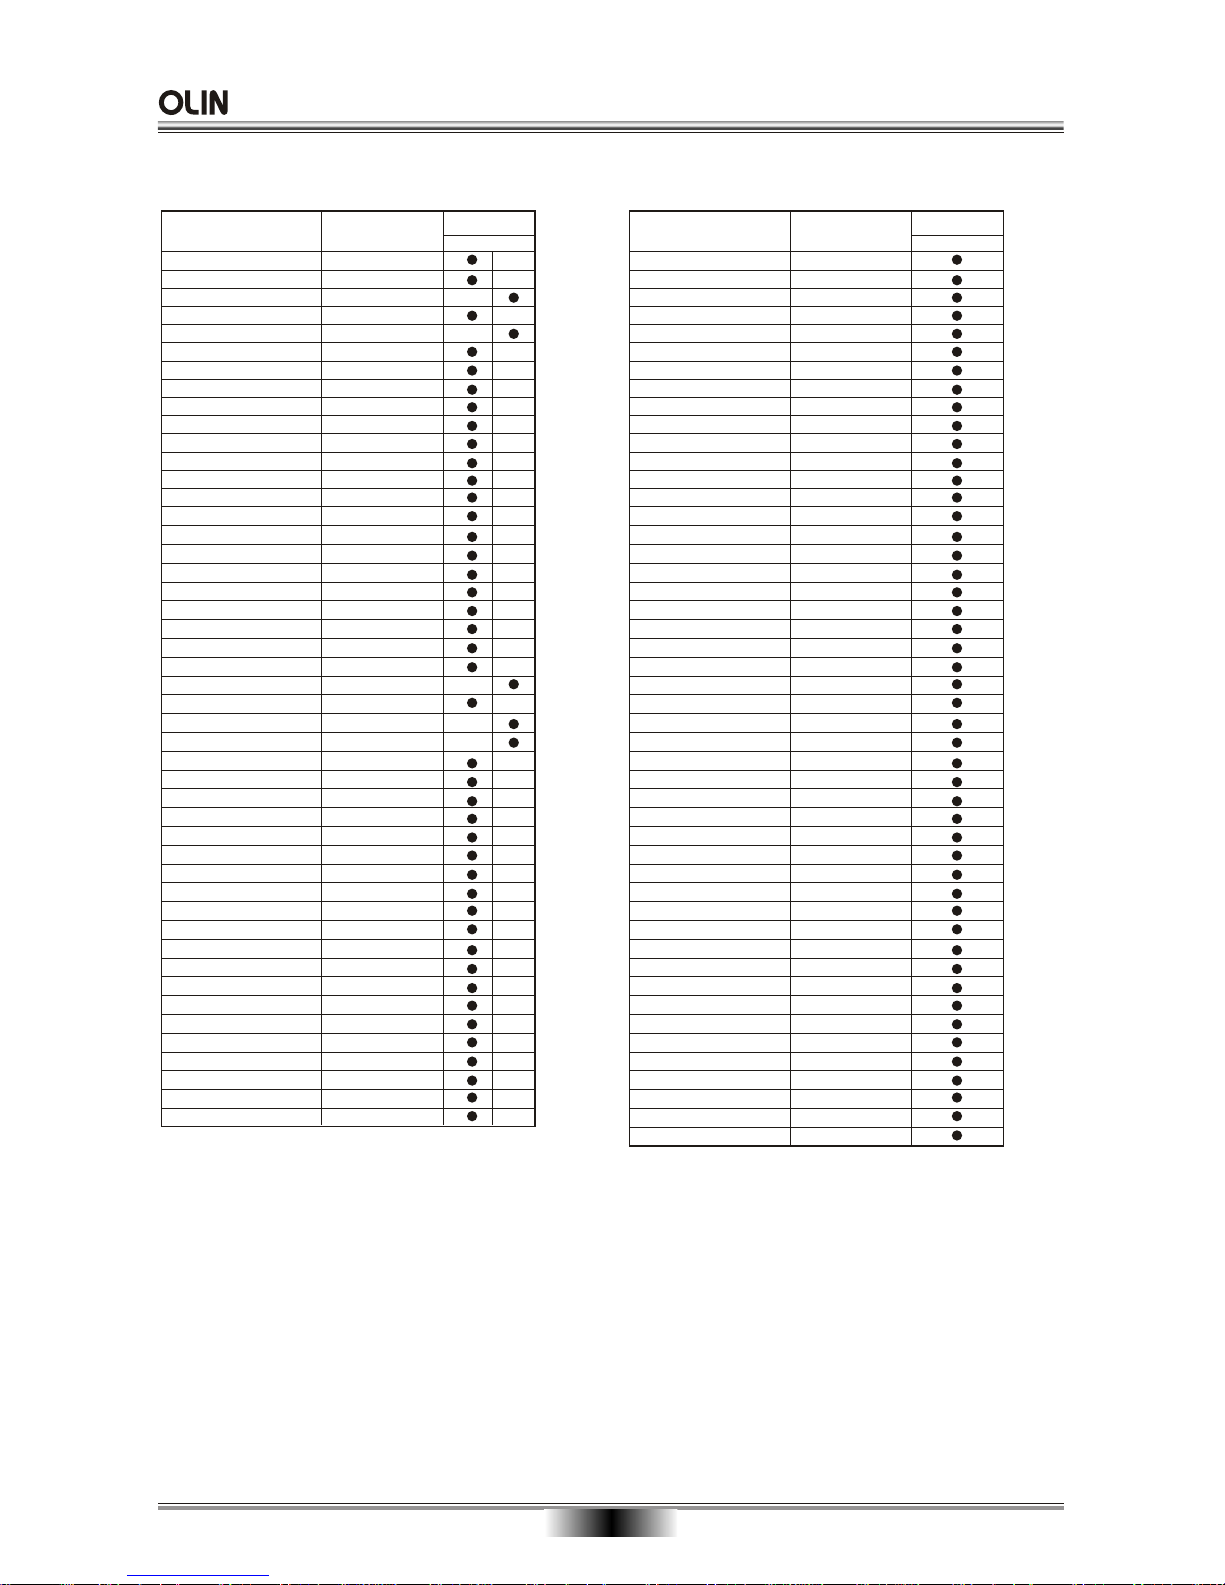
DVD+RW:
Media handling and cleaning
DVD-RW:
Misubishi 2x
Misubishi 1x
TDK 4.7GB
Maxell/victor*JVC
RiData 1x
Pioneer 2x
TDK 1x
Ritek 1x
Ritek 2x/Ridata 2x
Prodisc 1x
Princo 1x
Princo 2x
Melody/Imation
TDK 2x
CMC 2x
JVC
OPTO 2x
Meida
MID
Write Speed
2X
MCC 01RW11n9
MCC-00RW11N9
TDK401saku=3
JVC/VictorT7
RITEK004V11PVCW00V00245
TDK501saku]3
RITEK000V11A
RITEW01---ProdiscDVDRW
PRINCO-----PRINCO-----OPTODISCK001
TDK502sakuM3
CMCW02-----JVC-VictorW7
OPTODISCW02
1X
Ricoh, Ridata 2.4x
Mitsubishi 2.4x
Ritek 2.4x
Ricoh, Ridataa 4x
Mitsubishi 4x
Infodisc 2.4x
Prodisc 2.4x
CMC & Philips & 2.4x
Ritek 4x
Nanya 2.4x
Optodisc
Sentinel 2.4x
Daxon 4x
CMC 4x
Philips 4x
MBI 2.4x
infodisc 4x
Prodsic 4x
Nanya 4x
OPTO 4x
Philips 2.4x
Meida
MID
Write Speed
2X
RICOHJPN
MCC------
RITEK----
RICOHJPN
MKM-----
INFODISC
PRODISC-
CMC-MAG-
RITEK----
NANYASC--
OPTODISC
SENTINEL
DAXON---
CMC-MAG-
PHILIPS-
MBIPG101
INFODISC
PRODISC-
NANYA
OPTODISC
PHILIPS-
Media
type
W01
A01
001
W11
A02
A01
W01
W01
004
DRW
OP1
W01
D41
W02
041
W03
A10
W02
DRW
OP4
010
Playback only:
WMA
TM
Designed for
TM
Windows
Media
DVCD
CD+G
CD+G
HDVD
The Player does not support discs types which are not listed above.
Non-standardized discs, even if they may be labeled as above can not be played.
The performance of recorded disc is depend on the method and quality of disc-burning. In some cases,
the disc may not be played.
Page 8
PLAYABLE DISCS
06
DVD+R:
Meida
MID
Write Speed
Ricoh
RICOHJPNR00
MCC---002
CMC-MAG-F01
YUDEN000T01
PITEK---R01
PRODISC-R01
RICHJPNR01
CMC-MAG-R01
NANYA--DR--
LD------001
RITEK---R02
PRODISC-R02
MEDIA-ID001
OPTODISCOR4
OPTODISCOP1
SKYMEDIAR01
AML-----01
--------001
MPOMEDIA001
BEALL-P0001
RITEK---R03
DAXON---AZ1
YUDEN000T02
PRODISC-R03
YUDEN000T01
MCC-----003
CMC-MAG-F01
CMC-MAG-E01
Philips-081
LONGTEN-002
MBIPG101R03
NANYA---RJB
DAXON---AZ1
AML-----002
OPTODISCOP2
MPOMEDIA040
GSC502--002
MUST-002---
RITEK---M02
MAXELL--002
INFODISCR10
SONY----D01
LD------A02
VDSPMSAB001
IS01----001
PITSEXP-002
MCC 4X
CMC 4X
Taiyoyuden
PITEK
Prodisc
RICOH
CMC
NANYA
Lead Data
PITEK
Prodis
MELODY
OPTO
OPTO
NASHUA
AML
CHINA
VIDEOB
BEALL
RITEK
DAXON
Taiyoyuden
PRODIS
Taiyoyuden
MCC
CMC
CMC
Philip
LONGTE
MBI
NANYA
DAXON
AML
OPTO
MPO
GIGA
MUST 4X
PITEK 4X
MAXELL 4X
INFODISC 4X
SONY 4X
LEAD DATA 4X
RI/HENG 4X
Aotian/Clone/PDK/T-Bird
Pan 4x
2X 4X
MCC---001MCC 2X
DVD-R:
Meida
MID
Write Speed
RITEKG03---MCC-00RG200MXL-RG01---PVC001001--TAIYOYUDEN-NANYA-P1861MBI--------GSC001-----CMC-MAG.---SONY-------LD---------TAROKO-X2--PRODISCG02-PRINCO-----TDKG02000000
opt0d1sck001
TDKG010000d9
BeALL-G00001
PRINCO-----MCC-01RG20-PVCR001002-TYG01-----RITEKG04---CMC-MAG.-AF1
GSC001-----SCK-Co.,Ltd.
NANYA.JC001PRICO
LEADDATA01-PRODISCS03-MEI-00V001-GSC001-----LONGTEN-001DAXON004----
MBI-01RG20-OPTODISCK001
AML--------TAROKO.MX4-AN31--------
ME-153-----POSG04-----ONIDTECH----
MXL-RG02---AN32-------Yi-Jhan-001OPTODISCR004
VANGUARD----
LONGTEN-009-
Ritek
MCC
Maxell
Fujifilm
Taiyoyuden
NANYA
MBI
GIGA
CMC
SONY
Lead Date
TAROKO
PRODISC
PRINCO
TDK
OPTO
TDK
BEALL
PRINCO
MCC
Pioneer
Taiyoyuden
Ritek
CMC
GIGA
SKC
NAYA
PRICO
LD
PRODISC
PANSIC
GIGA
LONGTEN
DAXON
MBI
OPTO
AML
TAROKO
AN31
MJC
POSTECH
ONIDTECH
NUMBER
CYBERSTO
Yi Jhan
OPTO
VANGUARD
LONGTEN
2X
Page 9

DV IN L
VIDEO
R
AV2 IN
CH- CH+ REC
DVR-140
DVD RECORDER AND DVD/CD/MP3/CD-R/CD-RW/DVD+R/DVD+RW PLAYER
FRONT PANEL
07
FRONT PANEL
1. STANDBY/ON Switch on or off: to switch off or on, interrupt a function.
12
2. POWER INDICATOR indicator: green (working), red (standby).
3. CHANNEL-
CHANNEL+
5. RECORD Record:
6. PLAY/PAUSE Play: playback a disc. Pause:
7. STOP Stop:
8. OPEN/CLOSE Open/Close: open/close disc tray.
9. REMOTE CONTROL RECEIVER Receives the signal from the remote control.
D SCREEN
11. DV INPUT DV input socket: connection of digital video camera.
. VIDEO INPUT (F-A/V) C
13. L/R AUDIO INPUT ( F-A/V) C
TV Program Number: To select a lower program number.
4. TV Program Number: To select a higher program number.
Records the current source selected.
Temporarily pauses DVD playback or recording.
Stops playback/recording.
10. LE Displays information related to the unit such as Time, Current Chapter,
Disc Tray Status, etc.
onnection for external equipment using the Yellow Video (RCA) Cable.
onnection for external equipment using the Red/White Audio (RCA) Cables.
12
13
14
1
3
8
9
10
12
11
NOTES ON POWER STATES
There are 3 power states for this unit:
OFF - The unit draws no power and cannot be turned on by the remote control.
STANDBY -
ON - The STANDBY button on the remote control or the STANDBY/ON button on the front panel has been
pressed. The unit is ready to use.
The unit draws a slight amount of power to enable the remote control receiving circuit and to
retain basic settings such as the Time and Recording Settings.
114 2 6 75
13
2
Page 10
ON
OFF
RF
IN
OUT
VIDEO
S-VIDEO
VIDEO
S-VIDEO
VIDEO IN VIDEO OUT
FL
FR
SL
SR
CENTER
SUB-WOOFER
5.1-CH AUDIO OUT
Y
CB / PB CR / PR
COAXIAL
OPTICAL
VIDEO OUT / DIGITAL AUDIO OUT
AUDIO IN
L
R
RISK OF ELECTRIC SHOCK
DO NOT OPEN
CAUTION
Manufactured under license from Dolby
Laboratories. " Dolby " and the double-D
symbol are trademarks of Dolby Laboratories. Confidential unpublished works.
Copyright 1992 - 1997 Dolby Laboratories. All rights reserved.
Apparatus Claims of U.S.
Patent Nos. 4,631,603;
216; 4,819,098 and
4,907,093 licensed for
uses only.
4,577,
limited viewing
"DTS" and "DTS Digital Out"
are trademarks of Digital
Theater Systems, Inc.
CLASS 1 LASER PRODUCT
N14142
110V-240V~ 50/60Hz
MODEL: DVR-140 AC: 110V-240V~ 50/60Hz
POWER: 35W
S/N:
DVD RECORDER
For Warranty Please Call 1800 656 630
Made In China
REAR PANEL and ACCESSORIES
08
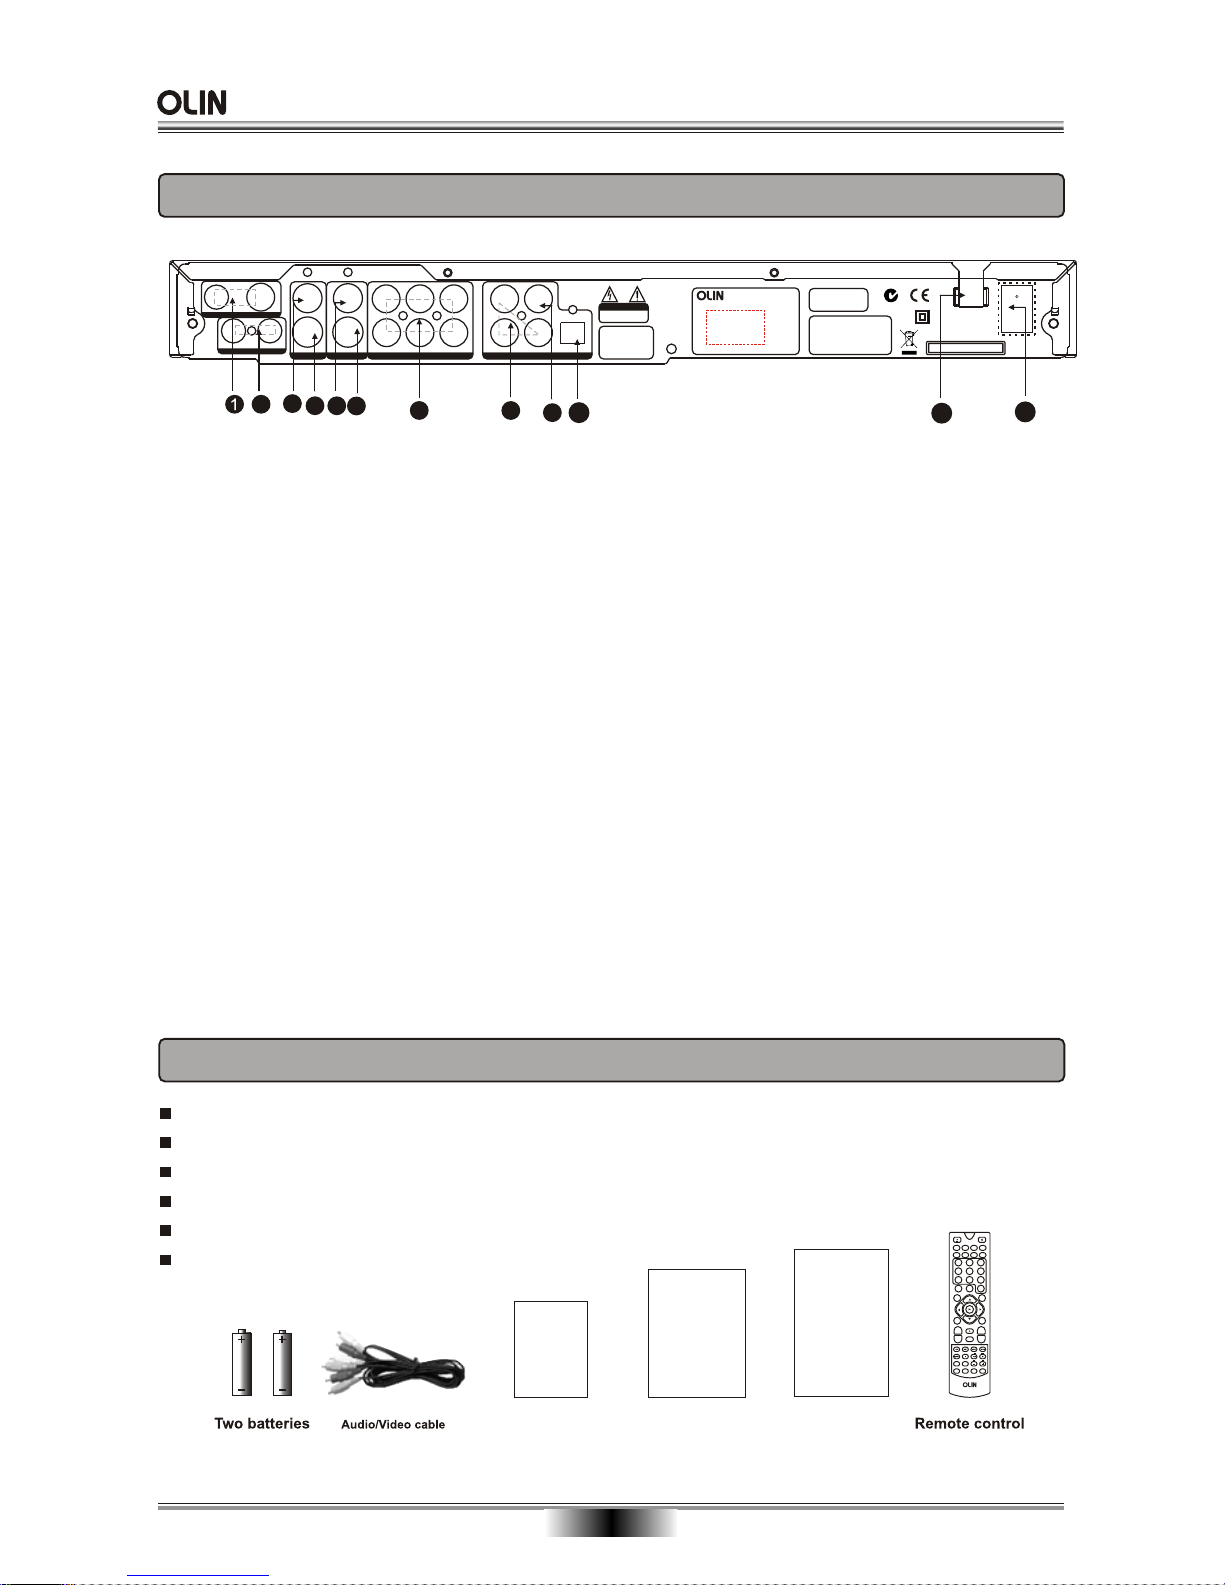
REAR PANEL
ACCESSORIES
Owner's manual x 1
Batteries x 2
Audio/Video cable x 1
Warranty Certificate x 1
Remote control x 1
Quick Install Guide x 1
PRO
G
S
ETUP
1
0
2
3
4
5
6
789
VOLUME
ANGLE
MUTE
V.MODE
REPEAT AUDIO
TITLE/PBC
SUBTITLE
I
N
T
RO
ZOOM
A-B RPT
SLOW
N/POSD
BOOK MARK
DVD
SOURCE
CHAP MARK
EDIT
PAUSE/STEP
STOP
MENU
CH-CH+
REC
TIMER
QUALITY
DISC
DVR-140
3
2
4
5
6
9
10
12
7
8
1.
. L/R AUDIO INPUT(R-A/V, R-SV) Audio input connection for external audio devices.
3. VIDEO INPUT
.
1
RF IN/OUT Aerial output: for Antenna or Cable TV.
2
(R-A/V) Composite Video input for recording.
4. S-VIDEO INPUT(R-SV) S-VIDEO input for recording.
5. VIDEO OUTPUT Standard Video Output supported by most TVs.
6. S-VIDEO OUTPUT Connect to TVs with S-VIDEO in for better picture quality than
standard composite video.
7. 5.1-CH AUDIO OUTPUT Connect to TVs or other Audio equipment supporting 5.1CH audio in.
8. YUV OUTPUT Use this output with TVs supporting Component Video or
Progressive Scan input for best video quality.
9 COAXIAL OUTPUT Use a special coaxial digital audio connector to send the raw coded
digital signal to devices supporting digital decoding.
0. OPTICAL OUTPUT Use a special optical digital audio connector to send the raw coded
digital signal to devices supporting digital decoding.
11. AC INLET Main socket: connection to the main supply.
12. POWER SWITCH Switch: switch on or off.
This output is the coded digital signal.
11
Owner's manual
Owner's manual
Warranty Certificate
WARRANTY
CERTIFICATE
Quick Install Guide
Quick Install Guide
Page 11
RF
IN
OUT
VIDEO
S-VIDEO
VIDEO
S-VIDEO
VIDEO IN VIDEO OUT
FL
FR
SL
SR
CENTER
SUB-WOOFER
5.1-CH AUDIO OUT
Y
CB / PB CR / PR
COAXIAL
OPTICAL
VIDEO OUT / DIGITAL AUDIO OUT
AUDIO IN
L
R
RF
IN
OUT
VIDEO
S-VIDEO
VIDEO
S-VIDEO
VIDEO IN VIDEO OUT
FL
FR
SL
SR
CENTER
SUB-WOOFER
5.1-CH AUDIO OUT
Y
CB / PB CR / PR
COAXIAL
OPTICAL
VIDEO OUT / DIGITAL AUDIO OUT
AUDIO IN
L
R
RF
IN
OUT
VIDEO
S-VIDEO
VIDEO
S-VIDEO
VIDEO IN VIDEO OUT
FL
FR
SLSRCENTER
SUB-WOOFER
5.1-CH AUDIO OUT
Y
CB / PB CR / PR
COAXIAL
OPTICAL
VIDEO OUT / DIGITAL AUDIO OUT
AUDIO IN
L
R
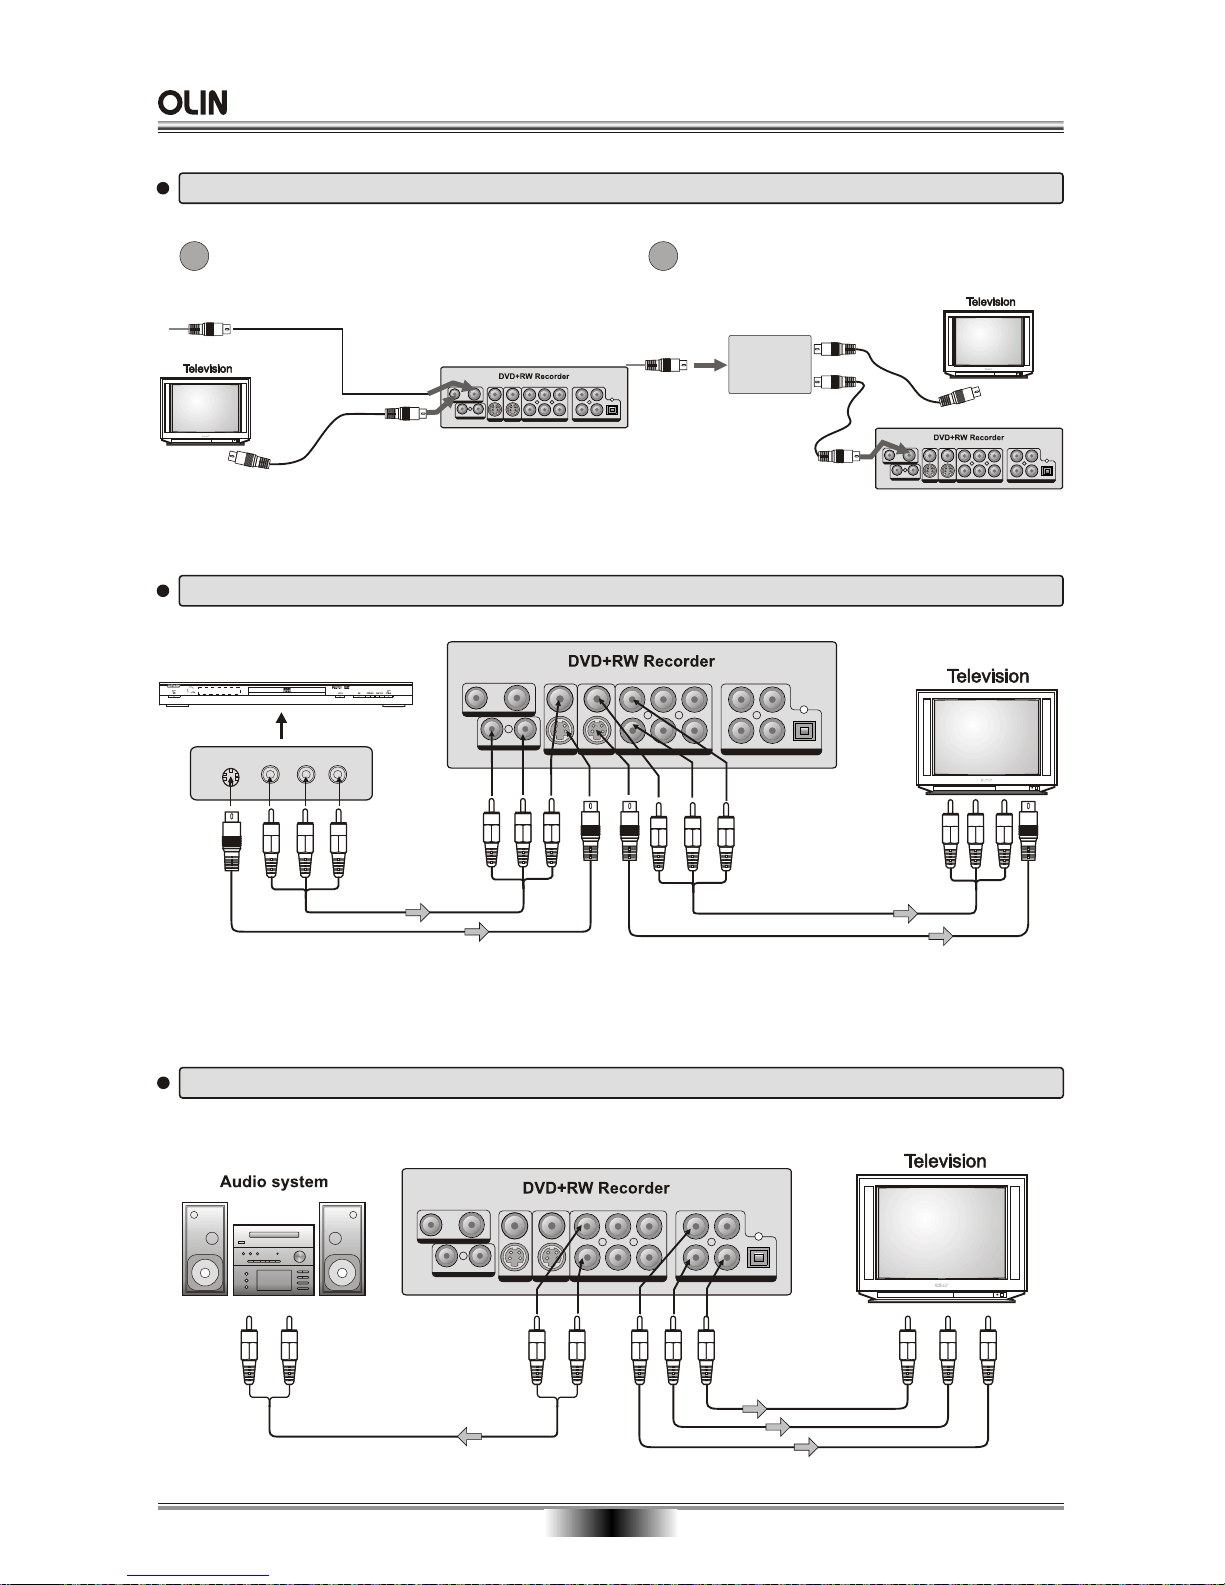
BASIC CONNECTION
To record from an analog cable TV signal, connect the cable to the RF In jack.
09
If the TV has an S-video input,
When using an S-video cable, do not connect the yellow video cable.
connect the DVD player to the TV with an S-video cable
Note: By this connection, you must set the unit standby when watching TV only.
A B
Traditional RF Connection
RF Connection When Using A Splitter Box
To record from devices such as DVD Players using the rear connections
ANTENNA or
TV signal cable
SPLITTER
LR
VIDEOS-VIDEO
DVD
DS-N809
DVD Video/DVD Audio/VCD/HDCD/JPEG/MP3 PLAYER
Red White Yellow
To Audio input(Red, White)
To Video input(Yellow)
To S-Video input
Yellow
Red
White
Connecting to an audio system and TV equipped with YUV video input
RF
IN
OUT
VIDEO
S-VIDEO
VIDEO
S-VIDEO
VIDEO IN VIDEO OUT
FL
FR
SL
SR
CENTER
SUB-WOOFER
5.1-CH AUDIO OUT
Y
CB / PB CR / PR
COAXIAL
OPTICAL
VIDEO OUT / DIGITAL AUDIO OUT
AUDIO IN
L
R
To audio inputs of the amplifier
Red
Red
White
White
To Y video input
To CB/PB video input
To CR/PR video input
To Y video output
To CB/PB video output
To CR/PR video output
Page 12
RF
IN
OUT
VIDEO
S-VIDEO
VIDEO
S-VIDEO
VIDEO IN VIDEO OUT
FL
FR
SLSRCENTER
SUB-WOOFER
5.1-CH AUDIO OUT
Y
CB / PB CR / PR
COAXIAL
OPTICAL
VIDEO OUT / DIGITAL AUDIO OUT
AUDIO IN
L
R
BASIC CONNECTION
10
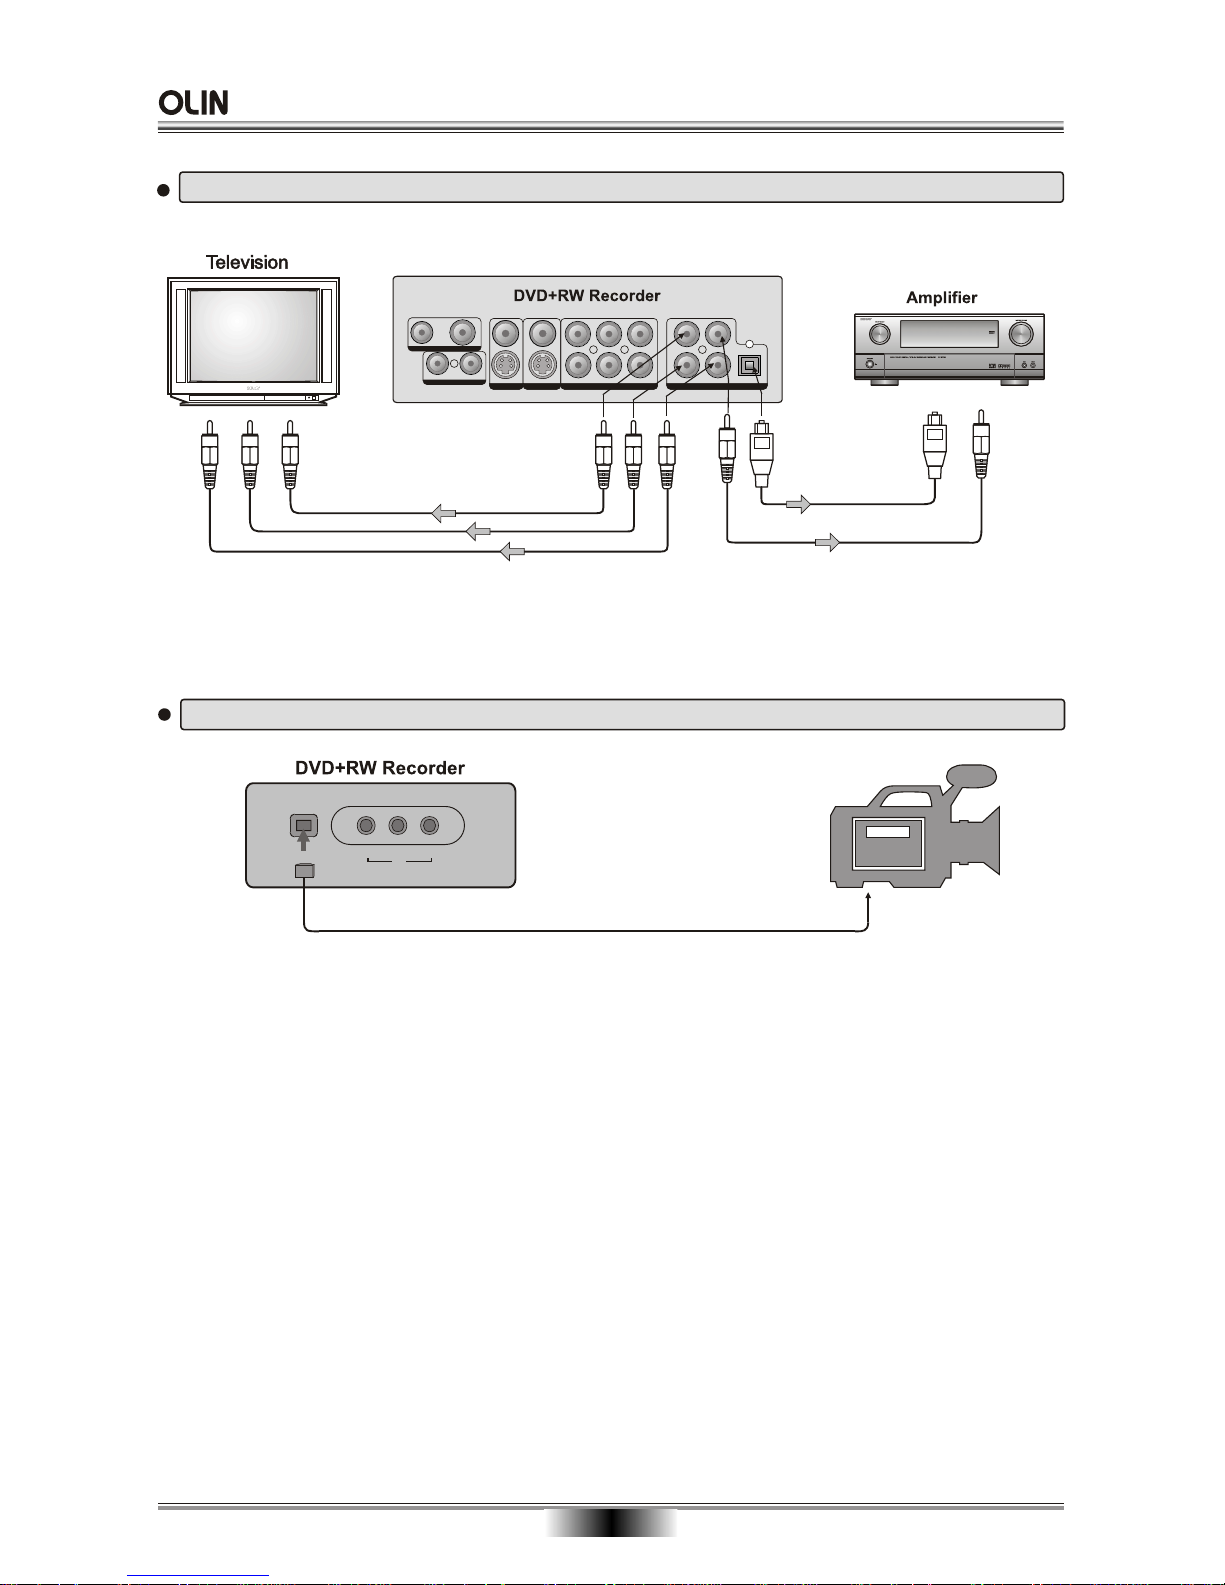
Connecting to an amplifier equipped with a digital audio input and TV
To connect DV (IEEE-1394) devices that you will be recording from.
Note: the connect of AV2 is the same as AV1.
To OPTICAL
type digital
audio input
Connect either
Optical digital cable
Coaxial cable
To COAXIAL
type digital
audio input
To Y video output
To CB/PB video output
To CR/PR video output
To Y video input
To CB/PB video input
To CR/PR video input
DV
VIDEO
AV2 IN
LR
DV IN
Page 13
RF
IN
OUT
VIDEO
S-VIDEO
VIDEO
S-VIDEO
VIDEO IN VIDEO OUT
FL
FR
SL
SR
CENTER
SUB-WOOFER
5.1-CH AUDIO OUT
Y
CB / PB CR / PR
COAXIAL
OPTICAL
VIDEO OUT / DIGITAL AUDIO OUT
AUDIO IN
L
R
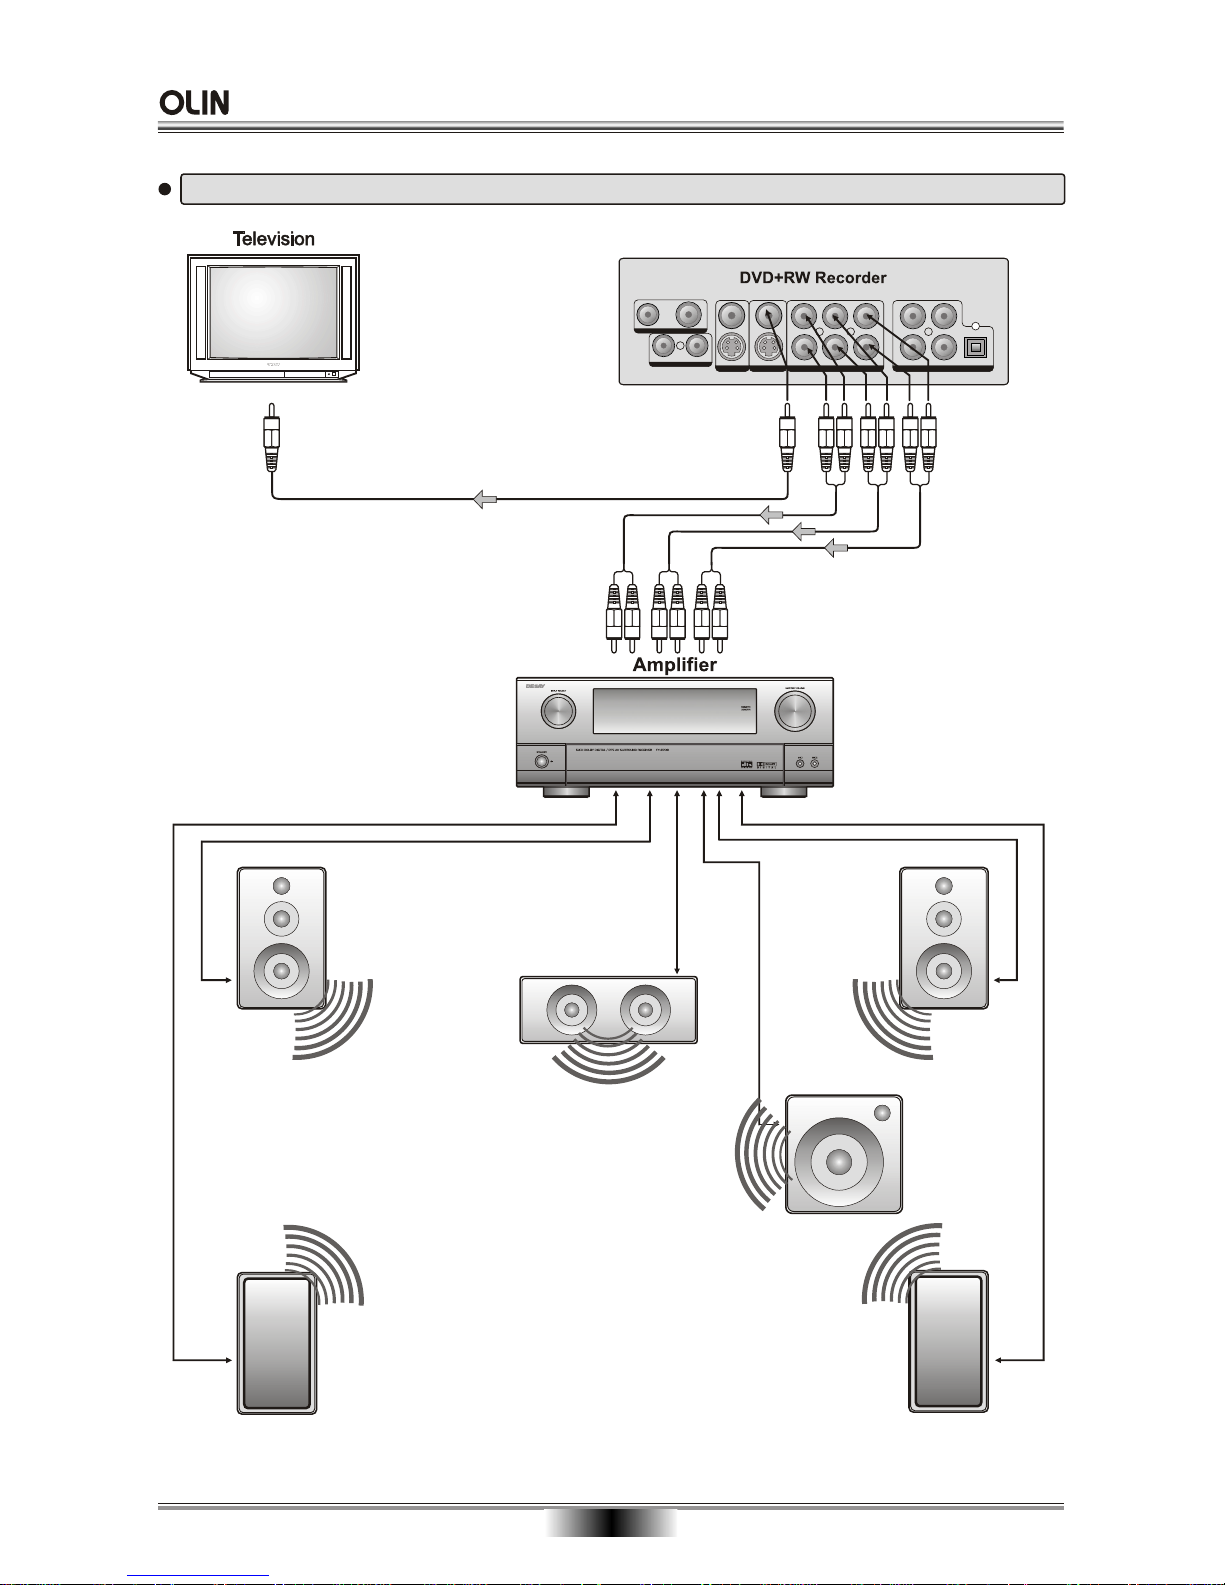
Connecting to an amplifier equipped with 5.1ch audio input and TV
BASIC CONNECTION
11
To 5.1ch audio inputs
To video input
To 5.1ch audio outputs
Audio cable
Front (L)
Surround(L)
Surround(R)
Subwoofer
Center
Front (R)
Page 14
PR
OG
SET
U
P
1
0
2
3
4
5
6
789
VOLUME
ANGLE
MUTE
V.MO DE
REPEAT AUDIO
TITLE/PBC
SUBTITLE
IN
T
RO
ZOOM
A-B RPT
SLOW
N/POSD
BOOK MARK
DVD
SOURCE
CHAP MARK
EDIT
PAUSE/STEP
STOP
MENU
CH-CH+
REC
TIMER
QUALITY
DISC
DVR-140
PROG
SET
UP
1
0
2
3
4
5
6
7 8 9
VOLUME
ANGLE
MUTE
V.MODE
REPEAT
AUDIO
TITLE/PBC
SUBTITLE
INTRO
ZOOM
A-B RPT
SLOW
N/P
BOOK MARK
DVD
SOURCE
CHAP MARK
EDIT
PAUSE/STEP
STOP
MENU
CH-CH+
REC
TIMER
QUALITY
DISC
STANDBY/ON
REMOTE CONTROL
REMOTE CONTROL
12
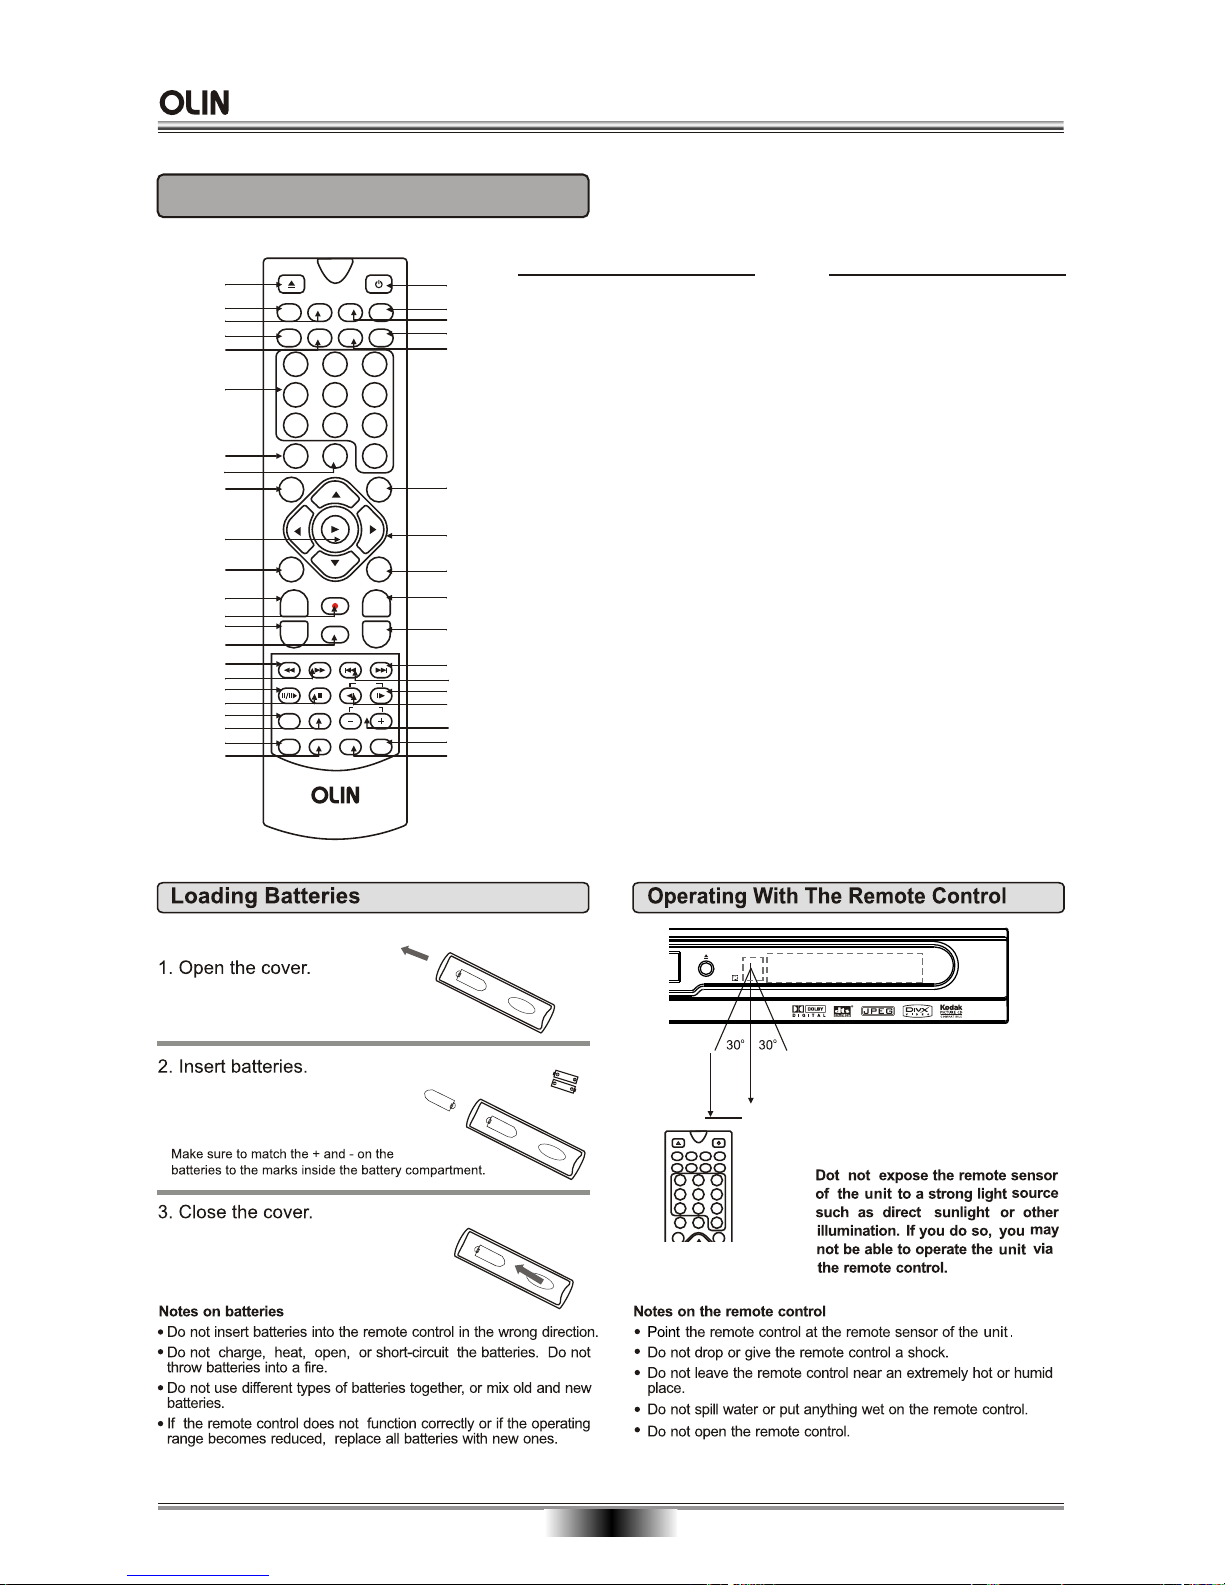
Distance: About 7m (23 feet) from the
front of the remote sensor.
o
Angle: About 30 in each direction
of the front of the remote
sensor.
About 7m
Function Function
1
2
4
6
7
8
9
10
11
12
14
16
18
20
21
22
23
13
15
17
19
3
5
24
25
27
29
30
31
32
33
34
36
38
39
26
28
40
1. OPEN/CLOSE DISC TRAY
2. Video Output Mode
3. TITLE/PBC
4. REPEAT
5. A-B REPEAT
6. DIGITS 0-9 BUTTONS
7. On Screen Display (OSD)
8. NTSC/PAL
9. SETUP
10. PLAY/ENTER
11. ZOOM
12. CHANNEL up
13. RECORD
14. TIMER
15. QUALITY
16. FAST REVERSE
17. FAST FORWARD
18. PAUSE/STEP
19. STOP
20. DVD Title Screen
21. MUTE
22. SOURCE
23. BOOK MARK
24. STANDBY
25. MENU
26. SUBTITLE
27. AUDIO
28. ANGLE
29. INTRO
30. CURSOR
31. PROGRAM
32. CHANNEL down
33. DISC
34. NEXT
35. PREVIOUS
36. SLOW FORWARD
37. SLOW REVERSE
38. VOLUME+/- (Volume Control)
39. CHAPTER MARK
40. EDIT
35
37
Page 15
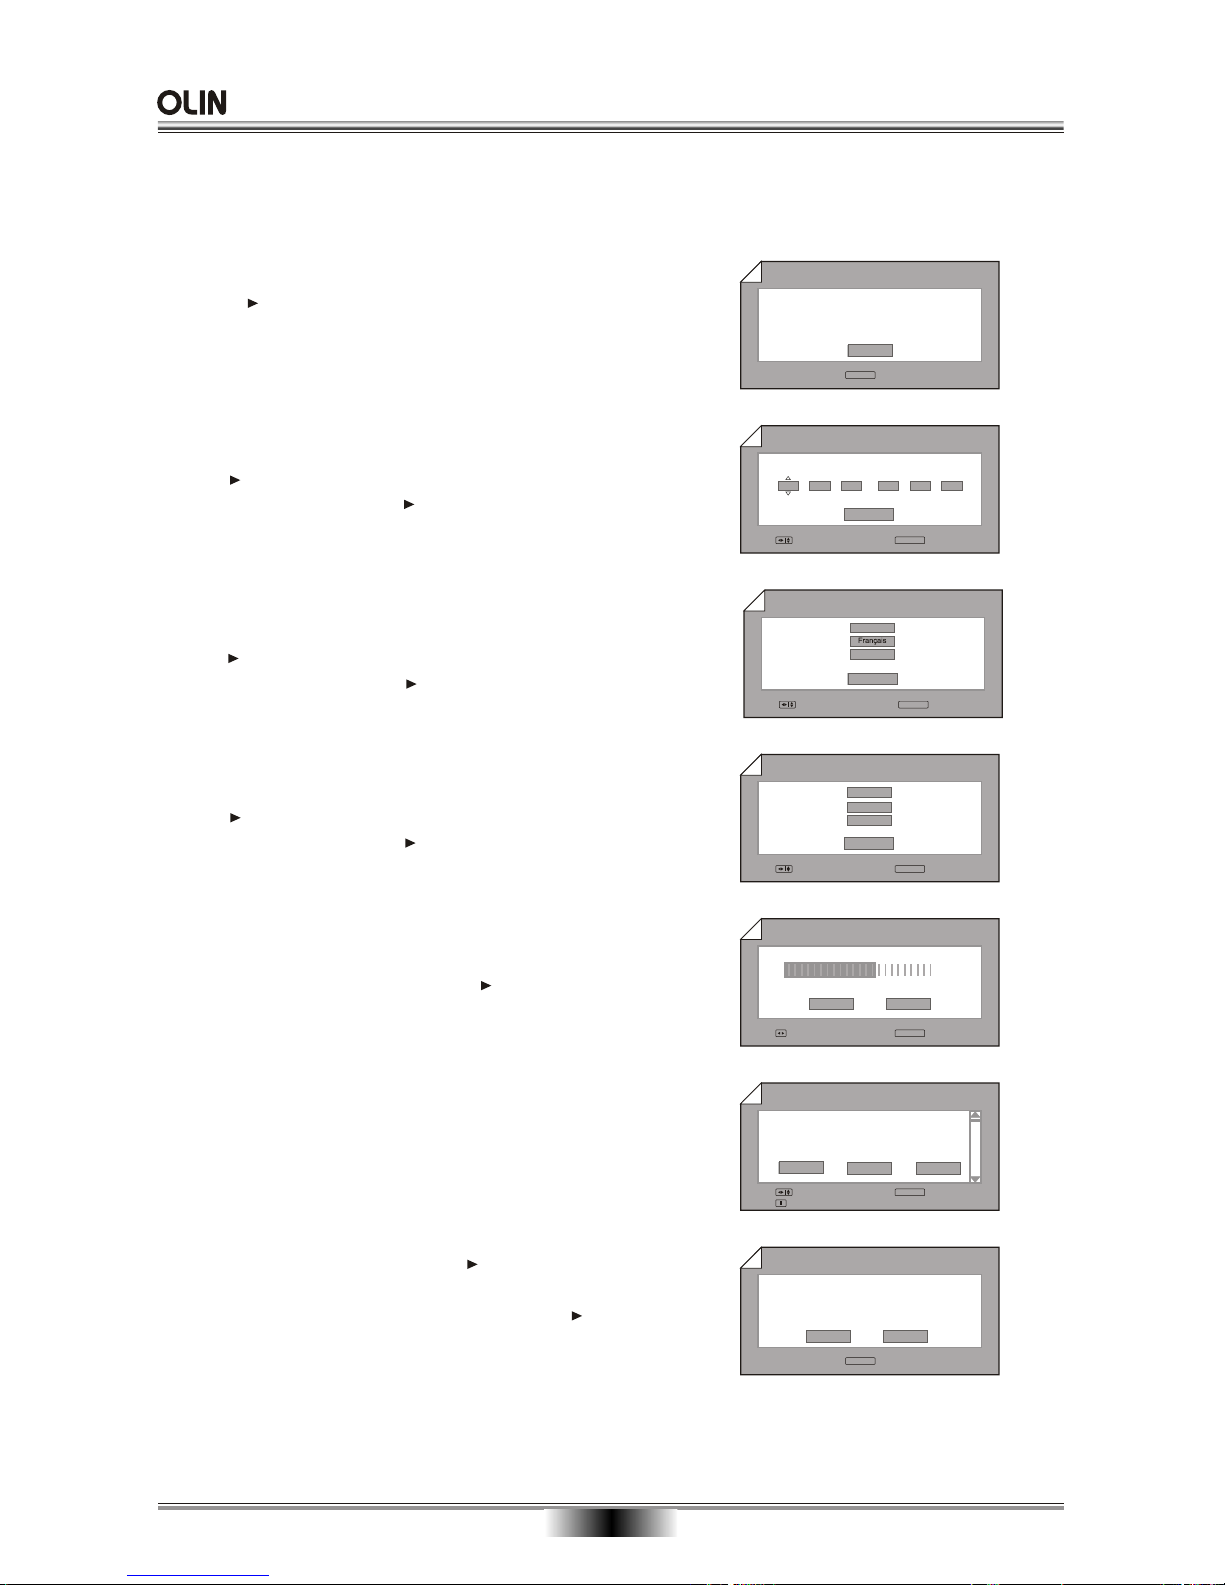
This chapter will show you how to start the initial set up, After successfully connecting your DVD recorder to
the TV set and other additional devices as described in the previous chapter .
ENTER
OK
Next
Initial Setup Wizard
Before using your recorder
Please complete this setup
1/7
INITIAL SETUP
13
Back
Clock Setting
2/7
OK
Choose
:
4
6
53
pm
/ /
11
2006
ENTER
OK
Back
Complete
Setup has been completed
Enjoy using your recorder
7/7
Finish
ENTER
Back
OSD Lang
3/7
English
OK
Choose
ENTER
Back
Country setting
4/7
UK
Australia
OK
Choose
ENTER
Germany
Auto Scan
5/7
OK
Choose
Back
Cancel
80%
ENTER
Channels Found 35
6. "CH List" will edit channel list, .please consult
page 29
1.Press button for next page
CH List
6/7
OK
Choose
PR CH Name Skip
OK
Cancel
Back
Skip
01 CH3 Off
02 S2 Off
ENTER
2.
buttons to input " date " and " time ",
press to confirm and go on next setting.
Use direction button to select clock entry fields.
Use number
Highlight "Back" and press to back to previous
page.
3. Use UP/DOWN button to select OSD Language,
press to confirm and go on next setting.
Highlight "Back" and press to back to previous
page.
4. Use UP/DOWN button to select Country Setting,
press to confirm and go on next setting.
Highlight "Back" and press to back to previous
page.
5. "Auto Scan" will start automatically from this step,
but you can also cancel by pressing .
7. If you are sure that all steps are correct, please
highlight "Finish" button and press to end the
setup and
If not, please highlight "Back" button and press
to
enjoy using your new DVD recorder.
re-enter the initial set-up info.
Deutsch
Page 16
BASIC PLAYBACK
14
Previous and Next
During playback, press PREV key to return to start
of the current chapter. Pressing again will skip back
to the start of the previous chapter. This will occur
until the 1st chapter of the disc is reached. (Note:
disc function may differ depending on disc format).
Pressing of the NEXT key during playback will skip
the current chapter and play the next one.
Fast forward and Fast reverse
1. Press F.FWD to fast forward through the disc.
Each time the F.FWD button is pressed, the
fast forward motion
2. Press to resume normal playback.
3. Press F.REV to fast reverse through the disc.
Each time the F.REV button is pressed, the
fast reverse motion
4. Press to resume normal playback.
speed changes (2x, 4x, 8x,
16x, 32x)
speed changes (2x, 4x, 8x,
16x, 32x)
Slow
Press SLOW to play a disc in
Each time the SLOW button is pressed, the
slow
Press to resume normal playback;
Press SLOW to play a disc in slow reverse. Each
time the SLOW button is pressed, the slow
Press to resume normal playback;
Note: This function is invalid for CD and MP3.
slow motion forward.
motion speed changes (1/2, 1/4 , 1/8, 1/16)
motion speed changes (1/2, 1/4 , 1/8, 1/16)
NOTES:
1. may appear on the TV screen during
operation. A means that the operation is
permitted by the unit or the disc.
2.
3.
not
This unit is controlled by CPU, under setting mode,
there may be screen saver, press any key to activate
the unit . If you can not use this function, you can
set SCREEN SAVER to OFF in GENERAL SETUP
of SYSTEM SETUP.
To prevent damage, do not restart the device within
5 seconds of turning off.
1. Press PAUSE/STEP first time to pause playback
(still mode). The sound will be muted during still
mode.
2. Press PAUSE/STEP continuously to single step
forward to the next frame in the video.
3. Press to resume normal playback.
Pause/Step playback
1. Press STOP button to go to stop mode, the unit
will change to input source automatically, the unit
can recall the location where stopped.
2. Press or DVD button to resume playback from
the location where playback is stopped or from the
beginning of the disc.
3. Press STOP twice to stop completely.
Stop playback
Basic playback
1. Press power switch on the rear panel to " ON " ,
then press "STANDBY/ON" on the front panel or
press " " on the remote to turn the unit ON, the
unit will change to input source automatically, after
the TV screen displays the start logo for a few
seconds.
2. Press OPEN/CLOSE to open the disc tray,
the dialog box shows "Open". Place a disc on the
disc tray.
There are two different disc sizes. Place the
disc in the correct guide on the disc tray. If the
disc is out of the guide, it may damage the disc
and cause the unit to malfunction.
Do not place a disc which is unplayable in this
unit.
3. Press OPEN/CLOSE to close the disc tray, the
dialog box shows " Loading " the playback will
automatically start.
Some discs may not playback automatically;
you can press button to start playback.
4. Some discs may start playback with a menu.
use the cursor button on the remote controller to
select menu options and press to start,
or alternatively, you can use digits if available on
the DVD menu to select a menu option directly.
Page 17
ADVANCED PLAYBACK
15
IMPORTANT NOTE:
THE FOLLOWING FUNCTIONS ARE APPLICABLE ONLY TO DVD DISCS. IF OTHER DISC FORMATS ARE
PLAYED, SCREEN DISPLAY AND OPERATIONS MAY BE DIFFERENT.
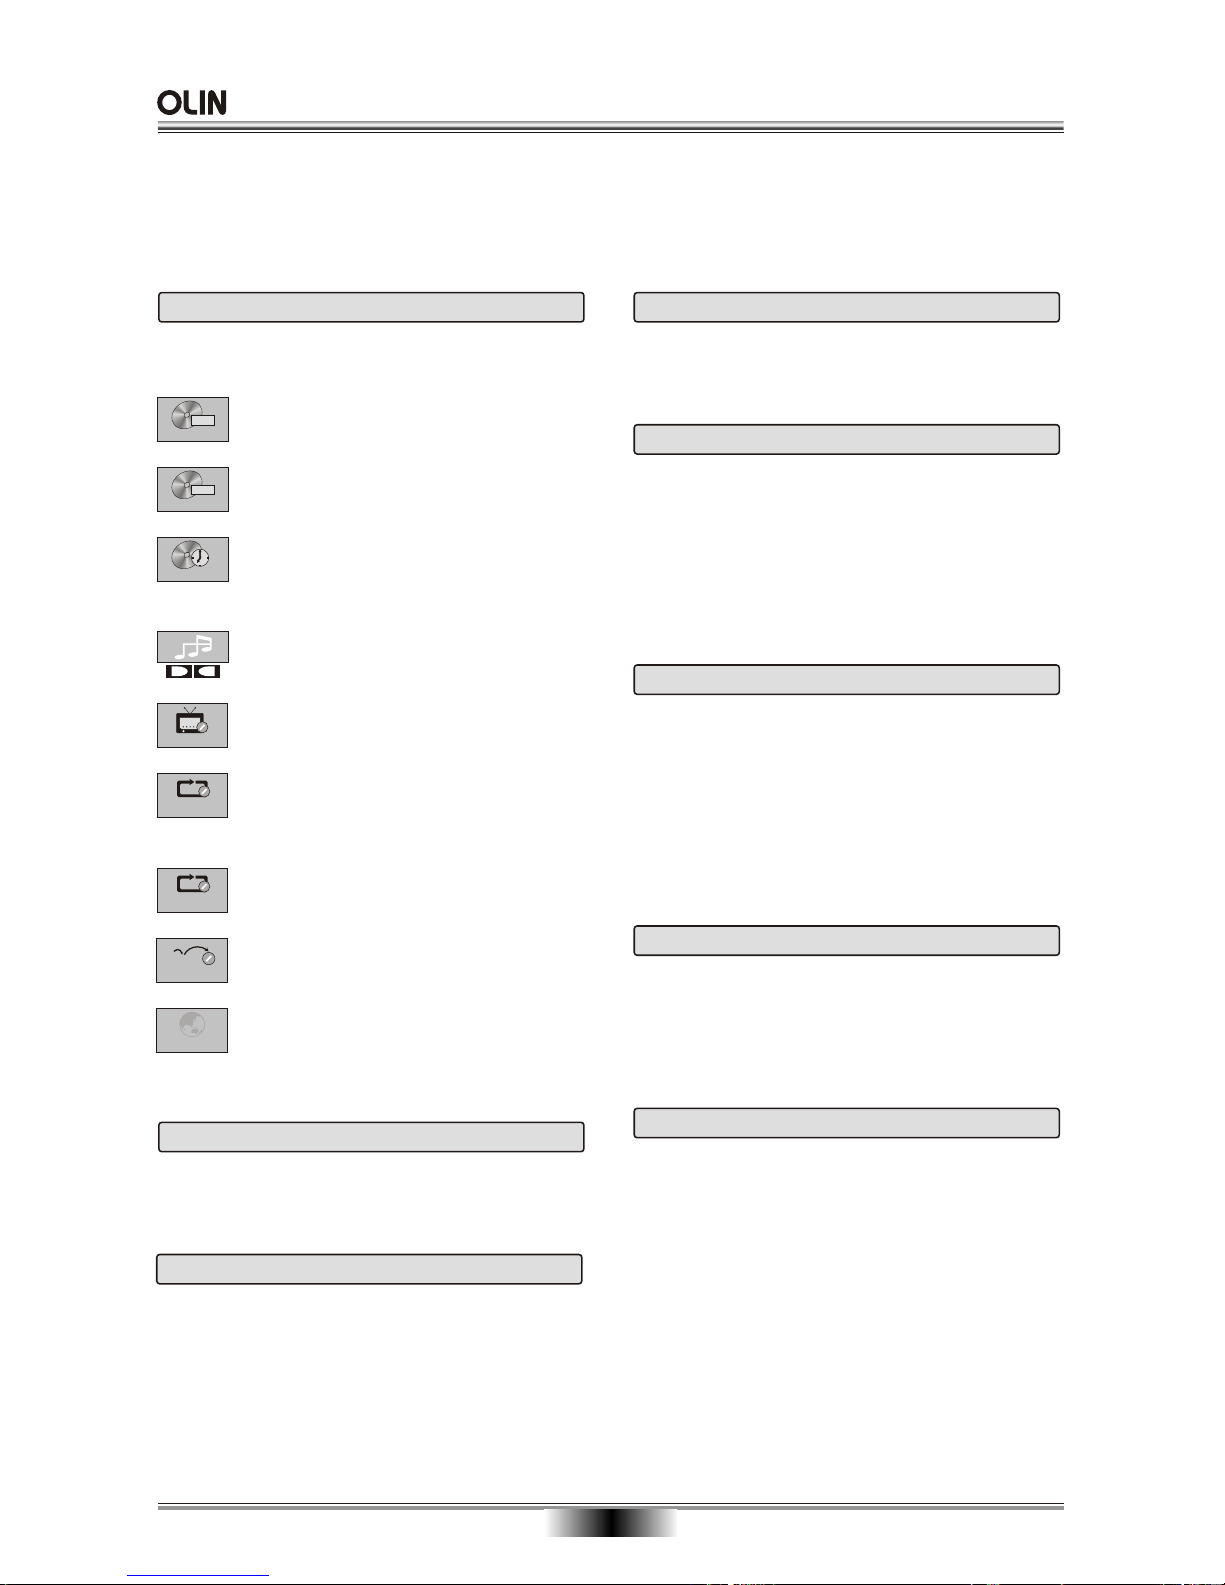
OSD (On-Screen Display)
During playback, press this button to view available
information, Press again to cancel the control menu.
ANGLE
If the video on the DVD was recorded with multiple
angles, you have the option to change the camera
angle of the scene you are watching.
Pressing ANGLE button during playback will display
the angle mark on screen.
Note: the angle function will not work if your DVD
disc does not contain the multiple angle features.
A-B REPEAT
During playback , when you reach the start of the
segment you want to repeat, press the A-B REPEAT
button(Ponit A), at the end of the segment(Ponit B),
the player will automatically return to point A and start
to repeat playback of the selected segment(A-B).
press A-B REPEAT button to resume normal playback.
ZOOM
Press to zoom in on the incoming AV
signal and to cycle through all the levels. A small
PIP(picture-in-picture) display indicating the zoom
rate will appear on the lower right-hand side of the
screen during playback mode. This is accompanied
by a number on the lower-left side of the screen
showing actual zoom rate.
You can use the cursor buttons to move around the
image. This will display the parts of the image that do
not appear on-screen when the image is zoomed in.
Press the ZOOM button repeatedly to return to normal
viewing.
this button
AUDIO
The toggles the display of the Audio Track
Menu. An audio field with the given audio type will
be displayed on the top left hand corner of the
screen.
button
Present/Total Title Select to choose an available
title to playback by inputting numbers.
Present/Total Chapter Select to choose an available
chapter to playback by inputting numbers.
Remainder / Elapsed Time Check remaining or
elapsed time for entire movie/disc (TITLE) or remaining or elapsed time per chapter. Pressing UP or DOWN
key cycles through the different modes.
Repeat Repeats playback of current title (if disc
contains more than 1 title), Chapter, All (entire disc).
Press REPEAT repeatedly to cycle through different
options.
Repeat A_B Repeat playback specific segment.
Audio Select your desired audio setting, if available.
Subtitle Select your desired subtitle language, if it
is supported by the disc; Select OFF to hide the subtitle.
OSD Language Select your desired On_Screen
Display language.
Playback Mode Select ON to playback random or
select OFF to playback normally.
1
LANG
Off
12 3
Off
AB
Off
Off
0:00:00
TT
03/20
CH
02/28
TT
V.MODE
This can set video output to " CVBS ", " YUV ",
" P-SCAN ".
TITLE/PBC
You can locate a specific title or track using this
button.
According to some VCD discs, if PBC is ON, the
user can use the digits buttons to select track only
in the menu, if PBC is OFF, the user can select the
track by digits buttons directly.
REPEAT
During playback, press this button and select repeat
mode. You can repeat an entire disc, title or chapter.
Page 18
BOOK MARK
Press BOOK MARK button during playback display
a message on screen and remind you that a bookmark
has been inserted at present position a thumbnail
will be added into the bookmark list.
Press BOOKMARK button for a few seconds to display the bookmark list.
Use UP/DOWN/LEFT/RIGHT to select the thumbnail
from the list and press
Note: the bookmarks will vanish as long as you open
the tray.
to start playing the
selected bookmarked portion of the disc.
This function can also be controlled in the INTRO
interface
16
ADVANCED PLAYBACK
VOLUME and MUTE
Press " + " at the right of VOLUME to increase
volume , " - " to decrease to volume . Press the
MUTE button to temporarily cancel the audio signal
at any time a screen will display Mute, Pressing
again will resume normal audio.
NTSC/PAL (N/P)
Pressing this button will switch between NTSC, PAL
and Auto
.
QUALITY
The record quality setting determines the quality
of your recordings as well as the maximum amount
of video you can record on a disc. The higher the
quality, the less video recording time .
Press this button and select the record quality, it is
including: HQ, SP, LP, EP, SLP, SEP.
SOURCE
The video input source that will be used for the
recording: Tuner, Front AV, Rear AV, Rear SV, DV.
INTRO
Move the cursor to select an item.
PROGRAM
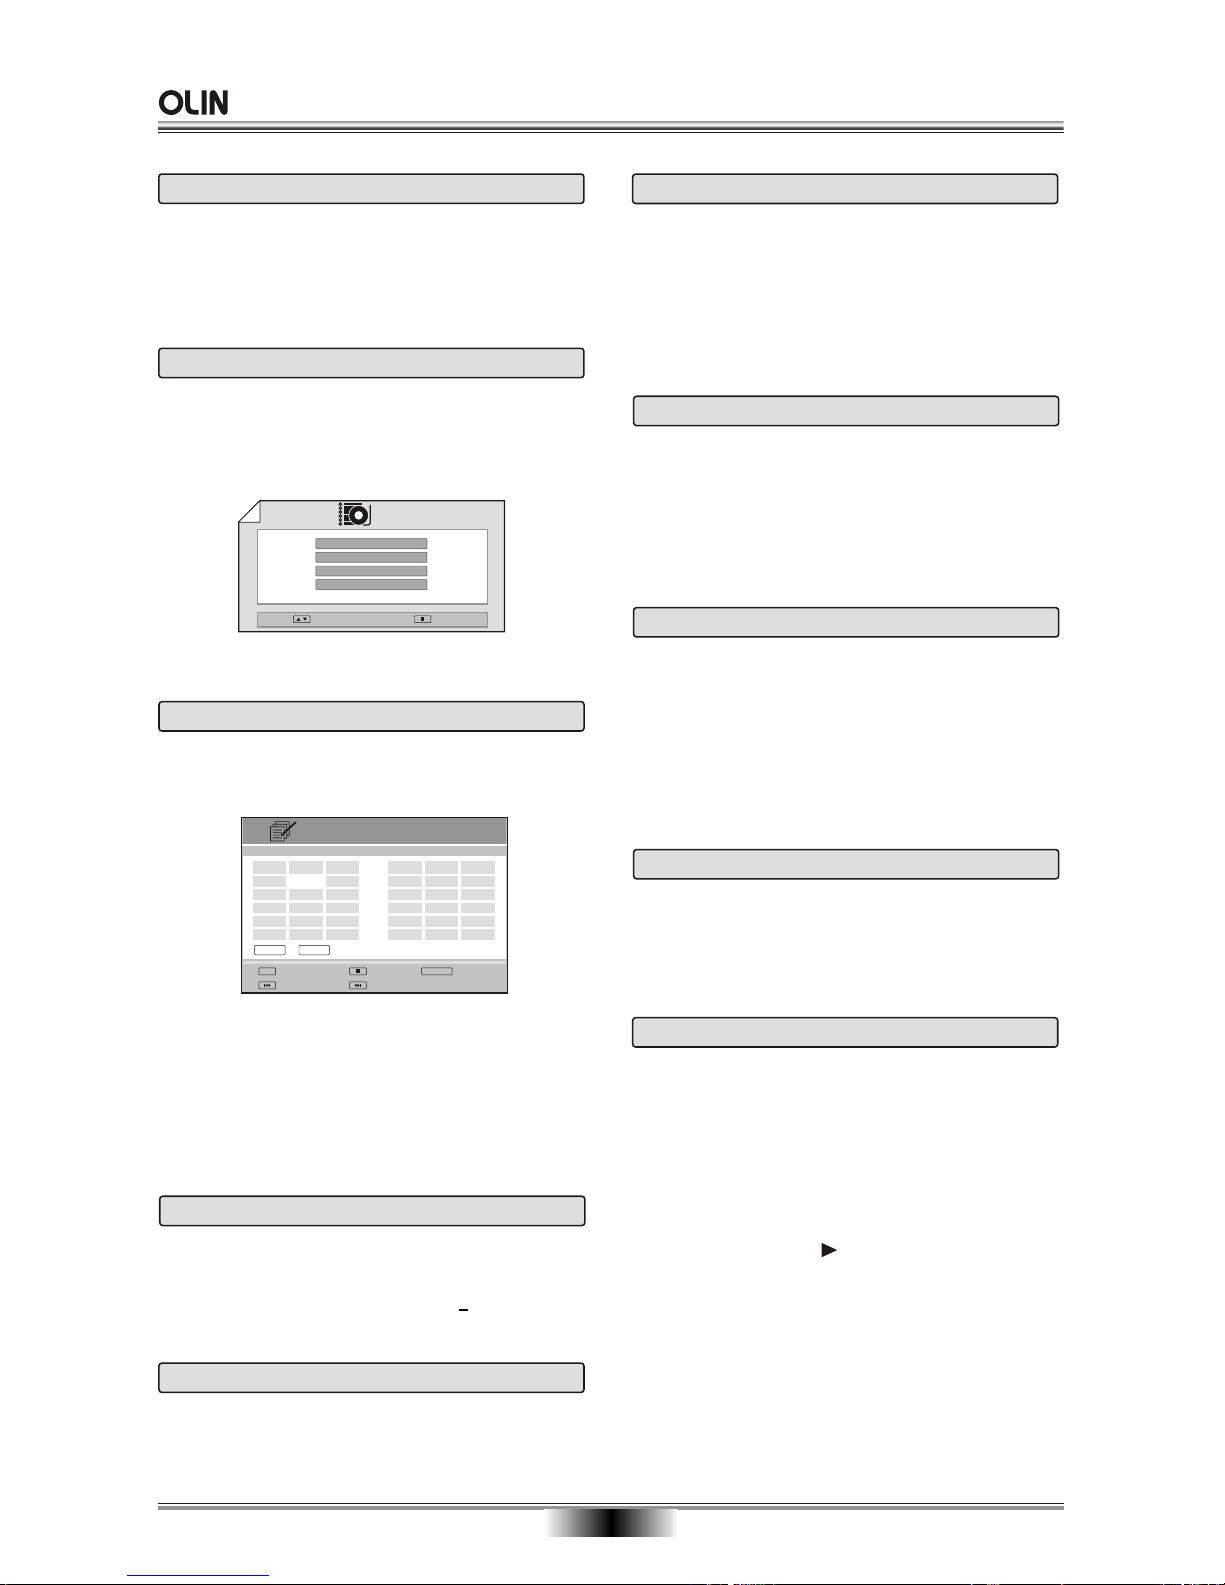
Press this button during playback, the program
window will display on the screen:
Title Digest
Chapter Digest
Title Interval
Chapter Interval
Exit
Select
Digest
use UP/DOWN/LEFT/RIGHT button to select the box
and input the available title and chapter by number
buttons. after that, the unit will play with program mode,
If you want to cancel this function, press STOP button.
Note: If power off or tray out, the program list will be
erased.
SUBTITLE
Subtitles are useful for viewing movies in a foreign
language or for hearing-impaired viewers.
This function can select up to 32 languages displayed
on screen.
Prev page
Input digits
0-9
ENTER
OK
Clear
Next page
List Title
Chapter
1
2
3
4
5
-
List Title
Chapter
6
7
8
9
10
-
Play
Exit
Program
--
--
--
--
--
--
--
--
--
TT: CH:
This provides a thumbnail-like summary of disc titles
(if there is more than 1 title recorded) or chapter in
both Digest and Interval modes.
Press this button, the screen display:
MENU
If available on the DVD, pressing this button to
display the Root Menu selects items according to
your preference. This menu is the first of possibly
many layers, and is therefore known as the Root
Menu.
DVD
Pressing this button will play the disc if the disc being
used supports this function.
Note: This function is invalid to DVD+R/RW disc.
Page 19
SPECIAL FUNCTION PLAYBACK
17
Kodak Picture CD Playback
Playback (Normal)
When a Kodak Picture CD is inserted in the unit, an automatic slide show is launched. Each picture in the
Kodak Picture CD will be displayed consecutively in a slide-show fashion and will be scaled to fit in the whole
TV screen.
To display an image and keep it on the screen, To view the next or previous picture, press NEXT or
PREV buttons. To resume the slide show, press the button.
Image Rotation
There are four modes to rotate a picture: "Inver", "Mirror", Left", and "Right". These operations are allowed
only when a picture is being displayed normally and will be canceled automatically when a new picture is
displayed. The arrow key is used to select the different rotation modes:
Up - Invert/Normal Left - Turn left
Down - Mirror/Normal Right - Turn right
Digest
The STOP button is used to display thumbnail size pictures. After it is enabled, scaled-down thumbnail pictures
will be displayed on the screen. The NEXT and PREV buttons can be used to display the next / prev pictures
in the Kodak Picture CD.
You can select any of the displayed thumbnails by using the Arrow buttons and pressing the button.
The thumbnail will be enlarged to fit the TV screen and the slide show will start. If you desire to display an
image and keep it on the screen, To view the next or previous picture press NEXT or PREV button.
To resume the slide show press the button.
IMPORTANT NOTE: The quality of pictures displayed on the screen is highly dependent on the viewing
device (TV).
MP3 PLAYBACK
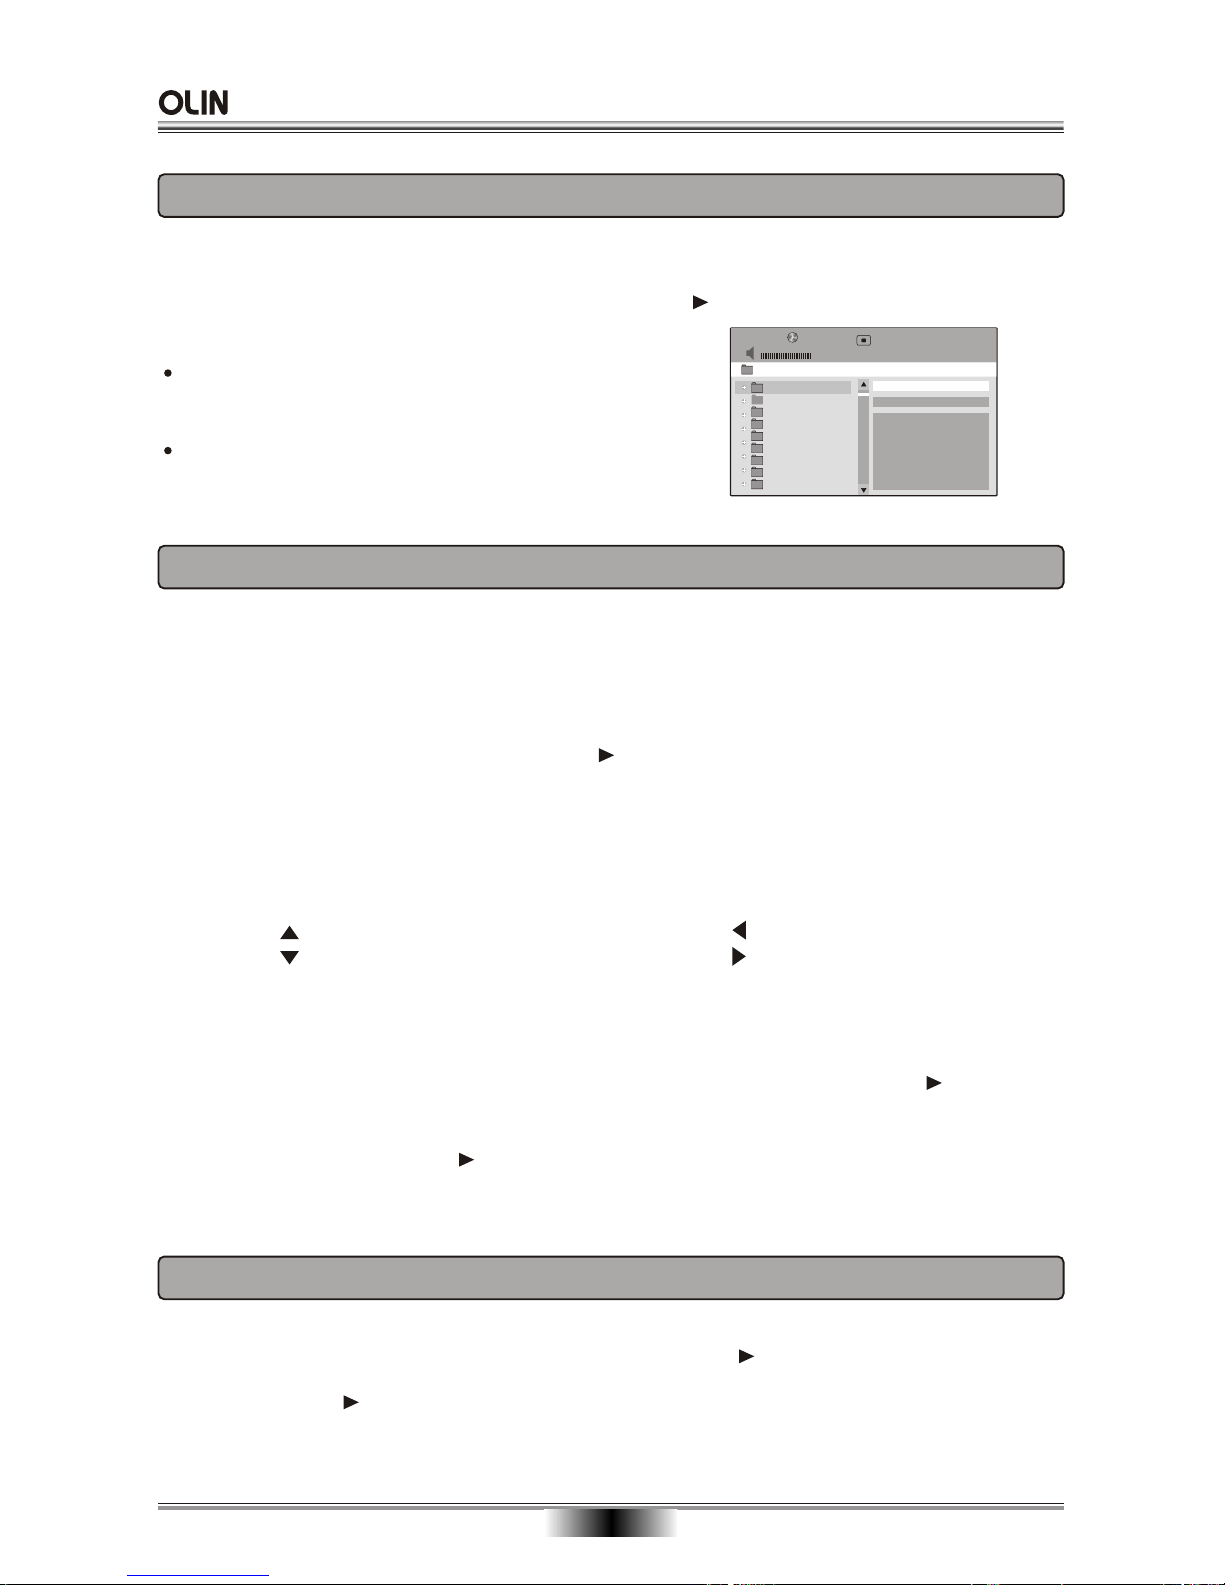
When playing a MP3 disc, a menu will be displayed automatically if the disc is loaded in successfully. In
the menu, use the UP / DOWN buttons to select a file to play. Alternatively, you can press TITLE/PBC button
and input the available file via the number buttons, then press to start playing the selected file of the disc.
Note:
MP3 files must be stored on discs with the extension
"MP3", such as "song1.mp3", otherwise the files
will not be recognized.
You can have a maximum of 250 files or folders.
DISC
- +
MP3_01
MP3_02
MP3_03
MP3_04
MP3_05
MP3_06
Preview
MP3_07
MP3_08
00:00 / 00:00
JPEG FILES
When playing JPEG disc, a navigation menu will be displayed automatically if the disc is loaded successfully.
In the menu, use UP or DOWN in the cursor to select a file, then press button, the file will be play with a
slide-show. Press PREV or NEXT to select the previous or the next picture and press PAUSE to pause the
current picture press button to return to normal playing. Press ZOOM to start zoom function. When ZOOM
is on, press F.REV and F.FWD to select different enlargement ratio, press CURSOR button to move the
enlarged picture.
Page 20
18
DVD RECORDING
Recording Type
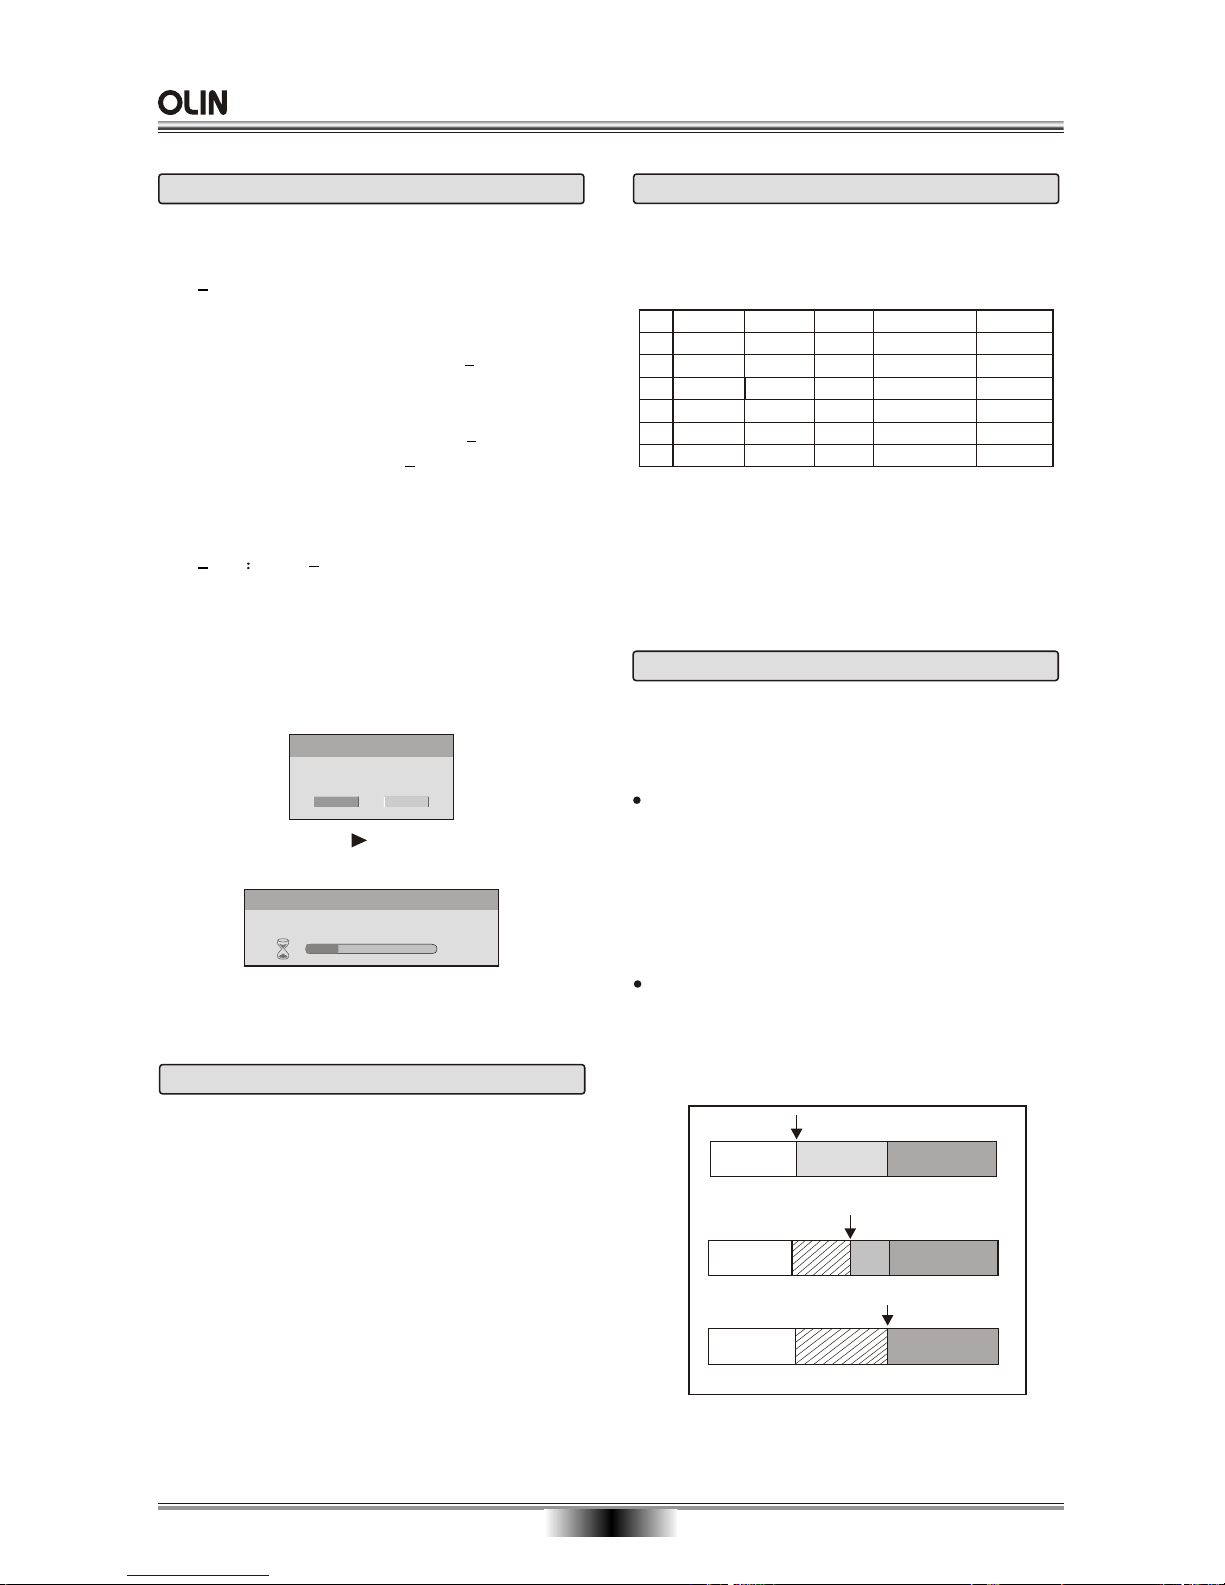
There are two ways to record on a DVD disc:
1 ) Overwrite a current recording, existing titles will
be overwritten with the new content.
Start of new recording
End of new recording
End of new recording
A) Original recording
B) New Title(D) is shorter than old Title B
C) New Title (D) is longer than old Title B
Title A Title B Title C
Title A Title D Title B Title C
Title A Title CTitle D
2) Record at the end of the disc (appending), the
new content will be written on free space.
The new title is shorter than the old (Title B).
Because the new title is shorter, a portion of the
previous title will remain on the disc. The unit will
automatically update the thumbnail and content
information of Title B as needed. A new Title D will
be created automatically. You can use the unit edit
functions to delete Title B.
The new title is longer than the old Title B.
Because the new title is longer, part of the old Title
C will be overwritten as well. The unit will remove
Title B, create a new Title D, and update the Title
C recording time.
This unit will accept four disc types for :
DVD+RW / DVD+R / .
Recording
DVD-RW / DVD-R
DVD+R : These discs can only be written once.
Existing recordings can be hidden but not deleted.
Once a disc is finalized, no further recordings can be made. Although DVD + R offers less
recording flexibility than DVD + RW , the lower cost
per disc and the fact that the material can not be
erased or edited make it the best choice for large
distributions of recordings to friends or clients.
DVD+RW DVD+RW discs can be written to and
erased multiple times . Existing recordings can be
deleted and disc space regained. These discs do
not require a finalization procedure.
If the disc has never been used, the format window
will be displayed on the screen:
Select OK and press button,
If the disc has been used, please consult page 19.
Therefore, any disc space already used by a recording
cannot be regained. A recorded DVD+R disc must be
Finalized before it will be compatible with other DVD
recorders.
formatting will
start automatically:
Introduction to Recording
Recording Quality
The recorder can offer five kinds of quality.
Recording
time is less
if the recording quality is better. Please
consult and setup on page 23.
Quality
HQ
SP
EP
SLP
Level
High Quality 1:03:47 9.716 mbps
5.037 mbps
2.537 mbps
2:03:12
4:07:13
Standard Play
Extended Play
Recording Time MBPS Resolution
D1 resolution, MPEG-2 CBR
CBR and VBR
CBR and VBR
D1 resolution, MPEG-2
LP resolution, MPEG-2
Encoding Type
LP
3.382 mbps
3:03:21Long Play
CBR and VBR
LP resolution, MPEG-2
Note: Please select the Quality required in the SETUP
menu, and press REC button at the first time to
record full disc. Pressing this REC button conti-
nuously records 30 minute intervals until the
disc is full. Recording time is an approximation
only.
Recording source
You can record to your DVD recorder from the
following sources:
TV Tuner: this unit features a built-in TV Tuner that
can be connected to a cable TV hookup or standard
antenna to record your favorite TV shows. You can
also auto-scan for available channels and add or
delete channels from the channel list.
AV Inputs(Composite/S-Video): use the Audio/Video
inputs to record from consumer electronics devices,
such as your camcorder or VCR, satellite receiver,
cable box, DVD player, etc.
To the A/V inputs- basically any video device that has
a S-Video or Composite Video output.
1.691 mbps
6:11:26
Super Long Play
CBR and VBR
SLF resolution, MPEG-2
SEP
1.268 mbps
8:03:21
Super Extended Play
CBR and VBR
SEP resolution, MPEG-1
Init Disc
OK Cancel
Init Disc
Auto Initializing
Please wait ...
20%
Page 21
19
1. Insert a DVD+RW or DVD+R disc.
2. Press source button to select the input source.
3.
Press REC button to start recording the preferences
in the menu which are now at the default setting. You
can change them in the SETUP menu by changing
the settings options. Make your selection using the
remote control and use to confirm your selection.
When the REC icon can be seen on the bottom
right corner of the screen, the unit is now record ing a program. At this time, the unit may not be
used for any other operations. The REC icon can
be removed from the screen by pressing the OSD
button.
4. To skip commercials from being recorded on the
DVDs , press the PAUSE button at the beginning
of the commercial to stop recording , and then
press the PAUSE button a second time at the end
of the commercial to resume recording.
5. To stop recording, press the STOP button on the
remote control, a white box with "WAIT'' inside will
appear
in the middle of the screen with a progress
bar to indicate the unit is stopping the recording
process.
6. To return to the Title Screen, press DVD button
and you will see a thumbnail image representing
your last recording,
with information on the details
of the recording, including the Date and Time the
recording was made, along with the Length and
Recording mode.
This will be on the upper left side
and to the left of the thumbnail.
One Time Recording(OTR)
Pause 1 Pause 2
Recording a Title
Resume Recording
a Title
Skip Commercial
TV Tuner Setup
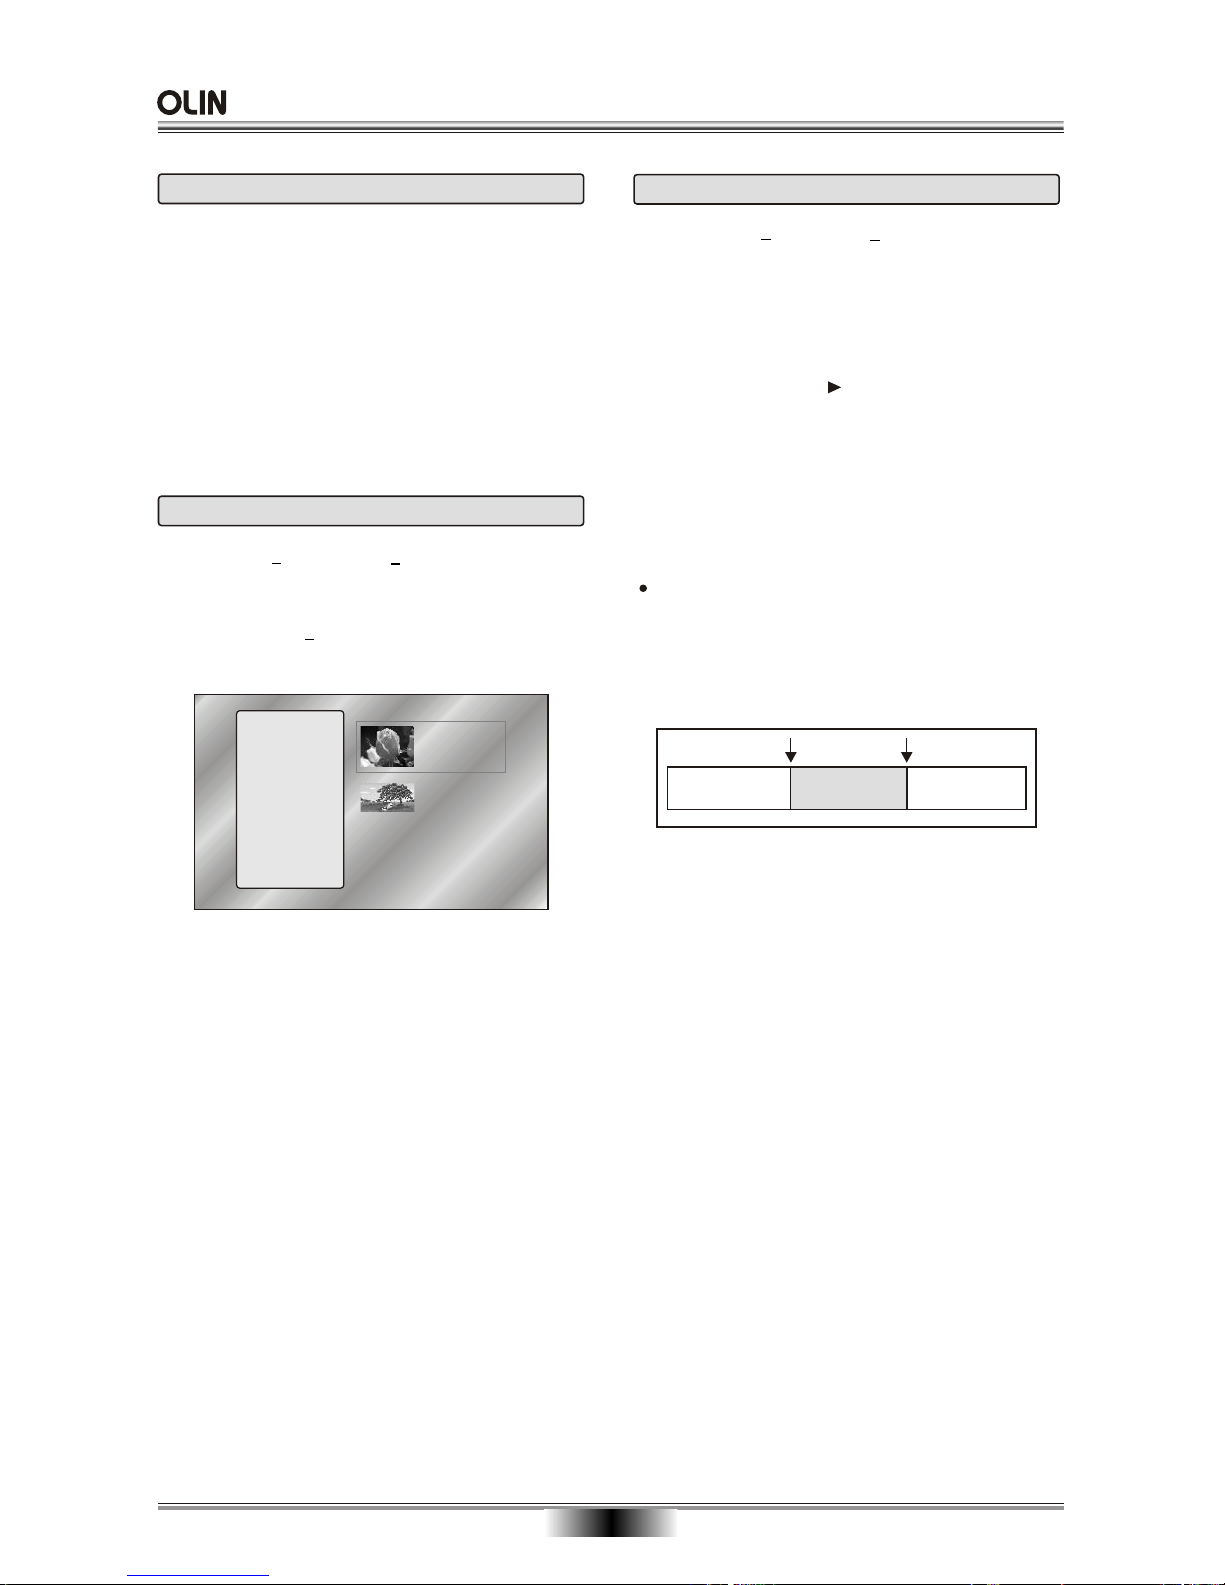
THUMBNAIL IMAGE - An image taken from the first
frame of the recording, the thumbnail image provides
a visual cue to help you identify the titles on the disc.
TITLE INFORMATION - displays information about
the recording, including the Date and Time that the
recording was made, the total length of the recording
and the Record Speed.
TITLE R AV
07:05 PM
01/10/05
01:16:22 SP
TITLE F AV
11:30 AM
12/06/04
00:02:22 LP
DVR
Erase
Select
Rename
Chapter Edit
Index
Divide
Finalize
Protect
Format
The Title Screen
Insert a DVD + RW or DVD + R disc, and the
DVD button. The Title Screen will display thumbnail
images and information for each title (recording) on
the disc. If a DVD+R/RW is inserted, the title screen
function will not work.
Press
Scanning for Available Channels
During the initial setup, the built-in TV Tuner scanned
for available channels and added these to the channel
list. However, if you have switched your input to Cable
or Antenna, or moved to a different location, you may
wish to perform the channel search again to refresh
the stored channel list.
DVD RECORDING
Page 22
20
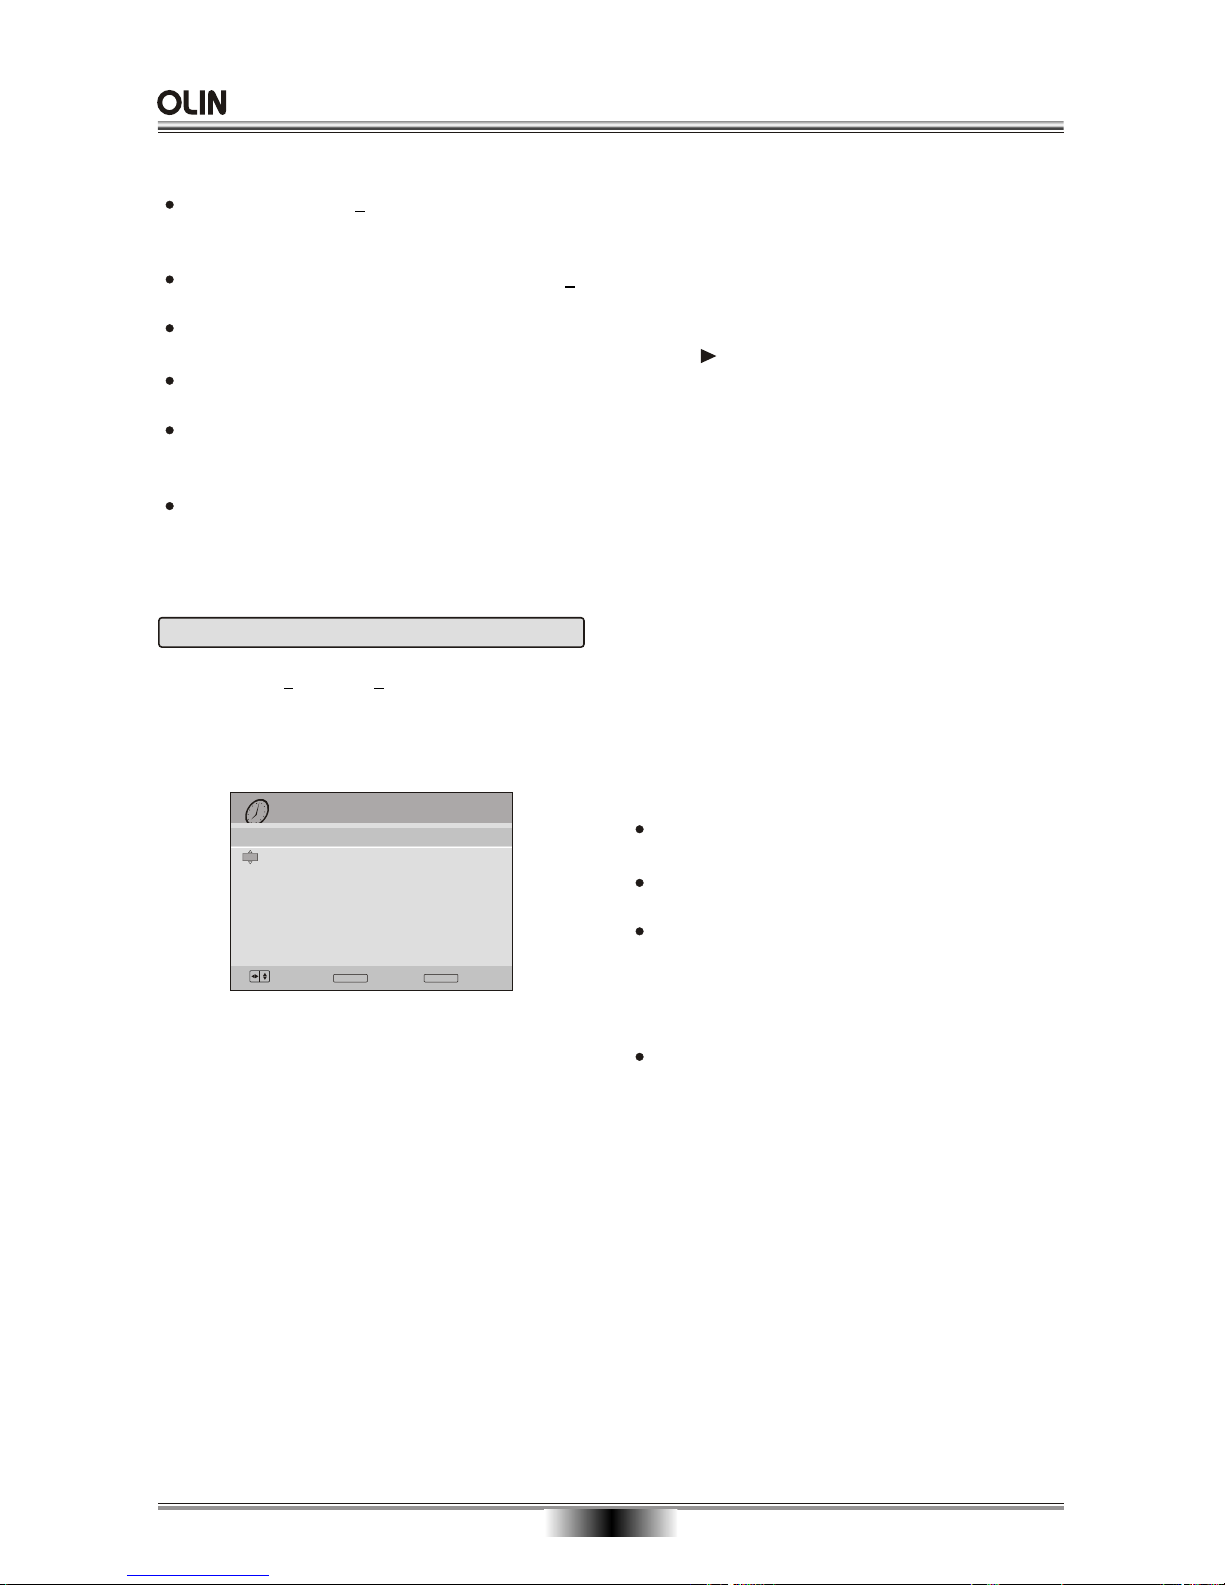
Timer Recording
1. Insert a DVD+R or DVD+RW disc.
2. To begin programming a scheduled recording,
press the TIMER button t
he maximum number of
timed recordings is 8.
RECORD TIME
Date - The date that the recording will begin.
Start - The time that the recording will begin, in
24-hour time. In this format, 1:00PM is represented
as 13:00, 2:00 PM as 14:00, etc.
Length -
The length that the recorder will record.
INPUT - The video input source that will be used for
the recording:
REPEAT -
The REPEAT function will perform again
the recording of the program you've set for timed
recording. The following options are available for
repeat mode:
Once, Daily, Mon-Fri, Weekly.
Tuner, Front AV, Rear AV, Rear SV.
Date(DD/MM)
Start
Length
Input
Mode
Repeat
Result
30/12/2005 06:00:00 am
Timer Recording
7:30 am
1:00
PR20
Once
SLP
The system time must be correct to accurately
record programs.
If any of these are not set , an error message is
given to the user and recording is disabled;
If a conflict occurs with a pre-existing schedule as
a result of the user attempting to enter a schedule
that conflicts with an existing one, then the user is
warned. Users have the option to modify or remove
the conflicting information for scheduling.
A timer - based recording in progress can be
cancelled by pressing the STOP button.
Notes:
MODE - the recording speed(Quality Mode) :
3.
If the DVD recorder’s the time you set for scheduled
comes, the unit will automatically record. If the unit
is in STANDBY/OFF and the scheduled time for
recording comes, the unit will activate and start to
record.
a. Push to add a new timed recording where
the "New Input" bar is highlighted.
b. Enter the information for setting your timed recording
as desired- follow the highlighted on-screen prompts
using the UP/DOWN key. If no UP/DOWN prompt
appears in the highlighted option, use EDIT
command at the bottom of screen.
c. To label the Title, press EDIT which takes you to
data-entry keypad. Switch keypad between small
letters, capitalized letters, and symbols using PREV
or NEXT button. Numbers can be entered to a title
by using the number keypad on your remote control.
Note: A poor signal source may cause a mismatch between the TV system input and the Disc writing program
which needs an optimum signal source before recording.
Ensure you have a good input source signal.
HQ,
SP, LP, EP, SLP, SEP.
If the disc is a DVD + R which is not finalized, a
new recording can only be added until the disc
space is full.
It is not possible to record on a finalized DVD+R
Disc.
A new Title is created for each new recording
session.
A warning is given if the user reaches the
maximum number of Titles in a recording (48).
For a given Title, if automatic Chapter creation is
" on ", then new chapters are created every 10
Minutes.
At the end of t he recording , the new title is
appended to the Main Title index; old Titles that
were overwritten are erased.
Notes:
ENTER
OK
Choose TIMER
Cancel
--/-- -- --/-- -- --/-- --- ---------
--/-- -- --/-- -- --/-- --- ---------
--/-- -- --/-- -- --/-- --- ---------
--/-- -- --/-- -- --/-- --- ---------
--/-- -- --/-- -- --/-- --- ---------
--/-- -- --/-- -- --/-- --- ---------
--/-- -- --/-- -- --/-- --- ---------
12 FRI
30
DVD RECORDING
Page 23
21
Title editing
Insert DVD+RW disc, press the DVD button to enter
title/chapter setting , the highlighted title is editable
now.
Erase Title
Delete the selected Title . The functionality of this
option is different with DVD+R or DVD+RW discs.
With DVD + RW disc, the title is erased and the
disc space freed for use within subsequent recor dings.However, when a title is erased on a DVD+R
disc, the disc space can not be reclaimed - the title
is essentially "hidden" and the disc space is still
used up.
If a DVD+R disc has been finalized, it cannot be
erased.
Protect
This operation will protect the disc from
unwanted
or accidental deletion.
It can be unlocked if you want
to record new content or make changes on a locked
disc.
Make Compatible
This operation will make the disc compatible for
play back in a normal DVD player.(The option is
only used with DVD
+RW disc)
Adapt
Use "Adapt" before recording a disc so that discs
recorded by another brand DVD recorder can continue
to record in your DVD Recorder.
Non-standard discs will not be able to "A
Note : To activate the EDIT menu bar you must insert
DVD+R/RW disc in the DVD recorder; then enter into
monitor mode (TV Tuner, Front AV, Rear AV, Rear SV,
DV)
Remark: dapter".
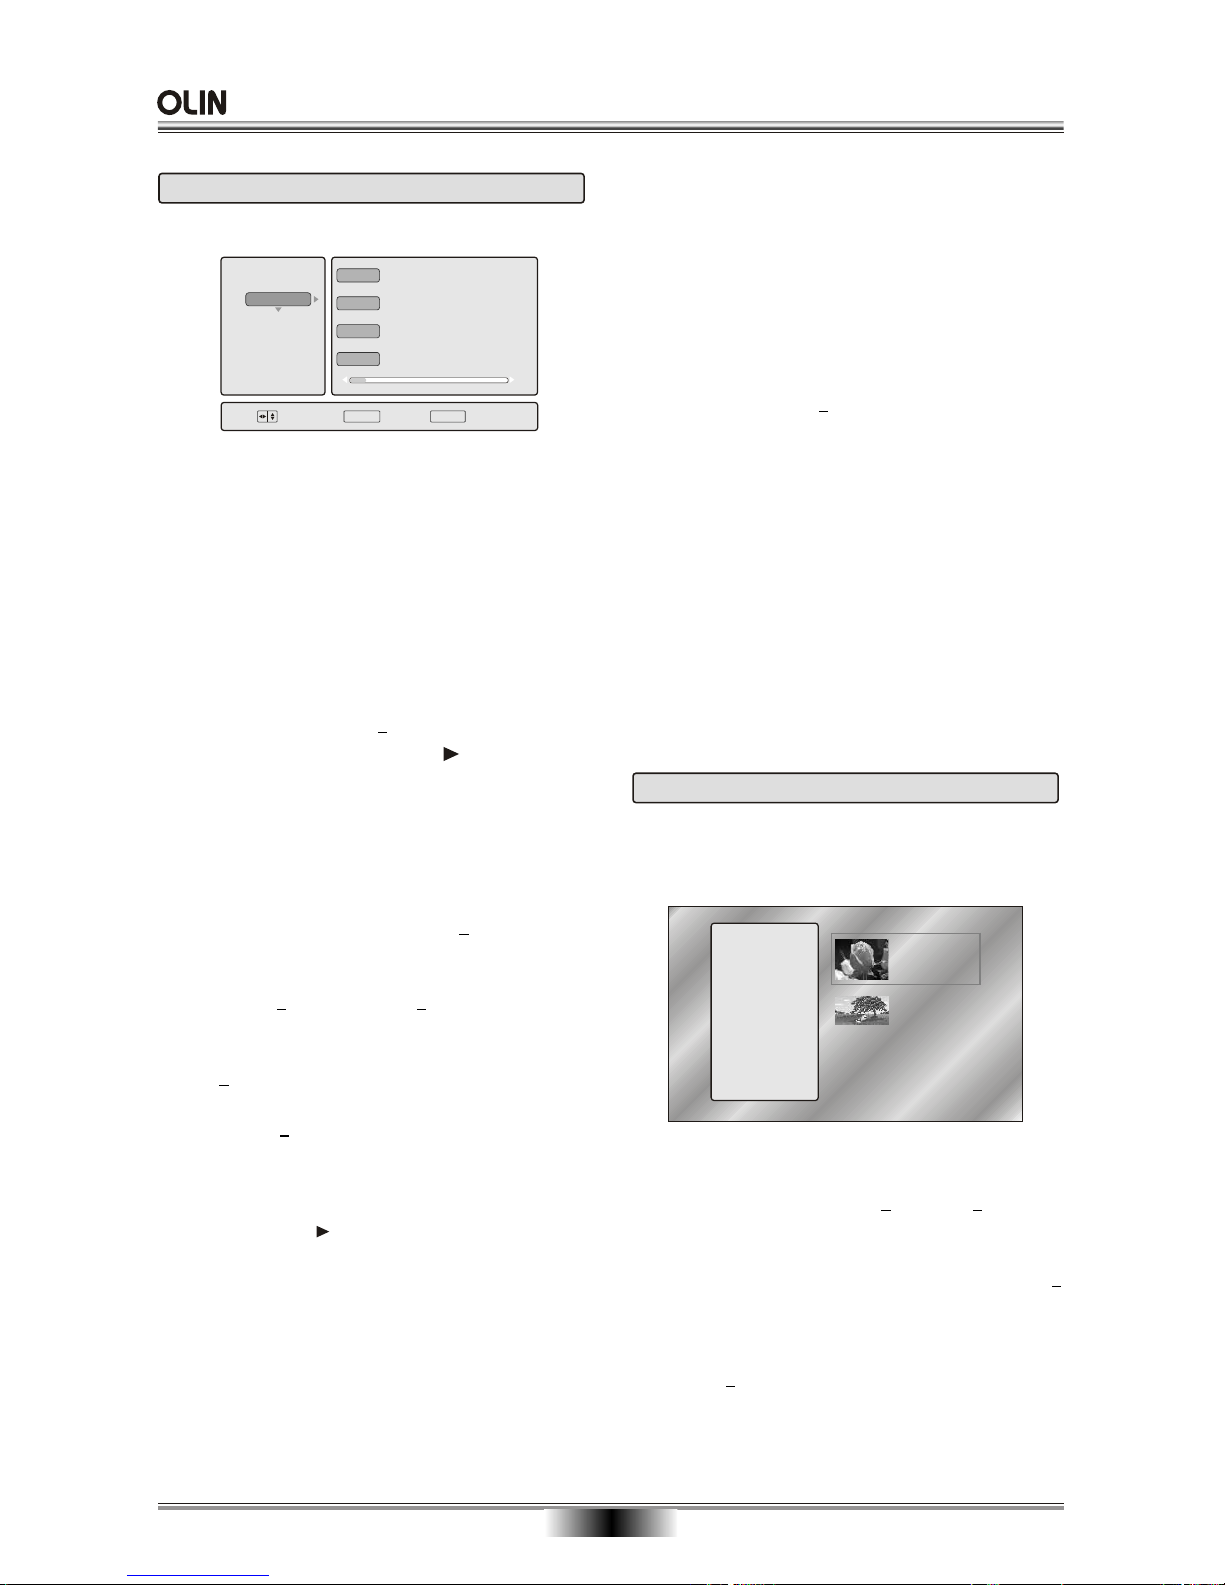
Disc Operation
Press DISC button for the disk operation menu.
Disc Info
Displays information about the current disc inside
the unit .
Format
Available only with DVD+RW disc. Use UP/DOWN
button to choose Format.
Push . A dialogue
confirmation box appears. Select OK to confirm
erase and CANCEL to abort.
Note: Everything recorded on disc will be lost
after erasing!
Finalize
This option is only used with DVD+R disc - which
must be FINALIZED before being used in a stand ard DVD player.
Unlike DVD+RW discs, DVD+R discs can not be
moved back and forth between the recorder and
standard players. You must finish all recordings on
DVD+R and finalize the disc before it will be usable
on any other player.
Once a DVD+R disc is finalized, no further record ings can be made on the disc, and no edits can be
performed.
To activate, use the UP/DOWN button to choose
FINALIZE. Push to select. A dialogue con firmation box appears. Select OK to confirm Finalize
and CANCEL to abort.
For the finalized disc, this recorder allow user to
unfinalize it. Select the unfinalize option in Disc
Edit menu, and then do the steps as above.
(The option is only used with DVD-RW disc)
DVR
Choose ENTER
OK
SETUP
Cancel
Disc info
Format
Finalize
Protect
Make Comp
Adapt
Title No.
Media
Status
Label
6
DVD+RW
Recordable(PAL)
Empty Remainber
HQ:62(m)
SP:119(m)
LP:179(m)
EP:241(m)
SLP:359(m)
SEP:472(m)
186/4418MB
Press DISC again to exit the disk operation menu.
Note: If you load a blank disc, a dialog box will pop
up to ask you whether to initialize it . Select OK
to start initialization.
TITLE R AV
07:05 PM
01/10/05
01:16:22 SP
TITLE F AV
11:30 AM
12/06/04
00:02:22 LP
DVR
Erase
Select
Rename
Chapter Edit
Index
Divide
Finalize
Protect
Format
DVD RECORDING
Page 24

22
Select Title
Highlights the title(s) you wish to select among
those available on disc.
Rename
You can rename your recorded titles by selecting
Rename.
This takes you to the Label Title Menu where you
can manually edit the title names of your recordings.
Note: Title names can not exceed 12 letters.
Chapter Edit
Enter the Chapter Edit interface, use UP/DOWN
buttons to select the title you want to edit.
Select
from available options on the right side of the screen.
Always highlight chapter you wish to edit. A yellow
token appears on the box below the chapter
thumbnail. Other options to edit the chapter then
become available.
Chapter Edit Options:
Play - Plays the Chapter highlighted within the Chapter
Edit Function.
Add Mark - Plays the content of the DVD in the tray
and places Title/Chapter/Time info on the screen.
Manually mark chapters by pressing CHAP MARK on
the remote control to make a start point in the movie
you wish to mark for review later. The Chapter Mark
Icon appears on the middle-left side of the screen.
Press CHAP MARK again to end chapter marking at
point in movie you wish the marked chapter to end.
Delete Mark - Deletes the chapter mark entries previously created from the Chapter Edit menu. Highlight
the chapter marker thumbnail(s) you wish to delete
and select DEL MARK.
Hide - Hides the selected chapter mark so it cannot
be played from the Title Menu screen. When a chapter
mark has the words "hidden" printed on the thumbnail,
this chapter mark cannot be played from the title screen.
Index
Press the REC button to set an index picture for
this title. You can manually select any part of the
movie being played and freeze it to become the
picture label for the index thumbnail on that title.
At the point REC is pressed, the frame or picture
currently on the screen will be the picture on the
title screen for that title's particular thumbnail.
Divide
You may divide any given title into 2 separate titles.
Just select the Divide Title Edit menu. The titled
movie will play. Select the point in the movie you
wish the second title portion to begin and press REC.
(The option is only used with DVD
+RW disc)
Protect
Protect the desired title, which will protect the disc
from operations ( Apart form the following ope rations: unprotect, play, and format).
Note: For a protected title, you can unprotect it by
selecting Unprotect option on the left
Copy Protection
It is the responsibility for all manufacturers to comply
with all licensing requirements and regulations. The
DVD Recorder supports the following copy protection
options:
In general, all copy management is performed
according to the DVD+RW specification.
recording if the input is
Macrovision
Enable Macrovision in the NTSC/PAL encoder if
the source is a TV program that
should be made (allow a single copy,
But not a copy of a copy).
All standard DVD Player copy protection schemes
(CGMS, region control, CSS, Macrovision) will be
Supported.
This unit does not allow
specifies only that
a single copy
protected.
DVD RECORDING
Page 25
DVR
Choose
OK
SETUP
Exit
Recording
Audio/Video
Disc
General
TV
HQ
LP
EP
SLP
SEP
SP
Recording Quality
Chapter Marker
Timer Recording
Overwrite
VPS/PDC
CH Mapping
DVR
Choose ENTER
OK
SETUP
Exit
Recording
Audio/Video
Disc
General
TV
Recording Quality
Chapter Marker
Timer Recording
Overwrite
VPS/PDC
CH Mapping
SP
5 min
Off
Off
SYSTEM SETUP
23
,
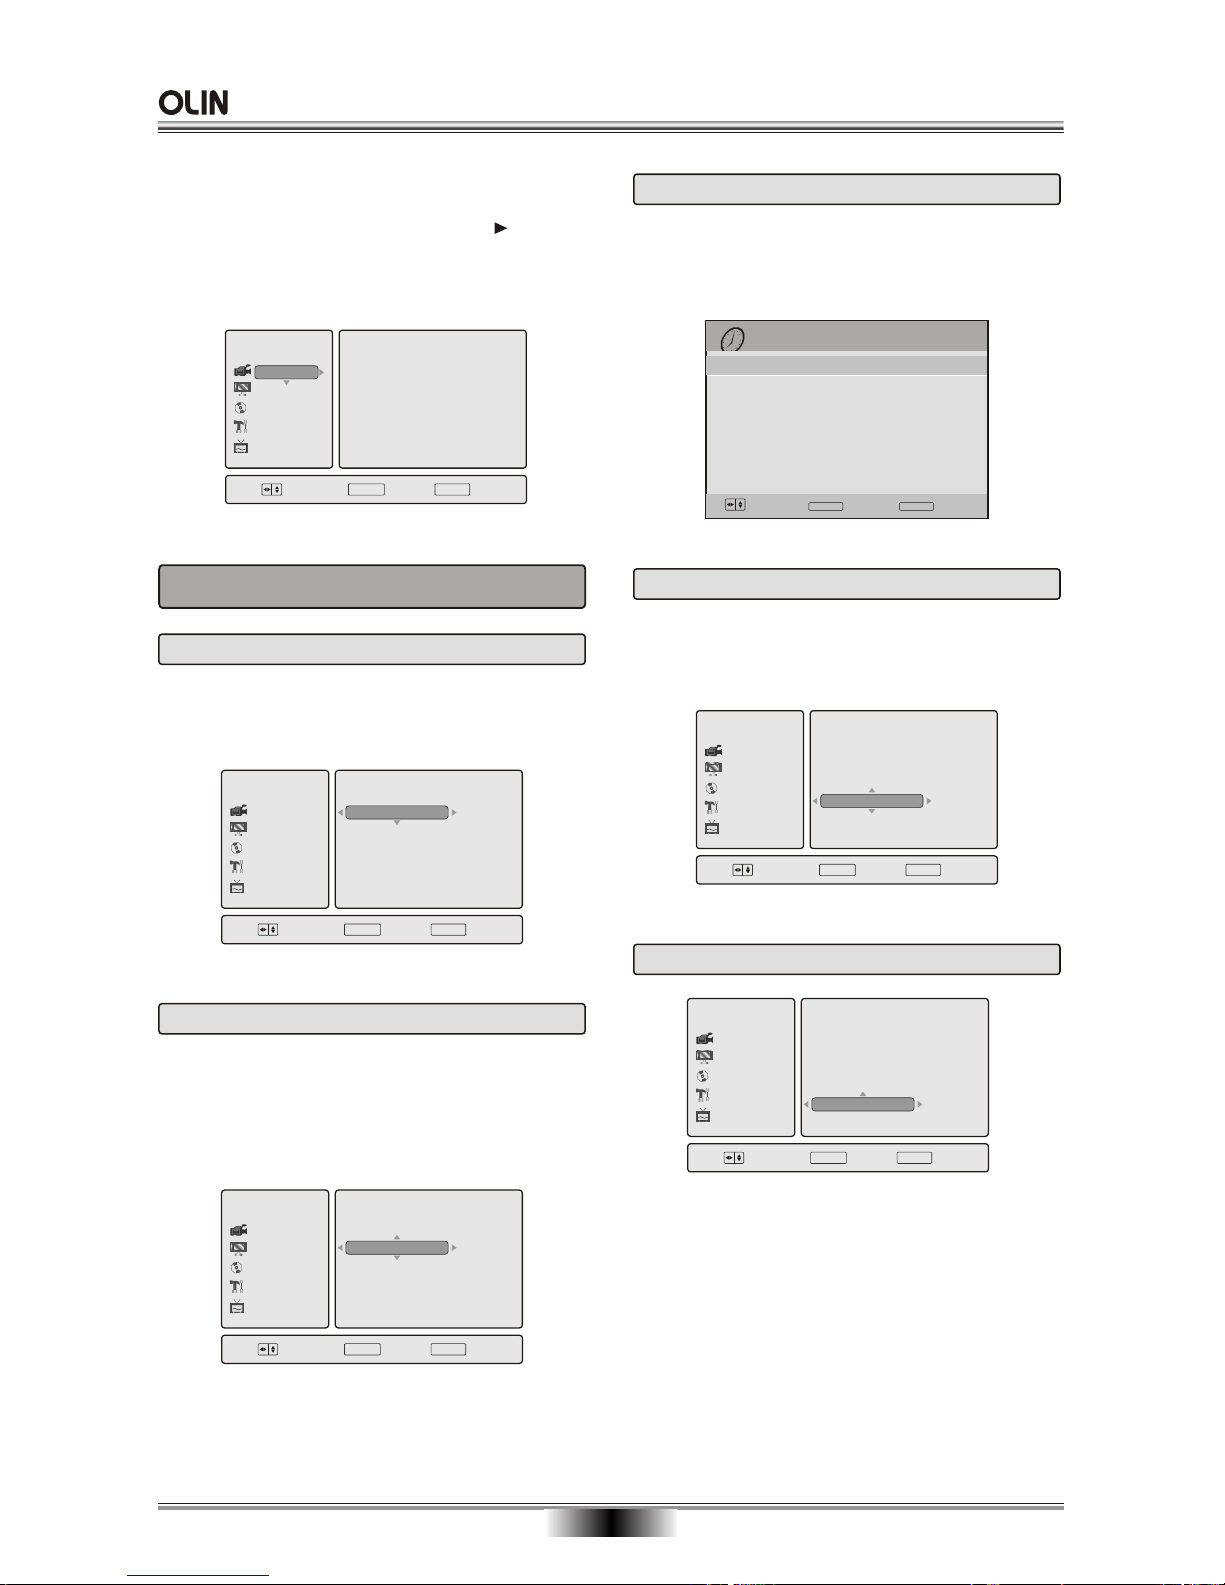
The DVD Recorder s SETUP MENU is where various
settings are configured, use the UP / DOWN / LEFT/
RIGHT buttons to select, then press the button
to perform the action. Press the Left button to exit
or return to upper menu. Press the SETUP button to
exit .
Recording Quality: Sets the quality mode for recording. You can choose from a variety of modes,
each offering different Video and Audio quality.
1. RECORDING SETUP PAGE
1.1 Record Quality
DVR
Choose
OK
SETUP
Exit
Recording
Audio/Video
Disc
General
TV
5 min
10 min
15 min
Off
Recording Quality
Chapter Marker
Timer Recording
Overwrite
VPS/PDC
CH Mapping
1.2 Chapter Marker
Chapter Marker: Allow user to set chapter mark in-
terval, which will be marked automatically during recording. The options include 5 min, 10 min, and 15
min and Off (Select Off to close auto adding chapter
mark function).
DVR
Choose
OK
SETUP
Exit
Recording
Audio/Video
Disc
General
TV
Recording Quality
Chapter Marker
Timer Recording
Overwrite
VPS/PDC
CH Mapping
Time Recording: Allow user to schedule recording.
The options for timer recording setting include date,
start time, the recording length, input source, quality,
repeat mode, VPS/PDC, and result.
1.3 Timer Recording
DVR
Choose
OK
SETUP
Exit
Recording
Audio/Video
Disc
General
TV
On
Off
Recording Quality
Chapter Marker
Timer Recording
Overwrite
VPS/PDC
CH Mapping
1.4 Overwrite
Overwrite: Allow user to overwrite with a new video
title recorded previously. Use UP/DOWN keys to
switch this feature On or Off.
1.5 VPS/PDC
Date(DD/MM)
Start
Length
Input
30/12/2005 06:00:00 am
Timer Recording
30/12 mon
7:30 am
1:00
PR20
Edit
Choose TIMER
Exit
--/-- -- --/-- -- --/-- --- ---------
--/-- -- --/-- -- --/-- --- ---------
--/-- -- --/-- -- --/-- --- ---------
--/-- -- --/-- -- --/-- --- ---------
--/-- -- --/-- -- --/-- --- ---------
--/-- -- --/-- -- --/-- --- ---------
--/-- -- --/-- -- --/-- --- ---------
Mode
Repeat
Result
Once
SLP
ENTER
ENTER
ENTER
ENTER
ENTER
Valid
On
Off
VPS (Video Programming System)/ PDC (Program
Delivery Control) are used to control the program
recording if your provider supports them. If a program
starts earlier or ends later than it was announced,
the recorder can record it at the correct time.
Use UP/DOWN keys to switch this feature On or Off.
When off is selected, there is no VPS/PDC item on
Timer Recording Schedule menu.
Page 26
DVR
Choose
OK
SETUP
Exit
Recording
Disc
General
TV
Audio/Video
LT/RT
Off
Stereo
Downmix
Front Speaker
Center Speaker
Rear Speaker
Subwoofer
SPDIF Output
SYSTEM SETUP
24
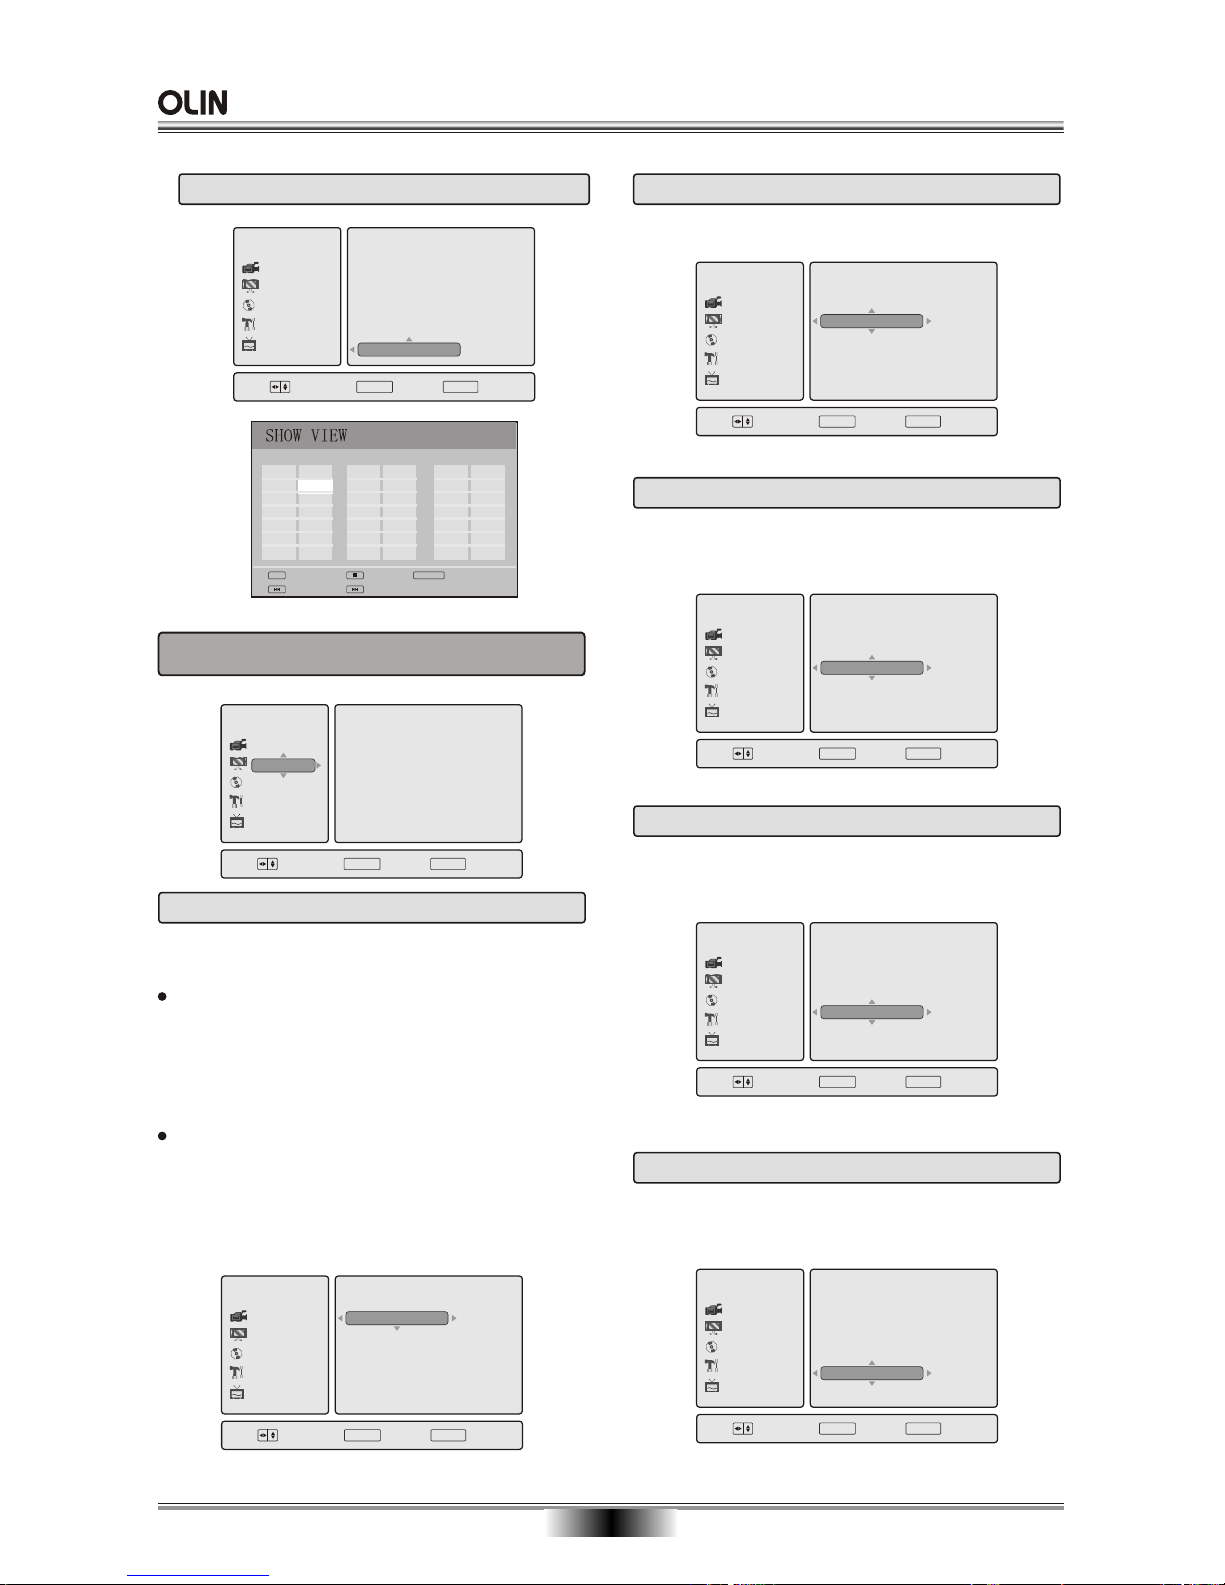
2. AUDIO/VIDEO SETUP PAGE
2.1 Downmix
DOWNMIX MODE: sets front speakers to Left/Right
Stereo or Off.
The first 2 settings (LT/RT, STEREO)
sound Signal for 2 - Speakers. This
to enjoy a surround sound effect
speakers. For this reason a setup for
speakers (described in the following
disabled when DOWNMlX is
You have to set the DOWNMlX to Off if
selected the Dolby Digital connection
would like to enjoy true Dolby Digital sur
downmix the
setting allows
you with onIy two
additional
sections) is
set to these settings.
you have
and you
round
sound. In this setting, the CENTER, REAR speakers
is active.
2.2 Front Speaker
DVR
Choose
OK
SETUP
Exit
Recording
Disc
General
TV
Audio/Video
Large
Small
Downmix
Front Speaker
Center Speaker
Rear Speaker
Subwoofer
SPDIF Output
Large,Front Speaker: Sets front speakers volume
Small.
2.3 Center Speaker
DVR
Choose
OK
SETUP
Exit
Recording
Disc
General
TV
Audio/Video
Large
Off
Small
Downmix
Front Speaker
Center Speaker
Rear Speaker
Subwoofer
SPDIF Output
Center Speaker: Sets center speakers volu
Large, Small or Off.
me
2.4 Rear Speaker
DVR
Choose
OK
SETUP
Exit
Recording
Disc
General
TV
Audio/Video
Large
Small
Off
Downmix
Front Speaker
Center Speaker
Rear Speaker
Subwoofer
SPDIF Output
Rear Speaker: Sets rear speakers volume
Small or Off.
Large,
2.5 Subwoofer Speaker
DVR
Choose
OK
SETUP
Exit
Recording
Disc
General
TV
Audio/Video
On
Off
Downmix
Front Speaker
Center Speaker
Rear Speaker
Subwoofer
SPDIF Output
Subwoofer Speaker: Sets subwoofer spea
On or Off.
kers
DVR
Choose
OK
SETUP
Exit
LTRT
LRG
On
RAW
LRG
LRG
Downmix
Front Speaker
Center Speaker
Rear Speaker
Subwoofer
SPDIF Output
Recording
Audio/Video
Disc
General
TV
ENTER
ENTER
ENTER
ENTER
ENTER
ENTER
Prev page
Input digits
0-9
ENTER
Confirm and Exit
Clear
Next page
Guide TV CH
Ch1
2
3
4
5
-
6
Ch7
8
9
10
Channel Mapping
-
-
-
-
-
-
-
-
-
Guide TV CH TV CH
-
-
-
-
-
-
-
11
12
Ch13
14
15
16
17
18
-
Guide
DVR
Choose
OK
SETUP
Exit
Recording
Audio/Video
Disc
General
TV
Recording Quality
Chapter Marker
Timer Recording
Overwrite
VPS/PDC
CH Mapping
ENTER
1.6 CH Mapping
Page 27
SYSTEM SETUP
25
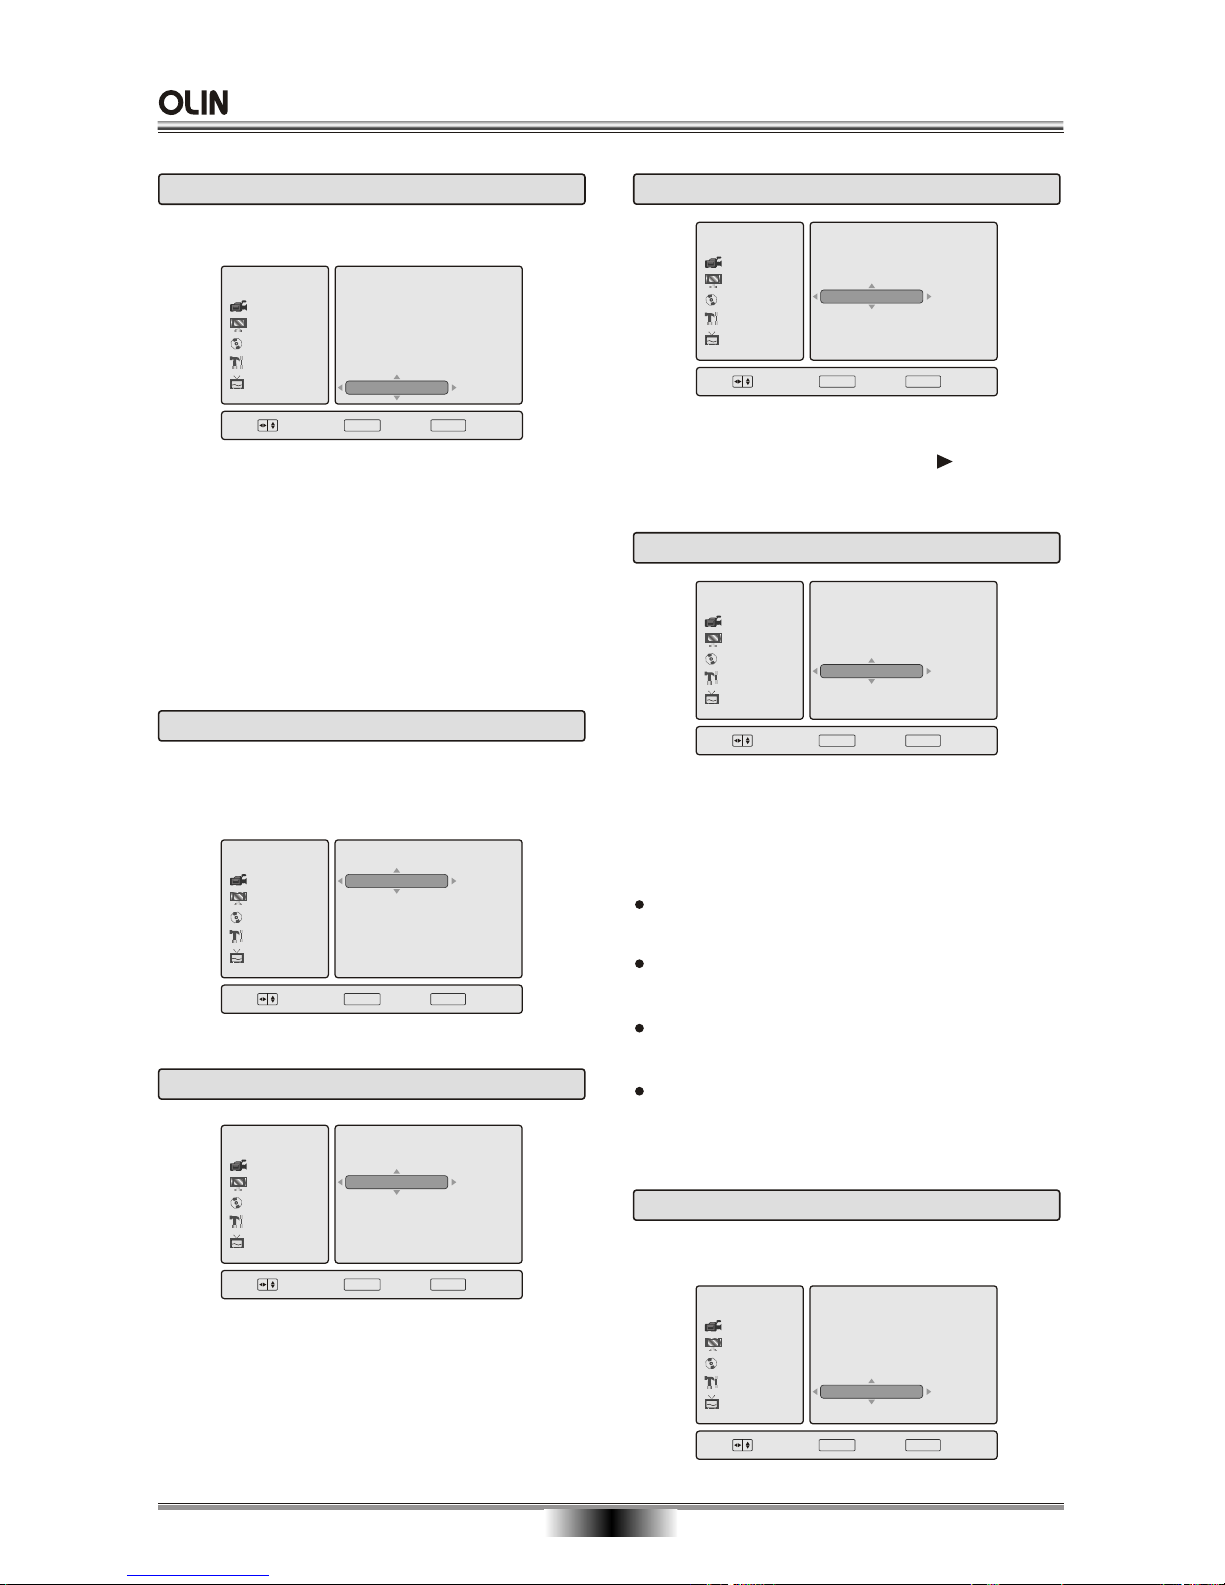
This DVD player includes three kinds of audio output:
1. SPDlF OFF: An analog surround sound format is
output through the back-paneI connections for L, R.
LS, RS, and Center speakers, and the Subwoofer
simulation.
2. SPDlF/RAW or SPDIF/PCM: This surround sound
format is output to a Dolby Digital decoder
of the product.
through
the optical and coaxial connectors on the back-panel
DVR
Choose
OK
SETUP
Exit
Recording
Disc
General
TV
Audio/Video
On
Off
Auto
Post DRC
HDCD
Quality
TV Display
Scan Mode
Component
2.7 Post DRC
Post DRC ( Dynamic Range Compression ); the
setup can select the quiets loud explosions and in
creases dialogue.
DVR
Choose
OK
SETUP
Exit
Recording
Disc
General
TV
Audio/Video
Off
88.2K
44.1K
Post DRC
HDCD
Quality
TV Display
Scan Mode
Component
2.8 HDCD
Please choose the sampling frequences for the digital
filter, the higher the sampling frequences are, the
clearer the audio quality is. When default setting is
off, it will display "CD" by reading HDCD, for HDCD
playback, please choose 44.1K or 88.2K.
DVR
Choose
OK
SETUP
Exit
Recording
Disc
General
TV
Audio/Video
Brightness
Contrast
Hue
Saturation
Post DRC
HDCD
Quality
TV Display
Scan Mode
Component
2.9 Quality
Press the RIGHT arrow button and the TV will display
a value. Press LEFT/RIGHT button to adjust that
value to desired setting, then press to confirm
and return to the Setup Page.
DVR
Choose
OK
SETUP
Exit
Recording
Disc
General
TV
Audio/Video
Normal/PS
Normal/LB
Wide
Post DRC
HDCD
Quality
TV Display
Scan Mode
Component
2.10 TV Display
DVR
Choose
OK
SETUP
Exit
Recording
Disc
General
TV
Audio/Video
Interlace
P-SCAN
Post DRC
HDCD
Quality
TV Display
Scan Mode
Component
2.11 Scan Mode
Scan Mode: Sets the scan mode to the same as that
of your TV.
TV Display: Users can select the different ratio of
display format and the screen of TV. There are
various types of display on screen for different
matches between Disc and TV( please see page
31 setting the TV screen size).:
Note:
No matter which display format is selected, a
picture recorded in standard 4:3 format always
displays in the 4:3 aspect ratio.
The display format of DVD titles may vary; please
refer to the information that accompanies your
specific DVD title.
If the DVD title is recorded in 16:9 wide display
format while the TV is a standard 4:3 screen,
horizontal compression of the image will result.
Some DVD titles may be recorded in special
formats. In such cases, the DVD titles will always
appear on the screen in their original format,
regardless of which TV display format you select.
2.6 SPDIF Output
DVR
Choose
OK
SETUP
Exit
Recording
Disc
General
TV
Audio/Video
SPDIF Off
SPDIF/PCM
SPDFI/RAW
Downmix
Front Speaker
Center Speaker
Rear Speaker
Subwoofer
SPDIF Output
SPDlF Output: Sets the audio outputs.
ENTER
ENTER
ENTER
ENTER
ENTER
ENTER
Page 28
DVR
Choose
OK
SETUP
Exit
On
Off
Password
Change Password
Parental Control
Angle Mark
Last Memory
Closed Captions
Recording
Audio/Video
General
TV
Disc
DVR
Choose
OK
SETUP
Exit
1 KID SAF
2 G
3 PG
4 Pg13
5 PGR
6 R
Password
Change Password
Parental Control
Angle Mark
Last Memory
Closed Captions
Recording
Audio/Video
General
TV
Disc
DVR
Choose
OK
SETUP
Exit
On
Off
Password
Change Password
Parental Control
Angle Mark
Last Memory
Closed Captions
Recording
Audio/Video
General
TV
Disc
DVR
Choose
OK
SETUP
Exit
On
8 ADULT
On
Off
Off
Password
Change Password
Parental Control
Angle Mark
Last Memory
Closed Captions
Recording
Audio/Video
Disc
General
TV
SYSTEM SETUP
26
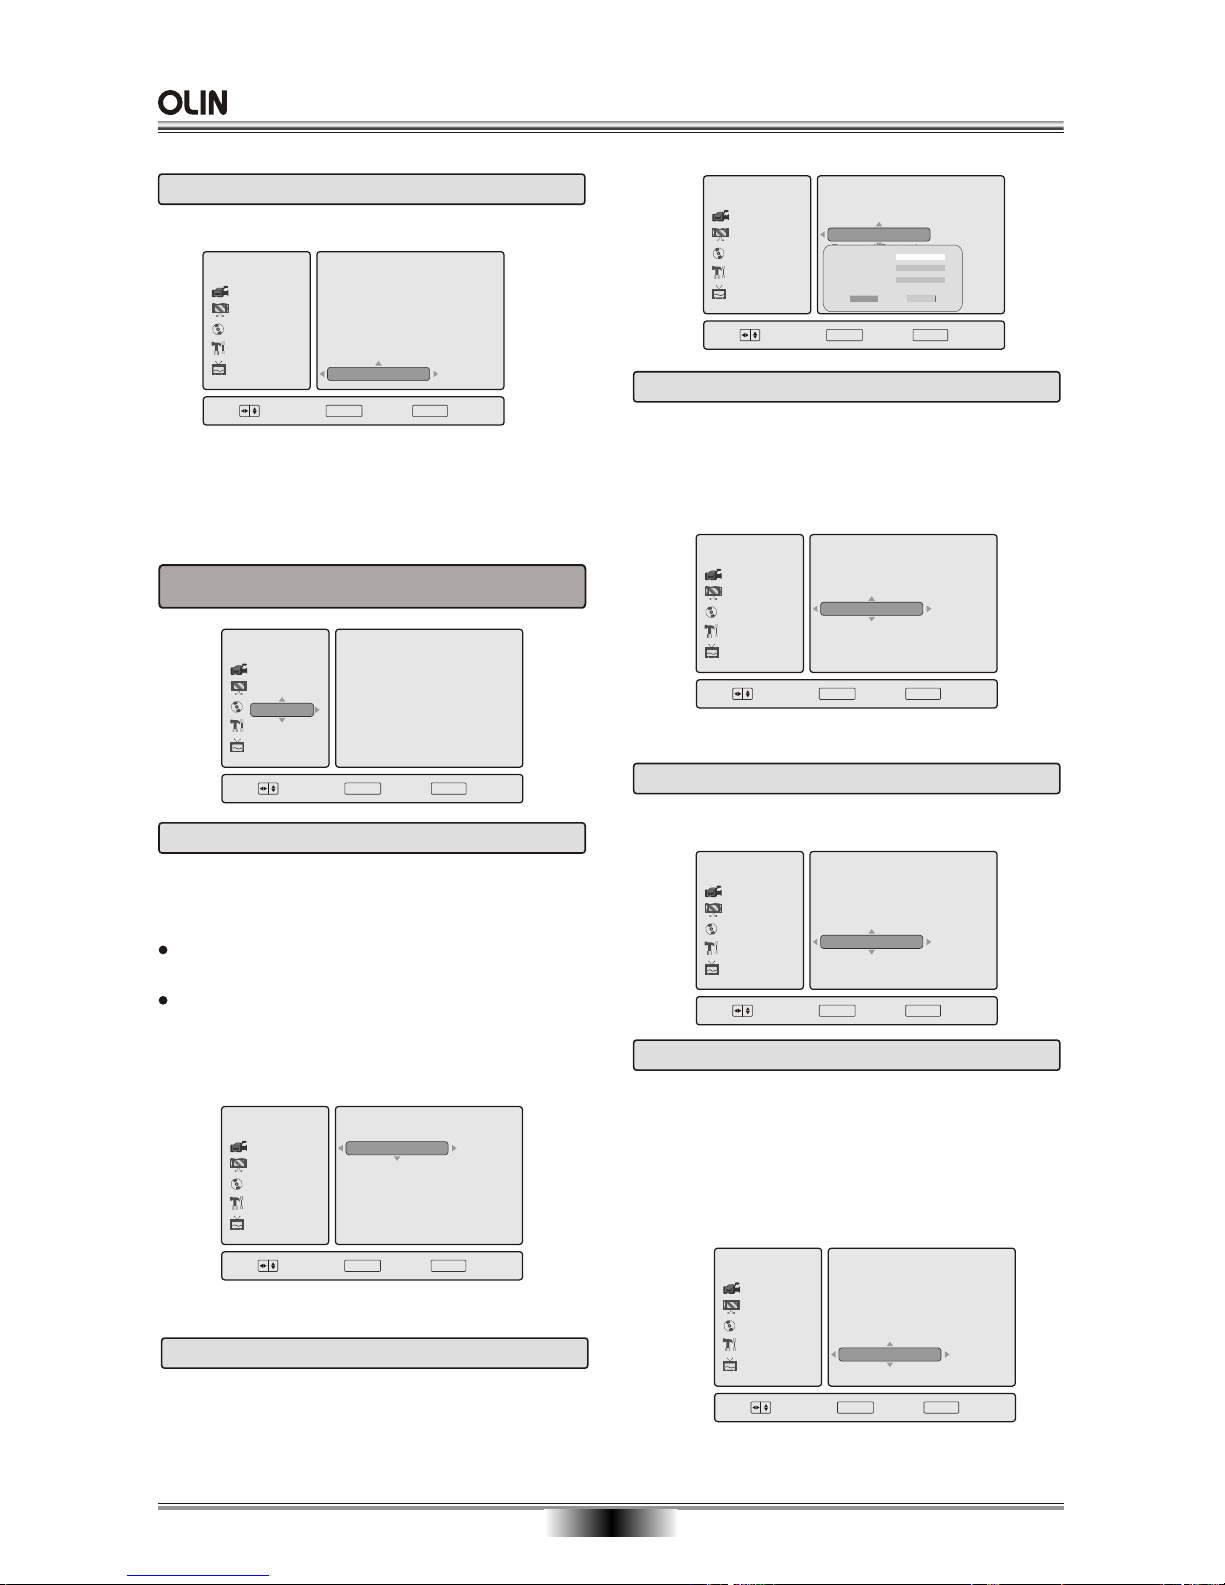
3. DISC SETUP PAGE
3.1 Password
Password Mode: Sets the function operation to
be ON for locking the parental function, and OFF
for changing the parental level.
There will be old password confirmation when
ON/OFF interchange.
The initial password is 810500.
TIP: If you forget your password, input the default
password 810500 in Old Password column, then
change another new password.
3.2 Change Password
Password Change: you can change the
please type 6 numerals as new password.
password,
3.3 Parental Control
Parental: The parental control function works in
conjunction with the different censorship classes
assigned to DVDs. These classes help to control
the types of DVDs that the family watches, There
are up to 8 censorship classes for DVDs.
3.4 Angle Mark
Angle Mark: Sets DVD multi-angle display function.
TIP: The option will be dimmed if there is a playable
disc, which means you cannot set Parental Control.
DVR
Choose
OK
SETUP
Exit
Recording
Disc
General
TV
Audio/Video
CVBS
YUV
Post DRC
HDCD
Quality
TV Display
Scan Mode
Component
2.12 Component
Component: Allow user to select video output jack.
CVBS: Set to CVBS Output
YUV: Set to Y. U. V. Output
Note: if you TV does not support some of these outputs
select CVBS.
DVR
Choose
OK
SETUP
Exit
Password
Change Password
Parental Control
Angle Mark
Last Memory
Closed Captions
Recording
Audio/Video
General
TV
Disc
Password
New Password
confirm PWD
OK Cancel
ENTER
ENTER
ENTER
ENTER
ENTER
ENTER
3.5 Last Memory
Last Memory: This function is convenient when
want to continue viewing a disc from the point where
you were watching before. Unlike the resume function,
the Last Memory function is effective even the DVD
is removed from the player.
Last Memory may not work reliably with some VCD
that feature PBC.
you
DVR
Choose
OK
SETUP
Exit
On
Off
Password
Change Password
Parental Control
Angle Mark
Last Memory
Closed Captions
Recording
Audio/Video
General
TV
Disc
ENTER
Page 29
SYSTEM SETUP
27
3.6 Closed Captions
Closed Captions: For hearing-impaired people. The
picture can be displayed with recorded explanatory
captions.
DVR
Choose
OK
SETUP
Exit
On
Off
Password
Change Password
Parental Control
Angle Mark
Last Memory
Closed Captions
Recording
Audio/Video
General
TV
Disc
DVR
Choose
OK
SETUP
Exit
ENG
ENG
ENG
ENG
PAL
OSD Language
Disc Menu Lang
Audio
Subtitle
TV Type
Clock Setting
Recording
Audio/Video
Disc
General
TV
DVR
Choose
OK
SETUP
Exit
Recording
Audio/Video
Disc
TV
General
OSD Language
Disc Menu Lang
Audio
Subtitle
TV Type
Clock Setting
4. GENERAL SETUP PAGE
4.1 OSD Language
On Screen Display (OSD) Language: Users can
select the whole setup menu and on-screen display
language.
The preference setting is active only when no disc,
and the setting is effective on each time power on till
exchanging the saved setting.
When Last Memory is ON. Each time when you
open the tray to remove the disc or stop the play ing to standby, the player memory the point where
you stop and continuously play again from the point.
The function is effective during the power is on
the state of On, even on the standby which is
operated by remote control.
ENTER
ENTER
DVR
Choose
OK
SETUP
Exit
English
French
Spanish
Chinese
Japanese
Korean
Recording
Audio/Video
Disc
TV
General
OSD Language
Disc Menu Lang
Audio
Subtitle
TV Type
Clock Setting
4.2 Disc Menu Language
Disc Menu: Sets the preferred menu language as
the default when playing DVD.()If DVD supports these
languages
ENTER
4.3 Audio
DVR
Choose
OK
SETUP
Exit
English
French
Spanish
Chinese
Japanese
Korean
Recording
Audio/Video
Disc
TV
General
OSD Language
Disc Menu Lang
Audio
Subtitle
TV Type
Clock Setting
Audio: Sets the preferred audio language as the
default when playing DVD. (IF DVD support these
languages)
ENTER
ENTER
3.7 Erase Disc
Erase Disc: Clear all recordings from the disc.
Available only with DVD+RW disc.
DVR
Choose
OK
SETUP
Exit
Erase Disc
Recording
Audio/Video
General
TV
Disc
ENTER
4.4 Subtitle
Subtitle: Sets the preferred subtitle language as
the default when playing DVD.(if DVD support these
languages)
DVR
Choose
OK
SETUP
Exit
English
French
Spanish
Chinese
Japanese
Korean
Recording
Audio/Video
Disc
TV
General
OSD Language
Disc Menu Lang
Audio
Subtitle
TV Type
Clock Setting
ENTER
4.5 TV Type
TV Type: This player supports different TV output,
including Auto, NTSC, and PAL systems.
lf your TV support only NTSC or PAL and had you
inadvertently selected the wrong TV type, the TV
screen will become flickering and black-and-white.
In this case, you should press the SETUP button
to set as following Note.
Page 30
DVR
Choose
OK
SETUP
Exit
On
Off
Recording
Audio/Video
Disc
TV
General
Time System
Screen Save
User Default
Auto go to DV
SYSTEM SETUP
28
DVR
Choose
OK
SETUP
Exit
PAL
Auto
NTSC
Recording
Audio/Video
Disc
TV
General
OSD Language
Disc Menu Lang
Audio
Subtitle
TV Type
Clock Setting
Note: How to Set the TV Type?
You may switch the NTSC/PAL setting of the DVD
player to match the video signal of your TV.
The table below shows what kinds of disc are com patible with each setting (Auto, PAL and NTSC)
4.6 Clock Setting
Clock Setting: Sets the Time and Date correctly is
important, as the Timer recordings depend on an
accurate setting.
DVR
Choose
OK
SETUP
Exit
12 Hour
24 Hour
Recording
Audio/Video
Disc
TV
General
Time System
Screen Save
Auto go to DV
User Default
4.7 Time System
Time System: Set timer system to 12 Hour or 24 Hour.
4.8 Screen Save
Screen Save: If the screen saver is on,then there
will be an animated picture on the screen whenever
the DVD player is idle for a certain time.
4.9 Auto go to DV
DVR
Choose
OK
SETUP
Exit
On
Off
Recording
Audio/Video
Disc
TV
General
Time System
Screen Save
User Default
Auto go to DV
DV: If set this option On, when a DV is connected,
the recorder will playback the content in DV automatically
DVR
Choose
OK
SETUP
Exit
Recording
Audio/Video
Disc
TV
General
OSD Language
Disc Menu Lang
Audio
Subtitle
TV Type
Clock Setting
Clock Setting
:
/ /
YearMonDate Hour
Min
A/PM
11
4
2006 06 00
AM
ENTER
ENTER
ENTER
ENTER
ENTER
4.10 User Default
Default: Resets to all the manufacturer's original
settings for this DVD player Press to perform
the reset.
DVR
Choose
OK
SETUP
Exit
Recording
Audio/Video
Disc
TV
General
Time System
Screen Save
DV
User Default
User Default Operation Confirm
System will reset all the setup items
to the default values, ok to
confirm, Cannel to exit
After user select OK, a progress bar pops up. When
the progress up to 100%, reset default successfully.
OK Cancel
ENTER
5. TV SETUP PAGE
DVR
Choose
OK
SETUP
Exit
Australia
Edit Channel List
Automatic Search
manual Search
Country Setting
Recording
Audio/Video
Disc
General
TV
ENTER
Press the SETUP button and move the highlight
down to TV.
Press the button .
Move the highlight bar down to Manual Search
and Press OK .
5.1 Manual Search
DVR
Choose
OK
SETUP
Exit
Recording
Audio/Video
Disc
General
TV
Manual Search
PR
CH
S - CH
Standard
55.00MHz
105.25MHz
Skip
ENTER
01
03
- PAL BG
Page 31
SYSTEM SETUP
29
DVR
Choose
OK
SETUP
Exit
UK
Romania
France
Greece
Australia
Germany
Recording
Audio/Video
Disc
General
TV
Edit Channel List
Automatic Search
manual Search
Country Setting
5.4 Country Setting
ENTER
This player may be used in several different countries.
When installing for the first time, you are told to choose
a "Country". If you move to another country, you should
Select "Country Select", Press"OK" and select the new
country of your choice. You must then "Auto Search"
or "Manual Search" to tune to the new stations in that
country.
Skip:
When you have finished Auto Search there could be
many unwanted stations.They may be noisy or out of
your area.To Hide these you may use the skip function.
Select Edit Channel List . Press OK and a list of the
received stations will be shown.
Use the / buttons to select the first un wanted
station. Press the button then the button and
select Skip Press OK and the Skip column will
change from OFF to ON.
To Exit the function move the cursor down to EXIT
and press OK.
Rename.
You may wish to Re Name certain stations.
Select Edit Channel List . Press OK and a list of the
received stations will be shown.
Use the / buttons to select the first station you need
to rename. Press the button then the button and
select Rename Press OK and an Alphabet will be
displayed. The Original station name is shown in a box
at the top of the table.
To edit this, move the cursor up into the box and use the
buttons to navigate the Alphabet.
You may only use 6 characters for any station name.
When complete press Enter . To exit press Setup .
5.2 Automatic Search
TV
Channels Found 0
Press Ok button to start
Press Cancel button to stop
scan
OK Cancel
1. Press OK and Auto search will begin.
2. As it progresses it will show how many stations have
been found.
3. At the end of the Search press OK .Twice
Using the CH+ and CH- buttons you can now select
any of the stored channels. Most of the stored stations
will be in the correct order, however any missing stations
may be added using the Manual Search method.
Press the SETUP button and move the highlight down to
TV.Press the button.
Move the highlight bar down to Auto Search and Press
OK
5.3 Edit Channel List
DVR
Choose
OK
SETUP
Exit
Recording
Audio/Video
Disc
General
TV
Channel List
PR CH Name Skip
Rename
Skip
Exit
01 CH3 Off
02 Ch5 Off
ENTER
Using this method it is wise to have a current TV Guide
so that you can see which programme you are viewing in
the background.If you know the TV Station numbers for
your area follow method 1. If you do not know the TV
Station numbers follow method 2.
Method 1.
1.Move the Blue highlight bar upwards using the
button to the PR box.
2.Use the or buttons to change the number to 01.
3.Use the button move the highlight down to CH
4.Use numeric buttons to enter the station channel
number e.g 44 . In a few seconds the picture will change
to the station on CH44 .
5.To put the next station in eg 02 , follow from 1 to 4 , and
repeat till all the stations are in memory.
6.When all stations are located, to Exit, press the SETUP
button.
Method 2.
1.Move the Blue highlight bar down to the bottom
horizontal bar using the
button.
2.A Yellow Cursor dot will now be shown. This
moves up and down the scale with the
or
buttons.
3.Move the
dot down the scale. You need not
start lower than 470. Mhz.
4.Move the dot up the scale with the button
until the first station is received.
5.Using the TV guide decide which channel it is.
6.Move the Highlight bar to the PR box using the
button.
7.Change the number to correspond the station
received, i.e BBC1 =1, BBC2 = 2, ITV = 3,
Channel 4 = 4 and Channel 5 = 5.
8.Continue from 1 to 7 until all the stations are
stored in the correct locations.
9.To Exit the menu press SETUP
.
Page 32
TROUBLE SHOOTING
30
Please check the following guide for the possible cause and solution for a problem before contacting the
nearest service center or dealer for repairs.
SYMPTOMS AND CORRECTIONS
Check to make sure that the power connection is secure.
No power
SYMPTOMS CORRECTIONS
No picture
No sound
Failed to Play
Make sure the connection between the player and the TV is secure.
Make sure that the TV is in good working condition.
Make sure that the TV and AMP are in good working condition and setup
properly.
Check that the disc is properly inserted.
Clean the disc.
Failed to respond to
remote control
Remove obstacles between remote control and unit.
Aim remote control at the sensor on the front panel.
Check batteries and replace them if necessary.
Picture Disturbance
Check the disc for dirt and scratches. Clean or replace disc.
Shut down the unit, wait ten seconds, and restart the unit.
Failed to work
with keys
Power surges or brown outs or other electrical phenomena.
Shut down the unit, wait ten seconds, and restart the unit.
Make sure the connection between the player and other devices are secure.
Recording will
not start
The Video input source may be protected with Macro Vision Copy Protection.
The disc may already contain recording of a different TV System type - PAL
or NTSC. If the disc already contains a PAL recording, you cannot record
from an NTSC source, and vice versa.
The maximum number of titles - 48 - may have been reached.
If the disc is a DVD+R/DVD-RW may already be finalized.
The disc is not a DVD+RW disc.
The disc may be dirty. Try cleaning the disc.
If the disc is a DVD+R/DVD-RW, make sure it has been FINALIZED.
The other DVD recorder may not support DVD+R/RW disc.
The disc cannot
be erased
Recording do not play
on other DVD Recorder
The Time/Date is invalid or conflicts with another schedule.
The Time/Date settings of the Recorder are incorrect. Set the Time/Date
in SETUP.
The specified Video input source is unavailable.
The disc is out of space.
Timer recording
does not start
DV image is not
displayed
The DV is off. Power on the DV.
Make sure the DV cable is connected correctly.
The DV link cable may be damaged. Change another one.
Page 33
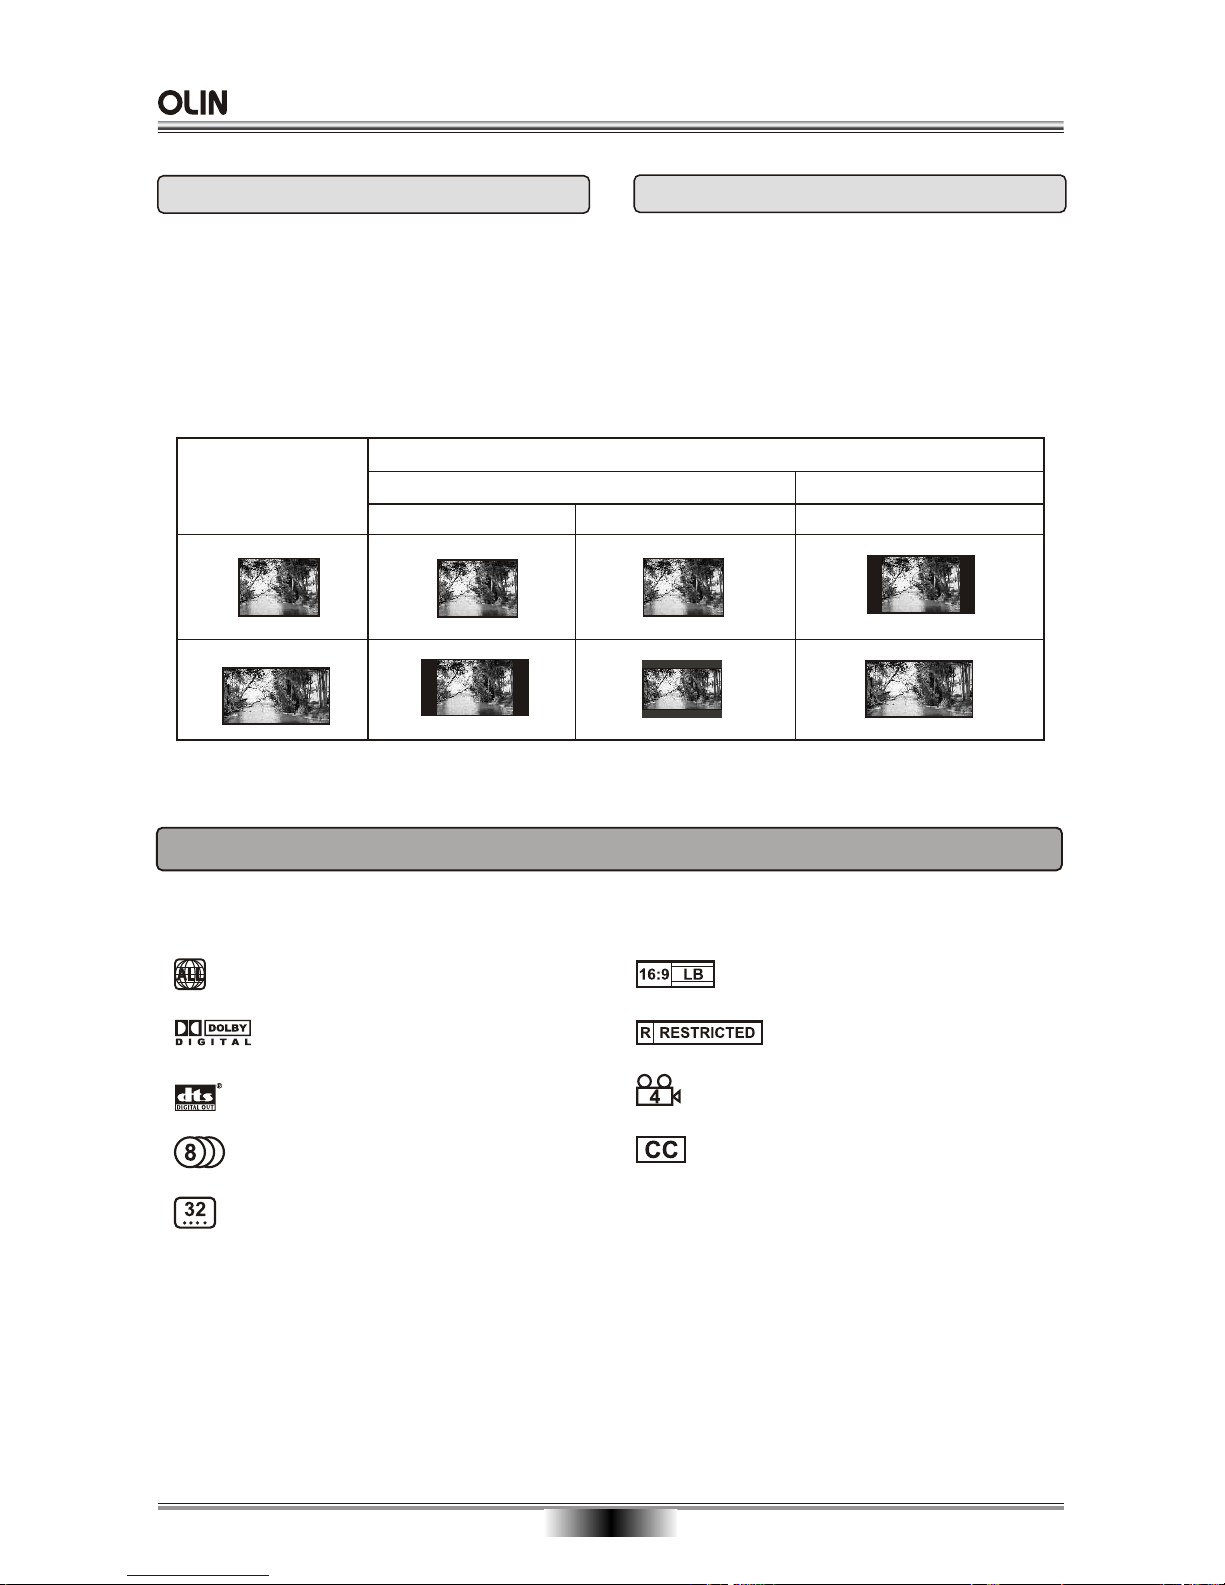
PARENTAL LOCK
This player lets you set the Parental Lock if the
DVD has a parental lock level recorded on it. With
Parental Lock capable discs, you can block access
to material you feel is inappropriate for your children.
Refer to the DVD disc jacket and the accompanying
documentation to see if a particular disc contains a
parental lock level.
SETTING THE TV SCREEN SIZE
Multi-aspect ratio suit to different TV screen size.
Functions supported by this device
There are many functions available on DVD discs and the functions vary per player and per manufacturer.
Regional code and signal system
Picture proportion modes
Parent lock
Angles for viewing
Closed Caption
Dolby digital surround sound
Number of languages
Subtitle languages
31
Letter-box Wide Screen
Picture format
on Disc
TV Screen Size
4:3
4:3
16:9
16:9
Pan Scan
DTS output
PARENTAL LOCK & SCREEN SIZE
Page 34
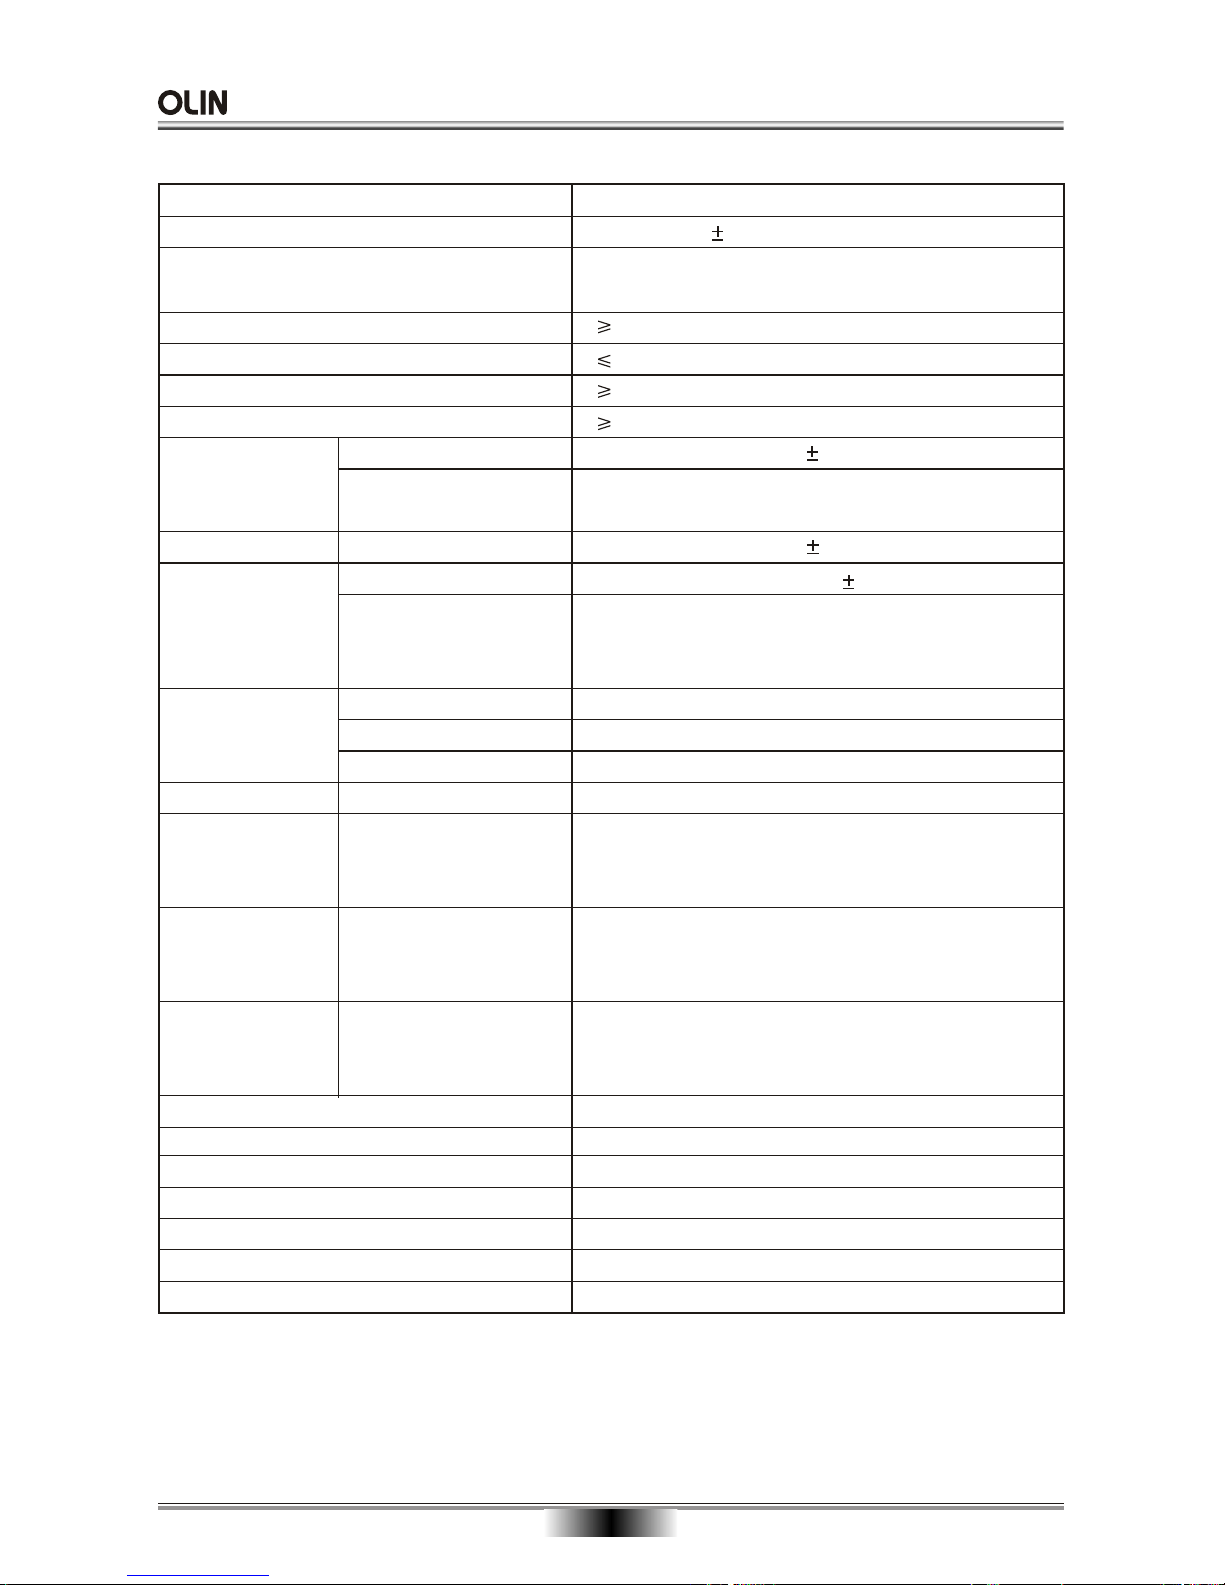
32
SPECIFICATION
VF Signal System
NTSC/PAL
Frequence Response
20Hz-20KHz 2.5dB(EIAJ)
Audio S/N ratio
90 dB
Audio distortion+Noise
-70dB(1KHz)
Channel Separation
Dynamic Range
Analog Audio Output
Analog Audio Input
Digital Audio Output
CVBS Output/Input
S-Video output/Input
80dB(1KHz)
80dB(1KHz)
Electric level output: resistance: 2V 10K
Electric level Input: 2V 0.2V resistance: 10K
Coaxial:
Optical: -21dBm~-15dBm
Electric level output: 0.5Vp-p resistance: 75
Electric level output: 1Vp-p 0.2 resistance: 75
Electric level output:
brightness(Y)1.0Vp--p,
Chrominance (C): 0.286Vp--p, resistance: 75
resistance: 75
Audio Output
Audio input
Video Output/Input
0.2
1.0
Other
Dimensions (W x D x H): 375 x 280 x 48 mm (height includes feet)
Weight:
2.7 Kg
Receiving System
Input Impedance
Frequency Cover Range
Gain
PAL BG
75
45MHz ~ 900MHz
1.5dB(Type)
RF-Input
RF-Output
~ 110V- 240V 50/60Hz
Power
Power Consumption
< 35W
Operating temperature
Operating humidity
oooo
5 C to 35 C (41 F to 95 F)
5% to 90%
Disc types for recording:
DVD+R (4.7GB), DVD+RW (4.7GB),
DVD-R (4.7GB), DVD-RW (4.7GB)
DVD+RW Best/High
and Pre-recorded
DVD Video:
Horizontal resolution 720 pixels
Vertical resolution 576 lines (for PAL recorder)
480 lines (for NTSC recorder)
DVD+RW Medium/
Basic:
Horizontal resolution 360 pixels
Vertical resolution 576 lines (for PAL recorder)
480 lines (for NTSC recorder)
Horizontal resolution 352 pixels
Vertical resolution 288 lines (for PAL recorder)
240 lines (for NTSC recorder)
VCD (Video CD):
Page 35

6565 Afar
6566 Abkhazian
6570 Afrikaans
6577 Amharic
6582 Arabic
6583 Assamese
6588 Aymara
6590 Azerbaijani
6665 Bashkir
6669 Byelorussian
6671 Bulgarian
6672 Bislama
6678 Bengali
6679 Tibetan
6682 Breton
6765 Catalan
6779 Corsican
6783 Czech
6789 Welsh
6865 Danish
6869 German
6890 Bhutani
6976 Greek
6978 English
6979 Esperanto
6983 Spanish
6984 Estonian
6985 Basque
7065 Persian
7073 Finnish
7074 Fiji
7079 Faeroese
7082 French
7089 Frisian
7775 Macedonian
7776 Malayalam
7778 Mongolian
7779 Moldavian
7782 Marathi
7783 Malay
7784 Maltese
7789 Burmese
7865 Nauru
7869 Nepali
7876 Dutch
7879 Norwegian
7982 Oriya
8065 Punjabi
8076 Polish
8083 PashtoPushto
8084 Portuguese
8185 Quechua
8277 Rhaeto-Romance
8279 Romanian
8285 Russian
8365 Kinyarwanda
8368 Sanskrit
8372 Serbo-Croatian
8373 Singhalese
8375 Slovak
8376 Slovenian
8377 Samoan
8378 Shona
8379 Somali
8381 Albanian
8382 Serbian
8385 Sundanese
8386 Swedish
7165 Irish
7168 ScotsGaelic
7176 Galician
7178 Guarani
7185 Gujarati
7265 Hausa
7273 Hindi
7282 Croatian
7285 Hungarian
7289 Armenian
7365 Interlingua
7378 Indonesian
7383 Icelandic
7384 Italian
7387 Hebrew
7465 Japanese
7473 Yiddish
7487 Javanese
7565 Georgian
7575 Kazakh
7576 Greenlandic
7577 Cambodian
7578 Kannada
7579 Korean
7583 Kashmiri
7585 Kurdish
7589 Kirghiz
7665 Latin
7678 Lingala
7679 Laothian
7684 Lithuanian
7686 LatvianLettish
7771 Malagasy
7773 Maori
8387 Swahili
8465 Tamil
8469 Tegulu
8471 Tajik
8472 Thai
8473 Tigrinya
8475 Turkmen
8476 Tagalog
8479 Tonga
8482 Turkish
8484 Tatar
8487 Twi
8575 Ukrainian
8582 Urdu
8590 Uzbek
8673 Vietnamese
8679 Volapuk
8779 Wolof
8872 Xhosa
8979 Yoruba
9072 Chinese
9085 Zulu
Code Language Code Language Code Language Code Language
LANGUAGE CODE LIST
33
If customer’s disc include other subtitle except of which show in SUBTITLE of SETUP menu, please
select and enter OTHERS, then there will exist a dialogue box, please input the code number which
shows in the language code list to support such subtitle .
 Loading...