

Olin DVR-130 User Manual

1
CONTENTS
Safety Warning ---------------------------------------------------------------------------------- 2
Product Features -------------------------------------------------------------------------------- 3
Discs Information ------------------------------------------------------------------------------ 4
Parts Introduction -------------------------------------------------------------------------------- 5
System Connection ---------------------------------------------------------------------------- 8
Function Operations -------------------------------------------------------------------- 12
Disc Recording ------------------------------------------------------------ 16
System Setup ------------------------------------------------------------------------------------ 21
Trouble Shooting ----------------------------------------------------------------------------- 38
Specifications ------------------------------------------------------------------------------------ 39
2
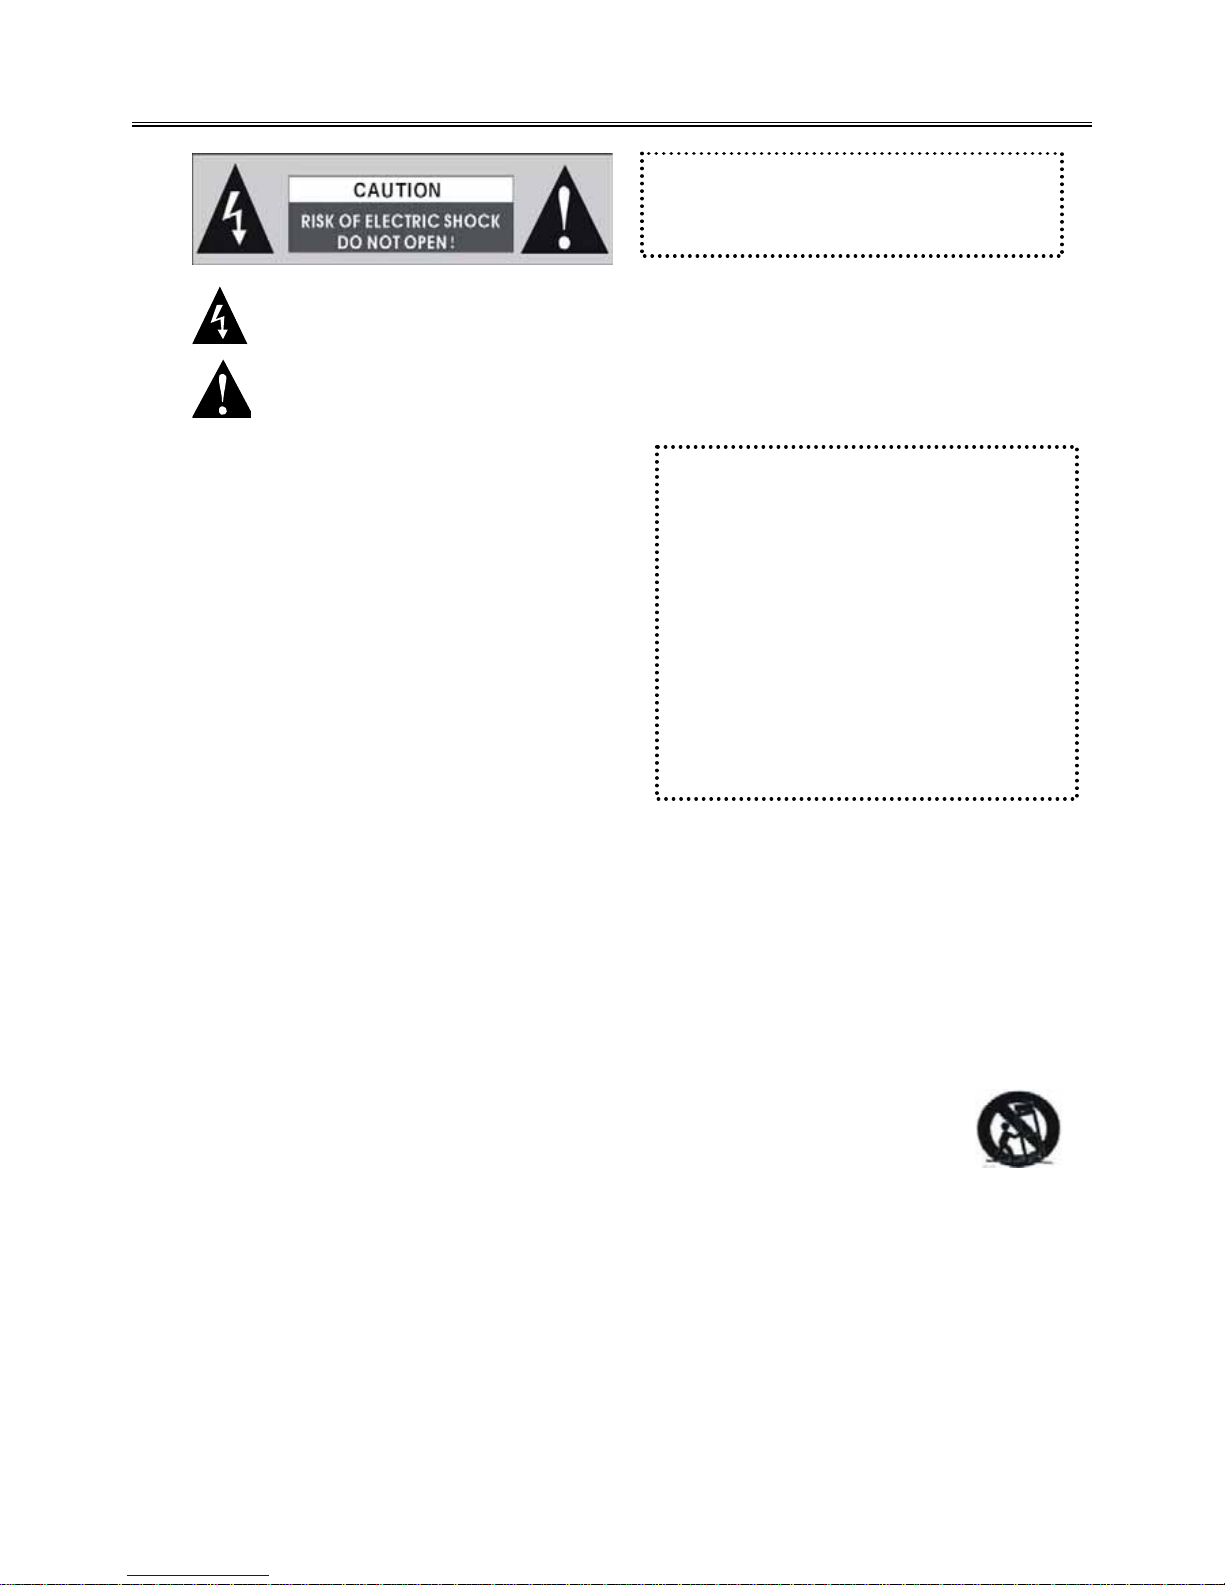
IMPORTANT FOR LASER PRODUCTS
1. CLASS 1 LASER PRODUCT
2. DANGER
Visible laser radiation when open and
interlock failed or defeated. Avoid direct
exposure to beam.
3. CAUTION
Do not open the top cover. There are no
user service-able parts inside the unit,
leave all servicing to qualified service
personnel.
SAFETY WARNING
Precaution Notes:
1) Read this manual carefully before use this product.
2) Keep this manual for late reference.
3) Heed all warnings, and follow all instructions.
4) Do not place this apparatus near water.
5) Clean only with dry cloth.
6) Do not block any ventilation openings. Install it in
accordance with the manufacturer’s instructions.
7) Do not install this product near any heat sources
such as radiators, heat registers, stoves, or other
apparatus (including amplifiers) that produce heat.
8) Do not defeat the safety purpose of the polarized
or grounding-type plug. A polarized plug has two
blades with one wider than the other. A grounding type plug has two blades and a third grounding prong.
The wide blade or the third prong are provided for your safety. If the provided plug does not fit into your
outlet, consult an electrician for replacement of the obsolete outlet.
9) Protect the power cord from being walked on or pinched particularly at plugs, convenience receptacles,
and the point where they exit from the apparatus.
10) Only use accessories specified by the manufacturer.
11) Use only with the cart, stand, tripod, bracket, or table specified by the manufacturer, or sold with the
apparatus. When a cart is used, use caution when moving the cart/apparatus combination to avoid injury
from tip-over.
12) Unplug this apparatus during lightning storms or when unused for long periods of time.
13) Refer all servicing to qualified service personnel. Servicing is required when the apparatus has been
damaged in any way, such as power supply cord or plug is damaged, liquid has been spilled or objects
have fallen into the apparatus, the apparatus has been exposed to rain or moisture, does not operate
normally, or has been dropped.
14) Apparatus shall not be exposed to dripping or splashing and no objects filled with liquids, such as vases,
shall be placed on the apparatus.
WARNING: To reduce the risk of fire
or electric shock , DO NOT expose
this product to rain or moisture !
The lighting Flash with arrowhead symbol within a triangle, Alerts the user to “dangerous
Voltage” which could cause electric shock.
The exclamation point within a triangle indicates to the user to read important operating
and maintenance instructions in the manual

3
PRODUCT FEATURES
Main features of product :
ƽ Fully compatible with DVD/VCD/CD/MP3/ PICTURE-CD/CD-R/CD-RW/DVD-R/DVD-RW/DVD+R/
DVD+RW/HDCD
ƽ Compatible with MPEG4/DivX3.11/ DivX4/DivX5 and Xvid,
ƽ Build-in Dolby AC-3 decoder
ƽ Advanced MDDi
TM
Progressive scan output
ƽ Full function remote control
ƽ Automatic screen protection
ƽ PAL/AUTO/NTSC optional
ƽ Universal power supply:AC110-240V 50/60HZ
Operation Functions:
ƽ Up to 32 language subtitles and 8 different sound languages
ƽ Memory stopping, A-B play function
ƽ Magnified and mobile picture, High clarity multi-level picture zoom
ƽ Multi -grade fast or slow motions, Multi-angle play
ƽ Adjustable screen aspect ratio(4:3 or 16:9)
ƽ FWD/FFD, slow motion and single-step play
ƽ Resume/memory play function
Special Functions:
ƽ DV mode record
Immediate manual record DV digital camera and other input signal. Automatic and time record of outside
signal input. Setup multi-disc edit selection of multi-period of time, multi-quality grade and user
individuation.
ƽ Full frequency TV receiver
With TV full frequency you can select channel through channel scan, and storage. Setup frequency
amendment menu, use to revise channel information that have received. If revised channel name᧨channel
frequency is changed little. Setup the channel compositor menu to adjust the sequence of program.
Output Terminals:
ƽ Video/S-video/YUV output
ƽ Coaxial and optical output
ƽ 5.1 channel output
ƽ VGA connector
Input Terminals:
ƽ DV digital camera input
ƽ 2 Composite video input
ƽ 2 audio input
ƽ S-video input
ƽ Cable TV input
Accessories
1, DVD Player
2, Remote Control
3, User’s Manual
4, AAA Battery
5, AV Cable
6, Warranty Certificate
1 PC
1 PC
1 PC
1 Pair
1 Pair
1 PC

4
DISCS INFORMATION
DISC FORMATS SUPPORTED BY THIS PLAYER
Disc Sort Disc Logo Disc Contents Disc Size
DVD
Video
(Active Picture)
12cm
CD
Audio
12cm
8cm
MP3
Audio
12cm
JPEG
Video
(Static Picture)
12cm
SVCD
Audio+Video
12cm
MPEG4
Audio+Video
12cm
DVD+R
Can use just once
12cm
DVD+RW
Can repeated use
12cm
ƹSoftware maker specifies the operation method of some DVD discs ,please refer to the instruction manual of
disc.
Disc Using
About Disc Terms
- Title: contents compressed on a DVD are divided into several sections which is called “TITLE”
- Chapter: the TITLE is comprised of one or more small sections called “Chapter”, which is numbered for
easily searching. But some discs may not have a recording chapter.
- Track: a segment of contents on a SVCD,VCD or CD. Each track is numbered for easily searching.
- Scene: contents in a VCD with playback control function be divided into certain portion is called scene, and
every scene will be showed on screen menu with a scene number, which can be easily searching
while playing. A scene usually is formed with one or several tracks
PBC function (Only for SVCD,VCD)
When playing SVCD or VCD discs, a content menu may be showed on screen, this is what we Called “Play
back control “ viz. PBC function.
Disc sort Functions
VCD without PBC function (1.1 version) Exhibiting both music and images.
SVCD/VCD with PBC function
(2.0 version)
The repeat playback can be performed to super VCD or
VCD2.0 only when the PBC is OFF.
1. Using of Discs
- Do not touch the playing surface of the disc.
- Do not stick paper and label on the disc.
- Do not expose discs to direct sunlight.
- Do not place discs near water or in dusty place.
2. Cleaning of Discs
- when clean a disc, lightly wipe it with soft cloth from
the center of the disc outward in a radial manner.
-Never use record cleaning sprays, benzene, thinner,
static electricity prevention liquids or any other
solvents to clean your discs.
5
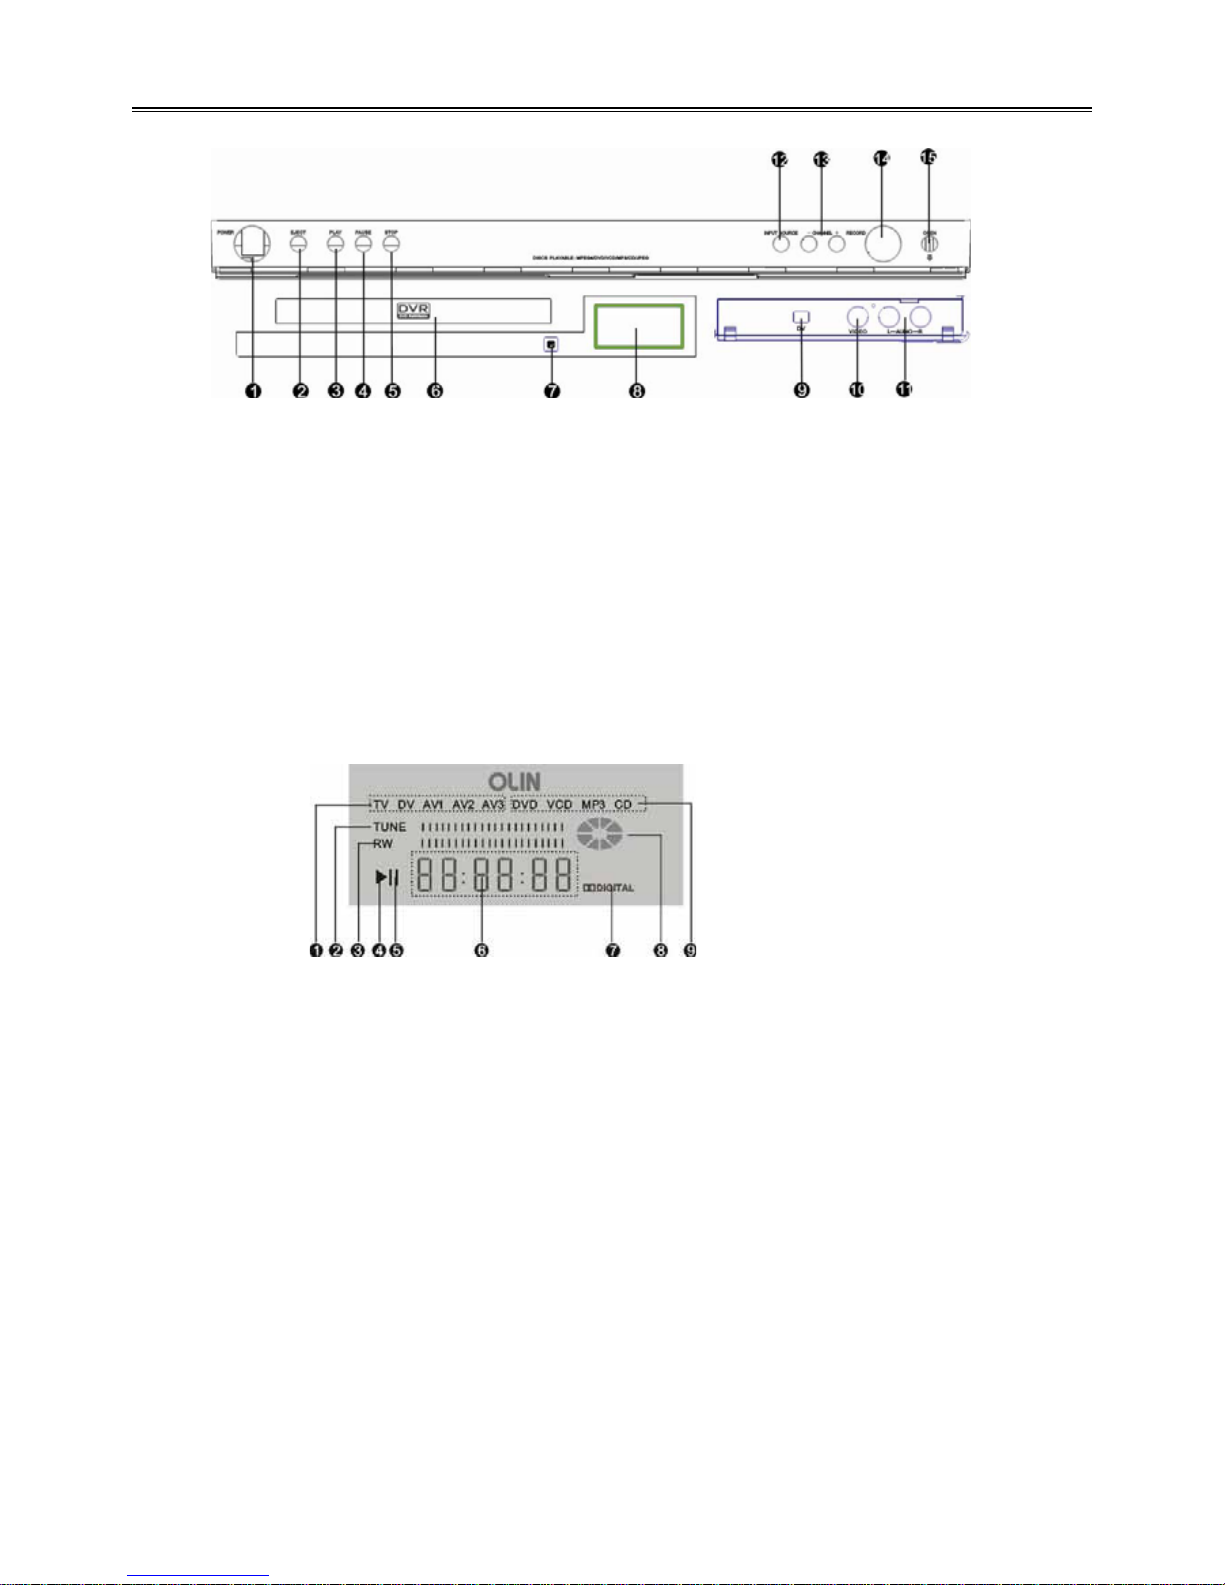
Parts Introduction
Front panel drawing
Function Key introduction:
Display screen drawing
Display Logo introduction
8 Display Screen.
9 DV Signal Input Jack
10 Video Input Jack
11 Audio Input Jack
12 INPUT: Press to choose the input source.
13 Channel -/+ key: Press to select channel.
14 Record: Press to start recording
15 Open: Press to open the cover.
1 Power: Press to turn on/off power.
2 Eject: Press to open/close the disc tray.
3 Play: Press to play the disc.
4 Pause: Press to pause playback.
5 Stop: Press to stop playback.
6 Disc Tray
7 Remote control signal receive window.
1 Input source indicator
2 Search progress indicator
3 Recording progress indicator
4 Play status indicator
5 Pause status indicator
6 Playing time indicator
7 DOLBY mark indicator
8 Playing disc status indicator
9 Playing disc type indicator
6
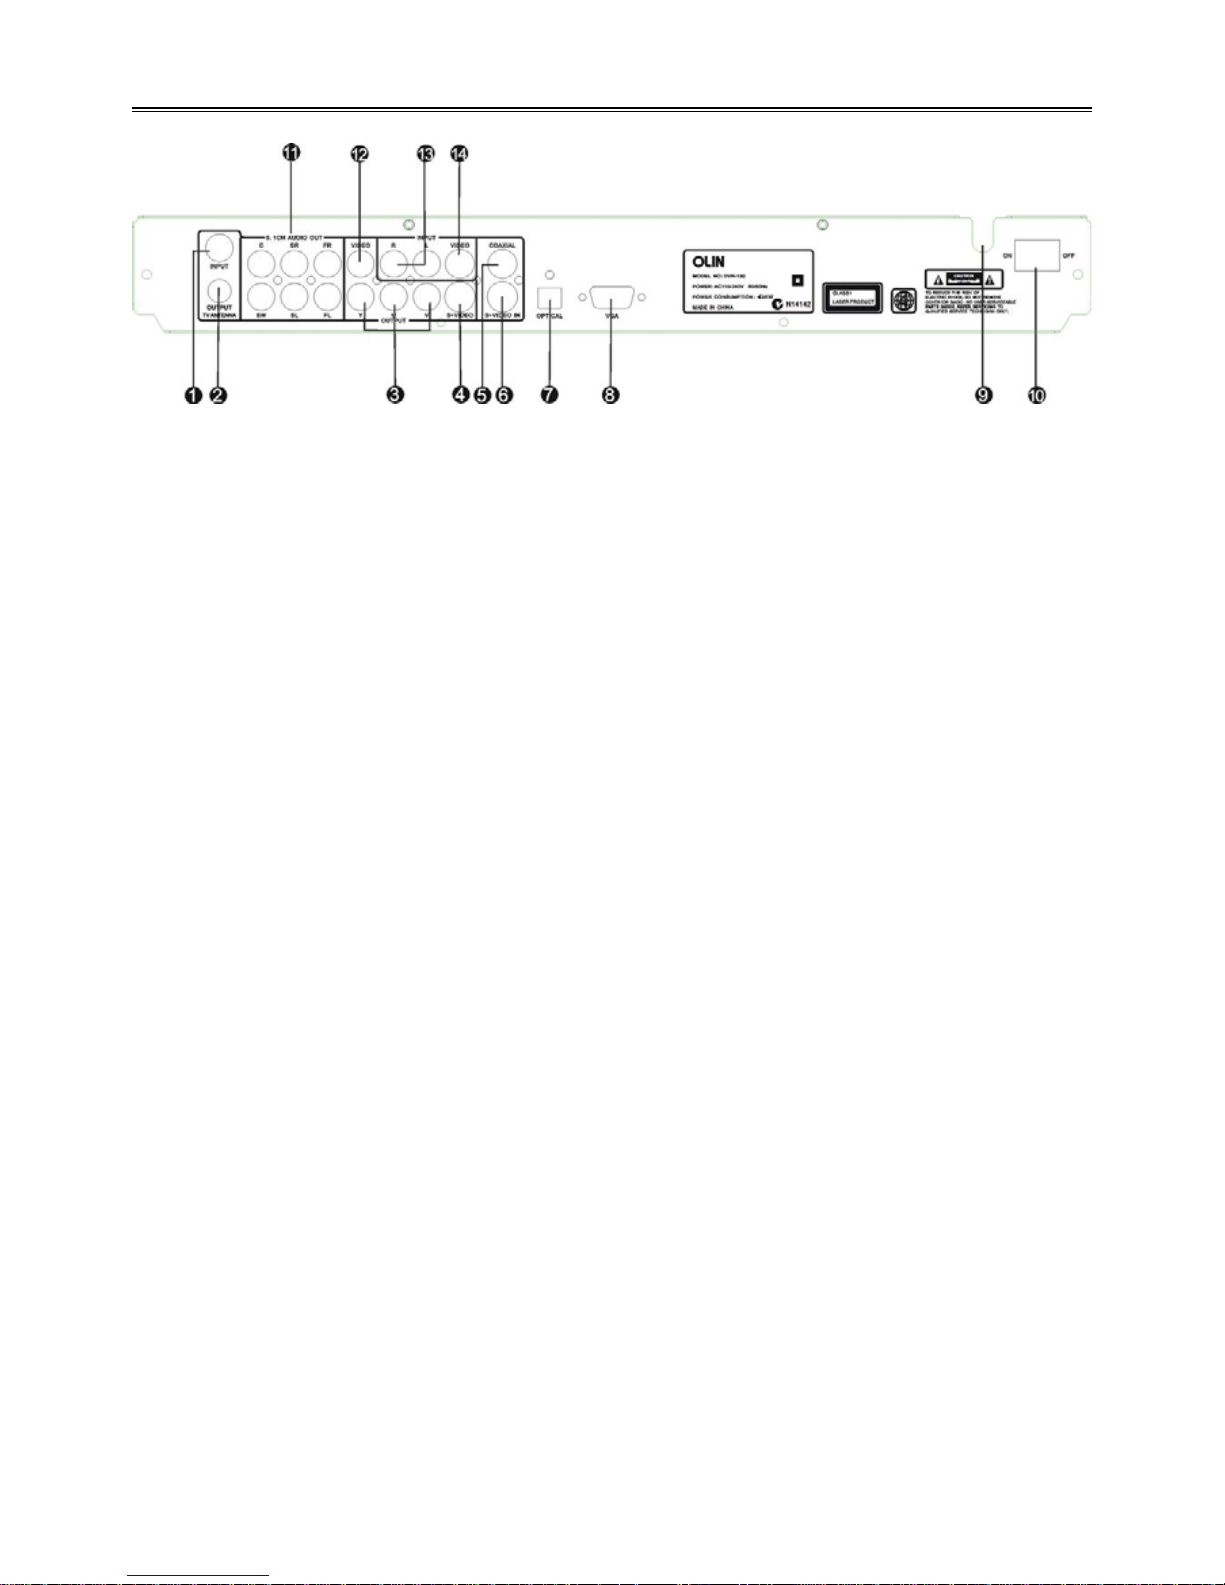
Parts Introduction
Rear panel drawing
1. Cable TV or Antenna signal Input Jack
2. Cable TV Signal Output Jack
3. YUV Output Jacks
4. S-video Output Jack
5. Coaxial Digital Output Jack
6. S-video Input Jack
7. Optical Digital Output Jack
8. VGA Output Jack
9. Power Cord
10. Power Switch
11. 5.1CH Audio Output Jacks
12. Video Output Jack
13. 2CH Audio Input Jacks
14. Video Input Jack
7
Parts Introduction
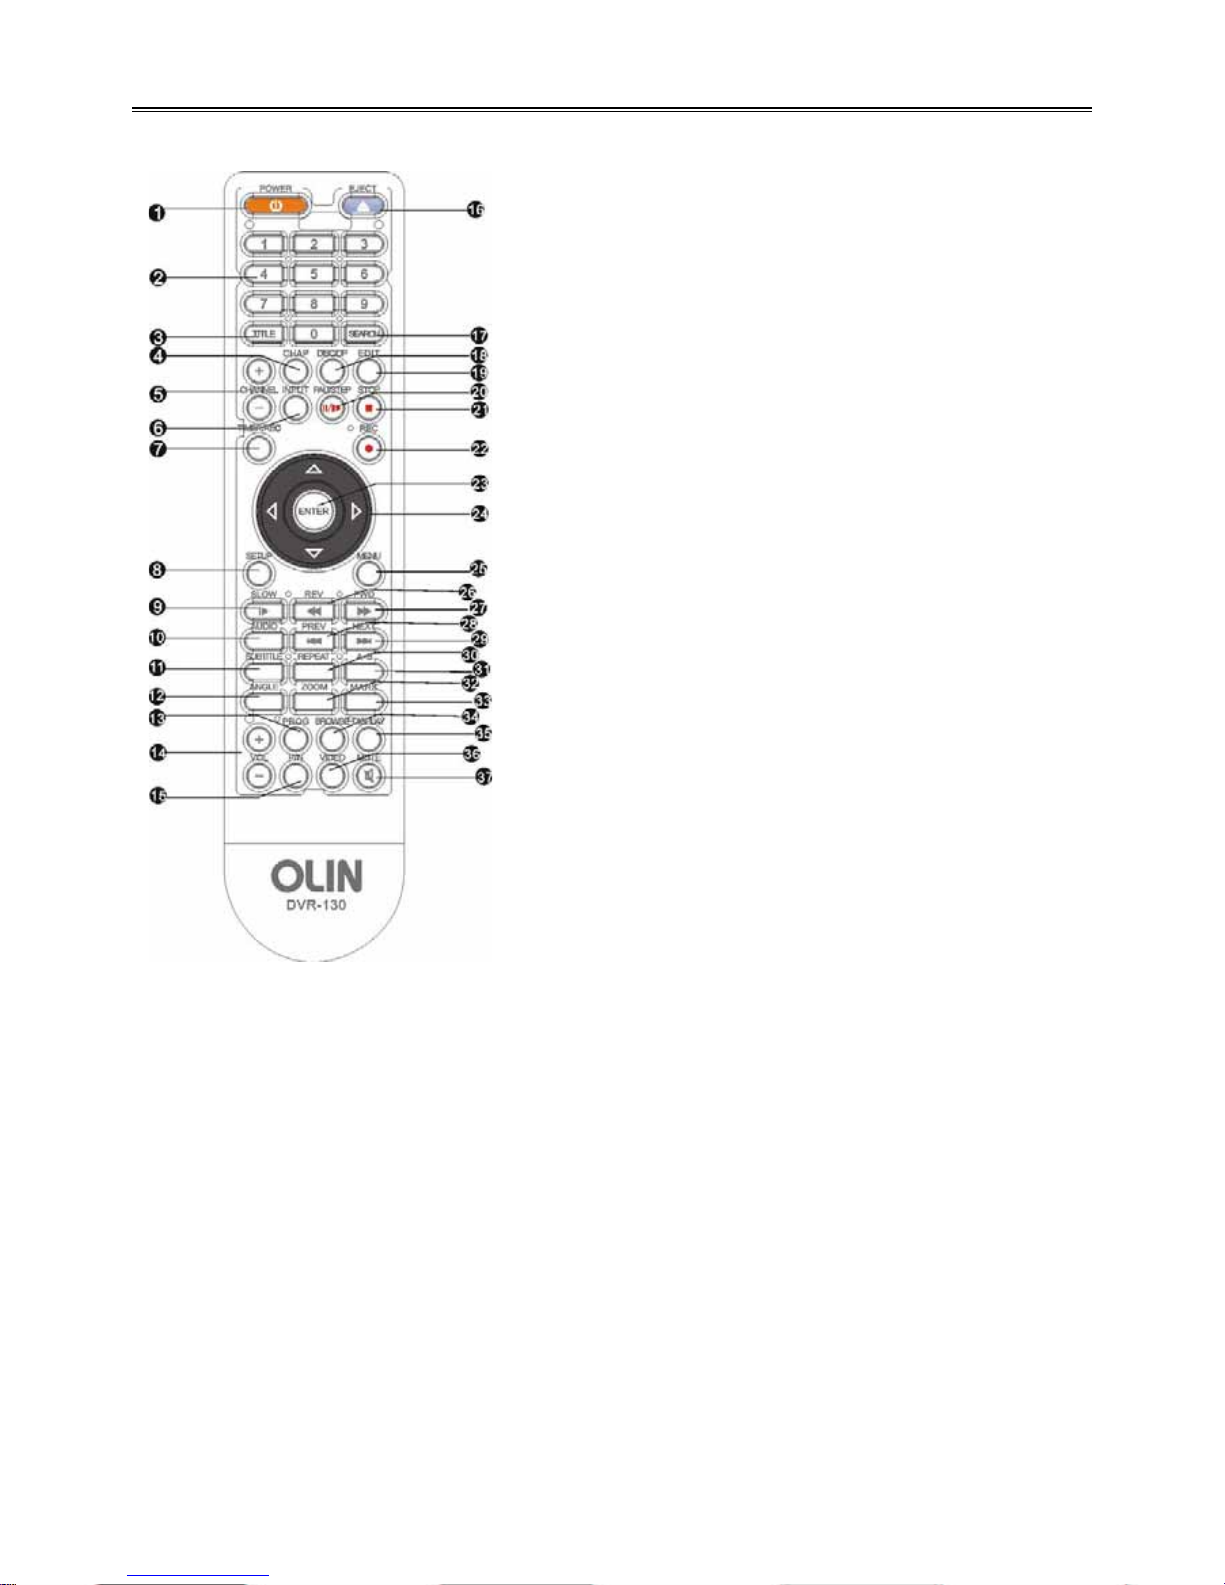
Remote control function key introduction
11. SUBTITLE-When playing DVD disc, press to
select a subtitle language.
12. ANGLE -Press to access various camera
angles.
13. PROG -Press to set the Disc in programming
play mode.
14. Volume +/- -Press to increase or decrease the
DVD volume level slightly.
15. P/N-Press to shift PAL/AUTO/NTSC Mode.
16. EJECT -Press to open or close the disc tray.
17. SEARCH-Allows you to select the desired disc
starting time, track or title.
18. DISC/OP - When playing a DVD+R/RW disc
press it to edit the disc.
19. EDIT-Press it to exit the chapter edit menu
when playing a DVD+R/RW disc.
20. PAUSE/STEP –Press one time as pause, press
again as step; During recording process, press
to stop the recording.
21. STOP -Press to stop playback.
22. REC- Press to recording.
23. ENTER - Press to enter or get into play mode.
24. Direction Buttons (///) -Use to select
menu items or settings.
25. MENU – Press to turn on/off the menu.
26. REV -Press to fast backward.
27. FWD –Press to search forward.
28. PREV -Press to skip to the previous chapter.
29. NEXT -Press to skip to the next chapter.
30. REPEAT-Press to repeat a chapter, track, title,
or all content.
31.A-B-Press to mark a segment to repeat between
A and B.
32.ZOOM - When playing DVD disc, press this
button to activate zoom.
33.MARK-Press to memory some playing frame,
stored for selecting.
34. BROWSE-Press to look through in advance
and can select the content you want.
35. DISPLAY-Press to show the elapsed playback
time or the track number, press to cancel
onscreen text.
36. VIDEO-Press to switch Interlace and
Progressive Mode.
37. MUTE-Press to turn on/off the speaker output.
1. POWER -Press to turn the DVD player on or off.
2. Number Buttons - 0-9 are used for direct access
of title, chapter ,track and time.
3. TITLE -Press to display titles.
4. CHAP - In chapter edit menu, press it to separate
the chapter, repeat the operation to divide the title
into multi-chapters.
5. CHANNEL +/- -Press to choose the TV channel.
6. INPUT -Press to shift different input source.
7.TIMER/REC– Use this key to realize timer
recording function.
8.SETUP -Press to access the player’s Setup menu.
9.SLOW -Press to slow down playback.
10.AUDIO – when play multi language disc, press it
to select different audio language.
8
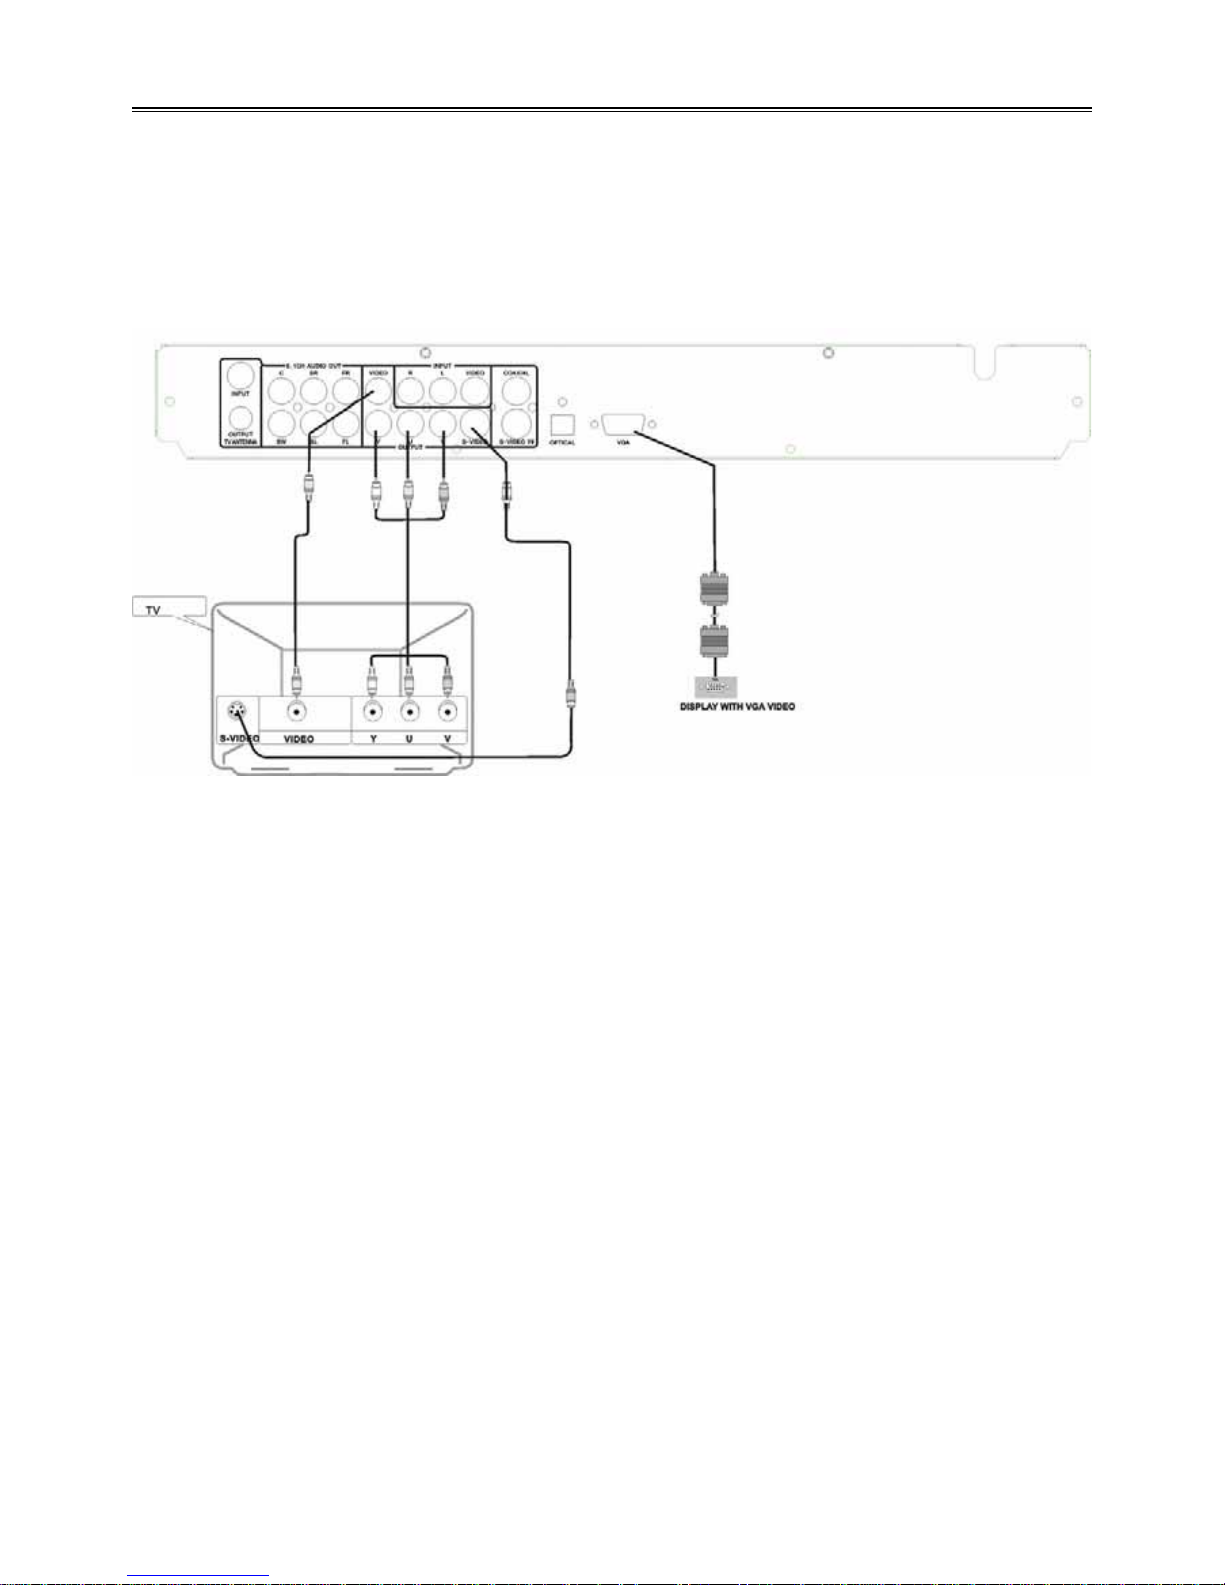
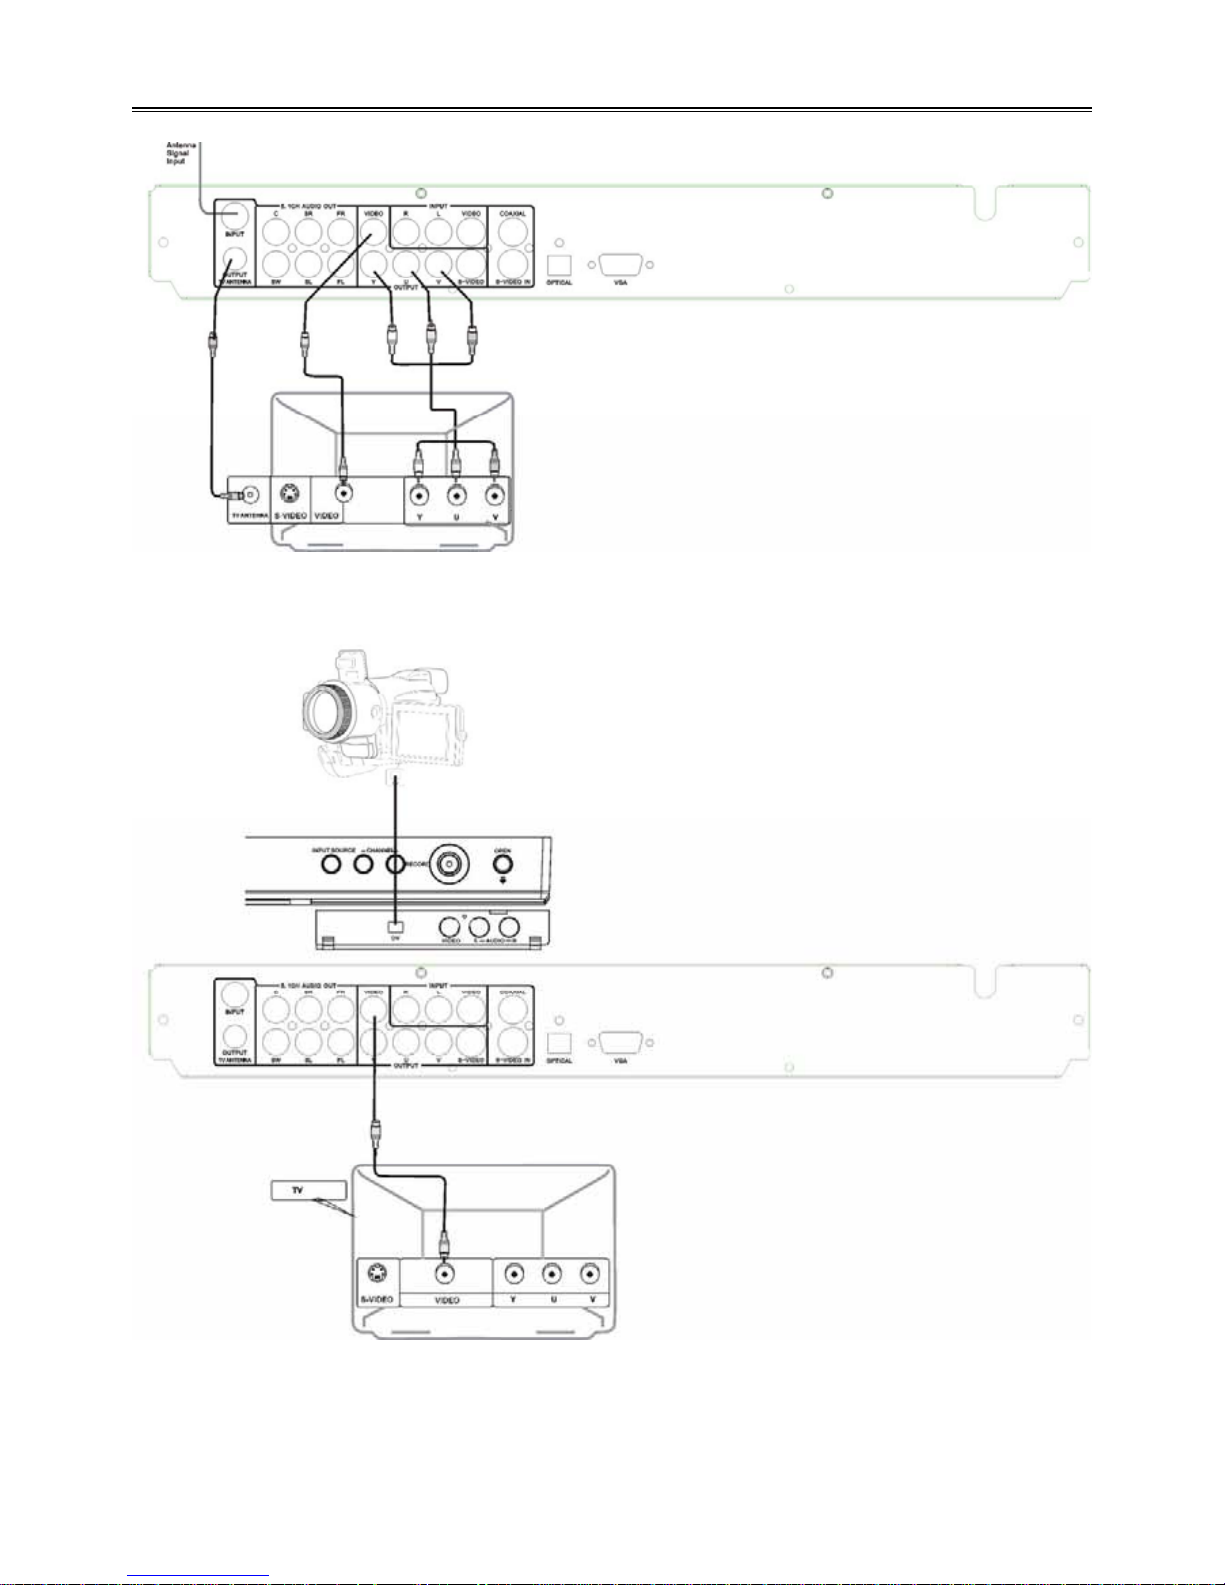
System Connections
Precaution: Do not turn on the power of the player before all connections have been correctly done.
Important Remark: The pictures maybe different from your DVD PLAYER ,the connections only for your
reference.
Connecting to TV
The video output connector of the player include: Video output, S-video output, and component output, VGA
output, you can select any one of them to connect refer to your connecting apparatus correspondingly. Correct
connection way as shown in the figure below:
Setup DVD Player Video Output Mode
-Setup your DVD player video output mode correctly refer to your connected TV system, Press P/N button on
remote control to select the same mode as TV system mode such as “PAL/AUTO/NTSC”.
For example: if the TV system is NTSC mode, press the P/N button to setup the player under “NTSC” mode.
-Setup the player video output display size refer to the screen size of the connected TV, set the “TV TYPE” to
“16:9” in system setup menu when wide screen TV connected, when connected to normal TV ,set the player’s
TV TYPE to “4:3 PS” or “4:3 LB”.
S-Video Connection Setting
Connect the S-Video output jack on the DVD Player to the Display device’s S-video input jack with a S-video
cable. Under this mode ,there is no need to do the setting in the setup menu.
Y U V Video Connection Setting
Connect the component output jack on the DVD player to the Display device’s component input jack with YUV
cable.
VGA Connection Setting
Connect the player to the display device with VGA cable if you want VGA output mode.
If the DVD player’s video output is under interlaced output mode, select “VGA” in ”COMPONENT” in the
Audio/Video menu, press ENTER button ,and restart the player, then the video out is shifted to VGA output
automatically.
If the DVD player’s video output is under Y/Pb/Pr output mode, select “VGA” in ”COMPONENT” in the
Audio/Video menu ,the press ENTER button to shift to VGA output.
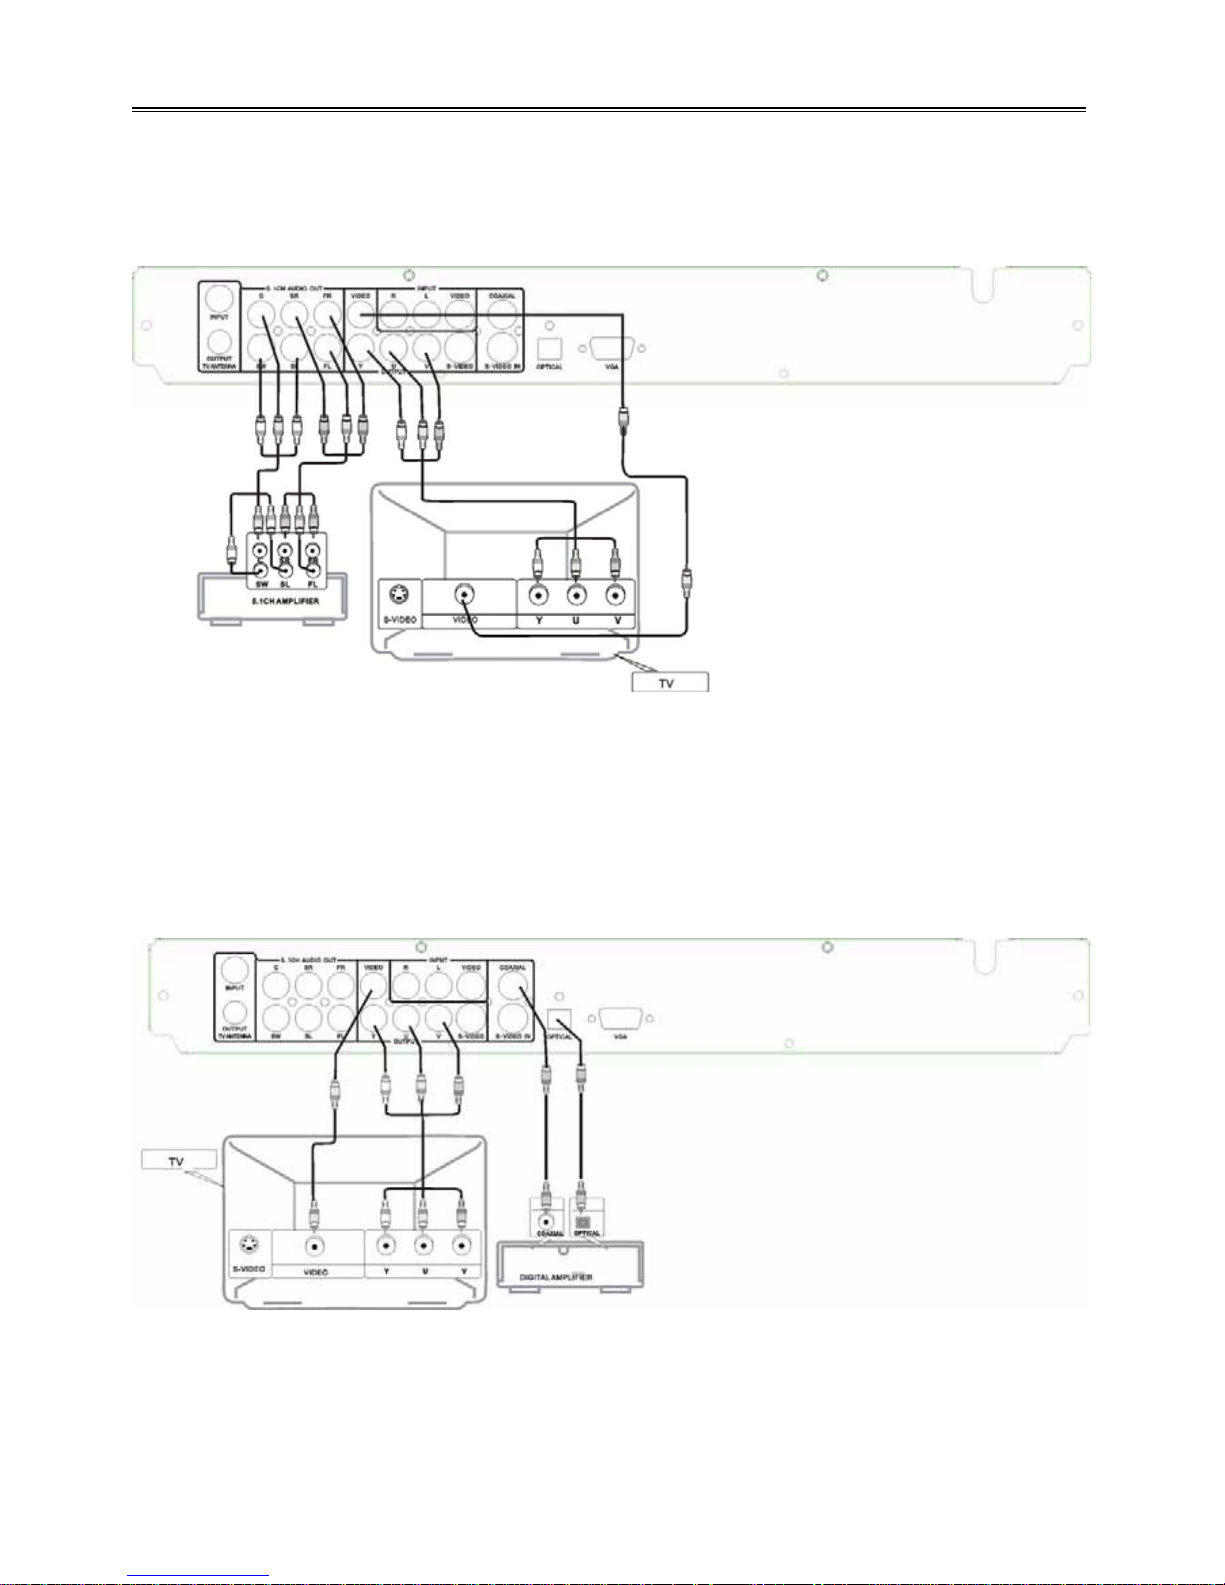
Audio Output Connector
There are 5.1CH output ,optical output, coaxial digital audio output for Audio connection use.
9
System Setup
Connecting to an Amplifier with 5.1CH Audio Output
Connect the player’s 5.1CH output to the 5.1CH amplifier’s 5.1CH input connector with Audio cable, as shown
in below figure.
Set the player’s Audio output mode as the “DOWNMIX” to “5.1CH” in “Audio/Video” menu.
The default audio output set is Stereo, then you can enjoy the 5.1CH home theatre system sound effect.
Connecting to an Amplifier with Dolby Digital Decoder by Optical and Coaxial Jack
To enjoy HiFi sound effect ,you can also connect the player to an amplifier by using the player’s Optical output
connector or Coaxial digital output jack correspondingly. Optical digital output jack’s can keep the raw audio
signal high quality when connect to the amplifier .To assure a HiFi Dolby sound enjoyment.
After finished connection set the player’s Audio output mode as “SPDIF Output” to “SPDIF/RAW” in “SPDIF
Output ” in the Audio/Video menu.
10
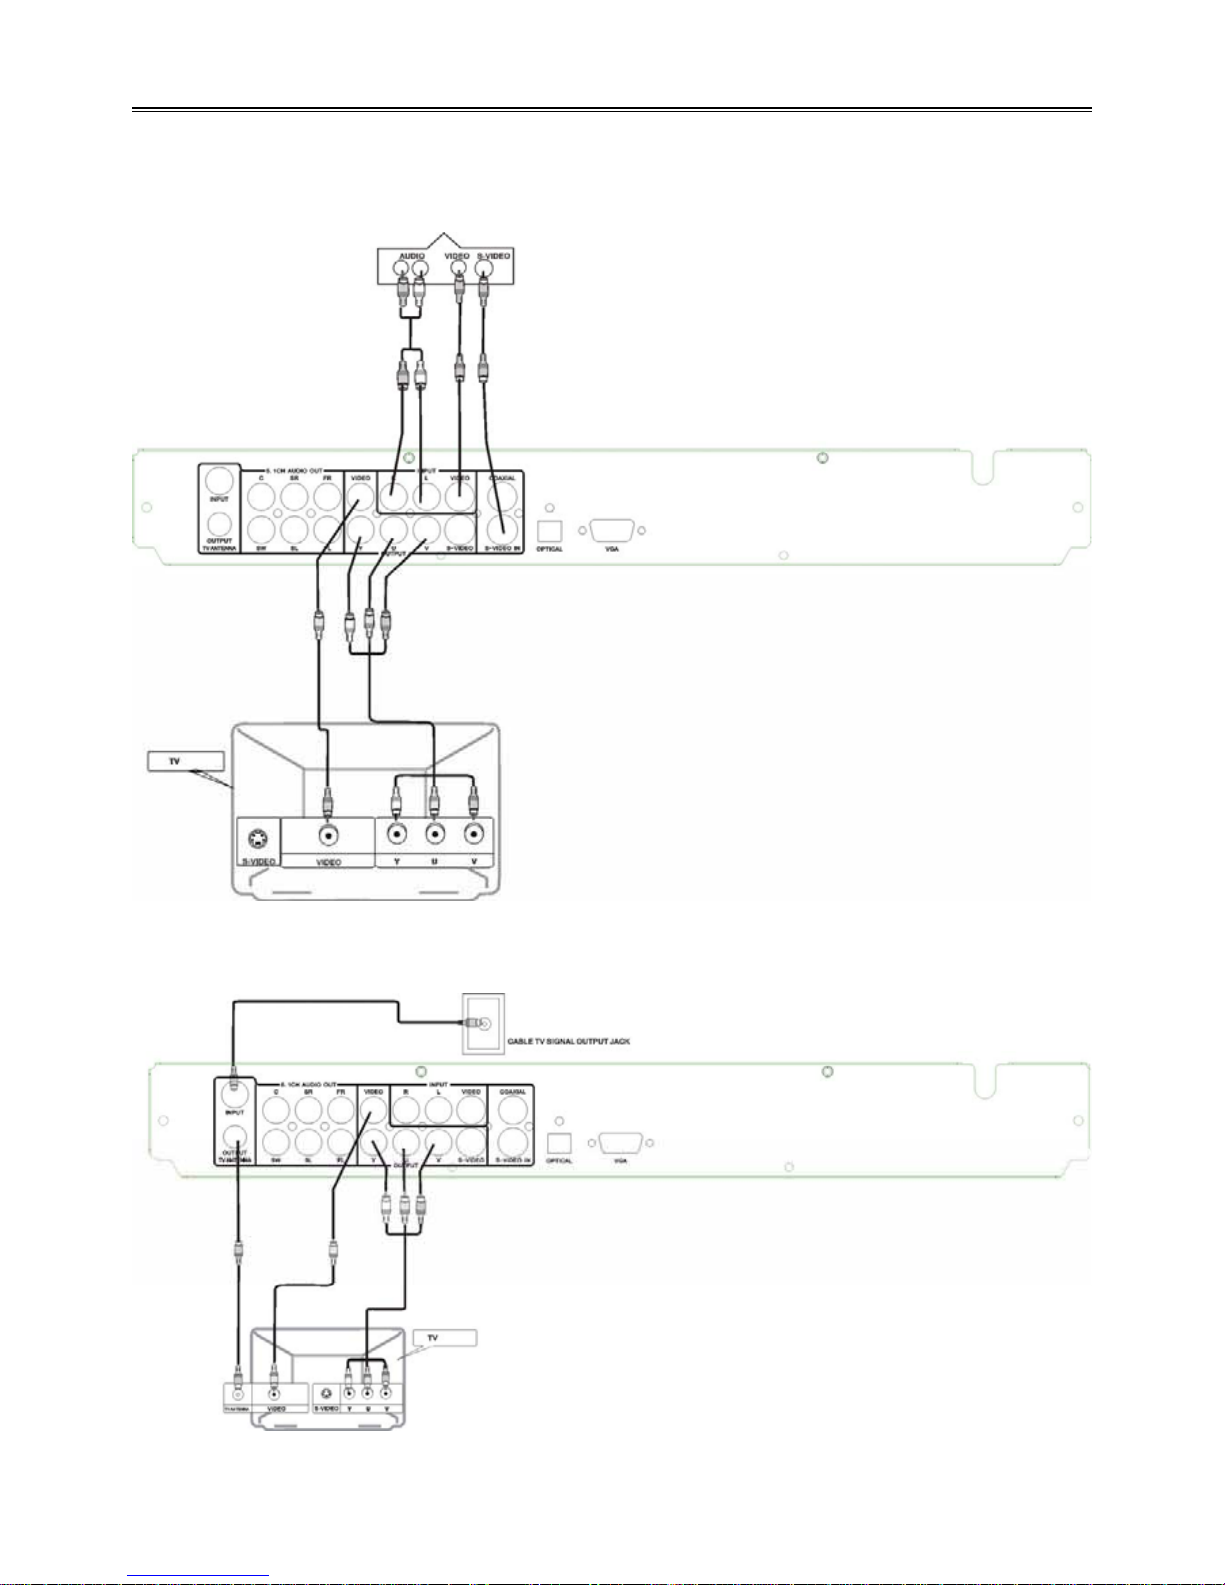
System Connections
Exterior Recording Signal Input
The front panel of the player with Audio/Video input jacks and the DV input jack, rear panel with S-Video,
Audio/Video input jacks. Cable TV input jack ,you can connect the relevant jack as your need of recording.
Connecting with exterior Audio/Video Input Signal or S-Video Input Signal
Connecting With Cable TV:
11
System Connections
Connecting With Antenna
Connecting With DV
12
FUNCTION OPERATIONS
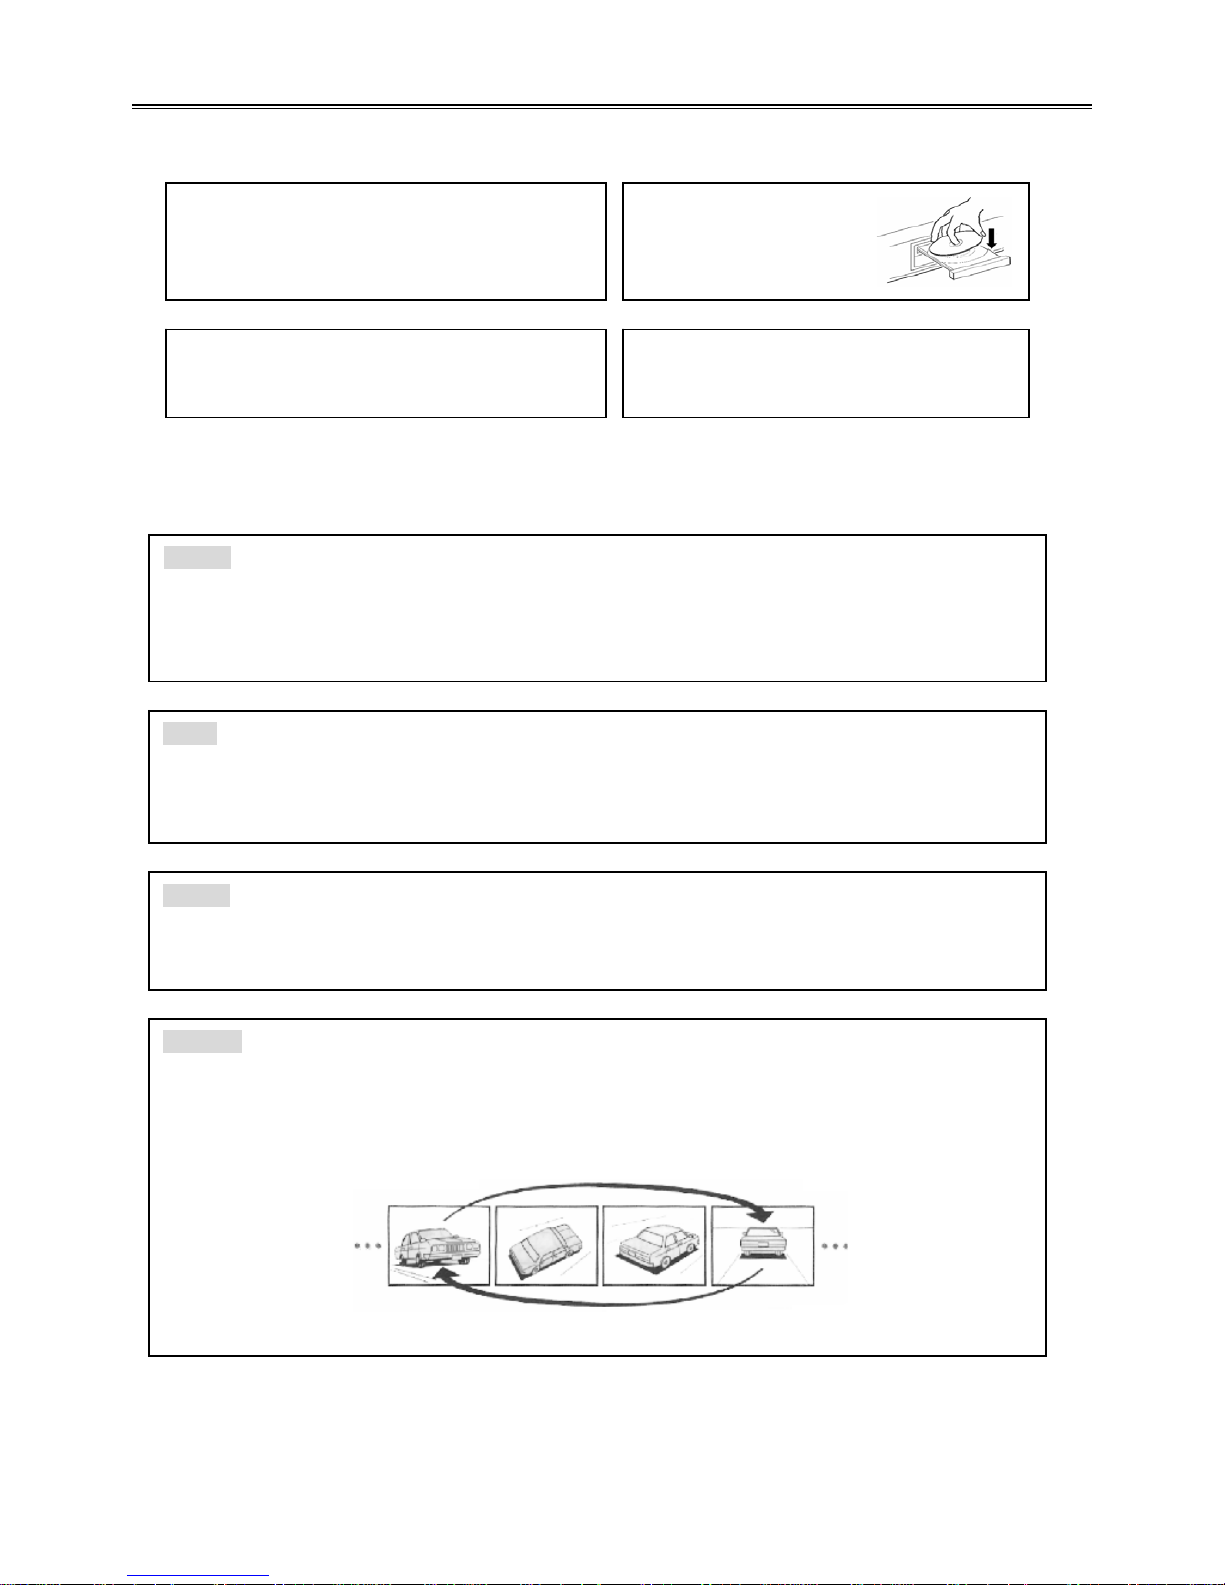
Load Discs
After correctly connect the Player to other apparatus, turn on the player, then follow below steps.
NOTE: Please check the Disc condition before putting it in the tray, bad quality or damaged discs will
damage the pickup inside the player, and shorten its working time.
Function Operation Instruction
1. Turn on the player
Press the POWER button. then the player will
search for the disc automatically.
3. Load the disc
Put the disc in the tray
as shown in the right
fi
g
ure.
2. Open Disc tray
Press the EJECT button to open the disc tray.
4. Press the EJECT button to close the disc
tray and begin playing.
STOP
During playback, press the STOP button on remote control to stop playback. For DVD discs, after
pressing the STOP button once, if you press the ENTER button, then the player will play from the
stopped point.
PAUSE
Press the PAUSE/STEP button on remote control to pause, and press it repeatedly to achieve
frame-by-frame playback.
REPEAT
1. Use the REPEAT button to repeat a title, a chapter, a track and a disc respectively according to
different discs, and also to cancel repeat.
2. Use the A-B button to repeat section A to B. Press it once to set the starting point A, twice to set
the ending point B, and the third time to cancel repeat.
(NOTE: Some discs do not support repeat function. )
ENTER
Press the ENTER button to start playback. Press the POWER button on remote control to enter
standby status, and press it again to resume playback status. If there is no operation for a long time,
the player will automatically enter screen saver status and then enter standby status.
 Loading...