

Page 1

1
Table of Contents
Operation guide……………………………………………………………………………………………………… 2
Maintenance and precautions for the camcorder…………………………………………………… 2
Maintenance and precautions for SD Memory card……………………………………………….. 3
System Requirements…………………………………………………………………………………………….. 4
Accessories……………………………………………………………………………………………………………… 5
Know Your Camcorder……………………………………………………………………………………………. 6
Buttons and Function Indicators…………………………………………………………………………….. 7
Getting Started………………………………………………………………………………………………………. 8
Basic Functions…..…………….……………………………………………………………………….…………… 10
Advanced Fuctions…………………………………………………………………………………………………. 11
Video Recording available options………………………………………………………………………….. 15
Still Photo available options……………………………………………………………………………………. 16
System Setting Available Options……………………………………………………………………………. 18
Connecting camcorder to Computer ……………………………………………………………………… 22
Connecting camcorder to TV………………………………………………………………………………….. 23
Specification…………………………………………………………………………………………………………… 23
Troubleshooting…….……………………………………………………………………………………………….. 25
Warranty................………………………………………………………………………………….…………….. 26
Page 2

2
Operating guide
Thank you for purchasing this Digital Camcorder. Please read this manual thoroughly
before operating the unit, and retain it for future reference.
Note: The operating guide is prepared with latest available information. The specification
of unit in the package of is subject to change without prior notice.
− Avoid all contact with water, and dry hands before using.
Maintenance and precautions for the camcorder
− Do not expose the camcorder to extreme high or low temperature or leave it in
direct sunlight.
− Avoid using the camcorder when this is a storm or lighting.
− Do not use organic solvent to clean lens. Clean only with soft dry cloth.
− Use only the accessories supplies by the manufacturer.
− Do not use batteries of different specifications.
− Remove batteries during long periods between usages.
− Dispose of used batteries according to the instructions.
Page 3
3
Maintenance and precautions for SD Memory
card
SD Memory Card
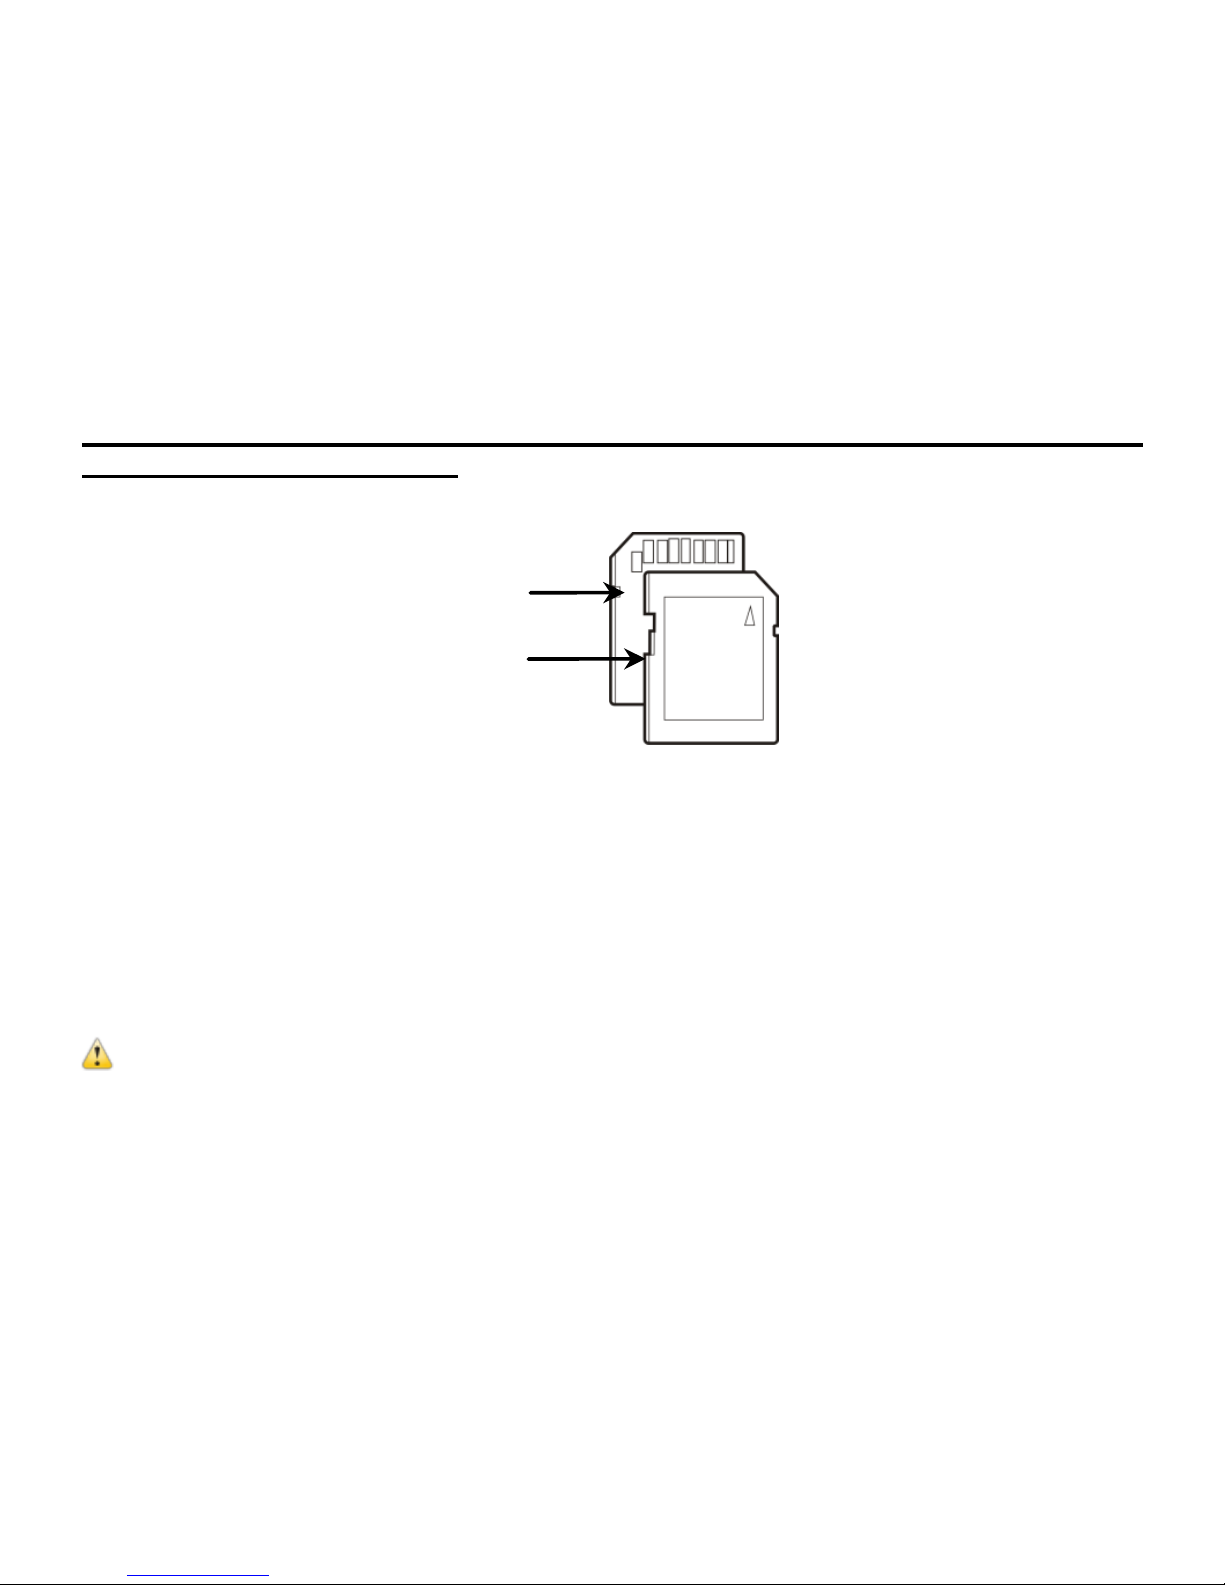
• Please note that the SD card has tiny LOCK slider on the side for write
protection of the SD memory card that helps avoid inadvertent deletion of
image files. Set this slider to “un-LOCK” position for storing still images or
recording videos.
• SD Memory card is delicate electronic device; do not open, bend or overheat
the card.
• Keep the card away from strong magnetic field and dirty / harsh environment.
Note: If your SD card has been used previously with other devices / cameras or is
brand new – the card may require to be formatted – please ensure you save all valuable
records before formatting.
Contact pins / connectors
Write protection LOCK
switch
Page 4

4
System Requirements
You may use the computer to download images and videos from your camcorder.
Make sure that your computer complies with (below) minimum requirements:
System Requirements
Operating System
Microsoft Windows XP
CPU
Intel Pentium4 1GHZ
Memory 512MB
CD-ROM/DVD Drive 24x CD-ROM DRIVE or above
Hard Drive space 1GB free HDD space
USB port Standard USB1.1 or USB2.0 port
Page 5
5
Accessories
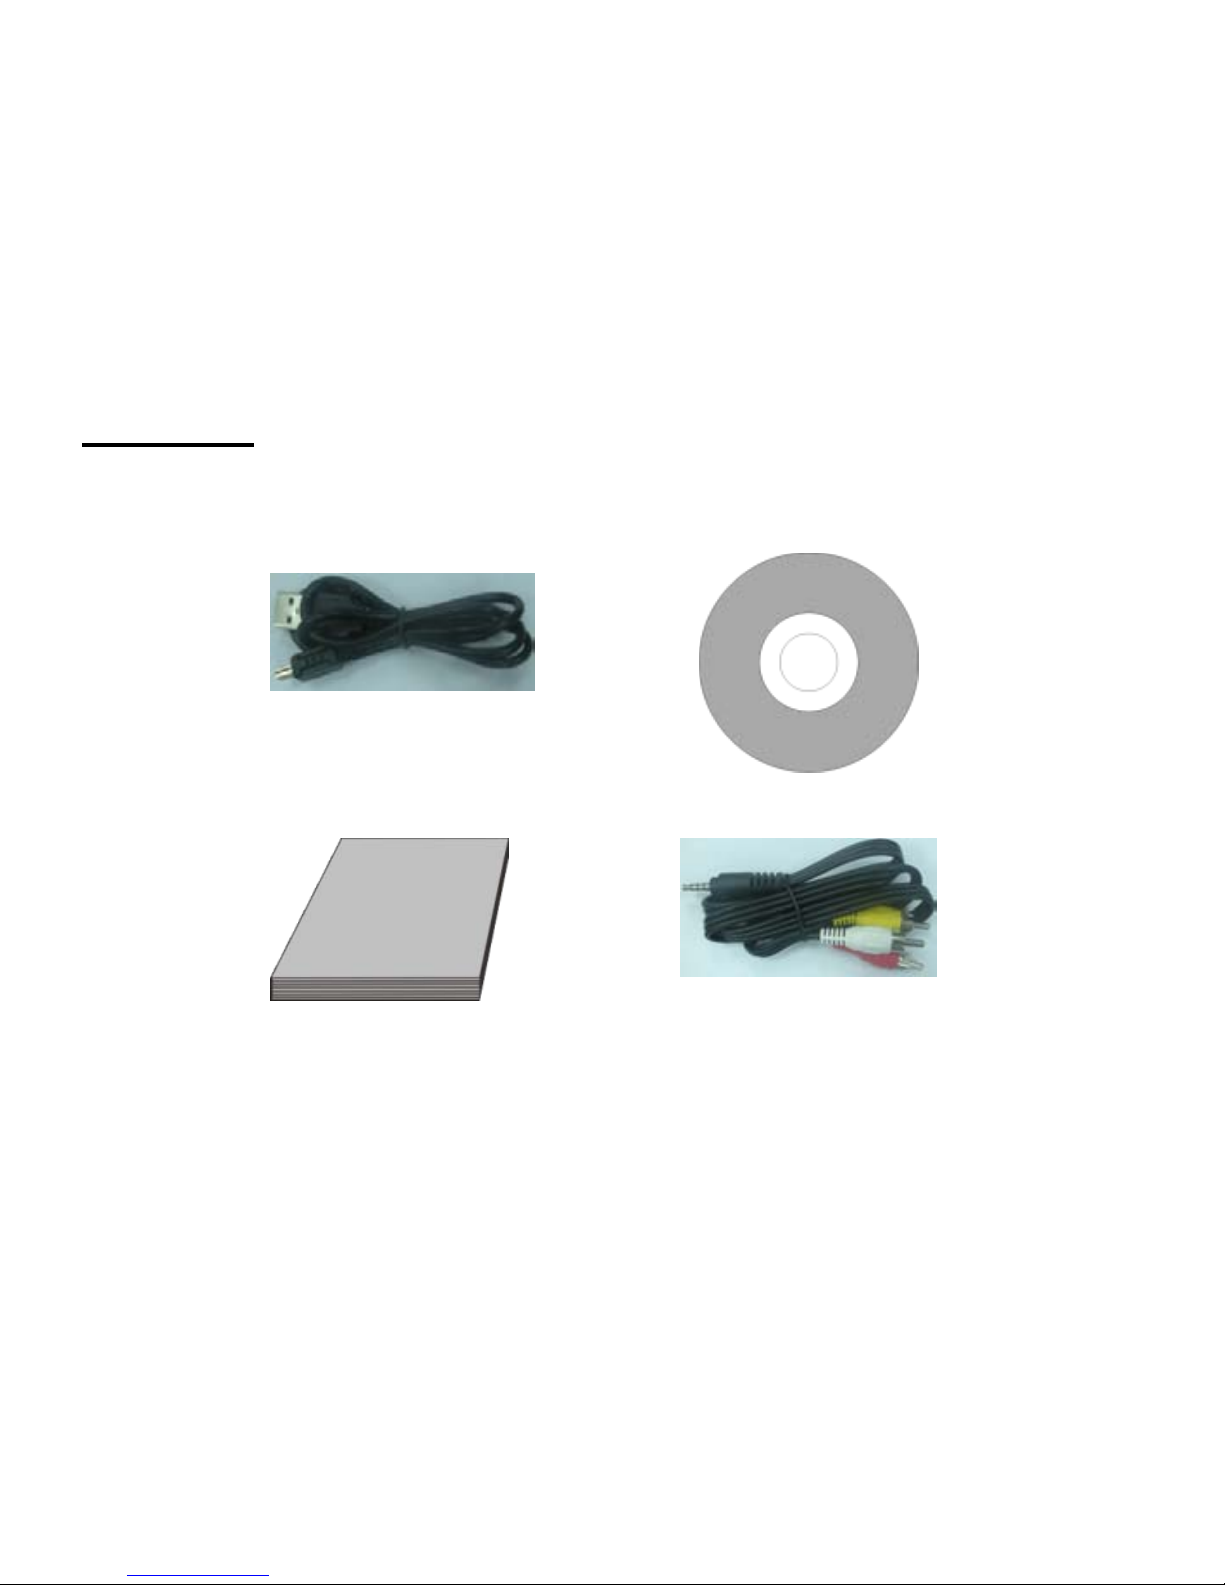
The following accessories are packed together with the camcorder:
USB Cable Installation CD
User Manual TV Cable
Page 6
6
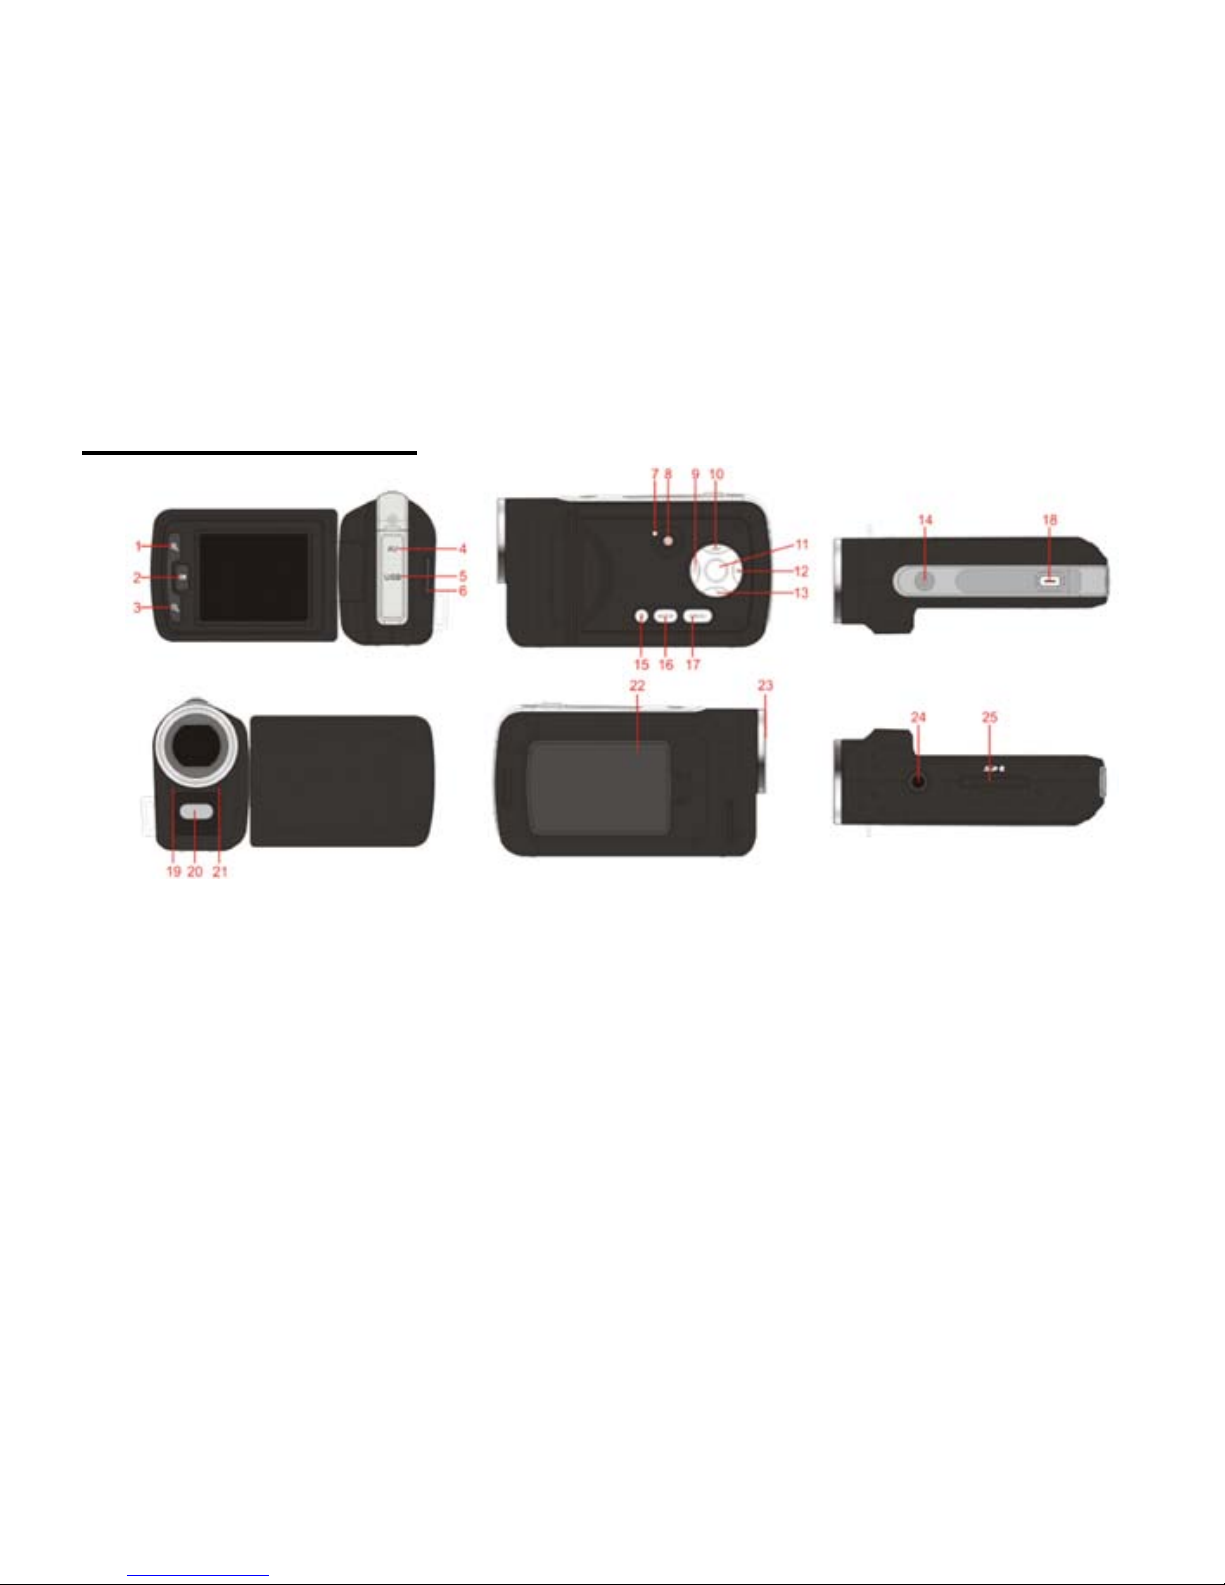
Know Your Camcorder
1.Zoom in Botton
2.Playback Botton
3.Zoom out Botton
4.AV interface
5.Mini-USB interface
6.Lanyard roller
7.Working indicator light
8.Power Button
9.Left/Timer Button
10.Up/Disp Button
11.OK Button
12.Right/Light Button
13.Down Button
14.Speaker
15.Delete Button
16.MODE Button
17.MENU Button
18.Shutter Button
19.Microphone
20.Fill light
21.Timer light
22.Battery cover
23.Lens
24.Tripod socket
25. SD card slot
Page 7

7
Buttons and Function Indicators
Buttons/Indicator
Function
Power Button Press to turn camcorder ON and OFF
SHUTTER Button
Press to start / stop video recording or taking Still Photo
Zoom IN
Zoom OUT
Press to zoom in scene
Press to zoom out the scene
MENU Button
Press to enter or exit the MENU selection
MODE Button
Press to select desired mode: Video Recording or Taking
Still Photos
PLAYBACK Button Press to enter / exit the PLAYBACK Mode
UP /DISP Button
- Press to scroll UP available options in the Menu
- Display OSD Information, or Turn Off/On the screen
DOWN Button
-Press to scroll DOWN available options in the Menu
LEFT/Timer
Button
- Photo Mode: set to take a photo in 2s or10s
- Playback Mode: select previous file
RIGHT/Light
Button
- Playback Mode: select next file
- Video/Photo Mode: Turn on/off LED light
OK Button
- Press to enter submenu or select the option in Menu
Page 8

8
- Playback mode: Press to start /stop video playing
Delete Button
-Video/photo Mode: Press to delete the last record
-Playback Mode: Press to delete the selected file
Fill light
To extend the brightness of the objects
Timer Indicator Indicator blinks when self-timer starts counting down
GETTING STARTED
Note:
You require 3* AAA alkaline batteries and SD/SDHC Memory Card to operate the
camcorder. These accessories are supplied separately. The supported capacity of SD/SDHC
memory card by this camcorder is up to 32GB.
Loading Batteries
- Open the Battery cover and insert three new AAA alkaline batteries into the battery
compartment.
- Sure inserting the batteries according to the correct polarity marks (+ or -)
- Close the battery cover.
Page 9
9
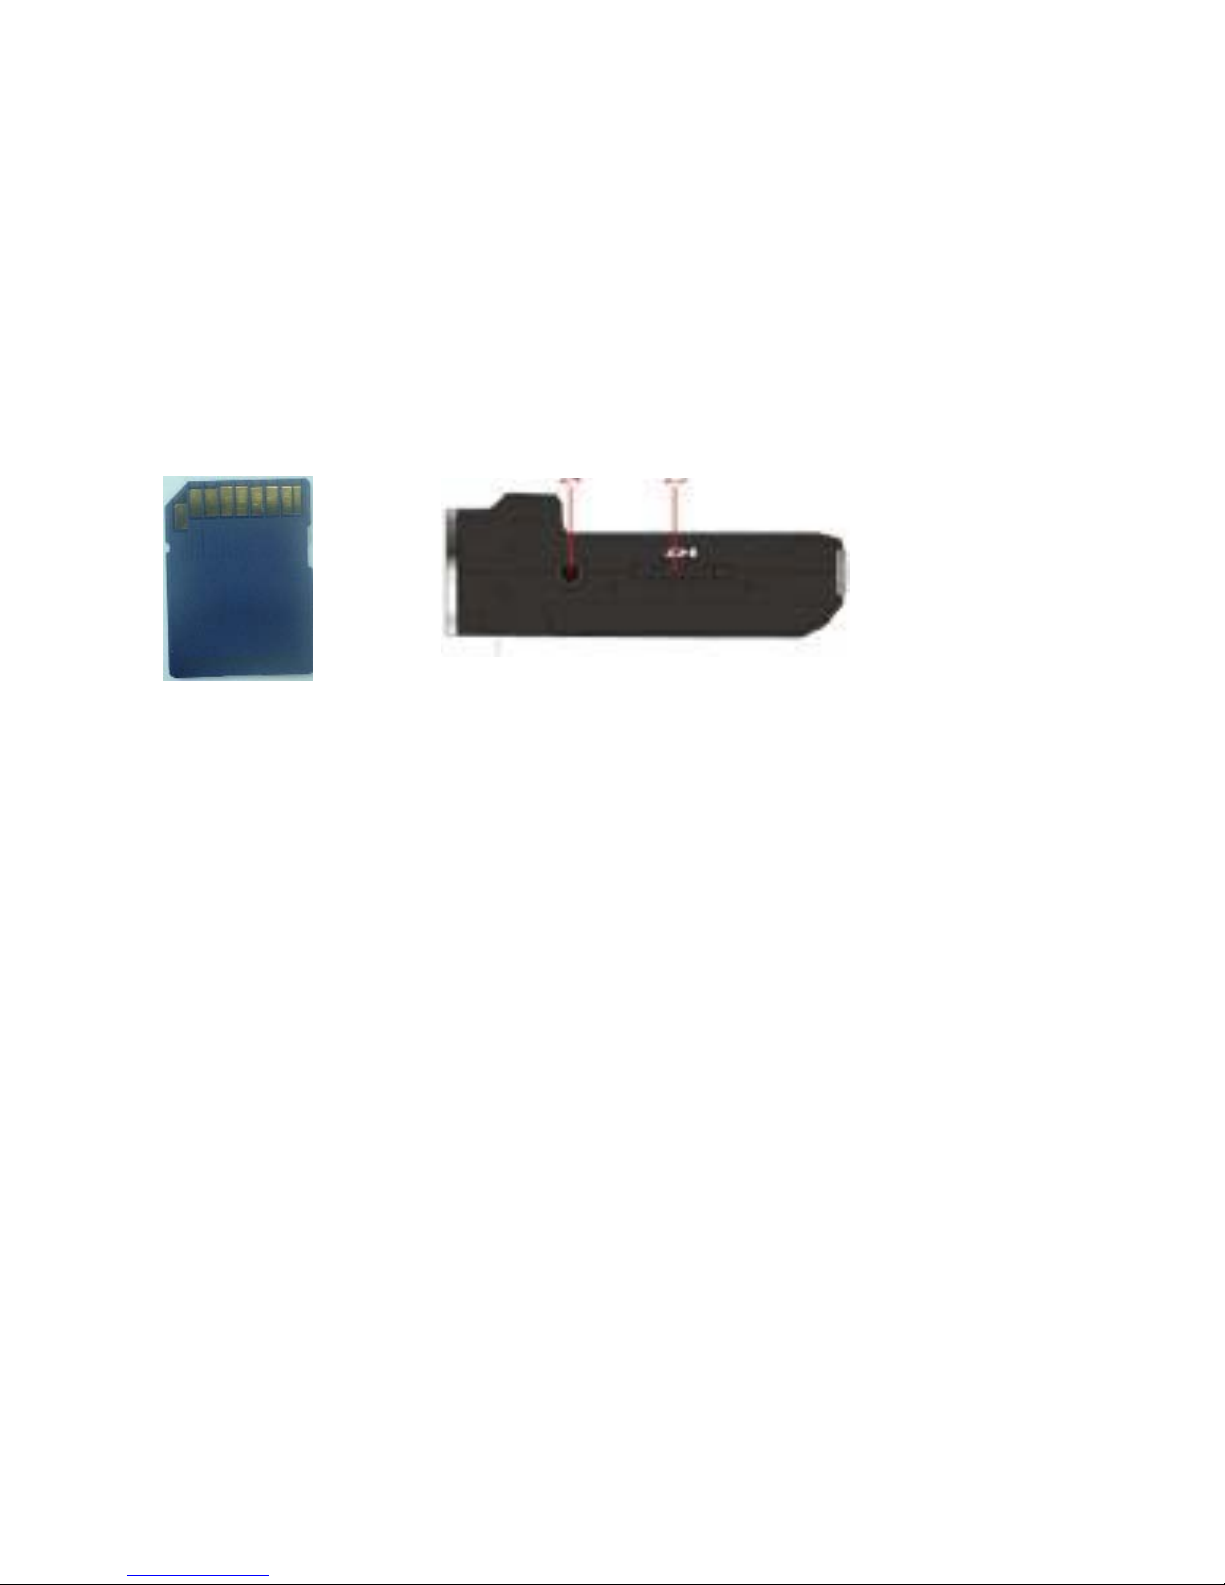
Installing SD Memory Card
- Position and insert SD Memory card into the SD card slot.
- Note the orientation of the card and insert as indicated. Press it down until the card is
firmly locked. Do not force card during insertion as the card or card slot could become
damaged.
To remove or replace the card, press the card down. The card will pop up and you may
remove the card from the camcorder.
Notes:
The card has a tiny “LOCK” slider located on the side. Set this slider to “non-LOCK”
position before inserting and taking video or still images.
Turn OFF the camcorder before inserting / removing or changing the memory card;
Insert the memory card according to the position mark. Do not force. If the card
cannot be inserted easily please check card alignment and position then repeat
installation.
Page 10

10
Turning Camcorder ON or OFF
- Open the LCD Screen
- Press the Power button to turn the camcorder ON.
- LCD screen becomes active and the camcorder is ON, ready to operate.
- Press the Power button again turn the camcorder OFF.
Note: The camcorder will turn OFF automatically when turned ON and left idle for 1 min
(by default, see ‘Power Save’ for more options) to save battery power.
Select the MODE
- Press the MODE button to select desired Mode: Video Recording or Still Photo taking.
- Press the PLAYBACK button to enter the playback mode. Press again to return.
Note: Video Recording is the default mode. When you turn the power on,
to avoid any
data loss, please do not change the operation mode until ‘Read Card’ finished.
BASIC FUNCTIONS
Video Recording mode
- Press the Shutter Button to start recording the video clip; press the Shutter Button again
to stop recording.
Page 11

11
Taking Still Photo (Still Photo Mode)
- Compose the scene visible on the LCD screen, keep camcorder steady and press the
Shutter Button to take a Still Photo.
Playback mode
- Press the Playback button to enter Playback mode.
- LCD screen will show the last taken photo or recorded video.
- You can use LEFT / RIGHT buttons to scroll through your records; press OK button to Play
the video. Press again to Stop playing, press the MENU button to display available playback
menu options.
- Press the Playback Button to return to record.
ADVANCED FUNCTIONS
MENU setup
- In the Video Recording or the Still photo mode, press the MENU button to enter available
setting .Use the LEFT/RIGHT Buttons to select VIDEO/PHPOTO setup or SYSTEM setup。
- Press UP/DOWN Button to select option; then press OK Button to enter available setting
sub-menu.
- Scroll and select desired option and press OK Button to confirm setting.
Page 12
12
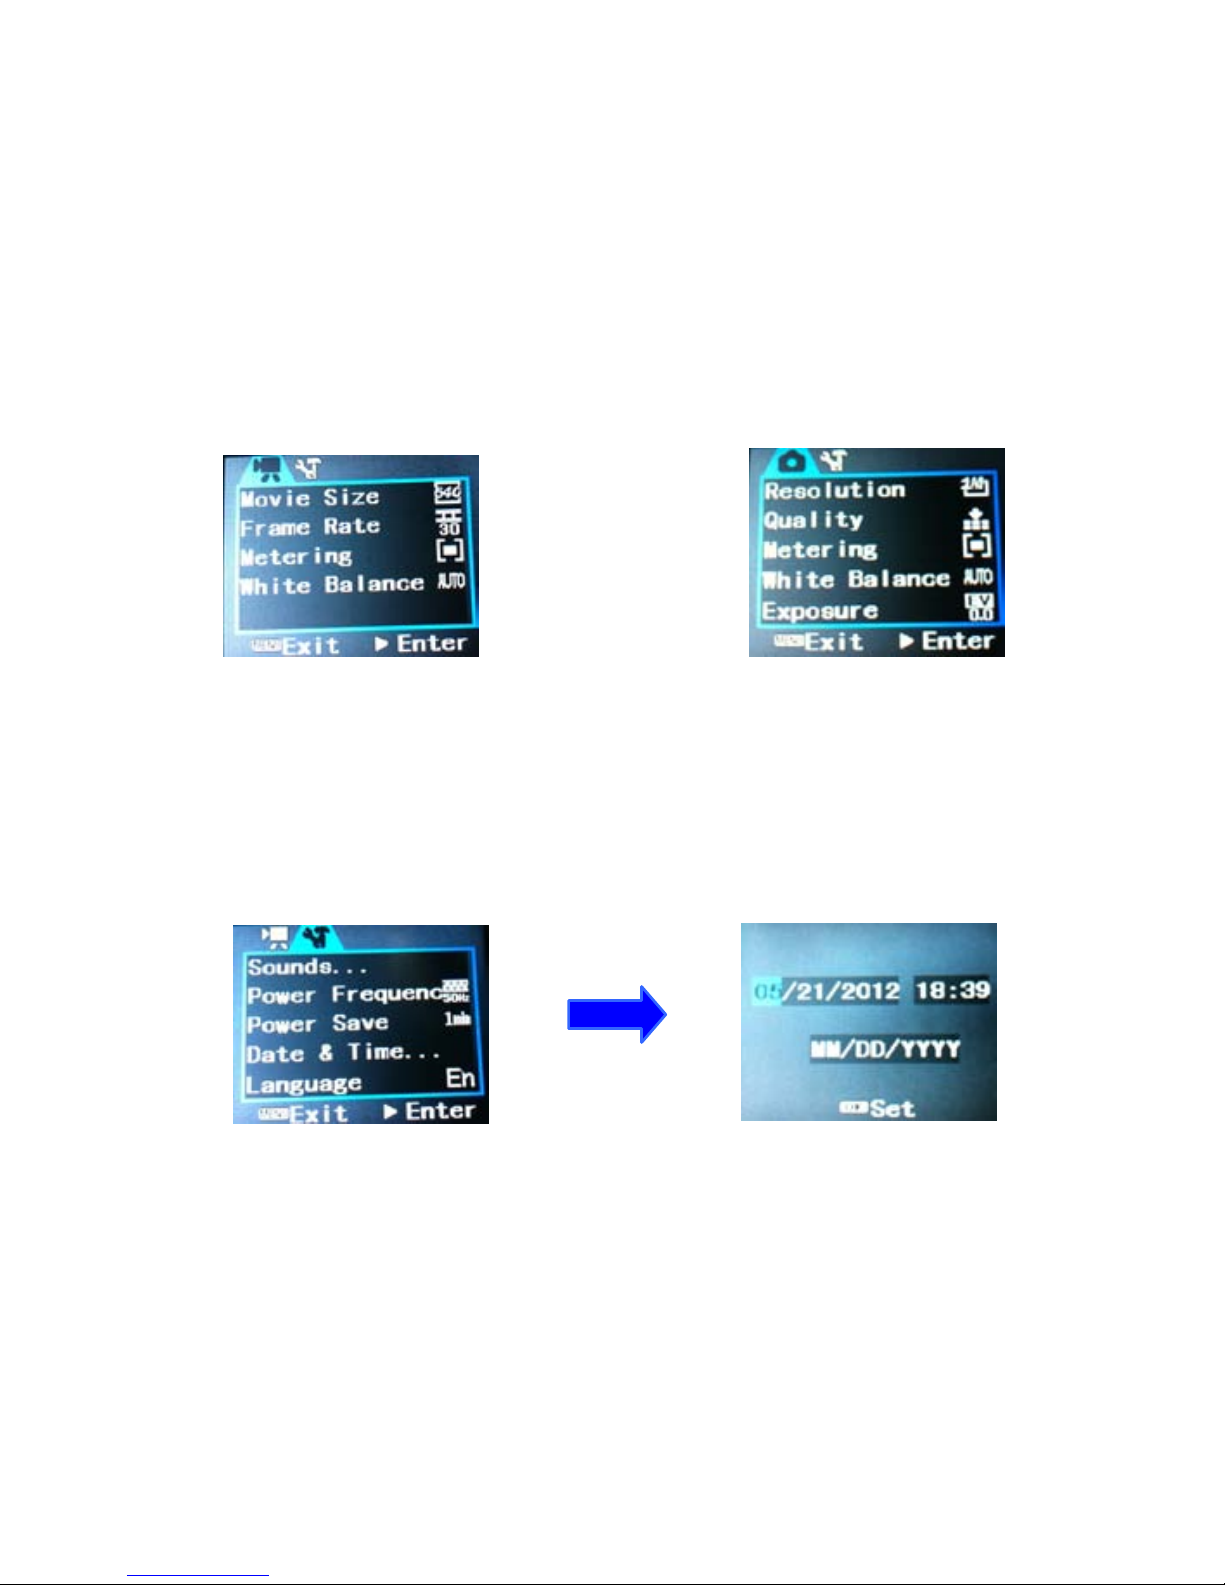
See figures (next page) showing samples of the MENU screens in Video and Photo Modes.
▲Video Menu ▲Photo Menu
Setting Date and Time
You can set Date and Time after loading batteries, you can use this setting .Press OK to
enter the setting page,see below.
Press the MENU Botton and press the RIGHT Button entering SYSTEM Setting.
Use LEFT / RIGHT Buttons to select Date & Time Setting. Press UP/DOWN Button to adjust,
Page 13
13
Then press OK to confirm, press the MENU Button to cancel and exit setting.
Note: You may need to set date & time again after changing batteries.
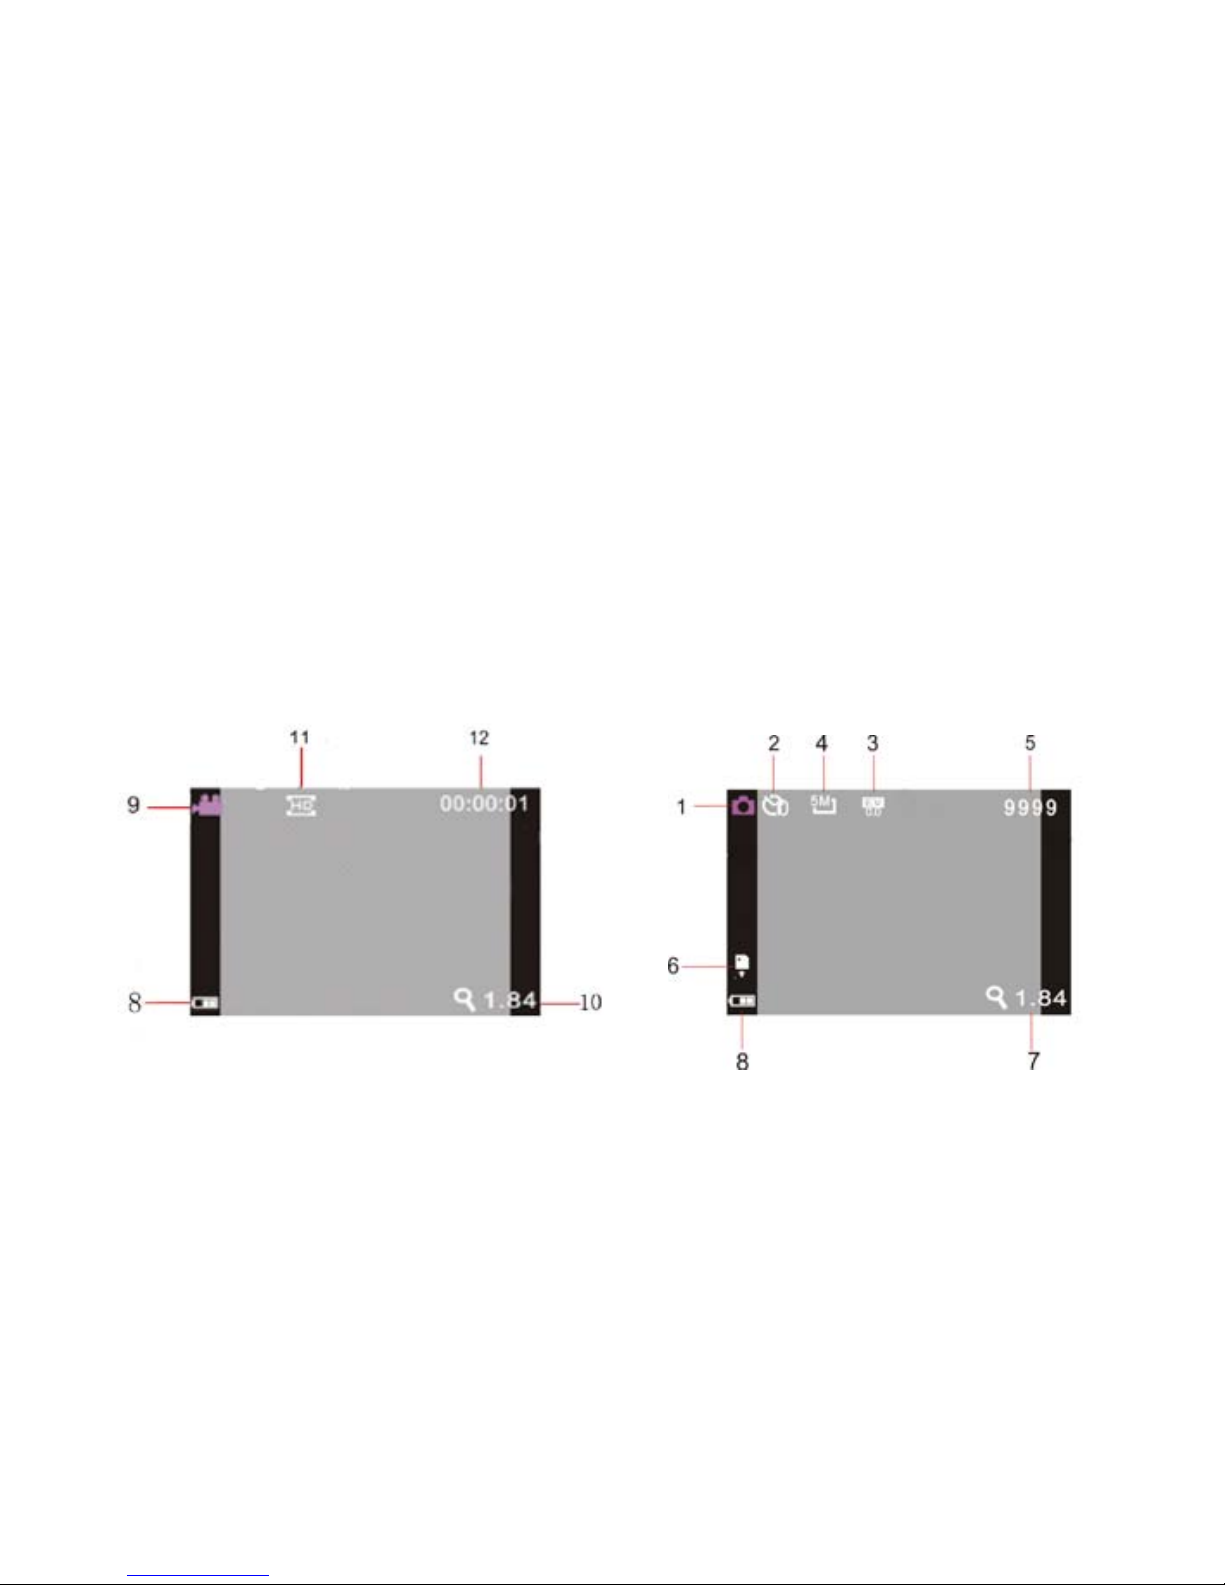
LCD screen information
Below are images of the LCD screen with related icons, information visible when the
camcorder is set to Video Recording or the Still Photo mode
-Video Recording Mode -Still Photo mode
Page 14

14
Please see the function and explanation of the corresponding icons
1 Photo Mode The camcorder is set at the Still Photo Mode
2 Driver Mode Indicates the self-timer counting down, default OFF
3 Exposure Indicates the selected exposure value; default 0.0
4 Image Size Indicates the Still Photo resolution; default 1M
5 Number of available Indicates the number of remaining Still Photos
6 SD Card
SD card is inserted
SD cards is LOCKED
7 Zoom range Indicates the zoom range ,default 0
8 Battery status Indicates batteries status
9 Video Mode The camcorder is set at the video record Mode
10 Zoom range Indicates the zoom range ,default 0
11 Video Resolution Indicates the Video Resolution; default 640
12 Recording time Indicates the video time recorded
Page 15

15
Video Recording available options
Select the Video Recording mode and press the MENU Button to select available
adjustment options. Press UP / DOWN Buttons to scroll options, press OK to enter submenu and press RIGHT to display available settings.
Main Menu Sub-menu Explanation
Movie Size 1280x720 High Resolution Video format,15fps
640x480 VGA Resolution Video format,15fps,
Metering Center
Multi
Spot
White Balance
Auto Uses automatic White Balance acceptable
for typical uses
Daylight Suitable for sunshine sky
Cloudy Suitable for overcast sky
Fluorescent Suitable for fluorescent indoor light
Page 16

16
Tungsten Suitable for tungsten source light
Still Photo available options
Main Menu Sub-menu Explanation
Resolution
2592x1944 5Mpix
2048x1536 3Mpix
1280x1024
640x480
1Mpix
VGA
Quality Super Fine Super Fine Image quality
Fine Good Image quality
Normal Normal Image quality
Metering Center
Multi
Spot
Page 17

17
White Balance Auto Uses automatic white balance, which is suitable for
most cases
Daylight Suitable for sunshine sky
Cloudy Suitable for overcast sky
Fluorescent Suitable for fluorescent source light
Tungsten Suitable for tungsten source light
Exposure EV Adjusts scene brightness, use LEFFT / RIGHT Buttons
Driver Mode Off
Self-timer 2s
Self-timer 10s
Burst
Page 18

18
System setting available options
Under Video/Photo mode press the MENU Button to enter setup. Press LEFT /RIGHT
Buttons to scroll options, press OK to enter sub-menu and press UP/DOWN to adjust
options
Main Menu Sub-menu Explanation
Sounds Shutter ON / OFF
Beep On / Off tone
Volume 0 / 1 / 2 / 3 (3 is the loudest)
Power Frequency 50Hz Setting for 50HZ power / light frequency
60Hz Setting for 60HZ power / light frequency
Power Save 1min Auto Power-OFF after 1 min
3min Auto Power-OFF after 3 min
5min Auto Power-OFF after 5 min
Date & Time / Sets date, time, and date format
Language En Displays Menu in English
TV out NTSC Sets TV system as NTSC
Page 19

19
PAL Sets TV system as PAL
USB MSDC
PCCAM
Recognized as mass storage when connecting to PC
Recognized as PC camera when connecting to PC
Start-up Image off
System
My Image
No start up image
Use the system default image
Use the your own image
Format Yes/ N o Formats memory card
Reset All Yes /No Resets to the factory setting
Playback Mode
Press the Playback button to enter the Playback Mode, Press again to exit.
The LCD screen will display the last still photo or video recorded.
Use LEFT / RIGHT Buttons and scroll through your records;
Press OK Button to start/stop playing Video.
Page 20
20
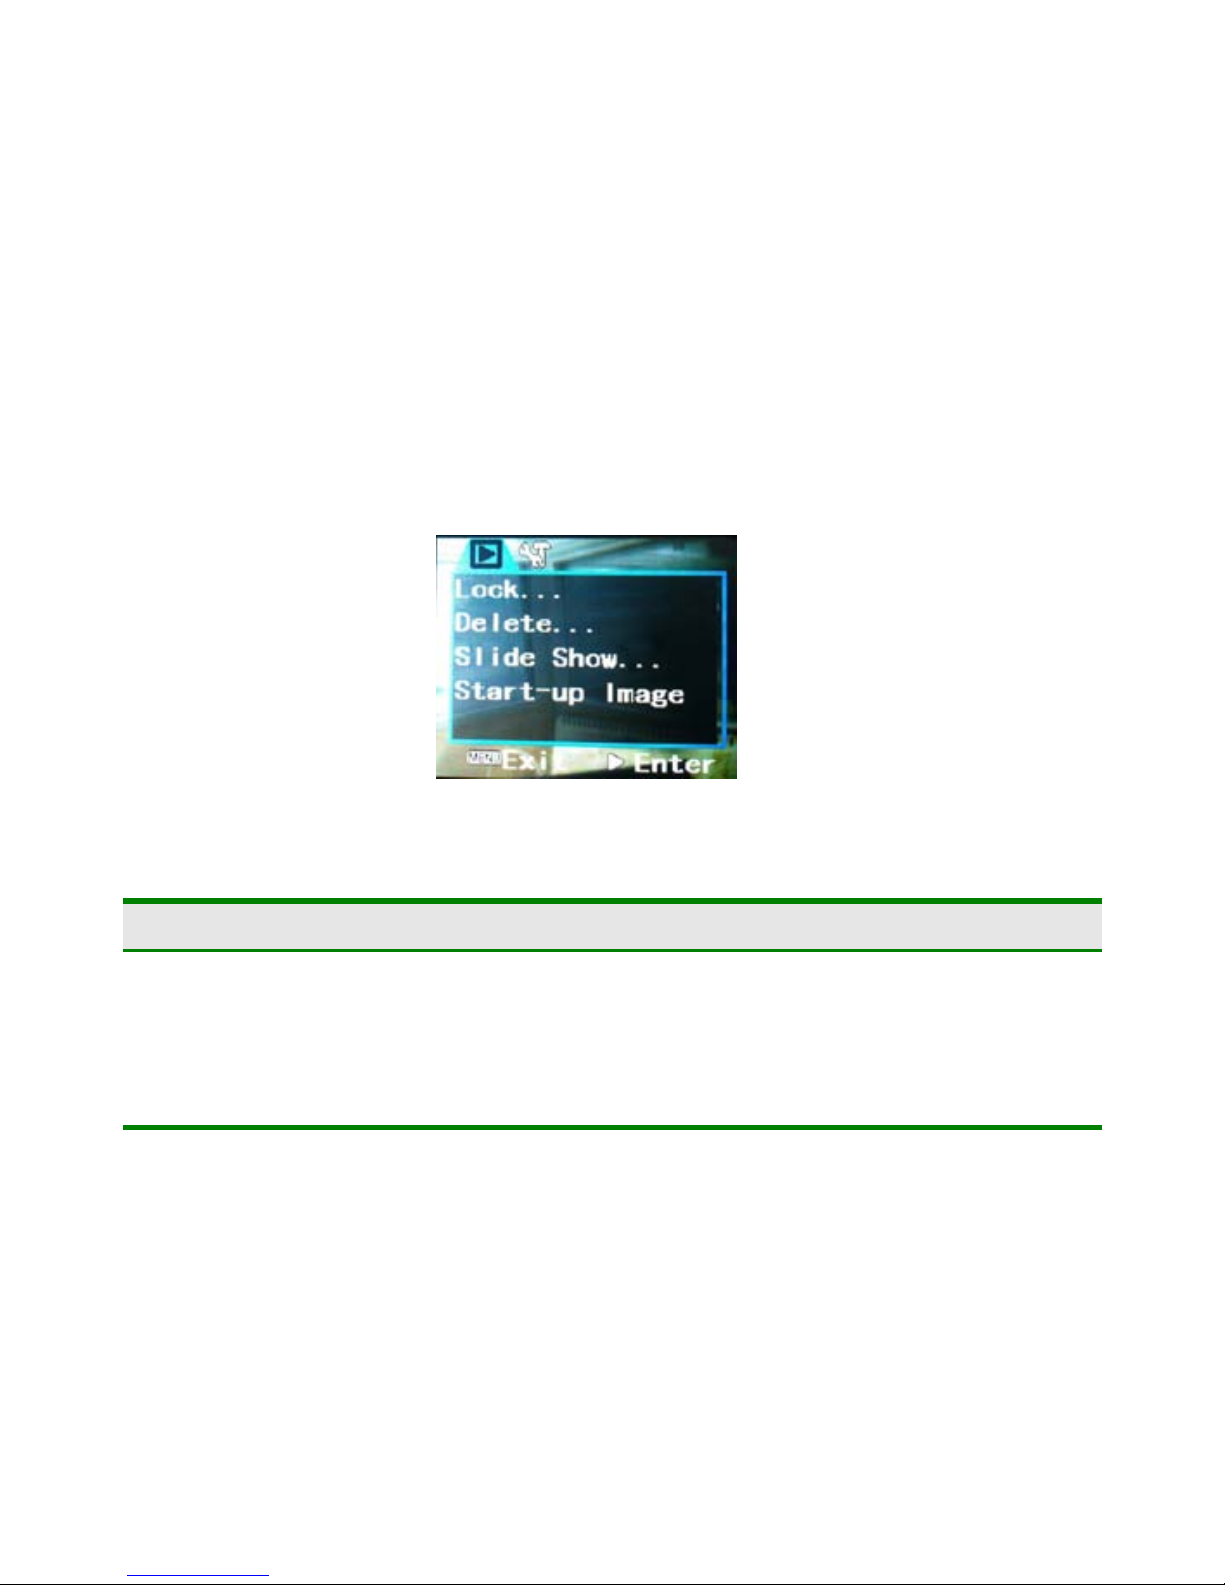
PLAYBACK Mode, Video MENU options(Lock, Delete only)
Press MENU Button to display available options, see screen below:
Playback, Photo Menu options (Lock, Delete, Slide show, Start-up Image)
Main Menu
Sub-menu Explanation
Lock
Lock/Unlock Locks/ Unlock one file
Lock All Locks All files
Unlock All Unlock All files
Delete Delete One Deletes current file
Page 21

21
Delete All Deletes All files
Slide Show
Start-up Image
Start Starts slide show
Interval 1sec~10sec interval
Repeat Yes/ No all displayed slides
Set
Cancel
Set current image as start-up image
quit setting the start-up image
Page 22

22
Make connections
-You can review all your records on the camcorder LCD screen
-You can connect the camcorder to computer and review, transfer your records
-In addition, your camcorder may be connected to TV so you can see your videos and
images
Connection with computer
Before connecting camcorder to computer it is strongly recommended that you
install programs from supplied CD.
1. Insert the CD-ROM into your computer’s CD-ROM drive. Double click setup.exe, follow
the on-screen instructions to complete the installation.
2. Connect camcorder to your computer with the supplied mini USB 2.0 cable.
3. Turn the camcorder on.
4. The camcorder will shown as Removable Disk or PC camera
Note: For PC Camera setting, see page 18&19, connect it to computer and then you use it
as a PC camera
Page 23

23
Connecting camcorder to TV
Connection with TV
This provides another way to review your records, video and still pictures on the big TV
screen.
- Use supplied TV cable and connects AV connector of the camcorder with AV input of your
TV.
- Set your TV to the AV input mode and turn the camcorder power ON.
- Select the PLAYBACK mode of the camcorder and review or display all your records in the
same way as on camcorder LCD screen.
Enjoy watching your records on the big screen!
Specification
Video Resolution
Frame rate
HD 1280X720,VGA 640×480
15fps
Still Photo Resolution
Available MODE
5Mpix 2592X1944, 3Mpix 2048X1536, 1Mpix 1280X1024,VGA 640x480
Video Recording, Still Photo taking, Playback
Page 24

24
File Format
Memory
JPEG, AVI
Slot for External SD card (up to 32GB)capacity
(SD card not supplied)
Zoom Digital, 4 X range
Screen 2.0” TFT LCD
Self-Timer 2 sec / 10sec delay
White Balance Auto / Daylight / Cloudy / Fluorescent / Tungsten
USB Interface
USB2.0 (cable supplied)
TV Output
NTSC / PAL
Power Required three AAA Alkaline batteries (supplied separately )
Menu Language English
Note: The product specifications are printed based on latest available information and are
subject to change without prior notice.
The specifications of your purchased camcorder may be slightly different from above data.
Page 25

25
TROUBLE SHOOTING
Condition
Cause/ Remedy
The camcorder can
not be turned ON
Insufficient power, please install new batteries.
Batteries installed incorrectly.
Reinstall batteries, note correct polarity alignment.
Can not take a picture
or make any records
The SD Card is not inserted.
Insert the SD card for photo taking / video recording.
Write protection switch on the SD card is set to LOCK-ed
position. Remove the SD Card and set the switch to nonLOCK position.
Un
clear or blurred
photos
Keep camcorder steady while taking records or taking
photos.
Use tripod or support camcorder while recording.
Dark photo or videos
Insufficient light during video or picture taking.
Use exposure control or add an additional light to improve
light condition.
Automatic shutdown
Insufficient power remaining- please replace the batteries.
To save power, the camcorder automatically shuts down after
one minute, three or five minutes of inactivity.
Video or Photo file
can not be deleted
Write protection switch on the SD card is set to LOCK
position. Remove SD card and set the switch to un-LOCK
position and re-insert the card.
Page 26

26
Westwell Warranty Statement
1. Warranty against defects
Westwell Australia Pty Limited ACN106 648 202 (“Westwell”) warrants the
product to be free of any defects in materials and workmanship for a period of 12
months from the date of purchase (“Warranty”). However, the Warranty does
not apply with respect of products damaged by unreasonable use or by use for
which the product is not intended. The Warranty will not cover defects resulting
from alteration, accident, misuse, abuse or neglect and the Warranty is otherwise
subject to the terms, conditions and stipulations recorded below.
2. Warranty is in addition to your rights under the law
The product Westwell supplies come with guarantees that cannot be excluded
under the Australian Consumer Law. You are entitled to a replacement or refund
for a major failure and for compensation for any other reasonably foreseeable
loss or damage. You are also entitled to have the products repaired or replaced if
the goods fail to be of acceptable quality and the failure does not amount to a
major failure.
The benefits accorded to you under this guarantee are in addition to your other
Page 27

27
rights and remedies any other law in relation to goods or services to which the
Warranty relates.
3. What you must do for Westwell to be entitled to claim under the warranty
To make a claim under the Warranty you must:
(a) return the product which you claim is defective to the Seller who supplied
our products to you (“Seller”). The product must be unmarked and
complete with instruction books and accessories (such as remote
controls, power cords, battery chargers and connectivity cables) supplied
at the time of purchase;
(b) complete a claims form that we have supplied to the Seller for that
purpose; and
(c) provide a copy of a proof of purchase to the Seller to whom you are
returning the products. The best proof of purchase is a tax invoice or
receipt. Please discuss any other acceptable proofs of purchase with the
Seller.
4. How Westwell will honour the warranty
If you comply with paragraph 3 above, and Westwell or the Seller determine that
the product does not comply with the Warranty then, the Seller may at its
discretion, promptly:
Page 28

28
(d) pay to you the cost of repairing or replacing the products or any part of
the products; or
(e) replace or repair the product.
(f) Except as to terms, conditions, warranties or guarantees prescribed by
law and from which Westwell cannot limit its liability (“prescribed term”):
(1) the liability of Westwell and any Seller in respect of a breach of a
prescribed term or the Warranty relating to the products or any
part of the products is limited to the options set out in this
paragraph 4 above;
(2) in these conditions you do not have under any circumstances any
cause of action against or right to claim or recover from the seller
for, or in respect of, any loss or damage of any kind whatsoever,
caused directly or indirectly by:
(a) any defect in material or workmanship of, or any other
defect whatsoever in, or unsuitability for, any purpose of
the products or any part of the products; or
(b) by default or negligence on the part of Westwell or of any
employee, contractor or agent of the seller or of any
person for whom the seller has legal responsibility relating
to the supply of, or otherwise concerning products or any
Page 29

29
part of the products.
PLEASE note that Westwell will honour all consumer guarantees
under the Australian Consumer Law to the extent it is required to do
so by that legislation
5. Expense of making warranty claim
Subject to your rights under the Australian Consumer Law, if Westwell
determines that the product you have returned does not breach the Warranty
and Westwell does not have a legal obligation to provide you with a remedy in
respect of the returned product (including for breach of a guarantee under the
Australian Consumer Law), then:
(a) Westwell reserves the right to claim all expenses and costs incurred by
Westwell in processing the claim and returning the products; and
(b) Westwell will have the right to make a claim against you for any monies
that have been paid to you on account of your claim of breach of the
Warranty,
and by returning making the claim for breach of Warranty you agree to this
proviso.
Subject to your rights under the Australian Consumer Law, where Westwell
determines that your claim under the Warranty is correct and there has been a
Page 30

30
breach of the Warranty, then Westwell will determine if it is reasonable to
reimburse your reasonable expenses in making the claim under the Warranty.
It will be for Westwell to determine what is a reasonable expense and you will
be required to substantiate that expense by documentation acceptable to
Westwell.
6. Customer Service - Who we are and how you may contact us
The company which gives the Warranty is Westwell Australia Pty Ltd ACN106
648 202.
For any Warranty query you can contact Westwell at:
(a) Customer Helpline: 1800 656 630
(b) Website:
www.olinlivenow.com.au
(c) E-mail:
Address: Westwell Australia, Suite 1802, Central Square, 323 Castlereagh Street,
Sydney NSW 2000
 Loading...