

Page 1
DPF-1006
10 INCH
DIGITAL PHOTO FRAME
Page 2

Safety War nin g----------------------------------------------------------------------------------------------
Features-------------------------------------------------------------------------------------------------------
Parts Introduction--------------------------------------------------------------------------------------------
Remote Control Introduction---------------------------------------------------------------------------
Remote Control Installation-----------------------------------------------------------------------------
How to Use the Remote Control------------------------------------------------------------------------ 5
Rear Panel Introduction---------------------------------------------------------------------------------- 5
Memory Card Insertion ----------------------------------------------------------------------------------
Mini USB Port to connect to a Computer--------------------------------------------------------------
Main Menu Setup-------------------------------------------------------------------------------------------
Basic Operation------------------------------------------------------------------------------------------
Photo Playback-------------------------------------------------------------------------------------------
Music Playback-------------------------------------------------------------------------------------------
Movie/Video Playback----------------------------------------------------------------------------------
File Navigation-------------------------------------------------------------------------------------------
Modifying the Settings------------------------------------------------------------------------------------
Calendar--------------------------------------------------------------------------------------------------
Troubleshooting--------------------------------------------------------------------------------------------
2
3
4
4
5
6
6
7
7
7
9
9
10
11
12
13
Table Of Contents
Page 3

In order to prevent damage to the memory card or the digital photo frame, please switch off
your digital photo frame before removing your memory card.
The digital photo frame should be used indoors only.
Use supplied power adapter only.
To reduce the risk of fire of electric shock, do not expose this appliance to the rain or moisture.
Do not block the ventilation holes on the back of the digital photo frame at any time.
Keep your
digital photo frame out of sunlight. Direct sunlight may cause damage.
Do not splash or fill the digital photo frame with liquids.Keep clear of liquids.
No objects filled with liquids,such as vases,shall be placed on the frame.
Keep the LCD screen clean and treat it gently. Avoid touching the LCD directly.
If you
need to clean the LCD screen, please make sure the digital photo frame is switched off
and the mains cable unplugged . And then use a soft cloth and spray the solutions on the soft
cloth first(Use only LCD specific cleaner).
Always position the digital frame on a suitable and level
surface.
The digital frame only complies with the voltage type specified on the back.
Working Conditions:
Operating Temperature: 0 C~ +45 C
Humidity:20%~ 80%
For an environmentally friendly operation and to save energy,please switch off the mains
supply when the digital photo frame is not in use.
The power device
can be easily removed from or plugged into wall outlet.
Page 4
Dimensions:315 X 223 X 40 mm.
Weight:0. 75kg
10.2 Inch 16: 9 TFT Screen
Picture,audio,video playback:JPEG/MP3/MPEG-4/Motion-JPEG
Compatible with SD/MMC/MS/XD memory cards
Earphone jack for headset connection
Instantly plays Mp3music with built-in speakers
Supports thumbnails mode and slide show
An
automatic,continuous slide show with background music lets you enjoy all of
your photos with ease.
Photo with multiple transition effects
USB Host for connecting to the USB mass storage
USB 2.0 high speed transmission for connecting to your computer to download the files.
Time and date display,alarm clock are available
Controlled by
infrared remote control and buttons on the rear panel
Built-in 2 X1.5W stereo speakers and with internal NAND memory(512MB)
Supports Memory Cards:SD/MMC/MS/XD
Supports Video:MPEG-4 & Motion-JPEG
Speaker S/N:≤60
Digital Photo Frame
1PC
User's Manual 1PC
Remote Control 1PC
Button Battery(For
the remote Control) 1PC
Power Adapter 1PC
Stand
1Set
Warranty Certificate 1PC
Please check and identify the contents of the box of your player package,as listed below:
Page 5
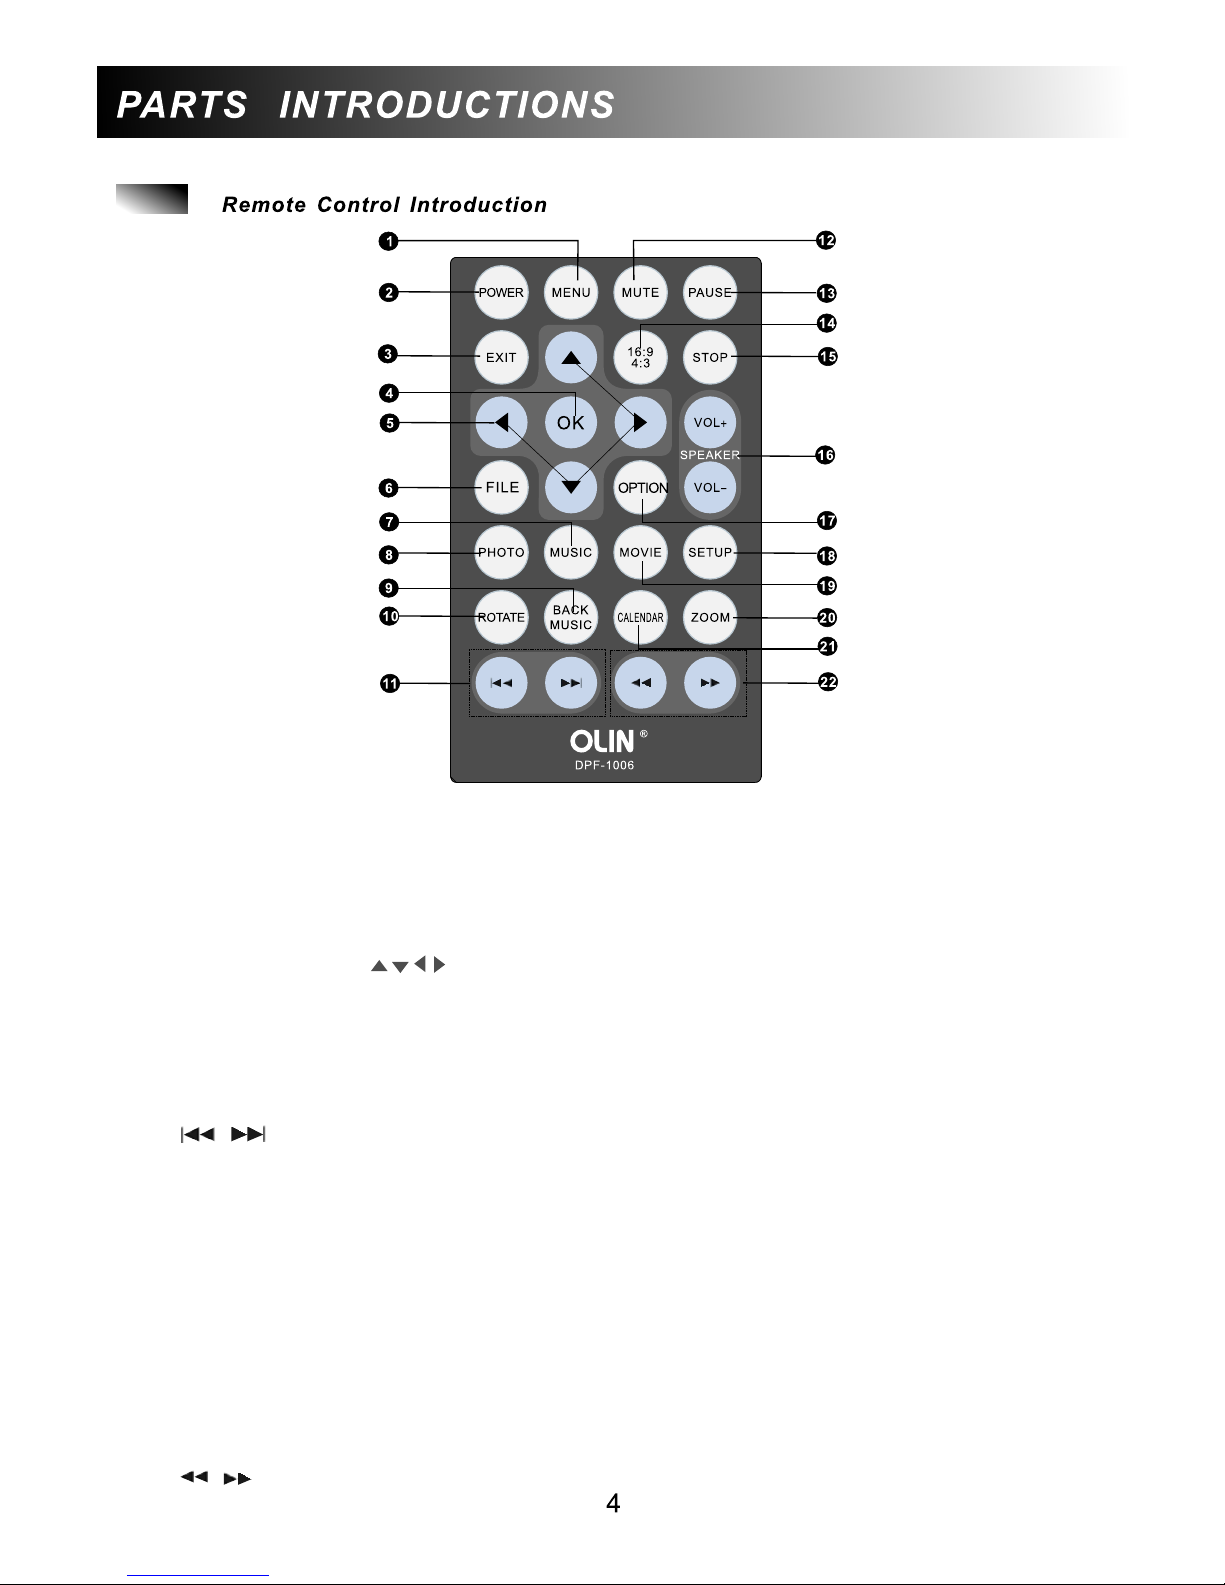
1. MENU-To access the main menu.
2. POWER-Switch the digital photo frame to either standby or ON.
3. EXIT-To stop the current the playback and return to the previous menu.
4. OK-To start the playback or to confirm selections.
5. Direction Buttons(
)-To select menu items or settings.
6. FILE-To access the file overview menu.
7. MUSIC-Automatically play music if present in the memory card /USB drive/ internal memory.
8. PHOTO-Automatically play images as a slide show.
9. BACKMUSIC-To play background music(MP3) during a photo slide show.
10. ROTATE-To
rotate the orientation of the images while displaying photos.
11. / (PREV& NEXT)-Skips to the previous or next photo page,track or video file.
12. MUTE-To turn off the speaker/pressing it again turns MUTE off.
13. PAUSE-To pause the playback.
14. 16:9/4:3-Switch the aspect ratio of the
displayed images.
15. STOP-To stop the playback.
16. VOL+/- -To adjust the volume level.
17. OPTION-On Screen display.
18. SETUP-To access the photo frame setting menu.
19. MOVIE- To play the movie/video stored in the memory card/USB drive/ internal memory .
The mode selection icon of such function appears
in interface as "VIDEO".
20. ZOOM-To zoom in the display image/video.
21. CALENDAR-To access the calendar display menu.
22. / (REV&FWD)-To fast rewind or forward search.
**
Page 6
When using the remote control, make sure no obstacles are placed between the
remote control and remote sensor.
The battery normally lasts around one year. When not using the frame for long periods
of time,remove the battery.
Dispose of used battery according to the local ordinance regulations.
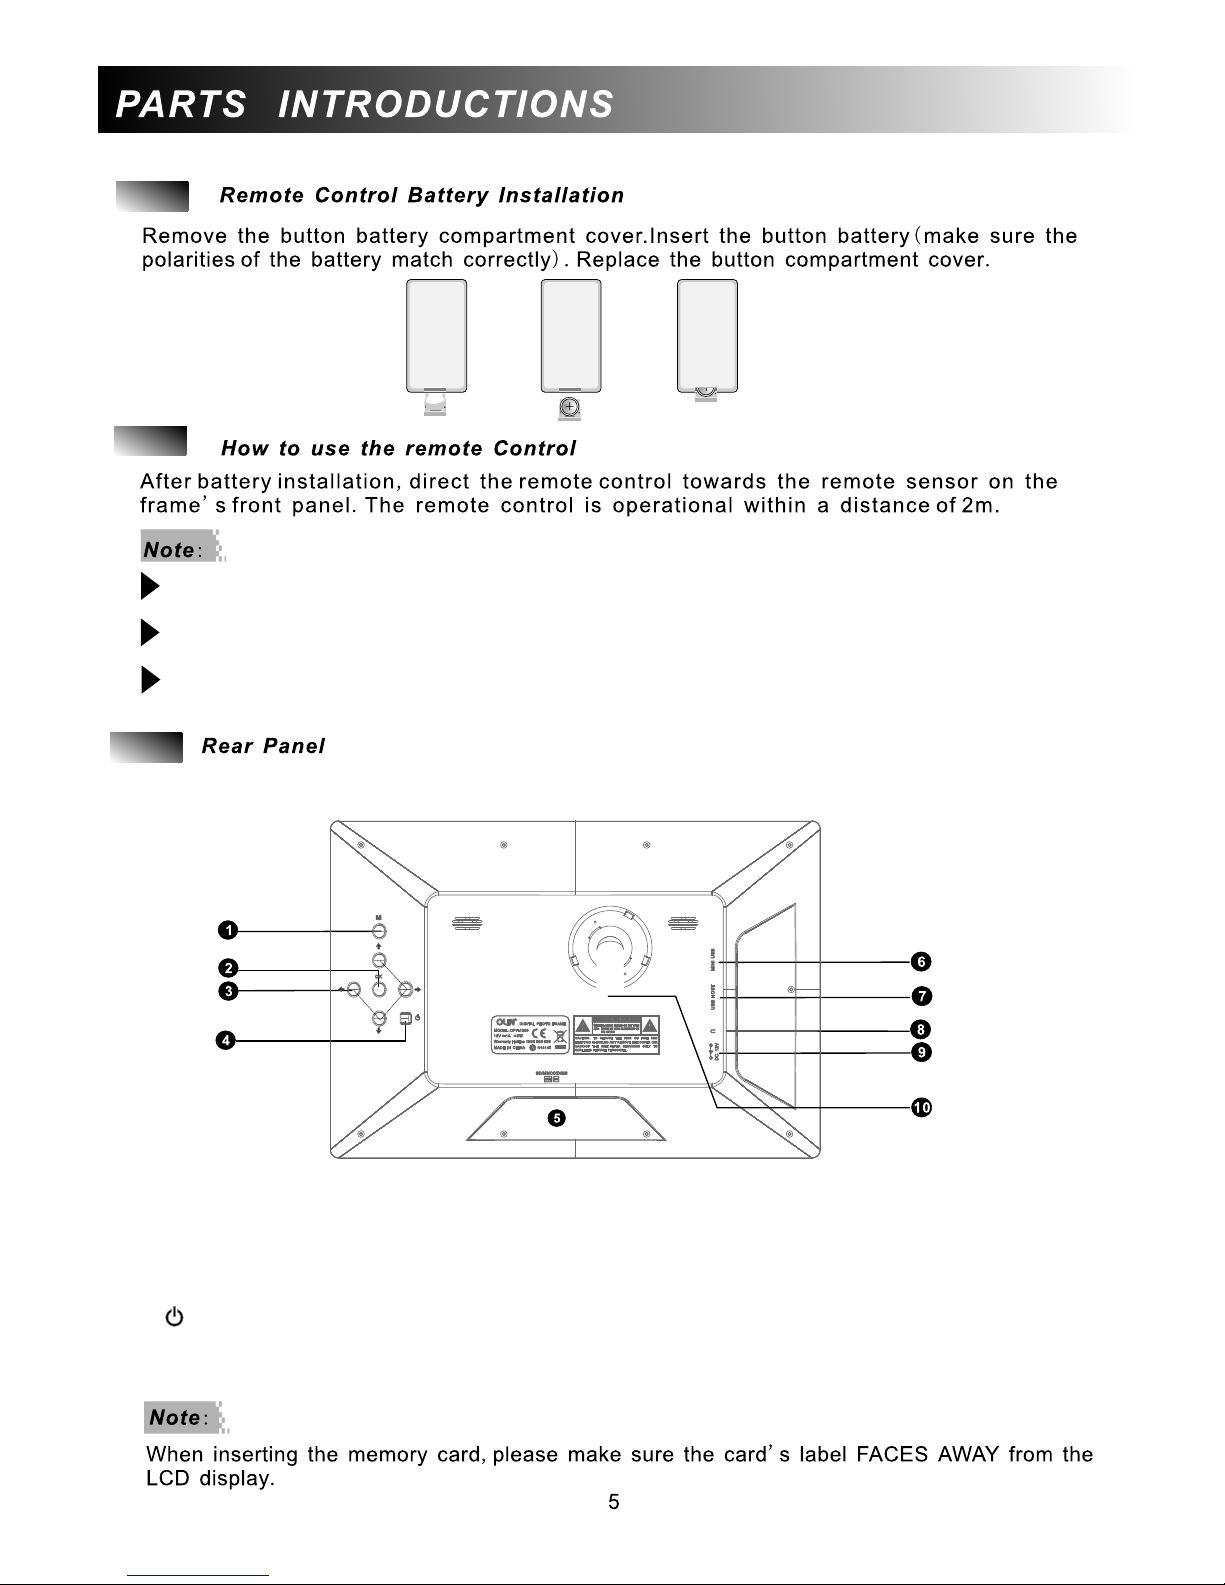
1.M:To access the main menu.
2.OK Button
3.Direction Buttons
4. : Press and hold about 5 seconds to
turn on or off the photo frame.
5.SD/MMC/MS/XD Slot
6.Mini USB Port:To connect to a computer
7. USB Port: To connect to an external USB
device
8. Earphone Jack
9. DC 12V,1A Jack
10. Stand
Page 7
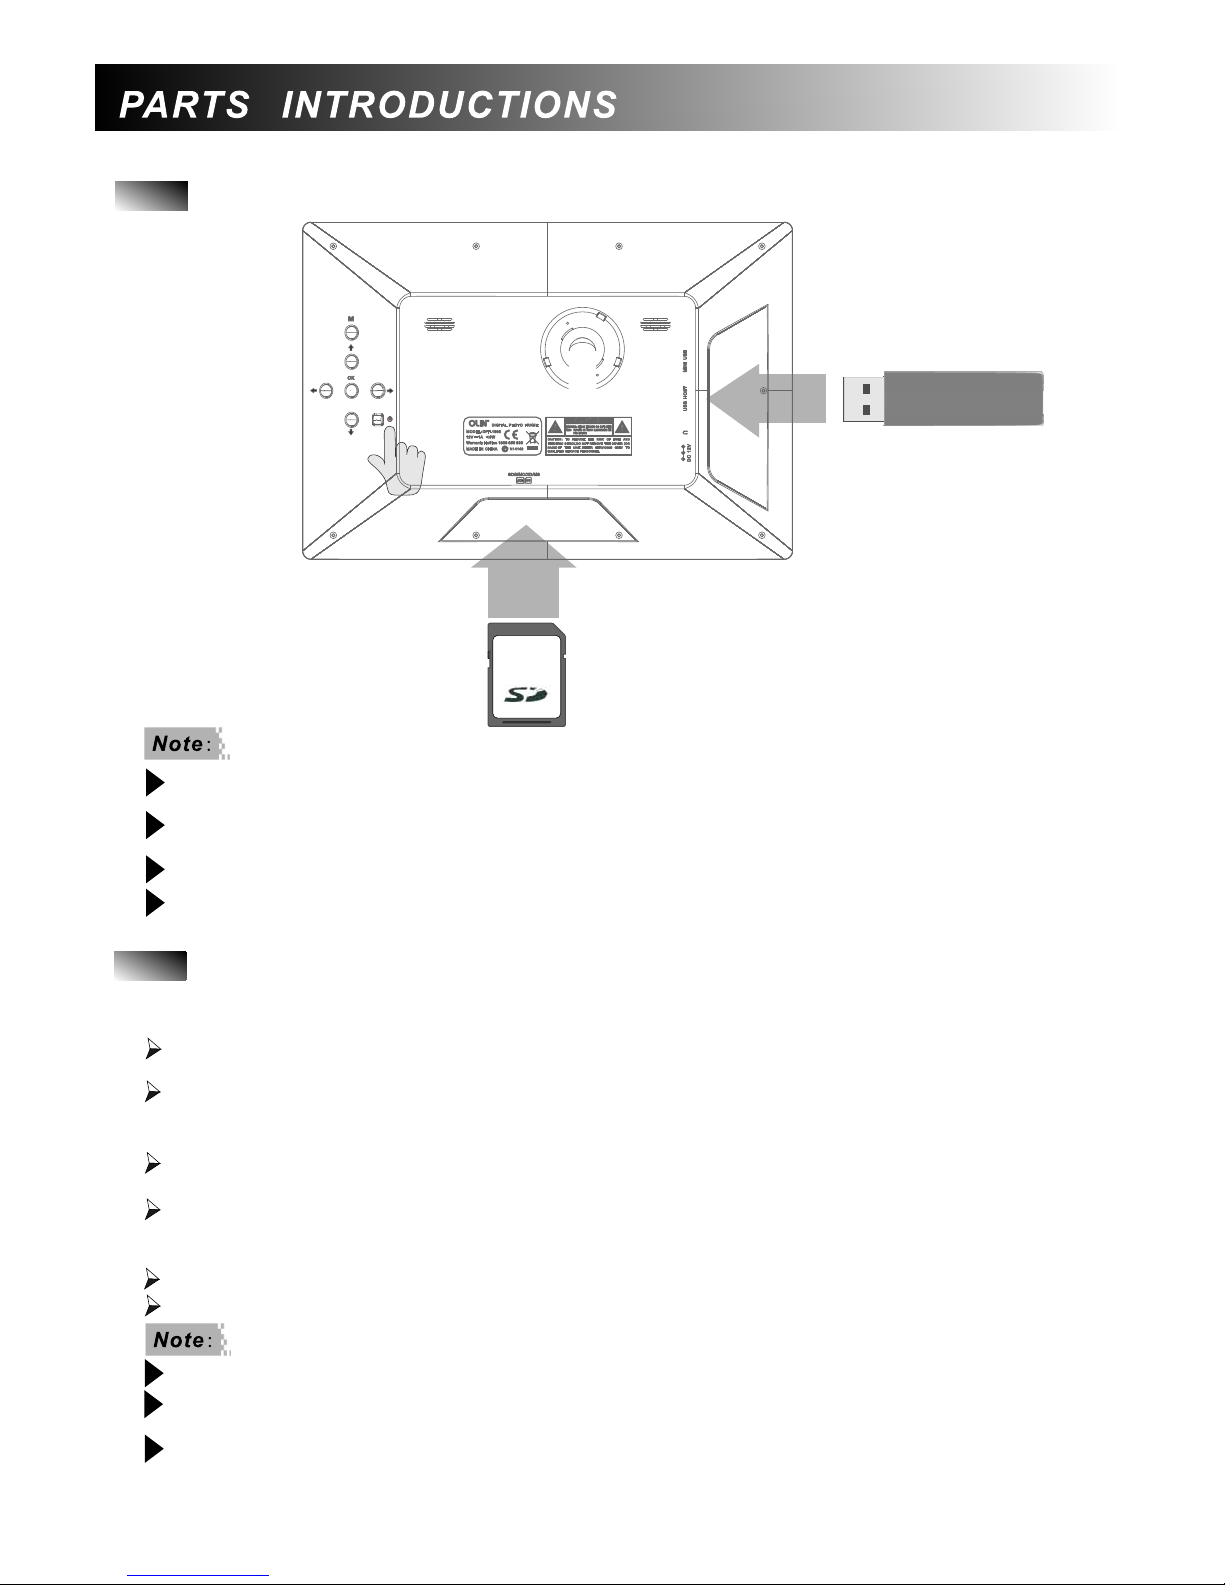
Memory Card Insertion
Please make sure the digital photo frame is powered off when removing the memory
card.
When inserting the memory card, please hold the memory card by its edges and gently insert
it into the appropriate slot (make sure the card’s label FACES AWAY from the LCD display).
Make sure there is at
last one available file on the memory card.
The USB HOST port supports USB flash drives for instance MP3/MP4 player or USB
memory sticks.
Mini USB Port ( for connection to a Computer)
6
Using the USB cable (not supplied), you can connect your digital photo frame to a computer
to transfer files between the two devices.
Connect the mini plug of the USB cable to the mini USB port on the digital photo frame,
and the other end to your computer.
Tur n the digital photo
frame on and allow the computer a few moments to recognize the
device.
, ny memory cards inserted in the digital photo frame will
appear as external storage devices on the computer.
through normal copy-and-paste or
drag-and-drop methods.
Follow the Safety Remove Instructions to disconnect the USB cable to the computer.
.
The photo frame will also display a message stating that the connection has been
established to a computer.
Once connected to the computer a
Then you can transfer files between the computer and the photo frame's internal memory,
or other memory devices inserted in the photo frame
After disconnecting from the computer the
frame starts the photo slide show automatically
When connecting with a computer, the USB HOST drive is not available.
When copying or transferring the files to the card/internal memroy, in the photo frame , do
not disconnect the USB cable or remove the card.
Make sure your computer is running Windows 2000 or above, e.g. Windows XP
or Vi st a,
with USB port supported.Mac system is not supported.
fla sh
memory card
SD/MMC/MS/XD cards supported
USB drive
Page 8
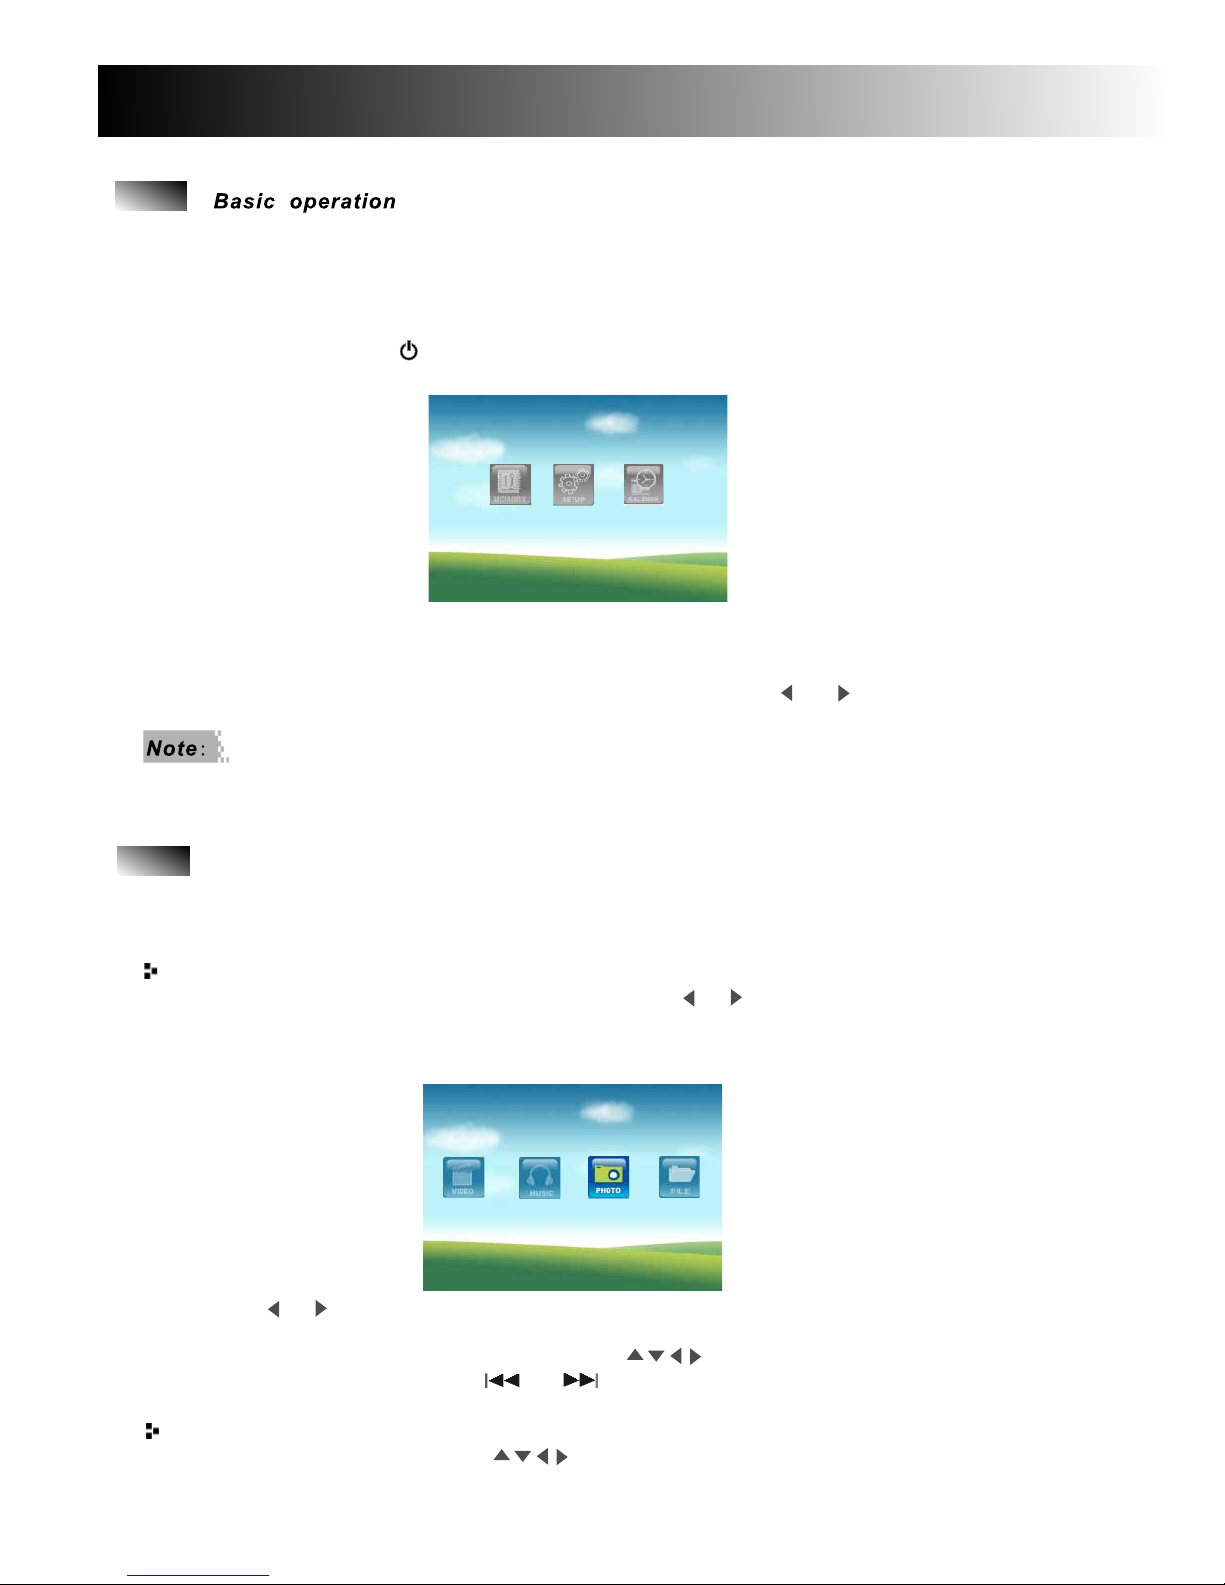
5. In the main menu, you can selected the inserted source to enjoy photo/music/movie,
change the frame setting or display the calendar. Use the or button to highlight an
item that you want to enter and press the OK button to
enter the sub-menu.
To view photo, make sure supported image files are loaded onto the storage device. A slideshow
will start automatically when the storage device is connected. To preview image in thumbnail list,
press the MENU button to return to main menu and follow the instructions below.
Viewing Thumbnails
1. After the above basic operation,you can use the or direction button to highlight USB/SD/
Memory icon on the main menu and press the OK button to confirm.
2. The screen will display the mode selection screen.There are four modes are available:Movie,
Music,Photo and File.
3. Use the or button to highlight the Photo icon(the third icon) and press the OK button to
confirm.A screen with 15 thumbnail images per page will appear.
4. Navigating among the images using the
button.To skip to the previous or
next image page,press the or button.
5. To return to the main menu,press the MENU button.
7
Main Menu Setup
Photo
1. Once removed from the package,attach stand to frame by placing it in the slot in the
rear of the frame, fully push in and gently rotate to a stable position,then the frame
can be securely place on a flat surface.
2. Insert
the supplied adapter DC plug into the frame, then plug the adapter into a stand-
and outlet.
Press and hold the button on the rear for 5 seconds to power on the frame and the
main menu will be displayed after the start-up
screen has been shown.
4. drive , a slide show will
start automatically.Press the MENU button to return to the main menu.
3.
Insert the available memory card or USB int o the corresponding slot
Photo Playback
Running a slide show
In thumbnails mode,use the button to highlight an image and press the OK button
to start slide show.
Note:
th -
Once a memory device is inserted
into the digital photo frame, e co
rresponding icon can be selected.
If there are available images/ AV files in the internal memory or inserted device, you can
enjoy the photo/music/movie or overview the file information just by pressing the
respective button(PHOTO/MUSIC/MOVIE/FILE)on the remote control directly.
Page 9
8
Rotate Photos
When a single image is displayed, you can rotate the image using the ROTATE button
on the remote control and finally return to original image. Every time you press this
button,the image rotates 90 degrees clockwise. Press the PAUSE button to resume the
slide show.
During a photo slide
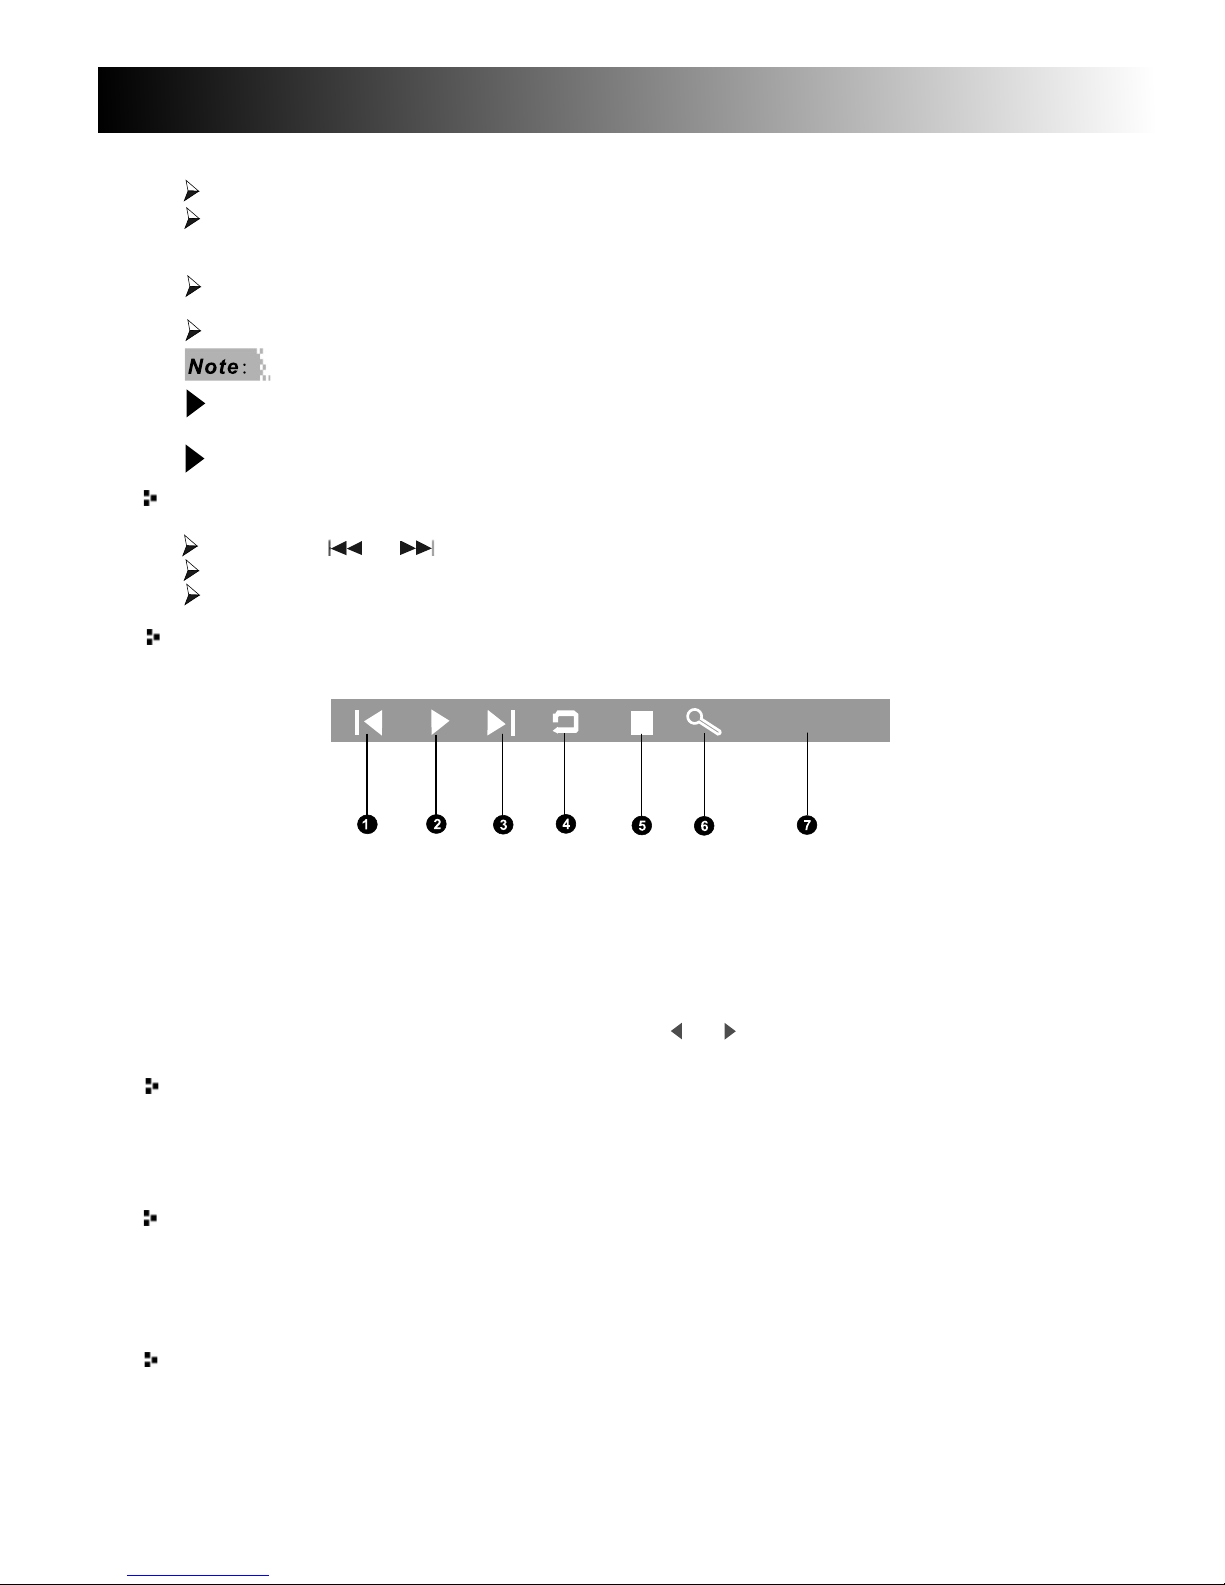
show, pressing the OPTION button on the remote will display a menu on
the screen, the functionalities of each icons on this menu is described below.
An image can be zoomed in using the ZOOM button on the remote control.
1. Return to the previous image.
To play/pause the playback.
Go to next image
4. To rotate images
5. To stop the play and return to the thumbnail screen.
6. To zoom in the image
2.
3.
7. Photo file name
Repeatedly pressing this button will ZOOM
in to various levels and finally return to the original
image.Use the direction buttons to move the image for viewing in zoom in mode.
Zoom In An Image
Press the EXIT/STOP button to return to the thumbnails screen.
, ress the BACK
MUSIC button
to start or stop the background music playback.
Use the VOL + or VOL- button to increase or decrease the volume of the background
music.
Press the MENU button to return to the main screen.
If music in MP3 format
is stored in the same memory card and in the same folder as that
of the photos then you can play a background music for the slide show p
On Screen Display
For changing the transition effects or time interval for slide show, please follow the
SETUP chapter instructions.
In any mode,press the PHOTO button to start a slide show automatically.
The menu icons can be navigated using the or button and activated by pressing the
OK button.
Viewing a single image
During a slide show, you can view a single image by pressing the PAUS E button.
Press the or button to skip to the previous or next image.
Press the PAUSE button again to enter slide show
mode.
Press the EXIT/STOP button to return to the thumbnails screen.
Changing Aspect Ratio
The frame has a wide screen with 16:9 aspect ratio. However most of the consumer camera's
take picture in 4:3 aspect ratio. The frame's default setting is to show slide show in full screen
mode with out distorting the image.
2005822.jpg
Due to automatic resizing in full screen mode (16:9 mode), the image's top/bottom/side
details will not be visible.
Main Menu Setup
Press the PAU SE button to resume normal playback.
Page 10

9
Music Playback
1. From the main menu to choose the inserted device and then choose Music icon on the
four mode selection screen.
2. Press the OK button to enter music files preview menu.
3. Highlight a music using the
or button and
then press the OK button to start the playback.
4. To change a new music for playback,press the or button.Repeatedly pressing
the or button to enter fast backward or forward playback,
.
5. To adjust the volume, press
the VOL+/VOL- button.Using the MUTE button to mutes
or unmutes the sound.
6. Repeatedly pressing the PAUSE button will pause or resume the playback.
7. Press the STOP button to stop the current playback.
This will list the files and folders present in that
memory card.
pressing the PAUSE
button on the remote control will revert to play
Before you can enjoy music,please make sure there are MP3 file(s) on the internal memory
or inserted device.
Movie/Video Playback
The frame supports three selection repeat playback modes: Repeat All, Repeat One
and Repeat Off.For changing the repeat mode, please follow the SETUP chapter
instructions.
The frame will start the music playback automatically by pressing the MUSIC button
on the remote control.
1. From the main menu, select your
desired plugged-in device, and then choose VIDEO(Movie)
icon on the mode selection screen.
2. Press the OK button to enter movie/video files preview menu.
3. Highlight a video file using the or button and then press the OK button to start
the playback.
4. To change a new movie/video file for playback, press the or button.Repeatedly
pressing the or button to enter fast backward/forward playback,
.
5. To adjust the volume, press the VOL+/VOL- button.Using
the MUTE button to mutes
or unmutes the sound.
6. Repeatedly pressing the PAUSE button will pause or resume the playback.
7. Press the STOP button to stop the current playback.
8. Pressing the OPTION button on the remote control during the movie/video playback
will display the info bar as following:
pressing the
PAUSE button on the remote control will revert to PLAY
You can watch the movies/videos on the digital photo frame. It supports the format of MPEG-4 and
Motion-JPEG used by most digital cameras.
Alternatively if you pre fer to view the images in 4:3 aspect ratio, pre ssing the 4: 3/16: 9 button
on the remote control will change the display aspect ratio to 4:3. This will result in images
appearing in the middle of the screen with black bars on both the sides.You can alternate
aspect ratio
You can alternate aspect ratios between 16:9 and 4:3 by repeatedly pressing this button on
the remote control.
Main Menu Setup
The frame will start the playback automatically by pressing the MOVIE
button on the remote control .
movies/videos
Page 11

10
1. Return to the previous video file.
To play/pause the playback.
4. Fast Forward
5. Go to the next video file.
6. To stop the current playback and return to the file list.
2. Fast Backward
3.
7. To zoom in the video.
8. Playback time
display.
In the file navigation menu, you can examine the content of the storage device.
1. From the main menu to choose the USB/ SD/ MEMORY icon and then press the OK
button, four mode selection screen, File icon and press
the OK button to
.
this will b ring the choose the
enter the file management menu
2. Use the or button to highlight a file, the information of the file will be shown on
the right of the screen.
3. Press the OK button to start playing the Photo/Music/Movie.
File Navigation
.
In any mode,the frame will display the file navigation menu directly by pressing the FILE
button on the remote control.
1. Select the inserted memory card from the main menu and press the OK button to
enter the four mode selection screen.
2. Highlight the File icon and press the OK button to enter the file management menu.
3. Highlight a file using the or
button to copy/ delete .
4. Press the button on the remote control (or press the button located on the rear panel
of the frame) , a paw will appear against the file to indicate that the file has been
selected
for copying. Press the button on the remote control (or press the button
located on the rear panel of the frame) to cancel the selected.To copy multiple files at
once,repeat step 3 and step 4.
5. Press the OPTION
button on the remote control, COPY or Delete icons will appear.
Select one.
If Select Copy, icons of all memory devices connected will appear.
1. Use the or button to highlight the device to copy to. Press the button on the
remote control (or press the button located on the rear panel of the frame) to enter the
selected device and select a folder by the or button.
2. Press the OK button to start copying.
3. The file will be copied
and a message confirming this will appear on screen.
4. Press the OK button to dismiss the message and turn to file navigation menu.
If selected Delete,select icon to deleted the selected file(s).Select ,to cancel RQ
this operation.
To copy/delete files on the memory cards
Make sure that the memory devices that you want to transfer files are connected to the photo
frame.
Files can be copied between memory cards or between the internal memory of the photo
frame and memory cards without a computer by following the steps
below.
00:10: 59
Main Menu Setup
Page 12

11
Brightness,Contrast-
This setting allows you to change the setting of LCD screen.Higlight the brightness or contrast
icon and then repeatedly press the or button to adjust the brightness or contrast of
the LCD screen,press the OK button to confirm and exit from the current setting.
Screen
Saver-
screen saver will be displayed to prevent potential damage to the LCD screen when there
is no activity of the frame within a preset time.
OFF:To disable the screen saver.
Default-
To restore all the settings to the factory default.
1. Select the SETUP Icon in the
main menu and confirm with the OK button.
2. Use the or button to select the setting you would like to allocate on the left side of
the screen.
3. Confirm with the OK button.
4. Set the new setting using the
or button.
5. Press the EXIT button to return to the previous menu.
Modifying the Settings
The system settings let you customize and configure your digital photo frame.
You can allocate the following settings.
Select the Ti me item from the setup menu.
Highlight the desired setting sub-item using the or button.
Repeatedly press the or button
to change the setting.
Confirm with the OK button.
Setting the time and date here reflects in the calendar menu.
Language-
Supports English on-screen display only.
Slide Show Time-
Allows you to change the time delay from the available list during slide show.
Transition Effect-
Allows you to choose different styles of slide show effects from the available list such as
3D_Flip, 3D_Cube, 3D_Switch and so on
.
Music/Movie Repeat Mode-
Allows you to choose different repeat mode for music/movie file playback.
Repeat One: To have each individual music/movie files repeat continuously.
Repeat All:To have all music/movie files repeat continuously.
Repeat Off:To have music/movie files played only once.
Display Mode-
Switch
the image display effect between 16:9 and 4:3.
Select 16:9: to have your images fille the screen (some cropping may occur).
Select 4:3: to
change the display aspect ratio to 4:3. This will result in
images appearing in
the middle of the screen with black bars on both the sides.
Time-
Alarm-
Allows you to use the frame as an Alarm clock. The alarm can be set to ring at a specific time.
Set the ring volume on the settings menu. Use the VOL+/VOL- and MUTE button on the remote
control to adjust the alarm volume when ringing.For alarm time setting
steps please follow
the Tim e setting instructions.
OFF: Disable the alarm function.
Every: The digital photo frame will ring at the required set time every day.
Once: The digital photo frame only rings at the pre-set
time once.
Main Menu Setup
Page 13

12
Main Menu Setup
Calendar.
1. Use the or direction button to highlight CALENDAR icon in the main menu;
2. The calendar and clock will be displayed by pressing the OK button. Yo u can access
the calendar screen by pressing the CALENDAR button at any time. The
date and time
can be adjusted in the Settings section.
3. Press the EXIT button to exit the Calendar mode.
You can switch the digital photo frame to Calendar mode so that the current date and time
is displayed on the screen.
Page 14
WEEE Directive
Was te Electrical and Electronic Equipment Directive.
If at any time in the future you should need to dispose of this product, please note that Was te
electrical products should not be disposed of with household waste.
Please recycle where facilities exist. Check with your Local Authority or retailer for recycling
advice.
Problem Solution
Frame doesn't power up.
Check mains supply cable is properly connected
and powered on.
Unable to play background
music for slide show.
Check whether the music file is in the same memory
device ,
and in MP3 format.
No Audio
Check whether the audio files are of MP3 format.
Remote Control does not
work.
Make sure there is no obstacle between the remote
control and remote control receiver window.
Replace the battery.
When you have plugged in your memory card and power source correctly,and the start- up
screen displays properly, but it can not read the c ontent on the card, re-insert the card, or
format it(back up the files before this procedure).
If problem persists, please turn off the power and contact
our customer support.
13
No sound.
Check whether the volume is set at 0.
If so, press the MUTE button to unmute the sound or press
the VOL+ button to increase the volume.
Unable to display or
download files.
Make sure the file format is supported or the computer
and the digital photo frame are in
correctly connected, or
memory card is not damaged.
Try to press the power button and hold for 5 seconds
to power on the frame.
Page 15

The information of this manual is based on the current version of the product,we
reserve the right to alter the content without prior notice.
All brand names in this manual are property of their respective owners.
td
 Loading...