

Page 1
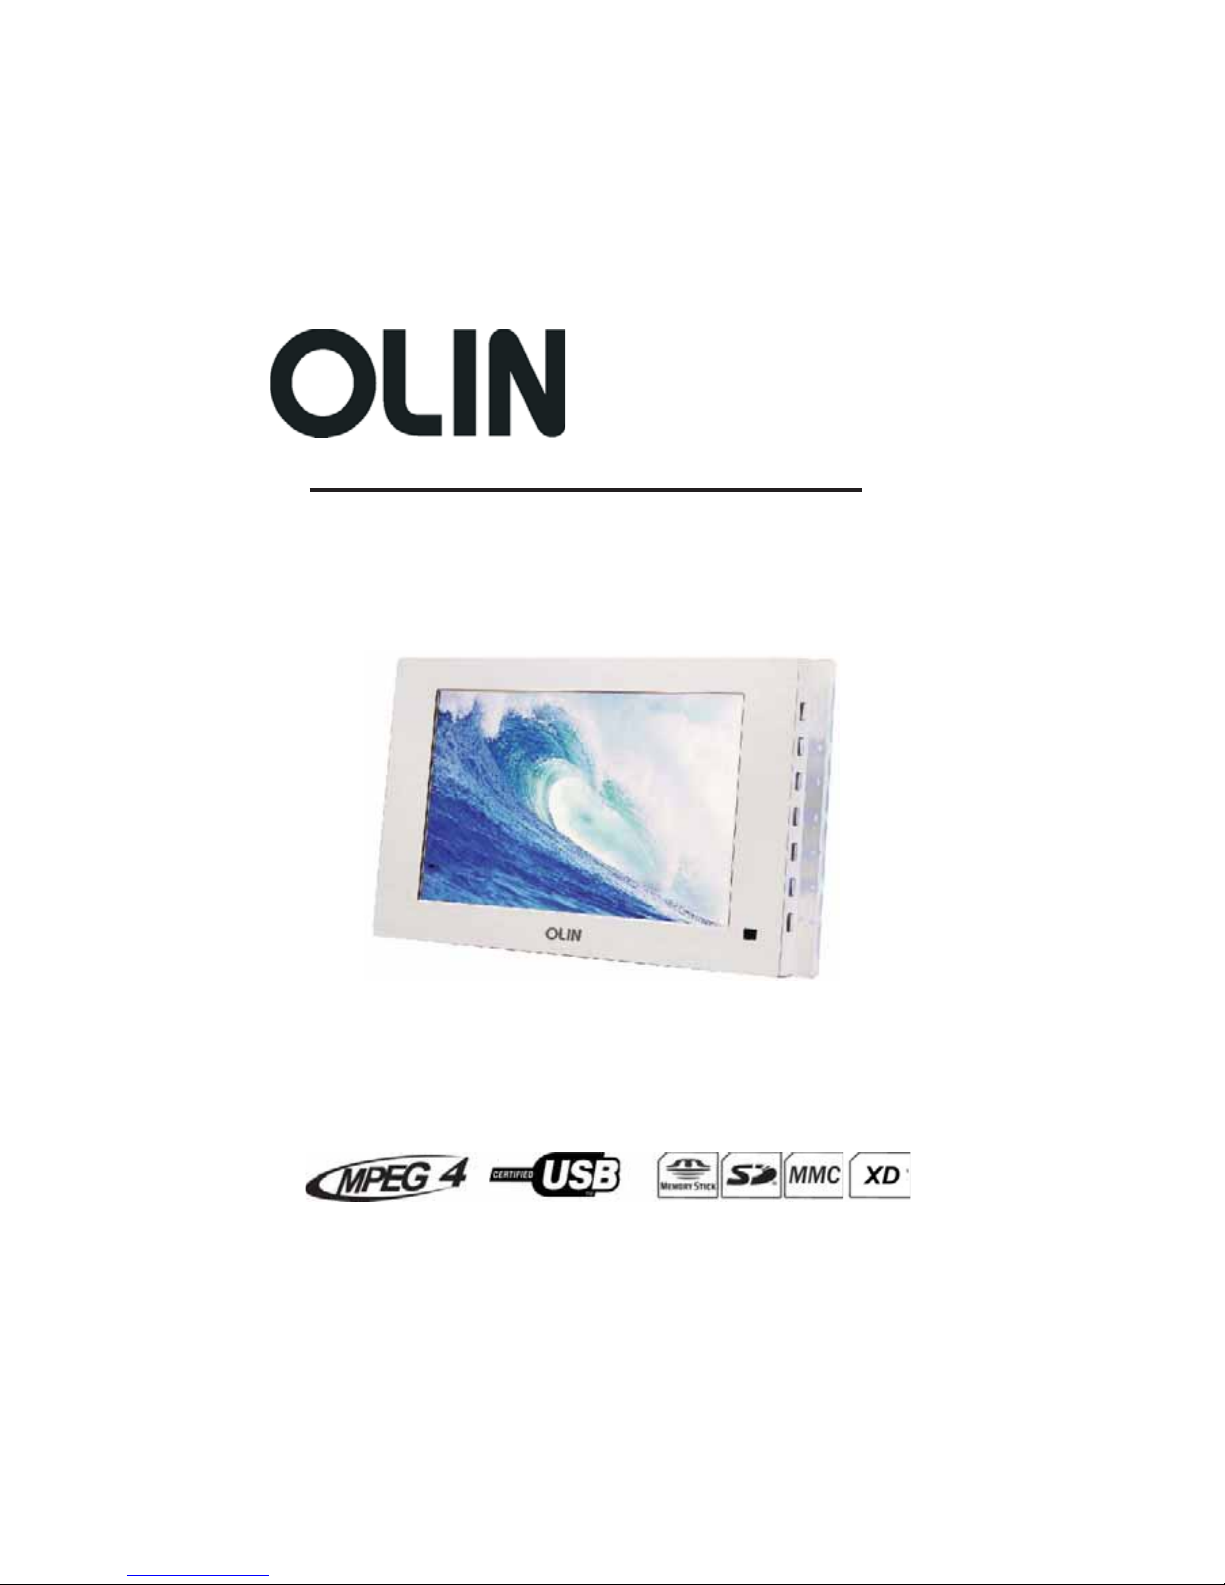
OLIN DIGITAL MEDIA FRAME DPF 1001-
'USER S MANUAL
Page 2
Table of Contents
1
Page 3

Safety Warning
SAFETY WARNING
Safety Warning:
The media frame should be used indoors only.
Use a DC 9 5V 3A power adapter./ .
To reduce the risk of fire or electric shock do not expose this appliance to rain or moisture,.
Do not block the ventilation holes on the back of the media frame at any time.
Keep your frame out of sunlight Direct sunlight may cause damage..media
Do not splash or fill the frame with liquids.media
Keep the LCD screen clean and treat it gently..Avoid touching the LCD screen directly
If you need to clean the LCD screen please use a soft cloth and spray the solution on,
the rag first.
Always position the rame on a stable and level surface.media f
The frame only complies with the voltage type specified on it s back side'.media
Working Conditions:
Operating Temperature 0 C 45 C:-+,
Humidity 20 80:%-%
Note:
In order to prevent damage to the memory card or the media frame please power off
your media frame before removing or inserting your memory card,.
Please check and identify the contents of the box of your player as list below,:
Packing
OLIN Digital Media Frame 1PC
User s' Manual 1PC
Remote Control
Bracket Screw&
Button Battery For the remote control()
AV Cord
AC Adapter
Warranty Certificate
1PC
1Set
1PC
1PC
1PC
1PC
2
Page 4

Main Features
Product Features
High resolution LCD screen with wide viewing angle
Display photos or videos without the need for a computer
Picture audio video playback JPEG MP3 AVI MPEG1 4
MS SD MMC XD CF cards compatible
Compatible with USB 2 0 disk
2 OSD languages English and Simplified Chinese
Duel placed mode Horizontal Vertical
Supports thumbnail and slide show
Photo with multiple transition effections enlarge rotate function
Image Enhanced Brightness Contrast Colour Saturation
Built in stereo speaker
Built in NAND memory 128MB to store your favourite photos without the need for a
memory card
Built in re chargeable battery making it portable and usable without cluttered cables
Supports calendar clock alarm auto power on off function
Supports backmusic while enjoy a photo Select COMBO item on the main menu to
achieve this function
;
,& :,// /;
,, , & ;
.;
:;
:/
:& ;
:// ;
-
-()
;
-- ;
,, , / ;
(
.)
P-P
Specifications
LCD Display: 10 2. inch
Power: 100V 240V 50 60Hz-,/ input
.,DC 9 5V 3A output
Power Consumption:
≤22W
Dimensions
: 308 8. X295. X 182 mm.
Video output:
1V
Audio output
:
1020.-.
Audio S N/ rate: 70
Audio distortion noise 60 1KHz
+:-()
Speaker output power 1 25W:.
Speaker S N 70/:
Weight 0 84:.
Supports Photo format JPEG:
Supports Video format AVI Motion JPEG:,-,
Supports Audio format: MP3
Supports Memory devices SD MMC MS XD CF USB 2 0
:////& .
≥
≥
Built in polymer Li Battery 1600mAh-:
3
*JPEG has to be savedin RGB -This is standardin All cameras.
*
Page 5
Panel Drawing
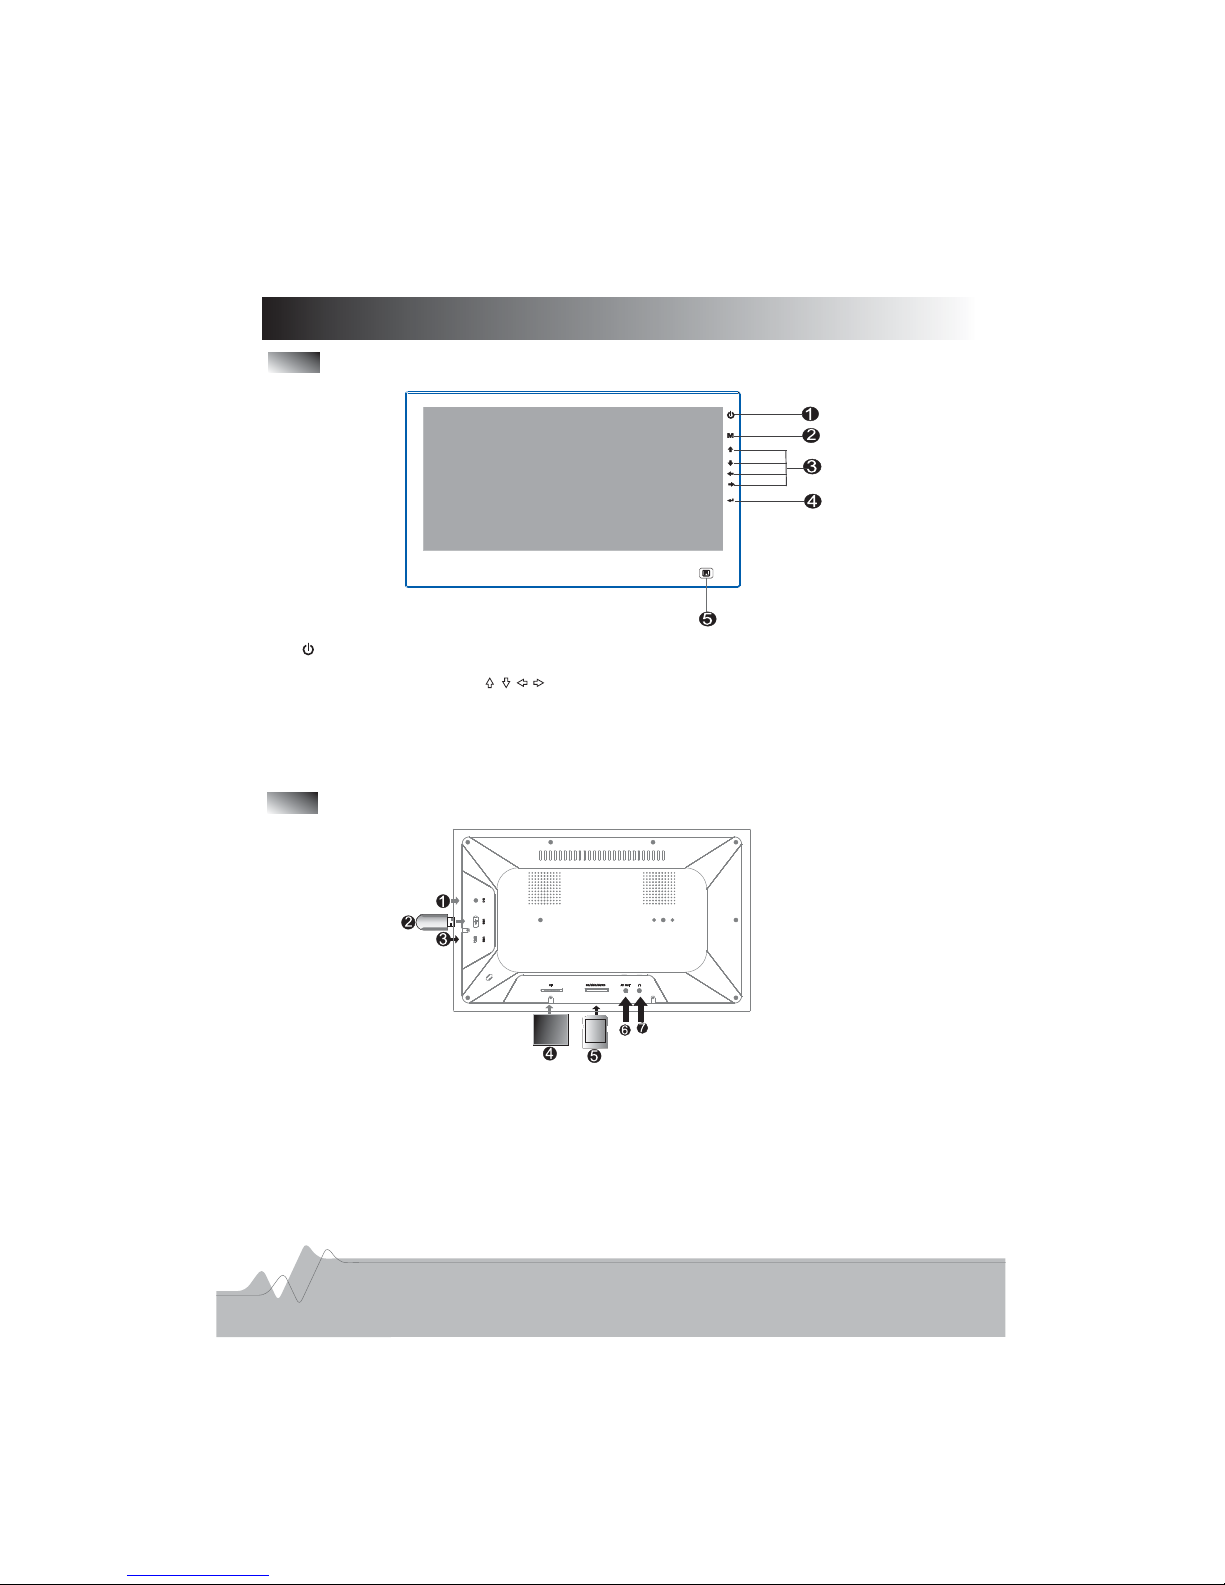
Front Panel
1 To open or close the player
2 M button To go to the main menu
3 Direction Buttons Use buttons to select the menu it m
4 ENTER To enter playback status or to confirm your selections
5 Remote Control Receiver
.: .
.: .
.: .
.: .
.
e
Rear Panel
1 DC 9 5V Jack
2 USB Port To connect to an external USB device
3 Mini USB Port To connect to a computer
4 CF Card Slot
5 SD MMC MS XD Card Slot
6 AV Output Jack To connect to a TV
7 Earphone Jack
..
.: .
.: .
.
./ / /
.: .
.
4
Page 6
Panel Drawing
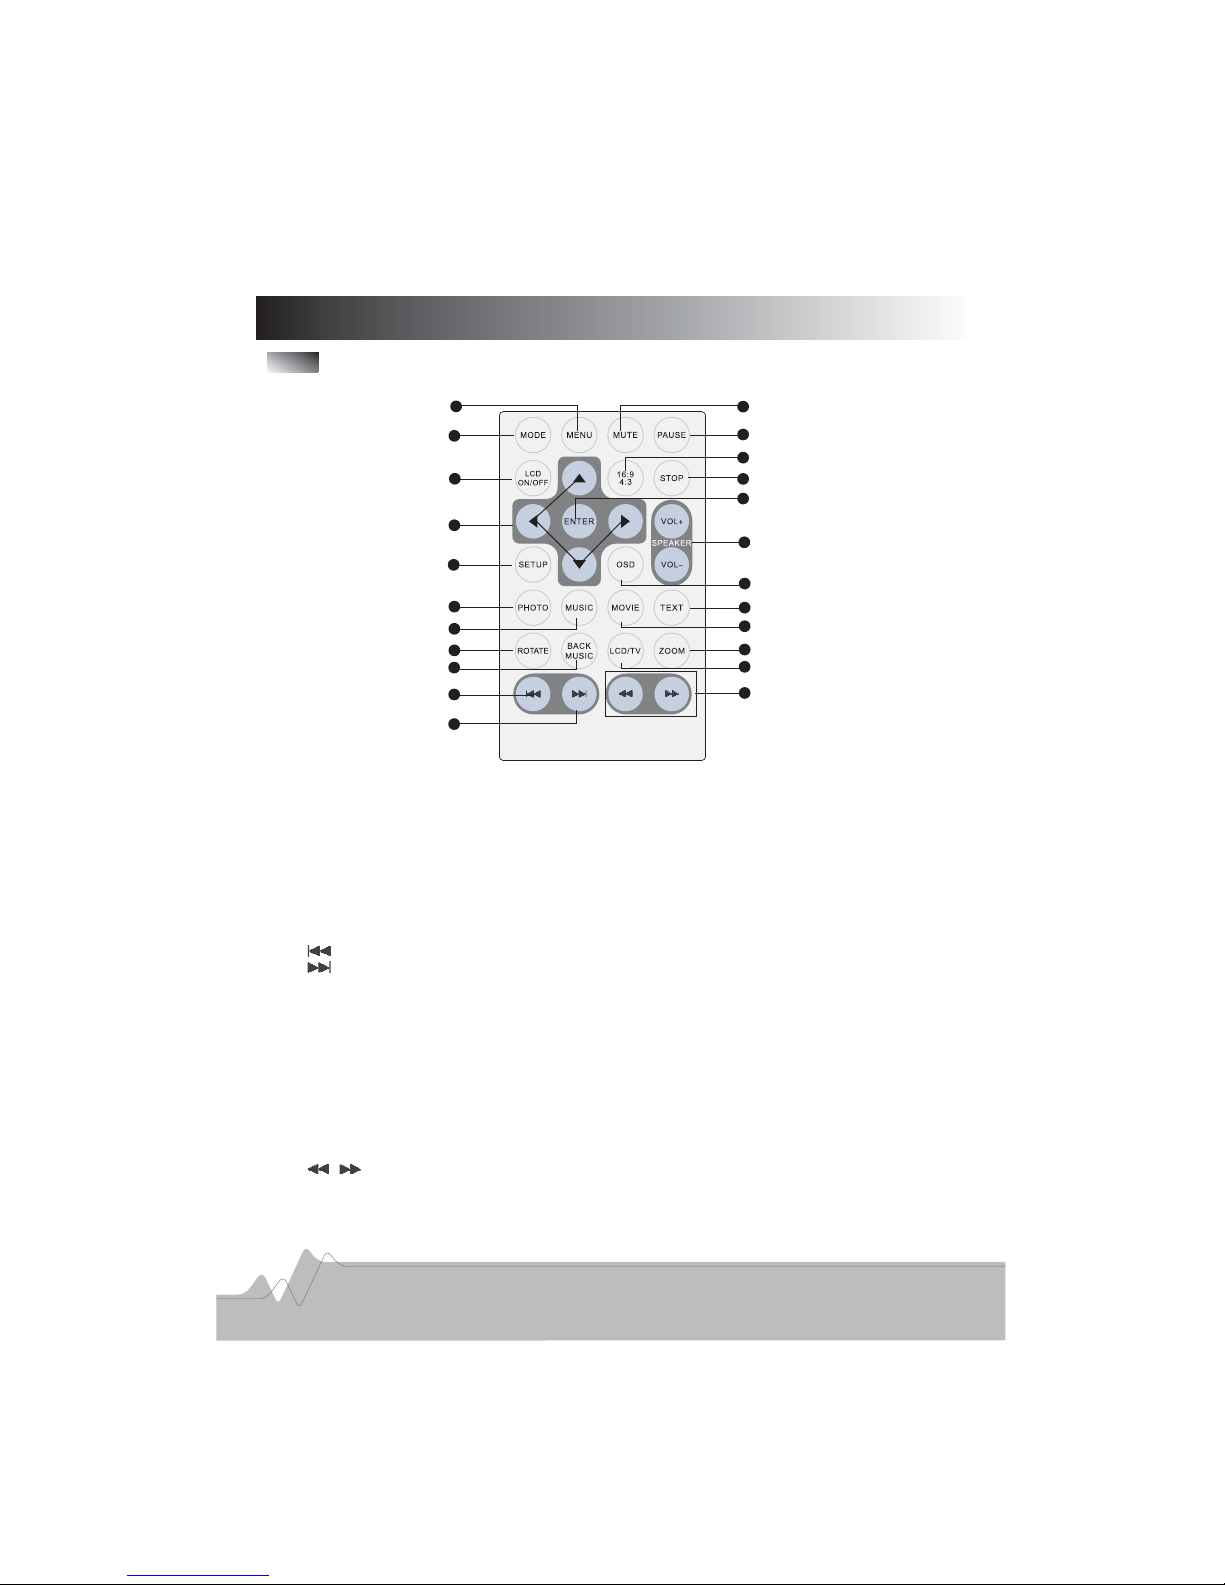
Remote Control
12
13
17
16
19
18
15
14
20
10
9
11
2
3
4
5
6
7
8
1
21
22
23
1 MENU To enter the main menu
2 MODE To display 9 thumbnail images when displaying photos
3 LCD ON OFF To open or close the LCD screen The LCD will be switched off even
though the unit is powered on
4 Direction Buttons
5 SETUP To access the photo frame setting menu
6 PHOTO Automatically play image slide show
7 MUSIC Automatically play music if present in the device
8 ROTATE To rotate the orientation of the images while displaying photos
9 BACKMUSIC To play background music during a photo slide show
10 Skips to the previous track
11 Skips to the next track
12 MUTE To turn off the speaker pressing it again turns MUTE OFF
13 PAUSE To pause the playback
1416943Toswitchtheaspectratioofthedisplayed images
15 STOP To stop the playback
16 ENTER To start the playback or confirm selections
17 VOL To adjust the volume level
18 OSD On screen display
19 TEXT Displays text files if present in the memory card
20 MOVIE Play the movie present in the memory card
21 ZOOM To zoom in the displayed iamge video
22 LCD TV To switch between LCD and TV mode
23 To fast rewind or fast forward while playing AV files
.: .
.: .
./: .
.
.
.: .
.: .
.: .
.: .
.: .
.: .
.: .
.: / .
.: .
. :/:: .
.: .
.: .
. +/-: .
.: .
.: /.
.: /.
.: /.
./: .
./: .
5
Page 7
Panel Drawing
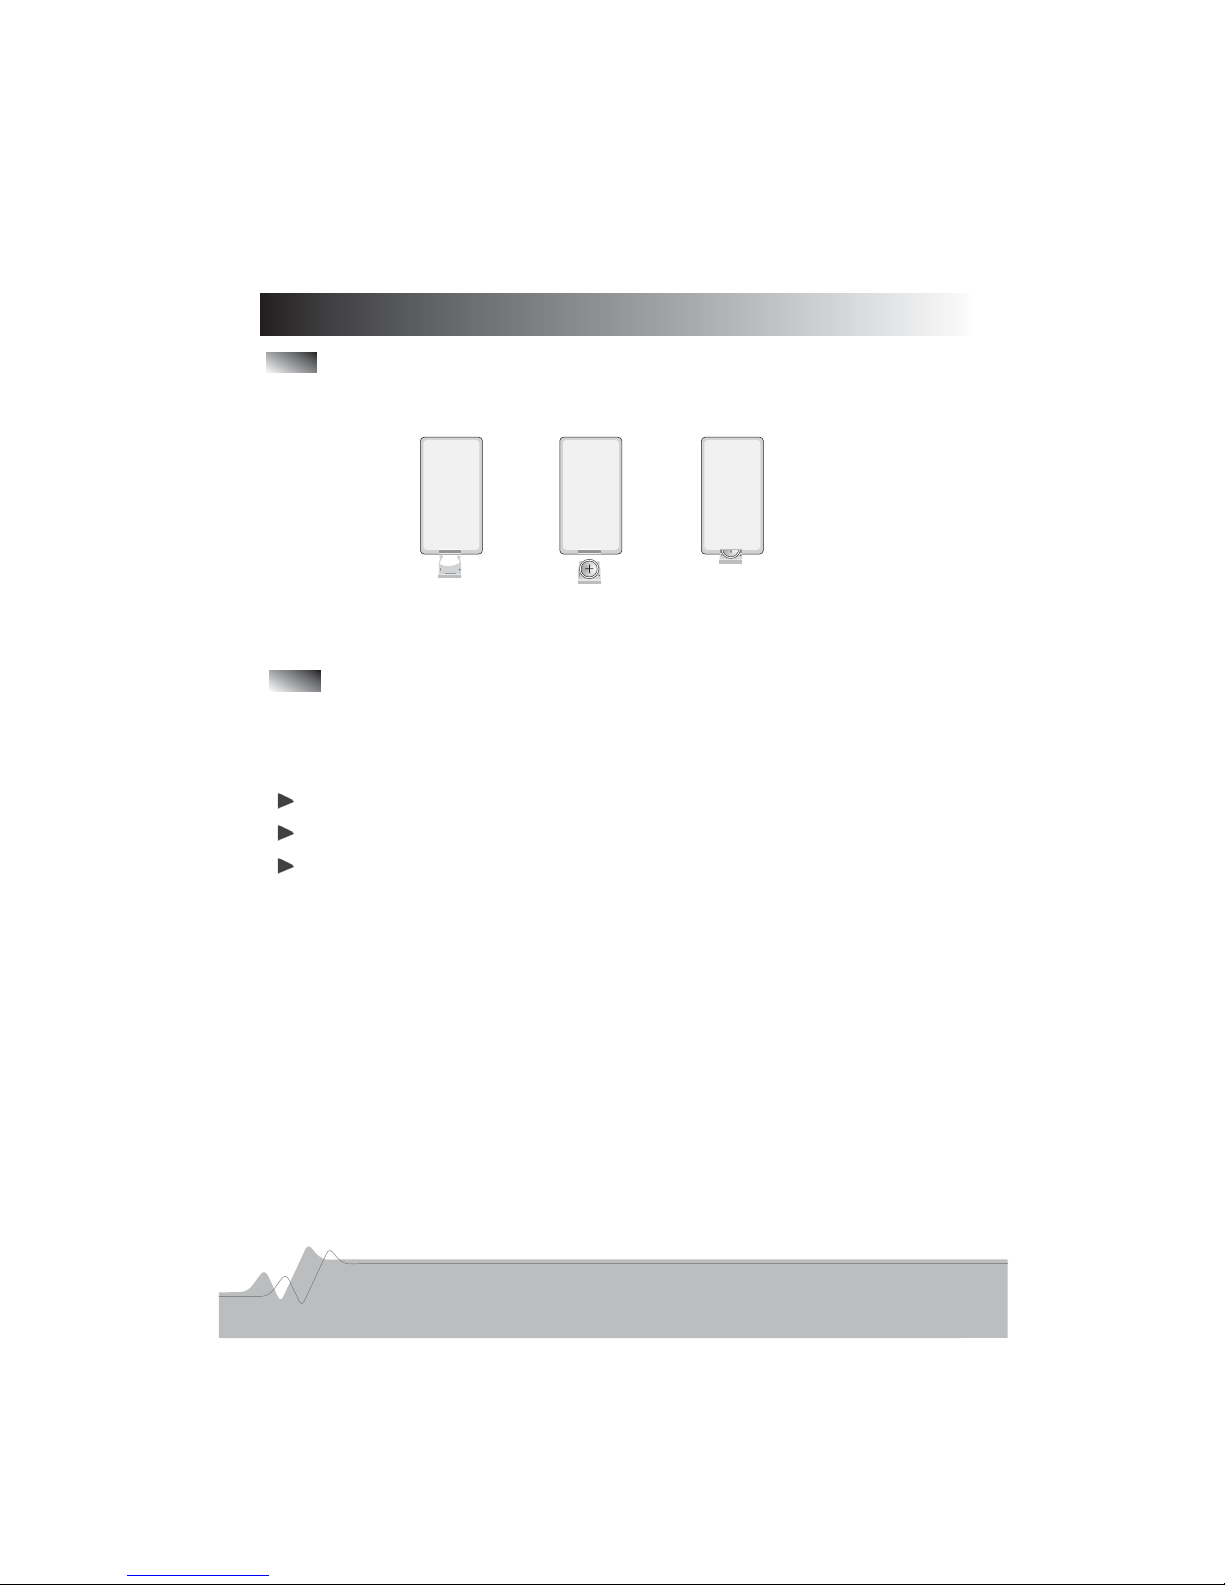
Remote Control Installation
Remove the battery cover on the rear of the remote control and insert the battery Make
sure the polarities and are aligned correctly
.
(+ -) .
Note
When using the remote control make sure no obstacle placed between the remote
control and remote sensor
The battery normally last arround one year Remove the batterey when not using the
player for a long time
Dispose of used batteries according to the local ordiance regulations
:
,
.
.
.
.
How to use the remote control
After having prepared the remote control direct it towards the remtoe sensor on the
player s front panel The remote control is operational within a distance of 2m
,
'. .
6
Page 8
OSD Menu Setup
Getting Started
1 Assemble the Photo Frame bracket on the back to prop the unit up Insert the adapter. .
,.DC plug into the unit first then plug the adapter into an standard outlet
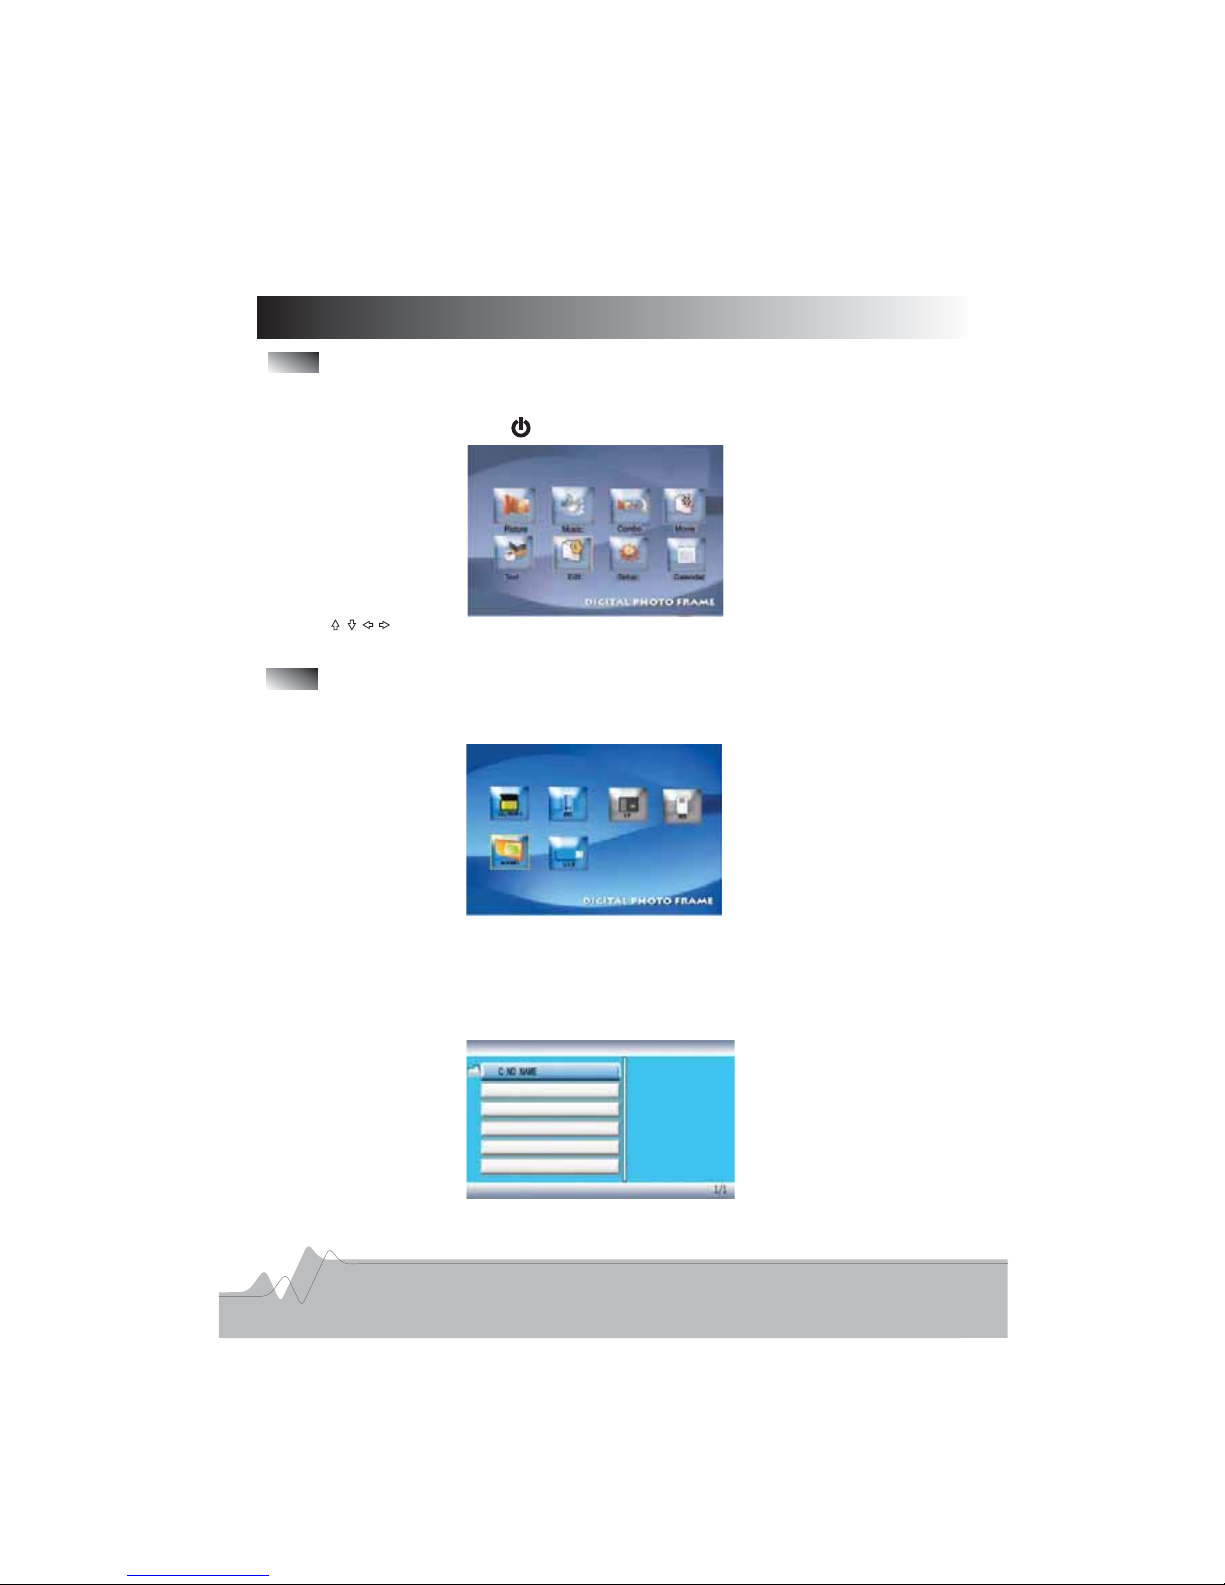
2 Turn on the unit by pressing button on the unit the main menu will appear as below.,:
3 Use direction buttons to highlight an icon and press ENTER button to confirm. .
Viewing Pictures
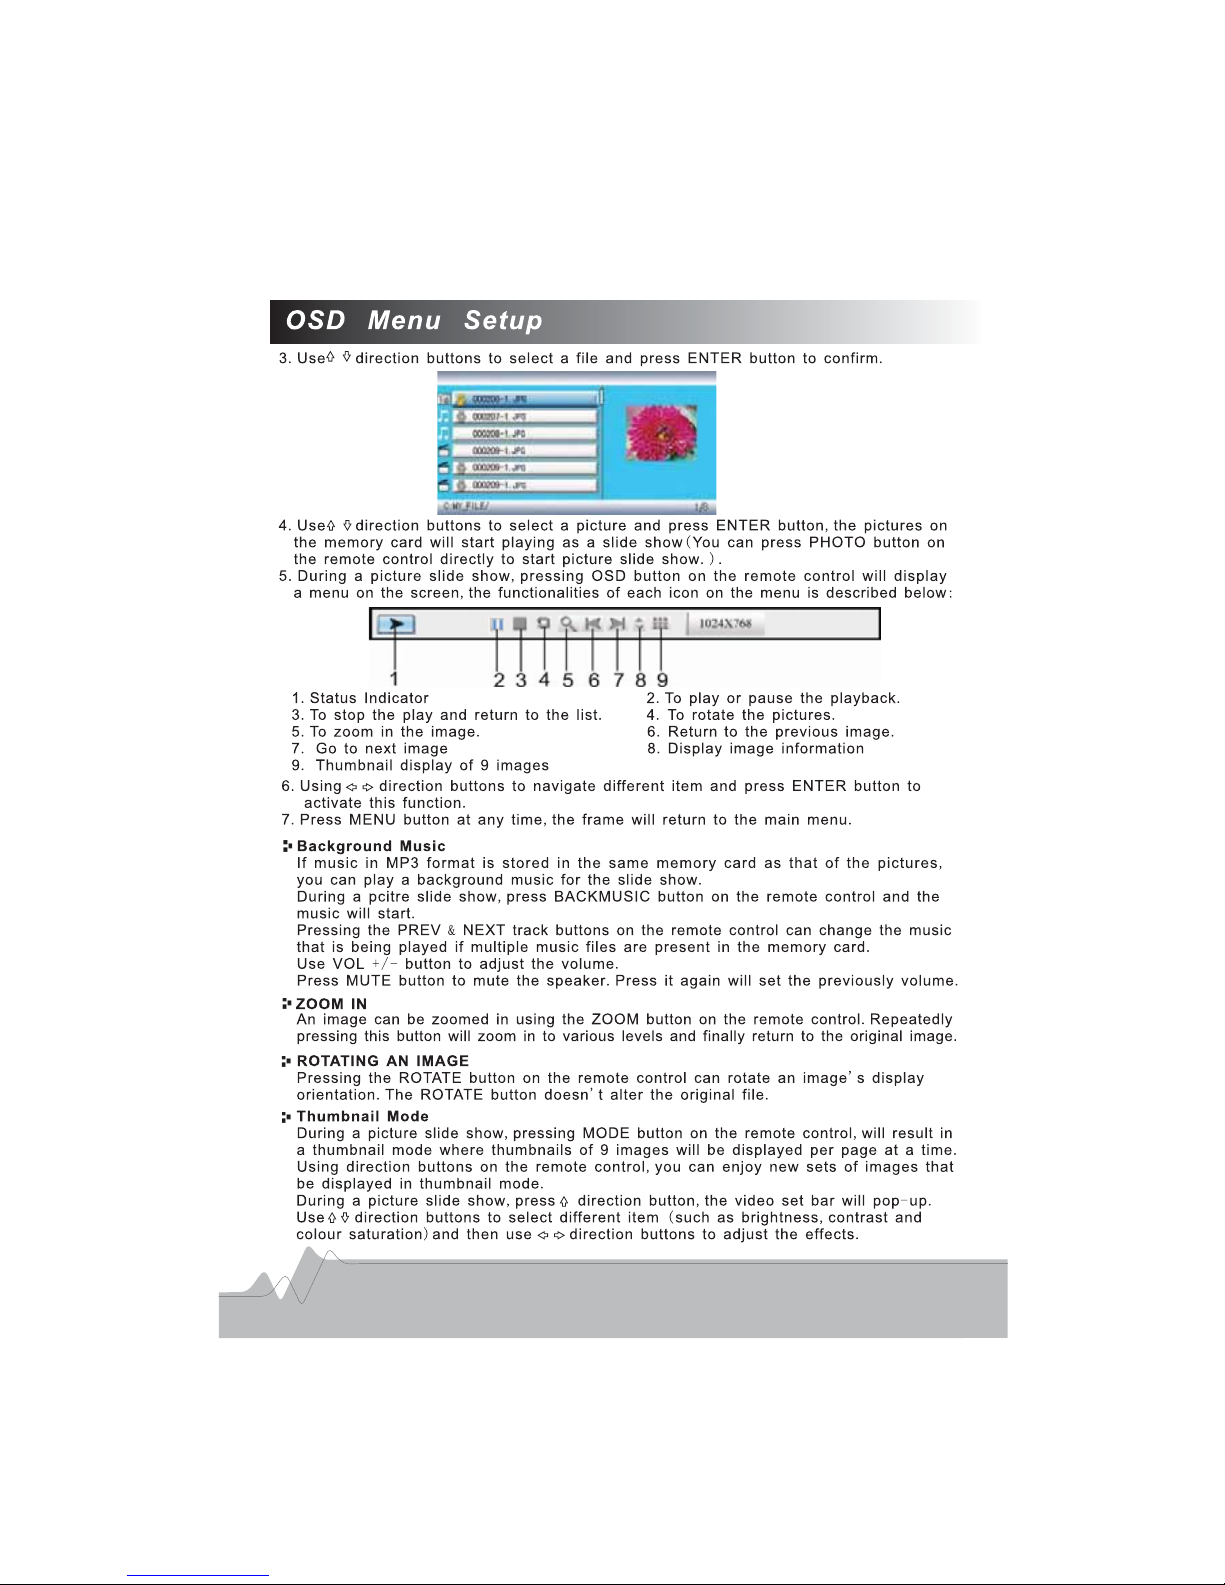
1 In the main menu choose Picture icon using the direction buttons press ENTER button
this will now bring the memory devices menu
.,,,
:
In this menu the memory cards which are inserted in the unit will be highlighted and
are enable for selection
Do not force the memory cards into the corresponding slot
,,
.
.
2 Use direction button to highlight the cards that you want to play and press ENTER
button the screen will display a list of files or folders
.
,.
7
Page 9
8
Page 10
9
Page 11
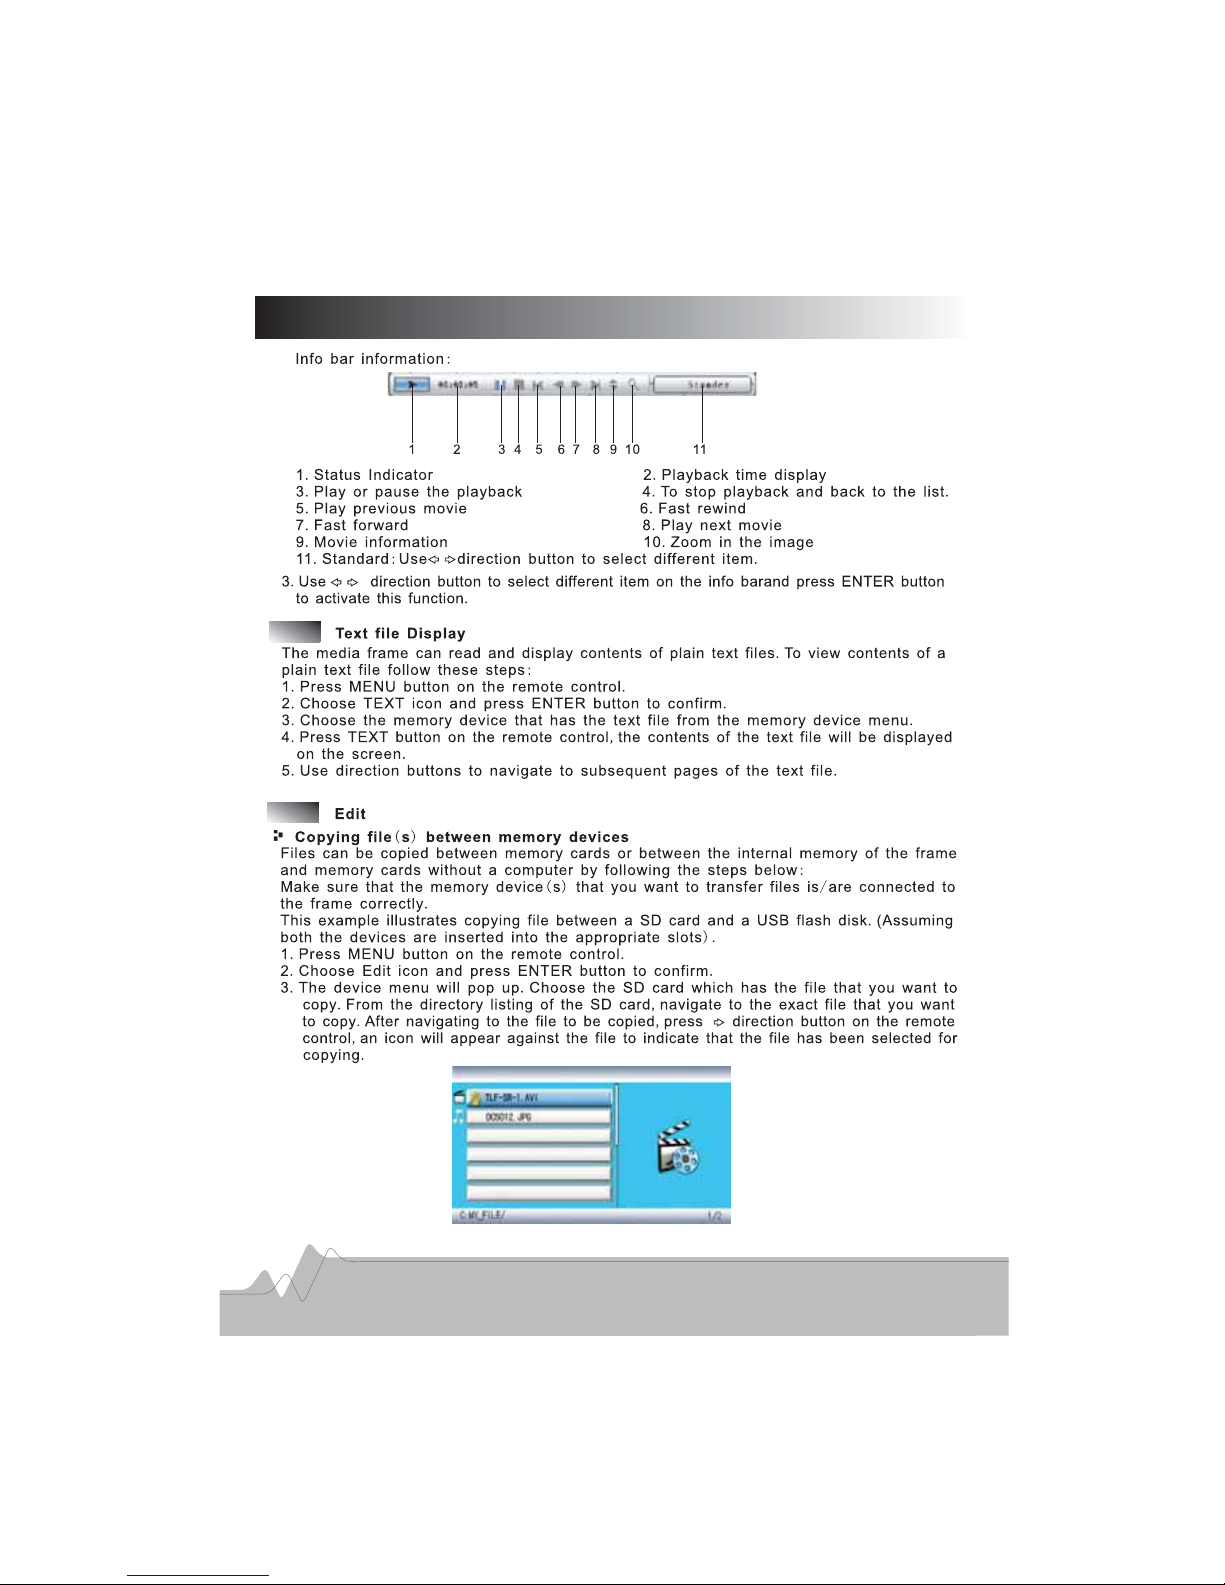
OSD Menu Setup
10
Page 12
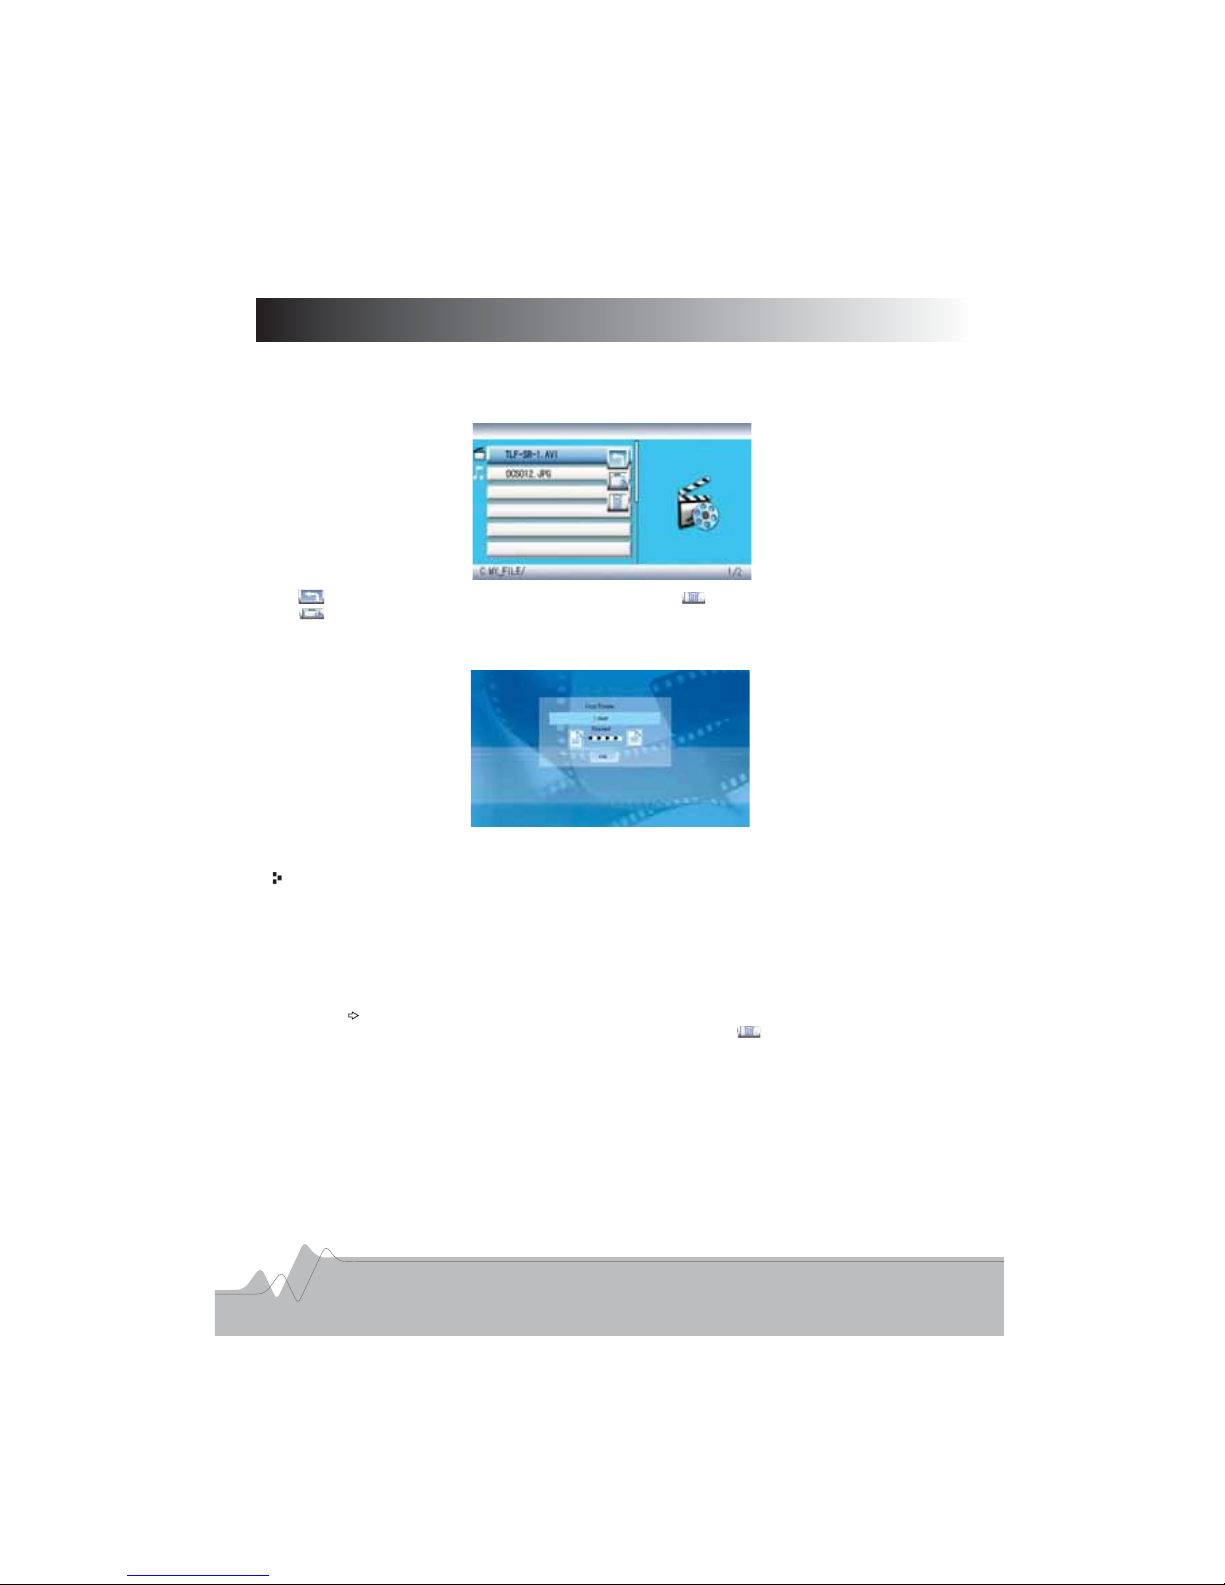
OSD Menu Setup
4 Press MENU button to back to the main menu and select the USB device to which
you would like the file to be copied
5 In the USB device choose a folder where you want copy the file
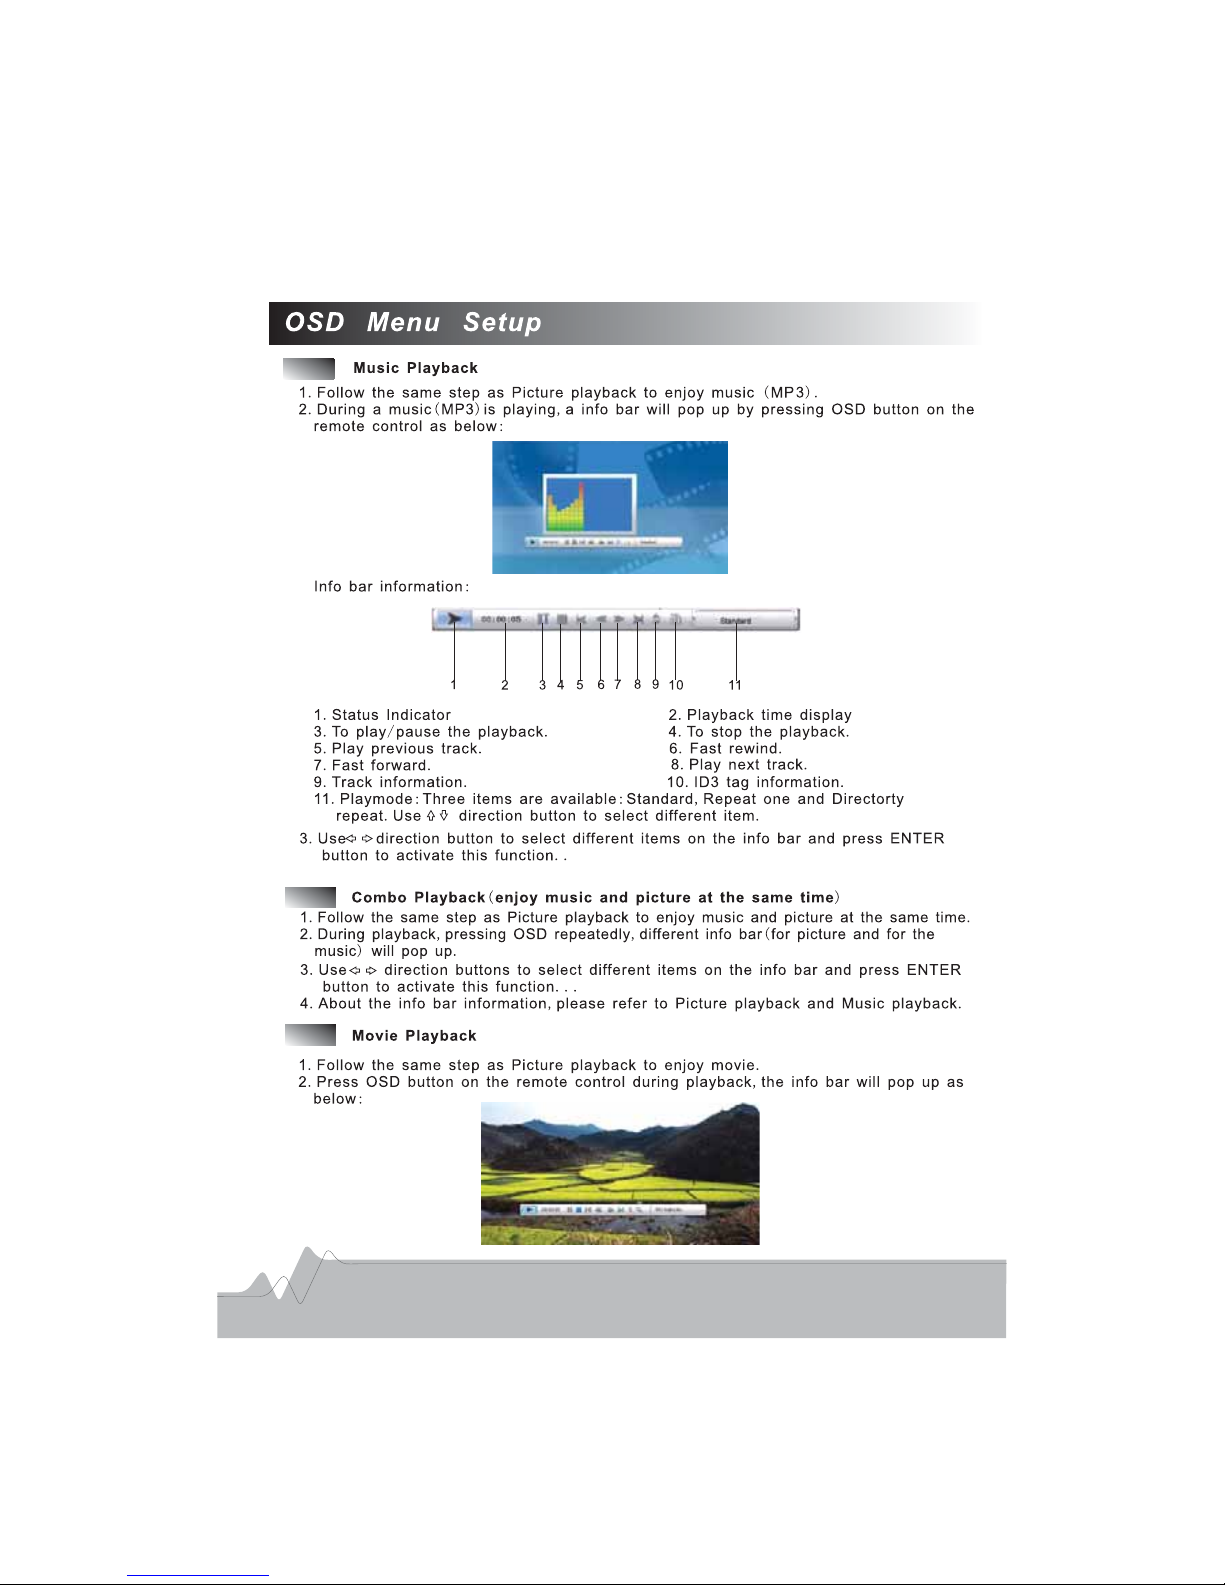
6 Press OSD button on the remote control the screen will display as below
. ,
.
. .
.,:
:.:.
:.
To exit the present menu To delete files
To copy files
7 Select the second icon and press ENTER button the unit will start copying process
And a message confirming this will appear on the screen
.,.
:
8 After finishing copying process press ENTER button to exit the present menu., .
Deleting file s from memory or memory cards() .
You can delete unwanted files from a memoy device using the frame by following the
steps below:
1 Press MENU button on the remote control and choose Edit icon on the main menu
2 Press ENTER to confirm
3 Choose the memory device from which files need to be deleted and press ENTER
button to confirm
4 From the directory listing navigate to the file you would like to delete
5 Press direction button and an icon will appear against the file
6 Press OSD button and use direction button to select the icon and press ENTER
button to confirm
7 The file will be deleted and a confirming message will pop up
8 After finishing this process press ENTER button to exit the present menu
. .
..
.
.
., .
. .
.
.
..
., .
11
Page 13
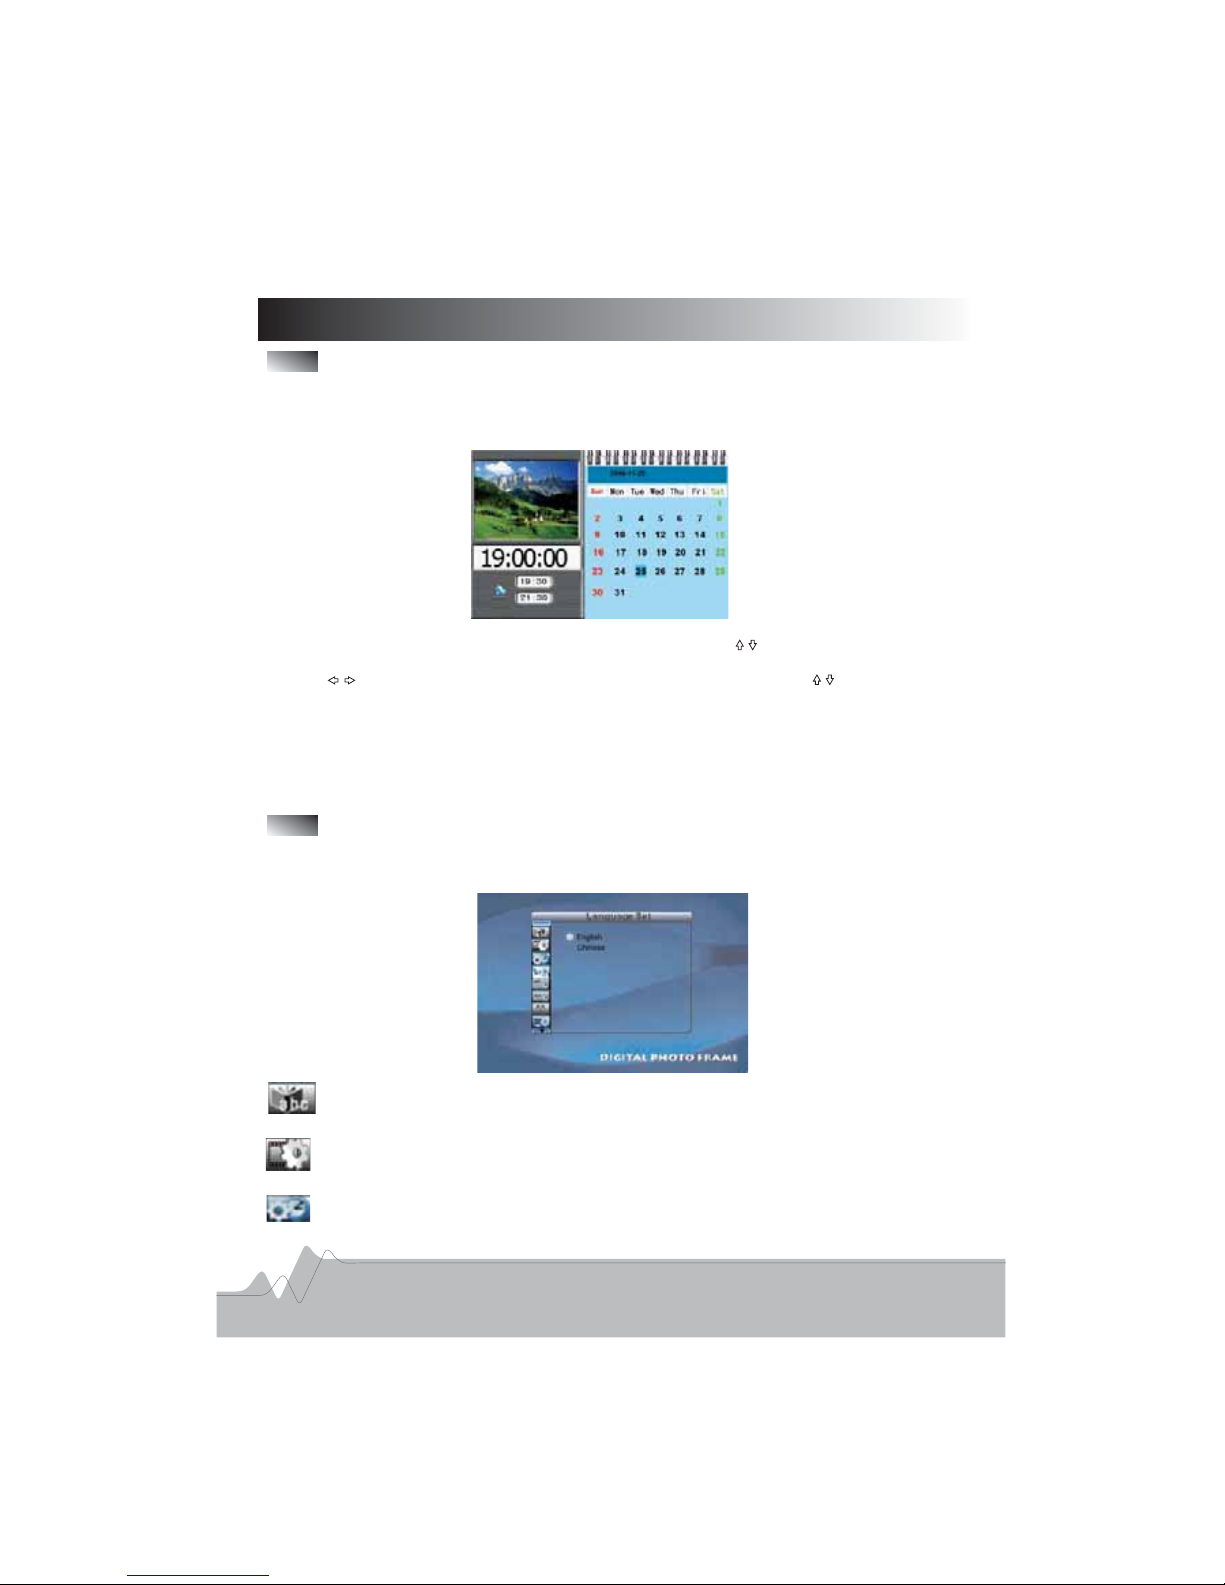
OSD Menu Setup
CALENDAR
The frame has a built in Calendar and a Clock To activate the Clock Calendar mode-./,
please following the step below:
..1 Press MENU button on the remote control
.,.2 Choose CALENDAR icon on the main menu the calendar and clock will be displayed
..3 Press SETUP button directly to enter SETUP menu Use direction buttons to select
() .Clock set icon the third icon on the left column and then press ENTER button to enter
4 Use direction button to navigate the setting item and then use buttons to do.
.the settings
. ,5 Press MENU button to back to the main menu and then select CANLENDAR item
,.press ENTER button the player will display the changed time
.6 Follow the same steps as Clock set to do the time settings of the Auto power on or
.off item
Setup
For all the setup options that are described in this chapter please choose the SETUP icon
on the main menu and press ENTER button to confirm,.
:- .Language Setup To select different on screen display language
12
Picture Setup To select different slide show mo e and picture playback mode
For slide show mdoe Fast Middle Slow are available for your selection
For playback mode Select different playback mode as Normal Random and so on
: .
:, , .
:,.
d
Clock Setup Setting the time and date here gets reflected in the Calendar menu: .
Page 14
OSD Menu Setup
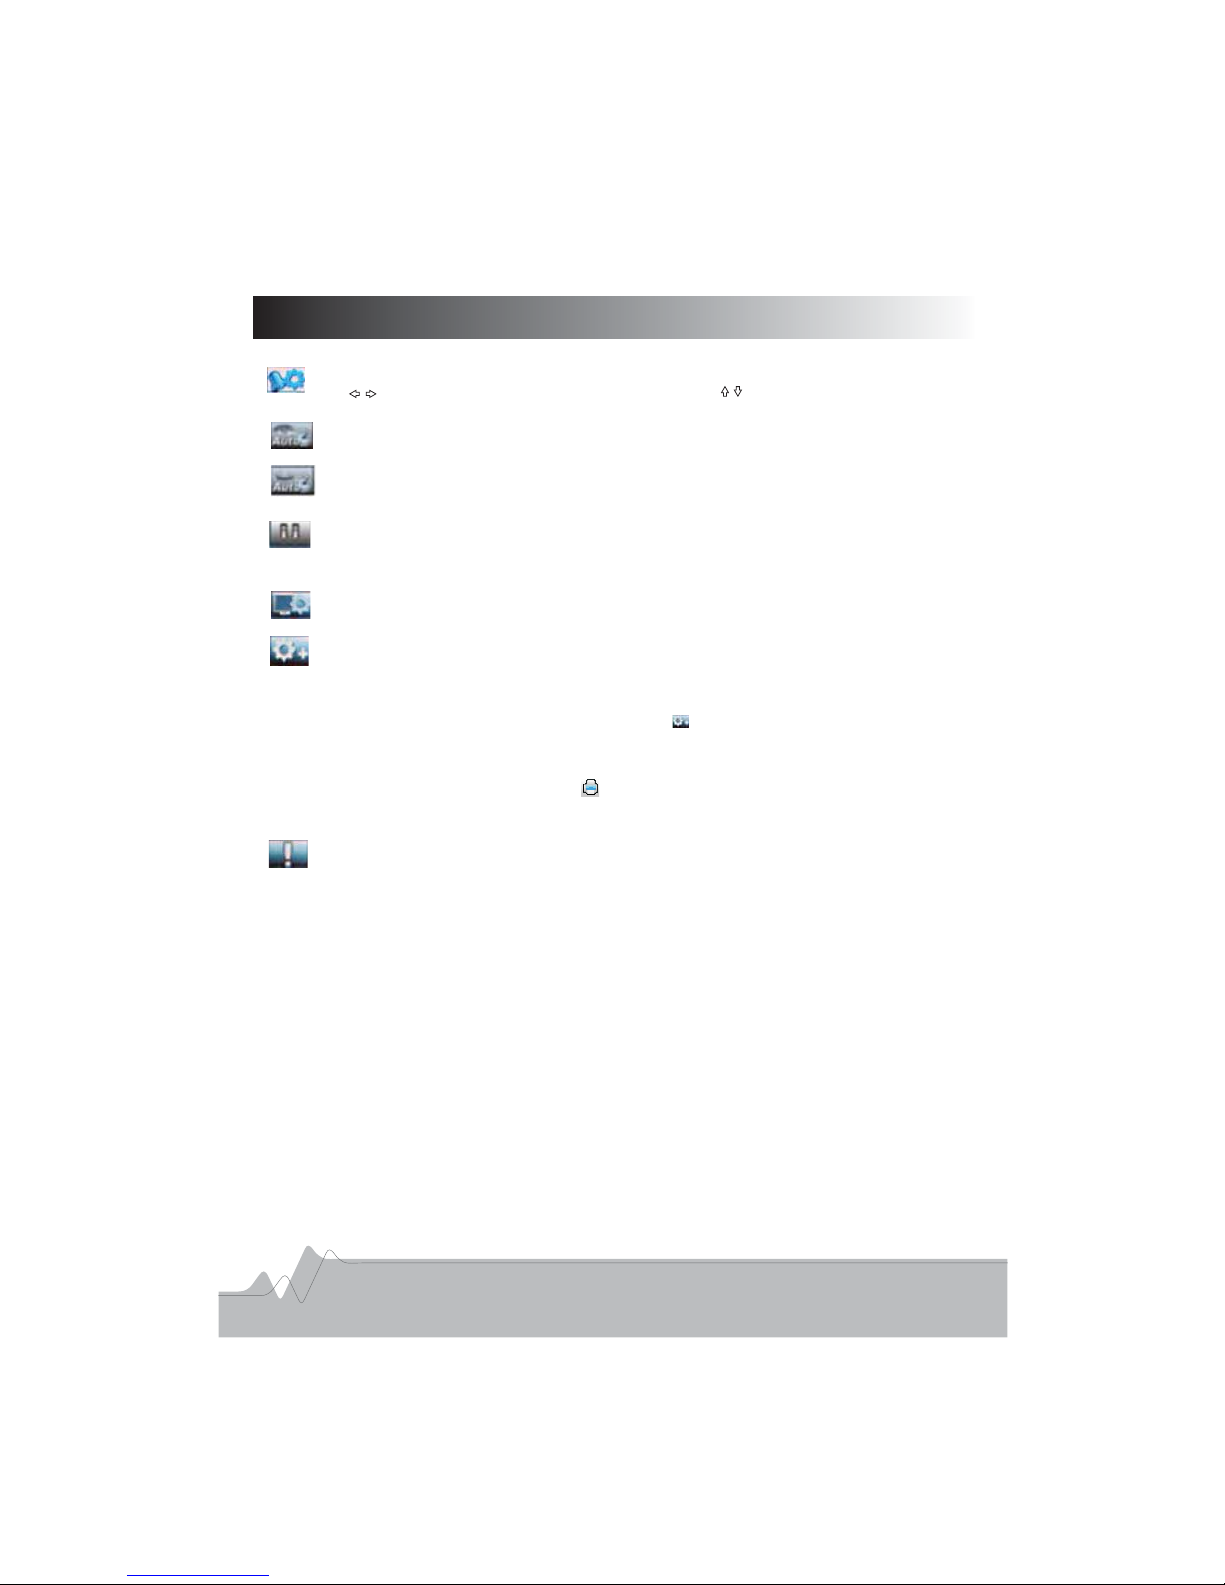
Auto Power on This setting allows the frame to automat cally power on at a particular:,i
time of the day The MODE must be set to ON..
Auto Power off This setting allows the frame to automatically power off at a parcicular:,
time of the day The MODE must be set to ON..
Default Start up mode This setting allows you to set the default start up mode for
he frame If you select any one of them restart the frame the frame will enter
the contents of the item you have selected direc ly
:
.,,
.tt
Video Setup This setting allows the user to alter the colour brightness and contrast
of the LCD display
:,
.
Two items are available Default Set and USB Mode:.
Default Set:.To recover to the factory default set
USB Mode:, (,)In this item you can select different external device PC Printer to connect
to the frame via USB cable not supplied().
Select Printer:
Press SETUP button to select icon and use direction buttons to
select PRINTER item Then u. sing a USB cable not supplied to()
connect the frame to a USB port on a printer During a photo slide.
show press OSD button an icon will pop up on the info bar and then,,
select printer icon the printer will start work(), .
Please kindly note that the printing function is only available for photo
printer special for home use(-).
Software Information To check out the information of current software edition:.
13
Alarm Set This setting allows you to use the frame as an Alarm Clock
Use direction button to select different item use to set a time the alarm
should sound The MODE must be set to ON
:.
,
..
Page 15

About the Battery
About the built in Polymer Lli Battery
1 Plug the AC plug of adapter into standard power socket and the other DC output plug
into the machine socket labeled with DC 9 5V The recharge will start without any
interference to the frame s work
2 It approximately takes about 4 5 hours to fully recharge To optimize the service life
of the battery the duration of recharging should be less than 8 hours
3 Sensor notes under low voltage for built in polymer Li battery
The light indicator will be flickering in low voltage recharge the battery as soon as
possible
When working with battery the indicator is blue
Working and recharging up simultaneously the indicator will flicker blue and red
On recharging the indicator is red The indicator will be off when the battery is fully
recharged
4 The rechargeable battery discharges gradually for a long time when not in use and
after approximately one month the battery will be fully discharged
-:
.
..
'.
.-.
,.
.--:
,
.
(): ;
:;
:.
.
.
.
Troubleshooting
PROBLEM
RESOLUTION
Frame doesn t power on'.
Make sure you connect the AC adapter to the frame
properly.
No START UP screen display-.
Note:
-
,,-
().
,.
When you have plugged in your memory card and power source correctly and the start up
screen displays properly but it can not read the content on the card please try to re insert
the card or format it back up the files before this produce
If problem persist please turn off the power and contact our customer support
14
The video jack is not connected correctly.
Page 16

Copyright
This manual contains information protected by copyright law No part of this document may
be used or reproduced in any form or by any means or stored in a database retrieval
system without prior written permission from Westwell Australia Pty Ltd
This information of this manual is base on the current version of the product we reserve
the rights for the improvement without prior notice
All brand names in this manual are property of their respective owners
.
,/
.
,
.
.
THE DESIGN AND SPECIFICATIONS ARE SUBJECT TO CHANGE WITHOUT NOTICE.
Page 17

Westwell Australia Pty Ltd
Westwell and its stylized logo are registered in the Australian IP office
OLIN is a registered trademark of Westwell Australia Pty Ltd
All rights reserved
All promotional materials are offered for reference only
Actual products may vary
.
.
.
.
.
w
www.olinstyle.com
 Loading...