

OLG PLANTATION, Round Tables 600D, Round Tables 900D, Round Tables 1050D, Round Tables 1200D Assembly Instructions Manual
...
PLANTATION
Assembly Instructions
Plantation Assembly Instructions
1
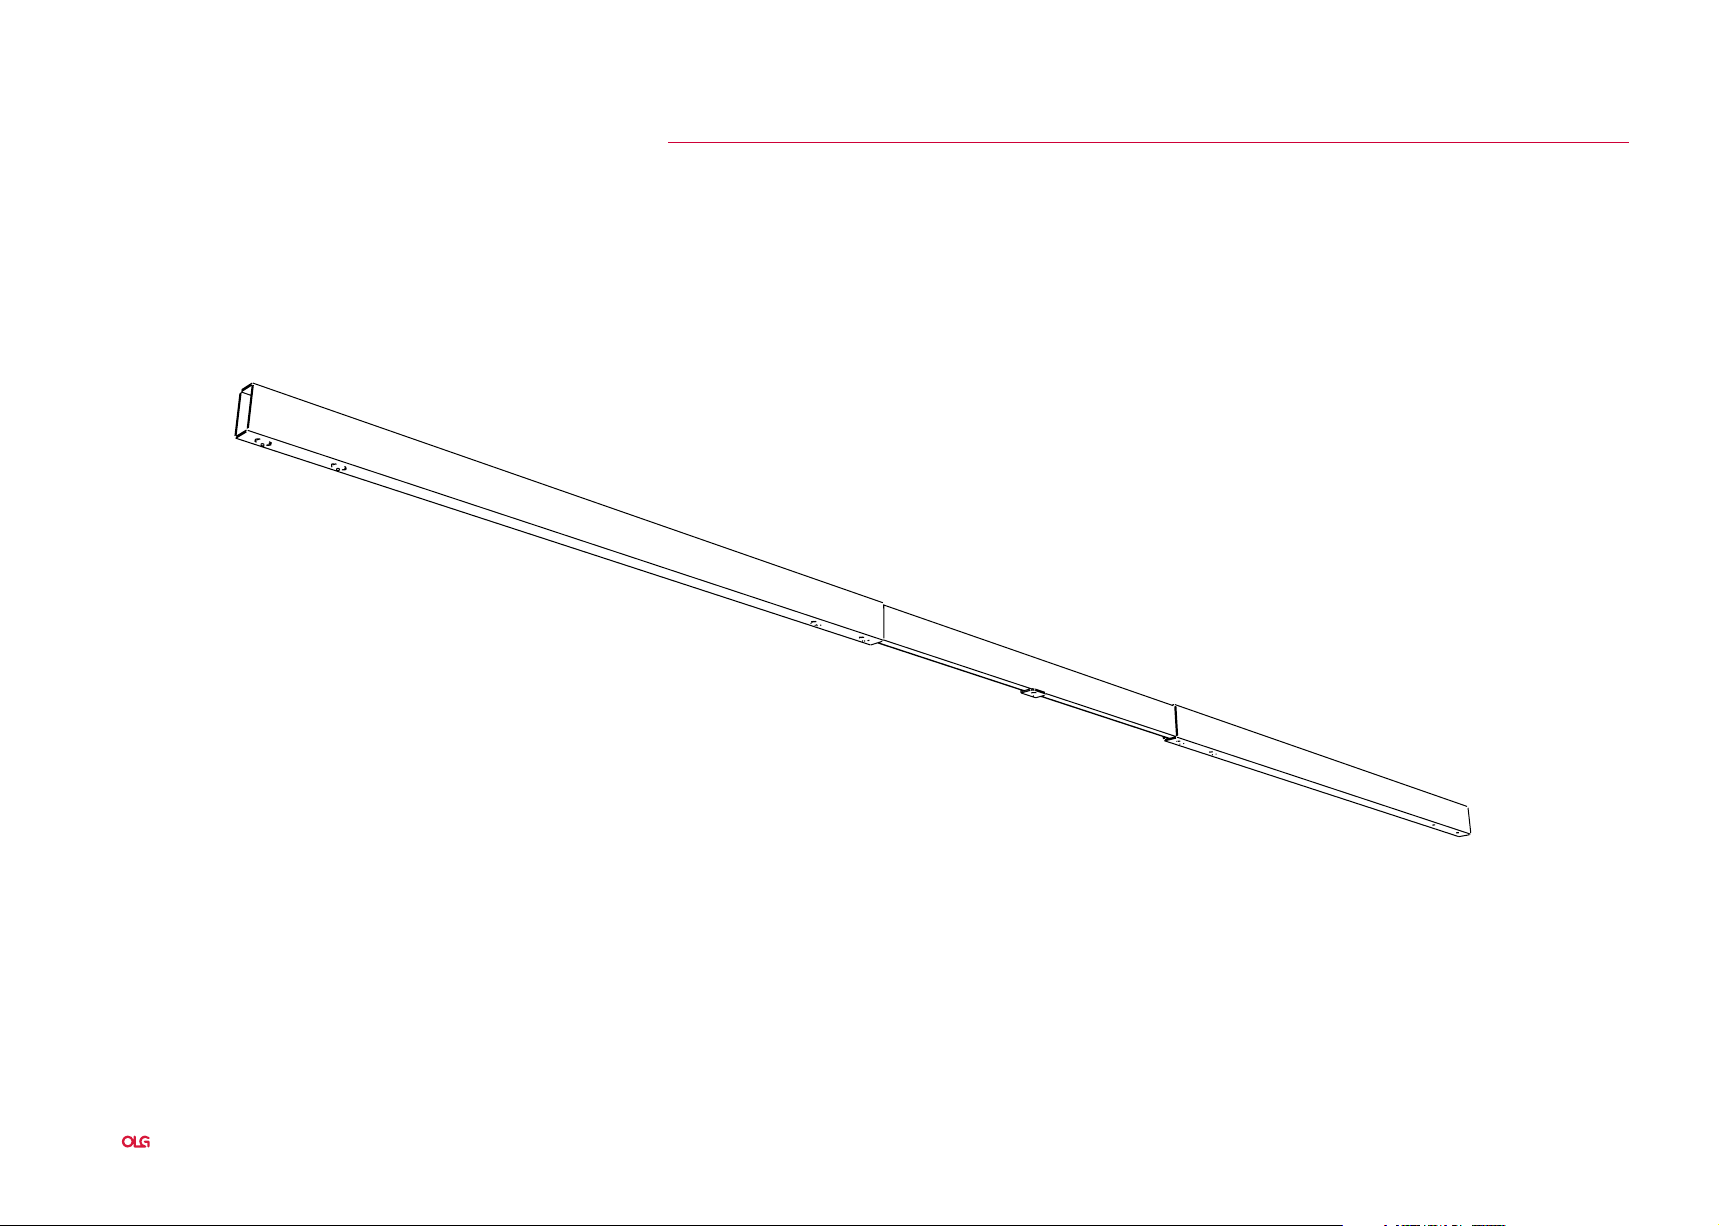
Plantation
Extendable Rails
2
Plantation Assembly Instructions
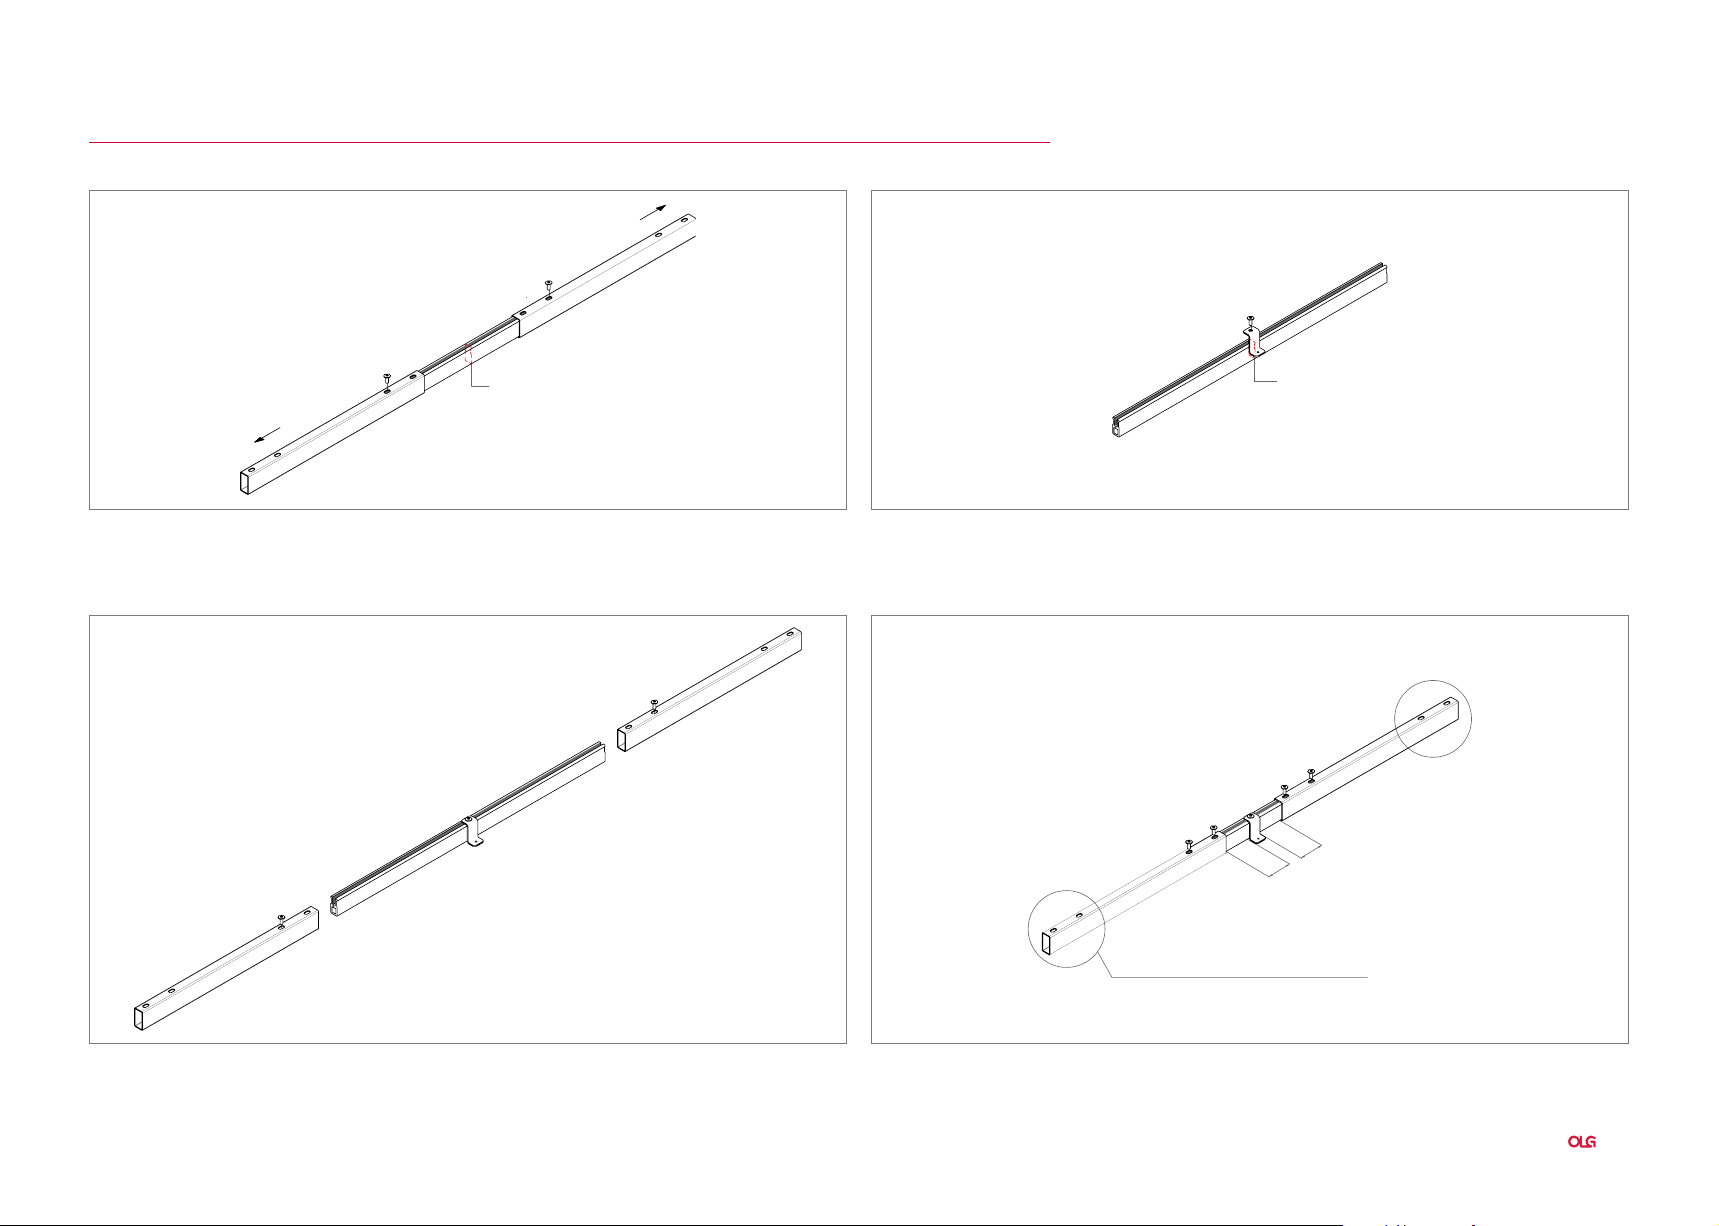
Plantation
Extendable Rails
1/2
1/2
STEP 1: Unscrew end rails and remove. STEP 2: Find the middle point of the center rail and screw the bracket.
Screw to the structure spigots.
STEP 3: Use the center as reference to position both ends back into the center rail
symmetrically.
STEP 4: Screw the end rails to the center rail once achieved the desired length.
Plantation Assembly Instructions
3

Plantation
Assembly Instructions - Round Tables 600D
4
Plantation Assembly Instructions
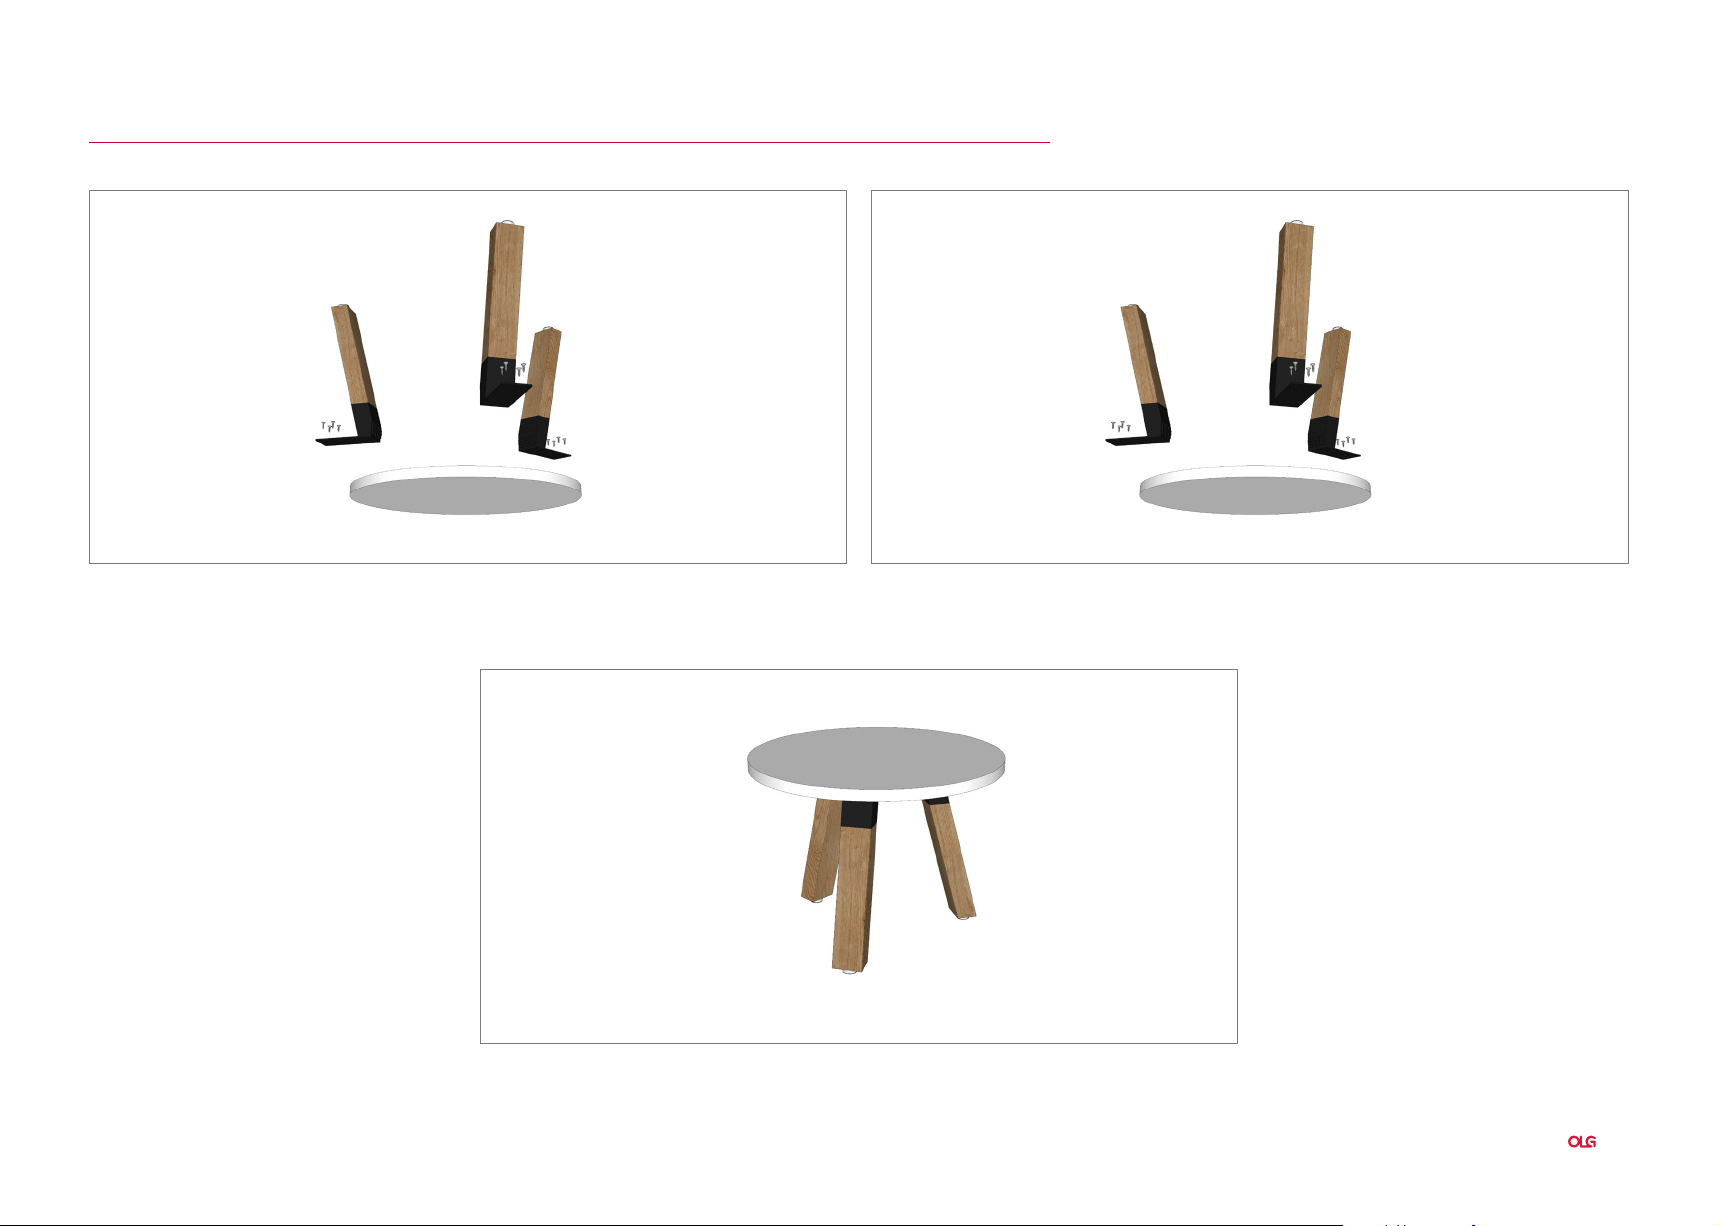
Plantation
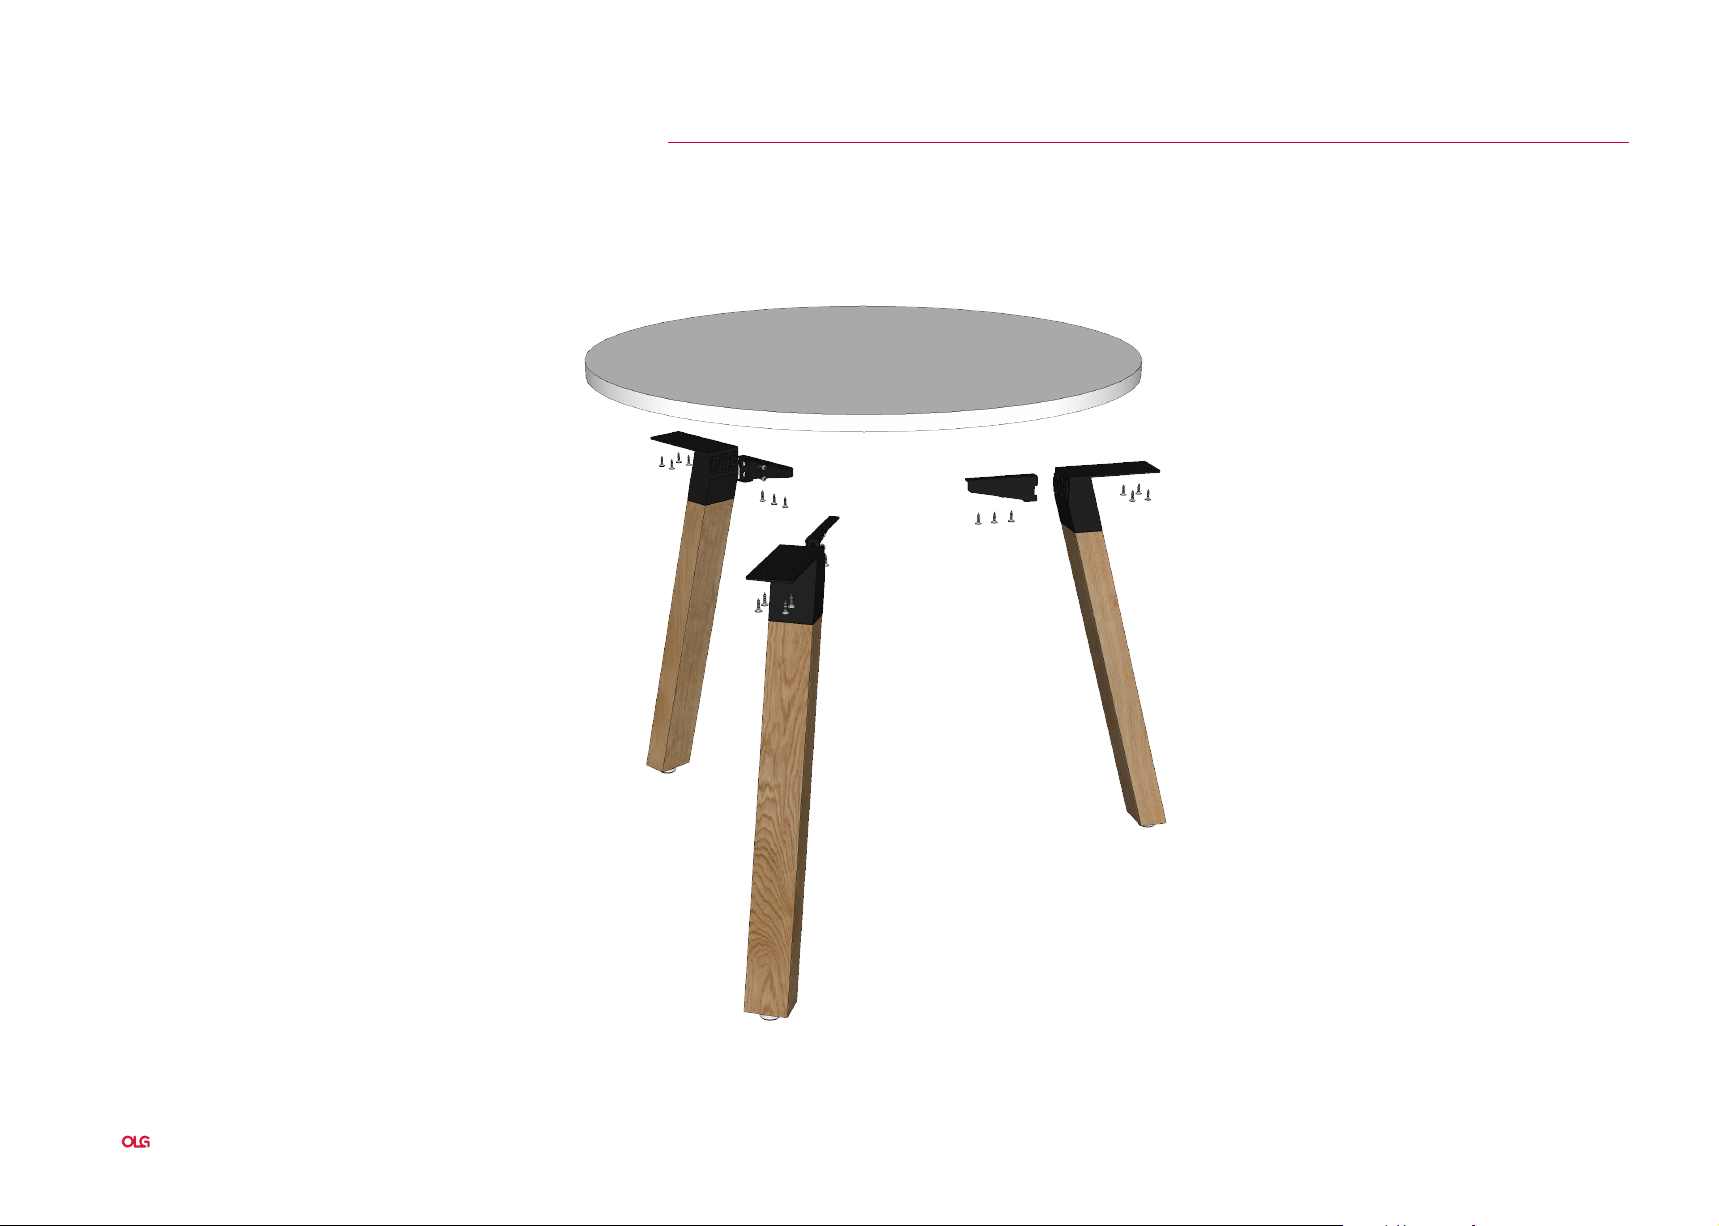
Assembly Instructions - Round Tables 600D
STEP 1: Align the legs at even spacing on the worktop, with the top plate being no
closer than 5 mm from the edge of worktop. Mark each leg location for easy
fixing in step 2.
STEP 3: Turn the table over.
STEP 2: Fix the leg to the worktop using 4 x 23 mm self-tapping screws per leg.
Plantation Assembly Instructions
5
Plantation
Assembly Instructions - Round Tables 900D
6
Plantation Assembly Instructions

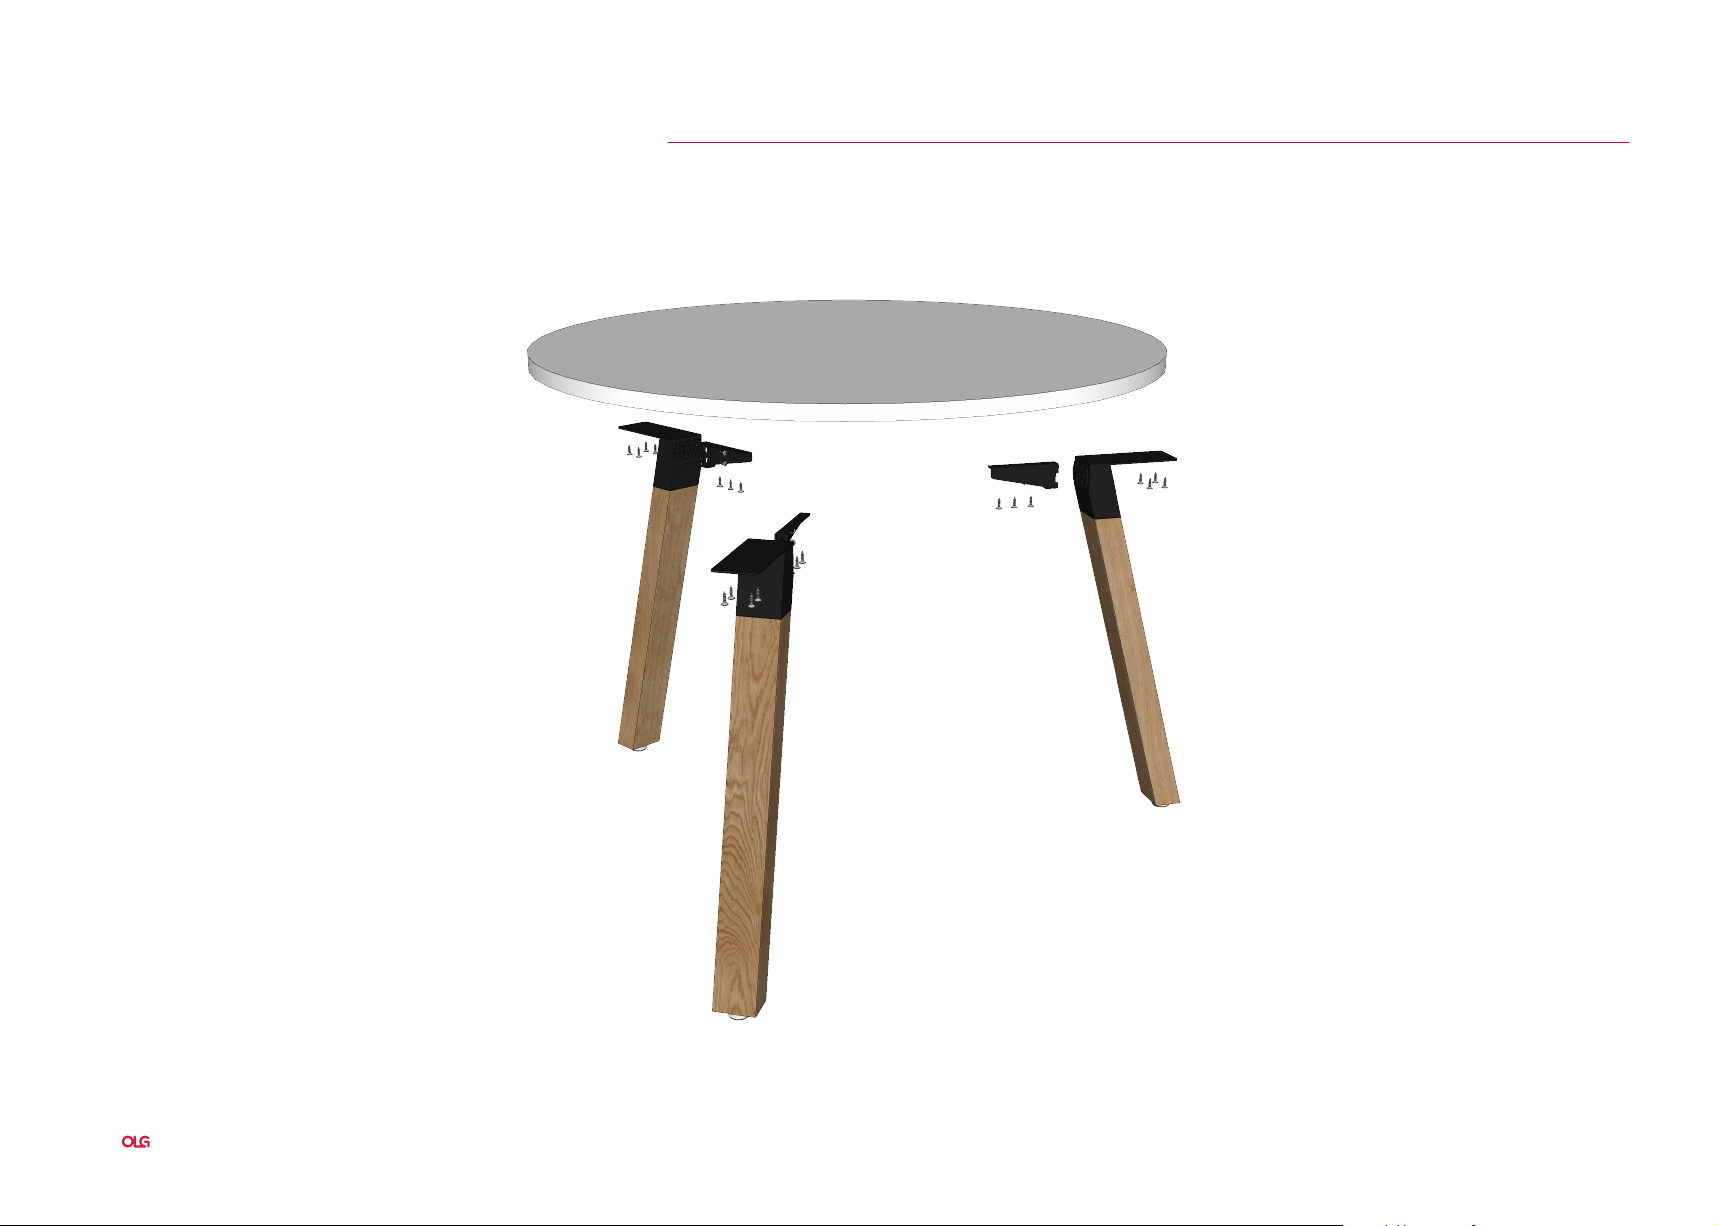
Plantation
Assembly Instructions - Round Tables 900D
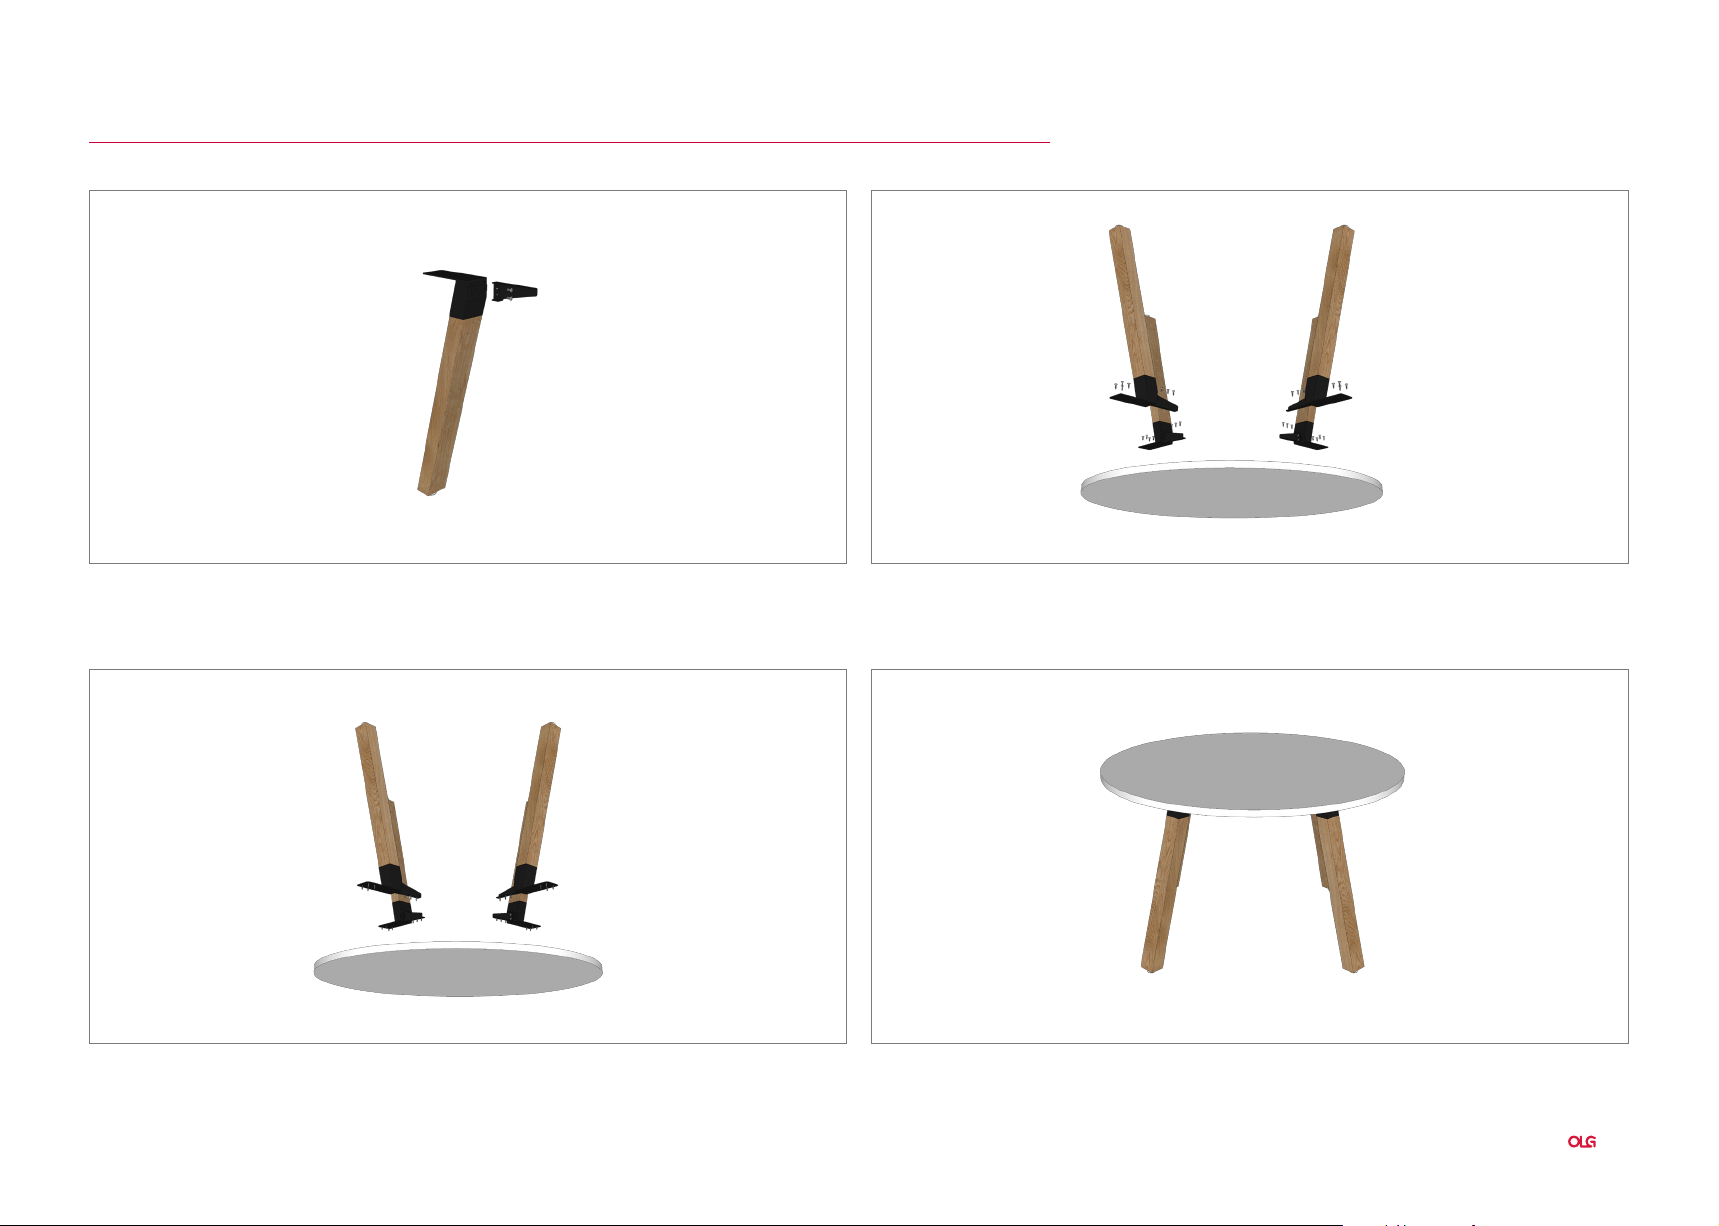
STEP 1: Fix 1x angle brack to each leg using 2 x M12 bolts. STEP 2: Align the legs at even spacing on the worktop, with the top plate being no
closer than 5 mm from the edge of worktop. Mark each leg location for easy
fixing in step 3.
STEP 3: Fix the leg to the worktop using 4 x 23 mm self-tapping screws per leg.
STEP 4: Turn the table over.
Plantation Assembly Instructions
7
Plantation
Assembly Instructions - Round Tables 1050D
8
Plantation Assembly Instructions
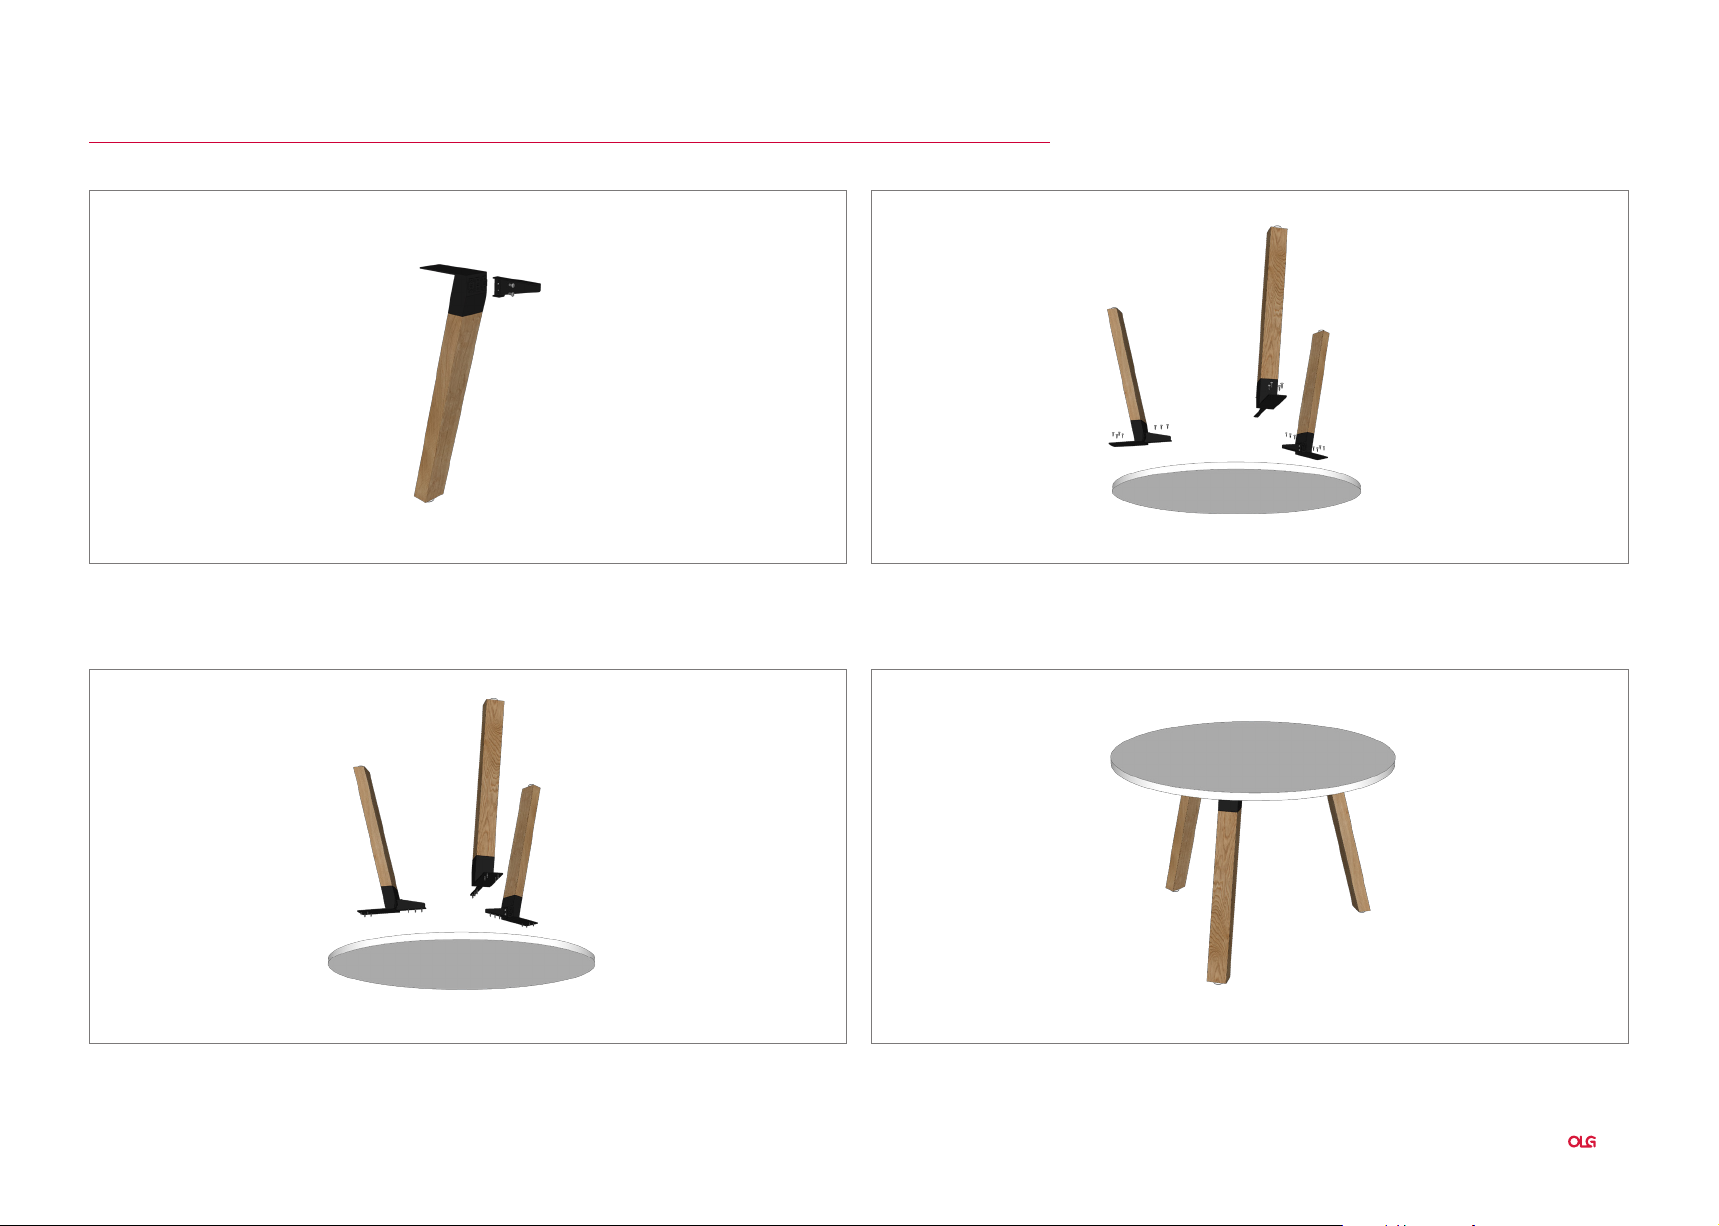
Plantation
Assembly Instructions - Round Tables 1050D
STEP 1: Fix 1x angle brack to each leg using 2 x M12 bolts. STEP 2: Align the legs at even spacing on the worktop, with the top plate being no
closer than 5 mm from the edge of worktop. Mark each leg location for easy
fixing in step 3.
STEP 3: Fix the leg to the worktop using 4 x 23 mm self-tapping screws per leg.
STEP 4: Turn the table over.
Plantation Assembly Instructions
9
Plantation
Assembly Instructions - Round Tables 1200D
10
Plantation Assembly Instructions
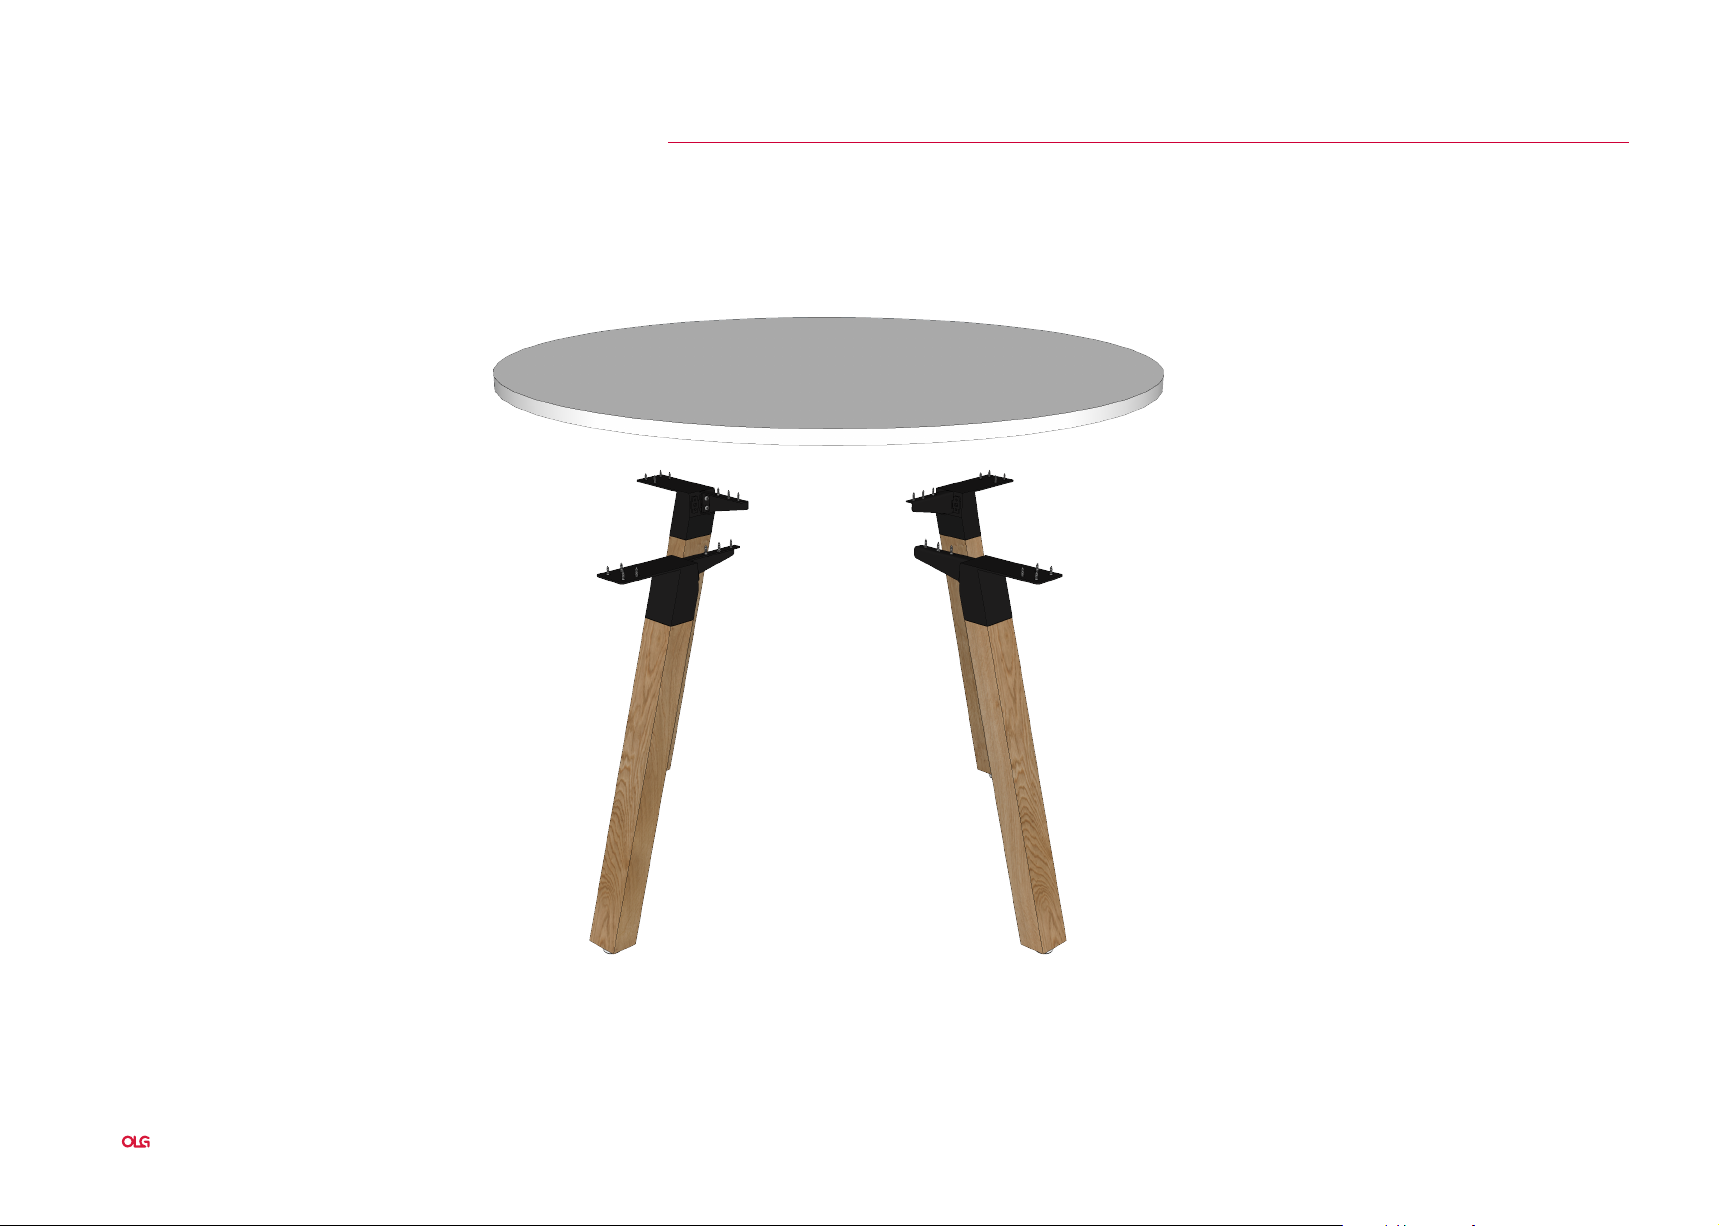
Plantation
Assembly Instructions - Round Tables 1200D
STEP 1: Fix 1x angle brack to each leg using 2 x M12 bolts. STEP 2: Align the legs at even spacing on the worktop, with the top plate being no
closer than 5 mm from the edge of worktop. Mark each leg location for easy
fixing in step 3.
STEP 3: Fix the leg to the worktop using 4 x 23 mm self-tapping screws per leg.
STEP 4: Turn the table over.
Plantation Assembly Instructions
11

Plantation
Assembly Instructions - Round Tables 1500D
12
Plantation Assembly Instructions

Plantation
Assembly Instructions - Round Tables 1500D
STEP 1: Fix 1x rail receiver to each leg using 2 x M12 bolts.
Fix 2x rail receivers to the centre rail using 2 x M12 bolts.
STEP 3: Align frame with worktop and fix down using 4 x 23 mm screws per leg and
4 x 70 mm screws for the rails.
STEP 2: Connect centre rail, 2x short rails, 4 x legs together as shown.
STEP 4: Use 2 persons to turn the table over to be the correct way up.
Plantation Assembly Instructions
13

14
Plantation Assembly Instructions

Plantation Assembly Instructions
15

Plantation
Assembly Instructions - Meeting Table 4 Leg
16
Plantation Assembly Instructions

Assembly Instructions - Meeting Table 4 Leg
STEP 1: Assemble 2x end leg frames to the legs. Total 6 x M12 per leg. STEP 2: Assemble the rail receivers to the crossbar.
Plantation
40 mm less than worktop
STEP 3: Assemble the rails to the end legs and set rail length.
STEP 4: Fix worktop to frame using 4 x 23mm screw per leg, 1 x 23mm screw per rail.
Plantation Assembly Instructions
17

Plantation
Assembly Instructions - Meeting Table 6 Leg
18
Plantation Assembly Instructions

Plantation
Assembly Instructions - Meeting Table 6 Leg
STEP 1: Assemble 2x end leg frames to the legs.
Total 6 x M12 per leg.
equal
measurement
40 mm less than worktop
STEP 4: Assemble the rails to the end legs and set rail length.
STEP 2: Assemble the rail receivers to the crossbar. STEP 3: Assemble the mid leg using bolts provided
in the spreader bar kit. Mount the rail to the
centre mounting point.
equal
measurement
STEP 5: Fix worktop to frame using 4 x 23mm screw per leg, 1 x 23mm screw per rail.
Plantation Assembly Instructions
19

20
Plantation Assembly Instructions

Plantation Assembly Instructions
21

Plantation
Assembly Instructions - Desking 2 DSD
22
Plantation Assembly Instructions

Plantation
Assembly Instructions - Desking 2 DSD
10 mm less than worktop length
STEP 1: Assemble 2x end leg sets as above, including assembling the rail receivers to the
crossbar.
STEP 3: Align worktops to frame, recommended spacing is 5 mm overhang on the ends
and central gap to suit screen type. (S50 = 52 mm, epanel = 20 mm, R18 = 20 mm)
STEP 2: Fit rails to end frames and set length to fit worktops.
STEP 4: Fix worktop to frame using 4 x 23mm screw per leg, 2 x 23mm screw per rail.
Plantation Assembly Instructions
23

Plantation
Assembly Instructions - 2DSD Studio50 Screen
24
Plantation Assembly Instructions

Plantation
Assembly Instructions - 2DSD Studio50 Screen
STEP 1: Fix AXSB bracket to end frame and tighten. STEP 2: Rest the screen panel on bracket so the end of the screen is equal distance
from each end of the setting.
STEP 3: Fix the screen down tightly to the bracket.
Plantation Assembly Instructions
25

Plantation
Assembly Instructions - Desking 4 DSD
26
Plantation Assembly Instructions

Plantation
Assembly Instructions - Desking 4 DSD
equal
measurement
equal
measurement
5 mm
STEP 1: Assemble 1x mid leg set including assembling rail receivers to the crossbar. STEP 2: Fit rails and 5 mm set worktop length to 10 mm less than the overall length.
5 mm
STEP 3: Align worktops to frame recommended spacing is 5 mm overhang on the ends
and central gap to suit screen type. (S50 = 52 mm, epanel = 20 mm, R18 = 20 mm)
STEP 4: Fix worktop to frame using 4 x 23mm screw per leg, 2 x 23mm screw per rail.
Plantation Assembly Instructions
27

Plantation
Assembly Instructions - 4DSD Studio50 Screen
28
Plantation Assembly Instructions

Plantation
Assembly Instructions - 4DSD Studio50 Screen
Same Instructions for 6DSD w/ Studio50 Screen
STEP 1: Fix AXSB bracket to end and mid frame and tighten. STEP 2: Rest the screen panel on bracket so the end of the screen is equal distance
from each end of the setting.
STEP 3: Connect the middle screens and panel finish as per normal studio assembly.
Plantation Assembly Instructions
29

Plantation
Assembly Instructions - Desking 6 DSD
30
Plantation Assembly Instructions

Plantation
Assembly Instructions - Desking 6 DSD
equal
measurement
equal
measurement
equal
measurement
5 mm
STEP 1: Assemble 1x mid leg set including assembling rail receivers to the crossbar. STEP 2: Fit rails and 5 mm set worktop length to 10 mm less than the overall length.
5 mm
and central gap to suit screen type. (S50 = 52 mm, epanel = 20 mm, R18 = 20 mm)
STEP 4: Fix worktop to frame using 4 x 23mm screw per leg, 2 x 23mm screw per rail.STEP 3: Align worktops to frame recommended spacing is 5 mm overhang on the ends
Plantation Assembly Instructions
31

Plantation
Assembly Instructions - Desking Straight Desk
32
Plantation Assembly Instructions

Plantation
Assembly Instructions - Desking Straight Desk
5 mm
10 mm less than worktop length
5 mm
STEP 1: Assemble 2x end leg sets as above, including assembling the rail receivers to the
crossbar.
STEP 3: Align worktops to frame recommended spacing is 5 mm overhang on the ends.
STEP 2: Fit rails to end frames and set length to fit worktops.
STEP 4: Fix worktop to frame using 4 x 23mm screw per leg, 2 x 23mm screw per rail.
Plantation Assembly Instructions
33

Plantation
Assembly Instructions - Desking Desk w/ Return
34
Plantation Assembly Instructions

Plantation
Assembly Instructions - Desking Desk w/ Return
STEP 1: Follow straight desk instructions, then assemble 1x additional end leg.
STEP 3: a.) Fit end leg to return top at 5mm off the end of worktop.
b.) Fix the return bracket to the main worktop, making sure the join between
the tops is tight.
STEP 2: Align main desk worktop and fit off.
STEP 4: Fit 2x joining plates to join.
Plantation Assembly Instructions
35

Sydney 02 8188 2732
Melbourne 03 9111 0315
Brisbane 07 3733 1923
Adelaide 08 7111 0810
Perth 08 9468 2707
info@olgoffice.com
myolg.online | olgoffice.com | officedesigner.net | motionoffice.com
 Loading...