

Page 1
Saranac Seat
Back Kit
Instruction
125 Gilman Falls Road
Building B
Old Town, ME 04468 USA
800-8-KAYAKS
www.oldtowncanoe.com
Please read kit instructions carefully prior to installation.
Many of our kit installations can be viewed at www.youtube.com/oldtowncanoeandkayak
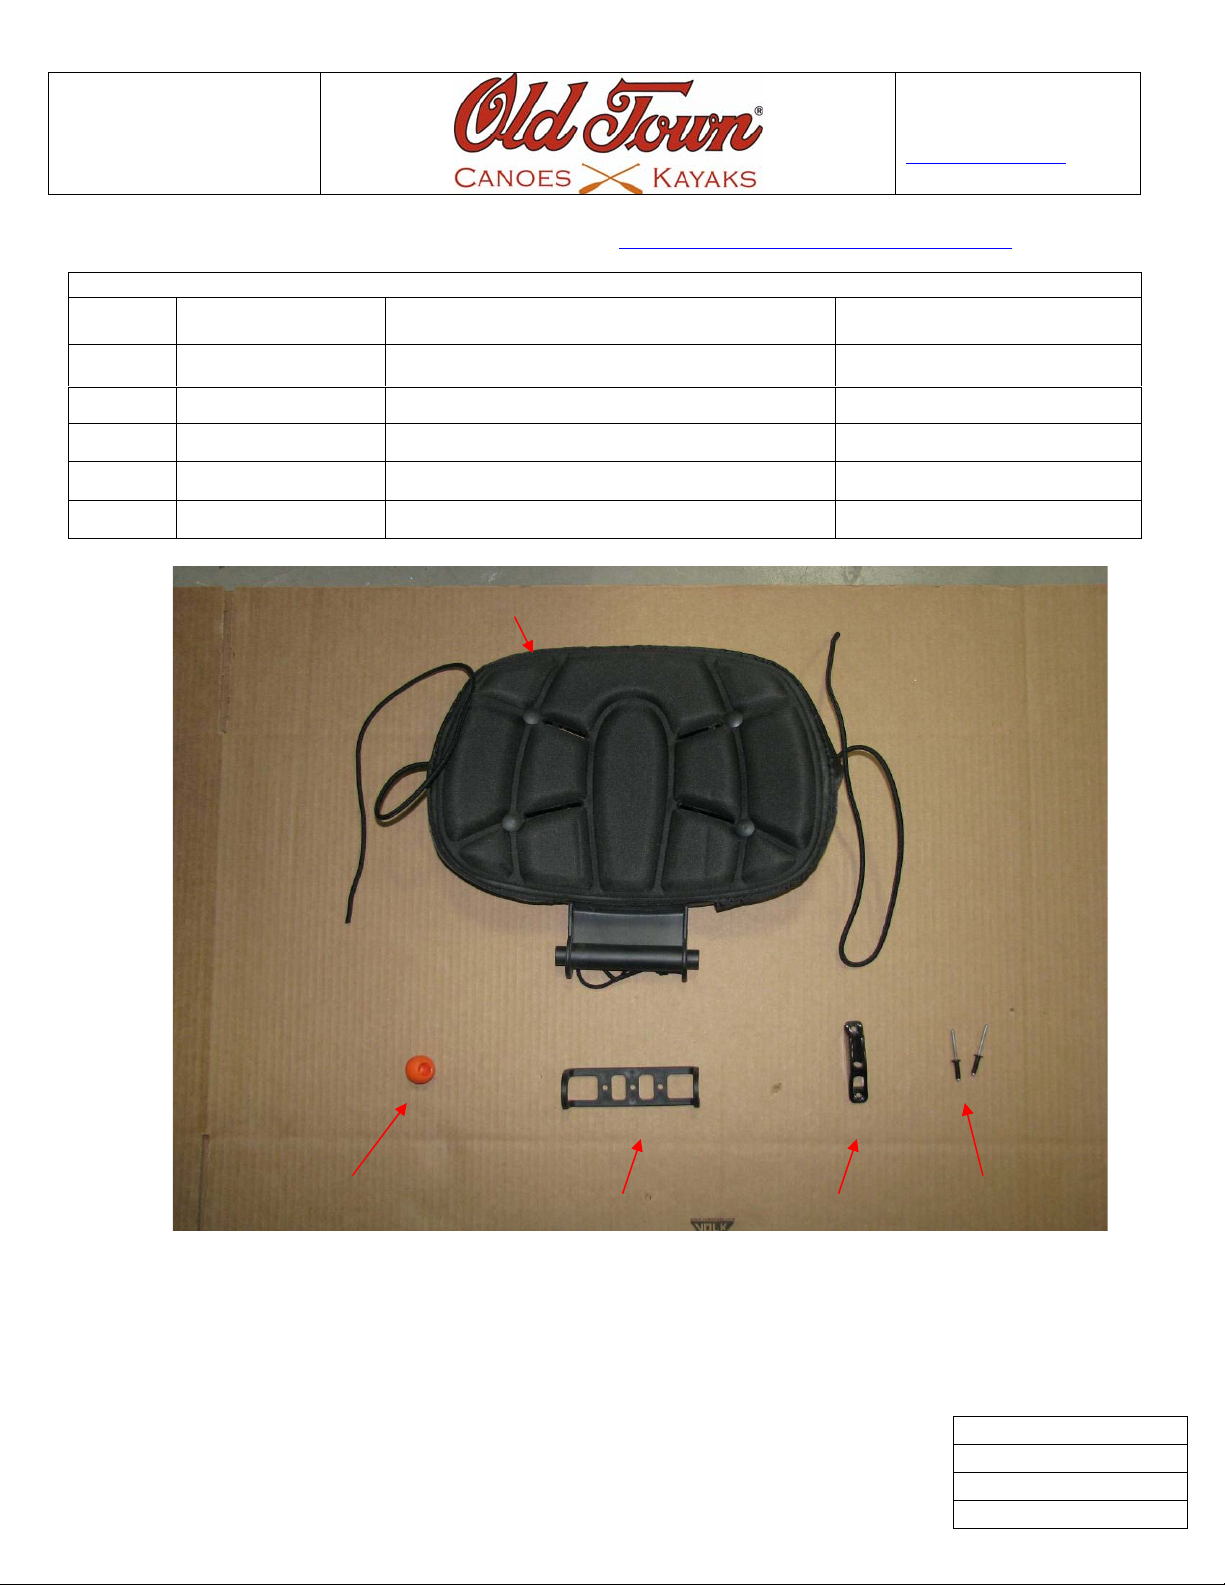
KIT CONTENTS
Ref.
Letter
A 01.1315.2467 Seat Back Saranac 1 EA
B 01.1315.0491 Saranac XT Seat Bracket 1 EA
C 01.1315.2813 Seat Adjustment Ball 1 EA
D 07.2479.0000 Cleat Clam CL 203 1 EA
E 01.1315.1558 Rivets-AA68D Black 2EA
Part Number Description Quantity
A
C
B
D
E
Before getting started we recommend sorting out and separating the parts for easy access
during assembly.
Tools Required: Flat Head Screw Driver, Drill, 13/64”Drill Bit, and Pop Rivet Tool
Rev. Original
Issue Date: 11/29/2010
Doc. # K-01.1331.1225
Page 1 of 5
Page 2
Saranac Seat
Back Kit
Instruction
125 Gilman Falls Road
Building B
Old Town, ME 04468 USA
800-8-KAYAKS
www.oldtowncanoe.com
Please read kit instructions carefully prior to installation.
Many of our kit installations can be viewed at www.youtube.com/oldtowncanoeandkayak
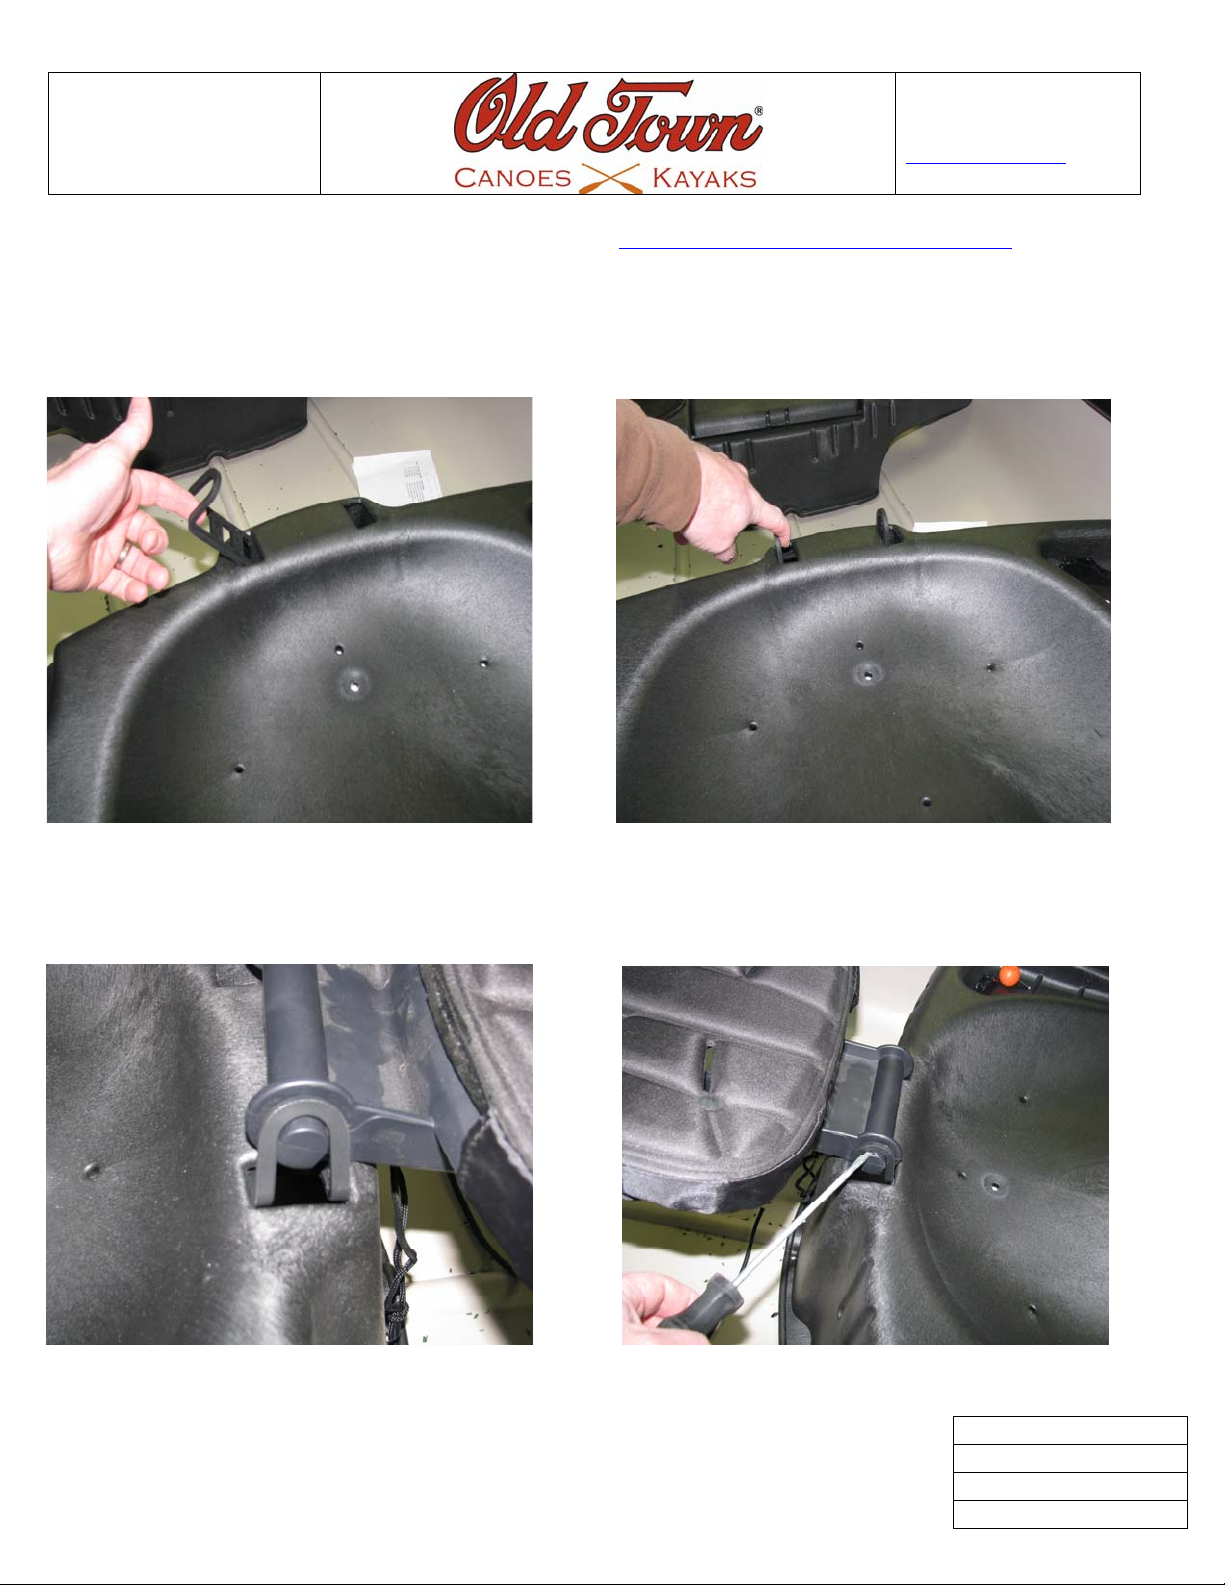
1.
Locate the Saranac Seat Bracket (B); insert it in one of the two seat bracket holes on the stern side of the seat as
shown in Fig #1. Now push the Seat bracket (B) through to the second hole and pull it up through as shown in
Fig# 2.
Fig# 1 Fig# 2
2. Locate the Seat back (A) and in the full back position insert one side of the Seat back (A) into the seat bracket
(B) as shown in Fig # 3. Now using your flat head screw driver for leverage pop in the other side of the seat
back as shown in Fig# 4.
Fig # 3 Fig# 4
Rev. Original
Issue Date: 11/29/2010
Doc. # K-01.1331.1225
Page 2 of 5
Page 3

Saranac Seat
Back Kit
Instruction
125 Gilman Falls Road
Building B
Old Town, ME 04468 USA
800-8-KAYAKS
www.oldtowncanoe.com
Please read kit instructions carefully prior to installation.
Many of our kit installations can be viewed at www.youtube.com/oldtowncanoeandkayak
3. Next find the Cleat Clam (D) and rest it in the pocket on the right side of your seat with the high end facing the
bow as shown in Fig# 5, using the clam cleat as a jig drill two holes with a 13/64” drill bit and install the two
Rivets AA68D (E) and pop the rivets with a pop rivet tool as shown in Fig# 6.
Fig# 5 Fig# 6
4. Take the rope that is attached to the seat back (A) on the right side and feed it threw the cleat clam (D) on the
right side of the seat, Locate the seat adjustment ball (C) then feed the same end of the rope threw it and tie a
knot at the end of the rope as shown in Fig# 7.
Fig# 7
Rev. Original
Issue Date: 11/29/2010
Doc. # K-01.1331.1225
Page 3 of 5
Page 4
Saranac Seat
Back Kit
Instruction
125 Gilman Falls Road
Building B
Old Town, ME 04468 USA
800-8-KAYAKS
www.oldtowncanoe.com
Please read kit instructions carefully prior to installation.
Many of our kit installations can be viewed at www.youtube.com/oldtowncanoeandkayak
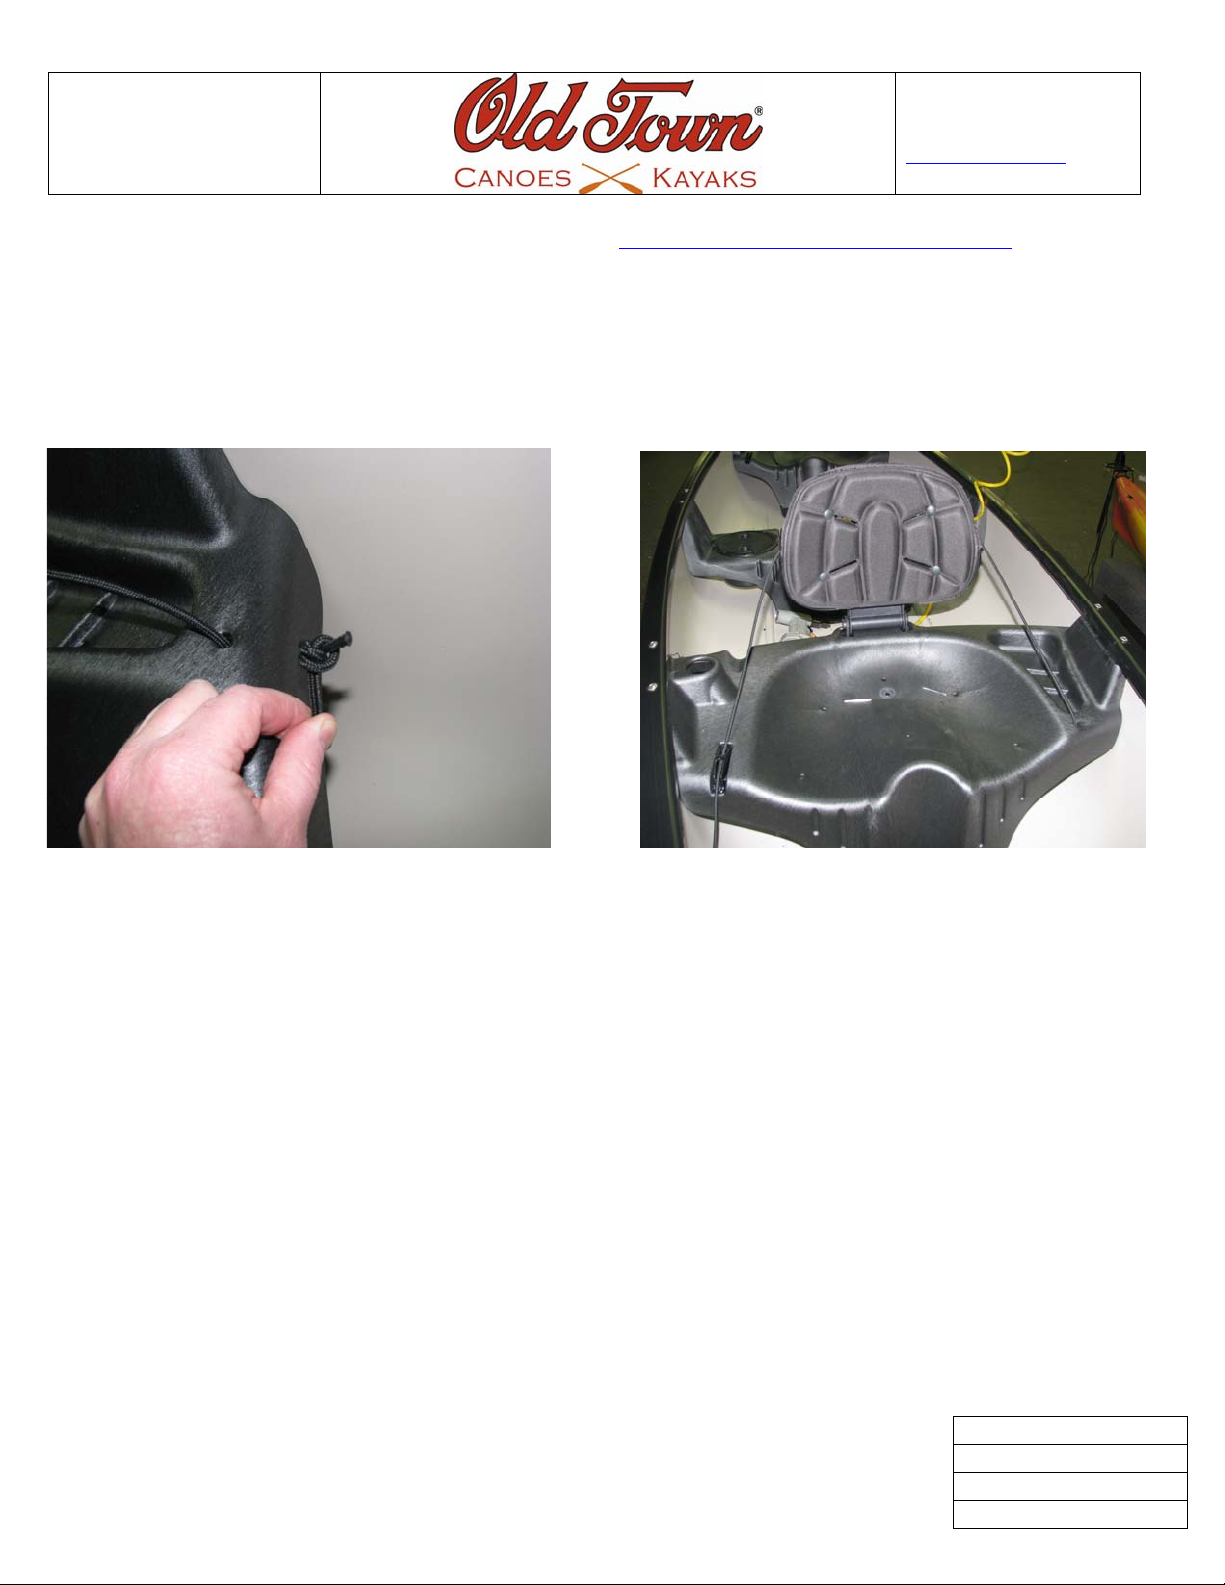
5. Locate the rope on the left hand side of the seat back (A) and insert it down threw the bow most left hand hole
in the seat. Now tie a double knot in the end of the line to keep it from pulling back threw the seat hole as
shown in Fig # 8. Your finished seat back should look like Fig# 9. You can adjust your seat back to your
desired angle by adjusting the rope connected to the seat adjustment ball (C) on the right side.
Fig# 8 Fig# 9
Rev. Original
Issue Date: 11/29/2010
Doc. # K-01.1331.1225
Page 4 of 5
 Loading...