

Page 1

Kayak Folding Anchor Kit
125 Gilman Falls Road
Building B
Old Town, ME 04468 USA
800-8-KAYAKS
Please read kit instructions carefully prior to installation.
KIT CONTENTS
Ref. Letter Part Number Description Quantity
A 01.1315.0353 Mini Jam Cleat 1 EA
B
C 01.1315.1564 AA611D Rivets 6 EA
D
E 01.1315.1568 3/16” Backup Deck Washers 6 EA
F 01.1315.3610 Single Loop Sheave 1 EA
G 01.1332.2709 1.5lb Folding Anchor 1 EA
H 01.1315.0351 3 ½” Black Tie Down Cleat 1 EA
I 01.1315.0455 3mm Black Nylon Rope 30’ FT
J 01.1315.0455 3mm Black Nylon Rope 13’ FT
K 01.1315.0459 Cherry Rivets 8 EA
01.1315.0430 Kayak Pad Eye 2 EA
01.1315.1567 612 Bulbtite Star Rivets 2 EA
G
I
H
A
F
J
B
E
K
D
C
TOOLS REQUIRED: Drill with 13/64” bit, Pliers, Rivet Gun, File, Scissors, Marking Pencil, Tape
Measure
Before getting started we recommend sorting out and separating the parts for easy access during assembly.
1. On top of the Stern Deck of the kayak, measure 1” toward the Bow from the Stern Tip. Set Pad Eye (B) centered at the 1”
measurement. Use your pad eye as a jig to drill your holes with a 13/64” drill bit as shown in Fig# 1. For Ocean Kayak Sit
on Tops, the Pad Eye (B) may have to be placed off to the right side as some models have rudder catchers on the Stern
Deck. It is important that you install the Anchor kit on the right hand side of this boat so it will not interfere with Rudder
Lines that run down the left hand side of the boat. Fig. #2
Fig# 1 Old Town Kayak Fig# 2 Ocean Kayak
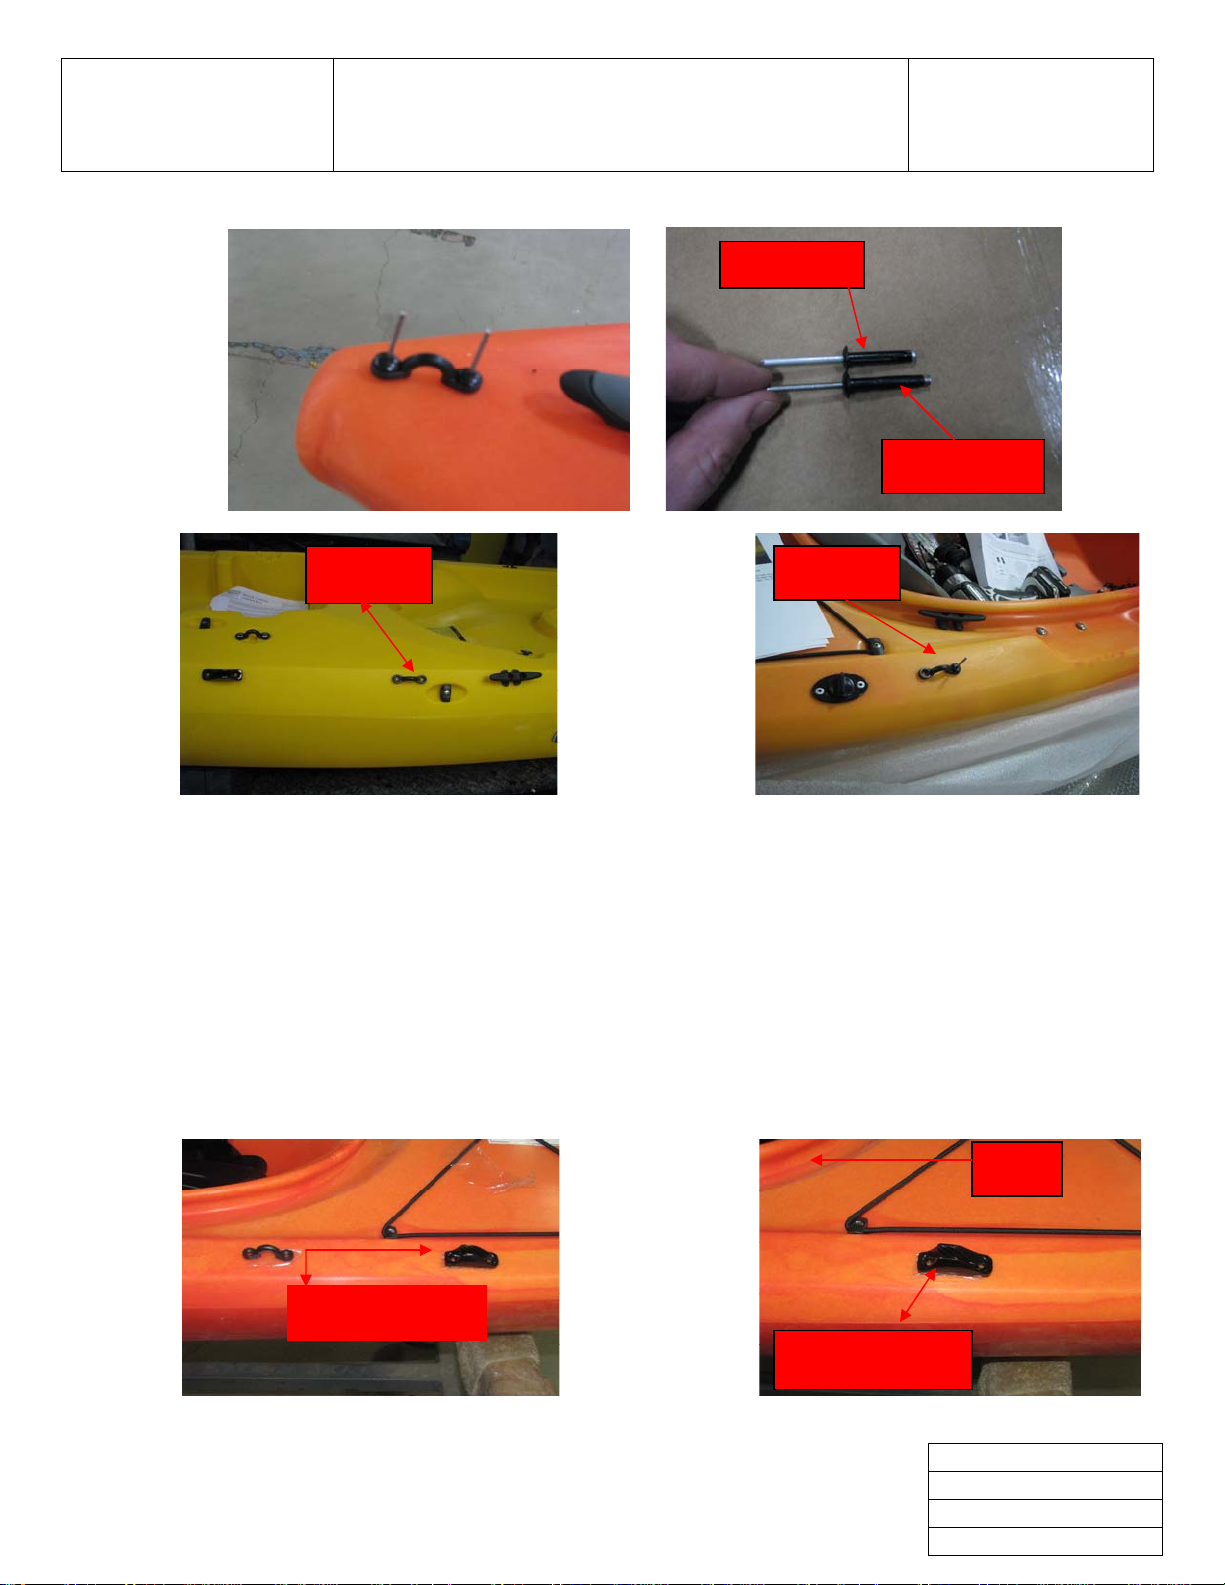
2. Insert Star Rivets (D) as shown in Fig# 3 they have narrow slits in the rivet and they are about ¼” shorter than the cherry
rivets. With a Rivet gun, pop the rivets. If the rivet does not break flush, grab the post extending out of the rivet with a pair
of pliers and wiggle back and forth until it breaks flush. If there is a jagged piece left, use your file to smooth it down. For
Ocean Kayak Sit on Tops you will use Cherry Rivets (K) Cherry Rivets have the rings around the mandrel also their about
¼” longer than the other rivets as shown in Fig# 3.5
Rev. C
Issue Date: 12/08/2010
Doc. # K- 07.1331.2709
Page 1 of 6
Page 2
Kayak Folding Anchor Kit
Please read kit instructions carefully prior to installation.
Star Rivet
125 Gilman Falls Road
Building B
Old Town, ME 04468 USA
800-8-KAYAKS
Cherry Rivet
Fig# 3 Fig# 3.5
Pad Eye Pad Eye
Fig# 4 Ocean Kayak Fig# 4 Old Town Kayak
3. Place a second Pad Eye (B) near the cockpit on the outer edge of the kayak leaving enough room for the Tie Down Cleat
(H) so it can be easily reached. Fig # 4. For Ocean Kayak Sit on Tops you need to install this on the Right Hand Side of
the Boat Fig # 4 Ocean Kayak.
4. Drill your holes for this second Pad Eye as you did in Step 2. Insert AA611D (C) rivets through this second Pad Eye and
into the boat. Add a Deck Washer (E) to the underside of each rivet, inside the boat and pop rivets as you did in Step 2.
For Ocean Kayak Sit on Tops you will use Cherry Rivets (K) without any Deck Washers.
5. Place Jam Cleat (A) on the boat 8” behind the Pad Eye you just installed next to the cockpit as shown in Fig#5. It is
important that the Jam Cleat is in line with both pad eyes as you want your pulley line to be as straight as possible. With
the high point of the cleat facing the Bow as shown in Fig# 6, Using your cleat as a jig drill the holes with a 13/64 “ bit. For
Ocean Kayak Sit on Tops you need to install this on the right hand side of the boat.
8” measurement
Cleat High End
Fig #5 Old Town Kayak Fig# 6
Bow
Rev. C
Issue Date: 12/08/2010
Doc. # K- 07.1331.2709
Page 2 of 6
Page 3

Kayak Folding Anchor Kit
125 Gilman Falls Road
Building B
Old Town, ME 04468 USA
800-8-KAYAKS
Please read kit instructions carefully prior to installation.
6. Insert AA611D Rivets (C) through the Jam Cleat as shown in Fig# 6 and into the boat. Add a Deck Washer (E) to the
underside of each rivet, inside the boat and pop rivet as you did in Step 2. For Ocean Kayak Sit on Tops you will use
Cherry Rivets (K) without any Deck Washers.
7. Place the 3 ½” Tie Down Cleat (H) 1 ½” to the Bow side of the Pad Eye you installed next to the cockpit as shown in Fig#
7. Using your (H) tie down cleat as a jig drill your holes with 13/64” bit, and attach with AA611D Rivets. For Ocean
Kayak Sit on Tops you need to install this on the Right Hand Side of the Boat and you will use Cherry Rivets (K) without
any Deck Washers as shown in Fig # 8.
11/2”
Tie Down Cleat
Tie Down Cleat
Fig# 7 Old Town Kayak Fig# 8 Ocean Kayak
8. Feed the 13’ long Rope (J) through both the Pad Eyes (B) so the free ends are on the outside edge of the boat as shown in
Fig# 9 and Fig# 10.
Stern Pad Eye
Bow Pad eye
Fig # 9 Fig # 10
9. Bring free ends parallel with each other, overlapping each other by about 8” Then tie a barrel knot with one of the ends
around the other about 8” from the end. To tie the Barrel Knot, loop one of the free ends over the other end three times.
Pull the tag end of the line you just looped back through the three loops you made and pull tight. Fig# 11 shows a barrel
knot diagram
Fig# 11 Barrel Knot
10. Slide the Sheave (F) onto the free end of the rope and pull out any slack so the lines are taught. The sheave should be on
the left side of the knot you just tied Fig# 12.Tie another barrel knot with the free end to the left of the sheave. Wrap
your three loops toward the sheave and pull the free end through the loops. Pull tight. This will trap the sheav e between
the knots and between the parallel lines as shown in Fig # 13.
Rev. C
Issue Date: 12/08/2010
Doc. # K- 07.1331.2709
Page 3 of 6
Page 4

Kayak Folding Anchor Kit
125 Gilman Falls Road
Building B
Old Town, ME 04468 USA
800-8-KAYAKS
Please read kit instructions carefully prior to installation.
Trim End’s
Here
Sheave
Fig# 12 Fig# 13
11. Make sure that the rope between the Pad Eyes is tight. Readjust your knots if needed, trim the ends as shown in Fig# 13,
about 1” from the knot so they look like the ends in Fig# 14. Then melt the ends of the rope with a lighter to keep them
from fraying.
Fig# 14
12. Tie the 30’ anchor rope (I) onto the ring on top of the Anchor (G) using a Barrel Knot, As shown in Fig# 16, Pull tight
as shown in Fig# 15. For further instruction if needed consult Fig# 11 on tying a barrel knot.
Anchor Rope
Fig # 15 Fig # 16
Rev. C
Issue Date: 12/08/2010
Doc. # K- 07.1331.2709
Page 4 of 6
Page 5

Kayak Folding Anchor Kit
Please read kit instructions carefully prior to installation.
13. Feed the free end of the 30’ anchor rope (I) through the sheave as show n in Fig# 17, then tie a stopper knot large enough
to keep the line from completely pulling through the sheave if the anchor is dropped, then wrap the free end around the
tie down cleat as shown in Fig# 18.
125 Gilman Falls Road
Building B
Old Town, ME 04468 USA
800-8-KAYAKS
Sheave
Anchor Rope
Fig# 17 Fig # 18
Stopper Knot
Rev. C
Issue Date: 12/08/2010
Doc. # K- 07.1331.2709
Page 5 of 6
 Loading...