

Page 1

Congratulations on your purchase of an Oldsmobile Bravada. Please read this information and
your Owner Manual to ensure an outstanding ownership experience. Note that your vehicle may
not include all the features described in this booklet. Place this booklet in your Owner Manual
portfolio for easy reference.
Instrument Panel . . . . . . . . . . . . . . . . . . . . . . . . . .2
Instrument Panel Cluster . . . . . . . . . . . . . . . . . . .3
Malfunction Indicator Lamp . . . . . . . . . . . . . . . . .4
Driver Information Center (DIC) . . . . . . . . . . . . . .4
Programmable Auto Door Locks . . . . . . . . . . . . .5
Personalization Options Chart . . . . . . . . . . . . . . .6
Remote Lock/Unlock Feedback . . . . . . . . . . . . . .7
Headlamp Controls and Washer . . . . . . . . . . . . .7
Automatic Lamp Control . . . . . . . . . . . . . . . . . . .7
Dome Lamp Override . . . . . . . . . . . . . . . . . . . . . .8
Manual Dual Climate Control . . . . . . . . . . . . . . . .8
Automatic Dual Climate Control . . . . . . . . . . . . .8
Outside Rearview Mirrors . . . . . . . . . . . . . . . . . . .9
Seats . . . . . . . . . . . . . . . . . . . . . . . . . . . . . . . . . .10
AM/FM Stereo with Cassette/CD and RDS . . . .10
AM/FM Stereo with Six-Disc CD . . . . . . . . . . . . .12
Travel Note Recorder . . . . . . . . . . . . . . . . . . . . .12
HomeLink® Universal Transmitter . . . . . . . . . .12
Rainsense Wipers . . . . . . . . . . . . . . . . . . . . . . . .13
Remote Keyless Entry (RKE) System . . . . . . . .13
Content Theft-Deterrent System . . . . . . . . . . . .14
Sun Visors . . . . . . . . . . . . . . . . . . . . . . . . . . . . . .14
Sunroof . . . . . . . . . . . . . . . . . . . . . . . . . . . . . . . . .14
All-Wheel Drive . . . . . . . . . . . . . . . . . . . . . . . . . .14
Traction Assist System (TAS) . . . . . . . . . . . . . .15
Luggage Carrier . . . . . . . . . . . . . . . . . . . . . . . . . .15
Air Inflator System . . . . . . . . . . . . . . . . . . . . . . .15
Roadside Assistance Program . . . . . . . . . . . . .16
My GMLink . . . . . . . . . . . . . . . . . . . . . . . . . . . . . .16
Page 2
2
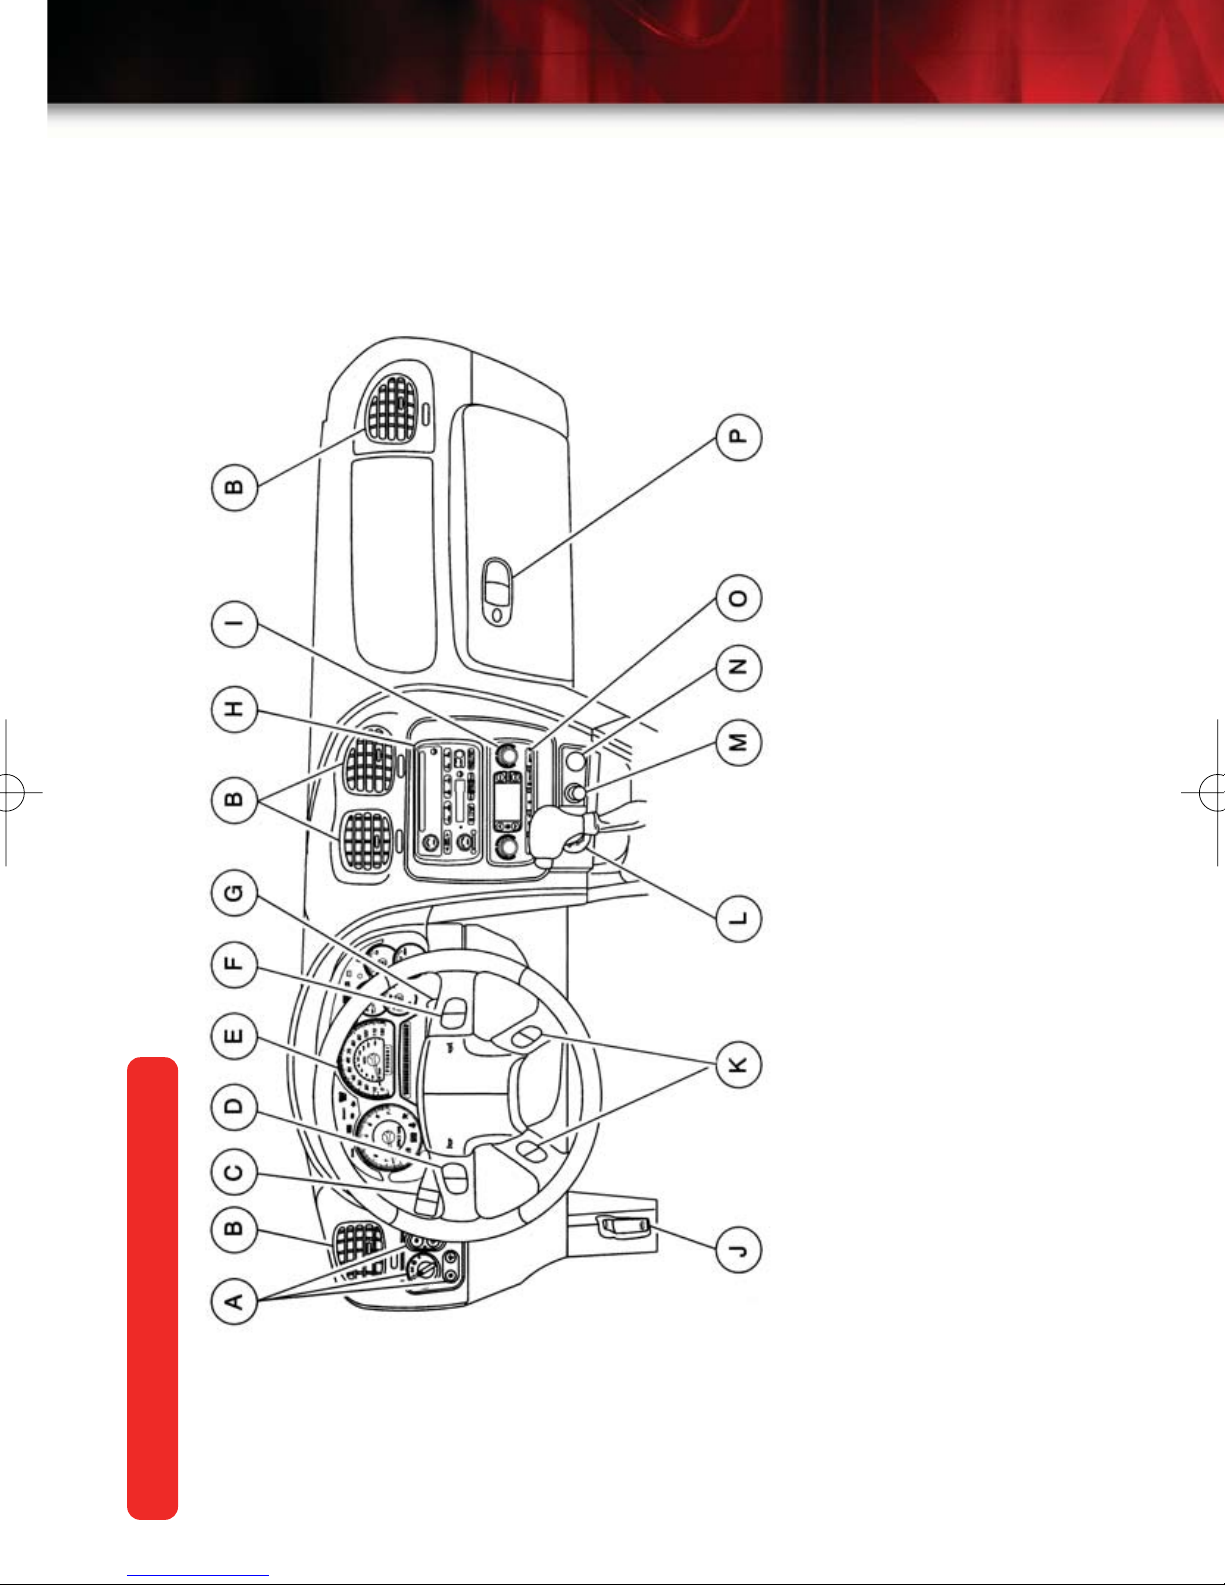
Getting to Know Your 2004 Bravada
L. Rear Window Washer/Wiper
M. Lighter
N. Accessory Power Outlet
O. Rear Window Defogger
P. Glove Box
Instrument Panel
Steering Wheel Controls
G. Ignition Switch
H. Audio System
I. Climate Controls
J. Hood Release
K. Driver Information Center (DIC)
Controls
A. Exterior Lamp Controls
B. Air Outlets
C. Turn Signal/Multifunction Lever
D. Climate Control Steering Wheel
E. Instrument Panel Cluster
F. Audio Steering Wheel Controls
See Section 3 of your Owner Manual.
Page 3
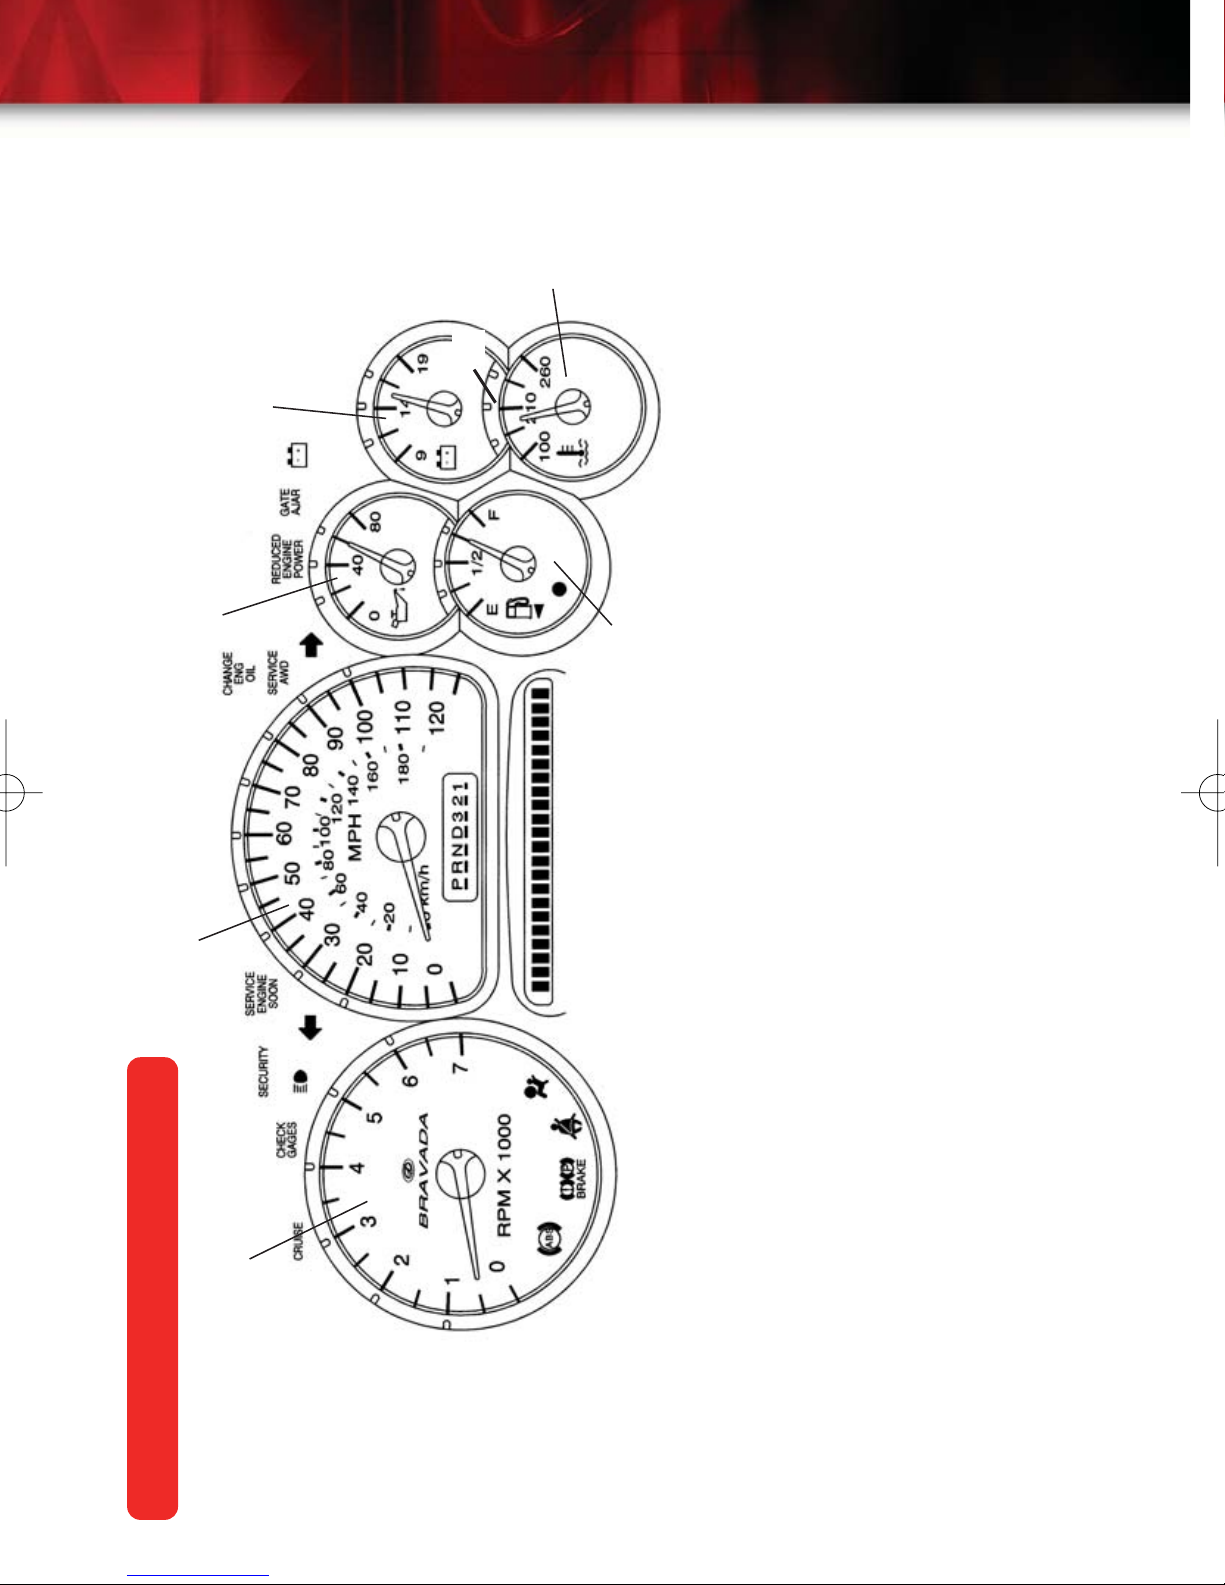
D
3
E
D
B
C
F
IMPORTANT: The instrument panel
cluster is designed to let you know
of many important aspects of your
vehicle’s operation. It is important to
read your Owner Manual and
become familiar with the information
being relayed to you by the lights,
gauges and indicators, and what
action can be taken to ensure safety
and to prevent damage.
See Section 3 of your Owner Manual.
A
Instrument Panel Cluster
Gauge
Your vehicle’s instrument panel is
equipped with this cluster or one very
similar to it. The instrument panel
cluster includes these key features:
A. Tachometer
B. Speedometer
C. Engine Oil Pressure Gauge
D. Voltmeter Gauge
E. Engine Coolant Temperature
F. Fuel Gauge
Page 4

4
Getting to Know Your 2004 Bravada
Malfunction Indicator Lamp
(Service Engine Soon Lamp)
Located In the instrument panel, this
lamp illuminates under a variety of conditions when the On-Board Diagnostics
II (OBD II) system detects a malfunction
in the vehicle’s emission controls. If it is
lit steadily, check the gas cap to ensure
that it is present and securely fastened.
Turn it clockwise until a “ratcheting”
sound is heard, signaling that it is
secure. If this is the cause of the condition, a few driving trips with the cap
installed properly should turn the light
off.
See Section 3 of your Owner Manual.
Driver Information Center (DIC)
The DIC features a message center that
can display trip information, fuel economy information, personalization features
and other messages or warnings. The
DIC display is located above the steering wheel on the instrument cluster, and
can be programmed in six languages. To
access the various DIC modes, press
one of the following DIC buttons located
on the steering wheel:
A
A. Trip Information Button: Press this
button to access each of the odometer,
TRIP A, TRIP B and TIMER functions.
To reset either trip odometer to zero,
access it on the DIC and press the
Select button for one second.
B. Fuel Information Button: Press this
button to access each of the range,
average fuel economy, instant fuel economy and GM Oil Life System™.
RANGE estimates the remaining distance you can drive without refueling.
It is based on recent fuel economy and
remaining fuel.
AVG. ECON calculates how many miles
per gallon you are getting based on
overall driving conditions over the previous 500 miles. Press and hold the
Select button while it is displayed and
the DIC will begin calculating average
fuel economy from that point in time.
INST. ECON calculates miles per gallon
being returned at a particular moment.
ENGINE OIL LIFE shows the estimated
percentage of the oil’s remaining useful
life calculated by the GM Oil Life
System™. This feature alerts you when
it’s time to change the oil by illuminating
the CHANGE ENG. OIL light on the
instrument panel. Please remember to
always reset the oil life system after an
oil change by pressing and holding the
Select/Reset button for four seconds
while ENGINE OIL LIFE is displayed.
When successful, the DIC displays
ENGINE OIL LIFE: 100%.
B
With the GM Oil Life System™, your
vehicle may achieve 15,000-mile oil
change intervals under ideal conditions.
Page 5
C
5
• Seat Position Recall
• Perimeter Lighting
• Remote Lock and Unlock Feedback
• Headlamps On at Exit
• Mirror Curb View Assist
• Easy Exit Driver Seat
D
C. Personalization Button: Up to two
people can program individualized settings. Press once and current-driver
preferences will be displayed. Any
changes made at this time affect only
the displayed driver. Press the button
again to scroll through and personalize
menu features.
D. Select Button: When scrolling
through the personalization features,
press the Select button to scroll through
the choices provided for each menu
item. When you find the choice you
want, press the Personalization button
to select it and move on to the next feature. To reset all personalization features
to their default settings, hold the Trip
Information button and the
Personalization button down for four
seconds. Driver preferences are recalled
by pressing any button on the Remote
Keyless Entry System transmitter or by
pressing the Memory button #1 or #2
located on the driver’s door.
Depending on the equipment levels
ordered on your vehicle, you could personalize a wide variety of preferences
on the DIC. Only the features included
on your vehicle will be displayed by the
DIC. Personalization features can
include:
• Display Units (English/Metric)
• Display Language
See Sections 3 and 5 of your Owner Manual.
See page 6 for Personalization Options
Programmable Automatic
Door Locks
Your vehicle features an automatic door
lock/unlock feature with a choice of four
features, as well as automatic door lockout prevention to prevent locking the
keys in the vehicle. In the event the
power door lock switch is activated
when a door is open and the key is in
the ignition, the driver door will unlock.
Locking Options: The default setting
for the programmable automatic door
locks is to lock automatically when the
trans-mission is shifted into gear. Other
locking options include:
Mode 1: All doors lock when the transmission is shifted into gear
Mode 2: All doors lock when vehicle
speed is over 8 mph (13 kph)
Mode 3: No automatic door locking
continued on page 7
• Alarm Warning Type
• Automatic Locking and Unlocking
Page 6

6
Getting to Know Your 2004 Bravada
Page 7

7
Programmable Automatic Door
Locks
continued from page 5
Unlocking options: Choose one of the
following options before personalizing
your unlocking preference:
Mode 1: Driver’s door unlocks when the
transmission is placed into PARK
Mode 2: All doors unlock when the
transmission is shifted into PARK
Mode 3: All doors unlock when the key
is removed from the ignition
Mode 4: No automatic door unlock
There are a number of methods for per-
sonalizing your vehicle locking/unlocking
preferences. See the Vehicle
Personalization section of your Owner
Manual for the various options.
See Section 2 of your Owner Manual.
Remote Lock/Unlock Feedback
Program the Remote Keyless Entry
System’s lock/unlock feedback (horn,
parking lamps, both or neither) by pressing the Personalization button on the
Driver Information Center until REMOTE
LOCK FEEDBACK (or unlock, as
desired) appears on the display. Press
the SELECT button to scroll through the
menu of choices. To program the
lock/unlock feedback feature, press the
Personalization button when the desired
menu option is displayed.
See Section 3 of your Owner Manual.
Headlamp Controls
The exterior lamps knob is located on
the instrument panel, to the left of the
steering wheel. The OFF position is on
the extreme left. Turn the knob clockwise to the first position to activate the
automatic headlamp system that illuminates all exterior lamps and the instrument panel/radio lights when they are
needed. The next position manually illuminates all exterior tail/marker lamps
and the instrument panel/radio lights.
The final clockwise position activates the
headlamps, all exterior tail/marker lamps
and the instrument panel/radio lights.
See Section 3 of your Owner Manual.
Automatic Lamp Control
During daytime driving, Automatic Lamp
Control (ALC) may temporarily switch
the headlamp and interior light systems,
including the radio display, to the nighttime mode. This occurs when passing
through darker conditions, such as
under a bridge or overpass, or inside a
parking garage. When you start the
vehicle at night, the automatic headlamps will come on immediately. The
ALC light sensor is located on top of the
instrument panel. To ensure proper system operation, avoid placing objects or
stickers on or near the sensor.
See Section 3 of your Owner Manual.
Page 8

8
Getting to Know Your 2004 Bravada
Dome Lamp Override
To disable the dome lamps when a door
is open, press the dome lamp override
button. The button is located below the
exterior lamps knob. The button also
disables entry lighting until it is pushed
again or the remote keyless entry transmitter is used to unlock the vehicle.
See Section 3 of your Owner Manual.
Automatic Dual Climate Control
Your vehicle may be equipped with a climate control system that automatically
maintains the desired temperature individually for the driver and front seat passenger. Independent rear seat fan and
air distribution controls are also included
for increased rear-passenger comfort. A
memory feature for up to two drivers is
also included in this optional system.
Manual Dual Climate Control
To cool the vehicle interior more quickly
on very hot days, open the windows just
long enough to let the hot air escape.
For maximum cooling, activate the
RECIRCULATE and A/C buttons on the
instrument panel and place the A/C
mode knob in the VENT mode.
The driver and front passenger can
adjust the dual zone temperature controls to individual comfort levels. The
front passenger-side control also controls rear passenger temperature output
levels.
See Section 3 of your Owner Manual.
Automatic Operation: Push the AUTO
button to set automatic air delivery
mode, fan speed, A/C and recirculation
functions. Each time the AUTO button is
pressed, the display shows the current
driver’s set temperature, automatic air
delivery mode and fan speed. The display shows the outside temperature five
seconds later. At vehicle startup, the
passenger temperature setting defaults
to match the driver’s setting.
Memory Feature: Up to two drivers can
store preferred climate control settings
for temperature, air delivery mode and
fan speed. On vehicles equipped with
the Remote Keyless Entry (RKE)
System, the keyless transmitter identifies the driver to the system when the
Page 9

key fob transmitter is used, and the
automatic climate control system adjusts
to the last comfort control setting saved
by that driver when the ignition key is
placed in the RUN position. If the RKE
System is not used to enter the vehicle,
the driver can identify him- or herself to
the system by pressing memory button
#1 or #2.
The OFF, Recirculation, A/C, FRONT
Defroster buttons, fan speed and mode
controls can also be manually adjusted
as desired. Fan speed and temperature
can also be adjusted by pressing corresponding buttons on the steering wheel.
Rear Seat Controls: Rear seat comfort
controls are included on the rear seat
audio system display. When the front
seat MODE button is set to Defrost, the
rear controls do not function. Sevenpassenger models have independent
rear temperature and fan controls.
9
Power (Optional): Twist the control knob
toward the mirror you want to adjust,
move the knob in the direction you want
the mirror to go, and when both mirrors
have been adjusted, twist the control
knob to the center position.
Heated (Optional): When you turn on
the rear window defogger, a defogger
also warms the outside mirrors to clear
them of mist, ice and snow.
On some Bravada models, when second
seat passengers select a fan speed
mode, the mode will mimic the front seat
fan speed and the passenger side temperature setting.
Note: In order for the second seat
climate controls to function, the front
climate control switch must be in the
“R” mode.
See Section 3 of your Owner Manual.
Outside Rearview Mirrors
Manual: Adjust by hand until you can
see a little of the side of your vehicle.
Pull the mirrors toward the vehicle
before entering a car wash to fold them
to the vehicle side and unfold them after
exiting.
Automatic Dimming Mirror with Curb
View Assist (Optional): Vehicles with
this feature automatically adjust one or
both mirrors downward to a preset tilt
position when the vehicle is in
REVERSE gear. The mirrors move to
their normal position when the vehicle is
moved out of REVERSE. See the
Owner Manual to activate the system for
the first time.
See Section 2 of your Owner Manual.
Page 10

10
Getting to Know Your 2004 Bravada
Seats
Heated Seats (Optional): The heated
seat controls are located on the front
door armrests. Controls can be set to
heat the seatback only or the seatback
and the seat cushion. The three lights
next to the controls indicate LO, MED or
HI settings. Push the vertical switch to
activate heat for the seatback only.
Push the horizontal switch to heat the
whole seat. The engine must be running
for the heated seat feature to work.
To store the driver seat and mirror settings, adjust the seat and outside mirrors
to the desired position. Press and hold
memory button #1 for three seconds
until a chime sounds to indicate that the
seat position is now stored. Repeat the
sequence using memory button #2 for a
second driver. Subsequently pressing
either of these buttons once will cause a
chime to sound and will move the seat
and mirrors to their programmed positions. To coordinate memory seat features with your Remote Keyless Entry
System transmitter, consult the Owner
Manual.
See Section 2 of your Owner Manual.
AM/FM Stereo with Cassette/
CD and RDS
See Section 1 of your Owner Manual.
Memory Seats (Optional): Memory seat
controls are located on the driver door.
They program and recall driver seat
position and outside mirror settings for
up to two drivers.
AUTO VOL (Automatic Volume):
This feature automatically adjusts the
audio volume to make up for road and
wind noise as you drive.
To program, set the volume at the
desired level. Press AUTO VOL and
select LOW, MEDIUM or HIGH. Each
higher setting will allow for more volume
compensation at faster vehicle speeds.
Select OFF if you prefer not to use
AUTO VOL.
Page 11

11
Setting the Clock: Press and hold the
H (or HR) button until the correct hour
appears. AM or PM will appear on the
radio display. Press and hold M (or MN)
until the correct minute appears.
To set the clock to the time of an FM
station broadcasting RDS information,
press/hold hour and minute simultaneously for two seconds until UPDATED
(and the clock symbol) appears on the
display. If the time is not available from
the station, NO UPDAT will appear.
Setting Stations: You can set up to 18
station presets (six AM, six FM1 and six
FM2).
•Turn the radio on
• Press AM-FM to select the band (AM,
FM1 or FM2)
•Tune to the desired station using the
seek function or tune knob
• Press AUTO EQ or AUTO TONE (as
applies to your radio) to select the
sound equalization best suiting the
type of station selected
• Press/hold a numbered button until a
beep confirms storage of the station
• Repeat the previous steps for each
pushbutton
Using RDS Mode: Your radio’s RDS
mode allows you to:
• Seek only stations with your preferred
programming type
• Seek to stations with traffic
announcements
• Receive announcements of local
and/or national emergencies
RDS features are available on FM
stations that broadcast RDS information.
When tuned to an RDS station, the radio
displays the station name instead of the
frequency. Most RDS stations broadcast
their station name, time of day and a
Program Type (PTY).
DISP: Press this knob to toggle between
the station frequency, station name, PTY
and the name of the program if available.
TRAF: Press this button to activate the
traffic announcement feature. When a
traffic announcement is being broadcast
on the tuned station you will hear it,
even if the volume is muted or a cassette tape or CD is playing.
INFO: If the tuned station has a message, the radio displays INFO. Press
the INFO button to see the message.
P-TYPE LIST: Use this button to turn the
Program Type selection on or off. Turn
the P-TYPE knob to select the Program
Type you want, then press the SEEK or
SEEK TYPE button (as it applies to your
radio) and the radio seeks to the first
RDS broadcast of the selected Program
Type.
AM FM (Alternate Frequency): Allows
the radio to switch to a station with a
stronger signal and of the same PTY.
Press and hold the button for two seconds to turn it on; repeat to turn it off.
ALERT!: Warns of local or national
emergencies and appears on the display
during such an announcement. If a CD
or cassette tape is playing, the
announcement overrides it.
• Receive and display messages from
radio stations
See Section 3 of your Owner Manual.
Page 12

12
Getting to Know Your 2004 Bravada
AM/FM Stereo with Six-Disc CD
To load one CD on vehicles equipped
with the radio/six-disc CD:
•Turn the ignition on, then press and
release the LOAD side of the LOAD
CD button
•Wait for the green indicator light at
the right side of the slot to turn green
• Insert the disc partway into the slot,
label-side up; the player will pull the
disc in
To load multiple CDs in the Six-Disc
CD Player:
•Turn the ignition on, then press and
hold the LOAD button for two seconds. The unit beeps and the light to
the right of the slot begins to flash
Travel Note Recorder
On equipped vehicles, the Travel Note
Recorder serves as a reminder system
that enables you to record a message
and play it back later.
Travel Note includes three buttons located in the overhead console. To record,
press the button marked with a circle
and begin speaking. Press the button
again to stop recording.
To listen to a message, press the button
with a right arrow designation. When
multiple messages are stored, the system plays one message and stops.
Press the button again until reaching the
desired message. To hear all messages,
press and hold the button for more than
one second.
•When the light stops flashing and
turns green, insert a disc partway,
label-side up
• The indicator light will begin blinking
and turn green. Load another disc at
this time
•When more than one disc is loaded,
a number for each disc is displayed
•To load more than one but fewer than
six discs, press the LOAD button
again after loading the final CD
• For every CD loaded, a number
appears on the radio display
•To play a specific CD, press the CD
AUX button, then the number of the
CD you want to hear
•Asmall bar appears under the CD
number that is playing, and the track
number appears
Delete messages by pressing the button
designated with a square while the message is playing. Delete all messages by
pressing and holding the right arrow button and the circle button simultaneously
for half a second.
See Section 2 of your Owner Manual.
HomeLink® Universal
Transmitter
See Section 3 of your Owner Manual.
Page 13

13
This programmable transmitter can store
three frequencies for items such as a
garage door opener, entry door lock or
security system. With the ignition OFF,
program the transmitter as follows:
• Hold down the desired button on the
unit until the red indicator light flashes
slowly (about 20 seconds); continue
holding down the button
• Hold the end of your hand-held transmitter up to three inches away from
the surface of the universal transmitter and hold down the button
• Up to 90 seconds may pass as the
universal transmitter is being programmed; programming is complete
when the red light on the HomeLink®
transmitter flashes rapidly
• Release both buttons
For garage door openers with a “rolling
code,” continue with the following steps:
• Press the training button on the
garage door opener motor head unit,
making sure that the indicator light
flashes to confirm training mode
• Within 30 seconds, press and hold
the HomeLink® transmitter button
programmed in the previous steps
• Press and release this button up to
three times to ensure that the
HomeLink® transmitter has been
trained
See Section 2 of your Owner Manual.
Rainsense Wipers
On equipped vehicles, these wipers
detect moisture on the windshield and
automatically turn the wipers on.
To activate Rainsense, set the wipers to
one of the five delay settings on the turn
signal/multifunction lever. The rain sensor automatically controls the frequency
of the wipes from OFF to HIGH speed
according to the amount of moisture on
the windshield.
Note: Turn this feature off before entering an automatic car wash.
See Section 3 of your Owner Manual.
Remote Keyless Entry (RKE)
System
The RKE system locks and unlocks the
doors and liftglass from a range of three
to 30 feet. At times the range may be
shorter than usual, which is normal. If
the transmitter doesn’t seem to be working properly:
• Ensure that you are within transmitter
range of the vehicle. Rainy and
snowy weather can reduce transmitter range
• Check to see whether other vehicles
or obstacles are blocking the transmitter signal by stepping a few feet to
the left or right, and hold the transmitter higher when pressing the
button(s)
• Consider the length of time that the
transmitter battery has been in service and replace it if necessary (the
DIC will display “RFA BAT # LOW” if
the battery needs replacing). Use CR
2032 battery or equivalent
See Section 2 of your Owner Manual.
Page 14

14
Getting to Know Your 2004 Bravada
Content Theft-Deterrent System
The Content TheftDeterrent System has
a red indicator lamp to
the left of the steering
wheel that is labeled
Security. After closing
all vehicle doors, the
system can be activated in two ways:
• Press on the RKE key fob
Sunroof
To open or close your sunroof, the ignition must be on or Retained Accessory
Power (RAP) must be active. Press and
release the back of the button in the
overhead console to open the sunroof.
Press (and hold) the front of the button
until the sunroof is closed. Once the
sunroof is closed, press the forward side
of the button to open the sunroof to the
vent position.
Note: In the closed position, the sunroof
may not appear parallel with the vehicle
headliner.
See Section 2 of your Owner Manual.
All-Wheel Drive (if equipped)
• Press the power door LOCK switch
with the door open
The alarm is not armed until the SECURITY light turns off (after a delay of
approximately 30 seconds).
If the alarm is tripped, the horn sounds
for 30 seconds, and the headlamps and
parking lamps also flash for two minutes
to get visual attention. The alarm sounds
whenever a locked door is opened without the key or Remote Keyless Entry
System transmitter.
See Section 2 of your Owner Manual.
Sun Visors
To block the sun’s glare, pull the sun
visor down. You can also slide the cover
from side to side to cover the driver or
passenger front window.
Your Bravada may be equipped with an
all-wheel-drive system. This system is
designed to make the most out of available traction to all four wheels and is
fully automatic, with no buttons to push
or levers to pull.
Your vehicle normally operates in twowheel drive. But, when the all-wheeldrive system senses wheelslip, it automatically engages all four wheels and
directs the right amount of power to the
wheels with the most traction. When
wheel slippage is no longer detected,
the vehicle returns to its normal twowheel-drive operation.
See Sections 2 and 5 of your Owner Manual.
See Section 2 of your Owner Manual.
Page 15

15
Traction Assist System (TAS)
(if equipped, 2WD Models)
The TAS helps limit wheelspin. It
operates only when it senses that one
or both rear wheels are beginning to
lose traction. When this happens,
engine power is reduced to limit
wheelspin. You may also hear or feel
the system working. TAS is automatically enabled whenever you start the
vehicle. You can disable it by pressing
the TAS ON/OFF button located near
the shift lever or on the instrument
panel. When disabled, the TRACTION
OFF light comes on. Enable the system
by pressing the TAS ON/OFF button
again and the TRACTION OFF light will
go out.
See Section 4 of your Owner Manual.
Luggage Carrier
The luggage carrier has side rails
attached to the roof and allows you to
carry load on top of your vehicle. Some
vehicles are equipped with sliding cross
rails and tie-down spots to secure cargo.
To slide the cross rails to the desired
position, lift the lever on each side of the
cross rail and slide it into position.
Secure the cross rail by pressing the
levers on each side of the cross rail
down into place. To reduce wind noise
when the luggage carrier is not in use,
position the rear cross rail at the rearmost position and the front cross rail
above the rearmost portion of the rear
door opening (above the “C”-pillar).
Note: Never carry anything on the vehicle roof that is longer or wider than the
luggage carrier itself. (Examples: plywood, paneling, a mattress, etc.) The
load could be violently torn off, causing
you or other drivers to have a collision.
Note: Loading cargo that weights more
than 220 pounds (100 kg) on the luggage carrier may damage your vehicle.
See Section 2 of your Owner Manual.
Air Inflator System (if equipped)
Your vehicle’s Air
Inflator System
can be used to
inflate such
things as basketballs and bicycle
tires, as well as
bring your vehicle’s tires up to
proper air pressure. The inflator
is located behind an access cover in the
passenger’s side rear compartment. The
air inflator kit, which includes a 22-foot
hose and three nozzle adapters, is located in the storage compartment. See
your Owner Manual for instructions on
using the Air Inflator System.
See Section 5 of your Owner Manual.
Page 16

16
Getting to Know Your 2004 Bravada
Roadside Assistance Program
1-800-442-OLDS (6537)
Text Telephone (TTY) Users:
1-888-889-2438
As the owner of a 2004 Bravada, you
are automatically enrolled as a member
in the Oldsmobile Roadside Assistance
Program. Membership is free; however,
some services may incur costs.
The Oldsmobile Roadside Assistance
toll-free number is staffed by courteous
and capable representatives who are
available 24 hours a day, 365 days a
year.
We will provide the following services for
3 years/36,000 miles (60 000 km), at no
expense to you.
For prompt and efficient assistance
when calling, please provide the following information to the Roadside
Assistance Representative:
• Location of the vehicle
•Telephone number or your location
•Vehicle model, year and color
•Vehicle mileage
•Vehicle Identification Number (VIN)
•Vehicle license plate number
Oldsmobile reserves the right to limit
services or reimbursement to an owner
or driver when, in Oldsmobile’s judgment, the claims become excessive in
frequency or type of service.
My GMLink
• Fuel delivery
• Lock-out service (identification
required)
•Tow to nearest dealership for warranty service
• Change a flat tire
• Jump starts
• Minor repairs to disabled vehicles
The Oldsmobile Owner Center at
MyGMLink is a complimentary service
for Oldsmobile Owners, a one-stop
resource to enhance your Oldsmobile
ownership experience. Exclusive member benefits include online service
reminders, vehicle maintenance tips,
online owner manual, special privileges
and more. Sign up today at
• Assistance when mired in sand, snow
www.mygmlink.com.
or mud
•Trip routing
•Trip interruption expense benefits
• Dealership locator services
Certain restrictions, precautions and safety procedures apply to your vehicle. Please read your Owner
Manual for complete instructions. All information contained herein is based on information available at
the time of printing and is subject to change without notice. Copyright 2003 by GM Corp.
All rights reserved.
04BRAVQRG
 Loading...