

Page 1
Oldfield Amplifiers
User Guide
Model 6736
Page 2
Thank You
Welcome to the Oldfield family and thank you for putting your trust in Oldfield Amplifiers.
We value that trust as much as you will enjoy your new Oldfield amplifier.
Your new Oldfield amplifier is built to provide you with the best tonal experience and
durability available in a guitar amplifier. As with all Oldfields It is hand built with you, the
player, as the central focus of our efforts. By using the highest grade components, point-
to- point vacuum tube circuitry and fine craftsmanship, your amplifier will inspire many
hours of musical satisfaction and lasting enjoyment.
Thanks,
The Oldfield Team
Page 3
Table Of Contents
Important Safety Instructions............................................................................................4~5
Overview...........................................................................................................................6
Front Panel Controls And Features..................................................................................7
Rear Panel Controls And Features...................................................................................9
Tube Layout.....................................................................................................................11
Warranty...........................................................................................................................12
Operational Tips...............................................................................................................1 3
Page 4
Important Safety Instructions
∆ For your safety read, retain, and follow all instructions. Heed all warnings.
∆ Only connect the power supply cord to an earth-grounded AC receptacle. This amplifier
is designed to operate on standard North American 115V AC and should only be plugged
in to a receptacle meeting those specifications.
∆ WARNING: To prevent damage, fire or shock hazard, do not expose this unit to rain or
moisture.
∆ Unplug the power supply cord before cleaning the unit exterior (use a damp cloth only).
Wait until the unit is completely dry before reconnecting it to power.
∆ Maintain at least 6 inches (1 5.25 cm) of unobstructed air space behind the unit to allow
for proper ventilation and cooling of the unit.
∆ This product should be located away from heat sources such as radiators, heat
registers, or other products that produce heat.
∆ This product may be equipped with a polarized plug (one blade wider than the other) or
a three-prong grounded plug. This is a safety feature. If you are unable to insert the plug
into the outlet, contact an electrician to replace your obsolete outlet. Do not defeat the
safety purpose of this plug.
∆ Protect the power supply cord from being pinched or abraded.
∆ This product should only be used with a cart or stand that is recommended by the
manufacturer.
∆ The power supply cord of this product should be unplugged from the outlet when left
unused for a long period of time, or during electrical storms.
∆ This product should be serviced by qualified service personnel when: the power supply
cord or the plug has been damaged; or objects have fallen, or liquid has been spilled onto
the product; or the product has been exposed to rain; or the product does not appear to
operate normally or exhibits a marked change in performance; or the product has been
dropped, or the enclosure damaged.
∆ Do not drip or splash liquids, nor place liquid filled containers on the unit.
∆ CAUTION: No user serviceable parts inside, refer servicing to qualified personnel only.
Do not expose the circuit of the amplifier under any circumstances.
Page 4
Oldfield Amplifiers
Page 5
Important Safety Instructions
∆ CAUTION: By nature vacuum tubes get very hot during operation. Do not touch
vacuum tubes until they have sufficiently cooled.
∆ Oldfield amplifiers are capable of producing very high sound pressure levels which may
cause temporary or permanent hearing damage. Use care when setting and adjusting
volume levels during use.
∆ Failure to comply with any of these safety precautions could result in damage to the
amplifier and in worst cases bodily harm. Non-compliance with any safety precaution
may void any stated warranties.
Page 5
Oldfield Amplifiers
Page 6
Overview
Congratulations on your purchase of a new Oldfield 6736 amplifier. The 6736 gets it roots
from the legends of the British rock revolution and is well suited for Americana, Blues and
Rock players.
This amplifier is all tube and hand-wired using the best quality components available for
guitar amplification. It is built to last a lifetime and give the owner countless hours of
enjoyment whether on stage, in the studio, or in the home.
The 6736 has two very distinctly voiced channels. Channel One is voiced a little cleaner
and with slightly fuller frequency response than Channel Two. Channel Two falls into
distortion faster than Channel One and feels somewhat brighter. Both channels use the
complete tone stack and Channel One has it’s own Top Cut control. Both channels
respond very well to adjustments In guitar.
Feature summary:
• Two channels
• 36 watts output power into 8Ω
• All tube, hand-wired circuitry
• (4) EL84 Power Section
• (4) 1 2AX7 Preamp Section
• 5AR4 Tube / Solid State Selectable Rectifier
• Power Scaling (Option)
• Fully Bypassed Effects Loop (Option)
• Negative Feedback Defeat Switch
• Finger–jointed Cabinet
Page 6
Oldfield Amplifiers
Page 7
Front Panel: Controls And Features
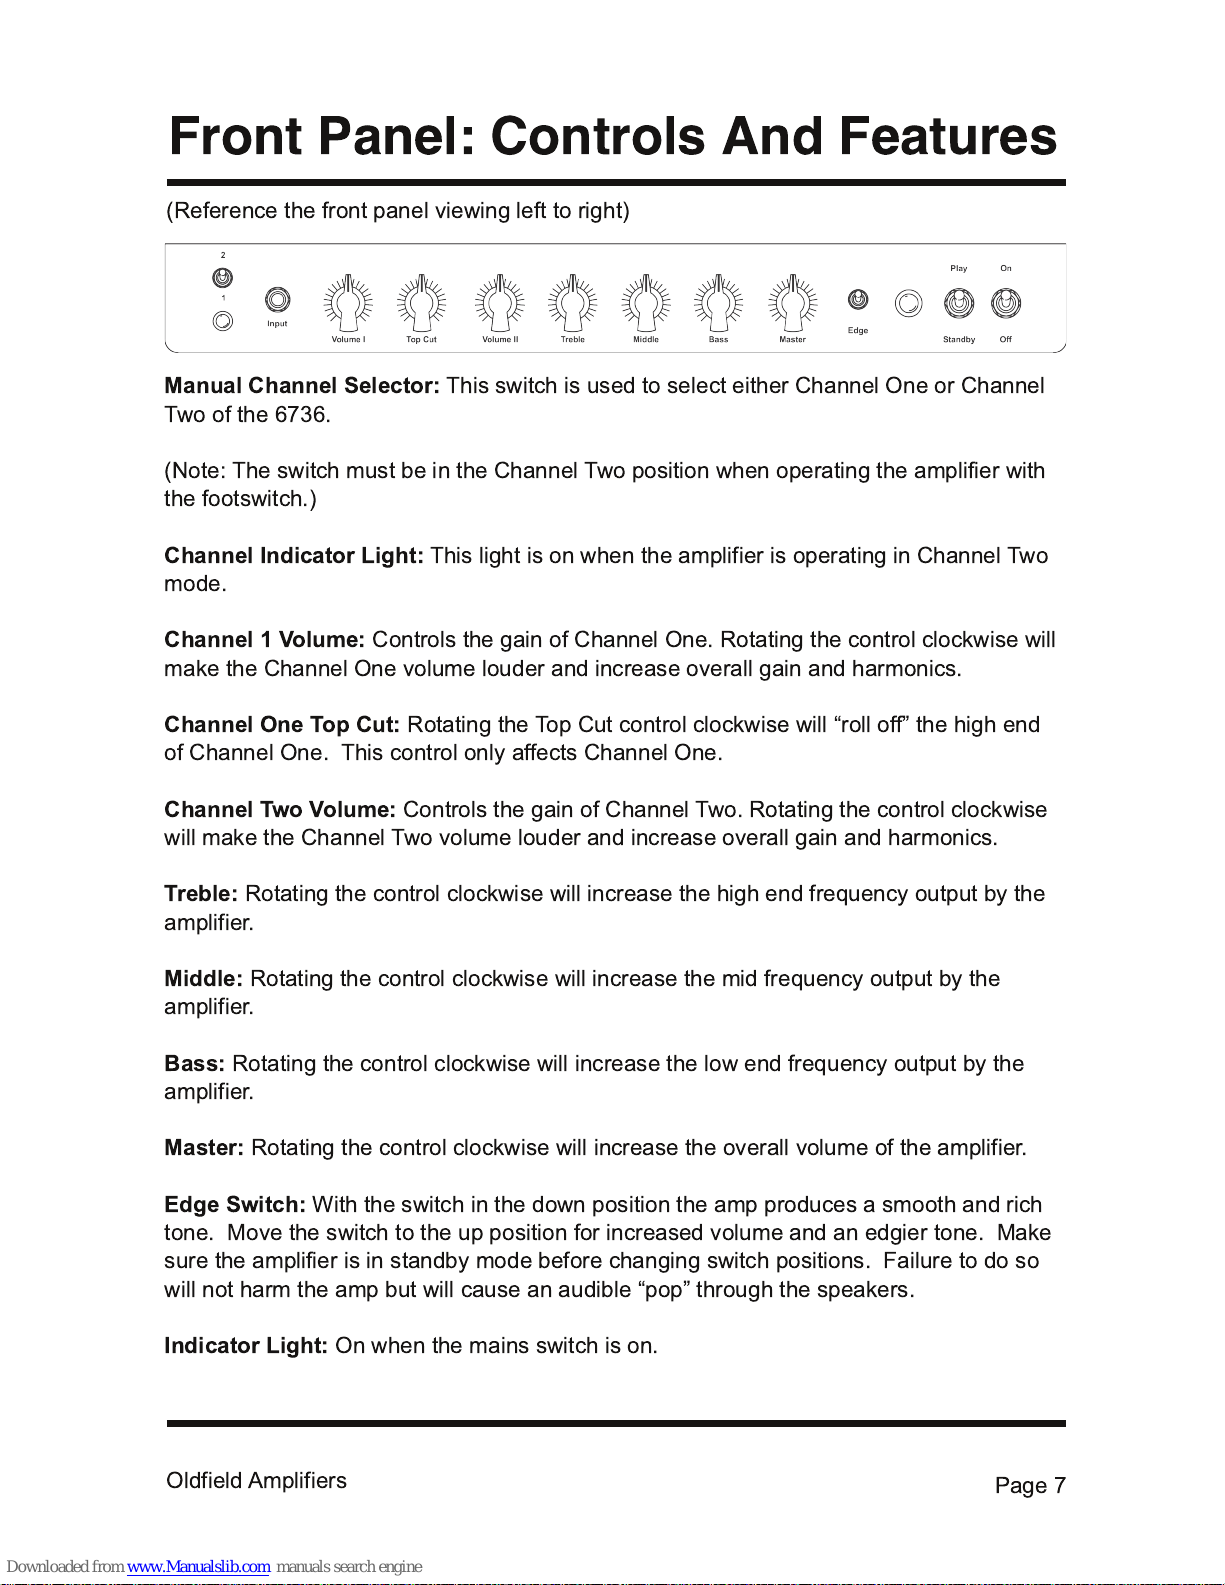
Manual Channel Selector:
This switch is used to select either Channel One or Channel
Two of the 6736.
(Note: The switch must be in the Channel Two position when operating the amplifier with
the footswitch.)
Channel Indicator Light:
This light is on when the amplifier is operating in Channel Two
mode.
Channel 1 Volume:
Controls the gain of Channel One. Rotating the control clockwise will
make the Channel One volume louder and increase overall gain and harmonics.
Channel One Top Cut:
Rotating the Top Cut control clockwise will “roll off” the high end
of Channel One. This control only affects Channel One.
Channel Two Volume:
Controls the gain of Channel Two. Rotating the control clockwise
will make the Channel Two volume louder and increase overall gain and harmonics.
Treble:
Rotating the control clockwise will increase the high end frequency output by the
amplifier.
Middle:
Rotating the control clockwise will increase the mid frequency output by the
amplifier.
Bass:
Rotating the control clockwise will increase the low end frequency output by the
amplifier.
Master:
Rotating the control clockwise will increase the overall volume of the amplifier.
Edge Switch:
With the switch in the down position the amp produces a smooth and rich
tone. Move the switch to the up position for increased volume and an edgier tone. Make
sure the amplifier is in standby mode before changing switch positions. Failure to do so
will not harm the amp but will cause an audible “pop” through the speakers.
Indicator Light:
On when the mains switch is on.
(Reference the front panel viewing left to right)
Page 7
Oldfield Amplifiers
Page 8
Front Panel: Controls And Features
Standby:
Move to the up position for play and down to put the amplifier in standby mode.
The standby switch should only be moved to the “Play” position after the Mains switch
has been in the “On” position for at least one minute to give the tubes time to warm up.
Mains:
Move to the up position to power up the amplifier and down to shut the amplifier
completely off.
Page 8
Oldfield Amplifiers
Page 9
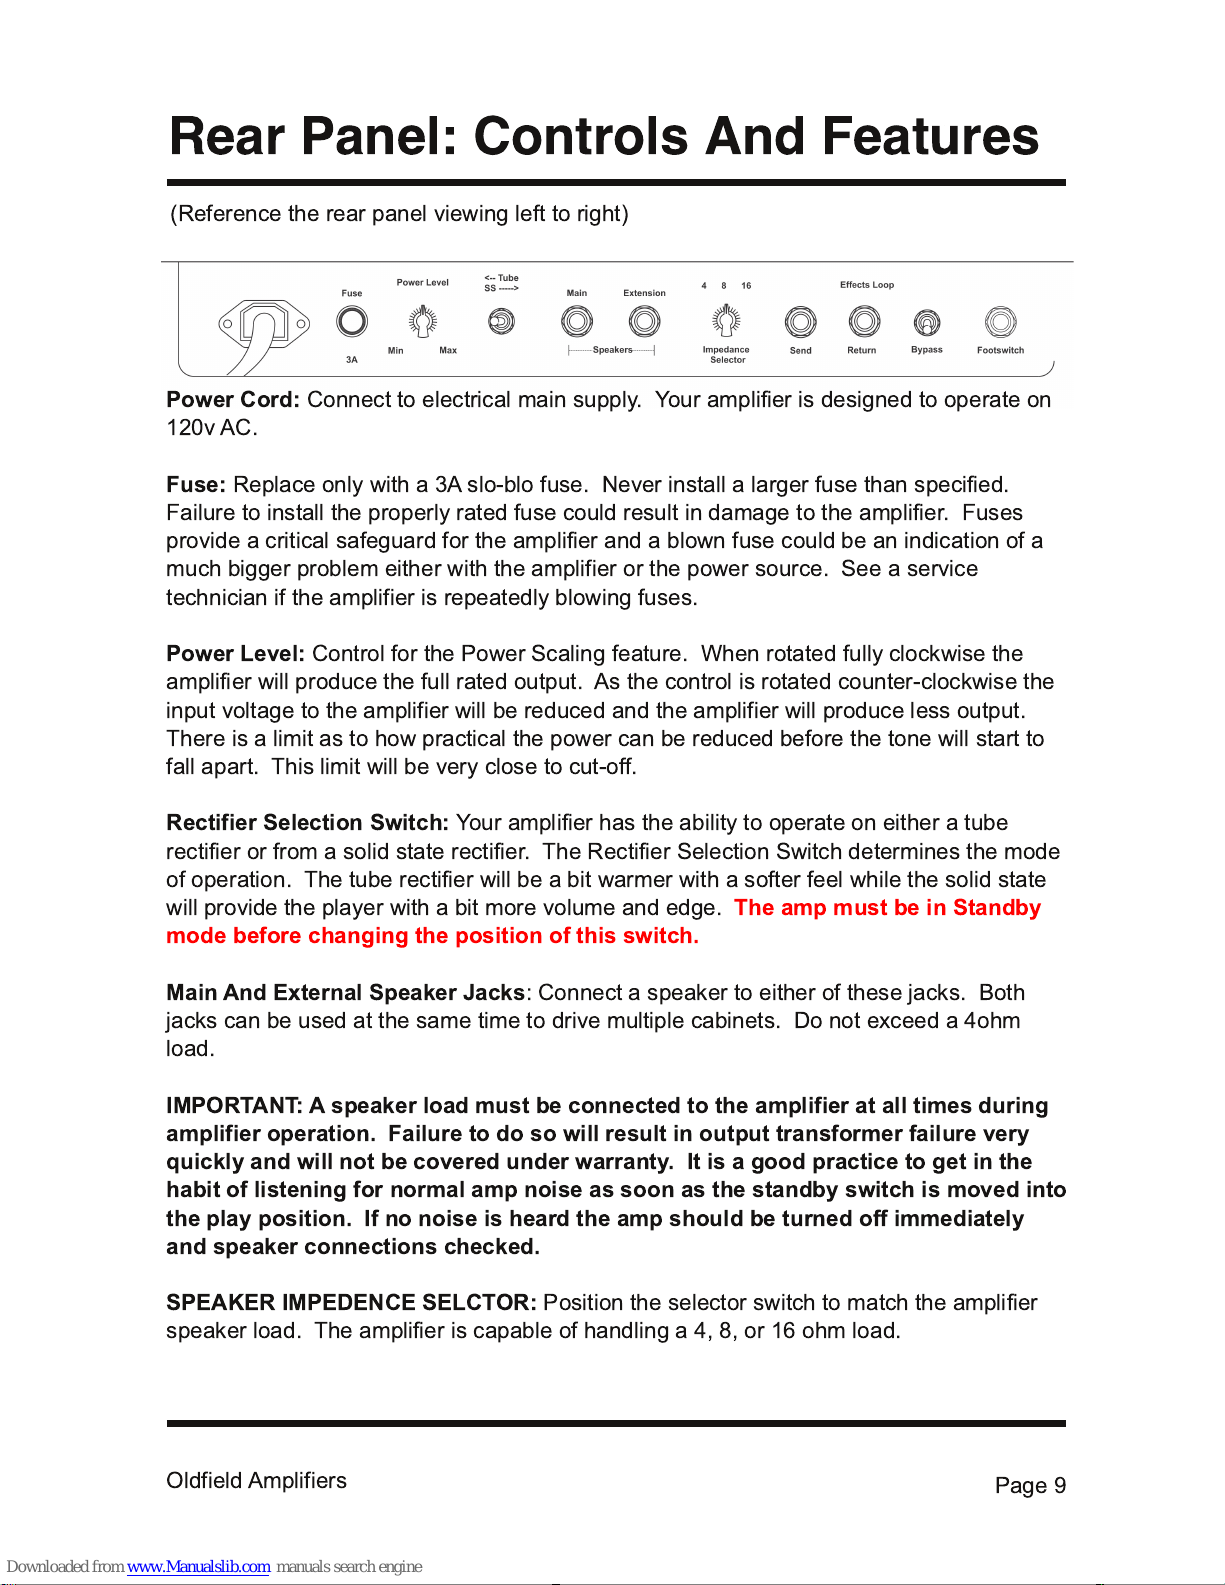
Rear Panel: Controls And Features
(Reference the rear panel viewing left to right)
Power Cord:
Connect to electrical main supply. Your amplifier is designed to operate on
1 20v AC.
Fuse:
Replace only with a 3A slo-blo fuse. Never install a larger fuse than specified.
Failure to install the properly rated fuse could result in damage to the amplifier. Fuses
provide a critical safeguard for the amplifier and a blown fuse could be an indication of a
much bigger problem either with the amplifier or the power source. See a service
technician if the amplifier is repeatedly blowing fuses.
Power Level:
Control for the Power Scaling feature. When rotated fully clockwise the
amplifier will produce the full rated output. As the control is rotated counter-clockwise the
input voltage to the amplifier will be reduced and the amplifier will produce less output.
There is a limit as to how practical the power can be reduced before the tone will start to
fall apart. This limit will be very close to cut-off.
Rectifier Selection Switch:
Your amplifier has the ability to operate on either a tube
rectifier or from a solid state rectifier. The Rectifier Selection Switch determines the mode
of operation. The tube rectifier will be a bit warmer with a softer feel while the solid state
will provide the player with a bit more volume and edge.
The amp must be in Standby
mode before changing the position of this switch.
Main And External Speaker Jacks
: Connect a speaker to either of these jacks. Both
jacks can be used at the same time to drive multiple cabinets. Do not exceed a 4ohm
load.
IMPORTANT: A speaker load must be connected to the amplifier at all times during
amplifier operation. Failure to do so will result in output transformer failure very
quickly and will not be covered under warranty. It is a good practice to get in the
habit of listening for normal amp noise as soon as the standby switch is moved into
the play position. If no noise is heard the amp should be turned off immediately
and speaker connections checked.
SPEAKER IMPEDENCE SELCTOR:
Position the selector switch to match the amplifier
speaker load. The amplifier is capable of handling a 4, 8, or 1 6 ohm load.
Page 9
Oldfield Amplifiers
Page 10
Rear Panel: Controls And Features
EFFECTS LOOP:
Send / Receive / Bypass switch for the serial effects loop. The bypass
switch disables the effects loop.
Footswitch Jack:
Connect the channel switching footswitch to this jack.
Page 1 0
Oldfield Amplifiers
Page 11
Tube Layout
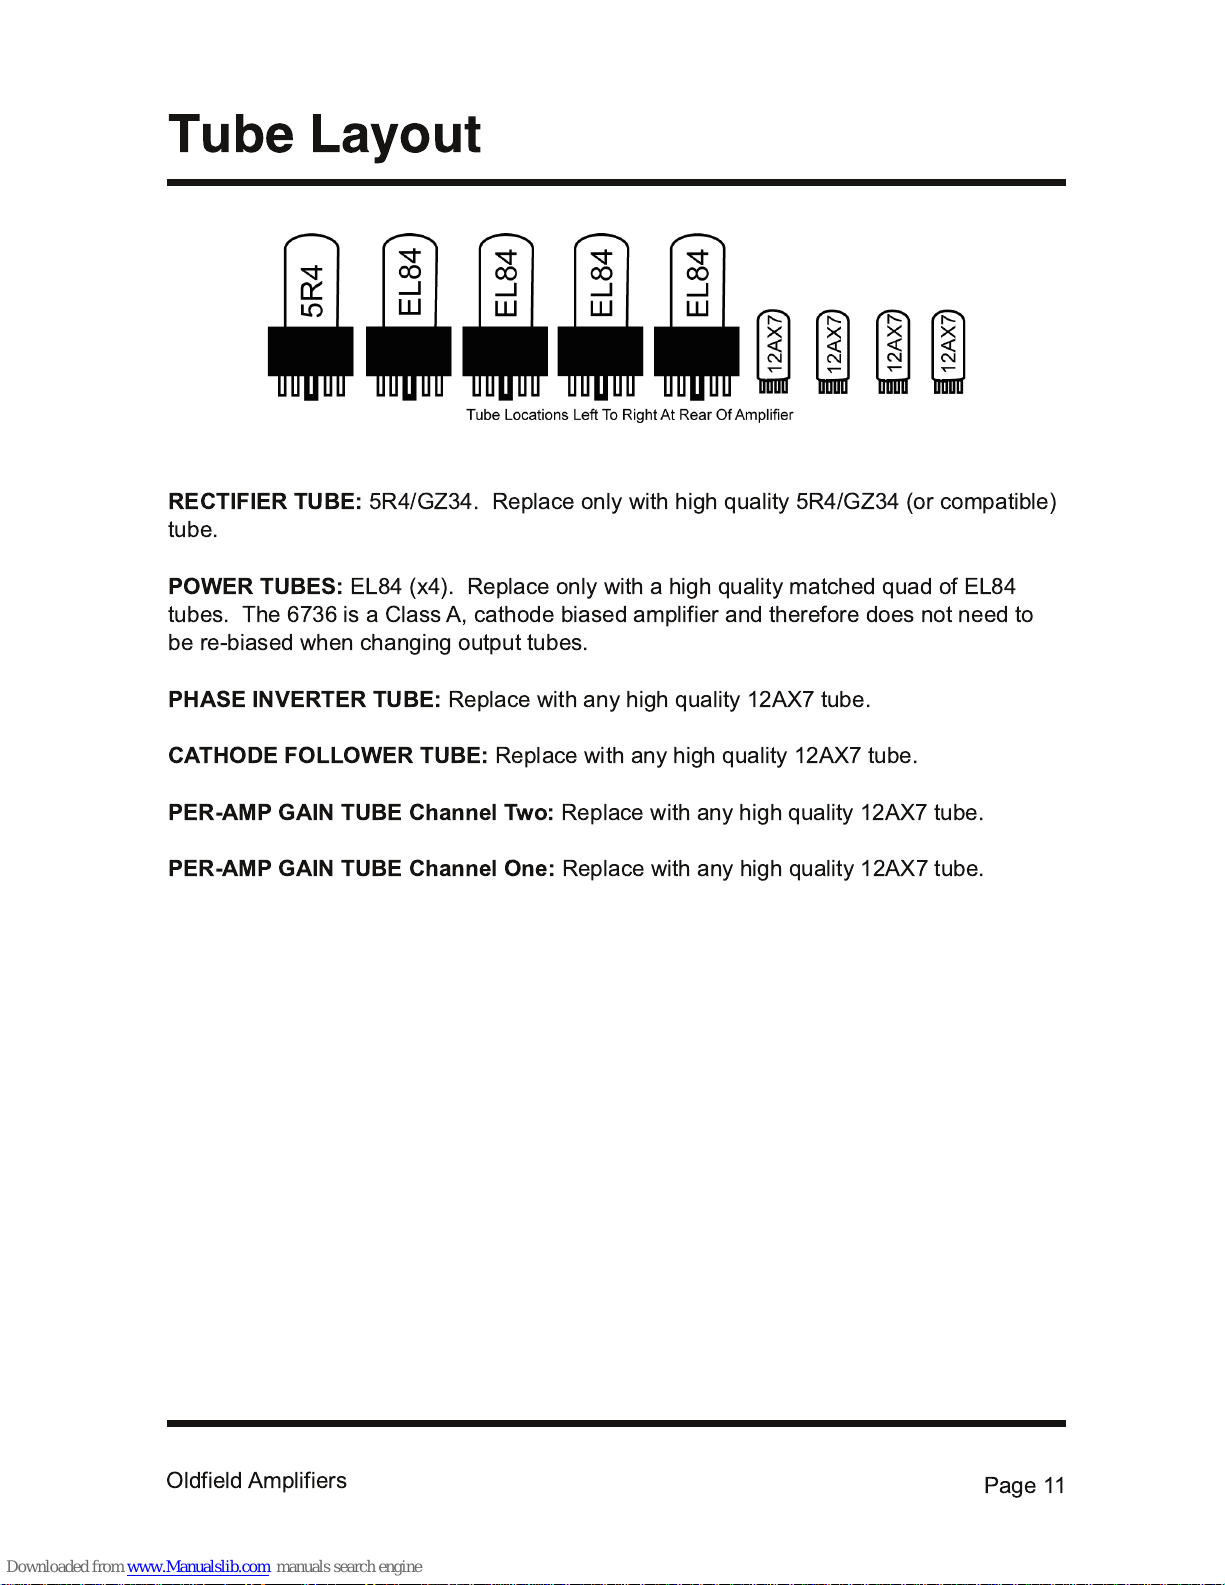
RECTIFIER TUBE:
5R4/GZ34. Replace only with high quality 5R4/GZ34 (or compatible)
tube.
POWER TUBES:
EL84 (x4). Replace only with a high quality matched quad of EL84
tubes. The 6736 is a Class A, cathode biased amplifier and therefore does not need to
be re-biased when changing output tubes.
PHASE INVERTER TUBE:
Replace with any high quality 1 2AX7 tube.
CATHODE FOLLOWER TUBE:
Replace with any high quality 1 2AX7 tube.
PER-AMP GAIN TUBE Channel Two:
Replace with any high quality 1 2AX7 tube.
PER-AMP GAIN TUBE Channel One:
Replace with any high quality 1 2AX7 tube.
Page 1 1
Oldfield Amplifiers
Page 12
Warranty
The following warranties apply to the original owner of the amplifier. All warranty work
must be performed by Oldfield or an authorized technician for the warranty to be in effect.
Warranties do not cover normal wear and tear or abuse. Failure to comply with the safety
precautions outlined earlier in the owner’s manual will void all warranties.
Rectifier and Power Tubes:
Guaranteed for thirty days after date of purchase. If a failure
occurs Oldfield will replace any rectifier or power tube during this period free of charge
Preamp Tubes:
Guaranteed for ninety days after date of purchase. If a failure occurs
Oldfield will replace any preamp tube during this period free of charge.
Power Transformer, Output Transformer And Choke:
These items are guaranteed for
five years after date of purchase against manufacturer’s defects. If a failure occurs due a
defect in manufacturing Oldfield will replace any of these items during this period free of
charge. Warranties on these items are void if the owner uses any type of power soak or
attenuator in conjunction with the operation of the amplifier or fails to connect a speaker
load to the amplifier while in operation.
Defects Due To Workmanship:
Oldfield guarantees the amplifier to be free from
workmanship defects for five years. Tolex and grill cloth are not covered in the warranty.
Circuit Components:
Any failed circuit component will be replaced at Oldfield’s
discretion. Some circuit components have a limited life such as filter and bypass
capacitors and Oldfield must use judgment to determine if the component was at end of
life or failed prematurely.
In every case Oldfield guarantees to work with the customer to remedy any situation in a
timely manner and to the satisfaction of the amplifier owner.
Page 1 2
Oldfield Amplifiers
Page 13
Operation Tips
Oldfield Amplifiers
Page 1 3
1 . The 6736 is a cathode biased Class A amplifier. This style of amplifier really benefits
from having the master volume turned up to 1 2 o'clock and beyond. This will open up the
amplifier's tone. Adjust the gain controls accordingly.
2. Channel one and channel two are not only voiced differently but their gain structure is
also different. Channel one has a wider frequency response so with it's gain control set at
the same level as channel two it will be quite a bit louder.
3. When setting up the amp I recommend starting with channel two first. Set the master
at about 1 2 o'clock and the channel two gain at a point where you are getting a typical
British rock tone. Adjust the tone controls to your liking. Switch to channel one and set
the gain control to match the volume level of channel two. The gain on channel one
should be somewhat less than the gain on channel two giving channel one a nice clean
and warm tone. Adjust the top cut control to cut any unwanted channel one high end.
4. Obviously there are a ton tonal more options than described above. Experiment.
5. The power scaling feature can be useful but there is a limit to it's effectiveness. Once
you get to a certain point in turning the power scaling down the tone will start to fall apart.
That is your limit. When turning the power scaling down the decrease in volume is not
dramatic through the first half of the control but you will notice the amplifier's tone
changing and the amplifier's feel changing. This is a control that requires some
experimenting to get the hang of. The 6736 will yield the most pleasing tone with the
power scaling set to maximum (fully clockwise).
 Loading...