

Page 1
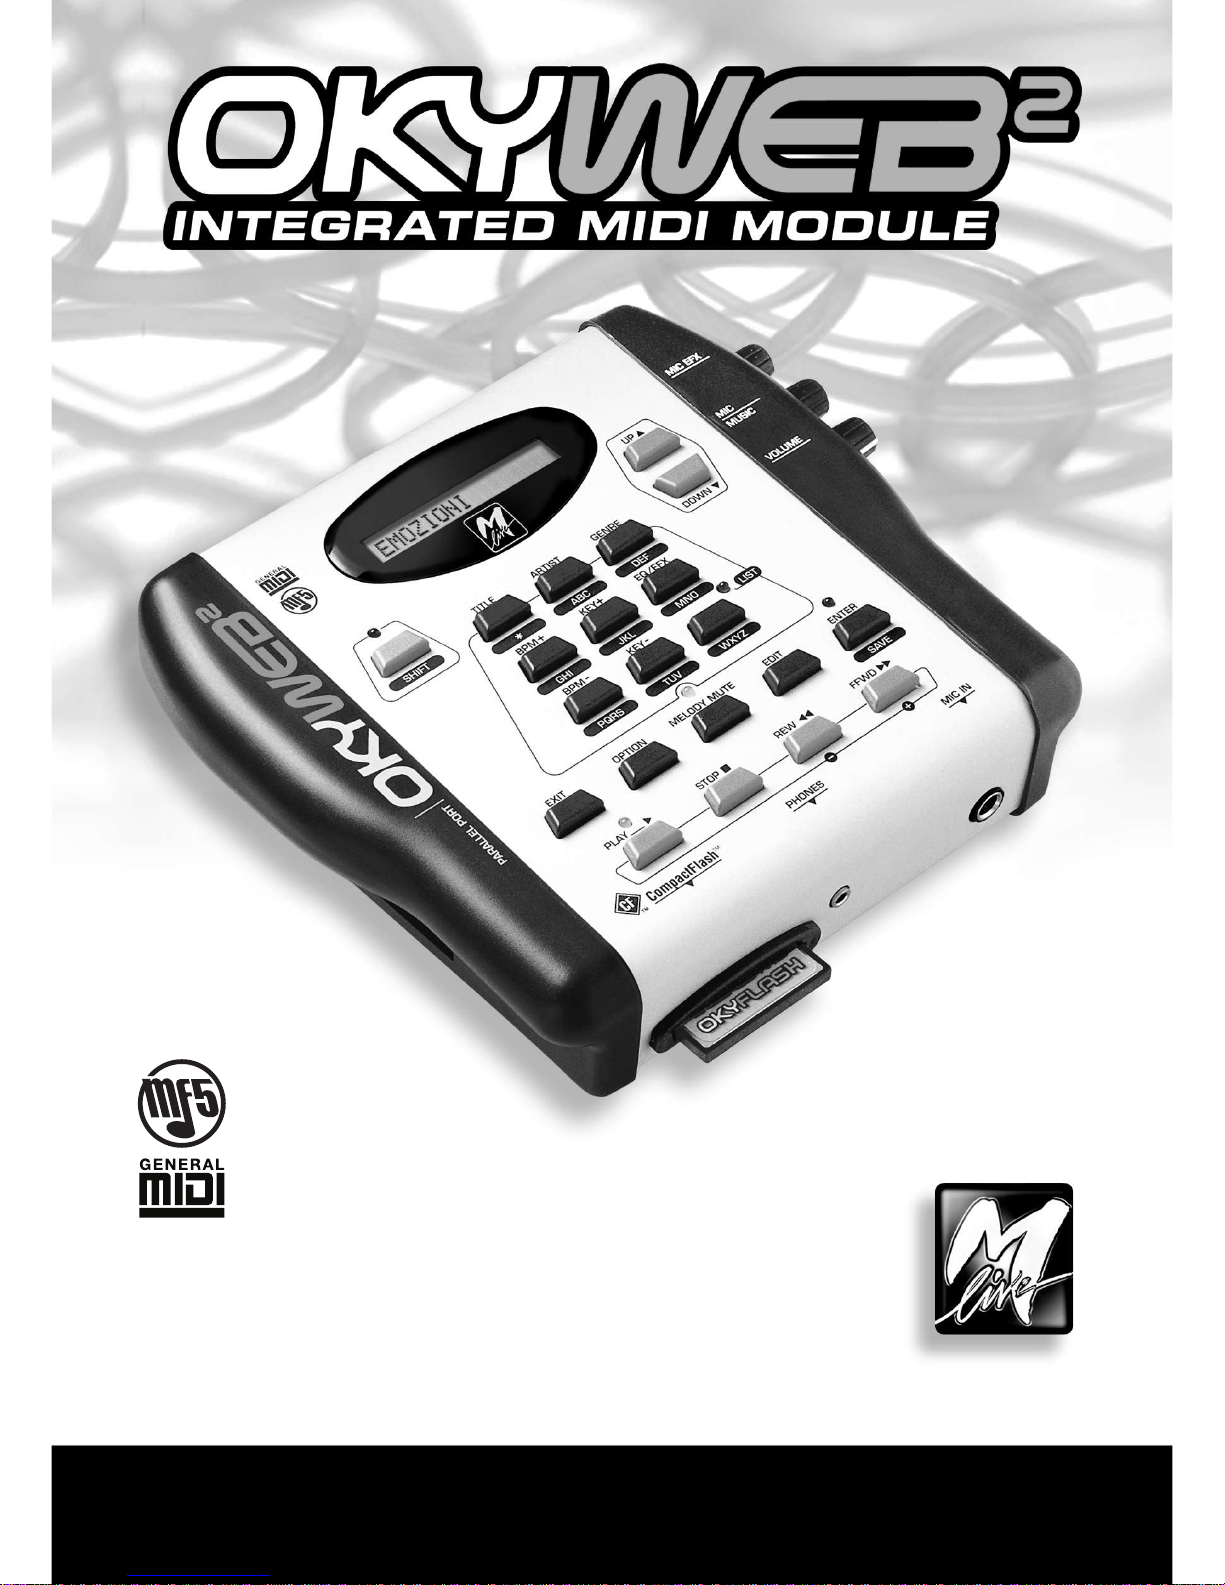
REFERENCE MANUAL
www.okyweb.com.au
www.hittrax.com.au
Page 2

M-LIVE s.r.l.
Via Luciona, 1872/B
47842 S.Giovanni in Marignano (RN) - ITALY
Phone +39 0541 827 066 - Fax +39 0541 827 067
web: www.m-live.com - e-mail: [email protected]
HitTrax MIDI Files
PO Box 6090
Vermont South 3133
Vic, Australia
Ph/Fax: +613 9887 8127
web: www.okyweb.com.au - e-mail: [email protected]
The information in this document has been carefully prepared and checked. Nevertheless, M-LIVE s.r.l. assumes no responsibility
for any errors. The information in this document, as well as the specifications of the products it refers to, are subject to change
without prior warning. M-LIVE s.r.l. assumes no responsibility for the use or application of the products described in this document.
Unless otherwise stated, any reference to names, products, data, authors, publishers and companies is purely casual and for the sole
purpose of explaining the use of M-LIVE s.r.l. products. Names, logos and trademarks appear herein belong to the respective proprietors.
All rights are reserved and no part of this document can be reproduced in any form, in any way or for any reason without written
permission from M-LIVE s.r.l.
© M-LIVE s.r.l. 2006
First edition 2006
Page 3

Reference Manual
Getting Started
Connections and Controls
Playing Songs
Searching Songs
Playlist
Editing
EQ / EFX
Options
Compact Flash & Software
Connection Examples
MIDI Sounds
Chapters
Families of Sounds
Troubleshooting
9
8
7
6
5
4
3
2
1
A
B
C
Lyrics & Chords Compatibility
D
E
Technical Specifications Spx
Page 4

Contents
II
Contents
Warnings ................................................................................................. 2.3
Rapid layout maps.................................................................................. 2.4
1 - Getting Started .................................................................................. 1.1
Switching on and off ..................................................................................................1.1
Connections ...............................................................................................................1.1
Playing Songs ............................................................................................................1.2
Audio controls ............................................................................................................1.3
Tempo / Key / Melody Mute ....................................................................................... 1.3
Searching Songs............................................................................................................ 1.4
2 - Connections and Controls ............................................................... 2.1
Front Panel .................................................................................................................2.1
Rear panel ...................................................................................................................2.2
Controls ......................................................................................................................2.3
Transport........................................................................................................................ 2.3
Function keys ................................................................................................................. 2.4
Browse Keys .................................................................................................................. 2.4
Real Time Changes ....................................................................................................... 2.4
Song search ................................................................................................................... 2.5
Save ............................................................................................................................... 2.5
Shift key ...................................................................................................................... 2.6
3 - Playing Songs ................................................................................... 3.1
Player Controls ........................................................................................................... 3.1
Changing Tempo ........................................................................................................3.2
Changing Key (or Transposing)................................................................................3.2
Saving Changes............................................................................................................. 3.2
Muting the melody track ............................................................................................3.3
Audio Controls ........................................................................................................... 3.3
Displaying Lyrics & Chords ......................................................................................3.4
Txt + Search Mode ........................................................................................................ 3.4
Text Only Mode .............................................................................................................. 3.4
Rolling Mode .................................................................................................................. 3.4
Search during Play ..................................................................................................... 3.6
4 - Searching Songs ............................................................................... 4.1
Search keys ................................................................................................................ 4.1
Search by Title ............................................................................................................ 4.2
Search by Artist .......................................................................................................... 4.3
Search by Genre ......................................................................................................... 4.4
Alphabetical Search ...................................................................................................4.5
T9 Search ....................................................................................................................4.6
Page 5

III
Contents
5 - Playlist ............................................................................................... 5.1
Running a Playlist ......................................................................................................5.2
Creating and Editing Playlists...................................................................................5.3
Add Song .................................................................................................................... 5.4
Delete Song ................................................................................................................5.5
Rename Playlist .......................................................................................................... 5.6
Delete Playlist .............................................................................................................5.6
New Playlist ................................................................................................................ 5.6
6 - Editing ................................................................................................ 6.1
How to edit a song ..................................................................................................... 6.1
The elements of the EDIT environment .................................................................... 6.2
Parameter selected for changing ................................................................................... 6.2
Tracks used ................................................................................................................... 6.3
Indicators of Notes being played .................................................................................... 6.3
Cursor ............................................................................................................................ 6.3
“All Tracks” mode ........................................................................................................... 6.3
“Single Track” mode ....................................................................................................... 6.3
Page counter ................................................................................................................. 6.4
Values of the selected parameter ................................................................................... 6.4
Status of the selected track ............................................................................................ 6.5
Transpose ...................................................................................................................... 6.6
Instrument & Family ....................................................................................................... 6.6
Choosing the Family ...................................................................................................... 6.6
Choosing the Instrument ................................................................................................ 6.6
To exit the EDIT environment ....................................................................................6.7
Saving changes ..........................................................................................................6.7
Summary of EDIT environment controls .................................................................6.8
7 - EQ / EFX ............................................................................................. 7.1
How to edit a processor ............................................................................................7.1
Mic Echo .....................................................................................................................7.2
Mic Reverb ..................................................................................................................7.3
Mic Echo & Mic Reverb Audio Controls ...................................................................7.3
Mic EQ .........................................................................................................................7.4
Music EFX ...................................................................................................................7.5
Saving EQ and EFX in the song ................................................................................ 7.6
Removing EQ and EFX from the song ..................................................................... 7.6
To exit the EQ/EFX environment ...............................................................................7.6
Page 6

Contents
IV
8 - Options............................................................................................... 8.1
General Options ......................................................................................................... 8.2
Music Options ............................................................................................................8.2
Mic Options ................................................................................................................. 8.3
MIDI Options ...............................................................................................................8.4
Video Option ...............................................................................................................8.5
Txt+Search mode .......................................................................................................... 8.5
Text Only mode .............................................................................................................. 8.5
Rolling mode .................................................................................................................. 8.5
9 - Compact Flash & Software............................................................... 9.1
Formatting Compact Flash cards ................................................................................... 9.1
Capacity of Compact Flash cards .................................................................................. 9.1
Inserting and replacing a Compact Flash card............................................................... 9.1
Card Status Messages ................................................................................................... 9.1
Saving data on a Compact Flash card ........................................................................... 9.2
Saving Songs on a Compact Flash card ........................................................................ 9.2
Software ......................................................................................................................9.2
Appendix A - Connection Examples .............................................App A.1
Front panel connections .......................................................................................... App A.1
Audio + Video with TV only ..................................................................................... App A.1
TV + Hi-FI System ................................................................................................... App A.1
Personal Computer ................................................................................................. App A.2
Keyboard & MIDI equipment ...................................................................................App A.2
TV + amplification system .......................................................................................App A.3
Live performances using a MIDI keyboard ............................................................. App A.3
Home Theater .........................................................................................................App A.4
Home Studio ........................................................................................................... App A.4
Karaoke Club ..........................................................................................................App A.5
VCR / DVD / DivX Image as a background for the lyrics.........................................App A.6
OkyWeb2 + VCR / DVD / DivX with the same TV ...................................................App A.6
Appendix B - Lyrics & Chords Compatibility ...............................App B.1
Appendix C - Troubleshooting ...................................................... App C.1
Errors appearing on the bottom line of the TV screen .................................. App C.1
Other non-explicit errors .................................................................................. App C.2
Appendix D - MIDI Sounds ............................................................App D.1
Appendix E - Families of Sounds ................................................. App E.1
Technical Specifications ................................................................Specs.1
Page 7

2.1
2
Introduction
Introduction
OkyWeb2 - the expression of technology
Small but powerful, OkyWeb2 is a 32-track MIDI file player with Karaoke TV functions that integrates a
32-channel Expander with polyphonic facilities of up to 124 notes.
OkyWeb2 is able to handle an immense archive of backing tracks, but is also extremely user-friendly.
The efficient song search functions, according to Title, Artist and Genre, various display modes for the songs
lyrics and chords, great audio quality and realism of the instruments make it a really valuable aid for live music
entertainment.
The sounds are the first striking feature of OkyWeb2: classic GM sounds made even more realistic and useable
in the backing tracks, R&B percussion, Disco Synth sounds, numerous really powerful Basses, Guitars, Brass,
fantastic Latin-American Brass, original new Drums and countless other details able to satisfy even the most
demanding users.
Two extended GM Effects and 4-band parametric EQ allow to process the overall sound of the backing tracks
with astonishing results.
OkyWeb2’s Expander functions allow to play in real time, even when the backing track is playing and put no less
than 32 MIDI channels at your disposal, i.e. the equivalent of 2 normal expanders.
A microphone channel with two Effects and 4-band parametric EQ plus a very intuitive mixing system allow you
to connect a microphone directly to OkyWeb2 and sing, combining your voice perfectly with the backing tracks
without requiring any other equipment.
The numerous interfaces and OkyWeb2’s connectability make it a versatile unit suited to highly varied applications.
Audio, Video, MIDI and USB outputs and inputs allow you to easily fit OkyWeb2 into your professional musical
equipment or use it in your lounge at home.
OkyWeb2 uses the new MIDI MF5 format, which includes 32 tracks (twice the number of a normal player),
proprietary sounds and extra tracks dedicated to vocal processing.
The MF5 backing tracks exploit all the features of the OkyWeb2’s on-board expander: each backing track can
have its own exclusive sounds, realized specifically to obtain the most suitable sound for every single song. The
sounds are automatically uploaded, instantly, without any complications and with no manual work to be done by
users.
MF5 backing tracks also contain extra tracks, dedicated to the processing of the microphone signal:
equalization, reverb and echo can in fact be given specific dynamic settings for each backing track.
It’s therefore possible to have the right echo, at the right point, with the right settings and repetitions in sync with
the speed of the backing music, independently of any changes in BPM.
The tracks dedicated to vocal processing can be enabled or disabled as required, always nevertheless allowing
complete manual control of the entire audio section.
M-Live’s range of MF5 backing tracks is updated monthly, with both new material and evergreens.
OkyWeb2 is however fully compatible with MIDI MF3 format and Standard MIDI Files (which can be converted
using the PC software supplied). OkyWeb2 thus has access to an enormous universal repertoire.
OkyWeb2 uses as storage media very small powerful Compact Flash cards, able to hold thousands of backing
tracks in a space just slightly larger than a postage stamp.
OkySoft2, the software provided with the unit, allows you to connect OkyWeb2 to a Personal Computer, organize
archives of backing tracks and Playlists, transfer songs from the Compact Flash card to OkyWeb2, store an
unlimited number of MIDI files on the computer’s Hard Disk, update the OkyWeb2 operating system, edit sounds,
effects and equalizers and prepare custom presets.
OkySoft2, moreover, enables a link to the
HitTrax MIDI Files web site, providing an easy access to thousands of
fully licensed MIDI Files.
OkyWeb2 is the easiest, more effective solution for entertaining the public with your music.
OkyWeb2: a small unit, a big sound...
Just add your voice and... the show can begin !
The M-LIVE STAFF
Page 8

Introduction
2.2
This Manual
Reading the Manual
The manual you’re reading has been conceived to guide you step by step through all OkyWeb2’s functions,
from the most elementary to the most complicated without ever taking it for granted that you’re necessarily experts.
The chapters have been drawn up following a logical progression to facilitate first-time reading.
But the manual is above all structured for “non linear” consultation, i.e. being consulted through time or
when looking for specific topics.
In fact, you’ll be able to notice that the various chapters may contain short repetitions of concepts, images
and information covered in a lengthier way in other chapters. The aim is to give you all the most important information
on the various topics without compelling you to continually jump from one chapter to another.
Lastly, the black edging of the pages, differentiated by chapter, the numbering of the pages with the formula
“Chapter.Page” (e.g. 3.8) and the graphics are conceived to help you quickly reach the required topics, estimate the
amount of information available and remember the most important operational passages without necessarily having to
re-read the text every time.
Other documentation
Check the contents of the documentation supplied: it may contain “last-minute information” not included in
this manual.
Remember also that you can always check if there are updates, additions or other support material on the
HitTrax/OkyWeb2 support web site.
Page 9

2.3
2
Introduction
Warnings
Connecting to the electricity mains
The OkyWeb2 has an external power supply adapter. Before connecting up, check that the mains voltage in the
place of installation corresponds to voltage stated on the power supply adapter (max. tolerance ±10%).
Check the state of the connection lead at periodic intervals.
About the external supply adaptor
Depending on your country of residence, the unit is supplied with either Australian or European external supply
adaptor.
USA wall plugs have different voltage rating and prongs. If the unit is used in USA, please replace the external
supply adaptor with the following specifications from a good electronics store: 9V DC (+ centr.), 800mA, 7.2W
Switching on and off
When switching on or off, make certain that the audio amplification system is off: this avoids signal peaks,
harmful for the loudspeaker enclosure components and for your hearing.
Initial connection and prevention of interference
In general, it’s always a good rule of thumb to avoid installation too close to radio apparatus, TV, mobile phones,
etc., as these are in fact normally sources of interference.
Also, make certain that the place of installation is not subject to disturbance of an industrial nature, strong RF
interference or breakdowns in the mains supply. If necessary, protect the mains connection with special “mains
filters” (normally found on sale).
For audio connections use quality cables, remembering to periodically check their condition and efficiency.
Connecting to particular models of television.
Even if only in rare cases, with some models of television, when switching on, the OkyWeb2 video signal may not
be immediately synchronized: the audio can be heard, but the image is disturbed.
In this case, just disconnect the OkyWeb2 power supply unit for a few seconds, and then reconnect.
Once it appears again, the image remains steady for the entire period it’s in use.
Compact Flash cards
OkyWeb2 uses rewritable Compact Flash memory cards to store thousands of backing tracks and other important data.
OkyWeb2 is compatible with <CF> CompactFlashTM specifications and has been successfully tested with a vast
number of Compact Flash cards manufactured by various companies. Nevertheless, M-Live declines all responsibility
for any faulty operation or loss of data with Compact Flash cards other than those sold with the M-Live brand.
FORMATTING: In order to be used with OkyWeb2, Compact Flash cards must firstly be appropriately formatted. To
carry out formatting procedure, connect OkyWeb2 to the computer and use the appropriate function of the software
supplied. Alternatively, use OkyFlash pre-formatted Compact Flash cards, tested and guaranteed by M-Live.
Protection and maintenance
When transporting your OkyWeb2, keep it safe from harm either in its original packaging or in an OkyBag, on
sale at your dealers.
Do not expose the unit to direct sunlight, intense heat sources, particularly damp or dusty environments or rain for
prolonged periods, as this may cause malfunctions, deterioration or even electric shocks.
It is always advisable to protect the unit from dust if it is not used for a long time. Dust deposits can be removed,
however, with a dry cloth or brush: never use alcohol, acetone or solvents.
No further maintenance is required.
In the event of breakdown
All the unit’s controls are external and easily accessible.
In the event of a breakdown, contact:
HitTrax MIDI Files
PO Box 6090
Vermont South 3133
Vic, Australia
Ph/Fax: +613 9887 8127
Email: [email protected]
Page 10

Introduction
2.4
Rapid layout maps
STOP
stopsplaybackofthesong.
: PAUSE
(press Play to start playback
againfromthesamepoint);
pressedonce
pressedtwice
pressedforalongtime
: STOP;
:switchesOkyWeb2off.
PLAY
- starts playback of the
selectedsong;
- re-starts playback of the
songputonPause.
REW &FFWD
-
+
&
REW FFWD
&
inPLAY
inEdit,EQ/EFX,Options
the song can be scrolled fast backwards
( )orforwards( );
modifythevalueoftheselected parameter (
-
+
)
KEY
change the key of the
songs,adapting it to the
performer'sneeds.
EXIT
to abandon the operation
under way, or the page
beingedited.
UP & DOWN
allows to run through the list
displayed and select the
required item (Song, Artist,
controlparameter,etc.).
MIC /MUSIC
adjusts the balancebetweenthe volume ofthe
backingtrackandthatofthe microphone.
MIC EFX
adjuststhevolumeofthemicrophone's effects.
VOLUME
adjuststhegeneralvolume.
OPTION
allows to access
OkyWeb2 system
settings: Audio, Video,
MIDI,etc,.
MELODY MUTE
disablesthesongs'melody.
: RedLED Mute(the melody isn't played);
: OrangeLED semi-Mute(themelodyisplayedat a low volume);
: LED off re-startsthemelody(themelodyisplayed);
MelodyMute MUTEoftheselectedtrack.
Shifton+MelodyMute SOLOoftheselectedtrack.
pressedforthe1 time
pressed time
pressed time
inEDIT
st
forthe2
forthe3
nd
rd
BPM
change playback
speedofthesongs.
TITLE
enablesthesearchand
the display ofsongs by
Title.
ARTIST
enablesthesearchand
display of thesongs by
Artist.
-Press ENTER on the
name of an Artist to
view the songs
available.
GENRE
enablesthesearchand
display of thesongs by
Genre.
-Press ENTER on the
name of a Genre to
view the songs
available.
LIST (Playlist)
enablesthemenuoftheautomatic playback lists.
-PressPLAY to play backtheselectedlist.
-PressEDITto program the selected list.
ENTER /SAVE
LEDoff
LEDon
Shift(on)+SAVE
:(ENTER) allows access to the selected
page(Option,Artist, Genre).
: song modifiedwithEDIT.
saveschangestothesong
EQ /EFX
allow access to the editing of Effects and
Equalizers.
- Press EQ/EFX repeatedly to select the
requiredprocessor.
- Use the combinationShift (on) + SAVE to
save the settings of the processor
selectedinthesong.
EDIT
allows access to song
editing.
- Press EDIT repeatedly to
select the required
parameter.
-UsetheUP& DOWN keys to
selecttherequiredtrack.
- Use the keys to
changethevalue.
- Use the combination
Shift (on) + SAVE to save
changestothesong.
-
+
&
SHIFT
Enablesthevariouslevelsofkey and function operation:
SHIFTdisabled
functionsprintedinpositive(onthe keys) are available:
SearchbyTitle,ArtistandGenre;BPM;KEY;EQ/EFX;PLAYLIST.
SHIFTenabled
functionsprintedinnegative(belowthe keys) :Alphabetical search;SAVE.
Shifton+UP& DOWN keys enable to scrollthroughthesonglistonepageata time.
T9searchenabled
usingthealphabetickeypad(lettersin negative) is similar to thatofmobilephones.
Toenable, pressSHIFT(off)forafew seconds.
SHIFTon+UP& DOWN movingpagebypage
SHIFTon+MelodyMute SOLOofthe selected track
SHIFToninTranspose transpositionsbyanoctave
SHIFToninInstrument choiceoftheFamilyofinstruments
LEDOFF
LEDON
FLASHINGLED
inEDIT
areavailable
Page 11

2.5
2
Introduction
MICROPHONE INPUT
Inputsfordynamicmicrophones.
-Use the MIC/MUSIC pot to adjust the balance
between the microphone's volume andthatofthe
backingtrack.
-Use the MIC EFXpot to adjust the volumeof the
microphone'seffects.
-To adjust the Reverb sends (i.e. the amount of
microphone signal to send to the Reverb)
repeatedly press the EQ/EFX key until the MIC
Reverb menu isdisplayed,then select theSEND
parameterandadjustitslevel.
-Carry out the same procedure to adjust Echo
sendintheMICEchomenu.
COMPACT FLASH
Slot for rewritable Compact Flashmemorycards,able to hold avery
largenumberofbackingtracksready for use.
TheCompactFlashcardsmustbe appropriately formatted.
To carry out formatting procedure, connect OkyWeb2 to your
computerandusetheappropriatefunction of the software provided.
ATTENTION:don't remove Compact Flashcards during formatting,
backingtracktransfer,index updating, etc.
Alternatively, you can use OkyFlash (available in various “sizes”),
alreadyformatted,testedandguaranteedby M-Live.
OkyWeb2 is compatible with specifications
and has been successfully tested with a vast number of Compact
Flash cards manufactured by various companies.
Nevertheless, M-Live declines all responsibility for any faulty
operation or loss ofdatawith Compact Flash cardsother thanthose
soldwiththeM-Livebrand.
<CF> CompactFlash
TM
PHONES
Stereoheadphoneoutput.
Allowsto listen to the samesignal asis
fedoutontheL-Raudio outputs.
This is useful when it's not possible to
use external amplification, or when
(with PA systems) it's necessary to
monitorthesoundwithout“delays”.
VIDEO IN
Videoinput.
Allows to connect a video camera,
video recorder or any other video
source and use its images as a
backgroundforOkyWeb2.
Using this mode, the function of
syllable highlighting of the lyrics is
disabled.
AUDIO OUTL-R
Stereoaudiooutput.
Allowstosendthesignal
(backing tracks + microphone)
to any audio amplification
system: audio mixer, Hi-Fi
system, amplified loudspeaker
enclosures, home theater or
surroundsystem,recorder,etc.
-UsetheVOLUMEpot to adjust
thevolume.
AVOUT
Audio/Videooutput.
Allowstoconnectatelevision(ora compatible
unitwiththesametypeofsignal) to display the
lyrics of the backing tracks and OkyWeb2
controlsystem.
The lyrics of the backing tracks are shown
with “in time”syllable highlighting, i.e.in sync
withthesong'smelody.
-Use the Option key,selectVideoOptions and
press Enter foraccessto Video settingsand
enabletherequiredoptions.
-Using the AV/SCART cable supplied, you
cansendtheaudiosignalto your TV too.
DC 9V
Powersupplysocket.
Connect the power
supply/adaptorsuppliedhere.
Attention: only use the unit
supplied along with the
equipment, or a replacement
unit with identical technical
specifications. Different
characteristics can cause
damage to your OkyWeb2, or
jeopardize its correct
operation.
FOOTSWITCH
Footswitchsocket.
Control can be programmed
(Play/Pause, EfxOn/Off, Mic On/Off,
Next Song, etc.) andallowsto enable
the required functions even if your
handsarefull.
-Use the Option key, select General
Options and press Enter for access
tothefootswitchsettings.
MIDI OUT
MIDIoutput.
Allows to send MIDI events
produced by OkyWeb2 to other
MIDIunits.
Forexample,ifyoudon'thaveaTV
screen, you can connect this
output to an M-Live WORD BOX
to display the backingtracks' lyrics
andchords.
MULTIPORT
MULTIPORT/MIDI cable
MULTIPORT/USB cable
Multi-functionport.
Usingthecablesprovided,allowsthis port to be used invariousways:
- : using the
OkyWeb2 can also be used as an expander.
In fact, connectinga keyboard or external sequencer,
it'spossibletoplayOkyWeb2'sonboard instruments.
- Usethe Option key, select MIDIOptions and press
Enter for access to the MIDI IN port settings.
A useful option allows to send the MIDI events to
.
- : using the
youcanconnectOkyWeb2to your PC via USB.
- Using the software provided, you can transfer
music files from your PC(Internet or Hard Disk) to
the OkyWeb2 Compact Flash card or vice versa,
update the OkyWeb2 operating system, play the
backing tracks storedonyour PC, usingOkyWeb2
directly as a player (ratherthan theplayer and the
PC'saudiocard),etc.
MIDI IN+ MIDITHRU port
USB Port
Ch1÷16or Ch17÷32
Page 12
Introduction
2.6
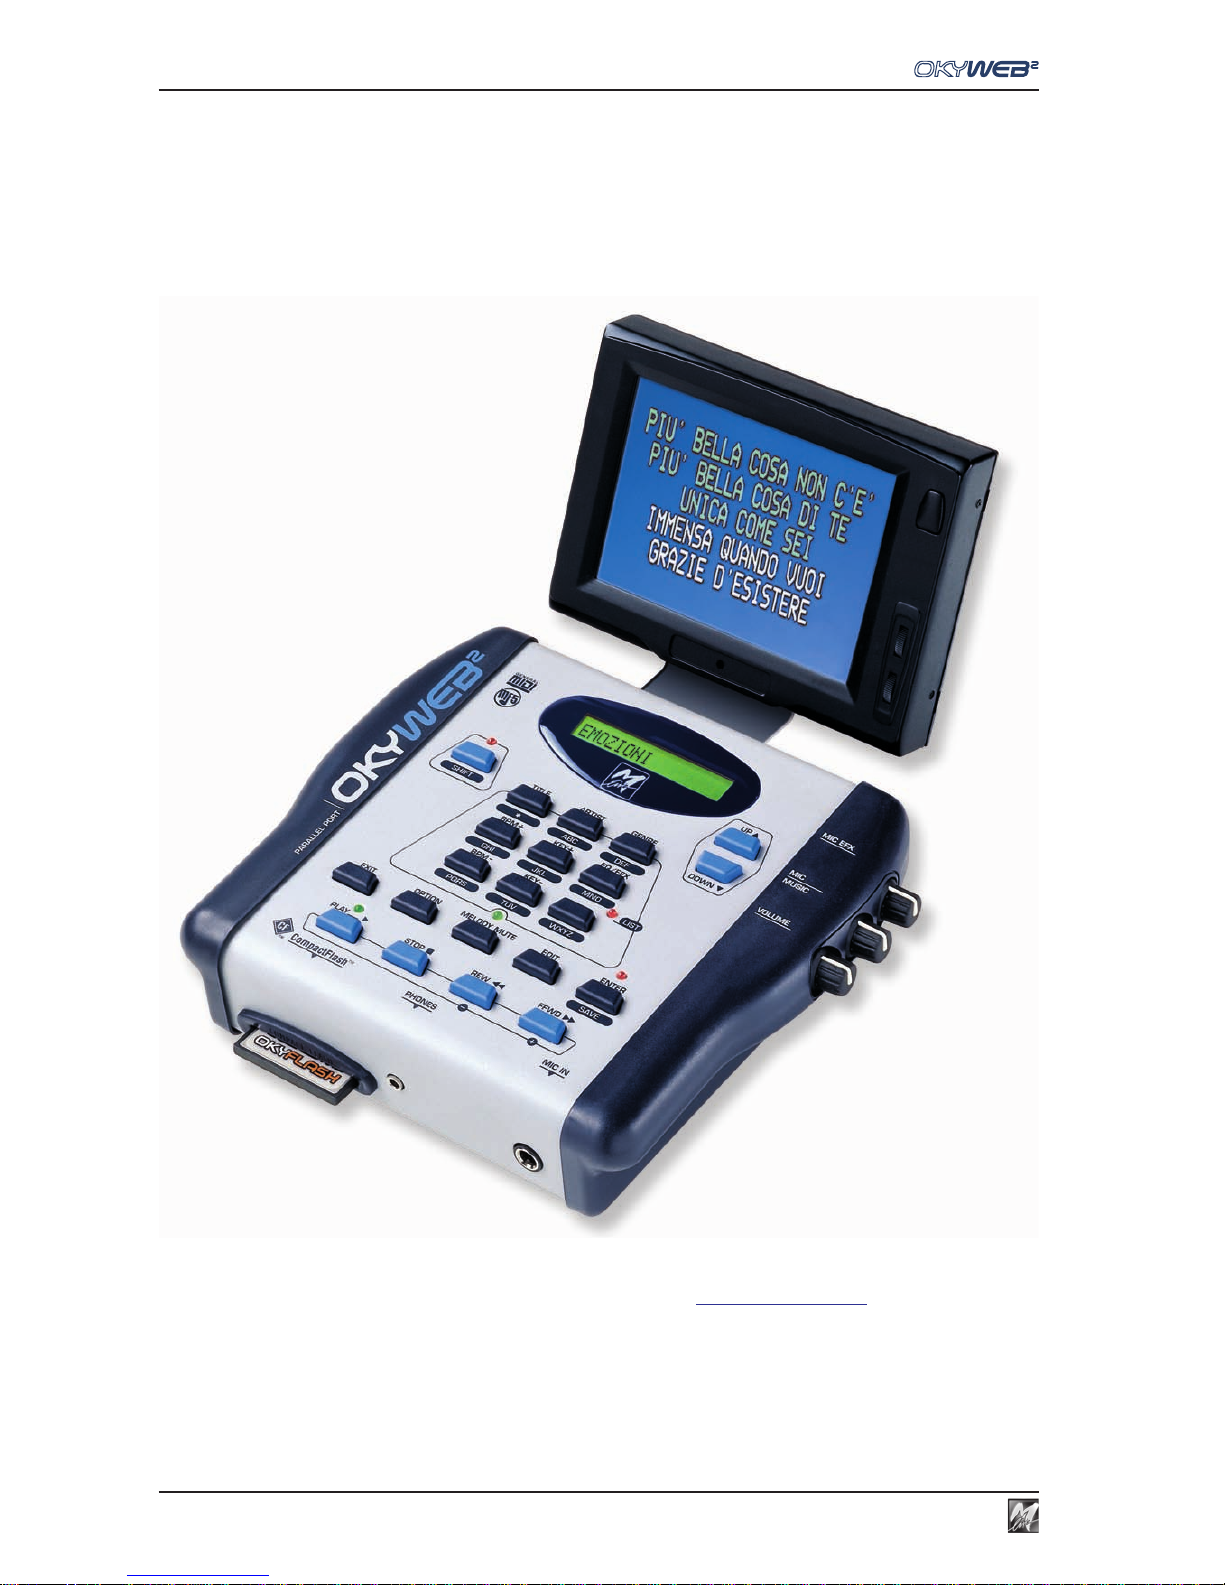
Okyweb2 with optional OkyTV available from www.okyweb.com.au
Enjoy enhanced view of scrolling lyrics, play lists and editing.
Page 13
1.1
1
Getting Started
AV/ SCART
CABLE
AV
YESTERDAY
ALL MY TROUBLES
SEEM SO FAR AWAY
AV CONNECTOR
+
DC 9V
DC 9V
1 - Getting Started
This is how to get started straight away using the main OkyWeb2 functions.
Switching on and off
OkyWeb2 is normally switched on by plugging the adapter plug into the DC 9V socket.
It can, however, be switched on and off with the keys on the upper panel.
for a long time = SWITCHING OFF Press and hold down the STOP key for two seconds.
Press ANY key for switching it on.
NOTE: You are advised to unplug the power supply plug only when you have to move the unit.
Use the STOP key procedure for switching it off and on. Switching off with the STOP key puts the unit into stand-by.
You are advised to unplug the external adapter from the mains if you are not planning to use the unit for a long time.
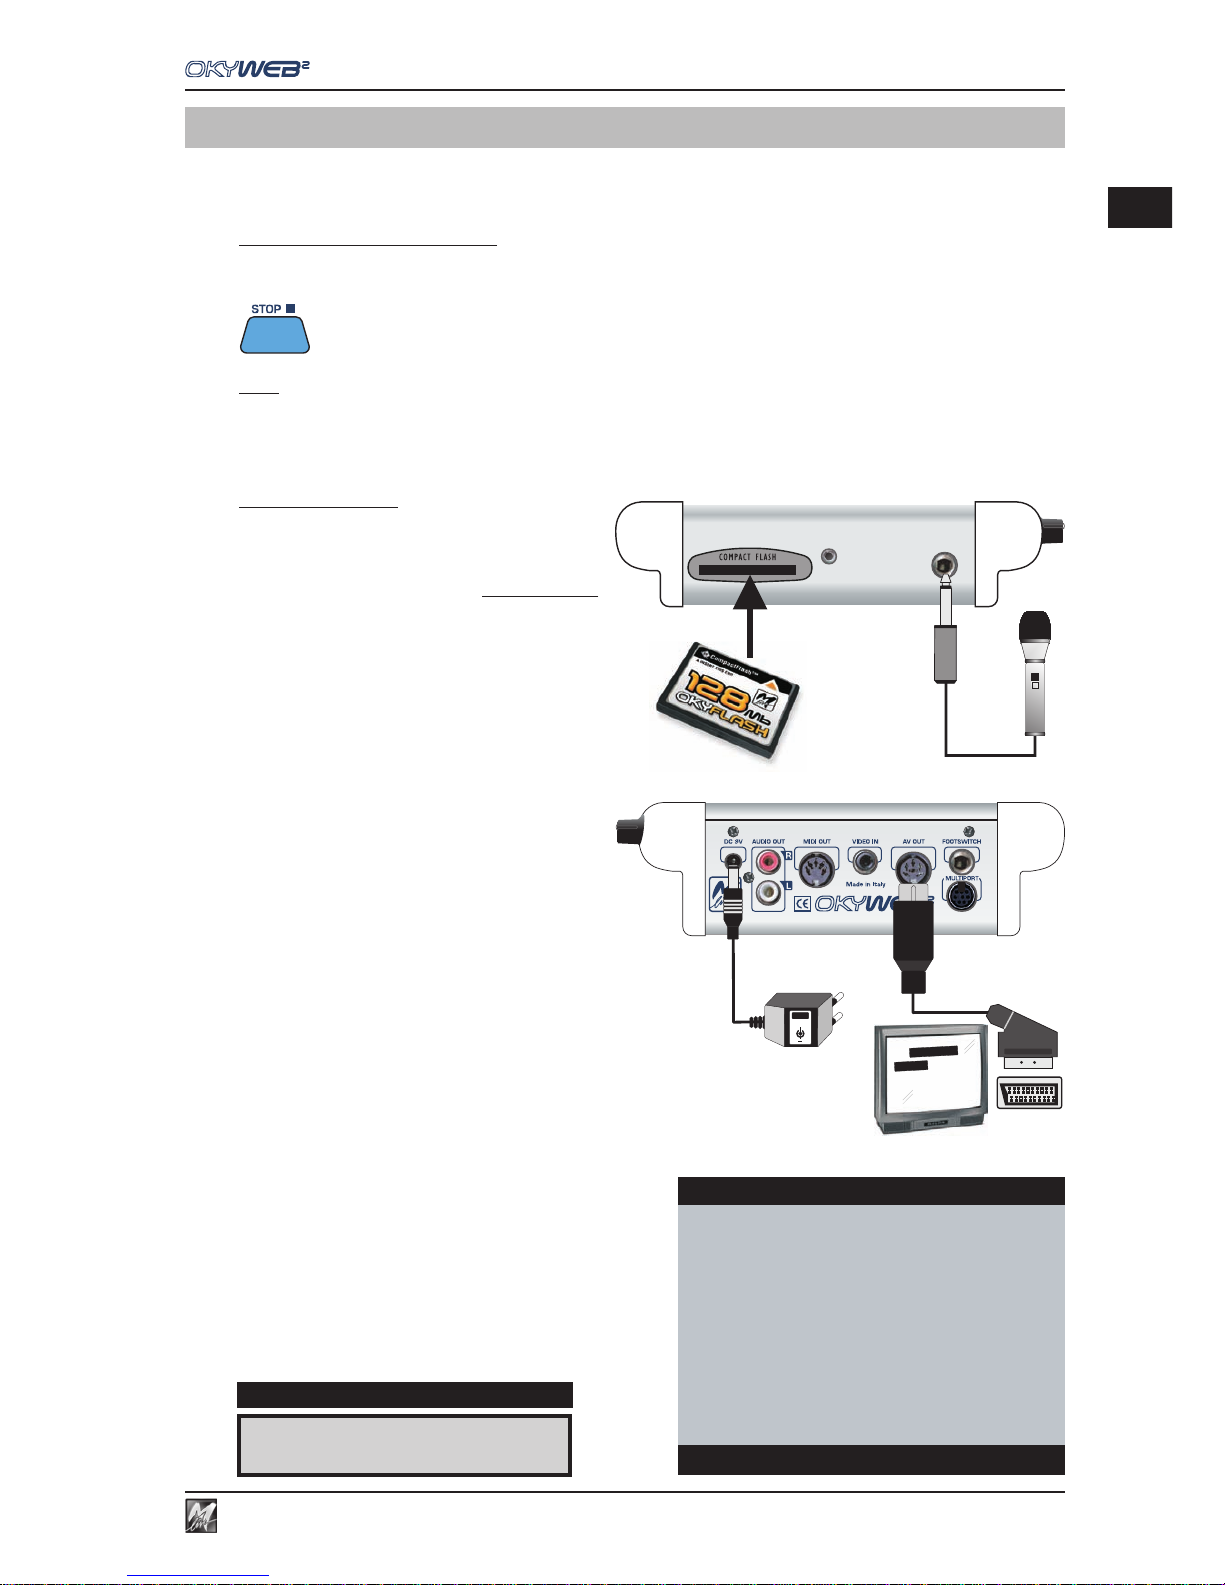
Connections
COMPACT FLASH: before carrying out any
connections, insert the Compact Flash card
supplied in the appropriate slot.
The Compact Flash card is indispensable,
because it contains the backing tracks and other
important data indispensable for using OkyWeb2.
N.B.: if necessary, you can also use an “empty” Compact Flash
card, proving its is appropriately formatted (e.g. a card
formatted with the software for PC supplied, or an M-Live
OkyFlash).
MICROPHONE: connect a microphone to the MIC
IN input.
AUDIO/VIDEO OUTPUT: connect the OkyWeb2
AV output to the TV SCART socket, using the
supplied lead.
OkyWeb2 allows good performances also connected just
to a normal television set. You can use this simple
connection for your first attempts.
ADAPTER UNIT: connect the external power supply adapter to
the DC 9V socket and to the mains.
TUNING A TV SET: set the television at AV.
At this point, after the introductory page, the first OkyWeb2
page will appear on the TV screen.
The window shows the list of Songs on the Compact Flash
card.
The upper panel display shows the first song in the list.
MIC
I
A FOGGY DAY È
DISPLAY
OkyWeb2
ÆA FOGGY DAY
AIN’T SHE SWEET
ALWAYS ON MY MIND
BLANKET ON THE GROUND
DANCE THE NIGHT AWAY
ESCAPE
FEVER
GREENSLEEVES
Select Song
Page 14
Getting Started
1.2
Playing Songs
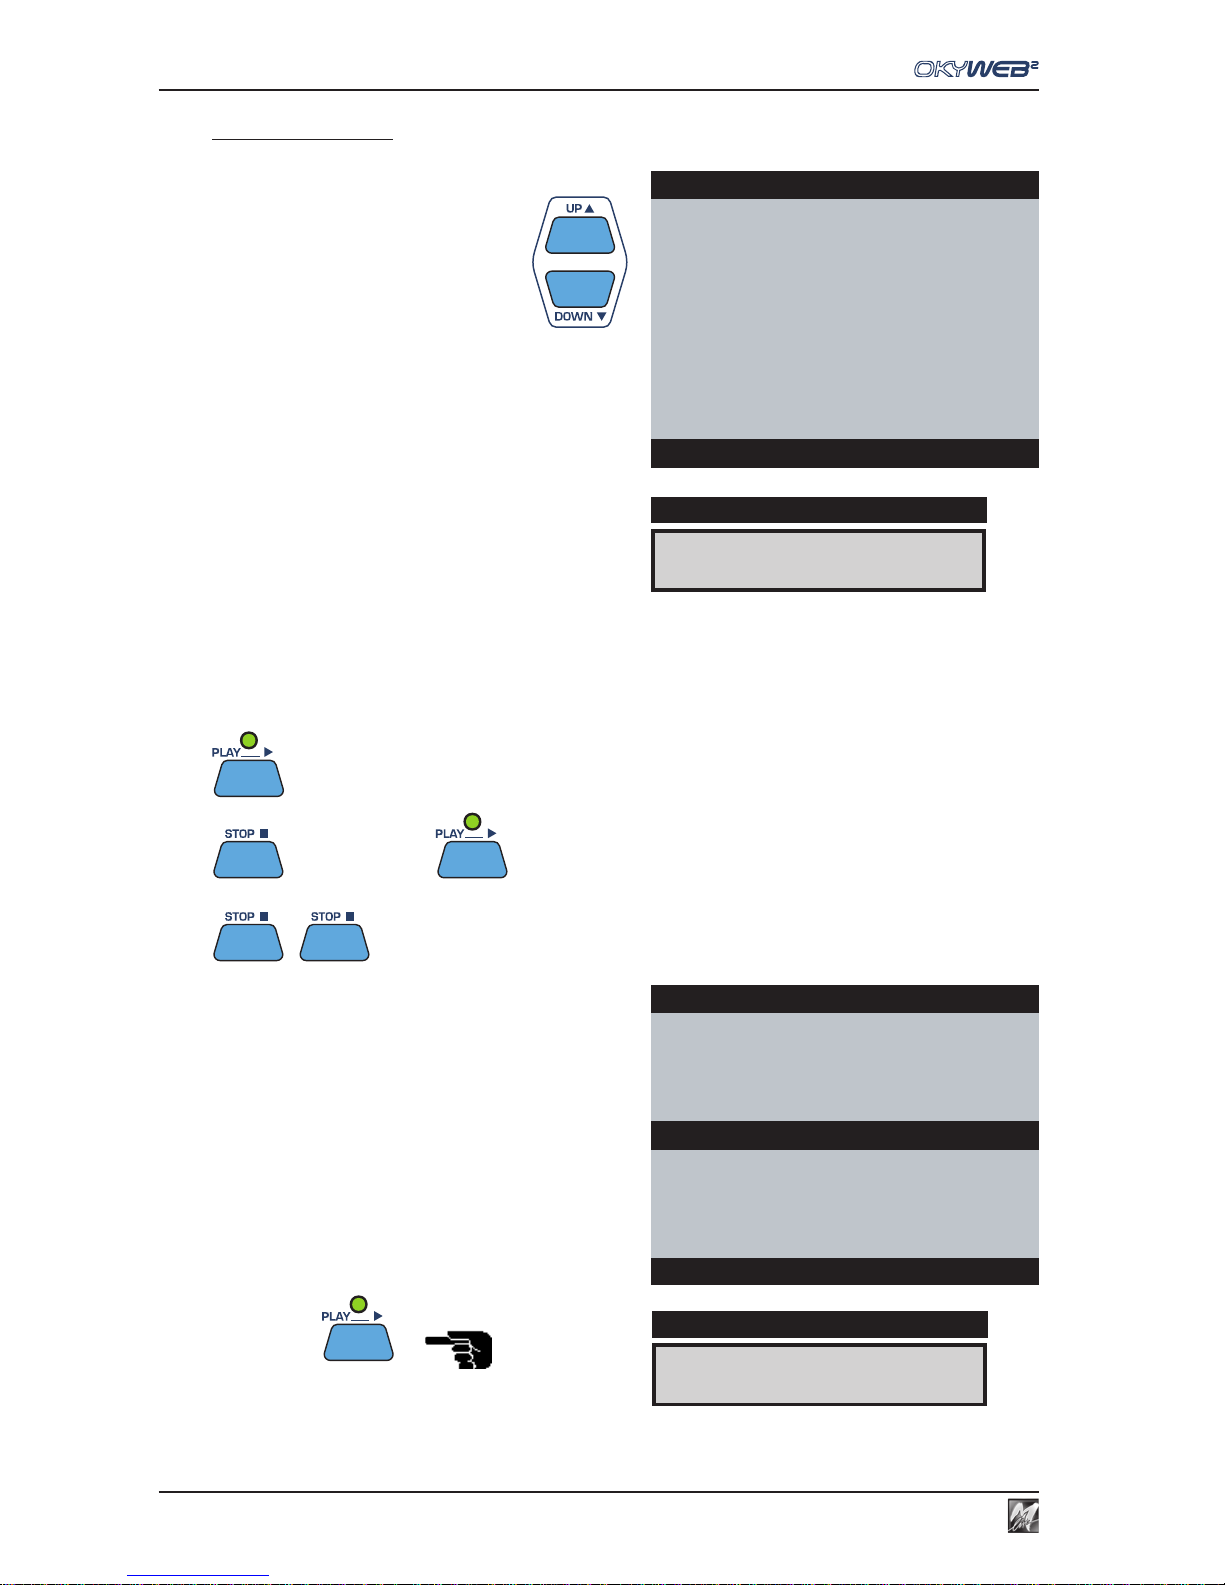
SELECTING A SONG: use the UP and DOWN keys to
scroll the list of songs.
The arrow
→→
→→
→ on the left points to the currently selected
song.
The currently selected song appears on the OkyWeb2
display.
The arrow on the right indicates the possible search
directions.
PLAY: press the PLAY button. OkyWeb2 will start playing the selected song.
STOP/PAUSE: press STOP and the player will pause.
Press PLAY to restart the song from where it was stopped.
Press STOP again to go back to the beginning of the song where you can start it again or scroll the list to select
a new song.
= PLAY
= PAUSE = CONTINUE from the PAUSE point
= STOP
While the song is playing the TV screen window will split
into two.
The top half shows the song details: Title, Performer, Lyrics
and Chords.
The bottom half keeps displaying the Song List, which
you can scroll with the UP and DOWN keys to select a
new song while the current one is playing.
Select a new song with the UP and DOWN keys.
Press PLAY
The new song will start playing straight away, replacing
the previous one.
YESTERDAY
DISPLAY
q 98
4/4
3/1
DISPLAY
OkyWeb2
THE CONTINENTAL
THE HOKEY COKEY
WATERLOO
WE WILL ROCK YOU
WHEN THE SAINTS
WHEN YOUR SMILING
ÆYESTERDAY
YOUR SONG
Select Song
Yesterday-Beatles
YESTERDAY
ALL MY TROUBLES
FEmA
WHEN THE SAINTS
WHEN YOUR SMILING
ÆYESTERDAY
YOUR SONG
Select Song
Page 15

1.3
1
Getting Started
Audio controls
The three potentiometers on the right side of the OkyWeb2 have real-time control over:
MIC EFX: amount of Echo and Reverb effect applied to the microphone.
MIC/MUSIC: balance between the microphone and the music volumes.
VOLUME: general output volume.
Tempo / Key / Melody Mute
These keys allow to control the following functions:
= TEMPO: change the playing speed.
= KEY: change the key allowing to find quickly the most suited to your voice.
= MELODY MUTE: to lower or mute the melody track.
The MELODY MUTE function has three modes, which can be selected by repeatedly pressing the key.
The MELODY MUTE LED shows the state of the function and hence the volume of the melody track:
RED LED = MELODY MUTE
ORANGE LED = MINIMUM MELODY VOLUME
LED OFF = NORMAL MELODY VOLUME
Page 16
Getting Started
1.4
Searching Songs
Search by Artist or Genre
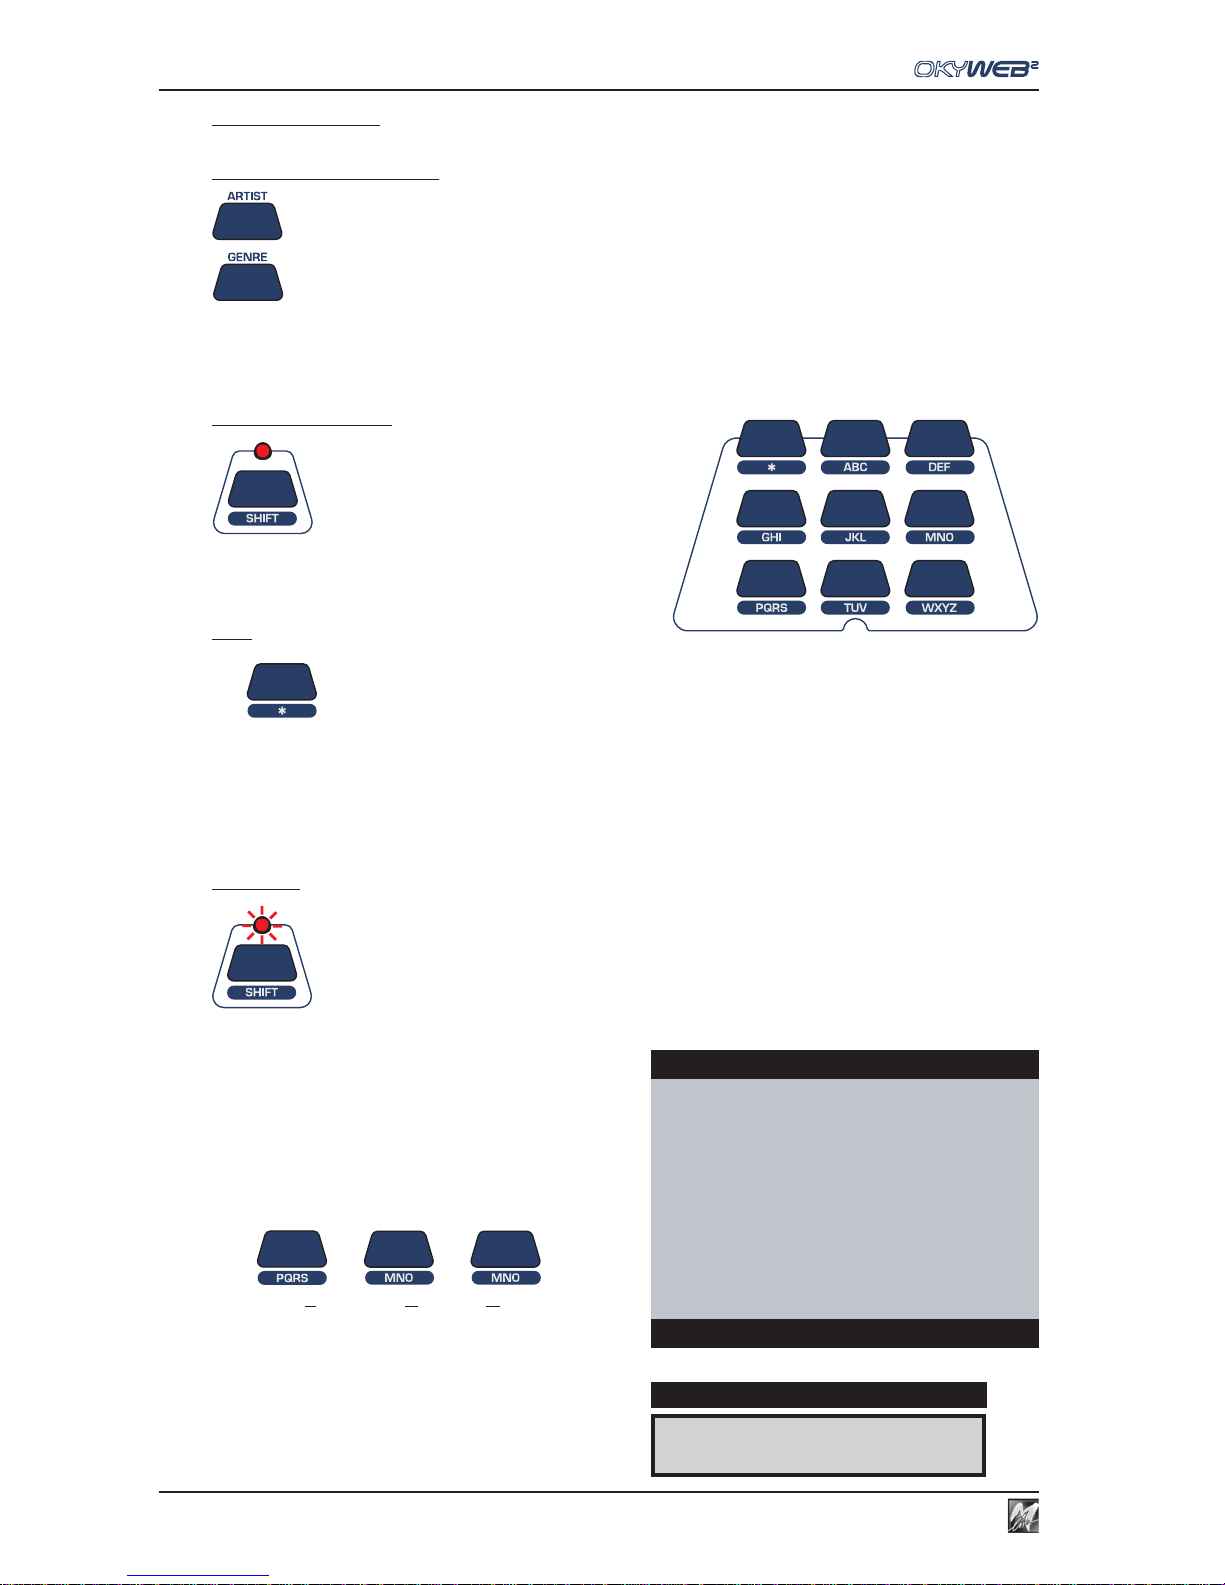
= SEARCH BY ARTIST
= SEARCH BY GENRE
Press the ARTIST or GENRE keys to display the list of performers/composer or categories stored in the memory.
Use the UP and DOWN keys to select the desired Artist or Genre.
Press ENTER to access the complete list of songs for the selected Artist or Genre.
Alphabetical Search
= ALPHABETICAL SEARCH
Press the SHIFT key: the red LED turns on.
The nine central keys on the upper panel are transformed
into a letter keypad, similar to a mobile phone keypad.
NOTE: press the key repeatedly to show in sequence all the letters on a key,
just like on a mobile phone. To input two letters on the same key one after the other, wait a few seconds between the first and second letter.
The
key enters the following characters: <space> * + - . :
Type in the first letters of the song title you’re looking for.
OkyWeb2 will display stored songs whose titles begin with the letter selected.
Add new letters to refine the search and proceed in this way until you find the desired song.
T9 search
= T9 SEARCH
Keep the SHIFT key pressed down for a few seconds:
the red LED will start flashing.
N.B.: In order to access the T9 search function the
SHIFT LED must be off. If the SHIFT LED is lit, switch it
off by pressing the SHIFT key.
Type in the first letters of the song title by pressing the
keys corresponding to each letter on the keypad.
EXAMPLE: to type the word “SOM” press the following
keys once each in order:
PQRS MNO MNO
OkyWeb2 will make an intelligent search for the titles
containing all the combinations of the selected letters.
The T9 search is the easiest and fastest search method
on the OkyWeb2.
Type in at least three or four letters and the song you’re
looking for will be found almost every time.
ROMANTIC LOVE
È
DISPLAY
OkyWeb2
ÆROMANTIC LOVE
SMOKE GET IN YOUR EYES
SNOW ON THE SAHARA
SOMEDAY
SOMEWHERE
SONG FOR GUY
Select Song
Page 17
2.1
2
Connections & Controls
2 - Connections and Controls
OkyWeb2 can be connected to a wide range of external units: TV, stereo system, MIDI expander, videocamera,
Computer, etc.
The best operating conditions are achieved by firstly connecting the unit to a television, which can thus be used
as a main display, enabling to easily exploit all OkyWeb2’s interactive potential: song search, song lyrics and
chord display, effect choice and settings, settings of audio and video options, etc.
Anyway, it is possible to use OkyWeb2 even alone, i.e. without a television set.
In fact, the display on OkyWeb2’s top panel allows to view the function or song selected. In this case, the
operations are obviously less immediate and slower.
The OkyWeb2 display normally shows exactly the same function or song as is selected on the TV.
During song playback however, the display shows the following information:
(1) alternatively:
qq
qq
q
BPM (Beat Per Minute, also called Tempo) and
&&
&&
&Transpose (in semitones)
(2) Time (also called Signature or Meter or Metric Division)
(3) Bar/Beat counter
Front Panel
MIC
I
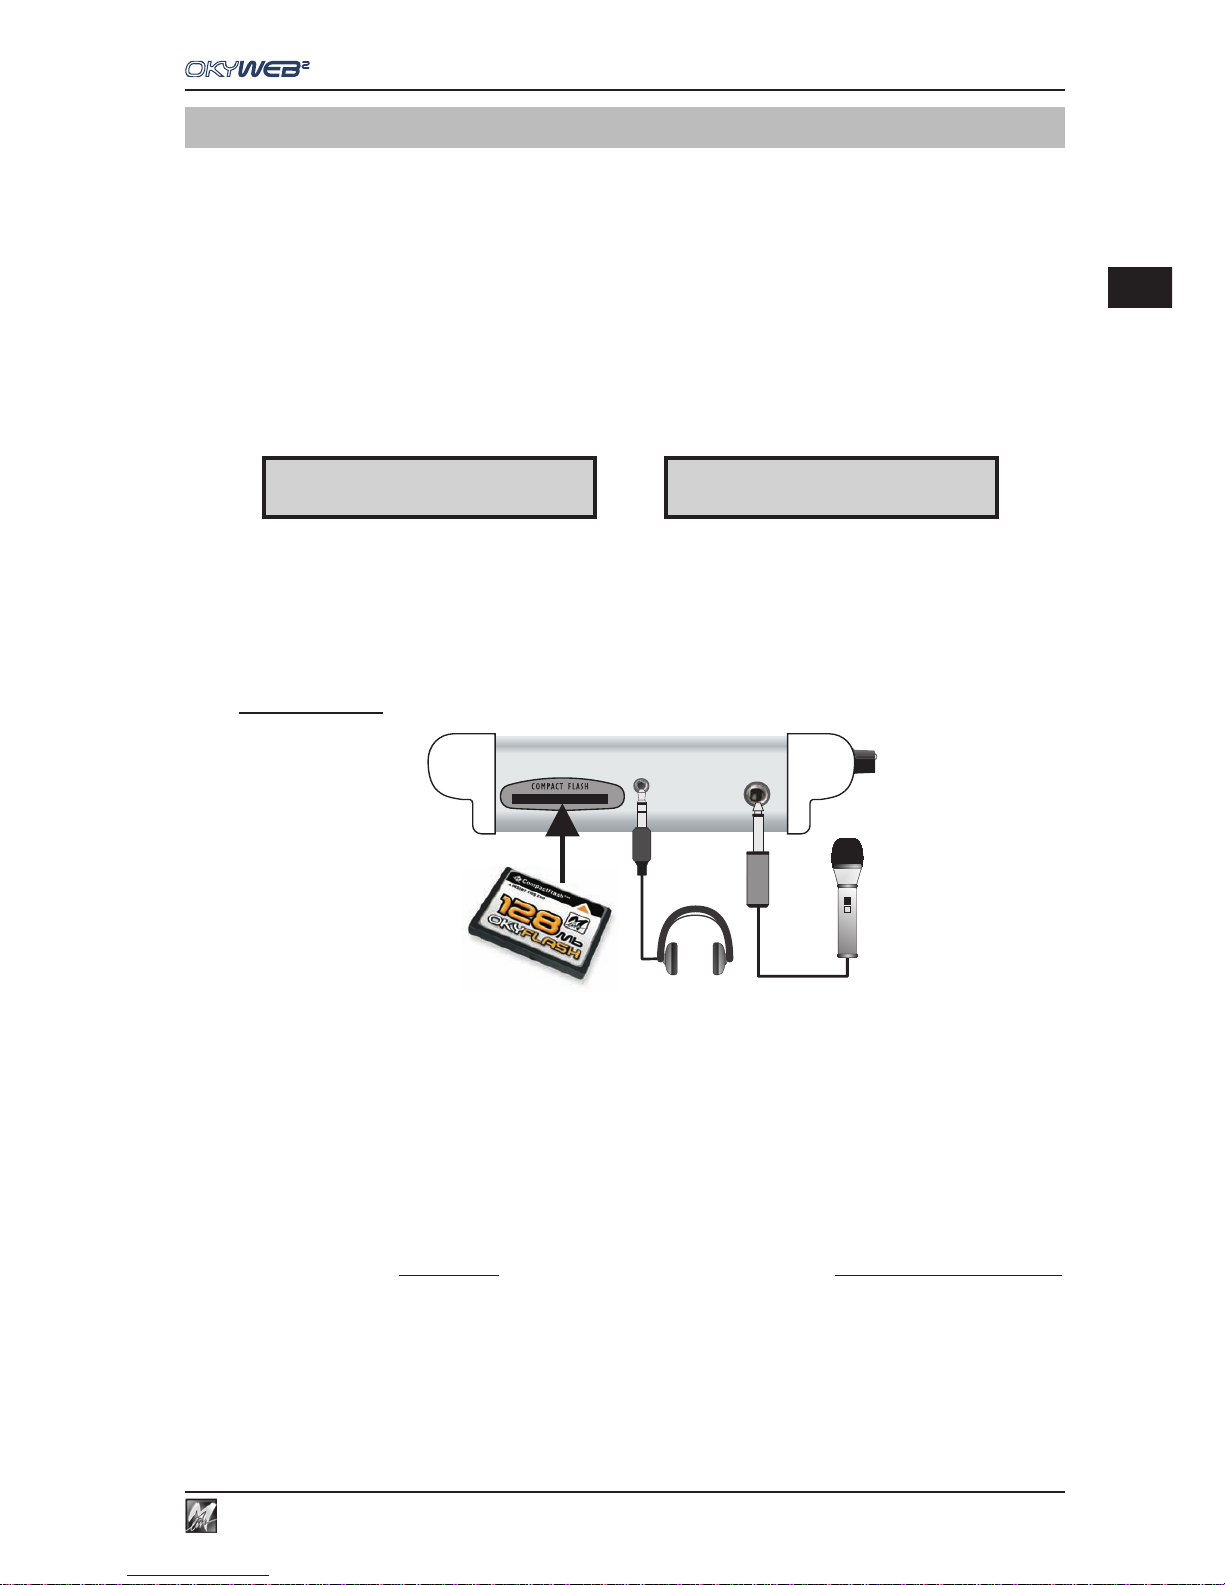
MIC IN Microphone connection socket.
PHONES Headphone connection socket.
COMPACT FLASH Slot for OkyFlash card (i.e. M-Live OkyFlash).
Compact Flash cards are rewritable electronic media able to store thousands of backing tracks and other important
data.
OkyWeb2 is compatible with <CF> CompactFlashTM specifications and has been successfully tested with a
vast number of Compact Flash cards manufactured by various companies. Nevertheless, M-Live declines all
responsibility for any faulty operation or loss of data with Compact Flash cards other than those sold with the
M-Live brand.
FORMATTING: In order to be used with OkyWeb2, Compact Flash cards must firstly be appropriately formatted.
To carry out formatting procedure, connect OkyWeb2 to the computer and use the appropriate function of the
software supplied. Alternatively, use OkyFlash pre-formatted Compact Flash cards, tested and guaranteed by
M-Live.
(1) (2) (3) (1) (2) (3)
qq
qq
q
72
4/4
2/1
& &
& &
&
0
4/4
2/1
Page 18
Connections & Controls
2.2
Rear panel
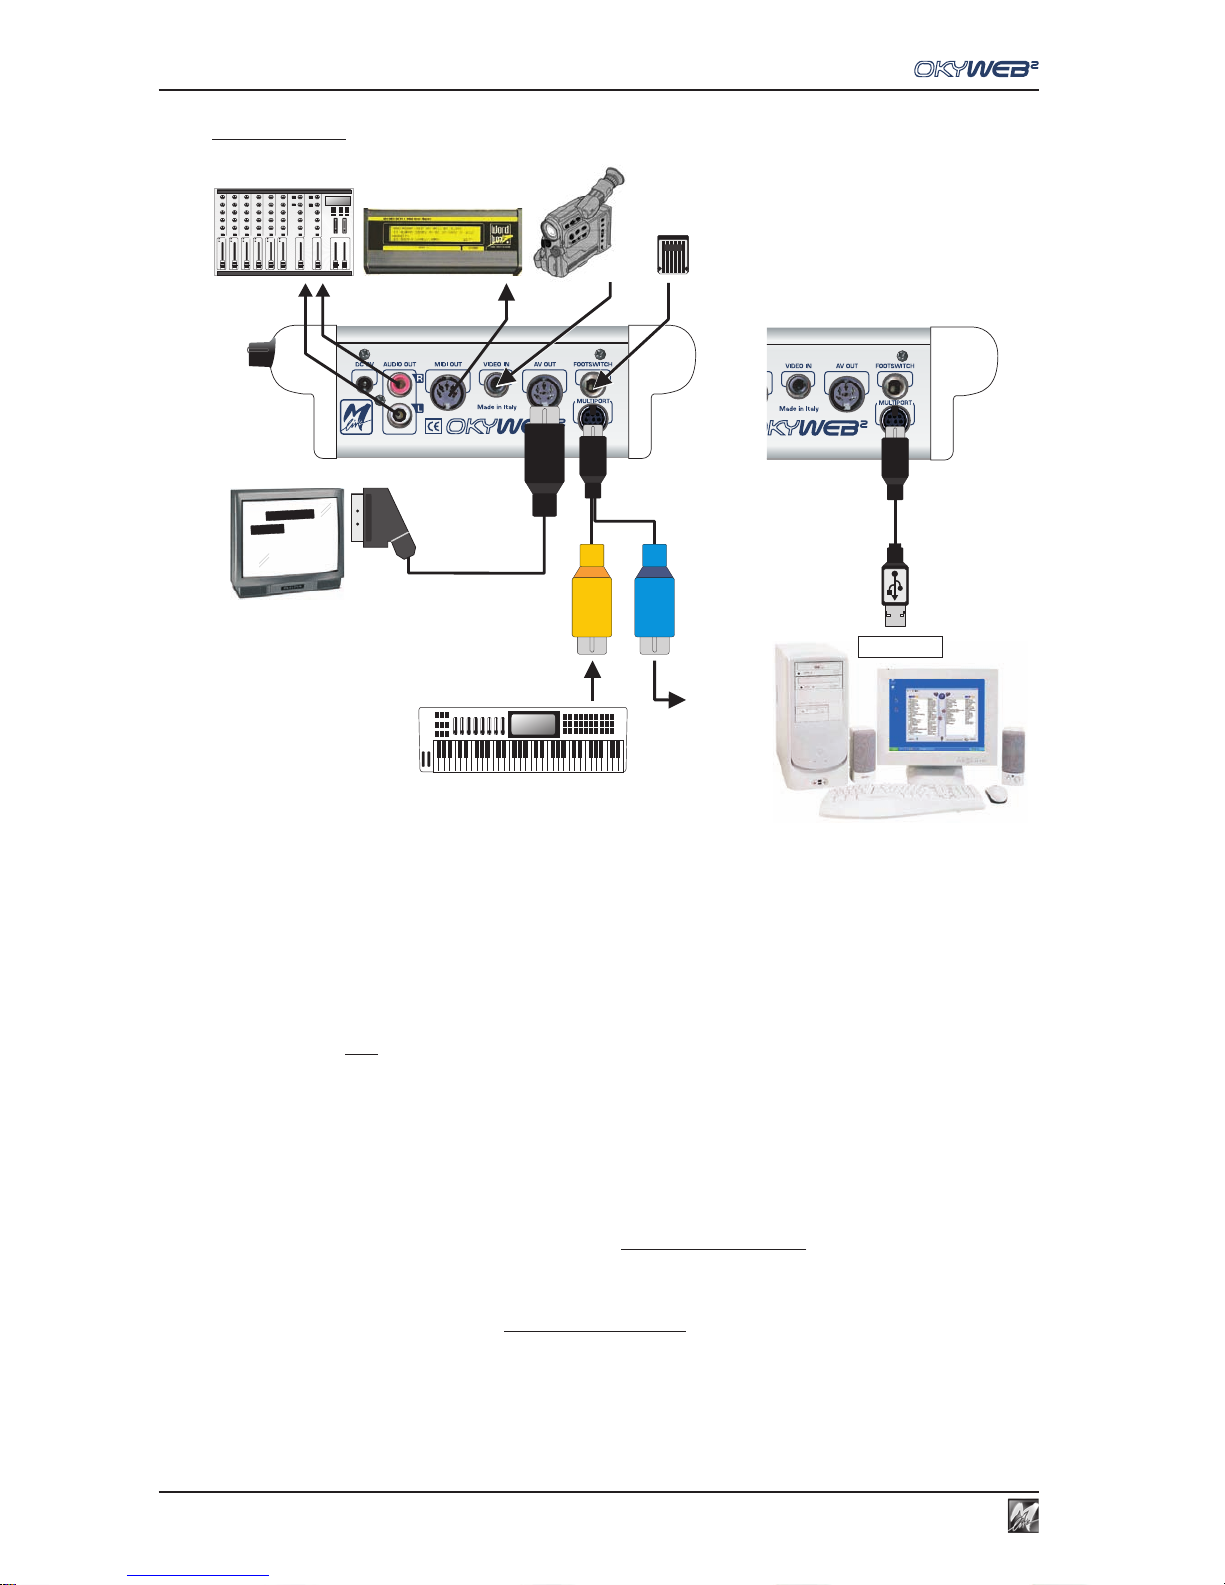
AUDIO OUT Stereo line output (0dB). To obtain the best reproduction of MIDI backing tracks, connect the
OkyWeb2 audio output to an amplification system, using the appropriate inputs and (if necessary)
adjusting their input sensitivity.
MIDI OUT Using the MIDI OUT output, the MIDI files can be played through an external expander.
Also, the MIDI output can be connected to a M-Live WORD BOX, allowing you to display the
MIDI file lyrics even without a television monitor.
VIDEO IN VIDEO input. Allows to connect a video camera, video recorder or any other video source and
use its images as a background on the OkyWeb2 screen.
N.B.: Using this mode, the function of syllable highlighting of the lyrics is disabled.
AV OUT Audio / Video output. Allows to connect OkyWeb2 to a television with the AV/SCART cable
supplied.
FOOTSWITCH Footswitch socket. Control can be programmed (Play/Pause, Efx On/Off, Mic On/Off,
Next Song, etc.) and allows you to enable the required functions even if your hands are full.
MULTIPORT Multifunction port. Thanks to the custom cables supplied, can be used
as a “MIDI IN + MIDI THRU port” or a “USB port”.
- MIDI IN + MIDI THRU port: using the
MULTIPORT/MIDI cable, the Multiport allows OkyWeb2
to also be used as an expander. In fact, connecting a keyboard or external sequencer, it’s
possible to play OkyWeb2’s onboard instruments.
A useful option also allows to send the MIDI events to Ch 1÷16 or Ch 17÷32.
- USB Port: using the MULTIPORT/USB cable, the Multiport allows to connect OkyWeb2 to a
PC via USB. Exploiting the advantages of this fast communications line, it’s possible to transfer
music files from your PC (Internet or Hard Disk) to the OkyWeb2 Compact Flash card or vice
versa, update the OkyWeb2 operating system, play the backing tracks stored on your PC,
using OkyWeb2 directly as a player (rather than the player and the PC’s audio card), etc.
PARALLEL PORT The parallel port on the left-hand side allows to connect OkyWeb2 to SongService
®
systems.
AV/ SCART
CABLE
AUDIO MIXER
WORD BOX
MULTIPORT/ MIDI
CABLE
AV
YESTERDAY
ALL MY TROUBLES
SEEM SO FAR AWAY
VIDEO
CAMERA
MIDI OUT
MIDIINMIDI
THRU
FOOT
SWITCH
MULTIPORT/ USB
CABLE
USB port
Page 19
2.3
2
Connections & Controls
Controls
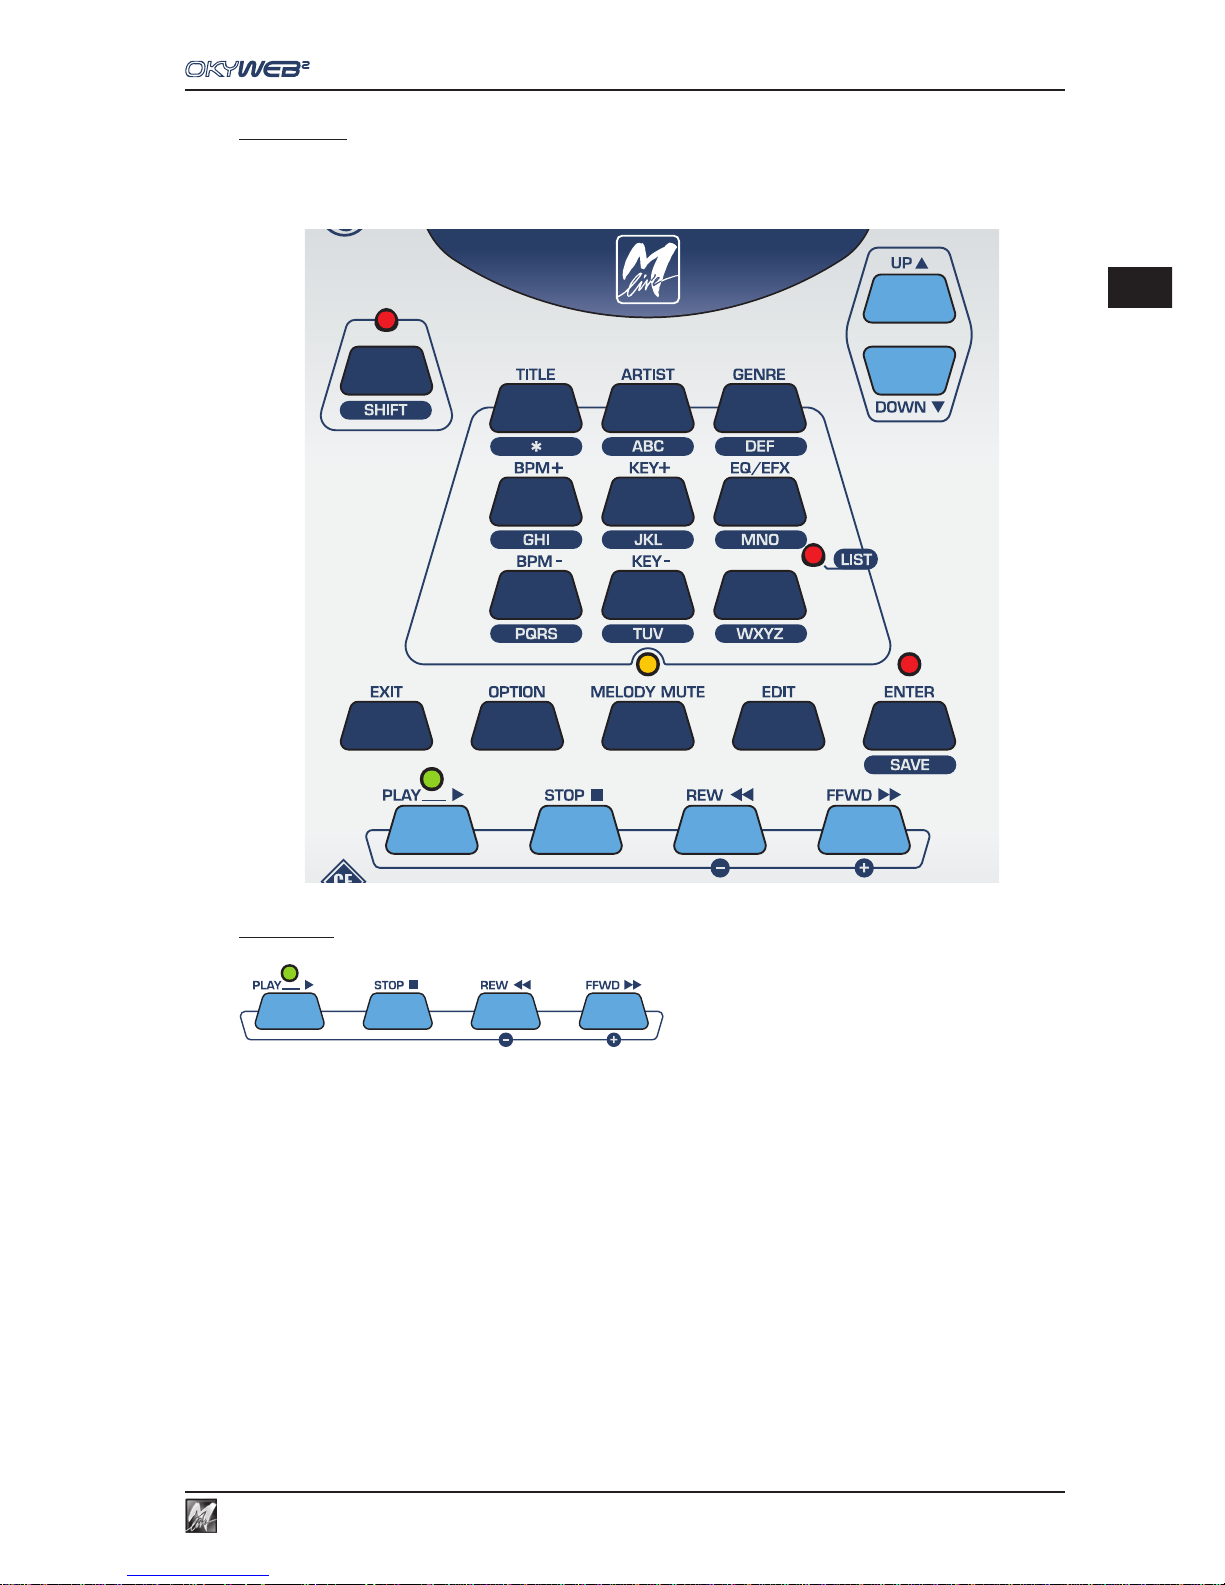
The top panel offers the keys for controlling all the OkyWeb2 functions: song playback, menu browsing, song
search, option setting, effects choice and settings, editing.
Transport
Song control keys.
PLAY Play key.
STOP PAUSE/STOP. Press once to pause during a song.
Press twice to go back to the beginning of a song.
The STOP key is also used for switching off the OkyWeb2: press and hold down for a few seconds
to turn the unit off.
REW Fast rewind. Enabled only during play.
FFWD Fast forward. Enabled only during play.
Page 20
Connections & Controls
2.4
Function keys
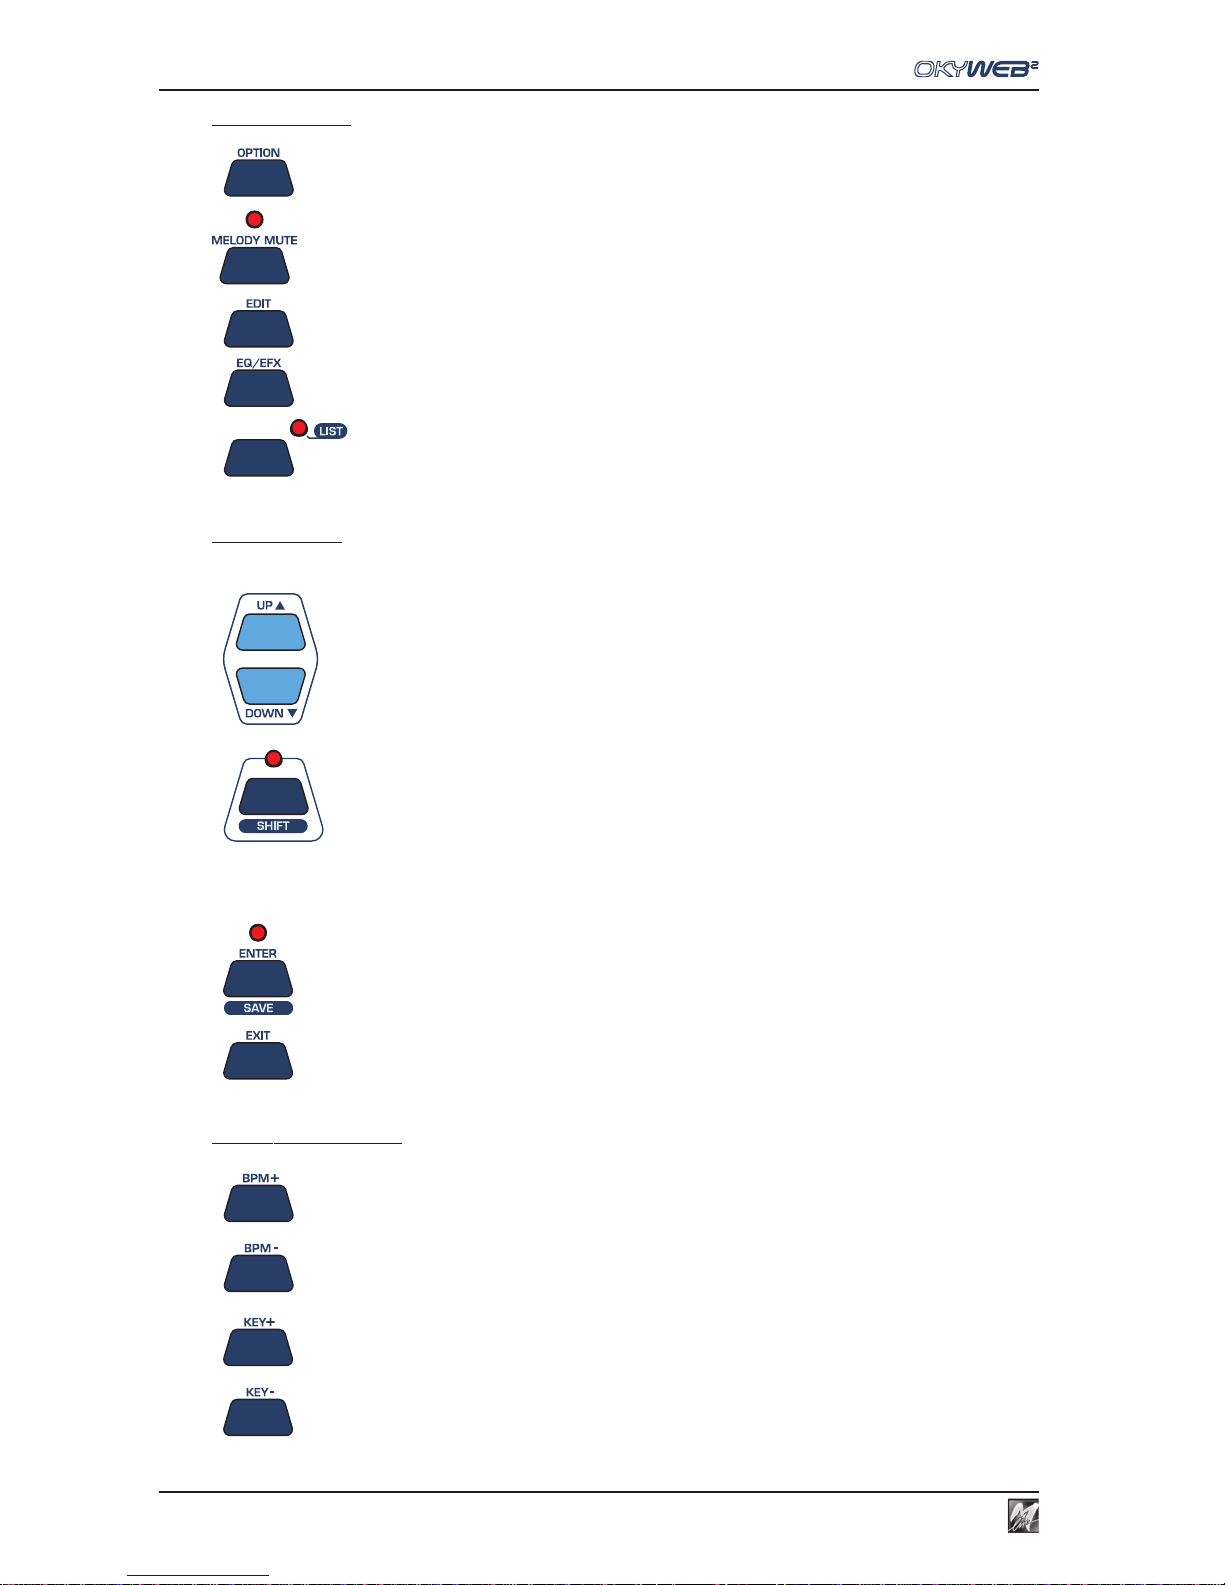
OPTION Key for access to optional functions.
MELODY MUTE Key for excluding or lowering the volume of the melody track.
EDIT Key for access to song track editing functions.
EQ/EFX Key for access to the page for selecting and controlling EQ and Effects.
LIST Key for access to Playlist management pages.
Browse Keys
These keys are used for browsing the OkyWeb2 menus.
UP/DOWN Scroll the lists, parameters and settings.
SHIFT Speeds up the scrolling.
Press the SHIFT key and the LED lights up. The Up and DOWN keys will
now scroll a page at a time. Press SHIFT again to go back to normal
scrolling. The LED will switch off.
ENTER Key for selecting parameters and confirming changes.
EXIT For exiting from the parameters and functions and controls pages.
Real Time Changes
BPM+/BPM- For changing the playing tempo (Beat Per Minute) of a song.
KEY+/KEY- For changing the key of a song.
Page 21
2.5
2
Connections & Controls
Song search
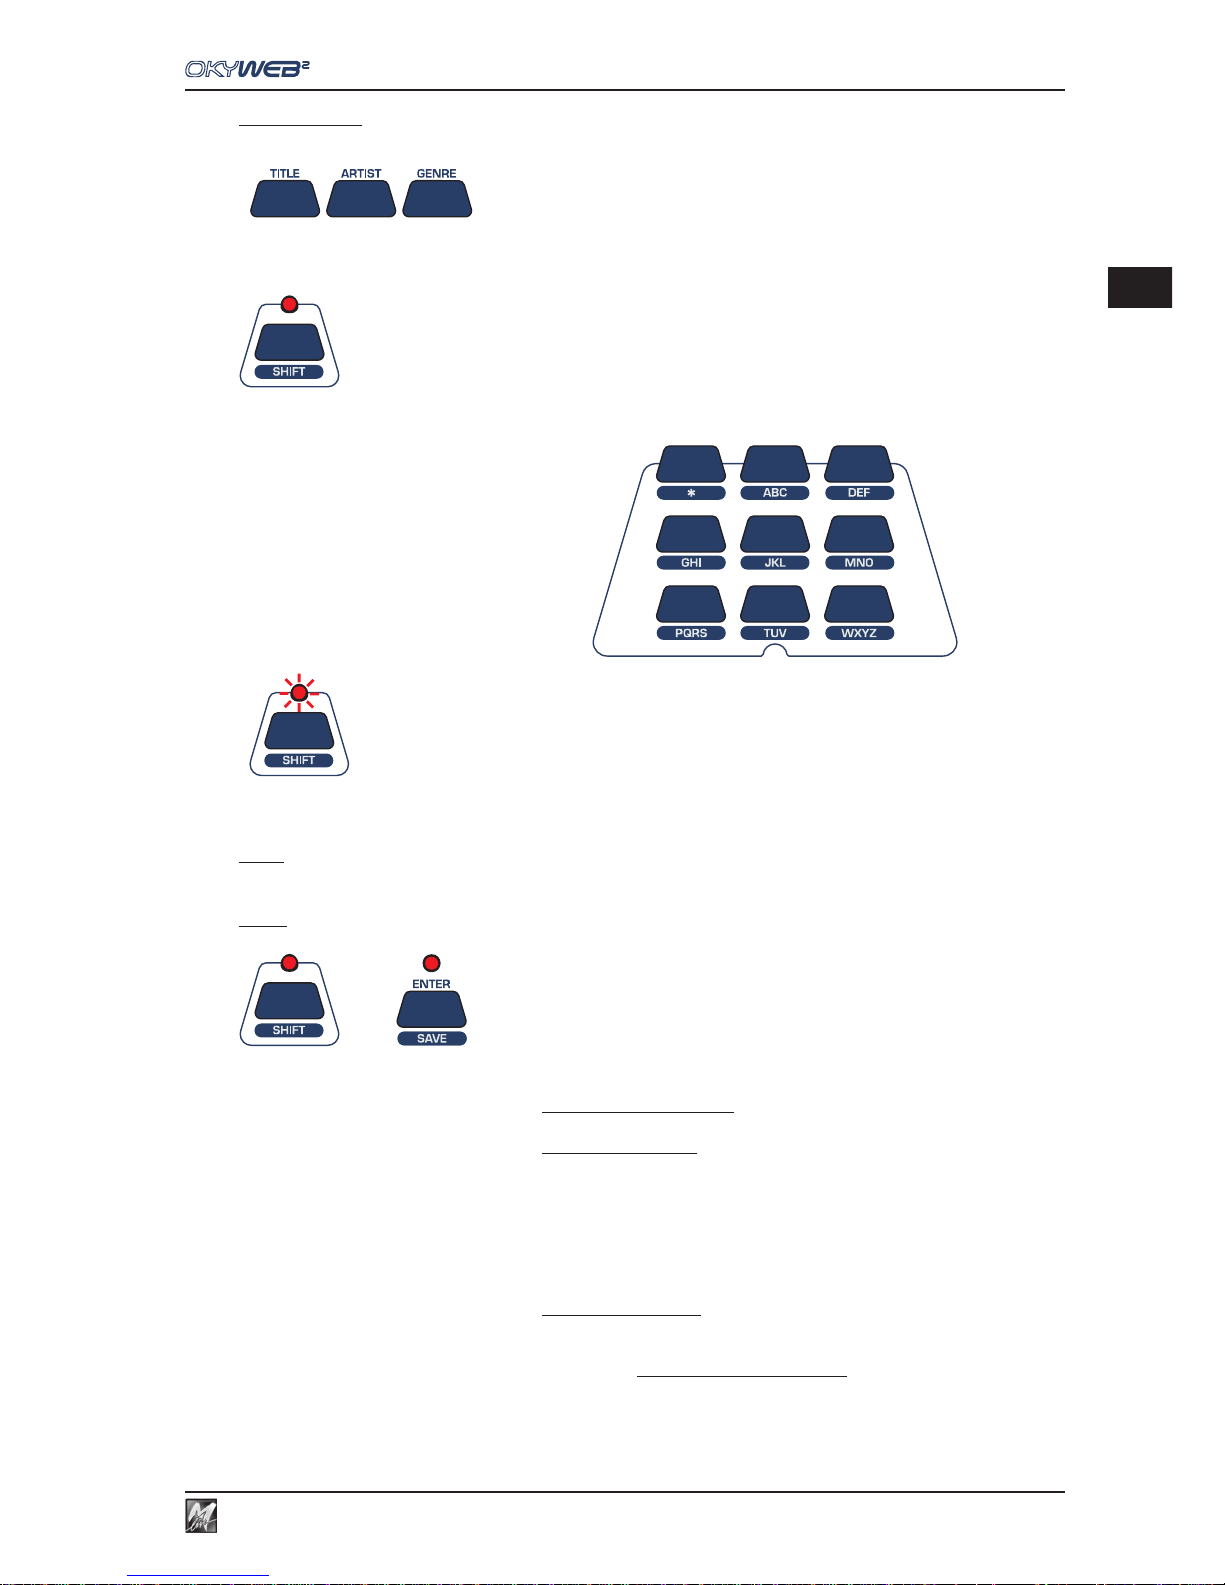
The song search function keys are in the central section of the OkyWeb2 panel.
TITLE - ARTIST - GENRE These three keys enable searches by Title, Performer and Category respectively.
With each request the archive of stored songs will be shown on the monitor, sorted
according to the requested criterion.
ALPHABETICAL SEARCH
Press the SHIFT key to enable the alphanumeric keypad.
To search for a song in the archive, simply type in the first letters of
the title.
T9 SEARCH Holding the SHIFT key down for a few seconds (with the LED off) the
LED starts to flash and a T9 Search (a very rapid intuitive search method)
is enabled.
NOTE: For more detailed information on search methods see Ch. ‘Searching Songs’.
Save
+ The combination of SHIFT and ENTER keys enables the SAVE function.
The following can be saved on a Compact Flash card:
- Playlists organised in the OkyWeb2
- Songs edited on the OkyWeb2
The following song parameters can be edited:
- Tempo
- Key
- Track Parameters
(Status, Program Change, Volume, Pan, Reverb, Chorus,
Velocity, Transpose).
- Effects edited on the OkyWeb2
The OkyFlash save procedure is enabled only when the song is not being played.
To avoid losing edited data, it’s advisable to stop the song after having carried out any changes and save it
immediately with the SAVE function.
Page 22
Connections & Controls
2.6
Shift key
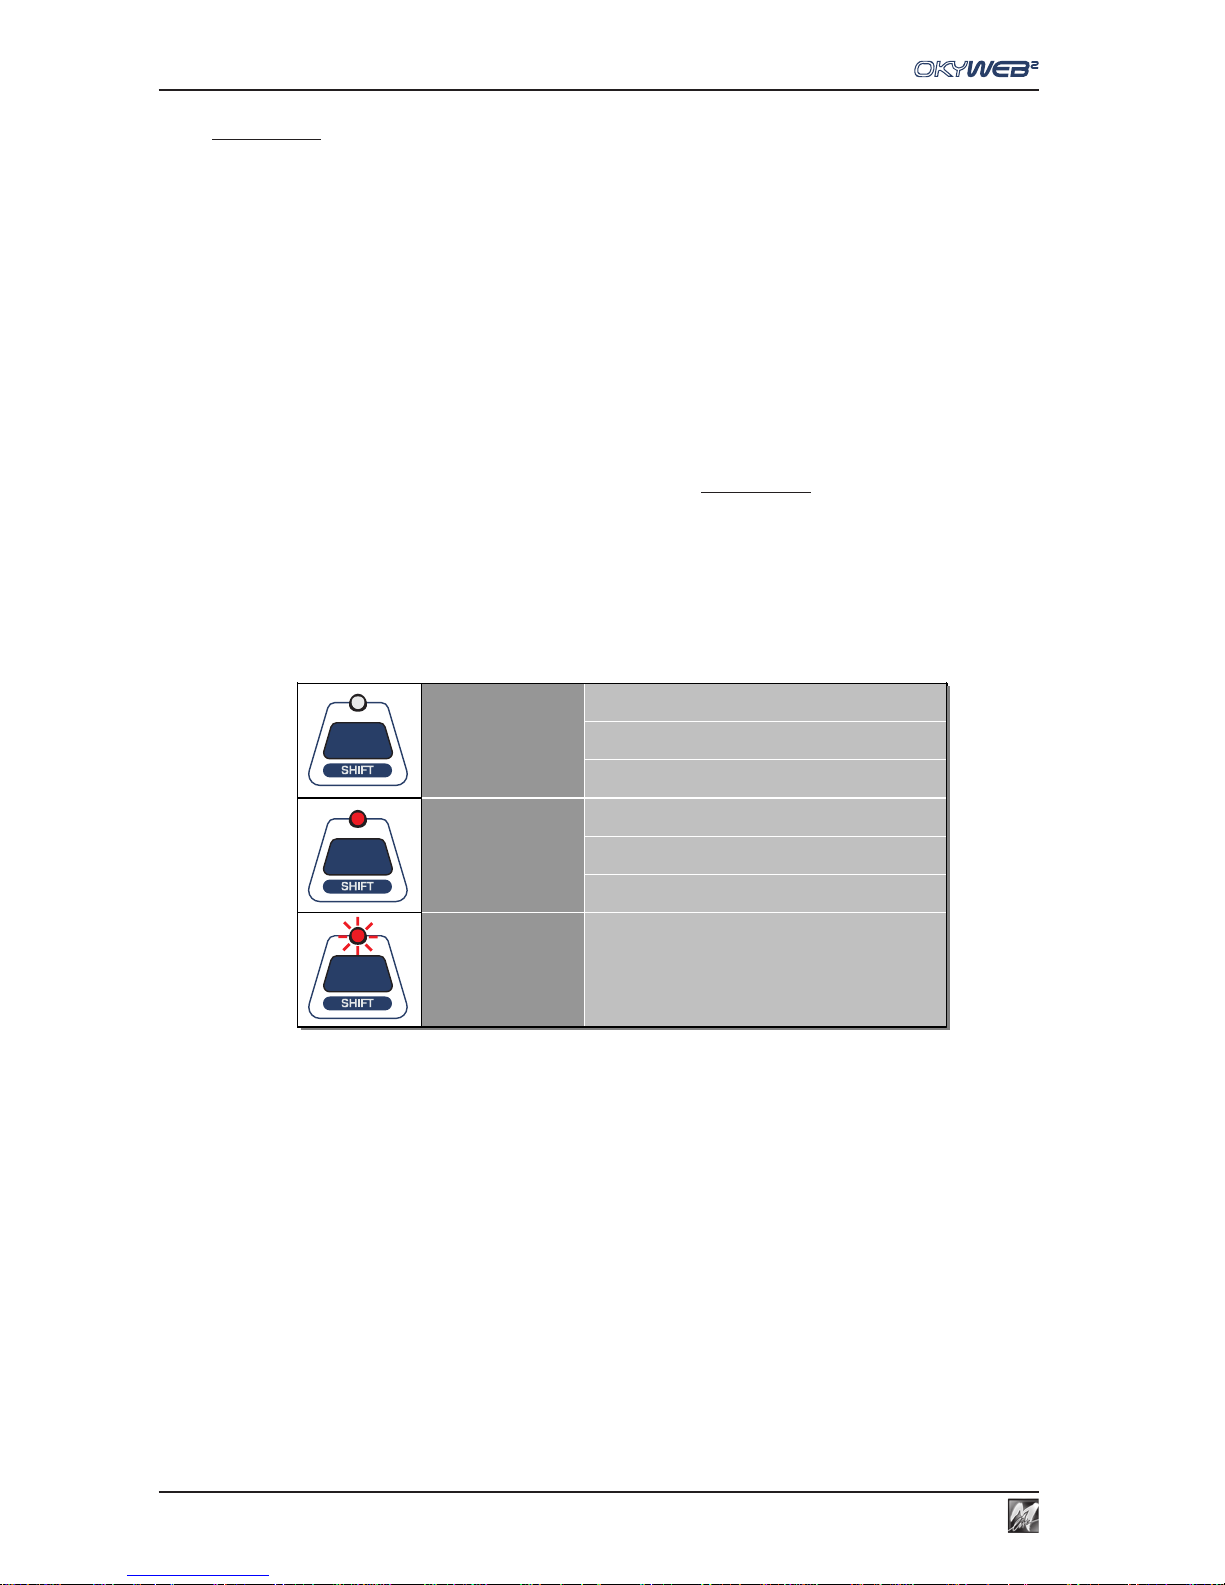
The various OkyWeb2 keys can carry out several functions, indicated with printing in different colours and enabled
via the SHIFT key. The status of the SHIFT LED shows the modes:
LED OFF The SHIFT function is disabled and the functions shown in positive (printed above
the key) are now available: Search by Title, Artist and Genre; BPM + / -;
KEY + / -; EQ/EFX; PLAYLIST.
LED ON The SHIFT function is enabled and the functions shown in negative (printed below
the key) are now available: Alphabetical search; SAVE function.
Also, in this status the UP and DOWN keys change their scroll function to scrolling
the song list a page at a time.
This mode is enabled by pressing and releasing the SHIFT key.
FLASHING LED T9 search is enabled, which allows to use the alphabetical keypad (characters in
negative) similar to that of a mobile phone.
This mode is enabled starting from LED off status and keeping the SHIFT key
pressed for a few seconds.
Alphabetical Search enabled
SAVE function enabled
Fast UP et DOW N scrolling enabled
T9 Search enabled
SHIFT LED
OFF
SHIFT LED
FLASHING
SHIFT LED
ON
Search by Title, A rtist and Genre enabled
BPM + / -; KEY + / -; EQ/EFX functions enabled
PLAYLIST func tion enabled
Page 23
3.1
3
Playing Songs
3 - Playing Songs
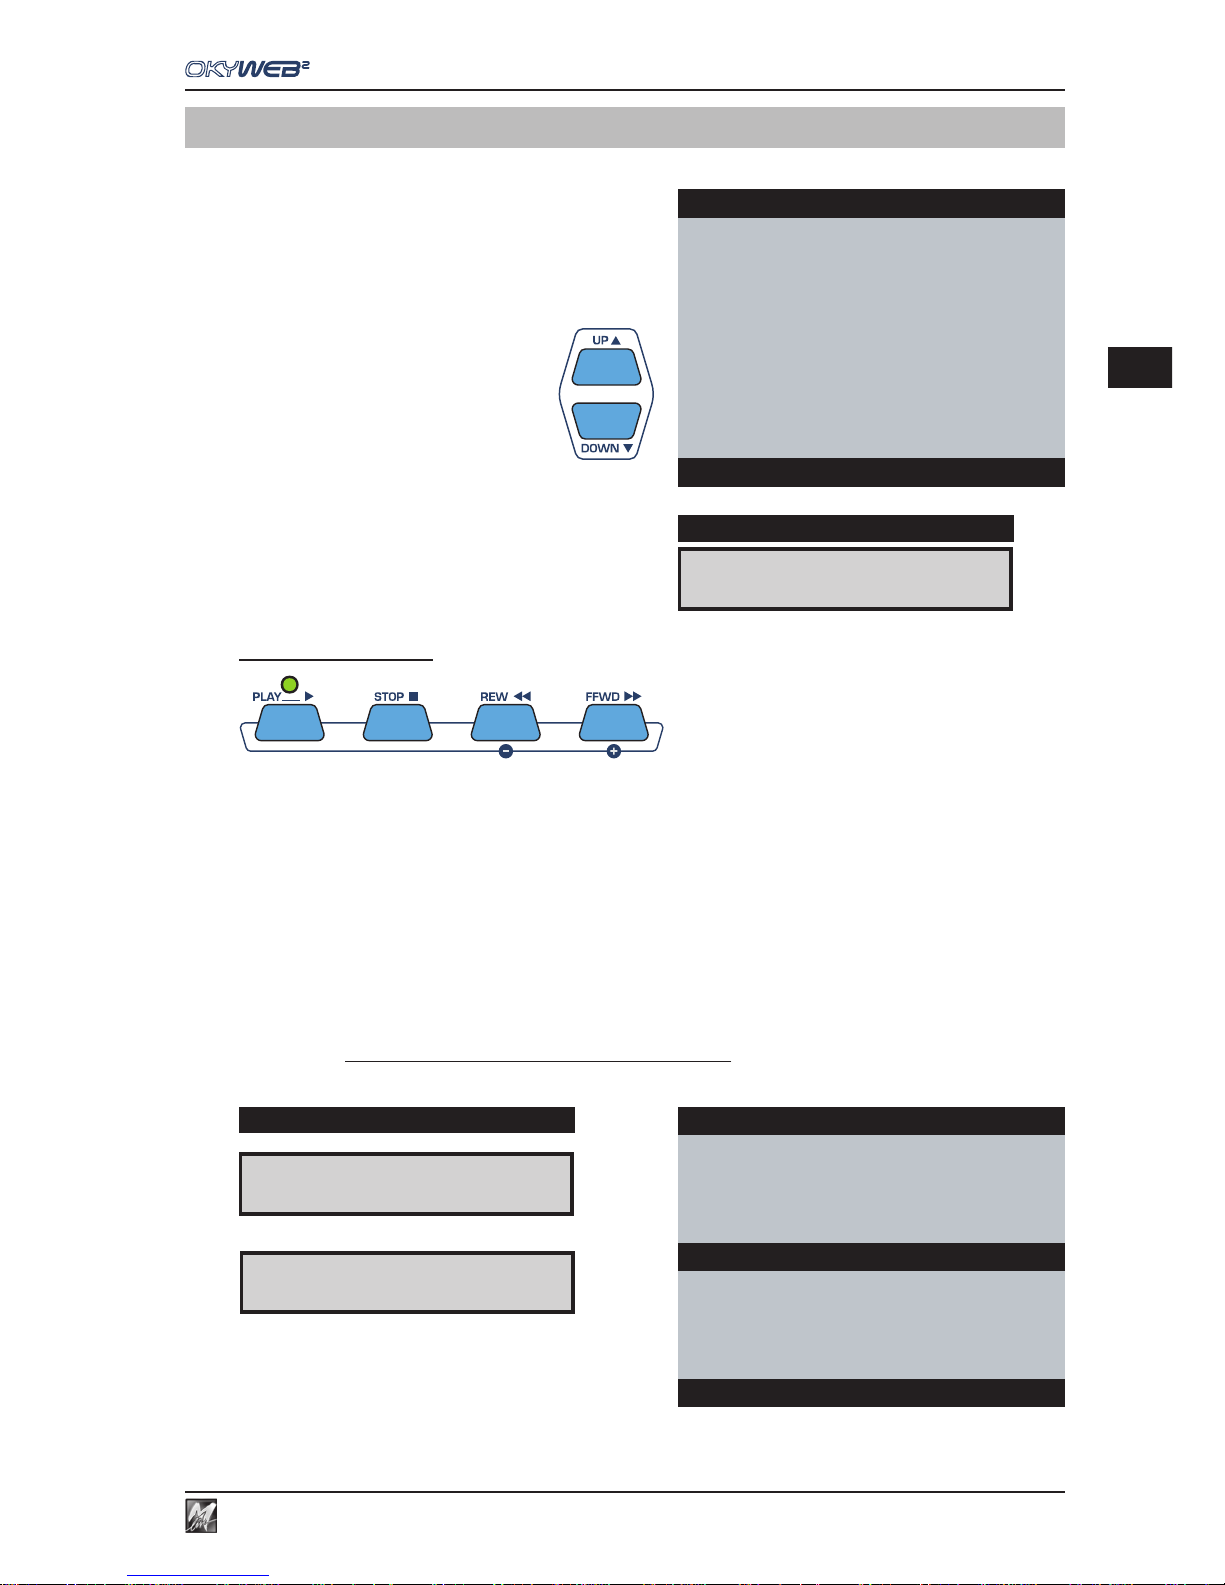
When you switch the OkyWeb2 on the video display goes
straight to the list of songs stored on the Compact Flash
card.
Scroll the list with the UP and DOWN keys to select the
song you want.
OkyWeb2 has a number of sophisticated search methods for finding
songs quickly.
(See Ch. ‘Searching Songs’ for more information).
The panel display shows the first song in the list.
Player Controls
PLAY Plays the selected song.
When the Play key is pressed:
- The monitor displays the lyrics and chords of the song.
- The LED above the PLAY key flashes to mark the tempo of the song.
- The display shows: BPM and Transpose (alternately), Metric Division and Beat Counter.
STOP STOP/PAUSE button.
Press once to pause during a song. PLAY restarts the song from where it was stopped.
Press STOP twice to stop the song. The video display goes back to the song list.
REW/FFWD REWIND and FAST FORWARD buttons.
Press these buttons to go forwards or backwards quickly in a song.
The video display scrolls through the lyrics and the corresponding number of beats.
The REW and FFWD are enabled only during PLAY.
(1)
qq
qq
q
BPM (Beat Per Minute or Tempo)
(1)
&&
&&
&Transpose (in semitones)
(2) Time (Metric Division)
(3) Bar/Beat counter
A FOGGY DAY È
DISPLAY
OkyWeb2
ÆA FOGGY DAY
AIN’T SHE SWEET
ALWAYS ON MY MIND
BLANKET ON THE GROUND
DANCE THE NIGHT AWAY
ESCAPE
FEVER
GREENSLEEVES
Select Song
Yesterday-Beatles
I’M NOT HALF THE MAN I USED
TO BE
THERE’S A
Dm Dm/C Bbmaj7
WHEN THE SAINTS
WHEN YOUR SMILING
ÆYESTERDAY
YOUR SONG
BPM 98 KEY 0 BAR 11
(1) (2) (3)
DISPLAY
& &
& &
&
0
4/4
11/1
qq
qq
q
98
4/4
11/1
Page 24
Playing Songs
3.2
Changing Tempo
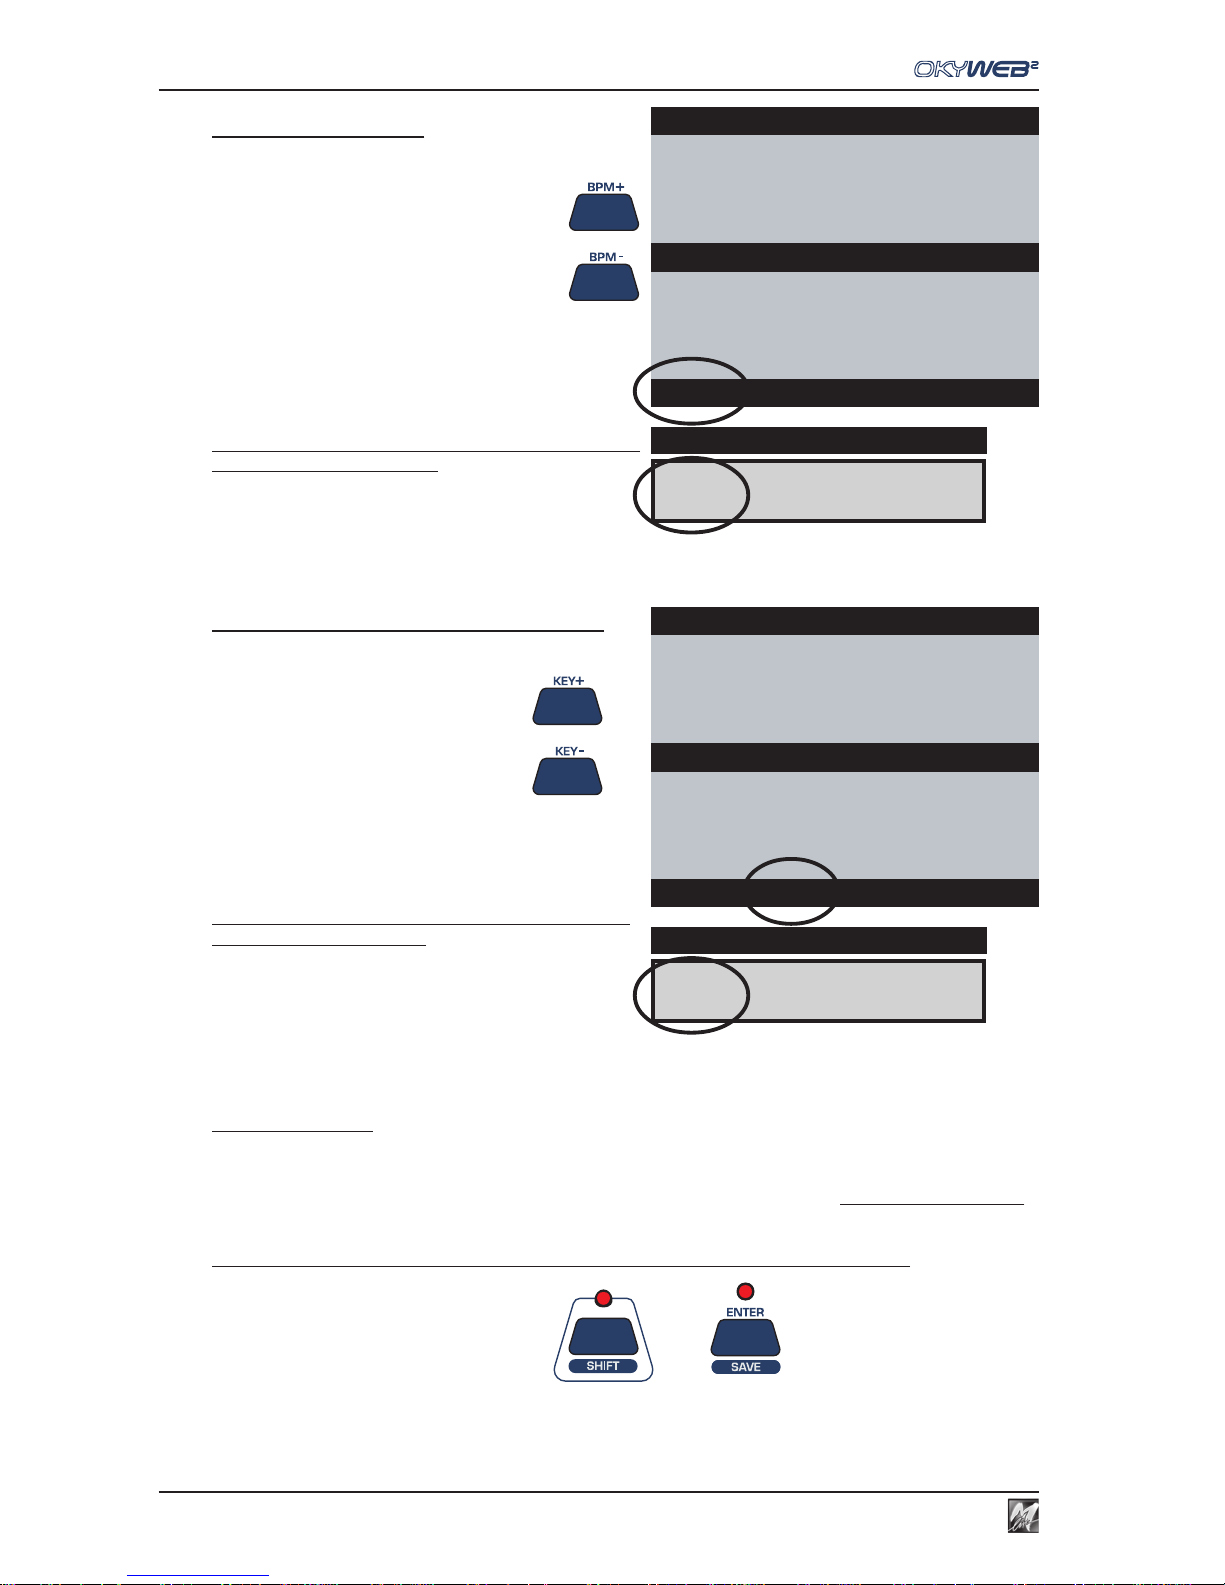
Press the BPM+ or BPM- keys
The song will change metronome setting.
The tempo settings range from 30 to 300 BPM.
The new BPM (Beats Per Minute) setting is displayed on
the bottom line of the video screen.
Press and hold down either of the keys for a few seconds
to go back to the original BPM.
Changing Key (or Transposing)
Press the KEY+ or KEY- keys
The song will change key.
The transposition is made by semitones (-12 / +12) and
displayed in on the bottom line of the video screen.
Press and hold down either of the keys for a few seconds
to go back to the original key.
Saving Changes
The tempo and key changes are temporary and are not saved in the OkyFlash memory, yet. If you exit the
changed song, the tempo and key parameters will go back to their original values.
Each time you make a change to a song (BPM, Transpose, Melody Mute or Edit) the Enter LED lights up to
signal that the song has been changed and stays lit until either the change is saved or another song is selected.
To make the tempo and key changes permanent and save them with the song:
Press the SHIFT key (the red LED lights up)
+ Press the SAVE key
Yesterday-Beatles
I’M NOT HALF THE MAN I USED
TO BE
THERE’S A
Cm Cm/Bb Abmaj7
WHEN THE SAINTS
WHEN YOUR SMILING
ÆYESTERDAY
YOUR SONG
BPM 98 KEY -2 BAR 11
& &
& &
&
-2
4/4
11/1
DISPLAY
Yesterday-Beatles
I’M NOT HALF THE MAN I USED
TO BE
THERE’S A
Dm Dm/C Bbmaj7
WHEN THE SAINTS
WHEN YOUR SMILING
ÆYESTERDAY
YOUR SONG
BPM 85 KEY 0 BAR 11
qq
qq
q
85
4/4
11/1
DISPLAY
Page 25
3.3
3
Playing Songs
Muting the melody track
One of the song’s tracks (normally track 4) contains the song’s melody.
It may be useful to listen to the melody at first, or to study it if you don’t know it very well. But when you want to
sing or play the song this track has to be either cut out or played at lower volume.
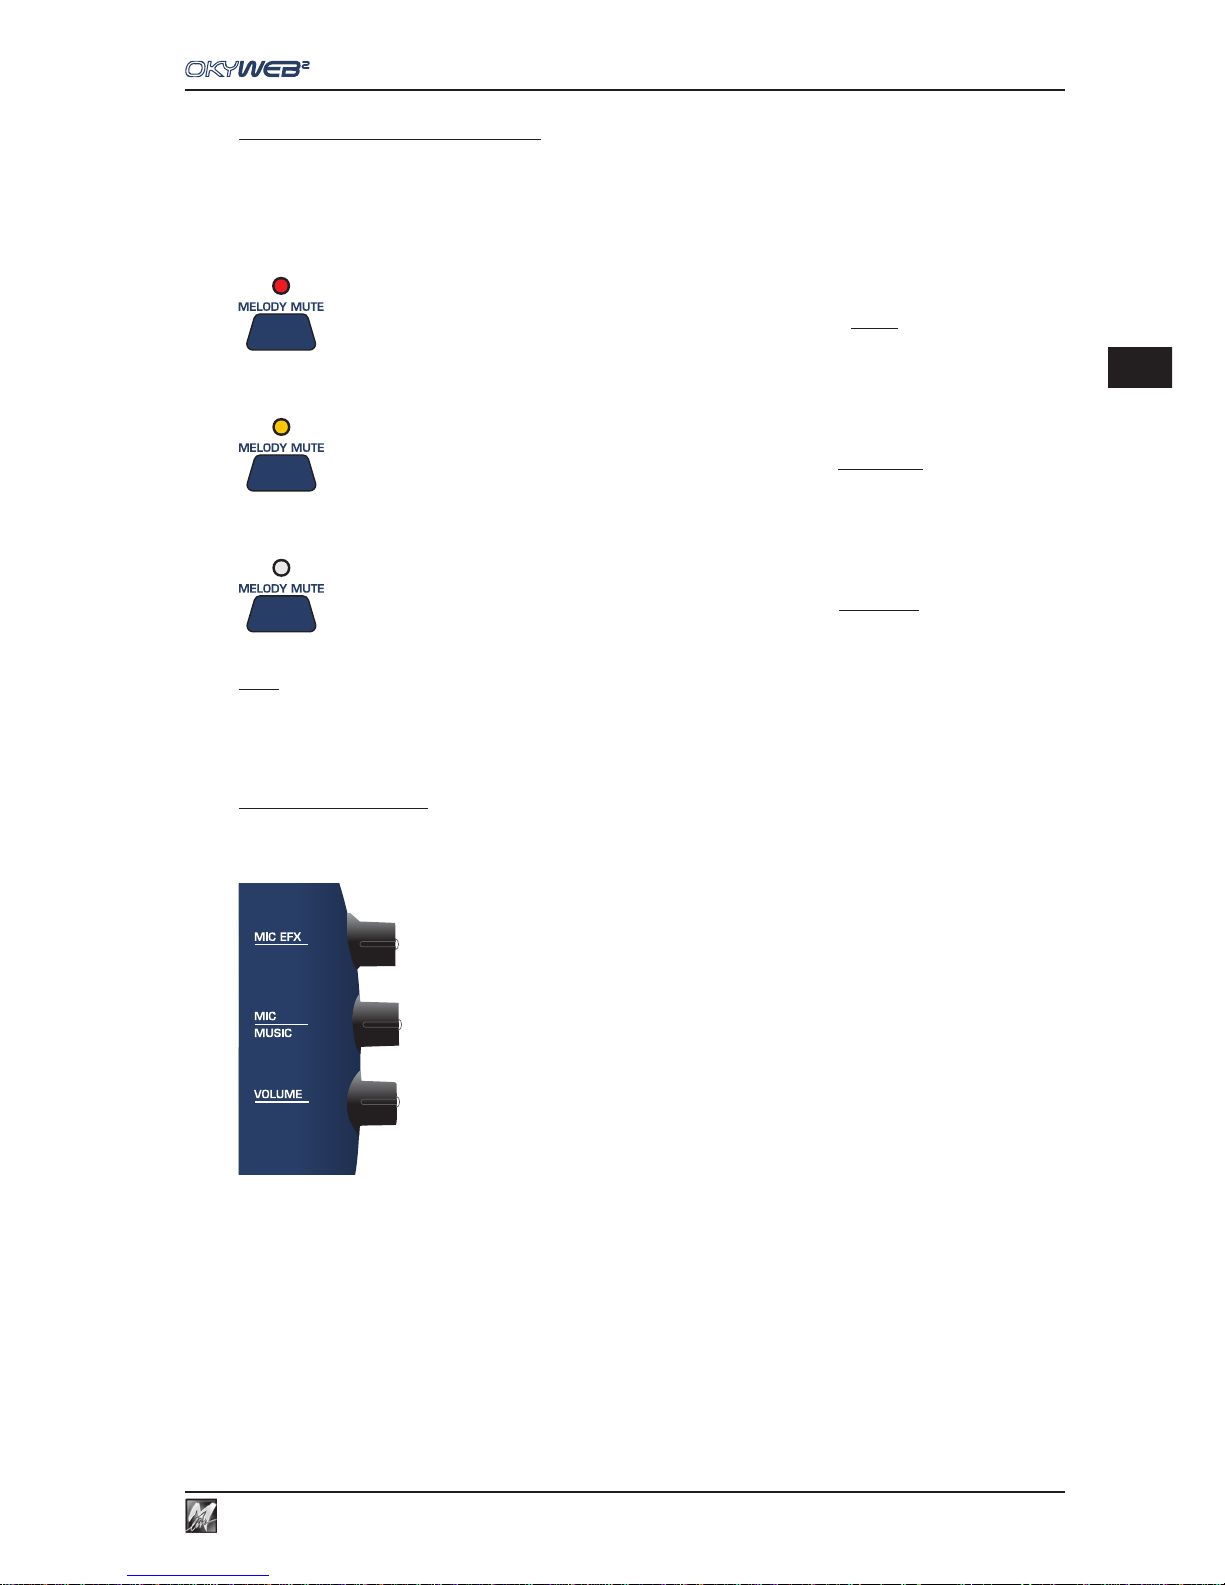
Press the MELODY MUTE key
The LED turns RED: the melody track will be completely muted.
Press the MELODY MUTE key again
The LED turns ORANGE: the melody track will be played at low volume.
Press the MELODY MUTE key again
The LED goes OUT: the melody track will be played at full volume.
NOTE: in some MIDI files the melody may be on a track other than track 4. The OkyWeb2 allows you to change the track number for the
melody mute. The MELODY TRACK function is in the OPTIONS / MUSIC OPTIONS menu. (See Ch. ‘Options’ for more information).
Audio Controls
The OkyWeb2 has three controls for making easy, real-time adjustments to the main audio parameters, i.e. the
ones essential for performing the song.
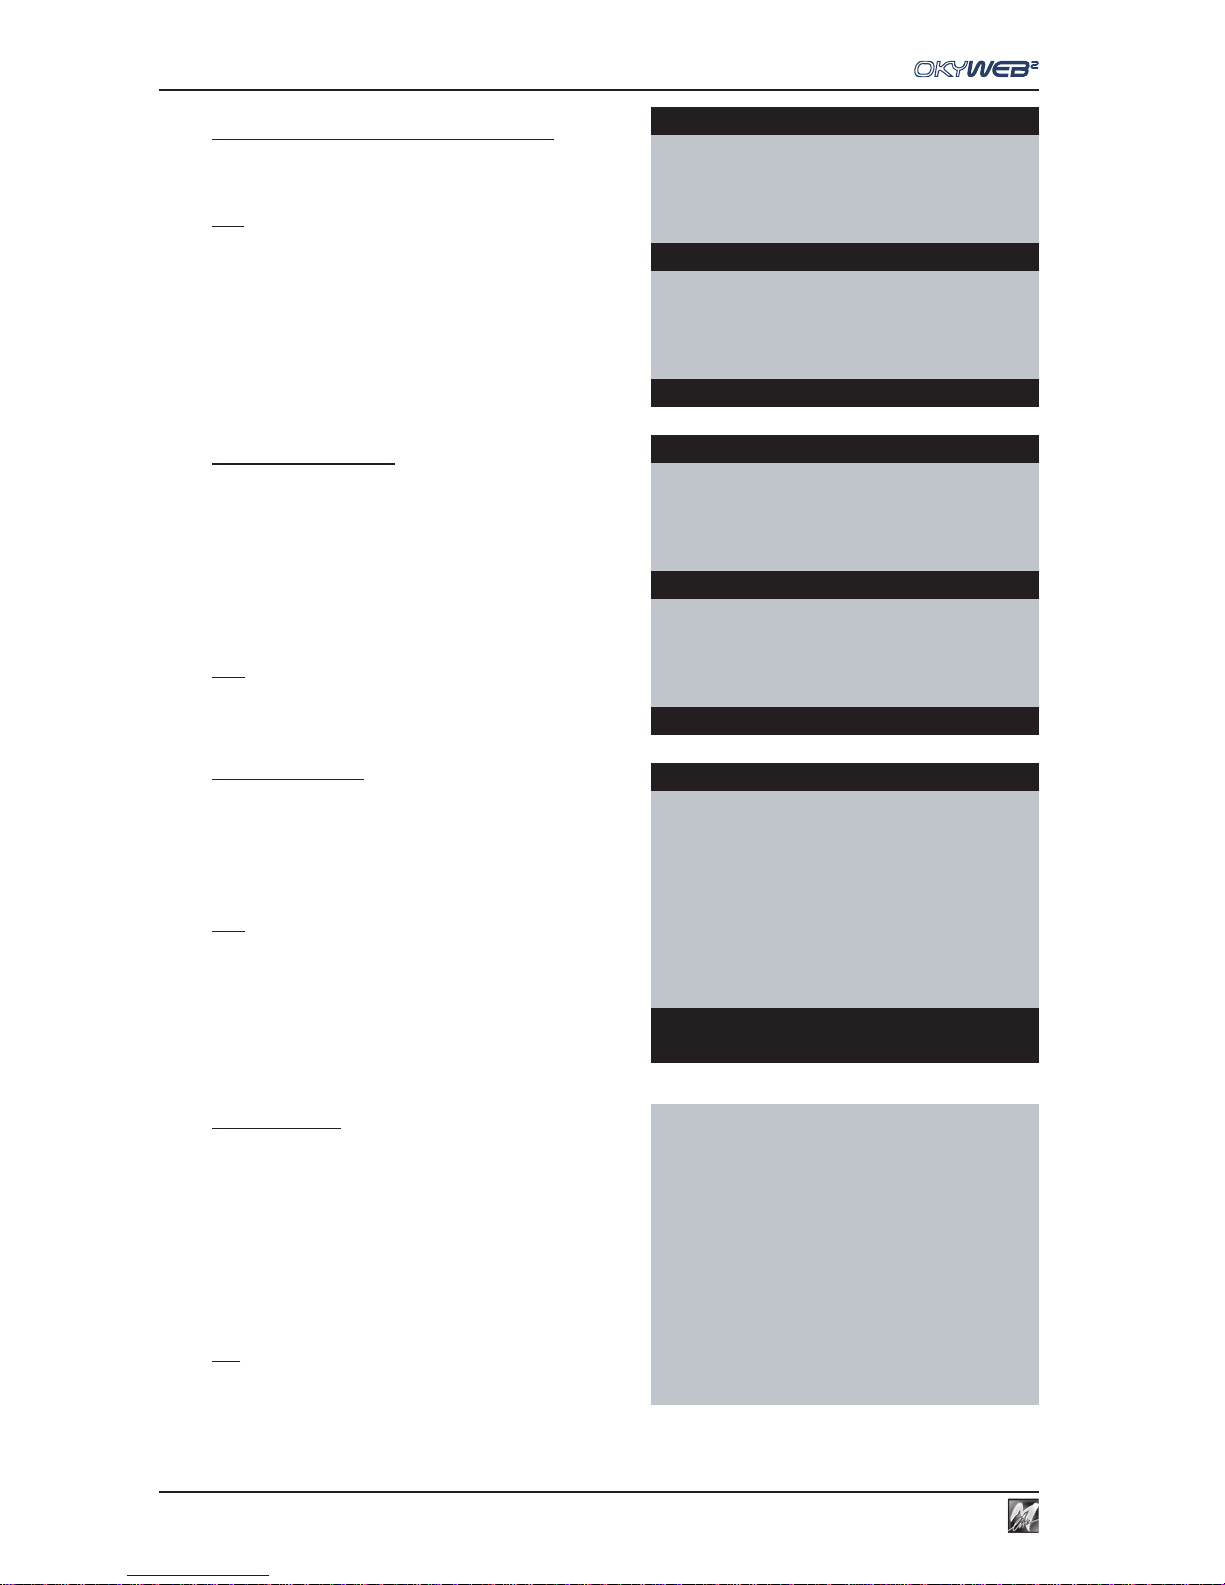
The three potentiometers on the right side of the unit control the following parameters:
MIC EFX: amount of Echo and Reverb effect applied to the microphone.
The effects and relative parameters can be adjusted in the EQ/EFX environment.
(See Ch. ‘EQ/EFX’ for more information).
MIC/MUSIC: balance between the microphone and the music volumes.
VOLUME: general output volume.
N.B.: OkyWeb2 output level is 0dB. If necessary, adjust the sensitivity of the input of the unit to which
you’re connecting it (mixer, amplification system, etc.).
Page 26
Playing Songs
3.4
Displaying Lyrics & Chords
As the song plays, the OkyWeb2 scrolls the song lyrics
and chords on the video screen (assuming, of course, the
MIDI file contains the lyrics and the chords).
N.B.: OkyWeb2 is able to display chords and lyrics with coloured syllable
highlighting, indicating the running through of the lyrics with a contrasting
colour. Obviously, to be displayed, lyrics and chords must be appropriately
stored in the file. It’s advisable to use M-Live backing tracks, high quality
products with all the features that ensure excellent performances.
Various display modes are available.
Txt + Search Mode
TXT+Search mode divides the screen into two main parts
and allows to display the song’s lyrics in the top window,
the chords in the centre section and at the same time to
run a search for other songs in the bottom window.
The phrases already performed or about to be performed
are written in UPPER CASE letters. The phrases to be
performed soon, but not immediately (anticipated
phrase), are written in lower case.
N.B.: The anticipated phrases can be positioned before or after the upper
case test, according to the characteristics of the lyrics.
Text Only Mode
TEXT ONLY mode uses the full screen to display lyrics
and chords with large-format characters.
The phrases already performed or about to be
performed are written in UPPER CASE letters. The
phrases to be performed soon, but not immediately
(anticipated phrase), are written in lower case.
N.B.: The anticipated phrases can be positioned before or after the
upper case test, according to the characteristics of the lyrics.
You can look for other songs even while a backing track
is being played.
In fact, using the UP and DOWN keys, the display passes
temporarily to TXT+SEARCH mode.
Rolling Mode
ROLLING mode uses the entire screen to display only
the lyrics of the song being played.
The letters are in large format and the lyrics scroll
continuously, as if on a reel.
You can look for other songs even while a backing track
is being played.
In fact, using the UP and DOWN keys, the display passes
temporarily to TXT+SEARCH mode.
N.B.: in this mode, mainly created for Karaoke functions, the chords
are not displayed.
Yesterday-Beatles
SHADOW HANGING OVER ME
OH YESTERDAY CAME SUDDENLY
F F/E Dm
WHEN THE SAINTS
WHEN YOUR SMILING
ÆYESTERDAY
YOUR SONG
Select Song
Yesterday-Beatles
why she had to go i don’t
OH YESTERDAY CAME SUDDENLY
Dm GBb
WHEN THE SAINTS
WHEN YOUR SMILING
ÆYESTERDAY
YOUR SONG
Select Song
Yesterday-Beatles
why she had to go i don’t
OH YESTERDAY CAME SUDDENLY
Dm GBb
I’M NOT HALF THE MAN I USED
TO BE
THERE’S A SHADOW HANGING OVER ME
OH YESTERDAY CAME SUDDENLY
WHY SHE HAD TO GO I DON’T
Page 27
3.5
3
Playing Songs
Choosing Lyrics display mode
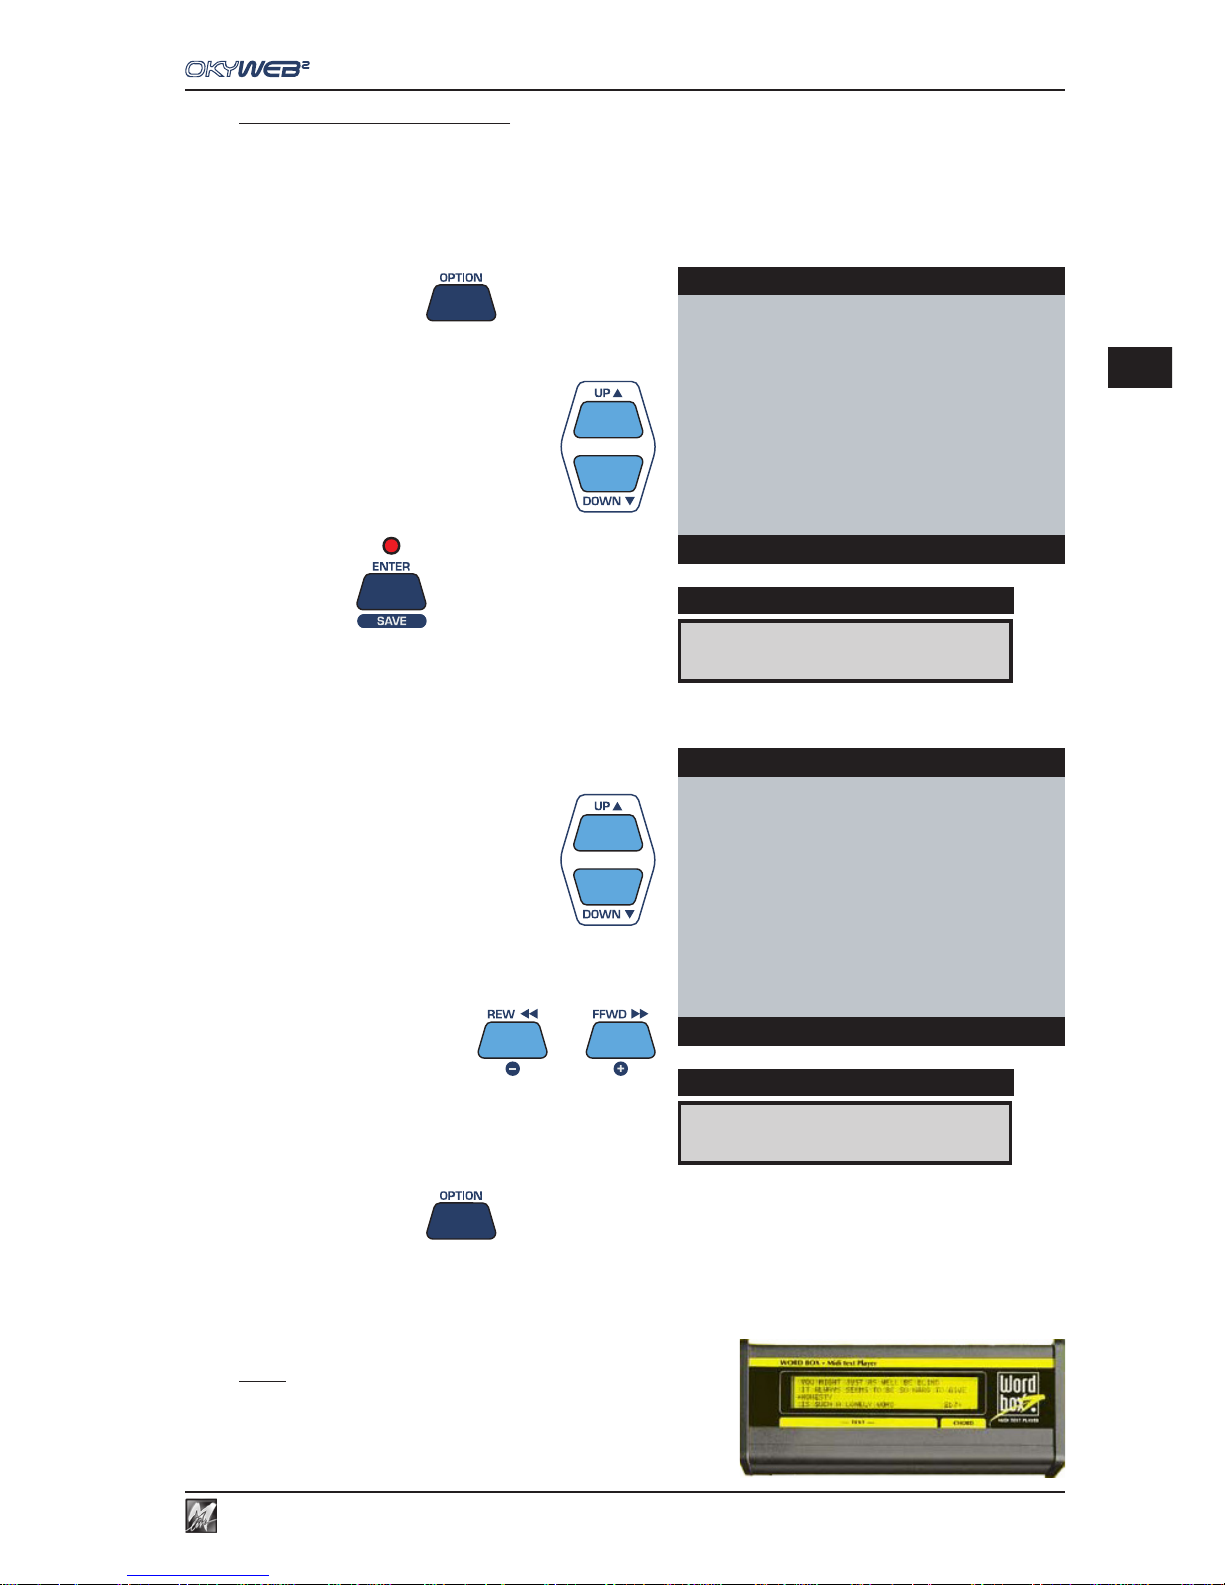
You can choose the mode with which lyrics are displayed via OPTIONS/VIDEO OPTIONS/Text Mode.
If you choose TEXT ONLY or ROLLING, the text will be displayed normally in the mode chosen, only changing to
TEXT+SEARCH mode temporarily during search work; if you choose TEXT+SEARCH, the display will be only in
TEXT+SEARCH mode.
N.B.: any display of the song’s chords (which can be enabled via OPTIONS/MUSIC OPTIONS/CHORDS) requires TEXT+SEARCH or
TEXT ONLY mode to be set as the preset mode.
Press the OPTION key
Select VIDEO OPTIONS with the UP and DOWN keys
Press ENTER
Select TEXT MODE with the UP and DOWN keys
Set the desired mode with the - and + keys
Press the OPTION key to exit the Options environment.
NOTE: as an alternative to a television set, an M-Live WORD
BOX can be used for viewing the lyrics.
The WORD BOX, which connects to the MIDI output, is easily
transportable and can be used for reading the lyrics if no television
set is available.
VIDEO OPTIONS
DISPLAY
OPTIONS MENU
GENERAL OPTIONS
MUSIC OPTIONS
MIC OPTIONS
MIDI OPTIONS
ÆVIDEO OPTIONS
Options
TXT MODE:ROLLING
DISPLAY
VIDEO OPTIONS
ÆTEXT MODE : ROLLING
TEXT ALIGN : CENTER
COLOURS : SET1
VIDEO IN : ENABLED
Options
Page 28
Playing Songs
3.6
Search during Play
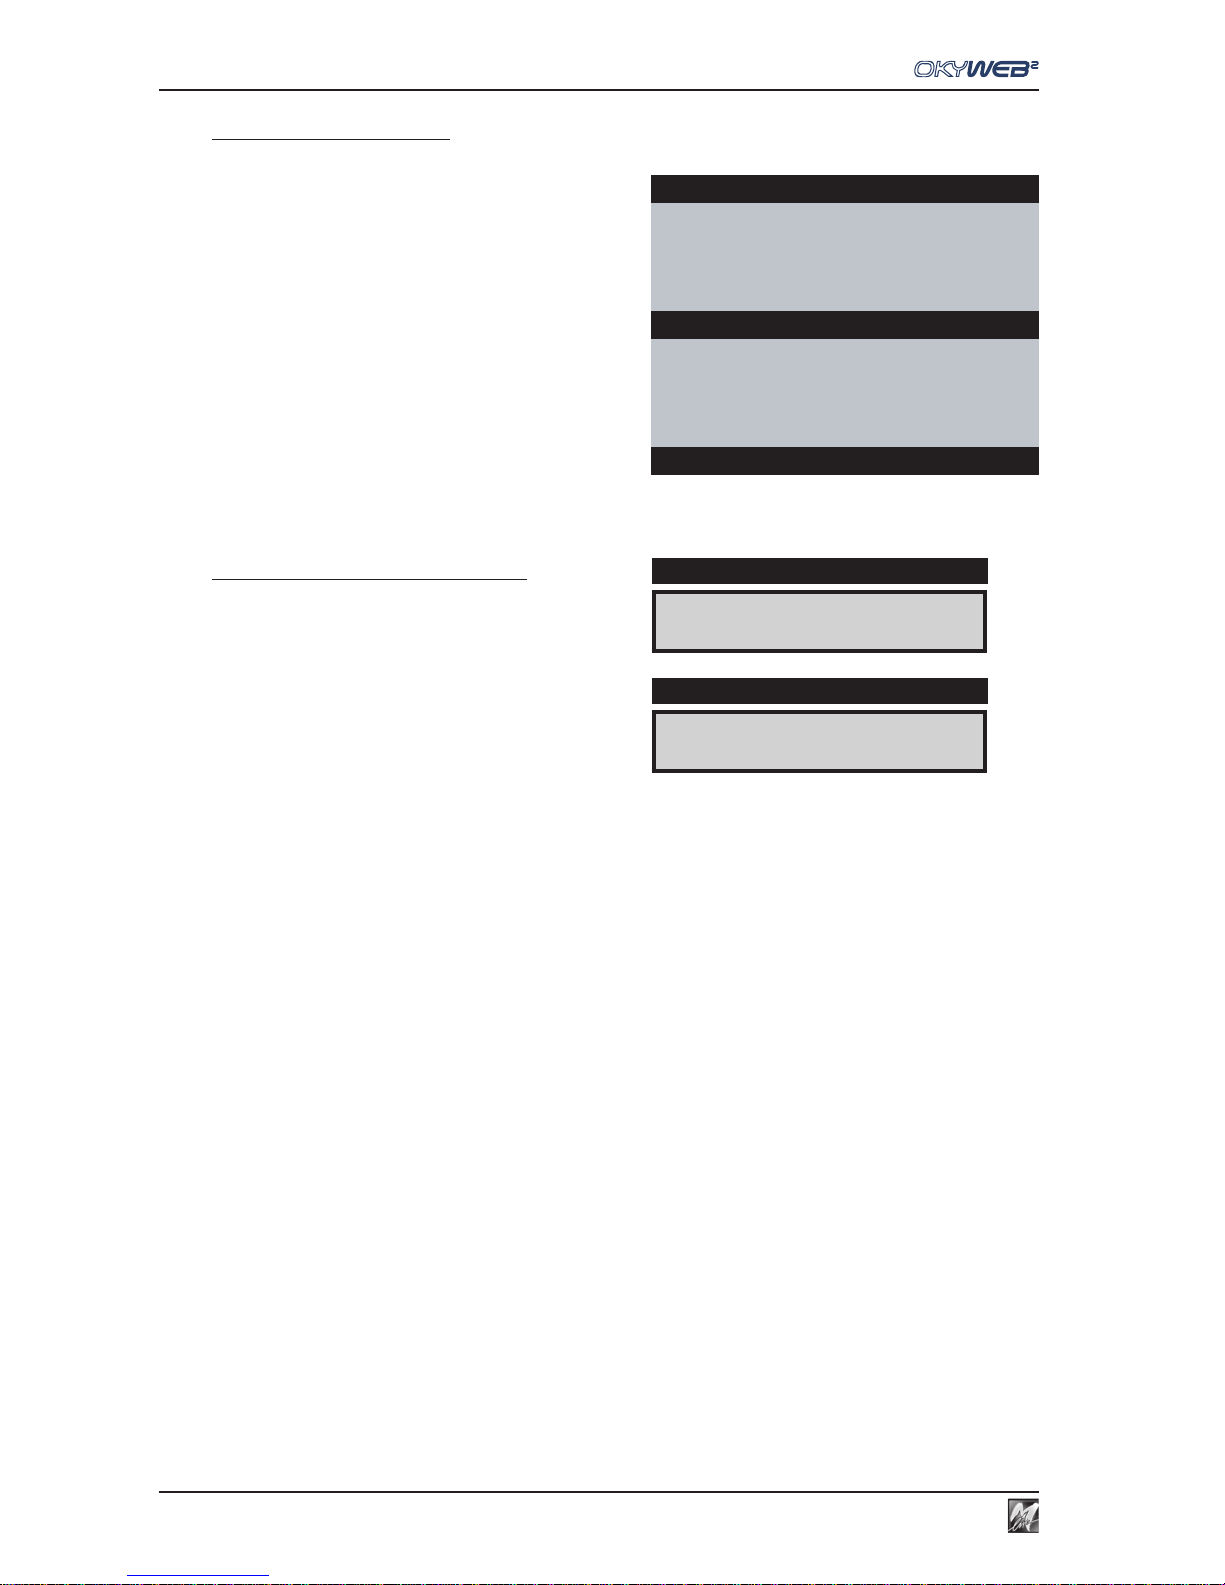
When the OkyWeb2 is in standard TEXT+SEARCH mode,
the bottom half of the video screen shows the list of songs
stored on the OkyFlash card.
With the UP and DOWN keys, you can scroll the list and
select a new song.
Press the PLAY key to play the new song immediately,
replacing the previous one.
Searching on the OkyWeb2 Display
While a song is playing, the OkyWeb2 display normally shows
music informations: BPM/Key, Time and Bar/Beat Counter.
Press UP or DOWN to display the song currently selected
from the list.
The UP and DOWN keys can then be used for scrolling
the list and selecting a new song.
Yesterday-Beatles
SHADOW HANGING OVER ME
OH YESTERDAY CAME SUDDENLY
F F/E Dm
BLANKET ON THE GROUND
DANCE THE NIGHT AWAY
ESCAPE
ÆFEVER
Select Song
qq
qq
q
98
4/4
14/1
DISPLAY
FEVER
DISPLAY
Page 29
4.1
4
Searching Songs
4 - Searching Songs
The Compact Flash card used by OkyWeb2 (i.e. OkyFlash by M-Live) for memory storage can contain an
enormous quantity of MIDI files.
A number of different search methods have been devised to make the song archive easy to use and functional.
Search keys
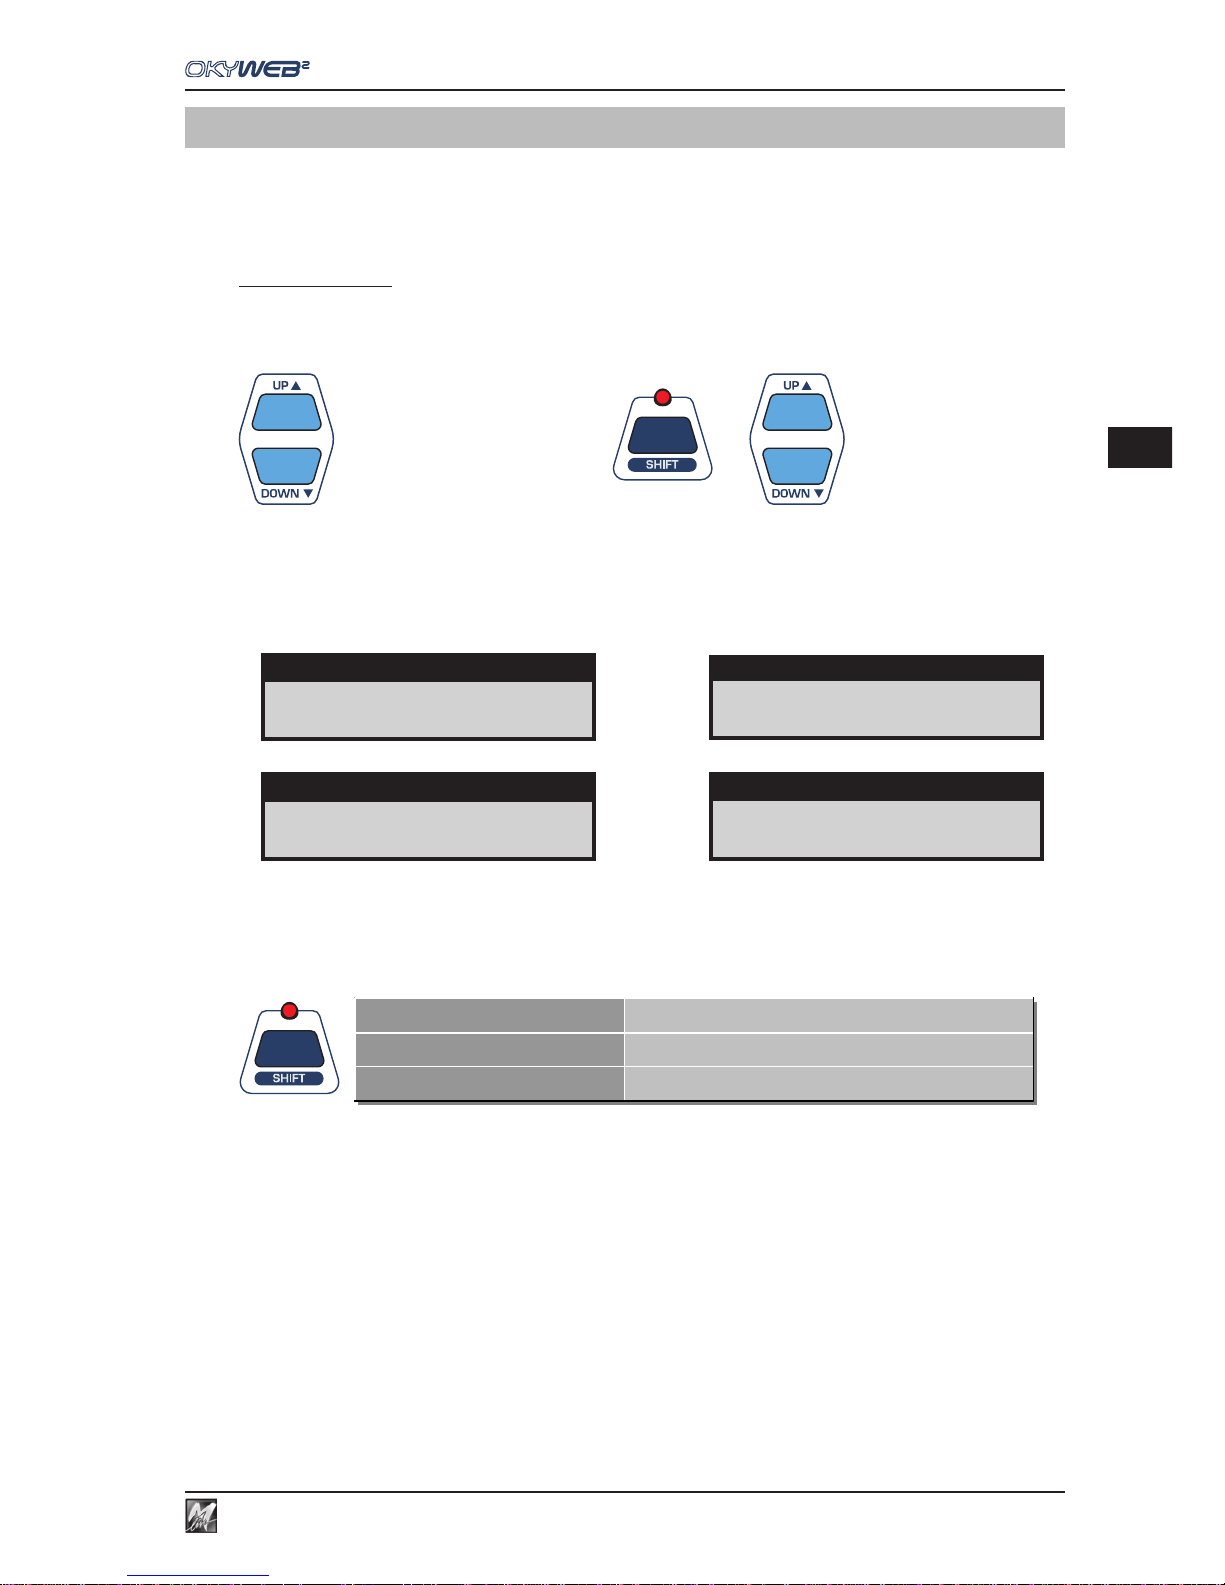
Use the UP and DOWN keys to scroll the lists Title, Artist or Genre on the video screen.
Press the SHIFT key to make the arrows move the cursor a page at a time.
Moves the cursor position by position.
+
Moves the cursor page by page.
On the OkyWeb2 display, the arrows on the right tell you whether you are at the beginning, middle or end of a list
and so whether you can move down, up or both ways.
If an item has a hyphen next to it, this means it is an only option and the arrows will have no effect.
The SHIFT key has three modes, associated to the selection of the three different OkyWeb2 search functions,
as signalled by the status of the corresponding LED:
SHIFT LED OFF
Searc h by Title, Artis t and Genre enabled
SHIFT LED ON
Alphabetical Searc h enabled
SHIFT LED FLASHING
T9 Search enabled
The various OkyWeb2 keys can carry out several functions, indicated with printing in different colours and enabled
via the SHIFT key:
LED OFF The SHIFT function is disabled and the functions shown in positive (printed above the key)
are available: Search by Title, Artist and Genre; BPM + / -; KEY + / -; EQ/EFX; PLAYLIST.
LED ON The SHIFT function is enabled and the functions shown in negative (printed below the key)
are available: Alphabetical search; SAVE function.
Also changes the function of the UP & DOWN keys, which in this case allow to scroll through
the song list one page at time.
This mode is enabled by pressing and releasing the SHIFT key.
FLASHING LED T9 search is enabled, which allows to use the alphabetical keypad (characters in negative)
similar to that of a mobile phone.
This mode is enabled starting from LED off status and keeping the SHIFT key pressed for a
few seconds.
RED RED WINE
Song in the middle of the list
A FOGGY DAY ↓
First song of the list
YOUR SONG ↑
Last song of the list
TITLE -
Single option
Page 30
Searching Songs
4.2
Search by Title
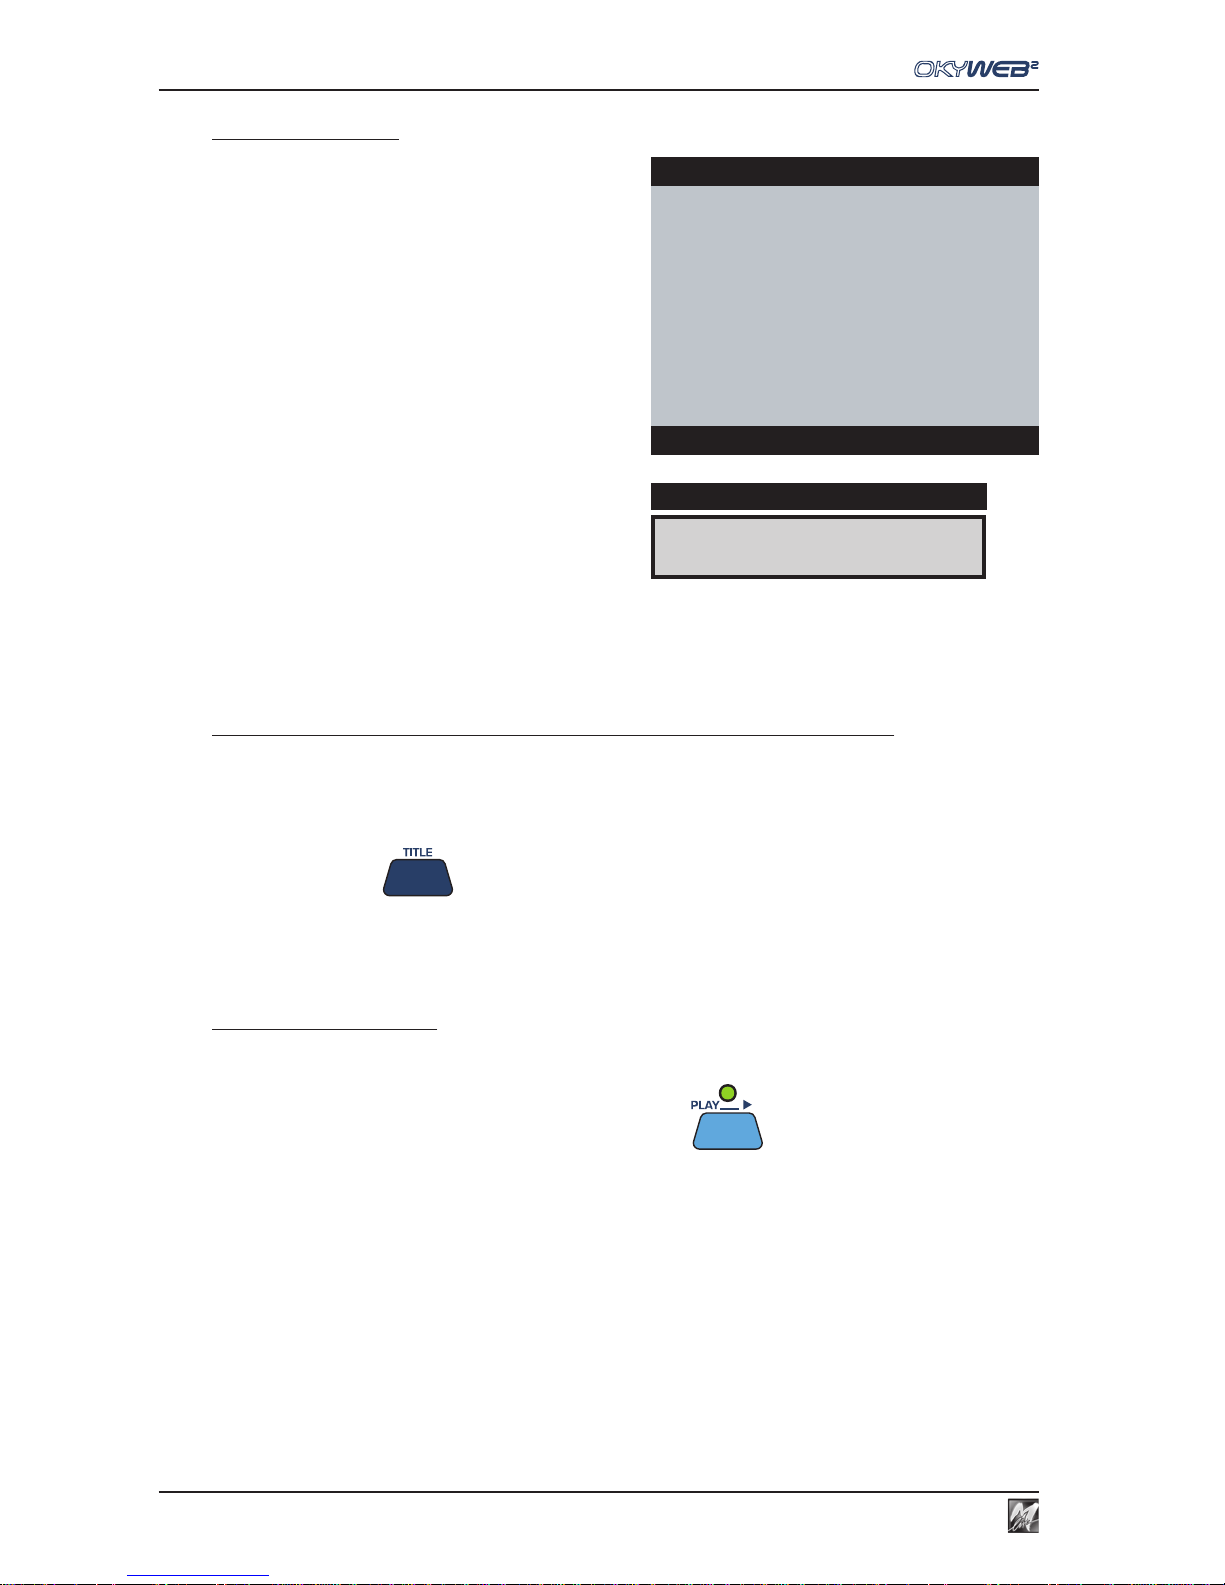
When you switch the OkyWeb2 on, the ‘Search by Title’
window is shown on the video screen.
All the MIDI files on the OkyFlash card are listed in
alphabetical order by title.
To access ‘Search by Title’ from another search window (ARTIST or GENRE)
The SHIFT LED must be OFF.
If the SHIFT LED is on or flashing you are in one of the Alphabetical Search functions.
Press the SHIFT key to exit and switch off the LED.
Press the TITLE key
To find the required song
Scroll the list with the UP and DOWN keys (SHIFT + UP/DOWN to move faster).
Position the arrow-cursor on the song title and press PLAY
You can search for a new song even while a song is playing: simply scroll the list in the lower part of the video
screen (TXT + SEARCH mode), select the new song and press PLAY again. The new song will replace the
previous one immediately.
A FOGGY DAY È
DISPLAY
OkyWeb2
ÆA FOGGY DAY
AIN’T SHE SWEET
ALWAYS ON MY MIND
BLANKET ON THE GROUND
DANCE THE NIGHT AWAY
ESCAPE
FEVER
GREENSLEEVES
Select Song
Page 31
4.3
4
Searching Songs
Search by Artist
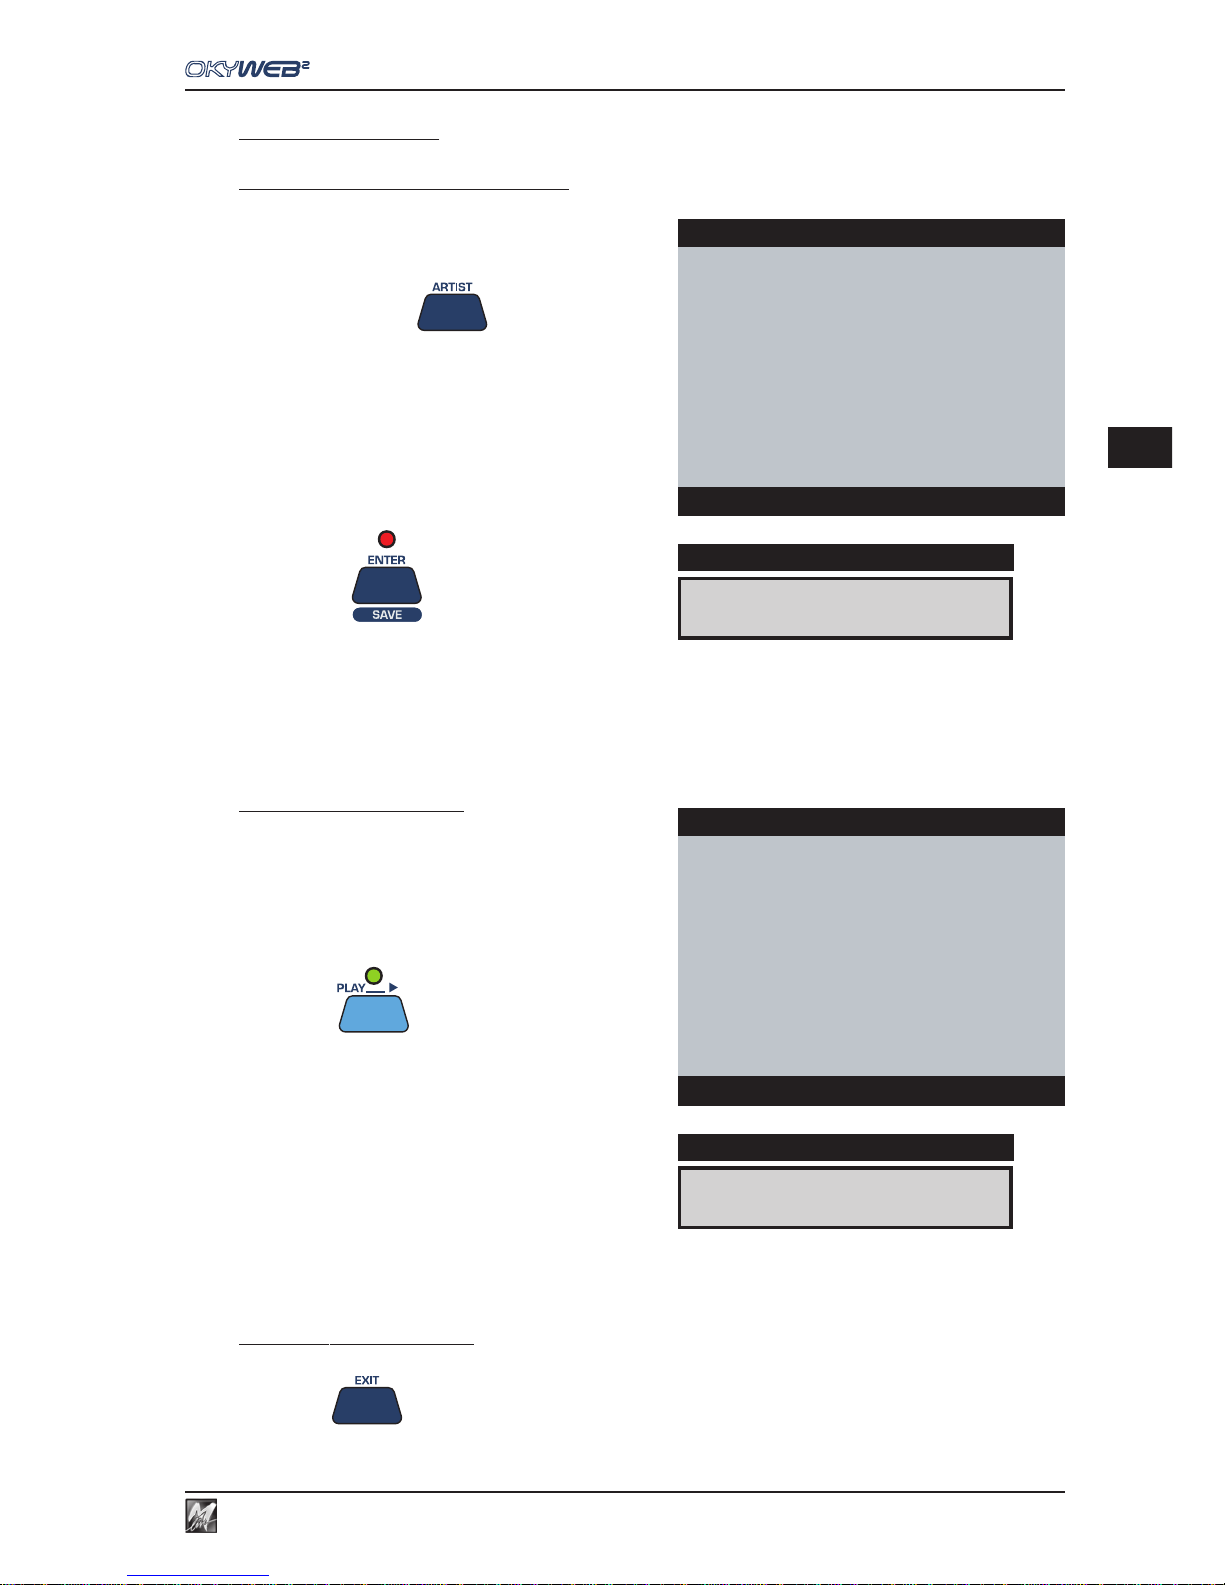
To access the ‘Search by Artist’ page
The SHIFT LED must be OFF.
Press the ARTIST key
The video screen will display the list of Artists
(performers, composers, ...) stored in the Compact Flash card.
Scroll the list with the UP and DOWN keys.
(SHIFT + UP/DOWN to move faster).
Position the arrow on the required Artist.
Press ENTER
The list of songs for the selected Artist will be shown.
To find the required song
Scroll the list with the UP and DOWN keys.
(SHIFT + UP/DOWN to move faster).
Position the arrow on the song title.
Press PLAY
To exit an Artist filter page
Press EXIT
BEATLES
DISPLAY
OkyWeb2
ABBA
ANIMALS
ÆBEATLES
BILLY JOE SPEARS
BILLY JOEL
ELTON JOHN
ELVIS PRESLEY
Select Artist
YESTERDAY ↑
DISPLAY
OkyWeb2
A HARD DAY’S NIGHT
ALL YOU NEED IS LOVE
BECAUSE
HEY JUDE
LET IT BE
MEDLEY BEATLES
→YESTERDAY
**end list**
filter:BEATLES
Page 32
Searching Songs
4.4
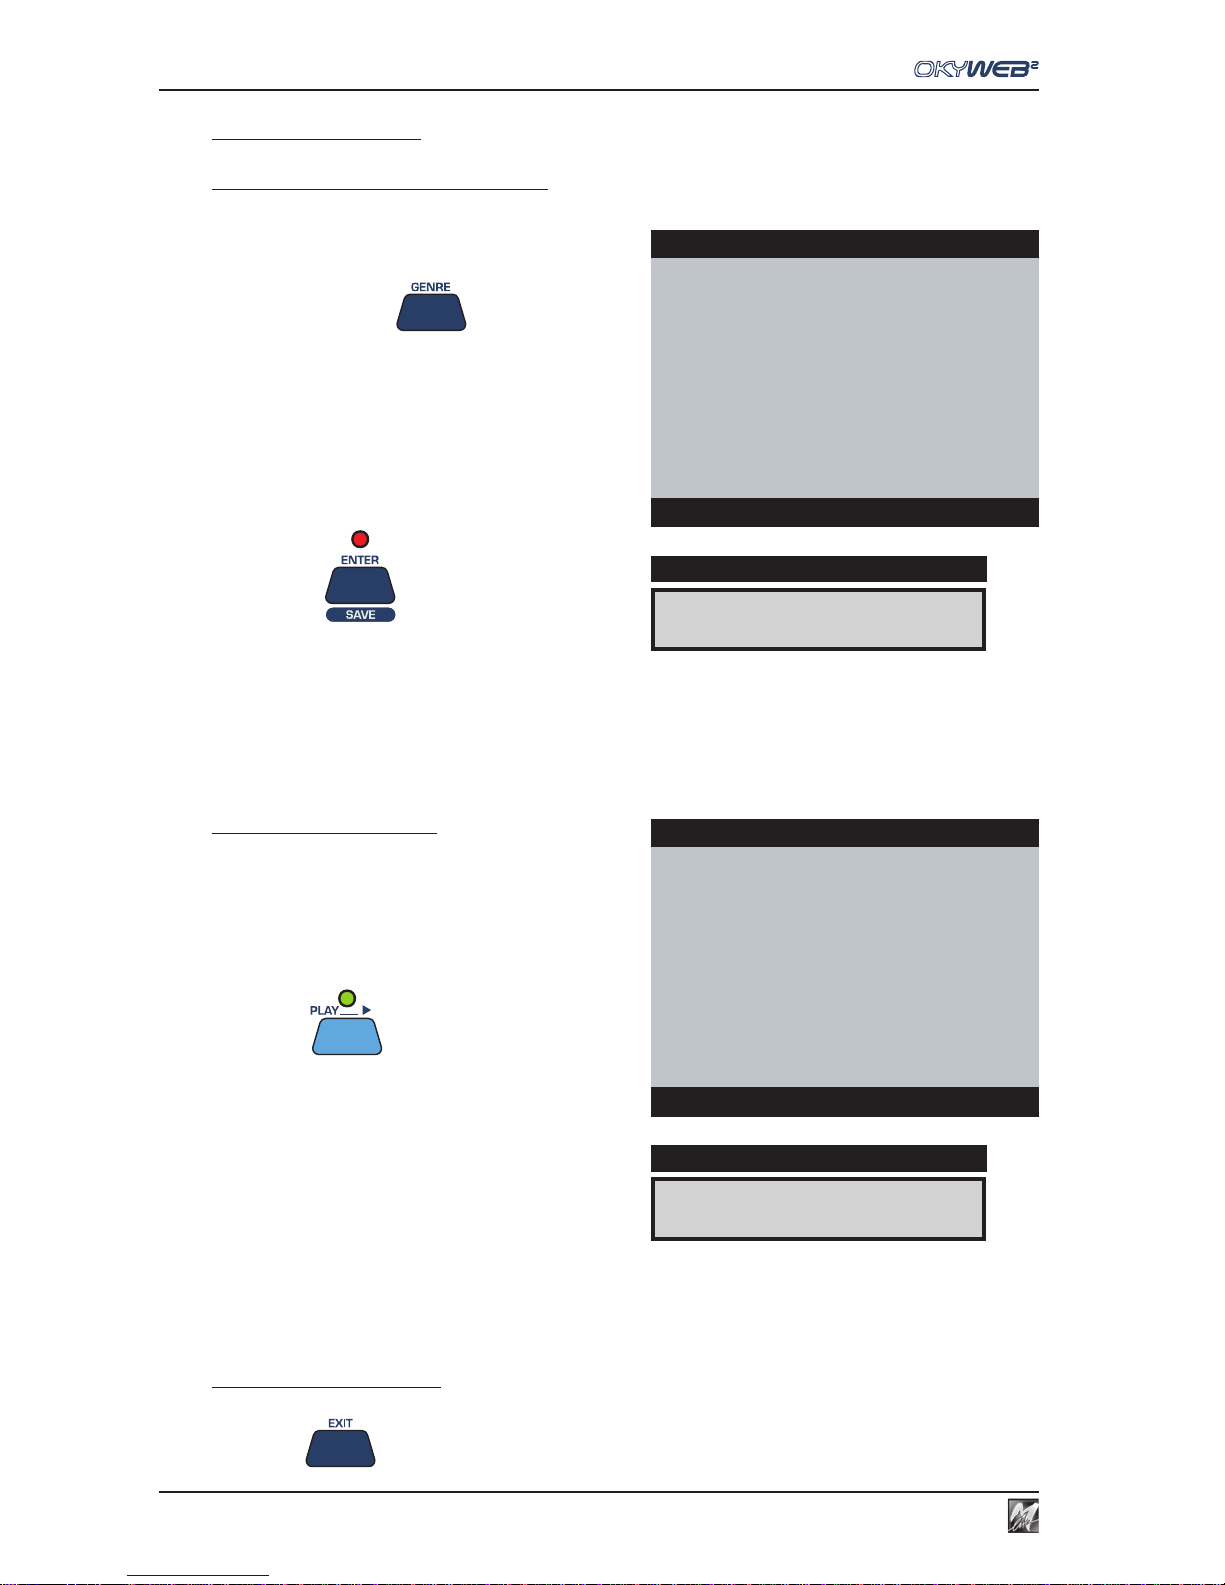
Search by Genre
To access the ‘Search by Genre’ page
The SHIFT LED must be OFF.
Press the GENRE key
The video screen will display the list of Genres
(categories, styles, ...) stored in the Compact Flash card.
Scroll the list with the UP and DOWN keys.
(SHIFT + UP/DOWN to move faster).
Position the arrow on the required Genre.
Press ENTER
The list of songs for the selected Genre will be shown.
To find the required song
Scroll the list with the UP and DOWN keys.
(SHIFT + UP/DOWN to move faster).
Position the arrow on the song title.
Press PLAY
To exit a Genre filter page
Press EXIT
MALE BALLAD
DISPLAY
OkyWeb2
BIG BAND
DANCE
EVERGREEN
FEMALE POP
GOSPEL
LATIN
ÆMALE BALLAD
MALE POP
Select Genre
ONE MORE NIGHT
DISPLAY
OkyWeb2
ALWAYS ON MY MIND
I WANT LOVE
ÆONE MORE NIGHT
ONLY THE LONELY
**end list**
filter:MALE BALLAD
Page 33
4.5
4
Searching Songs
Alphabetical Search
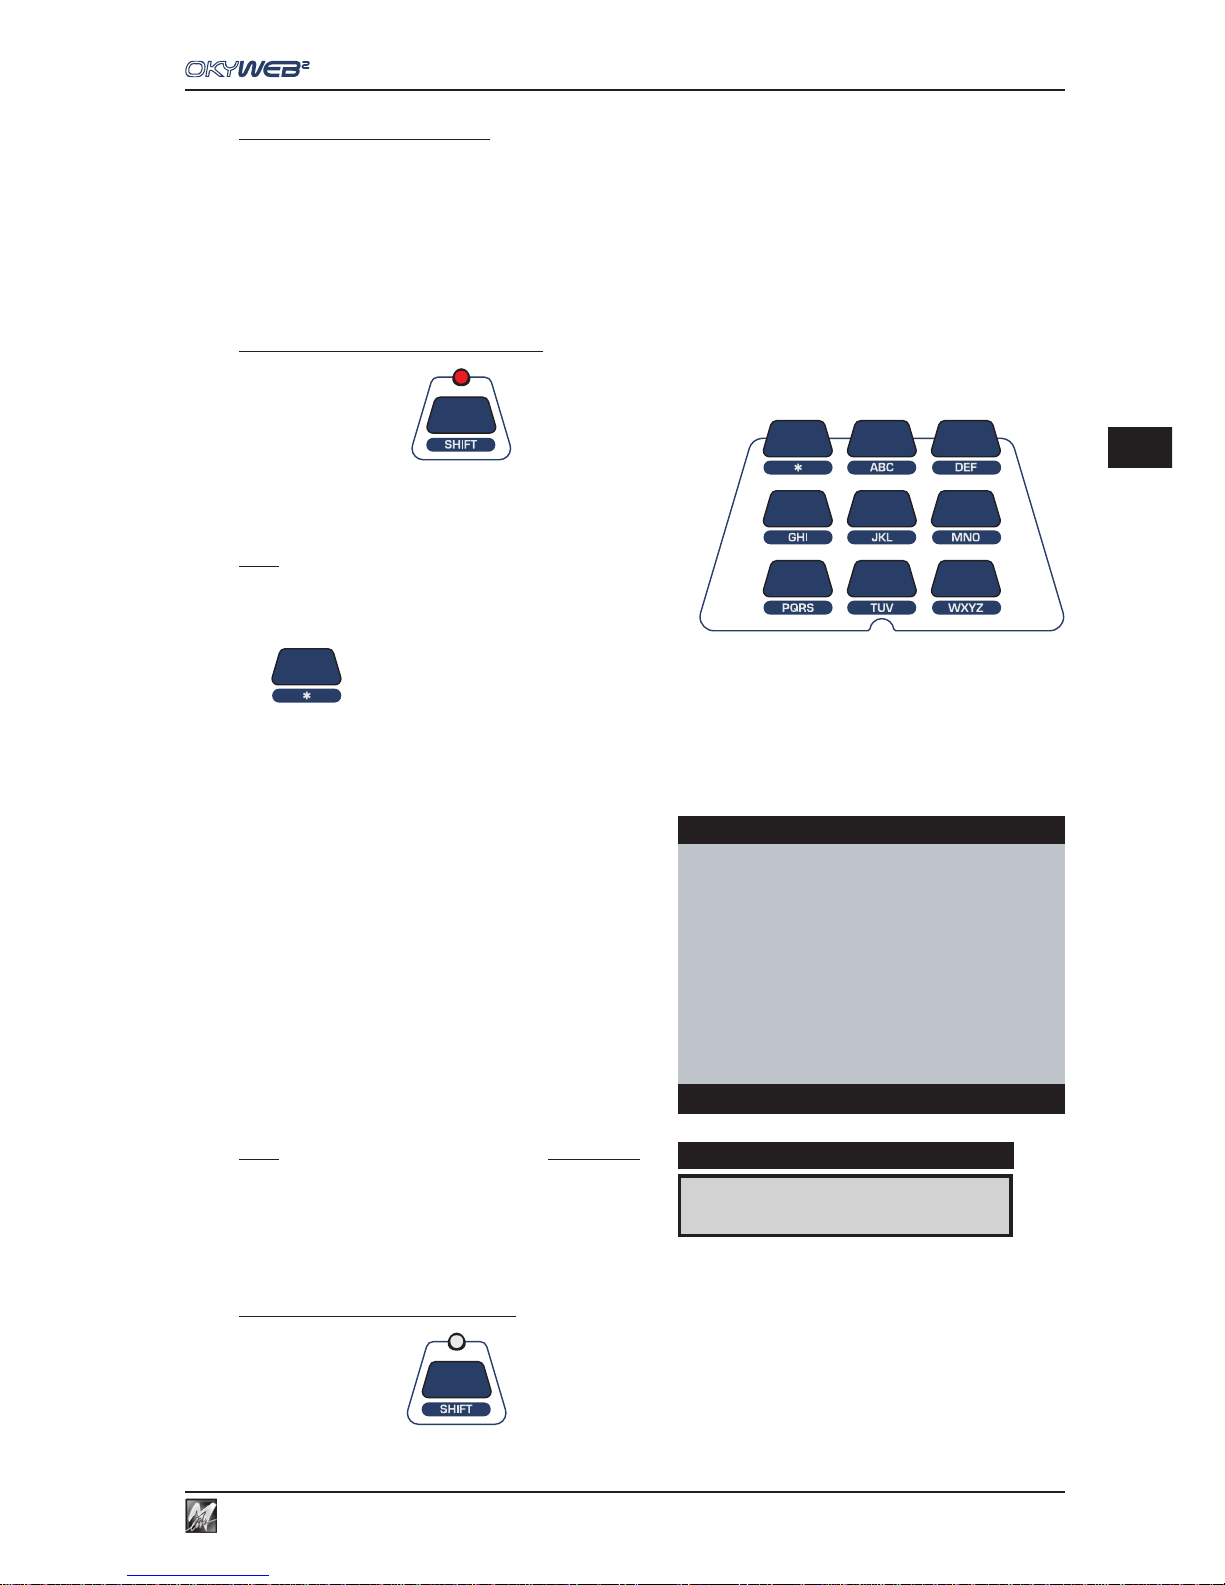
Scrolling a list of thousands of songs can be a tiresome task.
You can use the Alphabetical Search function to go straight to a required Title, Artist or Genre simply by typing in
the first letters of the Title, Artist’s name or Genre.
The Alphabetical Search can be enabled for each of the three lists: Title, Artist and Genre.
To enable the Alphabetical Search
Press the SHIFT key The red LED lights up.
The nine central keys on the upper panel are transformed into a
letter keypad, similar to a mobile phone keypad.
NOTE: press the key repeatedly to show all the letters on a key in sequence,
just like on a mobile phone. To input two letters on the same key one after the
other, wait a few seconds between the first and second letter.
The
key enters the following characters: <space> * + - . :
Type in the first letters of the Song Title, Artist or Genre
you’re looking for.
OkyWeb2 will display the Titles, Artists or Genres stored
that begin with the letter selected.
Add new letters to refine the search and proceed in this
way until you find what you’re looking for.
NOTE: the Alphabetical Search and the T9 Search are not enabled in
the specific Artist or Genre filter windows. The Alphabetical and T9
Searches, therefore, cannot be done in the ‘by Artist’ or ‘by Genre’
song lists.
To exit the Alphabetical Search
Press the SHIFT key The LED turns off.
SATISFACTION
DISPLAY
OkyWeb2
MY LIFE
ONE MORE NIGHT
ONLY THE LONELY
RED RED WINE
→SATISFACTION
SINGING IN THE RAIN
SWEET GEORGIA BROWN
THAT DON’T IMPRESS ME MU
Search:SA
Page 34
Searching Songs
4.6
T9 Search
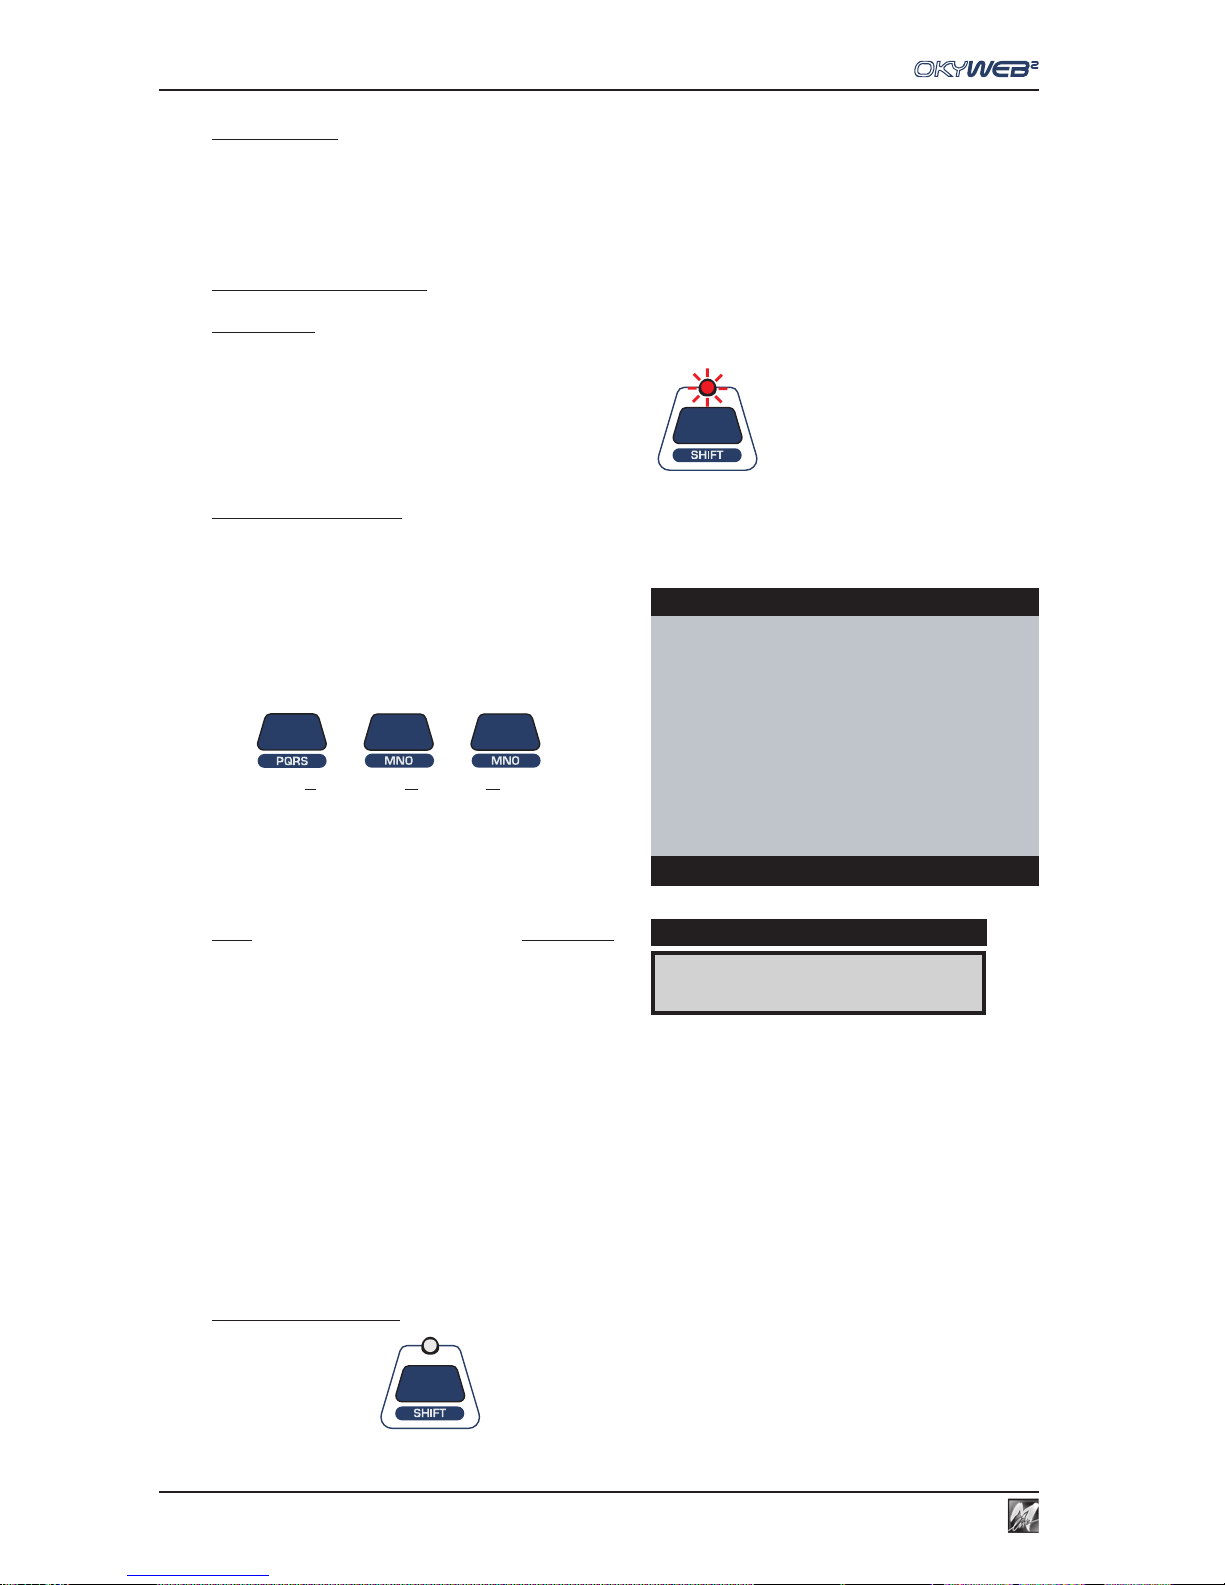
The T9 Search function is an additional Alphabetical Search method using a more intuitive algorithm to find a
song more quickly.
The T9 Search, like the other searches, can be enabled for each of the three lists: Title, Artist or Genre.
To enable the T9 Search
ATTENTION: the SHIFT LED must be off.
If the LED is lit (i.e. Alphabetical Search enabled) press the SHIFT key to switch it off.
Press and hold down the SHIFT key for a few seconds:
The red LED will flash
Key in the first letter of the Title, Artist or Genre required, pressing the corresponding key on the keypad
just once for each letter.
The T9 Search is the easiest and fastest search method on the OkyWeb2. Type in at least three or four letters
and the item you’re looking for will be found almost every time.
EXAMPLE: to type the word “SOM” press the following
keys once each in order:
PQRS MNO MNO
OkyWeb2 will make an intelligent search for all the Titles,
Artists or Genres containing the selected letters.
NOTE: the Alphabetical Search and the T9 Search are not enabled in
the specific Artist or Genre filter windows. The Alphabetical and T9
Searches, therefore, cannot be done in the ‘by Artist’ or ‘by Genre’
song lists.
To exit the T9 Search
Press the SHIFT key The LED turns off.
ROMANTIC LOVE
È
DISPLAY
OkyWeb2
ÆROMANTIC LOVE
SMOKE GET IN YOUR EYES
SNOW ON THE SAHARA
SOMEDAY
SOMEWHERE
SONG FOR GUY
Select Song
Page 35
5.1
5
Playlist
5 - Playlist
With OkyWeb2, looking for a song is extremely easy and fast even in a huge archive. Situations may arise,
however, when you have to perform your songs in quick succession without a pause, or when you simply prefer
to set the order beforehand without having to worry about searches so that you can concentrate on performing.
The OkyWeb2’s Playlist function meets all these needs.
With the Playlist function, you will be able to create up to 16 performance lists and store them permanently on a
Compact Flash card. When you select a Playlist and press Play the songs will be run in the set order without
having to stop and search for the next songs.
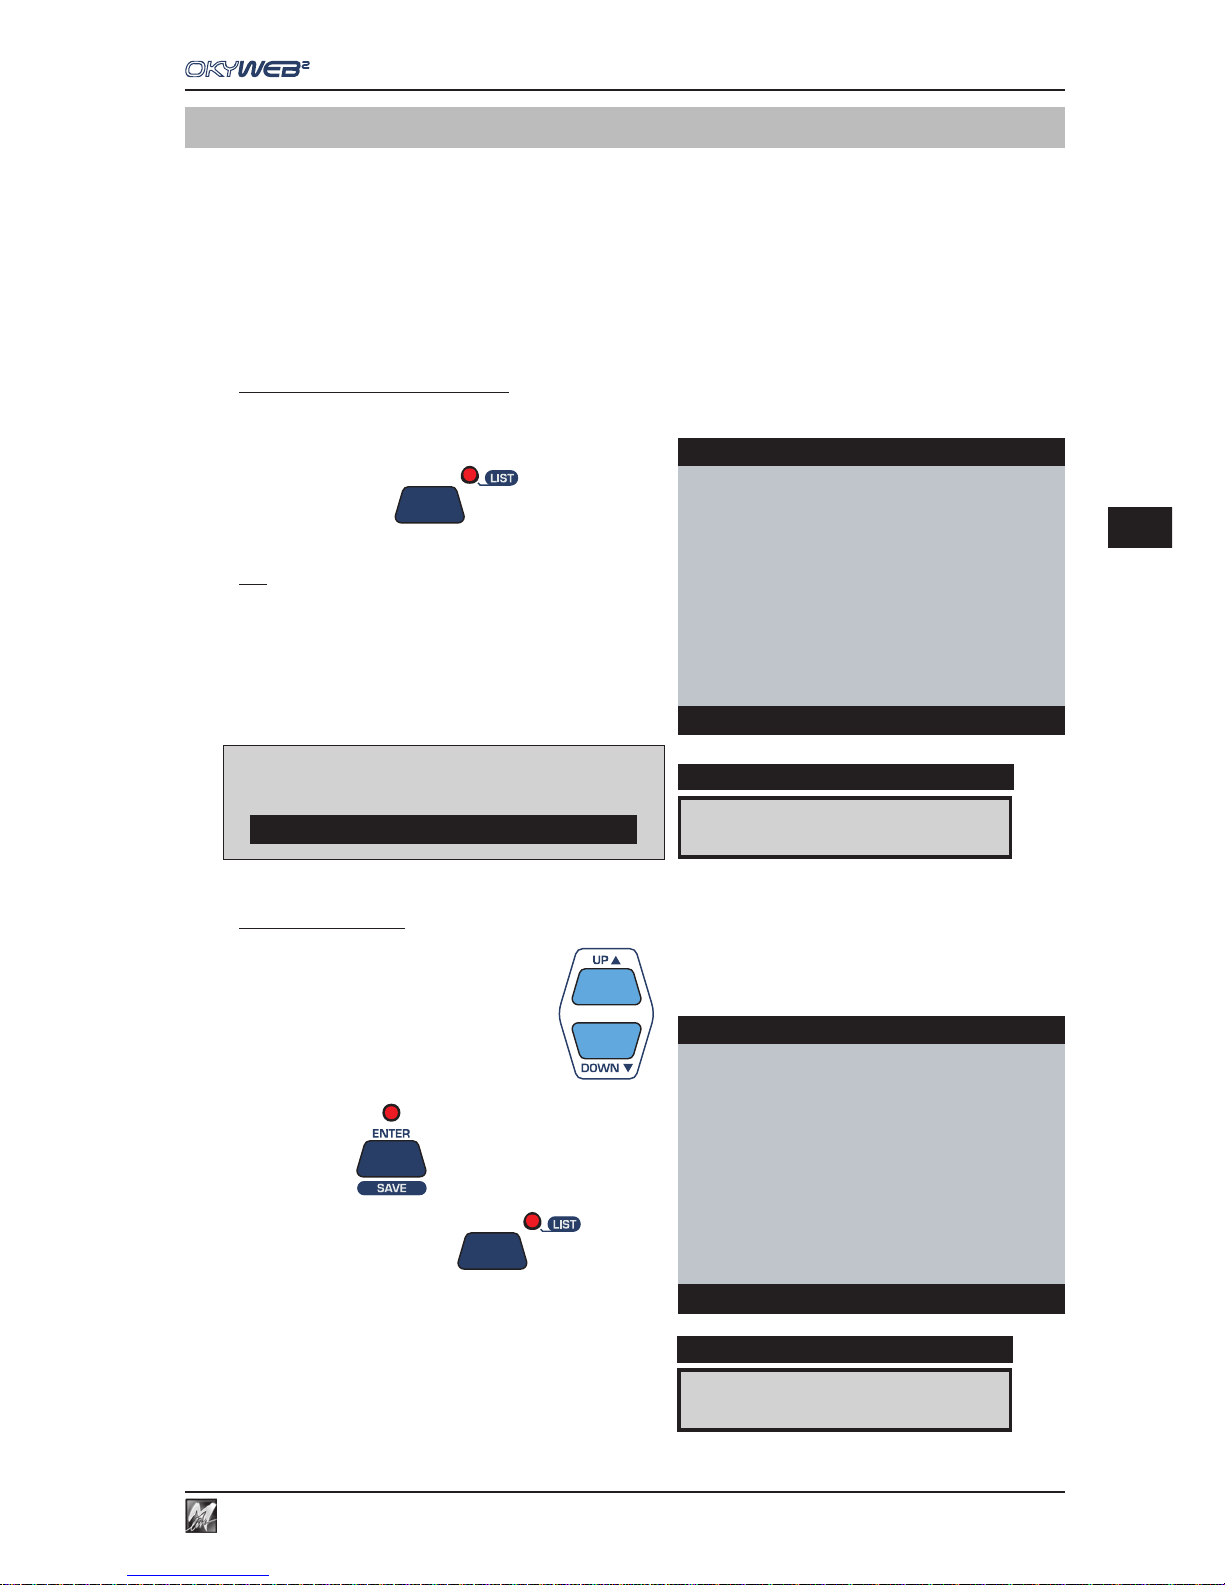
To enable the Playlist function
Press the LIST key
The Playlist selection window will appear.
N.B.: The Alphabetical and T9 Search functions are disabled while the
Playlist is being displayed.
To select a Playlist
Select a Playlist with UP and DOWN
Press ENTER
The LIST LED will light up
The page with the list of songs in the Playlist will appear.
CLUBs and PUBs
DISPLAY
OkyWeb2
EASY LISTENING
MEDLEY 60s-70s-80s
LATIN
→CLUBs and PUBs
DANCE
HIT
New Playlist 07
New Playlist 08
Select Playlist
Error: playlist not present
If there are no Playlists stored in the card
OkyWeb2 will display an alert message
I WANT LOVE
DISPLAY
OkyWeb2
→I WANT LOVE
FEVER
ONE MORE NIGHT
SATISFACTION
RED RED WINE
MY LIFE
**end list**
List:CLUBs and PUBs
Page 36
Playlist
5.2
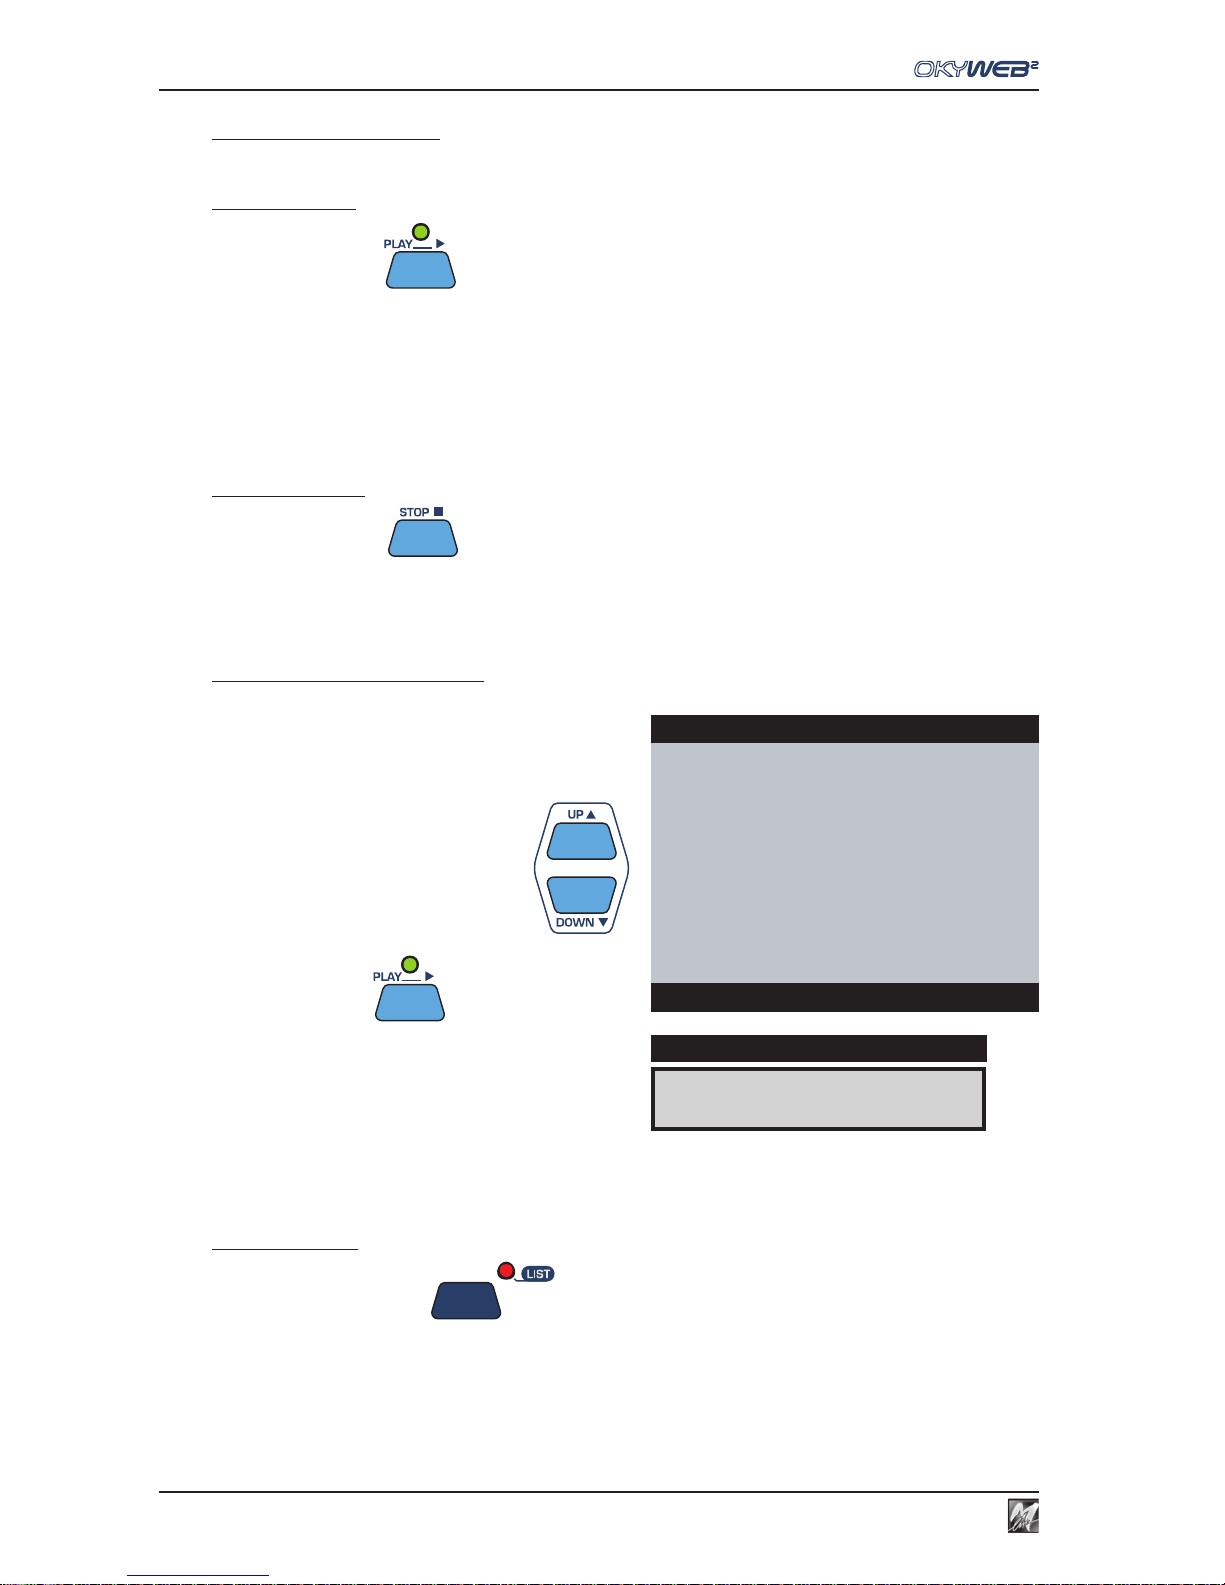
Running a Playlist
To run a Playlist
Press the PLAY key
You can choose whether you want the OkyWeb2 to run the Playlist without stopping or wait for a new Play
command to start each song.
Follow the path OPTIONS / GENERAL OPTIONS / PLAYLIST and set the required function:
AUTO Songs follow on automatically.
MANUAL The Playlist stops at the end of each song and waits for a Play command
before running the next song.
To stop a Playlist
Press the STOP key
To select a song in the Playlist
You can also scroll the Playlist normally, select the songs
in the list one by one or start the Playlist from any song.
Select a song with UP and DOWN
Press the PLAY key
To exit a Playlist
Press the LIST key TWICE
RED RED WINE
DISPLAY
OkyWeb2
I WANT LOVE
FEVER
ONE MORE NIGHT
SATISFACTION
→RED RED WINE
MY LIFE
**end list**
List:CLUBs and PUBs
Page 37
5.3
5
Playlist
Creating and Editing Playlists
When a Compact Flash card is formatted it is assigned 16 empty Playlists named ‘New playlist 01’...’New playlist 16’.
To create a new Playlist select one of these empty Playlists and edit it with the EDIT function options.
Each of the 16 Playlists in a Compact Flash card can contain up to 250 songs, as if to say 4000 songs for each card !
Even the most demanding repertory needs can be satisfied.
NOTE: all the Playlist procedures are much easier if you connect your OkyWeb2 to a PC and use the OkySoft2 software supplied with the unit.
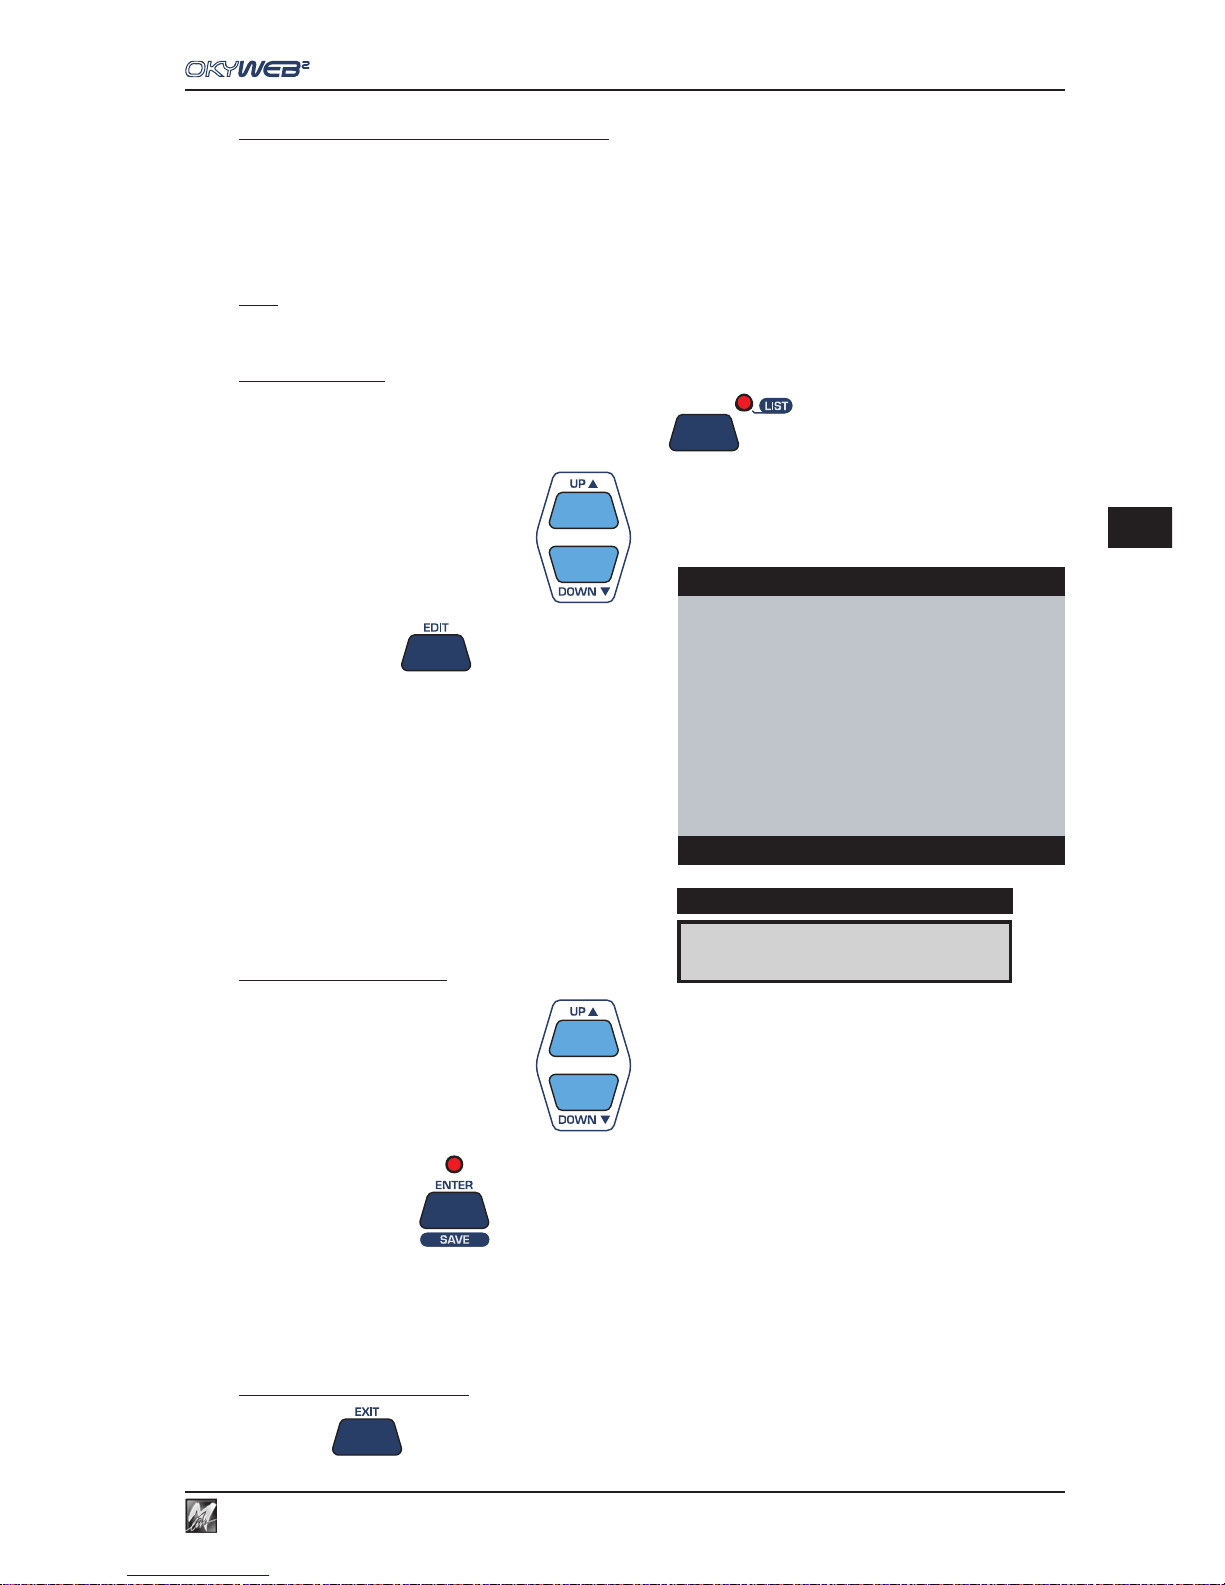
To edit a Playlist
Enable the Playlist function by pressing the LIST key
Select a Playlist with UP and DOWN
Press the EDIT key
The Edit Playlist window will appear with its options:
ADD SONG
DELETE SONG
RENAME PLAYLIST
DELETE PLAYLIST
To select an edit option
Select a Playlist with UP and DOWN
Press the ENTER key
To exit the Playlist editing
Press EXIT to exit the EDIT PLAYLIST function and go back to the LIST window.
ADD SONG
DISPLAY
LIST:CLUBs and PUBs
→ADD SONG
DELETE SONG
RENAME PLAYLIST
DELETE PLAYLIST
Select items
Page 38
Playlist
5.4
Add Song
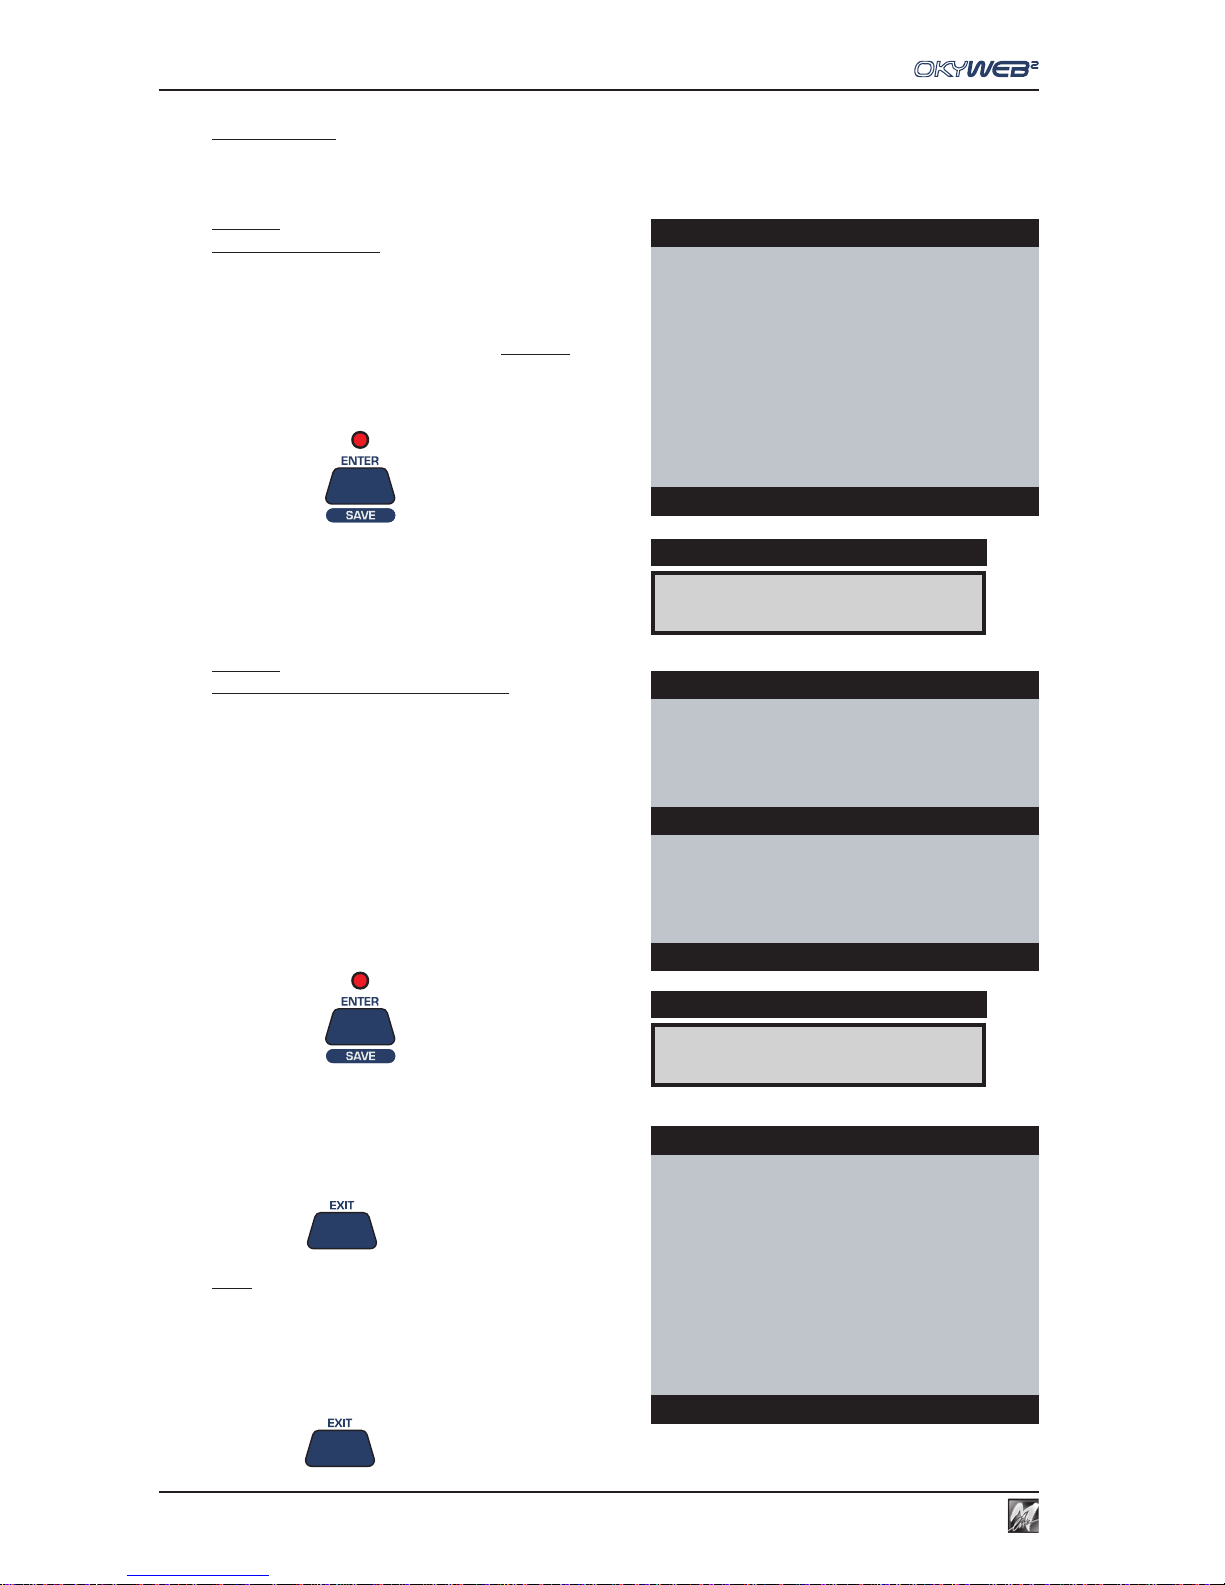
By selecting ADD SONG, one or more songs can be added to the Playlist.
Adding a new song to a Playlist is done in two stages: selecting the position and then entering the song.
PAGE 1
New song position
You can scroll the list with the UP and DOWN keys
and select where to enter the new song.
The new song will be entered in the list BEFORE the one
indicated with the arrow cursor.
To add a song to the end of the Playlist position the cursor
on **end list**.
Press ENTER
The “select and add song” page will appear
PAGE 2
Selecting and adding a new song
The video screen splits into two:
The top half shows the Playlists.
The bottom half shows the Song list. Here you can search
a song in the usual ways.
(See Ch. ‘Searching Songs’ for more information).
Select the song to be entered with the UP and DOWN
keys.
Press ENTER
The new song is added in the chosen position and then
PAGE 1 reappears, from where you can add more songs
to the Playlist.
Press Exit
to exit PAGE 2 without adding
any songs to the current Playlist.
NOTE: entered songs can be deleted from a Playlist with the “Delete
Song” function.
Press EXIT to exit the ADD SONG function.
SATISFACTION
DISPLAY
LIST:CLUBs and PUBs
I WANT LOVE
FEVER
ONE MORE NIGHT
→SATISFACTION
RED RED WINE
MY LIFE
**end list**
Add song: select position
LIST:CLUBs and PUBs
I WANT LOVE
FEVER
ONE MORE NIGHT
SATISFACTION
IT’S RAINING MEN
LIKE A VIRGIN
→MILLENIUM
MY GIRL
Add song: select song
MILLENIUM
DISPLAY
LIST:CLUBs and PUBs
I WANT LOVE
FEVER
ONE MORE NIGHT
→MILLENIUM
SATISFACTION
RED RED WINE
MY LIFE
**end list**
Add song: select position
Page 39
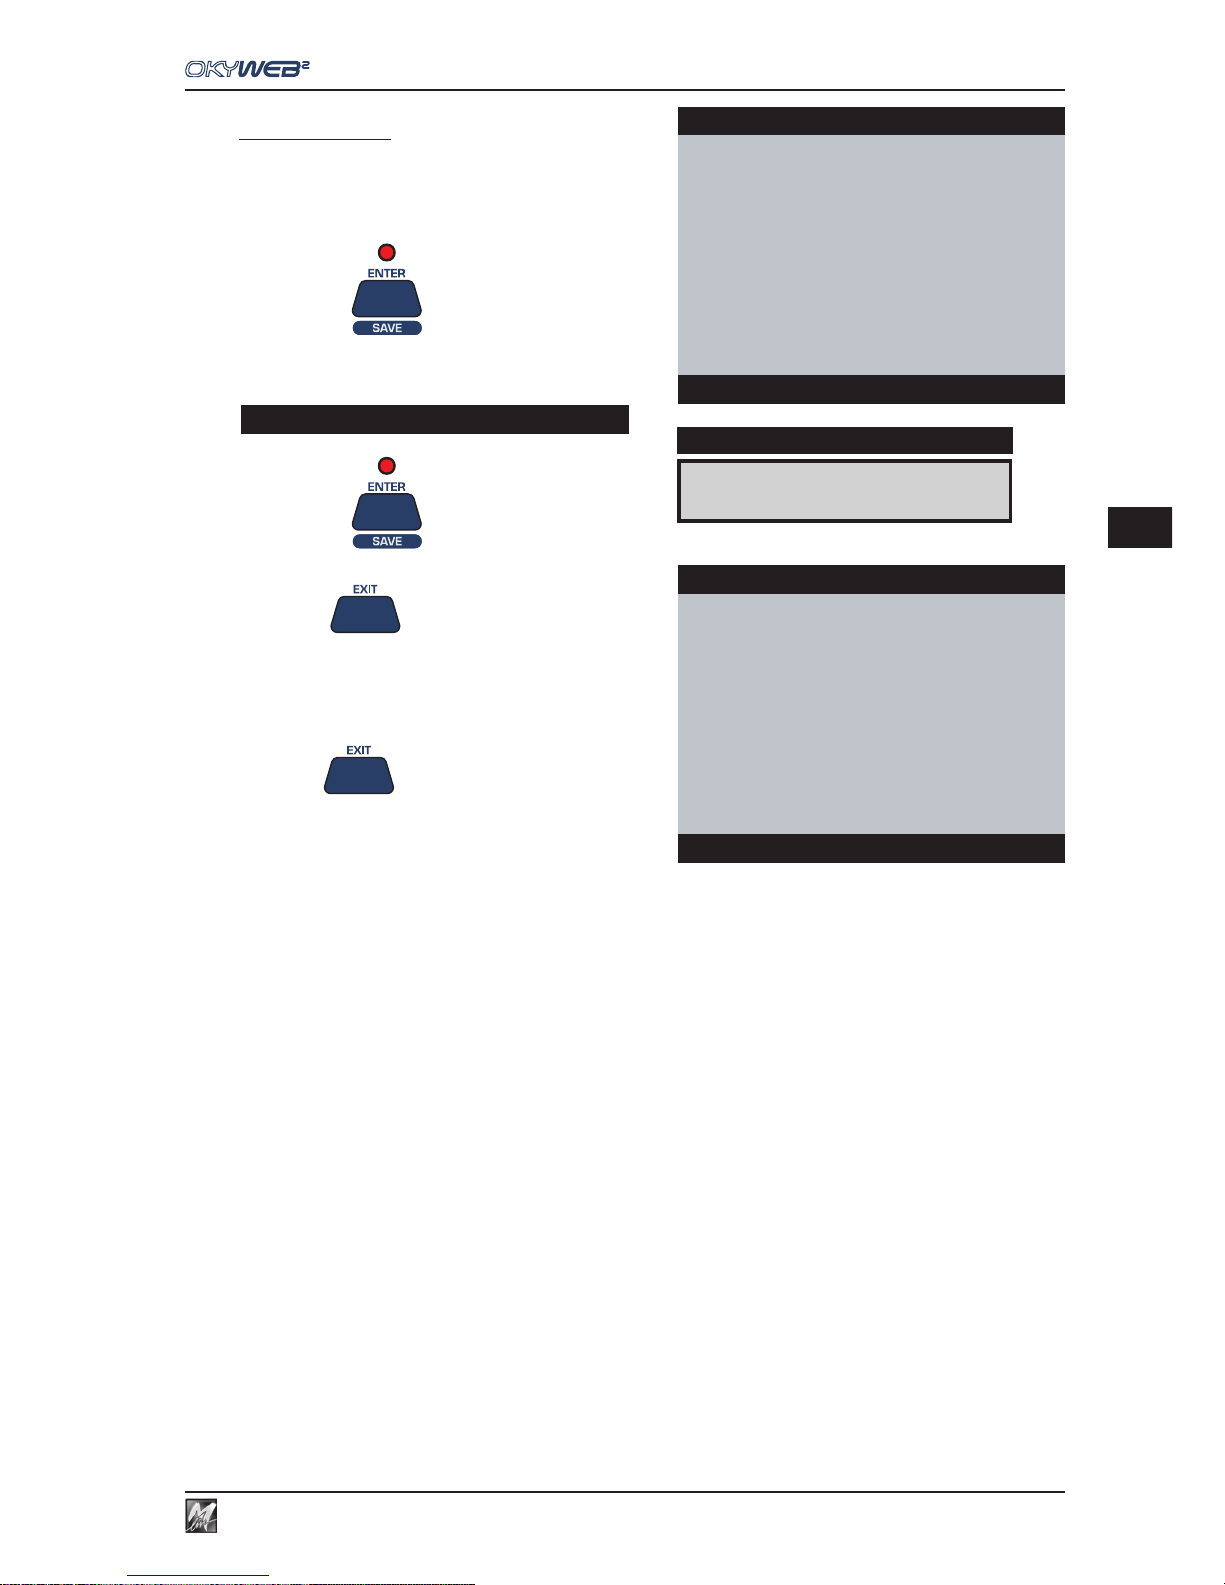
5.5
5
Playlist
Delete Song
By selecting DELETE SONG, one or more Songs can be
deleted from the Playlist.
Select a song with the UP and DOWN keys.
Press ENTER
An alert message will appear:
Press ENTER
to confirm the deletion.
or
Press EXIT to abort the deletion.
Press EXIT
to exit the DELETE SONG function.
FEVER
DISPLAY
LIST:CLUBs and PUBs
I WANT LOVE
→FEVER
ONE MORE NIGHT
MILLENIUM
SATISFACTION
RED RED WINE
MY LIFE
**end list**
Delete song
Press ENTER to erase
LIST:CLUBs and PUBs
I WANT LOVE
→ONE MORE NIGHT
MILLENIUM
SATISFACTION
RED RED WINE
MY LIFE
**end list**
Delete song
Page 40
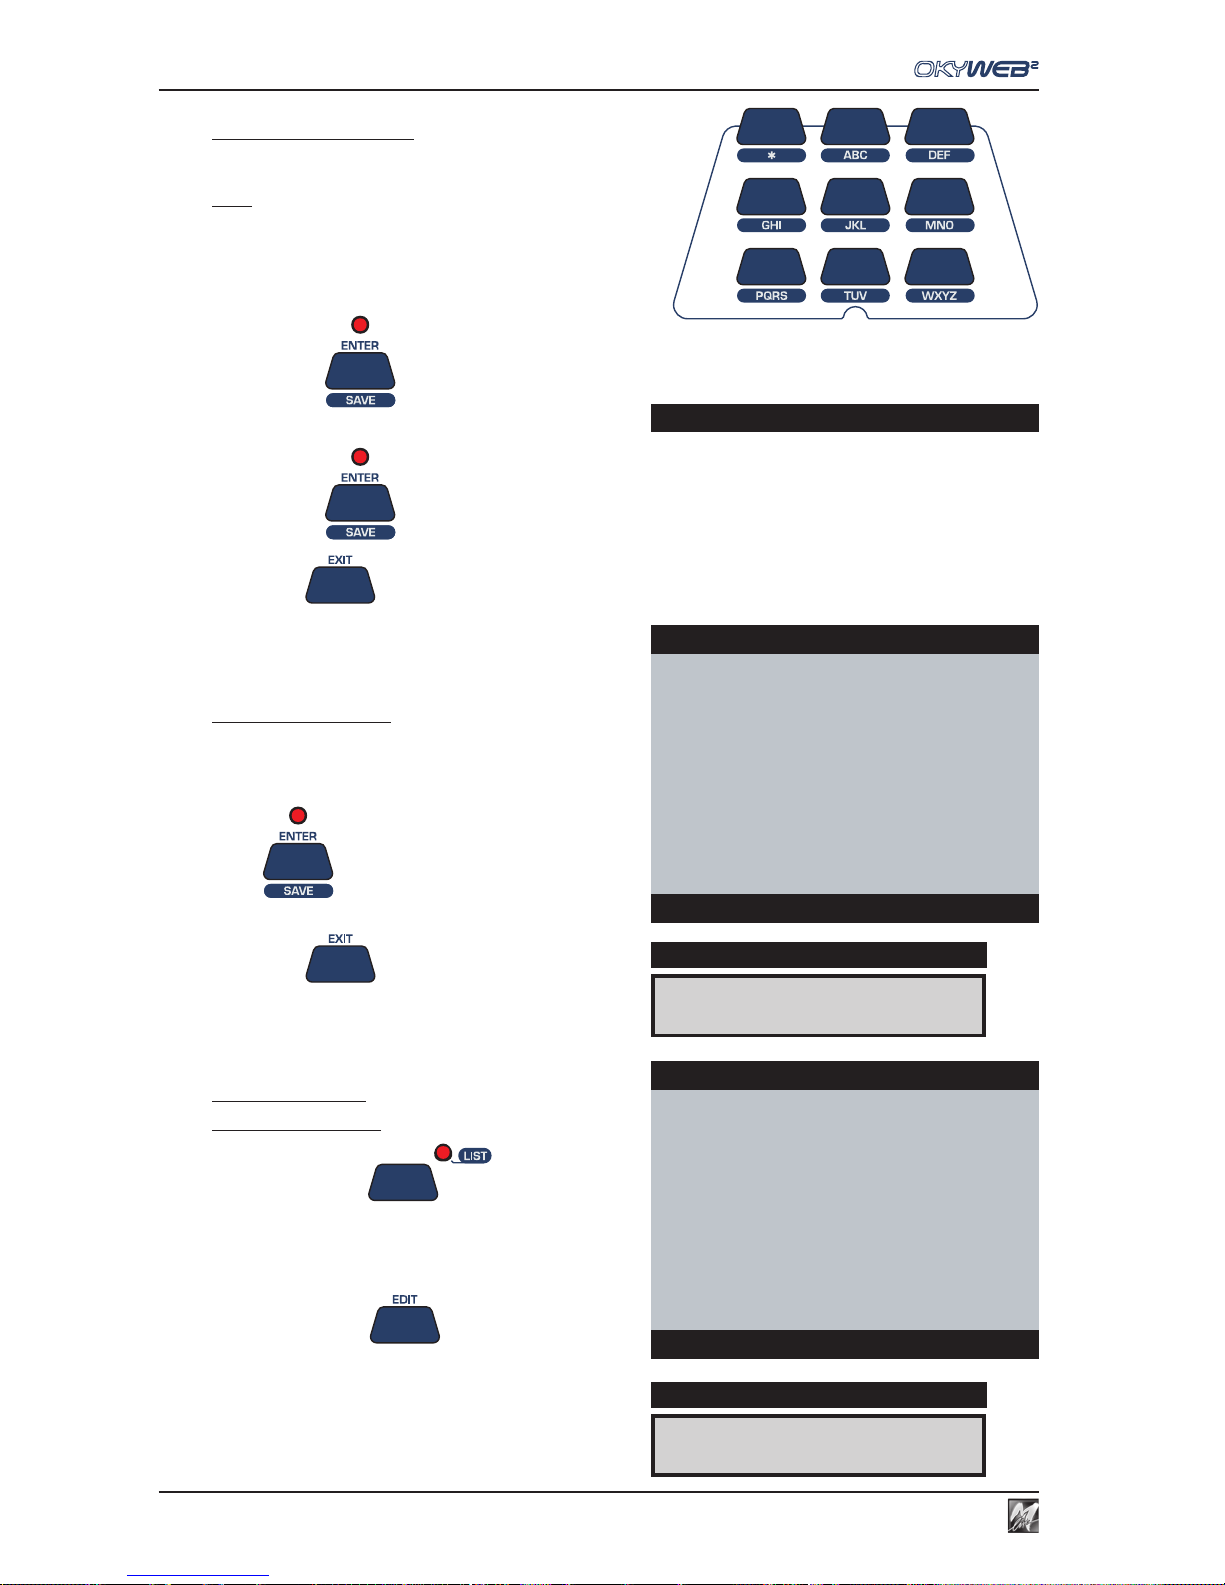
Playlist
5.6
Rename Playlist
By selecting RENAME PLAYLIST, the name of a Playlist can be
edited.
NOTE: the letter keypad is automatically enabled (SHIFT key LED lights up).
The keypad is similar to a mobile phone keypad. Press a key repeatedly to
show its letters in sequence. To input two letters on the same key one after the
other, wait a few seconds between the first and second letter.
Enter the new Playlist name.
Press ENTER
OkyWeb2 asks for the change to be confirmed.
Press ENTER
again to confirm the new Playlist name.
Press EXIT to exit the RENAME PLAYLIST function.
Delete Playlist
By selecting DELETE PLAYLIST, a Playlist can be
deleted.
An alert message appears asking for confirmation.
Press
ENTER to delete the Playlist
or
Press EXIT to abort the deletion.
New Playlist
To create a Playlist
Press the LIST key
Select one of the Playlists marked *New playlist x*
with the UP and DOWN keys
Press the EDIT key
In the EDIT window, use the functions:
RENAME PLAYLIST for giving a name to the new Playlist.
ADD SONG for entering songs in the new Playlist.
DELETE LIST
DISPLAY
OkyWeb2
Do you really want
to erase ‘CLUBs AND PUBs’
Press ENTER to confirm
Delete Playlist
New Playlist 07
DISPLAY
OkyWeb2
EASY LISTENING
MEDLEY 60s-70s-80s
LATIN
DISCO-BAR
DANCE
HIT
→New Playlist 07
New Playlist 08
Select Playlist
Press ENTER to confirm
Page 41
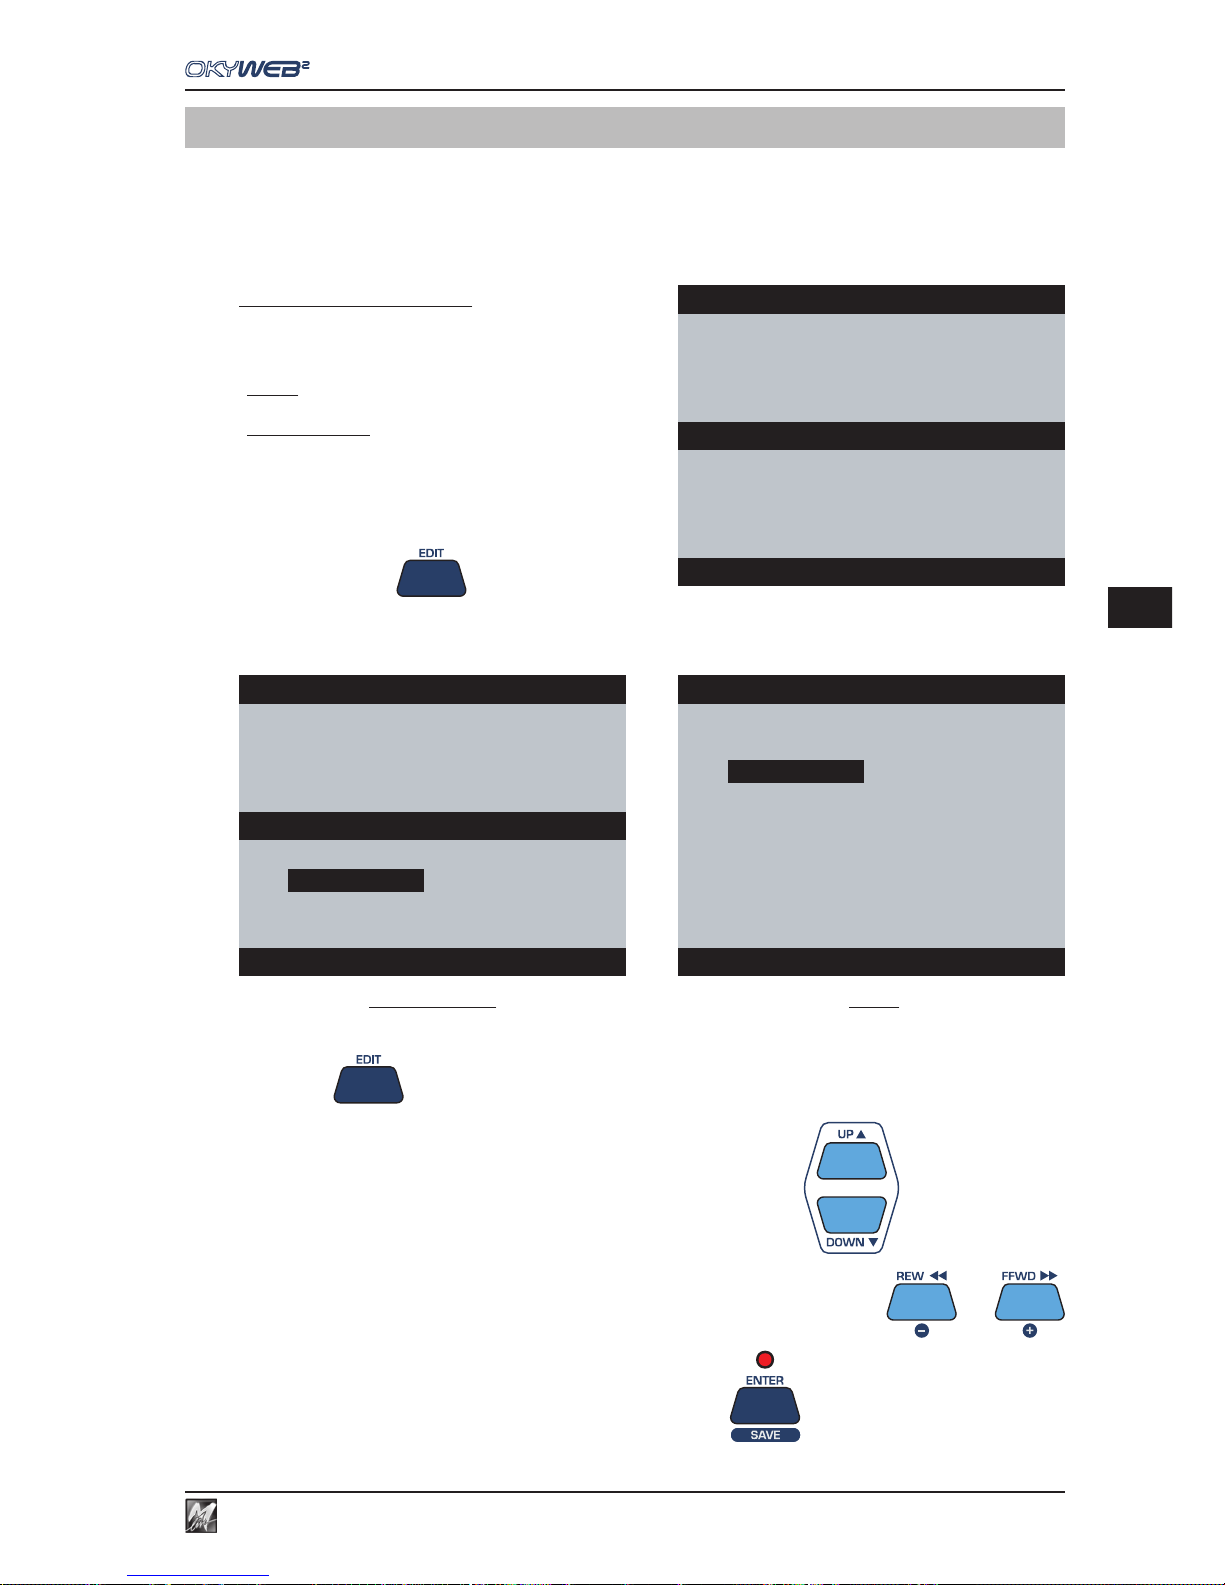
6.1
Editing
6
6 - Editing
The EDIT function allows to change the main parameters of the songs, adapting them to suit your needs.
You can change the instruments, transpose the tracks, raise or lower the levels, position the sounds in the stereo
image, adjust the effects and the dynamic response. In short, you can remix the entire arrangement of each song,
thus creating a truly custom archive.
How to edit a song
Select the Song to be changed.
Editing can be carried out no matter what playback mode
the song is in:
- in Stop: the song selected by the cursor is
edited.
- in Play or Pause: the song being played is edited, no
matter where the cursor is positioned.
Press the EDIT key
According to the playing conditions of the song, the Editing environment shows pages with or without the song’s
lyrics and shows a variable number of tracks.
Only the appearance changes: Editing procedure however remains unchanged.
Press EDIT
repeatedly to select the required parameter.
To move the cursor to the required track, use the UP and DOWN keys
To change the value of the parameter in the selected track, use the - and + keys
When one or more value is changed, the ENTER/SAVE key’s LED lights up, showing that the song has
undergone changes that have not yet been saved.
Feel-Robbie Williams
I JUST WANT TO FEEL
REAL LOVE IN THE HOME THAT
I LIVE IN
Bb F C
ÆFEEL
FEVER
HEYYA
I CAN’T STOP LOVING YOU
Select Song
Edit INSTRUMENT pag1/1
Feel-Robbie Williams
02
FingeredBs
14
SynStrings
03
¸¸
¸¸
¸
Clean Guit15 Bass+Lead
04
Vibraphone
16
Distort.Gt
07
SlowString
10
StndDrums1
11
GrandPiano
12
Overdr. Gt
13 Whistle
03 Clean Guitar PLAY
STOP
“16 editable Tracks” per page
Feel-Robbie Williams
I JUST WANT TO FEEL
REAL LOVE IN THE HOME THAT
I LIVE IN
Edit INSTRUMENT pag1/2
02
FingeredBs
10
StndDrums1
03
¸¸
¸¸
¸
Clean Guit
11
GrandPiano
04
Vibraphone
12
Overdr. Gt
07
SlowString 13 Whistle
03 Clean Guitar PLAY
PLAY / PAUSE
“Song’s lyrics + 8 editable Tracks” per page
Page 42

Editing
6.2
Edit
¸¸
¸¸
¸
VOLUME pag1/2
02
127
10
120
03
123
11
125
04
127
12
96
07
120 13 85
MODIFY ALL TRACKS
n
The elements of the EDIT environment
n
Parameter selected for changing
Shows the parameter currently undergoing changes.
Editable parameters are Volume, Instrument, Reverb,
Chorus, Transpose, Velocity, Pan.
VOLUME Volume of the track (MIDI Control Change 7)
0...127
INSTRUMENT Instrument or sound of the track (MIDI Bank Change + Program Change)
Allows to choose the instrument assigned to the track.
The instruments are grouped into Families (Pianos, Guitars, Strings, etc.).
The Families can be selected using the combination Shift (LED lit) plus - and + keys
N.B.: For a complete list of instruments available, check this manual’s Appendix.
REVERB Amount of Reverb applied to the sound (MIDI Control Change 91)
0...127
CHORUS Amount of Chorus applied to the sound (MIDI Control Change 93)
0...127
TRANSPOSE Semitones of transposition of the track
-36...+36
Changes can be carried out in steps of ±1 semitone
or ± 1 octave (12 semitones) (combination Shift (LED lit) plus - and + keys).
VELOCITY Control of the track’s dynamics
- No change.
-3dB Dynamics attenuated by 3dB.
COMP Compression Effect.
PUSH Dynamic “push”.
+3dB Dynamics boosted by 3dB.
+6dB Dynamics boosted by 6dB.
MAX Dynamics at maximum.
PAN Position of the sound in the stereo image (MIDI Control Change 10)
-64 Sound all on the left.
0 Sound centred.
+63 Sound all on the right.
Intermediate values correspond to intermediate positions.
For the VOLUME, PAN, REVERB and CHORUS parameters, the editing is relative, as if to say the editing will
respect any settings that have already been made in the track.
This means that if a change is made to a certain parameter all the values of that parameter in the track will be
changed to the same degree.
For example, if a track has a Volume setting of 80 at the start of the song and 100 in the second part, entering a
value of +10 will take the settings to 90 and 110 respectively.
Press EDIT
repeatedly to select the required parameter.
Page 43
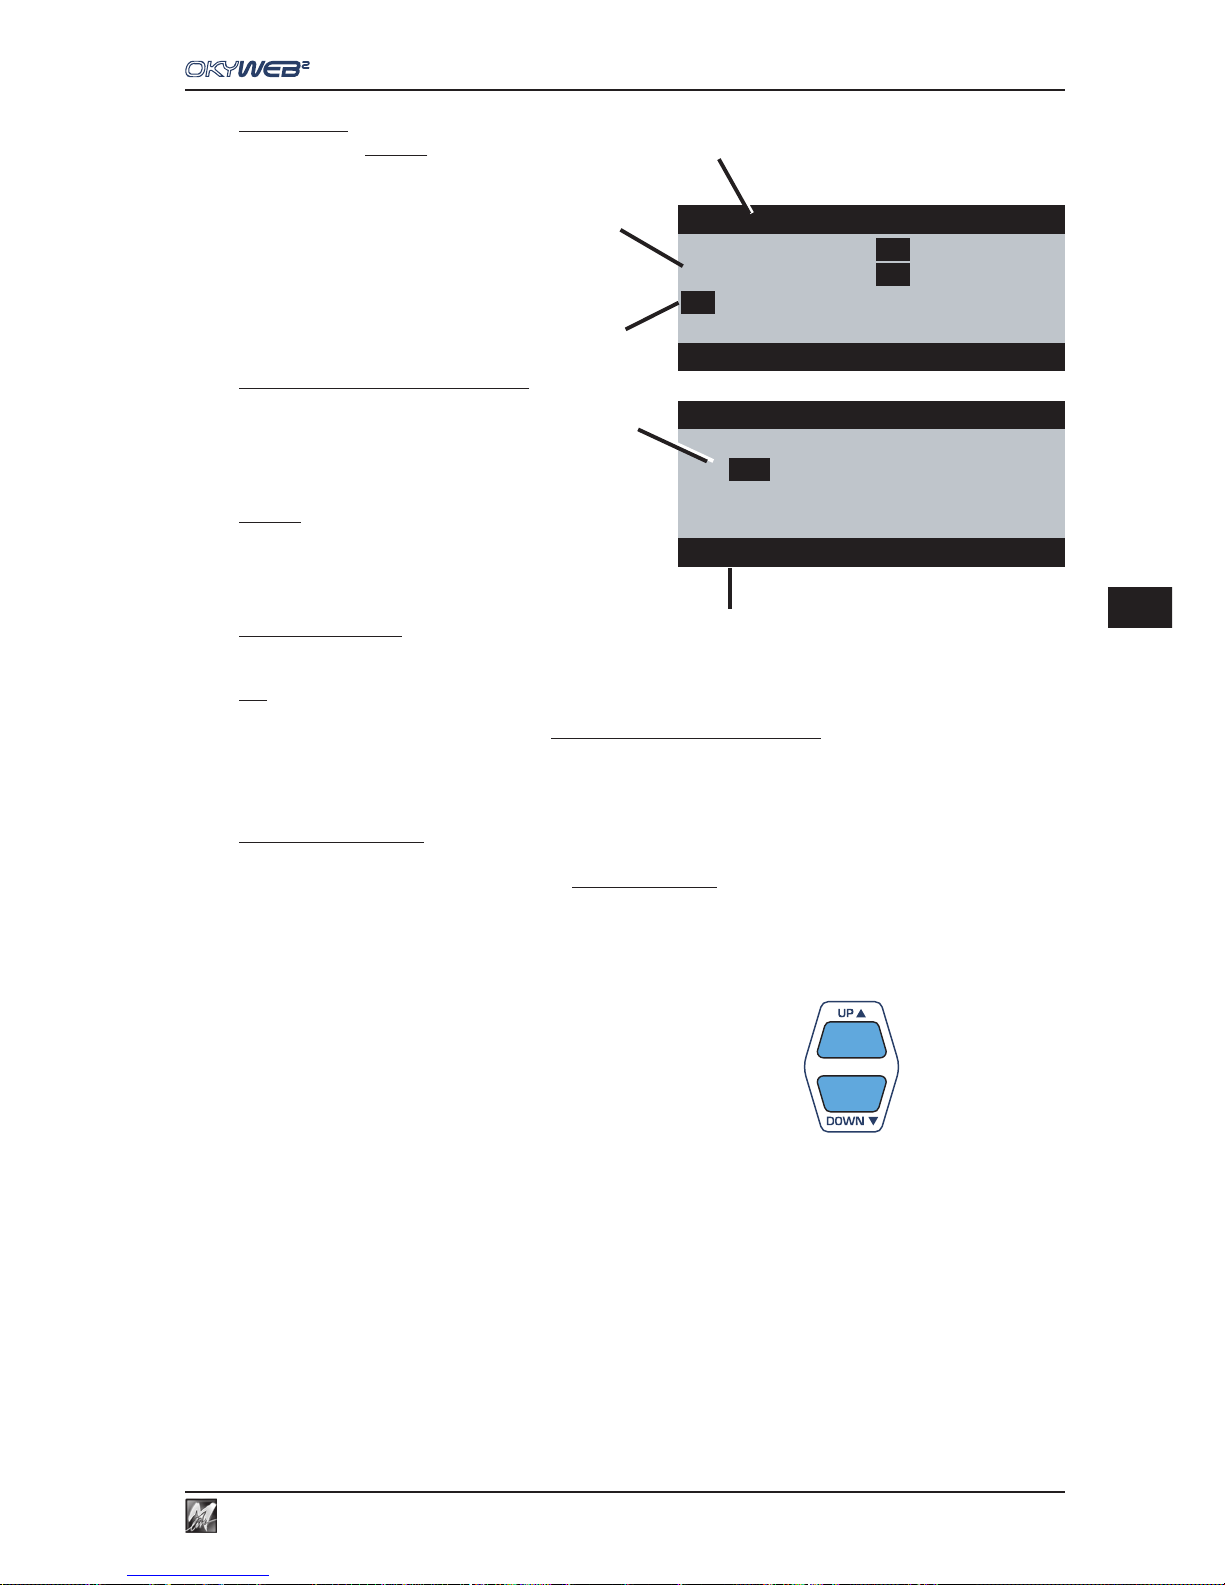
6.3
Editing
6
o
Tracks used
Only the tracks actually used by the song
(i.e. the tracks containing MIDI Notes)
are displayed (in progressive order).
In other words, the tracks that are not used,
or are used for other purposes (e.g. song
lyrics) are not shown, as they don’t require
Editing.
For example: a song that only contains piano
accompaniment + melody will only show two
tracks.
p
Indicators of Notes being played
Every time MIDI notes are played, the number
of the track that contains them is highlighted for
a few moments with a dark frame, facilitating
identification.
¸
Cursor
The cursor allows to select the tracks to edit.
According to its position, the cursor enables two
different Editing modes:
q
“All Tracks” mode
In All Tracks mode, changes made to the
selected parameter affect all the tracks of the song.
N.B.: this obviously is not the case with the Instrument parameter, which, as it establishes the sounds of the individual tracks, is not
accessible in this mode.
To enable All Tracks mode, just move the cursor to the name of the parameter:
- the name of the parameter changes colour;
- the information area
s
indicates “MODIFY ALL TRACKS”.
r
“Single Track” mode
In Single Track mode, the changes to the selected parameter only affect the selected track.
To enable Single Track mode, just move the cursor on to a track:
- the value of the parameter in the selected track is highlighted with a dark square.
- The information area
s
shows “Number of the Track” + “Name of the Instrument”.
To move the cursor to the required track, use the UP and DOWN keys
- To move the cursor from All Tracks mode to Single Track mode, press the DOWN key.
- To move the cursor from Single Track mode to All Tracks mode, position the cursor on the first track and
press the UP key. (With the Instrument parameter, All Tracks mode is not accessible).
- To move the cursor to a track with a higher (or lower) number than that contained in the current page,
proceed normally with the UP and DOWN keys: pages are scrolled automatically.
q
Edit
¸¸
¸¸
¸
VOLUME pag1/2
02
127
10
120
03
123
11
125
04
127
12
96
07
120 13 85
MODIFY ALL TRACKS
o
p
s
Edit VOLUME pag1/2
02
127
10
120
03
¸¸
¸¸
¸
123
11
125
04
127
12
96
07
120 13 85
03 Clean Guitar PLAY
r
Page 44
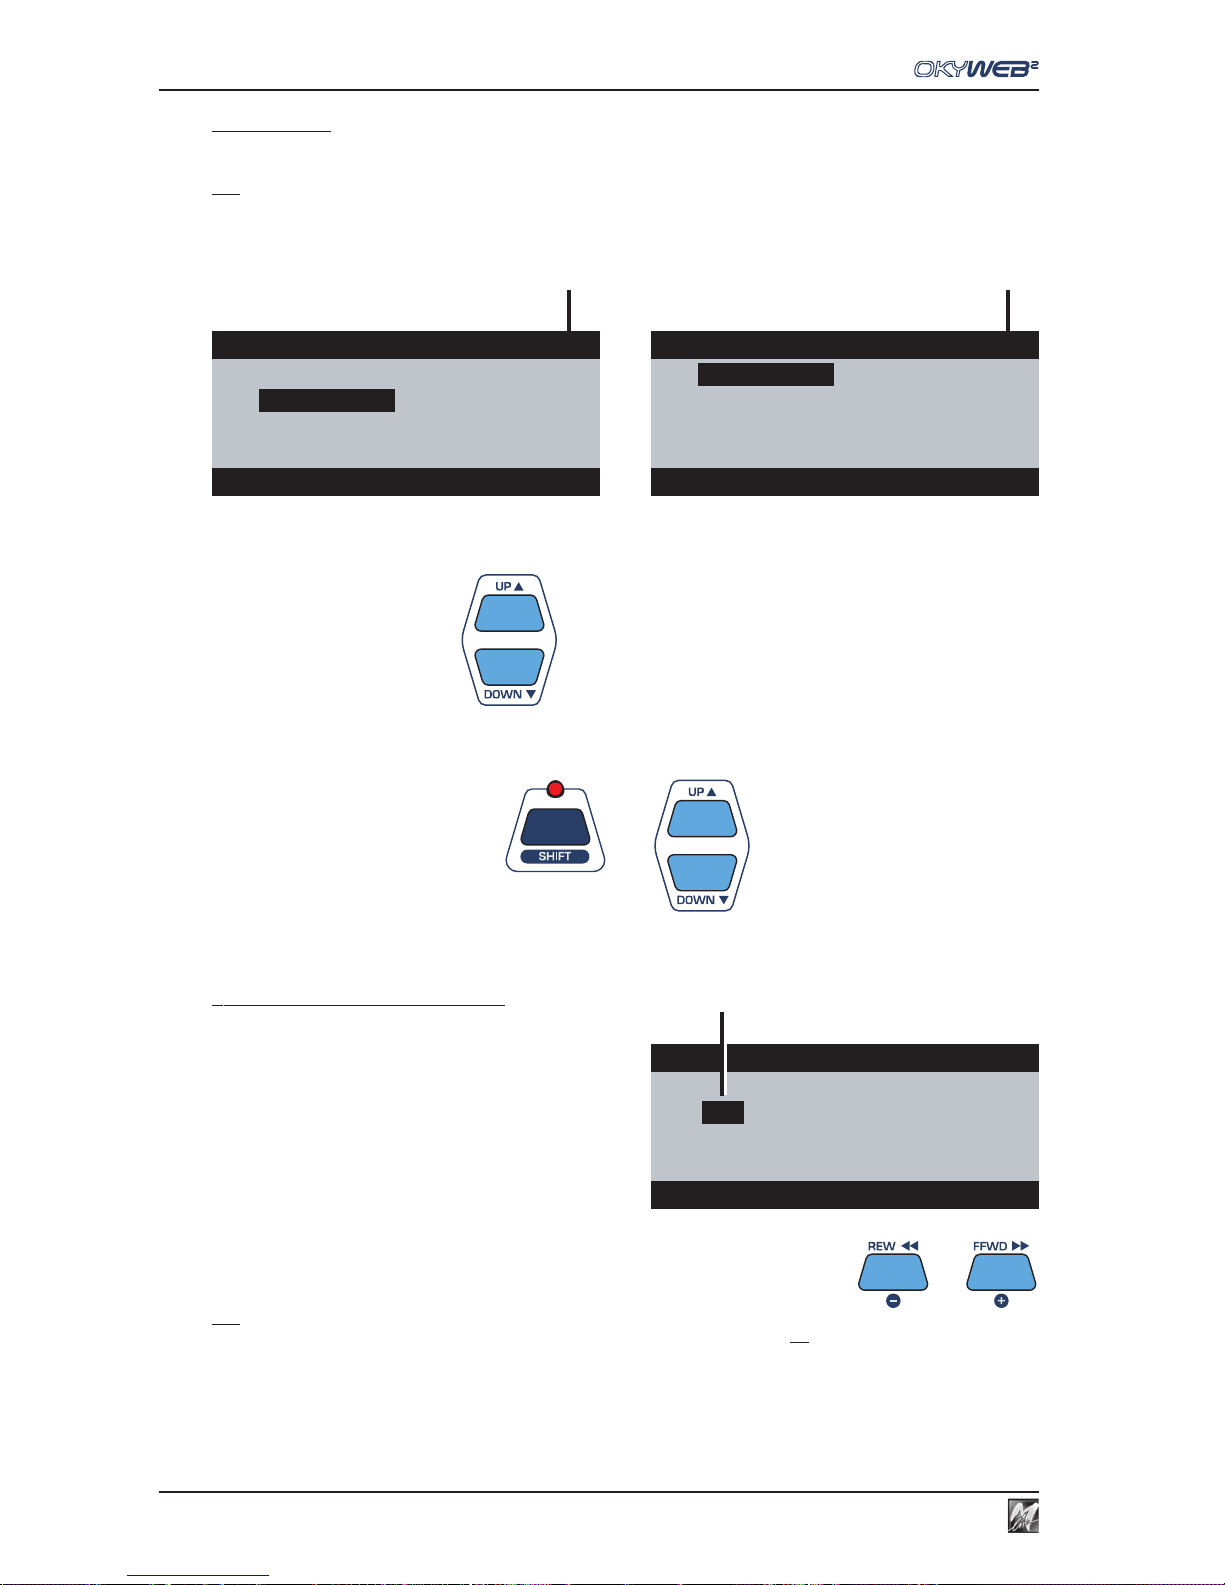
Editing
6.4
t
Page counter
Indicates the number of the current EDITING page and the overall number of pages used to contain all the tracks
of the song being edited.
N.B.: remember that OkyWeb2 is able to handle songs with 32 tracks and that each Editing page can contain up to 8 tracks (in Play/Pause)
or up to 16 tracks (in Stop). Therefore, according to the display mode and the number of tracks actually being used by the song, the number
of pages used can vary from a minimum of 1 to a maximum of 4.
To move the cursor to tracks contained in other pages, use the UP and DOWN keys:
pages are scrolled automatically.
To move the cursor one page at a time
use the combination SHIFT (LED lit)
+
UP and DOWN keys.
u
Values of the selected parameter
To the right of each track, the respective value of the
selected parameter is shown.
In the example: Selected parameter = Volume
Volume of track 02 = 127
Volume of track 03 = 123
..
Volume of track 13 = 85
If “MM” appears, this indicates the Melody Track with the
MELODY MUTE function enabled.
To change the value of the parameter in the selected track, use the - and + keys
N.B.: changes in ALL TRACKS mode (cursor on the name of the parameter) are very useful, but should be carried out after careful
consideration: in fact, what is changed is the “absolute value” of the parameter for each track, not the “proportional value” between the
tracks. In other words, the differences between the tracks are only kept until the limits of 0 or 127 are reached.
For example: 1) change the Volume parameter until it reaches the maximum value (127) in all the tracks;
2) now reduce the value: all the previous differences of volume will have been cancelled: all the tracks will have the same volume.
Edit INSTRUMENT pag1/2
02
FingeredBs
10
StndDrums1
03
¸¸
¸¸
¸
Clean Guit
11
GrandPiano
04
Vibraphone
12
Overdr. Gt
07
SlowString 13 Whistle
03 Clean Guitar PLAY
t
Edit INSTRUMENT pag2/2
14
¸¸
¸¸
¸
SynStrings
1
5 Bass+Lead
16
Distort.Gt
14 Synth Strings1 PLAY
t
Edit VOLUME pag1/2
02
127
10
120
03
¸¸
¸¸
¸
123
11
125
04
MM
12
96
07
120 13 85
03 Clean Guitar PLAY
u
Page 45
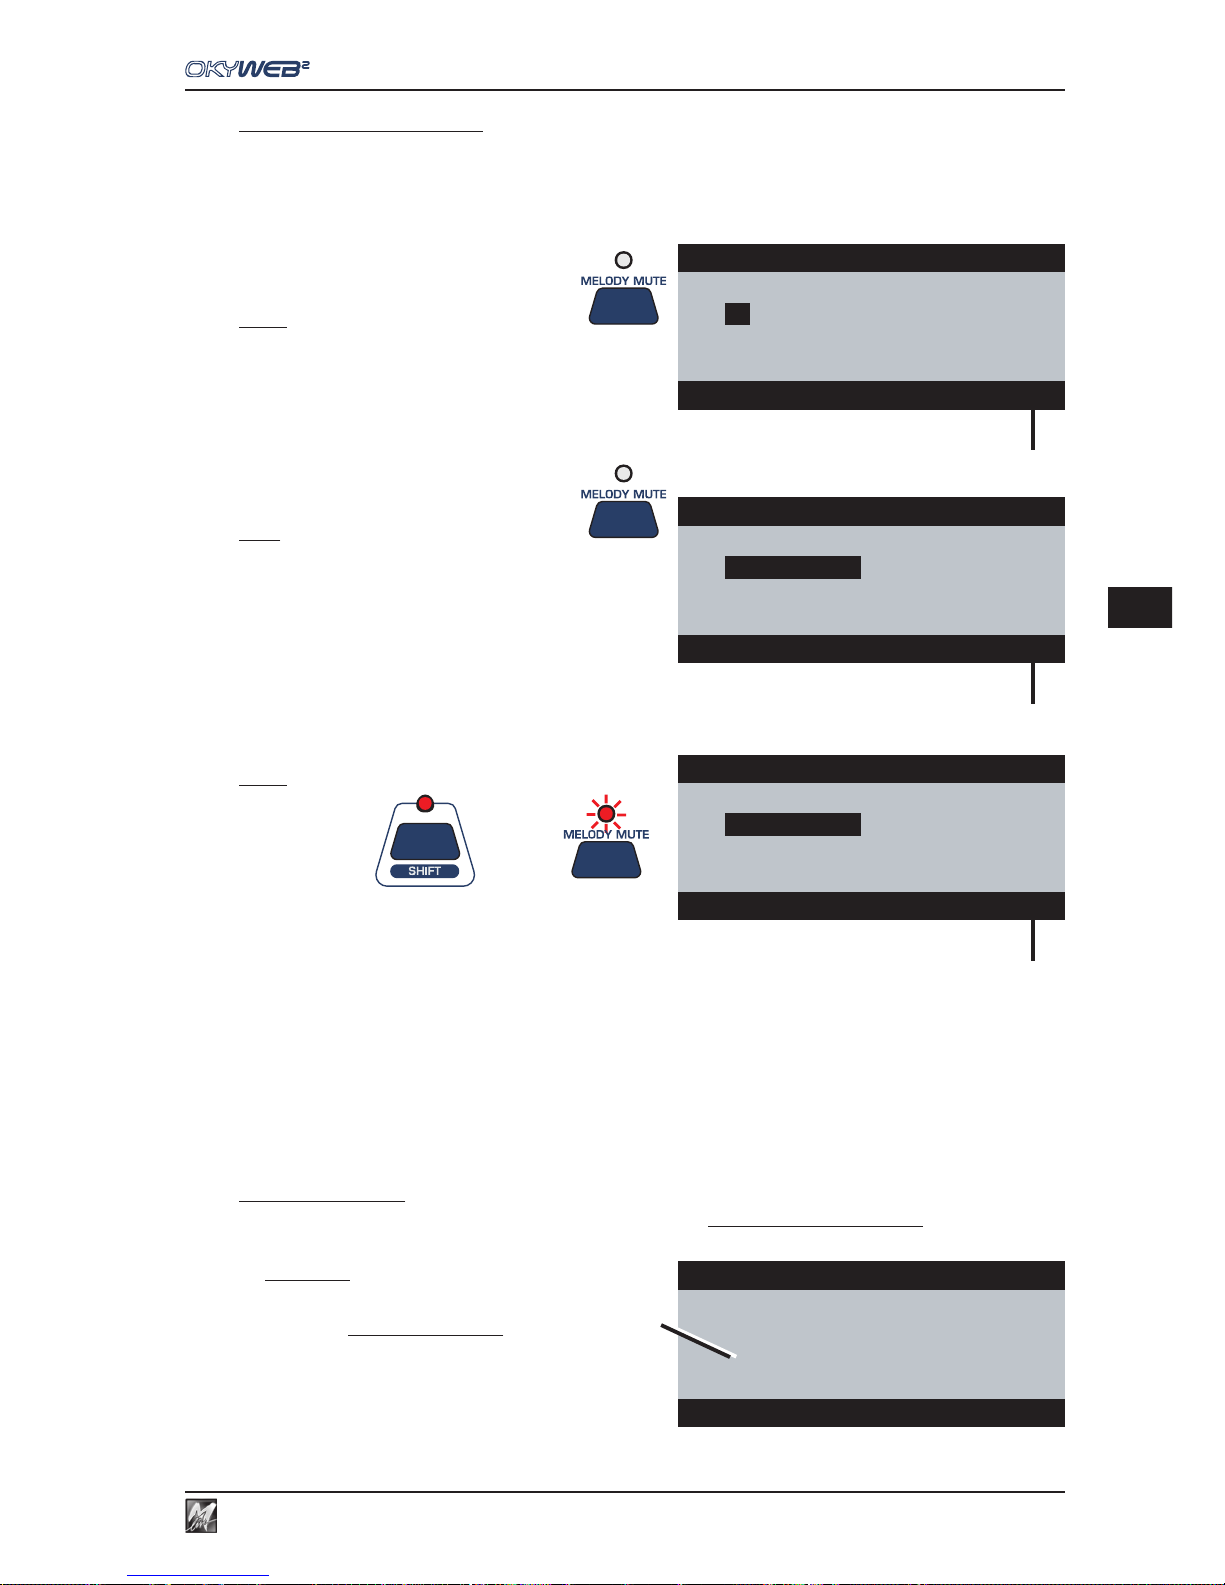
6.5
Editing
6
v
Status of the selected track
This Status indicates the operating condition of each track, and can be set as:
- PLAY = enabled track - MUTE = disabled track - SOLO = only active track
A track’s status is changed by means of the MELODY MUTE key, which in the EDIT environment assumes new
functions:
MUTE: pressing the Melody Mute key
on a track with Status = PLAY
- the tracks is set in Status = MUTE;
- all the values of all the parameters of the track in
MUTE are replaced with an asterisk.
PLAY: pressing the Melody Mute key
on a track with Status = MUTE
- the tracks is set in Status = PLAY;
- the asterisk disappears and all the values of all
the track’s parameters are reset as before.
SOLO: using the key combination
+
SHIFT (LED lit)
+
Melody Mute
- the selected track is set in Status = SOLO (only active track);
- all the other tracks are set in MUTE: the relative values are replaced with asterisks;
- the Melody Mute LED flashes.
- the Status indicator flashes.
To disable SOLO status, use the key combination Shift (LED lit) + Melody Mute again.
N.B.: for obvious reasons, MUTE and SOLO functions are enabled only in Single Track mode (cursor pointed on a track).
In ALL TRACKS mode (cursor pointed on the parameter’s name), the Melody Mute key is disabled.
The Melody Mute function as such (muting of the melody track) is not accessible, but can be normally enabled before accessing the EDIT
environment.
w
MM (Melody Mute)
Indicates that the MELODY MUTE function is enabled and the Melody Track can’t be edited.
ATTENTION: don’t confuse the Melody Mute function with
Muting of the tracks via editing.
The Melody Mute function only affects the playing of the track
set as Melody Track (Options/Music Options/Melody Track)
and can be enabled immediately without distinction for all songs.
On the other hand, Muting tracks via editing, affects the setting
of the Status parameter of every single track and can be saved
in the song. Each track of each song can therefore have different
settings.
The two functions are independent. The Melody Mute function
has no effect on a song whose melody track’s Status = MUTE.
Edit INSTRUMENT pag1/2
02
FingeredBs
10
StndDrums1
03
¸¸
¸¸
¸
Clean Guit
11
GrandPiano
04
Vibraphone
12
Overdr. Gt
07
SlowString 13 Whistle
03 Clean Guitar PLAY
v
Edit INSTRUMENT pag1/2
02
FingeredBs
10
StndDrums1
03
¸¸
¸¸
¸
11
GrandPiano
04
Vibraphone
12
Overdr. Gt
07
SlowString 13 Whistle
03 Clean Guitar MUTE
v
Edit INSTRUMENT pag1/2
02
10
03
¸¸
¸¸
¸
Clean Guit
11
04
12
07
13
03 Clean Guitar SOLO
v
Edit
¸¸
¸¸
¸
VOLUME pag1/2
02
127
10
120
03
123
11
125
04
MM
12
96
07
120 13 85
MODIFY ALL TRACKS
w
Page 46
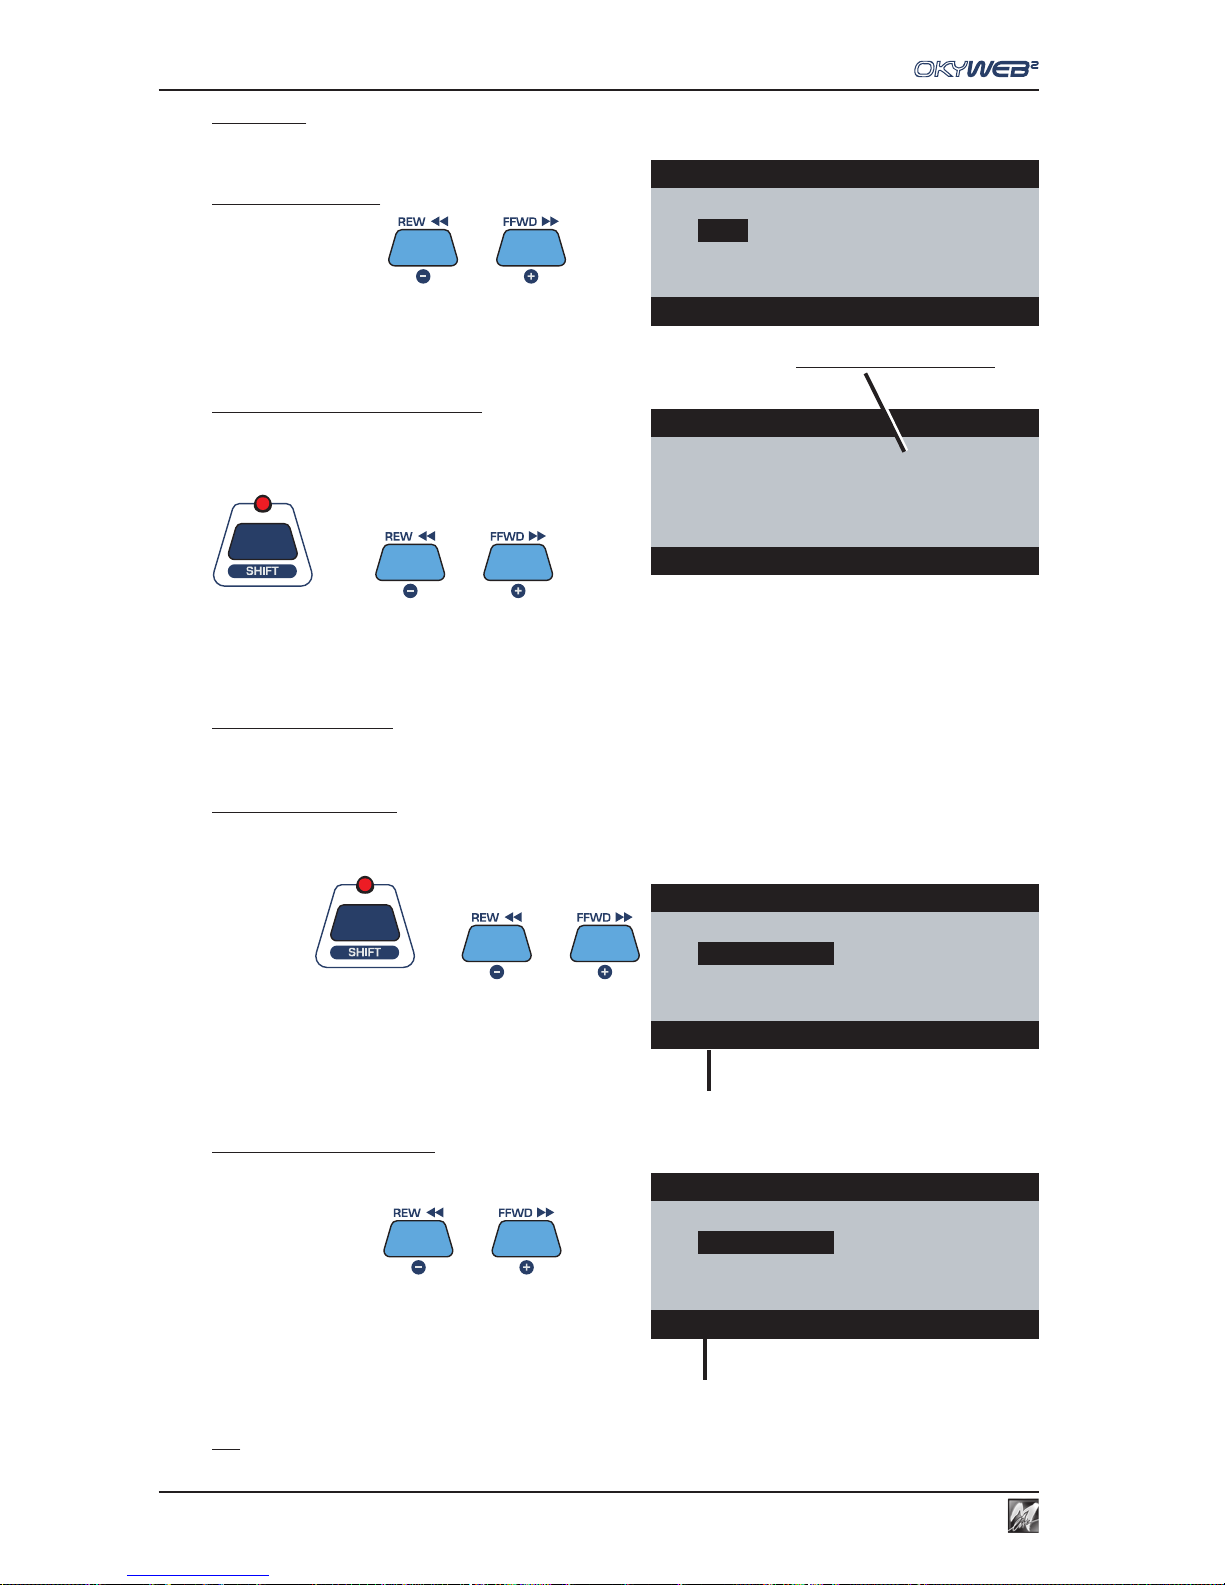
Editing
6.6
Transpose
The Transpose parameter has two 2 scales of operation:
a)
Steps of ±1 semitone
using the - and + keys
b) Steps of ±1 octave (12 semitones)
using the key combination
SHIFT (LED lit)
+
- e + keys
+
N.B.: obviously, the tracks protected with MIDI “no transpose” instructions - e.g. track 10, typically reserved for percussion – are not
subject to transposition, even in All Tracks mode.
Instrument & Family
The Instrument parameter allows to choose the sound assigned to the track.
To facilitate searches to the utmost, sounds are grouped into Families of Instruments (Pianos, Guitars, Strings, etc.).
Choosing the Family
Use the combination SHIFT (LED lit) + - and + keys.
+
Scrolling the list of Families:
- the information area
s
shows the name of the Family;
- the selected track shows the name of the first instrument
of the Family.
Choosing the Instrument
To choose an instrument in the same Family,
use the - and + keys
Scrolling through the list of instruments in the Family:
- the information area
s
shows the full name of the
Instrument;
- the selected track shows the abbreviated name of the
Instrument.
N.B.: for a complete list of the instruments available, check this manual’s Appendix.
Edit
¸¸
¸¸
¸
VOLUME pag1/2
02
+12
10
00
03
+12
11
+12
04
+12
12
+12
07
+12 13 +12
MODIFY ALL TRACKS
NO TRANSPOSE TRACK
Edit TRANSPOSE pag1/2
02
-36
10
00
03
¸¸
¸¸
¸
+12
11
+12
04
00
12
+07
07
-05 13 +36
03 Clean Guitar PLAY
s
Edit INSTRUMENT pag1/2
02
FingeredBs
10
StndDrums1
03
¸¸
¸¸
¸
12Str.Guit
11
GrandPiano
04
Vibraphone
12
Overdr. Gt
07
SlowString 13 Whistle
03 12-Strings Guitar PLAY
s
Edit INSTRUMENT pag1/2
02
FingeredBs
10
StndDrums1
03
¸¸
¸¸
¸
Nylon Guit
11
GrandPiano
04
Vibraphone
12
Overdr. Gt
07
SlowString 13 Whistle
03 FAMILY: GUITAR PLAY
Page 47
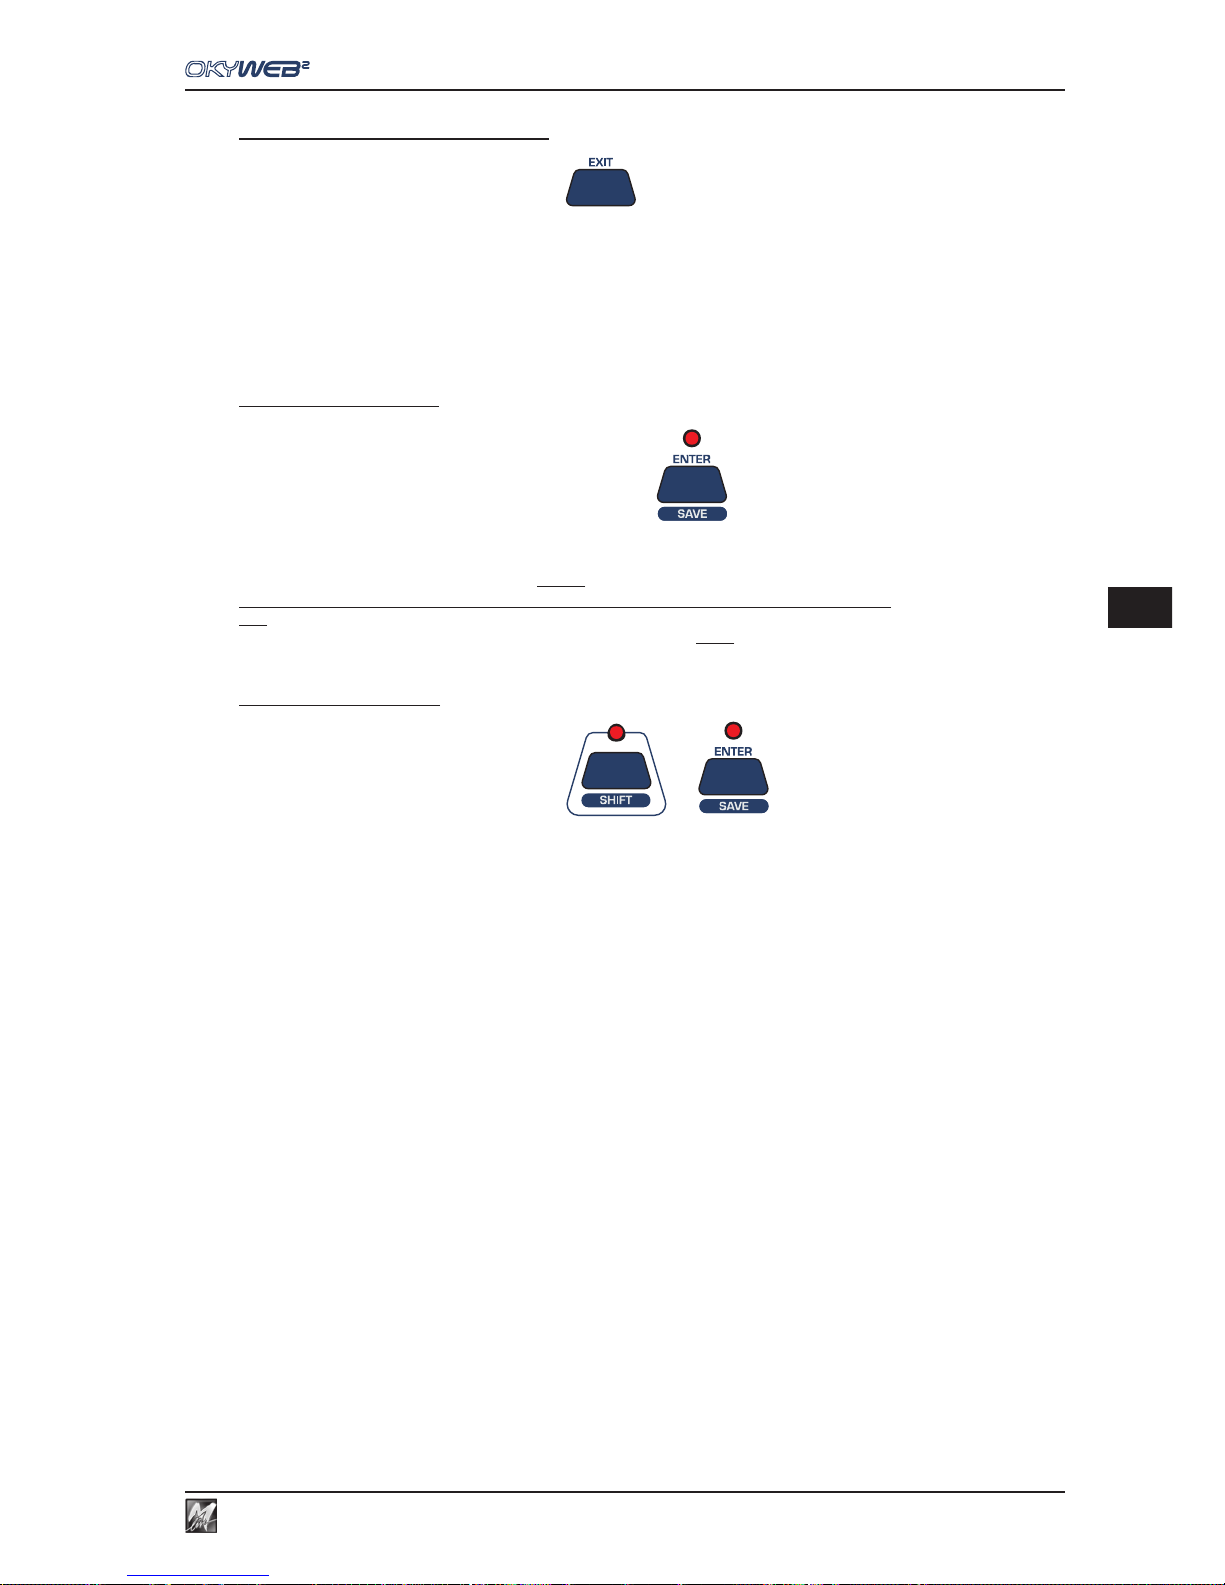
6.7
Editing
6
To exit the EDIT environment
Press EXIT to exit the EDIT environment
On re-entering the EDIT environment, you return directly to the last editing condition carried out (track and
parameter), jumping all the intermediate stages.
Saving changes
When a Song is changed, the ENTER/SAVE key’s LED lights up.
The changes can be saved in the Song on a Compact Flash card.
Saving can be done either directly in the EDIT environment, or after returning to the main environment (Song list).
In any case, saving must be carried out
before selecting a new Song.
Selecting a new Song, all the changes that have not been saved will be irreparably lost.
N.B.: changes that are not saved produce temporary effects, useful for example for carrying out impromptu changes required during live
performances: at the next performance, the Song will have the values saved before the editing just carried out.
Saving an edited Song
Use the key combination SHIFT (LED lit) + ENTER/SAVE.
- the song and relative changes will be saved on the Compact Flash card;
- the ENTER/SAVE key’s LED goes off.
Page 48
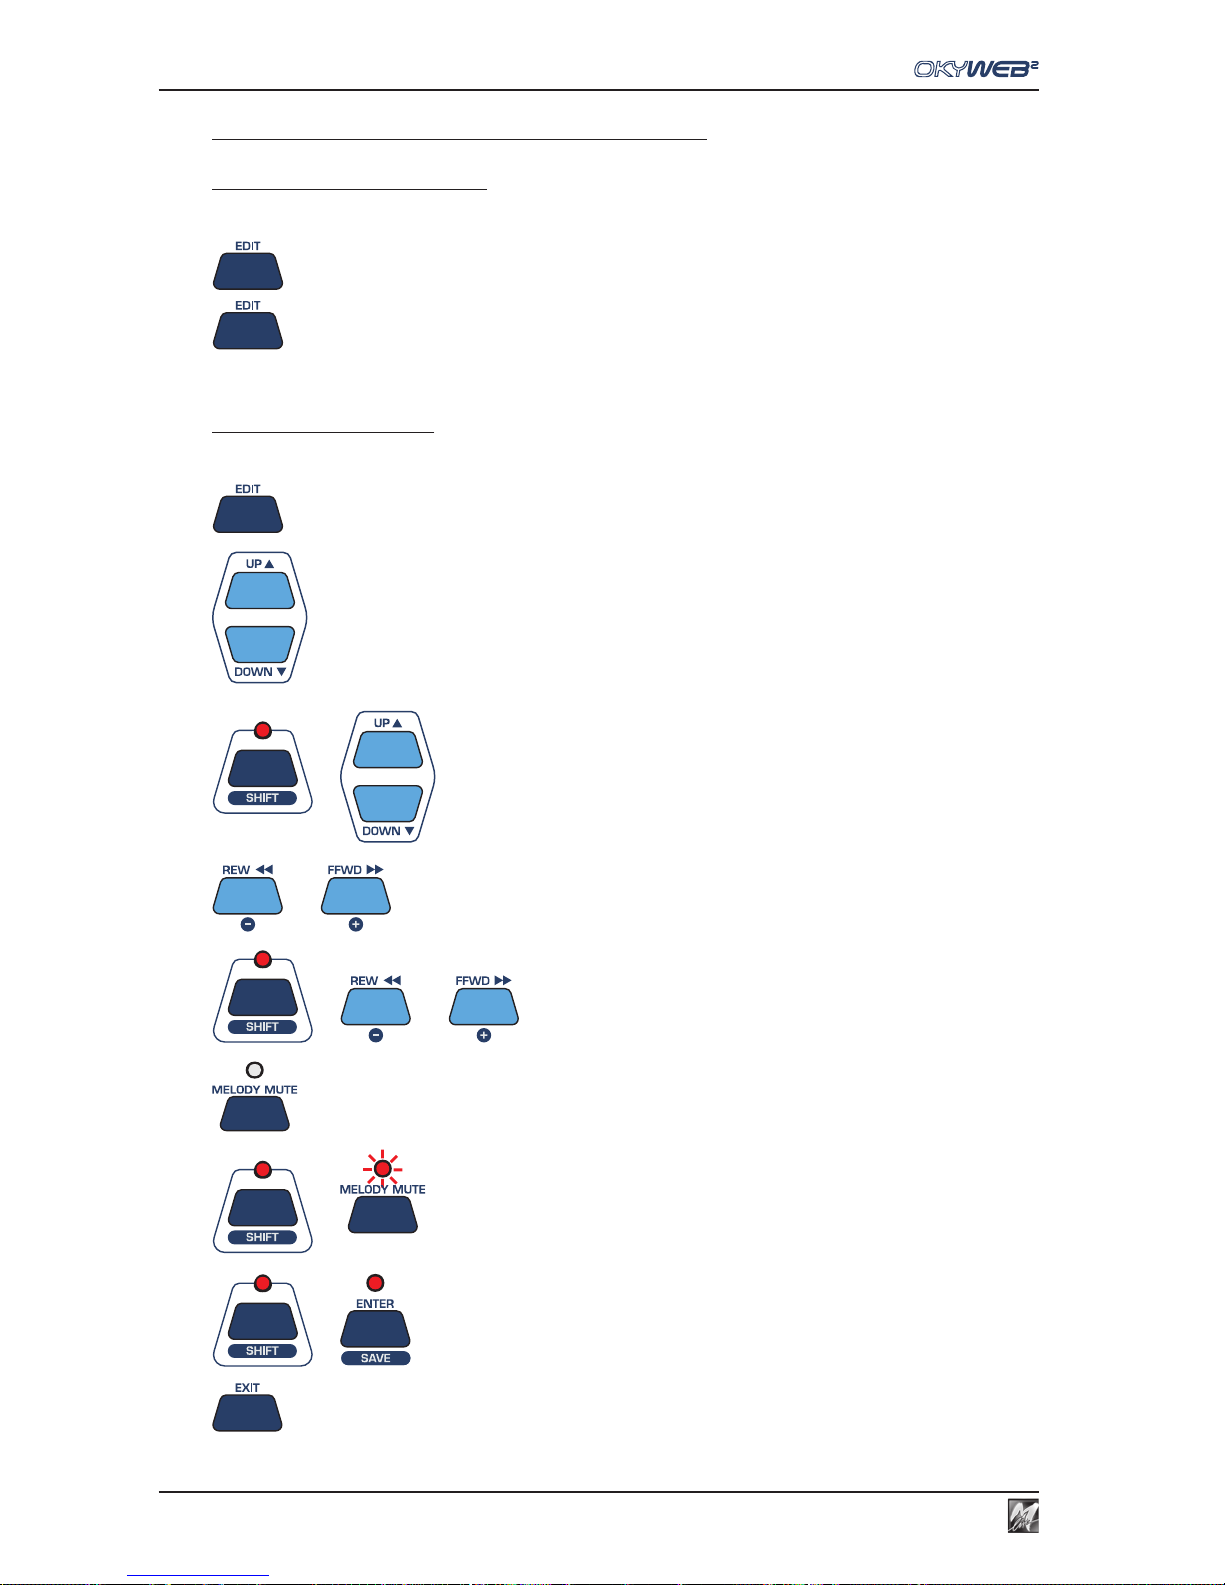
Editing
6.8
Summary of EDIT environment controls
Outside the EDIT environment:
= Access to the EDIT environment.
press for a long time = Access to the last Editing condition (track and parameter).
In the EDIT environment:
= Selection of the Parameter to edit.
= Selection of the track to edit (cursor on the parameter name = all).
+ = Scroll by track pages.
= Change of value.
+ -Instrument = change Family; -Transpose = steps of ±1 octave.
= Track’s PLAY / MUTE status.
+ = Track’s SOLO status.
+ = Saving changes.
= Exit EDIT environment.
Page 49
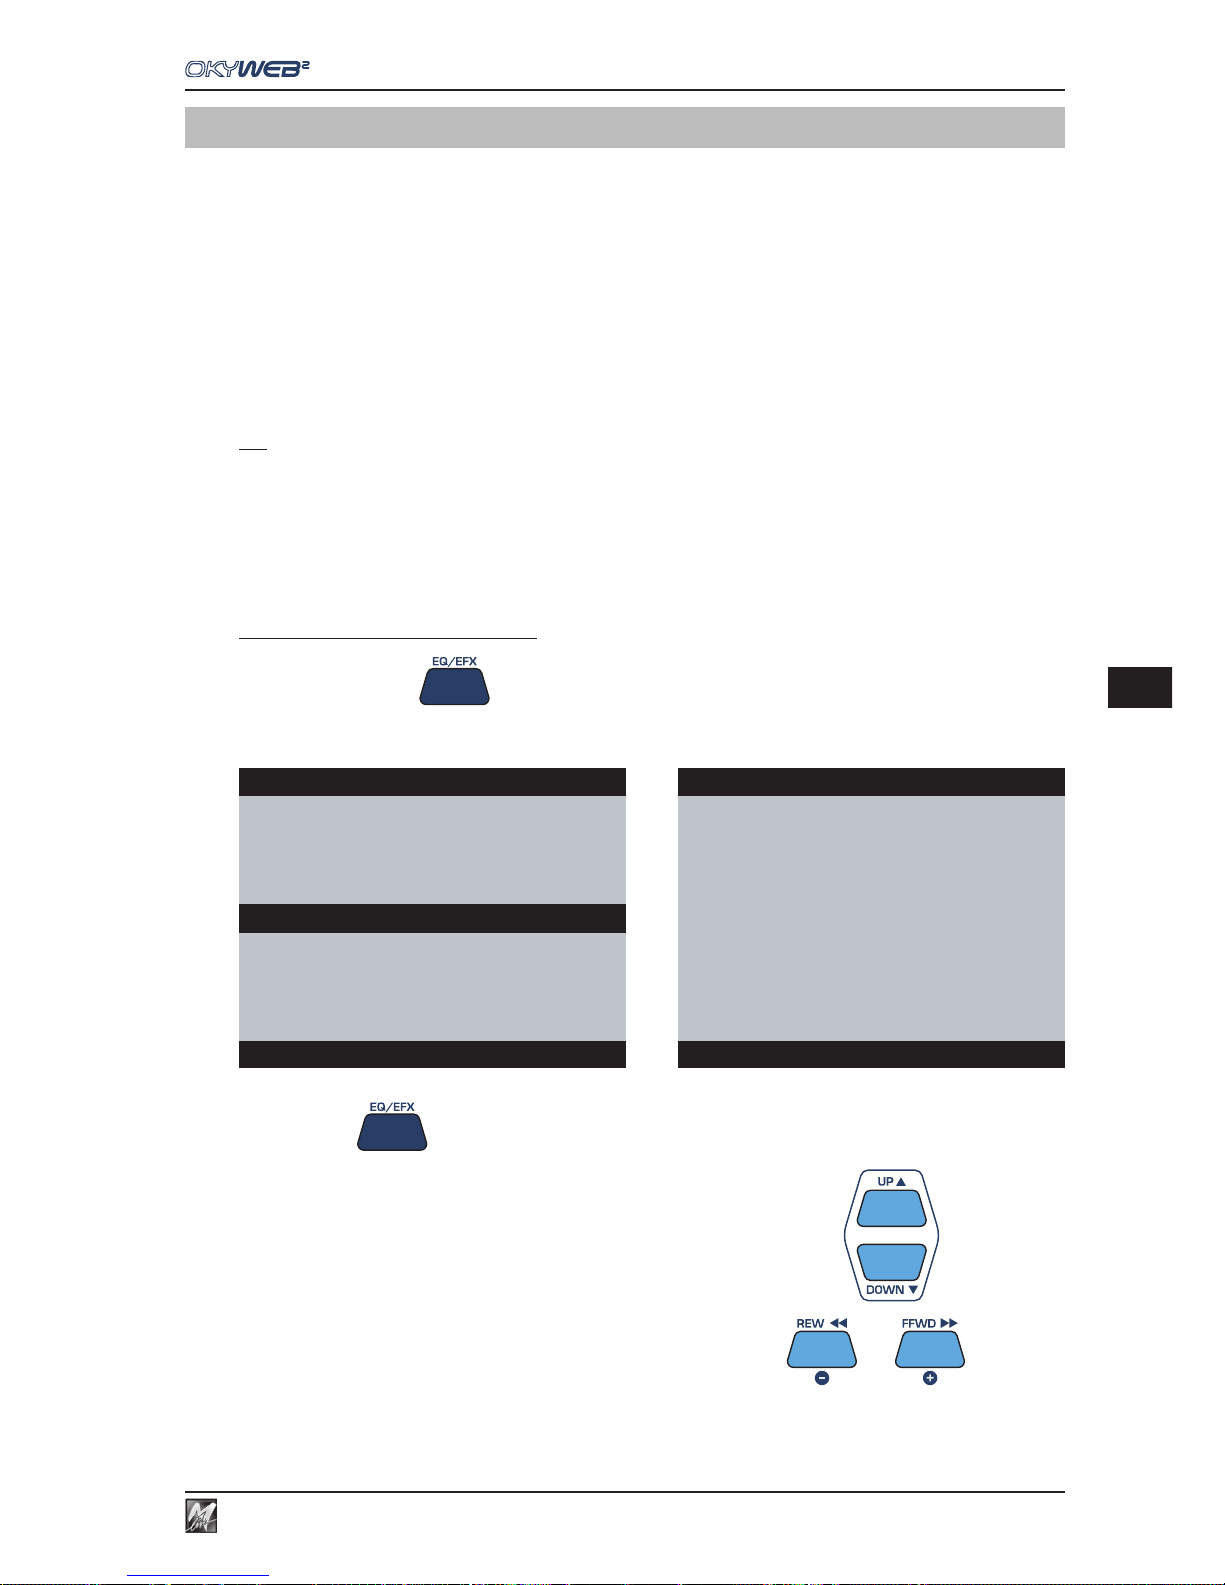
7.1
EQ / EFX
7
7 - EQ / EFX
The EQ/EFX environment contains a wide range of processors for processing the signals of the respective
sections of OkyWeb2. In fact, each section has its own set of dedicated processors:
- MIC section (microphone) : 4-band parametric Equalizer, Reverb, Echo with SYNCtoMIDI.
- MUSIC section (backing track) : 4-band parametric Equalizer, Reverb, Chorus.
Each processor has been designed to obtain the maximum sound results with the utmost user-friendliness.
Controls can be easily handled even during live performances.
Each processor has an initial library of Presets, already optimised for a wide range of applications.
By means of the PC software supplied, you can prepare your own Presets and add them to the Preset library
saved on the Compact Flash card.
The Presets and any changes made to them can be saved directly in the individual songs. You can thus save
the effects for both backing track and vocals, even in backing tracks that don’t normally have dedicated tracks
(e.g. MIDI Files and MF3), thus creating a truly customized archive.
N.B.: as well as 32 tracks dedicated to the backing track, songs in MF5 format also contain tracks reserved for the EQ/EFX processors.
Each individual song in this format can therefore contain dynamic changes for each Effect and each Equalizer, exactly as normally happens
with the instruments of the backing track.
For example: you can have a song in which your voice is processed in the verses with a short Echo, in the refrain with a long Echo and in the
bridge with a “megaphone-style” Equalization and a very long Reverb, followed by a song with a bass and treble boosting equalization and
completely different vocal effects. All this is done completely automatically, without moving a finger...
How to edit a processor
Press the EQ/EFX key
According to the song’s playing conditions, the EQ/EFX environment shows pages with or without the song’s
lyrics. Only the appearance changes: Editing procedure however remains unchanged.
Press EQ/EFX
repeatedly to select the required processor.
To move the cursor to the required parameter, use the UP and DOWN keys
To change the value of the selected parameter, use the - and + keys
For example: to change the Preset of the equalization used on your voice, press the EQ/EFX key repeatedly until the MIC EQ pages appears,
then use the UP and DOWN keys to move the cursor to the MIC EQ PRESET parameter and, lastly, use the - and + keys to scroll through the
Preset list until the required preset is reached. The Preset is immediately enabled.
Feel-Robbie Williams
I JUST WANT TO FEEL
REAL LOVE IN THE HOME THAT
I LIVE IN
MIC REVERB
→MIC REV PRESET: Medium Hall
MIC REV TIME : 085
MIC REV SEND : 074
SELECT REVERB PRESET
MIC REVERB
→MIC REV PRESET: Medium Hall
MIC REV TIME : 085
MIC REV SEND : 074
SELECT REVERB PRESET
Page 50
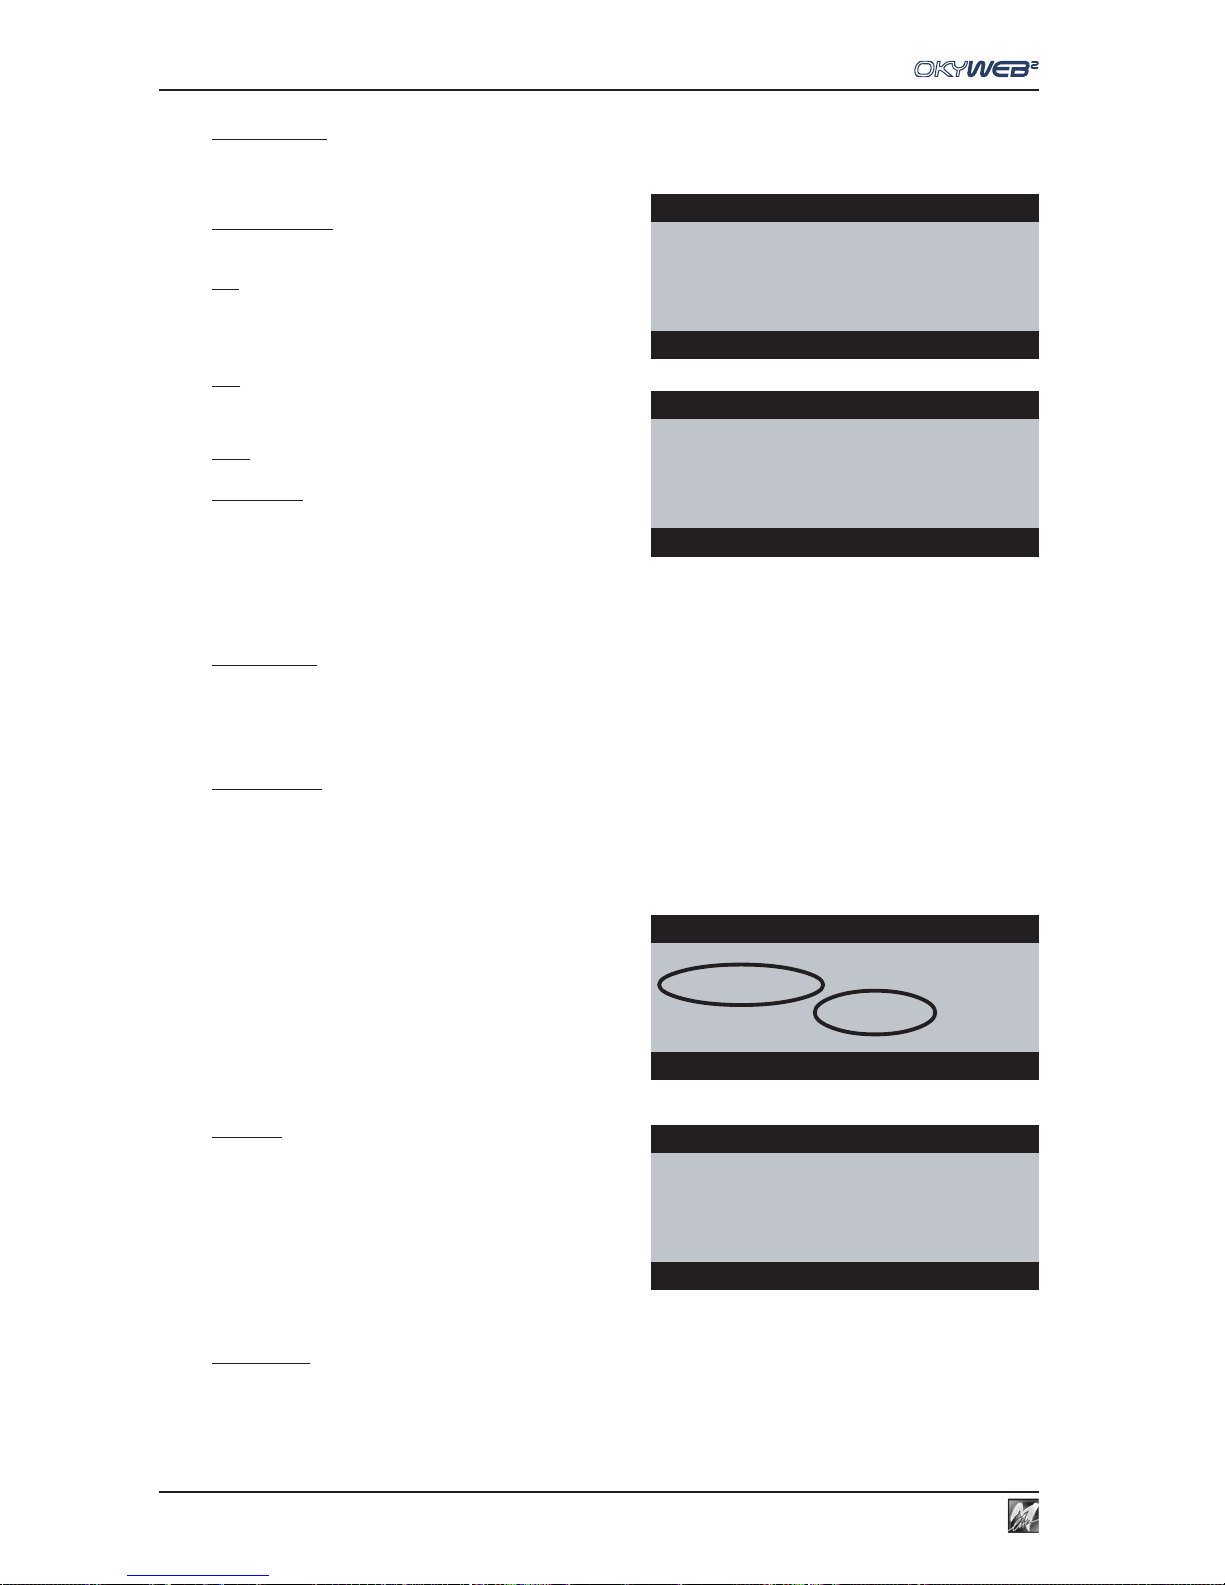
EQ / EFX
7.2
MIC ECHO
EchoPRESET:¥Stereo Echo 03
→EchoTIME:127 FEEDBACK:052
SYNCtoMIDI: DISABLED
EchoSEND:074
ECHO TIME= 446 ms
MIC ECHO
→EchoPRESET: Stereo Echo 03
EchoTIME:070 FEEDBACK:052
SYNCtoMIDI: DISABLED
EchoSEND:074
SELECT ECHO PRESET
MIC ECHO
EchoPRESET: Stereo Echo 03
SYNCto:1/2 FEEDBACK:052
→SYNCtoMIDI: ENABLED
EchoSEND:074
SELECT SYNC MODE
MIC ECHO
EchoPRESET: Stereo Echo 03
→SYNCto:1/4 FEEDBACK:052
SYNCtoMIDI: ENABLED
EchoSEND:074
ECHO TIME= 316 ms
Mic Echo
The Echo dedicated to the microphone allows to add various types of echo effects to your voice. The repetitions
can be synchronized with the rhythm of the backing tracks.
EchoPRESET
Enabled Preset.
8 Presets are available in the default configuration.
N.B.: By means of the PC software supplied, you can prepare your own
Presets and add them to the Preset library saved on the Compact Flash card.
¥ When the name of the Preset is preceded by a graphic
symbol, this shows that the Preset has been modified.
N.B.: changes that are not saved produce temporary effects, useful for
example for carrying out impromptu changes required during live
performances: When a new Preset is uploaded (including the same
recently edited Preset), it will have the values with which it was saved
before editing work just carried out.
EchoTIME
Delay time.
Using this control, you can change the delay time of the
effect’s main echo.
In fact, you can make the Echo longer or shorter according
to your needs.
The MIDI value 1..127 is shown in milliseconds at the bottom of the page.
FEEDBACK
Delay feedback.
Using this control, you can set the amount of signal to feed back to the processor.
In other words, you can change the effect’s persistence.
The MIDI value 1..127 is shown as a percentage at the bottom of the page.
SYNCtoMIDI
Echo synchronization mode.
This control allows to choose whether or not to synchronize the Echo’s repetitions with the tempo of the song
being performed. In other words, it allows to have an Echo able to “keep time” with any backing track.
The setting of this control considerably changes the behaviour of the effect and also causes a change of the
name and function of one of the other parameters:
DISABLED =The values of the repetitions are set by the
EchoTIME control.
The repetitions of the Echo operate with fixed
values, no matter what the tempo of the songs.
ENABLED =The repetitions are synchronized with the
tempo of the song being performed.
The repetitions of the Echo follow the effective
performance tempo of each song.
The EchoTIME parameter is replaced by the
SYNCto control.
SYNCto
Synchronization value.
Allows to choose the value of the music note to which the Echo’s
repetitions are to be synchronized: 1/2, 1/4, 1/8, 1/16, 1/32.
The corresponding time value is shown in milliseconds at
the bottom of the page. Obviously, due to the dynamic
nature of the SYNCtoMIDI function, this value varies along
with the speed of the songs (e.g. in STOP = 0 ms).
The note values and corresponding milliseconds are subject
to some automatic optimisation, to avoid synchronization times that are unsuitable from a musical point of view.
EchoSEND
The microphone signal sent to the Echo effect.
Adjusts the amount of microphone signal sent to the effect.
N.B.: the SEND control is the exact equivalent of an effect send on a normal audio mixer and must not be confused with the volume of the
effects, which on the other hand is adjusted with the MIC EFX pot on the right-hand side of the OkyWeb2.
In other words, the SEND parameter controls how much signal enters the effect and the MIC EFX pot how much is fed out.
Page 51
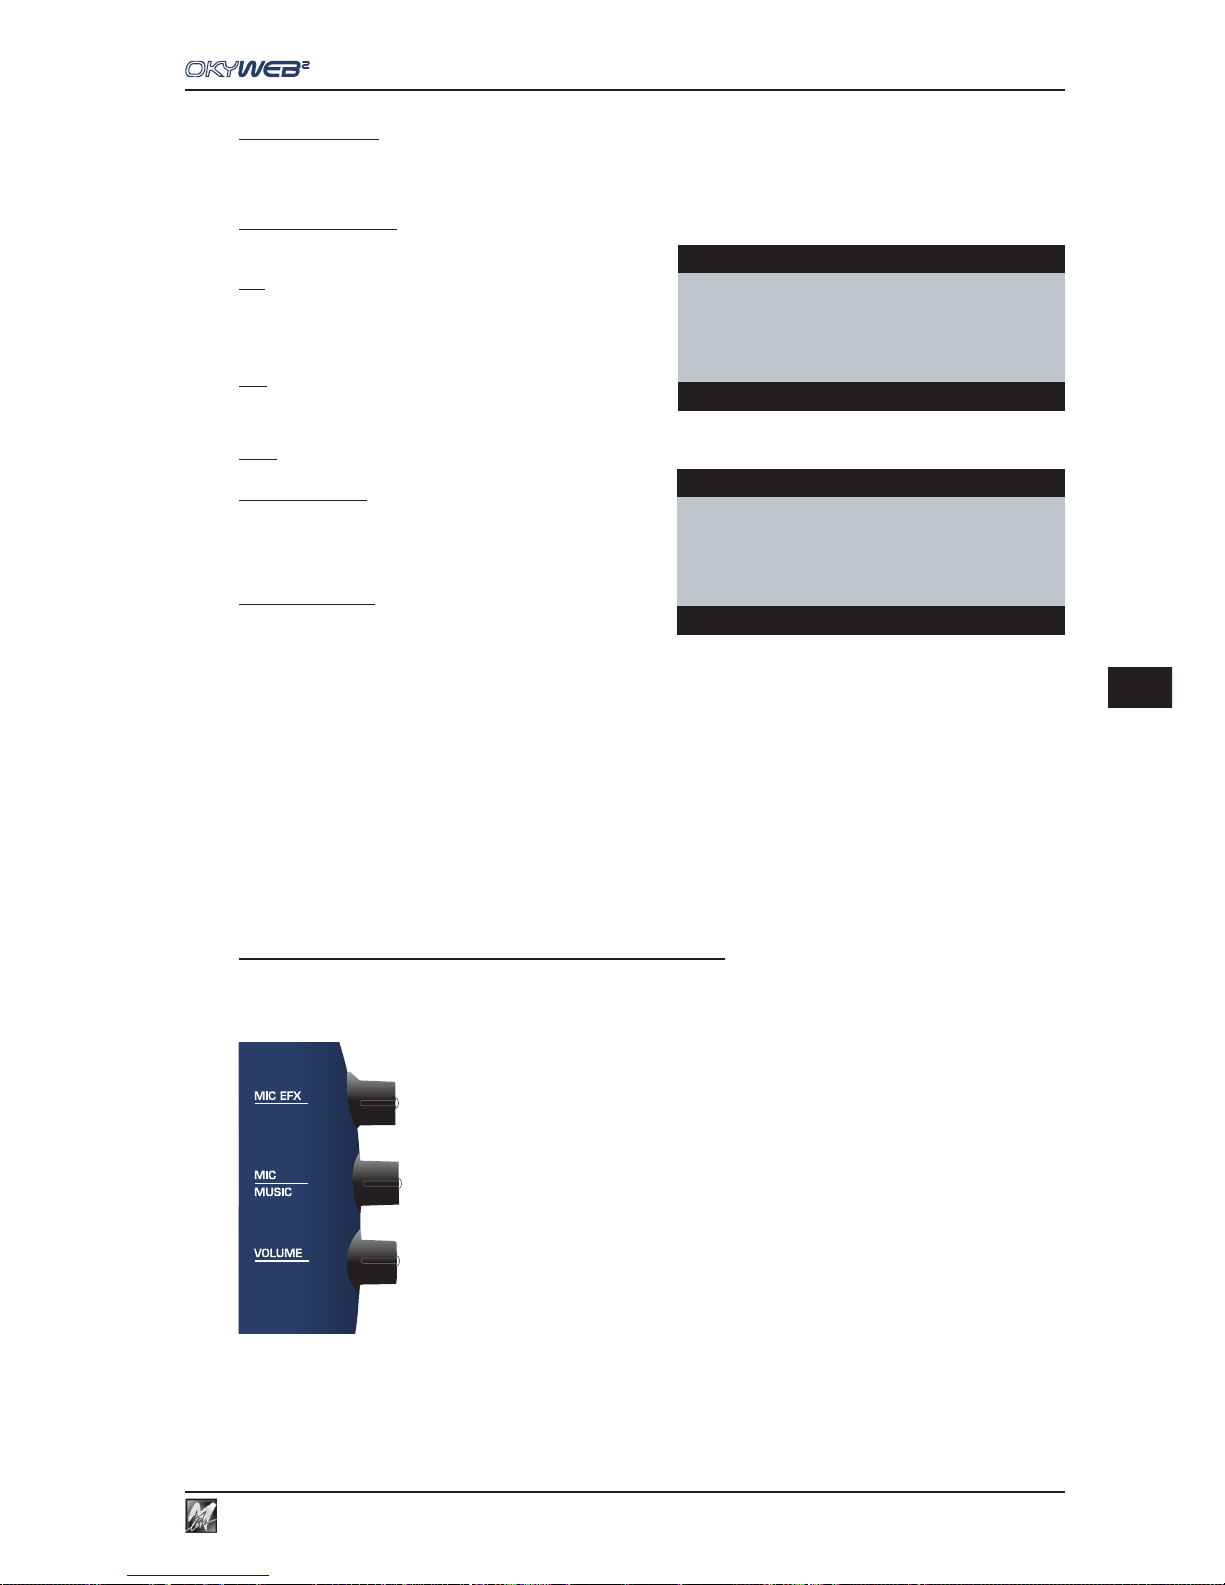
7.3
EQ / EFX
7
Mic Reverb
The Reverb dedicated to the microphone allows to add an ambient effect to your voice, combining it perfectly with
the backing tracks’ sounds.
MIC REV PRESET
Preset enabled.
8 Presets are initially available in the default configuration.
N.B.: By means of the PC software supplied, you can prepare your own
Presets and add them to the Preset library saved on the Compact Flash card.
¥ When the name of the Preset is preceded by a graphic
symbol, this shows that the Preset has been modified.
N.B.: changes that are not saved produce temporary effects, useful for
example for carrying out impromptu changes required during live
performances: When a new Preset is uploaded (including the same
recently edited Preset), it will have the values with which it was saved
before editing work just carried out.
MIC REV TIME
Reverberation time.
By using this control, you can change the duration of the
effect, adapting it to your needs.
MIC REV SEND
The microphone signal sent to the Reverb effect.
Adjusts the amount of microphone signal sent to the effect.
N.B.: the SEND control is the exact equivalent of an effect send on a
normal audio mixer and must not be confused with the volume of the effects, which on the other hand is adjusted with the MIC EFX pot on
the right-hand side of the OkyWeb2.
In other words, the SEND parameter controls how much signal enters the effect and the MIC EFX pot how much is fed out.
Mic Echo & Mic Reverb Audio Controls
The three pots on the right-hand side of the OkyWeb2 allow you to easily carry out any real-time changes to the
key audio parameters for handling the performance.
MIC EFX: adjusts the Volume of the Mic Echo and Mic Reverb effects
(if necessary, adjust the SEND controls of the respective effects).
N.B.: obviously, if the Microphone Volume is shut down, the Mic effects won’t be heard either.
MIC/MUSIC: adjusts the balance between the volume of the microphone and that
of the backing track.
VOLUME: adjusts the general output volume.
MIC REVERB
MIC REV PRESET:¥ Medium Hall
→MIC REV TIME : 127
MIC REV SEND : 074
REVERB TIME= 127REVERB
MIC REVERB
→MIC REV PRESET: Medium Hall
MIC REV TIME : 085
MIC REV SEND : 074
SELECT REVERB PRESET
Page 52
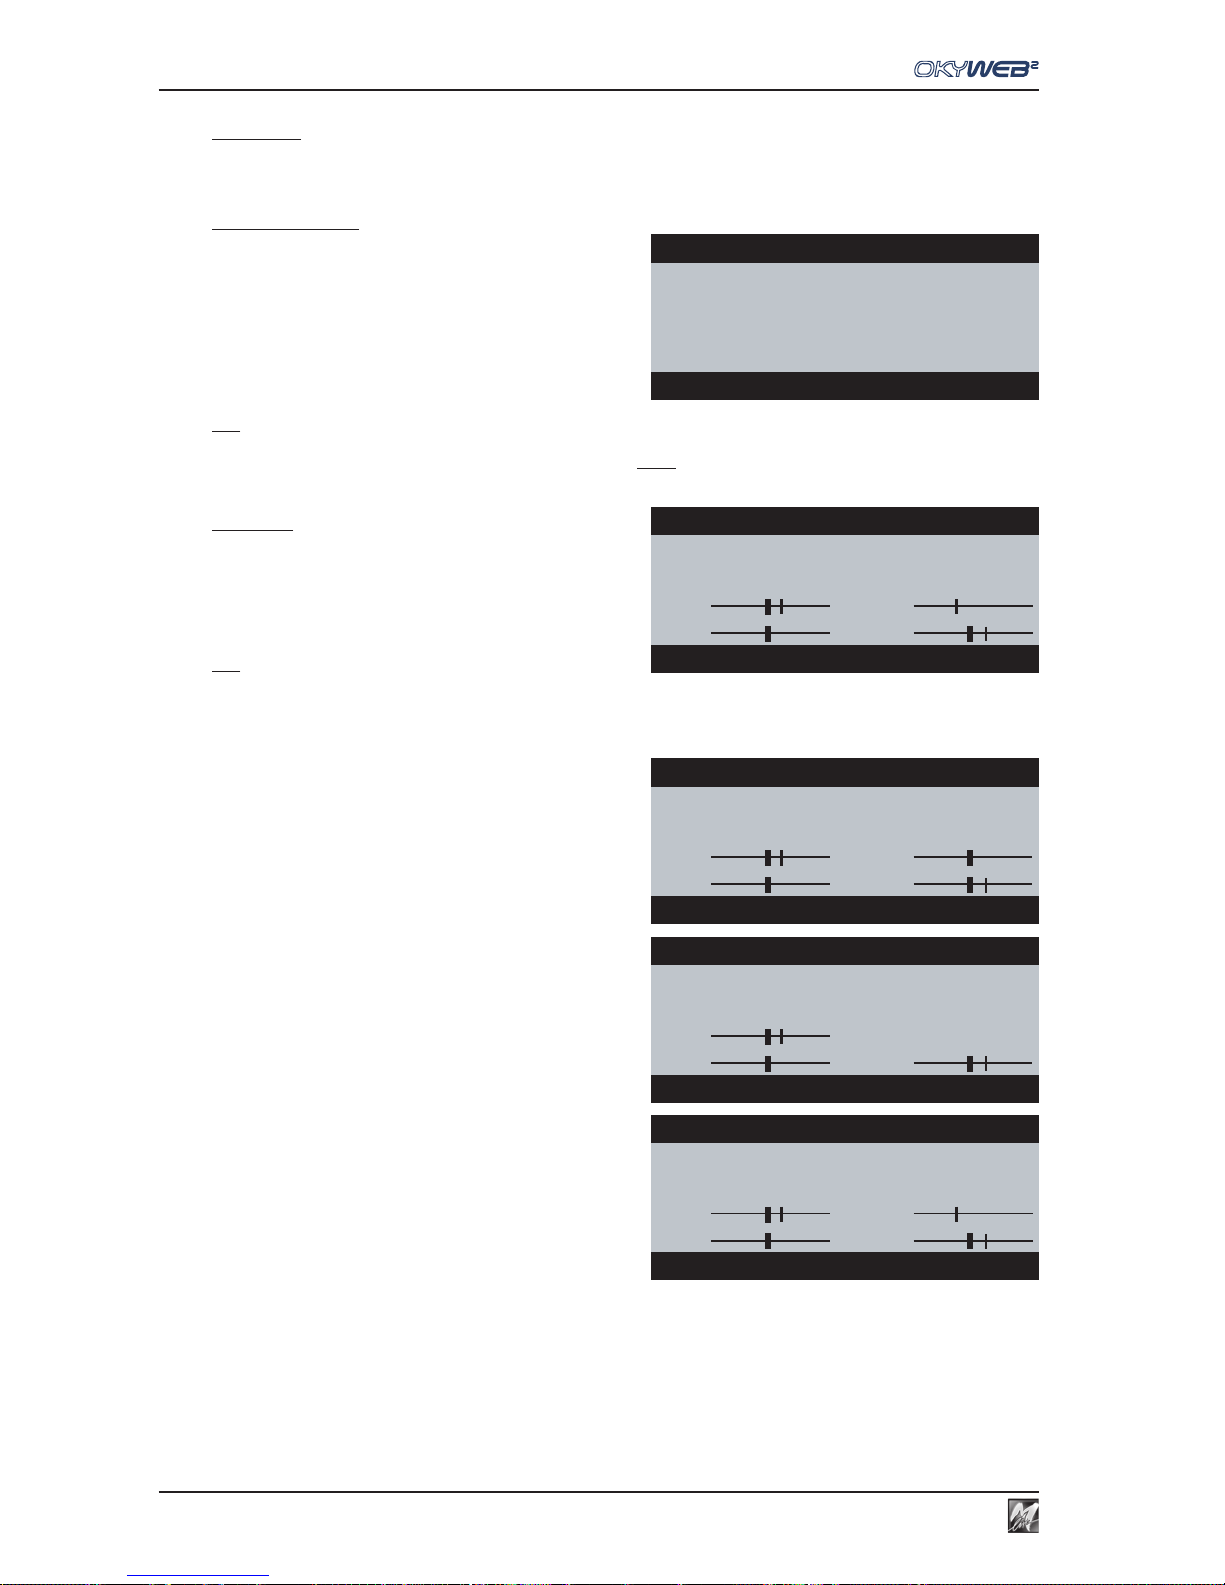
EQ / EFX
7.4
Mic EQ
The Equalizer dedicated to the microphone is a powerful versatile instrument that allows to control the sonic
texture of your voice, perfecting its integration with the sounds of the backing tracks.
MIC EQ PRESET
Enabled Preset.
The default configuration has 8 Presets, already optimised
for various applications.
The Presets can be changed but not overwritten.
By means of the PC software supplied, you can prepare
your own Presets and add them to the Preset library saved
on the Compact Flash card.
¥ When the name of the Preset is preceded by a graphic
symbol, this shows that the Preset has been modified.
N.B.: changes that are not saved produce temporary effects, useful for
example for carrying out impromptu changes required during live performances: When a new Preset is uploaded (including the same
recently edited Preset), it will have the values with which it was saved before editing work just carried out.
EQ TYPE
Type of Equalizer.
The Presets are originally prepared with a 4-band
parametric EQ, a powerful instrument, but rather demanding
to handle.
Using the EQ TYPE control, you can choose a set of more
intuitive controls with which to modify the uploaded Preset.
N.B.: the “4-band Parametric EQ” configuration is available by means
of the PC software supplied.
The following configurations are available:
4BAND GRAPHIC
4-band graphic EQ, with the following controls:
HI High frequency gain.
HMID Mid-High frequency gain.
LMID Mid-Low frequency gain.
LO Low frequency gain.
3BAND GRAPHIC
3-band graphic EQ, with the following controls:
HI High frequency gain.
MID Mid frequency gain.
LO Low frequency gain.
3BAND + MID Freq
3-band semi-parametric EQ, with the following controls:
HI High frequency gain.
FREQ centre frequency of the Mid frequencies.
MID Mid frequency gain.
LO Low frequency gain.
The Gain controls work with an amplitude of ±12dB (decibels) and allow to boost or cut the respective frequencies.
For example: L0 = -6dB is equivalent to halving the volume of the Low frequencies.
The Freq control establishes the centre frequency of the frequency range on which the relative gain has effect.
For example: using the (MID)-Freq control moves the frequency range that will be adjusted with the MID control.
The value in dB (Gain) or Hz (Freq) of each graphic representation is shown at the bottom of the page.
MIC EQ
→MIC EQ PRESET: Voice Booster
EQ TYPE:4BAND PARAMETRIC
SELECT EQ PRESET
MIC EQ
MIC EQ PRESET:¥Voice Booster
→EQ TYPE:3BAND+MidFREQ
HI: FREQ:
LO: MID:
SELECT EQ TYPE
MIC EQ
MIC EQ PRESET:¥Voice Booster
→EQ TYPE:4BAND GRAPHIC
HI: HMID:
LO:
→
LMID:
LOW-MID Gain= +4dB
MIC EQ
MIC EQ PRESET:¥Voice Booster
EQ TYPE:3BAND GRAPHIC
→HI:
LO: MID:
HIGH Gain= +3dB
MIC EQ
MIC EQ PRESET:¥Voice Booster
→EQ TYPE:3BAND+MidFREQ
HI: →FREQ:
LO: MID:
MID Freq= 508 Hz
Page 53

7.5
EQ / EFX
7
Music EFX
The Music EFX page contains the set of processors dedicated to the OkyWeb2 sound generator – i.e. reserved
for the MIDI section that produces the backing tracks.
Each processor has a series of Presets, already optimised
for various applications.
By means of the PC software supplied, you can prepare
your own Presets and add them to the Preset library saved
on the Compact Flash card.
REVERB / EFX1
Enabled Reverb Preset.
16 Presets are available in the default configuration.
- 8 GM Presets effects in General MIDI standard.
- 8 X-tra Presets Non-GM effects, able to offer further ambients for the sounds of the backing tracks.
CHORUS / EFX1
Enabled Chorus Preset.
16 Presets are available in the default configuration:
- 8 GM Presets. effects in General MIDI standard.
- 8 X-tra Presets Non-GM effects, able to further enrich the sounds of the backing tracks
EQ / 3D
Enabled 4-band parametric Equalizer Preset.
In the default configuration, 10 Presets are available, by means of which you can control the overall sound of the
backing tracks.
The processor also includes 3D processing, which give the effect of greater spatialization.
MUSIC EFX
→REVERB/EFX1: Warm Hall2
CHORUS/EFX2: Thick Sound
EQ/3D : Live 3D
SELECT REVERB PRESET
Page 54
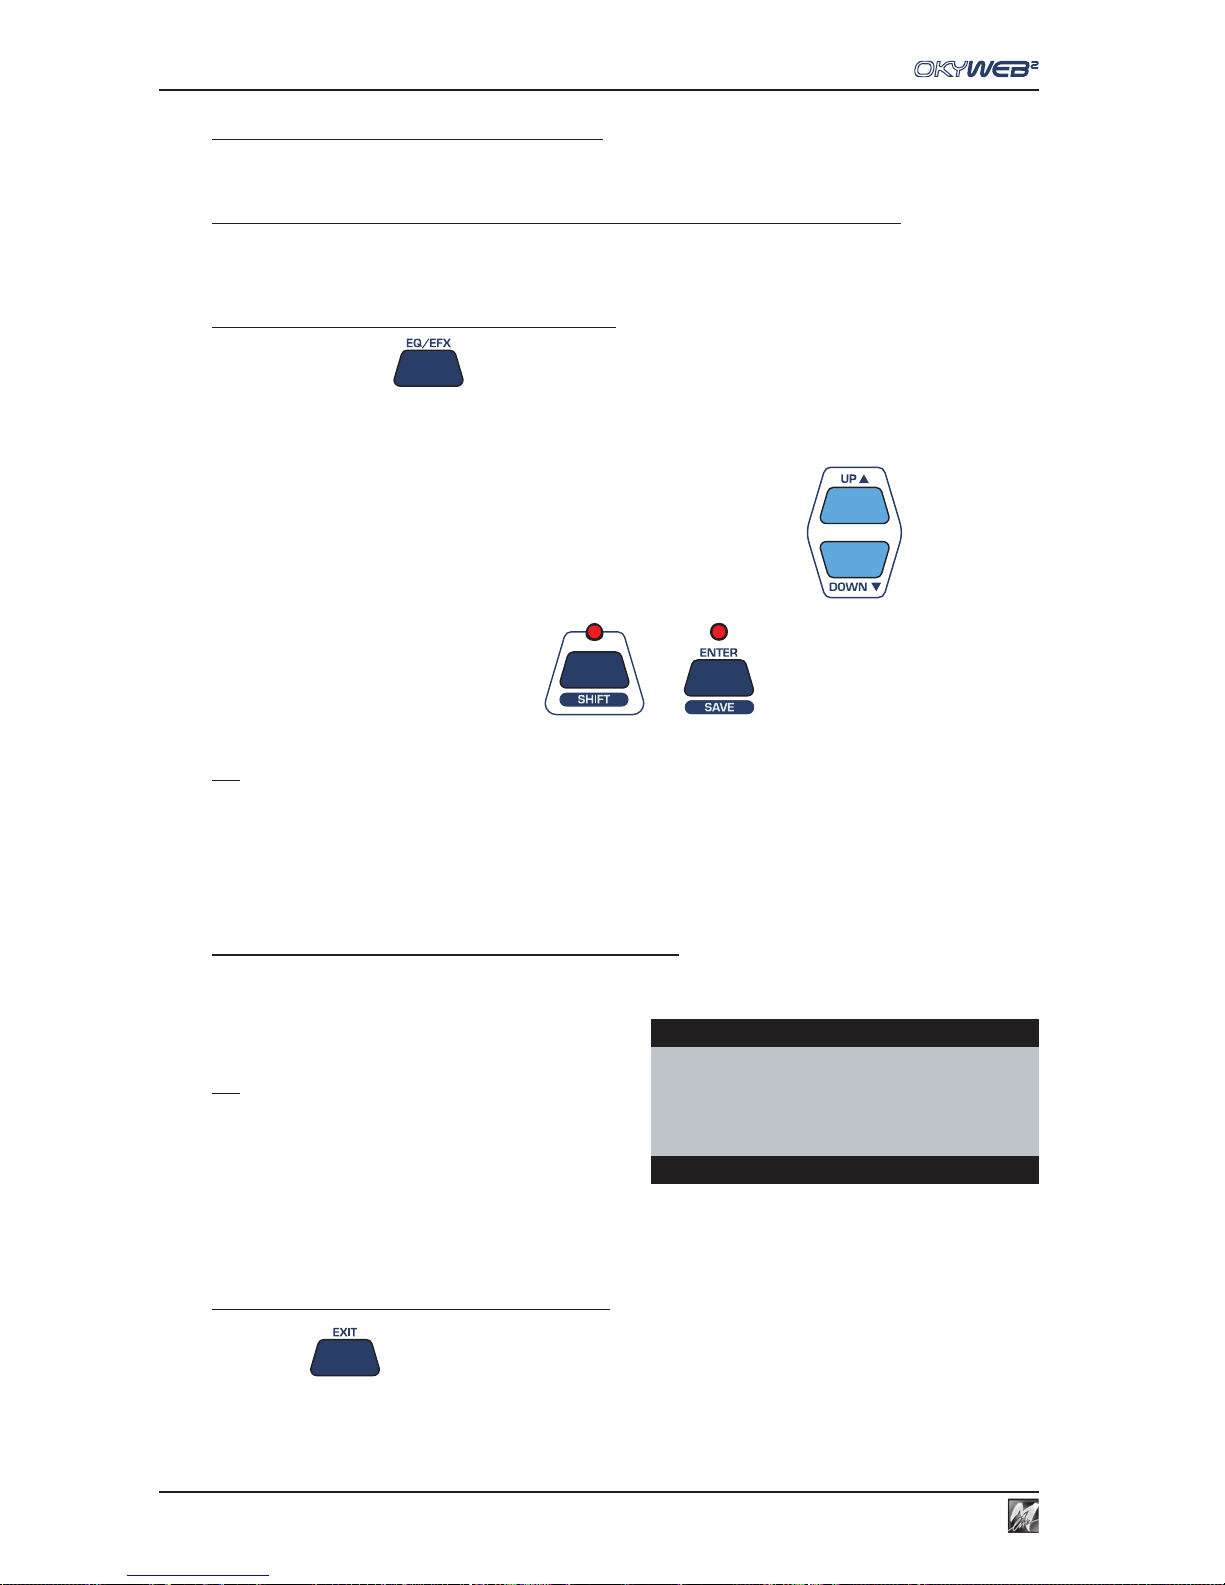
EQ / EFX
7.6
Saving EQ and EFX in the song
Using OkyWeb2, Presets can be edited but not overwritten or saved as new Presets.
N.B.: Remember that you can always prepare your own Presets and add them to the Preset library saved on the Compact Flash card, by
means of the PC software provided.
Presets and any changes made to them can however be saved directly in the individual songs, in order that each
backing track can have its own specific effect (Preset + changes).
This procedure is carried out processor by processor, thus enabling to choose which effect and which equalizer
of those being used is saved in the backing track.
Saving processor settings in a selected song
Press the EQ/EFX key repeatedly to select the required processor.
For MIC processors, it’s sufficient to select the processor’s page (no matter what the parameter);
for MUSIC EFX processors on the other hand, also select the processor required using the UP and DOWN keys
For example: if you want to save the equalization of the backing track, point the cursor on EQ/3D.
Use the key combination SHIFT (LED lit) + ENTER/SAVE.
All the processor’s settings are saved in the song on the Compact Flash card: every time the song is performed
from then on, it will reproduce the settings as they have been saved.
N.B.: the data are saved in the initialisation of the song, i.e., saved as static data, located before the musical performance.
Saving procedure is particularly suited to backing tracks without tracks specifically conceived for controlling the processors: in fact, any
dynamic changes already contained in the song (such as a change of effect or equalizer in the various phases of the song) are not changed.
Removing EQ and EFX from the song
If you wish to remove the EQ / EFX settings you have saved in the song:
carry out exactly the same procedure as for saving, but simply choose the Preset =======
E.g.: to cancel the settings of the equalization used for your voice, select
the MIC EQ processor, then the MIC EQ PRESET parameter, choose the
Preset = = = = = =
Then, lastly, use the key combination Shift (LED lit) + ENTER/SAVE.
N.B.: this procedure only eliminates the processor’s instructions in the
initialisation of the song, leaving any dynamic changes contained in it
unaltered.
To exit the EQ/EFX environment
Press EXIT to exit the EQ/EFX environment.
N.B.: returning to the EQ/EFX environment, the cursor goes directly to the last control edited
MIC ECHO
→EchoPRESET: ======
EchoTIME:=== FEEDBACK:===
SYNCtoMIDI: ===
EchoSEND:074
SELECT ECHO PRESET
Page 55
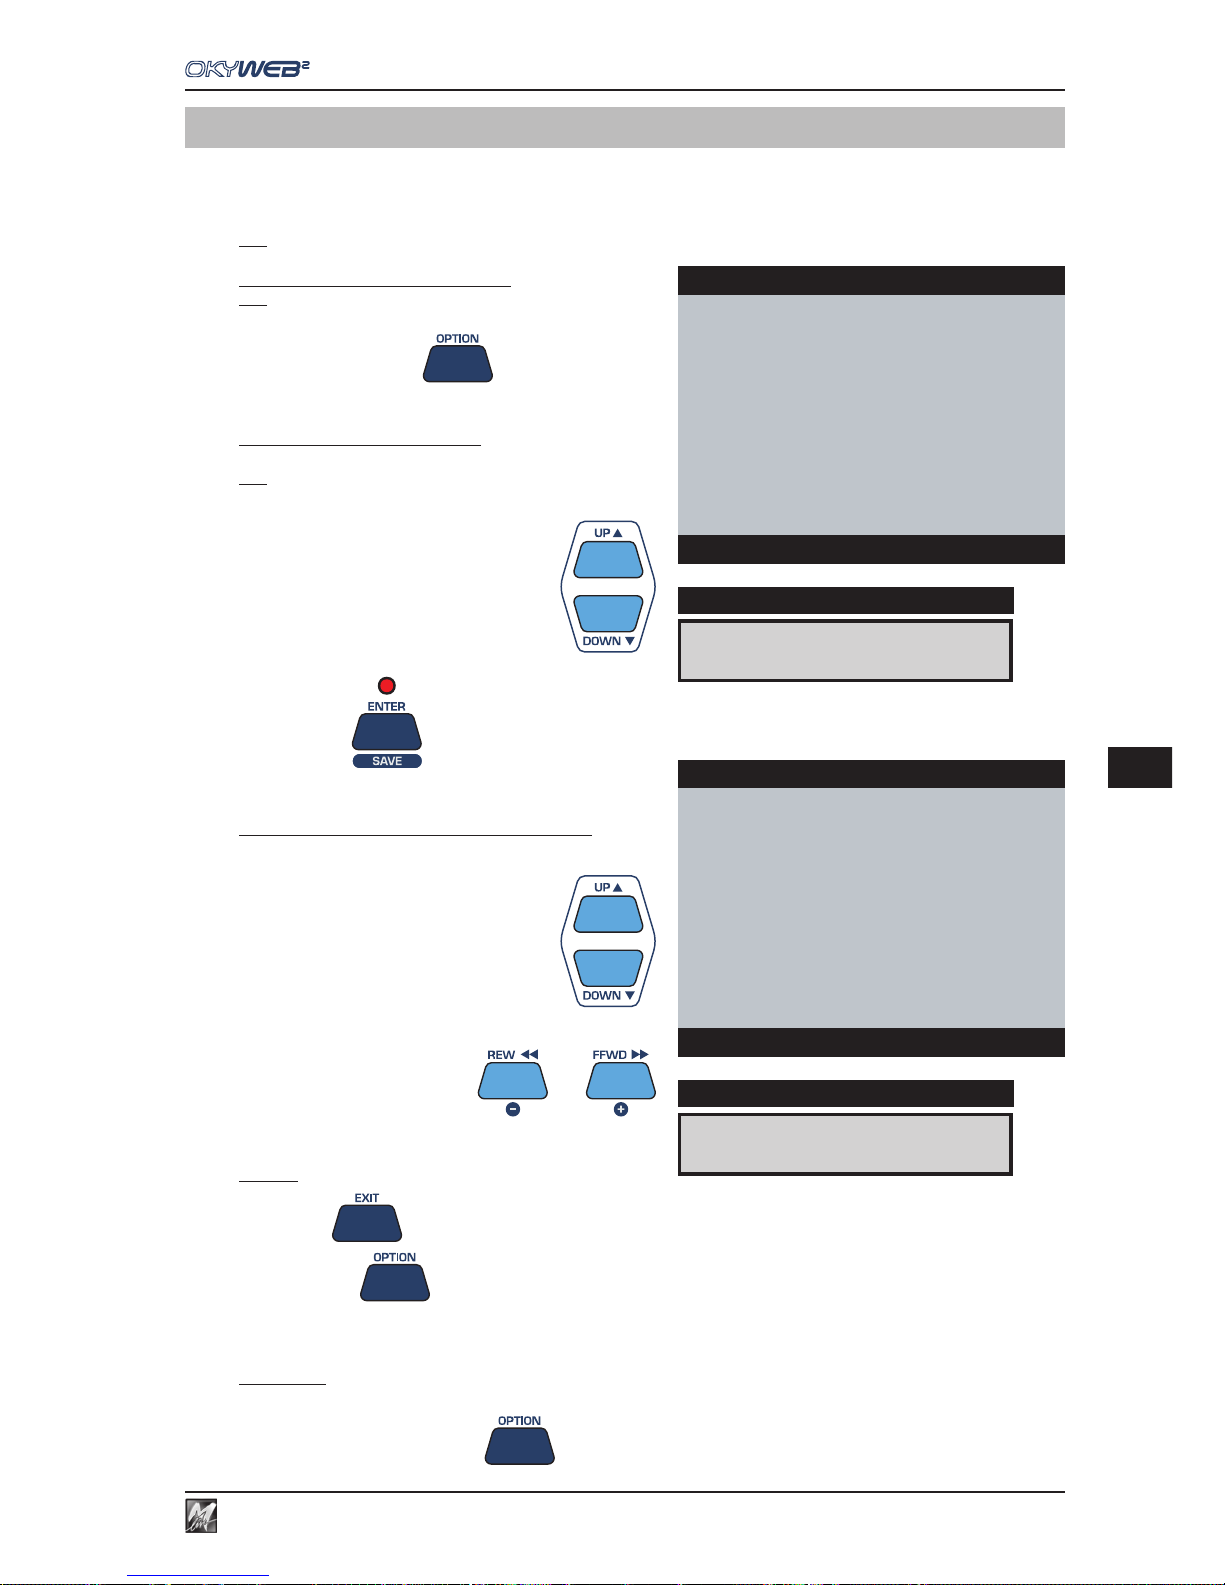
8.1
Options
8
8 - Options
The OPTION key gives access to the settings of various controls and parameters of OkyWeb2.
The settings are automatically saved in the Compact Flash card currently inserted in OkyWeb2. So, when using
several Compact Flash cards, remember that settings can vary from one Compact Flash card to another.
N.B.: the Option parameters can also be set by means of the PC software supplied.
Accessing the OPTIONS Menu
N.B.: for any accidental access during performance, the Options Menu
can only be enabled when OkyWeb2 is in STOP status.
Press the OPTION key
In this environment, the Options are listed according to type.
Accessing a type of Option
Choose the required type with the UP and DOWN keys.
N.B.: the cursor automatically goes to the type of Option selected during
the previous access from when the unit was switched on.
Press ENTER
The list of available options appears.
Changing the value of a specific Option
Use the UP & DOWN keys to select the option.
To change the value of the option, use the - and + keys.
To exit
Press EXIT to return to the Options Menu.
Press OPTION to exit the environment.
Short-Cut
To skip the intermediate stages and directly reach the last Option edited (from when the units was switched on):
Press and hold down OPTION
VIDEO OPTIONS
DISPLAY
OPTIONS MENU
GENERAL OPTIONS
MUSIC OPTIONS
MIC OPTIONS
MIDI OPTIONS
ÆVIDEO OPTIONS
OS Ver.X.x
Options
TXT MODE:ROLLING
DISPLAY
VIDEO OPTIONS
ÆTEXT MODE : ROLLING
TEXT ALIGN : CENTER
COLOURS : SET1
VIDEO IN : ENABLED
Options
Page 56
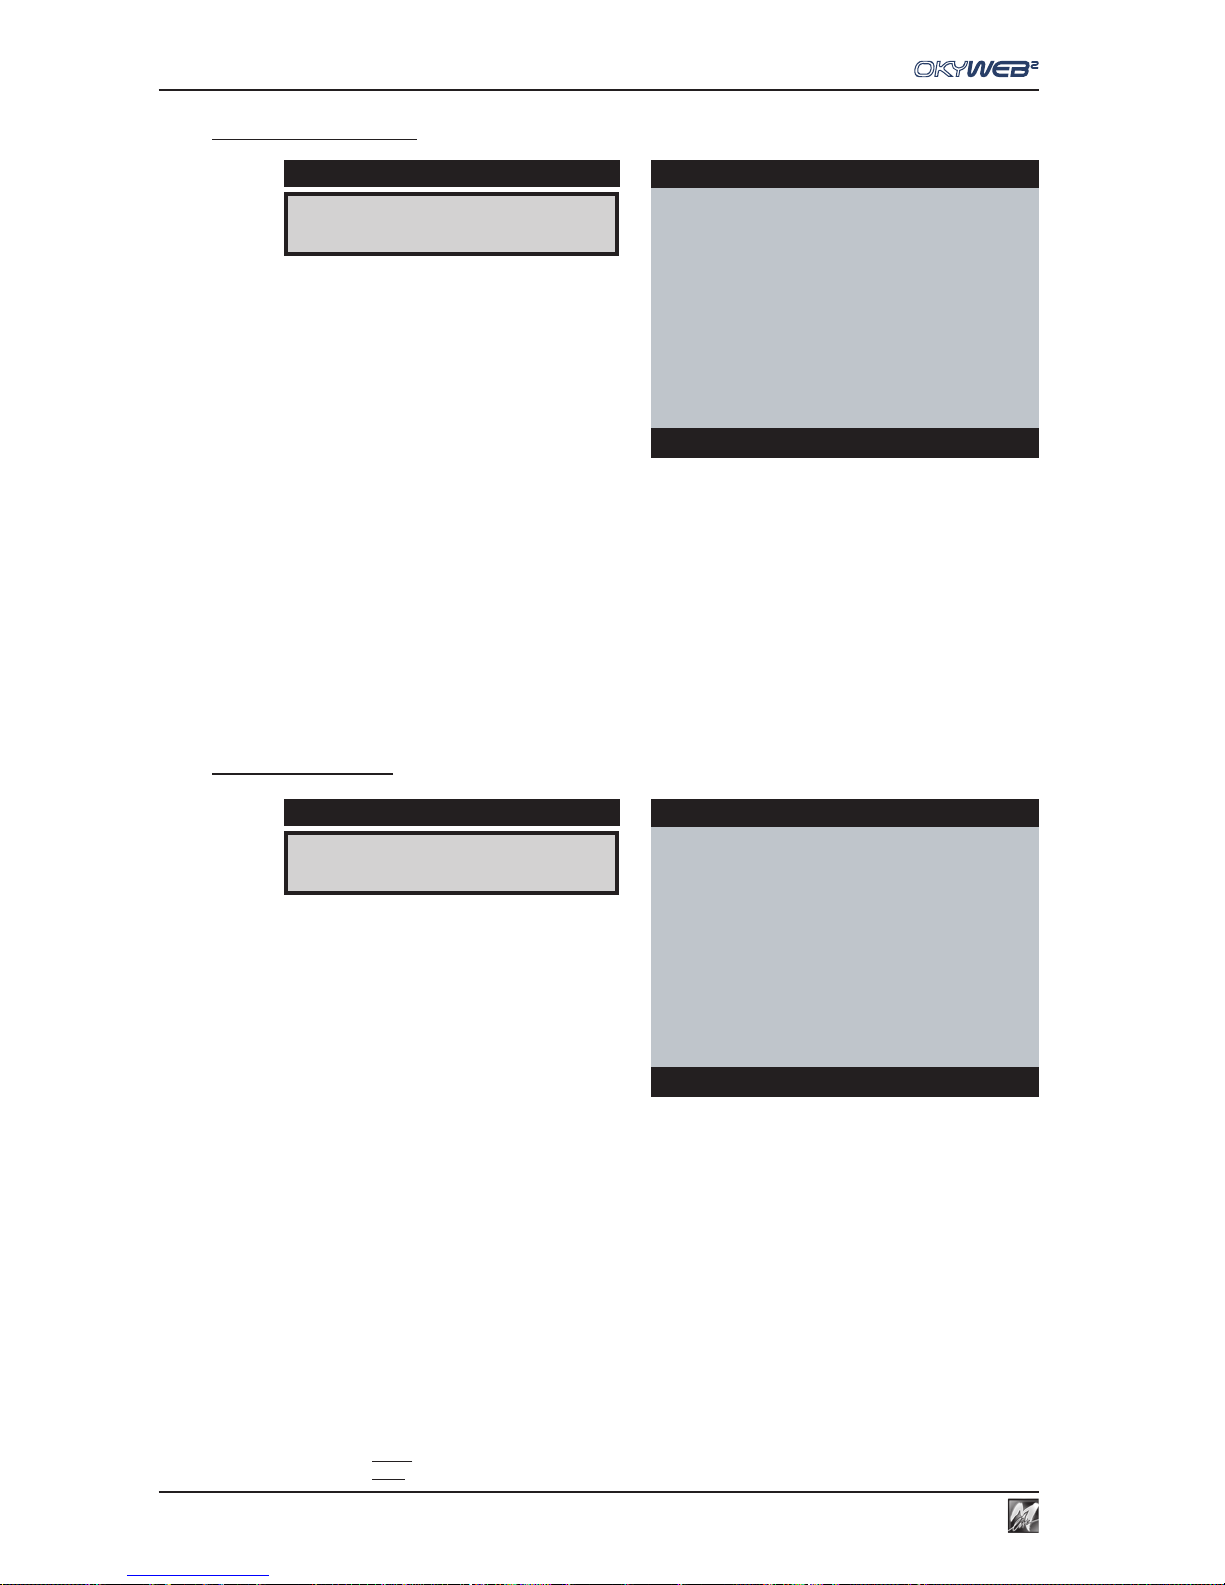
Options
8.2
General Options
PEDAL This parameter allows you to decide which functions to assign to the pedal connected to
the OkyWeb2. The following functions can be set:
DISABLED Pedal disabled.
PLAY/PAUSE Starts the song and puts it in pause.
EFX ON/OFF Enables or excludes the effects on the microphone.
MIC ON/OFF Enables or disables the microphone.
NEXT SONG Starts the next song on a Playlist.
PLAYLIST Sets the Playlist play mode:
AUTO Songs follow on automatically.
MANUAL the Playlist stops at the end of each song and waits for a Play command
before starting the next one.
Music Options
MELODY TRACK This option is linked to the Melody Mute function. It allows you to set which of the MIDI file
tracks must be assumed as the track that contains the song melody. The selected track will
be cut out or lowered when the MELODY MUTE key is pressed.
N.B.: therefore, this function can also be profitably used to mute any track (containing the song melody or not);
e.g. that of an instrument you want to play live or that of a part on which you are rehearsing.
EQ/3D TRACK This Option allows to enable or exclude the performance of the track reserved for the
Equalizer of the music section saved in the File.
DISABLED Playback of the disabled track.
Only manual control works.
ENABLED Playback of the enabled track.
Works along with the manual control.
CHORDS Sets the chord notation mode on the monitor:
DISABLED Chord display disabled.
INTERNAT. International notation (C, D, ...).
ITALIAN Italian notation (Do, Re, ...).
NOTE: in the chord notation the sharp (#) is shown with the ‘*’ character.
N.B.: chord display is not available in Rolling mode, which is conceived for Karaoke use.
PEDAL:PLAY/PAUSE
DISPLAY
GENERAL OPTIONS
ÆPEDAL : PLAY/PAUSE
PLAYLIST : AUTO
Options
MELODY TRACK:4
DISPLAY
MUSIC OPTIONS
ÆMELODY TRACK:4
EQ/3D TRACK : DISABLED
CHORDS : INTERNAT.
Options
Page 57

8.3
Options
8
Mic Options
MIC CHANNEL This Option allows to enable or exclude the microphone channel.
When it is preferred to process one or more microphone signals by means of an audio mixer
or an external processor, the exclusion of the microphone channel is useful for putting further
polyphony at users’ disposal, to the advantage of the musical section of OkyWeb2.
ATTENTION: enabling/disabling all the processors controlled by this option can cause high
signal peaks. It’s therefore advisable to change the settings only if necessary, or at least
with the amplification system off.
DISABLED Microphone channel disabled.
Not being used, access to all the options and audio controls regarding the
microphone is automatically disabled.
The musical section gains 18 notes of polyphony.
ENABLED Microphone channel enabled (default status).
MIC EQ TRACK This Option allows to enable or exclude performance of the track reserved for the
microphone Equalizer saved in the File.
DISABLED Track playback disabled
Only manual control works.
ENABLED Track playback enabled.
Works along with the manual control.
MIC REV TRACK This Option allows to enable or exclude the playback of the track reserved for the
microphone Reverb saved in the File.
DISABLED Track playback disabled
Only manual control works.
ENABLED Track playback enabled.
Works along with the manual control.
MIC ECHO TRACK This Option allows to enable or exclude the performance of the track reserved for the
microphone Echo saved in the File.
DISABLED Track playback disabled
Only manual control works.
ENABLED Track playback enabled.
Works along with the manual control.
MIC CH:ENABLED
DISPLAY
MIC OPTIONS
ÆMIC CHANNEL : ENABLED
MIC EQ TRACK : ENABLED
MIC REV TRACK : ENABLED
MIC ECHO TRACK : ENABLED
Options
Page 58

Options
8.4
MIDI Options
MIDI IN This Option allows to control the events sent to the OkyWeb2 MIDI IN port.
N.B.: This Option only regards the use of the MULTIPORT/MIDI cable supplied. In fact, the MULTIPORT/USB
cable supplied allows simultaneous access to all 32 MIDI channels.
DISABLED MIDI IN port disabled:
CH 1-16 Events sent to the MIDI IN port are normally fed to the OkyWeb2 MIDI
Channels between 1 and 16.
CH 17-32 Events sent to the MIDI IN port are repatched and sent to the OkyWeb2
MIDI Channels between 17 and 32 (1=17; 2=18; .. 16=32).
In fact, Ch 17-32 are the equivalent of a second MIDI module.
FAST RUN This Option allows to optimize the compatibility of OkyWeb2 with less recent generations
of keyboards. If, for example, an old keyboard connected to the MIDI OUT output of OkyWeb2
does not play back the song correctly, you can disable this function.
DISABLED Fast Run function disabled.
ENABLED Fast Run function enabled.
MIDI IN:CH 17-32
DISPLAY
MIDI OPTIONS
ÆMIDI IN : CH 17-32
FAST RUN : ENABLED
Options
Page 59
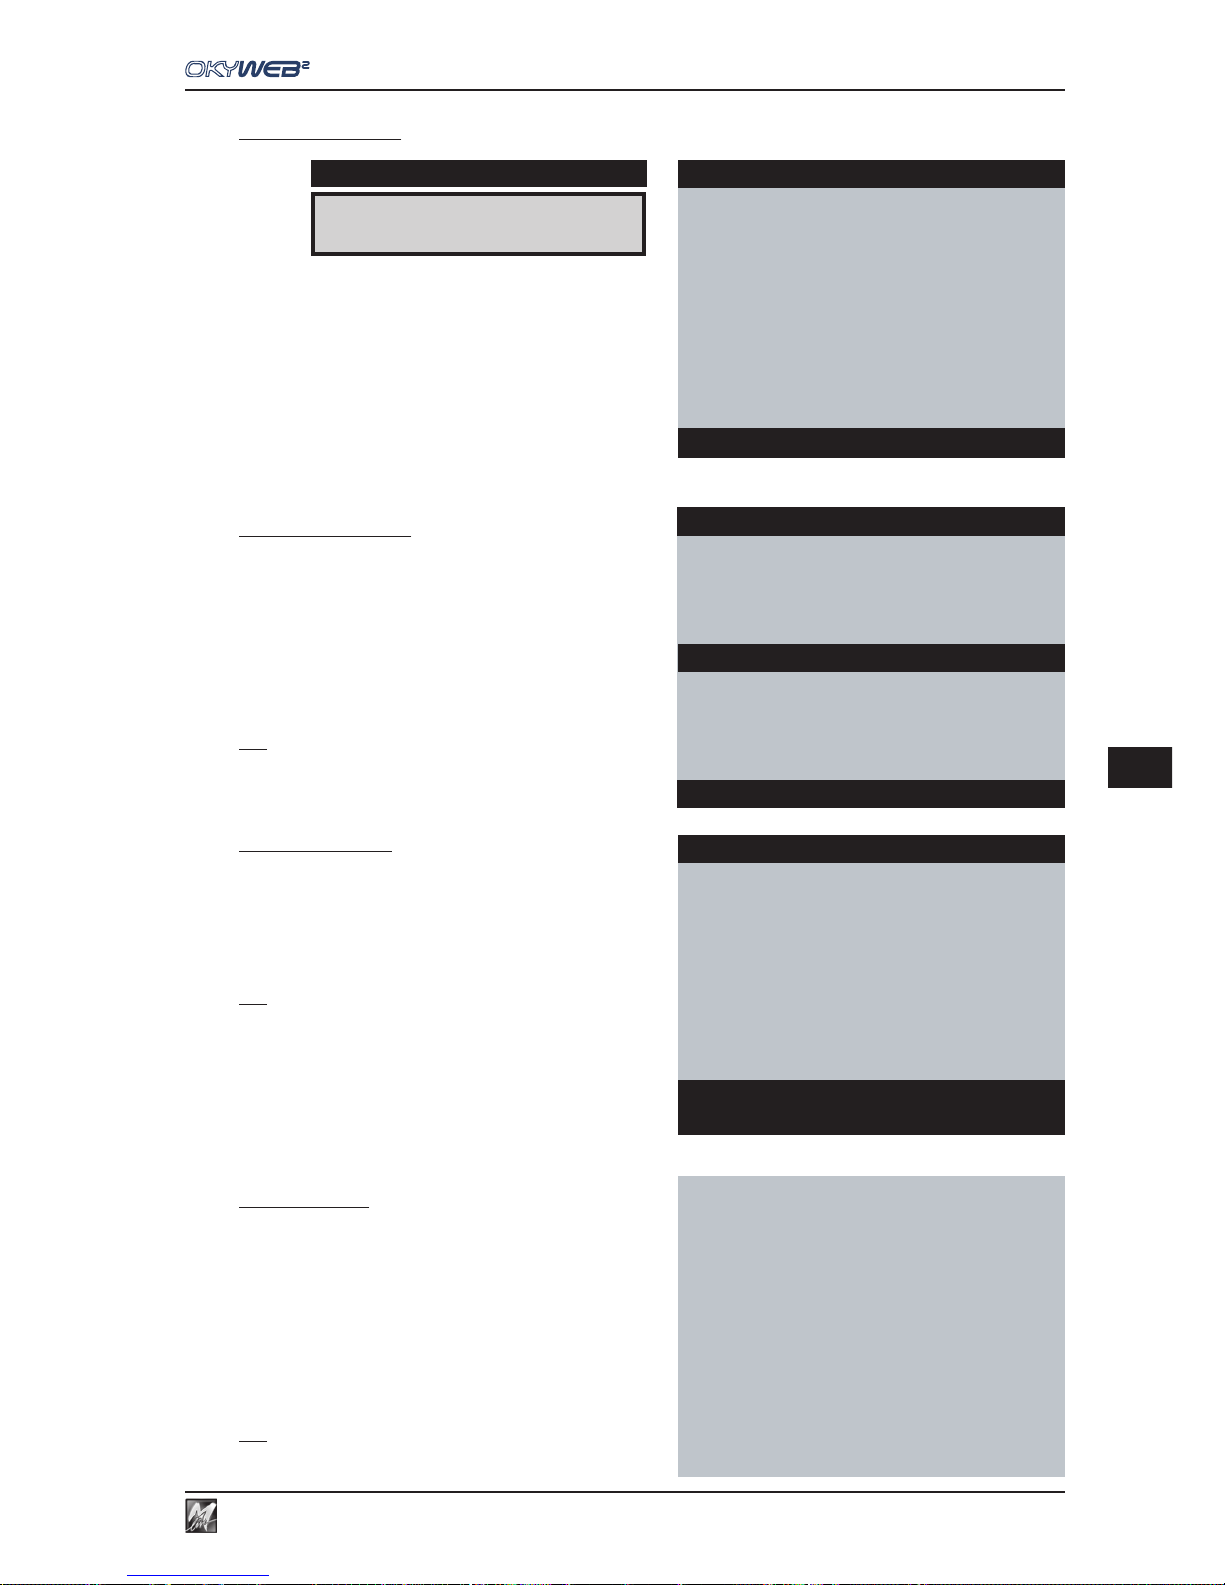
8.5
Options
8
Video Option
TEXT MODE This parameter determines the OkyWeb2
main page general layout:
Txt+Search mode
TXT+Search mode divides the screen into two main parts
and allows to display the song’s lyrics in the top window,
the chords in the centre section and at the same time run a
search for other songs in the bottom window.
The phrases already performed or about to be performed
are written in UPPER CASE letters. The phrases to be
performed soon, but not immediately (anticipated
phrase), are written in lower case.
N.B.: The anticipated phrases can be positioned before or after the upper
case test, according to the characteristics of the lyrics.
Text Only mode
TEXT ONLY mode uses the full screen to display lyrics
and chords with large-format characters.
The phrases already performed or about to be
performed are written in UPPER CASE letters. The
phrases to be performed soon, but not immediately
(anticipated phrase), are written in lower case.
N.B.: The anticipated phrases can be positioned before or after the
upper case test, according to the characteristics of the lyrics.
You can look for other songs even while a backing track
is being played.
In fact, using the UP and DOWN keys, the display passes
temporarily to TXT+SEARCH mode.
Rolling mode
ROLLING mode uses the entire screen to display only
the lyrics of the song being played.
The letters are in large format and the lyrics scroll
continuously, as if on a reel.
You can look for other songs even while a backing track
is being played.
In fact, using the UP and DOWN keys, the display passes
temporarily to TXT+SEARCH mode.
N.B.: in this mode, mainly created for Karaoke functions, the chords
are not displayed.
TXT MODE:ROLLING
DISPLAY
VIDEO OPTIONS
ÆTEXT MODE : ROLLING
TEXT ALIGN : CENTER
COLOURS : SET1
VIDEO IN : ENABLED
Options
Yesterday-Beatles
why she had to go i don’t
OH YESTERDAY CAME SUDDENLY
Dm GBb
WHEN THE SAINTS
WHEN YOUR SMILING
ÆYESTERDAY
YOUR SONG
Select Song
Yesterday-Beatles
why she had to go i don’t
OH YESTERDAY CAME SUDDENLY
Dm GBb
I’M NOT HALF THE MAN I USED
TO BE
THERE’S A SHADOW HANGING OVER ME
OH YESTERDAY CAME SUDDENLY
WHY SHE HAD TO GO I DON’T
Page 60

Options
8.6
TEXT ALIGN This Option allows to choose the alignment of the song’s lyrics.
CENTER Text centred.
LEFT Text aligned on the left.
COLOURS This option allows you to choose one of the four colour settings for the monitor display.
VIDEO IN This parameter allows you to ENABLE or DISABLE the OkyWeb2 video input.
Page 61
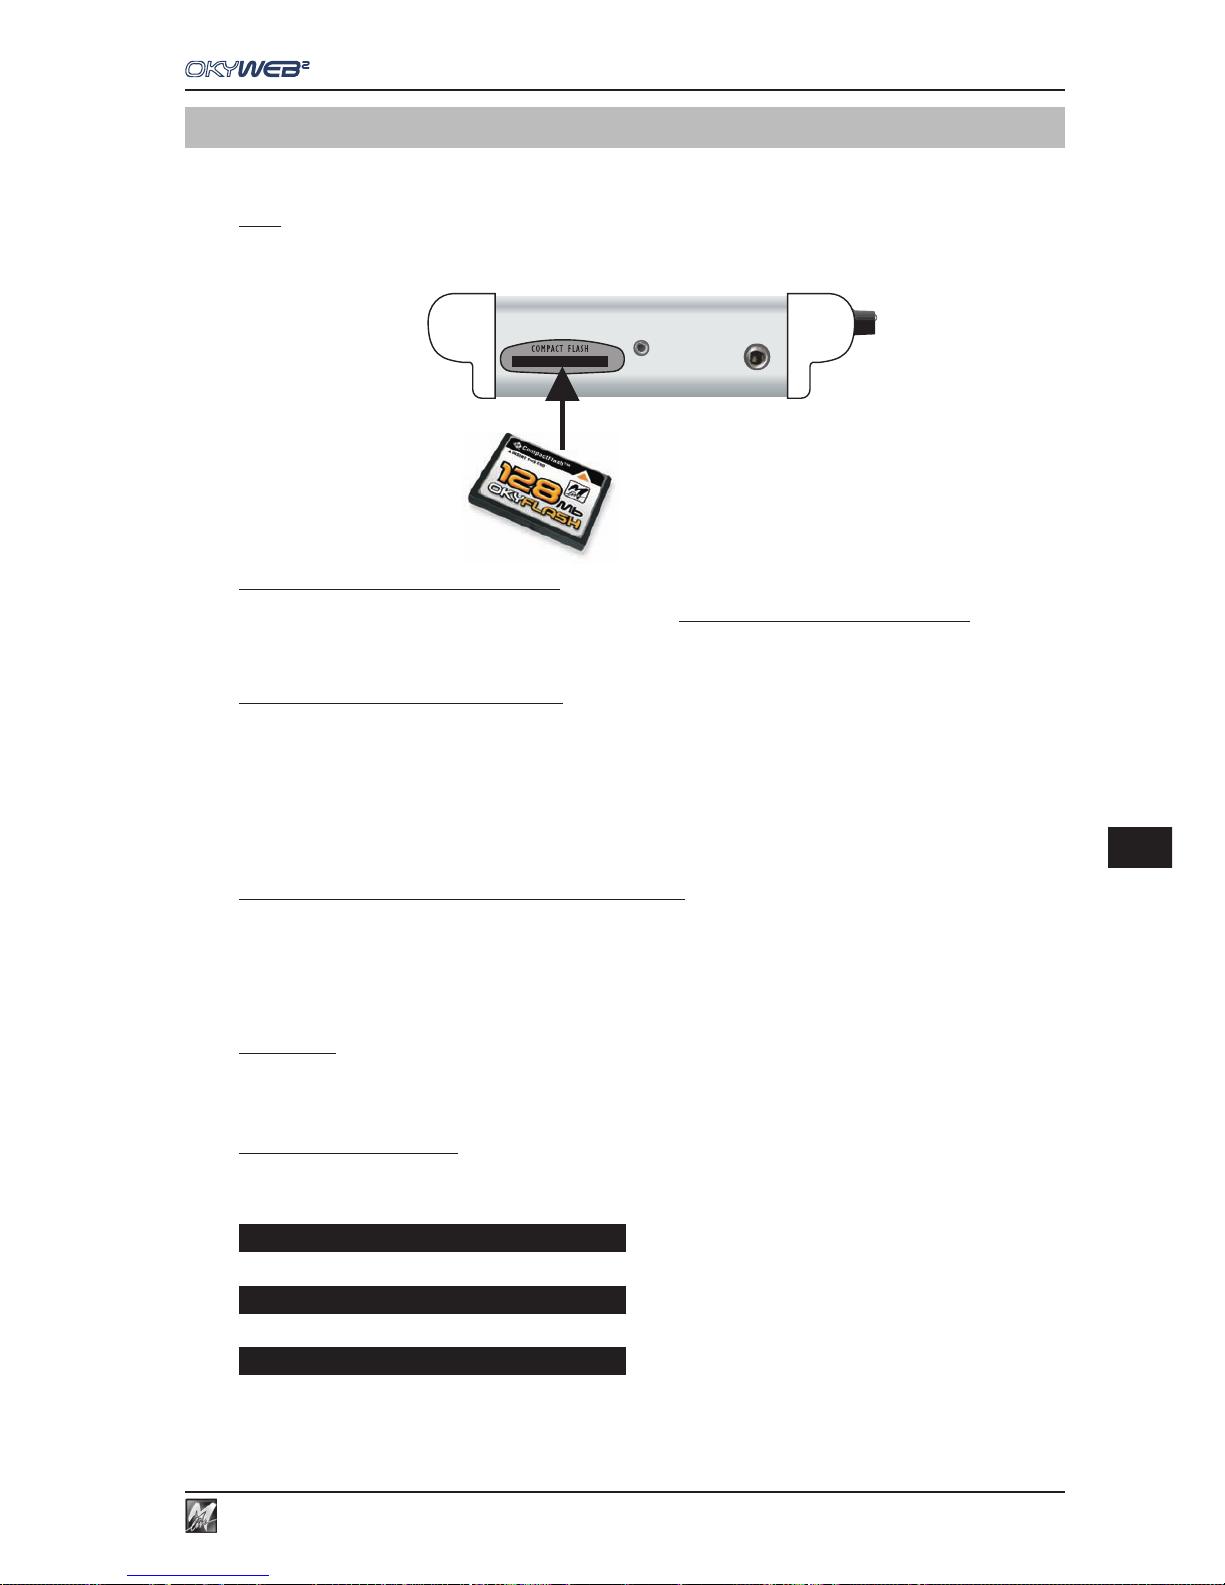
9.1
Compact Flash & Software
9
9 - Compact Flash & Software
OkyWeb2 uses the very small Compact Flash cards as storage media for thousands of backing tracks and
other important data indispensable for its operation.
NOTE: OkyWeb2 is compatible with <CF> CompactFlashTM specifications and has been tested successfully with a lot of Compact Flash
cards available on the market and made by several different Manufacturers. Nevertheless, M-Live will accept no liability for OkyWeb2
malfunctions if Compact Flash cards other than those with the M-Live logo are used.
Formatting Compact Flash cards
In order to be used with OkyWeb2, Compact Flash cards must firstly be appropriately formatted. To carry out
formatting procedure, connect OkyWeb2 to the computer and use the appropriate function of the software supplied.
Capacity of Compact Flash cards
Compact Flash cards are available in various formats with different memory capacities (e.g.: 64MB, 128MB, etc.).
The quantity of backing tracks that can be saved on a Compact Flash card depends on both the format of the
card and the size of the files. Indicatively speaking, a 64MB Compact Flash card can contain 2,000/2,800 backing
tracks, a 128MB card 4,000/5,600 backing tracks, etc.
Considering that the cards can be easily and rapidly interchanged, this gives you an idea of the amount of
material that this technology allows you to use in a fast, user-friendly way.
Inserting and replacing a Compact Flash card
Compact Flash cards must be inserted in the appropriate slot on the front panel.
Once it has been inserted, the card behaves like a hard disk: songs and data saved on it are immediately
available.
Each Compact Flash card contains its own backing tracks, options and data. Therefore, when replacing a card,
remember that the OPTIONS menu settings, EQ/EFX libraries and other parameters can differ from one Compact
Flash card to another.
IMPORTANT: even if “empty, appropriately formatted Compact Flash cards contain data indispensable for
some OkyWeb2 functions. So, to ensure correct operation, the Compact Flash card must
always be inserted, even when OkyWeb2 is used as an expander.
Card Status Messages
When the OkyWeb2 is switched on or when a Compact Flash card is just inserted, OkyWeb2 checks and reads
the contents of the card. An alert message is displayed if any anomalies are found.
Card unreadable (probably damaged).
No card inserted. The slot is empty.
Card empty: no songs stored on card.
Int error Flash not ready
Flash not inserted
Warning no songs
Page 62
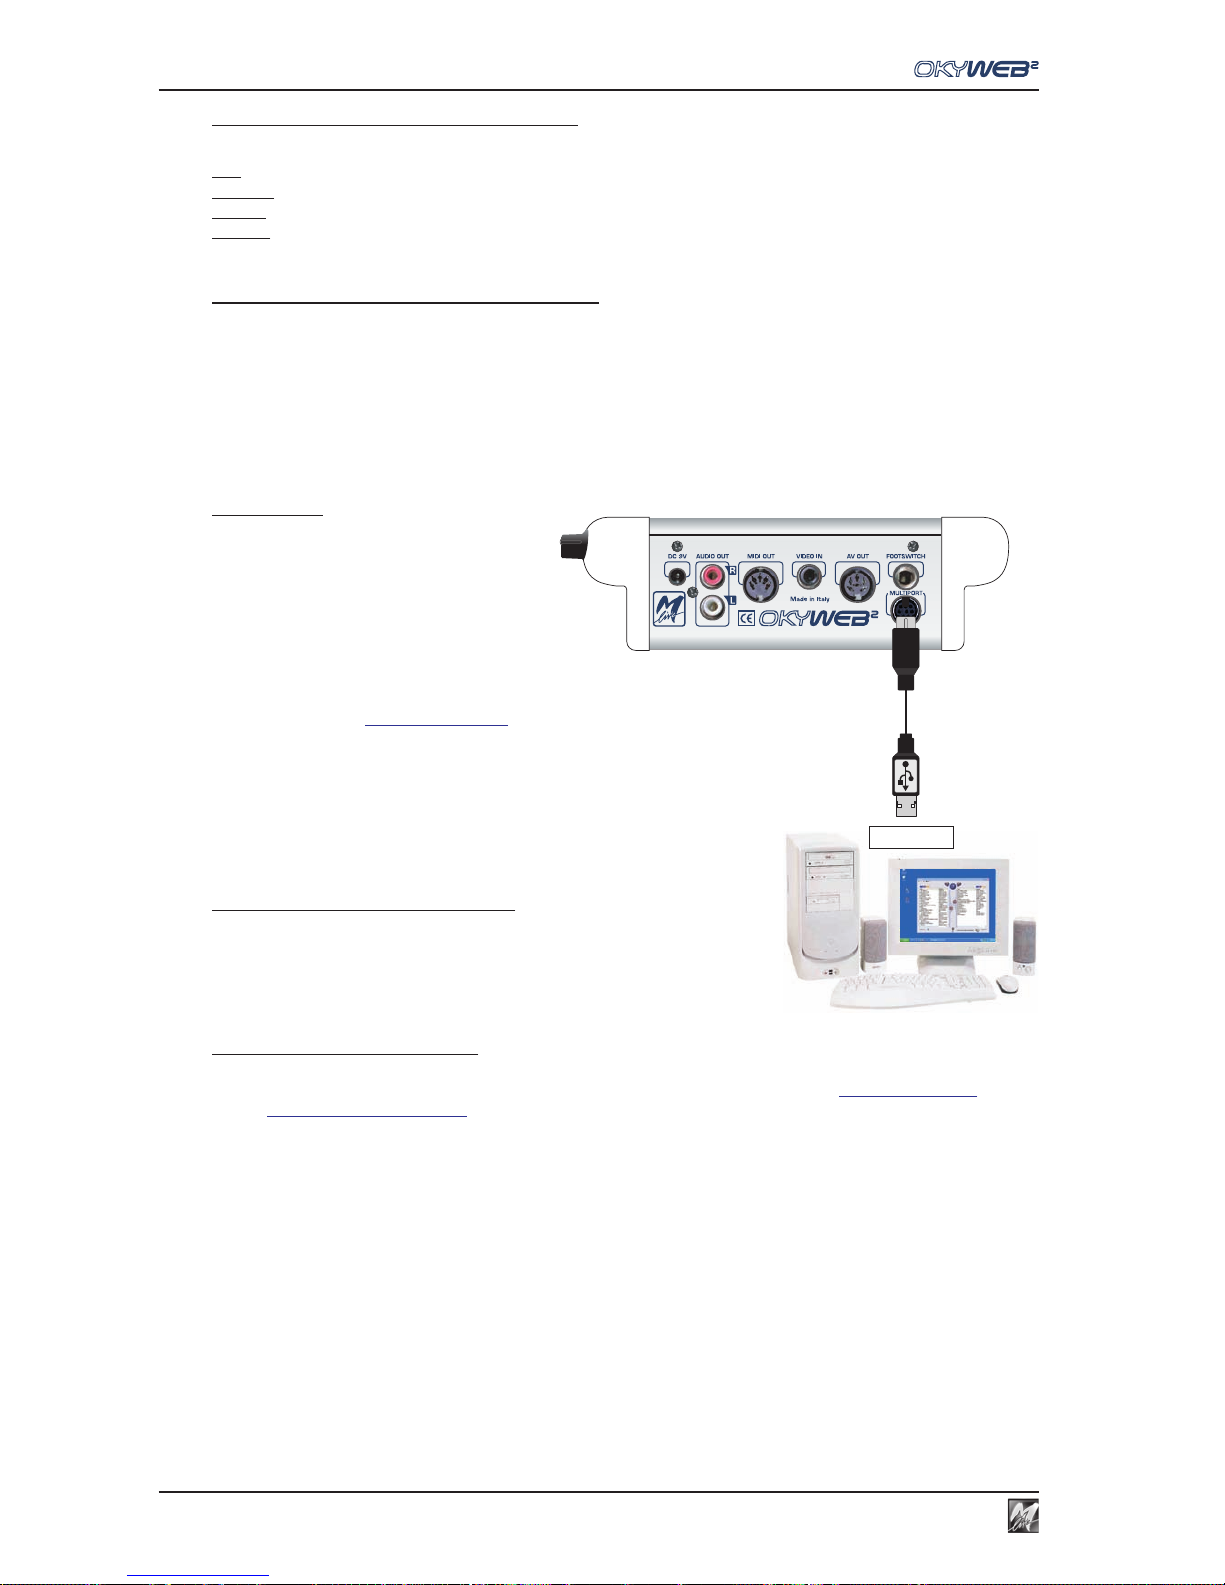
Compact Flash & Software
9.2
MULTIPORT/ USB
CABLE
USB port
Saving data on a Compact Flash card
The procedures that can be carried out in a Compact Flash card directly from OkyWeb2 are:
Edit: editing the sounds and parameters of the Songs’ tracks.
EQ/EFX: saving effects and equalizers for the voice and backing tracks in the songs.
Playlist: creating and editing Playlists.
Options: saving the options of the Options menu.
Saving Songs on a Compact Flash card
Songs can be saved on a Compact Flash card in various ways:
Loading the card at an M-Live Song Service center.
Using an OkyWrite drive for Compact Flash cards connected to a PC.
Connecting OkyWeb2 to a PC via the Multiport and Multiport/USB cable supplied and using the software provided.
Software
All procedure that involves the use of a PC can
be carried out using the software supplied,
which allows to easily handle large libraries of
songs and program various OkyWeb2 functions
more rapidly:
- Saving an unlimited number of songs on a
hard disk.
- Transferring backing tracks to the OkyWeb2 Compact Flash card.
- Programming Playlists.
- Connecting to the OkyWeb2 web site to download thousands of fully licensed MIDI Files.
- Transforming Standard MIDI Files into MF3 files.
- Handling MF5 files.
- Editing and transfer of EQ/EFX presets.
- On-line update of the OkyWeb2 operating system.
- Playing back backing tracks saved on a hard disk using OkyWeb2 instead
of the PC’s player.
Installing the software on your PC
Insert the CD supplied in the computer’s drive and follow installation
instructions.
At the end, if you have an Internet connection, you can use the appropriate
program function to download the latest update available.
Software updates and manual
You can find the users manual on the software CD.
Latest updates to this software and other documentation can be downloaded from the HitTrax/OkyWeb2 support
pages (http://www.okyweb.com.au).
Page 63
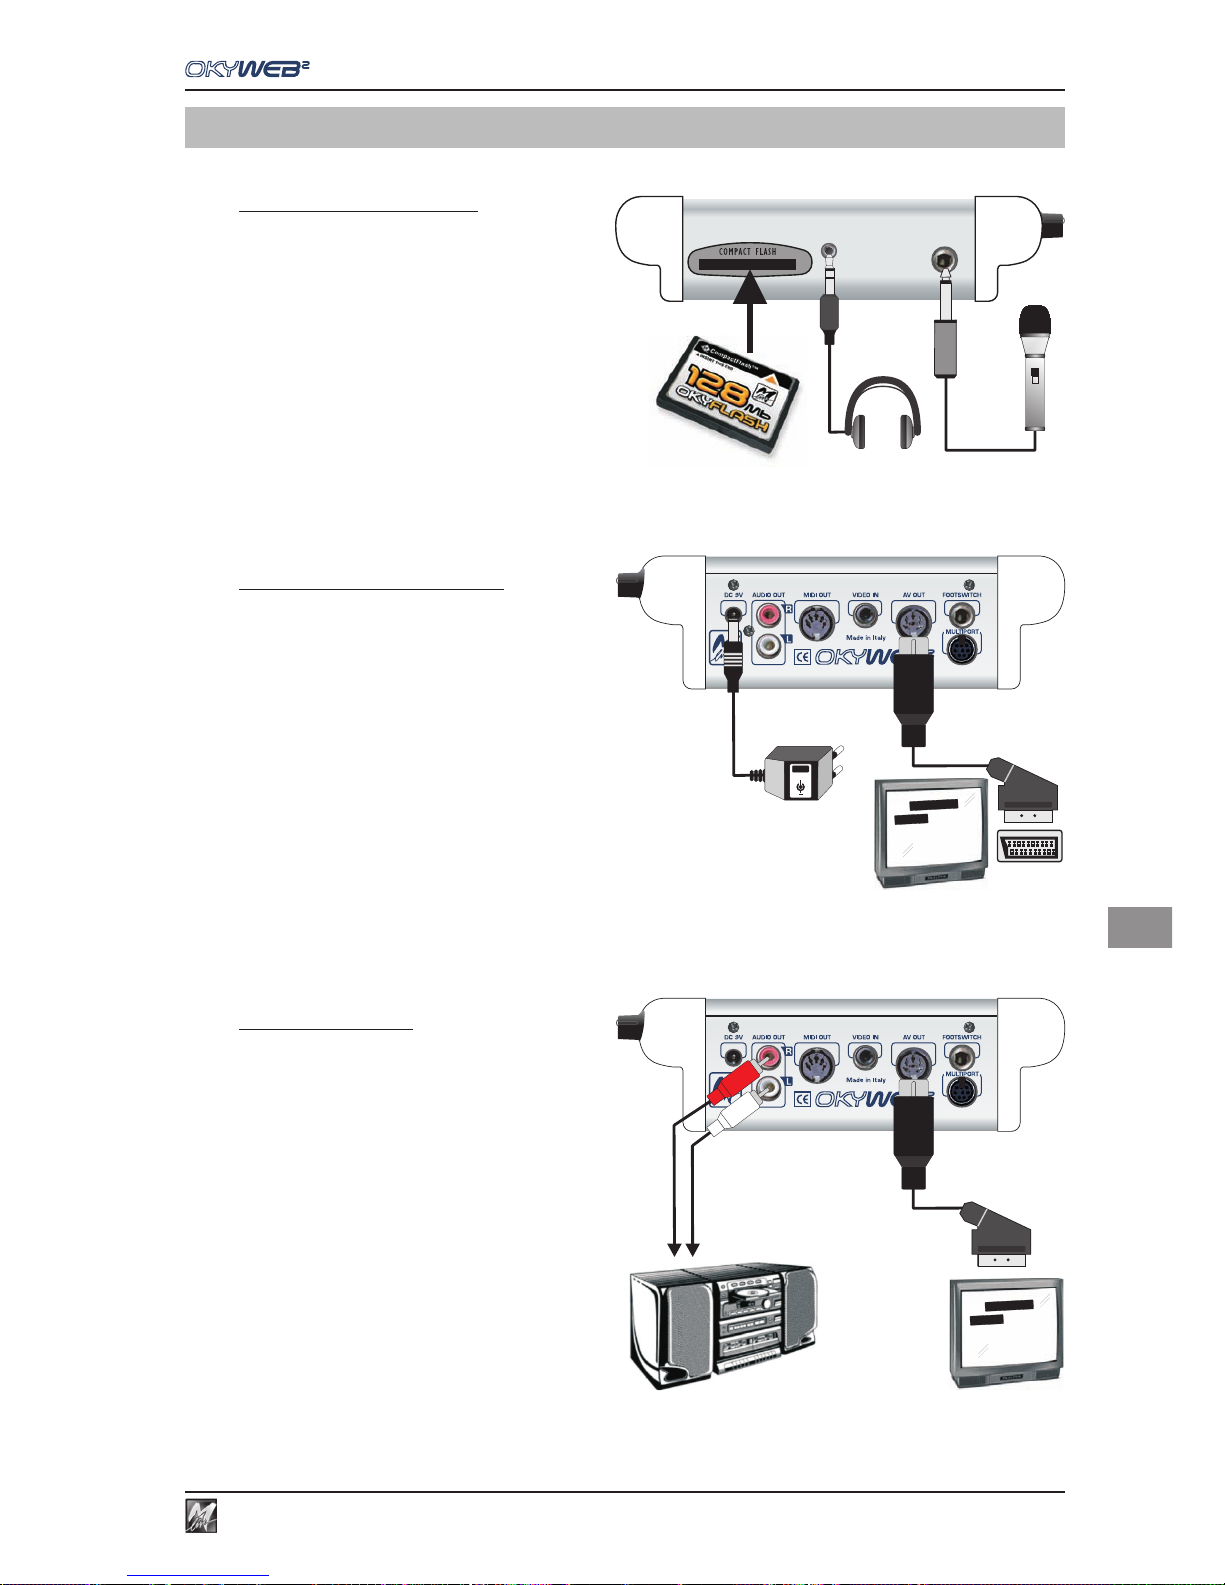
App A.1
Connection Examples
A
Appendix A - Connection Examples
Front panel connections
Audio + Video with TV only
TV + Hi-FI System
MIC
I
AV/ SCART
CABLE
AV
YESTERDAY
ALL MY TROUBLES
SEEM SO FAR AWAY
AV CONNECTOR
+
DC 9V
DC 9V
AV/ SCART
CABLE
AV
YESTERDAY
ALL MY TROUBLES
SEEM SO FAR AWAY
HI-FI
Page 64
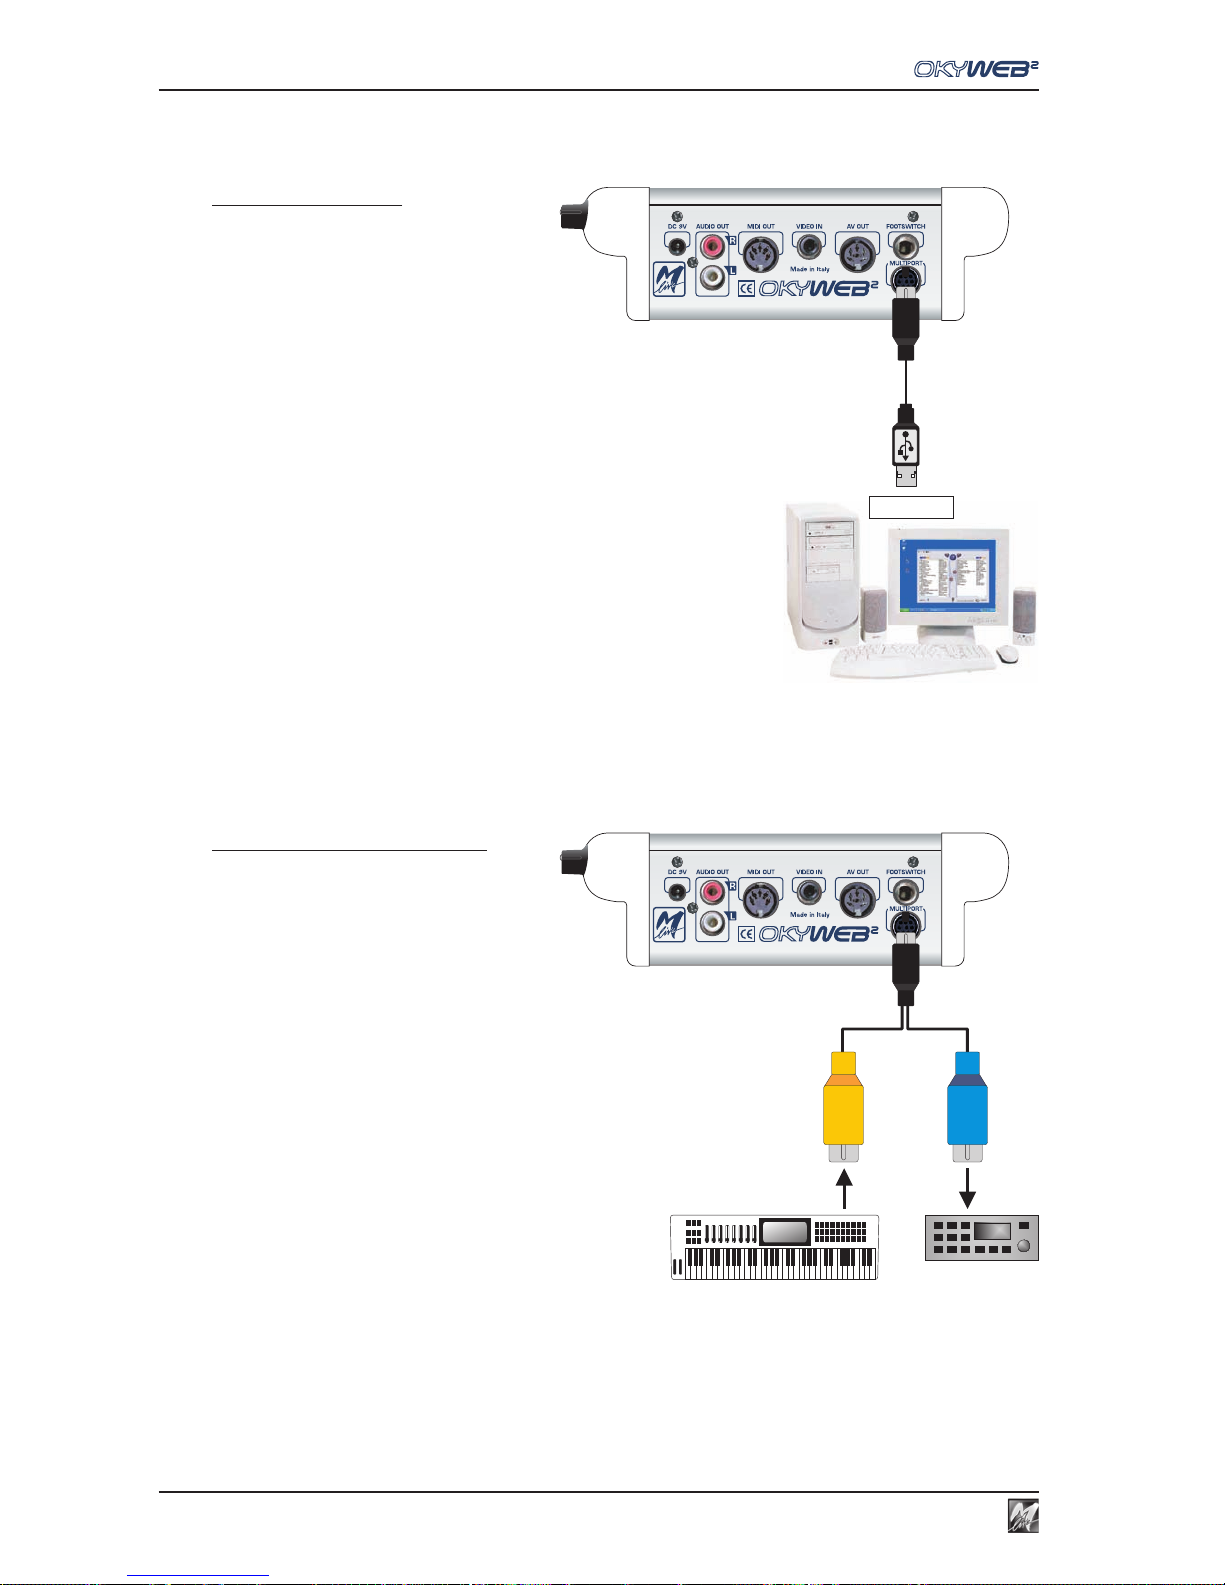
Connection Examples
App A.2
Personal Computer
Keyboard & MIDI equipment
MULTIPORT/ USB
CABLE
USB port
MULTIPORT/ MIDI
CABLE
MIDI OUT
MIDI
THRU
MIDI
IN
MIDI IN
Page 65
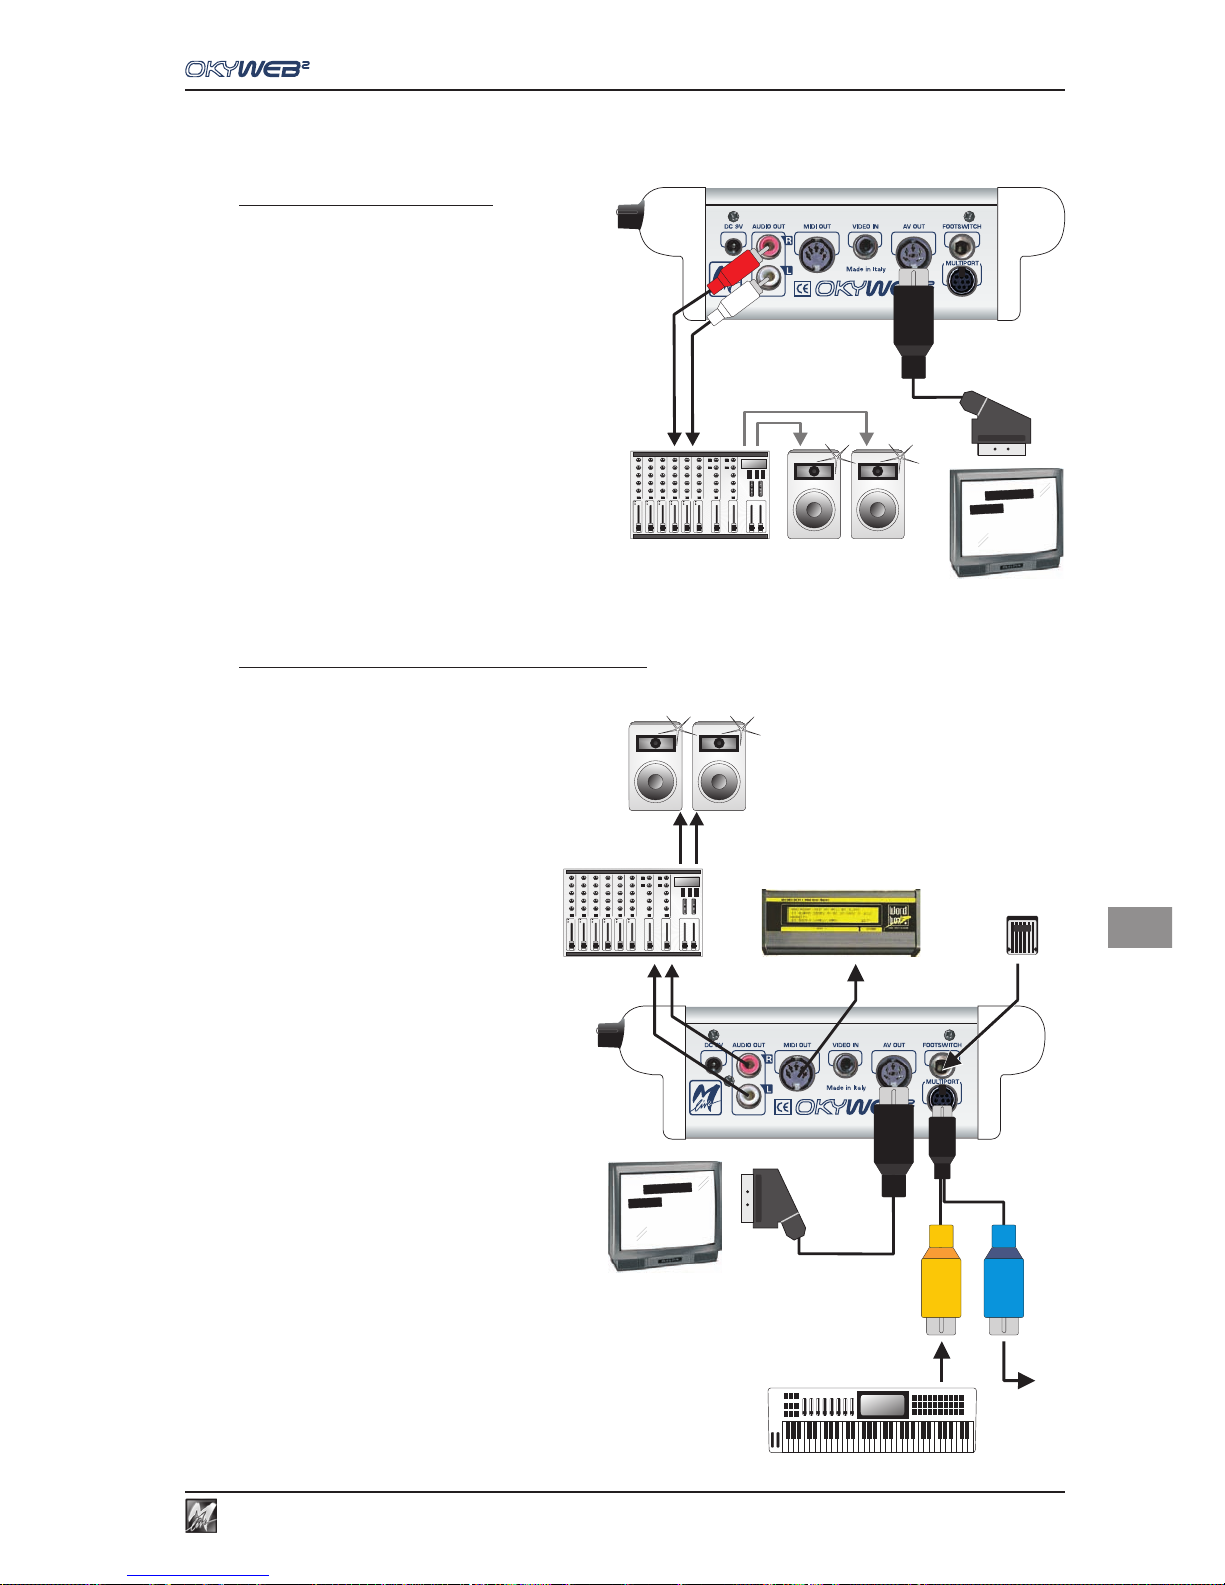
App A.3
Connection Examples
A
AV/ SCART
CABLE
Act. SPEAKERS
AUDIO MIXER
AV
YESTERDAY
ALL MY TROUBLES
SEEM SO FAR AWAY
AV/ SCART
CABLE
WORD BOX
(Lyrics & Chords)
MULTIPORT/ MIDI
CABLE
MIDI OUT
MIDIINMIDI
THRU
FOOT
SWITCH
AV
YESTERDAY
ALL MY TROUBLES
SEEM SO FAR AWAY
Act. SPEAKERS
AUDIO MIXER
TV + amplification system
Live performances using a MIDI keyboard
Page 66
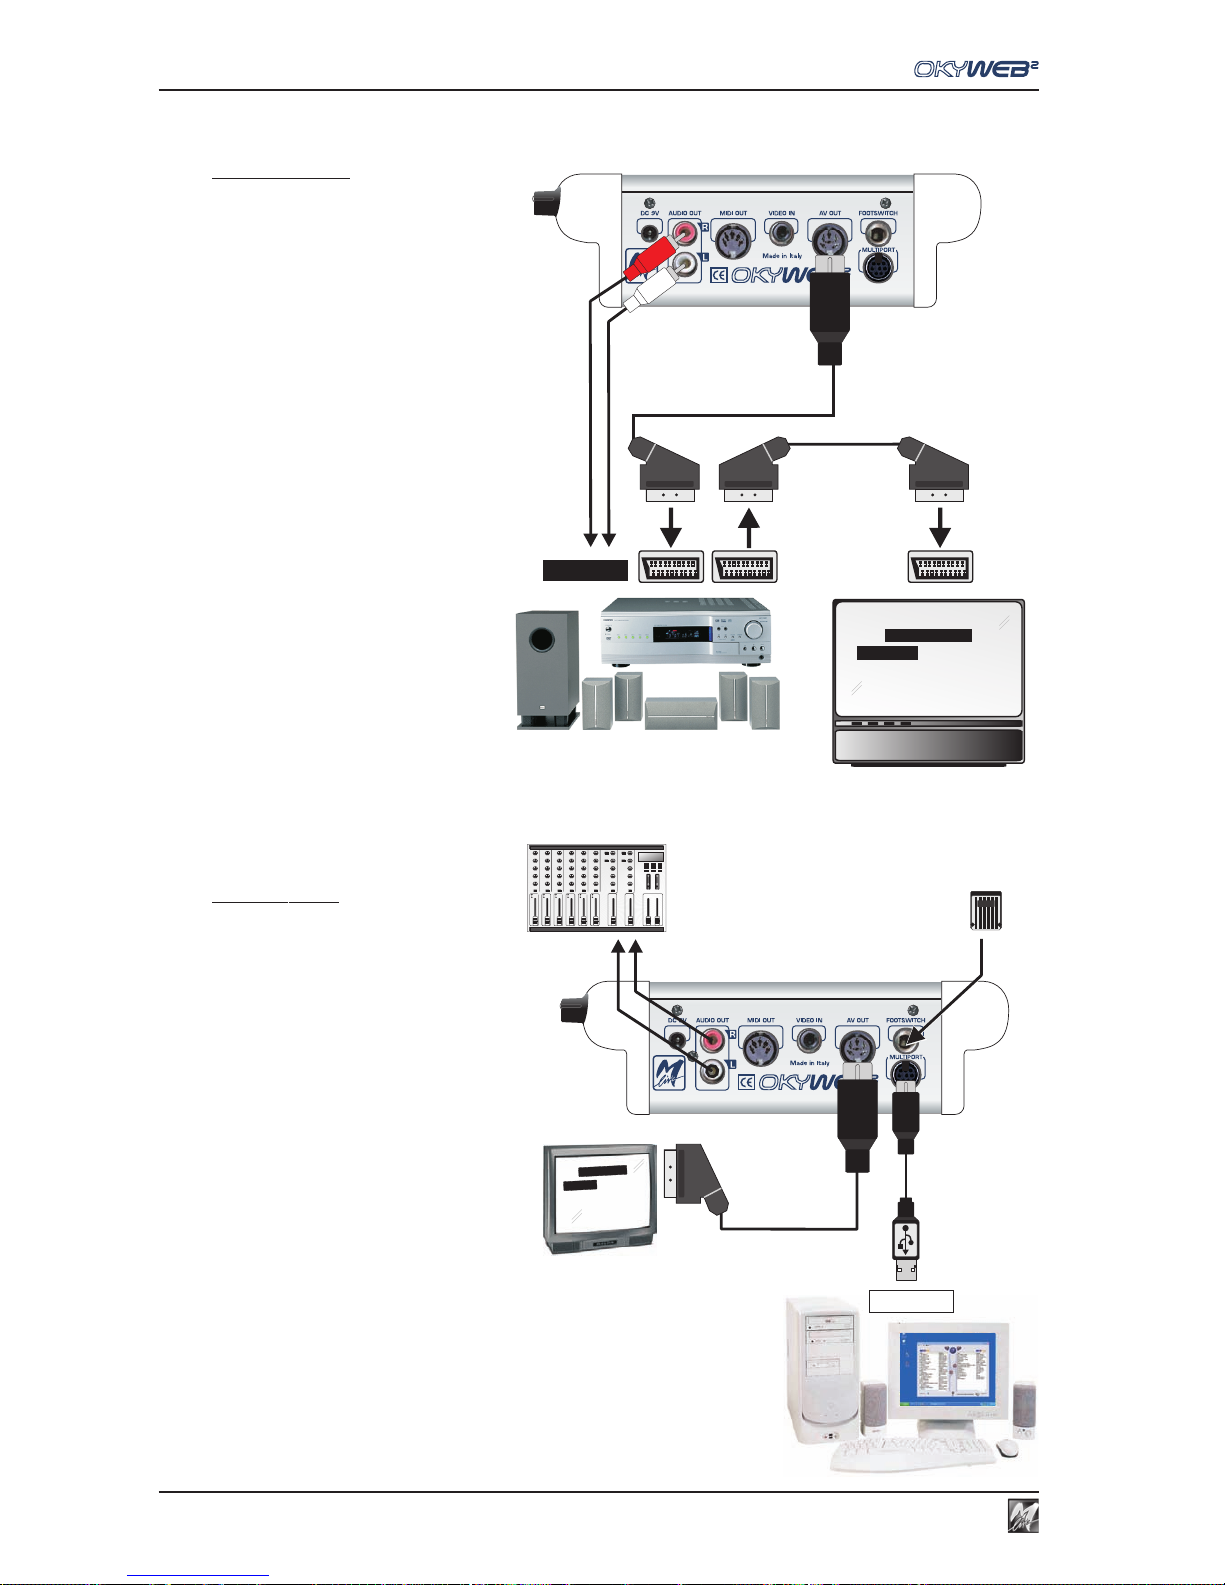
Connection Examples
App A.4
HOME THEATER SYSTEM
AV CONNECTORAV CONNECTOR
YESTERDAY
ALL MY TROUBLES
SEEM SO FAR AWAY
WIDE SCREEN TV
AV/ SCART
CABLE
AV CONNECTOR
LINE IN
Home Theater
Home Studio
MULTIPORT/ AV
CABLE
AUDIO MIXER
AV
YESTERDAY
ALL MY TROUBLES
SEEM SO FAR AWAY
FOOT
SWITCH
MULTIPORT/ USB
CABLE
USB port
Page 67
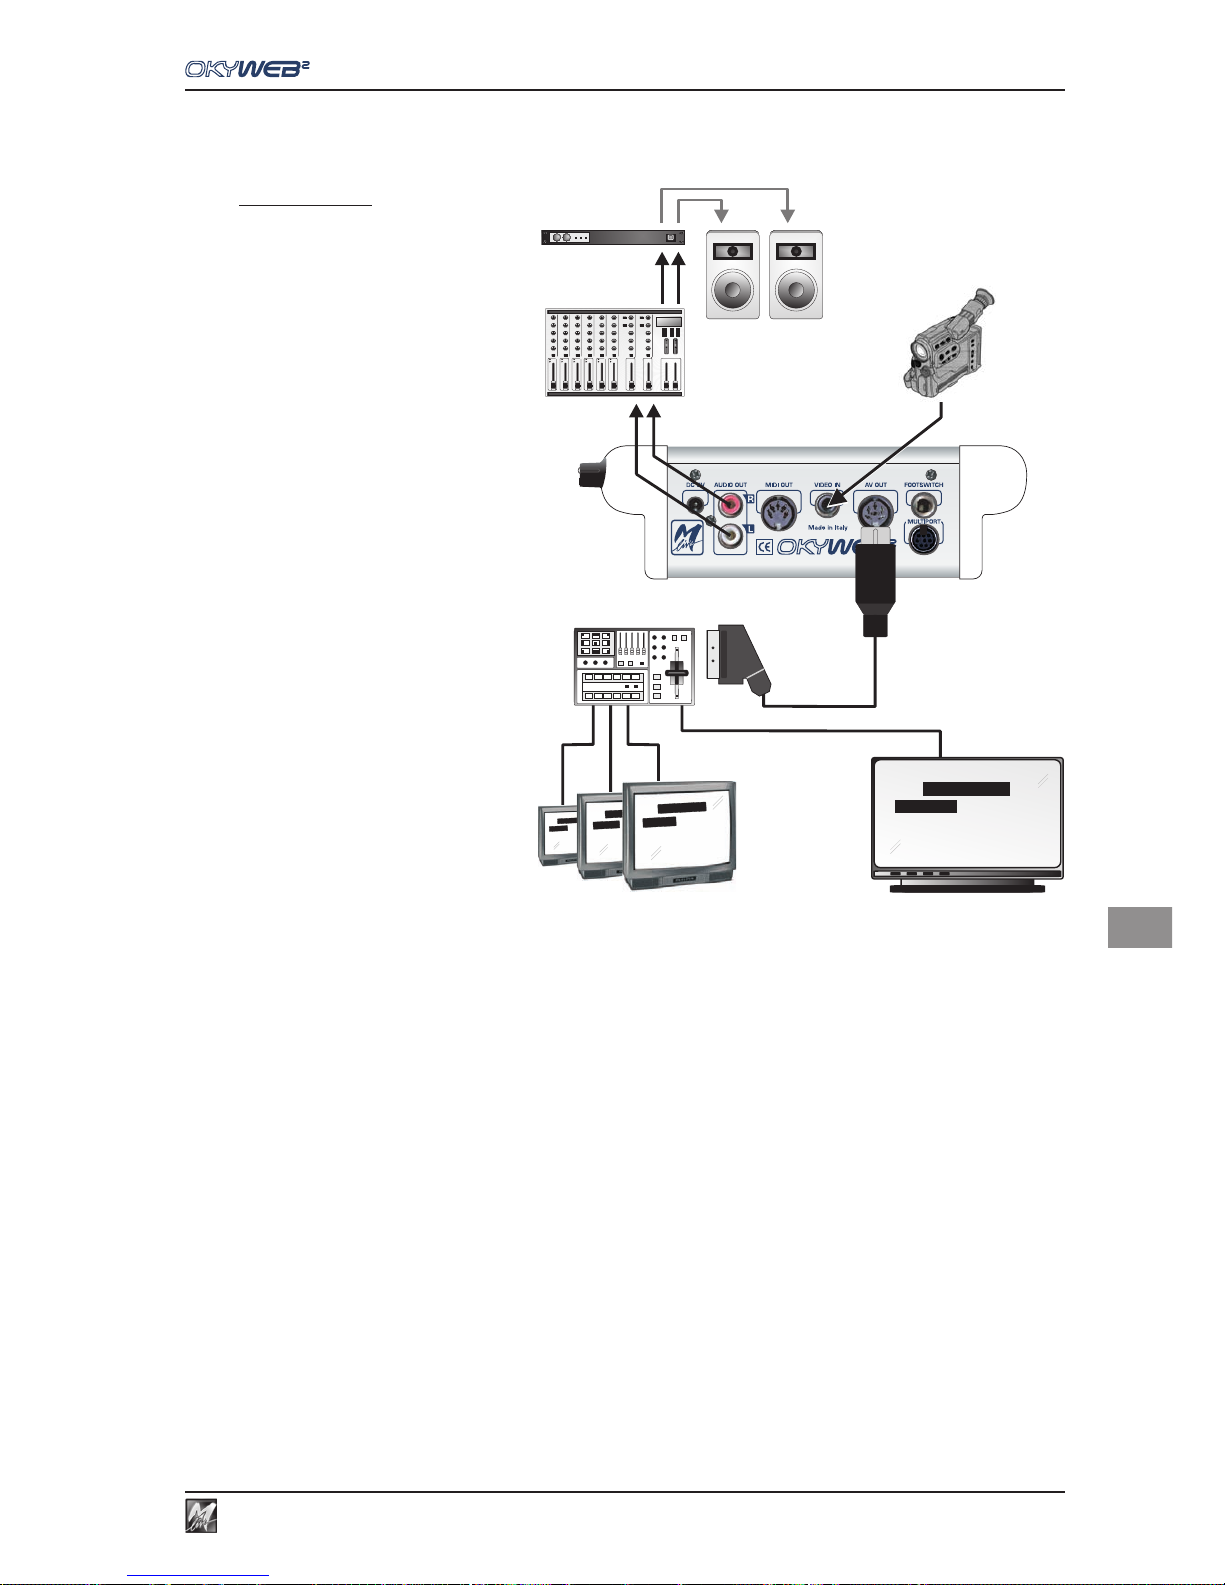
App A.5
Connection Examples
A
AV/ SCART
CABLE
VIDEO
CAMERA
MAIN MONITOR
AUDIO MIXER
VIDEO MIXER / SWITCHER
YESTERDAY
ALL MY TROUBLES
SEEM SO FAR AWAY
MONITORS / TV
AV
YESTERDAY
ALL MY TROUBLES
SEEM SO FAR AWAY
AV
YESTERDAY
ALL MY TROUBLES
SEEM SO FAR AWAY
AV
YESTERDAY
ALL MY TROUBLES
SEEM SO FAR AWAY
POWER AMP
SPEAKERS
Karaoke Club
Page 68
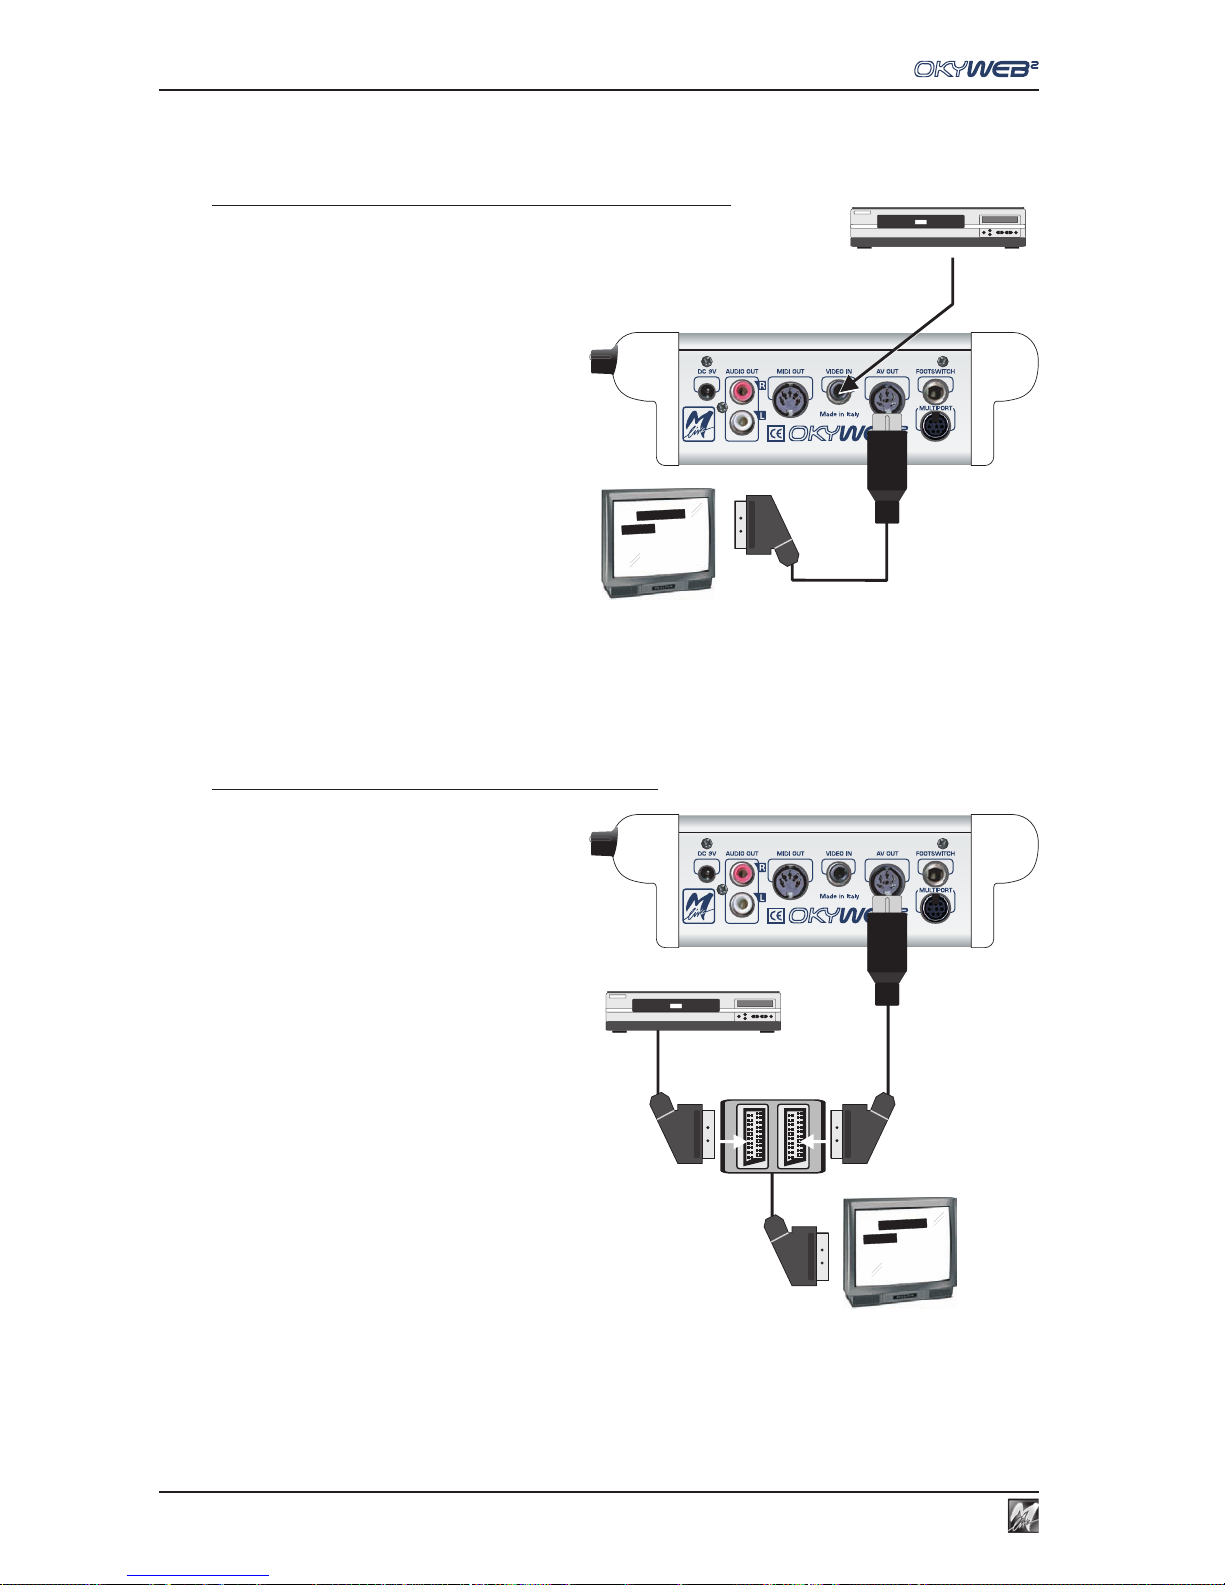
Connection Examples
App A.6
VCR - Video Recorder
AV/ SCART
CABLE
AV
YESTERDAY
ALL MY TROUBLES
SEEM SO FAR AWAY
AV CONNECTOR
AV CONNECTOR
VCR - Video Recorder
MULTIPLE SCART
AV
YESTERDAY
ALL MY TROUBLES
SEEM SO FAR AWAY
VCR / DVD / DivX Image as a background for the lyrics
OkyWeb2 + VCR / DVD / DivX with the same TV
Page 69
App B.1
Lyrics & Chords Compatibility
B
Appendix B - Lyrics & Chords Compatibility
Supported formats and specifications
Parameters to be used within the MIDI files to obtain a perfect compatibility with the software supplied with the
unit and to import Lyrics & Chords properly.
NOTE: MIDI files can be both type 0 and type 1 format.
FORMAT
Character that
MUST precede
the Me ssage
MESSAGE Type RESTRICTIONS
M-LIVE System Exclusive
M-Live System Exclusive
NO restriction
to syllable length
LYRICS
Meta-Event Lyrics ( FF 05 )
NO restriction
to syllable length
KAR
Meta-Event Text ( FF 01 )
NO restriction
to syllable length
SOLTON
<
Meta-Event Lyrics ( FF 05 )
NO restriction
to syllable length
M-LIVE System Exclusive
M-Live System Exclusive 14 characters MAX
LYRICS
%
Meta-Event Lyrics ( FF 05 )
or
Meta-Event Text ( FF 01 )
14 characters MAX
KAR
%
Meta-Event Lyrics ( FF 05 )
or
Meta-Event Text ( FF 01 )
14 characters MAX
SOLTON
%
Meta-Event Lyrics ( FF 05 )
or
Meta-Event Text ( FF 01 )
14 characters MAX
T E X T
C H O R D S
IMPORTANT: as the most part of the MIDI units, the software supplied does not support special characters, i.e.
characters with accent or peculiar characters belonging to a specific national language: in fact, these characters
are usually substituted (if recognized) or ignored (if not recognized).
For a perfect compatibility use only characters which ASCII code included in the range 1 .. 127
Page 70

Lyrics & Chords Compatibility
App B.2
Page 71
App C.1
Troubleshooting
C
Appendix C - Troubleshooting
Errors appearing on the bottom line of the TV screen
On OkyWeb2 Description What to do
Int. Error 01..03
Internal card reading
error.
Switch the OkyW eb2 off, remove and re-insert the
Compact Flash. Switch the OkyW eb2 on again. If
the problem disappears no further actions are
necessary. If the problem persists, try with a new MLive Flash card. If the problem still occurs c ontact
the M-Live assistance service.
Int. Error 04
Acce ss to non-valid area
requested when
accessing card.
This problem may occur when OkySoft2 is being
used. If the problem persists, format the Compact
Flash card. If it still persists, contact the M-Live
assistance service.
Flash not
inserted
Card not inserted
properly.
Insert the Compact Flash c ard correctly.
Error 01
The files required for the
searches in OkyWeb2
have been altered, or the
Flash card is empty.
Use the 'Index Regeneration' function in the Tools
menu of the OkySoft2 program or enter some songs
on the Flash card.
Error 02 Card not initialized
You are advis ed to format and rewrite the whole
Flash card with the program on PC OkySoft2.
Error 03 File system error
You are advis ed to format and rewrite the whole
Flash card with the program on PC OkySoft2.
Error 04 MF3 file not found.
Connect the OkyWeb2 to the PC and delete the
song with the defect. The song will have to be
transferred again with OkySoft2.
Error 05 Card not valid.
You are advis ed to format and rewrite the whole
Flash card with the program on PC OkySoft2. If the
problem persists use an M-Live Compact Flash c ard.
MF3 err. (01..06)
pos: 234
File damaged.
You are advis ed to delete the file on the Flash card
and rewrite it. Connect the OkyWeb2 to the PC and
use OkySoft2 to delete the song with the defect. The
song will have to be transferred again with OkySoft2.
Playlist not
created
Attempte d to access
Playlist menu, but no
Playlist has been created.
Create the Playlists with the program on PC
OkySoft2.
Error 99 General error
Unplug the OkyWeb2 power supply adapter and plug
it in again after some seconds. If the problem
persists contac t the M-Live assistance servic e.
Page 72
Troubleshooting
App C.2
What happens on OkyWeb2 What to do
On OkyWeb2, question marks appear
instead of the words
The file being used has no lyrics.
The music can be heard, but the
Lyrics don't appea r on the TV.
The file probably has no lyrics.
Check the contents of the file.
The audio can be heard, but the
image on the TV is disturbed.
Disconnect the OkyWeb2 power supply and reconnect it
after a few seconds.
The voice can be heard, the lyrics
appear on the TV, but the music can't
be heard
Turn the MIC/MUSIC balance pot to the centre position.
Turn the MIC/MUSIC balance pot to the centre postion.
Enable the microphone channel
with Options/Mic Options/Mic Channel.
Turn the Volume pot.
Check the connections and the volume of the TV or the
amplification sy st em us ed.
Turn the MIC EFX pot.
Adjust the SEND feeds of the EQ/EFX menu.
OkyWeb2 doesn't execute the events
send via MIDI.
Set the MIDI IN port in the Options / MIDI Options menu
OkyWeb2 doesn't execute the
microphone processing e vents
contained in the files.
Enable the playing of the MIC Track
with Options/Mic Options/Mic EQ, Rev and Echo Track.
Neither the voice nor the music can
be heard.
The voice can be heard, but not the
effects.
The music can be heard, the lyrics
apear on the TV, but the voice can't
be heard.
Other non-explicit errors
Page 73
App D.1
Sounds Chart
D
Appendix D - MIDI Sounds
PC Bnk GM Sound Bnk Sound Bnk Sound Bnk Sound Bnk Sound Bnk Sound Bnk Sound
0
0Grand Piano10Bright Piano20 El. Grd Piano30 Honky-Tonky Piano40 El. Piano 1 8
Detuned El.Piano 1
9
Soft El.Piano
16
FM + SA El.Piano
24
60's El.Piano
32
Hard Rhodes
40
Rhodes
5
0 El. Piano 2 8
Detuned El.Piano 3
9
Detuned El.Piano 2
16
FM Soft El.Piano
24
Hard FM EP
32
El. Pi a n o 3
6
0 Harpsichord 8
Coupled Harpsi
7
0Clavinet80Celesta90 Glockenspiel100 Music Box110 Vibraphone120Marimba 8
Balaf on
13
0 Xylophone140 Tubular bells 8
Chur c h Be ll
9
Carill on
15
0Santur160Drawbar Organ 8
Detuned Organ 1
9
Organ 109
16
60's Organ
24
Organ Bass
32
Ev en Bar
40
Organ 1
17
0 Percussive Organ 8
Detuned Organ 2
9
Organ 201
16
Detuned Organ 3
24
Organ 2
32
Organ 101
18
0 Rock Organ 8
Rotary Organ Slow
16
Rotary Organ Perc.
24
Rotary Organ Fast
19
0 Church Organ 8
Church Organ 2
20
0 Reed Organ210 French Accordion 8
Italian A cc ordion
22
0 Harmonica230 Bandoneon240 Nylon Guitar 8
Ukulele
9
VeloHarmnix
16
Ny lo n Gt.o
25
0Steel Guitar 5
Steelstrings Guitar812-Strings Guitar
9
12-Strings Guitar 2
16
Mandolin
24
Steel Guitar 2
32
Stee l Guitar 3
40
Ny lon + Steel
26
0Jazz Guitar 8
Haw aiian Guitar
27
0 Clean Guitar 8
Chorus Guitar 2
9
Chorus Funk
16
Clean Guitar 2
28
0 Mute d Guitar290 Ove rdr ive Guitar 8
Overdrive Guitar 2
30
0 Distorted Guitar 8
Feedback Guitar 1
31
0 Guitar Harmonix 8
Feedback Guitar 2
16
Ac. Guitar Harmonix
MIDI Sounds & Variations
Page 74
Sounds Chart
App D.2
PC Bnk GM Sound Bnk Sound Bnk Sound Bnk Sound Bnk Sound Bnk Sound Bnk Sound
32
0Acoustic Bass330Fingered Bass 8
Fingered Bass 2
16
Dynamic Bass
34
0 Picked Bass350 Fretless Bass360 Slap Bass 1 16
Slap Bass 3
37
0 Slap Bass 2380Synth Bass 1 5
Reso SH Bass
6
Synbass 5
8
Synth Bass 3
9
TB 303 Bass
16
Tekno Bass 1
24
Tekno Bass 2
32
Sq 303
40
Sq 303 ovd
39
0Synth Bass 2 1
Syn bas s 201
2
Modular Bass
3
Seq Bass
4
Analogic Bass
5
Subsonic Bass
6
Synbass 6
8
Synth Bass 4
9
Smooth Bass
16
Rubber Bass
24
80's Bas s
32
SH101 Bass 1
40
SH101 Bass 2
40
0 Violin410 Viola420 Cello430 Contrabass440 Tremolo strings450 Pizzicato s trings460Harp470 Timpani480 Strings Ense mble 8
Orc hestra Ensemble
49
0 Slow Strings Ensemble500 Synth Strings 1 8
Synth Strings 3
51
0 Synth Strings 2520 Choir Aahs530 Voice Oohs540Synvox550Orchestra Hit 8
Impac t Hit
9
Philly Hit
56
0 Classic Trum pe t 8
Flugel Horn
9
Trumpet 2
16
Mariachi Trumpet
24
Bright Trumpet
32
Sharp Trumpets
40
Trumpe t 3
57
0 Trombone580 Tuba590 M uted Trum pet 8
Muted Trumpet 2
60
0 French Horns610Brass Section 8
Brass Sec tion 2
16
Brass Fall
62
0Synth Brass 1 8
Synth Brass 3
63
0Synth Brass 2 8
Synth Brass 4
MIDI Sounds & Variations
Page 75
App D.3
Sounds Chart
D
PC Bnk GM Sound Bnk Sound Bnk Sound Bnk Sound Bnk Sound Bnk Sound Bnk Sound
64
0 Soprano Sax 8
Soprano Sax 2
65
0Alto Sax 8
Hy per Alto Sax
9
Alto Sax 2
16
Vibrato Sax
66
0Tenor Sax 8
Breathy Tenor Sax
67
0Baritone Sax 8
Baritone Sax 2
68
0Oboe690 English horn 8
English Horn 2
70
0Bassoon 8
Bass oon 2
71
0Clarinet 8
Bas s Clar inet
72
0 Piccolo730Flute740 Recorder750Pan Flute760Bottle Blown770Shakuhaci780Whistle790Ocarina800 Square Synw ave 8
Sine Wave
16
Square Synw av e 2
81
0Saw Synwave 8
Saw Synw ave 2
16
Killer Techno Synth
82
0 Syn Calliope830Chiffer Lead Synth840 Charang850Solo Vox8605th Saw Synth870Bass & Lead880 Fantas ia Pad890Warm Pad 8
Rota r y St ring s
90
0Poly Synth Pad910 Space Voice Pad920 Bowed Glass Pad930 Metal Pad940Halo Pad950Sweep Pad
MIDI Sounds & Variations
Page 76
Sounds Chart
App D.4
PC Bnk GM Sound Bnk Sound Bnk Sound Bnk Sound Bnk Sound Bnk Sound Bnk Sound
96
0 Ice Rain970 Soundtrack980Crystal Pad990 Atm ospher e
100
0 Brightness
101
0 Goblin
102
0 Echo Drops 8
Ec ho Pa n
103
0 Star Them e
104
0Sitar
105
0Banjo
106
0Shamisen
107
0Koto 8
Taisho K ot o
108
0Kalimba
109
0Bagpipes
110
0Fiddle
111
0 Shanai
112
0 Tinkle Bell
113
0 Agogo
114
0Steel Drums
115
0 Woodblock 8
Castanets
116
0Taiko 8
Concert B-drum
117
0 Melo Toms 8
Melo To ms 2
118
0Synth Drums 8
TR-808 Toms
9
El. Pe rc us s i o ns
119
0 Reverse Cymbal
120
0 Gt. Fre t Noise 1
Gt. Cut noise
2
String Slap
5
Bass Slide
6
Pic k S c rape
121
0Breath Noise 1
Fl. Key Ckick
122
0 Seashore 1
Rain
2
Thunder
3
Wind
4
Stream
5
Bubbles
123
0Bird 1
Dog
2
Horse Gallop
3
Bird 2
124
0 Te lephone Ring 1
Telephone Ring 2
2
Door Creaking
3
Door Clos ing
4
Scratch
5
Wind Chime
125
0Helicopter 1
Car Engine Start
2
Car Br eaking
3
Car Pas s
4
Car Cra s h
5
Police Siren
6
Train
7
Jet Takeof f
8
Star ship
9
Burst Noise
126
0 Applause 1
Laughing
2
Screaming
3
Pu n c h
4
Heart Beat
5
Footstep
127
0 Gun Shot 1
Mac hine Gun
2
Laser Gun
3
Ex p lo s i o n
MIDI Sounds & Variations
PC Bank D rum Kit
0
0
Standard Se t 1
1
0
Standard Set 2
2
0
R&B Set
3
0
Hip - Hop Set
8
0
Ro om Se t
16
0
Pow er Se t
24
0
Electronic Set
25
0
TR-808 Set
26
0
Dan c e Se t
27
0
Techno Set
32
0
Jazz Set
40
0
Brush Set
48
0
Orchestr a Set
49
0
Ethnic Set
53
0
BD & SD Set
56
0
SFX Set
127
0
CM-64/32 Se t
MIDI Drum Kits
Page 77
App E.1
Families of Sounds
E
Appendix E - Families of Sounds
#
Extended Name Short Name PC Bank
1
Grand Piano GrandPiano 0 0
2
Bright Piano BrghtPiano 1 0
3
Electric Grand Piano El.G.Piano 2 0
4
Honky Tonky Piano HonkyPiano 3 0
5
Electric Piano 1 El.Piano1 4 0
6
Electric Piano 2 El.Piano2 5 0
7
Electric Piano 3 El.Piano3 5 32
8
Rhodes Vintage Rhodes 4 40
9
Hard Rhodes HardRhodes 4 32
10
60's Electric Piano 60 E.Piano 4 24
11
FM+SA ElectricPiano FM+SA EP 4 16
12
FM Hard Elec.Pia no FM Hard EP 5 24
13
FM Soft Elec.Piano FM Soft EP 5 16
14
Soft Electric Piano SoftEl.Pno 4 9
15
Detuned Elec.Piano1 Det.Piano1 4 8
16
Detuned Elec.Piano2 Det.Piano2 5 9
17
Detuned Elec.Piano3 Det.Piano3 5 8
18
Harpsichord Harpsi 1 6 0
19
Coupled Harpsi Harpsi 2 6 8
20
Clavinet Clavinet 7 0
PIANO
#
Extended Name Short Name PC Bank
1
Celesta Celesta 8 0
2
Glockenspiel Glockensp. 9 0
3
Music Box Music Box 10 0
4
Vibraphone Vibes 11 0
5
Marimba Marimba 12 0
6
Balafon Balafon 12 8
7
Xylophone Xylophone 13 0
8
Tubular Bells Tub.Bells 14 0
9
Church Bell ChurchBell 14 8
10
Carillon Carillon 14 9
11
Santur 1 Santur 1 15 0
12
Santur 2 Santur 2 15 1
CHROM PERC
#
Extended Name Short Name PC Bank
1
Drawbar Organ DrawbOrgan 16 0
2
Even Bar Organ Even Bar 16 32
3
Organ 1 Organ 1 16 40
4
Organ 2 Organ 2 17 24
5
60's Organ 60's Organ 16 16
6
Organ 109 Organ 109 16 9
7
Organ 101 Organ 101 17 32
8
Organ 201 Organ 201 17 9
9
Percussive Organ Perc.Organ 17 0
10
Rock Organ Rock Organ 18 0
11
Rotary Organ RotaryOrg1 18 8
12
Rotary Organ Perc. RotaryOrg2 18 16
13
Rotary Organ Fast RotaryOrg3 18 24
14
Organ Bass OrganBass 16 24
15
Detuned Organ 1 Det.Org.1 16 8
16
Detuned Organ 2 Det.Org.3 17 8
17
Detuned Organ 3 Det.Org.2 17 16
18
Church Organ 1 ChurchOrg1 19 0
19
Church Organ 2 ChurchOrg2 19 8
20
Reed Organ Reed Organ 20 0
21
French Accordion Musette 21 0
22
Italian Accordion Fisa 21 8
23
Bandoneon Bandoneon 23 0
24
Harmonica Harmonica 22 0
ORGAN
Page 78
Families of Sounds
App E.2
#
Extended Name Short Name PC Bank
1
Nylon Guitar Nylon Gtr 24 0
2
Nylon Guitar.o NylonGtr.o 24 16
3
Nylon+Steel Guitar NylonSteel 25 40
4
Ukulele Ukulele 24 8
5
Steel Guitar 1 Steel Gtr1 25 0
6
Steel Guitar 2 Steel Gtr2 25 24
7
Steel Guitar 3 Steel Gtr3 25 32
8
Steelstrings Guitar SteelStGtr 25 5
9
12-Strings Guitar1 12Str.Gtr1 25 8
10
12-Strings Guitar2 12Str.Gtr2 25 9
11
Mandolin Mandolin 25 16
12
Velocity Harmonics GtrHarmonx 24 9
13
Jazz Guitar Jazz Gtr 26 0
14
Hawaiian Guitar Hawaii Gtr 26 8
15
Clean Guitar 1 Clean Gtr1 27 0
16
Clean Guitar 2 Clean Gtr2 27 16
17
Chorus Guitar 1 ChorusGtr1 27 9
18
Chorus Guitar 2 ChorusGtr2 27 8
19
Muted Guitar Muted Gtr 28 0
20
Funk Guitar Funk Gtr 28 8
21
Overdrive Guitar 1 OvrdrvGtr1 29 0
22
Overdrive Guitar 2 OvrdrvGtr2 29 8
23
Distorted Guitar DistortGtr 30 0
24
Feedback Guitar 1 FeedBkGtr1 30 8
25
El. Guitar Harmonix El.GtrHarm 31 0
26
Feedback Guitar 2 FeedBkGtr2 31 8
27
Ac. Guitar Harmonix Ac.GtrHarm 31 16
GUITAR
#
Extended Name Short Name PC Bank
1
Acoustic Bas s AcoustBass 32 0
2
Fingered Bass 1 FingrBass1 33 0
3
Fingered Bass 2 FingrBass2 33 8
4
Picked Bass PickedBass 34 0
5
Fretless Bas s Fretls Bass 35 0
6
Slap Bass 1 Slap Bas s 1 36 0
7
Slap Bass 3 Slap Bass3 36 16
8
Slap Bass 2 Slap Bas s 2 37 0
9
Synth Bass 1 SynBass 1 38 0
10
Synth Bass 2 SynBass 4 39 0
11
Synth Bass 3 SynBass 3 38 8
12
Synth Bass 4 SynBass 4 39 8
13
Synth Bass 5 SynBass 5 38 6
14
Synth Bass 6 SynBass 6 39 6
15
Techno Bass 1 Teknobass1 38 16
16
Techno Bass 2 Teknobass2 38 24
17
TB 303 Bass TB303 Bass 38 9
18
Synth Bass 201 SynBass201 39 1
19
SH101 Bass 1 SH101 Bs 1 39 32
20
SH101 Bass 2 SH101 Bs 2 39 40
21
80's Bass 80's Bass 39 5
22
Subsonic Bass SubsonBass 39 24
23
Smooth Bass Sm oothBass 39 9
24
Modular Bass Modul.Bass 39 2
25
Sequencer Bass Seq Bass 39 3
26
Analogic Bass AnalogBass 39 4
27
Rubber Bass RubberBass 39 16
28
Res o SH Bas s Res oSH Bs 38 5
29
Sq 303 Bass Sq303 Bs 38 32
30
Sq 303 Overdrv Bass Sq303BsOvd 38 40
BASS
#
Extended Name Short Name PC Bank
1
Violin Violin 40 0
2
Viola Viola 4 1 0
3
Cello Cello 42 0
4
Contrabass Contrabas s 43 0
5
Tremolo Strings TremoloStr 44 0
6
Pizzica to String s Pizzicato 4 5 0
7
Harp Harp 46 0
8
Timpani Timpani 47 0
ORCHESTRA
#
Extended Name Short Name PC Bank
1
Strings Ensemble Strings 48 0
2
Slow String s Ensem ble SlowStrngs 49 0
3
Orches tra Ens emble Orchestra 48 8
4
Synth Strings 1 SynStrngs1 50 0
5
Synth Strings 3 SynStrngs3 50 8
6
Synth Strings 2 SynStrngs2 51 0
7
Choir Aahs ChoirAahs 52 0
8
Voice Oohs VoiceOohs 53 0
9
Synvox Synvox 54 0
10
Orches tra Hit Orch.Hit 55 0
11
Impact Hit Impact Hit 55 8
12
Philly Hit Philly Hit 55 9
ENSEMBLE
Page 79
App E.3
Families of Sounds
E
#
Extended Name Short Name PC Bank
1
Square Synwave 1 SquarWave1 80 0
2
Square Synwave 2 SquarWave2 80 16
3
Saw Synwave 1 Saw Wave 1 81 0
4
Saw Synwave 2 Saw Wave 2 81 8
5
Sine Wave Sine Wave 80 8
6
Killer Techno Synth Kill Tsynt 81 16
7
Calliope Synth Calliope 82 0
8
Chiffer Lead Synth ChifferSyn 83 0
9
Charang Charang 84 0
10
Solo Vox Solo Vox 85 0
11
5th Saw Synth 5th Synth 86 0
12
Bass & Lead Bass&Lead 87 0
#
Extended Name Short Name PC Bank
1
Fantasia Pad Fantasia 88 0
2
Warm Pad Warm Pad 89 0
3
Rotary Strings Rotary Strings 89 8
4
Poly Synth Pad PolySynPad 90 0
5
Space Voice Pad SpaceVxPad 91 0
6
Bowed Glass Pad BowGlasPad 92 0
7
Metal Pad Metal Pad 93 0
8
Halo Pad Halo Pad 94 0
9
Sweep Pad Sweep Pad 95 0
#
Extended Name Short Name PC Bank
1
Ice Rain Ice Rain 96 0
2
Soundtrack Soundtrack 97 0
3
Crystal Pad CrystalPad 98 0
4
Atmosphere Atmosphere 99 0
5
Brightness Brightness 100 0
6
Goblin Goblin 101 0
7
Echo Drops Echo Drops 102 0
8
Echo Pan Echo Pan 102 8
9
Star Them e Star Theme 103 0
#
Extended Name Short Name PC Bank
1
Sitar Sitar 1 04 0
2
Banjo Banjo 105 0
3
Shamisen Shamisen 106 0
4
Koto Koto 107 0
5
Taisho Koto TaishoKoto 107 8
6
Kalimba Kalimba 108 0
7
Bagpipes Bagpipes 109 0
8
Fiddle Fiddle 110 0
9
Shanai Shanai 111 0
SYN LEAD
SYN PAD
SYN SFX
ETHNIC
#
Extended Name Short Name PC Bank
1
Classic Trumpet 1 Trum pet 1 56 0
2
Classic Trumpet 2 Trum pet 2 56 9
3
Classic Trumpet 3 Trum pet 3 56 40
4
Mariachi Trumpet Mariachi 56 16
5
Sharp Trumpets Sharp Trps 56 32
6
Bright Trumpet Bright Trp 56 24
7
Muted Trumpet 1 Muted Trp1 59 0
8
Muted Trumpet 2 Muted Trp2 59 8
9
Flugel Horn FlugelHorn 56 8
10
Trombone Trombone 57 0
11
Tuba Tuba 58 0
12
French Horns FrenchHrns 60 0
13
Brass Section 1 Brass 1 61 0
14
Brass Section 2 Brass 2 61 8
15
Brass Fall Brass Fall 61 16
16
Synth Brass 1 Syn Brass 1 62 0
17
Synth Brass 3 Syn Brass 2 62 8
18
Synth Brass 2 Syn Brass 3 63 0
19
Synth Brass 4 Syn Brass 4 63 8
#
Extended Name Short Name PC Bank
1
Soprano Sax 1 Soprano 1 64 0
2
Soprano Sax 2 Soprano 2 64 8
3
Alto Sax 1 Alto Sax 1 65 0
4
Alto Sax 2 Alto Sax 2 65 9
5
Hyper Alto Sax HypAltoSax 65 8
6
Vibrato Sax VibratoSax 65 16
7
Tenor Sax Tenor Sax 66 0
8
Breathy Tenor Sax BrthyTenor 66 8
9
Baritone Sax 1 Baritone 1 67 0
10
Baritone Sax 2 Baritone 2 67 8
11
Oboe Oboe 68 0
12
English Horn 1 Engl.Horn1 69 0
13
English Horn 2 Engl.Horn2 69 8
14
Bassoon 1 Bassoon 1 70 0
15
Bassoon 2 Bassoon 2 70 8
16
Clarinet Clarinet 71 0
17
Bass Clarinet Bass Clar. 71 8
#
Extended Name Short Name PC Bank
1
Piccolo Piccolo 72 0
2
Flute Flute 73 0
3
Recorder Recorder 74 0
4
Pan Flute Pan Flute 75 0
5
Bottle Blown Bottle Bl. 76 0
6
Shakuhaci Shakuhaci 77 0
7
Whistle Whistle 78 0
8
Ocarina Ocarina 79 0
BRASS
REED
PIPE
Page 80
Families of Sounds
App E.4
#
Extended Name Short Name PC Bank
1
Tinkle Bell TinkleBell 112 0
2
A Go-Go Bell Agogo 113 0
3
Steel Drums SteelDrums 114 0
4
Woodblock Woodblock 115 0
5
Castanets Castanets 115 8
6
Taiko Taiko 116 0
7
Concert B-Drum ConcrtDrum 116 8
8
Melodic Toms 1 MeloToms 1 117 0
9
Melodic Toms 2 MeloToms 2 117 8
10
Synth Drums SynthDrums 118 0
11
TR-8 08 Tom s TR8 08 Tom s 118 8
12
Electric Percussions El.Percuss 118 9
PERCUSSIVE
#
Extended Name Short Name PC Bank
1
Reverse Cymbal RevCymbal 119 0
2
Guitar Fret Noise Fret Noise 120 0
3
Guitar Cut noise Cut Noise 120 1
4
String Slap StringSlap 120 2
5
Bass Slide Bass Slide 120 5
6
Pick Scrape PickScrape 120 6
7
Breath Noise BreathNois 121 0
8
Flute Key Click FluteClick 121 1
9
Seashore Seashore 122 0
10
Rain Rain 122 1
11
Thunder Thunder 122 2
12
Wind Wind 122 3
13
Stream Stream 122 4
14
Bubbles Bubbles 122 5
15
Birds 1 Birds 1 123 0
16
Birds 2 Birds 2 123 3
17
Dog Dog 123 1
18
Horse Gallop Hors eGalop 123 2
19
Telephone Ring 1 Tel Ring 1 124 0
20
Telephone Ring 2 Tel Ring 2 124 1
21
Door Creaking DoorCreakin 124 2
22
Door Closing DoorClosin 124 3
23
Scratch Scratch 124 4
24
Wind Chimes WindChim es 124 5
25
Helicopter Helicopter 125 0
26
Car Engine Start EnginStart 125 1
27
Car Breaking Breaking 125 2
28
Car Pass Car Pass 125 3
29
Car Crash Car Crash 125 4
30
Police Siren Pol.Siren 125 5
31
Train Train 125 6
32
Jet Takeoff JetTakoff 1 25 7
33
Starship Starship 125 8
34
Burst Noise BurstNoise 125 9
35
Applause Applaus e 126 0
36
Laughing Laughing 126 1
37
Screaming Screaming 126 2
38
Punch Punch 126 3
39
Heart Beat Heartbeat 126 4
40
Footstep Footstep 126 5
41
Gun Shot Gun Shot 127 0
42
Machine Gun MachineGun 127 1
43
Laser Gun Laser Gun 127 2
44
Explosion Explosion 127 3
SFX
#
Extended Name Short Name PC Bank
1
Standard Set 1 0 0
2
Standard Set 2 1 0
3
R&B Set 2 0
4
Hip-Hop Set 3 0
5
Room Set 8 0
6
Power Set 16 0
7
Ele ctronic Set 24 0
8
TR-808 Set 25 0
9
Dance Set 26 0
10
Techno Set 27 0
11
Jazz S e t 32 0
12
Brus h Set 40 0
13
Orches tra Set 48 0
14
Ethnic Set 49 0
15
BD & SD Set
53 0
16
SFX Set 56 0
17
CM-64/32 Set 127 0
DRUM KITS
Page 81
Technical Specifications
Specs.1
Spx
Technical Specifications
INPUTS - OUTPUTS
MIC
Microphone Input
Unbalanced JACK - -40dB 1 kOhms
AUDIO OUT
Audio L-R outputs
2 x RCA (unbalanced) - +4dB
PHONES
Headphone output
Stereo mini-JACK
400mW @ 8Ohms 100mW @ 32Ohms
VID EO IN
Video input
RCA - PAL / TV composite video
AV OU T
Audio/Video output
6-pole DIN
composite video PAL / TV
(AV / SCART cable supplied)
COMM UNICATION PORTS
MIDI IN + MIDI THRU
(Multiport / MIDI cable supplied)
USB port (standard USB 1.1)
(Multiport / USB cable supplied)
PARALLEL PORT
Parallel port for SongService
®
services
Compact Flash <CF> CompactFlash™ standard slot
FOOTSWITCH
Mono JAC K
Pedal control (n.o. type)
GENERAL SPECIFICATIONS
Frequency response 20Hz ÷ 20kHz ±3dB
Distortion (THD + noise) <0.01% 20Hz ÷ 20kHz
Signal/Noise ratio -80dB
Power s upply 9V DC (+ centr.) 800mA
Adaptator/Power supply
PRI. 230V (±10%) AC 50Hz 14VA
SEC. 9V DC 800mA 7.2W
DIMENS IONS & WEIGHT
Dimensions L x H x D
20.5 cm x 5.5 cm x 17 cm
8.07" x 2.17" x 6.69"
Weight 1.20 kg - 2.6 lb
NORMS
MULTIPO RT
Multi-function po rt
In compliance with norm 89/336/CEE on electromagnetic compatibility
In compliance with norm 93/68/CEE EEC Marking
Page 82
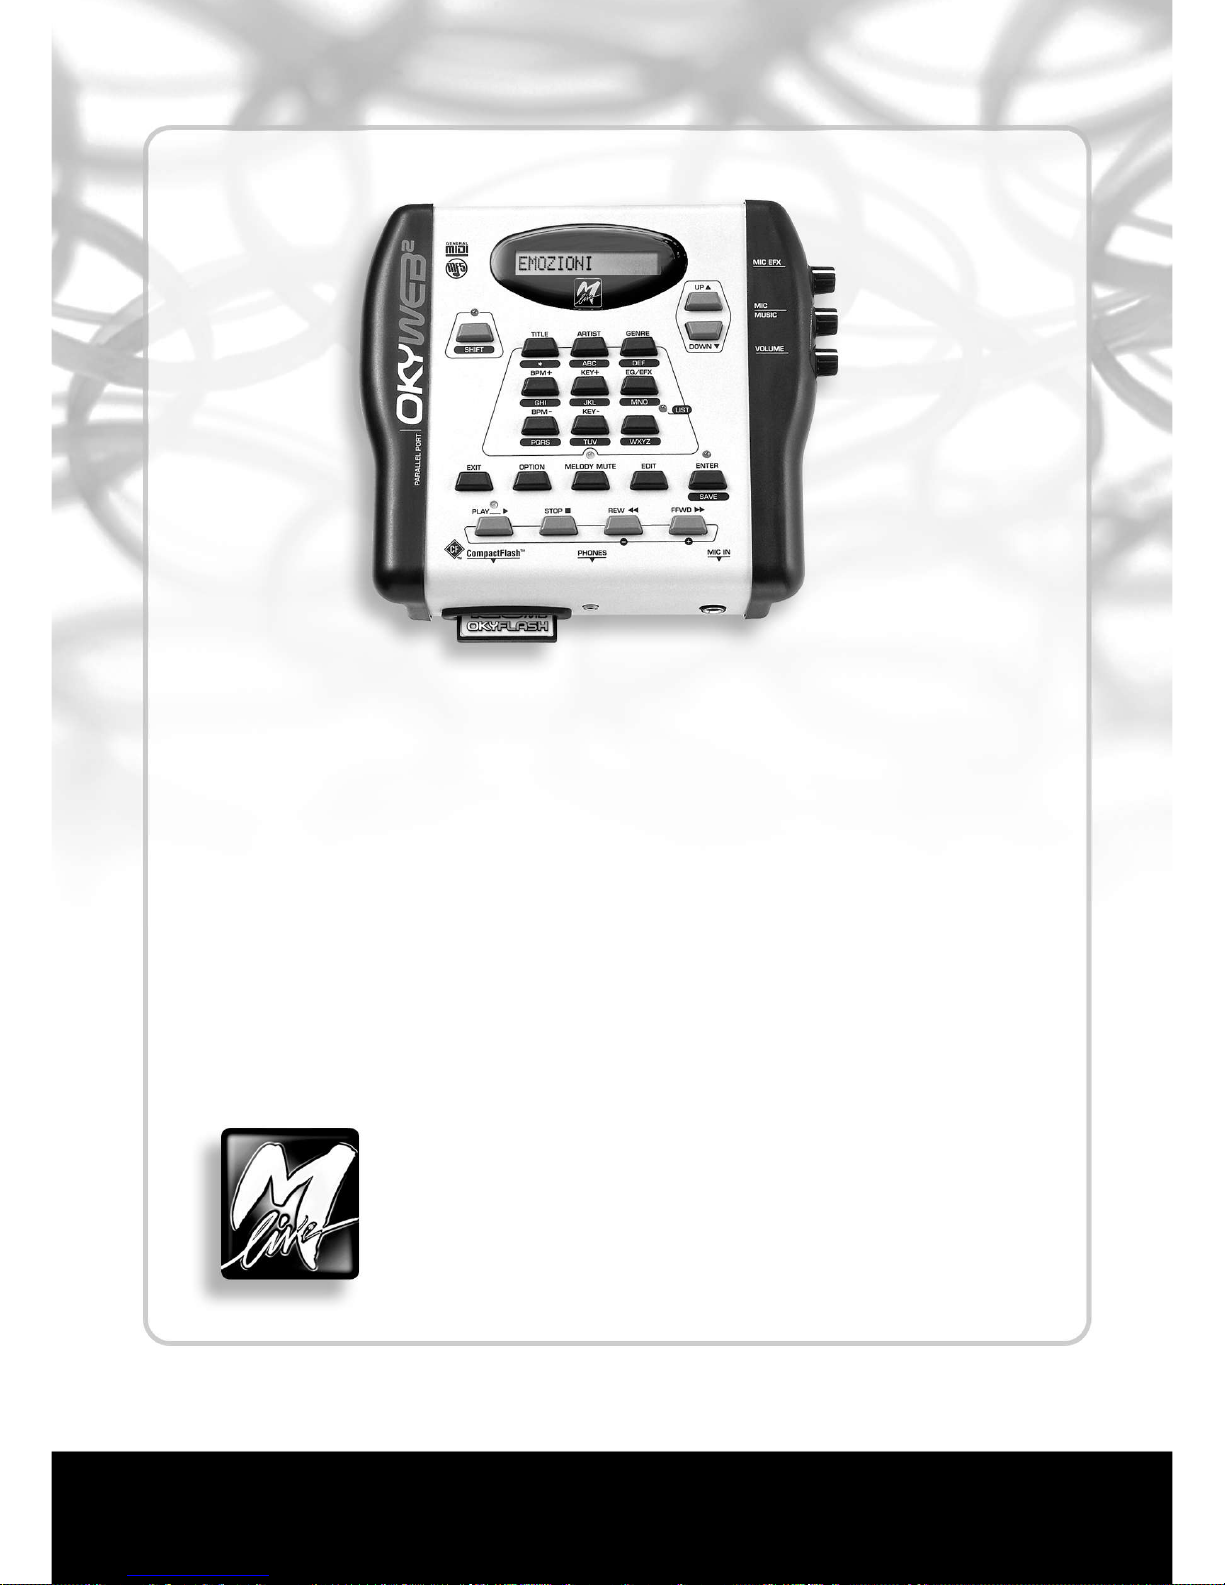
HitTrax MIDI Files
PO Box 6090
Vermont South 3133
VIC, AUSTRALIA
Ph/Fax: (+613) 9887 8127
E-mail: [email protected]
M-Live s.r.l.
ITALY • Via Luciona, 1872/B
47842 S.Giovanni in Marignano (RN)
Tel. (+39) 0541-827066
Fax (+39) 0541-827067
E-mail: [email protected]
www.hittrax.com.au
www.okyweb.com.au
 Loading...